
iu
User Guide
Processing Online Payments
Processing Online Payments–User Guide Page 2 of 53
Table of Contents
1 ABOUT THIS COURSE .................................................................................................................. 4
1.1 COURSE PREREQUISITES ........................................................................................................... 4
1.2 HOW TO USE THIS GUIDE ........................................................................................................... 4
1.3 COURSE OBJECTIVES ................................................................................................................ 4
2 GETTING STARTED ...................................................................................................................... 5
2.1 INTRODUCTION TO PAYMENT METHODS ...................................................................................... 5
2.2 INTRODUCTION TO SECURITY ROLES .......................................................................................... 6
3 LOGGING IN TO SAP ..................................................................................................................... 8
3.1 LOGGING IN TO THE SAP TRAINING CLIENT ................................................................................. 8
3.2 WEBGUI VS. WINGUI ................................................................................................................ 9
3.3 DETERMINING YOUR INTERFACE ............................................................................................... 10
3.4 WELCOME PAGE ...................................................................................................................... 10
4 ACCESSING ONLINE PAYMENTS .............................................................................................. 12
4.1 ONLINE PAYMENT REQUEST IN WEBGUI ................................................................................... 12
4.2 NAVIGATING IN WEBGUI .......................................................................................................... 12
4.3 ESTABLISHING INITIAL SETTINGS ............................................................................................... 13
5 CREATING AN ONLINE PAYMENT REQUEST .......................................................................... 16
5.1 COMPLETING THE BASIC DATA TAB ........................................................................................... 16
5.2 SEARCHING FOR A VENDOR NUMBER ........................................................................................ 17
5.3 ENTERING A COST ASSIGNMENT ............................................................................................... 19
5.4 CHANGE THE DEFAULT PAYMENT METHOD ............................................................................... 20
5.5 NAVIGATING THE TREE WINDOW ............................................................................................... 23
5.6 ATTACHING SCANNED DOCUMENTATION ................................................................................... 24
5.7 ACTIVITY—PRACTICE SESSION 1 .............................................................................................. 29
6 REVIEWING WORKFLOW ........................................................................................................... 30
6.2 ACTIVITY—PRACTICE SESSION 2 .............................................................................................. 36
6.3 ACTIVITY—PRACTICE SESSION 3 .............................................................................................. 36
7 DISPLAY PARKED DOCUMENTS ............................................................................................... 37
7.1 ACTIVITY—PRACTICE SESSION 4 .............................................................................................. 40
8 MODIFYING AND DELETING DOCUMENTS .............................................................................. 41
Processing Online Payments–User Guide Page 3 of 53
8.1 USING PARK INCOMING INVOICES ............................................................................................. 41
8.2 USING DISPLAY PARKED DOCUMENTS ...................................................................................... 42
8.3 ACTIVITY – PRACTICE SESSION 5 .............................................................................................. 43
9 DISPLAY PAYMENT ..................................................................................................................... 44
9.1 SEARCHING BY VENDOR NUMBER ............................................................................................. 44
9.2 SEARCHING BY INVOICE NUMBER .............................................................................................. 48
9.3 ACTIVITY—PRACTICE SESSION 6 .............................................................................................. 52
9.4 ACTIVITY – PRACTICE SESSION 7 .............................................................................................. 52
10 APPENDIX A—RESOURCES .................................................................................................. 53

Processing Online Payments–User Guide Page 4 of 53
1 About This Course
This course is designed to provide hands-on instruction that explains how to use the online
payment function in SAP @ Johns Hopkins to process vendor payments. In this course,
you will practice creating an online payment request, reviewing document status, and
reviewing payment status.
1.1 Course Prerequisites
Before you take this course, you must complete the following prerequisites.
Category 1: Introduction to Financial Administration
1.2 How to Use This Guide
As a Learning Guide
Each section of this guide provides specific step-by-step instructions for completing certain
tasks within the Online Payment Request transaction. As the instructor moves through
the training course, you can follow along using this guide as a classroom aide.
As a Reference
This manual was organized in a linear format that corresponds to the sequence of steps
required to complete an online payment request, review document status, and review
payment status. This guide serves as both a learning tool in class and a reference guide
after you complete the course. You can use it to find definitions, procedures, and
additional tips and information.
1.3 Course Objectives
After completing this course, you should be able to:
Identify and explain each of the various payment methods.
Create an online payment request.
Review, change, and delete documents.
Check document status.
Check payment status.

Processing Online Payments–User Guide Page 5 of 53
2 Getting Started
2.1 Introduction to Payment Methods
The Park Incoming Invoices transaction is used to request payment for a vendor invoice.
Let’s take a look at each of the various payment methods.
Purchase Order
Used to pay invoices against purchase orders (created with shopping carts).
o This method needs to be used if the transaction is NOT on the purchase order
exception list, which can be found online @ http://ssc.jhu.edu/supplychain/
exceptions.html.
Online Payment Request
Used to pay non-purchase order vendor invoices for transactions on the purchase
order exception list, which can be found online @ http://ssc.jhu.edu/supplychain/
exceptions.html.
o A 1099 tax document must be created for all nonincorporated vendors that re-
ceive more than $600 in one calendar year.
Travel Reimbursement
Used to reimburse employees’ out-of-pocket expenses for:.
o Travel costs.
o Business expenses.
These reimbursements are nontaxable.
Using a Combination of These Methods—Example: Paying an Honorarium
Submit an online payment request to pay his fee (which is 1099 reportable).
If the department is covering the travel costs (which are nontaxable), create a travel
reimbursement for these expenses. Submit the Non-Employee Travel &
Entertainment Expense Report Fax Cover Sheet, which can be found online @

Processing Online Payments–User Guide Page 6 of 53
http://ssc.jhu.edu/accountspayable/DataFiles/nonemployee_exp_report.xls, to
Accounts Payable Shared Services.
2.2 Introduction to Security Roles
Two security roles are associated with the Online Payment Request transaction. If you do not
have access to this transaction, contact your HR/payroll administrator and ask him to
process a Position Maintain ISR to add the appropriate security role(s) to your position.
Online Payment Requester (WinGUI)
Portal Role—Online Payment Requester (WebGUI)
Allows employees to request vendor payments for transactions that do not require
purchase orders.
Online Payment Approver (WinGUI)
Portal Role—Online Payment Approver (WebGUI)
Allows employees to process requests for vendor payments. Approvers cannot
modify requests.
The following security role also allows users to review vendor payments.
AP Display
Allows employees to display all nonemployee vendor transactions.
This course concentrates on the following four SAP transactions.
FV60—Park Incoming Invoices
o Create payment requests
FBV3—Display Parked Documents
o Display payment requests
FBL1N—Vendor Line Item
o Display payments by vendor number
FB03—Display Document (AP Display security role)
Processing Online Payments–User Guide Page 7 of 53
o Display payments by invoice number
Processing Online Payments–User Guide Page 8 of 53
3 Logging In to SAP
You should be familiar with the SAP login process, but this will serve as a review.
3.1 Logging In to the SAP Training Client
To log in:
1. Close all internet browsers.
2. Open Internet Explorer (on the desktop).
3. Go to the Favorites menu and click SAP Training Portal.
4. Enter the student login ID (User ID) and password (provided by the instructor).
When you log in to the SAP production client, use your JHED ID and password.
SAP production client URL: http://hopkinsone.johnshopkins.edu/
Processing Online Payments–User Guide Page 9 of 53
3.2 WebGUI vs. WinGUI
There are two ways to access the Online Payment Request transaction: the WebGUI and
WinGUI interfaces. Both have the same functionality, but some icons are different in each. This
guide documents the WebGUI interface.
WinGUI—Requires proper security access and client software installed on your computer
WebGUI—Can be used without installing special client software
Processing Online Payments–User Guide Page 10 of 53
3.3 Determining Your Interface
Log in to the SAP production client.
If you see an ECC tab,:
o You have the appropriate security role to access the WinGUI interface.
o This does not indicate that the client software has been installed on your work-
station.
If you need to install the client software, go to http://h1support.jhu.edu. You may
need to work with your LAN administrator for the installation.
If you do not see the ECC tab,:
o You can access the Online Payment Request transaction using the WebGUI
interface.
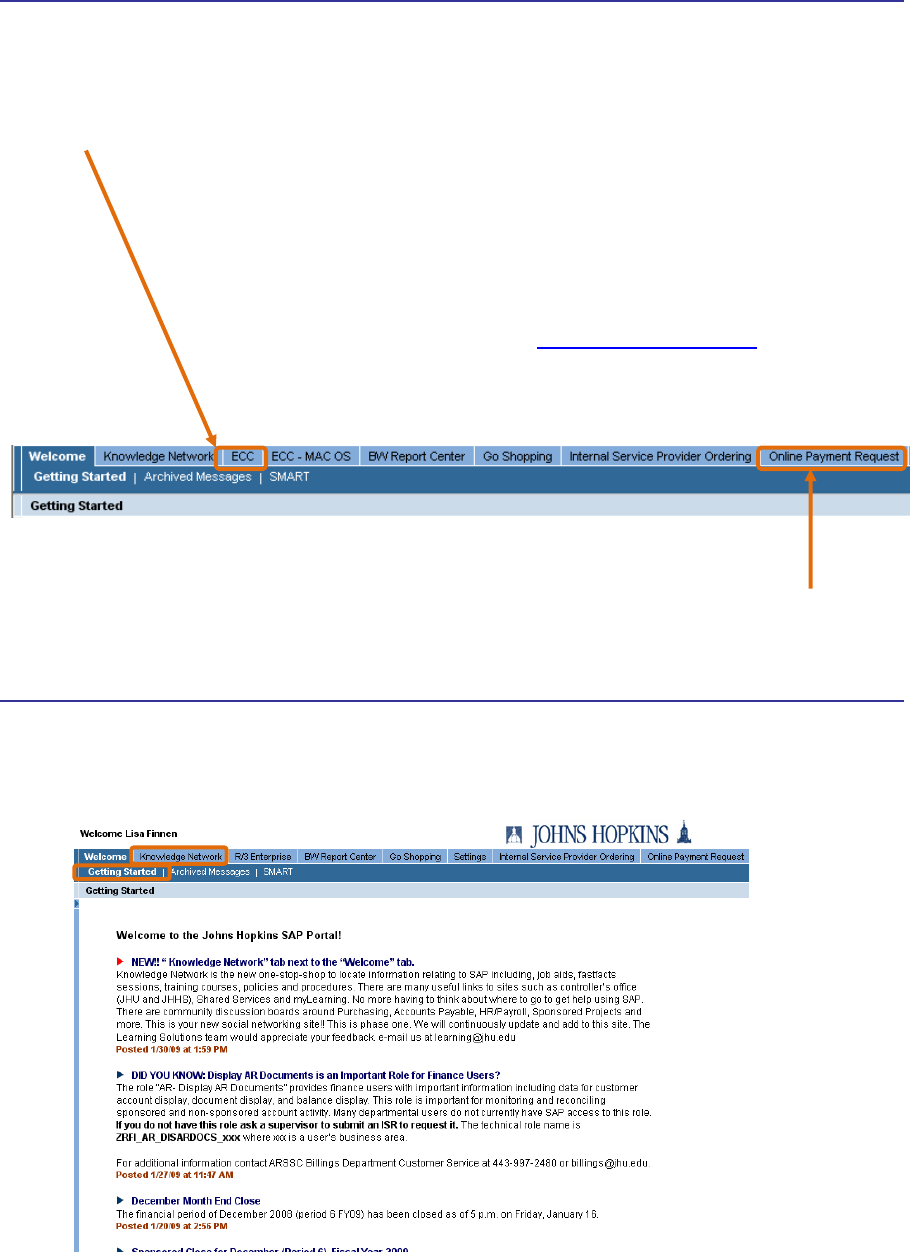
3.4 Welcome Page
The system will bring you to the Getting Started page in the Welcome section.
Processing Online Payments–User Guide Page 11 of 53
Important notices are posted on this page in descending chronological order. The top menu
bar also contains a new Knowledge Network tab. This link brings you to one-stop shop
for information relating to SAP, including job aids, FastFacts sessions, training courses,
and policies and procedures.
Processing Online Payments–User Guide Page 12 of 53
4 Accessing Online Payments
This guide shows you how to use the Online Payment Request transaction in the WebGUI
interface.
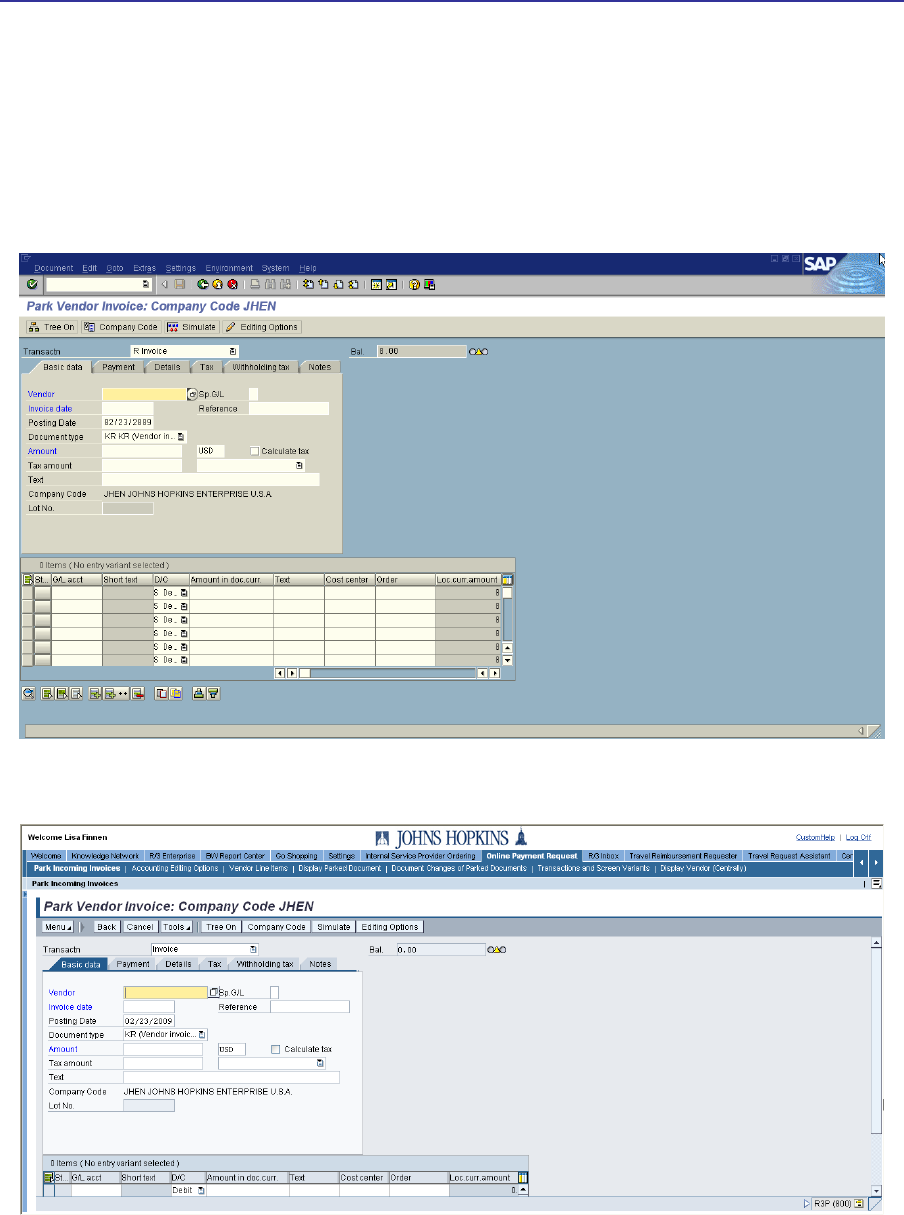
4.1 Online Payment Request in WebGUI
After logging in to SAP:
Click the Online Payment Request tab.
This always defaults to the Park Vendor Invoice transaction.
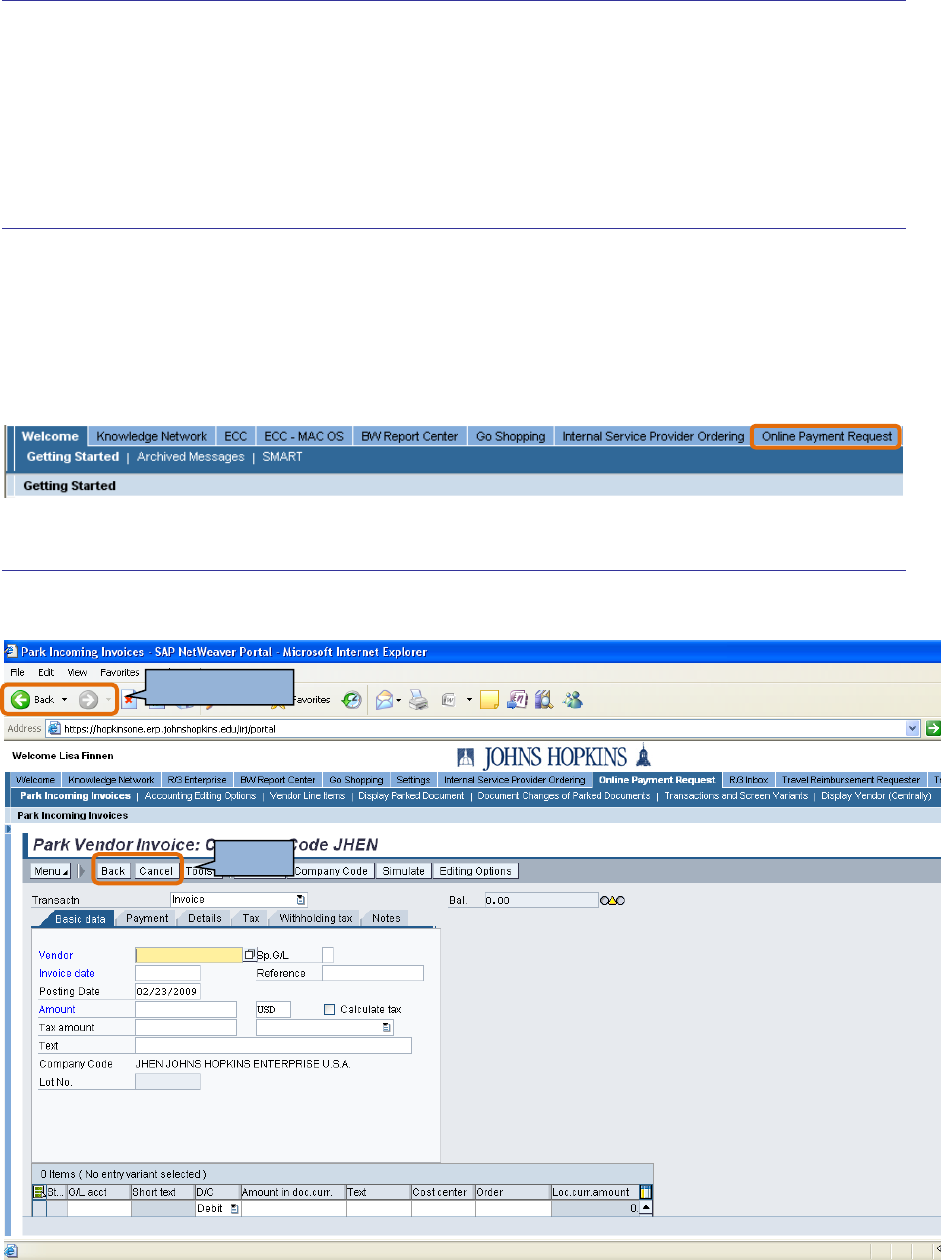
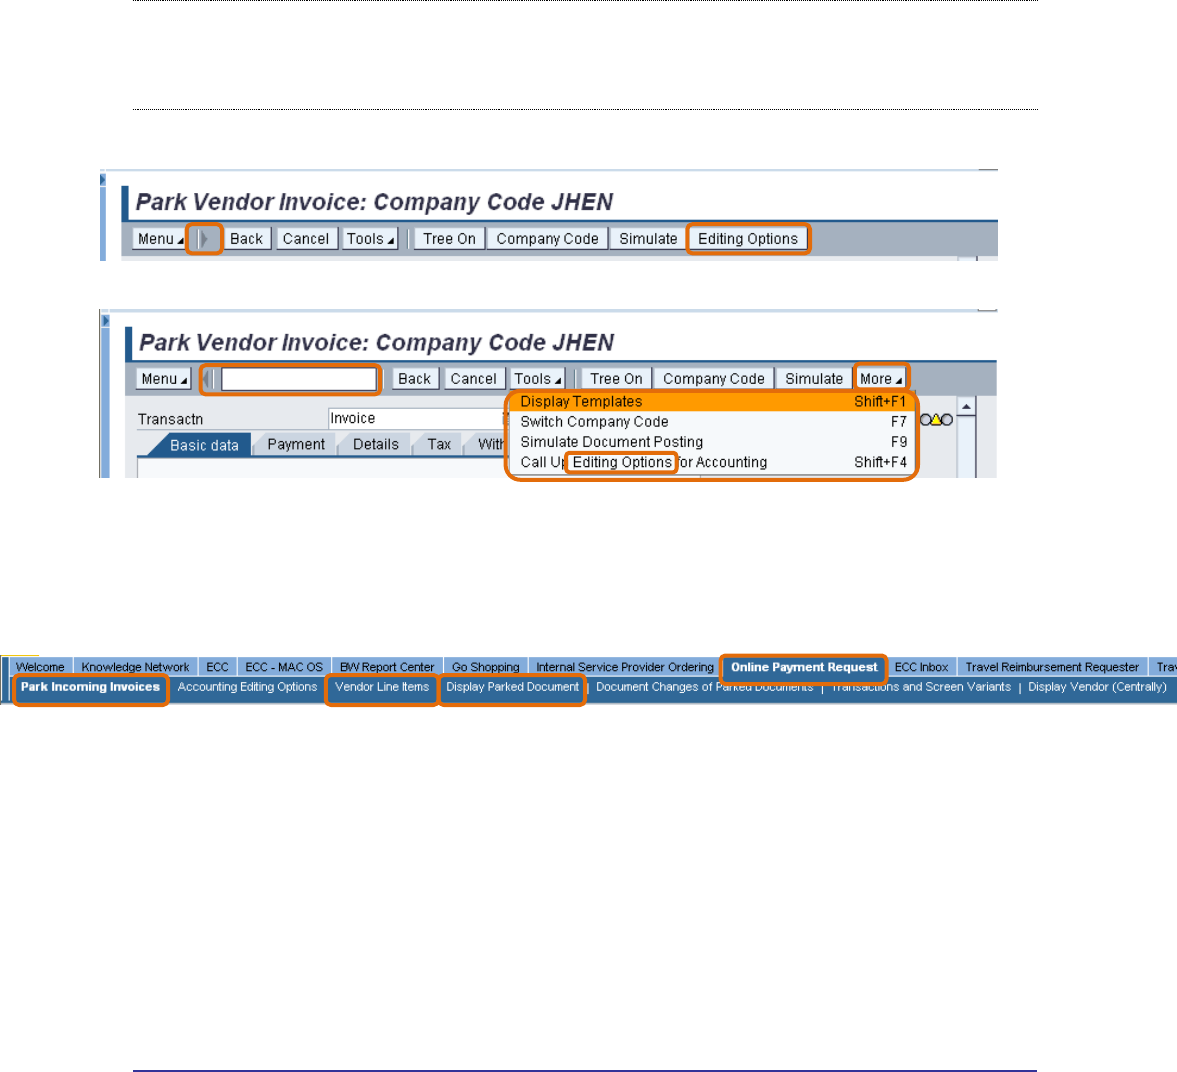
4.2 Navigating in WebGUI
DO NOT USE
USE
Processing Online Payments–User Guide Page 13 of 53
Warning: When you’re working in the WebGUI interface, only use the navigation buttons in the
SAP Online Payment Request application window. Do NOT use the Web browser’s
Back or Next buttons.
The application window size and open command boxes affect the display of
navigation buttons. If you need to use a button and don’t see it, check the drop-
down More menu.
The Online Payment Request tab has a series of subtabs that allow you to access various SAP
transactions. This course will focus on:
Park Incoming Invoices—Creates a payment request.
Vendor Line Items—Displays a payment by vendor number.
Display Parked Document—Displays a payment request.
4.3 Establishing Initial Settings
Perform the following actions to enable the setting that allows you to create online payment
requests.
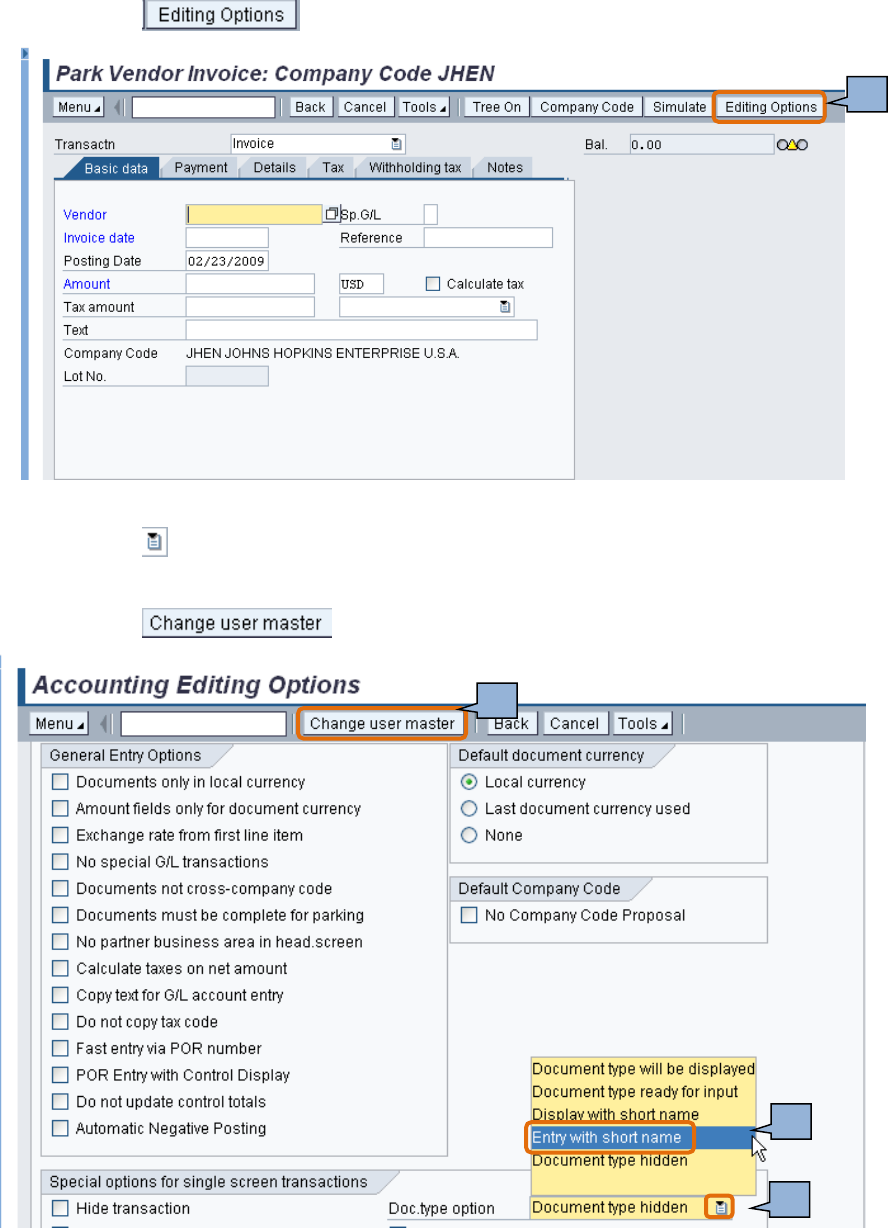
Processing Online Payments–User Guide Page 14 of 53
1. Click the button.
2. Click the button in the Doc.type option field.
3. Click Entry with short name.
4. Click the button.
2
3
4
1

Processing Online Payments–User Guide Page 15 of 53
You should see the following message in the lower left corner.
5. Click , a subtab on the top navigation bar.
This will refresh the Parking Vendor Invoice screen, and there should now be a
Document type field.
Processing Online Payments–User Guide Page 16 of 53
5 Creating an Online Payment Request
Use an online payment request to pay vendor invoices on the purchase order exception list.
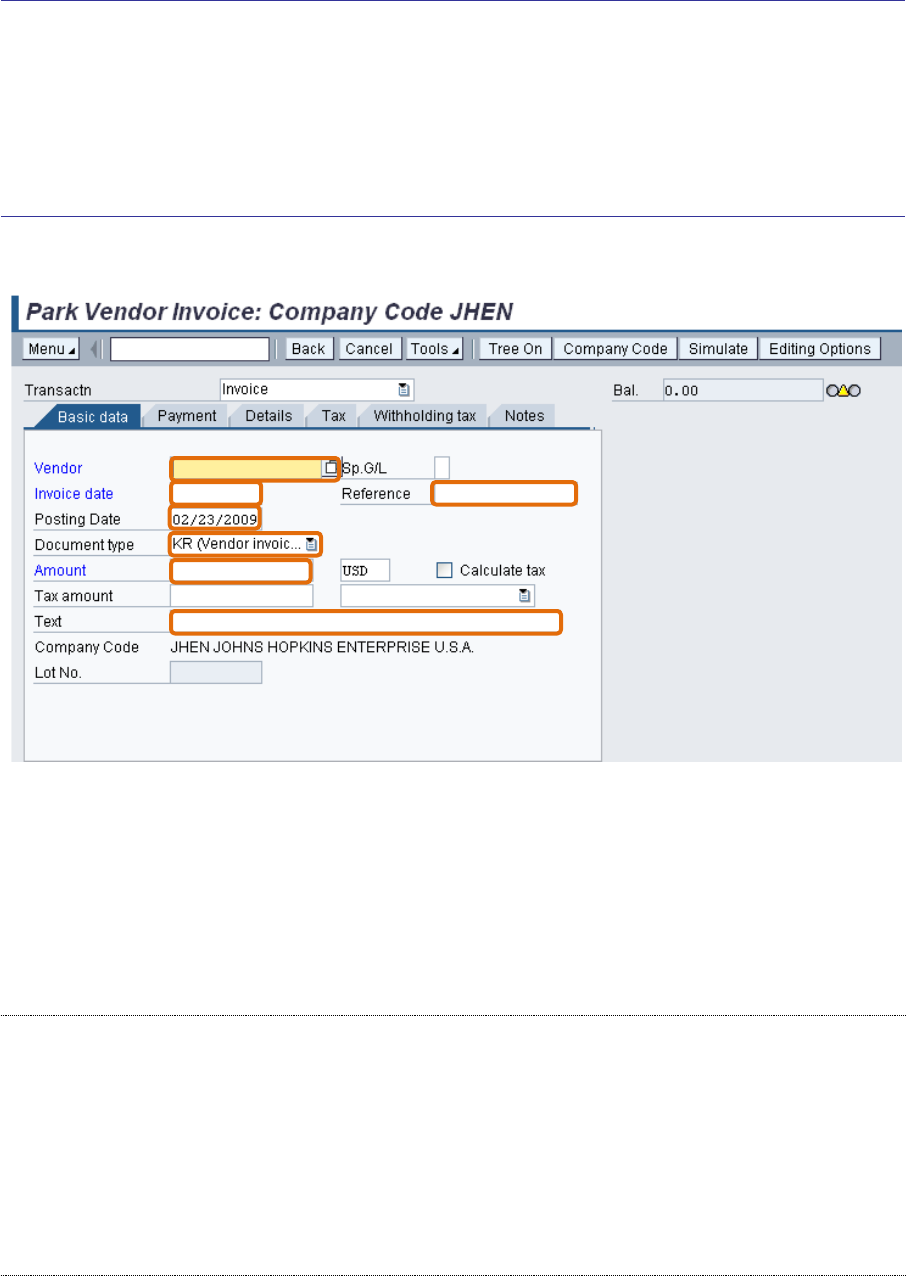
5.1 Completing the Basic Data Tab
1. Enter basic information about the trip in the Basic Data section.
a. Type the vendor number in the Vendor field, or search for the vendor number if
you don’t know it.
b. Enter the date on the invoice in the Invoice date field.
c. Enter the invoice number (unique identifier) in the Reference field.
Warning: It’s very important to enter the invoice number exactly as it appears on the invoice. This
prevents duplicate payments and helps users search for payment information. Accounts
Payable will reject a document if the Reference field is blank.
Warning: To prevent duplicate payments, the system reviews information from three fields: Ven-
dor (vendor number), Invoice date, and Reference (invoice number). If a match is
found, an error prevents the payment request from being created.
d. The Posting Date field defaults to the current system date. Leave this as is.

Processing Online Payments–User Guide Page 17 of 53
e. Click the button in the Document type field and select ZZ Check Request
from the drop-down list.
f. Enter the invoice amount in the Amount field.
g. The Text field is optional. Use it to enter additional information.
i. If the text is preceded by an asterisk (*), it will be included on the
vendor’s check.
ii. If the text is NOT preceded by an asterisk (*), it will only be read by
Accounts Payable Shared Services.
The text in this field is not displayed on the BW report.
5.2 Searching for a Vendor Number
1. Click in the Vendor box.
2. Click the Search button.
3. Click the button in the Category field and select Vendors by Address Attributes
from the drop-down list.
The Vendors by Address Attributes option generates a list of vendors that
includes vendors’ names, street addresses, zip codes, and state information.
This helps you select the correct address listed on the vendor’s invoice.
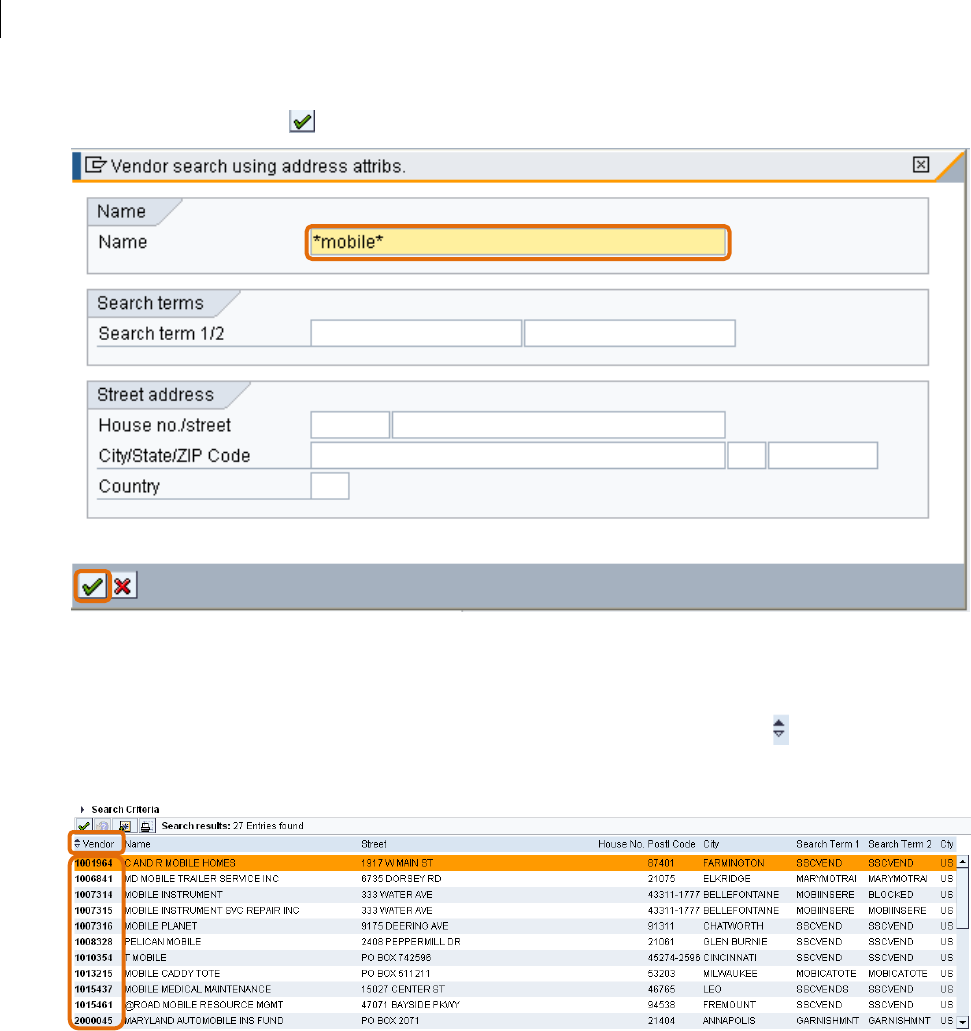
Processing Online Payments–User Guide Page 18 of 53
4. Type the wildcard character (*), followed by part of the vendor’s name, followed by a
second wildcard character (e.g., *mobile* to find T Mobile) in the Name field.
5. Click the Enter button.
By default, the results list is sorted by vendor number. You can also sort results
using any other column by clicking the column heading. The icon indicates the
column that is currently sorting results.
Vendor numbers that start with:
o 1 are linked to shopping carts. The purchase order will be mailed to the
address listed.
o 2 are used for online payments. The payment will be mailed to the address
listed.
Processing Online Payments–User Guide Page 19 of 53
o 3 are HR/PR vendor numbers used for employee reimbursements. These
numbers are not used in online payments.
o 4 are manufacturing numbers not used in online payments.
If the system only returns vendor numbers starting with 1, and if the address
listed on these records matches what’s on the invoice, you can select a vendor
number starting with 1.
If you can’t find the vendor you’re looking for, you need to request that a vendor
record be created. Fill out a New Vendor Form, which you can find online @
http://ssc.jhu.edu/accountspayable/DataFiles/VendorAddForm.pdf.
Create a personal list to save time searching for vendors you use frequently.
Refer to the SAP Navigation e-course for detailed instructions.
You can also find the following vendor forms on the Accounts Payable Shared Services website.
o Vendor ACH Information form (for domestic wire payments):
http://ssc.jhu.edu/accountspayable/DataFiles/vendorachinfo.pdf
o International Wire Form:
http://ssc.jhu.edu/accountspayable/DataFiles/INTLWIREINFO.pdf
o Foreign Currency Wire Form:
http://ssc.jhu.edu/accountspayable/DataFiles/ForeignCurrencyWireform.doc
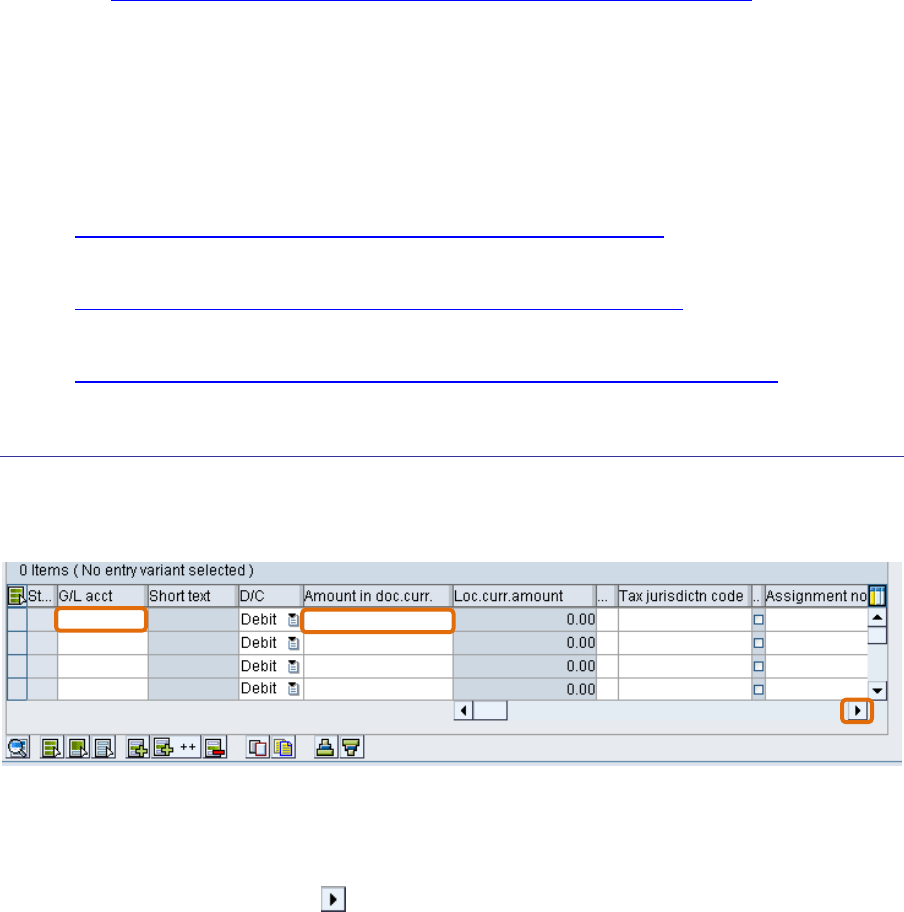
5.3 Entering a Cost Assignment
1. Enter the general ledger account (cost category) in the G/L acct field.
2. Enter the amount to be charged to the G/L account and cost object in the Amount in
doc.curr. field.
3. Click the right scroll arrow to access the remaining fields to be completed.

Processing Online Payments–User Guide Page 20 of 53
4. Enter the vendor name and/or invoice number in the Text field. This information will
display on the BW report.
5. Enter the cost object that the expense should be charged to in either the Cost Center,
Order, or WBS Element field.
An expense can be charged to multiple cost objects, but only one cost object can
be listed on each line.
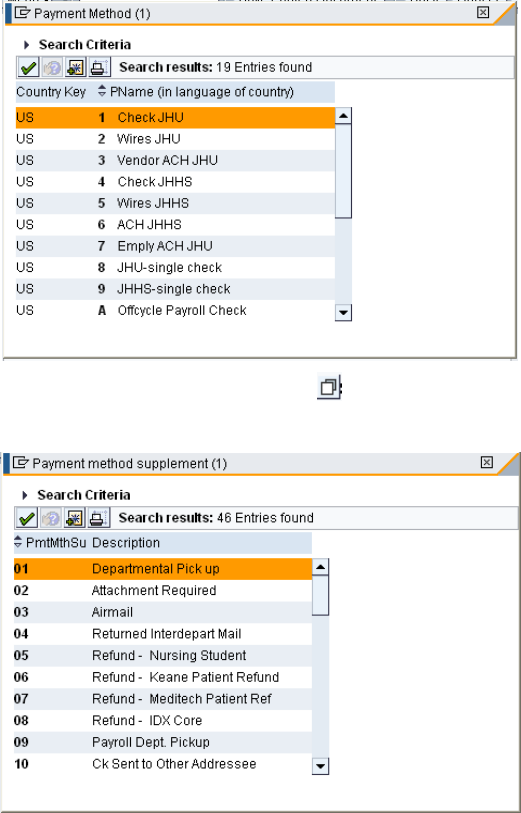
5.4 Change the Default Payment Method
The Payment tab allows you to specify the method of payment and delivery. The system
populates these fields using information from the vendor master record, and they should
normally be left as is, but you may need to override them in special situations.
For example, an employee is preparing for a business trip and wants to take a check with her to
pay the hotel. You can request that one JHU check be mailed to the department.
1. Click the Payment tab.
2. Click the Pmt Method box and click the button.
3. Double-click to select the appropriate payment method from the list.
Processing Online Payments–User Guide Page 21 of 53
4. Click the Pmnt Meth.Sup. box and click the button.
5. Double-click to select the appropriate delivery option from the list.
If you select Returned Interdepart Mail, enter the name, work address, and
work phone number for the employee that Accounts Payable should return the
check to in the Notes tab.
Processing Online Payments–User Guide Page 22 of 53
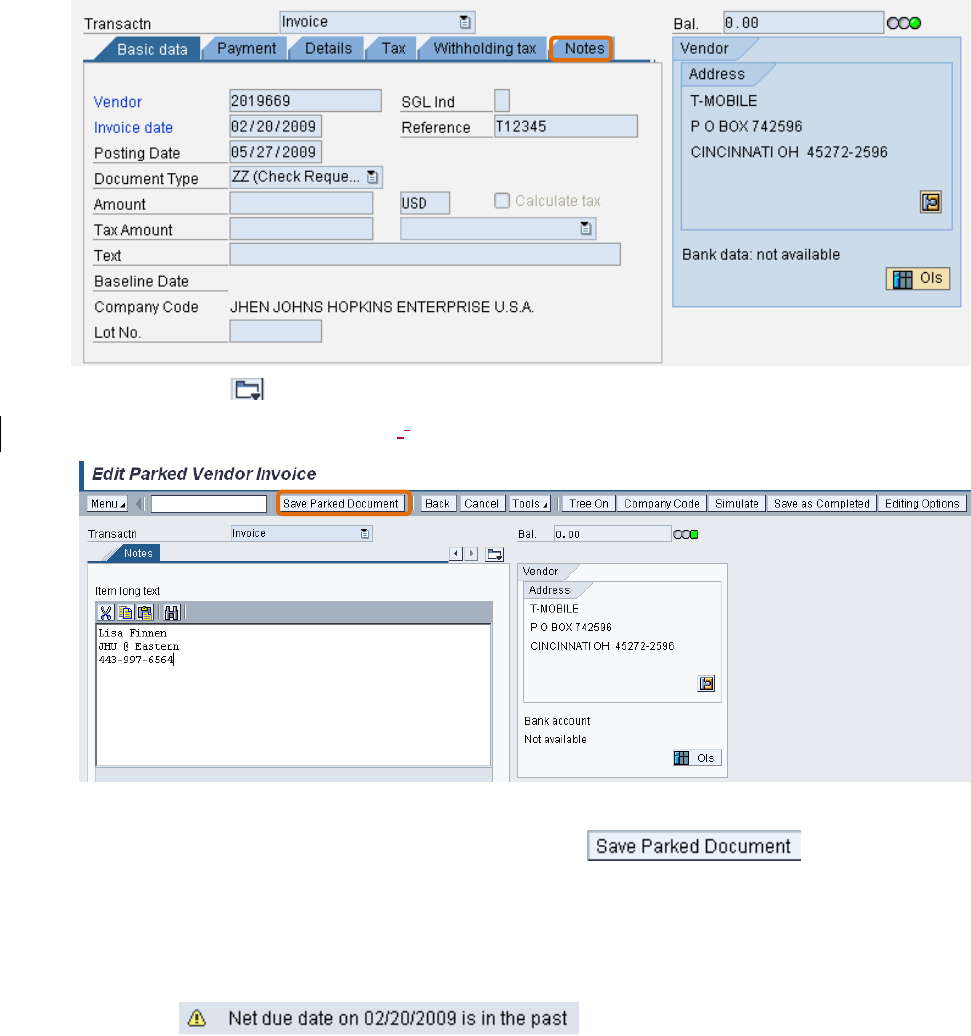
1. Click the button.
2. Select Notes from the drop- down list.
3. Enter the employee’s name, work address, and work phone number.
4. After all information has been entered, click the button to
generate a document number and save the document.
You’ll receive a warning message that says something like:
. (The system is looking at the date in
the Invoice date field.) Press ENTER to continue processing.
This action does not submit the document for approval; it only saves and exits
the document.
Processing Online Payments–User Guide Page 23 of 53
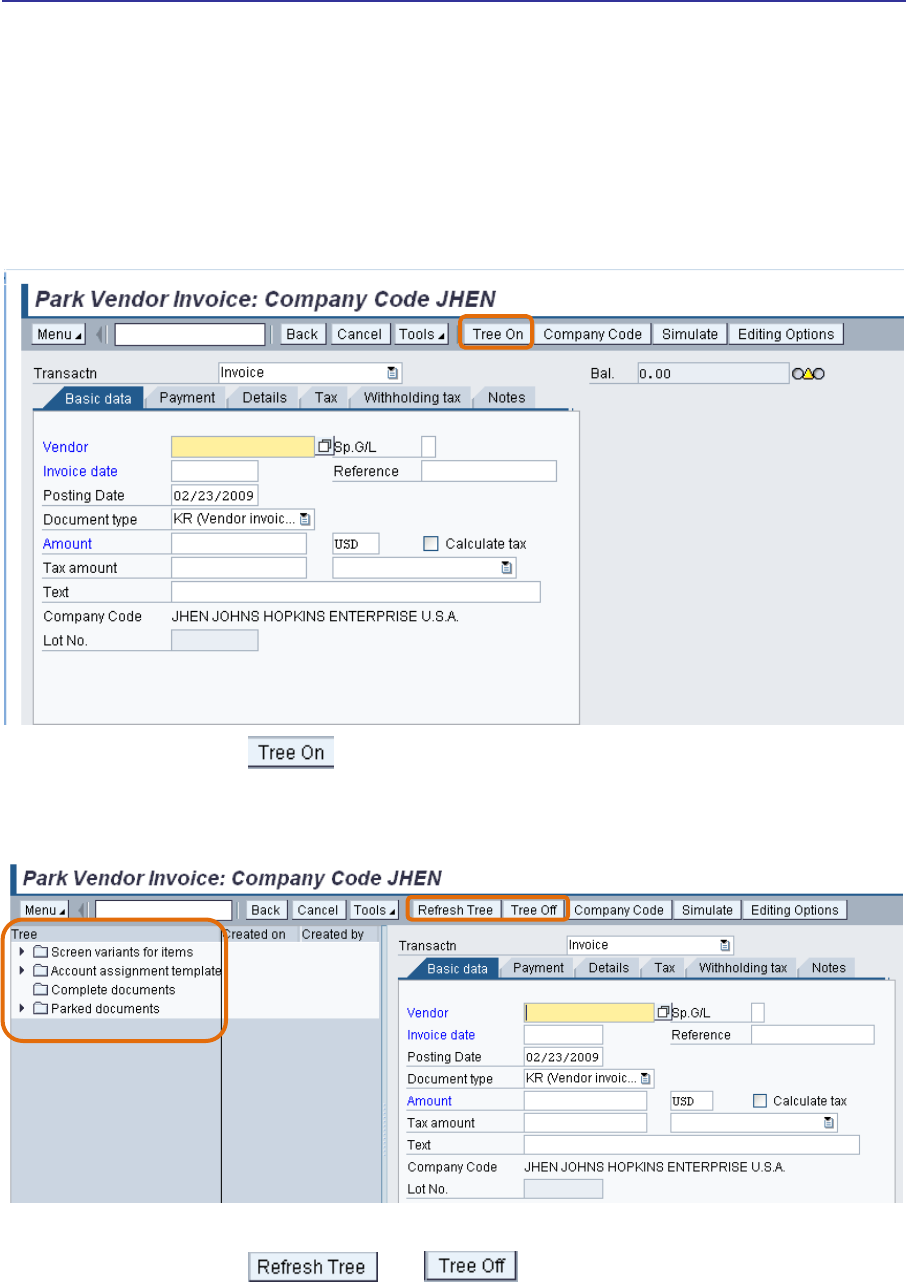
5.5 Navigating the Tree Window
The Park Vendor Invoice transaction provides quick access to documents you created that are
still in parked status.
A parked document has either been saved or submitted to workflow for approval.
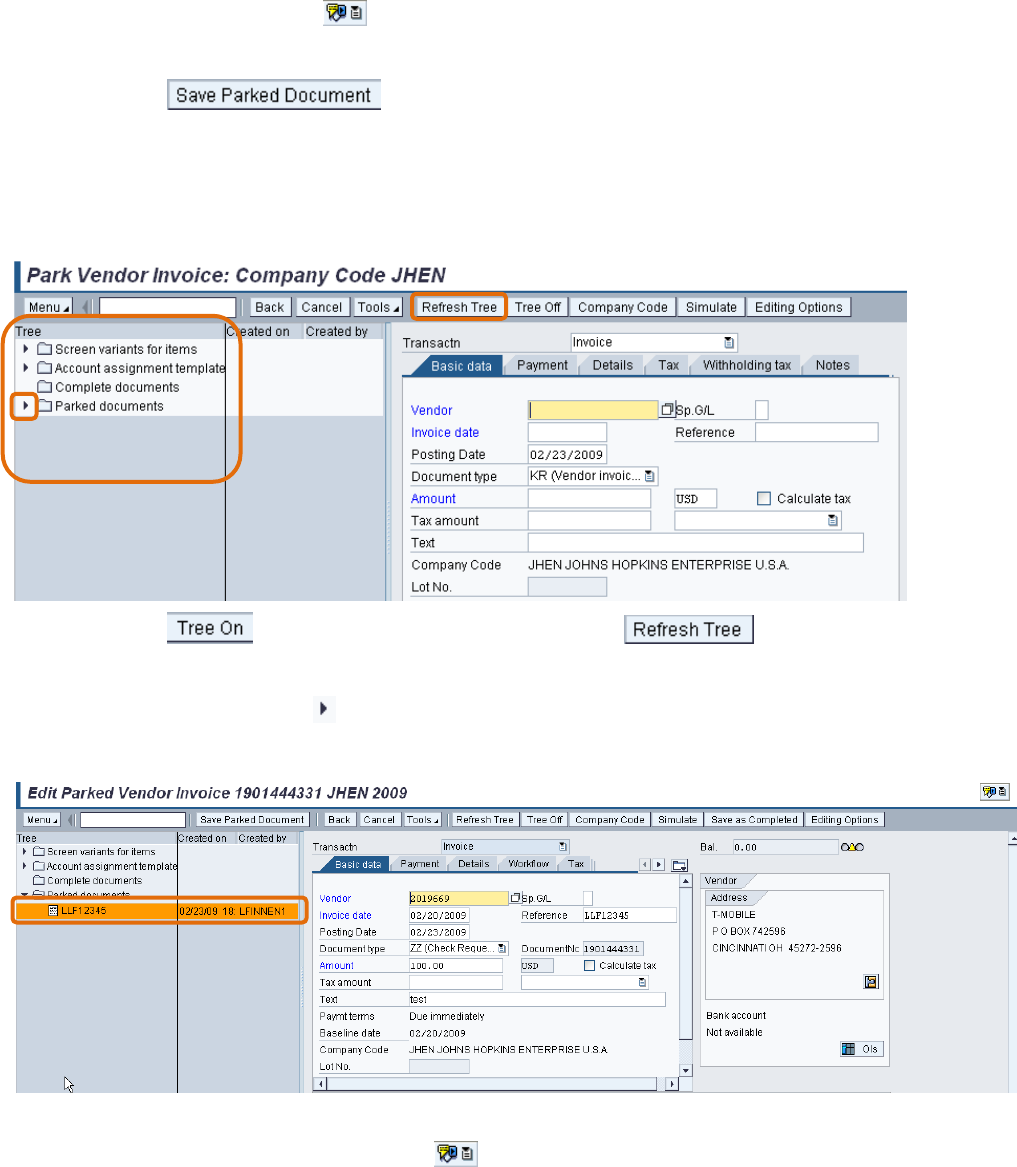
If you can see the button, the Tree window is currently closed, and you can
turn it on by clicking this button.
If you can see the and buttons, the Tree window is open.
Processing Online Payments–User Guide Page 24 of 53
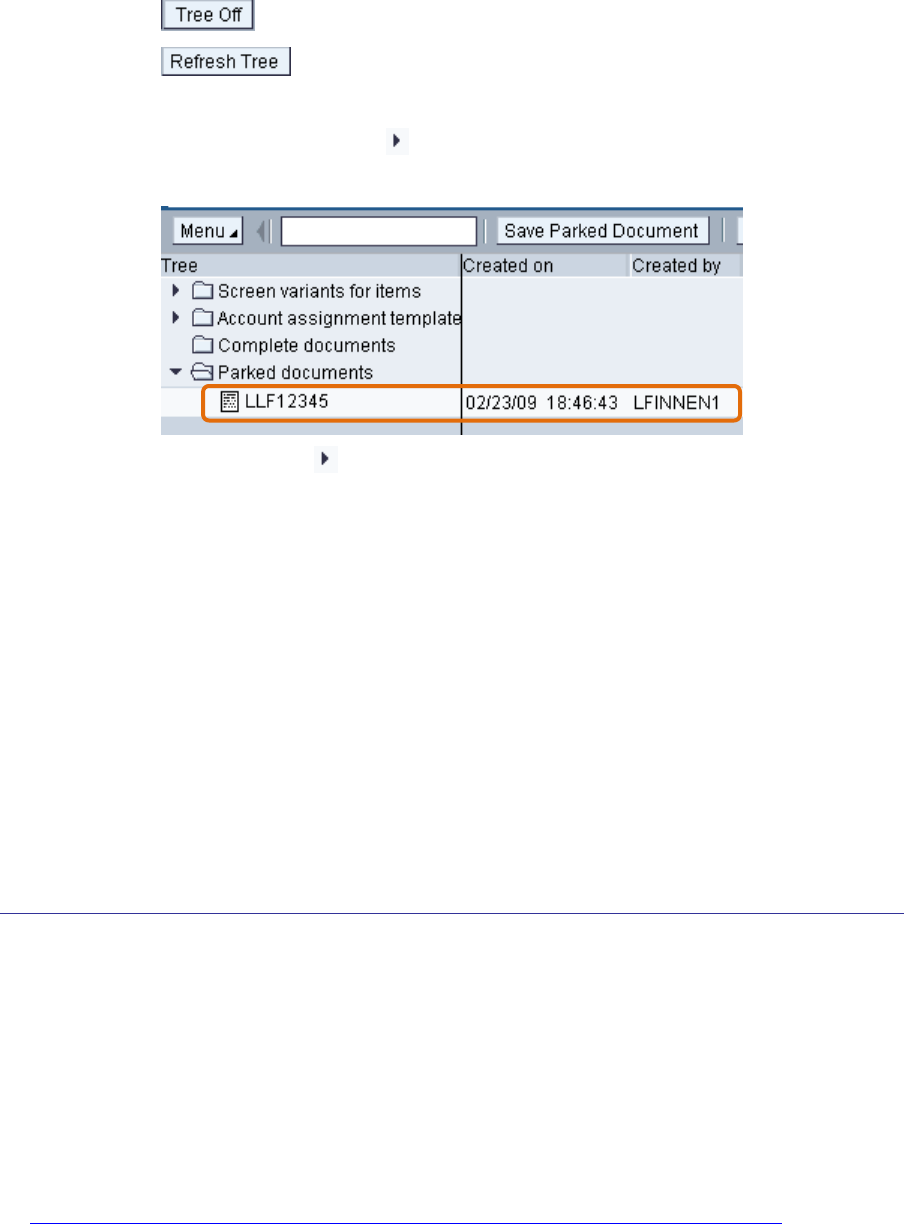
Click the button to close the Tree window.
Click the button to refresh the list of documents displayed in the Tree
window. This window does not automatically refresh.
If you can see the Expand button next to a folder (e.g., Complete documents,
Parked documents), this folder contains documents.
o Click the Expand button to see a list of documents in that folder. The system
will display each document’s invoice number, date and time created, and
originator’s JHED ID.
Documents in the Complete documents folder have been submitted to workflow
(i.e., you clicked Save as Completed).
Documents in the Parked documents folder have only been saved (i.e., you
clicked Save Parked Document).
5.6 Attaching Scanned Documentation
This step is optional, but strongly recommended. Departments can scan and attach their own
invoices, which speeds up the audit process in Accounts Payable and allows approvers to look
at invoices online.
If a department does not have scanning equipment, it can fax the invoice to Accounts Payable
Shared Services. Use the Online Payment Request Cover Sheet, which can be found online
@ http://ssc.jhu.edu/accountspayable/DataFiles/OnlinePaymentFaxCoverSheet.doc .
Scanned documents must be saved in PDF format with a 300 dpi resolution.
Processing Online Payments–User Guide Page 25 of 53
All pages of the invoice should be saved together in one PDF file.
You must save a document in order to see its assigned document number and
Services for Object button.
1. Click the button.
This action does not submit the document for approval; it only saves and exits
the document.
2. Click the button (if Tree window is closed) or the button (if the
Tree window is open) to refresh the document list.
3. Click the Expand button to the left of the Parked documents folder.
4. Double-click the invoice number to open the document for editing.
5. Click the Services for Object button.
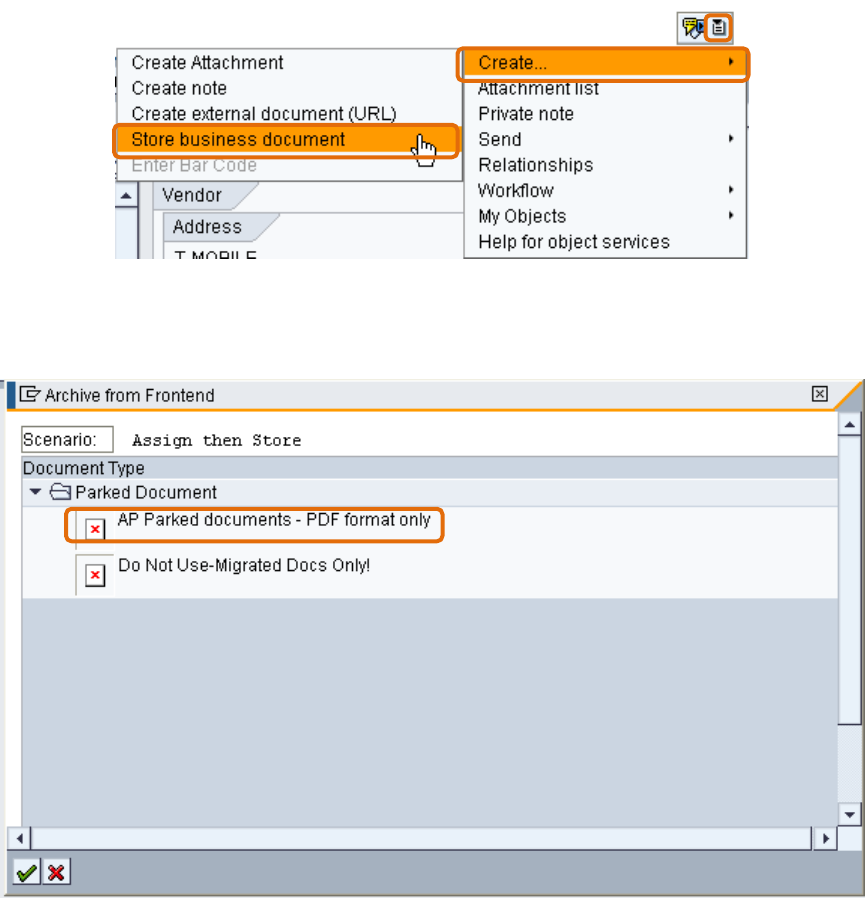
Processing Online Payments–User Guide Page 26 of 53
6. Click Create.
7. Click Store business document.
8. Double-click AP Parked documents – PDF format only.
Processing Online Payments–User Guide Page 27 of 53
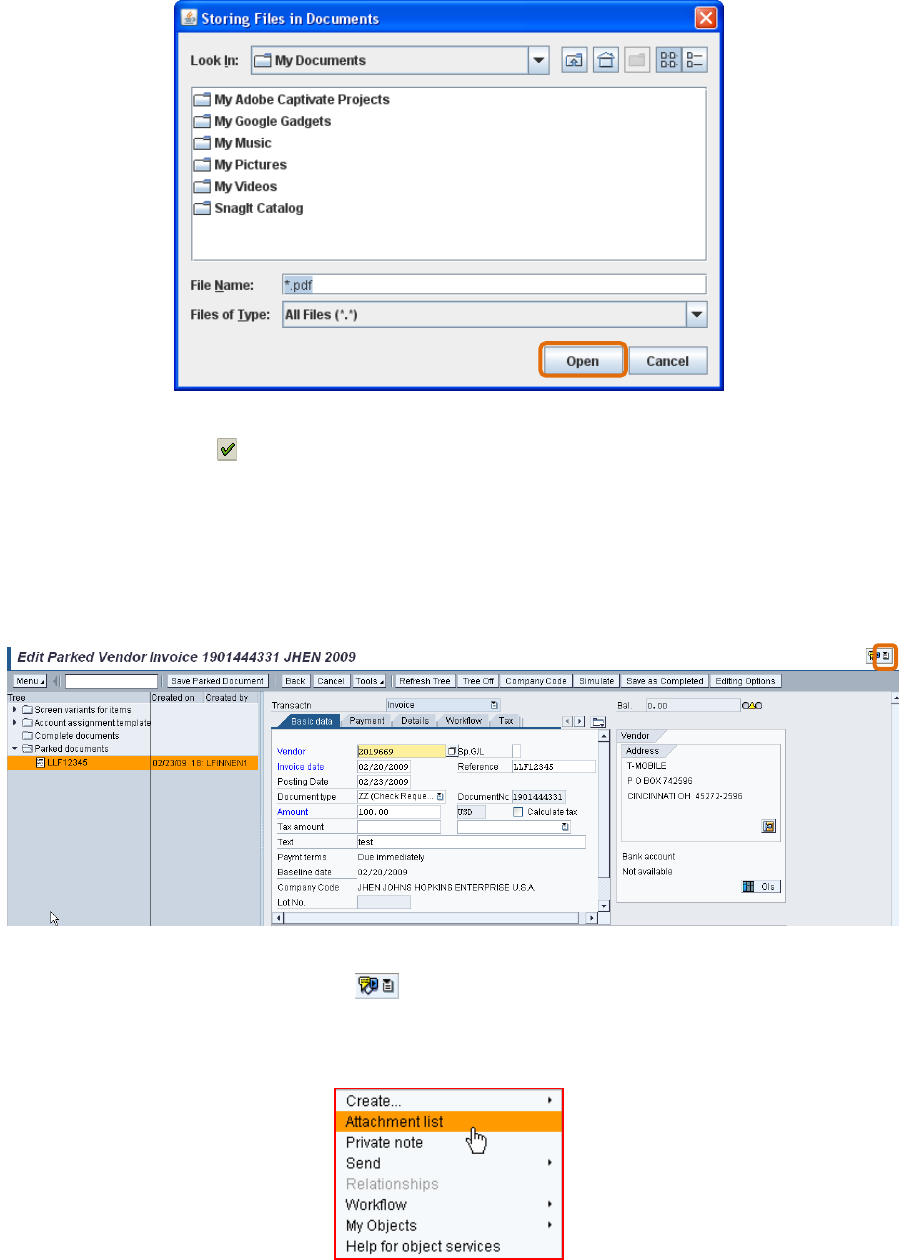
9. Find the PDF file, click to select it, and click Open.
10. Click the Enter button.
11. Close the document window.
An hourglass will appear, then disappear, but the PDF filename will not be listed.
Perform the following actions to make sure the document is attached.
12. Click the Services for Object button.
13. Click Attachment list.
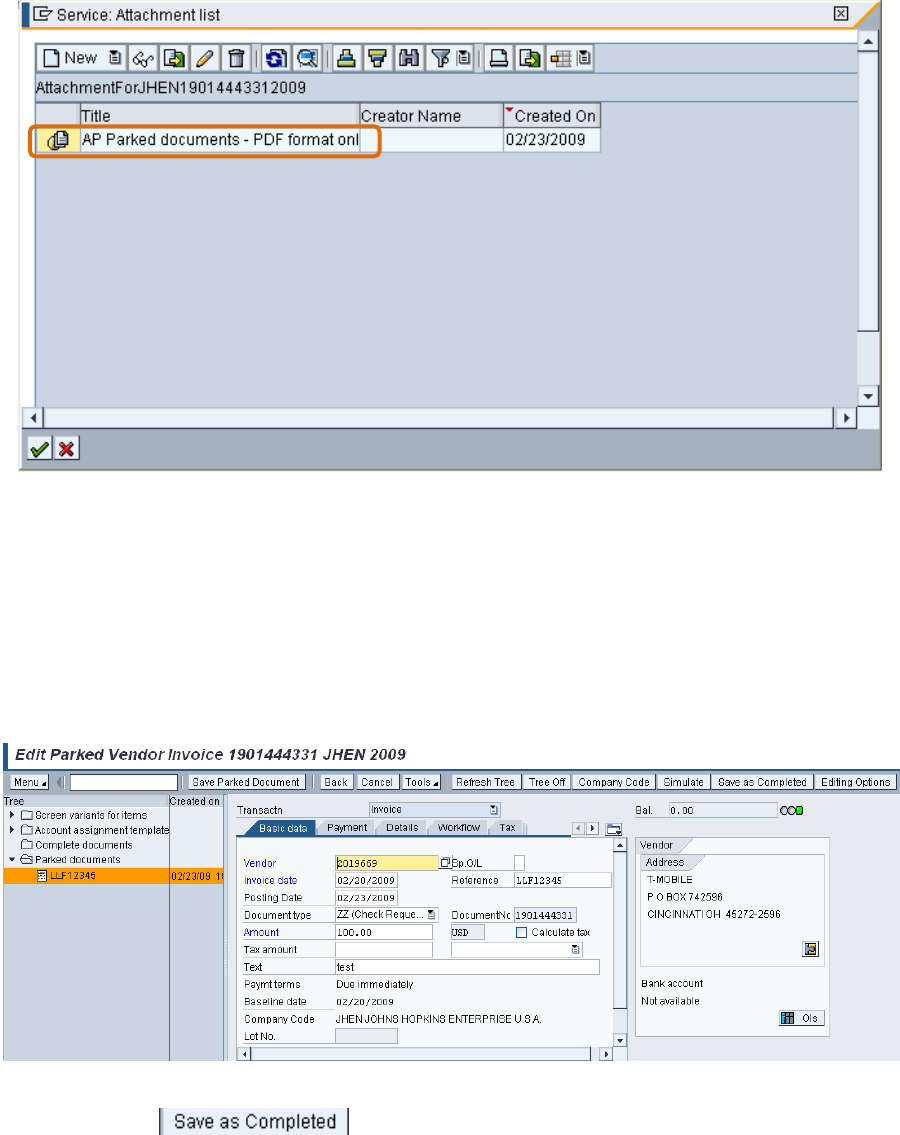
Processing Online Payments–User Guide Page 28 of 53
14. Double-click AP Parked documents - PDF format only.
This will open the PDF viewer and display scanned documentation.
Close the PDF viewer and submit your document for approval.
15. Click the button to submit the document to workflow.
After you click Save as Completed, the document moves to the Complete
documents folder. The Tree window, however, does not automatically refresh;
you have to click the Refresh Tree button in order to see the document.

Processing Online Payments–User Guide Page 29 of 53
5.7 Activity—Practice Session 1
Jays Restaurant sent your department the following invoice, which you need to pay by
submitting an online payment request.
INVOICE
Jays Restaurant Group Inc 02/02/2009
1309 N Charles St
Baltimore MD 21201
JHU Dept.
Attn: Jane Smith
1101 E. 33
rd
Street
Baltimore MD 21218
Invoice #: 000yourinitials12345
Sandwich Platter for 10 56.00
Total Cost: 56.00
Processing Online Payments–User Guide Page 30 of 53
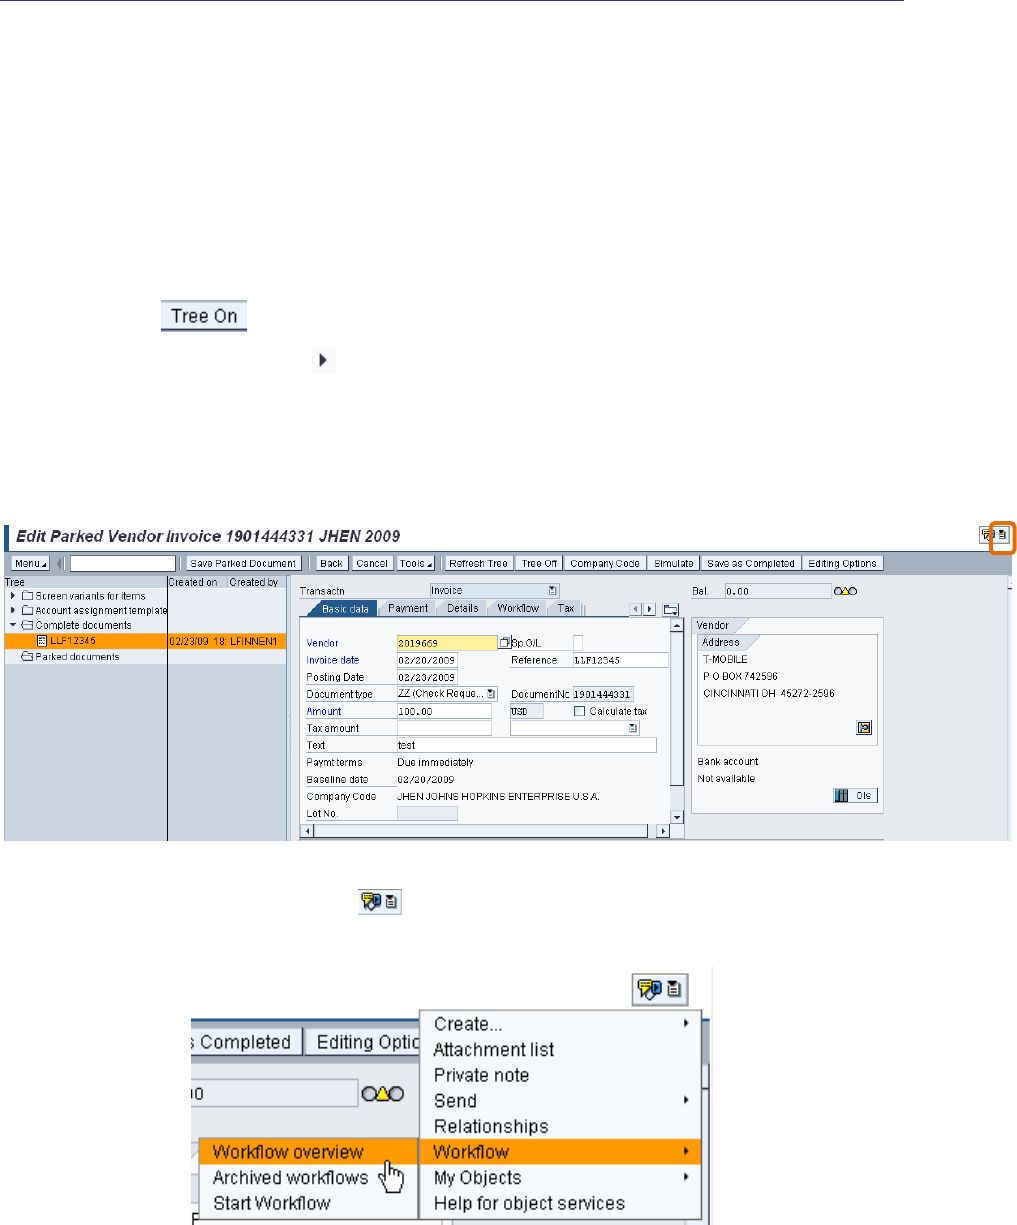
6 Reviewing Workflow
You can review workflow to see exactly where a document is in the approval process, names of
people who have already acted on the document, names of people who still have the document
in their inboxes, whether or not the document has been rejected, and reasons given for rejection.
1. Click the button.
2. Click the Expand button next to the Completed documents folder.
Documents in the Parked documents folder have not yet been submitted to
workflow.
3. Double-click an invoice to open the document and review its workflow.
4. Click the Services for Object button.
5. Click Workflow, and then click Workflow overview.
Processing Online Payments–User Guide Page 31 of 53
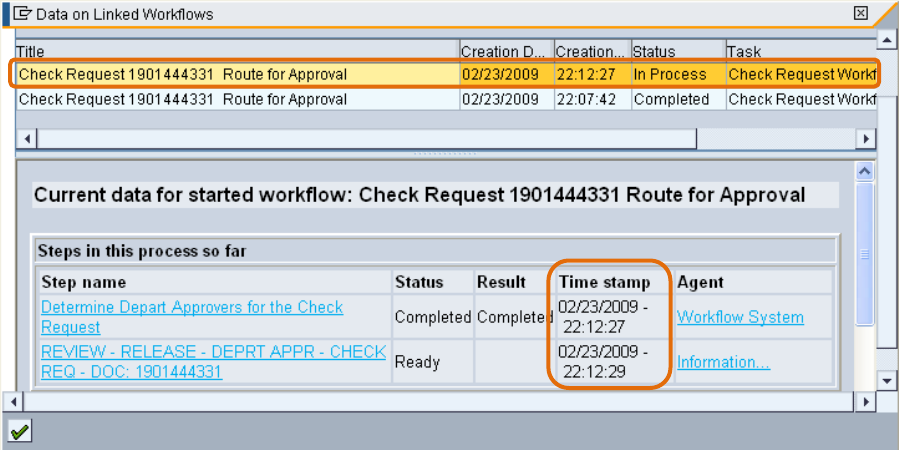
6.1.1 Documents That Have Been Submitted to Workflow Multiple
Times
The following example shows a document that has been submitted to workflow more than once.
Each time a user makes changes to a document and clicks Save as Completed
(thereby resubmitting it to workflow), a new workflow is created, and the old
workflow becomes obsolete. You need to look at the workflow with the most
recent date and time stamp.
6. Double-click the most recent workflow entry.
7. The bottom window will display the time stamp for the selected line.
Processing Online Payments–User Guide Page 32 of 53
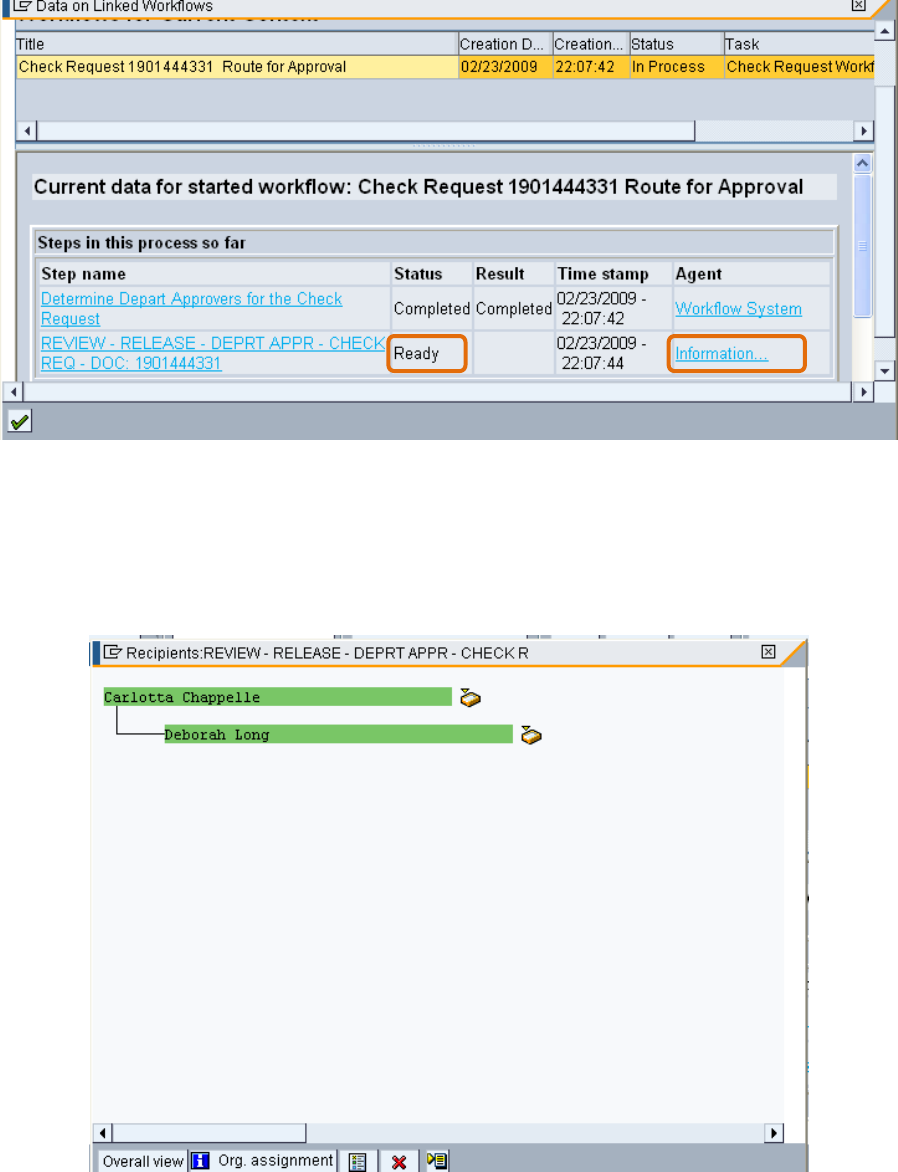
6.1.2 Awaiting Approval
The following is an example of a document in workflow awaiting approval.
The Status column is marked “Ready.”
The Agent column says “Information…”
1. Click Information… to see the names of the approvers who still have the document
sitting in their inboxes.
Processing Online Payments–User Guide Page 33 of 53
You may see many approvers listed for one document, because once a
document is submitted to workflow, it automatically routes to the inboxes of all
users who are authorized to approve it. After an approver opens a document, it
becomes his or her responsibility to process and it disappears from all other
approvers’ inboxes.
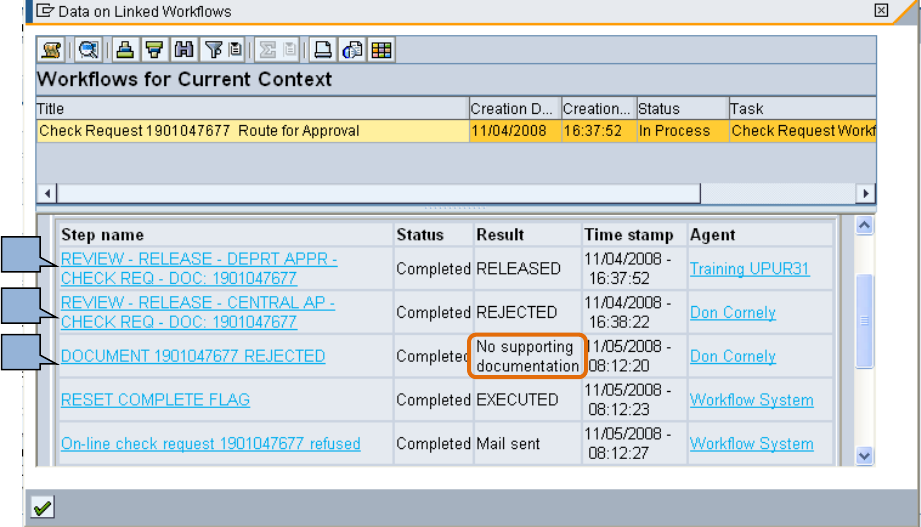
6.1.3 Approved by Department/Rejected by APSS
The following is an example of a document that was approved by the department but rejected by
Accounts Payable Shared Services.
.
1. The Step name column includes the phrase “DEPRT APPR,” indicating that the
department approved this document.
The Status column is marked “Completed.”
The Result column says “RELEASED”
The Agent column displays the approver’s name.
2. The Step name column includes the phrase ”CENTRAL AP,” indicating that APSS
rejected the document.
The Status column is marked “Completed.”
1
2
3
Processing Online Payments–User Guide Page 34 of 53
The Result column says “REJECTED”
The Agent column displays the rejecter’s name
3. In this example, you can find the rejection reason in the Result column on the next line.

Processing Online Payments–User Guide Page 35 of 53
6.1.4 Rejected by the Department
The following is an example of a document rejected by the department.
The Status column says “REJECTED.”
The Agent column displays the rejecter’s name.
Click REFUSED - DOC: <document number> to see any explanations entered for
the rejection.

Processing Online Payments–User Guide Page 36 of 53
Rejection text must be entered at the time the document is rejected in order for it
to appear here. If you don’t see an explanation, contact the person who rejected
the document.
Rejected documents remain in workflow. They can be corrected by the Online
Payment Requester and resubmitted for approval.
6.2 Activity—Practice Session 2
You learn that 100% of the charges on the Jays invoice should be charged to Cost Center
1010289732. Reopen the document you just submitted, modify the cost assignment, and
resubmit the document for approval.
6.3 Activity—Practice Session 3
You want to email your approver to let him know that you submitted an online payment request
for his review, but you’re not sure who the approver is. Look up the name of the person
authorized to sign the payment request you just submitted.
Processing Online Payments–User Guide Page 37 of 53
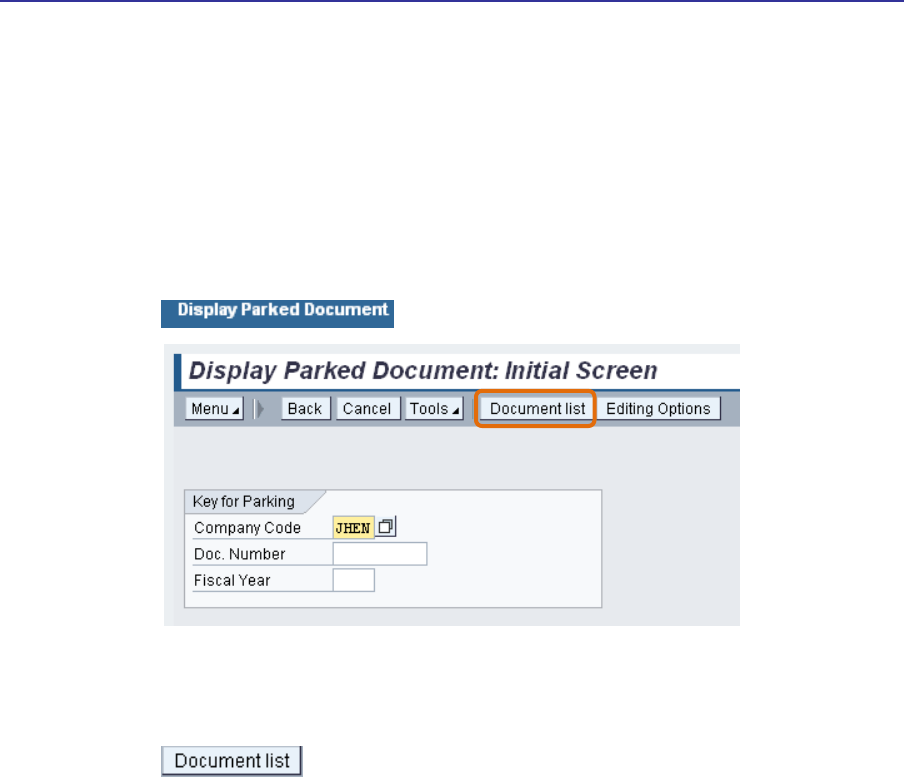
7 Display Parked Documents
This transaction can be used to review parked documents (i.e., documents that have been
saved or submitted to workflow). Unlike the Tree window, which only displays documents that
you created, this function can retrieve documents that other people originated.
1. Click the tab.
2. If you’re searching for a specific document and know the document number, type it in the
Doc. Number field and press ENTER.
OR
Click the button to search by document originator.

Processing Online Payments–User Guide Page 38 of 53
a. Type the originator’s JHED ID in the Entered by field.
To search for documents created by multiple users, click the Multiple
Selection button and enter all relevant JHED IDs.
b. Type ZZ (for check request documents) in the Document type field.
c. Click the button.
3. Click a document to select it for review, and then click the button.
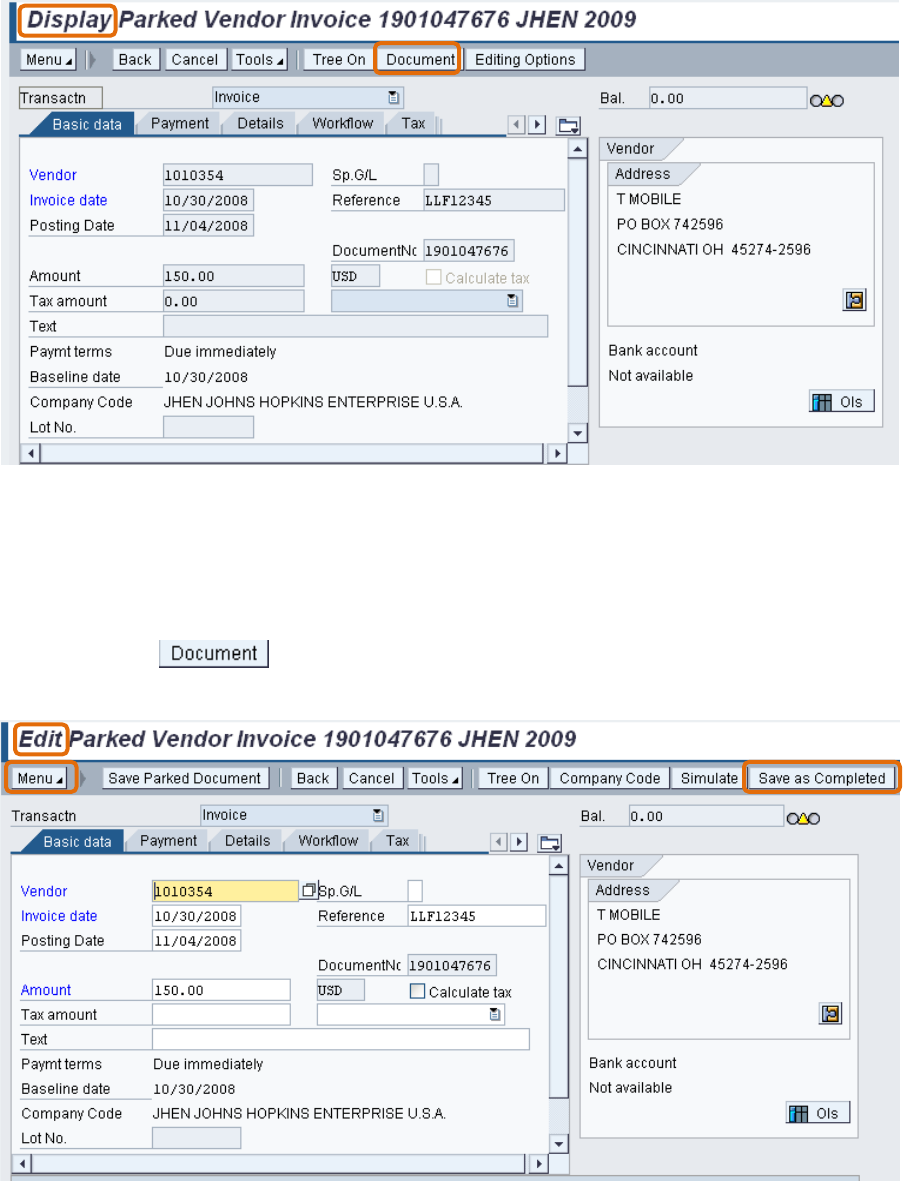
Processing Online Payments–User Guide Page 39 of 53
This opens the document in a read-only window. You can use this display to
review document information and workflow. (Refer to section 5.7.)
4. Click the button to open the document for editing.
The Edit function allows you to modify documents and resubmit them to
workflow, or delete documents that you no longer need.

Processing Online Payments–User Guide Page 40 of 53
To modify a document and resubmit it to workflow,:
a. Make any necessary corrections.
b. Click the button.
To delete a document,:
c. Click Menu, then click Document, and then click Delete Parked Document.
The Display Parked Documents list does not refresh automatically. A deleted
document will continue to appear on this list until you reexecute the report.
7.1 Activity—Practice Session 4
Using the Display Parked Document transaction, review workflow for documents created by your
coworker, whose JHED ID is UPUR01.

Processing Online Payments–User Guide Page 41 of 53
8 Modifying and Deleting Documents
You can modify and delete documents that are still in parked status.
8.1 Using Park Incoming Invoices
The following procedure allows you to modify or delete a document that you created and can
access from the Tree window.
1. Click the tab.
2. Click the button.
3. Click the Expand button next to either the Complete documents or Parked
documents folder.
4. Double-click an invoice to open a document.
5. To modify the document and resubmit it to workflow,:
d. Make any necessary corrections.
e. Click the button.
6. To delete the document,:
f. Click Menu, then click Document, and then click Delete Parked Document.
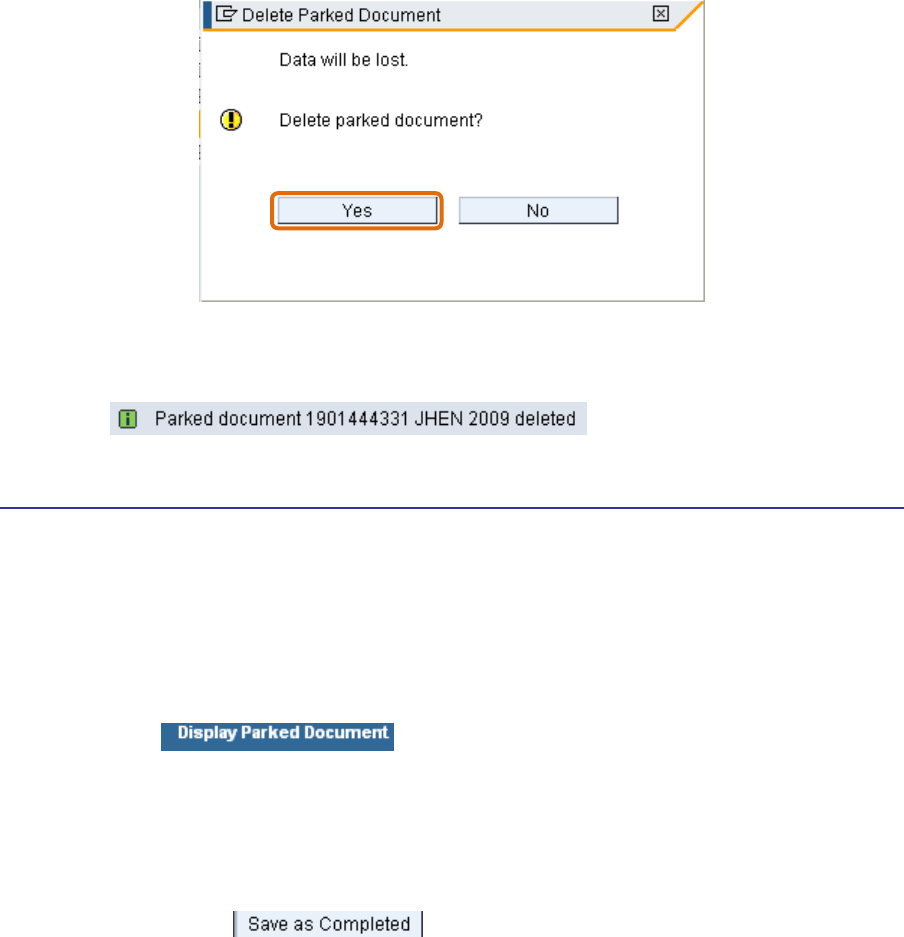
Processing Online Payments–User Guide Page 42 of 53
7. A warning message will appear, asking you to confirm the delete. Click Yes to delete the
document, or click No to cancel the delete.
If you click Yes, you’ll see a message that looks something like this:
8.2 Using Display Parked Documents
The following procedure allows you to modify or delete a document created by another staff
member.
1. Click the tab.
2. Find the appropriate document (refer to section 7 for instructions on how to perform a
search) and open it in edit mode.
2. To modify the document and resubmit to workflow,:
a. Make any necessary corrections.
b. Click the button.
3. To delete the document,:
a. Click Menu, then click Document, and then click Delete Parked Document.
The Display Parked Document list does not refresh automatically. A deleted
document will continue to appear on this list until you reexecute the report.

Processing Online Payments–User Guide Page 43 of 53
8.3 Activity—Practice Session 5
You just discovered that a payment request had already been submitted for the Jays invoice,
meaning you created a duplicate payment request. Because the original requestor forgot the
enter 000 before the invoice number, your request wasn’t flagged as a duplicate payment.
Delete your payment request
Processing Online Payments–User Guide Page 44 of 53
9 Display Payment
You have two options for finding payment information: searching by vendor number or searching
by invoice number.
9.1 Searching by Vendor Number
Let’s look at the way you find payments using vendor numbers.
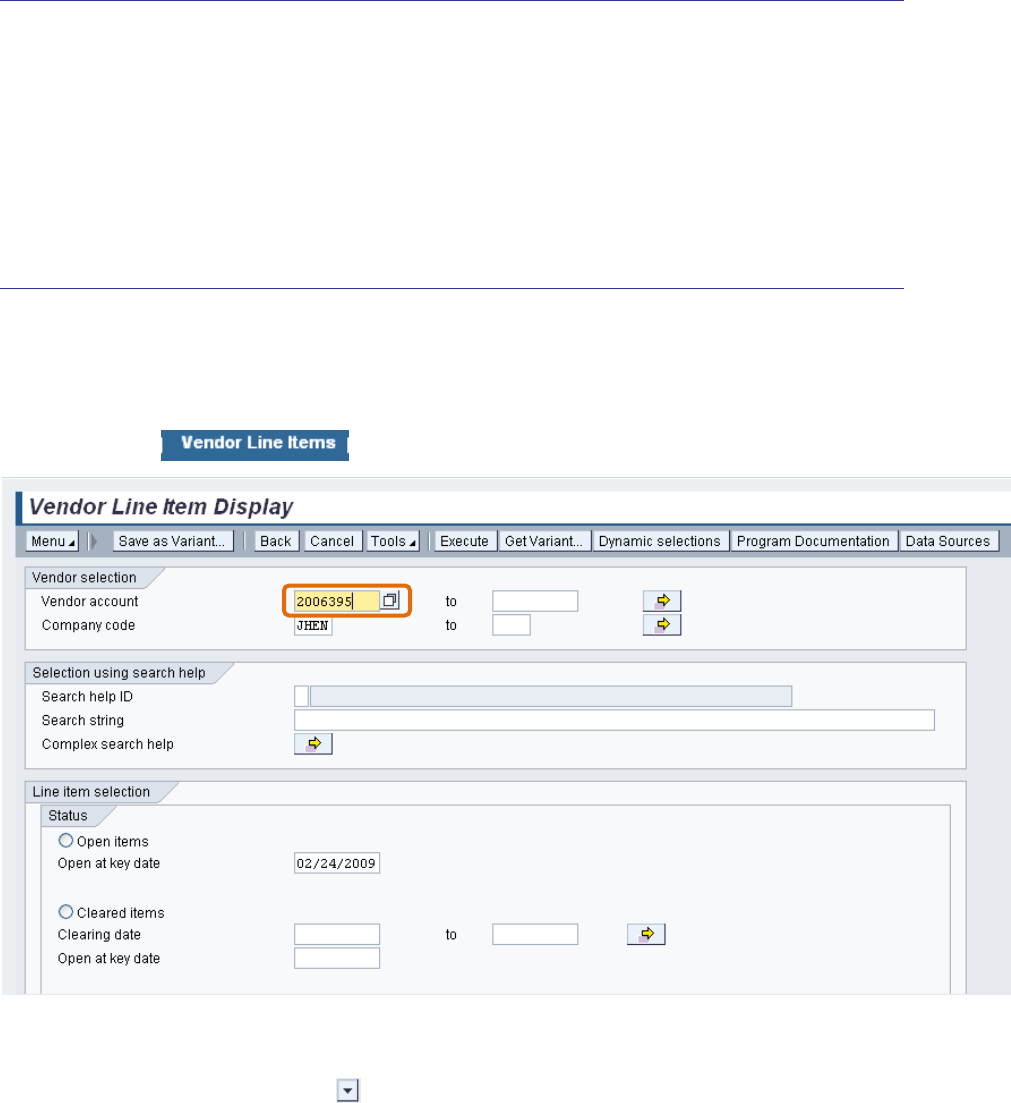
1. Click the tab.
2. Type the vendor number in the Vendor account field, or search for the vendor number
(refer to section 5.2 for instructions).
3. Click the down scroll arrow.
Processing Online Payments–User Guide Page 45 of 53
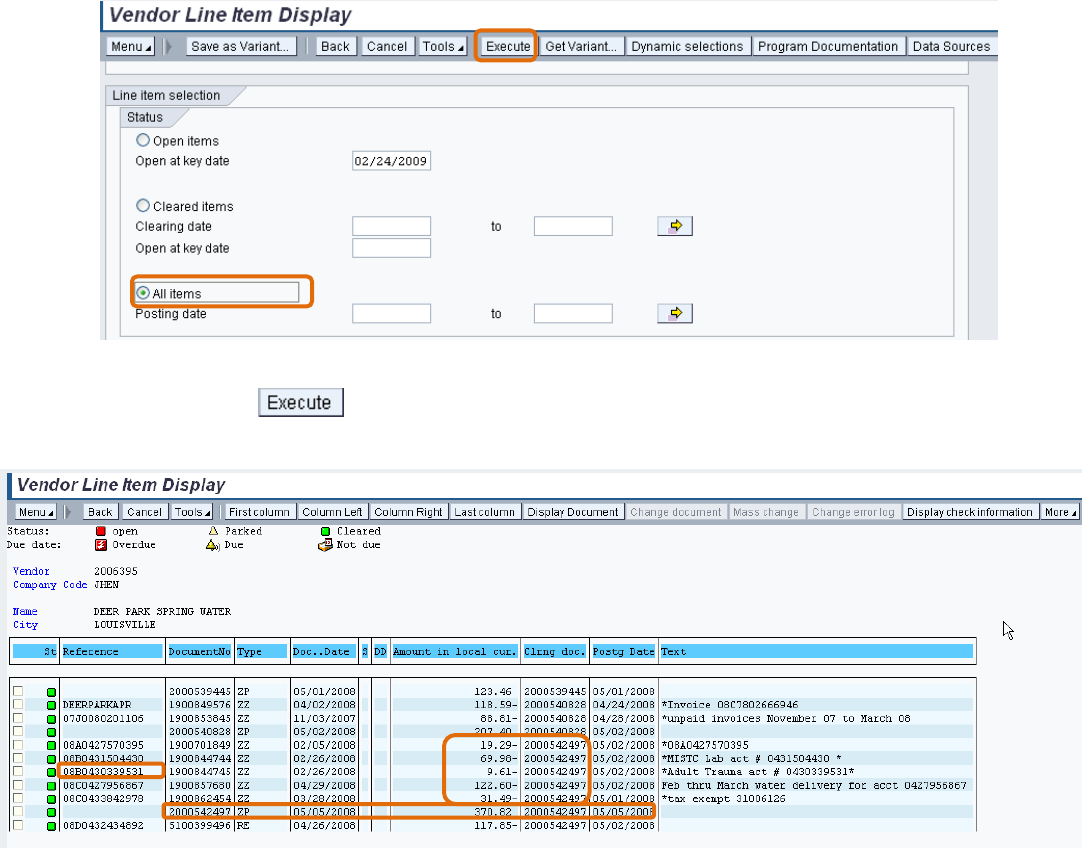
4. Click All items.
5. Click the button.
The Reference column displays the invoice number.
The DocumentNo column displays the SAP document number.
The Type column indicates the document type:
o ZZ: check request.
o ZP – payment to vendor.
The Doc..Date column shows the invoice date.
The Amount in local cur. column shows the invoice amount (in lines with ZZ in the Type column)
and payment amount (in lines with ZP in the Type column).
The Clrng doc. column displays the SAP payment document number.
Processing Online Payments–User Guide Page 46 of 53
In this example, we’re looking for Invoice 08B0430339531, which totaled $9.61. This document
is associated with four other invoices, which were all paid with one payment totaling $370.82.
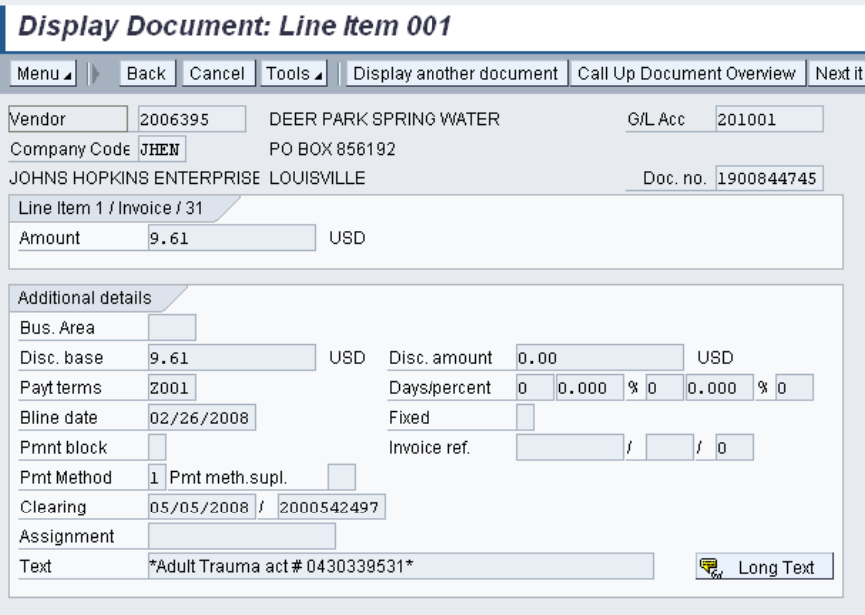
To see more detailed information on your invoice:
1. Double-click the invoice line.
Processing Online Payments–User Guide Page 47 of 53
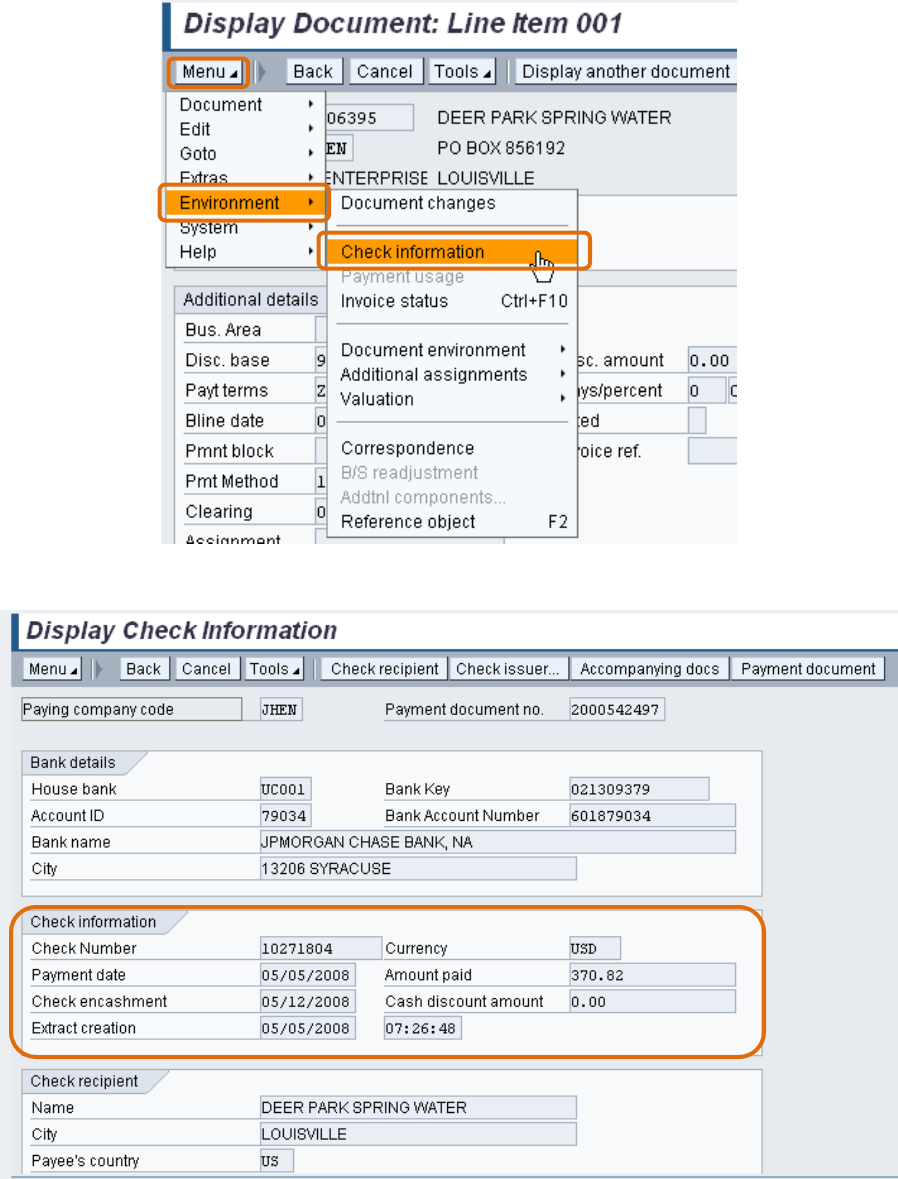
2. Click Menu, then click Environment, and then click Check Information.
Processing Online Payments–User Guide Page 48 of 53
This display shows you the check number, date paid, date cashed, and check amount. Even
though your invoice was only for $9.61, it was added to other invoices and included on a check
for $370.82.
9.2 Searching by Invoice Number
Let’s look at the way you find payments using invoice numbers.
You must have access to the AP Display role to use this transaction.
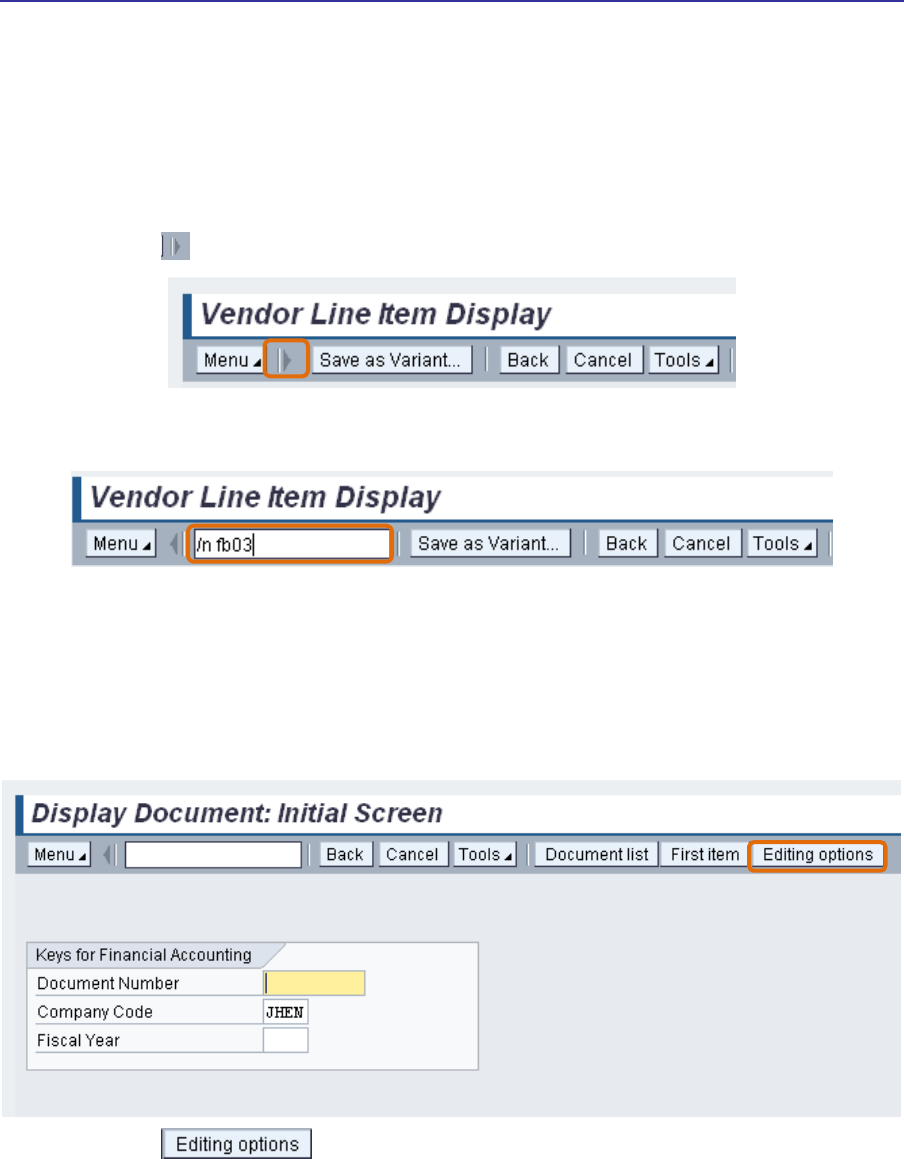
1. Click the button to expand the command box.
2. Type /n fb03 and press ENTER.
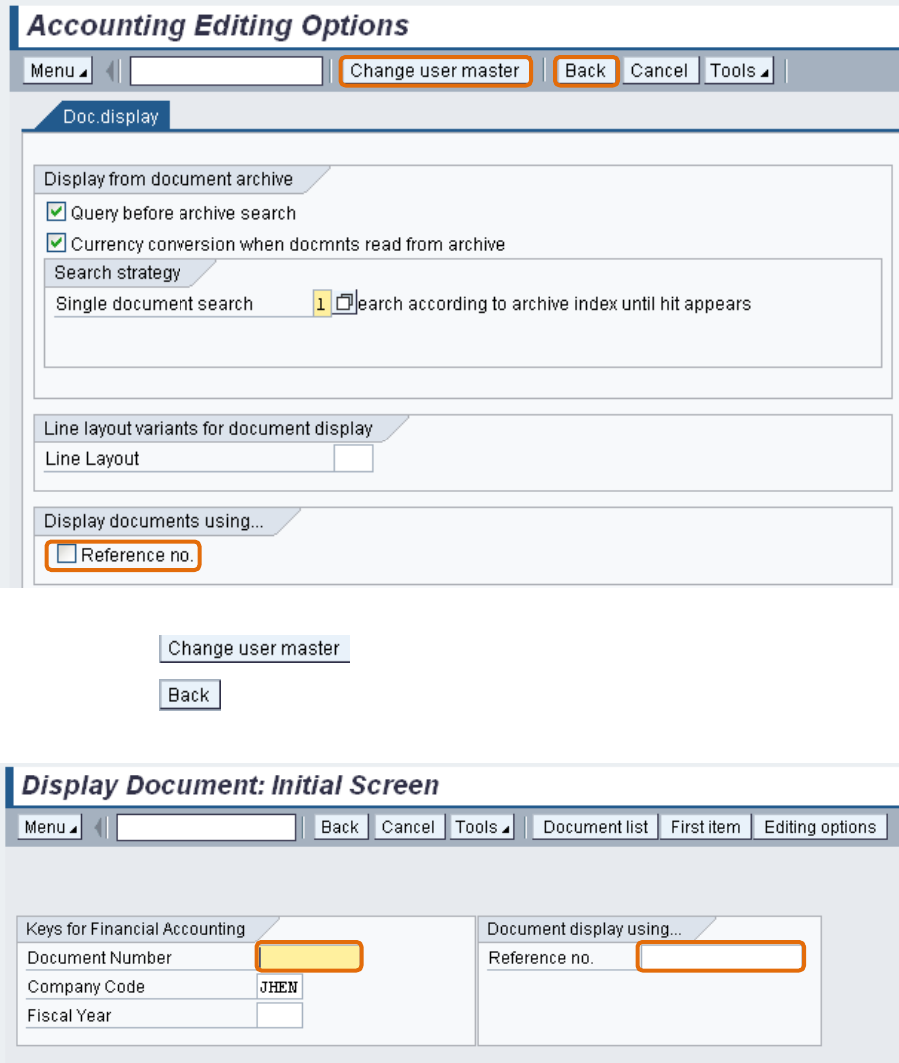
You need to establish an initial setting in order to access the field that allows you
to search by invoice number. You only have to do this once, and afterwards the
field will appear each time you access this transaction.
1. Click the button.
Processing Online Payments–User Guide Page 49 of 53
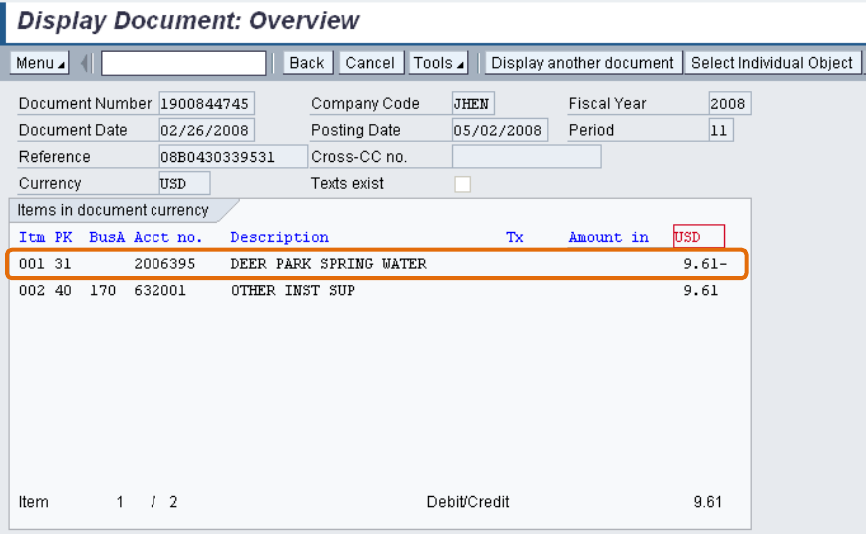
2. Click the check box next to Reference no.
3. Click the button.
4. Click the button.
Now you can search for a payment using either the SAP document number (in
the Document Number field) or the invoice number (in the Reference no. field).
Processing Online Payments–User Guide Page 50 of 53
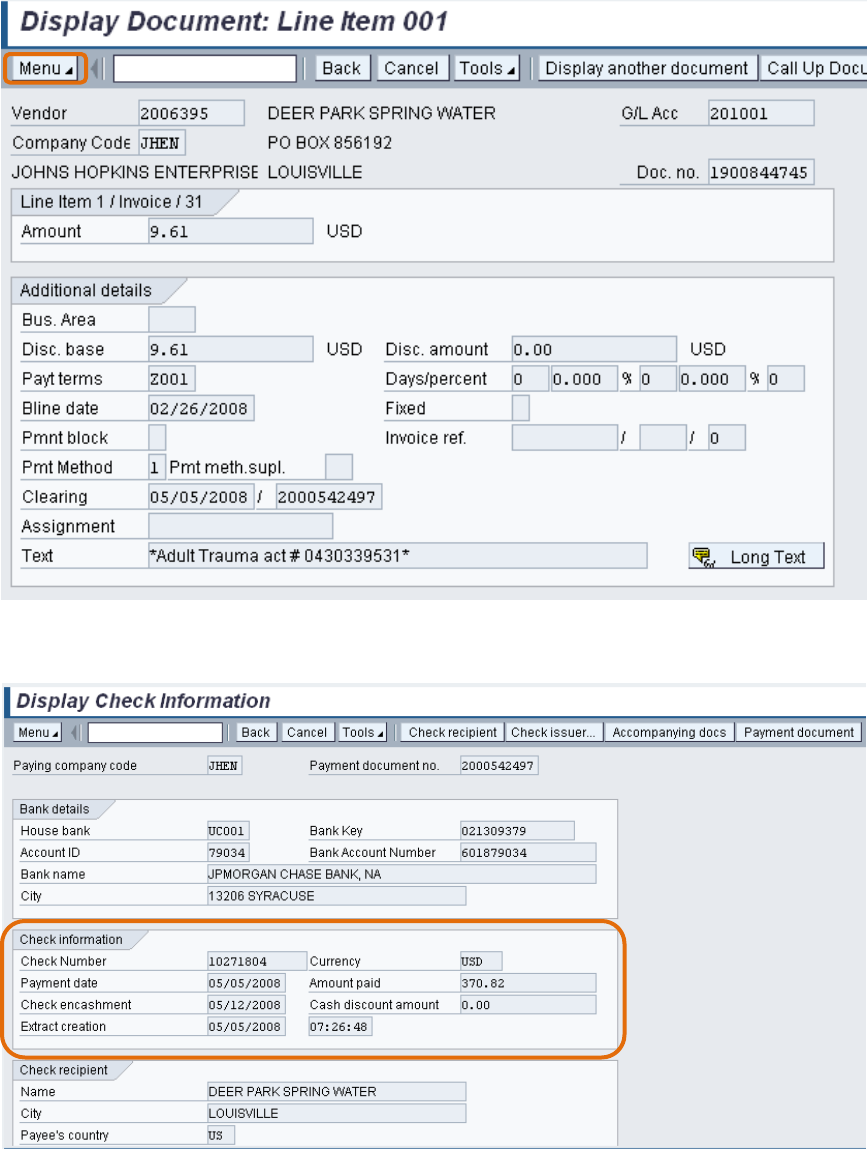
In this example, we’re looking for Invoice 08B0430339531, which totaled $9.61.
1. Type the invoice number in the Reference no. field and press ENTER.
To see more detailed information:
2. Double-click the invoice line.
Processing Online Payments–User Guide Page 51 of 53
3. Click Menu, then click Environment, and then click Check Information.
This display shows the check number, date paid, date cashed, and check amount. Even though
your invoice was only for $9.61, it was added to other invoices and included in a check for
$370.82.

Processing Online Payments–User Guide Page 52 of 53
9.3 Activity—Practice Session 6
A FEDEX vendor called you about Invoice 8-240-52342. The company says it has not received
any payment.
You checked both Park Incoming Invoices (documents you created) and Display Parked
Documents (documents created by any processor in your department), but you didn’t find any
check request.
Now you need to figure out whether or not a payment has been processed. Search for a
payment using the vendor number.
INVOICE
FEDEX 07/22/2008
PO Box 371461
Pittsburg, PA 15250-7461
JHU Dept.
Attn: Jane Smith
1101 E. 33
rd
Street
Baltimore MD 21218
Invoice #: 2-823-41284
Courier Service 10.53
Total Cost: 10.53
9.4 Activity – Practice Session 7
Using the invoice listed above, search for a payment using the invoice number.

Processing Online Payments–User Guide Page 53 of 53
10 Appendix A—Resources
For more information, consult the following resources.
General Web Sites
University Finance http://finance.jhu.edu
Shared Services http://ssc.jhu.edu/
PO Exception List
http://ssc.jhmi.edu/supplychain/exceptions.html
Searching Vendor Number job aid
http://ssc.jhmi.edu/accountspayable/DataFiles/Vendor_Search_and_Setup.pdf
Checking Workflow
http://ssc.jhmi.edu/accountspayable/DataFiles/Workflow_Overview_Online_Pymt
_Request.pdf
Add/Change Vendor Form for Honoraria payments
http://ssc.jhmi.edu/accountspayable/DataFiles/VendorAddChange.pdf
JHU Accounts Payable Policies and Procedures
http://ssc.jhu.edu/accountspayable/policies.html
Contact information for Accounts Payable Shared Services
http://ssc.jhu.edu/accountspayable/contact.html
Contact Information for SAP
http://www.sapathopkins.org/contact/
SAP Tips and Tricks
SAP Tutorials (short videos on initial settings and vendor search in WinGUI)
http://www.sapathopkins.org/sap-tutorials/
Useful Roles for Web GUI On-line Payment Requestor
ZRSC_AP_E_CHECK_REQ_ALL AP Online Payment Requester
Useful Roles for Win GUI On-line Payment Requestor
ZPSC_AP_CHKRQ_REQ_ALL Portal Role - Online Payment Requestor
ZRSC_AP_DISPLAY_ALL AP Display
ZPWINGUI_LAUNCH Portal Role - WIN GUI Pad
Useful Roles for Win GUI On-line Payment Requestor
FastFacts regarding Online Payments (click on Accounts Payable button)
http://hopkinsfastfacts.org
