
Windows Movie Maker 2011
User Guide
Download, install and create video presentations using
Windows Movie Maker 2011,
part of the Microsoft Live Essentials package.

Windows Movie Maker 2011
User Guide
©2011 Andy Weingartner
Before you Begin:
Users of this Windows Movie Maker 2011 instruction manual are expected to
have a basic understanding of the following software and hardware:
z Microsoft Office Word
z Word processing
z Graphic image editing (resizing, cropping and saving to alternate formats)
z Internet download procedures
z File upload from external devices, including digital cameras, digital video
cameras, digital voice recorders and smart phones.
z The proper operation of digital media hardware, including digital cameras,
digital video cameras, digital voice recorders and smart phones.

3
Table of Contents
Chapter 1: Getting Started .....................................................5
Download and install Movie Maker ...........................................................5
System Requirements ...........................................................................5
Download and install Windows Live Essentials ...................................5
File Organization ......................................................................................10
File organization guidelines ................................................................10
Create and save your Movie Maker 2011 project file ..............................11
Chapter 2: Script & Narration .............................................13
Script Preparation ....................................................................................13
Record your Narration ..............................................................................14
Record narration directly on your computer .......................................14
Record narration using a digital voice recorder ..................................14
Chapter 3: Graphic Images ..................................................15
Graphic File Specifications .......................................................................15
File editing ..........................................................................................15
File formats .........................................................................................15
File size ...............................................................................................15
Import Graphic Images .............................................................................16
Edit Graphic Images ................................................................................18
Apply Transitions ................................................................................18
Apply Pan and zoom effects ...............................................................18
Remove animation effects ...................................................................19
Set graphic image duration .................................................................19
Add captions .......................................................................................20
Delete a caption ..................................................................................21
Add caption effects .............................................................................21
Apply effects .......................................................................................22
4
Table of Contents
Title, Text and Credit Slides .....................................................................23
Title slide .............................................................................................23
Text slide .............................................................................................24
Credits .................................................................................................25
Chapter 4: Video ................................................................... 27
Video Editing Basics ................................................................................27
Video formats ......................................................................................27
Video sources ......................................................................................28
Video editing programs .......................................................................28
Edit Video Clips ........................................................................................28
Edit video clip length ..........................................................................28
Split a video clip .................................................................................29
Chapter 5: Audio Files .......................................................... 31
Import audio files ......................................................................................31
Edit Audio Files ........................................................................................32
Start location .......................................................................................32
Click and drag method ........................................................................32
Start time music tool ...........................................................................33
Adjust audio clip length ......................................................................33
Chapter 6: Finish Your Project ........................................... 35
AutoMovie Themes ..................................................................................35
Export your Movie Maker 2011 Project ...................................................36
Save movie ..........................................................................................37
Index ....................................................................................... 39

5
Chapter 1: Getting Started
In this chapter, you will learn the following techniques:
How to download and install Movie Maker 2011
How to organize your files
How to create and save a Movie Maker 2011 project file
Download and install Movie Maker
Movie Maker 2011 is included in the Windows Live Essentials 2011 package
along with the following applications: Messenger, Photo Gallery and Windows
Live Mesh. Live Essentials is a free download file available from the Microsoft
web site. Movie Maker 2011 is not included in the Windows XP, Windows Vista
and Windows 7 operating system installations.
System Requirements:
Download and install Windows Live Essentials. Microsoft Movie Maker
2011 is part of the Windows Live Essentials package that can be downloaded from
the Microsoft site.
1. Open the Microsoft web site: http://www.microsoft.com.
System
Component
System Requirements
Operating system Windows 7 (32- or 64-bit version)
Windows Vista Service Pack 2 (32- or 64-bit
version)
1
Processor 1.6 GHz or higher
Memory 1 GB of RAM or higher
Display Resolution 1024 × 576 minimum
Graphics card Graphics card must supports DirectX 9 or higher and
Shader Model 2 or higher.
1
Windows Vista Service Pack 2 requires the Platform Update for
Windows Vista
6
Chapter 1
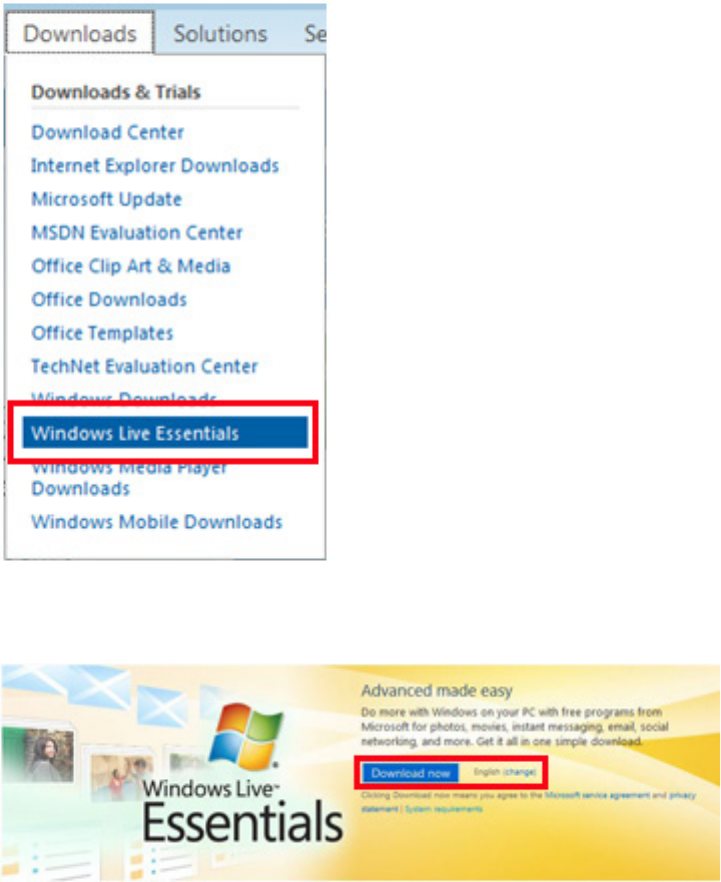
2. Click the Downloads link.
3. Select Windows Live Essentials from the content menu.
4. Click the Download now button to download the entire Windows Live
Essentials 2011 package to your computer.
]
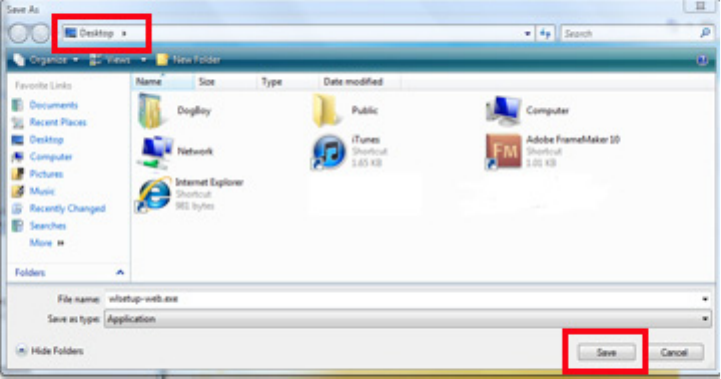
5. Click Save when prompted.
7
Getting Started
6. Save the installation package to your computer's desktop in the Save As
window.
7. Click Save.
[
8. Click Close in the Download complete window.
NOTE: You can choose Run to install the Windows Live Essentials 2011
package directly from the Microsoft Downloads web site, but this may take
longer depending on the speed of your internet connection.
9. Double-click the install icon named wlsetup-web saved to your desktop.
8
Chapter 1
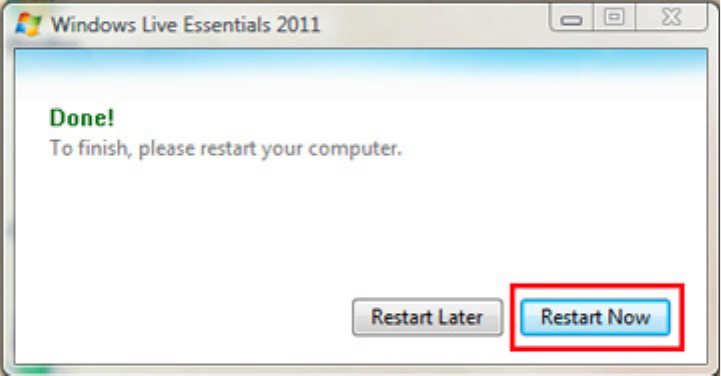
10.Click Continue if prompted.
11. Click Install all of Windows Live Essentials.
NOTE: You can click Choose the programs you want to install if you want to
install the individual components of Windows Live Essentials 2011. This
installation option is not recommended by Microsoft.
[
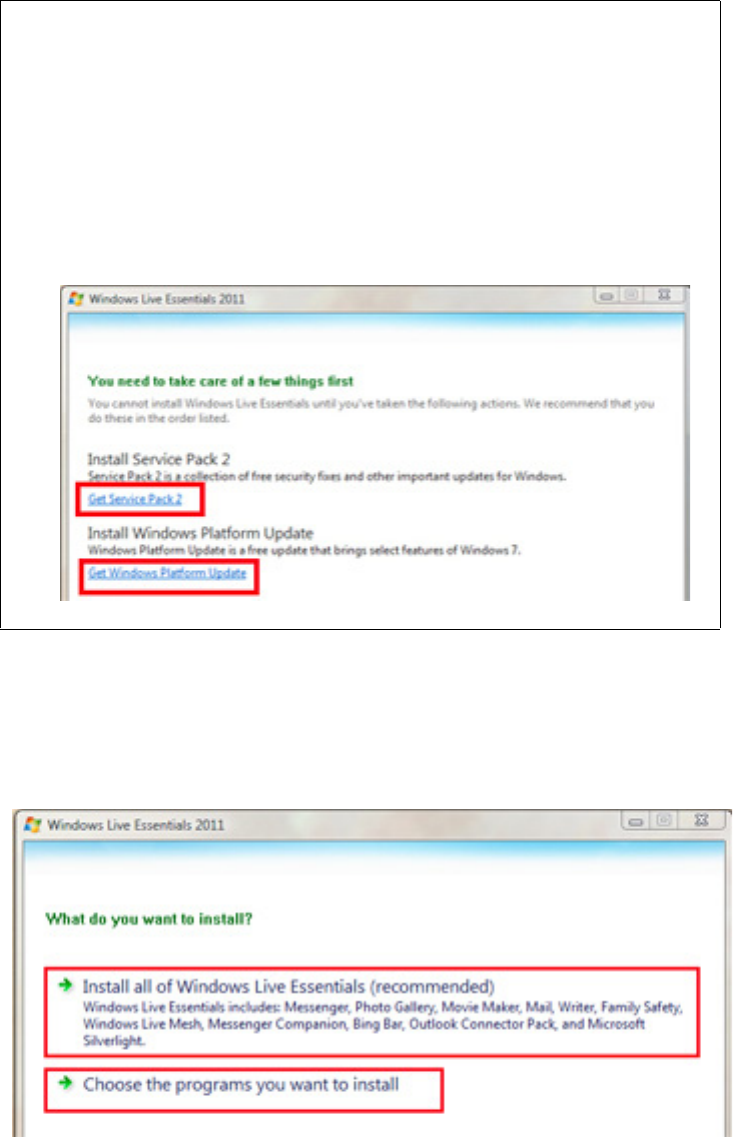
IMPORTANT
Install any needed system updates if prompted (Windows Vista
Service Pack 1 in the example graphic below). Click the
hyperlink below each requested system upgrade for download
and installation instructions.
Many of these system updates, especially service pack updates,
require a system reboot. Save and close all open files before
downloading and installing these updates.
9
Getting Started
12.Click either Restart Now or Restart Later when the Done! prompt appears.
[
10
Chapter 1
File Organization
Movie Maker 2011 requires careful file organization. Movie Maker 2011 projects
reference all imported graphic, video, audio, narration and text files.
You will have difficulty creating, editing and exporting a Movie Maker 2011
project that is not properly organized.
This is of particular importance if your Movie Maker 2011 project will be copied
to multiple computers for editing (this is common in a school setting where
students work on a variety of lab or school-provided computers).
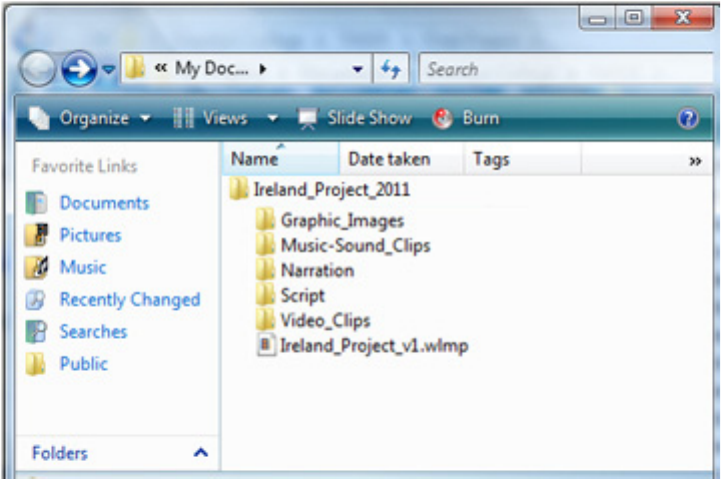
File organization guidelines. Follow this file organization template:
z Create a top-level folder that will contain all of the Movie Maker 2011 project
files. Give this folder a short, descriptive name (Ireland_Project_2011 in the
example below).
z Create separate folders for each imported element:
Graphic images
Video Clips
Audio files (music and sound clips)
Narration
Script and other written material
z Save the Movie Maker 2011 project file in the top-level folder
(Ireland_Project_2011 in the example below).
[
11
Getting Started
Create and save your Movie Maker 2011
project file
You will begin by creating and saving a Project File. Project files are used to create
and edit a Movie Maker 2011 project for final export. Project files can be edited
and re-exported as needed.
1. Select Start > Programs > Windows Live Movie Maker to open the
program.
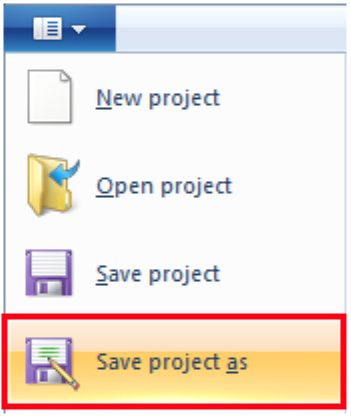
2. Select Movie Maker Tab > Save project as. Save your project in your top-
level folder as described in “File Organization” on page 10.
IMPORTANT: Save your Project File often. Use the keyboard shortcut Ctrl + S
for quick saves.
12
Chapter 1

13
Chapter 2: Script & Narration
In this chapter, you will learn about the following procedures:
Script preparation guidelines
Recording and saving narration files
IMPORTANT: There are two important considerations when planning to use
audio tracks in your presentation:
z Movie Maker 2011 does not have a built-in narration program. You will have
to record the narration track using a separate application or voice recorder
hardware.
z Movie Maker 2011 project files will play only one audio track at a time. For
example, you cannot have a song playing at the same time as a narration track.
Script Preparation
A thoroughly researched and written narration script will help you organize and
edit your project's graphic images, video clips, and audio files.
Review the following rules for writing a narration script and recording your
project narration:
z Write your narration script before you begin recording your narration track.
z Organize your narration script using the same structure as you would a written
essay. This includes (1) An introduction; (2) Thesis statement; (3) Main points
and sub-points, and (4) Conclusion.
z Double- or triple-space your narration script for easier reading during
recording. Include phonetic spelling of difficult-to-pronounce words and
names.
z Record your narration in a quiet area. Microphones will pick up ambient sound
around you.
z Practice recording your narration. You may have to record several takes before
you get a quality recording.
z Pay particular attention to microphone placement, breathing control, and your
vocal pitch and range. For example, do not narrate in a monotone voice.
z Record your narration in separate “chunks.” You do not have to record your
entire narration in one take.
14
Chapter 2
Record your Narration
IMPORTANT: See “Chapter 5: Audio Files” on page 31 for instructions on how
to import and edit the narration track in your Movie Maker 2011 project file.
You can install recording software and record your narration directly on your
computer, or you may record your narration on a digital voice recorder.
Record narration directly on your computer. Please follow these
guidelines for installing and using voice recorder software:
z Attach a microphone to your computer. Please see your microphone or sound
input device instructions for more details.
NOTE: Many notebook computers have built-in voice recorder hardware and
software.
z A variety of voice recorder software programs are available for free download.
Carefully review each program's technical specifications to make sure it is
compatible with your computer hardware and software.
z SourceForge's Audacity is a commonly-used voice recording program
available for free download. Click here for more information: http://
audacity.sourceforge.net/
z Save your narration file in MP3 format.
z Copy or save your completed narration file in your project's Narration folder.
See “Chapter 5: Audio Files” on page 31 for more information about sound file
formats and uploads.
Record narration using a digital voice recorder. Follow these guidelines
to successfully record narration using digital voice recorder hardware.
z Carefully read the instructions that came with your digital voice recorder.
Make sure it is compatible with your computer hardware and software.
z Make sure your digital voice recorder files can save files in MP3 format.
z Check the type of computer connection that your digital voice recorder uses.
Some digital voice recorders connect directly to a computer's USB slot; other
recorders require a separate connection cable.
z Save your narration file in MP3 format.
z Copy or save your completed narration file in your project's Narration folder.
See “Chapter 5: Audio Files” on page 31 for more information about sound file
formats and uploads.

15
Chapter 3: Graphic Images
In this chapter, you will learn how to use the following design techniques:
Inserting graphic images into your project file
Adding transitions and captions
Inserting title, text and credit slides
Graphic File Specifications
Edit and save graphic images before they are imported into your Movie Maker
2011 project.
File editing. Use a graphic editing program to edit graphic images. Programs
include:
z Adobe Photoshop
z Adobe Photoshop Express
z GIMP
z Google Piknik
z Windows Paint.
File formats. Graphic images must be saved in one of the following formats:
z JPEG
z GIF
z TIF
NOTE: JPEG is the preferred file format. It combines image quality with file size
compression.
File size. Setting proper graphic file size is essential; large graphic files sizes will
slow down production time and create project files that are too large to easily play
or post to web sites.
z Image resolution: 72 DPI.
z Image size: Width and height should not exceed 8" x 10".
NOTE: File size is particularly important when you import graphic images from
digital cameras. Digital camera resolution is often set to the maximum size of 36"
x 24". Images this large will slow processing time when you import, edit, save and
export your Movie Maker 2011 project.
16
Chapter 3
Import Graphic Images
Import and insert the graphic images you uploaded and organized as described in
“File Organization” on page 10.
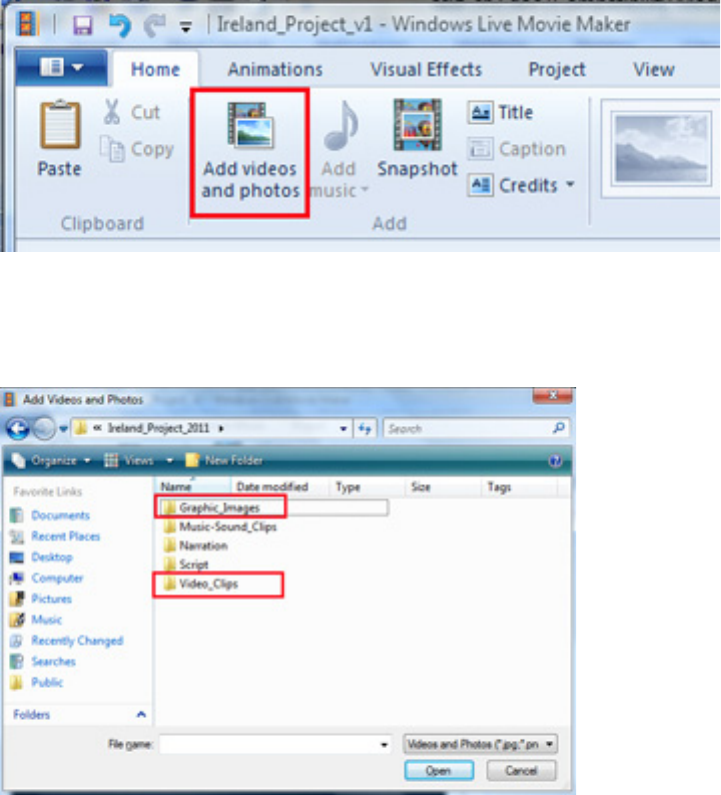
1. Click Home > Add videos and photos.
[
2. Double-click the folder that contains your graphic images.
3. Press the Ctrl key and click to select the images and video clips you want to
add to your project.
17
Graphic Images
4. Click Open.
[
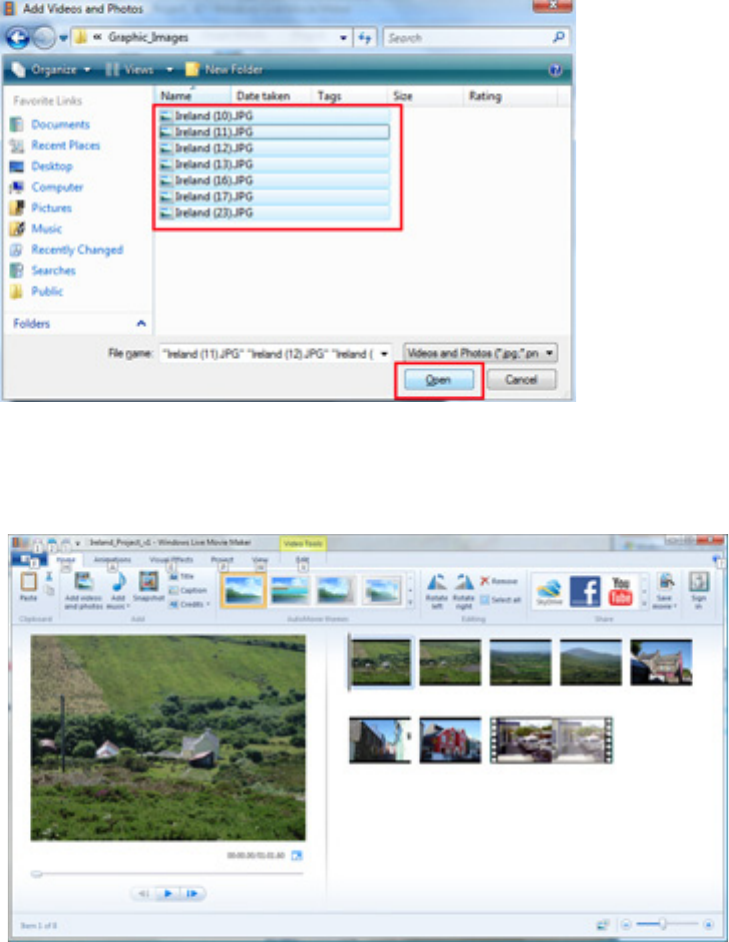
Imported graphic image thumbnails will be added to the Storyboard on the
right side of the Movie Maker 2011 window. The Preview Monitor on the left
side of the screen will display individual graphic images and video clips.
[
Storyboard
18
Chapter 3
Edit Graphic Images
Apply a variety of visual effects to the graphic images inserted into your Movie
Maker 2011 project.
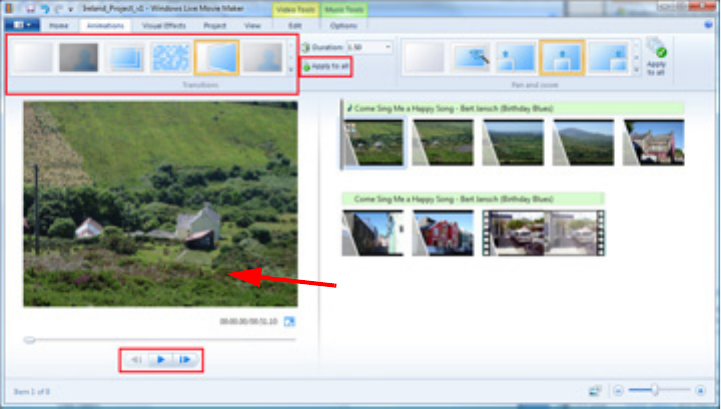
Apply Transitions. You can add transition effects between graphic images and
video clips.
1. Click the Animations tab.
2. Select a transition effect from the Transitions menu at the top-left of the
Movie Maker 2011 project window.
3. Click Apply to all.
4. Click the Play button in the Preview Monitor to preview your transitions.
[
NOTE: You can press the Ctrl + Click keys to select individual graphic
images to apply transitions.
IMPORTANT: Be judicious in your use of transitions. Too many different
types of transitions in one project can be distracting and look unprofessional.
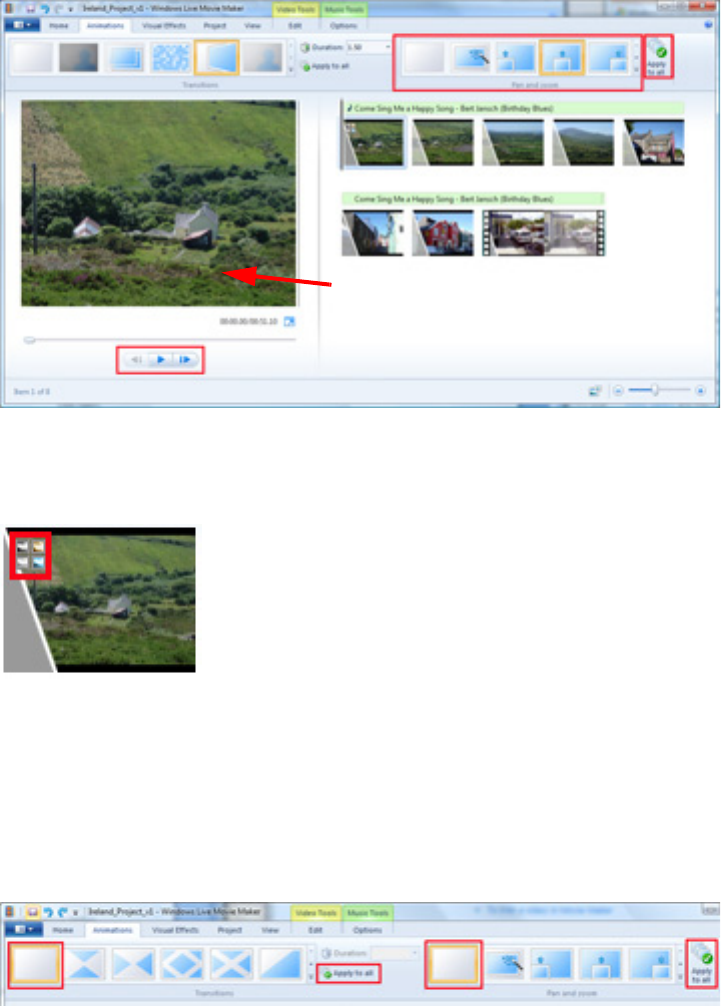
Apply Pan and zoom effects. Pan and zoom provides a “Ken Burns” effect to
individual images.
NOTE: Not all graphic images are suitable for pan and zoom effects. This should
be done on a picture-by-picture basis. Click Apply to all if you want the same pan
and zoom effect applied to all graphic images.
1. Click the Animations tab.
2. Press the Ctrl key and click to select an individual graphic image.
3. Select the appropriate pan and zoom effect from the Pan and zoom menu at
the top-right of the Movie Maker 2011 project window. The effect will be
applied automatically.
Preview monitor
19
Graphic Images
4. Click the Play button in the Preview Monitor to preview your transitions.
[
NOTE: Each graphic image and video clip thumbnail will have an icon
indicating transition and pan and zoom effects.
Remove animation effects. Remove effect from selected images or all images.
1. Select the Animations tab.
2. Click the None effect under Transitions or Pan and zoom menus.
3. Click Apply to all, or press the Ctrl + click keys to select individual graphic
images and video clips.
[
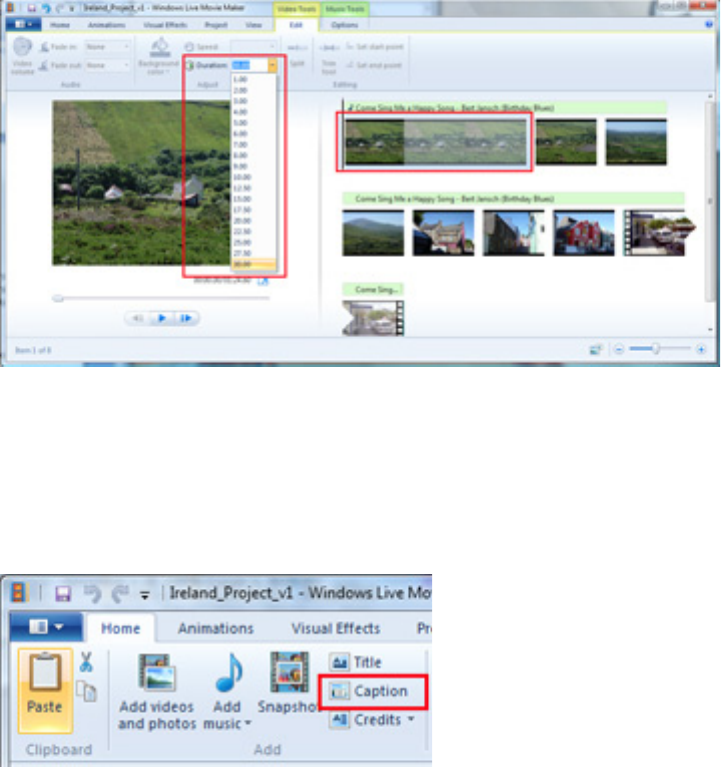
Set graphic image duration. You can control how long a graphic image
appears on-screen.
1. Click the Edit tab. The Edit tab should appear under the Video Tools heading.
2. Press the Ctrl + click keys to select an individual graphic image.
Preview monitor
20
Chapter 3
3. Select the appropriate duration time from the Duration content menu.
Duration is measured in seconds. You can enter a custom duration time in the
Duration box.
The length of the selected graphic image thumbnail in the Storyboard will
change to reflect the new duration time.
[
Add captions. Captions can be added directly to graphic images.
1. Click to select a graphic image in the Storyboard.
2. Click the Home tab.
3. Click Caption in the Add menu.
4. Triple-click to highlight the text box that appears in the Preview Monitor.
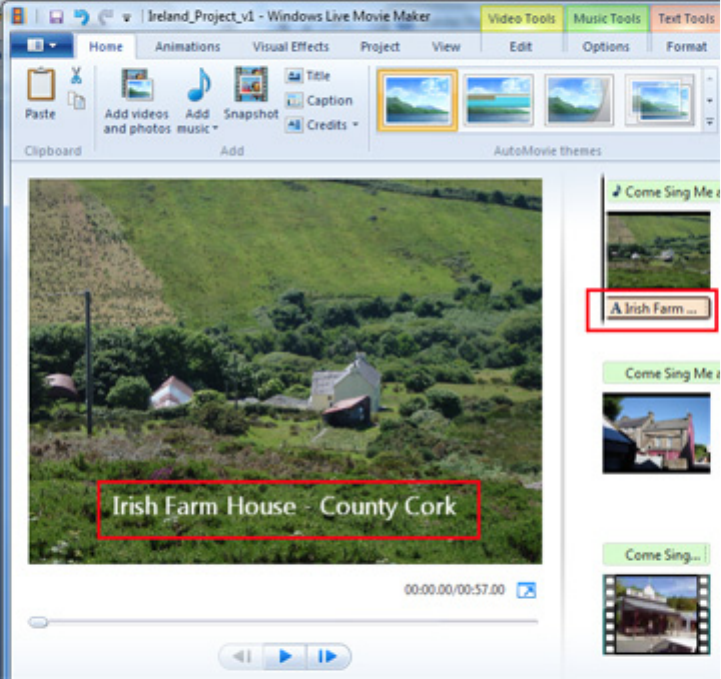
21
Graphic Images
5. Enter the desired caption text.
The caption text appears below the graphic image thumbnail in the Storyboard.
[
Delete a caption. Delete unwanted captions. Add new captions as described on
page 20.
1. Click to select a caption in the Storyboard.
2. Press the keyboard Delete key, or right-click and select Delete.
Add caption effects. Apply a variety of effects to a graphic image caption.
1. Click to select a graphic image with a caption.
2. Click Text Tools > Format.
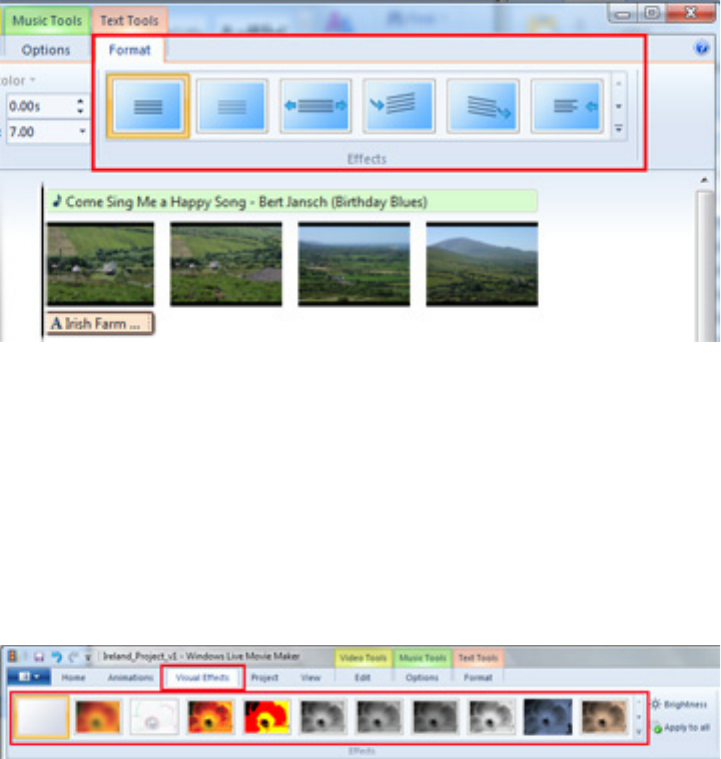
22
Chapter 3
3. Select the appropriate effect from the Effects menu. Effects include fade in,
spin, and fly-in.
[
IMPORTANT: Be judicious in your use of text effects. Overuse or too many
different effect styles in one project can be distracting and look unprofessional.
Apply effects. A variety of effects, including black and white, sepia tone and
pixelate, can be applied to graphic images.
1. Click to select an individual graphic image.
2. Click the Visual Effects tab.
3. Select the appropriate effect from the Effects menu.
[
Click the No Effect option to remove an effect.
NOTE: Each graphic image and video clip thumbnail will have an icon
indicating transition and pan and zoom effects.
23
Graphic Images
Title, Text and Credit Slides
Follow the Graphic Image Duration instructions on page 19 to adjust the length of
title, text and credit slides.
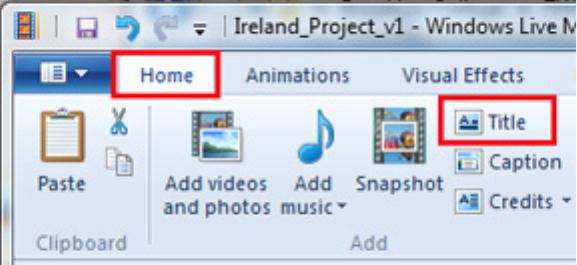
Title slide. Add a title to your project.
1. Click before the first object in the Storyboard.
2. Click the Home tab.
3. Click Title in the Add menu.
4. Triple-click to highlight the text box that appears in the Preview Monitor.
5. Enter the desired title text.
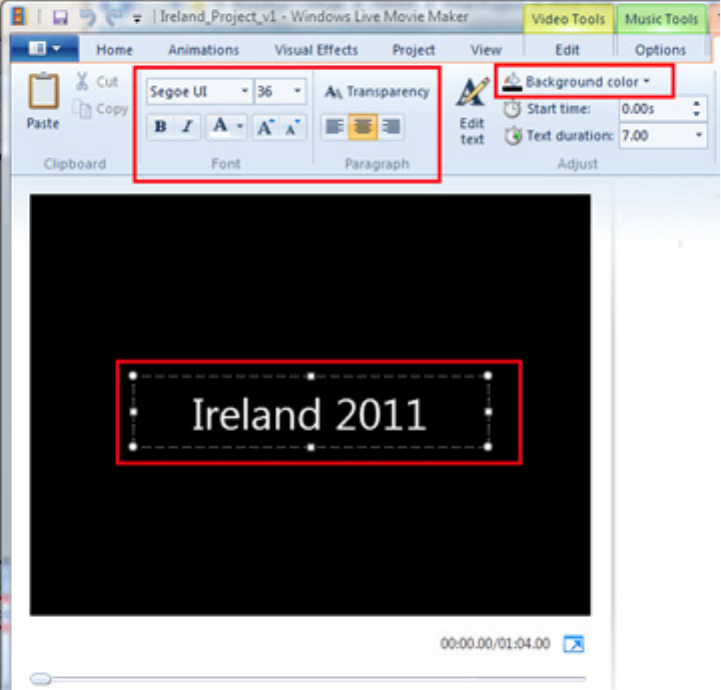
6. Edit title text using the Font and Paragraph tools in Text Tools > Format.
You use these tools to edit font type, size, style, and alignment.
24
Chapter 3
7. Edit slide background in Text Tools > Format > Background color.
[
NOTE: You can apply effects to title slide text. See page 22 for instructions.
Text slide. You can insert text slides anywhere in your Movie Maker 2011
project.
1. Click an insertion point between graphic or video objects in the Storyboard.
2. Click the Home tab.
3. Click Title in the Add menu.
4. Triple-click to highlight the text box that appears in the Preview Monitor.
5. Enter the desired title text.
6. Edit the text using the Font and Paragraph tools in Text Tools > Format. You
use these tools to edit font type, size, style, and alignment.
7. Edit the text slide background in Text Tools > Format > Background color.
NOTE: You can apply effects to the slide text. See page 22 for instructions.
25
Graphic Images
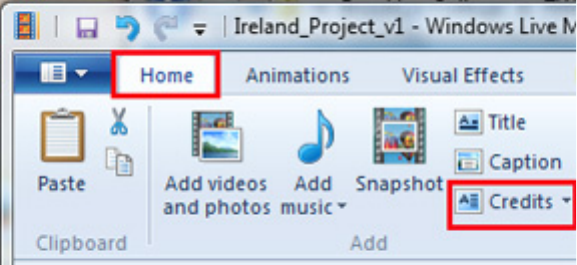
Credits. Add a credits slide at the end of your project.
1. Click the Home tab.
2. Click Credits in the Add menu.
3. Triple-click to highlight the text box that appears in the Preview Monitor.
4. Enter the desired title text.
5. Edit title text using the Font and Paragraph tools in Text Tools > Format.
You use these tools to edit font type, size, style, and alignment.
6. Edit slide background in Text Tools > Format > Background color.
NOTE: You can apply effects to title slide text. See page 22 for instructions.
26
Chapter 3
27
Chapter 4: Video
In this chapter, you will learn the following video techniques:
Video formats and specifications
Importing video clips
Editing video clips
Video Editing Basics
Video formats. Movie Maker 2011 supports the following video formats:
Format Name File Extensions
Windows Media files .asf and .wm)
Apple QuickTime files .mov and .qt
DV-AVI files .avi)
Microsoft Recorded TV Show
files
.dvr-ms and .wtv
MPEG-4 movie files .mp4, .mov,.m4v, .3gp, .3g2, and
.k3g
MPEG-2 movie files .mpeg, .mpg, .mpe, .m1v, .mp2,
.mpv2, .mod, and .vob
MPEG-1 movie files .m1v
Motion JPEG files .avi and .mov
28
Chapter 4
Video sources. Video files can be imported from the following sources:
z Digital cameras
z Digital video cameras
z Mobile phones or smart phones
z Flash memory cards (your computer will require either a built-in or external
memory card reader)
z Data CDs or DVDs
z Web site downloads
z Webcam and screen capture programs (many newer laptop computers have
built-in webcams)
NOTE: Many video capture devices can be connected directly to your computer
with a USB, Fire Wire, or video connection for file upload. Consult your device
manual or online documentation.
Video editing programs. Video clips can be edited in your Movie Maker 2011
project file (see “Edit Video Clips” on page 28). You can also pre-edit clips before
you import them into your Movie Maker 2011 project folder for easier use. Video
editing programs include:
z Adobe Final Cut
z Adobe Premiere
z AVG 2011 (free down load)
z Avid FreeDV (free download)
z AVS Video Editor (free download)
z iMovie (Macintosh users)
z Kino (UNIX system users)
z Microsoft Movie Maker (Windows users)
z Pinnacle
z Sony Vegas
Edit Video Clips
Control video clip length, start and end points, and split videos.
Edit video clip length. You can adjust the start and stop points of imported
video clips.
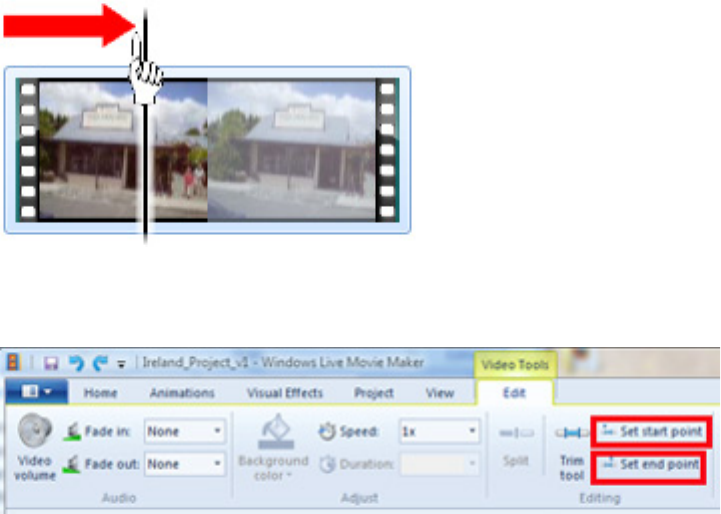
1. Click the Edit tab. The Edit tab will appear under the Video Tools heading.
2. Press the Ctrl + click keys to select an individual video clip. A vertical slider
bar will appear at the left edge of the video clip.
29
Video
3. Move the slider bar to the right. The Preview Monitor will play the video clip
as you move the slider bar.
4. Click the Set start point Trim tool. The video clip will begin where the slider
bar was set.
[
5. Move the slider bar to the right until you reach the desired end point of the
video clip. The Preview Monitor will play the video clip as you move the slider
bar.
6. Click the Set end point Trim tool.
The length of the trimmed video clip thumbnail in the Storyboard will change
to reflect the new duration time.
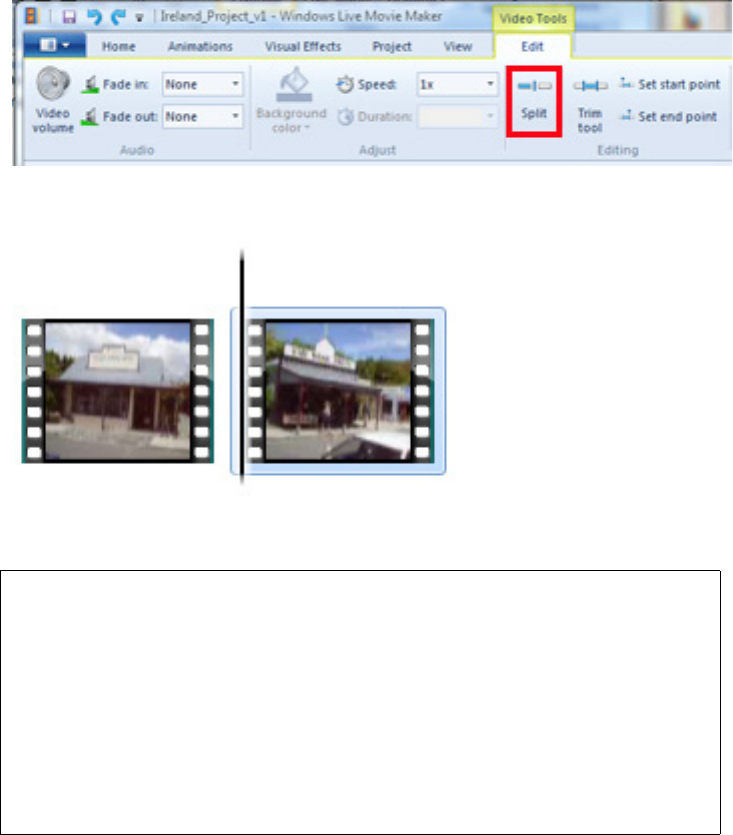
Split a video clip. You can split a video clip into two parts as needed. You may
have to do this to insert a graphic image or to show part of the video clip at a
different point in the presentation.
1. Click the Edit tab. The Edit tab should appear under the Video Tools heading.
2. Press the Ctrl + click keys to select an individual video clip. A vertical slider
bar will appear at the left edge of the video clip.
3. Move the slider bar to the right until you reach the split point. The Preview
Monitor will play the video clip as you move the slider bar.
30
Chapter 4
4. Click the Split tool.
[
The video clip will appear as two separate thumbnail images in the Storyboard.
IMPORTANT
Respect copyright and be careful what you share online. Copying
or sharing unauthorized materials violates the Microsoft service
agreement.
Audio and video files that are protected with digital rights
management (DRM) can't be used in Movie Maker. (Courtesy of
Windows Live Movie Maker Help Center,
http://explore.live.com/windows-live-movie-maker-help-center).

31
Chapter 5: Audio Files
In this chapter, you will learn the following audio file techniques:
Importing audio files
Editing audio files
Import audio files
Import and insert the audio files you uploaded and organized as described in “File
Organization” on page 10.
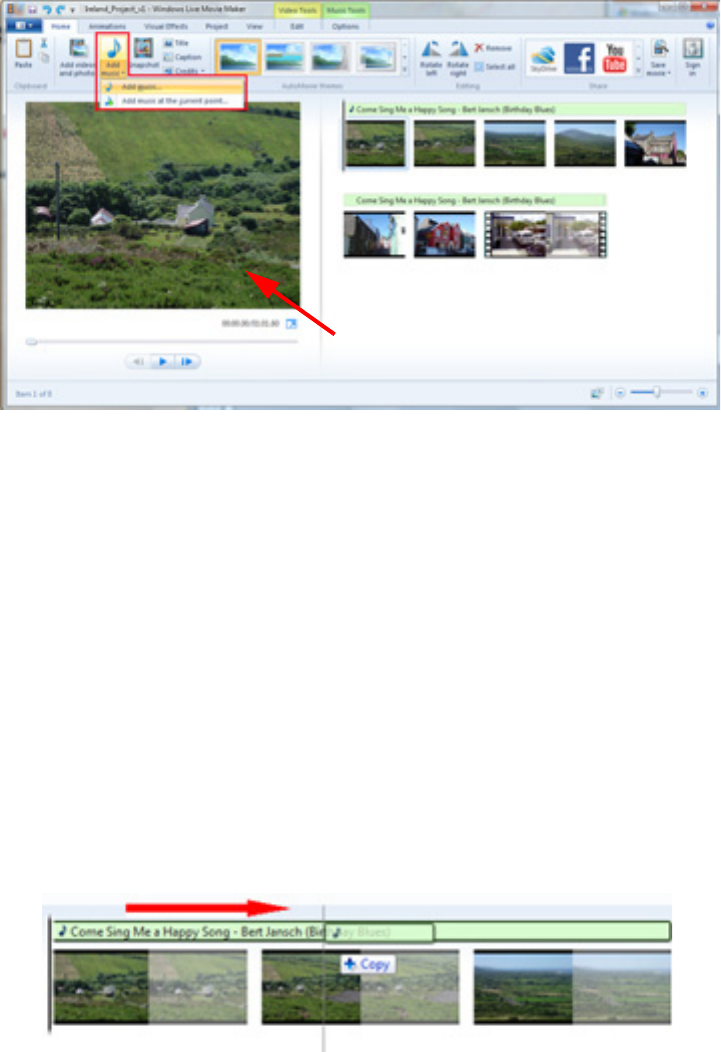
1. Click Home > Add music > Add music.
2. Double-click the folder that contain your audio files.
3. Press the Ctrl key and click to select the audio files you want to add to your
project.
4. Click Open.
IMPORTANT
Movie Maker 2011 project files will play only one audio track at
a time. For example, you cannot have a song playing at the same
time as a narration track.
32
Chapter 5
The imported audio files will appear in the Storyboard as a green bar above the
imported graphic images and video clips.
[
Edit Audio Files
NOTE: You can edit both the start location and the length of an audio file. For
example, you may want a song to start playing at the two-minute mark of your
project, and you may want the song to start playing at its one-minute mark. Please
read the following directions carefully to avoid errors.
Start location. Determine where an audio file will begin playing in your
presentation. You may use either (A) the Click and Drag method, or (B) the Start
time music tool.
A. Click and drag method.
1. Click at the start of the green audio file in the Storyboard.
2. Drag the mouse pointer to the desired start location.
3. The audio file will start at the selected insertion point.
4. Click Play in the Preview Monitor to review your changes.
Storyboard
Preview monitor
33
Audio Files
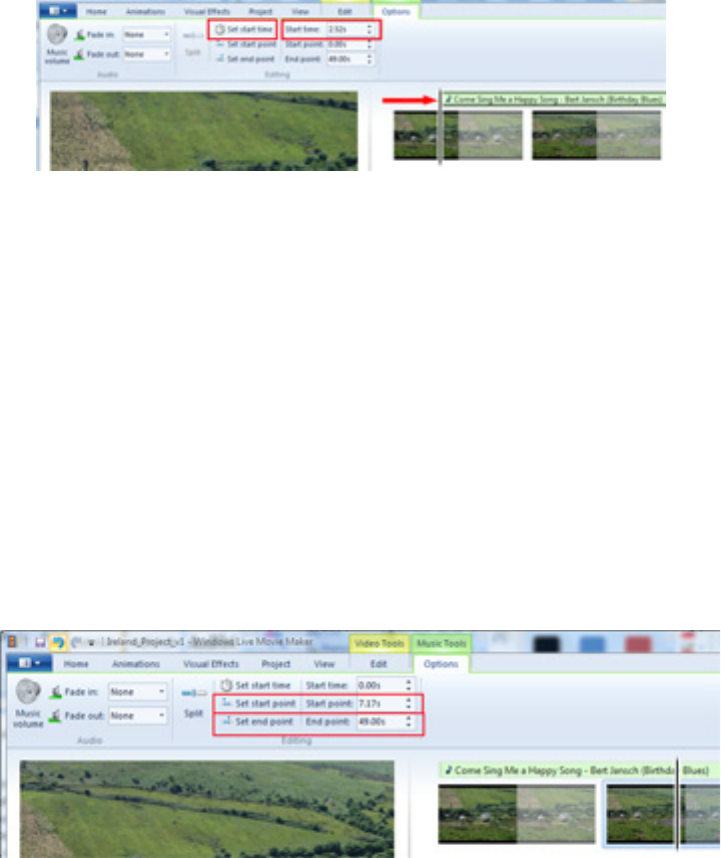
B. Start time music tool.
1. Click the Options tab. The Options tab will appear under the Music Tools
heading.
2. Click to select the green audio file thumbnail in the Storyboard.
3. Type a start time in the Start time box. You can use the up and down
arrows in the Start time tool to set a start time.
4. Click Set start time. The audio file will appear in its new start time setting.
5. Click Play in the Preview Monitor to review your changes.
Adjust audio clip length. Determine the length-or what parts-of the audio clip
will play in your presentation.
1. Click the Options tab. The Options tab will appear under the Music Tools
heading.
2. Click to select the green audio file thumbnail in the Storyboard.
3. Type a start point in the Start point box. You can also use the up and down
arrows to set a start point.
4. Click Set start point.
5. Type an end point in the End point box. You can also use the up and down
arrows to set an end point.
6. Click Set end point.
[

34
Chapter 5
7. Click Play in the Preview Monitor to review your changes.
IMPORTANT
Respect copyright and be careful what you share online. Copying
or sharing unauthorized materials violates the Microsoft service
agreement.
Audio and video files that are protected with digital rights
management (DRM) can't be used in Movie Maker. (Courtesy of
Windows Live Movie Maker Help Center,
http://explore.live.com/windows-live-movie-maker-help-center).
35
Chapter 6: Finish Your Project
This chapter will cover the following procedures:
Applying AutoMovie themes
Exporting your Movie Maker 2011 project
AutoMovie Themes
AutoMovie Themes apply advanced transition, graphic and text effects to your
entire Movie Maker 2011 project.
Individual graphic image, title, text and credit slide effects such as transitions and
text effects may not integrate with the AutoMovie themes.
Review the various effects in the Preview Monitor before you apply them to your
project.
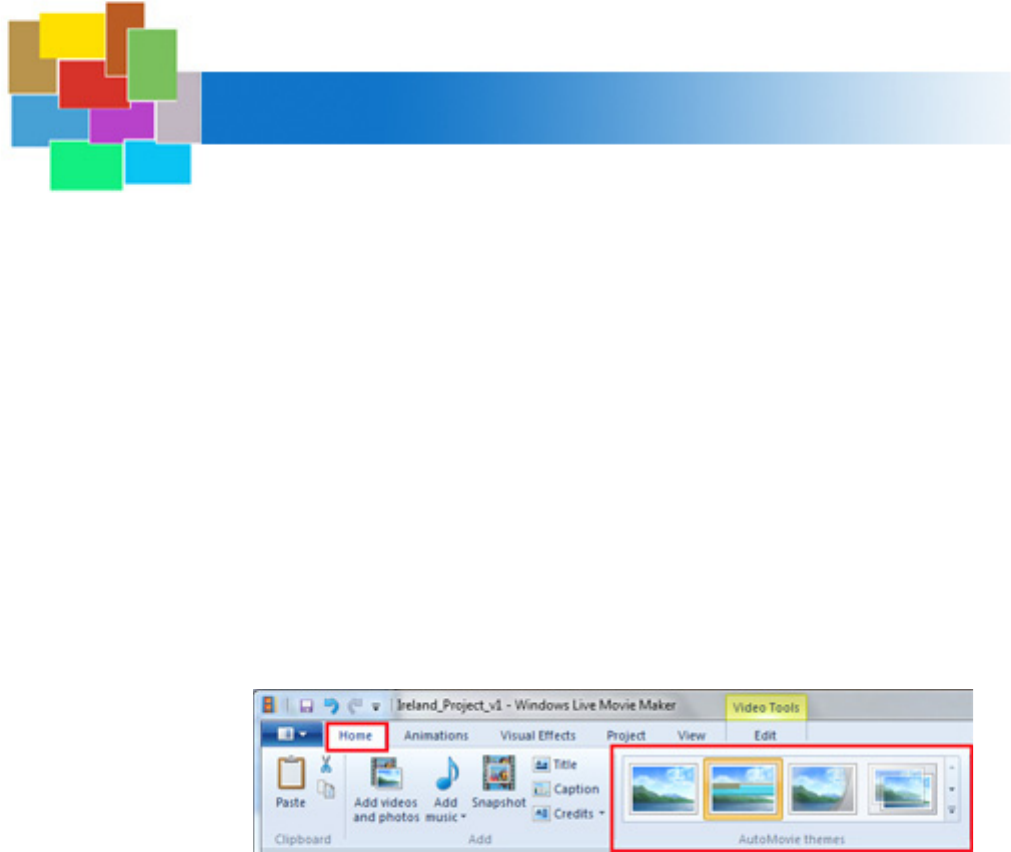
1. Click the Home tab.
2. Select the appropriate theme from the AutoMovie theme menu.
[
3. Select Default from the AutoMovie theme menu to undo a selection.

36
Chapter 6
Export your Movie Maker 2011 Project
When you finish your Windows Movie Maker 2011 project, you have to export the
file so it can be played and viewed by others.
Always save your original Movie Maker 2011 project file. You can make revisions
as needed, and you can also export the project file in a variety of formats as
needed.
The Save movie setting you choose depends on the end user. Please follow the
guidelines below to determine the best Save movie settings.
Save Movie
Setting
Frame Pixel Size
(Width x Height)
Notes
For computer 640 x 480
29 frames/second
This is the recommended setting. It
combines file compression with
excellent image quality.
For high-
definition display
1440 x 1080
29 frames/second
Use for high-end presentations on
HD displays and large-screen
projections. File size is typically
twice or three times the size of the
For computer save option.
For email 320 x 240
29 frames/second
Small file size (typically half or
one-third the size of the For
computer save option) and reduced
image quality. This setting is good
for e-mailing review or draft
copies, but should not be
considered presentation quality.
Windows phone
(large)
640 x 480
30 frames/second
Combines file compression with
excellent image quality. The higher
frames/second speed make this
suitable for phone apps.
Windows phone
(small)
320 x 240
30 frames/second
Small file size (typically half or
one-third the size of the For
computer save option) and reduced
image quality. This option should
be used strictly for phone apps.
NOTE: All Windows Movie Maker 2011 files save in Windows Media Video
File (.wmv) format.
37
Finish Your Project
Save movie. Save your completed Movie Maker 2011 project file in the
appropriate format.
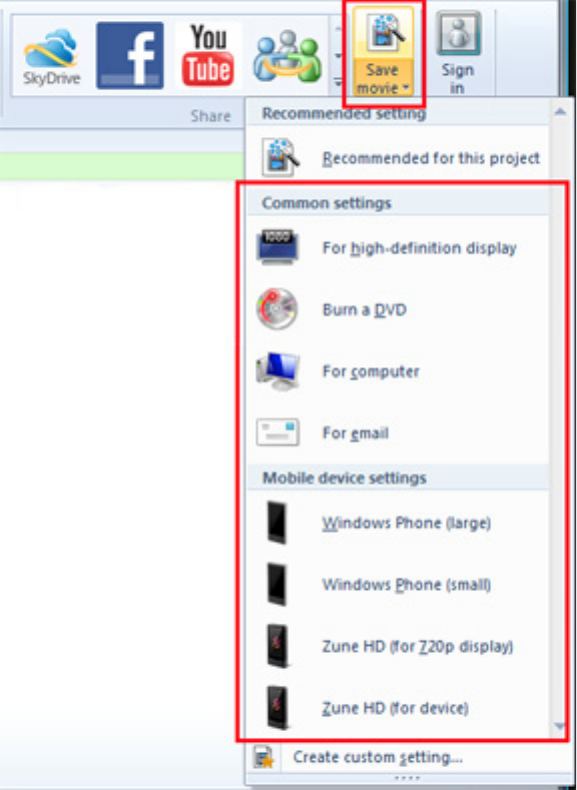
1. Click the Home tab.
2. Click the Save movie content menu.
3. Select the appropriate setting.
38
Chapter 6
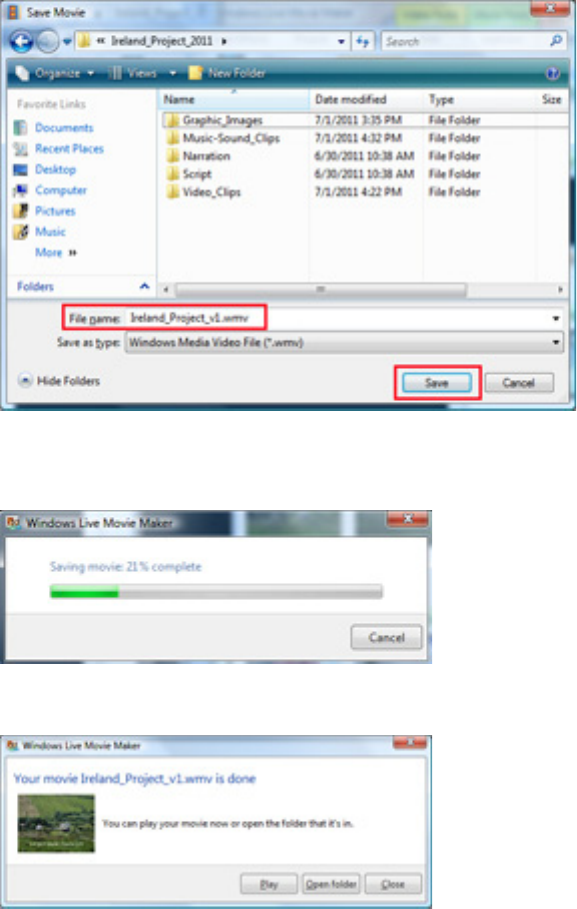
4. Enter a descriptive name in the File name box.
5. Click Save.
6. The progress bar will appear. The save process can take several minutes to
complete.
7. Click Play, Open folder or Close when prompted.
39
Index
A
Audio
click and drag edit 32
edit audio files 32
import 31
length 33
start time music tool edit 33
AutoMovie 35
C
Credits 25
D
Download Movie Maker 5
Duration
graphic images 19
E
Effects 22
Export
frame pixel size 36
movie settings 36
save movie 37
Export Movie Maker 2011 project 36
F
File editing 15
File formats 15
File organization
audio files 10
folders 10
graphic images 10
guidelines 10
narration 10
script 10
top-level folder 10
video clips 10
File size 15
G
Graphics
caption effects 21
captions 20
delete a caption. 21
duration 19
edit 18
file editing programs 15
file organization 10
file size 15
file specifications 15
formats 15
import graphic images 16
pan and zoom effects 18
remove animation effects 19
I
Install Movie Maker 5
N
Narration
record on your computer 14
record with digital voice recorder
14
P
Pixel size, frame 36
project file 10
S
Save Movie settings 36
Script preparation 13
Scripts 10
Slides 23
credits 25
text 24
title slide 23
System requirements 5
T
Text slide 24
Themes 35
AutoMovie 35
Title slide 23
Transitions 18
V
Video 27, 31
Index
©2011 Andy Weingartner
