INSTRUCTIONS FOR VARILIGHT
V-
PRO IR DIMMERSWITCHES
OVERVIEW
Thank you for choosing a VARILIGHT V-
Pro IR intelligent
programmable touch/remote control dimmerswitch. Use only on an
electricity supply of 200-250 volts AC.
IMPORTANT:
Read ALL sections below before installing this
dimmerswitch.
V-Pro IR dimmers are set to run in trailing-
edge Mode 1 by default.
This versatile mode is suitable for most dimmable LEDs. It is also
gentler on the load. Some types of dimmable LED perform bes
leading-
edge control. This dimmer can easily be set to run in leading
edge Mode 2 by following the instructions under “
Programming”
3 is suitable for some external LED drivers.
The V-Pro IR master dimmer is suitable for 1-
way circuits. For
(or multi-way) circuits, use a V-
Pro IR master dimmer with one or more
dimming slave units. V-
Pro IR touch/remote dimmers cannot be used
in conjunction with conventional switches in a 2-
way circuit. Use only
on an electricity supply of 216-253V~.
Dim
ming slaves are touch control only. Remote control is only possible
for the master unit.
This product complies with
European Safety Regulations
1 or BSEN60669-2-
1) when used in lighting circuits containing MCBs
(miniature circuit breakers). Thes
e can be rated at 6A, 10A or 16A
(preferably 6A for lighting circuits). Your guarantee is not affected if
you have an older lighting circuit protected by fuse wire links.
LOADING
Maximum loads for V-
Pro IR dimmerswitches
www.varilight.co.uk for latest loading advice);
Dimmer
Series
Lighting
Load
V
-
Pro IR
1 Gang
Max. Load
V
-
Pro IR
2 Gang
Max. Load
Per Gang
V
-
Pro IR
3 Gang
Max. Load
Per Gang
Dimmable Mains
LEDs
1 to 10 Dimmable LEDs (max. 100W)
Visit www.varilight.co.uk/leds
for the latest advice
Low Voltage LED
[USE DEFAULT
MODE 1 ONLY]
100W 100W
100W
Mains
Incandescent
350W 200W
250W
Mains Halogen 300W 150W
200W
Low Voltage
Halogen
300W 150W
200W
Maximum of 10 lamps for GLS and Halogen loads
Dimmable CFL
For 1 to 8 Digiflux CFLs
Use MODE 3: Digiflux Mode [see “
Visit
www.varilight.co.uk/digiflux
THIS SWITCH IS SUITABLE FOR
Most dimmable LEDs
Mains voltage incandescent GLS or candle-
shaped bulbs;
GU10 or similar mains halogen bulbs
Dimmable electronic low voltage transformers
Dimmable CFLs (Use Mode 3)
THIS SWITCH IS NOT SUITABLE FOR:
Non-dimmable fluorescent bulbs and tubes;
Wire-wound or toroidal transformers;
Electric motors
OVERLOAD PROTECTION:
This dimmerswitch
is protected against overload. If an overload occurs
it will automatically turn off until the overload is removed and the
dimmerswitch is switched off and then switched back on again.
However, if the dimmerswitch receives a total short
damaged beyond repair.
INSTRUCTIONS FOR VARILIGHT
PRO IR DIMMERSWITCHES
Pro IR intelligent
programmable touch/remote control dimmerswitch. Use only on an
Read ALL sections below before installing this
edge Mode 1 by default.
This versatile mode is suitable for most dimmable LEDs. It is also
gentler on the load. Some types of dimmable LED perform bes
t with
edge control. This dimmer can easily be set to run in leading
Programming”
. Mode
way circuits. For
2-way
Pro IR master dimmer with one or more
Pro IR touch/remote dimmers cannot be used
way circuit. Use only
ming slaves are touch control only. Remote control is only possible
European Safety Regulations
(IEC 669-2-
1) when used in lighting circuits containing MCBs
e can be rated at 6A, 10A or 16A
(preferably 6A for lighting circuits). Your guarantee is not affected if
you have an older lighting circuit protected by fuse wire links.
Pro IR dimmerswitches
(please see
Pro IR
3 Gang
Max. Load
Per Gang
V
-
Pro IR
4 Gang
Max. Load
Per Gang
1 to 10 Dimmable LEDs (max. 100W)
for the latest advice
100W
100W
250W
200W
200W
150W
200W
150W
Maximum of 10 lamps for GLS and Halogen loads
For 1 to 8 Digiflux CFLs
Use MODE 3: Digiflux Mode [see “
Programming”]
www.varilight.co.uk/digiflux
for latest advice
shaped bulbs;
is protected against overload. If an overload occurs
it will automatically turn off until the overload is removed and the
dimmerswitch is switched off and then switched back on again.
However, if the dimmerswitch receives a total short
-circuit it may be
LOADING (Continued)
TRANSFORMERS
Use only with quality dimmable
electronic
performance choose VARILIGHT transformers*.
To calculate load, add the VA ratings of the
wattage of the bulbs). Choose transformers with a maximum rating
close to their lamp load (eg. Use a 50VA, 60VA or 70VA transformer
to control a 50W low voltage bulb).N.B. Certain
behave according to their power rating when used with a
dimmer
. An overload will result in the dimmer turning itself off. If this
happens, change your transformer(s) (VARILIGHT transformer(s)
recommended); or remove one (or some) tran
circuit; or choose a higher rated dimmer instead.
*
If a transformer appears as a highly inductive load, e.g. Wire
or toroidal transformers, the dimmer will not work. To protect itself it
will turn off within 1 second.
ADVICE ON
CHANGING LIGHT BULBS
Always turn off the mains power when light b
Pro IR
dimmers are replaced. If you change the type of light bulb then
restore factory settings as described under “Programming”.
FREQUENTLY ASKED QUESTIONS
For FAQs, please visit:
www.varilight.co.uk/faqs
GUARANTEE
In case of any defect, return the dimmer to our service department.
Varilight undertakes to repair or replace, at its discretion, goods which
have become defective within 12 months of purchase, solely as a
result of faulty materials and workmanship, provid
a) The unit has been correctly fitted according to the instructions and
has not been used with an incompatible load, fluorescent tubes, or
overloaded beyond its rating, and has only been used on a 200
a.c. power supply.
b) The dimmer modul
e has not been tampered with or taken apart.
c) The unit is securely packed and safely returned to Service
Department, Carylls Lea, Faygate, Horsham, West Sussex, RH12 4SJ
(Tel. (01293) 851584) together with a letter stating the guarantee
registration nu
mber below, the date and place of purchase, the type
and wattage of the lighting or other load being controlled and the
details of the fault. This guarantee states Varilight’s entire liability,
which does not extend to cover consequential loss or damage or
installation costs arising from a defective product. The guarantee does
not apply to problems arising from any incompatibility between your
lamps and the dimmer switch. This guarantee does not in any way
affect the statutory rights of the purchaser and is
may have the benefit of our technical facilities.
G
UARANTEE REGISTRATION NUMBER 921
www.varilight.co.uk
Please
record the batch number
of the plastic moulding on the rear of the product. This
will assist us in providing any technical support you
may require.
BATCH NO:
INSTALLERS
–
Please leave these instructions with your customer
for future reference.
WARNING
: Do not apply products with metal faceplates directly
to freshly plastered or damp surfaces as product may tarnish. If in
doubt, use poly
thene as a temporary gasket to protect the
product. Do not use masking tape on metal faceplates.
electronic
transformers. For optimum
performance choose VARILIGHT transformers*.
To calculate load, add the VA ratings of the
transformers (not the
wattage of the bulbs). Choose transformers with a maximum rating
close to their lamp load (eg. Use a 50VA, 60VA or 70VA transformer
to control a 50W low voltage bulb).N.B. Certain
transformers may not
behave according to their power rating when used with a
. An overload will result in the dimmer turning itself off. If this
happens, change your transformer(s) (VARILIGHT transformer(s)
recommended); or remove one (or some) tran
sformer(s) from the
circuit; or choose a higher rated dimmer instead.
If a transformer appears as a highly inductive load, e.g. Wire
-wound
or toroidal transformers, the dimmer will not work. To protect itself it
CHANGING LIGHT BULBS
Always turn off the mains power when light b
ulbs controlled by your V-
dimmers are replaced. If you change the type of light bulb then
restore factory settings as described under “Programming”.
FREQUENTLY ASKED QUESTIONS
www.varilight.co.uk/faqs
In case of any defect, return the dimmer to our service department.
Varilight undertakes to repair or replace, at its discretion, goods which
have become defective within 12 months of purchase, solely as a
result of faulty materials and workmanship, provid
ed that:-
a) The unit has been correctly fitted according to the instructions and
has not been used with an incompatible load, fluorescent tubes, or
overloaded beyond its rating, and has only been used on a 200
-250V
e has not been tampered with or taken apart.
c) The unit is securely packed and safely returned to Service
Department, Carylls Lea, Faygate, Horsham, West Sussex, RH12 4SJ
(Tel. (01293) 851584) together with a letter stating the guarantee
mber below, the date and place of purchase, the type
and wattage of the lighting or other load being controlled and the
details of the fault. This guarantee states Varilight’s entire liability,
which does not extend to cover consequential loss or damage or
installation costs arising from a defective product. The guarantee does
not apply to problems arising from any incompatibility between your
lamps and the dimmer switch. This guarantee does not in any way
affect the statutory rights of the purchaser and is
offered so that you
may have the benefit of our technical facilities.
UARANTEE REGISTRATION NUMBER 921
.
IJ_I
record the batch number
printed on the side
of the plastic moulding on the rear of the product. This
will assist us in providing any technical support you
Reg. 921
Please leave these instructions with your customer
: Do not apply products with metal faceplates directly
to freshly plastered or damp surfaces as product may tarnish. If in
thene as a temporary gasket to protect the
product. Do not use masking tape on metal faceplates.

FITTING YOUR DIMMERSWITCH
Read the instructions below carefully. Incorrect installation may
damage the dimmer beyond repair. In case of any doubt or difficulty
consult a qualified electrician.
1. Switch off at the mains, then remove the existing switch and
disconnect the wiring from the switch terminals at the rear, taking note
of the present wiring of the switch and the marking on the terminals.
Where there are two or more wires together in the old switch, they
must be kept together in the dimmerswitch.
2. Ensure that any wall box is free of plaster lumps or projecting screw
heads. Dimmerswitches on single-sized plates can be fitted to wall
boxes having 60.3mm screw fixing centres and those with double-
sized plates to wall boxes with 120.6mm fixing centres. Most models
can be fitted into a box with a minimum depth of 25mm. A box having 4
fixing lugs cannot be used without modifying it. The top and bottom
lugs must be broken off or bent flat.
3. To connect the wiring for 1-way or 2-way circuits refer to the
diagrams below under the heading "1-Way, 2-Way and Multi-Way
Circuits". Take care that no bare wires project out of the terminals.
Keep wires together in a terminal if they were together in your old
switch.
4. Dimmerswitches having a metal plate must be earthed by means of
the earthing point on the dimmer.
5. After connecting the wires screw the dimmerswitch gently into the
wall box so that the front plate is not distorted or cracked. Do not trap
the wiring between the rear of the dimmer and the back of the wall box.
6. Once installation is complete. Switch on the mains supply and
switch on the dimmer.
OPERATION OF THE SWITCH
To initialize the dimmer, press the circular button on the front of the
plate once for 2 seconds. The dimmer will respond by making the
light(s) brighter. A single press will now turn the light(s) on or off. To
dim the lights, keep contact with the button until the desired light level
is reached. While contact with the button is maintained, the brightness
will cycle up and down. To change the direction of the dimming cycle
release and then press the button again. When the brightness reaches
the level you require, remove contact with the button.
PROGRAMMING
OPTIMISING THE PERFORMANCE OF YOUR DIMMERSWITCH
A. CHOOSE THE CORRECT DRIVING MODE
MODE 1: When you first install the dimmer switch it will
automatically default to trailing-edge mode. This mode is the best
one for most types of lighting. For certain lighting loads you may be
able to improve the dimming performance by changing to:-
MODE 2: Leading-edge mode for some LED lamps
MODE 3: DigiFlux® mode for DigiFlux® Dimmable CFLs and some
external LED drivers
B. CHANGING THE DRIVING MODE
1. Switch on, then press and hold the touch button on the dimmer for
15 seconds. During this time the lights will cycle up and down. After
15 seconds the lights will turn off.
2. To select MODE 2, press the touch button 4 times (each press
causes the light(s) to turn off/on)
OR To select MODE 3, press the touch button 6 times (each press
causes the light(s) to turn off/on)
OR To select MODE 1, press the touch button 2 times (each press
causes the light(s) to turn off/on)
3. The lights will flash once, twice or three times to confirm the mode
that has been selected.
C. ADJUSTING THE MINIMUM BRIGHTNESS (to utilise the full
dimming range of your lights)
Tap the touch button 6 times, roughly once per second (each tap
causes the light(s) to turn on or off). After 6 taps, wait until the lights
step up and down and then go off. Then tap the touch button 6 more
times. The lights will come on at a medium brightness and step down
to show the 8 brightness settings you can choose as your minimum.
Each further tap steps through the 8 settings available in sequence. At
your chosen brightness, usually the lowest brightness setting where
the lights do not flicker, stop tapping the button. After 5 seconds the
dimmer will step the lights up and down to confirm it has saved this
setting.
D. RESTORE TO FACTORY SETTINGS
To restore factory settings tap the touch button 6 times, roughly once
per second (each tap causes the light(s) to turn on or off). After 6 taps
on the button the lights will step up and down and go off. Press and
hold the touch button for at least 5 seconds. The lights will then come
on and fade to off to signal that the dimmer has been reset to factory
settings.
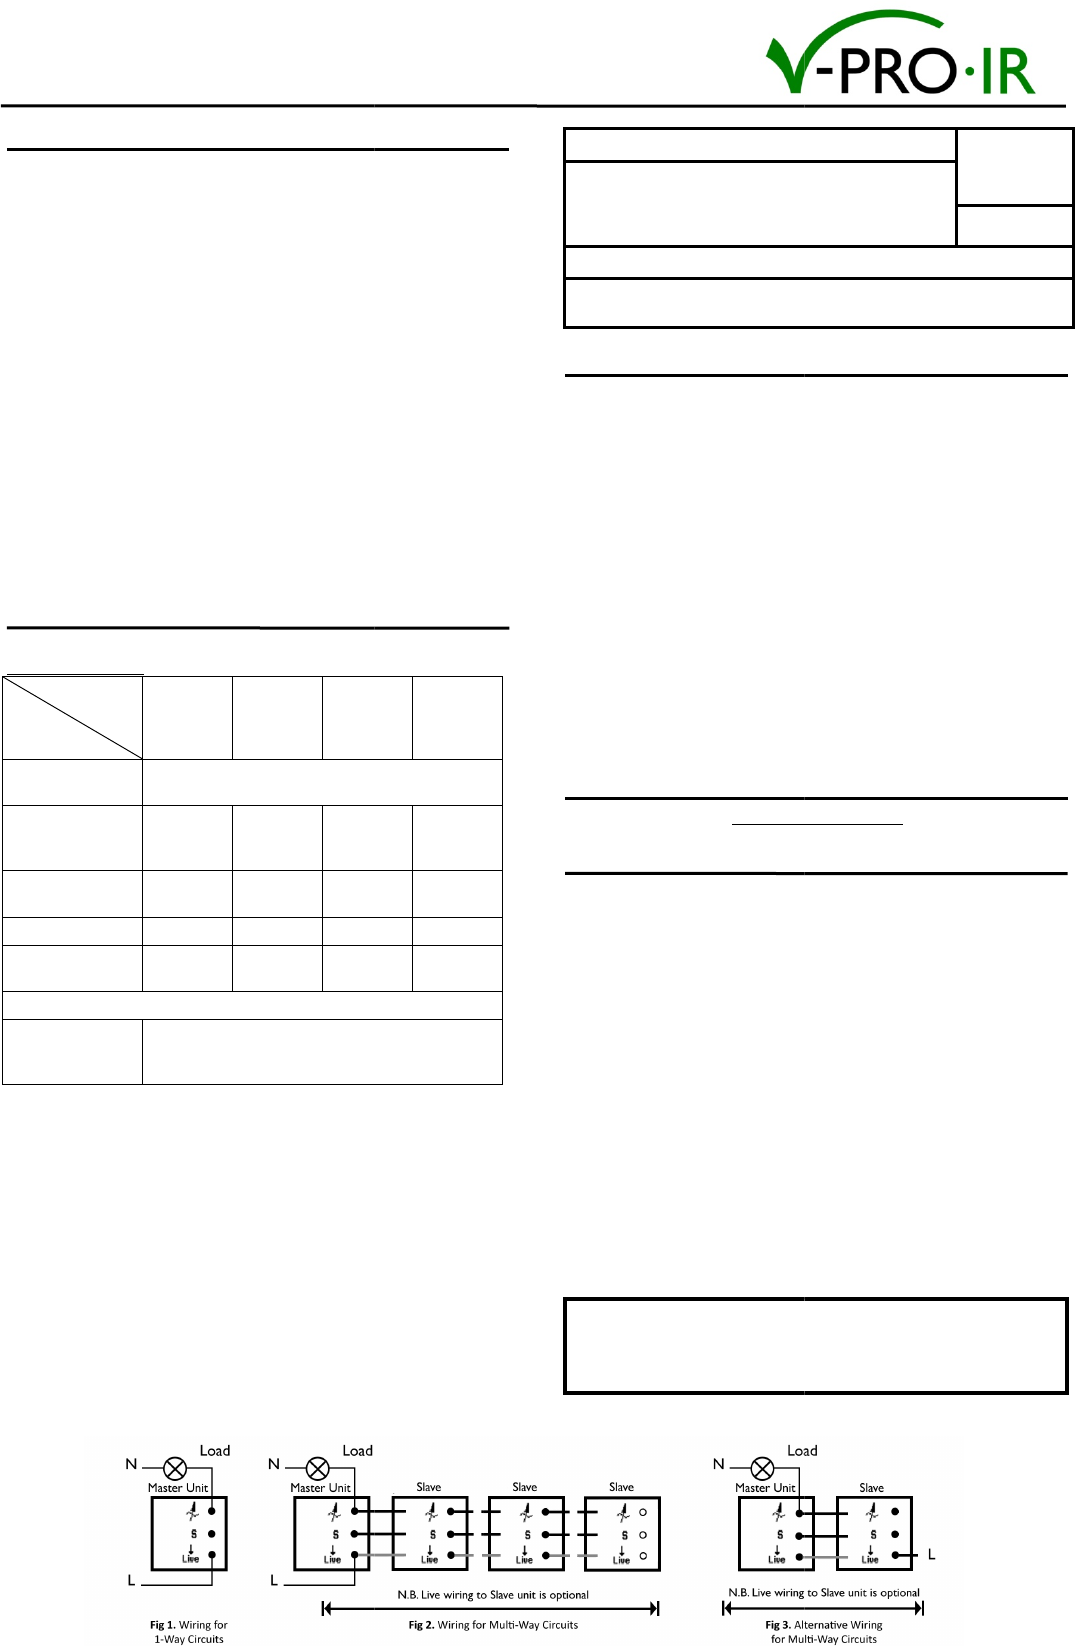
1-WAY, 2-WAY AND MULTI-WAY CIRCUITS
In 1-way lighting circuits the light(s) are controlled by one switch. This
dimmer should replace that switch. The live wire must be connected to
the terminal marked "LIVE" and the "load" wire to the terminal marked
"LOAD". To fit 2, 3 or 4-gang dimmers treat each group of terminals at
the back of the unit as a separate dimmer. You may also need a short
length of wire to connect together the "LIVE" terminals if only one live
wire is present.
For 2-way or Multi-way circuits (where the light(s) are controlled by
more than one switch) use this dimmer and any number of VARILIGHT
dimming slaves (total cable length from the master to the last slave
should be no more than 50m) following the wiring diagrams below. It is
not possible to use a conventional switch in combination with this type
of dimmer. Follow the same wiring as for 1-way circuits with three (or
two) wires linking each slave using the “LOAD” terminal, “SLAVE”
terminal and “LIVE” terminal. For more information please refer to the
wiring diagrams above.
REMOTE CONTROL HANDSET
PROGRAMMING DIMMER TO RESPOND TO A REMOTE CONTROL
HANDSET
Dimmers are pre-programmed to respond to button 1 and button 8 on
the VARILIGHT remote control handset (purchased separately).
Alternatively, dimmers can be re-programmed to respond to any other
button (2 to 7) on the VARILIGHT remote control handset or a spare
button on many other remote control handsets. If there is a button that
you do not currently use then you may be able to use it to control the
dimmer by following these steps carefully (do not omit step 3):-
1. To set the dimmer into learning mode tap the button 6 times, roughly
once per second (each tap causes the light(s) to turn on or off). After
6 taps on the button the lights will step up and down and go off.
2. Within 15 seconds and from a distance of less than 1 metre (3 feet)
away, pointing directly at the button on the dimmer, briefly press the
chosen button on the handset. The light(s) will turn on and turn off.
3. To confirm your choice, briefly press the same button again. If the
programming has been successful, the light(s) will turn on and turn
off. The lights then step up and down once to confirm. Try controlling
the dimmer with the remote control. If it does not respond return to
step 1 above and try again. If the problem persists, try a different
button, a different remote control unit or purchase the dedicated
VARILIGHT controller.
4. You can now use this button on the remote control to operate the
dimmer. As with the touch button, a single touch on the remote
control button will turn the light(s) on and off. Holding the button
down will make the brightness cycle up and down. To change the
direction of the dimming cycle remove contact and then press the
button again. Release contact from the button when the desired light
level is reached. The dimmer can still be operated using the touch
button.
5. For 2- gang models, repeat steps 1 to 4 for each button, teaching
each one a different button so you can control each one separately.
You can change your choice of control button by following steps 1 to 4
again at any time.
USING A REMOTE CONTROL HANDSET
On a remote control handset change the direction of the dimming cycle
by releasing and then pressing the button again. Turn the lights on or
off with a short press of the button.
1. Using a spare button on an existing handset
If you have a spare button on an existing remote control handset then
you may be able to use it to control this dimmer. Not all handsets are
compatible with VARILIGHT dimmers but many are. If you try and
program the dimmer using your own handset and find that it does not
respond then you will need to buy a VARILIGHT YRC8 handset
(standard control) or YRE8 handset (for advanced control with
LightScene™) instead. In some cases the dimmer may appear to learn
the signal from your own handset but then respond to other handsets
as well. In this case please use the reset function to restore factory
settings and buy a VARILIGHT handset instead. For best results,
always choose a VARILIGHT handset.
2. Using the standard VARILIGHT YRC8 handset
Our standard handset allows control of up to 7 dimmers. Button 8 can
be used to turn all the lights on or off. The dimmers will remember the
level they were at when switched off and so the previous light levels
can be recalled using button 8.
3. Choose the VARILIGHT YRE8 handset for enhanced lighting
control
• Control up to 4 lighting circuits from a numbered button
• Turn all the lights on or off using a master button
• Lightscene™ - Combine different light levels in separate circuits to
create a lighting scene (e.g. for dining, reading, movies, etc.)
• Save your 4 favourite lighting scenes and recall any one at any time
