
DUROCK
®
Brand
Cement Board
installation
guide
Substrate and ceramic tile
installation for walls,
floors, countertops and
wall shields.

A ceramic tile installation is only as good as
the surface beneath the tile. Strong, lightweight
and resistant to water damage, DUROCK
Brand
Cement Board is an ideal base for ceramic tile
installations throughout the home.
Installing tile takes planning, time and care.
But with the help of this step-by-step installation
guide, the careful do-it-yourselfer can get the
same results as a professional.
DUROCK
®
Brand Cement Board...
Strength beneath the surface
™
2
Textured side
Coated
glass-fiber
mesh
Aggregated
portland
cement core
Smooth wrapped edge
Smooth side
Cut edge
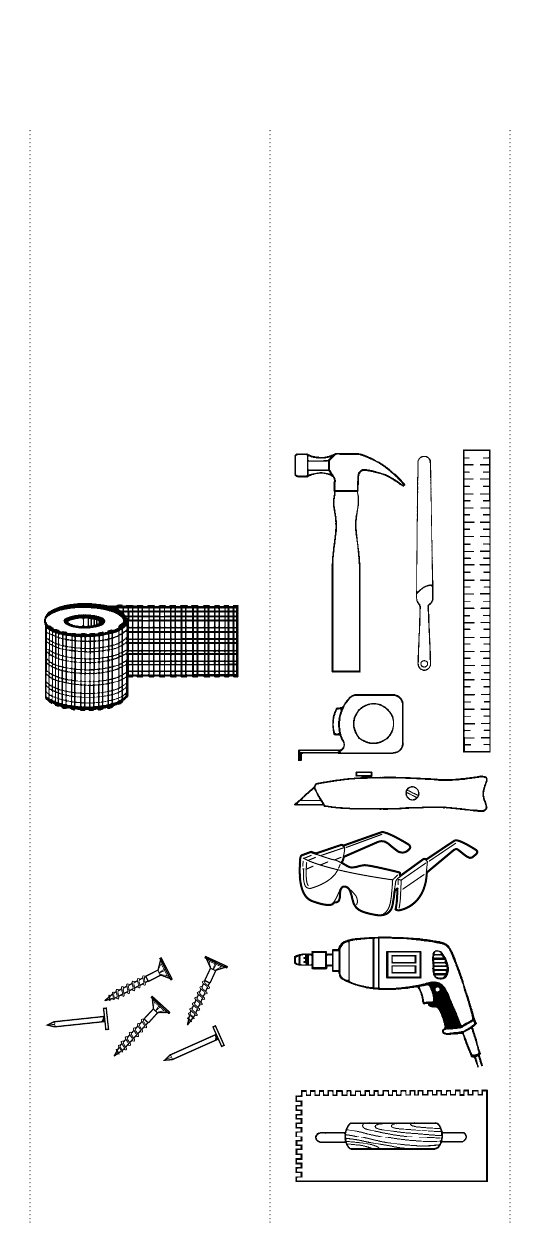
ToolsStart with Quality
Products
3
In general, common tools are used
for cement board installation while
installing tile requires special tools.
Retail stores frequently rent the
special tools needed for tile work on
a per-day basis, including tile cutter,
nippers and notched trowels. Other
tools you may need for cement
board and tile installations include:
straightedge, level, tape measure,
caulk and caulking gun, hammer,
drill, drill bits (including hole-saw
bits), wood rasp, scoring tool or
utility knife, sponge and squeegee.
D
UROCK Brand Cement Board
Standard board is 1/2 or 5/8 thick
and 32,3 or 4 wide. Standard
lengths are 4,5,6 or 8. Custom
lengths are available upon request
and minimum order requirements
do apply. D
UROCK
®
Brand Underlay-
ment is 4x4x5/16,3x5x5/16
or 4x8x5/16—ideal for floor and
countertop jobs.
Board is smooth on one side for
adhesive applications, textured
on the other for thin-set mortar
applications.
D
UROCK
™
Brand Interior Tape
Alkali-resistant glass fiber tape
reinforces interior cement board
joints to provide a strong, continu-
ous surface.
Fasteners
Cement board is readily applied
over framing with 1-1/2 hot-
dipped galvanized roofing nails
or 1-1/4 D
UROCK
™
Brand Wood
Screws. With steel framing
use 1-1/4 D
UROCK
™
Brand
Steel Screws.
Adhesives, Mortars, Grouts
Check your local tile distributor for
the products available and which
ones are appropriate for your job.
4
Installing Board—
Walls and Ceilings
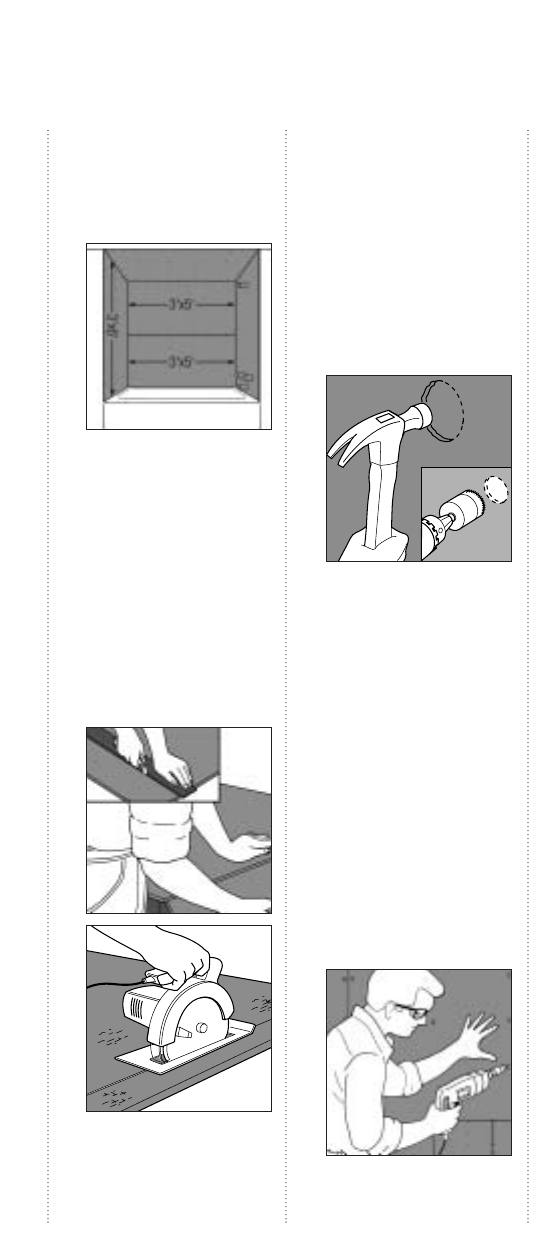
A typical tub surround uses two
3x5 cement boards horizontally
for tub backwall, one 3x6 board
vertically at each endwall, and
one 3x5 board for the ceiling.
1. Cutting
To cut D
UROCK Brand Cement
Board, mark desired size on the
board with a rule and pencil.
Score both sides and edges
with a utility knife through the
glass-fiber mesh, and snap the
board to size. Smooth cut
edges with wood rasp. Cutting
with a circular saw with a car-
bide-tipped blade is an alterna-
tive.
2. Cutouts
To make cutouts for fixtures,
outline area with utility knife, cut
through the mesh on both sides,
and punch out with a hammer
from the back side. Smooth
edges with wood rasp.
Alternatively, mark location and
drill hole using the appropriate
size hole-saw bit and drill. Use
slow speed if available.
3. Attachment
Place a 1/4 spacer strip or
shim around lip of tub or shower
pan to hold bottom edge of
cement board off lip.
Fasten board to wood studs
spaced at 16 o.c.* with 1-1/2
hot-dipped galvanized roofing
nails spaced 8 o.c. for walls,6
o.c. for ceilings, or using 1-1/4
D
UROCK Brand Wood Screws
with the same spacing.
(For steel stud applications, use
1-1/4 D
UROCK Brand Steel
Screws.) Leave a 1/8 gap
between all panel edges.
*On center is the spacing between the
centerlines of two structural members or
fasteners.

Installing Board—
Floors
5
1. Lamination
Laminate 5/16 D
UROCK Brand
Underlayment to minimum 5/8
thick exterior grade plywood or
oriented strand board (OSB)
using adhesive or mortar
suitable for bonding cement
backer board to the subfloor.
Apply adhesive with 5/8
V-notched trowel, mortar with
1/4 square-notched trowel.
2. Fasteners
Place underlayment with joints
staggered from subfloor joints.
Fit ends and edges closely but
not forced together, leaving a
1/8 gap. Fasten underlayment
to subfloor with 1-1/2 hot-
dipped galvanized roofing nails
or 1-1/4 D
UROCK Brand Wood
Screws spaced 8 o.c. in both
directions.
When 1/2” or 5/8” D
UROCK
Brand Cement Board is used
in underlayment applications,
follow the same procedure as
for 5/16” D
UROCK Brand
Underlayment.
1. Attachment
Install minimum 3/4 exterior-
grade plywood or OSB base
across the wood cabinet sup-
ports. Position ends and edges
over supports. Staple-attach
15-lb. felt or 4-mil polyethylene
film using 1/4 galvanized sta-
ples over the plywood base.
Fasten to the plywood with
1-1/4 D
UROCK Brand Wood
Screws or 1-1/2 hot-dipped
galvanized roofing nails, spaced
8 o.c. in both directions and
around edges. Leave a 1/8
gap between panels.
When using 1/2 or 5/8 D
UROCK
Brand Cement Board in under-
layment applications, follow the
same procedure as for 5/16
D
UROCK Brand Underlayment.
Installing Board—
Countertops
Installing Tile—
Measuring and Planning
Prefill joints, as well as inside and
outside corners, with latex-forti-
fied mortar or Type 1 organic
adhesive and then immediately
embed tape and level joints.
NOTE: Use latex-fortified portland cement
mortar for wall shield and floor protector
applications.
Joint Treatment—Walls,
Floors and Countertops
6
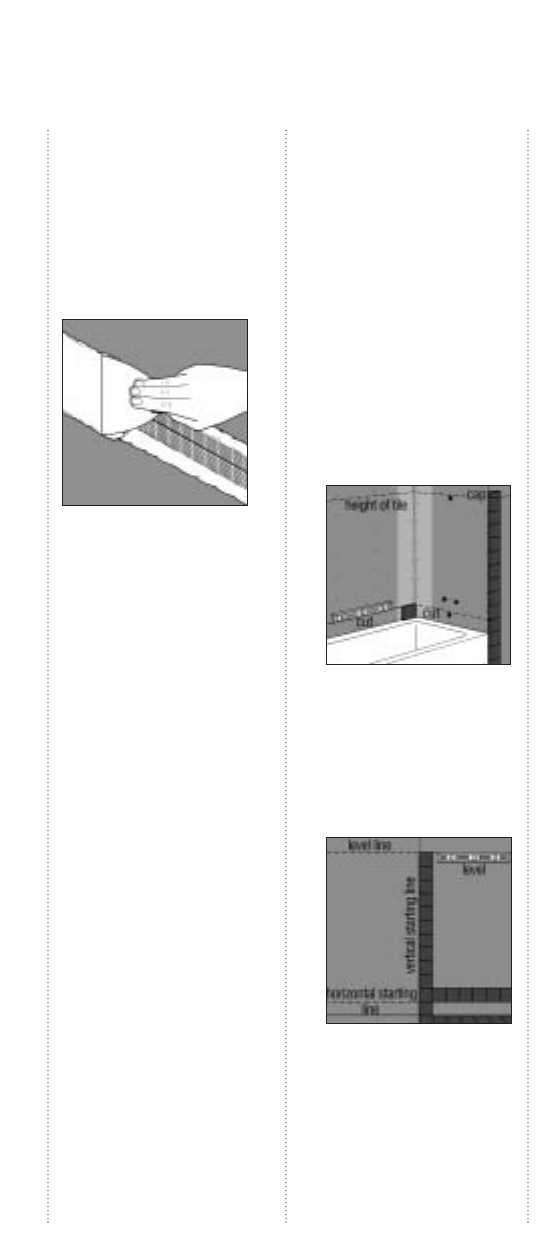
1. Walls
Establish tile height for walls by
finding the low point of the floor
next to the wall. Measure from
this point to wainscot height
including base and cap. On new
work where floor must be
installed, allow for tile thickness.
From low point, stack one row of
tile to required height with dabs
of mastic on the back of each
tile. Use cap to establish height
but draw line on top of the last
tile as caps can be installed
later.
Find vertical starting line by
beginning from the center of the
wall. Lay out a row of tile to the
corner. If cut comes to less than
half the tile, adjust vertical start-
ing line so its center hits middle
of tile instead of tile joint.
7
2. Floors
Find starting point for floors by
placing tile on floor in front of
the tub and along the adjoining
wall. Some tile may have to be
cut to fill in open spaces. Fit tiles
to pipes, then draw starting line
for adhesive.
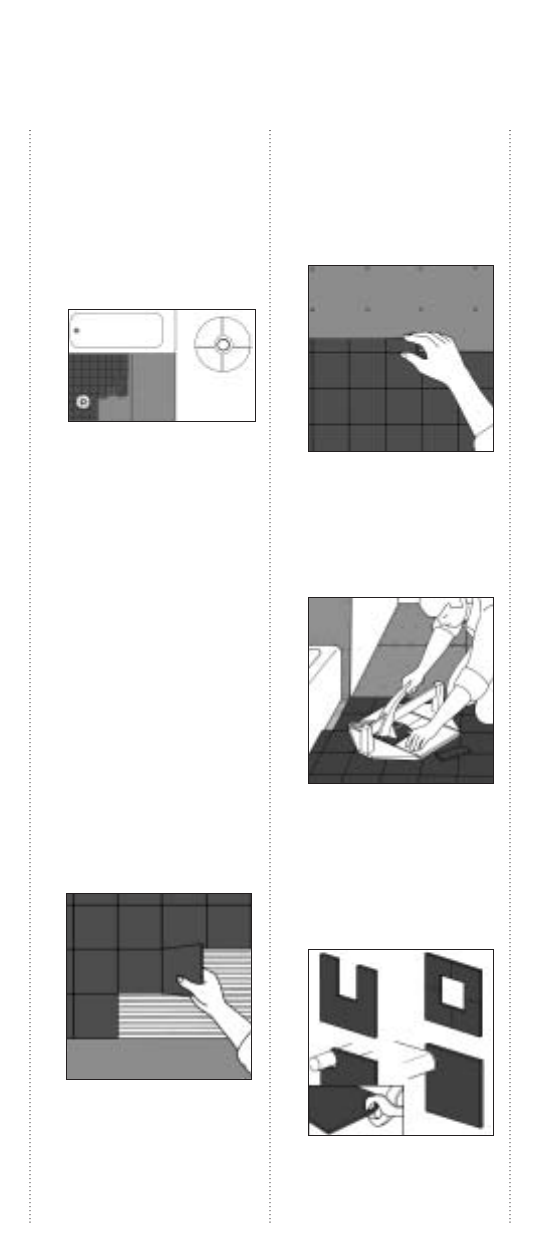
3. Setting tile
To set tile, apply the adhesive
or mortar you’ve selected to
wall, floor or counter top using
notched trowel, holding at 50°
or 60° angle for walls.
Working a small area at a time,
set tile with a slight sliding
motion and press into place.
This avoids adhesive pile-up on
tile edge and in grout space.
Keep tiles aligned so joints are
straight and uniform.
Use tile spacers, if desired.
If adhesive is squeezed from
under tile, you’re using too
much. Clean out excess
adhesive before it dries.
Maintain 1/4 shims beneath
the bottom row of tiles and
cement board to make a caulk
joint along tub rim.
When beginning at the top,
place tile to horizontal line, then
butter each cap and place in
position.This eliminates possi-
bility of troweling adhesive
above required height.
4. Cutting Tile
To trim tile use a professional
tile cutting tool. Score tile only
once for each cut.This prevents
uneven breaking of tile and
dulling of cutting wheel.
To make contoured and irregular
cuts, use nippers to take small
bites to prevent cracking or
breaking of tile.With rod saw
use long, even strokes to avoid
binding. Smooth cut edges with
an abrasive stone.
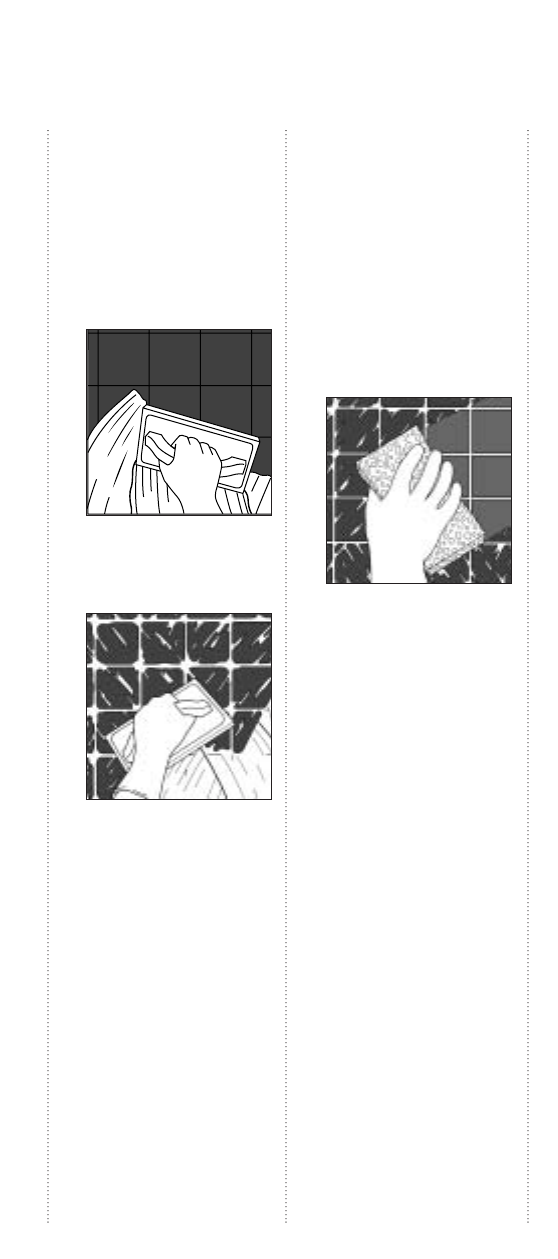
1. Application of Grout
on Walls
Wait at least 24 hours after tile
has been installed before grout-
ing.Apply with a rubber float or
squeegee at a slight angle to
the walls. Go over each joint
three times, spreading grout
across tile diagonally.
Fill joints completely. Remove
excess grout with a float or
squeegee as you go along.
Grouting
8
Let grout set for 20 minutes,
then wipe tile diagonally with a
damp square-edge sponge.
Continue until grout lines are
even and joints are smooth.
Rinse sponge often but keep it
as dry as possible. Let joints dry
about 15 to 20 minutes, or until
a haze forms on the tile.Then
polish with clean paper towel or
a clean white cloth.
Caulking
9
2. Application of Grout on
Floors and Countertops
Wait at least 48 hours after
the tile has been installed
before grouting. Apply grout
and force into joints with rub-
ber float. Remove excess
grout by drawing float across
tile at 45° angle. Then wipe
tile diagonally with damp
sponge until joints are smooth
and even. Rinse sponge often,
and wring it as dry as possi-
ble. Polish with clean paper
towels or a clean, white cloth.
NOTE: After you’ve completed grout-
ing, it’s important to put moisture back
into the grout for a few days for
stronger grout joints. Dampen grout
now and then with a fine water spray
during the first 24 hours while grout is
curing. After the final cure—in about 2
or 3 weeks—protect grout surface on
walls from dirt by coating with silicone
tile and grout sealer. Do not use sealer
on floors.
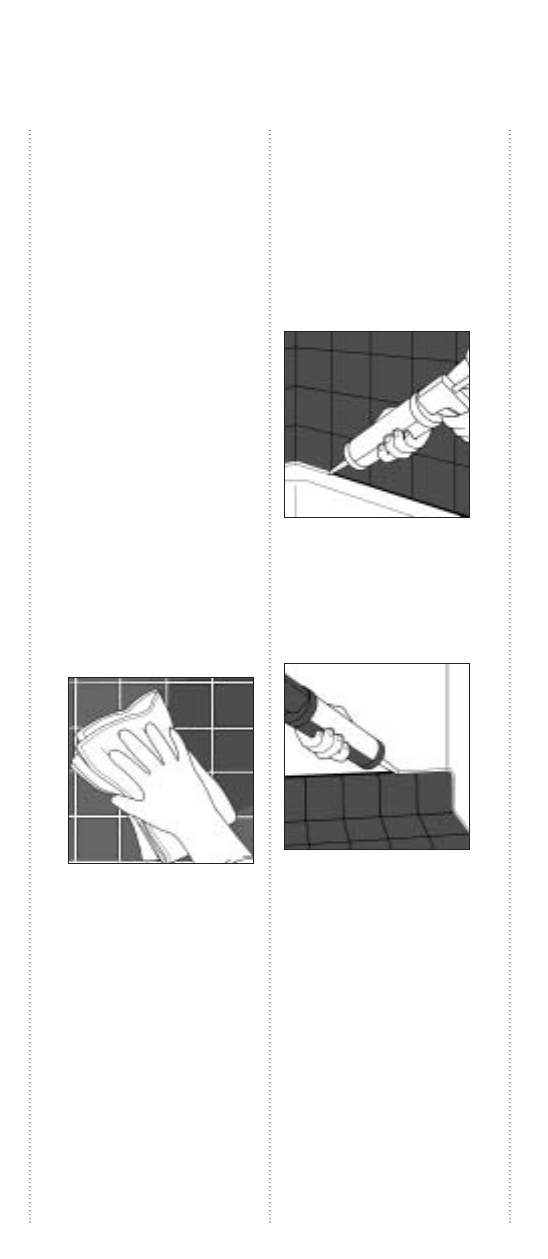
Walls
Fill 1/4 space between tub lip
and bottom edge of tile around tub
with flexible sealant. Also caulk
around tub soap dish and other
wall fixtures. Fill vertical grout
lines adjacent to door jambs with
flexible caulk rather than stiff
cement grout.
Floors
Caulk space where floor edges
meet walls with sealant. Protect
unglazed mosaic or quarry tile
with a sealer.
Countertops
Follow the same steps used for
grouting floors. Caulk abutments
of countertop and walls and, if
needed, underneath sink edge.
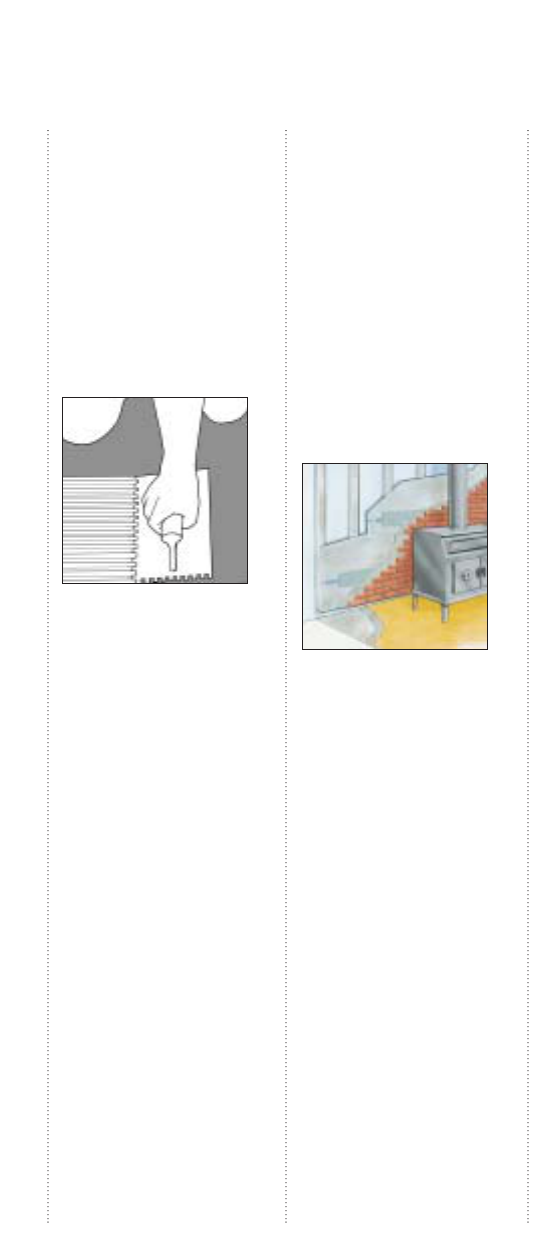
Floor Protectors
Apply 1/8 to 1/4 thick latex-
fortified portland cement to solid
surface—never on top of
carpeting or padding.
Fasten D
UROCK Brand Cement
Board with 1-1/4 hot-dipped
galvanized roofing nails or 1-1/4
D
UROCK Brand Screws, spaced 8
o.c. in both directions, penetrating
floor a minimum of 3/4.
Other Applications of
Cement Board
10
Wall Shields
Cut 1/2 D
UROCK Brand Cement
Board to panel and furring strip
sizes with carbide-tip scoring tool.
Smooth rough edges with wood
rasp.
Fasten furring strips to framing
with 1-1/2 hot-dipped galvanized
roofing nails spaced 8 o.c. Fasten
wall shield through furring to
framing with 2-3/4 nails 8 o.c.
Maintain 3/4 minimum framing
penetration for both furring and
shield.
For additional information on wall
shields and floor protectors, see
the D
UROCK Brand Cement Board
Submittal Sheet, CB198.

Manufactured by
United States Gypsum Company
125 South Franklin Street
Chicago, IL 60606
Trademarks
The following trademark used
herein is owned by United States
Gypsum Company: D
UROCK,
S
TRENGTH BENEATH THE SURFACE.
Notice
We shall not be liable for incidental
and consequential damages,
directly or indirectly sustained, nor
for any loss caused by application
of these goods not in accordance
with current printed instructions or
for other than the intended use.
Our liability is expressly limited to
replacement of defective goods.
Any claim shall be deemed waived
unless made in writing to us within
thirty (30) days from date it was or
reasonably should have been
discovered.
CB237/rev. 3-02
©2002, United States Gypsum Company
Printed in U.S.A.
Safety First!
Follow good safety and industrial
hygiene practices during handling
and installing of all products and
systems.Take necessary precau-
tions and wear the appropriate
personal protective equipment as
needed. Read material safety data
sheets and related literature on
products before specification
and/or installation.
For warranty or product information
and literature:
(800) USG-4YOU (874-4968)
http://www.usg.com
