Model M55-C2
USER MANUAL
VIZIO

6DIHW\&HUWLȴFDWLRQ
ii
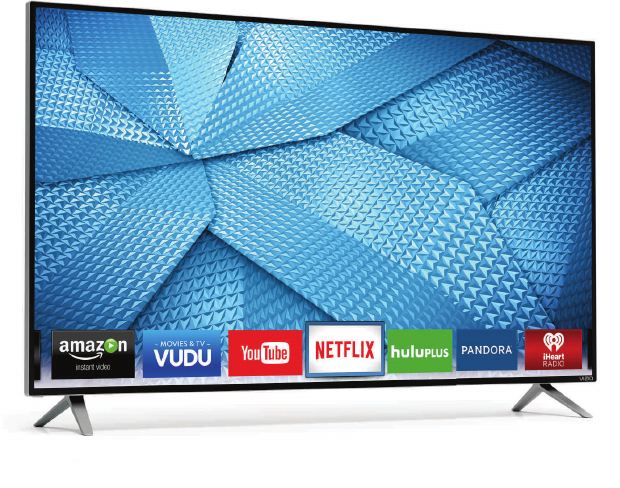
THANK YOU FOR CHOOSING VIZIO
And congratulations on your new VIZIO HDTV.
To get the most out of your new VIZIO product, read these
instructions before using your product and retain them for future
reference. Be sure to inspect the package contents to ensure there
are no missing or damaged parts.
PRODUCT REGISTRATION
To purchase or inquire about accessories and installation services
for your VIZIO product, visit our website at www.VIZIO.com or call
toll free at (877) 878-4946.
We recommend that you register your VIZIO product at
www.VIZIO.com
Extended Warranties
For peace of mind, and to protect your investment beyond the
VWDQGDUGZDUUDQW\9Ζ=Ζ2RHUVRQVLWHH[WHQGHGZDUUDQW\VHUYLFH
plans. These plans provide additional coverage during the standard
ZDUUDQW\SHULRG 7R SXUFKDVH DQH[WHQGHGZDUUDQW\ VHUYLFH SODQ
visit www.VIZIO.com.
WHEN READING THIS MANUAL
When you see this symbol, please read the
accompanying important warning or notice. It is
intended to alert you to the presence of important
operating instructions.
IMPORTANT SAFETY INSTRUCTIONS
<RXU 79 LV GHVLJQHG DQG PDQXIDFWXUHG WR RSHUDWH ZLWKLQ GHȴQHG
GHVLJQOLPLWV0LVXVHPD\UHVXOWLQHOHFWULFVKRFNRUȴUH7RSUHYHQW
your TV from being damaged, the following instructions should be
observed for the installation, use, and maintenance of your TV.
Read the following safety instructions before operating your TV.
Keep these instructions in a safe place for future reference.
• To reduce the risk of electric shock or component damage,
VZLWFKRWKHSRZHUEHIRUHFRQQHFWLQJRWKHUFRPSRQHQWV
to your TV.
• Read these instructions.
• Keep these instructions.
• Heed all warnings.
• Follow all instructions.
• Do not use this apparatus near water.
• Clean only with dry cloth.
• Do not block any ventilation openings. Install in accordance
with the manufacturer’s instructions.
• Do not install near any heat sources such as radiators, heat
UHJLVWHUVVWRYHVRURWKHUDSSDUDWXVLQFOXGLQJDPSOLȴHUV
that produce heat.
• Do not defeat the safety purpose of the polarized or
grounding-type plug. A polarized plug has two blades with
one wider than the other. A grounding type plug has two
blades and a third grounding prong. The wide blade or the
third prong are provided for your safety. If the provided
SOXJGRHVQRWȴWLQWR\RXURXWOHWFRQVXOWDQHOHFWULFLDQIRU
replacement of the obsolete outlet.
• Protect the power cord from being walked on or pinched
particularly at plugs, convenience receptacles, and the point
ZKHUHWKH\H[LWIURPWKHDSSDUDWXV
• 2QO\XVHDWWDFKPHQWVDFFHVVRULHVVSHFLȴHGE\WKH
manufacturer.
• Use only with the cart, stand, tripod, bracket,
RU WDEOH VSHFLȴHG E\ WKH PDQXIDFWXUHU RU
sold with the apparatus. When a cart is used,
use caution when moving the cart/apparatus
combination to avoid injury from tip-over.
• Unplug this apparatus during lightning storms or when
unused for long periods of time.
• 5HIHUDOOVHUYLFLQJWRTXDOLȴHGVHUYLFHSHUVRQQHO6HUYLFLQJ
is required when the apparatus has been damaged in
any way, such as when the power-supply cord or plug is
damaged, liquid has been spilled or objects have fallen into
WKHDSSDUDWXVWKHDSSDUDWXVKDVEHHQH[SRVHGWRUDLQRU
moisture, does not operate normally, or has been dropped.
• Unplug the power cord before cleaning your TV.
• When moving your TV from an area of low temperature to
an area of high temperature, condensation may form in the
housing. Wait before turning on your TV to avoid causing
ȴUHHOHFWULFVKRFNRUFRPSRQHQWGDPDJH
• A distance of at least three feet should be maintained
between your TV and any heat source, such as a radiator,
KHDWHURYHQDPSOLȴHUHWF'RQRWLQVWDOO\RXU79FORVHWR
smoke. Operating your TV close to smoke or moisture may
FDXVHȴUHRUHOHFWULFVKRFN
• 6ORWVDQGRSHQLQJVLQWKHEDFNDQGERWWRPRIWKHFDELQHW
are provided for ventilation. To ensure reliable operation of
your TV and to protect it from overheating, be sure these
openings are not blocked or covered. Do not place your
TV in a bookcase or cabinet unless proper ventilation is
provided.
• Never push any object into the slots and openings on your
TV cabinet. Do not place any objects on the top of your TV.
'RLQJVRFRXOGVKRUWFLUFXLWSDUWVFDXVLQJDȴUHRUHOHFWULF
shock. Never spill liquids on your TV.
• Your TV should be operated only from the type of power
source indicated on the label. If you are not sure of the type
of power supplied to your home, consult your dealer or
local power company.
When you see this symbol, please read the
accompanying helpful tip.

iii
• Do not apply pressure or throw objects at your TV. This may
compromise the integrity of the display. The manufacturer’s
warranty does not cover user abuse or improper
installations.
• 7KHSRZHUFRUGPXVWEHUHSODFHGZKHQXVLQJGLHUHQW
YROWDJHWKDQWKHYROWDJHVSHFLȴHG)RUPRUHLQIRUPDWLRQ
contact your dealer.
• :KHQFRQQHFWHGWRDSRZHURXWOHWSRZHULVDOZD\VȵRZLQJ
into your TV. To totally disconnect power, unplug the power
cord.
• 7KHOLJKWQLQJȵDVKZLWKDUURZKHDGV\PEROZLWKLQDQ
equilateral triangle is intended to alert the user to the
presence of un-isolated, dangerous voltage within the
LQVLGHRI\RXU79WKDWPD\EHRIVXɝFLHQWPDJQLWXGHWR
constitute a risk of electric shock to persons.
• 'RQRWRYHUORDGSRZHUVWULSVDQGH[WHQVLRQFRUGV
2YHUORDGLQJFDQUHVXOWLQȴUHRUHOHFWULFVKRFN
• The wall socket should be installed near your TV and easily
accessible.
• Only power of the marked voltage can be used for your TV.
$Q\RWKHUYROWDJHWKDQWKHVSHFLȴHGYROWDJHPD\FDXVHȴUH
or electric shock.
• Do not touch the power cord during lightning. To avoid
electric shock, avoid handling the power cord during
electrical storms.
• Unplug your TV during a lightning storm or when it will not
be used for long period of time. This will protect your TV
from damage due to power surges.
• Do not attempt to repair or service your TV yourself.
2SHQLQJRUUHPRYLQJWKHEDFNFRYHUPD\H[SRVH\RXWR
high voltages, electric shock, and other hazards. If repair
is required, contact your dealer and refer all servicing to
TXDOLȴHGVHUYLFHSHUVRQQHO
• :$51Ζ1*.HHS\RXU79DZD\IURPPRLVWXUH'RQRWH[SRVH
your TV to rain or moisture. If water penetrates into your TV,
unplug the power cord and contact your dealer. Continuous
XVHLQWKLVFDVHPD\UHVXOWLQȴUHRUHOHFWULFVKRFN
• Do not use your TV if any abnormality occurs. If any smoke
or odor becomes apparent, unplug the power cord and
contact your dealer immediately. Do not try to repair your
TV yourself.
• Avoid using dropped or damaged appliances. If your TV
is dropped and the housing is damaged, the internal
components may function abnormally. Unplug the power
cord immediately and contact your dealer for repair.
&RQWLQXHGXVHRI\RXU79PD\FDXVHȴUHRUHOHFWULFVKRFN
• Do not install your TV in an area with heavy dust or high
humidity. Operating your TV in environments with heavy
GXVWRUKLJKKXPLGLW\PD\FDXVHȴUHRUHOHFWULFVKRFN
• Follow instructions for moving your TV. Ensure that the
power cord and any other cables are unplugged before
moving your TV.
• When unplugging your TV, hold the AC/DC power adapter,
not the cord. Pulling on the power cord may damage the
ZLUHVLQVLGHWKHFRUGDQGFDXVHȴUHRUHOHFWULFVKRFN:KHQ
\RXU79ZLOOQRWEHXVHGIRUDQH[WHQGHGSHULRGRIWLPH
unplug the power cord.
• To reduce risk of electric shock, do not touch the connector
with wet hands.
• Insert batteries in accordance with instructions. Incorrect
polarities may cause the batteries to leak which can
damage the remote control or injure the operator. Do not
H[SRVHEDWWHULHVWRH[FHVVLYHKHDWVXFKDVVXQVKLQHȴUHRU
the like.
• If any of the following occurs, contact the dealer:
- The power cord fails or frays.
- Liquid sprays or any object drops into your TV.
<RXU79LVH[SRVHGWRUDLQRURWKHUPRLVWXUH
- Your TV is dropped or damaged in any way.
- The performance of your TV changes substantially.
• 7KLVDSSDUDWXVVKDOOQRWEHH[SRVHGWRGULSSLQJRU
VSODVKLQJDQGQRREMHFWVȴOOHGZLWKOLTXLGVVXFKDVYDVHV
shall be placed on the apparatus.
• The mains plug or appliance coupler is used as the
disconnect device, the disconnect device shall remain
readily operable.
• CAUTION - These servicing instructions are for use by
TXDOLȴHGVHUYLFHSHUVRQQHORQO\7RUHGXFHWKHULVNRI
electric shock, do not perform any servicing other than
that contained in the operating instructions unless you are
TXDOLȴHGWRGRVR
• TKHOLJKWQLQJȵDVKZLWKDUURZKHDGV\PEROZLWKLQ
an equilateral triangle is intended to alert the user to the
SUHVHQFHRIXQLQVXODWHG'$1*(528692/7$*(ZLWKLQWKH
SURGXFWȇVHQFORVXUHWKDWPD\EHRIVXɝFLHQWPDJQLWXGHWR
constitute a risk of electrical shock to persons.
h

iv
Ground Clamp
Antenna Lead In Wire
Antenna Discharge Unit
1(&6HFWLRQ
Grounding Conductors
1(&6HFWLRQ
Ground Clamps
3RZHU6HUYLFH*URXQGLQJ(OHFWURGH6\VWHP
1(&$57SDUW+
(OHFWULF6HUYLFH(TXLSPHQW
TELEVISION ANTENNA CONNECTION
PROTECTION
If an outside antenna/satellite dish or cable system is to be
connected to the TV, make sure that the antenna or cable system
is electrically grounded to provide some protection against voltage
surges and static charges.
$UWLFOHRIWKH1DWLRQDO(OHFWULFDO&RGH$16Ζ1)36$SURYLGHV
information with regard to proper grounding of the mast and
supporting structure, grounding of the lead-in wire to an antenna
discharge unit, size of the grounding conductors, location of
antenna discharge unit, connection to grounding electrodes, and
requirements of the grounding electrode.
Lightning Protection
For added protection of the TV during a lightning storm or when it
is left unattended or unused for long periods of time, unplug the TV
from the wall outlet and disconnect the antenna or cable system.
Power Lines
Do not locate the antenna near overhead light or power circuits, or
where it could fall into such power lines or circuits. Remember, the
VFUHHQRIWKHFRD[LDOFDEOHLVLQWHQGHGWREHFRQQHFWHGWRHDUWKLQ
the building installation.

v
Manufactured under license from Dolby Laboratories.
Dolby and the double-D symbol are trademarks of Dolby
Laboratories.
+'0Ζ WKH +'0Ζ ORJR DQG +LJK'HȴQLWLRQ 0XOWLPHGLD
Interface are trademarks or registered trademarks of
HDMI Licensing LLC.
)RU'76SDWHQWVVHHKWWSSDWHQWVGWVFRP
0DQXIDFWXUHGXQGHUOLFHQVHIURP'76/LFHQVLQJ/LPLWHG
'76 WKH 6\PERO '76 DQG WKH 6\PERO WRJHWKHU DUH
UHJLVWHUHG WUDGHPDUNV DQG '76 6WXGLR 6RXQG LV D
WUDGHPDUNRI'76ΖQFk'76ΖQF$OO5LJKWV5HVHUYHG

Table Of Contents
vi
Table Of Contents
Getting to Know Your TV .............................................7
Inspecting the Package Contents ...................................................... 7
Installing the TV .................................................................................. 8
ΖQVWDOOLQJWKH796WDQG .................................................................... 8
Installing the TV on a Wall ...............................................................9
Front Panel ..........................................................................................
Rear Panel ...........................................................................................
Remote Control Front .........................................................................
Replacing the Batteries ...................................................................
Connecting Your Devices .............................................
Connecting A Device ...........................................................................
&RQQHFWLQJ$'HYLFH$XGLR9LGHR&DEOH7\SHV...........................
Connecting an Audio Device ..............................................................
Connecting An Audio Device - Audio Cable Types ............................
Connecting an Audio Device - Arc .....................................................
Connecting to Your Network..............................................................
Connecting to a Wired Network (Best) ...........................................
Connecting to a Wireless Network .................................................
&RPSOHWLQJ7KH)LUVW7LPH6HWXS ...............................
8VLQJWKH2Q6FUHHQ0HQX .........................................
1DYLJDWLQJWKH2Q6FUHHQ0HQX ........................................................
&KDQJLQJWKHΖQSXW6RXUFH ................................................................
&KDQJLQJWKH6FUHHQ$VSHFW5DWLR .....................................................24
Viewing Video with the Menu Open ..................................................24
$GMXVWLQJWKH3LFWXUH6HWWLQJV ............................................................25
$GMXVWLQJ0RUH3LFWXUH6HWWLQJV .....................................................26
$GMXVWLQJWKH3LFWXUH0RGH(GLW6HWWLQJV ......................................26
6DYLQJD&XVWRP3LFWXUH0RGH .......................................................27
Locking/Unlocking a Custom Picture Mode ...................................27
Deleting a Custom Picture Mode ....................................................28
Resetting Picture Mode ...................................................................28
$GMXVWLQJWKH&RORU7XQHU6HWWLQJV ................................................29
$GMXVWLQJWKH$XGLR6HWWLQJV ..............................................................
&KDQJLQJWKH(TXDOL]HU6HWWLQJV .....................................................
Deleting the Custom Audio Mode ..................................................
6HWWLQJ7LPHUV .....................................................................................
6HWWLQJWKH6OHHS7LPHU ...................................................................
6HWWLQJWKH$XWR3RZHU2)HDWXUH ...............................................
(QDEOLQJWKH6FUHHQ6DYHU ..............................................................
%ODQN6FUHHQ)HDWXUH ......................................................................
Using the Network Connection Menu ...............................................
Connecting to a Wireless Network .................................................
&KDQJLQJWKH0DQXDO6HWXS6HWWLQJV .............................................
)LQGLQJ0$&$GGUHVVHVIRU1HWZRUN6HWXS ...................................
Connecting to a Hidden Network ...................................................
6HWWLQJ8SFKDQQHOV ............................................................................
6HOHFWLQJD&KDQQHO6RXUFH .............................................................
6FDQQLQJIRU&KDQQHOV ....................................................................
Adding New Channels .....................................................................
6NLSSLQJ&KDQQHOV ...........................................................................
Listening to Alternate Audio ..............................................................
Changing the Analog Audio Language ...........................................
Changing the Digital Audio Language ............................................
6HWWLQJ8S&ORVHG&DSWLRQLQJ ............................................................
Changing the Appearance of Digital Closed Captions ..................
Renaming Devices on the Input Menu ..............................................
&KDQJLQJWKH796HWWLQJV ...................................................................42
9LHZLQJ6\VWHPΖQIRUPDWLRQ ...........................................................42
&KDQJLQJWKH2Q6FUHHQ0HQX/DQJXDJH .....................................42
6HWWLQJWKH7LPHDQG/RFDO6HWWLQJV ...............................................
Using the Parental Controls ............................................................
Accessing the Parental Controls Menu ..........................................
Enabling or Disabling Program Ratings .........................................
Locking and Unlocking Channels ....................................................
Blocking and Unblocking Content by Rating .................................44
Changing the Parental Control PIN ................................................44
Resetting the Content Locks ...........................................................44
&KDQJLQJWKH9LHZ0RGH6HWWLQJV .................................................. 45
Adjusting the Wide Mode (Aspect Ratio) ........................................ 45
Changing your TV Name.................................................................. 45
$GMXVWLQJWKH&(&6HWWLQJV ..............................................................46
7XUQLQJWKH3RZHUΖQGLFDWRU2QRU2 ..........................................46
8VLQJWKH5HVHW$GPLQ0HQX .........................................................47
5HVWRULQJWKH79WR)DFWRU\'HIDXOW6HWWLQJV ................................. 47
8VLQJWKH*XLGHG6HWXS0HQX ........................................................48
8VLQJ*XLGHG6HWXS .........................................................................48
Using the Info Window ....................................................................... 48
8VLQJWKH86%0HGLD3OD\HU ........................................49
8VLQJWKH86%0HGLD3OD\HU ...............................................................49
3UHSDULQJ<RXU86%'ULYHWR3OD\86%0HGLD ............................... 49
3OD\LQJ86%0HGLD ........................................................................... 49
5HPRYLQJWKH86%'ULYHIURPWKH79 ............................................ 49
Using VIZIO Internet Apps Plus
®
(V.I.A. Plus) .............
Using the fullscreen V.I.A. Apps Window .......................................... 54
Fullscreen V.I.A. Plus Apps Window Overview .................................. 55
Customizing the V.I.A. Plus Apps Window ........................................56
Adding an App to the My Apps Tab ................................................ 56
Deleting an App from the My Apps Tab .........................................56
Moving an App in My Apps ............................................................. 56
Viewing Ultra HD Content ...........................................58
What is Ultra HD? ................................................................................58
What You Need to View Ultra HD Content ........................................58
:KDWLV+'0ΖDQG+'&3" ...................................................... 58
7URXEOHVKRRWLQJ7HFKQLFDO6XSSRUW ........................59
6SHFLȴFDWLRQV ...............................................................
Warranty .......................................................................64
/HJDO&RPSOLDQFH .....................................................65
1
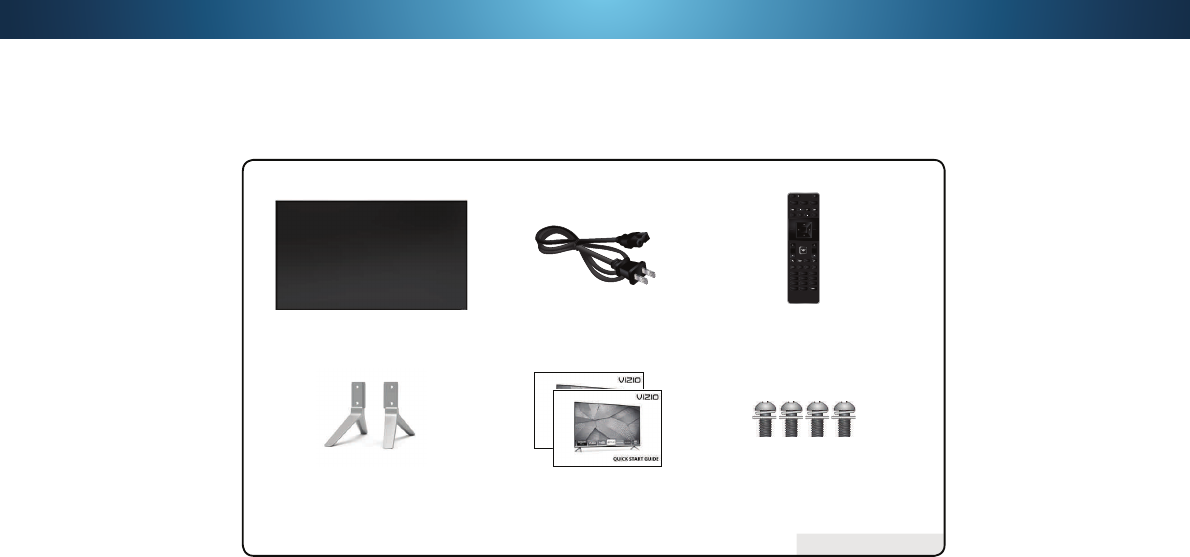
INSPECTING THE PACKAGE CONTENTS
Before installing your new TV, take a moment to inspect the package
contents. Use the images below to ensure nothing is missing or
damaged.
Getting to Know Your TV
PACKAGE CONTENTS
Power Cord
9Ζ=Ζ2/('8+'79ZLWK6WDQG 7ZR6LGHG5HPRWHZLWK.H\ERDUG
(Batteries Included)
INFO
MENU
GUIDEBACK
VOL
ENTER
CH
3D
1 2 3
4 5 6
7 8
0
9
EXIT
INPUT
LIST
[4XLFN6WDUW*XLGHV
(QJOLVK)UHQFK6SDQLVK
[3KLOOLSV6FUHZV796WDQGV
7

1
INSTALLING THE TV
$IWHU UHPRYLQJ WKH 79 IURP WKH ER[ DQG LQVSHFWLQJ WKH SDFNDJH
contents you can begin installing the TV. Your TV can be installed in
two ways:
• 2QDȵDWVXUIDFHXVLQJWKHLQFOXGHGVWDQG
• 2QDZDOOXVLQJD9(6$VWDQGDUGZDOOPRXQWQRWLQFOXGHG
Installing the TV Stand
Your TV includes a stand designed to support the weight of the TV
and keep it from falling over. However, the TV can still fall over if:
• It is placed on an uneven, unstable, or non-level surface
• It is pushed, pulled, or otherwise improperly moved
• If an earthquake occurs and the TV is not properly secured
3ODFHWKH79VFUHHQGRZQRQDFOHDQȵDWVXUIDFH7RSUHYHQW
scratches or damage to the screen, place the TV on a soft surface,
such as carpet, rug, or blanket.
To install the stands:
Insert the stands into the base of the TV.
2. 6HFXUHHDFKVWDQGWRWKH79with two (2) Phillips screws (included).
Insert the screws into the back of the TV and tighten them using a
Phillips screwdriver.
:KHQ\RXDUHȴQLVKHGSODFHWKH79RQDVWDEOHOHYHOVXUIDFH
It is recommended that two people take part in the
base installation.
8

1
Installing the TV on a Wall
To mount your TV on a wall, you will need a wall mount. Consult the
LQIRUPDWLRQEHORZWRȴQGWKHDSSURSULDWHPRXQWIRU\RXU79PRGHO
Be sure the mount you choose is capable of supporting the weight of
the TV. After you have determined that you have the correct mount
for your TV, you can begin the installation.
To install your TV on a wall:
Disconnect any cables connected to your TV.
2. 3ODFHWKH79IDFHGRZQRQDFOHDQȵDWVWDEOHVXUIDFH%HVXUH
the surface is clear of debris that can scratch or damage the TV.
Remove the stands by loosening and removing
the screws.
4. Attach your TV and wall mount to the wall, carefully following the
instructions that came with your mount. Use only with a UL-listed
wall mount bracket rated for the weight/load of this TV.
For some wall mounts, you may want to use cables
with right-angle connectors. This allows the TV to rest
closer to the wall.
WALL-MOUNT SCREW LOCATIONS
M55-C2
6FUHZ6L]H M6
Hole Pattern: PP9[PP+
:HLJKWZR6WDQG OEV
Installing a TV on a wall requires lifting. To prevent
injury or damage to the TV, ask someone to help you.
9

1
FRONT PANEL
REMOTE SENSOR & POWER INDICATOR
When using the remote, aim it directly at this sensor.
7KHSRZHULQGLFDWRUȵDVKHVRQZKHQWKH79WXUQVRQWKHQJRHVRXWDIWHUVHYHUDOVHFRQGV
To keep the power indicator on as long as the TV is on, see
7XUQLQJWKH3RZHUΖQGLFDWRU2QRU2RQSDJH
1
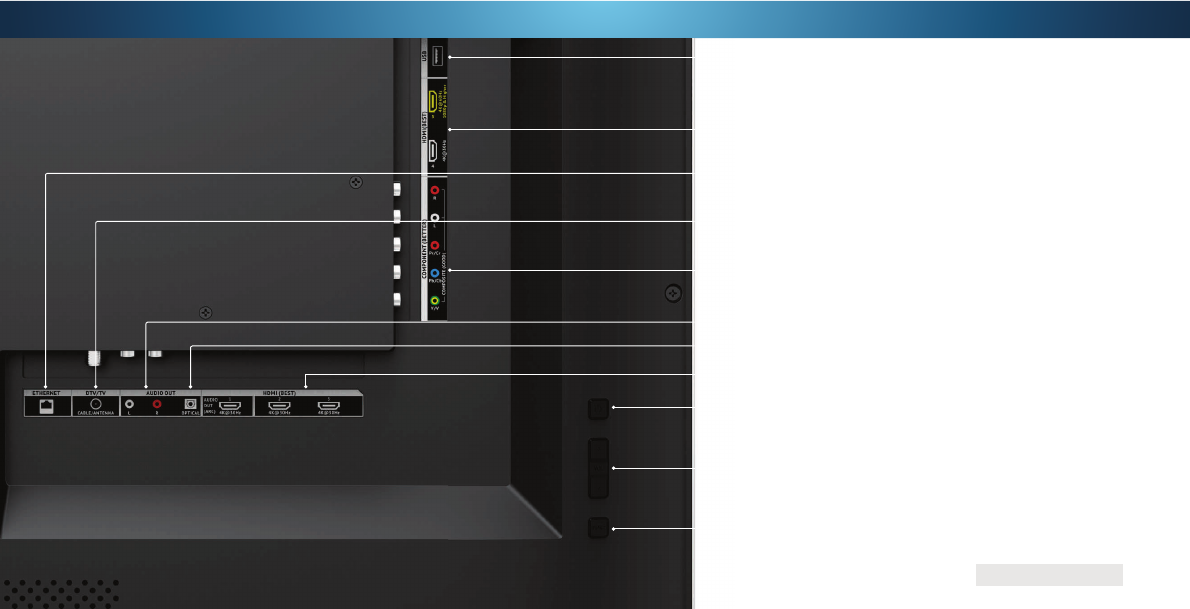
REAR PANEL
Ethernet - Connect Ethernet cable from home network.
Coaxial - &RQQHFWFRD[LDOFDEOHIURPFDEOHVDWHOOLWHRUDQWHQQD
Optical Audio Out&RQQHFWRSWLFDO63'Ζ)DXGLRGHYLFHVXFKDVKRPHDXGLRUHFHLYHU
Stereo Audio Out - Connect RCA audio device, such as sound bar.
Component/Composite - Connect component or composite device.
USB&RQQHFW86%WKXPEGULYHWRSOD\SKRWRPXVLFRUYLGHR
HDMI - Connect HDMI device.
HDMI - Connect HDMI device.
Power - Press once to turn on the TV.
Input - Press once to access the input menu.
Volume - Press the + button to increase volume and the - button to decrease volume.
Note:b7KHLPDJHVKRZQKHUHLVIRULOOXVWUDWLYHSXUSRVHVRQO\DQGPD\EHVXEMHFWWRFKDQJHb
The actual number of ports and their locations may vary, depending on the model.

1
REMOTE CONTROL
APP LAUNCHER
4XLFNO\ODXQFKWKHSLFWXUHG$SS
INPUT
Change the currently
displayed input.
NUMBER PAD
Manually enter a channel.
WIDE
Change the display mode.
ARROW
Navigate the on-screen menu.
POWER
7XUQ79RQRUR
INFO
Display the info window.
MENU
Display the on-screen menu.
GUIDE
Display the info window.
PIC
Opens the Picture Mode menu.
V BUTTON
Open the VIZIO Internet Apps
Plus
®
(V.I.A. Plus) dock.
CHANNEL UP/DOWN
Change the channel.
LAST
Return to the channel last viewed.
DASH
Use with number pad to manually
enter a digital sub-channel.
)RUH[DPSOHRU
ENTER
&RQȴUPFKDQQHORUSDVVFRGH
entered using the Number Pad.
A/V CONTROLS
&RQWURO86%PHGLDSOD\HUDQG
video streaming playback.
CLOSED CAPTIONS
7XUQFORVHGFDSWLRQVRQDQGR
EXIT
Close the on-screen menu.
VOLUME UP/DOWN
Increase or decrease loudness
of the audio.
OK
6HOHFWWKHKLJKOLJKWHGRSWLRQ
BACK
Go to the previous on-screen menu.
MUTE
7XUQWKHDXGLRRRURQ
SHIFT
Press and hold while
pressing another key to
enter a capital letter.
ALT
Press and hold while pressing another
key to enter a blue character. For
H[DPSOHSUHVV$/7DQG:WRHQWHUD
# character.
DO NOT COVER THIS AREA
This is the transmitter.
ARROWS
Navigate the
on-screen menu.

1
Replacing the Batteries
Insert two AAA batteries into the remote control. Make sure
that the (+) and (-) symbols on the batteries match the (+) and
(-) symbols inside the battery compartment.
4. Replace the battery cover. Press in on the button on the rear of the remote.
2. Remove the battery cover.
2Connecting Your Devices
CONNECTING A DEVICE
Your TV can be used to display output from most devices.
Verify that your device has a video port that matches an
available port on the TV (HDMI, Component, etc.).
2. 7XUQWKH79DQG\RXUGHYLFHR
Connect the appropriate cable (not included) to the TV and the
device.
4. 7XUQWKH79DQG\RXUGHYLFHRQ6HWWKH79ȇVLQSXWWRPDWFKWKH
FRQQHFWLRQ\RXXVHG+'0Ζ+'0ΖHWF
BETTER
COMPONENT CABLE
• ANALOG
• HD VIDEO (1080p)
1
• STEREO AUDIO
BEST
HDMI CABLE (HDMI 1-4)
2
• DIGITAL
• ULTRA HD VIDEO (4K @ 30 Hz)
1
• HD AUDIO
GOOD
AV CABLE
• ANALOG
• SD VIDEO (480i)
1
• STEREO AUDIO
BETTER
COAXIAL CABLE
• ANALOG/DIGITAL
• HD VIDEO (1080i)
1
• STEREO/HD AUDIO
BEST
HDMI CABLE (HDMI 5)*
• DIGITAL
• ULTRA HD VIDEO (4K @ 60 Hz)
1
• HD AUDIO
• HIGH VELOCITY MODE
†
0D[LPXP5HVROXWLRQ
2
+'&3VXSSRUWHGRQ+'0ΖSRUWVDQG
* Recommended for use with high-performance devices only
†
$YDLODEOHIRUFRPSDWLEOHJDPLQJV\VWHPVRUKLJKSHUIRUPDQFH3&VIRUGLVSOD\RIS#ISV
Note:
7KHLPDJHVKRZQKHUHLVIRULOOXVWUDWLYHSXUSRVHVRQO\DQGPD\EHVXEMHFWWRFKDQJHb
The actual number of ports and their locations may vary, depending on the model.

2
CONNECTING A DEVICE - AUDIO & VIDEO CABLE TYPES
AV CABLE
AV cables (or Composite cables) are the
traditional way of connecting your devices to
your TV. Video signals are sent over the yellow
connector while audio is sent over the red and
white connectors.
• 9LGHR5HVROXWLRQVXSWRL
• Analog Connection
• $XGLRDQG9LGHR6LJQDOV
GOOD
Y L R
COAXIAL CABLE
&RD[LDO FDEOHV DUH WKH WUDGLWLRQDO ZD\ RI
connecting antennas and cable television
VLJQDOV WR \RXU 79 &RD[LDO FDEOHV FDUU\ ERWK
audio and video signals through a single
connector.
• +'9LGHR5HVROXWLRQVXSWRL
• Analog Connection
• $XGLRDQG9LGHR6LJQDOV
BETTER
&RD[LDO
COMPONENT CABLE
Component cables are designed to carry high
GHȴQLWLRQ YLGHR VLJQDOV DORQJ ZLWK DGGLWLRQDO
audio connections. Colors are delivered with color
LQIRUPDWLRQ VSOLW XS WKUHH GLHUHQW ZD\V RYHU
three connectors for video (separated into Red,
Blue and Green signals) and the left and right
audio connectors (Red and White).
• +'9LGHR5HVROXWLRQVXSWRS
• Analog Connection
• $XGLRDQG9LGHR6LJQDOV
HDMI CABLE
HDMI is the intelligent, all-digital interface that
delivers both dazzling quality and unmatched ease
of use. HDMI technology transmits crystal-clear
digital video along with multi-channel surround
audio. HDMI-connected devices have the ability
to automatically adjust themselves for optimal
viewing.
• HD Video Resolutions up to UHD*
• HD Audio
• Digital Connection
• $XGLRDQG9LGHR6LJQDOV
BETTER
R L Pr/Cr Pb/Cb Y
HDMI
BEST
+LJK6SHHG+'0ΖFDEOHUHTXLUHGIRU8+'UHVROXWLRQV

2
CONNECTING AN AUDIO DEVICE
Your TV can output sound to an audio device, such as a receiver or
sound bar.
Verify that your device has an audio port that matches an
available port on the TV (Optical, RCA, etc).
2. 7XUQWKH79DQG\RXUDXGLRGHYLFHR
Connect the appropriate cable (not included) to the TV and the
device.
4. Turn the TV and your device on.
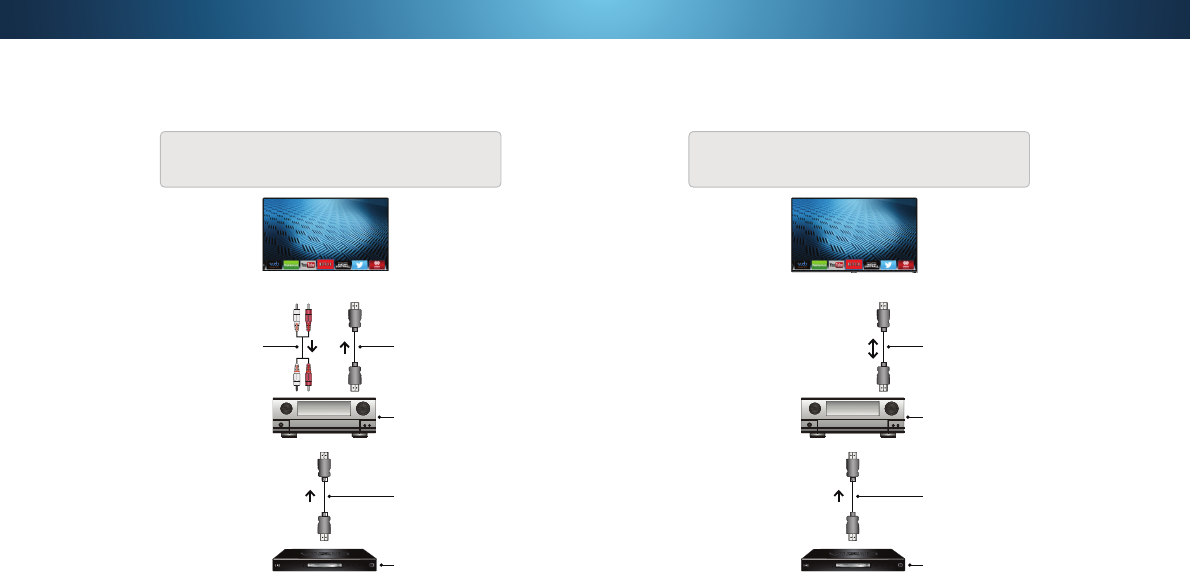
Home Audio Receiver 9Ζ=Ζ26RXQG%DU
BEST
HDMI CABLE
• ARC 2-WAY COMMUNICATION
• 2.0-5.1 DIGITAL AUDIO
• PCM, DTS, DOLBY DIGITAL
GOOD
RCA CABLE
• ANALOG STEREO CONNECTION
• 2.0 CHANNEL
BETTER
OPTICAL/SPDIF CABLE
• PCM STREAM
• DOLBY DIGITAL 5.1 CHANNEL
• DTS 5.1 CHANNEL
Note:
7KHLPDJHVKRZQKHUHLVIRULOOXVWUDWLYHSXUSRVHVRQO\DQGPD\EHVXEMHFWWRFKDQJHb
The actual number of ports and their locations may vary, depending on the model.

2
CONNECTING AN AUDIO DEVICE - AUDIO CABLE TYPES
RCA CABLE
RCA cables (or Composite cables) are the
traditional way of connecting your devices to your
audio device. Audio signals are sent over the red
and white connectors.
• Quality Stereo Connection
• 2.0 Channel
• Analog Connection
• Audio Signal Only
237Ζ&$/63'Ζ)&$%/(
2SWLFDO63'Ζ) FDEOHV WUDQVPLW DXGLR VLJQDOV DV
pulses of light through a cable made of plastic
ȴEHUV $XGLR VLJQDOV DUH GLJLWDOO\ WUDQVPLWWHG
between devices.
• PCM Stream (Lossless)
• Dolby Digital 5.1 Channel
• DTS 5.1 Channel
• Digital Connection
• Audio Signal Only
HDMI CABLE
HDMI technology transmits crystal-clear digital
multi-channel surround audio through a single
HDMI cable. Audio Return Channel-enabled
(ARC) TVs allow audio to be sent over an already
connected HDMI cable, eliminating the need for
D VHSDUDWHDXGLR FDEOH 6HH &RQQHFWLQJ DQ $XGLR
'HYLFH$UFRQSDJH
• ARC 2-way Communication
(Auto setup)
• PCM, DTS, Dolby Digital
• 2.0 - 5.1 Scaleable Lossless
Digital Audio Connection
• Audio and Video Signals
GOOD
L R
BETTER
2SWLFDO63'Ζ)
BEST
HDMI
2
CONNECTING AN AUDIO DEVICE - ARC
Your Home Audio Receiver
WITHOUT HDMI ARC
Your TV
Without an HDMI ARC setup, your TV will transmit audio signal
from the built-in tuner and VIA apps to your home audio receiver
through a separate audio connection.
HDMI Cable
HDMI Cable
Your Blu-Ray Player
RCA (Audio)
Your Home Audio Receiver
WITH HDMI ARC
Your TV
With an HDMI ARC setup, the audio connection between your
TV and Home Audio Receiver can be removed. The HDMI cable
will transmit audio signal to and from your TV with an all-digital
audio/video connection.
HDMI Cable
HDMI Cable
Your Blu-Ray Player

2
CONNECTING TO YOUR NETWORK
Your TV is Internet-ready. It can be connected to your home network
with a Wired or Wireless connection.
Connecting to a Wired Network (Best)
Connect an Ethernet cable to your router and to the Ethernet
SRUWRQWKHEDFNRIWKH796HHEHORZ
2. 8VHWKH*XLGHG1HWZRUN6HWXSWRFRQȴJXUHWKH796HH8VLQJ
*XLGHG6HWXSRQSDJH
Connecting to a Wireless Network
Ensure you have a router or modem broadcasting as
KLJKVSHHGZLUHOHVVVLJQDOQUHFRPPHQGHG
2. 8VHWKH*XLGHG1HWZRUN6HWXSWRFRQȴJXUHWKH796HH8VLQJ
*XLGHG6HWXSRQSDJH
.
Router / ModemEthernet Cable
Note:
7KHLPDJHVKRZQKHUHLVIRULOOXVWUDWLYHSXUSRVHVRQO\DQGPD\EHVXEMHFWWRFKDQJHb
The actual number of ports and their locations may vary, depending on the model.

3Completing The First-Time Setup
The first time you turn on the TV, the 6HWXS$SSZLOOJXLGH
you through each of the steps necessary to get your TV
ready for use.
Before you begin the first-time setup:
• Your TV should be installed and the power cord
should be connected to an electrical outlet.
• Your devices should be connected.
• If you have a wireless network, have the network
password ready.
• If you are connecting to your network with an
Ethernet cable, connect it to the Ethernet port on
the TV.
Choose your mode.
Select Store Demo for in-store display.
Select Home Use for in-home use.
Seleccione "Home Use" para Modo de Casa o "Store Demo" para Demostración en la Tienda.
Choisissez "Home Use" pour le Mode Domicile ou "Store Demo" pour la Démo en Magasin.
Store Demo Home Use
Press the Power button on the remote. The TV
SRZHUVRQDQGWKH6HWXS$SSVWDUWV
1
2
Use the Arrow buttons on the remote to
highlight Home Use and press OK.
To complete the first-time setup:
Use the Arrow buttons on the remote to highlight
your language of preference and press OK.
3
4
Use the Arrow buttons on the remote to
highlight your country, and then press OK.

3
6HOHFWWKHQDPHRI\RXUZLUHOHVVQHWZRUNIURPWKH
list of available networks and press OK.
6
Enter the network password using the keyboard on the
remote, then highlight Connect and press OK.
Use the Arrow and OK buttons on the remote to
UHYLHZWKH7HUPV2I6HUYLFHDQG3ULYDF\3ROLF\
:KHQ\RXDUHȴQLVKHGKLJKOLJKWI Accept
and press OK.
7
8
Enter your E-mail Address, First Name, Last
Name, and Zip Code using the keyboard
on the remote.
Highlight Next and press OK.
5
6HOHFW\RXUWLPH]RQHDQGSUHVVOK.

3
ΖIWKH796LJQDOFKDQQHOVFDQVFUHHQDSSHDUVWKH
TV will need to scan for channels, which takes
several minutes.
Use the arrow buttons on the remote to highlight
Begin Scan and press OK.
10
Otherwise, use the Arrow and OK buttons on
the remote to select the input your TV source
is connected to.
:KHQ\RXDUHȴQLVKHGWKHPHVVDJH
Ȋ6HWXSLVFRPSOHWHȋZLOODSSHDU
The First-Time Setup is complete.
Use the Arrow buttons on the remote to highlight
your TV source and press OK.
9
If you have cable TV, select whether you have
DFDEOHER[RULI\RXFRQQHFWWKH79GLUHFWO\
to a cable from the wall.
Note: Number of ports may differ by TV.
22

4
CHANGING THE INPUT SOURCE
([WHUQDO GHYLFHV VXFK DV '9' SOD\HUV %OXUD\ 3OD\HUV DQG YLGHR
game consoles can be connected to your TV. To use one of these
GHYLFHVZLWK\RXU79\RXPXVWȴUVWFKDQJHWKHLQSXWVRXUFHXVLQJ
the Input menu.
To change the input source:
Press the INPUT button on
the remote. The Input menu is
displayed.
2. Use the Up/Down Arrow
buttons or the INPUT button on
the remote to highlight the input
you wish to view and press OK.
The selected input is displayed.
You can change the input names that appear on the
ΖQSXWPHQXWRPDNH\RXUGHYLFHVHDV\WRUHFRJQL]H6HH
Renaming Devices on the Input Menu
RQ SDJH IRU
more information.
Note: Inputs may vary by TV.
Using the On-Screen Menu
Your TV features an easy-to-use on-screen menu.
To open the on-screen menu, press the MENU button on the remote.
You can also open the on-screen menu by pressing the VIA button
and selecting HDTV Settings from the VIA Dock, then pressing OK.
From this menu, you can:
• Adjust the Picture settings
• Adjust the Audio settings
• 6HWWLQJWKH6OHHS7LPHUV
• Adjust the Network settings
• Adjust the Channel settings
• 6HWXS&ORVHG&DSWLRQLQJ
• Name Inputs
• Adjust TV settings
• $FFHVVWKH*XLGHG6HWXS
• Access the User Manual
VIZIO
TV SETTINGS
Picture
Audio
Timers
Network
Channels
Closed Captions
Devices
System
Guided Setup
User Manual
CC
NAVIGATING THE ON-SCREEN MENU
To open the on-screen menu, press
the MENU button on the remote.
Use the Arrow buttons to highlight
a menu option, and press the OK
button to select that option.
While navigating the on-screen menu, you can
press the BACK button at any time to return to the
previous menu screen. The EXIT button will close the
on-screen menu.
COMP
HDMI-1
HDMI-2
TV
HDMI-4
Input Name
HDMI-3

4
CHANGING THE SCREEN ASPECT RATIO
7KH 79 FDQ GLVSOD\ LPDJHV LQ ȴYH GLHUHQW PRGHV 1RUPDO
6WUHWFK 3DQRUDPLF :LGH DQG =RRP (DFK PRGH GLVSOD\V WKH
SLFWXUHGLHUHQWO\6HH
Adjusting the Wide Mode (Aspect Ratio) on
page 45
for an alternate way of adjusting the screen aspect ratio.
To change the screen aspect ratio:
Press the
button on the remote.
2. Use the Arrow buttons to
highlight the aspect ratio you
wish to view and press OK.
• Normal preserves the content’s
RULJLQDODVSHFWUDWLR6LQFHWKH
aspect ratio is not large enough to
ȴOOWKH 79ȇVVFUHHQEODFNEDUVDUH
added to the left and right of the
display image.
• StretchH[SDQGVWKHGLVSOD\LPDJHWRȴOOWKHVFUHHQΖPDJHV
may appear wider than intended. If you are watching
ZLGHVFUHHQ RU FRQWHQW EODFN EDUV ZLOO VWLOO
appear on the top and bottom of the display image. This
option is only available when the TV is displaying a
720p/1080i/1080p source.
• Panoramic H[SDQGV WKH GLVSOD\ LPDJH WR ȴOO WKH VFUHHQ
Images may appear wider than intended. If you are watching
ZLGHVFUHHQ RU FRQWHQW EODFN EDUV ZLOO VWLOO
appear on the top and bottom of the display image. This
option is only available when the TV is displaying a
480i/480p source.
• Wide VWUHWFKHVDDVSHFWUDWLRSLFWXUHWRWKHHGJHVRIWKH
VFUHHQ6LQFHWKHSLFWXUHLVEHLQJVWUHWFKHGWKHGLVSOD\LPDJH
may appear distorted. If the program is already formatted
IRUZLGHVFUHHQYLHZLQJRUWKHQEODFNEDUVZLOO
appear on the top and bottom of the display image.
• Zoom H[SDQGVLPDJHVZLWKEODFNEDUVWRȴWWKHVFUHHQ
Panoramic
Wide
Zoom
Normal
Stretch
Wide
Zoom
Normal
Note: Aspect ratio settings may
vary by Input source.
VIEWING VIDEO WITH THE MENU OPEN
When the on-screen menu opens, it covers the left-hand portion of
WKHSLFWXUH7KHSLFWXUHFDQEHGLVSOD\HGLQWKUHHGLHUHQWZD\V
• Full-sized and centered on the screen (Overlay) - The
left-hand portion of the picture covered by the menu.
• 5HVL]HGWRȴW (Viewport) - The entire picture is visible in the
space to the right of the menu.
• Full-sized and aligned to the right edge of the menu
(Centered Overlay) 7KH SLFWXUH H[WHQGV R RI WKH ULJKW
side of the screen.
To change the position of the picture while the on-screen menu is
displayed:
Use the Arrow buttons on the
remote to highlight
Resize
Video.
2. Press OK to cycle through the
three display methods.
Press the Up Arrow button on
the remote to the menu.
4. 6HH
Changing the View Mode
6HWWLQJV
on page 45 for an
alternate method of adjusting
the video.
VIZIO
PICTURE
Picture Mode Standard
Auto Brightness Control Medium
Backlight 85
Brightness 50
Contrast 50
Color 59
Tint 0
Sharpness 9
More Picture
Picture Mode EDIT
Color Calibration
-
+
+
-
-
+
-
+
-
+
-
+
FULL-SIZED AND ALIGNED TO RIGHT OF
MENU (CENTERED OVERLAY)
RESIZED TO FIT (VIEWPORT)
VIZIO
FULL-SIZED AND CENTERED (OVERLAY)
-
+
+
-
-
+
-
+
-
+
-
+
PICTURE
Picture Mode Standard
Auto Brightness Control Off
Backlight 85
Brightness 50
Contrast 50
Color 59
Tint 0
Sharpness 9
More Picture
Picture Mode Edit
Color Calibration
VIZIO
VIZIO
Tip: The aspect ratio cannot be changed for Ultra HD
content or for any video content on HDMI-5.
-
+
+
-
-
+
-
+
-
+
-
+
PICTURE
Picture Mode Standard
Auto Brightness Control Off
Backlight 85
Brightness 50
Contrast 50
Color 59
Tint 0
Sharpness 9
More Picture
Picture Mode Edit
Color Calibration
-
+
+
-
-
+
-
+
-
+
-
+
PICTURE
Picture Mode Standard
Auto Brightness Control Off
Backlight 85
Brightness 50
Contrast 50
Color 59
Tint 0
Sharpness 9
More Picture
Picture Mode Edit
Color Calibration
24

4
Use the Arrow buttons on the
remote to highlight Picture
Mode, then use the Left/Right
Arrow buttons to change the
picture mode:
• Standard mode sets the
picture settings to the
default settings.
• Calibrated mode sets the
picture settings to values
ideal for watching TV in a
brightly-lit room.
• Calibrated Dark mode sets
the picture settings to values
ideal for watching TV in a
dark room.
• Vivid mode sets the picture
settings to values that
produce a brighter, more
vivid picture.
• Game mode reduces throughput delays and optimizes the
picture settings for displaying game console output.
• Computer mode optimizes the picture settings for
displaying computer output.
ADJUSTING THE PICTURE SETTINGS
Your TV display can be adjusted to suit your preferences and viewing
conditions.
To adjust the picture settings:
Press the MENU button on the remote. The on-screen menu is
displayed.
2. Use the Arrow buttons on the remote to highlight Picture and
press OK. The PICTURE menu is displayed.
Changes made while on any preset picture mode will add
an asterisk on the top right corner of the preset mode (see
6DYLQJD&XVWRP3LFWXUH0RGH
on page 27).
VIZIO
PICTURE
Picture Mode Standard
Auto Brightness Control Medium
Backlight 85
Brightness 50
Contrast 50
Color 59
Tint 0
Sharpness 9
More Picture
Picture Mode Edit
Color Calibration
-
+
+
-
-
+
-
+
-
+
-
+
4. To manually change each of the picture settings, use the Up/
Down Arrow buttons on the remote to highlight that picture
setting, then use the Left/Right Arrow buttons to adjust the
setting:
• Auto Brightness Control - The auto brightness control detects
the light levels in the room and automatically adjusts the backlight
IRUWKHEHVWSLFWXUH6HOHFW2, Low, Medium, or High.
• Backlight$GMXVWVWKH/('EULJKWQHVVWRDHFWWKHRYHUDOO
brilliance of the picture. Backlight cannot be adjusted when
starting from some picture modes.
• Brightness - Adjusts the black level of the picture. When this
setting is too low, the picture may be too dark to distinguish
details. When this setting is too high, the picture may appear
faded or washed out.
• Contrast - Adjusts the white level of the picture. When this
setting is too low, the picture may appear dark. When this
setting is too high, the picture may appear faded or washed
RXWΖIWKHVHWWLQJLVWRRKLJKRUWRRORZGHWDLOPD\EHGLɝFXOW
to distinguish in dark or bright areas of the picture.
• Color - Adjusts the intensity of the picture colors.
• Tint - Adjusts the hue of the picture. This setting is useful in
DGMXVWLQJWKHȵHVKWRQHVLQWKHSLFWXUHΖIȵHVKDSSHDUVWRR
orange, reduce the level of color before adjusting tint.
• Sharpness - Adjusts the edge sharpness of picture elements.
ΖWFDQEHXVHGWRVKDUSHQQRQ+'KLJKGHȴQLWLRQFRQWHQW
however, it will not produce detail that does not otherwise
H[LVW
5. :KHQ\RXKDYHȴQLVKHGDGMXVWLQJWKHSLFWXUHVHWWLQJVSUHVV
the EXIT button on the remote.
25

4
Adjusting More Picture Settings
To adjust more picture settings:
From the PICTURE menu, use the
Arrow buttons to highlight More
Picture, and then press OK.
2. Use the Arrow buttons to
highlight the setting you wish
to adjust, then press the Left/
Right Arrow buttons to change
the setting:
• Color Temperature -
Adjusts the 'warmness' and
'coolness' of the white areas
RIWKHSLFWXUH6HOHFWCool,
Normal, or Computer.
• Cool produces a blue-hued
picture.
• Computer optimizes the
picture for use as a
PC monitor.
• Normal is optimized for
television viewing.
• Black Detail - Adjusts the average brightness of the picture
WRFRPSHQVDWHIRUODUJHDUHDVRIEULJKWQHVV6HOHFW2,
Low, Medium, or High.
• Active LED Zones - Dynamically improves the contrast ratio
of the picture by adjusting the backlight. The adjustment is
FRQWUROOHGE\WKHFRQWHQWRQWKHVFUHHQ6HOHFWOn or 2.
• Reduce Judder$FWLYDWHV6PRRWK0RWLRQPRWLRQ
estimation/motion compensation, which suppresses motion
MXGGHURUȊVWXWWHULQJȋRIWKHLPDJHZKHQWKHFDPHUDPRYHV
across a scene horizontally. As the setting increases, judder
is reduced.
• Reduce Motion Blur - Increases frame rate to reduce
PRWLRQEOXURIKHUW]YLGHR$VWKHVHWWLQJLQFUHDVHV
motion blur is reduced.
• Clear Action5HGXFHVEOXULQVFHQHVZLWKIDVWDFWLRQ6RPH
VHQVLWLYHYLHZHUVPD\QRWLFHȵLFNHU6HOHFWOn or 2.
• Reduce Noise
• Reduce Signal Noise* - Diminishes artifacts in the image
FDXVHGE\WKHGLJLWL]LQJRILPDJHPRWLRQFRQWHQW6HOHFW
2, Low, Medium, or High.
• Reduce Block Noise -5HGXFHVSL[HODWLRQDQGGLVWRUWLRQ
IRUPSHJȴOHV6HOHFW2, Low, Medium, or High.
• Game Low Latency6HOHFWOn to reduce video delay (lag)
when gaming.
• Picture Size & Position - Highlight Picture Size & Position
and press OK7KH3Ζ&785(6Ζ=(326Ζ7Ζ21PHQXLV
displayed.
• Picture Size: Increase or decrease the vertical and
horizontal size of the displayed picture. Use the Left/
Right Arrow buttons to adjust the horizontal size of the
displayed picture. Use the Up/Down Arrow buttons to
adjust the vertical size of the displayed picture. Press the
OK EXWWRQZKHQ\RXDUHȴQLVKHG
• Picture Position: Adjust the vertical and horizontal
positions of the picture to ensure the image is centered
DQGFRPSOHWHO\ȴOOVWKHVFUHHQ8VHWKHLeft/Right
Arrow buttons to adjust the horizontal position of the
displayed picture. Use the Up/Down Arrow buttons to
adjust the vertical position of the displayed picture. Press
the OK EXWWRQZKHQ\RXDUHȴQLVKHG
• Film Mode2SWLPL]HVWKHSLFWXUHIRUZDWFKLQJȴOP6HOHFW
Auto or 2.
• Color Space
‡
6HOHFW&RORU6SDFHIRUWKHVRXUFH9LGHR
sources uses YCbCr, but PC uses RGB.
• Gamma6HWWKHVKDSHRIWKH*DPPDFXUYH8VHORZHU
Gamma values for bright room conditions, and higher
values when it’s dark.
:KHQ\RXKDYHȴQLVKHGDGMXVWLQJ0RUH3LFWXUH6HWWLQJVSUHVVWKH
EXIT button on the remote.
Adjusting the Picture Mode Edit Settings
3LFWXUH0RGH(GLW6HWWLQJVDOORZ\RXWRPDNHSUHFLVHDGMXVWPHQWV
to the picture and to create picture modes to save groups of picture
settings.
To adjust the Picture Mode Edit settings:
From the PICTURE menu, use the
Arrow buttons to highlight Picture
Mode Edit, and then press OK.
The PICTURE MODE EDIT menu is
displayed.
2. Use the Arrow buttons to
highlight the setting you wish to
adjust, then press OK to change
the setting:
• Save Picture Mode6DYHD
custom picture mode.
• Lock Picture Mode - Prevent
changes to custom picture
modes.
• Unlock Picture Mode - Allow
changes to custom picture
modes. (Available after a custom
picture mode is locked)
• Delete Picture Mode - Delete a custom picture mode. Inputs
assigned to that custom picture mode will be set to Calibrated
picture mode. (Available after a custom picture mode is saved)
• Reset Picture Mode
†
- Reset the picture mode settings to
factory default values.
VIZIO
PICTURE MODE EDIT
Save Picture Mode
Lock Picture Mode
Reset Picture Mode
VIZIO
MORE PICTURE
Color Temperature Cool
Black Detail Medium
Active LED Zones On
Reduce Judder
Reduce Motion Blur
Clear Action
Reduce Noise
Game Low Latency Off
Picture Size & Position
Film Mode Auto
Color Space Auto
Gamma 2.1
* Not available on HDMI input 5.
†
Only available on customized preset modes.
‡
Only available on HDMI input.
+
-
+
-
26

4
Locking/Unlocking a Custom Picture Mode
Custom picture modes can be locked/unlocked with a unique PIN to
prevent accidental changes to their settings.
To lock all custom picture modes:
From the PICTURE MODE EDIT
menu, use the Arrow buttons
to highlight Lock Picture
Mode, and then press OK. The
LOCK PICTURE MODE menu is
displayed.
2. Use the Number Pad on your
remote to enter a unique 4-digit
PIN.
Highlight Save and press OK.
4. Press the EXITEXWWRQWRH[LWWKH
menu screens.
To unlock all custom picture modes:
From the PICTURE MODE EDIT
menu, use the Arrow buttons
to highlight Unlock Picture
Mode, and then press OK. The
UNLOCK PICTURE MODE menu
is displayed.
2. Use the Number Pad on your remote to enter your 4-digit PIN.
VIZIO
LOCK PICTURE MODE
Create a picture control PIN to prevent
changes to all custom picture modes.
Save
Create a 4 digit passcode using the num-
ber keys on the remote.
Saving a Custom Picture Mode
Custom picture modes allow you to save a group of custom settings
for various viewing conditions and video sources.
• Changes made while on any preset picture mode will add an
asterisk on the top right corner of the preset mode.
• The custom picture mode is not automatically saved.
To save a custom picture mode:
From the PICTURE MODE EDIT
menu, use the Arrow buttons
to highlight Save Picture
Mode, and then press OK. The
6$9(3Ζ&785(02'( menu is
displayed.
2. Use either the on-screen
keyboard or keyboard on your
remote control to enter a name
for your custom picture mode.
Highlight Save and press OK.
4. Press the EXITEXWWRQWRH[LWWKH
menu screens.
VIZIO
SAVE PICTURE MODE
Custom1_
Save
a b c d e f g h i
j k l m n o p q r
s t u v w x y z 0
1 2 3 4 5 6 7 8 9
.@# .com Space
äêí
Make any desired changes to the picture modes.
4. Relock the picture modes, if desired. You must create a new 4-digit
PIN.
5. Press the EXITEXWWRQWRH[LWWKHPHQXVFUHHQV
27

4
Deleting a Custom Picture Mode
Custom picture modes that are no longer needed can be deleted.
To delete a custom picture mode:
From the PICTURE MODE EDIT
menu, use the Arrow buttons
to highlight Delete Picture
Mode, and then press OK. The
DELETE PICTURE MODE window
is displayed.
2. Use the Left/Right Arrow buttons to highlight Delete and
press OK.
Press the EXITEXWWRQWRH[LWWKHPHQXVFUHHQV
Inputs assigned to a deleted custom picture mode
become assigned to the
Calibrated
picture mode.
To delete the user created Custom 1 picture mode,
select the Delete button.
Delete Cancel
Resetting Picture Mode
Reset the picture mode settings (for a preset picture mode) to the
factory default values.
To reset a customized preset picture mode:
From the PICTURE MODE EDIT
menu, use the Arrow buttons
to highlight Reset Picture
Mode, and then press OK. The
5(6(73Ζ&785(02'( window is
displayed.
2. Use the Left/Right Arrow buttons to highlight Reset and press
OK.
Press the EXITEXWWRQWRH[LWWKHPHQXVFUHHQV
Select Reset to restore Standard
picture mode to factory defaults.
Reset Cancel
28

4
7RWXUQFRORUFKDQQHOVRDQGRQ
From the COLOR CALIBRATION menu, use the Arrow buttons
to highlight Color Tuner, and then press OK. The Color Tuner
menu is displayed.
2. Use the Arrow buttons on the remote to highlight Red, Green,
or Blue.
Press the OKEXWWRQWRWXUQWKHFRORUFKDQQHORRURQ$Q;
DSSHDUVRYHUDFRORUFKDQQHOWKDWKDVEHHQWXUQHGR
4. Use the Arrow buttons to highlight another color channel to
WXUQRRURQ2QO\WZRFRORUFKDQQHOVFDQEHWXUQHGRDWWKH
same time.
5. :KHQ\RXDUHȴQLVKHGZLWKWKHFRORUFKDQQHOVSUHVVWKHEXIT
button.
Color Tuner
Red Green Blue Cyan Magenta Yellow
Hue 0 0 0 0 25 -14
Saturation -1 5 -4 0 -2 0
Brightness -24 0 -22 0 0 0
Offset 0 0 0
Gain 0 0 0
7RDGMXVWWKH3RLQW:KLWH%DODQFHVHWWLQJV
From the Color Tuner menu, use the Arrow buttons to
highlight Color Tuner, and then press the Left/Right Arrow
EXWWRQVXQWLOWKH3RLQW:KLWH%DODQFHPHQXLVGLVSOD\HG
2. Use the Arrow buttons on the remote to highlight the Gain
and Color values you wish to adjust. Press the OK button and
use the Left/Right Arrow buttons to adjust the value. When
\RXDUHȴQLVKHGSUHVVWKHOK button to save the setting.
:KHQ\RXDUHȴQLVKHGSUHVVWKHEXIT button.
11 Point White Balance
Gain Red Green Blue
5% 0 0 0
Adjusting the Color Tuner Settings
7KH&RORU7XQHUVHWWLQJVDOORZ\RXWRDGMXVWWKH+6%FRORUDQG
SRLQWZKLWHEDODQFHWXUQFRORUFKDQQHOVRIRUWHVWLQJDQGGLVSOD\
FRORUEDUȵDWDQGUDPSWHVWSDWWHUQV
7RDGMXVWWKH+6%FRORUVHWWLQJV
From the COLOR CALIBRATION menu, use the Arrow buttons
to highlight Color Tuner, and then press OK. The Color Tuner
menu is displayed.
2. Use the Arrow buttons on the remote to highlight the Hue,
Saturation, Brightness, 2VHW, or Gain of the color you wish
to adjust. Press the OK button.
Use the Left/Right Arrow buttons to adjust the value. When
\RXDUHȴQLVKHGSUHVVWKHOK button to save the setting.
4. :KHQ\RXDUHȴQLVKHGDGMXVWLQJWKHFRORUWXQHUVHWWLQJVSUHVV
the EXIT button.
Color Tuner
Red Green Blue Cyan Magenta Yellow
Hue 0 0 0 0 25 -14
Saturation -1 5 -4 0 -2 0
Brightness -24 0 -22 0 0 0
Offset 0 0 0
Gain 0 0 0
7KH &RORU 7XQHU 3RLQW :KLWH %DODQFH DQG WHVW
patterns allow technicians to manually calibrate the TV.
Calibration requires specialized training, an input with
precisely set colors, and a specialized light meter.
29

4
To show or hide the Flat Test Pattern:
From the Color Tuner menu, use the Arrow buttons to
highlight Color Tuner, and then press the Left/Right Arrow
buttons until the Flat Test Pattern menu is displayed.
Flat Test Pattern
Off
2. Use the Arrow buttons on the remote to highlight 2. Use the
Left/Right Arrow buttons to select the percentage brightness
IRUWKHȵDWWHVWSDWWHUQ6HOHFWLQJDSHUFHQWDJHLPPHGLDWHO\
VKRZVWKHȵDWSDWWHUQDWWKDWbrightness.
—or—
To disable the Flat Test Pattern, use the Left/Right Arrow
buttons to highlight 2.
:KHQ\RXDUHȴQLVKHGSUHVVWKHEXIT button.
To show or hide the Ramp Test Pattern:
From the Color Tuner menu, use the Arrow buttons to
highlight Color Tuner, and then press the Left/Right Arrow
buttons until the Ramp Test Pattern menu is displayed.
2. Use the Arrow buttons on the remote to highlight 2. Use the
Left/Right Arrow buttons to select the color for the ramp test
SDWWHUQ6HOHFWLQJDFRORULPPHGLDWHO\VKRZVWKDWFRORUUDPS
—or—
To hide the Ramp Test Pattern, use the Left/Right Arrow
buttons to highlight 2.
:KHQ\RXDUHȴQLVKHGSUHVVWKHEXIT button.
Ramp Test Pattern
Off
7RVKRZRUKLGHWKH6037(7HVW3DWWHUQ
From the Color Tuner menu, use the Arrow buttons to
highlight Color Tuner, and then press the Left/Right Arrow
EXWWRQVXQWLOWKH6037(7HVW3DWWHUQPHQXLVGLVSOD\HG
SMPTE Test Pattern
Off
2. Use the Arrow buttons on the remote to highlight 2. Use the
Left/Right Arrow buttons to highlight OnWRVKRZWKH6037(
Pattern.
—or—
7RKLGHWKH6037(7HVW3DWWHUQXVHWKHLeft/Right Arrow
buttons to highlight 2.
:KHQ\RXDUHȴQLVKHGSUHVVWKHEXIT button.

4
ADJUSTING THE AUDIO SETTINGS
To adjust the audio settings:
Press the MENU button on the
remote. The on-screen menu
is displayed.
2. Use the Arrow buttons on the
remote to highlight Audio and
press OK. The AUDIO menu
is displayed.
Use the Arrow buttons to
highlight the setting you wish
to adjust, then press Left/
Right Arrow buttons to change
the setting:
• TV Speakers - Turns the
EXLOWLQVSHDNHUVRQRUR
• Surround Sound6XUURXQGVRXQGXVHV'767UX6XUURXQG
™
WR GHOLYHU DQ LPPHUVLYH VXUURXQG VRXQG H[SHULHQFH IURP
WKH 79ȇV LQWHUQDO VSHDNHUV 7UX6XUURXQG FRPSOHWHV WKH
HQWHUWDLQPHQWH[SHULHQFH E\ SURYLGLQJ GHHSULFKEDVVDQG
E\GHOLYHULQJFULVSGHWDLOVDQGFOHDULQWHOOLJLEOHGLDORJ6HOHFW
On or 2.
• Volume Leveling 9ROXPH OHYHOLQJ XVHV '76 7UX9ROXPH
™
to maintain consistent volume levels during transitions
between program content, AV formats, and input sources.
6HOHFW On or 2. In a few cases, volume leveling may
DUWLȴFLDOO\ VXSSUHVV YROXPH LQFUHDVHV PDNLQJ LW GLɝFXOW WR
KHDU GLDORJ RUȵDWWHQLQJVXGGHQQRLVHV ΖIWKLVRFFXUV WXUQ
YROXPHOHYHOLQJR
• Balance - Adjusts the loudness of the audio output from the
left and right speakers.
VIZIO
AUDIO
TV Speakers On
Surround Sound On
Volume Leveling On
Balance 0
Lip Sync 0
Digital Audio Out PCM
Analog Audio Out Fixed
Equalizer
Delete Audio Mode
-
+
-
+
When the TV speakers are set to On'76VLJQDOV
cannot be passed through digital audio outputs.
• Lip Sync - Adjusts the synchronization between the display
image and the accompanying audio track.
• Digital Audio Out - Changes the type of processing for
digital audio out and HDMI ARC output when connected to a
KRPHWKHDWHUDXGLRV\VWHP6HOHFWPCM or Bitstream.
• Analog Audio Out6HWVWKH YROXPHFRQWUROSURSHUWLHVIRU
the RCA connector when connected to a home theater audio
V\VWHP6HOHFWVariable if you are controlling the volume with
the TV’s volume controls, or select FixedLIDQH[WHUQDODXGLR
device (sound bar or AV receiver) will control the volume.
• Equalizer $GMXVWV WKH ERRVW RU DWWHQXDWLRQ RI GLHUHQW
IUHTXHQFLHV XVLQJ HLWKHU SUHVHW RU FXVWRP VHWWLQJV 6HH
&KDQJLQJWKH(TXDOL]HU6HWWLQJVRQSDJH
.
• Delete Audio Mode - Deletes a custom audio mode created
XVLQJWKH(TXDOL]HU6HWWLQJV6HH
Deleting the Custom Audio
0RGHRQSDJH
4. :KHQ\RXKDYHȴQLVKHGDGMXVWLQJWKHDXGLRVHWWLQJVSUHVVWKH
EXIT button on the remote.
You must select Bitstream for audio with more than
WZRFKDQQHOVRUIRUH[DPSOH
Changing the Equalizer Settings
The graphic equalizer has several pre-set modes and allows you to
create one custom mode.
To select a pre-set audio mode:
Press the MENU button on the remote. The on-screen menu is
displayed.
2. Use the Arrow buttons on the remote to highlight Audio and
press OK. The AUDIO menu is displayed.
Use the Arrow buttons to highlight Equalizer and press OK.
The Audio Mode and equalizer settings screen appears.
4. Use the Left and Right Arrow buttons to select an audio
PRGH7KHHTXDOL]HUEDUVFKDQJHWRUHȵHFWWKHPRGH
5. Press the EXIT button on the remote.

4
Deleting the Custom Audio Mode
To delete the custom audio mode that has been created:
Press the MENU button on the remote. The on-screen menu is
displayed.
2. Use the Arrow buttons on the remote to highlight Audio and
press OK. The AUDIO menu is displayed.
Use the Arrow buttons to highlight Delete Audio Mode and
press OK. The TV displays, “To delete the user created custom
DXGLRPRGHVHOHFWWKH'HOHWHEXWWRQȋ
4. Highlight Delete and press OK.
5. Press the EXIT button on the remote.
To create, modify, or replace the single custom equalizer setting:
Press the MENU button on the remote. The on-screen menu is
displayed.
2. Use the Arrow buttons on the remote to highlight Audio and
press OK. The AUDIO menu is displayed.
Use the Arrow buttons to highlight Equalizer and press OK.
The Audio Mode and equalizer settings screen appears.
4. Use the Left and Right Arrow buttons to select any audio
mode as a starting point.
5. Use the Arrow buttons to highlight a frequency and then press
OK.
6. Use the Up and Down Arrow buttons to adjust the boost (up)
and attenuation (down) for the frequency.
7. Use the Left and Right Arrow buttons to select another
frequency, if desired, and adjust it.
8. Press the EXIT button on the remote.
4
SETTING TIMERS
Setting the Sleep Timer
:KHQDFWLYDWHGWKH79ȇVVOHHSWLPHUZLOOWXUQWKH79RDIWHUDVHW
period of time.
Press the MENU button on the
remote. The on-screen menu is
displayed.
2. Use the Arrow buttons on the
remote to highlight Timers and
press OK. The 7Ζ0(56 menu is
displayed.
Use the Left/Right Arrow
buttons on the remote to
highlight the period of time after
which you want the TV to go to
sleep: 30, 60, 90, 120, or 180
minutes. If you don’t want the
sleep timer to activate, change
the setting to 2.
4. :KHQ\RXKDYHȴQLVKHGVHWWLQJ
the sleep timer, press the EXIT
button on the remote.
VIZIO
TIMERS
Sleep Timer Off
Auto Power Off 10 minutes
Screen Saver Off
Blank Screen
6HWWLQJWKH$XWR3RZHU2)HDWXUH
7R KHOS VDYH HQHUJ\ \RXU 79 LV VHW E\ GHIDXOW WR WXUQ R DIWHU
PLQXWHV ZLWKRXW D YLGHR RU DXGLR VLJQDO 7KLV IHDWXUH FDQ EH
deactivated.
7RVHWWKH$XWR3RZHU2IHDWXUH
From the 7Ζ0(56 menu, use the Up/Down Arrow buttons on
the remote to highlight $XWR3RZHU2.
2. Use the Left/Right Arrow buttons on the remote to change
ZKHWKHUWKH79ZLOOWXUQR ΖI\RXGRQȇWZDQWWKH79WRWXUQR
when there is no signal, change the setting to 2. Otherwise,
select 10 minutes.
:KHQ\RXKDYHȴQLVKHGVHWWLQJWKHDXWRSRZHURWLPHSUHVV
the EXIT button on the remote.
Enabling the Screen Saver
If there is no on-screen content or static content when audio is
VWUHDPLQJ WKH EDFNOLJKW LV WXUQHG R VDYLQJ HQHUJ\ <RX FDQ VHW
the time before the screen saver begins.
7RVHWWKH6FUHHQ6DYHU
From the 7Ζ0(56 menu, use the Up/Down Arrow buttons on
the remote to highlight Screen Saver.
2. Use the Left/Right Arrow buttons on the remote to change
the time before the screen saver begins. If you don’t want the
screen saver to be active, change the setting to 2. Otherwise,
select 2, 10, or 20 minutes.
:KHQ\RXKDYHȴQLVKHGVHWWLQJWKHVFUHHQVDYHUWLPHSUHVV
the EXIT button on the remote.
Blank Screen Feature
You can blank the screen while there is audio streaming. This
feature helps save energy and the life of the screen.
To blank the screen:
From the 7Ζ0(56 menu, use the Up/Down Arrow buttons on
the remote to highlight Blank Screen and press OK.
To exit the Screen Saver
Press any button other than the Volume and Mute
EXWWRQVRQWKHUHPRWHWRH[LWWKHVFUHHQVDYHU
To exit the Blank Screen
Press any button other than the Volume and Mute
EXWWRQVRQWKHUHPRWHWRH[LWWKHEODQNVFUHHQ

4
USING THE NETWORK CONNECTION MENU
Your TV is Internet-ready, featuring both an Ethernet port and
built-in high-speed Wireless-N.
Connecting to a Wireless Network
7R FRQQHFW WR D ZLUHOHVV QHWZRUN ZKRVH QHWZRUN QDPH 66Ζ' LV
being broadcast:
If your TV is connected to a network with an Ethernet
cable, you will not see the wireless network connection
menu. You must disconnect the Ethernet cable to set
up a wireless network connection.
Press the MENU button on the
remote. The on-screen menu is
displayed.
2. Use the Arrow buttons on the
remote to highlight Network
and press OK. The NETWORK
menu is displayed.
If you do not see your wireless
network displayed, highlight
More Access Points and press
OK. The :Ζ5(/(66$&&(66
32Ζ176 menu, which is a list of
available wireless networks, is
displayed.
4. Highlight the name of your
wireless network (this is the
QHWZRUNȇV66Ζ'DQGSUHVVOK.
5. Using the keyboard on the
remote, enter your network’s
password, then highlight
Connect and press OK.
6. Press the EXIT button on the remote.
VIZIO
NETWORK
Wired Connection Disconnected
Wireless Access Points
More Access Points
WPS
Manual Setup
Hidden Network
Test Connection
Changing the Manual Setup Settings
$GYDQFHGXVHUVFDQȴQHWXQHWKHQHWZRUNVHWWLQJVXVLQJWKH0DQXDO
6HWXSIHDWXUH
To change advanced network settings:
From the NETWORK menu,
highlight Manual Setup and
press OK. The 0$18$/6(783
menu is displayed.
2. To change the settings manually,
use the Arrow buttons on the
remote to highlight DHCP and
then use the Left/Right Arrow
buttons to change the setting to
2.
Use the Arrow and OK buttons
to adjust each setting:
• IP Address - The IP address
assigned to the TV.
• Subnet Mask - The subnet
mask.
• Default Gateway - Your
network’s default gateway
address.
• Pref. DNS Server - Your
preferred domain name
server address.
• Alt. DNS Server - Your alternate domain name server
address.
4. Use the Arrow buttons on the remote to highlight Save and
press OK.
5. Press the EXIT button on the remote.
VIZIO
MANUAL SETUP
DHCP Off
IP Address ____.____.____.____
Subnet Mask ____.____.____.____
Default
Gateway ____.____.____.____
Pref. DNS
Server ____.____.____.____
Alt. DNS
Server ____.____.____.____
Wireless MAC 0:0:0:0:0:0
Save
Cancel
Finding MAC Addresses for Network Setup
The security settings on your router may require you to enter the
TV's MAC address in the router's settings.
7RȴQGWKH79V0$&DGGUHVV
From the NETWORK menu, highlight Manual Setup and press
OK. The 0$18$/6(783 menu is displayed.
2. Find the MAC address for the TV at the bottom of the list. The
MAC addresses for the connections in use are displayed:
• RJ45 MAC - The Ethernet or RJ45 MAC address may be
needed to set up your network when you have connected
the TV to your network with an Ethernet (Cat 5) cable.
• Wireless MAC - The Wireless (WiFi) MAC address may be
needed to connect your TV to your network with WiFi.

4
Connecting to a Hidden Network
7RFRQQHFWWRDZLUHOHVVQHWZRUNZKRVHQHWZRUNQDPH66Ζ'LVQRW
being broadcast:
From the NETWORK menu,
highlight Hidden Network and
press OK. The (17(5$&&(66
POINT NAME screen is displayed.
2. Using the keyboard on the
remote, enter your network’s
QDPH66Ζ'WKHQKLJKOLJKW
Connect and press OK.
Using the keyboard on the
remote, enter your network’s
password, then highlight
Connect and press OK.
4. Press the EXIT button on the
remote.
VIZIO
ENTER ACCESS POINT NAME
Enter your access point name. This
is used to connect to an access
point with a hidden SSID.
a b c d e f g h i
j k l m n o p q r
s t u v w x y z 0
1 2 3 4 5 6 7 8 9
.@# .com Space
Connect
Testing Your Network Connection
To test your network connection:
From the NETWORK menu, highlight Test Connection and
press OK.
2. The 7(67&211(&7Ζ21 screen displays the connection
method, network name, signal strength, and download speed
of your network connection.
Press the EXIT button on the remote.
äêí

4
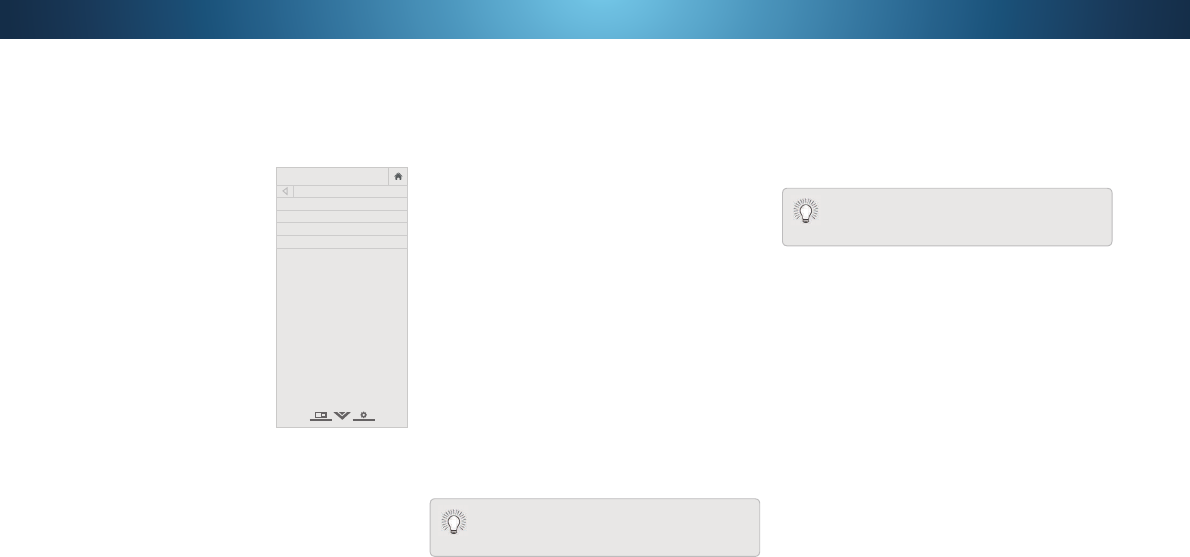
Selecting a Channel Source
6HOHFWWKHW\SHRIWXQHULQSXW\RXZLOOEHXVLQJ<RXFDQVHOHFWHLWKHU
Antenna (Over-the-air) or Cable (Out-of-the-wall) connections.
From the &+$11(/6 menu, highlight Channel Source and
press OK. The &+$11(/6285&( menu displays.
2. Highlight Antenna or Cable and press OK. Press EXIT.
Scanning for Channels
The TV may need to scan for channels before it can display programs
and their associated information. A channel scan is required for
free over-the-air channels (using an antenna) and cable channels
IURP DQ RXWRIWKHZDOO FRQQHFWLRQ ZLWKRXW D FDEOH ER[ 0RYLQJ
WKH79WRDQDUHDZLWKGLHUHQWFKDQQHOVUHTXLUHVWKH79WRVFDQIRU
channels again.
7RSHUIRUPDQ$XWR&KDQQHO6FDQ
From the &+$11(/6menu,
highlight Find Channels, and
press OK. The auto channel scan
begins.
2. Wait until the channel scan is
FRPSOHWH+LJKOLJKWDone
and press OK.
Press the EXIT button on the
remote.
If the channel scan is cancelled,
the channels that were already
discovered are retained. A new
channel scan will clear all channels.
SETTING UP CHANNELS
You can use the TV’s Channels menu to:
• 6HOHFWD&KDQQHO6RXUFH
• 3HUIRUPDQ$XWR&KDQQHO6FDQ
(Find Channels)
• 3HUIRUPD3DUWLDO&KDQQHO6HDUFK
• Manually Add Channels
• 6HOHFWFKDQQHOVWRVNLS
• 6HOHFW$QDORJ076PRGHV
• 6HOHFW'LJLWDO/DQJXDJHV
VIZIO
CHANNELS
Channel Source Cable
Find Channel
Partial Channel Search
Add Analog Channel
Skip Channel
Analog Audio Stereo
Digital Language English
VIZIO
FIND CHANNELS
Channels Found
Digital: 0
Analog: 19
18% Complete
Cancel
Cancel the channel scan.
Adding New Channels
Occasionally, you may need to add a new range of channels or
add a new analog channel. You can do this by using the Partial
&KDQQHO 6HDUFK DQG $GG $QDORJ &KDQQHO RSWLRQV 7KLV LV TXLFNHU
than scanning all possible channels.
To add a range of new channels:
From the &+$11(/6 menu, highlight Partial Channel Search,
and press OK. The 3$57Ζ$/&+$11(/6($5&+ menu is
displayed.
2. Highlight Scan Mode and select the type of channel you are
adding: Analog, Digital, or Analog/Digital.
Highlight From Channel and enter the channel where you
want to begin the scan. (Use the Left Arrow button to
backspace. Use the Number Pad on the remote to enter the
channel.)
4. Highlight To Channel and enter the channel where you want
to end the scan. (Use the Left Arrow button to backspace. Use
the Number Pad on the remote to enter the channel.)
5. Highlight Start and press OK. The partial channel search
begins.
6. :DLWXQWLOWKHSDUWLDOFKDQQHOVHDUFKLVFRPSOHWH
Highlight Done and press OK.
7. Press the EXIT button on the remote.
4
To add a single new analog channel:
From the &+$11(/6 menu,
highlight Add Analog Channel
and press OK. The ADD ANALOG
CHANNEL menu is displayed.
2. Highlight Enter Channel # and
use the Number Pad on the
remote to enter the number of
the channel you are adding.
Highlight Add Channel and
press OK. The TV scans for the
channel.
4. When the TV is done scanning
for the channel, press the EXIT
button on the remote.
VIZIO
ADD ANALOG CHANNEL
Enter Channel
Add Channel
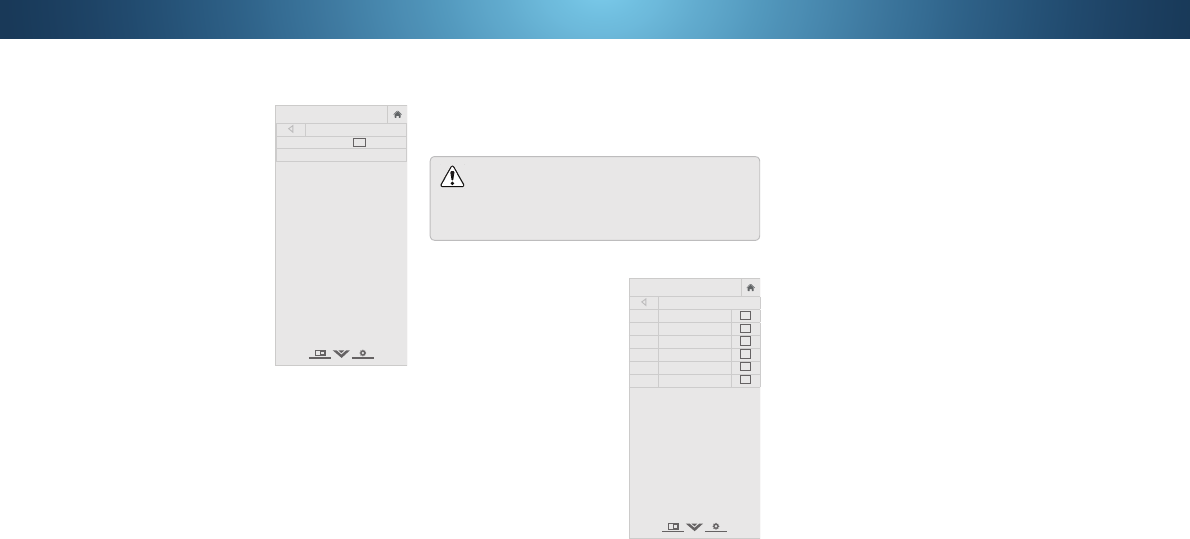
Skipping Channels
$IWHUDFKDQQHOVFDQLVFRPSOHWHG\RXPD\ȴQGWKDWVRPHFKDQQHOV
are too weak to watch comfortably. There may also be some
channels you do not want to view. You can remove these channels
IURPWKH79ȇVPHPRU\ZLWKWKH6NLS&KDQQHOIHDWXUH
&KDQQHOVWKDWKDYHEHHQUHPRYHGZLWKWKH6NLS
Channel feature can still be viewed if the channel
is entered using the Number Pad. If you wish to
completely block a channel from being viewed, use the
SDUHQWDOFRQWUROV6HH
Locking and Unlocking Channels
RQSDJH
To remove a channel:
From the &+$11(/6 menu,
highlight Skip Channel, and
press OK. The 6.Ζ3&+$11(/
menu is displayed.
2. For each channel you wish to
remove, use the Up/Down
Arrow buttons on the remote to
highlight the channel and press
OK. A
3 appears to the right of
each channel you select.
When you have selected all
of the channels you wish to
remove, press the EXIT button
on the remote.
VIZIO
SKIP CHANNEL
1
Test 0
1
Test 1
3
1-2
Test 2
3
2
Test 3
2-2
Test 4
3
2-3
Test 5

4
LISTENING TO ALTERNATE AUDIO
Changing the Analog Audio Language
6RPH DQDORJ RYHUWKHDLU IUHH DQG FDEOH FKDQQHOV EURDGFDVW
programs in more than one language. The TV’s Analog Audio
feature allows you to listen to audio in an alternate language using
6HFRQGDU\$XGLR3URJUDPPLQJ6$3
1RWDOOSURJUDPVDUHEURDGFDVWLQ6$37KH$QDORJ
Audio Language feature only works when the program
EHLQJYLHZHGLVEHLQJEURDGFDVWZLWK6HFRQGDU\$XGLR
Programming.
To use the Analog Audio feature:
From the &+$11(/6 menu,
highlight Analog Audio and
press OK. The ANALOG AUDIO
menu is displayed.
2. 6HOHFWStereo, SAP (secondary
audio programming), or Mono.
Press OK.
Press the EXIT button on the
remote.
VIZIO
ANALOG AUDIO
Stereo
SAP
Mono
Changing the Digital Audio Language
6RPH GLJLWDO RYHUWKHDLU IUHH DQG FDEOH FKDQQHOV EURDGFDVW
programs in more than one language. The TV’s Digital Audio feature
allows you to listen to audio in alternate languages.
Not all programs are broadcast in alternate languages.
The Digital Audio Language feature only works when
the program being viewed is being broadcast in the
language you select.
From the &+$11(/6 menu,
highlight Digital Language
and press OK. The DIGITAL
LANGUAGE menu is displayed.
2. 6HOHFW\RXUSUHIHUUHGODQJXDJH
English, Español, or Français .
Press OK.
Press the EXIT button on the
remote.
VIZIO
DIGITAL LANGUAGE
English
Español
Français

4
SETTING UP CLOSED CAPTIONING
Your TV can display closed captions for programs that include them.
Closed captions display a transcription of a program’s dialogue.
To activate or deactivate closed captions:
Press the MENU button on the
remote. The on-screen menu is
displayed.
2. Use the Arrow buttons on the
remote to highlight Closed
Captions and press OK. The
&/26('&$37Ζ216 menu is
displayed.
Use the Arrow buttons on the
remote to highlight Closed
Captions and then use the Left/
Right Arrow buttons to select
On or 2.
4. Use the Arrow buttons on
the remote to highlight either
Analog or Digital Closed
Captions.
5. Use the Left/Right Arrow
buttons on the remote to select
the caption channel you wish to
display, then press EXIT.
If the program you are viewing is not being broadcast
with closed captions, the TV will not display them.
VIZIO
CLOSED CAPTIONS
Closed Captions Off
Analog Closed Captions CC1
Digital Closed Captions CS1
Digital Style
The Closed Captions menu does not appear when an
HDMI input is selected.
Changing the Appearance of Digital Closed Captions
Digital closed captions can be displayed according to your
SUHIHUHQFH6HHWKHGLDJUDPRQWKHQH[WSDJHIRUDQH[SODQDWLRQRI
the parts of the closed caption area.
To change the appearance of digital closed captions:
From the &/26('&$37Ζ216
menu, use the Arrow buttons to
highlight Digital Style and press
OK.
2. Use the Left/Right Arrow
buttons on the remote to select
Custom. The 'Ζ*Ζ7$/67</(
menu appears as shown.
Use the Up/Down Arrow
buttons on the remote to
highlight the setting you wish to
change, then use the Left/Right
Arrow buttons to change the
setting:
• Caption Style - Choose
As Broadcast to keep
default settings or Custom
to manually change each
setting.
• Text Style - Change the
font used for the closed
FDSWLRQLQJWH[W
• Text Size0DNHWKHWH[WODUJHURUVPDOOHU
• Text Color&KDQJHWKHFRORURIWKHWH[W
• Text Opacity&KDQJHWKHWUDQVSDUHQF\RIWKHWH[W
• Text Edges&KDQJHWKHHHFWVDWWKHHGJHVRIWKHWH[W
such as raising the edges or adding drop shadows.
• Text Edges Color&KDQJHWKHFRORURIWKHWH[WHGJH
HHFWV
VIZIO
DIGITAL STYLE
Caption Style
Custom
Text Style
As Broadcast
Text Size
Large
Text Color
Green
Text Opacity
As Broadcast
Text Edges
As Broadcast
Text Edges Color
As Broadcast
Background Color
Black
Background Opacity
As Broadcast
Window Color
Red
Window Opacity
As Broadcast
• Background Color - Change the color of the background
GLUHFWO\EHKLQGWKHWH[W.
• Background Opacity - Change the transparency of the
EDFNJURXQGGLUHFWO\EHKLQGWKHWH[W.
• Window Color - Change the color of the closed captioning
ER[.
• Window Opacity - Change the opacity of the closed
FDSWLRQLQJER[
4. :KHQ\RXDUHVDWLVȴHGZLWKWKHDSSHDUDQFHRIWKHFORVHG
captions, press the EXIT button on the remote.

4
Typical choices include:
• Opaque background, transparent window—Only a strip of
EDFNJURXQGDSSHDUVEHKLQGWKHWH[WH[SDQGLQJDVWKHWH[W
appears. This is the typical "As Broadcast" mode.
• Opaque background and window in the same color—When
WH[WDSSHDUVWKHHQWLUHOLQHȴOOVZLWKFRORUDWRQFH
ΖQ WKH H[DPSOH EHORZ WKH FORVHG FDSWLRQ WH[W LV JUHHQ WKH
background is black, and the window is red.
CLOSED CAPTIONS SCREEN LAYOUT
Text
Window
Background
WH[W
hen
WKH
CLOS
ED C
APTI
ONS
SCRE
EN L
AYOU
T
Text
Wind
Wind
Wind
ow
ow
Back
grou
nd
&/26('&$37Ζ217(;76$03/(

4
RENAMING DEVICES ON THE INPUT MENU
You can rename the inputs to make them easier to recognize on
WKHΖQSXWPHQX)RUH[DPSOHLI\RXKDYHD'9'SOD\HUFRQQHFWHG
to the Component input, you can rename that input to display “DVD
3OD\HUȋ6HH
&KDQJLQJWKHΖQSXW6RXUFHRQSDJH
.
To change the name of an input:
Press the MENU button on the remote. The on-screen menu is
displayed.
2. Use the Arrow buttons on the remote to highlight Devices and
press OK. The '(9Ζ&(6 menu is displayed.
Highlight the input device that you want to rename and press
OK.
4. To use a preset input name:
a. Highlight the Input Port row and press OK.
b. Highlight the input name you want to use and press OK.
—or—
To enter a custom name:
a. Enter your custom label using the keyboard on the remote.
b. Highlight OK and press OK.
c. The Input Name changes to show the custom name that
you created.
5. :KHQ\RXKDYHȴQLVKHGQDPLQJ\RXULQSXWSUHVVWKHEXIT
button on the remote.
VIZIO
NAME INPUT
HDMI-1 DVD
DVD_
OK
Cancel
Select the input name from a list
of common device names (Blu-ray,
Cable Box, DVD, etc).
a b c d e f g h i
j k l m n o p q r
s t u v w x y z 0
1 2 3 4 5 6 7 8 9
.@# .com Space
Input Port
Custom Name
Input Name
äêí

4
CHANGING THE TV SETTINGS
8VLQJWKH6\VWHPPHQX\RXFDQ
• View system information
• Change the on-screen menu
language
• 6HWWLPH]RQHDQGORFDO
settings
• 6HWXSSDUHQWDOFRQWUROV
• Resize the video size
• Change your TV Name
• Adjust wide mode
• Adjust the CEC settings
• Adjust when the power
indicator is illuminated
• 5HVHWWKH79VHWWLQJVVHW
up administrative controls
VIZIO
SYSTEM
System Information
Menu Language English
Time & Local Settings
Parental Controls
View Mode Overlay
Wide
TV Name VIZIOTV
CEC
Power Indicator Off
Reset & Admin
View status information for the TV,
current input and your network.
Viewing System Information
To view a summary of the TV settings:
Press the MENU button on the remote. The on-screen menu is
displayed.
2. Use the Arrow buttons on the remote to highlight System and
press OK. The 6<67(0 menu is displayed.
Highlight System Information and press OK.
4. Use the Up/Down Arrow buttons to scroll through the system
information.
5. :KHQ\RXDUHȴQLVKHGUHYLHZLQJWKHV\VWHPLQIRUPDWLRQSUHVV
the EXIT button on the remote.
Changing the On-Screen Menu Language
<RXU79FDQGLVSOD\WKHRQVFUHHQPHQXLQGLHUHQWODQJXDJHV
To change the on-screen menu language:
Press the MENU button on the
remote. The on-screen menu is
displayed.
2. Use the Arrow buttons on the
remote to highlight System and
press OK. The 6<67(0 menu is
displayed.
Use the Arrow buttons on
the remote to highlight Menu
Language and press OK. The
MENU LANGUAGE menu is
displayed.
4. Highlight your preferred
language (English, Español, or
Français) and press OK.
5. Press the EXIT button on the
remote.
VIZIO
MENU LANGUAGE
English
Español
Français
42

4
Enabling or Disabling Program Ratings
To manage program content according to its rating, you must
enable the Program Rating feature.
To enable or disable the Program Rating feature:
From the 3$5(17$/&21752/6 menu, highlight Locks and
press OK. The /2&.6 menu is displayed.
2. 6HOHFWOn or 2 and press OK.
Locking and Unlocking Channels
When a channel is locked, it will be inaccessible. Locking a channel
is a good way to prevent children from viewing inappropriate
material.
To lock or unlock a channel:
From the 3$5(17$/&21752/6 menu, highlight Channel
Locks and press OK. The &+$11(//2&.6 menu is displayed.
2. Highlight the channel you want to lock or unlock and press OK.
When a channel is locked, the Lock icon appears locked. The
channel is not accessible unless the parental PIN is entered.
4. When a channel is unlocked, the Lock icon appears unlocked.
The channel is accessible.
Using the Parental Controls
The TV’s parental controls allow you to prevent the TV from
displaying certain channels or programs without a password.
The Parental Controls menu only appears when:
• You are using the tuner to receive your TV signals, such as
when you are using an antenna for Over-the-Air signals or
when connected to cable TV directly from the wall (no cable
ER[
• You have a device connected using a composite video cable
RUDFRD[LDOFDEOHVXFKDVD9&5VDWHOOLWHRUFDEOHER[RU
DVR.
Accessing the Parental Controls Menu
To access the Parental Controls menu:
Press the MENU button on the remote. The on-screen menu is
displayed.
2. Use the Arrow buttons on the remote to highlight System and
press OK. The 6<67(0 menu is displayed.
Use the Arrow buttons on the remote to highlight Parental
Controls and press OK.
4. Enter your parental PIN. If you have not set a PIN, enter the
default, 0000. The 3$5(17$/&21752/6 menu is displayed.
To set a custom parental passcode, see
Changing the
Parental Control PIN
on page 44.
Setting the Time and Local Settings
To ensure the correct time is displayed when you press the INFO
button, set the TV’s time zone:
Press the MENU button on the
remote. The on-screen menu is
displayed.
2. Use the Arrow buttons on the
remote to highlight System and
press OK7KH6<67(0PHQXLV
displayed.
Use the Arrow buttons on the
remote to highlight Time &
Local Settings and press OK.
The menu headed by the local
date and time is displayed.
4. Highlight Time Zone and press
OK. The TIME ZONE menu is
displayed.
5. Highlight your time zone and press OK.
6. Highlight Daylight Saving Time and press OK. The DAYLIGHT
6$9Ζ1*7Ζ0( menu is displayed. Choose On if your locale
observes daylight savings time, 2 if it does not, or Auto to
KDYHWKHV\VWHPDXWRPDWLFDOO\GHWHFW'D\OLJKW6DYLQJV6HWWLQJV
7. ΖI\RXDUHLQWKH8QLWHG6WDWHVKLJKOLJKWZip Code. Enter your Zip
code using the keypad on the remote, then press OK. Zip codes
are often used by V.I.A. Plus Apps to give you the most accurate
location-based information, such as weather or news.
8. Highlight Country and press OK. The COUNTRY menu is
displayed.
9. Highlight your country and press OK.
Press the EXIT button on the remote.
VIZIO
TIME ZONE
Hawaii (-10)
Alaska (-9)
Pacific (-8)
Mountain (-7)
Arizona (-7)
Central (-6)
Indiana (-5)
Eastern (-5)
Atlantic (-4)
Newfoundland (-3.5)
-3

4
Resetting the Content Locks
To reset the content locks to the factory-default settings:
From the 3$5(17$/&21752/6 menu, highlight Reset Locks
and press OK7KH79GLVSOD\VȊ6HOHFW5HVHWWRUHVWRUH3DUHQWDO
&RQWUROVWRIDFWRU\GHIDXOWVȋ
2. Highlight Reset and press OK.
Changing the Parental Control PIN
If you use the parental controls, you should change the PIN to
prevent children from accessing inappropriate material.
To change the parental control PIN:
From the 3$5(17$/&21752/6 menu, highlight Change PIN
and press OK. The CHANGE PIN menu is displayed.
2. In the NEW PINȴHOGXVHWKHNumber Pad on the remote to
enter your new 4-digit parental control PIN.
In the CONFIRM PINȴHOGXVHWKHNumber Pad on the remote
to re-enter your new 4-digit parental control PIN.
4. Write down your new parental control PIN and save it in a
secure location.
5. Press the EXIT button on the remote.
Blocking and Unblocking Content by Rating
A channel may sometimes broadcast programs that are meant for
children, and at other times broadcast programs that are meant
for mature audiences. You may not want to block the channel
completely using a channel lock, but you may wish to block certain
programs from being viewed.
When this is the case, you can use the TV’s Rating Block feature to
block content based on its rating.
)RUDOLVWRIFRQWHQWUDWLQJVDQGWKHLUGHȴQLWLRQVYLVLW
www.tvguidelines.org.
To block or unblock content by its rating:
From the 3$5(17$/&21752/6 menu, highlight the content
type you want to adjust and press OK:
USA TV86$WHOHYLVLRQSURJUDPEURDGFDVWV
USA Movie86$PRYLHEURDGFDVWV
Canadian English - Canadian English television program
broadcasts.
Canadian French - Canadian French television program
broadcasts.
2. For each rating type you want to block or unblock, use the
Up/Down and Left/Right Arrow buttons on the remote to
highlight the rating type and press OK.
When the rating type is blocked, the Lock icon appears
locked. Content with this rating and all higher ratings cannot
be viewed.
4. When the rating type is unblocked, the Lock icon appears
unlocked. Content with this rating and all lower ratings can be
viewed.
If you want to block all unrated content, highlight Block
Unrated Shows and use the Arrow buttons on the remote to
select On.
5. :KHQ\RXDUHȴQLVKHGDGMXVWLQJWKHUDWLQJOHYHOEORFNVSUHVV
the EXIT button on the remote.
44

4
Changing the View Mode Settings
<RXFDQUHVL]HWKHYLGHRFRQWHQWWRȴWZKLOHWKHPHQXLVRSHQ
To change the view mode settings:
Press the MENU button on the
remote. The on-screen menu is
displayed.
2. Use the Arrow buttons on the
remote to highlight System and
press OK. The 6<67(0 menu is
displayed.
Use the Arrow buttons on the
remote to highlight View Mode
and press OK. The VIEW MODE
menu is displayed.
4. Highlight Viewport, Overlay,
or Centered Overlay and press
OK.
• Viewport - The entire picture
is visible in the space to the
right of the menu.
• Overlay - The left-hand
portion of the picture
covered by the menu.
• Centered Overlay7KHSLFWXUHH[WHQGVRRIWKHULJKW
side of the screen.
5. Press the EXITEXWWRQRQWKHUHPRWH6HH
Viewing Video with
the Menu Open
on page 24 for an alternate way of resizing
the video content.
VIZIO
VIEW MODE
Viewport
Overlay
Centered Overlay
Adjusting the Wide Mode (Aspect Ratio)
7KH 79 FDQ GLVSOD\ LPDJHV LQ ȴYH GLHUHQW PRGHV 1RUPDO
6WUHWFK 3DQRUDPLF :LGH DQG =RRP (DFK PRGH GLVSOD\V WKH
SLFWXUH GLHUHQWO\6HH
&KDQJLQJWKH 6FUHHQ$VSHFW5DWLR RQSDJH
24
for an alternate way of adjusting the Wide Mode.
7RFKDQJHWKHVFUHHQDVSHFWUDWLRIURPWKH6<67(0PHQX
Press the MENU button on the remote. The on-screen menu is
displayed.
2. Use the Arrow buttons on the remote to highlight System and
press OK. The 6<67(0 menu is displayed.
Highlight Wide and press OK.
Use the Arrow buttons to
highlight the aspect ratio you
wish to view and press OK.
• Normal preserves the content’s
RULJLQDODVSHFWUDWLR6LQFHWKH
aspect ratio is not large enough to
ȴOOWKH 79ȇVVFUHHQEODFNEDUVDUH
added to the left and right of the
display image.
• StretchH[SDQGVWKHGLVSOD\LPDJHWRȴOOWKHVFUHHQΖPDJHV
may appear wider than intended. If you are watching
ZLGHVFUHHQ RU FRQWHQW EODFN EDUV ZLOO VWLOO
appear on the top and bottom of the display image. This
option is only available when the TV is displaying a
720p/1080i/1080p source.
• Panoramic H[SDQGV WKH GLVSOD\ LPDJH WR ȴOO WKH VFUHHQ
Images may appear wider than intended. If you are watching
ZLGHVFUHHQ RU FRQWHQW EODFN EDUV ZLOO VWLOO
appear on the top and bottom of the display image. This
option is only available when the TV is displaying a
480i/480p source.
• Wide VWUHWFKHVDDVSHFWUDWLRSLFWXUHWRWKHHGJHVRIWKH
VFUHHQ6LQFHWKHSLFWXUHLVEHLQJVWUHWFKHGWKHGLVSOD\LPDJH
may appear distorted. If the program is already formatted
IRUZLGHVFUHHQYLHZLQJRUWKHQEODFNEDUVZLOO
appear on the top and bottom of the display image.
• Zoom H[SDQGVLPDJHVZLWKEODFNEDUVWRȴWWKHVFUHHQ
Panoramic
Wide
Zoom
Normal
Changing your TV Name
(QWHUDFXVWRP'1/$QDPHIRU\RXU798SWRFKDUDFWHUVORQJ
To create a custom name for your TV:
Press the MENU button on the
remote. The on-screen menu is
displayed.
2. Use the Arrow buttons on the
remote to highlight System and
press OK. The 6<67(0 menu is
displayed.
Use the Arrow buttons on the
remote to highlight TV Name
and press OK. The TV NAME
menu is displayed.
4. Use either the on-screen
keyboard or keyboard on your
remote control to enter a name
for your TV (Name can be up to
FKDUDFWHUVORQJ
:KHQ\RXDUHȴQLVKHGKLJKOLJKW
OK and press the OK button.
5. Press the EXIT button on the remote.
Stretch
Wide
Zoom
Normal
Note: Aspect ratio settings may
vary by Input source.
VIZIO
TV NAME
VIZIOTV_
OK
Cancel
a b c d e f g h i
j k l m n o p q r
s t u v w x y z 0
1 2 3 4 5 6 7 8 9
.@# .com Space
äêí
45

4
7XUQLQJWKH3RZHUΖQGLFDWRU2QRU2
The Power Indicator on the front of your TV normally does not glow
when the TV is on. You can change this setting if you prefer the light
to be on.
7RWXUQWKH3RZHUΖQGLFDWRU/LJKWRQRUR
Press the MENU button on the remote. The on-screen menu is
displayed.
2. Use the Arrow buttons on the remote to highlight System and
press OK. The 6<67(0 menu is displayed.
Highlight Power Indicator and press OK.
4. Use the Up/Down Arrow buttons to select On or 2, then
press OK.
Adjusting the CEC Settings
The CEC function on your TV enables you to control HDMI-connected
devices with the included remote without any additional
programming.
1RWDOO+'0ΖGHYLFHVVXSSRUW&(&6HH\RXUGHYLFHȇV
user manual for details.
To enable, disable, or adjust CEC settings:
Press the MENU button on the remote. The on-screen menu is
displayed.
2. Use the Arrow buttons on the remote to highlight System and
press OK. The 6<67(0 menu is displayed.
Use the Arrow buttons on the remote to highlight CEC and
press OK. The CEC menu is displayed.
4. Use the Arrow and OK buttons to adjust each setting:
• CEC6HOHFWEnable to use the TV remote to control CEC
GHYLFHVFRQQHFWHGWR+'0Ζ6HOHFWARC Only for plug and
play of an audio device connected to the HDMI ARC input.
The ARC setting does not support video devices connected
WRWKHDXGLRGHYLFH6HOHFWEnable to enable support for
these devices).
6HOHFWDisableWRWXUQ&(&R
• Device Discovery - Use this function to determine if your
device is connected and supports CEC. (Required for Enable
option only)
5. Press the EXIT button on the remote.
46

4
5. If you have changed the default parental control PIN, enter it
now.
7KH79GLVSOD\VȊ6HOHFW5HVHWWRUHVWRUHDOO79VHWWLQJVWR
IDFWRU\GHIDXOWVDQGFOHDUDOODFFRXQWLQIRUPDWLRQȋ
6. Highlight Reset and press OK.
7. :DLWIRUWKH79WRWXUQR7KH79ZLOOWXUQEDFNRQVKRUWO\
DIWHUZDUGDQGWKH6HWXS$SSZLOOEHJLQ
USING THE RESET & ADMIN MENU
<RXFDQXVH WKH79ȇV5HVHW $GPLQ PHQXWRUHVWRUHWKH79WRLWV
factory default settings.
Restoring the TV to Factory Default Settings
All of the on-screen menu settings can be reset to the factory
defaults.
If you restore the TV to the factory default settings, all
changes you have made to the settings will be lost!
This includes any V.I.A. Plus Apps that you have added
and any changes you have made to the settings for
those Apps.
To restore the TV to its factory default settings:
Press the MENU button on the
remote. The on-screen menu is
displayed.
2. Use the Arrow buttons on the
remote to highlight System and
press OK. The 6<67(0 menu is
displayed.
Highlight Reset & Admin and
press OK. The 5(6(7$'0Ζ1
menu is displayed.
4. Highlight Reset TV to Factory
Defaults and press OK.
VIZIO
RESET & ADMIN
Reset TV to Factory Defaults
VIZIO Privacy Policy
Smart Interactivity On
Store Demo
47
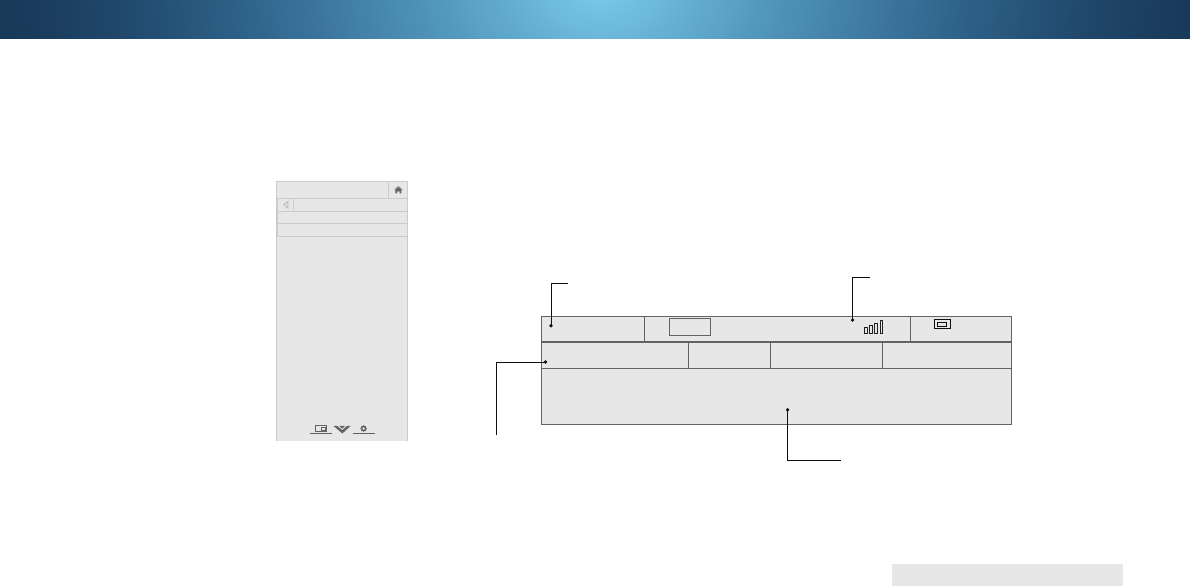
4
USING THE GUIDED SETUP MENU
Using Guided Setup
7KH79ȇV6HWXS$SSFDQEHXVHGWRHDVLO\VHWXSWKH79FKDQQHORUWR
connect the TV with your network.
To use guided setup:
Press the MENU button on the
remote. The on-screen menu is
displayed.
2. Highlight Guided Setup and
press OK.
Highlight the guided setup you
want to use and press OK:
• Channel Setup6HWXSWKH
TV channel.
• Network Setup - Connect
the TV to the Internet using
your network.
4. Follow the on-screen
LQVWUXFWLRQV:KHQȴQLVKHG
press the EXIT button on the
remote.
VIZIO
GUIDED SETUP
Channel Setup
Network Setup
USING THE INFO WINDOW
The Info Window can be displayed by pressing the INFO or GUIDE
button on the remote:
• Press the INFO or GUIDE button one time to display
channel, input, and display information.
• Press the INFO or GUIDE button two times to display the
program title, program rating, audio information, and the
start and end times of the program.
DIGITAL EPISODE GUIDE & INFO WINDOW
Oliver’s Holiday Surprise
1080p 6:15pm
11:00AM - 12:00PM
TV-PG-V
Dolby D Stereo
Oliver wakes up one morning only to discover that his pals are missing. In this
hour-long holiday special, Oliver goes on a journey in search of his pals. Who
knows what he’ll encounter on the way?
Program Description
Program Title/Rating Information
Network/Display Information
28-1
KCET-HD
Normal
Channel/Input Information
48

5Using the USB Media Player
USING THE USB MEDIA PLAYER
7KH86%0HGLD3OD\HUDOORZV\RXWRFRQQHFWD86%WKXPEGULYHWR
your TV and play music, video, or photos.
Preparing Your USB Drive to Play USB Media
7RSOD\86%PHGLD\RXPXVWȴUVWVDYH\RXUȴOHVRQWRD86%WKXPE
drive:
• 7KH86%WKXPEGULYHPXVWEHIRUPDWWHGDV)$7
• )LOHVRQWKH86%WKXPEGULYHPXVWHQGLQDVXSSRUWHGȴOH
H[WHQVLRQPSMSJHWF
• 7KHSOD\HULVQRWGHVLJQHGWRSOD\PHGLDIURPH[WHUQDOKDUG
GULYHV03SOD\HUVFDPHUDVRUVPDUWSKRQHV
Playing USB Media
7RSOD\\RXU86%PHGLD
&RQQHFW\RXU86%WKXPEGULYHWRWKH86%SRUWRQWKHVLGHRI
the TV.
2. Press the V button on the remote
.
Use the Arrow buttons to highlight the Multimedia app in the
V.I.A. Plus Dock and press OK. (The highlighted App is in the
center of the dock.)
4. Use the ArrowEXWWRQVWRKLJKOLJKWWKH86%GULYHIURPWKHOLVW
and press OK.
5. Use the Arrow buttons to highlight the type of media to
display (Music, Video, or Photo) and press OK.
6. Use the ArrowEXWWRQVWRKLJKOLJKWWKHȴOH\RXZDQWWRGLVSOD\
Press OK0XVLFRUYLGHRȴOHVSOD\SKRWRVGLVSOD\
<RXFDQGLVSOD\\RXUSKRWRVLQIXOOVFUHHQ6HOHFWWKH
photo, press OK, then highlight Fullscreen and press
OK.
Removing the USB Drive from the TV
'RQRWUHPRYHWKH86%WKXPEGULYHZKLOHWKH79LVRQ
Doing so may damage the drive.
7RVDIHO\UHPRYH\RXU86%GULYHIURPWKH79
7XUQRWKH79
2. 'LVFRQQHFW\RXU86%WKXPEGULYHIURPWKH86%SRUWRQWKH
side of the TV.
Note:
7KHLPDJHVKRZQKHUHLVIRULOOXVWUDWLYHSXUSRVHVRQO\DQGPD\EHVXEMHFWWRFKDQJHb
The actual number of ports and their locations may vary, depending on the model.
49

5
Browse Photos
Artist A-Z
View:
Sort:
Music
MyFlashDrive\Audio\root\My Music
USB1: MyFlashDrive
My Music
Page 1 of 1
VIZIO
Album Art
ΖILQFOXGHGRQWKH86%
thumb drive and associated
with your music, the album
art will display here.
Progress Bar
Displays the duration of the current-
ly-playing song. The blue bar will
lengthen as the song progresses.
Page Information
ΖI\RXU86%WKXPEGULYHKDVPRUH
ȴOHVWKDQFDQEHGLVSOD\HGRQD
single screen, the page information is
displayed here.
Now Playing Information
Displays song title, album title, and artist name.
Connected
Sources
Displays
FRQQHFWHG86%
devices.
Current Folder
Playback Controls
Use to control audio
playback. Highlight Play/
3DXVH3UHYLRXVRU1H[W
and press OK.
Toggle Music/Photos
Toggle between
viewing all content
and only viewing
folders.
MUSIC PLAYER
All
Sort by Album/Artist/
Track
Fab Apple Dream
On January Mix Comp
By Oliver
00:04:00 00:04:46
Track Album Artist Duration
#
Starry Summer
Summer Mix
JCheesy
2:42
1
Downspin JCheesy 6:20
2
Mango Dream
Oliver 8:46
3
Crystal Waters
The Dash
4:21
4
Smooth Waves
Rio Steve 7:58
5
Back Button
Highlight this button and
press OK to return to
the previous screen.
Folder Contents/
Playlist
This area displays
the contents of the
currently selected
folder. You can browse
ȴOHVDQGIROGHUVXVLQJ
the Arrow and OK
buttons on the remote.
Summer Mix
Beach Mix
Beach Mix
Breezy Mix
50

5
Date New-Old
View:
Sort:
Video
MyFlashDrive\Video\root\My Videos
USB1: MyFlashDrive
My Videos
Page 1 of 1
VIZIO
Page Information
ΖI\RXU86%WKXPEGULYHKDVPRUH
ȴOHVWKDQFDQEHGLVSOD\HGRQD
single screen, the page information is
displayed here.
Connected
Sources
Displays
FRQQHFWHG86%
devices.
Current Folder
View All or
View Folders
VIDEO PLAYER
Folders
File Date Duration#
Family Vacation - California
- 00:23:431
26th Birthday Party
- 00:38:182
Summer 2012
- 00:41:083
Greatest Trip Ever
- 00:05:324
Folder Contents/
Playlist
This area displays
the contents of the
currently selected
folder. You can
EURZVHDPRQJȴOHV
using the Arrow and
OK buttons on the
remote.
Back Button
Highlight this button and
press OK to return to
the previous screen.
Sort by Date
or File Name
51

5
Start Slideshow
Name A-Z
Thumbnails
Settings
View:
Sort:
Photo
VIZIO_2GB\Photo\root
File Name: D 1920x1080
Resolution: 1920x1080
Size: 1607270KB
USB1:
A.jpg
root
B.jpg C.jpg
D.jpg
E.jpg F.jpg
G.jpg
H.jpg I.jpg
Page 1 of 1
VIZIO
Current Folder
Displays the folder path.
Back Button
Highlight and press OK to return to left column.
Connected
Sources
Displays
FRQQHFWHG86%
devices.
Current Folder
View Thumbnails/Folders
Adjust Slideshow Settings
Start Fullscreen
Slideshow
PHOTO VIEWER
Browse Music
View Music Files
Back Button
Highlight this button and
press OK to return to
the previous screen.
Folder Contents
This area displays the
contents of the currently
selected folder. You can
EURZVHȴOHVDQGIROGHUV
using the Arrow and OK
buttons on the remote.
Page Information
ΖI\RXU86%WKXPEGULYHKDVPRUH
ȴOHVWKDQFDQEHGLVSOD\HGRQD
single screen, the page information is
displayed here.
Photo Information
Displays the name,
UHVROXWLRQDQGȴOH
size of the selected
photo.
Sort by Date
or File Name
52

6Using VIZIO Internet Apps Plus
®
(V.I.A. Plus)
VIZIO Internet Apps Plus
®
(V.I.A. Plus) delivers popular online content
to your TV. V.I.A. Plus features a selection of Apps that allow you to
watch movies and TV shows, listen to music, get weather and news
information, and more–all on demand.
A high-speed Internet connection is required to receive
product updates and to access online content.
6HH8VLQJ WKH1HWZRUN &RQQHFWLRQ0HQXRQSDJH
if your TV is
not yet connected to your home network.
USING THE V.I.A. PLUS APP DOCK
The V.I.A. Plus App Dock is where all of your V.I.A. Apps are accessed.
To launch an App from the Dock:
Press the V Button on the remote.
2. Highlight a V.I.A. Plus App by
scrolling left and right using the
Left/Right Arrow buttons on
the remote. (The highlighted App
is in the center of the dock.)
Press the OK button on the
remote to launch the App.
V Button
Note: App location, appearance, and availability subject to change without notice.
Note:
Note:
Note:
Note:
Note:
Note:
Note:
Note:
Note:
Note:
Note:
Note:
Note:
Note:
Note:
Note:
Note:
App lo
App lo
App lo
App lo
App lo
App lo
App lo
App lo
App lo
App lo
App lo
App lo
App lo
App lo
App lo
App lo
App lo
App lo
App lo
cation
cation
cation
cation
cation
cation
cation
cation
cation
cation
cation
cation
cation
cation
cation
cation
cation
cation
, appe
, appe
, appe
, appe
, appe
, appe
, appe
, appe
, appe
, appe
, appe
, appe
, appe
, appe
arance
arance
arance
arance
arance
arance
arance
, and
, and
, and
, and
, and
, and
, and
, and
, and
, and
, and
, and
, and
, and
availa
availa
availa
availa
availa
availa
bility
bility
bility
bility
bility
subje
subje
subje
subje
ct to
ct to
ct to
change
change
change
witho
witho
ut notice.

6
My Apps Tab
Displays the apps
installed on your
TV.
Installed Apps
The Apps displayed
here are also
available in the V.I.A.
Plus App Dock.
App Store Tabs
Browse through Apps
on these tabs to run
them and add them
to your My Apps tab.
USING THE FULLSCREEN V.I.A. APPS WINDOW
The Fullscreen V.I.A. Plus Apps window allows you to add and store
$SSV 7KH $SSV RQ WKH ȴUVW SDJH DUH GLVSOD\HG LQ WKH 'RFN DQG
Apps on additional pages can be moved to the Dock.
To open the Fullscreen V.I.A. Plus Apps Window:
Press the V Button on the remote twice.
2. Highlight an App by using the Arrow buttons on the remote.
Press the OK button on the remote to launch the App.
4. 7RH[LWIURPDQRSHQ$SSRUWRFORVHWKH$SS'RFNSUHVVWKH
Exit button on the remote.
Note: App location, appearance, and availability subject to change without notice.
54
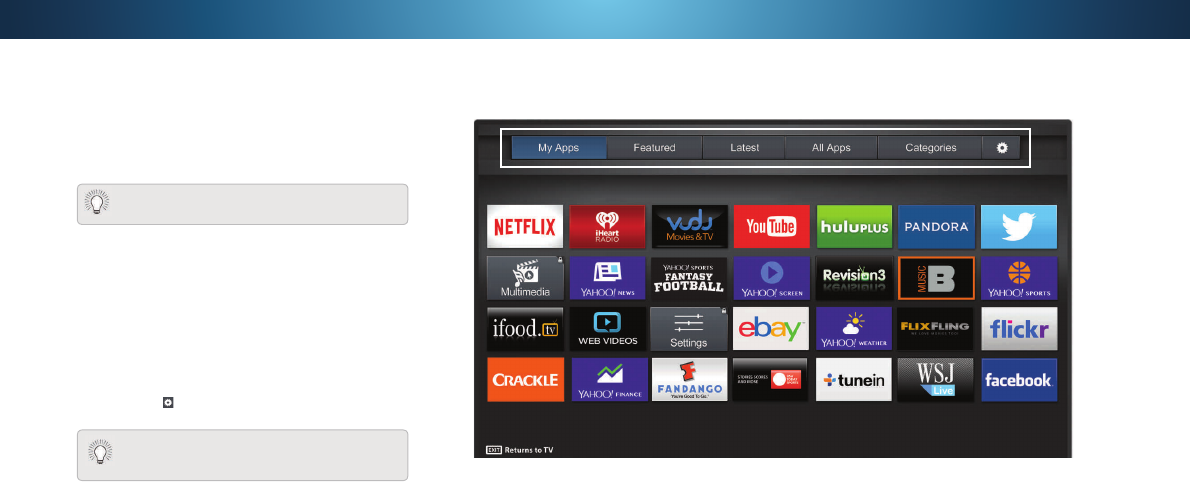
6
FULLSCREEN V.I.A. PLUS APPS WINDOW
OVERVIEW
The Fullscreen V.I.A. Plus Apps Window allows you to add, delete
and organize your Apps. The My Apps tab displays Apps that
DUH DOUHDG\ LQVWDOOHG RQ \RXU 79 7KH $SSV RQ WKH ȴUVW SDJH DUH
displayed in the V.I.A. Plus App Dock.
The following tabs are located at the top of your Fullscreen V.I.A.
Plus Apps Window:
• My Apps: Displays apps that are installed on your TV.
• Featured: Displays apps that are recommended by Yahoo!
• Latest: Displays apps that were most recently added to the
library of apps.
• All Apps: Displays every app that is available for download.
• Categories: Displays apps sorted into categories: 6SRWOLJKW
Yahoo!, Weather, News and Finance, Movies and TV, Photos
DQG9LGHR6SRUWV0XVLF6RFLDOΖQIRUPDWLRQ)XQDQG
*DPHV6KRSSLQJDQG/RFDO79
• Settings (
): Displays App software information and
development settings.
Apps with a small lock icon in the right-hand corner
cannot be deleted.
<RXFDQDOVRSUHYLHZ$SSVZLWKRXWLQVWDOOLQJWKHP6LPSO\
highlight the App you wish to preview and press OK to
open it.
Note: App location, appearance, and availability subject to change without notice.
55

6
CUSTOMIZING THE V.I.A. PLUS APPS WINDOW
You can add, delete, and move apps around on your My Apps tab
for a custom look and feel.
Adding an App to the My Apps Tab
To add an app to your TV:
Use the Arrow buttons on the remote to highlight one of the
$SS6WRUHWDEV)HDWXUHG/DWHVW$OO$SSVRU&DWHJRULHV
2. Use the Arrow buttons to highlight the app you wish to add.
Press and hold the OK button until [
App Name
]
has been
added to your My Apps list
appears.
Once the app has been installed, a star appears in the top right-hand
corner of the app icon as shown below.
Moving an App in My Apps
You can organize your Apps on your My Apps tab by moving them
where you want.
To move the Apps on your My Apps tab:
Use the Arrow buttons on the remote to highlight the app you
wish to move.
2. Press and hold the OK button. The following options appear:
6WDU
Note: App location, appearance, and availability subject to change without notice.
Deleting an App from the My Apps Tab
To delete an app from your TV:
Use the Arrow buttons on the remote to highlight the App you
wish to delete.
2. Press and hold the OK button. The following options appear:
Press OKWRGHOHWHWKHDSS7KHIROORZLQJGLDORJER[DSSHDUV
4. Use the Left/Right Arrow buttons to select Delete and press OK.
The App is removed from your My Apps tab.
Note: App location, appearance, and availability subject to change without notice.
Note: App location, appearance, and availability subject to change without notice.
2QO\WKH$SSVRQWKHȴUVWSDJHDSSHDULQWKH'RFN
56

6
Use the Arrow buttons to move the app to the desired location
and press OK to place the app.When you can move the app, it
appears as shown below.
Note: App location, appearance, and availability subject to change without notice.
Cursor showing the location that the
app will move to
57

7
WHAT YOU NEED TO VIEW ULTRA HD CONTENT
To view Ultra HD content, you will need:
• Ultra HD TV
• High-speed Internet connection
• Q:LUHOHVV5RXWHU
or
DF:LUHOHVV5RXWHU)RUEHVWSHUIRUPDQFH
• 66Ζ':LUHOHVVQHWZRUNQDPHDQG1HWZRUN3DVVZRUG
• +LJK6SHHG+'0ΖFDEOH
And at least one of the following:
• 1HWȵL[
®
RURWKHUVWUHDPLQJVHUYLFHDFFRXQWWKDWRHUV8OWUD
HD content
• Device with 4K Ultra HD output such as a
high-performance PC
Viewing Ultra HD Content
WHAT IS ULTRA HD?
8OWUD +' 8+' RHUV IRXU WLPHV WKH UHVROXWLRQ RI S 7KDWȇV
WZLFHDVPDQ\SL[HOVLQHDFKGLUHFWLRQKRUL]RQWDOO\DQGYHUWLFDOO\
The detail and resolution available from UHD makes everything you
watch more vibrant and lifelike, giving you a phenomenal viewing
H[SHULHQFH
7KH 9Ζ=Ζ2 06HULHV 8OWUD +'79 LV \RXU FU\VWDOFOHDU ZLQGRZ WR D
EUDQGQHZHQWHUWDLQPHQWH[SHULHQFHIHDWXULQJSRZHUIXO8OWUD+'
SHUIRUPDQFHEHVWLQFODVVSLFWXUHTXDOLW\DQGSUHPLXP6PDUW79
features.
ΖQ DGGLWLRQ 06HULHV LV IXOO\ HTXLSSHG DQG UHDG\ IRU QHDUO\ DOO
Ultra HD entertainment options. With support for HEVC decoding
DQGWKHODWHVW:L)L VWDQGDUGDF WKDWȇV XS WR [IDVWHUWKDQ
Q
06HULHV OHWV \RX VWUHDP 8OWUD +' IURP SRSXODU DSSV
VXFKDV1HWȵL[
®
ΖWVVXSHULRU6SDWLDO6FDOLQJ(QJLQHDFFXUDWHO\DQG
EHDXWLIXOO\ WUDQVIRUPV \RXU IDYRULWH S HQWHUWDLQPHQW VXFK
as sports, movies, and TV shows into spectacular Ultra HD. And
support for the latest HDMI standards enables Ultra HD playback
IURPQH[WJHQHUDWLRQFDEOH DQGVDWHOOLWHUHFHLYHUV %OXUD\ SOD\HUV
and game consoles.
WHAT IS HDMI 2.0 AND HDCP 2.2?
<RXU06HULHV79VXSSRUWVWKHODWHVW+'0ΖVWDQGDUGV7KLVDOORZV
QH[WJHQFDEOHDQGVDWHOOLWHUHFHLYHUV%OX5D\SOD\HUVJDPH
consoles, and more to deliver Ultra HD content.
In addition, the TV supports HDCP 2.2 technology which allows you
WRSOD\SURWHFWHGFRQWHQWIURP8OWUD+'SOD\HUVDQGQH[WJHQYLGHR
JDPHFRQVROHV7KH06HULHVLVEXLOWWREHIXWXUHSURRIZKHUHLWZLOO
allow users to view Ultra HD content as it becomes readily available.
6HH
&RQQHFWLQJ$'HYLFHRQSDJH
for more information about
FRQQHFWHG+'0Ζ+'&3HQDEOHGGHYLFHV
Remember:
+'0ΖSRUWVDQGVXSSRUW+'&3WHFKQRORJ\
+'0ΖSRUWVWKURXJKVXSSRUW8OWUD+'LQSXWVDW
XSWR+]ZKLOH+'0ΖSRUWFDQVXSSRUW8OWUD+'
LQSXWVRIXSWR+])RUEHVWSHUIRUPDQFHZLWK+'0Ζ
port 5, only connect high-performance devices that are
FDSDEOHRIRXWSXWWLQJSRUKLJKHUUHVROXWLRQ
6RXUFHΖ(((VWDQGDUGVSHFLȴFDWLRQV0D[LPXPWKURXJKSXWUDWHRIDF
0ESVLVDSSUR[LPDWHO\WKUHHWLPHVIDVWHUWKDQWKDWRIQ0ESV$FWXDOUDWHZLOO
vary, and will be subject to router model, site environment, range, Internet bandwidth,
and other factors.
Device with 4K Ultra HD output such
high-performance PC
58

ATroubleshooting & Technical Support
Find help with:
• New Product Setup
• Connecting Your Devices
• Technical Problems
• Product Updates
• And More
You can also contact our
award-winning support team at:
Phone:
Email:
(877) 878-4946 (TOLL-FREE)
WHFKVXSSRUW#9Ζ=Ζ2FRP
Hours Of Operation:
Monday - Friday: 7 AM TO 11 PM (CST)
6aturday6unday: 9
AM TO 6 PM (CST)
Live Chat
Support Available
'R<RX+DYH4XHVWLRQV")LQG$QVZHUV$W
SUPPORT.VIZIO.COM
59

A
Take A Moment To Register Your Product At
VIZIO.COM/PRODUCT-REGISTRATION
REGISTER YOUR VIZIO PRODUCT NOW
Customized Support
Get assistance quickly with your information on-hand.
News & Offers
Take advantage of the latest news and special offers from VIZIO.
Safety & Satisfaction
6WD\XSWRGDWH with important product updates and notifications.
Why Register?

A
The remote is not responding.
• Make sure the batteries are properly inserted matching
the - and + symbols.
• Replace the batteries with fresh ones.
The TV displays “No Signal.”
• Press the INPUT button on the remote control to select a
GLHUHQWLQSXWVRXUFH
• If you are using cable TV or antenna connected directly to
WKH79VFDQIRUFKDQQHOV6HH
6FDQQLQJIRU&KDQQHOVRQ
SDJH
.
There is no power.
• Ensure the TV is plugged into a working electrical outlet.
• Ensure the power cable is securely attached to the TV.
• Press the Power/Standby button on the remote or on the
back of the TV to turn the TV on.
The power is on, but there is no image on the screen.
• Ensure all cables are securely attached to the TV.
• (QVXUHDOOGHYLFHVDUHFRQQHFWHGFRUUHFWO\'HYLFHVGLHU
see your device’s user manual for details.
• $GMXVW%ULJKWQHVV&RQWUDVWRU%DFNOLJKW6HH
Adjusting
WKH3LFWXUH6HWWLQJVRQSDJH
.
• Press the INPUT button on the remote to select a
GLHUHQWLQSXWVRXUFH
There is no sound.
• Press Volume Up on the remote control.
• Press the MUTEEXWWRQRQWKHUHPRWHWRHQVXUHPXWHLVR
• &KHFNWKHDXGLRVHWWLQJV6HH
$GMXVWLQJWKH$XGLR6HWWLQJV
RQSDJH
• &KHFNWKHDXGLRFRQQHFWLRQVRIH[WHUQDOGHYLFHV%OXUD\
SOD\HUJDPHFRQVROHFDEOHVDWHOOLWHER[WKDWDUH
connected to the TV.
• If you are using an antenna, the signal strength of the
channel may be low. Ensure your antenna is connected
securely to the TV and move the antenna around the
room or close to a window for the best signal.
7KHVRXQGLVȵDWRUGLDORJLVQRWDXGLEOH
• 7XUQR9ROXPH/HYHOLQJ6HH
$GMXVWLQJWKH$XGLR6HWWLQJV
RQSDJH
.
The colors on the TV don’t look right.
• $GMXVWWKH&RORUDQG7LQWVHWWLQJVLQWKH3LFWXUHPHQX6HH
$GMXVWLQJWKH3LFWXUH6HWWLQJVRQSDJH
.
• 6HOHFWDSUHVHWSLFWXUHPRGH6HH
Adjusting the Picture
6HWWLQJVRQSDJH
. VIZIO recommends selecting
Calibrated.
• Check all cables to ensure they are securely attached.
The buttons on the remote aren’t working.
• Ensure you are only pressing one button at a time.
• Point the remote directly at the TV when pressing a button.
• 5HSODFHWKHUHPRWHEDWWHULHVZLWKQHZRQHV6HH
5HSODFLQJWKH%DWWHULHVRQSDJH
The image quality is not good.
• )RUWKHEHVWLPDJHTXDOLW\YLHZKLJKGHȴQLWLRQSURJUDPV
using digital sources. Connect your devices with HDMI
cables.
• If you are using an antenna, the signal strength of the
channel may be low. Ensure your antenna is connected
securely to the TV and move the antenna around the
room or close to a window for the best signal.
The picture is distorted.
• Move the TV away from electrical appliances, cars, and
ȵXRUHVFHQWOLJKWV
• Ensure all cables are securely attached.
The display image does not cover the entire screen.
• ΖI\RXDUHXVLQJ79$9RU&RPSRQHQWZLWKLLQSXW
press the button on the remote to change the screen
mode.
The TV has pixels (dots) that are always dark.
• Your UHD TV is precision-manufactured using an
H[WUHPHO\KLJKOHYHORIWHFKQRORJ\+RZHYHUVRPHWLPHV
SL[HOVPD\QRWGLVSOD\FRUUHFWO\7KHVHW\SHVRI
occurrences are inherent to this type of product and do
not constitute a defective product.

A
I see “noise” or static on the screen.
• :KHQ\RXU79ȇVGLJLWDOFDSDELOLWLHVH[FHHGDGLJLWDO
broadcast signal, the signal is up-converted (improved) to
match your TV’s display capabilities. This up-converting
can sometimes cause irregularities in the image.
• If you are using an antenna, the signal strength of the
channel may be low. Ensure your antenna is connected
securely to the TV and move the antenna around the
room or close to a window for the best signal.
When I change input source, the display image changes size.
• The TV remembers the viewing mode on each input
source. If the viewing mode on the new input source
GLHUVIURPWKHRQHRQWKHLQSXWVRXUFH\RXVZLWFKIURP
WKHGLHUHQFHPD\EHQRWLFHDEOH
• 6HH
&KDQJLQJWKH6FUHHQ$VSHFW5DWLRRQSDJH
.
62

B6SHFLȴFDWLRQV
M55-C2
Screen Size: 55"
Viewable Area: FP
Dimensions w/ Stand:
w/o Stand:
ȋ[ȋ[ȇȇFP[FP[FP
ȋ[ȋ[ȋFP[FP[FP
Weight w/ Stand:
w/o Stand:
OEVNJ
OEVNJ
LCD Backlight: DLED
Active LED Zones: =RQHV
Refresh Rate: +](HFWLYH5HIUHVK5DWH
Clear Action:
Maximum Resolution: [8+'S
Dynamic Contrast Ratio:
Pixel Pitch: PP+[PP9
Viewing Angle: r+r9
HDMI Inputs: 5
Component Video Inputs:
Composite Inputs: 6KDUHGZLWK&RPSRQHQW
RF Antenna Input:
USB Port:
Ethernet:
Audio Outputs: 5&$$QDORJ6WHUHR2XWSXW2SWLFDO'LJLWDO
OSD Language: (QJOLVK)UHQFK6SDQLVK
Ambient Light Sensor: Yes
M55-C2
Remote Control Model: ;57
&HUWLȴFDWLRQV
8/F8/120)&&&ODVV%%(7Ζ&(6
Ζ)(7(/+'0Ζ'ROE\'LJLWDO3OXV
Voltage Range: 9#+]
Power Consumption: :
Standby Power: :
Zero Bright Pixel Guarantee: Yes

CWarranty
ON PARTS AND LABOR
&RYHUV XQLWV SXUFKDVHG DV QHZ LQ 8QLWHG 6WDWHV DQG
Puerto Rico Only. VIZIO provides a warranty to the original
purchaser of a new Product against defects in materials and
ZRUNPDQVKLSIRUDSHULRGRIRQH\HDURIQRQFRPPHUFLDO
XVDJH DQG QLQHW\ GD\V RI FRPPHUFLDO XVH ΖI D 3URGXFW
covered by this warranty is determined to be defective within
the warranty period, VIZIO will either repair or replace the
Product at its sole option and discretion.
7R REWDLQ ZDUUDQW\ VHUYLFH FRQWDFW 9Ζ=Ζ2 7HFKQLFDO 6XSSRUW
YLD HPDLO 7HFK6XSSRUW#9Ζ=Ζ2FRP RU YLD SKRQH DW 0<
9Ζ=Ζ2IURP$0WR300RQGD\WKURXJK
)ULGD\ DQG $0 WR 30 6DWXUGD\ DQG 6XQGD\ 3DFLȴF
7LPH RU YLVLW ZZZ9Ζ=Ζ2FRP 35($87+25Ζ=$7Ζ21 0867
%( 2%7$Ζ1(' %()25( 6(1'Ζ1* $1< 352'8&7 72 $ 9Ζ=Ζ2
6(59Ζ&(&(17(53URRIRISXUFKDVHLQWKHIRUPRIDSXUFKDVH
receipt or copy thereof is required to show that a Product is
within the warranty period.
Parts and Labor
There will be no charge for parts or labor during the warranty
period. Replacement parts and Products may be new or
UHFHUWLȴHGDW9Ζ=Ζ2ȇVRSWLRQDQGVROHGLVFUHWLRQ5HSODFHPHQW
parts and Products are warranted for the remaining portion
RIWKHRULJLQDOZDUUDQW\RUIRUQLQHW\GD\VIURPZDUUDQW\
service or replacement, whichever is greater.
Type of Service
Defective Products must be sent to a VIZIO service center
to obtain warranty service. VIZIO is not responsible for
transportation costs to the service center, but VIZIO will
cover return shipping to the customer. PRE-AUTHORIZATION
Ζ6 5(48Ζ5(' %()25( 6(1'Ζ1* $1< 352'8&7 72 $ 9Ζ=Ζ2
6(59Ζ&(&(17(5)25:$55$17<6(59Ζ&(
Product returns to VIZIO’s service centers must utilize either
WKH RULJLQDO FDUWRQ ER[ DQG VKLSSLQJ PDWHULDO RU SDFNDJLQJ
WKDW DRUGV DQ HTXDO GHJUHH RI SURWHFWLRQ 9Ζ=Ζ2 7HFKQLFDO
6XSSRUWZLOOSURYLGHLQVWUXFWLRQVIRUSDFNLQJDQGVKLSSLQJWKH
covered Product to the VIZIO service center.
Limitations and Exclusions
VIZIO’s one-year limited warranty only covers defects in
materials and workmanship. This warranty does not cover, for
H[DPSOHFRVPHWLFGDPDJHQRUPDOZHDUDQGWHDULPSURSHU
operation, improper voltage supply or power surges, signal
issues, damages from shipping, acts of God, any type of
FXVWRPHU PLVXVH PRGLȴFDWLRQV RU DGMXVWPHQWV DV ZHOO
as installation and set-up issues or any repairs attempted
by anyone other than by a VIZIO authorized service center.
Products with unreadable or removed serial numbers, or
requiring routine maintenance are not covered. This one
\HDU OLPLWHG ZDUUDQW\ GRHV QRW FRYHU 3URGXFWV VROG Ȋ$6 Ζ6ȋ
Ȋ)$&725<5(&(57Ζ)Ζ('ȋRUE\DQRQDXWKRUL]HGUHVHOOHU
7+(5( $5( 12 (;35(66 :$55$17Ζ(6 27+(5 7+$1 7+26(
/Ζ67(' 25 '(6&5Ζ%(' $%29( $1< Ζ03/Ζ(' :$55$17Ζ(6
INCLUDING ANY IMPLIED WARRANTY OF MERCHANTABIL-
Ζ7< $1' )Ζ71(66 )25 $ 3$57Ζ&8/$5 385326( 6+$// %(
/Ζ0Ζ7(' Ζ1 '85$7Ζ21 72 7+( 3(5Ζ2' 2) 7Ζ0( 6(7 )257+
$%29( 9Ζ=Ζ2ȇ6 727$/ /Ζ$%Ζ/Ζ7< )25 $1< $1' $// /266(6
$1' '$0$*(6 5(68/7Ζ1* )520 $1< &$86( :+$762(9(5
Ζ1&/8'Ζ1* 9Ζ=Ζ2ȇ6 1(*/Ζ*(1&( $//(*(' '$0$*(
25 '()(&7Ζ9( *22'6 :+(7+(5 68&+ '()(&76 $5(
'Ζ6&29(5$%/(25/$7(176+$//Ζ112(9(17(;&(('7+(
385&+$6( 35Ζ&( 2) 7+( 352'8&7 9Ζ=Ζ2 6+$// 127 %(
5(63216Ζ%/()25/2662) 86(/2662) Ζ1)250$7Ζ2125
'$7$&200(5&Ζ$//266/2675(9(18(25/267352)Ζ76
25 27+(5 Ζ1&Ζ'(17$/ 25 &216(48(17Ζ$/ '$0$*(6
620( 67$7(6'2127$//2:/Ζ0Ζ7$7Ζ216 21+2:/21*
$1 Ζ03/Ζ(' :$55$17< /$676 25 7+( (;&/86Ζ21 2)
Ζ1&Ζ'(17$/ 25 &216(48(17Ζ$/'$0$*(6 62 7+($%29(
/Ζ0Ζ7$7Ζ21625(;&/86Ζ2160$<127$33/<72<287+Ζ6
:$55$17< *Ζ9(6 <28 63(&Ζ)Ζ& /(*$/ 5Ζ*+76 $1' <28
0$< $/62 +$9( 27+(5 5Ζ*+76 :+Ζ&+ 9$5< )520 67$7(
7267$7(7+Ζ6:$55$17<Ζ668%-(&772&+$1*(:Ζ7+287
NOTICE.
&+(&.:::9Ζ=Ζ2&20)257+(0267&855(179(56Ζ21
Personal Data
If your VIZIO product is capable of storing personal data
DQG RWKHU LQIRUPDWLRQ $// &217(176 $1' Ζ1)250$7Ζ21
:Ζ// %( '(/(7(' Ζ1 7+( &2856( 2) 620( Ζ1+20( $1'
$//6+Ζ3Ζ1:$55$17<6(59Ζ&(ΖIWKLVRFFXUV\RXUSURGXFW
ZLOO EH UHVWRUHG WR \RX FRQȴJXUHG DV RULJLQDOO\ SXUFKDVHG
You will be responsible for restoring all applicable data and
passwords. Recovery and reinstallation of user data is not
covered under this Limited Warranty. In order to protect
your personal information, VIZIO recommends that you
always clear all personal information from the unit before it is
serviced, regardless of the servicer.
Zero Bright Pixel Defect Guarantee
7KLVSROLF\FRYHUVȊ]HUREULJKWSL[HOȋGHIHFWVIRUWKHGXUDWLRQ
RIWKHOLPLWHGȊ21(<($5:$55$17<ȋRQVHOHFWQHZSURGXFW
purchases. To determine if this guarantee applies to your
SURGXFW UHIHU WR WKH Ȋ'(7$Ζ/6ȋ WDE RI WKH PRGHOȇV SURGXFW
information page (www.VIZIO.com) or look for the “zero bright
SL[HOȋJXDUDQWHHRQWKHER[
64

DLegal & Compliance
FCC Class B Radio Interference Statement
NOTE: This equipment has been tested and found to comply with the limits
IRUD&ODVV%GLJLWDOGHYLFHSXUVXDQWWR3DUWRIWKH)&&5XOHV7KHVHOLPLWV
are designed to provide reasonable protection against harmful interference
in a residential installation. This equipment generates, uses and can radiate
radio frequency energy, and if not installed and used in accordance with
the instructions, may cause harmful interference to radio communications.
However, there is no guarantee that interference will not occur in a particular
installation. If this equipment does cause harmful interference to radio or
WHOHYLVLRQUHFHSWLRQZKLFK FDQ EH GHWHUPLQHG E\ WXUQLQJWKH HTXLSPHQWR
and on, the user is encouraged to try to correct the interference by one or
more of the following measures:
Reorient or relocate the receiving antenna.
2. Increase the separation between the equipment and receiver.
&RQQHFWWKHHTXLSPHQWLQWRDQRXWOHWRQDFLUFXLWGLHUHQWIURPWKDW
to which the receiver is connected.
4. &RQVXOWWKHGHDOHURUDQH[SHULHQFHGUDGLR79WHFKQLFLDQIRUKHOS
7KLVGHYLFHFRPSOLHVZLWK3DUWRIWKH)&&5XOHV2SHUDWLRQLVVXEMHFWWRWKH
IROORZLQJWZRFRQGLWLRQVWKLVGHYLFHPD\QRWFDXVHKDUPIXOLQWHUIHUHQFH
and (2) this device must accept any interference received, including interference
that may cause undesired operation.
Notice
7KHFKDQJHVRUPRGLȴFDWLRQVQRWH[SUHVVO\DSSURYHGE\WKHSDUW\
responsible for compliance could void the user’s authority to operate
the equipment.
2. 6KLHOGHGLQWHUIDFHFDEOHVDQG$&SRZHUFRUGLIDQ\PXVWEHXVHGLQ
order to comply with the emission limits.
The manufacturer is not responsible for any radio or TV interference
FDXVHGE\XQDXWKRUL]HGPRGLȴFDWLRQWRWKLVHTXLSPHQWΖWLVWKH
responsibilities of the user to correct such interference.
FCC warning
&KDQJHVRUPRGLȴFDWLRQVQRWH[SUHVVO\DSSURYHGE\WKHSDUW\UHVSRQVLEOHIRU
compliance with the FCC Rules could void the user’s authority to operate this
equipment.
Caution
Always use an AC/DC power adapter that is properly grounded. Use the AC
cords listed below for each area.
USA: UL
Canada&6$
Germany: VDE
UK%$6(%6
Japan: Electric Appliance Control Act
Open Source Software Notice
<RXU9Ζ$GHYLFHPD\FRQWDLQ*3/H[HFXWDEOHVDQG/*3/OLEUDULHVWKDWDUHVXEMHFW
WRWKH3//*3//LFHQVH$JUHHPHQWV9Ζ=Ζ2RHUVWRSURYLGHVRXUFHFRGH
to you on CD-ROM for a processing fee covering the cost of performing such
distribution, such as the cost of media, shipping and handling upon request
made to VIZIO at www.VIZIO.com.
7KLVRHULVYDOLGIRUDSHULRGRIWKUHH\HDUVIURPWKHGDWHRIWKHGLVWULEXWLRQ
of this VIA device by VIZIO.
You can obtain a copy of the GPL, LGPL licenses from:
KWWSZZZJQXRUJOLFHQVHVROGOLFHQVHVJSOKWPO
and
KWWSZZZJQXRUJOLFHQVHVROGOLFHQVHVOJSOKWPO
<RXFDQDOVRREWDLQDFRS\RIJ62$3SXEOLFOLFHQVHIURP
http://www.cs.fsu.edu/~engelen/license.html
Please visit www.VIZIO.com for attribution of copyrights to any open source
software on your VIZIO VIA device.
Permission is hereby granted, free of charge, to any person obtaining a copy
RI DQ\VXFKVRIWZDUHDQG DVVRFLDWHG GRFXPHQWDWLRQȴOHV WKH Ȋ2SHQ 6RXUFH
6RIWZDUHȋWRGHDOLQWKH2SHQ6RXUFH6RIWZDUHZLWKRXWUHVWULFWLRQLQFOXGLQJ
without limitation the rights to use, copy, modify, merge, publish, distribute,
VXEOLFHQVH DQGRU VHOO FRSLHV RI WKH 2SHQ 6RXUFH 6RIWZDUH DQG WR SHUPLW
SHUVRQVWRZKRPWKH2SHQ6RXUFH6RIWZDUHLVIXUQLVKHGWRGRVRVXEMHFWWR
the following conditions:
7+( 62)7:$5( Ζ6 3529Ζ'(' Ȋ$6 Ζ6ȋ :Ζ7+287 :$55$17< 2) $1< .Ζ1'
(;35(66 25 Ζ03/Ζ(' Ζ1&/8'Ζ1* %87 127 /Ζ0Ζ7(' 72 7+( :$55$17Ζ(6
2) 0(5&+$17$%Ζ/Ζ7< )Ζ71(66 )25 $ 3$57Ζ&8/$5 385326( $1' 121Ζ1-
)5Ζ1*(0(17 Ζ1 12 (9(17 6+$// 7+( $87+256 25 &23<5Ζ*+7 +2/'(56
%( /Ζ$%/()25 $1< &/$Ζ0'$0$*(625 27+(5 /Ζ$%Ζ/Ζ7<:+(7+(5Ζ1 $1
$&7Ζ212)&2175$&772572527+(5:Ζ6($5Ζ6Ζ1*)5202872)25Ζ1
&211(&7Ζ21:Ζ7+7+(62)7:$5(257+(86(2527+(5'($/Ζ1*6Ζ17+(
62)7:$5(
VIZIO Internet Applications Disclaimer
9Ζ=Ζ2ΖQWHUQHW$SSOLFDWLRQVȊ9Ζ$ȋDRUGVWKHRSSRUWXQLW\WRDFFHVVWKLUGSDUW\
ΖQWHUQHW SURGXFW RHULQJV RU VHUYLFHV Ȋ9Ζ$ 6HUYLFHVȋ RQ FHUWDLQ 9Ζ=Ζ2 79V
7KH 9Ζ$ 6HUYLFHV DFFHVVLEOH KHUHLQ DUH SURYLGHG DV SHU RXU DJUHHPHQW ZLWK
these third parties. These agreements are subject to change, interruption,
suspension (including termination) at any time and for various reasons. VIZIO
PDNHVQRZDUUDQWLHVRUUHSUHVHQWDWLRQVWKDWDQ\SDUWLFXODU9Ζ$6HUYLFHZLOOEH
accessible, available, function in any particular manner or function at all.
7R XVH WKHVH 9Ζ$ 6HUYLFHV \RX PXVW REWDLQ DFFHVV WR WKH ΖQWHUQHW HLWKHU
directly or through devices that access the Internet and pay any service fees
associated with such access. In addition, you must provide all equipment
necessary to make such connection to the Internet including a modem or
other Internet access device.
9Ζ=Ζ2 RU VDLG WKLUGSDUWLHVSURYLGLQJ 9Ζ$ 6HUYLFHV UHVHUYH WKHULJKW WR GHOHWH
data from their servers, or prevent access to their servers or to change data
FDWHJRULHVSURGXFWRHULQJVRUVHUYLFHOHYHOVIRUDQ\UHDVRQWKDW9Ζ=Ζ2RUVDLG
WKLUGSDUWLHVGHHPVXɝFLHQWLQWKHLUVROHGLVFUHWLRQDWDQ\WLPHZLWKRXWQRWLFH
6RPHRUDOORIWKHGDWDRUIXQFWLRQDOLW\RI9Ζ$6HUYLFHVPD\UHTXLUHDGGLWLRQDO
SD\PHQWE\\RX+RZHYHULQQRHYHQWZLOO\RXEHFKDUJHGIRUDQ\9Ζ$6HUYLFHV
unless those charges are made available to you in advance. VIZIO makes no
warranties or representations of any kind as to the accuracy, currency, or
completeness of any information contained on the data servers of such third
SDUW\SURYLGHUVRIDQ\9Ζ$6HUYLFHV)XUWKHUPRUHZHGRQRWUHYLHZFRQWURORU
HQGRUVHWKHFRQWHQWSURGXFWVRUVHUYLFHVRI9Ζ$6HUYLFHVRUWKHLUGDWDVHUYHUV
<RXU ULJKWV WR XVH WKH ZLGJHW OLQNV WR DFFHVV 9Ζ$ 6HUYLFHV LV JRYHUQHG E\
WKH 9Ζ=Ζ2 ΖQWHUQHW $SSOLFDWLRQV 6RIWZDUH /LFHQVH $JUHHPHQW Ȋ9Ζ$ 6RIWZDUH
/LFHQVH$JUHHPHQWȋWKHWHUPVRIZKLFKDUHDYDLODEOHLQ\RXU3URGXFW*XLGH
DOORIZKLFKDUHLQFRUSRUDWHGKHUHLQE\WKLVUHIHUHQFHΖQWKHHYHQWRIDFRQȵLFW
EHWZHHQ WKLV 9Ζ=Ζ2 ΖQWHUQHW $SSOLFDWLRQV 'LVFODLPHU DQG WKH 9Ζ$ 6RIWZDUH
/LFHQVH$JUHHPHQWWKH9Ζ$6RIWZDUH/LFHQVH$JUHHPHQWVKDOOFRQWURO
VIZIO INTERNET APPLICATIONS SOFTWARE LICENSE
AGREEMENT
7+( )2//2:Ζ1* $*5((0(17 (;3/$Ζ16 +2: <28 0$< 86( 7+( 9Ζ=Ζ2
Ζ17(51(7 $33/Ζ&$7Ζ216 Ȋ9Ζ$ȋ 72 $&&(66 7+Ζ5' 3$57< Ζ17(51(7
352'8&7 2))(5Ζ1*6 $1' 6(59Ζ&(6 Ȋ9Ζ$ 6(59Ζ&(6ȋ $1' 7+( 9Ζ=Ζ2
62)7:$5(Ζ167$//('21<2859Ζ=Ζ2+'79%<86Ζ1*7+(9Ζ=Ζ2Ζ17(51(7
$33/Ζ&$7Ζ216 <28 &216(17 $1' $*5(( 72 %( %281' %< $// 2) 7+(
7(506 $1' &21'Ζ7Ζ216%(/2:$1' <280$< 68%-(&7727+26(7(506
$1'&21'Ζ7Ζ21686(7+(9Ζ=Ζ262)7:$5($1'$&&(667+(9Ζ$6(59Ζ&(6
65

D
VIZIO SOFTWARE LICENSE AGREEMENT
The following terms and conditions govern the use of any software on your
VIZIO HD TV:
*HQHUDO 7KH VRIWZDUH GRFXPHQWDWLRQ DQG DQ\ IRQWV DFFRPSDQ\LQJ WKLV
License Agreement whether on disk, in read only memory, on any other
PHGLD RU LQ DQ\ RWKHU IRUP FROOHFWLYHO\ WKH Ȋ9Ζ=Ζ2 6RIWZDUHȋ DUH OLFHQVHG
QRW VROG WR \RX E\ 9Ζ=Ζ2 ΖQF Ȋ9Ζ=Ζ2ȋ IRU XVH RQO\ XQGHU WKH WHUPV RIWKLV
/LFHQVH$JUHHPHQWDQG9Ζ=Ζ2UHVHUYHVDOOULJKWVQRWH[SUHVVO\JUDQWHGWR\RX
The rights granted herein are limited to VIZIO’s and its third party licensors’
LQWHOOHFWXDO SURSHUW\ ULJKWV LQ WKH 9Ζ=Ζ2 6RIWZDUH DQG GR QRW LQFOXGH DQ\
other patents or intellectual property rights. You own the media on which the
9Ζ=Ζ2 6RIWZDUH LV UHFRUGHG RU UHVLGHV EXW 9Ζ=Ζ2 DQGRU LWV OLFHQVRUV UHWDLQ
RZQHUVKLSRIWKH 9Ζ=Ζ26RIWZDUHLWVHOI7KH WHUPVRIWKLV/LFHQVH$JUHHPHQW
will govern any software upgrades provided or made available by or through
9Ζ=Ζ2WKDWUHSODFHDQGRUVXSSOHPHQWWKHRULJLQDO9Ζ=Ζ26RIWZDUHXQOHVVVXFK
upgrade is accompanied by a separate license in which case the terms of that
license will govern.
2. Permitted Uses and Restrictions. This License Agreement allows you to use
WKH9Ζ=Ζ26RIWZDUHDQGWKURXJKIXQFWLRQVVROHO\IRXQGZLWKLQWKH9Ζ=Ζ2+'79
WKLV$JUHHPHQWDOVRDOORZV\RXWRLQVWDOOXSJUDGHVWKHUHWR7KH9Ζ=Ζ26RIWZDUH
PD\EHXVHGWRDFFHVV9Ζ$6HUYLFHVDQGYLHZPDWHULDOVVRORQJDVVXFKXVHLV
limited to materials in which you are authorized or legally permitted to view.
<RXPD\QRWPDNHWKH9Ζ=Ζ26RIWZDUHRU9Ζ$6HUYLFHVDYDLODEOHRYHUDQHWZRUN
RUZKHUHLWFRXOGEHXVHGE\PXOWLSOHWHOHYLVLRQVDWWKHVDPHWLPH([FHSWDV
DQG RQO\ WR WKH H[WHQW H[SUHVVO\ SHUPLWWHG LQ WKLV /LFHQVH $JUHHPHQW RU E\
applicable law, you may not copy, decompile, reverse engineer, disassemble,
PRGLI\RUFUHDWHGHULYDWLYHZRUNVRIWKH9Ζ=Ζ26RIWZDUHRUDQ\SDUWWKHUHRI
7+( 9Ζ=Ζ2 62)7:$5( $1' 9Ζ$ 6(59Ζ&(6 $5( 127 Ζ17(1'(' )25 86( Ζ1
$1< (48Ζ30(17 25 (19Ζ5210(17 Ζ1 :+Ζ&+ 7+( )$Ζ/85( 2) 7+( 9Ζ=Ζ2
62)7:$5( 259Ζ$ 6(59Ζ&(6&28/'/($' 72 '($7+ 3(5621$/ Ζ1-85<25
6(9(5(3+<6Ζ&$/25(19Ζ5210(17$/'$0$*(
7UDQVIHU<RXPD\QRWUHQWOHDVHOHQGUHGLVWULEXWHRUVXEOLFHQVHWKH9Ζ=Ζ2
6RIWZDUH RU DFFHVVWRWKH 9Ζ$6HUYLFHV<RX PD\ KRZHYHU PDNH DRQHWLPH
SHUPDQHQW WUDQVIHU RI DOO RI \RXU OLFHQVH ULJKWV WR WKH 9Ζ=Ζ2 6RIWZDUH WR
another party, provided that: (a) the transfer must include the VIZIO HD TV,
including all its component parts, original media, printed materials and this
/LFHQVH$JUHHPHQWE\RXGRQRWUHWDLQDQ\FRSLHVRIWKH9Ζ=Ζ26RIWZDUHIXOO
RUSDUWLDOLQFOXGLQJFRSLHVVWRUHGRQDFRPSXWHURURWKHUVWRUDJHGHYLFHDQG
FWKHSDUW\UHFHLYLQJWKH9Ζ=Ζ2+'79DQG9Ζ=Ζ26RIWZDUHUHDGVDQGDJUHHVWR
accept the terms and conditions of this License Agreement.
4. Consent to Use of Collected Data. You agree that VIZIO and its third party
SURYLGHUVRI9Ζ$6HUYLFHVPD\FROOHFWDQGXVHWHFKQLFDOQRQWHFKQLFDODQG
related information, including but not limited to information about your use of
WKH9Ζ=Ζ26RIWZDUHWKH9Ζ$6HUYLFHVFRQWHQWYLHZHGDQGDWWDFKHGSHULSKHUDOV
products or services purchased, that is gathered periodically to facilitate the
provision of software updates, product support and other services to you,
LQFOXGLQJ DGGLWLRQDO RU GLHUHQW 9Ζ$ 6HUYLFHV UHODWHG WR WKH 9Ζ=Ζ2 6RIWZDUH
and to verify compliance with the terms of this License Agreement. VIZIO and
LWVWKLUGSDUW\ SURYLGHUV RI 9Ζ$ 6HUYLFHV DQGRURWKHUSURYLGHUV PD\XVH WKLV
information, as long as it is in a form that does not personally identify you, to
improve our products or to provide services or technologies to you.
9Ζ$6HUYLFHVDQGRWKHU6HUYLFHV7KH9Ζ=Ζ2VRIWZDUHDRUGVWKHRSSRUWXQLW\
WR DFFHVV WKLUG SDUW\ ΖQWHUQHW SURGXFW RHULQJV RU VHUYLFHV Ȋ9Ζ$ 6HUYLFHVȋ
7KH 9Ζ$ 6HUYLFHV DFFHVVLEOH KHUHLQ DUH SURYLGHG DV SHU RXU DJUHHPHQW ZLWK
certain third parties. These agreements are subject to change, interruption,
suspension, removal (including termination) at any time and for various
UHDVRQV 0RUHRYHU9Ζ=Ζ2RULWV WKLUG SDUW\ SURYLGHUV RI 9Ζ$6HUYLFHV UHVHUYH
the right to delete data from their servers, or prevent access to their servers
RUWRFKDQJHGDWDFDWHJRULHVSURGXFWRHULQJVRUVHUYLFHOHYHOVIRUDQ\UHDVRQ
WKDW9Ζ=Ζ2RUVDLGWKLUGSDUWLHVGHHPVXɝFLHQWLQWKHLUVROHGLVFUHWLRQDWDQ\
WLPH ZLWKRXWQRWLFH9Ζ=Ζ2PD\ DOVRLPSRVH DGGLWLRQDORUGLHUHQW OLPLWV RQ
WKH XVH RI RU DFFHVV WR FHUWDLQ 9Ζ$ 6HUYLFHV LQ DQ\ FDVH DQG ZLWKRXW QRWLFH
or liability. VIZIO makes no warranties or representations that any particular
9Ζ$6HUYLFHZLOOEHDFFHVVLEOHDYDLODEOH IXQFWLRQLQDQ\SDUWLFXODUPDQQHURU
function at all.
8VHRIWKH9Ζ$6HUYLFHVPD\UHTXLUH\RXWRDFFHSWDGGLWLRQDOWHUPVRIVHUYLFH
or end user license agreements which will be presented to you before you can
XVHVXFK6HUYLFHV 6RPH RU DOO RIWKH GDWD IXQFWLRQDOLW\ RI 9Ζ$6HUYLFHVPD\
require additional payment by you. However, in no event will you be charged
IRUDQ\9Ζ$6HUYLFHVXQOHVVWKRVHFKDUJHVDUHPDGHDYDLODEOHWR\RXLQDGYDQFH
'LVFODLPHUDVWR&RQWHQWRQ9Ζ$6HUYLFHV&HUWDLQ9Ζ$6HUYLFHVPD\LQFOXGH
materials from third parties or links to certain third party data servers.
<RX DFNQRZOHGJH DQG DJUHH WKDW 9Ζ=Ζ2 LV QRW UHVSRQVLEOH IRU H[DPLQLQJ RU
HYDOXDWLQJWKH FRQWHQW RUDFFXUDF\ RI DQ\ 9Ζ$6HUYLFHV WKHLU GDWD VHUYHUVRU
related third-party materials. VIZIO does not warrant or endorse and does
not assume and will not have any liability or responsibility for any third-party
materials or websites, or for any other materials, products, or services of third
SDUWLHV /LQNVWR 9Ζ$6HUYLFHV DQG DQ\ DVVRFLDWHG OLQNV WR RWKHU GDWD VHUYHUV
DUHSURYLGHGVROHO\DVDFRQYHQLHQFHWR\RX7RWKHH[WHQWSURYLGHGFRQWHQW
W\SHV RU GHVFULSWLRQV RI 9Ζ$ 6HUYLFHV SURYLGHG IRU FRQYHQLHQFH DQG \RX
acknowledge and agree that VIZIO does not guarantee their accuracy. You
XQGHUVWDQGWKDWE\XVLQJDQ\RIWKH9Ζ$6HUYLFHV\RXPD\HQFRXQWHUFRQWHQW
WKDWPD\EHGHHPHGRHQVLYH
LQGHFHQW RU REMHFWLRQDEOH ZKLFK FRQWHQW PD\ RU PD\ QRW EH LGHQWLȴHG DV
KDYLQJ H[SOLFLW ODQJXDJH 1HYHUWKHOHVV \RX DJUHH WRXVH WKH 9Ζ$ 6HUYLFHV DW
your sole risk and that VIZIO shall have no liability to you for content that may
EHIRXQGWREHRHQVLYHLQGHFHQWRUREMHFWLRQDEOH
You agree that you will not use any third-party materials in a manner that
would infringe or violate the rights of any other party, and that VIZIO is not in
any way responsible for any such use by you.
ΖQWHUQHW$FFHVV5HTXLUHG7RXVHWKHVH9Ζ$6HUYLFHV\RXPXVWREWDLQDFFHVV
to the Internet, either directly or through devices that access the Internet and
pay any service fees associated with such access. In addition, you must provide
all equipment necessary to make such connection to the Internet including a
modem or other Internet access device.
8SJUDGHV6XSSRUW9Ζ=Ζ2RULWVWKLUGSDUW\SURYLGHUVPD\HOHFWEXWVKDOOEH
under no obligation, to provide you with customer support and/or software
XSJUDGHV HQKDQFHPHQWV RU PRGLȴFDWLRQV WR WKH 9Ζ=Ζ2 6RIWZDUH RU 9Ζ$
6HUYLFHVFROOHFWLYHO\Ȋ6XSSRUWȋLQLWVVROHGLVFUHWLRQDQGPD\WHUPLQDWHVXFK
6XSSRUWDWDQ\WLPHZLWKRXWQRWLFHWR\RX9Ζ=Ζ2DQGLWVWKLUGSDUW\SURYLGHUV
UHVHUYH WKH ULJKW WR FKDUJH \RX IRU DQ\ 6XSSRUW LW SURYLGHV EXW ZLOO PDNH D
schedule of those charges available to you prior to your incurring any costs.
7HUPLQDWLRQ 7KLV /LFHQVH LV HHFWLYH XQWLO WHUPLQDWHG <RXU ULJKWV XQGHU
this License will terminate automatically without notice from VIZIO if you fail
to comply with any term(s) of this License Agreement. Upon the termination
RI WKLV/LFHQVH$JUHHPHQW\RXVKDOOFHDVH DOO XVH RI WKH 9Ζ=Ζ2 6RIWZDUHDQG
9Ζ$6HUYLFHV
/LPLWHG:DUUDQW\RQ9Ζ=Ζ20HGLD9Ζ=Ζ2ZDUUDQWVWKHPHGLDRQZKLFKWKH
9Ζ=Ζ2 6RIWZDUH LV UHFRUGHG DQG GHOLYHUHG E\ 9Ζ=Ζ2 WR EH IUHH IURP GHIHFWV
LQ PDWHULDOV DQG ZRUNPDQVKLSXQGHU QRUPDOXVH IRU D SHULRG RIQLQHW\
GD\VIURPWKH GDWHRI RULJLQDO UHWDLO SXUFKDVH<RXUH[FOXVLYH UHPHG\XQGHU
WKLV6HFWLRQVKDOOEH DW9Ζ=Ζ2ȇVRSWLRQD UHIXQG RIWKHSXUFKDVHSULFHRIWKH
SURGXFWFRQWDLQLQJWKH9Ζ=Ζ26RIWZDUHRUUHSODFHPHQWRIWKH 9Ζ=Ζ26RIWZDUH
which is returned to VIZIO or a VIZIO authorized representative with a copy
RI WKH UHFHLSW 7+Ζ6/Ζ0Ζ7(':$55$17< $1' $1<Ζ03/Ζ(' :$55$17Ζ(621
7+( 0('Ζ$ Ζ1&/8'Ζ1* %87 127 /Ζ0Ζ7(' 72 7+( Ζ03/Ζ(' :$55$17Ζ(6
2) 0(5&+$17$%Ζ/Ζ7< 2) 6$7Ζ6)$&725< 48$/Ζ7< $1' 2) )Ζ71(66 )25 $
3$57Ζ&8/$5385326($5(/Ζ0Ζ7('Ζ1'85$7Ζ21721Ζ1(7<'$<6)520
7+( '$7( 2) 25Ζ*Ζ1$/ 5(7$Ζ/ 385&+$6( 620( -85Ζ6'Ζ&7Ζ216 '2 127
$//2:/Ζ0Ζ7$7Ζ21621+2: /21*$1Ζ03/Ζ(':$55$17</$676627+(
$%29( /Ζ0Ζ7$7Ζ21 0$< 127 $33/< 72 <28 7+( /Ζ0Ζ7(' :$55$17< 6(7
)257++(5(Ζ1Ζ67+( 21/<:$55$17<0$'( 72<28$1'Ζ63529Ζ'('Ζ1
/Ζ(82)$1<27+(5:$55$17Ζ(6Ζ)$1<&5($7('%<$1<'2&80(17$7Ζ21
253$&.$*Ζ1*7+Ζ6/Ζ0Ζ7(':$55$17<*Ζ9(6<2863(&Ζ)Ζ&/(*$/5Ζ*+76
66

D
$1'<280$<$/62+$9(27+(55Ζ*+76:+Ζ&+9$5<%<-85Ζ6'Ζ&7Ζ21
'LVFODLPHU RI :DUUDQWLHV <28 (;35(66/< $&.12:/('*( $1' $*5((
7+$7 86(2) 7+( 9Ζ=Ζ2 62)7:$5( $1' 9Ζ$ 6(59Ζ&(6 $6 '()Ζ1(' $%29(
Ζ6 $7 <285 62/( 5Ζ6. $1' 7+$7 7+( (17Ζ5( 5Ζ6. $6 72 6$7Ζ6)$&725<
48$/Ζ7< 3(5)250$1&( $&&85$&< $1' ())257 Ζ6 :Ζ7+ <28 (;&(37
)25 7+( /Ζ0Ζ7(' :$55$17< 21 0('Ζ$ 6(7 )257+ $%29( $1' 72 7+(
0$;Ζ080 (;7(17 3(50Ζ77(' %< $33/Ζ&$%/( /$: 7+( 9Ζ=Ζ2 62)7:$5(
$1' 9Ζ$ 6(59Ζ&(6 $5( 3529Ζ'(' Ȋ$6 Ζ6ȋ :Ζ7+ $// )$8/76 $1' :Ζ7+287
:$55$17< 2) $1< .Ζ1' $1' 9Ζ=Ζ2 $1' 9Ζ=Ζ2ȇ6 7+Ζ5' 3$57< 3529Ζ'(56
2)9Ζ$6(59Ζ&(6$1'7+Ζ5'3$57</Ζ&(16256&2//(&7Ζ9(/<5()(55('72
$6 Ȋ9Ζ=Ζ2ȋ )25 7+( 385326(6 2) 6(&7Ζ216 $1' +(5(%< 'Ζ6&/$Ζ0
$//:$55$17Ζ(6$1'&21'Ζ7Ζ216:Ζ7+5(63(&7727+(9Ζ=Ζ262)7:$5(
$1' 6(59Ζ&(6 (Ζ7+(5 (;35(66 Ζ03/Ζ(' 25 67$78725< Ζ1&/8'Ζ1* %87
127/Ζ0Ζ7(' 72 7+(Ζ03/Ζ(':$55$17Ζ(6$1'25&21'Ζ7Ζ216 2) 0(5-
&+$17$%Ζ/Ζ7< 2) 6$7Ζ6)$&725< 48$/Ζ7< 2) )Ζ71(66 )25 $ 3$57Ζ&8/$5
385326( 2) $&&85$&< 2) 48Ζ(7 (1-2<0(17 $1' 121Ζ1)5Ζ1*(0(17
2)7+Ζ5'3$57<5Ζ*+769Ζ=Ζ2'2(6127:$55$17$*$Ζ167Ζ17(5)(5(1&(
:Ζ7+<285(1-2<0(172)7+(9Ζ=Ζ262)7:$5(259Ζ$6(59Ζ&(67+$77+(
)81&7Ζ216&217$Ζ1('Ζ17+(9Ζ=Ζ262)7:$5(259Ζ$6(59Ζ&(6:Ζ//0((7
<285 5(48Ζ5(0(176 7+$7 7+( 23(5$7Ζ21 2) 7+( 9Ζ=Ζ2 62)7:$5( 25
9Ζ$ 6(59Ζ&(6 :Ζ// %( 81Ζ17(55837(' 25 (5525)5(( 25 7+$7 '()(&76
Ζ17+(9Ζ=Ζ262)7:$5(259Ζ$6(59Ζ&(6:Ζ//%(&255(&7('1225$/25
WRITTEN INFORMATION OR ADVICE GIVEN BY VIZIO OR A VIZIO AUTHORIZED
5(35(6(17$7Ζ9( 6+$// &5($7( $ :$55$17< 6+28/' 7+( 9Ζ$ 62)7:$5(
25 9Ζ$ 6(59Ζ&(6 3529( '()(&7Ζ9( <28 $6680( 7+( (17Ζ5( &267 2)$//
1(&(66$5< 6(59Ζ&Ζ1* 5(3$Ζ5 25 &255(&7Ζ21 620( -85Ζ6'Ζ&7Ζ216 '2
127$//2: 7+( (;&/86Ζ21 2) Ζ03/Ζ(' :$55$17Ζ(6 25/Ζ0Ζ7$7Ζ216 21
$33/Ζ&$%/(67$78725<5Ζ*+762)$&21680(5627+($%29((;&/86Ζ21
$1'/Ζ0Ζ7$7Ζ2160$<127$33/<72<28
/LPLWDWLRQ RI /LDELOLW\ 72 7+( (;7(17 127 352+Ζ%Ζ7(' %< /$: Ζ1 12
(9(17 6+$// 9Ζ=Ζ2 %( /Ζ$%/( )25 3(5621$/ Ζ1-85< 25$1< Ζ1&Ζ'(17$/
63(&Ζ$/Ζ1'Ζ5(&725&216(48(17Ζ$/'$0$*(6:+$762(9(5Ζ1&/8'Ζ1*
:Ζ7+287 /Ζ0Ζ7$7Ζ21 '$0$*(6 )25 /266 2) 352)Ζ76 /266 2) '$7$
%86Ζ1(66Ζ17(55837Ζ2125$1<27+(5&200(5&Ζ$/'$0$*(625/266(6
$5Ζ6Ζ1*2872)255(/$7('72<28586(25Ζ1$%Ζ/Ζ7<7286(7+(9Ζ=Ζ2
62)7:$5(259Ζ$6(59Ζ&(6+2:(9(5&$86('5(*$5'/(662)7+(7+(25<
2)/Ζ$%Ζ/Ζ7<&2175$&772572527+(5:Ζ6($1'(9(1Ζ)9Ζ=Ζ2+$6%((1
$'9Ζ6(' 2) 7+( 3266Ζ%Ζ/Ζ7<2) 68&+'$0$*(6 620(-85Ζ6'Ζ&7Ζ216 '2
127 $//2: 7+( /Ζ0Ζ7$7Ζ21 2) /Ζ$%Ζ/Ζ7< )25 3(5621$/ Ζ1-85< 25 2)
Ζ1&Ζ'(17$/ 25 &216(48(17Ζ$/ '$0$*(6 62 7+Ζ6 /Ζ0Ζ7$7Ζ21 0$< 127
APPLY TO YOU. In no event shall VIZIO’s total liability to you for all damages
(other than as may be required by applicable law in cases involving personal
LQMXU\ H[FHHG WKH DPRXQW RI WZHQW\ ȴYH GROODUV 7KH IRUHJRLQJ
limitations will apply even if the above stated remedy fails of its essential
purpose.
([SRUW &RQWURO <RX PD\ QRW XVH RU RWKHUZLVH H[SRUW RU UHH[SRUW WKH
9Ζ=Ζ2 6RIWZDUH H[FHSW DV DXWKRUL]HG E\ 8QLWHG 6WDWHV ODZ DQG WKH ODZV RI
WKHMXULVGLFWLRQ LQ ZKLFK WKH 9Ζ=Ζ2 6RIWZDUH ZDV REWDLQHG ΖQ SDUWLFXODUEXW
ZLWKRXW OLPLWDWLRQ WKH 9Ζ=Ζ2 6RIWZDUH PD\ QRW EH H[SRUWHG RU UHH[SRUWHG
DLQWRDQ\86HPEDUJRHG FRXQWULHV RU E WR DQ\RQHRQWKH 86 7UHDVXU\
'HSDUWPHQWȇV OLVW RI 6SHFLDOO\ 'HVLJQDWHG 1DWLRQDOV RU WKH 86 'HSDUWPHQW
RI&RPPHUFH'HQLHG3HUVRQȇV/LVWRU(QWLW\/LVW%\XVLQJWKH9Ζ=Ζ26RIWZDUH
you represent and warrant that you are not located in any such country or
on any such list. You also agree that you will not use these products for any
SXUSRVHV SURKLELWHG E\ 8QLWHG 6WDWHV ODZ LQFOXGLQJ ZLWKRXW OLPLWDWLRQ WKH
development, design, manufacture or production of missiles, or nuclear,
chemical or biological weapons.
&RQWUROOLQJ/DZDQG6HYHUDELOLW\7KLV/LFHQVH$JUHHPHQWZLOOEHJRYHUQHG
E\ DQG FRQVWUXHG LQ DFFRUGDQFH ZLWK WKH ODZV RI WKH 6WDWH RI &DOLIRUQLD DV
applied to agreements entered into and to be performed entirely within
California between California residents. This License Agreement shall not be
governed by the United Nations Convention on Contracts for the International
6DOHRI*RRGVWKHDSSOLFDWLRQRIZKLFKLVH[SUHVVO\H[FOXGHGΖIIRUDQ\UHDVRQ
DFRXUWRIFRPSHWHQWMXULVGLFWLRQȴQGVDQ\SURYLVLRQRUSRUWLRQWKHUHRIWREH
unenforceable, the remainder of this License Agreement shall continue in full
IRUFHDQGHHFW
&RPSOHWH $JUHHPHQW *RYHUQLQJ /DQJXDJH 7KLV /LFHQVH $JUHHPHQW
constitutes the entire agreement between the parties with respect to the
XVH RI WKH 9Ζ=Ζ2 6RIWZDUH OLFHQVHG KHUHXQGHU DQG VXSHUVHGHV DOO SULRU RU
contemporaneous understandings regarding such subject matter, with the
H[FHSWLRQRIDQ\DGGLWLRQDOWHUPVDQGFRQGLWLRQV\RXDUHUHTXLUHGWRDFFHSW
LI \RX FKRRVH WR DFFHVV 9Ζ$ 6HUYLFHV ZKLFK ZLOOJRYHUQ \RXU XVH RI VXFK9Ζ$
6HUYLFHV1RDPHQGPHQWWRRUPRGLȴFDWLRQRIWKLV/LFHQVH$JUHHPHQWZLOOEH
binding unless in writing and signed by VIZIO. Any translation of this License
Agreement is done for local requirements and in the event of a dispute
between the English and any non-English versions, the English version of this
License Agreement shall govern.
Other
ΖPDJHVXVHGXQGHUOLFHQVHIURP6KXWWHUVWRFNFRP
67
© 2015 VIZIO INC. ALL RIGHTS RESERVED.
150128OC-US-NC
