DU-09821-001 _v01 | April 2023
NVIDIA DGX A100
User Guide
NVIDIA DGX A100 DU-09821-001 _v01|ii
Table of Contents
Chapter1.Introduction to the NVIDIA DGX A100 System.................................................... 1
1.1.Hardware Overview....................................................................................................................................1
1.1.1.DGX A100 Models and Component Descriptions................................................................2
1.1.2.Mechanical Specifications..............................................................................................................3
1.1.3.Power Specifications.........................................................................................................................4
1.1.3.1.Support for N+N Redundancy..............................................................................................4
1.1.4.DGX A100 Locking Power Cord Specification....................................................................... 4
1.1.5.Using the Locking Power Cords...................................................................................................5
1.1.6.Environmental Specifications........................................................................................................7
1.1.7.Front Panel Connections and Controls.....................................................................................7
1.1.7.1.With a Bezel................................................................................................................................. 7
1.1.7.2.With the Bezel Removed........................................................................................................ 8
1.1.8.Rear Panel Modules...........................................................................................................................8
1.1.9.Motherboard Connections and Controls................................................................................. 9
1.1.10.Motherboard Tray Components............................................................................................. 10
1.1.11.GPU Tray Components............................................................................................................... 10
1.2.Network Connections, Cables, and Adaptors..............................................................................11
1.2.1.Network Ports...................................................................................................................................11
1.2.2.Supported Network Cables and Adaptors............................................................................13
1.3.DGX A100 System Topology.............................................................................................................. 13
1.4.DGX OS Software....................................................................................................................................14
1.5.Additional Documentation...................................................................................................................14
1.6.Customer Support.................................................................................................................................. 15
Chapter2.Connecting to the DGX A100....................................................................................16
2.1.Connecting to the Console.................................................................................................................16
2.1.1.Direct Connection........................................................................................................................... 16
2.1.2.Remote Connection through the BMC.................................................................................. 18
2.2.SSH Connection to the OS................................................................................................................. 20
Chapter3.First Boot Setup.............................................................................................................. 21
3.1.Setting up the System......................................................................................................................... 21
3.2.Post Setup Tasks.....................................................................................................................................24
3.2.1.Obtaining Software Updates......................................................................................................24
3.2.2.Enabling the srp Daemon............................................................................................................24
Chapter4.Quick Start and Basic Operation..............................................................................25
4.1.Installation and Configuration........................................................................................................... 25
NVIDIA DGX A100 DU-09821-001 _v01|iii
4.2.Registering Your DGX A100................................................................................................................25
4.3.Obtaining an NGC Account.................................................................................................................26
4.4.Turning DGX A100 On and Off......................................................................................................... 26
4.4.1.Startup Considerations.................................................................................................................26
4.4.2.Shutdown Considerations............................................................................................................26
4.5.Verifying Functionality - Quick Health Check............................................................................. 26
4.6.Running the Pre-flight Test................................................................................................................27
4.7.Running NGC Containers with GPU Support.............................................................................. 28
4.7.1.Using Native GPU Support..........................................................................................................28
4.7.2.Using the NVIDIA Container Runtime for Docker............................................................. 28
4.8.Managing CPU Mitigations................................................................................................................. 29
4.8.1.Determining the CPU Mitigation State of the DGX System.........................................29
4.8.2.Disabling CPU Mitigations...........................................................................................................30
4.8.3.Re-enabling CPU Mitigations.....................................................................................................30
Chapter5.Additional Features and Instructions..................................................................... 31
5.1.Managing the DGX Crash Dump Feature..................................................................................... 31
5.1.1.Using the Script...............................................................................................................................31
5.1.2.Connecting to Serial Over LAN to View the Console.......................................................31
Chapter6.Managing the DGX A100 Self-Encrypting Drives..............................................33
6.1.Overview...................................................................................................................................................... 33
6.2.Installing the Software......................................................................................................................... 34
6.3.Configuring Trusted Computing.......................................................................................................34
6.3.1.Determining Whether Drives Support SID...........................................................................35
6.3.2.Enabling the TPM and Preventing the BIOS from Sending Block SID Requests....35
6.4.Initializing the System for Drive Encryption................................................................................36
6.5.Enabling Drive Locking..........................................................................................................................36
6.6.Initialization Examples...........................................................................................................................36
6.6.1.Example 1: Passing in the JSON File...................................................................................... 37
6.6.1.1.Determining Which Drives Can be Managed as Self-Encrypting........................37
6.6.1.2.Creating the Drive/Password Mapping JSON Files and Using it to Initialize
the System........................................................................................................................................... 38
6.6.2.Example 2: Generating Random Passwords.........................................................................39
6.6.3.Example 3: Specifying Passwords One at a Time When Prompted............................39
6.7.Disabling Drive Locking........................................................................................................................ 39
6.8.Enabling Drive Locking..........................................................................................................................39
6.9.Exporting the Vault................................................................................................................................ 40
6.10.Erasing Your Data.................................................................................................................................40
6.11.Clearing the TPM..................................................................................................................................40
NVIDIA DGX A100 DU-09821-001 _v01|iv
6.12.Changing Disk Passwords, Adding Disks, or Replacing Disks............................................41
6.13.Recovering From Lost Keys..............................................................................................................41
Chapter7.Network Configuration................................................................................................. 42
7.1.Configuring Network Proxies............................................................................................................. 42
7.1.1.For the OS and Most Applications.......................................................................................... 42
7.1.2.For apt..................................................................................................................................................42
7.1.3.For Docker..........................................................................................................................................43
7.2.Configuring Docker IP Addresses....................................................................................................43
7.3.Open Ports................................................................................................................................................. 44
7.4.Connectivity Requirements for NGC Containers.......................................................................44
7.5.Configuring a Static IP Address for the BMC.............................................................................45
7.5.1.Configuring a BMC Static Address by Using ipmitool.....................................................45
7.5.2.Configuring a BMC Static IP Address by Using the System BIOS..............................46
7.6.Configuring a BMC Static IP Address for the Network Ports.............................................. 46
7.7.Switching Between InfiniBand and Ethernet.............................................................................. 47
7.7.1. Starting the Mellanox Software Tools and Determining the Current Port
Configuration............................................................................................................................................48
7.7.2.Switching the Port Configuration............................................................................................ 48
Chapter8.Configuring Storage.......................................................................................................50
8.1.Setting Filesystem Quotas..................................................................................................................51
8.2.Switching Between RAID 0 and RAID 5.........................................................................................51
8.3.Configuring Support for Custom Drive Partitioning................................................................52
Chapter9.Updating and Restoring the Software...................................................................53
9.1.Updating the DGX A100 Software.................................................................................................. 53
9.1.1.Connectivity Requirements for Software Updates...........................................................53
9.1.2.Update Instructions........................................................................................................................54
9.2.Restoring the DGX A100 Software Image................................................................................... 54
9.2.1.Obtaining the DGX A100 Software ISO Image and Checksum File............................55
9.2.2.Remotely Reimaging the System............................................................................................. 55
9.2.3.Creating a Bootable Installation Medium..............................................................................56
9.2.3.1.Creating a Bootable USB Flash Drive by Using the dd Command.......................57
9.2.3.2.Creating a Bootable USB Flash Drive by Using Akeo Rufus...................................58
9.3.Reimaging the System from a USB Flash Drive.........................................................................59
9.4.Installation Options................................................................................................................................ 59
9.4.1.Retaining the RAID Partition While Installing the OS......................................................60
9.4.2.Advanced Installation Option (Encrypted Root - DGX OS 5 or Later)........................60
9.4.3.Boot into Live Environment (DGX OS 5 or Later)...............................................................61
9.4.4.Check Disc for Defects (DGX OS 5 or Later)...................................................................... 61
NVIDIA DGX A100 DU-09821-001 _v01|v
Chapter10.Using the BMC.............................................................................................................. 62
10.1.Connecting to the BMC.....................................................................................................................62
10.2.Overview of BMC Controls............................................................................................................... 63
10.3.Common BMC Tasks........................................................................................................................... 65
10.3.1.Changing the BMC Login Credentials..................................................................................65
10.3.2.Using the Remote Console.......................................................................................................66
10.3.3.Setting Up Active Directory or LDAP/E-Directory...........................................................67
10.3.6.Configuring Platform Event Filters....................................................................................... 73
10.3.7.Uploading or Generating SSL Certificates.........................................................................73
10.3.7.1.Viewing the SSL Certificate............................................................................................. 74
10.3.7.2.Generating the SSL Certificate.......................................................................................74
10.3.7.3.Uploading the SSL Certificate.........................................................................................76
10.3.7.4.Updating the SBIOS Certificate......................................................................................76
Chapter11.SBIOS Settings..............................................................................................................80
11.1.Accessing the SBIOS Setup.............................................................................................................80
11.2.Configuring the Boot Order.............................................................................................................81
11.3.Configuring the local terminal to access the SBIOS settings screen.............................82
If using the IPMI SOL protocol:............................................................................................................. 83
For Linux desktop users, set the character encoding:............................................................83
Power on or Reboot the system using one of the following interfaces, depending on
what the state of the system is:.................................................................................................... 83
Chapter12.Multi-Instance GPU..................................................................................................... 84
Chapter13.Security.............................................................................................................................85
13.1.User Security Measures.....................................................................................................................85
13.1.1.Securing the BMC Port..............................................................................................................85
13.2.System Security Measures...............................................................................................................85
13.2.1.Secure Flash of DGX A100 Firmware...................................................................................85
13.2.1.1.Encryption................................................................................................................................85
13.2.1.2.Signing.......................................................................................................................................86
13.2.1.3.NVSM Security.......................................................................................................................86
13.3.Secure Data Deletion..........................................................................................................................86
13.3.1.Prerequisites................................................................................................................................... 86
13.3.2.Instructions..................................................................................................................................... 86
Chapter14.Redfish APIs Support................................................................................................. 88
14.1.Supported Redfish Features............................................................................................................88
AppendixA.Installing Software on Air-Gapped DGX A100 Systems.............................. 90
A.1.Installing NVDIA DGX A100 Software............................................................................................90
NVIDIA DGX A100 DU-09821-001 _v01|vi
A.2.Reimaging the System......................................................................................................................... 90
A.3.Creating a Local Mirror of the NVIDIA and Canonical Repositories...................................91
A.4.Creating the Mirror in a DGX OS 4 System.................................................................................91
A.5.Configuring the Target Air-Gapped DGX OS 4 System..........................................................93
A.6.Configuring the Target Air-Gapped DGX OS 5 System..........................................................95
A.7.Installing Docker Containers..............................................................................................................96
AppendixB.Safety................................................................................................................................ 98
B.1.Safety Information..................................................................................................................................98
B.2.Safety Warnings and Cautions..........................................................................................................98
B.3.Intended Application Uses................................................................................................................100
B.4.Site Selection......................................................................................................................................... 100
B.5.Equipment Handling Practices........................................................................................................100
B.6.Electrical Precautions......................................................................................................................... 101
B.7.System Access Warnings..................................................................................................................102
B.8.Rack Mount Warnings........................................................................................................................103
B.9.Electrostatic Discharge......................................................................................................................103
B.10.Other Hazards..................................................................................................................................... 104
AppendixC.Compliance...................................................................................................................106
C.1.United States......................................................................................................................................... 106
C.2.United States/Canada........................................................................................................................ 106
C.3.Canada.......................................................................................................................................................107
C.4.CE.................................................................................................................................................................107
C.5.Australia and New Zealand.............................................................................................................. 108
C.6.Brazil...........................................................................................................................................................108
C.7.Japan..........................................................................................................................................................108
C.8.South Korea............................................................................................................................................ 111
C.9.China.......................................................................................................................................................... 112
C.10.Taiwan..................................................................................................................................................... 114
C.11.Russia/Kazakhstan/Belarus............................................................................................................115
C.12.Israel........................................................................................................................................................ 116
C.13.India......................................................................................................................................................... 116
C.14.South Africa......................................................................................................................................... 117
C.15.Great Britain (England, Wales, and Scotland)........................................................................ 117
NVIDIA DGX A100 DU-09821-001 _v01|vii
List of Tables
Table1. Model Differentiation..........................................................................................................................2
Table2. Component Description.....................................................................................................................3
Table3. Mechanical Specifications................................................................................................................ 3
Table4. Power Specifications...........................................................................................................................4
Table5. Motherboard Controls........................................................................................................................ 9
Table6. Network Port Mapping....................................................................................................................12
Table7. Open Ports............................................................................................................................................44
Table8. BMC Main Controls...........................................................................................................................64
Table9. BMC Main Controls...........................................................................................................................75
NVIDIA DGX A100 DU-09821-001 _v01|viii

NVIDIA DGX A100 DU-09821-001 _v01|1
Chapter1. Introduction to the NVIDIA
DGX A100 System
The NVIDIA DGX
™
A100 System is the universal system purpose-built for all AI
infrastructure and workloads, from analytics to training to inference. The system is built
on eight NVIDIA A100 Tensor Core GPUs.
This document is for users and administrators of the DGX A100 system.
1.1. Hardware Overview
This section provides information about the hardware in DGX A100.

Introduction to the NVIDIA DGX A100 System
NVIDIA DGX A100 DU-09821-001 _v01|2
1.1.1. DGX A100 Models and Component
Descriptions
There are two models of the NVIDIA DGX A100 system: the NVIDIA DGX A100 640GB
system and the NVIDIA DGX A100 320GB system.
Model Differentiation
Table1. Model Differentiation
Component
NVIDIA DGX A100 640GB
System
NVIDIA DGX A100 320GB
System
GPU
Qty 8 NVIDIA A100 GPUs
Third-generation NVLinks
Qty 8 NVIDIA A100 GPUs
Third-generation NVLinks
Total GPU Memory 640 GB 320 GB
NVIDIA NVSwitch
Qty 6
Second generation (2x faster
than first generation)
Qty 6
Second generation (2x faster
than first generation)
Networking
Up to 10 (Factory ship config)
NVIDIA ConnectX-6 or
ConnectX-7
InfiniBand/200 Gb/s Ethernet
Up to 9 (Factory ship config)
NVIDIA ConnectX-6 or
ConnectX-7 IB/200 Gb/s
Ethernet
(Optional Add-on: Second
dual- port 200 Gb/s Ethernet)
CPU 2 AMD Rome, 128 cores total 2 AMD Rome, 128 cores total
System Memory 2 TB (Factory ship config)
1 TB (Factory ship config)
(Optional Add-on: 1 TB to get
2 TB max.)
Storage
30 TB (Factory ship config)
U.2 NVMe Drives
(Optional drive upgrade to 60
TB)
15 TB (Factory ship config)
U.2 NVMe Drives
(Optional Add-on: 15 TB to get
30 TB max.
Optional drive upgrade to 60
TB)

Introduction to the NVIDIA DGX A100 System
NVIDIA DGX A100 DU-09821-001 _v01|3
Component Description
Table2. Component Description
Component Description
GPU NVIDIA A100 GPU
CPU 2x AMD EPYC 7742 CPU w/64 cores
NVSwitch 600 GB/s GPU-to-GPU bandwidth
Storage (OS) 1.92 TB NVMe M.2 SSD (ea) in RAID 1 array
Storage (Data Cache)
3.84 TB NVMe U.2 SED (ea) in RAID 0 array
(Optional 7.68 TB NVMe U.2. SEDs)
Network (Cluster) card
NVIDIA ConnectX-6 or ConnectX-7 Single Port
InfiniBand (default): Up to 200Gbps
Ethernet: 200GbE, 100GbE, 50GbE, 40GbE,
25GbE, and 10GbE
Network (Storage) card
NVIDIA ConnectX-6 or ConnectX-7 Dual Port
Ethernet (default): 200GbE, 100GbE, 50GbE,
40GbE, 25GbE, and 10GbE
InfiniBand: Up to 200Gbps
System Memory (DIMM) 1 TB per 16 DIMMs
BMC (out-of-band system management)
1 GbE RJ45 interface
Supports IPMI, SNMP, KVM, and Web UI
In-band system management 1 GbE RJ45 interface
Power Supply 3 kW
1.1.2. Mechanical Specifications
Here is some information about mechanical specifications.
Table3. Mechanical Specifications
Feature Description
Form Factor 6U Rackmount
Height 10.4” (264 mm)
Width 19" (482.3 mm) max

Introduction to the NVIDIA DGX A100 System
NVIDIA DGX A100 DU-09821-001 _v01|4
Feature Description
Depth 35.3" (897.1 mm) max
System Weight 271.5 lbs (123.16 kg) max
1.1.3. Power Specifications
The DGX A100 system contains six power supplies with balanced distribution of the
power load.
Table4. Power Specifications
Input
Specification for Each
Power Supply
200-240 volts AC 6.5 kW max. 3000 W @ 200-240 V, 16 A,
50-60 Hz
1.1.3.1. Support for N+N Redundancy
The DGX A100 includes six power supply units (PSU) configured for 3+3 redundancy.
If three PSUs fail, the system will continue to operate at full power with the remaining
three PSUs.
Note:
‣
If only two PSUs are working, the GPUs will not be available but the server will still
boot. This is to allow you to gather debug or system logs or other data from the cache
SSDs.
‣
If only one PSU is working, troubleshoot the cause for the loss of power from the
other PSUs and correct. If faulty PSUs need to be replaced, shut the system down and
install working PSUs.
1.1.4. DGX A100 Locking Power Cord
Specification
The DGX A100 is shipped with a set of six (6) locking power cords that have been
qualified for use with the DGX A100 to ensure regulatory compliance.
The following locking power cord types are approved:
‣
Switch-locking for the PSU side
‣
Twist-locking for the PSU side
WARNING: To avoid electric shock or fire, only use the NVIDIA-provided power cords to
connect power to the DGX A100. For more details, see Electrical Precautions.
Introduction to the NVIDIA DGX A100 System
NVIDIA DGX A100 DU-09821-001 _v01|5
Power Cord Specification
Power Cord Feature Specification
Electrical 250VAC, 16A
Plug Standard C19/C20
Dimension 1200mm length
Compliance
Cord: UL62, IEC60227
Connector/Plug: IEC60320-1
1.1.5. Using the Locking Power Cords
This section provides information about how to use the locking power cords.
Locking and Unlocking the PDU Side
Power Distribution Unit side
‣
To INSERT, push the cable into the PDU socket.
‣
To REMOVE, press the clips together and pull the cord out of the socket.
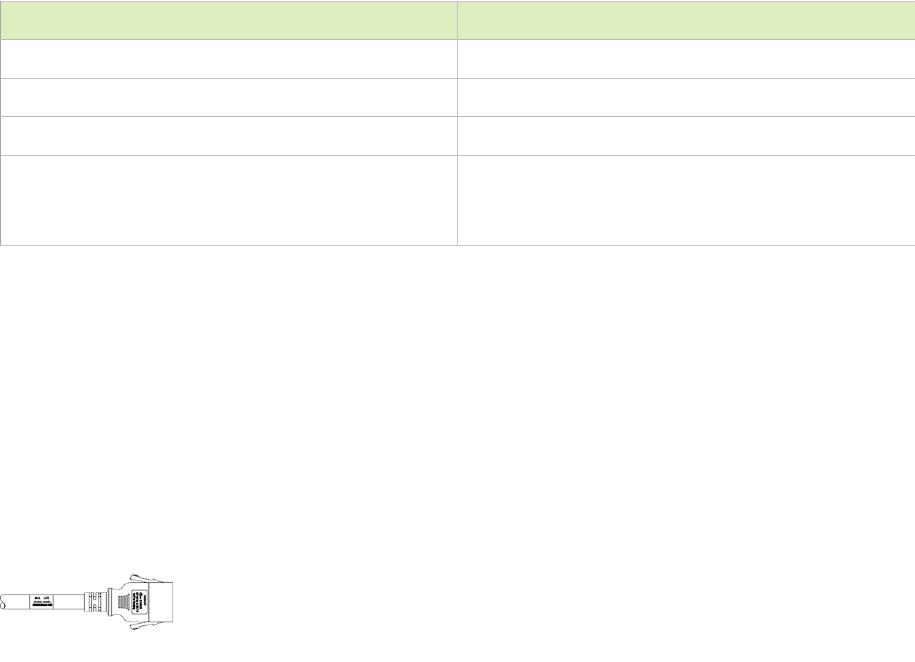
Locking/Unlocking the PSU Side (Cords with Switch-Lock Mechanism)
Power Supply (System) side - Switch locking
‣
To INSERT or REMOVE make sure the cable is UNLOCKED and push/ pull into/out of
the socket.
Introduction to the NVIDIA DGX A100 System
NVIDIA DGX A100 DU-09821-001 _v01|6
Locking/Unlocking the PSU Side (Cords with Twist-Lock Mechanism)
Power Supply (System) side - Twist locking
‣
To INSERT or REMOVE make sure the cable is UNLOCKED and push/ pull into/out of
the socket.
Introduction to the NVIDIA DGX A100 System
NVIDIA DGX A100 DU-09821-001 _v01|7
1.1.6. Environmental Specifications
Here are the environmental specifications for your DGX A100 system.
Feature Specification
Operating Temperature 5° C to 30° C (41° F to 86° F)
Relative Humidity 20% to 80% non-condensing
Airflow 840 CFM @ 80% fan PWM
Heat Output 22,179 BTU/hr
1.1.7. Front Panel Connections and Controls
This section provides information about the front panel, connections, and controls of the
DGX A100 system.
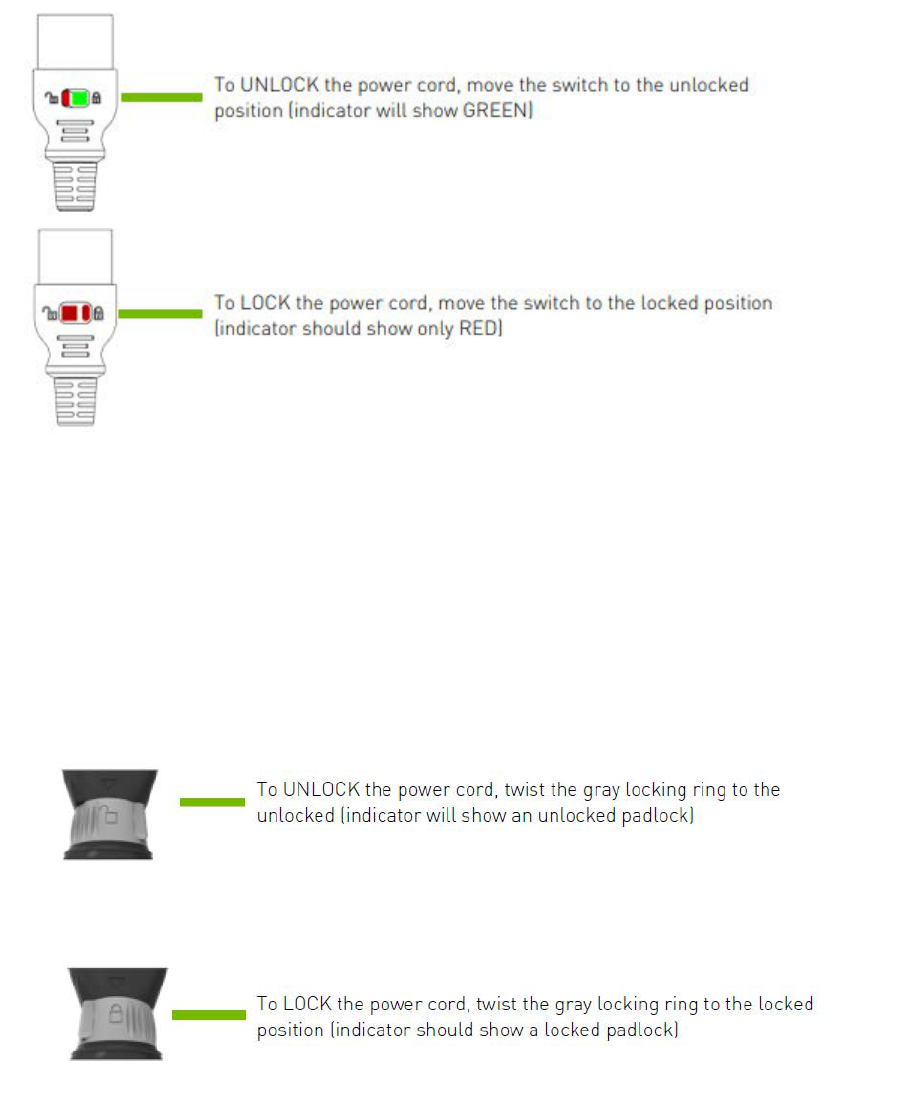
1.1.7.1. With a Bezel
Here is an image of the DGX A100 system with a bezel.
Control Description
Power Button
Press to turn the DGX A100 system On or Off.
‣
Green flashing (1 Hz): Standby (BMC
booted)
‣
Green flashing (4 Hz): POST in progress
‣
Green solid On: Power On
ID Button
Press to cause the button blue LED to turn On
or blink (configurable through the BMC) as an
identifier during servicing.
Introduction to the NVIDIA DGX A100 System
NVIDIA DGX A100 DU-09821-001 _v01|8
Control Description
Also causes an LED on the back of the unit to
flash as an identifier during servicing.
Fault LED Amber On: System or component faulted
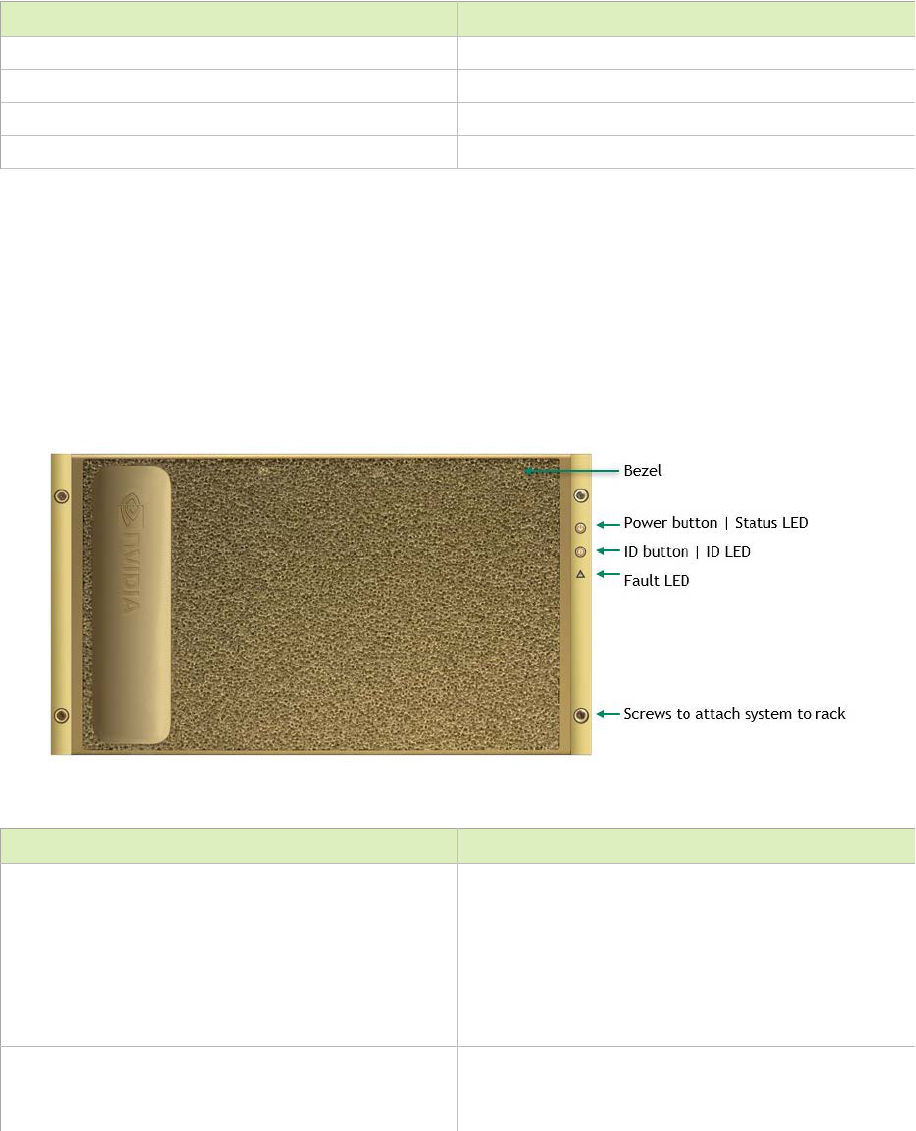
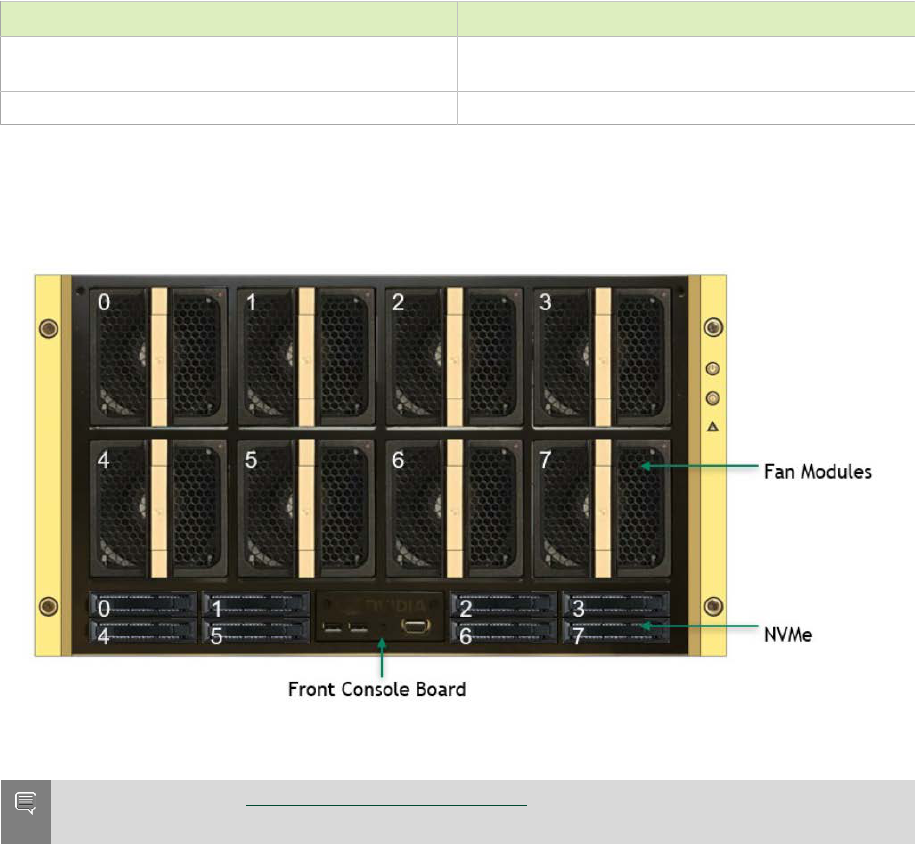
1.1.7.2. With the Bezel Removed
Here is an image of the DGX A100 system with a bezel.
Important: Refer to Turning DGX A100 On and Off for instructions on how to properly turn
the system on or off.
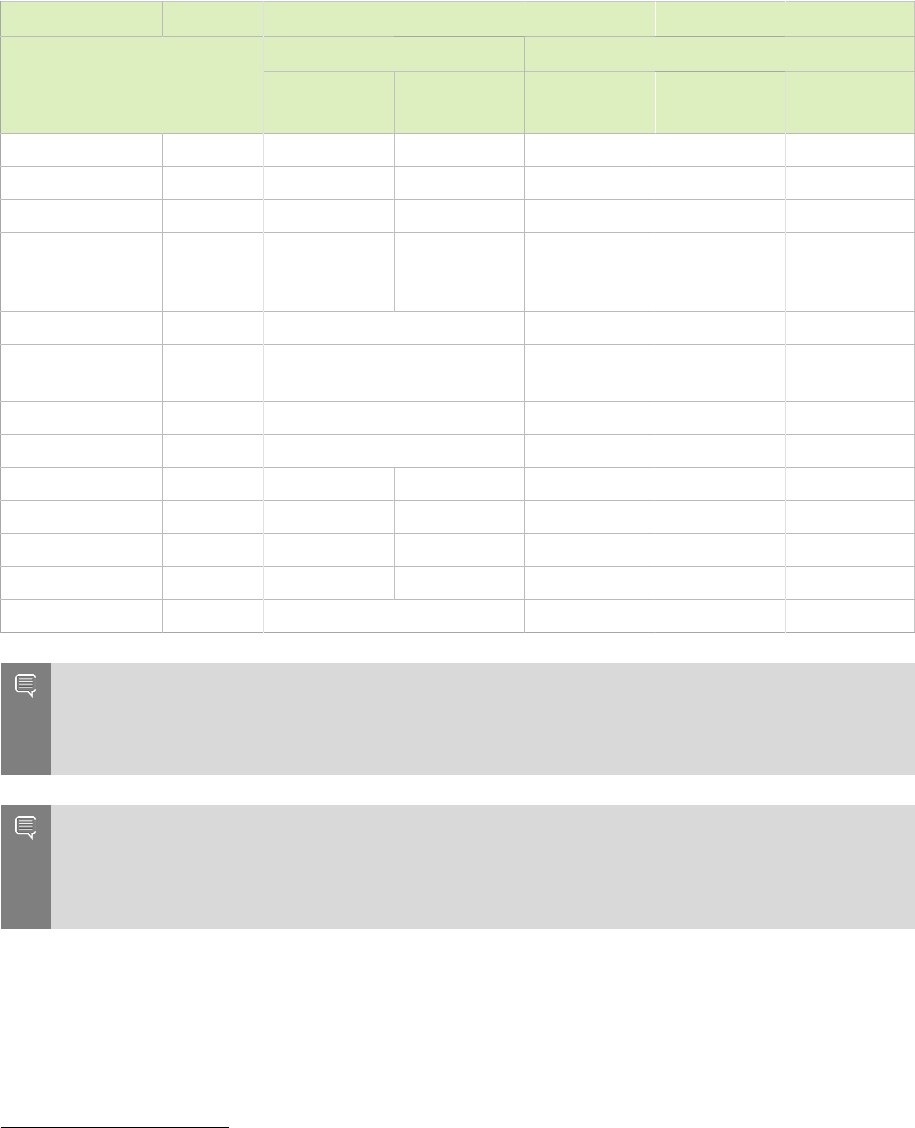
1.1.8. Rear Panel Modules
Here is an image that shows the real panel modules on DGX A100.

Introduction to the NVIDIA DGX A100 System
NVIDIA DGX A100 DU-09821-001 _v01|9
1.1.9. Motherboard Connections and Controls
Here is an image that shows the motherboard connections and controls in a DGX A100
system.
Table5. Motherboard Controls
Control Description
Power Button Press to turn the system On or Off.
Introduction to the NVIDIA DGX A100 System
NVIDIA DGX A100 DU-09821-001 _v01|10
Control Description
ID LED Button Blinks when ID button is pressed from the
front of the unit as an aid in identifying the
unit needing servicing.
BMC Reset button Press to manually reset the BMC.
See Network Connections, Cables, and Adaptors for details on the network connections.
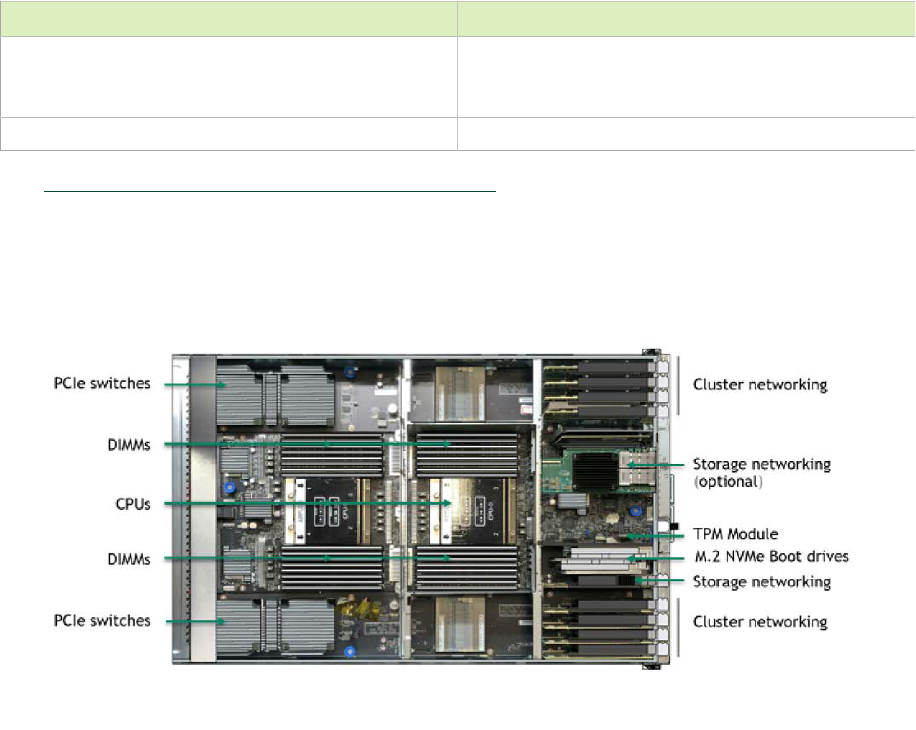
1.1.10. Motherboard Tray Components
Here is an image that shows the motherboard tray components in DGX A100.
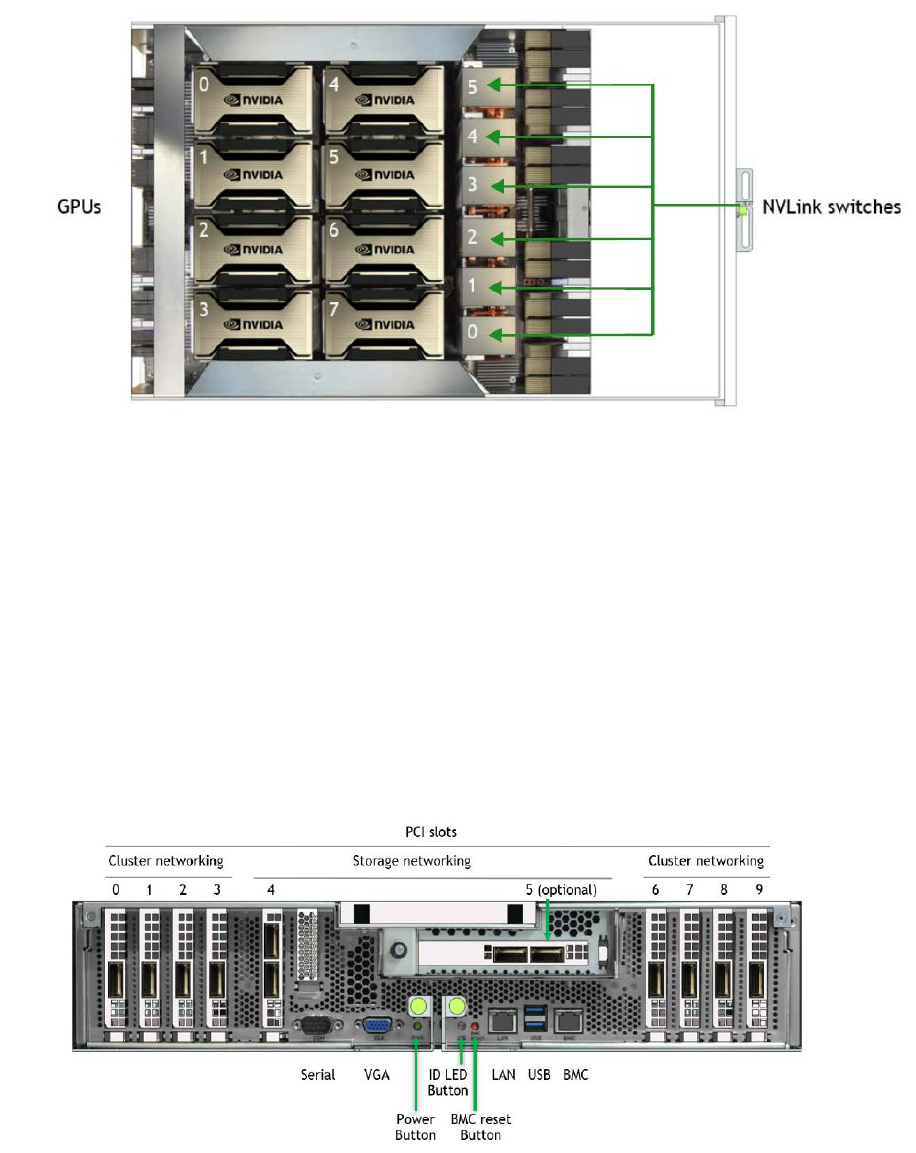
1.1.11. GPU Tray Components
Here is an image of the GPU tray components in a DGX A100 system.
Introduction to the NVIDIA DGX A100 System
NVIDIA DGX A100 DU-09821-001 _v01|11
1.2. Network Connections, Cables, and
Adaptors
This section provides information about network connections, cables, and adaptors.
1.2.1. Network Ports
Here is an image that shows the network ports on a DGX A100 system.
Introduction to the NVIDIA DGX A100 System
NVIDIA DGX A100 DU-09821-001 _v01|12
Table6. Network Port Mapping
Slot PCI Bus Port Designation RDMA
Default
Pre-DGS
OS 5
DGX OS 5
and later Optional
Slot 5 Not
Populated
Slot 5
Populated
0 4b:00.0 ib2 ibp75s0 enp75s0 mlx5_2 mlx5_2
1 54:00.0 ib3 ibp84s0 enp84s0 mlx5_3 mlx5_3
2 ba:00.0 ib6 ibp186s0 enp186s0 mlx5_6 mlx5_8
3
cc:00.0
1
ca:00.0
2
ib7
ibp204s0a
3
ibp202s0b
4
enp204s0a
5
enp202s0b
6
mlx5_7 mlx5_9
4 port 0 (top) e1:00.0 enp225s0f0 (see note) mlx5_8 mlx5_10
4 port 1
(bottom)
e1:00.1 enp225s0f1 (see note) mlx5_9 mlx5_11
5 port 0 (left) 61:00.0 enp97s0f0 (see note) - mlx5_4
5 port 1 (right) 61:00.1 enp97s0f1 (see note) - mlx5_5
6 0c:00.0 ib0 ibp12s0 enp12s0 mlx5_0 mlx5_0
7 12:00.0 ib1 ibp18s0 enp18s0 mlx5_1 mlx5_1
8 8d:00.1 ib4 ibp141s0 enp141s0 mlx5_4 mlx5_6
9 94:00.0 ib5 ibp148s0 enp148s0 mlx5_5 mlx5_7
LAN e2:00.0 enp226s0 N/A
Note: The enp37s0f3u1u3c2 interface or bmc_redfish0 is recognized by the OS and may
be listed in response to such commands as ifconfig or ip addr. This interface is reserved
for future support of BMC communication using Redfish APIs and is not available for
configuration.
Note: The Optional column lists the port designations after reconfiguring the default
InfiniBand ports to Ethernet.
When switching from the default Ethernet to InfiniBand, the InfiniBand port designations
will vary depending on changes made to the other ports.
1
Based on systems updated with DGX A100 Firmware Update Container 20.10.9 or later
3
Based on systems updated with DGX A100 Firmware Update Container 20.10.9 or later
5
Based on systems updated with DGX A100 Firmware Update Container 20.10.9 or later
2
Based on systems updated with DGX A100 Firmware Update Container 20.05.12.3 or earlier
4
Based on systems updated with DGX A100 Firmware Update Container 20.05.12.3 or earlier
6
Based on systems updated with DGX A100 Firmware Update Container 20.05.12.3 or earlier
Introduction to the NVIDIA DGX A100 System
NVIDIA DGX A100 DU-09821-001 _v01|13
1.2.2. Supported Network Cables and Adaptors
The DGX A100 system is not shipped with network cables or adaptors. You will need to
purchase supported cables or adaptors for your network.
The ConnectX-6 or ConnectX-7 firmware determines which cables and adaptors are
supported. For a list of cables and adaptors compatible with the NVIDIA ConnectX cards
installed in the DGX A100 system,
1. Visit the Mellanox Firmware Release page.
2. From the left navigation menu, select the ConnectX model and corresponding
firmware included in the DGX A100.
3. Select Firmware Compatible Products.
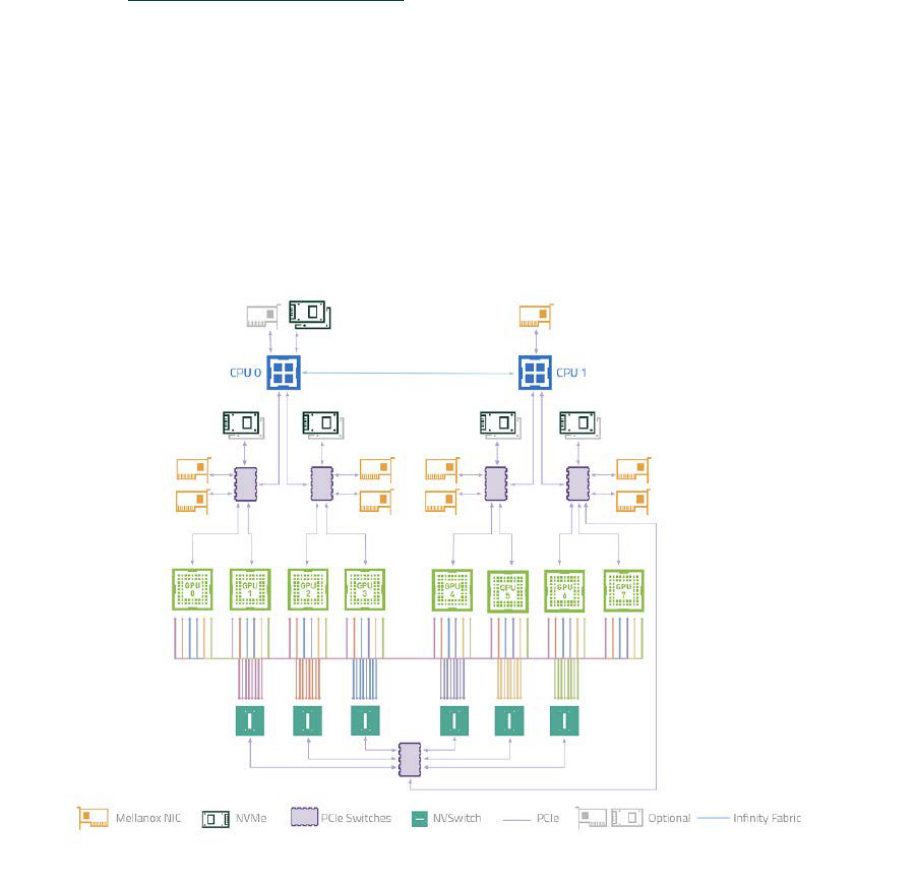
1.3. DGX A100 System Topology
Here is an image of the DGX A100 system topology.

Introduction to the NVIDIA DGX A100 System
NVIDIA DGX A100 DU-09821-001 _v01|14
1.4. DGX OS Software
The DGX A100 system comes pre-installed with a DGX software stack incorporating the
following components:
‣
An Ubuntu server distribution with supporting packages.
‣
The following system management and monitoring software:
‣
NVIDIA System Management (NVSM)
Provides active health monitoring and system alerts for NVIDIA DGX nodes in a
data center. It also provides simple commands for checking the health of the DGX
A100 system from the command line.
‣
Data Center GPU Management (DCGM)
This software enables node-wide administration of GPUs and can be used for
cluster and data-center level management.
‣
DGX A100 system support packages.
‣
The NVIDIA GPU driver
‣
Docker Engine
‣
NVIDIA Container Toolkit
‣
Mellanox OpenFabrics Enterprise Distribution for Linux (MOFED)
‣
Mellanox Software Tools (MST)
‣
cachefilesd (daemon for managing cache data storage)
1.5. Additional Documentation
This section provides links to additional documentation.
‣
MIG User Guide
The new Multi-Instance GPU (MIG) feature allows the NVIDIA A100 GPU to be
securely partitioned into up to seven separate GPU Instances for CUDA applications.
‣
NGC Container Registry for DGX
How to access the NGC container registry for using containerized deep learning GPU-
accelerated applications on your DGX A100 system.
‣
NVSM Software User Guide
Contains instructions for using the NVIDIA System Management software.
‣
DCGM Software User Guide
Contains instructions for using the Data Center GPU Manager software.

Introduction to the NVIDIA DGX A100 System
NVIDIA DGX A100 DU-09821-001 _v01|15
1.6. Customer Support
Contact NVIDIA Enterprise Support for assistance in reporting, troubleshooting, or
diagnosing problems with your DGX A100 system. Also contact NVIDIA Enterprise
Support for assistance in moving the DGX A100 system.
‣
For contracted Enterprise Support questions, you can send an email to
enterprisesupport@nvidia.com.
‣
For additional details about how to obtain support, go to NVIDIA Enterprise Support.
Our support team can help collect appropriate information about your issue and involve
internal resources as needed.
NVIDIA DGX A100 DU-09821-001 _v01|16
Chapter2. Connecting to the DGX
A100
This section provides information about how to connect to the DGX A100 system.
2.1. Connecting to the Console
Connect to the DGX A100 console using either a direct connection or a remote
connection through the BMC.
CAUTION: Connect directly to the DGX A100 console if the DGX A100 system is
connected to a 172.17.xx.xx subnet.
DGX OS Server software installs Docker Engine which uses the 172.17.xx.xx sub-net by
default for Docker containers. If the DGX A100 system is on the same sub-net, you will
not be able to establish a network connection to the DGX A100 system.
Refer to Configuring Docker IP Addresses for instructions on how to change the default
Docker network settings.
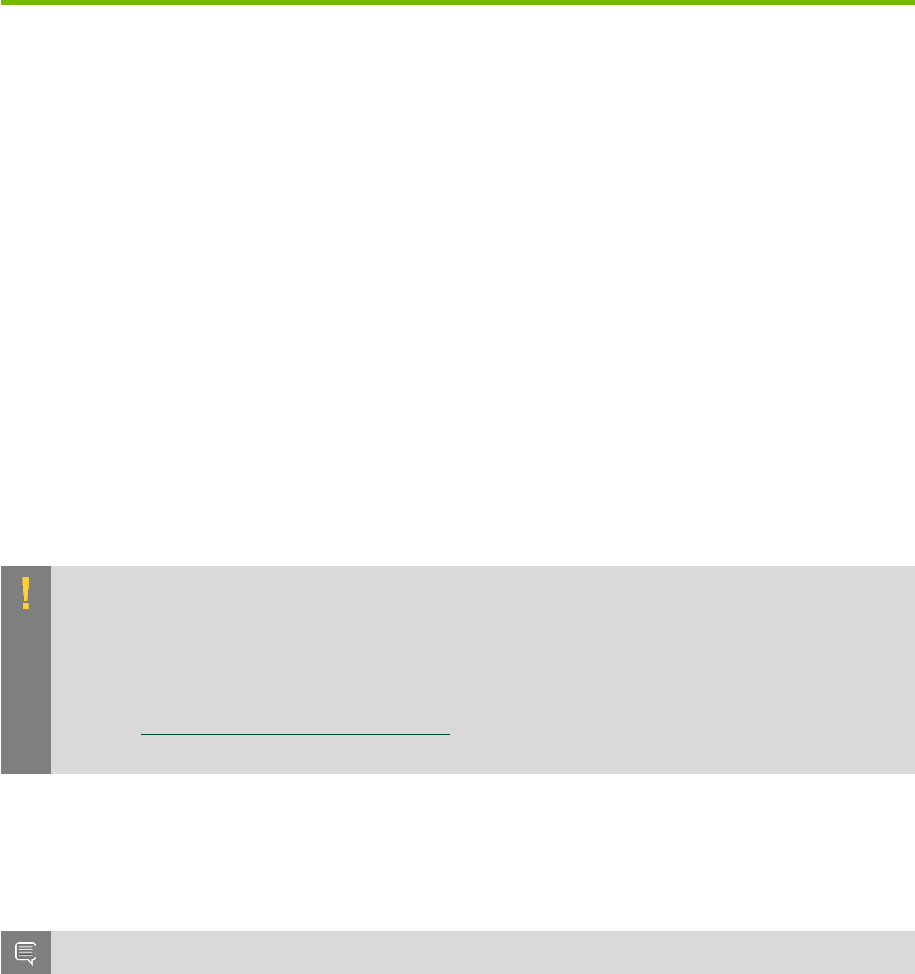
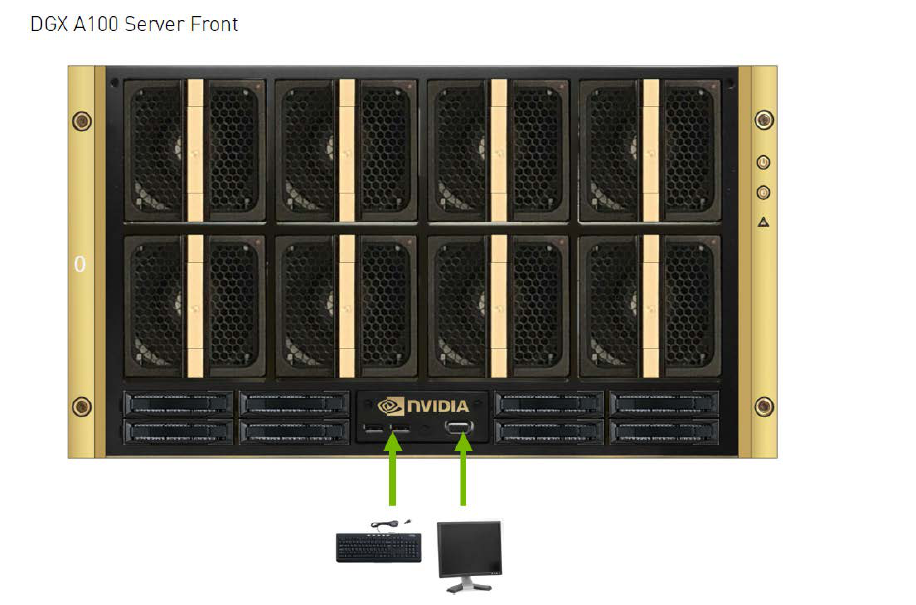
2.1.1. Direct Connection
At the front or the back of the DGX A100 system, you can connect a display to the VGA
connector and a keyboard to any of the USB ports.
Note: The display resolution must be 1440x900 or lower.
Connecting to the DGX A100
NVIDIA DGX A100 DU-09821-001 _v01|17
Connecting to the DGX A100
NVIDIA DGX A100 DU-09821-001 _v01|18
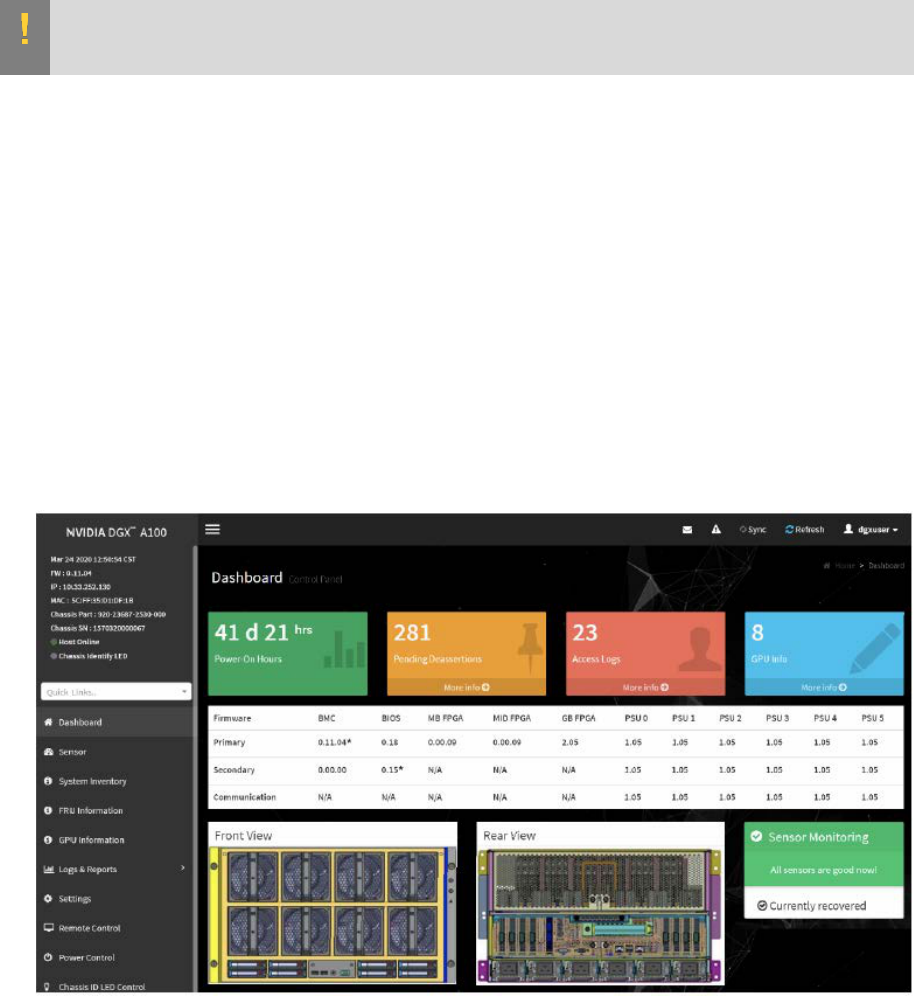
2.1.2. Remote Connection through the BMC
Here is some information about how you can remotely connect to DGX A100 through the
BMC.
Note: CBMC Security
NVIDIA recommends that customers follow best security practices for BMC management
(IPMI port). These include, but are not limited to, such measures as:
‣
Restricting the DGX A100 IPMI port to an isolated, dedicated management network.
‣
Using a separate, firewalled subnet.
‣
Configuring a separate VLAN for BMC traffic if a dedicated network is not available.
See Configuring Static IP Address for the BMC if you need to configure a static IP
address for the BMC.
This method requires that you have the BMC login credentials. These credentials depend
on the following conditions:
Before the First Boot Setup
‣
The default credentials are:
Connecting to the DGX A100
NVIDIA DGX A100 DU-09821-001 _v01|19
‣
Username: admin
‣
Password: dgxluna.admin
CAUTION: When you create a BMC admin user, we strongly recommend that you change
the default password for this user. Do not use the default password.
After the First Boot Setup
During the first-boot procedure, you were prompted to configure an administrator
username and password and a password for the BMC. The BMC username is the same as
the administrator username:
‣
Username: <administrator-username>
‣
Password: <bmc-password>
1. Make sure you have connected the BMC port on the DGX A100 system to your LAN.
2. Open a browser within your LAN and go to https://%3Cbmc-ip-address%3E/.
3. Make sure popups are allowed for the BMC address.
4. Log in.
5. From the left-side navigation menu, click Remote Control.
The Remote Control page allows you to open a virtual Keyboard/Video/Mouse (KVM)
on the DGX A100 system, as if you were using a physical monitor and keyboard
connected to the front of the system.
Connecting to the DGX A100
NVIDIA DGX A100 DU-09821-001 _v01|20
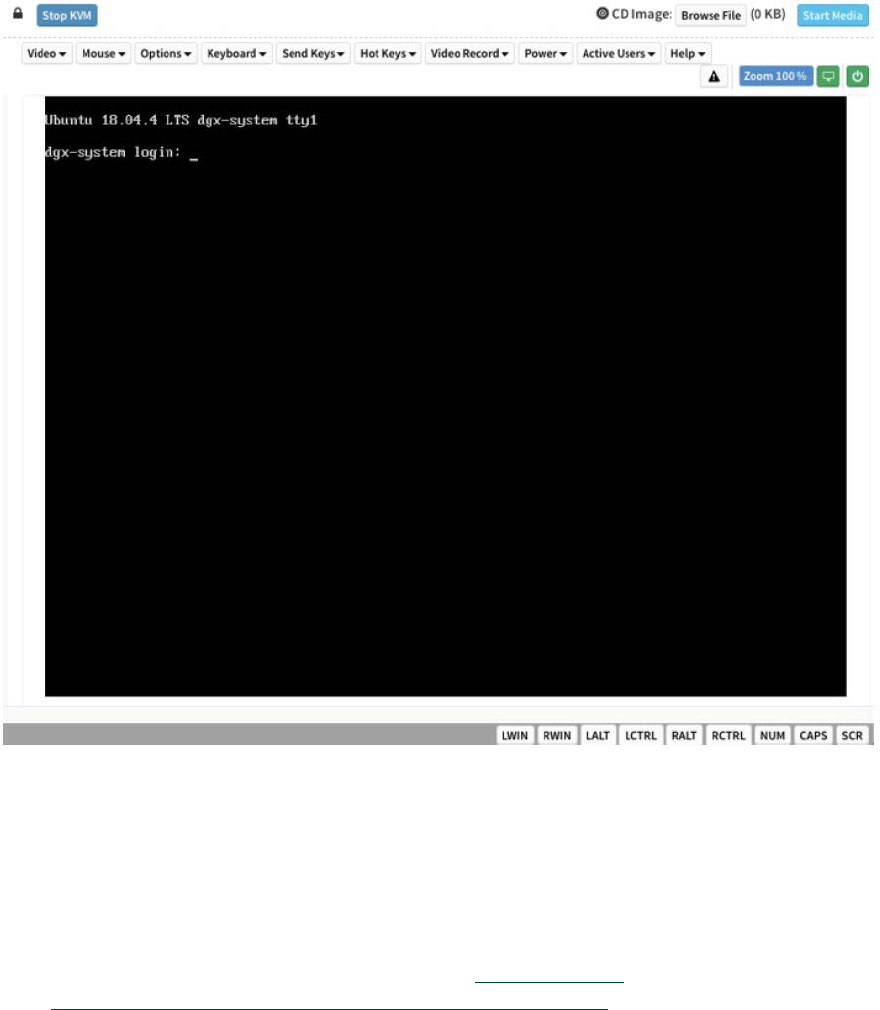
6. Click Launch KVM.
The DGX A100 console appears in your browser.
2.2. SSH Connection to the OS
Here is some information about how you can connect to the OS by using SSH.
After the system has been configured, you can also establish an SSH connection to the
DGX A100 OS through the network port. Refer to Network Ports to identify the port to
use and Configuring Static IP Addresses for the Network Ports to configure a static IP
address.

NVIDIA DGX A100 DU-09821-001 _v01|21
Chapter3. First Boot Setup
This section provides information about the set up process after you first boot the DGX
A100 system.
While NVIDIA partner network personnel or NVIDIA field service engineers will install
the DGX A100 system at the site and perform the first boot setup, the first boot setup
instructions are provided here for reference and to support any reimaging of the server.
3.1. Setting up the System
These instructions describe the setup process that occurs the first time the DGX A100
system is powered on after delivery or after the server is re-imaged.
Be prepared to accept all End User License Agreements (EULAs) and to set up your
username and password. To preview the EULA, visit https://www.nvidia.com/en-us/data-
center/dgx-systems/support/ and click the DGX EULA link.
1. Connect to the DGX A100 console as explained in “Connecting to the Console”.
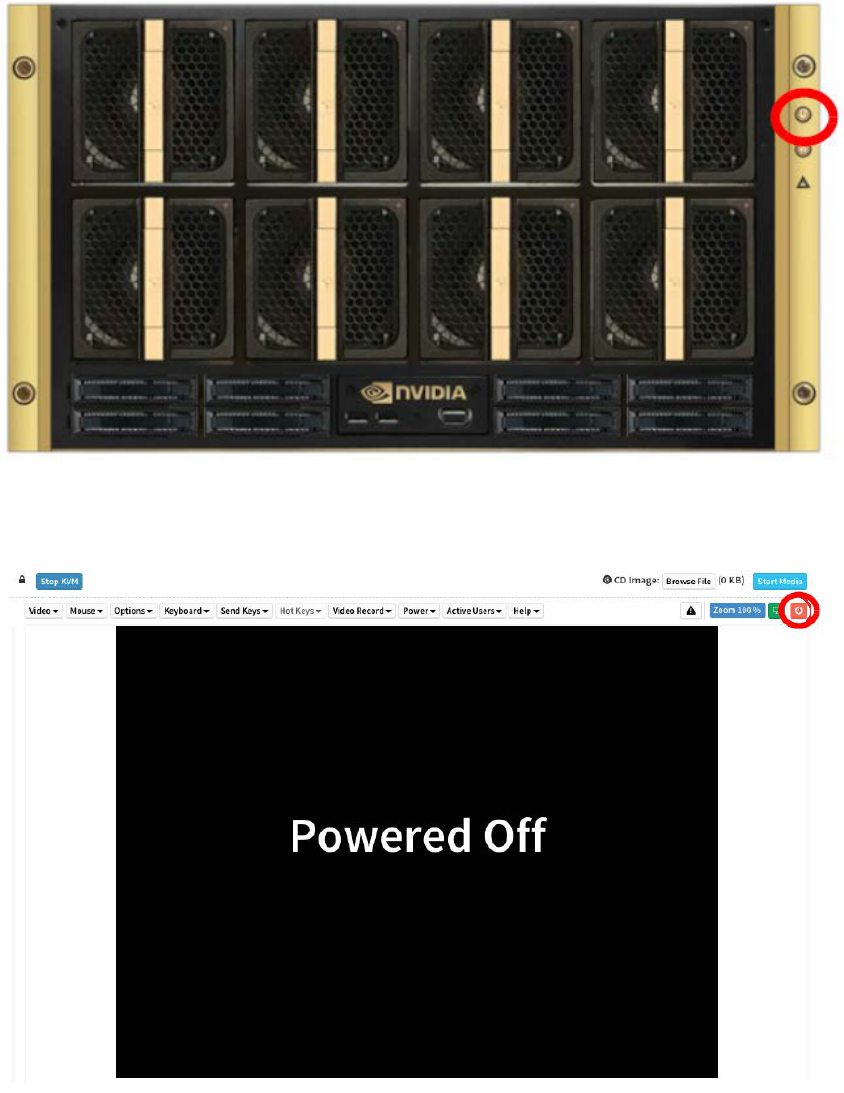
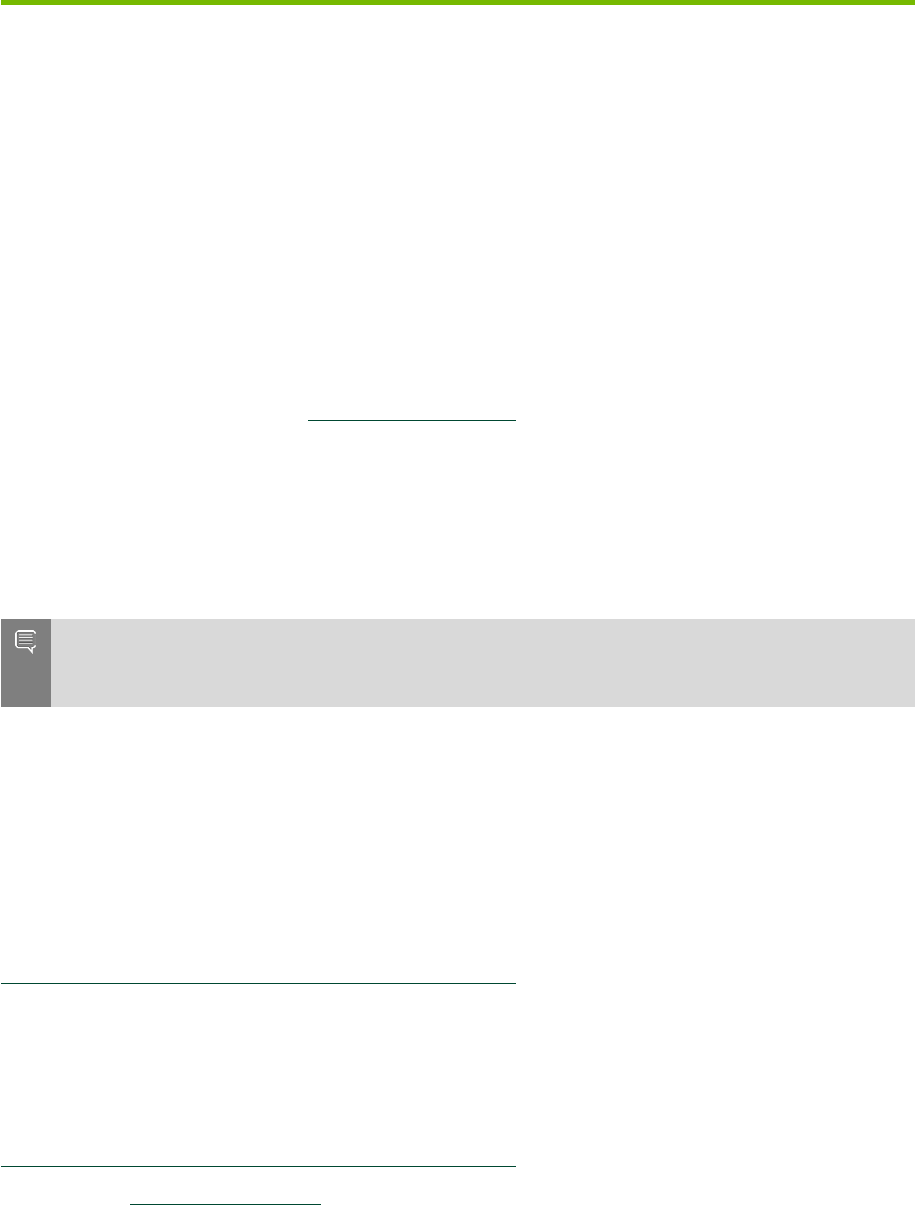
2. To power on the DGX A100 system in one of the following ways:
‣
Using the physical power button.
First Boot Setup
NVIDIA DGX A100 DU-09821-001 _v01|22
‣
Using the Remote BMC
3. If the DGX OS was installed with an encrypted root filesystem, you will be prompted
to unlock the drive.
4. Enter “nvidia3d” at the crypt: prompt.
5. You are presented with end user license agreements (EULAs) for the NVIDIA software.
6. Accept the EULA to proceed with the installation.

First Boot Setup
NVIDIA DGX A100 DU-09821-001 _v01|23
7. Perform the steps to configure the DGX A100 software.
a). Select your language and locale preferences.
b). Select the country for your keyboard.
c). Select your time zone.
d). Confirm the UTC clock setting.
e). Create an administrative user account with your name, username, and password.
The administrator username is used also for the BMC login username and GRUB
username.
Note: The BMC software will not accept "sysadmin" for a username. If you create
this username for the system log in, "sysadmin" will not be available for logging in
to the BMC.
f). Create a BMC admin password.
The BMC password length must be a minimum of 13 and a maximum of 20
characters.
CAUTION: Once you create your login credentials, the default admin/dgxluna.admin
credentials will no longer work.
g). (Available starting with DGX OS 5.0) Create a GRUB password.
‣
Your GRUB password must have at least 8 characters.
If it has less than 8 characters, you will not be able to continue.
‣
You can select OK without entering a password which will disable this step,
but NVIDIA recommends setting the GRUB password for security hardening.
h). (Available starting with DGX OS 5.0) Create a root filesystem passphrase.
You will need the new passphrase to unlock the root filesystem when the system
boots.
This step appears only if you installed the system with an encrypted root
filesystem during DGX OS installation.
i). Choose a primary network interface for the DGX A100 system; for example,
enp226s0.
This should typically be the interface that you will use for subsequent system
configuration or in-band management. Do not select enp37s0f3u1u3c2 (or
bmc_redfish0 or similar), as this is intended only for out-of-band management or
future support of in-band tools accessing the Redfish APIs.
After you select the primary network interface, the system attempts to configure
the interface for DHCP and then asks you to enter the name server addresses.
‣
If no DHCP is available, then click OK at the Network autoconfiguration failed
dialog and configure the network manually.
‣
If you want to configure a static address, then click Cancel at the dialog after
the DHCP configuration completes to restart the network configuration steps.

First Boot Setup
NVIDIA DGX A100 DU-09821-001 _v01|24
‣
If you need to select a different network interface, then click Cancel at
the dialog after the DHCP configuration completes to restart the network
configuration steps.
j). If prompted, fill in requested networking information, such as name server or
domain name.
k). Choose a host name for the DGX A100 system.
After completing the setup process, the DGX A100 system reboots automatically
and then presents the login prompt.
3.2. Post Setup Tasks
This section explains recommended tasks to perform after the initial system first-boot
setup.
Note: RAID 1 Rebuild May Temporarily Affect System Performance. When the system is
booted after restoring the image and running the first-boot setup, software RAID begins
the process of rebuilding the RAID 1 array, which creates a mirror of (or resynchronizing)
the drive containing the software. System performance may be affected during the RAID
1 rebuild process, which can take an hour to complete.
During this time, the command nvsm show health command will report a warning that the
RAID volume is re-syncing.
You can check the status of the RAID 1 rebuild process using sudo nvsm show volumes,
and then inspecting the output under /systems/localhost/storage/ volumes/md0/
rebuild.
3.2.1. Obtaining Software Updates
To ensure you are running the latest version, you might need to update the software.
Updating the software ensures your DGX A100 system contains important updates,
including security updates. The Ubuntu Security Notice site (https://usn.ubuntu.com/)
lists known Common Vulnerabilities and Exposures (CVEs), including those that can be
resolved by updating the DGX OS software.
1. Run the package manager.
$ sudo apt update
2. Upgrade to the latest version.
$ sudo apt full-upgrade
3.2.2. Enabling the srp Daemon
The srp_daemon comes with the Mellanox drivers and is disabled by default. It is needed
only if you are using RDMA over Infiniband (see SRP - SCSI RDMA Protocol). If necessary,
you can enable the srp_daemon by issuing the following commands:
$ sudo systemctl enable srp_daemon.service
$ sudo systemctl enable srptools.service
NVIDIA DGX A100 DU-09821-001 _v01|25
Chapter4. Quick Start and Basic
Operation
This chapter provides basic requirements and instructions for using the DGX A100
system, including how to perform a preliminary health check and how to prepare for
running containers. Go to the DGX documentation for additional product documentation.
4.1. Installation and Configuration
Before you install DGX A100, ensure you have given all relevant site information to your
Installation Partner.
Important: Your DGX A100 System must be installed by NVIDIA partner network personnel
or NVIDIA field service engineers. If not performed accordingly, your DGX A100 hardware
warranty will be voided.
4.2. Registering Your DGX A100
To obtain support for your DGX A100, follow the instructions for registration in the
Entitlement Certification email that was sent as part of the purchase.
Registration allows you to access the NVIDIA Enterprise Support Portal, obtain technical
support, get software updates, and set up an NGC for DGX systems account. If you did
not receive the information, open a case with the NVIDIA Enterprise Support Team at
https://www.nvidia.com/en-us/support/enterprise/.
To obtain support for your DGX A100 system, follow the instructions for registration in
the Entitlement Certification email that was sent as part of the purchase.
Registration allows you to access the NVIDIA Enterprise Support Portal, obtain technical
support, get software updates, and set up an NGC for DGX systems account. If you did
not receive the information, open a case with the NVIDIA Enterprise Support Team at
https://www.nvidia.com/en-us/support/enterprise/.
Refer to the Customer Support chapter for customer support contact information.

Quick Start and Basic Operation
NVIDIA DGX A100 DU-09821-001 _v01|26
4.3. Obtaining an NGC Account
Here is some information about how you can obtain an NGC account.
NVIDIA NGC provides simple access to GPU-optimized software for deep learning,
machine learning , and high-performance computing (HPC). An NGC account grants you
access to these tools and gives you the ability to set up a private registry to manage
your customized software.
If you are the organization administrator for your DGX system purchase, work with
NVIDIA Enterprise Support to set up an NGC enterprise account. Refer to the NGC
Private Registry User Guide for more information about getting an NGC enterprise
account.
4.4. Turning DGX A100 On and Off
DGX A100 is a complex system, integrating a large number of cutting-edge components
with specific startup and shutdown sequences. Observe the following startup and
shutdown instructions.
4.4.1. Startup Considerations
To keep your DGX A100 running smoothly, allow up to a minute of idle time after
reaching the login prompt. This ensures that all components can complete their
initialization.
4.4.2. Shutdown Considerations
When shutting down DGX A100, always initiate the shutdown from the operating
system, momentary press of the power button, or by using Graceful Shutdown from
the BMC, and wait until the system enters a powered-off state before performing any
maintenance.
WARNING: Risk of Danger - Removing power cables or using Power Distribution Units
(PDUs) to shut off the system while the Operating System is running may cause damage
to sensitive components in the DGX A100 server.
4.5. Verifying Functionality - Quick
Health Check
NVIDIA provides customers a diagnostics and management tool called NVIDIA System
Management, or NVSM. The nvsm command can be used to determine the system's
health, identify component issues and alerts, or run a stress test to make sure all

Quick Start and Basic Operation
NVIDIA DGX A100 DU-09821-001 _v01|27
components are in working order while under load. The use of Docker is key to getting
the most performance out of the system since NVIDIA has optimized containers for all
the major frameworks and workloads used on DGX systems.
The following are the steps for performing a health check on the DGX A100 System, and
verifying the Docker and NVIDIA driver installation.
1. Establish an SSH connection to the DGX A100 System.
2. Run a basic system check.
$ sudo nvsm show health
3. Verify that the output summary shows that all checks are Healthy and that the
overall system status is Healthy.
4. Verify that Docker is installed by viewing the installed Docker version.
$ sudo docker --version
This should return the version as “Docker version 19.03.5-ce”, where the actual
version may differ depending on the specific release of the DGX OS Server software.
5. Verify connection to the NVIDIA repository and that the NVIDIA Driver is installed.
$ sudo docker run --gpus all --rm nvcr.io/nvidia/cuda:11.0-base nvidia-smi
Docker pulls the nvidia/cuda container image layer by layer, then runs nvidia-smi.
When completed, the output should show the NVIDIA Driver version and a
description of each installed GPU.
See the NVIDIA Containers and Deep Learning Frameworks User Guide at https://
docs.nvidia.com/deeplearning/dgx/user-guide/index.html for additional instructions,
including an example of logging into the NGC container registry and launching a deep
learning container.
4.6. Running the Pre-flight Test
Instructions for running the DGX stress test.
NVIDIA recommends running the pre-flight stress test before putting a system into a
production environment or after servicing. You can specify running the test on the GPUs,
CPU, memory, and storage, and also specify the duration of the tests.
To run the tests, use NVSM.
Syntax:
$ sudo nvsm stress-test [--usage] [--force] [--no-prompt] [<test>...] [DURATION]
For help on running the test, issue the following.
~$ sudo nvsm stress-test --usage
Recommended Command
The following command runs the test on all supported components (GPU, CPU, memory,
and storage), and takes approximately 20 minutes.
~$ sudo nvsm stress-test --force

Quick Start and Basic Operation
NVIDIA DGX A100 DU-09821-001 _v01|28
4.7. Running NGC Containers with GPU
Support
To obtain the best performance when running NGC containers on DGX A100 systems,
the following methods of providing GPU support for Docker containers are available:
‣
Native GPU support (included in Docker 19.03 and later)
‣
NVIDIA Container Runtime for Docker (nvidia-docker2 package)
The method implemented in your system depends on the DGX OS version installed.
DGX OS Releases Method Included
5.0
‣
Native GPU support
‣
NVIDIA Container Runtime for Docker
(deprecated - availability to be removed in a
future DGX OS release)
Each method is invoked by using specific Docker commands, described as follows.
4.7.1. Using Native GPU Support
Here is some information about using native GPU support.
Use docker run --gpus to run GPU-enabled containers.
‣
Example using all GPUs
$ sudo docker run --gpus all ...
‣
Example using two GPUs
$ sudo docker run --gpus 2 ...
‣
Examples using specific GPUs
$ sudo docker run --gpus '"device=1,2"' ...
$ sudo docker run --gpus '"device=UUID-ABCDEF,1"' ...
4.7.2. Using the NVIDIA Container Runtime for
Docker
Currently, the DGX OS also includes the NVIDIA Container Runtime for Docker (nvidia-
docker2) which lets you run GPU-accelerated containers in one of the following ways.
‣
Use docker run and specify runtime=nvidia.
$ docker run --runtime=nvidia ...
‣
Use nvidia-docker run.
$ nvidia-docker run ...
The nvidia-docker2 package provides backward compatibility with the previous
nvidia-docker package, so you can run GPU-accelerated containers using this
command and the new runtime will be used.
Quick Start and Basic Operation
NVIDIA DGX A100 DU-09821-001 _v01|29
‣
Use docker run with nvidia as the default runtime.
You can set nvidia as the default runtime, for example, by adding the following line to the
/ etc/docker/daemon.json configuration file as the first entry.
"default-runtime": "nvidia",
Here is an example of how the added line appears in the JSON file. Do not remove any
pre-existing content when making this change.
{
"default-runtime": "nvidia",
"runtimes": {
"nvidia": {
"path": "/usr/bin/nvidia-container-runtime",
"runtimeArgs": []
}
You can then use docker run to run GPU-accelerated containers.
$ docker run ...
CAUTION: If you build Docker images while nvidia is set as the default runtime, make
sure the build scripts executed by the Dockerfile specify the GPU architectures that the
container will need. Failure to do so might result in the container being optimized only for
the GPU architecture on which it was built.
Instructions for specifying the GPU architecture depend on the application and are
beyond the scope of this document. Consult the specific application build process.
4.8. Managing CPU Mitigations
includes security updates to mitigate CPU speculative side-channel vulnerabilities.
These mitigations can decrease the performance of deep learning and machine learning
workloads.
If your installation of DGX systems incorporates other measures to mitigate these
vulnerabilities, such as measures at the cluster level, you can disable the CPU mitigations
for individual DGX nodes and thereby increase performance. This capability is available
starting with .
4.8.1. Determining the CPU Mitigation State of
the DGX System
If you do not know whether CPU mitigations are enabled or disabled, issue the following.
$ cat /sys/devices/system/cpu/vulnerabilities/*
‣
CPU mitigations are enabled if the output consists of multiple lines prefixed with
Mitigation:.
Example
KVM: Mitigation: Split huge pages
Mitigation: PTE Inversion; VMX: conditional cache flushes, SMT vulnerable
Quick Start and Basic Operation
NVIDIA DGX A100 DU-09821-001 _v01|30
Mitigation: Clear CPU buffers; SMT vulnerable
Mitigation: PTI
Mitigation: Speculative Store Bypass disabled via prctl and seccomp
Mitigation: usercopy/swapgs barriers and __user pointer sanitization
Mitigation: Full generic retpoline, IBPB: conditional, IBRS_FW, STIBP:
conditional, RSB filling
Mitigation: Clear CPU buffers; SMT vulnerable
‣
CPU mitigations are disabled if the output consists of multiple lines prefixed with
Vulnerable.
Example
KVM: Vulnerable
Mitigation: PTE Inversion; VMX: vulnerable
Vulnerable; SMT vulnerable
Vulnerable
Vulnerable
Vulnerable: __user pointer sanitization and usercopy barriers only; no swapgs
barriers
Vulnerable, IBPB: disabled, STIBP: disabled
Vulnerable
4.8.2. Disabling CPU Mitigations
CAUTION: Performing the following instructions will disable the CPU mitigations provided
by the DGX OS Server software.
1. Install the nv-mitigations-off package.
$ sudo apt install nv-mitigations-off -y
2. Reboot the system.
3. Verify CPU mitigations are disabled.
$ cat /sys/devices/system/cpu/vulnerabilities/*
The output should include several Vulnerable lines. See Determining the CPU
Mitigation State of the DGX System for example output.
4.8.3. Re-enabling CPU Mitigations
1. Remove the nv-mitigations-off package.
$ sudo apt purge nv-mitigations-off
2. Reboot the system.
3. Verify CPU mitigations are enabled.
$ cat /sys/devices/system/cpu/vulnerabilities/*
The output should include several Mitigations lines. See Determining the CPU
Mitigation State of the DGX System for example output.

NVIDIA DGX A100 DU-09821-001 _v01|31
Chapter5. Additional Features and
Instructions
This chapter describes specific features of the DGX A100 server to consider during
setup and operation.
5.1. Managing the DGX Crash Dump
Feature
The DGX OS includes a script to manage this feature.
5.1.1. Using the Script
This section provides information about how to use the script to manage DGX crash
dumps.
‣
To enable only dmesg crash dumps, enter the following command:
$ /usr/sbin/dgx-kdump-config enable-dmesg-dump
This option reserves memory for the crash kernel.
‣
To enable both dmesg and vmcore crash dumps, enter the following command:
$ /usr/sbin/dgx-kdump-config enable-vmcore-dump
This option reserves memory for the crash kernel.
‣
To disable crash dumps, enter the following:
$ /usr/sbin/dgx-kdump-config disable
This option disables the use of kdump and make sure no memory is reserved for the
crash kernel.
5.1.2. Connecting to Serial Over LAN to View the
Console
While dumping vmcore, the BMC screen console goes blank approximately 11 minutes
after the crash dump is started. To view the console output during the crash dump,
connect to serial over LAN as follows:
$ ipmitool -I lanplus -H <bmc-ip-address> -U <BMC-USERNAME> -P <BMC-PASSWORD>

Additional Features and Instructions
NVIDIA DGX A100 DU-09821-001 _v01|32
sol activate

NVIDIA DGX A100 DU-09821-001 _v01|33
Chapter6. Managing the DGX A100
Self-Encrypting Drives
The NVIDIA DGX OS software supports the ability to manage self-encrypting drives
(SEDs), including setting an Authentication Key for locking and unlocking the drives on
NVIDIA DGX
™
A100 systems. You can manage only the SED data drives.
The software cannot be used to manage OS drives even if they are SED-capable.
6.1. Overview
The SED management software is in the nv-disk-encrypt package.
The software supports the following configurations:
‣
NVIDIA DGX A100 systems where all data drives are self-encrypting drives.
‣
Only SEDs used as data drives are supported.
The software will not manage SEDs that are OS drives.
The software provides the following functionality:
‣
Identifies eligible drives on the system.
‣
Allows you to you assign Authentication Keys (passwords) for each SED as part of the
initialization process.
‣
Alternatively, the software can generate random passwords for each drive.
‣
The passwords are stored in a password-protected vault on the system.
‣
Once initialized, SEDs are locked upon power loss, such as a system shutdown or
drive removal.
Locked drives get unlocked after power is restored and the root file system is
mounted.
‣
Provides functionality to export the vault.
‣
Provides functionality for erasing the drives.
‣
Provides the ability to revert the initialization.

Managing the DGX A100 Self-Encrypting Drives
NVIDIA DGX A100 DU-09821-001 _v01|34
6.2. Installing the Software
Use the package manager to install the nv-disk-encrypt package and, optionally, the
TPM2 tools package, and reboot the system. You need the TPM tools package if you plan
to use the TPM2 to store security keys.
1. Update the packages.
$ sudo apt update
2. Install nv-disk-encrypt.
$ sudo apt install -y nv-disk-encrypt
3. (Optional) Install tpm2-tools.
$ sudo apt install -y tpm2-tools
4. Reboot.
$ sudo reboot
If you plan to use TPM2, enable it. Refer to “Configuring Trusted Computing” for more
information.
6.3. Configuring Trusted Computing
Here is some information about the controls that are required to configure Trusted
Computing (TC).
The DGX A100 system BIOS provides setup controls for configuring the following TC
features:
‣
Trusted Platform Module
The NVIDIA DGX A100 incorporates Trusted Platform Module 2.0 (TPM 2.0) which can
be enabled from the system BIOS and used in conjunction with the nv-disk-encrypt
tool. After being enabled, the nv-disk-encrypt tool uses the TPM for encryption
and stores the vault and SED authentication keys on the TPM instead of on the file
system. Using the TPM is preferred because this allows the vault data to persist even
if the system is reimaged.
‣
Block SID
Certain drives shipped with the DGX A100 system might support the Block SID
authentication feature. Block SID authentication prevents malicious actors from
taking ownership of drives and blocks others from using the drives. By default, the
DGX BIOS will send the Block SID request. On such setups, you will need to enable
the Disable Block Sid feature in the BIOS before proceeding with the initialization
steps.
Managing the DGX A100 Self-Encrypting Drives
NVIDIA DGX A100 DU-09821-001 _v01|35
6.3.1. Determining Whether Drives Support SID
The drive model is a good indicator of whether the drive supports this feature. Issue the
following and look for the KCM6DRUL3T84 model string:
$ sudo nvme list
Node SN Model ...
---------------- -------------------- ---------------------
/dev/nvme0n1 70H0A0AHTTHR KCM6DRUL3T84 ...
/dev/nvme1n1 70H0A007TTHR KCM6DRUL3T84
6.3.2. Enabling the TPM and Preventing the BIOS
from Sending Block SID Requests
This section provides instructions to enable the TPM and prevent the SBIOS from
sending Block SID request. Each task is independent, so you can select which task to
complete.
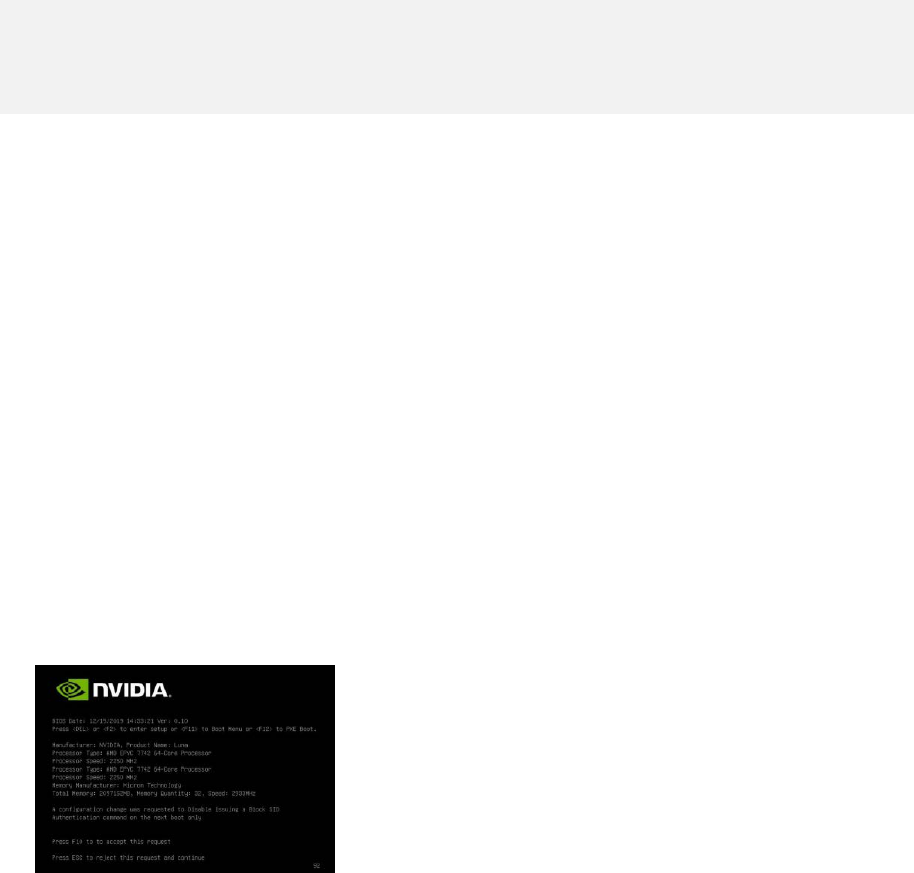
1. Reboot the DGX A100, then press [Del] or [F2] at the NVIDIA splash screen to enter
the BIOS Setup.
2. Navigate to the Advanced tab on the top menu, then scroll to Trusted Computing and
press [Enter].
‣
To enable TPM, scroll to Security Device and switch the setting to Enabled.
‣
To disable Block SID, scroll to Disable Block Sid, then switch to Enabled.
3. Save and exit the BIOS Setup to continue the boot process.
If you disabled Block SID, you will be prompted to accept the request to disable
issuing a Block SID Authentication command.
4. Press F10 at the prompt.
After the system boots, you can proceed to initialize drive encryption.
Managing the DGX A100 Self-Encrypting Drives
NVIDIA DGX A100 DU-09821-001 _v01|36
6.4. Initializing the System for Drive
Encryption
Here is some information about how to initialize the system for drive encryption.
Note: Before initializing drive encryption, review the information in Configuring Trusted
Computing and follow the configuration instructions if needed.
Initialize the system for drive encryption using the nv-disk-encrypt command.
$ sudo nv-disk-encrypt init [-k <your-vault-password>] [-f <path/to/json-file>] [-g]
[- r]
Here is a list of the options:
‣
-k: Lets you create the vault password in the command.
Otherwise, the software will prompt you to create a password before proceeding.
‣
-f: Lets you specify a JSON file that contains a mapping of passwords to drives.
Refer to “Example 1: Passing in the JSON File” for further instructions.
‣
-g: Generates random salt values (stored in /etc/nv-disk-encrypt/.dgxenc.salt)
for each drive password.
Salt values are characters added to a password for enhanced password security.
NVIDIA strongly recommends using this option for best security, otherwise the
software will use a default salt value instead of a randomly generated one.
‣
-r: Generates random passwords for each drive.
This avoids the need to create a JSON file or the need to enter a password one by
one during the initialization.
6.5. Enabling Drive Locking
After initializing the system for SED management, issue the following command, which
uses the nv-disk-encrypt command to enable drive locking.
$ sudo nv-disk-encrypt lock
After initializing the system and enabling drive locking, the drives will become locked
when they lose power. The system will automatically unlock each drive when power is
restored to the system and the system is rebooted.
6.6. Initialization Examples
This section provides some initialization examples.

Managing the DGX A100 Self-Encrypting Drives
NVIDIA DGX A100 DU-09821-001 _v01|37
6.6.1. Example 1: Passing in the JSON File
The following instructions in this section describe a method to specify the drive/
password mapping ahead of time. This method is useful for initializing several drives
at a time and avoids the need to enter the password for each drive after issuing the
initialization command, or if you want control of the passwords.
Refer to the following for more information:
‣
Determining Which Drives Can be Managed as Self-Encrypting
‣
Creating the Drive/Password Mapping JSON Files and Using it to Initialize the System
6.6.1.1. Determining Which Drives Can be Managed as
Self-Encrypting
Here is some information about how you can determine which drives can be managed as
self-encrypting.
Review the storage layout of the DGX system to determine which drives are eligible to be
managed as SEDs.
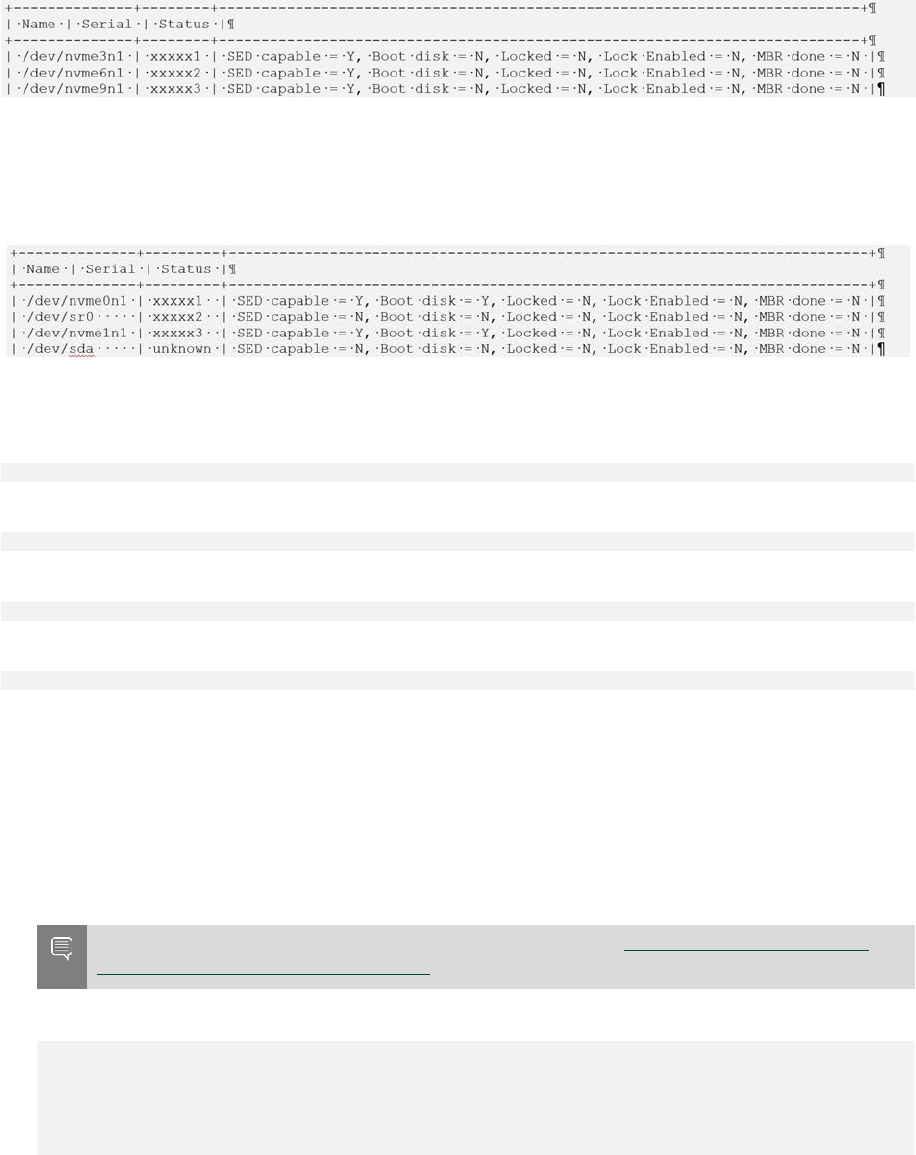
$ sudo nv-disk-encrypt info
The default output shows which drives can be used for encryption and which drives
cannot. The following status information is provided:
‣
SED capable: Is this a self-encrypting drive?
‣
Boot disk: Is this drive currently being used as a boot drive? Does it contain the root
filesystem?
‣
Locked: Is this drive currently in the locked state? Is it able to accept I/O?. It can only
be in this state after the following conditions have been met:
‣
Locking has been enabled (nv-disk-encrypt init, followed by nv-disk-encrypt
init lock)
‣
The drive is coming back from power-off.
‣
The user queries this state prior to it being (automatically) unlocked.
‣
Lock Enabled: Are locks enabled on this drive? It will be in this state after initialization
(nv- disk-encrypt init).
‣
MBR done: This setting is only relevant for drives that support MBR shadowing.
On drives that support this feature, this will report 'Y' after initialization (nv-disk-
encrypt init)
MBR done: This setting is only relevant for drives that support MBR shadowing. On drives
that support this feature, this will report 'Y' after initialization (nv-disk-encrypt init)
The following example output snippet shows drives than can be used for encryption.
Notice SED capable = Y and Boot disk = N.
Managing the DGX A100 Self-Encrypting Drives
NVIDIA DGX A100 DU-09821-001 _v01|38
The following example output snippet shows drives than cannot be used for encryption.
Notice SED capable = Y and Boot disk = Y, or SED capable = N.
Alternatively, you can specify the output be presented in JSON format by using the -j
option.
$ sudo nv-disk-encrypt info -j
In this case, drives that can be used for encryption are indicate by the following:
"sed_capable": true "used_for_boot": false
And drives that cannot be used for encryption are indicated by one of the following:
"sed_capable": true "used_for_boot": true
Or
"sed_capable": false
6.6.1.2. Creating the Drive/Password Mapping JSON
Files and Using it to Initialize the System
You can initialize the system by creating the drive and password map the JSON files.
1. Create a JSON file that lists all the eligible SED-capable drives that you want to
manage.
Note: These are the list of drives that you obtained from Determining Which Drives
Can be Managed as Self-Encrypting.
The following example shows the format of the JSON file.
{
"/dev/nvme2n1": "<your-password>",
"/dev/nvme3n1": "<your-password>",
"/dev/nvme4n1": "<your-password>",
"/dev/nvme5n1": "<your-password>",
}
‣
Ensure that you follow the syntax exactly.
‣
Passwords must consist of only upper-case letters, lower-case letters, digits, and/
or the following special characters: ~ : @ % ^ + = _ ,
2. Initialize the system and then enable locking.

Managing the DGX A100 Self-Encrypting Drives
NVIDIA DGX A100 DU-09821-001 _v01|39
The following command assumes you have placed the JSON file in the /tmp directory.
$ sudo nv-disk-encrypt init -f /tmp/<your-file>.json -g
$ sudo nv-disk-encrypt lock
When prompted, enter a password for the vault.
Passwords must consist of only upper-case letters, lower-case letters, digits, and/or
the following special characters: ~ : @ % ^ + = _ ,
6.6.2. Example 2: Generating Random Passwords
The commands in this topic use the -k and -r options so that you are not prompted to
enter passwords. You pass the vault password into the command and then the command
instructs the tool to generate random passwords for each drive.
The vault password must consist of only upper-case letters, lower-case letters, digits,
and/or the following special-characters: ~ : @ % ^ + = _ ,
$ sudo nv-disk-encrypt init -k <your-vault-password> -g -r
$ sudo nv-disk-encrypt lock
6.6.3. Example 3: Specifying Passwords One at a
Time When Prompted
If there are a small number of drives, or you do not want to create a JSON file, issue the
following command.
$ sudo nv-disk-encrypt init -g
$ sudo nv-disk-encrypt lock
The software prompts you to enter a password for the vault and then a password for
each eligible SED.
Passwords must consist of only upper-case letters, lower-case letters, digits, and/or the
following special characters: ~ : @ % ^ + = _ ,
6.7. Disabling Drive Locking
To disable drive locking at any time after you initialize, run the following command: $ sudo
nv-disk-encrypt disable
This command disables locking on all drives. You can run the initial set up again at any
time after this process is complete.
6.8. Enabling Drive Locking
After initializing the system for SED management, issue the following command, which
uses the nv-disk-encrypt command to enable drive locking.
$ sudo nv-disk-encrypt lock
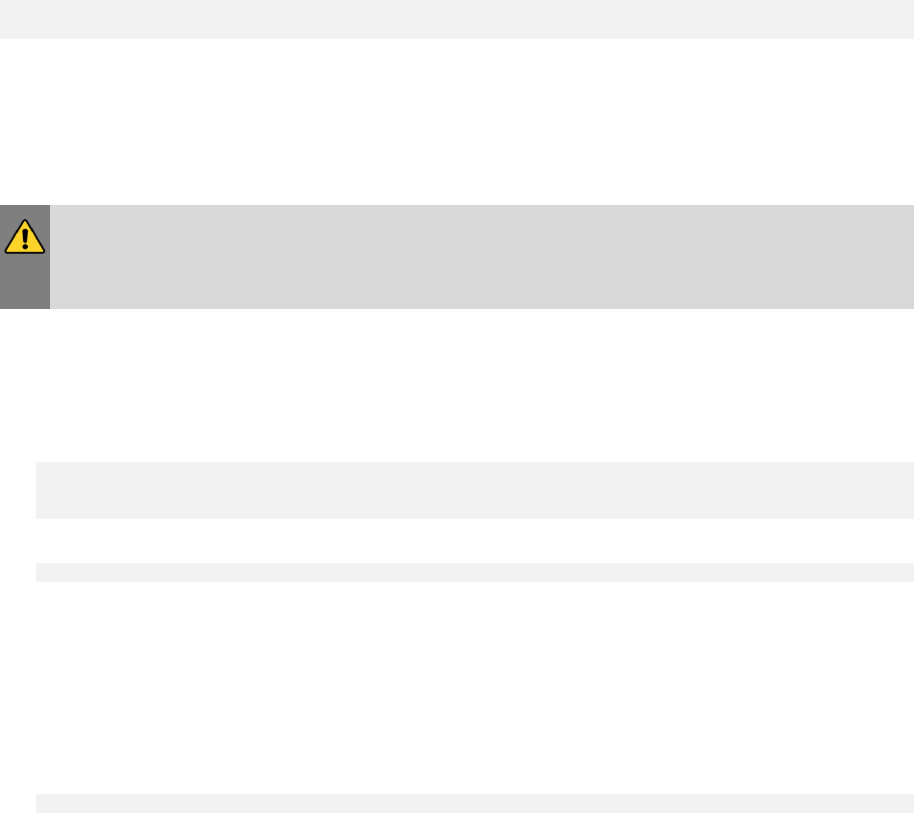
Managing the DGX A100 Self-Encrypting Drives
NVIDIA DGX A100 DU-09821-001 _v01|40
After initializing the system and enabling drive locking, the drives will become locked
when they lose power. The system will automatically unlock each drive when power is
restored to the system and the system is rebooted.
6.9. Exporting the Vault
Here is some information about how to export the vault.
To export all drive keys out to a file, use the export function. This requires that you pass
in the vault password.
$ sudo nv-disk-encrypt export -k yourvaultpassword
Writing vault data to /tmp/secrets.out
6.10. Erasing Your Data
Here is some information about how you can erase your data.
WARNING: Be aware when executing this that all data will be lost. On DGX A100 systems,
these drives generally form a RAID 0 array, and this array will also be destroyed when you
perform an erase.
After initializing the system for SED management, use the nv-disk-encrypt command to
erase data on your drives after stopping cachefilesd and unmounting the RAID array as
follows.
1. Completely stop the RAID.
$ systemctl stop cachefilesd
$ sudo umount /raid
$ sudo mdadm --stop /dev/md1
2. Perform the erase.
$ sudo nv-disk-encrypt erase
This command does the following:
‣
Sets the drives in an unlocked state.
‣
Disables locking on the drives.
‣
Removes the RAID 0 array configuration.
To rebuild the RAID array, issue the following command:
$ sudo /usr/bin/configure_raid_array.py -c -f
6.11. Clearing the TPM
If you've lost the password to your TPM, you will not be able to access its contents. In
this case, the only way to regain access to the TPM is to clear the TPM's contents. After
clearing the TPM, you will need to re-initialize the vault and SED authentication keys.
Managing the DGX A100 Self-Encrypting Drives
NVIDIA DGX A100 DU-09821-001 _v01|41
1. Reboot the DGX A100, then press [Del] or [F2] at the NVIDIA splash screen to enter
the BIOS Setup.
2. Navigate to the Advanced tab on the top menu, scroll to Trusted Computing, and
press [Enter].
3. Clear TPM2.
a). Scroll to Trusted Computing and press [Enter].
b). Scroll to Pending Operation and press [Enter].
c). Select TPM Clear at the Pending Operation popup and press [Enter].
4. Save and exit the BIOS Setup.
6.12. Changing Disk Passwords, Adding
Disks, or Replacing Disks
The same steps are needed for changing or rotating passwords, adding disks, or
replacing disks.
Context for the current task.
1. Disable SED management.
$ sudo nv-disk-encrypt disable
2. Add or replace drives as needed and then rebuild the RAID array.
Refer to the NVIDIA DGX A100 Service Manual for more information.
3. Enable SED management and assign passwords per the instructions in Initializing the
System for Drive Encryption.
6.13. Recovering From Lost Keys
NVIDIA recommends backing up your keys and storing them in a secure location. If
you’ve lost the key used to initialize and lock your drives, you will not be able to unlock
the drive again. If this happens, the only way to recover is to perform a factory-reset,
which will result in a loss of data.
SED drives come with a PSID printed on the label; this value can only be obtained by
physically examining the drive as exemplified in the following image.
Specify the PSID to reset the drive using the following sedutil-cli command:
NVIDIA DGX A100 DU-09821-001 _v01|42
Chapter7. Network Configuration
This chapter describes key network considerations and instructions for the DGX A100
System.
7.1. Configuring Network Proxies
If your network requires use of a proxy server, you will need to set up configuration files
to ensure the DGX A100 System communicates through the proxy.
7.1.1. For the OS and Most Applications
Edit the /etc/environment file and add the following proxy addresses to the file, below
the PATH line.
http_proxy="http://<username>:<password>@<host>:<port>/"
ftp_proxy="ftp://<username>:<password>@<host>:<port>/";
https_proxy="https://<username>:<password>@<host>:<port>/";
no_proxy="localhost,127.0.0.1,localaddress,.localdomain.com"
HTTP_PROXY="http://<username>:<password>@<host>:<port>/"
FTP_PROXY="ftp://<username>:<password>@<host>:<port>/";
HTTPS_PROXY="https://<username>:<password>@<host>:<port>/";
NO_PROXY="localhost,127.0.0.1,localaddress,.localdomain.com"
Where username and password are optional.
http_proxy="http://myproxy.server.com:8080/"
ftp_proxy="ftp://myproxy.server.com:8080/";
https_proxy="https://myproxy.server.com:8080/";
7.1.2. For apt
Edit (or create) the /etc/apt/apt.conf.d/myproxy proxy file and include the following
lines:
Acquire::http::proxy "http://<username>:<password>@<host>:<port>/";
Acquire::ftp::proxy "ftp://<username>:<password>@<host>:<port>/";
Acquire::https::proxy "https://<username>:<password>@<host>:<port>/";
Where username and password are optional.
Example:
Acquire::http::proxy "http://myproxy.server.com:8080/";
Acquire::ftp::proxy "ftp://myproxy.server.com:8080>/";
Acquire::https::proxy "https://myproxy.server.com:8080/";
Network Configuration
NVIDIA DGX A100 DU-09821-001 _v01|43
7.1.3. For Docker
To ensure that Docker can access the NGC container registry through a proxy, Docker
uses environment variables. For best practice recommendations on configuring proxy
environment variables for Docker, see https://docs.docker.com/.
7.2. Configuring Docker IP Addresses
To ensure that the DGX A100 system can access the network interfaces for Docker
containers, Docker should be configured to use a subnet distinct from other network
resources used by the DGX A100 System.
By default, Docker uses the 172.17.0.0/16 subnet. Consult your network administrator
to find out which IP addresses are used by your network. If your network does not
conflict with the default Docker IP address range, no changes are needed, and you can
skip this section.
However, if your network uses the addresses within this range for the DGX A100 system,
you should change the default Docker network addresses.
You can change the default Docker network addresses by modifying the /etc/docker/
daemon.json file or modifying the /etc/systemd/system/docker.service.d/docker-
override.conf file. These instructions provide an example of modifying the /etc/
systemd/system/docker.service.d/docker-override.conf file to override the default
Docker network addresses.
1. Open the docker-override.conf file for editing.
$ sudo vi /etc/systemd/system/docker.service.d/docker-override.conf
[Service] ExecStart=
ExecStart=/usr/bin/dockerd -H fd:// -s overlay2 LimitMEMLOCK=infinity
LimitSTACK=67108864
2. Make the changes indicated in bold below, setting the correct bridge IP address and
IP address ranges for your network.
Consult your IT administrator for the correct addresses.
[Service] ExecStart=
ExecStart=/usr/bin/dockerd -H fd:// -s overlay2 --bip=192.168.127.1/24
--fixed-cidr=192.168.127.128/25
LimitMEMLOCK=infinity
LimitSTACK=67108864
3. When you are finished save and close the /etc/systemd/system/docker.service.d/
docker- override.conf file.
4. Reload the systemctl daemon.
$ sudo systemctl daemon-reload
5. Restart Docker.
$ sudo systemctl restart docker
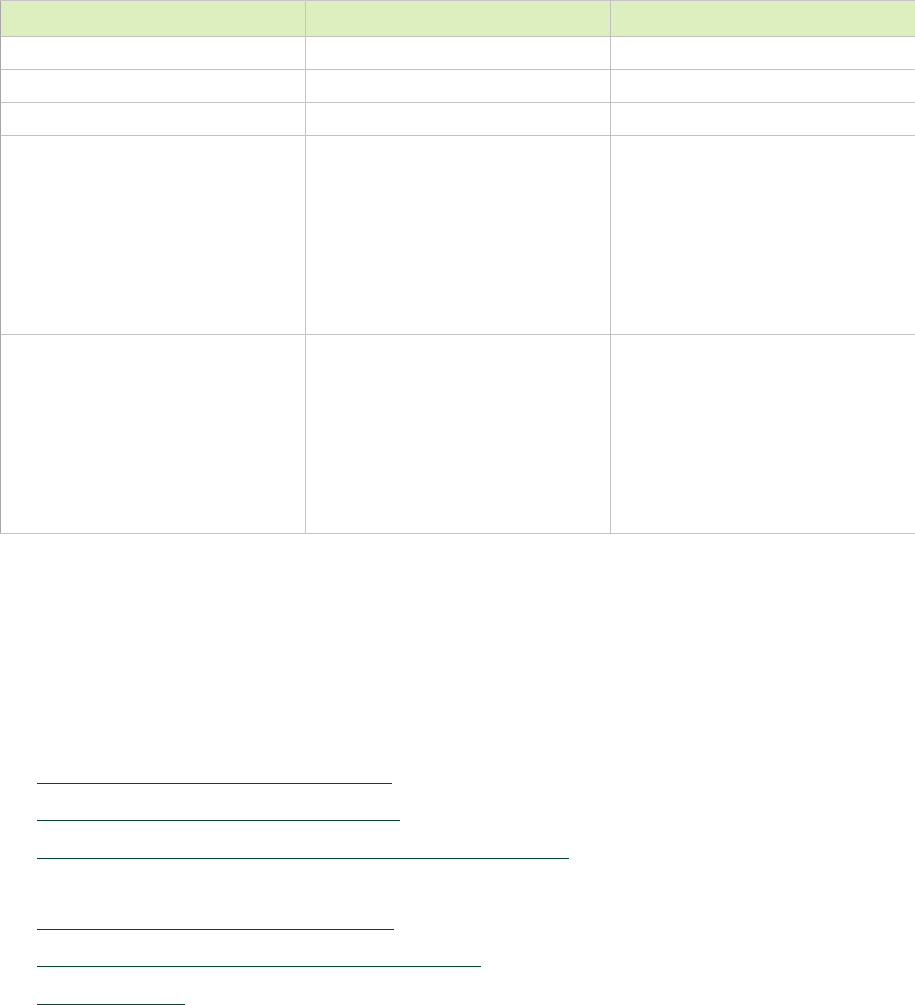
Network Configuration
NVIDIA DGX A100 DU-09821-001 _v01|44
7.3. Open Ports
Make sure that the ports listed in the following table are open and available on your
firewall to the DGX A100 System.
Table7. Open Ports
Port (Protocol) Direction Use
22 (TCP) Inbound SSH
53 (UDP) Outbound DNS
80 (TCP) Outbound HTTP, package updates
443 (TCP) Outbound
For internet (HTTP/HTTPS)
connection to NVIDIA GPU
Cloud
If port 443 is proxied through
a corporate firewall, then
WebSocket protocol traffic
must be supported.
443 (TCP) Inbound
For BMC web services, remote
console services, cd-media
service, and Redfish.
If port 443 is proxied
through a corporate firewall,
WebSocket protocol traffic
must be supported.
7.4. Connectivity Requirements for NGC
Containers
To run NVIDIA NGC containers from the NGC container registry, your network must be
able to access the following URLs:
‣
http://archive.ubuntu.com/ubuntu/
‣
http://security.ubuntu.com/ubuntu/
‣
http://international.download.nvidia.com/dgx/repos/
This URL should be accessed by using apt-get, not through a browser.
‣
https://apt.dockerproject.org/repo/
‣
https://download.docker.com/linux/ubuntu/
‣
https://nvcr.io/

Network Configuration
NVIDIA DGX A100 DU-09821-001 _v01|45
To verify connection to nvcr.io, run the following command:
$ wget https://nvcr.io/v2
You should see connecting verification followed by a 401 error.
--2018-08-01 19:42:58-- https://nvcr.io/v2
Resolving nvcr.io (nvcr.io)... 52.8.131.152, 52.9.8.8
Connecting to nvcr.io (nvcr.io)|52.8.131.152|:443... connected.
HTTP request sent, awaiting response... 401 Unauthorized
7.5. Configuring a Static IP Address for
the BMC
This section explains how to set a static IP address for the BMC. You will need to do this
if your network does not support DHCP.
Use one of the methods described in the following sections:
‣
Configuring a BMC Static IP Address Using ipmitool
‣
Configuring a BMC Static IP Address Using the System BIOS
7.5.1. Configuring a BMC Static Address by Using
ipmitool
This section describes how to set a static IP address for the BMC from the Ubuntu
command line.
Note: If you cannot access the DGX A100 System remotely, then connect a display
(1440x900 or lower resolution) and keyboard directly to the DGX A100 system.
To view the current settings, enter the following command.
$ sudo ipmitool lan print 1
1. Set the IP address source to static.
$ sudo ipmitool lan set 1 ipsrc static
2. Set the appropriate address information.
‣
To set the IP address (“Station IP address” in the BIOS settings), enter the
following and replace the italicized text with your information.
$ sudo ipmitool lan set 1 ipaddr <my-ip-address>
‣
To set the subnet mask, enter the following and replace the italicized text with
your information.
$ sudo ipmitool lan set 1 netmask <my-netmask-address>
‣
To set the default gateway IP (“Router IP address” in the BIOS settings), enter the
following and replace the italicized text with your information.
$ sudo ipmitool lan set 1 defgw ipaddr <my-default-gateway-ip-address>

Network Configuration
NVIDIA DGX A100 DU-09821-001 _v01|46
7.5.2. Configuring a BMC Static IP Address by
Using the System BIOS
This section describes how to set a static IP address for the BMC when you cannot
access the DGX A100 System remotely, and this process involves setting the BMC IP
address during system boot.
1. Connect a keyboard and display (1440 x 900 maximum resolution) to the DGX A100
System and turn on the DGX A100 System.
2. When you see the SBIOS version screen, press Del or F2 to enter the BIOS Setup
Utility screen.
3. At the BIOS Setup Utility screen, navigate to the Server Mgmt tab on the top menu,
then scroll to BMC network configuration and press Enter.
4. Scroll to Configuration Address Source and press Enter, then at the Configuration
Address source pop-up, select Static and then press Enter.
5. Set the addresses for the Station IP address, Subnet mask, and Router IP address as
needed by performing the following for each:
a). Scroll to the specific item and press Enter.
b). Enter the appropriate information at the pop-up, then press Enter.
6. When finished making all your changes, press F10 to save and exit.
7.6. Configuring a BMC Static IP
Address for the Network Ports
During the initial boot setup process for the DGX A100 System, you had an opportunity
to configure static IP addresses for a single network interface. If you did not set this up
at that time, you can configure the static IP addresses from the Ubuntu command line
using the following instructions.
Note: If you are connecting to the DGX A100 console remotely, connect using the BMC
remote console. If you connect using SSH, your connection will be lost when performing
the final step. Also, if you encounter issues with the config file, the BMC connection will
facilitate troubleshooting.
If you cannot access the DGX A100 System remotely, then connect a display (1440x900 or
lower resolution) and keyboard directly to the DGX A100 System.
1. Determine the port designation that you want to configure, based on the physical
Ethernet port that you have connected to your network.
See Configuring Network Proxies for the port designation of the connection you want
to configure.

Network Configuration
NVIDIA DGX A100 DU-09821-001 _v01|47
2. Edit the network configuration yaml file.
Note: Ensure that your file is identical to the following sample with regard to spacing;
please do not use tabs!
$ sudo vi /etc/netplan/01-netcfg.yaml
network:
version: 2
renderer: networkd
ethernets:
<port-designation>:
dhcp4: no
dhcp6: no
addresses: [10.10.10.2/24]
gateway4: 10.10.10.1
nameservers:
search: [<mydomain>, <other-domain>]
addresses: [10.10.10.1, 1.1.1.1]
Consult your network administrator for the appropriate information for the items
in bold, such as network, gateway, and nameserver addresses, and use the port
designations that you determined in step 1.
3. After you complete your edits, press ESC to switch to command mode, then save the
file to the disk and exit the editor.
4. Apply the changes.
$ sudo netplan apply
Note: If you are not returned to the command line prompt after a minute, reboot the
system.
For additional information, see https://help.ubuntu.com/lts/serverguide/network-
configuration.html.en.
7.7. Switching Between InfiniBand and
Ethernet
The NVIDIA DGX A100 System is equipped with up to eight NVIDIA ConnectX-6 or
ConnectX-7 single-port network cards on the I/O board, typically used for cluster
communications. By default, these are configured as InfiniBand ports, but you have the
option to convert these to Ethernet ports.
For these changes to work properly, the configured port must connect to a networking
switch that matches the port configuration. In other words, if the port configuration
is set to InfiniBand, then the external switch should be an InfiniBand switch with the
corresponding InfiniBand cables. If the port configuration is set to Ethernet, the switch
should also be Ethernet.
Network Configuration
NVIDIA DGX A100 DU-09821-001 _v01|48
The DGX A100 is also equipped with one (and optionally two) dual-port connections
typically used for network storage and configured by default for Ethernet. These can also
be configured for InfiniBand.
Note: On the dual-port cards, if one of the ports is configured for Ethernet and the other
port is configured for InfiniBand, the following limitations apply.
‣
FDR is not supported on the InfiniBand port (port 1 or 2).
‣
If port 1 is InfiniBand, then port 2 (Ethernet) does not support 40 GbE/10GbE.
‣
If port 1 is Ethernet, then port 2 (InfiniBand) does not support EDR.
7.7.1. Starting the Mellanox Software Tools
and Determining the Current Port
Configuration
Here is some information about how you can start the Mellanox software tools and
determine the configuration for the current port.
Start the Mellanox Software Tools services.
$ sudo mst start
To determine the current port configuration, enter the following:
$ sudo mlxconfig -e query | egrep -e Device\|LINK_TYPE
The following example shows the output for one of the port devices, showing the device
path and the default, current, and next boot configuration.
Device #2:
Device type: ConnectX6
Device: /dev/mst/mt4123_pciconf8
Configurations: Default Current Next Boot
* LINK_TYPE_P1 IB(1) IB(1) IB(1)
‣
IB(1) indicates the port is configured for InfiniBand.
‣
ETH(2) indicates the port is configured for Ethernet.
Determine the Device path bus numbers for the slot number of the port you want to
configure. Refer to the table in Open Ports for the mapping.
7.7.2. Switching the Port Configuration
Make sure that you have started the Mellanox Software Tools (MST) services as
described in Starting the Mellanox Software Tools and Determining the Current Port
Configuration and have identified the correct ports to change.
Issue mlxconfig for each port you want to configure.
$ sudo mlxconfig -y -d <device-path> set LINK_TYPE_P1=<config-number>
where:
‣
<device-path> corresponds to the port you want to configure.
‣
<config-number> is 1 for InfiniBand and 2 for Ethernet.

Network Configuration
NVIDIA DGX A100 DU-09821-001 _v01|49
Here is an example to set slot 0 to Ethernet:
$ sudo mlxconfig -y -d /dev/mst/mt4123_pciconf2 set LINK_TYPE_P1=2
Here is an example that sets slot 1 to InfiniBand:
$ sudo mlxconfig -y -d /dev/mst/mt4123_pciconf3 set LINK_TYPE_P1=1

NVIDIA DGX A100 DU-09821-001 _v01|50
Chapter8. Configuring Storage
By default, the DGX A100 System includes four SSDs in a RAID 0 configuration. These
SSDs are intended for application caching, so you must set up your own NFS storage
for long-term data storage. The instructions in this section describe how to mount the
NFS on the DGX A100 System and how to cache the NFS using the DGX A100 SSDs for
improved performance.
Disabling cachefilesd
The DGX A100 system uses cachefilesd to manage the caching of the NFS. To disable:
$ sudo systemctl stop cachefilesd
$ sudo systemctl disable cachefilesd
Using cachefilesd
The following instructions describe how to mount the NFS onto the DGX A100 system
and how to cache the NFS using the DGX A100 SSDs for improved performance.
Make sure that you have an NFS server with one or more exports with data to be
accessed by the DGX A100 System and that there is network access between the DGX
A100 System and the NFS server.
1. Configure an NFS mount for the DGX A100 System.
a). Edit the filesystem tables configuration.
$ sudo vi /etc/fstab
b). Add a new line for the NFS mount, using the local mount point of /mnt.
<nfs_server>:<export_path> /mnt nfs
rw,noatime,rsize=32768,wsize=32768,nolock,tcp,intr,fsc,nofail 0 0
‣
• /mnt is used here as an example mount point.
‣
• Consult your Network Administrator for the correct values for <nfs_server>
and <export_path>.
‣
• The nfs arguments presented here are a list of recommended values based
on typical use cases.
However, "fsc" must always be included as that argument specifies use of FS-
Cache.
c). Save the changes.

Configuring Storage
NVIDIA DGX A100 DU-09821-001 _v01|51
2. Verify the NFS server is reachable.
$ ping <nfs_server>
Use the server IP address or the server name provided by your network administrator.
3. Mount the NFS export.
$ sudo mount /mnt
/mnt is an example mount point.
4. Verify caching is enabled.
$ cat /proc/fs/nfsfs/volumes
In the output, look for FSC=yes.
The NFS will be automatically mounted and cached on the DGX A100 System in
subsequent reboot cycles.
8.1. Setting Filesystem Quotas
When running NGC containers, you might need to limit the amount of disk space
that is used on a filesystem to avoid filling up the partition. Refer to https://
www.digitalocean.com/community/tutorials/how-to-set-filesystem-quotas-on-
ubuntu-18-04 for information about how to set filesystem quotas on Ubuntu 18.04 and
later.
8.2. Switching Between RAID 0 and
RAID 5
As supplied from the factory, the RAID level of the DGX A100 RAID array is RAID 0. which
provides the maximum storage capacity but does not provide any redundancy.
If one SSD in the array fails, all data stored on the array is lost. If you are willing to accept
reduced capacity in return for some level of protection against failure of a SSD, you can
change the level of the RAID array to RAID 5. If you change the RAID level from RAID 0 to
RAID 5, the total storage capacity of the RAID array is reduced.
Before you change the RAID level of the DGX A100 RAID array, back up all data on the
array that you want to preserve. Changing the RAID level of the DGX A100 RAID array
erases all data stored on the array.
The DGX A100 software includes the configure_raid_array.py custom script, which
you can use to change the level of the RAID array without unmounting the RAID volume.
‣
To change the RAID level to RAID 5, run the following command:
$ sudo configure_raid_array.py -m raid5
After you change the RAID level to RAID 5, the RAID array is rebuilt. A RAID array that
is being rebuilt is online and ready to be used, but a check on the health of the DGX
system reports the status of the RAID volume as unhealthy.

Configuring Storage
NVIDIA DGX A100 DU-09821-001 _v01|52
The time required to rebuild the RAID array depends on the workload on the system.
On an idle system, the rebuild will take about 30 minutes to complete.
‣
To change the RAID level to RAID 0, run the following command:
$ sudo configure_raid_array.py -m raid0
To confirm that the RAID level was changed as required, run the lsblk command. The
entry in the TYPE column for each SSD in the RAID array indicates the RAID level of
the array.
8.3. Configuring Support for Custom
Drive Partitioning
DGX A100 systems incorporate data drives configured as RAID 0 by default. You can
alter the default configuration by adding or removing drives, or by switching between a
RAID 0 configuration and a RAID 5 configuration.
If you alter the default configuration, you must let NVSM know so that the utility does
not flag the configuration as an error, and so that NVSM can continue to monitor the
health of the drives.
1. Edit /etc/nvsm/nvsm.config and set the use_standard_config_storage parameter to
false.
"use_standard_config_storage":false
2. Restart NVSM.
$ systemctl restart nvsm
If you restore the drive partition back to the default configuration, set the parameter
back to true .

NVIDIA DGX A100 DU-09821-001 _v01|53
Chapter9. Updating and Restoring
the Software
This section provides information about how to update or restore software on your DGX
A100 system.
9.1. Updating the DGX A100 Software
You must register your DGX A100 system to receive email notification whenever a new
software update is available.
These instructions explain how to update the DGX A100 software through an internet
connection to the NVIDIA public repository. The process updates a DGX A100 system
image to the latest released versions of the entire DGX A100 software stack, including
the drivers, for the latest version within a specific release.
Refer to the DGX OS 5 User Guide for instructions on upgrading from one release to
another (for example, from Release 4 to Release 5).
9.1.1. Connectivity Requirements for Software
Updates
Before attempting to perform the update, verify that the DGX A100 system network
connection can access the public repositories and that the connection is not blocked by
a firewall or proxy.
Enter the following on the DGX A100 system.
$ wget -O f1-changelogs http://changelogs.ubuntu.com/meta-release-lts
$ wget -O f1-changelogs http://changelogs.ubuntu.com/meta-release-lts
$ wget -O f2-archive http://archive.ubuntu.com/ubuntu/dists/bionic/Release
$ wget -O f3-usarchive http://us.archive.ubuntu.com/ubuntu/dists/bionic/Release
$ wget -O f4-security http://security.ubuntu.com/ubuntu/dists/bionic/Release
$ wget -O f5-download http://download.docker.com/linux/ubuntu/dists/bionic/Release
$ wget -O f6-international http://international.download.nvidia.com/dgx/repos/
bionic/
dists/bionic/Release
$ wget -O f7-focal-repo https://repo.download.nvidia.com/baseos/ubuntu/focal/x86_64/
dists/focal/Release
All the wget commands should be successful and there should be seven files in the
directory with non-zero content.

Updating and Restoring the Software
NVIDIA DGX A100 DU-09821-001 _v01|54
9.1.2. Update Instructions
Here are the steps to update the software on your DGX A100 system.
CAUTION: These instructions update all software for which updates are available from
your configured software sources, including applications that you installed yourself. If you
want to prevent an application from being updated, you can instruct the Ubuntu package
manager to keep the current version. Refer to Introduction for more information.
Perform the updates using commands on the DGX A100 console.
1. Run the package manager.
$ sudo apt update
2. Check to see which software will get updated.
$ sudo apt full-upgrade -s
To prevent an application from being updated, instruct the Ubuntu package manager
to keep the current version. See “Introduction to Holding Packages”.
3. Upgrade to the latest version.
$ sudo apt full-upgrade
4. Answer any questions that appear.
Most questions require a Yes or No response. If asked to select the grub
configuration to use, select the current one on the system.
Other questions will depend on what other packages were installed before the
update and how those packages interact with the update. Typically, you can accept
the default option when prompted.
5. Reboot the system.
9.2. Restoring the DGX A100 Software
Image
If the DGX A100 software image becomes corrupted or the OS SSD was replaced after
a failure, restore the DGX A100 software image to its original factory condition from a
pristine copy of the image.
The process for restoring the DGX A100 software image is as follows:
1. Obtain an ISO file that contains the image from NVIDIA Enterprise Support as
explained in Obtaining the DGX A100 Software ISO Image and Checksum File.
2. Restore the DGX A100 software image from this file either remotely through the
BMC or locally from a bootable USB flash drive.
‣
If you are restoring the image remotely, follow the instructions in Remotely
Reimaging the System.

Updating and Restoring the Software
NVIDIA DGX A100 DU-09821-001 _v01|55
‣
If you are restoring the image locally, prepare a bootable USB flash drive and
restore the image from the USB flash drive as explained in the following topics:
‣
Creating a Bootable Installation Medium
‣
Remotely Reimaging the System
Note: The DGX OS Server software is restored on one of the two NMVe M.2 drives.
When the system is booted after restoring the image, software RAID begins the process
rebuilding the RAID 1 array, which creates a mirror of (or resynchronizing) the drive that
contains the software. System performance might be affected during the RAID 1 rebuild
process, which can take an hour to complete.
9.2.1. Obtaining the DGX A100 Software ISO
Image and Checksum File
To ensure that you restore the latest available version of the DGX A100 software image,
obtain the current ISO image file from NVIDIA Enterprise Support. A checksum file is
provided for the image to enable you to verify the bootable installation medium that you
create from the image file.
1. Log on to the NVIDIA Enterprise Support (https://nvid.nvidia.com/dashboard/) site.
2. Click the Announcements tab to locate the download links for the DGX A100
software image.
3. Download the ISO image and its checksum file and save them to your local disk.
The ISO image is also available in an archive file. If you download the archive file, be
sure to extract the ISO image before proceeding.
9.2.2. Remotely Reimaging the System
These instructions describe how to reimage the system remotely through the BMC. For
information about how to restore the system locally, see Reimaging the System from a
USB Flash Drive.
Before reimaging the system remotely, ensure that the correct DGX A100 software
image is saved to your local disk. For more information, see Obtaining the DGX A100
Software ISO Image and Checksum File.
1. Log in to the BMC.
2. Click Remote Control and then click Launch KVM.
3. Set up the ISO image as virtual media.
a). From the top bar, click Browse File and then locate the re-image ISO file and click
Open.
b). Click Start Media.
4. Reboot, install the image, and complete the DGX A100 system setup.
a). From the top menu, click Power and then select Reset Server.

Updating and Restoring the Software
NVIDIA DGX A100 DU-09821-001 _v01|56
b). Click OK at the Power Control dialogs, then wait for the system to power down
and then come back online.
c). As the system boots, press [F11] when the NVIDIA logo appears to get to the
boot menu.
d). Browse to locate the Virtual CD that corresponds to the inserted ISO, then boot
the system from it.
e). When the system boots up, select one of the following options from the GRUB
menu:
‣
Install DGX OS <version>: Install DGX OS and reformat data RAID
‣
Install DGX OS <version> Without Reformatting Data RAID
‣
Advanced Installation Options: Select if you want to install with an encrypted
root filesystem, then select one of the following options:
‣
Install DGX OS <version> With Encrypted Root
‣
Install DGX OS <version> With Encrypted Root and Without Reformatting
Data RAID
If you are an advanced user who is not using the RAID disks as cache and want to
keep data on the RAID disks, then select one of the “Without Reformatting Data
RAID” options. See the section “Retaining the RAID Partition While Installing the
OS” for more information.
f). Press Enter.
The DGX A100 system will reboot from ISO image and proceed to install the image. This
can take approximately 15 minutes.
Note: The Mellanox InfiniBand driver installation can take up to 30 minutes, depending on
how many cards undergo a firmware update.
After the installation is completed, the system ejects the virtual CD and then reboots
into the OS.
Refer to First Boot Setup for the steps to take when booting up the DGX A100 system
for the first time after a fresh installation.
9.2.3. Creating a Bootable Installation Medium
After obtaining an ISO file that contains the DGX OS Server software image from NVIDIA
Enterprise Support, create a bootable installation medium, such as a USB flash drive or
DVD-ROM, that contains the image.
‣
If you are creating a bootable USB flash drive, follow the instructions for the platform
that you are using:
‣
On a text-only Linux distribution, see Creating a Bootable USB Flash Drive by
Using the dd Command.
Updating and Restoring the Software
NVIDIA DGX A100 DU-09821-001 _v01|57
‣
On Ubuntu Desktop, see #unique_106.
‣
On Windows, see Creating a Bootable USB Flash Drive by Using Akeo Rufus.
‣
If you are creating a bootable DVD-ROM, you can use any of the methods
described in Burning the ISO on to a DVD (https://help.ubuntu.com/community/
BurningIsoHowto#Burning_the_ISO_on_to_a_DVD) on the Ubuntu Community Help
Wiki.
Note: The ISO file that contains software image for some DGX OS Server releases is
greater than the 4.7 GB capacity of a single-layer DVD-ROM. You cannot install these
releases from a bootable DVD-ROM because installation of DGX OS Server from a
dual-layer DVD-ROM is not supported. Check the size of the ISO file that contains the
DGX OS Server software image before creating a bootable DVD-ROM.
9.2.3.1. Creating a Bootable USB Flash Drive by Using
the dd Command
On a Linux system, you can use the dd (http://manpages.ubuntu.com/manpages/bionic/
en/man1/dd.1.html) command to create a bootable USB flash drive that contains the
DGX OS software image.
Note: To ensure that the resulting flash drive is bootable, use the dd command to perform
a device bit copy of the image. If you use other commands to perform a simple file copy of
the image, the resulting flash drive may not be bootable.
Ensure that the following prerequisites are met:
‣
The correct DGX OS software image is saved to your local disk.
For more information, see Obtaining the Software ISO Image and Checksum File.
‣
The USB flash drive meets the following requirement:
‣
The USB flash drive has a capacity of at least 16 GB.
‣
This requirement applies only to DGX A100: The partition scheme on the USD
flash drive is a CPT partition scheme for UEFI.
1. Plug the USB flash drive into one of the USB ports of your Linux system.
2. Obtain the device name of the USB flash drive by running the lsblk (http://
manpages.ubuntu.com/manpages/bionic/man8/lsblk.8.html) command.
lsblk
You can identify the USB flash drive from its size, which is much smaller than the size
of the SSDs in the DGX software, and from the mount points of any partitions on the
drive, which are under /media.
In the following example, the device name of the USB flash drive is sde.
~$ lsblk

Updating and Restoring the Software
NVIDIA DGX A100 DU-09821-001 _v01|58
NAME MAJ:MIN RM SIZE RO TYPE MOUNTPOINT
sda 8:0 0 1.8T 0 disk
|_sda1 8:1 0 121M 0 part /boot/efi
|_sda2 8:2 0 1.8T 0 part /
sdb 8:16 0 1.8T 0 disk
|_sdb1 8:17 0 1.8T 0 part
sdc 8:32 0 1.8T 0 disk
sdd 8:48 0 1.8T 0 disk
sde 8:64 1 7.6G 0 disk
|_sde1 8:65 1 7.6G 0 part /media/deeplearner/DGXSTATION
~$
3. As root, convert and copy the image to the USB flash drive.
$ sudo dd if=path-to-software-image bs=2048 of=usb-drive-device-name
CAUTION: The dd command erases all data on the device that you specify in the of
option of the command. To avoid losing data, ensure that you specify the correct path
to the USB flash drive.
9.2.3.2. Creating a Bootable USB Flash Drive by Using
Akeo Rufus
On a Windows system, you can use the Akeo Reliable USB Formatting Utility (Rufus)
(https://rufus.akeo.ie/) to create a bootable USB flash drive that contains the DGX OS
software image.
Ensure that the following prerequisites are met:
‣
The correct DGX OS software image is saved to your local disk. For more information,
see Obtaining the Software ISO Image and Checksum File.
‣
The USB flash drive has a capacity of at least 8 GB.
1. Plug the USB flash drive into one of the USB ports of your Windows system.
2. Download and launch the Akeo Reliable USB Formatting Utility (Rufus) (https://
rufus.akeo.ie/).
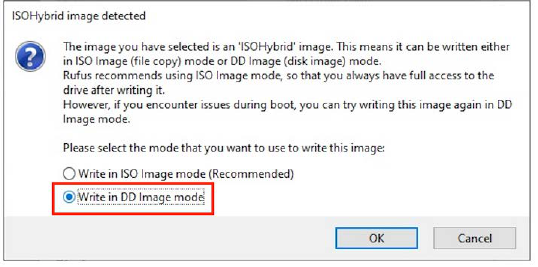
Updating and Restoring the Software
NVIDIA DGX A100 DU-09821-001 _v01|59
3. In Drive Properties, select the following options:.
a). In Boot selection, click SELECT, locate, and select the DGX OS software image.
b). In Partition scheme, select GPT.
c). In Target System, select UEFI (non CSM).
4. In Format Options, select the following options:
a). In File system, select NTFS.
b). In Cluster Size, select 4096 bytes (Default).
5. Click Start.
Because the image is a hybrid ISO file, you are prompted to select whether to write
the image in ISO Image (file copy) mode or DD Image (disk image) mode.
6. Select Write in ISO Image mode and click OK.
9.3. Reimaging the System from a USB
Flash Drive
Explain the benefits of the task, the purpose of the task, who should perform the task,
and when to perform the task in 50 words or fewer.
Context for the current task.
1. A task step.
2. Another ask step.
9.4. Installation Options
Explain what the concept is and why the reader should care about it in 50 words or fewer.
Concept definition.

Updating and Restoring the Software
NVIDIA DGX A100 DU-09821-001 _v01|60
9.4.1. Retaining the RAID Partition While
Installing the OS
The reimaging process creates a fresh installation of the DGX OS. During the OS
installation or reimage process, you are presented with a boot menu when booting the
installer image.
The default selection is Install DGX Software. The installation process then repartitions
all the SSDs, including the OS SSD as well as the RAID SSDs, and the RAID array is
mounted as /raid. This overwrites any data or file systems that might exist on the OS
disk as well as the RAID disks.
Since the RAID array on the DGX A100 system is intended to be used as a cache and
not for long- term data storage, this should not be disruptive. However, if you are an
advanced user and have set up the disks for a non-cache purpose and want to keep the
data on those drives, then select the Install DGX Server without formatting RAID option
at the boot menu during the boot installation. This option retains data on the RAID disks
and performs the following:
‣
Installs the cache daemon but leaves it disabled by commenting out the RUN=yes line
in /etc/ default/cachefilesd entry.
‣
Creates a /raid directory, leaves it out of the file system table by commenting out the
containing /raid in /etc/fstab.
‣
Does not format the RAID disks.
When the installation is completed, you can repeat any configurations steps that you had
performed to use the RAID disks as other than cache disks.
You can always choose to use the RAID disks as cache disks later by enabling cachefilesd
and adding /raid to the file system table as follows:
1. Uncomment the #RUN=yes line in /etc/default/cachefiled
2. Uncomment the /raid line in etc/fstab.
3. Run the following:
a). Mount /raid.
$ sudo mount /raid
b). Start the cache daemon.
$ systemctl start cachefilesd
These changes are preserved across system reboots.
9.4.2. Advanced Installation Option (Encrypted
Root - DGX OS 5 or Later)
Selecting this menu item provides the ability to encrypt the root filesystem of the DGX.
It should normally only be selected if this is desired.
Selecting Encrypted Root instructs the installer to encrypt the root filesystem. The
encryption is fully automated, and users will be required to manually unlock the root

Updating and Restoring the Software
NVIDIA DGX A100 DU-09821-001 _v01|61
partition by entering a passphrase at the console (either through a direct keyboard and
mouse connection or through the BMC) every time the system boots. During the First
Boot process (see First Boot Setup), you are provided the opportunity to create your
passphrase for the drive. The passphrase can be changed later if needed.
9.4.3. Boot into Live Environment (DGX OS 5 or
Later)
The DGX OS installer image can also be used as a Live image, which means it boots and
runs a minimal DGX OS in system memory and does not overwrite anything on the disks
in the system.
While this Live mode does not load drivers, and is essentially a simple Ubuntu Server
configuration, it can be used as a tool for debugging a system if the disks on the system
are not accessible, or otherwise should not be touched.
When booting into the live environment, log in as root (a password is not needed). In a
normal operation, this option should not be selected.
9.4.4. Check Disc for Defects (DGX OS 5 or Later)
Here is some information about how to check the disc for defects.
If you are experiencing oddities when installing DGX OS, and suspect the installation
media has an issue, selecting this item will do an extensive test of the contents of the
install media. It is time consuming, and the installation media generally is not the real
source of the problem.
In a normal operation, this option should not be selected.

NVIDIA DGX A100 DU-09821-001 _v01|62
Chapter10. Using the BMC
The NVIDIA DGX A100 system comes with a baseboard management controller (BMC)
for monitoring and controlling various hardware devices on the system. It monitors
system sensors and other parameters.
10.1. Connecting to the BMC
Here are the steps to connect to the BMC on a DGX A100 system.
Before you begin, ensure that you have connected the BMC port on the DGX A100
system to your LAN.
1. Open a browser within your LAN and go to https://<bmc-ip-address>/.
The BMC is supported on the following browsers:
‣
Internet Explorer 11 and later
‣
Firefox 29.0 (64-bit) and later
‣
Google Chrome 7.0.3396.87 (64-bit) and later
2. Log in.
The BMC dashboard opens.

Using the BMC
NVIDIA DGX A100 DU-09821-001 _v01|63
10.2. Overview of BMC Controls
The left-side navigation menu bar on the BMC main page contains the primary controls.
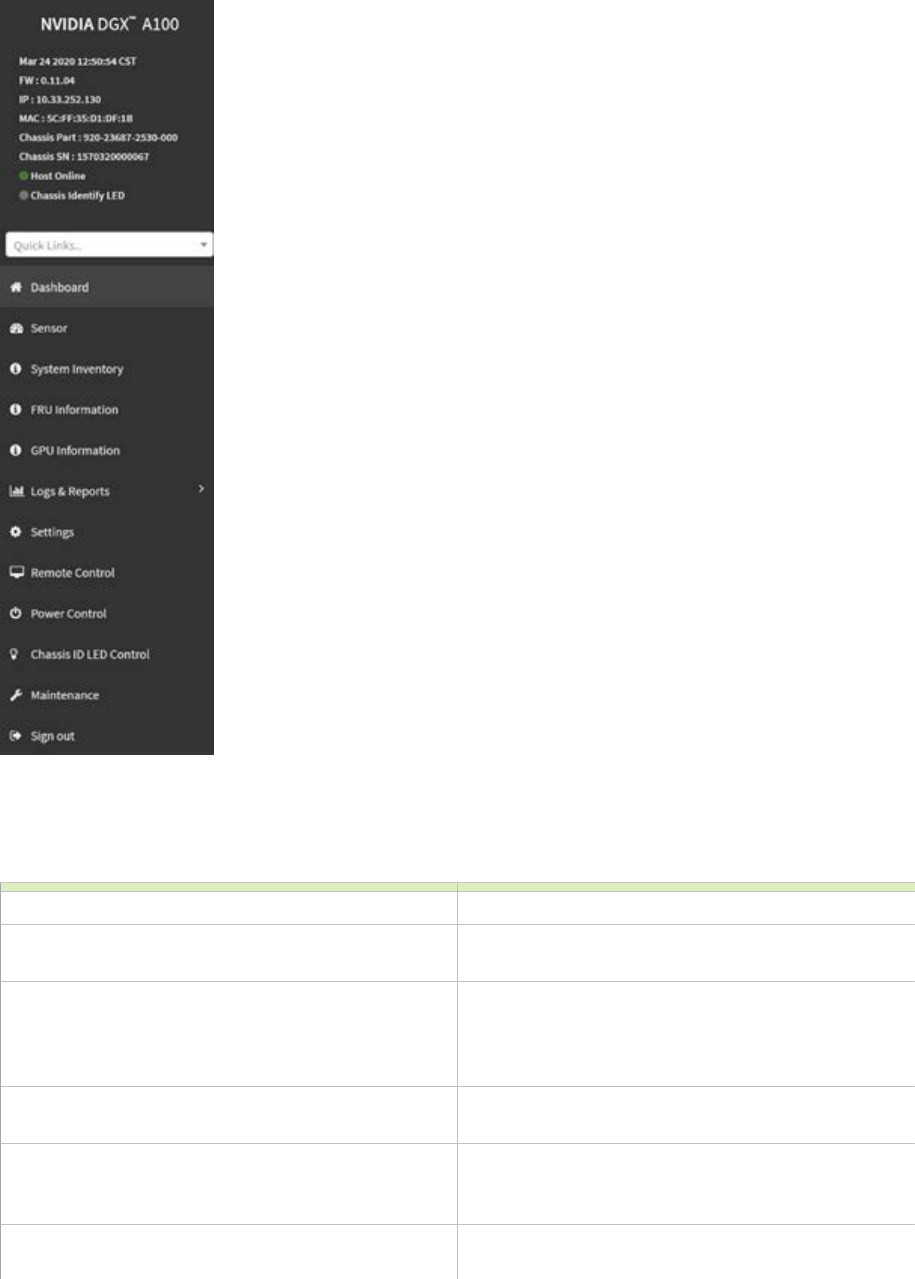
Using the BMC
NVIDIA DGX A100 DU-09821-001 _v01|64
Table8. BMC Main Controls
Quick Links Provides quick access to several tasks.
Dashboard Displays the overall information about the
status of the device.
Sensor Provides status and readings for system
sensors, such as SSD, PSUs, voltages, CPU
temperatures, DIMM temperatures, and fan
speeds.
System Inventory Displays inventory information of system
modules.
FRU Information System, Processor, Memory Controller,
BaseBoard, Power, Thermal, PCIE Device, PCIE
Function, and Storage.
GPU Information Provides basic information on all the GPUs in
the systems, including GUID, VBIOS version,

Using the BMC
NVIDIA DGX A100 DU-09821-001 _v01|65
InfoROM version, and number of retired pages
for each GPU.
Logs and Reports View, and if applicable, download and erase, the
IPMI event log, and System, Audit, Video, and
POST Code logs.
Settings
Configure the following settings:
Captured BSOD, External User Services,
KVM Mouse Setting, Log Settings, Media
Redirection Settings, Network Settings, PAM
Order Settings, Platform Event Filter, Services,
SMTP Settings, SSL Settings, System Firewall,
User Management, and Video Recording
Remote Control Opens the KVM Launch page to remotely
access the DGX A100 console.
Power Control
Perform the following power actions:
Power On, Power Off, Power Cycle, Hard Reset,
and ACP/Shutdown
Chassis ID LED Control Lets you to change the chassis ID LED
behavior: Off, Solid On, Blinking On (select from
5 to 255 second blinking intervals).
Maintenance
Perform the following maintenance tasks:
Backup Configuration, Firmware Image
Location, Firmware Update, Preserve
Configuration, Restore Configuration, Restore
Factory Defaults, and System Administrator
Sign out Sign out of the BMC web UI.
10.3. Common BMC Tasks
This section provides information about the most common BMC tasks.
10.3.1. Changing the BMC Login Credentials
Here is information about how you can add or remove users.
1. Select Settings from the left-side navigation menu.
2. Select the User Management card.
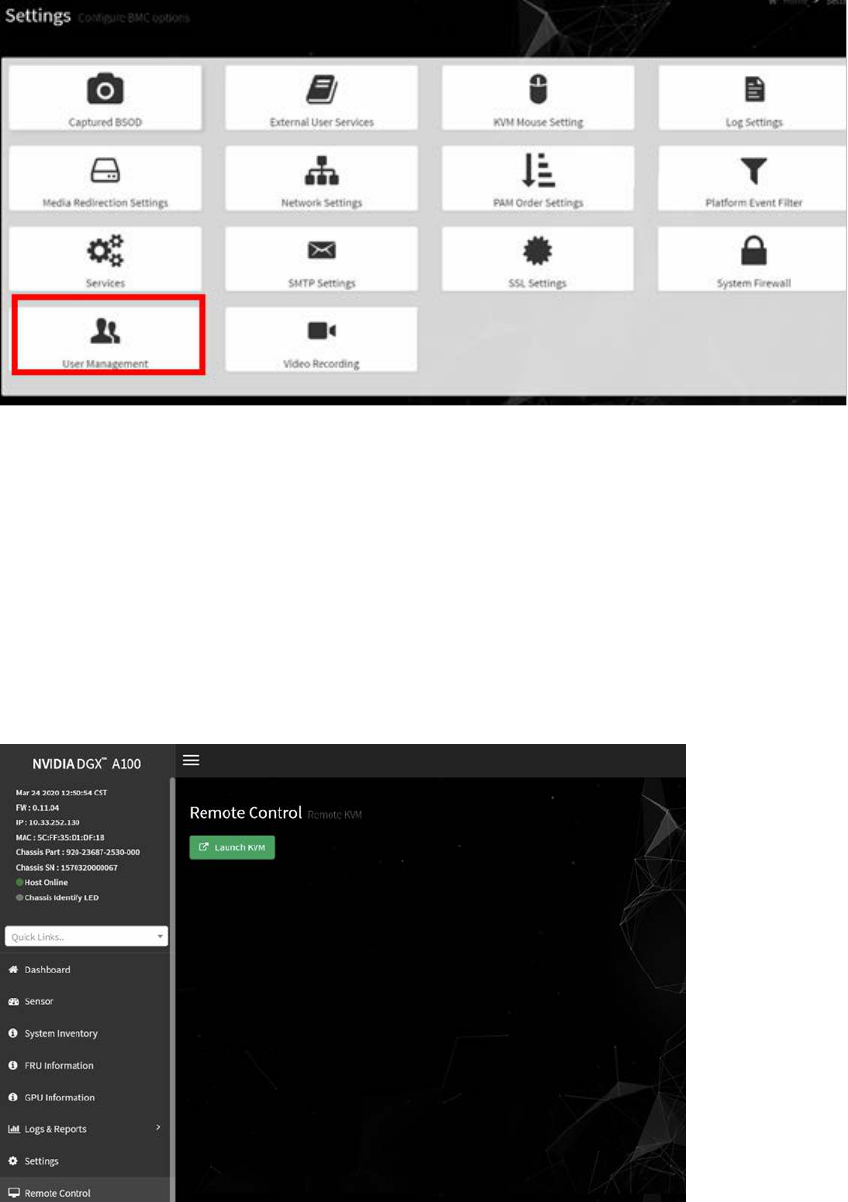
Using the BMC
NVIDIA DGX A100 DU-09821-001 _v01|66
3. Click the Help icon (?) for information about configuring users and creating a
password.
4. Log out and then log back in with the new credentials.
10.3.2. Using the Remote Console
Here is some information about how to log in to the remote console.
1. Click Remote Control from the left-side navigation menu.
2. Click Launch KVM to start the remote KVM and access the DGX A100 console.
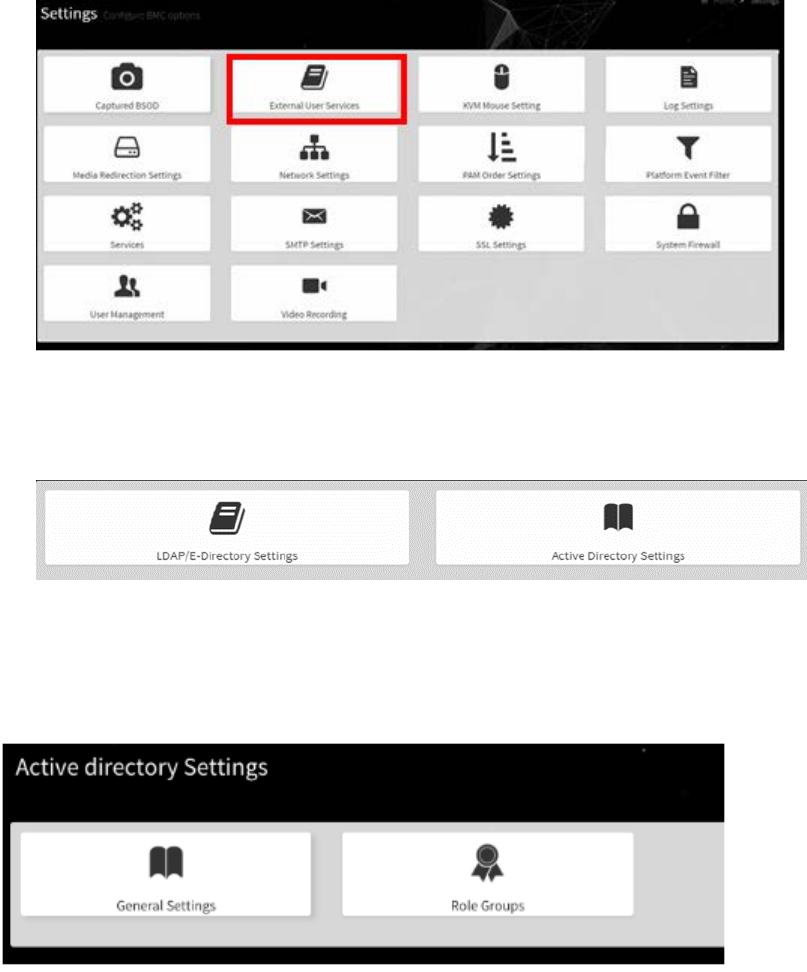
Using the BMC
NVIDIA DGX A100 DU-09821-001 _v01|67
10.3.3. Setting Up Active Directory or LDAP/E-
Directory
Here is some information about how you can set up Active Directory or LDAP/E-Directory.
1. From the side navigation menu, click Settings > External User Services .
2. Click Active Directory Settings or LDAP/E-Directory Settings and follow the
instructions.
10.3.4. LDAP/E-Directory Settings
Setup the BMC for external authentication and authorization using LDAP.
1. Configure the General Settings

Using the BMC
NVIDIA DGX A100 DU-09821-001 _v01|68
The configuration for the General LDAP/E-Directory Settings screen should be fairly
straightforward if you know the details about your LDAP service. If it is not clear what is
expected, the help explains the fields.
Note: Configuring LDAP to use an Active Directory server is supported. Contact the AD
administrator to configure the LDAP details and help with any troubleshooting that may
be necessary. Windows server firewall rules may be blocking external connections to the
default LDAP ports 389 and 636.
Authoritative Bind to the LDAP service is required, meaning this cannot be configured
with anonymous bind. The Bind DN and Password fields are the bind credentials used
for every lookup. The bind process is the BMC authenticating itself as a valid endpoint,
before it can perform any lookup.
The Search Base and Attribute of User Login are used to convert the BMC login username
string, to the expected DN string the LDAP server expects.
Finally, click Save to validate and store the LDAP settings. If you revisit this page, you will
have to re-enter the Password.
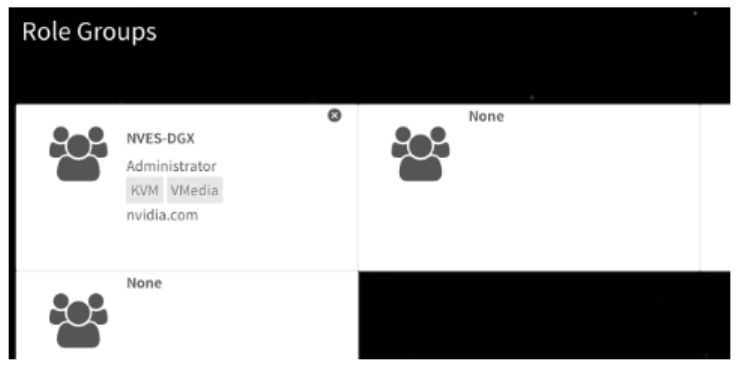
Using the BMC
NVIDIA DGX A100 DU-09821-001 _v01|69
2. Configure Role Groups
The Role Groups must be configured to assign BMC permissions to the authenticated
user, otherwise known as authorization. This is done by mapping an LDAP group
membership to BMC permissions.
Note: If no Role Group mapping is created, the authentication will fail, since the user
would not have any permissions in the BMC interface.
To add a Role Group, click on one of the cards.
Specify the LDAP group name and group domain to map to the BMC privilege level/
permissions. If you are unsure about the settings, contact the LDAP administrator for
help.
The Group Domain field should be considered the "Group Search Base DN" for the group
name lookup.
Note: The LDAP group filter used by the BMC is not configurable. The pre-
configured group filter searches for the group name (CN) with objectClass matching
"groupOfNames" or "group".
filter="(&(|(objectClass=groupOfNames)(?objectClass=group))(cn=dgx_admins))"
Therefore, the LDAP service group structure MUST use either of the following:
‣
LDAP standard (rfc2256) structural objectClass "groupOfNames", with the member
attributes specifying the users assigned to the group.
‣
Align with Active Directory structure using objectClass "group"
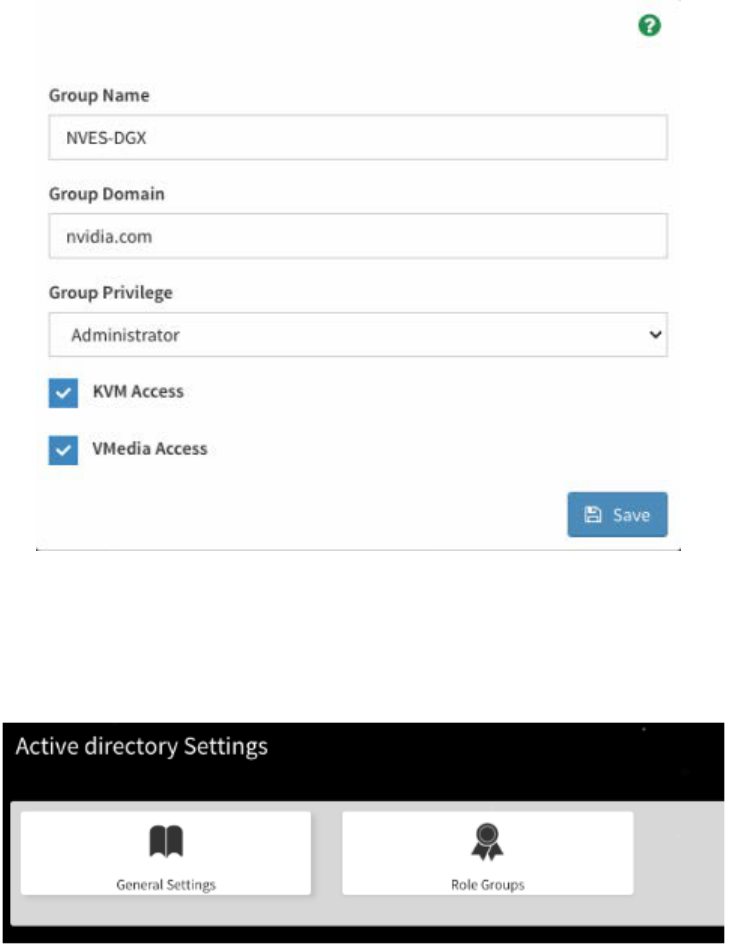
Using the BMC
NVIDIA DGX A100 DU-09821-001 _v01|70
Save the configuration and start authenticating using valid LDAP credentials.
10.3.5. Active Directory Settings
Setup the BMC for external authentication and authorization using Active Directory.
1. Configure the General Settings
The configuration for the General Active Directory Settings screen should be fairly
straight forward if you know the details about your Active Directory cluster. If it is not
clear what is expected, the help explains the fields.
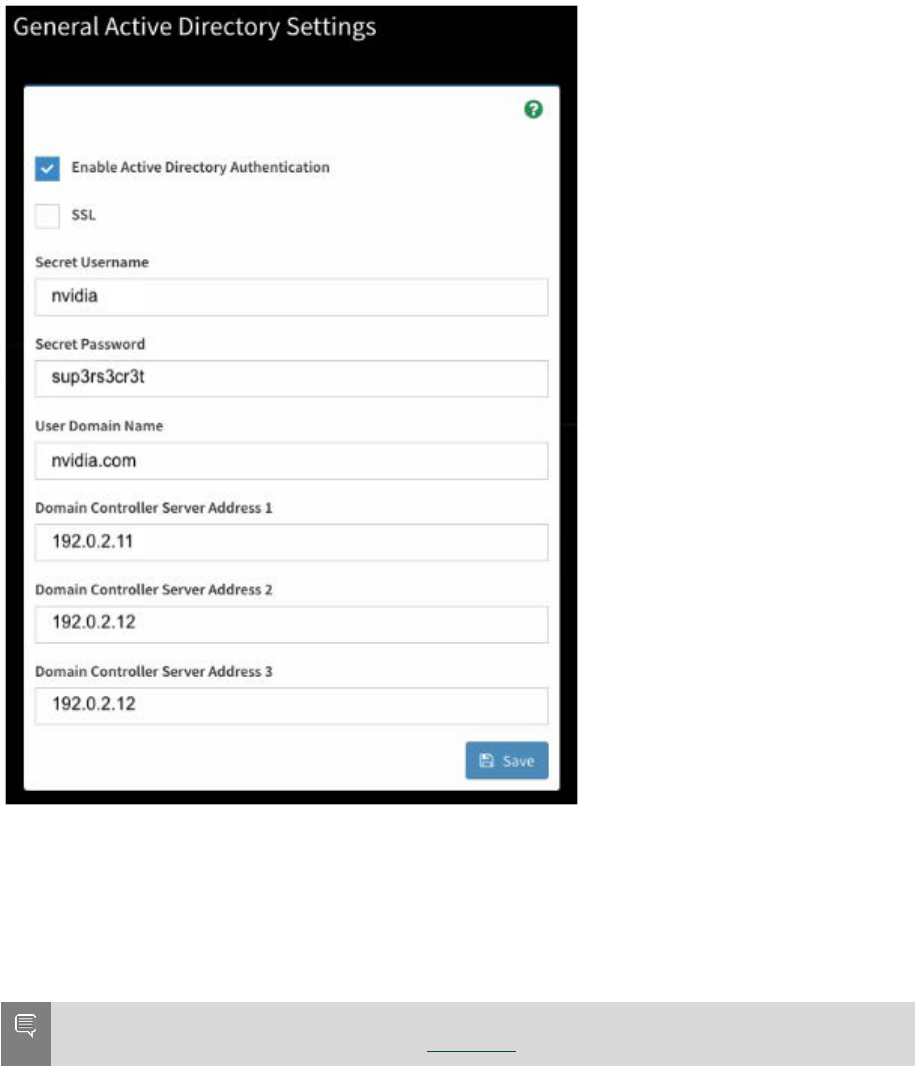
Using the BMC
NVIDIA DGX A100 DU-09821-001 _v01|71
If you are unsure about the settings, contact the AD administrator for help. You may
require an AD admin account to connect the BMC to the AD forest.
The User Domain Name must match all or part of the BMC domain name. If the BMC is
in a subdomain (bmc.nvex.nvidia.com), then the User Domain Name could be set to the
subdomain (nvex.nvidia.com), or the parent domain (nvidia.com).
Note: Authentication across domains requires the proper AD trust relationship. This is
outside the scope of the docs, but this reference can be provided.
Finally, click Save to validate and store the AD settings. If you revisit this page, you will
have to re-enter the Secret Password.
2. Configure Role Groups
The Role Groups must be configured to assign BMC permissions to the authenticated
user, otherwise known as authorization. This is done by mapping Active Directory group
membership to BMC permissions.
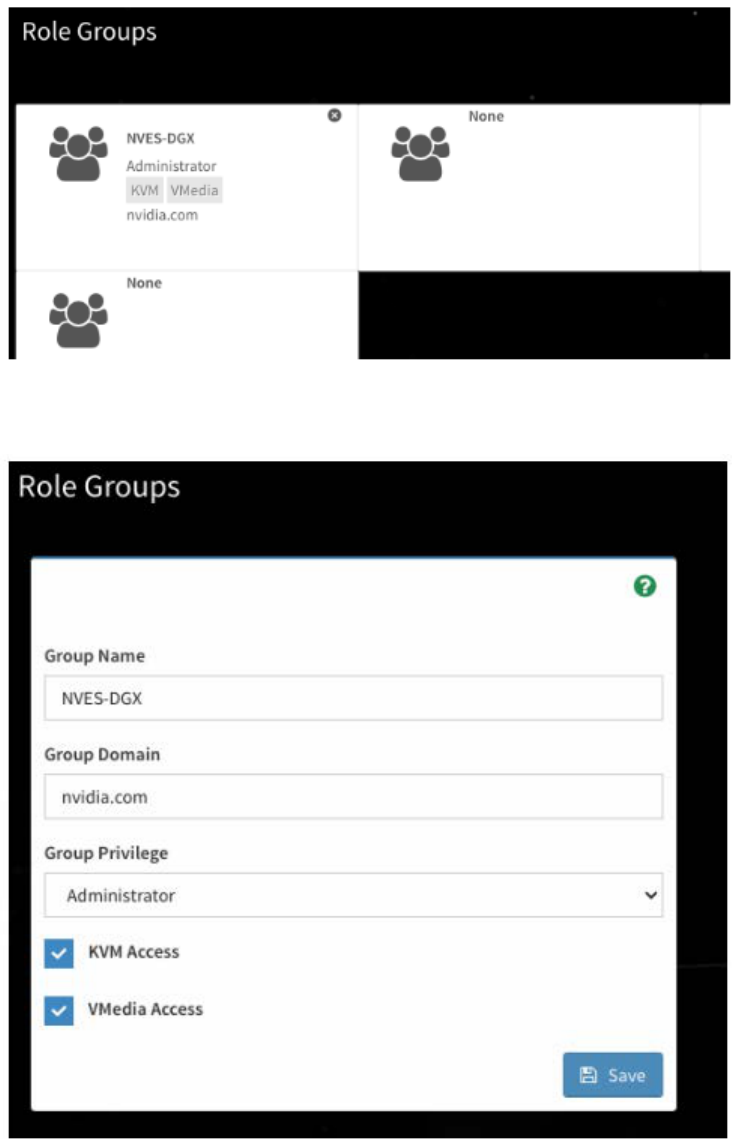
Using the BMC
NVIDIA DGX A100 DU-09821-001 _v01|72
Note: If no Role Group mapping is created, the authentication will fail, since the user
would not have any permissions in the BMC interface.
To add a Role Group, click on one of the cards.
Specify the AD group name and group domain to map to the BMC privilege level/
permissions. If you are unsure about the settings, contact the AD administrator for help.
Save the configuration and start authenticating using valid AD credentials.
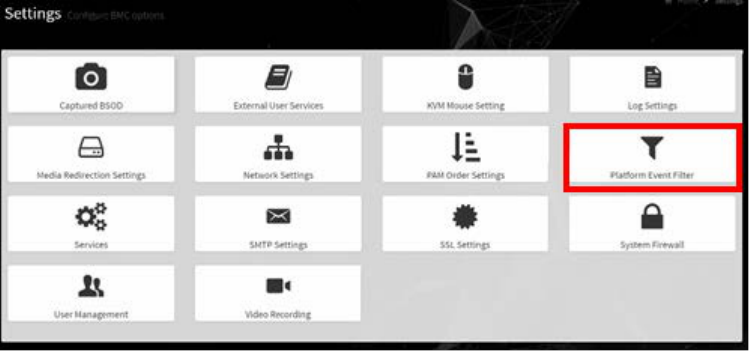
Using the BMC
NVIDIA DGX A100 DU-09821-001 _v01|73
10.3.6. Configuring Platform Event Filters
From the side navigation menu, click Settings and click Platform Event Filters.
The Event Filters page shows all configured event filters and available slots. You can
modify or add new event filter entry on this page.
‣
To view available configured and unconfigured slots, click All in the upper-left corner
of the page.
‣
To view available configured slots, click Configured in the upper-left corner of the
page.
‣
To view available unconfigured slots, click UnConfigured in the upper-left corner of
the page.
‣
To delete an event filter from the list, click the x icon.
10.3.7. Uploading or Generating SSL Certificates
You can set up a new certificate by generating a (self-signed) SSL or by uploading an SSL
(for example, to use a Trusted CA-signed certificate).
From the side navigation menu, click Settings > External User Services .
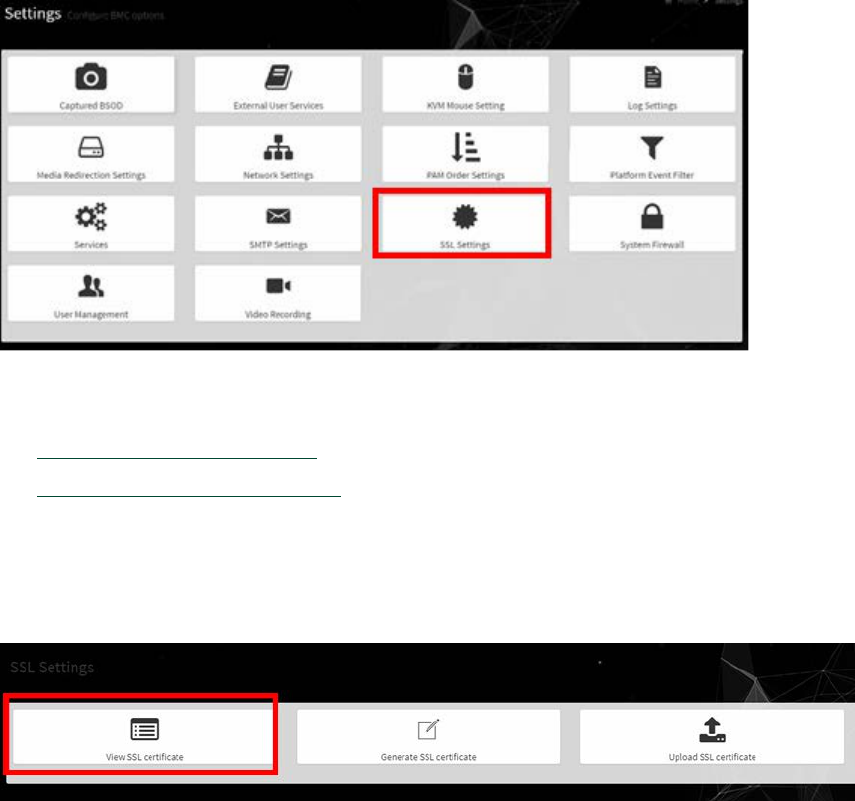
Using the BMC
NVIDIA DGX A100 DU-09821-001 _v01|74
Refer to the following sections for more information:
‣
Viewing the SSL Certificate
‣
Generating an SSL Certificate
10.3.7.1.Viewing the SSL Certificate
To view the SSL certificate, on the SSL Setting page, click View SSL Certificate.
The View SSL Certificate page displays the following basic information about the
uploaded SSL certificate:
‣
Certificate Version, Serial Number, Algorithm, and Public Key
‣
Issuer information
‣
Valid Date range
‣
Issued to information
10.3.7.2.Generating the SSL Certificate
Here is some information about generating an SSL certificate.
Context for the current task.
1. From the SSL Setting page, select Generate SSL Certificate.
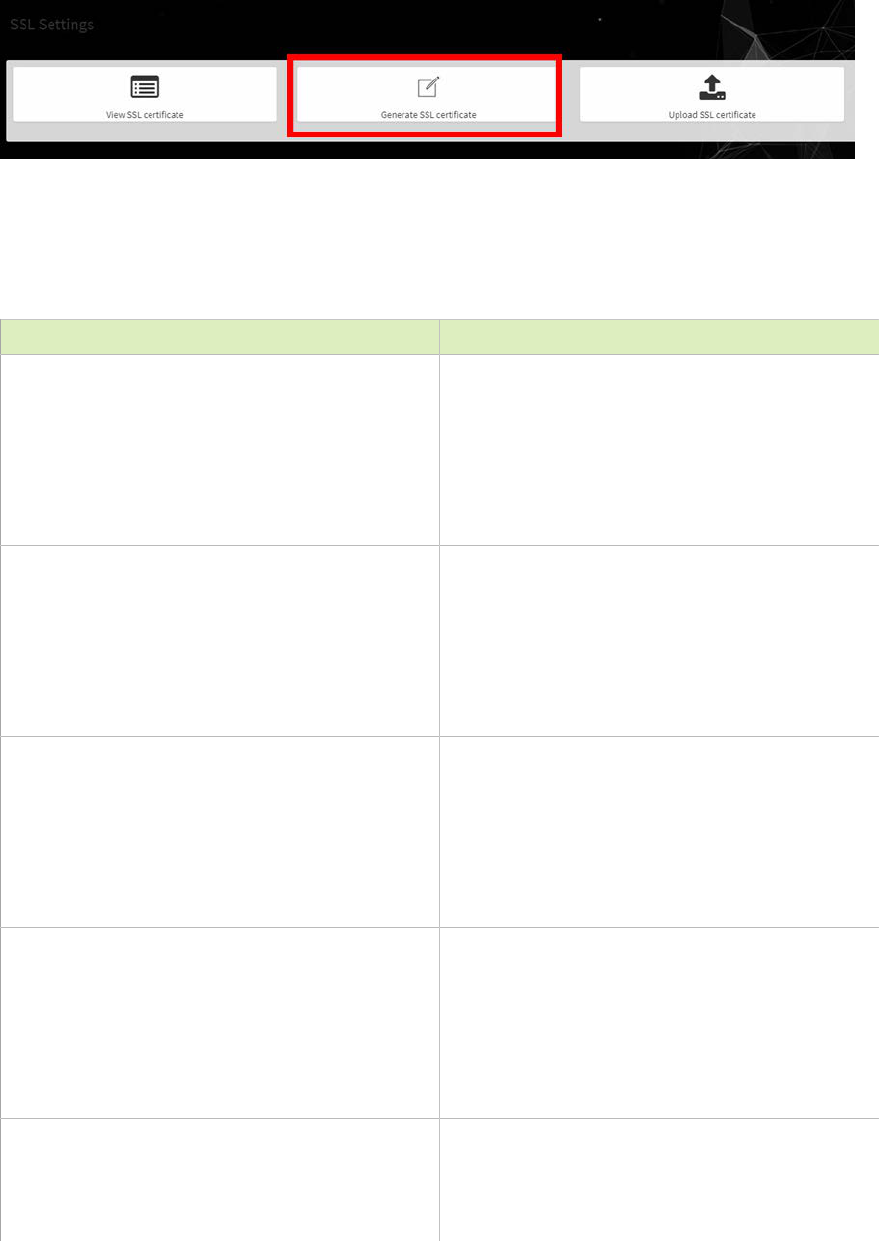
Using the BMC
NVIDIA DGX A100 DU-09821-001 _v01|75
2. Enter the information as described in the following table.
Table9. BMC Main Controls
Items Description/Requirements
Common Name (CN)
The common name for which the certificate
is to be generated.
‣
Maximum length of 64 alpha-numeric
characters.
‣
Special characters '#' and '$' are not
allowed.
Organization (O)
The name of the organization for which the
certificate is generated.
‣
Maximum length of 64 alpha-numeric
characters.
‣
Special characters '#' and '$' are not
allowed.
Organization Unit (OU)
Overall organization section unit name for
which the certificate is generated.
‣
Maximum length of 64 alpha-numeric
characters.
‣
Special characters '#' and '$' are not
allowed.
City or Locality (L)
City or Locality of the organization
(mandatory)
‣
Maximum length of 64 alpha-numeric
characters.
‣
Special characters '#' and '$' are not
allowed.
State or Province (ST)
State or Province of the organization
(mandatory)
‣
Maximum length of 64 alpha-numeric
characters.
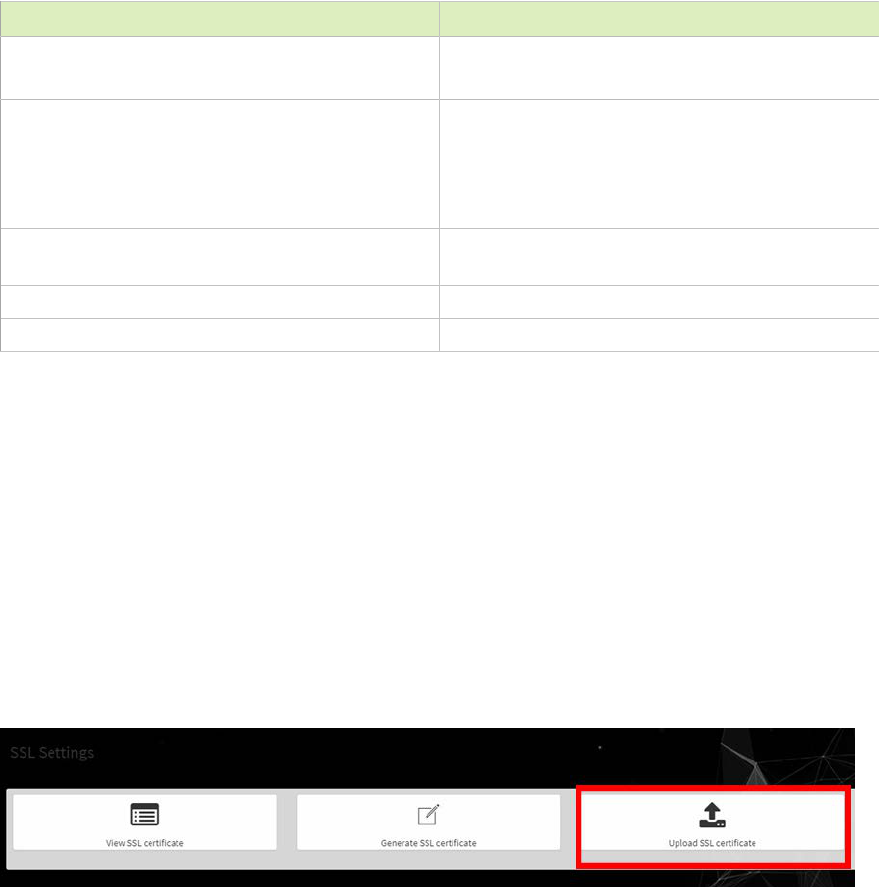
Using the BMC
NVIDIA DGX A100 DU-09821-001 _v01|76
Items Description/Requirements
‣
Special characters '#' and '$' are not
allowed.
Country (C)
Country code of the organization.
‣
Only two characters are allowed.
‣
Special characters are not allowed.
Email Address Email address of the organization
(mandatory)
Valid for Validity of the certificate.
Key Length Enter a range from 1 to 3650 (days)
3. To generate the new certificate, click Save .
10.3.7.3.Uploading the SSL Certificate
In BMC, you can upload your SSL certificate.
Make sure the certificate and key meet the following requirements:
‣
SSL certificates and keys must both use the .pem file extension.
‣
Private keys must not be encrypted.
‣
SSL certificates and keys must each be less than 3584 bits in size.
‣
SSL certificates must be current (not expired).
1. On the SSL Setting page, click Upload SSL Certificate.
2. Click the New Certificate folder icon, browse to locate the appropriate file, and select
it.
3. Click the New Private Key folder icon, browse and locate the appropriate file, and
select it.
4. Click Save.
10.3.7.4.Updating the SBIOS Certificate
The CA Certificate for the trusted CA that was used to sign the SSL certificate must be
uploaded to allow the SBIOS to authenticate the certificate.
1. Obtain the CA certificate from the signing authority that was used to sign the SSL
certificate.
2. Copy the CA certificate onto a USB thumb drive or to /boot/efi on the A100 OS.
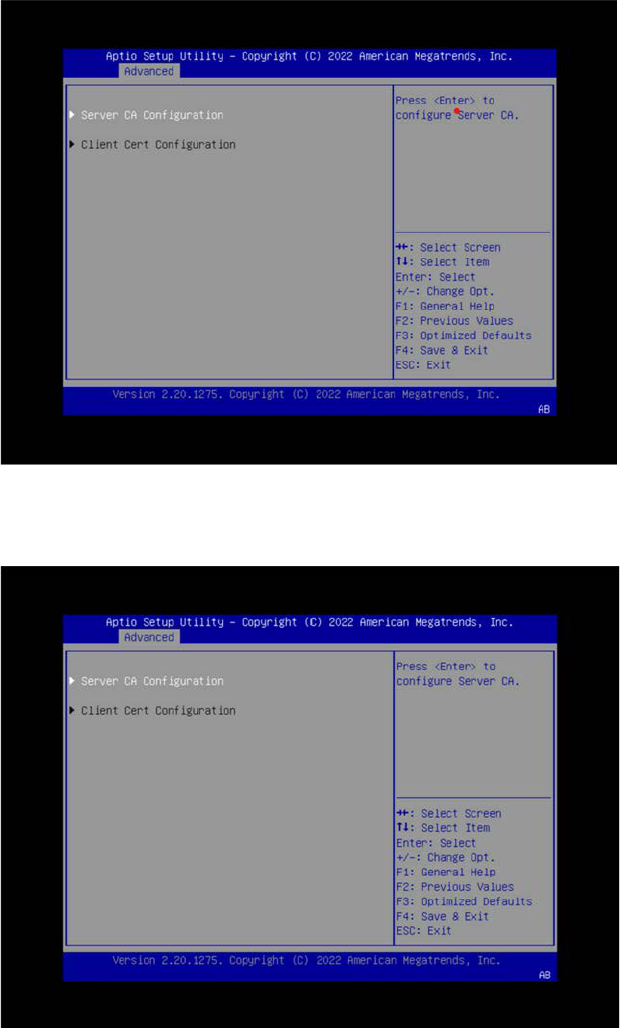
Using the BMC
NVIDIA DGX A100 DU-09821-001 _v01|77
3. Access the DGX A100 console from a locally connected keyboard and mouse or
through the BMC remote console.
4. Reboot the server
5. To enter BIOS setup menu, when prompted, press DEL.
6. In the BIOS setup menu on the Advanced tab, select Tls Auth Config.
7. Select Server CA Configuration.
8. Select Enroll Cert.
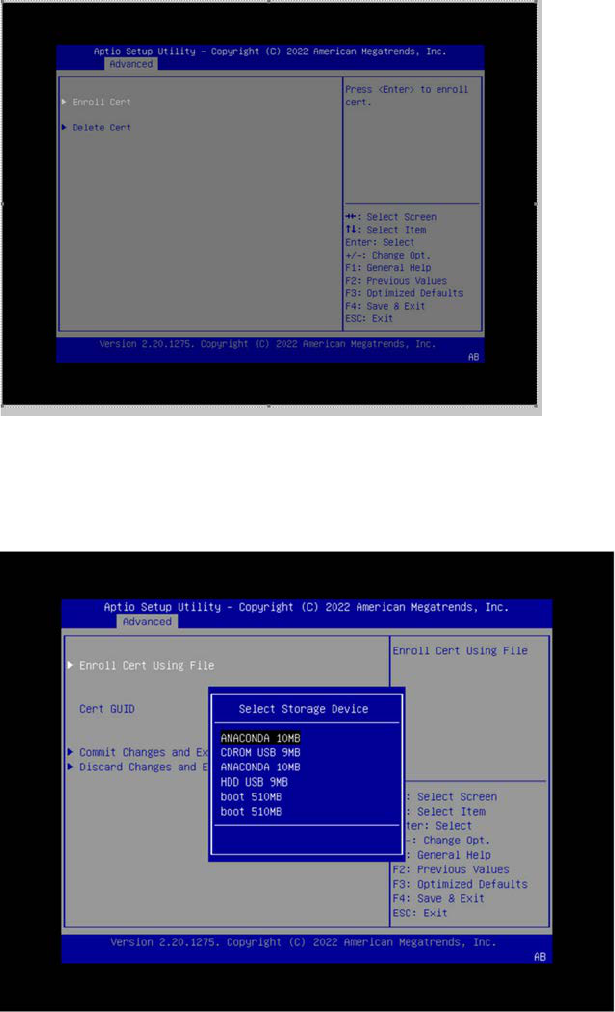
Using the BMC
NVIDIA DGX A100 DU-09821-001 _v01|78
9. Select Enroll Cert Using File.
10.Select the device where you stored the certificate.
11.Navigate the file structure and select the certificate.
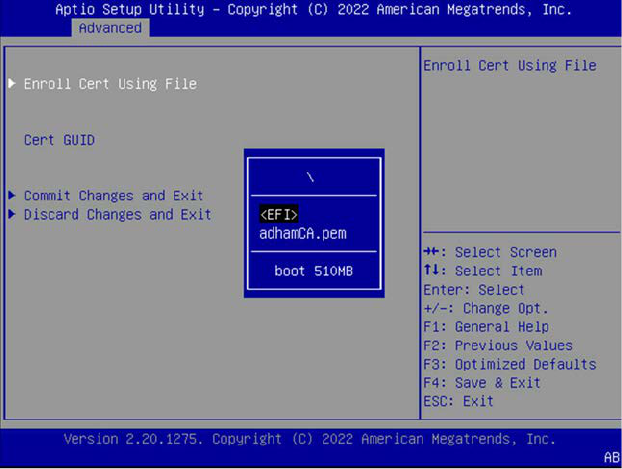
Using the BMC
NVIDIA DGX A100 DU-09821-001 _v01|79

NVIDIA DGX A100 DU-09821-001 _v01|80
Chapter11. SBIOS Settings
The NVIDIA DGX A100 system comes with a system BIOS with optimized settings for
the DGX system. There might be situations where the settings need to be changed, such
as changes in the boot order, changes to enable PXE booting, or changes in the BMC
network settings.
Instructions for these use cases are provided in this section.
Important: Do not change settings in the SBIOS other than those described in this or
other DGX A100 user documents. Contact NVIDIA Enterprise Services before making
other changes.
11.1. Accessing the SBIOS Setup
Here is information about how you can access the SBIOS setup.
1. Access the DGX A100 console, either from a locally connected keyboard and mouse
or through the BMC remote console.
2. Reboot the DGX A100.
3. When presented with the SBIOS version screen, press [Del] or [F2] to enter the BIOS
Setup Utility.
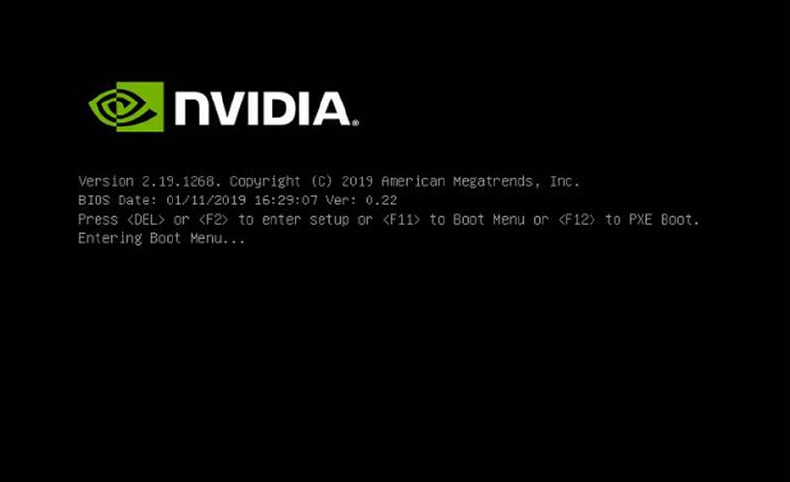
SBIOS Settings
NVIDIA DGX A100 DU-09821-001 _v01|81
Here are some occasions where it might be necessary to reconfigure settings in the
SBIOS:
‣
Configuring a BMC Static IP Address Using the System BIOS
‣
Enabling the TPM and Preventing the BIOS from Sending Block SID Requests
‣
Clearing the TPM
11.2. Configuring the Boot Order
The following instructions describe how to set the boot order at boot time. You can also
set the boot order from the SBIOS setup > Boot screen.
1. Access the DGX A100 console, either from a locally connected keyboard and mouse
or through the BMC remote console.
2. Reboot the DGX A100.
3. Press [F11] at the NVIDIA splash screen.
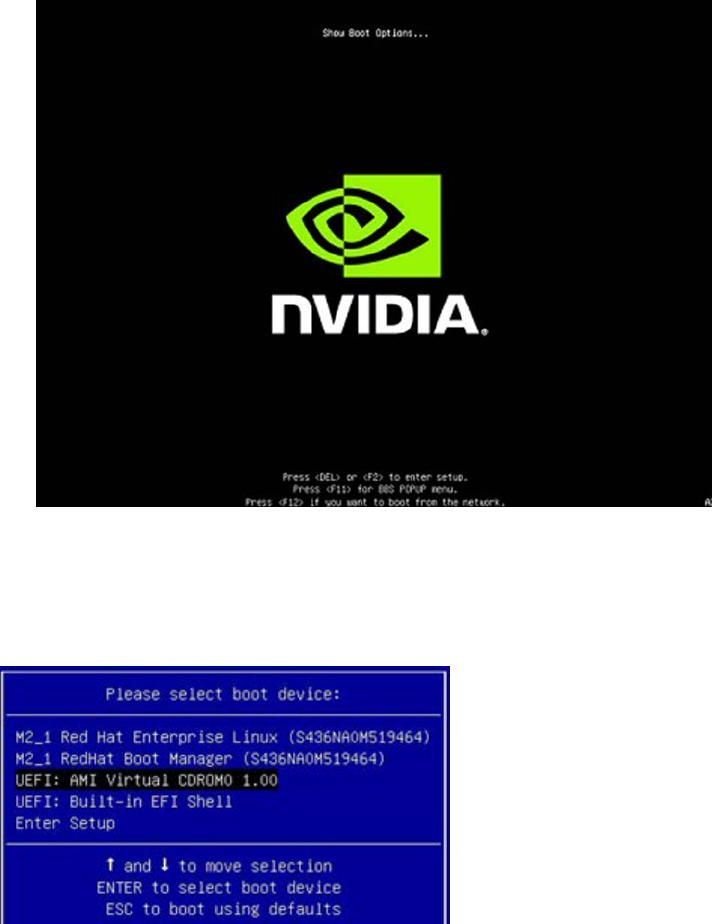
SBIOS Settings
NVIDIA DGX A100 DU-09821-001 _v01|82
4. Select the boot device.
The following example shows virtual media selected.
11.3. Configuring the local terminal to
access the SBIOS settings screen
There are two ways to access the BIOS setup screen, one is through a direct-attached
Keyboard and Monitor, and the other is through Serial-over-Lan (SOL) protocol using the
IPMI tools.
Below are the instructions on how to configure a terminal with the correct settings to
access the SBIOS configuration screens using SOL.
SBIOS Settings
NVIDIA DGX A100 DU-09821-001 _v01|83
If using the IPMI SOL protocol:
1. When accessing the SBIOS configuration screen, be sure to use the 'xterm' terminal
emulator and character encoding is set to en_UTF-8
2. Double-check the character encoding by running echo $LANG
For Linux desktop users, set the character
encoding:
1. $ sudo localectl set-locale LANG=en_US.UTF-8
2. Type export LANG=en_UTF-8 to set the locale for the current session
3. Type xterm to launch the terminal with the set locale.
4. From within the new xterm, use ipmitool to connect to the DGX A100 SOL console:
ipmitool -I lanplus -H {IP Address} -U admin -P dgxluna.admin sol
activate
For Windows or Macintosh users
Configure terminal application for en_US.UTF-8 support
Power on or Reboot the system using one
of the following interfaces, depending on
what the state of the system is:
1. Use the BMC User Interface to power on/reboot, OR
2. From the Operating System command line run $ sudo reboot
3. Using the following IPMI command: $ sudo ipmitool -I lanplus -H {IP Address}
-U {userid} -P {password} sol activate to access the SOL interface using the
terminal with the set locale.
4. Press DEL or F2 when the following message comes up as the system is booting.
5. The system should confirm your choice and will bring up the BIOS configuration
screen.

NVIDIA DGX A100 DU-09821-001 _v01|84
Chapter12. Multi-Instance GPU
Multi-Instance GPU (MIG) is a new capability of the NVIDIA A100 GPU. MIG uses
spatial partitioning to carve the physical resources of an A100 GPU into up to seven
independent GPU instances. These instances run simultaneously, each with its own
memory, cache, and compute streaming multiprocessors. MIG enables the A100 GPU to
deliver guaranteed quality of service at up to 7X higher utilization compared to non-MIG
enabled GPUs.
MIG enables the following:
‣
GPU memory isolation among parallel GPU workloads.
‣
Physical allocation of resources used by parallel GPU workloads.
Managing MIG instances is accomplished using the NVIDIA Management Library (NVML)
APIs or its command-line utility (nvidia-smi). Enablement of MIG requires a GPU reset
and hence some system services that manage GPUs should be terminated before
enabling MIG.
To enable MIG on all eight GPUs in the system, issue the following.
1. Stop the NVSM and DCGM services.
$ sudo systemctl stop nvsm dcgm
2. Enable MIG on all eight GPUs.
$ sudo nvidia-smi -mig 1
If other services are running that prevent you from resetting the GPUs, then reboot
the system and skip the next step.
3. Restart the DCGM and NVSM services.
$ sudo systemctl start dcgm nvsm
To use MIG, see the MIG User Guide, which provides more detailed information about
key MIG concepts and deployment considerations and explains how to create MIG
instances and how to run Docker containers using MIG.

NVIDIA DGX A100 DU-09821-001 _v01|85
Chapter13. Security
This section provides information about security measures in the DGX A100 system.
13.1. User Security Measures
The NVIDIA DGX A100 system is a specialized server designed to be deployed in a data
center. It must be configured to protect the hardware from unauthorized access and
unapproved use. The DGX A100 system is designed with a dedicated BMC Management
Port and multiple Ethernet network ports.
When you install the DGX A100 system in the data center, follow best practices as
established by your organization to protect against unauthorized access.
13.1.1. Securing the BMC Port
NVIDIA recommends that you connect the BMC port in the DGX A100 system to a
dedicated management network with firewall protection.
If remote access to the BMC is required, such as for a system hosted at a co-location
provider, it should be accessed through a secure method that provides isolation from the
internet, such as through a VPN server.
13.2. System Security Measures
This section provides information about the security measures that have been
incorporated in an NVIDIA DGX A100 system.
13.2.1. Secure Flash of DGX A100 Firmware
Secure Flash is implemented for the DGX A100 to prevent unsigned and unverified
firmware images from being flashed onto the system.
13.2.1.1.Encryption
Here is some information about encrypting the DGX A100 firmware.
The firmware encryption algorithm is AES-CBC.
‣
The firmware encryption key strength is 128 bits or higher.

Security
NVIDIA DGX A100 DU-09821-001 _v01|86
‣
Each firmware class uses a unique encryption key.
‣
Firmware decryption is performed either by the same agent that performs signature
check or a more trusted agent in the same COT.
13.2.1.2.Signing
Explain what the concept is and why the reader should care about it in 50 words or fewer.
Concept definition.
13.2.1.3.NVSM Security
For information about security in NVSM, see Configuring NVSM Security.
13.3. Secure Data Deletion
This section explains how to securely delete data from the DGX A100 system SSDs to
permanently destroy all the data that was stored there.
This process performs a more secure SSD data deletion than merely deleting files or
reformatting the SSDs.
13.3.1. Prerequisites
You need to prepare a bootable installation medium that contains the current DGX OS
Server ISO image.
Refer to the following content for more information:
‣
Obtaining the DGX A100 Software ISO Image and Checksum File
‣
Creating a Bootable Installation Medium
13.3.2. Instructions
Here are the instructions to securely delete data from the DGX A100 system SSDs.
1. Boot the system from the ISO image, either remotely or from a bootable USB key.
2. At the GRUB menu, select:
‣
(For DGX OS 4): ‘Rescue a broken system’ and configure the locale and network
information.
‣
(For DGX OS 5): ‘Boot Into Live Environment’ and configure the locale and network
information.
3. When prompted to select a root file system, choose Do not use a root file system and
then Execute a shell in the installer environment.
4. Log in.
5. Run the following command to identify the devices available in the system:
$ nvme list
If nvmecli is not installed, then install the CLI as follows and then run nvme list.

Security
NVIDIA DGX A100 DU-09821-001 _v01|87
DGX OS 4
$ dpkg -i /cdrom/extras/pool/main/n/nvme-cli/nvme-cli_1.5-1ubuntu1_amd64.deb
DGX OS 5
$ dpkg -i /usr/lib/live/mount/rootfs/filesystem.squashfs/curtin/repo/nvme-
cli_1.9-1ubuntu0.1_amd64.deb
6. Run nvme format -s1 on all storage devices listed.
$ nvme format -s1 <device-path>
where
<device-path> is the specific storage node as listed in the previous step. For example,
/dev/nvme0n1.

NVIDIA DGX A100 DU-09821-001 _v01|88
Chapter14. Redfish APIs Support
The DGX System firmware supports the ability to manage the system by using an
industry standard Redfish interface. This chapter provides details about the Redfish
protocol support that is available in the DGX A100 system and how to complete system
management functions by using the supported Redfish APIs.
Redfish is a web-based management protocol, and the Redfish server is integrated into
the DGX A100 BMC firmware. By default, Redfish support is enabled in the DGX A100
BMC and the BIOS. By using the Redfish interface, administrator-privileged users can
browse physical resources at the chassis and system level through a web-based user
interface.
Redfish provides information that is categorized under a specific resource end point and
Redfish clients can use the end points by using following HTTP methods:
‣
GET
‣
POST
‣
PATCH
‣
PUT
‣
DELETE
Not all endpoints support all these operations. Refer to the Redfish JSON Schema for
more information about the operations. The Redfish server follows the DSP0266 1.7.0
Specification and Redfish Schema 2019.1 documentation. Redfish URIs are accessed by
using basic authentication and implementation, so that IPMI users with required privilege
can access the Redfish URIs.
14.1. Supported Redfish Features
Here is some information about the Redfish features that are supported in DGX A100.
The following features are supported:
‣
Manage user accounts, privileges, and roles
‣
Manager Sessions
‣
BMC configuration
‣
BIOS configuration

Redfish APIs Support
NVIDIA DGX A100 DU-09821-001 _v01|89
‣
BIOS boot order management
‣
Get PCIe device and functions inventory
‣
Get storage Inventory
‣
Get system component information and health (PSU, FAN, CPU, DIMM, and so on)
‣
Get sensor information (Thermal/Power/Cooling)
‣
BMC configuration change/BMC reset
‣
System/Chassis power operations
‣
Get health event log/advanced system event log
‣
Logging Service, which provides critical/informational severity events
‣
Event Services (SSE)
Refer to the following documentation for more information:
‣
DMTF Redfish specification
‣
DSP0266 1.7.0 Specification
‣
Redfish Schema 2019.1 Now Available
For a list of the known issues and limitations with Redfish support that are specific to
the firmware version you are running, refer to the DGX A100 System Firmware Update
Container Release Notes.

NVIDIA DGX A100 DU-09821-001 _v01|90
AppendixA. Installing Software on
Air-Gapped DGX A100
Systems
For security purposes, some installations require that systems be isolated from the
internet or outside networks. Since most DGX A100 software updates are accomplished
through an over- the-network process with NVIDIA servers, this section explains how
updates can be made when using an over-the-network method is not an option. It also
includes a process for installing Docker containers.
A.1. Installing NVDIA DGX A100
Software
There are two ways to install DGX A100 software on an air-gapped DGX A100 system.
One method to update DGX A100 software on an air-gapped DGX A100 system is to
download the ISO image, copy it to removable media, and reimage the DGX A100 System
from the media. This method is available only for software versions that are available as
ISO images for download.
Alternately, you can update the DGX A100 software by performing a network update
from a local repository. This method is available only for software versions that are
available for over-the- network updates.
A.2. Reimaging the System
Here is some information about how you can reimage your DGX A100 system.
CAUTION: This process destroys all data and software customizations that you have made
on the DGX A100 System. Be sure to back up any data that you want to preserve and push
any Docker images that you want to keep to a trusted registry.
1. Obtain the ISO image from the NVIDIA Enterprise Services.

Installing Software on Air-Gapped DGX A100 Systems
NVIDIA DGX A100 DU-09821-001 _v01|91
a). a Log in to the NVIDIA Enterprise Support site, and on the Announcements tab,
locate the DGX OS Server image ISO file.
b). Download the image ISO file.
2. 2. Refer to the instructions in the Restoring the DGX A100 Software Image for
additional instructions.
A.3. Creating a Local Mirror of the
NVIDIA and Canonical Repositories
The procedure below describes how to download all the necessary packages to create a
mirror of the repositories that are needed to update NVIDIA DGX systems. The steps are
specific to versions 4.0.X and 4.1.X, but they can be edited to work with other versions.
For more information on DGX OS versions and the release notes available, visit https://
docs.nvidia.com/dgx/dgx-os-server-release-notes/index.html#dgx-os-release-number-
scheme. For more information on how to upgrade from versions 4.0.x to 4.1.x, review
the release notes: https://docs.nvidia.com/dgx/pdf/DGX-OS-server-4.1-relnotes-update-
guide.pdf.
Note: These procedures apply only to upgrades within the same major release, such as 4.x
→
4.y. It does not support upgrades across major releases, such as 3.x
→
4.x.
A.4. Creating the Mirror in a DGX OS 4
System
The instructions in this section are to be performed on a system with network access.
Here are the prerequisites:
‣
A system installed with Ubuntu OS is needed to create the mirror because there are
several Ubuntu tools that need to be used.
‣
You must be logged in to the system installed with Ubuntu OS as an administrator
user because this procedure requires sudo privileges.
‣
The system must contain enough storage space to replicate the repositories to a file
system. The space requirement could be as high as 250 GB.
‣
An efficient way to move large amount of data is needed, for example, shared storage
in a DMZ, or portable USB drives that can be brought into the air-gapped area.
The data will need to be moved to the systems that need to be updated. Make sure
that any portable drives are formatted using ext4 or FAT32.
1. Make sure the storage device is attached to the system with network access and
identify the mount point of the device.

Installing Software on Air-Gapped DGX A100 Systems
NVIDIA DGX A100 DU-09821-001 _v01|92
Example mount point used in these instructions: /media/usb/repository
2. Install the apt-mirror package.
$ sudo apt update
$ sudo apt install apt-mirror
3. Change the ownership of the target directory to the apt-mirror user in the apt-
mirror group.
$ sudo chown apt-mirror:apt-mirror /media/usb/repository
The target directory must be owned by the user apt-mirror or the replication will not
work.
4. Configure the path of the destination directory in /etc/apt/mirror.list and use
the included list of repositories below to retrieve the packages for both Ubuntu base
OS and the NVIDIA DGX OS packages.
############# config ##################
#
set base_path /media/usb/repository #/your/path/here
#
# set mirror_path $base_path/mirror
# set skel_path $base_path/skel
# set var_path $base_path/var
# set cleanscript $var_path/clean.sh
# set defaultarch <running host architecture>
# set postmirror_script $var_path/postmirror.sh
set run_postmirror 0
set nthreads 20
set _tilde 0
#
############# end config ##############
# Standard Canonical package repositories:
deb http://security.ubuntu.com/ubuntu bionic-security main
deb http://security.ubuntu.com/ubuntu bionic-security universe
deb http://security.ubuntu.com/ubuntu bionic-security multiverse
deb http://archive.ubuntu.com/ubuntu/ bionic main multiverse universe
deb http://archive.ubuntu.com/ubuntu/ bionic-updates main multiverse universe
#
deb-i386 http://security.ubuntu.com/ubuntu bionic-security main
deb-i386 http://security.ubuntu.com/ubuntu bionic-security universe
deb-i386 http://security.ubuntu.com/ubuntu bionic-security multiverse
deb-i386 http://archive.ubuntu.com/ubuntu/ bionic main multiverse universe
deb-i386 http://archive.ubuntu.com/ubuntu/ bionic-updates main multiverse
universe
#
# DGX specific repositories:
deb http://international.download.nvidia.com/dgx/repos/bionic bionic main
restricted universe multiverse
deb http://international.download.nvidia.com/dgx/repos/bionic bionic-updates main
restricted universe multiverse
deb http://international.download.nvidia.com/dgx/repos/bionic bionic-
r418+cuda10.1 main multiverse restricted universe
deb http://international.download.nvidia.com/dgx/repos/bionic bionic-
r450+cuda11.0 main multiverse restricted universe
#
deb-i386 http://international.download.nvidia.com/dgx/repos/bionic bionic main
restricted universe multiverse
deb-i386 http://international.download.nvidia.com/dgx/repos/bionic bionic-updates
main restricted universe multiverse
# Only for DGX OS 4.1.0
deb-i386 http://international.download.nvidia.com/dgx/repos/bionic bionic-
r418+cuda10.1 main multiverse restricted universe
# Clean unused items
clean http://archive.ubuntu.com/ubuntu
clean http://security.ubuntu.com/ubuntu

Installing Software on Air-Gapped DGX A100 Systems
NVIDIA DGX A100 DU-09821-001 _v01|93
5. Run apt-mirror and wait for it to finish downloading content.
This will take a long time depending on the network connection speed.
$ sudo apt-mirror
6. Eject the removable storage with all packages.
$ sudo eject /media/usb/repository
A.5. Configuring the Target Air-Gapped
DGX OS 4 System
The instructions in this section are to be performed on the target air-gapped DGX
system.
Here are the prerequisites:
‣
The target air-gapped DGX system is installed, has gone through the first boot
process, and is ready to be updated with the latest packages.
‣
The USB storage device on which the mirrors were created is attached to the target
DGX system.
There are other ways to transfer the data that are not covered in this document as
they will depend on the data center policies for the air-gapped environment.
1. Mount the storage device on the air-gapped system to /media/usb/repository for
consistency.
2. Configure the apt (http://manpages.ubuntu.com/manpages/bionic/en/man8/
apt.8.html) command to use the file system as the repository in the file /etc/apt/
sources.list by modifying the following lines.
deb file:///media/usb/repository/mirror/security.ubuntu.com/ubuntu bionic-
security main
deb file:///media/usb/repository/mirror/security.ubuntu.com/ubuntu bionic-
security universe
deb file:///media/usb/repository/mirror/security.ubuntu.com/ubuntu bionic-
security multiverse
deb file:///media/usb/repository/mirror/archive.ubuntu.com/ubuntu/ bionic main
multiverse universe
deb file:///media/usb/repository/mirror/archive.ubuntu.com/ubuntu/ bionic-updates
main multiverse universe
3. Configure apt to use the NVIDIA DGX OS packages in the file /etc/apt/
sources.list.d/dgx.list.
deb file:///media/usb/repository/mirror/international.download.nvidia.com/dgx/
repos/bionic bionic main multiverse restricted universe
4. If present, remove the file /etc/apt/sources.list.d/docker.list as it is no longer
needed and removing it will eliminate error messages during the update process.
5. (For DGX OS Release 4.1 and later only) Configure apt to use the NVIDIA DGX OS
packages in the file /etc/apt/sources.list.d/dgx-bionic-r418-cuda10-1-
repo.list.
$ echo "deb file:///media/usb/repository/mirror/international.download.nvidia.com/dgx/
repos/bionic/ bionic-r418+cuda10.1 main multiverse restricted universe" | sudo tee /etc/
apt/sources.list.d/dgx-bionic-r418-cuda10-1-repo.list
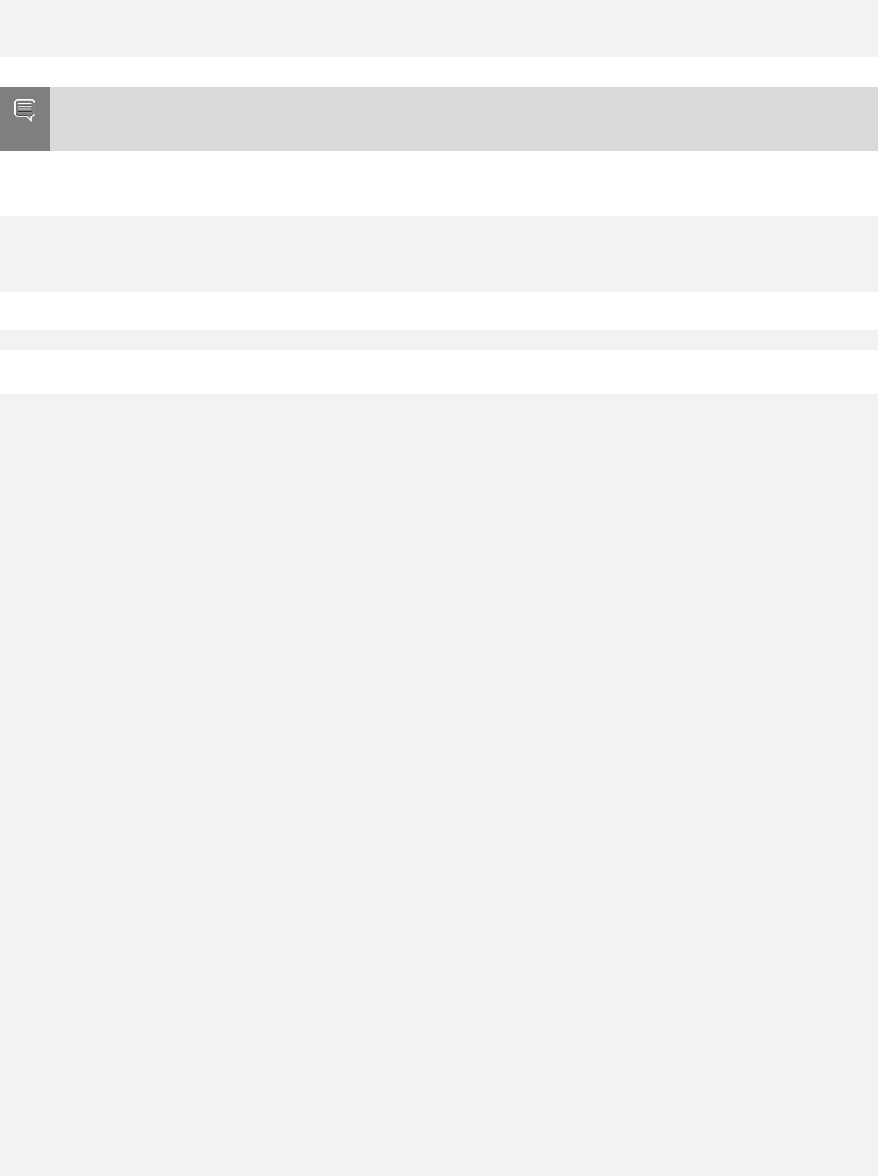
Installing Software on Air-Gapped DGX A100 Systems
NVIDIA DGX A100 DU-09821-001 _v01|94
6. Optional: (For DGX OS Release 4.5 and later only) If you want to use the R450 NVIDIA
graphics driver and CUDA Toolkit 11.0, configure apt to use the NVIDIA DGX OS
packages in the file /etc/apt/sources.list.d/dgx-bionic-r450-cuda11-0-
repo.list.
$ echo "deb file:///media/usb/repository/mirror/international.download.nvidia.com/dgx/
repos/bionic/ bionic-r450+cuda11.0 main multiverse restricted universe" | sudo tee /etc/
apt/sources.list.d/dgx-bionic-r450-cuda11-0-repo.list
Note: If you want to continue using earlier releases, for example the R418 NVIDIA
graphic driver and CUDA Toolkit 10.1, omit this step.
7. Edit the file /etc/apt/preferences.d/nvidia to update the Pin parameter as
follows.
Package: *
#Pin: origin international.download.nvidia.com
Pin: release o=apt-pin-parameter-air-gap
Pin-Priority: 600
8. Update the apt repository.
$ sudo apt update
Output from this command is similar to the following example.
Get:1 file:/media/usb/repository/mirror/security.ubuntu.com/ubuntu bionic-
security InRelease [88.7 kB]
Get:1 file:/media/usb/repository/mirror/security.ubuntu.com/ubuntu bionic-
security InRelease [88.7 kB]
Get:2 file:/media/usb/repository/mirror/archive.ubuntu.com/ubuntu bionic
InRelease [242 kB]
Get:2 file:/media/usb/repository/mirror/archive.ubuntu.com/ubuntu bionic
InRelease [242 kB]
Get:3 file:/media/usb/repository/mirror/archive.ubuntu.com/ubuntu bionic-updates
InRelease [88.7 kB]
Get:4 file:/media/usb/repository/mirror/international.download.nvidia.com/dgx/
repos/bionic bionic-r418+cuda10.1 InRelease [13.0 kB]
Get:5 file:/media/usb/repository/mirror/international.download.nvidia.com/dgx/
repos/bionic bionic-r450+cuda11.0 InRelease [7070 B]
Get:5 file:/media/usb/repository/mirror/international.download.nvidia.com/dgx/
repos/bionic bionic-r450+cuda11.0 InRelease [7070 B]
Get:6 file:/media/usb/repository/mirror/international.download.nvidia.com/dgx/
repos/bionic bionic InRelease [13.1 kB]
Get:3 file:/media/usb/repository/mirror/archive.ubuntu.com/ubuntu bionic-updates
InRelease [88.7 kB]
Get:4 file:/media/usb/repository/mirror/international.download.nvidia.com/dgx/
repos/bionic bionic-r418+cuda10.1 InRelease [13.0 kB]
Get:6 file:/media/usb/repository/mirror/international.download.nvidia.com/dgx/
repos/bionic bionic InRelease [13.1 kB]
Hit:7 https://download.docker.com/linux/ubuntu bionic InRelease
Get:8 file:/media/usb/repository/mirror/international.download.nvidia.com/dgx/
repos/bionic bionic-r418+cuda10.1/multiverse amd64 Packages [10.1 kB]
Get:9 file:/media/usb/repository/mirror/international.download.nvidia.com/dgx/
repos/bionic bionic-r450+cuda11.0/multiverse amd64 Packages [17.4 kB]
Get:10 file:/media/usb/repository/mirror/international.download.nvidia.com/dgx/
repos/bionic bionic-r418+cuda10.1/restricted amd64 Packages [10.3 kB]
Get:11 file:/media/usb/repository/mirror/international.download.nvidia.com/dgx/
repos/bionic bionic-r450+cuda11.0/restricted amd64 Packages [26.4 kB]
Get:12 file:/media/usb/repository/mirror/international.download.nvidia.com/dgx/
repos/bionic bionic-r418+cuda10.1/restricted i386 Packages [516 B]
Get:13 file:/media/usb/repository/mirror/international.download.nvidia.com/dgx/
repos/bionic bionic/multiverse amd64 Packages [44.5 kB]
Get:14 file:/media/usb/repository/mirror/international.download.nvidia.com/dgx/
repos/bionic bionic/multiverse i386 Packages [8,575 B]
Get:15 file:/media/usb/repository/mirror/international.download.nvidia.com/dgx/
repos/bionic bionic/restricted i386 Packages [745 B]
Installing Software on Air-Gapped DGX A100 Systems
NVIDIA DGX A100 DU-09821-001 _v01|95
Get:16 file:/media/usb/repository/mirror/international.download.nvidia.com/dgx/
repos/bionic bionic/restricted amd64 Packages [8,379 B]
Get:17 file:/media/usb/repository/mirror/international.download.nvidia.com/dgx/
repos/bionic bionic/universe amd64 Packages [2,946 B]
Get:18 file:/media/usb/repository/mirror/international.download.nvidia.com/dgx/
repos/bionic bionic/universe i386 Packages [496 B]
Reading package lists... Done
Building dependency tree
Reading state information... Done
249 packages can be upgraded. Run 'apt list --upgradable' to see them.
$
9. Upgrade the system using the newly configured local repositories.
$ sudo apt full-upgrade
If you configured apt to use the NVIDIA DGX OS packages in the file /etc/apt/
sources.list.d/dgx-bionic-r450-cuda11-0-repo.list, the NVIDIA graphics driver
is upgraded to the R450 driver and the package sources are updated to obtain future
updates from the R450 driver repositories.
10.Optional: (For DGX OS Release 4.5 and later only) If you configured apt to use the
NVIDIA DGX OS packages in the file /etc/apt/sources.list.d/dgx-bionic-r450-
cuda11-0-repo.list and want to use CUDA Toolkit 11.0, install it.
$ sudo apt install cuda-toolkit-11-0
Note: If you did not configure apt to use the NVIDIA DGX OS packages in the file /etc/
apt/sources.list.d/dgx-bionic-r450-cuda11-0-repo.list, omit this step. If you
try to install CUDA Toolkit 11.0, the attempt fails.
A.6. Configuring the Target Air-Gapped
DGX OS 5 System
The instructions in this section are to be performed on the target air-gapped DGX
system.
The following are the prerequisites.
‣
The target air-gapped DGX system is installed, has gone through the first boot
process, and is ready to be updated with the latest packages.
‣
The USB storage device on which the mirrors were created is attached to the target
DGX system.
There are other ways to transfer the data that are not covered in this document as
they will depend on the data center policies for the air-gapped environment.
1. Mount the storage device on the air-gapped system to /media/usb/repository for
consistency.
2. Configure the apt (http://manpages.ubuntu.com/manpages/bionic/en/man8/
apt.8.html) command to use the file system as the repository in the file /etc/apt/
sources.list by modifying the following lines.
deb file:///media/usb/repository/mirror/security.ubuntu.com/ubuntu focal-security
main multiverse universe restricted
Installing Software on Air-Gapped DGX A100 Systems
NVIDIA DGX A100 DU-09821-001 _v01|96
deb file:///media/usb/repository/mirror/archive.ubuntu.com/ubuntu/ focal main
multiverse universe restricted
deb file:///media/usb/repository/mirror/archive.ubuntu.com/ubuntu/ focal-updates
main multiverse universe restricted
3. Configure apt to use the NVIDIA DGX OS packages in the /etc/apt/
sources.list.d/dgx.list file.
deb file:///media/usb/repository/mirror/repo.download.nvidia.com/baseos/ubuntu/
focal/x86_64/ focal main dgx
deb file:///media/usb/repository/mirror/repo.download.nvidia.com/baseos/ubuntu/
focal/x86_64/ focal-updates main dgx
Configure apt to use the NVIDIA CUDA packages in the /etc/apt/sources.list.d/
cuda-compute-repo.list file.
deb file:///media/usb/repository/mirror/developer.download.nvidia.com/compute/
cuda/repos/ubuntu2004/x86_64/ /
4. Update the apt repository.
$ sudo apt update
Output from this command is similar to the following example.
Get:1 file:/media/usb/repository/mirror/security.ubuntu.com/ubuntu focal-security
InRelease [107 kB]
Get:2 file:/media/usb/repository/mirror/archive.ubuntu.com/ubuntu focal InRelease
[265 kB]
Get:3 file:/media/usb/repository/mirror/archive.ubuntu.com/ubuntu focal-updates
InRelease [111 kB]
Get:4 file:/media/usb/repository/mirror/developer.download.nvidia.com/compute/
cuda/repos/ubuntu2004/x86_64 InRelease
Get:5 file:/media/usb/repository/mirror/repo.download.nvidia.com/baseos/ubuntu/
focal/x86_64 focal InRelease [12.5 kB]
Get:6 file:/media/usb/repository/mirror/repo.download.nvidia.com/baseos/ubuntu/
focal/x86_64 focal-updates InRelease [12.4 kB]
Get:7 file:/media/usb/repository/mirror/developer.download.nvidia.com/compute/
cuda/repos/ubuntu2004/x86_64 Release [697 B]
Get:8 file:/media/usb/repository/mirror/developer.download.nvidia.com/compute/
cuda/repos/ubuntu2004/x86_64 Release.gpg [836 B]
Reading package lists... Done
5. Upgrade the system using the newly configured local repositories.
$ sudo apt full-upgrade
A.7. Installing Docker Containers
This method applies to Docker containers hosted on the NVIDIA NGC Container Registry,
and requires that you have an active NGC account.
1. On a system with internet access, log in to the NGC Container Registry by entering
the following command and credentials.
$ docker login nvcr.io
Username:
$oauthtoken
Password:
apikey
2. Type $oauthtoken exactly as shown for the Username.
This is a special username that enables API key authentication. In place of apikey,
paste in the API Key text that you obtained from the NGC website.

Installing Software on Air-Gapped DGX A100 Systems
NVIDIA DGX A100 DU-09821-001 _v01|97
3. Enter the docker pull command, specifying the image registry, image repository, and
tag:
$ docker pull nvcr.io/nvidia/repository:tag
4. Verify the image is on your system using docker images.
$ docker images
5. Save the Docker image as an archive.
$ docker save nvcr.io/nvidia/repository:tag > framework.tar
6. Transfer the image to the air-gapped system using removable media such as a USB
flash drive.
7. Load the NVIDIA Docker image.
$ docker load –i framework.tar
8. Verify the image is on your system.
$ docker images

NVIDIA DGX A100 DU-09821-001 _v01|98
AppendixB. Safety
This section provides information about how to safely use the DGX A100 system.
B.1. Safety Information
To reduce the risk of bodily injury, electrical shock, fire, and equipment damage, read this
document and observe all warnings and precautions in this guide before installing or
maintaining your server product.
In the event of a conflict between the information in this document and information
provided with the product or on the website for a particular product, the product
documentation takes precedence.
Your server should be integrated and serviced only by technically qualified persons.
You must adhere to the guidelines in this guide and the assembly instructions in your
server manuals to ensure and maintain compliance with existing product certifications
and approvals. Use only the described, regulated components specified in this guide. Use
of other products I components will void the UL Listing and other regulatory approvals of
the product and may result in noncompliance with product regulations in the region(s) in
which the product is sold.
B.2. Safety Warnings and Cautions
To avoid personal injury or property damage, before you begin installing the product,
read, observe, and adhere to all of the following safety instructions and information.
The following safety symbols may be used throughout the documentation and may be
marked on the product and the product packaging.
Symbol Meaning
CAUTION Indicates the presence of a hazard that may
cause minor personal injury or property
damage if the CAUTION is ignored.
WARNING Indicates the presence of a hazard that
may result in serious personal injury if the
WARNING is ignored.
Safety
NVIDIA DGX A100 DU-09821-001 _v01|99
Symbol Meaning
Indicates potential hazard if indicated
information is ignored.
Indicates shock hazards that result in serious
injury or death if safety instructions are not
followed.
Indicates hot components or surfaces
Indicates do not touch fan blades, may result in
injury.
‣
Shock hazard: The product might be
equipped with multiple power cords.
To remove all hazardous voltages,
disconnect all power cords.
‣
High leakage current ground (earth)
connection to the Power Supply is essential
before connecting the supply.
Recycle the battery.
The rail racks are designed to carry only the
weight of the server system. Do not use rail-
mounted equipment as a workspace. Do not
place additional load onto any rail-mounted
equipment.
Safety
NVIDIA DGX A100 DU-09821-001 _v01|100
B.3. Intended Application Uses
This product was evaluated as Information Technology Equipment (ITE), which may be
installed in offices, schools, computer rooms, and similar commercial type locations.
The suitability of this product for other product categories and environments (such as
medical, industrial, residential, alarm systems, and test equipment), other than an ITE
application, may require further evaluation.
B.4. Site Selection
Here is some information about how to select the correct site for the DGX A100 system.
Choose a site that is:
‣
Clean, dry, and free of airborne particles (other than normal room dust).
‣
Well-ventilated and away from sources of heat including direct sunlight and radiators.
‣
Away from sources of vibration or physical shock.
‣
In regions that are susceptible to electrical storms, we recommend you plug your
system into a surge suppressor and disconnect telecommunication lines to your
modem during an electrical storm.
‣
Provided with a properly grounded wall outlet.
‣
Provided with sufficient space to access the power supply cord(s), because they
serve as the product's main power disconnect.
B.5. Equipment Handling Practices
Here is some information about how to handle the equipment.
To reduce the risk of personal injury or equipment damage, do the following:
‣
Conform to local occupational health and safety requirements when moving and
lifting equipment.
‣
Use mechanical assistance or other suitable assistance when moving and lifting
equipment.

Safety
NVIDIA DGX A100 DU-09821-001 _v01|101
B.6. Electrical Precautions
Here is some information about electrical precautions.
Power and Electrical Warnings
CAUTION: The power button, indicated by the stand-by power marking, DOES NOT
completely turn off the system AC power; standby power is active whenever the system is
plugged in. To remove power from system, you must unplug the AC power cord from the
wall outlet. Make sure all AC power cords are unplugged before you open the chassis, or
add or remove any non hot-plug components.
Do not attempt to modify or use an AC power cord if it is not the exact type required. A
separate AC cord is required for each system power supply.
Some power supplies in servers use Neutral Pole Fusing. To avoid risk of shock use
caution when working with power supplies that use Neutral Pole Fusing.
The power supply in this product contains no user-serviceable parts. Do not open the
power supply. Hazardous voltage, current and energy levels are present inside the power
supply. Return to manufacturer for servicing.
When replacing a hot-plug power supply, unplug the power cord to the power supply
being replaced before removing it from the server.
To avoid risk of electric shock, tum off the server and disconnect the power cords,
telecommunications systems, networks, and modems attached to the server before
opening it.
Power Cord Warnings
CAUTION: To avoid electrical shock or fire, check the power cord(s) that will be used with
the product as follows:
‣
Do not attempt to modify or use the AC power cord(s) if they are not the exact type
required to fit into the grounded electrical outlets.
‣
The power cord(s) must meet the following criteria:
‣
The power cord must have an electrical rating that is greater than that of the
electrical current rating marked on the product.
‣
The power cord must have safety ground pin or contact that is suitable for the
electrical outlet.

Safety
NVIDIA DGX A100 DU-09821-001 _v01|102
‣
The power supply cord(s) is/ are the main disconnect device to AC power.
The socket outlet(s) must be near the equipment and readily accessible for
disconnection.
‣
The power supply cord(s) must be plugged into socket-outlet(s) that is /are
provided with a suitable earth ground.
B.7. System Access Warnings
Here is some information about system access warnings for the DGX A100 system.
To avoid personal injury or property damage, the following safety instructions apply
whenever accessing the inside of the product:
‣
Turn off all peripheral devices connected to this product.
‣
Turn off the system by pressing the power button to off.
‣
Disconnect the AC power by unplugging all AC power cords from the system or wall
outlet.
‣
Disconnect all cables and telecommunication lines that are connected to the system.
‣
Retain all screws or other fasteners when removing access cover(s). Upon completion
of accessing inside the product, refasten access cover with original screws or
fasteners.
‣
Do not access the inside of the power supply. There are no serviceable parts in the
power supply.
‣
Return to manufacturer for servicing.
‣
Power down the server and disconnect all power cords before adding or replacing any
non hot-plug component.
‣
When replacing a hot-plug power supply, unplug the power cord to the power supply
being replaced before removing the power supply from the server.
CAUTION: If the server has been running, any installed processor(s) and heat sink(s)
may be hot.
Unless you are adding or removing a hot-plug component, allow the system to cool
before opening the covers. To avoid the possibility of coming into contact with hot
component(s) during a hot-plug installation, be careful when removing or installing the
hot-plug component(s).
CAUTION: To avoid injury do not contact moving fan blades. Your system is supplied
with a guard over the fan, do not operate the system without the fan guard in place.

Safety
NVIDIA DGX A100 DU-09821-001 _v01|103
B.8. Rack Mount Warnings
The following installation guidelines are required by UL to maintain safety compliance
when installing your system into a rack.
The equipment rack must be anchored to an unmovable support to prevent it from
tipping when a server or piece of equipment is extended from it. The equipment rack
must be installed according to the rack manufacturer's instructions.
Install equipment in the rack from the bottom up with the heaviest equipment at the
bottom of the rack.
Extend only one piece of equipment from the rack at a time.
You are responsible for installing a main power disconnect for the entire rack unit. This
main disconnect must be readily accessible, and it must be labeled as controlling power
to the entire unit, not just to the server(s).
To avoid risk of potential electric shock, a proper safety ground must be implemented for
the rack and each piece of equipment installed in it.
Elevated Operating Ambient- If installed in a closed or multi-unit rack assembly, the
operating ambient temperature of the rack environment may be greater than room
ambient. Therefore, consideration should be given to installing the equipment in an
environment compatible with the maximum ambient temperature (Tma) specified by the
manufacturer.
Reduced Air Flow -Installation of the equipment in a rack should be such that the
amount of air flow required for safe operation of the equipment is not compromised.
Mechanical Loading- Mounting of the equipment in the rack should be such that a
hazardous condition is not achieved due to uneven mechanical loading.
Circuit Overloading- Consideration should be given to the connection of the equipment
to the supply circuit and the effect that overloading of the circuits might have on
overcurrent protection and supply wiring. Appropriate consideration of equipment
nameplate ratings should be used when addressing this concern.
Reliable Earthing- Reliable earthing of rack-mounted equipment should be maintained.
Particular attention should be given to supply connections other than direct connections
to the branch circuit (for example, the use of power strips).
B.9. Electrostatic Discharge
Here is some information about how to handle electric discharges (ESD) in the DGX A100
system.
CAUTION: ESD can damage drives, boards, and other parts. We recommend that you
perform all procedures at an ESD workstation. If one is not available, provide some ESD
Safety
NVIDIA DGX A100 DU-09821-001 _v01|104
protection by wearing an antistatic wrist strap attached to chassis ground (any unpainted
metal surface) on your server when handling parts.
Always handle boards carefully. They can be extremely sensitive to ESO. Hold boards only
by their edges. After removing a board from its protective wrapper or from the server,
place the board component side up on a grounded, static free surface. Use a conductive
foam pad if available but not the board wrapper. Do not slide board over any surface.
B.10. Other Hazards
Here is some information about other hazards.
CALIFORNIA DEPARTMENT OF TOXIC SUBSTANCES CONTROL:
Perchlorate Material – special handling may apply. See www.dtsc.ca.gov/perchlorate.
Perchlorate Material: Lithium battery (CR2032) contains perchlorate. Please follow
instructions for disposal.
NICKEL
NVIDIA Bezel. The bezel’s decorative metal foam contains some nickel. The metal foam
is not intended for direct and prolonged skin contact. Please use the handles to remove,
attach or carry the bezel. While nickel exposure is unlikely to be a problem, you should be
aware of the possibility in case you’re susceptible to nickel-related reactions.
Battery Replacement
CAUTION: There is the danger of explosion if the battery is incorrectly replaced. When
replacing the battery, use only the battery recommended by the equipment manufacturer.
Dispose of batteries according to local ordinances and regulations. Do not attempt to
recharge a battery.
Do not attempt to disassemble, puncture, or otherwise damage a battery.
Safety
NVIDIA DGX A100 DU-09821-001 _v01|105
Cooling and Airflow
CAUTION: Carefully route cables as directed to minimize airflow blockage and cooling
problems. For proper cooling and airflow, operate the system only with the chassis covers
installed.
Operating the system without the covers in place can damage system parts. To install
the covers:
‣
Check first to make sure you have not left loose tools or parts inside the system.
‣
Check that cables, add-in cards, and other components are properly installed.
‣
Attach the covers to the chassis according to the product instructions.
The equipment is intended for installation only in a Server Room/ Computer Room where
both these conditions apply:
‣
Access can only be gained by SERVICE PERSONS or by USERS who have been
instructed about the reasons for the restrictions applied to the location and about
any precautions that shall be taken.
‣
Access is through the use of a TOOL or lock and key, or other means of security, and
is controlled by the authority responsible for the location.

NVIDIA DGX A100 DU-09821-001 _v01|106
AppendixC. Compliance
The NVIDIA DGX A100 Server is compliant with the regulations listed in this section.
C.1. United States
Federal Communications Commission (FCC) FCC Marking (Class A)
This device complies with part 15 of the FCC Rules. Operation is subject to the following
two conditions: (1) this device may not cause harmful interference, and (2) this device
must accept any interference received, including any interference that may cause
undesired operation of the device.
NOTE: This equipment has been tested and found to comply with the limits for a Class
A digital device, pursuant to part 15 of the FCC Rules. These limits are designed to
provide reasonable protection against harmful interference when the equipment is
operated in a commercial environment. This equipment generates, uses, and can radiate
radio frequency energy and, if not installed and used in accordance with the instruction
manual, may cause harmful interference to radio communications. Operation of this
equipment in a residential area is likely to cause harmful interference in which case the
user will be required to correct the interference at his own expense.
California Department of Toxic Substances Control: Perchlorate Material - special
handling may apply. See www.dtsc.ca.gov/perchlorate.
C.2. United States/Canada
Explain what the concept is and why the reader should care about it in 50 words or fewer.
TÜV Rheinland of North America is accredited as a Nationally Recognized Testing
Laboratory (NRTL), by OSHA (The Occupational Safety and Health Administration) in the
United States, and as a Product Certification Body by SCC (Standards Council of Canada)
in Canada. Refer to https:// www.tuv.com/usa/en/ctuvus-certification.html.
cTUVus Mark
Compliance
NVIDIA DGX A100 DU-09821-001 _v01|107
C.3. Canada
Innovation, Science and Economic Development Canada (ISED) CAN ICES-3(A)/NMB-3(A)
The Class A digital apparatus meets all requirements of the Canadian Interference-
Causing Equipment Regulation.
Cet appareil numerique de la class A respecte toutes les exigences du Reglement sur le
materiel brouilleur du Canada.
C.4. CE
European Conformity; Conformité Européenne (CE)
This is a Class A product. In a domestic environment this product may cause radio
frequency interference in which case the user may be required to take adequate
measures.
This device bears the CE mark in accordance with Directive 2014/53/EU. This device
complies with the following Directives:
‣
EMC Directive A, I.T.E Equipment.
‣
Low Voltage Directive for electrical safety.
‣
RoHS Directive for hazardous substances.
‣
Energy-related Products Directive (ErP).
The full text of EU declaration of conformity is available at the following internet address:
www.nvidia.com/support.

Compliance
NVIDIA DGX A100 DU-09821-001 _v01|108
A copy of the Declaration of Conformity to the essential requirements may be obtained
directly from NVIDIA GmbH (Bavaria Towers – Blue Tower, Einsteinstrasse 172, D-81677
Munich, Germany).
C.5. Australia and New Zealand
Australian Communications and Media Authority
This product meets the applicable EMC requirements for Class A, I.T.E equipment.
C.6. Brazil
INMETRO
C.7. Japan
Voluntary Control Council for Interference (VCCI)
Compliance
NVIDIA DGX A100 DU-09821-001 _v01|109
This is a Class A product.
In a domestic environment this product may cause radio interference, in which case the
user may be required to take corrective actions. VCCI-A.
Japan RoHS Material Content Declaration

Compliance
NVIDIA DGX A100 DU-09821-001 _v01|110

Compliance
NVIDIA DGX A100 DU-09821-001 _v01|111
C.8. South Korea
Korean Agency for Technology and Standards (KATS)
Class A Equipment (Industrial Broadcasting & Communication Equipment). This
equipment Industrial (Class A) electromagnetic wave suitability equipment and seller or
user should take notice of it, and this equipment is to be used in the places except for
home.
Korea RoHS Material Content Declaration
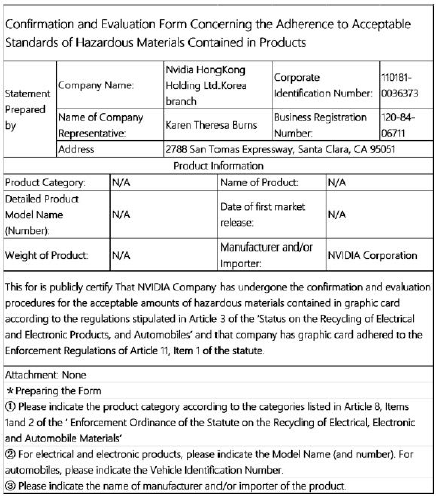
Compliance
NVIDIA DGX A100 DU-09821-001 _v01|112
C.9. China
China Compulsory Certificate
No certification is needed for China. The NVIDIA DGX A100 is a server with power
consumption greater than 1.3 kW.
China RoHS Material Content Declaration
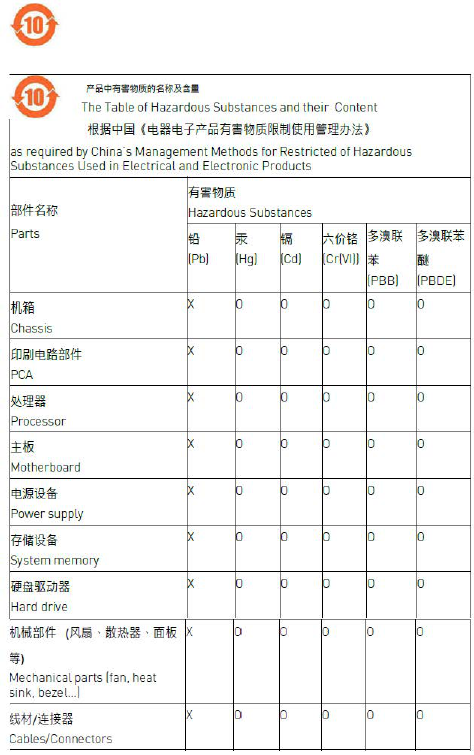
Compliance
NVIDIA DGX A100 DU-09821-001 _v01|113
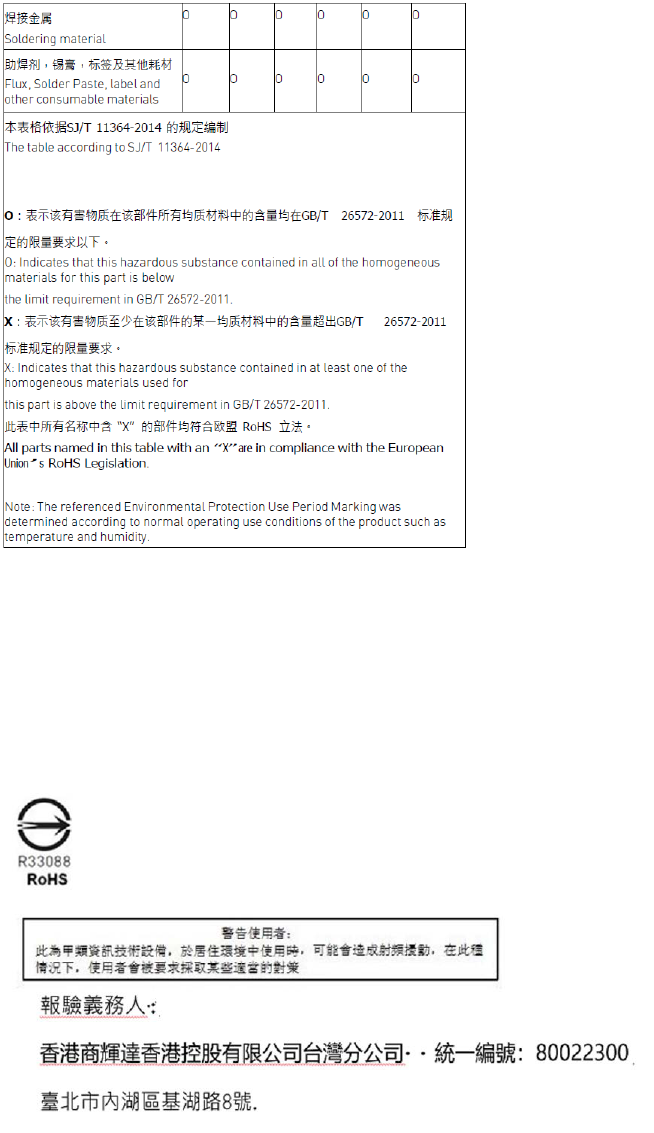
Compliance
NVIDIA DGX A100 DU-09821-001 _v01|114
C.10. Taiwan
Bureau of Standards, Metrology & Inspection (BSMI)
Taiwan RoHS Material Content Declaration
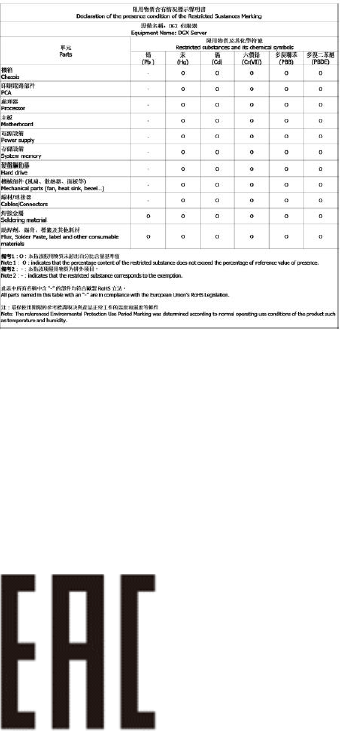
Compliance
NVIDIA DGX A100 DU-09821-001 _v01|115
C.11. Russia/Kazakhstan/Belarus
Customs Union Technical Regulations (CU TR)
This device complies with the technical regulations of the Customs Union (CU TR)
ТЕХНИЧЕСКИЙ РЕГЛАМЕНТ ТАМОЖЕННОГО СОЮЗА О безопасности низковольтного
оборудования (ТР ТС 004/2011)
ТЕХНИЧЕСКИЙ РЕГЛАМЕНТ ТАМОЖЕННОГО СОЮЗА Электромагнитная
совместимость технических средств (ТР ТС 020/2011)
Технический регламент Евразийского экономического союза "Об ограничении
применения опасных веществ в изделиях электротехники и радиоэлектроники" (ТР
ЕАЭС 037/2016)
Federal Agency of communication (FAC)
This device complies with the rules set forth by Federal Agency of Communications and
the Ministry of Communications and Mass Media.
Federal Security Service notification has been filed.

Compliance
NVIDIA DGX A100 DU-09821-001 _v01|116
C.12. Israel
SII
C.13. India
Concept definition.
Bureau of India Standards (BIS)
Authenticity may be verified by visiting the Bureau of Indian Standards website at http://
www.bis.gov.in.
India RoHS Compliance Statement
This product, as well as its related consumables and spares, complies with the reduction
in hazardous substances provisions of the "India E-waste (Management and Handling)
Rule 2016". It does not contain lead, mercury, hexavalent chromium, polybrominated
biphenyls or polybrominated diphenyl ethers in concentrations exceeding 0.1 weight %
and 0.01 weight % for cadmium, except for where allowed pursuant to the exemptions
set in Schedule 2 of the Rule.

Compliance
NVIDIA DGX A100 DU-09821-001 _v01|117
C.14. South Africa
South African Bureau of Standards (SABS)
This device complies with the following SABS Standards:
SANS 2332: 2017/CISPR 32:2015 SANS 2335:2018/ CISPR 35:2016
National Regulator of Compulsory Specification (NRCS)
This device complies with following standard under VC 8055:
SANS IEC 60950-1
C.15. Great Britain (England, Wales, and
Scotland)
UK Conformity Assessed
This device complies with the following Regulations:
‣
SI 2016/1091: Electromagnetic Compatibility (EMC)
‣
SI 2016/1101: The Low Voltage Electrical Equipment (Safety)
‣
SI 2012/3032: The Restriction of the Use of Certain Hazardous Substances in
Electrical and Electronic Equipment (As Amended)
A copy of the Declaration of Conformity to the essential requirements may be obtained
directly from NVIDIA Ltd. (100 Brook Drive, 3rd Floor Green Park, Reading RG2 6UJ,
United Kingdom)

Notice
This document is provided for information purposes only and shall not be regarded as a warranty of a certain functionality, condition, or quality of a
product. NVIDIA Corporation (“NVIDIA”) makes no representations or warranties, expressed or implied, as to the accuracy or completeness of the information
contained in this document and assumes no responsibility for any errors contained herein. NVIDIA shall have no liability for the consequences or use of
such information or for any infringement of patents or other rights of third parties that may result from its use. This document is not a commitment to
develop, release, or deliver any Material (defined below), code, or functionality.
NVIDIA reserves the right to make corrections, modifications, enhancements, improvements, and any other changes to this document, at any time without
notice.
Customer should obtain the latest relevant information before placing orders and should verify that such information is current and complete.
NVIDIA products are sold subject to the NVIDIA standard terms and conditions of sale supplied at the time of order acknowledgement, unless otherwise
agreed in an individual sales agreement signed by authorized representatives of NVIDIA and customer (“Terms of Sale”). NVIDIA hereby expressly objects
to applying any customer general terms and conditions with regards to the purchase of the NVIDIA product referenced in this document. No contractual
obligations are formed either directly or indirectly by this document.
NVIDIA products are not designed, authorized, or warranted to be suitable for use in medical, military, aircraft, space, or life support equipment, nor in
applications where failure or malfunction of the NVIDIA product can reasonably be expected to result in personal injury, death, or property or environmental
damage. NVIDIA accepts no liability for inclusion and/or use of NVIDIA products in such equipment or applications and therefore such inclusion and/or use
is at customer’s own risk.
NVIDIA makes no representation or warranty that products based on this document will be suitable for any specified use. Testing of all parameters of each
product is not necessarily performed by NVIDIA. It is customer’s sole responsibility to evaluate and determine the applicability of any information contained
in this document, ensure the product is suitable and fit for the application planned by customer, and perform the necessary testing for the application in
order to avoid a default of the application or the product. Weaknesses in customer’s product designs may affect the quality and reliability of the NVIDIA
product and may result in additional or different conditions and/or requirements beyond those contained in this document. NVIDIA accepts no liability
related to any default, damage, costs, or problem which may be based on or attributable to: (i) the use of the NVIDIA product in any manner that is contrary
to this document or (ii) customer product designs.
No license, either expressed or implied, is granted under any NVIDIA patent right, copyright, or other NVIDIA intellectual property right under this document.
Information published by NVIDIA regarding third-party products or services does not constitute a license from NVIDIA to use such products or services or
a warranty or endorsement thereof. Use of such information may require a license from a third party under the patents or other intellectual property rights
of the third party, or a license from NVIDIA under the patents or other intellectual property rights of NVIDIA.
Reproduction of information in this document is permissible only if approved in advance by NVIDIA in writing, reproduced without alteration and in full
compliance with all applicable export laws and regulations, and accompanied by all associated conditions, limitations, and notices.
THIS DOCUMENT AND ALL NVIDIA DESIGN SPECIFICATIONS, REFERENCE BOARDS, FILES, DRAWINGS, DIAGNOSTICS, LISTS, AND OTHER DOCUMENTS
(TOGETHER AND SEPARATELY, “MATERIALS”) ARE BEING PROVIDED “AS IS.” NVIDIA MAKES NO WARRANTIES, EXPRESSED, IMPLIED, STATUTORY, OR
OTHERWISE WITH RESPECT TO THE MATERIALS, AND EXPRESSLY DISCLAIMS ALL IMPLIED WARRANTIES OF NONINFRINGEMENT, MERCHANTABILITY, AND
FITNESS FOR A PARTICULAR PURPOSE. TO THE EXTENT NOT PROHIBITED BY LAW, IN NO EVENT WILL NVIDIA BE LIABLE FOR ANY DAMAGES, INCLUDING
WITHOUT LIMITATION ANY DIRECT, INDIRECT, SPECIAL, INCIDENTAL, PUNITIVE, OR CONSEQUENTIAL DAMAGES, HOWEVER CAUSED AND REGARDLESS OF
THE THEORY OF LIABILITY, ARISING OUT OF ANY USE OF THIS DOCUMENT, EVEN IF NVIDIA HAS BEEN ADVISED OF THE POSSIBILITY OF SUCH DAMAGES.
Notwithstanding any damages that customer might incur for any reason whatsoever, NVIDIA’s aggregate and cumulative liability towards customer for the
products described herein shall be limited in accordance with the Terms of Sale for the product.
Trademarks
NVIDIA, the NVIDIA logo, DGX, DGX-1, DGX-2, DGX A100, DGX H100, DGX, H800, DGX A800, DGX Station, DGX Station A100, and DGX Station A800 are
trademarks and/or registered trademarks of NVIDIA Corporation in the United States and other countries. Other company and product names may be
trademarks of the respective companies with which they are associated.
Copyright
©
2023 NVIDIA Corporation & Affiliates. All rights reserved.
NVIDIACorporation|2788SanTomasExpressway,SantaClara,CA95051
www.nvidia.com
