This classic chest
offers a lesson
in efficient
woodworking
BY CHRIS GOCHNOUR
Heirloom Tool Chest
MARCH/APRIL 2004 37Photos, except where noted: Matt Berger; facing page: Michael Pekovich; drawings: Bob La Pointe
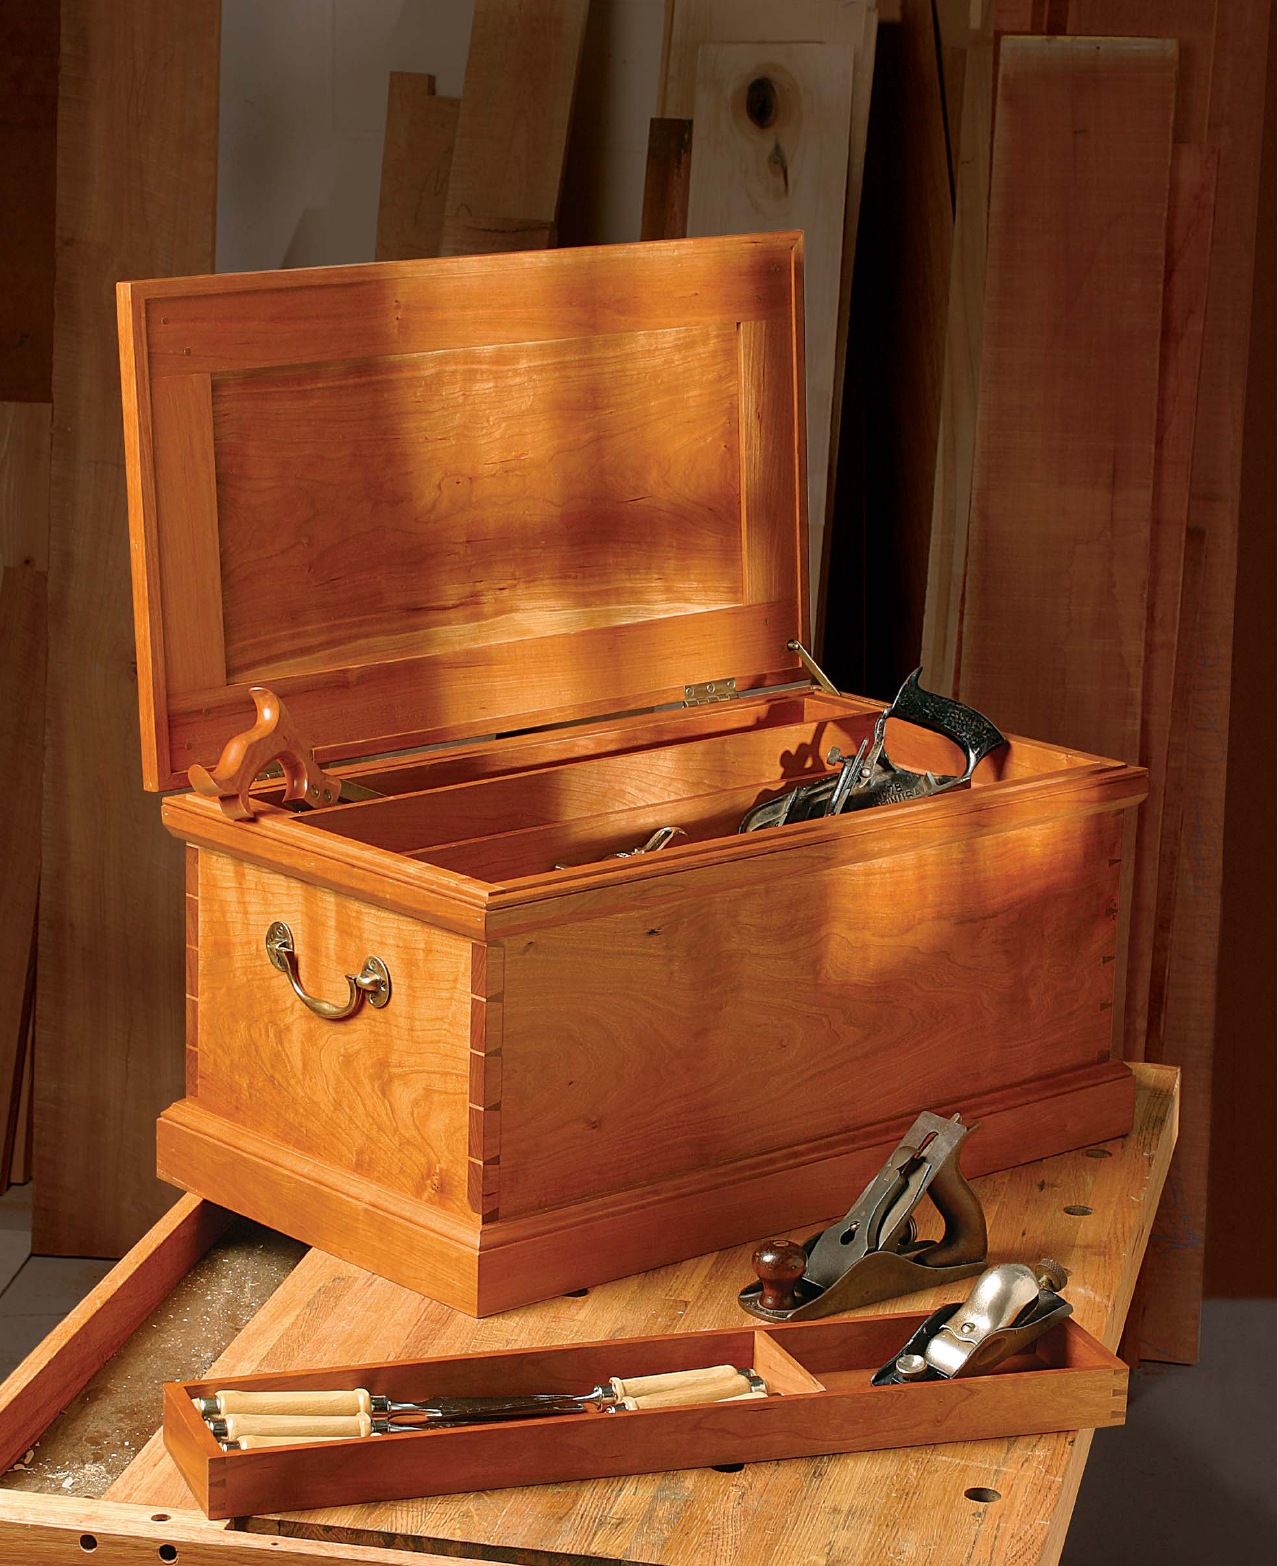
cabinetmaker’s tool chest embodies a certain nostalgia and
charm for modern woodworkers. It speaks of a time when
craftsmen had few tools but an abundance of skill. Tool
chests often served as a calling card to display a craftsman’s talents.
However, some were utilitarian, built simply to house tools.
The tool chest described in this article is of the latter kind—prac-
tical, enduring, and simple. But in a time when woodworkers have
an abundance of power tools at every turn, making this tool chest
with traditional hand-tool techniques can be a bridge to an era
past. I recommend using this project as a hand-tool exercise,
though power tools could be substituted for any of the operations.
Practicing the techniques involved in the chest’s construction will
make you more confident with hand tools, and you may find them
an indispensable resource in your day-to-day shop tasks.
Choose and mark the material
Select a medium-density hardwood that is worked easily with
hand tools. Because the tool chest is intended to be carried,
A
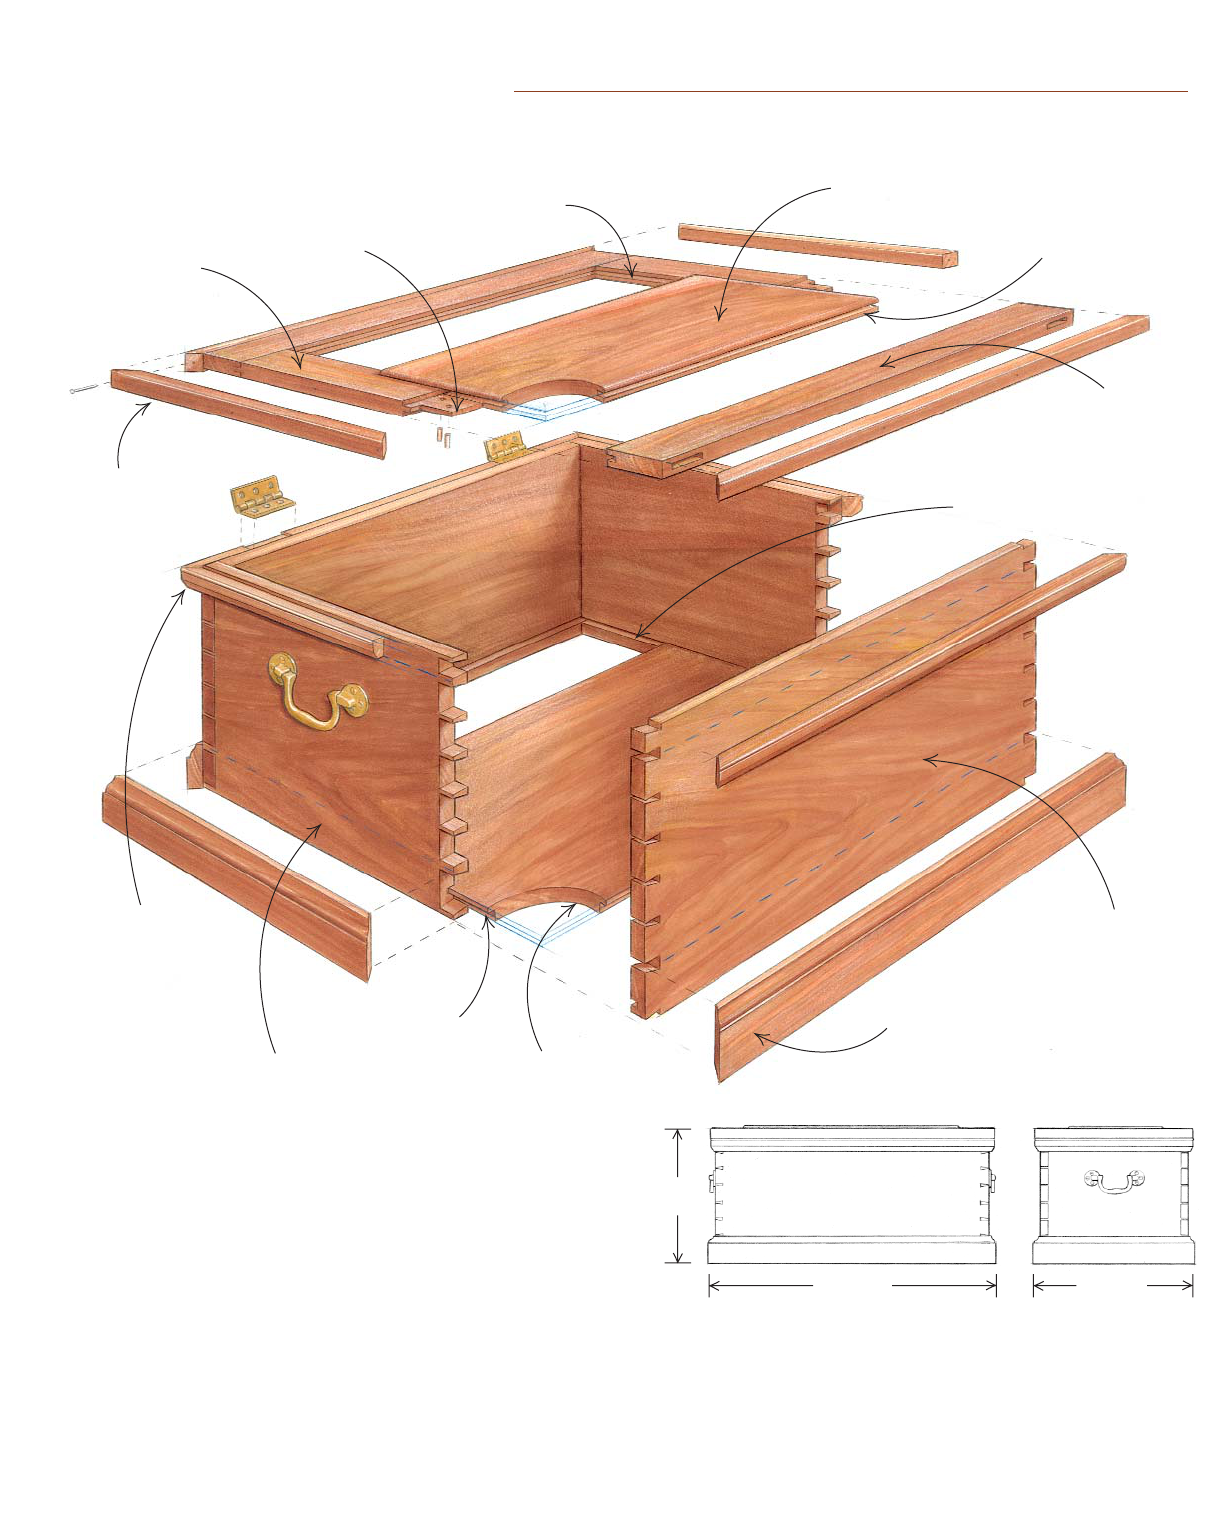
A COMFORTABLE HOME FOR TOOLS
Made of cherry and constructed entirely with hand tools, the tool chest incorporates
dovetail joinery, frame-and-panel construction, and applied molding.
Front and back,
3
⁄4 in. thick by
13 in. wide by
28 in. long
Groove,
3
⁄8 in. deep by
3
⁄8 in. wide, located
1
⁄2 in.
from the bottom edge
Sides,
3
⁄4 in.
thick by 13 in.
wide by 15 in.
long
Bottom panel,
3
⁄4 in. thick by
14 in. wide by
27
1
⁄4 in. long
Tongue,
3
⁄8 in. wide
by
3
⁄8 in.
long
Lid stiles,
3
⁄4 in. thick
by 2
1
⁄2 in. wide by
28
1
⁄8 in. long
Groove,
3
⁄8 in.
deep by
1
⁄4 in.
wide, centered
in thickness
Lid rails,
3
⁄4 in. thick
by 2
1
⁄2 in.
wide by
15
1
⁄8 in.
long
Haunched through-
tenons,
1
⁄4 in. thick
by 1
3
⁄4 in. wide by
2
1
⁄2 in. long
Lid panel,
7
⁄8 in.
thick by 10
5
⁄8 in.
wide by 23
5
⁄8 in. long
Groove,
3
⁄8 in. deep
by
1
⁄4 in. wide,
1
⁄4 in. from the
bottom edge
Base molding,
3
⁄4 in.
thick by 2
5
⁄8 in. wide,
with ogee profile
along top edge
Top molding,
3
⁄4 in. thick by
1
1
⁄4 in. high,
with
3
⁄16-in.-
radius bead
along top
edge and
1
⁄2-in.-wide
chamfer
along bottom
Lid molding,
11
⁄16 in. thick
by
7
⁄8 in. high
29
1
⁄2 in.
16
1
⁄2 in.
14 in.
38 FINE WOODWORKING
choose wood that is lightweight yet durable. For this box I chose
cherry, which is easy to work and attractive; however, woods such
as red alder, poplar, and white pine also are appropriate.
To reduce the likelihood of warp and twist, select clear, straight-
grained wood for the lid frame. This type of wood also is good for
the moldings because it will make them easier to work with mold-
ing planes. Knots are fine on panels, but keep them away from the
edges so that they will be out of the way of the joinery.
Once you’ve dimensioned the lumber for each part, mark them
with cabinetmaker’s triangles (see FWW #149, p. 90, 92). These tri-
angles clearly identify the face and the inside and outside edges of
each part. And they are helpful for identifying the orientation of
the pieces when you begin cutting joints.
From here, follow a sequential pattern of construction: Join the
box using dovetails; build the frame-and-panel lid with mortise-
and-tenon joinery; shape and apply moldings; and install the
hardware.
Practice and plan the carcase dovetails
I tell students that making dovetails is easy, but
controlling a handsaw can be difficult. Get
comfortable using a handsaw before you un-
dertake the dovetails, and practice dovetail-like
cuts on scraps of wood to improve your skill.
Clear and accurate layout is essential to
hand-cutting dovetails. Much of your success
will come down to your layout and your ability
to work to the lines and never cut beyond,
which comes with practice. The objective is to
cut precisely to the layout lines each step of the
way. This will greatly minimize cleanup and fit-
ting, making the entire process more efficient
and enjoyable.
Cut the tails two boards at a time—I cut the
tails first and then use them to lay out the pins.
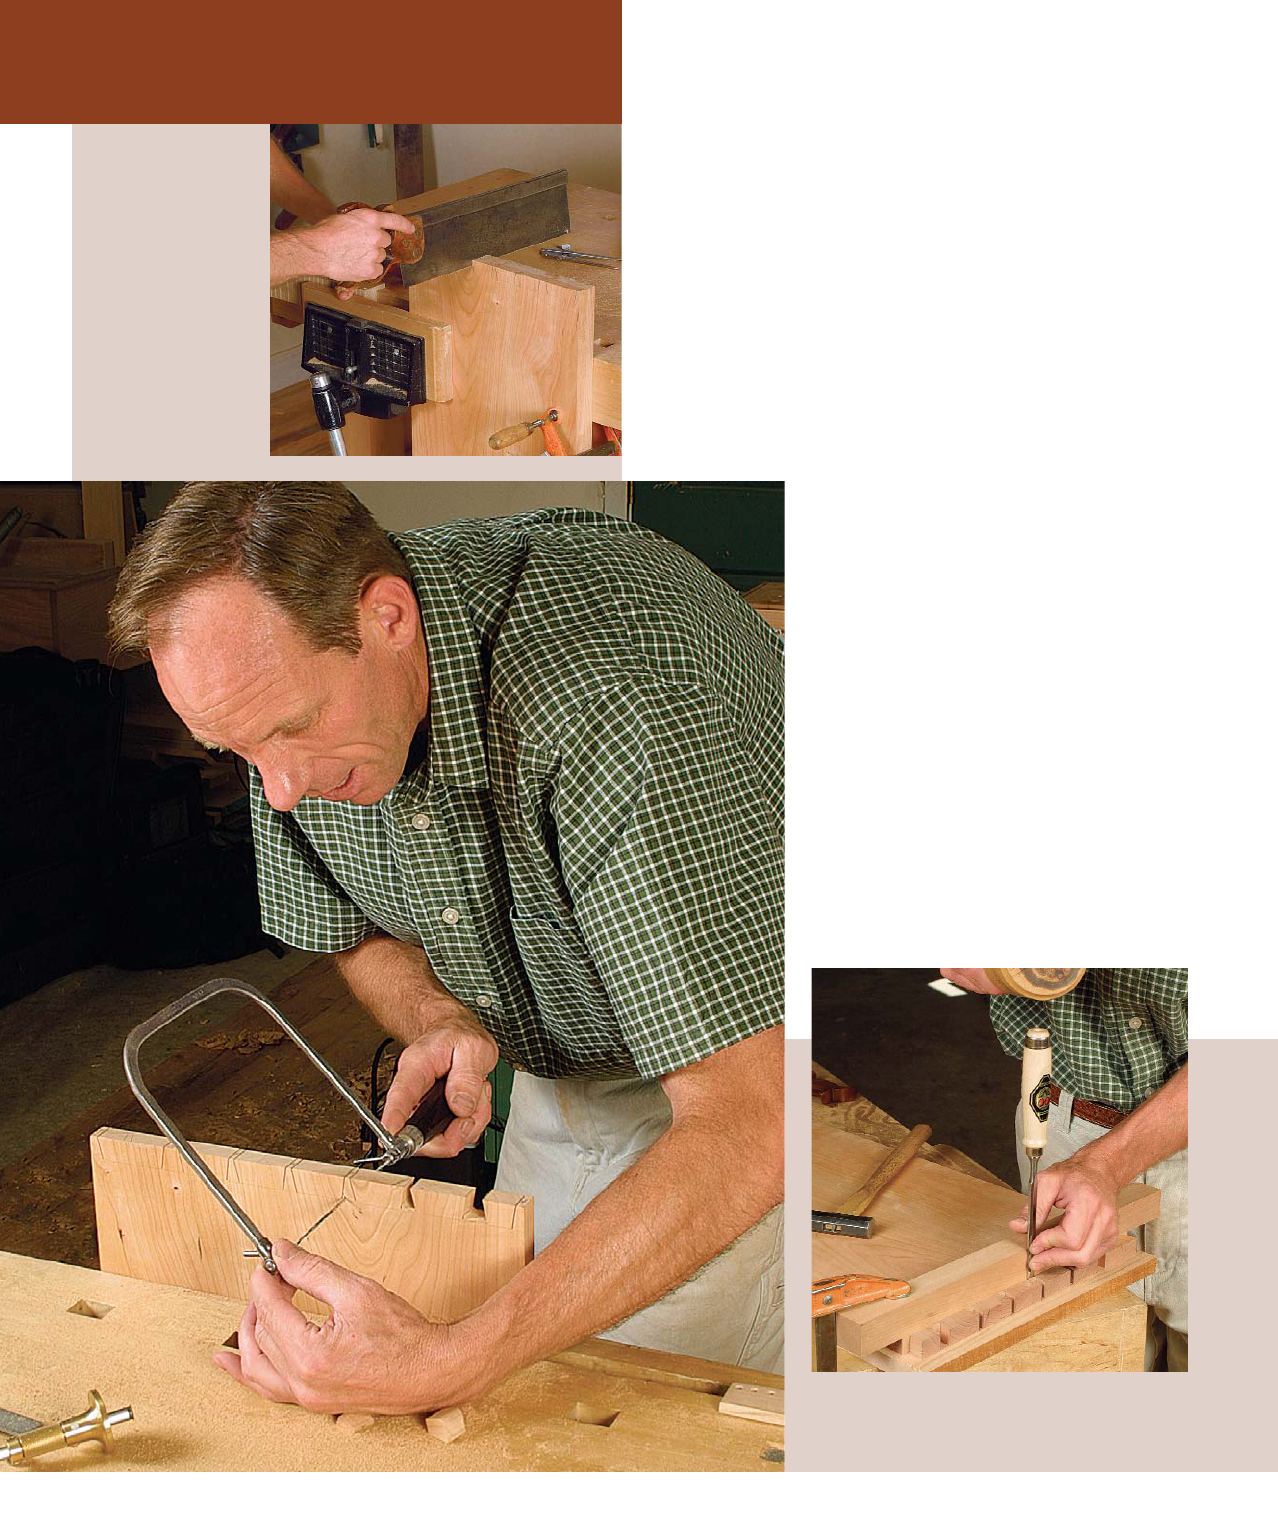
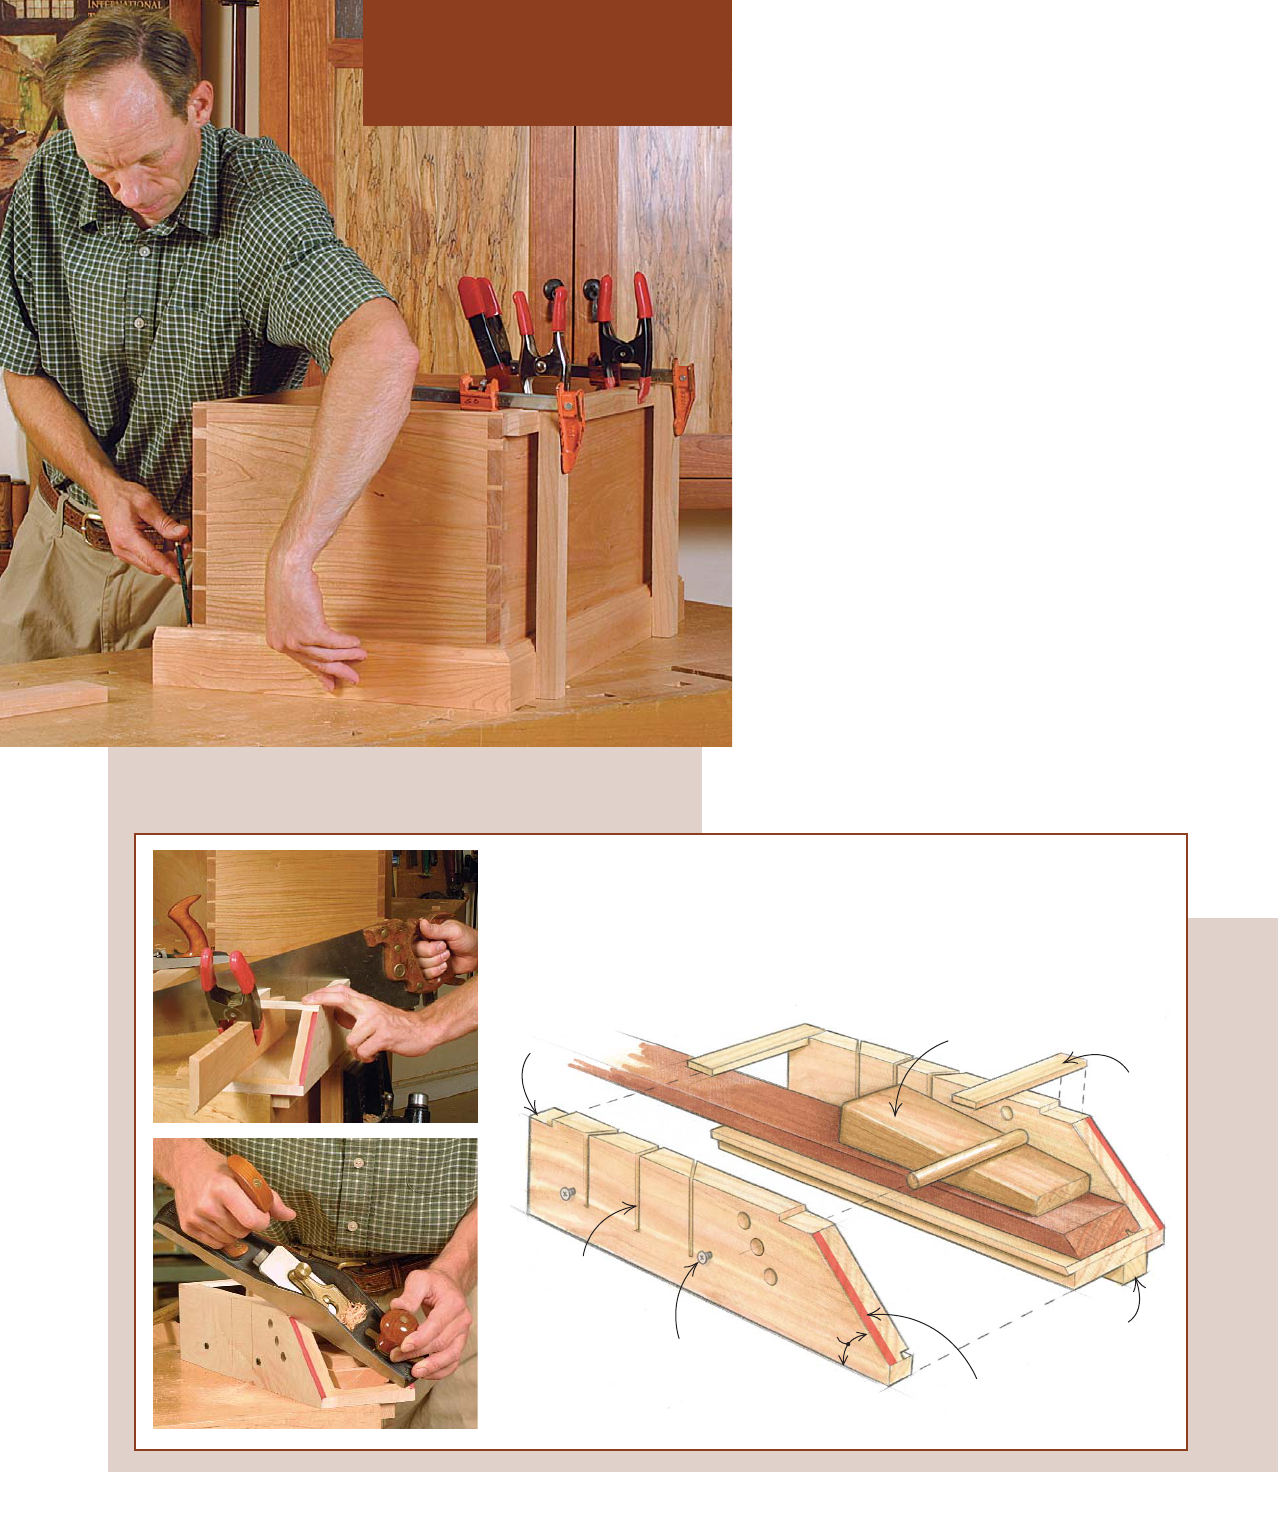
DOVETAIL AND ASSEMBLE THE CASE
Cut the tails. Clamp
both the front and
back of the chest in a
vise with the inside
faces touching (right).
Make the cuts with a
backsaw. Next, clean
out the waste one
board at a time with a
coping saw (below).
Make sure you do
not cut past the
scribe line.
Chop to the baseline with a chisel. Use a block
of wood, securely clamped along the scribe line, to
guide the chisel. Chop partway from both sides of
the board to avoid tearout.
MARCH/APRIL 2004 39
I also cut the tails on the front and back of the chest at the same
time with the two boards clamped together in a vise. It is faster and
more accurate because the saw has a longer line to follow as you
make the perpendicular cut along the end grain. Check your cab-
inetmaker’s triangles to see whether you have oriented the boards
correctly; the inside faces of the boards should be touching.
Next, remove the bulk of the waste with a coping saw one board
at a time. Finally, chop to the baseline with a chisel. This is a critical
step for the dovetails to fit together snug. One method I use is to
guide the chisel with a block of wood clamped in place along the
baseline. Chop halfway through from each side to avoid tearout.
Cut the pins to match the tails—The tails on the chest’s front
and back boards are used to lay out the pins. With one
board secured vertically in the bench vise, place the ad-
joining tail board on top, carefully aligned, and secure it
with a clamp.
Once again, make sure the box parts are oriented cor-
rectly, then define the pins on the end grain by tracing the
tails with a marking knife. Next, deepen the marks using
a broad chisel with its bevel facing the waste. This chisel
mark will help guide your saw. Continue the layout line
down the face of the board with a sharp pencil, stopping
at the scribed shoulder line.
The pins are cut much the same as the tails; however,
it is more critical here to cut to the line and not past it.
With the saw resting to the inside of your chisel mark,
make the vertical cuts down the waste side of the pins.
Next, remove the bulk of the waste with a coping saw
and pare to the baseline with a chisel.
Cut the bottom panel
The bottom panel of the chest must be sized and fitted
prior to glue-up. The panel floats in a groove plowed
on the inside of the sides, front, and back of the chest
carcase. Use a mortise gauge to scribe two lines
3
⁄8 in.
apart, about
1
⁄2 in. from the bottom. Now plow the groove with a
plow plane. The scored lines from the mortise gauge ensure
a clean cut.
The chest bottom is rabbeted, leaving a
3
⁄8-in. by
3
⁄8-in. tongue that
will be housed in the groove. Define the rabbet with two scribe
lines, then remove the material between these lines with a fillister
plane. Remember, the chest’s bottom panel should be free to
shrink and expand in the groove. Make sure it is slightly undersize,
and don’t glue it during assembly.
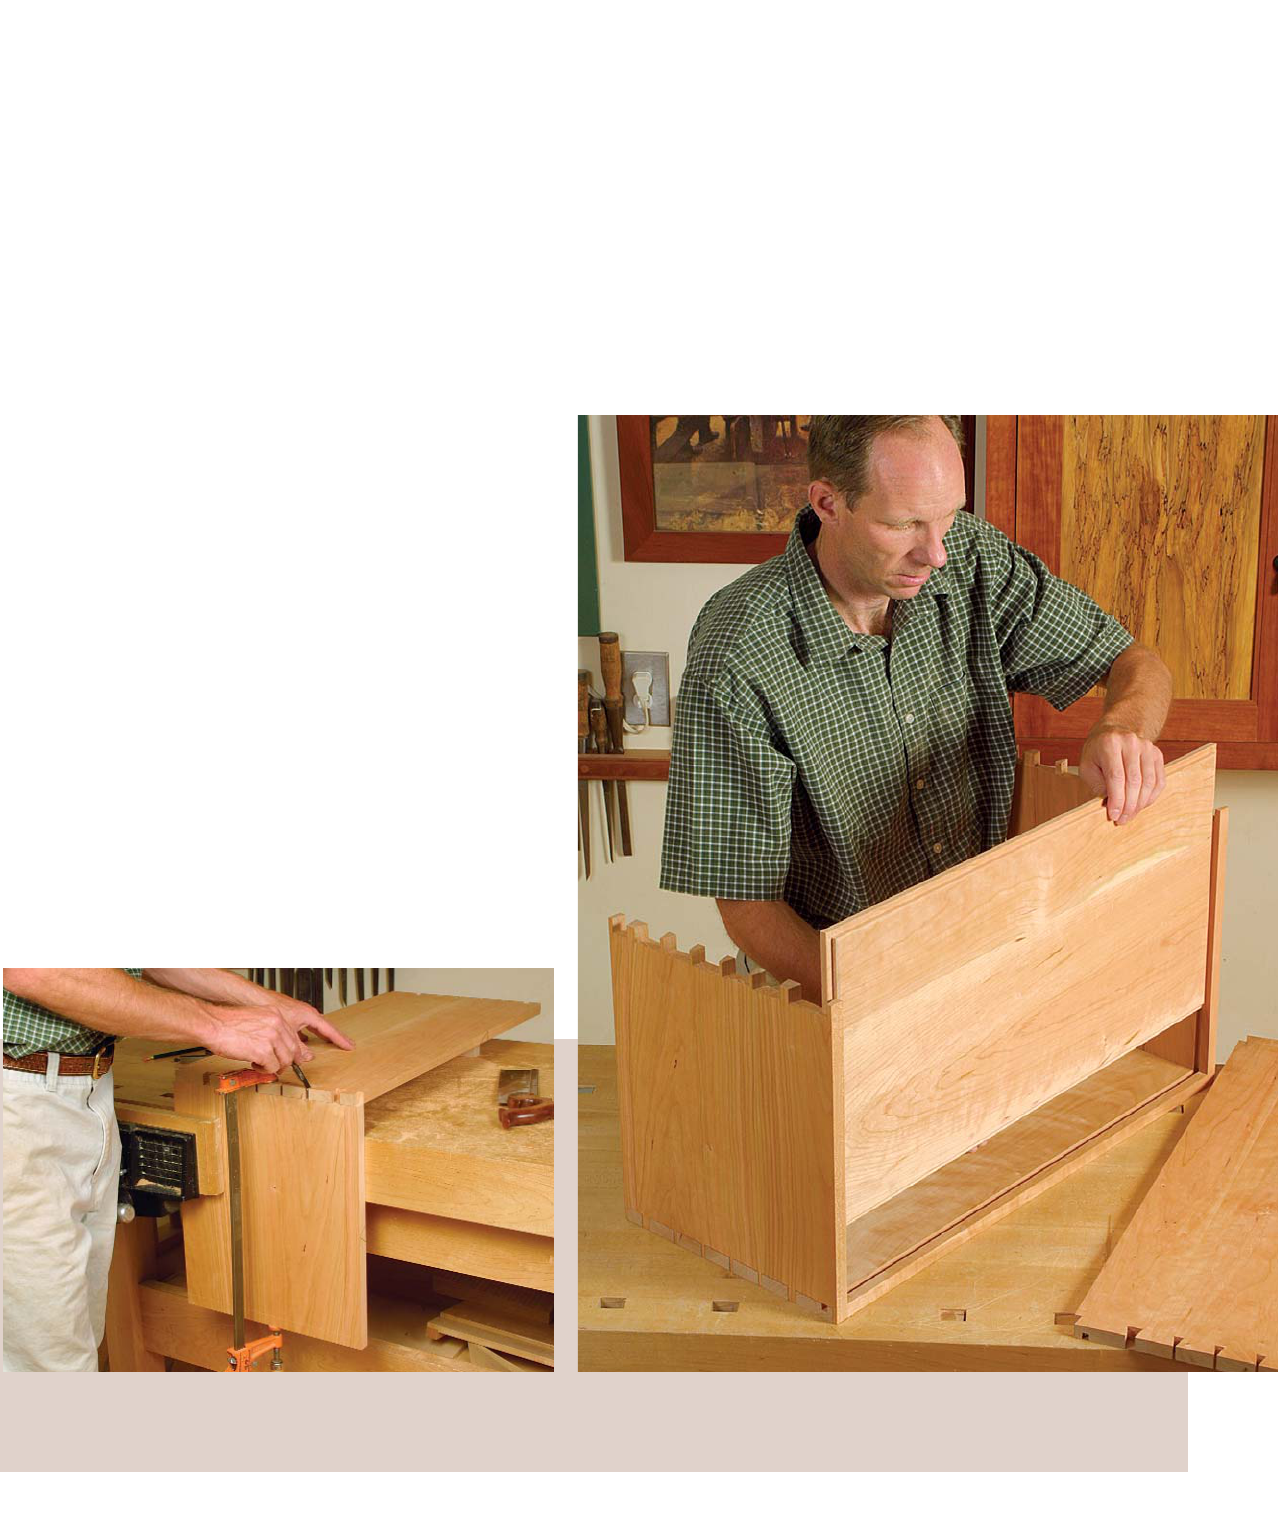
Glue up the chest carcase
Dry-fit the carcase prior to assembly to ensure that all of the
dovetails fit properly and that the bottom panel has room to
Mark the pins with the tails as your guide. With the tail
board clamped firmly in place, trace the tails onto the end
grain of the pin board with a marking knife. Deepen the marks
with a chisel to provide a kerf for the handsaw.
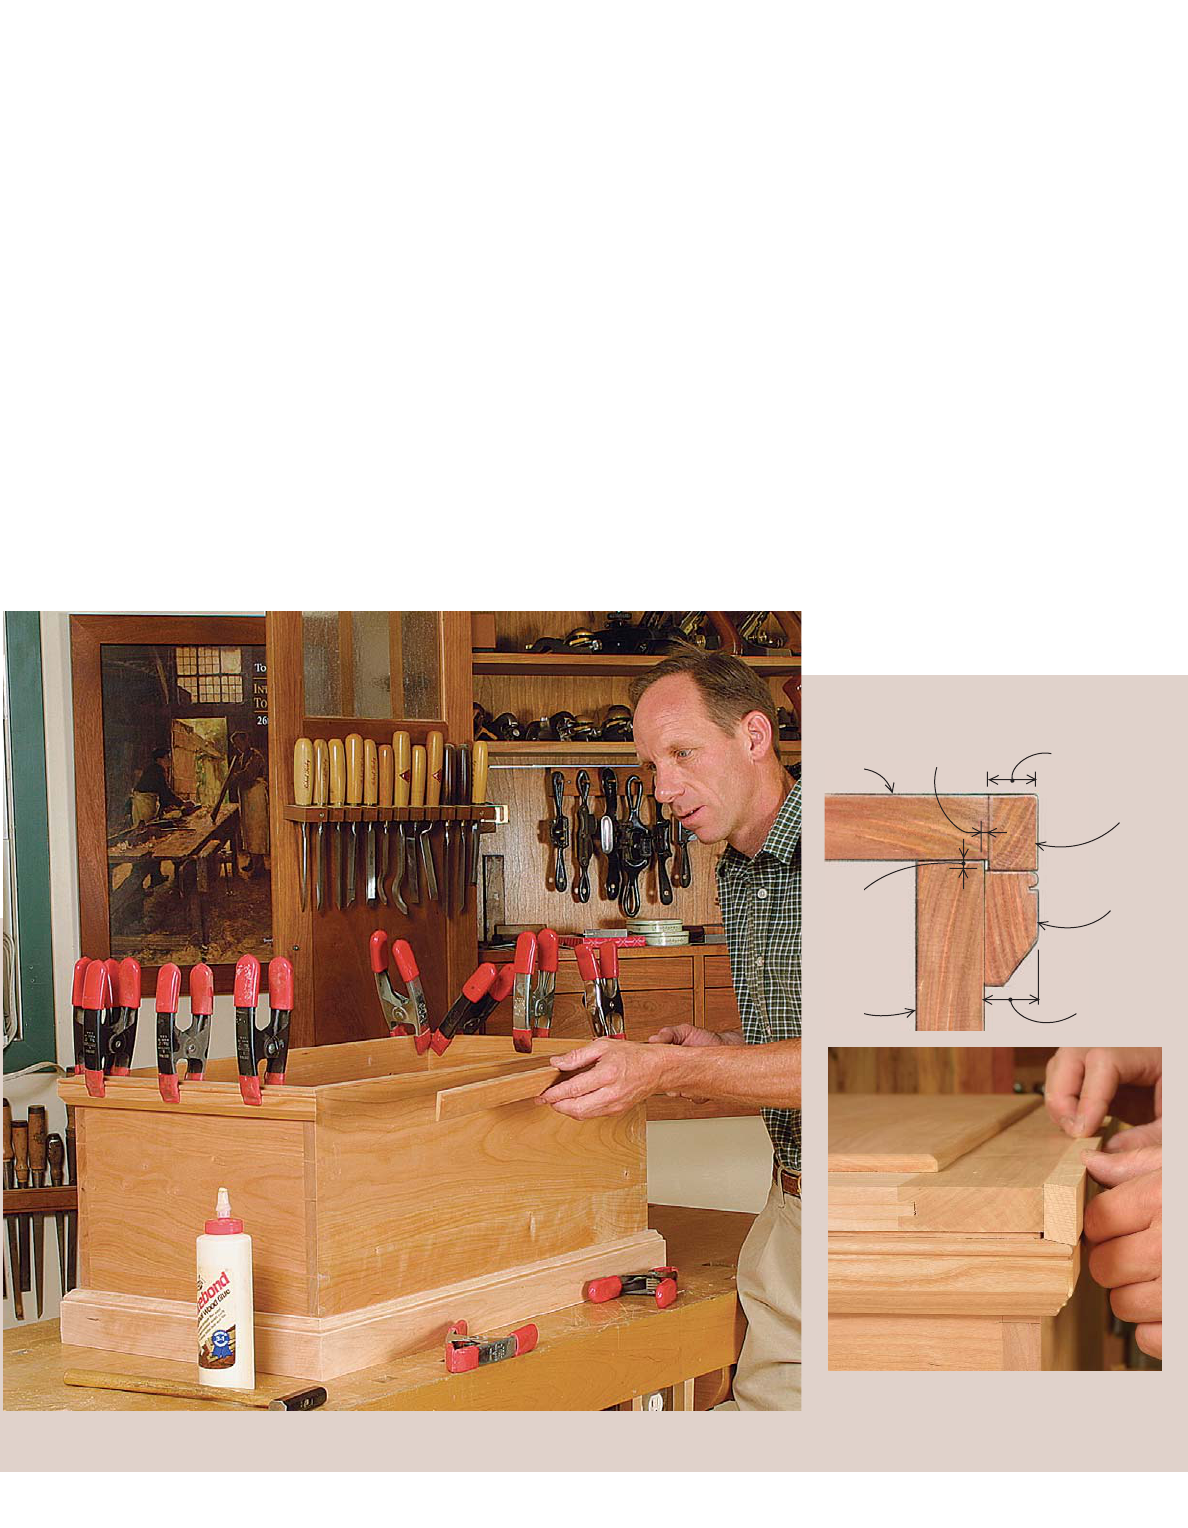
Glue up the carcase. After dry-fitting all of the pieces, coat the dovetail joints
with slow-setting wood glue and assemble. The rabbeted bottom panel floats in
the grooves plowed into the four sides. No glue is used.
40 FINE WOODWORKING
move. I’ve found that the glue-up can take some
time, so an extra pair of hands and slower-setting
glue can be helpful.
I prepared notched cauls that fit around the dovetail
pins to spread the clamp pressure evenly without get-
ting in the way of the joinery. Four clamps evenly
spaced are adequate for each side. Make sure the
chest is glued up squarely, and readjust your clamps
to correct any sides that are out of square.
Once the glue has dried, plane the dovetails clean
and flush, and turn your attention to the chest’s lid.
Through-tenons make a sturdy
frame-and-panel lid
For the lid’s frame, I used through mortise-and-
tenons. Through-tenons make the lid stronger be-
cause they provide more glue surface, and the strong,
long grain of the rails passes all the way through the
weak cross-grain of the stiles. In this way, the tenon
serves as a reinforcing cross-ply to the outside edge of
the lid. Through-tenons also minimize the chance of
twist in the frame. Because the mortises are chiseled
out from both sides at the same point, it is impossible
for the tenon to come through on an angle. Also,
chopping all the way through the stile is faster be-
cause you don’t have to clean the bottom of the mor-
tise, a difficult task.
The lid should be
1
⁄16 in. larger than the box on all
sides to provide clearance for the applied moldings.
Size your stiles and rails taking this into account. Also,
overcut the stiles by 2 in. to account for horns, which
A VERSATILE MITERING JIG
This simple maple jig works as a miter box, accommodating a panel saw in three
positions for cutting at 90° or 45° in either direction, and doubles as a miter jack. One
end is cut at 45° and is designed for fine-tuning miters with a bench plane. Once you
have sawn the miter, secure the workpiece in the shooting end of the jig with a cross
pin and wedge, and trim it to perfection.
Cut the front molding to size first. Once the front molding has been
fitted and clamped to the carcase, measure and cut the side moldings to
fit. The back piece is cut and fitted last.
APPLY THE MOLDINGS
Tips of screws help
secure a workpiece
during miter cuts.
Sawkerfs set
to cut 90° or
45° in either
direction
Removable dowel,
1
⁄2 in.
dia., and wedge secure
the workpiece for planing.
45°
Clamping rail fits
in a bench vise.
Body,
3
⁄4-in.-
thick maple
Brace,
1
⁄4 in. by
3
⁄4 in.
Color the miter-jack surface.
If it begins to fade, it means
the surface is no longer true.
MARCH/APRIL 2004 41
add strength to the material when cutting the mortises. The horns
are trimmed off after the lid has been assembled.
One setting on a mortise gauge is used throughout—On the
inside edge of the stiles, mark each end where the rails will inter-
sect the stiles. Then measure
3
⁄8 in. from these lines and draw two
more marks to define the width of the mortises. Because it is a
through-mortise, the lines also must be transferred across the face
to the outer edge of the stile.
Set up your mortise gauge precisely to mark the groove for the
lid panel as well as the mortises and tenons. Scribe all of these lines
referencing off the face of the boards. Last, lay out the tenon
cheeks, haunch, and shoulders with a marking knife.
Rough-cut the haunched tenons and then chop out the
mortises—Once the lines have been marked, begin rough-cutting
the tenons. Cut close to the lines, but leave material for final fitting
later. Then plow the groove on the inside edge of all of the stiles
and rails. Be sure to reference these plow cuts off the same face of
each part, guaranteeing a consistent alignment of the groove.
Finally, chisel the mortises. The key to successful mortising is to
use the right chisel—one with a thick blade to keep the chisel from
twisting and a long bevel to take a shearing cut. Clamp together the
two stiles in a wooden hand screw with the grooves facing up.
Clamping the boards will prevent them from splitting as you chisel
away the waste. Work your way through half the width of the stile
on all four mortises. Then flip over the stiles and finish chopping
from the other side. When you are all the way through, clear out the
debris and use a paring chisel to clean up any irregularities, ensuring
the mortise is straight and true on all four sides.
Once the mortises have been completed, fit the tenons. I used a
paring chisel or shoulder plane to fine-tune the shoulder and a
router plane set to the depth of the layout lines to fine-tune the fit
of the tenons. Dry-assemble the frame, and use this as one more
chance to get an accurate measurement for the panel.
Plow a groove in the panel and assemble—The panel should
be sized to fit into the groove with some extra room to accommo-
date expansion and contraction with humidity changes. Locate
and scribe a groove with the same setting on the mortise gauge as
used for the frame. However, this time register off the bottom side
of the panel. Then plow the groove on all four sides.
Next, shape a thumbnail molding on the
panel with a block plane. Before applying
glue, dry-fit the frame and panel to make
Glue the top molding. Later, after the hardware has been installed, nail the molding with fin-
ish nails to add additional holding power.
OFFSET THE MOLDINGS
TO CREATE A LIPPED LID
Lid
1
⁄8-in.
overhang
1
⁄16-in. gap
11
⁄16 in.
3
⁄4 in.
Case
side
Lid
molding
Top
molding
The lid molding masks minor warp or
twist in the frame-and-panel. Set the lid
on the box and apply the molding so that it
rests on the edge of the carcase molding.
42 FINE WOODWORKING
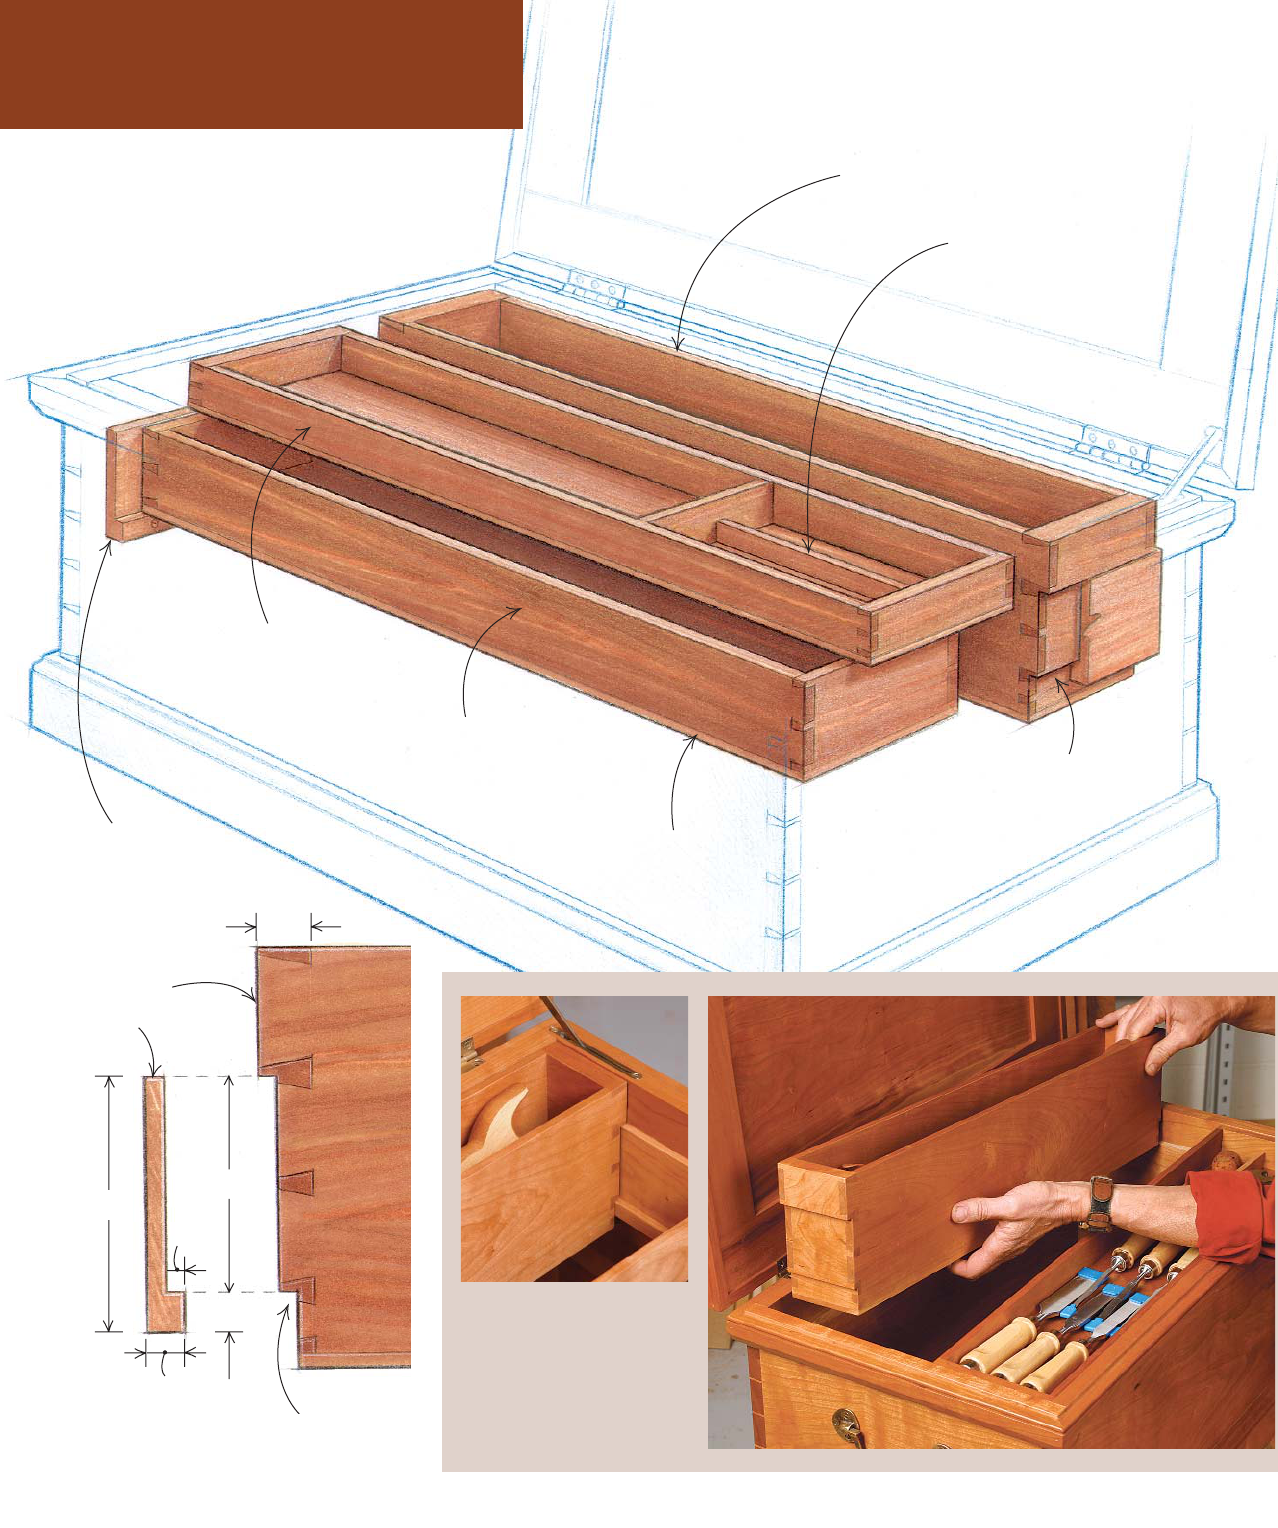
MAKE AND HANG TOOL TRAYS
Handplane tray,
3 in. deep by 5
1
⁄2 in. wide
by 26
1
⁄2 in. long, slides
along the cleat rabbet.
Handsaw box is
notched to fit over
the cleat.
Bottom panel,
1
⁄4 in.
thick, is glued flush to
the tray’s underside.
Chisel tray, 1
3
⁄4 in. deep by
5
1
⁄2 in. wide by 26
1
⁄2 in.
long, slides along the top
of the cleat.
Handsaw box, 6 in. deep
by 3
1
⁄2 in. wide by 26
1
⁄2 in.
long
Spacing of interior
dividers,
1
⁄4 in. thick, is
determined by the size
of the tools to be stored.
The interior tool trays slide along cleats attached
to the carcase sides. The sides and bottoms of
the trays are
1
⁄4 in. thick. The ends of the small
trays are
1
⁄2 in. thick. The ends of the saw box are
3
⁄4 in. thick and notched to fit the cleat.
Cleat
Saw box
Rabbets,
1
⁄4 in. deep
CLEAT DETAIL
1
⁄2 in.
1
⁄4 in.
3
⁄4 in.
4 in.
3 in.
1 in.
Trays slide on cleats inside
the chest. Nail the cleats to
the inside of the chest so that
the trays slide front to back.
The two shallow trays should
have enough clearance to
slide past each other.
Cleat,
1
⁄2 in. thick
(at its thickest)
by 4 in. wide by
13
1
⁄2 in. long
MARCH/APRIL 2004 43
sure all of the parts go together well. After gluing up the frame-
and-panel lid, trim off the horns and check that the lid is square to
the box and slightly oversize.
Top off the chest with molding
The molding on the tool chest is not only attractive, but it also
serves practical purposes. Along the bottom it provides a bumper
to protect the box as it is toted from place to place. On the top,
the molding seals the chest interior, keeping it relatively free
from dust and humidity.
I enjoy shaping and applying the molding because I love work-
ing with molding planes, and I like seeing the box begin to take
on its final form. Molding planes are simple tools, with only a con-
toured wooden body and a steel blade. They don’t require elec-
tricity like a router does, and the only noise they make is the sweet
sound of wood being sheared from a board edge in long, contin-
uous shavings. I enjoy the slight physical workout involved when
using molding planes and the satisfaction of seeing the molding
emerge from the board edge. The whole process takes me back to
a time when there was nothing between the board and the crafts-
man but a well-tuned tool.
I milled the base molding using a molding plane with an ogee
profile. A cove, quarter-round, or simple bevel profile would suit
the chest just as well. I shaped the molding for the upper portion
of the chest with
3
⁄16-in. beading on its top edge and a bevel on the
bottom. The band of moldings for the lid is shaped with
1
⁄8-in.
roundover, but only after it has been applied to the lid frame.
Begin by cutting miters on the front base
molding until the piece fits the carcase. Then
work your way around the chest measuring
and cutting the side pieces and finally the rear
section. Carefully fit each miter joint as you
move around the chest. I used a miter jack for
this (p. 40). Apply the moldings first with glue
and clamps, and then secure them later with
finish nails, being careful not to put nails
where the hinges and lid stay will be installed. Follow this series of
steps to install the lid and the lid moldings.
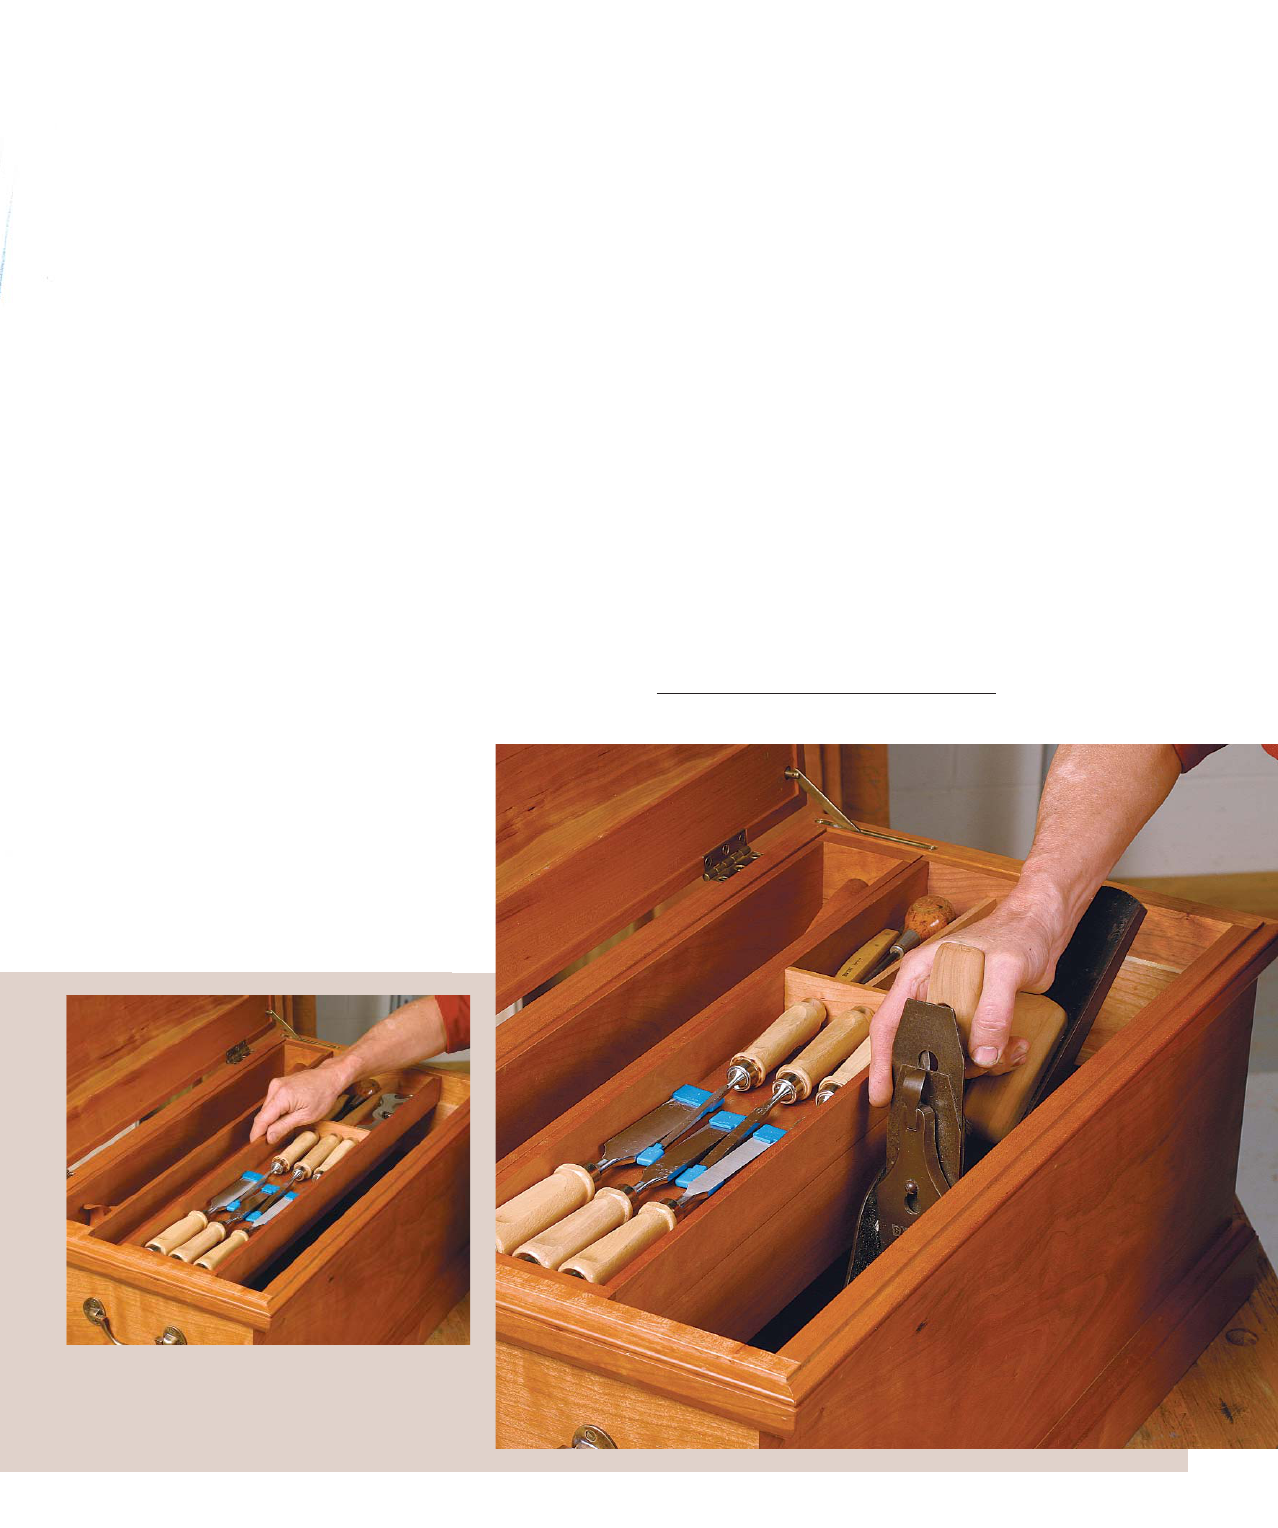
Build the sliding trays to fit
Because this tool chest is such a personal item, the inner tray sys-
tem can be personalized, too. I designed mine with three remov-
able sliding trays, which hold saws, chisels, handplanes, and a host
of other hand tools. The tray boxes are dovetailed, and the bottom
of each tray is glued flush in place. Two stepped cleats tacked on-
to the inner sides of the chest support the trays, allowing them
to slide forward and backward on different planes.
Install hardware and finish
Finish off the tool chest by installing the brass hardware, which
consists of two 90° stopped handles, two mortised hinges, and a lid
stay (Whitechapel Ltd.; 800-468-5534). The hinges are screwed on-
to the molding, which is why it’s a good idea to reinforce the mold-
ing with a few finish nails once the hardware has been installed.
I finished the chest with three coats of Tried and True oil/varnish
blend applied over several days, scuff-sanding between coats. Tool
chests often get abused, so I avoid built-up finishes such as shellac
or lacquer, which are prone to scratching and scuffing. But paint-
ing the chest would not be out of character with traditional tool
chests. Use a flat acrylic latex paint, which imparts a look similar to
milk paint, and top it off with a thin shellac topcoat.
Chris Gochnour makes custom furniture in Salt Lake City, Utah.
Dovetailed trays hold hand tools. The three
trays are sized specifically to hold Gochnour’s
chisels, planes, saws, and various other hand
tools. The sides are dovetailed, and the bottom
panels are glued flush to the trays.
