
Skype for Business
User Guide

P a g e | 1
HCC IT – Skype for Business March 2018
What is Skype for Business
This guide is for people who are new to Skype for Business and provides information on how to begin
using it to communicate with colleagues. Skype for Business was formerly known as Lync but was re-
branded under the current release name after Microsoft acquired Skype. It is a communications
platform that allows you to interact with your contacts using instant messaging (IM), audio and video
conversations, and Skype for Business Meetings.
It runs on Windows and Mac operating systems, and on mobile devices. For a full range of feature and
training videos see Microsoft’s Discover Skype for Business site.
P a g e | 2
HCC IT – Skype for Business March 2018
Accessing Skype for Business
Starting Skype for Business for the first time
The Skype for Business Windows client is installed by default on Highland
Community College standard desktops as part of the Office 2016
suite/Office 365.
1. Click the Windows start button at the bottom left of your screen
2. Select All Programs > Microsoft Office 2016 > Skype for Business
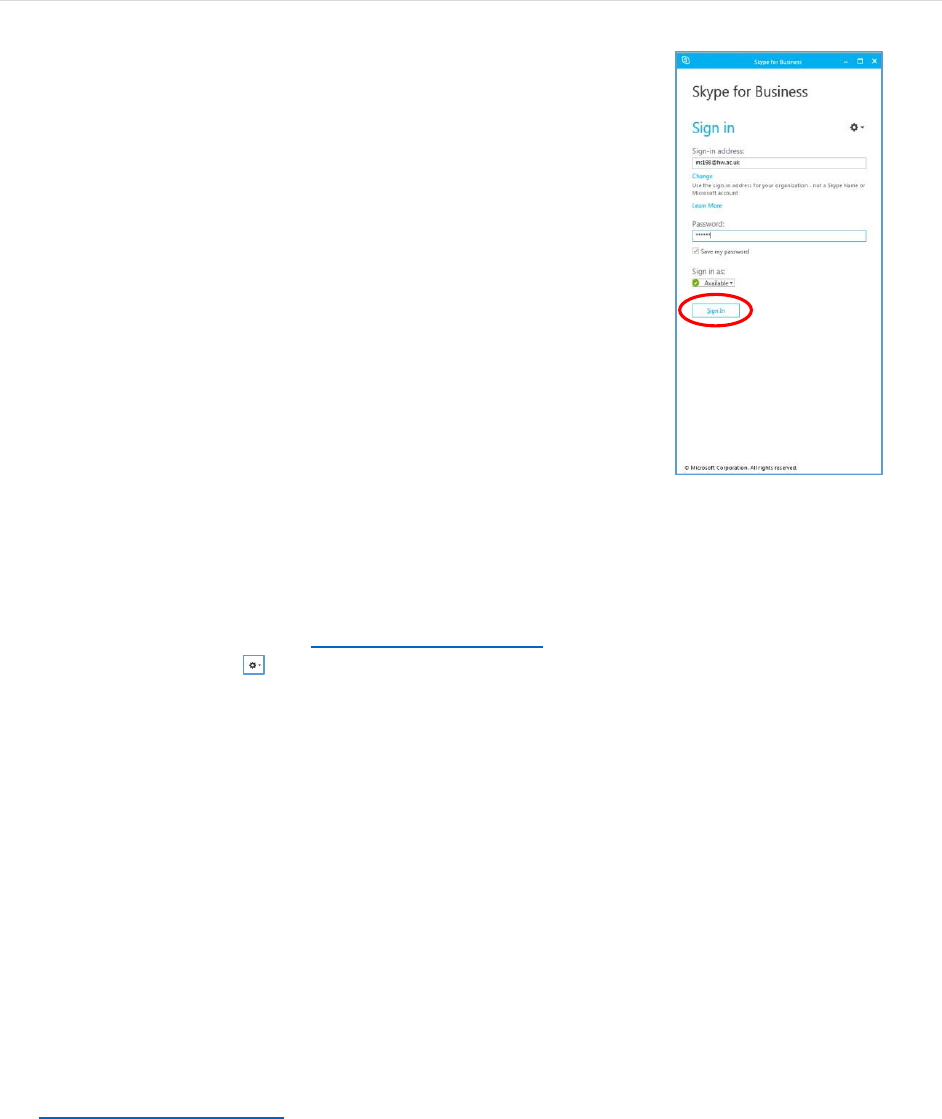
When the Skype for Business window appears
3. Enter your UserID in the format username@highlandcc.edu
4. Enter your Password (your HCC desktop password)
5. Click the Sign In button
Mac OS
To use Skype for Business (Lync) for Mac 2011 you need to download and install the client program
and then manually configure the settings.
Download and all the instructions can be found in the Office 365 web portal, on the Software page:
1. Log in to the Office 365 portal https://portal.office.com/
2. Click Settings(cog icon ) >Office 365 settings> Software > Skype for Business
3. Click the Install button
4. Save the .dmg file
5. Open it (if your security settings won’t allow it to be launched by clicking, hold down the CTRL
button and click the file, select ‘Open’ from the Finder menu)
6. Follow the installation instructions.
Follow steps 2 & 3 on the Software page to apply the update and configure the server settings.
To start after installation:
1. From the Finder menu bar, select Go > Applications >Microsoft Lync
In the Lync window
2. Enter the same data in both the Email address and User ID field in the format
username@highlandcc.edu
3. Enter your password (your HCC desktop password)
4. Click the Sign In button
P a g e | 3
HCC IT – Skype for Business March 2018
Subsequent access to Skype for Business
Once you have installed Skype for Business on your desktop and signed into it for the first time, it will
automatically log you in and open the main Skype for Business window every time you start up your
computer.
If you disable this preference (see Options below), you can start it manually when required.
To open Skype for Business manually
• Find it in the main Office program list: Start >Programs>Microsoft Office 2016 or
• Search for it: enter Skype in the Search programs and files field in the Start menu.
Tip - pin it to the taskbar for easy access.
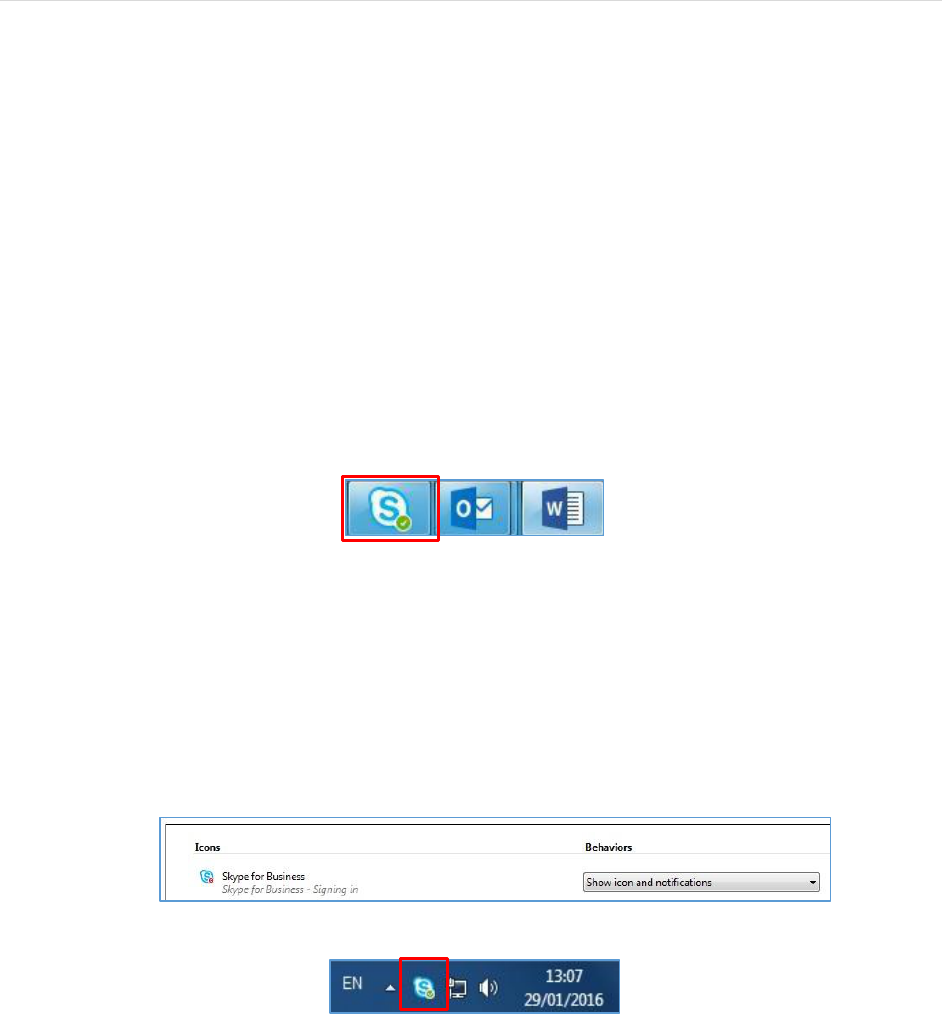
Taskbar
When Skype for Business is running, you will see a large Skype for Business icon on the Windows taskbar
Closing the Skype for Business window does not close the application, but merely minimizes the
window, which can then be opened by clicking the large taskbar icon.
System Tray
You can customize the System tray at the bottom right of the task bar to display a Skype for Business
icon if you wish.
1. Click Show Hidden Icons, then choose Customize
2. Set the Behavior of the Skype for Business to Show icon and notifications
3. Click OK
The small system tray icon provides access to a few select commands.
It doesn’t open the Skype for Business window but you can right-click it to quickly update your status
and exit Skype for Business.

P a g e | 4
HCC IT – Skype for Business March 2018
Customizing Skype for Business start-up
You can change your default Skype for Business start-up options using the Options menu (cog icon )
on the main screen, then choosing Tools > Options
Once the Options window opens, select Personal from the left-hand panel, then make the required
changes, e.g. Login, Contact display, Your status, Showing/hiding your picture, Audio and video devices –
see Options menu below.
P a g e | 5
HCC IT – Skype for Business March 2018
Skype for Business basics
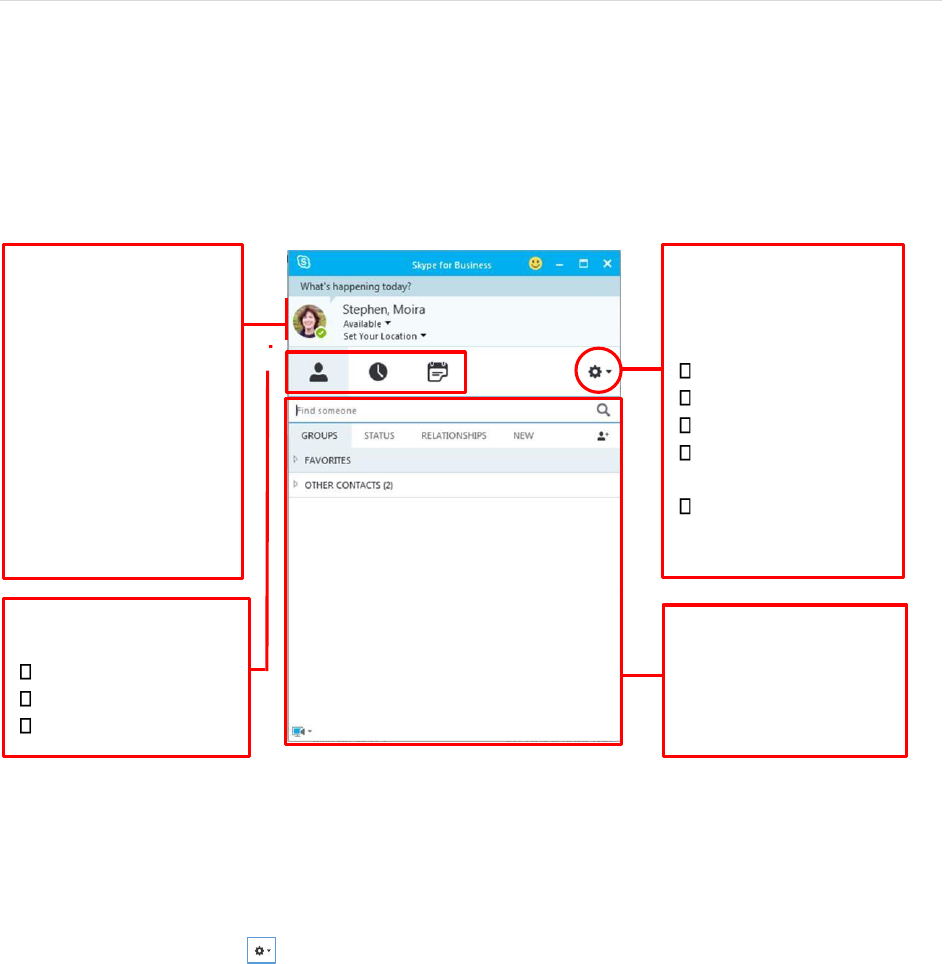
The main Skype for Business window
When you open Skype for Business, the main Skype for Business window will appear:
Adding a profile picture
If you have uploaded a profile picture to Office 365 through the main portal, it will automatically carry
through to Skype for Business.
To upload or edit your picture from within Skype for Business:
1. Click Options (cog icon ) on the Skype for Business main window
2. Choose Tools > Options
3. In the Skype for Business Options window, select My Picture from the left-hand panel
4. Click the Edit or Remove Picture button to upload an image. Office 365 will open.
5. Browse to select your picture file, then click Save at the bottom right of the screen
You will be returned to the Skype for Business Options window
6. Ensure that the Show my picture radio button is selected
7. Click OK
Your status information
if you have uploaded a
profile picture, it will
appear here with the
colored icon indicating
your availability. Enter
text in the box above it
to let others, know what
you’re up to, change
your availability using the
drop
-
down menu, or
add your location.
Tools and communication
Contacts
Conversations
Meetings
Options menu
Close, sign out or exit
Change settings for:
Login
Contact display
Your status
Showing/hiding
your
picture
Audio and video
devices
Main viewing and
interaction area changes
depending on the tool
you are using. Contacts
options displayed.
P a g e | 6
HCC IT – Skype for Business March 2018
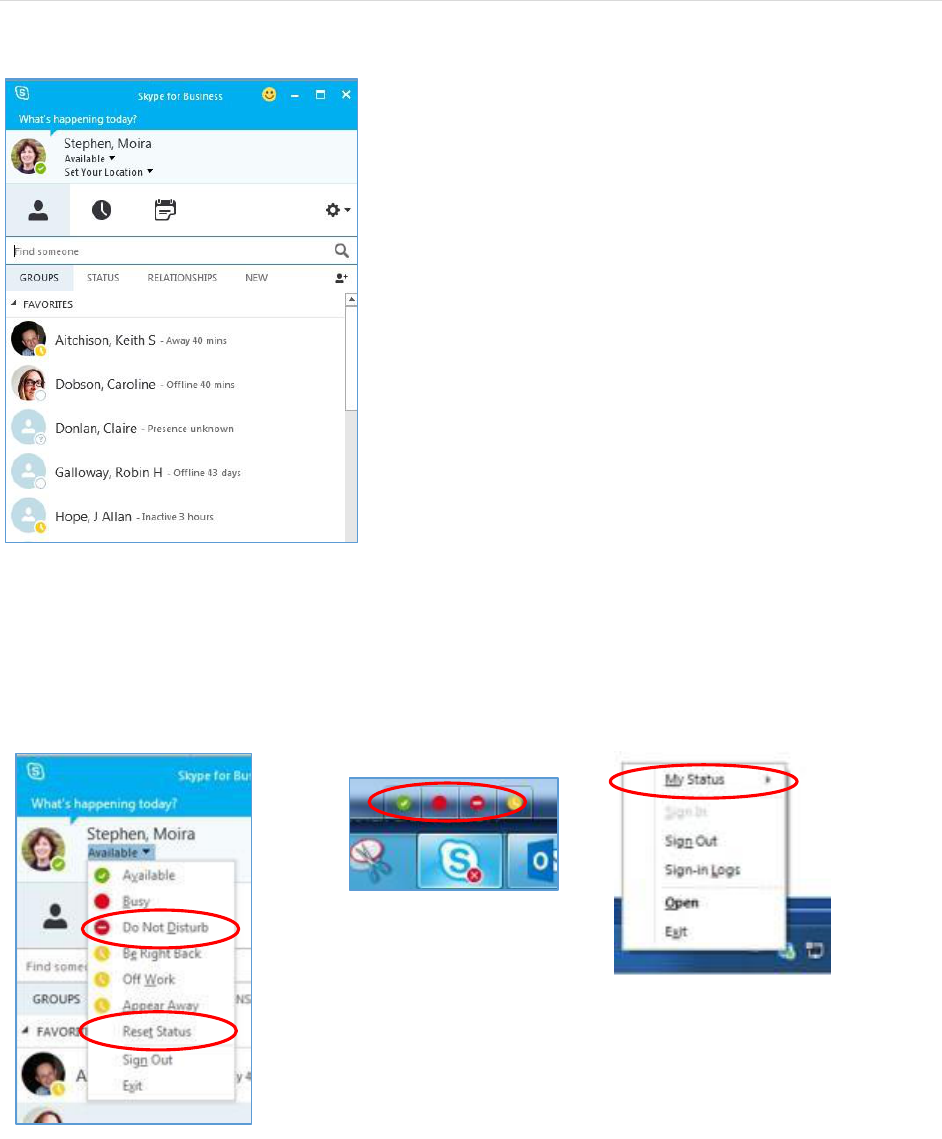
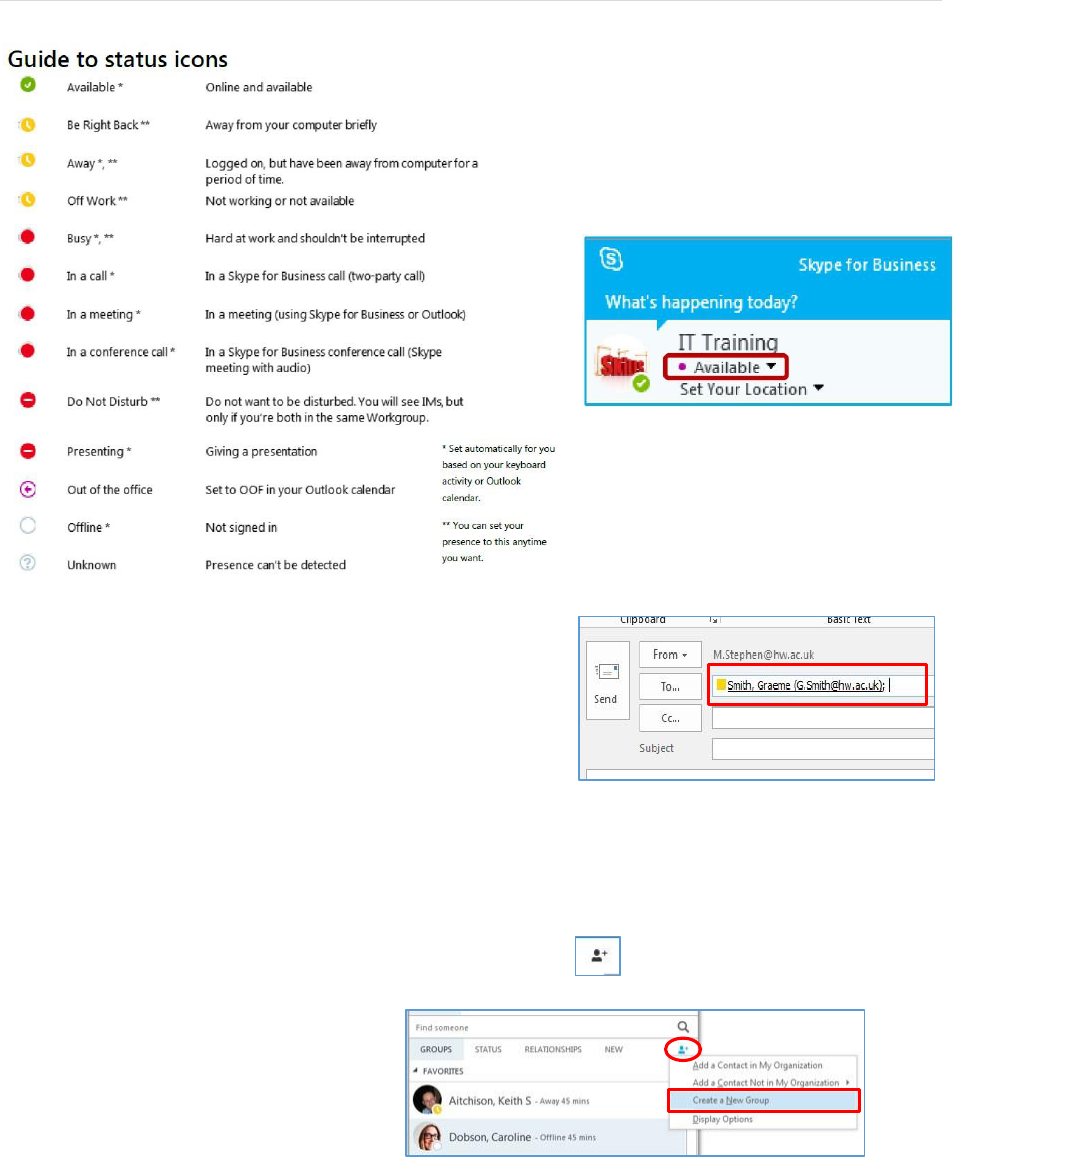
Displaying your availability: Presence
A user’s availability is indicated by the colored icon
beside their profile picture. This availability status is
known as your presence and will indicate a status such
as Available, Busy, Away, Do Not Disturb, etc. Your
presence indicator will effect which communication
options are available.
Presence is only indicated for those with the Skype for
Business client running, otherwise it will show as Offline
(uncolored). Indicators are based on your Outlook
calendar information, but update according to both
your calendar and your activity.
For instance, if you are available at your desk but don’t
use your mouse or keypad for a period of time (the
default is 5 minutes, but this can be changed –
Options> Tools> Options> Status), Skype for Business
automatically changes your presence indicator from
green to an inactive yellow icon. Using your keyboard or
mouse returns your status to available.
Using the drop-down status menu Hovering over the large icon on Right-clicking the small icon on
in the Skype for Business window the task bar taskbar
Manual status settings override all automatic changes.
To return to automatic settings, select Reset Status from the Status drop-down menu.
You can also manually change your availability by:
P a g e | 7
HCC IT – Skype for Business March 2018
As Skype for Business is integrated with Outlook, you will
automatically see the availability of colleagues when you
communicate with them by email.
When you add a name to the address field in a new email you
will also see their presence status displayed beside the name.
Contacts
When you first start using Skype for Business, it is worth investing some time setting up contacts and
groups so that you can easily communicate with people that you frequently interact with.
Creating a group
1. In the main Skype for Business
window, click the Add a Contact
2. Choose Create a New Group
Alternatively, right-click any group
name in your contacts list (e.g. Other
Contacts), and then click Create New
Group
3. A New Group box will appear.
Rename it by overwriting the text so that the new name is meaningful to you
Your group has been created, and you can start adding contacts to it
If your Outlook calendar is set to Out
-
of
-
Office,
but your Skype presence is set to
Available
(
for
instance,
when
you
are
Working from home),
there would be a purple dot displayed beside
the status, as shown below

P a g e | 8
HCC IT – Skype for Business March 2018
Finding and adding contacts
From HCC Directory
1. In the main Skype for Business window start
typing the name in the search box.
A list of matching people from your Contacts will
appear
2. Right-click on the required name and select
Add to Contacts List, which then gives options
of adding to a specific group.
You can also add contacts from the Add a Contact icon, then choose Add a Contact in My
Organization
From the Skype Directory
You can also add contacts worldwide from Skype.
Type either the person’s name or (if you know it) their Skype name in the search field, but this time
selecting the Skype Directory tab.
A list of Skype users will appear. Add them to your Contacts in the same way as you add local contacts.
Controlling Privacy Relationships
This setting controls the connectivity and the type of information that can be viewed by your contacts. If
you want to view or change the privacy relationship with a contact, right-click the contact’s listing, and
then click Change Privacy Relationship. You may also use this setting to block a contact.
Communicating with your contacts
To communicate with a contact, use one of the following methods to access the communication tools,
then select the option you want to use (e.g. instant message, video call, etc).
Hover your mouse over their Double-click anywhere on Right-click their contact listing:
picture in the contacts list: their contact listing:
P a g e | 9
HCC IT – Skype for Business March 2018
Instant messaging (IM) allows you to communicate with people in real time, and at a moment’s notice.
It is less formal than email, and faster than a phone call. You can have an IM conversation with one or
many people, send pictures and files or add audio or video.
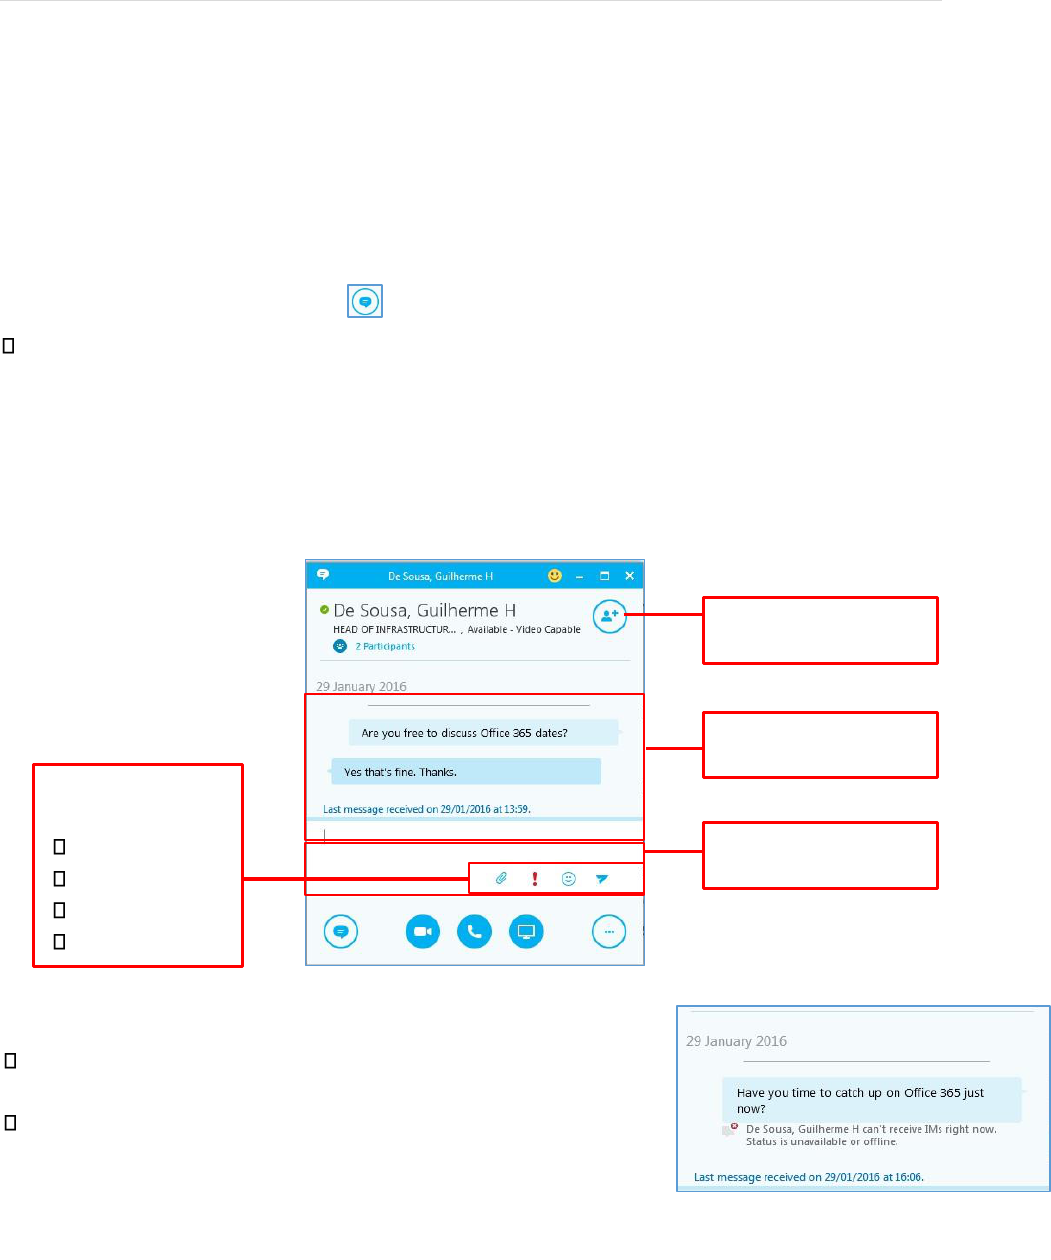
Starting an IM conversation with one person
1. Locate the person you want to send an instant message to
2. Display the communication options for that person using one of the methods above
3. Choose the instant messaging icon
A conversation window will appear
4. Type your message at bottom of the conversation window
5. Press the return key or click the send icon (>)
• Your conversation appears at the top of the conversation window.
• You can use the Notification tools to add an attachment, emoticon, or mark the message as
important.
If a person’s status is set to
Do Not Disturb
, your message will
not be sent.
To g
et a
notification when someone’s status returns to
Available,
you can
tag
the contact (
Right
-
click
on their contact
name and select
Tag for Status Change Alerts
)
. When they are
next available you will get a pop
-
up notification on screen,
allowing you the option
to make contact and un
-
tag them.
Invite more people
Conversation area
New message area
Notification tools:
Attachment
Importance
Emoticon
S
end
Instant messaging (IM)

P a g e | 10
HCC IT – Skype for Business March 2018
Responding to an IM alert
When someone starts a new IM conversation with you, an alert pop up on your
screen.
• To see the message, click anywhere on the photo area to accept it.
The IM conversation window will open to display the message.
• To reject the message, click Ignore. The message goes to your Outlook
Inbox.
If you do not want to receive new IM alerts, set your presence status to Do Not Disturb
You can do this using the Options menu on the alert box.
Holding an IM conversation with more than one person
If you have already started an IM conversation, you can add others to it by
• Dragging their picture from your contacts list into the conversation window or, if they are not in
your list
• Clicking the Invite More People button at the top of the conversation window to display the
directory
If you want to start a new IM conversation with a group that you have already set up
1. Right-click the group name in your contacts list
2. Click Send an Instant Message to start the conversation.
Your message will go to all group members.
To start a new IM conversation with contacts that aren’t in a group,
1. Go to your Contacts list
2. Hold the Ctrl key while you click each contact.
When you have selected all the required contacts
3. Right-click and select Send an IM to start a multi-way conversation.
Sending a file or image using IM
To send a file or image from an IM conversation, you can:
• Drag-and-drop a saved file into the text input area
• Attachment it using the notification tool in the message window
• Copy and paste a saved file or image from an Office program into the text input area
P a g e | 11
HCC IT – Skype for Business March 2018
Making an audio or video call
If you have a microphone, a headset (or speakers) and a webcam attached to your computer, you can
use Skype for Business to make and receive audio and video calls.
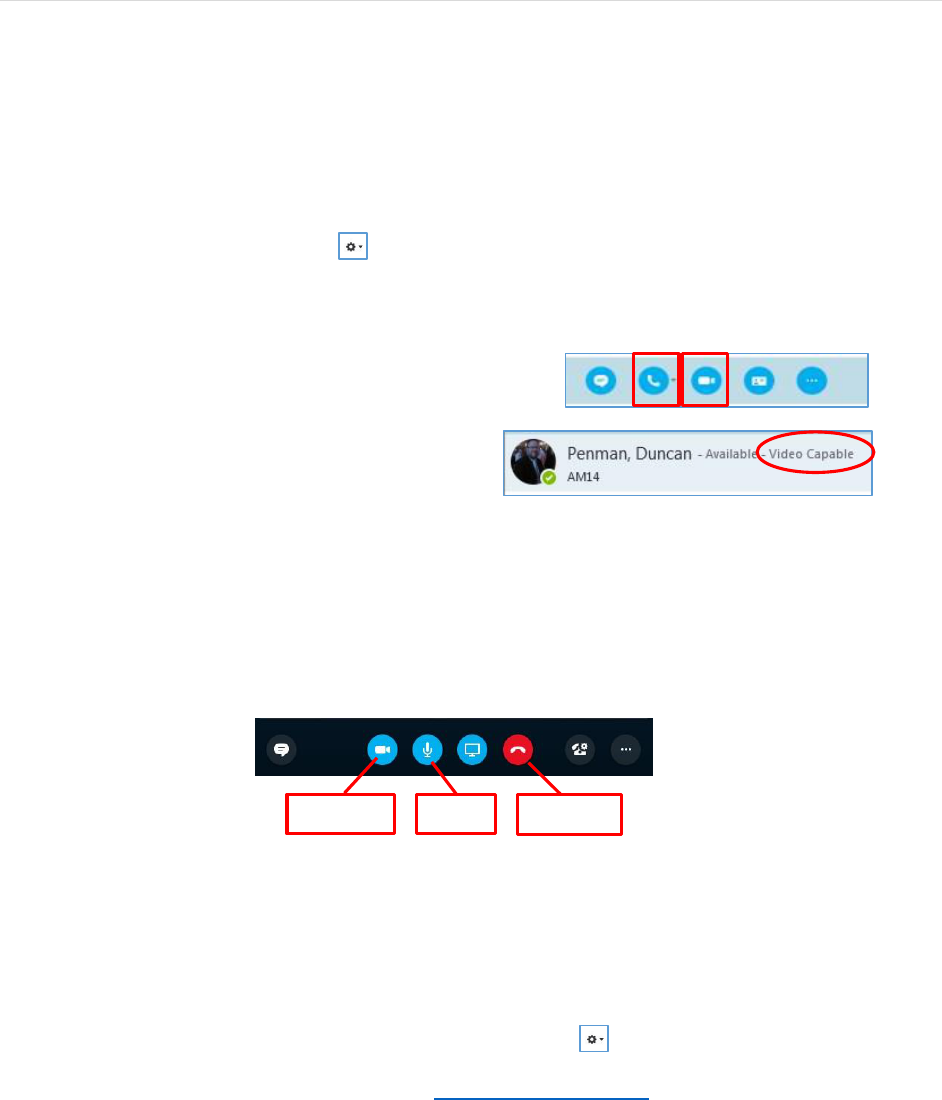
Skype for Business automatically detects your audio and video devices, but before making an audio or
video call you should check that they are set up correctly. To do this:
1. Click the Options menu (cog icon ) in the main Skype for Business window
2. Choose Tools > Audio (or Video) Device Settings
To make a call
1. Locate your contact in Skype for Business,
2. Click the Audio or Video icon.
Contacts who have a webcam set up, and so can
accept video calls, have Video Capable on their
contact details.
When you call a contact, an alert pop up on their screen.
To accept the call, they can click anywhere in the photo area of the pop-up (or they can choose to reject
the call).
Once in progress, you can control the call by putting it on hold, muting your audio, switching between
audio devices, and changing the way the video appears on screen.
To end the call, close the window or click the End call button.
Recording Audio and Video conversations
When you record a Skype for Business meeting, you capture audio, video, instant messaging (IM),
screen sharing, PowerPoint slides, whiteboard activity, and polling. Any of the presenters can record a
meeting and save it on their computer. Click the Options button to start and manage recordings.
For more information on making recordings see recording conversations.
Video off
Mute
End call
P a g e | 12
HCC IT – Skype for Business March 2018
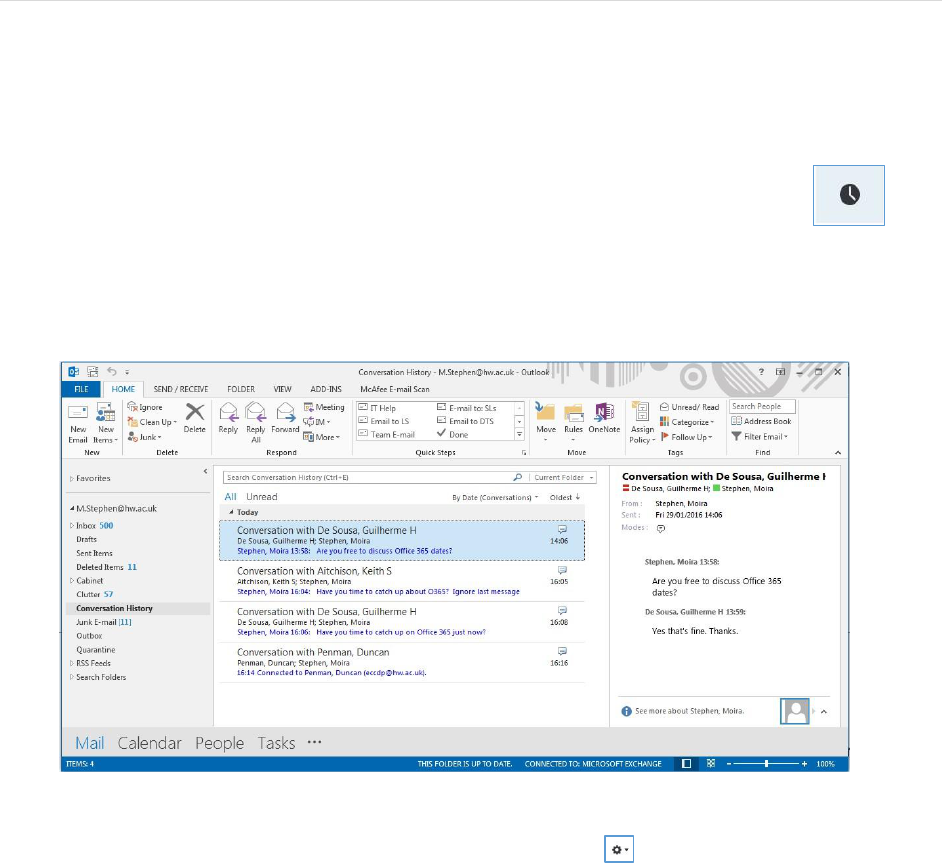
Conversation History
Skype for Business conversations are saved by default.
To view Conversations:
• In the main Skype for Business window click on the Conversation tab. All
conversations will be listed with the most recent on top; double click on one to open
and view a conversation.
OR
• In Outlook, Skype for Business conversations are saved in a folder labelled Conversation History.
Unimportant conversations may be deleted.
You can stop saving conversations by disabling the option (Options > Tools>Options >Personal).
P a g e | 13
HCC IT – Skype for Business March 2018
Skype for Business meetings
The meeting feature gives you the capability to collaborate by making presentations online and sharing
desktops, programs, files and a whiteboard between meeting participants.
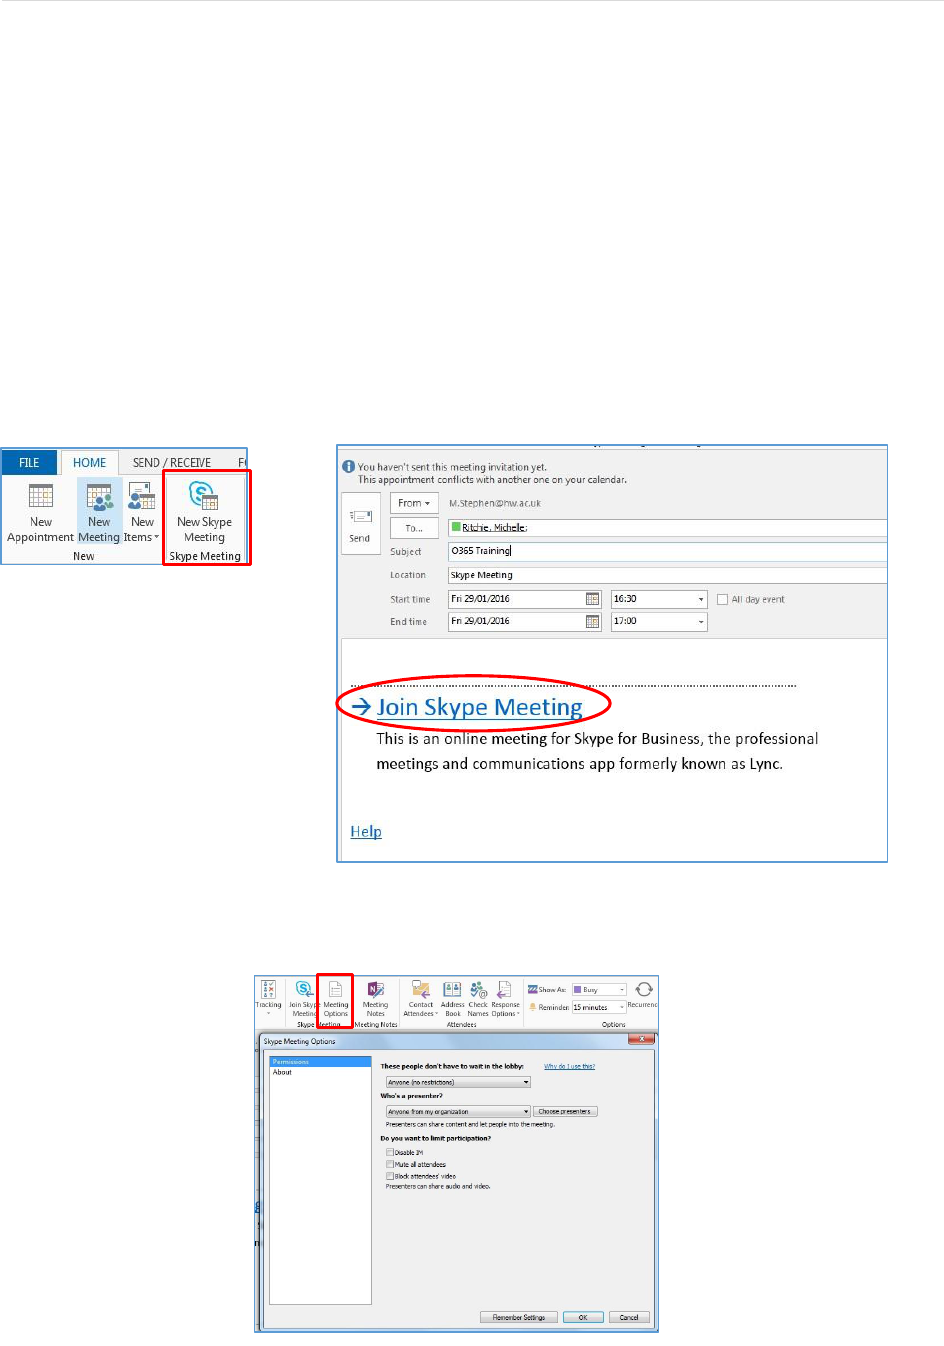
Scheduling a meeting
If you use the Outlook desktop client or Outlook 365 online, you can use Skype for Business Meeting to
schedule a single or recurring online meeting similar to the way you use Outlook to schedule regular
meetings. To initiate an online meeting request in the desktop client
1. Start as you would normally by going to your Outlook calendar
2. Click the New Skype Meeting button on the ribbon and in the meeting request window
3. Enter the attendee and date/time data as for a standard meeting
A link is automatically added to your meeting request that invitees can click to join the conversation.
With the meeting request created, you then have access to the Meeting Options button on the ribbon
where you can set preferences and permissions.

P a g e | 14
HCC IT – Skype for Business March 2018
Starting an unscheduled meeting
For spontaneous meetings, the Meet Now feature in Skype for Business allows
you to hold impromptu meetings without the need to schedule in Outlook.
• In the Skype for Business window, go to the Options menu
(cog icon select Meet Now
A meeting conversation window will open and you will be able to invite participants using
the Invite button
)
and
P a g e | 15
HCC IT – Skype for Business March 2018
Sharing your desktop and other content
You can share content with colleagues either from the messaging conversation window or during a
meeting.
This presentable content can include your computer desktop, a single program file or a PowerPoint
slideshow. You can also share a virtual whiteboard, conduct polls and hold a Q&A session.
NOTE:
When you share your desktop, everyone participating can see your entire desktop including
notifications. If you have confidential information or documents that you don’t want people to see,
close them or use program sharing instead.
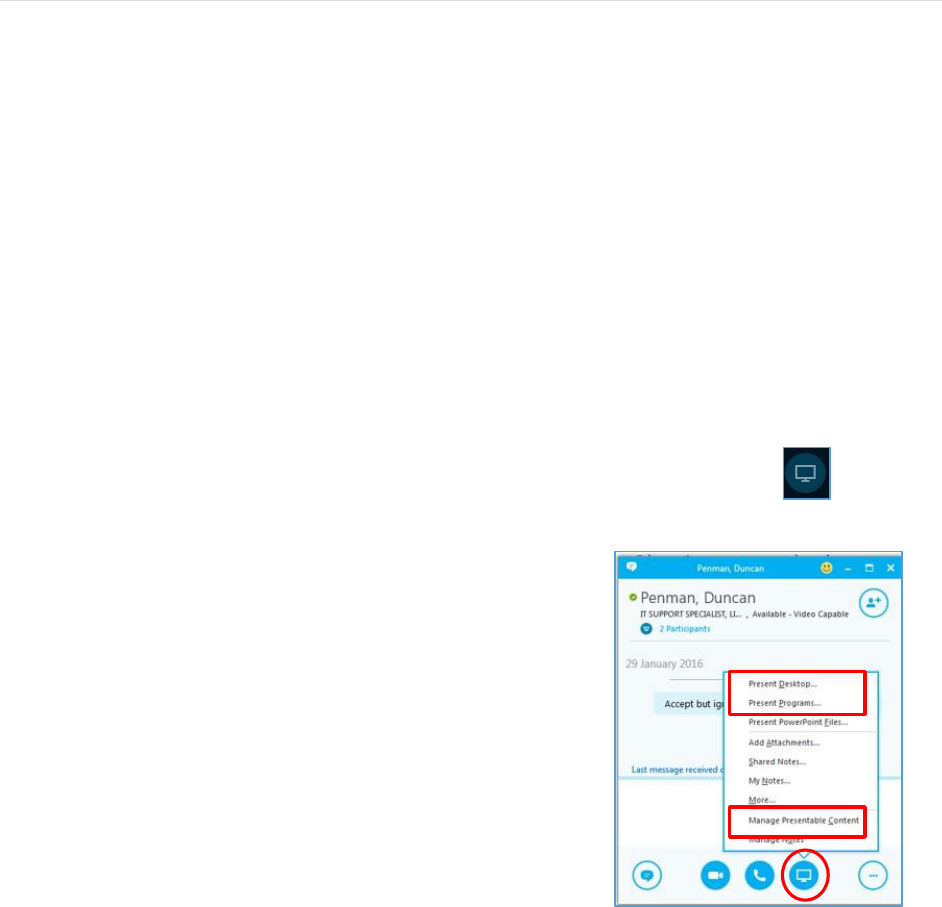
Start sharing
1. Start sharing by first establishing a connection to your contacts by starting an IM
conversation, audio/video call or a meeting
2. To share your screen, click the Present icon from within a
conversation or meeting window
From the content options menu:
• Click Present Desktop to show the entire contents of your
desktop (if, for instance you are working with multiple
programs). If you have a dual-monitor setup, you can choose
to select all monitors, the primary monitor only, or the
secondary monitor. or
• Click Present Programs and double-click the program window
you want to share (the program for sharing must already be
open)
• Click More… to access other presentable content items such
as Whiteboard and Polling
When you share a program file or desktop, the window will have a yellow border and a Now Presenting
tab will display on your desktop.
Your presence status will also automatically change to Presentation, and will thus restrict other Skype
for Business alerts appearing.
Your participants will receive an alert to notify them that you are sharing content. Once they click
Accept, the shared content will appear in a window on their screen.
Initially, only the person who started presenting can control the content. You can however allow any
participant to share control. You can take back full control at any time.
P a g e | 16
HCC IT – Skype for Business March 2018
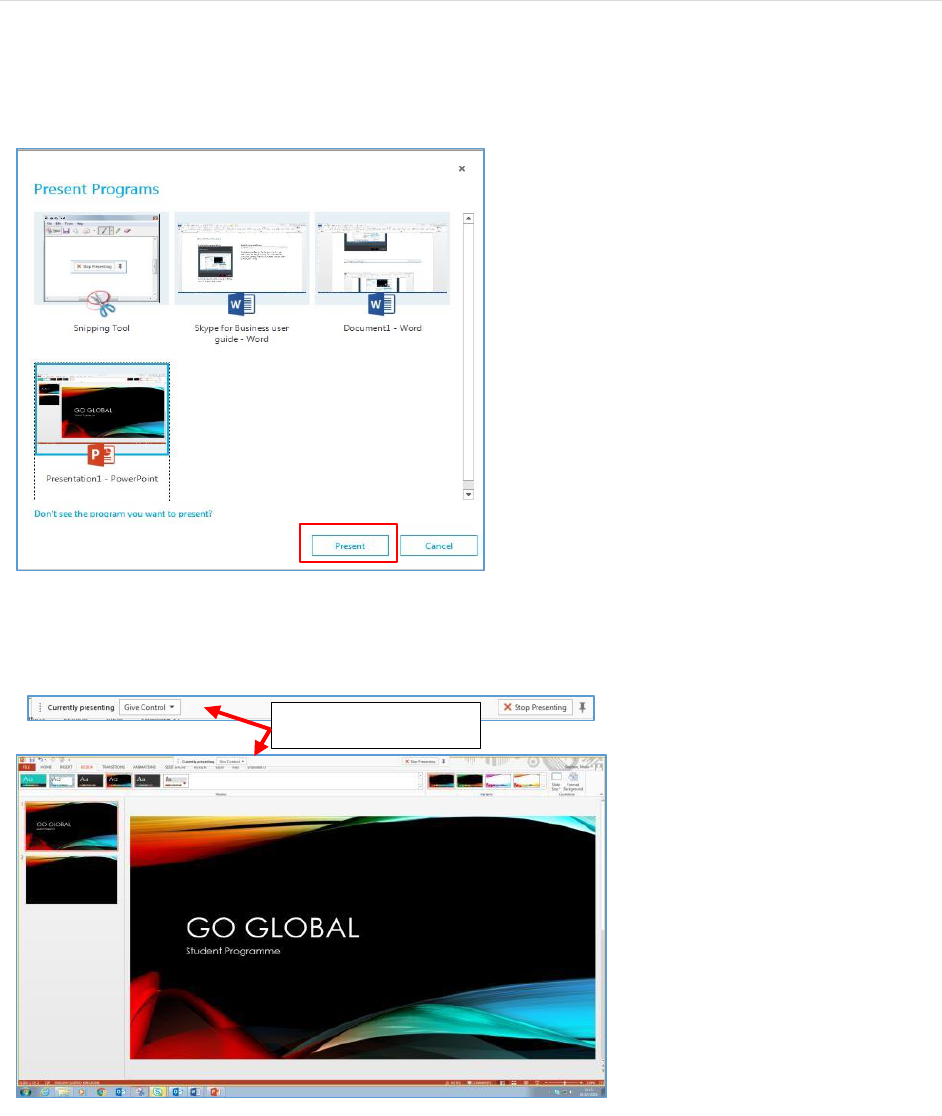
What the presenter sees:
Initiating the content share
Click the Present button to send a sharing request to your participants.
With sharing established
Sharing toolbar
P a g e | 17
HCC IT – Skype for Business March 2018
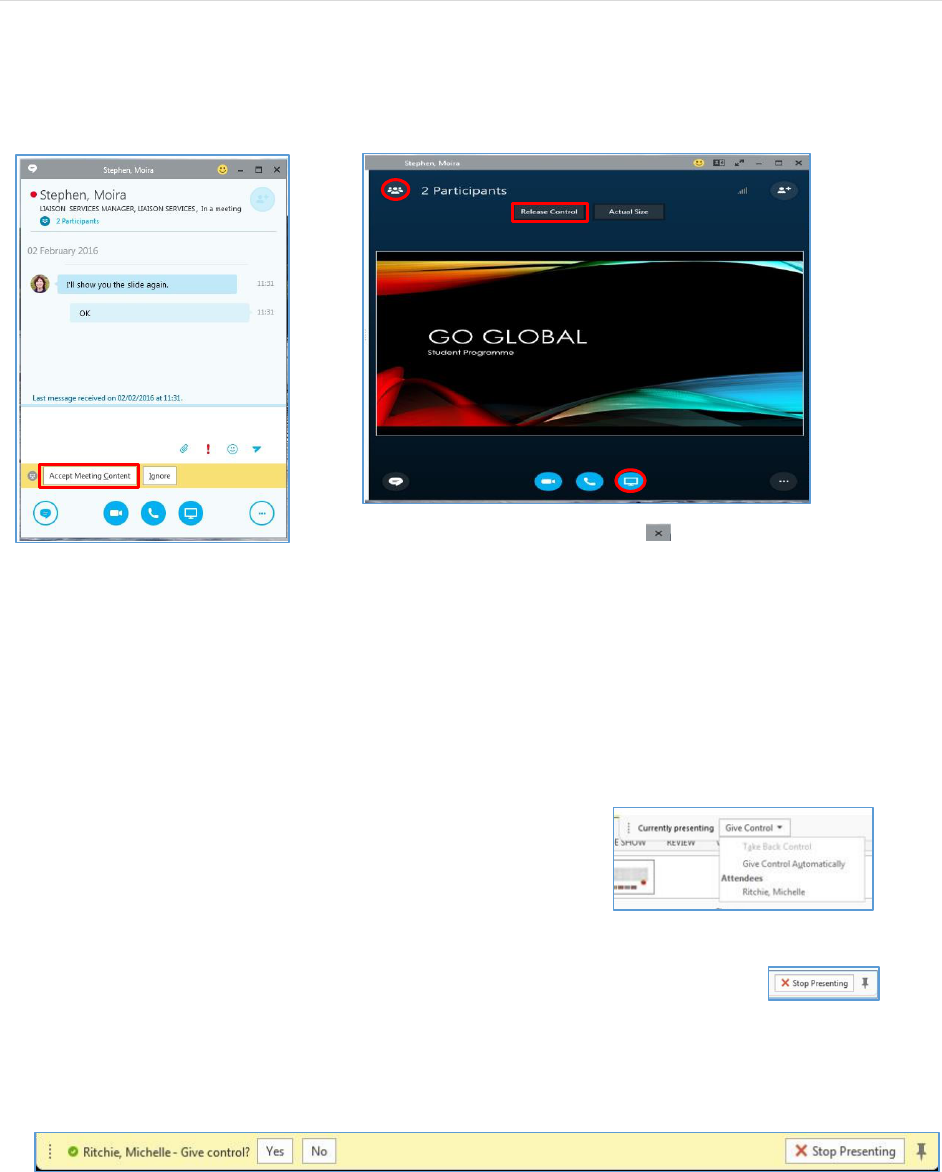
What the participant sees:
An invite to share alert appears either on the desktop or, if open, in the message window.
Click Accept or on the picture area in the desktop alert.
The participant will see this sharing stage, where they can click buttons to request/release control or
other options such as inviting more participants or sharing their own content.
Allowing participants to control content
On the Sharing toolbar at the top of the presenter’s screen, use any of these options:
• Click Give Control to share control of your desktop or
programs with the specific participants. (Control
Automatically gives access to anyone automatically who
requests control of your desktop; recommended only for
small meetings) o To revoke control rights, select Take Back
Control. Alternatively, hit the Ctrl + Alt + Space
• Click Stop Presenting when you are done sharing your screen.
• Click the pin to hide the toolbar and have more space.
To unhide the toolbar, move the mouse to the top of the screen.
If the attendee requests control the presenter will see the following prompt in the Sharing toolbar.
To stop sharing the content, close the stage window
P a g e | 18
HCC IT – Skype for Business March 2018
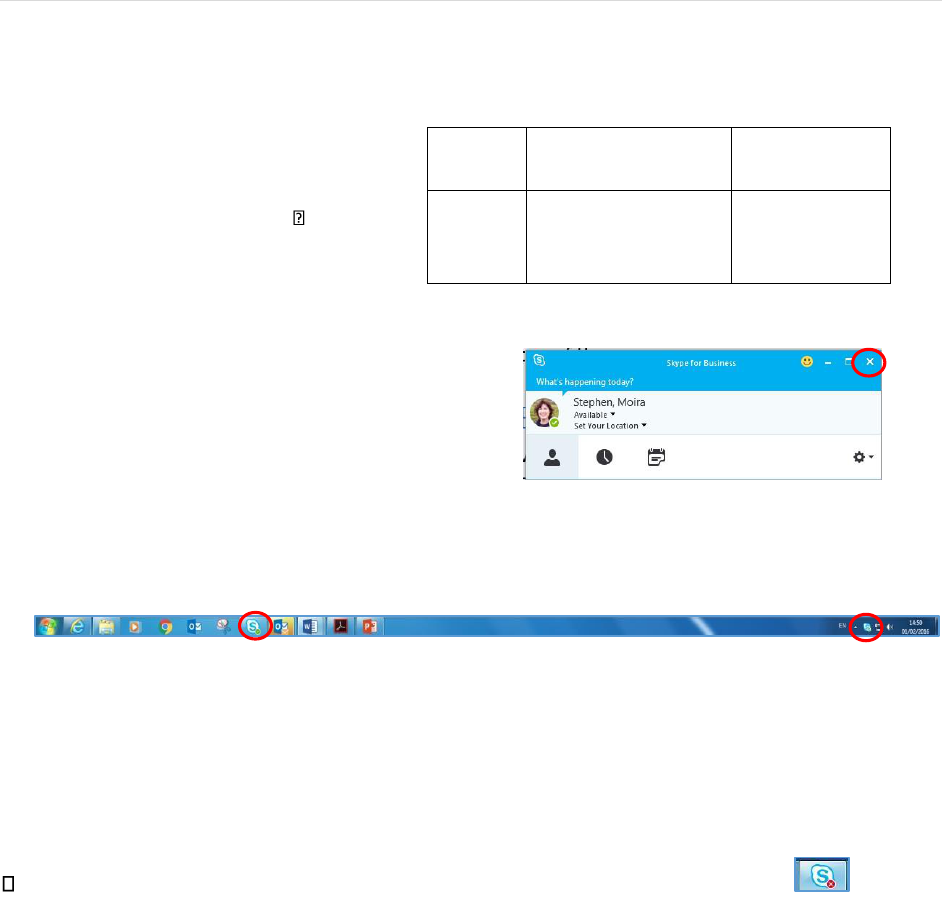
Exiting Skype for Business
When you have finished using Skype for The differences are summarized here:
Business, you can
• Close the Skype for Business window
• Sign out of your session Exit from
the program
Closing the Skype for Business window
You can close the Skype for Business window by clicking
the X in its upper-right corner. Although the window
closes, your session continues to run, so others can still
see your availability status and you still receive alerts.
The Skype for Business icons on your taskbar will appear as
they do when you have the Skype for Business window open, indicating your presence status. Re-open
the Skype for Business window at any time by clicking the large icon in the program section of the
taskbar.
Sign out
Sign out closes your Skype for Business session, but continues to run Skype for Business in the
background, making it easier to sign in again when you’re ready. The Sign out option is available from
your status drop- down in the main Skype for Business window or by right-clicking the small icon in the
system tray at the end of the taskbar. Once you have signed out in this way, others cannot see your
status or interact with you.
When signed out, the Skype for Business presence indicator displayed on the
taskbar/system tray is a red cross
Exit
Exit closes your Skype for Business session and stops Skype for Business running on your computer.
Both icons will disappear from the taskbar/system status tray at the bottom of your screen
Option
Is Skype for
Business running?
Can others see
your status?
Close
Sign out
Exit
Yes
Yes
No
Yes
No
No
P a g e | 19
HCC IT – Skype for Business March 2018
How to join a Skype for Business meeting as a guest (for use with non-
HCC staff/students)
This page describes how to use the Skype for Business Web App to join a meeting you have been invited
to.
The Skype for Business Web App allows guest users (non-HCC staff/students) who don't have a full
version of Skype for Business to participate in Skype for Business meetings.
A scheduled meeting is required - guests cannot join without an invitation.
Instructions for guests
HCC staff – you could send/direct your guest to these instructions
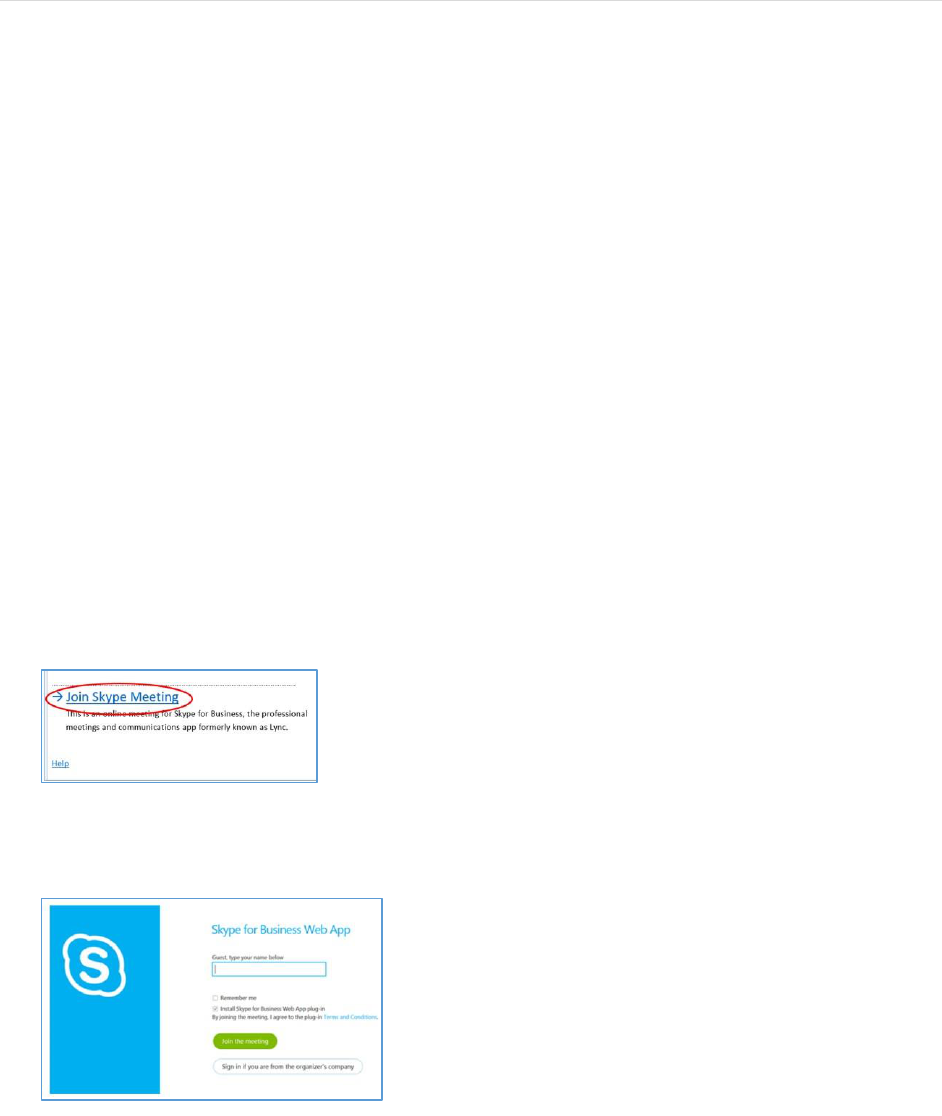
1. Open your Skype for Business invitation
In order to use the Skype for Business Web App, you must be invited to a Skype for Business
meeting (usually by someone with a full version of Skype for Business).
Look for your invitation in your Outlook calendar or your email
inbox. 2. In your invitation, click on Join Skype Meeting
4. Install Skype for Business guest app plug-in
If you have not yet downloaded the Skype for Business Web App, you will be prompted to do so.
3.
Sign in
as a guest
Enter a guest name and click
Join the meeting

P a g e | 20
HCC IT – Skype for Business March 2018
Follow your web browser's instructions for downloading and installing the Skype for Business Web App
plug-in.

P a g e | 21
HCC IT – Skype for Business March 2018
Online videos and guides
• Skype for Business: A quick introduction
• Microsoft Office: Skype for Business How-to
• Skype for Business: Step-by-step guide for new users
• Help topics about Skype for Business
• Record and play back a Skype for Business meeting
