CFL Guidelines for Developing October 2006
Critical Path Method Schedules (CPMs)
- 1 -
CFL Guidelines for Developing Critical Path Method
Schedules (CPMs)
Table of Contents
SECTION 1 INTRODUCTION
1.1 Purpose and Background for Construction Schedules
1.2 Construction Schedule Submittal Guidelines
SECTION 2 ELEMENTS IN DETERMINING CONTRACT TIME
2.1 Production Rates
2.2 Other Factors Affecting Contract Times
SECTION 3 STEPS FOR CREATING CPM CONSTRUCTION
SCHEDULES
3.1 Define Work Day
3.2 Define the Project Calendar and Task Calendar
3.3 Identify, Group and Sequence the Activities
3.4 Set Activity Durations
3.5 Link Activities
3.6 Documentation
3.7 Review and Coordinate with the COE
3.8 Modify the Construction Schedule
SECTION 4 USING MICROSOFT PROJECT
4.1 Create a New CPM Schedule
4.2 Define the Project
4.3 Input and Organize the Project Activities and Data
4.4 Link the Tasks/Activities
4.5 View and Print the Schedule
4.6 Review and Coordinate with the COE
4.7 Activity Constraints
4.8 Modify the Construction Schedule

CFL Guidelines for Developing October 2006
Critical Path Method Schedules (CPMs)
- 2 -
SECTION 5 ADDITIONAL RESOURCES AND INFORMATION
5.1 CPM Schedules
5.2 Microsoft Project
5.3 Production Rates
5.4 Terms and Definitions
5.5 Contract Time and Schedule Checklist Items

CFL Guidelines for Developing October 2006
Critical Path Method Schedules (CPMs)
- 3 -
1. INTRODUCTION
1.1 Purpose and Background for Construction Schedules
Construction schedules for our projects are used to determine reasonable and accurate
contract time for construction. Contract time is the maximum time allowed in the
contract for completion of all work contained in the contract documents.
A construction schedule will establish the number of days needed to complete the project.
This will help the FHWA in planning during the development of the project. It will help
construction management teams with time frames for staffing a project, for public
notifications and help determining warranted closures. It will help in determining
construction sequencing, phasing, milestones or alternate bid schedules. It will help to
develop funding for CE costs during constructions, and it will also provide background
support during reviews of Contractor submitted construction schedules.
If contract time is insufficient to complete the work, bid prices may be higher and there
may be an unusual number of time overruns and contractor claims. Contractors should
be provided the ability to schedule work to maximize equipment and labor. If contract
time is too short, these efficiencies are more difficult to obtain resulting in higher prices.
If the time allowed is excessive, there may be cost inefficiencies by the contractor. The
public may be inconvenienced unnecessarily and subjected to traveling on an unsafe
roadway for an extended period of time. In establishing contract time, strive for the
shortest practical traffic interruptions to the road user. If the time set is such that all work
on a project may be stopped for an extended period (not including necessary winter
shutdowns) and the contractor can still complete the project on schedule, it means the
contract time allowed was excessive.
Important Note:
The purpose of the Designer’s construction schedule is to determine the number of days
that is reasonable to complete the work. The schedule may be used as a reference by the
Construction staff. The FHWA generated schedule is usually not used by the Contractor.
However, it can be requested during Freedom of Information Act reviews and often
scrutinized by attorneys and expert witnesses during depositions and legal proceeding.
1.2 Construction Schedule Submittal Guidelines
For typical 4R projects, create the first construction schedule during the 50% design
development. Update the schedule for all remaining PS&E submittals. Special issues for
some projects may require that the construction schedule be prepared at an earlier stage
of design.

CFL Guidelines for Developing October 2006
Critical Path Method Schedules (CPMs)
- 4 -
For typical 3R projects, create the first construction schedule during the 70% design
review. Update the schedule for all remaining office and field reviews. Again, special
issues for some projects may require that the construction schedule be prepared at an
earlier stage of design.
The prepared construction schedule should be submitted for review along with PS&E
submittals.
2. ELEMENTS IN DETERMINING CONTRACT TIME
2.1 Production Rates
A production rate is the quantity produced or constructed over a specified time period.
Estimating realistic production rates is important when determining appropriate contract
completion time. Production rates may vary considerably depending on project size,
geographic location, whether the project is in a rural or urban setting.
To establish accurate production rates, use normal historic rates of efficient contractors.
A common method of establishing production rates is to divide the total quantity of an
item on previously completed projects by the number of days/hours the contractor used to
complete the item. Some possible resources to find historical production rates or
construction performance data are the local state’s DOT and the RSMeans Cost Data
Books. See also Section 5 (Additional Resources) for links and information on obtaining
established production rates. Base production rates upon five-day weeks and eight-hour
crew days or per piece of equipment.
Important Note: Many FHWA projects will not have 8-hour work days. The
production rate used should be adjusted for the project’s average work-day for that
activity. See example in Subsection 3.4.
Production rates developed by reviewing total quantities and total time are not
recommended as they may result in misleading rates which tend to be low since they may
include startup, cleanup, interruptions, etc. Base the production rates on the desired level
of resource commitment (labor, crew sizes, equipment, etc.) deemed practical given the
physical limitations of the project. Representatives of the construction industry are also
usually willing to assist in developing rates and time schedules.
Update rates regularly to assure accurate representation of the average rate of production
in the area. Place an emphasis on developing production rates for activities known to be
on the critical path. It is very important to document and/or coordinate the production
rates with the project’s Construction Operation Engineer (COE).
Adjustments to production rates should be based upon using engineering judgment and
specific project aspects noted above. For example:

CFL Guidelines for Developing October 2006
Critical Path Method Schedules (CPMs)
- 5 -
Hot Asphalt Concrete Pavement (HACP) production rate:
HACP Paving (max) - 1,980 tons/day (from local DOT)
HACP Paving (min) - 1,320 tons/day (from local DOT)
Starting rate = (1980 + 1320)/2 = 1,650 tons/day (assuming an 8-hr day)
Project Specifics (must document):
Paving in early spring. Due to cold temperatures, reduce to a 6-hr
day (11am-5pm).
Remote project location will increase haul times, no temporary
batch-plant, reduce to a 5-hr day.
Used/adjusted production rate = 1,650 * 5/8 = 1,030 tons/day (rounded)
2.2 Other Factors Affecting Contract Times
Some of the following items should be considered when determining contract time:
1. Effects of traffic on scheduling, production rates and the sequence of operations.
2. Curing time and waiting periods between successive paving courses or between
concrete placement operations, as well as specified embankment settlement
periods.
3. Setup times, mobilization, special equipment required.
4. Seasonal limitations for certain items when determining both the number of days
the contractor will be able to work as well as production rates such as: rain,
runoff, high water conditions and snow.
5. Conflicting operations of adjacent projects, both public and private.
6. Time for Government review of false-work plans, shop drawings, post-tensioning
plans, mix designs, etc.
7. Time for fabrication of structural steel and other specialty items.
8. Lead time to obtain necessary permits.
9. The effect of permitting conditions and/or restrictions.
10. Restrictions for nighttime and weekend operations.
11. Time of the year of the letting as well as duration of the project.
12. Additional time for obtaining specialty items or materials with long-lead
requirements, such as steel girders and treated timber.
13. Delays due to normal seasonal weather.
14. Other pertinent items as determined by the client agency.
15. Project or non-project special events and/or milestones, such as holidays, hunting
seasons, local celebrations, etc.
16. Number of crews and crew sizes.
17. Type of project (i.e. ERFO) and difficulty of work.
18. Environmental Commitments (i.e. migratory bird restrictions).
19. Construction of temporary works, diversion dikes and berms.
20. Earthwork type (i.e. rock, clay, sands, etc.)

CFL Guidelines for Developing October 2006
Critical Path Method Schedules (CPMs)
- 6 -
3. STEPS FOR CREATING CPM CONSTRUCTION
SCHEDULES
3.1 Define Work Day
Work hours establish the daily work times the contractor could work and may be set for
each project and/or task calendar. Use an eight hour workday defined as 8:00 am to 5:00
pm unless you have project specific restrictions or requirements.
See Subsection 4.2 for guidance on how to define the normal working day into Microsoft
Project.
3.2 Define the Project Calendar and Task Calendar
The project calendar defines the project’s work and non-work days. Non-work days
usually include Saturdays, Sundays, Holidays, and any other contractual non-work days.
They may also include local events when they would adversely impact construction. Each
project will have its own unique set of restrictions.
A task calendar defines the work and non-work days for a task or activity. If the task can
only be preformed during a limited time frame, the task calendar would show the work
and non-work days. For example, the project calendar shows the project lasting one year,
January through December. If seeding and turf establishment must be performed after
September 1, then a seeding task calendar would show non-work days from January
through August and show work days from September through December. Only one task
calendar can be assigned to a specific activity.
See Subsection 4.2 for guidance on how to define the working calendar in Microsoft
Project.
3.3 Identify, Group and Sequence the Activities
A key factor in developing a realistic schedule is to include the right activities. Consider
the uniqueness of each project and use engineering judgment. In most cases, it is not
necessary to include every bid item in the schedule. For example, the following items
generally are not shown: construction schedule, QC/QA plan, Contractor testing and
watering. Notice to Proceed (NTP) and Project Closeout should be the first and last
activities in a schedule. Once the activities are identified and grouped, determine the
general sequence of the activities.
The table below offers guidance for typical activity groupings, inclusions and exclusions
in a construction schedule.
CFL Guidelines for Developing October 2006
Critical Path Method Schedules (CPMs)
- 7 -
Activity Comment
Staking
Only show staking tasks that are necessary to start the
project (e.g., clearing limits and slope stakes). Do not show
staking as a continuous activity throughout the project.
Clearing & Grubbing
Show clearing & grubbing work needed in order to commence
major construction activities.
Erosion Control
Show items of work that are required to be in-place before
clearing or grading operations can begin, such as silt fence.
Earthwork
Break out rock excavation as a separate activity from other
earthwork items.
Pavement Structure Items
Combine associated bid items into one work activity. For
example, if asphalt cement is a separate 401 item, you only
need to show the work items, i.e. paving. However, separate
the major pavement structure items such as; base course and
asphalt.
Bridge Activities
Show by phase of construction - foundation, substructure,
superstructure, not by individual bid items.
Subexcavaton
Combine subexcavation, geotextile, and select borrow into
one activity
Drainage
Show individual major culverts larger than 48 inches in
diameter or box culverts that cause significant impacts to
traffic or other operations. Generally, most other drainage
items can be combined into one activity and not shown on the
construction schedule if they don't substantially impact other
operations and can be constructed with other activities.
Turf Establishment
Show as one item. Verify that work occurs in seeding
window.
Signing & Striping
Combine all permanent traffic control signing and striping into
one activity.
Guardrail Combine all type of guardrail into one activity.
See Subsection 4.3 for guidance on how to input the activities into Microsoft Project.

CFL Guidelines for Developing October 2006
Critical Path Method Schedules (CPMs)
- 8 -
3.4 Set Activity Durations
Developing activity or grouped activity durations is the most important part of
establishing reasonable and accurate schedules. Therefore, it is critical that time, effort,
research and thought go into these durations. The production rates will need to be
computed based on the average anticipated hours in a work day. That is, activity
durations are set on a per day basis not by hour. Therefore, to adjust an activity’s
duration, always use the ratio of the actual day work hours to the established workday. If
the production for HACP was 1,030 tons/day (based on an 8 hour work day) and the
contractor was only going to work 6 hour day (limited daylight hours) then the adjusted
rate would be:
1,030 tons/day x 6 hours / 8 hours = 770 tons/day (rounded).
The Factors Affecting Contract Time items listed in Subsection 2.2 should be given
thought and included in durations. Documenting your assumptions and reviewing the
information with the Construction Operations Engineer (COE) is imperative to finalize
the construction schedule. Try to limit the duration for any activity to 20 days. If the
duration is longer, consider breaking the activity into phases based on station ranges or
other project milestones.
See Subsection 4.3 for guidance on how to input activity durations and assumptions into
Microsoft Project.
3.5 Link Activities
Once all the activities necessary to complete a project have been listed, the relationship of
these activities to one another needs to be determined by linking activities. In some
instances, several activities can be undertaken concurrently, and at other times, certain
activities cannot be undertaken until others have been completed. Generally, when
determining the sequence of operations, some questions need to be asked such as: "What
needs to be done before proceeding with this activity" or "what can be done
concurrently?" Every activity has a definite event to mark its relationship with others
with respect to completing a task.
See Subsection 4.4 for guidance on how to link project activities.
3.6 Documentation
Document any assumptions such as: production rates, equipment types, quantities and
number/size of crews used. That way, if the schedule is modified, the logic can be
followed. It is recommended to document notes using Task Information Notes in the
Microsoft Project scheduling software.

CFL Guidelines for Developing October 2006
Critical Path Method Schedules (CPMs)
- 9 -
See Subsection 4.3 for guidance on documenting assumptions Using Microsoft Project.
3.7 Review CPM Schedule with the COE
Make sure that applicable notes have been added to the activities and phases. For review
by the COE it is a good idea to print the schedule from the Gantt Chart view, the Network
Diagram view (showing links/logic) and the notes.
See Subsection 4.5 for guidance on how to view or print the schedule in Microsoft
Project.
3.8 Modify the Construction Schedule
Modify the CPM schedule in conjunction with the COE by applying constraints,
modifying productions rates, project or task calendars, or activity sequences.
See Subsection 4.7 for guidance on how to add activity constraints in Microsoft Project.
4. USING MICROSOFT PROJECT
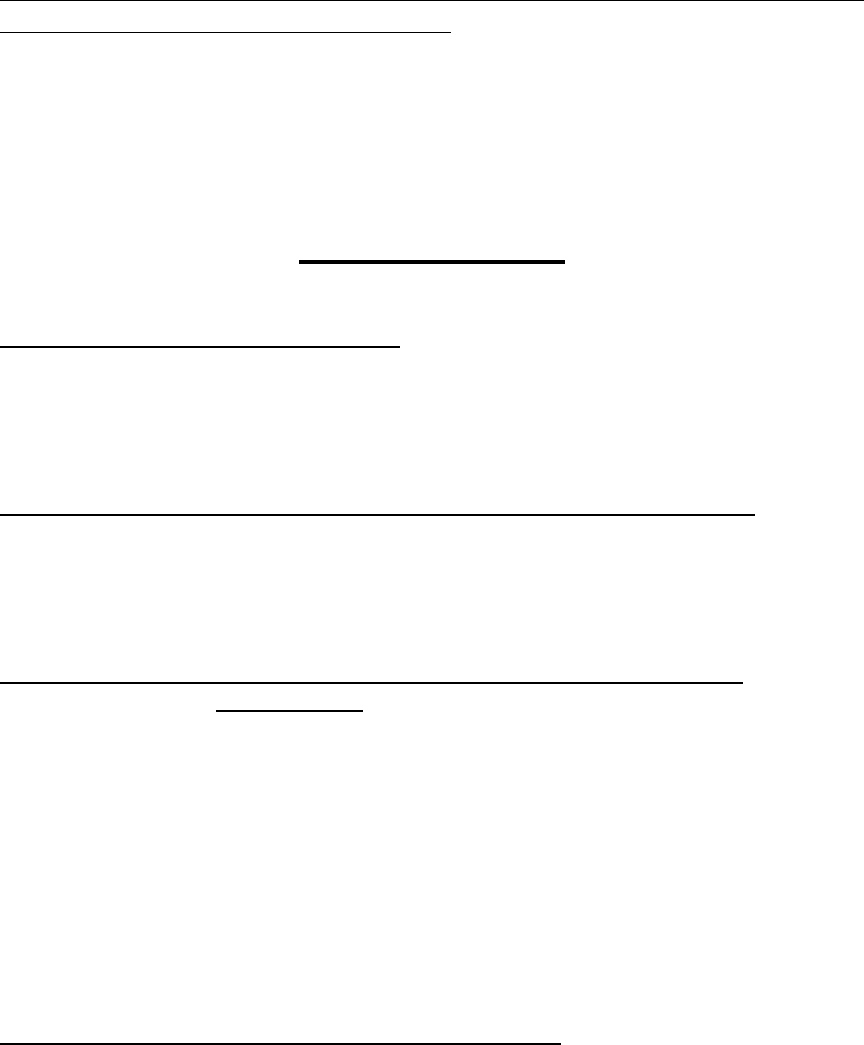
4.1 Create a New CPM Schedule
Open Microsoft Project.
Hint:
To set up a basic schedule, Microsoft Project offers a “Project Guide”. The Project
Guide should appear on the left side of the screen. If not, turn on the guide from the main
pull down menu by selecting View/Toolbars/Project Guide. The left icon toggles the
guide on and off. Follow the steps sequentially to create your schedule. If the Project
Guide is not used, then follow the following steps:
CFL Guidelines for Developing October 2006
Critical Path Method Schedules (CPMs)
- 10 -
Select “Create new project” or from the pull down menus select File/New
CFL Guidelines for Developing October 2006
Critical Path Method Schedules (CPMs)
- 11 -
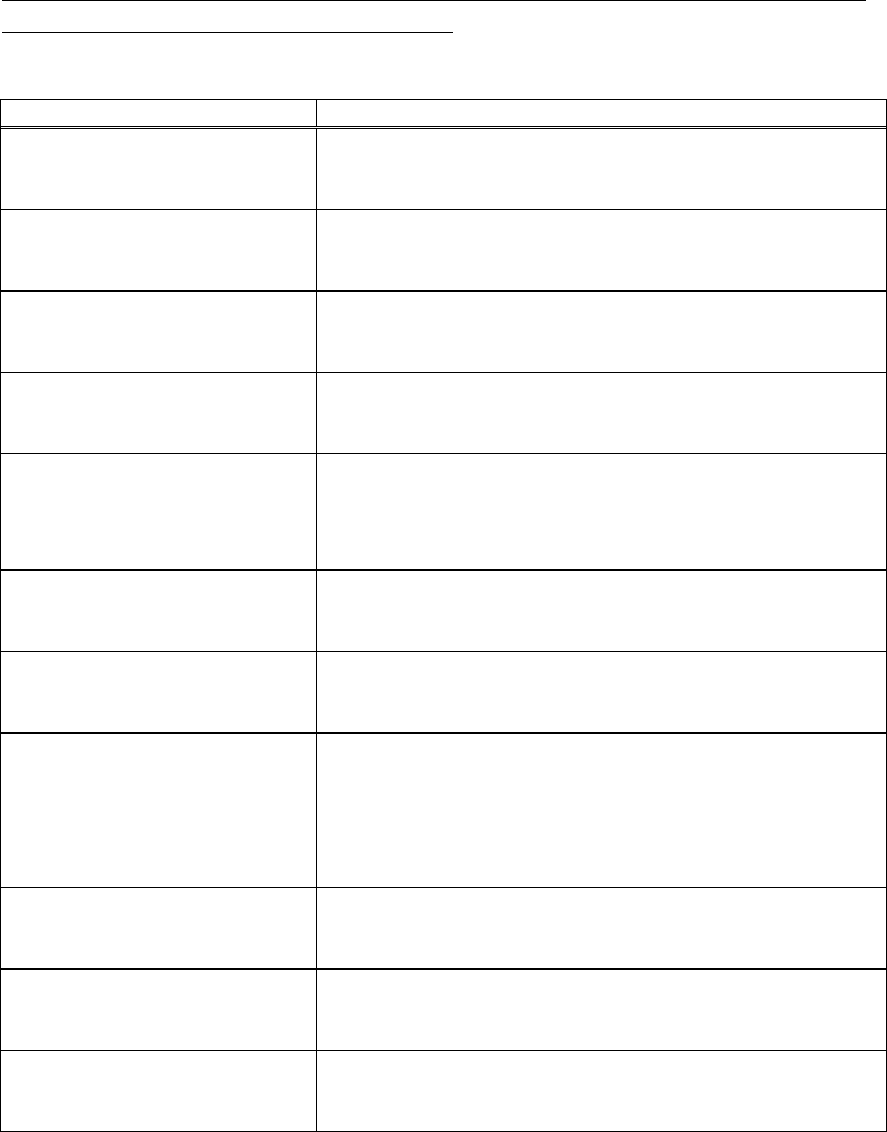
Select “blank project”
Save the file to your project directory with an appropriate naming convention using
File/Save from the main pull down menu.
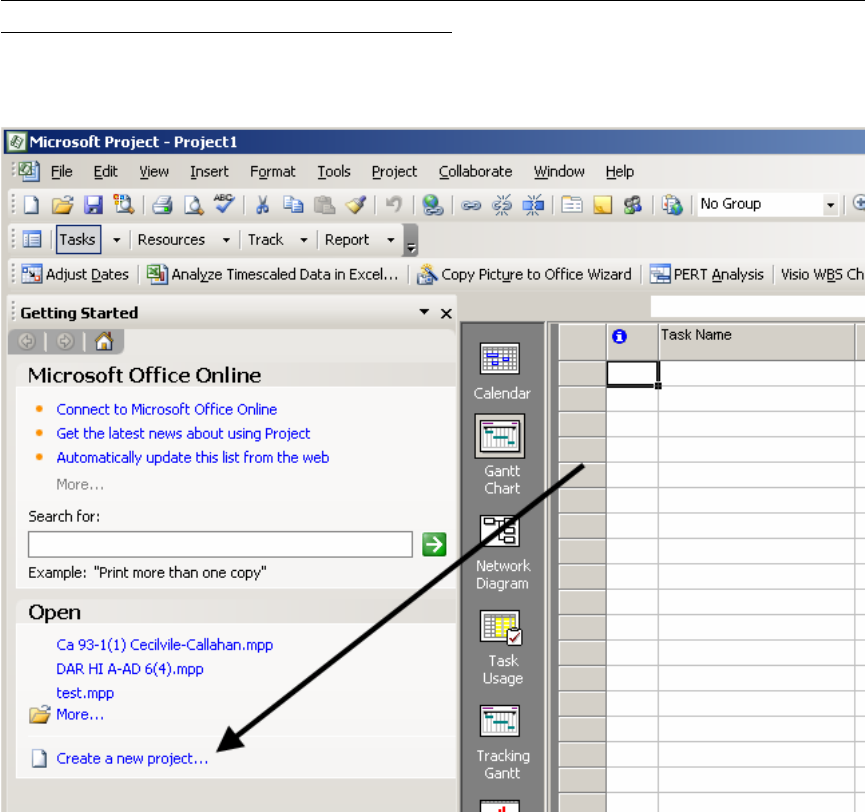
4.2 Define the Project
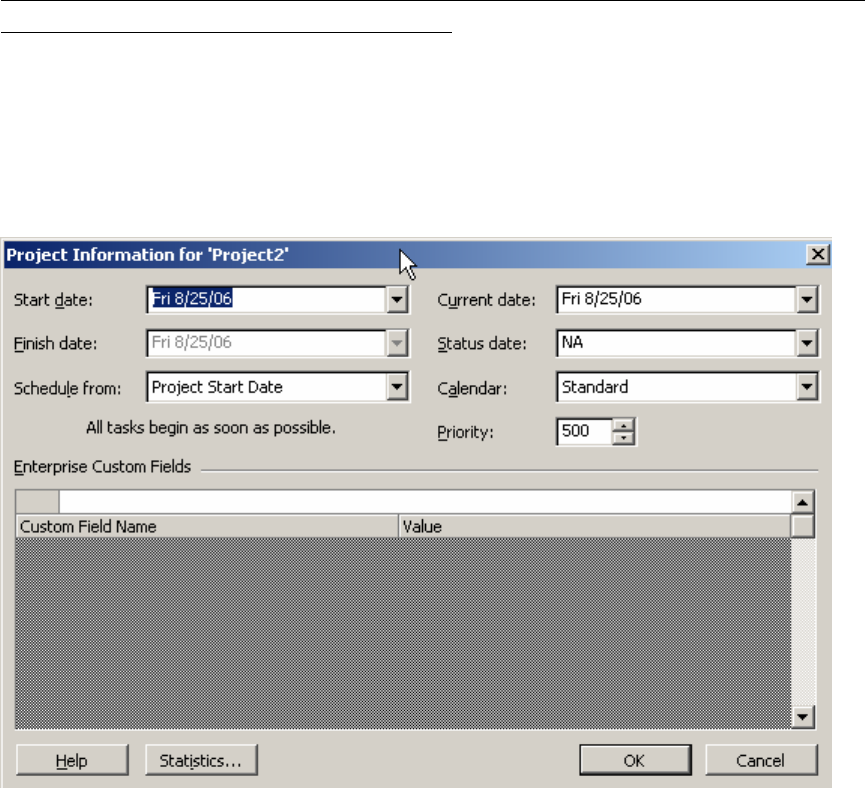
Select Project then Project Information.
CFL Guidelines for Developing October 2006
Critical Path Method Schedules (CPMs)
- 12 -
Enter the approximate start date (Notice to Proceed). Either type in the date or use the
drop down calendar. Check the other entries in the Project Information dialog box.
These defaults should work for almost all projects. Unless it is known that the majority
of the project will be constructed at night or with 24 hour shifts, keep the Standard
calendar selected.
CFL Guidelines for Developing October 2006
Critical Path Method Schedules (CPMs)
- 13 -
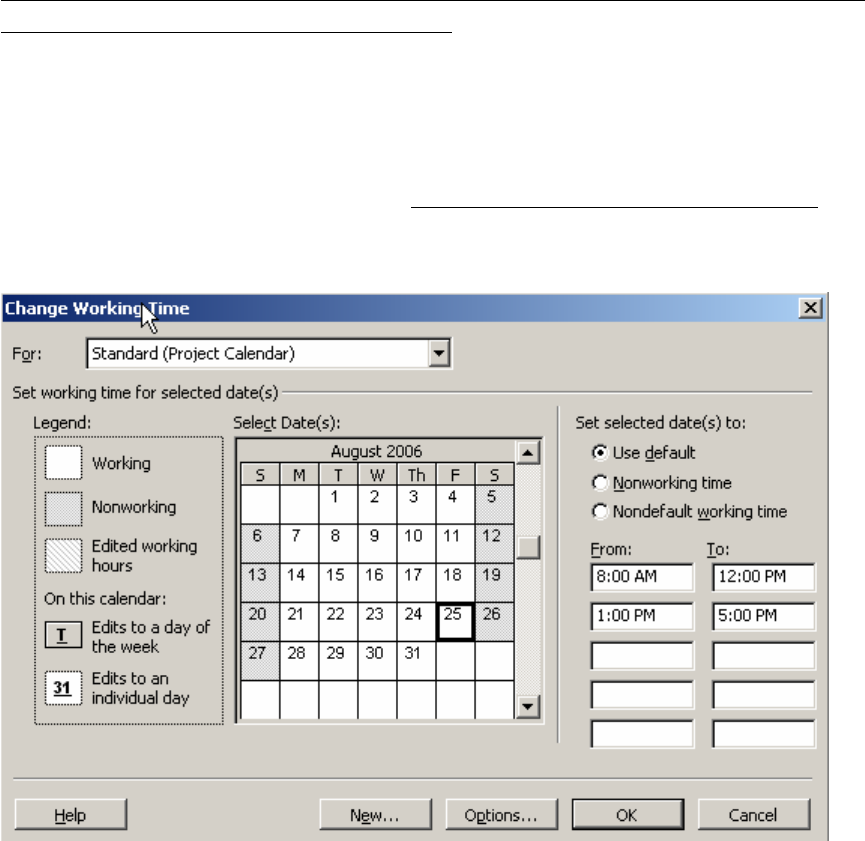
Set the project calendar/s by selecting from the main menu Tools/Change Working
Time. Modify the Standard calendar (project calendar) for the project. Highlight
days/weeks/months for project specific restrictions (non-working days). Do this for the
expected duration of the project plus an extended period of time (at least 3-6 months)
beyond the expected finish of the project. Do not edit the default working times here,
times will be changed under a different step. Show holidays and other non-working days
as non-working days.
If the project requires more than one calendar for specific construction activities, select
the New tab at the bottom of the Change Working Time dialog box. Complete the task
calendar in the same way as the project or “Standard” calendar.
CFL Guidelines for Developing October 2006
Critical Path Method Schedules (CPMs)
- 14 -
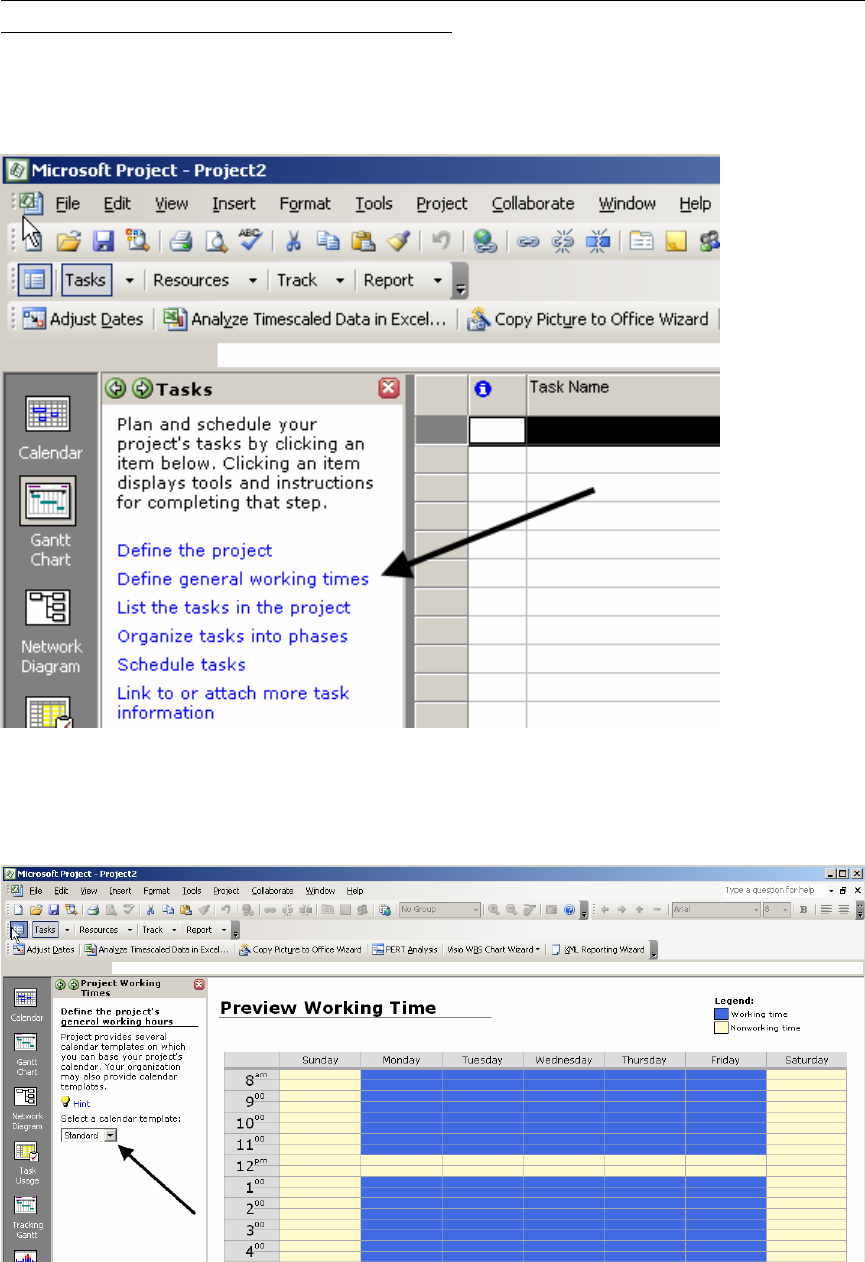
To change daily working hours for each calendar, it is easiest to use the Project Guide.
On the Project Guide toolbar, select Tasks/Define general working times.
Select the calendar to modify and make the appropriate changes. Keep in mind that this
is mostly insignificant to construction schedules. The production rates should be
established for working hours in a day. This will determine your durations.

CFL Guidelines for Developing October 2006
Critical Path Method Schedules (CPMs)
- 15 -
4.3 Input and Organize Project Activities and Data
Make sure the appropriate view is currently in use. Select View/Gantt Chart from the
main menu.
Under the Task Name column, enter the construction activities in sequential order.
If activities can be grouped as shown below, group construction activities under the
appropriate phase by selecting one or more activities and then indent “right”. The indent
controls are the green arrow icons located on the formatting toolbar.

CFL Guidelines for Developing October 2006
Critical Path Method Schedules (CPMs)
- 16 -
Add durations to the construction activities. If the activity is a milestone, put a zero for
the duration. Do not add durations for summary tasks. The summary tasks (in bold) will
summarize subtasks durations.
CFL Guidelines for Developing October 2006
Critical Path Method Schedules (CPMs)
- 17 -
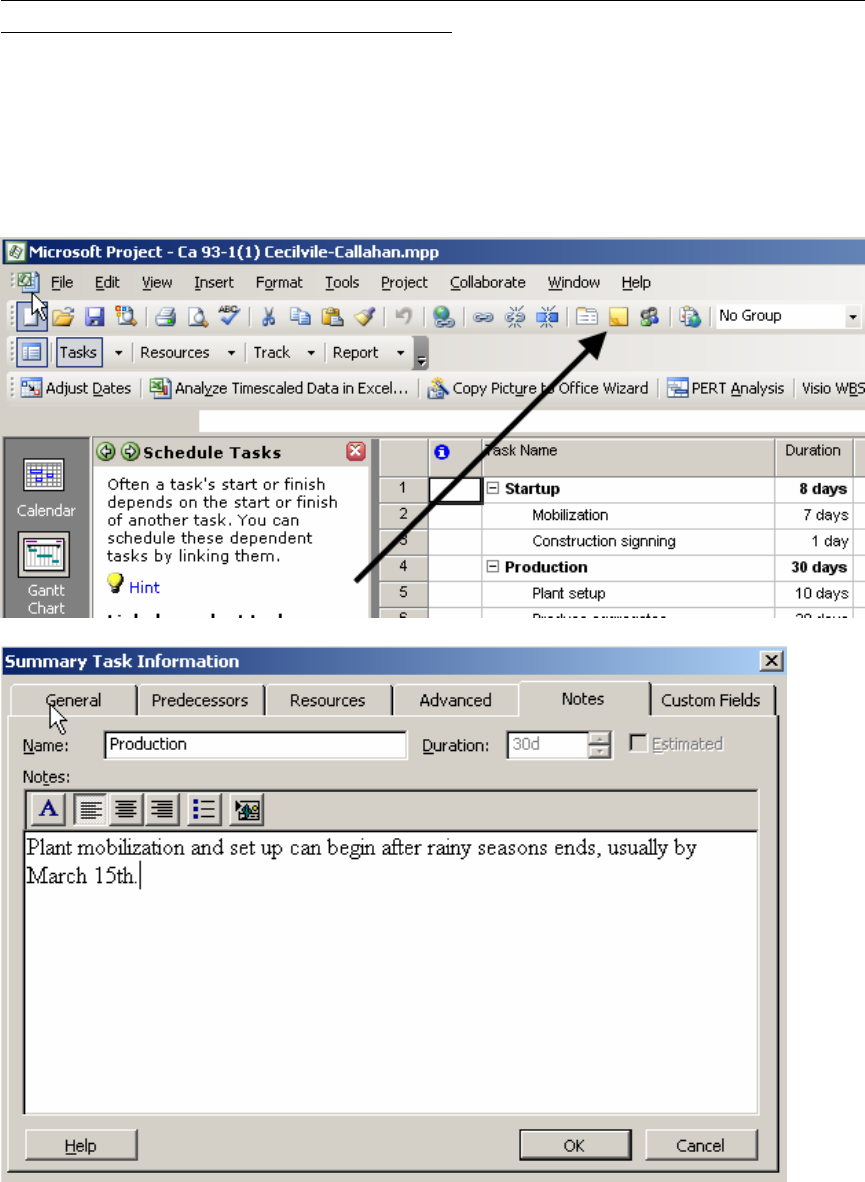
Document assumptions at this time by one of the two following methods: Either double-
click on an activity/task and select the Notes tab in the Task Information dialog, or
highlight the activity/task and select the Task Notes icon from the Standard toolbar.
Type in quantities, assumptions used for production rates, assumed bad weather days and
other items that have an effect on the duration.
CFL Guidelines for Developing October 2006
Critical Path Method Schedules (CPMs)
- 18 -
4.4 Link the Tasks/Activities
The next step in creating the schedule is to assign “links” between activities. This is
often called adding “logic” to the schedule. Here it is important to know the relationship
between activities and when the activities can commence or finish as related to other
activities. Along with activity durations, this linking will need the most coordination and
review with the COE.
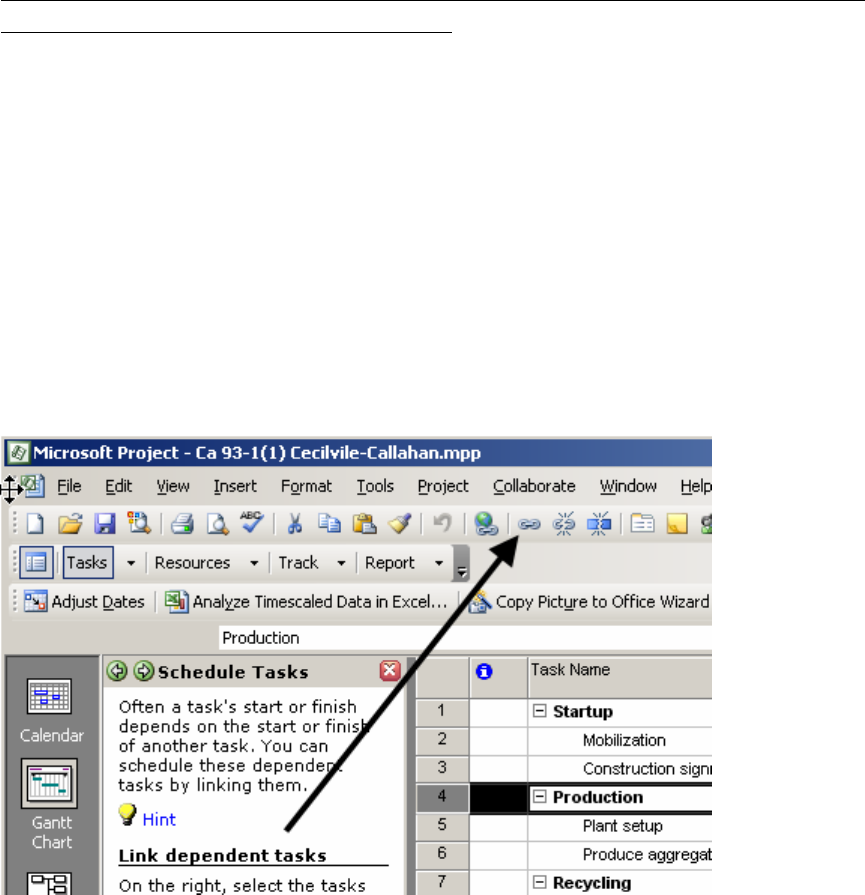
To assign a link, use the link tasks icon from the standard toolbar. This is the icon with a
segment of chain on it. Doing this will always create a Finish-to-Start link. Or, for
additional linking help, use the Project Guide.
CFL Guidelines for Developing October 2006
Critical Path Method Schedules (CPMs)
- 19 -
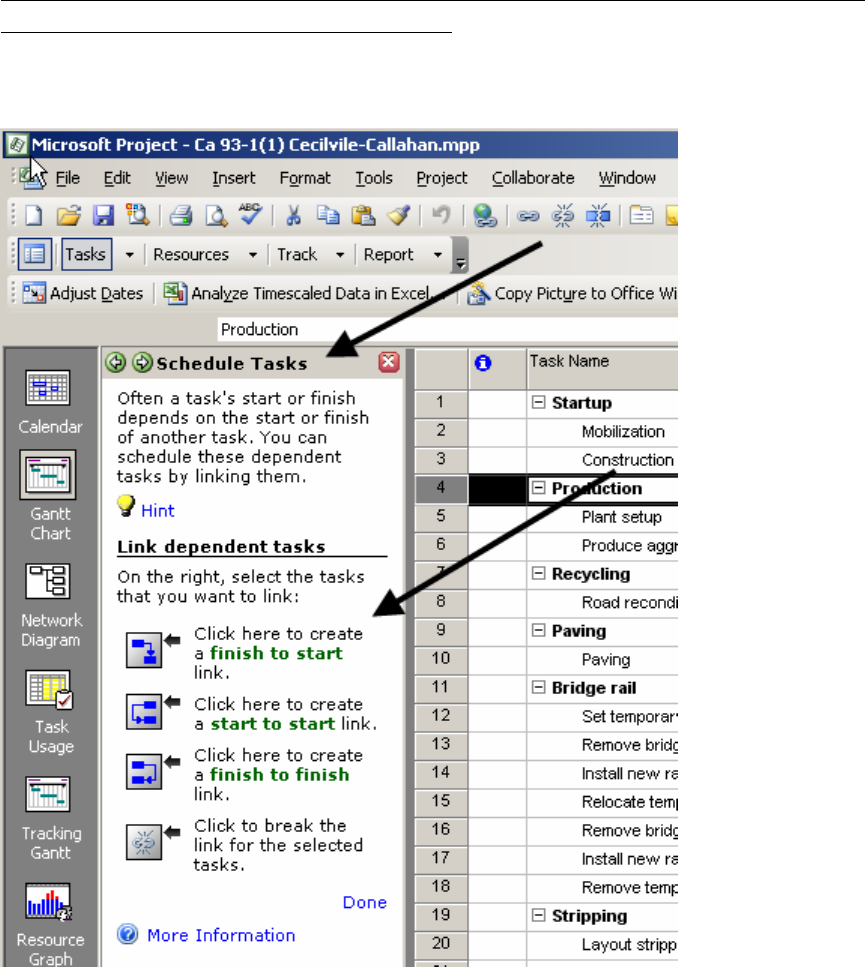
Or, On the Project Guide toolbar, select Tasks/Schedule Tasks.
Important Note:
Microsoft Project will always link the activity selected first as the predecessor and the
activity selected second as the successor.
CFL Guidelines for Developing October 2006
Critical Path Method Schedules (CPMs)
- 20 -
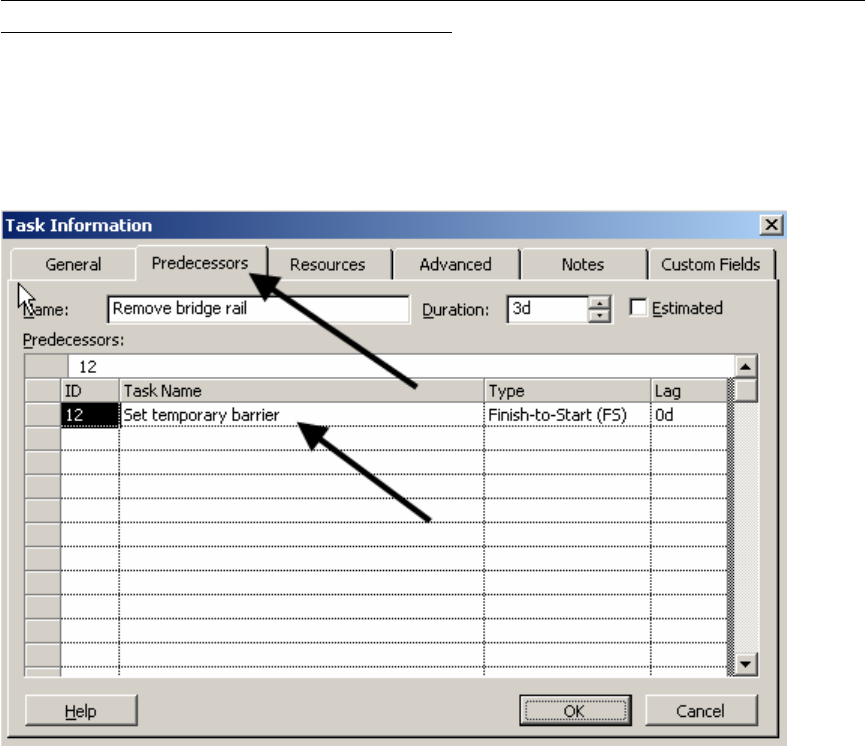
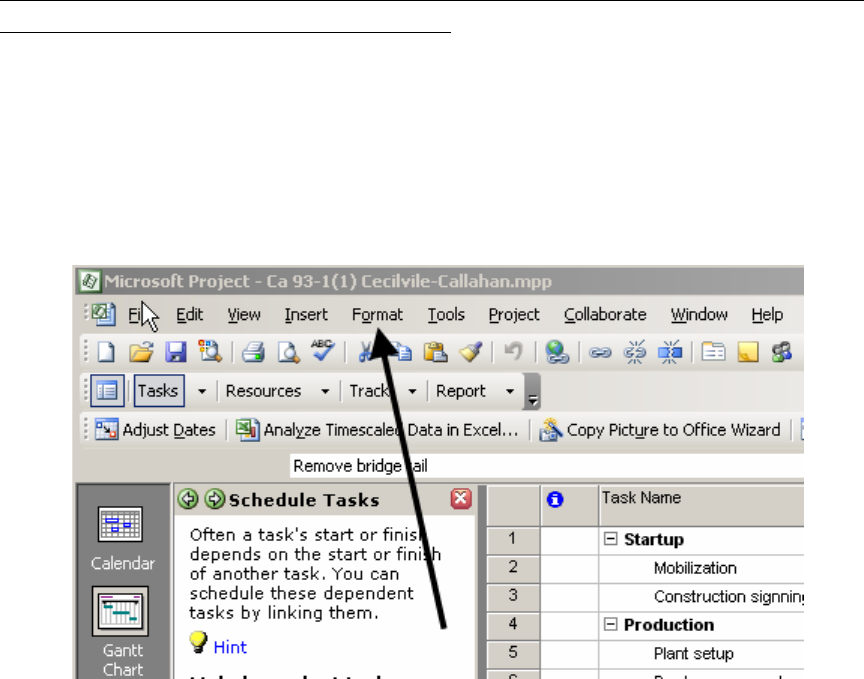
To modify the type of link between tasks, double-click the activity that is the successor.
A Task Information dialog box will appear. From here, it is possible to select a different
type of link and to assign lags. It is possible to have both positive and negative lags as
either a specific duration or a percentage of the task’s predecessor.
In the above example, the predecessor is “Remove bridge rail” and the successor is “Set
temporary barrier”. The temporary barrier must be in-place before any bridge railing is
removed.
4.5 View and Print the Schedule
Viewing and printing a construction schedule can be made easier by using the Gantt
Chart Wizard. To access this tool, on the main menu, go to Tools/Gantt Chart Wizard.
Follow the steps as directed.
Select Standard then next. Select None or Dates then next. Select Yes to show links
then next. Select Format It and Exit Wizard. If you want to show the critical path,
select the “Critical Path”. It is not necessary to view resources on CFL schedules.
Resources are typically used for management tracking on a progress schedule.
CFL Guidelines for Developing October 2006
Critical Path Method Schedules (CPMs)
- 21 -
Some additional recommendations:
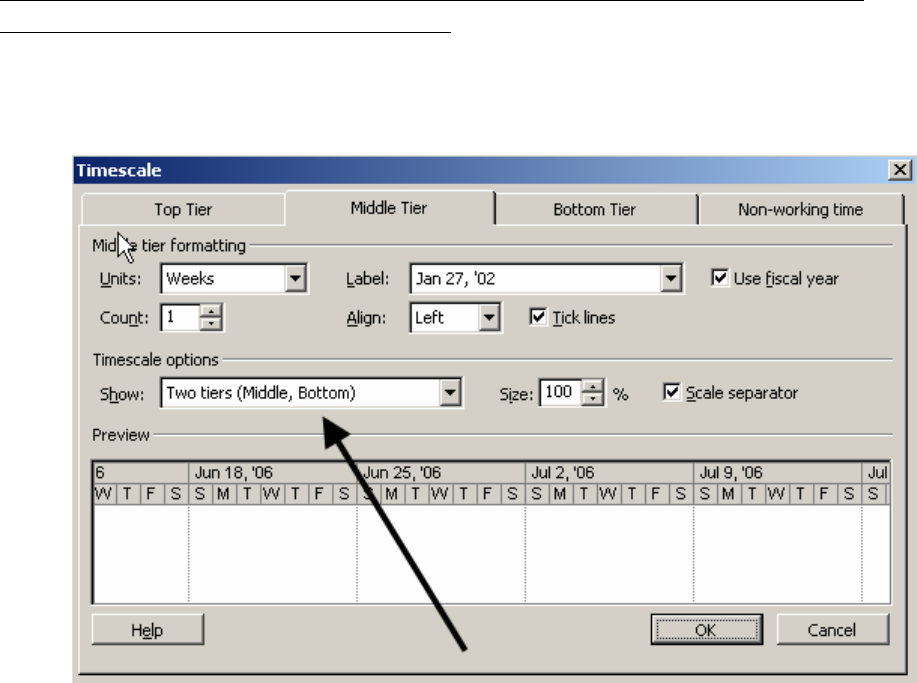
Set the timescale prompts
The timescale that you use depends on the overall project duration. To begin
open the timescale menu by selecting Formats/Timescale.
CFL Guidelines for Developing October 2006
Critical Path Method Schedules (CPMs)
- 22 -
In the “Show” field, using the right side scroll select Two Tiers (Middle,
Bottom).
For very short projects (less than 2 months) use WEEKS for the Middle Tier and
DAYS for the Bottom Tier. For longer projects, use MONTHS for the Middle
Tier and WEEKS for the Bottom Tier.
For short duration projects, label the Middle Tier with the week date and year,
label the Bottom Tier with the name of the day (S, M, T, etc.).
For longer duration projects, label the Middle Tier with the month and year; label
the Bottom Tier with the start date of the week.

CFL Guidelines for Developing October 2006
Critical Path Method Schedules (CPMs)
- 23 -
Page setup
As with normal Microsoft programs, on the main menu, select File/Page Setup…
From the Page tab, typically choose Landscape orientation and Fit to 1 x 1
pages. You may need two sheets for many activities. Also note that Summary
activities can be reduced to hide all sub-activities. Choose the Paper Size
required.
From the Legend tab, select Legend on every page.
Add footers and/or headers as a normal Microsoft document.
Select Print Preview or Print. Note that if working on a laptop, it may be
necessary to print to PDF and transferred to a computer with a network
connection to print. To create a PDF, just select Adobe PDF as the printer.
To print documented notes follow these steps:
On the View menu, click the view you want. Use Network Diagram.
To use a view that is not on the View menu, click More Views, click the view
you want to use in the Views list, and then click Apply.
On the File menu, click Page Setup, and then click the View tab.
Select the Print notes check box.
Click Print.
4.6 Activity Constraints
A constraint is a restriction placed on the start or finish date of a task. Constraints can be
“flexible” (not tied to a specific date, but instead ties to another task) or “inflexible” (tied
to a specific date.) Constraints are not deadlines. A deadline is a target completion date
for an activity. Example constraint types applied to an activity are: As Late As Possible,
As Soon As Possible, Finish No Earlier Than, Finish No Later Than, Must Start On, Must
Finish On, Start No Earlier Than & Start No Later Than.
Generally, it is not necessary or desirable to add a constraint to an activity. Linking
activities usually is all that is needed. Limit the use of constraints. An example of an
activity that should have a constraint is “Setting Bridge Girder.” In this case it would
make sense to add a “Start No Earlier Than” or “Must Start On” the date the girder will
be delivered to the project. Another example would be to set “Seeding” to “Start No
Earlier Than” the first day of the seeding/germination period.
CFL Guidelines for Developing October 2006
Critical Path Method Schedules (CPMs)
- 24 -
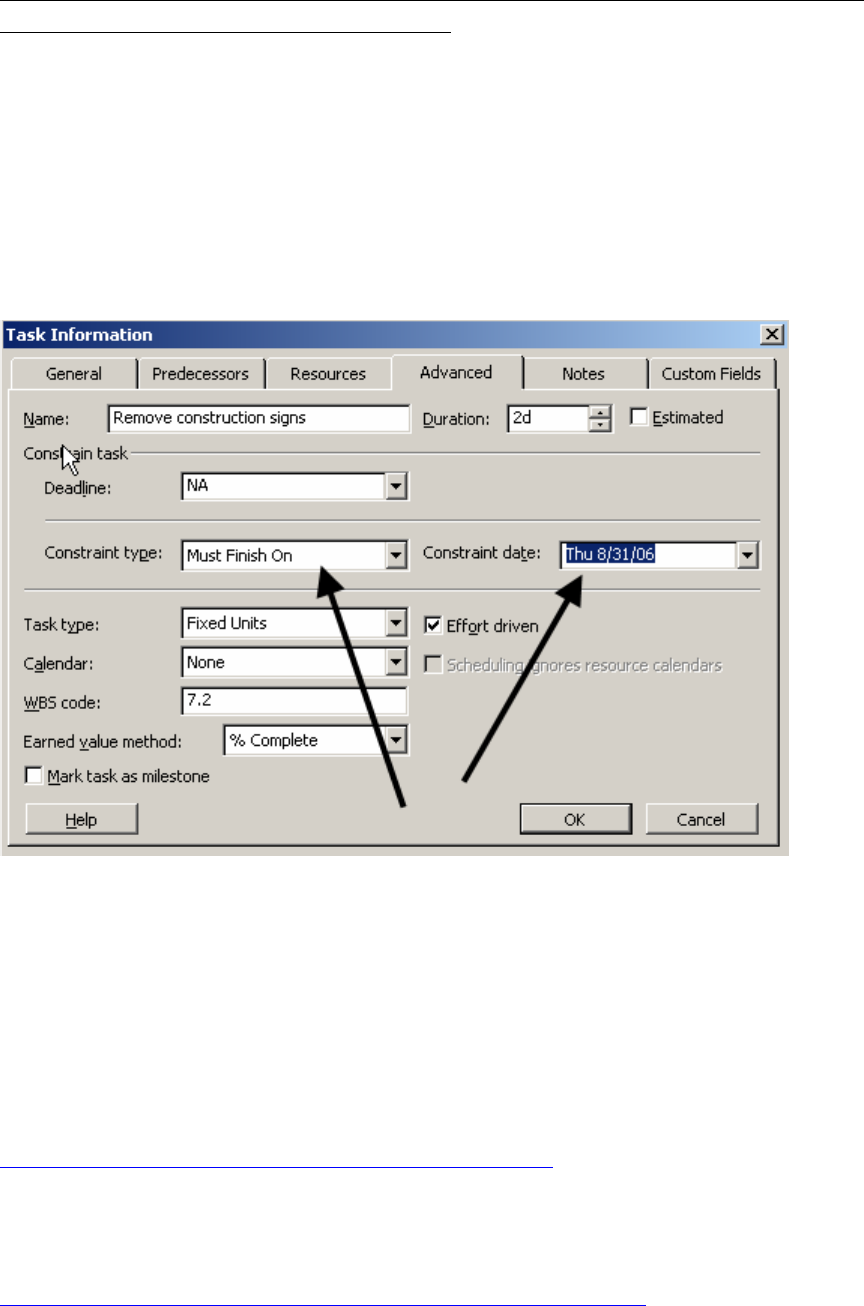
To add or change a constraint in Microsoft Project:
On the View menu, click Gantt Chart.
In the Task Name field, select a task, and then click Task Information. (You can also
right click on any activity and then click Task Information).
Click the Advanced tab.
In the Constraint type box, click a constraint type.
If you selected a constraint other than As Late As Possible or As Soon As Possible, type
a constraint date in the Constraint date box.
5. ADDITIONAL RESOURCES AND INFORMATION
5.1 CMP Schedules
Western Federal Lands (WFL) has published their own guide for preparing schedules.
To access WFL’s “Tips for Developing CPMs” click on the following link.
http://www.wfl.fha.dot.gov/design/resource/cpm_tips.pdf
To access a guide published by FHWA “FHWA GUIDE FOR CONSTRUCTION
CONTRACT TIME DETERMINATION PROCEDURES”, use the following link:
http://www.fhwa.dot.gov/legsregs/directives/techadvs/t508015.htm

CFL Guidelines for Developing October 2006
Critical Path Method Schedules (CPMs)
- 25 -
5.2 Microsoft Project
For additional guidance on using Microsoft Project, per WFL:
http://www.wfl.fha.dot.gov/design/resource/cpm_made_easy.pdf
Using Microsoft Project – Project Guide:
Using Microsoft Project – Gantt Chart Wizard:
5.3 Production Rates
http://www.methvin.org/ProductionRates/tabid/229/Default.aspx
http://www.oregon.gov/ODOT/HWY/SEOPL/docs/forms/production-rates.xls
http://www.lib.utexas.edu/etd/d/2004/kuoy81347/kuoy81347.pdf#page=3
http://www.dot.state.fl.us/Construction/Design%20Build/guidelines/english.pdf

CFL Guidelines for Developing October 2006
Critical Path Method Schedules (CPMs)
- 26 -
5.4 Terms and Definitions
Activity: Performance of a specific task having a duration.
Bar Chart (Gantt Chart): A schedule format (type) showing activities, sequencing, durations, task
interrelationships and start & finish dates.
Calendar: The scheduling mechanism that determines working time for resources and tasks.
Concurrent Activities: Activities which occur at the same time.
Constraint: Limitations placed on an activity, usually a "must start" or "must finish" date.
CPM: Critical Path Method predicts project duration by analyzing with sequence of activities.
Critical Path: The series of tasks that must be completed on schedule for a project to finish on schedule.
Or, the longest path for the earliest completion having zero (or least) float.
Duration: Time to complete an activity.
Early Start (ES)/Early Finish (EF): The earliest an activity can start or finish on the schedule.
Event: A zero-duration activity.
Finish-to-Finish (FF): Relationship between activities where the finish of the first activity is tied to the
finish of the second activity.
Finish-to-Start (FS): Relationship between activities where the start of the first activity is tied to the
finish of the second activity. (Most common).
Float: The amount of time between the early start and late start of an activity or group of activities.
Free Float (FF): The amount of time an activity can be delayed before it impacts the next activity.
Lag: Time offset between activities.
Late Start (LS)/Late Finish (FS): The latest an activity can start or finish without delaying project
completion.
Logic Loop: Sequence of activities with no end.
Logic: The relationship or "link" between activities or groups of activities.
Milestone: A reference point marking a major event in a project and used to monitor the project's
progress. Any task with zero duration is automatically displayed as a milestone within Microsoft Project.
Negative Float: Total float that is less than zero.
Network: graphical model of the project which shows activities and interrelationships.
Nonworking time: Hours or days designated in a resource or project calendar when Project should not
schedule tasks because work is not done. Nonworking time can include lunch breaks, weekends, and
holidays, for example.
Predecessors: Activities that must precede any given activity.
Pure Logic Diagram: A schedule format (type) showing tasks, sequencing and interrelationships
between tasks.
Start-to-Finish (SF): Relationship between activities where the start of the first activity is tied to the
finish of the second activity.
Start-to-Start (SS): Relationship between activities where the start of the first activity is tied to the start
of the second activity.
Subtask: A task that is part of a summary task. The subtask information is consolidated into the summary
task.
Successors: Activities that must succeed any given activity.
Task: An activity that has a beginning and an end.
Time Logic Network Diagrams (CPM): A schedule format (type) showing activities, sequencing, time-
scaled durations, and task interrelationships with lags, float and start & finish dates.
Total Float (TF): The amount of time an event can be delayed without delaying project completion.

CFL Guidelines for Developing October 2006
Critical Path Method Schedules (CPMs)
- 27 -
5.5 Contract Time and Schedule Checklist Items
The following is a list of items to review the completeness of the construction schedule:
Reviews/Submittals
o Are there critical Submittals? What time is needed?
o Are there critical testing periods and how long?
o Are there critical review times and how long?
o What are the assigned calendars for submittals & review times?
o What are the logical connections between review activities and
contractor’s actual work?
o Procurement activities
o Time for reviewing false-work plans, shop drawings, post-
tensioning plans, mix designs, etc.
Permits
o Are permits required?
o Time to obtain necessary permits?
Specific Activity Requirements
o Additional time for obtaining specialty items or materials with
long-lead requirements (i.e. Traffic Signal Equipment)
o Curing time and waiting periods between successive paving
courses or between concrete operations
o Embankment settlement periods or embankment surcharges.
o Coordination with utilities
o False-work & shoring activities
o Punch-list and cleanup activities
Material/Product Testing and Delays
o Government Furnished Material request?
o Trial shafts or piles
o Sample walls
o Time for fabrication of structural steel and other specialty items
o Staining, painting or other samples needing approvals
Construction Limitations and Requirements
o Haul characteristics
o Type of earthwork (sliver cuts, benching)
o Work area restrictions
o Equipment congestion
o Allowable bad weather days
o Material availability
o Labor shortages and resource loading
o Traffic Volumes

CFL Guidelines for Developing October 2006
Critical Path Method Schedules (CPMs)
- 28 -
o Traffic Staging events (closures, detours, etc)
o Critical interface activities (utilities, RR, etc.)
o Restrictions for nighttime and weekend operations
o Conflicting operations of adjacent projects, both public and private
o Are the NTP and Project Closeout activities shown?
Project Commitments
o Environmental Commitments
Winter season
clearing, grubbing, grading restrictions in FP
Noise restrictions
SWPPP
Seasonal limitations for certain activities
o Project Calendar Requirements
Work week (5-day, 7-day weeks)
Holidays
Other non-working times
Does the final schedule include/show:
o Critical Path?
o NTP date and completion date
o Entire work scope, all activities in plans and specs?
o Construction Staging and Mobilization?
o Realistic duration of individual activities?
o Maximum 20-day duration for any one activity? If longer, add
phases for the activity.
o Activities have at least one predecessor and 1 successor, except for
first and last activity?
o No negative lag for activities?
o Project Duration, Interim Milestones, Black-out dates, Contract
work Days
