
Microsoft Word 2010 - Level 3
© Watsonia Publishing Page 151 Macros
CHAPTER 16 MACROS
Macros enable you to automate routine operations and tasks in
Microsoft programs. A macro is a small program that records the
actions you take to complete a specific task, for example, adjusting
the page layout to a specific format. You then run the macro to
apply all of the recorded actions in just a single click! Needless to
say the time-saving potential with well-developed macros is huge.
Further, if you need to shield users from complex tasks, then
perhaps a macro is the answer. For example, if you need to pull
together five or six documents to create a monthly report, a macro
would enable you to hand this process over to even a novice user.
In this session you will:
gain an understanding of Word macros
learn how to set a macro security level
learn how to save a document as macro-enabled
learn how to record a macro
learn how to run a macro
learn how to assign a macro to the Quick Access
Toolbar
learn how to assign a keyboard shortcut to a macro
learn how to edit a macro
learn how to delete a macro
learn how to create a MacroButton field
learn how to copy a macro
gain an understanding of how to develop macros.
INFOCUS
WPL_W881

Microsoft Word 2010 - Level 3
© Watsonia Publishing Page 152 Macros
UNDERSTANDING MACROS IN WORD
In earlier versions, macros allowed you to record
the keystrokes used to perform an operation.
These days, macros have evolved into a full
programming language, allowing you to fully
automate virtually every facet of document
production. Macros have huge time-saving
potential, as a series of tasks can be performed in
just a single click.
What is a Macro?
A macro is simply a programmed set of instructions that tell Word what it should do. Macros are
written or recorded in a procedure, otherwise known as a routine.
How are Macros Created?
Word offers two main ways of creating macros. Macros can be recorded using the built-in macro
recorder, which records what you do and then converts this into a macro program. This is a great
way of creating macros for performing routine, complex or boring and repetitious tasks. Once
recorded, these tasks can be performed quickly over and over again by running the macro.
Macros can also be developed from scratch. In other words, you can type the programming steps
yourself rather than recording them using the built-in macro recorder.
What Types of Macros Are There?
There are two types of macro – global and local.
A global macro is available to all documents. For example, you may have a macro that adds your
company name and file details to the footer. Since you want all documents to have this, the macro to
add the footer should be available to all documents and would therefore need to be a global macro.
A local macro is only available to a particular document or template. For example, you may have a
monthly report document that needs to have information imported into it from other sources. You can
set up a macro that will import for you so that you don’t have to perform the steps each time.
Where Are Macros Located?
Macros are located in special macro sheets attached to either a document or template. Local
macros, because they pertain to one document, can be found in the macro sheet for that document.
Global macros are stored in the macro sheet for the Normal template. This then makes them
available to all documents based on that template.
Some advanced users store a collection of routines (macros) in a template and then attach that
template to documents where those macros are required.
How Do You Access Macros?
Macros can be created, viewed and edited using the various macro commands on the Code group
of the Developer tab. If you cannot see the Developer tab, you will need to add it to the Ribbon.
This is done by customising the ribbon in Word Options to display the Developer tab.
Macros can only be viewed using the Visual Basic Editor which is accessed by clicking on Macros
on the Developer tab or by pressing +
.
What is VBA?
VBA (Visual Basic for Applications) is the programming language used to create macros. Earlier
versions of Word used a more primitive version of this language known as WordBasic. VBA is a
common programming language found in virtually all Microsoft Office applications. Once you have
learned it for one product, you can easily adapt what you’ve learned to the other products.
Do I Need to be a Programmer to create Macros?
Absolutely not! While macros may appear cryptic and difficult to understand at first, tools such as the
macro recorder make creating macros easy and effortless.
Microsoft Word 2010 - Level 3
© Watsonia Publishing Page 153 Macros
SETTING MACRO SECURITY
Try This Yourself:
Open
File
Before starting this exercise
you MUST open the file W881
Macros_1.docx...
If the Developer tab is not
visible, click on the File tab,
click on Options, then click on
Customise Ribbon and click
on Developer for Customise
the ribbon, then click on [OK]
Click on the Developer tab,
then click on Macro Security
to display the Trust
Centre dialog box
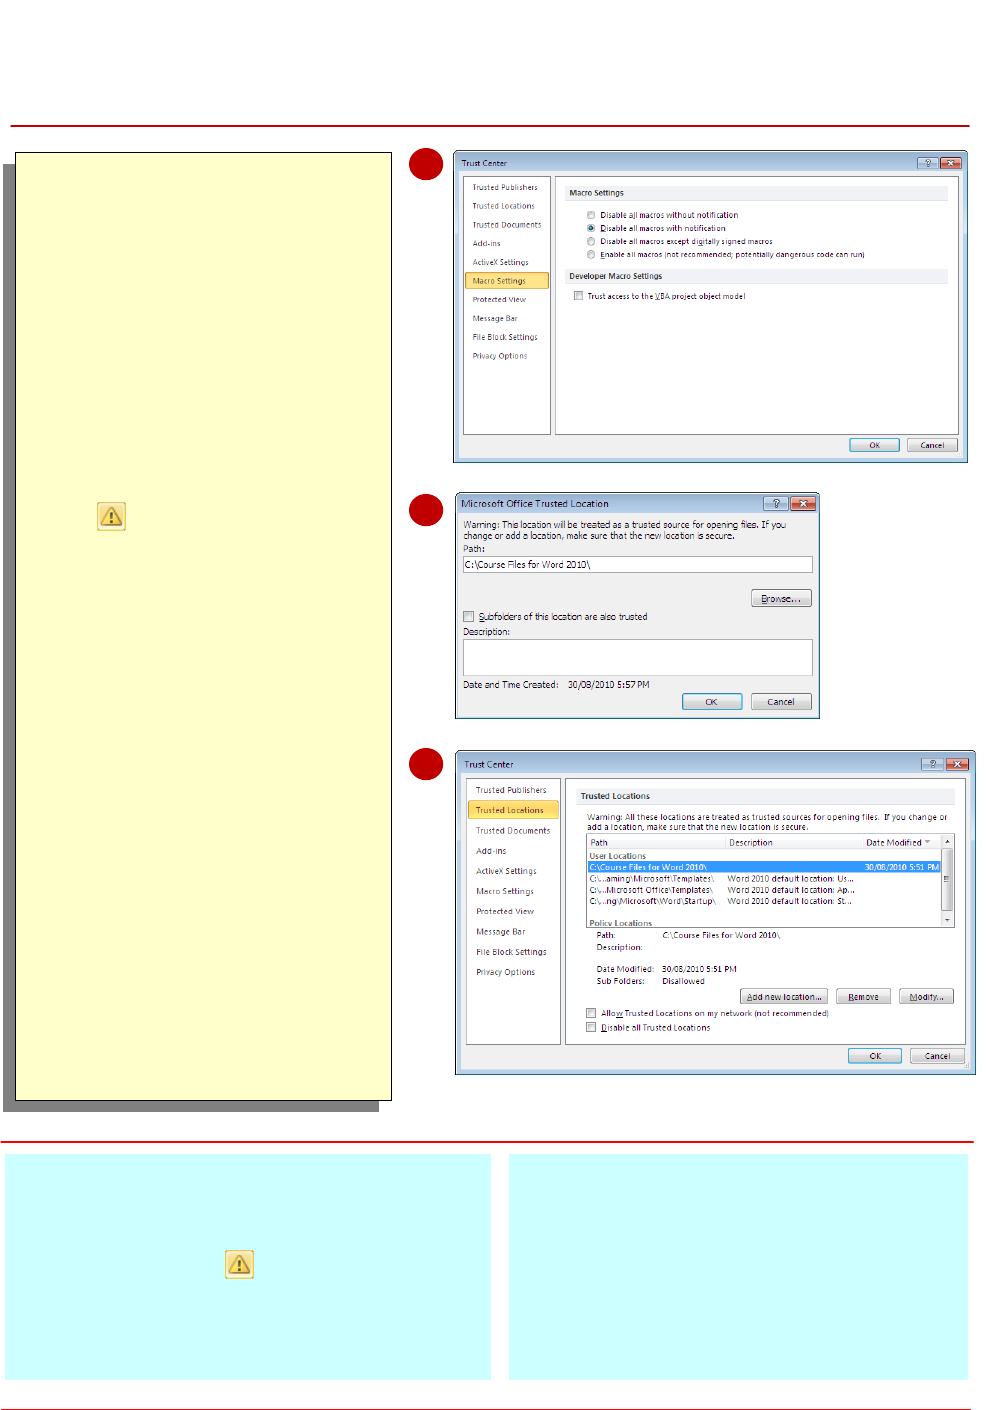
By default, all macros are
currently disabled unless they
are in a trusted location...
Click on Trusted Locations to
see the list of trusted folders
Click on [Add new location]
to open the Microsoft Office
Trusted Location dialog box
Click on [Browse] then
navigate to and select the
course files folder
Click on [OK]
The course files folder will be
added to the list of Trusted
Locations...
Click on [OK] to close the
dialog box, then save and
close the document
For Your Reference…
To set the level of macro security:
1. Click on the Developer tab, then click on
Macro Security
2. Click on the required level of security
3. Click on [OK]
Handy to Know…
Ideally you should only run macros that are
digitally signed and from a trusted publisher.
In reality, most macros aren’t digitally signed
and you need to place them in a trusted
location to make them work. Bottom line:
don’t use macros that you aren’t completely
sure about.
2
5
Recording or writing macros allows you to hack
into Word and manipulate the application to suit
your needs. One of the consequences of this is
that macros become a potential source of
viruses. To reduce the risk of viruses, Microsoft has
a Trust Centre that allows you to enable or disable
macros based on whether or not they are stored in
a trusted location or have a digital signature.
6
Microsoft Word 2010 - Level 3
© Watsonia Publishing Page 154 Macros
SAVING A DOCUMENT AS MACRO-ENABLED
s
Try This Yourself:
Same
File
Continue using the previous
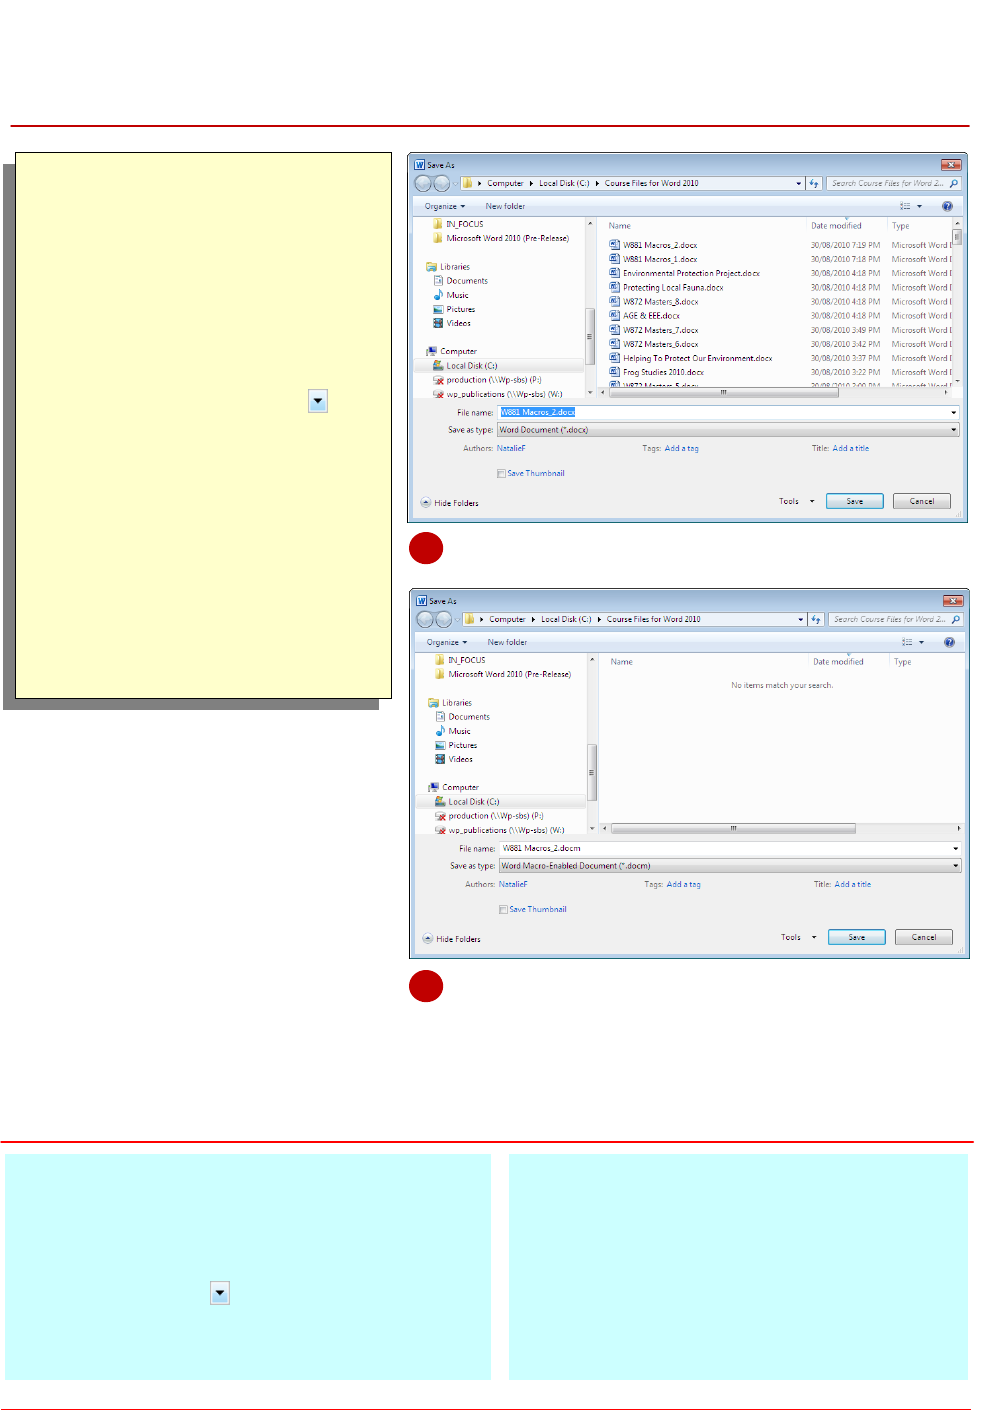
file with this exercise, or open
the file W881 Macros_2.docx...
Click on the File tab, then click
on Save As to open the Save
As dialog box
Click on the drop arrow for
Save as type and click on
Word Macro-Enabled
Document (*.docm)
Click on [Save]
The document will now be
saved with the file extension
.docm. You can now record
and run macros in this
document
For Your Reference…
To save a document as macro-enabled:
1. Click on the File tab, then click on Save As
2. Navigate to the save location, then click on
the drop arrow for Save as type and click
on Word Macro-Enabled Document
(*.docm)
Handy to Know…
Macros cannot be saved in documents with
the file extensions .docx or .dotx, while they
can be stored in documents with the file
extensions.docm or .dotm (template
document). You can create a macro in a
document that is not macro-enabled, but you
won’t be able to save it.
1
2
Microsoft Word 2010 enables you to save in
several different file formats that control whether
or not macros are saved with the file. The default
document format of .docx does not allow macros
to be saved with the document. To ensure that
macro code can be saved, you must change the
document type to .docm which is known as a
Word Macro-enabled Document.
Microsoft Word 2010 - Level 3
© Watsonia Publishing Page 155 Macros
RECORDING A MACRO
Try This Yourself:
Same
File
Continue using the previous
file with this exercise, or open
the file W881
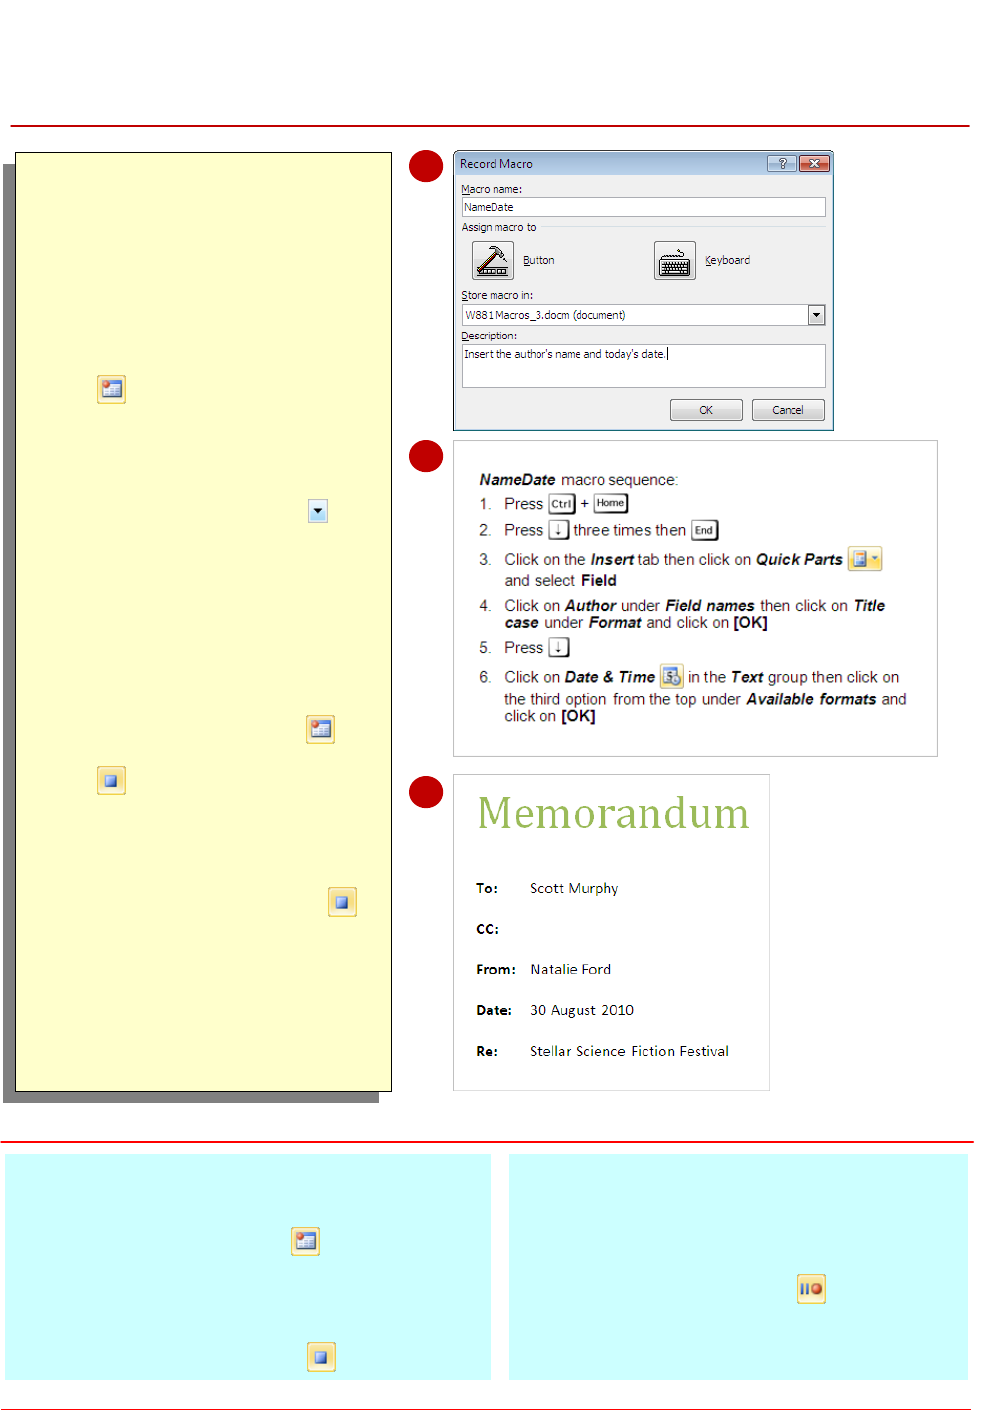
Macros_3.docm...
Click on the Developer tab,
then click on Record Macro
to open the Record Macro
dialog box
Type NameDate in Macro
name (no spaces)
Click on the drop arrow for
Store macro in and click on
the name of the current
document
Click in Description and type
Inserts the author’s name
and today’s date.
Click on [OK] to start recording
The Record Macro tool will
change to a Stop Recording
tool...
Carefully perform each of the
steps listed in the macro
sequence
Click on Stop Recording
to stop creating the macro
You have recorded the steps
as you have completed them.
The next step will be to test-
drive the macro
For Your Reference…
To record a macro:
1. Click on Record Macro on the
Developer tab
2. Type the macro name and select a location
3. Click on [OK] then perform the steps
4. Click on Stop Recording
Handy to Know…
The macro recorder does not allow you to
use the mouse on the document itself. You
must use keystrokes.
Click on Pause Recording to stop
recording temporarily.
4
6
Recording a macro is a bit like recording an
answering message for your phone, and like a
phone, you use a recorder to create it. The macro
recorder takes care of writing the macro’s
commands. The first step is to specify a name for
the macro and determine where it will be located. If
you store it in the Normal template, it will become a
global macro, available to all documents.
7
Microsoft Word 2010 - Level 3
© Watsonia Publishing Page 156 Macros
RUNNING A MACRO
Try This Yourself:
Same
File
Continue using the previous
file with this exercise, or open
the file W881
Macros_4.docm...
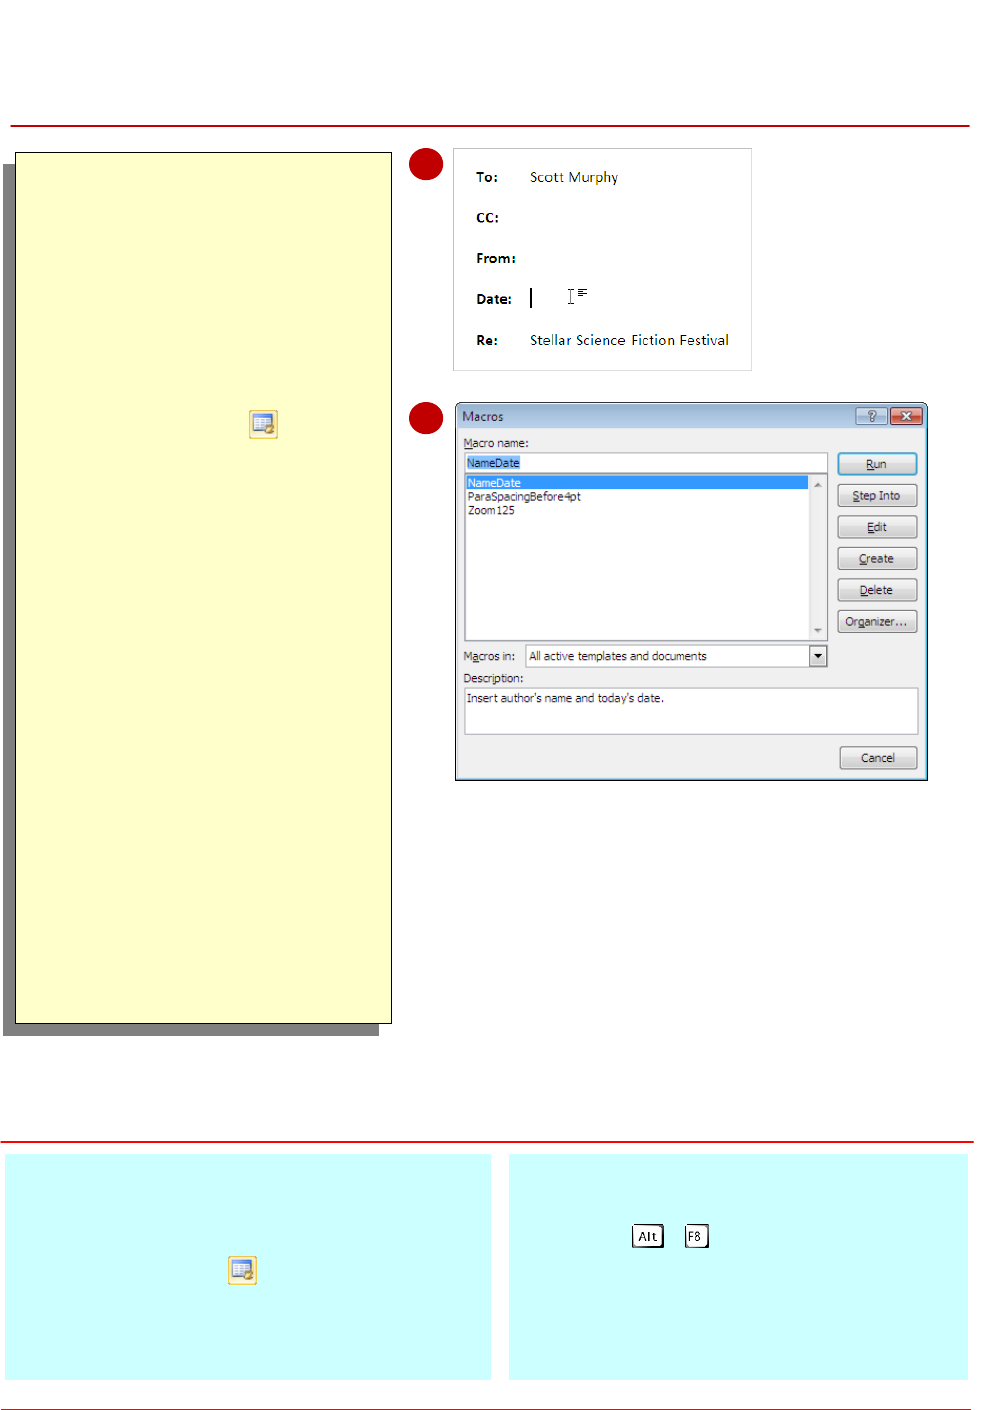
Delete the author and date text
that were inserted when you
created the macro
Click on Macros on the
Developer tab to open the
Macros dialog box
Click on NameDate if it is not
already selected and click on
[Run]
The macro will run and insert
the author and today’s date in
the correct positions.
As the cursor was positioned
when recording the macro, it
doesn’t matter where the
insertion point is when you run
it. Depending upon what your
macro does, you may need to
position the insertion point first
when recording a macro…
Delete the author and date text
that were inserted when you
ran the macro, then save the
document
For Your Reference…
To run a macro:
1. Position the insertion point if necessary
2. Click on Macros on the Developer tab
3. Click on the Macro name
4. Click on [Run].
Handy to Know…
The Macros dialog box can be displayed by
pressing
+ .
1
2
Once a macro has been recorded it should be
run at least once to ensure that it performs as
expected. All macros available to the current
document will be listed in the Macros dialog box.
This dialog box allows you to perform a variety of
tasks on macros. You can edit them, delete them,
and for the purpose of this exercise, run them.

Microsoft Word 2010 - Level 3
© Watsonia Publishing Page 157 Macros
ASSIGNING A MACRO TO THE TOOLBAR
Try This Yourself:
Same
File
Continue using the previous file
with this exercise, or open the file
W881 Macros_5.docm...
Click on the drop arrow for
Customise Quick Access Toolbar
on the Quick Access Toolbar and
select More Commands to open
the Word Options dialog box
Click on the drop arrow for
Choose commands from and
select Macros
Click on Project.NewMacros.
NameDate then click on [Add]
The macro will be added to the
Quick Access toolbar list...
Click on [Modify] to display the
Modify Button dialog box
Click on an icon of your choice then
edit the Display name so that it
reads Name and Date, then click
on [OK]
Click on [OK]
The new button will appear in the
Quick Access Toolbar. You can
point to it to display the name of the
macro...
Click on Name and Date to run
the macro
Delete the name and date text that
was inserted when you ran the
macro, then save the document
For Your Reference…
To assign a macro to a toolbar:
1. Click on the drop arrow for Customise
Quick Access Toolbar and select More
Commands
2. Click on the drop arrow for Choose
commands from and select Macros
For Your Reference (cont.)…
3. Click on the Macro name and click on
[Add]
4. Click on [Modify] to change the name
and/or icon
5. Click on [OK] and [OK]
3
4
Running a macro from the Macros dialog box is
not the most efficient way to do it. The time saved
running a macro is reduced by the need to open
the Macros dialog box. One way around this is to
assign the macro to a button on the Quick Access
Toolbar, which is always visible.This way you can
run the macro by simply clicking on the button. You
can also change the icon and button name.
6
Microsoft Word 2010 - Level 3
© Watsonia Publishing Page 158 Macros
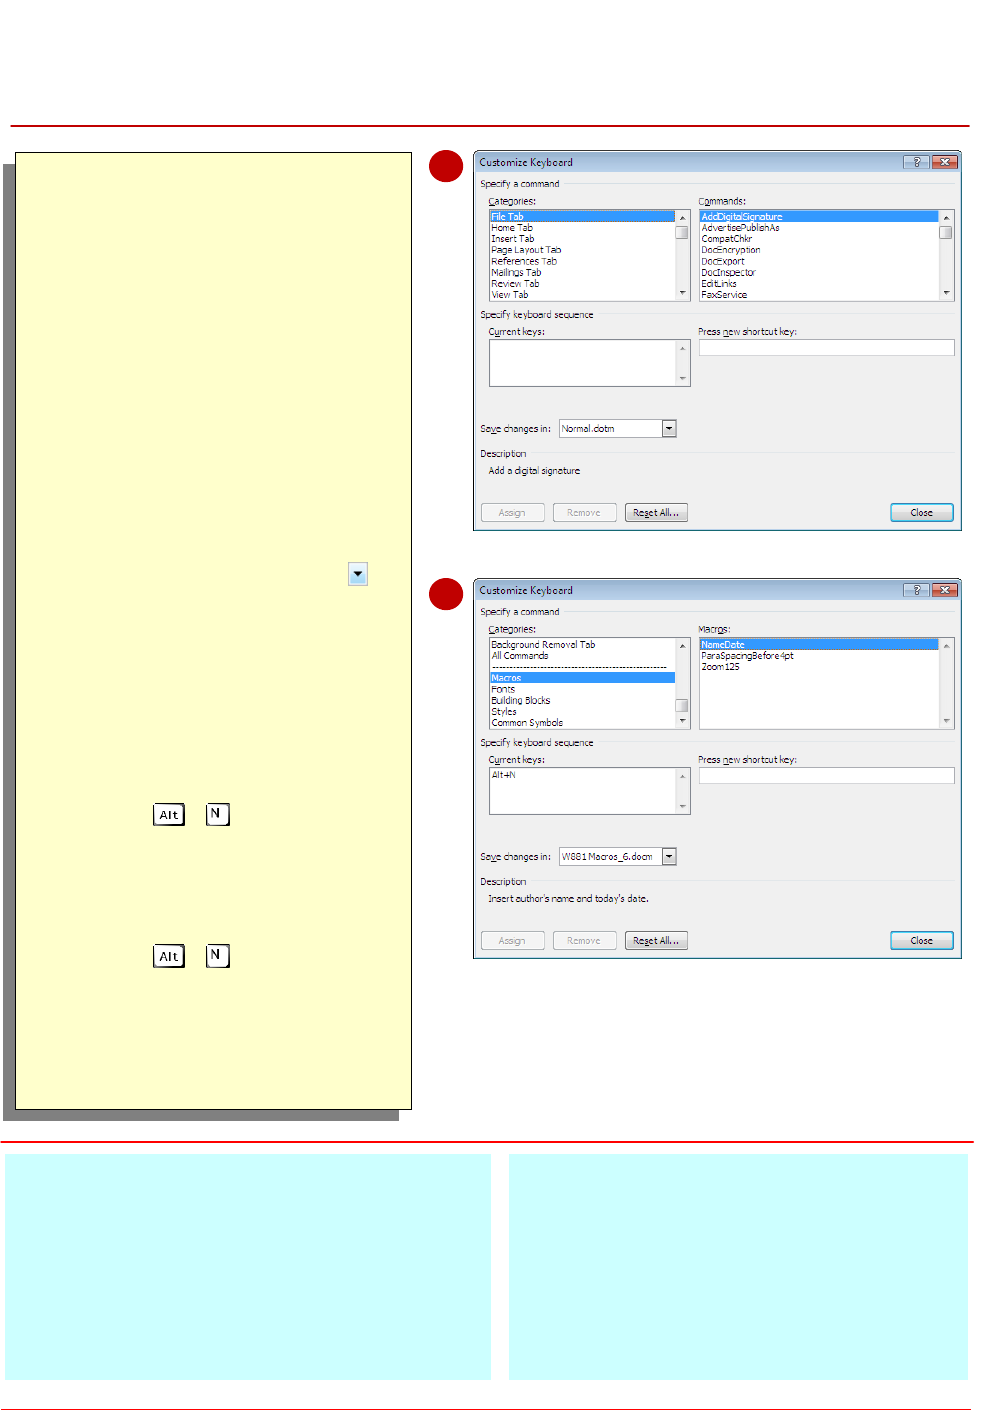
ASSIGNING A KEYBOARD SHORTCUT TO A MACRO
Try This Yourself:
Same
File
Continue using the previous file
with this exercise, or open the
file W881 Macros_6.docm...
Right-click on the Quick Access
Toolbar and select Customise
the Ribbon to open the Word
Options dialog box
Click on [Customise] for
Keyboard shortcuts to open the
Customise Keyboard dialog
box
Scroll down the list of
Categories and click on Macros
then click on the drop arrow
for Save changes in and click
on W881 Macros_6.docm
The macros stored in this
document will be listed under
Macros...
Click on NameDate to select it
then click in Press new shortcut
key
Press + then click on
[Assign] to create the keyboard
shortcut
Click on [Close] then [OK]
Press + to run the macro
Delete the name and date text
that was inserted when you ran
the macro, then save the
document
For Your Reference…
To assign a keyboard shortcut to a macro:
1. Right-click on the Quick Access Toolbar
and select Customise Quick Access
Toolbar
2. Click on [Customise] then scroll down the
list of Categories and click on Macros
For Your Reference (cont.)…
3. Select the document containing the macro
then click on the macro name
4. Click in Press new shortcut key
5. Press the shortcut key combination
6. Click on [Assign] then [Close] then [OK]
2
5
Running a macro from the Macros dialog box or
clicking on a macro tool on the Quick Access
Toolbar may still take unnecessary time if you
tend to work with your hands on the keyboard
rather than on the mouse. You can assign a
keyboard shortcut to a macro so that you can run
the macro simply by pressing a combination of
keys. This makes the process really quick.
Microsoft Word 2010 - Level 3
© Watsonia Publishing Page 159 Macros
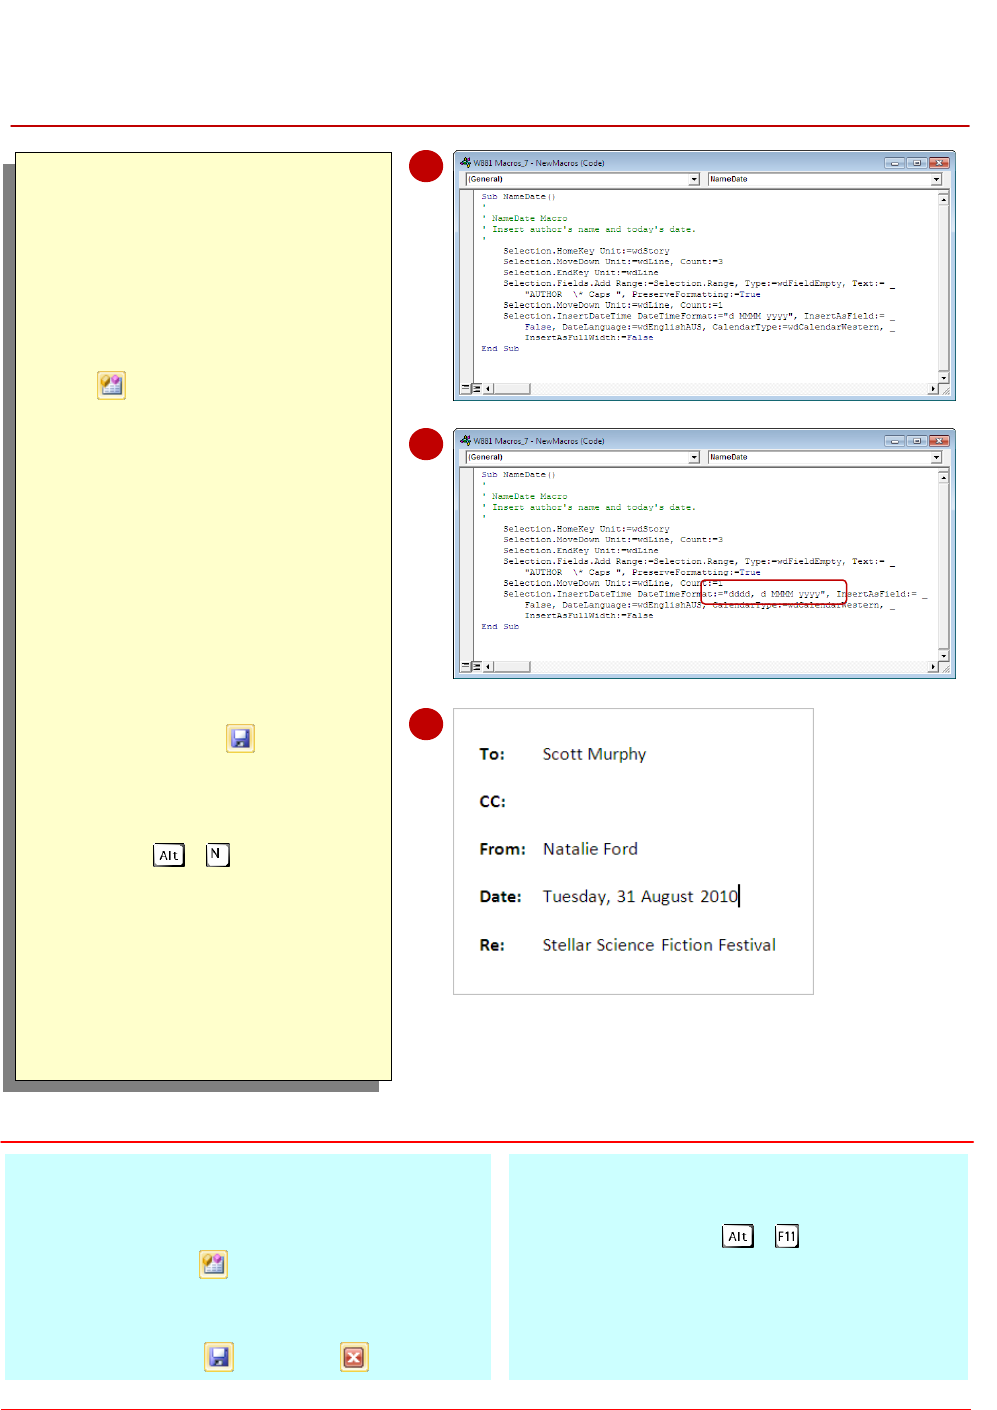
EDITING A MACRO
Try This Yourself:
Same
File
Continue using the previous
file with this exercise, or open
the file W881
Macros_7.docm...
Click on the Developer tab,
then click on Visual Basic
to open the Microsoft
Visual Basic editor
If the code isn’t visible,
double-click on Modules
under Project (W881
Macros_7) then double-click
on NewMacros
Spend a few moments reading
through each line of code –
see if you can work out what
each line does
Change the date code to
"dddd, d MMMM yyyy"
Click on Save then click on
File and select Close and
Return to Microsoft Word
Now to test it...
Press + to run the
macro
Notice the new date format…
Delete the name and date text
that was inserted when you
ran the macro, then save the
document
For Your Reference…
To edit a macro:
1. Click on the Developer tab then click on
Visual Basic
2. Double-click on Modules then NewMacros
3. Make the changes
4. Click on Save then close
Handy to Know…
You can also display the Visual Basic
Editor by pressing + .
You can record macros by typing the code
directly into Visual Basic Editor. The more
complex your macros, the more likely it is
that you’ll need to know how to write VBA
code.
2
4
When you record a macro you actually create a
series of commands in a programming language
called Visual Basic for Applications (VBA).
Each time you run the macro, the code is
executed. VBA can be edited using the Visual
Basic Editor that you access from the Developer
tab. The advantage of using the editor is that you
can easily change, delete or copy macro code.
6

Microsoft Word 2010 - Level 3
© Watsonia Publishing Page 160 Macros
DELETING A MACRO
Try This Yourself:
Same
File
Continue using the previous file
with this exercise, or open the
file W881 Macros_8.docm...
Click on the Developer tab,
then click on Macros to
open the Macros dialog box
Click on the NameDate macro
then click on [Delete]
A confirmation dialog box will be
displayed...
Click on [Yes]
The macro will be removed from
the list...
Click on [Close]
Notice that the button for the
macro still remains on the Quick
Access Toolbar...
Click on NameDate to see
what happens
A message box tells you that the
macro either can’t be found or
has been disabled...
Click on [OK]
Let’s remove the button...
Right-click on NameDate
and select Remove from
Quick Access Toolbar
Save and close the document
For Your Reference…
To delete a macro:
1. Click on Macros on the Developer tab
2. Click on the macro
3. Click on [Delete]
4. Click on [Yes] then click on [Close]
Handy to Know…
Effectively, to remove all traces of a macro
requires two steps: one to remove the actual
macro code via the Macros dialog box and
one to remove the button from the Quick
Access Toolbar (if one was added for this
macro).
1
5
Macros can tend to accumulate so it’s good idea
to remove any macros you don’t need. This helps
to maintain the integrity of the document, and
also means that you don’t have any redundant
macro code hanging around. Macros should be
deleted from the Macros dialog box. If you remove
a macro button from a toolbar, all that happens is
that the button is removed.
2
Microsoft Word 2010 - Level 3
© Watsonia Publishing Page 161 Macros
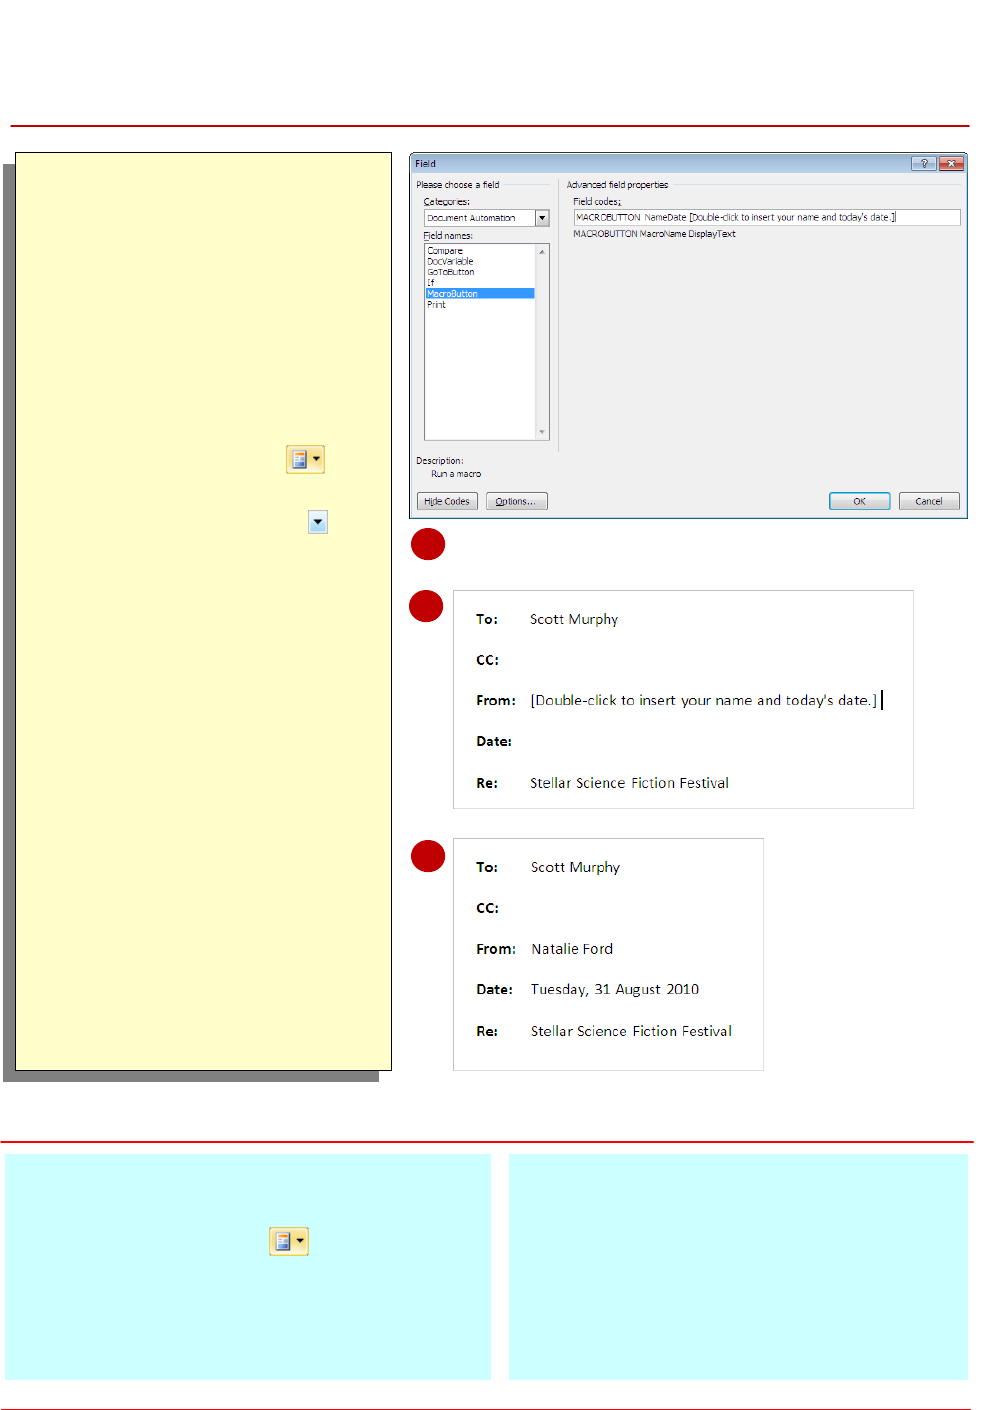
CREATING A MACROBUTTON FIELD
Try This Yourself:
Open
File
Before starting this exercise
you MUST open the file W881
Macros_9.docm...
Click in the empty cell to the
right of From: after the tab
We will insert the prompt
here...
Click on the Insert tab, then
click on Quick Parts and
select Field
Click on the drop arrow for
Categories and select
Document Automation
Click on MacroButton then
scroll down the list of Macro
names and click on
NameDate
Click on [Field Codes] then
click after NameDate and type
[Double-click to insert your
name and today’s date.]
Click on [OK] to create the
field
Double-click on the prompt to
run the macro
The prompt will be replaced
with the author’s name and the
current date…
Save the document
For Your Reference…
To insert a MacroButton field:
1. Click on Quick Parts and select Field
2. Select Document Automation in
Categories then click on MacroButton
3. Select a macro name, then click on [Field
Codes], type the prompt and click on [OK]
Handy to Know…
The MacroButton field doesn’t actually
display a button. It displays text that, when
double-clicked, will run the assigned macro.
Ideally, a macro such as this would be saved
to a template, which opens as a blank
document for users. This reduces the risk of
users deleting macro fields.
5
6
The MacroButton field is great for running
macros directly from text embedded in the
document. This is ideal to help novice users enter
text or other information in exactly the right place.
The MacroButton field requires the name of the
macro to run and the prompt to display in the
document. The macro runs when the user
double-clicks on the prompt.
7
Microsoft Word 2010 - Level 3
© Watsonia Publishing Page 162 Macros
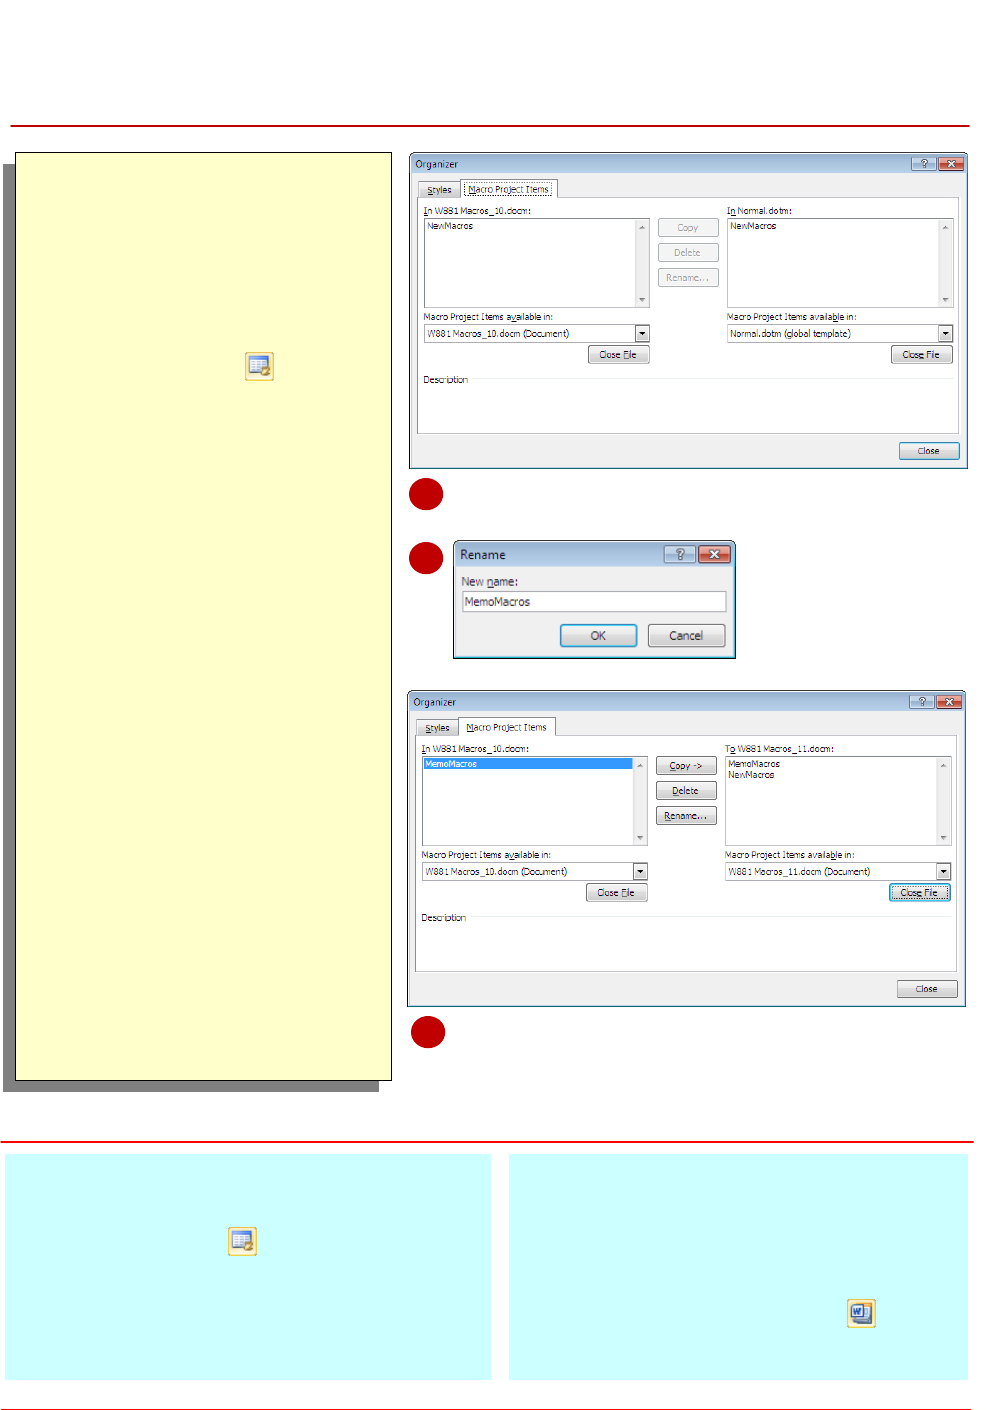
COPYING A MACRO
Try This Yourself:
Same
File
Continue using the previous
file with this exercise, or open
the file W881
Macros_10.docm...
Click on the Developer tab,
click on Macros to open
the Macros dialog box, then
click on [Organiser]
Click on [Close File] under
Normal.dotm then click on
[Open File]
Click on [All Word
Templates] and select All
Files
Navigate to the course files
folder and open W881
Macros_11.docm
Click on NewMacros under
W781 Macros_10.docm
Click on [Rename] and type
MemoMacros
Click on [OK] then click on
[Copy ->] to copy the macro
project item
Click on [Close] then click on
[Yes] to save the changes
Open W881 Macros_11.docm
and click after From: then run
the new macro from the
Macros dialog box, then save
and close both documents
For Your Reference…
To copy macros between files:
1. Click on Macros , then on [Organiser]
2. Open the file with the macro in the left pane
and the target file in the right pane
3. Rename the item if necessary then click on
[Copy] then click on [Close]
Handy to Know…
You can’t copy a macro project item if the
target file has one with the same name
already. Rename the item, then copy it.
You can also access the Organiser by
clicking on Document Template on the
Developer tab.
1
6
If you have recorded a macro and saved it in a
particular document or template, you might like to
copy the macro to another document or template
so that it can be used elsewhere. Microsoft Word
allows you to copy macro project items between
files – as well as styles – using the Organiser.
7

Microsoft Word 2010 - Level 3
© Watsonia Publishing Page 163 Macros
TIPS FOR DEVELOPING MACROS
1
If you spend a lot of time completing the same
word-processing tasks over and over, macros
can be an ideal solution to speed up document
production. They are also a great way for users
with limited knowledge to perform complex
operations without assistance. It is important,
therefore, that macros are well written. There are a
number of ways to ensure that macros achieve this.
Test Your Macros Thoroughly
Macros are really just programs where you pit your wits against the operation of the
computer. The macro will perform EXACTLY the way you specify – they have no
initiative whatsoever. Macros should be tested several times to ensure that the same
(correct) results are produced each time. Also, it is a good idea to test a macro on
several computers as settings on the development computer can sometimes differ to
those on other computers, which may affect the operation and performance of the
macro.
Conform to Company Guidelines and Standards
Macros that don’t adhere to or even deliberately flaunt company standards and
guidelines are doomed to failure. Before embarking on a new template ensure that you
are familiar with the company’s standards for macro development.
Document Macros
It is most likely that a week from now you will have forgotten what the macro does and
how it works. Even worse, the next person to do your job will have little idea of the
existence, role, and operation of your macro unless you document what you have done.
When you develop complex macros you should include comment lines in the macro
code which explain what is happening, what you have done, and also indicate the
current version and revision dates. All macro languages can be commented on without
impacting on the performance of the macro.
Print a Copy of the Code
In Microsoft Word you can print a copy of the macro on paper. This is a handy way of
checking the code and also serves as a useful archiving document. Macros can be
printed from within the VBA editor using the Print command on the File menu.
Train Other Users
Train other users to use the macro correctly. If training is not possible produce a set of
instructions or explanatory notes on the correct use of the macro.
2
3
4
5
Microsoft Word 2010 - Level 3
© Watsonia Publishing Page 164 Macros
NOTES:
1
4
