
User Guide
Version 1.0
Welcome to Sophisticated Sharing Model Control.
DrivEnable products are built with usability top of mind. Steam Role is no exception; its user-friendly web
2.0 interface requires little to no training or technical know-how to begin to navigate. That said, it is, as
the name implies, a very powerful utility that is highly customizable. This guide will walk you through all
the ways you can make Steam Role your own and how to put it to work in your org.
10% of the money you spend on Steam Role
goes directly to the Acumen Fund
Building transformative businesses to solve the problems of poverty
Acumen Fund is a non-profit global venture fund that uses entrepreneurial approaches to solve the
problems of global poverty. They seek to prove that small amounts of philanthropic capital, combined
with large doses of business acumen, can build thriving enterprises that serve vast numbers of the poor.
Their investments focus on delivering affordable, critical goods and services – like health, water, housing
and energy – through innovative, market-oriented approaches.
Fore more information visit: http://www.acumenfund.org
Steam Role ™ User Guide 1

Steam Role ™ User Guide 2
Table of Contents
Welcome to Sophisticated Sharing Model Control......................................................................................1
Table of Contents...........................................................................................................................................................
2
Installation and Setup.................................................................................................................................................
3
Try It On For Size… ....................................................................................................... 3
Granting Access............................................................................................................. 3
License Management..................................................................................................... 3
Open Sesame ................................................................................................................ 4
How to Purchase............................................................................................................ 5
The Basics..........................................................................................................................................................................
6
Roles and Territories...................................................................................................... 6
Public Groups and Queues ............................................................................................ 7
Owned Object Records .................................................................................................. 7
DrivEnable Menu............................................................................................................ 8
Searching for Users........................................................................................................ 9
Customizing ....................................................................................................................................................................
10
Role Settings................................................................................................................ 10
Territory Settings.......................................................................................................... 10
User Settings................................................................................................................ 10
Owned Object Settings................................................................................................. 11
Making Changes...........................................................................................................................................................
13
Roles ............................................................................................................................ 13
Territories ..................................................................................................................... 13
Users............................................................................................................................ 14
Public Groups............................................................................................................... 15
Queues......................................................................................................................... 15
Members ...................................................................................................................... 15
Owned Object Records ................................................................................................ 16
Drag and Drop Diagram............................................................................................... 16
Guide the Future!...........................................................................................................................................................
17
Troubleshooting...........................................................................................................................................................
18

Installation and Setup
Try It On For Size…
You can install and use Steam Role for 30 days without purchasing or making any commitment to
purchase. This free trial period is an excellent way to become familiar with the app right in your own org
before you decide if it’s the right tool for you. Go ahead…try it on!
Simply visit Steam Role on the AppExchange and click the “Get it Now” button to get started.
Granting Access
During installation you will be asked to set the access level of the package. You have three options as
shown here:
If all of the users who will be using the application have the System Administrator Profile, then you
should select the first option. Otherwise, if there are users with other Profiles (perhaps delegated
administrators for example) then you should pick the third option and it will open a section in which you
can grant access to specific Profiles.
After this step, simply continue through the installation wizard following the on-screen instructions for
each step. Be sure to choose “Deploy Now” to get started using the app right away.
License Management
If you are using the app in trial mode, you have 2 licenses available in your org. Otherwise you will have
as many as you have purchased via the Force.com Checkout. A System Administrator can designate
which users in the org will hold the licenses. Users without a license will not have visibility or access to
any of the package components (even System Administrators). This management is done by going to:
Setup > View Installed Packages > Steam Role > Click “Manage Licenses”
Here you can add users by creating a view to find the desired users and selecting them. Remember
that, of course, you can only add as many users as you have licenses for.
Steam Role ™ User Guide 3
Open Sesame
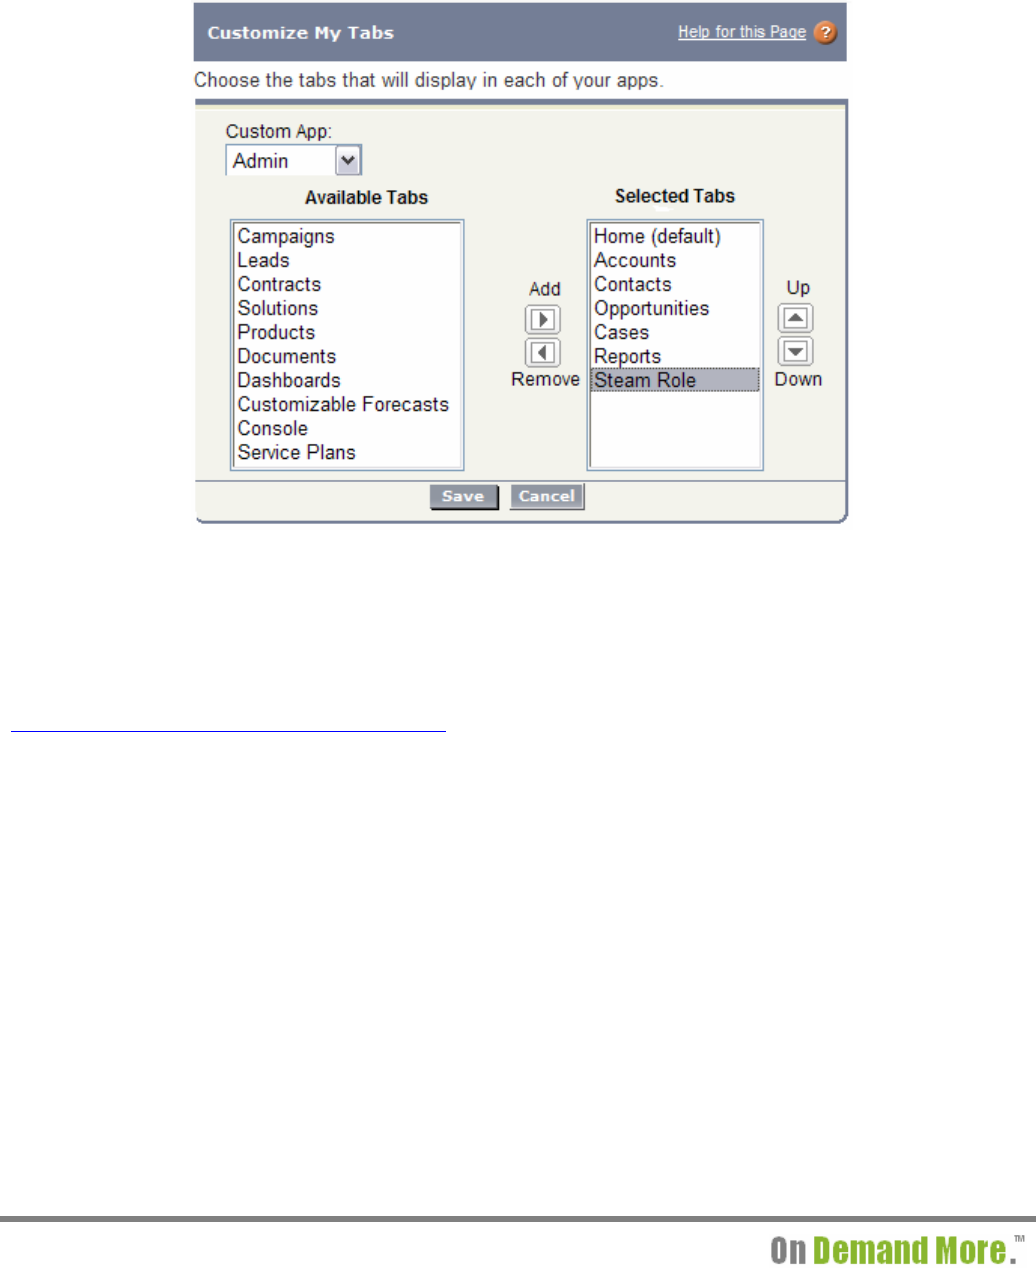
Now any user who has access to the package AND has a license can simply click the last tab “All Tabs”
(denoted with a triangle) and click “Steam Role”. Note that you can customize your tabs at this point and
add the Steam Role tab to any apps you have in your org.
Remember that in order to use Steam Role you must have Flash Player Version 9.0 or greater
installed for the browser you are using. This is a cutting edge, web 2.0 application written in Adobe Flex
which requires the correct plug-in to function. Steam Role will attempt to determine if you have the
correct version of Flash Player and if you do not it will display a link to Adobe’s website where you can
download it for free:
http://www.adobe.com/go/getflash/
When the application loads, you will see an orange console with three panes. It will inspect your org and
analyze your set up of Roles, Territories, Groups, and Queues, as well as take inventory of all the types
of Objects you may wish to reassign. This will only take a moment or two and as soon as the cursor
turns back from a ‘clock’ to a ‘pointer’ and the status message in the bottom right corner is blank, you are
ready to role!
Important Note: The application is designed to size itself to fit in your browser while still leaving room for
your salesforce tabs. Upon loading, if the application does not seem to fill the available space (occurs
most frequently in Internet Explorer), simply resize your browser a bit by dragging the lower right corner,
or if it is maximized, restore it and then maximize again. The app will then fit itself perfectly on your
screen.
Steam Role ™ User Guide 4

How to Purchase
DrivEnable is proud to have been chosen to participate in the Force.com Checkout Program from the
very beginning. This Program allows you to purchase great apps, like Steam Role, quickly and
conveniently right from your internet browser. Also,
instead of setting up payment to a new vendor, your
subscription to Steam Role will be billed in conjunction
with your subscription to salesforce.com. Now that’s
truly ‘on demand’.
When you are ready to purchase licenses of Ste
am Role,
simply log in to salesforce and choose “Force.com
Checkout” from the list of apps in the upper right corner
as shown here. Note that you must have Steam Role
installed in trial mode in order to purchase licenses.
Steam Role ™ User Guide 5
The Basics
Steam Role lets you choose what shows up in each pane of the console. As
shown here, use the drop-down lists to set the two upper panes to display any of
the following: Roles, Territories, Public Groups, or Queues. The first time you
click the “Steam Role” tab you will see Roles on the left and Public Groups on the
right. To change either, simply use the drop-down to make a new selection as
shown to the right.
These choi
ces as well as many others will be saved so that the next time you
click the “Steam Role” tab, it will know just what you like to see.
Roles and Territories
If you have any Roles or Territories defined in your organization, they will be displayed in a hierarchical
fashion. By default, all of them are displayed, but you can expand and collapse certain branches by
clicking the button to the left of any Role or Territory denoted with a “minus” sign. Once collapsed, the
button will display a “plus” sign and when clicked again will redisplay the subordinate Roles or Territories.
Note also that you can click the “Collapse All Branches” and “Expand All Branches” buttons at the top of
the pane at any time.
If you have a lot of Roles or Territories, Collapsing Branches you aren’t currently working on is a great
way to help the application and your browser stay light on their feet.
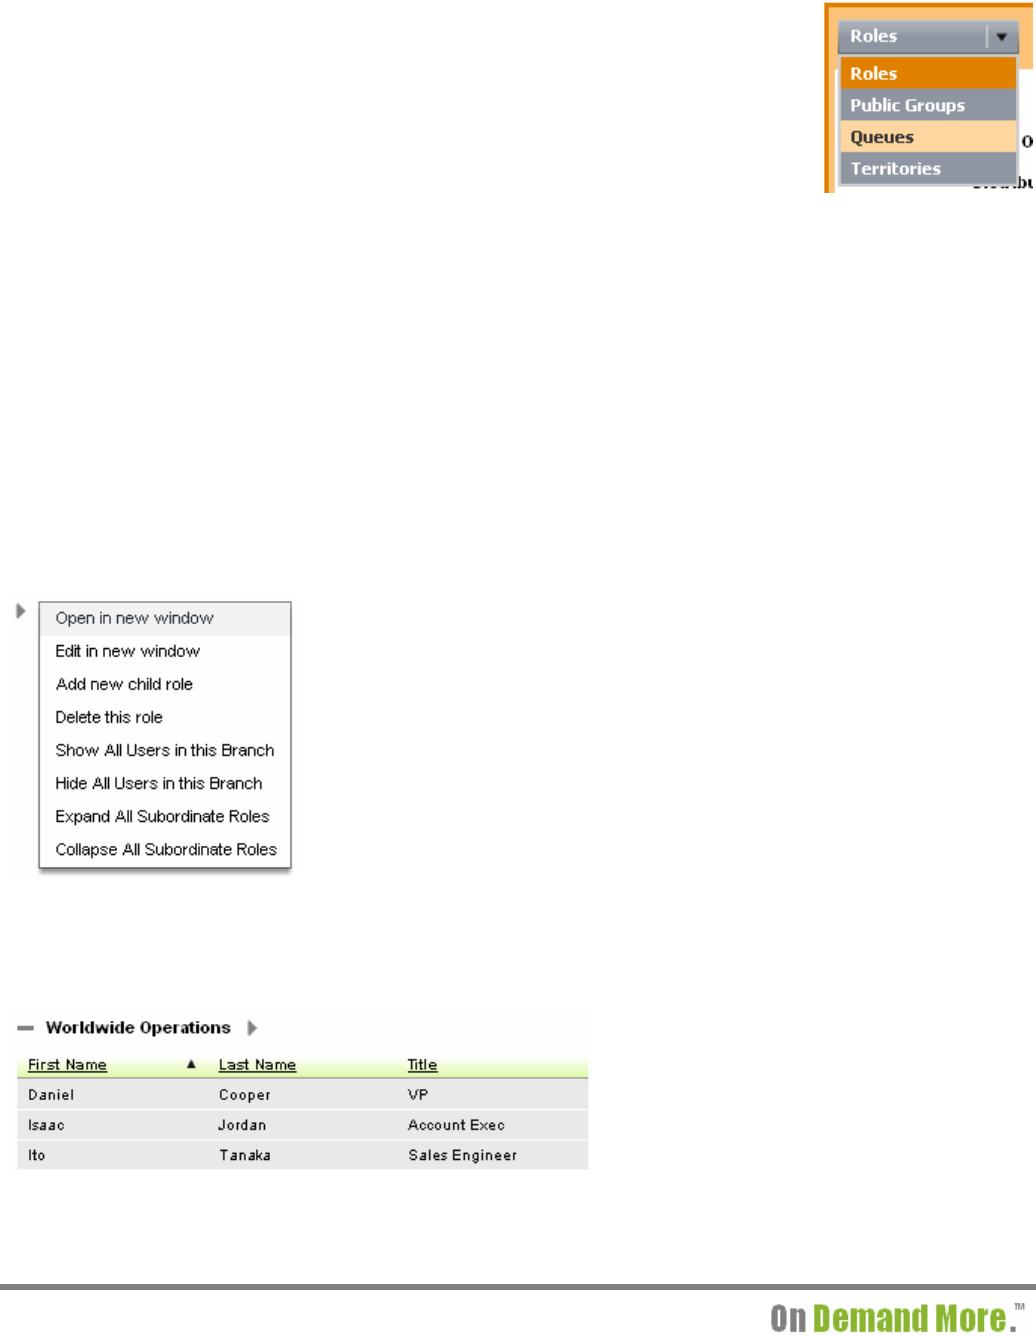
To the right of each Role and Territory is a small button displaying a
triangle. Click this button to see a list of options as shown to the left.
The first thr
ee options will open a new window. It is important to note
that after actions are taken in other windows such as creating or
editing a Role, you should use the “Refresh” button in the top left to
update the display.
“Delete this role” will attempt to delete the Role and then perform a
refresh of the display. The last four selections will perform various tasks
on the given Role / Territory and any subordinates.
An important basic function of Role and Territories is to display the Users assigned. To accomplish this,
simply click the Name of the Role or Territory. If there are no users assigned, a message stating so will
be displayed. Otherwise, the users are displayed in a green themed list as shown here:
Steam Role ™ User Guide 6
h
ss
later section.
You can sort the Users by any field by
clicking the header at the top of any
column. Click and drag a header to
change the order in which the columns are
showing up. You can also select whic
fields are being displayed; we will discu
this in a
Naturally, cli
cking the Role or Territory again will hide the User list. Note that if more than 500 Users are
found in a Role or Territory, the first 500 returned from the database will be displayed and you will see a

button label
ed “Show More Users…” just below the User list. Clicking this button will query and display
up to another 500 Users. You can continue this process as desired or until all Users are displayed.
Lastly, if you double-click any User being displayed it will open the edit screen for that User in a new
window. Note that after making changes to Users in any new window simply hide and redisplay the
Users in a Role or Territory to reflect the new changes.
Public Groups and Queues
When select
ing “Public Groups” or “Queues” in either the right or left pane,
all Public Groups or Queues in your organization will be displayed
alphabetically, respectively, in that pane. Each will have a small button
displaying a triangle next to it which, when clicked, displays a menu with
options as shown to the right.
Remember that after any changes are made in a new window, you should click the “Refresh” button in
the top left to update the display.
Steam Role ™ User Guide 7
dragging and dropping
another 500 Members. You can continue
is process as desired or until all Members are displayed.
wned Object Records
g.
or
d by
unts that are displayed 4 of which are visible, the rest we can see by utilizing
e scroll bar on the right:
Just like Roles and Territories, clicking the name of a Public
Group or Qu
eue will display the members assigned to it.
Members are always displayed with two columns, “Name” and
“Type”. The Type can be any of the following: User, Public
Group, Role, Role and Subordinates, Territory, or Territory and
Subordinates. The Name then obviously lists the name of the
given entity. An example of a member list is shown to the left.
You can sort it by either column by clicking the column header
and you can swap the two columns by
either one.
Lastly, you can double-click any member in a list to open the
edit screen for the entity in a new window.
Note that if more than 500 Members are found in a Public Group or Queue, the first 500 returned from
the database will be displayed and you will see a button labeled “Show More Members…” just below the
Member list. Clicking this button will query and display up to
th
O
The lower pane of the console is used to display Records owned by one or more Users of your choosin
You can click a User (note that “Users” are those listed in the green themed lists underneath a Role
Territory) to display the Records owned by that User. By default, Accounts are displayed with pre-
selected fields. We will go over how to change this in the next section. To select more than one User,
you can hold down the “Ctrl” key and click more Users. Also, if you have clicked a User in a list and want
to highlight additional adjacent Users you can hold down the “Shift” key and click another User in the list.
Each time you do any of these actions, the lower pane will be updated to display the Records owne
the currently selected User(s). Here is an example in which we see that 2 Users are selected and
together they own 11 Acco
th

Once we begin adding filters, we will see that a message is included below this pane to remind us when
a filter is being used. Also, if the User or Users you have selected own more than 500 records of the
selected object, a button will be displayed labeled “Show More Owned Objects…”. You can click this
button to show up to 500 more records. You can continue this process as desired or until all records are
displayed at which point the button will disappear.
Lastly, double-clicking a record in this list will display the record in a new window.
DrivEnable Menu
In the upper
right corner of the application, there is a DrivEnable
logo. If you roll your mouse over it, a menu will appear with
various options as shown here to the right. Each selection is
explained as follows:
View User Guide
: Use this link anytime you want to refer to the
guide you are currently reading.
Request Support
: This opens a web form in a new window
where you can submit a Case directly to DrivEnable support.
This would be used to request support, to make enhancement
suggestions or to report bugs.
Post a Review for this App
: Opens a new window which will bring you to the screen where you can
share your thoughts about Steam Role with the rest of the salesforce community. You may be asked to
log in.
Visit DrivEnable.com
: Opens the DrivEnable homepage in a new window.
Contact Us
: Displays a form in a new window you can use to submit general questions or feedback to
DrivEnable. (Note that for support requests, bug reports, or enhancement suggestions should use the
“Request Support” link described above)
About
: Displays information about the publisher and the application version number.
Steam Role ™ User Guide 8

Searching for Users
Just below the menu logo, you will find a text input box and a button labeled “Find Users” next to it as
shown below. This is used to find and display Users in your current view (Roles, Territories, Public
Groups and/or Queues). Simply enter two or more characters into the text input box and click “Find
Users” or hit “Enter” on your keyboard. The application will search the text fields of all your users for any
matches. If matching user records exist in any of the Role, Territories, Public Groups, or Queues that
you are currently displaying, they will be opened and the user or users will be highlighted.
Note that even though matching Users are highlighted, the Owned Object pane will not change. Owned
Object Records are only displayed when you deliberately click
on one or more Users. This is especially
desired in cases where you highlight multiple Users to see their Owned Records and wish to search for a
User to reassign them to.
Steam Role ™ User Guide 9

Customizing
As we have seen in the previous section, certain attributes can be customized directly from the console
view including:
What is being displayed in the upper two panes
How Users, Members, and Owned Records are sorted
The order of the columns displayed for Users, Members, and Owned Records
For other changes, we need to flip over to the customize screen. To do so, simply click the “Customize”
button in the top left corner. This will display a simple screen with four tabs. At any time you can then
click “Done Customizing” to save changes and return to the console.
Role Settings
Two options are available in this tab that control how your Role Hierarchy is displayed. The “Display
‘Name as Displayed on Reports’” checkbox, when checked, will include the ‘Name as Displayed on
Reports’ (if it exists) in parenthesis next to the Role name. Here is an example of each scenario:
Checked:
Unchecked:
The second option “Display from this role down:” controls how much of your Role Hierarchy is being
displayed. By default it will be set to “--Show All Roles--“ which will do exactly that. Setting this
dropdown to any other selection will display that selected Role and any Roles beneath it in the hierarchy,
(i.e. all Roles that report to it). This is particularly helpful if you are a Delegated Administrator for a
section of the Role hierarchy.
Territory Settings
Similar to the Role Settings described above, the two options in this tab will allow you to include the
‘Territory Description’ in the display of each Territory and to only display a subset of the Territories.
User Settings
Steam Role ™ User Guide 10
This tab is u
sed to control how Users show up when you
click Roles and Territories. The first option, shown here to
the right, allows you to specify whether you want only active
users to show up, inactive users, or both.
Below that you will see all the fields that exist in your User
table including custom fields. You simply check the box next to any fields you wish to see as columns in

the User list
s when you click Roles or Territories. Remember that you can rearrange the columns by
dragging the column’s header on any User list being displayed. You can also sort them by clicking any
column header being displayed.
Owned Object Settings
This tab is used to control what shows up in the lower pane of the console. First, use the dropdown
menu to select what type of Object you wish to view. The list will include any Standard Objects that are
owned by users and can be queried through the API, such as Accounts, Cases, Opportunities, etc. It will
also include all Custom Objects.
Upon selecting an Object from the dropdown, the three columns below it will now list all the fields on that
Object, including Custom Fields. Simply check the box next to any fields you wish to display. Note that
Text Area and Long Text fields are not available for display.
At the bottom of this page is a section labeled “Filter:”. These three dropdowns will allow you to filter the
Records that show up in the lower pane of the console. In the first dropdown you will find a list of the
field on the selected object which can be used to filter. The second dropdown list the comparators you
can use such as “equals” or “does not contain”. The last dropdown will accept text that you enter, but it
will also display options you can utilize depending on the type of field you are filtering. For example, if
you choose to filter a picklist, you can type any text into the box OR you can pick from the list of available
picklist values for that field as shown here:
Another example is filtering a date field, you can enter a specific date or use the third dropdown to select
from a variety of options:
Important Note: You cannot
enter multiple values separated by commas as you can when creating filters
on salesforce reports and views. Doing so will not necessarily cause an error, but will not filter as
expected.
As mentioned, when you click “Done Customizing” the settings you have chosen are saved. Every time
you do this for a new Owned Object the fields and filter you choose are stored and from that point on you
can change to display this type of Object directly from the console view. This is done by changing the
dropdown in the bottom left corner of the screen as shown here:
Steam Role ™ User Guide 11

If you use this dropdown and choose an Object without first telling Steam Role which fields you would
like displayed it will remind you and ask if you’d like to select fields at that time. Otherwise, if you choose
an Object which you have selected fields for in the past, it will instantly switch to display your selected
Object and begin querying Records owned by the last set of Users you selected.
Steam Role ™ User Guide 12

Steam Role ™ User Guide 13
Making Changes
So far we have discussed how to view your User base and sharing model elements in a brand new way.
This section will cover all the ways you can edit those elements swiftly and powerfully.
Important Note: Steam Role allows an administrator to execute a variety of high impact changes to your
sharing model and data in salesforce.com. As such, it should be used responsibly. Be advised that
when this guide was authored, there is no “Undo” button for any changes made within the application.
Before making major changes (e.g. mass reassignment, deletion of groups, queues or territories, org
realignments, etc.) it is advised that you first back up your data.
Roles
As described in an earlier section, you can use the “triangle” button on the right side of any Role to
display a menu. In this menu are some simple ways to make changes, including “Edit in new window”
and “Add new child role”. Both of these will open a new window in which you can edit or create a Role,
respectively.
Important Note: When making changes to Roles, Territories, Public Groups, or Queues in a new
window, such as editing or creation of, you should use the “Refresh” button in Steam Role after the
changes are made to have the app reflect those changes.
In the menu is also “Delete this role”, which does not require a refresh after executing.
Other than the changes you can make via the menu, you can Drag and Drop a Role onto several other
elements to accomplish various tasks. Those tasks are as follows:
Drag a Role onto…
Another Role to make it report to that Role. For example, if Role A is currently a child of Role B
but it needs to report to Role C, simply drag and drop Role A onto Role C to reassign it!
Subordinates of Role A will still report to Role A.
A Public Group to make the Role a member of the Public Group. The application will ask you if
you would like to include the Role’s subordinates or not.
A Queue to make the Role a member of the Queue. The application will ask you if you would like
to include the Role’s subordinates or not.
Territories
You can use the “triangle” button on the right side of any Territory to display a menu. In this menu are
some simple ways to make changes, including “Edit in new window” and “Add new child territory”. Both
of these will open a new window in which you can edit or create a Territory, respectively. In the menu is
also “Delete this territory”, which does not require a refresh after executing.
Other than the changes you can make via the menu, you can drag and drop a Territory onto several
other elements to accomplish various tasks. Those tasks are as follows:

Steam Role ™ User Guide 14
Drag a Territory onto…
Another Territory to make it report to that Territory. For example, if Territory A is currently a
child of Territory B but it needs to report to Territory C, simply drag and drop Territory A onto
Territory C to reassign it! Subordinates of Territory A will still report to Territory A.
A Public Group to make the Territory a member of the Public Group. The application will ask
you if you would like to include the Territory’s subordinates or not.
A Queue to make the Territory a member of the Queue. The application will ask you if you would
like to include the Territory’s subordinates or not.
Users
Users are displayed below Roles and Territories when you click the name of the Role or Territory. They
are displayed in a green themed list and should not be confused with “Members” which show up under
Public Groups and Queues and display in blue themed lists.
You can double click a User to open the User Record edit screen in a new window.
Important Note: When changes are made to a User in a new window, simply click the Role or Territory
they belong to twice to hide and re-show the User list so it will reflect the new changes.
The drag and drop manipulations you can execute with users can all be done with a single user, or
multiple users. To select multiple users, click your first User and then hold “Shift” and click within the
same list to highlight adjacent Users. You can also hold “Ctrl” to select additional Users from other lists.
Or you can do a combination of the two. Note that if you use these methods to select a combination of
Users and Members, but apply the drag and drop motion to a User, the highlighted Members are ignored
in the action and vice versa. In other words, you can’t drag Users AND Members together.
Drag one or more Users onto…
A Role to assign the User(s) to that Role. Note that they will no longer report to their previously
assigned Role because Users can only be assigned to one Role at a time.
A Territory to include the Users(s) in that Territory. Note that User(s) CAN be assigned to
multiple Territories, so Users will still report to both the Roles and/or Territories from which they
are dragged.
A Public Group to assign them as a member of that Public Group.
A Queue to assign them as a member of that Queue.
Lastly, you can highlight one or more Users in lists under Territories and hit the “Delete” key to remove
them from the Territory. Note that if they still own records in the Territory they will show up in the
Territory detail screen, but will no longer be “Active in Territory”.

Steam Role ™ User Guide 15
Public Groups
Public Groups also have a menu accessed by the “triangle” button to their right. From this menu, you
can edit or delete the Public Group.
Drag a Public Group onto…
Another Public Group to assign it as a member of that Public Group.
A Queue to assign it as a member of that Queue.
Queues
Queues again have a menu accessed by the “triangle” button to their right. From this menu, you can edit
or delete the Queue.
Queues cannot be dragged onto other entities.
Members
Once again, Members show up in blue themed lists upon clicking the name of a Public Group or Queue.
You can double-click any Member to open that given entity (Role, Territory, Public Group, or User) in a
new window in edit mode.
Similar to Users, the drag and drop manipulations you can execute with members can all be done with a
single Member, or multiple Members. To select multiple Members, click your first Member and then hold
“Shift” and click within the same list to highlight adjacent Members. You can also hold “Ctrl” to select
additional Members from other lists. Or you can do a combination of the two. Note that if you use these
methods to select a combination of Users and Members, but apply the drag and drop motion to a
Member, the highlighted Users are ignored in the action and vice versa. In other words, you can’t drag
Users AND Members together.
Drag one or more Members onto…
A Public Group to assign them as a member of that Public Group.
A Queue to assign them as a member of that Queue.
Lastly, you can highlight one or more Members and hit the “Delete” key to remove them from the Public
Groups and/or Queues under which you have selected them.
Owned Object Records
To edit Owned Object Records, you can double-click the Record in the lower pane (this opens a new
window displaying the record) and then click “Edit”. Otherwise, the only change you can make via drag
and drop is as follows:
Drag one or more Owned Object Records onto…
A User to reassign the record(s) to that User. In other words, to make that User the owner of the
records.
Note that you cannot drag Owned Object Records onto Members. Also note that if the new target of
such a reassignment is not currently selected the Records will no longer show in the lower pane after
reassignment (since they will no longer belong to the previously selected group of Users).
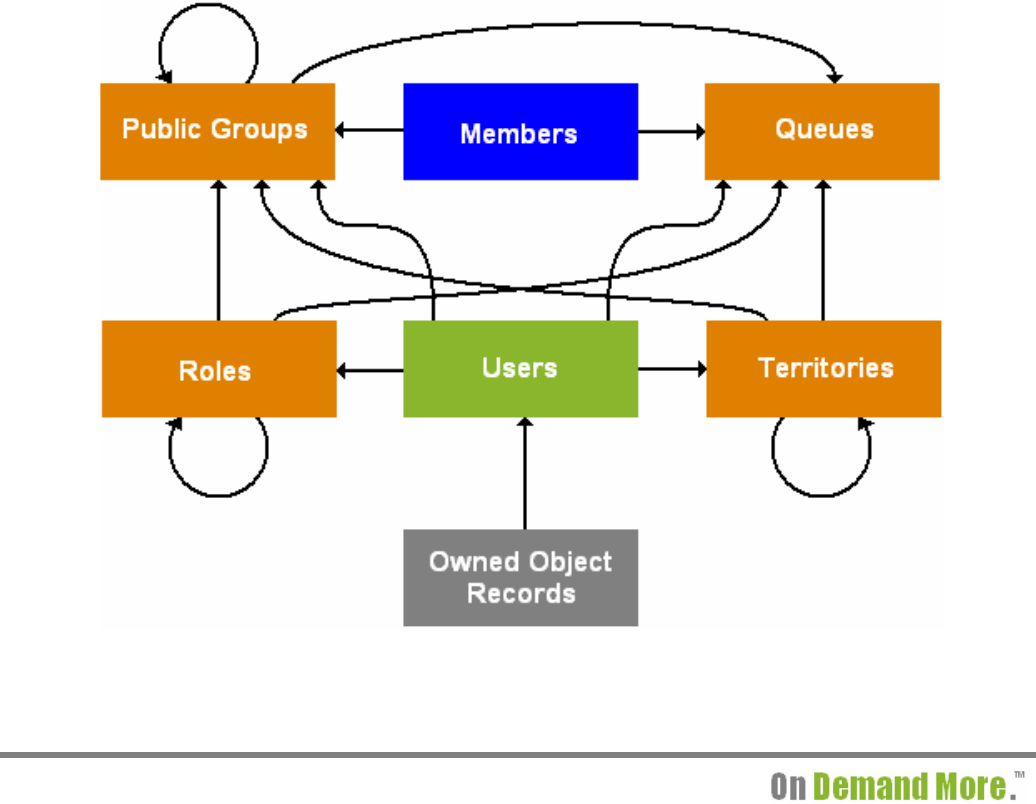
Drag and Drop Diagram
The following diagram depicts the elements of the sharing model which can be managed in Steam Role
via drag and drop operations. Each arrow represents a legal operation, for example, if you look at the
“Roles” block you see three arrows originate there representing the fact that you can drag a Role onto
another Role, onto a Public Group, or onto a Queue.
As you can see the multi-pane layout of Steam Role gives you many different ways to modify your org
with a swift motion of the mouse… 15 to be exact!
Steam Role ™ User Guide 16

Guide the Future!
Have a great idea about how to improve Steam Role, or any other DrivEnable products? We want to
hear it! Because our products are available only as-a-service, our customers are entitled to any and all
improvements made to our tools and as such we encourage you to get involved and let your opinions be
heard.
The best way to make suggestions and provide feedback is from directly in the application. Simply roll
your mouse over the DrivEnable Logo in the upper right corner and select “Request Support”.
That will open the following form where you can select “Enhancement Suggestion” under Reason and
share your thoughts.
Steam Role ™ User Guide 17

Steam Role ™ User Guide 18
Troubleshooting
If any error or unexpected behavior occurs while using Stea
m Role, it will most likely be fixed by simply
re-loading the page. To do this just click on the “Steam Role” tab again (even If you are still on it… just
click it again and the app will reload). Alternatively, you can hit “refresh” on your browser. This is
recommended before trying anything else.
What follows is a list of possible issues and how to solve them.
The application is not filling up the window; there is a lot of white space
visible below it.
The application has a ‘smart resizing’ feature that will cause it to take up as much room as it can while
still leaving room for your salesforce tabs AND all fit on the screen at once (i.e. You should see the
whole orange console without having to scroll).
The ‘smart resizing’ should fire upon load, but if it does not, you can force it to fire by resizing your
window (drag the bottom right corner). If your window is maximized, restore it, and then maximize again.
If it still isn’t properly taking up the available space in your browser window, your browser may be
preventing the JavaScript that does the resizing from running. Try changing your browser options to
allow scripting.
When I click the Steam Role tab, all I see is a blank screen.
Remember that in order to use Steam Role you must have Flash Player Version 9.0 or greater
installed for the browser you are using. During loading, Steam Role will attempt to determine if you
have the correct version of Flash Player and if you do not it will display a link to Adobe’s website where
you can download it for free:
http://www.adobe.com/go/getflash/
Even if the link does not display, you should navigate to the above URL to make sure you have version
9.0 or greater installed.
I have Flash Player 9.0 installed, but it still will not display.
There may be an issue with the plug-in you have installed. The recommended approach would be to
remove the plug-in and reinstall. Rather than ‘removing the program’ you should go to the following link
and download the official “Adobe Uninstaller” for your operating system:
http://www.adobe.com/support/flashplayer/downloads.html#uninstaller
Once you have run this program, reinstall Flash Player by going to the following link:
http://www.adobe.com/go/getflash/

Steam Role ™ User Guide 19
I get the error: “[Browser Name] encountered an error with an add-on and
needs to close”
While these errors are extremely rare, they could be caused by something as simple as a spotty internet
connection. Testing has shown that these types of errors occur most frequently in Internet Explorer, if
you are having problems with IE you may wish to use another browser. Regardless of the browser, you
should contact DrivEnable via the “Request Support” option in the menu if you receive this error more
than once. Be sure to include as much information as possible about what you were doing when the
error occurred.
Uninstalling and reinstalling Flash Player 9.0 (as described above) can help in certain cases.
I have installed the application, but do not see the “Steam Role” tab
To use the app, you must have access to the package AND have a license assigned to you, even if you
are a System Administrator. See the section above entitled “License Management”.
I have upgraded to a new version of the app, but it doesn’t appear to have the
latest changes
Some browsers will cache the main part of the application to decrease loading times. You should clear
this cache to make sure your browser accepts the latest version which you have installed. This would be
done by deleting “temporary internet files”.
The application seems to have ‘frozen’, displaying the clock cursor
If this has happened as a result of making a significant change such as a mass reassignment of many
Records, or moving a branch of a hierarchy which had many Users in it then you will want to give Steam
Role ample time to complete the task. Check the status bar in the lower right corner, if it still displays
text (e.g. Processing Changes…) then wait a bit longer. If this does not work, or there is no text in the
status bar, simply reload the app by clicking the Steam Role tab again, or by hitting ‘refresh’ on your
browser.
© Copyright 2008 DrivEnable LLC
