
For In Vitro Diagnostic Use.
TaqPath
™
COVID‑19 CE‑IVD RT‑PCR Kit
INSTRUCTIONS FOR USE
Multiplex real-time RT-PCR test intended for the qualitative
detection of nucleic acid from SARS‑CoV‑2
Catalog Number A48067
Publication Number MAN0019215
Revision F.0

Life Technologies Corporation |
6055 Sunol Blvd |
Pleasanton, CA 94566 USA
Life Technologies Europe B.V.
Kwartsweg 2, 2665 NN Bleiswijk
The Netherlands
For descriptions of symbols on product labels or product documents, go to thermofisher.com/symbols-definition.
The customer is responsible for compliance with regulatory requirements that pertain to their procedures and uses of the instrument.
The information in this guide is subject to change without notice.
DISCLAIMER: TO THE EXTENT ALLOWED BY LAW, THERMO FISHER SCIENTIFIC INC. AND/OR ITS AFFILIATE(S) WILL NOT BE
LIABLE FOR SPECIAL, INCIDENTAL, INDIRECT, PUNITIVE, MULTIPLE, OR CONSEQUENTIAL DAMAGES IN CONNECTION WITH OR
ARISING FROM THIS DOCUMENT, INCLUDING YOUR USE OF IT.
Revision history: Pub. No. MAN0019215
Revision Date Description
F.0
1 March 2021
•
Added Applied Biosystems
™
COVID‑19 Interpretive Software v1.5 and Applied Biosystems
™
COVID‑19 Interpretive Software v2.5.
•
Removed Applied Biosystems
™
COVID‑19 Interpretive Software v1.3 and Applied Biosystems
™
COVID‑19 Interpretive Software v2.3.
•
Added general laboratory recommendations.
•
Updated template files for the following instruments:
–
7500 Fast Dx Real‑Time PCR Instrument
–
7500 Fast Real‑Time PCR Instrument with SDS Software v1.5.1
•
Updated instructions to obtain the COVID‑19 Interpretive Software.
•
Added an optional step to review the amplification curve for each sample in the COVID‑19
Interpretive Software.
•
Updated wording for the interpretation of results (Table 6 on page 56) and specified that the Ct for
MS2 can be >32 if any of the viral targets is positive (Table 14 on page 64).
E.0 15 July 2020
•
Added Applied Biosystems
™
COVID‑19 Interpretive Software v1.3 and Applied Biosystems
™
COVID‑19 Interpretive Software v2.3.
•
Removed Applied Biosystems
™
COVID‑19 Interpretive Software v1.2, Applied Biosystems
™
COVID‑19 Interpretive Software v2.1, and Applied Biosystems
™
COVID‑19 Interpretive Software
v2.2.
•
Added new guidelines for sample collection, storage, packaging, and shipping to “Assay
limitations” on page 12.
•
Added C
t
cuto information (Appendix A, “Ct cuto values for assay targets”).
•
Updated instructions to seal, vortex, and centrifuge the RT-PCR plates.
•
Provided additional details for naming negative control wells in 384-well plates with unique names.
•
Updated reactivity (inclusivity) (page 59).
•
Added more information about Limit of Detection experiments to “Limit of detection (LoD)” on
page 57.
D.0 2 June 2020
•
Removed instructions to mix by pipetting up and down 10 times when preparing RT-PCR plates.
Added instructions to vortex the plates for 10–20 seconds to ensure proper mixing.
•
Added instructions to unseal and reseal one extraction plate at a time when preparing 384-well
RT-PCR plates.
•
Updated instructions to create a unique name for each well in the physical plate, not only the wells
with a patient sample.
•
Added Applied Biosystems
™
QuantStudio
™
5 Real‑Time PCR Instrument, 384-well block.
•
Added QuantStudio
™
5 Dx IVD Software for the Applied Biosystems
™
QuantStudio
™
5 Dx
Real‑Time PCR Instrument.
•
Added COVID‑19 Interpretive Software v2.2.
•
Updated retesting requirements for samples with inconclusive results.

Revision Date Description
C.0 1 May 2020
•
Updated specimen types to upper respiratory specimens (such as nasopharyngeal, oropharyngeal,
nasal, and mid-turbinate swabs, and nasopharyngeal aspirate) and bronchoalveolar lavage (BAL)
specimens (“Intended Use” on page 7, “Assay limitations” on page 12, and “Workflow” on
page 13).
•
Added procedures to perform RT-PCR with the following instruments: Applied Biosystems
™
7500
Real‑Time PCR Instrument, Applied Biosystems
™
QuantStudio
™
5 Real‑Time PCR Instruments (96-
well 0.1-mL block and 96-well 0.2-mL block), Applied Biosystems
™
QuantStudio
™
5 Dx Real‑Time
PCR Instrument, and QuantStudio
™
7 Flex Real-Time PCR Instrument (384-well block).
•
Added new software versions: Applied Biosystems
™
COVID‑19 Interpretive Software v1.2 and
Applied Biosystems
™
COVID‑19 Interpretive Software v2.1.
•
Changed the shelf life of TaqPath
™
COVID‑19 Control Dilution Buer from 9 months to 12 months.
•
Updated guidelines extracted RNA (Chapter 3, “Guidelines for the RNA extracted from the
sample”).
•
Updated requirements for controls based on the addition of 384-well real-time RT-PCR plates
(“Guidelines for RT-PCR” on page 19).
•
Added reaction plates without a barcode as an option for real-time RT-PCR (MicroAmp
™
Fast
Optical 96-Well Reaction Plate, 0.1 mL, MicroAmp
™
Optical 96-Well Reaction Plate, 0.2 mL, and
MicroAmp
™
Optical 384-Well Reaction Plate).
•
Created separate procedures to prepare the RT‑PCR reactions based on the volume of sample
input (≤ 200 μL or > 200 μL), the RT-PCR plate (96-well or 384-well), and added specific
instructions to vortex and centrifuge the reaction plate.
•
Specified that retesting must be done with the original sample (“Interpretation of the results” on
page 56).
•
Updated control requirements in interpretation of results, based on addition of 384-well real-time
RT-PCR plates (“Interpretation of the results” on page 56).
•
Added “Interfering substances” on page 59.
•
Removed references to COVID‑19 Interpretive Software v1.1.
B.0
27 March 2020
•
Corrected description of MS2 Phage Control in 'Product Description' from DNA Control to RNA
Control.
•
Expanded description of the service and technical support information available at https://
www.thermofisher.com/contactus in 'Customer and technical support'.
•
Changed the shelf life of the TaqPath
™
COVID‑19 Control Dilution Buer.
A.0 24 March 2020 New document.
Important Licensing Information: This product may be covered by one or more Limited Use Label Licenses. By use of this product,
you accept the terms and conditions of all applicable Limited Use Label Licenses.
TRADEMARKS: All trademarks are the property of Thermo Fisher Scientific and its subsidiaries unless otherwise specified. Nasacort is
a trademark of AVENTISUB LLC. Dymista is a trademark of Meda Pharmaceuticals Inc. NeilMed and Nasogel are trademarks of NeilMed
Products, Inc. Chloraseptic is a trademark of Medtech Products Inc. Bactroban is a trademark of GLAXOSMITHKLINE LLC. Similasan is
a trademark of Similasan AG Corporation Switzerland.
©2020 Thermo Fisher Scientific Inc. All rights reserved.
Contents
■
CHAPTER 1 TaqPath
™
COVID‑19 CE‑IVD RT‑PCR Kit
product information ................................................................. 7
Intended Use ................................................................... 7
Product description ............................................................. 7
Contents and storage ............................................................ 8
Required materials not supplied ................................................... 8
Instrument and software compatibility ............................................ 11
General laboratory recommendations ............................................. 11
Assay limitations ............................................................... 12
Samples and controls .......................................................... 13
Workflow ..................................................................... 13
■
CHAPTER 2 Before you begin .................................................... 15
Warnings and precautions ....................................................... 15
Sample collection, transport, and storage ........................................ 16
■
CHAPTER 3 Guidelines for the RNA extracted from the sample ............. 17
Sample input volumes .......................................................... 17
Guidelines for RNA extraction ................................................... 17
Add MS2 Phage Control ........................................................ 18
■
CHAPTER 4 Prepare RT-PCR reactions ......................................... 19
Guidelines for RT-PCR .......................................................... 19
Prepare the RT‑PCR reactions (≤200‑µL sample input volume, 96‑well reaction plate) ... 20
Prepare the RT‑PCR reactions (≤200‑µL sample input volume, 384‑well reaction plate) .. 21
Prepare the RT‑PCR reactions (>200‑µL sample input volume, 96‑well reaction plate) ... 24
Prepare the RT‑PCR reactions (>200‑µL sample input volume, 384‑well reaction plate) .. 26
4
TaqPath
™
COVID‑19 CE‑IVD RT‑PCR Kit Instructions for Use
■
CHAPTER 5 Perform RT-PCR using the Applied Biosystems
™
7500
Fast Dx Real‑Time PCR Instrument .............................................. 28
Dye calibration for the 7500 Real‑Time PCR Instrument series ....................... 28
Transfer the template (SDT) file for the 7500 Fast Dx Real‑Time PCR Instrument ........ 28
Set up and run the 7500 Fast Dx Real‑Time PCR Instrument ......................... 29
■
CHAPTER 6 Perform RT-PCR using the Applied Biosystems
™
7500
Fast Real‑Time PCR Instrument ................................................. 31
Dye calibration for the 7500 Real‑Time PCR Instrument series ....................... 31
Transfer the template (SDT or EDT) file for the 7500 Fast Real‑Time PCR Instrument .... 32
Set up and run the 7500 Fast Real‑Time PCR Instrument (SDS Software v1.5.1) ....... 32
Set up and run the 7500 Fast Real‑Time PCR Instrument (7500 Software v2.3) ......... 34
■
CHAPTER 7 Perform RT-PCR using the Applied Biosystems
™
7500
Real‑Time PCR Instrument ....................................................... 36
Dye calibration for the 7500 Real‑Time PCR Instrument series ....................... 36
Transfer the template (EDT) file for the 7500 Real‑Time PCR Instrument ............... 37
Set up and run the 7500 Real‑Time PCR Instrument ................................ 37
■
CHAPTER 8 Perform RT-PCR using the Applied Biosystems
™
QuantStudio
™
5 Real‑Time PCR Instrument .................................... 39
Dye calibration for the QuantStudio
™
5 Real‑Time PCR Instrument ................... 39
Transfer the template (EDT) file for the QuantStudio
™
5 Real‑Time PCR Instrument ..... 40
Set up and run the QuantStudio
™
5 Real‑Time PCR Instrument (96-well plates) ........ 40
Set up and run the QuantStudio
™
5 Real‑Time PCR Instrument (384-well plates) ....... 42
■
CHAPTER 9 Perform RT-PCR using the Applied Biosystems
™
QuantStudio
™
5 Dx Real‑Time PCR Instrument ................................ 44
Dye calibration for the QuantStudio
™
5 Dx Real‑Time PCR Instrument ................ 44
QuantStudio
™
5 Dx TD Software ................................................. 45
Transfer the template (EDT) file for the QuantStudio
™
5 Dx Real‑Time PCR
Instrument (QuantStudio
™
5 Dx TD Software) ................................ 45
Set up and run the QuantStudio
™
5 Dx Real‑Time PCR Instrument
(QuantStudio
™
5 Dx TD Software) .......................................... 45
QuantStudio
™
5 Dx IVD Software ................................................ 48
Transfer the template (EDT) file for the QuantStudio
™
5 Dx Real‑Time PCR
Instrument (QuantStudio
™
5 Dx IVD Software) ............................... 48
Install the template file in the QuantStudio
™
5 Dx IVD Software .................. 48
Set up and run the QuantStudio
™
5 Dx Real‑Time PCR Instrument
(QuantStudio
™
5 Dx IVD Software) ......................................... 49
Contents
TaqPath
™
COVID‑19 CE‑IVD RT‑PCR Kit Instructions for Use
5
■
CHAPTER 10 Perform RT-PCR using the Applied Biosystems
™
QuantStudio
™
7 Flex Real-Time PCR Instrument (384-well block) ............ 50
Dye calibration for the QuantStudio
™
7 Flex Real-Time PCR Instrument ............... 50
Transfer the template (EDT) file for the QuantStudio
™
7 Flex Real-Time PCR
Instrument (384–well block) ................................................... 51
Set up and run the QuantStudio
™
7 Flex Real-Time PCR Instrument (384–well block) ... 51
■
CHAPTER 11 Analysis and results ............................................... 54
Obtain the Applied Biosystems
™
COVID‑19 Interpretive Software .................... 54
Analyze the data ............................................................... 54
Interpretation of the results ...................................................... 56
■
CHAPTER 12 Performance characteristics ...................................... 57
Limit of detection (LoD) ......................................................... 57
Reactivity (Inclusivity) ........................................................... 59
Interfering substances .......................................................... 59
Cross-reactivity ................................................................ 61
Clinical evaluation .............................................................. 62
■
APPENDIX A C
t
cuto values for assay targets ................................ 64
■
APPENDIX B Documentation and support ...................................... 65
Related documentation ......................................................... 65
Customer and technical support ................................................. 65
Limited product warranty ........................................................ 66
Contents
6
TaqPath
™
COVID‑19 CE‑IVD RT‑PCR Kit Instructions for Use

TaqPath
™
COVID‑19 CE‑IVD
RT‑PCR Kit product information
Intended Use
TaqPath
™
COVID‑19 CE‑IVD RT‑PCR Kit contains the reagents and controls for a real-time reverse
transcription polymerase chain reaction (RT-PCR) test intended for the qualitative detection of nucleic
acid from SARS-CoV-2 in upper respiratory specimens (such as nasopharyngeal, oropharyngeal, nasal,
and mid‑turbinate swabs, and nasopharyngeal aspirate) and bronchoalveolar lavage (BAL) specimens
from individuals suspected of COVID-19.
Results are for the identification of SARS-CoV-2 RNA. The SARS-CoV-2 RNA is generally detectable
in upper respiratory and bronchoalveolar lavage (BAL) specimens during the acute phase of infection.
Positive results are indicative of the presence of SARS-CoV-2 RNA; clinical correlation with patient
history and other diagnostic information is necessary to determine patient infection status. Positive
results do not rule out bacterial infection or co-infection with other viruses. The agent detected may
not be the definite cause of disease. Laboratories may be required to report all positive results to the
appropriate Competent Health Authorities.
Negative results do not preclude SARS-CoV-2 infection and should not be used as the sole basis for
patient management decisions. Negative results must be combined with clinical observations, patient
history, and epidemiological information.
Testing with the TaqPath
™
COVID‑19 CE‑IVD RT‑PCR Kit is intended for use by qualified and trained
clinical laboratory personnel specifically instructed and trained in the techniques of real-time PCR and
in vitro diagnostic procedures.
Note: The following countries require the CE-marked In Vitro Diagnostics: Austria, Belgium, Bulgaria,
Croatia, Cyprus, Czechia, Denmark, Estonia, Finland, France, Germany, Greece, Hungary, Ireland, Italy,
Latvia, Lithuania, Luxembourg, Malta, Netherlands, Poland, Portugal, Romania, Slovakia, Slovenia,
Spain, Sweden, UK, Norway, Iceland, Liechtenstein, Switzerland, Turkey.
Product description
TaqPath
™
COVID‑19 CE‑IVD RT‑PCR Kit includes the following components:
•
TaqPath
™
COVID‑19 RT‑PCR Kit, 1000 reactions
–
TaqPath
™
COVID‑19 Assay Multiplex—Multiplexed assays that contain three primer/probe sets
specific to dierent SARS-CoV-2 genomic regions and primers/probes for bacteriophage MS2.
–
MS2 Phage Control—RNA control to verify the ecacy of the sample preparation and the
absence of inhibitors in the PCR reaction. To perform the control, add MS2 Phage Control to
the samples before extraction of the RNA.
1
TaqPath
™
COVID‑19 CE‑IVD RT‑PCR Kit Instructions for Use
7

•
TaqPath
™
COVID‑19 Control—RNA control that contains targets specific to the SARS-CoV-2
genomic regions targeted by the assays.
•
TaqPath
™
COVID‑19 Control Dilution Buer
•
TaqPath
™
1‑Step Multiplex Master Mix (No ROX
™
)
•
Package insert—Provides the instructions and the link to download the Instructions for Use.
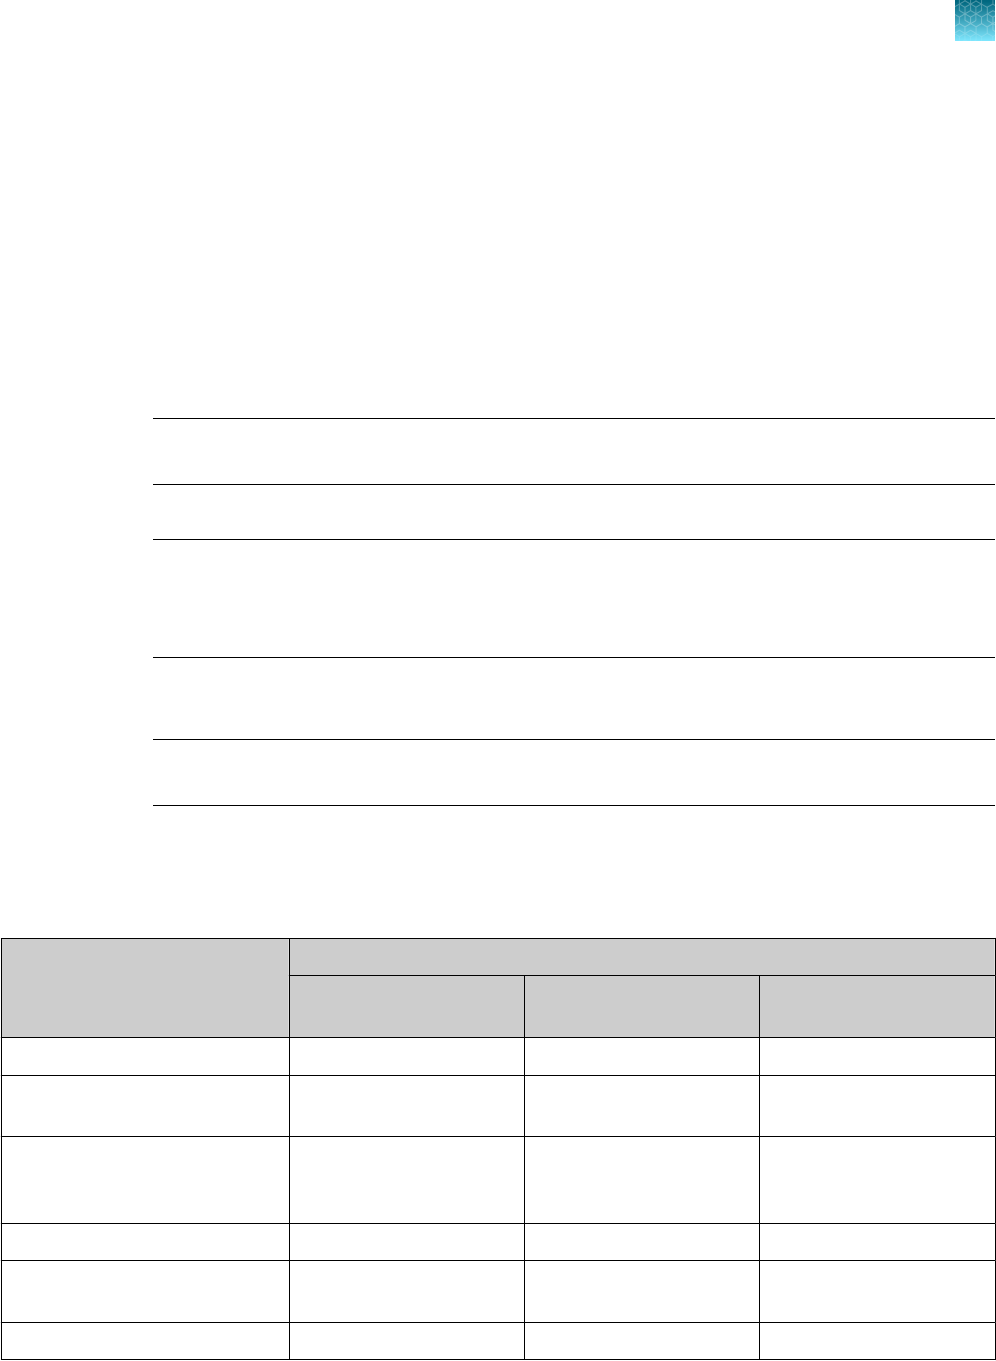
Contents and storage
Table 1 TaqPath
™
COVID‑19 CE‑IVD RT‑PCR Kit, 1,000 reactions (Cat. No. A48067)
Component Contents Quantity
Volume per tube
or bottle
Unit part
number
Storage Shelf life
[1]
TaqPath
™
COVID‑19
RT‑PCR Kit
TaqPath
™
COVID‑19
Assay Multiplex
(Gene ORF1ab, N
Protein, S Protein,
MS2)
1 tube
1,500 µL
(1,000 reactions)
100093311
–30°C to
–10°C
12 months
MS2 Phage Control 10 tubes 1 mL 100093312
–30°C to
–10°C
12 months
TaqPath
™
COVID‑19 Control 10 tubes
10 µL
(1 x 10
4
copies /
μL)
100093314 ≤ –70°C 12 months
TaqPath
™
COVID‑19 Control Dilution Buer 10 tubes 250 µL 100093291
–30°C to
–10°C
12 months
TaqPath
™
1‑Step Multiplex Master Mix (No
ROX
™
)
1 bottle 10 mL A48111
–30°C to
–10°C
12 months
[1]
The shelf life of the kit is determined by the component with the shortest shelf life.
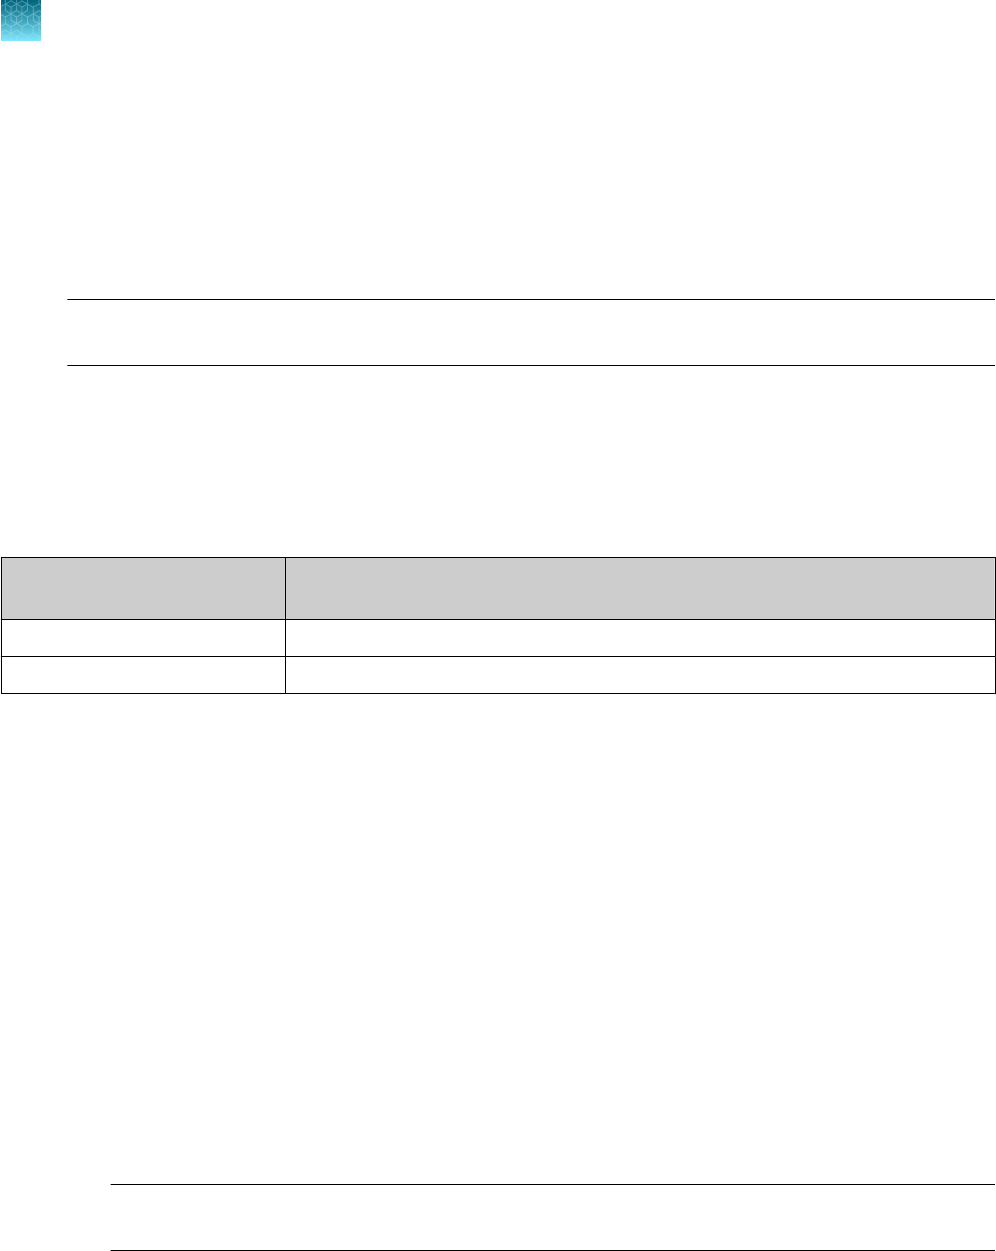
Required materials not supplied
Unless otherwise indicated, all materials are available through thermofisher.com. "MLS" indicates that
the material is available from fisherscientific.com or another major laboratory supplier.
Item
Source
Real-time PCR instrument
Applied Biosystems
™
7500 Fast Dx Real‑Time PCR Instrument
(used with SDS Software v1.4.1)
4406984 (with laptop computer)
4406985 (with tower computer)
Applied Biosystems
™
7500 Fast Real‑Time PCR Instrument
(used with SDS Software v1.5.1 or 7500 Software v2.3)
4351106 (with laptop computer)
4351107 (with desktop computer)
Chapter 1 TaqPath
™
COVID‑19 CE‑IVD RT‑PCR Kit product information
Contents and storage
1
8
TaqPath
™
COVID‑19 CE‑IVD RT‑PCR Kit Instructions for Use

(continued)
Item Source
Applied Biosystems
™
7500 Real‑Time PCR Instrument
(used with 7500 Software v2.3)
4351104 (with laptop computer)
4351105 (with desktop computer)
Applied Biosystems
™
QuantStudio
™
5 Real‑Time PCR
Instrument, 0.2-mL block
(used with QuantStudio
™
Design and Analysis Desktop
Software v1.5.1)
A28569 (with laptop computer)
A28574 (with desktop computer)
A28139 (instrument only)
Applied Biosystems
™
QuantStudio
™
5 Real‑Time PCR
Instrument, 0.1-mL block
(used with QuantStudio
™
Design and Analysis Desktop
Software v1.5.1)
A28568 (with laptop computer)
A28573 (with desktop computer)
A28138 (instrument only)
Applied Biosystems
™
QuantStudio
™
5 Real‑Time PCR
Instrument, 384-well block
(used with QuantStudio
™
Design and Analysis Desktop
Software v1.5.1)
A28570 (with laptop computer)
A28575 (with desktop computer)
A28140 (instrument only)
Applied Biosystems
™
QuantStudio
™
5 Dx Real‑Time PCR
Instrument
(used with QuantStudio
™
5 Dx TD Software v1.0.2
or
QuantStudio
™
5 Dx IVD Software v1.0.2)
A32005 (with laptop computer)
A32006 (with tower computer)
Applied Biosystems
™
QuantStudio
™
7 Flex Real-Time PCR
Instrument, 384–well block
(used with QuantStudio
™
Real‑Time PCR Software v1.3)
4485695 (with laptop computer)
4485701 (with desktop computer)
Equipment
Laboratory freezers
•
–30°C to –10°C
•
≤ –70°C
MLS
Centrifuge, with a rotor for microplates MLS
Microcentrifuge MLS
Laboratory mixer, vortex or equivalent MLS
Single and multichannel adjustable pipettors (1.00 µL to
1,000.0 µL)
MLS
Cold block (96‑well or 384‑well) or ice MLS
Kits and reagents
Nuclease-free Water (not DEPC-Treated) MLS
Chapter 1 TaqPath
™
COVID‑19 CE‑IVD RT‑PCR Kit product information
Required materials not supplied
1
TaqPath
™
COVID‑19 CE‑IVD RT‑PCR Kit Instructions for Use
9

(continued)
Item Source
Calibration plates (7500 Real‑Time PCR Instrument series)
ABY
™
Dye Spectral Calibration Plate for Multiplex qPCR, Fast
96-well (0.1‑mL)
A24734
JUN
™
Dye Spectral Calibration Plate for Multiplex qPCR, Fast
96-well (0.1‑mL)
A24735
ABY
™
Dye Spectral Calibration Plate for Multiplex qPCR, 96-
well (0.2‑mL)
A24738
JUN
™
Dye Spectral Calibration Plate for Multiplex qPCR, 96-
well (0.2‑mL)
A24737
Calibration plates (QuantStudio
™
7 Flex Real-Time PCR Instrument)
ABY
™
Dye Spectral Calibration Plate for Multiplex qPCR, 384-
well
A24736
JUN
™
Dye Spectral Calibration Plate for Multiplex qPCR, 384-
well
A24733
Tubes, plates, and other consumables
MicroAmp
™
Fast Optical 96‑Well Reaction Plate with Barcode,
0.1 mL
4346906, 4366932
MicroAmp
™
Fast Optical 96-Well Reaction Plate, 0.1 mL 4346907
MicroAmp
™
Optical 96‑Well Reaction Plate with Barcode,
0.2 mL
4306737, 4326659
MicroAmp
™
Optical 96-Well Reaction Plate, 0.2 mL N8010560, 4316813
MicroAmp
™
Optical 384-Well Reaction Plate with Barcode 4309849, 4326270, 4343814
MicroAmp
™
Optical 384-Well Reaction Plate 4343370
MicroAmp
™
Optical Adhesive Film 4311971, 4360954
MicroAmp
™
Adhesive Film Applicator 4333183
Nonstick, RNase-free microcentrifuge tubes (1.5 mL and
2.0 mL)
thermofisher.com/plastics
Sterile aerosol barrier (filtered) pipette tips thermofisher.com/pipettetips
Chapter 1 TaqPath
™
COVID‑19 CE‑IVD RT‑PCR Kit product information
Required materials not supplied
1
10
TaqPath
™
COVID‑19 CE‑IVD RT‑PCR Kit Instructions for Use

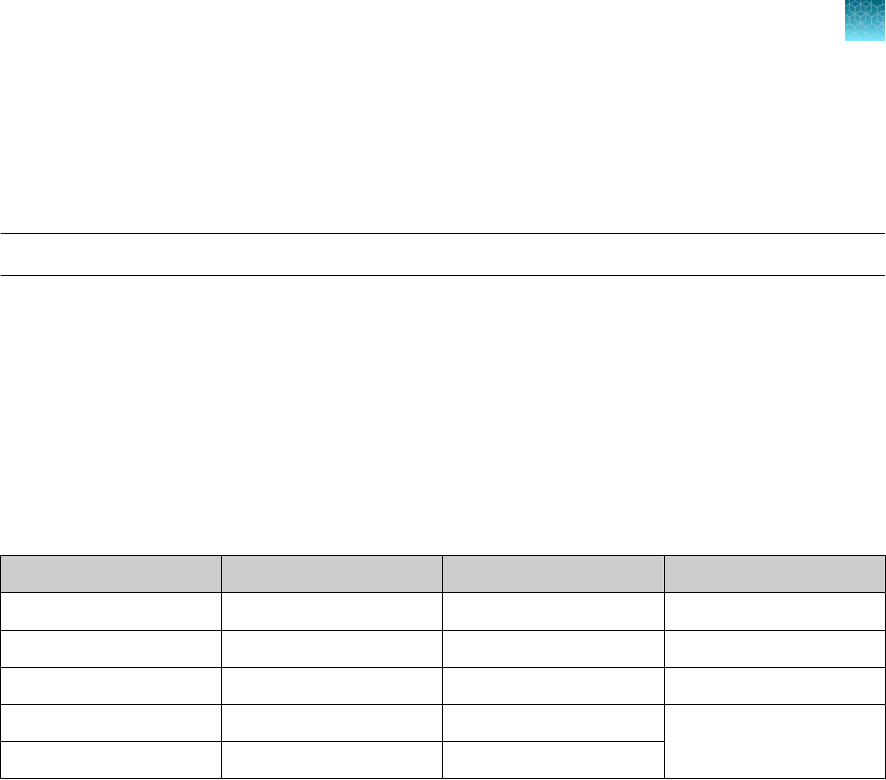
Instrument and software compatibility
The following table lists the version of the Applied Biosystems
™
COVID‑19 Interpretive Software that is
compatible with your instrument and its associated analysis software.
For information on how to obtain the Applied Biosystems
™
COVID‑19 Interpretive Software, see “Obtain
the Applied Biosystems
™
COVID‑19 Interpretive Software” on page 54.
To obtain the analysis software or firmware for use with your real‑time PCR instrument, go to
thermofisher.com/qpcrsoftware, then select your instrument in the Real-Time PCR section.
Instrument
Analysis software used with the
instrument
Compatible COVID‑19
Interpretive Software version
7500 Fast Dx Real‑Time PCR Instrument SDS Software v1.4.1 v1.5
7500 Fast Real‑Time PCR Instrument
SDS Software v1.5.1
or
7500 Software v2.3
v1.5
7500 Real‑Time PCR Instrument 7500 Software v2.3 v1.5
QuantStudio
™
5 Real‑Time PCR Instrument
with instrument firmware v1.3.3
96-well, 0.2-mL block
96-well, 0.1-mL block
QuantStudio
™
Design and
Analysis Desktop Software v1.5.1
v2.5
QuantStudio
™
5 Real‑Time PCR Instrument
with instrument firmware v1.3.3
384-well block
QuantStudio
™
Design and
Analysis Desktop Software v1.5.1
v2.5
QuantStudio
™
5 Dx Real‑Time PCR
Instrument with instrument firmware v1.0.3
QuantStudio
™
5 Dx TD Software
v1.0.2
v2.5
QuantStudio
™
5 Dx Real‑Time PCR
Instrument with instrument firmware v1.0.3
QuantStudio
™
5 Dx IVD Software
v1.0.2
v2.5
QuantStudio
™
7 Flex Real-Time PCR
Instrument with instrument firmware v1.0.4
384-well block
QuantStudio
™
Real‑Time PCR
Software v1.3
v2.5
General laboratory recommendations
•
Implement standard operating procedures in your laboratory to prevent contamination, such as the
following:
–
Frequent glove changes
–
Frequent decontamination of surfaces, equipment, and pipettes with 10% bleach or
decontamination solution, followed by 70% ethanol
–
Use of ultraviolet light during biosafety cabinet decontamination (when available)
Chapter 1
TaqPath
™
COVID‑19 CE‑IVD RT‑PCR Kit product information
Instrument and software compatibility
1
TaqPath
™
COVID‑19 CE‑IVD RT‑PCR Kit Instructions for Use
11

•
To prevent degradation, keep eluted sample RNA, master mixes, assays, and controls on ice or in
cold blocks while in use.
•
Limit freeze-thaw cycles.
•
Aliquot reagents to prevent stock contamination and reduce the number of freeze-thaw cycles.
•
After each run, review the amplification curves in the interpretive software for signs of inadequate
vortexing or centrifugation. Contact your Applications Support team for additional information or
training on data QC in your instrument software.
Assay limitations
•
This assay is intended to be used for in vitro diagnostic purposes only. Follow good laboratory
practices and all precautions and guidelines in these user guides to avoid cross-contamination
between samples.
•
The TaqPath
™
COVID‑19 CE‑IVD RT‑PCR Kit performance was established using nasopharyngeal
and oropharyngeal swab, nasopharyngeal aspirate, and bronchoalveolar lavage samples only.
Nasal swabs and mid-turbinate swabs are considered acceptable specimen types according to
the Interim Guidelines for Collecting, Handling, and Testing Clinical Specimens from Persons
for Coronavirus Disease 2019 (COVID-19) published by the Centers for Disease Control and
Prevention, but performance of the TaqPath
™
COVID‑19 CE‑IVD RT‑PCR Kit with these specimen
types has not been established. Testing of nasal and mid-turbinate nasal swabs (self-collected
under supervision of or collected by a healthcare provider) is limited to patients with symptoms
of COVID-19. Specimen types other than nasopharyngeal, oropharyngeal, nasal and mid-turbinate
nasal swabs, nasopharyngeal aspirate and bronchoalveolar lavage should not be tested with this
assay.
•
Samples must be collected, transported, and stored using appropriate procedures and conditions.
Improper collection, transport, or storage of specimens may hinder the ability of the assay to detect
the target sequences.
•
Refer to the Interim Guidelines for Collecting, Handling, and Testing Clinical Specimens from
Persons for Coronavirus Disease 2019 (COVID-19), published by the Centers for Disease Control
and Prevention, for specimen collection and storage guidelines.
•
Specimens must be packaged, shipped, and transported according to the current edition of
the International Air Transport Association (IATA) Dangerous Goods Regulations (iata.org/en/
programs/cargo/dgr).
•
This kit uses purified RNA as a sample for the analysis. The quality of the RNA recovered from
biological samples is essential for the quality of the results generated with this kit.
•
False-negative results may arise from:
–
Improper sample collection
–
Degradation of the viral RNA during shipping/storage
–
Specimen collection after nucleic acid can no longer be found in the specimen matrix
–
Using poor extraction method
–
The presence of RT-PCR inhibitors
–
Mutation in the SARS-CoV-2 virus
–
Failure to follow instructions for use
Chapter 1
TaqPath
™
COVID‑19 CE‑IVD RT‑PCR Kit product information
Assay limitations
1
12
TaqPath
™
COVID‑19 CE‑IVD RT‑PCR Kit Instructions for Use

•
False-positive results may arise from:
–
Cross contamination during specimen handling or preparation
–
Cross contamination between patient samples
–
Specimen mix-up
–
RNA contamination during product handling
•
The impacts of vaccines, antiviral therapeutics, antibiotics, chemotherapeutic or
immunosuppressant drugs have not been evaluated. The TaqPath
™
COVID‑19 CE‑IVD RT‑PCR Kit
cannot rule out diseases caused by other bacterial or viral pathogens.
•
Negative results do not preclude infection with SARS-CoV-2 virus, and should not be the sole basis
of a patient management decision.
•
Laboratories may be required to report all positive results to the appropriate Competent Health
Authorities.
Samples and controls
Patient samples must be collected according to appropriate laboratory guidelines. Positive and negative
test controls must be included to accurately interpret patient test results.
Include the following controls:
Control
Used to monitor Assays
Positive Control (TaqPath
™
COVID‑19 Control Kit)
RT-PCR reaction setup and reagent
integrity
All three SARS-CoV-2
assays
MS2 Phage Control
RNA extraction and absence of inhibitors in
the qPCR reaction
MS2 assay
Negative Control
Cross-contamination during RNA extraction
and reaction setup
All three SARS-CoV-2
assays
MS2 assay
Workflow
The workflow begins with nucleic acid purified from upper respiratory specimens (such as
nasopharyngeal, oropharyngeal, nasal, and mid‑turbinate swabs, and nasopharyngeal aspirate) and
bronchoalveolar lavage (BAL) specimens.
The purified nucleic acid is reverse transcribed into cDNA and amplified using the TaqPath
™
COVID‑19
CE‑IVD RT‑PCR Kit and one of the following real-time PCR instruments:
•
Applied Biosystems
™
7500 Fast Dx Real‑Time PCR instrument
•
Applied Biosystems
™
7500 Fast Real‑Time PCR Instrument
•
Applied Biosystems
™
7500 Real‑Time PCR Instrument
•
Applied Biosystems
™
QuantStudio
™
5 Real‑Time PCR Instrument, 96-well, 0.2-mL block
•
Applied Biosystems
™
QuantStudio
™
5 Real‑Time PCR Instrument, 96-well, 0.1-mL block
Chapter 1
TaqPath
™
COVID‑19 CE‑IVD RT‑PCR Kit product information
Samples and controls
1
TaqPath
™
COVID‑19 CE‑IVD RT‑PCR Kit Instructions for Use
13

•
Applied Biosystems
™
QuantStudio
™
5 Real‑Time PCR Instrument, 384-well block
•
Applied Biosystems
™
QuantStudio
™
5 Dx Real‑Time PCR Instrument
•
Applied Biosystems
™
QuantStudio
™
7 Flex Real-Time PCR Instrument, 384-well block
In the process, probes anneal to three (3) target sequences that are specific to SARS-CoV-2. Each
target is located between unique forward and reverse primers for the following genes:
•
ORF1ab
•
N Protein
•
S Protein
During the extension phase of the PCR cycle, the 5’ nuclease activity of Taq polymerase degrades the
probe. This degradation causes the reporter dye to separate from the quencher dye, which generates a
fluorescent signal. With each cycle, additional reporter dye molecules are cleaved from their respective
probes, which increases the fluorescence intensity. Fluorescence intensity is monitored at each PCR
cycle by the real-time PCR instrument.
The data are analyzed and interpreted by the Applied Biosystems
™
COVID‑19 Interpretive Software.
Chapter 1 TaqPath
™
COVID‑19 CE‑IVD RT‑PCR Kit product information
Workflow
1
14
TaqPath
™
COVID‑19 CE‑IVD RT‑PCR Kit Instructions for Use

Before you begin
Warnings and precautions
The TaqPath
™
COVID‑19 CE‑IVD RT‑PCR Kit workflow should be performed by qualified and trained
sta to avoid the risk of erroneous results. Use separate areas for the preparation of patient samples
and controls to prevent false positive results. Samples and reagents must be handled under a laminar
airflow hood or biological safety cabinet.
•
Specimens should always be treated as if infectious and/or biohazardous in accordance with safe
laboratory procedures.
•
Follow necessary precautions when handling specimens. Use personal protective equipment (PPE)
consistent with current guidelines for the handling of potentially infectious samples.
•
Always use pipette tips with aerosol barriers. Tips that are used must be sterile and free from
DNases and RNases.
•
Do not eat, drink, smoke, or apply cosmetic products in the work areas.
•
Modifications to assay reagents, assay protocol, or instrumentation are not permitted, and are in
violation of the In Vitro Diagnostic Directive 98/79/EC.
•
Do not use the kit after the expiry date.
•
Dispose of waste in compliance with the local regulations.
•
Safety Data Sheets are available upon request.
•
Laboratories may be required to report all positive results to the appropriate Competent Health
Authorities.
The following countries require the CE‑marked In Vitro Diagnostics: Austria, Belgium, Bulgaria,
Croatia, Cyprus, Czechia, Denmark, Estonia, Finland, France, Germany, Greece, Hungary, Ireland,
Italy, Latvia, Lithuania, Luxembourg, Malta, Netherlands, Poland, Portugal, Romania, Slovakia,
Slovenia, Spain, Sweden, UK, Norway, Iceland, Liechtenstein, Switzerland, Turkey.
•
Positive results are indicative of the presence of SARS‑CoV‑2 RNA.
•
Handle all samples and controls as if they are capable of transmitting infectious agents.
•
Reagents must be stored and handled as specified in Table 1.
•
The quality of the sample preparation (purified RNA) may influence the quality of the qPCR test.
Laboratories shall only use the purification method they have selected. Laboratories that do not
have any selected method may use the MagMAX
™
Viral/Pathogen Nucleic Acid Isolation Kit or the
MagMAX
™
Viral/Pathogen II Nucleic Acid Isolation Kit.
•
The qPCR kit includes an RNA phage control to verify the ecacy of the sample preparation and
the absence of inhibitors in the PCR reaction. To perform the control, add MS2 Phage Control
to the samples before extraction of the RNA, according to the recommendations in Chapter 3,
“Guidelines for the RNA extracted from the sample”.
2
TaqPath
™
COVID‑19 CE‑IVD RT‑PCR Kit Instructions for Use
15

Sample collection, transport, and storage
Note: Handle all samples and controls as if they are capable of transmitting infectious agents.
Chapter 2 Before you begin
Sample collection, transport, and storage
2
16
TaqPath
™
COVID‑19 CE‑IVD RT‑PCR Kit Instructions for Use

Guidelines for the RNA extracted
from the sample
Sample input volumes
To meet the need for a broad range of sample input volumes, 2 RT-PCR protocols are provided,
depending on the sample input volume.
The following sample input volumes were tested:
•
Low input: 200 µL
•
High input: 400 µL
Sample input volumes > 400 µL have not been tested with the TaqPath
™
COVID‑19 CE‑IVD RT‑PCR Kit.
The following RNA extraction kits were tested:
•
MagMAX
™
Viral/Pathogen Nucleic Acid Isolation Kit
•
MagMAX
™
Viral/Pathogen II Nucleic Acid Isolation Kit
Guidelines for RNA extraction
Extracted RNA can be prepared with any standard RNA extraction procedure or RNA extraction kit. The
minimum recommended elution volume is 50 µL.
The following guidelines are defined as optimal for the use of the TaqPath
™
COVID‑19 CE‑IVD RT‑PCR
Kit.
•
The MS2 Phage Control provided in the kit must be used to verify the ecacy of the sample
preparation and the absence of inhibitors in the RT-PCR reaction. It is added to the sample before
extraction (see “Add MS2 Phage Control” on page 18).
•
Use Nuclease-free Water (not DEPC-Treated) containing MS2 Phage Control as the Negative
Control. The purified Negative Control is used as the Negative Control for RT-PCR.
•
We recommend that the volume of MS2 Phage Control is 2.5% of the sample input volume.
3
TaqPath
™
COVID‑19 CE‑IVD RT‑PCR Kit Instructions for Use
17

Add MS2 Phage Control
The MS2 Phage Control must be used to verify the ecacy of the sample preparation and the absence
of inhibitors in the RT-PCR reaction.
Add the appropriate volume of MS2 Phage Control to each sample well and to the Negative Control
well just before lysis during RNA extraction.
We recommend that the volume of MS2 Phage Control is 2.5% of the sample input volume. Examples
are provided in the table below:
Sample input volume MS2 Phage Control volume
200 µL 5 µL MS2 Phage Control
400 µL 10 µL MS2 Phage Control
Chapter 3 Guidelines for the RNA extracted from the sample
Add MS2 Phage Control
3
18
TaqPath
™
COVID‑19 CE‑IVD RT‑PCR Kit Instructions for Use

Prepare RT-PCR reactions
■
Guidelines for RT-PCR ................................................................ 19
■
Prepare the RT‑PCR reactions (≤200‑µL sample input volume, 96‑well reaction plate) ......... 20
■
Prepare the RT‑PCR reactions (≤200‑µL sample input volume, 384‑well reaction plate) ........ 21
■
Prepare the RT‑PCR reactions (>200‑µL sample input volume, 96‑well reaction plate) ......... 24
■
Prepare the RT‑PCR reactions (>200‑µL sample input volume, 384‑well reaction plate) ........ 26
Note: The procedure used to prepare the RT-PCR reactions depends on the original sample input
volume that was used during the preparation of RNA (≤ 200 µL or > 200 µL). The procedure used to
prepare the RT-PCR reactions also depends on whether a 96–well plate or a 384–well plate is used for
RT-PCR.
Guidelines for RT-PCR
IMPORTANT!
·
For each RT-PCR reaction plate, include the following controls:
·
One Positive Control
·
One Negative Control from each extraction run.
For example, if RNA samples from 4 extraction runs are combined on one 384-well RT-PCR
reaction plate, then 4 Negative Control wells must be run on that 384-well reaction plate.
·
Prepare the RT-PCR reaction plate on ice and keep it on ice until it is loaded into the real-time PCR
instrument.
·
Run the plate immediately after preparation. Failure to do so could result in degraded RNA samples.
·
To prevent contamination, prepare reagents in a PCR workstation or equivalent amplicon-free area.
Do not use the same pipette for controls and RNA samples, and always use aerosol barrier pipette
tips.
·
Maintain an RNase-free environment.
·
Protect assays from light.
·
Keep RNA samples and components on ice during use.
4
TaqPath
™
COVID‑19 CE‑IVD RT‑PCR Kit Instructions for Use
19

Prepare the RT‑PCR reactions (≤200‑µL sample input
volume, 96‑well reaction plate)
Use this procedure under the following conditions:
•
Original sample input volume of up to 200 µL was used for extraction
•
Instrument is compatible with 96-well RT-PCR reaction plates
1.
If frozen, thaw the reagents on ice.
2.
Gently vortex the reagents, then centrifuge briefly to collect liquid at the bottom of the tube.
3.
Dilute TaqPath
™
COVID‑19 Control (1 × 10
4
copies/µL) to a working stock of 25 copies/µL:
a.
Pipet 98 µL of TaqPath
™
COVID‑19 Control Dilution Buer into a microcentrifuge tube, then
add 2 µL of TaqPath
™
COVID‑19 Control. Mix well, then centrifuge briefly.
b.
Pipet 87.5 µL of TaqPath
™
COVID‑19 Control Dilution Buer into a second microcentrifuge
tube, then add 12.5 µL of the dilution created in substep 3a. Mix well, then centrifuge briefly.
Note: The TaqPath
™
COVID‑19 Control does not contain the MS2 template.
4.
Prepare the Reaction Mix:
a.
For each run, combine the following components sucient for the number of RNA samples to
be tested plus one Positive Control and one Negative Control.
All volumes include 10% overage for pipette error.
IMPORTANT! The volumes in this table assume that you extracted sample RNA using an original
sample input volume of up to 200 µL.
Component
Volume per RNA sample
or control
Volume for n RNA samples
plus 2 controls
Volume for 94 RNA
Samples plus 2 controls
TaqPath
™
1‑Step Multiplex
Master Mix (No ROX
™
) (4X)
6.25 µL 6.875 x (n + 2) µL 660 µL
COVID-19 Real Time PCR
Assay Multiplex
1.25 µL 1.375 x (n + 2) µL 132 µL
Nuclease-free Water 7.50 µL 8.25 x (n + 2) µL 792 µL
Total Reaction Mix volume 15.0 µL — 1584 µL
5.
Set up the reaction plate:
a.
Pipette 15.0 µL of the Reaction Mix prepared in step 4 into each well of a MicroAmp
™
Fast Optical 96‑Well Reaction Plate with Barcode, 0.1 mL or a MicroAmp
™
Optical 96‑Well
Reaction Plate with Barcode, 0.2 mL.
Plates without a barcode can be used (see “Required materials not supplied” on page 8).
Chapter 4
Prepare RT-PCR reactions
Prepare the RT‑PCR reactions (≤200‑µL sample input volume, 96‑well reaction plate)
4
20
TaqPath
™
COVID‑19 CE‑IVD RT‑PCR Kit Instructions for Use

b.
Gently vortex the sealed plate containing the purified sample RNA and Negative Control from
the RNA extraction procedure, then centrifuge briefly to collect liquid at the bottom of the
plate.
c.
Unseal the plate containing the purified sample RNA and Negative Control from the RNA
extraction procedure. Add either sample RNA, Negative Control, or Positive Control to each
well of the reaction plate according to Table 2 on page 21.
d.
Seal the plate thoroughly with MicroAmp
™
Optical Adhesive Film.
IMPORTANT! When applying the MicroAmp
™
Optical Adhesive Film, ensure that pressure
is applied across the entire plate and that there is a tight seal across every individual well.
Failure to do so runs the risk of an improperly sealed well, leading to potential well-to-well
contamination during vortexing and evaporation during PCR.
e.
Vortex the plate at the highest setting speed for 10–30 seconds with medium pressure. Move
the plate around to ensure equal contact on the vortex mixer platform.
IMPORTANT! Vortex for 10–30 seconds to ensure proper mixing. Failure to do so might
result in false classification of samples.
f.
Centrifuge the reaction plate for 1–2 minutes at ≥650 × g (≥650 RCF) to remove bubbles and
to collect the liquid at the bottom of the reaction plate.
Table 2 Reaction plate volumes
Component
Volume per reaction
RNA Sample reaction Positive Control reaction Negative Control reaction
Reaction Mix 15.0 µL 15.0 µL 15.0 µL
Purified sample RNA (from
RNA extraction)
10.0 µL — —
Positive Control (diluted
TaqPath
™
COVID‑19
Control, from step 3)
— 2.0 µL —
Nuclease-free Water — 8.0 µL —
Purified Negative Control
(from RNA extraction)
— — 10.0 µL
Total volume 25.0 µL 25.0 µL 25.0 µL
Prepare the RT‑PCR reactions (≤200‑µL sample input
volume, 384‑well reaction plate)
Use this procedure under the following conditions:
•
Original sample input volume of up to 200 µL was used for extraction
•
Instrument is compatible with 384-well RT-PCR reaction plates
Chapter 4
Prepare RT-PCR reactions
Prepare the RT‑PCR reactions (≤200‑µL sample input volume, 384‑well reaction plate)
4
TaqPath
™
COVID‑19 CE‑IVD RT‑PCR Kit Instructions for Use
21

1.
If frozen, thaw the reagents on ice.
2.
Gently vortex the reagents, then centrifuge briefly to collect liquid at the bottom of the tube.
3.
Dilute TaqPath
™
COVID‑19 Control (1 × 10
4
copies/µL) to a working stock of 25 copies/µL:
a.
Pipet 98 µL of TaqPath
™
COVID‑19 Control Dilution Buer into a microcentrifuge tube, then
add 2 µL of TaqPath
™
COVID‑19 Control. Mix well, then centrifuge briefly.
b.
Pipet 87.5 µL of TaqPath
™
COVID‑19 Control Dilution Buer into a second microcentrifuge
tube, then add 12.5 µL of the dilution created in substep 3a. Mix well, then centrifuge briefly.
Note: The TaqPath
™
COVID‑19 Control does not contain the MS2 template.
4.
Prepare the Reaction Mix.
a.
For each run, combine the following components sucient for the number of RNA samples,
plus one Positive Control per 384-well real-time RT-PCR plate, and one Negative Control from
each extraction run.
For example, if RNA samples from 4 extraction runs are being combined on one 384-well real-
time RT-PCR plate, then 4 Negative Control wells need to be run on that 384-well real-time
RT-PCR plate.
All volumes include 10% overage for pipette error.
IMPORTANT! The volumes in this table assume that you extracted sample RNA using an original
sample input volume of up to 200 µL.
Component
Volume per RNA Sample
or control
Volume for n RNA
Samples plus y Negative
Controls plus 1 Positive
Control
Volume for 379 RNA
Samples plus 4 Negative
Controls plus 1 Positive
Control
TaqPath
™
1‑Step Multiplex
Master Mix (No ROX
™
) (4X)
5.00 µL 5.50 x (n + y + 1) µL 2112.0 µL
COVID-19 Real Time PCR
Assay Multiplex
1.00 µL 1.10 x (n + y + 1) µL 422.4 µL
Nuclease-free Water 4.00 µL 4.40 x (n + y + 1) µL 1690.0 µL
Total Reaction Mix volume 10.0 µL — 4224.4 µL
5.
Set up the reaction plate:
a.
Pipette 10.0 µL of the Reaction Mix prepared in step 4 into each well of a MicroAmp
™
Optical
384-Well Reaction Plate with Barcode.
Plates without a barcode can be used (see “Required materials not supplied” on page 8).
b.
Gently vortex the sealed plate containing the purified sample RNA and Negative Control from
the RNA extraction procedure, then centrifuge briefly to collect liquid at the bottom of the
plate.
Chapter 4
Prepare RT-PCR reactions
Prepare the RT‑PCR reactions (≤200‑µL sample input volume, 384‑well reaction plate)
4
22
TaqPath
™
COVID‑19 CE‑IVD RT‑PCR Kit Instructions for Use

c.
Unseal the plate containing the purified sample RNA and Negative Control from the RNA
extraction procedure. Add either sample RNA, Negative Control, or Positive Control to each
well of the reaction plate according to Table 3 on page 23.
IMPORTANT! To prevent sample contamination, unseal one extraction plate at a time, then
reseal it after adding the samples to the RT-PCR reaction plate.
d.
Seal the plate thoroughly with MicroAmp
™
Optical Adhesive Film.
IMPORTANT! When applying the MicroAmp
™
Optical Adhesive Film, ensure that pressure
is applied across the entire plate and that there is a tight seal across every individual well.
Failure to do so runs the risk of an improperly sealed well, leading to potential well-to-well
contamination during vortexing and evaporation during PCR.
e.
Vortex the plate at the highest setting speed for 10–30 seconds with medium pressure. Move
the plate around to ensure equal contact on the vortex mixer platform.
IMPORTANT! Vortex for 10–30 seconds to ensure proper mixing. Failure to do so might
result in false classification of samples.
f.
Centrifuge the reaction plate for 1–2 minutes at ≥650 × g (≥650 RCF) to remove bubbles and
to collect the liquid at the bottom of the reaction plate.
Table 3 Reaction plate volumes
Component
Volume per reaction
RNA Sample reaction Positive Control reaction
Negative Control
reaction
Reaction Mix 10.0 µL 10.0 µL 10.0 µL
Purified sample RNA (from RNA
extraction)
10.0 µL — —
Positive Control (diluted
TaqPath
™
COVID‑19 Control
from step 3)
— 2.0 µL —
Nuclease-free Water — 8.0 µL —
Purified Negative Control (from
RNA extraction)
— — 10.0 µL
Total volume 20.0 µL 20.0 µL 20.0 µL
Chapter 4 Prepare RT-PCR reactions
Prepare the RT‑PCR reactions (≤200‑µL sample input volume, 384‑well reaction plate)
4
TaqPath
™
COVID‑19 CE‑IVD RT‑PCR Kit Instructions for Use
23

Prepare the RT‑PCR reactions (>200‑µL sample input
volume, 96‑well reaction plate)
Use this procedure under the following conditions:
•
Original sample input volume of >200 µL, but ≤400 µL, was used for extraction
Note: A sample input volume >400 µL has not been tested with the TaqPath
™
COVID‑19 CE‑IVD
RT‑PCR Kit.
•
Instrument is compatible with 96-well RT-PCR reaction plates
1.
If frozen, thaw the reagents on ice.
2.
Gently vortex the reagents, then centrifuge briefly to collect liquid at the bottom of the tube.
3.
Dilute TaqPath
™
COVID‑19 Control (1 × 10
4
copies/µL) to a working stock of 25 copies/µL:
a.
Pipet 98 µL of TaqPath
™
COVID‑19 Control Dilution Buer into a microcentrifuge tube, then
add 2 µL of TaqPath
™
COVID‑19 Control. Mix well, then centrifuge briefly.
b.
Pipet 87.5 µL of TaqPath
™
COVID‑19 Control Dilution Buer into a second microcentrifuge
tube, then add 12.5 µL of the dilution created in substep 3a. Mix well, then centrifuge briefly.
Note: The TaqPath
™
COVID‑19 Control does not contain the MS2 template.
4.
Prepare the Reaction Mix:
a.
For each run, combine the following components sucient for the number of RNA samples to
be tested plus one Positive Control and one Negative Control.
All volumes include 10% overage for pipette error.
IMPORTANT! The volumes in this table assume that you extracted sample RNA using an original
sample input volume between 201 µL and 400 µL.
Component
Volume per RNA Sample
or control
Volume for n RNA
Samples plus 2 controls
Volume for 94 RNA
Samples plus 2 controls
TaqPath
™
1‑Step Multiplex
Master Mix (No ROX
™
) (4X)
6.25 µL 6.875 x (n + 2) µL 660 µL
COVID-19 Real Time PCR
Assay Multiplex
1.25 µL 1.375 x (n + 2) µL 132 µL
Nuclease-free Water 12.50 µL 13.75 x (n + 2) µL 1320 µL
Total Reaction Mix volume 20.0 µL — 2112 µL
5.
Set up the reaction plate:
a.
Pipette 20.0 µL of the Reaction Mix prepared in step 4 into each well of a MicroAmp
™
Fast Optical 96‑Well Reaction Plate with Barcode, 0.1 mL or a MicroAmp
™
Optical 96‑Well
Reaction Plate with Barcode, 0.2 mL.
Plates without a barcode can be used (see “Required materials not supplied” on page 8).
Chapter 4
Prepare RT-PCR reactions
Prepare the RT‑PCR reactions (>200‑µL sample input volume, 96‑well reaction plate)
4
24
TaqPath
™
COVID‑19 CE‑IVD RT‑PCR Kit Instructions for Use

b.
Gently vortex the sealed plate containing the purified sample RNA and Negative Control from
the RNA extraction procedure, then centrifuge briefly to collect liquid at the bottom of the
plate.
c.
Unseal the plate containing the purified sample RNA and Negative Control from the RNA
extraction procedure. Add either sample RNA, Negative Control, or Positive Control to each
well of the reaction plate according to Table 4 on page 25.
d.
Seal the plate thoroughly with MicroAmp
™
Optical Adhesive Film.
IMPORTANT! When applying the MicroAmp
™
Optical Adhesive Film, ensure that pressure
is applied across the entire plate and that there is a tight seal across every individual well.
Failure to do so runs the risk of an improperly sealed well, leading to potential well-to-well
contamination during vortexing and evaporation during PCR.
e.
Vortex the plate at the highest setting speed for 10–30 seconds with medium pressure. Move
the plate around to ensure equal contact on the vortex mixer platform.
IMPORTANT! Vortex for 10–30 seconds to ensure proper mixing. Failure to do so might
result in false classification of samples.
f.
Centrifuge the reaction plate for 1–2 minutes at ≥650 × g (≥650 RCF) to remove bubbles and
to collect the liquid at the bottom of the reaction plate.
Table 4 Reaction plate volumes
Component
Volume per reaction
RNA Sample reaction Positive Control reaction
Negative Control
reaction
Reaction Mix 20.0 µL 20.0 µL 20.0 µL
Purified sample RNA (from RNA
extraction)
5.0 µL — —
Positive Control (diluted
TaqPath
™
COVID‑19 Control
from step 3)
— 2.0 µL —
Nuclease-free Water — 3.0 µL —
Purified Negative Control (from
RNA extraction)
— — 5.0 µL
Total volume 25.0 µL 25.0 µL 25.0 µL
Chapter 4 Prepare RT-PCR reactions
Prepare the RT‑PCR reactions (>200‑µL sample input volume, 96‑well reaction plate)
4
TaqPath
™
COVID‑19 CE‑IVD RT‑PCR Kit Instructions for Use
25

Prepare the RT‑PCR reactions (>200‑µL sample input
volume, 384‑well reaction plate)
Use this procedure under the following conditions:
•
Original sample input volume of >200 µL, but ≤400 µL, was used for extraction
Note: A sample input volume >400 µL has not been tested with the TaqPath
™
COVID‑19 CE‑IVD
RT‑PCR Kit.
•
Instrument is compatible with 384-well RT-PCR reaction plates
1.
If frozen, thaw the reagents on ice.
2.
Gently vortex the reagents, then centrifuge briefly to collect liquid at the bottom of the tube.
3.
Dilute TaqPath
™
COVID‑19 Control (1 × 10
4
copies/µL) to a working stock of 25 copies/µL:
a.
Pipet 98 µL of TaqPath
™
COVID‑19 Control Dilution Buer into a microcentrifuge tube, then
add 2 µL of TaqPath
™
COVID‑19 Control. Mix well, then centrifuge briefly.
b.
Pipet 87.5 µL of TaqPath
™
COVID‑19 Control Dilution Buer into a second microcentrifuge
tube, then add 12.5 µL of the dilution created in substep 3a. Mix well, then centrifuge briefly.
Note: The TaqPath
™
COVID‑19 Control does not contain the MS2 template.
4.
Prepare the Reaction Mix.
a.
For each run, combine the following components sucient for the number of RNA samples,
plus one Positive Control per 384-well real-time RT-PCR plate, and one Negative Control from
each extraction run.
For example, if RNA samples from 4 extraction runs are being combined on one 384-well real-
time RT-PCR plate, then 4 Negative Control wells need to be run on that 384-well real-time
RT-PCR plate.
All volumes include 10% overage for pipette error.
IMPORTANT! The volumes in this table assume that you extracted sample RNA using an original
sample input volume between 201 µL and 400 µL.
Component
Volume per RNA Sample
or control
Volume for n RNA
Samples plus y Negative
Controls plus 1 Positive
Control
Volume for 379 RNA
Samples plus 4 Negative
Controls plus 1 Positive
Control
TaqPath
™
1‑Step Multiplex
Master Mix (No ROX
™
) (4X)
5.00 µL 5.50 x (n + y + 1) µL 2112.0 µL
COVID-19 Real Time PCR
Assay Multiplex
1.00 µL 1.10 x (n + y + 1) µL 422.4 µL
Nuclease-free Water 9.00 µL 9.90 x (n + y + 1) µL 3802.0 µL
Total Reaction Mix volume 15.0 µL — 6336.4 µL
Chapter 4 Prepare RT-PCR reactions
Prepare the RT‑PCR reactions (>200‑µL sample input volume, 384‑well reaction plate)
4
26
TaqPath
™
COVID‑19 CE‑IVD RT‑PCR Kit Instructions for Use
5.
Set up the reaction plate:
a.
Pipette 15.0 µL of the Reaction Mix prepared in step 4 into each well of a MicroAmp
™
Optical
384-Well Reaction Plate with Barcode.
Plates without a barcode can be used (see “Required materials not supplied” on page 8).
b.
Gently vortex the sealed plate containing the purified sample RNA and Negative Control from
the RNA extraction procedure, then centrifuge briefly to collect liquid at the bottom of the
plate.
c.
Unseal the plate containing the purified sample RNA and Negative Control from the RNA
extraction procedure. Add either sample RNA, Negative Control, or Positive Control to each
well of the reaction plate according to Table 5 on page 27.
IMPORTANT! To prevent sample contamination, unseal one extraction plate at a time, then
reseal it after adding the samples to the RT-PCR reaction plate.
d.
Seal the plate thoroughly with MicroAmp
™
Optical Adhesive Film.
IMPORTANT! When applying the MicroAmp
™
Optical Adhesive Film, ensure that pressure
is applied across the entire plate and that there is a tight seal across every individual well.
Failure to do so runs the risk of an improperly sealed well, leading to potential well-to-well
contamination during vortexing and evaporation during PCR.
e.
Vortex the plate at the highest setting speed for 10–30 seconds with medium pressure. Move
the plate around to ensure equal contact on the vortex mixer platform.
IMPORTANT! Vortex for 10–30 seconds to ensure proper mixing. Failure to do so might
result in false classification of samples.
f.
Centrifuge the reaction plate for 1–2 minutes at ≥650 × g (≥650 RCF) to remove bubbles and
to collect the liquid at the bottom of the reaction plate.
Table 5 Reaction plate volumes
Component
Volume per reaction
RNA Sample reaction Positive Control reaction
Negative Control
reaction
Reaction Mix 15.0 µL 15.0 µL 15.0 µL
Purified sample RNA (from RNA
extraction)
5.0 µL — —
Positive Control (diluted
TaqPath
™
COVID‑19 Control
from step 3)
— 2.0 µL —
Nuclease-free Water — 3.0 µL —
Purified Negative Control (from
RNA extraction)
— — 5.0 µL
Total volume 20.0 µL 20.0 µL 20.0 µL
Chapter 4 Prepare RT-PCR reactions
Prepare the RT‑PCR reactions (>200‑µL sample input volume, 384‑well reaction plate)
4
TaqPath
™
COVID‑19 CE‑IVD RT‑PCR Kit Instructions for Use
27

Perform RT-PCR using the Applied
Biosystems
™
7500 Fast Dx
Real‑Time PCR Instrument
■
Dye calibration for the 7500 Real‑Time PCR Instrument series ............................. 28
■
Transfer the template (SDT) file for the 7500 Fast Dx Real‑Time PCR Instrument .............. 28
■
Set up and run the 7500 Fast Dx Real‑Time PCR Instrument ............................... 29
Dye calibration for the 7500 Real‑Time PCR Instrument
series
A maintained instrument will be calibrated for many dyes. In addition to those dyes, the instrument
operator must calibrate the instrument for ABY
™
dye and JUN
™
dye that are used with this kit. For all
other assays, refer to the standard calibration process.
Transfer the template (SDT) file for the 7500 Fast Dx
Real‑Time PCR Instrument
The template (SDT) file contains the settings for the instrument run. It is installed on the computer with
Applied Biosystems
™
COVID‑19 Interpretive Software, and must be transferred via a USB drive or other
method to the computer on which SDS Software v1.4.1 is installed.
IMPORTANT! Be careful to select the appropriate template file for your instrument. Failure to do so
can cause errors in the analysis.
1.
On the computer with Applied Biosystems
™
COVID‑19 Interpretive Software, navigate to the
following directory (where <…> is the installation directory):
<…>\Applied Biosystems\COVID-19 Interpretive Software\Client\docs\User
Documents
2.
Select the SDT file:
TaqPath COVID-19 Kit Template 7500fastDx sds1_4_1 v1-4.sdt
3.
Transfer the SDT file to the computer with SDS Software v1.4.1, using a USB drive or other
method.
5
28
TaqPath
™
COVID‑19 CE‑IVD RT‑PCR Kit Instructions for Use

Set up and run the 7500 Fast Dx Real‑Time PCR Instrument
For more information about the instrument, see the documents listed in “Related documentation” on
page 65.
1.
Using SDS Software v1.4.1, open the SDT file that you transferred in “Transfer the template (SDT)
file for the 7500 Fast Dx Real‑Time PCR Instrument” on page 28.
IMPORTANT! Be careful to select the appropriate template file for your instrument. Failure to do
so can cause errors in the analysis.
2.
Confirm the run settings in the template and adjust as necessary.
•
Assay: Standard Curve (Absolute Quantitation)
•
Run mode: Standard 7500
•
Passive reference: None
•
Sample volume: 25 µL
IMPORTANT! The passive reference must be set to None.
3.
Confirm that the reporter dye and the detector pairs are correct in the Detector Manager in the
Tools menu.
Reporter dye
Detector
FAM ORF1ab
VIC N gene
ABY S gene
JUN MS2
4.
Confirm that the targets above are assigned to each well in the plate layout.
5.
Confirm the labeling of the control wells.
•
The template has one positive control and one negative control assigned to wells for
reference.
•
Move the control well assignments by copying the existing control wells and pasting them
according to their location on the physical plate.
6.
For wells with a positive control, confirm that Task is set to Standard.
7.
For wells with a negative control, confirm that Task is set to NTC.
8.
Edit the plate layout to assign a unique sample name to each well in the physical plate.
For wells with a patient sample, confirm that Task is set to Unknown for all detectors.
Note: Wells that do not have a sample name will not be analyzed by the software.
Chapter 5
Perform RT-PCR using the Applied Biosystems
™
7500 Fast Dx Real‑Time PCR Instrument
Set up and run the 7500 Fast Dx Real‑Time PCR Instrument
5
TaqPath
™
COVID‑19 CE‑IVD RT‑PCR Kit Instructions for Use
29

9.
Confirm the thermal protocol.
Step Temperature Time Number of cycles
UNG incubation 25°C 2 minutes 1
Reverse transcription 53°C 10 minutes 1
Activation 95°C 2 minutes 1
Denaturation 95°C 3 seconds
40
Anneal / extension 60°C 30 seconds
10.
Click Save As, enter a file name, then click Save.
11.
Reopen the file to connect the computer to the instrument, load the plate, then start the run on the
real-time PCR instrument.
12.
After the instrument run is complete, open the SDS file in SDS Software v1.4.1. Analyze, then save
the file.
Chapter 5 Perform RT-PCR using the Applied Biosystems
™
7500 Fast Dx Real‑Time PCR Instrument
Set up and run the 7500 Fast Dx Real‑Time PCR Instrument
5
30
TaqPath
™
COVID‑19 CE‑IVD RT‑PCR Kit Instructions for Use

Perform RT-PCR using the Applied
Biosystems
™
7500 Fast Real‑Time
PCR Instrument
■
Dye calibration for the 7500 Real‑Time PCR Instrument series ............................. 31
■
Transfer the template (SDT or EDT) file for the 7500 Fast Real‑Time PCR Instrument .......... 32
■
Set up and run the 7500 Fast Real‑Time PCR Instrument (SDS Software v1.5.1) .............. 32
■
Set up and run the 7500 Fast Real‑Time PCR Instrument (7500 Software v2.3) ............... 34
Dye calibration for the 7500 Real‑Time PCR Instrument
series
A maintained instrument will be calibrated for many dyes. In addition to those dyes, the instrument
operator must calibrate the instrument for ABY
™
dye and JUN
™
dye that are used with this kit. For all
other assays, refer to the standard calibration process.
6
TaqPath
™
COVID‑19 CE‑IVD RT‑PCR Kit Instructions for Use
31
Transfer the template (SDT or EDT) file for the 7500 Fast
Real‑Time PCR Instrument
The template (SDT or EDT) file contains the settings for the instrument run. It is installed on the
computer with Applied Biosystems
™
COVID‑19 Interpretive Software, and must be transferred via a
USB drive or other method to the computer on which instrument data collection software is installed.
IMPORTANT! Be careful to select the appropriate template file for your instrument and data collection
software. Failure to do so can cause errors in the analysis.
1.
On the computer with Applied Biosystems
™
COVID‑19 Interpretive Software, navigate to the
following directory (where <…> is the installation directory):
<…>\Applied Biosystems\COVID-19 Interpretive Software\Client\docs\User
Documents
2.
Select the correct SDT or EDT file for the version of the instrument software that you are using:
Data collection software
version
Template file
SDS Software v1.5.1 TaqPath COVID-19 Kit Template 7500fast sds1_5_1 v1-4.sdt
7500 Software v2.3 TaqPath COVID-19 Kit Template 7500fast sds2_3 v1-2.edt
3.
Transfer the appropriate SDT or EDT file to the computer with your data collection software, using a
USB drive or other method.
Set up and run the 7500 Fast Real‑Time PCR Instrument
(SDS Software v1.5.1)
This procedure is specific for the 7500 Fast Real‑Time PCR Instrument using SDS Software v1.5.1.
For more information about the instrument, see the documents listed in “Related documentation” on
page 65.
1.
Using SDS Software v1.5.1, access the appropriate template file.
a.
Create a new experiment.
b.
In the Template field, browse to, then open the SDT file that you transferred in “Transfer the
template (SDT or EDT) file for the 7500 Fast Real‑Time PCR Instrument” on page 32.
IMPORTANT! Be careful to select the appropriate template file for your instrument and data
collection software. Failure to do so can cause errors in the analysis.
Chapter 6 Perform RT-PCR using the Applied Biosystems
™
7500 Fast Real‑Time PCR Instrument
Transfer the template (SDT or EDT) file for the 7500 Fast Real‑Time PCR Instrument
6
32
TaqPath
™
COVID‑19 CE‑IVD RT‑PCR Kit Instructions for Use

2.
Confirm the run settings in the template and adjust as necessary.
•
Assay: Standard Curve (Absolute Quantitation)
•
Run mode: Standard 7500
•
Passive reference: None
•
Sample volume: 25 µL
IMPORTANT! The passive reference must be set to None.
3.
Confirm that the reporter dye and the detector pairs are correct in the Detector Manager in the
Tools menu.
Reporter dye
Detector
FAM ORF1ab
VIC N gene
ABY S gene
JUN MS2
4.
Confirm that the targets above are assigned to each well in the plate layout.
5.
Confirm the labeling of the control wells.
•
The template has one positive control (PC) and one negative control (NC) assigned to wells for
reference.
•
Move the control well assignments by copying the existing control wells and pasting them
according to their location on the physical plate.
6.
For wells with a positive control, confirm that Task is set to Standard.
7.
For wells with a negative control, confirm that Task is set to NTC.
8.
Edit the plate layout to assign a unique sample name to each well in the physical plate.
For wells with a patient sample, ensure that Task is set to Unknown for all detectors.
Note: Wells that do not have a sample name will not be analyzed by the software.
9.
Confirm the thermal protocol.
Step
Temperature Time Number of cycles
UNG incubation 25°C 2 minutes 1
Reverse transcription 53°C 10 minutes 1
Activation 95°C 2 minutes 1
Denaturation 95°C 3 seconds
40
Anneal / extension 60°C 30 seconds
10.
Click Save As, enter a file name, then click Save.
Chapter 6
Perform RT-PCR using the Applied Biosystems
™
7500 Fast Real‑Time PCR Instrument
Set up and run the 7500 Fast Real‑Time PCR Instrument (SDS Software v1.5.1)
6
TaqPath
™
COVID‑19 CE‑IVD RT‑PCR Kit Instructions for Use
33

11.
Reopen the file, load the plate, then start the run on the instrument.
12.
After the instrument run is complete, open the SDS file in SDS Software v1.5.1. Analyze, then save
the file.
Set up and run the 7500 Fast Real‑Time PCR Instrument
(7500 Software v2.3)
This procedure is specific for the 7500 Fast Real‑Time PCR Instrument using SDS Software v2.3.
For more information about the instrument, see the documents listed in “Related documentation” on
page 65.
1.
In the 7500 Software v2.3 home page, click Template.
2.
Browse to, then open the EDT file that you transferred in “Transfer the template (SDT or EDT) file for
the 7500 Fast Real‑Time PCR Instrument” on page 32.
IMPORTANT! Be careful to select the appropriate template file for your instrument and data
collection software. Failure to do so can cause errors in the analysis.
3.
In the Experiment Properties window, enter or confirm the following information:
•
Experiment name: Enter a unique name
•
Instrument type: 7500 Fast (96 wells)
•
Type of experiment: Quantitation - Standard Curve
•
Reagents: TaqMan
™
•
Ramp Speed: Standard
4.
In the Plate Setup window, in the Define Targets and Samples tab and the Define Targets pane,
confirm that the targets, reporter dyes, and quenchers are listed correctly.
Target
Reporter dye Quencher
ORF1ab FAM None
N gene VIC None
S gene ABY None
MS2 JUN None
5.
In the Plate Setup window, in the Define Targets and Samples tab and the Define Samples
pane, confirm the labeling of the control wells.
•
The template has one positive control (PC) and one negative control (NC) assigned to wells for
reference.
•
Move the control well assignments by copying the existing control wells and pasting them
according to their location on the physical plate.
•
To include additional controls, select Add New Sample.
Chapter 6
Perform RT-PCR using the Applied Biosystems
™
7500 Fast Real‑Time PCR Instrument
Set up and run the 7500 Fast Real‑Time PCR Instrument (7500 Software v2.3)
6
34
TaqPath
™
COVID‑19 CE‑IVD RT‑PCR Kit Instructions for Use
6.
Select Add New Sample to assign a unique sample name to each well in the physical plate.
7.
In the Plate Setup window, in the Assign Targets and Samples tab, confirm that four targets are
assigned to each well in the plate layout. To designate a target or sample to a well, select the well,
then check the Assign checkbox.
Note: Wells that do not have a sample name will not be analyzed by the software.
8.
For wells with a positive control, confirm that Task is set to S for Standard.
9.
For wells with a negative control, confirm that Task is set to N for Negative.
10.
For wells with a patient sample, confirm that Task is set to U for Unknown.
11.
Confirm that the Passive Reference is set to None.
12.
In the Run Method window, confirm that the Reaction Volume Per Well is 25 μL, then confirm the
thermal protocol.
Step
Temperature Time Number of cycles
UNG incubation 25°C 2 minutes 1
Reverse transcription 53°C 10 minutes 1
Activation 95°C 2 minutes 1
Denaturation 95°C 3 seconds
40
Anneal / extension 60°C 30 seconds
13.
Select Start Run, enter a file name, then click Save.
14.
After the instrument run is complete, click Analyze, then save the file.
Chapter 6 Perform RT-PCR using the Applied Biosystems
™
7500 Fast Real‑Time PCR Instrument
Set up and run the 7500 Fast Real‑Time PCR Instrument (7500 Software v2.3)
6
TaqPath
™
COVID‑19 CE‑IVD RT‑PCR Kit Instructions for Use
35

Perform RT-PCR using the Applied
Biosystems
™
7500 Real‑Time PCR
Instrument
■
Dye calibration for the 7500 Real‑Time PCR Instrument series ............................. 36
■
Transfer the template (EDT) file for the 7500 Real‑Time PCR Instrument ..................... 37
■
Set up and run the 7500 Real‑Time PCR Instrument ...................................... 37
Dye calibration for the 7500 Real‑Time PCR Instrument
series
A maintained instrument will be calibrated for many dyes. In addition to those dyes, the instrument
operator must calibrate the instrument for ABY
™
dye and JUN
™
dye that are used with this kit. For all
other assays, refer to the standard calibration process.
IMPORTANT! Use only the calibration plates listed in “Required materials not supplied” on page 8.
7
36
TaqPath
™
COVID‑19 CE‑IVD RT‑PCR Kit Instructions for Use

Transfer the template (EDT) file for the 7500 Real‑Time PCR
Instrument
The template (EDT) file contains the settings for the instrument run. It is installed on the computer with
Applied Biosystems
™
COVID‑19 Interpretive Software, and must be transferred via a USB drive or other
method to the computer on which 7500 Software v2.3 is installed.
IMPORTANT! Be careful to select the appropriate template file for your instrument. Failure to do so
can cause errors in the analysis.
1.
On the computer with Applied Biosystems
™
COVID‑19 Interpretive Software, navigate to the
following directory (where <…> is the installation directory):
<…>\Applied Biosystems\COVID-19 Interpretive Software\Client\docs\User
Documents
2.
Select the EDT file:
TaqPath COVID-19 Kit Template 7500std sds2_3 v1-2.edt
3.
Transfer the EDT file to the computer with your data collection software, using a USB drive or other
method.
Set up and run the 7500 Real‑Time PCR Instrument
This procedure is specific for the 7500 Real‑Time PCR Instrument using 7500 Software v2.3.
For more information about the instrument, see the documents listed in “Related documentation” on
page 65.
1.
In the 7500 Software v2.3 home page, click Template.
2.
Browse to, then open the template file that you transferred in “Transfer the template (EDT) file for
the 7500 Real‑Time PCR Instrument” on page 37.
IMPORTANT! Be careful to select the appropriate template file for your instrument. Failure to do
so can cause errors in the analysis.
3.
In the Experiment Properties window, enter or confirm the following information:
•
Experiment name: Enter a unique name
•
Instrument type: 7500 (96 wells)
•
Type of experiment: Quantitation - Standard Curve
•
Reagents: TaqMan
™
•
Ramp Speed: Standard
Chapter 7
Perform RT-PCR using the Applied Biosystems
™
7500 Real‑Time PCR Instrument
Transfer the template (EDT) file for the 7500 Real‑Time PCR Instrument
7
TaqPath
™
COVID‑19 CE‑IVD RT‑PCR Kit Instructions for Use
37
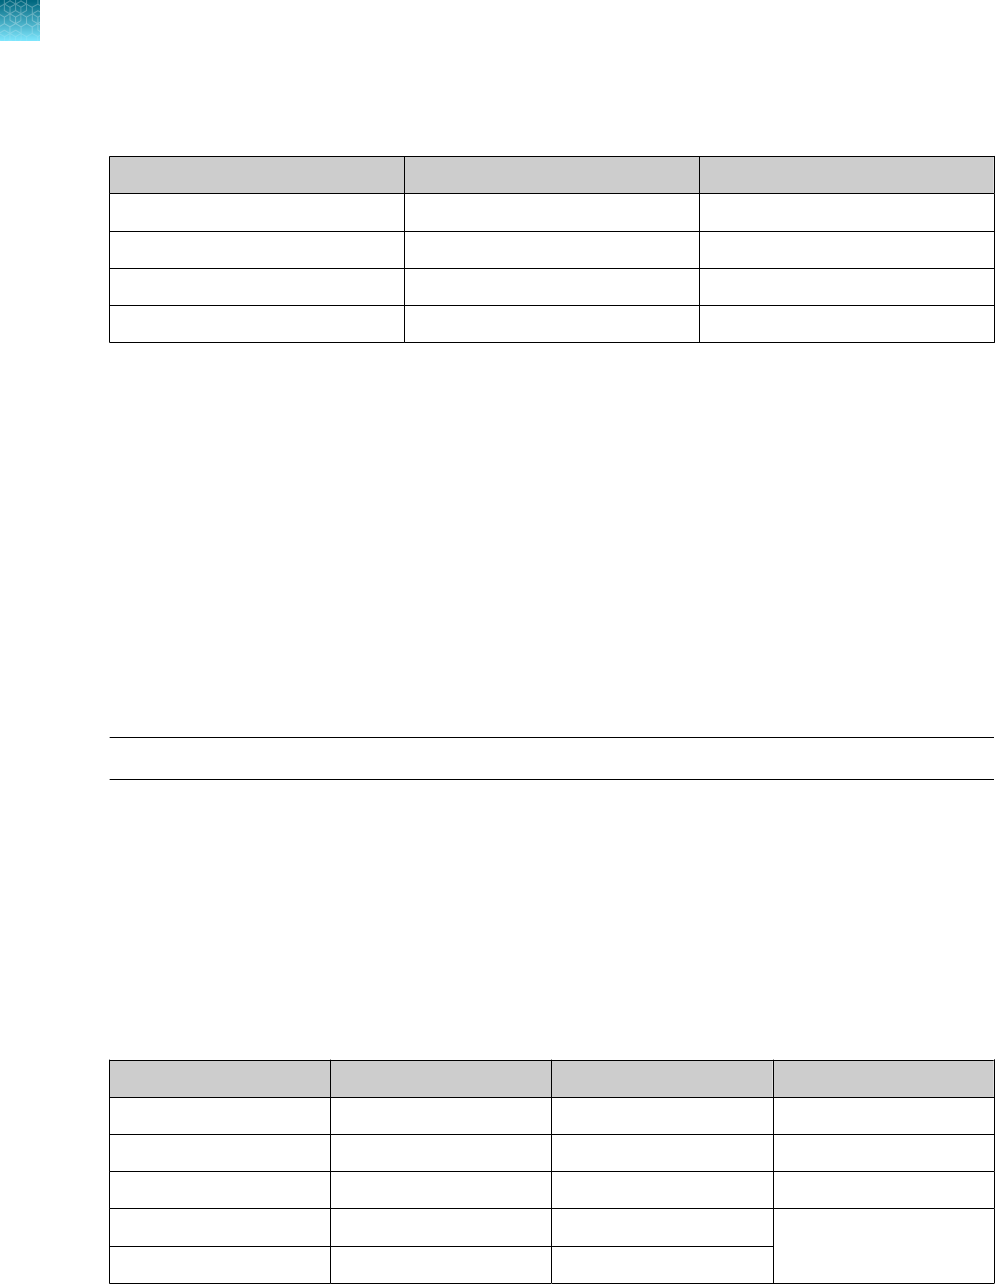
4.
In the Plate Setup window, in the Define Targets and Samples tab and the Define Targets pane,
confirm that the targets, reporter dyes, and quenchers are listed correctly.
Target Reporter dye Quencher
ORF1ab FAM None
N gene VIC None
S gene ABY None
MS2 JUN None
5.
In the Plate Setup window, in the Define Targets and Samples tab and the Define Samples
pane, confirm the labeling of the control wells.
•
The template has one positive control (PC) and one negative control (NC) assigned to wells for
reference.
•
Move the control well assignments by copying the existing control wells and pasting them
according to their location on the physical plate.
To include additional controls, select Add New Sample.
6.
Select Add New Sample to assign a unique sample name to each well in the physical plate.
7.
In the Plate Setup window, in the Assign Targets and Samples tab, confirm that four targets are
assigned to each well in the plate layout. To designate a target or sample to a well, select the well,
then check the Assign checkbox.
Note: Wells that do not have a sample name will not be analyzed by the software.
8.
For wells with a positive control, confirm that Task is set to S for Standard.
9.
For wells with a negative control, confirm that Task is set to N for Negative.
10.
For wells with a patient sample, confirm that Task is set to U for Unknown.
11.
Confirm that the Passive Reference is set to None.
12.
In the Run Method window, confirm that the Reaction Volume Per Well is 25 μL, then confirm the
thermal protocol.
Step
Temperature Time Number of cycles
UNG incubation 25°C 2 minutes 1
Reverse transcription 53°C 10 minutes 1
Activation 95°C 2 minutes 1
Denaturation 95°C 3 seconds
40
Anneal / extension 60°C 30 seconds
13.
Select Start Run, enter a file name, then click Save.
14.
After the instrument run is complete, click Analyze, then save the file.
Chapter 7
Perform RT-PCR using the Applied Biosystems
™
7500 Real‑Time PCR Instrument
Set up and run the 7500 Real‑Time PCR Instrument
7
38
TaqPath
™
COVID‑19 CE‑IVD RT‑PCR Kit Instructions for Use

Perform RT-PCR using the Applied
Biosystems
™
QuantStudio
™
5
Real‑Time PCR Instrument
■
Dye calibration for the QuantStudio
™
5 Real‑Time PCR Instrument ......................... 39
■
Transfer the template (EDT) file for the QuantStudio
™
5 Real‑Time PCR Instrument ........... 40
■
Set up and run the QuantStudio
™
5 Real‑Time PCR Instrument (96-well plates) .............. 40
■
Set up and run the QuantStudio
™
5 Real‑Time PCR Instrument (384-well plates) ............. 42
Dye calibration for the QuantStudio
™
5 Real‑Time PCR
Instrument
A maintained instrument will be calibrated for all dyes that are used with this kit. Ensure that the
calibrations for FAM
™
dye, VIC
™
dye, ABY
™
dye, and JUN
™
dye are current. If calibration is required,
refer to the standard calibration process in the instrument user guide.
8
TaqPath
™
COVID‑19 CE‑IVD RT‑PCR Kit Instructions for Use
39
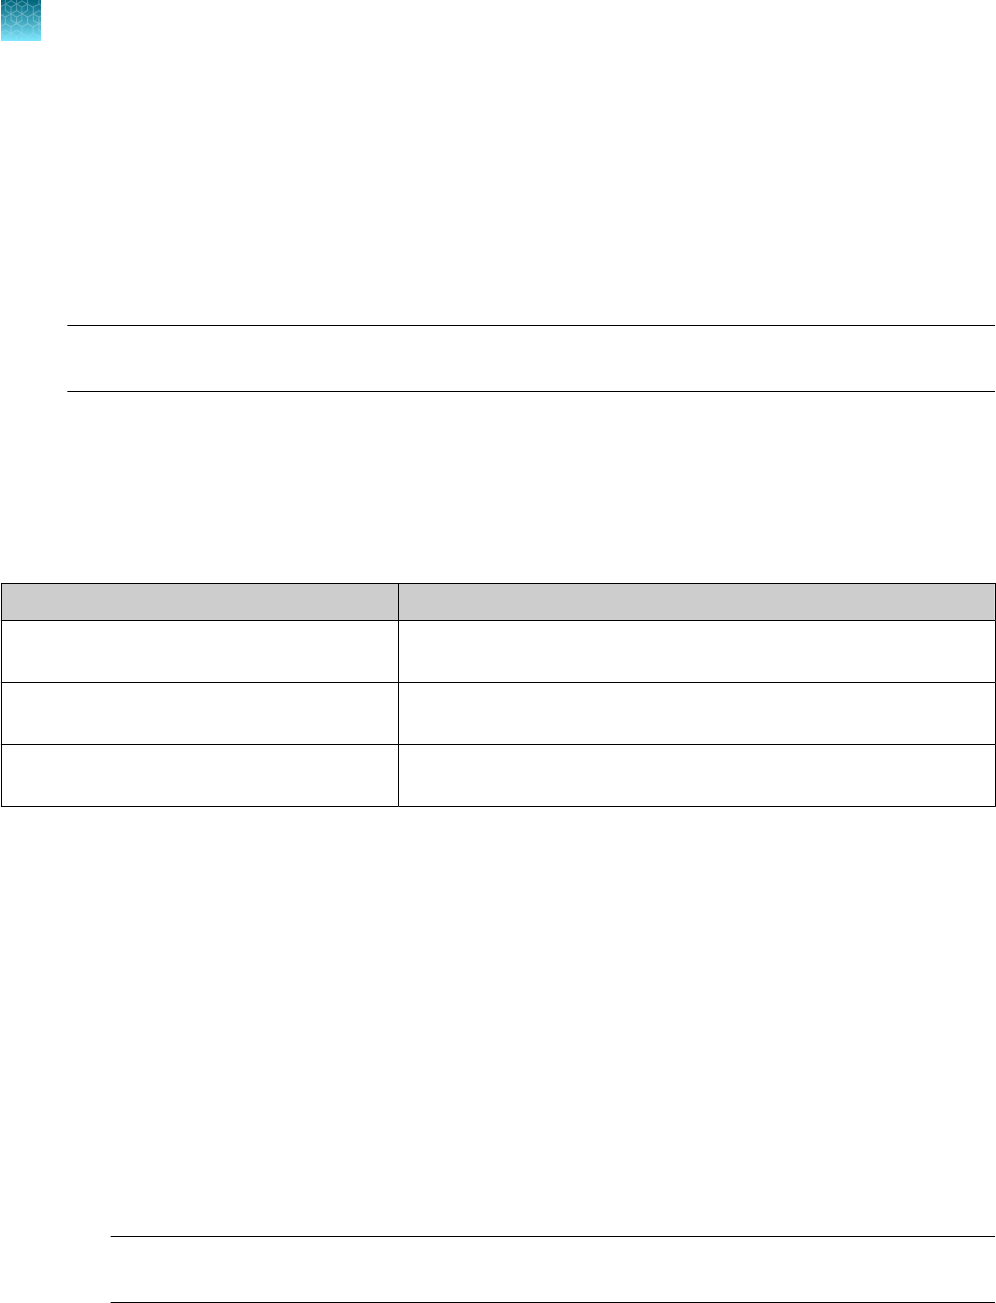
Transfer the template (EDT) file for the QuantStudio
™
5
Real‑Time PCR Instrument
The template (EDT) file contains the settings for the instrument run. It is installed on the computer
with Applied Biosystems
™
COVID‑19 Interpretive Software, and must be transferred via a USB drive or
other method to the computer on which QuantStudio
™
Design and Analysis Desktop Software v1.5.1 is
installed.
IMPORTANT! Be careful to select the appropriate template file for your instrument and block type.
Failure to do so can cause errors in the analysis.
1.
On the computer with Applied Biosystems
™
COVID‑19 Interpretive Software, navigate to the
following directory (where <…> is the installation directory):
<…>\Applied Biosystems\COVID-19 Interpretive Software\Client\docs\User
Documents
2.
Select the correct EDT file for your instrument.
Instrument
Template file
QuantStudio
™
5 Real‑Time PCR Instrument
(96-well, 0.1-mL block)
TaqPath COVID-19 Kit Template QS5 0_1ml_da1_5_1
v2-2.edt
QuantStudio
™
5 Real‑Time PCR Instrument
(96-well, 0.2-mL block)
TaqPath COVID-19 Kit Template QS5 0_2ml_da1_5_1
v2-2.edt
QuantStudio
™
5 Real‑Time PCR Instrument
(384-well block)
TaqPath COVID-19 Kit Template QS5 384_da1_5_1
v2-2.edt
3.
Transfer the EDT file to the computer with QuantStudio
™
Design and Analysis Desktop Software
v1.5.1, using a USB drive or other method.
Set up and run the QuantStudio
™
5 Real‑Time PCR
Instrument (96-well plates)
For more information about the instrument, see the documents listed in “Related documentation” on
page 65.
1.
In the QuantStudio
™
Design and Analysis Desktop Software v1.5.1, in the New Experiment box,
select Create New Experiment4Template.
2.
Browse to, then open the EDT file that you transferred in “Transfer the template (EDT) file for the
QuantStudio
™
5 Real‑Time PCR Instrument” on page 40.
IMPORTANT! Be careful to select the appropriate template file for your instrument and block
type. Failure to do so can cause errors in the analysis.
Chapter 8 Perform RT-PCR using the Applied Biosystems
™
QuantStudio
™
5 Real‑Time PCR Instrument
Transfer the template (EDT) file for the QuantStudio
™
5 Real‑Time PCR Instrument
8
40
TaqPath
™
COVID‑19 CE‑IVD RT‑PCR Kit Instructions for Use
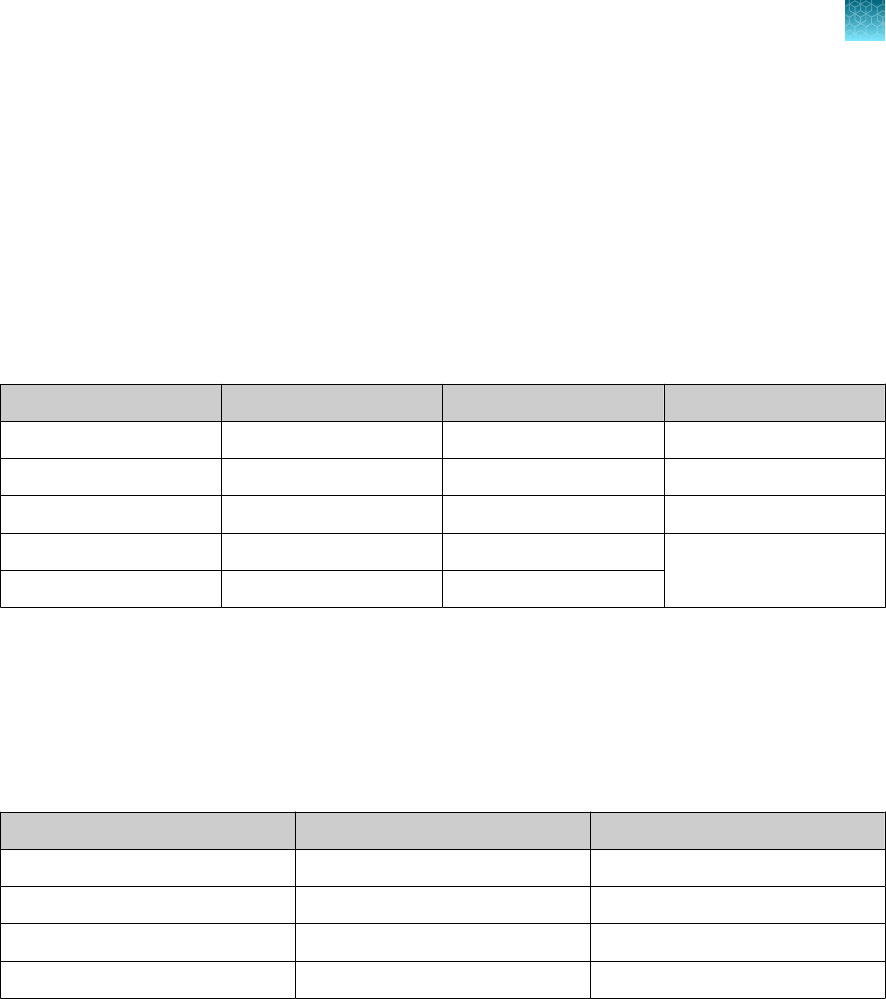
3.
In the Properties tab, enter or confirm the following.
•
Name: Enter a unique name
•
Instrument type: QuantStudio
™
5 System
•
Block type: 96-Well 0.2-mL Block or 96-Well 0.1-mL Block
•
Experiment type: Standard Curve
•
Chemistry: TaqMan
™
Reagents
•
Run Mode: Standard
4.
In the Method tab, confirm that the Volume is 25 µL, then confirm the thermal protocol.
Step Temperature Time Number of cycles
UNG incubation 25°C 2 minutes 1
Reverse transcription 53°C 10 minutes 1
Activation 95°C 2 minutes 1
Denaturation 95°C 3 seconds
40
Anneal / extension 60°C 30 seconds
5.
In the Plate tab, click Quick Setup.
6.
In the Plate Attributes pane, confirm that the Passive Reference is set to None.
7.
In the Plate tab, click Advanced Setup.
8.
In the Targets table, confirm that the reporter dye and the target pairs are correct.
Reporter dye
Detector Quencher
FAM ORF1ab None
VIC N gene None
ABY S gene None
JUN MS2 None
9.
Confirm that the targets above are assigned to each well in the plate layout.
10.
In the plate layout pane, confirm the labeling of the control wells.
•
The template has one positive control (PC) and one negative control (NC) assigned to wells for
reference.
•
Move the control well assignments by copying the existing control wells and pasting them
according to their location on the physical plate.
11.
For all targets in the positive control well, confirm that Task is set to S (Standard).
12.
For all targets in the negative control well, confirm that Task is set to N (Negative Control).
13.
In the Samples table, click Add to define the sample names. Create a unique sample name for
each well in the physical plate.
Chapter 8
Perform RT-PCR using the Applied Biosystems
™
QuantStudio
™
5 Real‑Time PCR Instrument
Set up and run the QuantStudio
™
5 Real‑Time PCR Instrument (96-well plates)
8
TaqPath
™
COVID‑19 CE‑IVD RT‑PCR Kit Instructions for Use
41

14.
To assign a sample to a well, select the well in the plate layout, then select the sample from the
Samples table.
For all targets in the patient sample wells, confirm that Task is set to U (Unknown).
Note: Wells that do not have a sample name will not be analyzed by the software.
15.
In the Run tab, click Start Run, then select your instrument from the drop-down list.
16.
Enter a file name in the dialog box that prompts you to save the run file, then save the file.
Set up and run the QuantStudio
™
5 Real‑Time PCR
Instrument (384-well plates)
For more information about the instrument, see the documents listed in “Related documentation” on
page 65.
1.
In the QuantStudio
™
Design and Analysis Desktop Software v1.5.1, in the New Experiment box,
select Create New Experiment4Template.
2.
Browse to, then open the EDT file that you transferred in “Transfer the template (EDT) file for the
QuantStudio
™
5 Real‑Time PCR Instrument” on page 40.
IMPORTANT! Be careful to select the appropriate template file for your instrument and block
type. Failure to do so can cause errors in the analysis.
3.
In the Properties tab, enter or confirm the following.
•
Name: Enter a name
•
Instrument type: QuantStudio
™
5 System
•
Block type: 384-well Block
•
Experiment type: Standard Curve
•
Chemistry: TaqMan
™
Reagents
•
Run Mode: Standard
4.
In the Method tab, confirm that the Volume is 20 µL, then confirm the thermal protocol.
Step
Temperature Time Number of cycles
UNG incubation 25°C 2 minutes 1
Reverse transcription 53°C 10 minutes 1
Activation 95°C 2 minutes 1
Denaturation 95°C 3 seconds
40
Anneal / extension 60°C 30 seconds
5.
In the Plate tab, click Quick Setup.
6.
In the Plate Attributes pane, confirm that the Passive Reference is set to None.
Chapter 8
Perform RT-PCR using the Applied Biosystems
™
QuantStudio
™
5 Real‑Time PCR Instrument
Set up and run the QuantStudio
™
5 Real‑Time PCR Instrument (384-well plates)
8
42
TaqPath
™
COVID‑19 CE‑IVD RT‑PCR Kit Instructions for Use
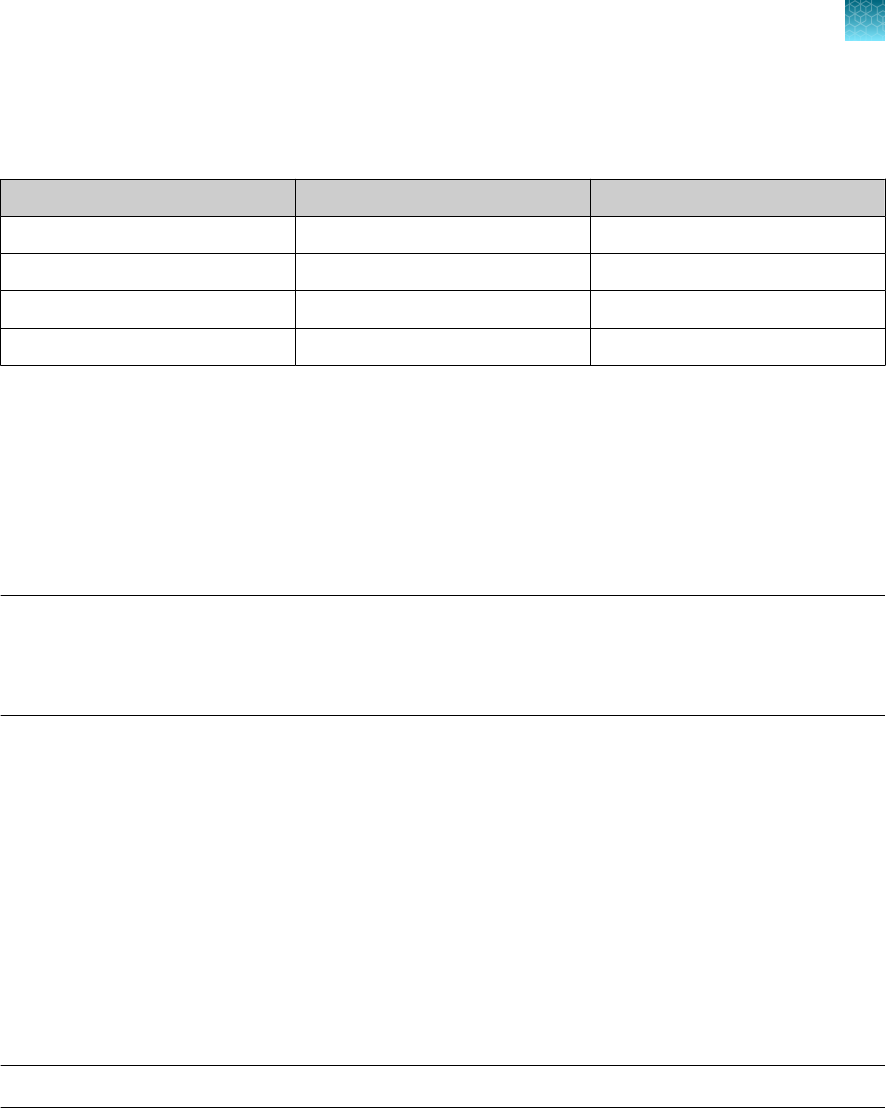
7.
In the Plate tab, click Advanced Setup.
8.
In the Targets table, confirm that the reporter dye and the target pairs are correct.
Reporter dye Detector Quencher
FAM ORF1ab None
VIC N gene None
ABY S gene None
JUN MS2 None
9.
Confirm that the targets above are assigned to each well in the plate layout.
10.
In the plate layout pane, confirm the labeling of the control wells.
•
The template has one positive control (PC) and one negative control (NC) assigned to wells for
reference.
•
Move the control well assignments by copying the existing control wells and pasting them
according to their location on the physical plate.
Note: If samples from more than one RNA extraction run are being included on the same RT-PCR
384-well plate, then there must be one negative control for each RNA extraction run included on
the RT-PCR 384-well plate (see “Guidelines for RT-PCR” on page 19). Label each negative control
with a unique name, for example, NC1, NC2, NC3, and NC4.
11.
For all targets in the positive control well, confirm that Task is set to S (Standard).
12.
For all targets in the negative control well, confirm that Task is set to N (Negative Control).
13.
In the Samples table, click Add to define the names. Create a unique sample name for each well in
the physical plate.
The template has one positive control and one negative control assigned to wells for reference. If
additional control wells are required, each control well must have a unique name.
14.
To assign a sample to a well, select the well in the plate layout, then select the sample from the
Samples table.
For all targets in the patient sample wells, confirm that Task is set to U (Unknown).
Note: Wells that do not have a sample name will not be analyzed by the software.
15.
In the Run tab, click Start Run, then select your instrument from the drop-down list.
16.
Enter a file name in the dialog box that prompts you to save the run file, then save the file.
Chapter 8 Perform RT-PCR using the Applied Biosystems
™
QuantStudio
™
5 Real‑Time PCR Instrument
Set up and run the QuantStudio
™
5 Real‑Time PCR Instrument (384-well plates)
8
TaqPath
™
COVID‑19 CE‑IVD RT‑PCR Kit Instructions for Use
43

Perform RT-PCR using the Applied
Biosystems
™
QuantStudio
™
5 Dx
Real‑Time PCR Instrument
■
Dye calibration for the QuantStudio
™
5 Dx Real‑Time PCR Instrument ...................... 44
■
QuantStudio
™
5 Dx TD Software ....................................................... 45
■
QuantStudio
™
5 Dx IVD Software ...................................................... 48
Dye calibration for the QuantStudio
™
5 Dx Real‑Time PCR
Instrument
A maintained instrument will be calibrated for all dyes that are used with this kit. Ensure that the
calibrations for FAM
™
dye, VIC
™
dye, ABY
™
dye, and JUN
™
dye are current. For all other assays, refer to
the standard calibration process.
9
44
TaqPath
™
COVID‑19 CE‑IVD RT‑PCR Kit Instructions for Use

QuantStudio
™
5 Dx TD Software
Follow the procedures in this section if you are using the QuantStudio
™
5 Dx TD Software.
If you are using QuantStudio
™
5 Dx IVD Software, see “QuantStudio
™
5 Dx IVD Software” on page 48.
Transfer the template (EDT) file for the QuantStudio
™
5 Dx Real‑Time PCR
Instrument (QuantStudio
™
5 Dx TD Software)
The template (EDT) file contains the settings for the instrument run. It is installed on the computer with
Applied Biosystems
™
COVID‑19 Interpretive Software, and must be transferred via a USB drive or other
method to the computer on which QuantStudio
™
5 Dx TD Software is installed.
1.
On the computer with Applied Biosystems
™
COVID‑19 Interpretive Software, navigate to the
following directory (where <…> is the installation directory):
<…>\Applied Biosystems\COVID-19 Interpretive Software\Client\docs\User
Documents
2.
Select the EDT file:
TaqPath COVID-19 Kit Template QS5 Dx_da1_0_2 v2-2.edt
3.
Transfer the EDT file to the computer with the QuantStudio
™
5 Dx TD Software, using a USB drive
or other method.
IMPORTANT! Be careful to select the appropriate template file for the instrument and software
version that you are using. Failure to do so can cause errors in the analysis.
Set up and run the QuantStudio
™
5 Dx Real‑Time PCR Instrument
(QuantStudio
™
5 Dx TD Software)
For more information about the QuantStudio
™
5 Dx Real‑Time PCR Instrument, see the documents
listed in “Related documentation” on page 65.
1.
In the QuantStudio
™
5 Dx TD Software, in the New Experiment box, select Create New
Experiment4Template.
2.
Browse to, then open the EDT file that you transferred in “Transfer the template (EDT) file for the
QuantStudio
™
5 Dx Real‑Time PCR Instrument (QuantStudio
™
5 Dx TD Software)” on page 45.
IMPORTANT! Be careful to select the appropriate template file for the instrument and block type.
Failure to do so can cause errors in the analysis.
3.
In the Properties tab, enter or confirm the following.
•
Name: Enter a unique name
•
Instrument type: QuantStudio
™
5 Dx System
•
Block type: 96-Well 0.2-mL Block
•
Experiment type: Standard Curve
•
Chemistry: TaqMan
™
Reagents
•
Run Mode: Standard
Chapter 9
Perform RT-PCR using the Applied Biosystems
™
QuantStudio
™
5 Dx Real‑Time PCR Instrument
QuantStudio
™
5 Dx TD Software
9
TaqPath
™
COVID‑19 CE‑IVD RT‑PCR Kit Instructions for Use
45
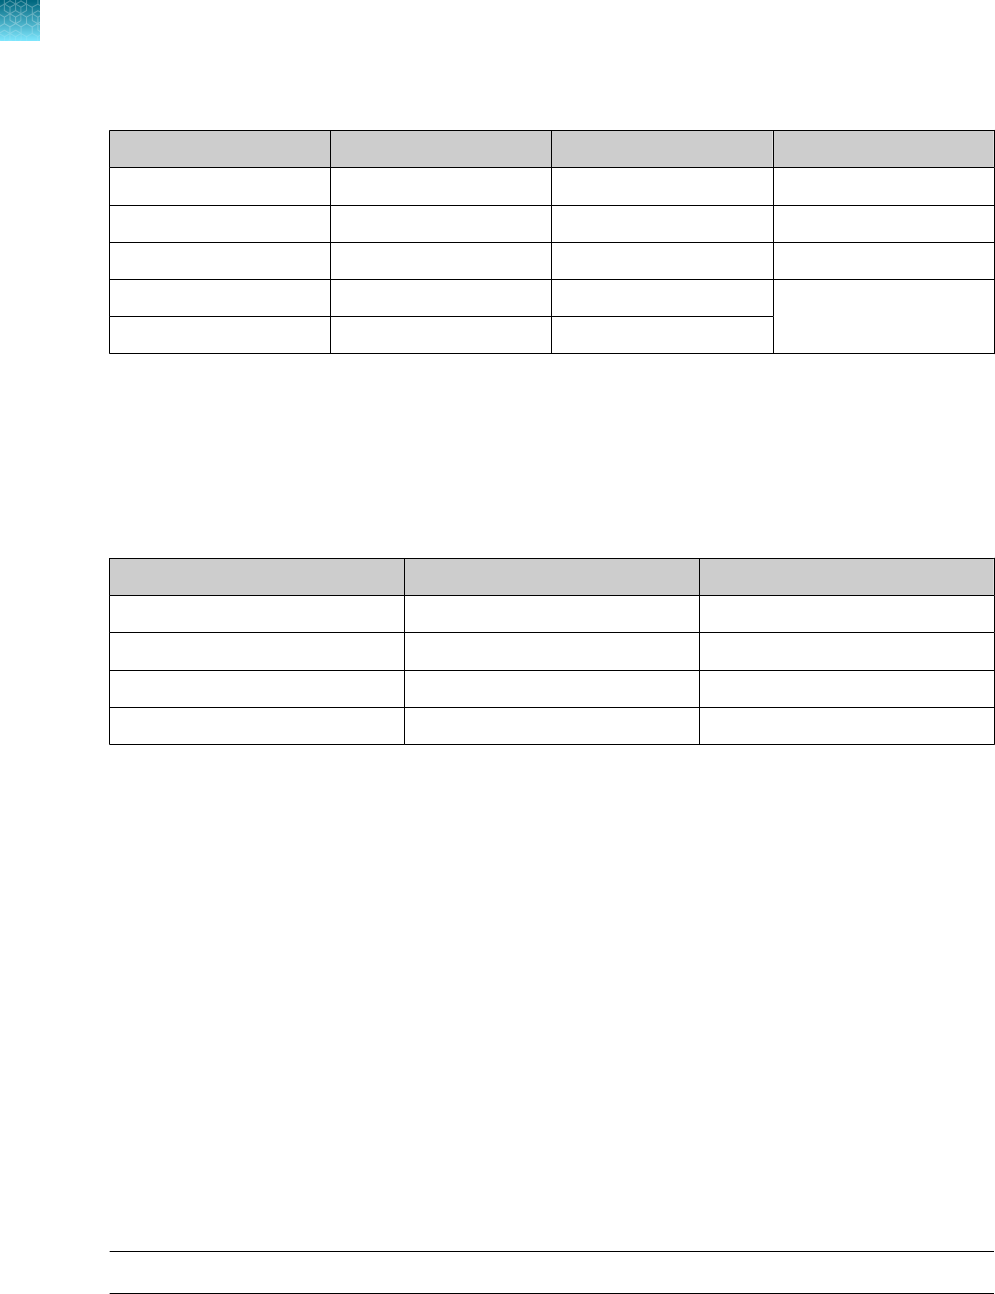
4.
In the Method tab, confirm that Volume is 25 µL, then confirm the thermal protocol.
Step Temperature Time Number of cycles
UNG incubation 25°C 2 minutes 1
Reverse transcription 53°C 10 minutes 1
Activation 95°C 2 minutes 1
Denaturation 95°C 3 seconds
40
Anneal / extension 60°C 30 seconds
5.
In the Plate tab, click Quick Setup.
6.
In the Plate Attributes pane, confirm that the Passive Reference is set to None.
7.
In the Plate tab, click Advanced Setup.
8.
In the Targets table, confirm that the reporter dye and the target pairs are correct.
Reporter dye
Detector Quencher
FAM ORF1ab None
VIC N gene None
ABY S gene None
JUN MS2 None
9.
Confirm that the targets above are assigned to each well in the plate layout.
10.
In the plate layout pane, confirm the labeling of the control wells.
•
The template has one positive control (PC) and one negative control (NC) assigned to wells for
reference.
•
Move the control well assignments by copying the existing control wells and pasting them
according to their location on the physical plate.
11.
For all targets in the positive control well, confirm that Task is set to S (Standard).
12.
For all targets in the negative control well, confirm that Task is set to N (Negative Control).
13.
In the Samples table, click Add to define the sample names. Create a unique sample name for
each well in the physical plate.
14.
To assign a sample to a well, select the well in the plate layout, then select the sample from the
Samples table.
For all targets in the patient sample wells, confirm that Task is set to U (Unknown).
Note: Wells that do not have a sample name will not be analyzed by the software.
Chapter 9
Perform RT-PCR using the Applied Biosystems
™
QuantStudio
™
5 Dx Real‑Time PCR Instrument
QuantStudio
™
5 Dx TD Software
9
46
TaqPath
™
COVID‑19 CE‑IVD RT‑PCR Kit Instructions for Use

15.
In the Run tab, click Start Run, then select your instrument from the drop-down list.
16.
Enter a file name in the dialog box that prompts you to save the run file, then save the file.
Chapter 9 Perform RT-PCR using the Applied Biosystems
™
QuantStudio
™
5 Dx Real‑Time PCR Instrument
QuantStudio
™
5 Dx TD Software
9
TaqPath
™
COVID‑19 CE‑IVD RT‑PCR Kit Instructions for Use
47

QuantStudio
™
5 Dx IVD Software
Follow the procedures in this section if you are using the QuantStudio
™
5 Dx IVD Software.
If you are using QuantStudio
™
5 Dx TD Software, see “QuantStudio
™
5 Dx TD Software” on page 45.
Transfer the template (EDT) file for the QuantStudio
™
5 Dx Real‑Time PCR
Instrument (QuantStudio
™
5 Dx IVD Software)
The template (EDT) file contains the settings for the instrument run. It is installed on the computer with
Applied Biosystems
™
COVID‑19 Interpretive Software, and must be transferred via a USB drive or other
method to the computer on which QuantStudio
™
5 Dx IVD Software is installed.
1.
On the computer with Applied Biosystems
™
COVID‑19 Interpretive Software, navigate to the
following directory (where <…> is the installation directory):
<…>\Applied Biosystems\COVID-19 Interpretive Software\Client\docs\User
Documents
2.
Select the EDT file:
TaqPath COVID-19 Kit Template QS5 Dx_da1_0_2_CE_IVD v2-2.edt
3.
Transfer the EDT file to the computer with the QuantStudio
™
5 Dx IVD Software, using a USB drive
or other method.
IMPORTANT! Be careful to select the appropriate template file for the instrument and software
version that you are using. Failure to do so can cause errors in the analysis.
The template must be installed in the QuantStudio
™
5 Dx IVD Software before the run is started. See
“Install the template file in the QuantStudio
™
5 Dx IVD Software” on page 48.
Install the template file in the QuantStudio
™
5 Dx IVD Software
To install a template, the logged-in user must have the SAE permission of Manage Installed
Templates. For information about SAE permissions, see the QuantStudio
™
5 Dx TD Software User
Guide (Pub. No. 100049554).
1.
Open the QuantStudio
™
5 Dx IVD Software.
2.
When prompted, log in with a user account with the appropriate permissions.
3.
In the menu bar, select Tools4Template Menu.
4.
Click Install, then click Yes to confirm the Template Installation Agreement.
5.
Navigate template file that was transferred, then click Open.
The template is now installed and accessible in the Template Menu.
6.
Click Close.
Chapter 9
Perform RT-PCR using the Applied Biosystems
™
QuantStudio
™
5 Dx Real‑Time PCR Instrument
QuantStudio
™
5 Dx IVD Software
9
48
TaqPath
™
COVID‑19 CE‑IVD RT‑PCR Kit Instructions for Use

Set up and run the QuantStudio
™
5 Dx Real‑Time PCR Instrument
(QuantStudio
™
5 Dx IVD Software)
For more information about the QuantStudio
™
5 Dx Real‑Time PCR Instrument, see the documents
listed in “Related documentation” on page 65.
IMPORTANT! When the QuantStudio
™
5 Dx IVD Software is used, the positive control must be placed
in well A12 and the negative control must be placed in well A1 on the physical plate.
1.
In the QuantStudio
™
5 Dx IVD Software, in the New Experiment box, select Experiment Setup.
2.
Select the template file that you installed in “Install the template file in the QuantStudio
™
5 Dx
IVD Software” on page 48.
3.
Click Create New Experiment.
4.
In Samples table, click Add to define the sample names. Create a unique sample name for each
well in the physical plate.
5.
To assign a sample to a well, select the well in the plate layout, then select sample from the
Samples table.
Note: Wells that do not have a sample name will not be analyzed by the software.
6.
In the Run tab, click Start Run, then select your instrument from the drop-down list.
The Enter Reason for Change dialog box will appear.
7.
In the Enter Reason for Change dialog box, click OK.
8.
Enter a file name in the dialog box that prompts you to save the run file, then save the file.
Chapter 9 Perform RT-PCR using the Applied Biosystems
™
QuantStudio
™
5 Dx Real‑Time PCR Instrument
QuantStudio
™
5 Dx IVD Software
9
TaqPath
™
COVID‑19 CE‑IVD RT‑PCR Kit Instructions for Use
49

Perform RT-PCR using the Applied
Biosystems
™
QuantStudio
™
7 Flex
Real-Time PCR Instrument (384-well
block)
■
Dye calibration for the QuantStudio
™
7 Flex Real-Time PCR Instrument ..................... 50
■
Transfer the template (EDT) file for the QuantStudio
™
7 Flex Real-Time PCR Instrument
(384–well block) ...................................................................... 51
■
Set up and run the QuantStudio
™
7 Flex Real-Time PCR Instrument (384–well block) ......... 51
Dye calibration for the QuantStudio
™
7 Flex Real-Time PCR
Instrument
A maintained instrument will be calibrated for many dyes. In addition to those dyes, the instrument
operator must calibrate the instrument for ABY
™
dye and JUN
™
dye that are used with this kit. For all
other assays, refer to the standard calibration process.
10
50
TaqPath
™
COVID‑19 CE‑IVD RT‑PCR Kit Instructions for Use

Transfer the template (EDT) file for the QuantStudio
™
7 Flex
Real-Time PCR Instrument (384–well block)
The template (EDT) file contains the settings for the instrument run. It is installed on the computer with
Applied Biosystems
™
COVID‑19 Interpretive Software, and must be transferred via a USB drive or other
method to the computer on which the QuantStudio
™
Real‑Time PCR Software v1.3 is installed.
IMPORTANT! Be careful to select the appropriate template file for your instrument and block type.
Failure to do so can cause errors in the analysis.
1.
On the computer with Applied Biosystems
™
COVID‑19 Interpretive Software, navigate to the
following directory (where <…> is the installation directory):
<…>\Applied Biosystems\COVID-19 Interpretive Software\Client\docs\User
Documents
2.
Select the EDT file:
TaqPath COVID-19 Kit Template QS7 384 1_3 v2-2.edt
3.
Transfer the EDT file to the computer with QuantStudio
™
Real‑Time PCR Software v1.3, using a
USB drive or other method.
Set up and run the QuantStudio
™
7 Flex Real-Time PCR
Instrument (384–well block)
For more information about the instrument, see the documents listed in “Related documentation” on
page 65.
1.
In the QuantStudio
™
Real‑Time PCR Software v1.3 home screen, click Template.
2.
Browse to, then open the EDT file that you transferred in “Transfer the template (EDT) file for the
QuantStudio
™
7 Flex Real-Time PCR Instrument (384–well block)” on page 51.
IMPORTANT! Be careful to select the appropriate template file for your instrument and block
type. Failure to do so can cause errors in the analysis.
3.
In the Experiment Properties tab, enter or confirm the following.
•
Experiment Name: Enter a unique name
•
Instrument type: QuantStudio
™
7 Flex System
•
Block: 384‑well
•
Type of Experiment: Standard Curve
•
Reagents: TaqMan
™
•
Properties: Standard
Chapter 10
Perform RT-PCR using the Applied Biosystems
™
QuantStudio
™
7 Flex Real-Time PCR Instrument (384-well
block)
Transfer the template (EDT) file for the QuantStudio
™
7 Flex Real-Time PCR Instrument (384–well block)
10
TaqPath
™
COVID‑19 CE‑IVD RT‑PCR Kit Instructions for Use
51
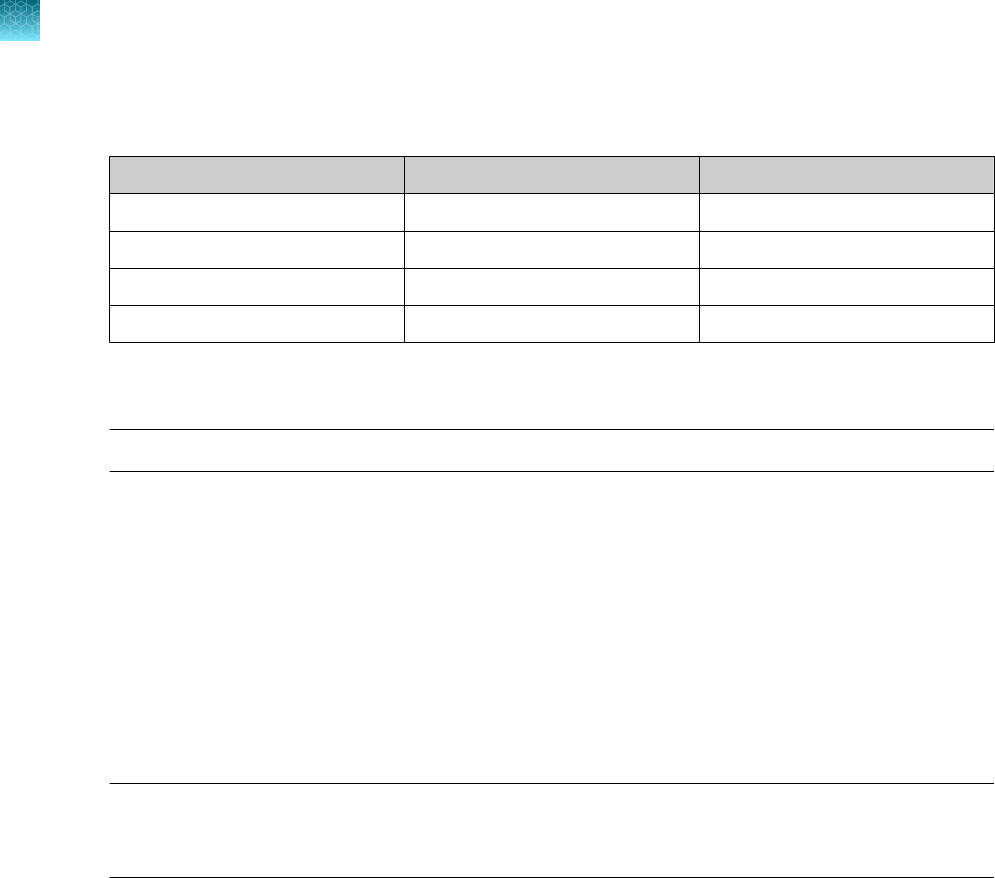
4.
In the Define tab, in the Targets pane, confirm that the targets, reporter dyes, and quenchers are
listed correctly.
Target Reporter dye Quencher
ORF1ab FAM None
N gene VIC None
S gene ABY None
MS2 JUN None
5.
In the Define tab, in the Samples pane, define a unique sample name for each well in the physical
plate.
Note: Wells that do not have a sample name will not be analyzed by the software.
6.
In the Define tab, confirm that the Passive Reference is set to None.
7.
In the Assign tab, confirm that four targets are assigned to each well in the plate layout.
To assign a target to a well, select the well, then check the Assign checkbox.
8.
In the Assign tab, in the Samples pane, confirm the labeling of the control wells.
•
The template has one positive control (PC) and one negative control (NC) assigned to wells for
reference.
•
Move the control well assignments by copying the existing control wells and pasting them
according to their location on the physical plate.
Note: If the 384-well plate includes additional negative controls (from combined extraction runs),
define each additional negative control and assign it to a well to match the physical plate. Give
each negative control a unique name (for example, NC1, NC2, NC3, and NC4).
9.
In the Assign tab, confirm the Task assignments.
•
For wells with a Positive Control (PC), confirm that the Task is set to S for Standard for all of
the targets.
•
For wells with a Negative Control (NC), confirm that the Task is set to N for Negative for all of
the targets.
•
For the wells with a patient sample, confirm that the Task is set to U for Unknown for all of the
targets.
10.
In the Assign tab, assign a sample name to each well to match the physical plate.
To assign a sample to a well, select the well, then check the Assign checkbox.
Chapter 10 Perform RT-PCR using the Applied Biosystems
™
QuantStudio
™
7 Flex Real-Time PCR Instrument (384-well
block)
Set up and run the QuantStudio
™
7 Flex Real-Time PCR Instrument (384–well block)
10
52
TaqPath
™
COVID‑19 CE‑IVD RT‑PCR Kit Instructions for Use

11.
In the Run Method tab, confirm that the Reaction Volume Per Well is 20 µL, then confirm the
thermal protocol.
Step Temperature Time Number of cycles
UNG incubation 25°C 2 minutes 1
Reverse transcription 53°C 10 minutes 1
Activation 95°C 2 minutes 1
Denaturation 95°C 3 seconds
40
Anneal / extension 60°C 30 seconds
12.
In the Run tab, click Start Run, then select your instrument from the drop-down list.
13.
Enter a file name in the dialog box that prompts you to save the run file, then save the file.
Chapter 10 Perform RT-PCR using the Applied Biosystems
™
QuantStudio
™
7 Flex Real-Time PCR Instrument (384-well
block)
Set up and run the QuantStudio
™
7 Flex Real-Time PCR Instrument (384–well block)
10
TaqPath
™
COVID‑19 CE‑IVD RT‑PCR Kit Instructions for Use
53

Analysis and results
Obtain the Applied Biosystems
™
COVID‑19 Interpretive
Software
To perform data analysis and results interpretation, you must use the Applied Biosystems
™
COVID‑19
Interpretive Software.
To obtain the software, contact your local instrument service team. Go to https://
www.thermofisher.com/contactus.
Analyze the data
For detailed instructions about using the software, click the Help menu in the COVID‑19 Interpretive
Software.
1.
Using a USB drive or other method, transfer the SDS or EDS files from the computer with the data
collection software to the computer with the COVID‑19 Interpretive Software.
2.
Sign in to the COVID‑19 Interpretive Software.
3.
In the Home screen, click the Import Samples button.
4.
Select the SDS files or the EDS files to import, then click Open.
After import, the software analyzes the run data, performs Quality Check (QC) analysis, and
calculates the interpretive results for each sample and control.
5.
In the Home screen, under Batches, click the <Batch ID> link for the batch of interest to display
the Batch Details screen.
•
In the Batch Details screen, view the status and result for each sample in the Sample
Information tab.
•
Optional: To identify signs of inadequate vortexing or centrifugation, select the Amplification
Plot tab to view the amplification curve for each sample.
•
Optional: To enter a comment for the sample, select the Amplification Plot tab, select the
Comment tab, enter a comment, then click Add.
The comment will appear in all exports (CSV files) and reports (PDF files). It will include the
user name and date.
11
54
TaqPath
™
COVID‑19 CE‑IVD RT‑PCR Kit Instructions for Use

6.
To generate a Batch Export (CSV file), return to the Home screen, select the checkbox for the
batch, then click Export Batch at the top of the Home screen. Click Open folder location in the
dialog box to locate and open the CSV file.
7.
To generate a Batch Report (PDF file), select the checkbox for the batch, then click Report Batch
at the top of the Home screen. Click Open folder location in the dialog box to locate and open
the PDF file.
Chapter 11 Analysis and results
Analyze the data
11
TaqPath
™
COVID‑19 CE‑IVD RT‑PCR Kit Instructions for Use
55

Interpretation of the results
Interpretation of the results is performed by the Applied Biosystems
™
COVID‑19 Interpretive Software.
For information about the C
t
values that are used by the software to interpret results, see Appendix A,
“Ct cuto values for assay targets”.
Quality control and validity of results
A minimum of one Negative Control and one Positive Control must be present for each run for the
COVID-19 assay.
Additional Negative Control wells must be run for each extraction that is represented on a real-time
RT-PCR plate. All control wells must pass for the real-time RT-PCR plate to be considered valid.
Validation of results is performed automatically by the Applied Biosystems
™
COVID‑19 Interpretive
Software based on performance of the Positive and Negative Controls.
Table 6 Patient samples
ORF1ab N gene S gene MS2 Status Result Action
NEG NEG NEG NEG INVALID NA Repeat test by re-extracting the original
sample and repeating the RT-PCR. If
the repeat result remains invalid, consider
collecting a new specimen.
NEG NEG NEG POS VALID SARS-CoV-2
Not Detected
Report results to the healthcare provider
and appropriate public health authorities.
Consider testing for other viruses.
Only one SARS-CoV-2 target
= POS
POS or
NEG
VALID SARS-CoV-2
Inconclusive
1.
Repeat test by re-extracting the
original sample and repeating the RT-
PCR.
2.
After retesting one time, report
results to the healthcare provider and
appropriate public health authorities.
IMPORTANT! Samples with a result
of SARS-CoV-2 Inconclusive shall be
retested one time.
If the repeat result remains inconclusive,
the healthcare provider should conduct
additional confirmation testing with a new
specimen, if clinically indicated.
Two or more SARS-CoV-2
targets = POS
POS or
NEG
VALID Positive SARS-
CoV-2
Report results to the healthcare provider
and appropriate public health authorities.
Chapter 11 Analysis and results
Interpretation of the results
11
56
TaqPath
™
COVID‑19 CE‑IVD RT‑PCR Kit Instructions for Use

Performance characteristics
The analytical and clinical performance of the TaqPath
™
COVID‑19 CE‑IVD RT‑PCR Kit was evaluated
by determining limit of detection (LoD), characterizing the impact of interfering substances and cross-
reactivity, as described in the following sections.
Limit of detection (LoD)
The LoD study established the lowest SARS-CoV-2 viral concentration (Genomic Copy Equivalents or
GCE) that can be detected by the TaqPath
™
COVID‑19 CE‑IVD RT‑PCR Kit in a particular specimen
type at least 95% of the time. Banked Nasopharyngeal swab (NP) and Bronchoalveolar lavage (BAL)
samples were obtained from patients in the United States in the years 2015–2019. The NP and BAL
samples were pooled, respectively, and spiked with purified SARS-CoV-2 viral genomic RNA at several
concentrations, then processed using the kit workflow. A three-phase approach was used to determine
the LoD for each specimen type. In phases I and II, the preliminary LoD was established and confirmed
in phase III by testing 20 replicates.
Table 7 LoD determination in BAL
Eective
Concentration
Replicate
Mean C
t
Interpretation % Positive
ORF1ab N S MS2
10 GCE/
reaction
1 29.9 29.1 28.5 23.1 Positive
100%
2 30.1 29.3 29.7 24.0 Positive
3 30.0 29.7 29.3 24.0 Positive
4 30.3 29.7 29.1 23.8 Positive
5 30.2 29.6 29.6 23.7 Positive
6 30.3 29.3 29.7 23.5 Positive
7 29.9 29.6 32.8 23.4 Positive
8 30.2 29.8 29.2 23.8 Positive
9 30.1 29.4 28.6 23.8 Positive
10 30.1 29.4 29.1 24.0 Positive
11 29.8 29.5 29.4 24.3 Positive
12 30.1 29.7 29.1 24.6 Positive
13 30.7 30.1 28.4 25.1 Positive
12
TaqPath
™
COVID‑19 CE‑IVD RT‑PCR Kit Instructions for Use
57
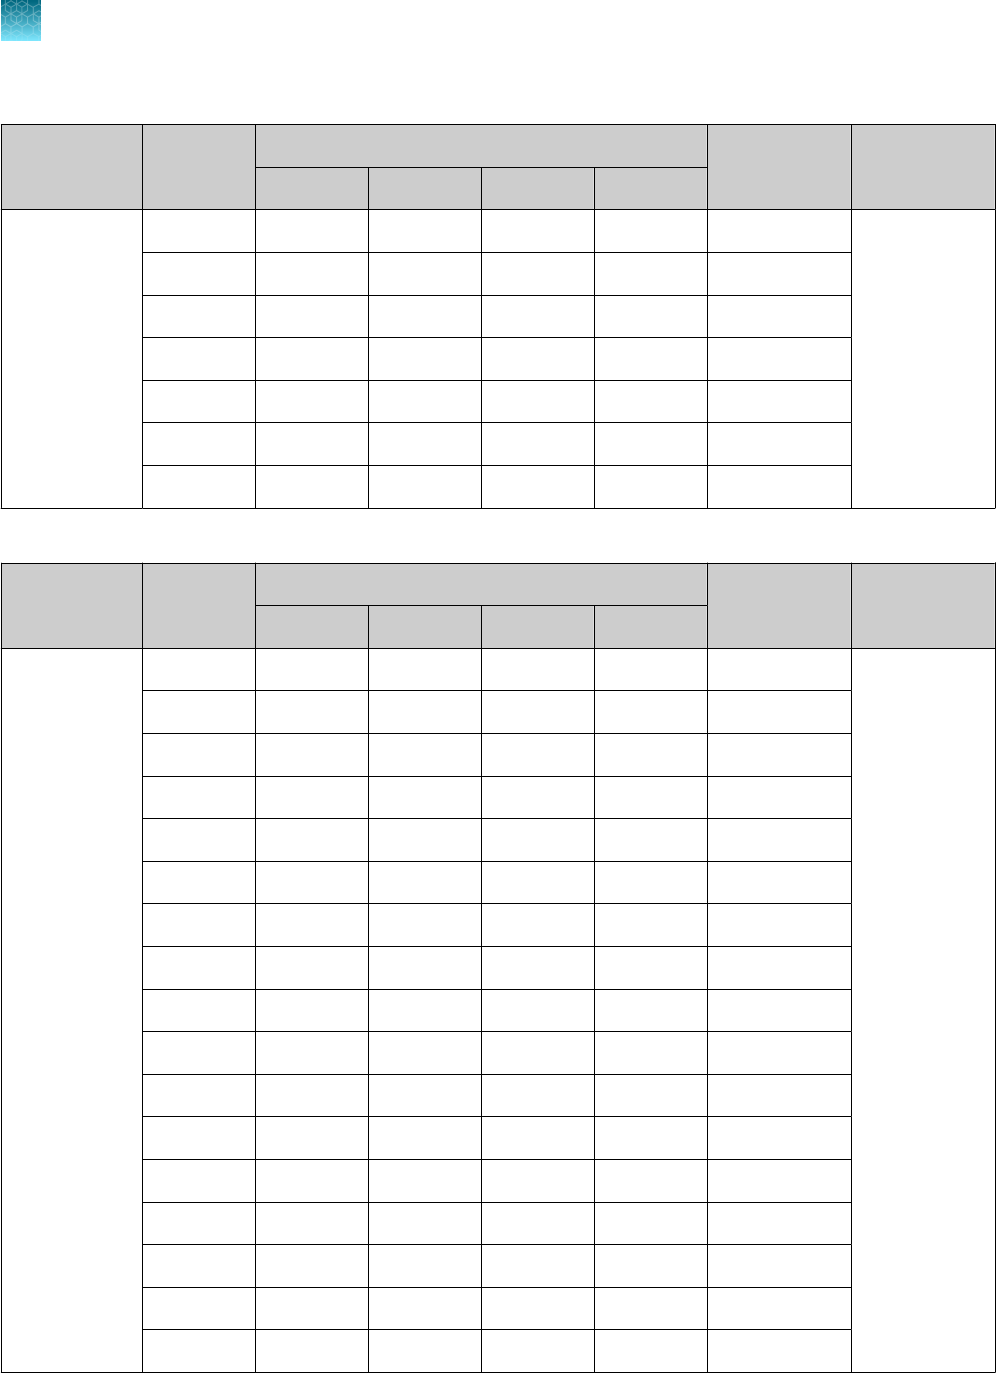
Table 7 LoD determination in BAL (continued)
Eective
Concentration
Replicate
Mean C
t
Interpretation % Positive
ORF1ab N S MS2
10 GCE/
reaction
14
100%
30.4 29.8 29.1 24.8 Positive
15 30.2 29.8 29.7 24.9 Positive
16 30.3 29.8 29.4 24.6 Positive
17 30.4 30.0 31.5 24.7 Positive
18 30.4 30.1 29.3 24.9 Positive
19 30.9 29.7 29.2 25.4 Positive
20 30.3 29.9 29.4 25.7 Positive
Table 8 LoD determination in Nasopharyngeal specimens
Eective
Concentration
Replicate
Mean C
t
Interpretation % Positive
ORF1ab N S MS2
10 GCE/
reaction
1 30.0 28.9 35.7 25.7 Positive
100%
2 30.6 28.9 33.6 25.8 Positive
3 30.2 28.8 32.0 25.8 Positive
4 30.4 28.7 34.2 25.7 Positive
5 30.5 29.0 31.4 25.8 Positive
6 31.0 29.3 36.6 26.0 Positive
7 30.3 29.2 31.1 25.8 Positive
8 31.1 29.2 31.8 26.5 Positive
9 30.5 28.9 33.0 26.2 Positive
10 30.3 28.8 34.7 26.8 Positive
11 30.5 29.8 38.7 27.4 Positive
12 31.6 29.7 35.0 27.6 Positive
13 30.7 29.3 36.4 27.4 Positive
14 31.6 28.8 31.3 27.2 Positive
15 31.0 29.3 36.0 27.0 Positive
16 30.5 29.1 35.7 27.0 Positive
17 30.7 29.4 34.8 27.4 Positive
Chapter 12 Performance characteristics
Limit of detection (LoD)
12
58
TaqPath
™
COVID‑19 CE‑IVD RT‑PCR Kit Instructions for Use

Table 8 LoD determination in Nasopharyngeal specimens (continued)
Eective
Concentration
Replicate
Mean C
t
Interpretation % Positive
ORF1ab N S MS2
10 GCE/
reaction
18
100%
30.7 29.3 34.6 27.5 Positive
19 31.0 29.3 35.9 28.7 Positive
20 30.4 29.2 32.7 28.4 Positive
Table 9 LoD results
LoD studies were performed by extracting 400 μL of each specimen followed by elution in 50 μL, then 5 μL of eluate was added to
the RT-PCR reaction. The LoD of 10 GCE/reaction is calculated from a starting concentration of 250 GCE/mL of specimen.
Specimen type Limit of Detection (GCE/reaction)
Bronchoalveolar lavage 10 GCE/reaction
Nasopharyngeal swab 10 GCE/reaction
Reactivity (Inclusivity)
In silico analysis was updated on June 3, 2020, using 25,998 complete SARS-CoV-2 genomes
in GISAID and GenBank databases. Based upon BLAST analysis, the TaqPath
™
COVID‑19 CE‑IVD
RT‑PCR Kit maps with 100% homology to >99.99% of known SARS-CoV-2 isolates in GISAID and
100% of known isolates in GenBank databases. Mapping was deemed successful for a given isolate if
at least two of the three targets (ORF1ab, S gene, and N gene) showed 100% identity.
Interfering substances
Pooled SARS-CoV-2-negative nasopharyngeal swab and bronchoalveolar lavage specimens were
spiked with purified SARS-CoV-2 viral RNA at 3X the Limit of Detection (30 GCE/reaction) and
potential interfering substances at the concentrations above. Each substance was tested with triplicate
extractions. The results are presented in Table 10 on page 60.
Pooled SARS-CoV-2-negative nasopharyngeal swab and bronchoalveolar lavage specimens were
spiked with potential interfering substances at the concentrations above. Each substance was tested
with triplicate extractions. No false positive results were observed for any of the substances at the
concentrations tested.
Chapter 12 Performance characteristics
Reactivity (Inclusivity)
12
TaqPath
™
COVID‑19 CE‑IVD RT‑PCR Kit Instructions for Use
59

Table 10 Interfering substances
Interfering substance
Final concentration
in sample
Agreement with expected results
Positive BAL
samples
Positive NP samples
Negative BAL
samples
Negative NP
samples
None N/A 100%
[1]
100% 100% 100%
Mucin: bovine submaxillary
gland, type I-S
0.1 mg/mL 100%
[2]
100% 100% 100%
Blood (human) 1% v/v 100%
[3]
100% 100% 100%
Nasal sprays or drops—
Nasacort
™
10% v/v 100%
[4]
100%
[4]
100% 100%
Nasal corticosteroids—Dymista
™
5 µg/mL 100%
[2]
100% 100% 100%
NeilMed
™
Nasogel
™
1% w/v 100%
[2]
100% 100% 100%
Influenza A H1N1 Brisbane/59/07 1 × 10
5
TCID
50
/mL 100%
[2]
100% 100% 100%
Throat lozenges, oral anesthetic
and analgesic—Chloraseptic
™
1% w/v 100%
[3]
100% 100% 100%
Oseltamivir phosphate 33 µg/mL 100%
[2]
100% 100% 100%
Antibiotic, nasal ointment—
Bactroban
™
5 µg/mL 100%
[2]
100% 100% 100%
Antibacterial, systemic—
Tobramycin
0.6 mg/mL 100%
[2]
100% 100% 100%
Homeopathic allergy relief
medicine—Similasan
™
Nasal
10% v/v 100% 100% 100% 100%
[1]
Two of six replicates produced a C
t
>37 or Undetermined for S Gene, but all replicates were called Positive based on the interpretation algorithm.
[2]
Two of three replicates produced a C
t
>37 or Undetermined for S Gene, but all replicates were called Positive based on the interpretation algorithm.
[3]
All three replicates produced a C
t
>37 or Undetermined for S Gene but were called Positive based on the interpretation algorithm.
[4]
One of three replicates produced a C
t
>37 or Undetermined for S Gene, but all replicates were called Positive based on the interpretation algorithm
Chapter 12 Performance characteristics
Interfering substances
12
60
TaqPath
™
COVID‑19 CE‑IVD RT‑PCR Kit Instructions for Use

Cross-reactivity
In silico analysis of the following forty-three (43) organisms was performed.
Table 11 Organisms used for in silico cross-reactivity analysis
Human coronavirus 229E Rhinovirus/Enterovirus
Human coronavirus OC43 Parechovirus
Human coronavirus HKU1 Candida albicans
Human coronavirus NL63 Corynebacterium diphtheriae
SARS-coronavirus Legionella (non-pneumophila)
MERS-coronavirus Bacillus anthracis (Anthrax)
Adenovirus Moraxella catarrhalis
Human Metapneumovirus (hMPV) Neisseria elongata and Neisseria meningitidis
Parainfluenza 1 Pseudomonas aeruginosa
Parainfluenza 2 Staphylococcus epidermidis
Parainfluenza 3 Streptococcus salivarius
Parainfluenza 4 Leptospira sp.
Influenza A Chlamydophila pneumoniae
Influenza B Chlamydophila psittaci
Influenza C Coxiella burnetii (Q-Fever)
Enterovirus Staphylococcus aureus
Respiratory Syncytial Virus A Haemophilus influenzae
Respiratory Syncytial Virus B Legionella pneumophila
Bordetella pertussis Mycobacterium tuberculosis
Mycoplasma pneumoniae Streptococcus pneumoniae
Pneumocystis jirovecii (PJP) Streptococcus pyogenes
Among the tested organisms, Neisseria elongata showed homology for the forward and reverse primers
and probe for the N gene. The forward primer showed ≥80% homology while the reverse primer and
probe showed 36% homology. The N gene reverse primer and probe show low homology, therefore the
risk of the non-specific amplification is low.
Blast analysis showed ≥80% homology for one assay component (forward primer, reverse primer, or
probe) for select isolates. Despite ≥80% homology of one assay component for select isolates, there
is no anticipated amplification because hybridization of all three assay components are necessary to
generate a signal. We also found multiple instances where dierent assay components had ≥80%
Chapter 12
Performance characteristics
Cross-reactivity
12
TaqPath
™
COVID‑19 CE‑IVD RT‑PCR Kit Instructions for Use
61

homology to dierent isolates of the same species. For example, Bacillus anthracis strain AFS029987
had ≥80% homology to the ORF1ab forward primer while strain MCCC 1A01412 had ≥80% homology
to the ORF1ab reverse primer. Since these are two dierent organisms, amplification is not likely to
occur. The in silico analysis indicates that significant amplification of non-target sequences that result in
cross-reactivity or potentially interfere with detection of SARS-CoV-2 is not likely to occur.
Clinical evaluation
A clinical evaluation study was performed to evaluate the performance of the TaqPath
™
COVID‑19
CE‑IVD RT‑PCR Kit using nasopharyngeal swab (NP) and bronchoalveolar lavage (BAL) specimens.
A total of sixty (60) contrived positive specimens were tested:
•
30 contrived positive nasopharyngeal swab (NP) specimens
•
30 contrived positive bronchoalveolar lavage (BAL) specimens
Samples were contrived by spiking known concentrations of extracted SARS-CoV-2 viral genomic RNA,
relative to the product LoD, into matrices which were determined to be negative by the TaqPath
™
COVID‑19 CE‑IVD RT‑PCR Kit prior to spiking in the RNA.
In addition to the contrived positive specimens, sixty (60) negative specimens were tested:
•
30 negative nasopharyngeal swab (NP) specimens
•
30 negative samples bronchoalveolar lavage (BAL) specimens
•
All negative samples yielded negative results
Results for positive samples are shown in the tables below:
Table 12 BAL Clinical Evaluation Study
Final RNA
Concentration in
Sample
Number of
Positives
Mean C
t
S gene ORF1ab N gene
2X LoD 20/20
[1]
28.9 29.5 28.7
3X LoD 5/5
[1]
28.8 29.2 28.5
5X LoD 5/5 27.4 28.2 27.4
[1]
Two samples initially gave inconclusive results and were retested. The results were positive after the retest. Mean C
t
values are
calculated from the retest results.
Chapter 12 Performance characteristics
Clinical evaluation
12
62
TaqPath
™
COVID‑19 CE‑IVD RT‑PCR Kit Instructions for Use

Table 13 NP Clinical Evaluation Study
Final RNA
Concentration in
Sample
Number of
Positives
Mean C
t
S gene ORF1ab N gene
2X LoD 20/20
[1]
30.9 30.6 29.3
3X LoD 5/5 30.0 30.1 28.8
5X LoD 5/5 28.7 29.0 27.9
[1]
One sample initially gave an inconclusive result and was retested. The result was positive after the retest. Mean C
t
values are
calculated from the retest results.
Chapter 12 Performance characteristics
Clinical evaluation
12
TaqPath
™
COVID‑19 CE‑IVD RT‑PCR Kit Instructions for Use
63

C
t
cuto values for assay targets
The Applied Biosystems
™
COVID‑19 Interpretive Software uses the following C
t
cuto values for assay
targets during interpretation of the results.
Table 14 COVID-19 Assay C
t
cuto values
Sample or Control Target C
t
cuto
Positive Control
MS2 Valid C
t
values are >37
Viral targets Valid C
t
values are ≤37
Negative Control
MS2 Valid C
t
values are ≤32
Viral targets Valid C
t
values are >37
Clinical samples
MS2 Valid C
t
values are ≤32
[1]
Viral targets Positive C
t
values are ≤37
[1]
If any of the viral targets is positive, the C
t
for MS2 can be >32.
A
64
TaqPath
™
COVID‑19 CE‑IVD RT‑PCR Kit Instructions for Use
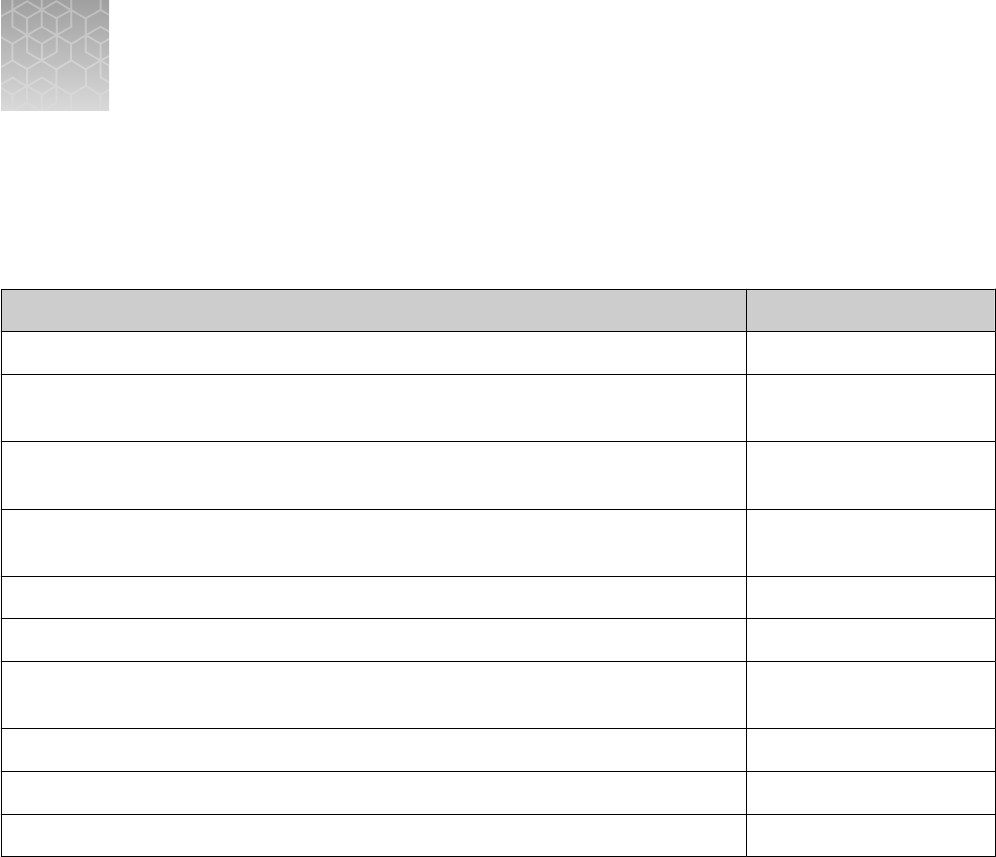
Documentation and support
Related documentation
Document
Publication Number
Applied Biosystems
™
7500 Fast Dx Real‑Time PCR Instrument Reference Guide 4406991
Applied Biosystems
™
7300/7500/7500 Fast Real‐Time PCR System Installation and
Maintenance Guide
4347828
QuantStudio
™
3 and 5 Real‑Time PCR Systems Installation, Use, and Maintenance
Guide
MAN0010407
QuantStudio
™
5 Dx Real‑Time PCR Instrument Maintenance and Administration User
Guide
100042186
QuantStudio
™
5 Dx TD Software User Guide 100049554
QuantStudio
™
5 Dx IVD Software User Guide 100049556
QuantStudio
™
6 and 7 Flex Real-Time PCR Systems Maintenance and Administration
Guide
4489821
QuantStudio
™
6 and 7 Flex Real-Time PCR Systems Quick Reference 4489826
QuantStudio
™
Real‑Time PCR Software Getting Started Guide 4489822
COVID‑19 Interpretive Software CE‑IVD Edition Installation Quick Reference MAN0019230
Customer and technical support
For additional documentation and information about this kit, visit:
https://www.thermofisher.com/covid19ceivd
For download instructions for the COVID‑19 Interpretive Software, see “Obtain the Applied Biosystems
™
COVID‑19 Interpretive Software” on page 54.
Refer to the Read Me file provided with the COVID‑19 Interpretive Software before contacting support
for the software.
Visit: https://www.thermofisher.com/contactus for service and support information for this kit,
including the following:
•
Worldwide contact telephone numbers
•
Product support information
•
Order and web support
B
TaqPath
™
COVID‑19 CE‑IVD RT‑PCR Kit Instructions for Use
65

•
Product documentation such as:
–
Certificates of Analysis
–
Safety Data Sheets (SDSs; also known as MSDSs)
Note: For SDSs for reagents and chemicals from other manufacturers, contact the
manufacturer.
Limited product warranty
Life Technologies Corporation and/or its aliate(s) warrant their products as set forth in the
Life Technologies' General Terms and Conditions of Sale at www.thermofisher.com/us/en/home/
global/terms-and-conditions.html. If you have any questions, please contact Life Technologies at
www.thermofisher.com/support.
Appendix B Documentation and support
Limited product warranty
B
66
TaqPath
™
COVID‑19 CE‑IVD RT‑PCR Kit Instructions for Use