Wirecast
Guide
ISO Best Practices Guide

Introduction
ISO (or Isolated Output) is a Wirecast Pro feature that allows you to create clean recordings of
your system devices (cameras, capture cards, or mics) even when they are not being displayed in
the Live canvas window. This is often helpful when you want to edit together a video-on-demand
version of your live show – you can have recordings of all your cameras even when they weren’t
live in your broadcast.
There are two ways to ISO record :
1. The Capture Source ISO capability allows you to choose one source (such as your webcam,
or a microphone). This is truly an isolated source recording, so it doesn’t enable you to com-
bine a separate audio and video raw sources into one ISO recording. However if your source
includes audio, you can capture that as part of your Capture Source ISO.
2. The Shot ISO capability lets you record any “shot” that is on your Main Shot Display. This lets
you mix two or more sources into a single shot and record that. It also lets you ISO record
sources that are not available in the Capture Source ISO option such as WebRTC sources
(Rendezvous and Wirecast Go), NDI, Webstream, or Elgato capture sources.
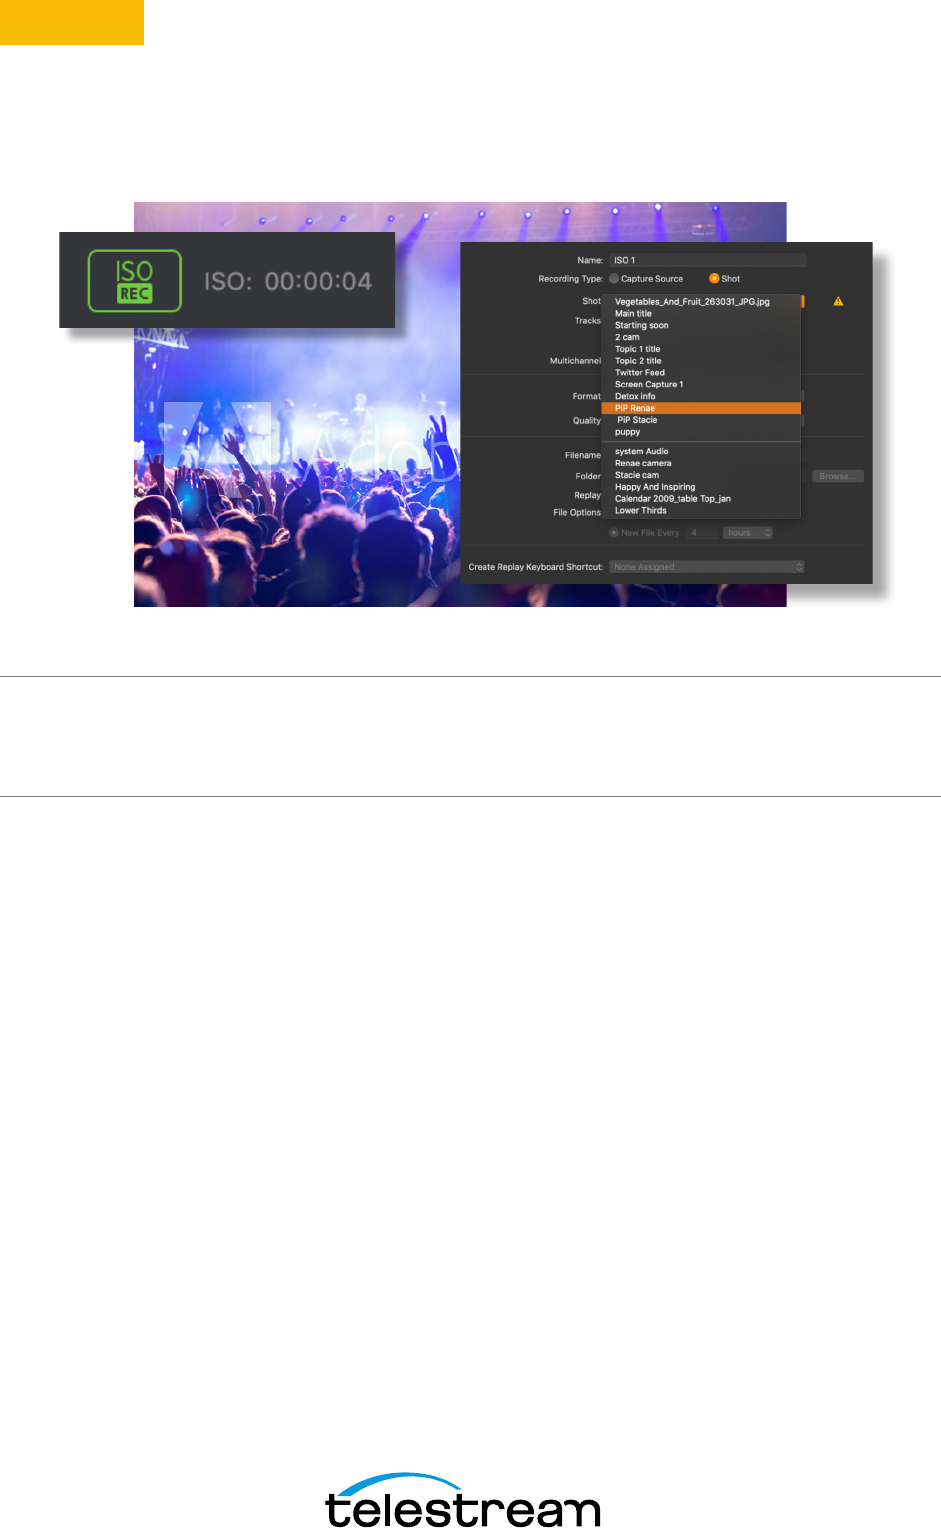
Conguring Your ISO Recordings
• Select “Congure” from the Replay+ISO
main navigation.
• Click on “Add ISO”.
• You have two choices for Recording type:
Capture Source ISO or Shot ISO.
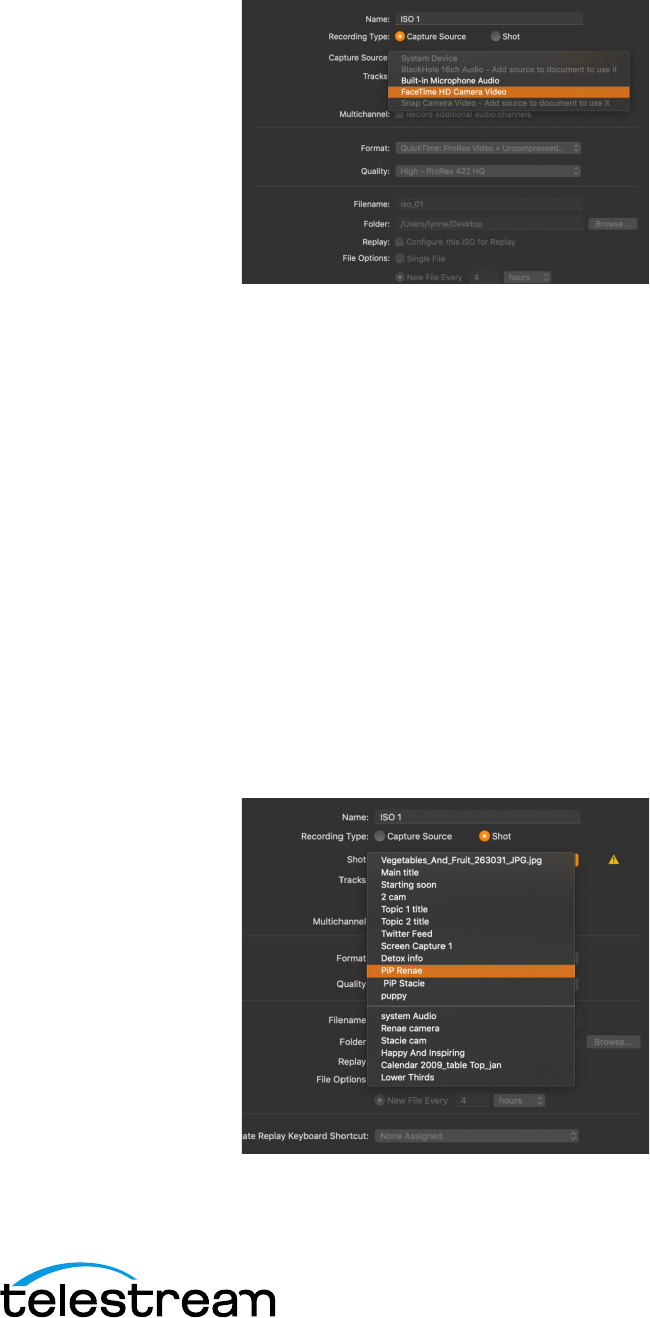
Capture Source ISO
Capture Source ISO lets you ISO record an individual
camera or audio source, (e.g. your Facetime Camera,
or a camera plugged in via a capture card.
Note: Certain sources, such as Rendezvous guests,
Web Stream sources, IP Cameras sources, Web Page
plugin sources, or Wirecast Go sources will not show
up as available Capture Source sources. To record
these, you should use Shot ISO.
• If your chosen source produces both video and audio, you will have the option to include
which media tracks are included from your single source.
• If you want to record audio that is coming from a separate source (like from a separate micro-
phone), you can either set up another Capture Source ISO for that audio separately, OR you
can place your chosen video and audio sources into a single SHOT on the Main Shot Display
and use Shot ISO to record that shot.
Note: Documents created prior to Wirecast version 14.1 that had ISO congured that includ-
ed video and audio from two dierent sources will be split into two separate source recordings
(one for Audio, one for Video).
Shot ISO
Shot ISO lets you ISO record any shot on the Main
Shot Display. The advantage of this, is you can com-
bine any audio and video sources into a shot. You
can also record shots that contain sources that aren’t
available in Capture Source ISO, like Rendezvous
guests, and IP camera sources.
• If your chosen shot has both video and audio, you
will have the option to include which media tracks
are included from the shot.
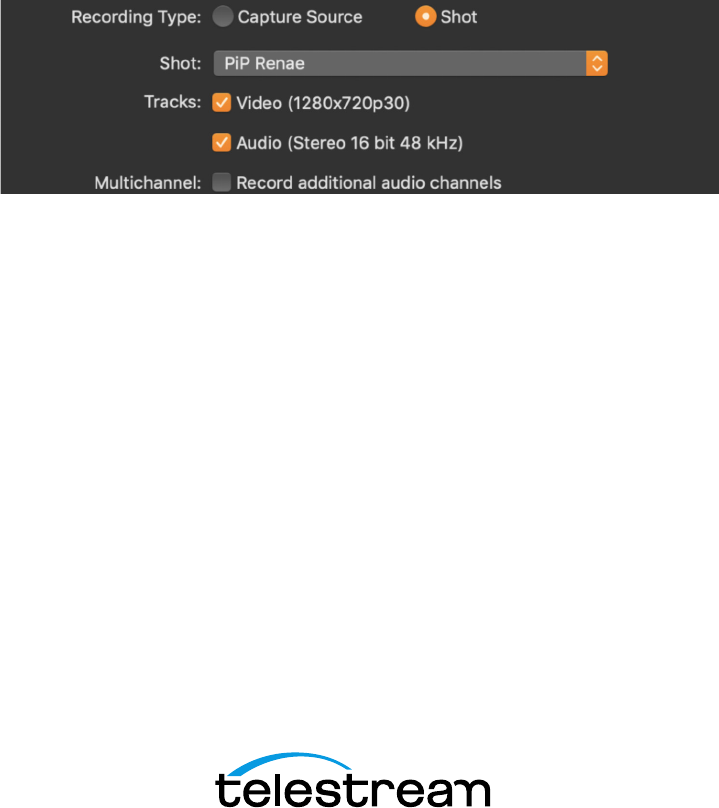
• Shot ISO recordings will produce video at the canvas resolution and frame rate. (This can be
adjusted in Preferences>Canvas) Audio will match our internal mixer which is stereo, 32-bit
float, 48 kHz.
• Note:
Any animated graphic or media file contained in your shot will not play as part of a Shot
ISO recording. So, if you don’t want a static image where your media is, you should place that
source in a different shot on a different layer.
• Audio-Only Recordings: In Wirecast versions prior to 14.1, it was not possible make audio-
only ISO recordings. Now Wirecast allows this both as a Capture Source (if your source is
audio) or as a Shot ISO (if your shot only includes audio).
The ISO conguration dialog displays the selected source’s current video resolution and frame
rate so you know what to expect in your recording. The same goes for audio channels, bits per
sample, and sample rate. When no source is selected or the source does not produce a certain
type of media, ‘None’ is displayed where the source media information would normally appear
(next to the corresponding video/audio media track checkboxes).
Format and Quality:
Wirecast oers the ability to encode your les using ProRes or x264 on both Mac and Windows.
Format
• QuickTime: ProRes Video + Uncompressed Audio:
- ProRes is better suited for NLE work. Also, color space information is less ambiguous.
• QuickTime: x264 Video + Uncompressed Audio:
- x264 is a compressed video le that results in signicantly smaller le sizes.
- x264 recordings are still placed in QuickTime les and still paired with uncompressed audio.
Uncompressed audio oers top quality and minimal CPU drain for archival purposes.
- You can choose the bitrate and keyframe interval for recordings that use x264 encoding.
The default values are 10 Mbps with 15 frames/second. The defaults were chosen for high
quality full HD archival. We use the high-prole encoder setting and the “fast” x264 algorithm
with variable bitrate encoding.
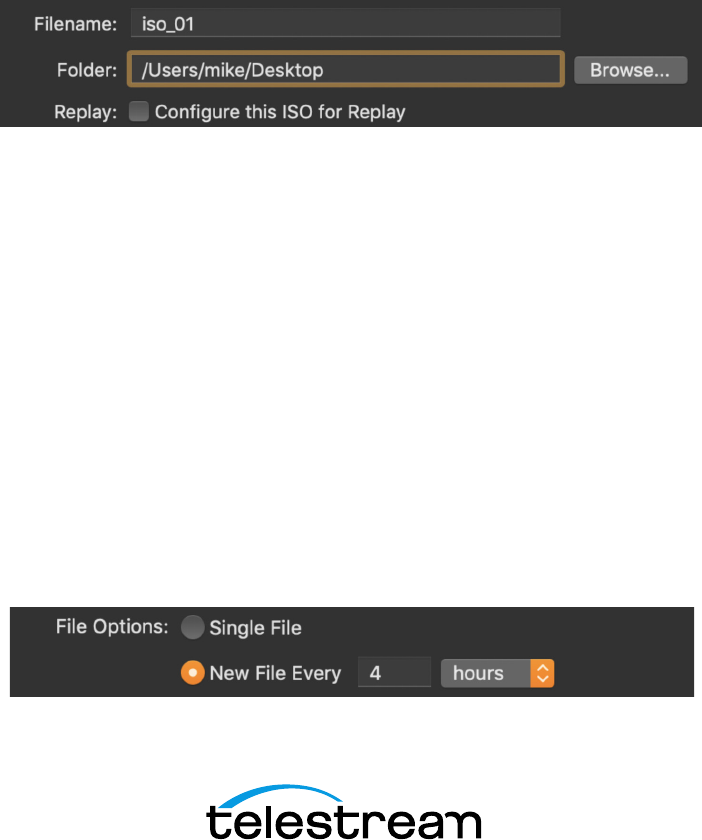
File names
Each new ISO recording you create in a document includes the next number in a sequence that
begins with 1 and is incremented when you create a new ISO conguration. For example, the rst
ISO will be named “ISO 1”, the second will be named “ISO 2”, third “ISO 3”, and so on. Likewise,
lenames given will be “iso_01”, “iso_02”, “iso_03”, and so on. (Savvy users will appreciate that
name-sorted listings of recordings on disk will remain in order beyond the 9th ISO conguration.)
You can always choose another name for the les, but that will not aect the sequencing. So if
you rename “ISO 1” to “Names Don’t Matter”, the next ISO will still be named “ISO 2” by default.
Folder
Wirecast will remember the last folder you assigned to an ISO recording conguration and use
that folder as the default for the next conguration that you create. This setting is app-wide so it
will transfer between projects.
Replay
Check this to congure your ISO recording to be available for Instant Replay within your broad-
cast. This can be applied for Capture Source ISOs as well as Shot ISOs (See tutorials on Replay
for more information on conguring this).
File Options
• Single le: This is best used if you have shorter broadcasts and have plenty of disk storage
space. When the user chooses the “Single le” option, what you’re really choosing is the
maxed-out 12-hour le duration.
• New File every X time-period: This will ensure you don’t have les that are so big you run out
of disk space. If you have a long broadcast or have limited space, you may want to limit your
le sizes with this option. This will break the recordings up and start a new le at the increment
you specify.
S
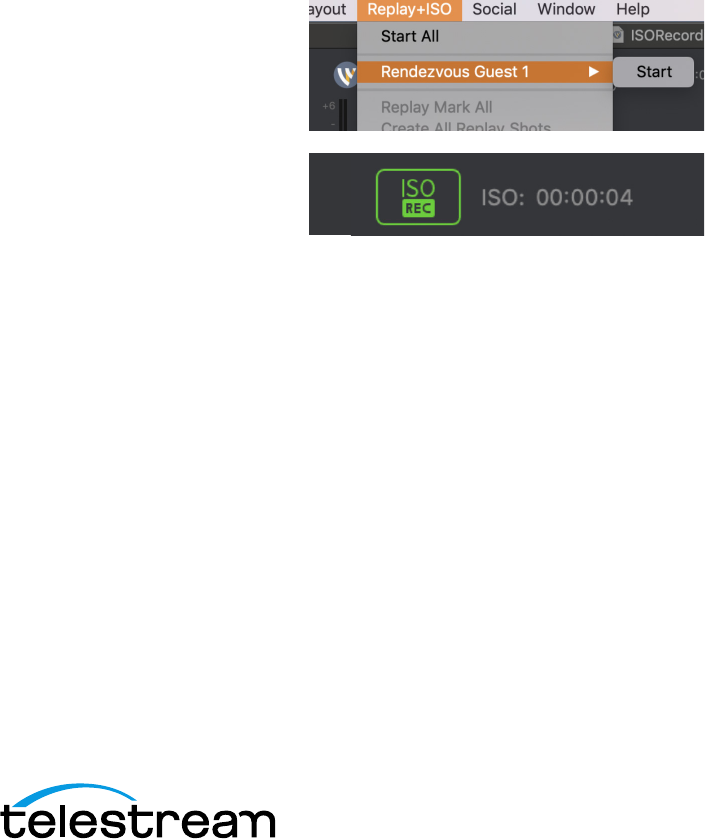
tarting your ISO Recording
When you finish configuring your ISO recordings, you’re ready to start recording. There are a
couple of ways to start your ISO recordings.
1. Go to “Replay+ISO” in the main navigation bar. There you
have the choice to “Start All” or choose to start only a
specic ISO that you have set up.
2. Alternatively, you can click the ISOREC button at the top
of the User Interface, which will start all your congured
ISO recordings.
E
rror Reporting
When starting ISO recordings, Wirecast will send any number of specific error messages to the
user-log and present you with a very generic modal dialog that reads: “Avrecording failed to
start.” “View the user log for details and edit the Replay+ISO configuration to resolve issues.” The
dialog contains an Edit button which opens the ISO configuration dialog.
Also be aware that many ISO recording errors occur after you start recording and some occur
soon after. These asynchronous errors are reported only in the 'Notifications' window (accessed
from the Window menu item in the main navigation window) and no modal dialog is shown.

Conguration Errors and Warnings
Wirecast tries to catch a number of conguration errors and potential problems while you are
interacting with the ISO conguration dialog.
Warnings are shown in the dialog as warning icons next to the conguration elds. If you hover
the mouse over each warning icon, a tooltip will appear detailing the problem. Also, the topmost
warning message will appear in red text at the bottom of the dialog until all warnings are cleared
for the selected conguration.
Each ISO conguration listed on the right-hand side of the ISO conguration dialog will have a
warning icon if it has a problem. Below is a list of the conguration problems we currently detect.
• No source/shot is selected for recording.
• The recording uses a source/shot that no longer exists.
• The recording uses the same source/shot as another recording.
• No media tracks are enabled for recording.
• The source does not produce media that matches the enabled tracks.
• The selected output le is the same as another recording.
• The le name contains restricted characters.
• The selected output folder does not exist.
• The space available on the selected drive is insucient for recording.
• The le duration must be between 10 seconds and 12 hours.
A Note about Resources
Keep in mind that this feature is very resource intensive. Because you are recording individual
cameras or shots alongside your actual production you will need a rather powerful system.
We recommend that at minimum you have:
• an i7 processor
• a high-end dedicated graphics card
• and an SSD for recording
Something similar to our Wirecast Gear 420 system would do.

www.telestream.net | [email protected] | tel +1 530 470 1300
Specifications subject to change without notice. Copyright © 2021 Telestream, Inc.
Telestream, CaptionMaker, Episode, Flip4Mac, FlipFactory, Flip Player, Lightspeed, Screen-
Flow, Switch, Vantage, Wirecast, Gameshow, GraphicsFactory, MetaFlip, and Split-and-Stitch
are registered trademarks and MacCaption, e-Captioning, Pipeline, Post Producer, Tempo,
TrafficManager, and VOD Producer are trademarks of Telestream, LLC. All other trademarks
are the property of their respective owners. January 2021
You are recording a lot of data at the same time as running a production, so there’s a lot of pro-
cessing going on that your system will need to manage. And this can also be impacted by other
features you’re using that rely heavily on your computer’s GPU - such as Multi-viewer, or if you
have your live icons on.
We recommend that you practice using the ISO recording in a full rehearsal, so you can gauge
how your system handles the loads.
