Raspberry Pi Zero Headless Quick Start
Created by Carter Nelson
https://learn.adafruit.com/raspberry-pi-zero-creation
Last updated on 2024-06-03 02:06:44 PM EDT
©Adafruit Industries Page 1 of 34

3
5
7
8
13
21
23
27
32
Table of Contents
Overview
• Suggested Items
• But I Want To Connect A Keyboard/Mouse/Monitor
• Other Pi Models
Is There Even Life?
• Here's how to run a sanity check to verify if the Pi Zero is OK.
Install OS on to SD Card
Text File Editing
• Create User Account and Password
• Configure WiFi
• Enable UART
• Enable SSH
• Final Check
Using rpi-imager
• Set Hostname
• Enable SSH
• Set Username and Password
• Configure WiFi
• Location Settings
• Burn OS Image
• How It Works
Give It Life
• Done?
Suggested Initial Setup
• System Configuration
• Enable SPI and I2C
Using A Console Cable to Troubleshoot
• Interfacing To Pi Zero
• Power Options
• Booting With A Console Cable
Enable UART
©Adafruit Industries Page 2 of 34
Overview
This guide shows how to bring up a Raspberry Pi Zero, Zero W, or Zero 2 W without
needing to attach a keyboard/mouse/monitor. For older Pi OS releases, basic settings
can be configured by editing text files directly on the SD card using an editor on your
main PC prior to first boot. For newer Pi OS releases, the rpi-imager tool can be used
to both burn the OS image and configure settings.
Suggested Items
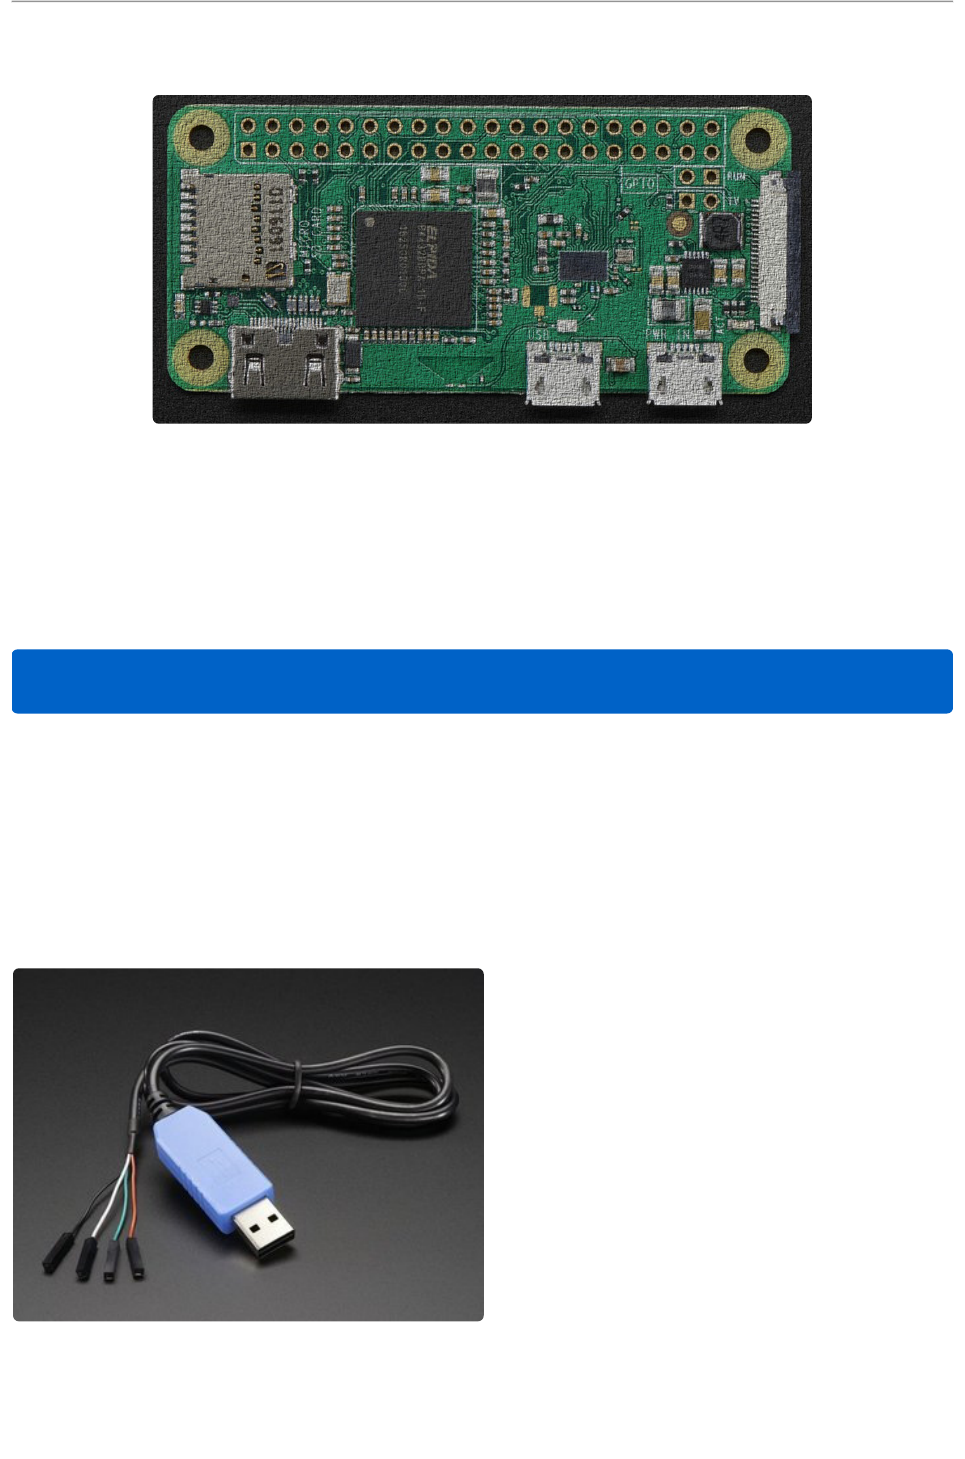
If you need to troubleshoot for any reason, this item is your best friend. For $10, it
makes working with a headless Pi Zero so much easier. It's also included with a lot of
the kits.
USB console cable.(http://adafru.it/954)
Don't leave home without it.
This is a slightly fancier option specifically made for the Pi. It has the convenience of
allowing you to use a standard micro USB cable. It was mainly designed for attaching
In this guide the term "Pi Zero" will be used for all the Pi Zero models.
©Adafruit Industries Page 3 of 34
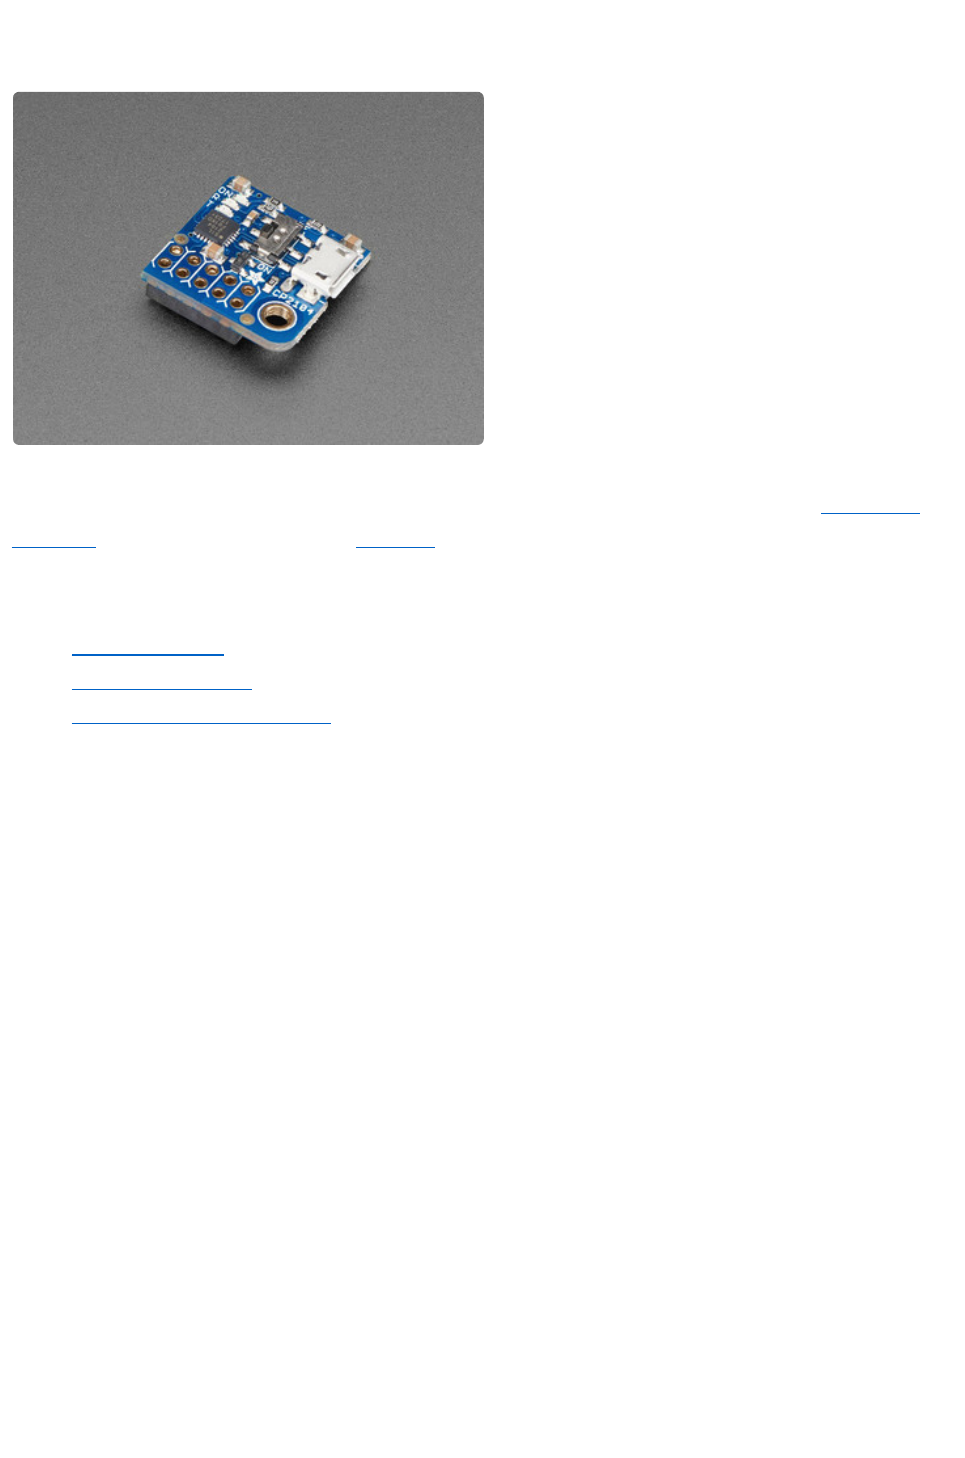
to male headers, so if you've soldered on something different you'll have to find some
way to jumper it.
Adafruit PiUART - USB Console and Power
Add-on for Raspberry Pi(http://adafru.it/
3589)
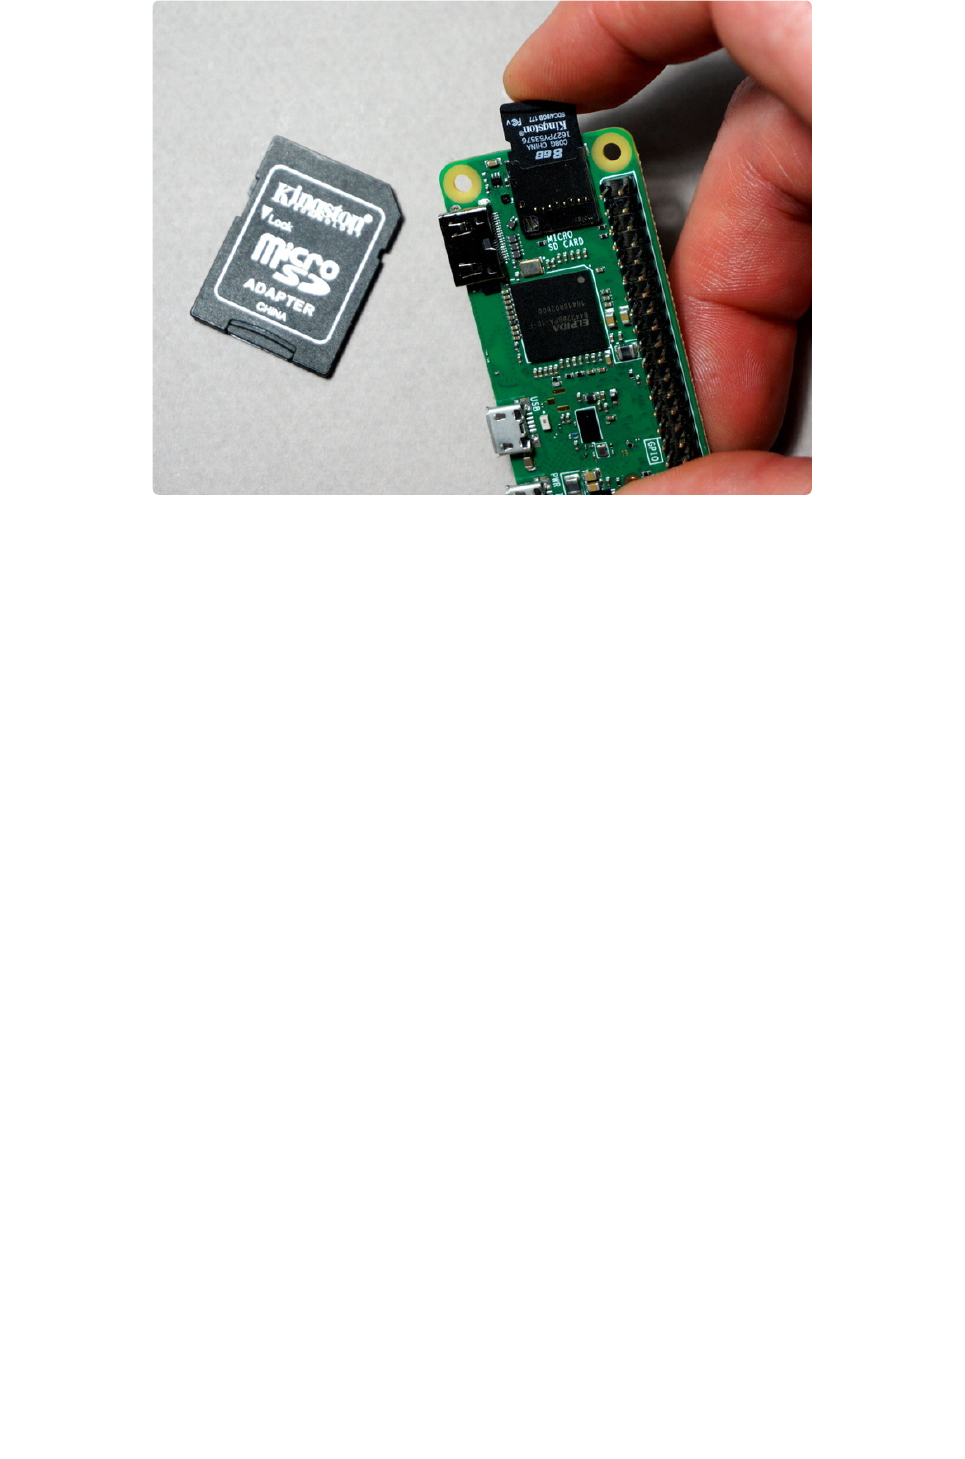
Of course you'll also need an SD card for the operating system, a Pi Zero (plus WiFi
adapter(http://adafru.it/814)) or Zero W(https://adafru.it/vIa), and some form of header
pins to access the GPIO.
Male Headers(http://adafru.it/2822)
Female Headers(http://adafru.it/2222)
90deg Female Headers(http://adafru.it/2823)
But I Want To Connect A Keyboard/Mouse/
Monitor
That's fine but not covered in this guide. Troubleshooting HDMI issues, configuring
display settings, and dealing with possible HDMI and/or USB cable and/or power
problems are worth a separate guide.
Other Pi Models
This guide is targeted for the Pi Zero and Zero W as those models are more difficult to
attach a keyboard / mouse / and monitor to. However, these setup instructions should
also work on any Pi with WiFi. It has been tested to work with:
Pi 3 Model B
Pi 3 Model B+
Pi 3 Model A+
Pi 4 Model B
•
•
•
•
•
•
•
©Adafruit Industries Page 4 of 34

Is There Even Life?
You can skip this section unless you have reason to believe your Pi Zero isn't alive.
The Pi Zero doesn't have much in the way of blinky LEDs to give you a warm fuzzy
that it's doing anything or even alive. And if the GPU doesn't find a valid OS image, it
doesn't even turn on the green ACT LED and looks totally dead. Typically this just
means something is up with the SD card. Bad card. Bad image. Out of date image.
Whatever. It does not mean the Pi Zero is dead.
Here's how to run a sanity check to verify if the Pi Zero is
OK.
(taken from here(https://adafru.it/upa) and also provided here(https://adafru.it/vIe))
Take your Zero, with nothing in any slot or socket (yes, no SD-card is needed or
wanted to do this test!).
Take a normal micro-USB to USB-A DATA SYNC cable (not a charge-only cable!
make sure its a true data sync cable!)
Connect the USB cable to your PC, plugging the micro-USB into the Pi's USB,
(not the PWR_IN).
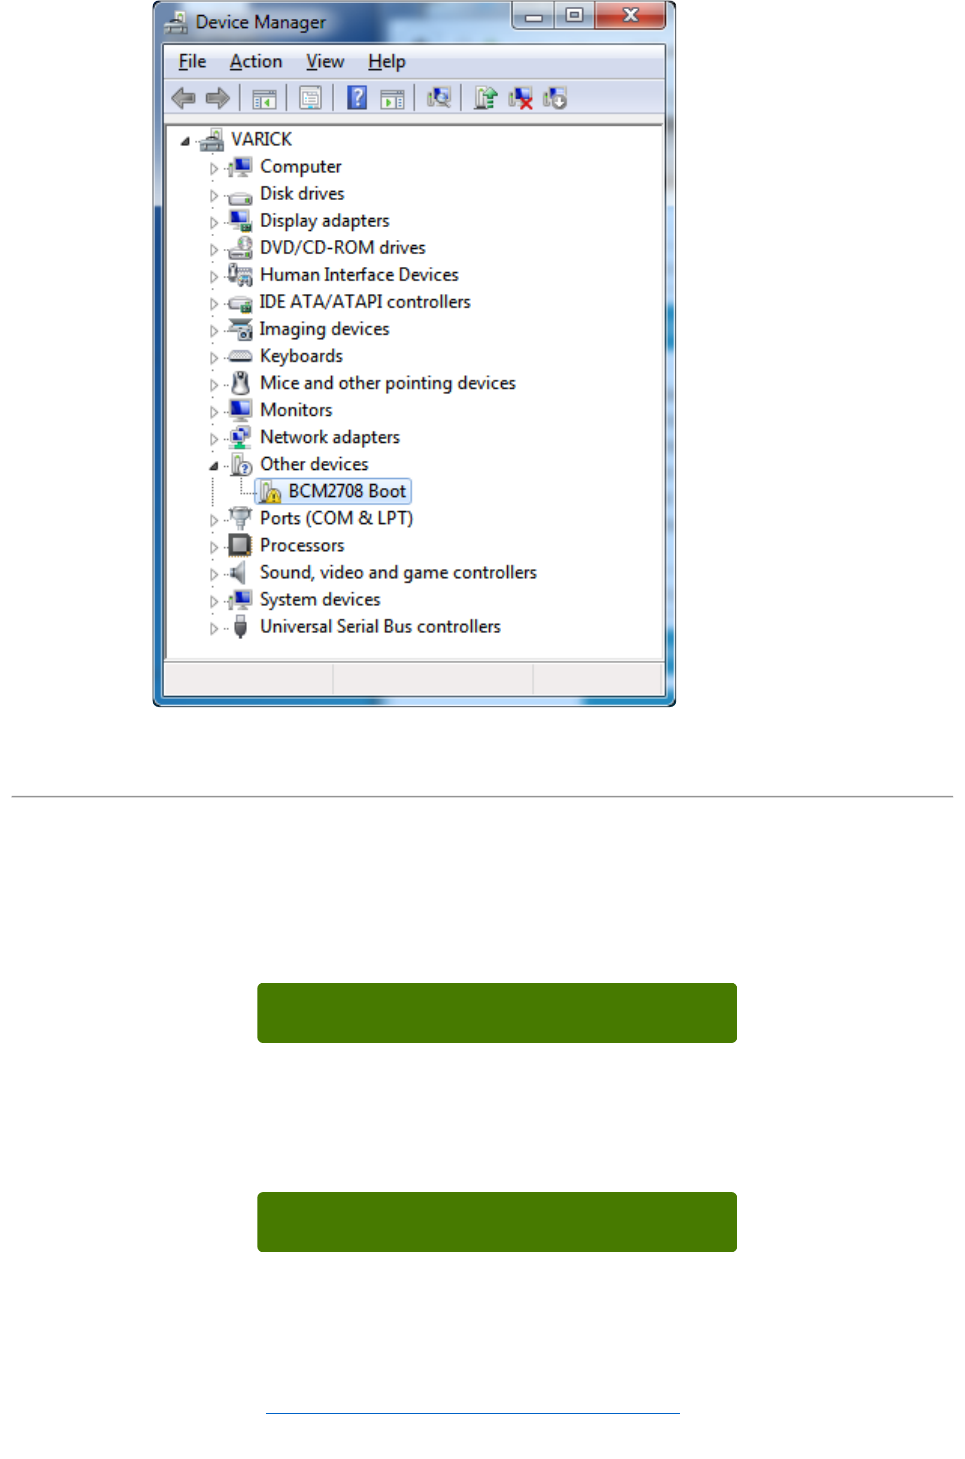
If the Zero is alive, your Windows PC will go ding for the presence of new
hardware & you should see "BCM2708 Boot" in Device Manager.
Or on linux, runsudo lsusb or run dmesg and look for a ID 0a5c:2763
Broadcom Corp message. If you see that, so far so good, you know the Zero's
not dead.
Below is a Pi Zero connected to a Linux computer via a USB cable and the resulting
dmesg output. Note: there is no SD card installed, USB cable is in USB port, and
there are no lights.
THE ZERO DOES NOT HAVE A POWER LED
•
•
•
•
•
It may take a few seconds for the messages to show up.
©Adafruit Industries Page 5 of 34
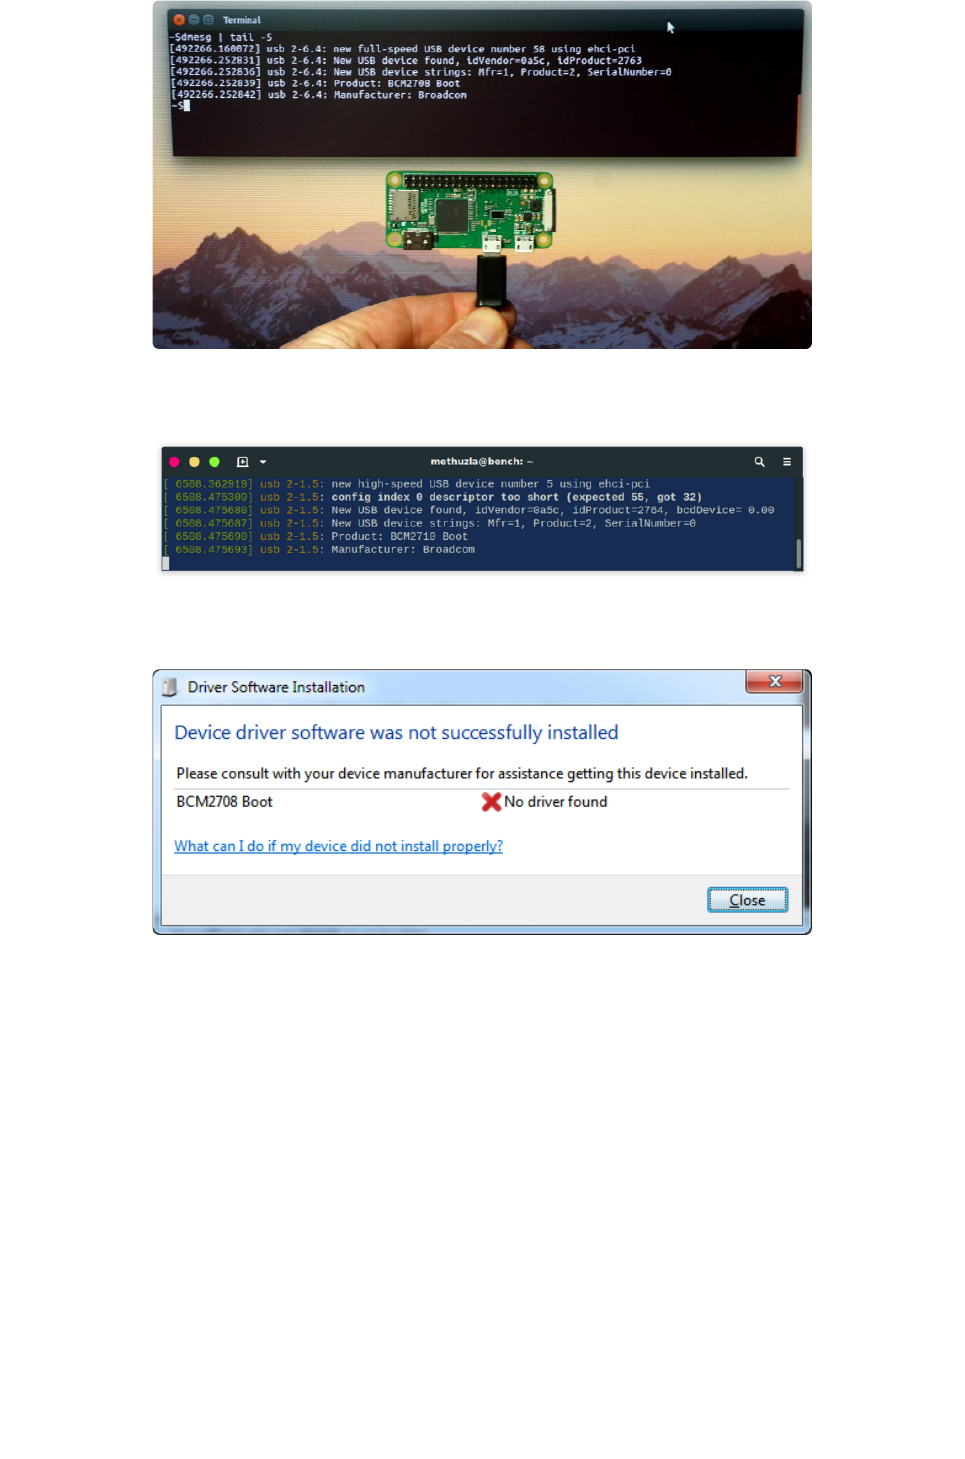
This is what a Pi Zero 2 W shows up as:
Here's what our Windows machine showed:
©Adafruit Industries Page 6 of 34
Looks dead, but it's not.
Install OS on to SD Card
This guide uses Raspbian Lite as the starting point. Download the latest version from
here:
Raspbian Download
https://adafru.it/fQi
You will get a .zip file. Unzip that and you should get a .img file. Then follow these
excellent instructions to burn the OS image to an SD card:
Raspberry Pi Imaging Tutorial
https://adafru.it/jd0
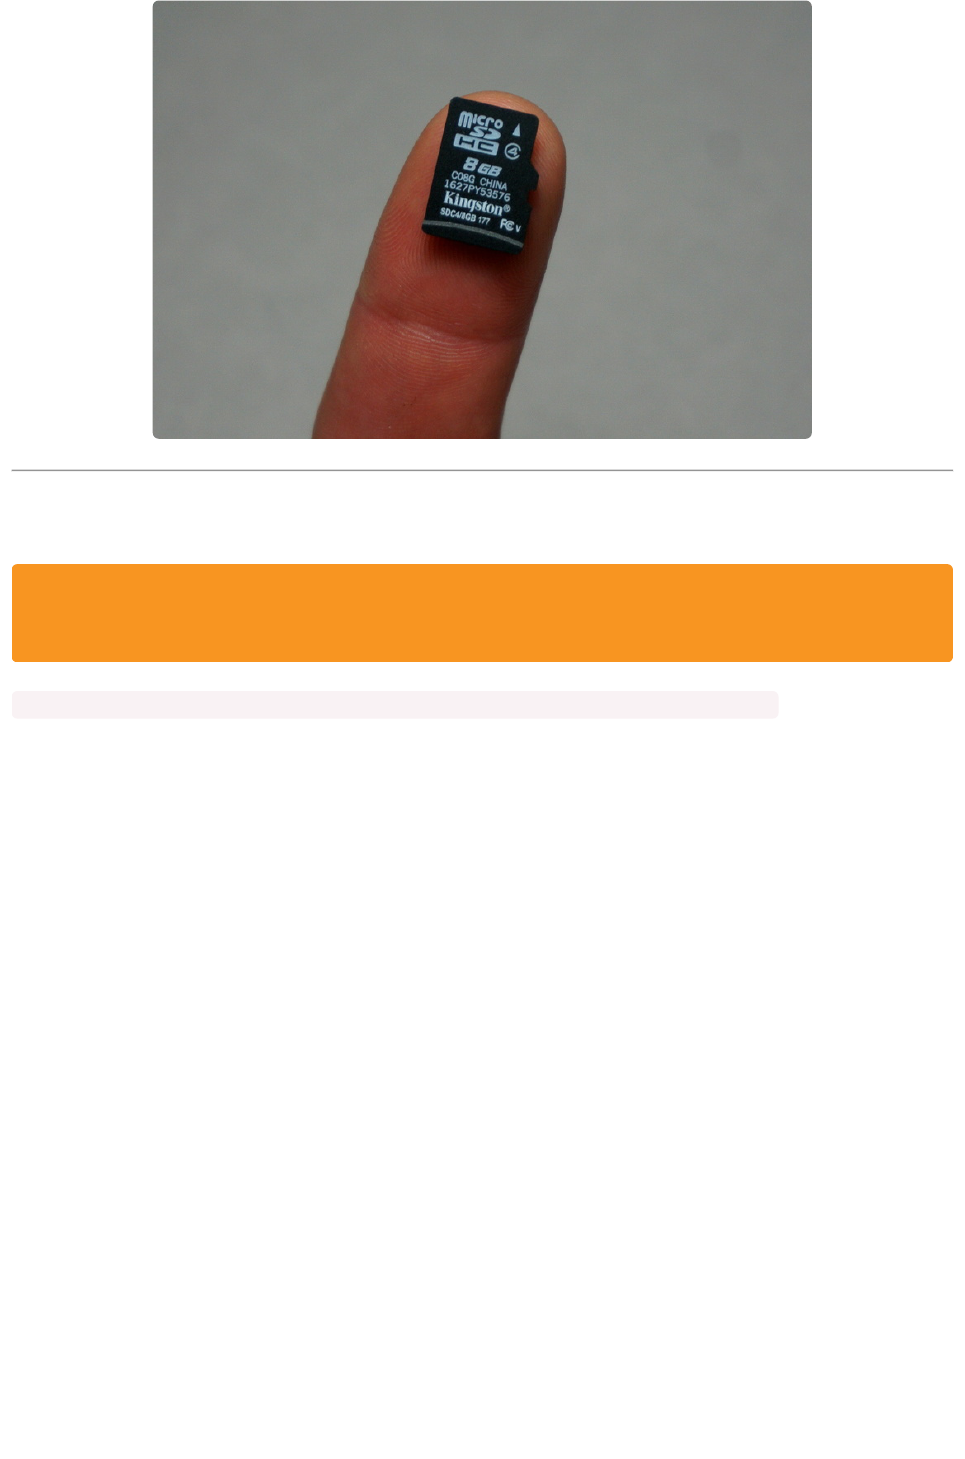
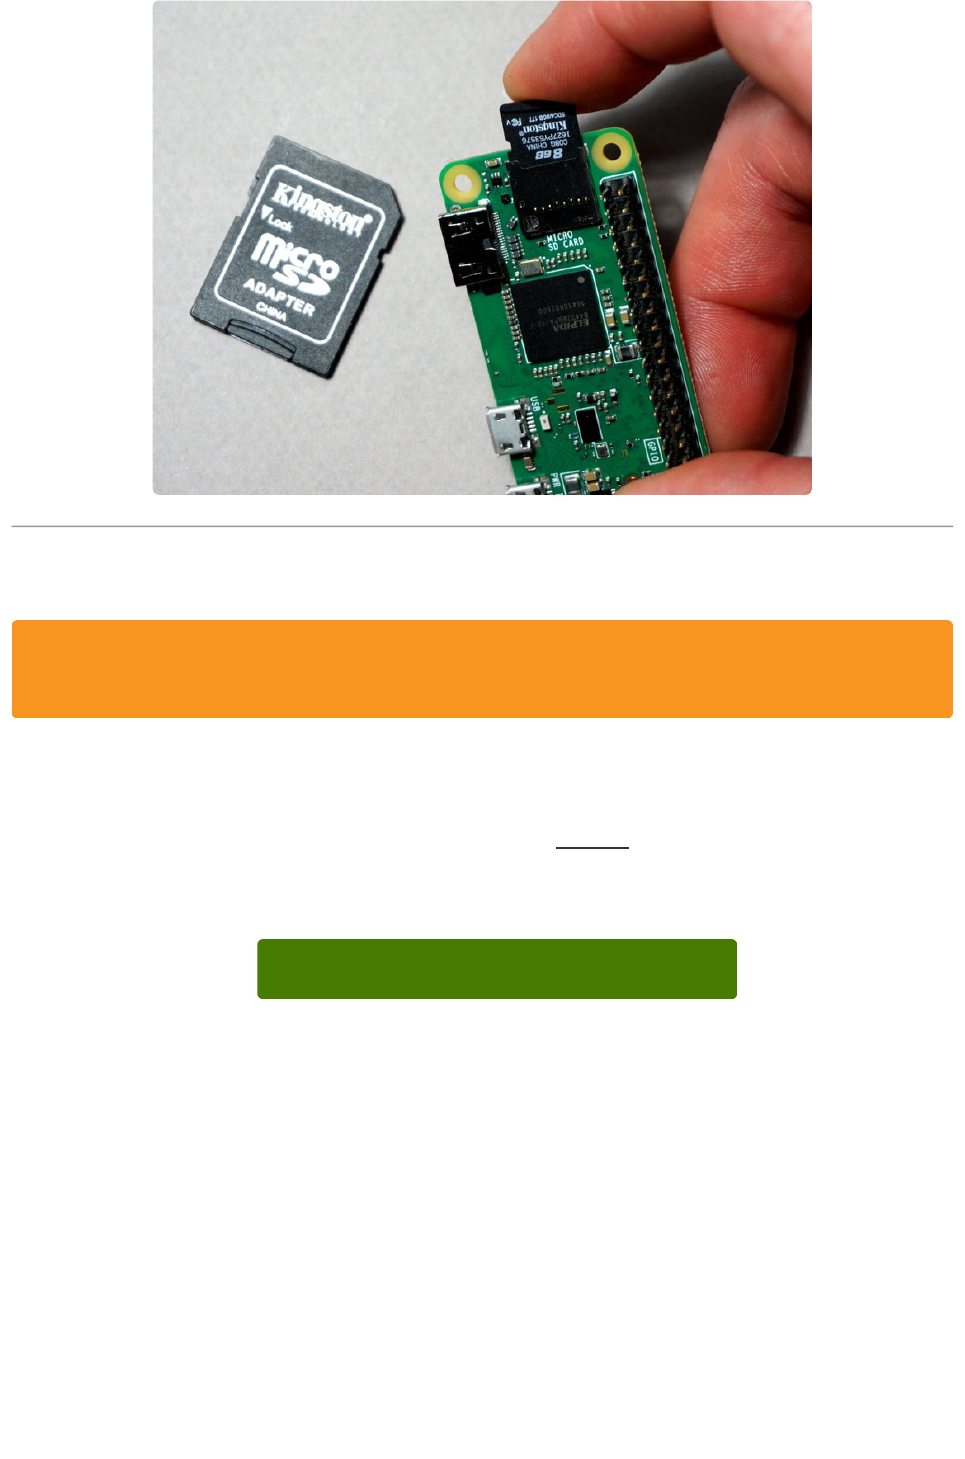
You live in a world where an entire operating system can fit on a wafer thin piece of
plastic smaller than your finger tip. And you can run this on a $5 (or $10) computer
that is small enough to give away on the cover of a magazine(https://adafru.it/vIf). You
should be amazed, excited, and happy about this.
©Adafruit Industries Page 7 of 34
Text File Editing
Latest OS tested: Raspberry Pi OS Buster Lite 2021-05-07
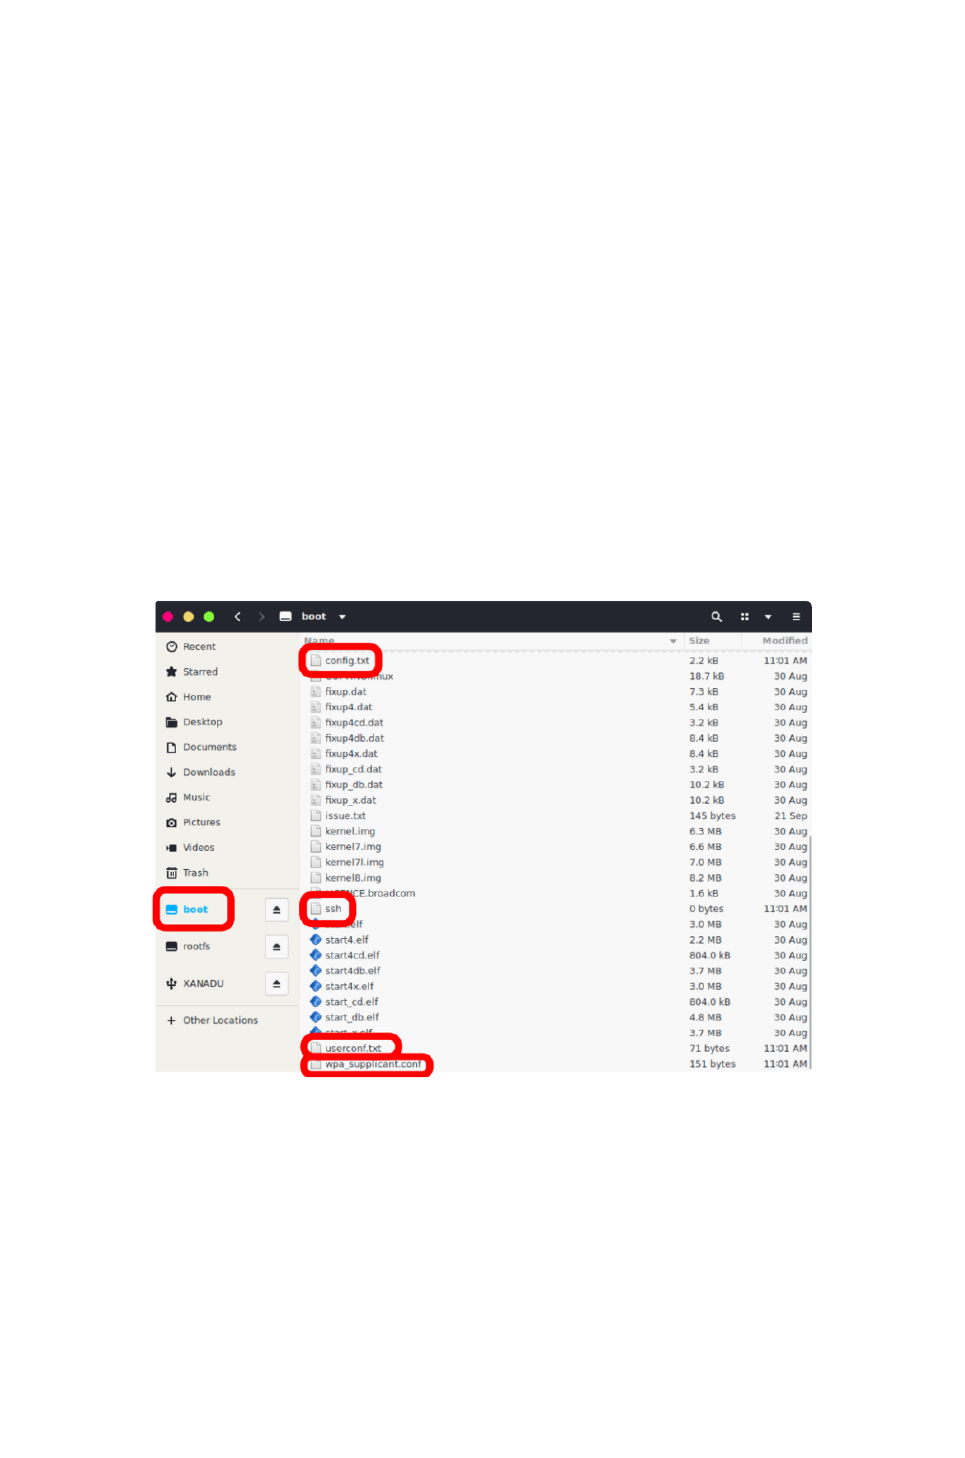
If you burned the OS image successfully, you should see a folder named boot appear
on your main computer. If it doesn't, try removing and reinserting the SD card. If it still
doesn't, try burning the image again.
There are four text files we will create/edit in boot.
userconf.txt - user account id and password
wpa_supplicant.conf - wifi settings
config.txt - global system settings
ssh - an empty text file to enable ssh
We are going to edit these directly on the SD card before putting it in the Pi Zero. This
way you can edit these files using your favorite text editor on your main computer. Try
to avoid using a word processor though. A "text editor" edits text and nothing else,
whereas a "word processor" allows for all kinds of formatting, like making text bold,
inserting images, etc.
This process only works for Raspberry Pi OS releases prior to the 2023-10-10
Bookworm release. For any newer OS releases use rpi-imager.
1.
2.
3.
4.
©Adafruit Industries Page 8 of 34

Create User Account and Password
As of the bullseye release of the Raspberry Pi OS, the default account with username
pi and password raspberry has been removed. This blog post has more
information.(https://adafru.it/19te)
To create a user account, a file named userconf.txt is created that contains the
account username and encrypted password. The password must be encrypted, which
can be a hassle. If you have access to a running Pi or other linux machine, can use the
following:
pi@raspberrypi:~ $ echo "raspberry" | openssl passwd -6 -stdin
$6$AAEwDli5NhfHfGpt$Wtvv7DiMGR8mtGn/
rDlgn80.MYQ2.bGCBmWrULW75KyTsXNm1vFndSS8TLdlxWZbNMoEuWqlmIwr3f9grFMf5/
The resulting contents of the userconf.txt file would then look like:
pi:$6$AAEwDli5NhfHfGpt$Wtvv7DiMGR8mtGn/
rDlgn80.MYQ2.bGCBmWrULW75KyTsXNm1vFndSS8TLdlxWZbNMoEuWqlmIwr3f9grFMf5/
That will create a user account with username pi and password raspberry.
Configure WiFi
The Pi Zero W has built in WiFi so nothing additional is required. WiFi is only
supported on 2.4 GHz band. If you are using the original Pi Zero, you will need some
form of WiFi Adapter(http://adafru.it/814) and a way to connect it: cable(http://
adafru.it/1099) or adapter(http://adafru.it/2910).
The WiFi configuration file does not exist and needs to be created. The name of the
file should be wpa_supplicant.conf and its contents will get copied to the system
folder at boot time. It will then be deleted. So this a one time only process. If you want
to try again, you have to recreate the file and reboot.
The contents of the file should be as shown below. Replace YOURSSID and
YOURPASSWORD with whatever is used for your network setup.
ctrl_interface=DIR=/var/run/wpa_supplicant GROUP=netdev
update_config=1
country=US
network={
ssid="YOURSSID"
psk="YOURPASSWORD"
©Adafruit Industries Page 9 of 34
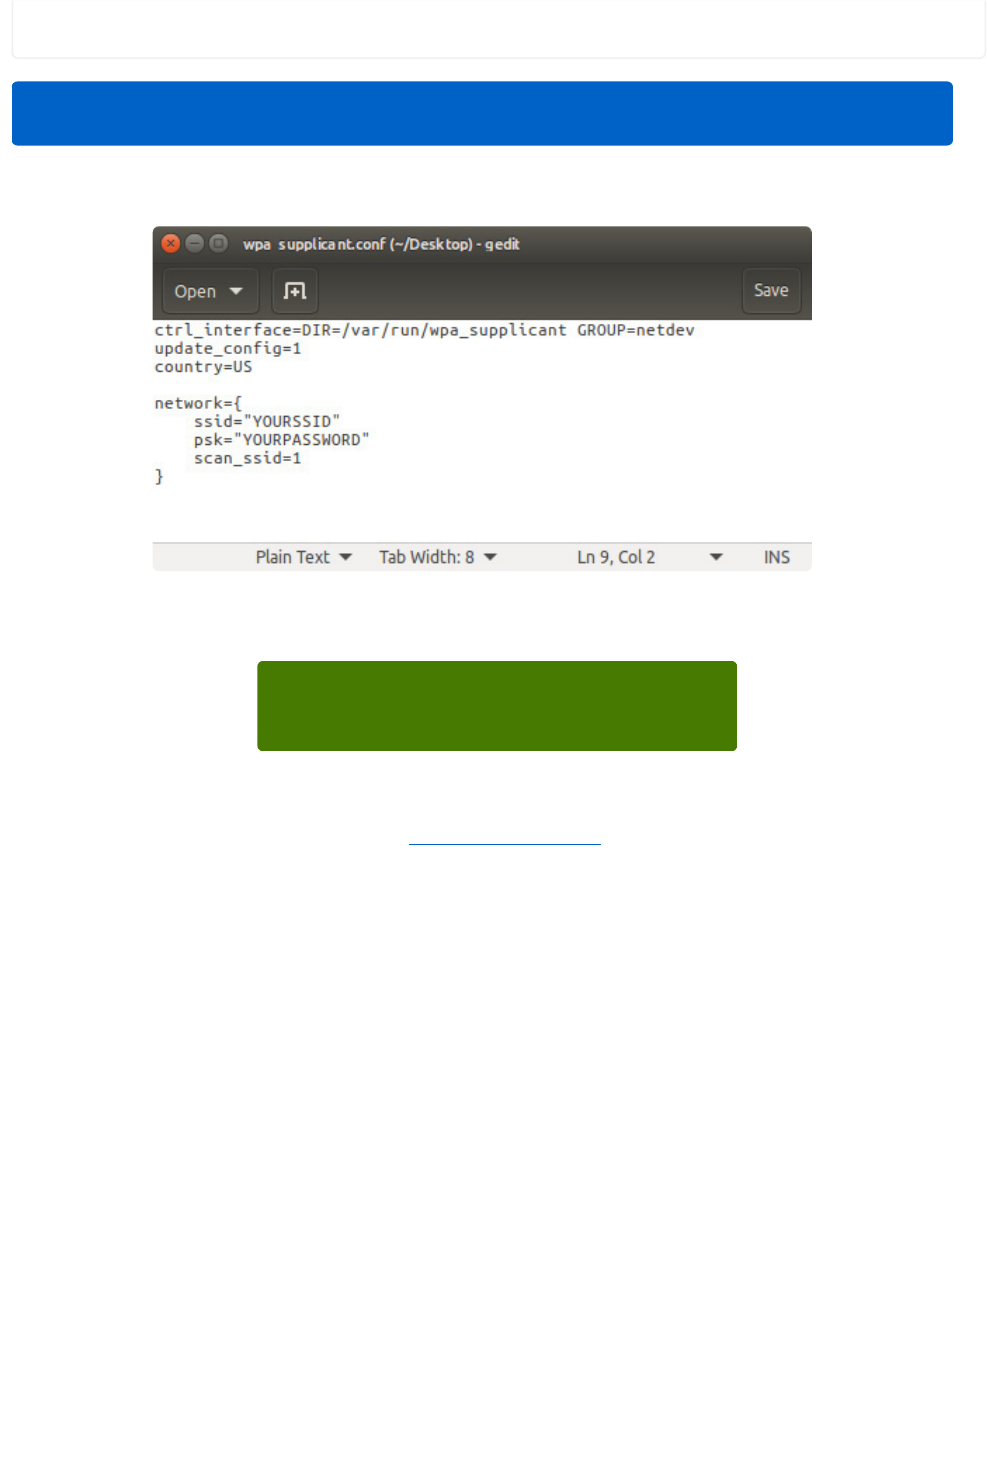
scan_ssid=1
}
Like this:
On the country= line, if not in the US, replace with code for your specific country.
Click here for a list of country
codes.
https://adafru.it/B1R
Save file and move on to next step. (more details here(https://adafru.it/yPd))
Enable UART
The file called config.txt already exists, we are just going to edit its contents. We will
add some text to the bottom to enable the UART on the GPIO header pins. This allows
a USB console cable to be attached later for troubleshooting.
Don't put any spaces around the = in this file. It doesn't like that.
©Adafruit Industries Page 10 of 34
Enable SSH
SSH used to be enabled by default, but was then (Nov 2016) turned off by default.
This was due to security concerns since the pi user id and password are well known.
However, you'll likely want this enabled so you can remotely connect to the Pi Zero.
To do so, we simply create a file called ssh. This file does not exist and needs to be
created. It can be empty. The system looks for it at boot time and will enable ssh if it
is there. It is then deleted. So just create a new file and save it as ssh to the boot
folder.
Final Check
After the above steps, you should have the following files on the SD card in the boot
folder.
Safely remove the SD card from the main computer and install it in the Pi Zero.
©Adafruit Industries Page 12 of 34
Using rpi-imager
This approach uses the rpi-imager software created by the Raspberry Pi Foundation.
This allows configuring and writing the OS image all in one step. No text file editing
required. This process can do all the same setup except for the UART enabling.
Information on installing and running rpi-imager can be found here:
Raspberry Pi Software
https://adafru.it/QbQ
Once you've installed rpi-imager and launched it, you should see the initial screen.
Configuration settings are accessed via the Advanced Options by clicking on the gear
icon:
These screenshots may not exactly match the current rpi-imager release.
However, the general process should be as shown.
©Adafruit Industries Page 13 of 34
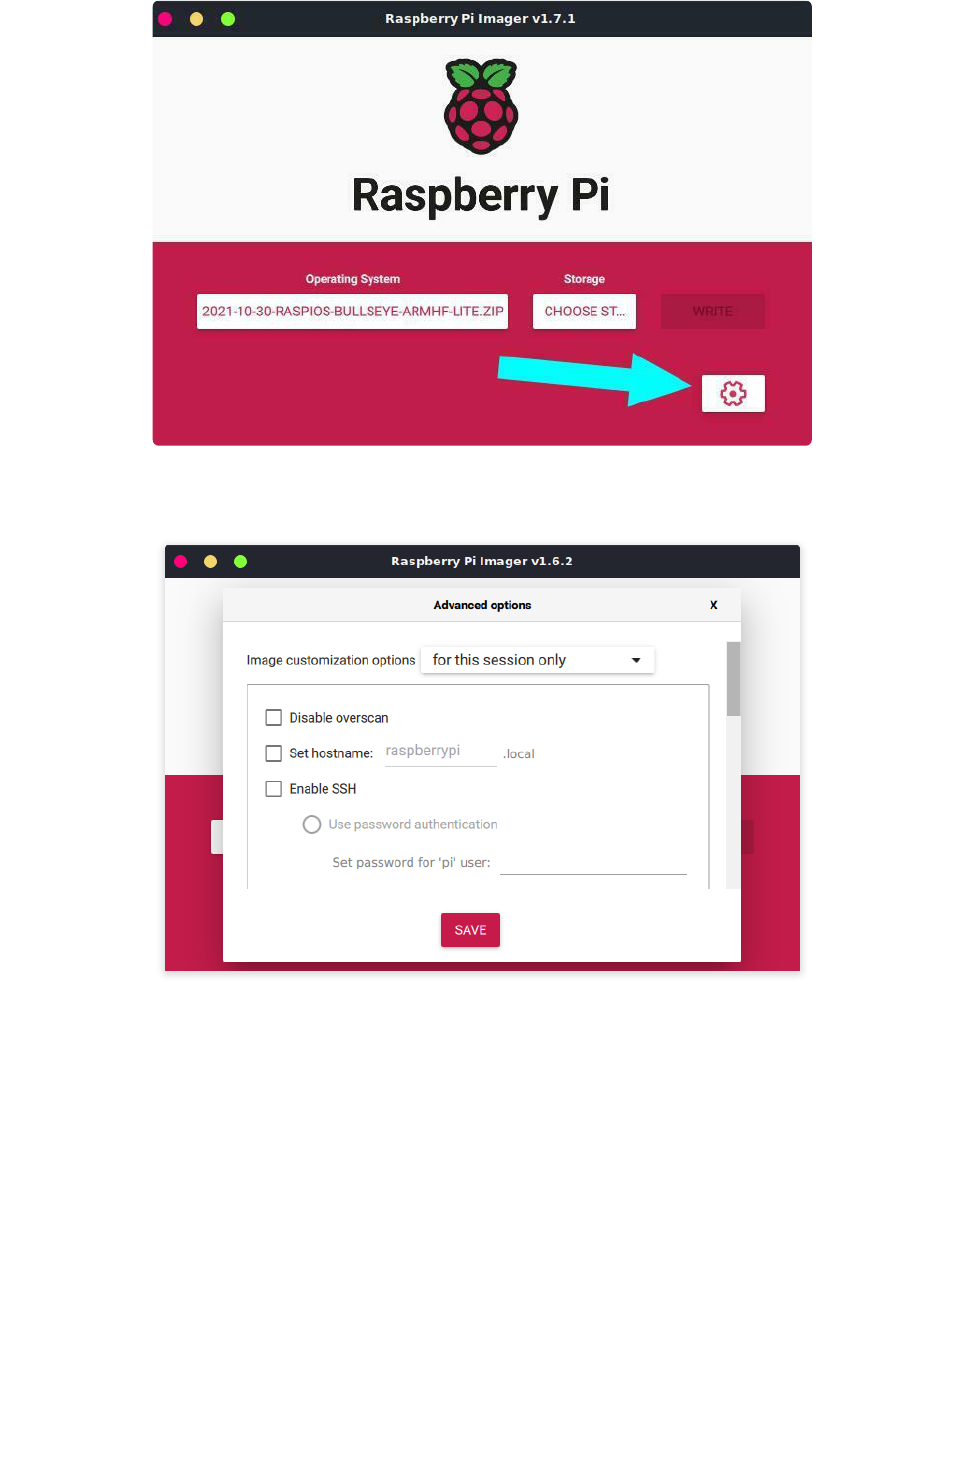
The Advanced Options should look like this:
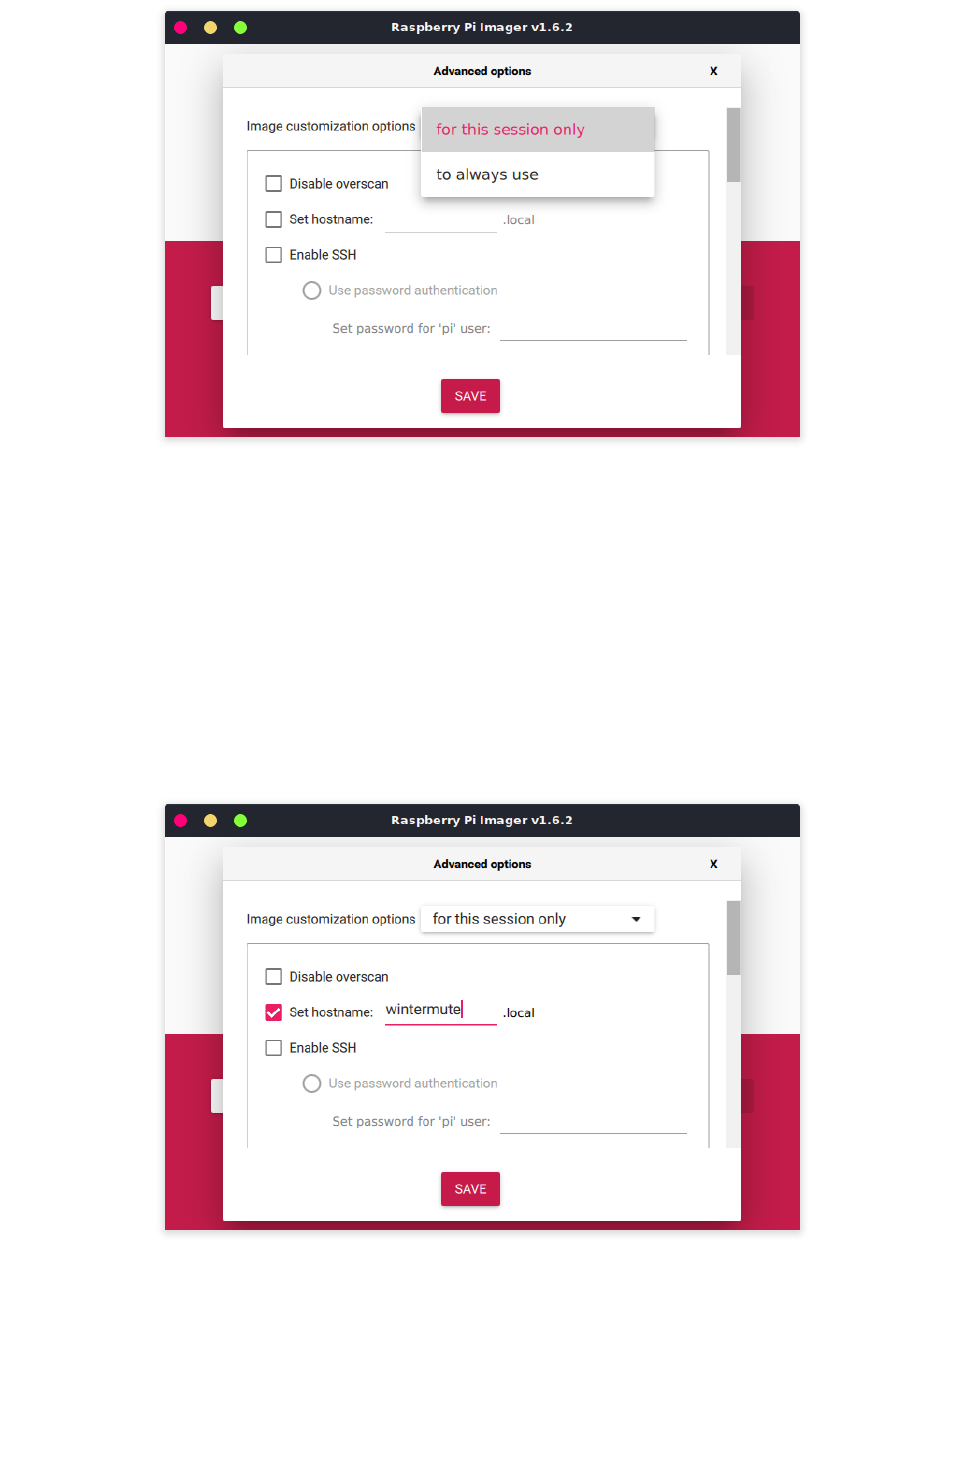
The top drop down lets you choose between applying the settings just once (for this
session only) or every time you burn an image (to always use). The later can be useful
so you don't have to type in the same information each time you burn an image.
©Adafruit Industries Page 14 of 34
And then you can just scroll through and enable any of the options you want and
configure as appropriate. Be sure to scroll, there are more items than can fit in the
small rpi-imager app window.
Set Hostname
This is the name the Raspberry Pi will show up as on your network. If nothing is done
here, the default is raspberrypi.
Enable SSH
Not only can you enable SSH, you can set a new password to use as well. By default,
SSH is disabled.
©Adafruit Industries Page 15 of 34
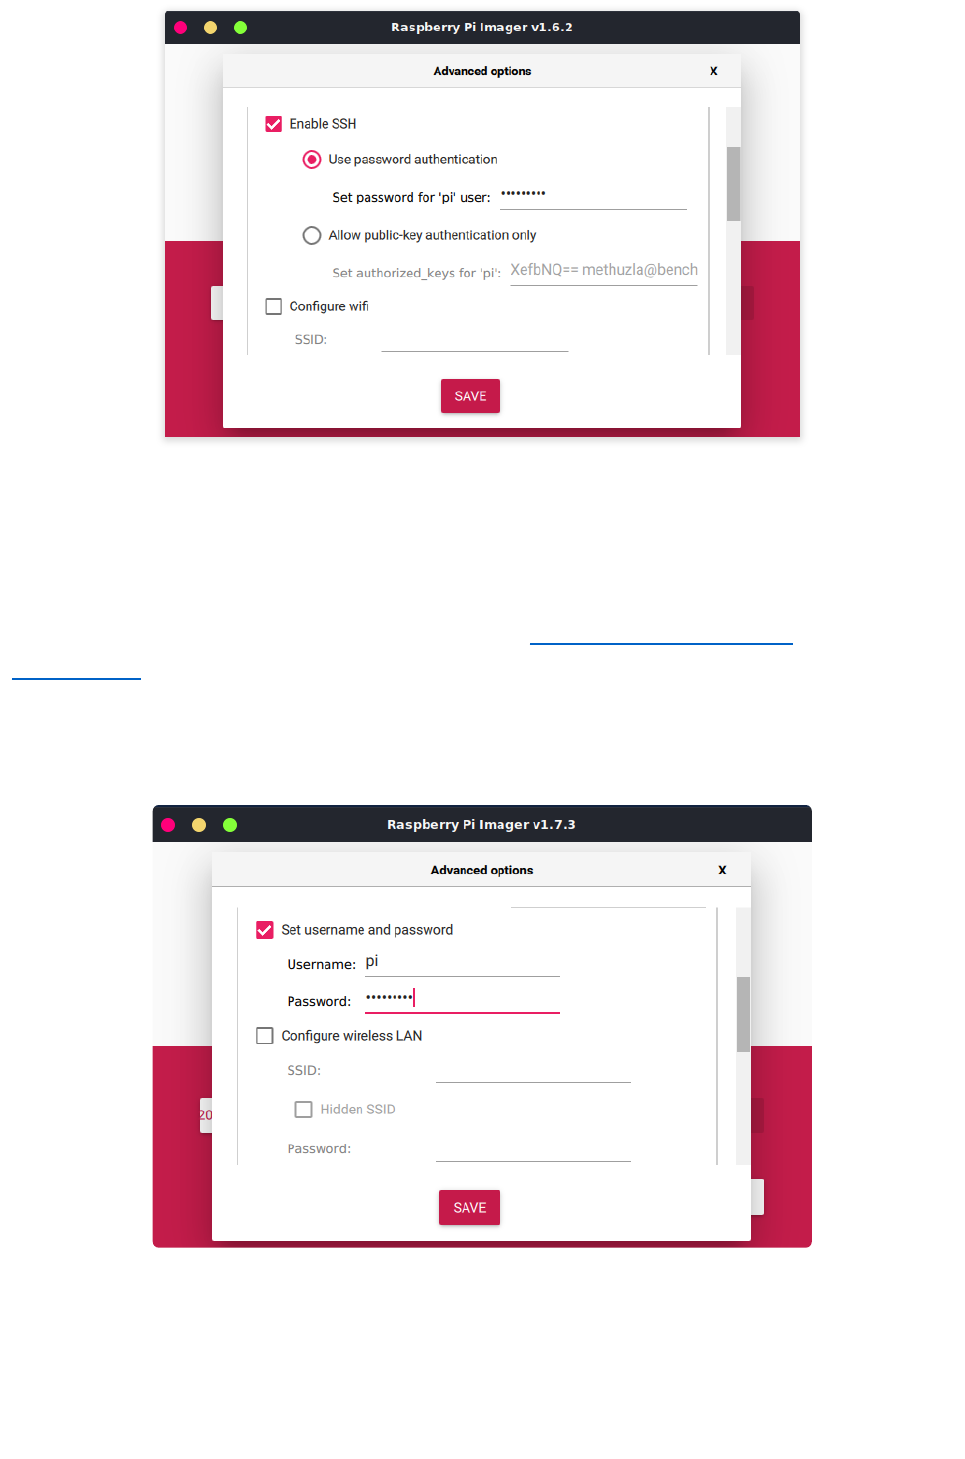
Set Username and Password
As of the bullseye release of the Raspberry Pi OS, the default account with username
pi and password raspberry has been removed. This blog post has more
information.(https://adafru.it/19te)
To create a user account, fill in the username and password. This can be whatever
you want, including the old default pi:raspberry.
Configure WiFi
This sets up the Raspberry Pi to be able to connect to your local WiFi network. Type in
your WiFi network name (SSID) and password. Be careful not to have any typos.
©Adafruit Industries Page 16 of 34
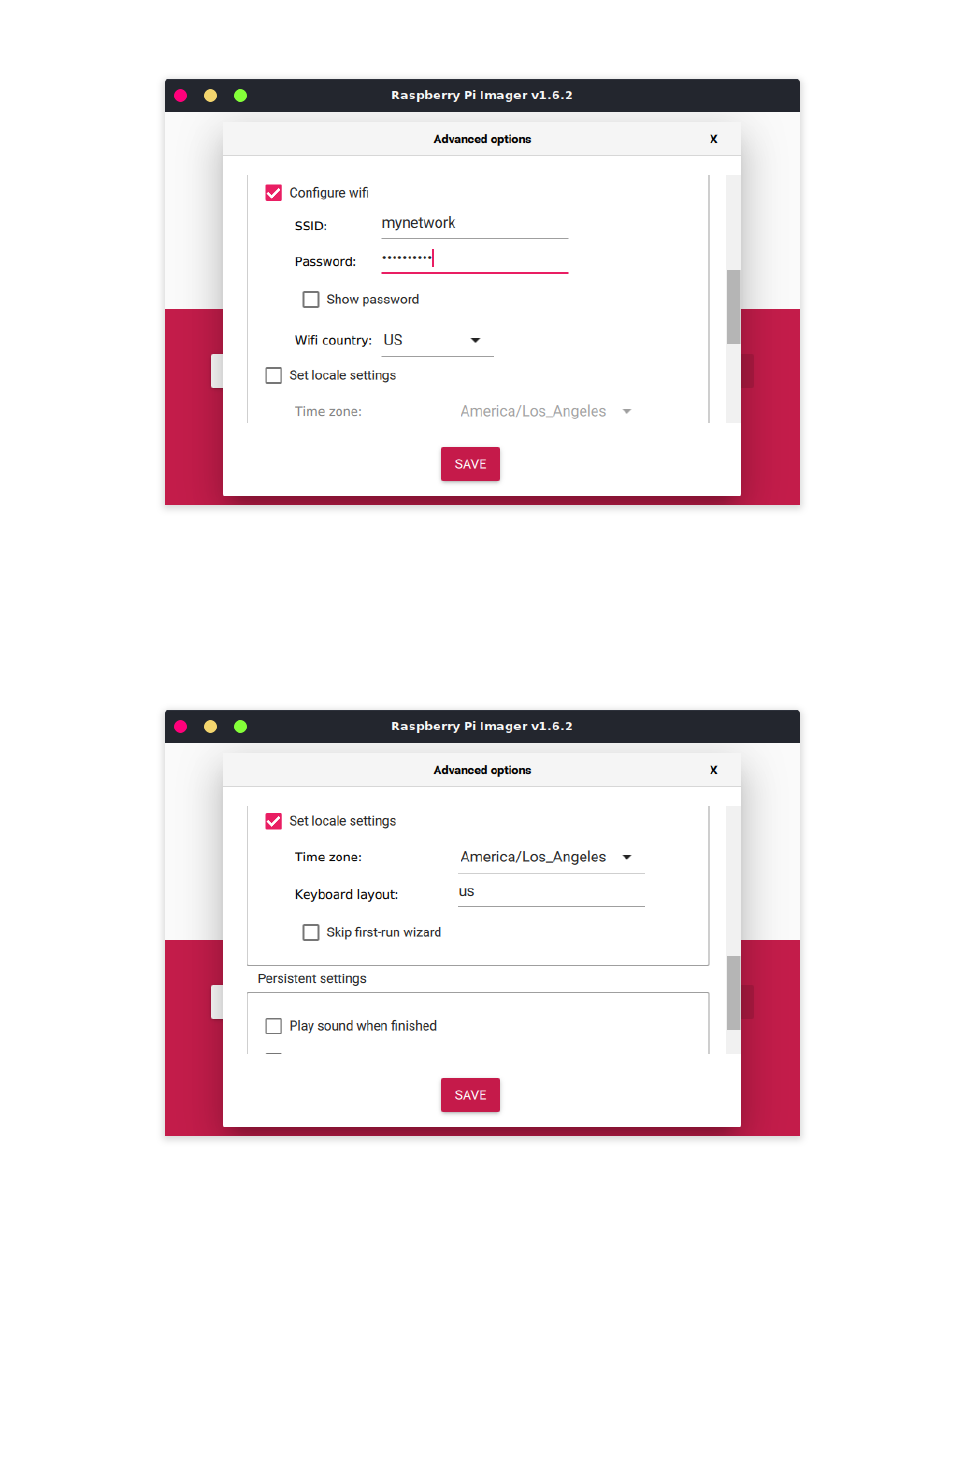
Don't forget to also set the country code.
Location Settings
This can be used to set time zone and keyboard layout.
Burn OS Image
Once done with the settings, click the SAVE button to get back to the main rpi-imager
screen. Then, pick an OS image by clicking the CHOOSE OS button.
©Adafruit Industries Page 17 of 34
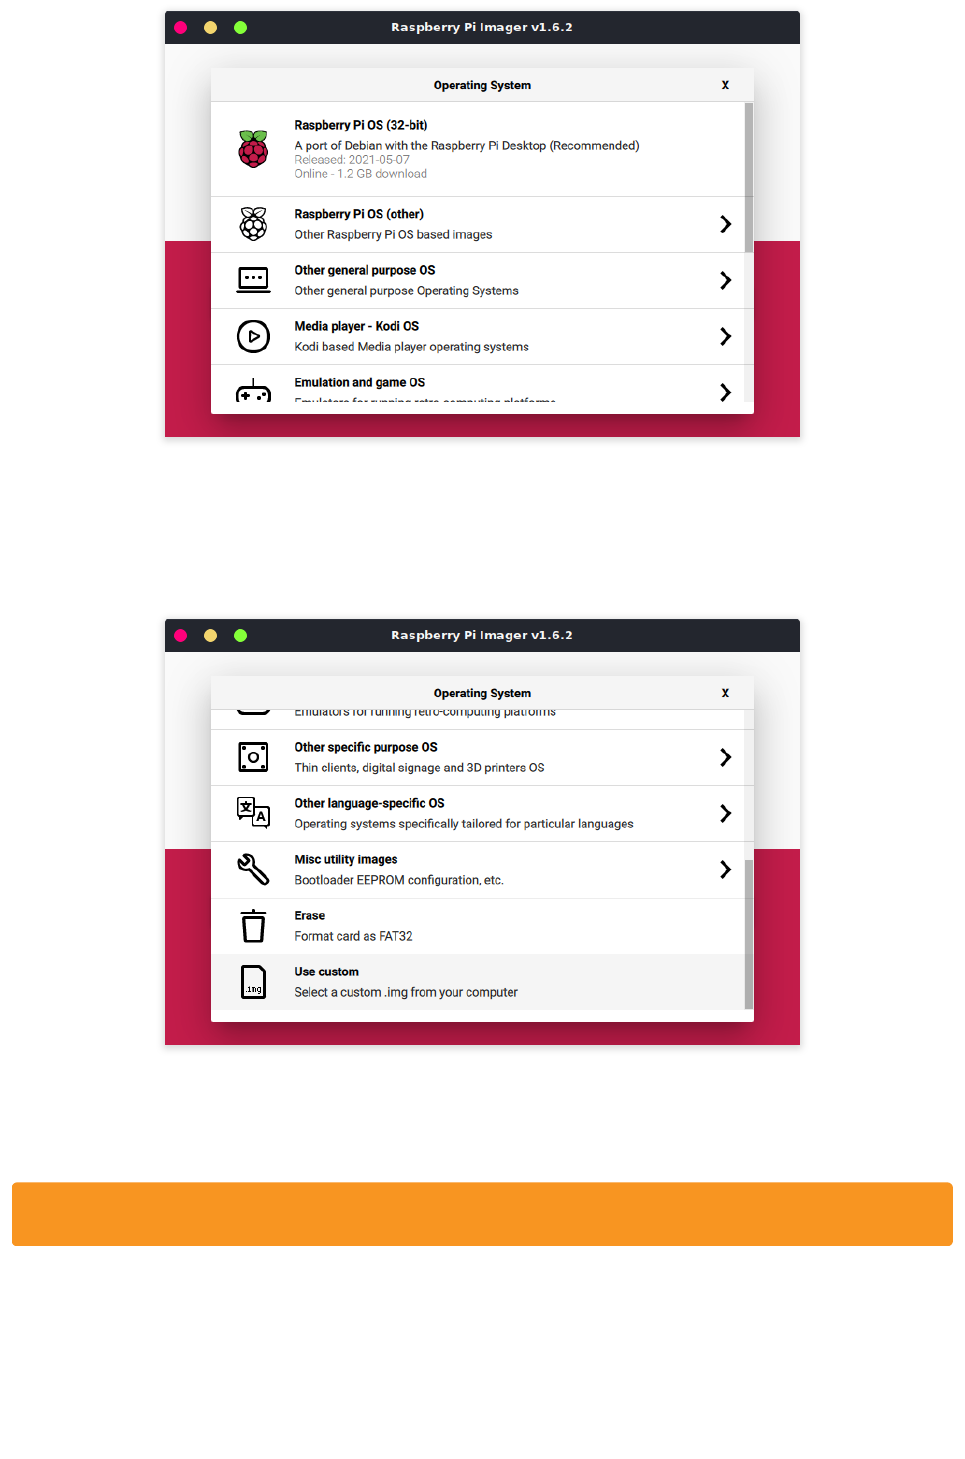
Most of these options will download the selected image from the internet before
burning. If you want to instead use a specific OS image you've already downloaded,
then scroll to the very last option - Use Custom.
Click CHOOSE STORAGE to pick the SD card to use. Be careful to select the correct
device here.
Make sure you select the SD card and not your hard drive.
©Adafruit Industries Page 18 of 34
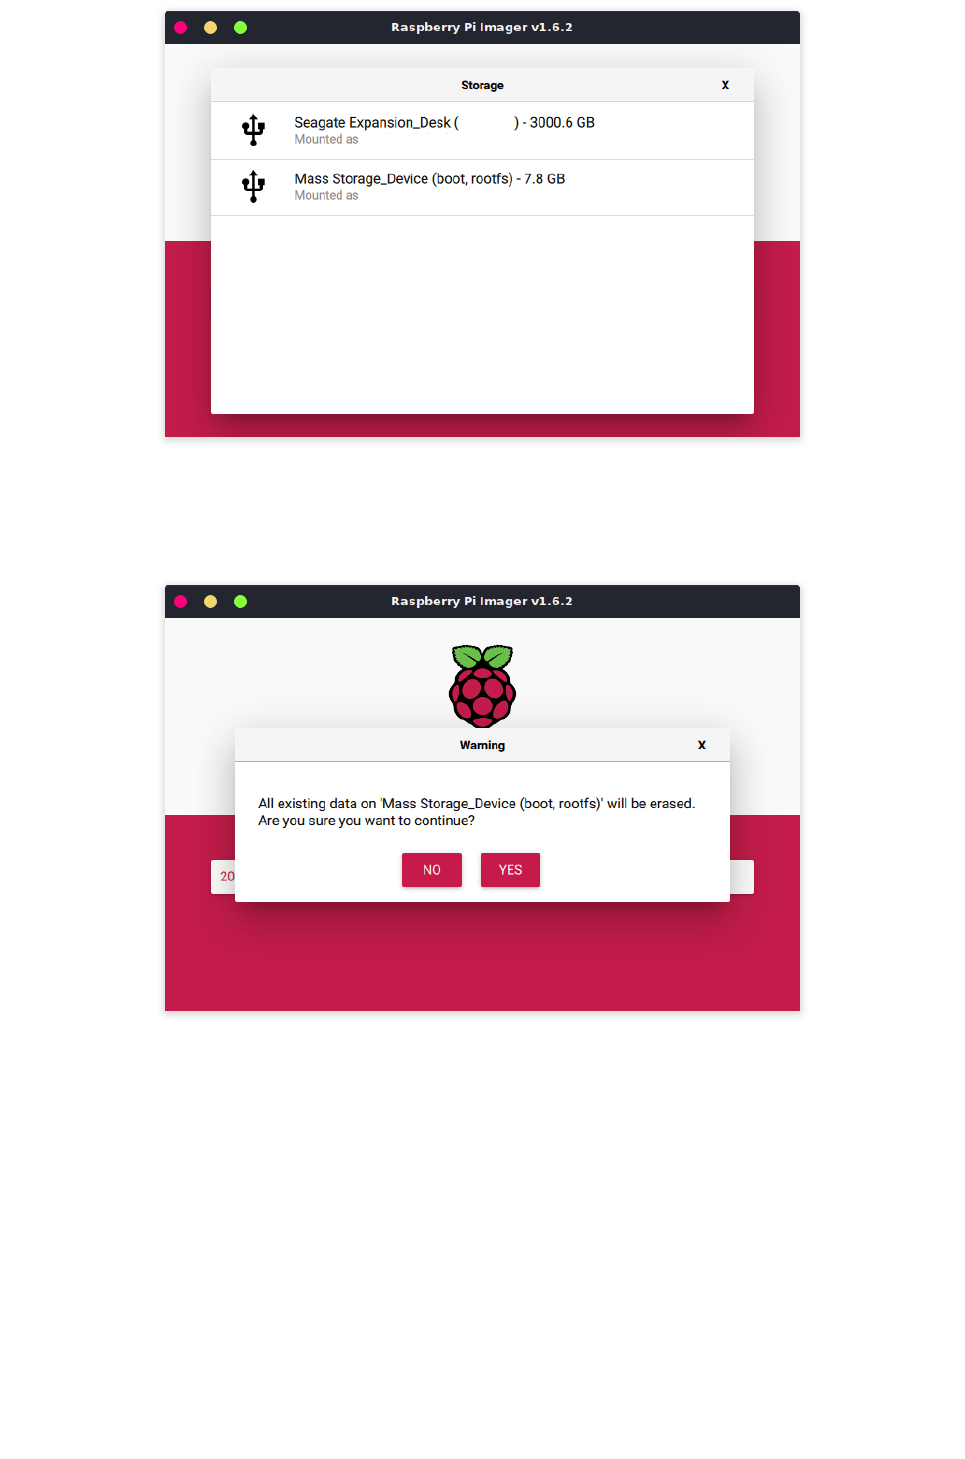
Then click WRITE to start writing the image to the SD card. You'll be prompted to
confirm before starting.
Click YES and away it goes. It will take several minutes to complete. Longer if it also
has to download the image first.
©Adafruit Industries Page 19 of 34
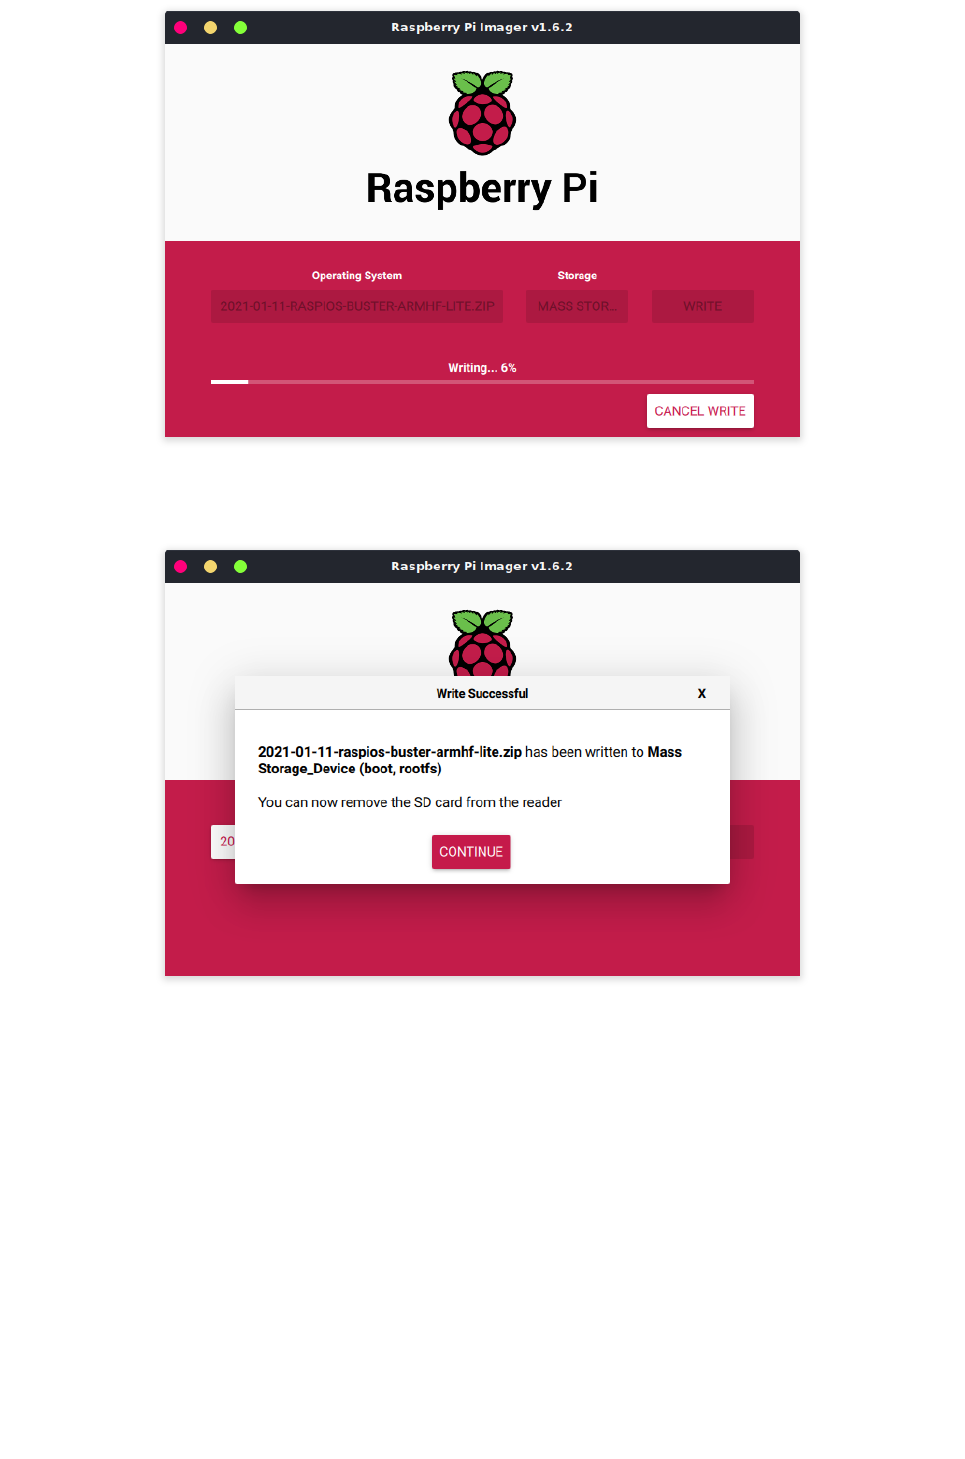
Once done, you get this pop up, and...well...you're done.
How It Works
This process seems to rely entirely on creating a custom script called firstrun.sh in
the /boot partition of the SD card. It does not create a wpa_supplicant.conf or ssh file.
Nor does it alter config.txt.
Here are the contents of the firstrun.sh file created after the screen shots above and
burning the OS image.
NOTE: The SD card has not been booted in a Pi yet.
©Adafruit Industries Page 20 of 34

#!/bin/bash
set +e
CURRENT_HOSTNAME=`cat /etc/hostname | tr -d " \t\n\r"`
echo wintermute >/etc/hostname
sed -i "s/127.0.1.1.*$CURRENT_HOSTNAME/127.0.1.1\twintermute/g" /etc/hosts
FIRSTUSER=`getent passwd 1000 | cut -d: -f1`
FIRSTUSERHOME=`getent passwd 1000 | cut -d: -f6`
echo "$FIRSTUSER:"'$5$.JCul6mnDH$/TjzLsqN9iHpAhva/OlrCoANkWNU7nn6dfQplh3.WBC' |
chpasswd -e
systemctl enable ssh
cat >/etc/wpa_supplicant/wpa_supplicant.conf <<'WPAEOF'
country=US
ctrl_interface=DIR=/var/run/wpa_supplicant GROUP=netdev
ap_scan=1
update_config=1
network={
ssid="mynetwork"
psk=69e49214ef4e7e23d0ece077c2faf3c73f7522ad52a26b33527fa78d9033ff35
}
WPAEOF
chmod 600 /etc/wpa_supplicant/wpa_supplicant.conf
rfkill unblock wifi
for filename in /var/lib/systemd/rfkill/*:wlan ; do
echo 0 > $filename
done
rm -f /etc/xdg/autostart/piwiz.desktop
rm -f /etc/localtime
echo "America/Los_Angeles" >/etc/timezone
dpkg-reconfigure -f noninteractive tzdata
cat >/etc/default/keyboard <<'KBEOF'
XKBMODEL="pc105"
XKBLAYOUT="us"
XKBVARIANT=""
XKBOPTIONS=""
KBEOF
dpkg-reconfigure -f noninteractive keyboard-configuration
rm -f /boot/firstrun.sh
sed -i 's| systemd.run.*||g' /boot/cmdline.txt
exit 0
This is just a bash script that will get copied over and run (with elevated privileges!)
the first time the Pi is booted (run). It's sort of a rubber ducky hacker style approach.
Give It Life
OK. Let's power it up.
With the SD card inserted, apply power via a USB cable to the PWR IN connector as
shown.
©Adafruit Industries Page 21 of 34
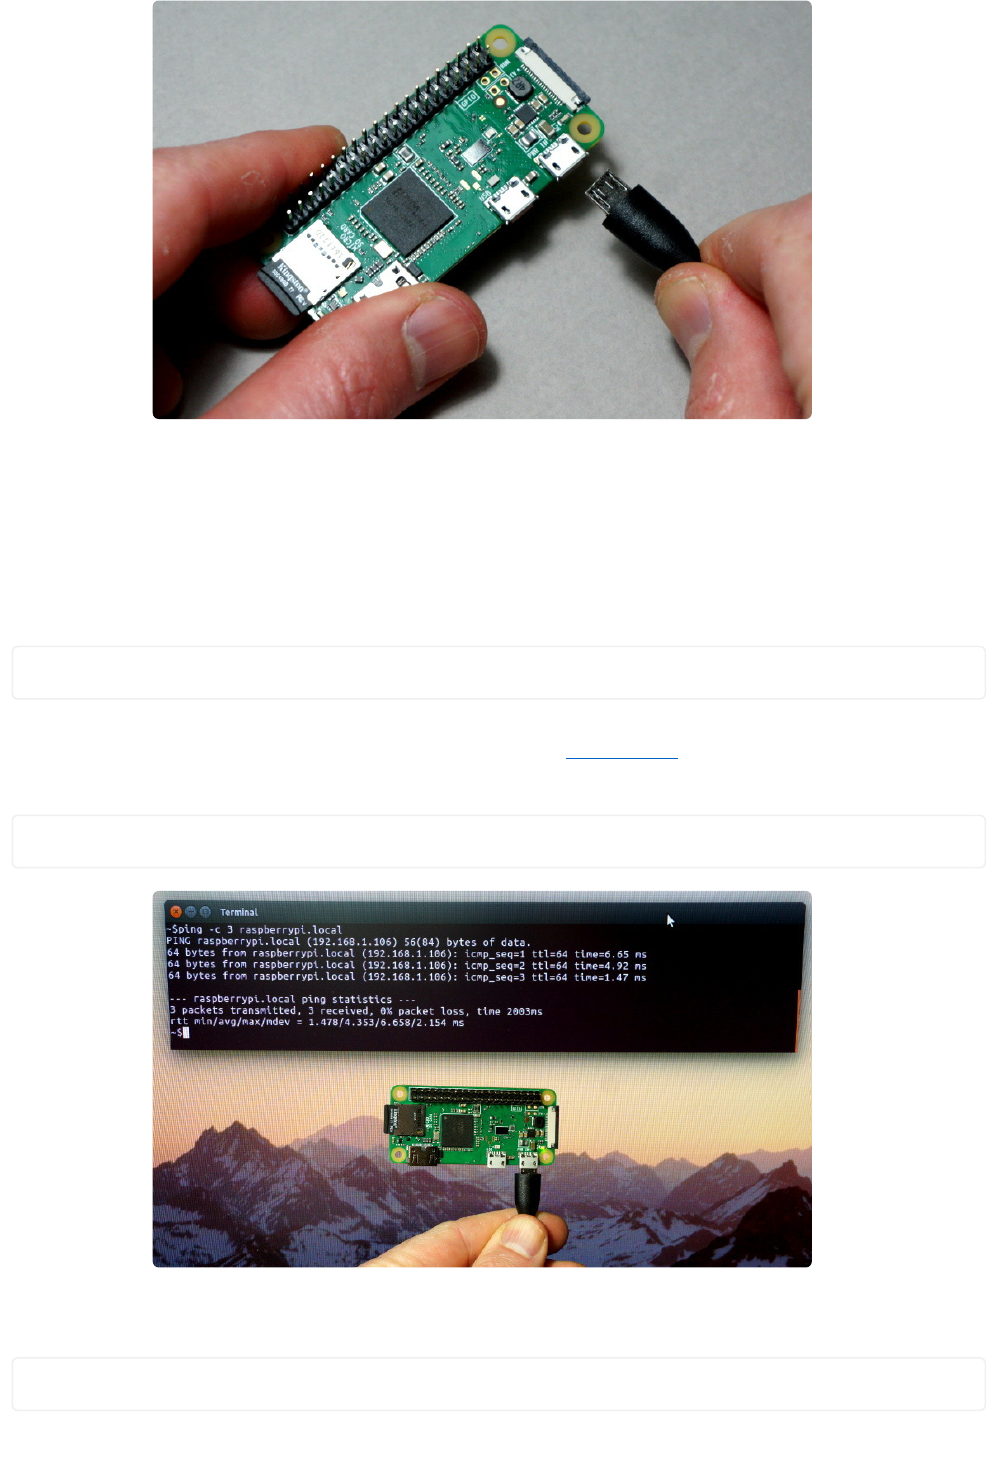
You should see some activity on the green LED light. This means the Pi Zero found a
good OS image and is booting.
After a minute or two, you can try and ping the Pi Zero to see if it has connected to
your network. You can access the Pi Zero using mDNS style addressing.
ping -c 3 raspberrypi.local
Windows users will require some additional setup. Read here(https://adafru.it/q1e).
Also, the ping options on Windows are different, so the above would be:
ping -n 3 raspberrypi.local
You should also be able to ssh into the Pi Zero.
ssh pi@raspberrypi.local
©Adafruit Industries Page 22 of 34
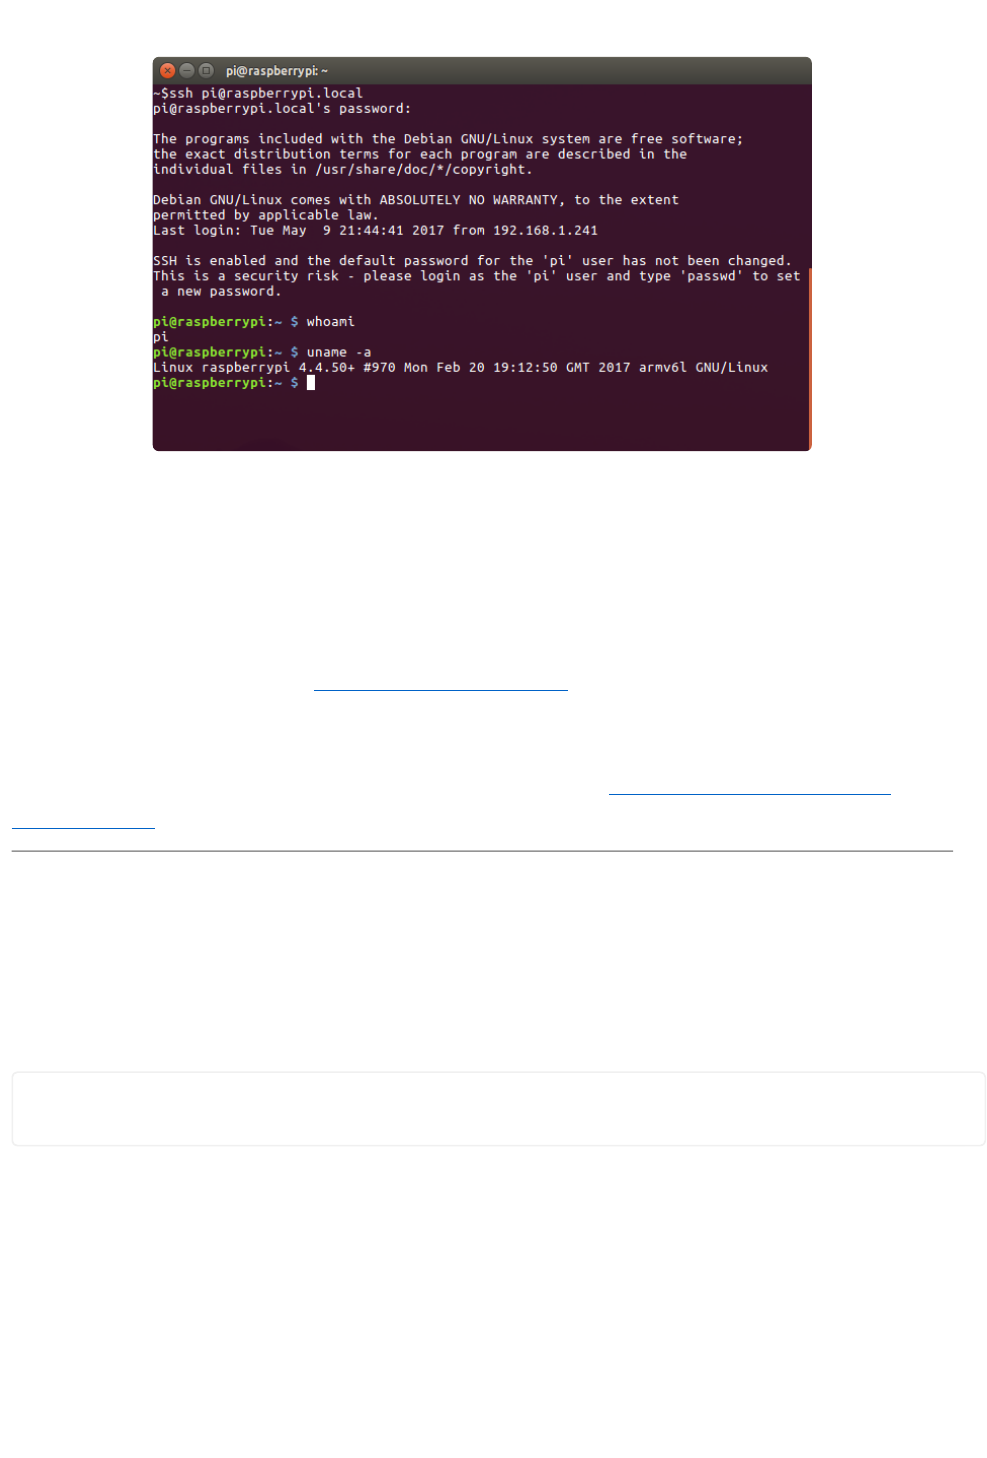
The default password is raspberry.
Done?
If that worked, then you're pretty much done. The Pi Zero has connected to your
network, and assuming your network is connected to the Internet, so is the Pi Zero. If
you want, you can read the Suggested Initial Setup(https://adafru.it/wvE) section for
some suggested first steps.
If that did not work, it's time to troubleshoot. Go to the Using A Console Cable to
Troubleshoot(https://adafru.it/wvF) section.
Suggested Initial Setup
Where you go next is entirely up to you and what your plans are. However, it's a good
idea to start by running a system update first. Connect to the pi via ssh and run the
following commands:
sudo apt-get update
sudo apt-get upgrade
Both commands may take a while to complete. Raspbian Lite is a pretty minimal
install, so your next steps are probably to install a bunch of packages. By running the
above first, you will make sure to bring in the most up to date versions.
System Configuration
General system configuration is done by running the raspi-config utility.
©Adafruit Industries Page 23 of 34
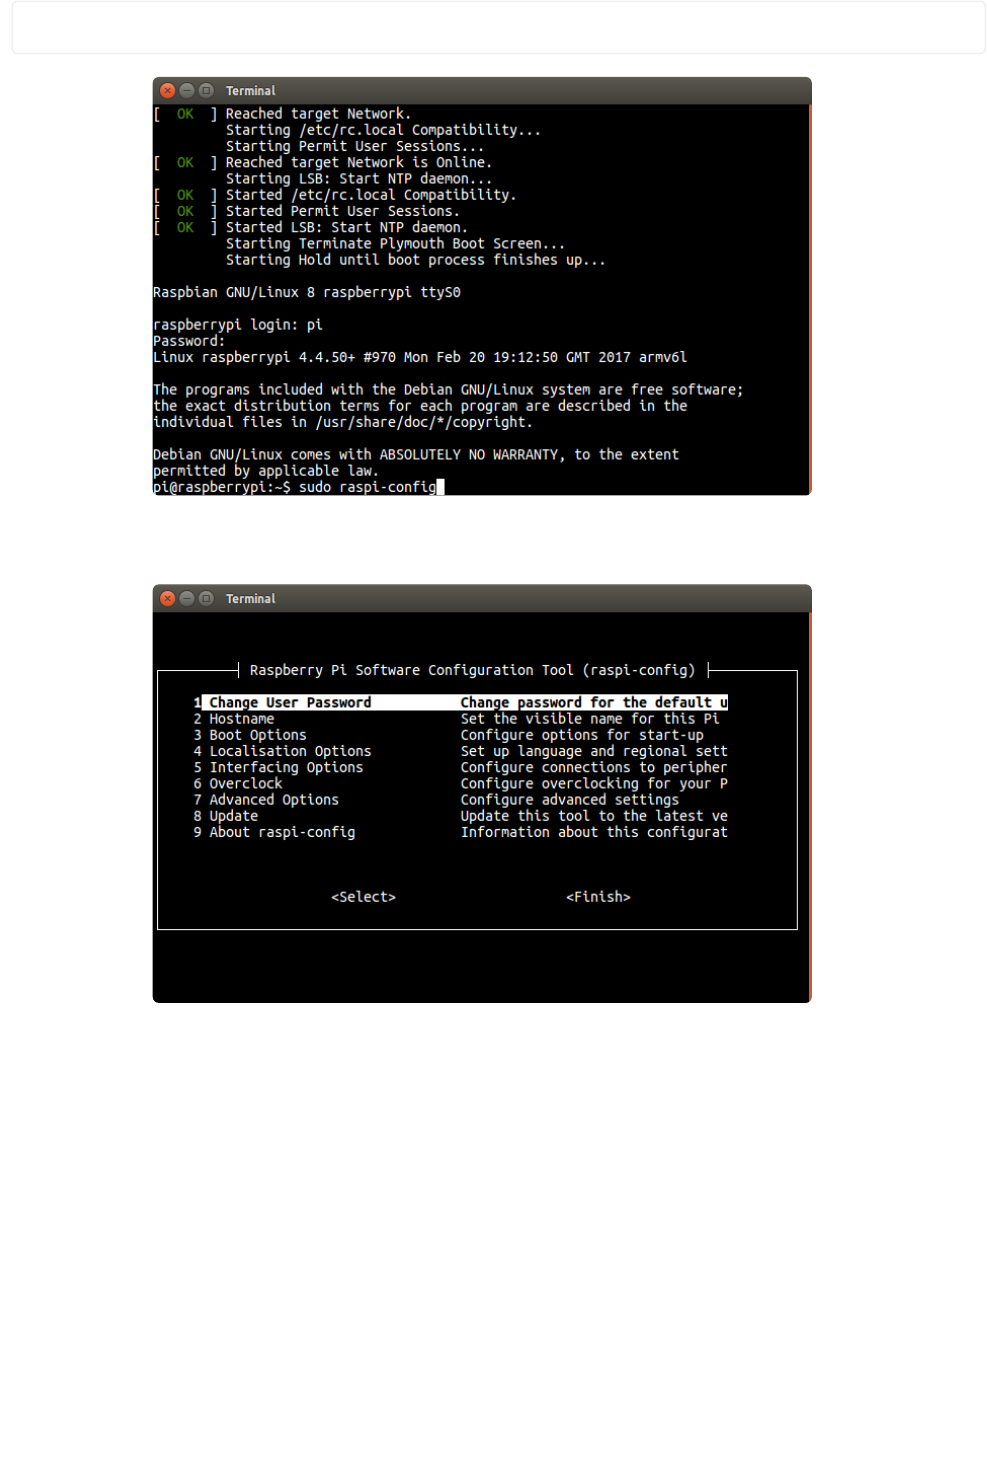
sudo raspi-config
This will bring up the main menu.
This is a good time to change the password to something other than the default.
You can also do other things like change the time zone, keyboard layout, hostname,
etc.
Enable SPI and I2C
These are both used in a lot of projects but are disabled by default. It's a good idea to
enable them now so you don't waste time later wondering why it's not working.
©Adafruit Industries Page 24 of 34
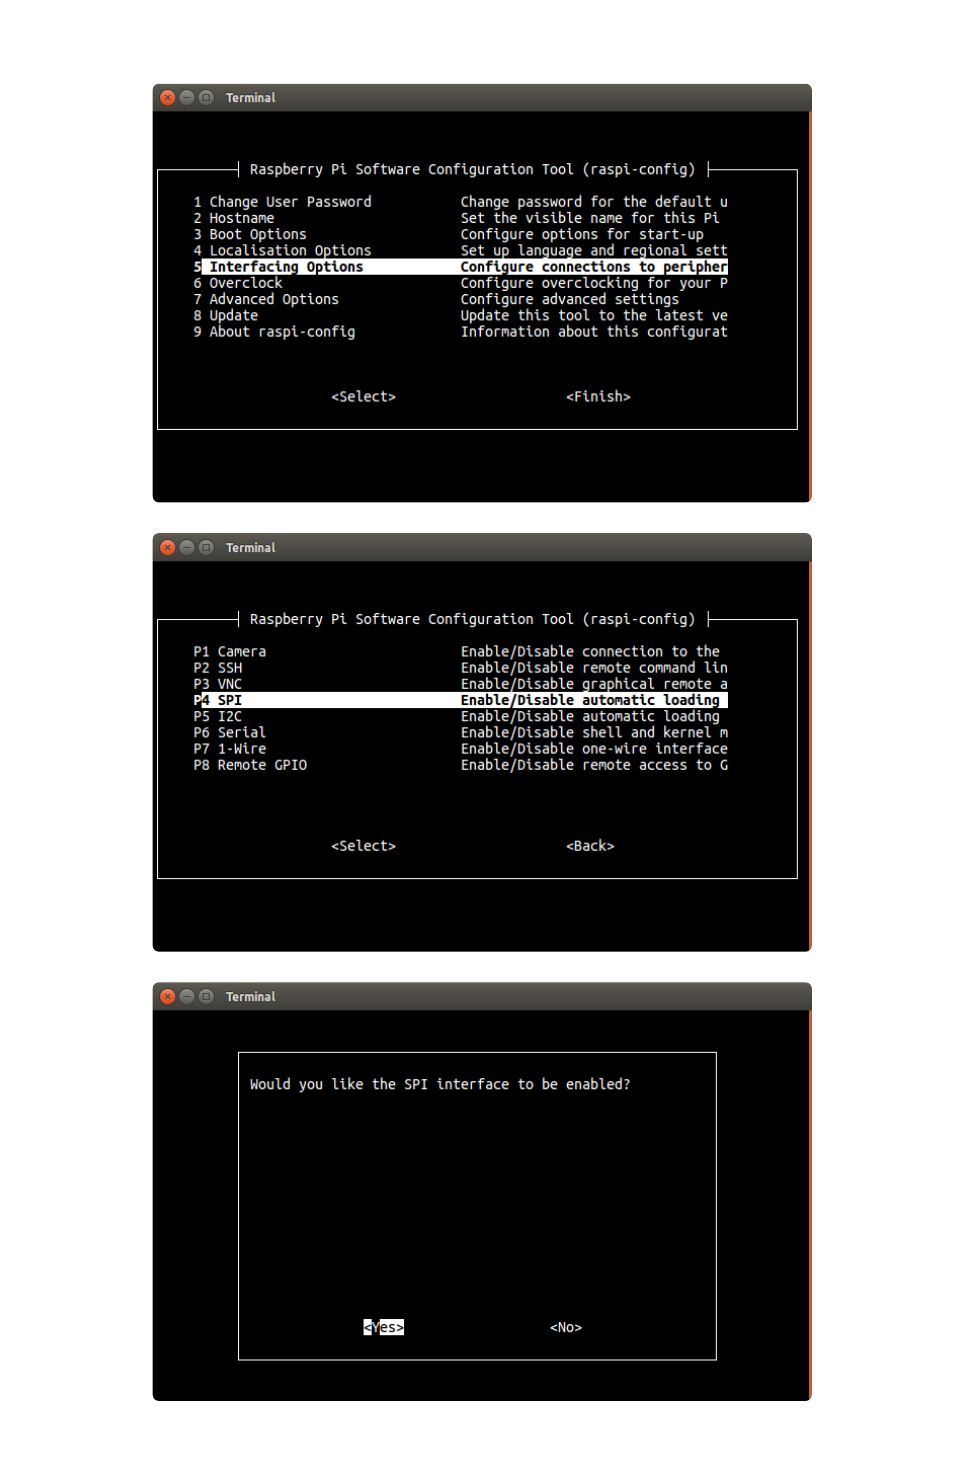
SPI
©Adafruit Industries Page 25 of 34

I2C
©Adafruit Industries Page 26 of 34
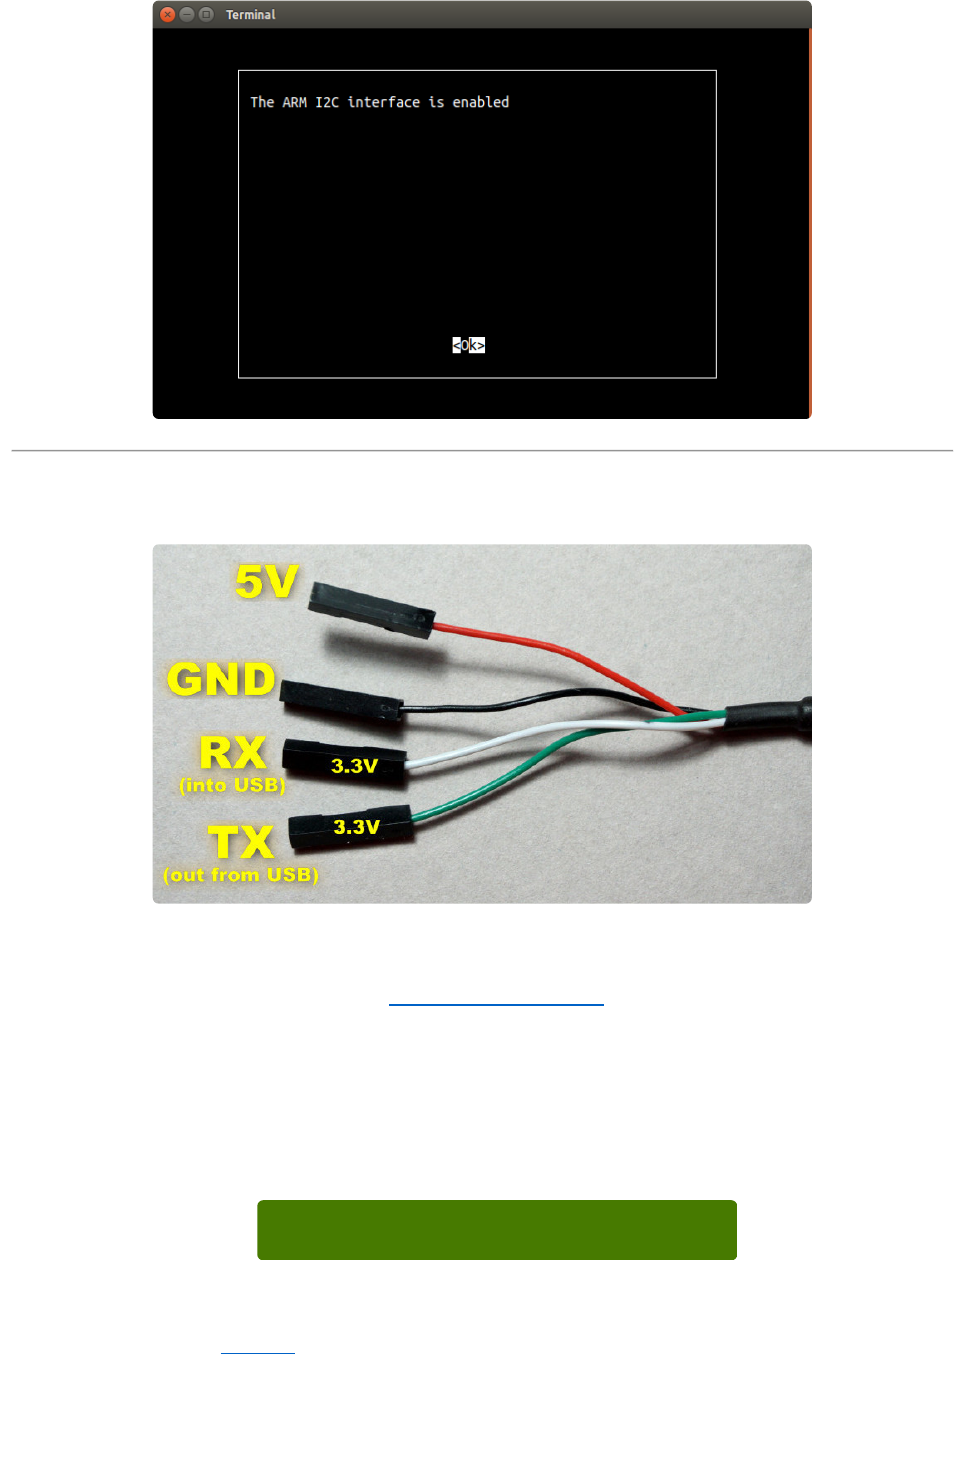
Using A Console Cable to Troubleshoot
If you were unable to ping or ssh into the Pi Zero then you need to trouble shoot
what's going on. This is where the USB Console Cable(http://adafru.it/954) comes in
handy.
There is already an excellent guide that goes over the basics of using a USB console
cable with instructions on requirements for the various major operating systems. Read
this first and then come back.
Using A Console Cable
https://adafru.it/kgF
This guide will use screen(https://adafru.it/wD0) on Linux for the examples, but since
pretty much everything is command line based and just a bunch of text, it should look
the same on all OS's.
©Adafruit Industries Page 27 of 34
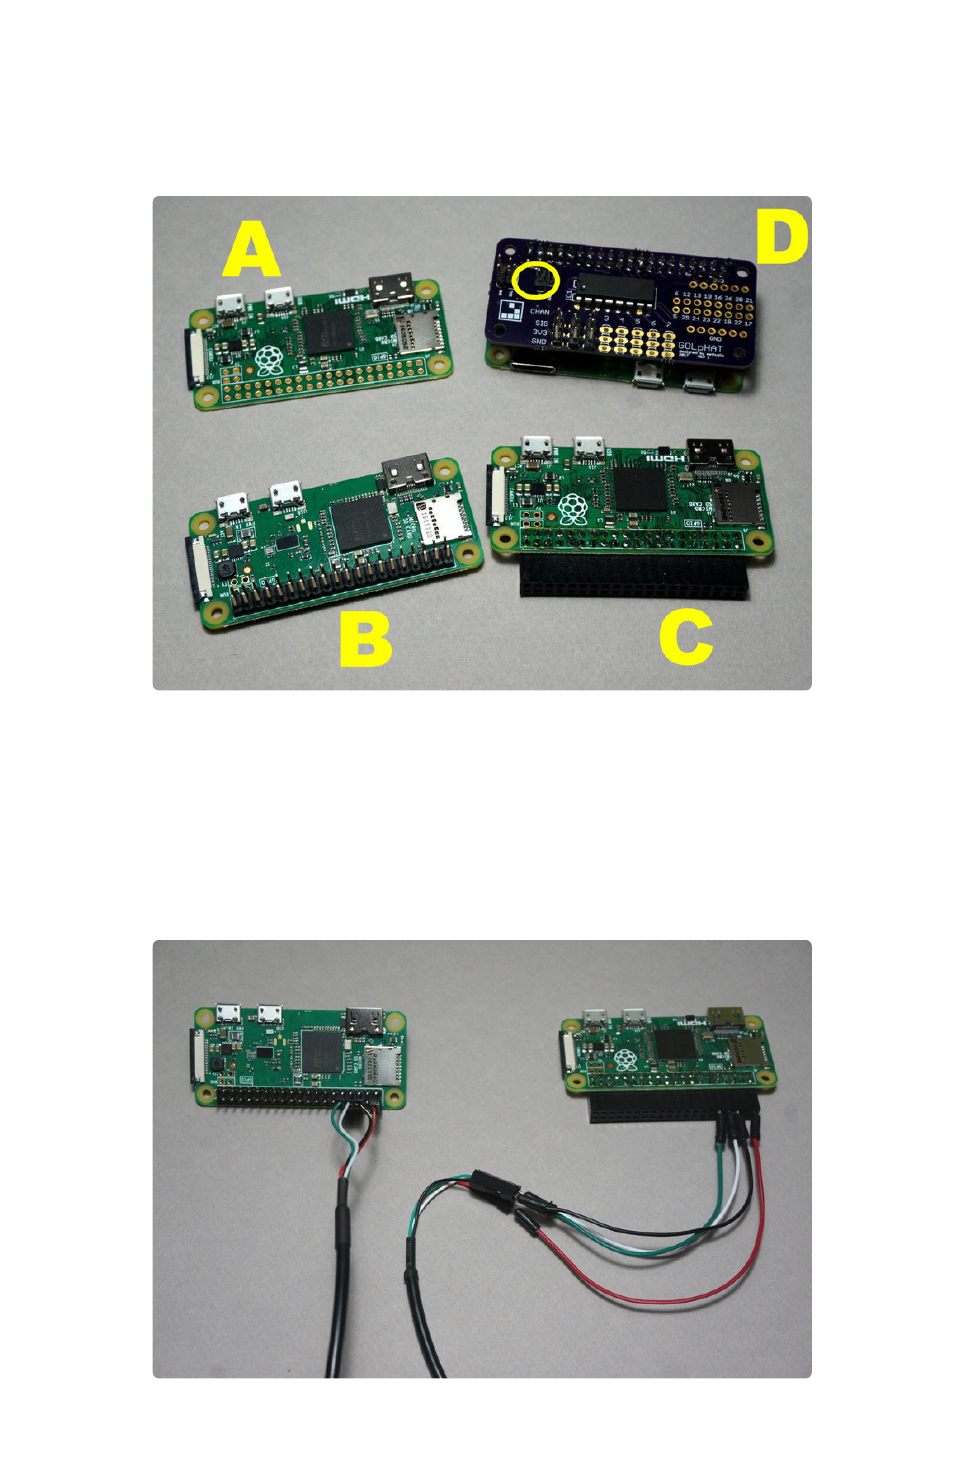
Interfacing To Pi Zero
The Pi Zero leaves the GPIO header pins unpopulated. This is actually a great feature
as it allows you to solder on whatever style makes most sense for your project.
In the image above there's (A) a Pi Zero with no header attached, (B) a Pi Zero W with
male headers, (C) a Pi Zero with right angle female headers, and (D) a custom topper
with serial pins indicated.
If you have male headers, you can connect the console cable directly. If you have
female headers, just use some short lengths of prototyping wire.
©Adafruit Industries Page 28 of 34
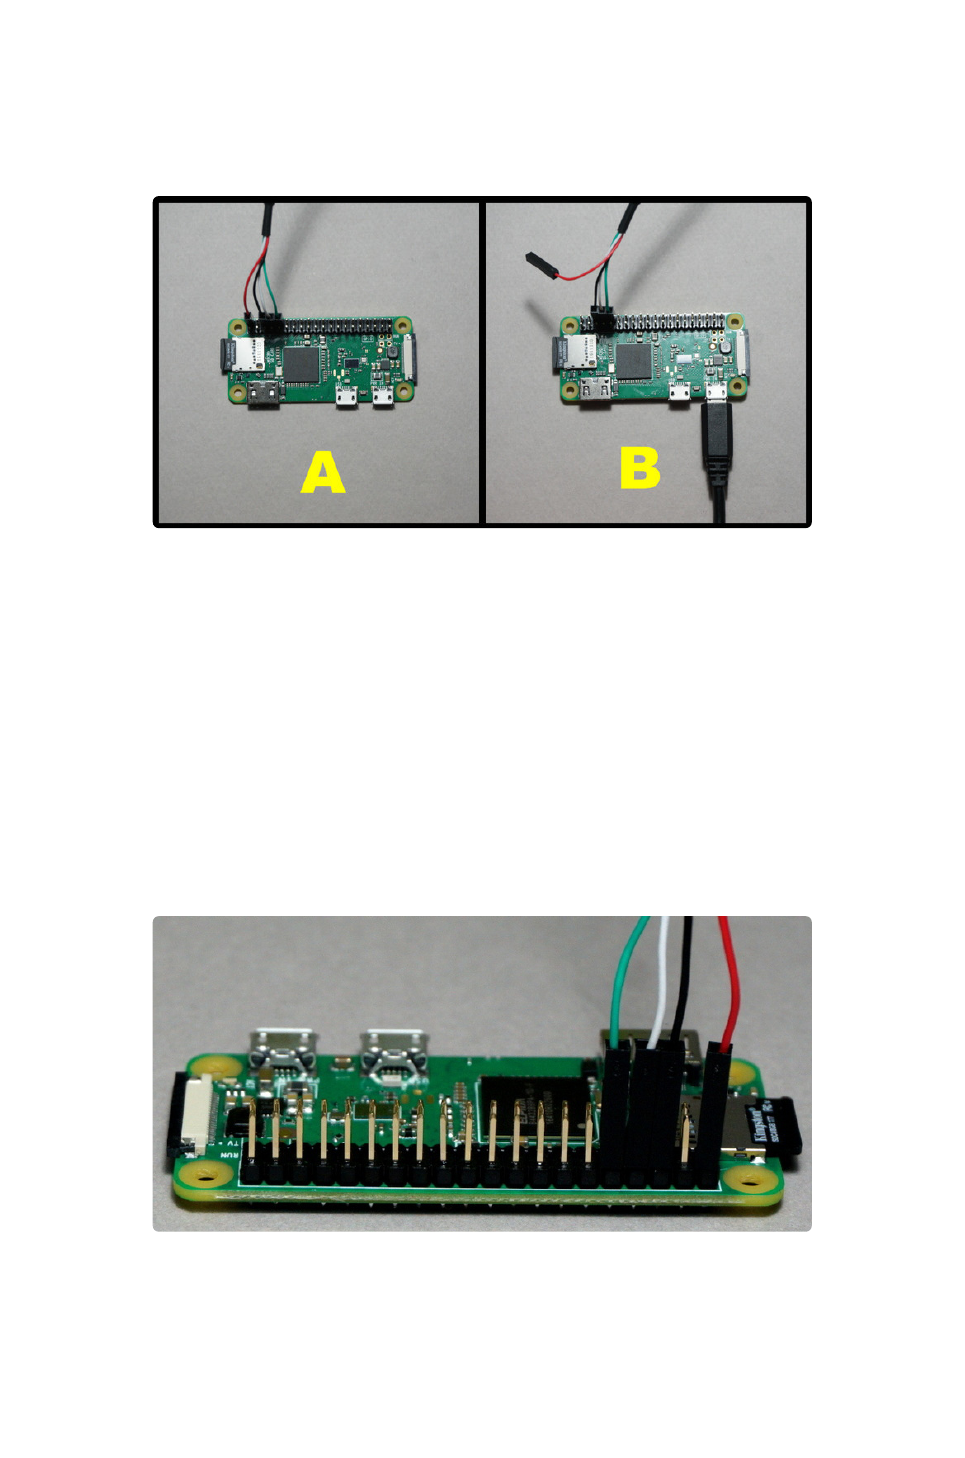
Power Options
There are a couple of different ways to power the Pi Zero when using a console
cable. Both options are shown below.
You should be able to power the Pi Zero directly from the USB cable (A). However, if
you have other items attached to the Pi Zero that require more power, you may need
to provide power through the micro-USB connector (B). In that case, do not connect
the red power lead.
Booting With A Console Cable
Proper wiring is critical, esp. for the red power cable. Carefully examine the images
below to insure you have the correct cable connections.
©Adafruit Industries Page 29 of 34
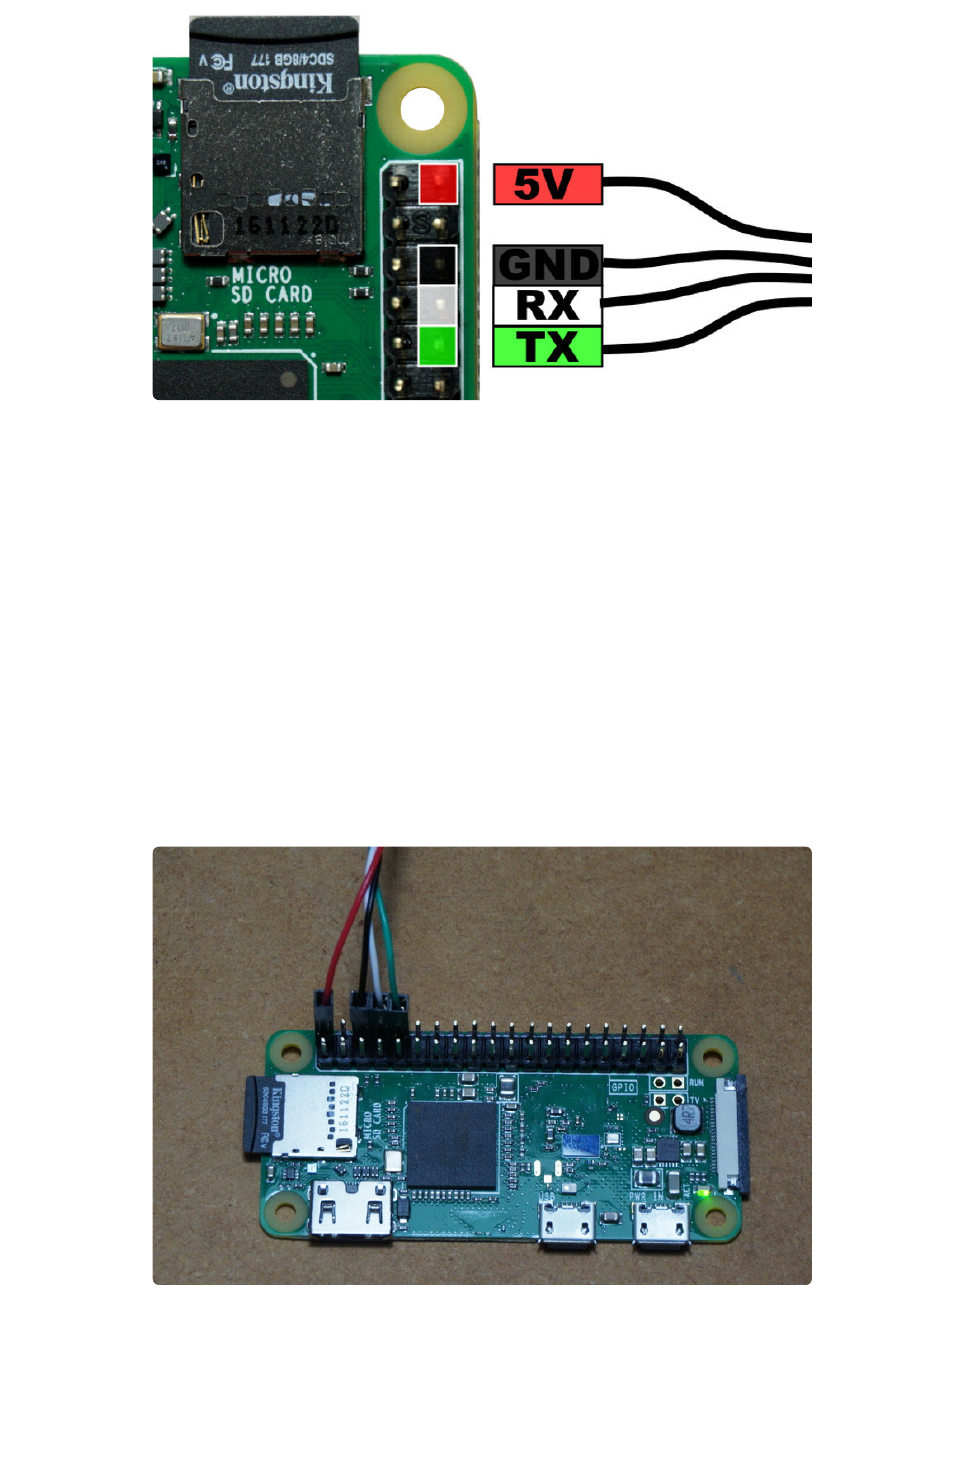
OK. Let's bring it up. Do things in this order:
Insert SD card into Pi Zero.
Connect the green, white, and black cable leads to the GPIO header. Leave red
disconnected for now.
Insert USB console cable into host computer.
Launch whatever terminal program you use.
Make 110% sure you know where the 5V pins are on the GPIO header.
Swiftly and carefully attach the red cable lead to one of the 5V pins on the
header. THIS IS THE SPARK OF LIFE! (or death if you chose the wrong pin)
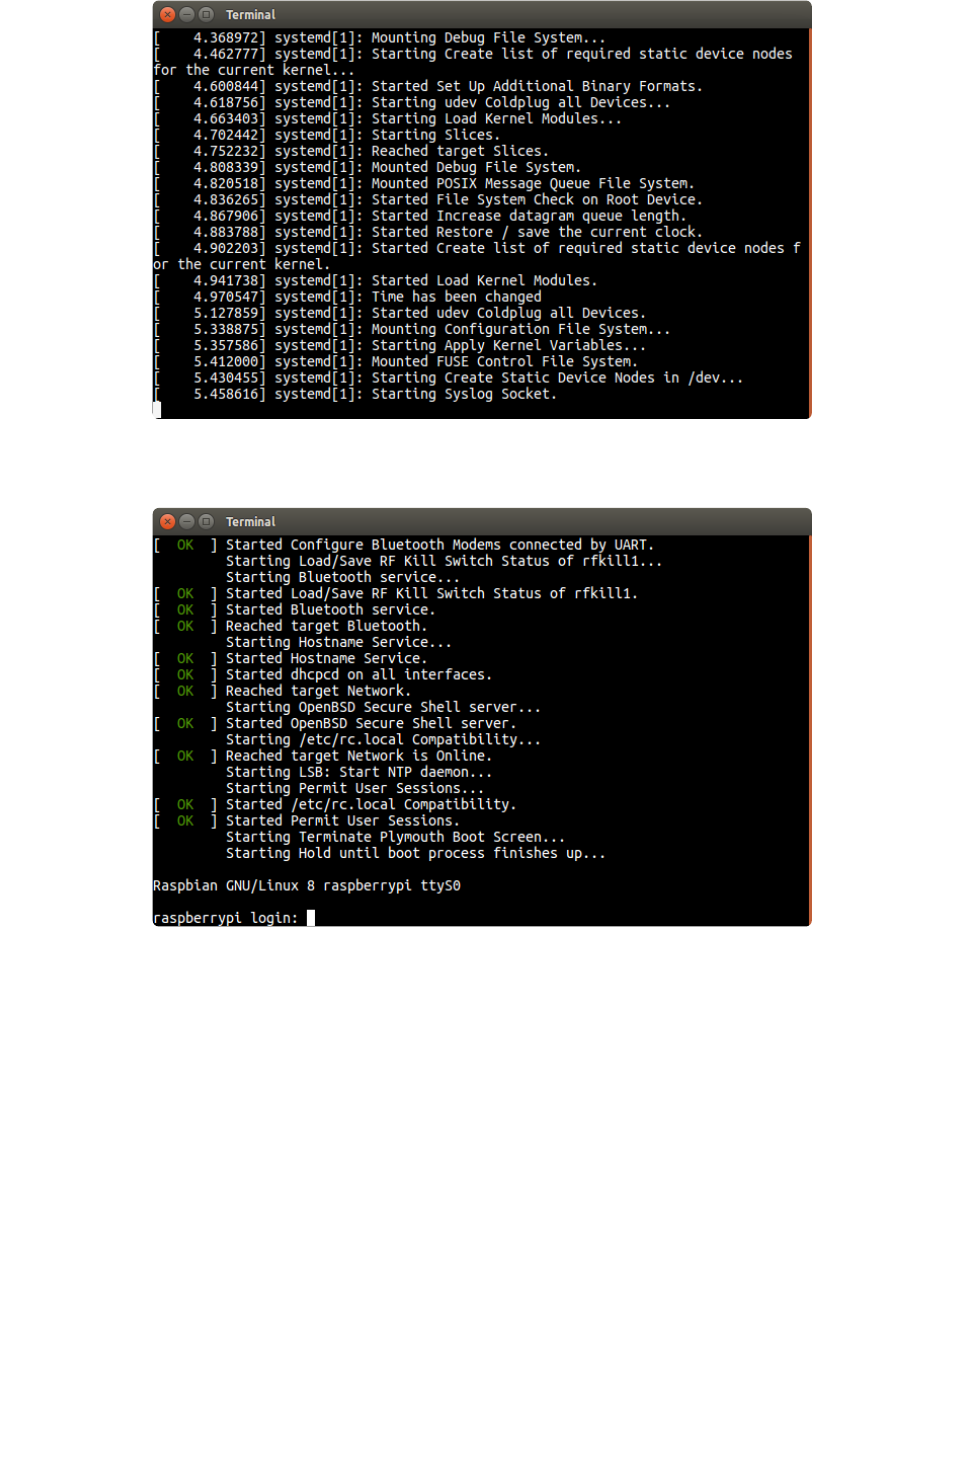
You should now see some signs of life on the green ACT LED.
And in your terminal window, you should see boot messages scrolling by.
1.
2.
3.
4.
5.
6.
©Adafruit Industries Page 30 of 34
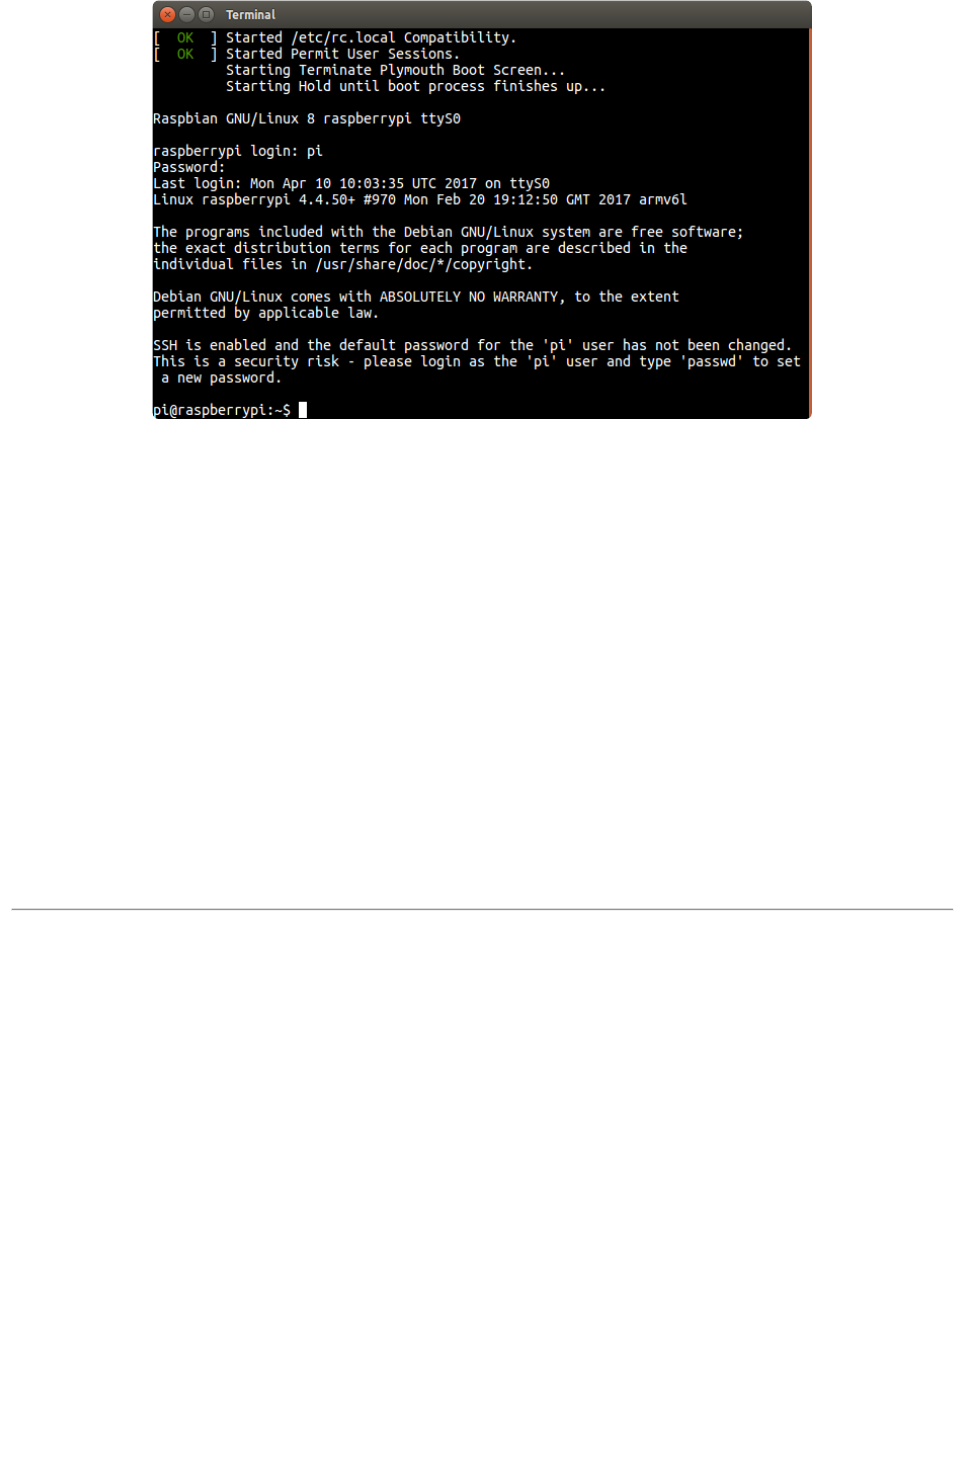
Eventually you should get to a login prompt.
Use the following user name and password to login:
pi
raspberry
•
•
©Adafruit Industries Page 31 of 34
And you're in.
What's next depends on what the problem is. We can't cover them all here. But now
you have access to the Pi Zero and can navigate the system and edit things as
needed based on whatever guidance you receive.
Some common basic commands are:
dmesg to check the kernel log for anything odd
ifconfig to see network status and settings
lsusb to see what's connected to USB port
lsmod to check for kernel modules
Enable UART
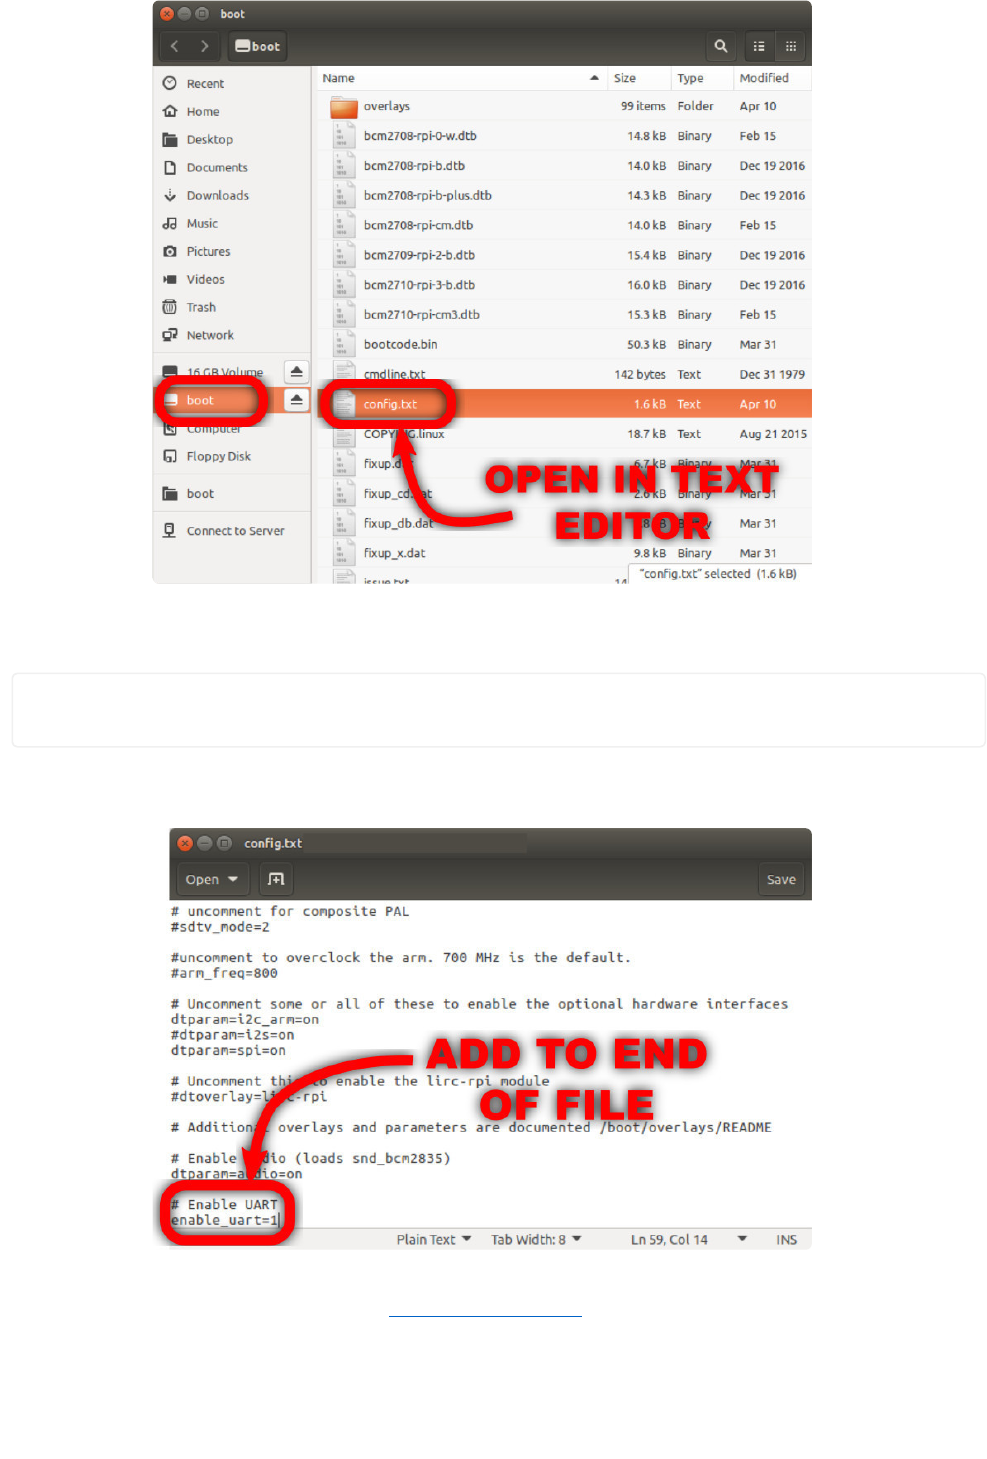
If you burned the image successfully, you should see a folder named boot appear. If it
doesn't magically appear once the burn is complete, try removing and reinserting the
SD card into your computer.
Find the file named config.txt and open it in a text editor.
•
•
•
•
©Adafruit Industries Page 32 of 34
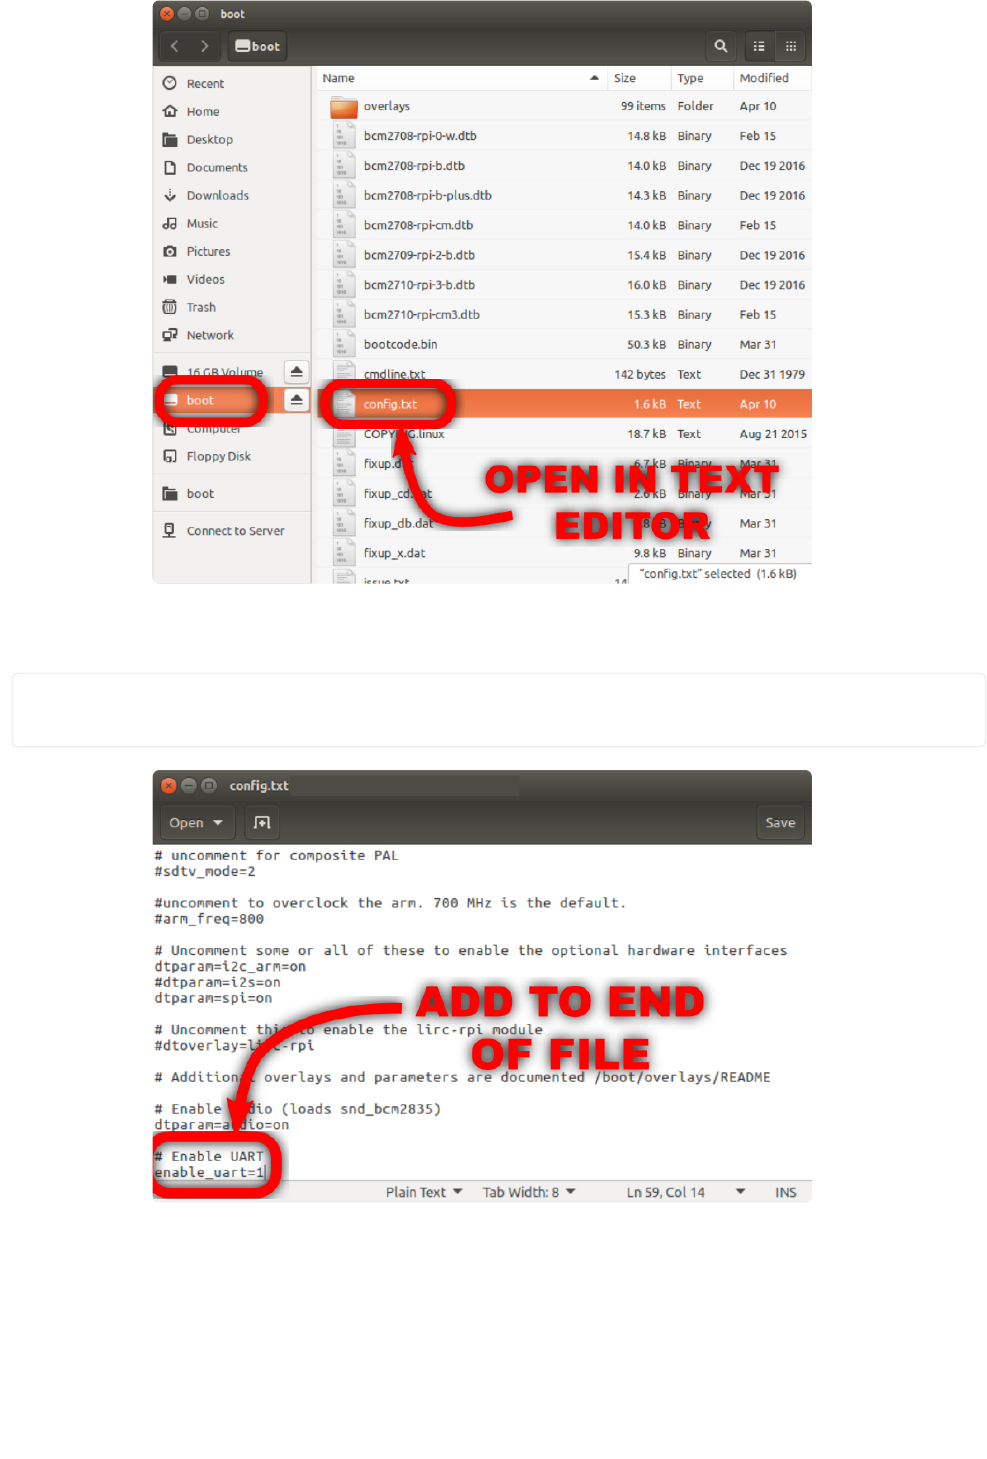
Scroll to the bottom of the file and add the following lines of text.
# Enable UART
enable_uart=1
Save the file. Safely remove the SD card from your computer. Put the SD card in to the
Pi Zero.
©Adafruit Industries Page 33 of 34
We're so close!
©Adafruit Industries Page 34 of 34
