
Table of Contents
Schedules Input Program Version 9.x Documentation
iv
GSA/FAS
Vendor Support Center
Schedules Input Program (SIP)
Version 9.x Documentation
Oct 2022
VSC-SIP-VER 9.x
4
++ -

Table of Contents
Schedules Input Program Version 9.x Documentation
v
Table of Contents
1
GENERAL
INFORMATION
.................................................................................................
1-
1
1.1
Introduction
.....................................................................................................................
1-
1
1.2
GSA Advantage! Overview .............................................................................................
1-
1
1.3
Schedules Input Program (SIP) .......................................................................................
1-
1
1.4
Vendor Support Center (VSC) ........................................................................................
1-
1
1.5
GSA Contract Award .......................................................................................................
1-
1
1.6
GSA Advantage! Catalog Upload Process .....................................................................
1-
1
2
GETTING
STARTED
.............................................................................................................
2-
1
2.1
SIP
Registration
............................................................................................................... 2-1
3
SIP DATA ENTRY ....................................................................................................................
3-
5
3.1
Contractor Information Screen........................................................................................
3-
5
3.2
Primary Contract Information Screen .............................................................................
3-
6
3.3
Product Information Screen ..........................................................................................
3-
13
3.3.1
Quantity Volume Discount Breaks ...................................................................
3-
14
3.3.2
Dollar Volume Discount Breaks .......................................................................
3-
15
3.4
Accessories Information Screen ...................................................................................
3-
16
3.5
Options Information Screen ..........................................................................................
3-
17
3.6
How to update products
................................................................................................ 3-19
4
ADDING PRODUCT PHOTOS..........................................................................................
4-
210
4.1
Adding Photos Using Product Information Screen ......................................................
4-
21
4.2
Adding Photos in the Photo Screen
..............................................................................
4-
22
5
IMPORTING
PRODUCTS
...................................................................................................
5-
23
5.1
Import Program Overview .............................................................................................
5-
23
5.2
Building Import Files .....................................................................................................
5-
23
5.3
Shortcut for Building Import Files ................................................................................
5-
23
5.4
Adding Photos Using Spreadsheets
..............................................................................
5-
24
5.5
Importing Files into SIP
................................................................................................
5-
24
6
ENTERING SERVICE CATALOG INFORMATION ......................................................
5-
26
6.1
Creating Text Files .........................................................................................................
5-
26
6.2
Attaching FSS Terms and Conditions Price List to SIP
..............................................
5-
26

Table of Contents
Schedules Input Program Version 9.x Documentation
vi
7
UPLOADING CATALOG INFORMATION ........................................................................
6-
1
7.1
SIP Upload File Types .....................................................................................................
6-
1
7.2
Firewall Settings
..............................................................................................................
6-
1
7.3
SIP Upload Instructions ...................................................................................................
6-
1
7.4
Uploading/Using VSC Website.......................................................................................
6-
2
7.5
Website Upload Conditions .............................................................................................
6-
2
8
DOWNLOADING AND PROCESSING RESPONSE FILES ...........................................
7-
2
8.1
Downloading and Processing Files .................................................................................
7-
3
8.2
Connectivity
Errors
.........................................................................................................
7-
3
9
BACKING UP AND RESTORING SIP DATA .................................................................... 8-
4
9.1
Backing up SIP Data
....................................................................................................... 8-
4
9.2
Restoring SIP Data ........................................................................................................... 8-
5
10
UPGRADING SIP VERSION ................................................................................................. 9-
5
10.1
Upgrading SIP Version 8.x with Firewall
...................................................................... 9-
6
10.2
Upgrading From SIP Version 8.x ................................................................................... 9-
6
11
VENDOR SUPPORT CENTER CONTACT INFORMATION ...................................... 10-
6

General Information
Schedules Input Program Version 9.x Documentation
1-1
1
GENERAL INFORMATION
1.1
Introduction
The Schedules Input Program (SIP) Version 9.x Users Guide defines the process, procedures and
tools used to maintain and support the SIP software by the General Services
Administration/Federal Acquisition Services (GSA/FAS) Vendor Support Center (VSC).
1.2
GSA Advantage! Overview
GSA
Advantage!
is the online shopping and ordering system used by vendors to provide their
products and/or services to government buyers. GSA
Advantage
allows vendors to sell to the
government without obtaining agency specific contracts.
1.3
Schedules Input Program (SIP)
SIP is a proprietary software program provided by GSA to assist contract holders with uploading
their electronic catalog to GSA Advantage.
1.4
Vendor Support Center (VSC)
The VSC supports GSA contract holders that use SIP to upload their data. The VSC also
supports password related issues concerning eBuy, SRP and PO portal.
1.5
GSA Contract Award
Any contractor interested in providing products and/or services to the government may benefit
from obtaining a GSA contract. Most government buyers use GSA
Advantage!
to search and
shop for products and/or services. Companies that wish to acquire a GSA contract must contact a
GSA Procurement Contracting Officer (PCO) to obtain the necessary documentation. GSA e-
Offers is another tool used to obtain a GSA contract.
1.6
GSA Advantage! Catalog Upload Process
After a contract is awarded, the contract must be registered with the VSC. Following registration,
a unique password will be assigned to the contract. This password will be used for electronic
catalog submission via SIP. Catalog information is then entered into SIP and uploaded. The PCO
will receive the file and check for consistency between the electronic file and the written
contract. After verification and approval in CORS (Contract Officer Review System) the file is
posted in GSA
Advantage
..
General Information
Schedules Input Program Version 9.x Documentation
1-2
Acronyms and Abbreviations
The acronyms and abbreviations used in this document are listed and defined in the table below.
Acronym
Definition
ATSM/EPA
Acute Traumatic Stress Management/Environmental
Protection Agency
CPG
Comprehensive Procurement Guidelines
EDI
Electronic Data Interchange
FOB
Freight On Board
FAS
Federal Acquisition Service
FTP File Transfer Protocol
GBL Government Bills of Lading
GSA General Services Administration
MB Megabyte
NSN National Stock Number
PCO
Procurement Contracting Officer
QTY/VOL Quantity Volume
SIN Special Items Numbers
SIP Schedules Input Program
VER Version
VSC Vendor Support Center
Entering Service Catalog
Information
Schedules Input Program
Version 9.x Documentation
3-3
2
GETTING
STARTED
2.1
SIP
Registration
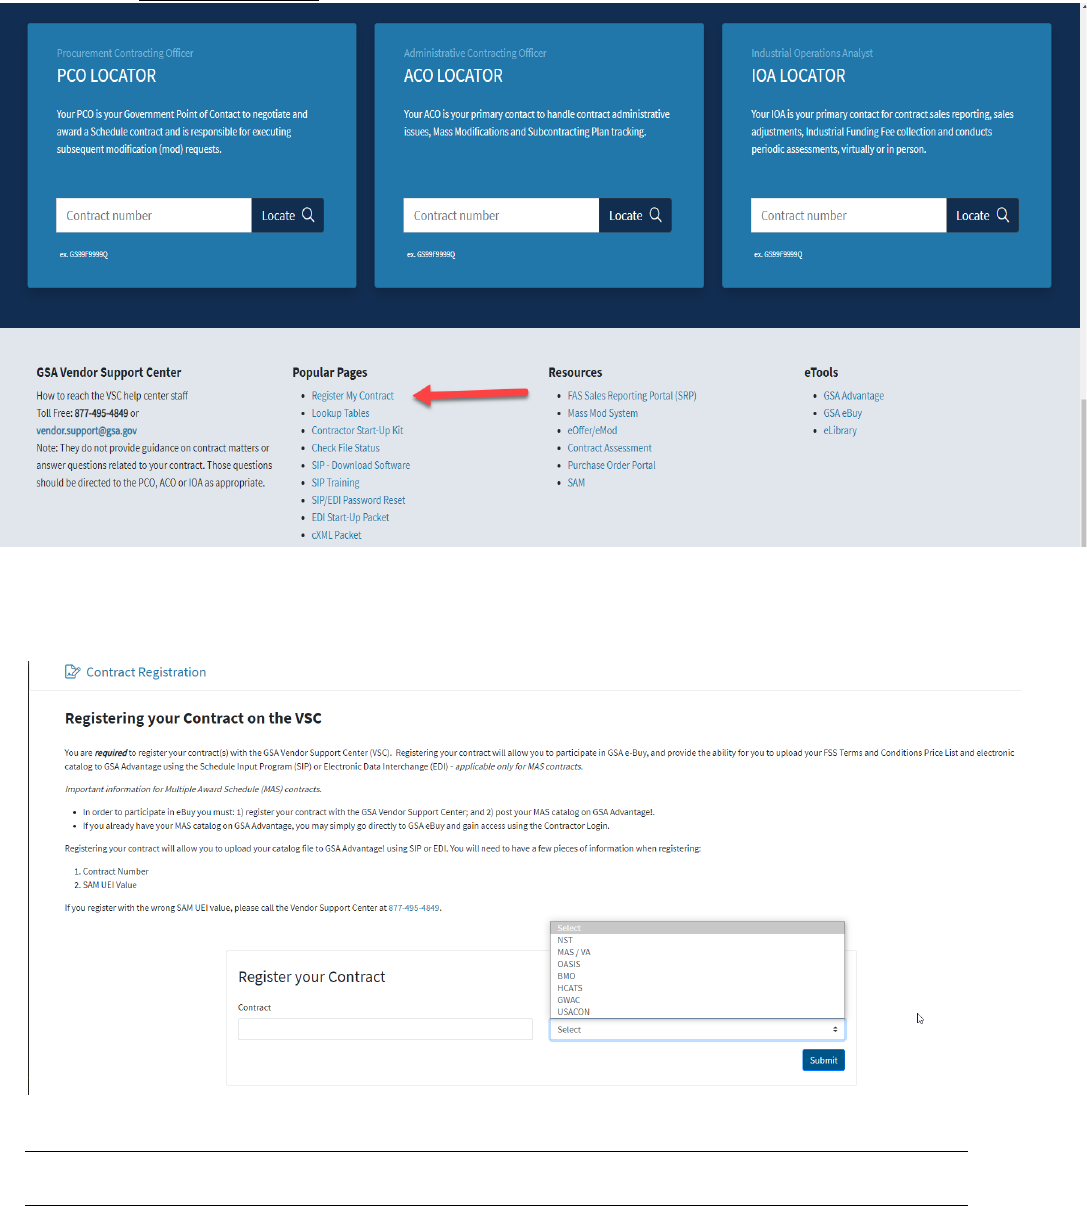
You must register your contract before you can upload your catalog. To register, visit the VSC
website at (https://vsc.gsa.gov
).
Select “Register” Then select your contract type in the drop down box and enter in your contract
number.
Entering Service Catalog
Information
Schedules Input Program
Version 9.x Documentation
3-4
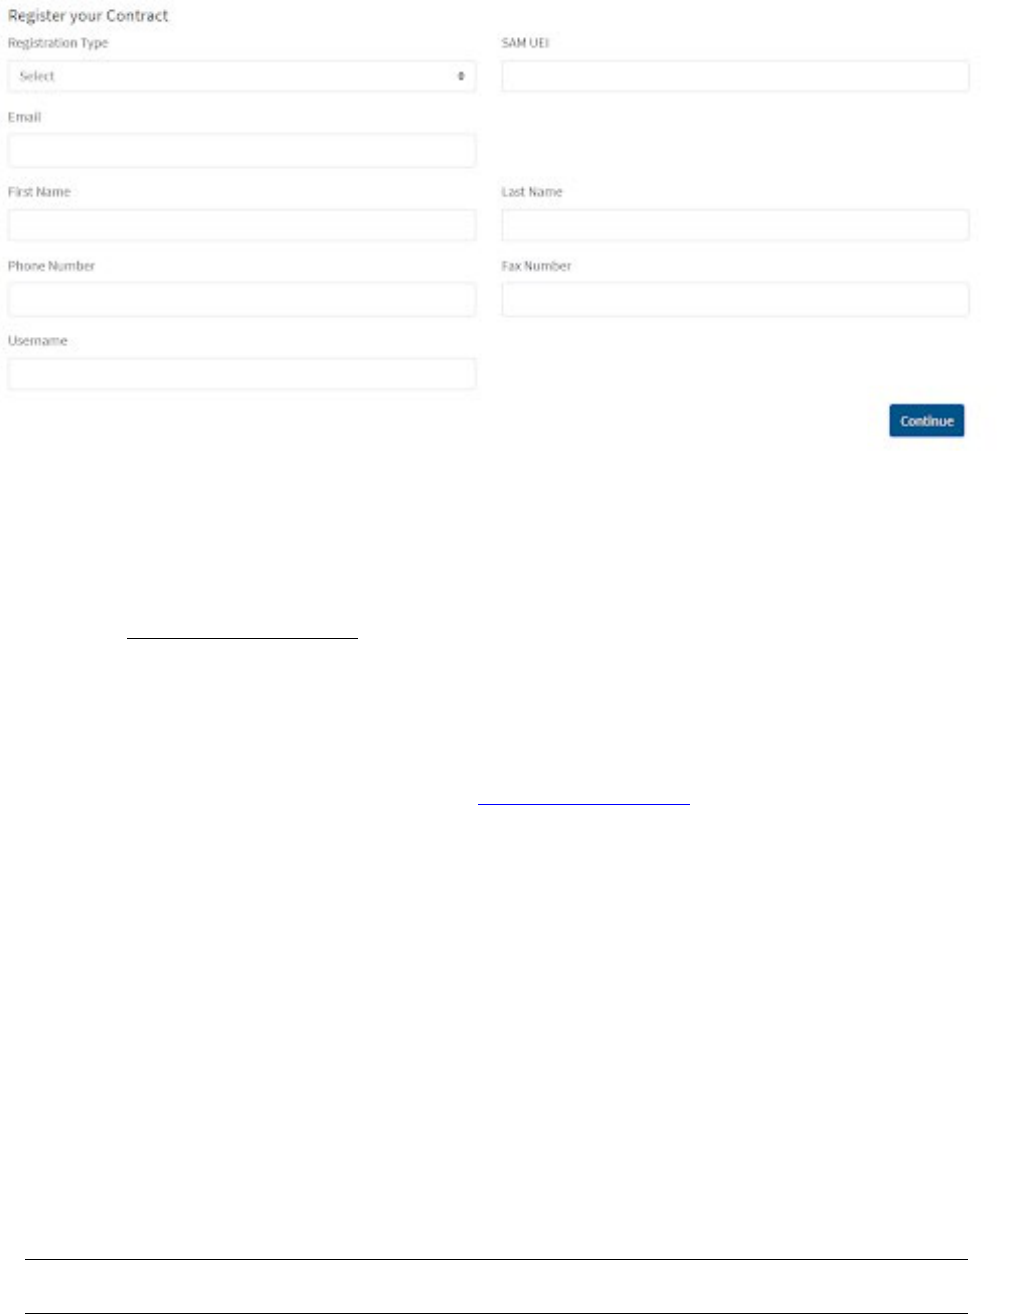
The SIP registration form is shown below. All required information is indicated by
an asterisk (*):
After registration is complete, a confirmation will be sent to the email address provided. The
confirmation will include a unique password used for SIP uploads and GSA eBuy
*Before you can access eBuy, you must upload a catalog using the SIP software or EDI. The file
must then be approved by your GSA Contracting Officer. If your products or services are not
posted on www.gsaadvantage.gov
, you will not have access to eBuy.
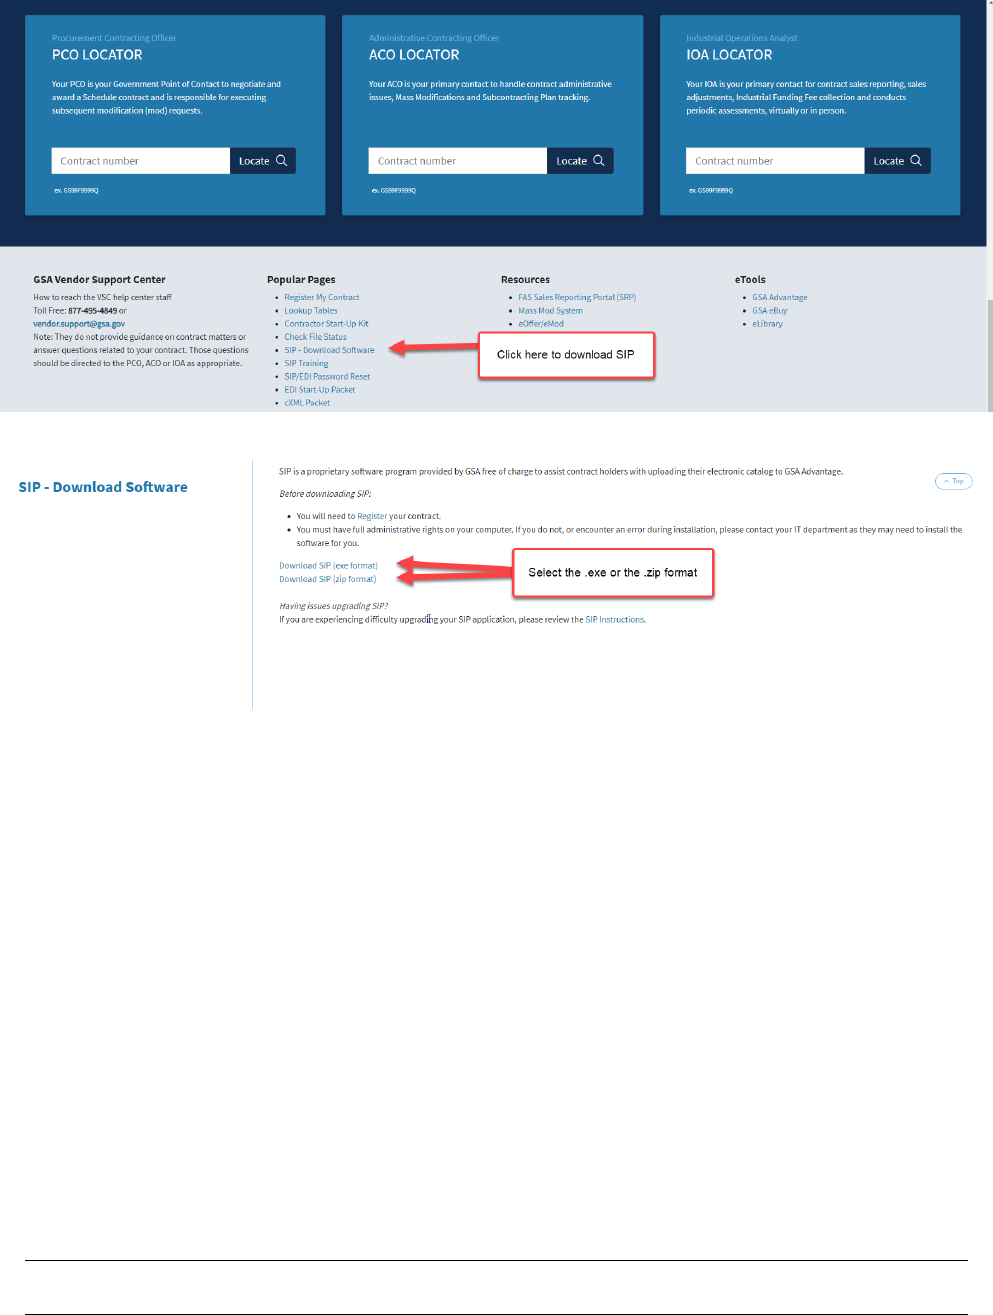
SIP Download and Installation
SIP can be downloaded from the VSC website(SIP Software download).
System requirements: Windows 10 or Windows 11 Operating System, Pentium II processor, 32
MB of RAM, internet capabilities and 12 MB of hard disk space. SIP is not compatible with
MAC.
* Note – Depending on the amount of product data, more disk space may be required.
The SIP program is available in two formats (.exe and .zip). The download files are
approximately 9.6 MB is size. Vendors with firewalls that will not allow the download of .exe
file will want to download the .zip format.
Note: You must have full administrative rights on your computer to install the SIP software. If
you do not or encounter an error during installation, please contact your IT department. They
may need to install the software for you.
Entering Service Catalog
Information
Schedules Input Program
Version 9.x Documentation
3-5
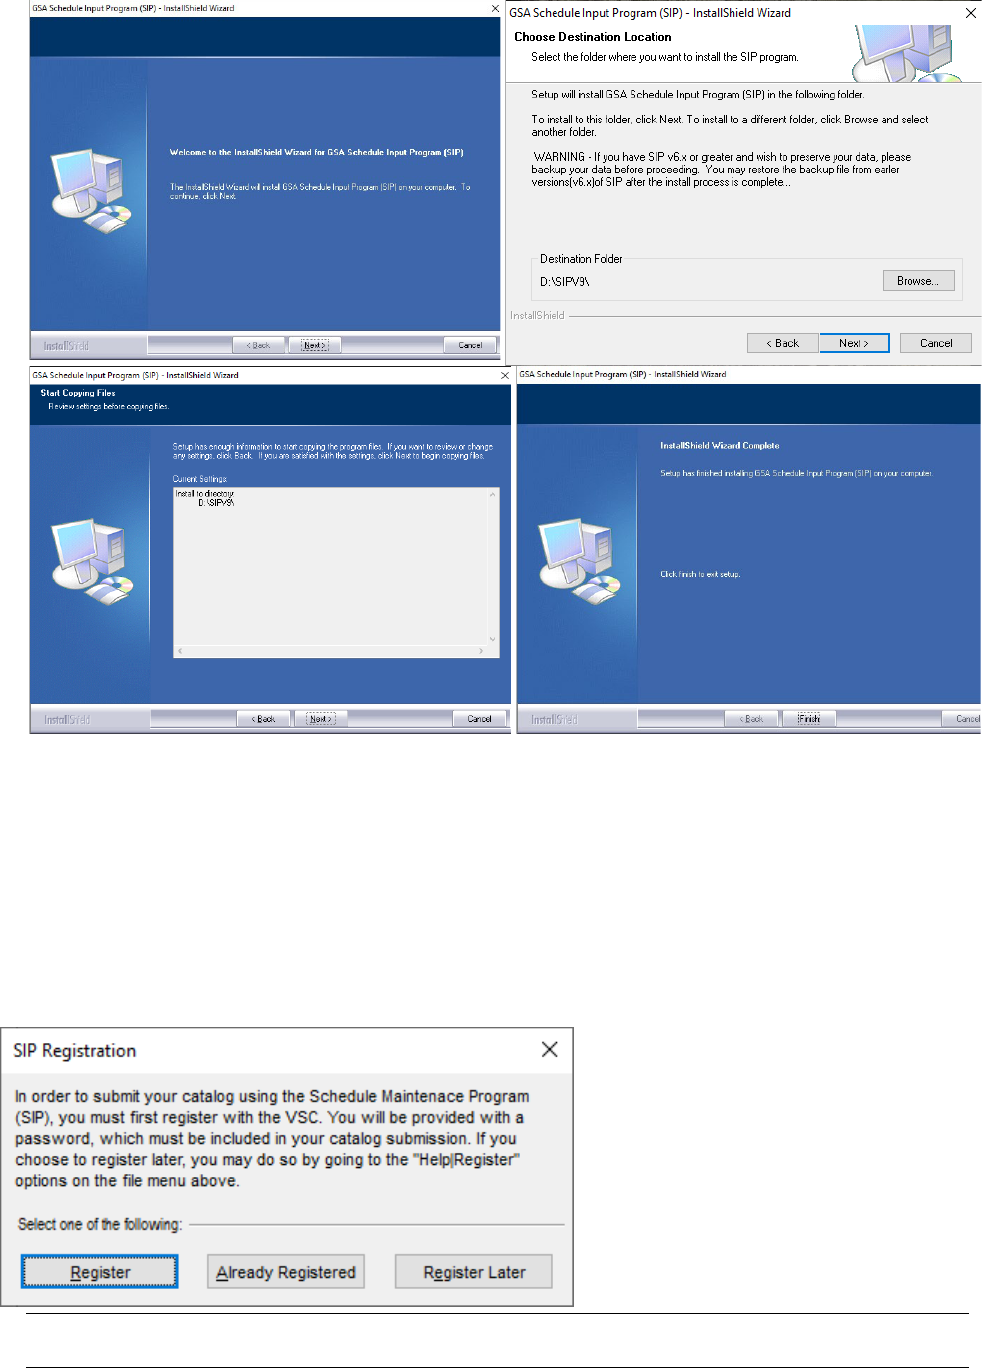
Step 1:
Download and install the .exe or .zip format. (You may need to download the executable
to the desktop and then right click on the setup icon and run as administrator to install)
Step 2:
Select ”Next” on each of the dialog boxes to accept the default settings.
Step 3:
Select “Finish” to complete the installation.
Entering Service Catalog
Information
Schedules Input Program
Version 9.x Documentation
3-6
3
SIP DATA ENTRY
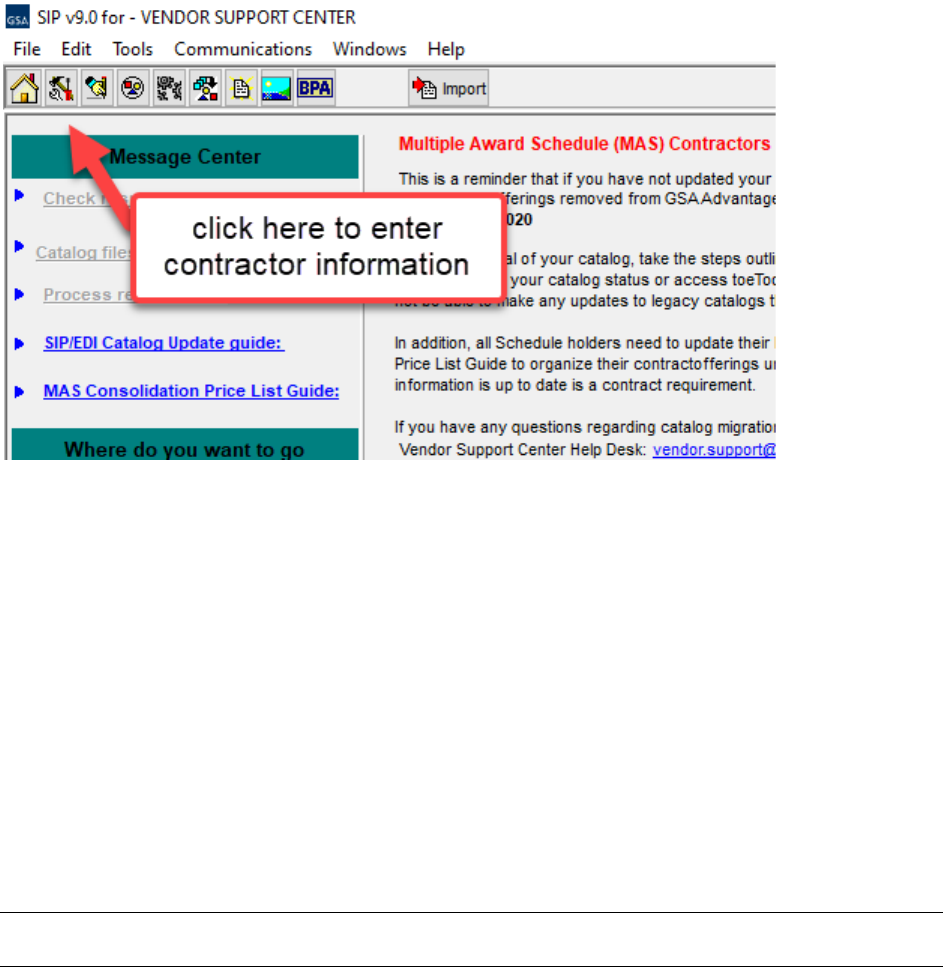
If you have a newly installed SIP program you will receive the following dialog box when you
open the software. If you have used SIP before, you will not see the below dialog box.
Entering Service Catalog
Information
Schedules Input Program
Version 9.x Documentation
3-7
If your company has already registered using the steps in section 2, select “Already Registered”.
If your company is brand new and have not registered, select “Register”. If you selected
“Already Registered” proceed to section 3.1 “Contractor Information”. If you have not
registered, select “Register” and go back to section 2
3.1
Contractor Information Screen
In the Contractor Information screen you will enter information such as SAM UEI number,
password provided by GSA (Password you received after you registered your contract in
section 2) and company address.
Step 1:
Select “File” → “Open” → “Contractor” or select the “Contractor” icon shown below.
This icon is located in the top left corner of the SIP software.
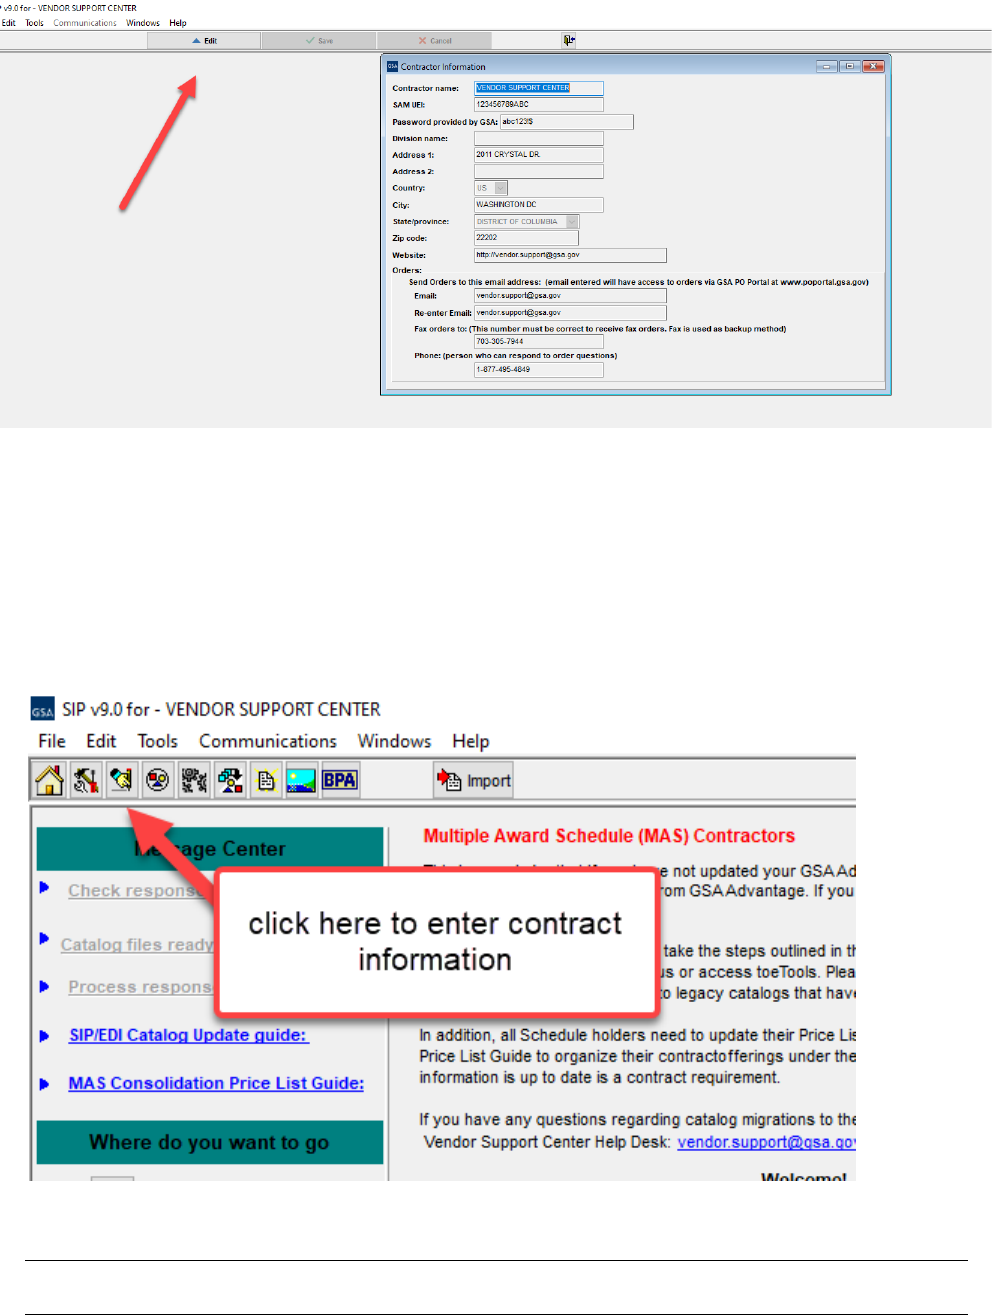
Step 2:
Select “Edit” on the top tool bar Shown with the arrow below. This will highlight the
fields and allow you to edit the fields. If the fields are all gray, it will not allow you to edit the
data.
Entering Service Catalog
Information
Schedules Input Program
Version 9.x Documentation
3-8
Step 3:
Enter contractor information and click “Save” at the top of the program.
Please see the Index for field descriptions
Step 4:
Close the Contractor Information Screen.
3.2
Primary Contract Information Screen
Step 1:
Select → “File” →”Open” → “Contracts” or select the “Contracts” icon shown below.
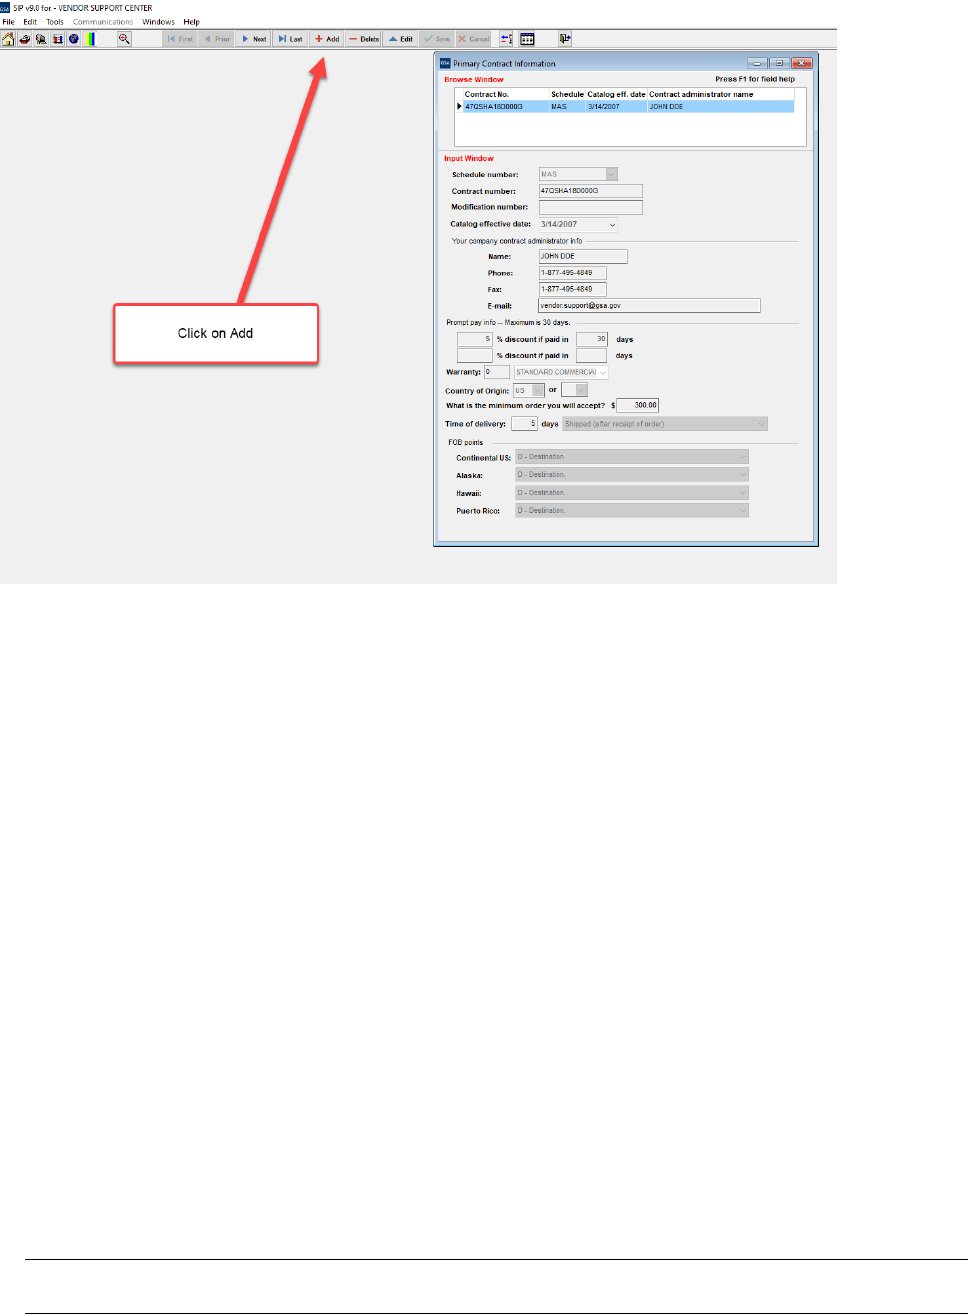
Step 2:
Select “Add”.
Entering Service Catalog
Information
Schedules Input Program
Version 9.x Documentation
3-9
Step 3:
Enter all required and applicable contract information.
Entering Service Catalog
Information
Schedules Input Program
Version 9.x Documentation
3-10
Please see the index for field descriptions
Step 4:
Select “Save” when finished.
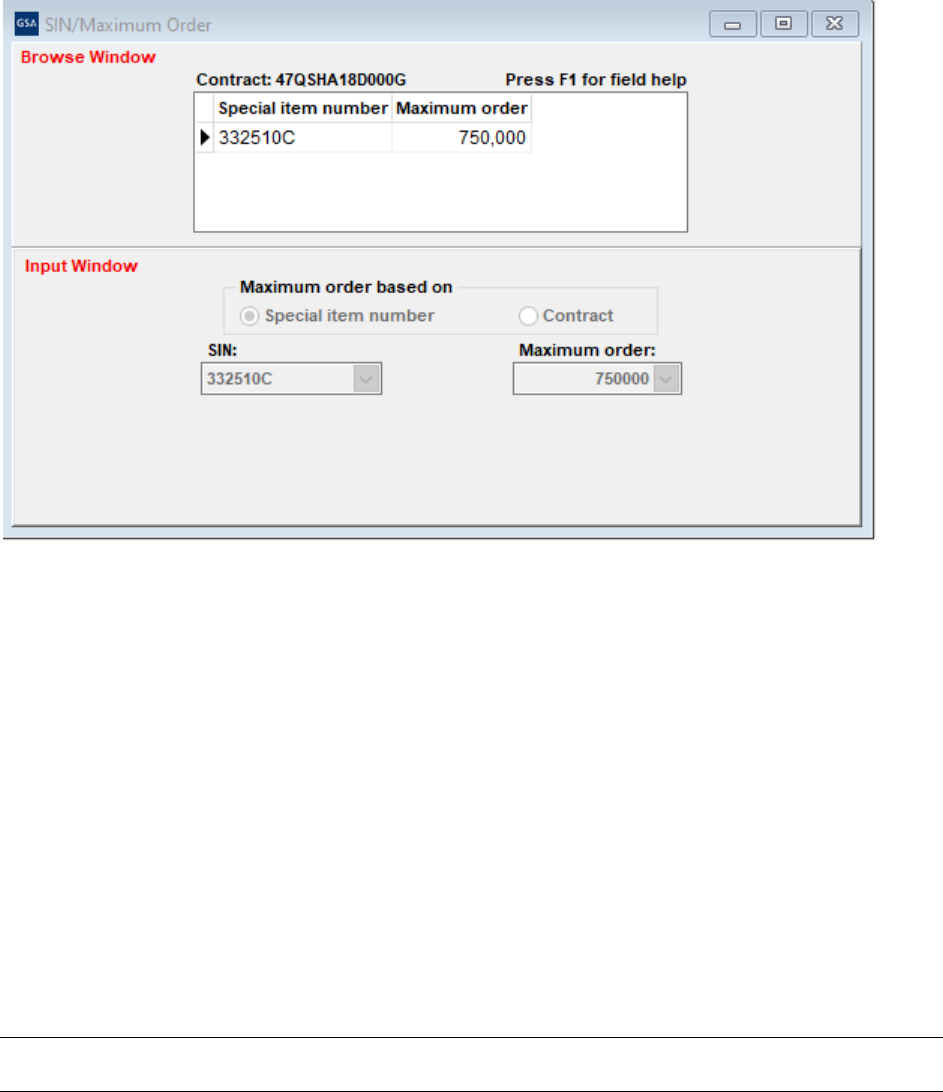
If this is the first time you are using SIP, it will automatically take you to the SIN Maximum
Order screen (Step 5).
Step 5:
The SIN/Maximum Order screen will appear. Enter Special Item Numbers (SIN's) and
Maximum Order Limit(s).
Step 6:
Select “Save” and close the SIN/Maximum Order screen.
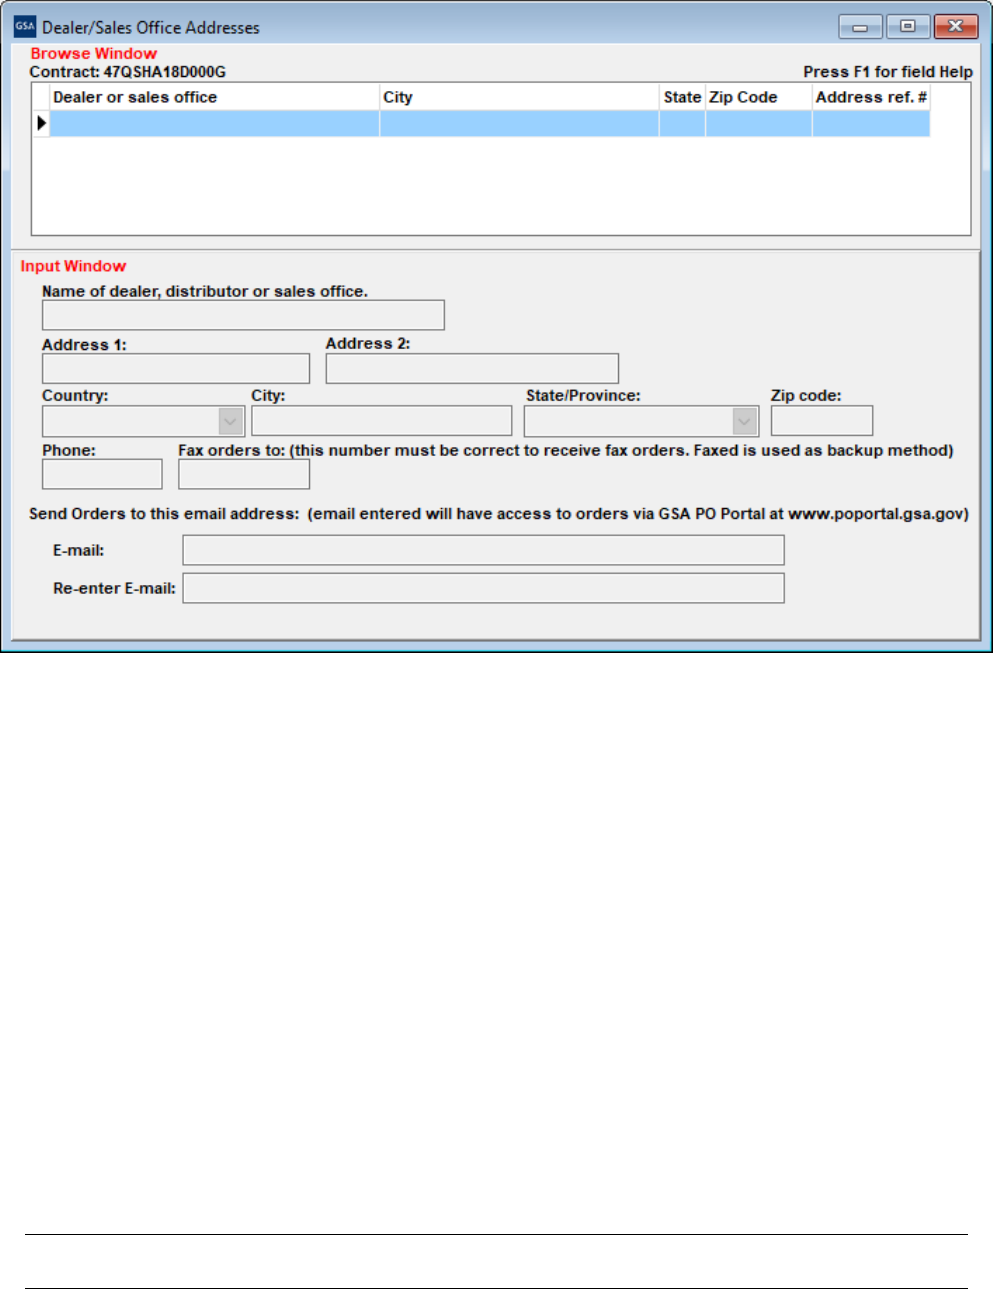
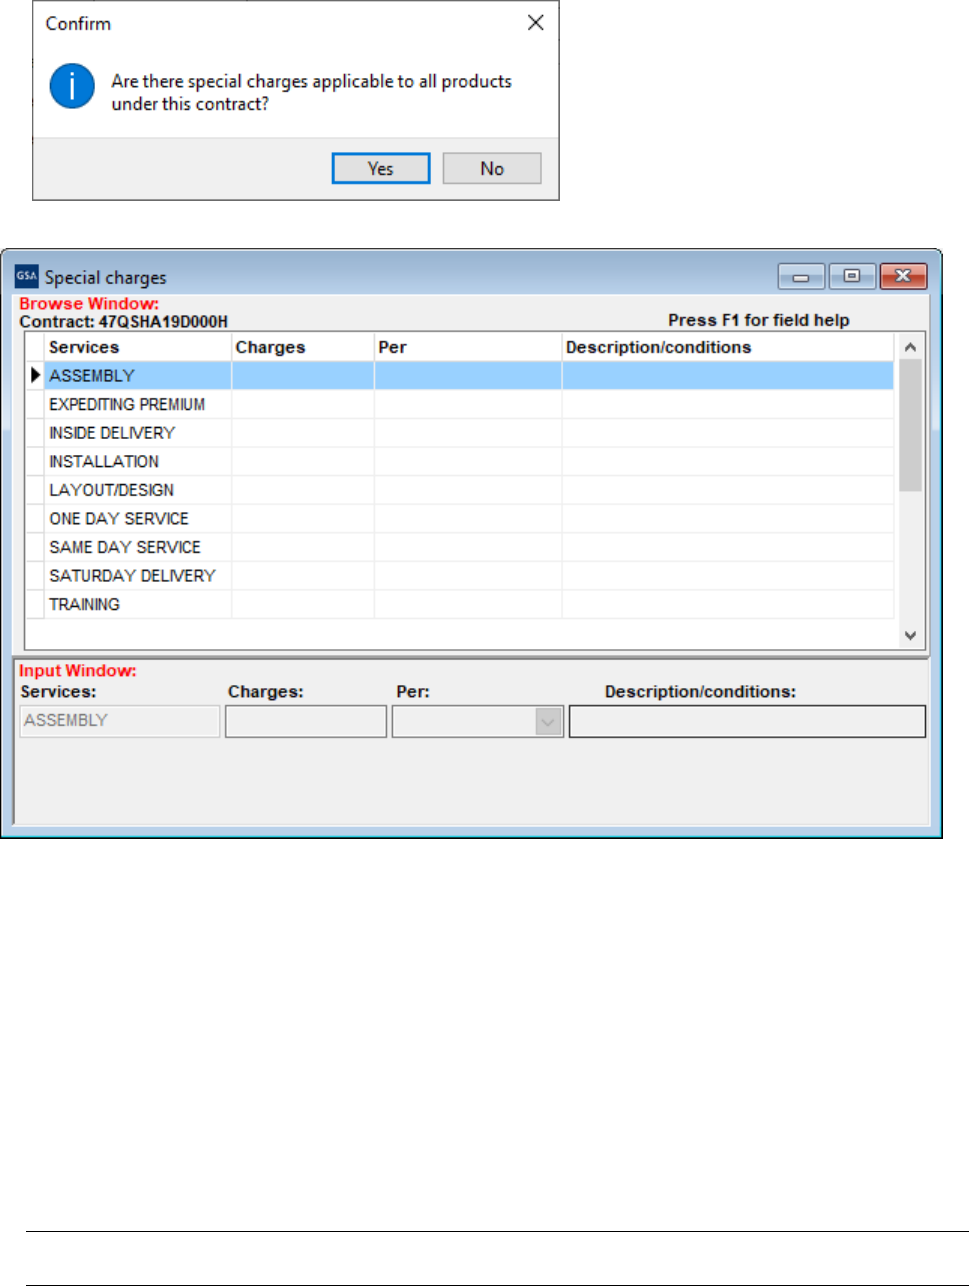
Step 7:
The Dealer/Sales Office Addresses screen will appear. If the address for receiving orders
and/or payments is the same as the address entered in the “Contractor Screen”, select No and do
not complete this screen. Select Yes if you have Dealer/sales offices and then fill out the
information and then select “Save”
Entering Service Catalog
Information
Schedules Input Program
Version 9.x Documentation
3-11
Note: Dealers/Sales offices are other locations or authorized entities to make transactions on your
behalf. If you do not have dealers DO NOT complete this screen.
Step 8: Close Dealer/Sales Office Addresses.
Entering Service Catalog
Information
Schedules Input Program
Version 9.x Documentation
3-12
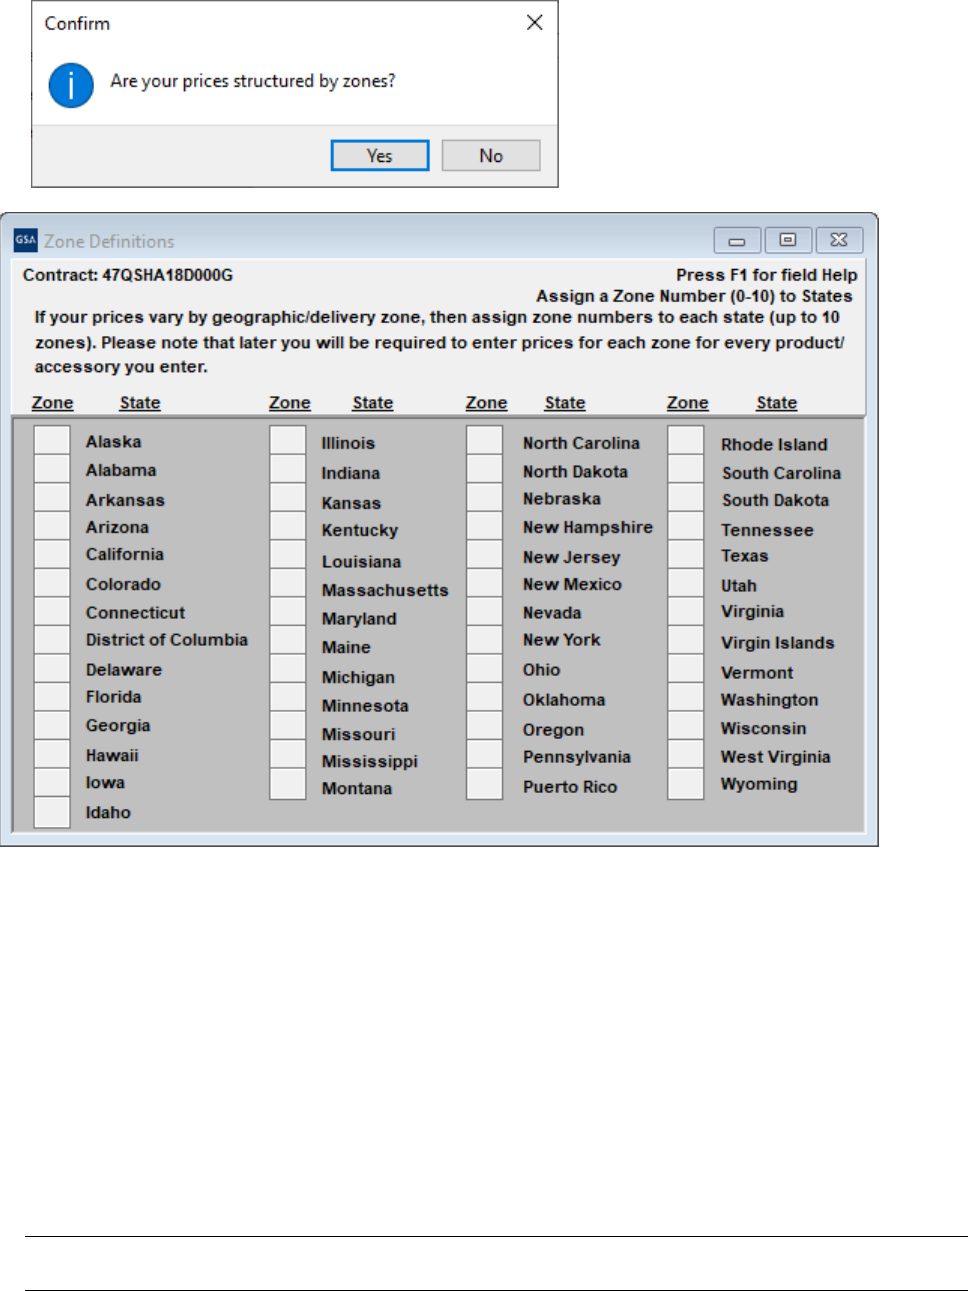
ZONES
If your pricing varies depending on what part of the country the buyer is located, use this
screen.
Ex 1: Prices in VA, MD, DC, NC, PA are different from anywhere else in the country. In this
example VA, MD, DC, NC, PA would be Zone 1. All other states would be Zone 2. If you use
this table each state must have a zone.
EX 2: Prices in FL, GA, SC are $100. These would be Zone 1. Prices in CA, AZ, WA are $150.
These would be Zone 2. All other states are $125. The rest of the states would be Zone 3. All
states must have a zone number if this table is used.
Note: Do not complete this table if your prices are the same across the country. Leave the entire
table blank.
Entering Service Catalog
Information
Schedules Input Program
Version 9.x Documentation
3-13
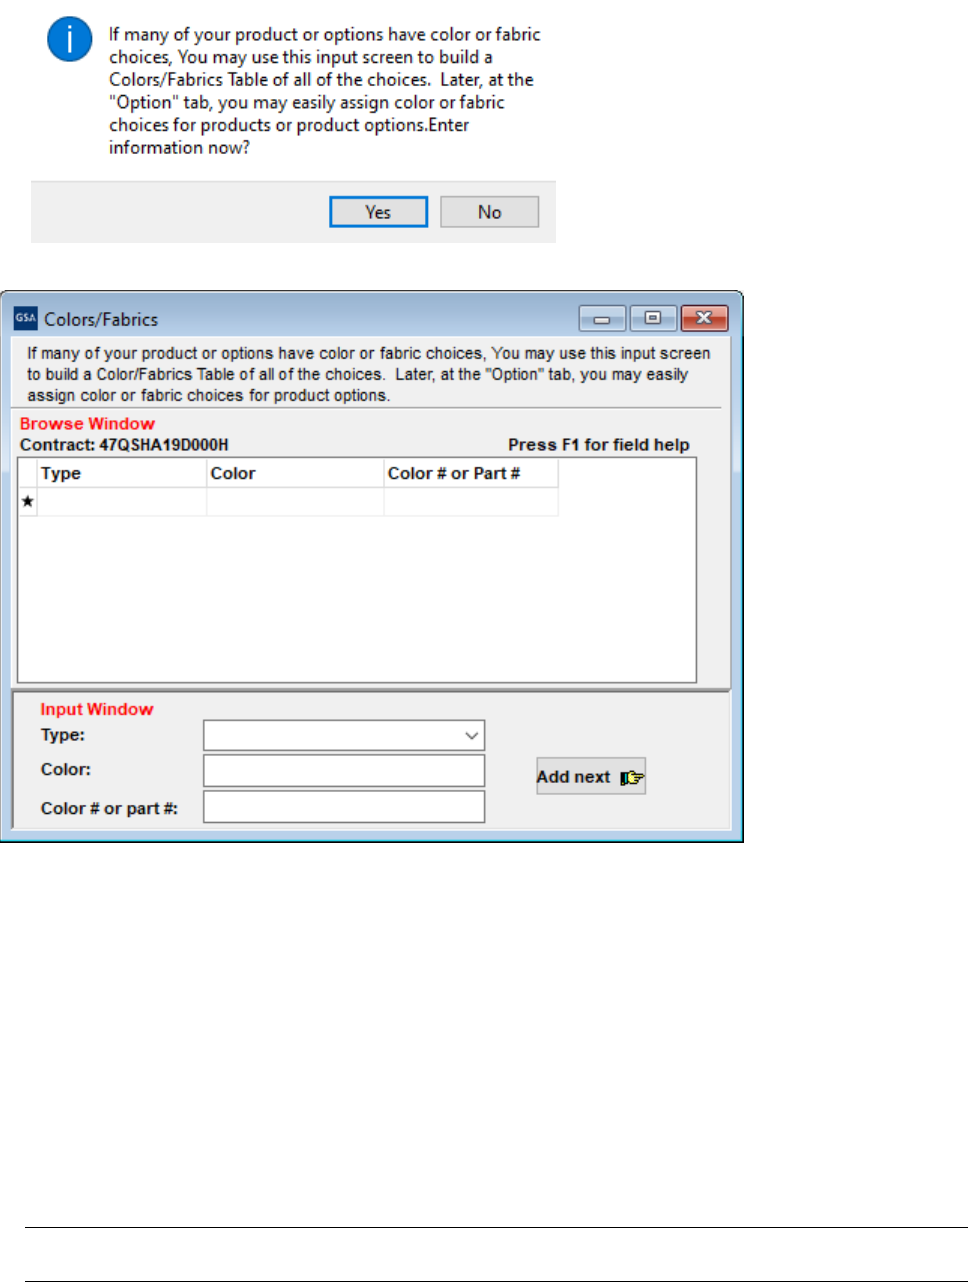
COLORS/FABRICS
If your items have color or fabric options, enter the information here.
Entering Service Catalog
Information
Schedules Input Program
Version 9.x Documentation
3-14
SPECIAL
CHARGES
If your items have additional charges enter that information here.
Step 9:
Close the Special Charges screen.
Entering Service Catalog
Information
Schedules Input Program
Version 9.x Documentation
3-15
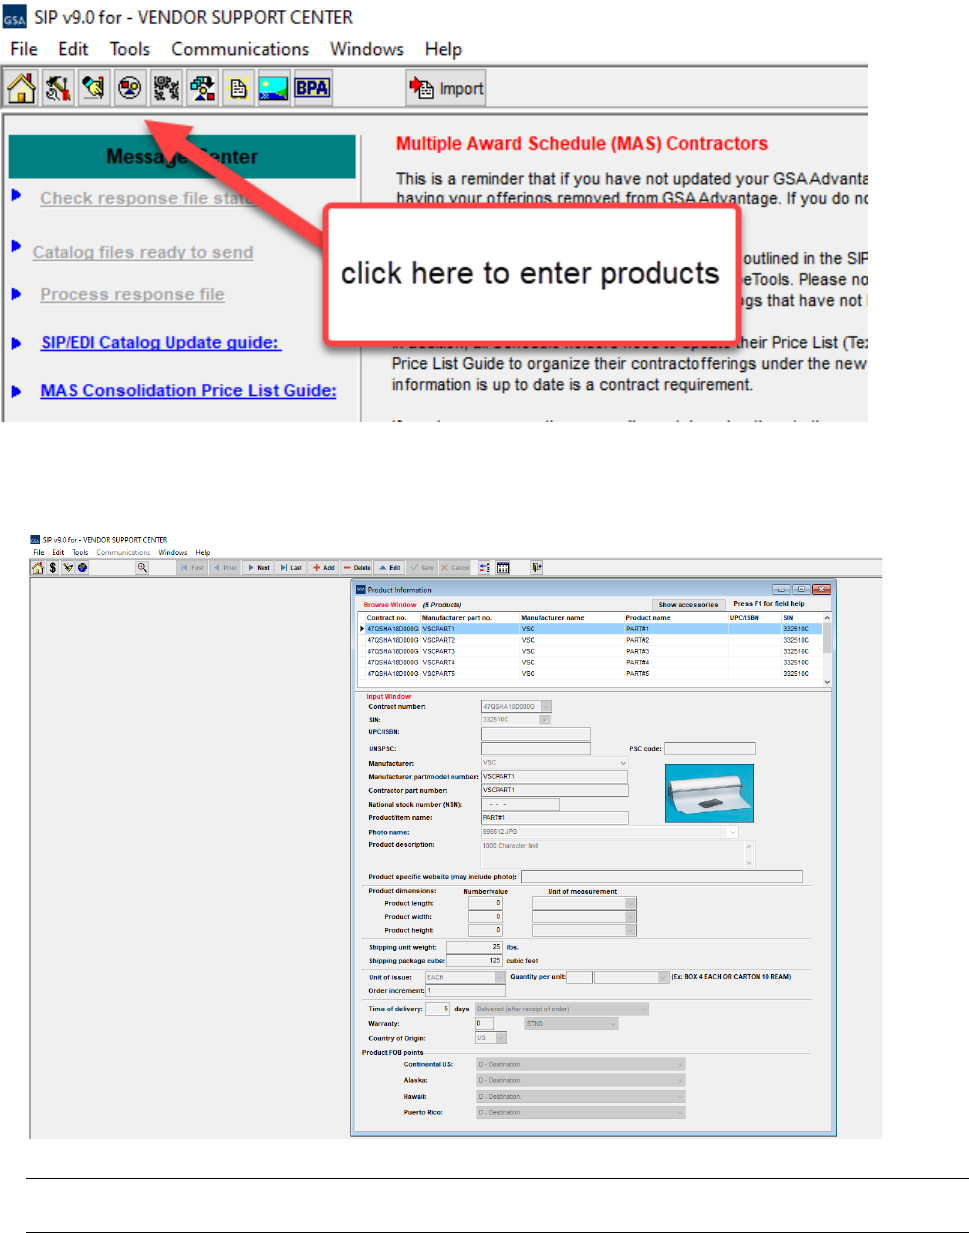
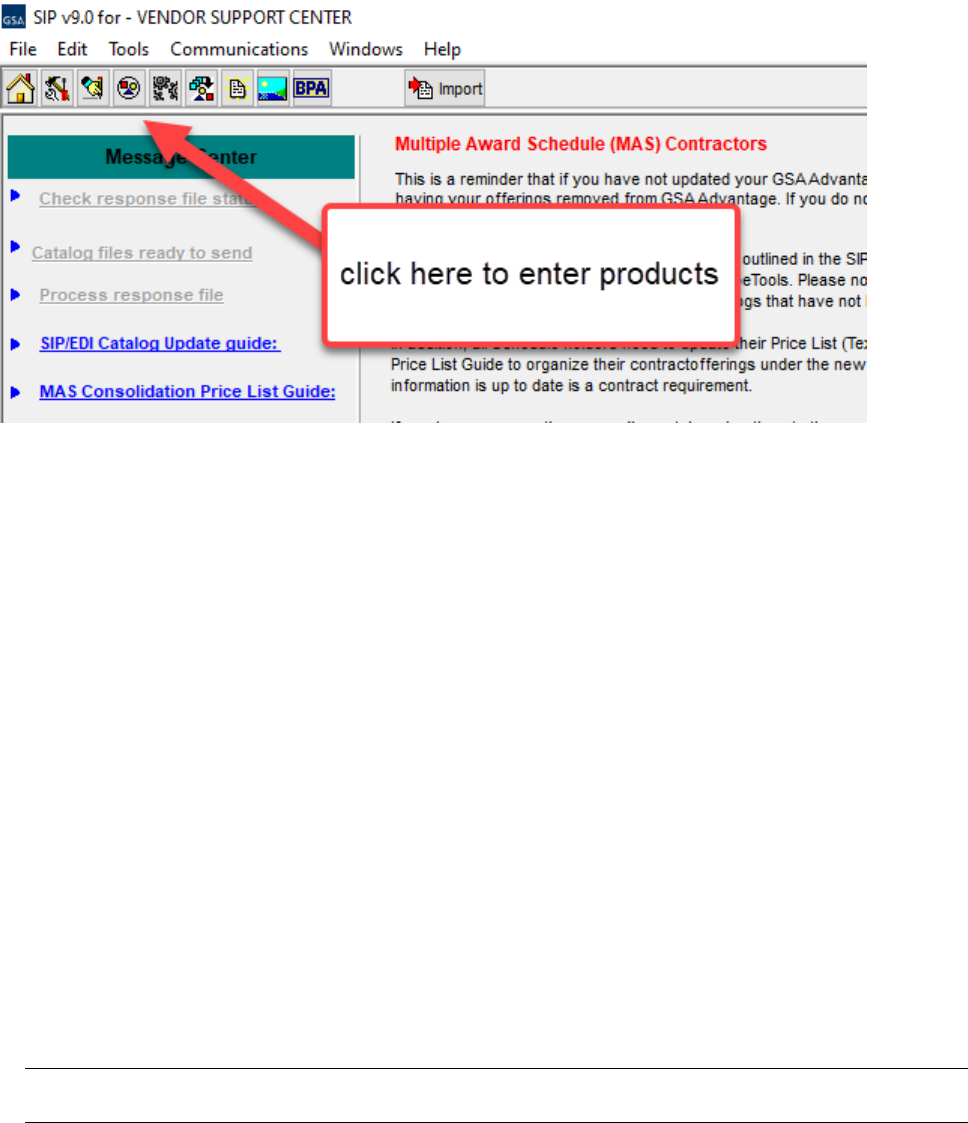
3.3
Product Information Screen
(Do not enter services in this screen. See section 5.6 on how to enter a text file.)
Step 1:
Select “File” → “Open” →”Products” or select the “Products” icon shown below.
Step 2:
Select “Add”.
Step 3:
Enter product information and select “Save”

Entering Service Catalog
Information
Schedules Input Program
Version 9.x Documentation
3-16
Please see the index for field descriptions
Step 4:
The Price Information screen will appear. Enter your pricing information and select
“Save” when finished.
Please see the index for field descriptions
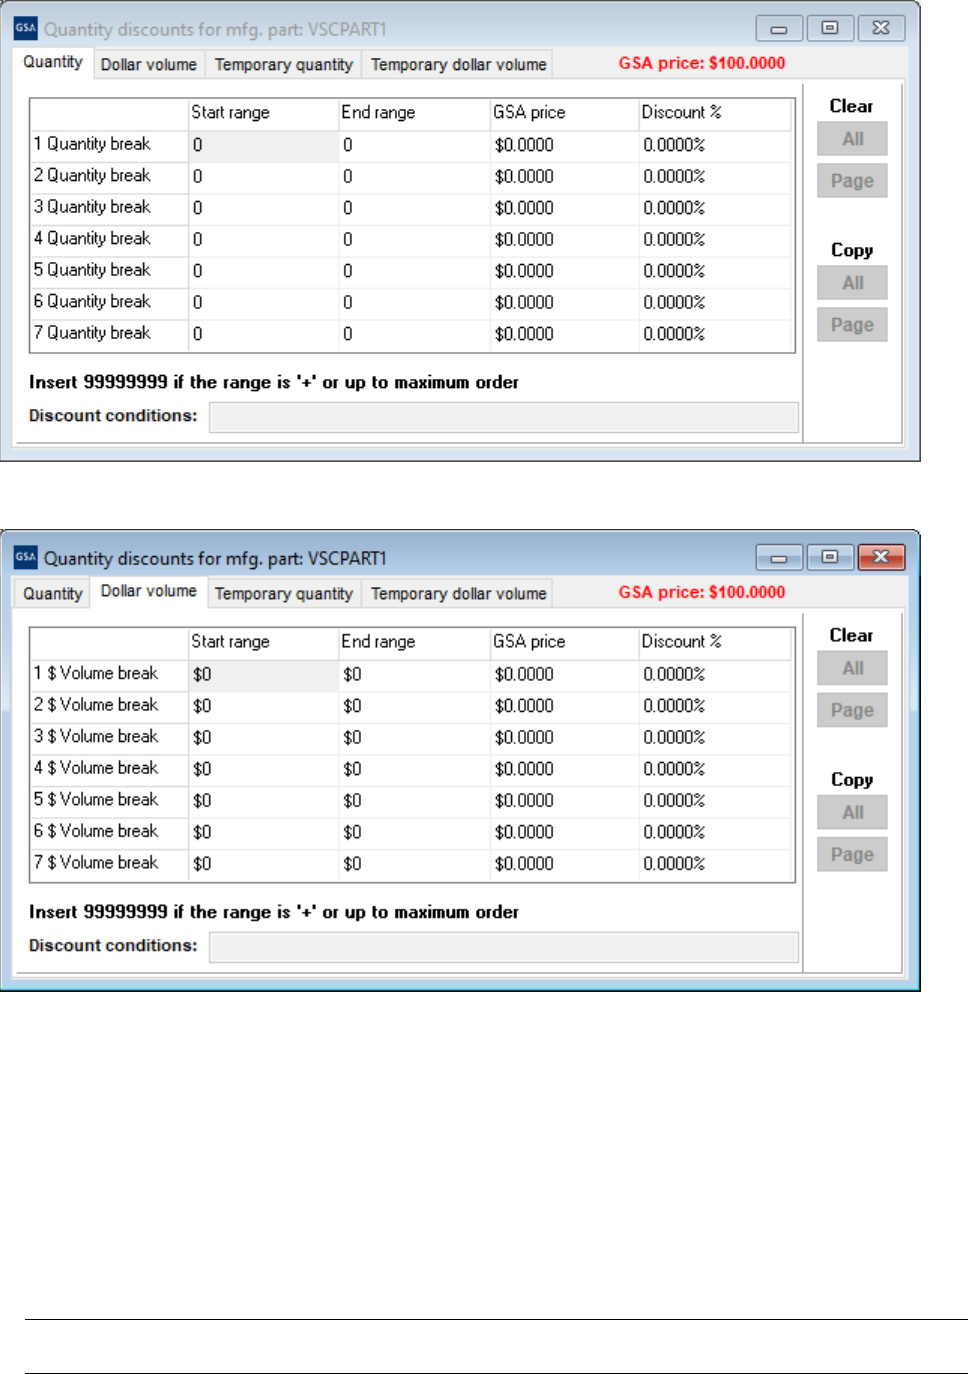
If you have quantity discounts/dollar volume discounts, select the “Qty/Vol” button shown
below and select “Edit”.
3.3.1
Quantity Volume Discount Breaks
Entering Service Catalog
Information
Schedules Input Program
Version 9.x Documentation
3-17
3.3.2
Dollar Volume Discount Breaks
Save and close this screen. You will be redirected back to the “Price” screen.
Step 5:
Close the Price Information screen.
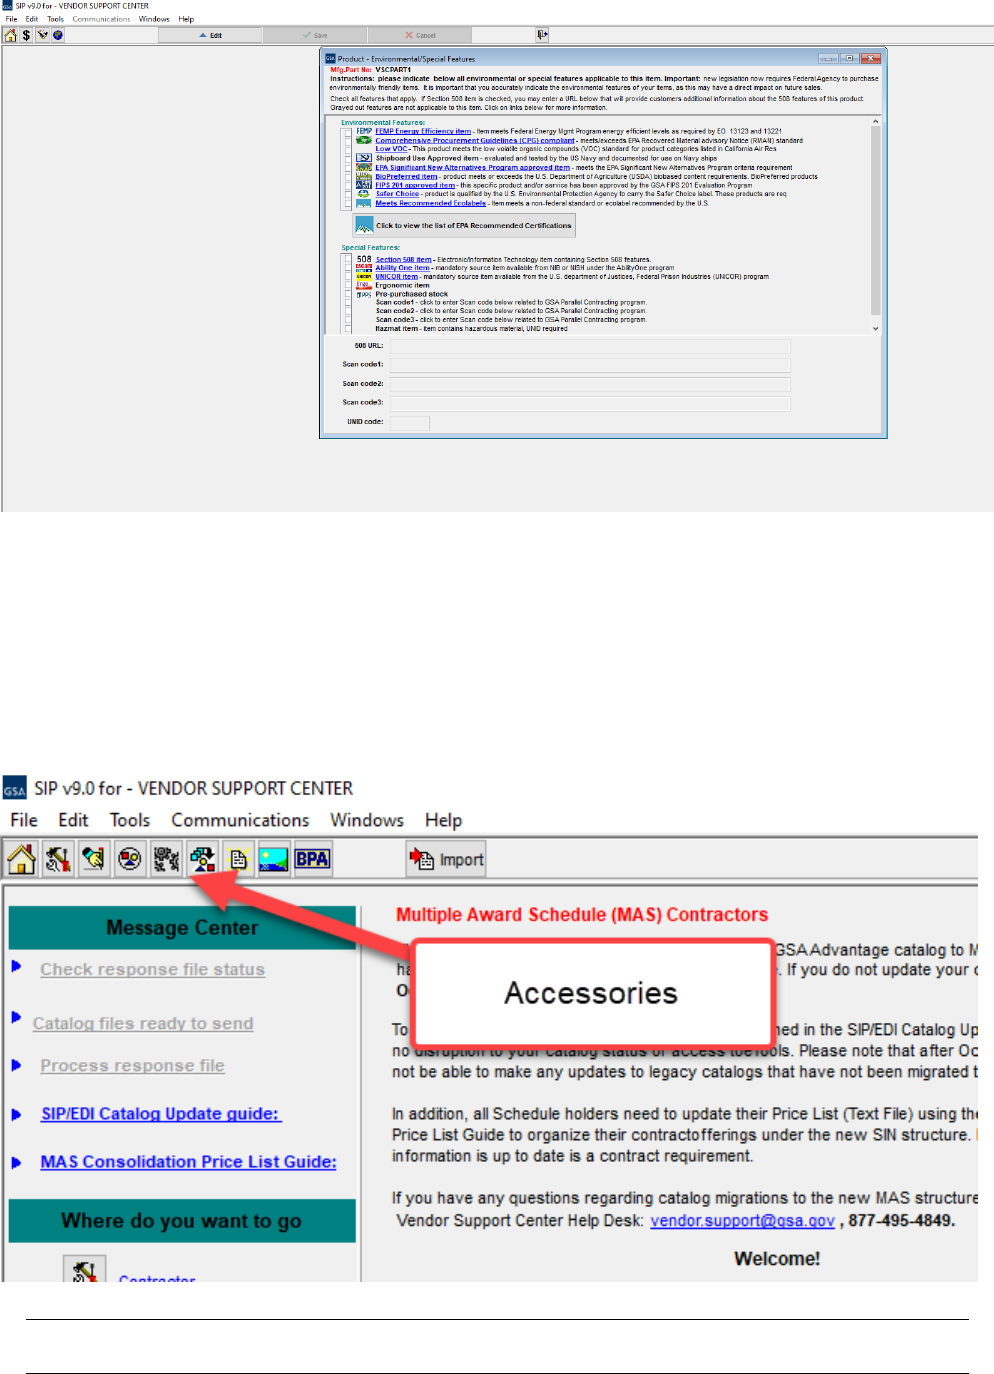
Step 6:
The Environmental/Special Features screen will appear as shown below. Complete this
screen for any applicable product features that apply.
Entering Service Catalog
Information
Schedules Input Program
Version 9.x Documentation
3-18
.
Step 7:
Repeat steps 2 - 7 to add additional items.
Step 8:
Close Product Information screen.
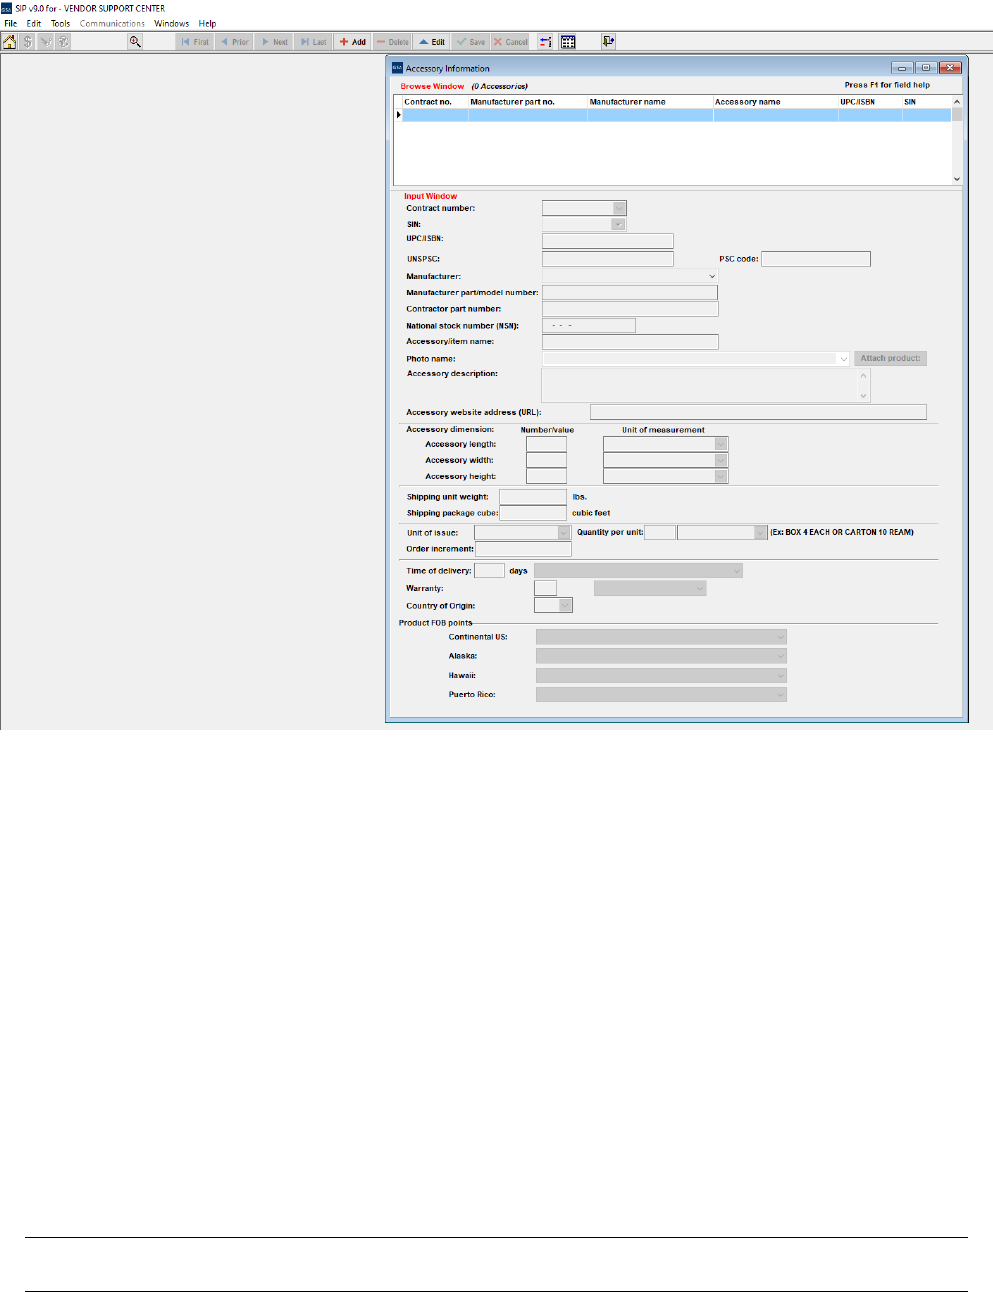
3.4
Accessories Information Screen
Step 1:
Select “File” → “Open” → “Accessories” or select the Accessories icon.
Entering Service Catalog
Information
Schedules Input Program
Version 9.x Documentation
3-19
Step 2:
Select “Add”.
Step 3:
Enter Accessory information and select “Save”.
The Accessory screen is identical to the Product screen, with the exception of the “Attach
Product” button
Step 4:
The Accessory Price Information screen will appear. Enter price information and select
“Save” when finished.
Step 5:
Repeat steps 2 - 7 to add additional accessories.
Step 6: Close Accessory Information screen.
Entering Service Catalog
Information
Schedules Input Program
Version 9.x Documentation
3-20
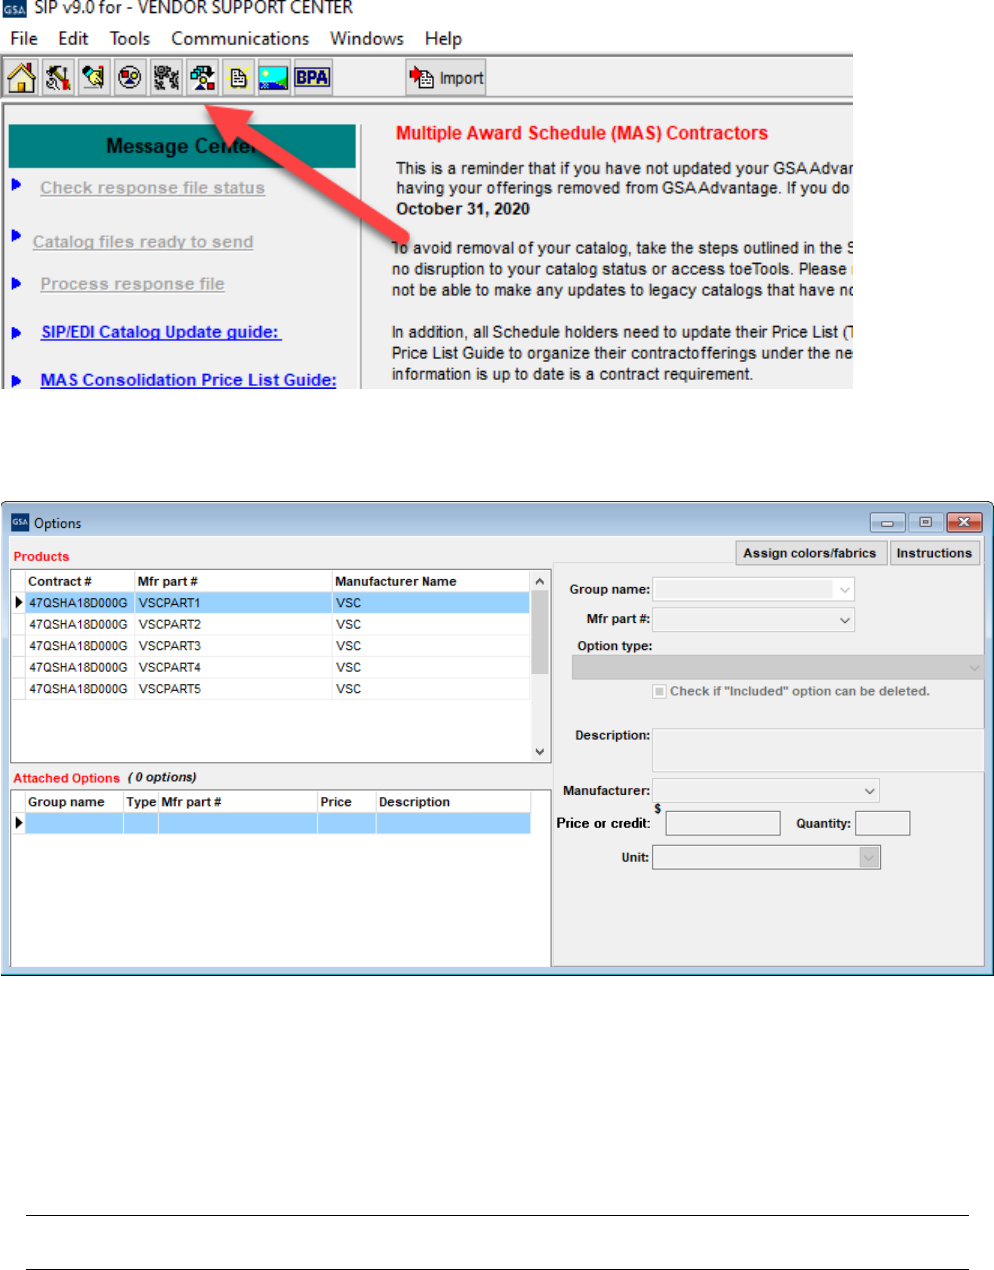
Options Information Screen
Step 1:
Select “File” → “Open” → “Options” or select the Options icon.
Step 2:
Select “Add”.
Step 3:
Enter option information and select “Save”.
Entering Service Catalog
Information
Schedules Input Program
Version 9.x Documentation
3-21
Step 4:
Close Options Information Screen.
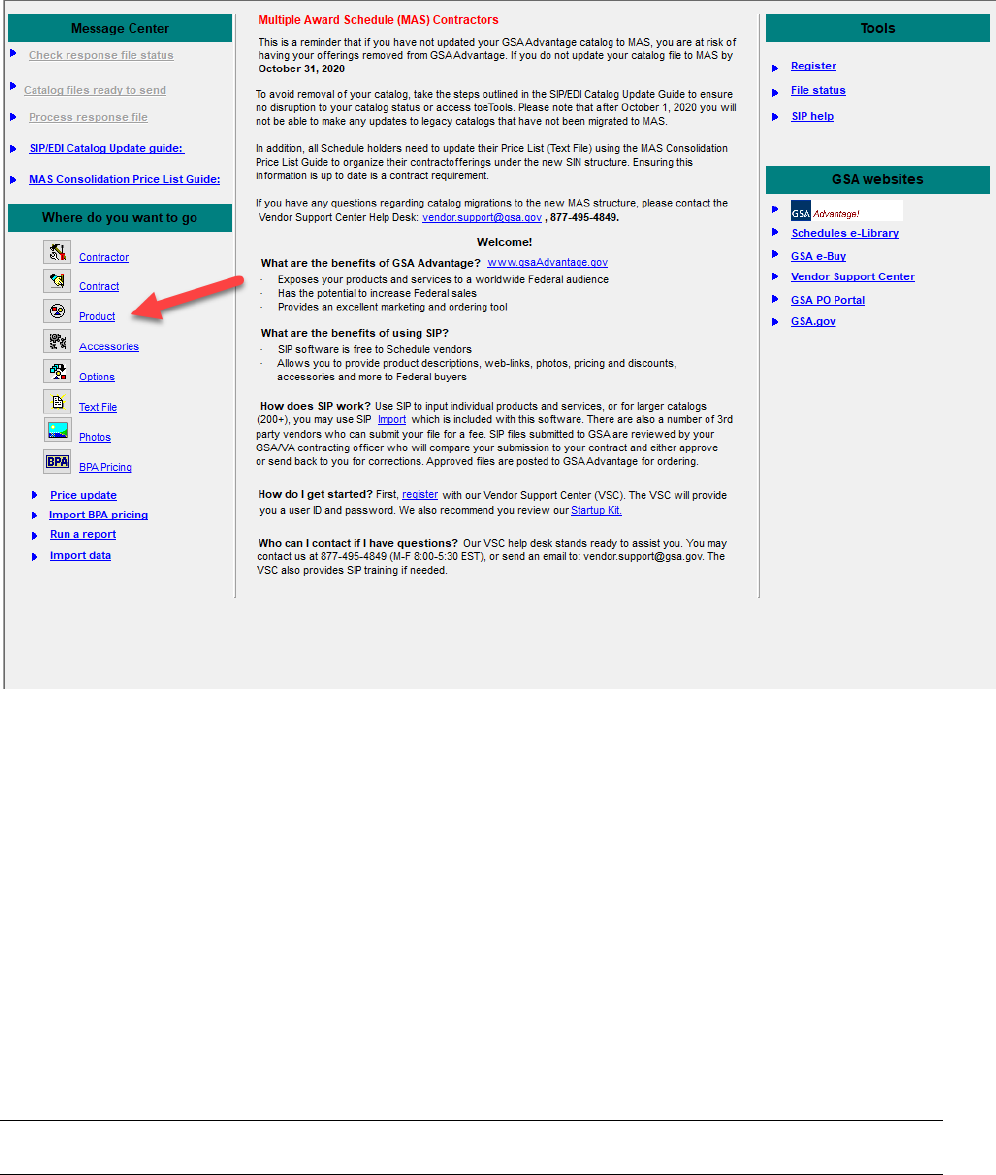
3.5
:
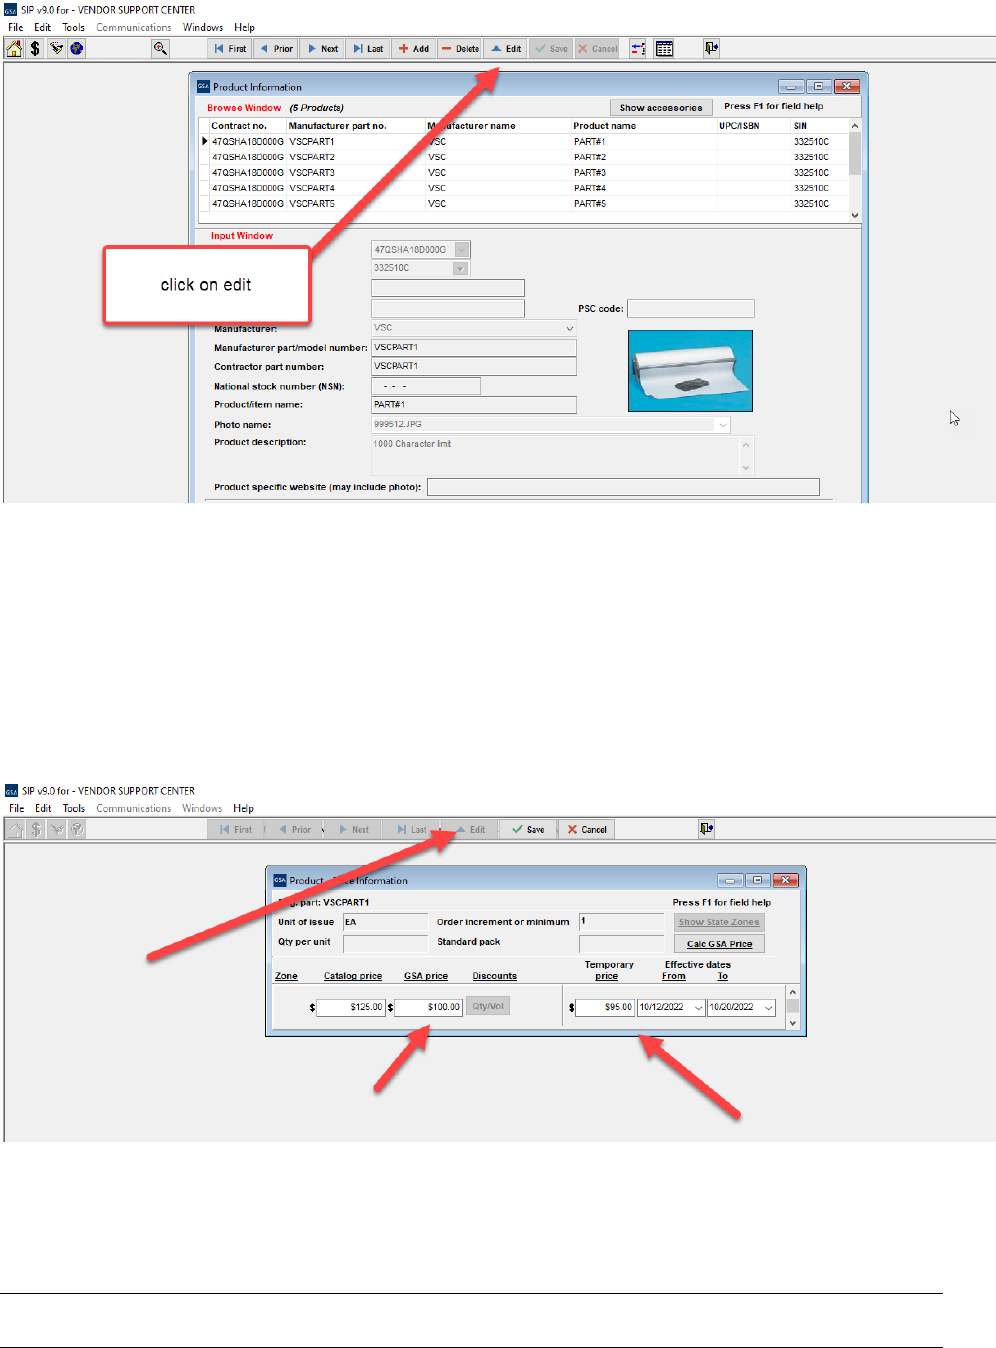
How to update products
Step 1:
In the SIP program click on product
Entering Service Catalog
Information
Schedules Input Program
Version 9.x Documentation
3-22
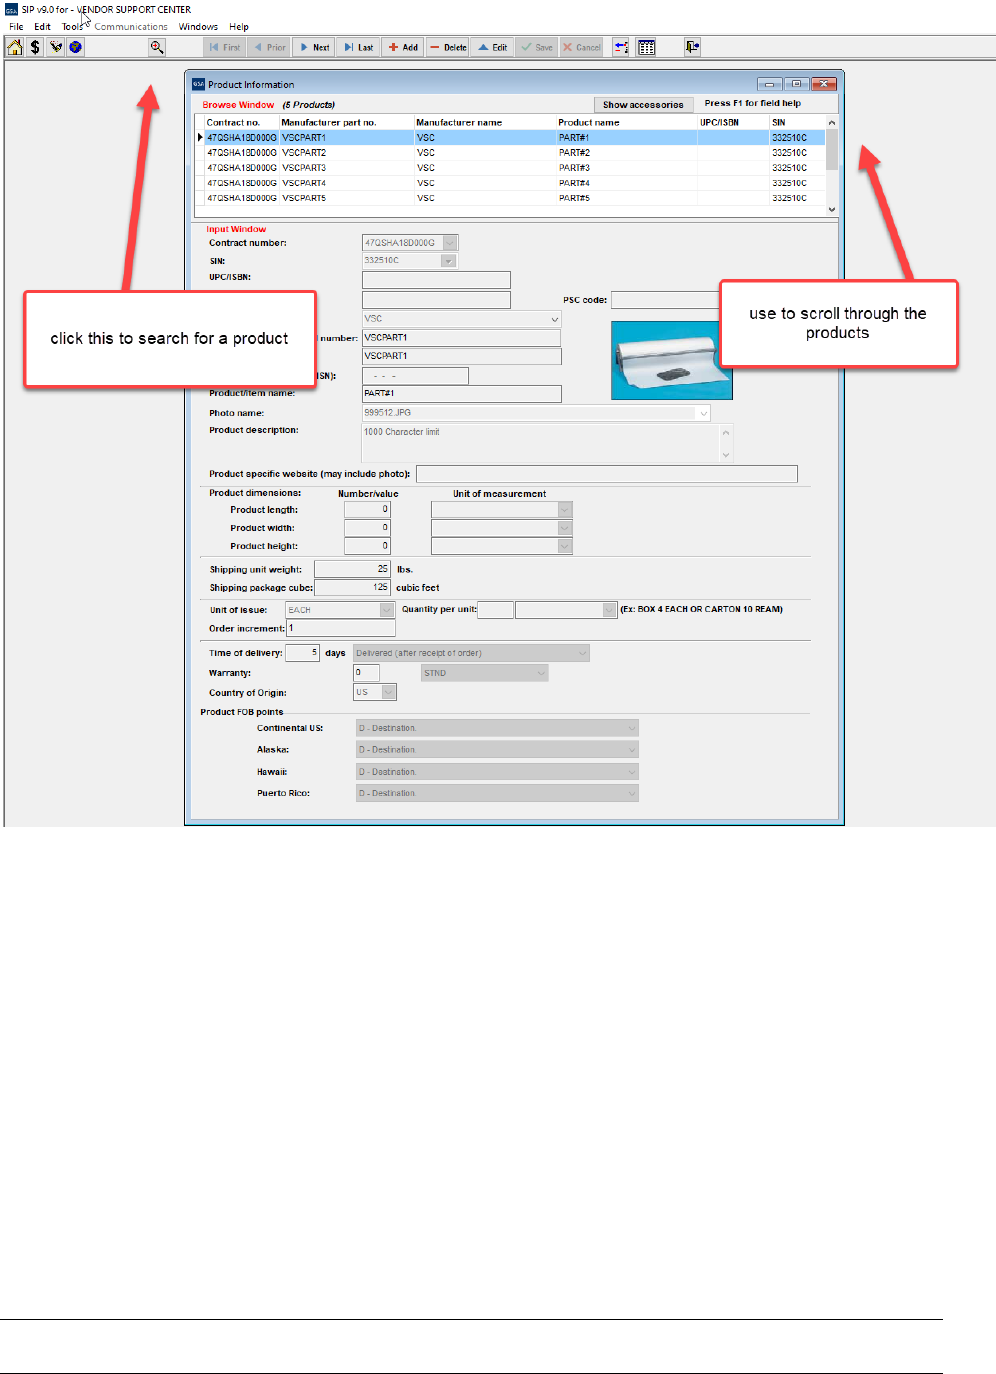
Step 3:
Then click on the edit button in the toolbar:
Entering Service Catalog
Information
Schedules Input Program
Version 9.x Documentation
3-23
Step 4:
Now the screen will not be grayed out and you can make whatever changes need to be
made. Once you do that click on the save button next to the edit button in the tool bar. If you
need to change the price click on the $ sign in the tool bar after you have selected the product
and then click on edit just like you did for the product and make the price changes here or do
your temp pricing too. Once you are done click on Save and then go to the next product that you
want to make the changes and repeat till you are done.
4

Entering Service Catalog
Information
Schedules Input Program
Version 9.x Documentation
5-24
4
ADDING PRODUCT PHOTOS
Photos can be added using the Product Information Screen or the Photo Screen.
4.1
Adding Photos Using Product Information Screen
Step 1:
Photo requirements:
-
jpg format or gif format
-
no larger than 1 MB
-
file name can be no longer that 30 characters
-
file name should not contain special characters (i.e. space, symbols, etc.)
Step 2:
Place the images into the C:\SIPV9\Photo folder.
Step 3:
You can attach the photo in the Product Information screen by selecting a product,
selecting “Edit” on the top tool bar, and then select the photo name drop down menu, and
choosing appropriate photo file.
NOTE
: Image of photo will appear in Product Information Screen once selected. Some images
may seem distorted in the Product Information Screen; this is just a thumbnail image. This does
not indicate how the file will view on
Advantage!
. Images will show correctly on
Advantage!
.
Entering Service Catalog
Information
Schedules Input Program
Version 9.x Documentation
5-25
NOTE:
Follow steps 1, 2, and 3 from above to add photos in the Accessory Screen.
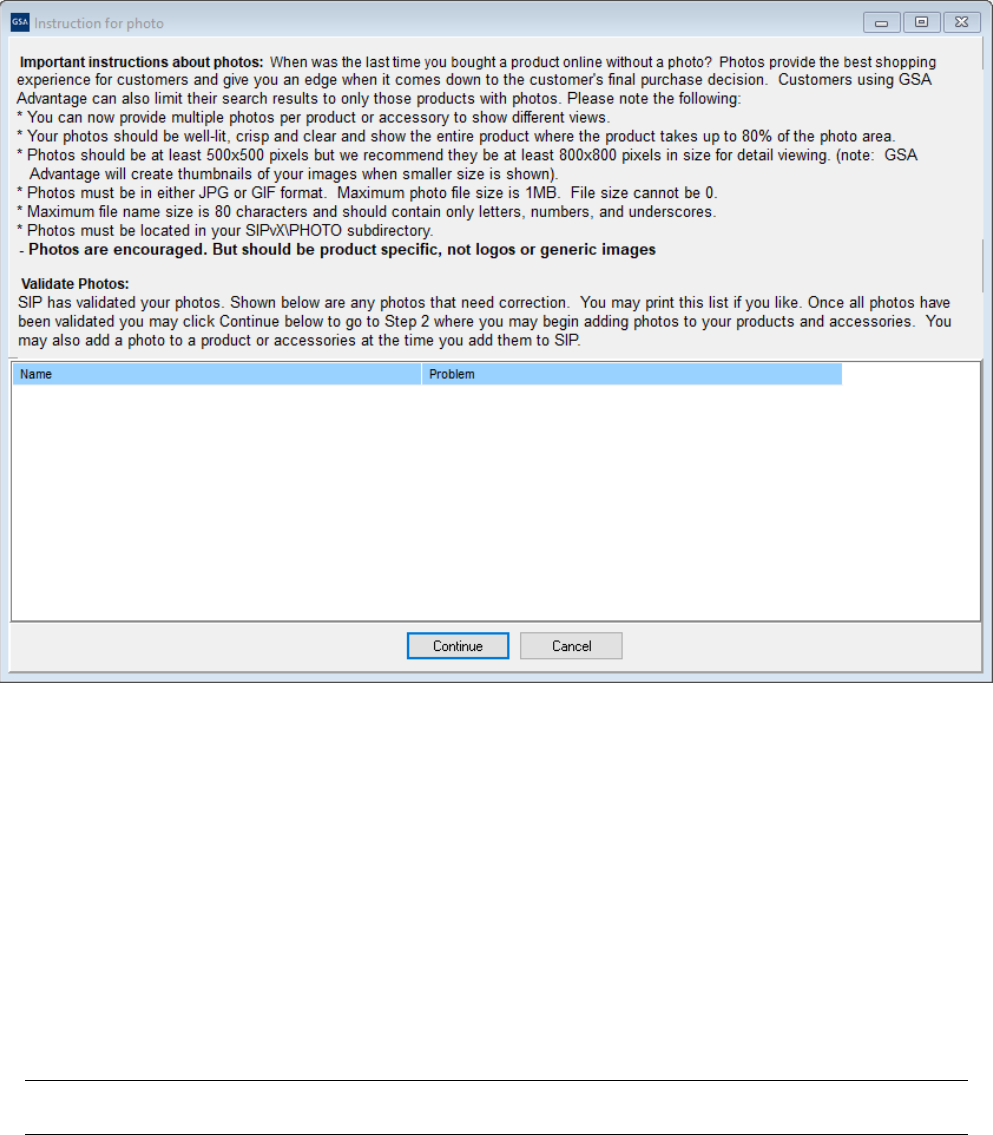
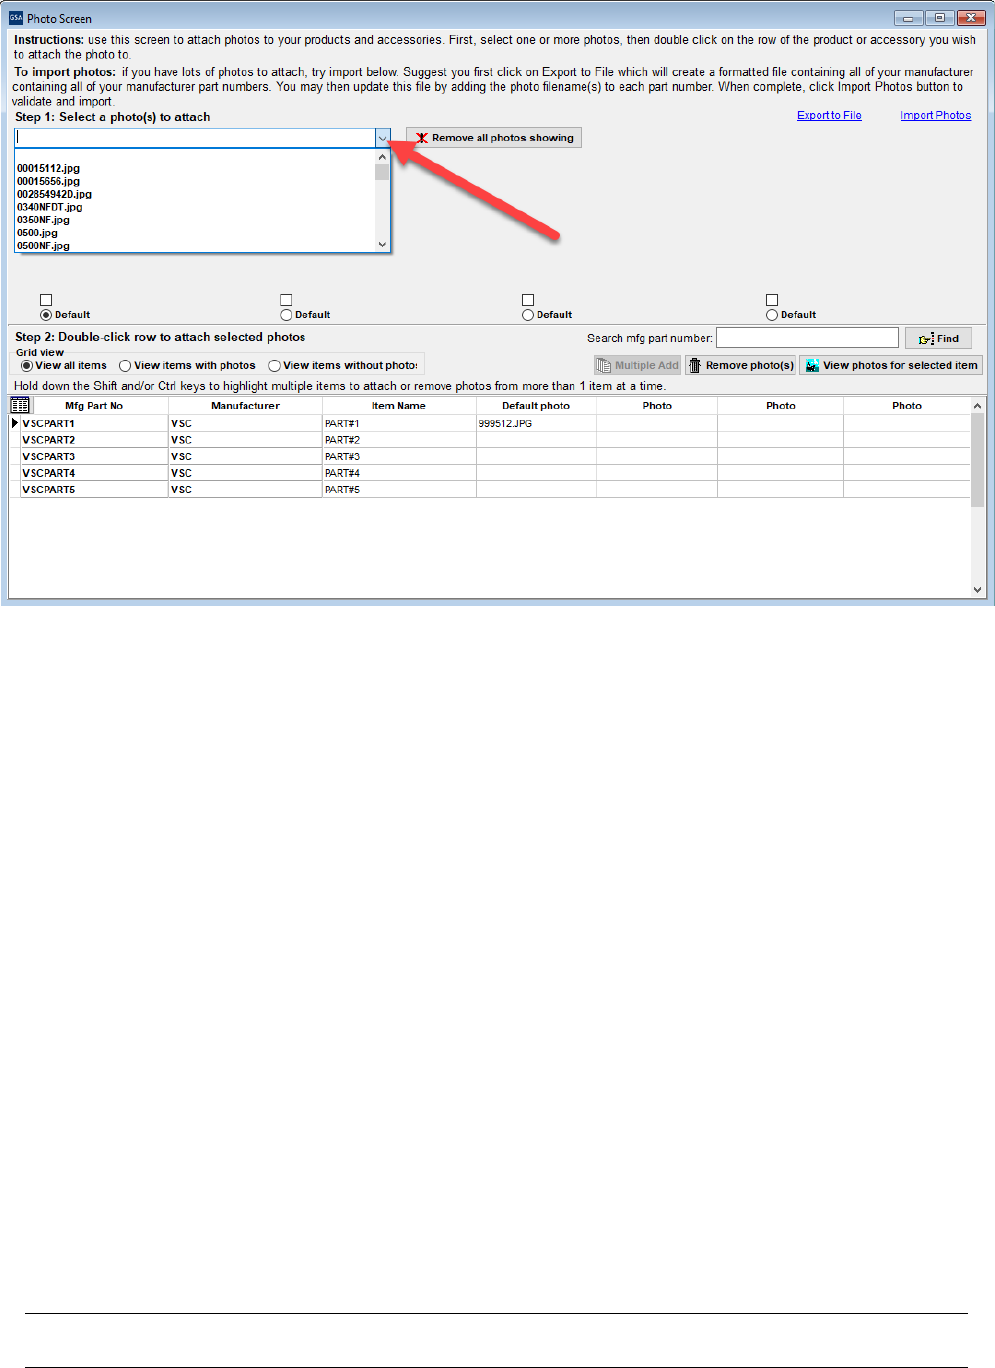
4.2
Adding Photos in the Photo Screen
Step 1:
Follow steps 1 and 2 from above.
Step 2:
Select File → Open → Photos. When Photo Screen appears, select “Continue”.
Entering Service Catalog
Information
Schedules Input Program
Version 9.x Documentation
5-26
Step 3:
Select the appropriate photo from the photo drop down menu.
Step 4:
Double click in the last column of the table to attach/detach a photo.
Note:
You can add a single photo to multiple products.
5
IMPORTING
PRODUCTS
5.1
Import Program Overview
The import program is used to enter a large number of products into the SIP program at once. It
is suggested that vendors with 100 or more products, use the import program to enter their
product data into SIP.
5.2
Building Import Files
The import program accepts three file types, ASCII text (.txt), Excel spreadsheets (.xls), and
Database files (.dbf). Import Templates are located in the C:\SIPV9\import\template folder.
Also refer to the SIP Import Excel document located at the VSC website for detailed information
on the Excel Import Templates. For further assistance in regards to ASCII text and dbf files,
contact the VSC.
Entering Service Catalog
Information
Schedules Input Program
Version 9.x Documentation
5-27
Shortcut for Building Import Files
The most efficient way to build your import templates is to manually fill out the first 4 screens in
the SIP software (Contractor, Contracts, SIN Max Order, Order Payment). Once those sections
are complete, follow the steps below:
Step 1:
Select File → Open, → Products or select the “Product” icon shown below. You cannot
access the Product screen until the Contractor, Contracts, SIN Max Order and Order Payment
screens are complete.
Step 2:
Follow steps 2 – 7 of the Product Information section and manually enter 10 products.
Step 3:
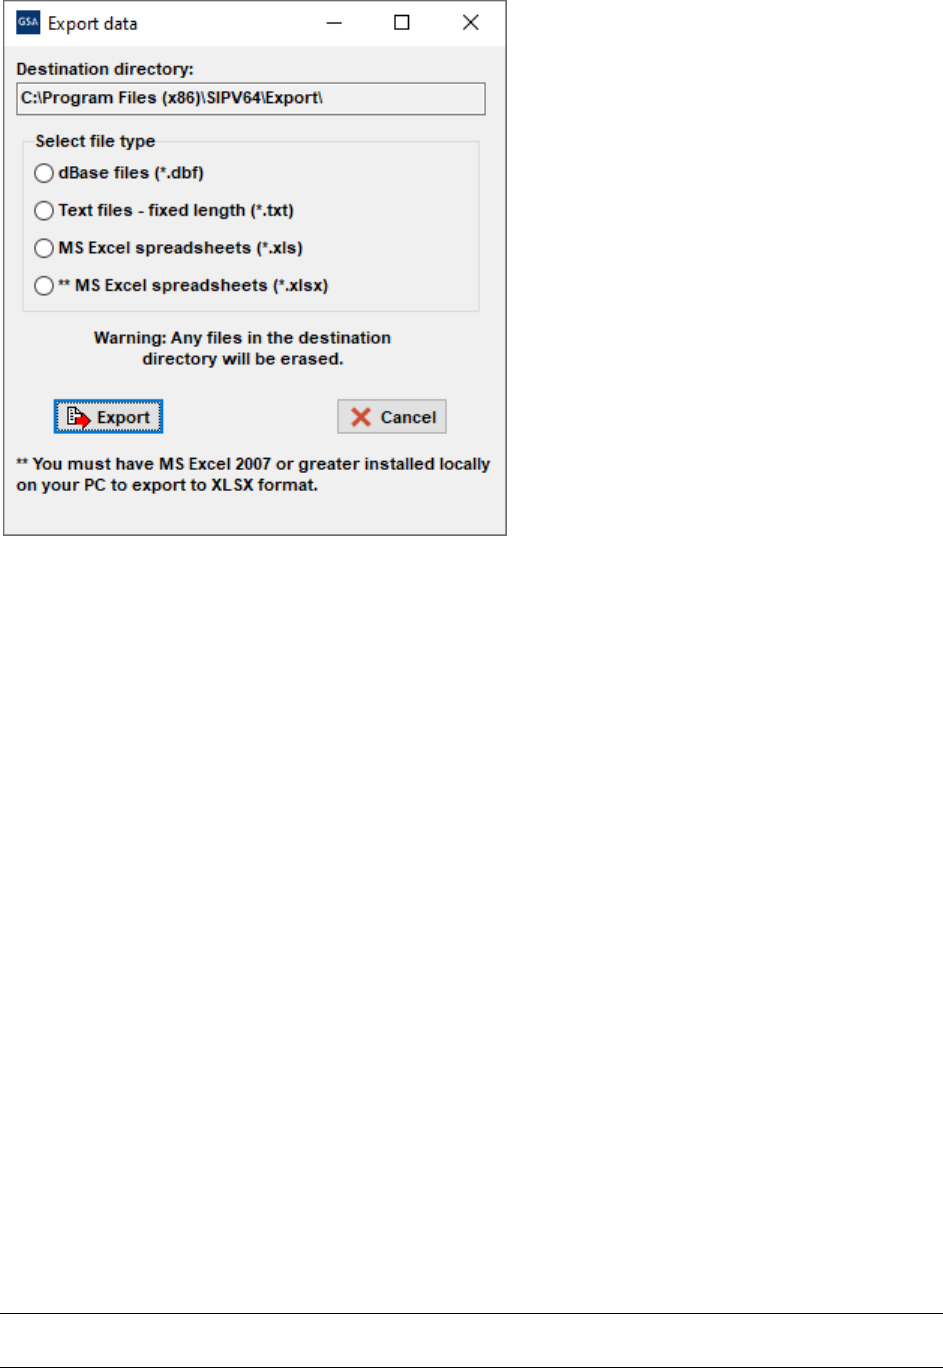
Close the Product Information screen and select “File” → “Export”.
Step 4:
Select the export file type.
Entering Service Catalog
Information
Schedules Input Program
Version 9.x Documentation
5-28
These files will be exported to the C:\SIPV9\export folder. The first 10 products you entered in
SIP will be in the correct import format. Add the rest of your products to the IPROD and IPRICE
files, following the format from the 10 files you manually entered (additional spreadsheets may
be required if you have accessories, options, volume discounts, zones or colors/fabrics).
Once
these files have been completed, they MUST be copied or saved to the C:\SIPV9\Import folder
for importing.
5.3
Adding Photos Using Spreadsheets
Step 1:
Follow steps 1 and 2 from the photo section
Step 2:
Enter photo file name with the extension (example: photoname.jpg) next to its
corresponding part number under column C in the IPHOTO.xls spreadsheet.
5.4
Importing Files into SIP
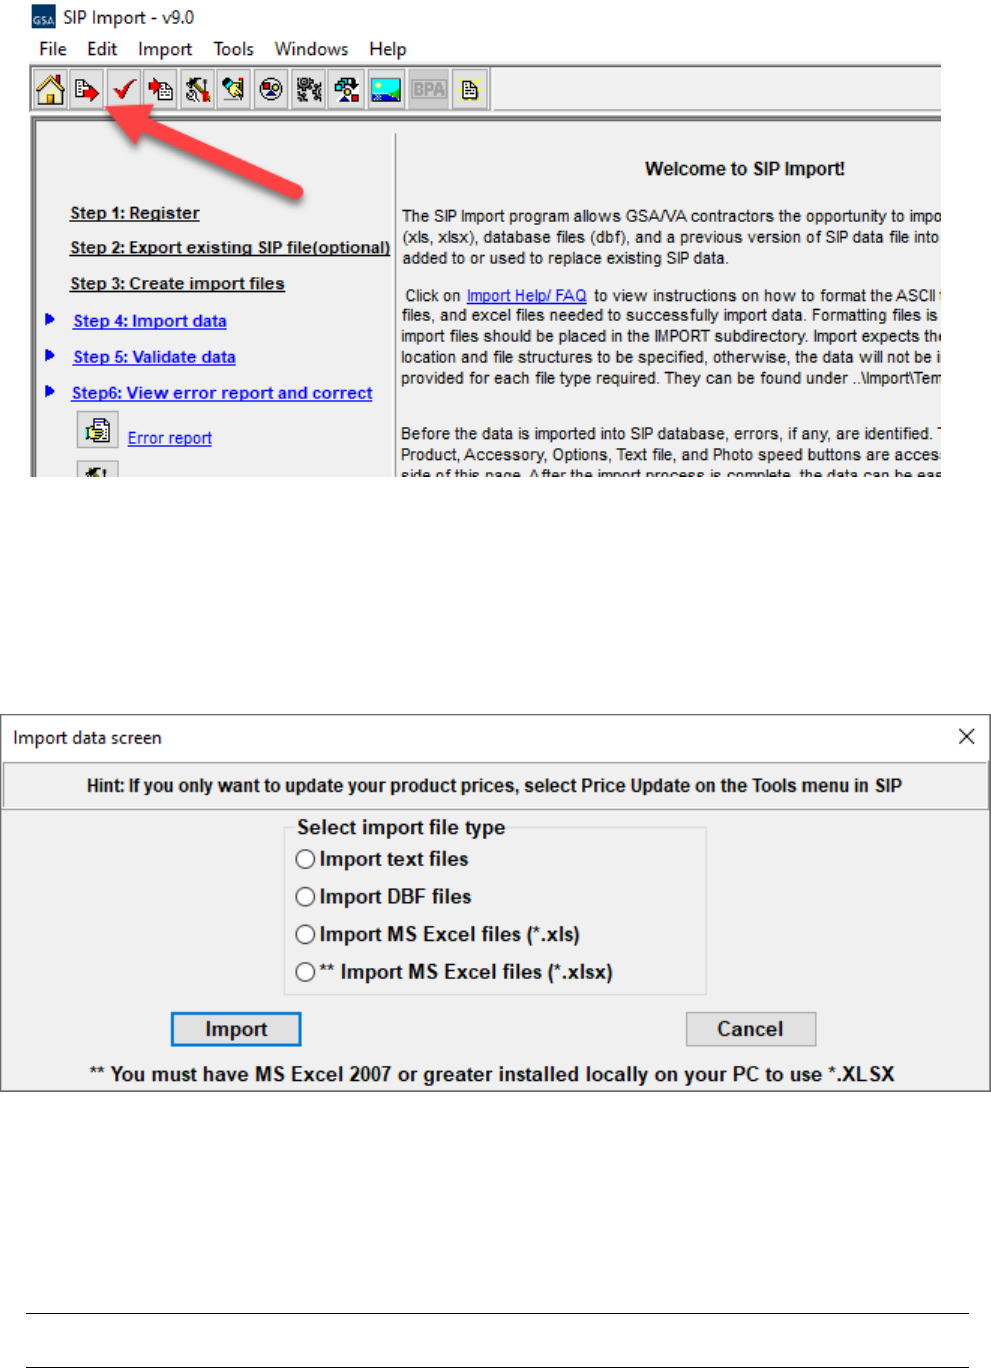
To open the SIP Import program, open SIP and select the “Import” icon. You can also access this
program by double-clicking the Import32.exe file located in the C:\SIPV9\import folder.
Step 1:
Select Import → Move data into import or select the “Move data into import” icon
shown below.
Entering Service Catalog
Information
Schedules Input Program
Version 9.x Documentation
5-29
Step 2:
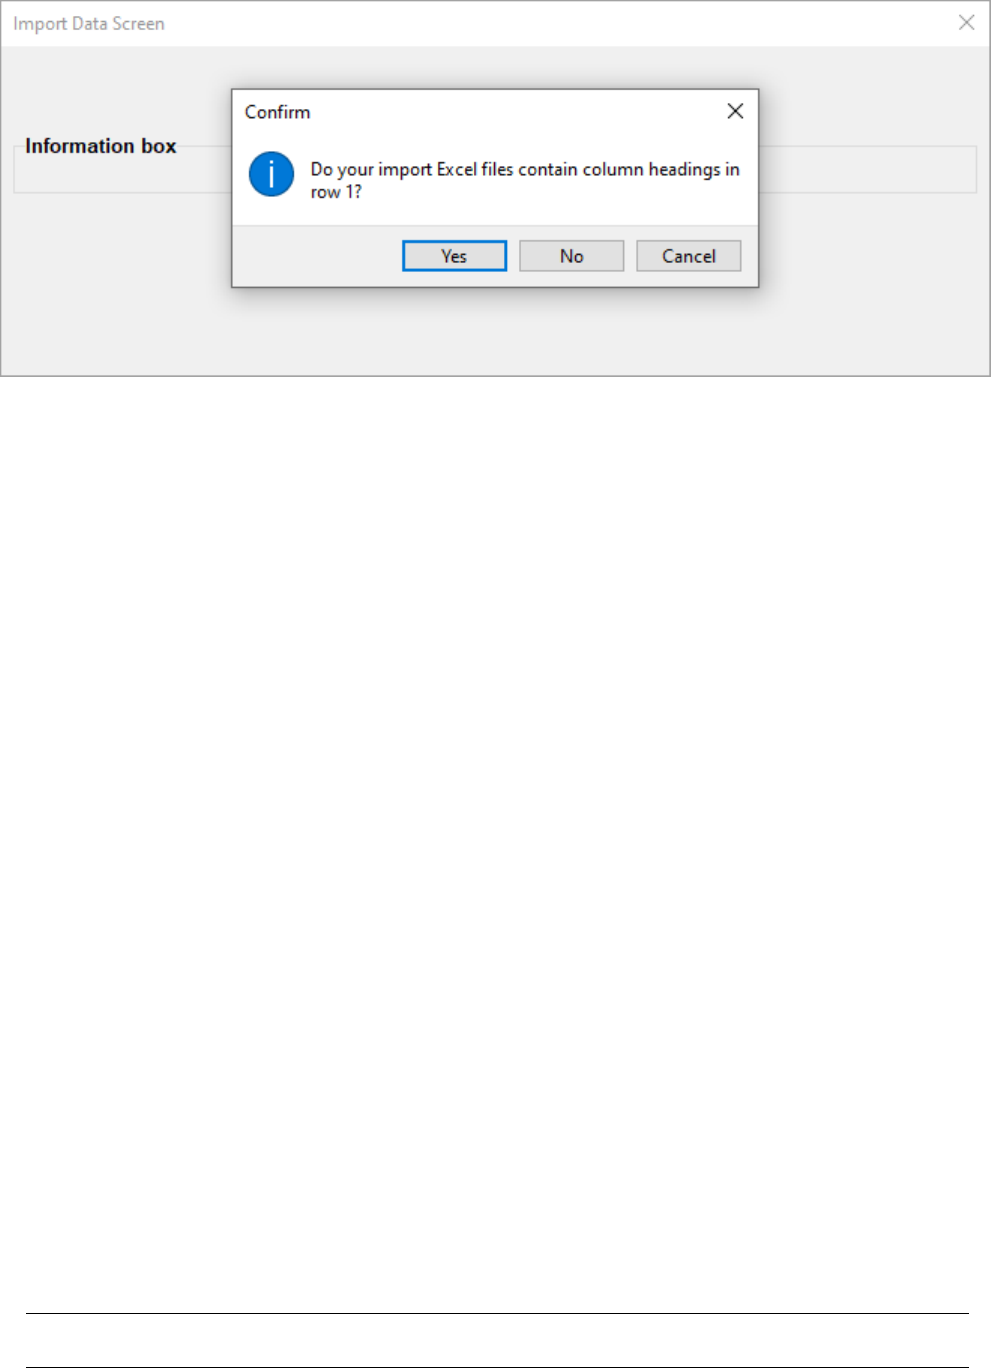
Import Data screen will appear. Select your file type and select Import.
Sip will ask you if you have column headers, select yes or no depending if you have headers. If
you did an export from the SIP program you will have headers.
Entering Service Catalog
Information
Schedules Input Program
Version 9.x Documentation
5-30
Step 3:
Once this process is complete you may receive errors with the file(s) if data was not
entered correctly. If this occurs, correct the error(s) indicated in the error report and begin import
process from Step 1.
(*NOTE: If you need assistance with this process, contact the Vendor Support Center.)
Step 4:
If there are no errors or when the errors are corrected, select “Import” → “Import Data
into SIP” or select the “Import Data into SIP” icon shown in step 1.

Entering Service Catalog
Information
Schedules Input Program
Version 9.x Documentation
5-31
Step 5:
You will then be asked if you would like to
append
or
replace
the information currently
in SIP. If you are replacing the data in SIP with the information in IPRICE and IPROD, you will
need the following data in the import folder (IPROD, IPRICE, ICORPET, ICONTR, IMOLS,
and IPHOTO files). If you’re appending your data
do not
include ICORPET.
Step 6:
Close the SIP import function and open SIP by selecting Step 8 on the import menu.
Note: If you have the ICORPET sheet in the import folder, it will always
replace
the data even if
you select append.
ENTERING SERVICE CATALOG INFORMATION
5.5
Creating Text Files (FSS Terms and Conditions Price List)
Vendors offering services to the Government use the text file feature to explain their services,
labor categories and pricing. This option may also be used to explain custom products with
approval from the Contracting Officer.
Step 1:
Create a document explaining the services your company offers along with your prices.
The formats that are acceptable are Microsoft Word (.doc), Adobe Acrobat (.PDF), Excel
Spreadsheet (.xls or .xlxs) and Web Page (.htm/.html).
NOTE: File names must not include
spaces or special characters and must not exceed 30 characters.
This document may
include but not limited to the following:
a.
Company’s Information (name, address, phone and fax numbers, web address, and point
of contact information)
b.
Contract Information (contract number, schedule number and description, SIN numbers
and description)
c.
Table of Contents
d.
Terms and Conditions
e.
Labor Categories
f.
Labor Categories Description
g.
Price List
NOTE: Check with your Contracting Officer for FSS Terms and Conditions Price List
page format.
5.6
Attaching FSS Terms and Conditions Price List to SIP
Step 2:
Save or copy your FSS Terms and Conditions Price List into the C:\SIPV9\textfile
folder.
Step 3:
Open SIP, select “File” → “Open” → “Text Files” or select the text file icon.

Vendor Support Center Contact
Information
Schedules Input Program
Version 9.x Documentation
7-2
Step 4:
Choose “Select File” on the bottom left of the screen
Step 5:
Select the drop down arrow and select your file.
NOTE:
Any file in the text file folder will appear in the drop down list.
Step 6:
Select “Save” at the top of the program.
Step 7:
Close Text File screen.
6
UPLOADING CATALOG INFORMATION
6.1
SIP Upload File Types
SIP allows you to upload your product or service information and prices in six (6) file types. SIP
catalog file types are:
1.
A90
Original File
: Contains original information to be placed on
Advantage!
2.
C90
Change file
: Changes made to existing file on GSA
Advantage!
3.
R90
Replacement file
: Replacing entire catalog on
Advantage!
4.
W90
Text file
:
FSS Terms and Conditions Price List.
5.
P90A, B, C…etc
Photo File
: Contains all photos you have attached in SIP.
6.
T90
Temporary Price File:
Any temporary prices start and stop dates.
7.
B9A
BPA
file
6.2
Firewall Settings
When uploading using SIP and you are on a network, please make sure you have full
administrative rights. FTP (port 22) should be open both inbound and outbound to our web
address http://vsc.gsa.gov
.
6.3
SIP Upload Instructions
After all the products, service and price information are entered into SIP, and you are connected
to the internet:
1.
Select “Communications” → “Create Catalog File”. This will generate an A90 or
C90 file depending if (1) this is the first time uploading with the current SIP program
(A90) (2) you’ve made changes to the existing file in SIP (C90). To create an R90
(Replacement) file, select “Communications” → “Create a Replacement File” to
replace the catalog on GSA
Advantage!
with the new catalog in SIP. If you have a
FSS Terms and Conditions Price List attached, SIP will generate a W90 file.

Vendor Support Center Contact
Information
Schedules Input Program
Version 9.x Documentation
7-2
2.
When the program has notified you that the files were created successfully, Select →
“Communications
”
→ “Send Catalog File(s)” → “
Send”.
At the top of the dialog
box, you will see “Select File Type”. Make sure “
New Catalog”
is selected. Select
the button labeled “Click Here to Start Upload” (upload times will vary depending on
the size of the files).
6.4
Uploading/Using VSC Website
If you are behind a firewall or having connectivity issues with SIP, you can upload using our
Vendor Response Retrieval and Catalog Upload System website
https://vsc.gsa.gov/vsc/app-
catalog-upload
You can attach SIP files and successfully upload information to GSA
Advantage!
.
Before uploading file(s) using the website, create the catalog files using the SIP program (see
step 1 in SIP Upload Instructions.)
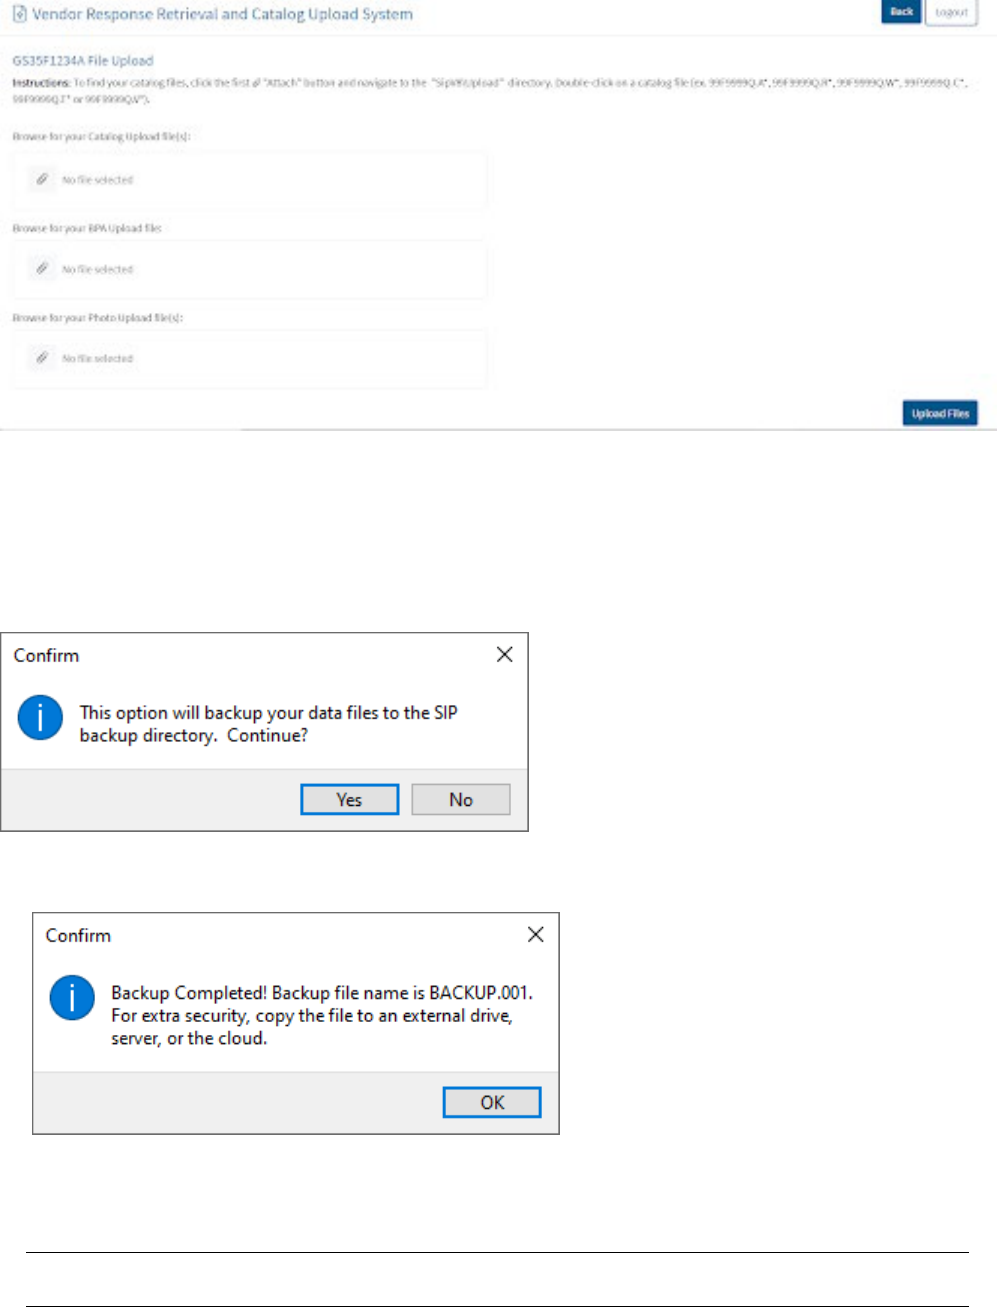
6.5
Website Upload Conditions
The Vendor Response Retrieval and Catalog Upload System website is only used if you cannot
upload using SIP because of firewall issues, or connectivity issues.
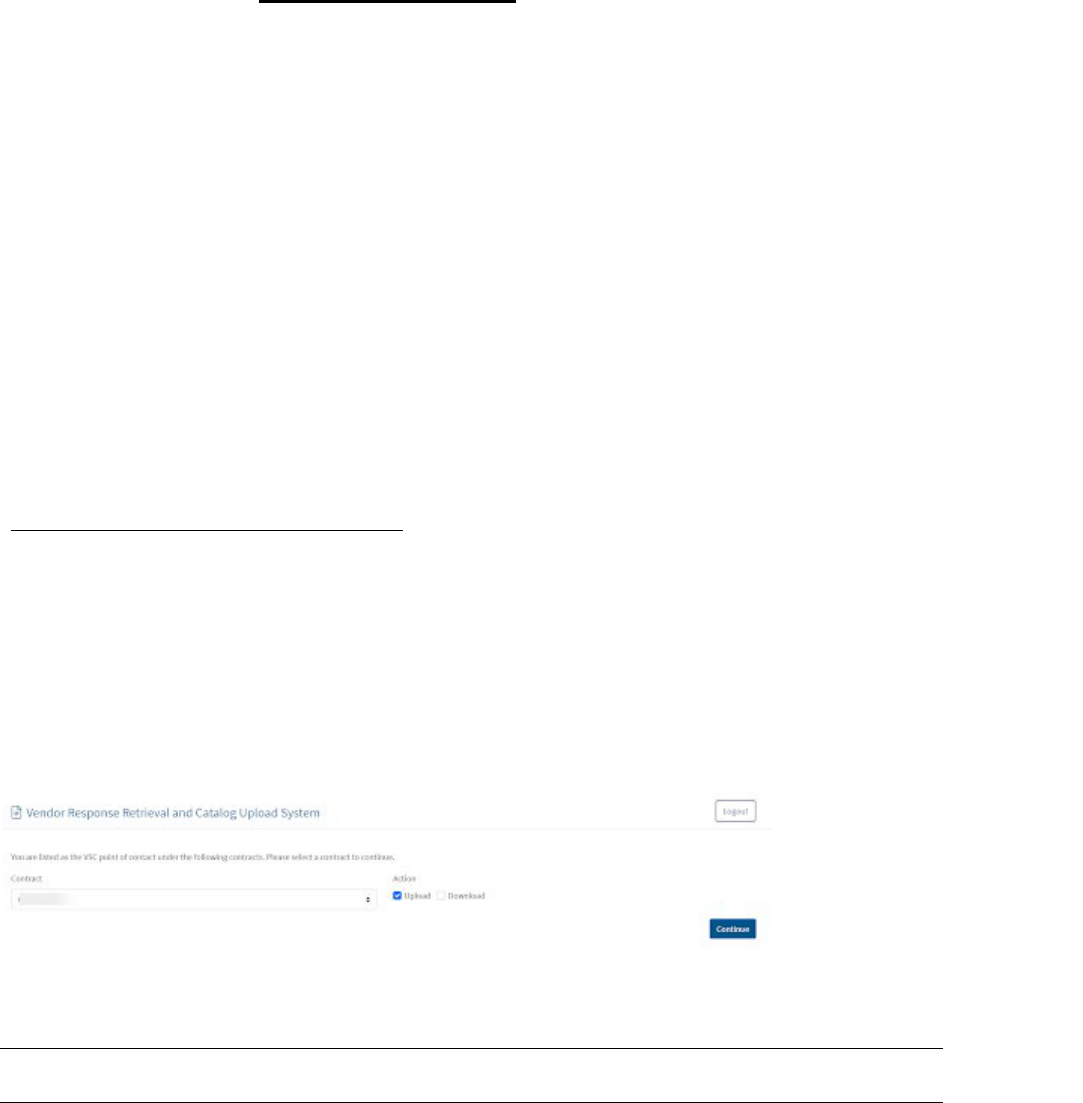
Website Upload Instructions
1.
Log into the Vendor Response Retrieval and Catalog Upload System website
https://vsc.gsa.gov/vsc/app-catalog-upload using your GSA FAS ID and password
.
Select the “Upload” radio button and select “Proceed”.
2.
Click on the browse button(s). From the “Choose File” box and browse to
C:\SIPV9\Upload folder.
3.
Attach file(s) from this location. When attaching a photo file (P90A, B, C…) use the
browse button for photo. You can only upload A90, C90, R90, W90, P90A, B, C…,
T90 Or V90 extensions
4.
After all files are attached to the website, click on button labeled “Upload Files”.
The website will notify you of a successful upload. After uploading catalog files, please log out
of website.
7
DOWNLOADING AND PROCESSING RESPONSE FILES
The purpose of response files is to unlock the SIP program from a previous upload. After files
are uploaded successfully through SIP, a message will appear each time SIP is accessed. This
message will read, "
SIP is waiting on a response file
..." until the electronic response file(s) are
downloaded and processed. Electronic response files are available via SIP the day after you
receive a fax or e-mail response from your GSA contracting officer.
Download file types
: .A90= Original file, .C90= Change file, .R90= Replacement file, .W90=
Text file
Vendor Support Center Contact
Information
Schedules Input Program
Version 9.x Documentation
7-3
7.1
Downloading and Processing Files
Step 1:
Open SIP. A message will appear "SIP is waiting on a response file..."
Step 2:
Select "I want to download".
Step 3:
Select “Check for Response Files”.
Must be connected to the internet to download
response file(s). If you experience connectivity problems or if file is not available for
download, send e-mail to vendor.support@gsa.gov
or call the Vendor Support Center at
877-495-4849.
Step 4:
Once download is complete, click OK and close the dialog box
Step 5:
Dialog box will appear stating, "Response files are ready to be processed." Select
“Process Now.” After processing is complete, you can review the file.
Step 6:
Close the screen to return to the main menu
7.2
Connectivity
Errors
If you’ve uploaded using the Vendor Response Retrieval and Catalog Upload System, follow the
steps below.
Step 1:
Go online to the Vendor Response Retrieval and Catalog Upload System
(
https://vsc.gsa.gov/vsc/app-catalog-upload
).
Step 2:
Enter your contract number and username, select “Download”, and click “Login”.
Vendor Support Center Contact
Information
Schedules Input Program
Version 9.x Documentation
10-6
Step 3: Follow
the
instructions in the screen shot below
.
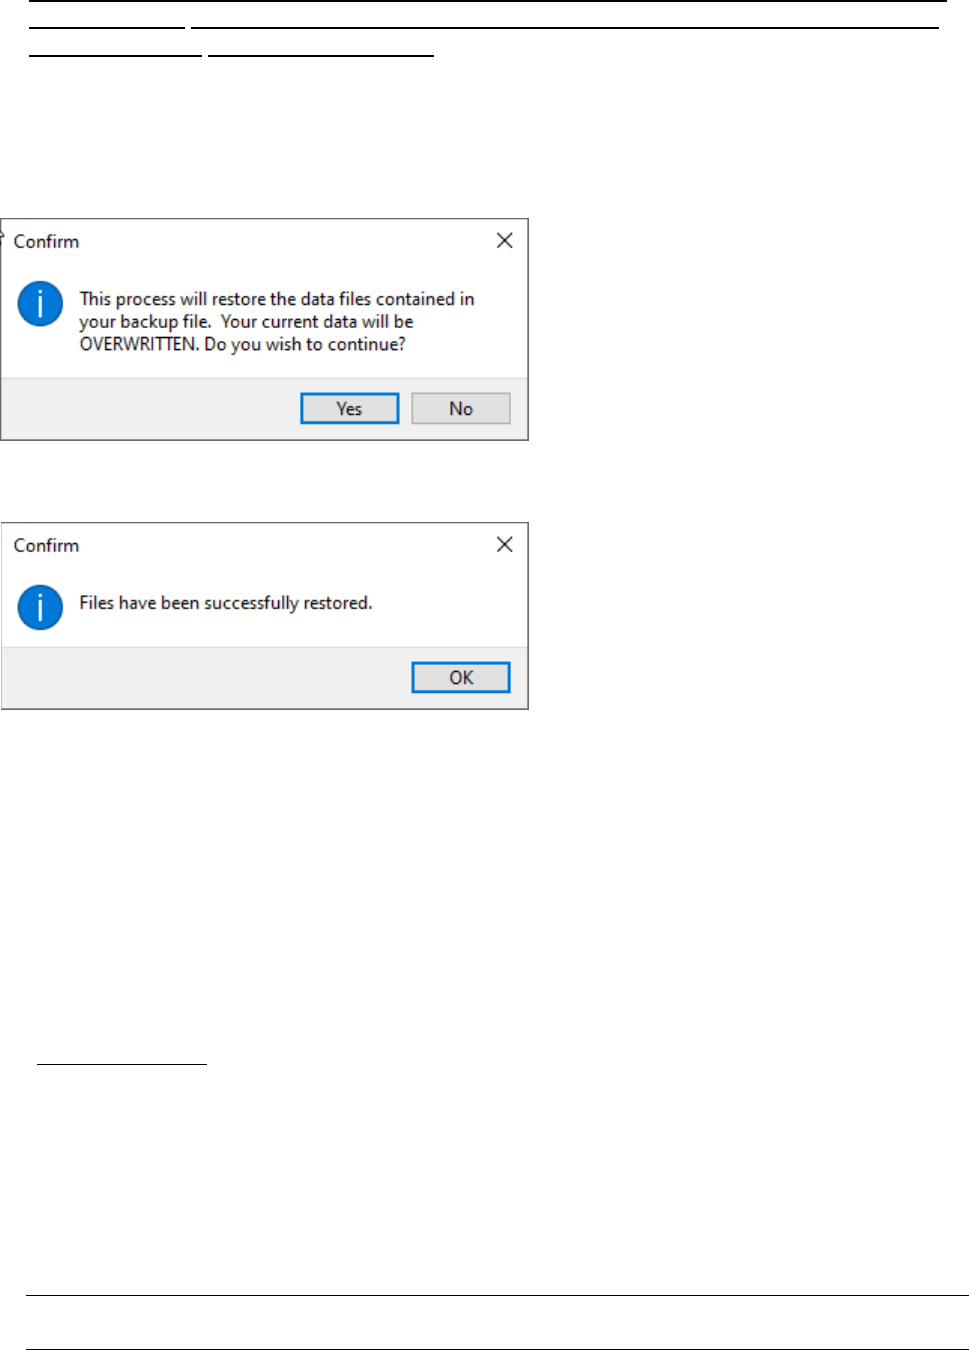
8
BACKING UP AND RESTORING SIP DATA
8.1
Backing up SIP Data
To backup data, select “Tools” → “Backup”.
Select
“Yes”
Select “OK” to complete process.
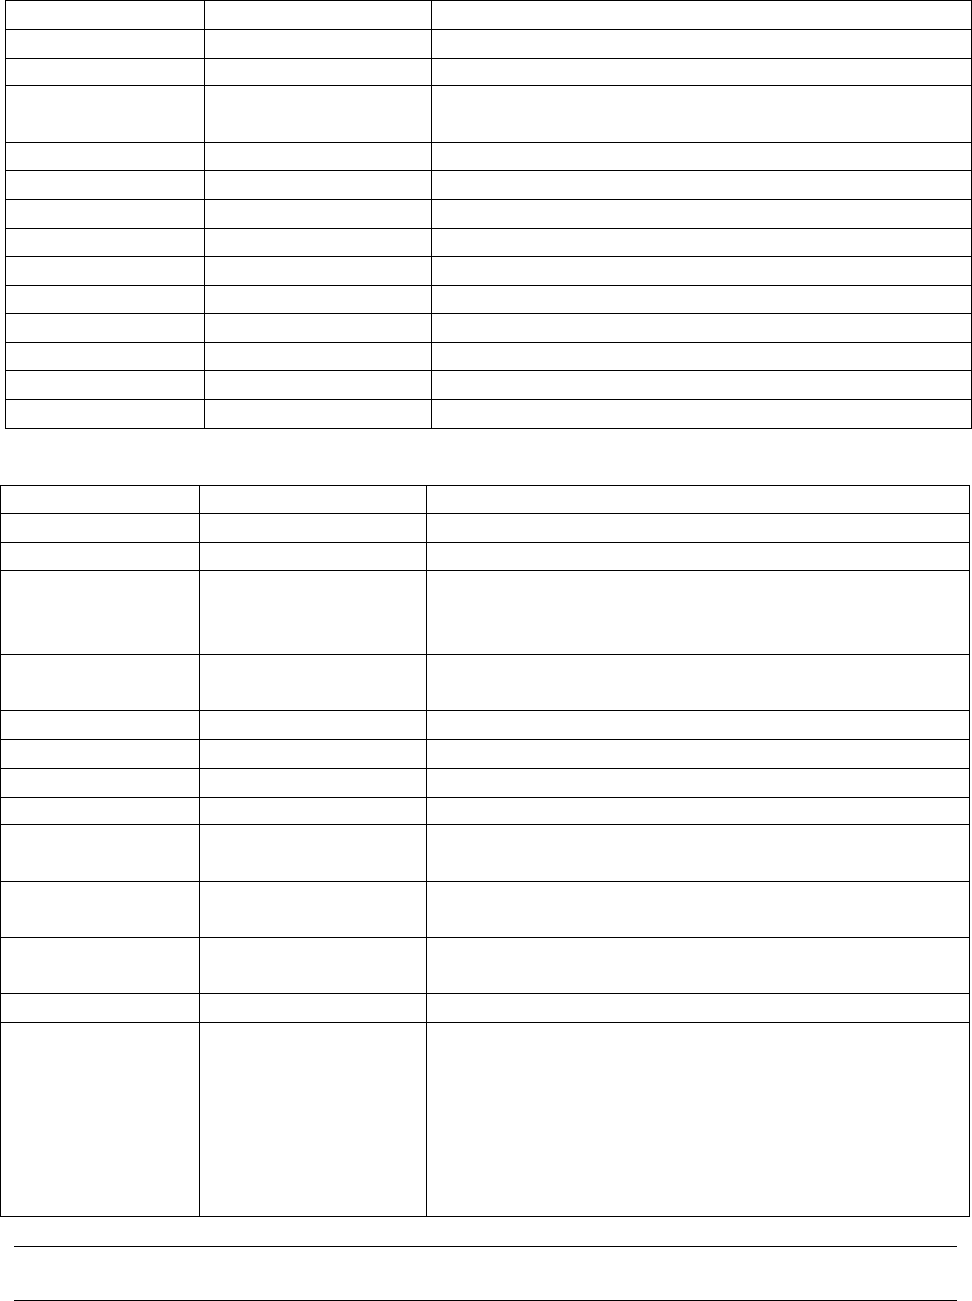
The process created a file called backup.001. This file is located in the C:\SIPV9\backup folder.
Vendor Support Center Contact
Information
Schedules Input Program
Version 9.x Documentation
10-6
Keep a copy of this file in another location (external drive, server, flash drive or the cloud.).
If you lose your SIP data and do not have a backup file, you must re-enter the entire catalog
in SIP. We do not keep copies of this file.
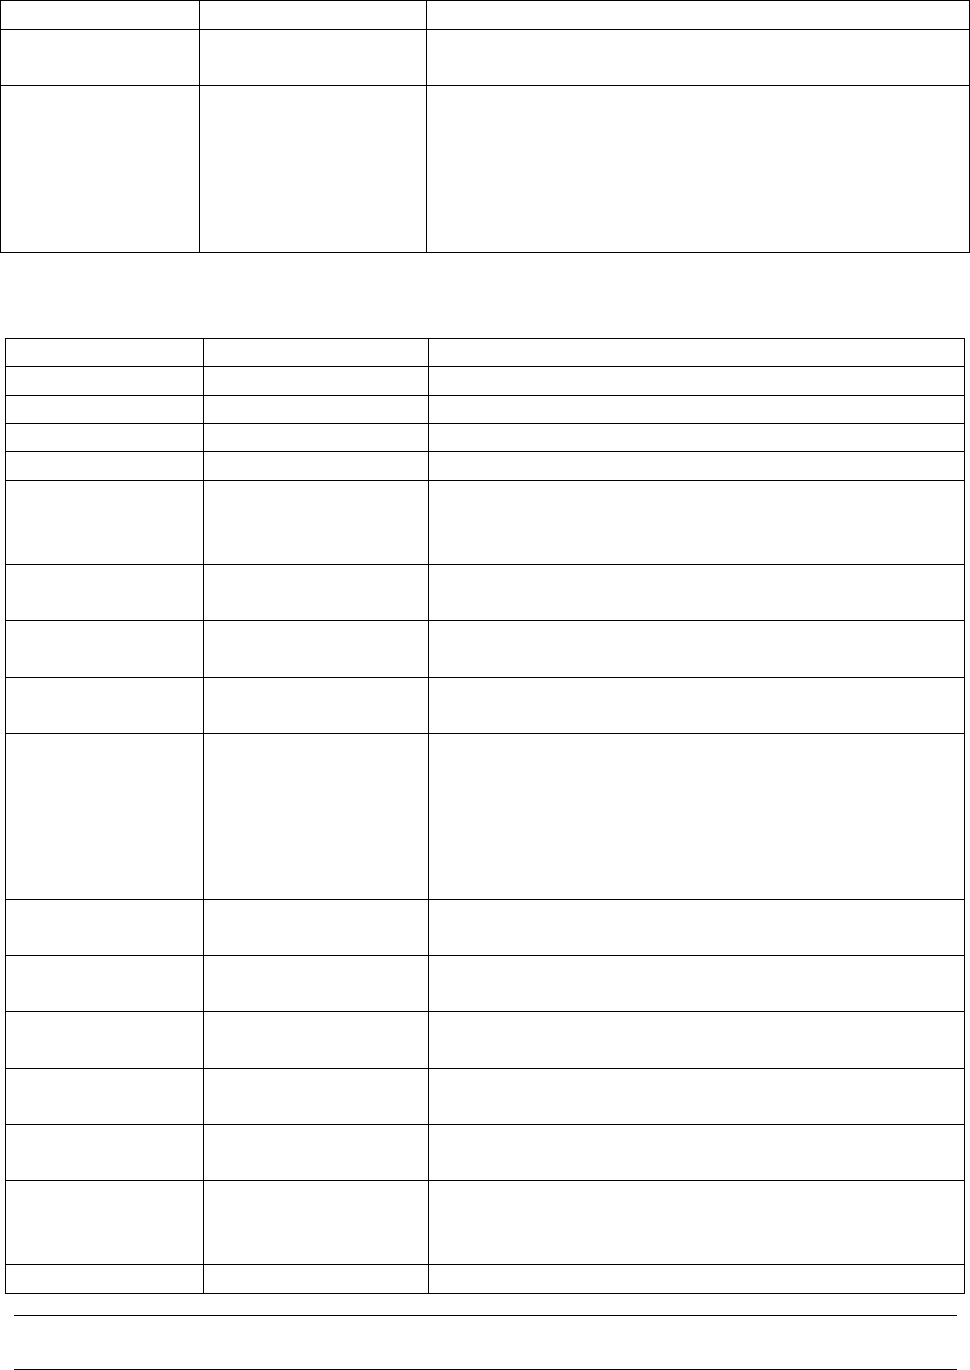
8.2
Restoring SIP Data
Copy the backup.001 file into C:\SIPV9\backup folder. Open SIP and select “Tools” →
“Restore”.
Select “Yes” to restore SIP data.
Select
“OK”
9
UPGRADING SIP VERSION
SIP version 9.x automatically searches for upgrades when the SIP program is opened and will
upgrade to version 9. For versions earlier than 9.x or for those with firewalls preventing
automatic upgrades please read below:
9.1
Upgrading SIP Version 9.x with Firewall
If SIP version 8.x does not upgrade automatically to the newest version of 9, follow section 6.1
“Back up SIP Data”. Download latest version of SIP from the Vendor Support Center website
(http://vsc.gsa.gov
), and then follow section 6.2 “Restoring SIP Data”.
After you backup your
data, save the backup.001 file on a different drive to prevent any data loss.
9.2
Upgrading From SIP Version 8.x
Contact the VSC
10
VENDOR SUPPORT CENTER CONTACT INFORMATION

Vendor Support Center Contact
Information
Schedules Input Program
Version 9.x Documentation
10-6
For any problems regarding SIP or SIP documentation, send an email to
vendor.su[email protected]v
or call the Vendor Support Center at (877) 495-4849.
Vendor Support Center Contact
Information
Schedules Input Program
Version 9.x Documentation
10-7
INDEX
Contractor
Screen
FIELD
NAME
REQUIRED
(Y/N)
DESCRIPTION
Contractor
Name
Y
Company/Business
Name
SAM UEI
Y
SAM UEI Number
Password
Provided by GSA
Y
Password provided at the time of SIP registration.
Division
Name
N
Not required
Address
1
Y
Company/Business Street Address
Address
2
N
Additional address info. (ex. Suite 900)
Country
Y
Country
City
Y
City
State
Y
State
Zip Code
Y
Zip Code
Telephone
Y
Business Phone Number
Fax
Y
Business Fax Number
Website
N
Business
website/URL
Contracts
Screen
FIELD
NAME
REQUIRED
(Y/N)
DESCRIPTION
Schedule
Number
Y
GSA Schedule Category Number
Contract
Number
Y
Assigned GSA Contract Number
Modification
Number
N
Required only when there is a modification to
original contract. Modification Number will be given
by assigned Procurement Contracting Officer (PCO).
Catalog Effective
Date
Y
Date GSA contract was awarded
Name
Y
Company Contract Administrator’s name
Phone
Y
Company Contract Administrator’s phone number
Fax
Y
Company Contract Administrator’s fax number
E-Mail
Y
Company Contract Administrator’s e-mail address
Prompt Pay Info
N
Additional discount if payment is made within a
certain number of days
Warranty
Y
Warranty information: if no warranty applies select
“No Warranty” from drop down menu
Production
Points
Y
Country(ies) where products are manufactured. If you
provide services use “US”
Minimum
Order
Y
Minimum order amount
Time of Delivery
Y
Time of Delivery of products:
Shipped
– Products will be shipped in indicated
number of days after the receipt of order
Delivered
– Products will be delivered in the
indicated amount of days after the receipt of order
Contracts providing services must select “from date
Vendor Support Center Contact
Information
Schedules Input Program
Version 9.x Documentation
10-8
FIELD
NAME
REQUIRED
(Y/N)
DESCRIPTION
of award to date of completion”
FOB Points
Y
Freight information
D – Destination
O – Origin – Freight prepaid by seller
W – Worldwide (Continental US = destination,
Outside Continental US = origin)
N – No delivery to this destination
Products Screen
FIELD
NAME
REQUIRED
(Y/N)
DESCRIPTION
Contract
Number
Y
Assigned GSA Contract Number
SIN
Y
Special Item Number
UPC/GTIN
N
Manufacturer
Y
Manufacturer of Product
Manufacturer
part/model
number
Y
Manufacturer part/model number of product
Contractor part
number
N
Contractors that use their own part number scheme
rather than the manufacturers part number
National Stock
Number
(NSN)
N
National Stock Number
Product/Item
Name
Y
Name of Product or Item
Photo Name
N
Filename of photo associated with product -
Note:
The Photo Name field can only be entered when
all appropriate photos files have been placed in
the C \SIPV9\Photo folder and follow all photo
criteria. Please refer to the “Adding Product
Photos”
section.
Product
Description
Y
Detailed description of products. (1000 character
limit)
Product
Specific
Website
N
URL for webpage with product information or
company
website
Product
Length
N
Length of product packaging –
NOTE: This field is
required when FOB point value is O.
Product
Width
N
Width of product packaging –
NOTE: This field is
required when FOB point value is O or.
Product Height
N
Height of product packaging –
NOTE: This field is
required when FOB point value is O.
Unit of
Measurement
N
Unit of measurement used for product length, width,
and height -
NOTE: This field is required when
Product Length, Width, and Height are entered.
Shipping Unit
N
Shipping weight of packaged product -
NOTE:
Vendor Support Center Contact
Information
Schedules Input Program
Version 9.x Documentation
10-9
FIELD
NAME
REQUIRED
(Y/N)
DESCRIPTION
Weight
This field is required when FOB point value is O.
Shipping Package
Cube
N
Shipping Package Cube (cubic feet) -
NOTE: This
field is required when FOB point value is O.
Unit of Issue
Y
Unit in which the product is issued/sold
Quantity Per Unit
N
This field is activated when the Unit of Issue
requires additional information.
Order Increment
N
Order increment information
Time of Delivery
Y
Number of days in which product will be delivered.
Warranty
Y
Warranty
information.
Production
Points
Y
Country in which product is manufactured.
Price Screen
FIELD
NAME
REQUIRED
(Y/N)
DESCRIPTION
Unit of Issue
Y
Cannot be edited in pricing screen. Must be edited in
product information screen.
Quantity per unit
N
Cannot be edited in pricing screen. Must be edited in
product information screen.
Order Increment
or minimum
N
Cannot be edited in pricing screen. Must be edited in
product information screen.
Standard
Pack
N
Cannot be edited in pricing screen. Must be edited in
product information screen.
Catalog Price
Y
Catalog/Commercial
Price
GSA
Price
Y
GSA
Price
Temp Price
N
Temporary discount price – must be lower than GSA
price
Effective Date
From
N
Temporary discount start date – required if temp
price is entered
Effective Date To
N
Temporary discount end date – required if temp price
is entered
Vendor Support Center Contact
Information
Schedules Input Program
Version 9.x Documentation
10-10
QTY/Vole
Screen
FIELD
NAME
REQUIRED
(Y/N)
DESCRIPTION
Start Range
Y
Start range (quantity or dollar volume amount) of
current break. Start range MUST be 1 greater than
previous end range. First start range must be greater
than 1. The number 1 is already assumed to be the
original GSA price.
End Range
Y
End range (quantity or dollar volume amount) of
current break. The final end range value MUST be
entered as 999999999 to indicate infinite value OR
up to maximum order.
GSA
Discount
price
Y if
GSA discount price
OR
discount percentage is to be
entered. Both fields cannot be used.
Discount
%
Y if
GSA discount price
OR
discount percentage is to be
entered. Both fields cannot be used.
Discount
Conditions
N
Conditions to discounts that may apply to the
product.
Accessories
Screen
FIELD
NAME
REQUIRED
(Y/N)
DESCRIPTION
Contract
Number
Y
Assigned GSA Contract Number
SIN
Y
Special Item Number
Manufacturer
Y
Manufacturer of Accessory
Manufacturer
part/model
number
Y
Manufacturer part/model number of accessory
Contractor
part
number
N
Contractors that use their own part number scheme
rather than the manufacturers part number
National
Stock
Number (NSN)
N
National Stock Number
Accessory/Item
Name
Y
Name of Accessory or Item
Photo Name
N
Filename of photo associated with product -
Note:
The Photo Name field can only be entered when
all appropriate photos files have been placed in
the C:\ SIPV9\Photo folder and follow all photo
criteria. Please refer to the “Adding Product
Photos” section.
Attach Product
Y
Attach a product to the accessory.
All accessories
must be attached to at least one product.
Accessory
Description
Y
Detailed description of accessory. (1000 character
limit)
Accessory
Specific Website
N
URL for webpage with accessory info or company
website
Vendor Support Center Contact
Information
Schedules Input Program
Version 9.x Documentation
10-11
FIELD
NAME
REQUIRED
(Y/N)
DESCRIPTION
Accessory Length
N
Length of accessory packaging –
NOTE: This field
is required when FOB point value is O.
Accessory
Width
N
Width of accessory packaging –
NOTE: This field
is required when FOB point value is O.
Accessory
Height
N
Height of accessory packaging –
NOTE: This field
is required when FOB point value is O.
Unit of
Measurement
N
Unit of measurement used for accessory length,
width, and height -
NOTE: This field is required
when Accessory Length, Width, and Height are
entered.
Shipping Unit
Weight
N
Shipping weight of packaged accessory -
NOTE:
This field is required when FOB point value is O.
Shipping
Package
Cube
N
Shipping Package Cube (cubic feet) -
NOTE: This
field is required when FOB point value is O.
Unit of Issue
Y
Unit in which the accessory is issued/sold
Quantity Per Unit
N
Required when Unit of Issue is BOX, CASE, PACK,
etc. Used to provide quantity within the BOX,
CASE, PACK, etc.
Order Increment
N
Order increment information
Time of Delivery
Y
Number of days in which accessory will be
delivered.
Warranty
Y
Warranty
information
Production
Points
Y
Country in which accessory is manufactured
Options Screen
FIELD
NAME
REQUIRED
(Y/N)
DESCRIPTION
Group Name
Y
Accessory group name
Manufacturer Part #
Y
Manufacturer’s accessory part number
Option
Type
Y
How option will relate to base product. Values are
I=included, S=substituted, A=added, and O=none
can be selected for group.
NOTE: Option type
“S” can only be used if first option in group has
an option type”I”.
Description
Y
Accessory
description
Manufacturer
Y
Manufacturer of accessory
Price or Credit
Y
Price or credit of accessory
Quantity
Y
Number of accessory(s)
Unit
Y
Unit of measurement of accessory
