
1
e-Signature
Adobe Sign User Guide
for Microsoft Dynamics 365
August 2021
e-Signature Adobe Sign User Guide
(How to work with e-Signatures for Microsoft Dynamics 365)
The content of this document is subject to change without notice. “Microsoft” and “Microsoft Dynamics
365” are registered trademarks of Microsoft Inc. All other products- and company names mentioned are
trademarks of their respectful owners.

2
CONTENT
Optional DocumentsCorePack Feature: Adobe Sign ....................................................................................................... 4
1 How to work with Adobe Sign in DocumentsCorePack ........................................................................................ 5
Obtaining the Adobe Sign package ................................................................................................................... 5
Installing the Adobe Sign package ..................................................................................................................... 5
Adobe Sign Users and Security Roles................................................................................................................ 5
AdobeSign Impersonation options .................................................................................................................... 6
2 DocumentsCorePack templates for Adobe Sign ...................................................................................................... 7
How to create a DocumentsCorePack template for AdobeSign ............................................................ 7
Adobe Sign text tags ................................................................................................................................................ 7
Template Settings ...................................................................................................................................................... 8
3 Tutorials (“How To’s”) .......................................................................................................................................................... 9
How to merge a document with Adobe Sign by e-mail? .......................................................................... 9
How to merge a document and start an in-person signing process? ............................................... 16
4 List of figures ....................................................................................................................................................................... 21
5 Contact ................................................................................................................................................................................... 22

3
Preamble
This documentation is intended to guide you through the usage of e-Signatures made with Adobe Sign
in Microsoft Dynamics 365.
e-Signatures require the installation of DocumentsCorePack. For further
information on DocumentsCorePack, have a look at our documentation on
DocumentsCorePack or get your free trial version of the product here.
Target Audience
This guide is intended for users who have DocumentsCorePack in use and have the following minimum
skills
• Basic Microsoft Dynamics 365 knowledge
Supported Web Browsers and versions
Supported Web Browsers:
• Internet Explorer 10 and higher
• Chrome
• Edge
• Firefox
One of the following versions of Microsoft Dynamics 365 must be available:
• Microsoft Dynamics 365 OnPremise
• Microsoft Dynamics 365 Online
The purpose of e-Signatures?
DocumentsCorePack offers the possibility to use e-Signatures as an additional feature, supported by
Adobe Sign as an additional feature, which simplifies the world of e-Signatures. The tool empowers you
to electronically sign documents.
Benefit from the combination and take the usability of Microsoft Dynamics 365 to a whole new level.

4
Optional DocumentsCorePack Feature: Adobe Sign
DocumentsCorePack has the possibility to use Adobe Sign as an additional feature. Adobe Sign offers a
plug-and-play integration solution with Microsoft Dynamics 365. It is a tool that empowers you to
electronically sign documents.
Benefit from this combination to take the usability of Microsoft Dynamics 365 to a whole new level.
If you decide to use Adobe Sign as an additional feature, please follow the steps in this documentation.
• OBTAIN ADOBE SIGN PACKAGE
• INSTALL ADOBE SIGN
• SETUP ADOBE SIGN TO WORK CORRECTLY IN DYNAMICS 365
• SELECT THE USERS TO WHICH YOU WANT TO GRANT ACCESS
For more Information about how to install and set up Adobe Sign for Dynamics 365 please follow the
Installation Guide written by Adobe.

5
1 How to work with Adobe Sign in DocumentsCorePack
This chapter contains information about how to get started with Adobe Sign in DocumentsCorePack. If
you decide to use Adobe Sign as an additional feature, please follow the steps in this chapter.
Obtaining the Adobe Sign package
Please find the current Adobe Sign for Microsoft Dynamics 365 Online package on AppSource.
The Adobe Sign for Microsoft On-Premises package can be downloaded from the Adobe Sign
Integration page. On this page, you will also be able to review release notes, known issues and additional
install/user guide information.
Installing the Adobe Sign package
The installation of Adobe Sign is very easy, please just follow the Installation Guide written by Adobe.
Adobe Sign Users and Security Roles
For using the Adobe Sign application, it is necessary that users have their security role configured to
the Dynamics environment. The available security roles are:
ADOBE SIGN READER
Users have read-only access to Agreement records.
ADOBE SIGN USER
Users are able to see only their own records and have User level access to built-in Dynamics records
such as Contacts, Accounts, Leads, Opportunities, Orders etc.
ADOBE SIGN ADMINISTRATOR
This role includes additional privileges in addition to the Adobe Sign User role such as adjusting Global
Settings, Data Migration and allowing visibility over all Agreements throughout the application.
The DocumentsCorePack dialog only allows to select the option "Attach as
AdobeSign e-mail" if Dynamics 365 user has "read-rights" for the AdobeSign
settings entity (adobe_integrationsettings).
Find more information about how to configure the security roles in the Adobe Installation Guide in
chapter Post Install Configuration (Required) and scroll down to Deploy Adobe Sign to Users by Assigning
Security Roles.
6
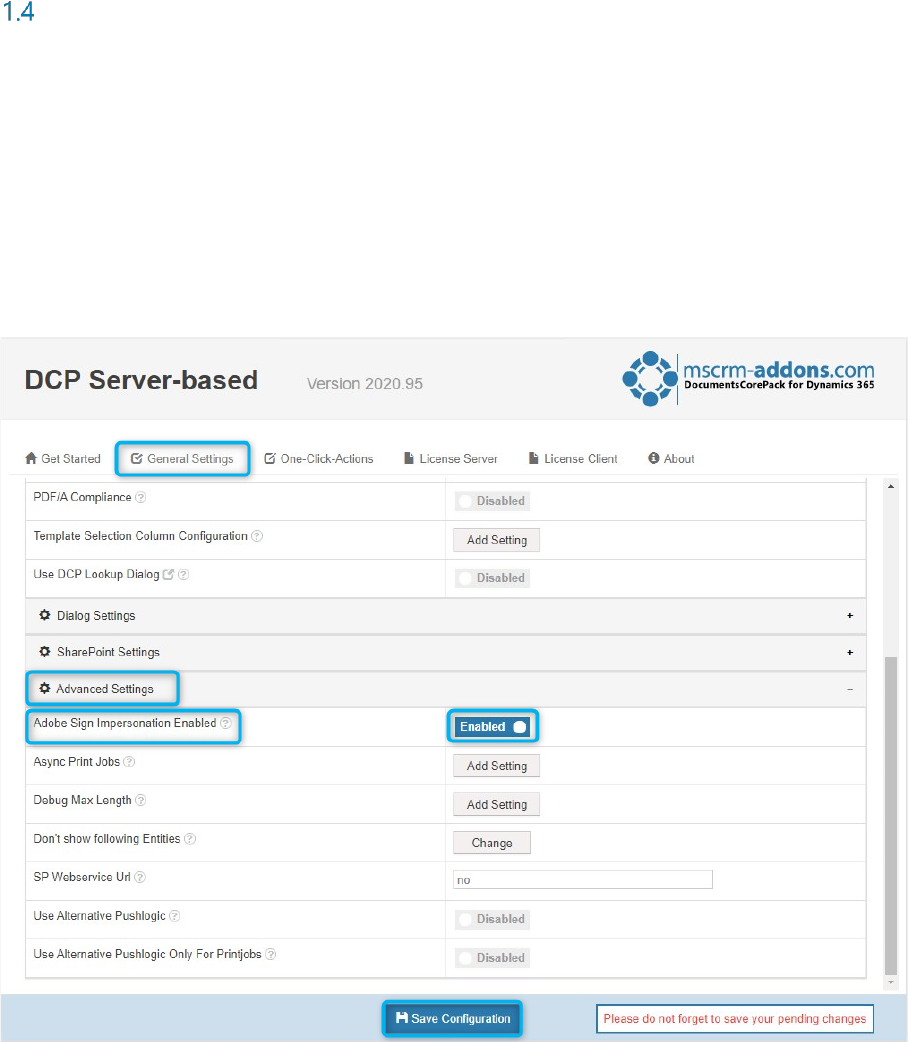
AdobeSign Impersonation options
When you use DocumentsCorePack the default AdobeSign user is the service user. If you want to
change it to the executing user, navigate to your DocumentsCorePack General Settings , open the
Advanced Settings and enable the [Adobe Sign Impersonation Enabled]-button.
If the Impersonating setting is enabled, the AdobeSign emails are sent on behalf of the CRM users. If
the option is deactivated (what is the standard setting), the AdobeSign email is sent on behalf of the
CRM user of the DocumentsCorePack service.
Figure 1: Adobe Sign Impersonation Enabled
7
2 DocumentsCorePack templates for Adobe Sign
After you have configured the security roles for Adobe Sign users in Microsoft Dynamics 365, and you
have made sure that they have all the rights they need, you can create a DocumentsCorePack template
for AdobeSign. This chapter outlines how to create such templates.
How to create a DocumentsCorePack template for AdobeSign
To be able to insert fields into Microsoft Word documents, you must use the DocumentsCorePack
TemplateDesigner. To do so, please open the Insert MailMerge Fields in the www.mscrm-addons.com-
tab of the Word document to create your DocumentsCorePack template for AdobeSign.
Please find all the information about how to use the Template Designer in the Template Designer User
Guide on our website.
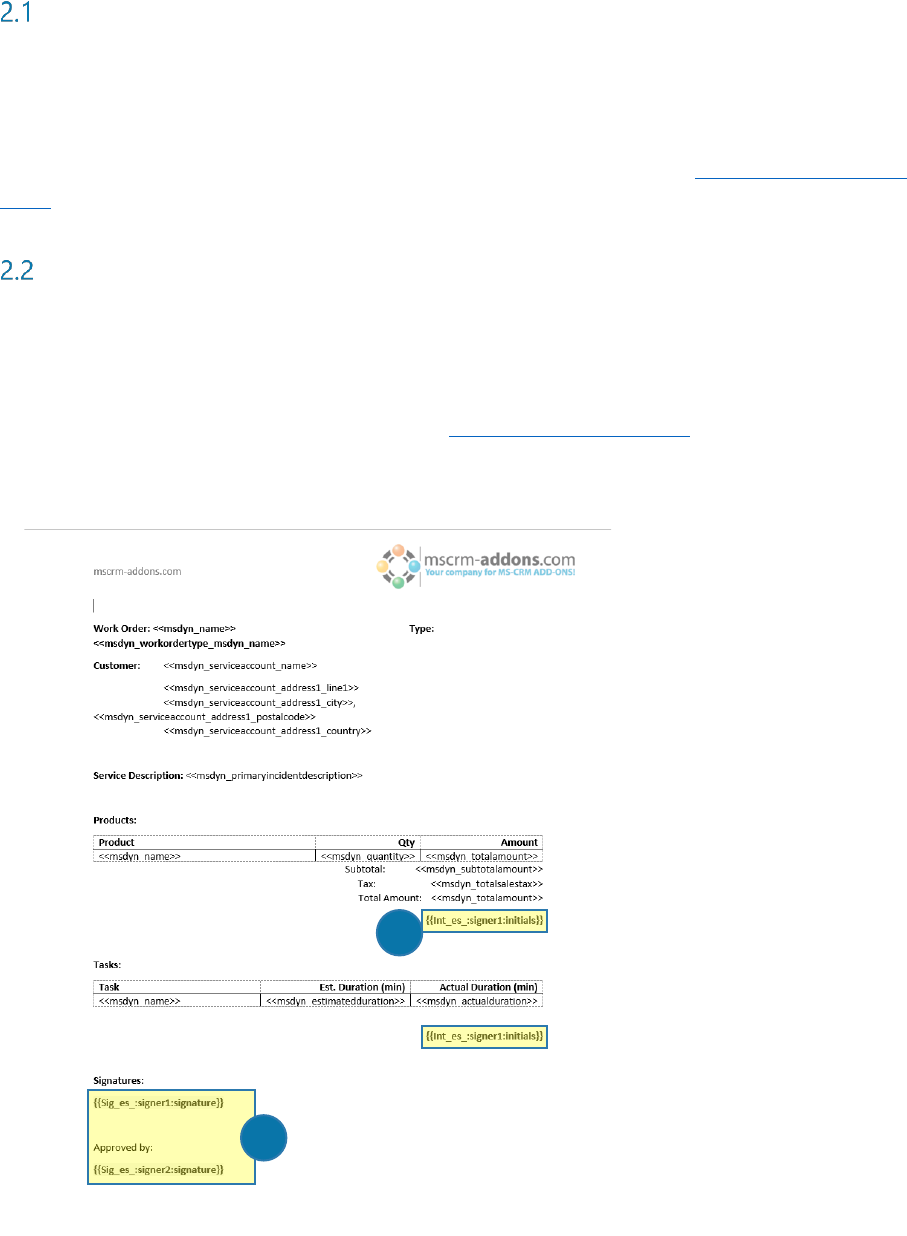
Adobe Sign text tags
To use Adobe Sign in DocumentsCorePack you have to enter Adobe Sign text tags. These are formatted
text that can be placed anywhere within the content of your template. Text tags are converted into
Adobe Sign form fields when the document is sent for signature or uploaded.
Please find all possible Adobe Sign text tags in the Adobe Sign Text Tag Guide.
The figure below shows a template with Adobe text tags for initials and signatures for two signees.
Figure 2: DCP template with two signees
1
2
8
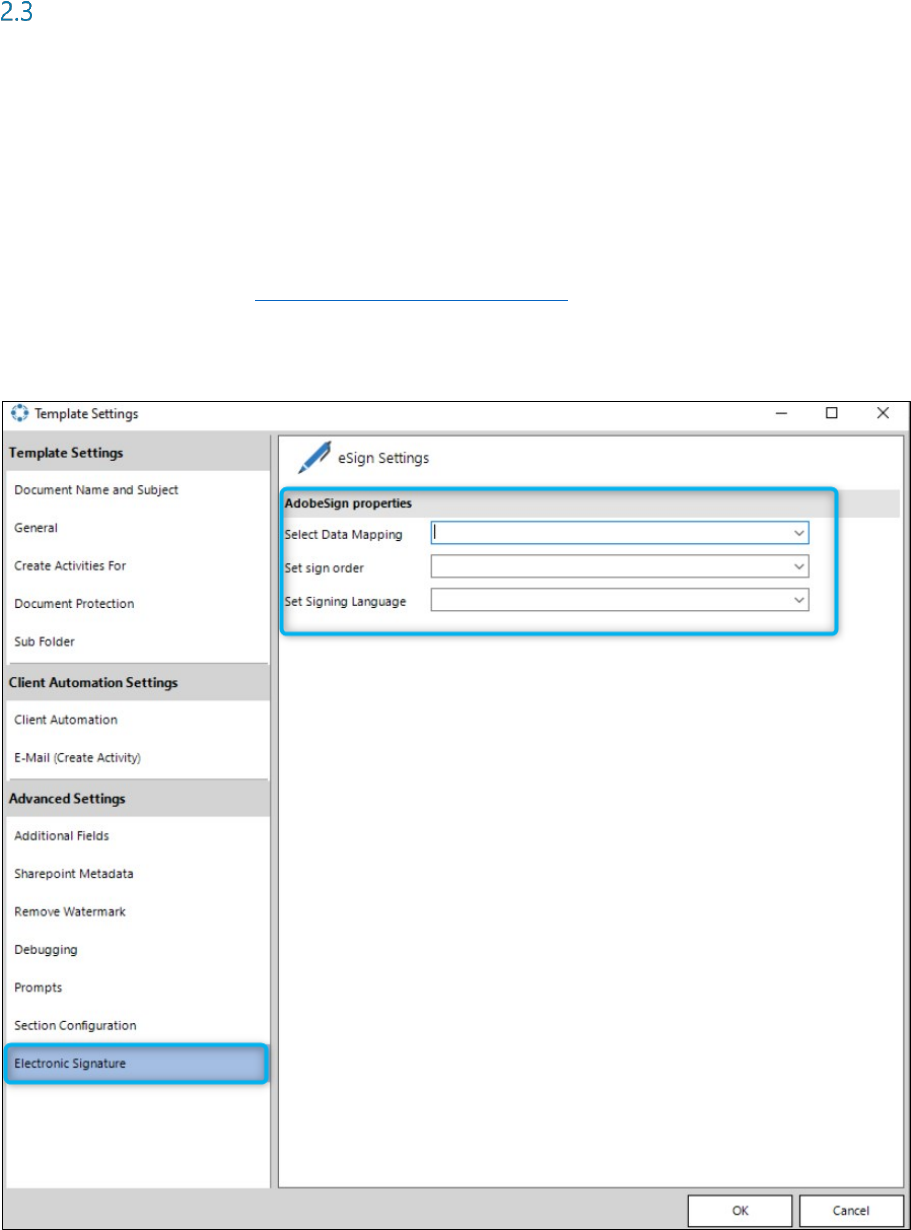
Template Settings
Open the „eSign Settings“ and set following properties for „AdobeSign“:
• DataMapping (The Agreement Mapping Template entity has to be already created in CRM),
• Sign order – choose if signee should sign document in any order or in order of adding to
agreement,
• Signing language – default language of Agreement
Learn more about creating a AdobeSign Data Mapping template.
In eSign Settings select the created DataMapping template:
Figure 3: eSign settings
9
3 Tutorials (“How To’s”)
This chapter provides you with helpful tutorials that show you how to work with Adobe Sign efficiently.
How to merge a document with Adobe Sign by e-mail?
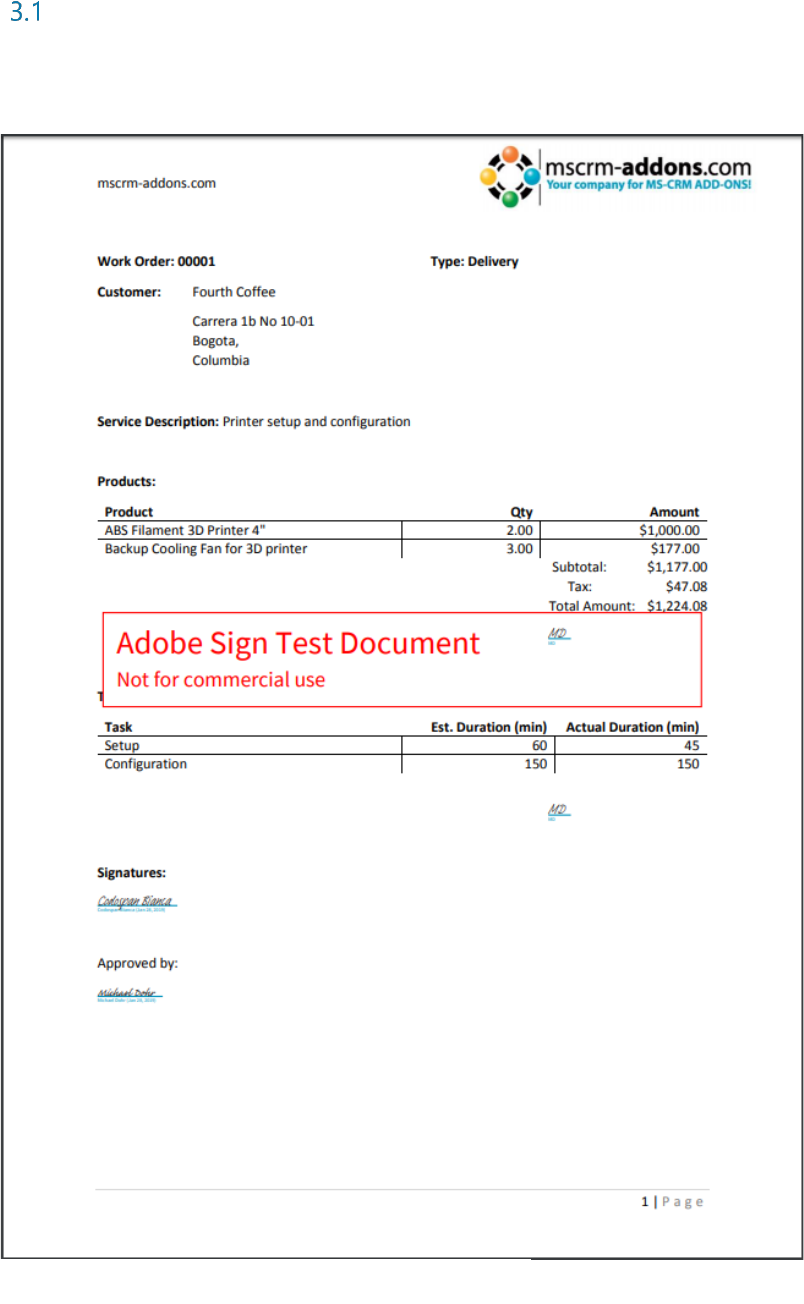
This tutorial outlines how to merge a document with Adobe Sign by e-mail. In this example, we use a
template which contains two signees. The document will be sent via e-mail to the two signees be signed.
The result can look like in the figure below.
Figure 4: Example: DCP document with two Adobe Sign signatures
10
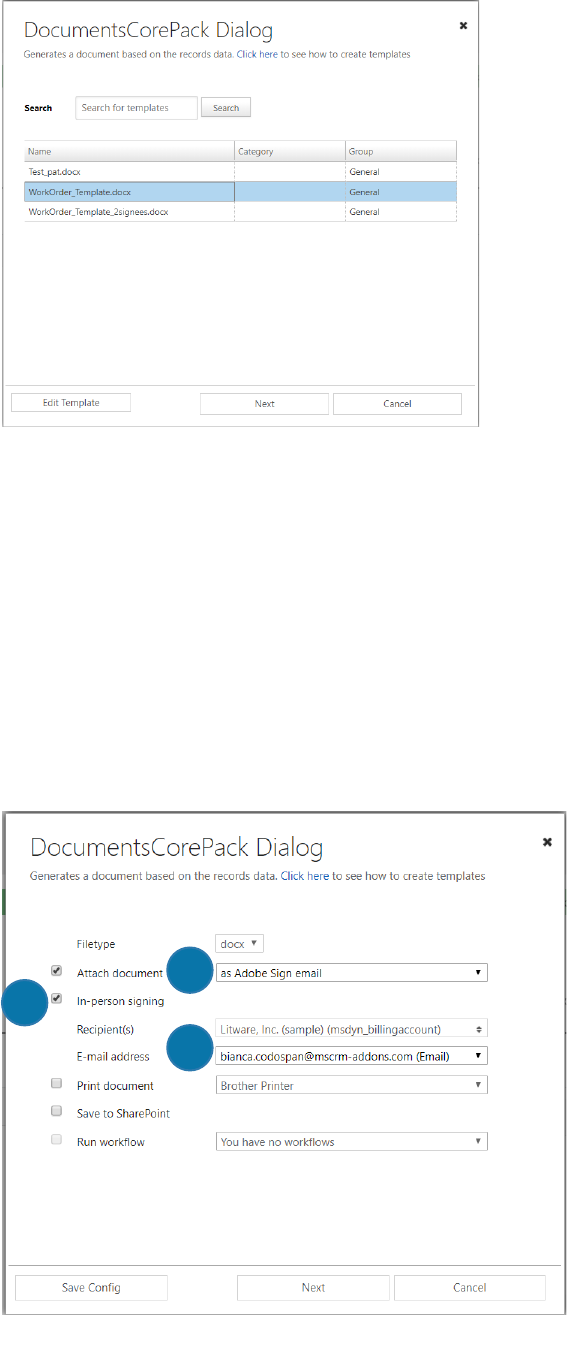
First, open your Dynamics 365 and search the entity you want to create a document for – in this example
Work Order. Next, please hit the [CREATE DOCUMENT]-button which opens the DocumentsCorePack
Dialog as you can see below.
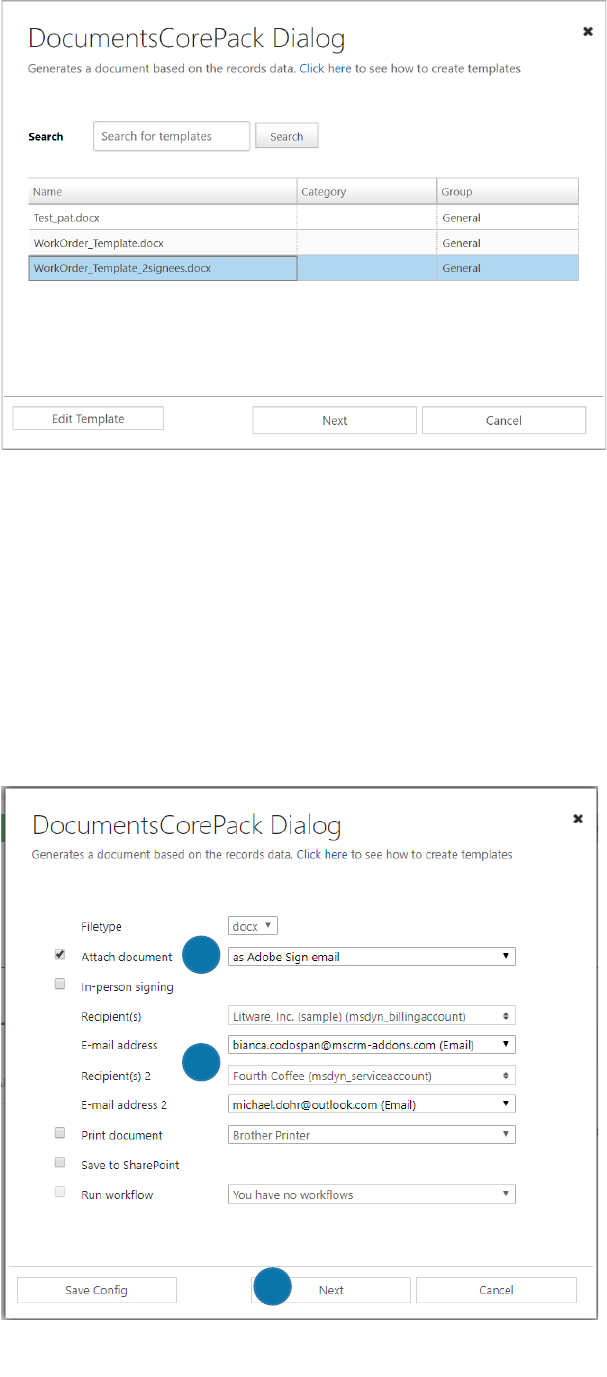
Here, please select the template you want to execute – in this case we want a document with two signees
to be signed, so please select the WorkOrder_Template_2signees.docx.
Next, define what your document should do. In this example, we want the document to be attached, so
please check the Attach document checkbox and select as Adobe Sign email from the drop-down menu.
Select your recipients and their e-mail addresses from the drop-down menus – in this case, two, because
we have two signees. Please note: The first recipient will get the document first and after signing it, the
document will be sent to the second recipient. Click on the [Next]-button to continue.
Figure 5: DCP Dialog – select your template
Figure 6: DCP Dialog – define how your document should be executed
1
2
3
11
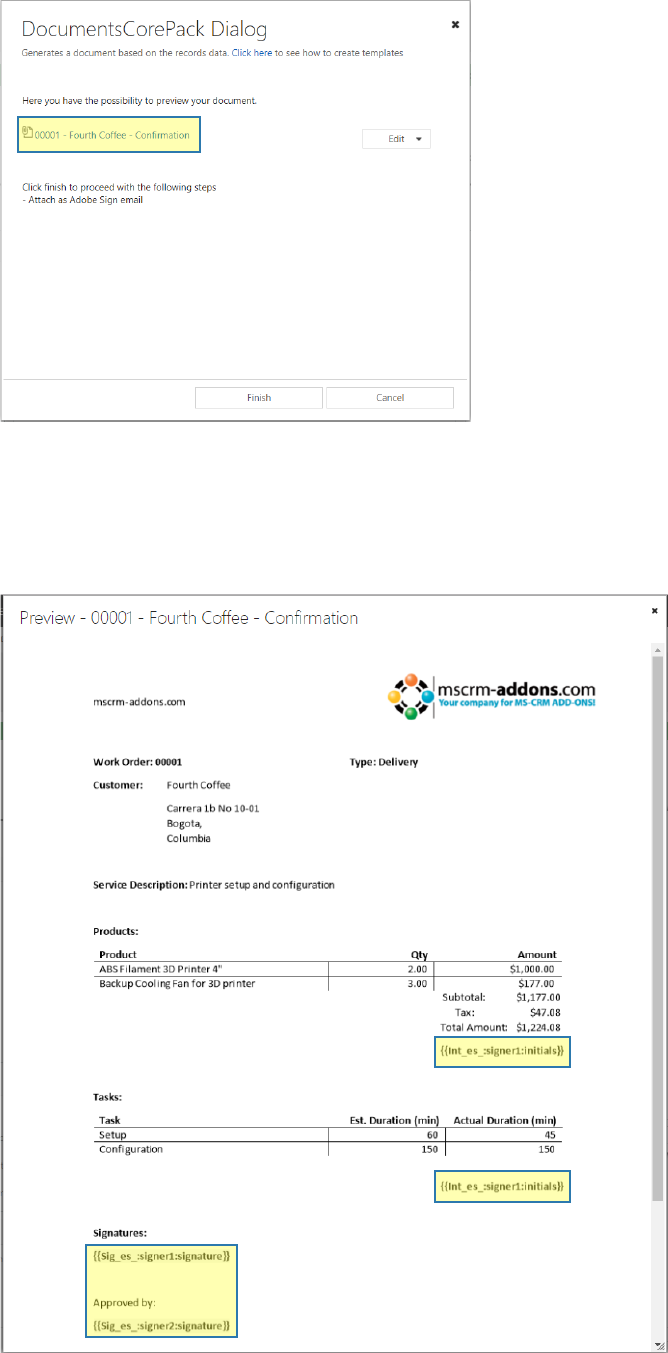
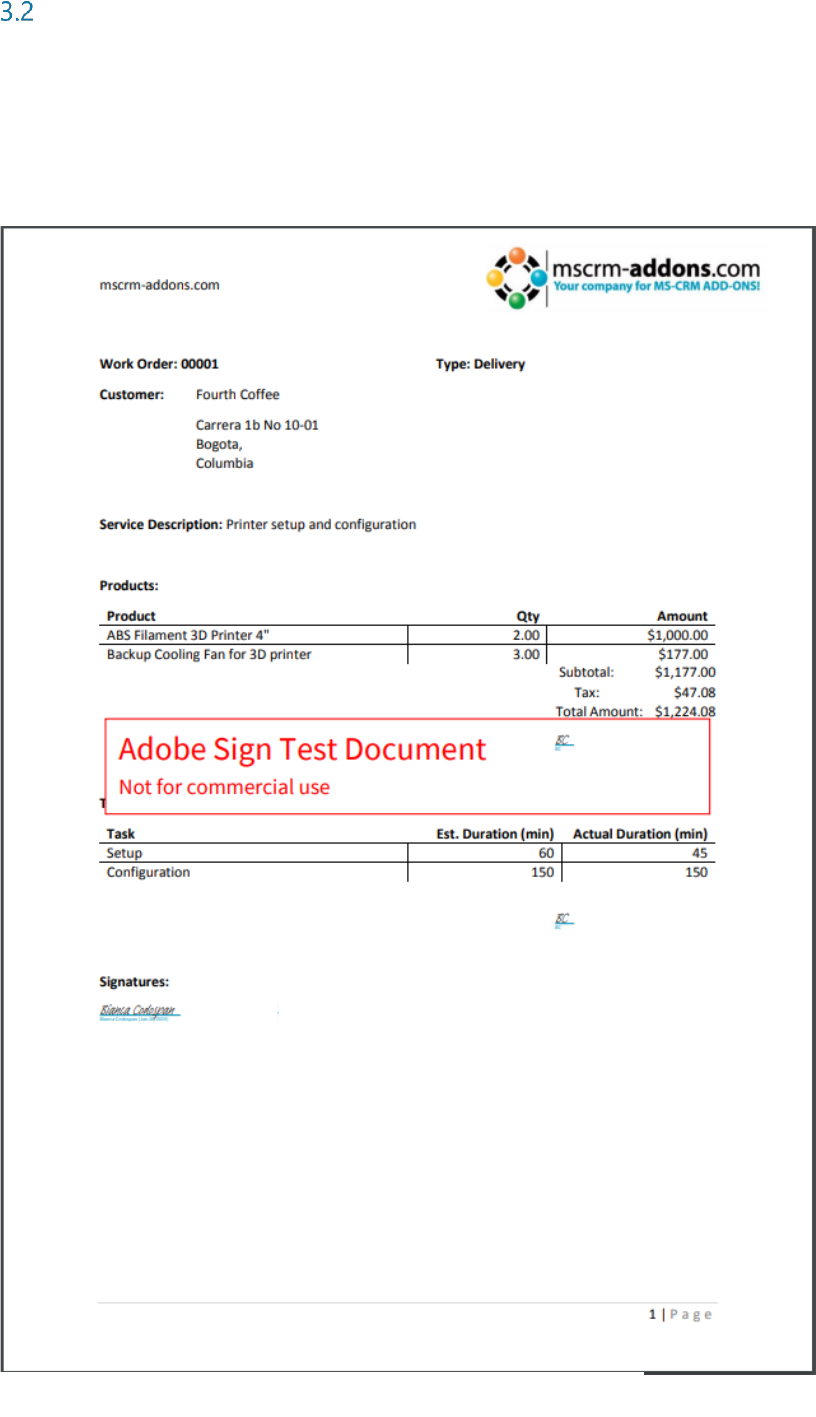
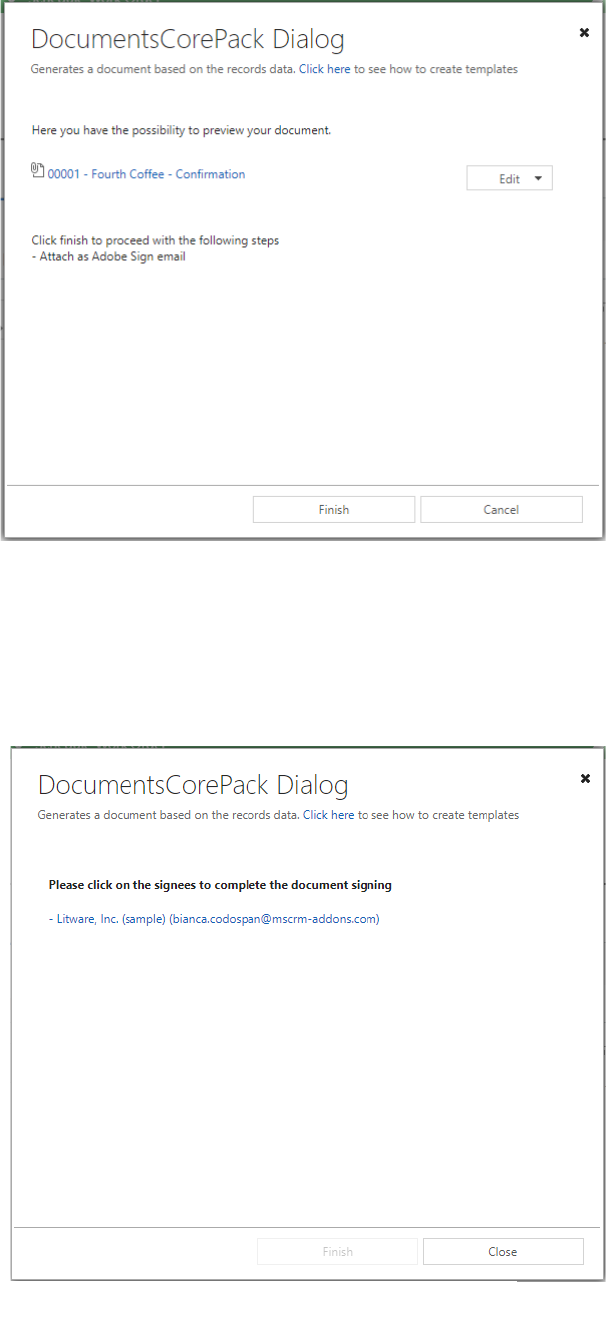
You can check your document before you forward it to Adobe Sign. Therefore, please click on the
attachment, highlighted in yellow.
This opens a preview of your document. As you can see, there are two different Adobe Sign text tags:
one for the initials and one at the bottom of your document for the signatures of the two signees
(highlighted in yellow).
Figure 7: DCP Dialog – Preview document
Figure 8: Preview of your document
12
If your document is fine, please click [Finish] to attach the document as Adobe Sign mail.
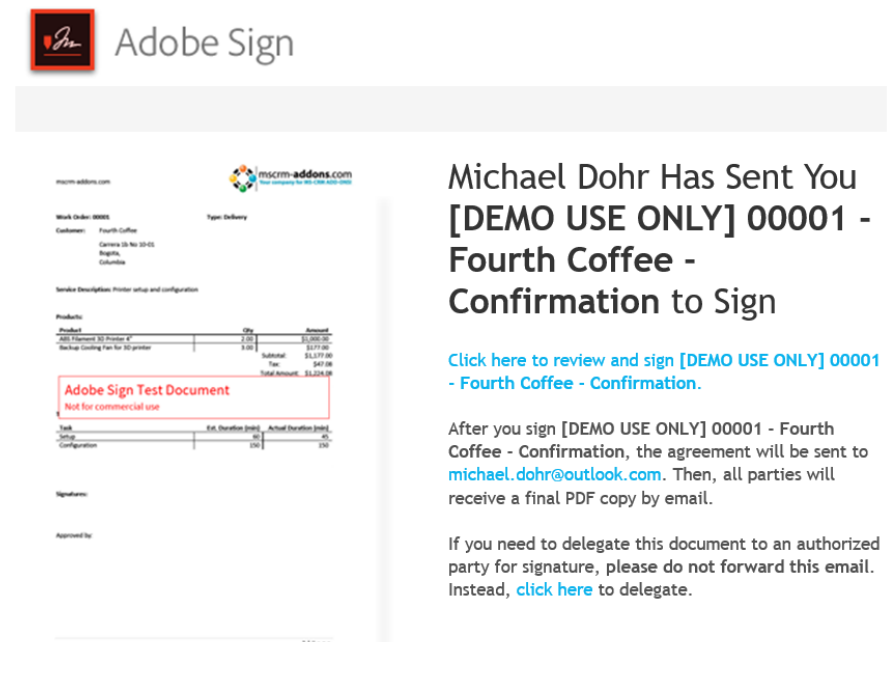
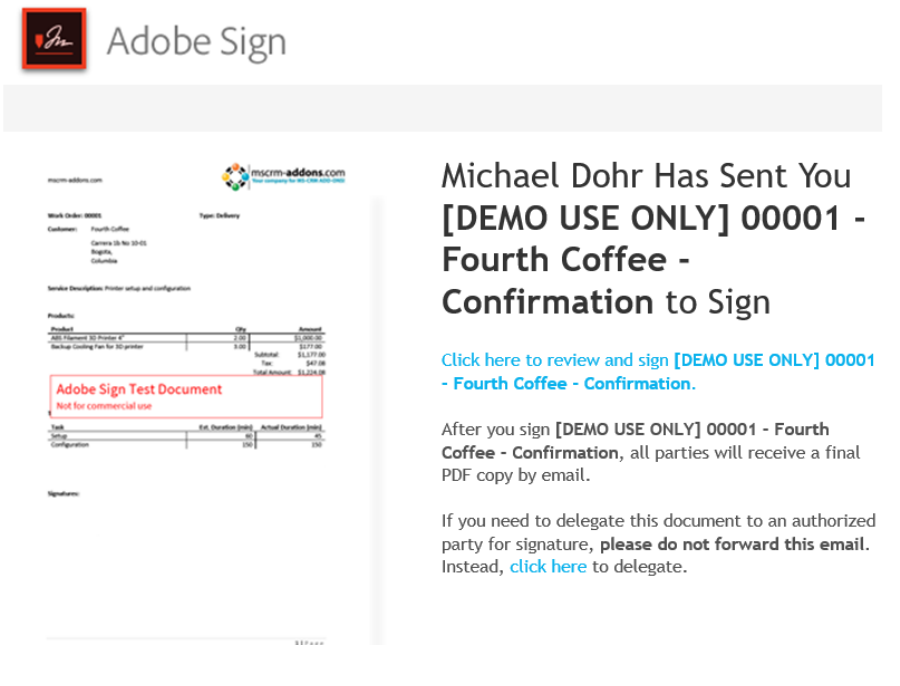
Now the first recipient you have selected receives an e-mail with the Adobe Sign document as you can
see below.
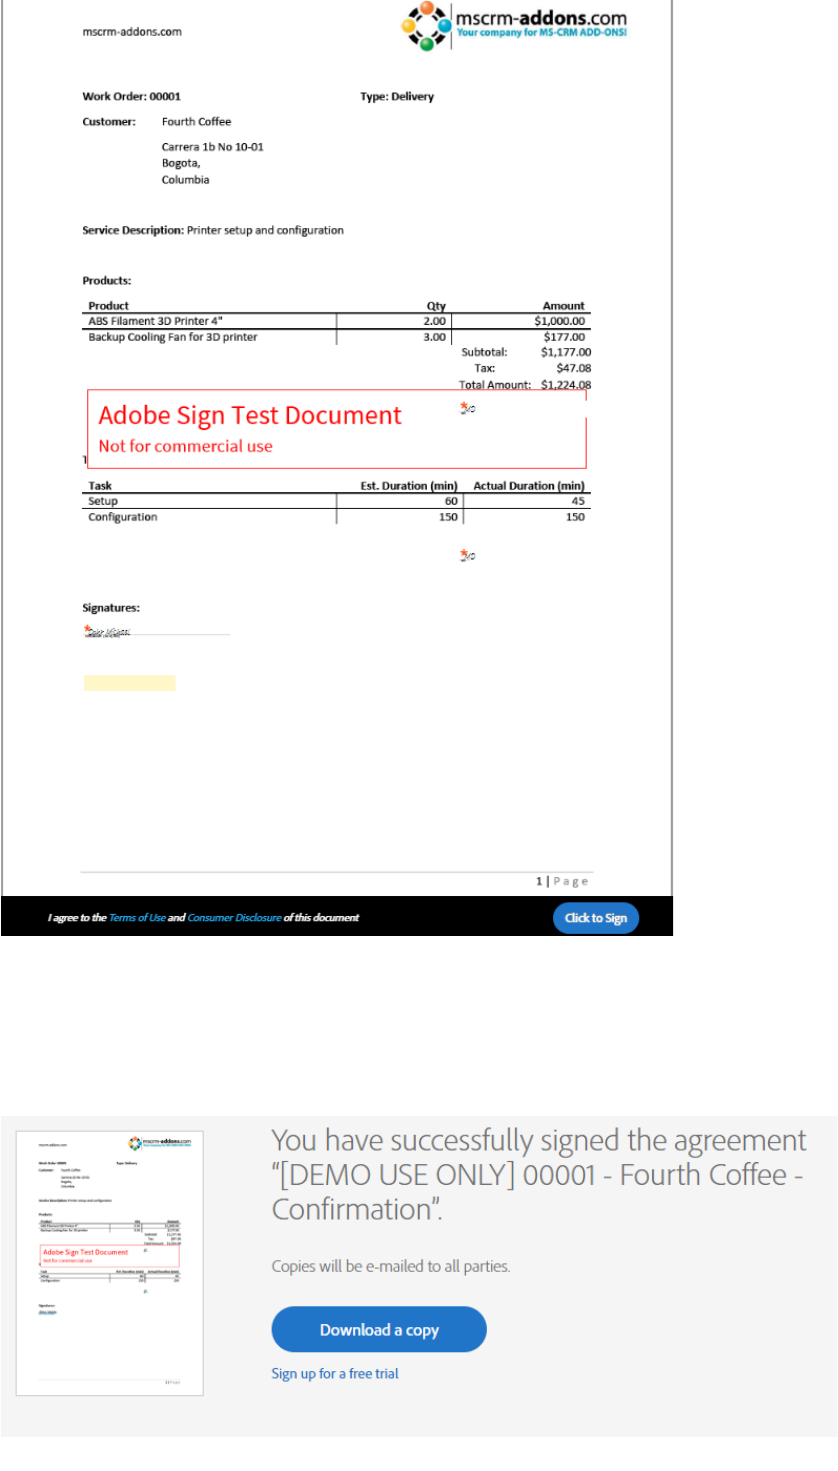
With a click on the blue text “Click here to review and sign”, the document opens in a browser where the
first recipient must enter his initials and sign the document. As you can see in the figure below, the fields,
that must be completed by the first recipient, are highlighted in yellow and marked with Start.
Figure 9: E-mail with link to Adobe Sign document
13
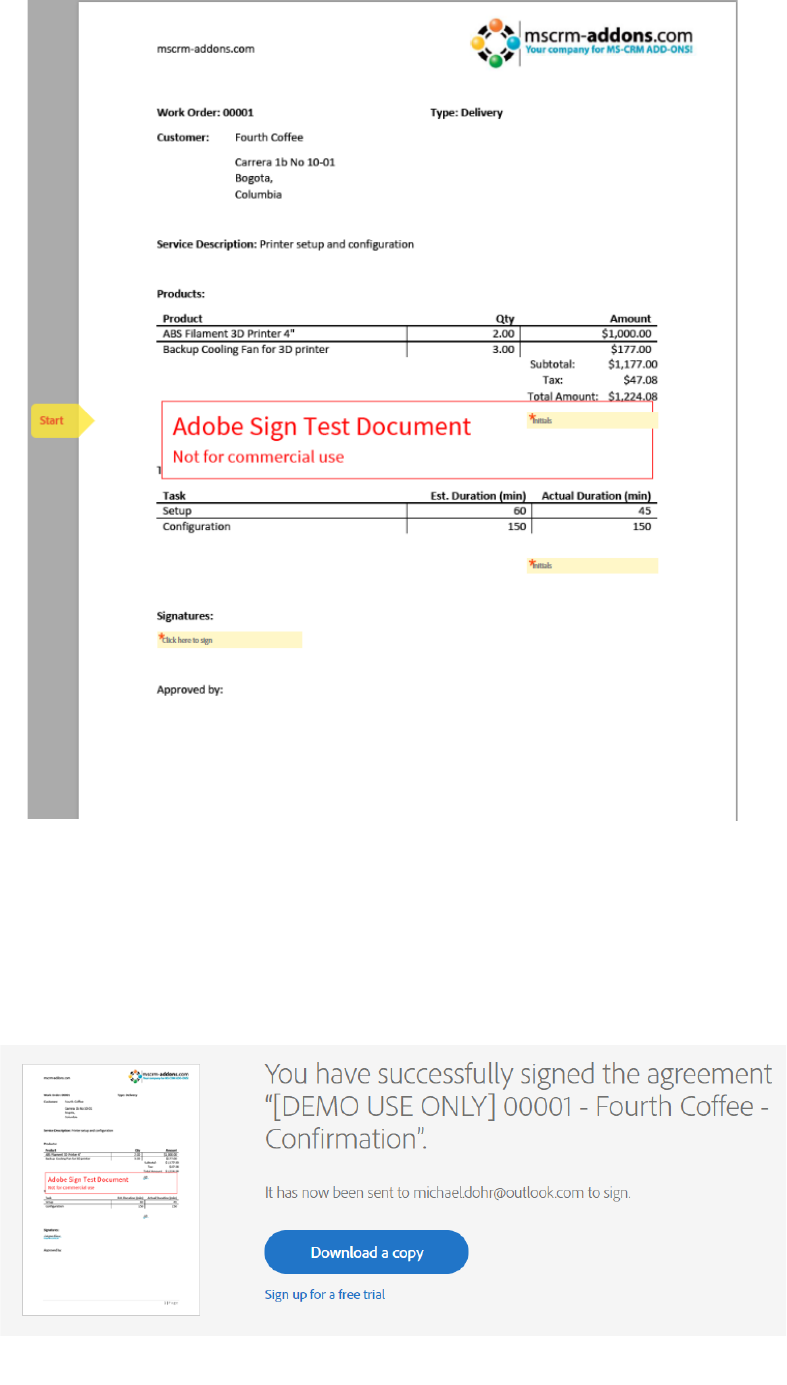
A click on the [Click to Sign]-button at the bottom will finish the process and will send the document
to the second recipient (selected before) to be signed. Also, a copy can be downloaded here.
Figure 10: Sign the document
Figure 11: Document successfully signed - message
14
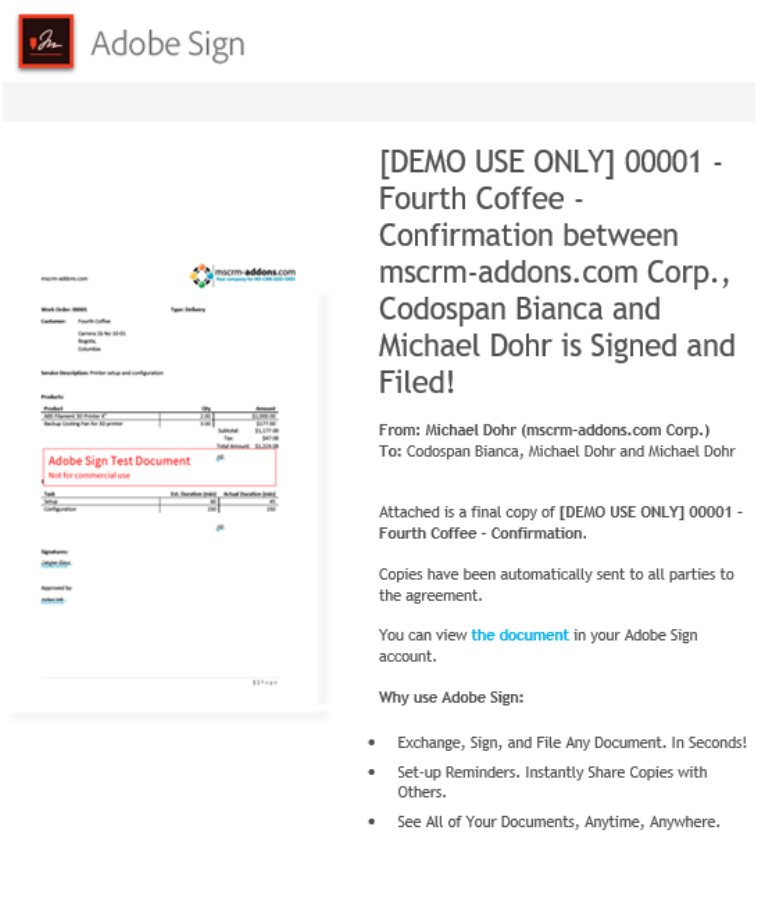
After the second recipient signs the document, all parties of the agreement will automatically receive a
copy of the signed document (see figure below).
Hit the blue text “the document” to open the signed document.
Figure 12: E-mail signed document with two signees
15
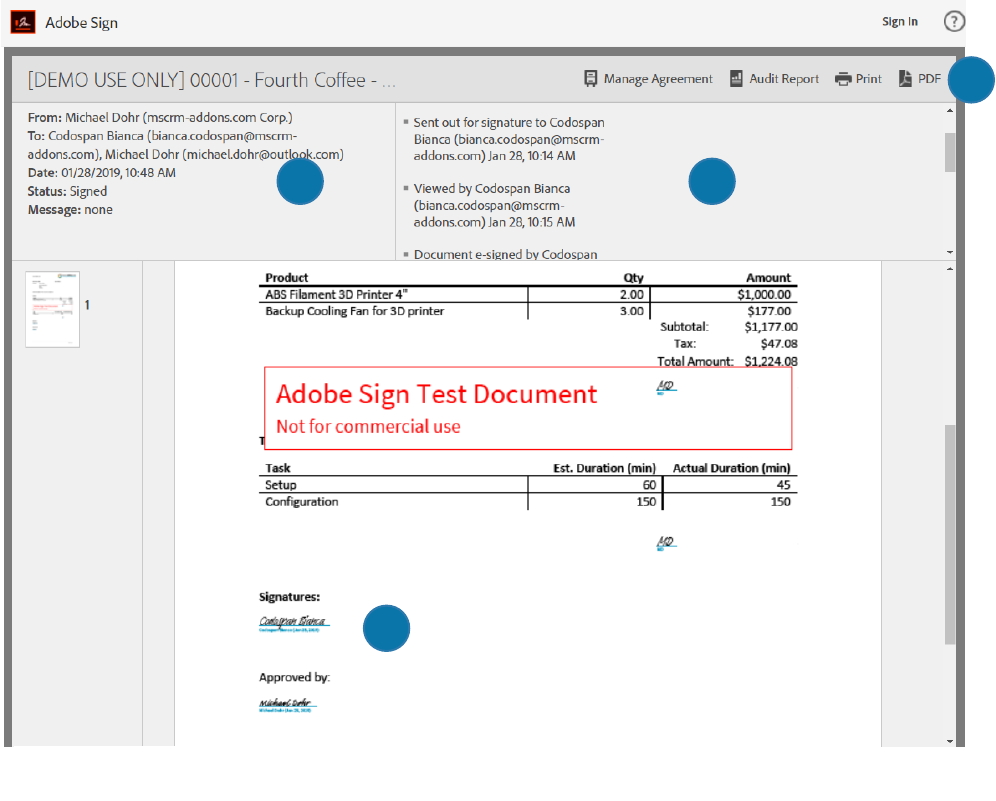
In the so opened window in your browser, you can see ❶ all details, ❷ the steps of the process and
the document, which now contains ❸ both signatures. Click on ❹ PDF to download your signed
document.
Congratulations! You have your first document signed with Adobe Sign.
Figure 13: The signed document ready for download
1
2
3
4
16
How to merge a document and start an in-person signing process?
This tutorial outlines how to merge a document with Adobe Sign and start an in-person signing process.
With the in-person signing, a host facilitates an Adobe Sign session. The host must be an Adobe Sign
account holder and the signers are only required to be with the host in order to sign documents.
In this example, we create a document and use therefore a template which contains one signer. The
result can look like in the figure below.
––
Figure 14: Example: Adobe Sign in-person signing in DocumentsCorePack
17
Like explained in the last chapter, please open your Dynamics 365 and search the entity you want to
create a document for. Next, please hit the [CREATE DOCUMENT]-button which opens the
DocumentsCorePack Dialog as you can see below.
Here, please select the template you want to execute – in this case WorkOrder_Template.docx.
Next, define what your document should do. In this example, we want the document to be attached, so
please check the Attach document checkbox and select as Adobe Sign email from the drop-down menu.
Check the In-person signing checkbox and your recipient and the e-mail address from the drop-down
menu.
Please note: The recipient should be the person (the host – explained at the beginning) who is required
to be with the signer in order to sign the document. Click on [Next] to continue.
Figure 15: DCP Dialog – select template
Figure 16: DCP Dialog – define how your document should be executed
1
2
3
18
The next window allows you to preview and edit your document, as explained in the chapter before. Hit
[Finish] to continue.
Now you are able to open the document directly from the DCP Dialog, as you can see in the figure
below.
Figure 17: DCP Dialog – Preview or edit document
Figure 18: DCP Dialog – complete the document signing
19
But also, an e-mail has been sent to the host who is required to be with the signer in order to sign the
document (see figure below). With a click on the blue text “Click here to review and sign”, the document
opens in a browser to be signed.
As you can see in the figure below, the document is now ready to be signed. After the signer signs the
document, the host has to hit the [Click to Sign]-button at the bottom of the page (see picture on the
next page).
Figure 19: E-mail with a link to Adobe Sign document
20
Like before, a copy will be sent to all parties. Congratulations, you have signed your first Adobe Sign
document using in-person signing.
Figure 20: Sign the document
Figure 21: Document successfully signed - message
21
4 List of figures
Figure 1: Adobe Sign Impersonation Enabled .................................................................................................................... 6
Figure 2: DCP template with two signees............................................................................................................................. 7
Figure 3: eSign settings ............................................................................................................................................................... 8
Figure 4: Example: DCP document with two Adobe Sign signatures ........................................................................ 9
Figure 5: DCP Dialog – select your template ................................................................................................................... 10
Figure 6: DCP Dialog – define how your document should be executed ............................................................ 10
Figure 7: DCP Dialog – Preview document ....................................................................................................................... 11
Figure 8: Preview of your document ................................................................................................................................... 11
Figure 9: E-mail with link to Adobe Sign document ..................................................................................................... 12
Figure 10: Sign the document ................................................................................................................................................ 13
Figure 11: Document successfully signed - message ................................................................................................... 13
Figure 12: E-mail signed document with two signees ................................................................................................. 14
Figure 13: The signed document ready for download ................................................................................................. 15
Figure 14: Example: Adobe Sign in-person signing in DocumentsCorePack ...................................................... 16
Figure 15: DCP Dialog – select template ........................................................................................................................... 17
Figure 16: DCP Dialog – define how your document should be executed .......................................................... 17
Figure 17: DCP Dialog – Preview or edit document ...................................................................................................... 18
Figure 18: DCP Dialog – complete the document signing ......................................................................................... 18
Figure 19: E-mail with a link to Adobe Sign document ............................................................................................... 19
Figure 20: Sign the document ................................................................................................................................................ 20
Figure 21: Document successfully signed - message ................................................................................................... 20
22
5 Contact
For further technical questions, please visit our blog http://blogs.mscrm-addons.com
or contact support@mscrm-addons.com.
For sales and licensing questions please contact office@mscrm-addons.com or the corresponding
contact information below.
Headquarter – Europe
PTM EDV-Systeme GmbH
Bahnhofgürtel 59
A-8020 Graz
Austria
Tel Austria +43 316 680-880-0
Fax +43 316 680-880-25
Support:
7AM - 8PM GMT+1 (Monday-Friday)
Sales:
+43 316 680 880 14
sales@mscrm-addons.com
www.ptm-edv.at
www.mscrm-addons.com
Headquarter – US
mscrm-addons.com Corp
1860 North Rock Springs Rd
Atlanta, GA 30324
United States
Tel US +1 404.720.6066
Support:
9AM - 6PM EST (Monday-Friday)
Sales:
+1 404 720 6046
bailey.moss@mscrm-addons.com
www.mscrm-addons.com
