
User Guide
WHAT IS SOUNDSWITCH?
At its core, SoundSwitch is a DMX lighting control software.
SoundSwitch diers from all other DMX lighting control
because of its direct connection with leading
DJ software and hardware.
SoundSwitch not only allows you to create and edit lighting
displays but also syncs your lighting creations with
DJ software, in time with your DJ performance so that you can
focus on DJing.
SoundSwitch supports:
Serato DJ
Virtual DJ
Engine Prime Hardware
Ableton LINK
WHAT TO EXPECT
What SoundSwitch can do?
SoundSwitch allows you to edit presets and create your
own custom Autoloop lighting scenes as well as create
Scripted Light shows for individual audio tracks.
SoundSwitch can also analyze your music library and
create basic light shows for you, however, as with any
creative pursuit, the more work you put in the better the
result. SoundSwitch gives you a great base to start from
which you can customize to your liking, if you choose to
do so.
Once you have created and/or customized Autoloops and
Scripted Tracks, SoundSwitch will automatically load and
sync these lighting displays while you focus on DJing.
What SoundSwitch Can’t Do?
Because of the way DMX works, SoundSwitch cannot
discover and patch your lighting xtures automatically.
This means there is some setup required, but don’t worry,
setting up xtures is easy and this only needs to
be done once.
The following Setup Guide steps you through exactly how
to connect your lights and make sure they
are working correctly.
HOW DOES SOUNDSWITCH WORK?
SoundSwitch works in two “Modes”
Edit Mode and Performance Mode.
Using Edit Mode, you can setup xtures, and edit
xtures and lighting displays then, when it comes time
to perform, switch into Performance Mode and
SoundSwitch connects with your DJ software and loads
and syncs your light shows in real time.
In Performance Mode, SoundSwitch knows what song
you are playing, at what tempo and follows along as you
mix.
SoundSwitch uses Track Tags, Play-head, Beat-grid and
Fader Position data to sync the lighting displays created
for each song and load Autoloops for songs that do not
have a custom light show.
Think of Autoloops as a backup system so that you
DO NOT need to create custom Scripts for every song.
DMX Explained
- What is DMX 1
- DMX Modes 2
- DMX Addressing 3 - 4
- What Fixtures are Supported 5
Quick Setup Guide
- Installing Software 7
- Connecting hardware 8 - 9
- Setting up DMX Fixtures 10 - 12
- Setting up Philips HUE 13 - 14
- Testing
- Customizing Autoloops 15
- Moving Heads 16
- Controlling Strobe 17
- Performance Mode
- Serato DJ 18
- Virtual DJ 19
- Engine Prime 20
- Fader Settings 21
- General FAQ’s 22 - 23
CONTENTS
More Info
For more information check out our Tutorial Videos at
soundswitch.com/tutorial-videos
Or chat with us on :
Facebook.com/soundswitchdj
Instagram/soundswitch_dj
And for technical support email us at
support@soundswitch.com
DMX Explained
DMX is the most confusing thing about lighting control.
We will try and explain it as simply as possible here, however,
its best to do some research and try to understand how DMX
works. This will help when it comes to troubleshooting errors
but here goes:
What is DMX?
DMX is a protocol for controlling DMX Fixtures. A DMX Fixture
is anything that can be controlled via DMX. For example, a
xture might be a smoke machine or a simple RGB LED light.
DMX Fixtures are controlled using “Channels”. Each channel
controls a dierent feature of a light. Simple lights have less
DMX control channels then more complex xtures.
SoundSwitch allows control of 512 DMX channels for each
DMX interface connected to your computer.
Each set of 512 DMX channels is called a DMX Universe and
SoundSwitch allows for control of up to two universes.
Every DMX xture has one or more DMX Modes with each
mode having a dierent number of DMX channels.
When “Patching” or setting up a xture, you must also set a
DMX Address, which tells SoundSwitch where a xture is in
the DMX Universe.
This is the most confusing part and its important to know the
dierences between DMX Modes and DMX Channels and
DMX addresses.
1
DMX Explained
- What is DMX 1
- DMX Modes 2
- DMX Addressing 3 - 4
- What Fixtures are Supported 5
Quick Setup Guide
- Installing Software 7
- Connecting hardware 8 - 9
- Setting up DMX Fixtures 10 - 12
- Setting up Philips HUE 13 - 14
- Testing
- Customizing Autoloops 15
- Moving Heads 16
- Controlling Strobe 17
- Performance Mode
- Serato DJ 18
- Virtual DJ 19
- Engine Prime 20
- Fader Settings 21
- General FAQ’s 22 - 23
DMX Modes
Every DMX Fixture has one or more DMX Modes.
For example a simple RGB Wash light, typically has two DMX
Modes however some xtures can have 10 or more DMX
modes.
Let's use a simple RGB Wash Light as an example. Below are
two dierent modes, each with a dierent amount of DMX
Channels, the more advanced mode, the more channels and
features can be controlled.
Mode One = Simple (3 Chn Mode)
Channel 1 = Red
Channel 2 = Green
Channel 3 = Blue
Mode Two = Advanced (6 Chn Mode)
Channel 1 = Red Channel 4 = Dimmer
Channel 2 = Green Channel 5 = Strobe
Channel 3 = Blue Channel 6 = Build in Eects
For more Information on DMX Modes, check the user manual
for your specic xtures
2
DMX Addressing
SoundSwitch allows control of two 512 channel DMX Universes.
The DMX Address is where in the DMX Universe the xture is
patched. For example, if you have a RGB LED Wash running in 3 Chn
Mode, SoundSwitch needs to know where it is patched.
You can set the DMX Address to any number between 1 and 512.
If you set the DMX Address on the xture to 1, and the xture is in 3
Chn Mode, then the xture will use channels 1,2 and 3,
however, you only need to set the start address.
So the Address for this xture is 1.
If you set the DMX Address on the xture to 10 and the xture is set
to 6 Chn Mode, the xture will use channels 10,11,12,13,14 and 15.
Again, the DMX Address is 10
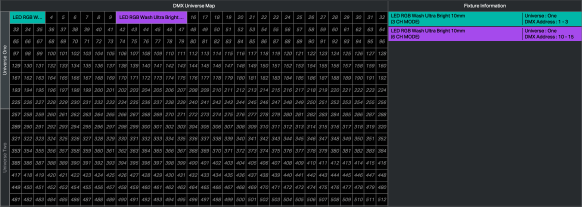
Below is an image of the SoundSwitch DMX Universe Map. As you
can see, there are two xtures “Patched” in the DMX Universe and
you can see how many channels each xture is using and what the
DMX Address is.
3

DMX Addressing cont..
The main thing to avoid when setting up your xtures is “Cross
Patching”. You must also make sure the settings on the xture
match the settings in the software.
Cross Patching is when you have two xtures with
overlapping channels.
For example you might have one xture on DMX Address 9 and
another on DMX Address 10. This would cause the light on DMX
Address 10 to function incorrectly as it will be receiving information
meant for the xture on DMX Address 9.
SoundSwitch will indicate cross patched xtures in the DMX Map as
shown below:
Cross patching is the main cause of setup issues, however, making
sure the settings on your xtures match the settings in the software
is also super important.
Basically, however the xture is setup in the real world must match
how the xture is patched in the software or the lights
won't function properly.
The example below is of a correct setup:
Fixture Settings = DMX Mode 1, DMX Address 10
Software Settings = DMX Mode 1, DMX Address 10
4
What Type of Fixtures are Supported?
There are loads of dierent DMX Fixtures and SoundSwitch can
control them all, however, some xtures work dierently to others.
SoundSwitch works best with RGBWAUV LED xtures, however,
Moving Heads with Color and Gobo wheels work great as do
Lasers and Smoke machines however, these xtures require a few
extra steps to setup when compared with simple LED wash lights.
All-in-one combination FX lights, while fully supported, are
sometimes a little more complex to control.
However, as combination FX lights provide a lot of functionality in a
single unit you can create some really cool eects but it often
takes a little more work.
We will dive into controller xtures later in the User Guide.
If you cannot nd your xture listed in the Fixture Library, please
send the user manual to support@soundswitch.com and we will
add them for you.
5
Quick Start Guide:
Now that you’re up to speed with the concept, lets get started.
The following is a step by step guide to getting started with
SoundSwitch. We will cover installing and setting up the software,
connecting your hardware, setting up and controlling xtures and
nally switch over to Performance Mode and start mixing!
Here is an overview of steps covered in the Quick Start Guide:
Installing Software
Connecting Hardware
Setting up DMX Fixtures
Testing Fixtures
Customizing an Autoloop
- Controlling Color
- Controlling Movement
- Controlling Strobe
Switching to Performance Mode
6
Installing Software
Step 1: Download the Latest Version of SoundSwitch
To get started, head over to www.soundswitch.com to setup your
SoundSwitch account and download the latest version of the
software.
Step 2: Update your Operating System, close all other applications
and reboot.
Once downloaded, make sure your operating system is up to date
with all the updates installed. Its also a good idea to close all other
applications and reboot your computer just for good measure.
Step 3: Run the SoundSwitch Installer
Be patient and make sure not to close any windows during the
installation process as the may cause some elements such as
drivers not to be installed.
Step 4: Activate SoundSwitch
Once the installation is nished, sign in using the login details
provided when setting up your account on our website.
Done!
7
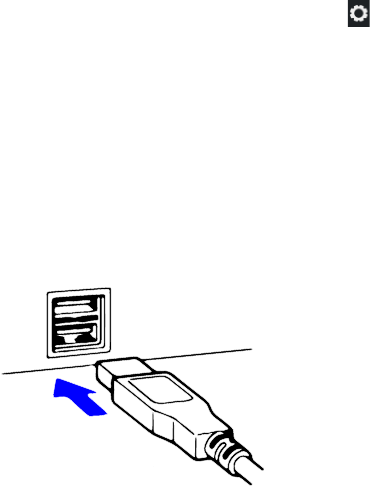
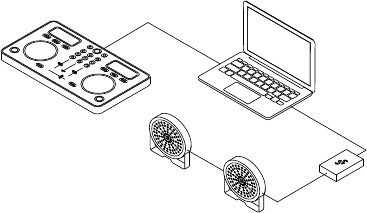
Connecting Hardware:
Step 1: Connect your SoundSwitch or Third Party Interface.
Connect your DMX interface to a spare USB port or Powered Hub.
If SoundSwitch does not recognize your hardware right away, leave
the hardware connected and restart SoundSwitch.
Step 2: Check the Hardware Settings.
Open the Preferences but clicking on the Preferences icon
and select the “Hardware Tab”. Check that your hardware is listed
and make sure the correct universe is assigned.
In most cases you will want to select assign Universe One to your
hardware.
Done!
8
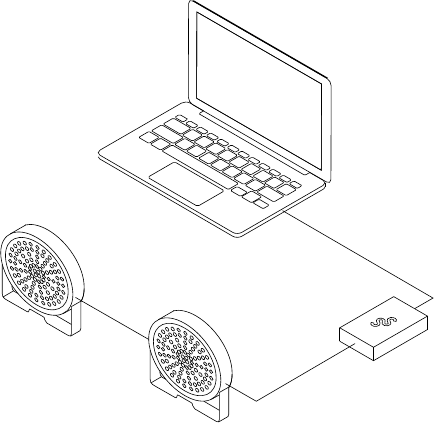
Connecting Hardware:
Step 1 : Connect your xtures to power and power them on.
Step 2 : Connect a DMX cable from the DMX interface to the
rst xture and continue to connect the cables from each light
to the next. This is called “Daisy Chaining”.
Step 3 : Set the xtures into DMX Mode and Select a DMX Mode
and Set the DMX Address.
Now that your xtures are powered on and Daisy Chained set
the DMX Mode and DMX Address on the xtures and patch the
xtures in SoundSwitch
9

Setting Up DMX Fixture
Step 1: Open SoundSwitch and select Edit Mode
Step 2 : Create a new Venue tab and name it and press
Enter/Return
In SoundSwitch, “Venues” are used to setup and organize lighting
rigs allowing you to design and create eects specically for that
lighting rig.
SoundSwitch allows seven Venues to be setup in the software.
If you are a Club DJ you might setup multiple Venues each specic
to the dierent clubs that you play at. Mobile DJs on the other
hand might setup dierent Venues for each lighting package they
oer to clients. For example you might have Venues for Small,
Medium and Large Lighting Rigs Rigs.
SoundSwitch shares information between Venues. For example, if
you create a light show for a song in one Venue, you can easily play
this back in another venue, even if the xtures are completely
dierent. This makes adding, updating and changing your xtures
easy, without having to go through and rebuild your shows and
allows you to jump between Venues without having to re-script.
To create a new Venue, press the (plus) icon at the top of the
workspace, name the Venue and press Enter.
10
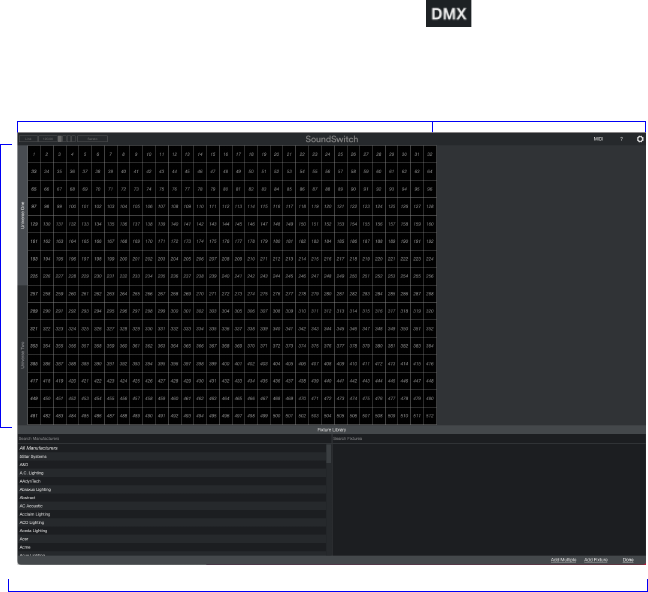
Setting Up DMX Fixture
Step 3: Patching Fixtures
This is the most important step to get right. If you do not patch
your xtures correctly, SoundSwitch will not be able to
communicate with the xtures.
Start by opening the DMX Map by select the Icon from the
tool bar. The DMX Map will look like this:
Universe Tabs
Fixture Library
DMX Map
Fixture Information
Search for the xtures you are using.
11
Fixture Library
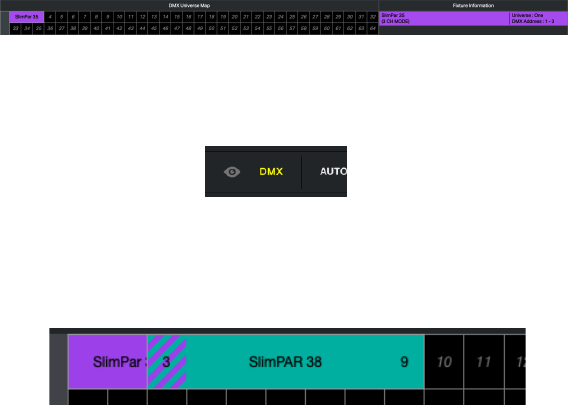
Setting Up DMX Fixture
Step 3: Patching Fixtures
Once you have found the xture, select the mapping which
matches the DMX Mode you set on your xture.
Then drag and drop the mapping onto the DMX Universe Map and
position the mapping on the same DMX Address you have set on
your xture.
For example, if you have set the xture to DMX address 1 , drag the
mapping and place it on 1 in the DMX Map
If your Fixture is set on a dierent DMX Address, make sure to
place your mapping on the correct address.
Remember to make sure xtures are not crosspatched.
SoundSwitch will indicate if you have crosspatched a xture by
turning the DMX icon yellow and in the DMX map as shown below:
Continue to add xtures until all of the xtures in your rig have
been patched.
12
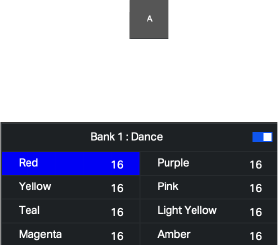
Testing
Now its time to test to see if everything is setup correctly.
To do so, open an Autoloop and see if this plays back correctly.
Step 1 : Open an Autoloop
To open an Autoloop, select the icon in the bottom right hand
corner of the screen to display the Autoloop Banks and open the
rst Autoloop called “Red” in “Bank 1 : Dance”
If all is working and setup correctly, all of your lights will be
displaying Red and if you have moving heads, these will be pointing
straight up.
Step 2 : Customize the Autoloop
Selecting & Changing Colors:
Make a selection in the Master Track, Right Click then select
“Change Color”. Choose a new color and Press Apply.
Now set the play-head at the beginning of the Autoloop by double
clicking on the Master Track or waveform and press
Space-bar to start playing the Autoloop.
The lights should start pulsing and will change color in time with
changes in the color track. Don't worry If your moving heads are
not moving, that’s ne, we will work on Movement next.
15

Setting Up Philips HUE Lighting
SoundSwitch 2.3 adds support for Philips Hue lights. This allows
basic lighting eects from the Main Track to be displayed on all
Philips HUE lights.
To get started, make sure your Philips HUE Bridge is connected to
power, and using an ethernet cable connect the bridge to your
network router. Also make sure you have setup an Entertainment
Area in the Philips HUE app & your lights are assigned to an
Entertainment Area.
Connect your computer to the same wired or WIFI network used to
connect your Philips HUE Bridge.
Download and install the Philips HUE app on your smartphone.
Proceed through the Philips HUE setup guide and be sure to set up
an Entertainment Area inside the Philips HUE app.
Open SoundSwitch and enter Edit Mode.
Select Preferences Icon in the top right-hand corner of the screen:
Then select the Hardware tab
13
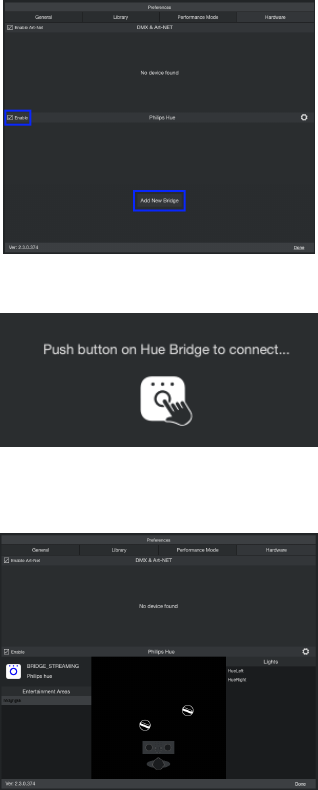
Setting Up Philips HUE Lighting
Select “Enable” & “Add New Bridge”
Then when prompted, press the button on the Philips Hue Bridge.
SoundSwitch will then discover and connect to all of your Philips
HUE lights
*SoundSwitch requires an Entertainment Area to be setup in the
Philips HUE before connection is possible
14
Testing
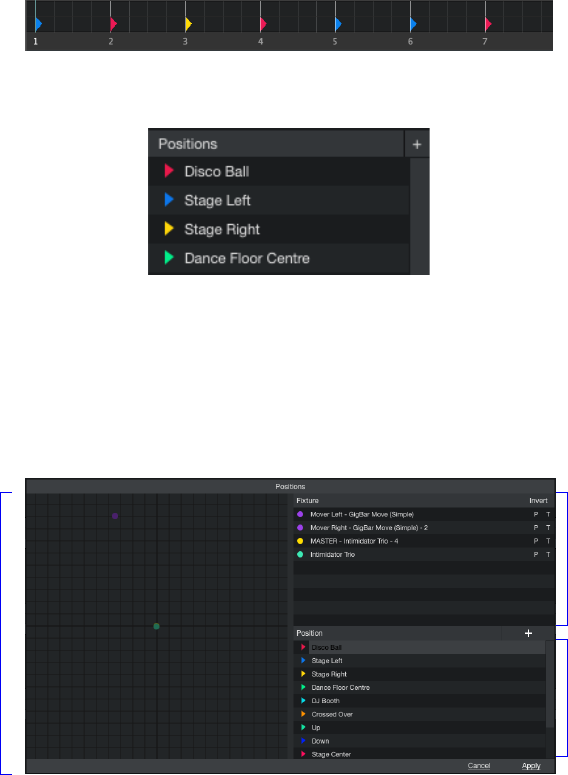
Step 3 : Controlling Moving Fixtures
If you have moving xtures in your rig, it’s time to learn how to
control the Pan and Tilt.
In the Master Track you can see that there are small Cues, these
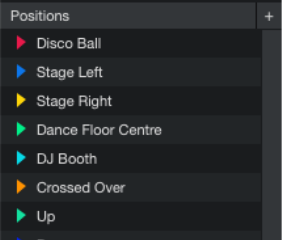
are called Position Cues.
You can name and adjust Position Cues and Position Cue Folders
using the Positions Menu on the left hand side as shown below.
To add Pan and Tilt settings to a Position Cue, double click on a
Position Cue in the Positions Menu to bring up the
Position Cues Window.
Now you can use the X/Y Control to point the Movers in any
direction you like.
16
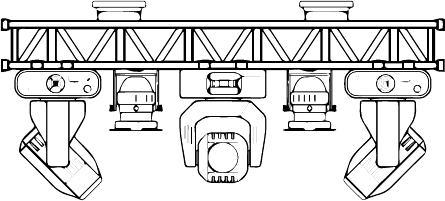
Pan/Tilt
control
Position
Selection
Fixture
Selection
17
Testing
Step 3 : Controlling Moving Fixtures
The idea behind Position Cues is that you can name a Position
Cue; for example “DJ Booth”, then point the movers toward the
appropriate direction, IE the DJ Booth.
If you are a mobile DJ and change between venues, you can
redirect the Movers as the venue and position of
the DJ Booth changes.
SoundSwitch will then automatically update all of the Position
Cues that have been placed in Autoloops or Scripted Tracks saving
you from having to rebuild every light show.
Testing
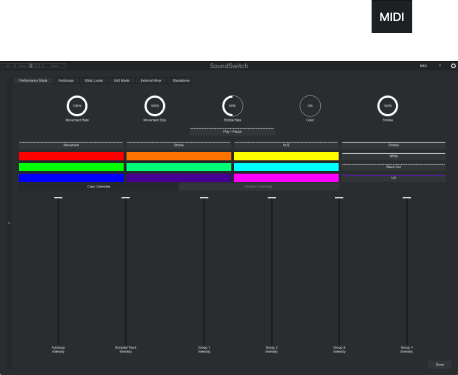
Step 4 : Controlling Strobe:
Now that you have your lights patched and have set your Position
Cues we will show you how to Strobe your lights using Hot Keys,
On Screen Buttons or a MIDI Controller.
To use the On Screen Buttons or to MIDI map a secondary
controller, select the MIDI Icon in the top right hand corner of the
screen to open the MIDI Menu.
Here you can press the on-screen button to control any of the
eects, or Right Click to arm the button and map it to any MIDI
controller connected to your computer.
To clear a mapping, simple right click the button again and press
Return/Enter
18
Testing
Step 5 : Switching to Performance Mode
Now that everything is setup and ready to go in Edit Mode its time to
connect SoundSwitch to your DJ Software/Hardware.
The process is much the same for all supported DJ Software/Hardware
below are the steps for each.
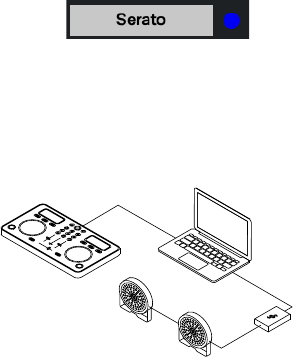
Serato DJ
Connect a Serato DJ Controller or Mixer to your computer via USB and
Open Serato DJ
In SoundSwitch navigate to the File Menu and Select “Switch Modes” and
select “Performance Mode” and select the Venue used to setup your lights
Switch to Serato DJ, load a song on each Deck and start mixing.
If the connection is successful you will see a Blue Connection Status
Indicator showing next to the Serato Icon in the top left hand corner of the
screen.
If the Connection Status Indicator is not showing, something is blocking
the connection between the software. Try turning o your rewall or
contact support@soundswitch.com for help.
19
Testing
Step 5 : Switching to Performance Mode
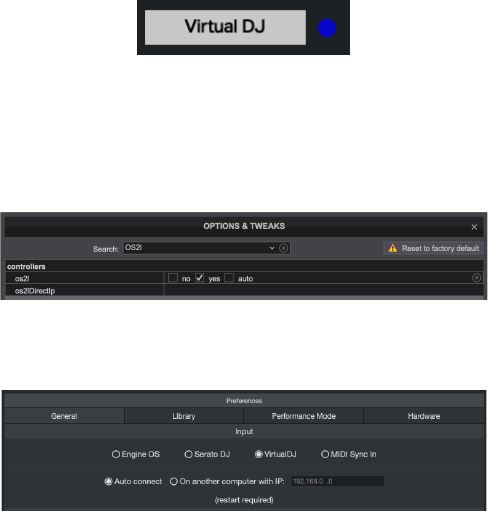
Virtual DJ
Connect a DJ Controller or Mixer to your computer via USB and open
Virtual DJ.
Open the Preferences in SoundSwitch and select Virtual DJ, then select
ether “Auto Connect” or “On this Computer”
In SoundSwitch navigate to the File Menu and Select “Switch Modes” and
select “Performance Mode” and select the Venue used to set your lights
Switch to Virtual DJ, load a song on each Deck and start mixing.
If the connection is successful you will see a Blue Connection Status
Indicator showing next to the Virtual DJ in the top left hand corner of the
screen.
If the Connection Status Icon doesn't show, check the settings in both
Virtual DJ and SoundSwitch.
To access the settings in Virtual DJ, open the Preferences and search for
OS2L and make sure the option for “Auto” is checked.
In SoundSwitch, open the Preferences and Select Virtual DJ, then select
ether “Auto Connect” or “On This Computer”
20
Testing
Step 5 : Switching to Performance Mode
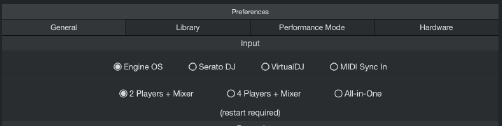
Engine Prime Hardware
Connect the Prime 4, 2 or GO or X1850 to your computer using an
Ethernet Cable If you are using the Media Players, also connect these to
the X1850 using Ethernet Cables.
Open the Preferences in SoundSwitch and select Engine OS, then select
ether of the Player + Mixer options or the All-in-One depending on which
hardware you own.
In SoundSwitch, navigate to the File Menu and Select “Switch Modes” and
select “Performance Mode” and select the Venue used to set your lights.
Switch to using your Engine OS Hardware, load a song on each Deck and
start mixing.
If the connection is successful you will see a Blue Connection Status
Indicator showing next to the Engine OS in the top left hand corner of the
screen.
* Depending on setup individual setups, you may need to disconnected your
computer from WIFI in order to secure a connection with the Engine OS Hardware
21
Testing
Step 5 : Switching to Performance Mode
Virtual DJ
Connect a DJ Controller or Mixer to your computer via USB and open
Virtual DJ.
Open the Preferences in SoundSwitch and select Virtual DJ, then select
ether “Auto Connect” or “On this Computer”
In SoundSwitch navigate to the File Menu and Select “Switch Modes” and
select “Performance Mode” and select the Venue used to set your lights
Switch to Virtual DJ, load a song on each Deck and start mixing.
If the connection is successful you will see a Blue Connection Status
Indicator showing next to the Virtual DJ in the top left hand corner of the
screen.
If the Connection Status Icon doesn't show, check the settings in both
Virtual DJ and SoundSwitch.
To access the settings in Virtual DJ, open the Preferences and search for
OS2L and make sure the option for “Auto” is checked.
In SoundSwitch, open the Preferences and Select Virtual DJ, then select
ether “Auto Connect” or “On This Computer”
Testing
Step 5 : Switching to Performance Mode
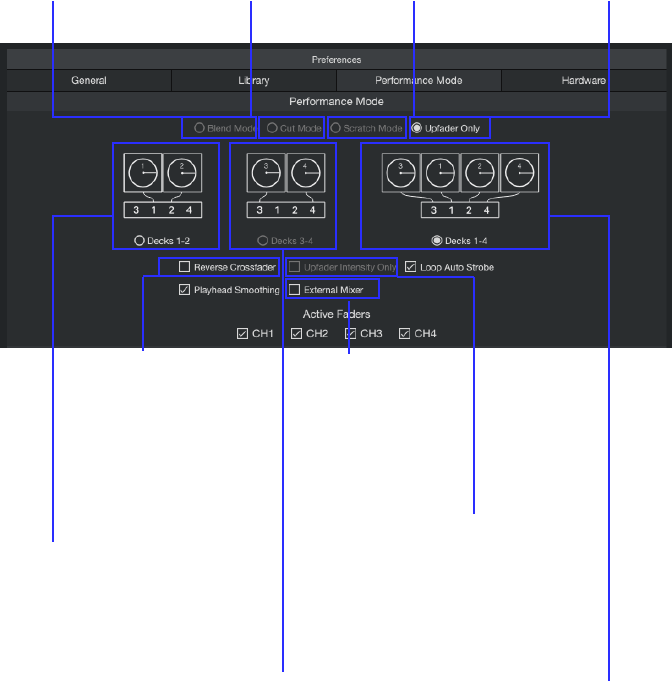
Fader Settings:
In SoundSwitch you need to select the Fader Setting that matches how
you mix. The Fader Settings are explained below.
Decks 1-2
Use this option if you are
mixing only Decks 1-2
Decks 3-4
Use this option if you
are using only
Decks 3-4
Decks 1-4
Use this option when you
are mixing with all
four Decks
Reverse
Crossfader
Use this option
if your crossfader
is Reversed on
your mixer on
controller
Upfader Intensity
Only
Use this option if you want to
the Upfaders to only control
the intenisty of your lights
and nothing else
External
Mixer
Only for use
with interfaces
such as
Rane SL1, 3 & 4
Blends light shows
smoothly using the X-Fader
Switches light shows
when the X-Fader
passes halfway
Switches light shows
when the X-Fader
passes 90%
Uses the Upfader Position
to mix light shows
22
General FAQ’s
What xtures can be controlled by SoundSwitch?
SoundSwitch can control any xture that uses DMX, while RGB LED
xtures work best, Lasers, Eect Lights and even Smoke Machines can be
controlled using SoundSwitch.
Can I Connect SoundSwitch to a USB Hub and if so what Hub?
Yes, SoundSwitch hardware can be connected to a USB Hub or Adapter.
Its best to use Powered hubs and be sure to thoroughly test any
connecting using a Hub or adapter. We suggest connecting SoundSwitch
hardware directly to your computer whenever possible.
How many machines can I run SoundSwitch on?
SoundSwitch licenses can be activated on up to three dierent
computers.
Do I require an iLok dongle?
No. Your SoundSwitch iLok license can be stored on your computer or on
an iLok dongle if you like.
Whats the dierence between Autoloop and Autoscript?
Autoloops are lighting scenes that sync with songs that have not been
scripted this means you do not need to create a custom
lighting script every song.
Auto Scripting is when SoundSwitch analysis the Audio and creates a light
show for you.
Both features have their benets and draw backs but when used together
these features combine to create a great live show for your audience.
23
General FAQ’s
Can I use SoundSwitch without DJ Software?
Yes, SoundSwitch can be run in Standalone Mode allowing you to
manually enter and set the tempo and launch lighting scenes in time
as a DJ plays on stage.
Does SoundSwitch support Smoke/Hazers?
Absolutely. The Attributes Cues feature in SoundSwitch allows you to
control any DMX xture including atmospheric eects like
Smoke and Hazers.
How do I deactivate a SoundSwitch license?
Simple login to your account on the SoundSwitch website, select the
Orders Tab and turn o the Auto Renew option. This will stop your
Subscription and put your license on hold.
If you wish to fully deactivate or cancel your account, contact
support@soundswitch.com.
How can I reset SoundSwitch to its Default state?
To reset SoundSwitch back to its default state, locate and delete your
SoundSwitch directory then restart SoundSwitch.
This can be found in ether:
users/username/Music/SoundSwitch
or
users/username/SoundSwitch
The Dierence between the V1 Interface and the
Micro Interface?
Both interfaces output DMX data from SoundSwitch to your lighting
xtures. The Micro Interface is the latest hardware and replaces the
original V1 unit. Besides form factor, size and weight, there is little
dierence between the two.
24
General FAQ’s
Should I create my Beat-grids before starting
SoundSwitch?
SoundSwitch relies on accurate beat-grids to sync Autoloops and
create light shows using the Automation Feature so its important to
have these setup correctly before playing or Auto Scripting these les.
Fixtures only Display Color but No Gobo?
In order to control Gobos, you need to edit or create some Attribute
Cues. The same goes for Prism, Built in Eects and more. The
Attribute Cues control all other functions of a xture besides Color,
Intensity, Strobe and Pan/Tilt.
Autoscript not triggering Gobo or Lasers etc?
SoundSwitch controls some xtures dierently. Lasers, Gobos, Built in
Eects and other non standard lighting eects are controlled using
the Attribute Cues feature. To learn more about how to control these
types of lights and eects check out:
soundswitch.com/tutorial-videos
search for Attribute Controls
When adding a xture, sometimes a Group Track
containing more than one track is added. Why?
If a xture has more then one light or LED pixel, SoundSwitch will add a
Group Track with multiple Fixture Tracks. Each Fixture Track in the
group corresponds to each Light, Pixel or Cell.
For example the Chauvet DJ Core 3x3 has 9 Pixels (or Cells as we call
them) In order to control each Cell, SoundSwitch needs to create a
Fixture Track for each one. So, when patching this xture in
SoundSwitch, a Group Track containing nine
Fixture Tracks will be added.
25
General FAQ’s
How do I Script tracks on my Prime 4’s Hard-drive
The SSD in your Prime 4 behaves like a normal External Hard-drive. To
access the drive, you need to set the Prime 4 into Controller/USB
Mode. To do so follow the steps below.
Step 1 : Connect a USB cable to the USB B port on the PRIME 4 and
the other end to your computer.
Step 2 : On PRIME 4, hold the VIEW button for 2 seconds to show the
Menu.
Step 4 : Tap the SOURCE icon.
Step 5 : Tap the computer icon to put the device into controller/USB
mode.
Step 6 : Once in controller/USB mode, the drive will be mounted to
your computer.
Note: The PRIME 4 may continue "searching for the computer" but this
is normal.
Step 7 : Once mounted, you will now see the hard drive as an available
media device in Engine Prime and SoundSwitch
Where can I learn more about SoundSwitch?
Web Support
support.soundswitch.com
soundswitch.com/gettingstarted
Social Media
facebook.com/soundswitchdj
instgram.com/soundswitch_dj
Email Customer Support:
support@soundswitch.com
26
