
IBM Systems
Technical white paper April 2023
1
Oracle RAC implementation
on IBM Power Systems
Virtual Server
Practical guide for deploying Oracle
Real Application Cluster
Table of contents
Executive overview ......................................................... 2
Disclaimer ...................................................................... 2
Introduction ................................................................... 3
Terminology .................................................................... 3
Key features ................................................................... 3
Hardware configuration of Power Systems Virtual Server
....................................................................................... 4
System topology ............................................................. 5
Create networks for Oracle RAC public & private traffic.. 6
Create LPARs on Power Systems Virtual Server .............. 8
Create shared storage for cluster.................................. 16
Validate network connectivity....................................... 20
Oracle RAC implementation .......................................... 23
Conclusion .................................................................... 35
Appendix ...................................................................... 35
Resources ..................................................................... 37
About the authors ......................................................... 37

IBM Systems
Technical white paper April 2023
2
Executive overview
This paper outlines the steps required to deploy Oracle® Real
Application Cluster (RAC) on the IBM® Power Systems Virtual
Server infrastructure. IBM Power Systems Virtual Server is an IBM
Power systems based enterprise Infrastructure as a Service (IaaS)
offering that utilizes PowerVM™ servers, networking, and
virtualization technology, and a SAN based storage. This is
identical to what a customer could deploy as a certified Oracle
stack on Power systems in their own data center. With this
offering you can quickly create and deploy one or more logical
partitions (LPARs) that are running on either AIX®, IBM i or Linux
operating system.
This paper details the configuring steps for Oracle RAC version
19c on Power Systems Virtual Server LPARs.
Disclaimer
The data presented in this paper is intended for education
purposes only.
Overview
This paper provides steps for
installing Oracle RAC 19c on
two IBM Power Systems Virtual
Server AIX V73 LPARs.

April 2023
3
Introduction
Power Systems™ Virtual Server is a Power systems enterprise Infrastructure as a Service (IaaS) offering
that enables quick creation and deployment of one or more LPARs running on AIX or other supported
operating systems. After LPAR provisioning, it is your responsibility to ensure operating system and
application security. IBM manages up to operating system (OS) deployment and the client self-manages
the OS and applications deployed on those LPARs. Power Systems Virtual Server offers flexible LPAR
resources adjustment (CPU, Memory, storage, and network) based on workload demands.
Existing AIX customers can use the Power Systems Virtual Server service for several workload
scenarios, including disaster recovery, development environments, and partial IT infrastructure moves.
Power Systems Virtual Server customers can scale their infrastructure and remain flexible with their
workload management and capacity both on and off-premises. Since the infrastructure layer is identical,
system administrators who run on-premises AIX, IBM i, and Linux on Power systems today can use the
same tools, workflows, and enhancements in the Power Systems Virtual Server environment.
This article demonstrates LPAR creation, Oracle RAC installation, basic configuration techniques with
the help of GUI screens, and the steps required to create or configure various resources like storage
volumes, networks etc.
It is important to note that the reader is expected to have prior knowledge and familiarity with Power
Systems Virtual Server, AIX, and Oracle RAC technologies.
Terminology
Workspace: A container that holds all Power Systems Virtual Server instances located in a specific
geographic location or data center.
Power Systems Virtual Server instance: A logical partition created using PowerVM technology and
running AIX, IBM i or Linux operating system. It is also referred to as Virtual Machine (VM).
In this paper we refer to AIX Logical Partitions as LPARs.
ASM: Oracle Automatic Storage Management, a system used to store Oracle database files.
Key features
The following are some of the key features of the Power Systems Virtual Server service.
Straightforward billing
The Power Systems Virtual Server service uses a monthly billing rate that includes the licenses for the
AIX and IBM i operating systems. The monthly billing rate is pro-rated by the hour, based on the
resources that are deployed to the Power Systems Virtual Server instance.
Refer to Pricing for Power Systems Virtual Servers
on ibm.com for more information on pricing.
Hybrid cloud environment
The Power Systems Virtual Server service allows you to run any AIX workload off-premise from your
existing Power Systems hardware infrastructure. Running workloads in Power Systems Virtual Servers,
provides advantages such as self-service, fast delivery, elasticity, and low-latency connectivity to other

April 2023
4
services. Although AIX workloads are running in Power Systems Virtual Servers, you can maintain the
same scalable, resilient, production-ready features that Power Systems hardware provides.
Bring your own image
While IBM provides stock AIX and IBM i images to instantiate a LPAR, You can also bring your own
custom AIX image that has been tested and deployed.
Refer to Deploying a custom image within a Power Systems Virtual Server
on ibm.com for additional
information.
Infrastructure customization
When creating a Power Systems Virtual Server, you can configure and customize the following options:
• Number of virtual server instances
• Number of cores and mode (dedicated, shared, capped or un-capped, shared processor pools)
• Amount of memory
• Data volume size and type
• Addition/Deletion of network interfaces
Hardware configuration of Power Systems Virtual Server
Power Systems Virtual Server service utilizes IBM Power systems S922 and E980 for hosting. The
following are the hardware specifications:
• Compute
o Power System S922 (9009-22A)
o Power System E980 (9080-M9S)
• Storage
o Flash Storage, IBM FS9000 series devices
o IBM SAN48B (Brocade)
• Network
o Cisco Nexus9000 93180YC-EX (10G)
o Cisco Nexus9000 C9348GC-FXP (1G)
o Cisco Nexus9000 93180YC-FX (Leaf 25G)
o Avocent ACS
The Power Systems Virtual Servers data centers are currently hosted in various regions globally, with
potential differences in hardware configuration across the regions, which may change over time.
For up-to-date information, refer to hardware specification
from ibm.com.

April 2023
5
System topology
Power Systems Virtual Server provides a simple and easy interface for creating shared storage and
network resources required for Oracle RAC implementation. The implementation requires shared
storage between the cluster nodes, and public and private networks for RAC communication between
the nodes. Figure 1 shows the usage of three networks in this implementation. Net I is used as the
Oracle RAC public interface, where users and application servers connect to access data from the RAC
database. Net II and III are used for Oracle RAC private interconnects. The Oracle RAC public network
interface runs the node virtual IPs (VIPs) and SCAN VIPs, and a domain name server (DNS) is required to
resolve those IPs. The DNS server can be configured on a LPAR inside Power Systems Virtual Server,
which can act as a jump host or bridge server and has a public network for communication with the
outside world. Alternatively, a DNS server can also be hosted on-prem or in IBM Cloud x86 VM using
direct link cloud connect offerings. For more information on direct link services, refer to
Ordering Direct
Link Connect for Power Systems Virtual Servers on ibm.com.
Figure 1. System/Network Topology.
IBM Direct
Link Services
x86 VM
IBM Cloud
On-Premises
AIX
LPAR
Server
Public
(Internet)
IBM PowerVS
IBM PowerVS
Oracle RAC Public [ Net l ]
LPAR2
LPAR1
Oracle RAC Private Interconnect [ Net II ]
Oracle RAC Private Interconnect [ Net III ]
LPARn

April 2023
6
The steps for setting up the Oracle RAC on Power Systems Virtual Server LPARs are as follows.
1) Create Networks for Oracle RAC.
2) Create AIX LPARs which act as Oracle RAC database nodes.
3) Create and attach local disks for Oracle software.
4) Create and attach shared disks for Oracle ASM disk groups.
5) Validate network connectivity (Create support ticket for network configuration if needed).
6) Perform Operating System (OS) prerequisite steps.
7) Install and configure the Oracle Grid software.
Create networks for Oracle RAC public & private traffic
Figure 1 shows that the public network provides access to the internet and should not be utilized as the
Oracle RAC public network. For testing purposes only, Figure 2 shows that enabling the public network
option allows access to the LPAR via public internet without the need for VPN or Direct Link service.
However, a Direct Link service is required to connect the LPARs to on-premises networks and other
resources, as demonstrated in Figure 1.
Figure 2: Enable the public network.
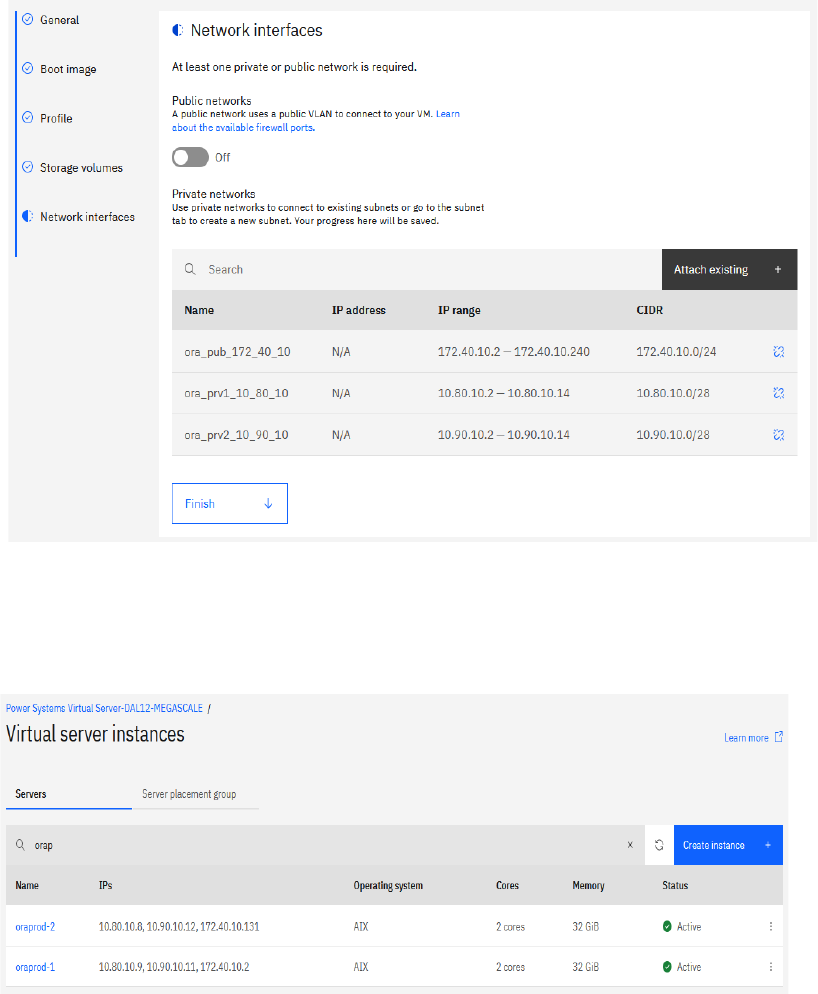
To create the required Oracle RAC Public and Private networks, Power Systems Virtual Server subnets
are utilized. Our setup includes three networks, with one for the Oracle RAC public network where RAC
VIPs will be configured, and the other two for the Oracle RAC cluster interconnect. Follow these steps to
create the required networks:
1. Select your workspace under Workspaces, click Subnets on left pane and the click Create
subnet.
Figure 3. Create new subnet.
April 2023
7
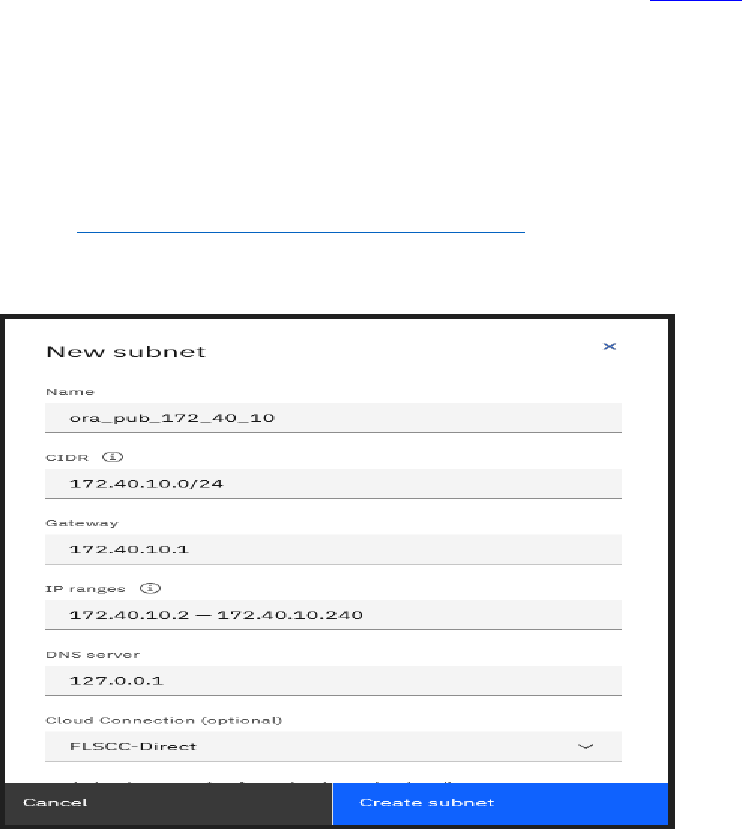
2. Enter subnet name in the Name field and CIDR format in the CIDR field.
Ensure that the IP ranges for the subnet is within the ranges defined by RFC 1918 (10.0.0.0/8,
172.16.0.0/12, or 192.168.0.0/16). The number after the slash represents the bit length of the
subnet mask, with a smaller number after the slash indicating more IP addresses being
allocated. For RAC private interconnect subnets, use a higher CIDR number to allocate fewer IP
addresses to those subnets.
Do not include the IPs X.X.X.1 and X.X.X.255 in the IP ranges field as they are reserved.
The cloud connection field is optional.
Refer to Configuring and adding a private network subnet
on ibm.com for additional details on
subnet creation and CIDR notation.
Figure 4. Creation of RAC Public subnet.
In our setup, the network 172.40.10.0 is designated as the Oracle RAC public network, and the
IP range typically used is 172.40.10.2 to 172.40.10.254. However, to ensure that the Power
Systems Virtual Server control plane does not use the IPs ranging from 172.40.10.241 to
172.40.10.254 for new LPARs, we have limited the IP range to 172.40.10.240 as depicted in
Figure 4. For the Oracle RAC software to function properly, Virtual IPs (VIPs) are required for the
cluster. In our 2-node cluster, we have reserved IPs from 172.40.10.241 to 172.40.10.254 for
node VIPs and SCAN VIPs.

April 2023
8
3. Create Oracle RAC private networks by specifying the CIDR field as 10.80.10.0/28,
10.90.10.0/28 as illustrated in Figure 5.
Figure 5. Creation of RAC Private subnets.
4. Select your workspace under Workspaces, click Subnets on left pane to view the final list of
networks created and their characteristics.
Figure 5a. Networks list.
Create LPARs on Power Systems Virtual Server
This section describes steps for creating new LPARs using the Power Systems Virtual Server offering.
Choose the workspace to work in from the dashboard and then create the required LPARs for Oracle
RAC. A workspace acts as a container for all the resources in one data center/location. For this demo
two LPARs are needed.
Refer to Creating a Power Systems Virtual Server
on ibm.com for more details on creating a Power
Systems Virtual Server Workspace and configuring Virtual server instance.
To create new LPARs using the Power Systems Virtual Server offering, follow these steps:
April 2023
9
1. Select the “Workspace for Power Systems Virtual Server” resource in the Catalog and then
select your workspace under Workspaces. Under the Compute header on the left pane then
select Virtual server instances. Click on the “Create Instance” button to start the guided process.
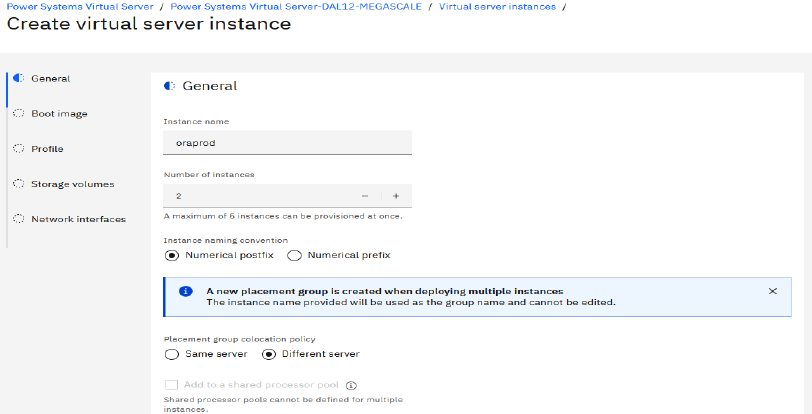
Start by specifying the name of the LPAR and number of instances you want to create.
2. Enter the name of LPAR in Instance name field and choose the Number of instances. If you
select more than one instance, the Add a shared processor pool check box will be disabled.
Click appropriate Instance naming convention.
Select the appropiate policy (Same Server/Different Server) under the placement group
colocation policy.
a) Same Server: Select this option when you want all LPARs on same host server.
b) Different Server: To minimize the risk of an outage affecting all LPARs on a single physical
server, choose the "Different server" option. This option ensures that each LPAR is hosted
on a different physical server, providing an added layer of redundancy. For Oracle RAC
deployments, it is strongly recommended to select this option. When selected, a new server
placement group is created to ensure that all LPARs in the group are deployed onto different
physical servers. If additional RAC nodes need to be added later, the same specific server
placement group must be specified to ensure that all LPARs of the cluster are deployed on
different physical servers.
Figure 6. Provide Virtual Machine details.
3. Select the appropriate pinning option (Hard/Soft/None) from the Virtual server pinning list.
a) Select the Soft or None option during planned maintenance activity requiring a physical
server restart, to automatically migrate the LPAR to a different host using Live Partition
Mobility (LPM) and to automatically migrate the LPAR back to the original host once the
maintenance activity is completed.

April 2023
10
b) Select the Hard pin option to restrict the movement of a LPAR to a different host and to
prevent an outage during host maintenance. It is recommended to select Hard pin for LPARs
running Oracle databases to control the use of licensed cores and to prevent LPM activity .
Choose an existing SSH key or create one via the SSH Keys menu to securely connect to your
Power Systems Virtual Server from a given system and click Continue.
Figure 7. Select VM pinning and SSH Key.
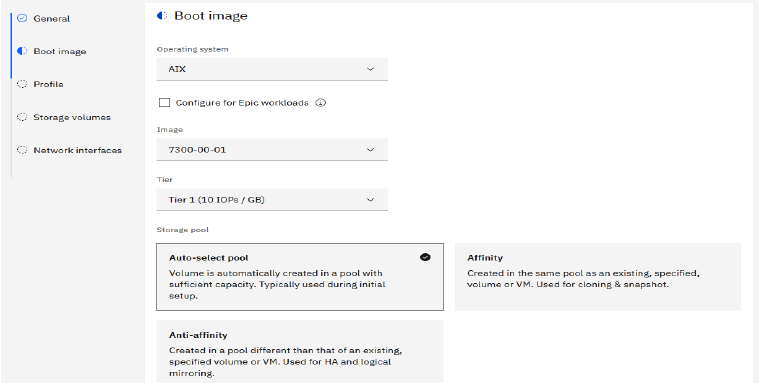
4. Select the boot image for your LPAR in the Power Systems Virtual Server offering either from the
pre-existing stock operating system images or upload your own custom image. When using a
custom image, it is important to ensure that the AIX image technology level is supported on the
Power Systems hardware selected in the "Machine Type" field. The AIX boot volume is created
automatically during deployment, and it is recommended to choose the Tier 1 option for the
boot LUN of the LPAR. If you choose a standard AIX image from the Power Systems Virtual
Server catalog, a 25GB boot volume will be automatically created for AIX 7.3 images and a
20GB boot volume for AIX 7.2 images.
Refer to Deploying a custom image within a Power Systems Virtual Server
on ibm.com for more
information on custom image deployment.
April 2023
11
Figure 8. Select Operating System type.
Note: In this deployment, the option Auto-select pool was chosen. If you plan on adding more
RAC nodes later, you need to choose the "Affinity" option for those LPARs and select the same
storage pool that was used for the initial RAC deployment. The storage pool used can be found
under the Storage volumes menu.
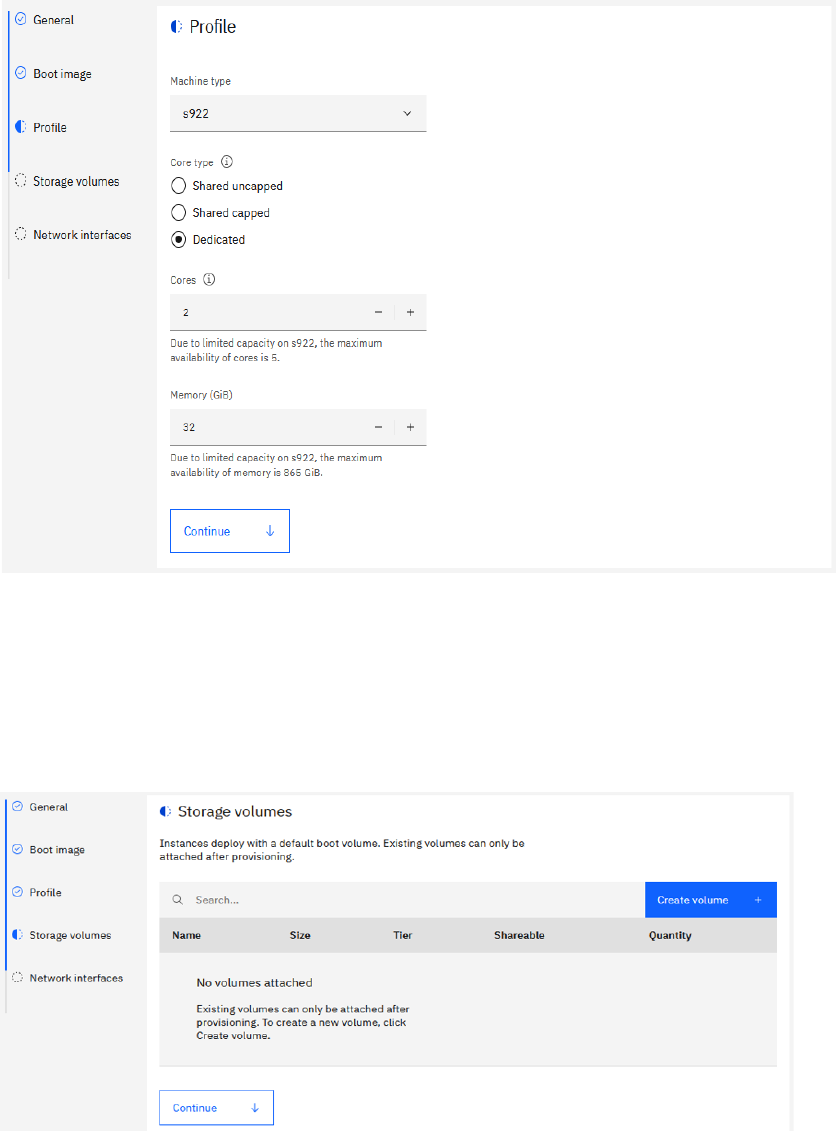
5. In the Profile section select Machine type and Core type.
There are three Core types available.
a) Dedicated: resources are allocated for a specific client
b) Shared uncapped: shared with other clients and can utilize additional unused compute
capacity if available on the server, up to the hard limit of available virtual processors
configured for the LPAR.
The number of virtual processors available in the LPAR can be determined in AIX with the
“lparstat -i" command and be used to determine required Oracle core licenses.
c) Shared capped: shared, but compute resources do not expand beyond those that are
specified.
For shared capped and uncapped modes the “Cores” value can be allocated in multiples of
0.25 of a core.
Note: Select the processor mode and number of cores based on your Oracle licensing terms.
Enter the number of cores and the amount of memory to be allocated to the LPAR.
April 2023
12
Figure 9. Provide partition profile details.
6. Retain the default values and click Continue.
Additional storage volumes can be attached during LPAR creation or can be added after an LPAR
is deployed. During multiple LPARs creation we can only create and attach shareable storage
volumes. In this demo we will attach the shared disks to the LPARs after the LPARs are
deployed and therefore no additional storage volumes are specified here.
Figure 10: Storage section.
April 2023
13
7. Select the private networks that were created earlier for Oracle RAC public and Oracle RAC
private interconnect networks. Review the details, check the agreement terms, and click Create.
It is recommended to attach the Oracle RAC public subnet first, followed by the Oracle
interconnect subnets. Any other non-RAC subnets should be added last.
Figure 11. Select subnets.
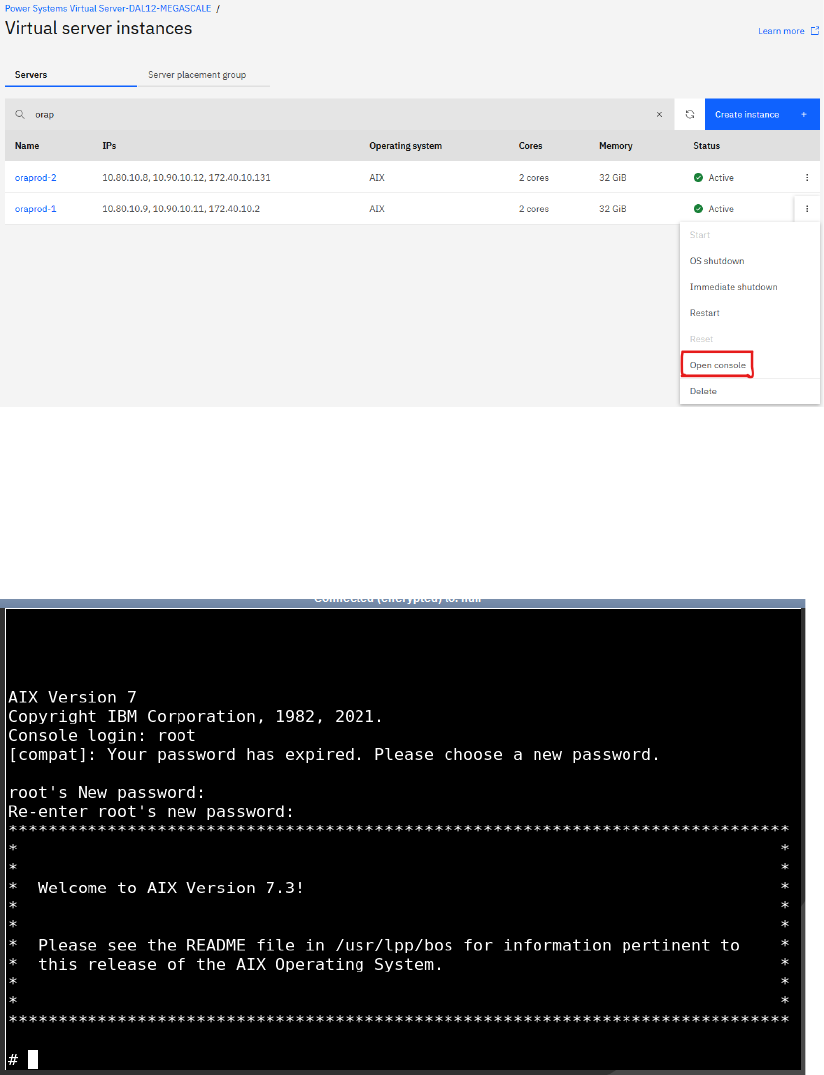
5. Wait for the LPARs to get deployed, it may take few minutes. Refresh the page using Refresh
button. On the Virtual server instances page notice that the Status is now Active, indicating
successful deployment.
Figure 12. Power Systems Virtual Server LPARs for Oracle 2-node RAC.
April 2023
14
6. Click the three dots icon corresponding to each LPAR, Select the Open console option to set the
root user password to enable standard SSH access to the LPAR.
Figure 13. Opening LPAR console.
7. In the password prompt press <Enter>, then specify the login username root, then press
<Enter> to continue with no password and then follow the prompt to set the password for the
root user.
Note: Power Systems Virtual Server standard AIX builds do not have a predefined password.
Figure 14. Set the root password.
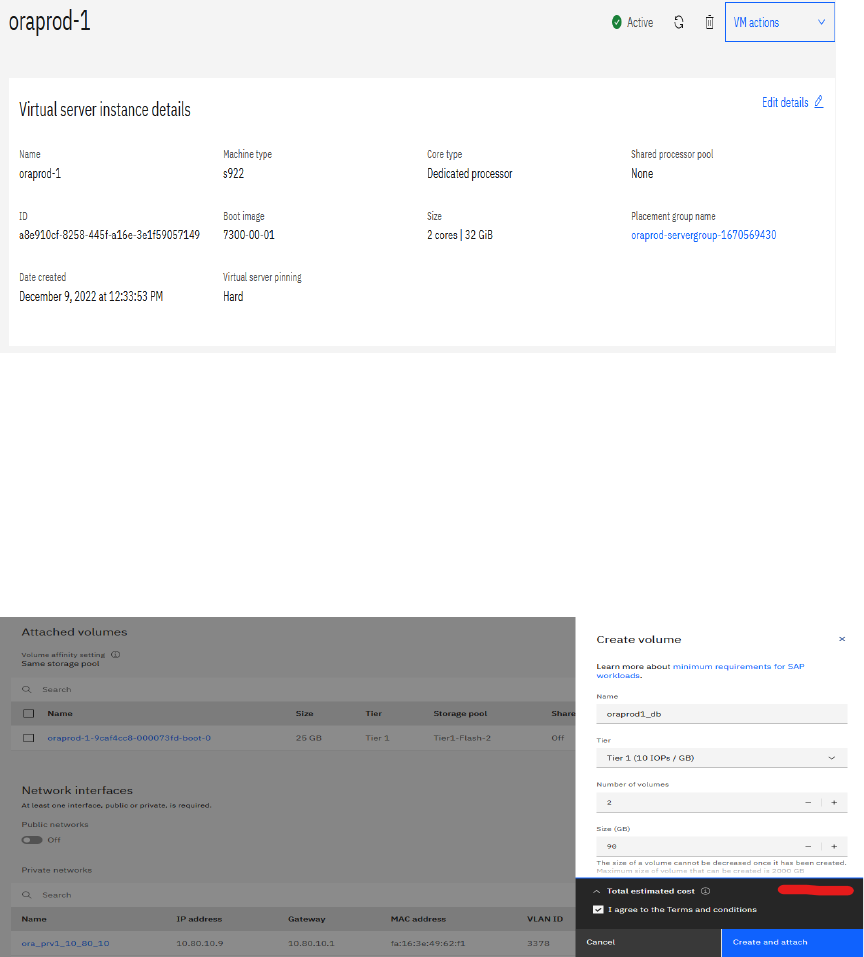
8. On the Virtual server Instances screen, click the LPAR name to modify or view the LPAR
configuration after deployment.
For this demonstration LPAR ‘oraprod-1’ is selected.
April 2023
15
You can dynamically change the LPAR configuration and take advantage of additional features
like capturing and exporting LPAR image to Cloud Object Storage, which can also be used as a
backup of the LPAR. You can provision a LPAR from a backup or use a customized image from
your current non-cloud environment, resize/modify a LPAR, and add/remove storage volumes
and networks. You can also specify virtual server pinning based on your business needs.
Figure 15. LPAR settings.
9. Create the storage volumes for the oracle software. Click oraprod-1 Attached volumes
Create volume. Specify Shareable as Off and select Affinity option Virtual machine (boot volume)
and oraprod-1.
For this demonstration we create two 90G local volumes and attached to the LPAR oraprod-1 as
shown in Figure 16.
Figure 16. Create and attach local LUNs.
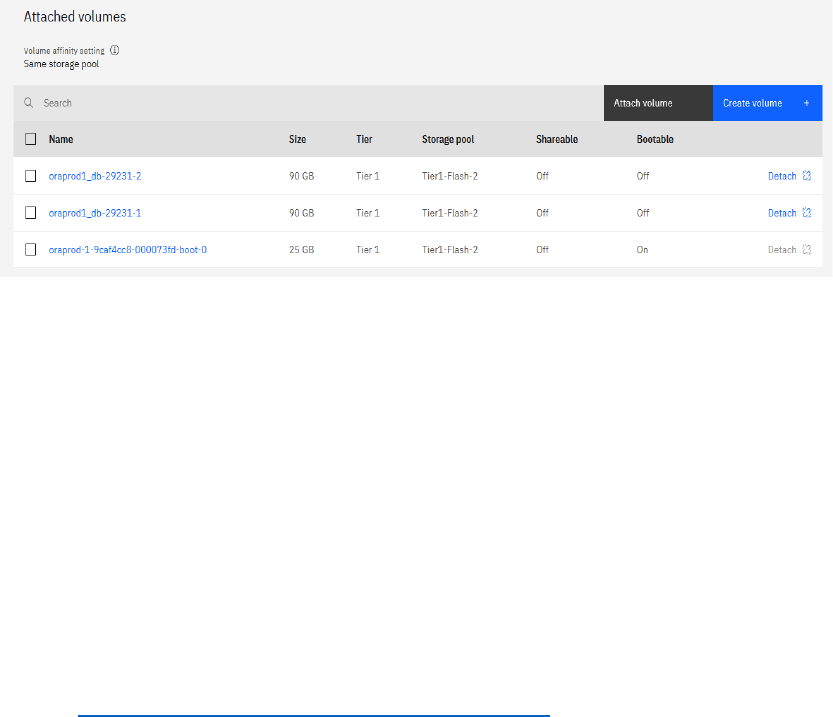
Storage volumes are now displayed under Attached volumes, indicating successful attachment
of volumes.
April 2023
16
Figure 17. List of Local storage volumes.
10. Run the ‘cfgmgr’ command as root user to make the disks available at AIX level.
‘hdisk1’ and ‘hdisk2’ are the latest attached volumes of 90GB each.
# lspv
hdisk0 00fa00d6b552f41b rootvg active
# cfgmgr
# lspv
hdisk0 00fa00d6b552f41b rootvg active
hdisk1 none None
hdisk2 none None
11. Repeat the previous steps to create and attach two new storage volumes to the second LPAR
oraprod-2 for oracle software.
Refer to Modifying a Power Systems Virtual Server instance
on ibm.com for more details on
storage volumes.
The following section describes the process of creating a shared disks and attaching them to the newly
created LPARs.
Create shared storage for cluster
Create shared storage volumes to store Oracle cluster registry (OCR), voting disks, data files, and redo
log files for Oracle Real Application Cluster. The shared disks are created from fiber channel attached
SAN storage that is consistent with an on-premises PowerVM setup. By default, for each volume (hdisk
in AIX), multipath is configured from the LPAR to the storage volume. It is recommended to create
storage volumes for RAC DB from the same storage tier and storage pool.
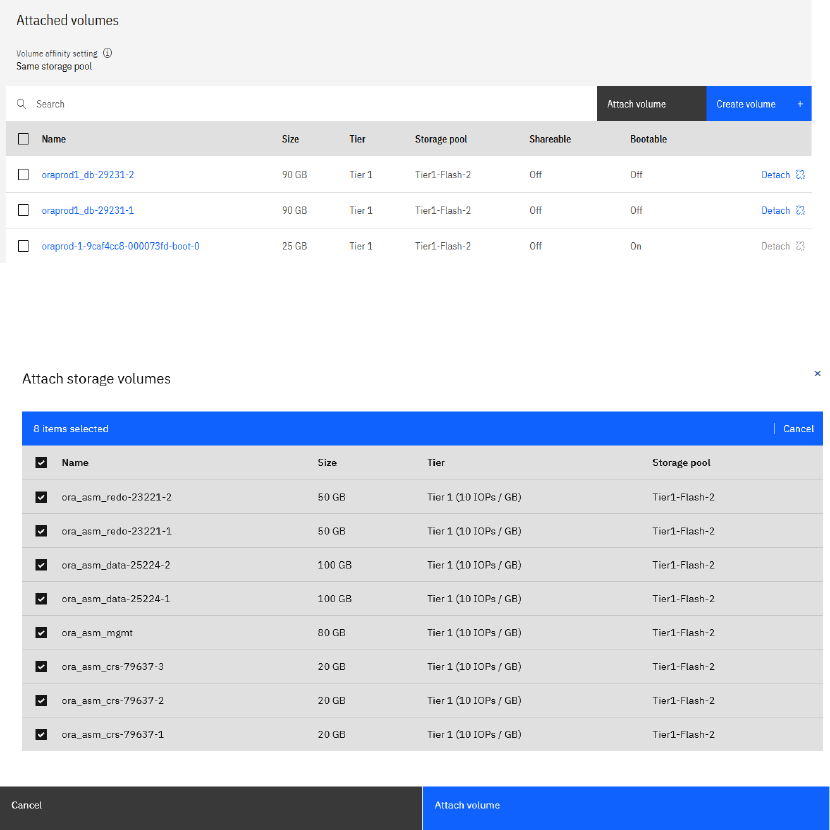
For this demo, we are using eight shareable disks: three 20GB disks for OCR and Vote, one 80GB disk for
the MGMT ASM disk group, two 100GB disks for the DATA disk group, and two 50GB disks for the REDO
disk group.
To create the shared volumes, follow these steps for each group of disks:
a) Open the Power Systems Virtual Server dashboard, click Storage volumes on the left pane and
the click Create volume.

April 2023
17
Enter the volume name and tier details. To make the volume shareable ensure that Shareable is
set to On. Select the storage pool affinity option and make sure all the shared volumes are
created from the same storage pool. For the Affinity object select Virtual machine (boot volume)
and LPAR oraprod-1 as Affinity VM.
Figure 18. Shared Disk creation.
Figure 19 lists all the storage volumes created in the previous step.
Figure 19. List of Shared Storage Volumes.
April 2023
18
The following steps describes the process to attach a shared volume to newly created LPARs ‘ or aprod-1’
and ‘oraprod-2'.
b) Click on LPAR ‘oraprod-1’ and scroll down to Attached volumes then click Attach volume.
Figure 20. Attached volumes of oraprod-1 VM
c) Select all shared disks and then click Attach volume.
Figure 21. Select ASM Shared disks.
d) After the disks are attached to the LPAR, login to the LPAR and run ‘cfgmgr’ command to make
the new volumes visible in AIX as hdisks.
# lspv
hdisk0 00fa00d6b552f41b rootvg active
hdisk1 none None
hdisk2 none None
# cfgmgr
# lspv
hdisk0 00fa00d6b552f41b rootvg active
hdisk1 none None
hdisk2 none None
hdisk3 none None
hdisk4 none None

April 2023
19
hdisk5 none None
hdisk6 none None
hdisk7 none None
hdisk8 none None
hdisk9 none None
hdisk10 none None
e) Repeat the previous steps for ‘oraprod-2’ LPAR.
Ensure that AIX disk names (hdiskX) for the same volume frequently are not matched for all
nodes after the discovery with ‘cfgmgr’ command. For oracle RAC, ASM shared disks name
should be same across all nodes of the RAC cluster. To correct the disk names use the ‘rendev’
command.
f) Use the ‘lsmpio -q’ command to view the hdisk details including ‘Volume Name’ across all RAC
nodes allowing to match devices across LPARs.
Notice that the shared disks on both nodes (‘oraprod-1’ and ‘oraprod-2’) have different names.
On ‘oraprod-1’, the CRS disks are identified as hdisk3, hdisk5, and hdisk10, while on ‘oraprod-
2’, the CRS disks are identified as hdisk3, hdisk6, and hdisk10.
From node ‘oraprod-1’
# lsmpio -q
Device Vend or I d P rodu ct I d Size Volum e Na me
--------------------- ---- ---- ---- ---- ---- ---- ---- ---- -------- ---- -------- --------
hdisk0 IBM 2 145 25 .00G iB volum e-orapro d-1-9caf 4cc8 -00007
hdisk1 IBM 2 145 90 .00G iB volum e-orapro d1_d b-29231-1-b0ea
hdisk2 IBM 2 145 90 .00G iB volum e-orapro d1_d b-29231-2-0688
hdisk3 IBM 2 145 20 .00G iB volum e-ora_as m_cr s-79637-2-70e3-- >hdi skas mcrs 2
hdisk4 IBM 2 145 100 .00G iB volum e-ora_as m_da ta-25224 -2-a3e
hdisk5 IBM 2 145 20 .00G iB volum e-ora_as m_cr s-79637-1-a953-- >hdi skas mcrs 1
hdisk6 IBM 2 145 50 .00G iB volum e-ora_as m_re do-23221 -2-188
hdisk7 IBM 2 145 80 .00G iB volum e-ora_as m_mg mt-5ae24 f49-56
hdisk8 IBM 2 145 50 .00G iB volum e-ora_as m_re do-23221 -1-624
hdisk9 IBM 2 145 100 .00G iB volum e-ora_as m_da ta-25224 -1-9ac
hdisk10 IBM 2 145 20 .00G iB volum e-ora_as m_cr s-79637-3-277a-- > hd iska smcr s3
From node ‘oraprod-2’
# lsmpio -q
Device Vend or I d P rodu ct I d Size Volum e Na me
------------------------- ---- ---- ---- ---- ---- ---- ---- ---- -------- ---- -------- ----
hdisk0 IBM 2 145 25 .00G iB volum e-orapro d-2-d3c4 b8d0 -00007
hdisk1 IBM 2 145 90 .00G iB volum e-orapro d2_d b-26878-1-5455
hdisk2 IBM 2 145 90 .00G iB v olume-orapro d2_d b-26878-2-30f2
hdisk3 IBM 2 145 20 .00G iB volum e-ora_as m_cr s-79637-3-277a-- >hdi skas mcrs 3
hdisk4 IBM 2 145 50 .00G iB volum e-ora_as m_re do-23221 -1-624
hdisk5 IBM 2 145 100 .00G iB volum e-ora_as m_da ta-25224 -2-a3e
hdisk6 IBM 2 145 20 .00G iB volum e-ora_as m_cr s-79637-2-70e3-- >hdi skas mcrs 2
hdisk7 IBM 2 145 50 .00G iB v olum e-ora_asm_re do-23221-2-188
hdisk8 IBM 2 145 100 .00G iB volum e-ora_as m_da ta-25224 -1-9ac
hdisk9 IBM 2 145 80 .00G iB volum e-ora_as m_mg mt-5ae24 f49-56
hdisk10 IBM 2 145 20 .00G iB v olum e-ora_asm_cr s-79637-1-a953-- >hdi skas mcrs 1
g) The hdisk name for a specific volume should be same across all RAC nodes. Use ‘rendev’
command to make the three CRS disk names the same on both nodes.
Commands ran on oraprod-1
# rendev -l hdisk5 -n hdiskasmcrs1
hdiskasmcrs1
# rendev -l hdisk3 -n hdiskasmcrs2
hdiskasmcrs2
# rendev -l hdisk10 -n hdiskasmcrs3
hdiskasmcrs3
# lsmpio -q | grep crs
hdiskasmcrs1 IBM 2145 20.00GiB volume-ora_asm_crs-79637-1-a953
hdiskasmcrs2 IBM 2145 20.00GiB volume-ora_asm_crs-79637-2-70e3

April 2023
20
hdiskasmcrs3 IBM 2145 20.00GiB volume-ora_asm_crs-79637-3-277a
Commands ran on oraprod-2
# rendev -l hdisk10 -n hdiskasmcrs1
hdiskasmcrs1
# rendev -l hdisk6 -n hdiskasmcrs2
hdiskasmcrs2
# rendev -l hdisk3 -n hdiskasmcrs3
hdiskasmcrs3
# lsmpio -q | grep crs
hdiskasmcrs1 IBM 2145 20.00GiB volume-ora_asm_crs-79637-1-a953
hdiskasmcrs2 IBM 2145 20.00GiB volume-ora_asm_crs-79637-2-70e3
hdiskasmcrs3 IBM 2145 20.00GiB volume-ora_asm_crs-79637-3-277a
h) Rename all Oracle ASM shared disks on both nodes so that they match. After renaming the
shared disks on LPAR oraprod-1, execute the ‘lsmpio -q’ command to verify.
# lsmpio -q
Device Vendor Id Product Id Size Volume Name
---------------------------------------------------------------------------------
hdisk0 IBM 2145 25.00GiB volume-oraprod-1-9caf4cc8-00007
hdisk1 IBM 2145 90.00GiB volume-oraprod1_db-29231-1-b0ea
hdisk2 IBM 2145 90.00GiB volume-oraprod1_db-29231-2-0688
hdiskasmcrs1 IBM 2145 20.00GiB volume-ora_asm_crs-79637-1-a953
hdiskasmcrs2 IBM 2145 20.00GiB volume-ora_asm_crs-79637-2-70e3
hdiskasmcrs3 IBM 2145 20.00GiB volume-ora_asm_crs-79637-3-277a
hdiskasmdata1 IBM 2145 100.00GiB volume-ora_asm_data-25224-1-9ac
hdiskasmdata2 IBM 2145 100.00GiB volume-ora_asm_data-25224-2-a3e
hdiskasmmgmt1 IBM 2145 80.00GiB volume-ora_asm_mgmt-5ae24f49-56
hdiskasmredo1 IBM 2145 50.00GiB volume-ora_asm_redo-23221-1-624
hdiskasmredo2 IBM 2145 50.00GiB volume-ora_asm_redo-23221-2-188
Validate network connectivity
To enable communication over newly created subnets for LPARs created in different physical systems, a
support ticket must be created for configuring the internal routing. However, LPARs created in the same
physical system can communicate over new subnets without a support ticket. If using cloud connection
subnets, internal routing is automatically configured without the need for a support ticket. Note that
issues with HAIP have been observed with cloud connection subnets when RAC LPARs are created in
different physical systems, which is explained in detail in issue #3 of the "Issues and Solution" section
of this document.
For more information on creating the support ticket, refer to the following:
• IBM Cloud support
on ibm.com
• Getting help and support on ibm.com
Following is the sample template for creating the support ticket.
Subject: “<Data_Center>” - Configure internal Routing for 3 subnets
Datacenter: Dallas 12 - all communication local to that DC
Service name : Power Systems Virtual Server-DAL12-MEGASCALE
Please configure internal routing for following 3 private subnets (ora_pub_172_40_10,
ora_prv1_10_80_10, ora_prv2_10_90_10) and provide subnet name and vlan details

April 2023
21
SubnetName
VLAN
ID
CIDR
IP range
Gateway
DNS
ora_pub_172_40_10
3377
172.40.10.0/24
172.40.10.2 -
172.40.10.240
172.40.10.1
NA
ora_prv1_10_80_10
3378
10.80.10.0/28
10.80.10.2 -
10.80.10.14
10.80.10.1
NA
ora_prv2_10_90_10
3388
10.90.10.0/28
10.90.10.2 -
10.90.10.14
10.90.10.1
NA
To ensure that the Oracle grid software works properly, it is necessary that the Oracle public and private
network interfaces have consistent names across all nodes based on their role. The ‘rendev’ command
can be utilized to rename network interfaces.
The following example depicts the usage of command ‘rendev’ to rename interface en1 to interface
en10.
rendev -l <current_name> -n <new_name>
For example, if you want to change en1 to en10, run below commands:
# ifconfig en1 down detach
# rendev -l ent1 -n ent10
# rendev -l en1 -n en10
# ifconfig en10 up
It is recommended to use en0 as the oracle RAC public interface and en1, en2(, en3) as Oracle RAC
private interconnect interfaces. Any other interfaces should be named as enX where X > 2 (3).
Following is the output of ‘ifconfig -a’ on both nodes, where en0 is used for Oracle RAC public and en2
and en3 are used for Oracle RAC private interconnects. It is recommended to use jumbo frames for RAC
interconnect interfaces. By default, jumbo frames are enabled on Power Systems Virtual Server network
interfaces, to verify use ping -s 8200 <remote server on interconnect interface>’ command.
From node oraprod-1
# ifconfig -a
en0:
flags=1e084863,81cc0<UP,BROADCAST,NOTRAILERS,RUNNING,SIMPLEX,MULTICAST,GROUPRT,64BIT,CHEC
KSUM_OFFLOAD(ACTIVE),LARGESEND,CHAIN>
inet 172.40.10.2 netmask 0xffffff00 broadcast 172.40.10.255
tcp_sendspace 262144 tcp_recvspace 262144 rfc1323 1
en1:
flags=1e084863,81cc0<UP,BROADCAST,NOTRAILERS,RUNNING,SIMPLEX,MULTICAST,GROUPRT,64BIT,CHEC
KSUM_OFFLOAD(ACTIVE),LARGESEND,CHAIN>
inet 10.80.10.9 netmask 0xfffffff0 broadcast 10.80.10.15
tcp_sendspace 262144 tcp_recvspace 262144 rfc1323 1
en2:
flags=1e084863,81cc0<UP,BROADCAST,NOTRAILERS,RUNNING,SIMPLEX,MULTICAST,GROUPRT,64BIT,CHEC
KSUM_OFFLOAD(ACTIVE),LARGESEND,CHAIN>
inet 10.90.10.11 netmask 0xfffffff0 broadcast 10.90.10.15
tcp_sendspace 262144 tcp_recvspace 262144 rfc1323 1
en3:
flags=1e084863,81cc0<UP,BROADCAST,NOTRAILERS,RUNNING,SIMPLEX,MULTICAST,GROUPRT,64BIT,CHEC
KSUM_OFFLOAD(ACTIVE),LARGESEND,CHAIN>
inet6 fe80::480:1ff:fe6d:5d2a/64
tcp_sendspace 262144 tcp_recvspace 262144 rfc1323 1
April 2023
22
sit0: flags=8100041<UP,RUNNING,LINK0>
inet6 ::/96
lo0:
flags=e08084b,c0<UP,BROADCAST,LOOPBACK,RUNNING,SIMPLEX,MULTICAST,GROUPRT,64BIT,LARGESEND,
CHAIN>
inet 127.0.0.1 netmask 0xff000000 broadcast 127.255.255.255
inet6 ::1%1/128
tcp_sendspace 131072 tcp_recvspace 131072 rfc1323 1
From node oraprod-2
# ifconfig -a
en0:
flags=1e084863,81cc0<UP,BROADCAST,NOTRAILERS,RUNNING,SIMPLEX,MULTICAST,GROUPRT,64BIT,CHEC
KSUM_OFFLOAD(ACTIVE),LARGESEND,CHAIN>
inet 172.40.10.131 netmask 0xffffff00 broadcast 172.40.10.255
tcp_sendspace 262144 tcp_recvspace 262144 rfc1323 1
en1:
flags=1e084863,81cc0<UP,BROADCAST,NOTRAILERS,RUNNING,SIMPLEX,MULTICAST,GROUPRT,64BIT,CHEC
KSUM_OFFLOAD(ACTIVE),LARGESEND,CHAIN>
inet 10.80.10.8 netmask 0xfffffff0 broadcast 10.80.10.15
tcp_sendspace 262144 tcp_recvspace 262144 rfc1323 1
en2:
flags=1e084863,81cc0<UP,BROADCAST,NOTRAILERS,RUNNING,SIMPLEX,MULTICAST,GROUPRT,64BIT,CHEC
KSUM_OFFLOAD(ACTIVE),LARGESEND,CHAIN>
inet 10.90.10.12 netmask 0xfffffff0 broadcast 10.90.10.15
tcp_sendspace 262144 tcp_recvspace 262144 rfc1323 1
en3:
flags=1e084863,81cc0<UP,BROADCAST,NOTRAILERS,RUNNING,SIMPLEX,MULTICAST,GROUPRT,64BIT,CHEC
KSUM_OFFLOAD(ACTIVE),LARGESEND,CHAIN>
inet6 fe80::6cc6:a9ff:fee4:8633/64
tcp_sendspace 262144 tcp_recvspace 262144 rfc1323 1
sit0: flags=8100041<UP,RUNNING,LINK0>
inet6 ::/96
lo0:
flags=e08084b,c0<UP,BROADCAST,LOOPBACK,RUNNING,SIMPLEX,MULTICAST,GROUPRT,64BIT,LARGESEND,
CHAIN>
inet 127.0.0.1 netmask 0xff000000 broadcast 127.255.255.255
inet6 ::1%1/128
tcp_sendspace 131072 tcp_recvspace 131072 rfc1323 1
Validating RAC interconnect interfaces for large packets transmission
From oraprod-1 verifying the ping of oraprod-2 RAC interconnect IP addresses
# ping -s 8200 10.80.10.8
PING 10.80.10.8 (10.80.10.8): 8200 data bytes
8208 bytes from 10.80.10.8: icmp_seq=0 ttl=255 time=0 ms
8208 bytes from 10.80.10.8: icmp_seq=1 ttl=255 time=0 ms
8208 bytes from 10.80.10.8: icmp_seq=2 ttl=255 time=0 ms
8208 bytes from 10.80.10.8: icmp_seq=3 ttl=255 time=0 ms
8208 bytes from 10.80.10.8: icmp_seq=4 ttl=255 time=0 ms
8208 bytes from 10.80.10.8: icmp_seq=5 ttl=255 time=0 ms
8208 bytes from 10.80.10.8: icmp_seq=6 ttl=255 time=0 ms
^C
--- 10.80.10.8 ping statistics ---
7 packets transmitted, 7 packets received, 0% packet loss
round-trip min/avg/max = 0/0/0 ms
# ping -s 8200 10.90.10.12
PING 10.90.10.12 (10.90.10.12): 8200 data bytes
8208 bytes from 10.90.10.12: icmp_seq=0 ttl=255 time=0 ms
8208 bytes from 10.90.10.12: icmp_seq=1 ttl=255 time=0 ms

April 2023
23
8208 bytes from 10.90.10.12: icmp_seq=2 ttl=255 time=0 ms
8208 bytes from 10.90.10.12: icmp_seq=3 ttl=255 time=0 ms
8208 bytes from 10.90.10.12: icmp_seq=4 ttl=255 time=0 ms
8208 bytes from 10.90.10.12: icmp_seq=5 ttl=255 time=0 ms
^C
--- 10.90.10.12 ping statistics ---
6 packets transmitted, 6 packets received, 0% packet loss
round-trip min/avg/max = 0/0/0 ms
Oracle RAC implementation
This section covers installation of Oracle grid infrastructure software at 19.17 level on the two LPARs.
Refer to Oracle installation guide for information on hardware and software requirements for Oracle grid
19c installation.
Operating system readiness
To prepare for the installation, it is necessary to perform the same operating system prerequisite tasks
that are identical to those required for on-premises RAC deployment. These tasks must be performed on
both RAC nodes, oraprod-1 and oraprod-2.
+ Change the value for maxuproc parameter, increase /tmp size and change the limit values
# chdev -l sys0 -a maxuproc="16384"
# chsec -f /etc/security/limits -s "default" -a fsize=-1 -a core=-1 -a cpu=-1 -a data=-1
-a rss=-1 -a stack=-1 -a nofiles=-1
# chfs -a size=+5G /tmp
+ Set I/O completion ports to “Available” state
# mkdev -l iocp0
# chdev -l iocp0 -P -a autoconfig='available'
# lsdev |grep iocp
+ Create user and groups for oracle grid installation. This demo utilizes a simplified
role separation between grid and oracle users. Please review the Oracle installation
documentation for best practices of a production deployment.
# mkgroup id=300 adms=root oinstall
# mkgroup id=400 adms=root dba
# mkuser id=300 pgrp=oinstall groups="oinstall,dba" grid
+ Set password for grid user and change the permissions
# passwd grid
# chuser capabilities=CAP_NUMA_ATTACH,CAP_BYPASS_RAC_VMM,CAP_PROPAGATE grid
# chuser capabilities=CAP_NUMA_ATTACH,CAP_BYPASS_RAC_VMM,CAP_PROPAGATE root
+ Create filesystem for oracle grid software on the two 90GB hdisks
# mkvg -S -s 16 -y oravg hdisk1 hdisk2
# mklv -ex -y oralv -t jfs2 oravg 150G
# crfs -v jfs2 -A yes -d oralv -m /u01
# mount /u01
+ Create directories for staging the Oracle grid software, where GRID_HOME=/u01/19c/grid
and ORACLE_BASE=/u01/base
# mkdir -p /u01/19c/grid
# mkdir /u01/base
# mkdir /u01/app
# chown -R grid:oinstall /u01
# chmod -R 775 /u01
April 2023
24
+ Enable Berkely packets
# cd /dev
# rm bpf*
# tcpdump -D
# ls -l /dev/bpf*
+ Network parameter setting
# no -p -o sb_max=4194304
# no -p -o udp_sendspace=65536
# no -p -o udp_recvspace=655360
# no -p -o tcp_sendspace=262144
# no -p -o tcp_recvspace=262144
# no -rK -o ipqmaxlen=512
+ Oracle installation requires swap space >16GB. We have created new swap space on oravg
volume group and oravg having “PP Size” as 16M (lsvg -L oravg).
# mkps -a -n -s4 oravg
# chlv -x 1024 paging00
# chps -s '1020' paging00
# swap -l
device maj,min total free
/dev/paging00 47, 3 16384MB 16383MB
/dev/hd6 10, 2 512MB 499MB
Note: If you want to increase the default swap device(hd6) which is part of rootvg, refer
to Appendix.
+ Update RAC node names in /etc/hosts file on both LPARs
# RAC Public (en0)
172.40.10.2 oraprod-1
172.40.10.131 oraprod-2
# RAC Private #1 (en1)
10.80.10.9 oraprod1-priv1
10.80.10.8 oraprod2-priv1
# RAC Private #2 (en2)
10.90.10.11 oraprod1-priv2
10.90.10.12 oraprod2-priv2
+ Update /etc/netsvc.conf file on both LPARs
hosts = local , bind
+ Install filesets
# cd /usr/sys/inst.images/installp/ppc
# installp -aXYgd . bos.net.tcp.bind
# installp -aXYgd . bos.net.tcp.bind_utils
# installp -aXYgd . xlfrte.aix61
+ Change below OS parameters
# vmo -r -o vmm_klock_mode=2
# schedo -r -o vpm_xvcpus=2

April 2023
25
Note: As per Oracle's best practices, role separation is recommended between users with access to
GRID_HOME (ASM) and Oracle DB users with access to ORACLE_HOME (DB). However, in this demo, we
did not fully implement role separation. For production deployments, please refer to the installation
documentation from Oracle for the recommended groups and users to be implemented for
recommended role separation.
To prepare for the installation, ensure that the local and shared disks reserve policy is set to
‘no_reserve’ if not already set to that value. For shared disks that will be used for ASM, change the raw
hdisk ownership and permissions.
Note that all hdisk used for ASM disk groups were named ‘hdiskasmXXX’, so we can easily change the
properties for just those disks using the for loop below.
# lsattr -El hdiskasmcrs1|grep reserve_policy
reserve_policy single_path Reserve Policy True+
# cd /dev
# for i in hdiskasm*
do
chdev -l $i -a reserve_policy=no_reserve
chown grid:dba /dev/r$i
chmod 660 /dev/r$i
done
# lsattr -El hdiskasmcrs1|grep reserve_policy
reserve_policy no_reserve Reserve Policy True+
Perform the changes mentioned earlier on all ASM disks present on both nodes.
DNS resolution check
To install RAC, you need to have SCAN and Node-VIPs. You can host a DNS server that provides these
SCAN and Node-VIPs either within Power Systems Virtual Server or outside of it. If the DNS server is
outside of Power Systems Virtual Server, then you need to establish a Cloud Connection to enable RAC
VMs to communicate with the DNS server.
Figure 22. Power Systems Virtual Server connection to IBM cloud.
IBM Power Systems
Virtual Server
IBM Direct Link cloud
connection
IBM Cloud
oraprod-1
oraprod-2
X86 VM
DNS

April 2023
26
The x86 VM hosted on IBM cloud classic infrastructure acts as the DNS server in our setup, and the
Oracle RAC nodes oraprod-1 and oraprod-2 communicate with it using the IBM Direct Link Cloud
Connection service. To ensure proper name resolution, update the file ‘/etc/resolv.conf’ on both nodes
with the nameserver details and verify the resolution of the scan name and node VIP name.
# cat /etc/resolv.conf
nameserver 10.61.69.12
search solutiontest.cloud.ibm.com
+ Verify SCAN name resolution
# nslookup orac-scan
Server: 10.61.69.12
Address: 10.61.69.12#53
Name: orac-scan.solutiontest.cloud.ibm.com
Address: 172.40.10.245
Name: orac-scan.solutiontest.cloud.ibm.com
Address: 172.40.10.243
Name: orac-scan.solutiontest.cloud.ibm.com
Address: 172.40.10.244
+ Verify node vips resolution
# nslookup oraprod1-vip
Server: 10.61.69.12
Address: 10.61.69.12#53
Name: oraprod1-vip.solutiontest.cloud.ibm.com
Address: 172.40.10.241
# nslookup oraprod2-vip
Server: 10.61.69.12
Address: 10.61.69.12#53
Name: oraprod2-vip.solutiontest.cloud.ibm.com
Address: 172.40.10.242
We can also configure DNS on a separate AIX LPAR in our workspace. Refer to Appendix for configuring DNS
on AIX Power Systems Virtual Server LPAR.
Install and configure Oracle Grid Infrastructure
To install and configure Oracle Grid Infrastructure, perform the following steps:
• Download the Oracle Grid Infrastructure (GI) software from the
Oracle Technology Network
(OTN) or Oracle Software Delivery Cloud site.
• Push the downloaded software to one of the RAC nodes using the bridge server, which can be
another AIX LPAR with a public IP or the Direct Link service for a secure connection between on-
premises network or IBM cloud to Power Systems Virtual Server.
Note that it is the customer's responsibility to adhere to the Oracle License and usage requirements.
Additionally, in this demo, we apply the Release Update (19.17) patch during the installation.
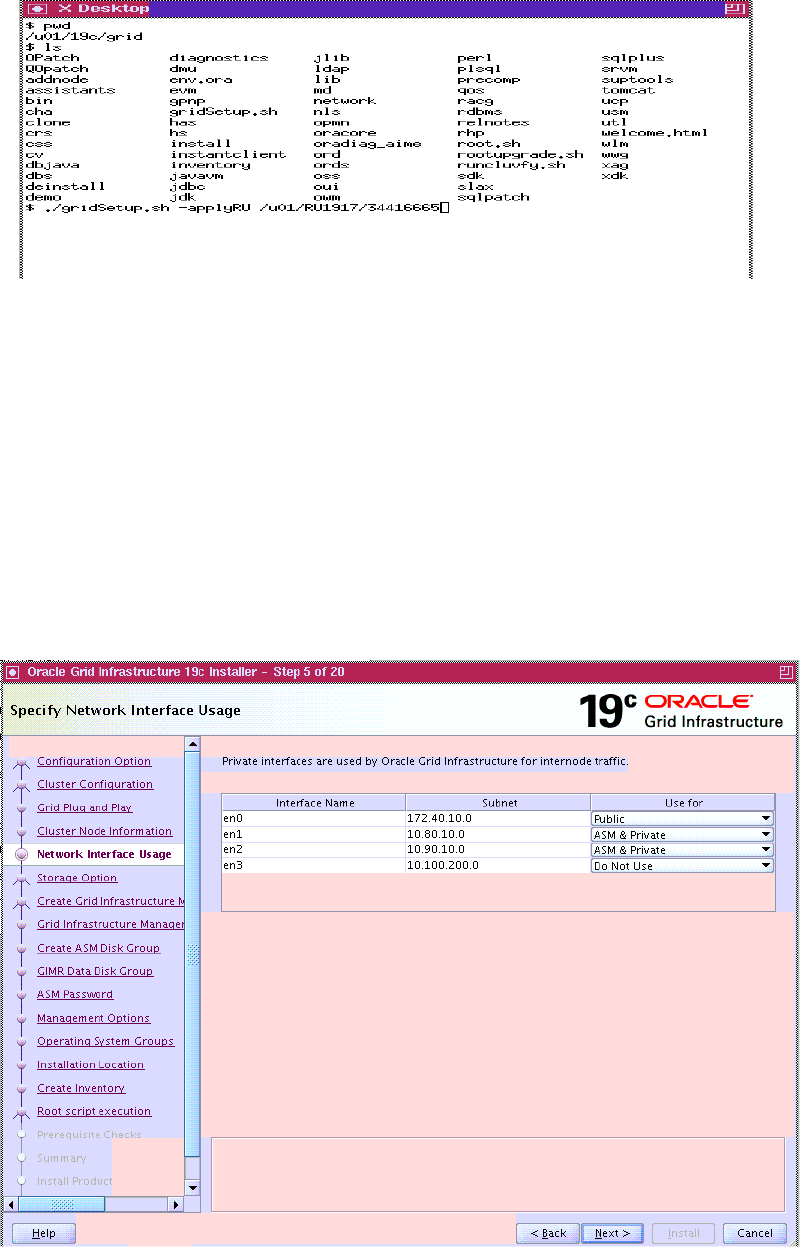
1. On node ‘oraprod-1’, extract grid infrastructure 19.3 installation file to ‘/u01/19c/grid’ which
acts as GRID_HOME and update OPatch to the latest version.

April 2023
27
Refer to How To Download And Install The Latest OPatch(6880880) Version (Doc ID 274526.1)
for more information.
unzip AIX.PPC64_193000_grid_home.zip -d /u01/19c/grid/
2. Download the latest Release Update patch from My Oracle Support (MOS) and extract it on
oraprod-1.
mkdir /u01/RU1917/
unzip p34416665_190000_AIX64-5L.zip -d /u01/RU1917/
3. Setup a password less SSH connectivity between the two RAC nodes for grid installation user.
/u01/19c/grid/oui/prov/resources/scripts/sshUserSetup.sh -advanced -
noPromptPassphrase -user grid -hosts "oraprod-1 oraprod-2"
4. Run the ‘runcluvfy.sh’ script and verify that no errors are reported.
/u01/19c/grid/runcluvfy.sh stage -pre crsinst -n oraprod-1,oraprod-2 -verbose -
method root
Proceed with installing the Oracle Grid Infrastructure either using the silent option via response file or the
GUI once runcluvfy.sh does not report any errors.
5. Create / modify the response file with necessary cluster details and then install the grid software
using the silent option. In this installation we patch the GRID_HOME to the 19.17 RU prior to
configuring the GRID software stack using the ‘-applyRU’ option. Use “-ignorePrereqFailure”
option if you want to ignore any precheck failures during installation.
/u01/19c/grid/gridSetup.sh -applyRU /u01/RU1917/34416665 -ignorePrereqFailure -
silent -responseFile /u01/19c/grid/install/response/editgridsetup.rsp
For the GUI option, install vncserver on RAC node oraprod-1 using ‘dnf’ or YUM - “dnf install tightvnc-
server”. In case you donot have access to external network, obtain vnc package manually from
AIX-
Toolbox.
To utilize the graphical interface when the public network was enabled during LPAR creation, an SSH
tunnel via putty can be used. It is important to note that direct VNC traffic on the 59xx port is not
allowed due to the firewall between the Internet and the Power Systems Virtual Server LPARs. Another
option is to configure vnc on the bridge or jumpstart server and use the ‘xhost’ command to export the
X11 display to the bridge server.
The following screen captures depicts Oracle 19c grid software installation via the GUI interface and it
should be noted that not all the installation screens were included in this demonstration.
1. Change into the directory where the grid infrastructure was extracted to ($GRID_HOME) and
invoke “./gridSetup.sh” script as user grid.
April 2023
28
Figure 23. Install / patch grid software.
2. Wait for the RU patch to be applied, it may take several minutes.
Select Configure Oracle Grid Infrastructure for a New cluster Configure an Oracle
Standalone Cluster.
3. On the ‘Grid Plug and Play Information’ page enter the cluster name as ‘oraprod-cluster’, scan
name as ‘orac-scan’ and scan port as ‘1521’.
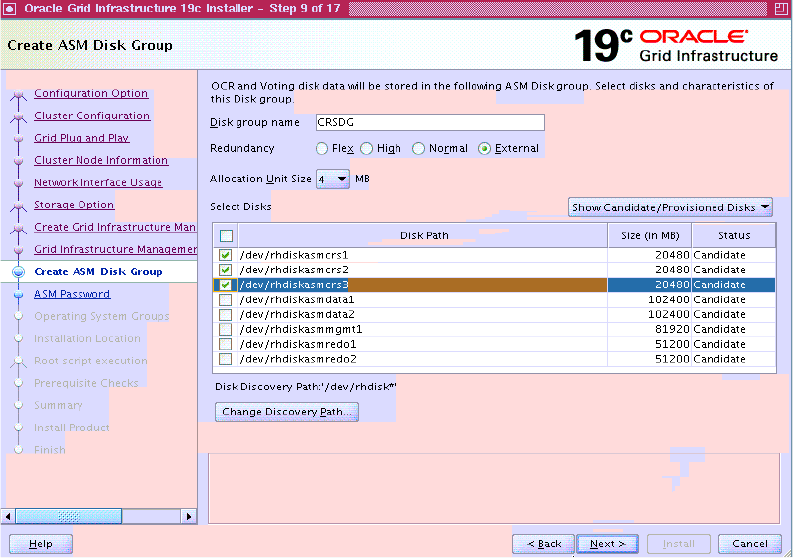
4. On the ‘Cluster Node Information’ page, add the nodes (oraprod-1 & oraprod-2) and their
corresponding node VIPs (oraprod1-vip & oraprod2-vip) to be part of the cluster.
Select Public and Private networks for the Oracle RAC cluster. Subnet 172.40.10.X is used as
oracle RAC public and 10.80.10.X, 10.90.10.X subnets are used as oracle RAC private
interconnect. Any other interfaces / subnets must be marked as “Do Not Use” as shown in
Figure 24.
Figure 24. Select public and private networks.
April 2023
29
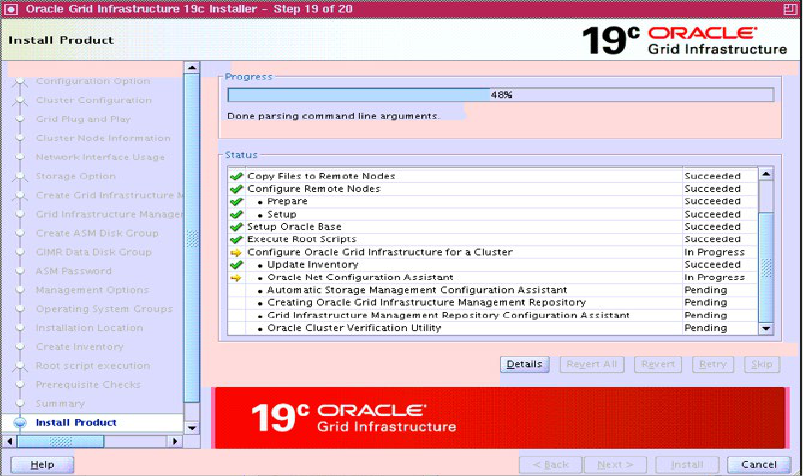
5. Specify the disk-group name for OCR and Voting and select the corresponding shared disks
‘/dev/rhdiskasmcrs[1-3]’. Use “CRSDG” disk-group for storing OCR and voting disk data. Ensure
that External Redundancy is selected for CRSDG diskgroup as the IBM FlashSystem providing
the SAN storage is highly available as ASM mirroring is not required in this configuration.
In Power Systems Virtual Server, you can implement an extended configuration with two sets of
shared disks supported by different backend FlashSystems, as two ASM failure groups, and
utilize ASM Normal redundancy to mirror the data. This provides additional protection against a
potential IBM FlashSystem failure, but requires double the amount of SAN storage. This
configuration is not typically used in Power Systems Virtual Server.
Figure 25. Create OCR and Vote Disk group.
6. On the ‘Operating System Groups’ page, select ‘oinstall’ for OSDBA group and ‘dba’ for OSASM
group.
Specify ORACLE_BASE as "/u01/base" and inventory directory as ‘/u01/app/oraInventory’.
Ensure that all necessary prechecks are passed before starting the installation.
Click install and execute ‘root.sh’ and ‘orainstRoot.sh’ on all nodes when prompted.
April 2023
30
Figure 26. Grid Installation in Progress.
7. Wait for the installation to finish, then use the following commands to verify cluster health.
From first node ‘oraprod-1’
# /u01/19c/grid/bin/crsctl stat res -t -init
--------------------------------------------------------------------------------
Name Target State Server State details
--------------------------------------------------------------------------------
Cluster Resources
--------------------------------------------------------------------------------
ora.asm
1 ONLINE ONLINE oraprod-1 Started,STABLE
ora.cluster_interconnect.haip
1 ONLINE ONLINE oraprod-1 STABLE
ora.crf
1 ONLINE ONLINE oraprod-1 STABLE
ora.crsd
1 ONLINE ONLINE oraprod-1 STABLE
ora.cssd
1 ONLINE ONLINE oraprod-1 STABLE
ora.cssdmonitor
1 ONLINE ONLINE oraprod-1 STABLE
ora.ctssd
1 ONLINE ONLINE oraprod-1 ACTIVE:0,STABLE
ora.diskmon
1 OFFLINE OFFLINE STABLE
ora.drivers.acfs
1 ONLINE ONLINE oraprod-1 STABLE
ora.evmd
1 ONLINE ONLINE oraprod-1 STABLE
ora.gipcd
1 ONLINE ONLINE oraprod-1 STABLE
ora.gpnpd
1 ONLINE ONLINE oraprod-1 STABLE
ora.mdnsd
1 ONLINE ONLINE oraprod-1 STABLE
ora.storage
1 ONLINE ONLINE oraprod-1 STABLE
--------------------------------------------------------------------------------
April 2023
31
From second node ‘oraprod-2’
# /u01/19c/grid/bin/crsctl stat res -t -init
--------------------------------------------------------------------------------
Name Target State Server State details
--------------------------------------------------------------------------------
Cluster Resources
--------------------------------------------------------------------------------
ora.asm
1 ONLINE ONLINE oraprod-2 STABLE
ora.cluster_interconnect.haip
1 ONLINE ONLINE oraprod-2 STABLE
ora.crf
1 ONLINE ONLINE oraprod-2 STABLE
ora.crsd
1 ONLINE ONLINE oraprod-2 STABLE
ora.cssd
1 ONLINE ONLINE oraprod-2 STABLE
ora.cssdmonitor
1 ONLINE ONLINE oraprod-2 STABLE
ora.ctssd
1 ONLINE ONLINE oraprod-2 ACTIVE:0,STABLE
ora.diskmon
1 OFFLINE OFFLINE STABLE
ora.drivers.acfs
1 ONLINE ONLINE oraprod-2 STABLE
ora.evmd
1 ONLINE ONLINE oraprod-2 STABLE
ora.gipcd
1 ONLINE ONLINE oraprod-2 STABLE
ora.gpnpd
1 ONLINE ONLINE oraprod-2 STABLE
ora.mdnsd
1 ONLINE ONLINE oraprod-2 STABLE
ora.storage
1 ONLINE ONLINE oraprod-2 STABLE
--------------------------------------------------------------------------------
To check the status of the CRS controlled resources from any node
# /u01/19c/grid/bin/crsctl stat res -t
--------------------------------------------------------------------------------
Name Target State Server State details
--------------------------------------------------------------------------------
Local Resources
--------------------------------------------------------------------------------
ora.LISTENER.lsnr
ONLINE ONLINE oraprod-1 STABLE
ONLINE ONLINE oraprod-2 STABLE
ora.helper
OFFLINE OFFLINE oraprod-1 STABLE
OFFLINE OFFLINE oraprod-2 IDLE,STABLE
ora.net1.network
ONLINE ONLINE oraprod-1 STABLE
ONLINE ONLINE oraprod-2 STABLE
ora.ons
ONLINE ONLINE oraprod-1 STABLE
ONLINE ONLINE oraprod-2 STABLE
ora.proxy_advm
OFFLINE OFFLINE oraprod-1 STABLE
OFFLINE OFFLINE oraprod-2 STABLE
--------------------------------------------------------------------------------
Cluster Resources
--------------------------------------------------------------------------------
ora.ASMNET1LSNR_ASM.lsnr(ora.asmgroup)
1 ONLINE ONLINE oraprod-1 STABLE
2 ONLINE ONLINE oraprod-2 STABLE
ora.ASMNET2LSNR_ASM.lsnr(ora.asmgroup)
1 ONLINE ONLINE oraprod-1 STABLE
2 ONLINE ONLINE oraprod-2 STABLE

April 2023
32
ora.LISTENER_SCAN1.lsnr
1 ONLINE ONLINE oraprod-2 STABLE
ora.LISTENER_SCAN2.lsnr
1 ONLINE ONLINE oraprod-1 STABLE
ora.LISTENER_SCAN3.lsnr
1 ONLINE ONLINE oraprod-1 STABLE
ora.MGMT.dg(ora.asmgroup)
1 ONLINE ONLINE oraprod-1 STABLE
2 ONLINE ONLINE oraprod-2 STABLE
ora.MGMTLSNR
1 ONLINE ONLINE oraprod-1 169.254.34.204 10.80.10.9
10.90.10.11,
STABLE
ora.OCRVOT.dg(ora.asmgroup)
1 ONLINE ONLINE oraprod-1 STABLE
2 ONLINE ONLINE oraprod-2 STABLE
ora.asm(ora.asmgroup)
1 ONLINE ONLINE oraprod-1 Started,STABLE
2 ONLINE ONLINE oraprod-2 Started,STABLE
ora.asmnet1.asmnetwork(ora.asmgroup)
1 ONLINE ONLINE oraprod-1 STABLE
2 ONLINE ONLINE oraprod-2 STABLE
ora.asmnet2.asmnetwork(ora.asmgroup)
1 ONLINE ONLINE oraprod-1 STABLE
2 ONLINE ONLINE oraprod-2 STABLE
ora.cvu
1 ONLINE ONLINE oraprod-1 STABLE
ora.mgmtdb
1 ONLINE ONLINE oraprod-1 Open,STABLE
ora.oraprod-1.vip
1 ONLINE ONLINE oraprod-1 STABLE
ora.oraprod-2.vip
1 ONLINE ONLINE oraprod-2 STABLE
ora.qosmserver
1 ONLINE ONLINE oraprod-2 STABLE
ora.rhpserver
1 OFFLINE OFFLINE STABLE
ora.scan1.vip
1 ONLINE ONLINE oraprod-2 STABLE
ora.scan2.vip
1 ONLINE ONLINE oraprod-1 STABLE
ora.scan3.vip
1 ONLINE ONLINE oraprod-1 STABLE
--------------------------------------------------------------------------------
Issues and solutions
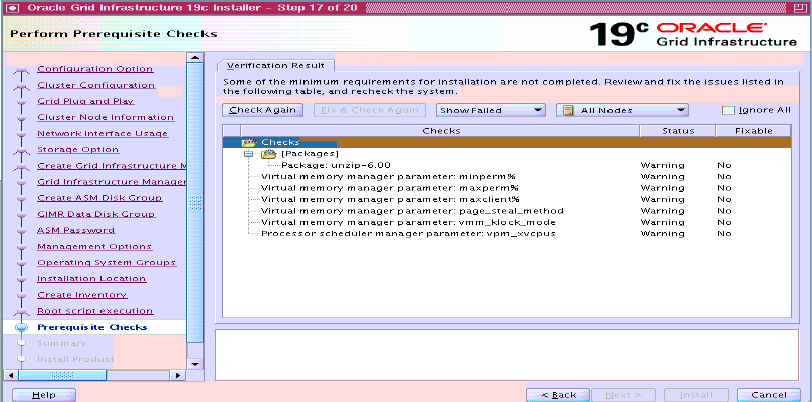
Issue 1: Failed Operating system checks.
During precheck on AIX 73 TL0 SP1, some of the OS checks may fail even after providing the root
credentials. This is a known issue that has been addressed in APAR IJ38518, and a fix is included in
SP2. If you encounter the below check failures even after applying the fix, you can ignore the checks and
continue with the installation.
Refer to IJ38518: AIX 7.3 CHANGED SOME PERFORMANCE TUNING COMMANDS' DEFAULT OUTPUT
on
ibm.com for more information on this issue.
April 2023
33
Figure 27. Grid prechecks.
Issue 2: ASMNET resource unable to start.
After root.sh execution you may observe that ‘ora.asmnetX.asmnetwork’ resource is in ‘ONLINE
OFFLINE’ state as shown.
ora.asm(ora.asmgroup)
1 ONLINE ONLINE rac93 Started,STABLE
2 ONLINE OFFLINE STABLE
ora.asmnet1.asmnetwork(ora.asmgroup)
1 ONLINE OFFLINE STABLE
2 ONLINE OFFLINE STABLE
ora.asmnet2.asmnetwork(ora.asmgroup)
1 ONLINE OFFLINE STABLE
2 ONLINE OFFLINE STABLE
The file crsd_orarootagent_root.trc shows:
============================
2022-10-31 13:02:38.420 :CLSDYNAM:3600: [ora.asmnet1.asmnetwork]{0:3:6} [check] ifname=en0
2022-10-31 13:02:38.420 :CLSDYNAM:3600: [ora.asmnet1.asmnetwork]{0:3:6} [check]
subnetmask=255.255.255.0
2022-10-31 13:02:38.420 :CLSDYNAM:3600: [ora.asmnet1.asmnetwork]{0:3:6} [check]
subnetnumber=172.30.1.0
2022-10-31 13:02:38.420 :CLSDYNAM:3600: [ora.asmnet1.asmnetwork]{0:3:6} [check] primary
IpAddress=172.30.1.125
2022-10-31 13:02:38.458 :CLSDYNAM:3600: [ora.asmnet1.asmnetwork]{0:3:6} [check] (null) category:
-1, operation: failed system call, loc: ioctl, OS error: 68, other:
2022-10-31 13:02:38.458 :CLSDYNAM:3600: [ora.asmnet1.asmnetwork]{0:3:6} [check] OsdsException
getting NetMask
2022-10-31 13:02:38.458 :CLSDYNAM:3600: [ora.asmnet1.asmnetwork]{0:3:6} [check] Not an IPV4
address
2022-10-31 13:02:38.458 :CLSDYNAM:3600: [ora.asmnet1.asmnetwork]{0:3:6} [check] (null) category:
-1, operation: failed system call, loc: inet_aton, OS error: 68, other:
The following is an example of the 'ifconfig' command output of a problematic node where the IPv6
interface is listed as en1, en2 is used as the RAC public network, and en3 and 4 interfaces are used as
the RAC private interconnect.

April 2023
34
# ifconfig -a
en0:
flags=1e084863,814c0<UP,BROADCAST,NOTRAILERS,RUNNING,SIMPLEX,MULTICAST,GROUPRT,64BIT,CHECKSUM
_OFFLOAD(ACTIVE),LARGESEND,CHAIN>
inet 192.168.193.164 netmask 0xfffffff8 broadcast 192.168.193.167
tcp_sendspace 262144 tcp_recvspace 262144 rfc1323 1
en1:
flags=1e084863,814c0<UP,BROADCAST,NOTRAILERS,RUNNING,SIMPLEX,MULTICAST,GROUPRT,64BIT,CHECKSUM
_OFFLOAD(ACTIVE),LARGESEND,CHAIN>
inet6 fe80::406e:50ff:fe3b:158f/64
tcp_sendspace 262144 tcp_recvspace 262144 rfc1323 1
en2:
flags=1e084863,816c0<UP,BROADCAST,NOTRAILERS,RUNNING,SIMPLEX,MULTICAST,GROUPRT,64BIT,CHECKSUM
_OFFLOAD(ACTIVE),LARGESEND,CHAIN,MONITOR>
inet 172.40.10.2 netmask 0xffffff00 broadcast 172.40.10.255
tcp_sendspace 262144 tcp_recvspace 262144 rfc1323 1
en3:
flags=1e084863,816c0<UP,BROADCAST,NOTRAILERS,RUNNING,SIMPLEX,MULTICAST,GROUPRT,64BIT,CHECKSUM
_OFFLOAD(ACTIVE),LARGESEND,CHAIN,MONITOR>
inet 10.80.10.9 netmask 0xffffff00 broadcast 10.80.10.255
tcp_sendspace 262144 tcp_recvspace 262144 rfc1323 1
en4:
flags=1e084863,816c0<UP,BROADCAST,NOTRAILERS,RUNNING,SIMPLEX,MULTICAST,GROUPRT,64BIT,CHECKSUM
_OFFLOAD(ACTIVE),LARGESEND,CHAIN,MONITOR>
inet 10.90.10.11 netmask 0xffffff00 broadcast 10.90.10.255
tcp_sendspace 262144 tcp_recvspace 262144 rfc1323 1
sit0: flags=8100041<UP,RUNNING,LINK0>
inet6 ::192.168.193.164/96
lo0:
flags=e08084b,c0<UP,BROADCAST,LOOPBACK,RUNNING,SIMPLEX,MULTICAST,GROUPRT,64BIT,LARGESEND,CHAI
N>
inet 127.0.0.1 netmask 0xff000000 broadcast 127.255.255.255
inet6 ::1%1/128
tcp_sendspace 131072 tcp_recvspace 131072 rfc1323 1
To resolve the issue of IPv6 causing problems when listed at the beginning or between Oracle RAC
interfaces, there are several possible workarounds.
• Use the ‘rendev’ tool to rename the IPV6 interface to the last interface (for example, rename it
to en10).
• Create a dummy IPV4 address on the existing IPV6 interface.
• Bring down or delete the IPV6 interface.
Oracle has created Bug 34781773 to address this issue. Refer to oracle support Doc ID 2942411.1
and
apply the patch #34781773.
Issue 3: Inability to Reach HAIP Between Oracle RAC Nodes
After executing the root.sh scripts on LPARs created on different physical servers in Power Systems
Virtual Server with cloud connection subnets for Oracle RAC private interconnects, HAIPs were found to
be unreachable between RAC nodes. The cloud connection option eliminates the need for creating
support tickets for network connectivity between nodes. However, the current automation scripts in
Power Systems Virtual Server do not establish full connectivity required by HAIP at this time. The Power
Systems Virtual Server team is updating the automation scripts to address the issue. In the meantime,
users can create a support case to resolve the issue.
For more information on cloud connection refer to Managing IBM Cloud connections
.

April 2023
35
Conclusion
Power Systems™ Virtual Server is a Power Systems enterprise Infrastructure as a Service (IaaS) offering
providing the same hardware and software stack as utilized in an on-premises customer data center. In
this paper we demonstrated the simple and efficient creation and management of even quite complex
environments like an Oracle Real Application cluster deployment in Power Systems Virtual Server.
Power Systems™ Virtual Server provides an agile environment where resources can be quickly scaled up
and down as needed and costs are based on consumption. Additional advanced features like capturing
of VMs for easy duplication, backups to Cloud Object Storage or storage level replication to a Power
Systems Virtual Server data center in a different region were not covered in this paper but are available
as well.
Appendix
A) Extend rootvg by adding new disk for increasing the swap device(hd6) space
By default, the swap device hd6 is configured on rootvg and rootvg LUN size is 25G. To increase
the swap space(hd6) using chps, we need to extend the rootvg. The rootvg has PP size as 32MB
(lsvg rootvg|grep 'PP SIZE'). Here hdiskX is the newly added disk.
chvg -t 4 rootvg
extendvg -f rootvg hdiskX
chlv -x 1024 hd6
chps -s '500' hd6
B) DNS Setup on AIX LPAR
LPAR oracln created for configuring DNS.
For more information on DNS configuration on AIX refer to
Configuring domain name servers -
BIND version 9.4
• Create and update the /etc/named.conf file.
# cat /etc/named.conf
server 172.40.10.205 {
transfer-format many-answers;
};
logging{
channel simple_log {
file "/var/log/named/bind.log" versions 3 size 5m;
severity warning;
print-time yes;
print-severity yes;
print-category yes;
};
category default{
simple_log;
};
};
zone "example.cloud.ibm.com" in {
type master;
file "/etc/named.example.data";
};
zone "10.40.172.in-addr.arpa" in {
type master;
April 2023
36
file "/etc/named.example.rev";
};
zone "0.0.127.in-addr.arpa" in {
type master;
file "/etc/named.local";
};
zone "." in {
type hint;
file "/etc/named.root.hints";
};
• Create the data file /etc/named.example.data mentioning node VIPs and scan VIPs.
# cat /etc/named.example.data
;
;primary host data file for example.cloud.ibm.com - oracln.example.cloud.ibm.com
;
@ IN SOA oracln.example.cloud.ibm.com.
root.oracln.example.cloud.ibm.com. (
9 ;serial
3600 ;refresh
600 ;retry
3600000;expire
86400 ;minimum
)
;name servers for example.cloud.ibm.com
IN NS oracln.example.cloud.ibm.com
oracln IN A 172.40.10.205
localhost IN A 127.0.0.1
loopback IN A 127.0.0.1
;RAC cluster Oracle public IPS, static SCAN and Node VIP names
oraprod-1 IN A 172.40.10.2
oraprod-2 IN A 172.40.10.131
oraprod1-vip IN A 172.40.10.241
oraprod2-vip IN A 172.40.10.242
orac-scan IN A 172.40.10.243
A 172.40.10.244
A 172.40.10.245
• Start the dns daemon named on oracln AIX LPAR.
# startsrc -s named
# lssrc -s named
Subsystem Group PID Status
named tcpip 24576224 active
On Oracle RAC nodes ‘oraprod-1’, ‘oraprod-2’, update the ‘resolv.conf’ file with
nameserver details and verify the scan name and node VIP name resolution.
# cat /etc/resolv.conf
nameserver 172.30.1.205
search example.cloud.ibm.com
+ Verify SCAN name resolution
# nslookup orac-scan
Server: 172.30.1.205
Address: 172.30.1.205#53
Name: orac-scan.example.cloud.ibm.com
Address: 172.30.1.243
Name: orac-scan.example.cloud.ibm.com
Address: 172.30.1.244
Name: orac-scan.example.cloud.ibm.com

April 2023
37
Address: 172.30.1.245
+ Verify node vips resolution
# nslookup oraprod1-vip
Server: 172.30.1.205
Address: 172.30.1.205#53
Name: oraprod1-vip.example.cloud.ibm.com
Address: 172.30.1.241
# nslookup oraprod2-vip
Server: 172.30.1.205
Address: 172.30.1.205#53
Name: oraprod2-vip.example.cloud.ibm.com
Address: 172.30.1.242
Resources
The following websites can be used as references to complement the information presented in this
document:
• AIX with Oracle Database on IBM Power Systems Considerations for Performance and Stability -
All Releases
• Power Systems Virtual Servers documentation
• Oracle Grid Infrastructure 19c on AIX
• Oracle DB & RAC 19c on IBM AIX : Tips and Considerations
• IBM Power servers: Engineered for agility
• IBM Publications Center
• IBM Documentation
• IBM Redbooks
About the authors
Bhargavaram Akula is a Technical Consultant with IBM India, Hyderabad. He collaborates with the
specialists at the IBM Oracle International Competency Center based in Foster City, and Redwood
Shores, California, US, working on Oracle product certifications on IBM Power Systems™ running AIX. He
has extensive experience with Oracle Products. You can reach him at bhargaku@in.ibm.com
.
Bobichan P John is a Senior Software Engineer at IBM Infrastructure where he is driving Power
Systems™ Hybrid Cloud IaaS Offerings' features/technologies validation and usage patterns. Primary
areas of expertise are Hybrid Cloud IaaS, PowerVM, Power Systems management, Solution integration,
IBM Application Platform, Middle-ware, and Database products. You can reach him at
jbobicha@in.ibm.com
.
Sougata Sarkar is Senior Staff Software Engineer working for the Integrated Software Systems Test
Team for 10 years. He is working as the ISST AIX/VIOS lead . His areas of expertise are Shared Storage
Pools, Virtual IO Server, PowerVM virtualization concepts like NPIV, vSCSI, Remote Restart, Logical

April 2023
38
Partition Mobility, Oracle Database and DB2. He has good knowledge on AIX features like Live Kernel
Update. He can be reached at sougsark@in.ibm.com
.
Wayne Martin is the IBM Systems Technology Solutions Manager responsible for the technology
relationship between IBM and the developers of Oracle Corporation’s Database and Fusion Middleware
for all IBM server brands. His responsibilities include driving the mutual understanding between IBM
and Oracle on technology innovations that will generate benefits for mutual customers, managing the
process of getting that technology implemented in products and ensuring that availability of the
products to customers is timely. Wayne has held a variety of technical and management roles at IBM
that have focused on driving enhancements of ISV software that uses IBM’s mainframe, workstation,
and scalable parallel products.
Ralf Schmidt-Dannert
has over 31 years of experience in IT and currently works as a Principal IT
Specialist with the IBM Advanced Technology Group, ISV on Power – Oracle team. He has spent most of
his career focused on very large database environments, designing, testing, and troubleshooting
solutions for high performance, high availability and near zero data loss disaster recovery. Ralf has
helped customers in the financial, telecommunications, utility, retail and manufacturing industries
choose appropriate database and infrastructure technologies to meet their business requirements for
databases up to a hundred terabytes in size. Most recently, he has been evaluating and implementing
technologies to provide Database as a Service to customers running their databases on IBM Power
servers - on-prem or in IBM Power Systems Virtual Server infrastructure - off-prem.

April 2023
39
© Copyright IBM
Corporation 2023 IBM
Systems
3039 Cornwallis Road
RTP,
NC
27709
Produced in the United States of America
IBM, the IBM logo and ibm.com are trademarks or registered trademarks of the Internal Business Machines
Corporation in the United States, other countries, or both. If these and other IBM trademarked items are
marked on their first occurrence in the information with a trademark symbol (® or ™), these symbols indicate
U.S. registered or common law trademarks owned by IBM at the time this information was published. Such
trademarks may also be registered or common law trademarks in other countries. A current list of IBM
trademarks is available on the web at “Copyright and trademark information” at
https://www.ibm.com/legal/copytrade
Copyright © 2021 Oracle Corporation 500 Oracle Parkway Redwood Shores, CA 94065
Oracle and Java are registered trademarks of Oracle and/or its affiliates. Other names may be trademarks of
their respective owners. Other product, company or service names may be trademarks or service marks of
others.
References in the publication to IBM products or services do not imply that IBM intends to make them
available in all countries in the IBM operates.
Please recycle.
