SUPER DAMPER
6718 Whitestone Rd • Gwynn Oak, Maryland 21207 • (410) 298-4343
[email protected] • www.atiracing.com
Installation Instructions
Additional tools required depending on damper
Torx T-45 Plus Bit
3/8-12 Point Socket
5/16-12 Point Socket
Red Loctite
Allen Wrench Sockets
Required tools
Damper Installation Tool (ATI Part #918999)
Torx T-40 Plus Bit (ATI Part #918997)
Torque Wrench (ft/lbs & in/lbs)
Blue Loctite 242 or similar grade
7/2023
STEP KEY
3/16” to 1/4” Step key for
reducing cranks with 1/4”
keyway to 3/16” ..............918992
KEYS
3/16 x 3/16 x 2-7/8” .........916325
1/4 x 1/4 x 2-7/8” .............916326
1/8 x 1/8 x 5-3/4”
(Mandrels) ......................916327
NOTE: SOME DAMPERS AND HUBS ARE ALREADY ASSEMBLED
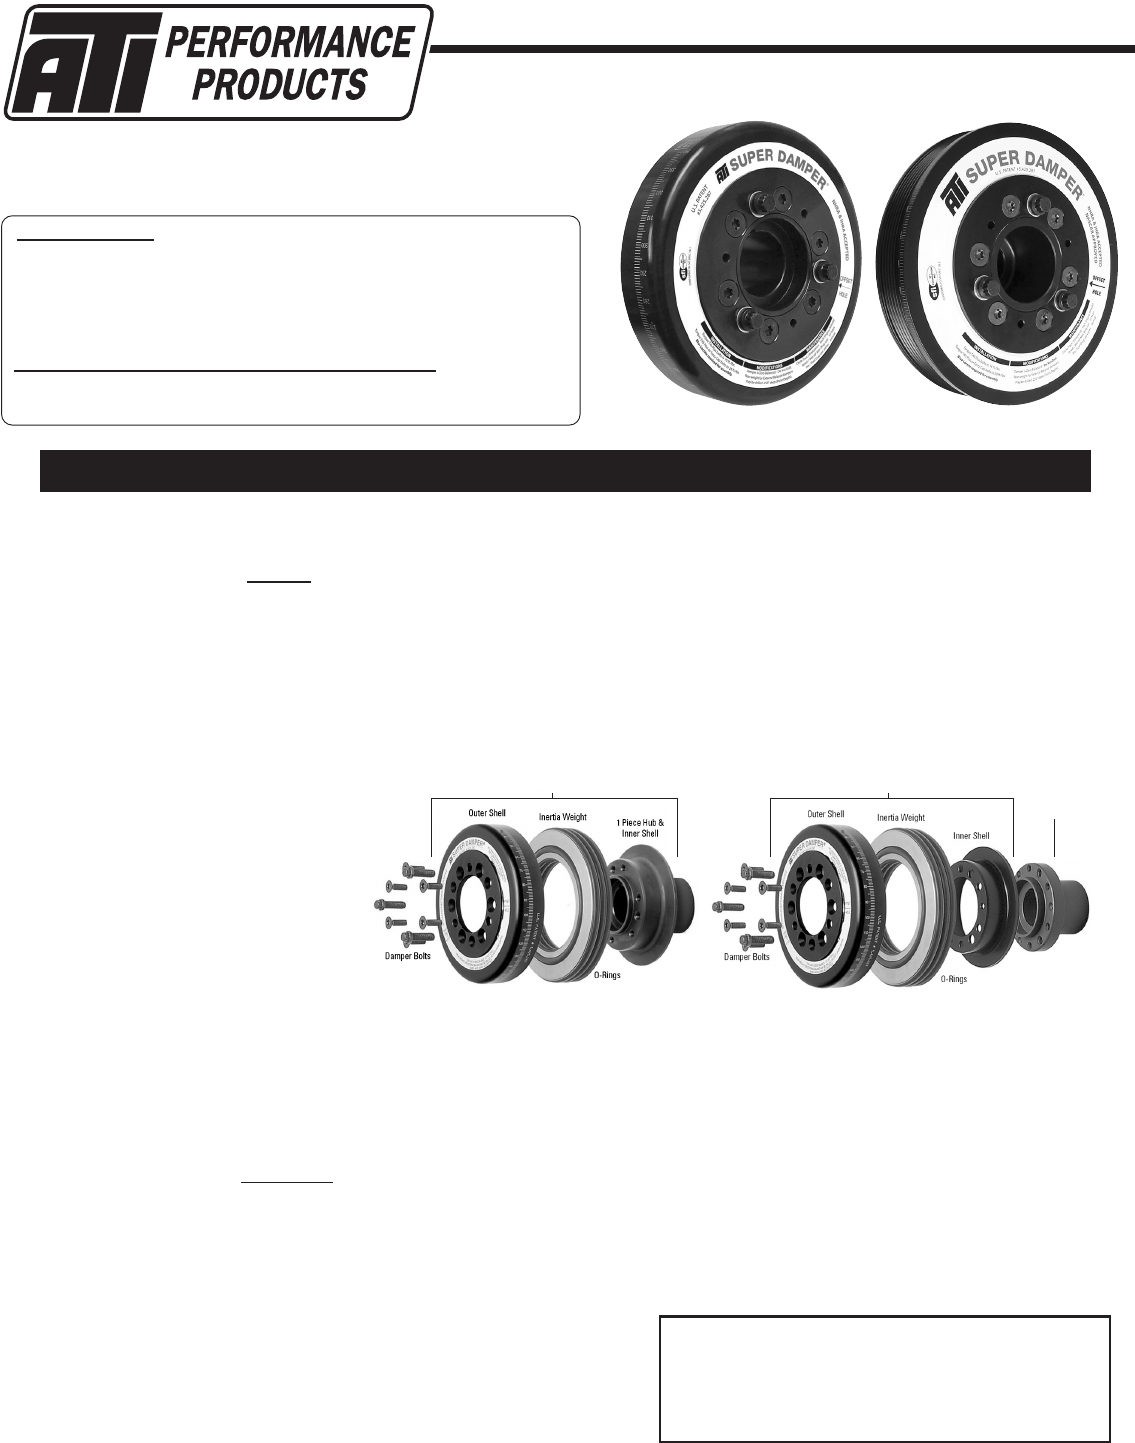
Assembling the Damper to the Hub
NOTE: ALL BOLT HOLES MUST HAVE A BOLT INSTALLED!
NOTE: DAMPER HUB TO DAMPER SHELL ASSEMBLY FIT IS HELD TO AN EXTREMELY CLOSE TOLERANCE!
1. TheSuperDampershellassemblyisindexedtothecrankhubwithanosetholemarkedbyanindentdimpleonthefrontof
the hub and on the front face decal with an arrow. These must be aligned for proper assembly.
2. Starttheshellassemblyontothehub.Ifyouareexactlystraight,itwillsliprighton.Youmayneedtouseyourpalmsorststo
getittogoallthewayback.Iftheshellassemblyisonenoughtostarttwo5/16"countersunkatheadbolts,doso180ºapart
and "snug" them slightly opposite of each other so the shell will "walk" on. The shell assembly will slip on as the bolts straighten
it out.
3.Start the remaining (7), (4) or (2), (depending on pulley bolt conguration dampers) countersunk at head screws in the
remainingtaperedholes.Drawthedamperassemblyontothehubevenly.Torquethesix(6)atheadscrewsto16ft/lbs.For
any 5 1/2" damper with 1/4"-20/28 bolts, torque to 120 in/lbs utilizing Loctite. Be sure to use Blue Loctite 242 and the proper
Torx-40 Plus Bit in most cases. T40 PLUS is not a standard Torx bit. Using a standard bit will ruin the head of the bolt and
make it nearly impossible to ever get the bolts out.
Installation of the Damper and Hub Assembly to the Crankshaft
1. Inspectyourcrankshaftforburrs,nicks,etc.andletocleanup.
2. Stoneorleaslightradiusontheendtobreakthesharpedge.
3. Inspect your key and replace as necessary.
4. It is highly recommended that you use anti-seize lubricant on the
crankshaft before hub installation.
5. Presstofthehubtothecrankshaftisvitaltotransferharmonicstothedamperassembly.(Seepage2.)
Shell Assembly
Comes complete
Hub is
separate
1-PIECE HUB 2-PIECE HUB
For part numbers 917060, 917062,
917080, 917740, 917780, 917781,
917788, any 5.5" damper or 1-piece
damper, DO NOT disassemble
damper for installation. Install as a
complete damper. Remove pulley
bolts, install pulley, apply Loctite
and torque all bolts.
Proceed directly to Installation of
Damper and Hub Assembly section.
** FOR CHEVY LS DAMPERS SEE ADDITIONAL INFORMATION ON PAGE 3 **
2
For Dampers with Aluminum Hubs
Alldamperswithaluminumhubshavea.002”presstbetweenthecrankandthehub.DONOTALTERthepresstof
thehubinanyway!Thepresstonthealuminumhubisslightlytightertocompensatefortheelasticityofthealuminum.
Inspectyourcrankshaftandthecrankkeyasdescribedontherstpageoftheseinstructions.Alsouseanti-seize
lubricant on the crank snout.
Toexpandthehubslightlyandhelpitslideontothecrank,placethehubinboilingwateroronacoeepotburnerforve
(5) minutes. Use gloves to handle the hub after it has been heated. After installing the hub, allow time for it to cool.
Fordamperboltinstallation,refertoPage2(Step9)fornon-LSapplicationsorPage3(bottom)forLSapplications.
IF USING A FRONT COVER TEFLON SEAL, YOU MUST HAVE A “SPEEDY SLEEVE” OR A STEEL HUB.
Recommended press is as follows:
Crankshaft OD Interference Crankshaft OD Interference
1.0000" - 1.2500"-------------.0009" to .0012" 1.6010" - 2.0000"-------------.0006" to .0008"
1.2510" - 1.3750"-------------.0008" to .0011" 2.0010" - 2.5000"-------------.0005" to .0007"
1.3750" - 1.6000"-------------.0007" to .0009"
GMcranksaretypicallytotolerance+/-.0001(onetenthousandth).IfyouareusinganOEMGMcrankyoucanhonethedamper
hub as follows:
Big Block:--------------------------hone to 1.5993" +/- .0001"
Small Block:-----------------------hone to 1.2453" +/- .0001"
Onallothercranks,thecrankmustbecheckedwithmicrometersandthehubwithadialboregaugetoverifyt.MostOEM
cranks are held to +/- .0002" while most aftermarket cranks are held to +/- .0005." Hub bores are tight to accommodate
aftermarket cranks and most hubs will require honing. ATI can perform this service for $40.
Do not hone aluminum hubs!
6. Rear mounted accessory pulleys must be placed on the rear of the hub before installation. Insert (3) 5/16” or 3/8” pulley bolts
through the front pulley, through the damper body, and through the 3/8” tapped holes in the hub. If the damper is supplied with
3/8” rear pulley bolts (i.e. supercharger versions), they will pass through a hole clearanced for this size bolt in the hub. These
bolts will thread into the pulley and draw it up tight to the rear of the damper hub. Use Blue Loctite 242 on all bolts and torque
any3/8”boltsto28-30ft/lbsand5/16”boltsto16-18ft/lbsevenly.NOTE:Chrysler(6)boltdampersarenotfurnishedwith
pulley bolts.
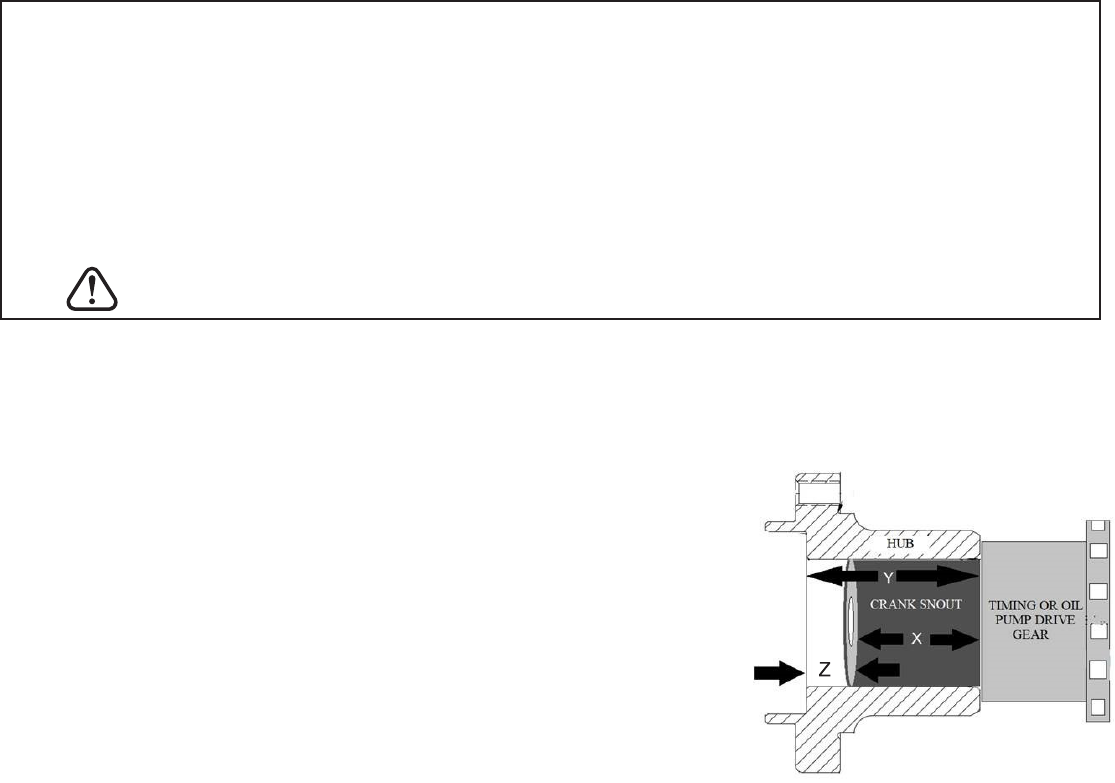
7. MAKE CERTAIN THE HUB IS ALL THE WAY ON!
Measure the length of the snout from the face of the timing/oil pump drive gear
to the tip of the snout. Record this number as "X". Measure the bore length of the
hub from the crank bolt washer surface to the back edge of the hub where it will
contact the timing/oil pump drive gear or timing gear. Record this number as "Y".
Subtract "x" from "y". This will give you the measurement from the tip of the snout
to the washer surface which you must have when the damper is fully installed on
the crank.
Y: ______ - X: ______ = Z: _______
"Z" is the correctmeasurementneededtoconrmthehubisfullyseated.
8. Press the Damper and Hub assembly onto the crankshaft using the proper install tool. (Refer to your damper Installer/
Removal tool instructions to properly press the damper onto the crank.) If you wish to install the hub onto the crankshaft
rst,usetheproperdamperinstaller.Becauseofclearanceissuesinsomevehicles,andcertaindesignfeaturesonsome
ATIdampers,thehubmayneedtobeinstalledbeforethedamperbodycanbeaxedtothehub(i.e.somesportcompacts
andsomeCumminsdiesels).
9. InstalltheOEMcrankbolt(s)alongwiththecorrelatingwasher(s),orcrankbolts(s)andwasher(s)andtorquetothe
manufacturer’sspecicationsunlesspartnumberspecicinstructionsspecifyotherwise(i.e.aftermarketLSdamperbolts).
A SINGLE LONG BOLT SHOULD NOT BE USED TO RETAIN THE DRIVE MANDREL AND THE DAMPER TO THE
CRANK AS IT WILL STRETCH WHEN IT GETS HOT
10.Forfrontmountedcrankpulleyswiththe3/8”12-point,5/16”Torx,5/16”12-point,orbuttonheadboltsprovided,insertthe
(3) (4) or (6) bolts through the pulley and into the hub. Make sure the pulley is located on the damper hub ID or on the face
register. Use Blue Loctite 242 on all bolts and torque any 3/8” bolts to 28-30 ft/lbs, and 5/16” bolts to 16-18 ft/lbs evenly.
THESE BOLTS MUST BE INSTALLED AND TORQUED EVEN IF NO PULLEYS ARE USED.

Using the GM Factory Bolt
Note! The GM factory bolt is a 1-time use bolt! Directions are for installing a new bolt only,
part #951499 for wet sump LS or part #951500 for LS7 / LS9.
1. UsetheATIPuller/Installer(#918999)withAdapterforLS1/LS7(#918999SC)orsimilar
damperpullertoinstallthehub.Useyouroldbolttonishseatingthedamperandtorqueto
240 ft/lbs, then remove and discard it.
2. Use and install a new bolt and tighten to 37 ft/lbs. We recommend Blue or Red Loctite here if you are doing any
high performance driving with this engine.
3. This step is to get a reference on the front of the engine: With the torque wrench hanging at the spot where the 37
ft/lbs was achieved, reference 140° clockwise for another tightening cycle. Put a mark or a piece of tape where you
need to tighten.
4. Then go another 140° from the 37 ft/lbs starting point and you are now tight.
If using an aftermarket ARP Bolt for any LS damper, or bolt #951359 (16 mm, 10.9 grade
supplied with
Super Damper part numbers 918844, 918845, 918852 and 918855):
1. Apply high temperature RTV to both sides of the washer prior to installation.
2. Use 262 Red Loctite and tighten to 230 ft/lbs.
3
Installing the Hub onto the Crank
1. Remove existing damper bolt and damper from engine. If necessary, use ATI Puller/Installer (#918999) with Adapter for LS1/
LS7(#918999SC)orsimilardamperpuller.Save your old bolt for installation in the last step. (OEM bolts are a 1-time
use only bolt - do not reuse as a primary bolt!)
2. Depending on the year of your engine / vehicle you may notice a thin “friction” washer behind the damper hub in front of the
rstoilpumpgear.Thiswashershouldbeleftinplaceandwillnothurtanythingifyouareorarenotpinningorkeyingyour
crankshaft. If your year does not have this washer and you would like to add one, there must be a machined “lip” provision on
the back of the hub to do so.
If you are not using a key or pin, you must ll the key slot with some high temp silicone so no oil leaks past the
damper bolt washer!
3. This would be the time to consider whether or not you would like to pin the crankshaft as the ATI damper has a keyway in the
hubunlikemanyOEMdampers.Ifyoudecidetopinthecrankshaft(amustforsupercharging),youwillneedtopurchase
ATI’sLSCrankPinDrillFixture(#918993)andfollowtheinstructionsenclosedwiththeFixturebeforeproceeding.
4. Ifarearpulley(i.e.4ribA/C)isbeingused,itmustbeplacedonthebackofthehubbeforethehubispressedonthecrank.
Installing an Accessory Pulley
Note! MostLSdamperswillincludeafrontorrearpulleyforOEMaccessorydrives.Ifnofrontpulleyisusedand/oryou
choose not to use a front or rear mounted pulley, you MUST still put the additional (3) bolts through the unit for a total of (9)
boltsholdingtheassemblytogetherandtothehub.Someapplicationsrequirethedampershellorhubtobemodiedifarear
pulley is not used.
Damper damage will occur if you do not use at least nine bolts total!
IMPORTANT: A NEW CRANK BOLT SHOULD BE USED FOR ALL INSTALLATIONS
*** ATTENTION: Manual transmission Corvette LS1, 2 & 3 owners ***
A very small number of manual transmission-equipped Corvettes had a balance issue from the factory. GM
addressed the issue with a 1/4” dowel installed in the OEM damper. ATI's Super Damper will not accept this
dowel. The problem this dowel corrected was a small vibration felt in the shifter at a certain RPM. Take note
when removing your OEM damper to see if you have this factory installed dowel. Remember - the ATI damper
CAN NOT be drilled to install this dowel. It will damage the damper.
Installing Super Dampers on Chevy LS/LT Engines
Additional tools you may need: 1/2" 6 or 12 point socket, Torx 45 Plus bit
LS CRANK BOLTS
OEM GM - LS1/2/3/6, L92
& '2014
+
LT1/ LT4 Wet Sump .........951499
OEM GM - LS3/7/9
& '2014
+
LT1/ LT4 Dry Sump...........951500
LS1/2/3/6 and L92 - ARP .................951503
Balance Information
Internal balance units have each part of the damper accurately balanced to 1/10 oz. in. before assembly. These units should
not be on the crank for balancing as the inertia weight may not be centered until the engine starts. External balance GM 400
and454areidenticallybalancedtoGMservicebalancespecications.Thehubandweightonlyshouldbeinstalledforcrank
balance.Sinceallhub/weightsareidenticallybalanced,ATIoersaslipthubandweightassemblyforboththe400and454,
allowing you to balance before pressing the damper on the crank.
Replacing a damper on a previously balanced engine requires match balancing the Super Damper to the existing damper,
unless the previous damper was an unaltered ATI unit. ATI can match balance a Super Damper to your existing unit accurately
and promptly.
Should you need to return your Super Damper for any reason -- overhaul, repair, etc. -- please call ATI at
410-298-4343 or 800-284-3433 to receive your RGA # (Returned Goods Authorization).
4
Removal of your Super Damper
1. Remove at least (3) bolts from the damper on an equal pattern for use with the damper installer/removal tool.
2. Refer to the Damper Installer/Removal tool instructions to remove the damper.
To Tell When Your Damper Needs New Rubber
DragRaceEnginessubjectthedampertolowtotalcyclesatintermittentintervals.Elastomersinallunitsunder800HPwill
easilymeetthetenyearrecommendation.NitrousandDragRacingenginesinexcessof800HPthatseefrequenttrackuse
should be inspected and rebuilt annually.
CircleTrackEnginessubjectthedampertogreatlyincreasedcycletimesforanextendedperiodoftimeandthedamper
requires more attention.
NASCARCup,XnitySeriesandTrucks-Mostteamsareinspectingrubberaftereachraceorevery2races(2.5to3.75
millioncycles).Enginesrunningshorterracescaneasilygo2.5millioncyclessincethedamperisnotsubjectedtolengthy,
continuous cycles under extreme heat.
Recommended Maintenance Schedules
ForStreet and Drag Race motors (up to 800 HP), damper should be rebuilt every 10 years
Above 800 HP, Blown or Nitrous racing, damper should be rebuilt annually
Circle Track / Endurance dampers should be rebuilt during each engine rebuild
For5.5" Dampers, rebuild depends on HP: 400 HP- every 5 years, 400-600 HP-every 2 to 3 years 600+ HP- every year
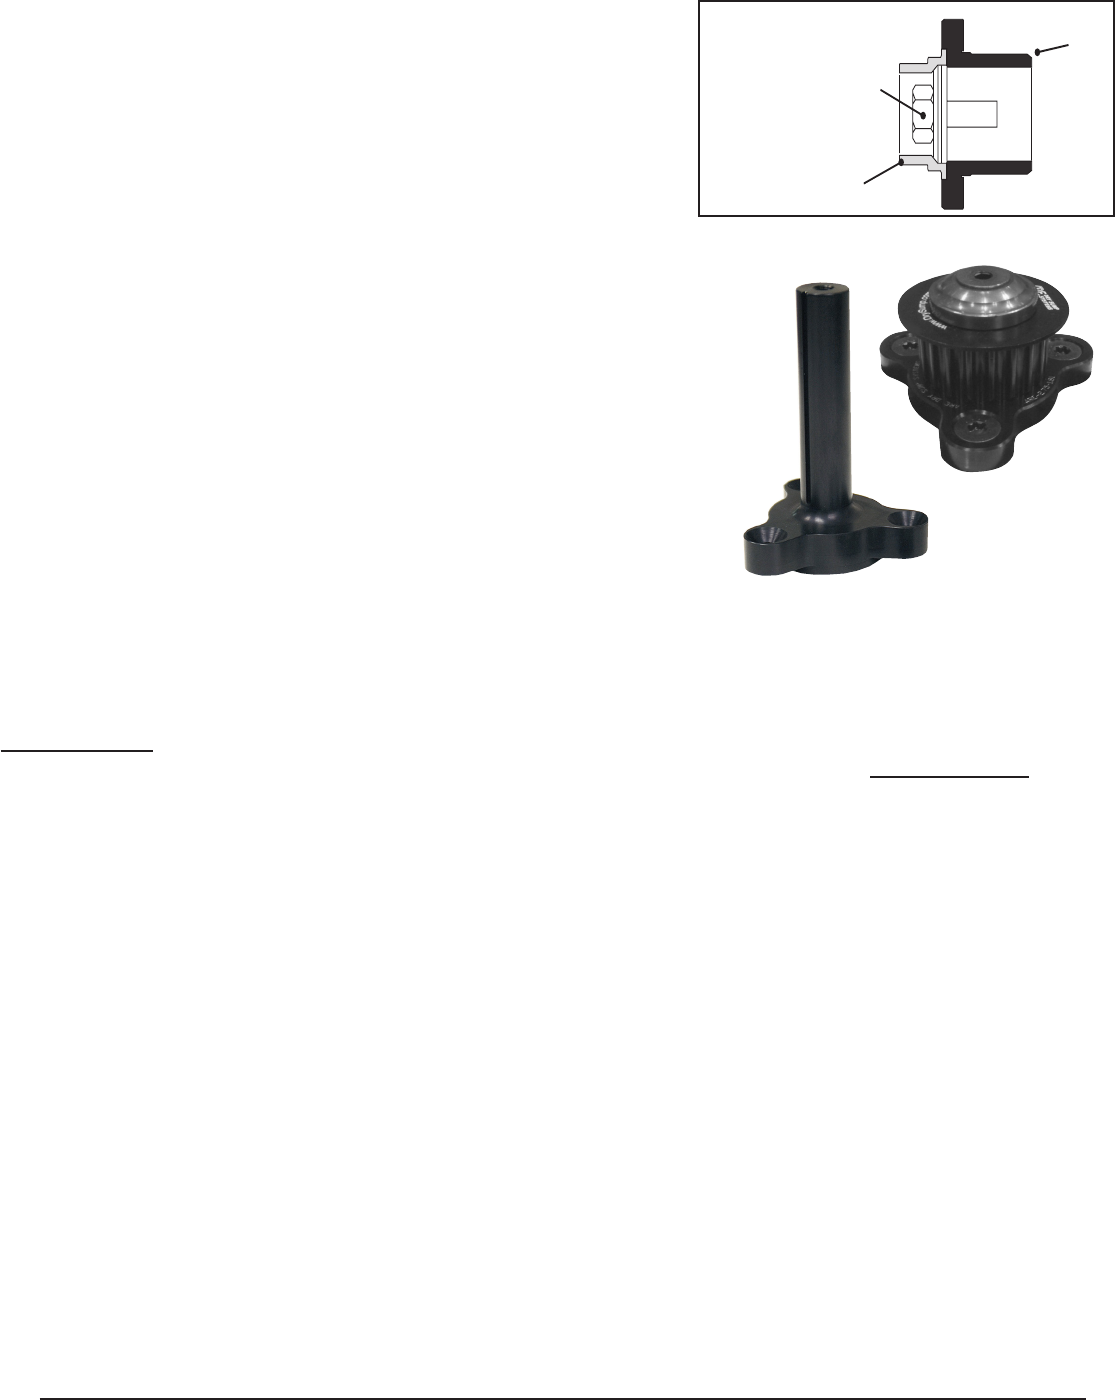
Damper Mandrels and Mandrel Bolts
ATI dampers, in all cases, must be retained to the crank with a standard length bolt torqued to
themanufacturer'sspecications.Longboltsusedtoretaindrivemandrelsstretchwhenthey
get hot and should not be used. ATI manufactures special hubs for many engines to put the bolt
belowushandallowdrivemandrelstobelocatedandboltedtothe3pulleyboltholes.ATI
can duplicate your existing long bolt drives to bolt-on mandrel type in one week without plating.
Mandrels are drilled and tapped to retain pulleys and dry sump drives. Mandrels, pulleys, and
accessory drives are available from:
ATI ................................. 800-284-3433
AREDrySump .............. 916-652-5282
Jones Belt Drives........... 610-847-2028
Moroso........................... 203-453-6571
PetersonFluidSystems 800-926-7867
RaceMate ...................... 800-671-1711
STANDARD LENGTH
CRANKSHAFT BOLT
HUB EXTENSION
New high strength
bolt included!
HUB
Assembling Blower Drive Hubs
1. Install "hub" portion by itself on the crank with the proper installation tool.
2.Install"crankshaftbolt"andtorquetotheOEMtorquegure.
3. Install the "hub extension" by lightly tapping it with a rubber mallet if needed.
4. Install the damper body with provided 5/16" countersunk bolts to 16 ft/lbs
with blue Loctite
®
5. Install user furnished pulley with provided 3/8" 12-point bolts to 32 ft/lbs
with blue Loctite
®

CAUTION!
NEW BALANCING INFORMATION
#919128 / #919103 2/2019
IMPORTANT INFORMATION!
CUSTOMERS MUST
INSPECT ALL GOODS UPON ARRIVAL!
ATI must be notied of all claims for loss or damaged merchandise
within 5 days of receipt. Contact us at 800-284-3433.
After receiving your order, please keep all packaging material until you
arecompletelysatisedwiththepurchase.Noreturnsofmerchandise
will be accepted without prior consent. Unless other arrangements are
made with ATI, all freight must be insured and charges prepaid. Any
returns for credit must be in new and resalable condition and in the
original packaging. Loose bolts in the box will damage a damper!
Credit may be delayed or declined for items that are not
packaged suciently and arrive damaged.
6FlatHeadScrewsshouldbeinstalledwith#242(blue)Loctite
and torqued as follows.
Allen Head: 16 ft/lbs Use a Torx 40 Plus.
CapScrews:28-32ft/lbs
3 ferry cap screws can be used for pulley or trigger mounting
but MUST be installed and torqued if no pulleys are used.
ON CHRYSLER DAMPERS:
Capscrewsforpulley mountingarenotsupplied,butmust
be installed. Length of bolts must be 3/8" longer than stock.
Bolt ends may be very close to the timing cover at the back
of the damper hub. Bolts should not go through the damper
hub with the pulley installed.
Torque 28-32 ft/lbs.
RECOMMENDED MAINTENANCE:
■
StreetandDragUse(upto800HP):Every10years
■
Above800HP,BlownorNitrous:Annually
■
CircleTrack/Endurance:eachenginerebuild
■
For5.5"dampers,rebuilddependsonHP:
• 400 HP: every 5 years
• 400-600 HP: every 2 to 3 years
• 600+ HP: yearly
BALANCE:
Zero balance units should not be drilled and should
not be on the crankshaft for balancing. Install the
damper at engine assembly. Since the inertia weight
in the Super Damper is not bonded, it may not be on
center until the engine is started. The damper may
show out of balance until the engine reaches 2000
RPMthersttimeandtheinertiaweightcentersitself.
EXTERNAL BALANCE:
Parts#917740and#917741EBigBlockand#917080Small
Block are balanced to factory specs within one-tenth inch
ounce. However, MOST engines are factory balanced with the
DAMPERandFLYWHEELinstalled.Dampersmayhavebeen
drilled from factory specs to balance the engine at the factory.
IfyouhavetheORIGINALdamperthatcameontheengine
OR your engine was balanced with a replacement damper
installed, it is desirable to match-balance the new damper to
your old unit provided the outer ring of your existing unit has not
moved. When balancing external balance units, use only the
hub and the weight. The inertia ring and outer shell have been
factory zero balanced. ALL OTHER EXTERNAL BALANCE
UNITS ARE APPROXIMATELY 10 GRAMS HEAVY AND
MUST BE BALANCED WITH YOUR ENGINE.
*** See pages 7 and 8 for Warranty and Product Information!***
Limited Warranty
Except as set forth herein, ATI Performance Products, Inc. and/or ATI Tech and Logistics, Inc.(ATI)
warrants to the original retail buyer that all products manufactured by ATI and purchased in the
United States or its territories from ATI or authorized ATI dealers will be free from defects in material
and workmanship. This warranty will extend for a period of 90 days from the date of the original
invoice, unless otherwise agreed. ATI will repair or replace, at their option, any part, assembly or
portion thereof which ATI's examination discloses to be defective. Shipping costs are not included.
Disassembly by anyone other than an authorized ATI representative voids all warranties. Use
of any automatic transmission uid or oil that is not red in color will void all warranties!
This includes all transmissions, converters, gearsets, valve bodies and all other transmission
parts. ATI MAKES NO REPRESENTATIONS OR WARRANTIES WHATSOEVER WITH
RESPECT TO THE GOODS, INCLUDING BUT NOT LIMITED TO: (A) ANY WARRANTY OF
MERCHANTABILITY, OR (B) ANY WARRANTY OF FITNESS FOR PARTICULAR PURPOSE
WHETHER DIRECT OR INDIRECT, EXPRESS OR IMPLIED BY LAW, COURSE OF DEALING,
COURSE OF PERFORMANCE, USAGE OF TRADE, OR OTHERWISE. ATI makes no warranty
as to the quality, nish, accuracy or tolerance compliance or with any safety codes required by any
governmental or quasi governmental body or as to the efciency, productivity or performance of
any of the goods. There are no warranties that extend beyond the description on the face hereof.
Buyer expressly agrees that in no event shall ATI be liable under any theory of recovery, whether
based in contract, in tort (including negligence and strict liability), under warranty, or otherwise, for
any direct, special, incidental, or consequential loss or damage whatsoever. Any loss of prots,
loss of goodwill, loss of opportunity, loss of business, or loss of reputation as a result of any claim
brought by buyer or third party arising out of, or relating to, any breach by ATI of these terms, any
representation statement or tortious act or omission (including negligence of ATI), and any use of
the goods or the failure of the goods to operate properly even if such loss was in contemplation of
the parties or was wholly foreseeable. Buyer expressly agrees that in no event shall the aggregate
liability of ATI under any theory of recovery exceed the aggregate price paid to ATI under these
terms. The foregoing limitation shall apply even if the buyers remedies under these terms fail in
their essential purpose.
THIS WARRANTY CONSTITUTES THE FULL AND FINAL ATI LIMITED WARRANTY. THERE
IS NO OTHER EXPRESS WARRANTY EXCEPT AS STATED HEREIN. ANY AND ALL IMPLIED
WARRANTIES OF FITNESS FOR A PARTICULAR PURPOSE AND MERCHANTABILITY ARE
LIMITED IN DURATION TO THE DURATION OF THIS WARRANTY. THE LIABILITIES OF
ATI ARE LIMITED SOLELY AND EXCLUSIVELY TO REPLACEMENT AS STATED HEREIN,
AND DO NOT INCLUDE ANY LIABILITY FOR ANY INCIDENTAL, CONSEQUENTIAL, OR
OTHER DAMAGES OF ANY KIND WHATSOEVER, WHETHER ANY CLAIM IS BASED
UPON THEORIES OF CONTRACT, NEGLIGENCE, OR TORT. THIS WARRANTY GIVES YOU
SPECIFIC LEGAL RIGHTS, AND YOU MAY ALSO HAVE OTHER RIGHTS WHICH VARY
FROM STATE TO STATE. THERE ARE NO WARRANTIES WHICH EXTEND BEYOND THE
FACE HEREOF.
This writing constitutes the full, complete, and nal statement of the ATI Performance Products,
Inc. Limited Warranty for Parts. All prior oral and written correspondence, test data, negotiations,
representations, understandings and the like regarding Parts are merged in this writing, and
extinguished by it. This Limited Warranty may not be altered, amended, extended, or modied
except by a writing signed by an authorized representative of ATI. Failure at any time of ATI to
enforce any of the terms and conditions stated herein shall not constitute a waiver of any of the
provisions herein.
Buyer understands and agrees that no ofcer, director, employee, or salesman of ATI or any vendor,
dealer, or distributor has any authority to make any statements contrary to the terms of this Limited
Warranty. ATI disavows any statements contrary to what is above written.
BUYER HEREBY AGREES TO INDEMNIFY, DEFEND, AND HOLD HARMLESS ATI FROM
AND AGAINST ANY AND ALL CLAIMS, LIABILITY, AND LOSS AND DAMAGES (INCLUDING
ATTORNEY FEES), MADE BY ANY THIRD PARTY AGAINST ATI RELATING TO A PART, OR
THE USE OF ANY PART, THEREOF.
Disputes shall be construed in accordance with, and governed by, the laws of the State of Maryland,
without regard to choice of law principles thereof. All disputes that may arise in connection with
these Terms shall, unless settled by the parties, be submitted to arbitration in Baltimore County,
Baltimore, Maryland, in accordance with the commercial arbitration rules of the American Arbitration
Association. Any action by Buyer relating to the goods shall be commenced no later than one year
from the date of the alleged breach.
WHO IS COVERED BY THE WARRANTY - This warranty extends to the Original Retail Purchaser only.
WHAT IS COVERED BY THIS WARRANTY - This warranty covers only ATI manufactured products. Any
ATI product that, during the term of this warranty, fails to function properly UNDER NORMAL USAGE
due to defects in material or workmanship will be repaired by ATI at no charge for parts or labor, or at the
option of ATI, the product will be replaced.
WHAT IS NOT COVERED BY THE WARRANTY -
Damages or malfunctions not resulting from defects in
material and workmanship and damages or malfunctions from other than intended use including, but not
limited to, improper installation, repair by unauthorized parties, tampering, modication, accident or abuse
are not covered by this warranty.
#919124 2/2022
KEEP THIS FOR YOUR RECORDS!
ATI recommends you retain this Warranty along with your invoice.
For your protection, ll in the information and immediately
mail the Purchase Information form below so that we may
contact you directly in the event a safety notication is
issued. Also, in order to serve you better, please take a moment
to answer the questionnaire on the reverse side of this form.
We value your comments!
ORDER #:
PURCHASE DATE:
If more than one product was purchased, list each part # separately with serial # (if applicable).
Part #:
Serial #:
Part #:
Serial #:
Part #:
Serial #:
WHAT TO DO WHEN SERVICE IS NEEDED
Carefullypackagetheproductusingamplematerial(preferablyinthe
original carton) to prevent damage during shipping. Be sure to drain
any uid left in your converter or transmission! You may either
deliver it or ship it postage prepaid and insured to ATI. Send to:
ATI PERFORMANCE PRODUCTS, INC.
Attention: Service Department
6718 Whitestone Road
Gwynn Oak, Maryland 21207-9805
Phone: (410) 298-4343 • Fax: (410) 298-3579
When returning items for service, your package must include:
1. A copy of the sales invoice.
2. Product serial number(s).
3. A detailed description of the problem.
4. Daytime and cell phone numbers plus an e-mail address where
our technicians can contact you.
Note! Finished repairs must be picked up or shipped within 30 days
or storage fees will occur. After 90 days, they will be subject to sale or
disposal by ATI.
IF YOU HAVE QUESTIONS OR NEED HELP
If you have questions about the use or performance of your
products, or if you have any questions or comments regarding
service performed at ATI which has not been resolved to your
satisfaction, write directly to: ATI Performance Products, Inc.,
Attention:ConsumerAairsDepartment,6718WhitestoneRoad,
Gwynn Oak, MD 21207 or send an e-mail to [email protected].
This warranty gives you specic legal rights. You may also have other
rights which vary from state to state.
If not purchased directly from ATI:
DEALER:
DEALER'S ADDRESS:

Name:
E-Mail:
Address:
City: State: Zip:
Phone: Cell:
Part(s) Purchased: Order #:
Part # Serial Number / SFI #
Date of Purchase: Purchased From:
Did the Seller meet your expectation:
- With service? _____ yes _____ no
- With product knowledge? _____ yes _____ no
- With sales help? _____ yes _____ no
How did you hear about ATI?
If no, explain:
Other Comments:
Section 1
____ Drag Race ____ Oval Track ____ Street Performance
____ Truck/Tractor ____ Marine Use ____ Other
Section 2
____ GM ____Ford ____Chrysler ____Import
____ Other
Section 3
____ Vehicle Owner ____ Do-It-Yourself ____
Professional Mechanic
____ShopOwner ____EngineBuilder ____RaceCarBuilder
____ Transmission Builder ____ Other
CHECK ALL THAT APPLY:
4 WAYS TO REGISTER YOUR PRODUCT!
So that we may better assist you, please ll in the Purchase Information form below and return to ATI.
• On-line at www.atiracing.com/warranty for quick and easy registration!
• E-mail: [email protected]
• Fax: 410-298-3579
• Mail: ATI Performance Products, Inc., Attn: Consumer Aairs, 6718 Whitestone Rd, Gwynn Oak, MD 21207-9805
ATI Performance Products, Inc. 6718 Whitestone Road, Gwynn Oak, MD 21207-9805 • 800-284-3433 • www.atiracing.com
PUBLICATIONS YOU READ:
____ D-Sport
____ Diesel Power
____DragRacingEdge
____ Drag Illustrated
____ Drag Review (IHRA)
____ Drive!
____FastestStreetCar
____ Grassroots
____ Hot Rod
____ Mopar Action
____NationalDragster(NHRA)
____ Performance Racing Industry
____ RPM Magazine
____StreetScene(NSRA)
____SuperChevy
____ Other: ______________________
______________________
______________________
WEBSITES & FORUMS:
____ChevyHardcore
____ClassRacer.com
____CompetitionPlus
____ DragRaceResults.com
____DragtimeNews.com
____ Dragzine
____EngineLabs
____Facebook
____FordNXT
____ Instagram
____ LSX Mag
____ RacingJunk com
____ YouTube
____ Other: _____________________
_____________________
_____________________
