
ET80/ET85
Rugged 2-in-1 Tablet
MN-004138-03EN Rev A
Product Reference Guide
for Microsoft
®
Windows
®
10

2
ZEBRA and the stylized Zebra head are trademarks of Zebra Technologies Corporation, registered in
many jurisdictions worldwide. All other trademarks are the property of their respective owners.
© 2021 Zebra Technologies Corporation and/or its affiliates. All rights reserved.
Information in this document is subject to change without notice. The software described in this document
is furnished under a license agreement or nondisclosure agreement. The software may be used or copied
only in accordance with the terms of those agreements.
For further information regarding legal and proprietary statements, please go to:
SOFTWARE:zebra.com/linkoslegal
COPYRIGHTS:zebra.com/copyright
WARRANTY:zebra.com/warranty
END USER LICENSE AGREEMENT: zebra.com/eula
Terms of Use
Proprietary Statement
This manual contains proprietary information of Zebra Technologies Corporation and its subsidiaries
(“Zebra Technologies”). It is intended solely for the information and use of parties operating and
maintaining the equipment described herein. Such proprietary information may not be used, reproduced,
or disclosed to any other parties for any other purpose without the express, written permission of Zebra
Technologies.
Product Improvements
Continuous improvement of products is a policy of Zebra Technologies. All specifications and designs are
subject to change without notice.
Liability Disclaimer
Zebra Technologies takes steps to ensure that its published Engineering specifications and manuals are
correct; however, errors do occur. Zebra Technologies reserves the right to correct any such errors and
disclaims liability resulting therefrom.
Limitation of Liability
In no event shall Zebra Technologies or anyone else involved in the creation, production, or delivery of the
accompanying product (including hardware and software) be liable for any damages whatsoever
(including, without limitation, consequential damages including loss of business profits, business
interruption, or loss of business information) arising out of the use of, the results of use of, or inability to
use such product, even if Zebra Technologies has been advised of the possibility of such damages. Some
jurisdictions do not allow the exclusion or limitation of incidental or consequential damages, so the above
limitation or exclusion may not apply to you.
Publication Date
January 10, 2022

3
Contents
About This Document ........................................................................................................................ 7
Introduction ...................................................................................................................... 7
Configurations.................................................................................................................. 7
Energy Star ...................................................................................................................... 9
Notational Conventions.................................................................................................... 9
Icon Conventions ............................................................................................................. 9
Service Information ........................................................................................................ 10
Software Release Information....................................................................................... 11
Getting Started.................................................................................................................................. 12
Unpacking ...................................................................................................................... 12
Features........................................................................................................................ 13
Setting Up the Device .................................................................................................... 15
Installing a nano SIM Card ..................................................................................... 15
Using the Tablet................................................................................................................................ 19
Start Screen ................................................................................................................... 19
Know Your Tablet........................................................................................................... 20
Tablet Information................................................................................................... 20
Support ................................................................................................................... 20
Battery Management...................................................................................................... 20
Optimizing Battery Life or Performance.................................................................. 21
Changing the Power Settings ................................................................................. 21
Manually Changing the Display Brightness ............................................................ 21
Automatically Changing the Display Brightness ..................................................... 21
Manually Activate Sleep Mode .............................................................................. 21
Battery Health Monitor............................................................................................ 22
Viewing Battery Health..................................................................................... 22
Tablet Mode ................................................................................................................... 22
Configuring Tablet Mode ........................................................................................ 22

Contents
4
Tablet Mode Start Screen....................................................................................... 23
Multi-Touch Gestures ............................................................................................. 25
Configuring Touch Settings.............................................................................. 25
Changing Touch Mode ........................................................................................... 25
On-Screen Keyboard.............................................................................................. 26
Opening the On-Screen Keyboard................................................................... 26
Opening the Keyboard and Handwriting Panel ................................................ 26
Active Stylus ........................................................................................................... 27
Using the Camera .......................................................................................................... 27
Fingerprint Reader ........................................................................................................ 28
Setting Up a PIN..................................................................................................... 28
Setting Up the Fingerprint Reader.......................................................................... 28
Logging In with Your Fingerprint............................................................................. 29
Fingerprint Reader Tips ...................................................................................... 29
Windows Hello Face ..................................................................................................... 30
Setting Up Windows Hello Face ............................................................................. 30
Logging In with Windows Hello Face...................................................................... 30
Software............................................................................................................................................. 31
Initial Windows Setup..................................................................................................... 31
Factory Reset................................................................................................................. 31
Reinstall Windows......................................................................................................... 32
Creating an Installation USB Flash Drive ............................................................... 32
Reinstalling Windows ............................................................................................. 33
Checking BIOS Version.......................................................................................... 34
Checking Operating System Version...................................................................... 34
Enter the BIOS............................................................................................................... 34
Entering the BIOS with a Keyboard........................................................................ 34
Entering the BIOS without a Keyboard................................................................... 34
Entering the BIOS without a Keyboard from Windows ........................................... 34
Zebra Barcode Scanning Resources ............................................................................. 35
Application Installation ................................................................................................... 35
Getting Apps from the Windows Store ................................................................... 35
Data Capture ..................................................................................................................................... 36
Imaging .......................................................................................................................... 36
Digital Camera ............................................................................................................... 36
Scanning Considerations ............................................................................................... 36
Scanning with Internal Imager........................................................................................ 37

Contents
5
Wireless............................................................................................................................................. 39
Wireless Local Area Networks ....................................................................................... 39
Connecting to a Wi-Fi Network............................................................................... 40
Viewing Network Information.................................................................................. 41
Configuring Proxy Settings ..................................................................................... 41
Adding a Wi-Fi Network.......................................................................................... 41
Wireless Wide Area Networks....................................................................................... 42
Connecting to a Cellular Data Network .................................................................. 42
Adding an Internet APN.......................................................................................... 42
Setting Up a SIM PIN ............................................................................................. 43
Removing a SIM PIN .............................................................................................. 43
Changing a SIM PIN............................................................................................... 43
Unblocking a SIM PIN ............................................................................................ 43
Bluetooth....................................................................................................................... 45
Adaptive Frequency Hopping ................................................................................. 45
Security................................................................................................................... 45
Bluetooth Profiles ................................................................................................... 46
Pairing with a Bluetooth Device.............................................................................. 47
Unpairing a Bluetooth Device ................................................................................. 47
Turning on Airplane Mode.............................................................................................. 47
Near Field Communications.......................................................................................... 48
Enabling NFC ......................................................................................................... 48
Reading NFC Cards ............................................................................................... 48
Accessories....................................................................................................................................... 49
Device Charging............................................................................................................. 52
Charging Indicators ................................................................................................ 52
Charging Temperatures.......................................................................................... 52
Charging Using the Dock........................................................................................ 52
Removing the Tablet ........................................................................................ 54
Charging Using the USB-C to AC Adapter ............................................................. 55
Power Only Dock .......................................................................................................... 56
Vehicle Dock ................................................................................................................. 57
Office Dock.................................................................................................................... 58
Expansion Backs........................................................................................................... 59
Installing the Expansion Backs............................................................................... 59
Power Pack................................................................................................................... 61
Installing the Power Pack ....................................................................................... 61
Power Pack Charging............................................................................................. 62
Charging the Power Pack Using a Dock .......................................................... 62
Charging the Power Pack Using the 4-Slot Battery Charger ........................... 62

Contents
6
Viewing the Power Pack Charge Level .................................................................. 63
Checking Power Pack Status ................................................................................. 64
Keyboard....................................................................................................................... 65
Attaching the Keyboard .......................................................................................... 66
Removing the Keyboard ......................................................................................... 67
Setting the Backlight Color ..................................................................................... 68
Configuring the Programmable Keys...................................................................... 68
Maintenance and Troubleshooting ................................................................................................. 69
Maintaining the Device................................................................................................... 69
Preventing Image Persistence ....................................................................................... 69
Maintaining the Stylus.................................................................................................... 70
Battery Safety Guidelines............................................................................................... 70
Best Practices for Enterprise Mobile Computing Devices Operating in Hot Environments
and Direct Sunlight......................................................................................................... 71
Cleaning Instructions...................................................................................................... 71
Approved Cleanser Active Ingredients ................................................................... 71
Harmful Ingredients ................................................................................................ 71
Device Cleaning Instructions .................................................................................. 72
Special Cleaning Notes .......................................................................................... 72
Cleaning Materials Recommended ........................................................................ 72
Cleaning Frequency ............................................................................................... 72
Cleaning the Fingerprint Reader ............................................................................ 72
Traveling with Your Tablet ............................................................................................. 73
Troubleshooting ............................................................................................................. 73
Restarting the Device ............................................................................................. 73
Performing a Cold Boot .......................................................................................... 73
Troubleshooting the Tablet..................................................................................... 74
Troubleshooting the Dock....................................................................................... 75
Troubleshooting the 4-Slot Battery Charger ........................................................... 75
Specifications ................................................................................................................................... 76
Data Capture Supported Symbologies........................................................................... 76
Decode Distances.......................................................................................................... 76
Dock Specifications........................................................................................................ 77

7
About This Document
Introduction
This guide provides information about using the device and accessories.
NOTE: Screens and windows pictured in this guide are samples and can differ from actual screens.
Configurations
This guide covers the following configurations of the tablet:
Configuration Processor Memory Display Radios
ET80 TGL i5 Core
w/Vpro WLAN
TGL U42
4 +2 Core
I5-1140G7
8MB LLC
Gen12 GFX
16 GB RAM/
128 GB or
256 GB or
512 GB
PCIe SSD
3:2 Aspect
Ratio
12.0 inch 800
Nits
WLAN: Intel Typhoon
Peak 2 WIFI6E 802.11ax
2x2 MIMO
WPAN: Bluetooth v5.2 Low
Energy
ET85 TGL i5 Core
w/Vpro WAN
TGL U42
4 +2 Core
I5-1140G7
8MB LLC
Gen12 GFX
16GB RAM/
128 GB or
256 GB or
512 GB
PCIe SSD
3:2 Aspect
Ratio
12.0 inch 800
Nits
WLAN: Intel Typhoon
Peak 2 802.11 ax - WIFI6E
Quectel RM505Q 4x4
MIMO
WPAN: Bluetooth v5.2 Low
Energy
WWAN: 5G
ET85 TGL i5 Core
w/Vpro WAN
TGL U42
4 +2 Core
I5-1140G7
8MB LLC
Gen12 GFX
16GB RAM/
128 GB or
256 GB or
512 GB
PCIe SSD
3:2 Aspect
Ratio
12.0 inch 800
Nits
WLAN: Intel Typhoon
Peak 2 802.11 ax - WIFI6E
Quectel EM121 Cat 12 2x2
MIMO
WPAN: Bluetooth v5.2 Low
Energy
WWAN: LTE

About This Document
8
ET80 TGL i5 Core
WLAN
TGL U42
4 +2 Core
i5-1130G7 8MB
LLC Gen12
GFX
8 GB or 16GB
RAM/
128 GB or
256 GB or
512 GB
PCIe SSD
3:2 Aspect
Ratio
12.0 inch 800
Nits
WLAN: Intel Typhoon Peak
2 WIFI6E 802.11ax 2X2
MIMO
WPAN: Bluetooth v5.2 Low
Energy
ET85 TGL i5 Core
WAN
TGL U42
4 +2 Core
i5-1130G7 8MB
LLC Gen12
GFX
8 GB or 16GB
RAM/
128 GB or
256 GB or
512 GB
PCIe SSD
3:2 Aspect
Ratio
12.0 inch 800
Nits
WLAN: Intel Typhoon
Peak 2 802.11 ax - WIFI6E
Quectel RM505Q 4x4
MIMO
WPAN: Bluetooth v5.2 Low
Energy
WWAN: 5G
ET85 TGL i5 Core
WAN
TGL U42
4 +2 Core
i5-1130G7 8MB
LLC Gen12
GFX
8 GB or 16GB
RAM/
128 GB or
256 GB or
512 GB
PCIe SSD
3:2 Aspect
Ratio
12.0 inch 800
Nits
WLAN: Intel Typhoon Peak
2 802.11 ax - WIFI6E
Quectel EM121 Cat12 2X2
MIMO
WPAN: Bluetooth v5.2 Low
Energy
WWAN: LTE
ET80 TGL i7 Core
w/Vpro WLAN
TGL U42
4 +2 Core
I7-1180G7
12MB LLC
Gen12 GFX
16GB RAM/
128 GB or
256 GB or
512 GB
PCIe SSD
3:2 Aspect
Ratio
12.0 inch 800
Nits
WLAN: Intel Typhoon
Peak 2 WIFI6E 802.11ax
2X2 MIMO
WPAN: Bluetooth v5.2 Low
Energy
ET85 TGL i7 Core
w/Vpro WAN
TGL U42
4 +2 Core
I7-1180G7
12MB LLC
Gen12 GFX
16GB RAM/
128 GB or
256 GB or
512 GB
PCIe SSD
3:2 Aspect
Ratio
12.0 inch 800
Nits
WLAN: Intel Typhoon
Peak 2 802.11 ax - WIFI6E
Quectel RM505Q 4x4
MIMO
WPAN: Bluetooth v5.2 Low
Energy
WWAN: 5G
ET85 TGL i7 Core
w/Vpro WAN
TGL U42
4 +2 Core
I7-1180G7
12MB LLC
Gen12 GFX
16GB RAM/
128 GB or
256 GB or
512 GB
PCIe SSD
3:2 Aspect
Ratio
12.0 inch 800
Nits
WLAN: Intel Typhoon Peak
2 802.11 ax - WIFI6E
Quectel EM121 Cat12 2X2
MIMO
WPAN: Bluetooth v5.2 Low
Energy
WWAN: LTE
Configuration Processor Memory Display Radios
About This Document
9
Energy Star
Zebra products that are Energy Star qualified help you save money while improving the
quality of the environment. The sleep mode of your tablet is especially adept at saving
energy, often up to 80% or more.
ENERGY STAR
®
is the government-backed symbol for energy efficiency, providing
simple, credible, and unbiased information that you can rely on to make well-informed
decisions. Thousands of industrial and commercial products deliver cost-saving energy solutions that
improve air quality and protect the climate. ENERGY STAR and its partners have helped save families and
businesses trillions of kilowatt-hours of electricity and reduced greenhouse gases every year.
You can see more information about Energy Star features at: energystar.gov
This PC is ENERGY STAR® compliant. The power management settings enabled by default on this PC
have been selected for compliance with the current ENERGY STAR® Requirements. For optimal energy
savings, ENERGY STAR® recommends that sleep mode is entered within 30 minutes of user inactivity
and the display is turned off within 15 minutes of user inactivity.
The default power management settings on this PC are as follows.
Notational Conventions
The following conventions are used in this document:
• Tablet refers to the Zebra ET80/ET85 tablet.
• Bold text is used to highlight the following:
• Dialog box, window and screen names
• Drop-down list and list box names
• Check box and radio button names
• Icons on a screen
• Key names on a keypad
• Button names on a screen.
• Bullets (•) indicate:
• Action items
• Lists of alternatives
• Lists of required steps that are not necessarily sequential.
• Sequential lists (such as those that describe step-by-step procedures) appear as numbered lists.
Icon Conventions
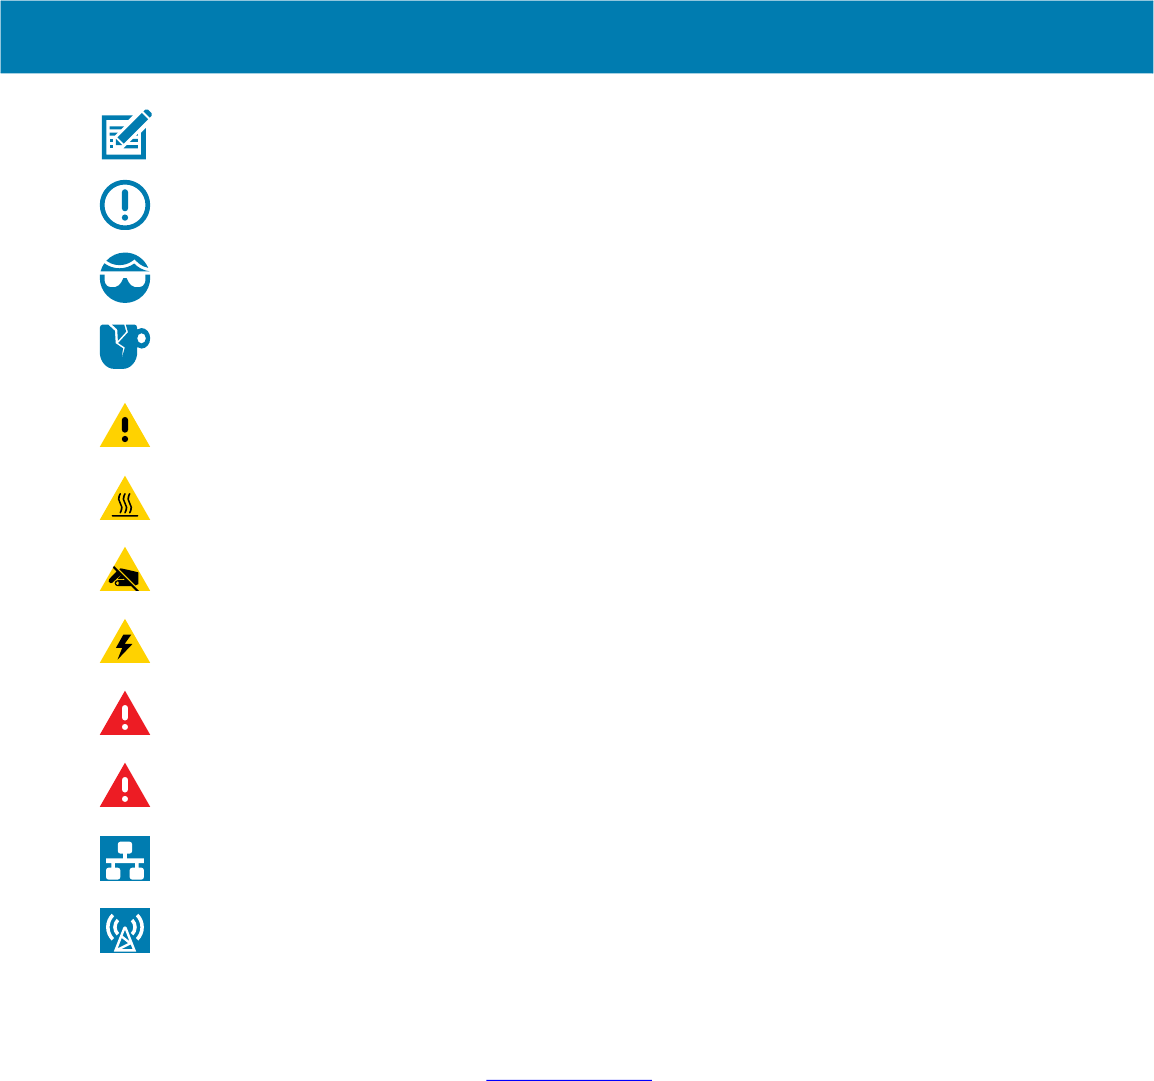
The documentation set is designed to give the reader more visual clues. The following graphic icons are
used throughout the documentation set. These icons and their associated meanings are described below.
Power Settings On Battery On AC
Turn off the display 5 minutes 20 minutes
Computer to sleep 5 minutes 20 minutes
About This Document
10
NOTE: The text here indicates information that is supplemental for the user to know and that is not
required to complete a task.
IMPORTANT: The text here indicates information that is important for the user to know.
CAUTION—EYE INJURY: Wear protective eyewear when performing certain tasks.
CAUTION—PRODUCT DAMAGE: If the precaution is not taken, the product could be damaged.
CAUTION: If the precaution is not heeded, the user could receive minor or moderate injury.
CAUTION—HOT SURFACE: Touching this area could result in burns.
CAUTION—ESD: Observe proper electrostatic safety precautions.
CAUTION—ELECTRIC SHOCK: Disconnect the printer power before performing certain procedures to
avoid the risk of electric shock.
WARNING: If danger is not avoided, the user CAN be seriously injured or killed.
DANGER! If danger is not avoided, the user WILL be seriously injured or killed.
NOTE: This is an icon for wired networking notes.
NOTE: This is an icon for wireless networking notes.
Service Information
If you have a problem with your equipment, contact Zebra Global Customer Support for your region.
Contact information is available at zebra.com/support
.
When contacting support, please have the following information available:
• Serial number of the unit
• Model number or product name
• Software type and version number
Zebra responds to calls by email, telephone or fax within the time limits set forth in support agreements.
If your problem cannot be solved by Zebra Customer Support, you may need to return your equipment for
servicing and will be given specific directions. Zebra is not responsible for any damages incurred during
shipment if the approved shipping container is not used. Shipping the units improperly can possibly void
the warranty.
If you purchased your Zebra business product from a Zebra business partner, contact that business
partner for support.

About This Document
11
Software Release Information
To check the software release information:
1. Touch the Start icon .
2. Select Settings > System > About.
• Device Specifications - Displays the device model number followed by the software release date
and serial number.
• Windows Specifications - Displays the OS version.

12
Getting Started
This section explains how to set up the device for the first time.
Unpacking
1. Carefully remove all protective material from the device and save the shipping container for later
storage and shipping.
2. Verify that the following were received:
• Rugged 2-in-1 tablet
• Regulatory guide
• SIM lock plate with screw (may be available on some ET85 models)
3. Inspect the equipment for damage. If any equipment is missing or damaged, contact the Global
Customer Support center immediately.
4. Prior to using the device for the first time, remove the protective shipping film that covers the scan
window and display.
Getting Started
13
Features
NOTE: Some features may not be available on all configurations.
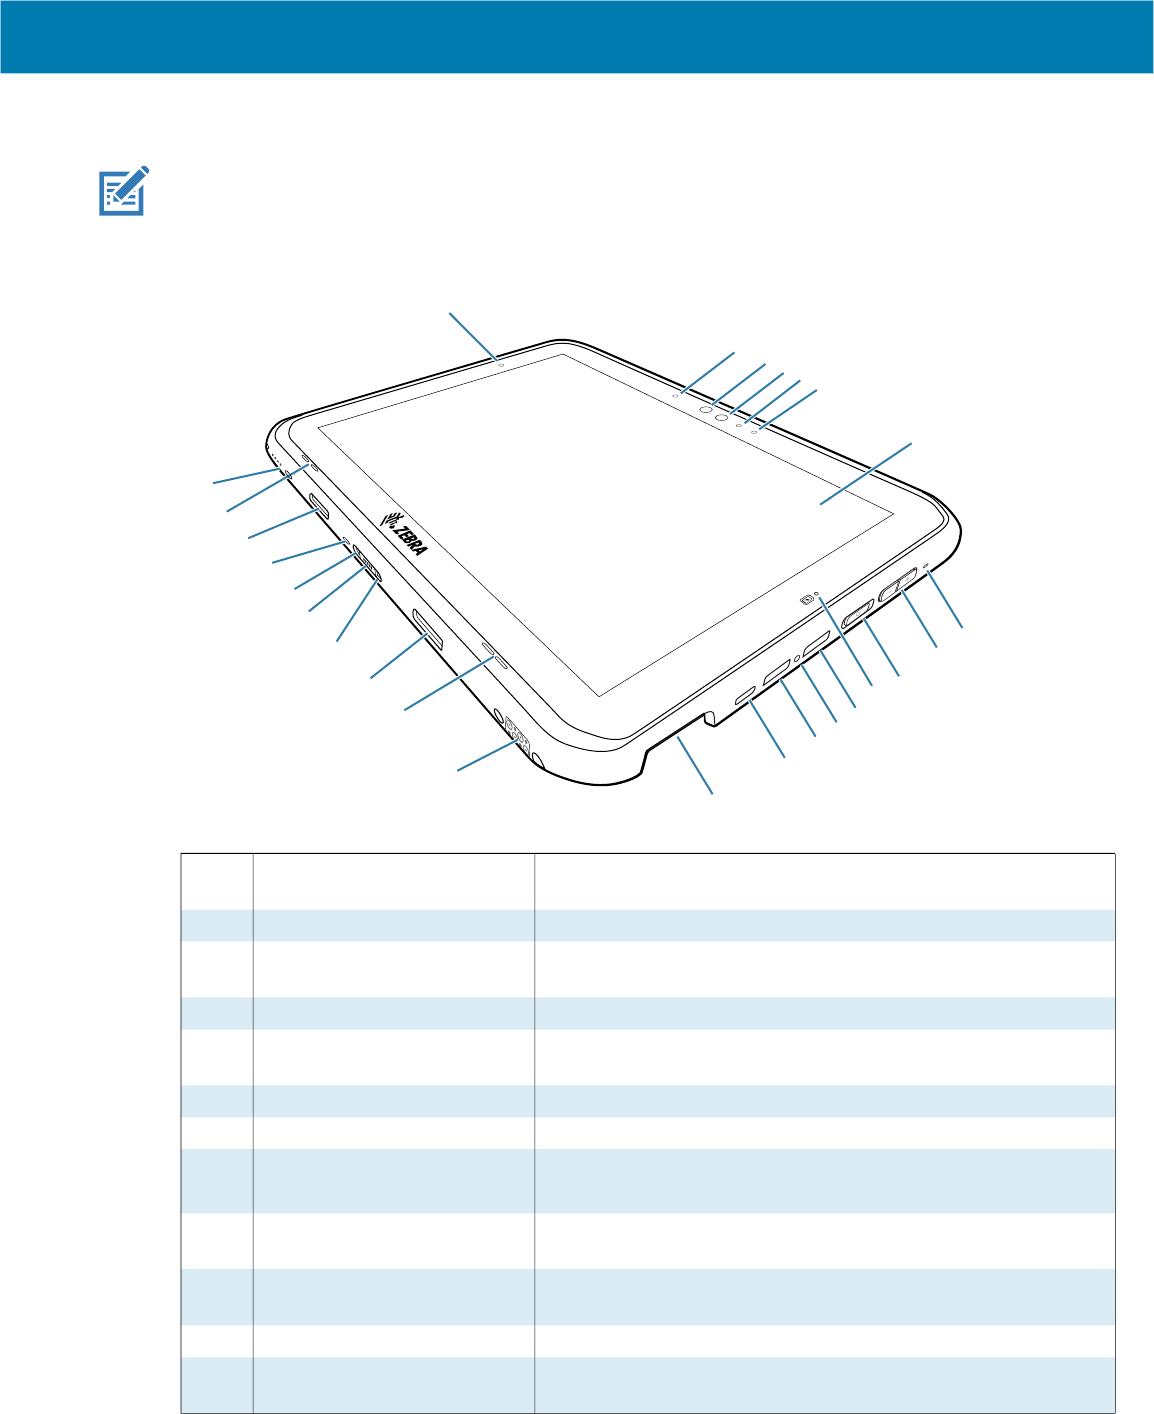
Figure 1 Front View
1 Light sensor Determines ambient light for controlling display backlight
intensity.
2 Front microphones Use for voice communications or audio recordings.
3 Windows Hello Infrared
Illuminator
Illuminates your face with infrared (IR) light during Windows
Hello face authentication.
4 Front camera Use for video conferencing.
5 Camera indicator LED Illuminates when the camera is activated. Momentarily lights
white when the device boots.
6 Touch screen Displays all information needed to operate the device.
7 Stylus tether mount Use to attach a stylus tether mount.
8 Volume up/down
button
Increases and decreases audio volume.
9 Power button Turns the display on and off. Press and release to power on the
device. Press and hold to reset the device or power off.
10 Charging indicator LED Indicates power state and battery charging status while
charging and application generated notifications.
11 USB-A port Provides USB host and client communications.
12 Threaded Insert Use to restrict access to the USB ports in hazardous locations
(requires boot).
1
2
3
4
5
2
6
7
8
9
10
11
13
14
16
20
21
22
19
17
17
19
18
18
15
12
Getting Started
14
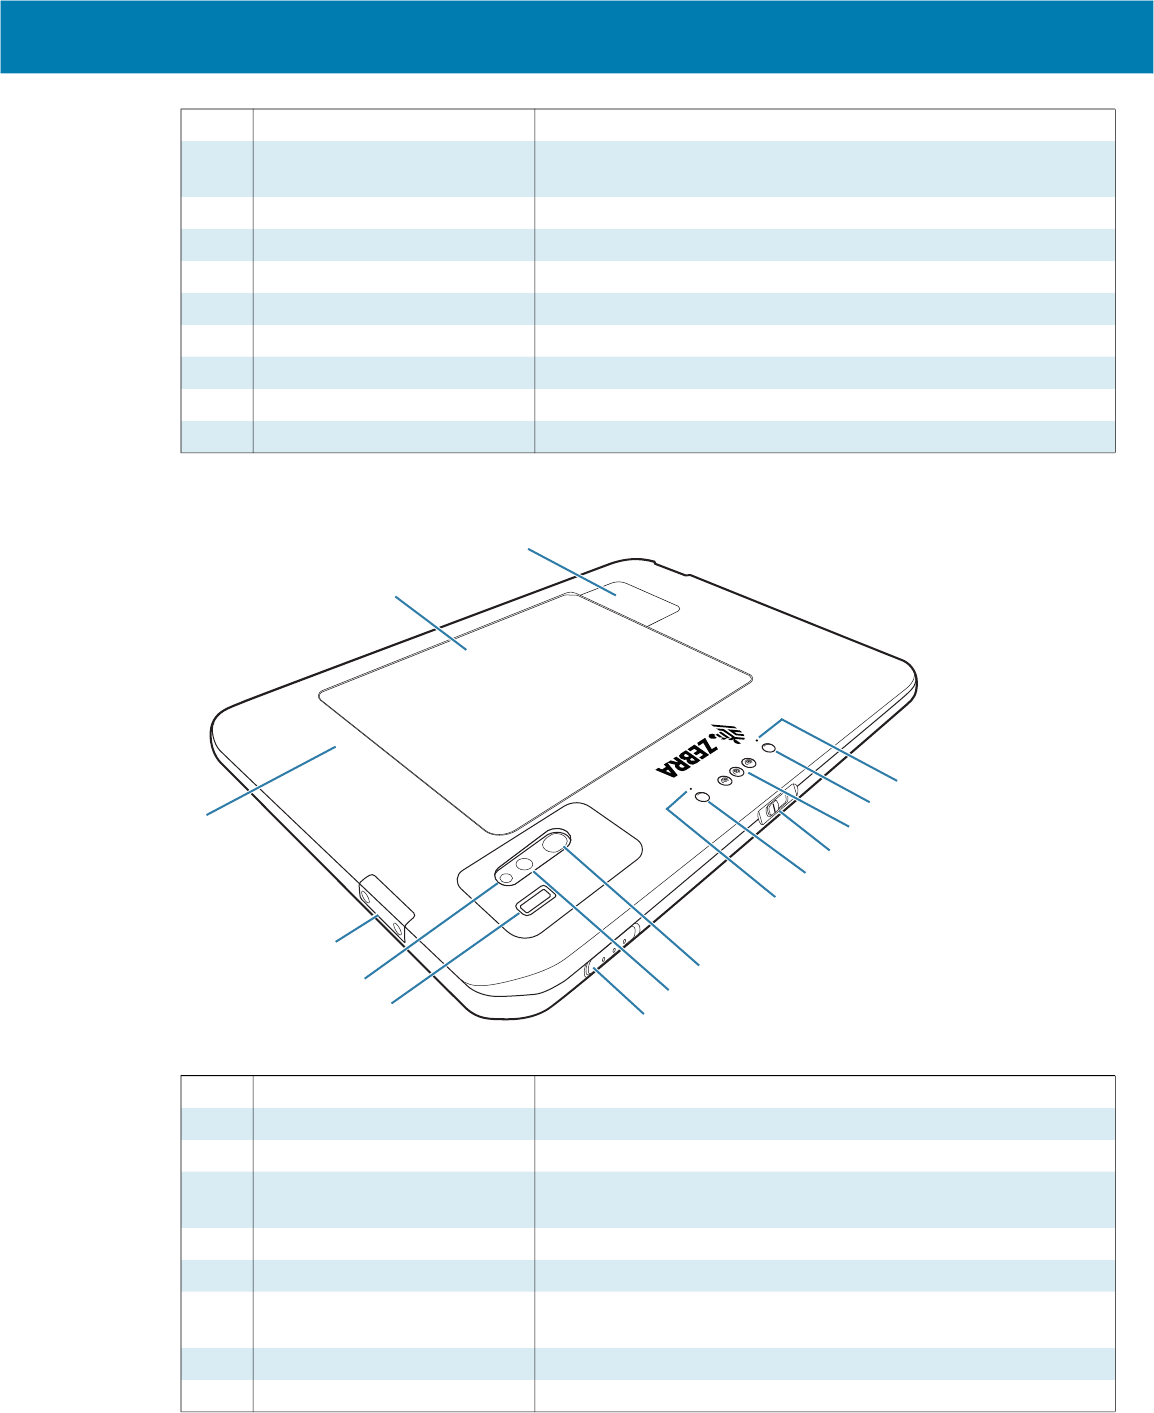
Figure 2 Back View
13 USB-A port Provides USB host and client communications.
14 USB-C port Provides USB host and client communications, and device
charging via cables and accessories.
15 Scanner window Provides data capture using the imager.
16 Dock interface connector Provides communication to the device from the dock.
17 Speakers Provides audio output.
18 Keyboard latch slot Attaches the keyboard to the tablet.
19 Keyboard alignment slot Assists in aligning the tablet with the keyboard.
20 Keyboard interface connector Provides power and communication with the keyboard
21 Kensington security slot Use with a security cable to lock the tablet to the keyboard.
22 Power interface connector Provides power to the device through the dock.
1 Rear microphones Use for audio recordings.
2 Dock alignment slot Assists in aligning the tablet with the dock.
3
Pass-through antenna
Use to connect to an external antenna.
4 Front camera privacy cover
switch
Use to cover the front camera when not in use.
5 Rear camera privacy cover Use to cover the rear camera when not in use.
6 Rear camera LED flash Provides illumination for the camera.
7 Scan button Initiates barcode data capture when a scan-enabled application
is active (programmable).
8 Fingerprint sensor Provides biometric authentication.
9 Rear camera Autofocus camera that takes photos.
3
6
7
8
9
10
11
12
13
4
2
1
1
2
5
Getting Started
15
Setting Up the Device
To start using the device for the first time:
1. Install a nano SIM card (optional for ET85 only).
2. Charge the device.
3. Power on the device.
Installing a nano SIM Card
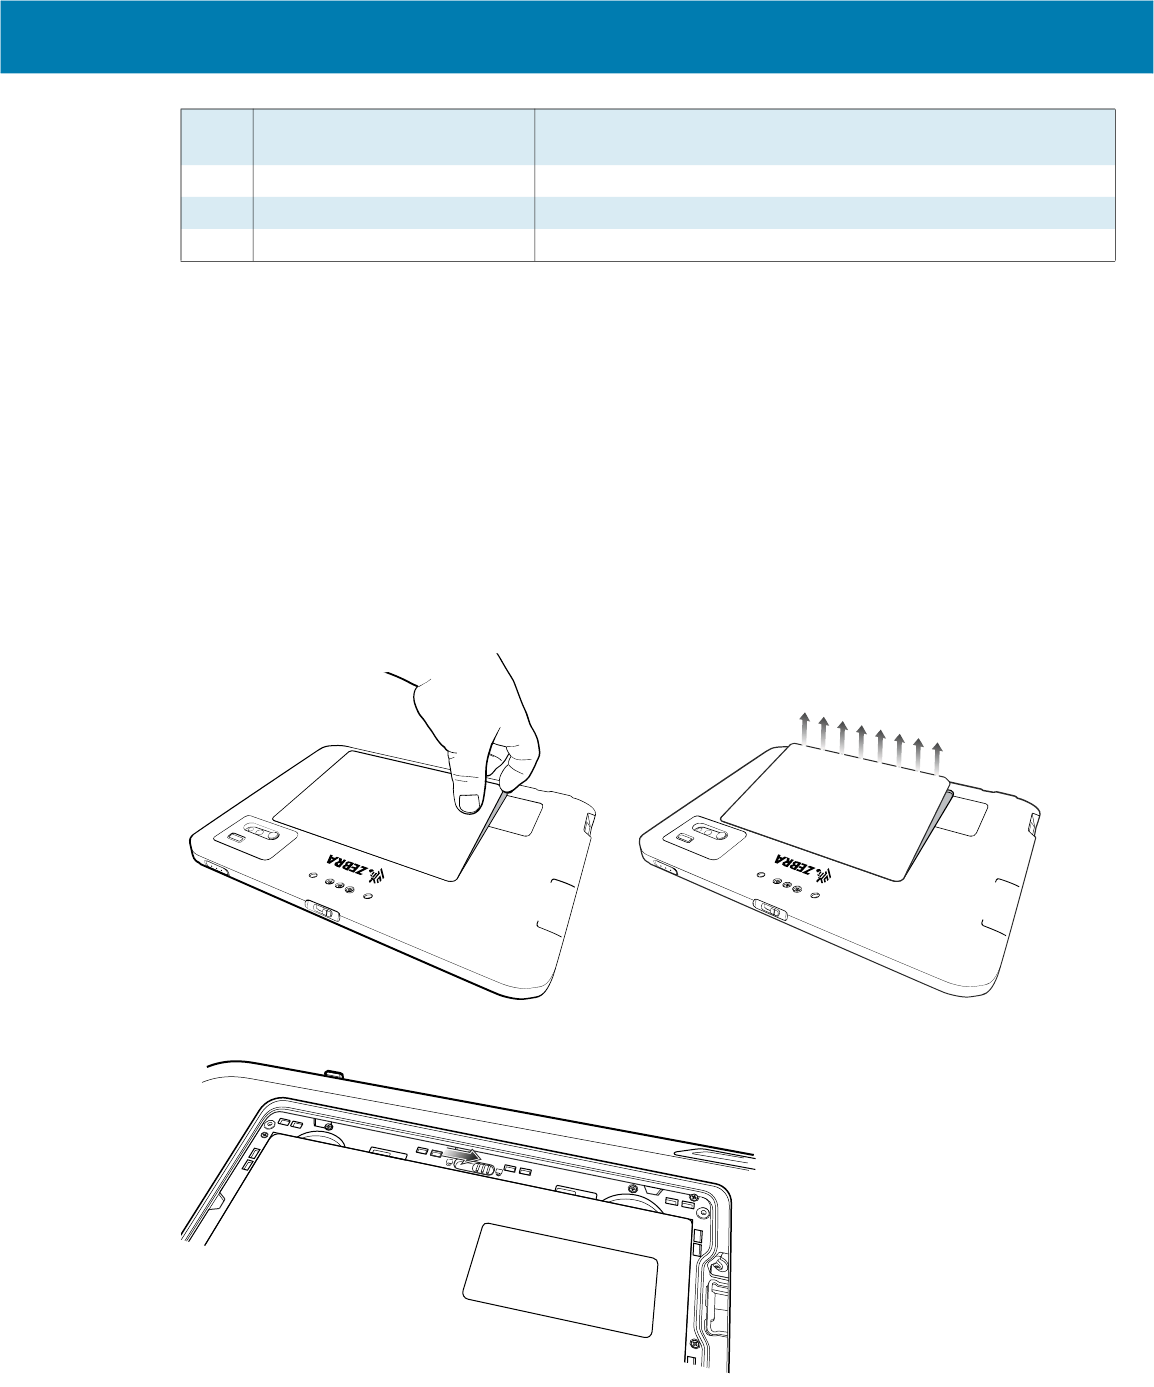
1. Ensure the tablet is powered off.
2. Lift the notched corner of the battery cover and carefully lift the battery cover off the device.
3. Slide the battery lock switch to the unlock position.
10 Communication expansion
port
For Ethernet and serial communication through the expansion
adapter.
11 NFC antenna position Use to read NFC cards.
12 Battery cover Provides access to the replaceable battery.
13 Solid State Drive Cover Provides access to the solid state drive.
Getting Started
16
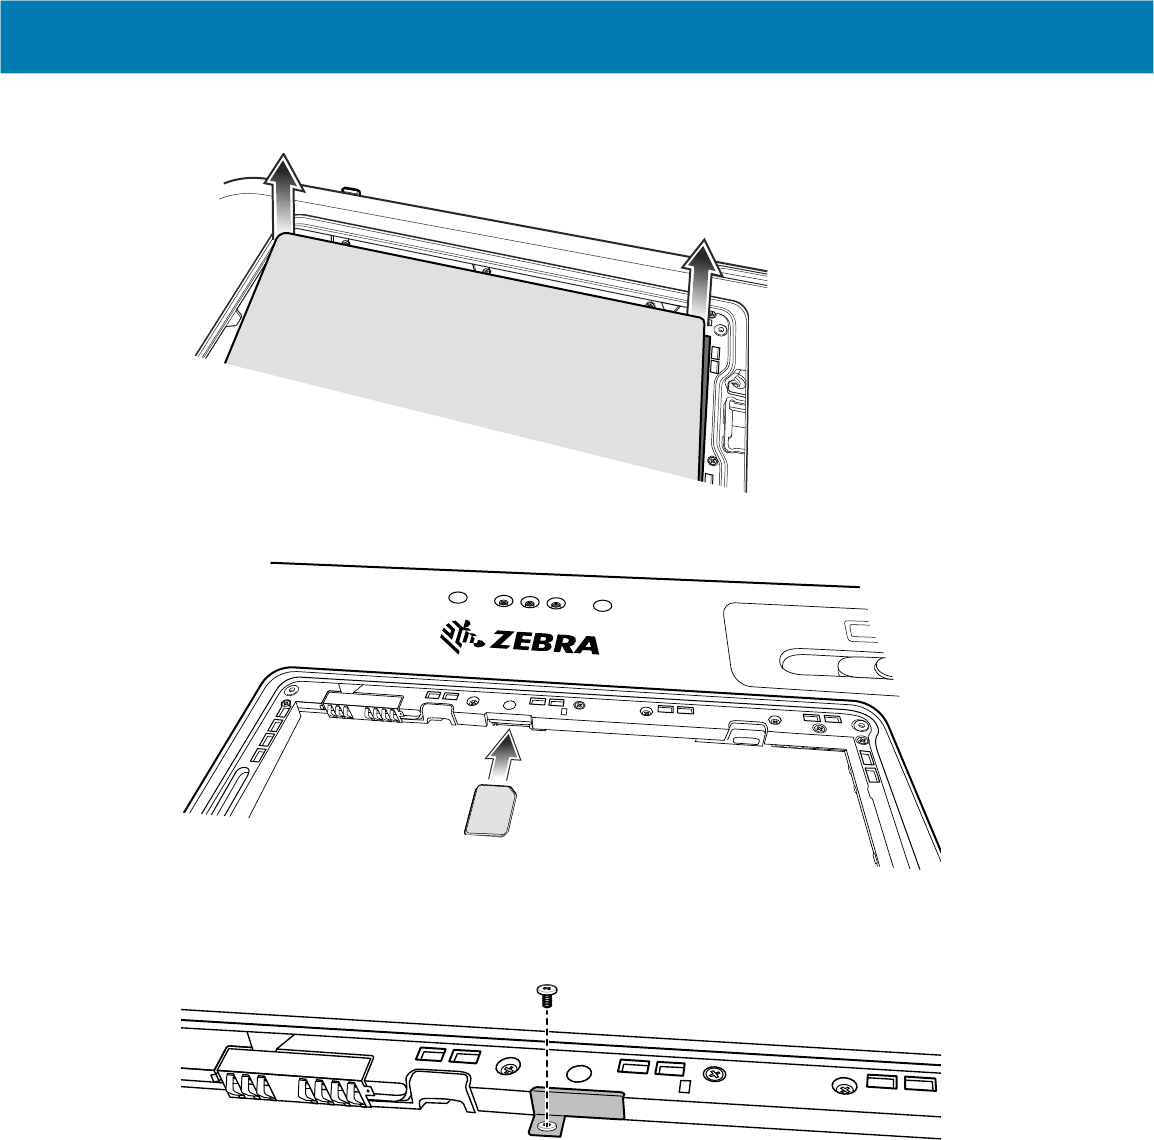
4.
Using index fingers, life the battery up.
5. Insert the nano SIM card with the contacts facing up.
6. Push the SIM card in and ensure that it locks into place.
7. If required, install the SIM lock plate and secure with the M1.4 x 2 mm screw using a Phillips #0
screwdriver. The maximum torque for the screw is 1 kg/m (7 lb/ft).
8. Replace the battery, ensuring it is seated properly.
Getting Started
17
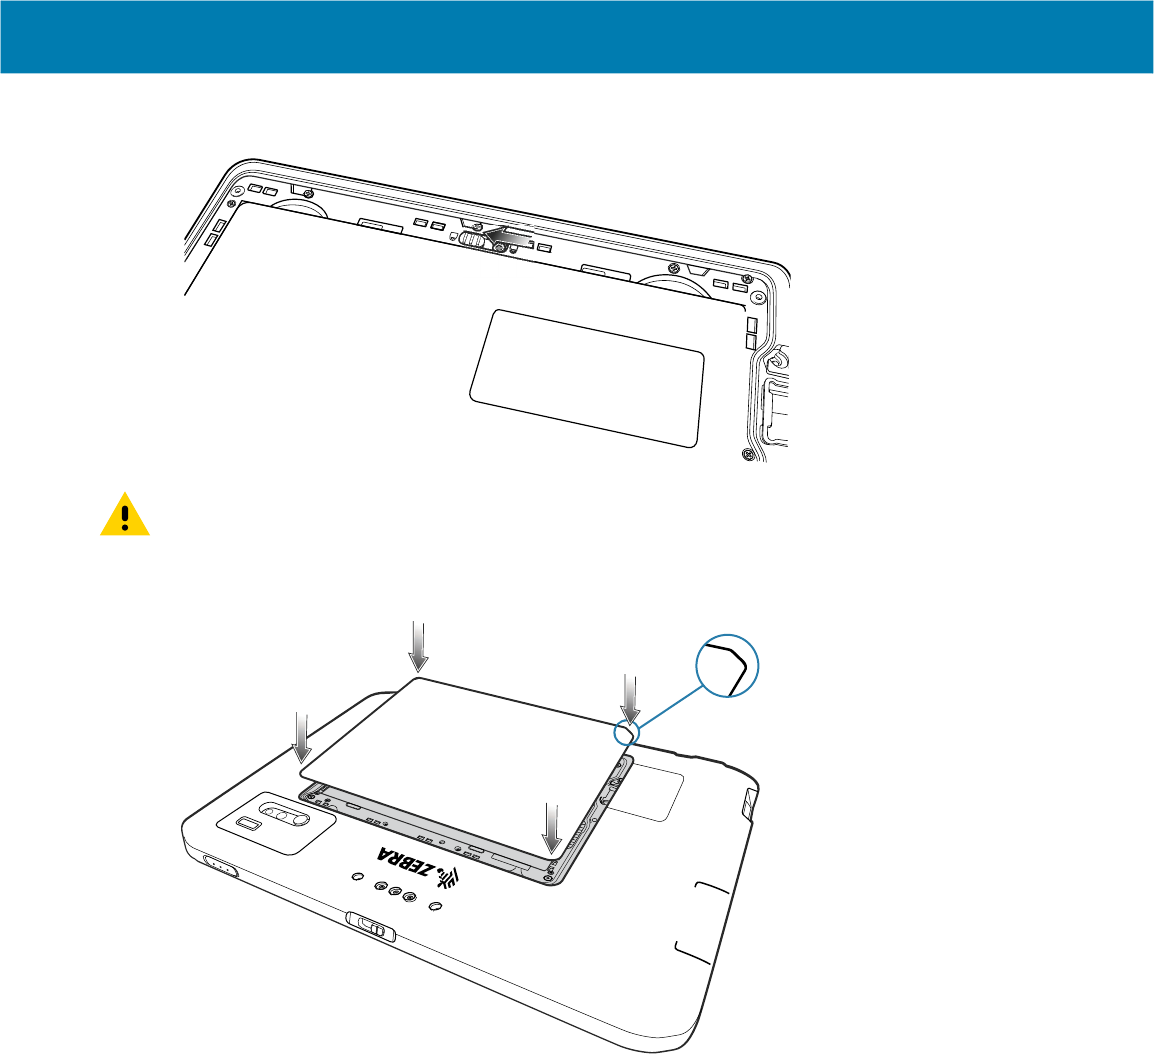
9.
Slide the battery lock switch to the lock position.
CAUTION: Be aware of the orientation of the battery cover. Failure to replace the battery cover properly
may cause damage.
10. Align the tabs on the underside of the cover with the slot around the battery well.
11. Ensure that the chamfer on the battery cover is at the bottom left corner of the device.
Getting Started
18
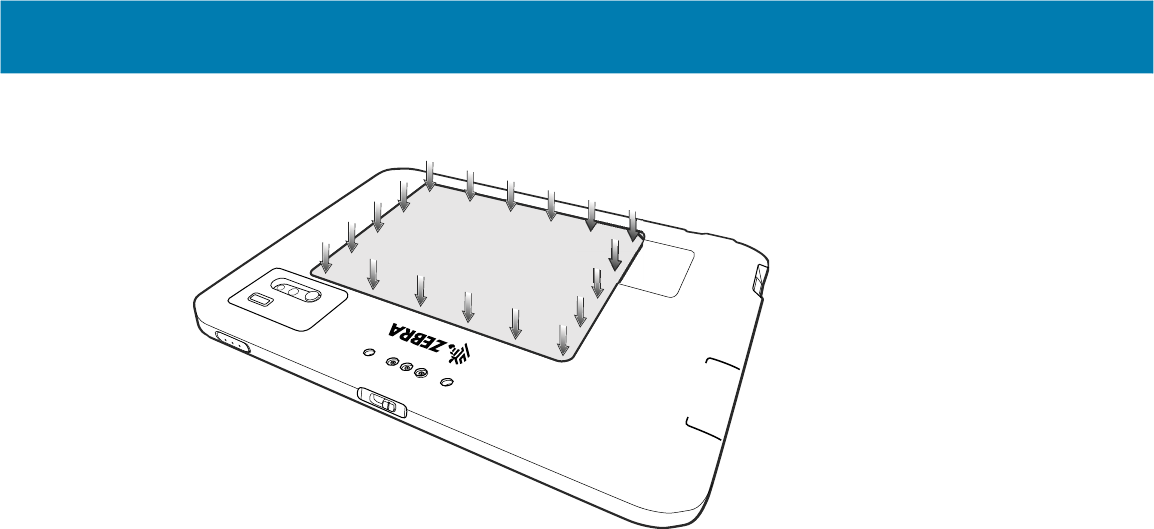
12.
Carefully press down around the edges of the cover. Make sure that the cover is seated properly.
19
Using the Tablet
This chapter provides instructions on how to use some basic applications and key features.
Start Screen
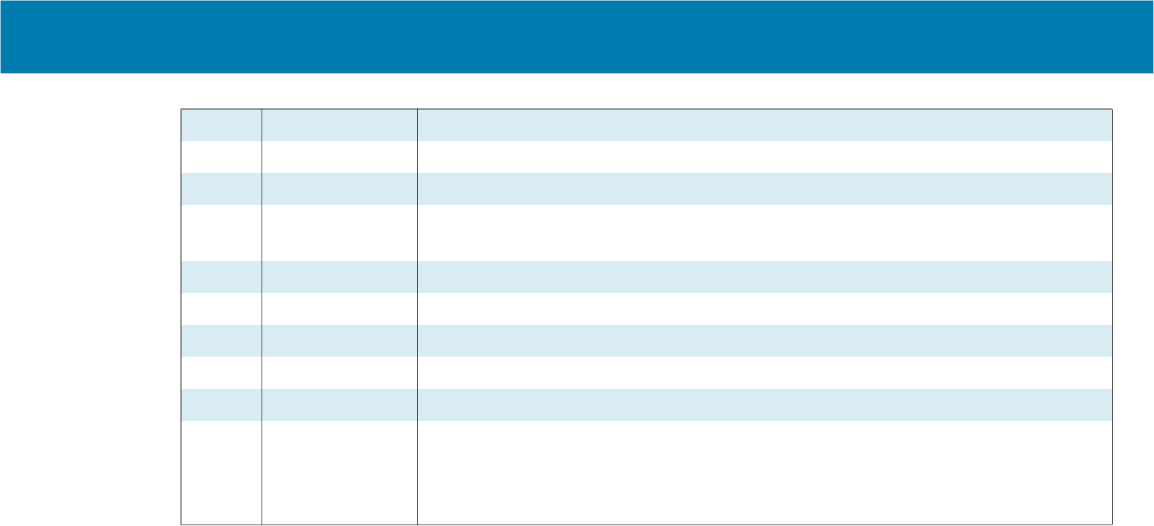
By default, the Start screen displays in Desktop mode.
Figure 3 Start Screen in Desktop Mode
1 Users Opens user account window, locks screen or logs user off the device.
2 Documents Opens documents folder.
3 Pictures Opens pictures folder.
4 Settings Opens the Settings window.
5 Power Touch to place the device in sleep mode, shutdown or restart.
Using the Tablet
20
Know Your Tablet
You can access information about your tablet by touching Know Your Tablet on the desktop.
This app has icons that provide access to PC information and Support. The Support page includes
information about drivers, BIOS, accessories, and documentation.
Tablet Information
The System Information window displays information about the BIOS, the battery, the network adapters,
the hard disk. This information is stored on the solid-state drive (SSD) in your tablet.
Support
Select Support to open the Zebra web site, where you can access these sites and pages:
• Product support
• User documentation
• Software, Firmware/BIOS, and driver downloads
• Knowledge base articles
• Repair request and status and RMA status
• Warranty information
• Registration
• TPM notification for security advisory
Battery Management
Follow these tips to optimize battery life.
• Set the device to turn off after a short period of non-use.
• Set the display to turn off or dim backlight.
6 Start Access the Home screen from any window.
7 Search Search apps, settings, and files on your tablet or perform a web search.
8 Cortana Opens voice activated search window.
9 Recent
Applications
Displays all open applications.
10 More Settings Includes Bluetooth, Intel Graphics, and Windows Defender.
11 Battery Displays current battery status.
12 Network Opens network settings.
13 Sound Use to control audio volume level.
14 Keyboard Opens the virtual keyboard.
15 Action Center Provides easy access to some frequently used settings and notifications.
Touch the icon to open the Action Center. The first row of setting option
boxes display and any notifications. Touch Expand to view all setting option
boxes.

Using the Tablet
21
• Turn off all wireless radio activity when not in use.
Optimizing Battery Life or Performance
Optimize the battery life when running the tablet on battery power, or optimize performance when the
tablet is connected to a power source.
1. In the taskbar, touch the battery icon and use the slider to adjust for battery life or performance.
2. Touch Battery settings to display battery saver options.
Changing the Power Settings
To set the device or display to turn off after a short period of non-use:
1. In the taskbar, touch the Action Center icon .
2. Touch All Settings > System > Power and sleep.
3. Under Sleep, choose when you want the device/screen to go to sleep (on battery power and when
plugged in).
Manually Changing the Display Brightness
To manually change the display brightness:
1. In the taskbar, touch Action Center icon .
2. Touch All Settings > System > Display.
3. Under Change brightness, move the slider to adjust the brightness.
Automatically Changing the Display Brightness
To toggle automatic brightness:
1. In the taskbar, Action Center icon .
2. Touch All Settings > System > Display.
3. Check the box to enable Change brightness automatically when lighting changes.
Manually Activate Sleep Mode
Manually activate sleep mode to conserve battery power when you are not actively using the tablet.
1. It is recommended to first save your files.
2. Touch the Start icon and then the Power icon just above it.
A small menu pops up.
3. Touch Sleep.
The screen goes dark and the computer enters sleep mode.
4. You can wake up the tablet by pressing the Power button

Using the Tablet
22
Battery Health Monitor
Use the Battery Health Monitor app to view battery health and information.
• Battery Health - The health of the battery.
• Manufacture Date - The date of manufacture.
• Serial Number - Serial number of the device.
A warning message appears if the battery is past its useful life and should be replaced.
Viewing Battery Health
1. In the taskbar, select .
2. Select .
Tablet Mode
This section describes how to configure and use tablet mode.
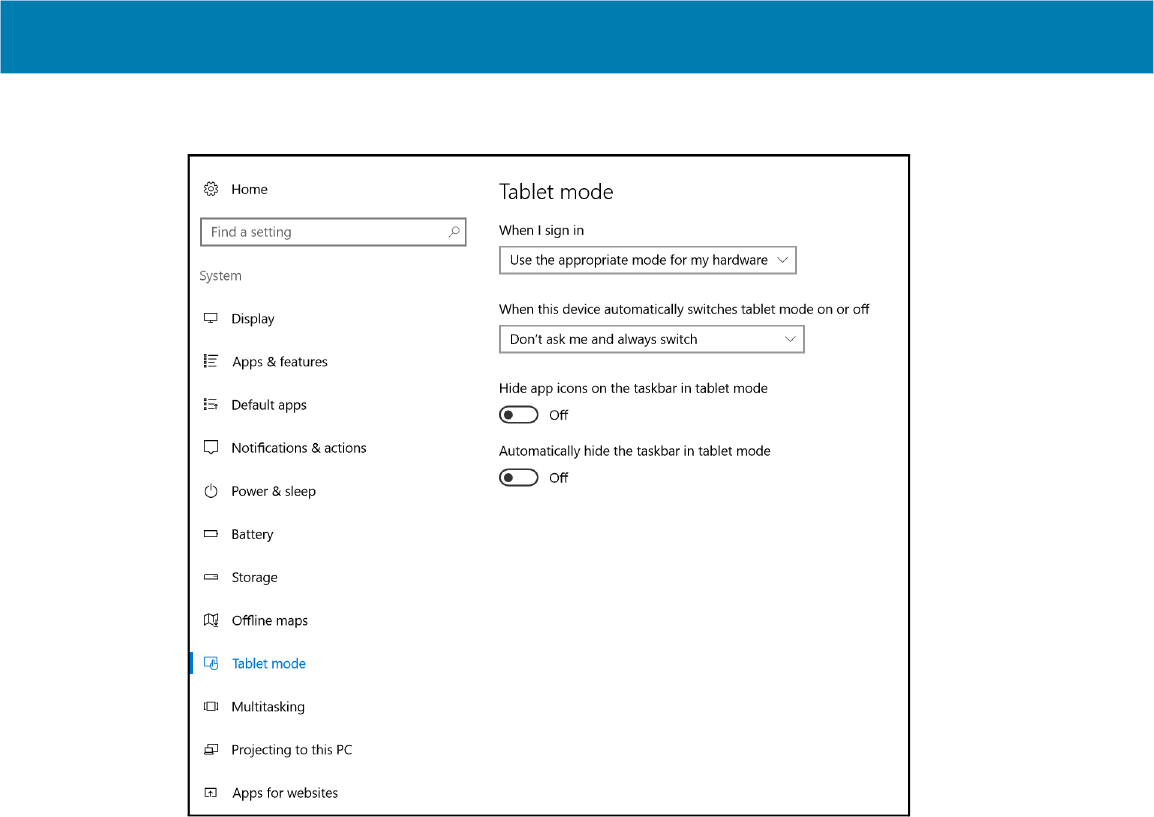
Configuring Tablet Mode
You may configure how the tablet Start screen displays depending upon if it is being used as a tablet or
docked in a cradle.
Using the Tablet
23
1.
Touch All Settings > System > Tablet mode.
• When I sign in:
• Use tablet mode - set to tablet mode after signing in.
• Use desktop mode - set to desktop mode after signing in.
• Use the appropriate mode for my hardware - let the tablet determine if it is.
• When this device automatically switches tablet mode on or off
• Don’t ask me and don’t switch
• Always ask me before switching
• Don’t ask me and always switch
• Hide app icons on the taskbar in tablet mode - enable to hide application icons in the taskbar.
• Automatically hide the taskbar in tablet mode - enable to hide the taskbar when in tablet mode.
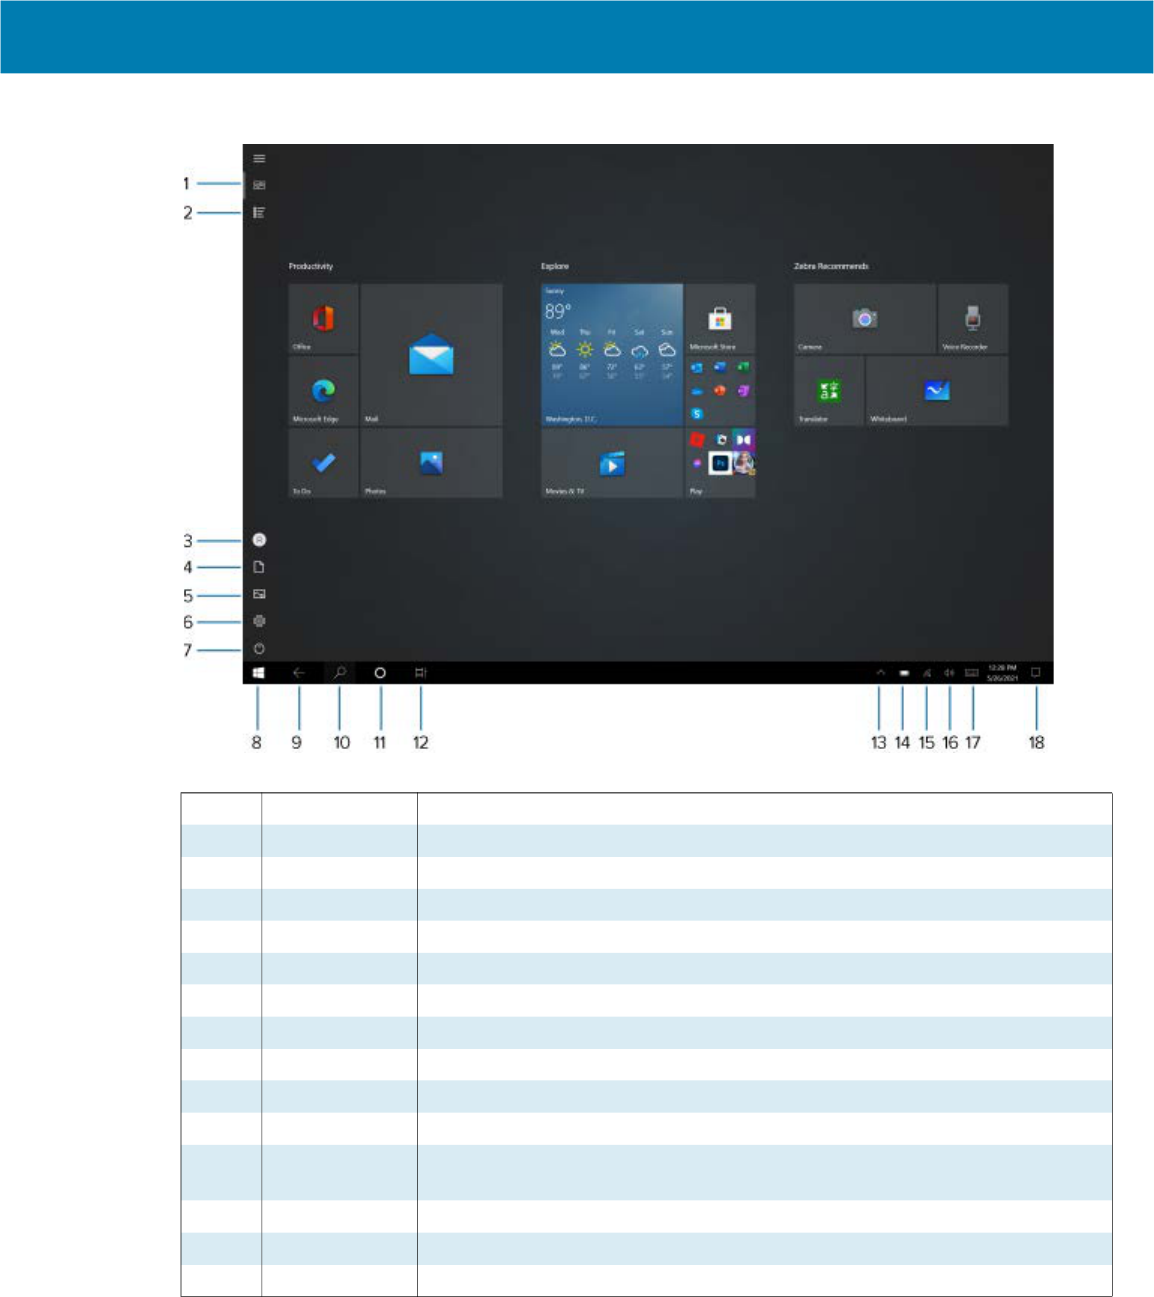
Tablet Mode Start Screen
The tile-based interface allows direct access to recently used applications, emails, photos, contacts, and
frequently viewed websites. You may pin favorite apps as tiles to customize the Start screen. See Know
Your Tablet for information.
Live Tiles, such as news, sports, weather, social-networking sites, etc. update in real time.
Using the Tablet
24
Figure 4 Start Screen in Tablet Mode
1 Pinned tiles Places the Home screen in Tile view.
2 All apps Lists all applications alphabetically.
3 Users Opens user account window, locks screen or logs user off the device.
4 Documents Opens documents folder.
5 Pictures Opens pictures folder.
6 Settings Opens the Settings window.
7 Power Touch to place the device in sleep mode, shutdown or restart.
8 Start Access the Home screen from any window.
9 Back Displays the previous screen.
10 Search Search apps, settings, and files on your tablet or perform a web search.
11 Cortana Opens voice activated search window.
12 Recent
Applications
Displays all open applications.
13 More Settings Includes Bluetooth, Intel Graphics, and Windows Defender.
14 Battery Displays current battery status.
15 Network Opens network settings.
Using the Tablet
25
Multi-Touch Gestures
Depending on the application, some gestures might not be available.
• Touch: Open an application or perform an action on an open application, such as copy, save and
delete, depending on the application.
• Touch and hold: Open a menu.
• Slide: Scroll through items, such as lists, pages, and photos.
• Drag: Move an object.
• Move two fingers closer together: Zoom out.
• Move two fingers farther apart: Zoom in.
• Put two or more fingers on an item and then rotate your fingers clockwise or counterclockwise: Rotate
an item.
• Swipe in from the right edge: Display the Action Center.
• Swipe in from the left edge: Displays open applications.
• Swipe in from the top edge to the bottom on an open application: Close the current application.
Configuring Touch Settings
1. Touch the Search icon to search for Control Panel.
2. Open Control Panel.
3. Touch Hardware and Sound > Pen and Touch.
4. Select Touch action and then Settings.
5. After making changes touch Apply.
Changing Touch Mode
The device display is able to detect touch using a finger, glove, or stylus; also included is support for using
the device in the rain.
NOTE: The glove may be made of medical latex, leather, cotton, or wool. For optimal performance use a
Zebra certified stylus.
1. Touch All apps > Zebra Technologies > Touch Mode Switcher.
2. When prompted to allow device changes, touch Yes. The Touch Mode Switcher window displays with
the current mode indicated.
3. Touch the desired option to change the mode, then touch OK.
16 Sound Use to control audio volume level.
17 Keyboard Opens the virtual keyboard.
18 Action Center Provides easy access to some frequently used settings and notifications.
Touch the icon to open the Action Center. The first row of setting option
boxes display and any notifications. Touch Expand to view all setting option
boxes.
Using the Tablet
26
On-Screen Keyboard
Use the On-Screen Keyboard to type text, numbers, symbols, and other characters. The touch keyboard
and handwriting panel also can be used to perform handwriting.
When you rotate the device the On-Screen Keyboard or the touch keyboard and handwriting panel
automatically rotates to the corresponding portrait or landscape view.
Opening the On-Screen Keyboard
1. Touch the Search icon to search for Keyboard, and then tap On-Screen Keyboard.
2. Touch the Keyboard icon in the Task bar.
Opening the Keyboard and Handwriting Panel
1. Touch the Keyboard icon in the Task bar. The Keyboard displays.
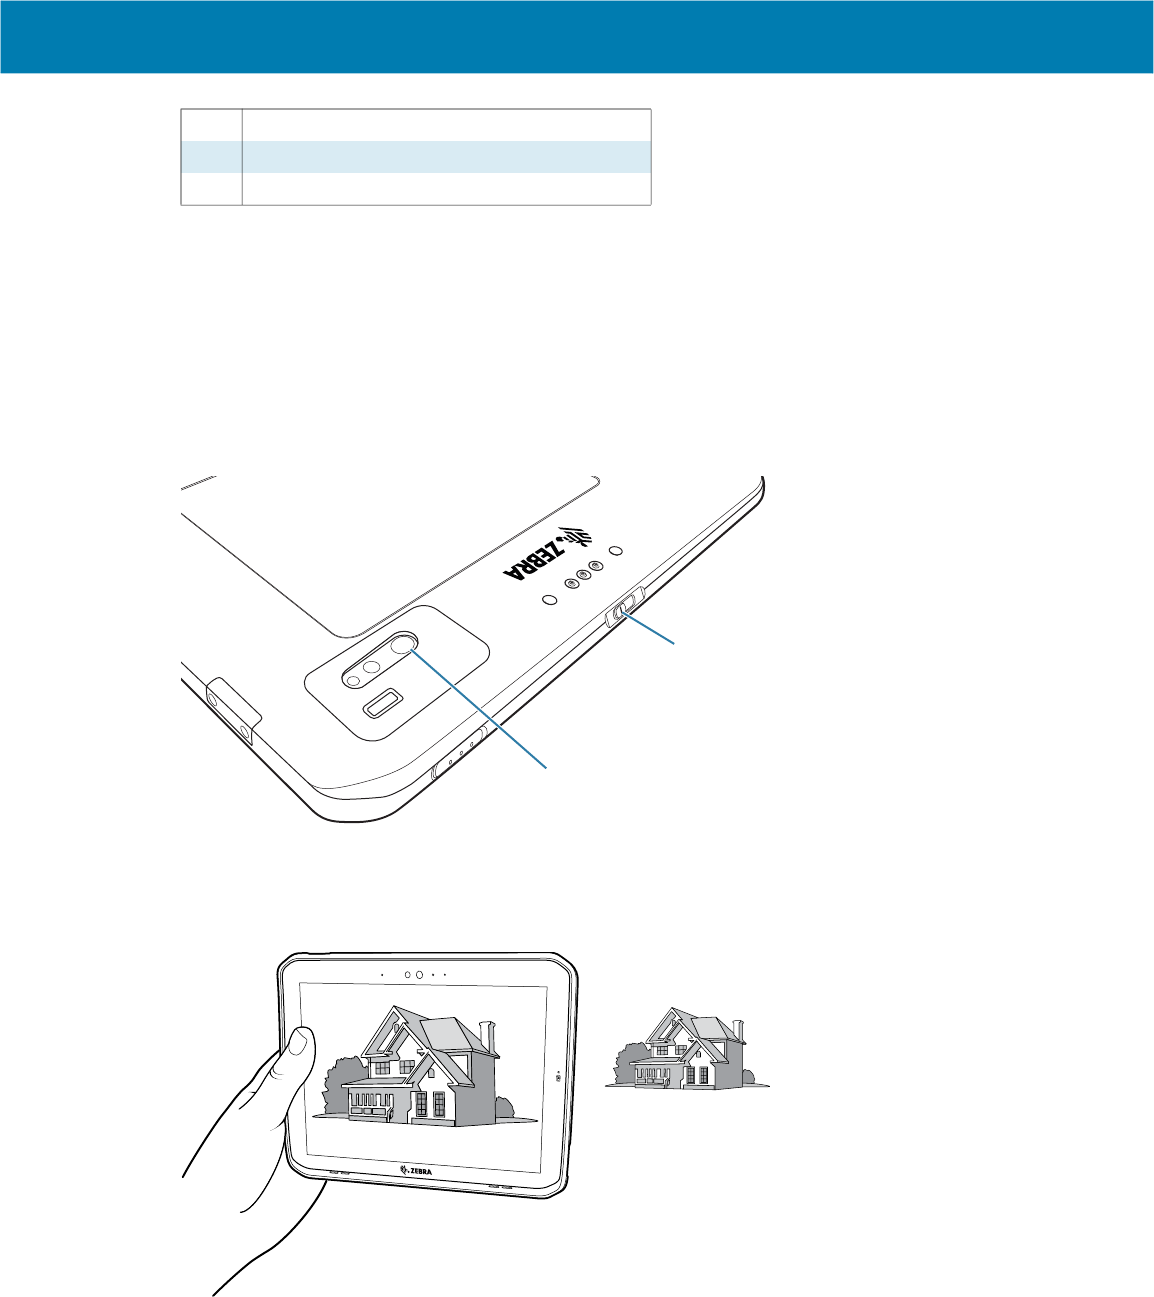
2. In the top left of the keyboard tap the Keyboard icon to display a Keyboard and Handwriting Options
window.
3. Select from desired options.
1 Small keyboard
2 Handwriting panel
3 Alternate keyboard layout
4 All settings
Using the Tablet
27
Active Stylus
The tablet supports stylus pens with Microsoft pen protocol MPP 2.0 technology, including the ET80/ET85
active stylus.
Using the Camera
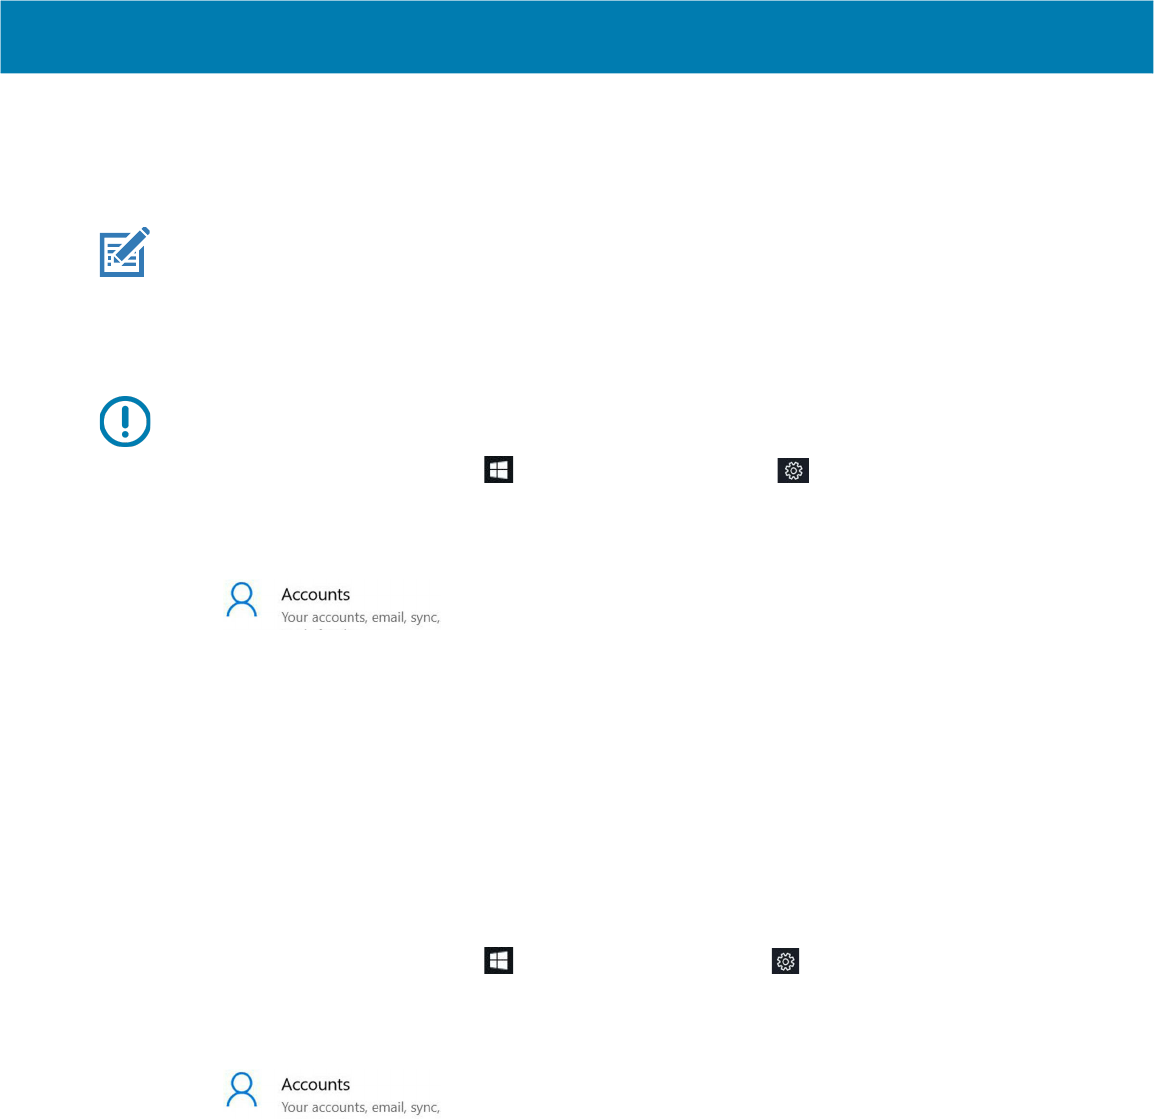
1. Ensure the front camera privacy cover (1) or rear camera privacy cover (2) is open.
2. Open the camera application. The Camera Indicator LED illuminates.
3. Point the camera at an object.
4. Touch the on-screen shutter button to take a photo or record a video.
5 Region and language
6 Small keyboard
7 Change keyboard width
1
2
Using the Tablet
28
Fingerprint Reader
You can use the fingerprint reader to log on to the tablet by reading your fingerprint instead of entering a
password. This feature provides an additional level of security for the tablet.
NOTE: The fingerprint reader is available only on some configurations.
These instructions assume that you have a password for logging into your tablet.
Setting Up a PIN
IMPORTANT: To use the fingerprint reader, you need to set up a PIN. If you already have a PIN, then you
can skip these steps and go to Setting Up the Fingerprint Reader on page 28.
1. Touch the Windows Start icon and touch the Settings icon.
The Settings window appears.
2. Touch the Accounts icon.
The Accounts window appears.
3. In the left pane, touch Sign-in options.
4. In the right pane of the Sign-in options, under Windows Hello PIN, touch Add.
5. Enter your PIN and touch OK.
Now you can set up the fingerprint reader.
Setting Up the Fingerprint Reader
After you have a PIN, the Windows Hello section of the Sign-in Options is enabled and you can set up your
fingerprint.
1. Touch the Windows Start icon and touch the Settings icon above it.
The Windows Settings menu appears.
2. Touch the Accounts icon.
3. Touch Sign-in options in the left pane.
4. Touch Windows Hello Fingerprint > Set up.
A welcome window appears.
5. In this window, touch Get started.
6. Enter your PIN.
7. Decide which finger to use.
8. The setup asks you to place your finger on the fingerprint reader a few times for it to map your finger.
9. It prompts you to touch the sensor multiple times and from different angles. Follow the instructions as
you are registering your fingerprint.

Using the Tablet
29
10.
When successful, touch Close.
11. Next time you log in, you can use your PIN or you can use your finger on the fingerprint reader.
NOTE: You can register more than one finger to use with this reader. Keep in mind which fingers you have
established with the reader and use only those fingers.
Logging In with Your Fingerprint
When you start the tablet or wake it up from sleep mode, put your finger on the fingerprint scanner and
press it for a brief time.
It will either recognize your print and open up Windows or it will ask you to try again.
Fingerprint Reader Tips
• Be consistent. Press the finger to the scanner and hold it there for a moment and scan at the same
angle each time. For example, if you register your finger with your hand open, hold your hand the same
way each time you scan.
• Read the prompts carefully and ensure that you wait for the prompt before you swipe.
• When scanning, press hard enough to fully contact the sensor.
• Wipe dirt or debris off your finger before scanning it so nothing interferes with the scan. Rub your
fingers together to stimulate the natural skin oils so your fingerprint is easier to detect.
• If you are having trouble registering a specific finger, try to register a different finger.
• If you are repeatedly having trouble getting a good scan, you might need to clean the sensor.
See Cleaning the Fingerprint Reader on page 72.
NOTE: Be sure to press your finger to the scanner in the same way each time.
Using the Tablet
30
Windows Hello Face
You can use the front camera to log on to your tablet using Windows Hello Face Authentication instead of
entering a password.
Setting Up Windows Hello Face
To use Windows Hello Face, you need to set up a PIN. For steps on how to set up a PIN, see Setting Up a
PIN on page 28.
1. Touch the Windows Start icon and touch the Settings icon.
The Settings window appears.
2. Touch the Accounts icon.
The Accounts window appears.
3. In the left pane, touch Sign-in options.
4. Touch Windows Hello Face > Set up > Get Started.
5. Enter your PIN.
6. Hold your face steady until the image is captured.
Logging In with Windows Hello Face
When you start the tablet or wake it up from sleep mode, make sure your face is in view of the front
camera.
If your face is not recognized, the Sign-in screen displays. Log in with your PIN or touch Sign-in options
for more options.

31
Software
This chapter provides instructions on initial setup, how to reset the tablet, and how to reinstall Windows.
Initial Windows Setup
After performing a factory reset or updating the tablet firmware or operating system, the Windows setup
process begins.
The welcome screen appears and then a series of windows prompt you for information regarding your
preferences including Keyboard Layout, Network Setup, Account Name, Security, and Privacy.
Next, a short configuration process occurs after which the Windows home screen displays.
Any apps that you installed from the Windows Store prior to reset, are automatically reinstalled using your
mobile broadband or Wi-Fi internet connection when connected; apps installed from other sources are not.
After the process is complete a list of apps removed during reset is created on the desktop.
Factory Reset
Restores Windows to original factory settings. To reset the device:
1. Connect the device to a power source.
2. Touch Settings > Update and security > Recovery.
3. Under Reset this PC, touch Get started.
4. Touch Keep my files to remove all apps and settings but keep all personal files or Remove everything
to remove all personal files, apps, and settings.
CAUTION: Removing everything erases all data, including your account configuration, applications, music,
pictures and files. Make sure that you back up all the required data before you proceed.
5. Touch Next until the reset process begins. The process can take an hour or longer.
6. When the reset is complete the Windows setup process begins.
Software
32
Reinstall Windows
Create an installation USB flash drive to reinstall the operating system on the device.
CAUTION: All data on the tablet is erased upon installation.
Creating an Installation USB Flash Drive
Before you begin, request software for your tablet by visiting Zebra Support and Downloads at
zebra.com/support and download the software to a host computer.
NOTE: Make sure the entire file downloads completely. Partial downloads may corrupt the device.
1. Insert a 16 GB or larger USB flash drive into a host computer.
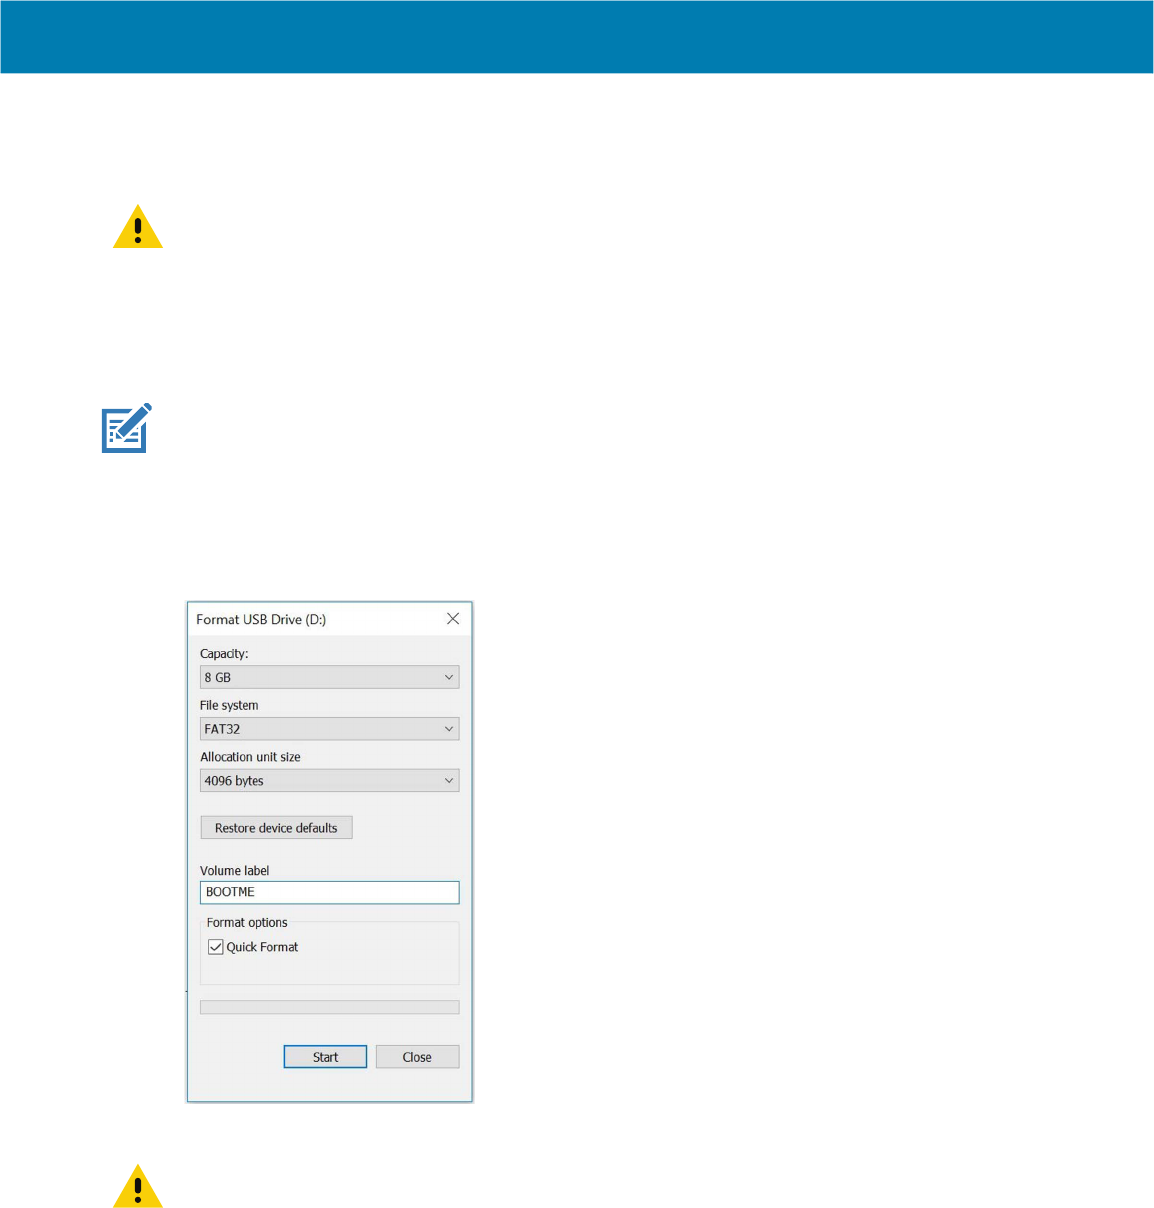
2. From Windows Explorer right click on the USB flash drive and select Format.
Figure 5 Format Dialog Box
3. In the File system drop down, select FAT32.
CAUTION: Only FAT32 format is recognized by the system BIOS.
4. In the Volume label text box, enter BOOTME.
5. Click Start. A warning appears; click OK to proceed.
6. Click OK when the format complete and confirmation dialogs appear.
7. Using Windows Explorer, extract the software file you downloaded into a folder.
8. Copy the entire contents of the folder to the formatted flash drive.
9. Ensure that all the files copied successfully and then safely unmount the USB drive.

Software
33
Reinstalling Windows
Before you begin, connect either the ET80/ET85 keyboard or any standard USB keyboard to the tablet. A
physical keyboard is required to complete the setup.
1. Connect the tablet to a power source.
2. Plug the bootable USB flash drive into the tablet USB port.
3. Reboot the device.
4. Before Windows starts, press F12 on the keyboard.
The Boot menu displays.
5. Select USB. The tablet boots to WinPE and installs the operating system and BIOS updates.
Installation takes approximately 9 minutes.
6. When complete, press Alt + F4 on the keyboard. The device reboots and the Windows setup process
initiates. See Initial Windows Setup.
7. After Windows setup is complete, in the taskbar, touch , then touch , then touch Eject (drive
name).
8. After the message Safe To Remove Hardware message appears, remove the flash drive from the
tablet.

Software
34
Check Versions
You may check the versions for:
• BIOS Version
• Operating system Version
Checking BIOS Version
Use one of the following methods to check the current version of the BIOS.
• From the desktop, open Know Your Tablet.
• Access system information using the command prompt.
a. In the search field, type cmd, then touch Command Prompt Desktop App to open.
b. In the Command window, type msinfo32.
c. Press Enter key. The System Information window appears. The BIOS version displays in the BIOS
Version/Date field.
Checking Operating System Version
To check the current operating system version, see Software Release Information on page 11.
Enter the BIOS
Enter the BIOS to make system changes such as managing your hardware and changing the boot
sequence.
Entering the BIOS with a Keyboard
1. Connect a keyboard to the tablet.
2. Start or restart the tablet.
3. Before the boot screen appears, repeatedly press the F2 key on the keyboard.
Entering the BIOS without a Keyboard
1. Start or restart the tablet.
2. When the boot screen appears, repeatedly tap the screen above the Zebra logo.
3. Select Enter Setup.
Entering the BIOS without a Keyboard from Windows
Enter the BIOS without a keyboard from Windows.
1. From Windows, touch the Start icon .
2. Touch All Settings > Update & Security > Recovery.
3. Under Advanced startup, touch Restart Now. Windows shuts down.
4. Touch Troubleshoot.

Software
35
5.
Touch Advanced options.
6. Touch UEFI Firmware Settings.
7. Touch Restart.
Zebra Barcode Scanning Resources
To obtain Zebra scanning resources such as applications, SDKs, drivers, and RFID software see the
Zebra Barcode Scanning Software web page at:
zebra.com/us/en/products/software/scanning-systems.html
.
Application Installation
Install programs and apps from the Internet, or a local network. Make sure you trust the publisher of the
app and the website.
In your web browser, tap or click the link to the app. To install it now, tap Open or Run, and then follow the
instructions on your screen. To install the app later, tap Save or Save as to download it.
Getting Apps from the Windows Store
To obtain apps from the Windows Store, select the Store tile from the Start menu or taskbar.

36
Data Capture
The device supports data capture using an integrated scanner and Windows compatible Zebra Bluetooth
and USB scanners.
For information on pairing and scanning using Zebra scanners, go to the Product Reference Guide for your
scanner.
NOTE: When using 123Scan to configure the ET80/85 on-board scan engine, a mouse is required.
123Scan does not support touch screen use. If using 123Scan on a computer other than your tablet, select
scanner model SE4107.
Imaging
The device with an integrated 2D imager has the following features:
• Omnidirectional reading of a variety of barcode symbologies, including the most popular linear, postal,
PDF417, Digimarc, and 2D matrix code types.
• Advanced intuitive laser aiming cross-hair and dot aiming for easy point-and-shoot operation.
The imager uses imaging technology to take a picture of a barcode, stores the resulting image in memory,
and executes state-of-the-art software decoding algorithms to extract the barcode data from the image.
Digital Camera
The device with an integrated camera based barcode scanning solution has the following features:
• Omnidirectional reading of a variety of barcode symbologies, including the most popular linear, postal,
QR, PDF417, and 2D matrix code types.
• Cross-hair reticle for easy point-and-shoot operation.
The solution uses the advanced camera technology to take a digital picture of a barcode, and executes
state-of-the-art software decoding algorithms to extract the data from the image.
Scanning Considerations
Typically, scanning is a simple matter of aim, scan, and decode, with a few quick trial efforts to master it.
However, consider the following to optimize scanning performance:
Data Capture
37
• Range: Scanners decode best over a particular working range — minimum and maximum distances
from the barcode. This range varies according to barcode density and scanning device optics. Scan
within range for quick and constant decodes; scanning too close or too far away prevents decodes.
Move the scanner closer and further away to find the right working range for the barcodes being
scanned.
• Angle: Scanning angle is important for quick decodes. When the illumination/flash reflects directly back
into the imager, the specular reflection can blind/saturate the imager. To avoid this, scan the barcode
so that the beam does not bounce directly back. Do not scan at too sharp an angle; the scanner needs
to collect scattered reflections from the scan to make a successful decode. Practice quickly shows what
tolerances to work within.
• Hold the device farther away for larger symbols.
• Move the device closer for symbols with bars that are close together.
NOTE: Scanning procedures depend on the app and device configuration. An app may use different
scanning procedures from the one listed above.
Scanning with Internal Imager
To read a barcode, a scan-enabled app is required.
1. Ensure that an app is open on the tablet and a text field is in focus (text cursor in text field).
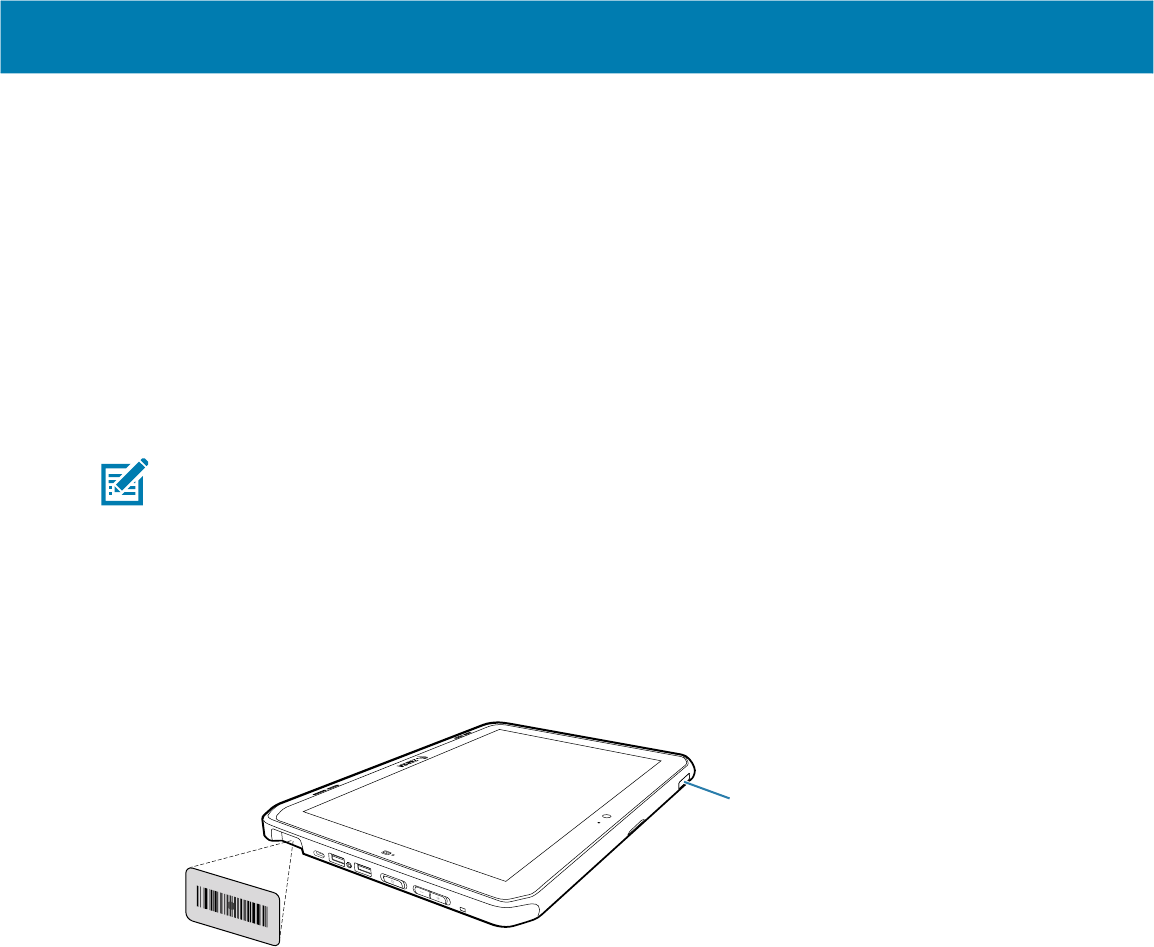
2. Point the scanner exit window at a barcode.
3. Press and hold the Scan button (1). The aiming pattern turns on to assist in aiming.
1
Data Capture
38
4.
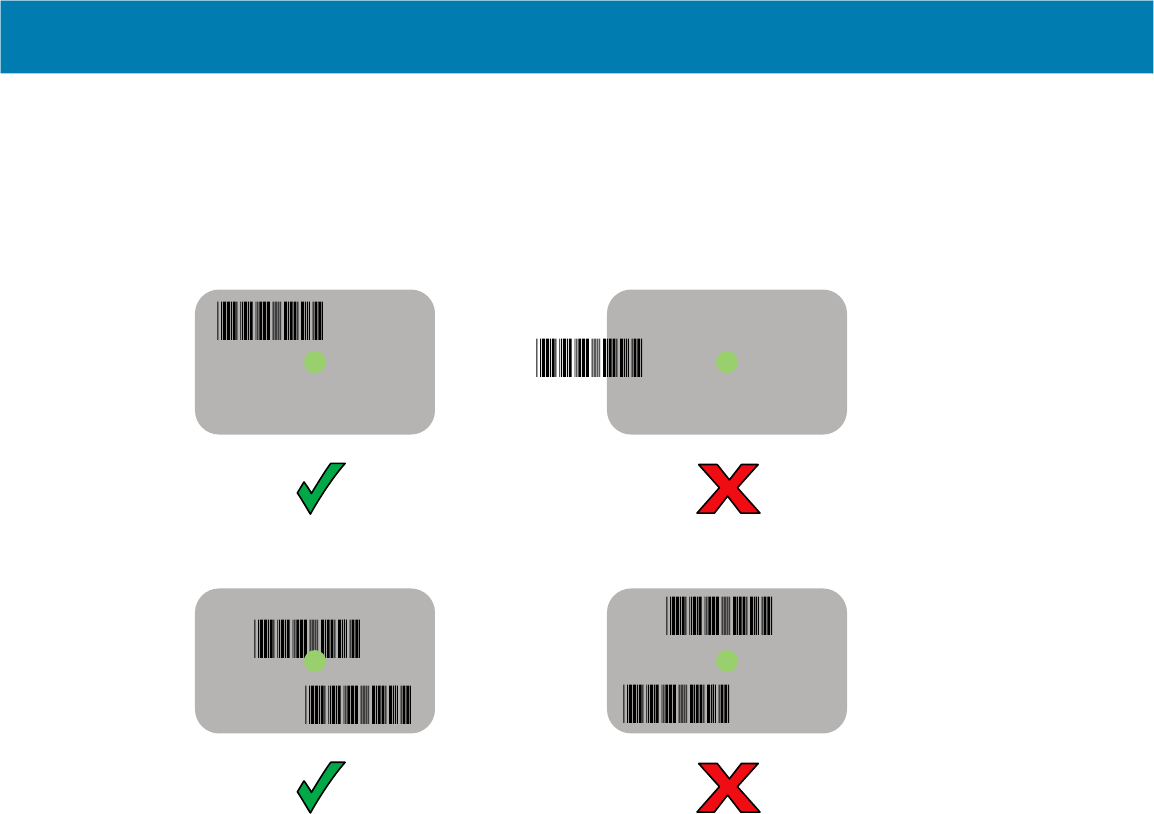
Ensure the barcode is within the area formed by the aiming pattern. The aiming dot increases visibility
in bright lighting conditions.
A beep sounds to indicate the barcode was decoded successfully. When the Internal Scanner is in Pick
List mode, the tablet does not decode the barcode until the aiming dot touches the barcode.
Figure 6 Internal Scanner Aiming Pattern
Figure 7 Internal Scanner Pick List Mode with Multiple Barcodes in Aiming Pattern
5. Release the scan button. The captured data appears in the text field.

39
Wireless
This section provides information on the wireless features:
• Wireless Local Area Network (WLAN)
• Wireless Wide Area Network (WWAN)
• Bluetooth
• Near Field Communications (NFC).
Wireless Local Area Networks
Wireless local area networks (WLANs) allow the device to communicate wirelessly inside a building that
has the appropriate WLAN infrastructure. Both the infrastructure and the device must both configured
properly to enable this communication.
Once the infrastructure is set up to enforce the chosen WLAN security scheme, use the Wireless &
networks settings to configure the device to match the security scheme.
The device supports the following WLAN security options:
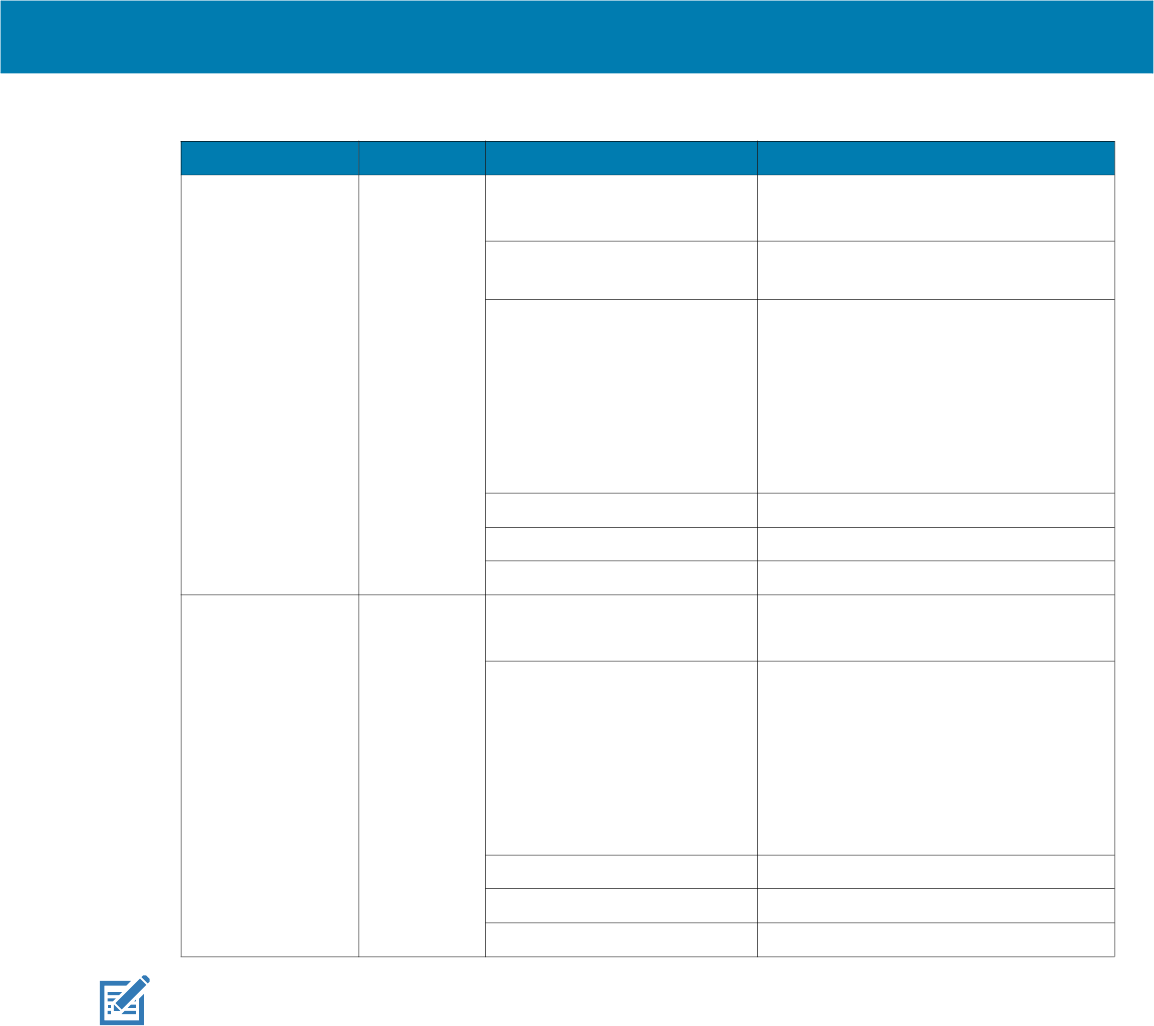
Table 1 WLAN Security Options
Security Type Encryption EAP Method Authentication Method
Open Network None/WEP N/A N/A
WPA2-Personal
WPA3-Personal
AES N/A N/A
Wireless
40
NOTE: To extend the battery, turn off Wi-Fi when not in use.
Connecting to a Wi-Fi Network
To establish a Wi-Fi network connection:
1. In the taskbar, touch the network icon. A list of available Wi-Fi networks displays.
2. Touch the network to connect.
3. Touch the Connect automatically checkbox to allow the tablet to connect automatically to this network
whenever the device is on.
4. Touch Connect.
5. If required, enter security key and then touch Next.
6. Touch Yes to find PCs and devices on the network or No to not find these devices. Once connected,
Connected appears under the network name.
WPA2-Enterprise
WPA3-Enterprise
AES Protected EAP (PEAP) Secured password (EAP-MSCHAPv2)
Smart card or other certificate
Smart Card or other
Certificate
EAP-TTLS Unencrypted password (PAP)
CHAP
Microsoft CHAP (MS-CHAP)
Microsoft CHAP v2 (MS-CHAPv2)
Smart card or other certificate
Secured password (EAP-MSCHAPv2)
EAP-SIM N/A
EAP-AKA N/A
EAP-AKA’ N/A
802.1x WEP PEAP Secured password (EAP-MSCHAPv2)
Smart Card or other Certificate
EAP-TTLS Unencrypted password (PAP)
CHAP
MS-CHAP
MS-CHAPv2
Smart Card or other Certificate
Secured password (EAP-MSCHAPv2)
EAP-SIM N/A
EAP-AKA N/A
EAP-AKA’ N/A
Table 1 WLAN Security Options (Continued)
Security Type Encryption EAP Method Authentication Method

Wireless
41
Viewing Network Information
To view security, address, and other information about the connected Wi-Fi network:
1. In the taskbar, touch the network icon. A list of available Wi-Fi networks display.
2. Touch the Wi-Fi network name.
3. Touch Properties.
Configuring Proxy Settings
The device supports the proxy feature for Wi-Fi connections. The proxy feature enables access to more
Web-based source and browse the Internet more securely. To configure the proxy settings when
connecting to a Wi-Fi network:
1. In the taskbar, touch Action Center.
2. Touch All Settings.
3. Touch Network & internet, then touch Proxy.
4. In the Manual proxy setup section, touch the Use proxy server switch to turn on.
5. In the Address text box, enter the address of the proxy server.
6. In the Port text box, enter the port number for the proxy server.
7. In the text box, enter addresses for web sites that do not require to go through the proxy server. Use the
semicolons between addresses but no spaces and do not use the carriage return.
8. Touch Save.
Adding a Wi-Fi Network
To access a Wi-Fi network that does not broadcast its network name (SSID), you must add that Wi-Fi
network before you can connect to it. To add a Wi-Fi network:
1. In the taskbar, touch the network icon. A list of available Wi-Fi networks display.
2. Scroll to the bottom of the list and touch Hidden network.
3. Follow the instructions on the screen to add a Wi-Fi network.
Wireless
42
Wireless Wide Area Networks
NOTE: ET85 only.
A Wireless wide area network is a mobile cellular network that allows you to browse the Internet, check
email, or connect to a virtual private network (VPN) from anywhere within the regional boundaries of the
cellular service. A micro SIM card is required to connect to a mobile network.
Connecting to a Cellular Data Network
1. Ensure that an activated SIM card is installed.
2. Touch in the taskbar.
3. Touch the Cellular option to turn on the WAN radio if required.
4. Touch the Cellular network in the list.
5. Touch Connect automatically to automatically connect to the cellular data network when it is
available. Clear the check box to manually connect each time you want to use the cellular data
connection.
6. Touch Allow roaming to allow the cellular data connection to stay on when outside of the mobile
operator’s network. Leaving the check box cleared can help prevent data roaming charges.
7. Touch Connect.
8. The name of the mobile operator appears next to the Cellular network icon.
9. If prompted, type your user name and password and the access point name (APN).
NOTE:
If the Cellular quick action is turned off, select it to turn it on. When off, the cellular radio is turned off, and you
cannot connect to a cellular network.
Adding an Internet APN
The Internet access point name (APN) is the address the tablet uses to connect to the Internet when using
a cellular data connection. Usually, the Internet APN is set automatically. If your cellular data connection is
not working, try entering a new Internet APN based on the mobile operator.
To add an Internet APN, type an address in the APN box. The other settings are optional and depend on
the mobile operator.
1. Touch Settings > Network & Internet > Cellular.
2. Touch Advanced options.
3. Under the APN settings section, touch Add an APN.
4. Update one or more of the following:
• In the Profile name box, type a name for the APN profile.
• In the APN box, type the address for the APN to use.
• In the User name box, type the user name for your mobile account.
• In the Password box, type the password for your mobile account.
• Select Type of sign-in info drop-down list and then select the authentication method.
• Select IP type drop-down list and then select the type of IP address.

Wireless
43
5.
Touch the Apply this profile check box if you want the APN profile to be used right after you save it.
6. Touch Save > OK.
Setting Up a SIM PIN
A SIM PIN helps prevent other people from using your cellular data connection. To set up a SIM PIN:
1. Touch Settings > Network & Internet > Cellular.
2. Touch the cellular connection name.
3. Touch Advanced options.
4. Under the Security section, touch Use SIM PIN.
5. Enter the SIM PIN.
If this is the first time using it, type the default SIM PIN. If you don't know the default SIM PIN, visit your
mobile operator's website to see if it is listed. Restart the tablet to lock the cellular data connection with
the SIM PIN.
If you already set up a PIN for the SIM, type the SIM PIN when prompted, and then select OK.
Removing a SIM PIN
If you are using a SIM PIN and want to remove it:
1. Touch Settings > Network & Internet > Cellular.
2. Touch the cellular connection name.
3. Touch Advanced options.
4. Under the Security section, touch Remove SIM PIN.
5. Enter the current SIM PIN.
6. Touch OK.
Changing a SIM PIN
To change the SIM PIN:
1. Touch Settings > Network & Internet > Cellular.
2. Touch the cellular connection name.
3. Touch Advanced options.
4. Under the Security section, touch Change SIM PIN.
5. In the Current SIM PIN box, enter the current SIM PIN.
6. In the New SIM PIN box, enter a new SIM PIN.
7. In the Confirm new SIM PIN box, enter the same new SIM PIN.
8. Touch OK.
Unblocking a SIM PIN
If you enter an incorrect SIM PIN, the SIM is blocked and cannot be used until you unblock it. Contact your
mobile operator for the PIN Unblocking Key (PUK), then select proceed as follows:

Wireless
44
To find this setting if your SIM is blocked,
1. Touch Settings > Network & Internet > Cellular.
2. Touch the cellular connection name.
3. Touch Advanced options > Unblock SIM PIN under the Security section.
4. Type the PUK code. If an incorrect PUK code is entered too many times, your SIM card will be blocked
permanently, and you will need to obtain a new SIM card from your mobile operator.

Wireless
45
Bluetooth
Bluetooth-equipped devices can communicate without wires, using frequency-hopping spread spectrum
(FHSS) radio frequency (RF) to transmit and receive data in the 2.4 GHz Industry Scientific and Medical
(ISM) band (802.15.1). Bluetooth wireless technology is specifically designed for short-range (100 meters
(328 feet)) communication and low power consumption.
Devices with Bluetooth capabilities can exchange information (e.g., files, appointments, and tasks) with
other Bluetooth enabled devices such as printers, access points, and other mobile devices.
Adaptive Frequency Hopping
Adaptive Frequency Hopping (AFH) is a method of avoiding fixed frequency interferers, and can be used
with Bluetooth voice. All devices in the Bluetooth network (piconet) must be AFH-capable in order for AFH
to work. There is no AFH when connecting and discovering devices. Avoid making Bluetooth connections
and discoveries during critical 802.11b and other 2.4G WLAN
communications. AFH for Bluetooth consists
of four main sections:
• Channel Classification - A method of detecting an interference on a channel-by-channel basis, or
pre-defined channel mask.
• Link Management - Coordinates and distributes the AFH information to the rest of the Bluetooth
network.
• Hop Sequence Modification - Avoids interference by selectively reducing number of hopping
channels.
• Channel Maintenance - A method for periodically re-evaluating the channels.
When AFH is enabled, the Bluetooth radio “hops around” (instead of through) the 802.11b and other 2.4G
WLAN high-rate channels. AFH coexistence allows Enterprise devices to operate in any infrastructure.
The Bluetooth radio in this device operates as a Class 1 device power class. The maximum output power
is 9mW and the expected range is 100 meters (328 feet). A definition of ranges based on power class is
difficult to obtain due to power and device differences, and whether one measures open space or closed
office space.
NOTE:
Use of Bluetooth wireless technology is not recommended when high rate 802.11b operation using 2.4G chan-
nel is required.
Security
The current Bluetooth specification defines security at the link level. Application-level security is not
specified. This allows application developers to define security mechanisms tailored to their specific need.
Link-level security occurs between devices, not users, while application-level security can be implemented
on a per-user basis. The Bluetooth specification defines security algorithms and procedures required to
authenticate devices, and if needed, encrypt the data flowing on the link between the devices. Device
authentication is a mandatory feature of Bluetooth while link encryption is optional.
Pairing of Bluetooth devices is accomplished by creating an initialization key used to authenticate the
devices and create a link key for them. Entering a common personal identification number (PIN) in the
devices being paired generates the initialization key. The PIN is never sent over the air. By default, the
Bluetooth stack responds with no key when a key is requested (it is up to user to respond to the key
request event). Authentication of Bluetooth devices is based-upon a challenge-response transaction.
Bluetooth allows for a PIN or passkey used to create other 128-bit keys used for security and encryption.
The encryption key is derived from the link key used to authenticate the pairing devices. Also worthy of
note is the limited range and fast frequency hopping of the Bluetooth radios that makes long-distance
eavesdropping difficult.

Wireless
46
Recommendations are:
• Perform pairing in a secure environment
• Keep PIN codes private and do not store the PIN codes in the device
• Implement application-level security.
Bluetooth Profiles
The device supports the following Bluetooth services:
• Advanced Audio Distribution Profile (A2DP) - Allows the device to stream stereo-quality audio to a
wireless headset or wireless stereo speakers.
• Audio/Video Remote Control Profile (AVRCP) - Allows the device to control A/V equipment to which a
user has access. It may be used in concert with A2DP.
• Device ID Profile (DIP) - allows a device to be identified above and beyond the limitations of the Device
Class already available in Bluetooth. It enables identification of the manufacturer, product id, product
version, and the version of the Device ID specification being met.
• Generic Access Profile (GAP) - Allows the device to be visible to other Bluetooth devices and
determines their interaction.
• Generic Attribute Profile (GATT) - Provides profile discovery and description services for Bluetooth Low
Energy protocol.
• Hands Free Profile (HFP) - Allow car hands-free kits to communicate with the device and lets the
headset control the device.
• Hard Copy Cable Replacement Profile (HCRP) - Provides a simple wireless alternative to a cable
connection between a device and a printer.
• Headset Profile (HSP) - Provides a simple audio connection between the device and the headset.
• HID Over GATT Profile (HOGP) - Connects human interface devices such as keyboards and mice to a
host device.
• Human Interface Device Profile (HID) - Allows Bluetooth keyboards, pointing devices, gaming devices
and remote monitoring devices to connect to the device.
• Object Push Profile (OPP) - Allows the device to push and pull objects to and from a push server.
• Out of Band (OOB) and Near Field Communications (NFC) - Allows for pairing of a Bluetooth device
such as headsets and scanners by touching the devices together (NFC tap to pair).
• Personal Area Network User (PANU) - Allows the use of Bluetooth Network Encapsulation Protocol to
provide L3 networking capabilities over a Bluetooth link. Only PANU role is supported.
• Radio Frequency (RF) Kill - All RF activities are terminated and device goes into low power mode.
• Serial Port Profile (SPP) - Allows use of RFCOMM protocol to emulate serial cable connection between
two Bluetooth peer devices. For example, connecting the device to a printer.
• Service Discovery Profile (SDP) - Allows applications running on different Bluetooth-enabled devices to
discover each other's existence, and exchange information to determine their characteristics.

Wireless
47
Pairing with a Bluetooth Device
To connect and exchange data with another Bluetooth device, pair the tablet with another Bluetooth
device:
1. In the taskbar, touch the Action Center icon.
2. Touch All Settings, then touch Devices > Bluetooth.
3. Slide the control to the right to turn it on.
4. Touch the plus sign to select Add Bluetooth or other device then in the Add a Device window, touch
Bluetooth.
5. Discoverable Bluetooth devices populate the window.
6. When the scanner you want to pair is found, touch the ID. After a few minutes a notification appears
that the devices are paired.
Unpairing a Bluetooth Device
To unpair a Bluetooth device:
1. In the taskbar, touch Action Center.
2. Touch All Settings.
3. Touch Devices > Bluetooth.
4. Touch the ID of the Bluetooth device to unpair.
5. Touch Remove device. A notification prompt displays.
6. Touch Yes.
Turning on Airplane Mode
When Airplane mode is on, the Wi-Fi, Bluetooth, Global Navigation Satellite System (GNSS) and
Near-field communication (NFC) radios are turned off. This is useful when traveling on an airplane or when
you don’t need Wi-Fi or Bluetooth for a while. Airplane mode extends the amount of time before the battery
needs recharging. To place the device in Airplane mode:
1. In the taskbar, touch the network icon .
2. Touch the Airplane mode option. The option box turns blue and the airplane icon appears in the
taskbar.
To turn on radios in Airplane Mode (without turning on WAN):
1. In the taskbar, touch the airplane icon.
2. Touch Wi-Fi option. The option box turns blue indicating that Wi-Fi is on.
Wireless
48
Near Field Communications
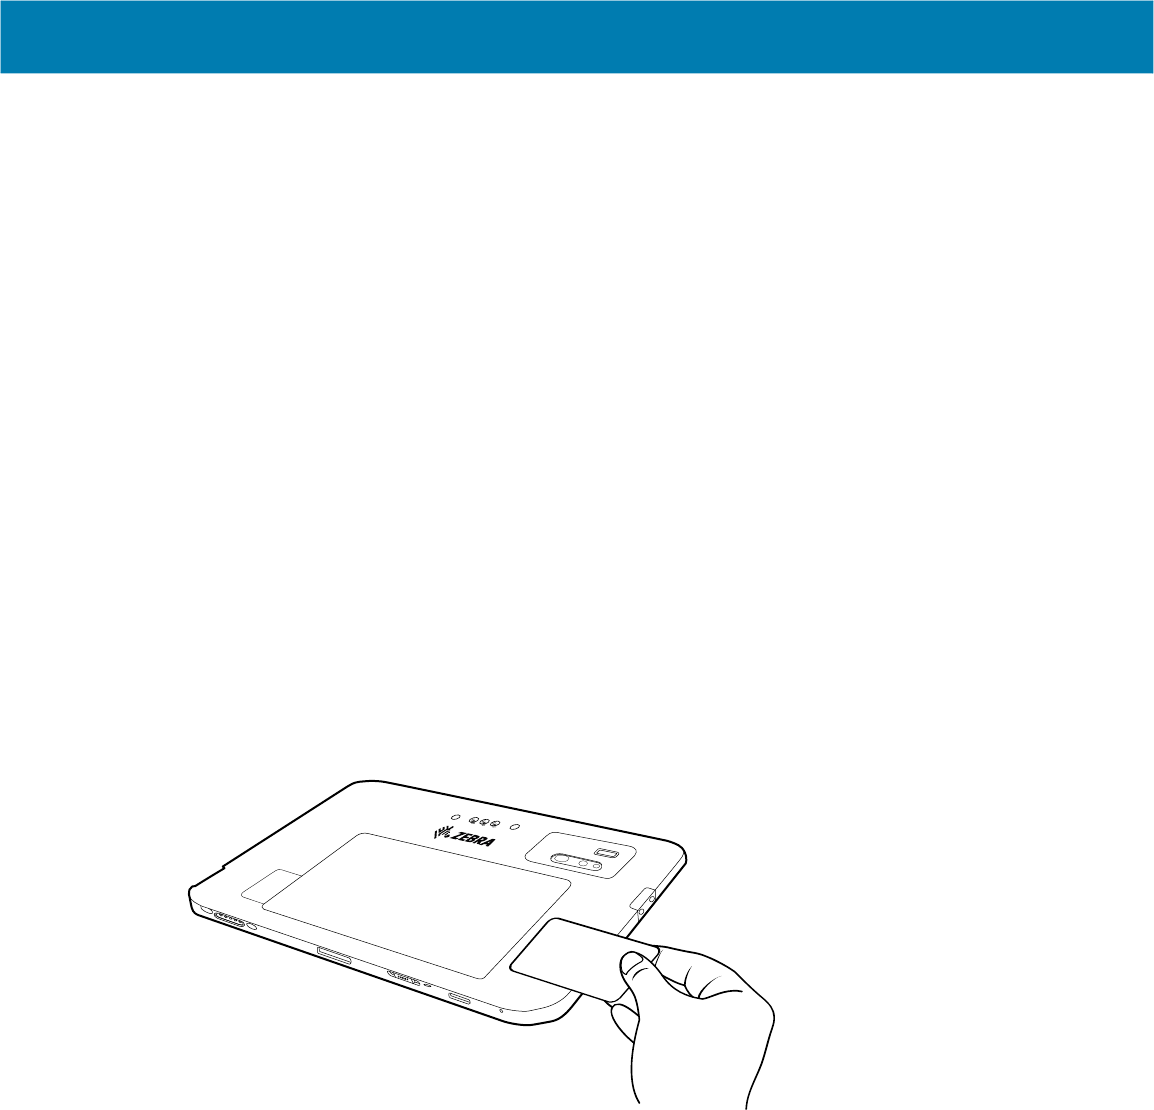
The device supports reading NFC cards. The NFC antenna is located on the back of the device under the
NFC logo.
Enabling NFC
NFC is disabled by default. Before using NFC, you must enable it in the BIOS and then in Windows.
1. Enter the BIOS setup. See Enter the BIOS on page 34.
2. From the BIOS setup screen, select the Advanced tab.
3. Select NFC Controller > Enabled.
4. Select the Save & Exit tab.
5. Select Exit Saving Changes > Yes.
6. After Windows loads, go to Settings > Network & Internet > Airplane mode. Under Wireless
devices, select the NFC slider to turn it on.
Reading NFC Cards
The tablet supports reading NFC cards. The NFC antenna is located on the back of the tablet under the
NFC logo.
With an NFC enabled application open, bring the NFC card toward the antenna. Depending upon the
application, an audio or visual indication indicates successful reading of the card.
49
Accessories
This section provides information for using the accessories for the device.
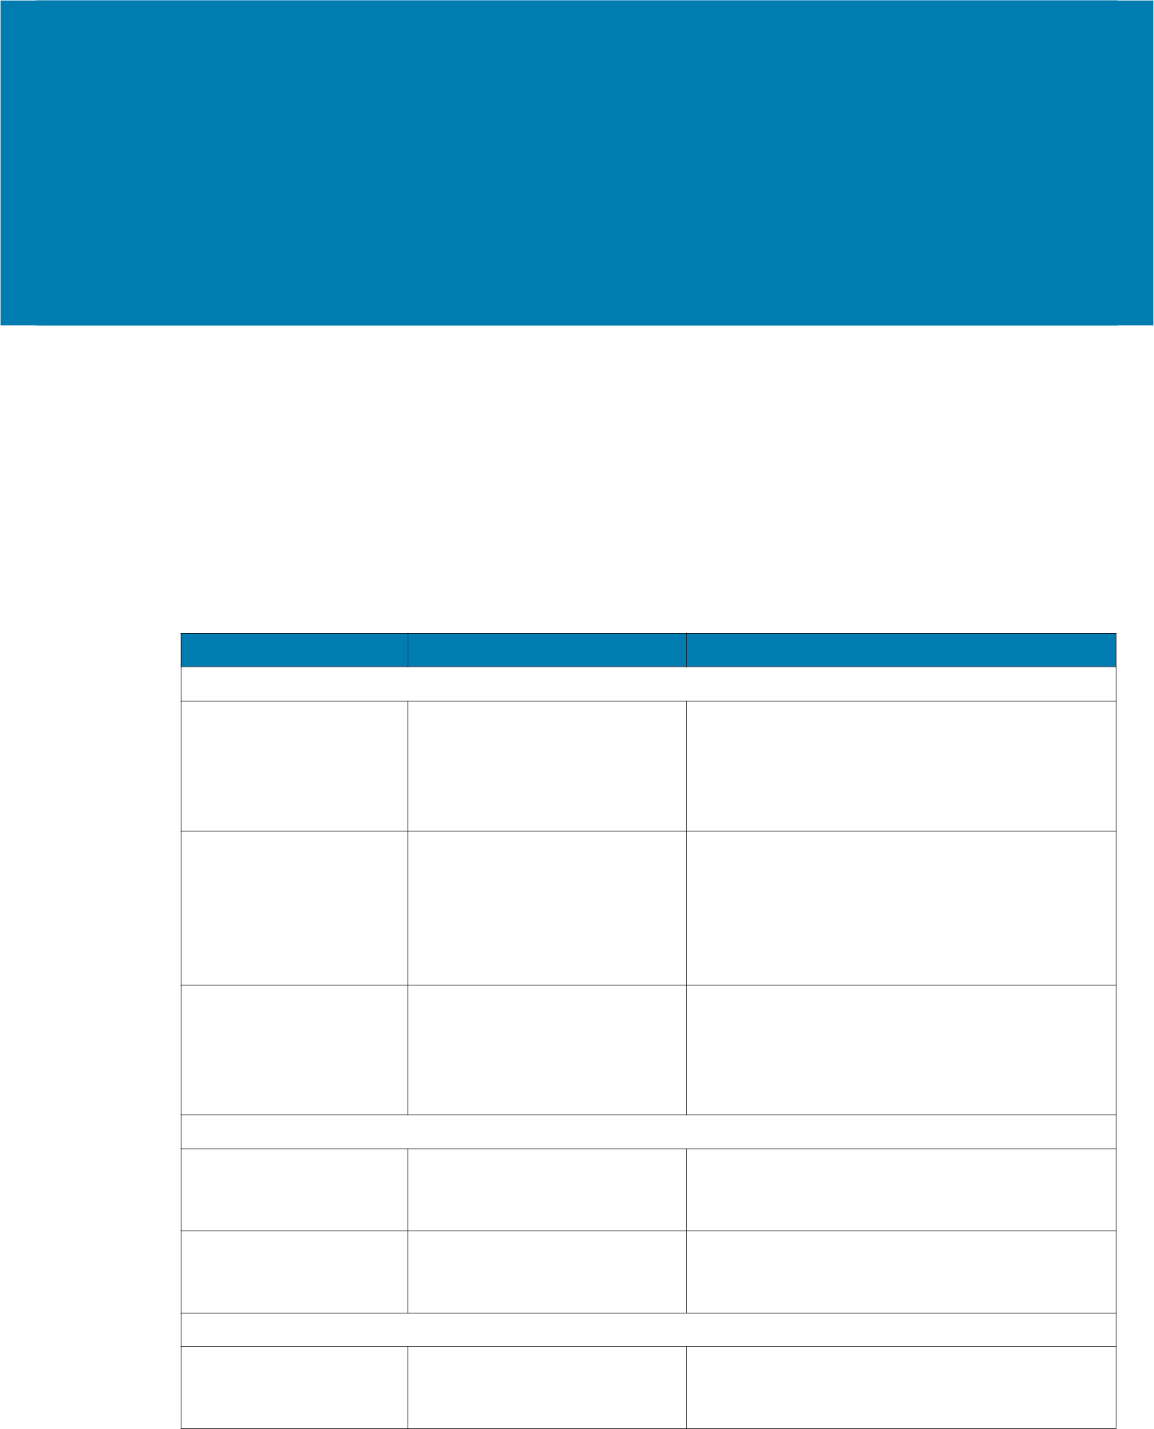
This following table lists the accessories available for the device.
Table 2 Accessories
Accessory Part Number Description
Docks
Vehicle Dock CRD-ET8X-VEHDK1-01 Provides tablet charging, USB
communication, and Ethernet communication.
Includes set of 10-32 nuts (4), screws (4), and
washers (4). Mount not included. Supports
VESA 100 x 100, 100 x 50, and 75 x 75.
Power Dock CRD-ET8X-PWRDK1-01 Provides tablet charging only. Requires power
supply (PWR-BGA15V45W-UC-WW) with
country specific AC line cord. Includes set of
10-32 nuts (4), screws (4), and washers (4).
Mount not included. Supports VESA 100 x
100, 100 x 50, and 75 x 75.
Office Dock CRD-ET8X-OFFDK1-01 Provides tablet charging, USB
communication, Ethernet communication, and
HDMI. Includes stand. Requires power supply
(PWR-BGA15V45W-UC-WW) with country
specific AC line cord.
Communication Cables
RS232 Serial Cable CBL-ET8X-SER1-01 Provides Serial communication to the device.
Includes tool-less and screw attachment
options.
Ethernet RJ45 Cable CBL-ET8X-E1-01 Provides Ethernet communication to the
device. Includes tool-less and screw
attachment options.
Audio Accessories
Bluetooth Headset HS3100-OTH Rugged Bluetooth Headset. Includes HS3100
Boom Module and HSX100 OTH Headband
Module.

Accessories
50
Carrying Solutions
Soft Handle SG-ET8X-HANDLE1-01 Use with the boot to carry the tablet.
Shoulder Strap SG-ET8X-SHLDR1-01 Use with the boot to carry the tablet on your
shoulder.
Miscellaneous
Boot SG-ET8X-BOOT1-01 Adds extra protection for the tablet.
Expansion Module CRD-ET8X-M-7PEM1-01 Provides USB communication and Ethernet
communication.
Expansion Module with
HDMI
CRD-ET8X-M-9PEM1-01 Provides USB communication, Ethernet
communication, and HDMI.
Pass Through Antenna
Module
CRD-ET8X-M-PTA1-01 Provides access to WWAN, GPS, and WLAN
antenna signals when the tablet is docked.
Keyboard Support
Bracket
CRD-ET8X-M-KBBK1-01 Provides support for an attached keyboard.
Expansion Module
Cover
CRD-ET8X-M-PEMCV1-01 Provides protection for the expansion module
ports.
Dock Fan Module CRD-ET8X-M-FAN1-01 Provides cooling for the tablet when docked.
Replacement Battery BTRY-ET8X-12IN1-01 Replacement battery for the tablet.
Passive Stylus SG-TC7X-STYLUS-03 Provides easy writing, drawing, and navigation
and accuracy.
Active Stylus SG-ET8X-STYLUS1-01 Provides easy writing, drawing, and navigation
and accuracy with the thin tip and hovering
capabilities.
Stylus Coil Tether SG-ET5X-SLTETR-01 Secures a stylus to the hand strap.
Stylus Holder SG-ET8X-PENLOOP1-01 Secures a stylus to the tablet.
Expansion Back with
Handstrap
ZBK-ET5X-10RH1-01 Provides rotating hand strap and slot for
optional Power Pack.
Expansion Back with
Smart Card CAC
Reader
ZBK-ET8X-SMARTCARD-01 Provides Smart Card CAC reader and slot for
optional Power Pack.
Kickstand for
Expansion Back
ZBK-ET8X-KICKSTAND-01 Provides a kickstand for Expansion Backs.
4-Slot Battery Charger SAC-ET5X-4PPK1-01 Chargers up to four Power Packs. Requires
power supply PWR-BGA12V50W0WW, DC
Line cord CBL-DC-388A1-01, and
country-specific AC line cord.
Power Pack BTRY-ET8X-PRPK1-01 Provides additional power for charging the
tablet using an Expansion Back.
Replacement
Expansion Back Hand
Strap
SG-ET5X-RHTP1-01 Replacement hands strap for Expansion
Backs.
Forklift Mount 350025 Allows installation of the device on a roll bar or
square surface of a forklift.
Table 2 Accessories (Continued)
Accessory Part Number Description

Accessories
51
Charge Cables and Power Supplies
Cigarette Lighter
Adapter (CLA) cable
450143 Provides power to the vehicle dock for
vehicles providing 12V.
Cigarette Lighter
Adapter (CLA) cable
450019 Provides power to the vehicle dock for
vehicles providing 12V to 32V.
Direct Wire Power
Cable
450134 Use with CLA cable (450019) to connect
directly to vehicle power.
Direct Wire Power
Cable Kit to Vehicle
Docks
300039 Provides power to the vehicle dock for
vehicles providing 12V to 14V.
Vehicles providing more than 14V require an
additional power converter (450083 or
450084).
LXE/Honeywell Power
Adapter Cable
ACC-PWRCBL01 Allows ET8X docks to be powered from a
legacy LXE/Honeywell power cable.
Converts forklifts wired for LXE/HON VX8,
VX9, VM1, VM2, and VM3 to support ET8X
without re-wiring the forklift.
Requires Vehicle Power DC Converter
(450083) and Direct Wire Power Cable Kit
(300039).
Vehicle Power DC
Converter (9V to 60V)
450083 Accepts 9V to 60V (9A maximum) vehicle
power and converts it to 13.2V output.
Requires Direct Wire Power Cable Kit
(300039).
Vehicle Power DC
Converter
(50V to 150V)
450084 Accepts 50V to 150V (2A maximum) vehicle
power and converts it to 13.2V output.
Requires Direct Wire Power Cable Kit
(300039).
USB to AC Adapter PWR-BGA15V45W-UC-WW Provides power to the tablet. Requires country
specific AC adapter. 450020.
US AC Line Cord 450040 Provides power to the USB to AC Adapter.
Australia/New Zealand
AC Line Cord
450047 Provides power to the USB to AC Adapter.
EU AC Line Cord 450042 Provides power to the USB to AC Adapter.
UK AC Line Cord 450041 Provides power to the USB to AC Adapter.
India AC Line Cord ACC-L10LINECORD-IN Provides power to the USB to AC Adapter.
Taiwan AC Line Cord ACC-L10LINECORD-TW Provides power to the USB to AC Adapter.
Japan AC Line Cord ACC-L10LINECORD-JP Provides power to the USB to AC Adapter.
China AC Line Cord ACC-L10LINECORD-CN Provides power to the USB to AC Adapter.
Power Supply PWR-BGA12V50W0WW Provides power to the 4-Slot Battery Charger.
Table 2 Accessories (Continued)
Accessory Part Number Description
Accessories
52
Device Charging
Before using the tablet for the first time, connect it to an external power source. Keep the tablet connected
to the external power source until it is fully charged. The Charging Indicator LED turns green when the
tablet is fully charged. You may use the tablet while it is charging.
For the best charging experience, Zebra recommends using the ET80/ET85 dock or the Zebra USB-C to
AC adapter.
The tablet main battery charges from fully depleted to 90% in approximately 2 hours and from fully
depleted to 100% in approximately 3 hours.
Charging Indicators
The Charging Indicator LED illuminates and changes color to indicate battery status.
Charging Temperatures
Charge batteries in ambient temperatures from 0°C to 45°C (32°F to 113°F). The tablet or dock always
performs battery charging in a safe and intelligent manner. To accomplish this, for small periods of time,
the charger alternately enables and disables battery charging to keep the battery at acceptable
temperatures.
Charging Using the Dock
When the tablet is docked and charging, the charging indicator LED illuminates amber.
1. Connect the dock to the appropriate power source.
State Indication
Off Device is not charging. Device is not inserted correctly in the cradle or connected
to a power source. Charger/cradle is not powered.
Amber Device is charging.
Green Connected to external power and the tablet is fully charged.
Red Charging error. For example:
• Temperature is too low or too high.
• Charging has gone on too long without completion (typically 8 hours).
• Battery is not installed.
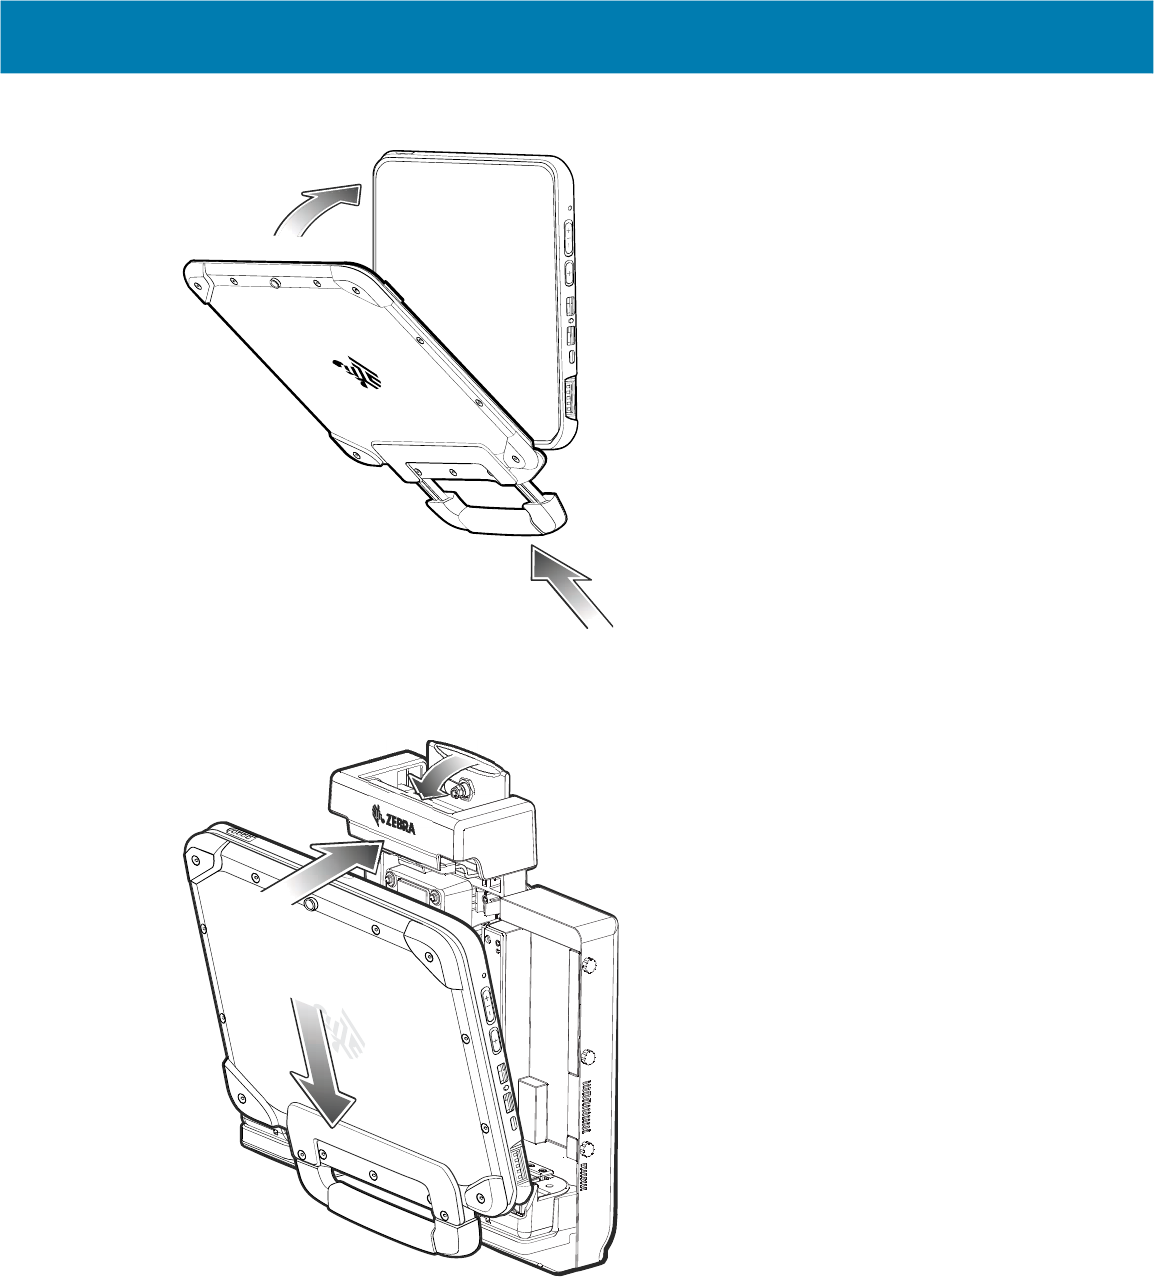
Accessories
53
2.
If installed, ensure the keyboard and handle are closed.
3. Insert the bottom of the tablet into the bottom of the dock (1), aligning the charging contacts on the
tablet with the connector pins on the dock.
4. Rotate the top of the tablet towards the top of the dock (2).
1
2
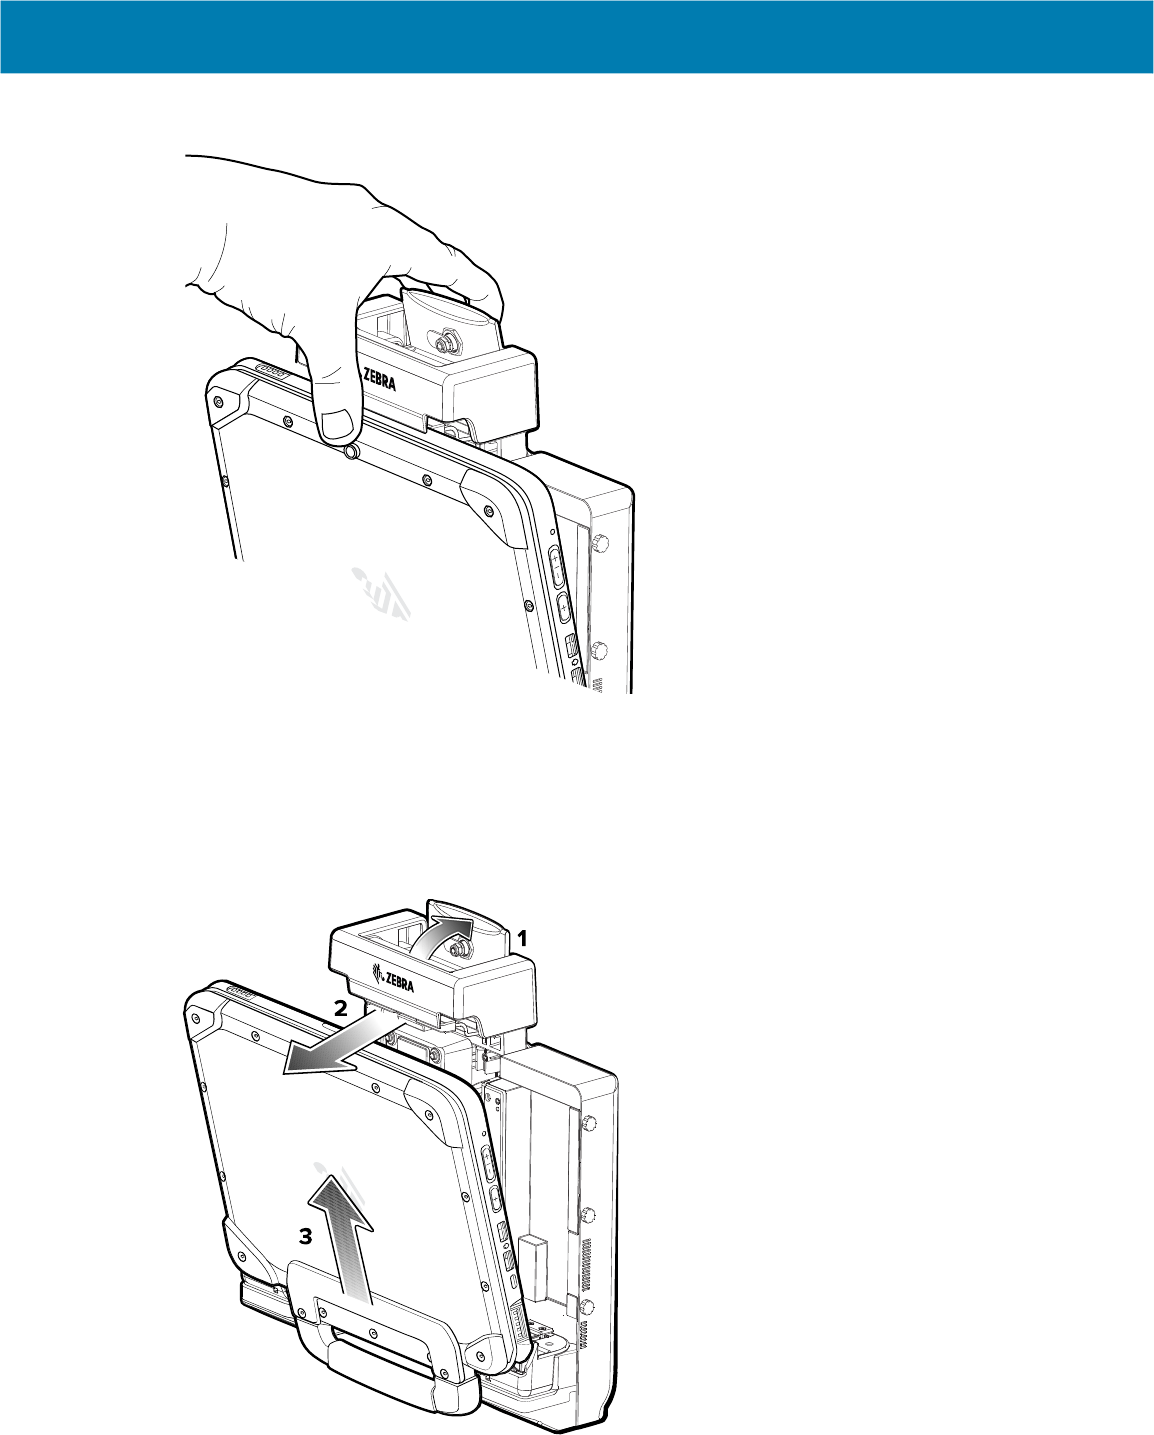
Accessories
54
5.
Use your thumb to push the tablet into the dock, then push the lever down to secure the tablet.
6. After the tablet is secured in the dock, you can lower the keyboard (optional).
Removing the Tablet
1. If installed, ensure the keyboard is closed.
2. To remove the tablet from the dock, lift the lever on top of the dock (1) to release the tablet, rotate the
top of the tablet down (2), then lift the tablet out of the dock (3).
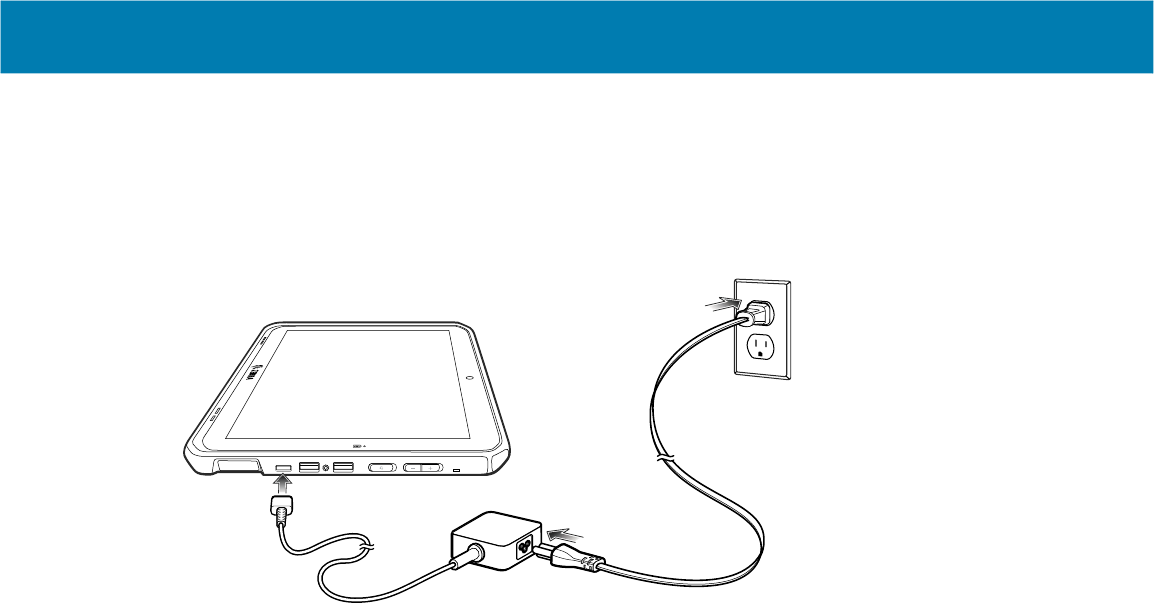
Accessories
55
Charging Using the USB-C to AC Adapter
Use the USB-C to AC adapter to charge the tablet.
1. Plug the AC line cord into the USB-C to AC adapter (1).
2. Plug the AC line cord into the AC wall outlet (2).
1
2
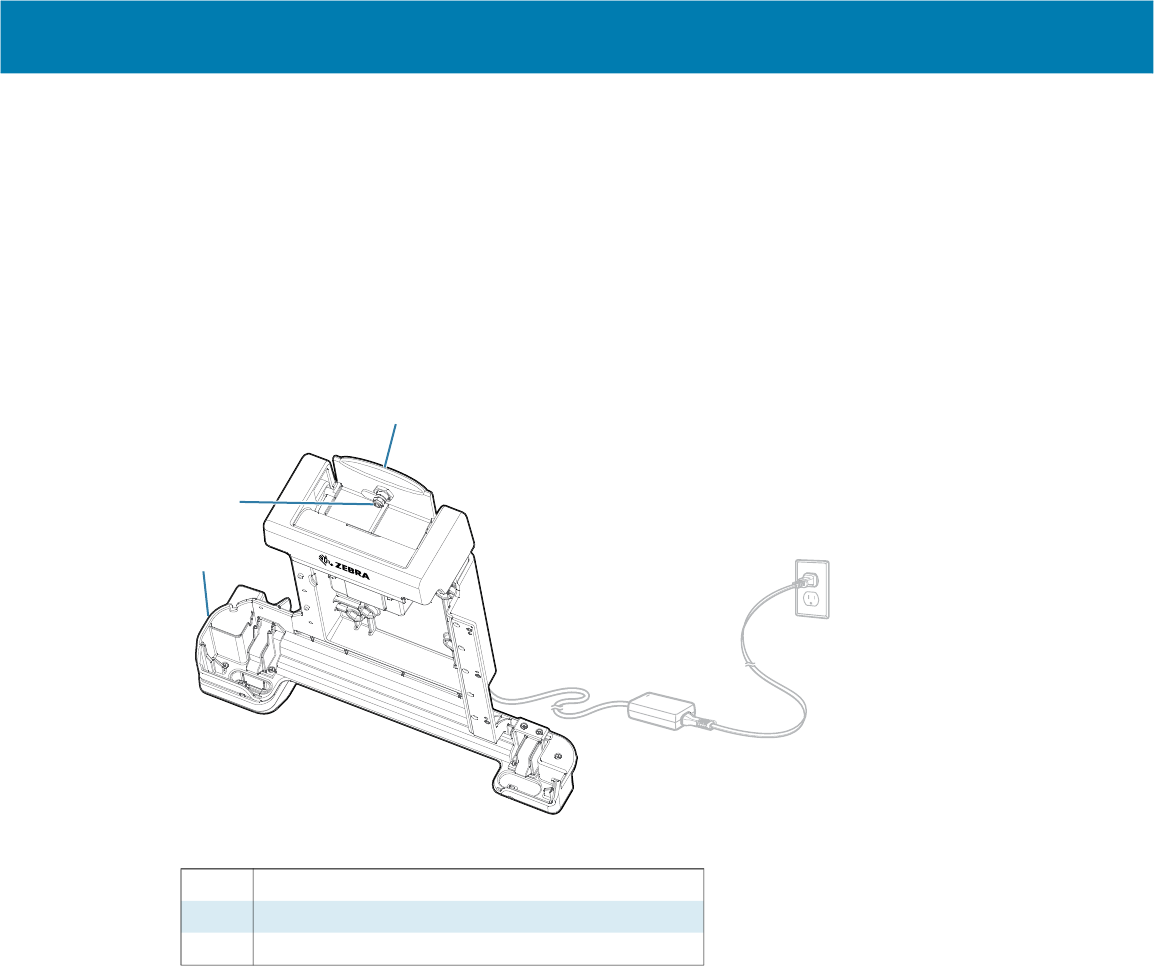
Accessories
56
Power Only Dock
The Power Only Dock provides:
• Power for operating the device.
• Charging for the device’s battery and optional Power Pack installed in an Expansion Back.
• Barrel lock and two keys to secure the tablet to the dock.
• Support for VESA 100 x 100, 100 x 50, and 75 x 75.
Figure 8 Power Only Dock Setup
.
1 Power module
2 Barrel lock (two keys included)
3 Lever
1
2
3
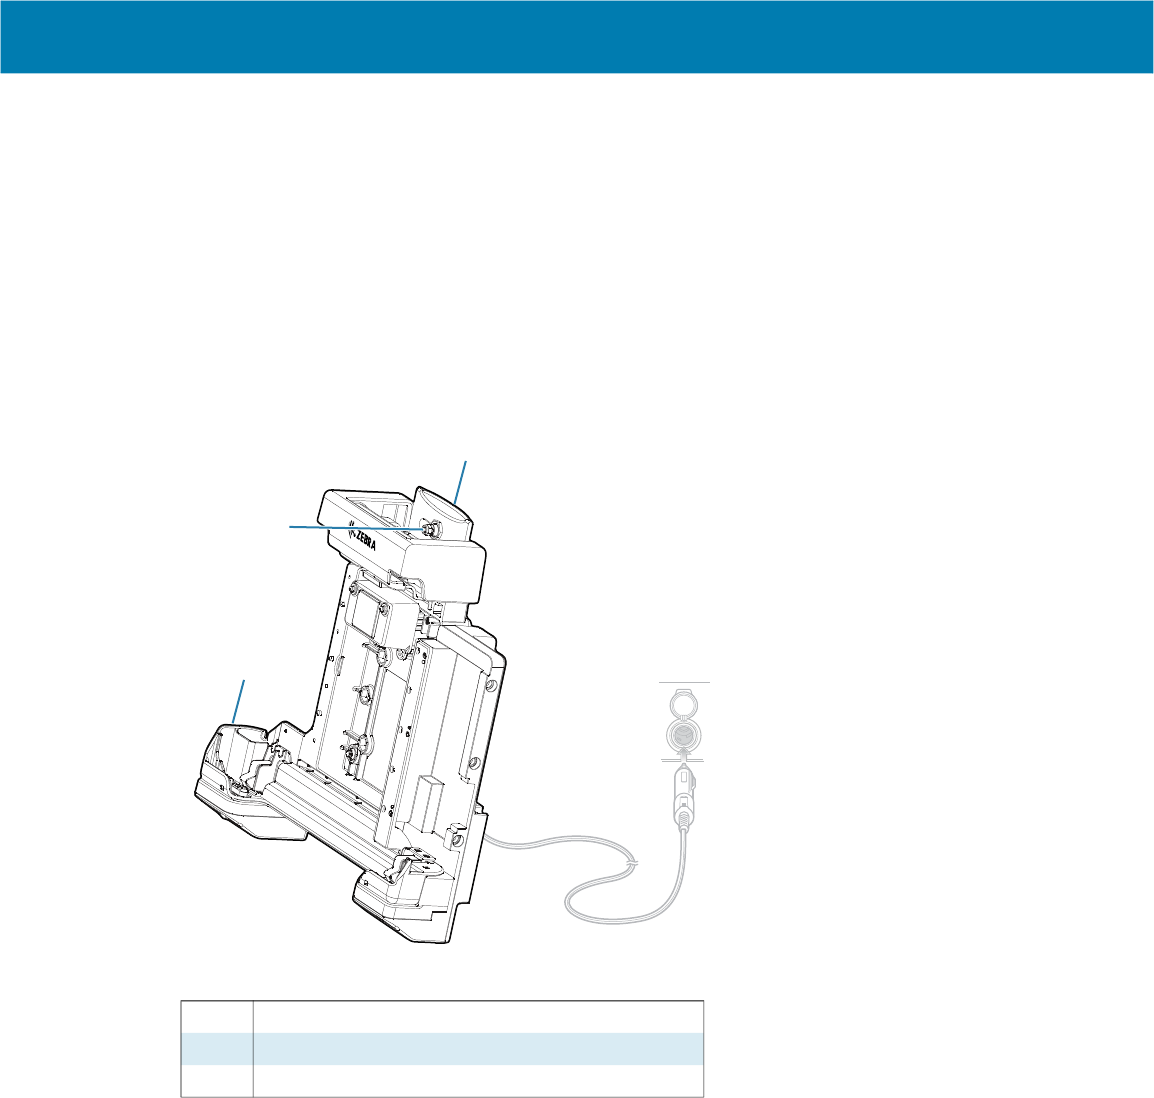
Accessories
57
Vehicle Dock
The Vehicle Dock provides:
• Power for operating the device.
• Charging for the device’s battery and optional Power Pack installed in an Expansion Back.
• Ports for connecting USB devices and Ethernet communication.
• Barrel lock and two keys to secure the tablet to the dock.
• Support for VESA 100 x 100, 100 x 50, and 75 x 75.
Figure 9 Vehicle Dock Setup
1 Power module
2 Barrel lock (two keys included)
3 Lever
1
3
2
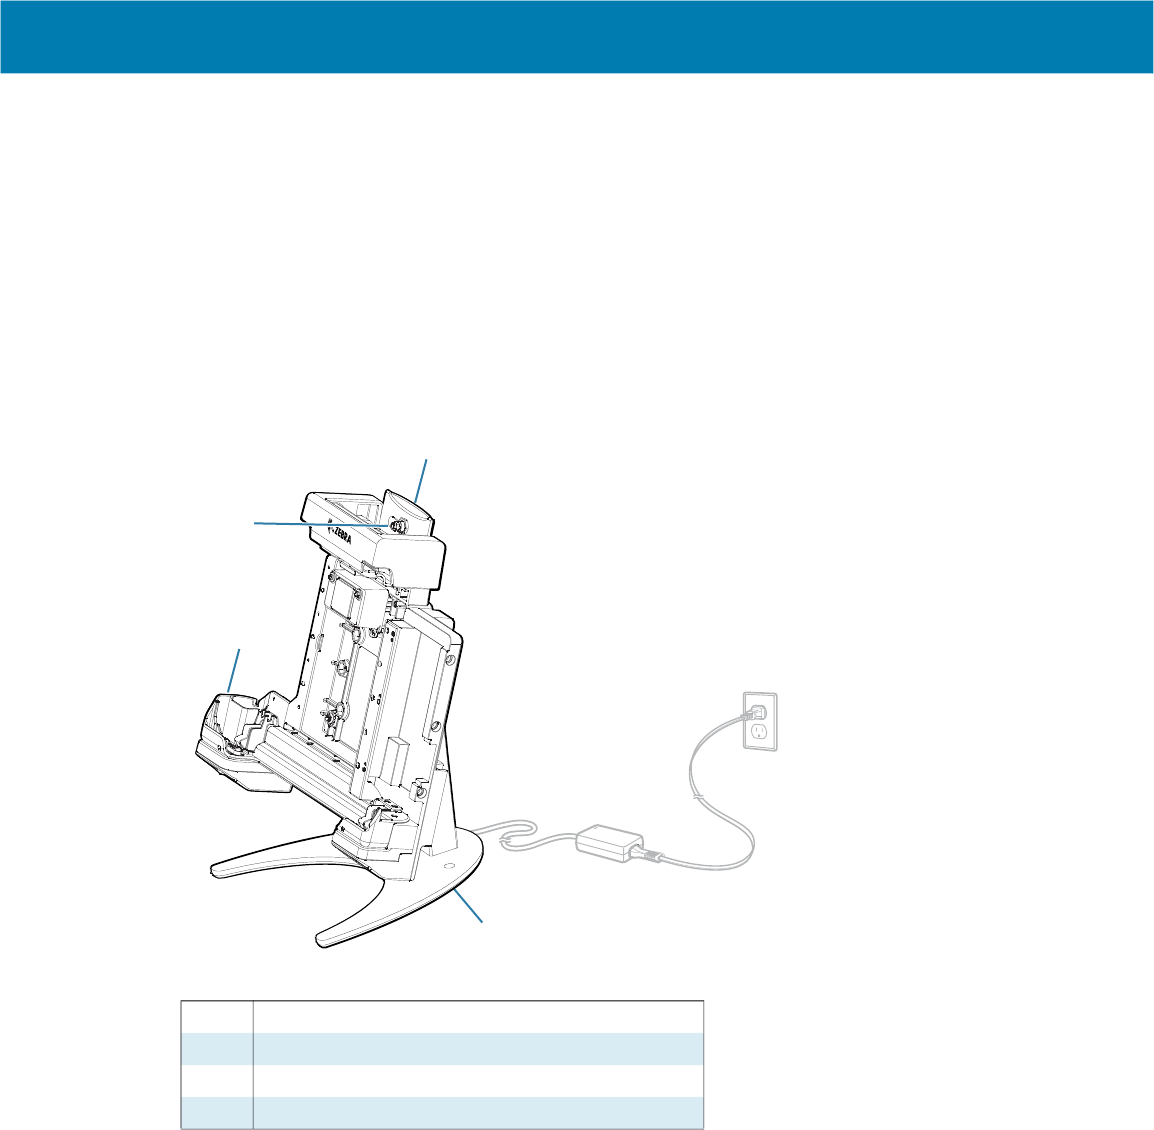
Accessories
58
Office Dock
The Office Dock provides:
• Power for operating the device.
• Charging for the device’s battery and optional Power Pack installed in an Expansion Back.
• Ports for connecting USB devices, HDMI video output, and Ethernet communication.
• Barrel lock and two keys to secure the tablet to the dock.
• Desktop mount.
Figure 10 Office Dock Setup
1 Power module
2 Barrel lock (two keys included)
3 Lever
4 Desktop mount
1
4
3
2
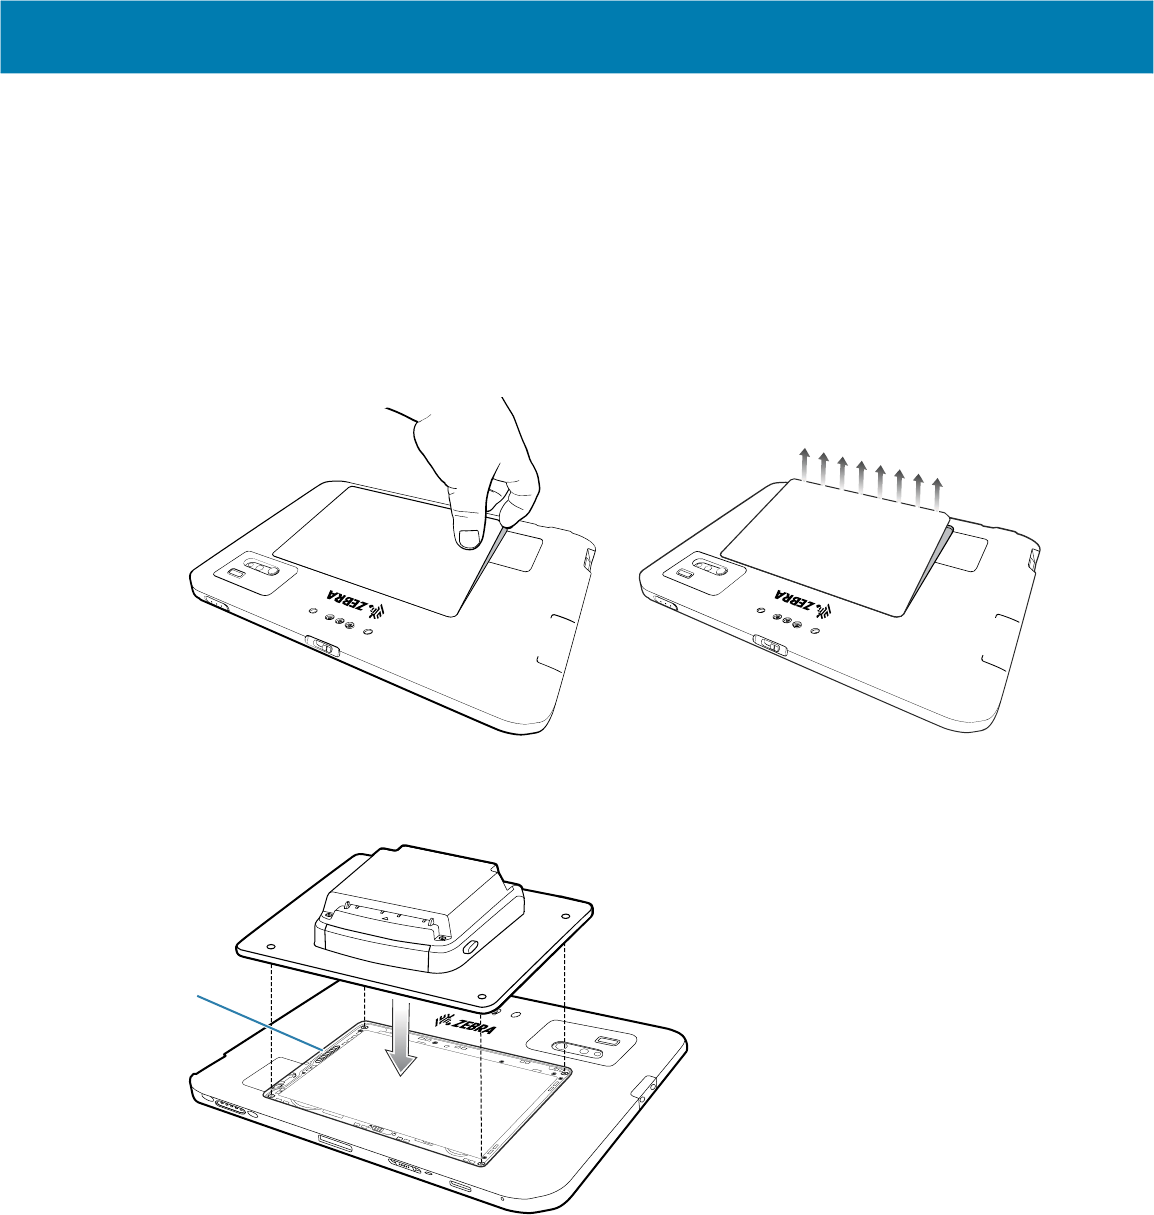
Accessories
59
Expansion Backs
The Expansion Backs provide a Power Pack slot for the device and either a hand strap or Smart Card CAC
reader.
Installing the Expansion Backs
1. Power off the tablet before installing or removing the Expansion Back.
2. Lift the notched corner of the battery cover and carefully lift the battery cover off the device. Store the
cover in a safe place.
3. Align the expansion back with the device. Ensure that the power pack slot cover is aligned with the
bottom of the device and the interface connector on expansion back aligns with interface connector (1)
on device.
1
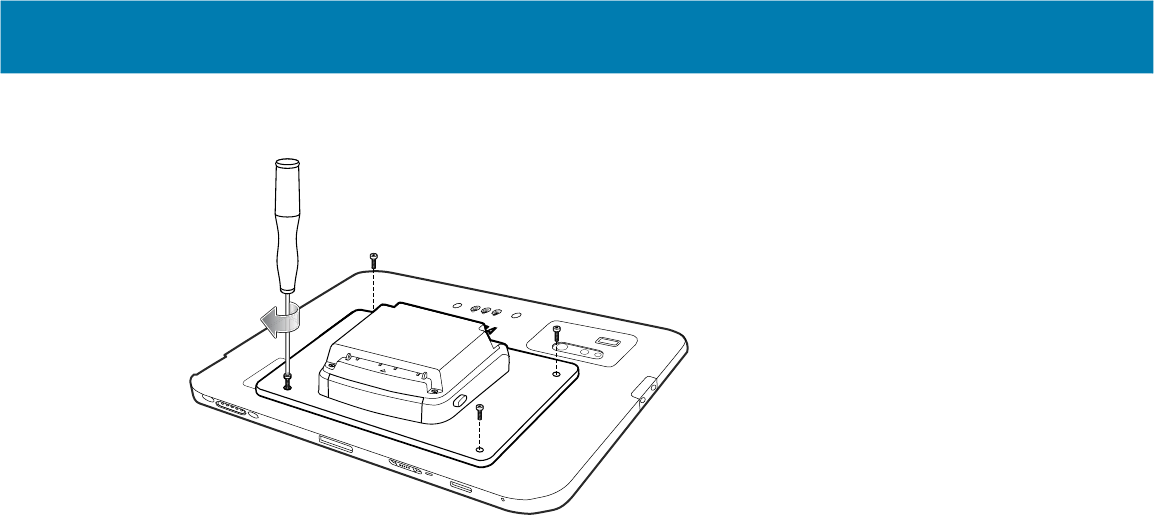
Accessories
60
4.
Using a T6 Torx screwdriver, secure expansion back to device using four screws. Torque to 14 n-cm.
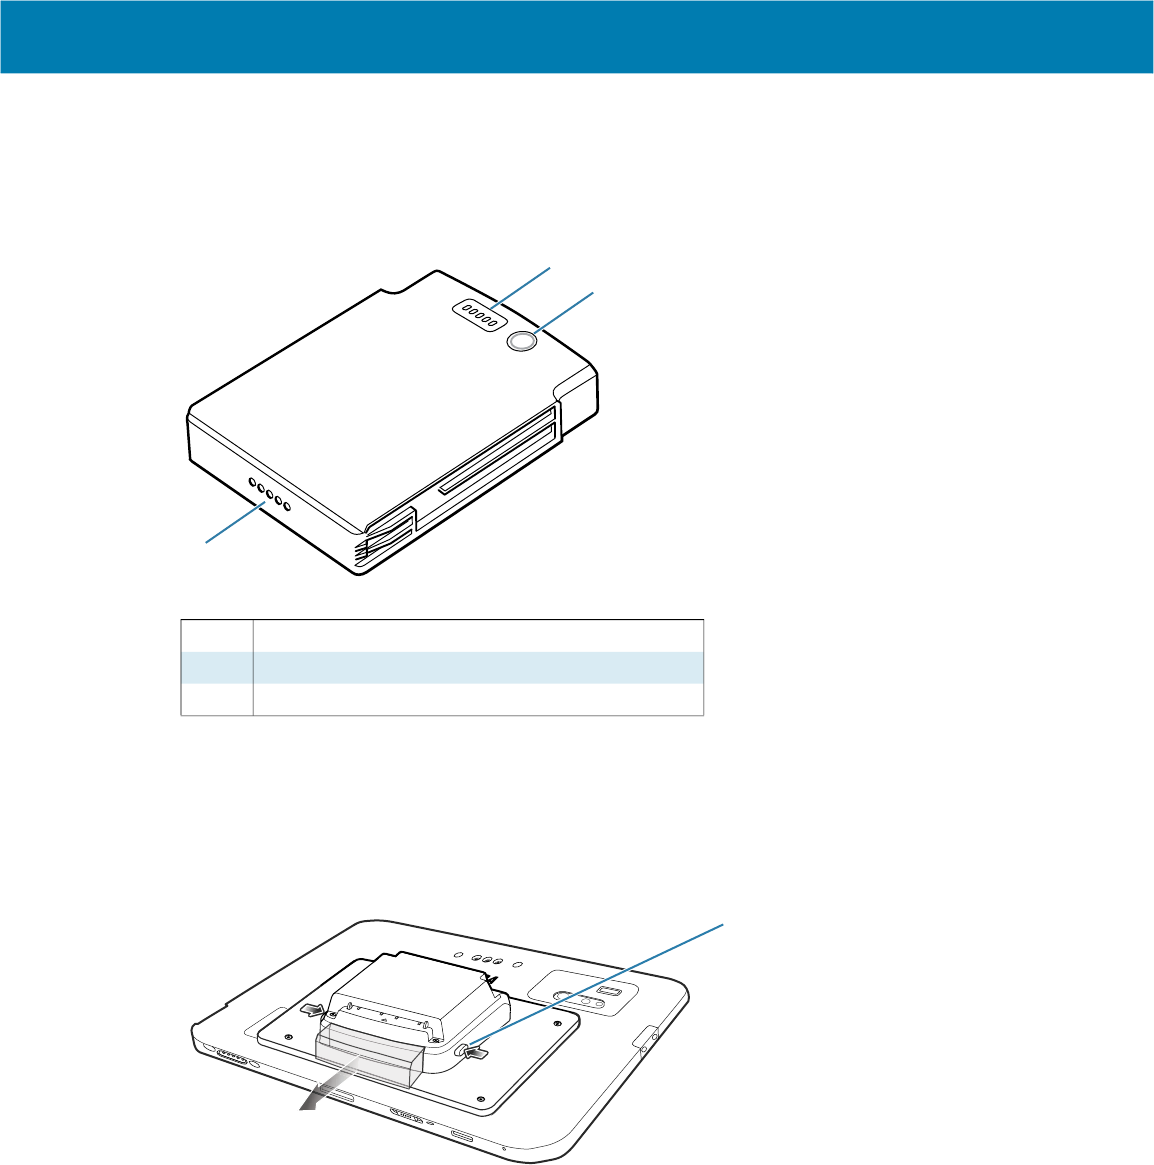
Accessories
61
Power Pack
The optional Power Pack provides additional power to the tablet.
Figure 11 Power Pack
Installing the Power Pack
1. Install one of the optional Expansion Backs.
2. Press the two release buttons (1) on the side of the Expansion Back. The dummy battery insert ejects
slightly.
3. Remove dummy battery insert.
1 Power output contacts
2 Charge level indicators
3 Charge indicator button
2
3
1
1
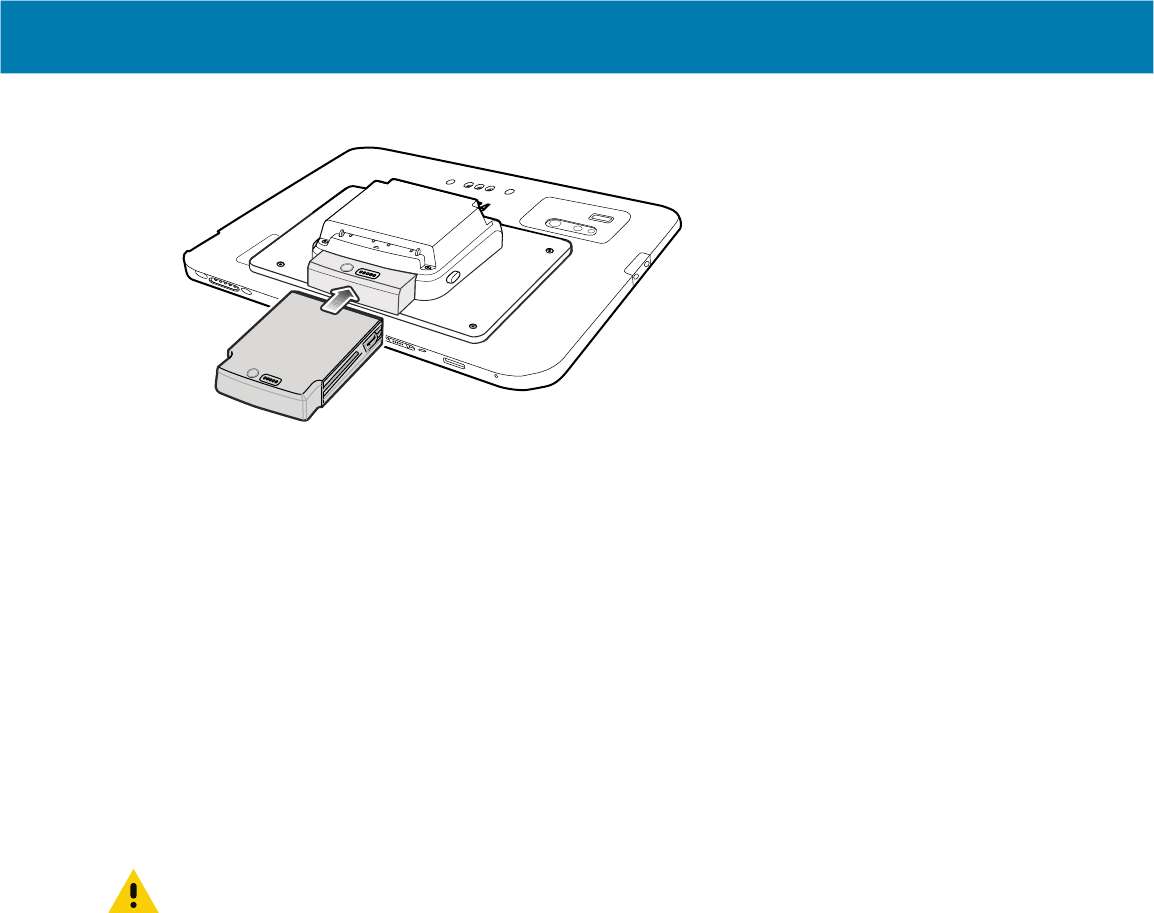
Accessories
62
4. Insert Power Pack into slot until it snaps into place.
Power Pack Charging
Charge Power Packs in ambient temperatures from 0°C to +50°C (32°F to 122°F) as reported by the
Power Pack. Charging is intelligently controlled by the charger. To accomplish this, for small periods of
time, the charger alternately enables and disables Power Pack charging to keep the battery at acceptable
temperatures.
The Power Pack charge LED shows the status of the battery charging. The Power Pack charges in less
than three hours. When charging, the Charge LEDs indicate the charge level.
Charging the Power Pack Using a Dock
With the Power Pack installed in an Expansion Back, place the device into a dock. The Power Pack
charges in less than 3.5 hours.
Charging the Power Pack Using the 4-Slot Battery Charger
CAUTION: Ensure that you follow the guidelines for battery safety described in Battery Safety Guidelines.
Use the 4-Slot Battery Charger to charge up to four Power Packs.
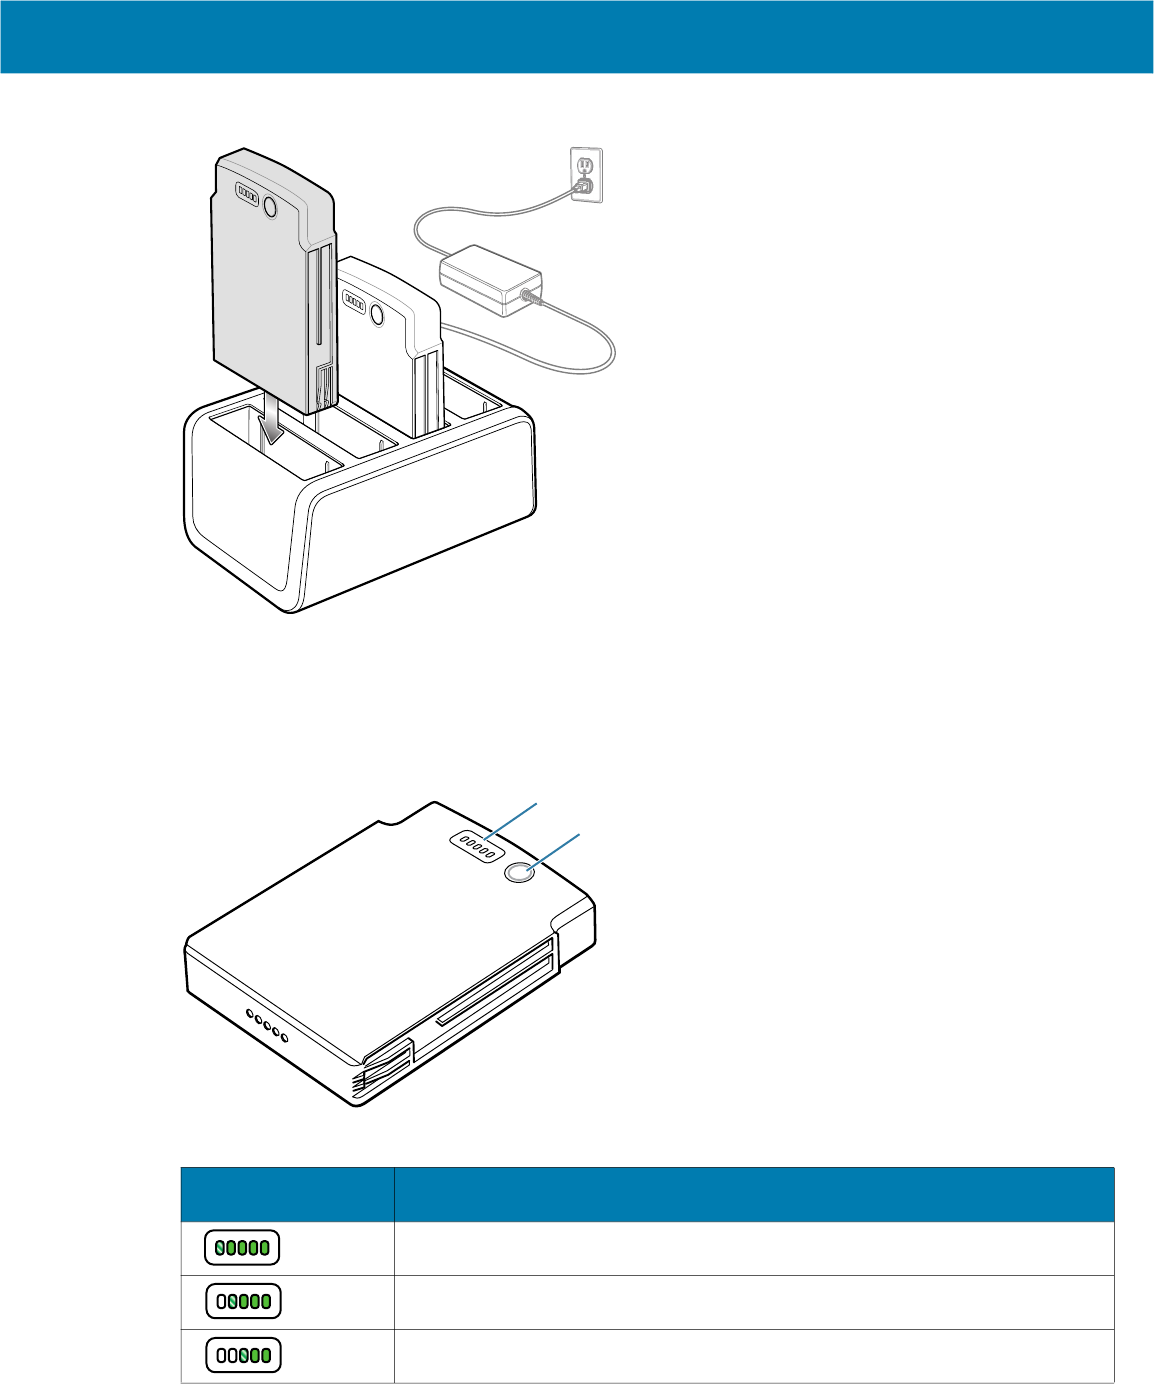
Accessories
63
Figure 12 4-Slot Battery Charger
Viewing the Power Pack Charge Level
1. Remove the Power Pack from the Expansion Back.
2. Press the Charge Status button (2). The Charge Status LEDs (1) light to indicate the charge level.
Table 3 Power Pack Charge Status Indicators
Power Pack
Indicators
Description
Charge level is 100%.
Charge level is 80%.
Change level is 60%.
2
1
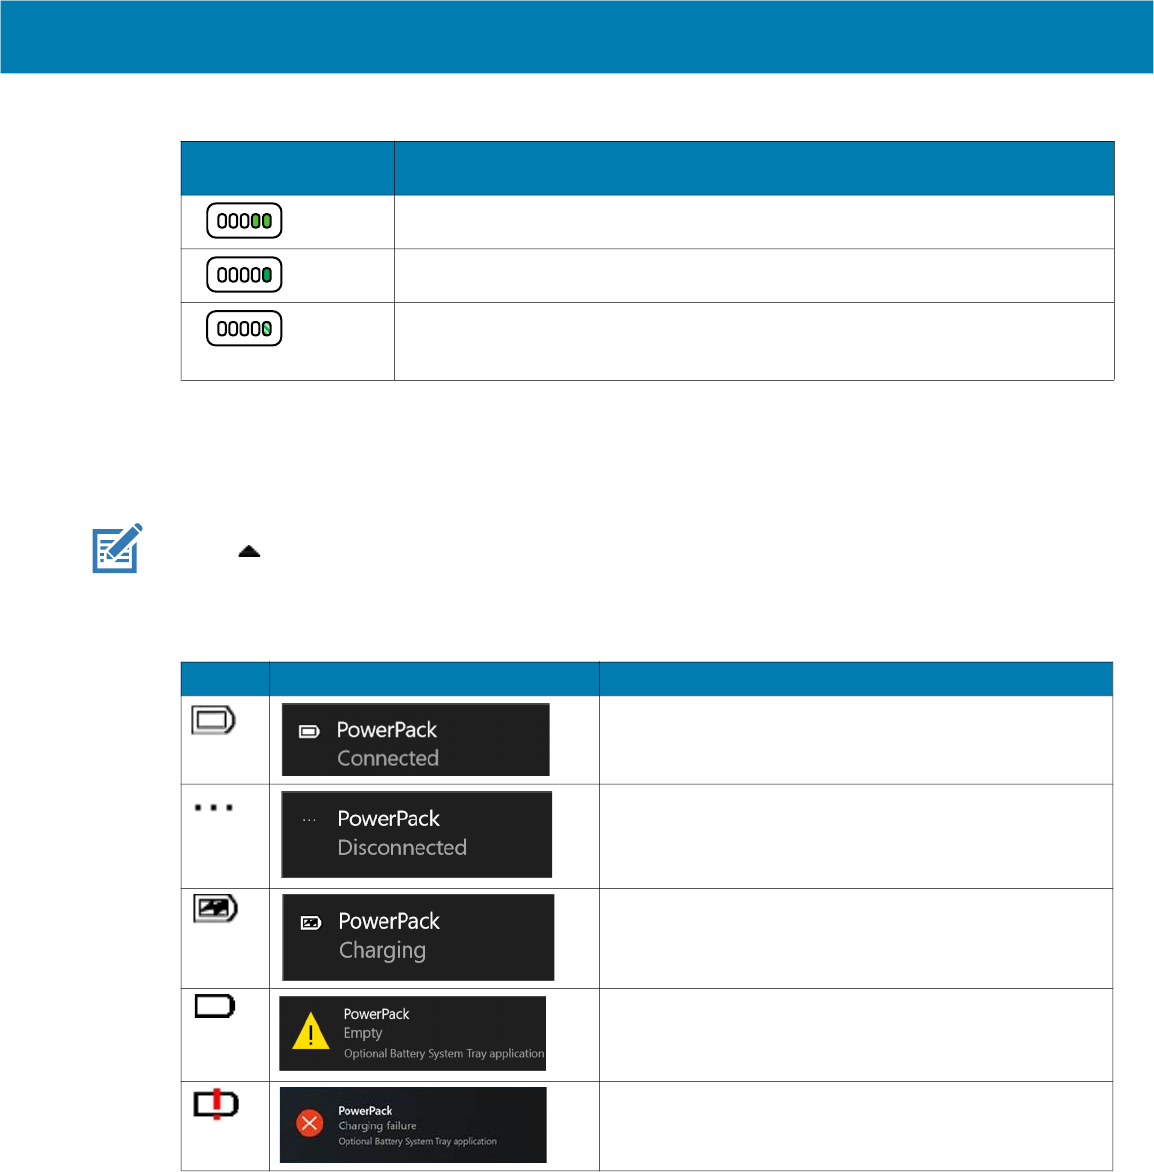
Accessories
64
Checking Power Pack Status
Power Pack status appears on the desktop taskbar.
NOTE: The Power Pack Status icon appears when it issues a notification. To always display the icon,
select > Customize. In the Notification Area Icons window, check the Always show all icons and
notifications on the taskbar and then select OK.
• Tap the Power Pack icon to see the status.
Charge level is 40%.
Charge level is 20%.
Blinking
Charge level is below 20%.
Table 3 Power Pack Charge Status Indicators (Continued)
Power Pack
Indicators
Description
Icon Message Box Description
Power Pack is connected to the device.
Power Pack is removed from to the device.
Power Pack is connected to the device and the device is
in the dock changing.
Power Pack is fully discharged.
Power Pack is experiencing charging failure.
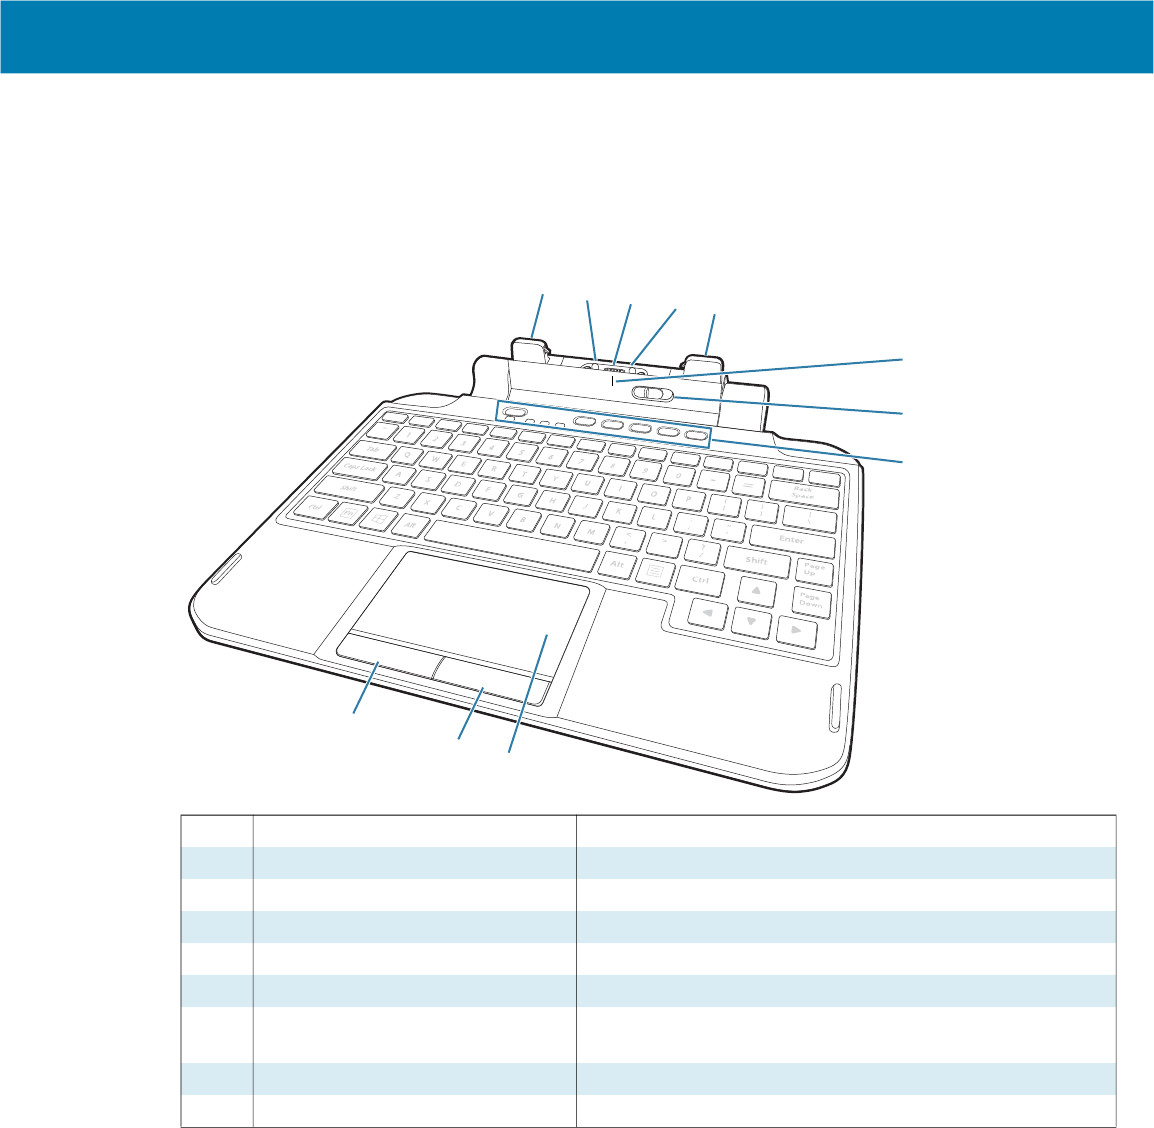
Accessories
65
Keyboard
The ET80/ET85 attachable rugged keyboard is a QWERTY keyboard that provides a multi-color backlight
and six programmable keys.
Figure 13 ET80/ET85 Keyboard Features
1 Keyboard latch Attaches the keyboard to the tablet.
2 Keyboard alignment pin Assists in aligning the keyboard with the tablet.
3 Tablet interface connector Provides power and communication from the tablet.
4 Keyboard alignment marking Use to assist in aligning the tablet and keyboard.
5 Locking switch Use to unlock the keyboard from the tablet.
6 Programmable keys Configure to perform custom actions.
7 Touchpad Use to move the cursor, scroll, tap, double-tap, drag and
drop, and make multiple text selections.
8 Right button Use to perform right-clicks.
9 Left button Use to perform left-clicks.
1
8
1
3
2
2
9
5
6
7
4
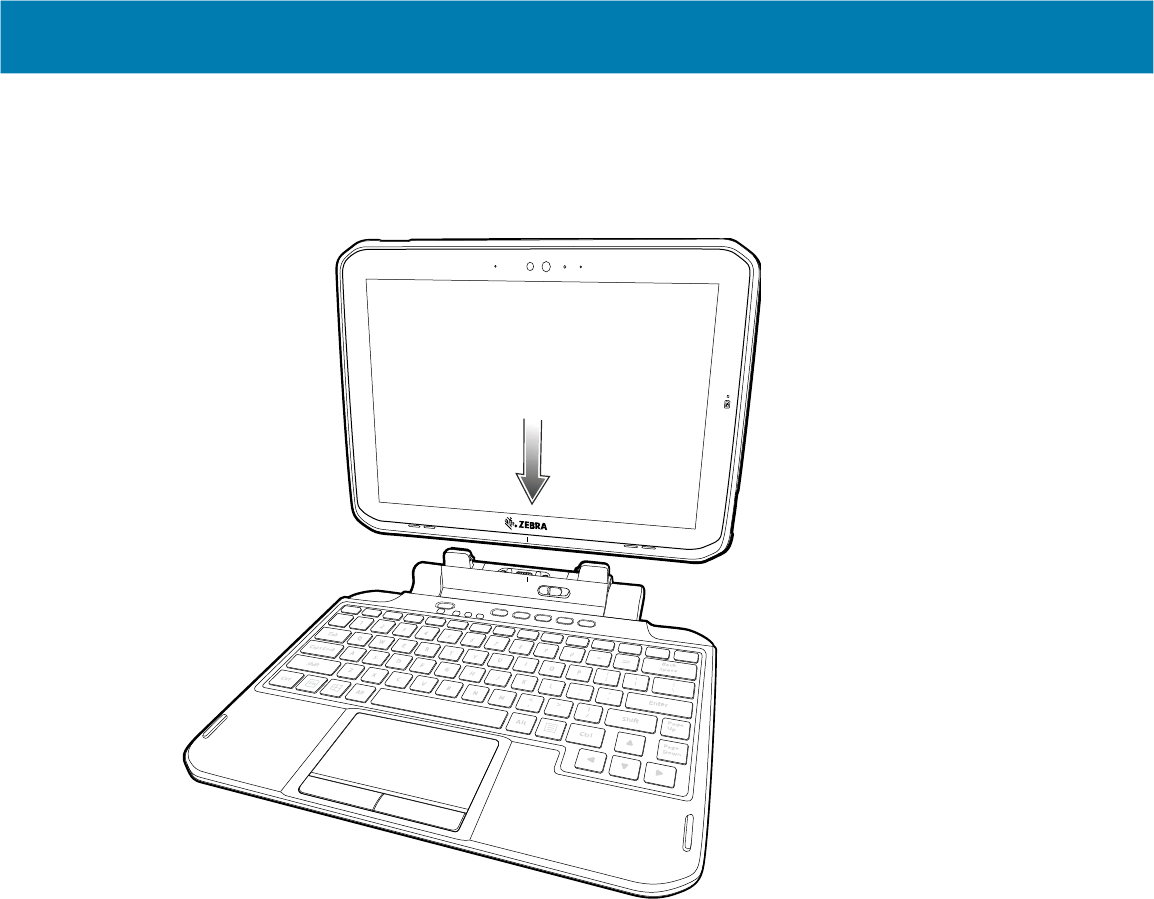
Accessories
66
Attaching the Keyboard
1. Place the keyboard on a flat and level surface.
2. Align the keyboard alignment markings on the tablet and keyboard.
3. Gently press the tablet down onto the keyboard until you hear a click.
When the keyboard is correctly installed, the keyboard locking switch automatically clicks into the lock
position and the orange indicator is hidden under the switch.
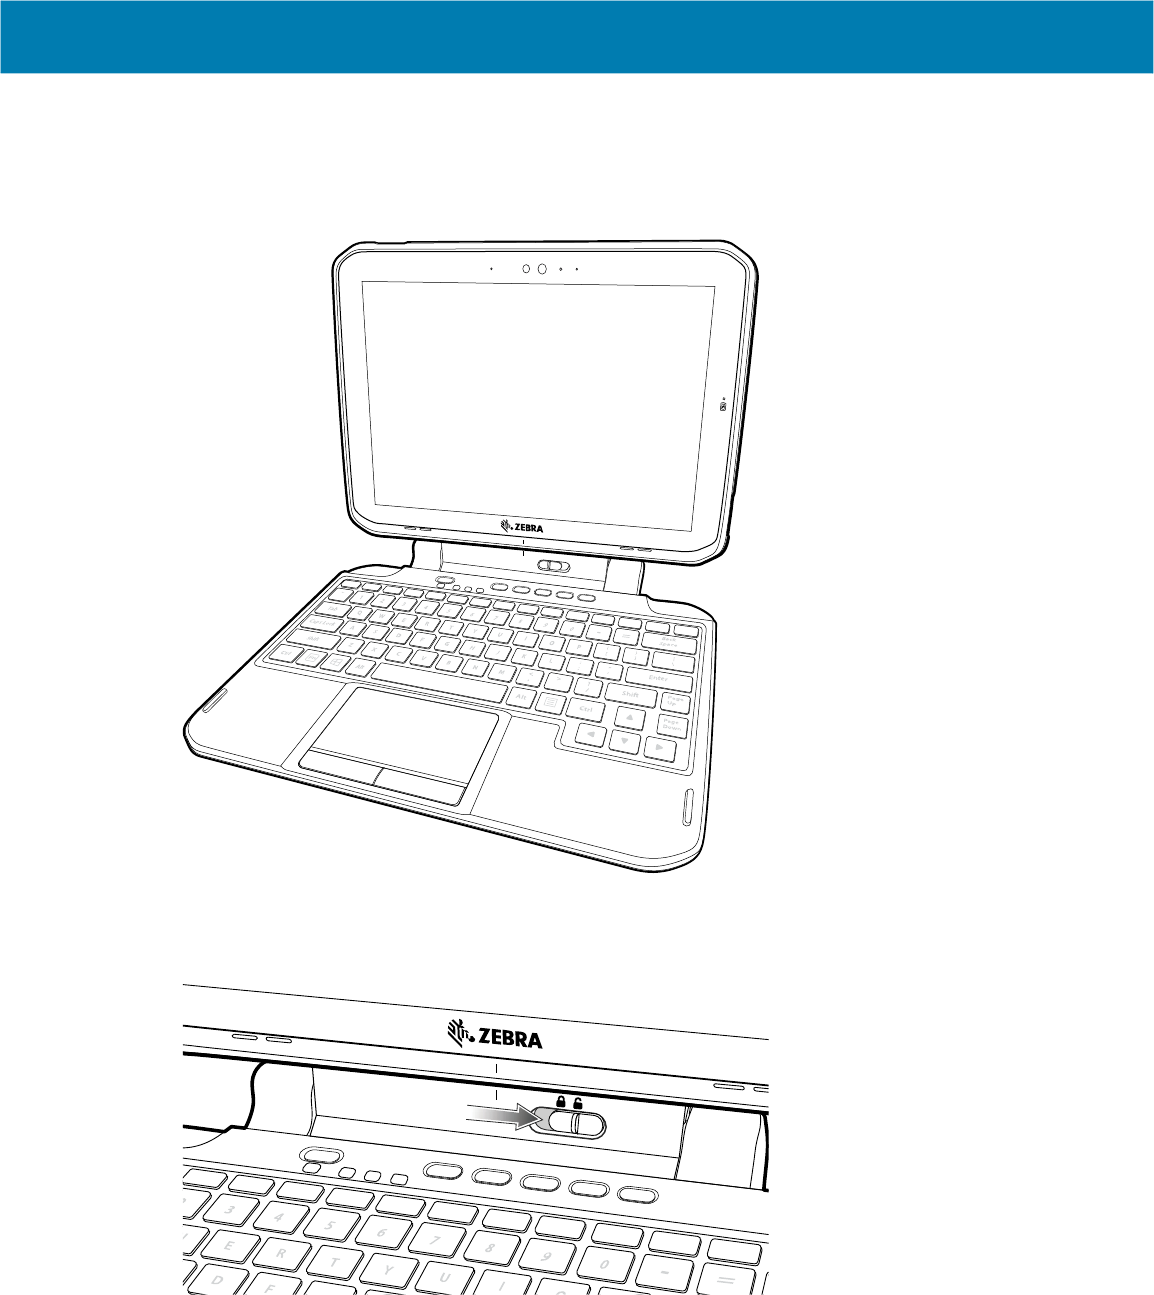
Accessories
67
Removing the Keyboard
1. Place the tablet on a flat and level surface.
2. Ensure the keyboard and tablet are in the open position.
3. Move the keyboard locking switch to the Unlock position.
When in the unlock position, the orange indicator is visible to the left of the switch.
4. Lift the tablet from the keyboard.

Accessories
68
Setting the Backlight Color
Customize the keyboard backlight color.
1. In the taskbar, select > .
2. Select the desired color.
3. Select OK.
Configuring the Programmable Keys
Customize the programmable keys to start your favorite program or open a web page.
1. In the taskbar, select > .
2. Select the desired key (P1-P5).
3. Select the type of action.
• Open Application - Provide a path to the desired application. For example,
C:\Windows\notepad.exe.
• Open Web page - Provide a URL. For example,
https://www.zebra.com.
• No Action - Select to have the button not perform any action.
4. Select Apply.
5. Select Save.

69
Maintenance and
Troubleshooting
This chapter includes instructions on cleaning and storing the tablet, battery maintenance and provides
troubleshooting solutions for potential problems during tablet operations.
Maintaining the Device
For trouble-free service, observe the following tips when using the device:
• In order to avoid scratching the screen, use the supplied stylus or plastic-tipped pens intended for use
with a touch-sensitive screen. Never use an actual pen or pencil or other sharp object on the surface of
the device screen.
• The touch-sensitive screen of the device is glass. Do not drop the device or subject it to strong impact.
• Protect the device from temperature extremes. Do not leave it on the dashboard of a car on a hot day,
and keep it away from heat sources.
• Do not store the device in any location that is dusty, damp, or wet.
• Use a soft lens cloth to clean the device. If the surface of the device screen becomes soiled, clean it
with a soft cloth moistened with an approved cleanser. For a list of approved cleansers, see Approved
Cleanser Active Ingredients.
• Periodically replace the rechargeable battery to ensure maximum battery life and product performance.
Battery life depends on individual usage patterns.
• Dock or mount the device vertically to allow air cooling of the front and back surfaces. The tablet does
not contain an internal cooling fan. An optional dock fan module provides cooling for the tablet while
docked.
Preventing Image Persistence
When a still image displays on the screen for long time, the image may persist, remaining slightly visible
even after another image replaces it.
To prevent image persistence, use one or more of the following methods.
• Set the screen to automatically turn off after a few minutes of idle time.
• Set a screen saver to automatically start after a few minutes of idle time.
• Manually turn off the display when the device is not in use.
• Change the desktop background image every day or every few days.

Maintenance and Troubleshooting
70
Maintaining the Stylus
If you use an active (digitizer) pen with your tablet:
• Store the active (digitizer) pen in the pen holder when not in use.
• Avoid storing the pen vertically on its tip. It can damage the pen-to-digitizer function.
• Keep the pen away from any liquid, because the pen contains electronic components that can be
damaged when wet.
• In certain environments, particles or debris can stick to the pen tip or the tablet display. Make sure you
wipe off the pen with a soft cloth to avoid scratching the display.
Battery Safety Guidelines
• The area in which the units are charged should be clear of debris and combustible materials or
chemicals. Particular care should be taken where the device is charged in a non commercial
environment.
• Follow battery usage, storage, and charging guidelines found in this guide.
• Improper battery use may result in a fire, explosion, or other hazard.
• To charge the mobile device battery, the battery and charger temperatures must be between 0ºC and
+40ºC (+32ºF and +104ºF).
• Do not use incompatible batteries and chargers, including non-Zebra batteries and chargers. Use of an
incompatible battery or charger may present a risk of fire, explosion, leakage, or other hazard. If you
have any questions about the compatibility of a battery or a charger, contact the Global Customer
Support Center.
• For devices that utilize a USB port as a charging source, the device shall only be connected to products
that bear the USB-IF logo or have completed the USB-IF compliance program.
• Do not disassemble or open, crush, bend or deform, puncture, or shred battery.
• Severe impact from dropping any battery-operated device on a hard surface could cause the battery to
overheat.
• Do not short circuit a battery or allow metallic or conductive objects to contact the battery terminals.
• Do not modify or remanufacture, attempt to insert foreign objects into the battery, immerse or expose to
water or other liquids, or expose to fire, explosion, or other hazard.
• Do not leave or store the equipment in or near areas that might get very hot, such as in a parked vehicle
or near a radiator or other heat source. Do not place battery into a microwave oven or dryer.
• Battery usage by children should be supervised.
• Please follow local regulations to properly dispose of used re-chargeable batteries.
• Do not dispose of batteries in fire.
• In the event of a battery leak, do not allow the liquid to come in contact with the skin or eyes. If contact
has been made, wash the affected area with water for 15 minutes and seek medical advice.
• If you suspect damage to your equipment or battery, contact Customer Support to arrange for
inspection.
Maintenance and Troubleshooting
71
Best Practices for Enterprise Mobile Computing Devices Operating in
Hot Environments and Direct Sunlight
Exceeding the operating temperature by external hot environments will cause the device's thermal sensor
to notify the user of a shutdown of the WAN modem or shutdown the device until the device's temperature
returns to the operational temperature range.
• Avoid direct sunlight to the device - The easiest way to prevent overheating is to keep the device out of
direct sunlight. The device absorbs light and heat from the sun and retains it, getting hotter the longer it
remains in sunlight and heat.
• Avoid leaving the device in a vehicle on a hot day or hot surface - Similar to leaving the device out in
direct sunlight, the device will also absorb the thermal energy from a hot surface or when left on the
dashboard of a vehicle or seat, getting warmer the longer it remains on the hot surface or inside the hot
vehicle.
• Turn off unused apps on the device. Open, unused apps running in the background can cause the
device to work harder, which in turn may cause it to heat up. This will also improve your mobile
computer device's battery life performance.
• Avoid turning your screen brightness up - Just the same as running background apps, turning your
brightness up will force your battery to work harder and create more heat. Minimizing your screen
brightness may extend operating the mobile computer device in hot environments.
• Follow all recommendations for Preventing Image Persistence.
Cleaning Instructions
CAUTION: Always wear eye protection.
Read warning label on alcohol product before using.
If you have to use any other solution for medical reasons please contact the Global Customer Support Center for more
information.
WARNING: Avoid exposing this product to contact with hot oil or other flammable liquids. If such exposure occurs,
unplug the device and clean the product immediately in accordance with these guidelines.
Approved Cleanser Active Ingredients
The approved cleaning and disinfecting agent recommended is 70% isopropyl alcohol solution.
Harmful Ingredients
The following chemicals are known to damage the plastics on the device and should not come in contact
with the device: acetone; ketones; ethers; aromatic and chlorinated hydrocarbons; acqueous or alcoholic
alkaline solutions; ethanolamine; toluene; trichloroethylene; benzene; carbolic acid and TB-lysoform.
Many vinyl gloves contain phthalate additives, which are often not recommended for medical use and are
known to be harmful to the housing of the device.
NOTE:
If using the tablet in a healthcare environment, do not use PDI Sani-Hands/ PDI Super Sani Cloth Germicidal
Wipes to clean the device.
Maintenance and Troubleshooting
72
Device Cleaning Instructions
Do not apply liquid directly to the device. Dampen a soft cloth or use pre-moistened wipes. Do not wrap the
device in the cloth or wipe, but gently wipe the unit. Be careful not to let liquid pool around the display
window or other places. Allow the unit to air dry before use.
NOTE:
For thorough cleaning, it is recommended to first remove all accessory attachments, such as hand straps or
boot, from the tablet and to clean them separately.
Special Cleaning Notes
The device should not be handled while wearing vinyl gloves containing phthalates, or before hands are
washed to remove contaminant residue after gloves are removed.
If products containing any of the harmful ingredients listed above are used prior to handling the device,
such as hand sanitizer that contain ethanolamine, hands must be completely dry before handling the
device to prevent damage to the device.
IMPORTANT:
If the battery connectors are exposed to cleaning agents, thoroughly wipe off as much of the chemical
as possible and clean with an alcohol wipe. It is also recommended to install the battery in the terminal prior to cleaning
and disinfecting the device to help minimize buildup on the connectors.
When using cleaning/disinfectant agents on the device, it is important to follow the directions prescribed by the
cleaning/disinfectant agent manufacturer.
Cleaning Materials Recommended
• Lens tissue
• Cotton-tipped applicators
• 70% isopropyl alcohol
• Can of compressed air with a tube.
Cleaning Frequency
The cleaning frequency is at the customer’s discretion due to the varied environments in which the mobile
devices are used and may be cleaned as frequently as required. When dirt is visible, it is recommended to
clean the mobile device to avoid build up of particles which make the device more difficult to clean later on.
Cleaning the Fingerprint Reader
Under normal circumstances, you should clean the fingerprint reader once a month, or whenever
necessary.
To clean the fingerprint reader, gently rub the sensor surface with the cloth that is included with the tablet
or any microfiber cloth.
You can use a small amount of alcohol or warm soapy water from time to time to clean the reader surface.
Dry it off after cleaning.
CAUTION:
Do not use bleach, solvents, or abrasives to clean the reader.
Maintenance and Troubleshooting
73
Traveling with Your Tablet
Use the following tips when you travel with your Tablet:
• Put the tablet in a case to protect the display.
• Store the pen in the pen bay located on the tablet.
• Pack the tablet securely in a briefcase or hand-carried luggage and keep it separate from toiletries,
liquids, and food. Don’t pack it in checked luggage.
• Before extended use in the field or long trips away from AC power, adjust the power properties to
maximize battery conservation.
• For international travel, you need either a travel plug adapter or the AC power cord that is appropriate
for the country that you are visiting. The travel plug adapter can be found in most airports and travel
stores.
• You don’t need to buy a voltage converter; the AC adapter will automatically adjust to different voltages.
• You might want to carry proof of ownership or a merchandise passport when traveling internationally.
• Consult your insurance and credit card companies to learn about emergency travel assistance in case
your tablet becomes lost or disabled.
• Turn off the tablet or place it in airplane mode for takeoff and landing. Check with the airline for rules on
using your tablet and Wi-Fi while traveling. You can turn off all of your wireless devices temporarily with
airplane mode. See Turning on Airplane Mode on page 47.
IMPORTANT:
Don’t carry your tablet through a metal detector.
DANGER! Don’t transport Li-ion batteries in checked baggage. The baggage hold can get very hot, which can cause
the Li-ion battery to overheat and result in a possible explosion.
Troubleshooting
This sections provides information for troubleshooting issues on your tablet.
Restarting the Device
If the device is running slow or some applications are not functioning properly, restart the device:
1. Touch Start .
2. Touch Power > Update and restart.
3. If software updates are pending, these install and then the device restarts.
Performing a Cold Boot
If the device does not respond to any input, perform a cold boot:
1. Press and hold the power button for at least 10 seconds. The device shuts down.
2. Press the Power button again to turn on the device.
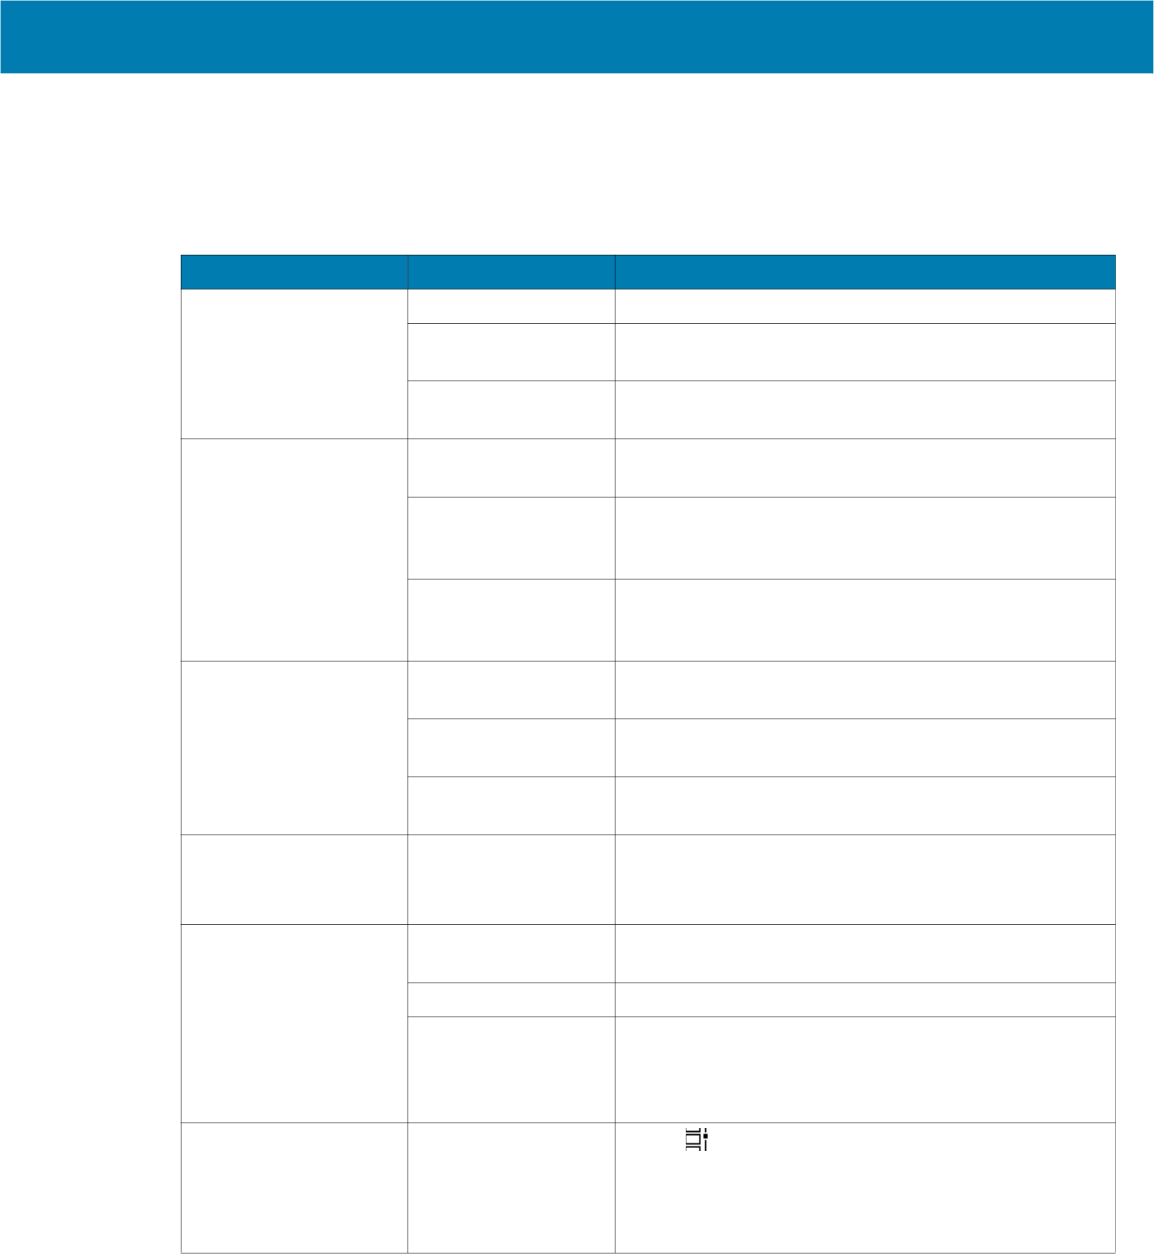
Maintenance and Troubleshooting
74
Troubleshooting the Tablet
This section provides troubleshooting options for the device.
Table 4 Troubleshooting the Tablet
Problem Cause Solution
Tablet does not turn
on.
Battery not charged. Charge the battery in the tablet.
Battery not installed
properly.
Ensure battery is installed properly.
System crash. If the tablet does not turn on, perform a cold boot. See
Performing a Cold Boot on page 73.
Battery did not charge. Battery failed. Replace battery. If the tablet still does not operate, try
a cold boot. See Performing a Cold Boot on page 73.
Tablet removed from
dock before charging
completed.
Insert the tablet into the dock and begin charging. The
battery fully charges in approximately four hours.
Ambient temperature
of the dock is too
warm or too cold.
The ambient temperature must be between 0 °C and
45 °C (32 °F and 113 °F).
Unable to connect to
the wireless network.
SIM card is invalid. Ensure that the micro SIM card is valid and workable if
using a mobile network.
Not within range of
network.
Move within the network’s service range and the signal
strength is good.
Tablet is in airplane
mode.
Ensure that tablet is not in Airplane mode.
The multi-touch screen
responds slowly or
improperly.
Finger or screen is
wet.
Ensure that your hands are clean and dry when
touching the screen. Restart the tablet to try again.
Ensure that wet touch mode is enabled.
Tablet turns itself off. Tablet is inactive. The tablet turns off after a period of inactivity. If the
tablet is running on battery power.
Battery is depleted. Place the tablet in the dock to re-charge the battery.
The tablet’s battery
is low and it powers
down to protect
memory content.
Place the tablet in a dock to re-charge the battery.
After selecting a link in
a full-screen app
(Tablet mode), a dialog
box or app does not
display.
The dialog box or
app is hidden behind
the full-screen app.
Touch in the taskbar to view all running apps and
select the dialog box or app.
Maintenance and Troubleshooting
75
Troubleshooting the Dock
This section provides troubleshooting options for the dock.
Troubleshooting the 4-Slot Battery Charger
This section provides troubleshooting options for the 4-Slot Battery Charger.
Table 5 Troubleshooting the Dock.
Problem Cause Solution
Battery is not charging. Battery failed. Replace battery. If the tablet still does not operate, try
a cold boot. See Performing a Cold Boot on page 73.
Dock was unplugged
from power source.
Ensure the dock is receiving power.
Ambient temperature
of the dock is too
warm or too cold.
The ambient temperature must be between 0 °C and
45 °C (32 °F and 113 °F).
Table 6 Troubleshooting the 4-Slot Battery Charger
Problem Cause Solution
Power Pack Charging
LED does not light
when inserted.
Power Pack is not
correctly seated.
Remove and re-insert the spare battery into the
charging slot, ensuring it is correctly seated.
Power Pack is not
charging.
Power Pack was
removed from
charger or charger
was unplugged from
AC power.
Ensure charger is receiving power. Ensure Power
Pack is seated correctly. Confirm Power Pack
is charging. The Power Pack fully charges in
approximately four hours.
Power Pack is faulty. Verify that other Power Pack charge properly. If so,
replace the faulty Power Pack.
The Power Pack is
not fully seated in the
charger.
Remove and re-insert the Power Pack into the
charger, ensuring it is firmly seated.
Ambient temperature
of the charger is too
warm or too cold.
Move the charger to an area where the ambient
temperature is between 0°C and 40°C (32°F and
104°F).

76
Specifications
For device technical specifications, go to zebra.com/support.
Data Capture Supported Symbologies
Decode Distances
The table below lists the typical distances for selected bar code densities. The minimum element width (or
“symbol density”) is the width in mils of the narrowest element (bar or space) in the symbol.
Table 7 Data Capture Supported Symbologies
Item Description
1D Bar Codes Chinese 2 of 5, Codabar, Code 11, Code 128, Code 39, Code 93,
Discrete 2 of 5, EAN-13, EAN-8, Interleaved 2 of 5, MSI, UPCA,
UPCE, UPCE1, ISBN/Bookland, ISSN, Coupon Code,
Matrix 2 of 5
2D Bar Codes Australian Post, Aztec Code, Canada Postal, Composite AB,
Composite C, DataMatrix, Dutch Postal, GS1 DataBar, GS1
Expanded, GS1 Limited, GS1 Datamatrix, Han Xin, Japan Postal,
Maxicode, Micro PDF, Micro QR Code, PDF-417, QR Code,
TLC-39, PDF-417, UK Postal, US4state, US4State FICS, US
Planet, US Postnet
Table 8 SE4107 Decode Distances
Symbol Density/ Bar Code Type
Typical Working Ranges
Near Far
5 mil Code 39 2.4 in.
6.1 cm
9.5 in.
24.1 cm
5.0 mil Code 128 2.8 in.
7.1 cm
9.0 in.
22.9 cm
6.6 mil PDF417 2.4 in.
6.1 cm
8.0 in.
20.3 cm
10 mil Data Matrix 2.9 in.
7.49 cm
9.0 in.
22.9 cm
Specifications
77
Dock Specifications
100% UPCA 1.8 in.
5.1 cm
19.5 in.
26.2 cm
15 mil QR Code 1.2 in.
4.6 cm
12 in.
30.5 cm
20 mil QR Code 1.2 in.
4.6 cm
14 in.
35.6 cm
20 mil Code 39 2.0 in.
5.1 cm*
26.0 in.
66.0 cm
*Limited by width of bar code in field of view.
Notes: Photographic quality bar code at 15° tilt pitch angle under 30 fcd ambient illumination.
Distances measured from front edge of scan engine chassis.
Table 8 SE4107 Decode Distances (Continued)
Symbol Density/ Bar Code Type
Typical Working Ranges
Near Far
Table 9 Dock Technical Specifications
Item Description
Input Voltage 12-14 VDC
Power Consumption 60 watts
Operating Temperature
Office Dock, 9 port
expansion module (PEM)
-20 °C to 40 °C (-4 °F to 104 °F)
Operating Temperature
Vehicle Dock, 7 port PEM
-20 °C to 60 °C (-4 °F to 150 °F)
Storage Temperature -30 °C to 70 °C (-22 °F to 158 °F)
Humidity 5% to 95% non-condensing
Electrostatic Discharge
(ESD)
+/- 15 kV air
+/- 8 kV contact
+/- 8 kV indirect discharge

zebra.com
