
This document is accessible online via this link: http://acs.ist.psu.edu/reports/dR19 /dR19.pdf and /dR
A condensed version of this document is published in XRDS: Crossroads, The ACM Magazine for Students, 26(1), 10–11.
Some Tips for Academic Writing and Using Microsoft Word
Pooyan Doozandeh
1
& Frank E. Ritter
Applied Cognitive Science Lab, The Pennsylvania State University
ACS Tech. Note 2019–2 (June 10, 2019)
1 pooyan.d[email protected]
2 Derived from the Publication Manual of the American Psychological Association, Sixth Edition.
1 of 6
This document will teach some writing tips and some advanced techniques in Microsoft Word. It
includes using dash and hyphen, quotations and italicizing, outline view, styles, hidden text, key
bindings, breaks, and bibliography tools. The main use of this document is in writing articles,
proposals, theses, dissertations, books, resumes, CVs, and other academic texts.
Using dash and hyphen. Dash and hyphen are two different characters, and there are different
types of dashes and hyphens described in Table 1. Word does not make these clearly available, but
they are available to use if you know how to find them.
Table 1. Description of the usage of different types of dash and hyphen.
Character
Name
Key(s)
Typical usage
-
hyphen or
hyphen-minus
Win: minus key
Mac: minus key
To separate components of a compound word
(long-standing; twentieth-century writers);
prefixes and suffixes (de-Stalinization).
–
en-dash
Win: ctrl + minus
Mac: option + minus
To indicate spans or differentiation, replacing “to”
and “and” (years 1754–1763; US–Canada border;
pp. 81–101).
—
em-dash
Win: ctrl + alt + minus
Mac: option + shift + minus
To show a break in a sentence or parenthetical
statements (“Glitter, felt, yarn, and buttons—his
kitchen looked as if a clown had exploded”;
“A flock of sparrows—some of them juveniles—
alighted and sang.”). There is no space around
em-dash.
--
double hyphen
or sig dash
Win: two minus keys
Mac: two minus keys
To insert dashes when you do not have a
phototypesetter tool like Word or LaTex (with no
space around it); with a space after, it is also used
in electronic signatures (-- Sophie Smith).
Note: minus keys mentioned above refer to the minus key in the numeric keypad section of key-
boards. They might not work with the hyphen key on the main section of keyboards.
Quotations and italicizing.
2
There are no agreed-upon rules about the usage of quotations; but
there are certain conventions that are followed commonly. The purpose of double quotation is to
Doozandeh & Ritter June 2019
2 of 6
write materials quoted directly from a source. But it can be used for other reasons. When introduc-
ing a word or phrase used as an ironic comment as slang, or as an invented or coined expression,
you can use double quotation (considered "normal" behavior; the "good-outcome" variable). In
this usage, use quotation marks only the first time the word or phrase is used. To cite a letter, word,
phrase, or sentence as a linguistic example, or to introduce a technical or key term, do not use
double quotation. Instead, italicize the term (“we call it fidelity-transfer correlation”). The main
use of single quotation marks is within double quotations to set off material that in the original
source was enclosed in double quotation marks (In their study they found that “the ‘fidelity of
simulation’ should not be of concern” (p. 55).).
Outline view. It helps you manage a document’s structure and headings without getting lost in the
text. Academic papers usually have headings in different levels; a heading might have several sub-
headings, each having their own sub-headings, and so on. This tool can thus help in organizing
your documents. To access Word’s outline view, go to the View tab. In outline view, you can
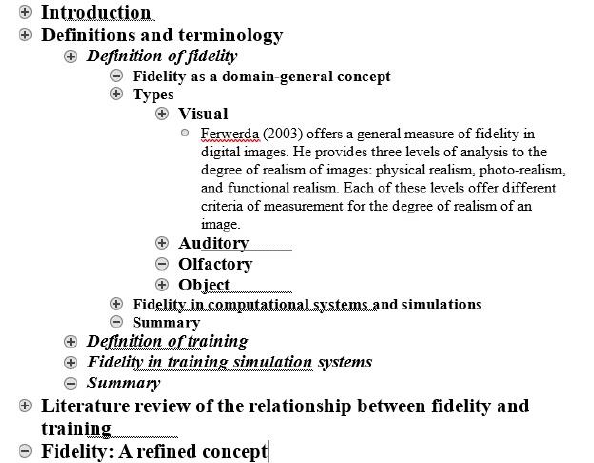
directly edit headings and paragraphs beneath each heading. An example of using outline is shown
in Figure 1.
Figure 1. An example of using Outline View when editing a document.
Each heading or paragraph has a level. The highest level (i.e., level 1) contains the primary
headings (e.g., title, introduction, method, conclusion). The next level (i.e., level 2) contains sec-
ondary headings (e.g., within the method section, there are headings of materials, participants, and
design), and these levels continue as such. See the Appendix for a list of keybindings for outline
view. Some operations available in outline view are listed below.

Doozandeh & Ritter June 2019
3 of 6
• The entire document in the outline view (i.e., headings and paragraphs) is editable.
• You can move sections, headings, and paragraphs around the document in outline view by
dragging them with the mouse pointer.
• You can change the level of sections by first selecting them, and then using the left or right
arrows on the top menu (or using the Tab key or Shift+Tab to change the level).
• You can open or close a heading and its content by double-clicking on the heading icon, or
using + or – keys on the keyboard while the heading is selected.
Note: it is preferable to use outline view when you start creating a document. Converting docu-
ments that were created without outline to outline view might take some time.
Styles. Use Styles to format sections in your document. As for some examples, you can use the
"Title" style for your title, "Heading 1" for level 1 heading, "Text" style for the main text of the
document, and "Caption" style for the figure captions and subtitles. The main reason of using
Styles is that, instead of repeatedly going through several steps (e.g., spacing, font, color, italics)
across many sections in the document and monitoring their uniformity by hand, you can use Styles
and choose the kind of formatting you need (e.g., title), and Word does all the formatting for those
parts across the whole document. Once you have several sections of your document in a specific
style, and if you want to apply a change to all those sections (e.g., changing the font size from 11
to 12), instead of editing those sections one by one, you can simply make the change to the Style
of those sections, and it automatically applies the change to all sections with the same Style.
Figure 2. Default Style menu which is usually on the top of Word’s main page.
To use Styles, you can navigate to the provided Styles tab on the top menu. As is shown in
Figure 2, there exist several styles by default. You can first select your text or paragraph and click
on one of the styles. To remove the style from the selected text, you should open the tab on the
right-bottom corner of the panel and choose Clear Formatting. This will change the style of the
text to your Word’s default settings of text. You can also create your own style by opening the tab
on the right-bottom corner and choosing Create a Style.
As a side note, when you install Word in your computer and open a new page, the default
formatting (e.g., line spacing, paragraph spacing, indention, font, font size) is decided by Word,
and it might be different from your preferred default formatting. So, you should change formatting
elements for every new document. You can change this, so that every time you open Word, the

Doozandeh & Ritter June 2019
4 of 6
formatting of a blank page is your default preference. To do this, create a Word document, and in
the blank page, click on the small opening tab on the right bottom corner of Font menu, decide
your formatting, and click on “Set As Default”. Similarly, you can do this for Paragraph menu in
which you can decide spacing, indention, alignments, and other options.
Hidden text. If you have confidential information in a document or text that you do not want oth-
ers to see at first sight, or if you have old or personal notes about the document (e.g., author con-
tact details, dead prose, prose to reuse, references yet to include), you can hide selected text in
your document. To hide a piece of text, select the text, and then press Ctrl+Shift+H. Or:
• Right-click on the selected text, and then click the Font tab.
• Select or clear the Hidden check box. Click Ok.
Note: make sure the Hidden Text checkbox is unchecked in File>Options>Display.
To show the hidden text, you can use Ctrl+* (in Mac, Option+*). To show the hidden text
together with all other hidden formatting in the document, you can also use ¶ on the top menu of
Word (in Paragraph tab).
Other useful characters and keybindings. Keybinding means pressing (binding) several keys at
the same time for a specific purpose (also called keyboard shortcuts). There is a list of useful
keybindings in the Appendix. You can also find many useful keybindings when using Word at:
https://support.office.com/en-us/article/. In that webpage, search “keyboard shortcuts”, and you
can find keybindings for both Win and Mac. Two useful keybindings are listed below.
Non-breaking space
If you reach the end of a line in Word, it automatically breaks the line and goes to a new line
at the closest space character. To prevent Word from breaking a line at a certain space char-
acter, you can insert a non-breaking space. To do so, you can use Ctrl+Shift+Spc (in Mac
Option+Spc). For example, you would not want Word to break a line at the space in “730 ms”
or “ad hoc”.
Non-breaking return (cr - carriage return), or soft return
When you press the Enter (or Return) key in Word, it automatically puts extra space between
the current line and the next line. But sometimes you do not need space between lines (e.g.,
you may want to divide a title into two lines without adding additional space between them).
Here, you should use a soft return or non-breaking return. To do so, press Shift+Enter (in
Mac, Option+Return). For example, the space between the current paragraph and the title
line “Non-breaking return” is non-breaking return, but the space between the end of the pre-
vious paragraph (“…’ad hoc’”.) and the next line (“Non…”) is simple (or hard) return.

Doozandeh & Ritter June 2019
5 of 6
(B)
Section and page breaks. Section Breaks should be used for separating different sections of a
document when they have different structure. For example, if you want to write a document in one
column in each page, and you need to write the next section of the document in two columns, you
should insert a Section Break after the first section, and write in the two-column structure in the
next section. Page Break is used to separate different sections with the same structure.
Also, when you select a line or a heading and want Word to keep it together with the next
paragraph, you can right click, choose Paragraph, and in Lines and Page Breaks tab, choose “Keep
with next”. For example, this would preclude Word from separating a heading from its paragraph
in two separate pages. You can similarly insert page break.
Bibliography tools. Sometimes you need to cite articles, books, or other sources several times in
a document, and keeping track of literature and citing papers by hand becomes a challenge. In
those cases, references need to be stored in an accessible way for future citations. If you are a
graduate student or write frequently, bibliography tools can be helpful; it may not pay off in the
first 100 pages, but will pay off after that. You can use a range of tools to store the citation of your
articles, books, and other sources, and afterwards, you can cite those sources easily, both in text
and in references section. For a list of the professional bibliography management tools, go to the
webpage:
https://en.wikipedia.org/wiki/Reference_management_software.
Word has a simple tool that can help you manage your references. In Word, go to Refer-
ences>Citations & Bibliography (Figure 3, A). After choosing your style of formatting (e.g., APA),
you can click on Insert Citation, and choose Add New Source (Figure 3, B). After filling the in-
formation of a source and adding the source, you can go to Citations & Bibliography and choose
Insert Citation for inserting a source in text. When you want to write the reference section, in
Citations & Bibliography you should choose Bibliography, and choose the source.
Figure 3. A refers to the Citations & Bibliography tab in Word’s References menu, and
B is the window that appears when you choose Add New Source in the Insert Citation
menu.
(A)

Doozandeh & Ritter
June 2019
6 of 6
Appendix: Some Useful Keys and Keybindings in Word
General
Moving Around a Document
Selecting Text
Ctrl+N: Create a new document
Ctrl+O: Open an existing document
Ctrl+S: Save a document
F12: Open the Save As dialog box
Ctrl+W: Close a document
Ctrl+Z: Undo an action
Ctrl+Y: Redo an action
Alt+Ctrl+S: Split a window
Ctrl+Alt+V: Print Layout View
Ctrl+Alt+O: Outline View
Ctrl+Alt+N: Draft View
Ctrl+F2: Print Preview View
F1: Open the Help pane
Ctrl+F: Search a document
F7: Run a spelling and grammar check
Shift+F7: Open the thesaurus. If you have
a word selected, Shift+F7 looks up
hat word in the thesaurus.
Ctrl+Left/Right Arrow: Move one word
to the left or right
Ctrl+Up/Down Arrow: Move up or down
one paragraph
End: Move to the end of the current line
Ctrl+End: Move to the end of the
document
Home: Move to the beginning of the
current line
Ctrl+Home: Move to the beginning of the
document
Page Up/Page Down: Move up or down
one screen
Ctrl+Page Up/Page Down: Move to the
previous or next browse object (after
performing a search)
Alt+Ctrl+Page Up/Page Down: Move to
the top or bottom of the current
window
F5: Open the Find dialog box with the
“Go To” tab selected, so you can
quickly move to a specific page,
section, bookmark, and so on.
Shift+F5: Cycle through the last three
locations where the insertion point
was placed. If you just opened a
document, Shift+F5 moves you to the
last point you were editing before
closing the document.
Shift+Left/Right Arrow: Extend your
current selection by one character to
the left or right
Ctrl+Shift+Left/Right Arrow: Extend
your current selection by one word to
the left or right
Shift+Up/Down Arrow: Extend selection
up or down one line
Ctrl+Shift+Up/Down Arrow: Extend
selection to the beginning or end of the
paragraph
Shift+End: Extend selection to the end of
the line
Shift+Home: Extend selection to the
beginning of the line
Ctrl+Shift+Home/End: Extend selection
to the beginning or end of the
document
Shift+Page Down/Page Up: Extend
selection down or up one screen
Ctrl+A: Select the entire document
F8: Enter selection mode. While in this
mode, you can use the arrow keys to
extend your selection. You can also
press F8 up to five times to extend the
selection outward. Use Esc to exist the
selection mode.
Editing Text
Ctrl+Backspace: Delete one word to the
left
Ctrl+Delete: Delete one word to the right
Ctrl+C: Copy or graphics to the Clipboard
text
Ctrl+F3: Cut selected text to the Spike.
The Spike is an interesting variant on
the regular clipboard. You can keep
cutting text to the Spike and Word
remembers it all. When you paste the
Spikes contents, Word pastes
everything you cut, but places each
item on its own line.
Ctrl+Shift+F3: Paste the Spike contents
Alt+Shift+R: Copy the header or footer
used in the previous section of the
document
Paragraph Formatting
Ctrl+M: Increases a paragraph’s indent
one level each time you press it
Ctrl+Shift+M: Reduces a paragraph’s
indent one level each time you press
it
Ctrl+T: Increases a hanging indent each
time you press it
Ctrl+Shift+T: Reduces a hanging indent
each time you press it
Ctrl+E: Center a paragraph
Ctrl+L: Left-align a paragraph
Ctrl+R: Right-align a paragraph
Ctrl+J: Justify a paragraph
Ctrl+1: Set single-spacing
Ctrl+2: Set double-spacing
Ctrl+5: Set 1.5 line Spacing
Ctrl+0: Remove one line spacing
preceding a paragraph
Ctrl+Shift+S: Open a popup window for
applying styles
Ctrl+Shift+N: Apply the normal
paragraph style
Alt+Ctrl+1: Apply the Heading 1 style
Alt+Ctrl+2: Apply the Heading 2 style
Alt+Ctrl+3: Apply the Heading 3 style
Ctrl+Shift+L: Apply the List style
Ctrl+Q: Remove all paragraph formatting
Character Formatting
Ctrl+B: Apply bold formatting
Ctrl+I: Apply italic formatting
Ctrl+U: Apply underline formatting
Ctrl+Shift+W: Apply underline
formatting to words, but not the
spaces between words
Ctrl+Shift+D: Apply double underline
formatting
Ctrl+D: Open the Font dialog box
Ctrl+Shift+< or >: Decrease or increase
font size one preset size at a time
Ctrl+[ or ]: Decrease or increase font size
one point at a time
Ctrl+=: Apply subscript formatting
Ctrl+Shift+Plus key: Apply superscript
formatting
Ctrl+Shift+A: Formats all letters as
uppercase
Ctrl+Shift+K: Formats all letters as
lowercase
Ctrl+Shift+C: Copies the character
formatting of a selection
Ctrl+Shift+V: Pastes formatting onto
selected text
Ctrl+Space: Removes all manual
character formatting from a selection
Working with Outlines
Alt+Shift+Left/Right Arrow: Promote
(move to the left) or demote (move
to the right) a line
Ctrl+Shift+N: Demote an outline level to
regular body text
Alt+Shift+Up/Down Arrow: Move the
line with the insertion point up or
down in the outline
Alt+Shift+Plus or Minus keys: Expand or
collapse text under a heading
Alt+Shift+A: Expand or collapse all text
or headings in an outline
Alt+Shift+L: Show the first line of body
text or all body text
Alt+Shift+1: Show all headings that have
the Heading 1 style applied
Alt+Shift+any other number key: Show
all headings up to that level
Note. Except in some cases, Mac uses Option key instead of Ctrl.
Acknowledgements. Helpful comments from Farnaz Tehranchi, Cesar Colchado, and Raphael Rodriguez in preparing this
document is gratefully acknowledged.
