OPERATOR'S MANUAL
Cat. No.
M12 360IC32
M12™ M-SPECTOR™ 360 INSPECTION CAMERA
WARNING
To reduce the risk of injury, user must read and understand operator's manual.

2
GENERAL POWER TOOL
SAFETY WARNINGS
WARNING
Read all safety warnings and all
instructions, illustrations and
•
Failure to follow all instructions listed below may
Save all warnings and instructions for future
reference. The term "power tool" in the warnings
refers to your mains-operated (corded) power tool or
battery-operated (cordless) power tool.
WORK AREA SAFETY
• Keep work area clean and well lit. Cluttered or
dark areas invite accidents.
• Do not operate power tools in explosive atmo-
liquids, gases or dust. Power tools create sparks
which may ignite the dust or fumes.
•
ELECTRICAL SAFETY
• Do not use near any heat sources such as ra-
diators, heat registers, stoves, or other apparatus
• Keep children and bystanders away while oper-
ating a power tool. Distractions can cause you to
lose control.
Do not operate power tool in an area where it
could contact electrical wiring or an electrically
charged object. Contact with a "live" wire or
object will make exposed metal parts of the tool
"live" and shock the operator.
Do not operate power tool near moving ma-
chinery. The cable can be tangled in moving parts,
pulling in the power tool and your hands and arms.
PERSONAL SAFETY
• Do not expose power tools to rain or wet condi-
tions. Water entering a power tool will increase the risk
of electric shock. Dry hands before turning tool on or
POWER TOOL USE AND CARE
• Stay alert, watch what you are doing and use
common sense when operating a power tool. Do
not use a power tool while you are tired or under
A
moment of inattention while operating power tools
may result in serious personal injury.
• Use personal protective equipment. Always
wear eye protection. Protective equipment such
as dust mask, non-skid safety shoes, hard hat, or
hearing protection used for appropriate conditions
will reduce personal injuries.
• Do not overreach. Keep proper footing and bal-
ance at all times. This enables better control of the
power tool in unexpected situations.
• This Inspection Scope is not intended for medi-
cal use or personal inspection.
• Store idle power tools out of the reach of chil-
dren and do not allow persons unfamiliar with
the power tool or these instructions to operate
the power tool. Power tools are dangerous in the
hands of untrained users.
BATTERY USE AND CARE
•
• Always remove the battery pack before cleaning.
•
•
manufacturer. A charger that is suitable for one type
with another battery pack.
battery packs. Use of any other battery packs may
• Maintain power tools. Check for misalignment or
binding of moving parts, breakage of parts and
tool operation. Do not use if power tool smokes
tool repaired before use. Many accidents are
caused by poorly maintained power tools.
• Use the power tool, accessories and tool bits
etc., in accordance with these instructions,
taking into account the working conditions and
the work to be performed. Use of the power tool
result in a hazardous situation. Only use accessories
be hazardous.
•
SERVICE
• When battery pack is not in use, keep it away
from other metal objects like paper clips, coins,
keys, nails, screws, or other small metal objects
that can make a connection from one terminal
to another. Shorting the battery terminals together
• Under abusive conditions, liquid may be ejected
from the battery, avoid contact. If contact ac-
cidentally occurs, flush with water. If liquid
contacts eyes, additionally seek medical help.
Liquid ejected from the battery may cause irritation
or burns.
SPECIFIC SAFETY RULES FOR
INSPECTION CAMERA
•
• Never disassemble the power tool or try to do any
rewiring on the power tool’s electrical system.
• Do not store the tool in an area of high heat or
humidity. Do not expose the tool to extended
high heat from the sun (such as on a vehicle
dashboard.) Damage to the product or the battery
pack can result.
This tool is designed to be powered by a 12 volt
MILWAUKEE
®
battery pack. Do not attempt to
use with any other voltage or power supply.
Clean only with dry cloth. Certain cleaning
agents and solvents are harmful to plastics and
other insulated parts. Some of these include:
petrol, turpentine, lacquer thinner, paint thinner,
chlorinated cleaning solvents, ammonia and
household detergents containing ammonia. Clean
dust and debris from vents. Keep the apparatus
handle clean, dry and free of oil or grease.
Contact a MILWAUKEE
®
service facility for ALL
repairs. Have your power tool serviced by a
qualified repair person using only identical
replacement parts. This will ensure that the
safety of the power tool is maintained.
•
Maintain labels and nameplates. These carry
important information. If unreadable or missing,
contact a MILWAUKEE
®
service facility for a
replacement.

3
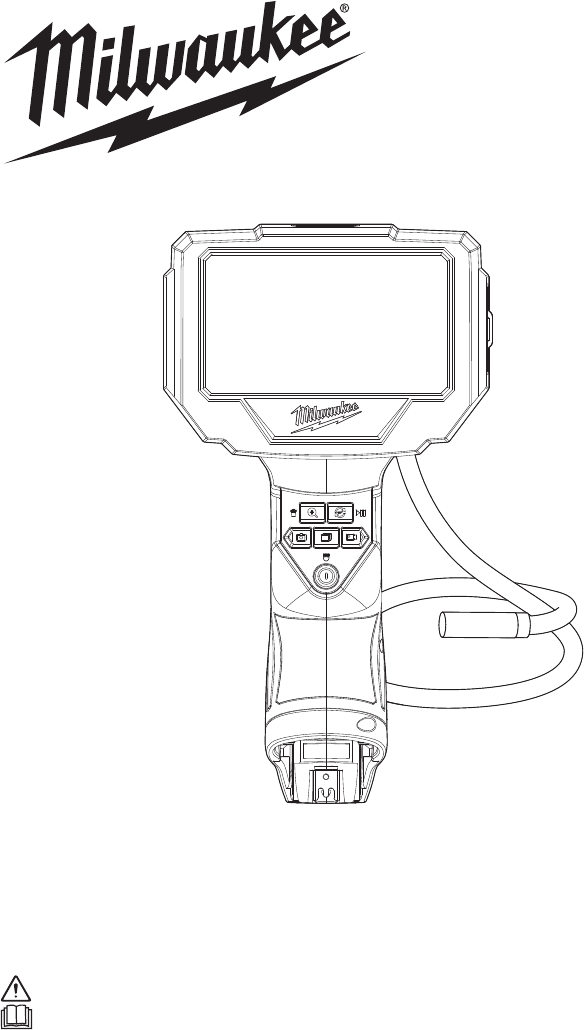
FUNCTIONAL DESCRIPTION
1. LCD
2. Zoom/Rotate Capture/Playback buttons
3. Power button/camera LED brightness selector
4. Handle
5. Camera LEDs
6. Camera
7. Cable
8. Memory card slot
1
3
5
4
6
2
7
8
SYMBOLOGY
ASSEMBLY
Volts
Direct Current
To prevent electric shock, do not allow
product to contact live electrical parts
Do not stare at the operating light
source
Wear eye protection
Read Operator's Manual
-
WARNING
Recharge only with the charger
any time the tool is not in use.
WARNING
Always remove the battery
pack
manual supplied with your charger and battery.
Inserting/Removing the Battery
To remove the battery, push in the release buttons
and pull the battery pack away from the tool.
To insert the battery, slide the pack into the body
of the tool. Make sure it latches securely into place.
WARNING
reco
Only use
mmended
accessorie
for thi
s
s tool. Others
may be hazardous.
WARNING
WARNING
Do not charge non-rechargeable
batteries.
ADDITIONAL BATTERY SAFETY RULES
WARNING
T
injury
o reduce
, and product damage
the risk of fire, personal
due to
a short circuit, never immerse your tool, battery
pack or charger in fluid or allow a fluid to flow inside
them. Corrosive or conductive fluids, such as
seawater, certain industrial chemicals, and bleach
or bleach-containing products, etc., can cause a
short circuit.
SPECIFICATIONS
Cat. No. ............................................. M12 360IC32
Volts............................................................ 12V DC
Battery Type .................................................M12™
Charger Type................................................M12™
Cable Length .................................... 3 m (2324-20)
Memory Card ................ Micro-SD (32GB supplied)
Display Size ..................................... 110 mm (4.3")
Camera Resolution .........................................720 p
Camera Head Diameter................................10 mm
Digital Image Rotation ..................................... 180º
Drop Rating .......................................................1 m
Storage Temperature
..........................-17°C to 60°C
(-4°F to 140°F)
-10°C to 40°C
(-14°F to 104°F)
Operating Temperature
......................
Regulatory Compliance Mark (RCM).
This product meets applicable
regulatory requirements.
Do not dispose of electric tools
together with household waste
material. Electric tools and electronic
equipment that have reached the end
of their life must be collected
separately and returned to an
environmentally compatible recycling
facility.
Do not disposal of a battery into fire
or a hot oven, or mechanically
WARNING
Do not leaving a battery in an
extremely high temperature
crushing or cutting of a battery, that can result in an
explosion.
surrounding environment that can result in an
explosion or the leakage of flammable liquid or gas.
WARNING
Do not expose the battery to
extremely low air pressure that may
result in an explosion or the leakage of flammable
liquid or gas.
Indoor use

4
Camera LED Brightness
Zoom Button
Once the tool is turned On, press the power button
to cycle through the levels of brightness or turn it
is displayed on the
LCD.
180
Rotate Button
Press the zoom button to cycle through the 3 zoom
levels. The level of zoom is displayed on the LCD.
Press the
180
button to rotate the LCD image 180º.
Push the
180
button again to return the image to its
original position.
Save Photo Button
Press the button to save a photo of the current
view of the LCD screen.
Record Video Button
Press the button to start recording the current
view of the LCD screen. Press the
button again
to stop recording.
Taking Photos/Videos
1.
2.
checking the workspace for hazards, insert the
cable.
3.
4.
Use the
button to zoom in or out on the image.
Use the
180
button to rotate the image 180°.
Use the power button
camera LED brightness.
to increase/decrease the
button.
5. To save a photo, press the
6. To record a video, press the
button.
NOTE: During a video recording, REC displays
on the LCD and the timecode starts counting up.
7. To end the video, press
.
Formatting a New Memory Card
The camera comes preinstalled with a memory card
formatted to FAT32. The indicator will display if a
memory card is inserted that is not formatted to
FAT32. Memory cards must be formatted to FAT32.
To format a memory card to FAT32, press the
button twice. The
indicator will display until format-
Attaching/Removing Accessories
To attach an accessory, snap the clips into the de-
tents at the end of the cable. To remove, unclip and
pull away from the cable.
OPERATION
WARNING
To reduce the risk
wear proper eye protection marked
of injury, always
to comply with AS/NZS 1337.
To reduce the risk of explosion, electric shock
and property damage, always check the work
area before beginning a job. Do not allow cable to
contact electrical, chemical, or moving hazards.
entire area.
Inside pipes: Ensure there is no electrical charge
to the pipes before beginning inspection. Do not
cool before beginning inspection. Do not allow
the camera or cable to contact oil, gas, or other
corrosive materials.
NOTE: Formatting will erase all existing data
including any photos and videos contained on that
memory card.
Inserting/Removing the Memory Card
The number of photos/videos that can be saved is
based on the size of the memory card.
1. Open the protective cover to access the memory
card slot.
2. Slide the memory card into the
slot, the top of the card should
face away from the LCD screen.
Press in the card securely. It
should click in place.
3. Close the protective cover.
4. To remove the memory card,
press it in and release. It will
pop out.
NOTE: To transfer photos/video to an external
device, the Micro-SD card must be removed and
inserted into external device. The Micro-SD card
can also be used with the supplied SD Card adaptor
to transfer photos/videos to external devices. To
delete or save to the Micro SD Card when installed
in the adaptor, ensure the 'lock' switch on the side of
the adaptor is not in the 'lock' position (lower
position).
To turn On:
When the inspection camera is turned On and the
camera is pointed at an object, the LCD screen will
show the image the lens is pointing at.
1.
.
when the screen
:
1. Press and hold the power button
2. Release the power button
turns On.
2.
.
when the screen
Press and hold the power button
Release the power button
structions. This is not a drain cleaner!
NOTICE
To reduce the risk of damage to the tool,
do not use excessive force or "kink"
the cable. Do not use in areas where camera and
cable will contact corrosive or oily substances.
Do not use the cable to clear clogs or move ob-

5
Memory Card Missing
Sleep Mode
minutes.
The indicator will display if a memory card is not
detected in the memory card slot.
No Media Detected
Memory Card Full
The
full.
The indicator will display if there is no media
detected on the memory card.
indicator will display if the memory card is
File Archive
The indicator will display when the maximum
number of photos/videos that can be displayed in
to the archive folder of the memory card. To move
files to the archive folder, press the
button twice.
Gallery Mode
NOTE: When in gallery mode,
button actions change to their
secondary functions to allow for
navigation, playback, pause,
and deletion purposes.
photos and videos saved on the SD card.
2.
1. Press the
button to enter gallery mode to view
2/50
The number of saved photos/videos is displayed
on the top of the LCD screen.
3.
While in gallery mode, use the
through the stored photos/videos.
buttons to move
4. Press the
button to play a saved video.
5. While a video is playing, press the
pause.
button to
7. To cancel a deletion, press the
6. To delete a photo/video, press the
button then
press the
button.
8. To exit gallery mode, press the
button.
Battery Level
Replace the battery pack when low. The level of
battery is displayed in the upper right corner of the
LCD screen.
MAINTENANCE
WARNING
WARNING
Use only recommended accesso-
ries. Others may be hazardous.
Maintaining Tool
WARNING
Cleaning
Repairs
For repairs, return the tool, battery pack and charger
to the nearest authorised service centre.
ACCESSORIES
Clean dust and debris from any vents. Keep tool
clean, dry and free of oil or grease. Use only mild
soap and a damp cloth to clean, since certain
cleaning agents and solvents are harmful to plastics
and other insulated parts. Some of these include
petrol, turpentine, lacquer thinner, paint thinner,
chlorinated cleaning solvents, ammonia and
household detergents containing ammonia. Never
use flammable or combustible solvents around
tools.
To reduce the risk of injury,
always remove the batteries from
To reduce the risk of personal
injury and damage, never
the tool before performing any maintenance.
Never disassemble the tool. Contact a
MILWAUKEE
®
service facility for ALL repairs.
Keep your tool in good repair by adopting a regular
maintenance program. After six months to one year,
depending on use, return the tool to a
MILWAUKEE
®
service facility for repairs.
If the tool does not start or operate at full power with
new batteries, clean the contacts on the battery
door. If the tool still does not work properly, return
the tool to a MILWAUKEE
®
service facility for
repairs.
immerse your tool in liquid or allow a liquid to
flow inside it.
For a complete listing of accessories, go online to
milwaukeetool.com.au/milwaukeetool.co.nz. or
contact a distributor.
Rotating Screen
To rotate the screen for ease of use, grasp the LCD
housing and turn clockwise or counter clockwise. The
screen can be rotated approximately 270°.
Over Temperature
If the battery over temperature indicator comes
on, remove the battery and allow the battery to cool.

WARRANTY - AUSTRALIA and NEW ZEALAND
SERVICE - AUSTRALIA and NEW ZEALAND
MILWAUKEE
®
prides itself in producing a premium quality product that is Nothing But Heavy Duty
TM
.
Your satisfaction with our products is very important to us! If you encounter any problems with the
operation of this tool, please contact your authorised MILWAUKEE
®
dealer.
For a list of MILWAUKEE
®
dealers, guarantee or service agents please contact MILWAUKEE
®
Customer Service or visit our website.
(Australia Toll Free Telephone Number 1300 645 928)
(New Zealand Toll Free Telephone Number 0800 645 928)
or visit milwaukeetool.com.au/milwaukeetool.co.nz.
Please refer to Australian and New Zealand warranty supplied with tool. This warranty applies only to
product sold by authorised dealers in Australia and New Zealand.
01618000401Q-02(A)
DESIGNED BY MILWAUKEE ELECTRIC TOOL CORP.
PROFESSIONALLY MADE IN CHINA
PRINTED IN CHINA
Milwaukee Electric Tool Corporation
13135 West Lisbon Road, Brookfield, Wisconsin U.S.A. 53005
Milwaukee Tool (Australia)
26 - 40 Nina Link, Dandenong South,
Victoria, 3175, Australia
Milwaukee Tool (New Zealand)
274 Church Street, Penrose,
Auckland, 1061, New Zealand
