
OpenText RightFax 20.2
Managed Services
Administrator Guide

Edition
OpenText RightFax 20.2 Managed Services
April 22, 2020
Copyright © 2020 Open Text. All Rights Reserved. Trademarks owned by Open Text.
One or more patents may cover this product. For more information, please visit, https://www.opentext.com/patents.
Open Text Corporation
275 Frank Tompa Drive
Waterloo, Ontario, Canada
N2L 0A1
(519) 888-7111
http://www.opentext.com
Copyright Statement
Portions of this product Copyright © 2002-2006 Glyph & Cog, LLC. Portions Copyright © 2001 artofcode LLC.
This software is based in part on the work of the Independent JPEG Group. This software is based in part on the work of the Freetype Team.
Portions Copyright © 1998 Soft Horizons. Portions Copyright ©2001 URW++. All Rights Reserved. Includes Adobe® PDF Library technology. Adobe,
Acrobat and the Acrobat logo are trademarks of Adobe Systems Incorporated.
Disclaimer
No Warranties and Limitation of Liability. Every effort has been made to ensure the accuracy of the features and techniques presented in this publication.
However, Open Text Corporation and its affiliates accept no responsibility and offer no warranty whether expressed or implied, for the accuracy of this
publication.
OpenText RightFax 20.2 2 Managed ServicesAdministrator Guide
Contents
Chapter 1: Introduction 7
Chapter 2: Managing fax servers with RightFax Web Admin 8
Starting Web Admin 8
Creating a list of RightFax servers 8
Viewing the dashboard 9
Viewing fax channel information 10
About RightFax services 10
Monitoring server statistics and queues 10
Monitoring client connections 12
Configuring the session timeout for FaxUtil Web 13
Chapter 3: Viewing RightFax Analytics 14
About the charts 14
Viewing and downloading Analytics data 15
Customizing the charts 15
Chapter 4: Creating RightFax user accounts 17
About the DEFAULT user 17
Creating, deleting, copying, and editing users 18
Disabling a user account 18
Editing a user profile 19
Managing user delegates 33
Chapter 5: Creating groups of users 36
Creating, deleting, copying, and editing groups of users 36
Editing group properties 37
Chapter 6: Creating signatures 45
Editing and deleting signature files 45
Editing signature file properties 45
Chapter 7: Creating a stamp library 47
Creating, deleting, and editing stamps 47
Chapter 8: Creating overlay forms 49
Creating and deleting form files 49
Editing form file properties 50
Configuring two forms for use in a single fax 51
Chapter 9: Connecting printers and scanners 52
Creating, deleting, and copying a printer 52
Editing printer properties 52
Importing printers into RightFax 53
Configuring RightFax to automatically print faxes 54
Chapter 10: Creating billing codes 55
OpenText RightFax 3 Managed ServicesAdministrator Guide

Customizing the use of billing codes 55
Creating, deleting, and copying billing codes 56
Editing billing code properties 56
Making ODBC billing codes available in FaxUtil 56
Chapter 11: Creating fax cover sheet templates 58
Creating an HTML cover sheet template 58
Creating a Microsoft Word cover sheet template 59
Creating a PostScript cover sheet template 59
Creating a PCL cover sheet template 59
Inserting cover sheet codes 59
Managing cover sheet template files 62
Granting user permission to select a cover sheet 63
Setting default cover sheets 63
Setting required cover sheet information 64
Chapter 12: Managing library documents 65
Creating a new library document 65
Editing library document properties 66
Deleting library documents 67
Chapter 13: Adding messaging services for notification
messages 68
Adding messaging services 68
Editing messaging service properties 68
Logging administrative alerts 69
Chapter 14: Managing fax numbers 70
Adding and deleting fax numbers 70
Assigning a fax number to a user or group 71
Activating fax numbers in the RightFax Connect Portal 71
Chapter 15: Running RightFax reports 72
Generating RightFax reports 72
RightFax Advanced Audit Report 74
RightFax Deleted Inbound Faxes 74
RightFax Deleted Outbound Faxes 74
Failed Received Fax Report: Unsuccessful Inbound Faxes by
User 75
Received Fax Report: Inbound Faxes by Day 75
Received Fax Report: Inbound Faxes by Remote ID 75
Received Fax Report: Inbound Faxes by User 76
Sent Fax Report: Outbound Faxes by Day 76
Failed Fax Report: Unsuccessful Outbound Faxes by User 77
Fax Report: Outbound Faxes by Unique ID 77
Fax Report: Outbound Faxes by User 78
Detailed Billing Report - Billing Code 1: Outbound Faxes Only 78
Detailed Billing Report - Billing Code 1 and Billing Code 2:
Outbound Faxes Only 78
Detailed Billing Report - Billing Code 2: Outbound Faxes Only 79
Summary Billing Report - Billing Code 1: Outbound Faxes Only 79
Summary Billing Report - Billing Code 1 and Billing Code 2:
Outbound Faxes Only 80
Summary Billing Report - Billing Code 2: Outbound Faxes Only 80
Channel Usage Report: by Day 80
Channel Usage Summary Report 81
OpenText RightFax20.2 4 Managed Services Administrator Guide

RightFax Conversion Error Report 81
Delegates by User 82
Destination Report: Outbound Faxes by Fax Number 82
Destination Report: Outbound Faxes by Remote ID 82
Destination Report: Outbound Faxes by To-Company 83
Destination Report: Outbound Faxes by To-Name 83
Failed Login Report 84
Fax Inactivity by User with Delegates 84
Fax Printing Report: Faxes Printed by Group(s) 84
Fax Printing Report: Faxes Printed by User(s) 84
User History Report: All Outbound Faxes for User(s) 85
User History Report: Completed Outbound Faxes for User(s) 85
User Fax Report: Outbound Summary of All Faxes for User(s) 86
User Fax Report: Outbound Summary of Completed Faxes for
User(s) 86
User Routed Received Documents Report: Activities on
Received Documents Performed by User(s) 87
Time-of-Day Usage by Group - Inbound 87
Time-of-Day Usage by Group - Outbound 88
User History Report: All Outbound Activities for User(s) 88
User History Report: Completed Outbound Activities for User
(s) 89
Permissions by User 89
Fax Printing Report 89
Time-of-Day Inbound Faxes Channel Usage Report 90
Time-of-Day Outbound Faxes Channel Usage Report 90
Time-of-Day Usage Report Outbound Faxes 91
Inbound Fax Users by Transmission Time 91
Inbound Fax Use by Pages 92
Outbound Fax Users by Transmission Time 92
Outbound Fax Use by Pages 92
Server Inbound and Outbound Usage 92
Top-10 Inbound Fax Users by Transmission Time 93
Top-10 Inbound Fax Users by Pages 93
Top-10 Outbound Fax Users by Transmission Time 93
Top 10 Outbound Fax Users by Pages 94
User Inactivity 94
Chapter 16: Configuring FTP routing 95
Configuring RightFax for FTP routing 95
Chapter 17: Registering RightFax on MFPs 97
Step 1: Defining global MFP settings 97
Step 2: Adding MFPs 97
Chapter 18: Adding external connections 100
Adding an external connection 100
Configuring external connection properties 100
Chapter 19: Creating dialing rules and Least-Cost Routing
plans 106
Creating, deleting, and copying dialing rules 106
Editing dialing rules 106
Testing dialing rules and fax routes 115
Viewing destination tables 116
OpenText RightFax20.2 5 Managed Services Administrator Guide

Blocking outbound calls 116
Examples of Least-Cost Routing 117
Chapter 20: Creating phonebook entries in FaxUtil Web 120
Creating a personal RightFax phonebook 120
Exporting phonebook entries 122
Chapter 21: Managing phonebooks in FaxUtil 123
Creating a personal RightFax phonebook 123
Exporting the entries from your RightFax phonebook 127
Selecting MAPI, LDAP, or ODBC phonebook entries 127
Chapter 22: Setting up workflows 128
Preparing to configure workflows for metadata tagging 128
Creating, editing, and deleting workflows for metadata tagging129
Configuring the properties of an exception workflow 129
Configuring the properties of a workflow 132
Managing workflows 134
Chapter 23: Configuring faxing for the Epic Print Service 136
Chapter 24: Installing a TLS/SSL certificate 137
OpenText RightFax20.2 6 Managed Services Administrator Guide

Chapter 1: Introduction
Chapter 1: Introduction
As an administrator of a RightFax implementation managed by
OpenText Professional Services, you can use Web-based RightFax
Web Admin to define and manage items such as user accounts, cover
pages, and billing codes, monitor statistics, run reports, and define
settings for your multifunction printers (MFPs).
For mailbox tasks, you use the Web-based mailbox application FaxUtil
Web. Specially trained administrators may need to use the Windows-
based mailbox application FaxUtil for select tasks.
With the optional RightFax Analytics module you can monitor the usage
of the RightFax server.
OpenText RightFax 7 Managed ServicesAdministrator Guide
Chapter 2: Managing faxservers with RightFax Web Admin
Chapter 2: Managing fax servers with RightFax Web Admin
Web Admin includes most of the functionality of Enterprise Fax
Manager (EFM).
Use Web Admin to administer a RightFax server, stop and restart its
services, define administrative components, monitor statistics, and
manage MFPs.
For information about administering multiple servers, configuring
RightFax services, and using EFM, refer to the RightFax Administrator
Guide.
Starting Web Admin
To log on to Web Admin
1. Open http://<servername>/RightFax/Admin, where servername
is either the name of the RightFax server or its IP address. You
can also open http://<servername>/RightFax, and then click
Web Admin.
2. In the User ID box, enter an administrator user ID. If required,
enter the Password, and then click Sign In. When it is first
installed, the default password for the Administrator account is
password. Web Admin opens, the list of RightFax services
appears in the right pane.
To enable dark mode
l On the <username> menu, select the Dark mode check box.
To log off
l On the <username> menu, click Sign Out.
The system will log you off after 15 minutes of inactivity.
Creating a list of RightFax servers
In Web Admin you can create a list of servers that you administer. From
a server in the list, you can open Web Admin. This list is saved in
cookies for each user.
To add a server
1. Open http://<servername>/RightFax/Servers, where
servername is either the name of the RightFax server or its IP
address. You can also open http://<servername>/RightFax, and
then click Servers.
2. If the server list is empty, the Add RightFax Server dialog box
opens.
If the list has entries, click Add to add another server.
3. In the RightFax Server Address box, enter the server name or
the IP address, and then click Ok.
OpenText RightFax 8 Managed ServicesAdministrator Guide

Chapter 2: Managing faxservers with RightFax Web Admin
To sign in to Web Admin from the list of servers
1. In the list of servers, click the link to the server.
2. In the User ID box, enter an administrator user ID. If required,
enter the Password, and then click Sign In. Web Admin opens,
and the dashboard appears in the right pane
Viewing the dashboard
The dashboard provides an overview of the usage of the RightFax
server.
To change which charts appear
1. In the left pane, click Dashboard.
2. Click Configure, and as needed select and clear the check
boxes of the charts you want to show or hide.
About the dashboard charts
Channels
l The Channels panel shows the number of fax channels that are in
the process of sending, the number of fax channels that are in the
process of receiving, and the number of fax channels that are idle.
l Click the panel to open the list of fax channels and view the status
of each one.
Work Requests
l The Work Requests panel shows the total number of database
work requests from the WorkServer modules and email gateway
modules that are being processed by the server.
l WorkServer and email gateway work requests are shown as a
percentage of the total.
l Click the panel to open the list of server statistics and queues and
view the status of each one.
Services
l The Services panel shows the condition of the fax server services.
l Click the panel to open the list of services.
CPU Usage
l The CPU Usage panel shows the percentage of CPU that is in use
by the fax server.
Fax by Volume
l The Fax by Volume panel shows the total number of faxes that
have been received by the fax server and the number of faxes
received by the two RightFax users with the most faxes.
Queues
l The Queues panel shows the current health of the work request
queues. If one or more queues is out of the normal operating range,
the chart shows the worst case.
Client Connections
l The Client Connections panel shows the current number of
connections from the client applications to the RightFax server.
l Click the panel to open the list of client connections.
Fax Status
l The Fax Status panel shows the total number of faxes that are
being processed for sending and the number of faxes in each
sending process.
OpenText RightFax20.2 9 Managed Services Administrator Guide
Chapter 2: Managing faxservers with RightFax Web Admin
l Click the panel to open the list of server statistics and queues and
view the status of each one.
Viewing fax channel information
To view fax channel information for the server
l In the left pane, click Channels. The right pane shows the following
information for each fax channel that is available on the server:
Channel
Channel status, channel number, (channel capability), DocTransport.
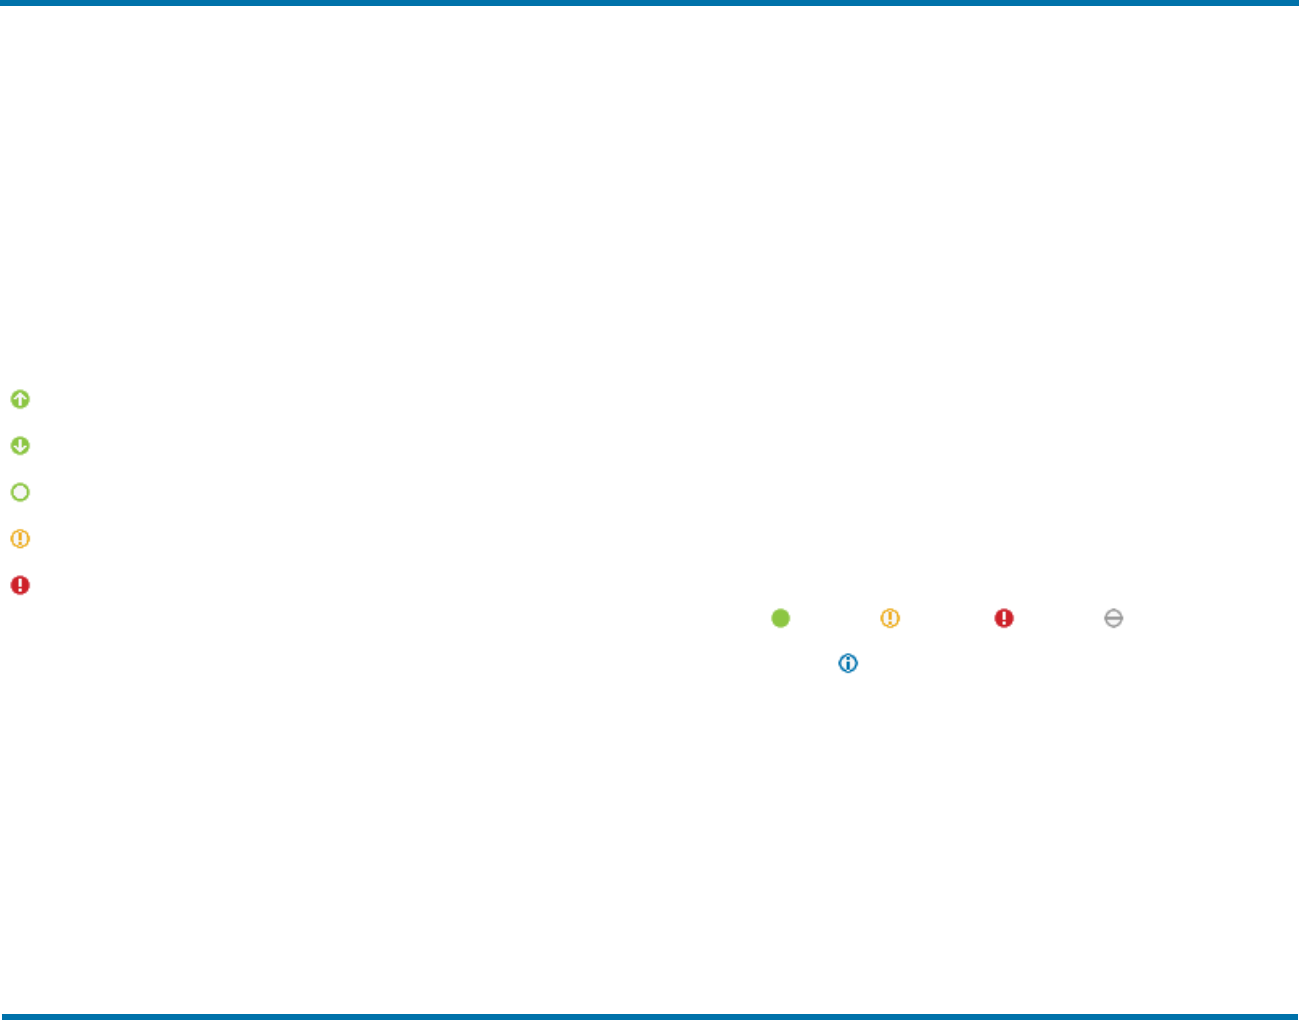
Channel status:
Sending
Receiving
Idle or waiting
Temporarily not available
Offline
Channel capability:
(N)
Reserved
(S)
Send (Dial)
(R) Receive (Answer)
(B) Both
(Vs) (Vr) or (Vb) VM-Notify send, receive, or both
(Ss) (Sr) or (Sb) Dial w/Ring Detect send, receive, or both
Operation
The current operational status of the channel.
Routing Code
The routing code for incoming faxes.
Phone Number
User ID
The destination user ID for incoming faxes.
State
Remote ID
Rate
Compression
About RightFax services
The RightFax services are configured and started during installation. If
a service stops without user intervention, it is automatically restarted
after 60 seconds.
Remote services appear in the list with (servername) appended to the
service name. Monitoring services on remote servers requires network
administrative access to the server as well as administrative access.
See the RightFax Administrator Guide.
To open the list
l Click Services. The list of services appears with the status for
each: Running Disabled Stopped Not configured or
disconnected Interactive
Monitoring server statistics and queues
Statistics and queues help you monitor your RightFax server. You can
customize when the warning or alert icons appear for a queue on a
server in Enterprise Fax Manager. See the RightFax Administrator
Guide.
OpenText RightFax20.2 10 Managed ServicesAdministrator Guide
Chapter 2: Managing faxservers with RightFax Web Admin
To view RightFax server statistics and queues
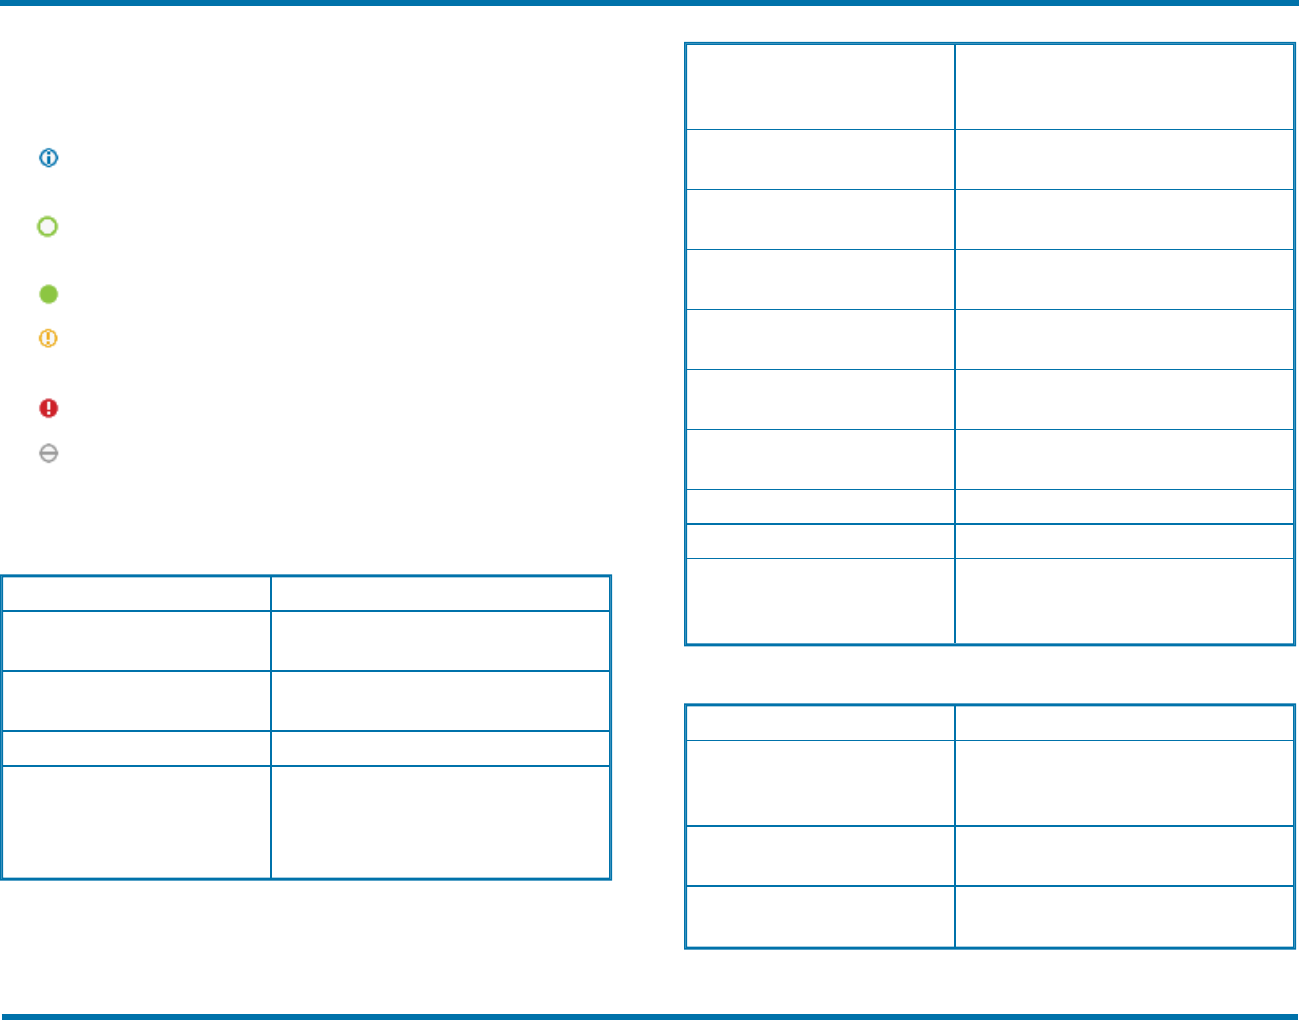
l Click Statistics. The available queues and statistics appear in the
list, The following icons may appear:
Value is provided for informational purposes. No warning or alert
threshold values defined.
Stable amount of work in the queue. No warning or alert
threshold values defined.
Work is below the threshold values defined for this queue.
Work exceeds the threshold value defined for the warning icon
and below that for the alert icon, if defined.
Work exceeds the threshold value defined for the alert icon.
Queue could not be queried or does not apply to this server, or
value is unavailable.
Fax Server
Statistic or Queue Description
Total server events Total number of events currently scheduled on
a Server module.
Documentsin queue on FaxServ(s) Totalnumber of document-related events
currently scheduled on a Server module.
Total documents Alldocumentsin the system.
Deleted documents All documents flagged in the database as
deleted. Associated value fluctuatesbased on
the days to keep deleted fax recordssetting of
each user group.
Transmission check events Number of "Scheduled to be sent" and
"Sending" documentsthat are pending Server
module action.
System messagesin the database Messagesfrom a Database module to a Server
module that have deferred faxprocessing.
Quickkicks from Database module to
Server module
Messageskicked by a Database module and
passed to a Server module.
Gatewayroute requests Number of requestsfrom a Server module to
gateways to pickup documents.
Fax Server Event Queue Usage The percentage of the faxserver’sinternal
Event Queue currentlyin use.
All Faxes Scheduled Number of documentson DocTransport
scheduled to be sent.
All Transmission Statuses Number of documents sent by DocTransport,
but not yet processed by a Server module.
Deleted faxes queue depth Number of itemsin the deleted faxesqueue.
Notification queue depth Number of itemsin the notifications queue.
Fax Server EventsProcessed on
servername
The number of server eventsprocessed bythe
server. Thisstatistic appears for each server in
a collective.
Conversion
Statistic Description
Conversion events Number of eventsin the queue that are
preparing an outbound faxto be scheduled for
transmission.
PCL5 conversion requests Number of requeststo convert PCL
documents.
Postscript conversion requests Number of requeststo convert Postscript
documents.
OpenText RightFax20.2 11 Managed ServicesAdministrator Guide

Chapter 2: Managing faxservers with RightFax Web Admin
General purpose conversion
requests
Number of requeststo convert documentsfrom
anyformat, including compound requestsfor
multiple typesof conversion.
Coversheet creation requests Number of requeststo create cover sheets.
DocTransport
Statistic Description
Failsafe queue depth Number of itemsin the failsafe queue.
Globalqueue depth Number of itemsin the global queue.
RightFax queue depth Number of itemsin the RightFax queue.
VM ntofiyqueue depth Number of items in the VMnotify queue.
Remote send statusqueue depth Number of items in the remote send status
queue.
All-Time Send Attempts The totalnumber of faxes sent from thisserver
since the
All-Time Counter Starting Date
.
All-Time PagesSent The totalnumber of faxpagessent from this
server since the
All-Time Counter Starting
Date
.
All-Time FaxesReceived The totalnumber of faxes received on this
server since the
All-Time Counter Starting
Date
.
All-Time PagesReceived The total number of fax pagesreceived on this
server since the
All-Time Counter Starting
Date
.
All-Time Counter Starting Date The starting date from which the “All-Time”
statisticsare calculated.
Fax Status
For each of the following fax statuses, the total number of faxes in each
status:
l Initial Processing
l Waiting for Phone Expansion
l Waiting for Conversion
l In Conversion
l In Cover Conversion
l Waiting to be Sent
l Scheduled to be Sent
l Sending
Monitoring client connections
You can display a list of the current connections from the client
applications to the RightFax server for all sessions where a user signed
in but not out.
As an administrator you can remove client connections that appear to
have ended. Removing a client connection from the list does not impact
the user’s connection even if it is still valid.
To open the list of client connections
l Click Client Connections. For each connection, the user ID, the
date and time that user ID connected, and the application used to
sign in appear in the right pane.
To refresh the view
l
Click .
To remove client connections that appear to be invalid
l Select the check box next to one or more connections, and then
click Delete. To delete all of the connections, click Delete All.
OpenText RightFax20.2 12 Managed ServicesAdministrator Guide

Chapter 2: Managing faxservers with RightFax Web Admin
For each client connection that is deleted, the entry in the database
will be marked as AdminLogOut.
Configuring the session timeout for FaxUtil
Web
For security reasons, the system will sign out FaxUtil Web users after
15 minutes of inactivity. Administrators can change this setting.
To configure the session timeout
1. In the left pane, click System, and then in the right pane click
General.
2. Click Settings, and the Settings dialog box opens. Enter the
number of minutes of inactivity, and then click OK.
OpenText RightFax20.2 13 Managed ServicesAdministrator Guide

Chapter 3: Viewing RightFaxAnalytics
Chapter 3: Viewing RightFax Analytics
The optional RightFax Analytics module provides an overview of the
usage of the RightFax server. It is helpful for assessing if fax channels
are used at their capacity, for example. To troubleshoot the RightFax
server, refer to the RightFax Administrator Guide.
Before you begin
l RightFax Analytics must be licensed and activated on the server,
and the database must be installed and connected. See the
RightFax Administrator Guide.
l Your user account permissions determine if you can view RightFax
Analytics. See Editing a user profile on page19.
To sign in
1. Open http://<servername>/RightFax/analytics, where
servername is either the name of the RightFax server or its IP
address.
2. In the User ID box, enter an administrator password. If required,
enter the Password, and then click Sign In.
To return to the main Analytics page after viewing detailed
data
l In the left pane, click Analytics
To sign out
l On the <username> menu, click Sign Out.
l The system will sign you out after 15 minutes of inactivity.
About the charts
The Analytics page provides an overview of server usage in charts.
Faxes
l The number of faxes that were successfully sent compared to the
number of faxes that were successfully received during the
specified time period.
l The total number of faxes that were sent and received appears in the
center of the chart.
Pages
l The number of pages that were successfully sent compared to the
number of pages that were successfully received during the
specified time period.
l The total number of pages that were sent and received is shown in
the center of the chart. This includes all pages, whether or not a fax
was successfully sent.
OpenText RightFax 14 Managed ServicesAdministrator Guide

Chapter 3: Viewing RightFaxAnalytics
Send Success Rate
l The number of faxes that were successfully sent compared to the
number of faxes that were not successfully sent during the specified
time period.
l The percentage of faxes that were successfully sent compared to
faxes that were not successfully sent appears in the center of the
chart.
Channel Usage
l The number of channels that were in use during peak usage of the
specified time period. This includes all inbound and outbound calls
regardless of the fax statuses during the specified time period.
l The number of channels at peak usage as a percentage of total
channels appears the center of the chart.
l Click Calculate to view the chart.
Viewing and downloading Analytics data
To view the data behind a chart or graph
1. Click a chart to see the data in a graph on a timeline.
2. Click data in a graph to see the detailed data. Continue clicking
for more details on successive pages.
The list of records appears last and can be downloaded as a .csv
file.
To print or download a chart
1. Find the chart you want to download.
2.
Click to open the Export or Print menu, and do one of the
following:
l To print the chart using the print function of the browser, click
Print chart.
l To save the chart as a .png, .jpeg, .svg, or .pdf file, click the
respective Download... option and specify the download
location.
3. To return to the Analytics page, click Analytics.
To download a .csv file of the records
1. Click the chart and the data behind the chart until the list of
records appears.
2. Click Download.
3. In the Download dialog box, click Download again.
4. Use the save function in the browser to save the file.
Customizing the charts
To specify a RightFax user group to analyze
1. On the Analytics page, click Configure.
2. Under Group, enter or search for the group ID. The charts will
update with the data for the group.
To set channel usage thresholds
1. On the Analytics page, click Configure.
2. Under Channel Usage Thresholds, enter the number for the
percentage at which the channel usage levels should change
from green to yellow and from yellow to red.
3. Click Ok.
OpenText RightFax20.2 15 Managed ServicesAdministrator Guide

Chapter 3: Viewing RightFaxAnalytics
To change the time period for the data in the charts
1. On the Analytics page, click Configure.
2. Under Configure Timeframes, do one of the following:
l To display data for the past 30 days including today, click
Month.
l To display data for the past 365 days including today, click
Year.
3. Click Ok.
OpenText RightFax20.2 16 Managed ServicesAdministrator Guide
Chapter 4: Creating RightFaxuser accounts
Chapter 4: Creating RightFax user accounts
Every RightFax user in your organization must be assigned a unique
user ID and profile on the RightFax server. The RightFax server uses
the user ID to assign ownership to sent faxes and route received faxes
to their intended recipients. The user account settings determine each
user's access to and usage of the system.
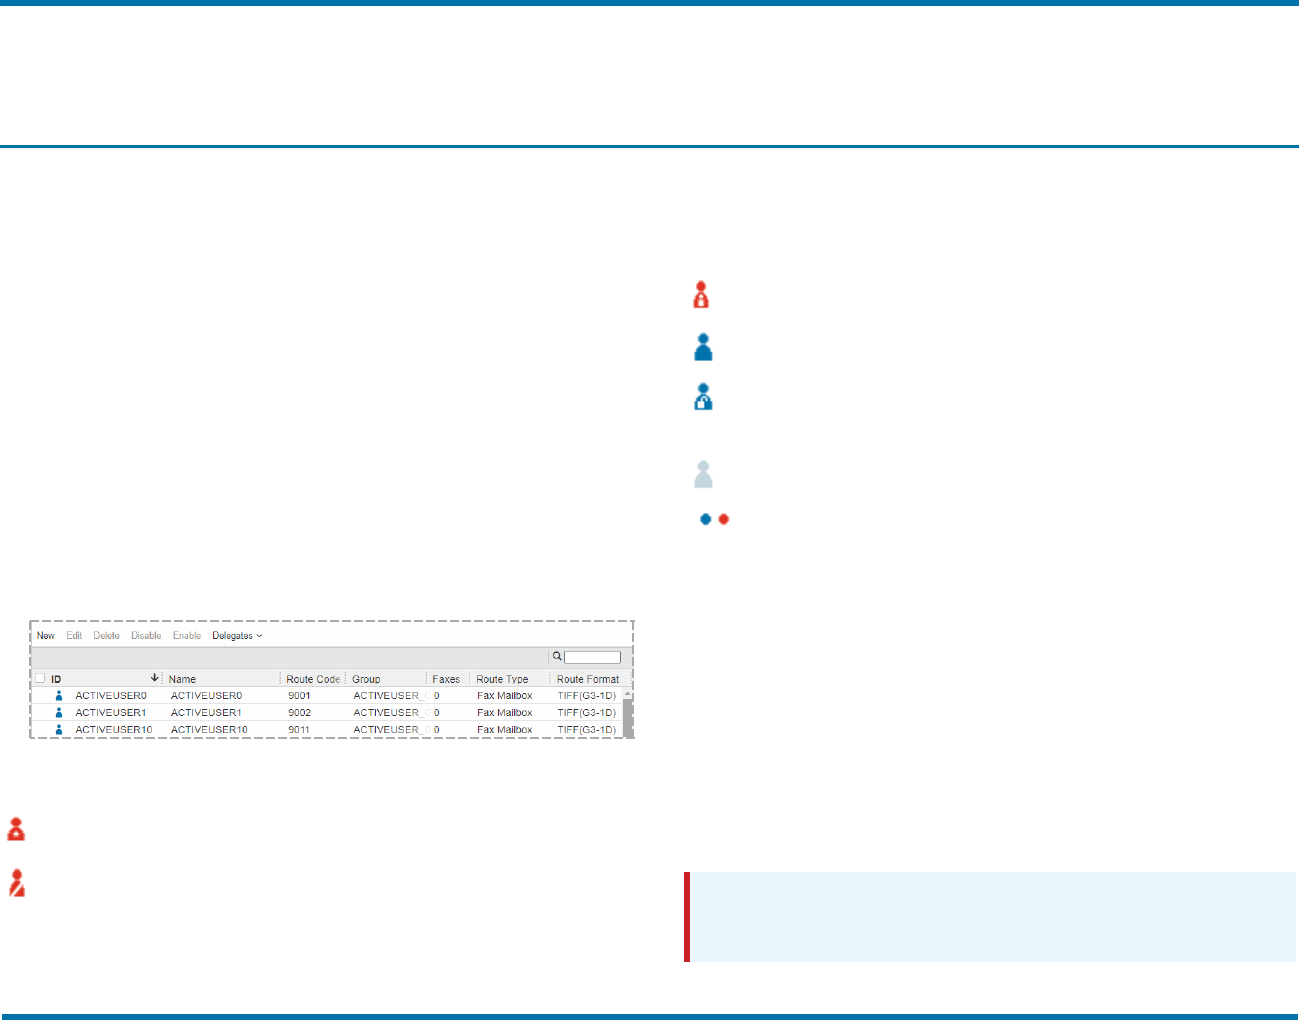
To open the list of users
l In Web Admin, in the left pane, click Users. The list of users
appears in the right pane. The list always includes the DEFAULT
user. For more information about this user, see About the DEFAULT
user below.
To select users in the list, select the check box next to their User
ID.
The icons next to the user ID identify the type of user:
Administrator. Can perform all administrative functions in
RightFax.
Read-Only Administrator. Can view the settings for
administrative items, such as user accounts, billing codes,
and cover sheets.
User Management Administrator. Can create, edit, delete,
enable, and disable user accounts.
User. Can send and receive faxes.
Unprotected User. Can send and receive faxes. Other
users can view, manipulate, and delete faxes from this
mailbox.
Disabled User. Cannot send faxes or sign in to the mailbox.
The mailbox continues to receive faxes
... /
Synchronized Account. Combined with the icon for a user
or administrator, shows that the account was created from
and is maintained by an external data source using the
RightFax Sync module.
Any changes to users synchronized with another application, must be
made in the other application, not in RightFax.
About the DEFAULT user
RightFax bases the creation of new users— including those created
through importing, synchronization, or automatic enrollment — on the
user profile of the DEFAULTuser. It is good practice to customize the
DEFAULT user profile with the attributes of the majority of your fax
users.
Caution Do not delete or rename the DEFAULTuser ID. It is
required for many functions and deleting or renaming it could lead to
parts of RightFax not functioning as intended.
OpenText RightFax 17 Managed ServicesAdministrator Guide
Chapter 4: Creating RightFaxuser accounts
Note If used, the profile settings for Active Directory synchronization
override any user profile settings of the DEFAULT user. For more
information, see the RightFax Administrator Guide.
Creating, deleting, copying, and editing users
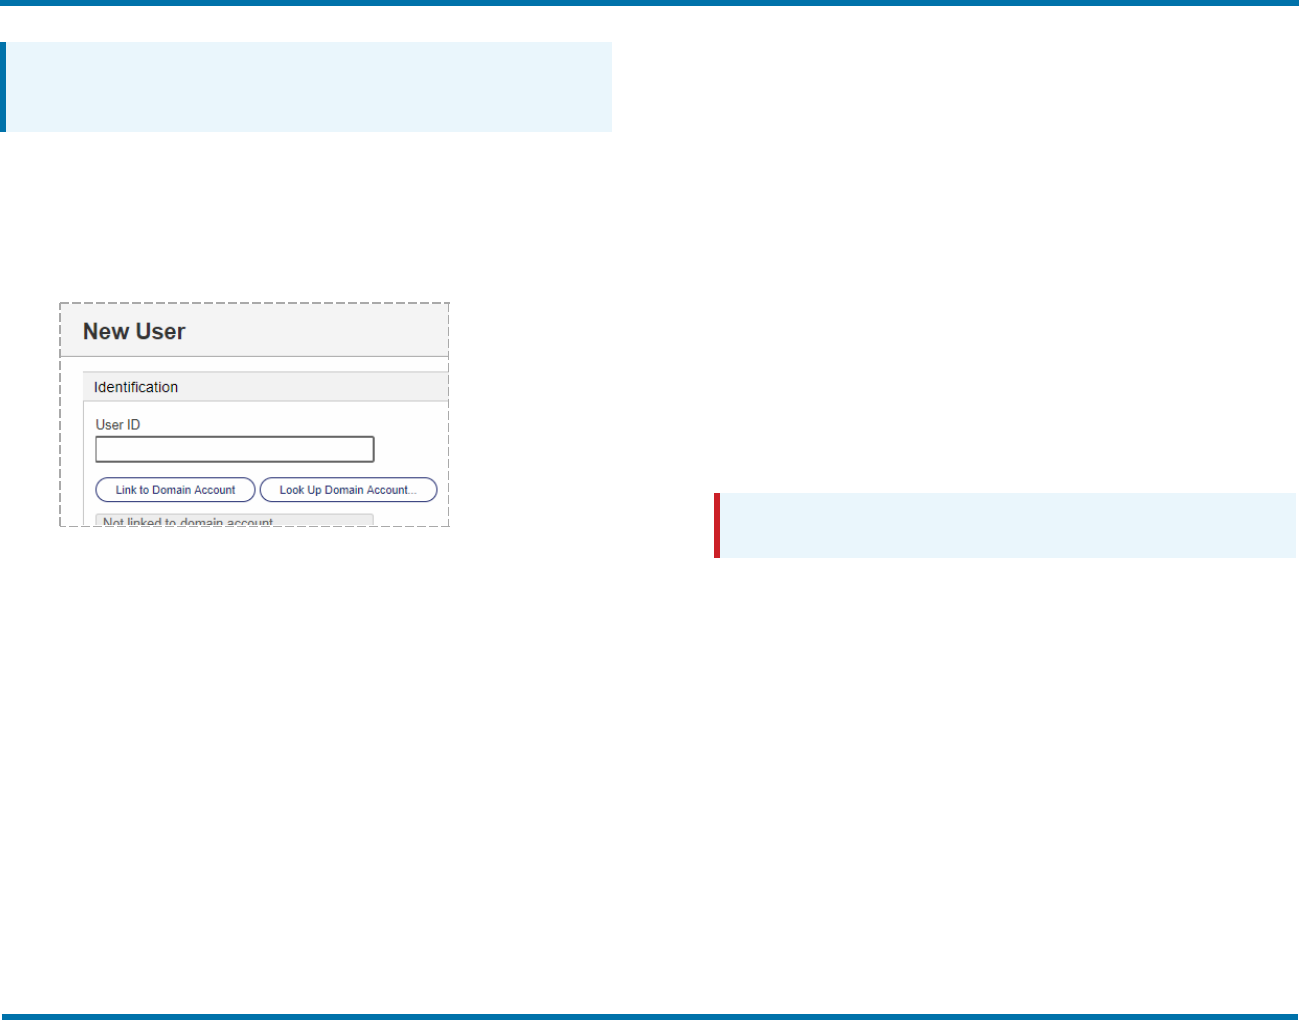
To create a new user
1. Open the list of users.
2. Click New. The New User page opens.
3. In the User ID box enter a unique user IDfor the new user. All
other boxes are optional. For information about completing these
options, see Editing a user profile on the next page.
The new user has the same attributes as the DEFAULTuser ID,
except for User ID, User Name, Password, and
Distinguished Name.
To edit the properties of an existing user
1. Select the user in the list.
2. Click Edit. The Edit User page opens. For more information,
see Editing a user profile on the next page.
To delete a user account
1. Select the user or users in the list.
2. Click Delete, and confirm the deletion if there are faxes or
phonebooks associated with a user.
Disabling a user account
At times you may need to disable a user's account. Disabling a user
account means that:
l The user's outbound faxes will be blocked from sending.
l The user will not be able to send faxes from their fax mailbox
(FaxUtil or FaxUtil Web), through the RightFax Fax control module
(QuickFax, Send To, or from a native application), or from the
RightFax Outlook Add-In.
l A user with administrative permissions will not be able to sign in to
the administrator client (EFM or Web Admin).
l The user account will be excluded from Smart Fax distributions
within groups they are part of.
Caution Smart Fax distribution may not work as intended after
disabling users within a group. Verify that active users remain.
While disabling an account keeps the user from sending faxes and
signing into their fax mailbox, the following does not change:
l The user's received faxes will continue to be placed into their
mailbox, including faxes routed or forwarded to them using their
RightFax user account.
l The user will continue to receive any faxes routed to their email
address, fax notifications of certified delivery, and any other email
notifications.
l Other users with delegate access to the user's account can still act
on the disabled user account's behalf.
RightFax requires at least one enabled administrator account.
Therefore, you cannot disable the last administrator account.
OpenText RightFax20.2 18 Managed ServicesAdministrator Guide

Chapter 4: Creating RightFaxuser accounts
To disable a user account
l Select the user or users in the list, and then click Disable. The icon
changes to the disabled icon.
To enable a disabled user account
l Select the user or users in the list, and then click Enable. The icon
changes to the appropriate user or administrator icon.
Editing a user profile
In the Edit User window, as needed, click the heading of the section
you want to edit.
Identification
User ID
Enter a unique identifier to be used throughout the RightFax system to
identify the user. In most cases, this ID should be the same as the
user’s network login name. The ID can be up to 21 characters long.
Link to Domain Account
l Click to link this RightFax user to a Windows user account and use
Windows authentication to access the user account. A RightFax
password will not be used.
Username
Enter a descriptive name to identify the user.
Entering user names with diacritical or other characters requires the
appropriate character sets and code pages be installed on the RightFax
server. See the RightFax Installation Guide.
Password
If not using Windows Authentication, create a RightFax user password.
To change a user’s password, type the new password.
When it is first installed, the default password for the Administrator
account is password.
If your organization requires strong passwords, enter a password that:
l Consists of 8 - 11 characters.
l Includes both upper- and lowercase characters.
l Includes at least one number or one of the following special
character: ` - = [] \ ; ’ , / ~ ! @ # $% ^ & * _ + {} | : ” < > ?
If you leave this box blank, the user will not be required to enter a
password when accessing RightFax client applications.
Confirm password
If used, retype the RightFax password.
OpenText RightFax20.2 19 Managed ServicesAdministrator Guide
Chapter 4: Creating RightFaxuser accounts
Distinguished name
Enter the Microsoft Exchange distinguished name used to confirm
accurate RightFax and Exchange user synchronization.
Group ID
Select the name of a group. Every user must assigned to a RightFax
group. For information on creating groups, see Creating, deleting,
copying, and editing groups of users on page36.
Voice mail subscriber ID
Enter the mailbox number to use when routing faxes to a telephony
server. This box is also used to assign TeleConnect mailbox numbers
to RightFax accounts (requires the TeleConnect module, purchased
separately).
Email address
Enter the user's email address.
l The user will be able to send documents to email as well as fax
addresses.
l If configured, notifications about the user's sent and received faxes
will be sent to this address.
l When using email gateways, RightFax can determine the correct
RightFax user as the sender .
SMS/Mobile Address
Enter the user’s SMS phone number. If configured, SMS notifications
about sent and received faxes can be sent to this number.
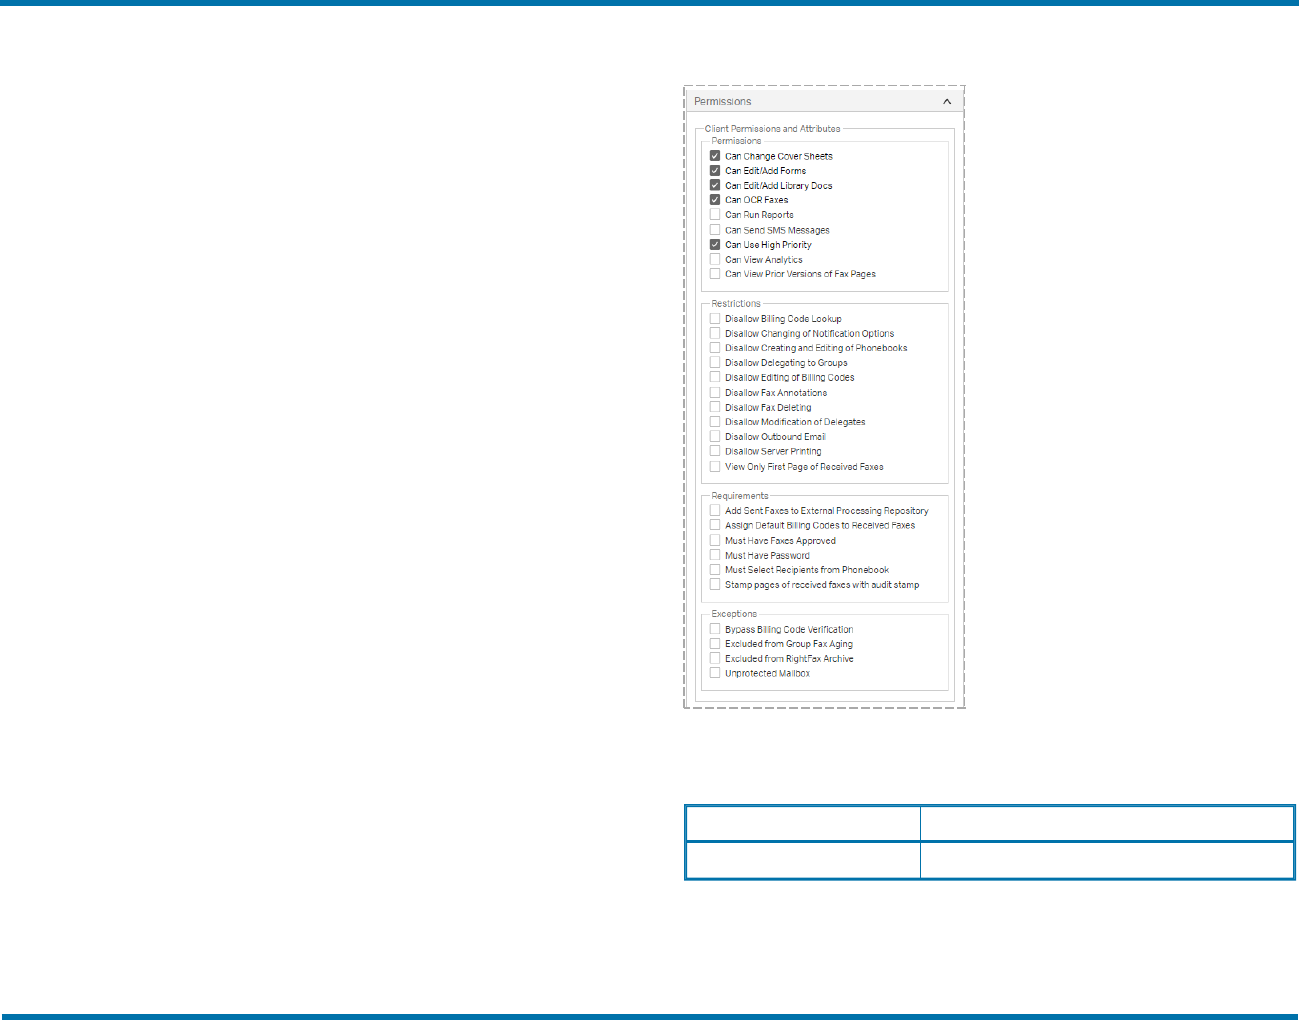
Permissions
l Under User Permission Attributes, select or clear the permission
check boxes.
Setting Description
Permissions
OpenText RightFax20.2 20 Managed ServicesAdministrator Guide

Chapter 4: Creating RightFaxuser accounts
Setting Description
Can Change Cover Sheets If selected, the user can change cover sheetsand is
not restricted to use the cover sheet specified under
Default Outbound Settings (Default Outbound
Settings on page23).
Can Edit/Add Forms If selected, the user can add new overlay forms to
the RightFax system using the client applications.
Can Edit/Add LibraryDocs If selected, the user can add new librarydocuments
to the RightFaxsystem using the client applications.
Can OCR Faxes If selected, the user can OCR faxes, either manually
or automatically, asdefined in FaxUtil. Thisattribute
is not required for OCR routing. All OCR
functionsRightFax OCRConverter module.
Can Run Reports If selected, the user can run RightFaxreports.
Can Send SMS Messages If selected, the user can send documentsto SMS
addressesfrom within the RightFax client
applications.
Can Use High Priority If selected, the user can send faxes using “high”
priority. If not selected, the user can use only
“normal” and “low” priorities.
Can View Prior Versionsof Fax
Pages
If selected, the user can view previously saved
versionsof fax pages.
Can View Analytics If selected, the user can view RightFax Analytics.
Restrictions
Setting Description
Disallow Billing Code Lookup If selected, the user cannot view the list of valid billing
codes. Thisrequiresthe user to know at least one
valid billing code.
Note You must select both Disallow Billing
Code Lookup and Disallow Editing of Billing
Codes to ensure that users cannot modify their
default billing code settings.
Disallow Changing of
Notification Options
If selected, the user cannot change hisor her
notification options.
Disallow Creating and Editing of
Phonebooks
If selected, the user cannot create or edit phonebook
entriesand phonebookgroups, or configure MAPI,
LDAP, and ODBC phonebooks.
Disallow Delegating to Groups If selected, the user cannot add groupsof users as
delegates. Thispermission appliesonly if the
Disallow Modification of Delegatespermission isnot
selected.
Disallow Editing of Billing Codes If selected, the user cannot change the default billing
code settingsfor outgoing faxes. In addition, any
billing codesspecified in phonebookentriesare
ignored as are any<BILLINFO> embedded codes.
Disallow FaxAnnotations If selected, the user cannot add notesto faxes and
cannot create stamps.
Disallow FaxDeleting If selected, the user cannot delete faxes. Thissetting
can be usefulfor persons doing manualfaxrouting.
Disallow Modification of
Delegates
If selected, the user cannot modifytheir delegates.
The current delegate settings are honored.
Disallow Outbound Email If selected, when the user sends a fax addressed to
an email address, the faxserver failsthe fax.
OpenText RightFax20.2 21 Managed ServicesAdministrator Guide
Chapter 4: Creating RightFaxuser accounts
Setting Description
Disallow Server Printing If selected, the user cannot print to networkprinters
configured on the faxserver for automated network
print functions.
View OnlyFirst Page of
Received Faxes
If selected, the user can view or print onlythe first
page of a received fax. Thisisuseful when manual
routing isemployed. The restriction appliesto the
mailboxregardless of the permissions of the user
viewing the mailbox. Faxesmust be routed out of the
restricted mailboxbefore subsequent pagescan be
viewed or printed.
Requirements
Must Have FaxesApproved If selected, every faxsent bythe user must be
approved bya fulladministrator, or a group or
alternate group monitor.
Must Have Password If selected, the user must have a password. This
doesnot restrict the abilityto change the password.
Must Select Recipientsfrom
Phonebook
If selected, the user can onlyenter recipientsby
selecting them from a phone bookwhen sending a
faxfrom a Windows-based client.
Use thispermission in conjunction with Disallow
Creating and Editing of Phonebooks to ensure
that the user cannot add entriesto the phonebook.
Add Sent Faxes to External
Processing Repository
If selected, the user'soutbound faxesare archived
bya WorkServer. To configure WorkServer
archiving, see the RightFax Administrator Guide.
Note Thischeckbox applies only to WorkServer
archiving of outbound faxes. WorkServer
archiving isdisabled when the optionalXML
Generator or Vault module is configured.
Setting Description
Assign Default Billing Codes to
Received Faxes
If selected, the user'sdefault billing code settings
(see Other on page32) are applied to allreceived
faxes. This is most usefulif RightFax is set up to
require billing codeson received
faxes.See.Customizing the use of billing codeson
page55.
Stamp Pagesof Received
Faxeswith Audit Stamp
If selected, printing of the RTI line isenabled and one
line of text will be added to the bottom of each
received faxpage listing totalpages, date and time
received, faxserver used, routing code used, CSID
(caller subscriber identification) of sender, and
transmission duration.
Exceptions
Bypass Billing Code Verification If selected, the user can send faxes without
supplying correct billing codes. Thisdoesnot exclude
the user from having to supply other required fields
to send faxes. Thisattribute isonly effective if billing
code verification isrequired system-wide.
Excluded from Group Fax Aging If selected, the user'sfaxesare not subject to the
automatic faxaging (image deletion) attributesof the
group to which the user belongs.
Excluded from RightFaxArchive If the server islicensed for RightFax Archive, then all
of the faxes for all RightFaxusers are subject to
archiving. If selected, the user'sfaxeswill not be
archived with RightFax Archive.
Unprotected Mailbox If selected, allother RightFaxusers can view,
manipulate and delete documents in thisuser’s
mailbox. Thisdoesnot affect the securityof
phonebook entries belonging to the user.
OpenText RightFax20.2 22 Managed ServicesAdministrator Guide
Chapter 4: Creating RightFaxuser accounts
Granting administrative access
You can grant a user limited or full administrative access:
l A Read-Only Administrator can view the settings for
administrative items in EFM and Web Admin, but cannot create,
edit, or delete any items or settings.
l A User Management Administrator can create, edit, delete,
disable and enable user accounts, and—like the read-only
administrator—can view the settings for other administrative items
in EFM and Web Admin, but cannot create, edit, or delete any of
these items or settings. The ability to create and edit users does not
include the ability to copy users between servers.
l An Administrator can perform all administrative functions in
RightFax, including creating, editing, and deleting administrative
items in EFM and Web Admin and performing administrative tasks
on the mailboxes of other users.
Important The administrative access permissions do not control the
ability to access the RightFax Services in EFM. This is controlled by
the user's Windows permissions. However, you can grant an
administrative user access to RightFax Services in EFM and Web
Admin.
In addition to the above administrative roles, you could define a
Services Administrator where the user would have sufficient Windows
permissions to access the RightFax Services and be granted Read-
Only Administrator access to be able to run Enterprise Fax Manager.
To grant a user limited administrative access
1. In the Client Permissions and Attributes list, select the check
boxes for the appropriate user permissions.
2. Select the Administrative Access check box.
3. Click one of the limited administrator roles:
l For read-only access to EFM and Web Admin, click Read-
Only Administrator.
l For user management access to EFM and Web Admin, click
User Management Administrator.
To grant a user full administrative access
1. In the User Permissions and Attributes list, select the check
boxes for the appropriate user permissions.
2. Select the Administrative Access check box.
3. Click Administrator.
4. Select the Can Bypass Privacy Restrictions check box if the
administrator should have access to faxes in other users'
mailboxes and be able to manage user delegates in EFM and
Web Admin.
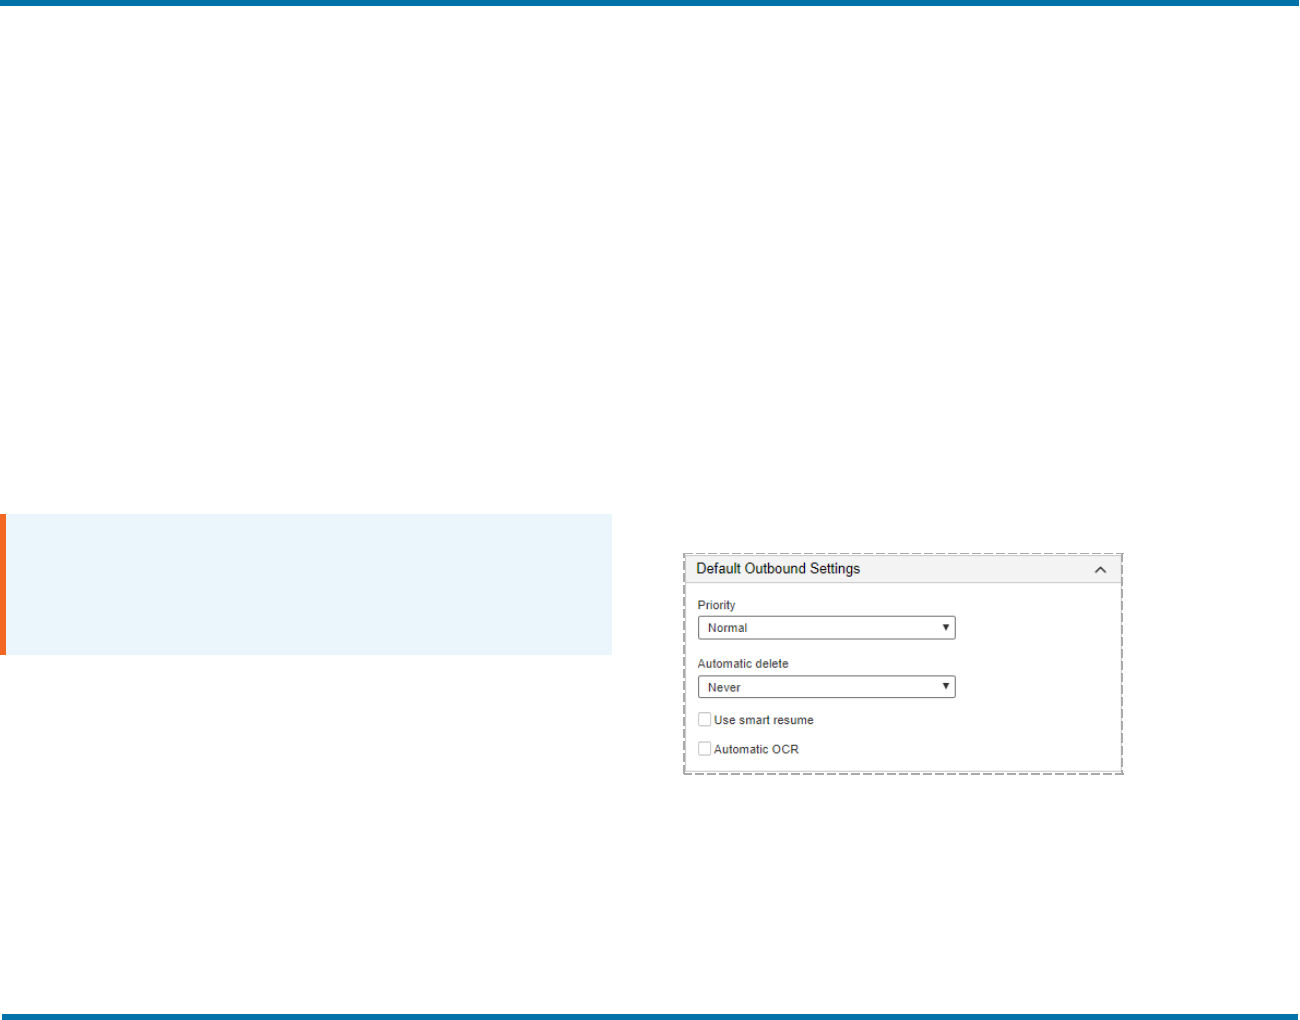
Default Outbound Settings
Priority
Select the default priority (Normal, Low, or High) for the user’s faxes.
Users can set a different priority when creating a fax.
OpenText RightFax20.2 23 Managed ServicesAdministrator Guide
Chapter 4: Creating RightFaxuser accounts
Automatic delete
Caution Auto-deleting sent faxes prevents users from reviewing or
forwarding their sent faxes, and notifications of sent faxes will not be
sent.
Specify whether to automatically delete faxes:
l Never. Sent faxes are never automatically deleted. The user can
review and forward sent faxes and notifications of sent faxes are
sent. Select this option for most users.
l Only If Successfully Sent. Select this option if the account will be
used to send large broadcast faxes.
l All Faxes (successful & unsuccessful). Select this option to
prevent large numbers of faxes from accumulating in the user’s fax
inbox and to save disk space. Fax image files, not original
documents created in other applications, are deleted.
With this option enabled, sent faxes will not be automatically
deleted if either of the following options is configured:
l If the permission Add Sent Faxes to External Processing
Repository is enabled for the user.
l If autoprinting of sent faxes is enabled for the user in FaxUtil.
Use smart resume
Select this check box to have the fax server resend only the portion of a
fax that failed to send. Users can also set this option when they send a
fax.
Automatic OCR
Select this check box to convert the text of the user's outbound faxes to
text files with optical character recognition (requires the OCR Converter
Module).
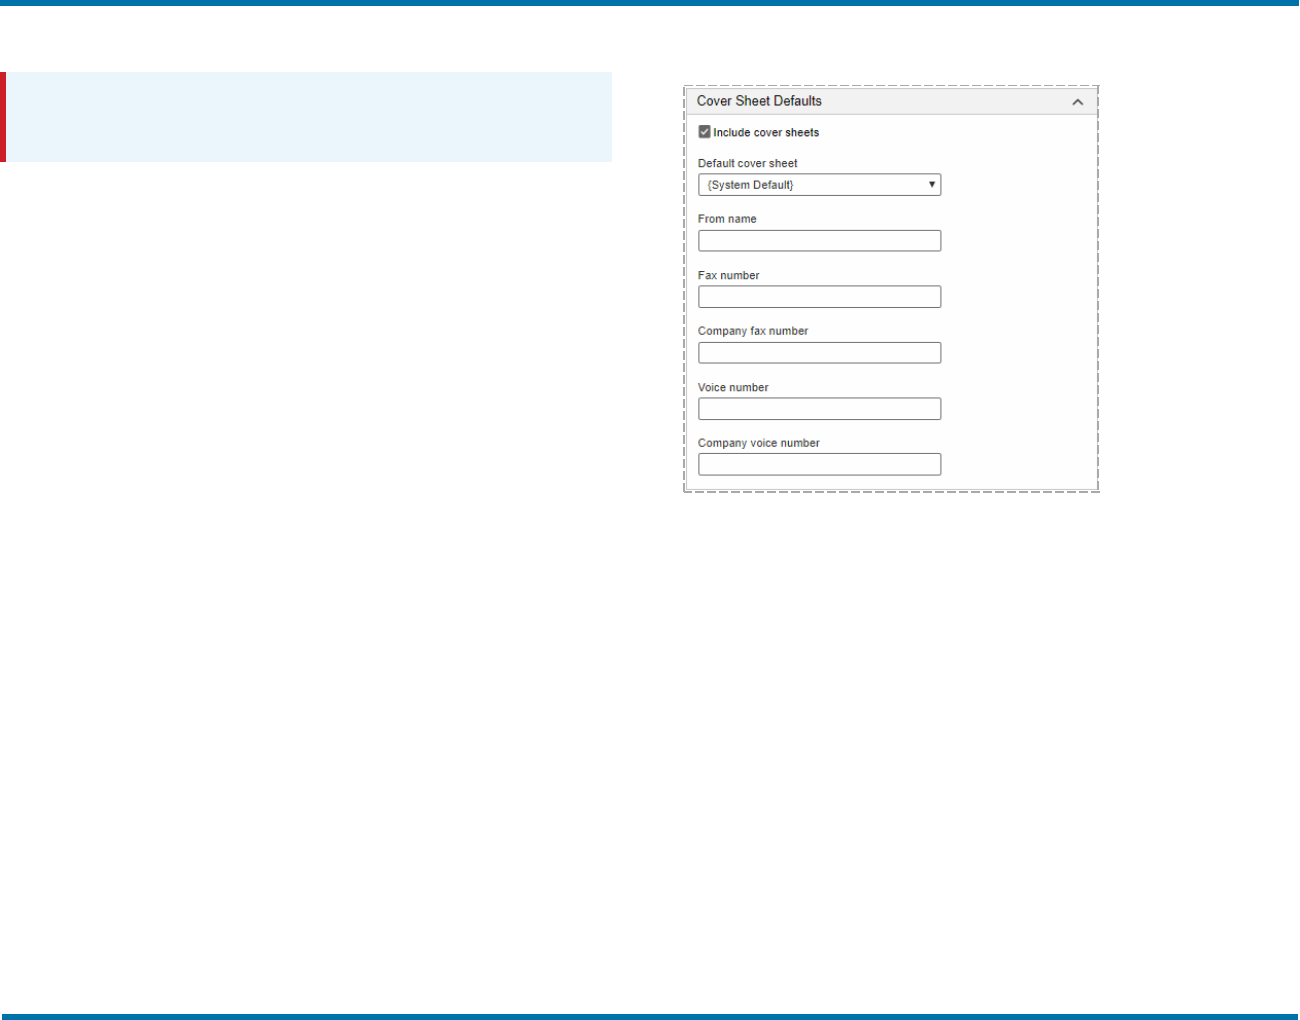
Cover Sheets Defaults
l For a user that should be able to send cover sheets with faxes,
select the Include cover sheets check box and specify the cover
sheet defaults.
Default cover sheet
Select the default fax cover sheet file to use for this user. The list
shows the fax cover sheet files added in EFM or Web Admin. Select
System Default to use the fax cover sheet specified for the user's
group or, if no group cover sheet is assigned, the cover sheet set as the
system default in Cover Sheets.
Default sender information
In the remaining boxes, enter the default sender information that will
appear on fax cover sheets for this user, including the name, fax
number, company fax and voice numbers. A fax number assigned from
the Fax Numbers list for routing may appear as the default fax number.
OpenText RightFax20.2 24 Managed ServicesAdministrator Guide
Chapter 4: Creating RightFaxuser accounts
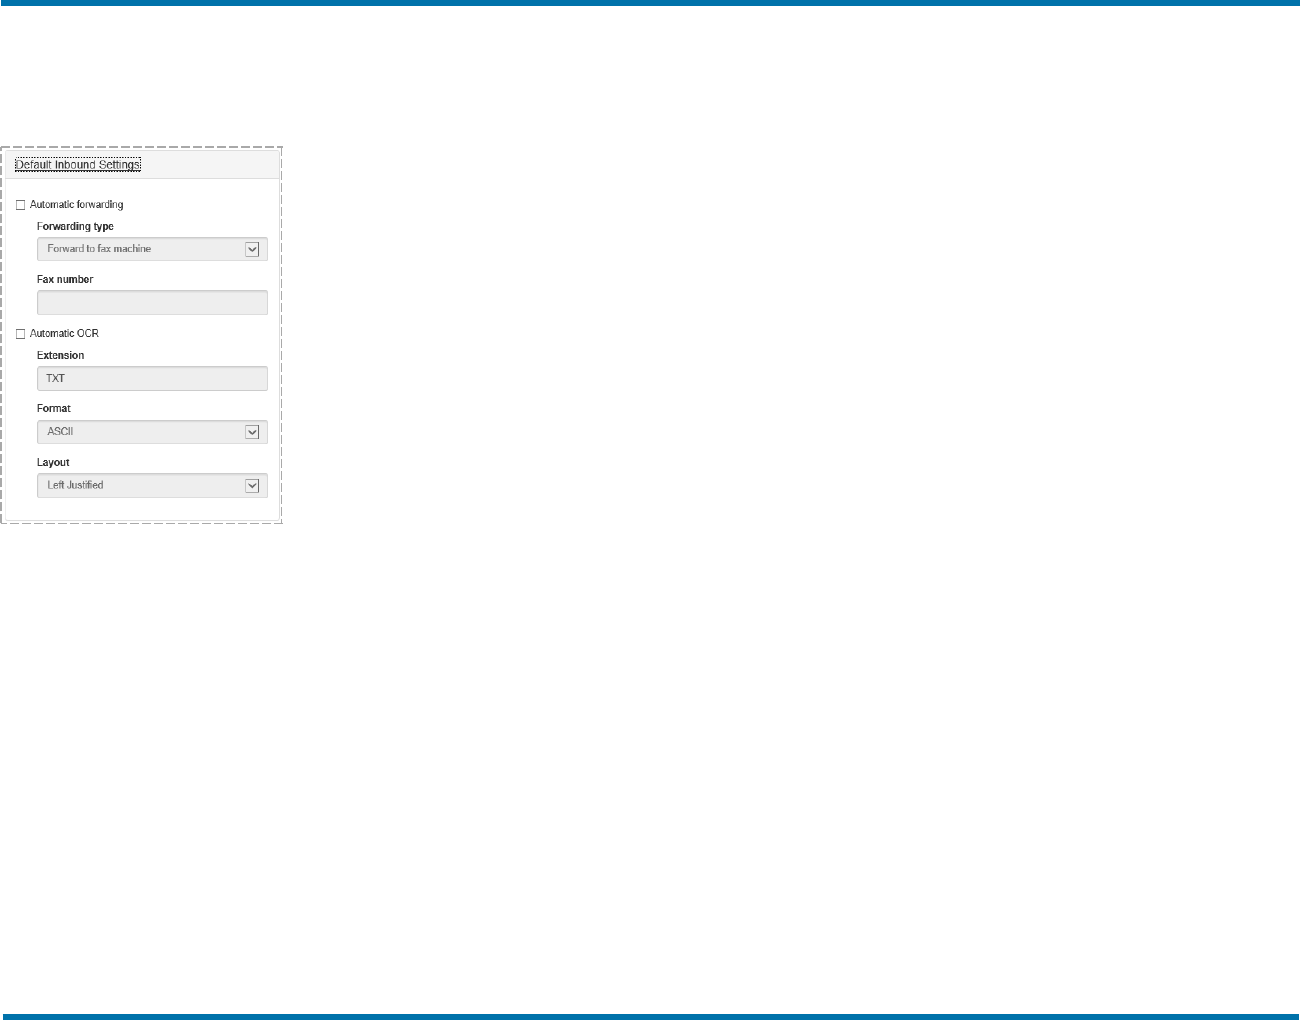
Default Inbound Settings
The Automatic OCR(optical character recognition) option requires the
RightFax OCR Converter module.
To forward the user’s faxes as soon as the faxes are received
1. Select the Automatic forwarding check box.
2. In the Forwarding type list, select whether to forward to a fax
machine or network users:
l To forward to a fax machine, select Forward to fax
machine and in the Fax number box, enter the fax number.
l To forward to one or more RightFax user IDs, select
Forward to RightFax user(s) and in the User IDs box, enter
the user IDs. Separate multiple user IDs by comma.
To convert all received faxes to text using OCR
1. Select the Automatic OCRcheck box.
2. In the Extension box, enter a three-letter file extension for the
output file.
3. In the Format list, click the text format used to interpret your fax
pages:
l ASCII produces a plain text file.
l RTF (rich text format) preserves fonts and formatting but is
only available for Windows clients.
4. In the Layout box, Left Justified means that left justified text
starts from the left margin of the fax.
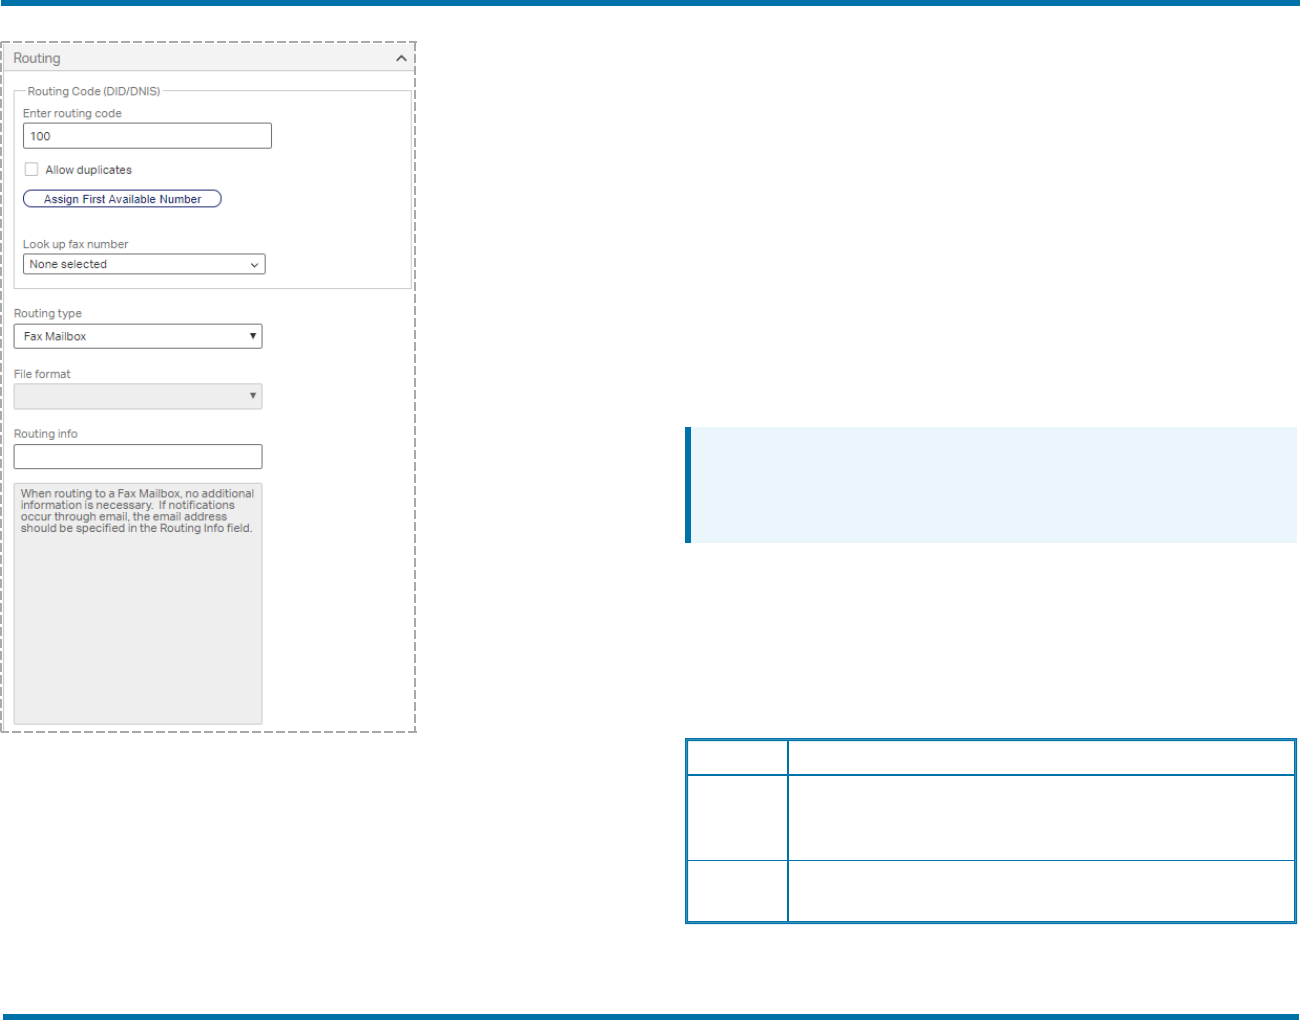
Routing
When a fax is received by the server, RightFax attempts to match any
included routing information to a RightFax user. If a match is found, the
fax is routed to the user’s mailbox. For more information, see the
RightFax Administrator Guide.
OpenText RightFax20.2 25 Managed ServicesAdministrator Guide
Chapter 4: Creating RightFaxuser accounts
Routing code (DID/DNIS)
Enter a unique number to which to route received faxes for this user.
Enter the DTMF extension, DID phone number, or channel number.
If your organization maintains fax numbers in RightFax, you may be
able to do one of the following:
l To assign the next fax number available, click Assign First
Available Number. A message informs you if all numbers have
been assigned. To view the list of fax numbers and their assignees,
click Look Up Fax Number.
l To select a fax number from the list of fax numbers available to the
user’s group, click Look up fax number, click a number not
associated with a user ID, and then click OK.
l To disassociate the current number from this user, delete the
number from the Routing Code box.
If you enter a number from the Fax Numbers list, the number will be
copied to the Fax number box—if currently blank—in the Cover
Sheets Defaults section upon saving, and the Fax Numbers list will be
updated to show this user’s ID.
Note Each routing code is best assigned to only one user or group. If
you assign a routing code to multiple users or groups, only the initial
assignee will receive the faxes for the code and will appear as the
assignee in the fax number list.
Routing type
Select where incoming faxes will be routed after they arrive in the user’s
fax mailbox.
File format
Select the file format in which faxes are delivered when routed. The
available formats vary depending on the routing type you choose.
Format Description
DCX DCX combinesmultiple PCX pagesinto a single file. It solvesthe multiple
attachment problem of PCX filesbut maintainsthe large file size
(average of 135 Kb per page).
GIF The graphicsinterchange format isavailable for routing in Microsoft
Exchange.
OpenText RightFax20.2 26 Managed ServicesAdministrator Guide
Chapter 4: Creating RightFaxuser accounts
PCX PCX produces a single page per file with an average fax page size of
135 Kb. It isusefulfor routing received faxesto DOS and Macintosh
users because DOS and Macintosh have built-in capabilities to view
PCX-formatted faxpages.
Thisformat is not recommended for Windows client applications,
because PCX isa large format and users have to sift through multiple
attachmentswhen viewing multiple page faxes.
PDF The portable document format.
PDF
(searchable)
The searchable portable document format includesa searchable text
component. It requiresadditionallicensing. When licensed, all received
PDFs are searchable regardlessof which PDF format isselected.
TIFF-G3/
TIFF-G4
TIFF-G3 is a structured file type that is best for monochromatic images
like faxpages(average of 35 Kb per page). Most email systemscan
read TIFF-G3 files, and you can associate the RightFaxFaxViewer
with TIFF-G3 filesto view these faxesin anyapplication.
TIFF-G4 is a more compressed file format.
TIFF
(Enhanced)
TIFF (Enhanced) can help improve the readability of text by
straightening skewed pagesand removing background noise. It does
not improve the appearance of graphics.
WebDelivery Instead of the fax, onlythe URL for Web Deliveryissent for inbound
faxes routed via SMTP or Microsoft Exchange.
Routing info
Specify how to route the fax to the correct destination for the specified
routing type. If you route faxes to an email mailbox, you must enter the
email address here. For information on the required routing info for each
routing type see the RightFax Administrator Guide.
Routing Filename Format
If faxes will be routed to a network directory, you have the option to
define the format of the file name. For information on the options for
naming files, see the RightFax Administrator Guide.
Received fax routing form
If you selected Exchange Mailbox as the routing type, select the
Outlook form to which you want to route incoming faxes. Select
System Default to use the form set in the Email Gateway configuration
program. For more information, see the RightFax Connector for
Microsoft Exchange Administrator Guide.
Include Web Delivery URL
Select this check box to include the URL for Web Delivery together with
the fax image for inbound routed faxes. If the user's routing format is set
to WebDelivery, only the URL is sent.
Delete after routing
Select this check box to delete a received fax from the user’s mailbox
after the fax has been successfully routed to the application specified in
the Routing Type list.
Automatic Printing
You can enable automatic printing if you have defined at least one
RightFax printer. See Creating, deleting, and copying a printer on
page52.
OpenText RightFax20.2 27 Managed ServicesAdministrator Guide
Chapter 4: Creating RightFaxuser accounts
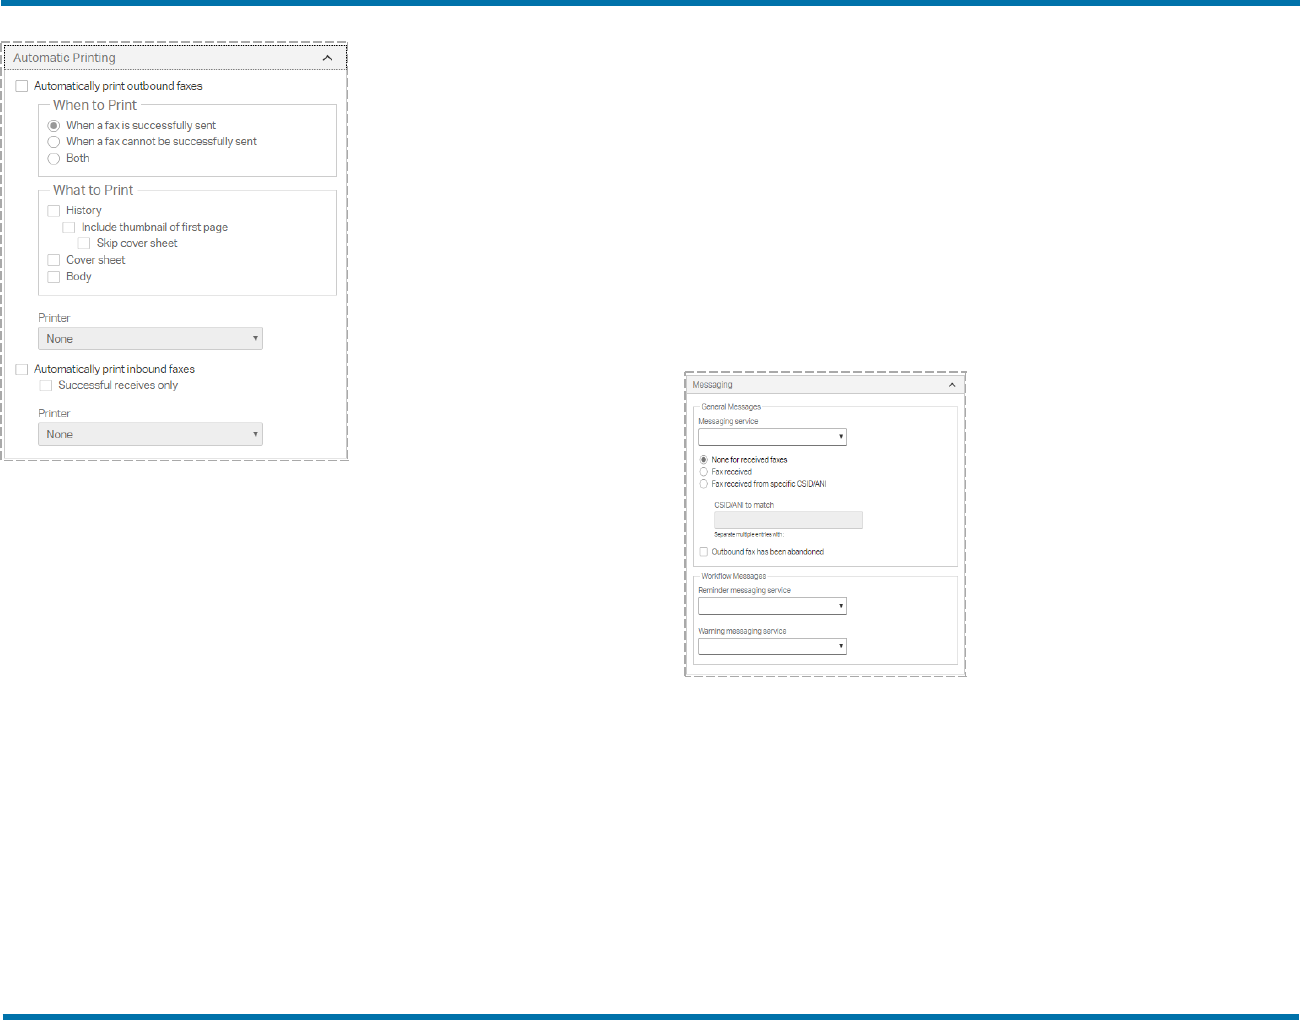
To automatically print the user’s outbound faxes
1. Select the Automatically print outbound faxes check box.
2. Under When to Print, select whether to print only successfully
sent faxes, only faxes that cannot be successfully delivered, or
both.
3. Under What to Print, select the check boxes next to the items
that should print: the fax History, Cover sheet, and Body.
When printing the fax history, you can include a small image of
the first fax page by selecting the Include thumbnail of first
page check box. Alternatively, to include a small image of the
second page of the fax, select the Skip cover sheet check box.
4. In the Printer box, select a printer.
To automatically print the user’s inbound faxes
1. Select the Automatically print inbound faxes check box.
2. To only print successfully received faxes, select the Successful
receives only check box.
3. In the Printer box, select a printer.
Messaging
These settings determine how and when messages are sent to
RightFax users to notify them about the status of sent and received
faxes. The messages can be sent by email or SMS. The text of these
status messages can be customized. For more information, see the
RightFax Administrator Guide.
Before completing this information, you must configure the messaging
service providers in RightFax. See the RightFax Administrator Guide.
General Messages
Messaging service
Select the email or SMS messaging service that will send the
notification.
To not send notifications of received faxes to this user, select None for
received faxes.
OpenText RightFax20.2 28 Managed ServicesAdministrator Guide
Chapter 4: Creating RightFaxuser accounts
Fax received
Select this check box to send a message to the user each time a new
fax is received. If the TeleConnect module is installed, the RightFax
server includes the TeleConnect ID with all notifications of incoming
faxes. Users can retrieve faxes without first requesting a fax list.
Fax received from specific CSID/ANI
Select this check box to send a message to the user each time a new
fax is received from the specific sender or senders that you enter in the
CSID/ANI to match box.
CSID/ANI to match
To send a message to the user each time a new fax is received from a
specific sender or senders, enter the CSID or ANI numbers for the
senders. Separate multiple entries with semicolons.
Outbound fax has been abandoned
Select this check box to send a message to the user each time one of
the user's outbound faxes fails to send.
Workflow Messages
Select the messaging services that will send reminders and warnings to
this user that a workflow for a fax is due to be completed. For more
information, see Setting up workflows on page128.
Reminder Messaging Service
Select the email or SMS messaging service that will send the reminder.
Warning Messaging Service
Select the email or SMS messaging service that will send the warning.
Administrative Alerts
You can define SMS or email alerts for RightFax administrators about
specific RightFax events. The text of these status messages can be
customized. See the RightFax Administrator Guide.
Before completing this information, you must configure the messaging
service providers in RightFax. See the RightFax Administrator Guide.
In addition to these alerts, you can use the RightFax Alerting and
Monitoring service to select from hundreds of server statistics to
monitor and define the event thresholds, alert types, and alert
messages to send. See the RightFax Administrator Guide.
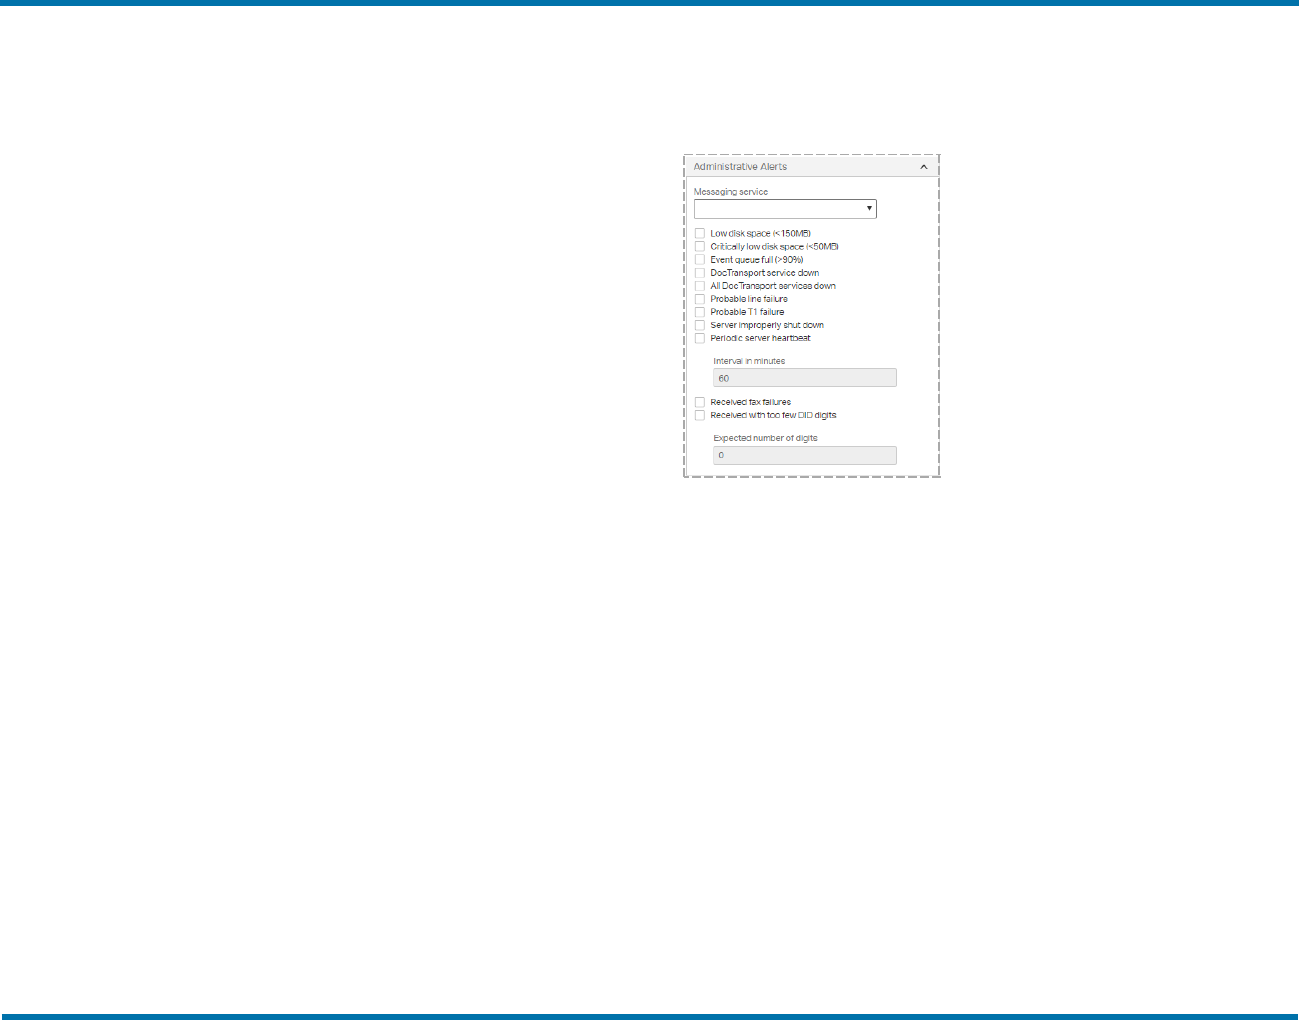
Messaging service
Select the email or SMS messaging service that will send the
notification.
Select the check boxes next to the events for which to generate alert
messages.
Low disk space (<150MB)
If selected, an alert is sent when free hard drive space on the RightFax
server falls below 150MB.
Critically low disk space (<50MB)
If selected, an alert is sent when free hard drive space on the RightFax
server falls below 50 MB.
Event queue full (>90%)
If selected, an alert is sent when the percentage of the fax server’s
internal Event Queue reaches 90%. For information about RightFax
queues, see .the RightFax Administrator Guide.
OpenText RightFax20.2 29 Managed ServicesAdministrator Guide

Chapter 4: Creating RightFaxuser accounts
DocTransport service down
If selected, an alert is sent when one of the DocTransports are unable to
send or receive faxes.
All DocTransport services down
If selected, an alert is sent when all DocTransports are unable to send
or receive faxes.
Probable line failure
If selected, an alert is sent when an error or a series of errors has
indicated to the DocTransport that a phone line is not operating
correctly.
Probable T1 failure
If selected, an alert is sent when multiple phone lines have failed in
such a way that the DocTransport suspects a T1 line is not operating
correctly.
Server improperly shut down
If selected, an alert is sent when the RightFax Server module shut
down unexpectedly. This may indicate that the operating system has
failed or the server has lost power.
Periodic server heartbeat
If selected, a brief notification of the RightFax server’s status is sent
periodically, including statistics on fax activity. When you select this
check box, in the Interval in minutes box, enter the number of minutes
for the interval at which to take the server's heartbeat.
Received fax failures
If selected, an alert is sent if a received fax has a transmission error or
is received with partial pages.
Received with too few DID digits
If selected, an alert is sent if a fax is received with fewer DID digits than
are needed to route it. Enter the required number of digits in the
Expected number of digits box.
About alert frequencies
After an alert is triggered, the problem causing the alert must be
remedied within a set length of time before a fault of the same type
causes another alert. For example, this prevents free disk space
fluctuating around 50Mb from causing repeated alerts. If an alert
condition persists, the alert is repeated periodically. Different types of
alerts have different delays and repeat intervals as listed in the following
table.
Alerts that are not listed here are sent only one time, when the alert
condition occurs.
Alert Delay Repeat interval
All DocTransportsdown. 10 min 60 min
Diskspace is critically low (<50MB). 10 min 30min
Diskspace is getting low (<150MB). 20 min 60 min
DocTransport service down. 10 min 60 min
RightFax internalqueue hasreached 90%
utilization.
30 min 90 min
Notification
The Notification settings determine whether to notify RightFax users
about the status of sent and received faxes. Notifications can be sent
by email or SMS. Before you begin, you must configure the messaging
service providers in RightFax. See the RightFax Administrator Guide.
To customize the text of the notification messages, see the RightFax
Administrator Guide.
OpenText RightFax20.2 30 Managed ServicesAdministrator Guide
Chapter 4: Creating RightFaxuser accounts
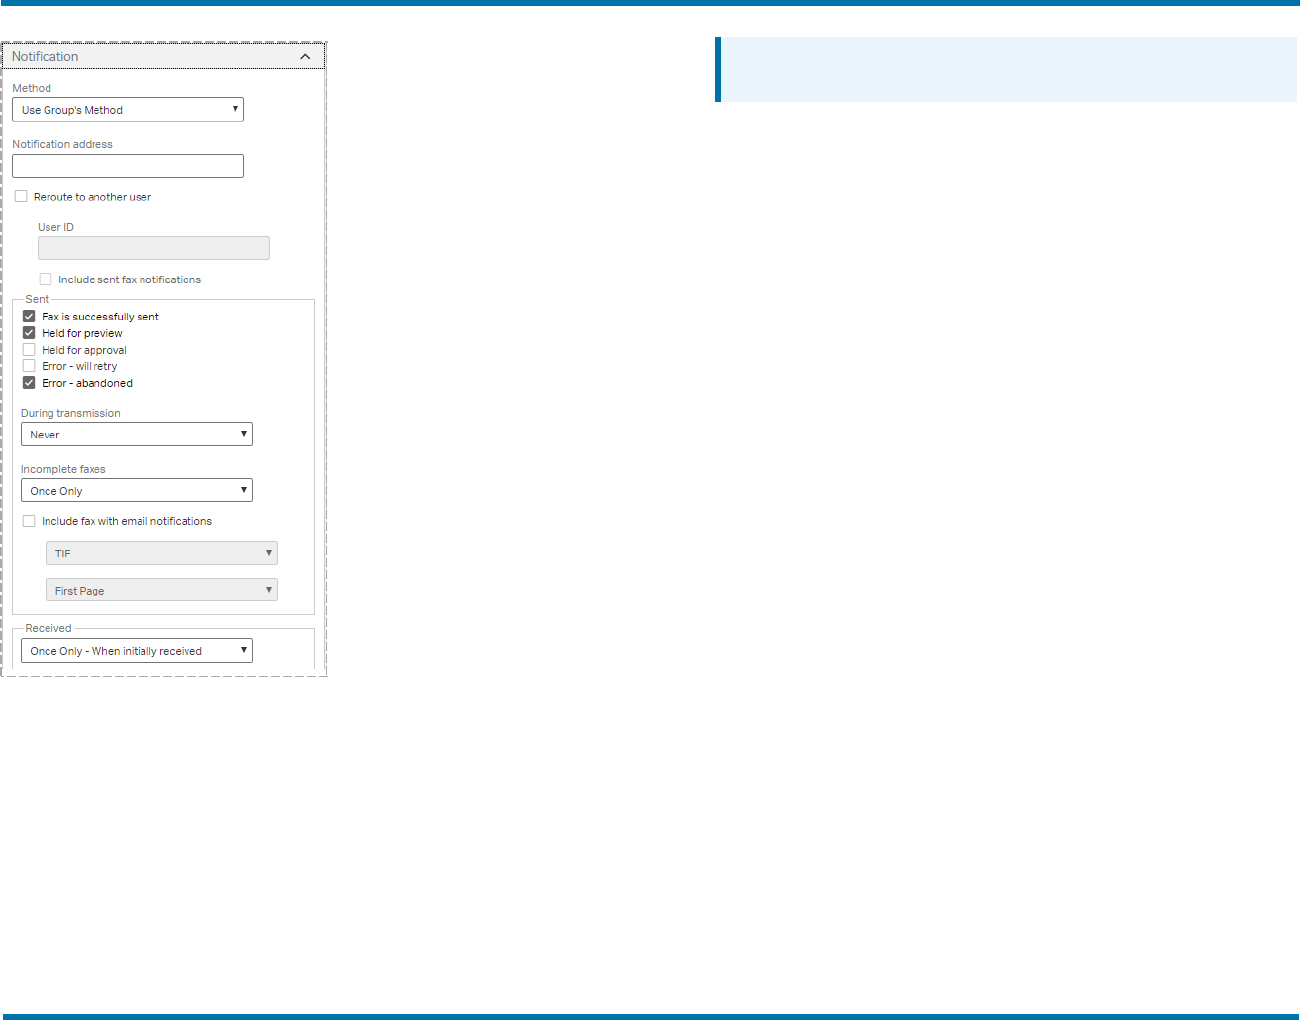
Method
Select a notification method for the user:
l Use Group’s Method. Use the notification method defined for the
group to which the user belongs.
l SMS. Send the notification to an SMS-capable device.
l Email Systems. Send the notification to the user’s email box.
Note Notifications for Notes and Exchange require you to
purchase and license a separate module.
l Custom notification methods. Custom notification methods are
created using the RightFax API. For more information, see the
RightFax APIReference Guide.
Notification address
Enter an address or other information that specifies where notifcations
will be sent for this user. For example, enter the user’s email address for
email notifications or phone number for SMS messages.
Reroute to another user
l To reroute received fax notifications to another user, select this
check box. In the User ID box, enter the RightFax user ID.
l To also reroute sent fax notifications to the same user, select the
Include sent fax notifications check box.
Sent
1. Select the check boxes next to the events about which to notify
this user.
2. In the During transmission list, select when this user should
be notified about sent faxes in transmission: Never, Once Only,
or Periodically.
3. In the Incomplete faxes list, select when this user should be
notified about incomplete faxes: Never, Once Only, or
Periodically.
4. To include the fax with email notifications, select the Include
fax with email notifications check box, and in the lists below,
select the format (TIF or PDF) and whether to include only the
First Page of the fax or All Pages.
OpenText RightFax20.2 31 Managed ServicesAdministrator Guide
Chapter 4: Creating RightFaxuser accounts
Received
1. Select when this user should be notified about received faxes:
Never, Once Only - When initially received, or Periodically -
While fax has not been viewed or printed.
2. To include the fax with email notifications, select the Include
fax with email notifications check box, and in the lists below,
select the format (TIF or PDF) and whether to include only the
First Page of the fax or All Pages.
Note If you select All Pages and the user account includes
the permission View First Page Only, only the first page will be
included.
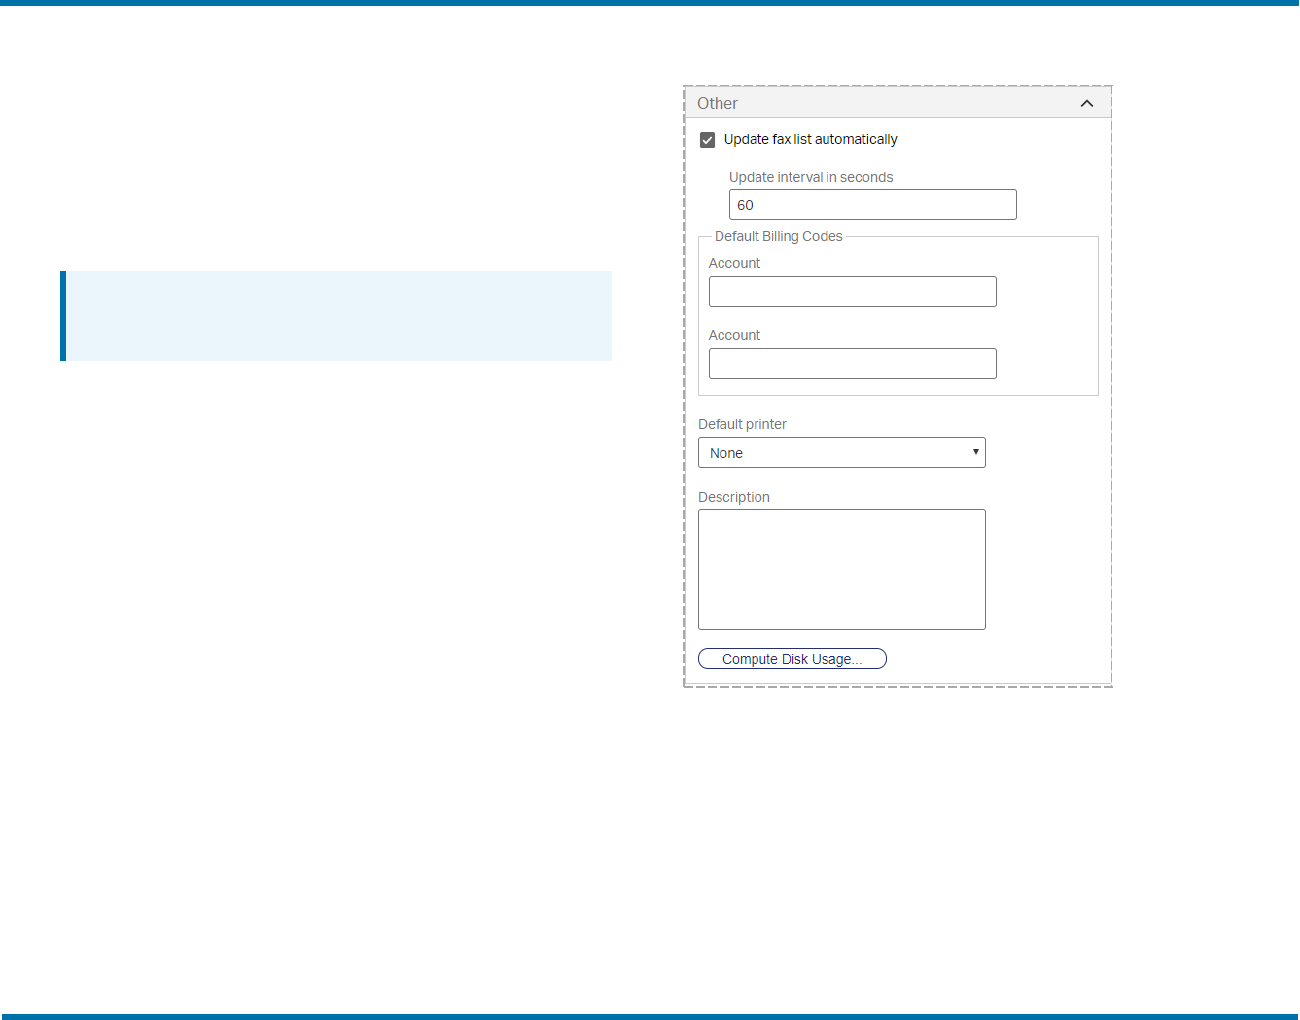
Other
Update fax list automatically
If selected, the user’s mailbox in FaxUtil or FaxUtil Web will be
automatically refreshed (scanned for new faxes).
Update interval in seconds
Enter the number of seconds to specify the interval at which automatic
fax list updates will occur.
Default Billing Codes
In the respective boxes, specify the Billing Code #1 and Billing Code #2
that will appear in the Fax Information dialog box each time the user
OpenText RightFax20.2 32 Managed ServicesAdministrator Guide
Chapter 4: Creating RightFaxuser accounts
sends a fax.
Default printer
Specify a default printer.
Description
Enter any information you want to record about this user account.
Compute Disk Usage
Click to calculate the space on the server that is used by this user's
faxes.
Managing user delegates
As an administrator you can manage delegates—users with access to a
user's fax mailbox—for a user independent of whether the user has
permission to modify delegates. You can assign delegate permissions
from system-defined roles or by defining custom roles. For more
information about delegate permissions and roles, see Default delegate
permissions by role on the next page.
l On the Delegates menu, select whether to add, edit, or remove
delegates. You can also create, edit, and delete custom delegate
roles.
Adding and removing delegates
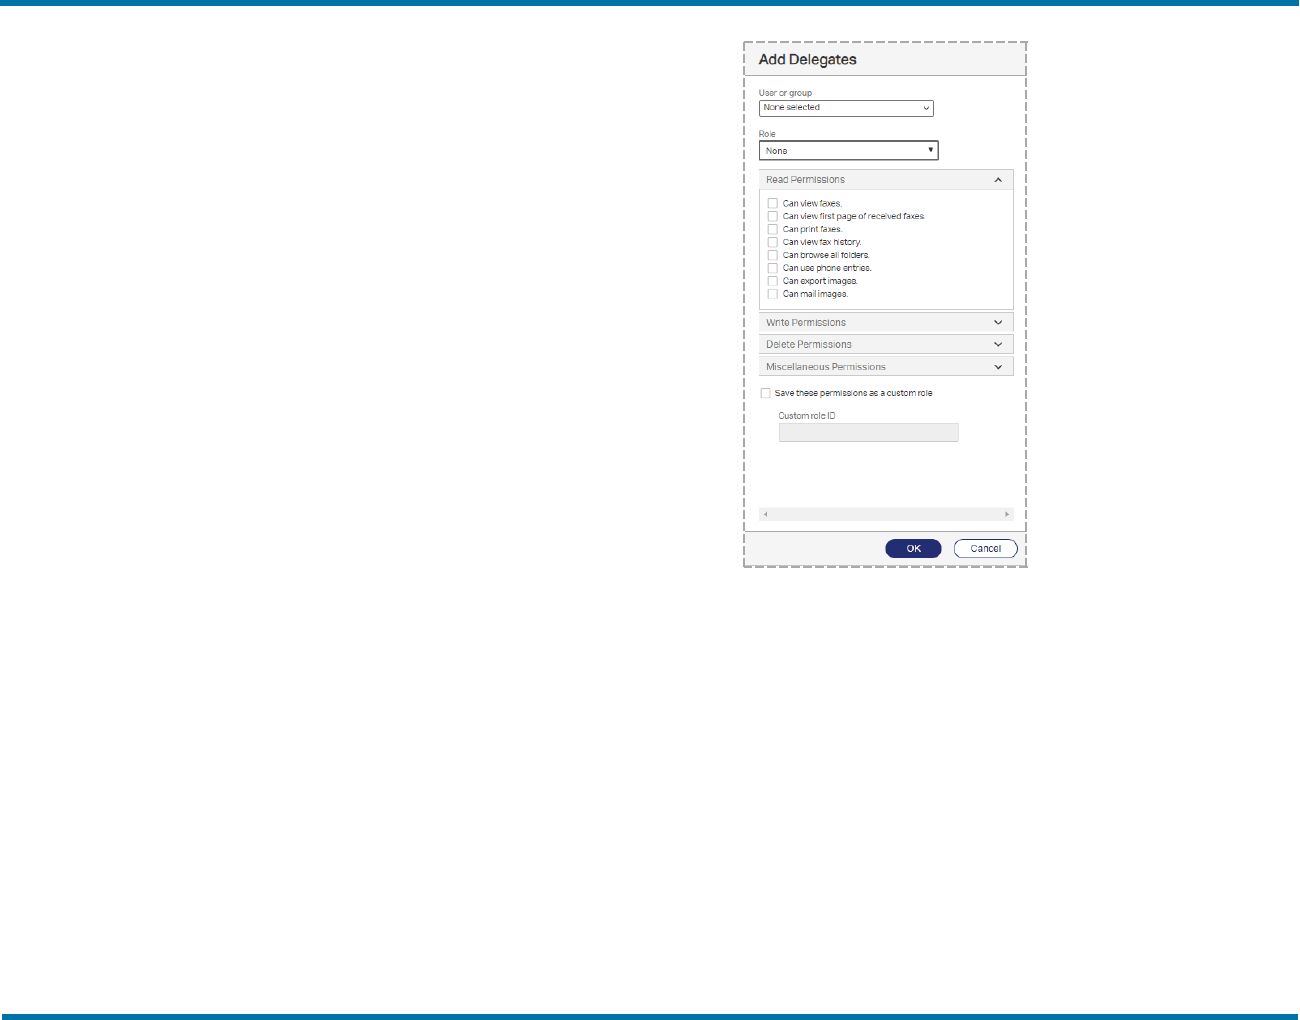
To add delegates for a user
1. Select one or more users in the list.
2. On the Delegates menu, click Manage Delegates. The
Delegates dialog box opens with the list of the user's delegates.
3. Click New, and the Add Delegates dialog box opens.
4. In the User or group box, select one or more user or group IDs.
5. In the Role list, select the role for the delegate.
6. In the lists of permissions, as needed, select and clear access
options.
7. To save the selections as a custom role, select the check box
Save these permissions as a custom role, and enter a name
in the Custom role ID box.
8. Click OK.
To remove delegates
l Select one or more users in the list, and then click Delete.
OpenText RightFax20.2 33 Managed ServicesAdministrator Guide
Chapter 4: Creating RightFaxuser accounts
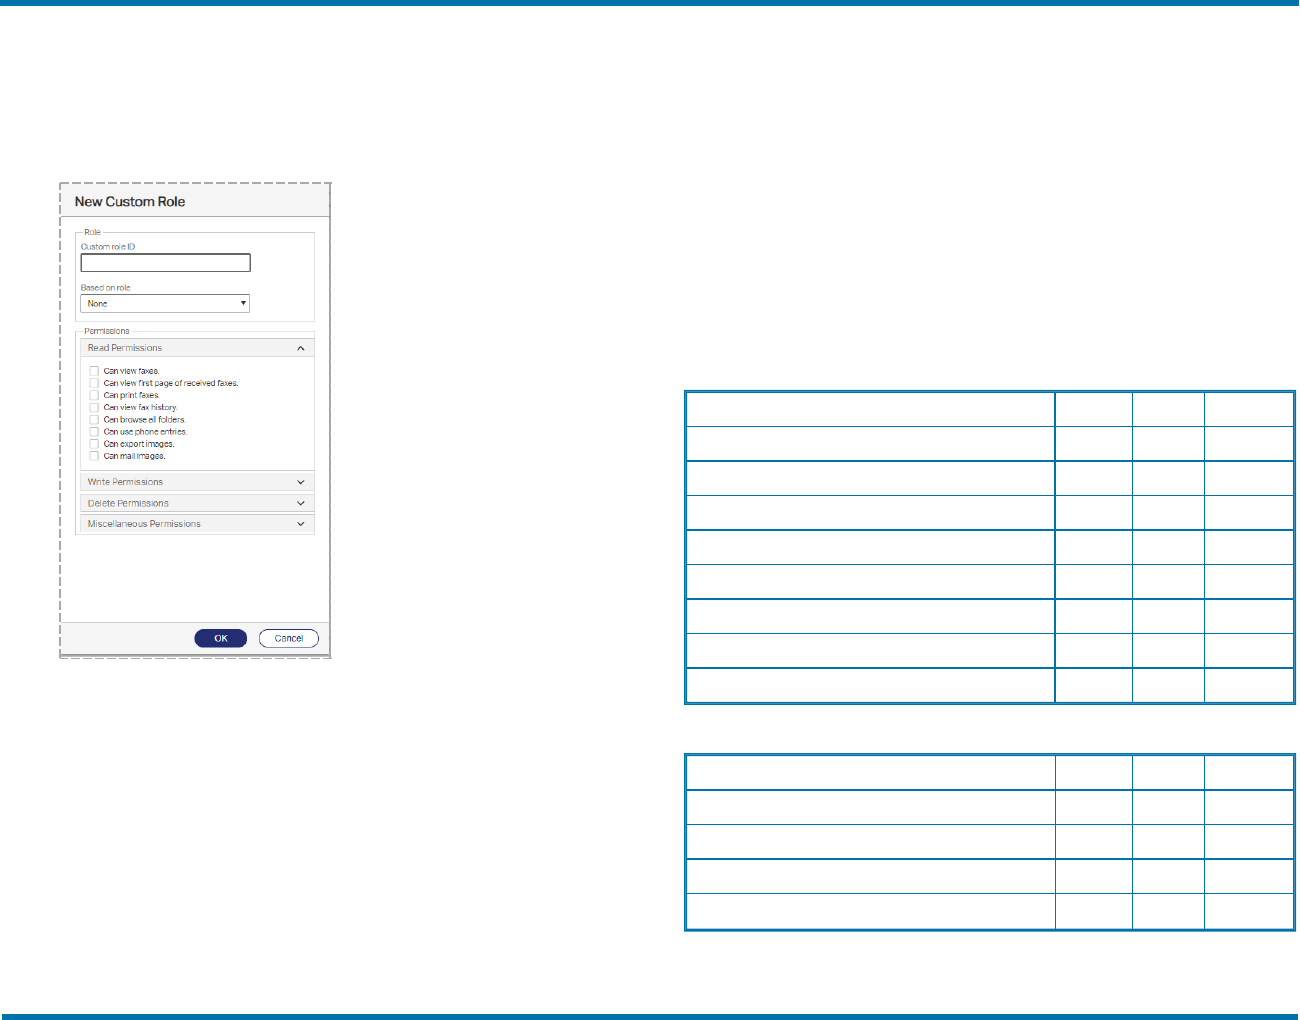
Managing custom delegate roles
To create or edit a custom role
1. On the Delegates menu, click New Custom Role or Edit
Custom Role.
2. In the Custom role ID box, enter a name or select a role.
3. To create the role from an existing role, in the Based on role
list, select the role.
4. In the lists of permissions, select and clear access options.
5. Click OK.
To save a custom role
1. With a delegate selected, select a role in the Role list.
2. In the lists of permissions, select and clear access options. The
selection in the Role list changes to Custom.
3. In the Custom role ID box, enter a name, and then click OK.
To delete a custom delegate role
1. On the Delegates menu, click Delete Custom Role.
2. In the Custom Role ID list, select the role. The permissions for
the role appear, but cannot be edited.
3. To confirm the deletion, click Ok.
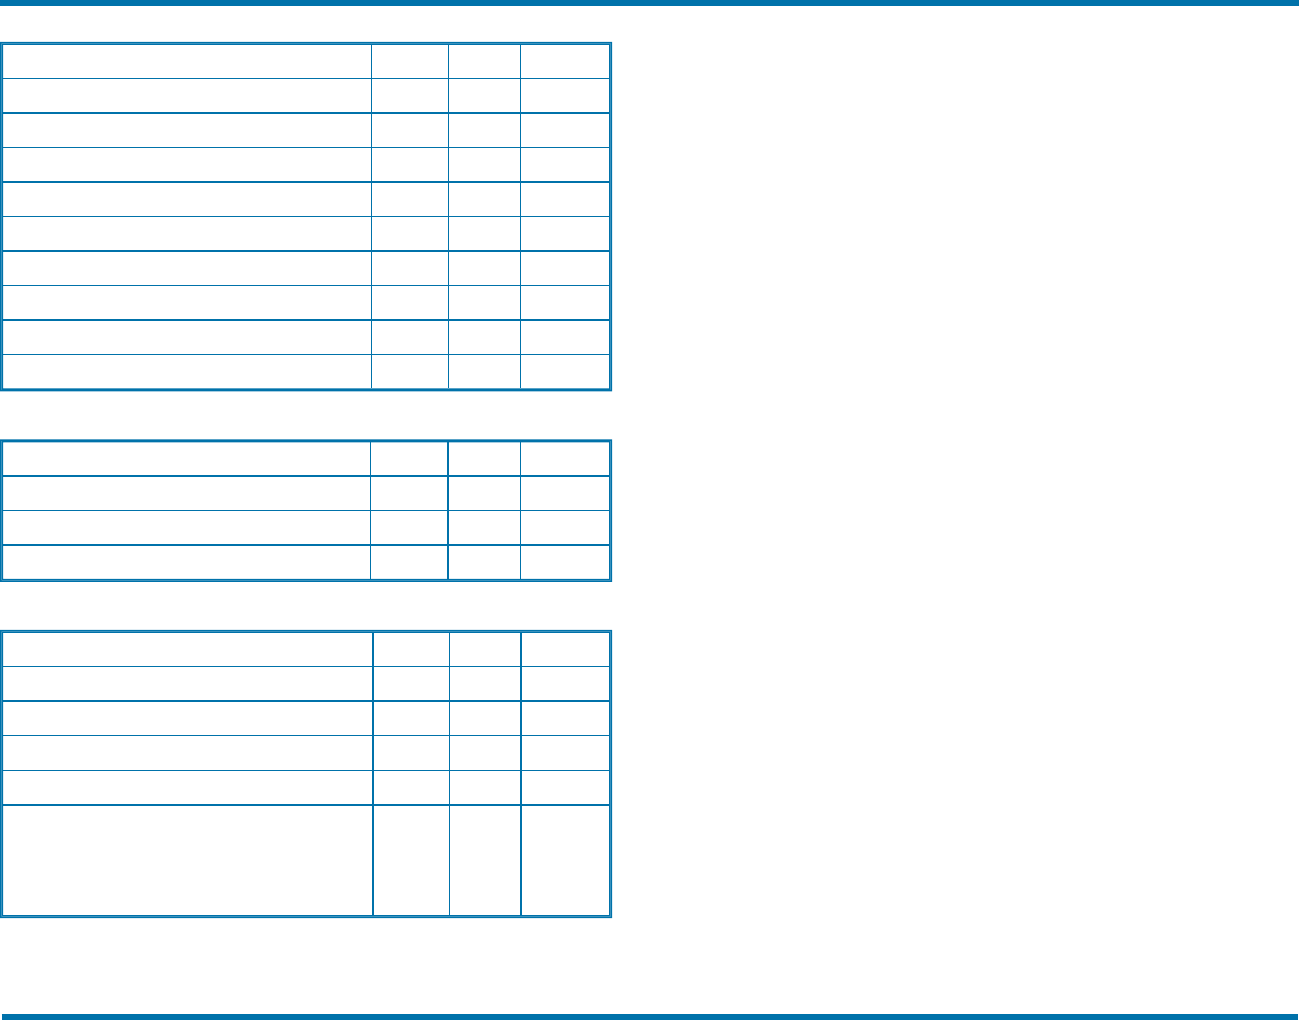
Default delegate permissions by role
Read permissions
Owner Editor Reviewer
Can view faxes. x x x
Can view first page of received faxes. x x x
Can print faxes. x x x
Can view faxhistory. x x x
Can browse allfolders. x x x
Can use phone entries. x x x
Can export images. x x x
Can mail images. x x x
Write permissions
Owner Editor Reviewer
Can create faxes. x x --
Can edit faxes. x x --
Can update faxstatus. x x --
Can forward faxes. x x --
OpenText RightFax20.2 34 Managed ServicesAdministrator Guide
Chapter 4: Creating RightFaxuser accounts
Can OCR faxes. x x --
Can create folders x x --
Can rename folders. x x --
Can create phone items. x x --
Can edit phone items. x x --
Can annotate faxes. x x --
Can move faxes. x x --
Can route faxes. x x --
Can route faxes x x --
Can annotate faxes with personalstamp x x --
Delete permissions
Owner Editor Reviewer
Can delete faxes. x -- --
Can delete folders. x -- --
Can delete phone items. x -- --
Miscellaneous permissions
Owner Editor Reviewer
Can approve faxes. x x --
Can modify user options. x -- --
Can modify delegates. x -- --
Can toggle refuse fax distributions. x x --
Requires fax approval. This permission doesnot
apply to faxesthat the user creates, including faxes
that the user createsasa delegate on behalf of
another user.
-- -- --
OpenText RightFax20.2 35 Managed ServicesAdministrator Guide
Chapter 5: Creating groupsof users
Chapter 5: Creating groups of users
Every RightFax user must be assigned to a group of users. Group
settings determine fax options, cover sheets, and notification options
for all of the users in the group.
To open the list of user groups
l In Web Admin, in the left pane, click Groups. The list of groups
appears in the right pane.
Creating, deleting, copying, and editing
groups of users
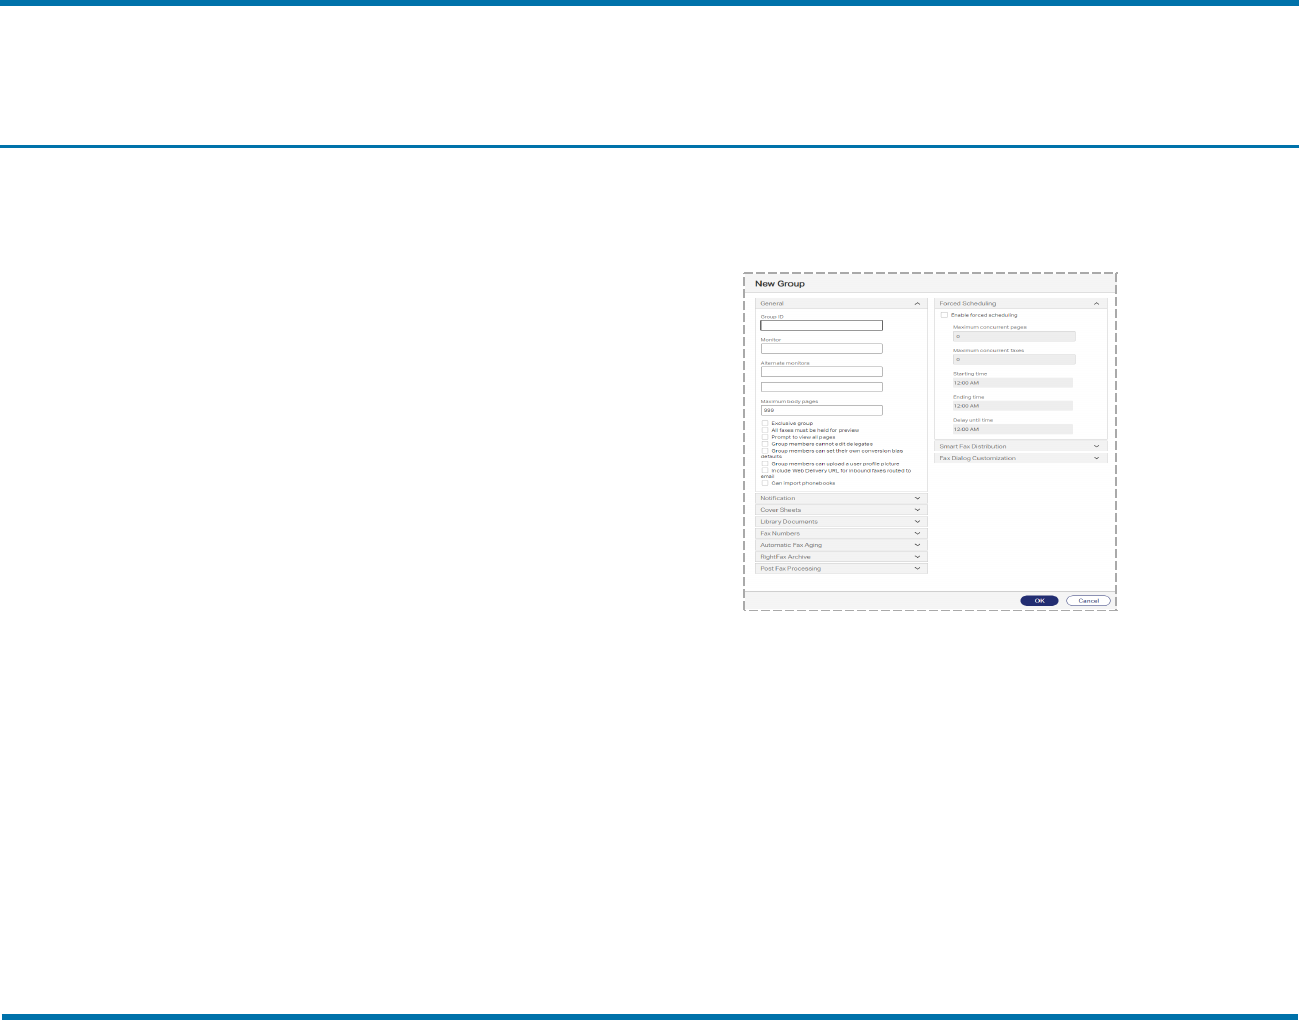
To create a new group
1. Open the list of groups.
2. Click New. The New Group page opens.
3. In the Group ID box, enter a unique group ID.
All remaining options are optional. For information on completing
these options, see Editing group properties on the next page.
To create a new group from an existing group
1. In the list of groups, select the group you wish to copy.
2. Click New From Selected. The New Group window opens.
3. In the Group ID box, enter a unique group ID
All remaining options are optional. For information on completing
these options, see Editing group properties on the next page.
OpenText RightFax 36 Managed ServicesAdministrator Guide
Chapter 5: Creating groupsof users
To delete a group
1. Select the group or groups in the list.
2. Click Delete, and then confirm the deletion.
Note If you delete the only group assigned a specific library
document, then that library document will be marked as
expired. It can be deleted, edited, or reassigned to another
group.
To edit the properties of an existing group
l Select the group in the list, and then click Edit. The Edit Group
page opens.
Editing group properties
To edit the properties of an existing group
1. Select the group in the list.
2. Click Edit. The Edit Group page opens.
3. As needed, click the heading of the section you want to edit.
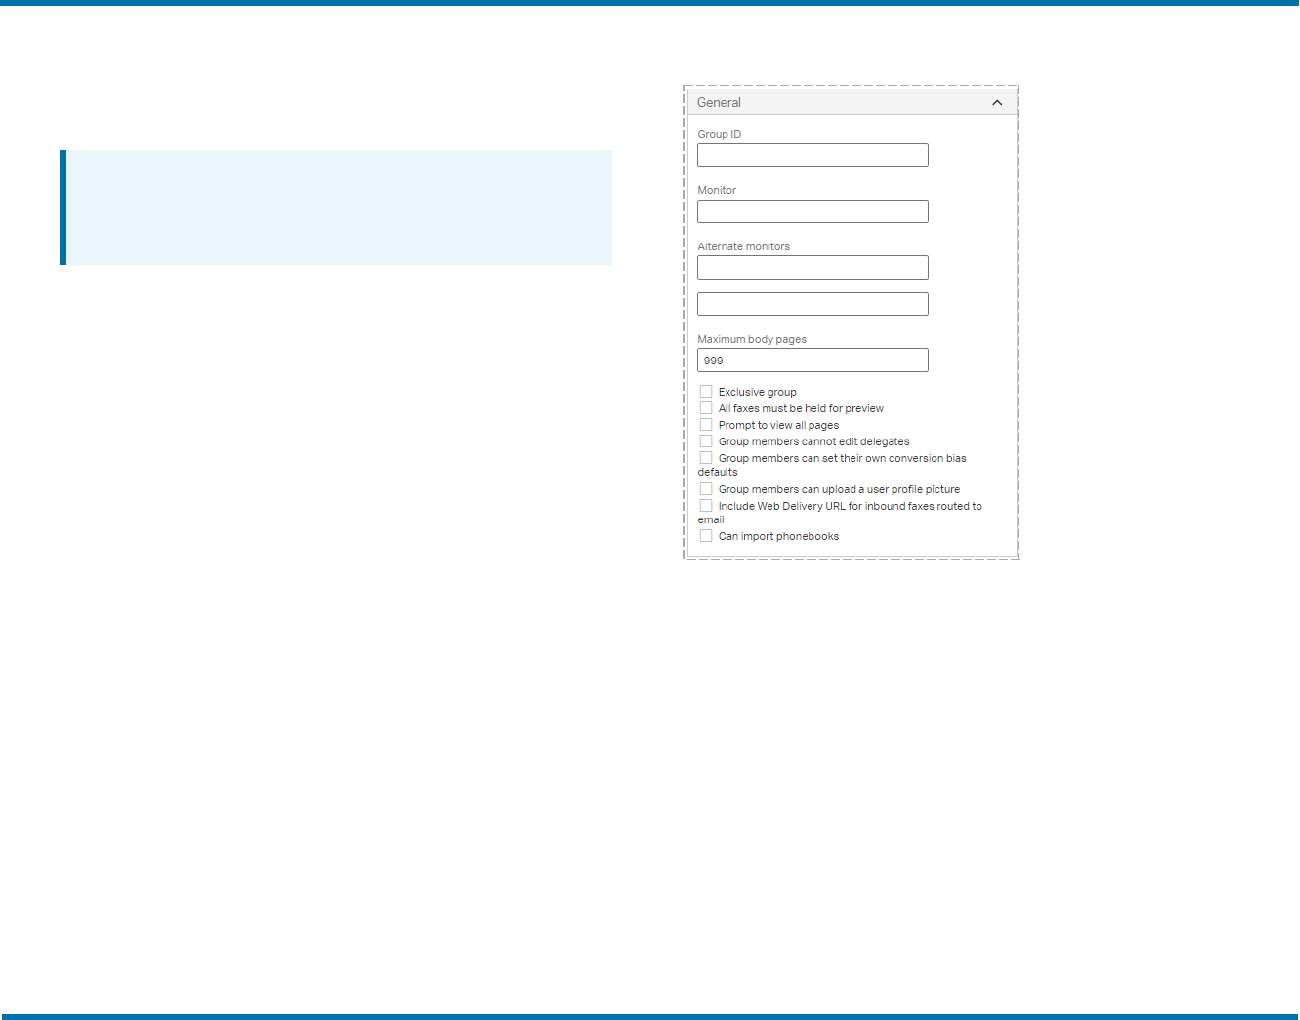
General
Group ID
Enter a unique ID for the group.
Monitor
Enter the user ID of the primary monitor of this group. The primary
monitor has access to all the mailboxes in the group and receives alerts
when a user has not printed or viewed a fax before the time specified in
User Notify Time in the RightFax Server configuration program
expires. See the RightFax Administrator Guide.
Alternate monitors
Enter up to 9 user IDs of alternate monitors of this group, each in a
separate box. When you press TAB to advance to the next box or type
an ID in the next box, another entry box is added. Alternate monitors
have access to all the mailboxes in the group and receive messages
OpenText RightFax20.2 37 Managed ServicesAdministrator Guide
Chapter 5: Creating groupsof users
about faxes belonging to group members if neither the user nor the
primary monitor have printed or viewed a fax in the designated interval.
Maximum Body Pages
Specify the maximum number of body pages that a member of the
group can send in one fax. This number does not include the cover
sheet.
Exclusive group
This option only is available if it is licensed. If selected, the following
restrictions apply to all members of this group that are not full
administrators:
l When selecting or searching for users, only fellow group members
appear.
l When selecting or searching for groups, only this group appears.
Full administrators can view and select all users and groups.
If not selected, all members can see and select all users and groups.
Prompt to view all pages
If the user attempts to close a received fax before all of the pages have
been viewed, the system can detect it. Select this option to prompt the
user to view all of the pages. If the user doesn't view all of the pages, it
will be logged in the fax history.
All faxes must be held for preview
If selected, all faxes for users in the group will be held for preview before
they are sent. Users must view the faxes and verify that they should be
sent.
Group members can set their own conversion bias defaults
Before documents are rendered in the selected fax resolution, they can
be converted with a bias toward improved text legibility, toward
improved graphical fidelity, or a bias toward both. If selected, members
of the group can select to override the defaults that are set in the
RightFax Conversion Engine by setting their own defaults for
conversion bias in the client application.
Group members cannot edit delegates
If selected, members of the group can view delegate information but
cannot change it.
Group members can upload a user profile picture
With this setting, users can upload profile pictures so that they appear
in the header of RightFax applications. The picture shows which user is
logged in. When a profile picture has not been uploaded, then the default
image is the first two letters of the user name. Select this check box to
allow each member of the group to upload a profile picture.
Include Web Delivery URL for inbound faxes routed to e-mail
Select this check box to include the URL for Web Delivery together with
the fax image for inbound routed faxes. If the routing format for the user
group is set to Web Delivery, only the URL is sent.
Can import phonebooks
Select this check box to allow the users in this group to import
phonebooks from text files.
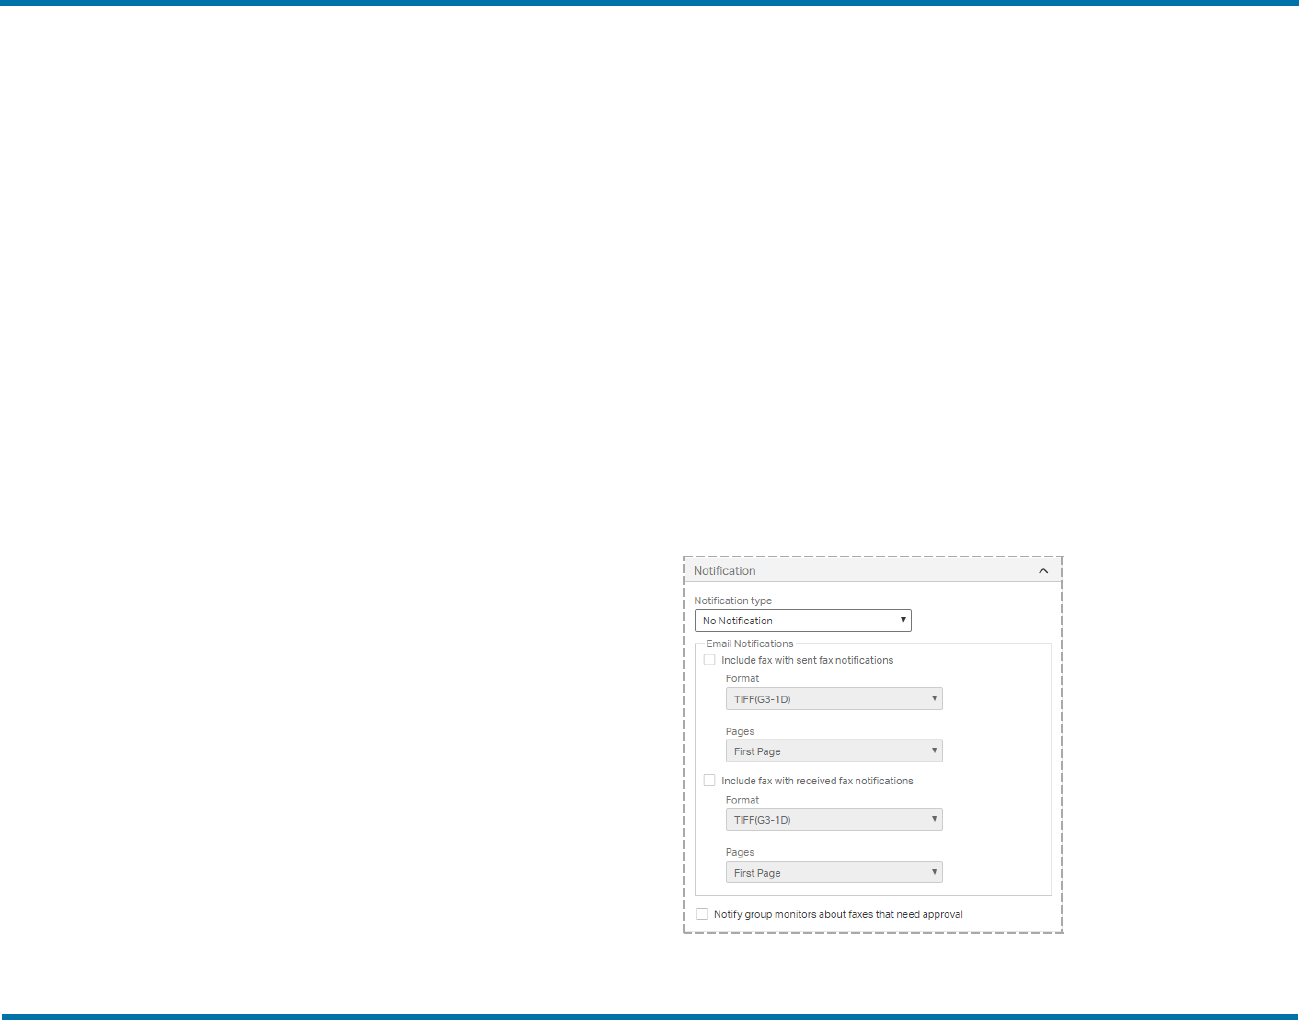
Notification
OpenText RightFax20.2 38 Managed ServicesAdministrator Guide
Chapter 5: Creating groupsof users
Notification type
Select the default notification method for the group.
Email notifications
These settings apply if the user’s notification method is set to Use
Group’s Method.
To include the fax in the email notification of successfully sent or
received faxes, select the Include fax with sent fax notifications or
the Include fax with received fax notifications check box, select the
format (TIF or PDF), and then select whether to include only the First
Page of the fax or All Pages.
Notify group monitors about faxes that need approval
If selected, the group monitor and the alternate group monitors are
notified about all faxes that need approval.
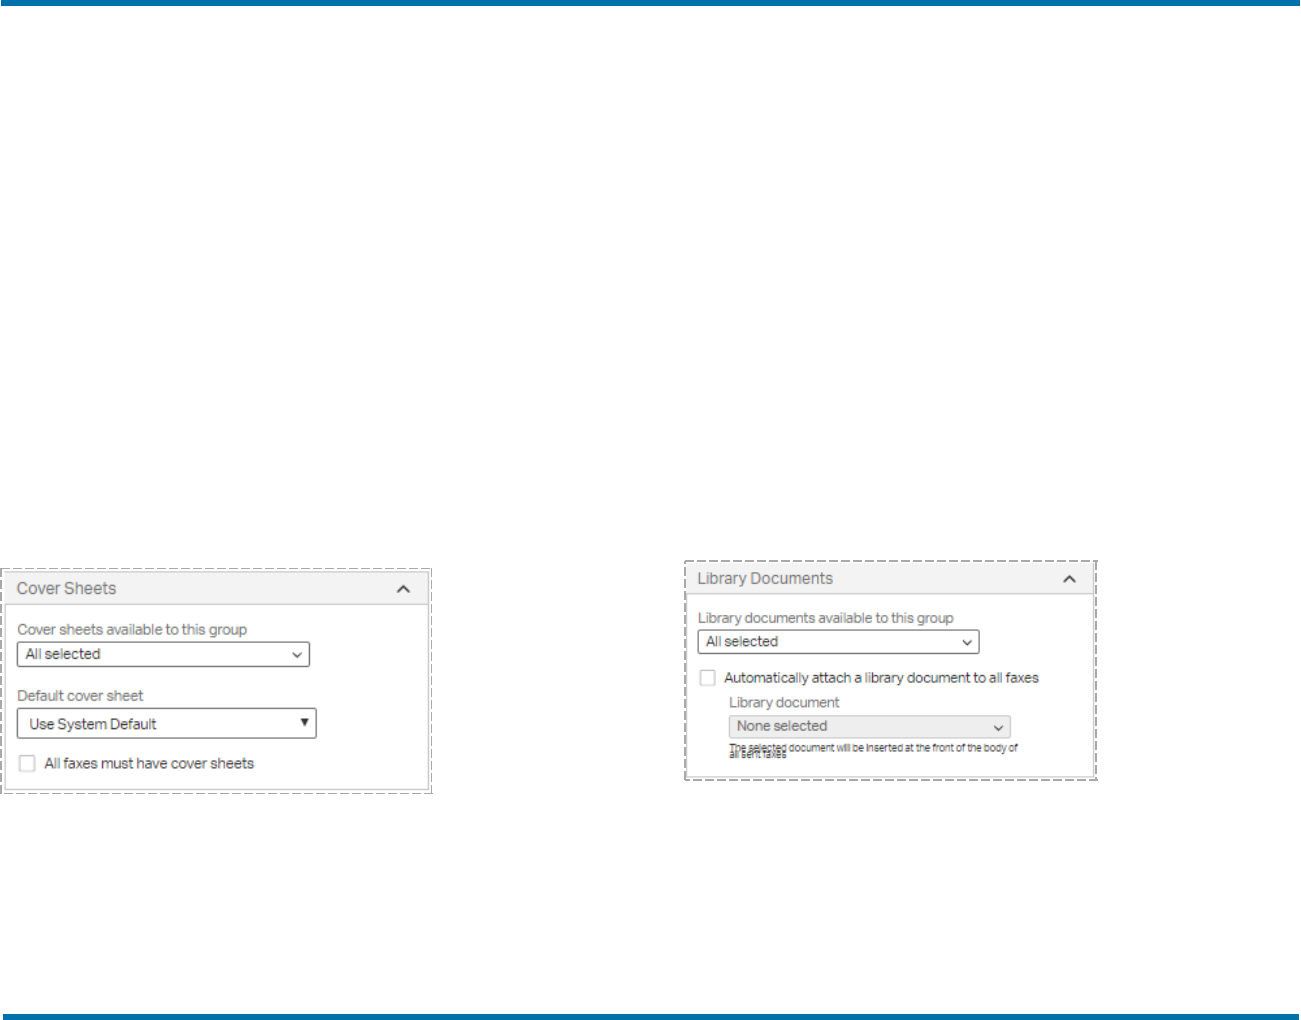
Cover Sheets
You can control the group members' access to specific cover sheets.
You can also require the use of a cover sheet and set a default cover
sheet.
Cover sheets available to this group
The currently available cover sheets appear in the list. Select or clear
check boxes:
l To make an item available, select its check box.
l To make an item unavailable, clear its check box.
To search for items, in the All selected or None selected box, enter
the full or partial name of the item.
Default cover sheet
In the Default cover sheet list, select the cover sheet to use as the
default cover sheet. To use the default cover sheet assigned by the
administrator, select System Default. See Setting default cover sheets
on page63.
All faxes must have cover sheets
To require members of the group to use a cover sheet on outbound
faxes, select the All faxes must have cover sheets check box.
Library Documents
You can control the group members' access to specific library
documents. You can also specify a library document that will be
attached to all faxes by default.
Library documents available to this group
The currently available library documents appear in the list. Select or
clear check boxes:
l To make an item available, select its check box.
l To make an item unavailable, clear its check box.
OpenText RightFax20.2 39 Managed ServicesAdministrator Guide
Chapter 5: Creating groupsof users
Note that the list of library documents includes expired and inactive
documents.
To search for items, in the All selected or None selected box, enter
the full or partial name of the item.
Automatically attach a library document to all faxes
To specify a library document that will be attached to all faxes by
default, select this check box. Under Library document, select the
required library document.
The selected document will be inserted at the front of the body of all
sent faxes.
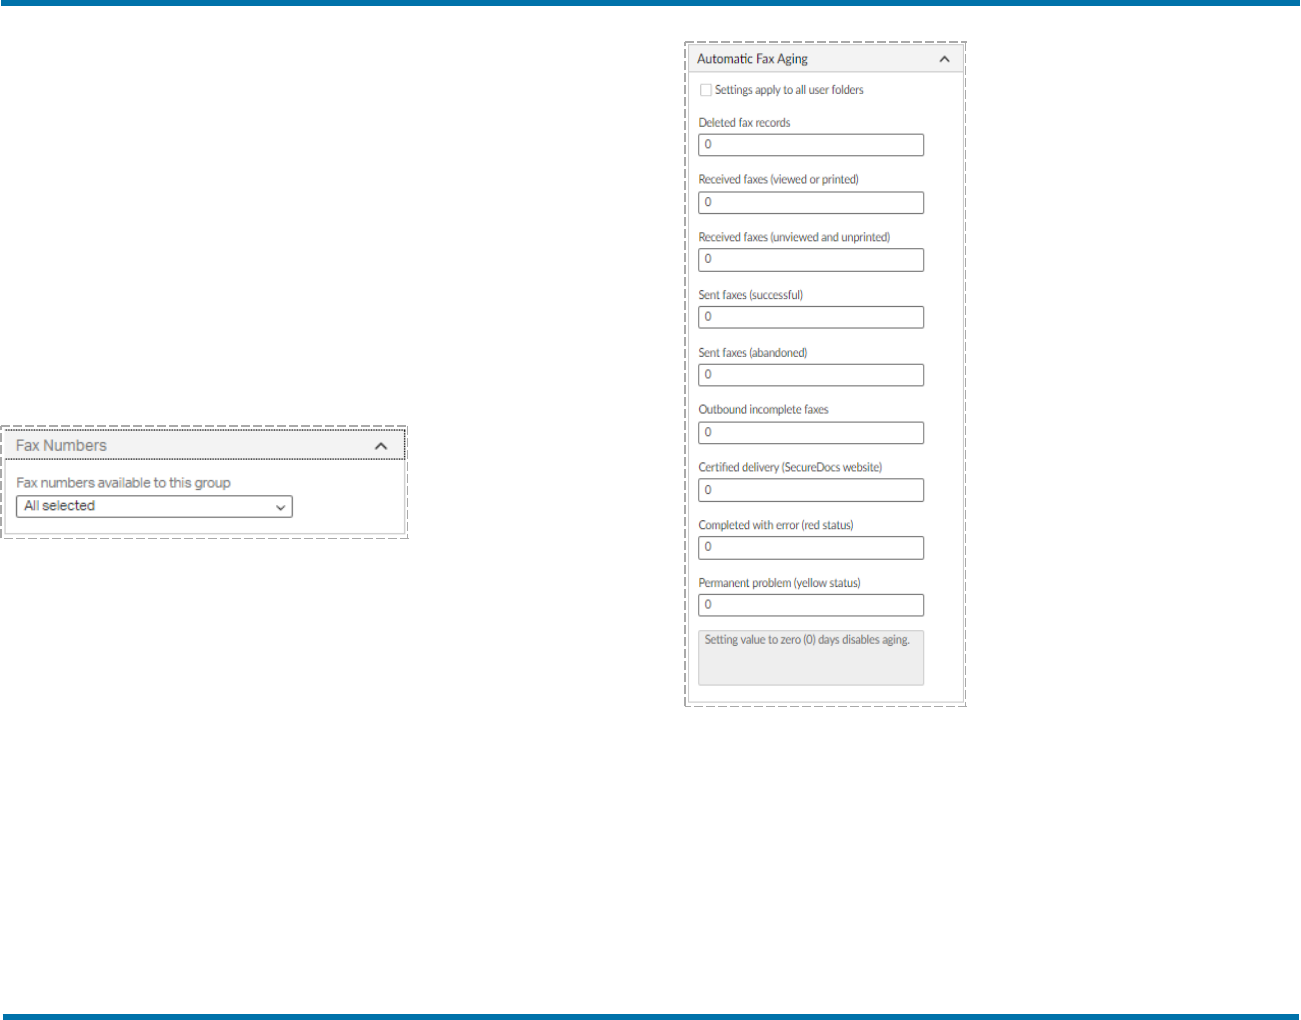
Fax Numbers
You can control the group members' access to specific fax numbers.
Fax numbers available to this group
The currently available fax numbers appear in the list. Select or clear
check boxes:
l To make an item available, select its check box.
l To make an item unavailable, clear its check box.
To search for items, in the All selected or None selected box, enter
the full or partial name of the item.
The Automatic Fax Aging tab
RightFax Managed Services includes automatic fax aging. You can
also perform manual fax aging using the Faxage.exe utility program. For
more information, see the RightFax Administrative Utilities Guide.
With automatic fax aging you specify how many days after having been
sent or received faxes will be removed from the group members' FaxUtil
mailboxes. Automatic fax aging does not delete the fax records from the
RightFax database. You can still run reports about the faxes.
To set automatic fax aging
1. To apply these settings to all the user folders, select the check
box Settings apply to all user folders. To disable fax aging in
folders other than Main, clear the check box.
OpenText RightFax20.2 40 Managed ServicesAdministrator Guide
Chapter 5: Creating groupsof users
2. For each type of fax, enter the number of days the fax will remain
before it is considered aged. To specify that faxes should not be
aged, enter 0 (zero).
Option Description
Deleted fax
records
All sent and received faxesthat have been deleted.
Received faxes
(viewed or
printed)
All received faxes that have been viewed or printed.
Received faxes
(unviewed and
unprinted)
All received faxes that have not been viewed or printed.
Sent faxes
(successful)
All faxesthat have been successfullysent.
Sent faxes
(abandoned)
All faxesthat failed to send.
Outbound
incomplete faxes
All faxeswith the statusInformation Incomplete.
Certified delivery
(SecureDocs
website)
All faxesthat were sent for Certified Delivery. The faxes
will be deleted from the Certified Deliverywebsite.
Certified Deliveryisa feature of the optional RightFax
SecureDocsModule.
Completed with
error (red status)
All sent faxesthat failed to send. The statusindicator for
these faxesin the RightFax client applicationsisred.
Option Description
Permanent
problem (yellow
status)
All faxesthat encountered a problem in sending that
caused the faxesto be retried. The statusindicator for
these faxesin the RightFax client applicationsisyellow.
(If the fax failsto send after all attempts, then the status
changesto red.)
For example:
l Sent faxes that are in the process of retrying to
send.
l Faxesthat are held for preview.
l Faxeswith the statusNeeds Approval.
l Faxeswith the statusBad Paper. A fax with an
overlayform that failed.
l Invalid recipient faxphone number.
l Invalid billing code.
The Restrictions tab
Forced Scheduling
With forced scheduling, you can restrict the total number of pages or
total number of faxes that can be sent simultaneously by group
members during a specified time period. The restriction applies to
simultaneously scheduled faxes within a time period only. You can
reschedule delayed faxes at any time in FaxUtil and Web Admin.
Example The 50 representatives in your organization's Sales group
each send 100 faxes per hour, causing delays of more important faxes
from other departments and blocking incoming faxes. To avoid this, you
define that between 8 A.M. and 5 P.M. members of the Sales group can
only send up to 20 pages at a time and that all faxes exceeding that limit
will be delayed until 6 P.M.
OpenText RightFax20.2 41 Managed ServicesAdministrator Guide
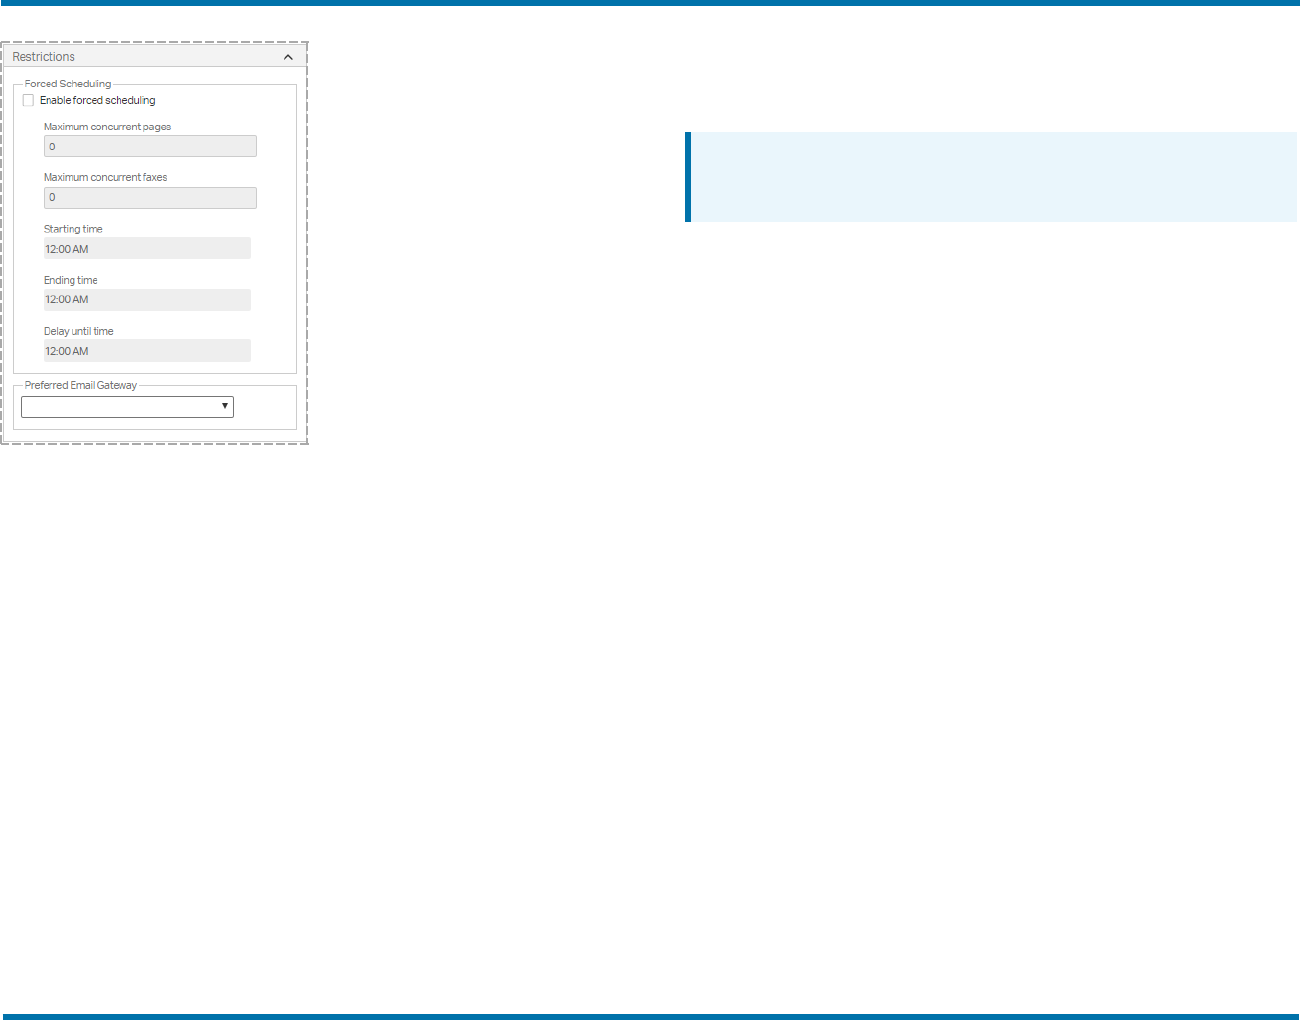
Chapter 5: Creating groupsof users
Enable forced scheduling
Select to enable the forced scheduling feature.
Maximum concurrent pages
Specify the maximum number of fax pages that can be scheduled at
one time by all the users in the group.
Maximum concurrent faxes
Specify the maximum number of faxes that can be scheduled at one
time by all the users in the group.
Starting time/Ending time
The starting and ending times for the period that the restriction applies.
This is written in 24-hour HHMM format. For example, to set the
restriction from 8:00 A.M. to 5:30 P.M., set the Starting time to 0800,
and set the Ending time to 1730.
Delay until time
Enter a time after the Ending time at which to send delayed faxes.
Enter the time in 24-hour HHMM format.
Example If you enter 0800-1730 for the Start/Ending time and 1800 for
the Delay until time, all faxes exceeding the limit between 8 A.M. and
5:30 P.M. will be delayed until 6:00 P.M.
Note Do not enter a Delay Until Time that falls between the Starting
and Ending times. Doing so will cause delayed faxes to never be sent
as they are continuously bumped to the next day.
Preferred Email Gateway
You can assign email gateways to process the received faxes and
email notifications to user groups. Consider the following constraints:
l If group members are configured for email routing, then email
gateways only will route received faxes to the group members that
are assigned to the email gateway.
l If group members are configured for email notifications, then email
gateways only will process email notifications for the group
members that are assigned to the email gateway.
l Once a gateway has been assigned to one or more groups, that
gateway only will receive faxes and email notifications for group
members that are assigned to the email gateway.
l You must assign all groups to email gateways, or you can create a
gateway to receive faxes and email notifications for groups that are
not assigned to gateways.
l In the Preferred Email Gateway list, select the email gateway to
receive the faxes and email notifications for the group.
Smart Fax Distribution
With Smart Fax Distribution, you assign a fax number or routing code to
the group. All faxes received by the group will be distributed between
the users in the group according to the selected distribution type.
OpenText RightFax20.2 42 Managed ServicesAdministrator Guide

Chapter 5: Creating groupsof users
Enable Smart Fax Distribution
Select to enable smart fax distribution for the group.
Routing code (DID/DNIS)
Enter a fax number or routing code for the group.
l To use the next available fax number, click .Assign First Available
Number.
l To select from the list of fax numbers, click Look Up Fax Number,
search for the number and select it.
l To disassociate the current number from this group, delete the
number from the Routing Code box.
Note Each routing code is best assigned to only one user or group. If
you assign a routing code to multiple users or groups, only the initial
assignee will receive the faxes for the code and will appear as the
assignee in the fax number list.
Allow duplicates
Select to allow duplicate routing codes.
Distribution type
Select one of the following:
l Linear. Faxes are distributed to group members one after the other.
l Balanced. Faxes are distributed to group members according to
their processing speed, with distribution going first to the user with
the fewest unopened faxes.
Allow member refusal
If selected, users can take themselves temporarily out of the
distribution loop by selecting Refuse Distributions on the Tools menu
in FaxUtil.
Fax Dialog Customization
Use these settings to customize the appearance of the New Fax dialog
box that is used to create and address outgoing faxes. You can hide
options that do not apply or are off-limits to users in this group. For more
information on the options in the New Fax dialog box, see the RightFax
FaxUtil Web User Guide.
OpenText RightFax20.2 43 Managed ServicesAdministrator Guide

Chapter 5: Creating groupsof users
l Clear the check box for each option that you wish to hide.
OpenText RightFax20.2 44 Managed ServicesAdministrator Guide
Chapter 6: Creating signatures
Chapter 6: Creating signatures
Signature files are specially formatted graphic images (typically of
signatures) that RightFax users can use to personalize outbound faxes.
To create a signature file, a user with administrative access and access
to FaxUtil selects parts of an image in FaxUtil and stores it as a
signature together with identifying information and authorized user
information. To add signature files created outside of FaxUtil, refer to
the RightFax Administrator Guide.
Each signature file is stored in the RightFax database and appears in
the Signature list. You can modify file names, descriptions, and
authorized user information.
Note RightFax signature files are not supported in outbound PDF
documents and do not appear correctly in documents converted using
a PostScript driver. Use a PCL driver instead.
To open the list of signatures
l In Web Admin, in the left pane, click Signatures. The list of
signatures appears in the right pane.
Editing and deleting signature files
To add signature files, refer to the RightFax Administrator Guide.
To edit the properties of an existing signature
1. Select the signature in the list.
2. Click Edit. The EditSignature page opens. For more
information, see Editing signature file properties below.
To delete a signature
1. Select the signature in the list.
2. ClickDelete.
3. Do one of the following to confirm the deletion:
l To only delete the entry, but not the image file, clear the
Delete associated image file check box, and then click
Delete.
l To delete both the entry and the associated image file, select
the check box, and then click Delete.
Editing signature file properties
To edit the properties of an existing signature
1. Select the signature in the list.
2. Click Edit.
OpenText RightFax 45 Managed ServicesAdministrator Guide
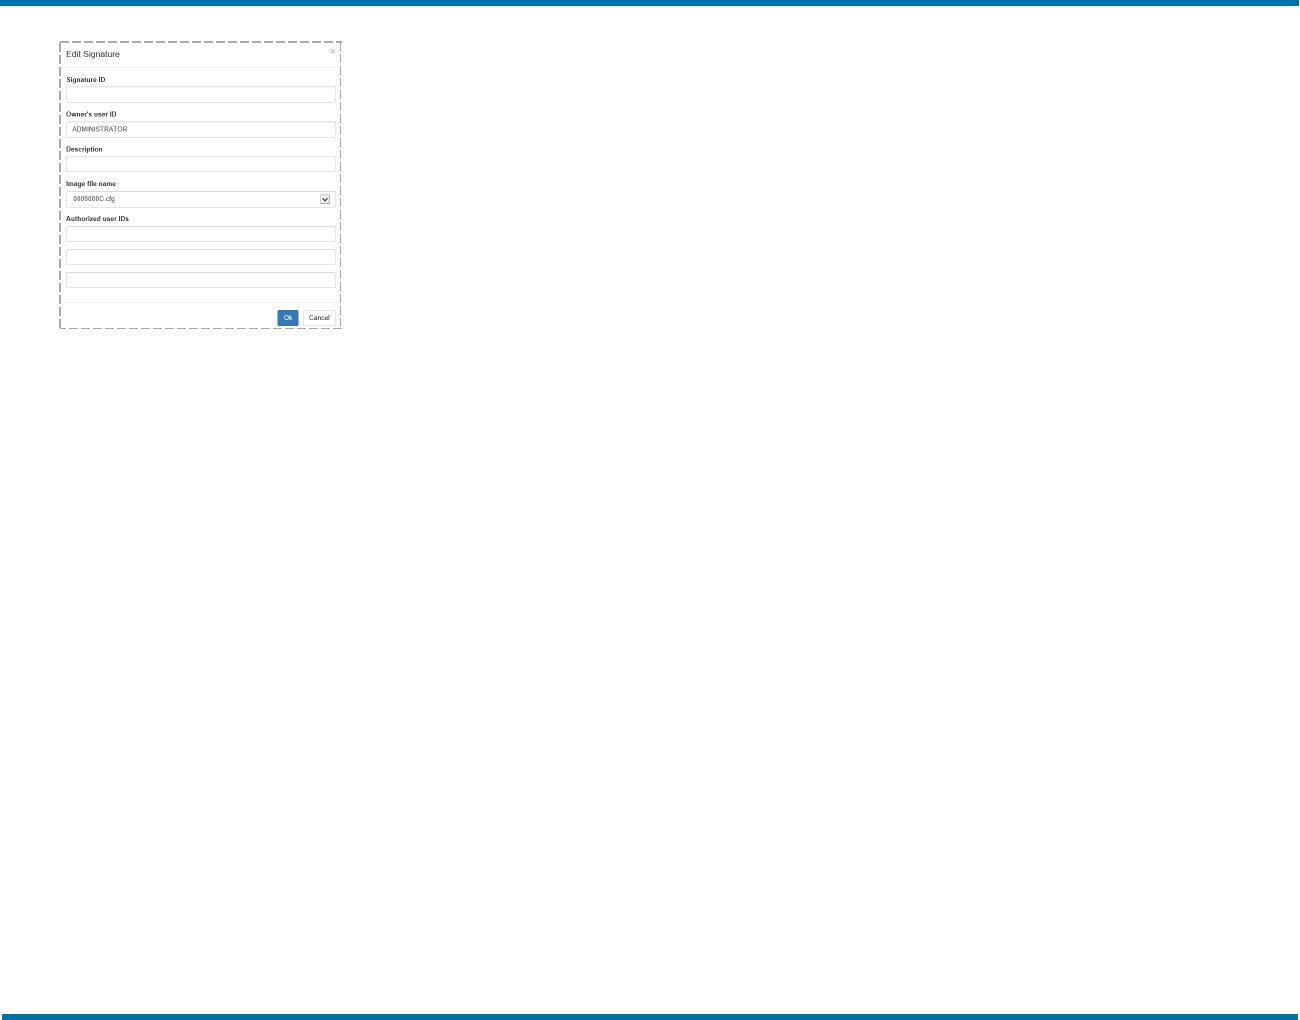
Chapter 6: Creating signatures
Signature ID
The name of the signature file that appears in the list of signatures.
Owner’s user ID
The user ID of the owner of the signature file.
Description
A description of the signature file.
Image file name
The name of the signature image file. This file name is automatically
generated and stored in the RightFax database.
Authorized user IDs
Up to three RightFax user IDs or group IDs who are authorized to use
this signature in addition to the owner of the signature.
OpenText RightFax20.2 46 Managed ServicesAdministrator Guide

Chapter 7: Creating a stamp library
Chapter 7: Creating a stamp library
Stamps are graphic images that can be used to personalize outbound
and inbound faxes.
l The library of stamp images is maintained by a RightFax
administrator.
l Stamp image files only are available to users who do not have the
Disallow Fax Annotations permission.
l Users can create stamps, unless they have the Disallow Fax
Annotations permission.
l People who have delegate access to faxes cannot use or edit the
personal stamp files of other users.
To open the list of stamp image files
l In Web Admin, in the left pane, click Stamps. The list of stamps
appears in the right pane.
Creating, deleting, and editing stamps
Administrators can create a library of stamps, and stamps can be
created by and for users (known as personal stamps).
Each user can have one personal stamp. Library stamps are listed in
alphabetical order, and the personal stamp appears first in the user's
list. Personal stamps are not included in the library of stamp images.
To create a library stamp image file
1. Using a graphics program, create a .gif, .tiff, .jpg, .png, or .bmp
image. The maximum file size is 1 MB.
2. Click New. The New Stamp dialog box opens.
3. In the Description box, enter a description of the stamp.
4. Click Select and select the stamp image file.
5. Click Ok.
To import library stamp image files
1. Using a graphics program, create one or more .gif, .tiff, .jpg,
.png, or .bmp images. Save the images in a folder that is
accessible from the RightFax server. The maximum file size is 1
MB.
2. Click Import, and the Import Stamps dialog box opens.
3. Browse to locate the image files. Select the files, and then click
Open.
4. In the Import Stamp dialog box, click Import.
To delete a library stamp image file
1. Select the stamp image file in the list.
2. ClickDelete.
OpenText RightFax 47 Managed ServicesAdministrator Guide

Chapter 7: Creating a stamp library
To edit the properties of a library stamp image file
1. Select the stamp image file in the list.
2. ClickEdit. The Edit Stamp dialog box opens.
3. You have the following options:
l In the Description box, edit the description of the stamp
image.
l In the Select box, import a different stamp image file.
4. Click Ok.
To create, edit, or replace a personal stamp file
OpenText RightFax20.2 48 Managed ServicesAdministrator Guide
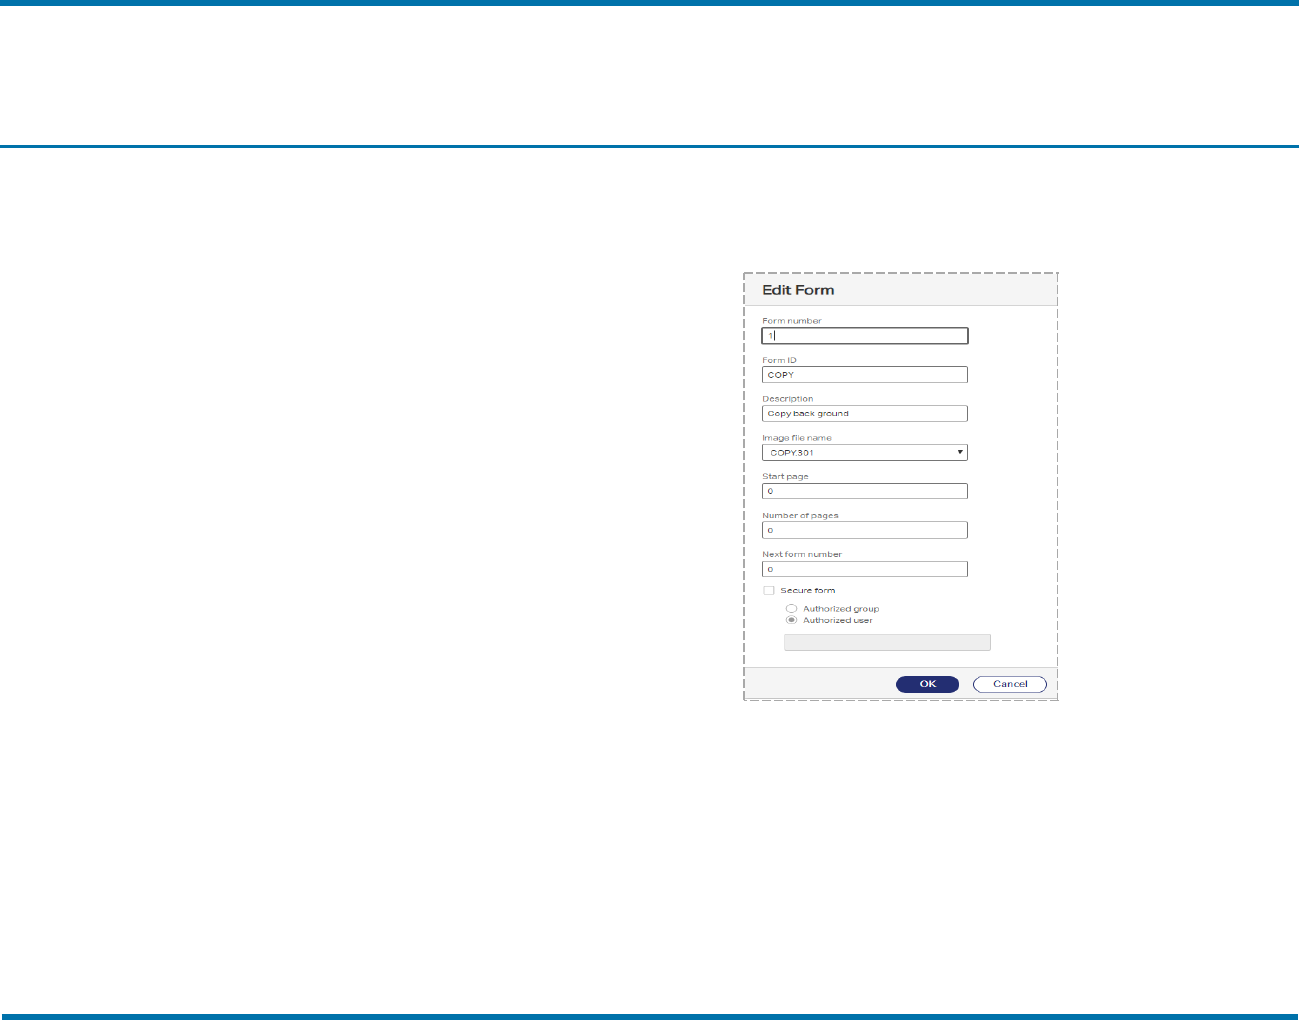
Chapter 8: Creating overlayforms
Chapter 8: Creating overlay forms
Overlay forms are fax image files that RightFax can superimpose over
outgoing faxes to give them the appearance of having been printed on
the form prior to faxing. Typically they are replicas of documents that
your organization uses such as the company letterhead.
You can create and edit forms if your user profile includes the Can
Edit/Add Forms permission. To create forms, you must also have
access to FaxUtil.
After you create an overlay form file, it appears in the list of forms. Each
overlay form file is stored in the RightFax database.
To open the list of forms
l In Web Admin, in the left pane, click Forms. The list of forms
appears in the right pane.
Creating and deleting form files
You can create and edit overlay forms if your user profile includes that
permission. For more information, see Permissions on page20.
To create an overlay form
To create an overlay form, refer to the RightFax FaxUtil User Guide or
RightFax FaxUtil Web User Guide.
To edit an overlay form
1. Select the form in the list.
2. Click Edit. The Edit Form dialog box opens.
3. See Editing form file properties on the next page.
4. Click OK. The new form appears in the list of forms in EFM and
Web Admin.
To delete a form
1. Select the form in the list.
2. ClickDelete.
3. Do one of the following to confirm the deletion:
OpenText RightFax 49 Managed ServicesAdministrator Guide
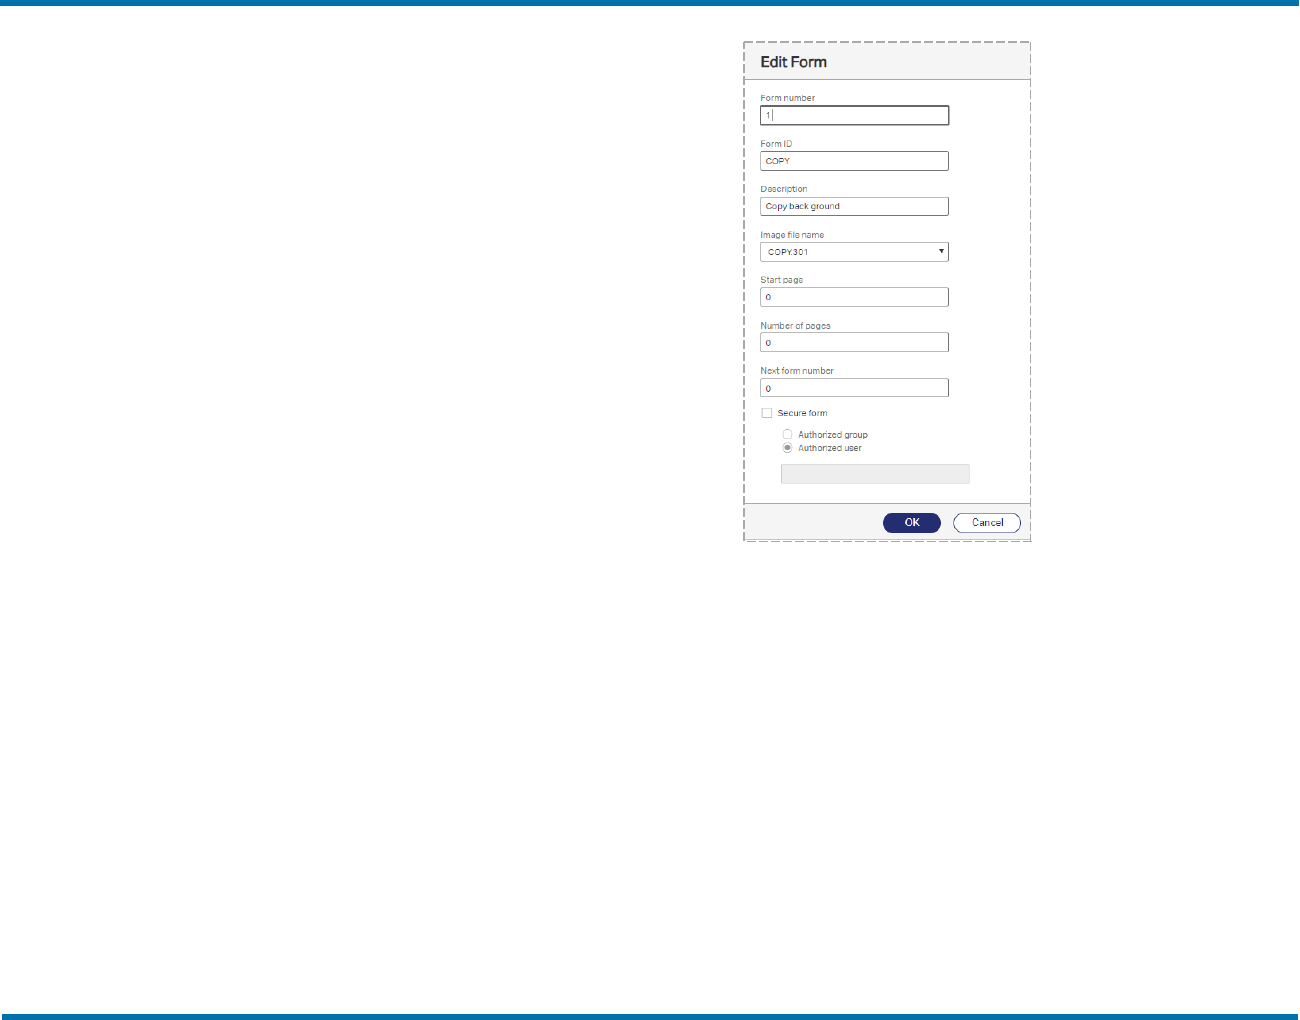
Chapter 8: Creating overlayforms
l To only delete the entry, but not the image file, clear the
Delete associated image file check box, and then click
Delete.
l To delete both the entry and the associated image file, select
the check box, and then click Delete.
Editing form file properties
You can use two overlay forms in a single fax. For example, you might
use a form with the company letterhead for page 1 and an invoice form
for all subsequent pages. See Configuring two forms for use in a single
fax on the next page.
To edit the properties of an existing form
1. Select the form in the list.
2. Click Edit.
Form number
The number that identifies the form. This is assigned by RightFax when
the form is created.
Form ID
Enter a unique name to identify the form.
Description
Enter a short description of the form.
Image file name
Select the name of the image file of the form. The image file is
generated automatically when the form file is created and stored in the
RightFax database.
OpenText RightFax20.2 50 Managed ServicesAdministrator Guide

Chapter 8: Creating overlayforms
Start page
Enter the first page after the cover sheet to which to apply the form. If
you enter 1, the form will appear on the first body page.
Note Page numbers are absolute. If you set the start page to 3 and a
document only has two pages, none of the pages will include the form.
Number of pages
To overlay each page of the fax with the form, enter 0 (zero). Otherwise,
enter the number of fax pages to which to apply the form.
Next form number
To use a second form, enter its form number.
Secure form
Select this check box to restrict the form to specific groups or users.
Click Authorized group or Authorized user, and then enter the user
or group authorized to use the form.
Configuring two forms for use in a single fax
You can set up two forms to be applied one after the other in a single
document. For example, the first form might be a form with your
company letterhead for the first page and the second form an invoice
form for all remaining pages of the document.
To configure two forms for use in a single fax document
1. Create two forms. See Creating and deleting form files on
page49.
2. Edit the first and second form according to the instructions in
Editing form file properties on the previous page.
l To edit the properties of the first form:
a. In the Startpage box, enter the first page after the
cover sheet to which to apply the first form. If you
enter 1, the form will appear on the first body page.
b. In the Number of pages box, enter the number of
pages to which to apply the first form. If the first form
is only used on the first page, enter 1.
c. In the Next form number box, enter the form number
of the second form.
d. Click OK.
l To edit the properties of the second form:
a. In the Start page box, enter the first page number to
which to apply the second form. In most cases, this
value is set to 2.
b. In the Number of pages box, to have the second
form appear on all subsequent pages, enter 0 (zero).
Otherwise, enter the number of pages to which to
apply the second form.
c. Click OK.
OpenText RightFax20.2 51 Managed ServicesAdministrator Guide
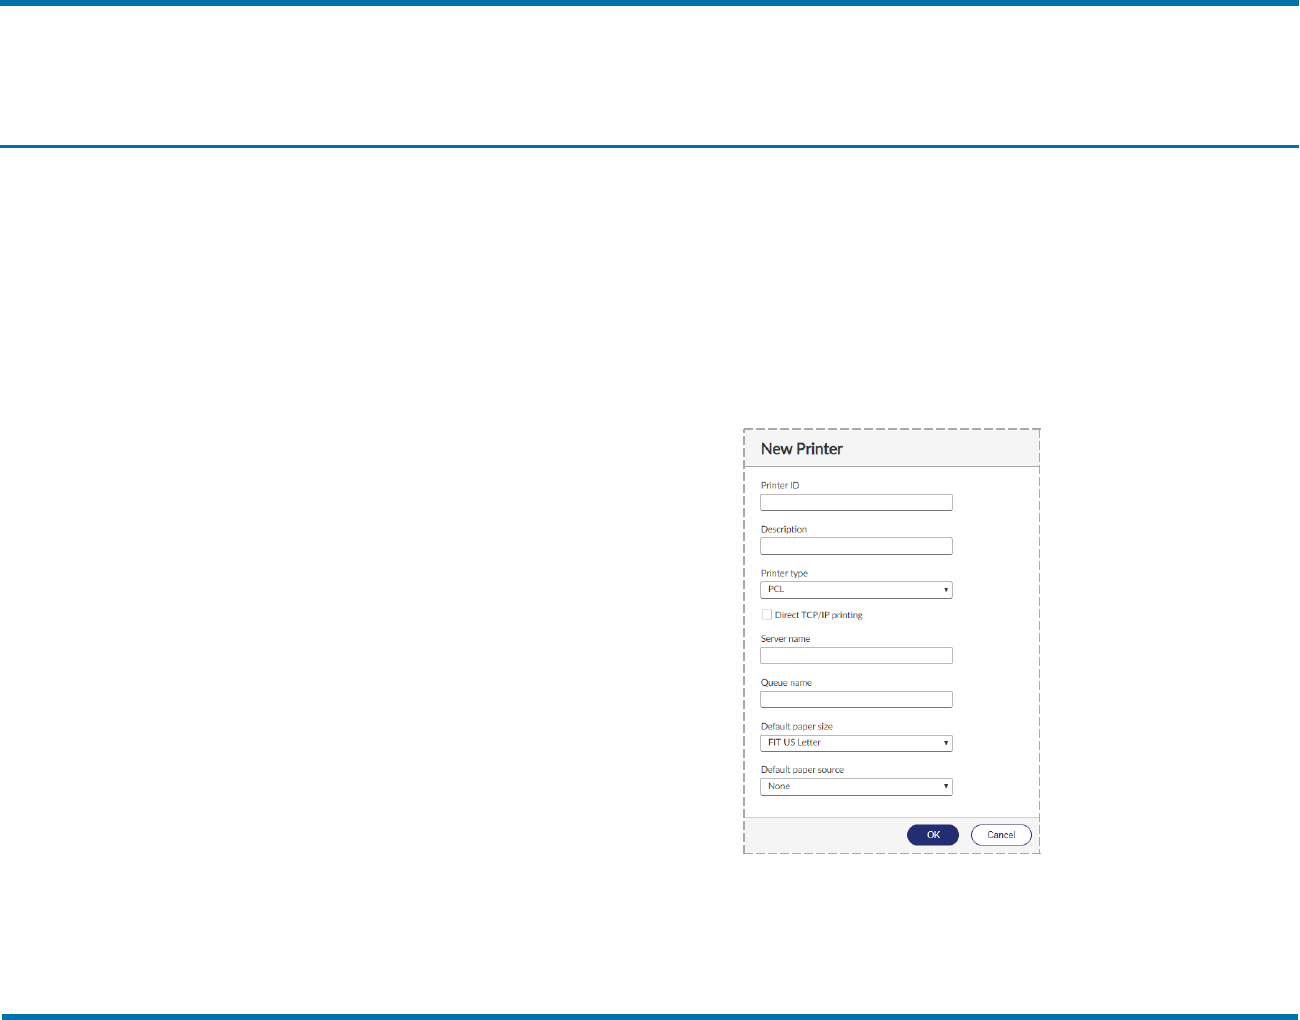
Chapter 9: Connecting printers and scanners
Chapter 9: Connecting printers and scanners
You can define an unlimited number of network printers in RightFax and
make them available for automatic printing of faxes and other
automated network print functions. Printers can be added individually or
imported in groups from your network.
To configure printers and print-to-fax devices that allow RightFax users
to fax documents from native applications, see the RightFax
Administrator Guide.
To open the list of printers
l In Web Admin, in the left pane, click Printers. The list of printers
appears in the right pane.
Creating, deleting, and copying a printer
To add a new printer to RightFax
1. Click New.
2. Enter a Printer ID and the remaining printer properties. For more
information, see Editing printer properties below.
To delete a printer
1. Select the printer in the list.
2. Click Delete. Confirm that you want to delete the printer.
Editing printer properties
To edit the properties of an existing printer
1. Select the printer in the list.
2. Click Edit.
Printer ID
The printer’s network ID.
OpenText RightFax 52 Managed ServicesAdministrator Guide
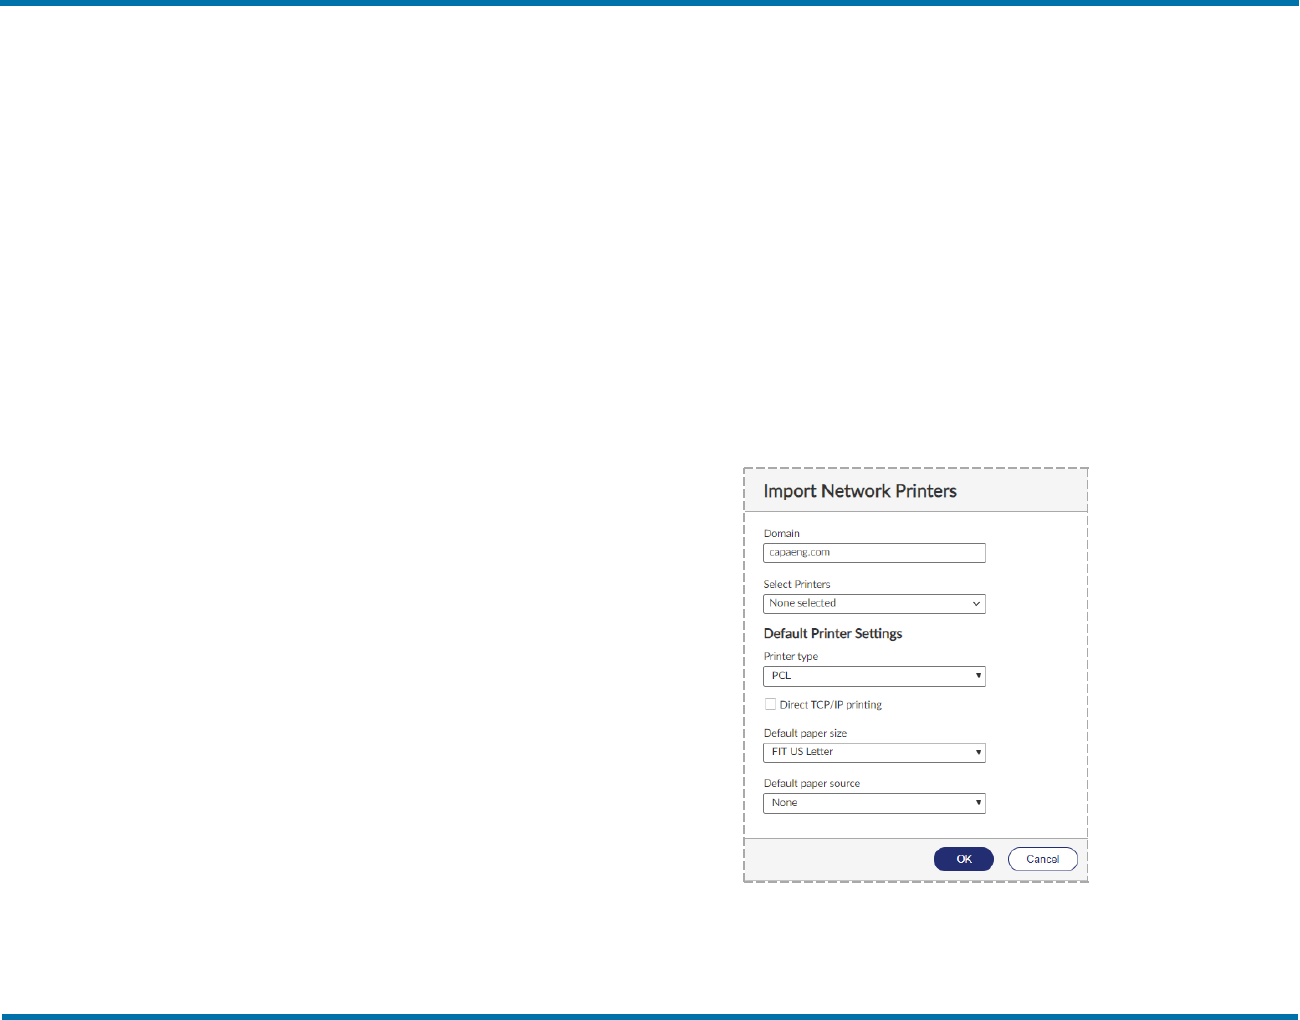
Chapter 9: Connecting printers and scanners
Description
Enter a description of the printer. To show only the Printer ID in the
Print dialog box, leave this box blank.
Printer type
Select the printer driver used by RightFax to format faxes printed to this
printer. Choose the one that most closely corresponds to your printer.
Direct TCP/IP printing
Select this check box to allow faxes to be printed to an IP port on a
printer using the LPR, a TCP/IP utility.
Server name
Indicate on which file server the queue exists. If the queue is in NDS,
this is the value at the top of the tree.
Queue name
Depending on your network operating system, this can be one of the
following:
l The share name of the queue (LAN Server and Windows-based
networks)
l The Bindery name of the queue, for example “LASER1.” (Netware)
l The Distinguished Name of the queue object, for example
“LASER1.SALES.ACME.” (NetWare servers using NDS)
Default paper size
Select how RightFax scales a fax page to fit onto the printable area of a
laser printer and the paper size:
l No Scaling. The image is not scaled which can result in some
portion of the page being truncated.
l Fit Letter, Fit Legal, Fit A4. The fax page is scaled to fit onto the
printable area of the indicated paper size: U.S. letter (8.5 × 11 in.),
U.S. legal (8.5 × 14 in.), or A4 (210 × 297 mm).
If you receive faxes in a mix of letter and legal sizes and use dual-
bin laser printers, select Fit Letter/Legal or Fit A4/Legal to let the
laser printer select the size paper that corresponds to the size of the
fax page.
Default paper source
Determines which paper tray selection command RightFax sends to the
printer. Select None if the default paper size is set to Fit Letter/Legal
or Fit A4/Legal.
Importing printers into RightFax
You can import printers from your network into RightFax. To appear in
the network, printers must be shared in Windows Active Directory.
To import printers
1. Click Import.
2. Select the Domain from which to import.
3. To change the default printer characteristics by which to search,
OpenText RightFax20.2 53 Managed ServicesAdministrator Guide

Chapter 9: Connecting printers and scanners
under Default Printer Settings, select the printer driver, paper
size, and paper source, and whether to search for printers set to
print to an IP port.
4. Click Select Printers. Depending on the size of the network,
this scan can take several minutes.
The list of available printers appears.
5. In the Printer type box, select PCL or Postscript.
6. Select the printers, and then click OK.
Configuring RightFax to automatically print
faxes
After defining at least one network printer, you can configure RightFax
user profiles to automatically print sent or received faxes.
Note The ability to automatically print sent and received faxes can
also be configured by individual users in the FaxUtil client application.
To configure a user to automatically print sent and received
faxes
1. Add at least one network printer. For more information, see
Creating, deleting, and copying a printer on page52.
2. Open the user ID you want to configure. For more information,
see Creating, deleting, copying, and editing users on page18.
3. Configure the user profile settings to automatically print sent and
received faxes. For more information, see Automatic Printing on
page27.
OpenText RightFax20.2 54 Managed ServicesAdministrator Guide

Chapter 10: Creating billing codes
Chapter 10: Creating billing codes
RightFax can track and report about faxes with billing codes. Users can
be required to enter one or two codes for every fax before it can be sent
or deleted. RightFax provides two billing code fields (Billing Code 1 and
Billing Code 2) for each faxed document.
Billing codes can be validated internally against a master table or
externally using a separate application, such as an accounting program.
To validate billing codes internally, you must create a list of valid billing
codes in RightFax. Your organization can use:
l Both billing codes on faxes, such as one code for account number
and one for a matter number.
l Only one billing code, for example to track the individual or
department sending the fax.
l No billing codes.
To open the list of billing codes
l In Web Admin, in the left pane, click Billing Codes. The list of
billing codes appears in the right pane.
Customizing the use of billing codes
You can do any of the following:
l Change the labels for billing codes 1 and 2. By default they appear in
the RightFax client applications as Account and Matter.
l Require that all users enter one or both billing codes with each fax
sent.
l Require billing codes for received faxes to track information about
received faxes.
l Validate billing codes against the RightFax billing code list or
against a list in an external application. If a supplied billing code
does not match a billing code in the list, it is rejected and the fax is
not sent.
Validating against a list in an external application requires creating a
custom utility using the RightFax API. For more information, see
https://mysupport.opentext.com or contact OpenText for
implementation services.
To change the Account and Matter (billing code 1 and 2) labels
1. Click Options.
2. Enter the new descriptions in the Label for billing code 1 and
Label for billing code 2 boxes.
To require billing codes before a fax can be sent
1. Click Options.
2. Select the Required for sending check box under either or both
Label for billing code 1 and Label for billing code 2.
OpenText RightFax 55 Managed ServicesAdministrator Guide
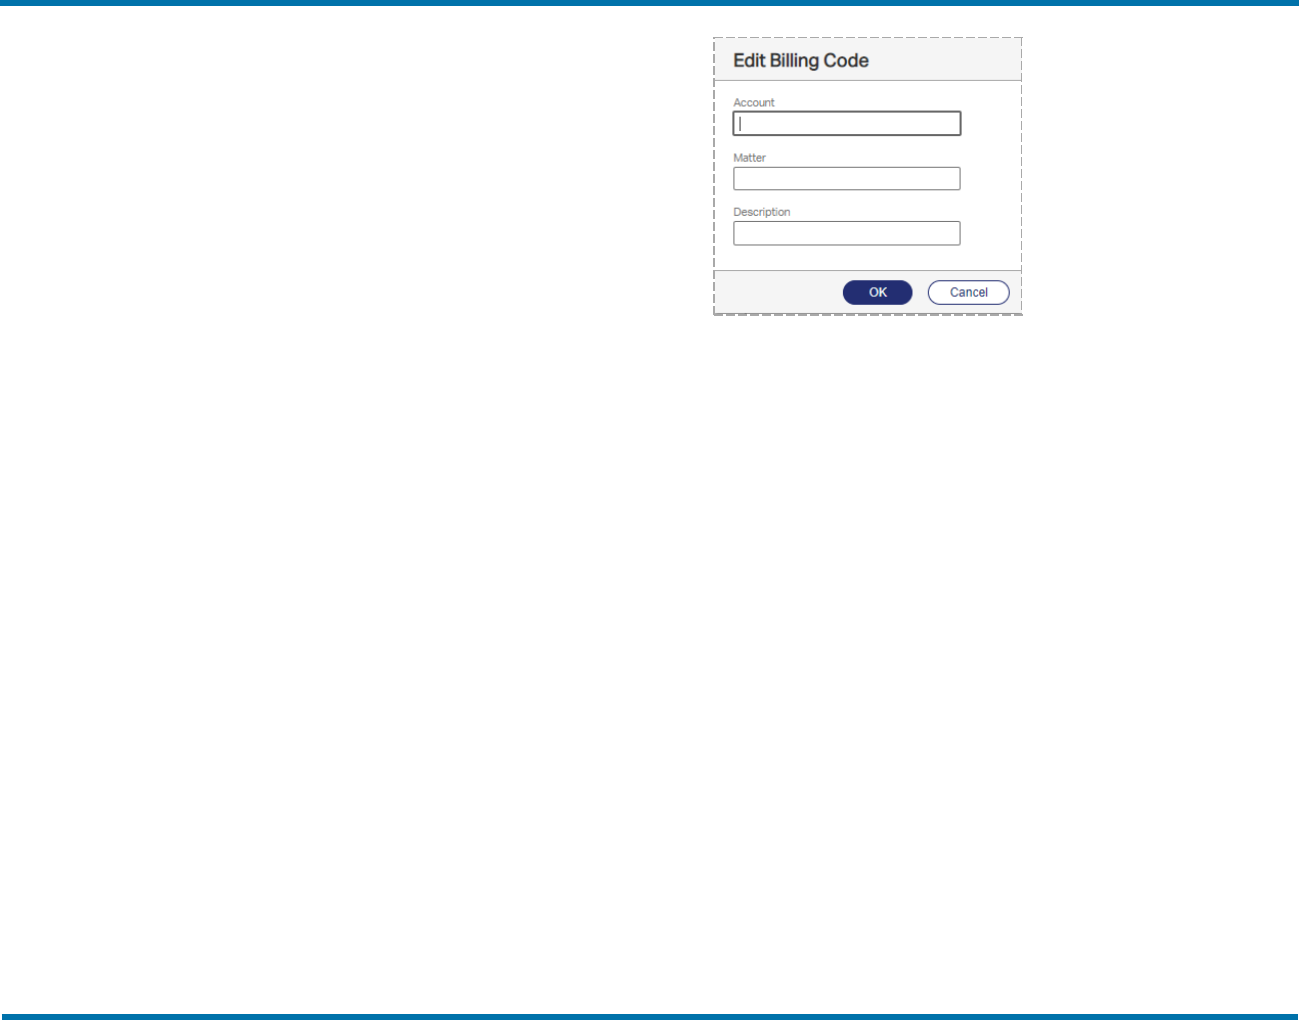
Chapter 10: Creating billing codes
Fields that you have marked as required will appear bold in the
Fax Information dialog box.
To require billing codes on received faxes
1. Click Options.
2. Select the Required for receiving check box under either or
both Label for billing code 1 and Label for billing code 2.
Users can manually assign billing codes to their received faxes
in the client applications.
To validate billing codes
1. Click Options.
2. Select the Validate billing codes check box.
Creating, deleting, and copying billing codes
To create a billing code
l Click New. The Edit Billing Code dialog box opens. For
information on completing each of the options, see Editing billing
code properties below.
To delete a billing code
l Select the billing code or codes in the list, click Delete, and then
confirm the deletion.
Editing billing code properties
To edit the properties of an existing billing code
l In the list, select the billing code, and then click Edit.
Account, Matter
Enter one or two billing codes.
Description
Enter a descriptive name for the billing code.
Making ODBC billing codes available in
FaxUtil
You can make billing codes from an external ODBC source available to
your users so they can use them in their outbound faxes.
Each client workstation must be configured individually. After you
configure the ODBC information on a user’s workstation that has
FaxUtil installed, that user can look up ODBC billing codes when
sending faxes from FaxUtil.
To access the ODBCbilling codes
1. In the Windows task bar, right-click the RightFax tray icon, and
click ODBC Configuration. The Configure ODBC Tables
window opens.
OpenText RightFax20.2 56 Managed ServicesAdministrator Guide
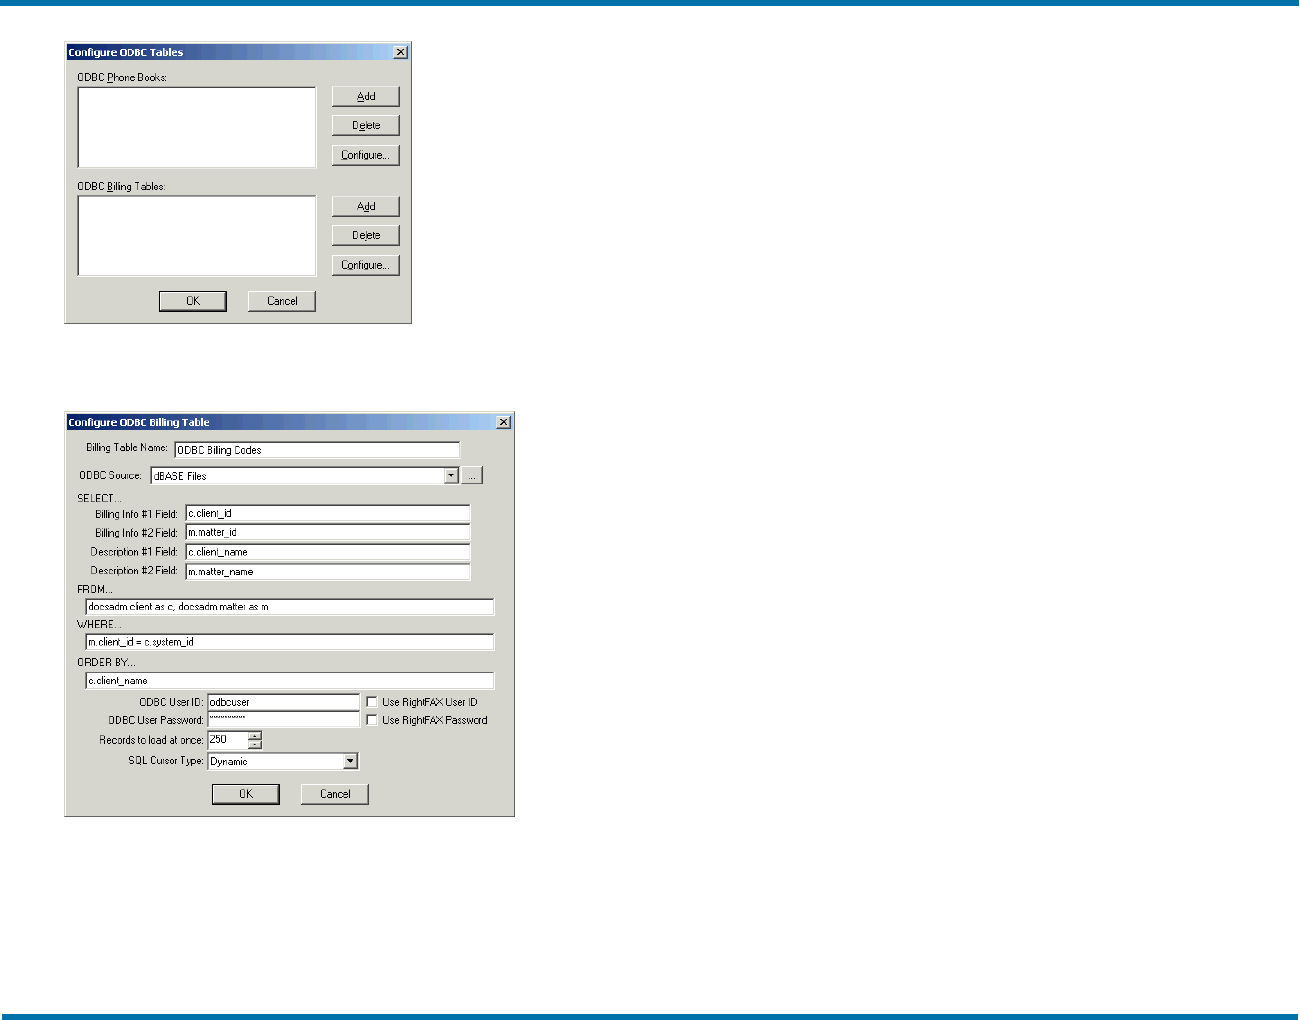
Chapter 10: Creating billing codes
2. Under ODBC Billing Tables, click Add. The Configure
ODBC Billing Table window opens.
3. Fill in the information according to your ODBC database
specifications.
Billing Table Name
Enter a descriptive name for this billing codes table.
ODBC Source
Enter the name of your ODBC billing codes data source.
ODBC Field Names
Relates the fields of the ODBC database to the standard RightFax
billing code fields. This is done with simple SQL query statements.
ODBC User ID and Password
Enter the ID and password to access the ODBC database. If the ID and
password match those used to log into RightFax, you can select those
check boxes instead.
Records to Load at once
Select a number to limits the number of records listed at one time during
billing code lookup.
SQL Cursor Type
Select an SQL cursor type. In most cases, this option should be set to
Dynamic.
OpenText RightFax20.2 57 Managed ServicesAdministrator Guide

Chapter 11: Creating fax cover sheet templates
Chapter 11: Creating fax cover sheet templates
Fax cover sheet templates determine the information included on the
cover sheet for each outgoing fax. They usually include information
about your organization—such as logo, address, and phone number—
and codes that represent specific sender and destination information.
The information on a RightFax cover sheet must fit on one page. Any
cover sheet information appearing on subsequent pages will be ignored.
The RightFax server includes cover sheet template files that you can
modify or use as examples when creating your own templates. The
template files are located in RightFax\FCS\Imported.
You can create multiple cover sheet templates, such as a cover sheet
for each department or separate cover sheets for different types of fax
documents.
You can create the following types of cover sheet templates:
l HTML. See Creating an HTML cover sheet template below.
l Microsoft Word. See Creating a Microsoft Word cover sheet
template on the next page.
l PostScript. See Creating a PostScript cover sheet template on the
next page.
l Printer control language (PCL). See Creating a PCL cover sheet
template on the next page.
In general, PostScript and PCL cover sheet templates convert to fax
format more quickly than HTML and Microsoft Word cover sheet
templates.
After you create the cover sheets you need, import the files into
RightFax. See Managing cover sheet template files on page62.
To open the list of cover sheets
l In Web Admin, in the left pane, click Cover Sheets. The list of
currently available cover sheets appears in the right pane. The
default cover sheet is highlighted in bold text.
Creating an HTML cover sheet template
Use an HTML editor or a text editor to create HTML and HTM cover
sheet templates.The templates can include any text and graphic
supported by these file types.
When creating an HTML cover sheet template, follow these guidelines:
l Use absolute paths to reference other files, such as graphics.
l Use cover sheet codes to specify information such as sender and
destination data. For instructions, see Inserting cover sheet codes
on the next page for a list of valid codes, see Cover sheet codes on
page60.
l Save the file with a file name extension of .htm or .html.
OpenText RightFax 58 Managed ServicesAdministrator Guide

Chapter 11: Creating fax cover sheet templates
Creating a Microsoft Word cover sheet
template
When creating a Microsoft Word cover sheet template, follow these
guidelines:
l Word cover sheets support all language character sets supported by
Word and Windows, including Hebrew. To show special characters,
such as French accents, verify that ANSI mode is enabled on the
code page of the server. See the RightFax Administrator Guide.
Word cover sheet codes can also use any TrueType font.
l Use cover sheet codes to specify information such as sender and
destination data. For instructions, see Inserting cover sheet codes
below. For a list of valid codes, see Cover sheet codes on the next
page.
l Save the file with a .docx extension.
Creating a PostScript cover sheet template
To create a PostScript cover sheet template, start with a Microsoft
Word 2016 or later source file.
In the Word file, you can use cover sheet codes to specify information
such as sender and destination data. For instructions, see Inserting
cover sheet codes below for a list of valid codes, see Cover sheet
codes on the next page.
RightFax is shipped with a sample PostScript cover sheet template,
located in the folder RightFax\FCS.
To create a PostScript cover sheet template
1. On the RightFax server in Windows Control Panel, add a local
printer and choose the RightFax printer driver. See your
Microsoft documentation for instructions.
2. Print the .docx file to the RightFax printer.
3. Save the file with the file name extension .ps.
Creating a PCL cover sheet template
To create a printer control language (PCL) cover sheet template, use an
application that can print to PCL5 . First create a source file (such as a
.doc or .txt file), and then output this file to PCL. Store both the source
file and the PCL output on the RightFax server. This is recommended
so that you can modify the template at a later time. The PCL file cannot
be edited.
When creating a PCL 5-compatible cover sheet template, follow these
guidelines:
l For .doc source files, PCL cover sheets only can be created for
Microsoft Word 2010 and previous versions. For later versions of
Microsoft Word, convert the file to PostScript. See Creating a
PostScript cover sheet template above.
l Use cover sheet codes to specify information such as sender and
destination data. For instructions, see Inserting cover sheet codes
below for a list of valid codes, see Cover sheet codes on the next
page.
l To save the source file as a PCL file, print the document to a file,
and select a printer driver that supports PCL 5 or later.
l Save the file with the file name extension .pcl.
RightFax is shipped with sample PCL cover sheet files, located in the
folder RightFax\FCS\PCL_Source.
Inserting cover sheet codes
When the RightFax server generates a cover sheet for an outgoing fax,
it replaces the cover sheet codes in the template with the data they
represent. For a list of codes, see Cover sheet codes on the next page.
To insert a code in an htm and html cover sheet template
l In the desired location of the html cover sheet, type
{coversheetcode}.
OpenText RightFax20.2 59 Managed ServicesAdministrator Guide
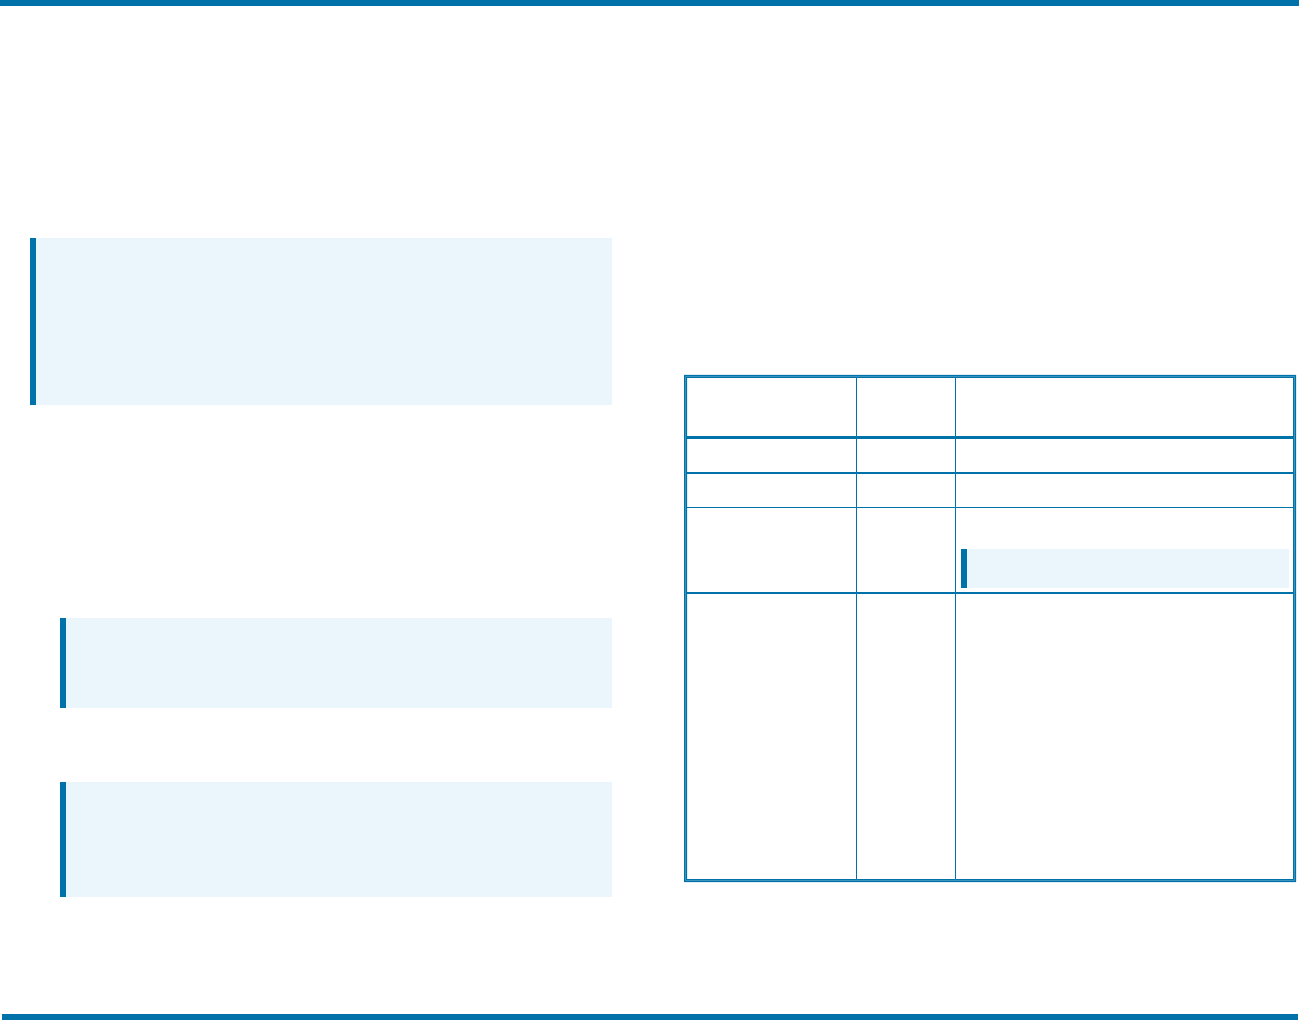
Chapter 11: Creating fax cover sheet templates
Example For the recipient’s company name, you would type
{FROMPHONENUM}.
To insert a code in a PCL cover sheet template
l In the desired location of the PCL cover sheet, in the source file,
type <coversheetcode> and apply a native printer font to both the
angle brackets and the code.
Note The remaining text can use any font. When the cover sheet
template is printed to PCL format, only text formatted with native
printer fonts is stored in text format. All other font types are
converted to graphic images. Any cover sheet code not formatted
in a native font will appear on the cover sheet instead of being
replaced by its associated data.
Example For the recipient’s company name, you would type and
apply a native printer font to <FROMPHONENUM>.
To insert a code in a Microsoft Word cover sheet template
1. In the desired location of the Word cover sheet, insert the
Document Automation field DocVariable, and then click Field
Codes.
Note If you place a cover sheet code in a Word text box,
make sure the box is large enough to fit all of the text that
replaces the codes.
2. In the Field codes box,type “coversheetcode” so that the text
in the box appears as DOCVARIABLE“coversheetcode”.
Note Do not use double-byte characters into the DocVariable
field. While double-byte characters added to the text of a
Microsoft Word cover sheet convert correctly, double-byte
characters inserted into DocVariable fields do not.
Example For the recipient’s company name, you would insert
DOCVARIABLE ”FROMPHONENUM”.
3. Click OK. To view the added code, right-click in the location of
the inserted DocVariable, and then click Toggle Field Codes.
The inserted variable becomes visible.
4. Apply a TrueType or native printer font to
{DOCVARIABLE“coversheetcode”\*MERGEFORMAT}
Cover sheet codes
Not all cover sheet codes are supported in all formats. Refer to the
following table for a list of available cover sheet codes.
Cover sheet code Maximum
characters
Description
BILLINFO1 15 Billing code 1 (if any).
BILLINFO2 15 Billing code 2 (if any).
CALL_BACK
CALLBACK2
31 The callbackinformation (if any).
Note Not for Microsoft Word cover sheets.
CCTEXT 69 All the listed recipientsof a fax(including CC
and BCC recipients) in thisformat:
Name,FaxNum;Name,Faxnum;...
You can include up to 21 {CCTEXT} codeson a
cover sheet, each code representing one line of
recipients up to 69 characterslong. Include one
{CCTEXT} code on each line that contains
recipients. The cover sheet only lists the
number of recipientsfor which space is
provided.
OpenText RightFax20.2 60 Managed ServicesAdministrator Guide
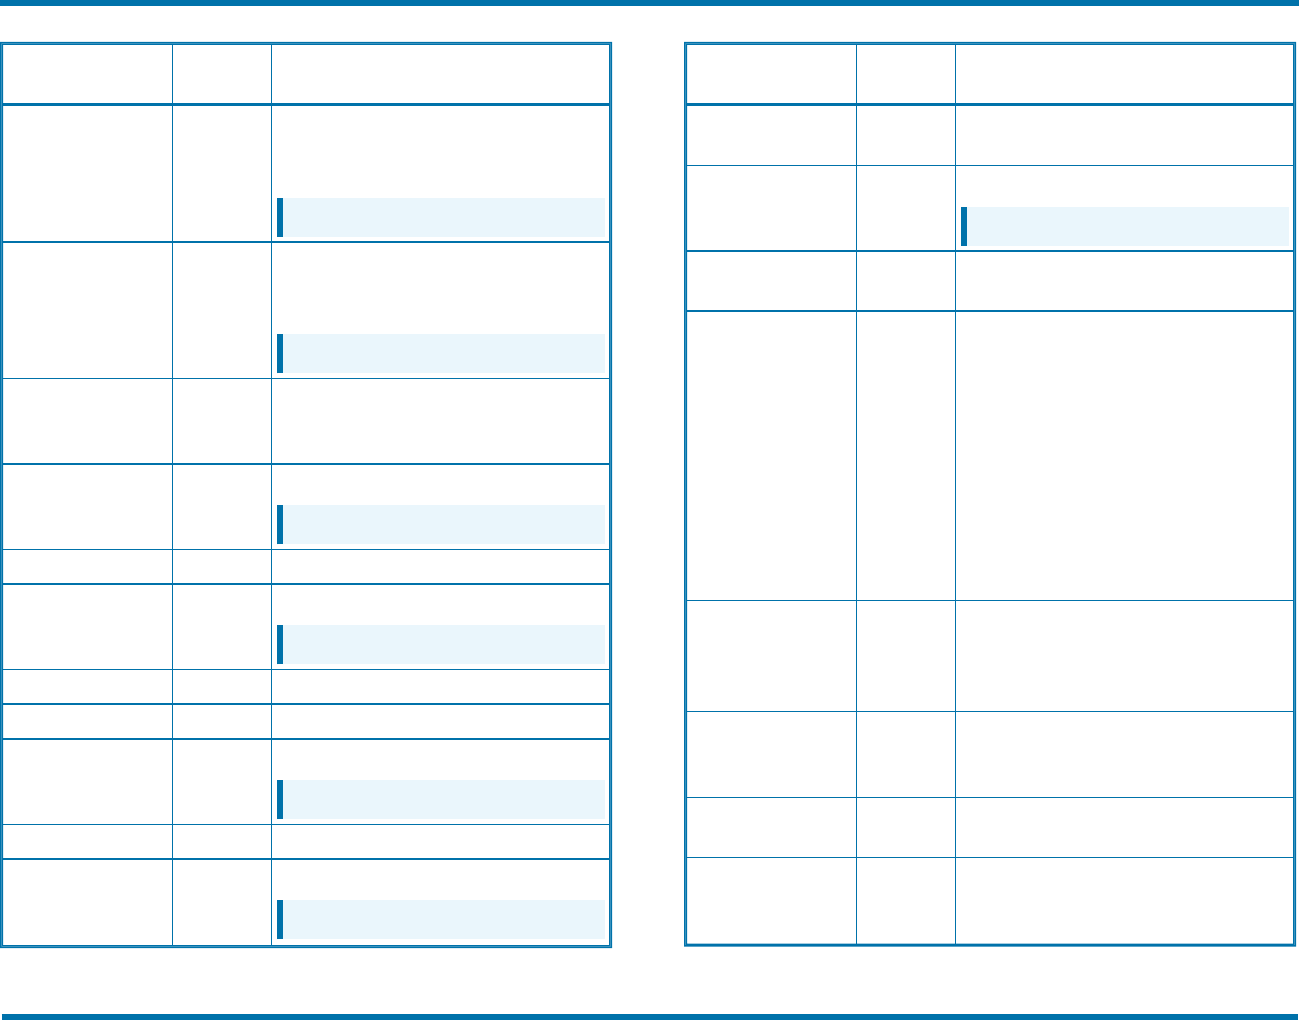
Chapter 11: Creating fax cover sheet templates
Cover sheet code Maximum
characters
Description
DATEONLY Variable The date that the faxcover sheet was
generated. The date format is determined by
the default date format on the RightFaxserver.
Note Not for Microsoft Word cover sheets.
EMAIL_ADDRESS Variable The sender’s email address from the RightFax
user properties(See Editing a user profile on
page19).
Note Not for Microsoft Word cover sheets.
EMAILADDRESS Variable The sender’semail address from the RightFax
user properties. (See Editing a user profile on
page19.)
FAXDATE Variable The date that the fax iscreated.
Note Not for HTML or PCL cover sheets.
FAXDIDNUM 31 The sender’s faxnumber.
FAXSENDDATE Variable The date that the faxwas sent.
Note Not for HTML or PCL cover sheets.
FROMCOMPANY 59 The sender’scompanyname.
FROMCITYSTATE 59 The sender’scityand state.
FROM_NAME 59 The sender’sname.
Note Not for Microsoft Word cover sheets.
FROMNAME 59 The sender’sname.
FROM_PHONENUM 31 The sender’sphone number,
Note Not for Microsoft Word cover sheets.
Cover sheet code Maximum
characters
Description
FROMPHONENUM 31 The sender’sphone number, available for all
three typesof cover sheets.
FROMPHONE 31 The sender’sphone number,
Note Not for HTML or PCL cover sheets.
GENERALFAXNUM 31 The companyfaxnumber for the sender’s
organization.
NOTETEXT 69 The notesadded to the fax when it was
addressed. You can include up to 21
<NOTETEXT> codes on a cover sheet, each
code representing one line of notesup to 69
characters long. Include one <NOTETEXT>
code on each line that you want notesto be
listed on. The cover sheet only includesas
much note text asthere is space allotted for. If
the notesfor a fax are shorter than the space
provided by <NOTETEXT> codes, the
remaining lineswill be filled with blanks.
NUMPAGES Variable The number of pagesin the faxbody, not
including the cover sheet. To include the cover
sheet in the page count, use the
<NUMPAGESC> code.
NUMPAGESC Variable The number of pagesin the fax including the
cover sheet. To exclude the cover sheet in the
page count, use the <NUMPAGES> code.
OPERATORNUM 31 The general phone number for the sender’s
organization.
ROUTEINFO Variable The routing information entered in the user
profile of the user creating the fax. (See
Routing on page25).
OpenText RightFax20.2 61 Managed ServicesAdministrator Guide

Chapter 11: Creating fax cover sheet templates
Cover sheet code Maximum
characters
Description
TIMEONLY Variable The time that the faxcover sheet was
generated. The time format is determined by
the default time format on the RightFax server.
Note Not for Microsoft Word cover sheets.
TO_CITYSTATE 59 The recipient’scity and state,
Note Not for Microsoft Word cover sheets.
TOCITYSTATE 59 The recipient’s city and state.
TO_COMPANY 59 The recipient’s organization name.
Note Not for Microsoft Word cover sheets.
TOCOMPANY 59 The recipient’sorganization name.
TO_CONTACTNUM 31 The recipient’s phone number.
Note Not for Microsoft Word cover sheets.
TOCONTACTNUM 31 The recipient’s phone number.
TO_FAXNUM 31 The recipient’s faxnumber.
Note Not for Microsoft Word cover sheets.
TOFAXNUM 31 The recipient’s faxnumber.
TO_NAME 59 The recipient’s name.
Note Not for Microsoft Word cover sheets.
TONAME 59 The recipient’s name.
UNIQUEID 16 The unique ID assigned to the outgoing fax.
Cover sheet code Maximum
characters
Description
USERID 59 The RightFaxUser ID.
Note Not for HTML or PCL cover sheets.
USERNAME 59 The RightFaxUser Name,
Note Not for HTML or PCL cover sheets.
WHEN_FAXED Variable The date and time the document was
generated bythe fax server. The time the fax
was processed by the faxserver can differ
largely from the time it isactuallysent as
recorded on the TTI line, especiallyif you are
using the RightFaxDelaySend feature.
Note Not for HTML or Microsoft Word cover
sheets.
WHENFAXED Variable The date and time the document was
generated bythe fax server. The time the fax
was processed by the faxserver can be very
different from the time it isactuallysent as
recorded on the TTI line, especiallyif you are
using the RightFaxDelaySend feature.
Managing cover sheet template files
The list of cover sheets includes all cover sheet templates currently
available in RightFax. You can import additional cover sheet files, edit
information about existing files, and delete files no longer needed.
Note RightFax only imports the first 21 characters of cover sheet file
names from the \FCS folder. File names of imported cover sheets
must be unique within the first 21 characters.
OpenText RightFax20.2 62 Managed ServicesAdministrator Guide

Chapter 11: Creating fax cover sheet templates
To add a cover sheet to the list
1. Click New.
2. Enter the following information:
l ID. The text string that will appear when a user selects a
cover sheet.
l Description. The text string that will appear in the cover
sheet list.
l Click Select, and browse to the location of the cover sheet
file. Select the file and click OK.
3. Click Ok. The cover sheet is copied to RightFax and appears in
the list of cover sheets.
To delete a cover sheet from the list
l Select the cover sheet or sheets in the list, click Delete, and then
click Delete to confirm the deletion.
To edit a cover sheet ID, description, or file name
1. Select the cover sheet, and then click Edit.
2. You can change any of the following information:
l ID. The text string that appears when a user is selecting a
cover sheet.
l Description.The text string that appears in the cover sheet
list.
l To choose a new file for the ID, click Select, and browse to
the location of the new file. Select the file, and then click
Open.
3. Click Ok.
To preview a cover sheet file
You can preview Word, PostScript, PCL, and HTML cover sheet files.
l Select the cover sheet in the list, and then click View. Word files
open in Microsoft Word in read-only mode, and HTML files open in
your browser.
Granting user permission to select a cover
sheet
If your organization has several fax cover sheets for different types of
faxes, users with the appropriate permission can select which cover
sheet to use for any fax they send.
Users can also include the <FCSFILE> code in documents to specify a
cover sheet file for that document. See the RightFax Administrator
Guide.
To set the user permission Can Change CoverSheets
l See Cover Sheets Defaults on page24. Select the check box for the
permission Can Change Cover Sheets.
Setting default cover sheets
When a user sends a fax, RightFax creates the cover sheet using the
default template. You can define the following defaults settings:
l A default cover sheet for each user. The indicated file is used if the
user does not select a cover sheet when sending a fax.
l A default cover sheet for a group of users. The indicated file is used
if the user does not select a cover sheet and does not have a default
user cover sheet.
l A default cover sheet for the entire system. The indicated file is
used when the user does not select a cover sheet and has neither a
default user or group cover sheet defined. The cover sheet template
selected as the system default appears in bold text in the list of
cover sheets.
OpenText RightFax20.2 63 Managed ServicesAdministrator Guide
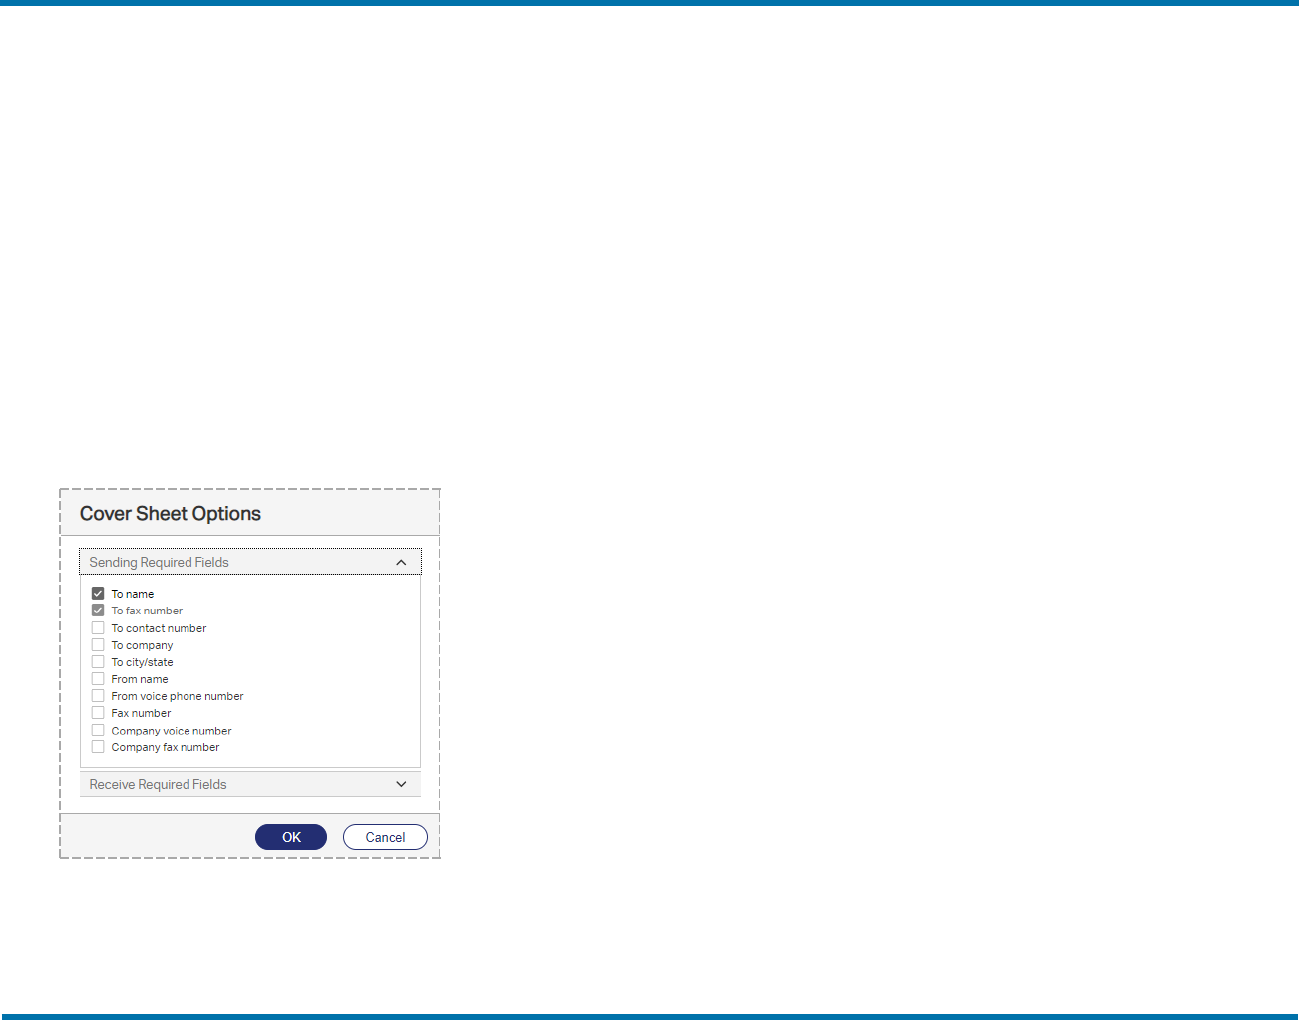
Chapter 11: Creating fax cover sheet templates
To assign a default cover sheet to a RightFax user
l See Cover Sheets Defaults on page24.
To assign a default cover sheet to a group of RightFax users
l See Cover Sheets on page39.
To change the system default cover sheet
l Select the cover sheet in the list, and then click Set default.
Setting required cover sheet information
As the administrator, you can specify the cover sheet information that
users must enter when sending or after receiving a fax.
To require cover sheet information
1. In the left pane, click Cover Sheets, and then click Options.
2. Under Sending Required Fields, select the check boxes next
to the fields required for sending faxes. The To fax number
option is always required. If a user sends a fax without filling in
all required fields, the fax remains in the user’s mailbox with the
status Information Incomplete.
3. Under Receive Required Fields, select the check boxes next
to the fields required for received faxes. If a fax arrives that does
not include all required fields, the recipient will not be able to
delete the fax until the required fields have been completed.
OpenText RightFax20.2 64 Managed ServicesAdministrator Guide

Chapter 12: Managing library documents
Chapter 12: Managing library documents
You can store frequently faxed documents (such as company literature,
credit applications, or employment forms) in a fax document library for
easy retrieval. Library documents are stored in a format that does not
require document conversion before transmission.
Your server configuration determines whether library documents are
stored in the default RightFax\Image folder on the RightFax server or in
a SQL database, and whether they are encrypted.
Library documents can be added as attachments when sending a fax or
specified in the embedded codes <LIBDOC> or <LIBDOC2> to be sent
in addition or instead of other documents. See the RightFax
Administrator Guide.
To create, edit, or manage library documents, your user profile must
include the Can Edit/Add Library Docs permission. To create library
documents, you must also have access to the FaxUtil application.
Creating a new library document
You create a library document by sending a fax to your mailbox and then
saving it in the document library.
The new document will be available in the Library Documents list for
all users except those in groups that do not have access to all library
documents. For information about editing this group property, see Cover
Sheets on page39.
To create a new library document in FaxUtil Web
1. Create the document in a word processor or other application
from which you can print to the RightFax fax printer.
2. Send the fax image to your fax mailbox.
3. Open the received fax in FaxUtil Web, and on the Fax menu,
click Add to Library. The Add to Library dialog box opens.
4. Specify a Document ID and Description for the new library
document. For information about these and the remaining
options, see Editing library document properties on the next
page.
5. Click OK.
If you entered an existing document ID, confirm that you want to
overwrite the existing document.
The new document will be available in the Library Documents
list for all users except those in groups that do not have access
to all library documents. For information about editing this group
property, see Cover Sheets on page39.
To create a new library document in Web Admin
1. Create the document in a word processor or other application
from which you can print to the RightFax fax printer.
2. Send the fax image to your fax mailbox.
3. In Web Admin, in the left pane, click Library Documents.
OpenText RightFax 65 Managed ServicesAdministrator Guide
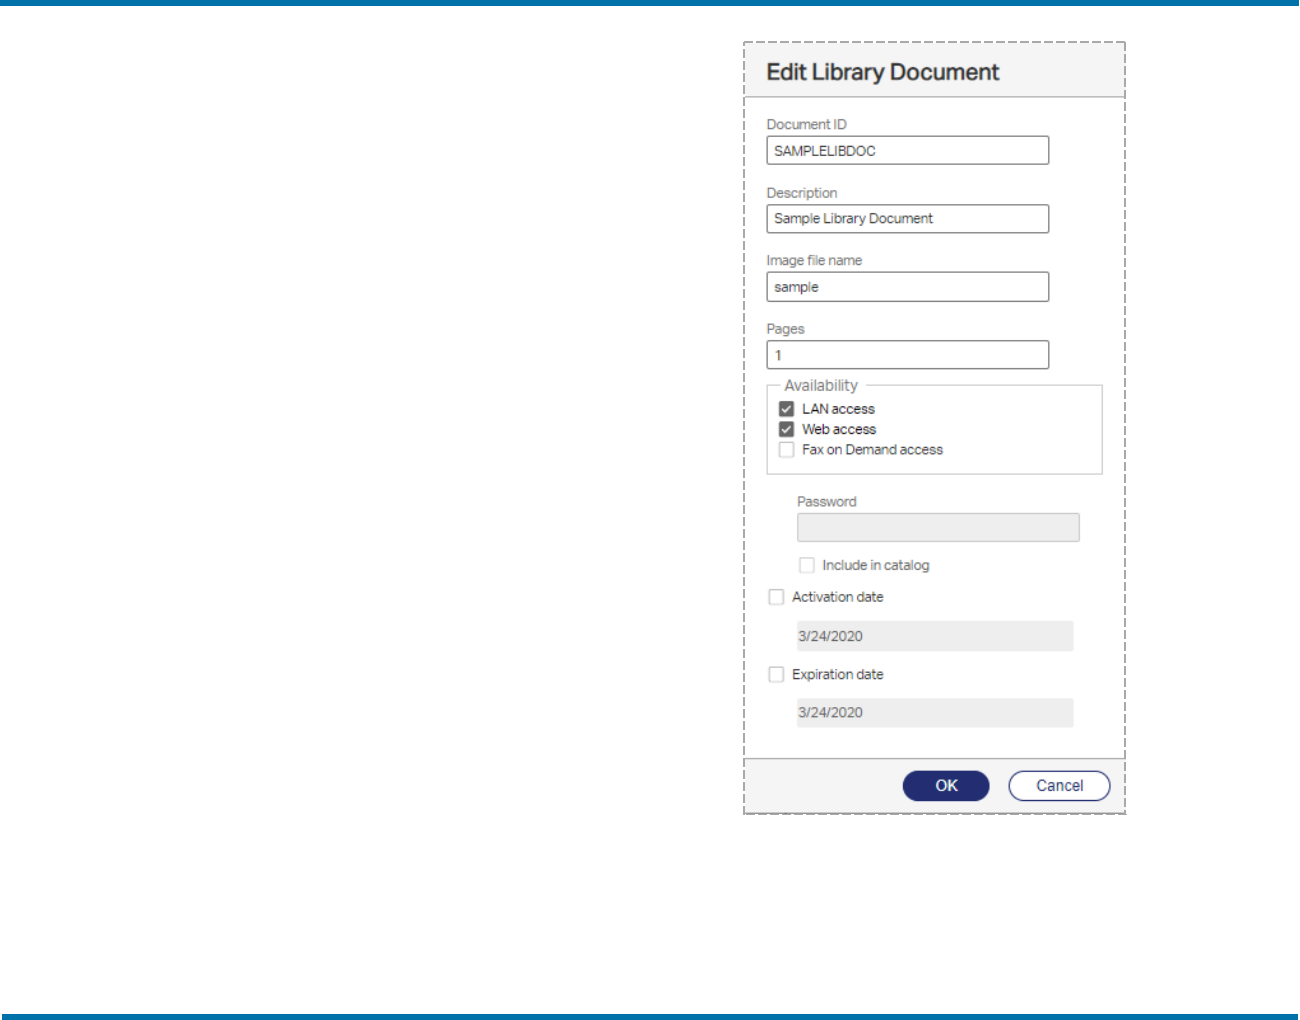
Chapter 12: Managing library documents
4. In the right pane, click New. The New Library Document dialog
box opens.
5. Specify a Document ID and Description for the new library
document. For information about these and the remaining
options, see Editing library document properties below.
6. Click OK.
If you entered an existing document ID, confirm that you want to
overwrite the existing document.
To automate the creation of new library documents
l Use the NEWLIB and NEWLIB2 embedded codes. For information
about using these and other embedded codes, see the RightFax
Administrator Guide.
Editing library document properties
To edit the properties of an existing library document
1. In Web Admin, in the left pane, click Library Documents.
2. Select the document in the list, and on the Edit menu, click Edit.
Document ID
Enter a unique code that identifies the library document.
OpenText RightFax20.2 66 Managed ServicesAdministrator Guide

Chapter 12: Managing library documents
To make the library document available via the Web or Fax-on-Demand,
assign a numeric document ID. See RightFax Docs-on-Demand
Module Administrator Guide.
Description
Enter a descriptive name for the library document.
Image file name
The name of the library document file. This is generated automatically
when the library document is created and doesn't change.
Pages
Enter the number of pages in the document.
LAN access
Select to make the library document available on the local area network
for faxing from client workstations.
Web access
Select to make the library document available to users via RightFax
web client applications.
Fax on Demand access
Select to make the library document available to users via touch tone
phone using Fax on Demand.
Password
Enter the numeric password that is required by Fax on Demand when
users request this document.
Include in catalog
Select to include this document in the Fax on Demand catalog of
available faxes.
Activation date
The library document becomes available immediately unless you select
this check box to set a later activation date. After selecting the check
box, enter the date when the library document will become available for
use.
Expiration date
The library does not have an expiration date unless you select this
check box to set an expiration date. After selecting the check box, enter
the date when the library document will become unavailable.
Deleting library documents
To delete a library document
1. Select the document or documents in the list.
2. Click Delete, and then confirm the deletion. Select the check
box Delete associated image file if you wish to delete the
library document file.
OpenText RightFax20.2 67 Managed ServicesAdministrator Guide
Chapter 13: Adding messaging services for notification messages
Chapter 13: Adding messaging services for notification messages
The RightFax server can send emails or SMS messages to RightFax
users and administrators to alert or notify them of specific RightFax
events. To send these alerts and notifications from RightFax, you must
configure the services and providers in RightFax.
To configure RightFax SMS Service, refer to the RightFax
Administrator Guide.
Adding messaging services
To add a messaging service to RightFax
1. In Web Admin in the left pane, click Messaging Services.
2. Click New. The New Messaging Service dialog box opens.
See Editing messaging service properties below.
After adding the necessary messaging services, you can configure the
notifications and alerts:
l To configure fax status notifications and their mode of delivery for
individual users, see Notification on page30. You can also configure
a default notification method per group of users. See General on
page37.
l To configure administrative alerts for individual administrative users,
see Administrative Alerts on page29).
l To use the RightFax Alerting and Monitoring service to create and
customize a list of server statistics to monitor and alert on, see the
RightFax Administrator Guide.
Editing messaging service properties
Each type of service you add requires different configuration settings.
Configuring SMTP services
Service ID
Enter a descriptive ID for the service provider or type of service.
The service ID of an existing service cannot be changed. If you enter a
new service ID for an existing service, RightFax creates a copy of the
service with the new name.
OpenText RightFax 68 Managed ServicesAdministrator Guide
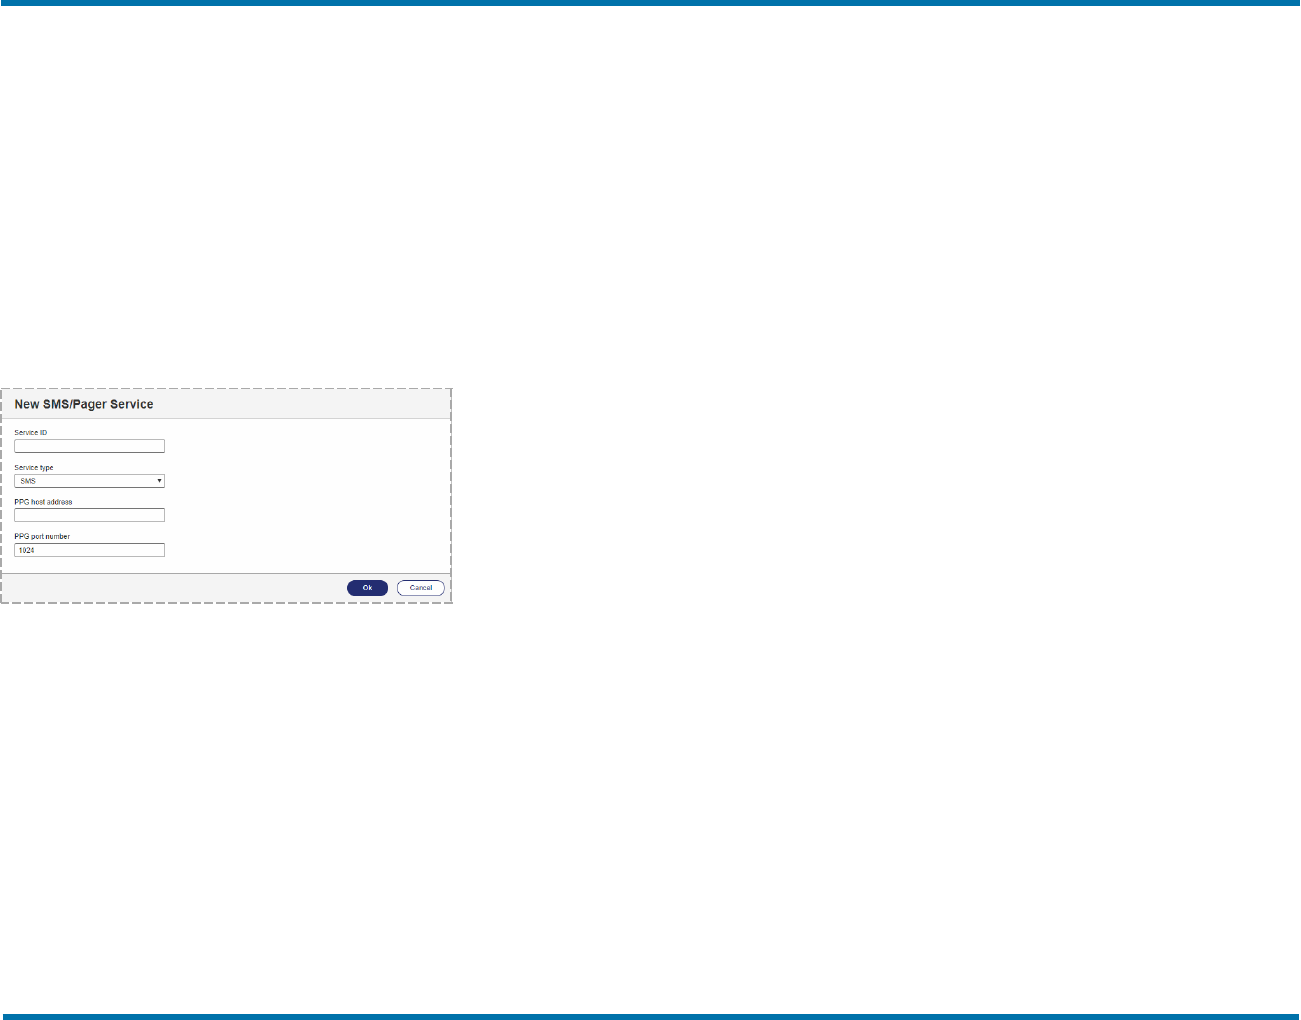
Chapter 13: Adding messaging services for notification messages
Service type
Select SMTP.
External connection
Select the SMTP connection through which emails will be sent. If the
SMTP connection is not listed, click New, and see Configuring an
SMTP connection on page101.
SMTP sender address
Some SMTP message servers require the sender’s SMTP address to
process transactions. If required, enter the SMTP email address from
which the message will be sent.
Configuring SMS via Push-Proxy Gateway services
Service ID
Enter a descriptive ID for the service provider or type of service.
The service ID of an existing service cannot be changed. If you enter a
new service ID for an existing service, RightFax creates a copy of the
service with the new name.
Service type
Select SMS. In the SMS Service selection dialog box, select Push
Proxy Gateway, and then click OK.
PPG host address
Use the default value for the PPG host.
PPG port number
Use the default value for the PPG port number.
Logging administrative alerts
Administrative alerts are logged in the Windows Event Log with a
special event identifier. Using this identifier, Windows monitoring
systems can identify when an alert has occurred without monitoring the
contents of the event entry.
To ensure that logging occurs using the special event identifier
l For each alert type, set up at least one user to receive it.
If no users are set up to receive alerts, none are logged in the Event Log
using the special event identifier.
To filter on these events
l Enter the following:
source = “RightFax Server Module” and Category = “Administrative
Alert”
OpenText RightFax20.2 69 Managed ServicesAdministrator Guide
Chapter 14: Managing faxnumbers
Chapter 14: Managing fax numbers
You can maintain a list of your organization’s fax numbers in RightFax.
The list shows whether a number has been assigned as a routing code
to a user id. The user ID can be that of a user or of a group.
To open the list of fax numbers
l In Web Admin, in the left pane, click Fax Numbers. The list of fax
numbers appears in the right pane.
Adding and deleting fax numbers
You can add your organization’s fax numbers as individual numbers, as
a range of numbers, or import them from a .csv (comma-separated
values) file. The numbers can then be added as routing codes to users
and groups, with RightFax keeping track of which numbers are
assigned and which are available.
Note To assign a fax number to a group, Smart Fax Distribution must
be enabled.
Any non-numeric characters in the import file, such as parentheses, will
be stripped when imported. If an entry contains the user id of a user or
group (faxnumber,userid), the fax number will be automatically added
as the routing code to the user’s or group’s profile.
The length of the fax number depends on your telephone system.
To add individual fax numbers
1. Open the list of fax numbers.
2. Click New.
3. Click Single number.
4. In the box, type the fax number, and then click Ok.
To add a range of fax numbers
1. Open the list of fax numbers.
2. Click New.
3. Click Range.
4. In the first box, enter the lowest fax number in the range.
5. In the second box, enter the highest fax number in the range.
Note You cannot create more than 5000 fax numbers at one time.
To import fax numbers from a .csv file
1. Open the list of fax numbers.
2. Click Import, and then click Choose File.
3. Find and select the .csv file, and then click Import.
4. A status message shows how many fax numbers were
processed and how many of them were not imported.
OpenText RightFax 70 Managed ServicesAdministrator Guide

Chapter 14: Managing faxnumbers
To delete a fax number
1. Check if a number you want to delete is associated with a user
or group. If yes, edit the user or group to disassociate the
number.
2. Select the fax number or numbers in the list, and click Delete.
3. Click Delete to confirm the deletion.
Assigning a fax number to a user or group
Perform this task to assign a fax number as the routing code to a user’s
or group’s profile. This may not be necessary if the fax numbers were
imported from a file that included the associated user and group IDs.
Note To assign a fax number to a group of users, Smart Fax
Distribution must be enabled.
To assign a fax number to a user
l Under Routing, in the Routing code (DID/DNIS) box, enter the
fax number. See Routing on page25
To assign a fax number to a group of users
l Under Smart Fax Distribution, in the Routing code (DID/DNIS)
box, enter the fax number. See Smart Fax Distribution on page42.
To remove a fax number assignment
l Under Routing for the user or Smart Fax Distribution for the
group, delete the fax number or enter a different number.
Activating fax numbers in the RightFax
Connect Portal
If your RightFax implementation routes faxes to RightFax Connect and
you plan to port fax numbers, you must activate the fax numbers in the
RightFax Connect Portal prior to the scheduled port date.
To activate fax numbers in the RightFax Connect Portal
1. Log on to the RightFax Connect Portal.
2. Under Action Menu, click Manage Fax Numbers.
3. In the Available Numbers list, select the check boxes of the
fax numbers.
If the numbers do not appear in the list, click , fill in the
necessary information of the range of fax numbers to receive,
and then select the fax numbers to activate. The numbers must
include the complete country code, region, and area/city code.
4. Click Activate, and then click Save Changes.
OpenText RightFax20.2 71 Managed ServicesAdministrator Guide

Chapter 15: Running RightFaxreports
Chapter 15: Running RightFax reports
In Web Admin you can generate a variety of reports of the information
stored in the RightFax database about sent and received faxes.
To schedule a report to run once on another day or to run on a recurring
schedule, see the RightFax Administrator Guide.
To generate RightFax reports from Enterprise Fax Reporter or from a
command line from the RightFax server or a client workstation, see the
RightFax Administrative Utilities Guide.
Generating RightFax reports
To run reports, the permission Can Run Reports must be enabled for
the logged in user.
To open a report
1. In Web Admin, in the left pane, click Reports.
2. In the right pane, click Open. In the Select Report dialog box,
select the report, and then click Next.
3. In the Parameters dialog box, enter all required parameters,
such as the time frame. The parameters vary by report. See
Entering report parameters below.
Entering report parameters
After selecting a report to generate, you are prompted to enter the
parameters for which to show data, most commonly a date range.
Specifying a date range
To enter a range of dates
1. Under Select start date, do one of the following:
l Enter a start date.
l To include all data up to a specified end date, select No
lower limit.
2. Under Select end date, do one of the following:
l Enter an end date.
l To include all data after the specified start date, select No
upper limit.
Specifying RightFax users
To enter RightFax users
l In the User box, do one of the following:
l To select all users, enter an asterisk (*).
l To specify a user or users, enter the RightFax user ID or part of a
user ID. You can enter an asterisk (*) to search for any one or
more characters and ? to search for any one character.
OpenText RightFax 72 Managed ServicesAdministrator Guide

Chapter 15: Running RightFaxreports
Specifying destinations
Destinations may be fax numbers, remote IDs (the name or telephone
number of the sending fax machine), company, or recipient names.
To enter destinations
l Under Destination, do one of the following:
l To select all fax numbers, remote IDs, companies, or names,
enter an asterisk (*).
l To specify one or more destinations, enter the fax number,
remote ID, company name, or name. You can enter an asterisk
(*) to search for any one or more characters and ? to search for
any one character.
Specifying actions to audit
To select actions to audit
l Under Action, do one of the following:
l To select all actions, click All.
l To run the report on a specific action, click Added, Deleted,
Modified, or Login.
To specify types of objects to audit
l Under Object, do one of the following:
l To select all object types, click All.
l To run the report on a specific type of object, click Group, User,
or Delegate.
To specify values to audit
l Under Users and groups, do one of the following:
l To select all RightFax users or groups, enter an asterisk (*).
l To select a specific RightFax user or group, enter the user or
group ID. You can enter an asterisk (*) to search for any one or
more characters and ? to search for any one character.
Calculating phone costs
To specify phone time costs
l Under Cost per minute for phone time, enter the number.
Specifying the number of channels
To specify the number of channels
l Enter the number of channels in the box.
Specifying a log out action
The LogOut action is when the user logs out. The AdminLogOut action
is when the administrator removes the connection from the list of
connections in Web Admin.
To select a log out action
l Under Corollary action, click All, LogOut, or AdminLogOut.
Saving a report to file
To export fax report information to a specific file format
l In the Parameters dialog box, under Export format, select CSV
(comma separate value) or PDF (portable document format).
OpenText RightFax20.2 73 Managed ServicesAdministrator Guide

Chapter 15: Running RightFaxreports
RightFax Advanced Audit Report
The report shows an audit trail of additions, deletions, and modifications
to user and group accounts and to delegates. You can also run the
report for login and logout actions.
Data included
For each change of a user, group, or delegate:
l Date and time of the action
l Name of the user performing the action
l Action taken (added, deleted, or modified)
l Type of object modified (user, group, or delegate)
l Name of object modified (user, group, or delegate name)
For each login or logout action:
l Date and time of the action.
l Name of the user performing the action.
l Action (Login) and Corollary Action (LogOut, AdminLogOut).
AdminLogOut appears if the connection was removed from the list
of connections in Web Admin, and the user has not since signed off.
l Date and time of the corollary action.
To generate the Advanced Audit Report
1. Select Advanced Audit.
2. Specify the parameters user, date range, actions, objects,
values, and log out action.
RightFax Deleted Inbound Faxes
Data included
For each day:
l Fax handle of the received fax, as assigned by the fax server
l Date and time the fax was received
l Date and time the fax was deleted
l RightFax user ID of the person who deleted the fax
l RightFax user ID of the"owner" of the fax
l Age of each fax
Fax page count
l Total number of faxes deleted
l Average age of the faxes
To generate the RightFax Deleted Inbound Faxes Report
1. Select Faxes Deleted to Trash Inbound.
2. Specify the parameter date range.
RightFax Deleted Outbound Faxes
Data included
For each day:
l Fax handle of the sent fax, as assigned by the fax server
l Date and time the fax was sent
l Date and time the fax was deleted
l RightFax user ID of the person who deleted the fax
l RightFax user ID of the "owner" of the fax
l Age of each fax
Fax page count
OpenText RightFax20.2 74 Managed ServicesAdministrator Guide

Chapter 15: Running RightFaxreports
l Total number of faxes deleted
l Average age of the faxes
To generate the RightFax Deleted Outbound Faxes Report
1. Select Faxes Deleted to Trash Outbound.
2. Specify the parameter date range.
Failed Received Fax Report: Unsuccessful
Inbound Faxes by User
Data included
For each RightFax user ID:
l Unique ID of the received fax, as assigned by the fax server.
l Date and time the fax was attempted.
l Status of the fax (viewed or printed).
l DID number the fax was sent to.
l Name or telephone number of the sending fax machine (remote ID).
l Status of the fax transmission.
l Number of pages in the attempted transmission.
l Length of time of the attempted transmission.
Fax page count
l Total number of failed pages per user.
l Overall total number of failed pages for all users.
To generate the Received Fax Report: Inbound Faxes by User
1. Select Automation Inbound Failed User.
2. Specify the parameter date range.
Received Fax Report: Inbound Faxes by Day
Data included
For each day:
l RightFax user ID.
l Date and time the fax was received.
l Status of the fax (viewed or printed).
l DID number that the fax was sent to.
l Name or telephone number of the sending fax machine (remote ID).
l Status of the fax transmission.
l Number of pages in the fax.
l Length of time of the transmission.
Fax page count
l The total number of pages received for the day.
l The overall total number of pages received for all users.
To generate the Received Fax Report: Inbound Faxes by Day
1. Select Automation Inbound Day.
2. Specify the parameter date range.
Received Fax Report: Inbound Faxes by
Remote ID
Data included
For each sending fax machine:
l Name or telephone number of the sending fax machine (remote ID).
l RightFax user ID of the user who received the fax.
OpenText RightFax20.2 75 Managed ServicesAdministrator Guide

Chapter 15: Running RightFaxreports
l Date and time the fax was received.
l Status of the fax (viewed or printed).
l DID number that the fax was sent to.
l Status of the fax transmission.
l Number of pages in the fax.
l Length of time of the transmission.
l Overall total number of fax pages received by the user.
Fax page count
l The total number of pages received for each sending fax machine.
l The overall total number of pages received.
To generate the Received Fax Report: Inbound Faxes by
Remote ID
1. Select Automation Inbound Remote ID.
2. Specify the parameter date range.
Received Fax Report: Inbound Faxes by User
Data included
For each RightFax user ID:
l Unique ID of the received fax, as assigned by the fax server.
l Date and time the fax was received.
l Status of the fax (viewed or printed).
l DID number the fax was sent to.
l Name or telephone number of the sending fax machine (remote ID).
l Status of the fax transmission.
l Number of pages in the fax.
l Length of time of the transmission.
Fax page count
l Total number of pages received by each user.
l Overall total number of pages received by all users.
To generate the Received Fax Report: Inbound Faxes by User
1. Select Automation Inbound User.
2. Specify the parameter date range.
Sent Fax Report: Outbound Faxes by Day
Data included
For each day:
l Unique ID of the sent fax, as assigned by the fax server.
l Date and time the fax was sent.
l Date and time the fax was transmitted.
l RightFax user ID of the person who sent the fax.
l Name of the recipient.
l Name of the recipient company.
l Fax number of the recipient.
l Name or telephone number of the recipient fax machine (remote ID).
l Status of the fax transmission.
l Number of pages in the fax.
l Length of time of the transmission.
Fax page count
OpenText RightFax20.2 76 Managed ServicesAdministrator Guide

Chapter 15: Running RightFaxreports
l Total number of pages sent for each user.
l Overall total number of pages sent.
To generate the Sent Fax Report: Outbound Faxes by Day
1. Select Automation Outbound Day.
2. Specify the parameter date range.
Failed Fax Report: Unsuccessful Outbound
Faxes by User
Data included
For each sent fax that failed in transmission:
l RightFax user ID of the person who attempted to send the fax.
l Unique ID of the fax, as assigned by the fax server.
l The initial date and time that the server attempted to send the fax.
l The final date and time that the server attempted to send the fax.
l Name of the recipient.
l Name of the recipient company.
l Fax number of the recipient.
l Name or phone number of the recipient fax machine (remote ID).
l Status of the fax transmission.
l Length of time of the attempted transmission.
Fax page count
l Total number of pages sent for each user.
l Overall total number of pages sent.
To generate the Failed Fax Report Unsuccessful Outbound
Faxes by User
1. Select Automation Outbound Failed User.
2. Specify the parameter date range.
Fax Report: Outbound Faxes by Unique ID
Data included
For each sent fax:
l Unique ID of the sent fax, as assigned by the fax server.
l Date and time the fax was sent.
l Date and time the fax was transmitted.
l RightFax user ID of the person who sent the fax.
l Name of the recipient.
l Name of the recipient company.
l Fax number of the recipient.
l Name or telephone number of the recipient fax machine (remote ID).
l Status of the fax transmission.
l Number of pages in the fax.
l Length of time of the transmission.
Fax page count
l Overall total number of pages sent.
To generate the Fax Report: Outbound Faxes by Unique ID
1. Select Outbound Unique ID.
2. Specify the parameter date range.
OpenText RightFax20.2 77 Managed ServicesAdministrator Guide

Chapter 15: Running RightFaxreports
Fax Report: Outbound Faxes by User
Data included
For each RightFax user:
l RightFax user ID of the person who sent the fax.
l Unique ID of the sent fax, as assigned by the fax server.
l Date and time the fax was sent.
l Date and time the fax was received by the recipient.
l Name of the recipient.
l Name of the recipient company.
l Fax number of the recipient.
l Name or telephone number of the recipient fax machine (remote ID).
l Status of the fax transmission.
l Number of pages in the fax.
l Length of time of the transmission.
Fax page count
l Total number of pages sent for each user.
l Overall total number of pages sent.
To generate the Fax Report: Outbound Faxes by User
1. Select Automation Outbound User.
2. Specify the parameter date range.
Detailed Billing Report - Billing Code 1:
Outbound Faxes Only
RightFax supports the use of two billing codes for each faxed
document. This detailed report lists outbound faxes sorted by billing
code 1. Unless a custom field name has been defined, billing code 1
appears as Account.
Data included
For each fax:
l Date the fax was sent.
l Number of pages in the fax.
l Name of the recipient.
l Fax number of the recipient.
l Caller Subscriber Identification (CSID) from the recipient fax
machine.
l RightFax user ID of the person who sent the fax.
Fax page count
l The overall total number of pages sent.
To generate the Detailed Billing Report - Billing Code 1:
Outbound Faxes Only
1. Select Billing Detailed Billing Code 1.
2. Specify the parameter date range.
Detailed Billing Report - Billing Code 1 and
Billing Code 2: Outbound Faxes Only
RightFax supports the use of two billing codes for each faxed
document. This detailed report lists outbound faxes sorted by billing
codes 1 and 2. Unless custom field names have been defined, billing
code 1 appears as Account and billing code 2 as Matter.
Data included
For each fax:
OpenText RightFax20.2 78 Managed ServicesAdministrator Guide

Chapter 15: Running RightFaxreports
l Date the fax was sent.
l Number of pages in the fax.
l Name of the recipient.
l Fax number of the recipient.
l Caller Subscriber Identification (CSID) from the recipient fax
machine.
l RightFax user ID of the person who sent the fax.
Fax page count
l The overall total number of pages sent.
To generate the Detailed Billing Report - Billing Code 1 and
Billing Code 2: Outbound Faxes Only
1. Select Billing Detailed Billing Code 1 Billing Code 2.
2. Specify the parameter date range.
Detailed Billing Report - Billing Code 2:
Outbound Faxes Only
RightFax supports the use of two billing codes for each faxed
document. This detailed report lists outbound faxes sorted by billing
code 2. Unless a custom field name has been defined, billing code 2
appears as Matter.
Data included
For each fax:
l Date the fax was sent.
l Number of pages in the fax.
l Name of the recipient.
l Fax number of the recipient.
l Caller Subscriber Identification (CSID) from the recipient fax
machine.
l RightFax user ID of the person who sent the fax.
Fax page count
l The overall total number of pages sent.
To generate the Detailed Billing Report - Billing Code 2:
Outbound Faxes Only
1. Select Billing Detailed Billing Code 2.
2. Specify the parameter date range.
Summary Billing Report - Billing Code 1:
Outbound Faxes Only
RightFax supports the use of two billing codes for each faxed
document. This report shows a summary of outbound faxes sorted by
billing code 1. Unless a custom field name has been defined, billing
code 1 appears as Account.
Data included
For each billing code 1:
l Number of pages.
l Elapsed time .
For all billing codes 1:
l Number of pages.
l Elapsed time.
Fax page count
l The overall total number of pages and elapsed time.
OpenText RightFax20.2 79 Managed ServicesAdministrator Guide

Chapter 15: Running RightFaxreports
To generate the Summary Billing Report - Billing Code 1:
Outbound Faxes Only
1. Select Billing Summary Billing Code 1.
2. Specify the parameter date range.
Summary Billing Report - Billing Code 1 and
Billing Code 2: Outbound Faxes Only
RightFax supports the use of two billing codes for each faxed
document. This report shows a summary of outbound faxes sorted by
billing codes 1 and 2. Unless custom field names have been defined,
billing code 1 appears as Account and billing code 2 as Matter.
Data included
For each and all billing codes 1 and 2:
l Number of pages.
l Elapsed time .
For all billing codes 1 and 2:
l Number of pages.
l Elapsed time.
Fax page count
l The overall total number of pages and elapsed time.
To generate the Summary Billing Report - BillingCode 1 and
Billing Code 2: Outbound Faxes Only
1. Select Billing Summary Billing Code 1 Billing Code 2.
2. Specify the parameter date range.
Summary Billing Report - Billing Code 2:
Outbound Faxes Only
RightFax supports the use of two billing codes for each faxed
document. This report shows a summary of outbound faxes sorted by
billing code 2 Unless a custom field name has been defined, billing code
2 appears as Matter.
Data included
For each billing code 2:
l Number of pages.
l Elapsed time .
For all billing codes 2:
l Number of pages.
l Elapsed time .
Fax page count
l The overall total number of pages and elapsed time.
To generate the Summary Billing Report - Billing Code 2:
Outbound Faxes Only
1. Select Billing Summary Billing Code 2.
2. Specify the parameter date range.
Channel Usage Report: by Day
The detailed report lists the usage of the fax channels on each board
server for each day of the reporting period.
Data included
For each fax channel:
OpenText RightFax20.2 80 Managed ServicesAdministrator Guide

Chapter 15: Running RightFaxreports
l Total minutes.
l Receive minutes.
l Send minutes.
l Utilization percentage.
For each DocTransport:
l Total minutes.
l Total receive minutes.
l Total send minutes.
For all DocTransports for each day:
l Overall total minutes.
l Overall total receive minutes.
l Overall total send minutes.
For all DocTransports and all days in the reporting period:
l Overall total minutes.
l Overall total receive minutes.
l Overall total send minutes.
To generate the Channel Usage Report: by Day
1. Select Channel Usage.
2. Specify the parameter date range.
Channel Usage Summary Report
The summary report lists the usage of the fax channels on each board
server.
Data included
For each fax channel:
l Total minutes.
l Receive minutes.
l Send minutes.
l Utilization percentage.
For each board server:
l Total minutes.
l Total receive minutes.
l Total send minutes.
For all board servers:
l Overall total minutes.
l Overall total receive minutes.
l Overall total send minutes.
To generate the Channel Usage Summary Report
1. Select Channel Usage Summary.
2. Specify the parameter date range.
RightFax Conversion Error Report
Data included
For each sent fax that failed to convert:
l The initial date and time that the server attempted to convert the fax.
l Unique ID of the fax, as assigned by the fax server.
l RightFax user ID of the person who attempted to send the fax.
l Error message.
OpenText RightFax20.2 81 Managed ServicesAdministrator Guide

Chapter 15: Running RightFaxreports
To generate the Conversion Error Report
1. Select Conversion Errors.
2. Specify the parameter date range.
Delegates by User
Data included
For each RightFax user ID:
l The users to which this user has granted delegate permissions.
l The groups to which this user has granted delegate permissions.
To generate the Delegates by User report
1. Select Delegates by User.
2. Specify the parameter user.
Destination Report: Outbound Faxes by Fax
Number
This report lists faxes sent to a specific fax number.
Data included
For each fax number:
l RightFax user ID of the person who sent the fax.
l The user group of the user.
l Date the fax was sent.
l Name of the recipient.
l Name of the recipient company.
l Fax number of the recipient.
l Name or telephone number of the recipient fax machine (remote ID).
l Status of the fax.
l Number of pages in the fax.
l Unique ID of the fax, as assigned by the fax server.
Fax page count
l The overall total number of pages sent.
To generate the Destination Report: Outbound Faxes by Fax
Number
1. Select Destination Fax Number.
2. Specify the parameters destination and date range.
Destination Report: Outbound Faxes by
Remote ID
This report lists faxes sent to a specific recipient fax machine.
Data included
For each fax machine:
l RightFax user ID of the person who sent the fax.
l The user group of the user.
l Date the fax was sent.
l Name of the recipient.
l Name of the recipient company.
l Fax number of the recipient.
l Name or telephone number of the recipient fax machine (remote ID).
l Status of the fax.
OpenText RightFax20.2 82 Managed ServicesAdministrator Guide

Chapter 15: Running RightFaxreports
l Number of pages in the fax.
l Unique ID of the fax, as assigned by the fax server.
Fax page count
l The overall total number of pages sent.
To generate the Destination Report: Outbound Faxes by
Remote ID
1. Select Destination Remote ID.
2. Specify the parameters destination and date range.
Destination Report: Outbound Faxes by To-
Company
This report lists faxes sent to a specific recipient company.
Data included
For each company:
l RightFax user ID of the person who sent the fax.
l The user group of he user.
l Date the fax was sent.
l Name of the recipient.
l Name of the recipient company.
l Fax number of the recipient.
l Name or telephone number of the recipient fax machine (remote ID).
l Status of the fax.
l Number of pages in the fax.
l Unique ID of the fax, as assigned by the fax server.
Fax page count
l The overall total number of pages sent.
To generate the Destination Report: Outbound Faxes by To-
Company
1. Open Destination_ToCompany.rpt.Select Destination To
Company.
2. Specify the parameters destination and date range.
Destination Report: Outbound Faxes by To-
Name
This report lists faxes sent to a specific recipient.
Data included
The report shows for each recipient:
l RightFax user ID of the person who sent the fax.
l The user group of the user.
l Date the fax was sent.
l Name of the recipient.
l Name of the recipient company.
l Fax number of the recipient.
l Name or telephone number of the recipient fax machine (remote ID).
l Status of the fax.
l Number of pages in the fax.
l Unique ID of the fax, as assigned by the fax server.
Fax page count
l The overall total number of pages sent.
OpenText RightFax20.2 83 Managed ServicesAdministrator Guide

Chapter 15: Running RightFaxreports
To generate the Destination Report: Outbound Faxes by To-
Name
1. Open Destination_ToName.rpt.Select Destination To Name.
2. Specify the parameters destination and date range.
Failed Login Report
Lists the failed login attempts by user.
Data included
l Date of login.
l Time of login.
l RightFax user ID of the person who attempted to log in.
l Client application.
l Count of successive failed attempts.
To generate the Failed Login Report
1. Select Failed Logins.
2. Specify the parameters user and date range.
Fax Inactivity by User with Delegates
Data included
For each user with delegates:
l Date of last login
l User ID
l For each userID: delegate count and list, delegator count and list
l User name
l Number of days inactive
To generate the Fax Inactivity report
1. Select Fax Inactivity User.
2. Specify the number of elapsed days since the last login.
Fax Printing Report: Faxes Printed by Group(s)
Lists the faxes that have been printed in order by group.
Data included
l Event date
l Printer ID
l Pages
l Copies
l Print time
l Notes
To generate the Fax Printing Report: Faxes Printed by Group(s)
1. Select Fax Printing Group.
2. Specify the parameters groups on which to report and date
range.
Fax Printing Report: Faxes Printed by User(s)
Lists the faxes that have been printed in order by user.
Data included
l Event date
l Printer ID
l Pages
l Copies
OpenText RightFax20.2 84 Managed ServicesAdministrator Guide

Chapter 15: Running RightFaxreports
l Print time
l Notes
To generate the Fax Printing Report: Faxes Printed by User(s)
1. Select Fax Printing User.
2. Specify the parameters destination and date range.
User History Report: All Outbound Faxes for
User(s)
This report lists the details of all faxes. The report requires datareader
and execute SQL permissions.
Data included
For each RightFax user ID:
l Date and time the fax was sent.
l RightFax user ID of the person who sent the fax.
l Name of the recipient.
l Name of the recipient company.
l Fax number of the recipient.
l Estimated cost based on transmission time and standard rates.
l Status of the fax transmission
l Number of pages in the fax.
l Length of time of the transmission.
l Transmission history, which consists of:
l event date and time
l off hook time
l Name or telephone number of the recipient fax machine (remote ID).
l Fax channel used for the transmission
l Number of pages transmitted
l Board result
Fax page count
l Total pages faxed and cost for the user
To generate the User History Report: All Outbound Faxes for
User(s)
1. Select Fax Lists Detailed All Faxes.
2. Specify the parameters users, cost per minute, and date range.
User History Report: Completed Outbound
Faxes for User(s)
This report lists the details of all completed faxes.
Required SQL permission
l datareader
l execute
Data included
For each RightFax user ID:
l Date and time the fax was sent
l RightFax user ID of the person who sent the fax
l Name of the recipient
l Name of the recipient company
l Fax number of the recipient.
l Estimated cost based on transmission time and standard rates
OpenText RightFax20.2 85 Managed ServicesAdministrator Guide

Chapter 15: Running RightFaxreports
l Status of the fax transmission
l Number of pages in the fax
l Length of time of the transmission
l Transmission history, which consists of:
l event date and time
l off hook time
l Name or telephone number of the recipient fax machine (remote ID)
l Fax channel used for the transmission
l Number of pages transmitted
l Board result
Fax page count
l Total number of pages and total costs for each user
To generate the User History Report: Completed Outbound
Faxes for User(s)
1. Select Fax Lists Detailed Completed Faxes.
2. Specify the parameters user, cost per minute, and date range.
User Fax Report: Outbound Summary of All
Faxes for User(s)
This report lists all faxes that the fax server attempted to send.
Data included
For each fax:
l Date and time the fax was sent.
l RightFax user ID of the person who sent the fax.
l Name of the recipient.
l Name of the recipient company.
l Fax number of the recipient.
l Name or telephone number of the recipient fax machine (remote ID).
l Status of the fax transmission.
l Number of pages in the fax.
l Length of time of the transmission.
Fax page count
l The overall total number of pages sent.
To generate the User Fax Report: Outbound Summary of All
Faxes for User(s)
1. Select Fax Lists Summary All Faxes.
2. Specify the parameters user and date range.
User Fax Report: Outbound Summary of
Completed Faxes for User(s)
This report lists all faxes that were successfully sent.
Data included
For each fax:
l Date and time the fax was sent.
l RightFax user ID of the person who sent the fax
l Name of the recipient
l Name of the recipient company
l Fax number of the recipient
l Name or telephone number of the recipient fax machine (remote ID)
l Status of the fax transmission
OpenText RightFax20.2 86 Managed ServicesAdministrator Guide

Chapter 15: Running RightFaxreports
l Number of pages in the fax
l Length of time of the transmission
Fax page count
l The overall total number of pages sent
To generate the User Fax Report: Outbound Summary of
Completed Faxes for User(s)
1. Select Fax Lists Summary Completed Faxes.
2. Specify the report parameters destination and date range.
User Routed Received Documents Report:
Activities on Received Documents Performed
by User(s)
This report lists activities that users performed on received documents
(such as viewing or forwarding).
Data included
For each activity:
l Date and time of the action
l RightFax user ID of the person who owns the fax
l Operation (the action performed)
l Fax number or remote ID of recipient
l Status of fax document
l Unique ID of fax document
To generate the User Routed Received Documents Report:
Activities on Received Documents Performed by User(s)
1. Select Fax Lists Summary Human Routed Received.
2. Specify the parameters user and date range.
Documents Received report
This reports returns the number of documents received for the selected
users and time frame. This number appears at the top of the report.
To generate the Documents Received report
1. Select Fax Lists Summary Human Routed Received -
Received Count.
2. Specify the parameters user and date range.
Received documents sent to post fax processing
report
This report returns a count of the number of documents received for the
selected users and time frame that were sent for post fax processing by
RightFax Vault or XML Generator. This number appears at the top of the
report below the Documents Received total.
To generate the Received Documents sent to Post Fax
Processing report
1. Select Fax Lists Summary Human Routed Received - EDC
Count.
2. Specify the parameters user and date range.
Time-of-Day Usage by Group - Inbound
Data included
For each RightFax group:
OpenText RightFax20.2 87 Managed ServicesAdministrator Guide

Chapter 15: Running RightFaxreports
l The time of day
l The number of pages
l The minutes elapsed
Fax page count
l The number of pages sent for each group on the specified day
l The overall total number of pages sent for all groups on the specified
day
To generate the Time-of-Day Usage by Group - Inbound report
1. Select Group Fax Usage Inbound.
2. Specify the parameter date.
Time-of-Day Usage by Group - Outbound
Data included
For each RightFax group:
l The time of day
l The number of pages
l The number of minutes the fax took to send
Fax page count
l Total number of pages sent for each group on the specified day
l Overall total number of pages sent on the specified day
To generate the Time-of-Day Usage by Group - Outbound
report
1. Select Group Fax Usage Outbound.
2. Specify the parameter date.
User History Report: All Outbound Activities
for User(s)
This report shows all outbound activities for selected users for all faxes,
including deleted faxes. The fax information appears sorted by user.
The report requires execute SQL permission in addition to datareader
permission.
Data included
For each fax:
l Date and time the fax was sent
l RightFax user ID of the person who sent the fax
l Name of the recipient
l Fax number of the recipient
l Estimated cost per minute
l Status of the fax transmission
l Number of pages in the fax
l Length of time of the transmission
l Total off-hook time for this fax
l Transmission History for each transmission attempt:
l Event date and time
l Remote ID of recipient device
l Pages transmitted
l Off-hook time
l RightFax server name/Channel number
l Board result: call status from fax board
Fax page count
OpenText RightFax20.2 88 Managed ServicesAdministrator Guide

Chapter 15: Running RightFaxreports
l Total number of pages with estimated cost for each user
To generate the User History Report: All Outbound Activities
for User(s)
1. Select Outbound Activities Users.
2. Specify the parameters user, cost per minute, and date range.
User History Report: Completed Outbound
Activities for User(s)
This report shows all outbound activities for selected users for
completed faxes only, including deleted faxes. The information is sorted
by user. The report requires execute SQL permission in addition to
datareader permission.
Data included
For each fax:
l Date and time the fax was sent
l RightFax user ID of the person who sent the fax
l Name of the recipient
l Fax number of the recipient
l Estimated cost per minute
l Status of the fax transmission
l Number of pages in the fax
l Length of time of the transmission
l Total off-hook time for this fax
l Transmission history for each transmission attempt:
l Event date and time
l Remote ID of recipient device
l Pages transmitted
l Off-hook time
l RightFax server name and channel number
l Board result: call status from the fax board
Fax page count
l Total number of pages with estimated costs for each user
To generate the User History Report: Completed Outbound
Activities for User(s)
1. Select Outbound Completed Activities Users.
2. Specify the parameters user, cost per minute, and date range.
Permissions by User
Data included
For each RightFax user:
l A list of the permissions granted to this user
To generate the Permissions by User report
1. Select Permissions by User.
2. Specify the parameter user.
Fax Printing Report
Data included
For each system printer (and local printer, if selected in parameters):
l Printer ID (if a local printer, the printer ID will be Local User Printers)
l RightFax user ID for each user of the printer
l Printer use method
OpenText RightFax20.2 89 Managed ServicesAdministrator Guide

Chapter 15: Running RightFaxreports
l Number of uses (number of times each print method was logged for
the user)
To generate the Fax Printing Report
1. Select Printer Usage.
2. To include local and system printers in the report, select Include
local user printers.These printers will be listed after all system
printers.
Time-of-Day Inbound Faxes Channel Usage
Report
This report shows the total number of minutes used by all inbound
channels for each hour of the day, and calculates a utilization
percentage for both a hypothetical number of receiving channels and for
the actual number of inbound channels used.
Example You have a 16 channel board server that on a given day
receives faxes for 120 minutes in the hour between noon and one pm.
To find out the percentage of capacity if this volume had occurred
across only 4 channels, run the report for 4 receive-capable channels.
The resulting report would show the actual minutes (120), a utilization of
50% on 4 channels, and the actual utilization of 12.5% across all 16
channels. If you ran the report for 1 receive-capable channel, the
utilization percentage column would show 200% capacity. One channel
can only receive for 60 minutes each hour and the actual volume was
120 minutes.
Data included
For each hour:
l Minutes elapsed. If the date range spans more than one day, this
will reflect a total of the reception time for all days for each hour (not
an average).
l Percentage of capacity for entered number of channels.
l Percentage of capacity for the actual number of channels.
For all channels:
l The grand total number of minutes
The channel numbers that were actually used during the specified date
range.
To generate the Time-of-Day Inbound Faxes Channel Usage
Report
1. Select Time of Day Inbound.
2. Specify the parameters the number of receive-capable channels
and date range.
Time-of-Day Outbound Faxes Channel Usage
Report
This report shows the total number of minutes used by all outbound
channels for each hour of the day, and calculates a utilization
percentage for both a hypothetical number of sending channels and for
the actual number of outbound channels used.
Example A 16 channel board server sends faxes for 120 minutes in the
hour between noon and one pm on a given day. To find out the
percentage of capacity if this volume had occurred across only 4
channels, run the report using “4” for the Send-Capable Channels field.
The resulting report would show the actual minutes (120), a utilization of
50% on 4 channels, and the actual utilization of 12.5% across all 16
channels. If you entered “1” for the Send-Capable Channels field, the
utilization percentage column would show a 200% capacity. One
channel can only transmit for 60 minutes each hour and the actual
volume was 120 minutes.
Data included
For each hour:
OpenText RightFax20.2 90 Managed ServicesAdministrator Guide

Chapter 15: Running RightFaxreports
l Minutes elapsed. If the date range spans more than one day, this
will reflect a total of the transmission time for all days for each hour
(not an average).
l Percentage of capacity for entered number of channels.
l Percentage of capacity for the actual number of channels.
For all channels:
l The grand total number of minutes
The channel numbers that were actually used during the specified date
range.
To generate the Time-of-Day Outbound Faxes Channel Usage
Report
1. Select Time of Day Outbound.
2. Specify the parameters the number of receive-capable channels
and date range.
Time-of-Day Usage Report Outbound Faxes
This report shows the total number of minutes used by all outbound
channels for each hour of the day, and calculates a utilization
percentage for both a hypothetical number of sending channels and for
the actual number of outbound channels used.
Example A 16 channel board server sends faxes for 120 minutes in the
hour between noon and one pm on a given day. To find out the
percentage of capacity if this volume had occurred across only 4
channels, run the report using “4” for the Send-Capable Channels field.
The resulting report would show the actual minutes (120), a utilization of
50% on 4 channels, and the actual utilization of 12.5% across all 16
channels. If you entered “1” for the Send-Capable Channels field, the
utilization percentage column would show a 200% capacity. One
channel can only transmit for 60 minutes each hour and the actual
volume was 120 minutes.
Data included
For each hour:
l Minutes elapsed. If the date range spans more than one day, this
will reflect a total of the transmission time for all days for each hour
(not an average).
l Percentage of capacity for entered number of channels.
l Percentage of capacity for the actual number of channels.
For all channels:
l The grand total number of minutes.
The channel numbers that were actually used during the specified date
range.
To generate the Time-of-Day Usage Report Outbound Faxes
1. Select Time of Day Usage.
2. Specify the parameters the number of receive-capable channels
and date range.
Inbound Fax Users by Transmission Time
Data included
For each RightFax user ID:
l Date
l Number of minutes of transmission time for the user’s received
faxes that day
l Total number of minutes of transmission time for the user’s received
faxes for all days
For all users:
l The overall number of minutes of transmission receipt time
OpenText RightFax20.2 91 Managed ServicesAdministrator Guide

Chapter 15: Running RightFaxreports
To generate the Inbound Fax Users by Transmission Time
report
1. Select Usage Inbound Transmission Time.
2. Specify the parameter date range.
Inbound Fax Use by Pages
Data included
For each RightFax user ID:
l Date
l Number of pages received that day
l Total number of pages received for all days
Fax page count
l The overall total pages received for all users
To generate the Inbound Fax Use by Pages report
1. Select Usage Inbound Users.
2. Specify the parameter date range.
Outbound Fax Users by Transmission Time
Data included
For each RightFax user ID:
l Date
l Number of minutes of transmission time for the user’s sent faxes
that day
l Total number of minutes of transmission time for the user’s sent
faxes for all days
For all users:
l The overall number of minutes of transmission time for sent faxes
To generate the Outbound Fax Users by Transmission Time
report
1. Select Usage Outbound Transmission Time.
2. Specify the parameter date range.
Outbound Fax Use by Pages
Data included
For each RightFax user ID:
l Date
l Number of pages sent that day
l Total number of pages sent for all days
Fax page count
l Overall total number of pages sent for all users
To generate the Outbound Fax Use by Pages report
1. Select Usage Outbound Users.
2. Specify the parameter date range.
Server Inbound and Outbound Usage
Data included
For the server, for each group of users, and for each user ID:
l Total number of inbound pages
l Total number of outbound pages
l Total number of all pages
OpenText RightFax20.2 92 Managed ServicesAdministrator Guide

Chapter 15: Running RightFaxreports
To generate the Server Inbound and Outbound Usage report
1. Select Usage Server.
2. Specify the parameter date range.
Top-10 Inbound Fax Users by Transmission
Time
This report lists the 10 RightFax users whose received faxes used the
most transmission time during the reporting period.
Data included
For each of the top 10 RightFax user IDs:
l Date
l Number of minutes of transmission time for the user’s received
faxes that day
l Total number of minutes of transmission time for all days
For all top 10 users:
l The overall number of minutes of transmission receipt time
l A bar chart of their transmission receipt times
To generate the Top-10 Inbound Fax Users by Transmission
Time report
1. Select Usage Top 10 Inbound Transmission Time.
2. Specify the parameter date range.
Top-10 Inbound Fax Users by Pages
This report lists the 10 RightFax users who received the most faxes
during the reporting period.
Data included
For each of the top 10 RightFax user IDs:
l Date
l Number of pages received that day
l Total number of pages received for all days
For all top 10 users:
l The overall total pages received by the top ten users
l A bar chart of their received faxes
To generate the Top-10 Inbound Fax Users by Pages report
1. Select Usage Top 10 Inbound Users.
2. Specify the parameter date range.
Top-10 Outbound Fax Users by Transmission
Time
This report lists the 10 RightFax users whose sent faxes used the most
transmission time during the reporting period.
Data included
For each of the top 10 RightFax user IDs:
l Date
l Number of minutes of transmission time for the user’s sent faxes
that day
l Total number of minutes of transmission time for all days
For all top 10 users:
l The overall number of minutes of transmission send time
l A bar chart of the transmission send times
OpenText RightFax20.2 93 Managed ServicesAdministrator Guide

Chapter 15: Running RightFaxreports
To generate the Top-10 Outbound Fax Users by Transmission
Time report
1. Select Usage Top 10 Outbound Transmission Time.
2. Specify the parameter date range.
Top 10 Outbound Fax Users by Pages
This report lists the 10 RightFax users who sent the most faxes during
the reporting period.
Data included
For each of the top 10 RightFax user IDs:
l Date
l Number of pages sent that day
l Total number of pages sent for all days
For all top 10 users:
l The overall total pages sent by the top ten users
l A bar chart of their sent faxes
To generate the Top 10 Outbound Fax Users by Pages report
1. Select Usage Top 10 Outbound Users.
2. Specify the parameter date range.
User Inactivity
Data included
For each inactive user:
l Date of last login
l UserID
l User name
l Number of days inactive
To generate the User Inactivity report
1. Select User Inactivity.
2. Specify the elapsed number of days since the last login.
OpenText RightFax20.2 94 Managed ServicesAdministrator Guide
Chapter 16: Configuring FTP routing
Chapter 16: Configuring FTP routing
With FTP (File Transfer Protocol) routing, faxes are routed from the
RightFax server to an FTP site.
Configuring RightFax for FTP routing
Configuring FTP routing includes the following tasks:
l Configure a connection to the FTP site.
l Configure users for FTP routing.
To configure a connection to an FTP site
1. In Web Admin, click External Connections. The list of
connections appears in the right pane.
2. Click New. The New External Connection dialog box opens.
See Configuring an FTP connection on page100.
To configure users for FTP routing
1. In Web Admin, click Users. The list of users appears in the right
pane.
2. Select a user in the list, and then click Edit. The Edit User
dialog box opens.
3. Under Routing, in the Enter routing code box, enter the user's
fax number.
4. In the Routing type list, select FTP.
5. In the External connection list, select the network connection
for the FTP site. If you have not configured a connection to an
FTP site, click New and see Configuring an FTP connection on
page100.
6. In the File format list, select the file format for the faxes. For
more information, see Routing on page25.
7. In the Routing info box, enter the path to the folder on the FTP
site. You have the option to use the following macros for the
path.
Macro Definition
~1 Date (YYYYMMDD)
~2 Day of the week (SUN-SAT)
~3 Month (JAN-DEC)
~4 Year (YYYY)
~5 Day of the month (DD)
~6 Month asdecimal (01–12)
~7 User ID (up to 12 charactersin 8.3 FAT format)
~8 Weekas decimal(00–51)
~9 Billing Code #1 (up to 12 characters in 8.3 FAT format)
~0 Billing Code #2 (up to 12 characters in 8.3 FAT format)
OpenText RightFax 95 Managed ServicesAdministrator Guide
Chapter 16: Configuring FTP routing
Macro Definition
~A Remote ID (left to right, up to 12 characters in 8.3 FAT
format)
~B Remote ID (right to left, up to 12 charactersin 8.3 FAT
format)
~C Group ID (up to 12 characters in 8.3 FAT format)
~D ANI (up to 12 characters in 8.3 FAT format)
~E Channel
~F Name of the faxserver
~G Receive time hour (00-23)
~H Receive time minutes
~I Receive time seconds
~J Unique ID of the fax
8. In the Routing filename format box, you have the option to
define the format of the file name for each fax that is routed.
Include one or more of the following macros in the path, and
RightFax will dynamically name the files with the date, day of
the week, user ID, etc. To ensure that file names are unique, it is
recommended that you include the unique ID of the fax or a
combination of macros that ensures that each file name is
unique.
Macro Definition
~1 Date (YYYYMMDD)
~2 Day of the week (SUN-SAT)
~3 Month (JAN-DEC)
~4 Year (YYYY)
~5 Day of the month (DD)
~6 Month asdecimal (01–12)
Macro Definition
~7 User ID (up to 12 charactersin 8.3 FAT format)
~8 Weekas decimal(00–51)
~9 Billing Code #1 (up to 12 characters in 8.3 FAT format)
~0 Billing Code #2 (up to 12 characters in 8.3 FAT format)
~A Remote ID (left to right, up to 12 characters in 8.3 FAT
format)
~B Remote ID (right to left, up to 12 charactersin 8.3 FAT
format)
~C Group ID (up to 12 characters in 8.3 FAT format)
~D ANI (up to 12 characters in 8.3 FAT format)
~E Channel
~F Name of the faxserver
~G Receive time hour (00-23)
~H Receive time minutes
~I Receive time seconds
~J Unique ID of the fax
9. Click OK.
OpenText RightFax20.2 96 Managed ServicesAdministrator Guide

Chapter 17: Registering RightFaxon MFPs
Chapter 17: Registering RightFax on MFPs
You must register RightFax on each MFP that you will use with the
RightFax server. Registering detects the type of MFP and adds the
appropriate RightFax interface to the device. Registering requires that
you know the IPaddress of the MFP.
For more information about using an MFP with RightFax, see the
RightFax Connector Administrator Guide for the MFP.
Step 1: Defining global MFP settings
Before adding MFPs, you must specify global settings that will apply to
all MFPs that you add.
To define general MFP settings
1. In Web Admin, in the left pane, click MFPs.
2. In the right pane, click Global MFPSettings, and then click the
General tab.
3. Enter the RightFax server address.
4. To use TLS/SSL for the MFP app, select the Connect securely
check box. Use this only if you have installed a certificate on the
device. For information, see the documentation for your MFP.
5. Defaults for notifications for users about the status of faxes that
are sent from MFPs can be configured under Notification
Defaults.
l In the Condition list, select the status of the faxes for which
users will be notified: Success, Failure, or Success and
failure.
l Click Print to print a notification at the MFP.
l Click Email to send a notification to the email address of the
user who logs in at the MFP. In the Email address box,
enter the email address where notifications will be sent if a
user doesn't have an email address.
6. Click OK.
Step 2: Adding MFPs
When you add an MFP, the RightFax server detects the MFP and
registers RightFax on the device.
To add an MFP
1. In Web Admin, in the left pane, click MFPs.
2. In the right pane, click New.
3. Enter a Description, and in the Network address box, enter the
IP address or network name of the MFP.
If you use a non-standard port, append the port to the IP address
separated by a colon. For example, IP:port#
4. Click Detect. The device type appears in the dialog box.The
OpenText RightFax 97 Managed ServicesAdministrator Guide

Chapter 17: Registering RightFaxon MFPs
device type determines which options are available when
registering RightFax on the device.
5. If available, in the Fax addressing restrictions list, select
None to not apply any addressing restrictions, Confirm Fax
Address to require that users enter the recipient's fax number
twice, or Phonebook Only to require that users select
recipients from the phonebook.
6. If available, select a Default paper size.
7. If available, you can change the default Guest user account
(WALKUP) to any RightFax user account. This account will be
the guest user account for all users.
8. If you wish to designate this printer for automated network print
functions, select the Also add a server printer check box.
9. Click OK. The device is added to the MFPlist. If registration
fails, the Registered column shows that the device is not
registered.
To import MFPs from a .csv file
1. Create a .csv file. For each MFP, the file must include a line of
text in the following format:
Description,NetworkAddress,Username,Password,GuestUsern
ame,AddressingType,Skip
The variables are described in the following list:
l Description. A description of the MFP.
l NetworkAddress. The IP address of the MFP.
l Username. The user name with administrative rights to the
MFP. The user name will be used to install the RightFax
software on the MFP.
l Password. The password for the user name with
administrative rights to the MFP.
l GuestUsername. The user ID for the guest user account.
Typically this is WALKUP.
l AddressingType. Restrictions for users when they address
faxes on the MFP.
l Enter None or 0 for no addressing restrictions.
l Enter Confirm Fax Address or 1 to require that users
enter the recipient's fax number twice.
l Enter Phonebook Only or 2 to require the user to select
recipients from the phonebook.
l Skip.
l Enter True or 1 to skip this MFP.
l Enter False or 0 to install the MFP.
l AddServerPrinter. Designate this printer for automated
network print functions.
l Enter True or 1 to designate this printer for automated
network print functions.
l Enter False or 0 to if you do not wish to designate this
printer for automated network print functions.
2. In Web Admin, in the list of items, click MFPs.
3. Click Import, and then click Choose File.
4. Find and select the .csv file, and then click Import.
5. To check the status of the device import task, on the
<username> menu, click View Task Monitor. The Status
column shows one of the following:
l In progress. The task has not yet completed.
l Warning. The process completed, but not all of the devices
were successfully imported or created.
OpenText RightFax20.2 98 Managed ServicesAdministrator Guide

Chapter 17: Registering RightFaxon MFPs
l Error. The tasks did not complete. The associated error
message appears in the Output column.
l Ok. The task completed.
6. If the task completed, click View to check how many devices
were created. If there were problems, a Download link appears
in the Output column. Click the link to download a file containing
detailed information for each device not created.
To delete and unregister an MFP
1. In Web Admin, in the left pane, click MFPs.
2. In the right pane, click the MFP in the list, click Delete, and click
OK to confirm the deletion. This deletes the MFP from the list
and attempts to remove the RightFax interface from the device.
If the device is deleted from the list but the device could not be
reached, then you must re-add the device in Web Admin and
delete it again.
To edit an MFP
1. In Web Admin, in the left pane, click MFPs.
2. In the right pane, click the MFP in the list, and then click Edit.
3. Make any necessary changes.
If you change the network address, the MFP is considered new.
The license will be transferred to the MFP, and RightFax will be
registered on the device.
4. Click OK.
OpenText RightFax20.2 99 Managed ServicesAdministrator Guide
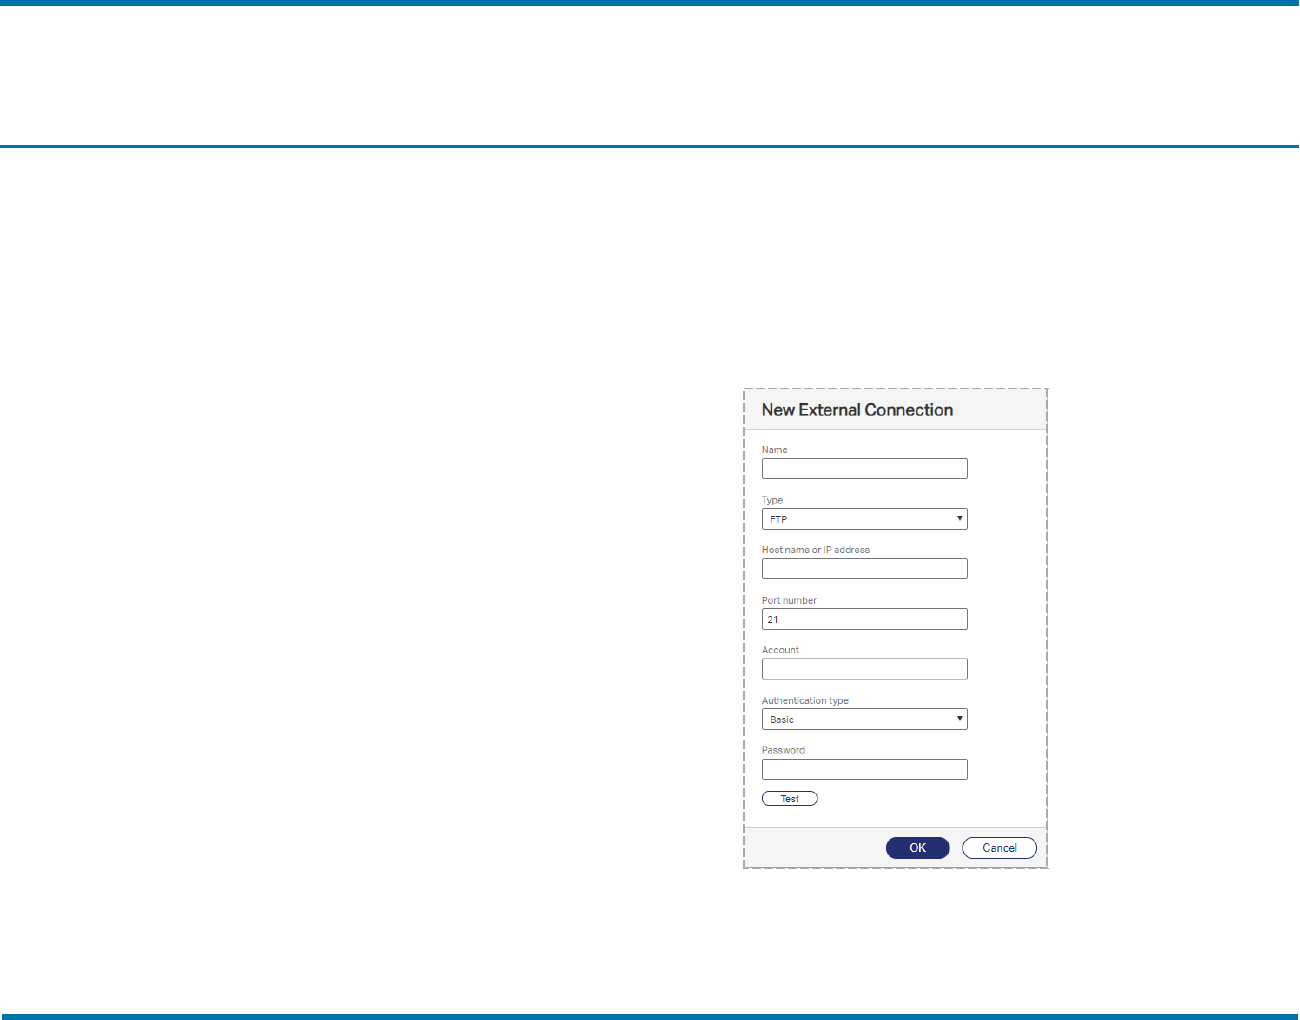
Chapter 18: Adding external connections
Chapter 18: Adding external connections
Connections to external services are required for sending and receiving
emails, sending SMS messages, and routing to an FTP site.
Adding an external connection
To add an external connection
1. In Web Admin in the left pane, click External Connections.
2. Click New. The New External Connection dialog box opens.
See Configuring external connection properties below.
Configuring external connection properties
Each type of external connection you add requires different
configuration settings.
Configuring an FTP connection
To configure a connection to an FTP site
1. Click New. The New External Connection dialog box opens.
2. In the Name box, enter a descriptive name for this connection.
3. In the Type box, select FTP, FTP over FTP over SSL (FTPS),
OpenText RightFax 100 Managed ServicesAdministrator Guide
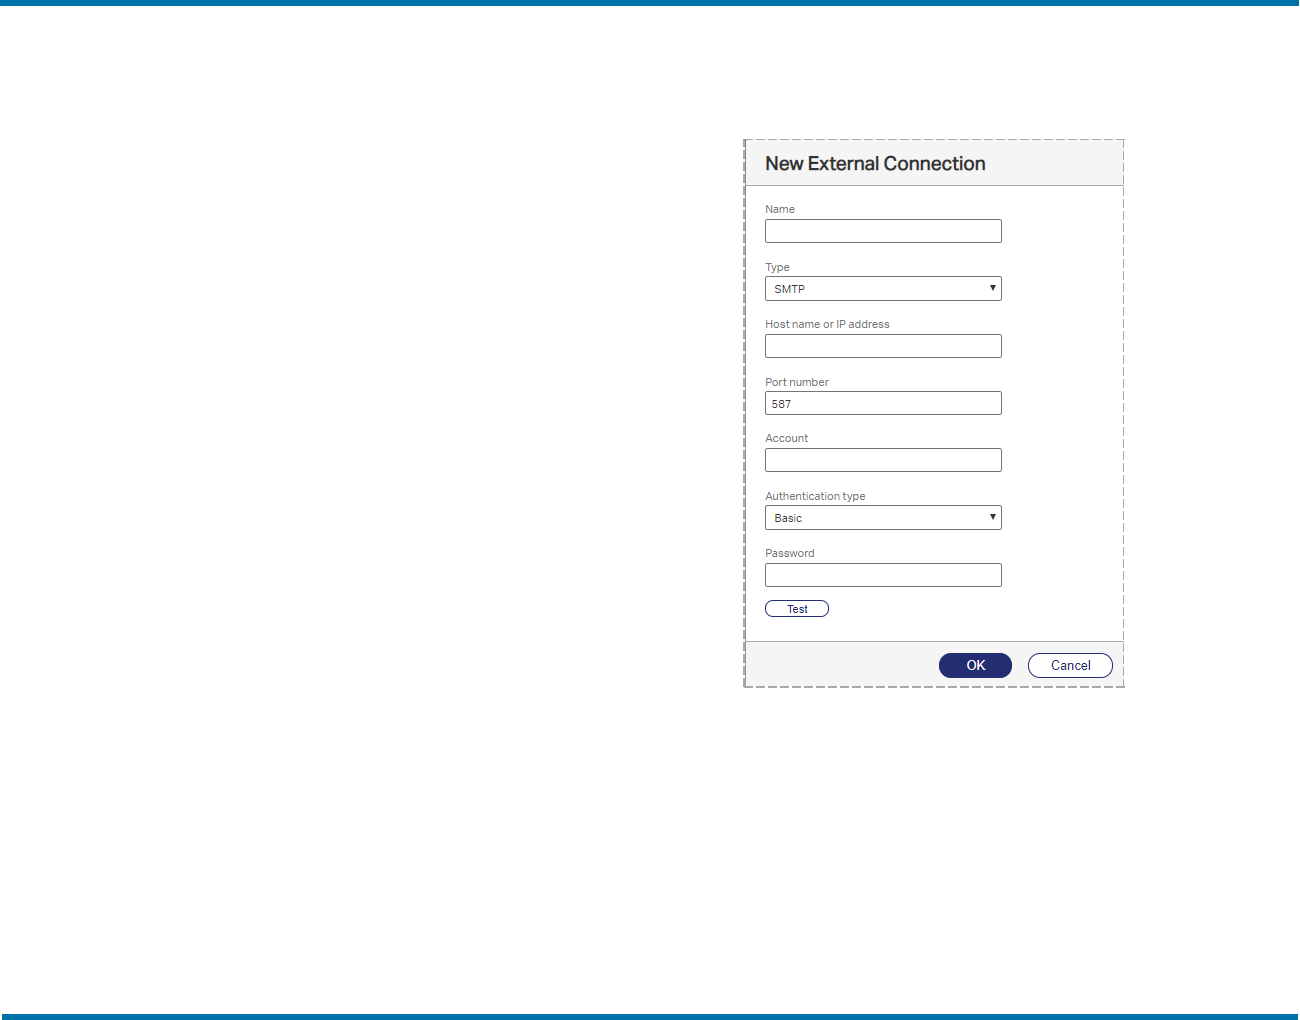
Chapter 18: Adding external connections
or SSH File Transfer Protocol (SFTP).
4. In the Host name or IP address box, enter the IP address or
the name of the server that is hosting the FTPsite.
5. In the Port number box, enter the port number.
6. In the Account and Password boxes, enter the user name and
password for the FTP site.
7. For FTP over SSL (FTPS), under Certificate, click the ellipsis
button, browse to the location of the security certificate, and
select it.
8. To test the connection, click Test.
9. Click OK.
Configuring an SMTP connection
You can configure an SMTP connection with basic or OAuth
authentication with the Client Credentials Flow.
To configure a connection to an SMTP email server for basic
authentication
1. The New External Connection dialog box opens.
2. In the Name box, enter a descriptive name for this connection.
3. In the Type box, select SMTP. To send email messages with
transport layer security (TLS), select SMTP using TLS.
4. In the Host name or IP address box, enter the IP address or
the name of the SMTP server.
5. In the Port number box, enter the SMTP port number.
6. If an account is required by the SMTP server for basic
OpenText RightFax20.2 101 Managed ServicesAdministrator Guide
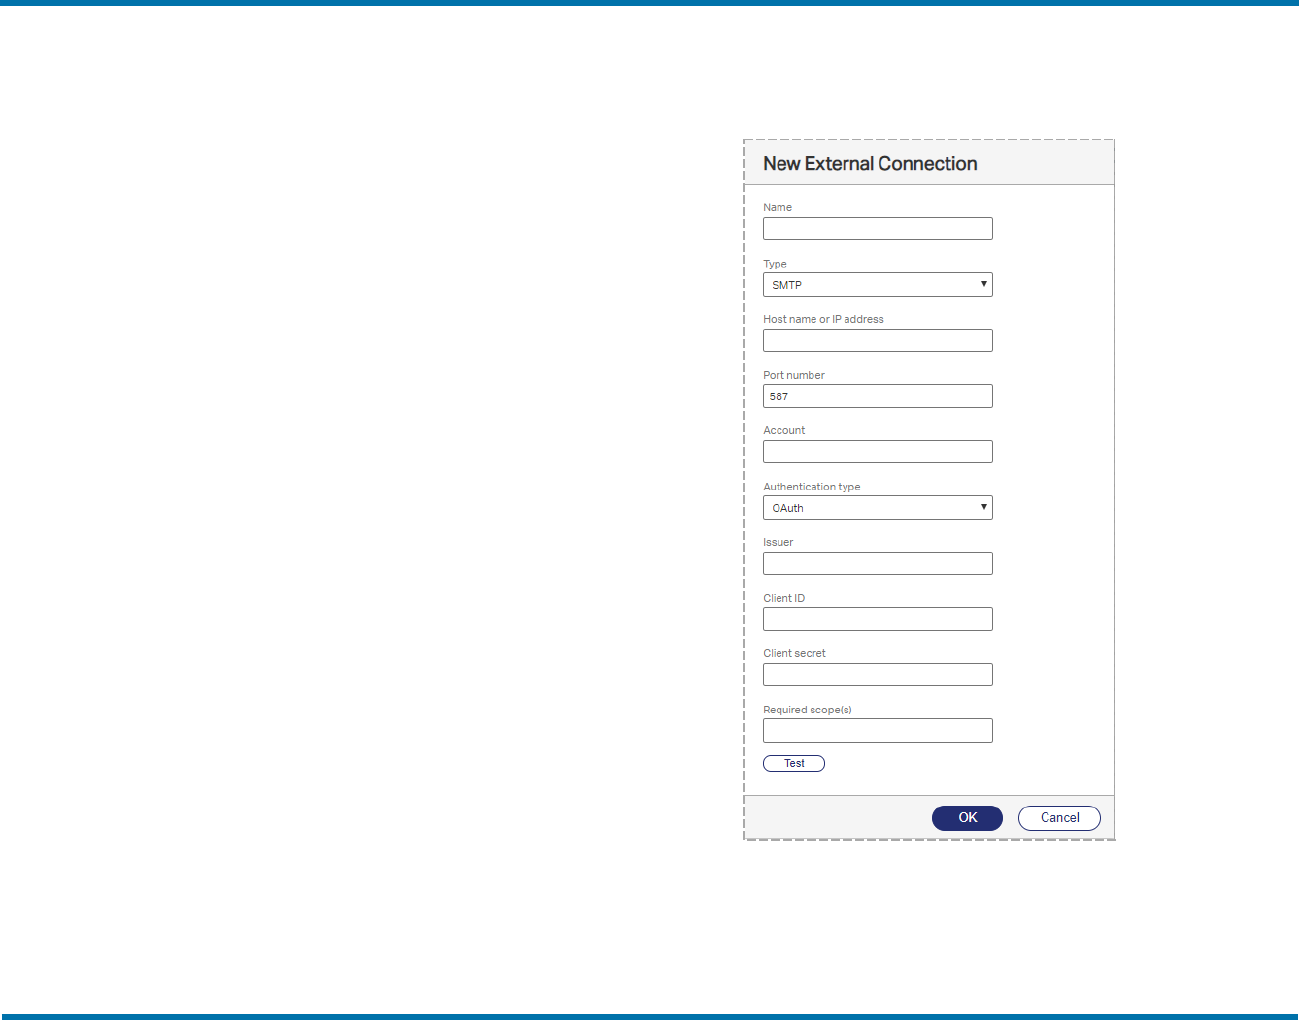
Chapter 18: Adding external connections
authentication, then in the Account and Password boxes, enter
the account and password.
7. Under Authentication type, select Basic.
8. To test the connection, click Test.
9. Click OK.
To configure a connection to an SMTP email server for OAuth
authentication
1. The New External Connection dialog box opens.
2. In the Name box, enter a descriptive name for this connection.
3. In the Type box, select SMTP. To send email messages with
OpenText RightFax20.2 102 Managed ServicesAdministrator Guide
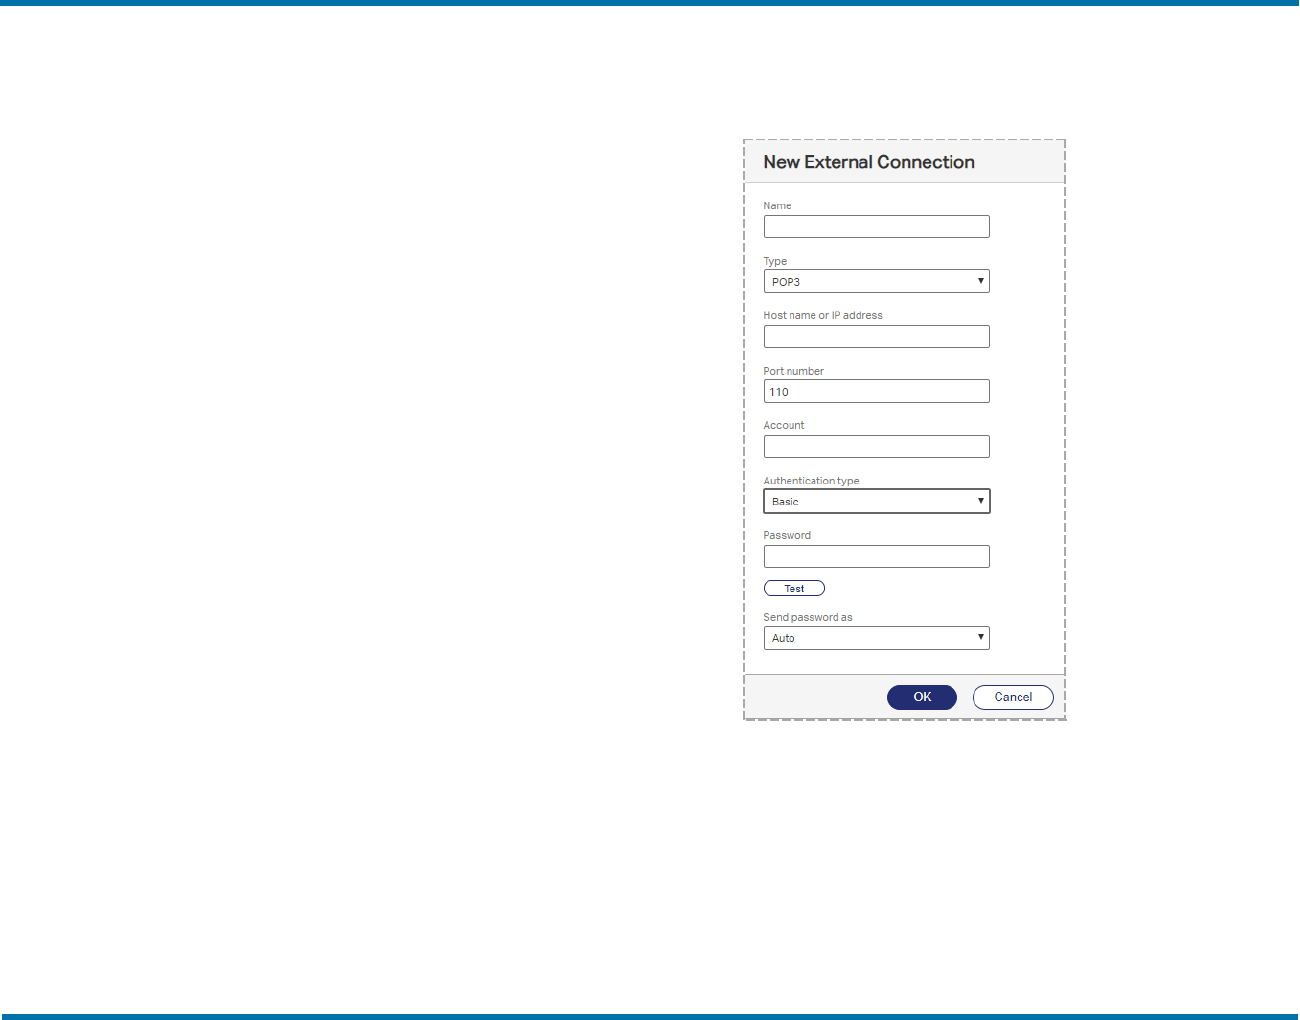
Chapter 18: Adding external connections
transport layer security (TLS), select SMTP using TLS.
4. In the Host name or IP address box, enter the IP address or
the name of the SMTP server.
5. In the Port number box, enter the SMTP port number.
6. If an account is required by the SMTP server for OAuth
authentication, then in the Account box, enter the account.
7. Under Authentication type, select OAuth.
8. In the Issuer box, enter the name of the authorization server that
will issue the access token.
9. In the Client ID box, enter the client ID.
10. In the Client secret box, enter the client secret.
11. In the Required scope(s) box, enter the scope of access for the
user account. To enter multiple scopes, separate each scope
with a space as prescribed in the OAuth standards.
12. To test the connection, click Test.
13. Click OK.
Configuring a POP3 connection
You can configure an POP3 connection with basic or OAuth
authentication with the Client Credentials Flow.
To configure a connection to a POP3 email server for basic
authentication
1. Click New. The New External Connection dialog box opens.
2. In the Name box, enter a descriptive name for this connection.
3. In the Type box, select POP3 or POP3 over SSL (POP3S).
4. In the Host name or IP address box, enter the IP address or
the name of the POP server.
5. In the Port number box, enter the port number.
6. In the Account and Password boxes, enter the user name and
password for the account on the POP server.
OpenText RightFax20.2 103 Managed ServicesAdministrator Guide
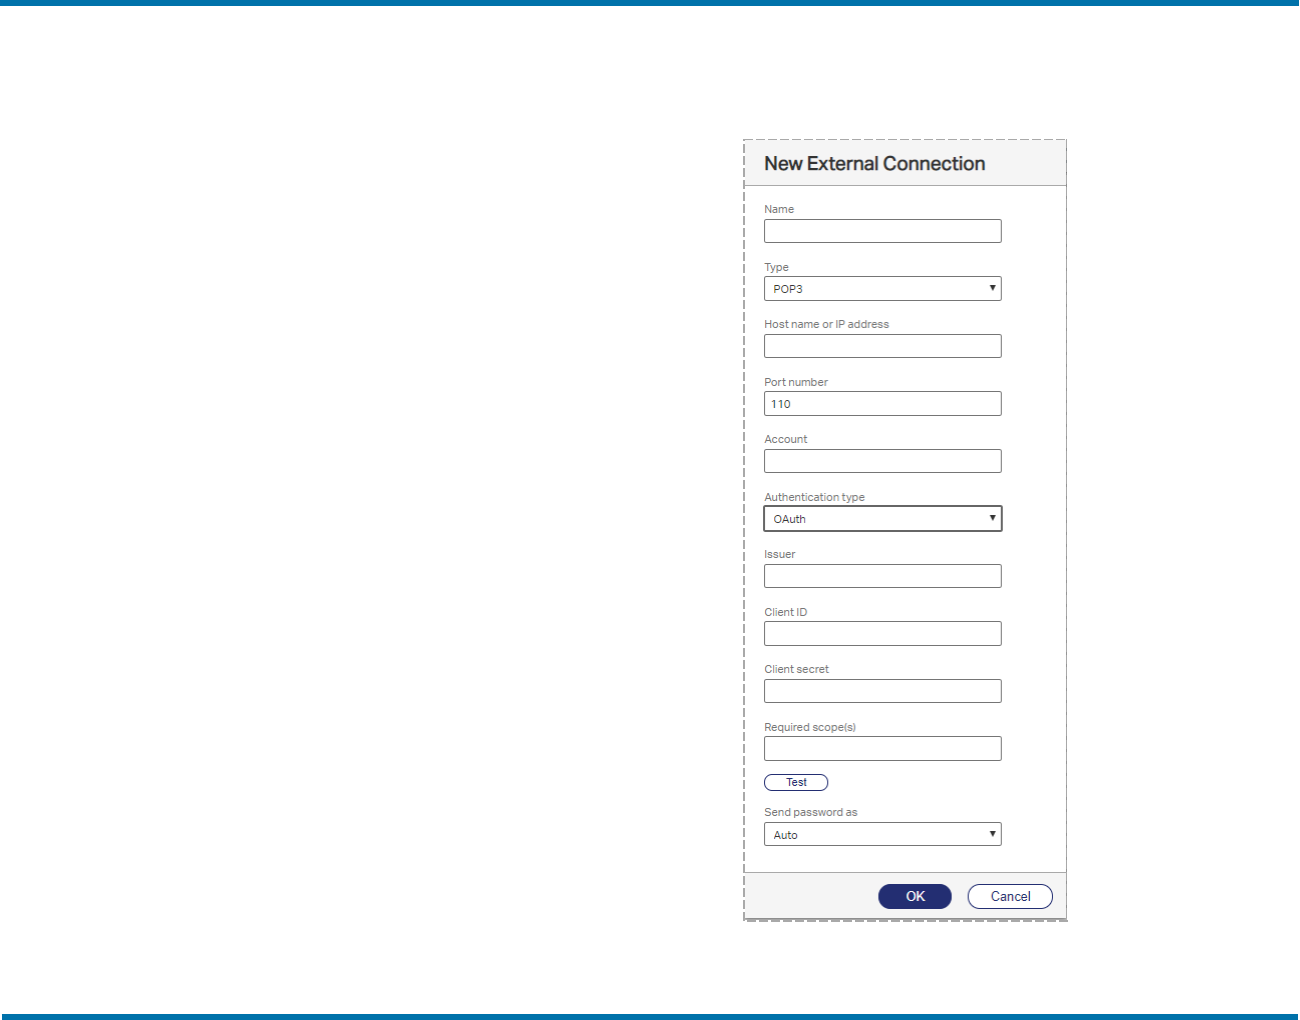
Chapter 18: Adding external connections
7. Under Authentication Type, select Basic.
8. If using POP3, under Send passwords as, select Auto,
Encrypted only (APOP), or Clear text only.
9. To test the connection, click Test.
10. Click OK.
To configure a connection to an POP3 email server for OAuth
authentication
1. Click New. The New External Connection dialog box opens.
OpenText RightFax20.2 104 Managed ServicesAdministrator Guide

Chapter 18: Adding external connections
2. In the Name box, enter a descriptive name for this connection.
3. In the Type box, select POP3 or POP3 over SSL (POP3S).
4. In the Host name or IP address box, enter the IP address or
the name of the POP server.
5. In the Port number box, enter the port number.
6. If an account is required by POPserver for OAuth
authentication, then in the Account box, enter the account.
7. Under Authentication type, select OAuth.
8. In the Issuer box, enter the name of the authorization server that
will issue the access token.
9. In the Client ID box, enter the client ID.
10. In the Client secret box, enter the client secret.
11. In the Required scope(s) box, enter the scope of access for the
user account. To enter multiple scopes, separate each scope
with a space as prescribed in the OAuth standards.
12. If using POP3, under Send passwords as, select Auto,
Encrypted only (APOP), or Clear text only.
13. To test the connection, click Test.
14. Click OK.
OpenText RightFax20.2 105 Managed ServicesAdministrator Guide

Chapter 19: Creating dialing rulesand Least-Cost Routing plans
Chapter 19: Creating dialing rules and Least-Cost Routing plans
When you use dialing rules you can precisely control outbound faxing
by specifying rules and restrictions about how faxes are sent according
to their destination fax numbers.
Example A dialing rule might specify that all faxes to a certain area
code are sent via wide-area network (WAN) to another RightFax server,
saving long-distance charges. Another dialing rule might specify that
international faxes can only be sent at times of day when rates are
lowest.
RightFax Least-Cost Routing (LCR) routes outbound faxes between
RightFax Enterprise servers or RightFax Branch Office servers on a
WAN to minimize long distance and other telephone charges. Least-
Cost Routing includes dialing rules, load balancing, destination tables,
InterConnect, and testing tools.
Creating, deleting, and copying dialing rules
Each dialing rule consists of the following parts:
l A number pattern of wildcard characters or a specific fax number.
Outgoing faxes are checked if their destination fax numbers match
this pattern or number.
l Rules and restrictions that will be applied if the destination fax
number matches the pattern or number.
If one fax number matches multiple dialing rule patterns, the fax server
weighs each rule according to how closely it matches the fax number,
and then sends the fax according to the rule with the greatest weight.
Dialing rules are server-specific, allowing different rules for servers in
different locations or serving groups with varying needs. If you have
multiple RightFax servers, you can copy rules from one server to
another. See the RightFax Administrator Guide.
To open dialing rules
l In Web Admin, clickDialing Rules. The list of dialing rules appears
in the right pane of the window.
To add a new dialing rule
1. Click New. The New Dialing Rule page opens.
2. Complete the options, and then click Ok. See Editing dialing
rules below.
To delete a dialing rule
l Select the rule or rules in the list, and click Delete. To confirm the
deletion, click Delete.
Editing dialing rules
To edit the properties of an existing dialing rule
1. Select the dialing rule and click Edit. The Edit Dialing Rule
page opens.
OpenText RightFax 106 Managed ServicesAdministrator Guide
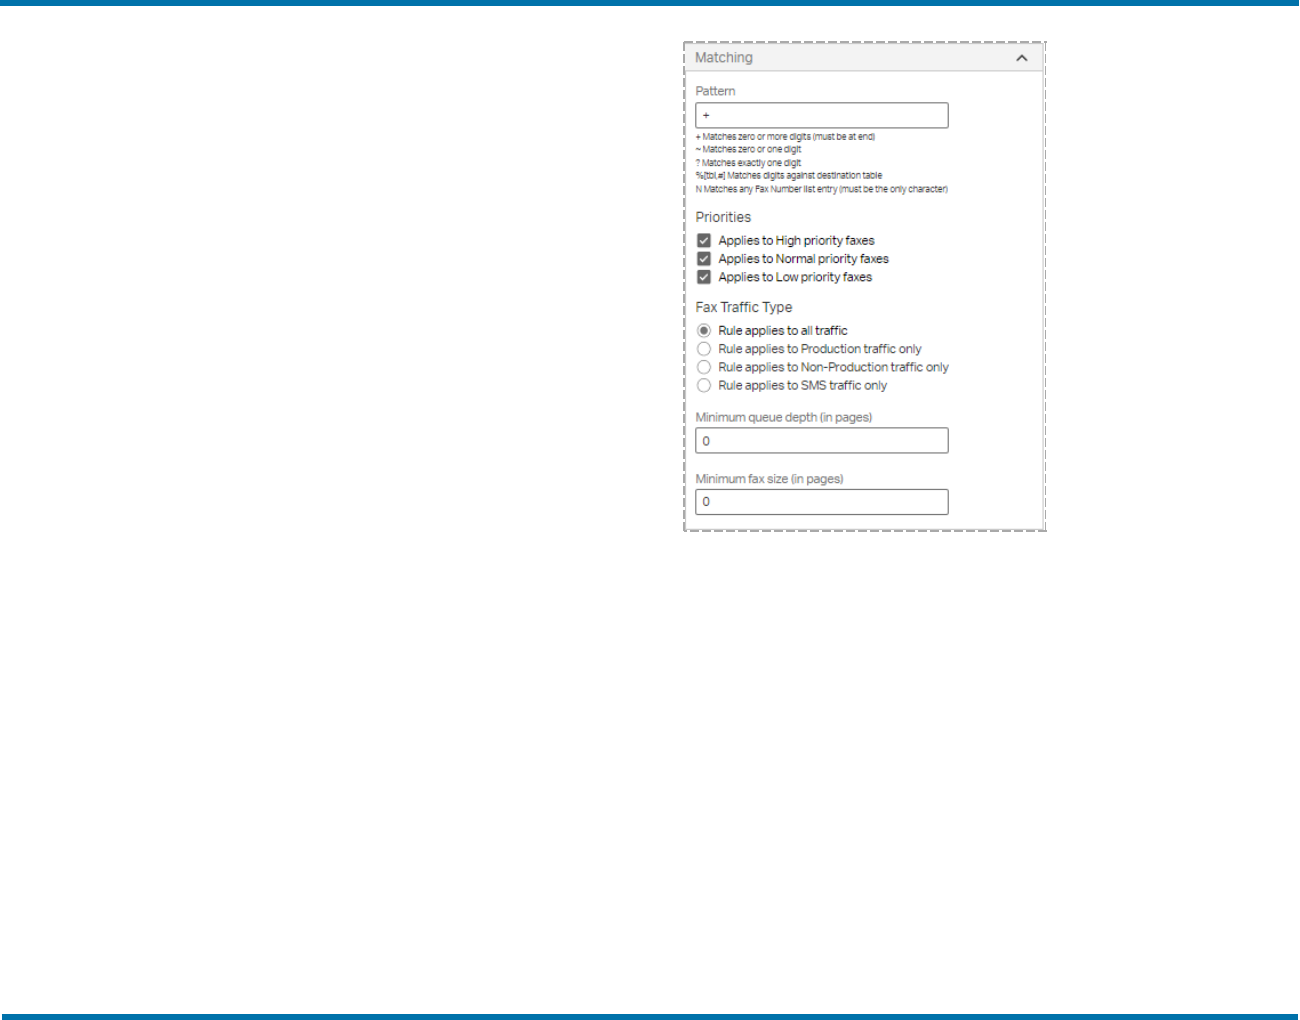
Chapter 19: Creating dialing rulesand Least-Cost Routing plans
2. In the Comment box, enter a comment about the rule.
3. As needed click the heading of the section you want to edit.
To temporarily disable the rule
l Select the Disable rule check box.
To enable the rule
l Clear the Disable rule check box.
To share with other nodes
l To share the rule on all nodes of a Shared Services system, select
the Share with other nodes check box. Shared rules are shown
with “(Shared)” after the rule number. The rule can be edited on any
server where it appears.
To give the rule extra weight
When a fax number matches two or more dialing rules, RightFax
weighs each rule according to how closely it matches the dialed number
and uses the rule with the highest weight. This setting adds extra
weight to the rule so it can be selected over another rule that has a
better pattern match.
Dialing rule pattern characters are weighted as follows:
l digit match (0–9) = 10 points
l + (plus) = 0 points
l ? (question mark) = 5 points
l ~ (tilde) = 4 points
Matching
The Matching settings determine to which faxes the dialing rule will be
applied. The main match is based on the destination fax number
pattern, and additional matching options are available.
Pattern
The destination fax number pattern or number that the dialing rule
applies to. RightFax ignores any hyphens, parentheses, or spaces in
the pattern string. The pattern can include the digits 0–9, as well as the
pound [#] and asterisk [*] keys.
You can use wildcard characters to define variables in the number
pattern and thereby specify a range of numbers that the rule will apply
to. The following table lists each wildcard character that can be used in
the Pattern box and its definition.
OpenText RightFax20.2 107 Managed ServicesAdministrator Guide

Chapter 19: Creating dialing rulesand Least-Cost Routing plans
Wildcard Definition Examples Weight
+ Matcheszero or
more digits; must
always appear at
the end of number
string.
+ matchesanyfax number entered.
415+matchesany number that
beginswith 415, including 415-555-
7000, 415-4455, and 4151.
0 points
~ Matcheszero or one
digit; can be placed
anywhere in the
number string.
~415+matchesany number
beginning with 415 or [digit]415
including 415-555-7000, 415-3222,
1-415-555-7000, and 2415.
~~415+ matches1-415-555-7000,
9-1-415-555-7000, and 415-555-
7000.
4 points
? Matchesexactlyone
digit.
415-555-7??? matchesany
number that starts with 415-555 and
hasitsfinal four digitsbetween 7000
and 7999.
415-???-???? matchesany
number within the area code 415.
5 points
%
[tableID,#]
Matchesdigits
defined in a
destination table to
the number of digits
specified (see
Viewing destination
tables on page116).
415-%[EAST,3]+ matchesall
numbers that begin with 415 and
have a three-digit prefixdefined in
the destination table “EAST.”
N Matchesentriesin
the faxnumber list.
N must be the only
entry.
N
matchesallfax numbers that have
been added to the faxnumber list in
EFM, regardlessof whether they
are assigned.
Exact matches on the digits 0-9 have a weight of 10 points. Use of
wildcard characters decreases the weight of a pattern match because
wildcard character matching is always less specific than an exact
match.
Example The fax number 520-555-7000 matches the patterns “520-
555-700?” and “520+”, but is always matched with the first rule because
it is more specific.
Priorities
Matching based on priority can be useful when broadcasting faxes or
other large volume faxing. It can also be useful for universal redirection
of faxes (for example, to send all high priority faxes from Server2
instead of Server1).
Select the check boxes next to the priorities you want to match for this
rule. Only faxes with the priority levels selected here will be considered
for this rule.
Fax Traffic Type
Apply the dialing rule based on whether the fax or SMS was generated
by the RightFax Integration Module for production faxing. You can
restrict the rule to apply to:
l All traffic
l Production traffic only
l Non-production traffic only
l SMS traffic only
Minimum queue depth (in pages)
Specify the number of fax pages that must be waiting in the server’s
queue before this rule is considered. Use to define a dialing rule to
offload outgoing fax traffic to another server when the load on the
current server gets too high.
Minimum fax size (in pages)
Specify the minimum number of pages a fax must be before this rule is
considered. Use to define a dialing rule to offload very large faxes to
another server, leaving the local server free to send only smaller faxes.
OpenText RightFax20.2 108 Managed ServicesAdministrator Guide
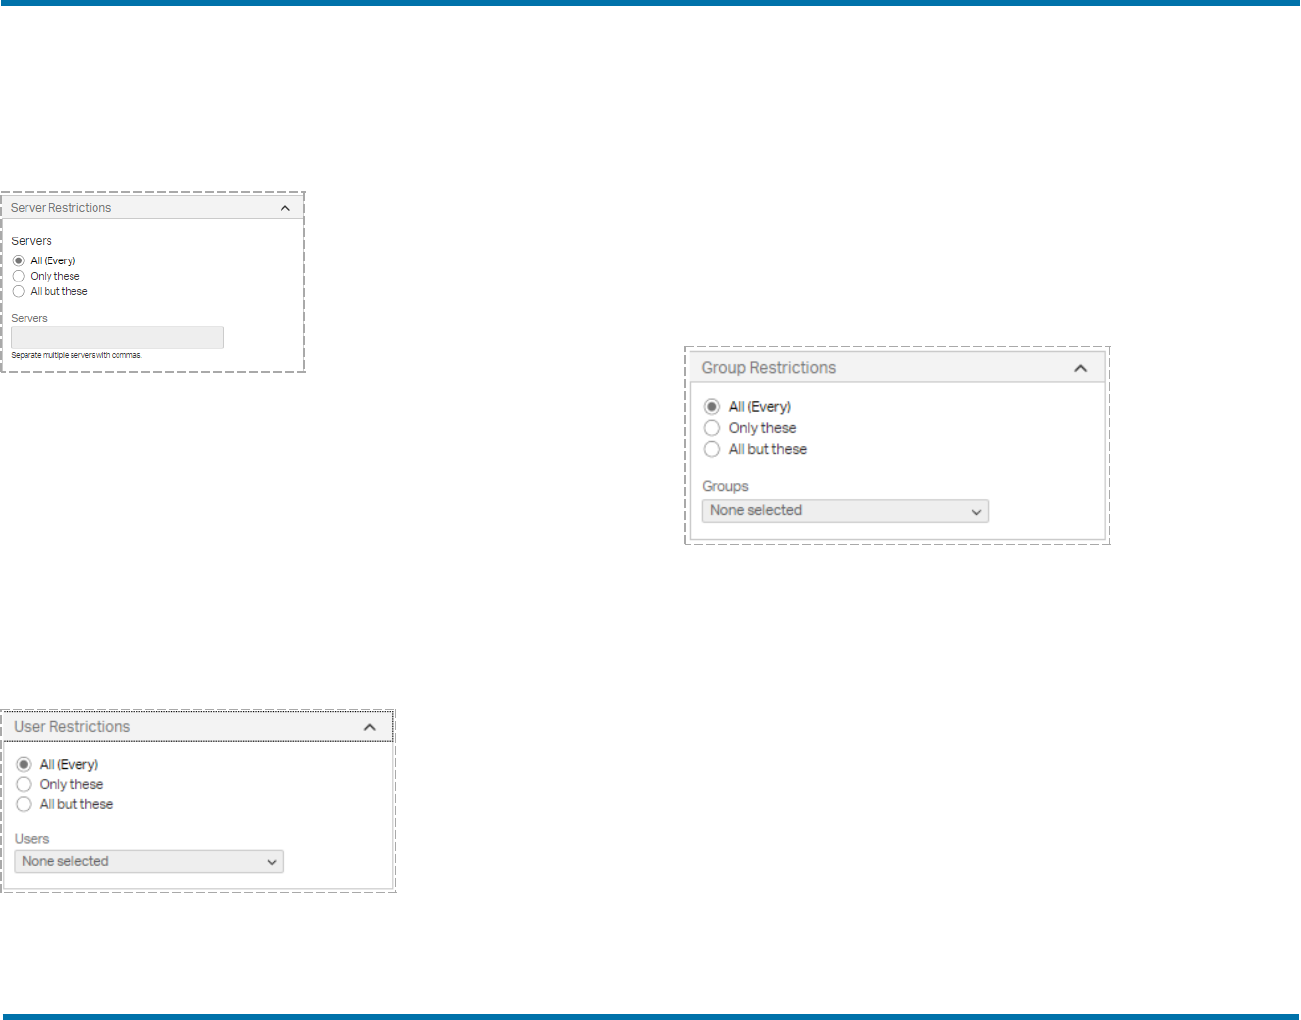
Chapter 19: Creating dialing rulesand Least-Cost Routing plans
Restrictions
You can restrict each dialing rule to specific servers, users, or groups in
your organization.
Server Restrictions
All(Every)
The rule will be applied regardless of the origin of the fax.
Only These
The rule will be applied to the servers you enter in the Servers box.
Enter one or more server name or names. Use commas to separate
multiple entries.
All But These
The rule will be applied to all servers except those you enter in the
Servers box. Use commas to separate multiple entries.
User Restrictions
All(Every)
The rule will be applied regardless of the origin of the fax.
Only these
The rule will be applied to the users you enter in the Select users box.
You can select one or more user IDs. Enter user IDs by selecting the
check boxes next to the IDs in the list.
All but these
The rule will be applied to all servers except those you enter in the
Select users box. Enter one or more user IDs. Use commas to
separate multiple entries. You can select one or more user IDs. Enter
user IDs by selecting the check boxes next to the IDs in the list.
Group Restrictions
All(Every)
The rule will be applied regardless of the origin of the fax.
Only these
The rule will be applied to the users you enter in the Select groups box.
You can select one or more group IDs. Enter group IDs by selecting the
check boxes next to the IDs in the list.
All but these
The rule will be applied to all servers except those you enter in the
Select groups box. You can select one or more group IDs. Enter group
IDs by selecting the check boxes next to the IDs in the list.
Adjustments
The Adjustments settings determine how fax numbers that match the
dialing rule can be modified to properly send from the specified
OpenText RightFax20.2 109 Managed ServicesAdministrator Guide
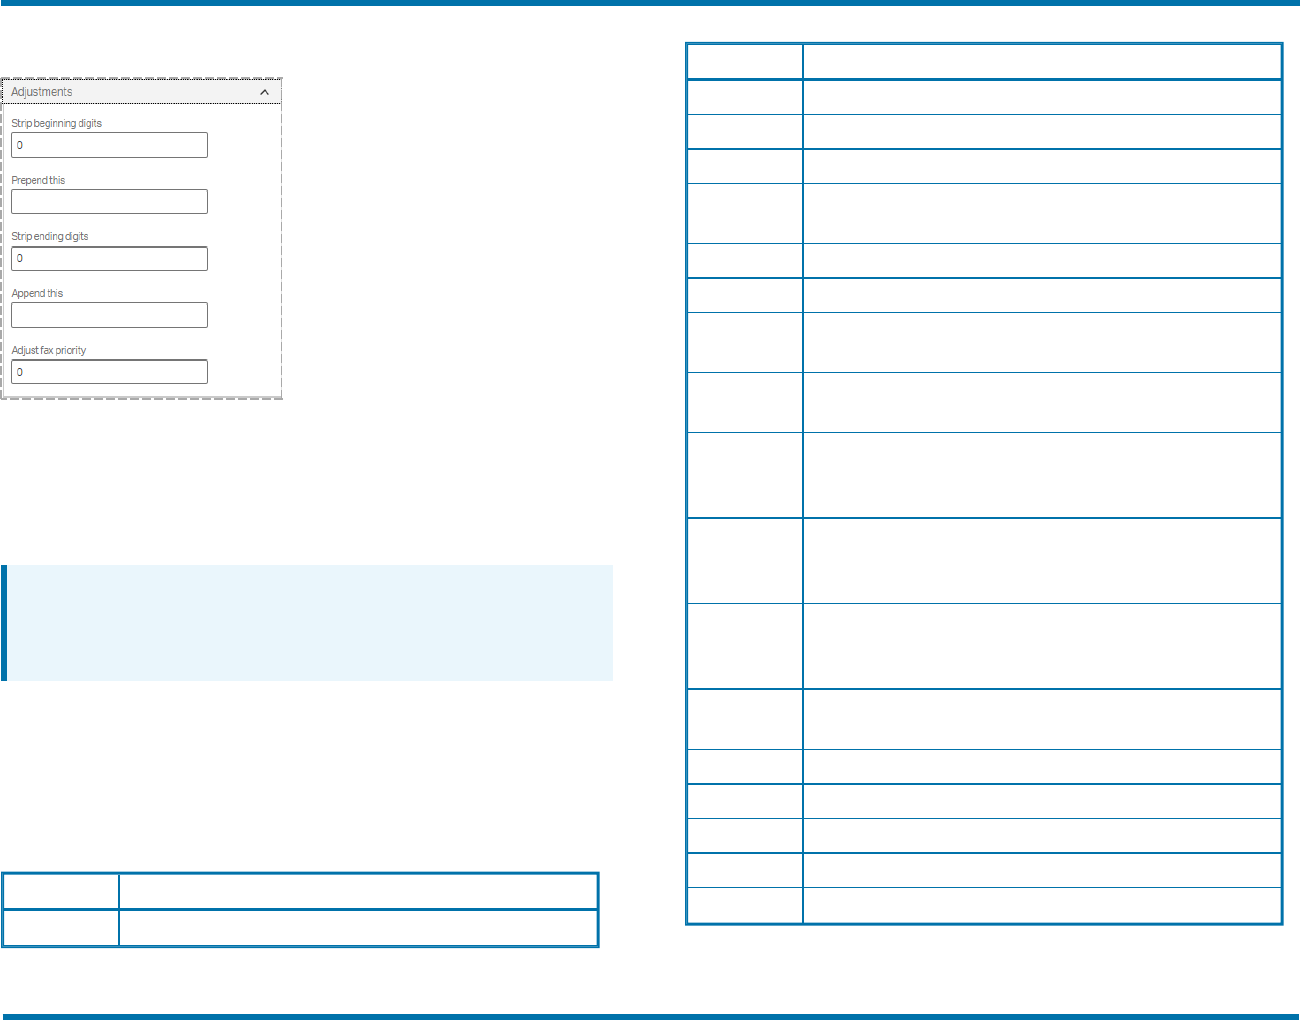
Chapter 19: Creating dialing rulesand Least-Cost Routing plans
destination.
You can add or remove digits from the beginning or end of the
destination fax number (for example, to automatically add a 1 to long
distance calls or a 9 if necessary to get an outside line).
You can also add a user’s international billing code or remove all but the
last four digits of a number for internal routing.
Note If your organization requires a dialing prefix for all outgoing calls
(including all outgoing faxes), specify the prefix in the Global
Transport Settings of DocTransport Configuration. See the RightFax
Administrator Guide. Do not specify the prefix in the dialing rules.
You can append or prepend any combination of dialable digits. You can
also include special dialing characters that have special meaning to
RightFax.
Dialing characters supported by dialing rules
The following table lists the dialable characters and their definitions.
Characters are not case-sensitive.
Character Definition
0–9 Dialable phone digits.
Character Definition
! Hook-flash signal.
# Pound button on phone.
* Asterisk button on phone.
, (comma) 1-second pause (you can combine several of these charactersto
increase the length of the pause).
A Replaced in the dial string bythe fax’sBilling Code 1 value.
B Replaced in the dial string bythe fax’sBilling Code 2 value.
C Replaced in the dial string bythe fax’sToContactNum value (the
recipient’svoice number).
D Replaced in the dial string bythe fax’sToName value (the recipient’s
name). Anyundialable charactersin this field are discarded.
E Replaced in the dial string bythe fax’sToCompanyvalue (the
recipient’scompanyname). Anyundialable characters in this field
are discarded.
F Replaced in the dialstring by the user’sdomesticlong distance Auto
Billing Code configured in DocTransport Configuration. See the
RightFax Administrator Guide.
G Replaced in the dial string bythe user’s internationallong distance
Auto Billing Code configured in DocTransport Configuration. See
the RightFax Administrator Guide.
I 5-second pause (you can combine severalof these characters to
increase the length of the pause).
P Pulse dialing mode.
T Tone dialing mode (default).
W Wait up to 15 seconds for a dial tone.
{ Do not prepend the dialing prefix.
} Do not append the dialing postfix.
OpenText RightFax20.2 110 Managed ServicesAdministrator Guide
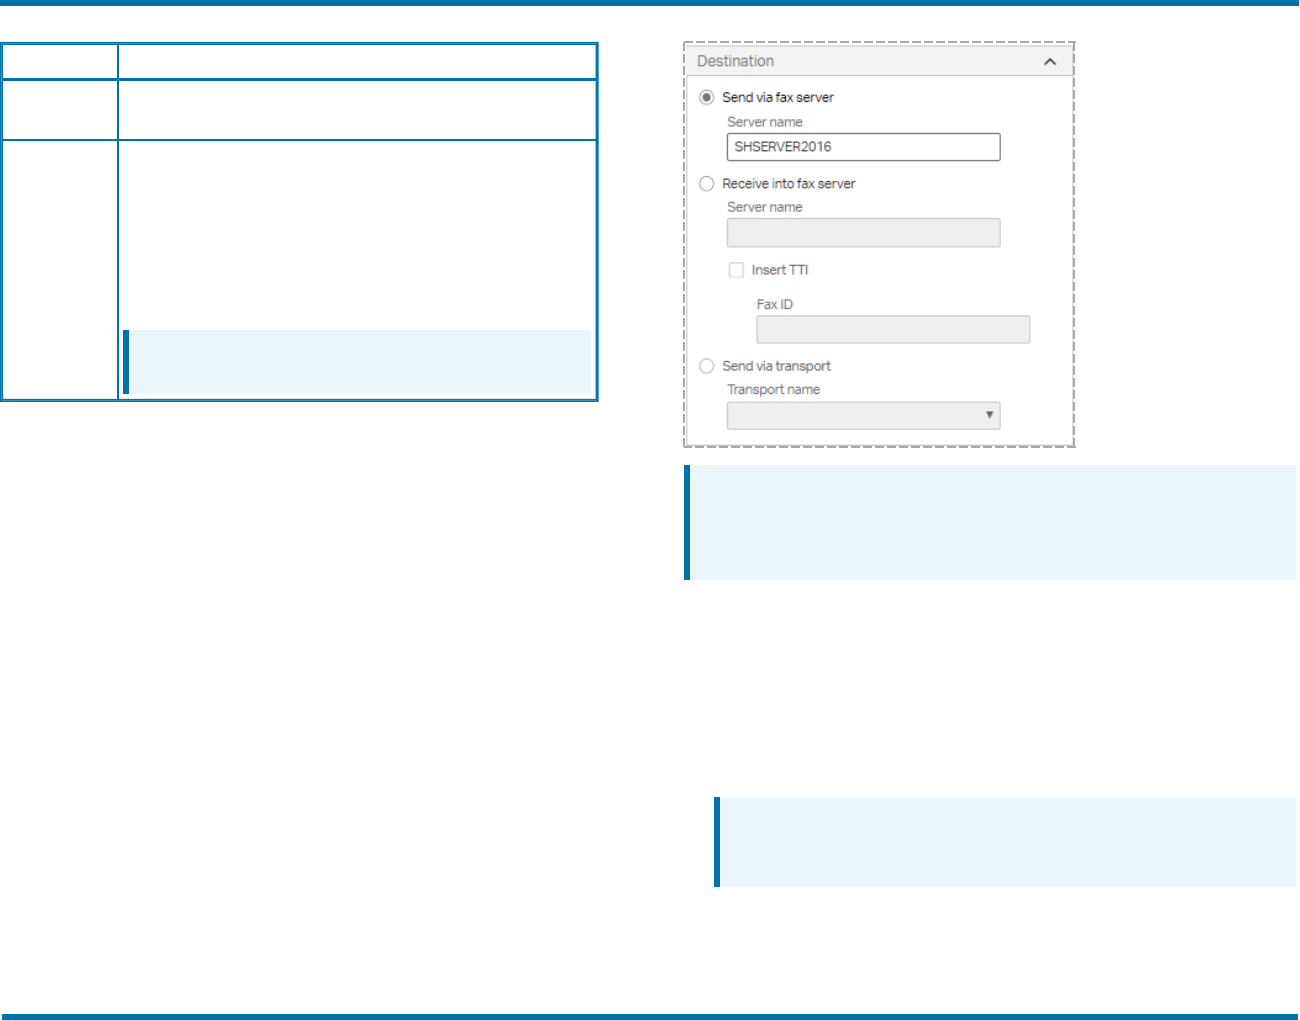
Chapter 19: Creating dialing rulesand Least-Cost Routing plans
Character Definition
@ Required for SR140 FoIP numbers. Appends the IPaddress of the
FoIP router.
& Indicatesthat a sequence of DTMF digitswill follow. This appliesto
post-dialing for in-band FoIP callsusing an SR140,
The post-dial string can include PSTN Telephonycharacters such
as0-9, #, *, and a comma, but not p, t, w, and !.
The digitswill be dialed assoon asthe SR140 receives a SIP 183 or
SIP200 response code or a H323 message from the gateway.
Note To use DTMFpost dialing, the post_dialing_enable
parameter must be enabled on the SR140.
Example For international calls, a dialing rule 001+wGii
(001=Pattern;wGii=Append) specifies that if the first three digits of an
outgoing call are the international dialing prefix (pattern of 001+),
RightFax will wait for a dial tone (w), look up the user’s international
billing code to dial (G), and wait 10 seconds before dialing it (ii).
Example For post-dialing for in-band FoIP calls using an SR140, a
dialing rule including @172.17.9.225&5555 appended, specifies that if
the gateway’s IPaddress is @172.17.9.225, the SR140 will post-dial
the digits 5555 as soon as one of the following has been received from
the gateway: a SIP 183, SIP 200, or H.323 message.
Adjust fax priority
Enter -2, -1, 1, or 2 to add or subtract priority points for all faxes that
match the dialing rule pattern. Enter 0 to not change the priority. Priority
is rated on a three-point scale: low priority <= 1, normal priority = 2, high
priority >= 3.
Destination
The Destination settings determine where in your organization a fax
matching the dialing rule pattern will be routed before the destination fax
number is dialed.
Note Entries in the name boxes are limited to 47 characters. This
means that you can enter fully qualified domain names that have 47 or
fewer characters, including periods and backslashes. If the domain
name is longer, use the IP address instead.
Send via fax server
Select this option to route the fax to any RightFax Enterprise or
RightFax Branch Office server (including the local server) on your
network. The new server evaluates the destination fax number against
its own dialing rules and transmits or forwards the fax accordingly.
l After you select this option, in the Server name box, enter the
destination server name to use for routing.
Note Take care not to create dialing rules on two or more servers
that will cause a fax to loop between them. If this occurs,
RightFax sends the fax after ten loops.
OpenText RightFax20.2 111 Managed ServicesAdministrator Guide

Chapter 19: Creating dialing rulesand Least-Cost Routing plans
Receive into fax server
Select this option to route the fax to a RightFax Enterprise or RightFax
Branch Office server (including the local server) on your network and
deliver them as inbound faxes. You can use this option to define intra-
office routing rules that let RightFax users in your organization send
faxes to each other across different fax servers on the network.
If the fax number does not match a routing code on the receiving
RightFax server, the fax is routed to the Default user ID on that server.
1. After you select this option, in the Server name box, enter the
destination server name to use for routing.
2. To include a TTIline on the fax, select the Insert TTI check box.
By default, faxes received into the fax server do not include a
TTI line.
3. In the Fax ID box, specify the fax ID that should appear in the
TTI line.
Send via transport
Select this option to select one of the transport methods that you added
and configured in the RightFax DocTransport module as the fax
destination, rather than a specific RightFax server. See the RightFax
Administrator Guide.
After you select this option, select a transport method in the Transport
name list. The transport must have been added in the DocTransport
module. You can select from the following transport methods:
l FOIP.The fax will be transmitted packaged as an email message
with a TIFF attachment via your SMTP server via fax over IP (FoIP).
To specify the email address of the destination device, click
Adjustments, strip all of the digits from the destination fax number,
and then prepend the destination email address.
l RFCONNECT. The fax will be routed to RightFax Connect.
RightFax Connect requires a ten-digit phone number. Depending on
your incoming digits, you may need to make changes under
Adjustments.
l SMS.The fax will be routed to an SMS number. When a fax is sent
to an SMS device, only the cover page notes are transmitted.
To specify the destination SMS number, under Adjustments, strip all
of the digits from the destination fax number, and then prepend the
desired SMS number. For information about making changes under
Adjustments, see Adjustments on page109.
Time and Day
The Time and Day settings determine for each day the time period to
apply the rule. You can use these settings to take advantage of special
off peak phone rates or to balance fax loads between servers at the
times when your fax traffic is the highest.
OpenText RightFax20.2 112 Managed ServicesAdministrator Guide
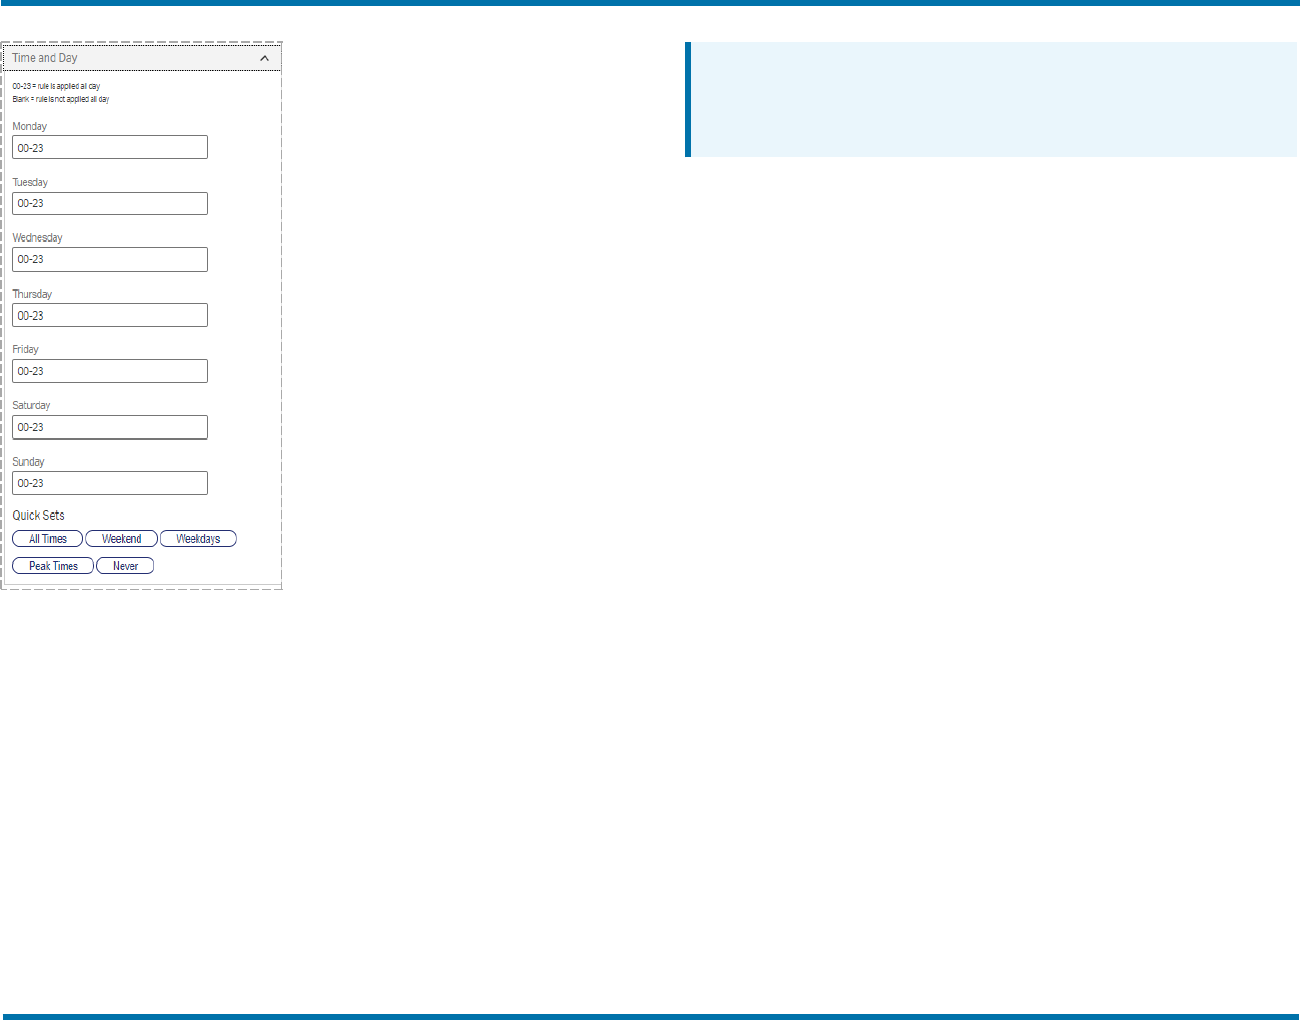
Chapter 19: Creating dialing rulesand Least-Cost Routing plans
Days (listed separately)
For each day on which the rule should be applied, enter hh-hh to specify
the time range. hh is the time in 24-hour format. Do not specify minutes.
To change the hours that a rule is applied, do one of the following:
l To specify multiple time ranges, enter the time ranges separated by
comma in the format hh-hh,hh-hh.
Example To have a rule apply nights only between 7 P.M. and 2
A.M., enter 00-02,19-23 in each day of the week box.
l To not apply a rule during a given day, delete any entries and leave
the box blank.
Note If you enter a range that straddles two days, the system divides
the time between the current and the next day, adding the time range
for the next day to any existing time ranges. Verify that the time
ranges for each day are correct.
Quick Sets
Click one of the following to quickly apply common time restriction
settings:
l All Times applies 00-23 from 00:00:00 to 23:59:59 every day. This
is the default.
l Weekend applies 00-23 to Saturday and Sunday and removes all
weekday settings .
l Weekdays applies 00-23 to Monday through Friday and removes all
weekend settings.
l Peak Times applies 00-18 to Monday through Friday and removes
all weekend settings.
l Never removes all settings.
Special Actions
Use the Special Actions settings to set special sending options, such
as sending at specific times or on specific channels, increase the
weight of the rule, or disable it.
OpenText RightFax20.2 113 Managed ServicesAdministrator Guide

Chapter 19: Creating dialing rulesand Least-Cost Routing plans
No special action
Click to process faxes without delay on any available channel.
Send on specific range of channels
Click to send the fax only on the channels you specify. The channel
range specified here overrides any channel restriction placed on a
specific fax using the <CHANNEL> embedded code. This parameter is
not transferred with the fax if it is routed to another fax server for
sending.
Disallow sending
Select this option to prevent faxes from sending based on attributes
such as the number pattern, time of day, or sender. The user gets the
message “Fax blocked from dialing phone number.” This is sometimes
referred to as the Do Not Dial or DnD feature. For information about
setting notifications for disallowed faxes, see DnD Notifications below.
Reschedule after disallow sending
Select this option to prevent faxes from sending based on attributes
such as the number pattern, time of day, or sender and then, based on
the settings on the Time and Day tab, retries faxing at the same time
each subsequent day until the fax is either sent or blocked altogether.
Example If a user tries to send a fax at 1 P.M. on Saturday and has
weekend time restrictions in effect, the fax is not sent until 1 P.M. on
Monday, when dialing rules no longer restrict sending.
Delay fax to specific time
Select this option to prevent the fax from sending before a specified
time of day. If the specified time is earlier than the time the fax is
received, the fax will be sent at that time on the next day.
In the Delay until box, enter the time using 24-hour notation (0000–
2359).
Note Least-Cost Routing rules are evaluated one time. If this setting
delays transmission, other settings for the rule will not be evaluated.
Delay fax for specific interval
Select this option to delay the fax from sending for a specified number
of minutes. In a Shared Services environment, using this option in
conjunction with a dialing rule of greater weight that will send the faxes
immediately, you can prevent faxes from being sent by a DocTransport
with incompatible telephony settings in case the original DocTransport
is down.
In the Minutes to delay box, enter the number of minutes to delay.
Note Least-Cost Routing rules are evaluated one time. If this setting
delays transmission, other settings for the rule will not be evaluated.
DnD Notifications
DnD notifications notify about faxes that were blocked by the Disallow
Sending feature. Disallow Sending is also referred to as Do Not Dial
(DnD). For more information, see Special Actions on the previous page.
OpenText RightFax20.2 114 Managed ServicesAdministrator Guide
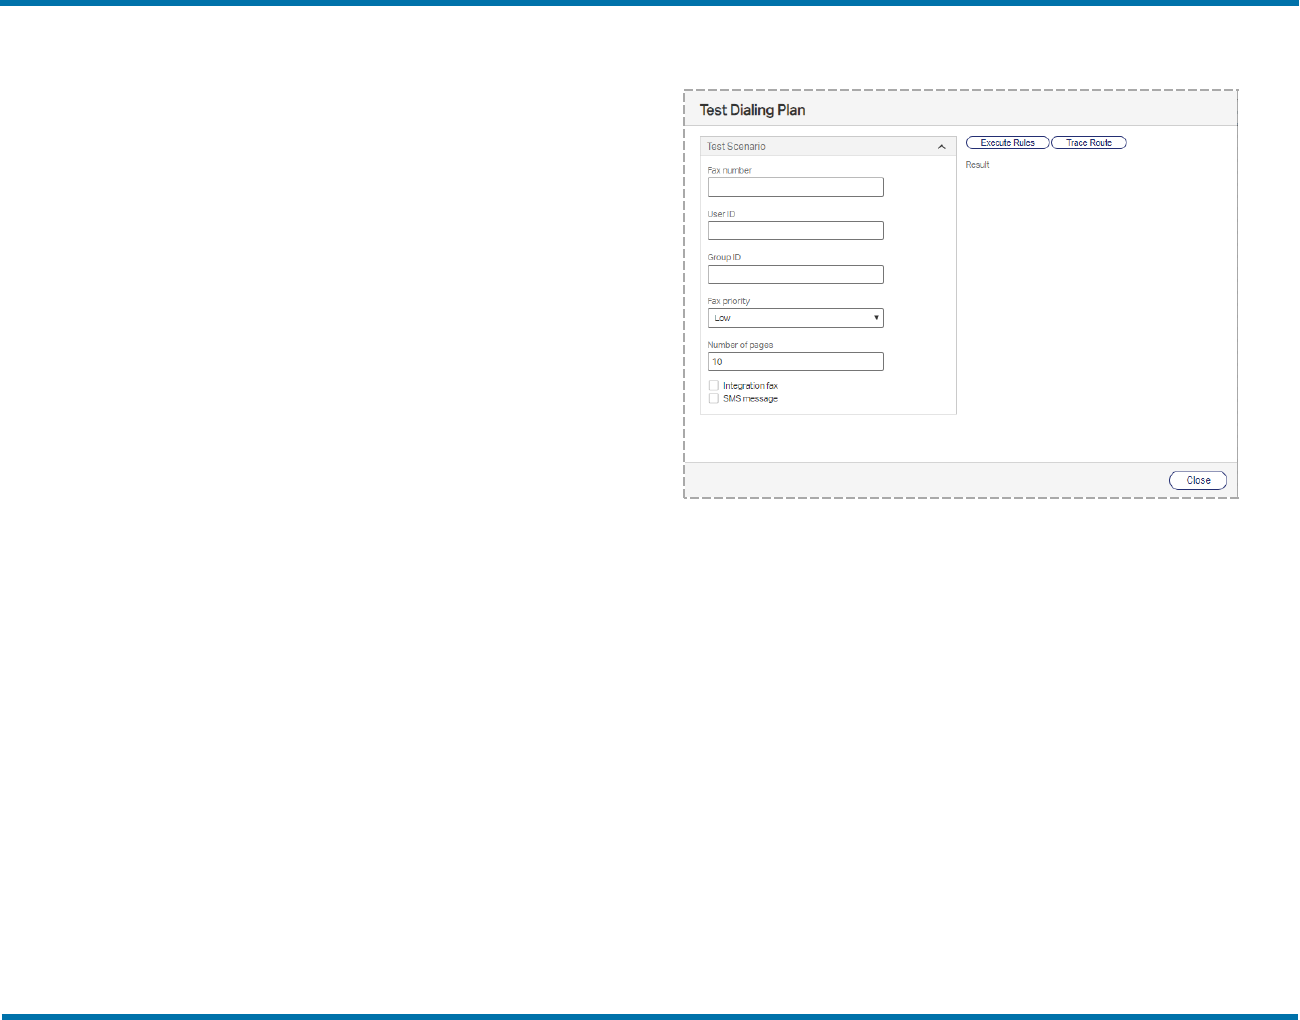
Chapter 19: Creating dialing rulesand Least-Cost Routing plans
Users to notify
Enter the RightFax user IDs to which to send notifications about faxes
that are blocked by the Disallow Sending feature.
Under Users to notify, select the check box for each user to notify.
Notify the sender that the document was blocked
Select this check box if you want the sender to be notified after
attempting to send a fax to a blocked number.
If this option is not selected, the sender will get the “Fax number
blocked” custom message. To configure this message, see the
RightFax Administrator Guide.
Example of dialing rules
Example A company with RightFax servers in New York and Seattle
adds the following dialing rules on the New York server:
l 206-???-????
Remove first three digits and send via Seattle server
l 206-820-50??
Remove first six digits and receive into Seattle server
When someone in New York sends a fax to 206-820-7000 (a customer
in Seattle) the server routes the fax to the Seattle server which sends it
via a local call. When someone in New York sends a fax to a co-worker
in Seattle at 206-820-5065, the server considers the fax a received fax
and routes it to the appropriate internal fax mailbox (5065).
Testing dialing rules and fax routes
You can test and confirm your dialing rules and fax routing scheme
without sending a fax.
To start testing
l In Web Admin, in the left pane, click Dialing Rules. The testing
options appear in the right pane.
l Open the list of dialing rules, and then click Test Dialing Plan.
To verify the route of a fax
1. In the Fax Number box, enter a fax number. You can also enter
a specific User ID, Group ID, Fax priority, and Number of
pages to test how each affects the fax routing.
2. To test routing for production faxes, select the Integration fax
check box. Production faxing is implemented with the optional
Integration module.
3. If the dialing rule applies to SMS messaging, select the
SMSmessage check box.
4. Click Trace Route. As the fax number passes one or more
servers, the results box shows the following:
l Which rules are being used.
l How the fax number is manipulated along the way.
OpenText RightFax20.2 115 Managed ServicesAdministrator Guide

Chapter 19: Creating dialing rulesand Least-Cost Routing plans
l The number of hops or jumps from server to server.
l The time it takes to route between servers. This does not
include the time to transfer image data. That additional time
depends on the size, resolution, and density of the fax.
To verify dialing rule execution
1. In the Fax Number box, enter a fax number. You can also enter
a specific User ID, Group ID, Fax priority, and Number of
pages to test how each affects the route and execution of the
dialing plan.
2. To test the rule execution for production faxes, select the
Integration fax check box. Production faxing is implemented
with the optional Integration module.
3. If the dialing rule applies to SMS messaging, select the
SMSmessage check box.
4. Click Execute Rules. As the fax is routed, the results box
shows the following:
l Each dialing rule against which the fax number is compared.
l Information about the match weights and server availability.
Viewing destination tables
Destination tables contain groups of numbers such as dialing prefixes
and area codes. You can use destination tables to create dialing rules
for a range of numbers instead of creating a separate rules for each
number pattern. For information about creating destination tables, see
the RightFax Administrator Guide.
To open the list of destination tables
l In Web Admin, in the left pane, click Destination tables. The list of
destination tables appears in the right pane.
Blocking outbound calls
You can prevent users from sending faxes to certain numbers by using
dialing rules in combination with a destination table.
The DocTransport module by default blocks all outgoing calls to
numbers beginning with 911 (the standard emergency number
throughout the United States). All non-numeric characters are ignored
by DocTransport.
Example If a user sends a fax to ,,911, DocTransport ignores the two
preceding commas, matches 911, and then blocks the number.
Note You can also use the Windows registry keys for DocTransport
BlockedNumbers and BlockingFlags to further block faxes to specific
numbers and control sending to 911. Entries added in the
BlockedNumbers registry key are written to the database and applied
to all DocTransports on all servers. See the RightFax Administrator
Guide
To add or change blocked numbers
1. Create a destination table for the numbers you want to block.
See the RightFax Administrator Guide.
2. Create a dialing rule that uses that table for the matching string.
3. Edit the dialing rule to Disallow sending.
4. Save the rule.
Full RightFax administrators can approve, disapprove, or delete faxes
that were blocked by dialing rules. Approved faxes are immediately
scheduled to send. Disap proved faxes are assigned a status of “Fax
was disapproved” in the original sender’s FaxUtil mailbox.
To approve or disapprove a fax blocked by a dialing rule
1. Sign on to FaxUtil as an administrator and on the List menu,
click Administrative Mode
2. To view only faxes needing approval, on the List menu, click
OpenText RightFax20.2 116 Managed ServicesAdministrator Guide

Chapter 19: Creating dialing rulesand Least-Cost Routing plans
Needing Approval.
3. Right-click the fax. On the shortcut menu, point to Status, and
then click Approve Fax or Disapprove Fax. You can add a note
(up to 450 characters) to be stored in the fax history together with
the date and your user ID
Examples of Least-Cost Routing
This section describes several examples of Least-Cost Routing.
Scenario 1: Using LCR (a simple example)
PDQ Company has a RightFax server in New York City (NYSERVER)
and one in Tucson (TSNSERVER).
PDQ determines that it would be cheaper to send New York faxes
bound for Tucson and Southern Arizona numbers via TSNSERVER. It
adds this rule to NYSERVER:
520+
Send via fax server TSNSERVER.
Scenario 2: Using dialing destination tables
PDQ Company wants to make sure that TSNSERVER will correctly
dial Southern Arizona numbers outside of Tucson by prepending a 1.
PDQ could add rules to TSNSERVERthat prepend all numbers that
have a certain prefix, such as 458, with 1 and as needed strip the 520
area code before prepending the 1:
458+
Send via local fax server. Prepend 1.
520-458+
Send via local fax server. Strip 3 digits from beginning. Prepend 1.
But PDQ determines that area code 520 includes several prefixes for
which similar rules would need to be created. To avoid having to create
individual rules for each prefix, PDQ creates a destination table named
SOUTHAZ that includes all necessary prefixes. And it creates the
following two rules on TSNSERVER referencing the SOUTHAZ
destination table:
%[SOUTHAZ,3]+
Send via local fax server. Prepend 1.
520-%[SOUTHAZ,3]+
Send via local fax server. Strip 3 digits from beginning. Prepend 1.
Scenario 3: Distinguishing ‘+’ wildcard rules from other local
numbers
The PDQsystem administrator for NYSERVER notices that faxes
bound for internal four-digit PBX numbers in New York that begin with
520 are being inadvertently routed to Tucson. In addition, New York just
added a prefix for the Tri-State area of 520 (requiring a 1 to be dialed first
from the PDQ office.) Those calls too are going to Tucson. To correct
this situation, the administrator adds these two rules to NYSERVER:
520?
Send via local fax server.
520-????
Send via local fax server. Prepend 1.
These two rules intercept 520 calls that would otherwise match the
520+ rule in Scenario #2. These rules would match the local destination
numbers more specifically and therefore be weighted more heavily.
Scenario 4: Stripping unnecessary digits
The PDQ system administrator for NYSERVER has also noticed that
recent transfers from the Tucson site out of habit still dial a 1 at the
beginning of ten digit long distance numbers. Because the PDQ New
York long distance carrier does not require it, the administrator adds a
rule to NYSERVER to strip the 1 from these numbers:
1-???-???-????
Send via local fax server. Strip 1 beginning digit.
Scenario 5: Using LCR (an advanced example)
PDQ Company opens a sales office in Los Angeles with a new
RightFax server (LASERVER). PDQ and the local phone companies in
OpenText RightFax20.2 117 Managed ServicesAdministrator Guide

Chapter 19: Creating dialing rulesand Least-Cost Routing plans
L.A. have worked out a special low rate for all calls in the local Los
Angeles/Orange County area. A similar deal was worked out for the
New York metro area. This means PDQ can save money by routing all
LA faxes to the LASERVER and all NY faxes to the NYSERVER.
Because of charges related to the TCP/IP connection between L.A. and
N.Y., it is still cheaper to send faxes during off-peak periods to L.A. and
N.Y. via direct long distance dialing.
PDQ would first set up the following destination tables:
l On NYSERVER an LA area code table (LAACODE) and an LA area
code+destination table (LAPREFIX).
l On LASERVER a NY area code table (NYACODE) and a NY area
code+destination table (NYPREFIX).
LAACODE and NYACODE each contain a list of area codes that match
the low-rate phone numbers in their respective regional areas.
LAPREFIX and NYPREFIX match numbers with low rates in area
codes where only certain prefixes in area code are included in the
special low rate.
PDQ would define the following two rules on NYSERVER:
%[LAACODE,3]+
Time of day set to peak times. Send via fax server LASERVER.
1%[LAPREFIX,6]+
Time of day set to peak times. Send via fax server LASERVER.
LASERVER would have a matching set of rules referencing
NYACODE and NYPREFIX and routing to NYSERVER. Peak times
are specified because it is still cheaper to send in the evening and at
night via long distance.
A local rule stripping off the unnecessary area code is required on both
the NYSERVER and LASERVER. PDQ adds this rule on NYSERVER
and a similar rule on LASERVER:
212+
Send via local fax server. Strip 3 digits.
To enable Least-Cost Routing for TSNSERVER to NY and LA, a copy
of each of the four destination tables and each of the dialing rules would
be entered on TSNSERVER.
Scenario 6: Boosting priority
PDQ Company is expanding and the load on the RightFax servers is
increasing. PDQ decides to boost the priority of faxes from certain high
priority Groups and Users on LASERVER to verify that their faxes are
sent quickly. This rule is added to LASERVER:
+
Restricted only to Users: SALESMGR,CFO and to Group: TOPDOGS.
Priority Delta +1.
Scenario 6: International routing
PDQ Company expands into the international market. Their first
overseas site is London which has a RightFax server installed
(UKSERVER). All faxes from LA, NY, and Tucson bound for England
need to be routed to UKSERVER. This rule is added to each of these
servers:
011-44+
Send via fax server UKSERVER.
Rules would need to be placed on UKSERVER to normalize the phone
numbers for England (such as stripping area codes or adding digits if
necessary).
Scenario 7: Load balancing
PDQ adds another RightFax server to its expanding NY site
(NYSERVER2).Usage data indicates that during peak times, faxes on
NYSERVER are taking on average several minutes longer to be sent
than those on NYSERVER2. Upon analysis, PDQ finds that the users
of NYSERVER are sending many more faxes than the users on
NYSERVER2.
By entering these two rules on each server, new outgoing faxes on each
server are routed to the one with the least load:
+
Send via local fax server.
OpenText RightFax20.2 118 Managed ServicesAdministrator Guide

Chapter 19: Creating dialing rulesand Least-Cost Routing plans
+
Send via fax server NYSERVER2 (or NYSERVER).
Because each rule is weighted the same, RightFax load balances
between the two servers.
Scenario 8: Backup servers
PDQ Company’s system administrator for LASERVER hears about the
new NYSERVER2 in New York and decides to make use of the
additional server by replicating all the dialing rules on LASERVER for
NYSERVER but this time referring them to NYSERVER2. This leads
to a guaranteed path of Least-Cost Routing if one or the other of the
N.Y. servers fail for any reason.
Upon hearing about the new NYSERVER2 in New York, PDQ
Company’s system administrator for LASERVER replicates all the
dialing rules on LASERVER for NYSERVER but this time referring
them to NYSERVER2. This leads to a guaranteed path of Least-Cost
Routing should one or the other of the New York servers fail for any
reason.
OpenText RightFax20.2 119 Managed ServicesAdministrator Guide

Chapter 20: Creating phonebookentries in FaxUtil Web
Chapter 20: Creating phonebook entries in FaxUtil Web
To sign in
1. Open http://<servername>/RightFax/User or
https://<servername>/RightFax/User where servername is
either the name of the RightFax server or its IP address.
2. In the User ID box, enter an administrator password. If required,
enter the Password, and then click Sign In.
To sign out
l On the <username> menu, click Sign Out.
Creating a personal RightFax phonebook
Your RightFax phonebook can include entries for individual fax
recipients and groups of fax recipients.
To open your RightFax phonebook
l From your fax mailbox, click Phonebook. The Phonebook page
opens.
To create an individual entry
1. On the Phonebook page, on the New menu, click Phonebook
Entry. The Phonebook Entry dialog box opens.
2. In the ID box, type an ID for the entry.
3. Under To, enter addressing information for the recipient.
4. Under Options, select any of the following check boxes:
OpenText RightFax 120 Managed ServicesAdministrator Guide
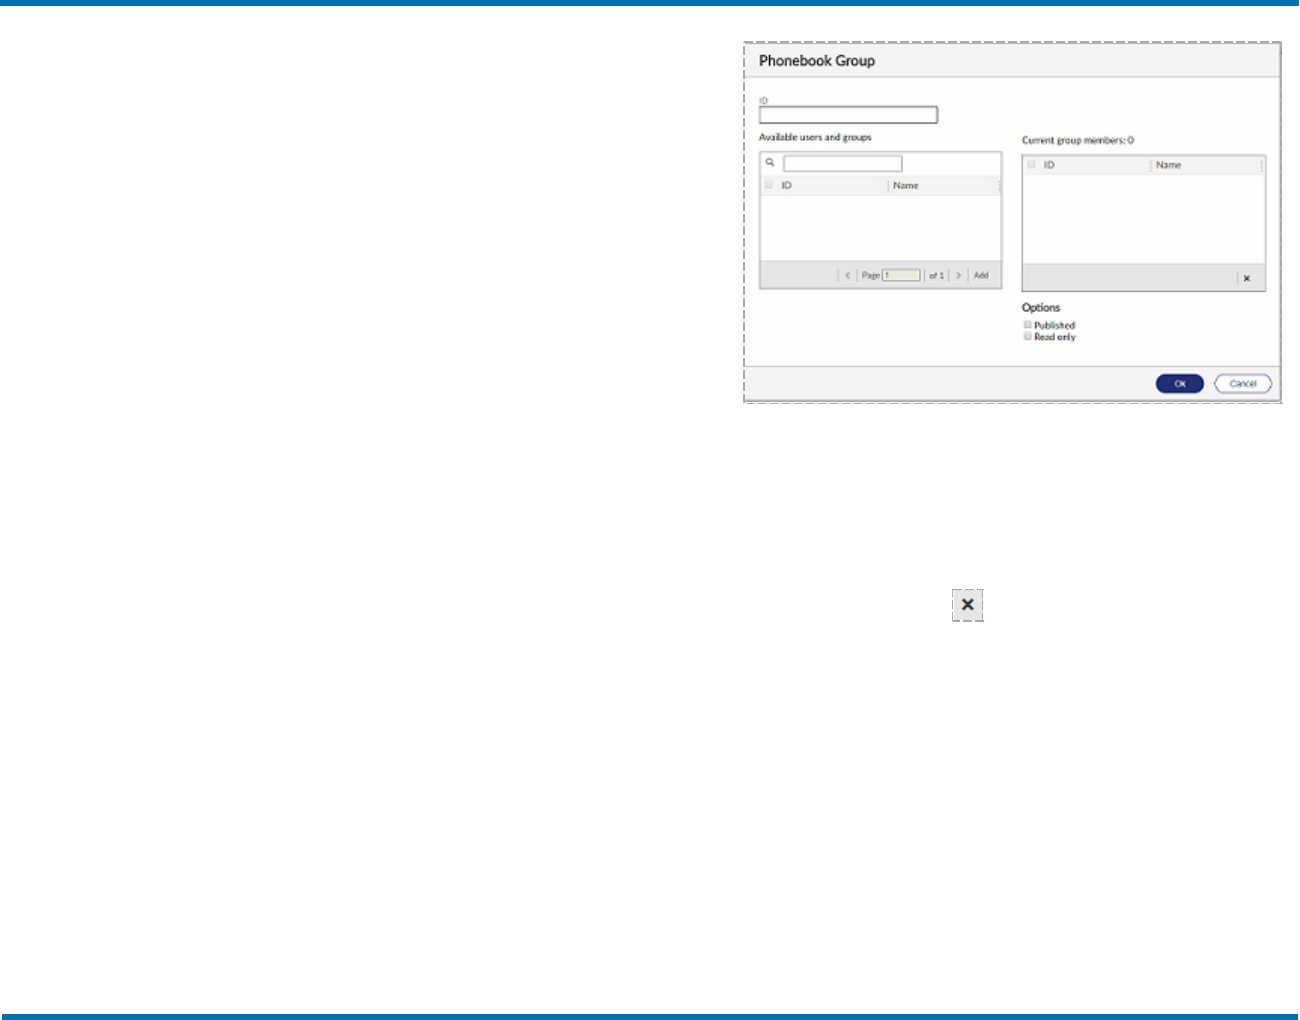
Chapter 20: Creating phonebookentries in FaxUtil Web
l Published. If selected, the entry will be available to other
RightFax users. If your RightFax account is not password-
protected, unpublished entries from your phonebook will be
accessible to other users.
l Read only. If selected, only you can edit the entry.
l Hidden on cover sheet CC list. If selected, the item will
not appear in the CC list on the cover sheet.
5. Under Accounting, enter billing codes to assign to all faxes sent
to this recipient.
6. Under Other, enter optional contact information, such as a
secondary fax number, voice numbers, and the recipient's fax
ID. In the Notes box, enter notes about the recipient.
7. Click Ok. The new entry appears in your phonebook list.
To create a group entry
A group phonebook entry can consist of both individual and group
entries.
1. On the Phonebook page, on the New menu, click Phonebook
Group. The Phonebook Group dialog box opens.
2. In the ID box, type an ID for the group.
3. Under Available users and groups, select the users and
groups to include in the group. To search for a user or group, in
the search box, enter a full or partial user or group ID.
4. Click Add. The users and groups are added to the Current
group members list. To remove an entry from the list, select
the entry, and then click .
5. Select any of the following check boxes to specify who can view
and edit this group phonebook entry.
l Published. If selected, the entry will be available to other
RightFax users. If your RightFax account is not password-
protected, unpublished entries from your phonebook will be
accessible to other users.
l Read only. If selected, only you can edit the entry.
6. Click Ok. The group appears in your phonebook list.
To print phonebook entries
OpenText RightFax20.2 121 Managed ServicesAdministrator Guide
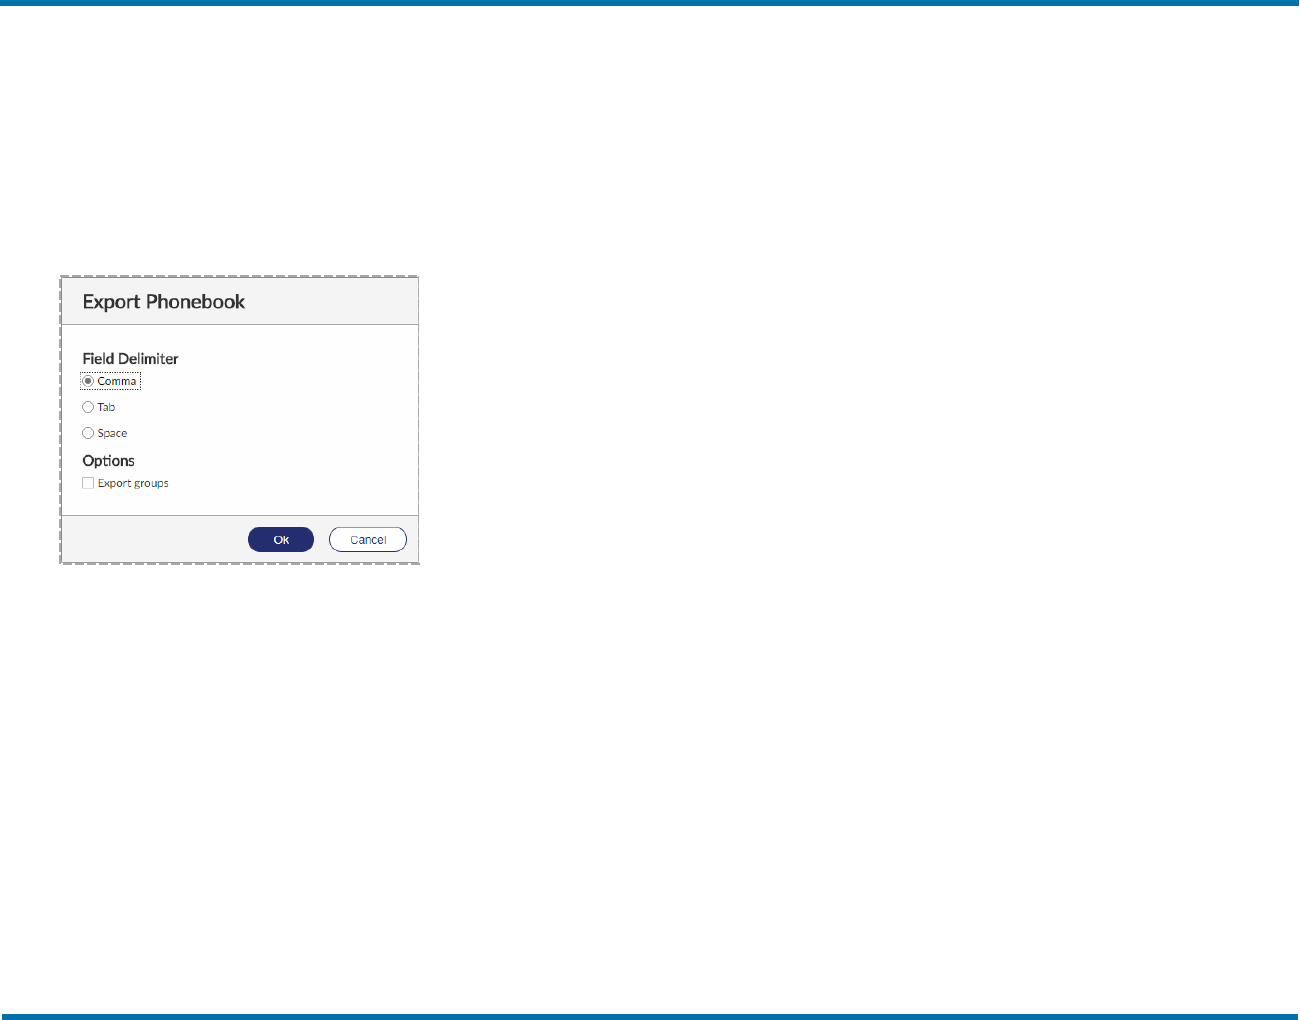
Chapter 20: Creating phonebookentries in FaxUtil Web
Exporting phonebook entries
You can export your RightFax phonebook to a text file.
To export the phonebook
1. In your fax mailbox, click Phonebook. The Phonebook page
opens.
2. On the File menu, click Export. The Export Phonebook dialog
box opens.
3. Under Field Delimiter, select the delimiter to use to separate
fields within phonebook entries, Comma, Tab, or Space.
4. To include phonebook groups as separate entries in the file,
select the Export groups check box. The text file shows groups
at the bottom of the file, and the IDs of the users in each group
are listed.
5. Click Ok.
OpenText RightFax20.2 122 Managed ServicesAdministrator Guide
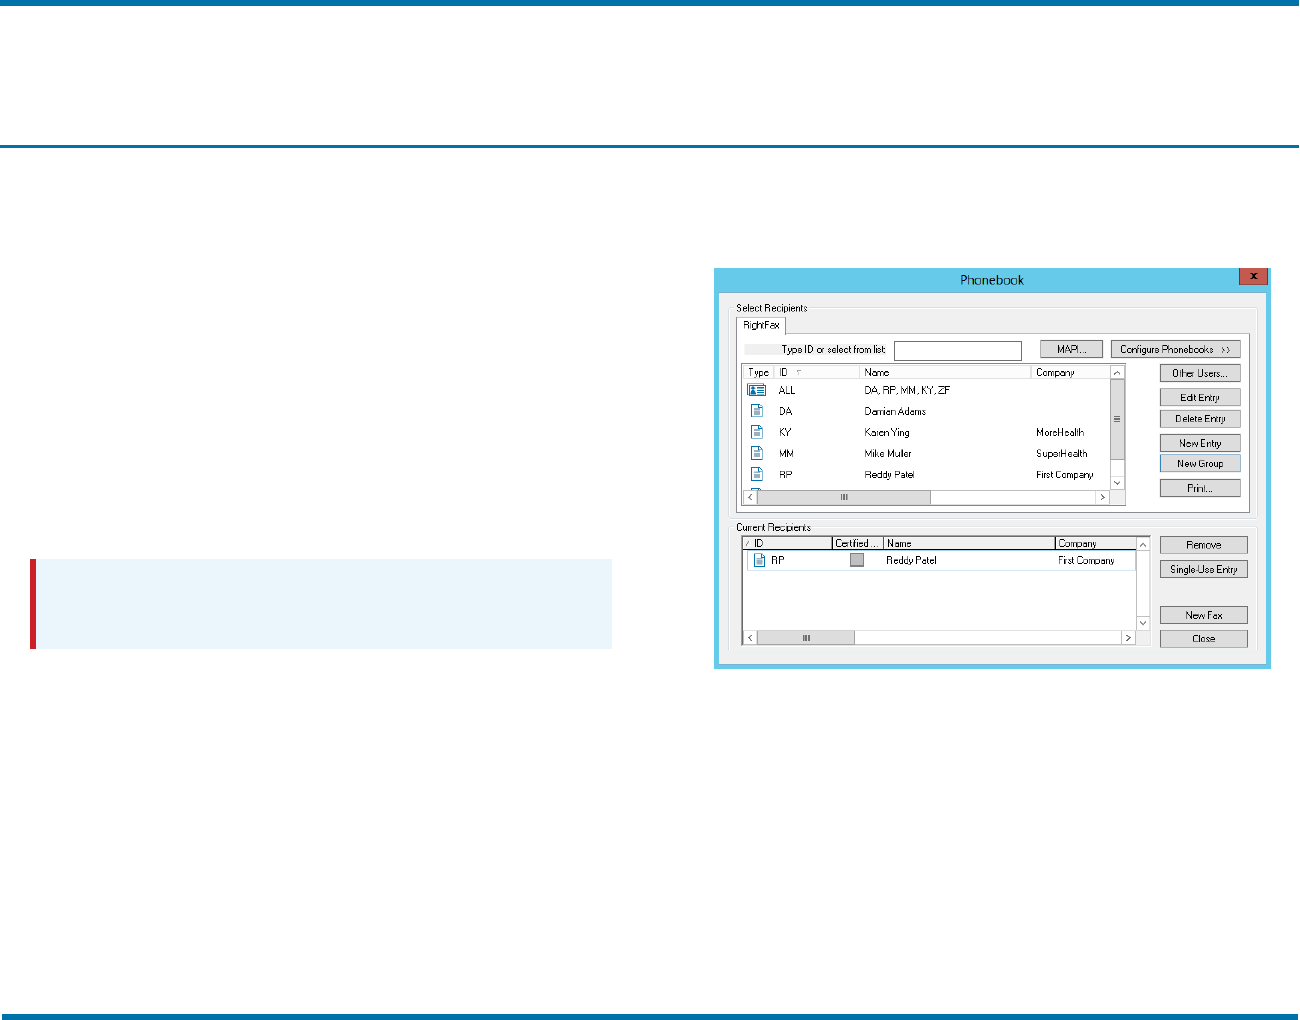
Chapter 21: Managing phonebooks in FaxUtil
Chapter 21: Managing phonebooks in FaxUtil
Depending on your user account configuration and access, you can
store fax recipient information in a RightFax phonebook and link to
existing ODBC, LDAP, or MAPI contact lists.
Creating a personal RightFax phonebook
Your RightFax phonebook can include entries for individual fax
recipients and groups of fax recipients. When you add or edit an entry,
you can select any of the following to specify who can view and edit the
entry:
l Published. The entry will be available to other RightFax users.
Caution If your RightFax account is not password-protected,
unpublished entries from your phonebook will also be accessible
to other users.
l Read Only. Only you can edit the entry.
l Externally available. The entry will be available outside of
RightFax.
l Hidden on cover sheet CClist. The information for individual
entries will not appear in the CClist on the cover sheet.
To open your RightFax phonebook
l From your mailbox, click Phonebook. The Phonebook window
opens.
Creating RightFax phonebook entries
To create or edit an individual entry
1. In the Phonebook window, do one of the following:
l Click New Entry.
l Click the entry in the list, and then click Edit Entry.
OpenText RightFax 123 Managed ServicesAdministrator Guide
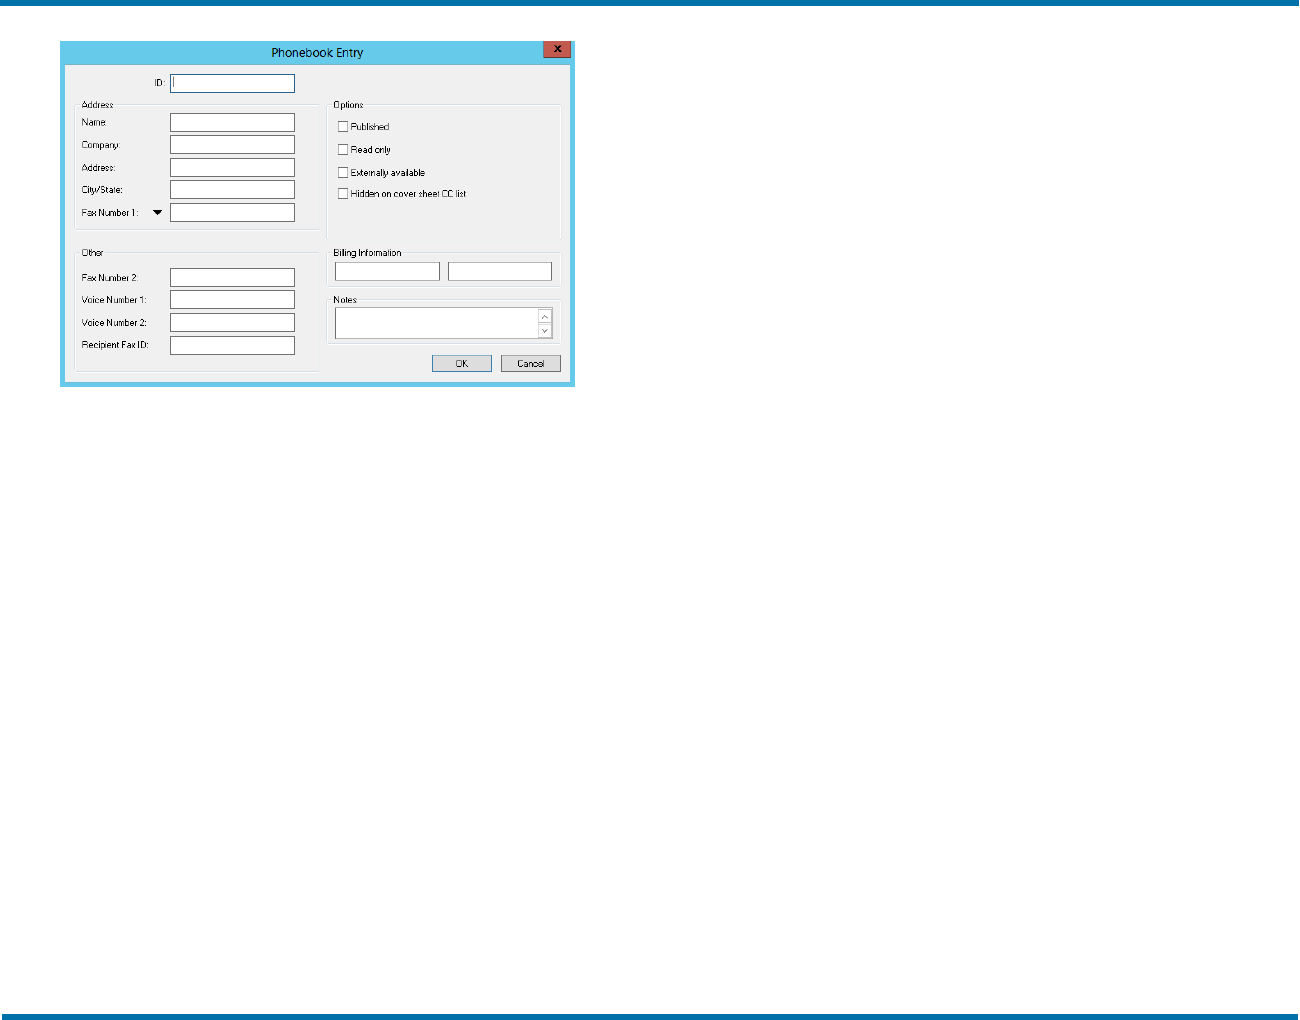
Chapter 21: Managing phonebooks in FaxUtil
2. In the ID box, type an ID for the entry.
3. Under Address, enter addressing information for the recipient; at
a minimum, enter a name and a fax number.
4. Under Other, enter optional contact information, such as a
secondary fax number, voice numbers, and the recipient's fax id.
5. Under Options, select any of the following check boxes:
l Published. If selected, other RightFax users can view the
item.
l Read Only. If selected, only the owner can modify the item.
l Externally available. If selected, the item is available to
applications other than RightFax software.
l Hidden on cover sheet CC list. If selected, the item does
not appear in the CC list on the cover sheet.
6. Under Billing Information, enter billing codes and notes you
want to assign to all faxes sent to this recipient.
7. Click OK. The new entry appears as an individual entry in your
phonebook list.
To create or edit a group entry
A group phonebook entry can consist of both individual and group
entries.
1. In the Phonebook window, do one of the following:
l Click New Group.
l Click the group in the list, and then click Edit Entry.
2. In the ID and Type name or select from list boxes, enter an ID
and a description for the group.
3. Select any of the following check boxes to specify who can view
and edit this group phonebook entry.
l Published. If selected, other RightFax users can view this
phonebook item.
l Read Only. If selected, only the owner can modify this
phonebook item.
l Externally available. If selected, this phonebook item is
available to applications other than RightFax software.
4. In the box on the left, select all individual and group items you
want to add to the group, and then click the right arrow to move
them to the Group Members box.
5. Click OK. The group appears in your phonebook list.
Importing phonebook entries
To load another user's public phonebook entries
1. In the Phonebook window, click Other Users.
2. In the Search for Users box, enter a full or partial user name or a
RightFax user ID, and then click Search.
3. Select the user, and then click Load. Any public entries from this
user's phonebook appear in your RightFax phonebook list.
OpenText RightFax20.2 124 Managed ServicesAdministrator Guide
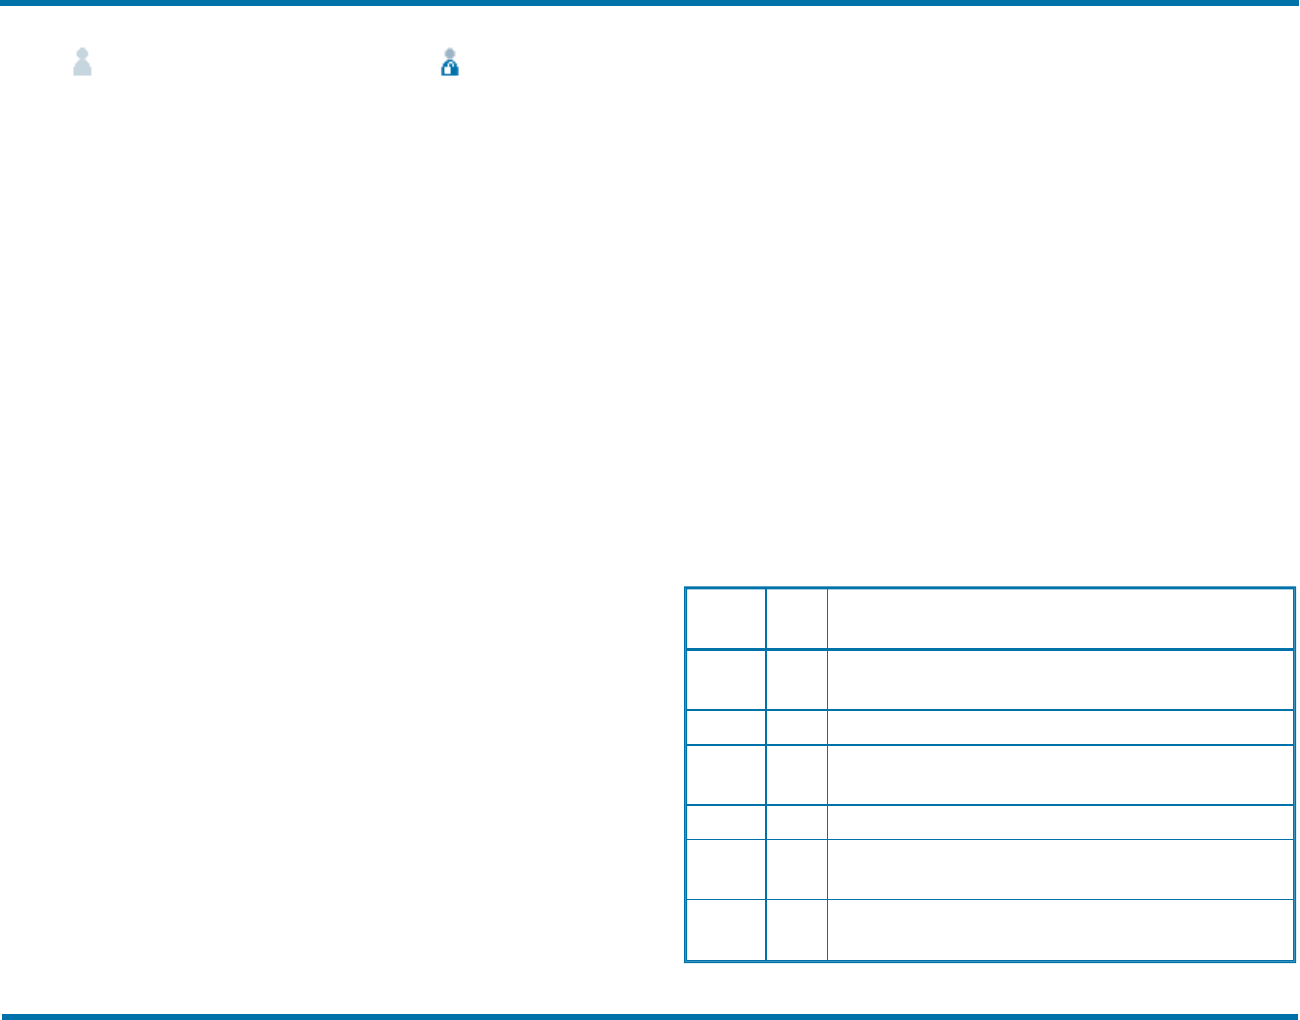
Chapter 21: Managing phonebooks in FaxUtil
indicates if a user account is disabled, if it is
unprotected.
4. Repeat to load public phonebook entries from another user.
To import entries from a text file
If your user account permission allows creating and editing
phonebooks, you can import entries into your personal phonebook from
a specially formatted text file.
l To create the import file, see Creating a text file to import below.
l To import the file, see Importing entries from a text file on the next
page.
Deleting RightFax phonebook entries
To delete an entry
1. In the Phonebook window, in the list, click the entry.
2. Click Delete Entry, and then click Yes to confirm the deletion.
Printing RightFax phonebook entries
To print all or select phonebook entries:
1. Click Phonebook.
2. To print all entries in the phonebook, click Print. Otherwise
select the entries in the list, and then click Print Selected.
3. Select the printer and specify any other print settings, and then
click Print.
Creating a text file to import
The import file can be generated by an external source such as a
contact database manager, exported from another RightFax
phonebook, or generated by the RightFax PhnPrint administrative
utility. For information about PhnPrint, see the RightFax Administrative
Utilities Guide.
The file to import must be a comma-, tab-, or space-delimited ASCII
text file where:
l The first line is made up of the RightFax field names shown in the
table below. When exporting from an existing source, map each field
name to the corresponding RightFax name.
l Each phonebook record is separated from the next by a line break.
l Each field is separated from the next by a comma, tab, or space,
depending on the selected format.
l The field values in each record appear in the same order as the
corresponding field names on the first line.
l Each blank field value appears as a single space surrounded by
quotation marks (" ").
l If quotation marks are used to surround any field name or field value,
they must be used for all fields in the file.
The following table lists each of the valid phonebook entry fields.
Field
name
Max
length
Description
ID 17 A unique ID used onlyto reference the phonebookentry. It never
appears on the fax.
Name 59 The recipient’s name asit willappear on the faxcover sheet.
Company 59 The recipient’s companyname as it will appear on the faxcover
sheet.
Address 59 The recipient’s address asit will appear on the fax cover sheet.
CityState 59 The recipient’scity and state as they willappear on the faxcover
sheet.
Fax1 31 The recipient’s primary faxnumber. Thisis used when dialing the
faxdestination and mayappear on the faxcover sheet.
OpenText RightFax20.2 125 Managed ServicesAdministrator Guide
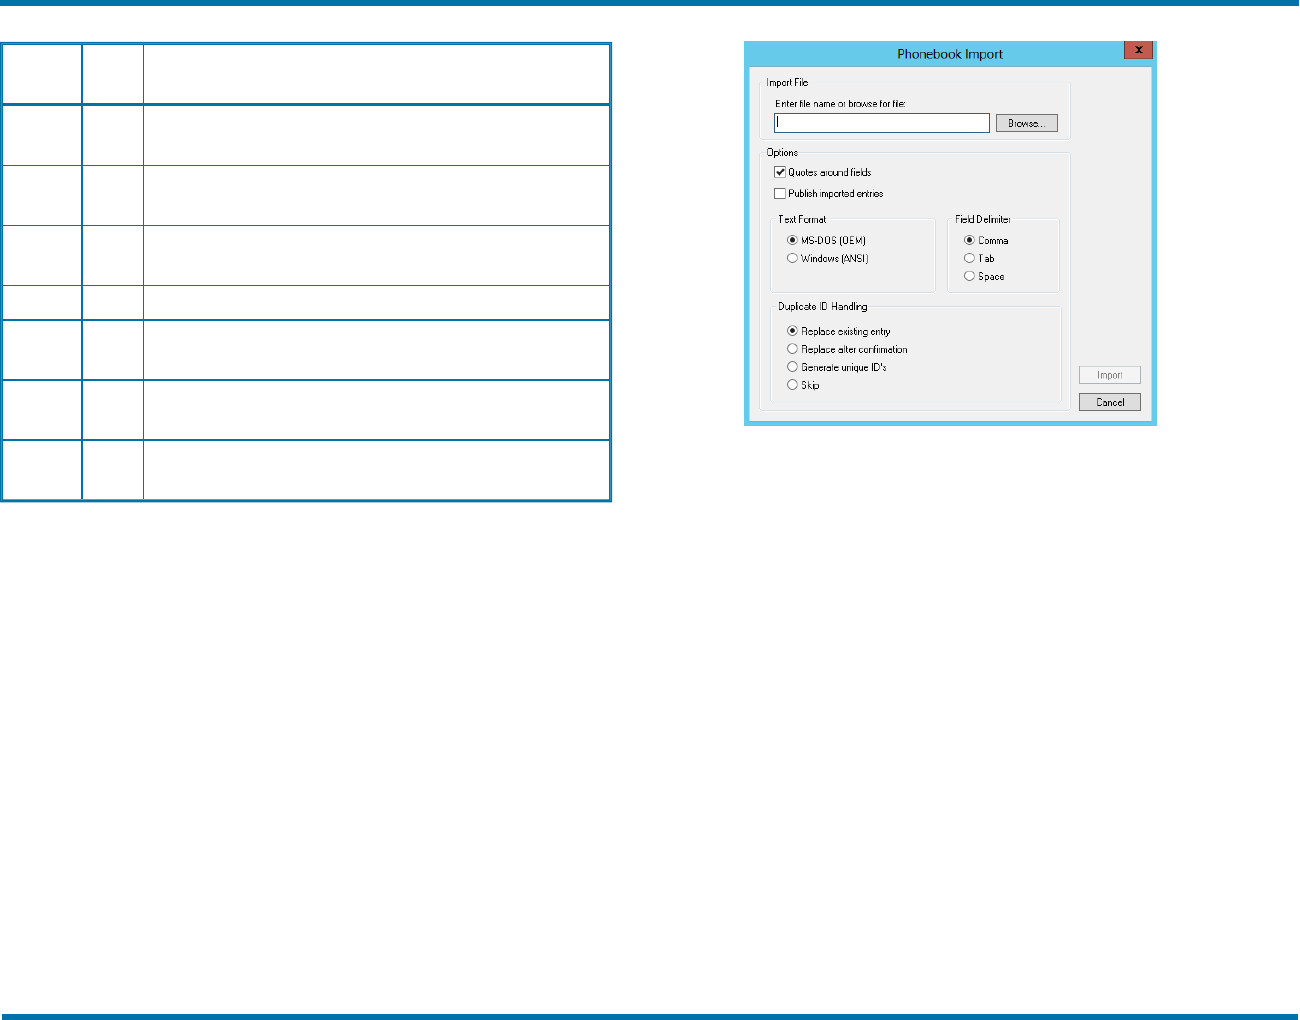
Chapter 21: Managing phonebooks in FaxUtil
Field
name
Max
length
Description
Fax2 31 The recipient’s alternate faxnumber. Thisis used when dialing the
faxdestination and mayappear on the faxcover sheet.
Voice1 31 The recipient’s primaryvoice number asit will appear on the fax
cover sheet.
Voice2 31 The recipient’s alternate voice number asit will appear on the fax
cover sheet.
FaxID The recipient'sfaxID.
BillCode1 17 A code associated with the recipient used for billing or tracking
purposes. It never appearson the fax.
BillCode2 17 An additional code associated with the recipient used for billing or
tracking purposes. It never appears on the fax.
Notes 128 Anyadditional information about the recipient. Thiswillnot appear
on the fax and is for your information only.
Example The following shows the first three lines and first three fields
of an import file. Instead of (...), a usable import file would include all
field names listed in the table and field values for each. For an example
of a blank field value, see the value for Company in the second record.
"ID","Name","Company",(...)
"Jan","Jan Smith","First Company",(...)
"Reddy","Reddy Patel"," ",(...)
Importing entries from a text file
To import entries from a text file
1. On the Tools menu, click Phonebook Import.
2. Enter the path and file name of the text file to import, or browse
to it.
3. As needed, select the Quotes around field check box to
specify that the entries in the import file include quotes and the
Publish imported entries check box to make the imported
phonebook entries available to other user.
4. Under Text Format, click the format of the import file.
5. Under Field Delimiter, click whether the fields within the import
file are separated by comma, tab, or space.
6. Under Duplicate IDHandling, specify the action to take when
a duplicate ID is encountered:
l To import the entry and replace the existing entry, click
Replace the existing entry.
l To import the entry and replace the existing entry if confirmed
during import, click Replace after confirmation.
l To import the entry and assign a unique ID, click Generate
OpenText RightFax20.2 126 Managed ServicesAdministrator Guide

Chapter 21: Managing phonebooks in FaxUtil
unique IDs.
l To not import the entry, click Skip.
7. Click Import . As needed, respond to confirmation messages for
duplicate entries.
Exporting the entries from your RightFax
phonebook
You can export phonebook entries to a comma, tab, or space delimited
text file.
To export the phonebook to a comma, tab, or space delimited
text file
1. On the Tools menu, click Phonebook Export.
2. To include phonebook groups as separate entries in the file,
select the Export Groups check box. The text file shows
groups at the bottom of the file, listing the IDs of the users in
each group.
3. Click the delimiter to use to separate fields within phonebook
entries: Comma, Tab, or Space.
Selecting MAPI, LDAP, or ODBC phonebook
entries
You can select entries from phonebooks other than the RightFax
phonebook only if you have user permission to create and edit
phonebooks. For information about configuring MAPI, LDAP, and
ODBC phonebooks, see the RightFax Administrator Guide.
To select recipients from a MAPI source
1. Click Phonebook, and then click MAPI.
2. In the Profile Name box, select the MAPI profile name, and then
click OK.
3. If prompted, enter your network user name, domain, and
password, and then click OK.
4. In the contact list, double-click each contact entry you want to
select, and then click OK. You can search for recipients by
name only or by data in other columns.
The selected entries appear in the Current Recipients list of the
Phonebook window.
To select recipients from an ODBCor LDAP phonebook
1. Click Phonebook.
2. On the tab of the phonebook, select the entries, and then click
OK. Use the arrow keys to show more records.
OpenText RightFax20.2 127 Managed ServicesAdministrator Guide

Chapter 22: Setting up workflows
Chapter 22: Setting up workflows
Workflows can be configured for handling faxes among different users
or groups in an organization. For example, faxed invoices may be
handled by several departments in an organization, such as the Sales
department and then the Accounts Payable department.
Metadata helps describe an item and can be many kinds of information
such as a location, a date, or an invoice number. Each sent and
received fax is associated with a set of RightFax-specific metadata.
With workflows, custom metadata fields can be configured for received
faxes so that users in a workflow can associate faxes with additional
descriptive information.
Aworkflow can capture unlimited metadata.
For example, faxed invoices may route to a workflow that is configured
for RightFax Archive. In FaxUtil, the faxes appear in the workflow
mailbox of all assigned users. These users collaborate to tag the faxed
invoices with the required metadata. After a fax is tagged with
metadata, it is removed from the workflow mailbox. When archiving
occurs, the completed faxes move to RightFax Archive.
In the RightFax client applications, if a user is responsible for tagging
faxes in a workflow, then a workflow mailbox appears in the tree view in
the left pane of the RightFax client application.
Metadata only can be added to received faxes. If a user opens a fax to
tag it with metadata, the fax is locked so that other users cannot open it.
Preparing to configure workflows for
metadata tagging
Before you begin configuring workflows, prepare the following
information.
l Identify the types of received faxes that will be tagged with
metadata. For example, invoices and orders.
l For each type of received fax, create a list of the metadata that you
wish to capture. For example, order date and ship date.
l Determine which users or groups of users should add metadata to
faxes.
l Determine the workflow and the ultimate destination of the fax. For
example,
l Workflow step 1: Faxes are received in a central mailbox where
a user evaluates each fax for appropriate action. One of the
faxes is an order for the Sales department, so the user routes the
fax to the Sales department to verify that the order is complete.
l Workflow step 2: From the Sales department, the fax is routed to
the Accounts Receivable department to initiate the invoice.
l Workflow step 3: From the Accounts Receivable department,
the fax is routed the fax to RightFax Archive.
l Identify exceptions to the workflows so that users can divert faxes
OpenText RightFax 128 Managed ServicesAdministrator Guide

Chapter 22: Setting up workflows
from workflows. For example, if a Sales order is received with the
incorrect price for goods sold, the order can be diverted in order to
correct the price. Identify the steps in the exception workflows.
l For each type of received fax, determine the routing code that will
route faxes to a workflow. For information about routing codes, see
the RightFax Administrator Guide.
l To retrieve the metadata after the faxes have been tagged, you must
license and configure RightFax XML Generator or RightFax Vault.
For information, see the RightFax XML Generator Administrator
Guide or the RightFax Vault Administrator Guide. Metadata for each
fax in a workflow can be viewed in FaxUtil or FaxUtil Web.
Creating, editing, and deleting workflows for
metadata tagging
To create new workflows, complete the following general steps:
1. Create exception workflows. Workflows can include subordinate
workflows for handling exceptions (known as "exception
workflows"). Exception workflows allow users to divert faxes
from a workflow and then return them to the original workflow.
You must create exception workflows before you create
workflows.
2. Create workflows.
3. After you create workflows, assign RightFax users to the
workflows. See the RightFax Administrator Guide to define
delivery methods for users.
To create a workflow
l In Web Admin, in the left pane, click Workflows. The list of
workflows appears in the right pane. Click New. You have the
following options:
l To create a workflow, click New workflow, see Configuring the
properties of a workflow on page132.
l To create an exception workflow, click New exception
workflow, and see Configuring the properties of an exception
workflow below.
To delete a workflow
l Select the workflow in the list, and then click Delete.
Configuring the properties of an exception
workflow
After you create exception workflows, they can be added to workflows,
as described in Configuring the properties of a workflow on page132.
In the New Exception Workflow dialog box, click the tab you want to
edit.
OpenText RightFax20.2 129 Managed ServicesAdministrator Guide
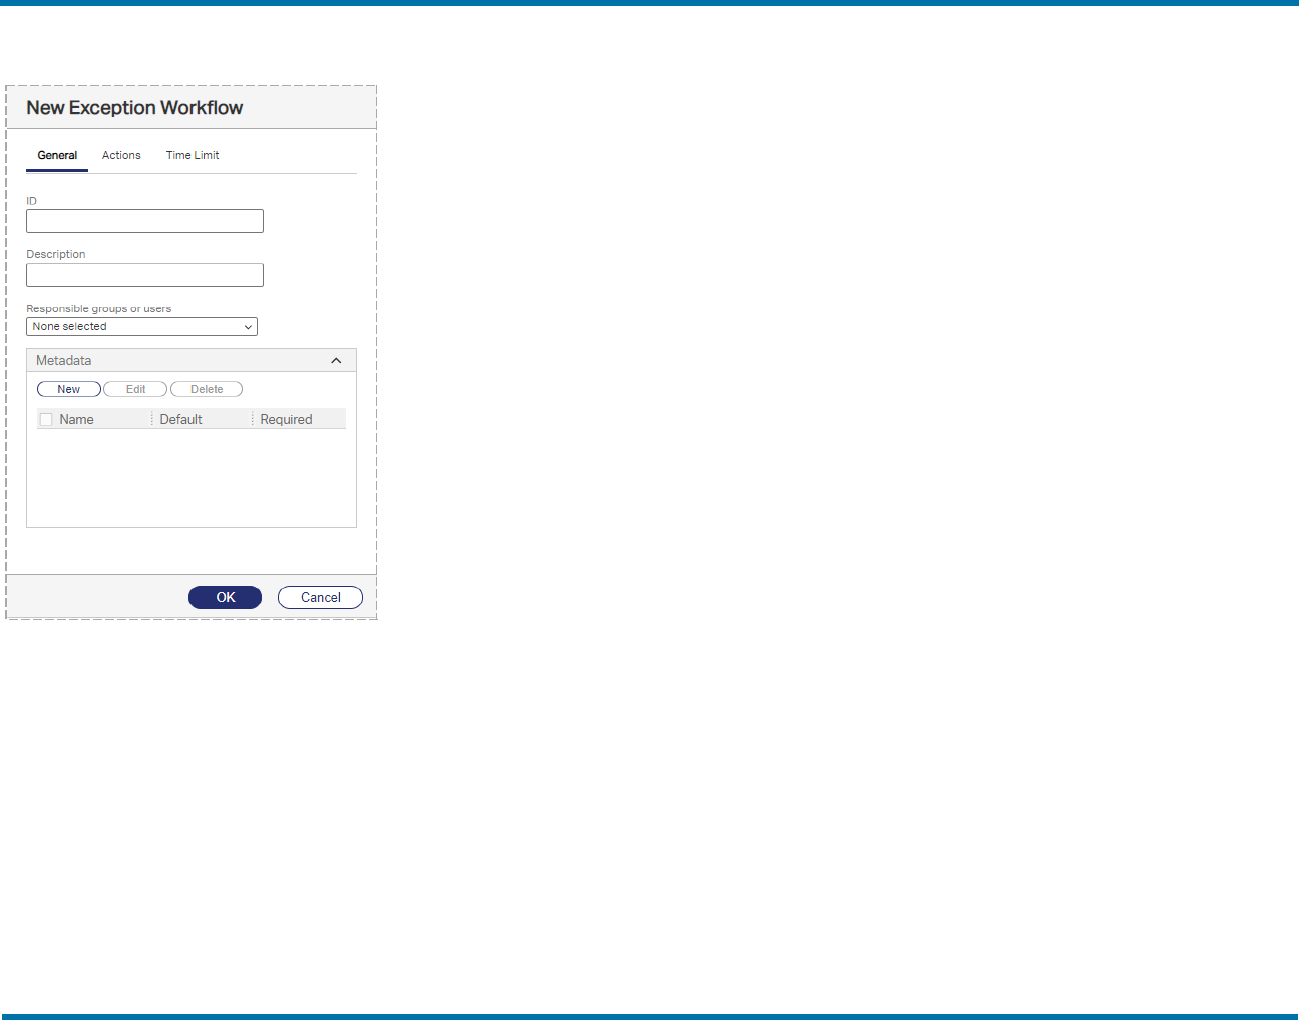
Chapter 22: Setting up workflows
The General tab
.
1. In the ID box, enter the name of the exception workflow.
2. In the Description box, enter a description of the exception
workflow.
3. In the Responsible groups or users box, select the users and
groups that will be responsible for tagging faxes in the exception
workflow with metadata. The responsible user of one workflow
can edit the data from any previous workflow through which the
fax has flowed.
4. Under Metadata, click New. The New Metadata dialog box
opens.
5. In the Name box, enter a descriptive name for the metadata
field. This name will appear in the fax viewer as a prompt for
users who are tagging faxes with metadata.
6. Select one of the following:
l If you wish for users to enter free form text, click User entry.
If you wish to specify a default value, in the Default box enter
the value. The user can change this text during data entry.
l If you wish to provide multiple choices, you can create up to
five options from which users can select. Click Multiple
choice. In the Choices box, enter the text for the first
choice. Subsequent text boxes will appear after each entry. If
you wish to select one of these as the default value, under
Default click the selection.
Multiple choice entries will appear in the fax viewer in the
order they are created.
7. If the metadata is required, select the Required check box.
OpenText RightFax20.2 130 Managed ServicesAdministrator Guide
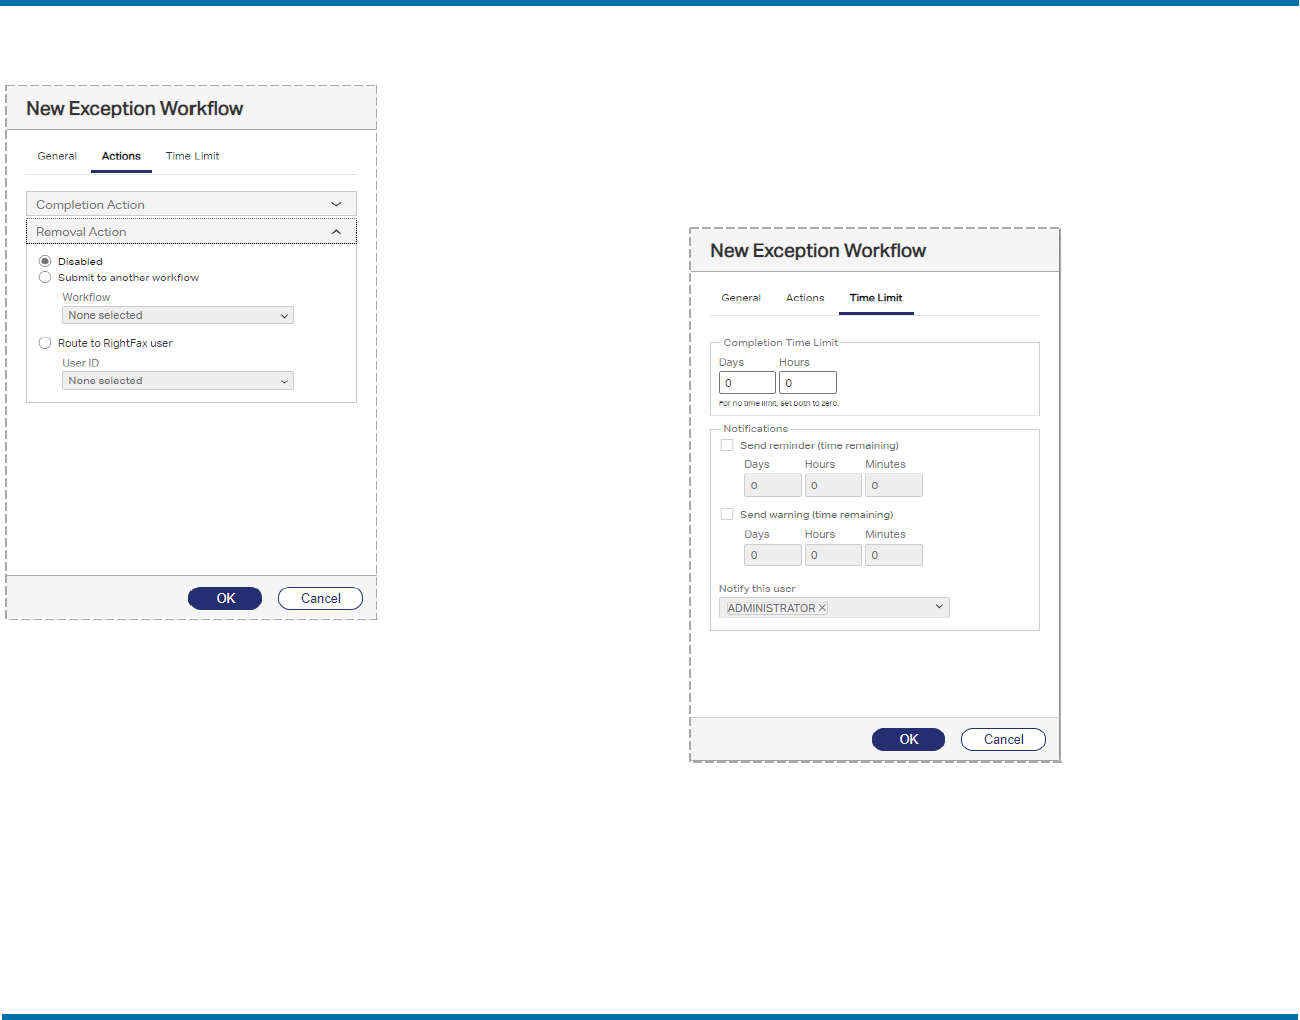
Chapter 22: Setting up workflows
The Actions tab
.
ll The Completion Action determines the disposition of the fax when
metadata tagging is completed. The fax will be re-submitted to the
workflow that had the exception.
l Under Removal Action, select one of the following actions:
l Disabled. The user cannot remove the fax from the workflow.
l Submit to another workflow. The fax will be routed to another
workflow. Under Workflow, select the name.
l Route to RightFax user. The fax will be routed to another
RightFax user. Under User ID, select the user ID. (Note that if
this user is deleted at a later time, the removal action will change
to None.)
When a fax is removed from a workflow, the metadata for the
current workflow is not saved.
The Time Limit tab
.
1. To set a time limit to complete each fax in the exception
workflow, under Completion Time Limit, select the number of
days or hours. The completion time is calculated from the time
the fax arrives in the workflow.
2. Reminder and warning notifications can be set for faxes in the
exception workflow. The time remaining for the reminder is
OpenText RightFax20.2 131 Managed ServicesAdministrator Guide
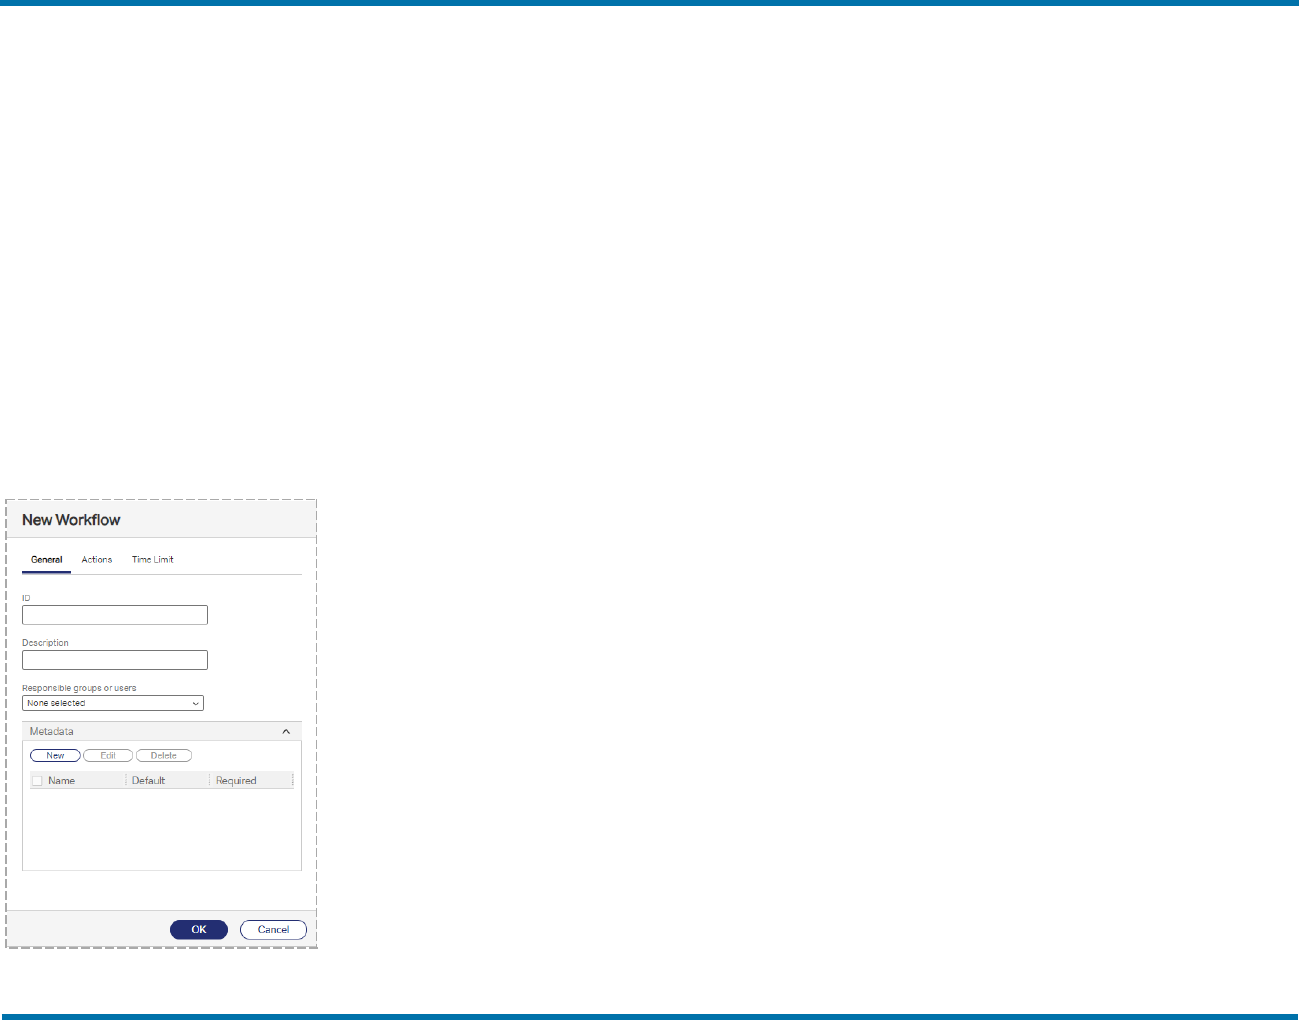
Chapter 22: Setting up workflows
calculated from the completion time (the time remaining before
the workflow deadline). Select the check box Send reminder
(time remaining) or Send warning (time remaining), and then
select the days, hours, or minutes before the completion time
when the reminder or warning should be sent to the user. A
reminder or warning is sent once for each fax.
3. Under Notify this user, select the RightFax user who will
receive the reminder or warning.
4. Configure the email or SMS service for the selected users who
will receive notifications. See Creating RightFax user accounts
on page17.
Configuring the properties of a workflow
In the New Workflow dialog box, click the tab you want to edit.
The General tab
.
1. In the ID box, enter the name of the workflow.
2. In the Description box, enter a description of the workflow.
3. In the Responsible groups or users box, select the users and
groups that will be responsible for tagging faxes in the workflow
with metadata. The responsible user of one workflow can edit
the data from any previous workflow through which the fax has
flowed.
4. Under Metadata, click New. The New Metadata dialog box
opens.
5. In the Name box, enter a descriptive name for the metadata
field. This name will appear in the fax viewer as a prompt for
users who are tagging faxes with metadata.
6. Select one of the following:
l If you wish for users to enter free form text, click User entry.
If you wish to specify a default value, in the Default box enter
the value. The user can change this text during data entry.
l If you wish to provide multiple choices, you can create up to
five options from which users can select. Click Multiple
choice. In the Choices box, enter the text for the first
choice. Subsequent text boxes will appear after each entry. If
you wish to select one of these as the default value, under
Default click the selection.
Multiple choice entries will appear in the fax viewer in the
order they are created.
7. If the metadata is required, select the Required check box.
OpenText RightFax20.2 132 Managed ServicesAdministrator Guide
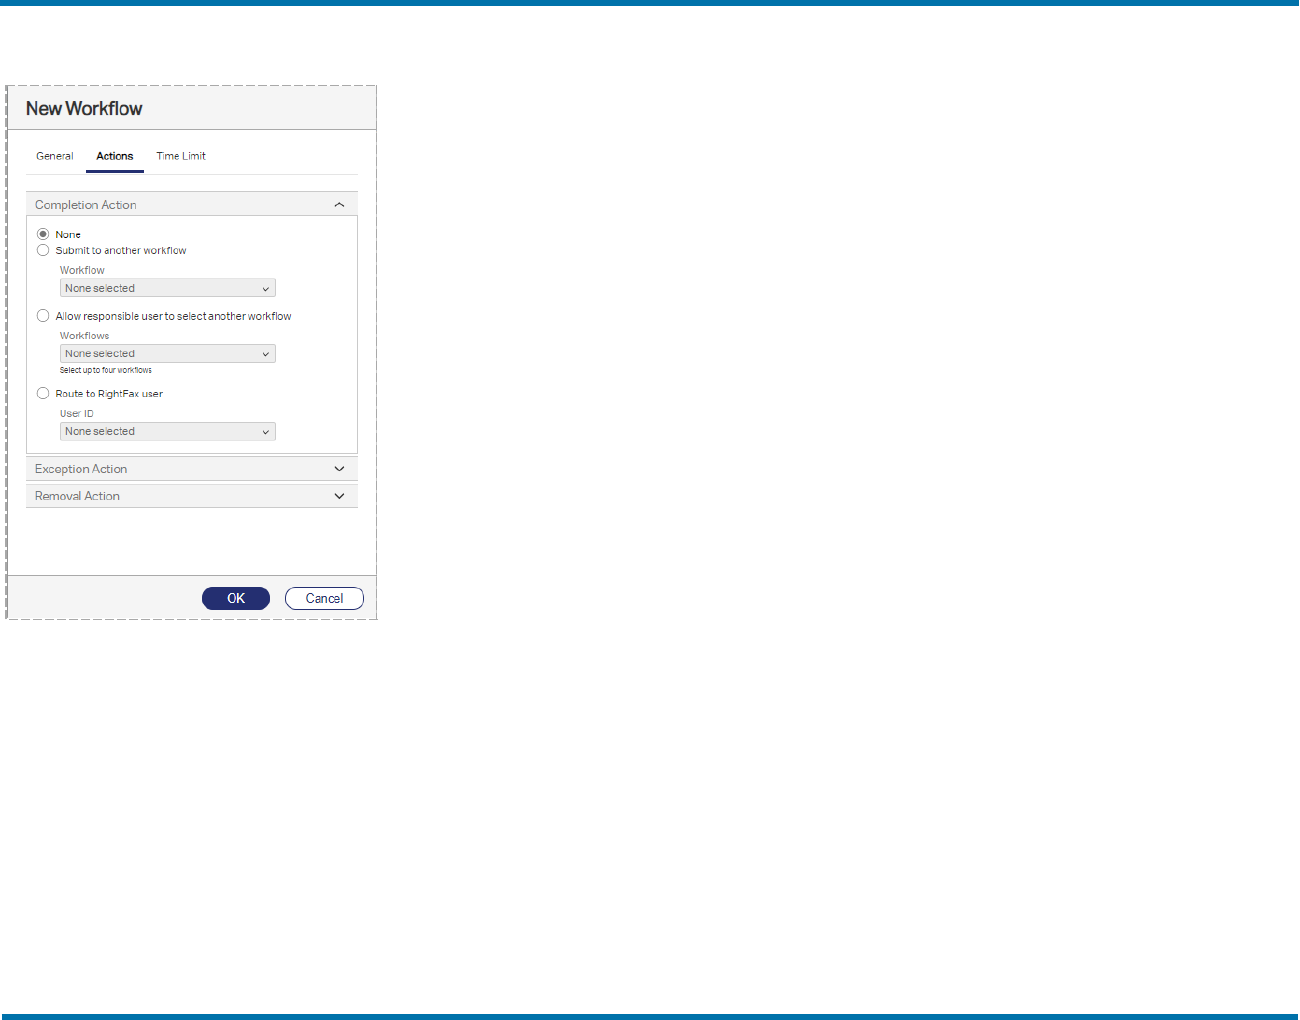
Chapter 22: Setting up workflows
The Actions tab
.
ll The completion action determines the disposition of the fax when
metadata tagging is completed. Under Completion Action, select
one of the following:
l None. The fax will be removed from the list of faxes that require
metadata, and it will be aged or archived according to the
configuration of the workflow mailbox.
l Submit to another workflow. The fax will be routed to another
workflow. Under Workflow, select the name. Exception
workflows are not available for completion actions.
l Allow responsible users to select another workflow. Users
in the workflow can choose another workflow for the fax. Under
Workflows, select up to four workflows. Exception workflows
are not available for completion actions.
l Route to RightFax user. The fax will be routed to another
RightFax user. Under User ID, select the user ID. (Note that if
this user is deleted at a later time, the completion action will
change to None.)
l Exception workflows allow users to divert faxes from a workflow
and then return them to the original workflow. To provide this
method, under Exception Action, select one of the following:
l Disabled. The user cannot remove the fax from the workflow.
l Submit to an exception workflow. The fax will be routed to
another workflow. Under Workflow, select the name.
l To provide a method for a user to remove a fax from the workflow,
under Removal Action, select one of the following:
l Disabled. The user cannot remove the fax from the workflow.
l Submit to another workflow. The fax will be routed to another
workflow. Under Workflow, select the name. Exception
workflows are not available for removal actions.
l Route to RightFax user. The fax will be routed to another
RightFax user. Under User ID, select the user ID. (Note that if
this user is deleted at a later time, the removal action will be
disabled.)
When a fax is removed from a workflow, the metadata for the
current workflow is not saved.
OpenText RightFax20.2 133 Managed ServicesAdministrator Guide
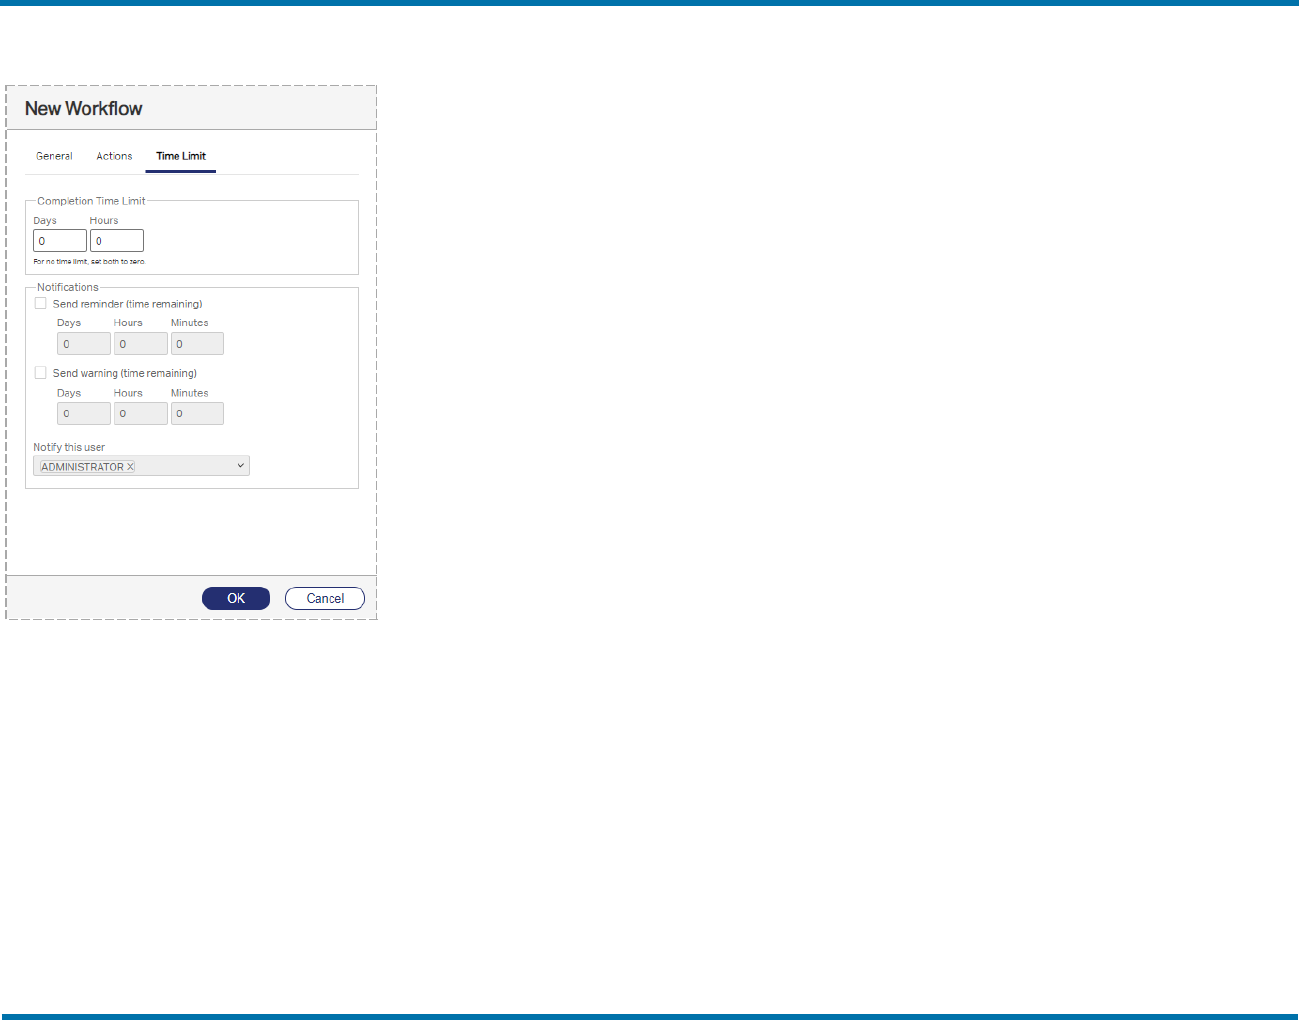
Chapter 22: Setting up workflows
The Time Limit tab
.
1. To set a time limit to complete each fax in the workflow, under
Completion Time Limit, select the number of days or hours.
The completion time is calculated from the time the fax arrives in
the workflow.
2. Reminder and warning notifications can be set for faxes in the
workflow. The time remaining for the reminder is calculated from
the completion time (the time remaining before the workflow
deadline). Select the check box Send reminder (time
remaining) or Send warning (time remaining), and then
select the days, hours, or minutes before the completion time
when the reminder or warning should be sent to the user. A
reminder or warning is sent once for each fax.
3. Under Notify this user, select the RightFax user who will
receive the reminder or warning.
4. Configure the email or SMS service for the selected users who
will receive notifications. See Creating RightFax user accounts
on page17.
Managing workflows
The RightFax administrator can ensure that faxes in workflows are
being processed in a timely manner.
To view the status of a workflow
1. In Web Admin, in the left pane, click Workflows. The list of
workflows appears in the right pane.
2. Click Status. The status dialog box appears.
l Waiting. The number of faxes in the workflow that are
waiting to be viewed since they entered the workflow. Shows
the number of faxes waiting , the average time waiting, and
the longest time a fax has waited to be viewed.
l Processing. The number of faxes in the workflow that are
open in the fax viewer.
l Total. The total number of faxes that are waiting and in
processing in the workflow, the average total time in the
workflow, and the longest time a fax has existed in the
workflow.
To view the workflow in FaxUtil Web, select the workflow and
click Open in FaxUtil Web. FaxUtil Web opens with the
workflow folder open.
OpenText RightFax20.2 134 Managed ServicesAdministrator Guide

Chapter 22: Setting up workflows
To view the faxes in a workflow in the client applications
1. In FaxUtil or FaxUtil Web, log in as the administrator or workflow
mailbox user. The list of workflows appears in the left pane.
2. Click the workflow, and all of the faxes in the workflow appear in
the fax list in the right pane. This includes available, unavailable,
and completed workflow faxes. If a fax is locked by another
RightFax user, then the user ID appears in the Availability
column. If the administrator opens a fax that has not been
completed (the "complete workflow" action is pending), then the
user will see a message that the fax is in use by an
administrator.
If a fax is unavailable, then a RightFax administrator can make it
available. On the Fax menu, click Make Available.
OpenText RightFax20.2 135 Managed ServicesAdministrator Guide

Chapter 23: Configuring faxing for the Epic Print Service
Chapter 23: Configuring faxing for the Epic Print Service
If your RightFax system will send faxes that are submitted by a system
from Epic Systems Corporation via the Epic Print Service, enter the
Epic authentication credentials in RightFax.
This option only is available if you have licensed the RightFax
Integration Module.
To enter Epic system authentication credentials
1. In Web Admin, in the left pane, click System.
2. In the right pane, click Integrations, and then click Configure
Epic Authentication.
3. In the Configure Epic Authentication dialog box, enter the
user name, password, and client ID for the Epic system.
OpenText RightFax 136 Managed ServicesAdministrator Guide

Chapter 24: Installing a TLS/SSL certificate
Chapter 24: Installing a TLS/SSL certificate
You can install digital code signing certificates on the IIS server for
secure sessions via HTTPS.
You have the following options for installing and uploading a certificate.
l Create a self-signed certificate.
l Use a certificate from a third-party certificate authority. The
certificate must be X.509 format, base-64 encoded.
l Use a private certificate authority.
To create a self-signed certificate
1. In Web Admin, in the left pane, click System.
2. In the right pane, click TLS/SSL Certificate.
3. Under Self-Signed Certificate, click Create. The Create Self-
Signed Certificate dialog box opens.
4. In the Common name box, enter the unique, fully qualified
domain name of the IIS server.
5. Enter the identifying organizational information in the
Organization, Organizational unit, City/Locality,
State/Province, and Country/Region boxes, and then click Ok.
6. After the certificate is created, under Security, click Change. In
the Change Security dialog box, select the certificate, and then
select the Use TLS/SSL check box.
To use a certificate from a third-party certificate authority
1. In Web Admin, in the left pane, click System.
2. In the right pane, click TLS/SSL Certificate.
3. Under Signing Request, click Create. The Create Signing
Request dialog box opens.
4. In the Common name box, enter the unique, fully qualified
domain name of the IIS server.
5. Enter the identifying organizational information in the
Organization, Organizational unit, City/Locality,
State/Province, and Country/Region boxes, and then click Ok.
6. When you receive the third-party certificate, under Certificate,
click Upload.
7. In the Upload Certificate dialog box, click File name, and
select the third-party certificate. Select Upload signed
response, and then click Ok.
8. Under Security, click Change. In the Change Security dialog
box, select the certificate, and then select the Use TLS/SSL
check box.
To use a private certificate authority
1. First, install the organization's root certificate on client
computers.
2. In Web Admin, in the left pane, click System.
OpenText RightFax 137 Managed ServicesAdministrator Guide

Chapter 24: Installing a TLS/SSL certificate
3. In the right pane, click TLS/SSL Certificate.
4. Under Certificate, click Upload. In the Upload Certificate
dialog box, select Upload root certificate.
5. Click File name, and select the trusted root certificate, and then
click Ok.
6. Second, create your signed response certificate. Under Signing
Request, click Create. The Create Signing Request dialog
box opens.
7. In the Common name box, enter the unique, fully qualified
domain name of the IIS server.
8. Enter the identifying organizational information in the
Organization, Organizational unit, City/Locality,
State/Province, and Country/Region boxes, and then click Ok.
9. Third, after the certificate is prepared by your private certificate
authority, install the signed response certificate on the IIS
server. Under Certificate, click Upload. In the Upload
Certificate dialog box, click File name, and select the signed
response certificate.
10. Select Upload signed response, and then click Ok.
11. Under Security, click Change. In the Change Security dialog
box, select the root certificate, and then select the Use
TLS/SSL check box.
OpenText RightFax20.2 138 Managed ServicesAdministrator Guide
