Activity Guide
For educators
1

Welcome to the rainforest! We’re excited you’ll be joining us to experience a Rainforest
Adventure. Included in this guide you will find resources to use in your classroom before your
visit and ideas on how to use the exhibit to extend on the content you’re already teaching.
Activities are divided into grade band appropriate lessons for K-2nd, 3rd-5th, and 6th-8th grade,
and they relate to standards in Life Science, Earth & Space Science, Language Arts, Math, and
more. The section titled “Exploring the Exhibit” gives additional details and resources to help
you make the most out of your visit. See the “Rainforest Adventure Connection” at the end of
each activity to guide you toward the appropriate extension activity. There are additional lessons
and activity resources provided in the educational materials folder from Minotaur Mazes.
Feel free to use and adapt the activities described in this guide to suit the needs of your
students and classroom.
Enjoy!
Contents
K-2nd Classroom
ACTIVITY 1 - Rainforests Around the World 2
ACTIVITY 2 - Tree Stewardship 7
ACTIVITY 3 - The Great Kapok Tree 11
3rd-5th Classroom
ACTIVITY 4 - Build a rainforest 18
ACTIVITY 5 - How much water? 21
ACTIVITY 6 - Rainforest Animals and Adaptations 25
ACTIVITY 7 - Biodiversity and Earth’s Rainforests 30
ACTIVITY 8 - Migration Headache 35
ACTIVITY 9 - Tropical Resources & Sustainability 37
6th-8th Classroom
ACTIVITY 10 - Tree Architecture 42
ACTIVITY 11 - Tropical Resources & Sustainability 47
ACTIVITY 12 - Migration Math Madness 52
ACTIVITY 13 - Animal Essays 54
Exploring the Exhibit
Hunting for Animal Adaptations 56
How Rainforests are Important 61
Layers of the Rainforest 63
Animal Classification 66
Back to Top 2

ACTIVITY 1 - Rainforests Around the World
Ages: Grades K-2
Time: 20-30 minutes
Standards: Life Science: Biological Evolution
Overview: Students will practice observation skills to compare and contrast ecosystems in
rainforest environments from around the world.
Materials:
● Rainforests of the world coloring pages (provided)
● Coloring materials (crayons, colored pencils, etc.)
Procedure:
Part 1: Coloring the rainforest
● Let students pick (or assign) a coloring page highlighting plants and animals of a
different rainforest around the world (provided in Resources). Try to hand out pages so
that students sitting next to each other end up with different rainforest pages.
● Give students time to color the pages.
Part 2: Analyzing the rainforest
● After students have finished coloring their pages, let them compare their drawings with a
neighbor. What animals and plants are the same and what is different? For example,
both drawings might have birds, but one has a toucan and one has a hornbill. Ask
students to dive deeper into their observations. If they noticed different birds, ask them
what differences there are in the physical characteristics of the birds and if they can
guess why the animals may have different features.
Part 3: Rainforests of the world
● Explain to the students that rainforests are located around the world. Show students a
world map indicating where the rainforests are located in Africa, Asia, and South
America.
● Rainforests provide home to lots of different types of plants and animals, which are very
different from the ones we see everyday. Explain that just like humans look different
around the world, so do the animals of the rainforests on different continents.
Rainforest Adventure Connection:
● As students explore the Rainforest Adventure exhibit, ask them to pay attention to the
different animals highlighted on the informational panels.
Back to Top 3

● After visiting the exhibit, ask students to recall the animals they saw in the exhibit. If
possible relate the animals to the coloring pages to determine which rainforest of the
world they are from.
Resources:
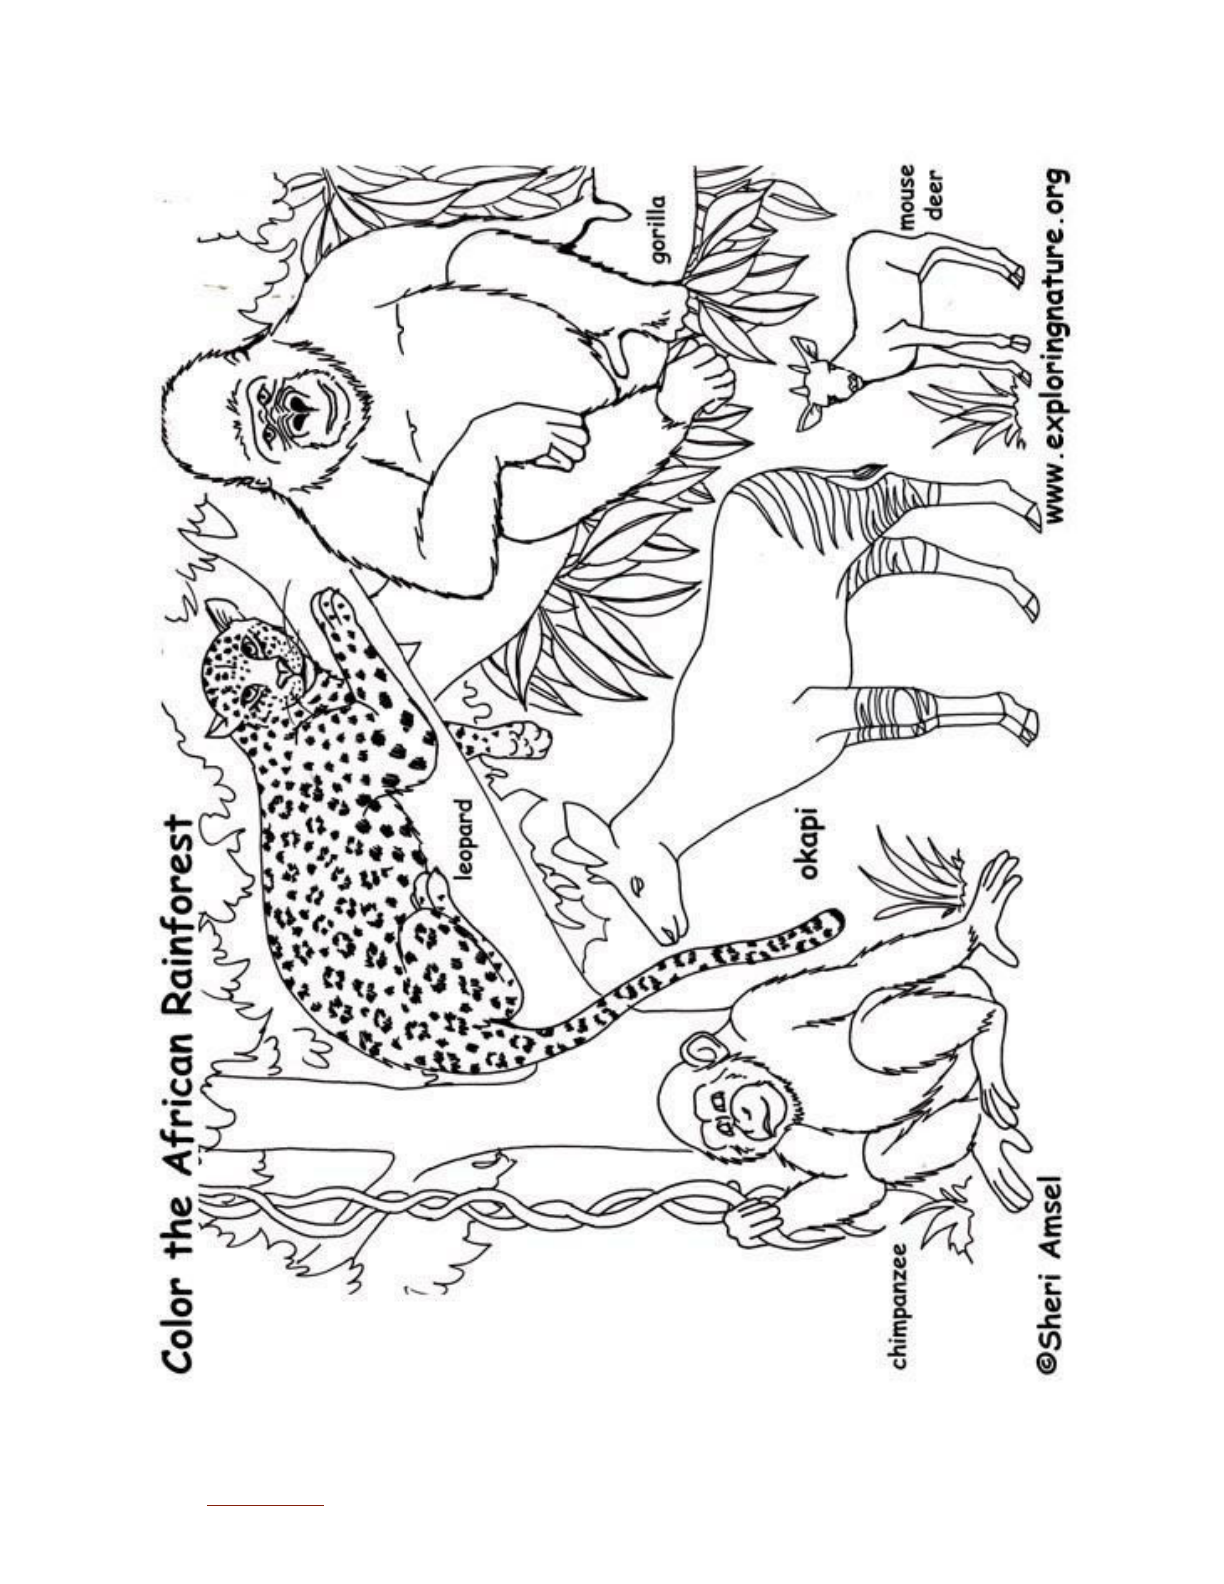
● African Rainforest coloring page
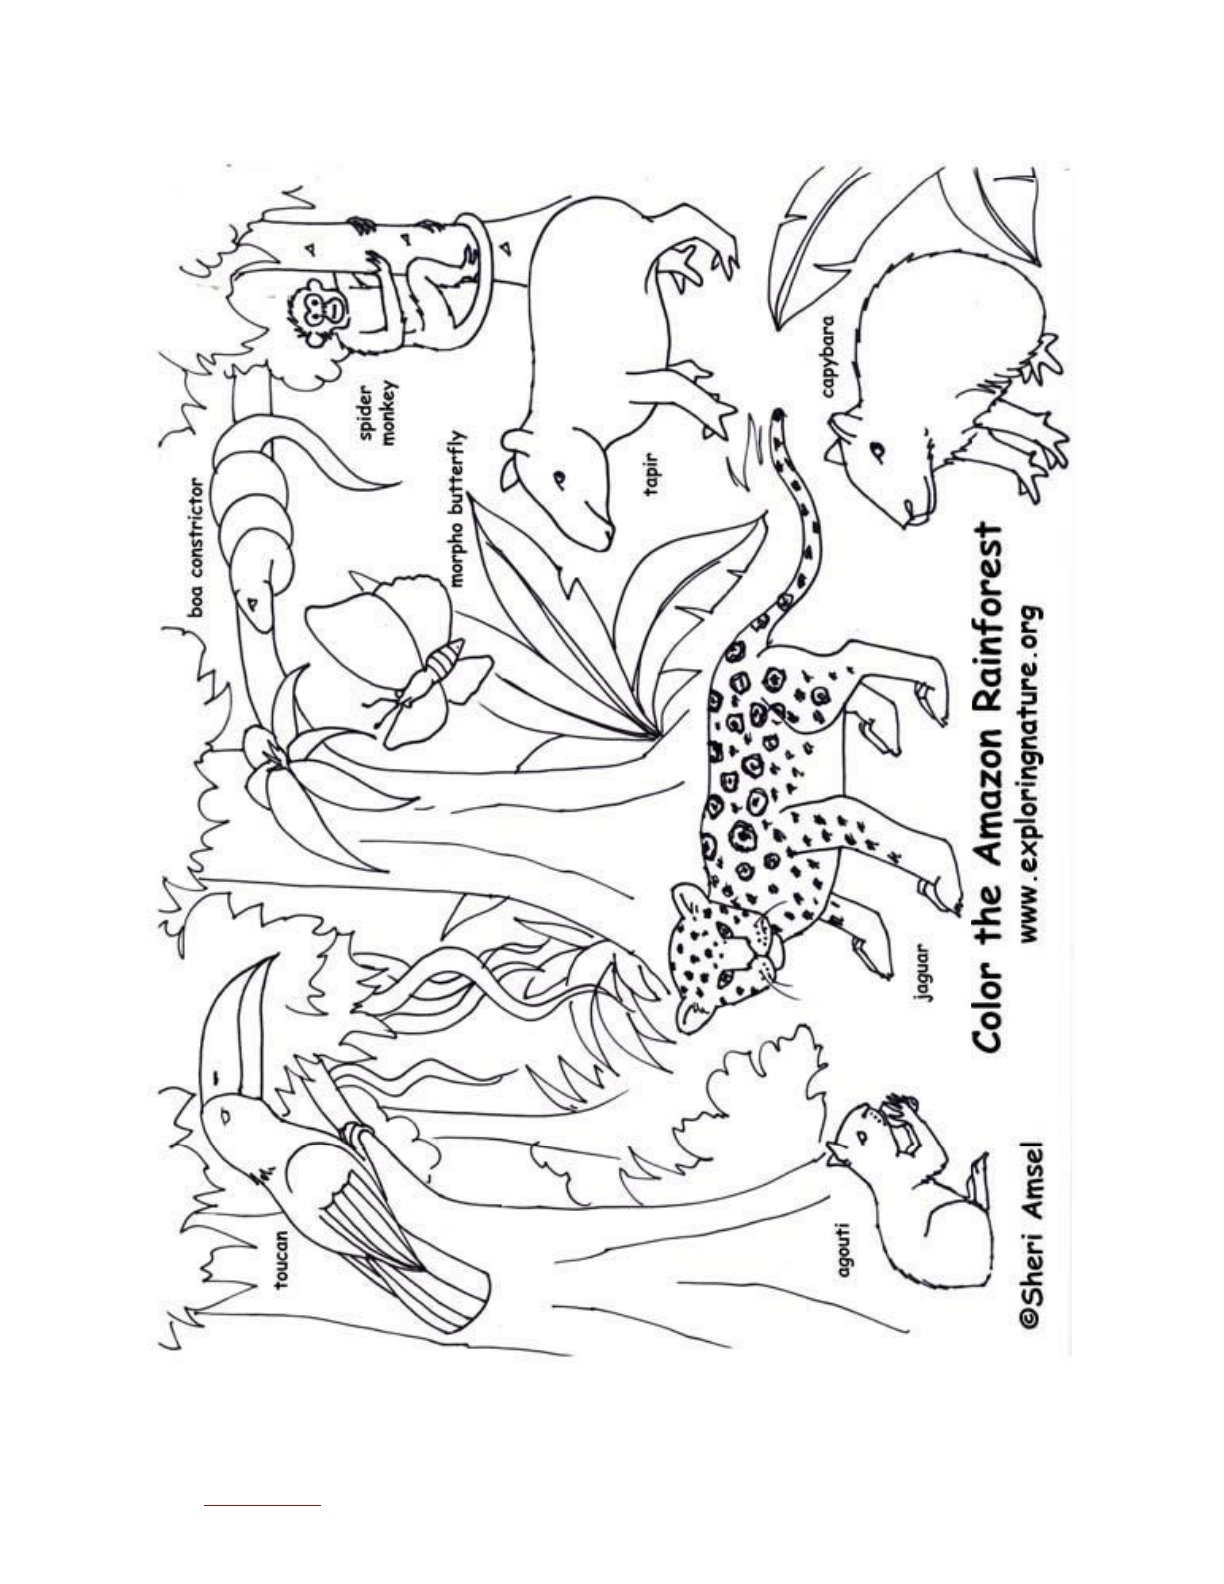
● Amazon Rainforest coloring page
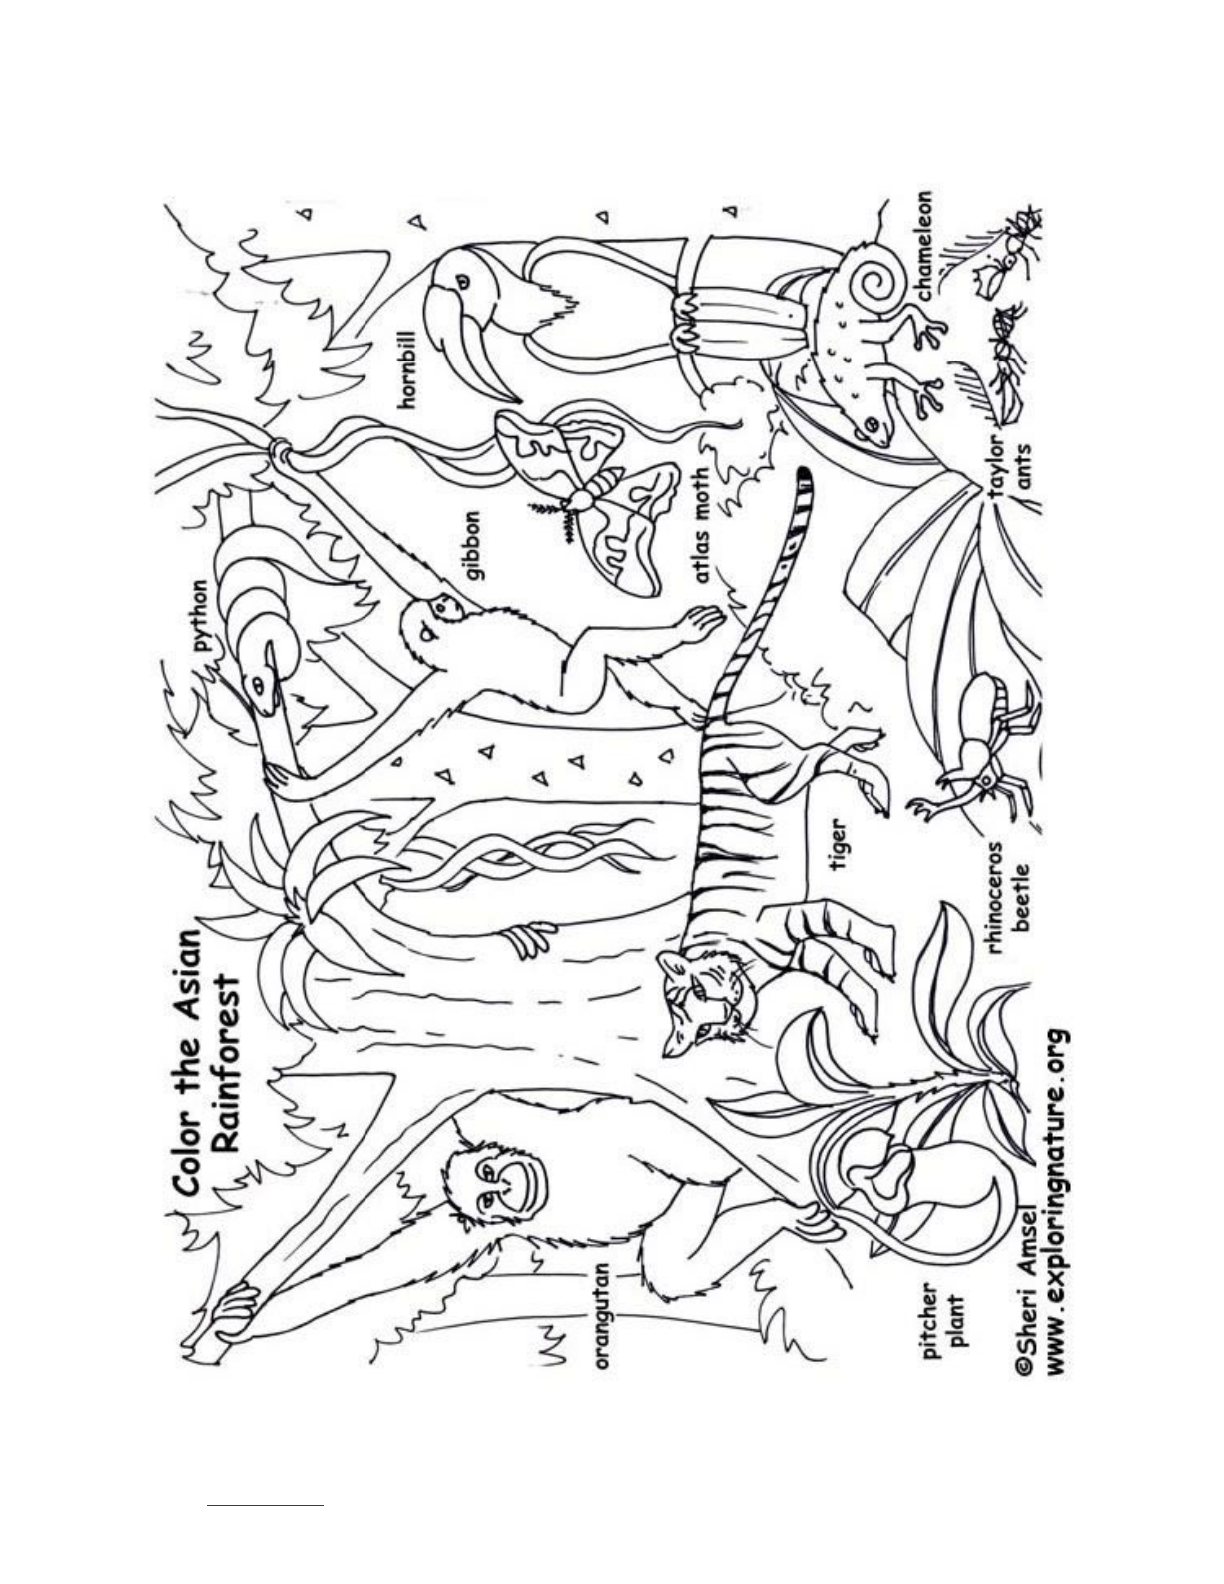
● Asian Rainforest coloring page
● Coloring Pages from
○ Amsel, Sheri. "Rainforest ( ) Coloring Page" Exploring Nature Educational
Resource ©2005-2020. April 3, 2020 < http://www.exploringnature.org/ >
Back to Top 4

ACTIVITY 2 - Tree Stewardship
Ages: 1st-2nd grade
Time: 30-45 minutes
Overview: Students will develop an understanding of stewardship by exploring the things that
trees give and need things from humans and what humans give and need from trees.
Standards: Language Arts: Key Ideas & Details; Earth & Space Science: Earth & Human
Activity
Materials:
● A copy of The Giving Tree
by Shel Silverstein (hardcopy, video, or digital)
● Chart paper and markers
● Examples of paper and cardboard products to display to class
● Leaf pattern (provided in Resources)
● Writing and coloring utensils
● Large teacher-made tree for bulletin board (see notes in Prep)
Prep: Draw a line down the middle of a piece of chart paper to divide it into two columns. Label
one column “Giving” and the other “Receiving.”
Create a large tree trunk and branches for a display board by cutting out brown paper or color
the paper brown. Alternatively, draw a large tree on a big piece of paper.
Procedure:
Part 1: The Giving Tree
● Ask the students what trees give to people and keep track of responses on a piece of
chart paper under a header labeled “Giving.”
● To explore the ways that trees give to people, read the book The Giving Tree
by Shel
Silverstein. Choose one of the options below to share the story with your students. If
desired and if able, read the story outside under a tree.
○ Teacher reads a paper copy of “The Giving Tree” aloud to the class
○ Class watches a video: https://www.youtube.com/watch?v=XFQZfeHq9wo
○ Teacher and/or students read aloud from a projected version of the story as an
online slideshare: https://www.slideshare.net/peneglos/thegivingtree
○ 12 students volunteer to read parts of the story as a Reader’s Theater activity:
https://www.slideshare.net/joselyn198/the-giving-tree-40608459
Part 2: The Receiving Tree
● After reading the story, ask students to add any new ideas to the chart of what trees give
to people.
● Explain that trees give people a lot, but they also need things in return.
Back to Top 8

● Ask students what they think trees need to receive, or in other words, what do people
need to give trees? Responses can include: sunshine, air, soil, water, space to grow, no
pollution. Catalog these responses on the opposite side of the chart paper under the
header, “Receiving.”
Part 3: Giving and Receiving together
● Explain to students that there are ways trees can give to us and we can give to trees at
the same time. Ask students to think about what paper has to do with trees. If students
are stumped, explain that paper comes from trees and there are lots of paper products
we get from trees! Hold up examples of tissues, paper towels, cardboard packaging, and
other materials made from paper pulp.
● Explain that the more paper and cardboard used, the more trees that need to be cut.
Recycled paper products are made from old paper that is remade into new products.
● Ask students why using two sides of paper, recycling paper, and buying recycled paper
can help trees. Explain that if we do these things, we can use what trees have to offer,
but not use so much that it hurts the trees.
Part 4: Stewardship
● Write the word steward on the board. Explain to students that people who take care of,
treat with respect, and do not harm things are stewards of those things. “Tree stewards”
are friends to the trees. They take care of and treat the trees with respect so that the
trees will be around for a long time.
● Ask students how they can be stewards of trees and add responses to the “Receiving”
side of the chart. Responses may include planting new trees, using less products from
trees like cloth napkins rather than paper, reusable lunch box rather than paper bag,
reusable cup rather than paper cup.
Part 5: Make a Receiving Tree
● Explain that we have now discovered ways people need and can help trees and trees
need and can help people.
● To remind us to be good tree stewards, we are going to make our own “Receiving Tree”
to keep in the classroom.
● Provide a large tree with trunk and branches cut from brown paper or colored brown, or
draw one on paper. If desired, label the parts of the tree.
● Give each student a leaf pattern to cut out, add an illustration and/or sentence, and
color. The illustration and sentence should show an example of a way people can give to
trees or what trees can receive from people.
● When students are done, have them add their leaves to the tree branches to complete
the tree.
○ Alternatively, students can take their leaves home to remind them to be Tree
Stewards.
Back to Top 9

Rainforest Adventure Connection:
● Students should complete the Rainforest Adventure exhibit from start to finish.
● If possible, send students in small groups through the maze accompanied by adult
chaperones. Adult chaperones should help students read question prompts and
informational text so that students can get the most out of the exhibit experience.
● After completing the exhibit, ask students to reflect on their experience and think about
what else they can add to their Giving and Receiving Tree chart.
● Based on the exhibit experience, have the class complete a Giving and Receiving
Rainforest chart to highlight things humans get from the rainforest and what the
rainforest needs from humans.
Resources:
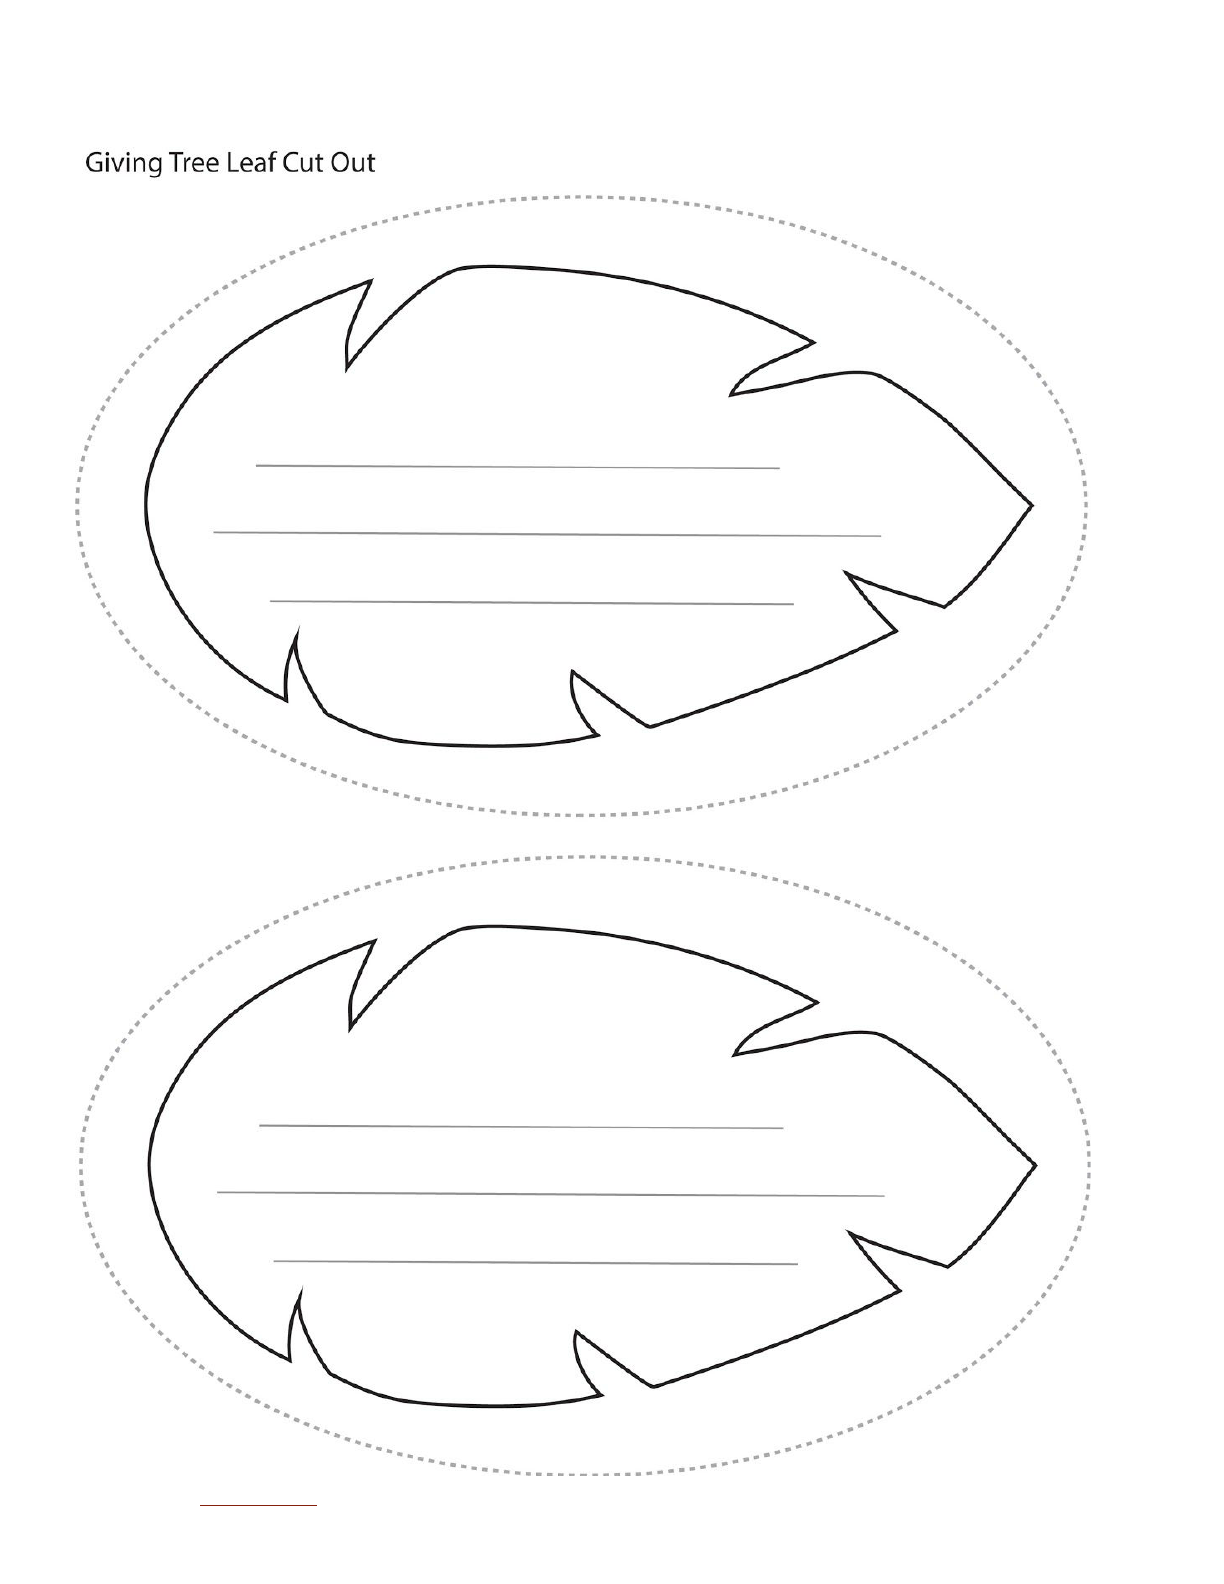
● Giving Tree Leaf cut out
Back to Top 10

ACTIVITY 3 - The Great Kapok Tree
Ages: Grades K-2
Time: 30 minutes
Overview: Students will synthesize information from a story about human activity in the Amazon
to develop an understanding of interdependent relationships in rainforest ecosystems.
Standards: Language Arts: Key Ideas & Details; Earth & Space Science: Earth & Human
Activity; Life Science: Ecosystems
Materials:
● White board or chart paper
● The Great Kapok Tree: a tale of the Amazon Rainforest
by Lynne Cherry
● Animal pictures (provided in Resources below)
● Tape
● Large drawing or construction paper cutout of a tree (see notes Prep)
● Drawing paper and pencils
Prep: Draw a large tree on paper and print pictures of the animals listed in the story.
Procedure:
Part 1: What animals need to survive
● Ask students to think about the animals that live outside in their neighborhood. As a
class, develop a list of animals, where they live, and what they need to survive. You can
record their responses on a white board or chart paper. Draw the conversation especially
toward animals that live in or depend on trees. Examples of animals could include
different types of birds, squirrels, bats, raccoons, opossums, chipmunks, porcupines,
tree frogs, beetles, etc.
● After creating a list of animals, ask the students to think about what the animals need to
survive and what might happen to them if they lose important resources like trees.
Examples might include: birds lose nesting places, squirrels lose food sources, raccoons
lose holes to nest inside of, etc.
Part 2: The Great Kapok Tree
● Explain to students that while we may only see a few animals outside around our
neighborhoods, thousands of animals live in rainforests and the trees that they live
around are very important to them. In this lesson, we will be meeting some of the
animals of the rainforest.
● Read the story, The Great Kapok Tree: a tale of the Amazon Rainforest
by Lynne Cherry
○ Video telling: Mrs. Thomas reads The Great Kapok Tree
https://www.youtube.com/watch?v=H-j9RRSWS1U
Back to Top 12

○ Slideshare: Great Kapok Tree
https://www.slideshare.net/YenTan1/great-kapok-tree
Part 3: Rainforest animals
● After reading the story, have students review the details of the story as a class. Explain
that you are going to create your own Kapok tree as a class to remind us how important
trees are to animals around them.
● Hold up a picture of an animal described in the story. Ask the students to raise their
hands and share a detail about what the animal told the sleeping man, discuss what the
animal was afraid of losing if the man cut down the tree, and why it might be afraid. Write
the answer next to the image for the class.
● Discuss where in the tree the animal lives (based on text in the story or prior knowledge)
and have a volunteer place the cutout on the tree using a piece of tape. See notes in
Prep for making the tree ahead of time.
Part 4: Animal-tree connections
● After discussing the story, provide students with paper and drawing materials. Ask the
students to each pick one animal from the story and draw a picture of it in its habitat.
Make sure students highlight how the animals depend on their tree in their drawing.
Rainforest Adventure Connection:
● Students should complete the Rainforest Adventure exhibit from start to finish.
● If possible, send students in small groups through the maze accompanied by adult
chaperones. Adult chaperones should help students read question prompts and
informational text so that students can get the most out of the exhibit experience.
● After completing the exhibit, students should pause in the final room to complete the
Rainforest Puzzle and place animals in their correct habitat.
● Students may also spin the wheel in the final room to go on a Rainforest Quest to find
the animals throughout the maze.
● After visiting the exhibit, debrief the experience by discussing the animals that were
showcased within the exhibit. Did the exhibit have any animals in common with The
Great Kapok Tree
story?
● Adaptation: Older students who are proficient at reading may be able to complete the
“Hunting for Animal Adaptations” activity described in the “Exploring the Exhibit” section
of this activity guide.
Back to Top 13
Resources:
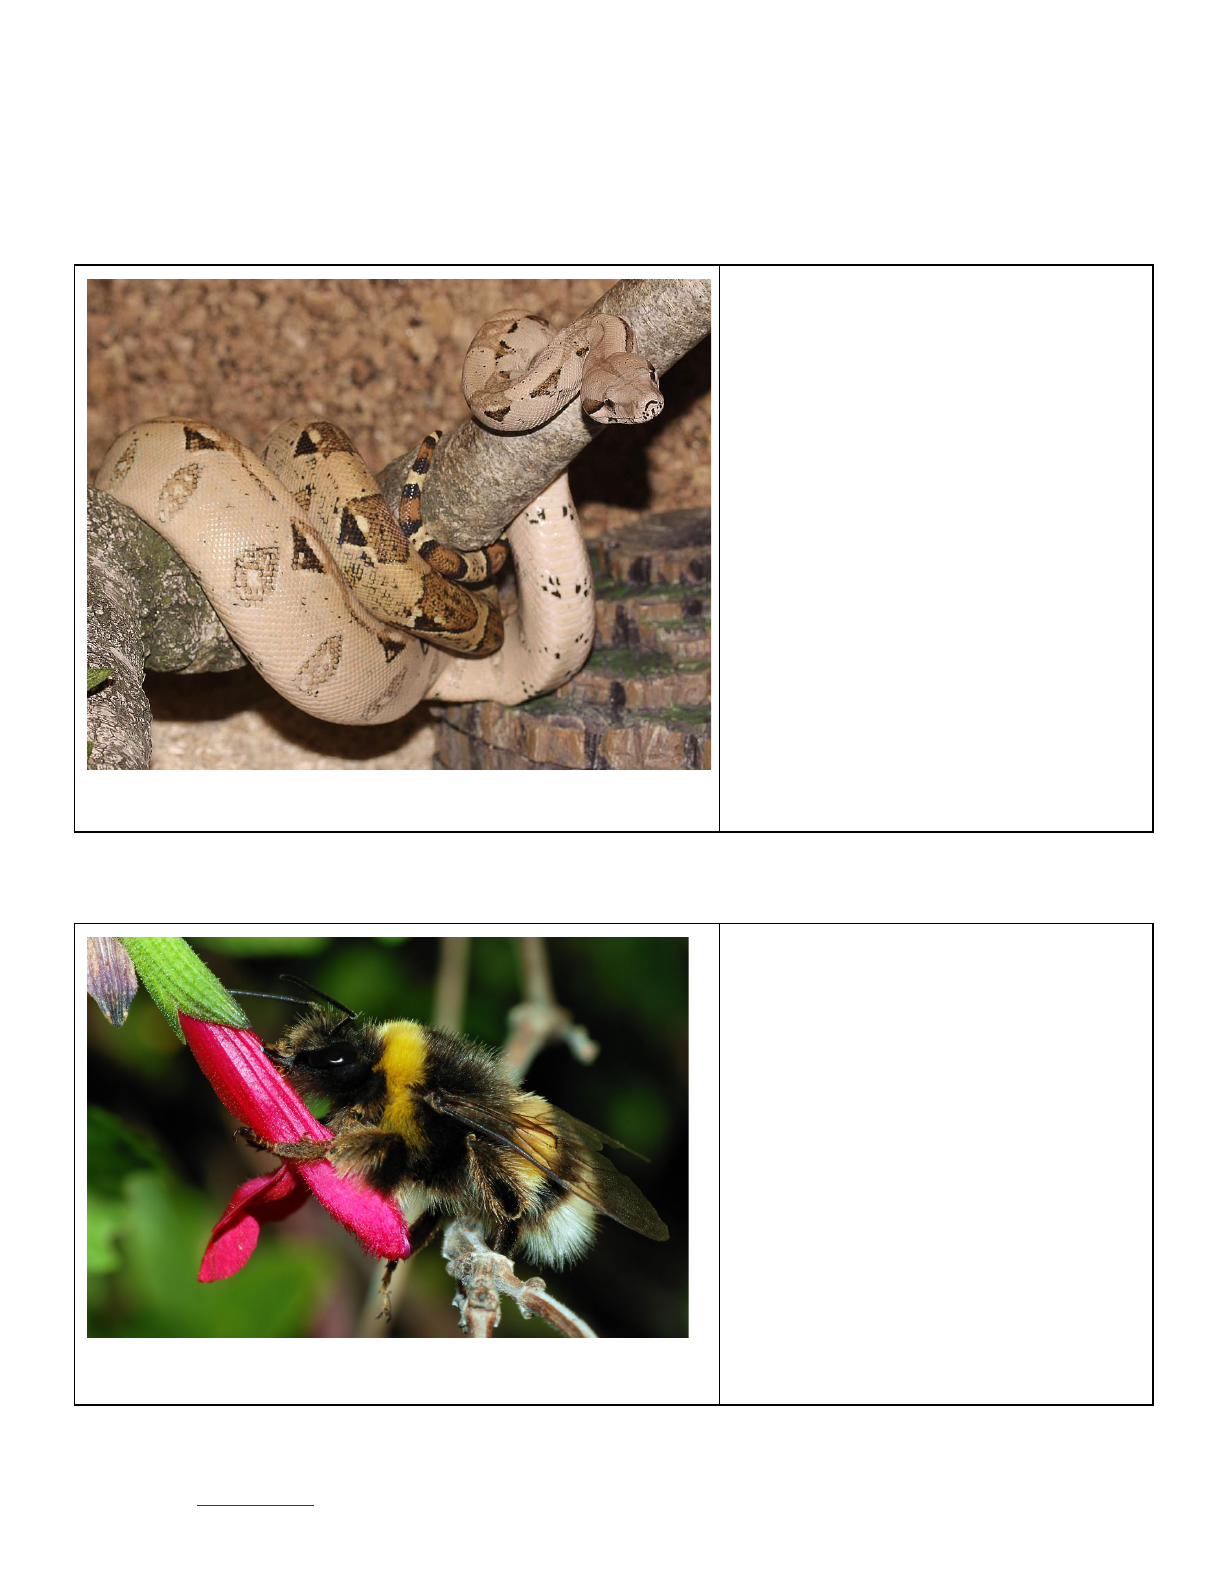
Pictures of animals from The Great Kapok Tree
Boa Constrictor
________________________
________________________
________________________
________________________
________________________
________________________
________________________
________________________
________________________
Bumble Bee
________________________
________________________
________________________
________________________
________________________
________________________
________________________
________________________
Back to Top 14
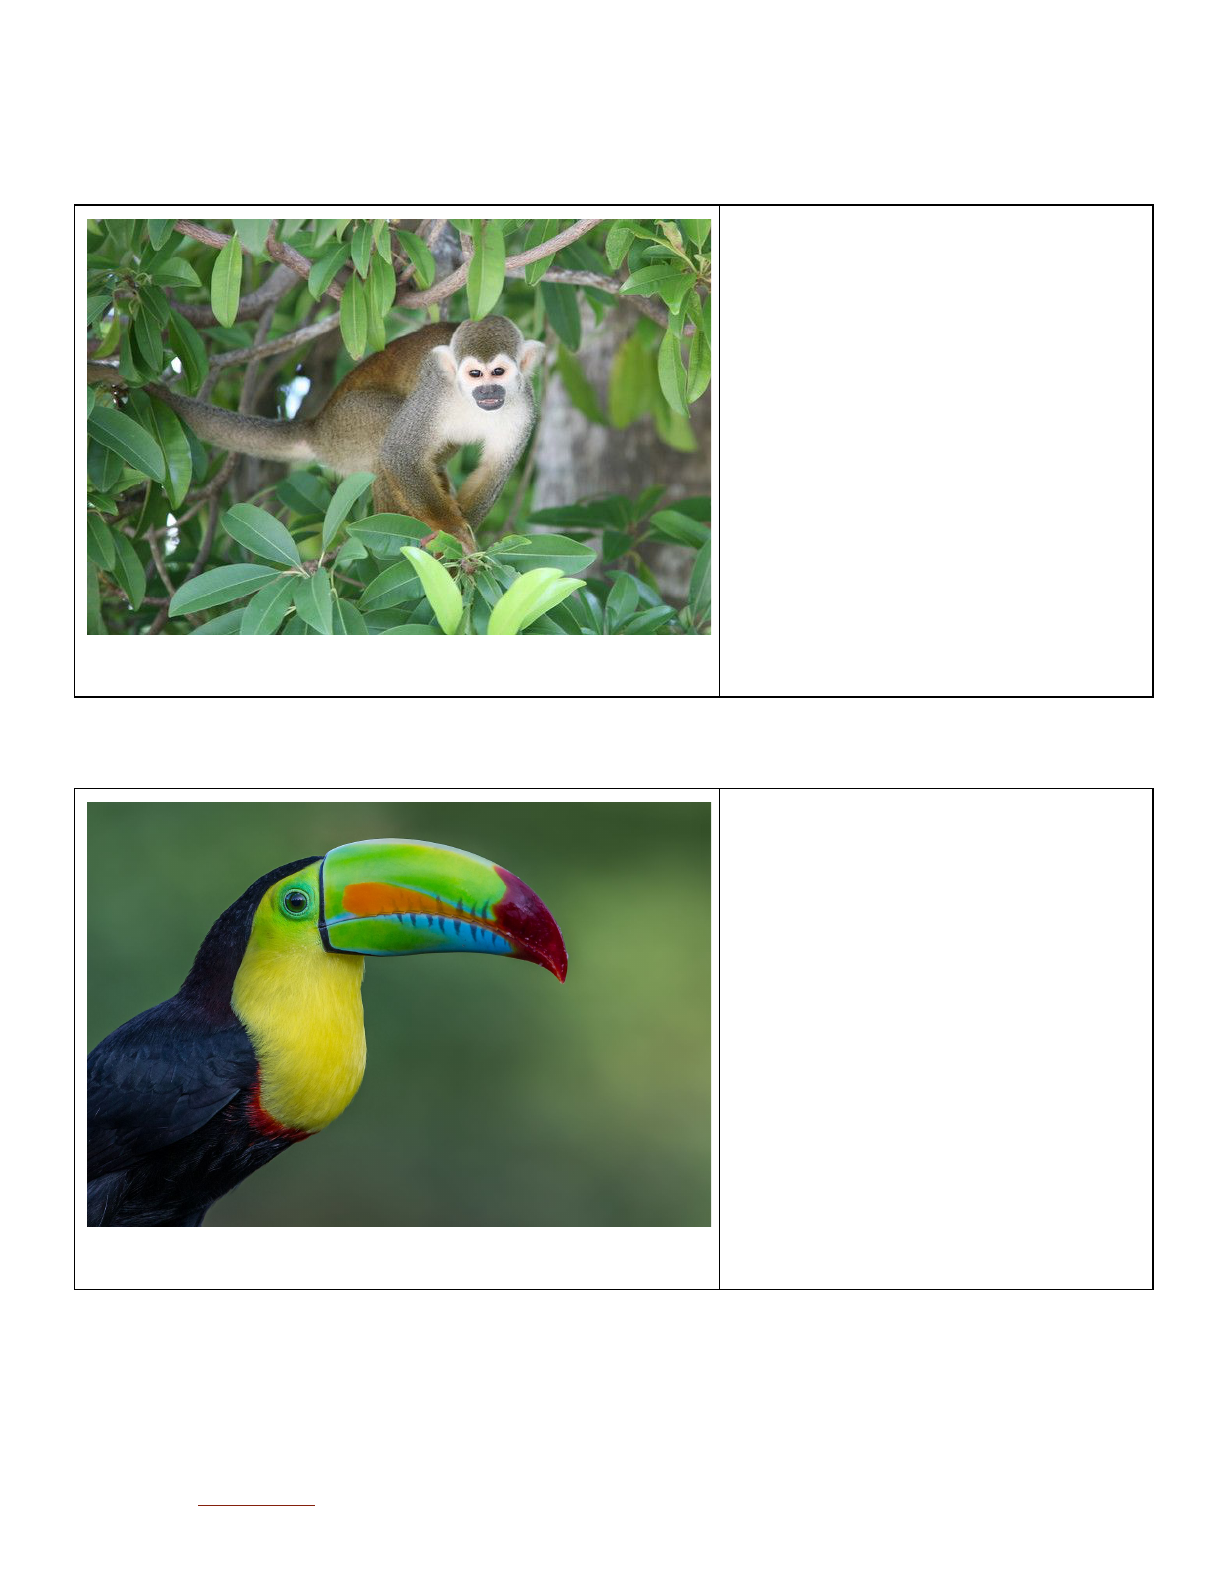
Monkey
________________________
________________________
________________________
________________________
________________________
________________________
________________________
________________________
Toucan
________________________
________________________
________________________
________________________
________________________
________________________
________________________
________________________
Back to Top 15

Macaw
________________________
________________________
________________________
________________________
________________________
________________________
________________________
________________________
Cock-of-the-Rock
________________________
________________________
________________________
________________________
________________________
________________________
________________________
________________________
Back to Top 16
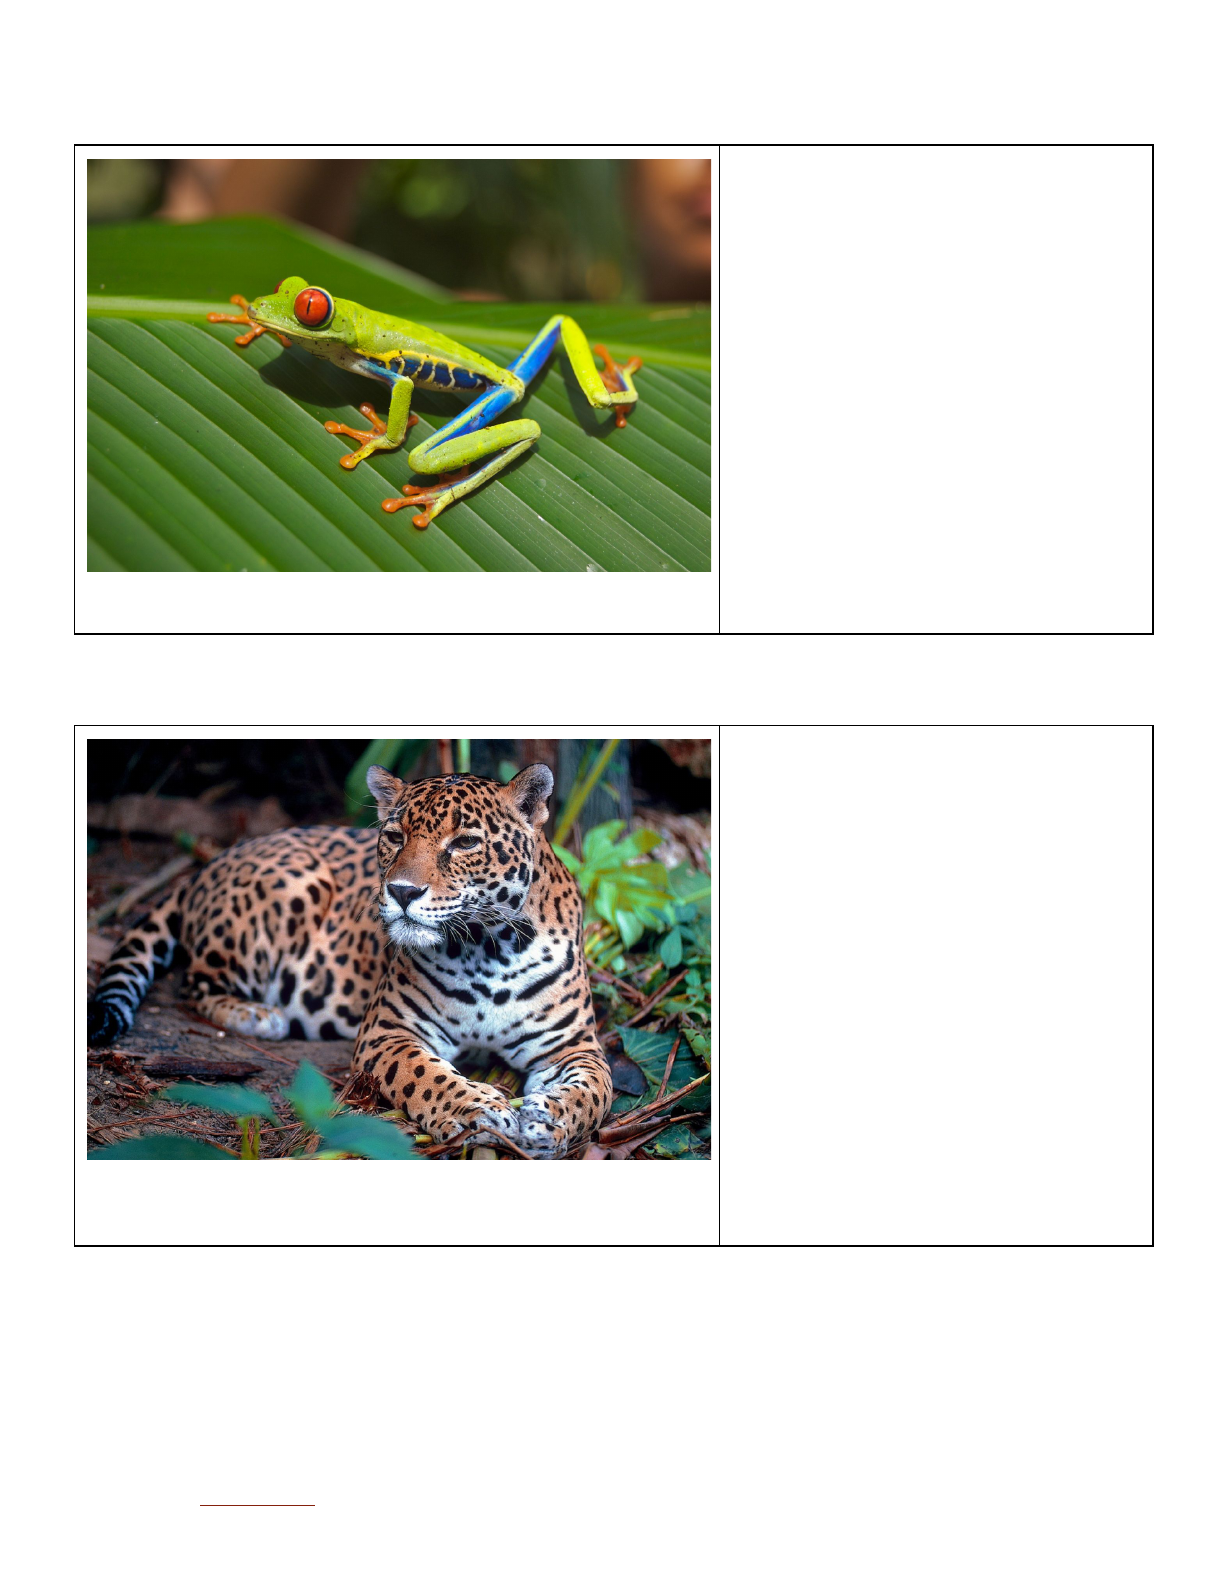
Red-eyed tree frog
________________________
________________________
________________________
________________________
________________________
________________________
________________________
________________________
Jaguar
________________________
________________________
________________________
________________________
________________________
________________________
________________________
________________________
Back to Top 17
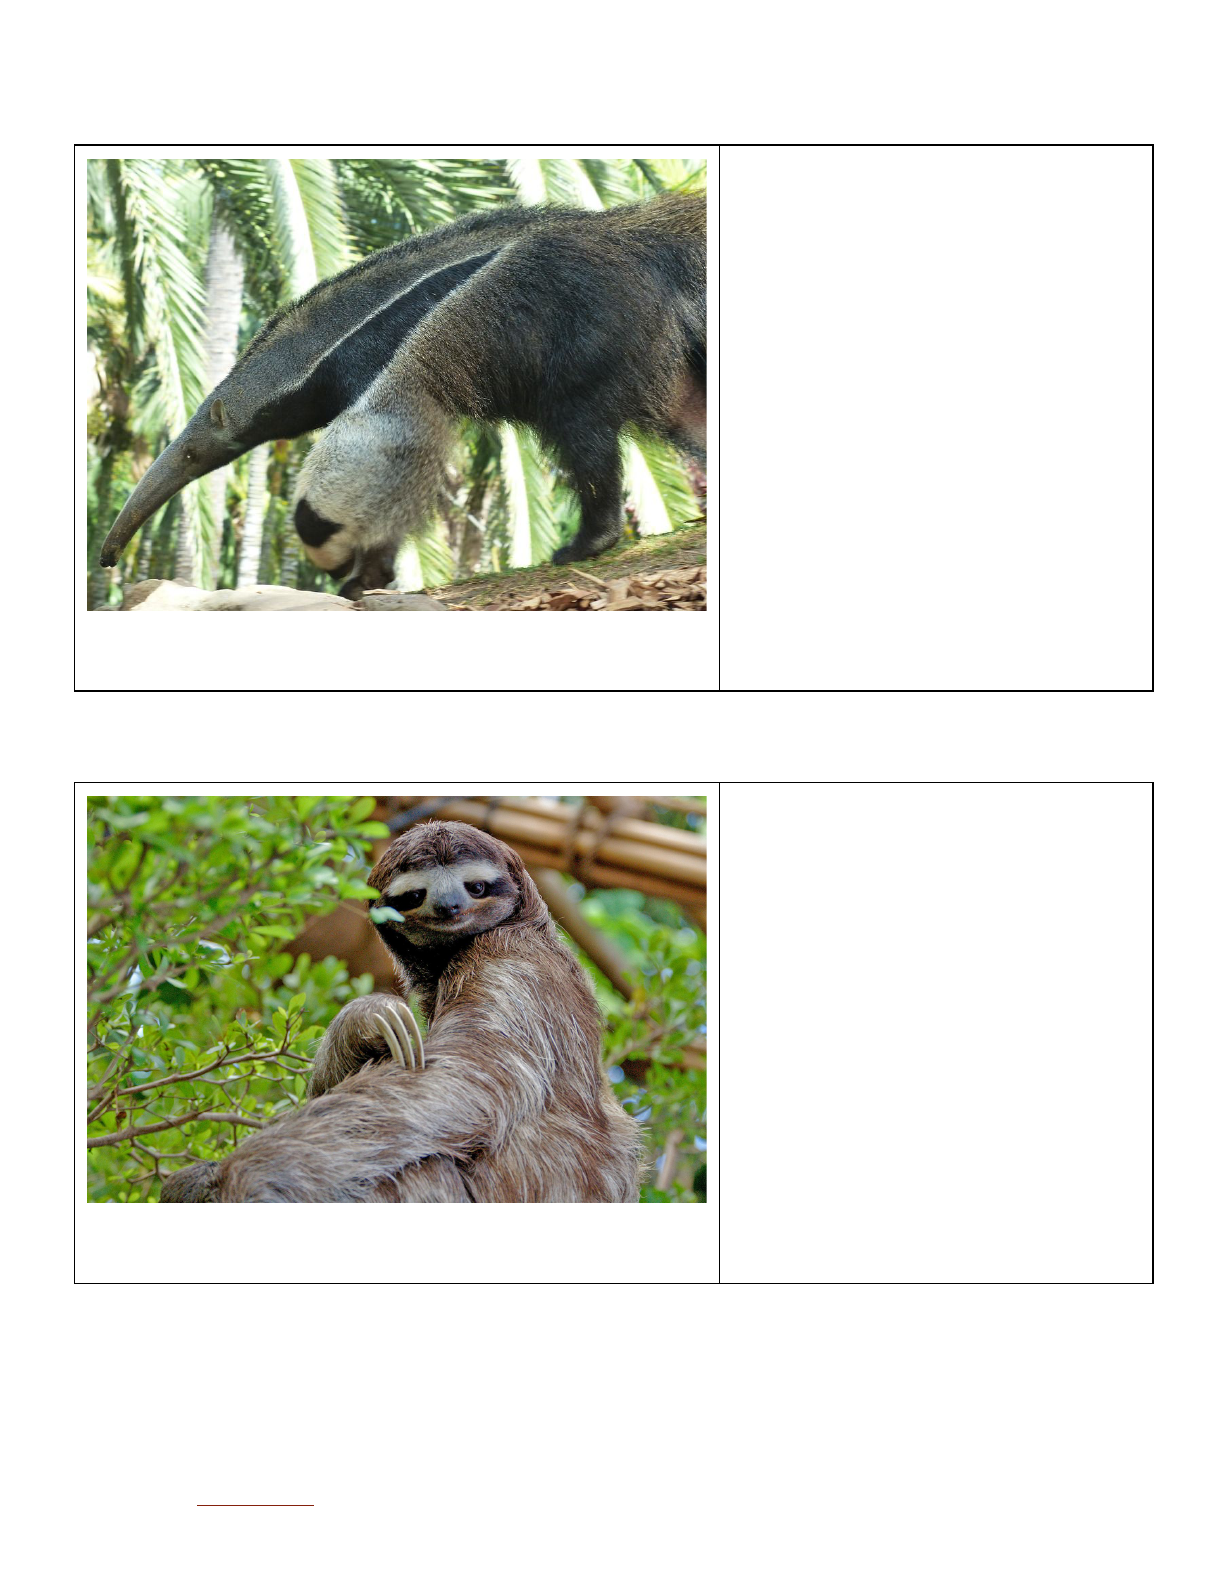
Giant Anteater
________________________
________________________
________________________
________________________
________________________
________________________
________________________
________________________
________________________
Three-toed sloth
________________________
________________________
________________________
________________________
________________________
________________________
________________________
________________________
Back to Top 18

ACTIVITY 4 - Build a rainforest
Ages: 3rd-5th grade
Time: 90-120 minutes, can be divided over 2-3 class periods, or assign diorama construction as
homework
Overview: Students will use a KWL chart to collect information from video resources, then
create a diorama to demonstrate understanding of the structure of and ecological relationships
in rainforests.
Standards: Language Arts: Comprehension; Life Science: Ecosystems; Visual Arts: Create a
model that represents an environment
Materials:
● KWL chart (written in science journals or on paper provided by instructor)
● Video projector or TV monitor with Internet access
● Shoe boxes
● Craft materials (construction paper, tissue paper, pipe cleaners, markers, crayons,
colored pencils scissors, tape, glue, hot glue)
Procedure:
Part 1: Video introduction to rainforests
● Before watching the video, ask students to complete a KWL chart about the rainforest.
Students may use science journals, if applicable, to create and complete their own KWL
chart. Students should complete the K and W columns by themselves first, then share
with a partner. Review the answers as a class to get a sense of what to help students
highlight from the video.
● Watch an introductory video about the Amazon Rainforest (approximately 7 minutes)
○ “Virtual Field Trip - Amazon Rainforest”, starting at 2:00 minutes.
https://www.youtube.com/watch?v=JEsV5rqbVNQ
● As students watch the video, ask them to jot down notes in the L column of their chart.
When the video is finished, students should finish their notes with complete sentences.
● Optional Extension: Students can create and complete KWL charts for different aspects
of the rainforest (i.e. animals, plants, water, human populations, etc.)
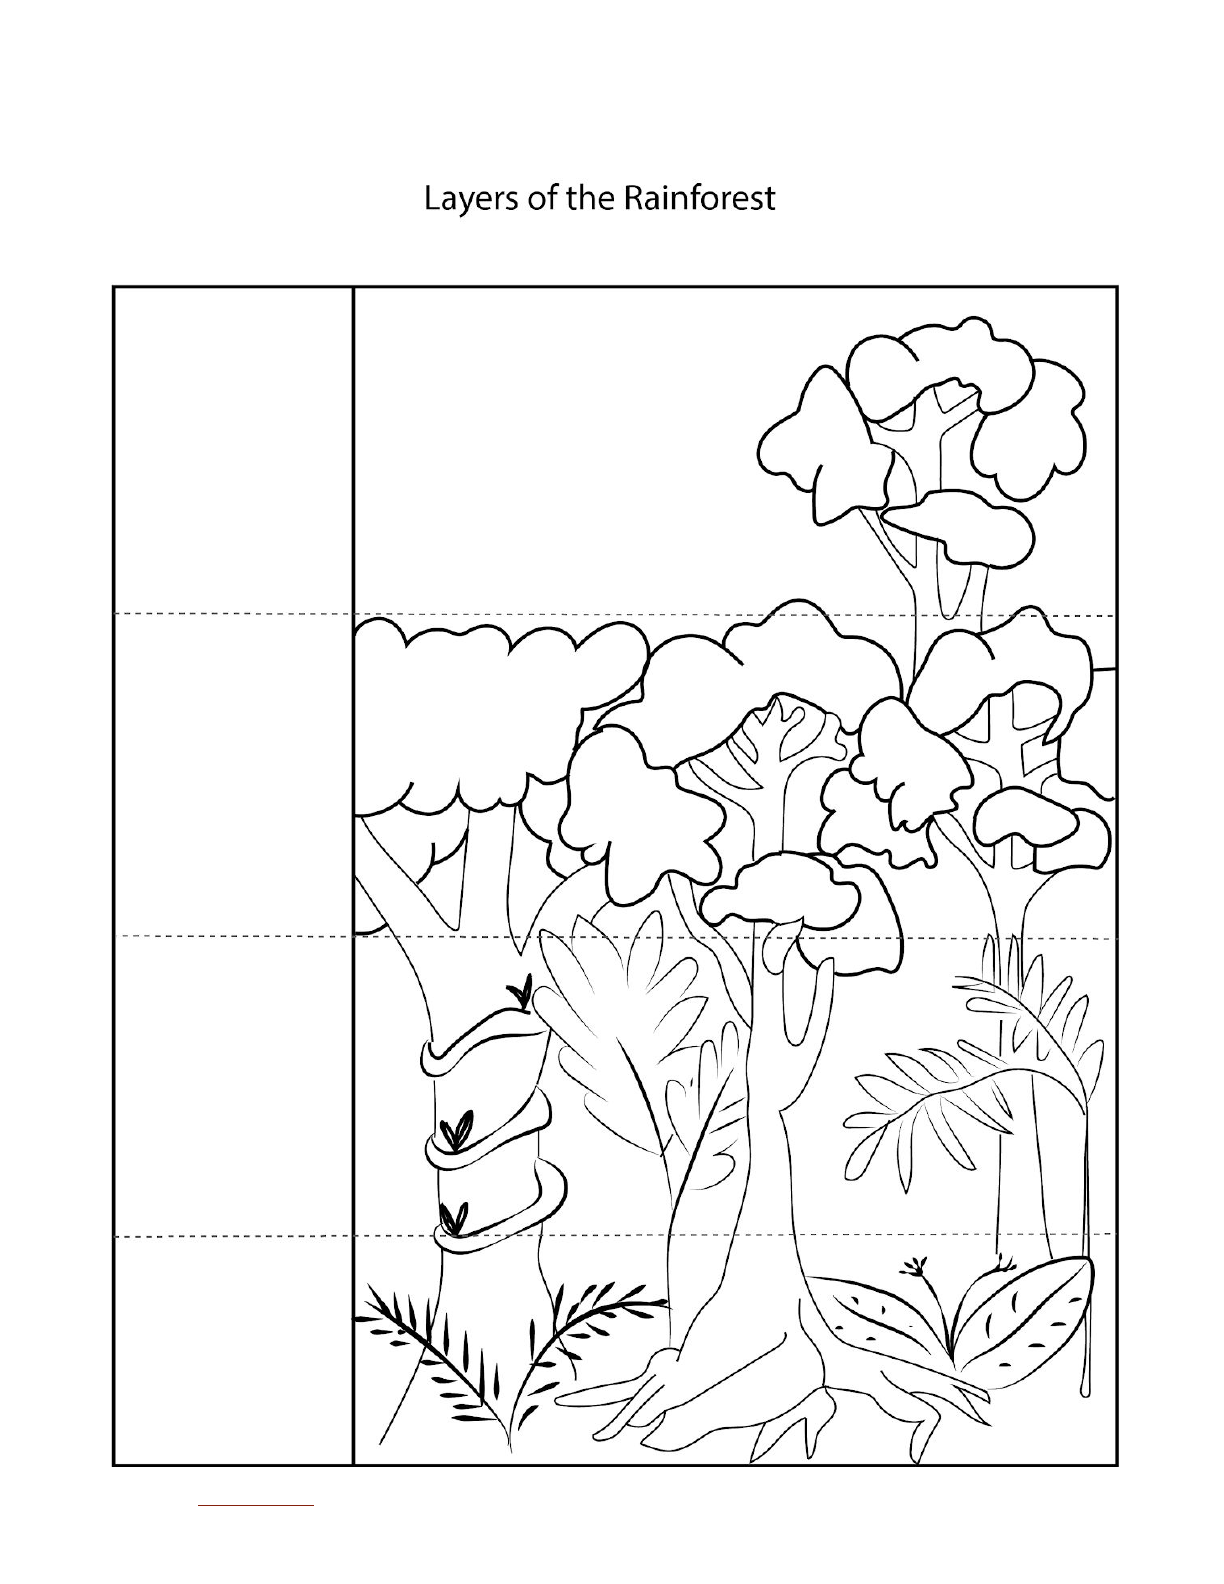
Part 2: Rainforest layers reviewed
● After watching the video, the instructor should draw a profile of the rainforest on a
whiteboard or large piece of paper, or use a projected image on a smart board. See an
example profile image provided in the Resources section for this lesson.
● As a class, ask for student help labeling the 4 layers of the rainforest on the drawing or
image. Students should share what they learned about the rainforest layers from the
Back to Top 19

video and work together to create a list of descriptive words for each layer. Place the
correct words next to their corresponding layer on the drawing or image.
● Additionally, create a list of the plants and animals that live in the forest and match them
to the layer in which they most frequently reside in the rainforest.
Part 3: Diorama design
● Provide students with a shoebox and craft materials to
build a rainforest model. Students should label the model
to demonstrate understanding of rainforest structure.
Part 4: Animal habitats
● Ask students to draw and place different animals in the
model in their correct habitats (see examples of animals
to be included in the dioramas listed below). If desired,
provide information relating to the needs of each animal
so that students can use information to help with
placement.
○ Emergent layer: howler monkey, harpy eagle,
vine snake
○ Canopy layer: toucan, sloth, red-eyed tree frog
○ Understory: jaguar, green anaconda, horned
guan
○ Forest floor: capybara, leaf-cutter ant, poison dart
frog
Rainforest Adventure Connection:
● While at the Rainforest Adventure exhibit, students should work in partners or small
groups to complete the “Layers of the Rainforest” activity outlined in the section of this
guide labeled “Exploring the Exhibit.”
Resources:
● Layers of the Rainforest image (can be used as a worksheet or projected on a
whiteboard)
Back to Top 20

ACTIVITY 5 - How much water?
Ages: 3rd-6th grade
Time: 60 minutes
Overview: Students will review the water cycle, use a measuring tool to create a number line
and compare relative average rainfall of locations in North America to the tropics. They will then
use a model to help understand why precipitation is higher in warmer, tropical climates.
Standards: Earth & Space Science: Earth’s Systems; Math: Measurement & Data
Materials:
● Tape measure or yardsticks
● Prepared notecards with city names and average rainfall (see Resources for list)
● 2 quart sized glass jars with lids, containing 1 inch of water in the bottom
● Classroom thermometers
● Map of world biomes indicating tropical rainforests (provided in Resources)
● Projector and video playing equipment
● Optional materials from Amazon Water Cycle Role-play (see below)
Prep: Prepare notecards with locations and average rainfall. This list is provided in Resources.
See notes in Part 4 of this activity about preparation and adaptations for this experiment.
Procedure:
Part 1: What causes rain?
● Review the water cycle with students to recall what causes precipitation. To do so, you
may watch a review video or complete a separate lesson on the water cycle.
○ Video resources from YouTube:
■ 1) The Water Cycle by the National Science Foundation (6:46)
https://www.youtube.com/watch?v=al-do-HGuIk or
■ 2) The Water Cycle | Educational Video for Kids by Happy Learning
English (3:56) https://www.youtube.com/watch?v=y5gFI3pMvoI
○ Amazon Water Cycle Role-play activity from the California Academy of Sciences
PDF (also available in resources folder provided by Minotaur Mazes)
■ https://www.calacademy.org/sites/default/files/assets/docs/pdf/039_amaz
onwatercycleroleplay_redesignmay2015.pdf
Part 2: Precipitation around the world
● Precipitation is crucial for life on Earth, but it is not evenly distributed. Sometimes it even
comes down as snow instead of water!
● Let’s compare rainfall in different places around the world to that in the tropics. How do
you think your home would measure up?
Back to Top 22

● Use a tape measure or yard sticks to create a long number line (you will need at least 30
feet of space to measure this all out). Give each student a city label with the
corresponding amount of rainfall in inches.
● After measuring out 30 feet of distance with your class, ask students to place their cities
along the number line. Review the locations with the students and ask them if they notice
any trends. Is anything surprising? Provide students with a map if necessary to help
identify trends.
Part 3: Why does it rain so much in the tropics?
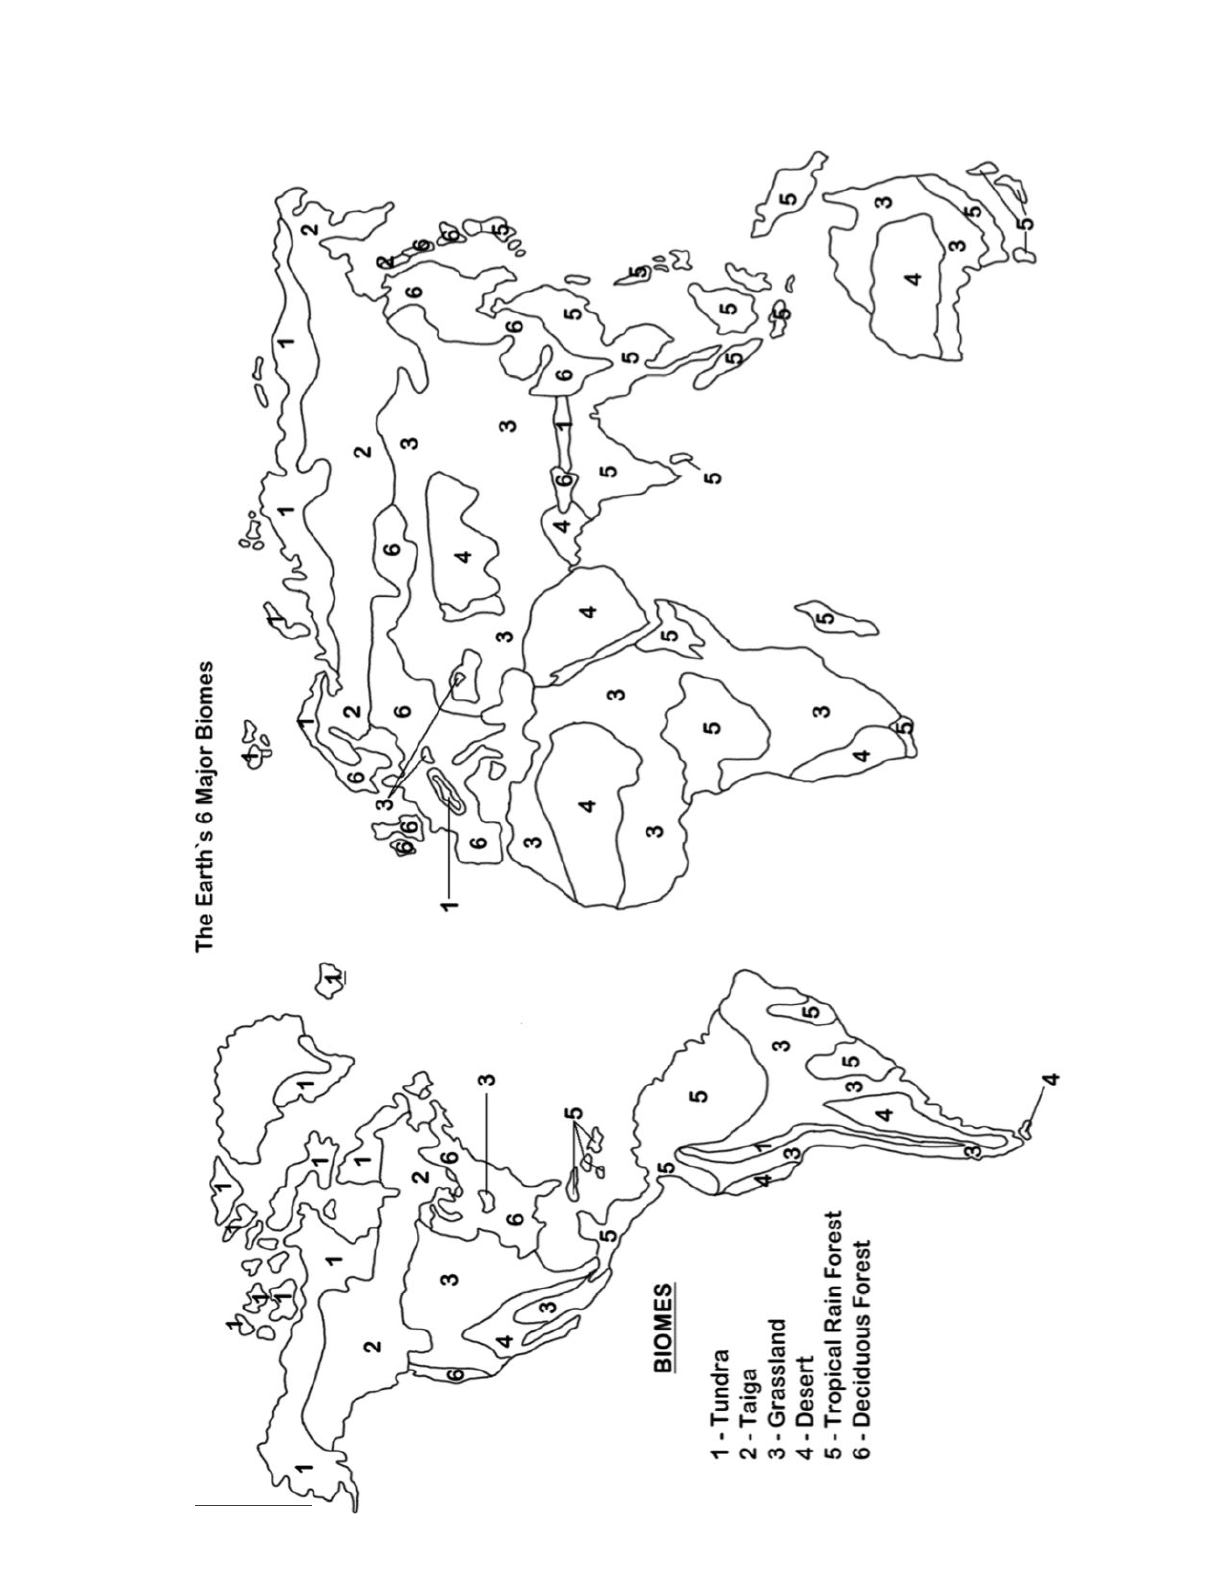
● Use a projector to show students a map of the world’s biomes and ask them to make
observations to identify a trend in the locations of tropical rainforests. Make sure the map
highlights the Equator and preferably the Tropics of Cancer and Capricorn to show the
extent of range for the rainforest. See the provided Resources for example maps.
● Notice that for the most part the tropics are located near the equator.
● The equator is warmer than the rest of the planet, receiving more sunlight throughout the
year, averaging 70-90 degrees Fahrenheit throughout the day, around the year.
● Ask students to make predictions about how the warmth might affect rainfall? To spur
ideas, ask them to think about taking a hot bath or shower. Have they noticed anything
about the air in the bathroom as they do that, or condensation collecting on the walls or
mirror?
Part 4: Water Cycle in a Jar demonstration
● Let’s look at a miniature water cycle in a jar to see if we can figure out why it rains so
much in the warm climate of the tropics.
● Add 1 inch of water to the bottom of two 1-quart jars with lids. Place one jar in a sunny
spot, and the other in a shady spot. Label the jar in the sunny spot “tropical” and the jar
in the shady spot “temperate” If possible, tape a thermometer to the side of each jar
above the water level.
● Make observations of both jars every 15 minutes for an hour to notice any changes.
● At the end of an hour, compare and contrast the changes in condensation in each jar
and rise in the thermometer. The jar that was warmed by the sun should have seen a
greater rate and more total condensation on the sides of the jar.
● ADAPTATIONS: If time does not allow for making observations over an hour, this
experiment may be set up ahead of time and students can make observations after the
jars have been sitting. If a sunny space is not available, a heat lamp may be used
instead. If a heat lamp or sunny space are both not available, use hot water in one jar
and room temp water in another jar as a proxy for climate.
Part 5: Debrief
● Ask students to reflect on this activity and make a hypothesis for how the climate (warm
temperatures and amount of rainfall) affect the living things in the rainforest.
Back to Top 23

Rainforest Adventure Connection:
● Before exploring the exhibit, prompt students to pay attention to the diversity of animal
life discussed throughout the exhibit.
● Ask students to spend a few extra minutes reviewing the, “How Much Water”
informational panel before exploring the rest of the exhibit.
● Debrief the experience after visiting. Ask students to share one thing that surprised them
and to reflect on their previous answer to the question of how climate (temperature and
rainfall) is related to the diversity of life in the rainforest.
Resources:
● City names and annual average rainfall amounts
● World map showing tropical rainforests biomes in relation to the Equator
Annual average rainfall of select cities
* Prepare notecards ahead of time with several of the following city names and rainfall amounts.
4.2” - Las Vegas
11” - Albuquerque
13” - Calgary, Canada
15”- Los Angeles
17” - Denver
23” - London, UK
25” - San Francisco
31” - Toronto, Canada
32” - Minneapolis
36” - Chicago
38” - Seattle
43” - Portland, OR
47” - New York City
50” - Houston
52” - Atlanta
54” - Memphis
62” - Miami
64” - New Orleans
Research your local average rainfall and prepare a card
Rainforests:
102” - average across Monteverde Cloud Forest, Costa Rica
120” - average across the Amazon Rainforest, Brazil
130” - average across Borneo Rainforest, Indonesia
385” - Kauai, Hawaii (top 5 wettest places on Earth)
Back to Top 24

Map indicating the location of the world’s rainforests in relation to the Equator
Source: http://geography.parkfieldprimary.com/climate-types/equatorial-regions
World biomes relative to the Equator and Tropics of Cancer and Capricorn
http://mrsbioblog.blogspot.com/2014/03/chapter-41-what-is-ecosystem.html
Back to Top 25

ACTIVITY 6 - Rainforest Animals and Adaptations
Ages: 3rd-5th grade
Time: 45-60 minutes
Overview: In this activity students will review structural and behavioral adaptations by learning
about rainforest animals* that exhibit each type of trait. Then students will apply their
understanding of animal needs and adaptations to design their own animal.
*Note the animals described in this activity are limited to those of the Amazon Rainforest
Standards: Life Science: Ecosystems, Biological Evolution; Language Arts: Comprehension
Materials:
● TV monitor or projector capable of showing video
● Slips of paper with animal requirements (provided in Resources)
● Drawing paper
● Pencils
● Colored pencils
Prep: Prepare slips of paper for the Design an Animal activity described in Part 5 below.
Procedure:
Part 1: Tap into prior knowledge
● Check for prior knowledge by asking students to share the names of rainforest animals
they already know about.
● After hearing a few suggestions, explain to students that every type of animal on Earth
can be found in tropical rainforests, including rhinoceroses, deer, leopards, gorillas,
chimpanzees, elephants, armadillos and even bears. In this activity we’ll be exploring the
incredible adaptations that help so many animals survive around each other!
Part 2: Watch some incredible animals!
● Prepare students to watch a video overview of common animals from the Amazon
Rainforest. Ask them to pay attention to the physical traits or behaviors that help animals
survive in the wild.
● Show students a video spotlighting common rainforest wildlife. Choose either resource
below or find another age appropriate option that highlights specific wildlife.
○ “Most INCREDIBLE Animals of the Amazon” by Talltanic (approximately 10:00
long) - Highlights 26 animals, including physical characteristics and adaptations
■ https://www.youtube.com/watch?v=t16qP6HRkaM
○ “10 Jungle Animals for Kids || Amazon Animals for Kids” by Socratica Kids
(approximately 6:20 minutes long)
■ https://www.youtube.com/watch?v=qgK1WdYq_aw
Back to Top 26

Part 3: Incredible adaptations
● Share with students that the average four-square-mile area of tropical rainforest contains
up to: 125 mammal species, 400 bird species, 100 reptile species, 60 amphibian
species, 150 butterfly species, and 30 to 80 million insect species.
● Ask students to think about what all these animals have in common to help them
cohabitat in the same space? The answer? They all have adaptations!
● Explain that an adaptation is a physical (structural) or behavioral trait that helps a plant
or animal survive. There are two types of adaptations. You can discuss each of these
adaptations by writing a list on the board for students to have as reference.
○ Structural adaptations relate to the physical features of an organism, including:
■ Fur, feathers, or scales - body protection for the animal’s environment
■ Coloration - can help attract mates or be used as camouflage; may
change seasonally
■ Camouflage - specific color patterns to help blend in with surroundings
■ Mimicry - color or body structure to make an animal look like something
more dangerous or less palatable
■ Super senses - smell, hearing, and eyesight help locate food or predators
■ Claws, talons, teeth - to procure food or for defense
■ Tails - useful for balance or propulsion, or as an extra hand
■ Flight - allows for high mobility
■ Number of legs/limbs - two or four legs, or no legs at all
■ Size/shape of body or body features (like eyes, ears, hands etc.)
○ Behavioral adaptations are the things organisms do to survive, including:
■ Vocalizations - use of different voice sounds for communication
■ Migration (moving north to south seasonally, or up and down trees
throughout the day) - helps animals avoid dangerous habitats
■ Huddling - groups provide each other warmth and protection
■ Herds, colonies, or large family groups - for group protection
■ Nocturnal or Diurnal - being active at certain times of day
Part 4: Types of adaptations
● Highlight animal adaptations by rewinding the video and replaying bits about specific
animals. Ask students to describe what they see and how the animal's traits or behaviors
help them survive. Encourage them to refer to the list written in the previous part for help
describing what they see. Animals that would make for good discussion include:
○ Capybara - flees to water if predators are present, live in groups and
communicate with each other
○ Tapir - has a long flexible nose that can act like a snorkel
○ Capuchin or Spider Monkey - has a prehensile tail that they can use like an extra
arm
○ Jaguar - spots are great camouflage
○ Poison dart frog - uses bright colors as a warning sign
Back to Top 27

○ Macaws - vocalize to communicate with each other
○ Giant Anteater - has giant claws and a long face to access ants and termites
○ Kinkajou - nocturnal, with feet that can rotate 180 degrees
Part 5: Design an animal
● Evaluate student understanding by letting them design their own animal.
● Let each student choose a slip of paper with an Animal Type, an Animal Niche, a
Structural Adaptation, and a Behavioral Adaptation. At the teacher’s discretion, students
can trade slips as long as they end up with one of each type of card. Use the cards
provided in the Resources.
● Students should draw a picture of an imaginary animal that fits all the requirements
specified by the cards and provide labels for adaptations and important features. They
can give the animal a common and Latin name if they choose.
Rainforest Adventure Connection:
● Complete the “Hunting for Animal Adaptations” activity described in the “Exploring the
Exhibit” portion of this activity guide.
● After visiting the exhibit, review and discuss the six interactive animal adaptation
activities the students completed while traveling through the exhibit. For reference, the
interactive adaptation activities include:
○ Flight (Glide like a butterfly on the monorail)
○ Prehensile tail (Swing like a monkey on the bars)
○ Camouflage (Camouflage mural and Bonus Seek & Find)
○ Powerful legs (Leap like a frog)
○ Migration (Migratory bird magnet maze)
Resources:
● Design an Animal activity cards
○ Print these cards and cut apart, enough so that each student can have one from
each category.
○ Allow students to select one card from each type so they should have one Animal
Type card, one Niche card, one Structural Adaptation card, and one Behavioral
card.
Back to Top 28

Animal Type Cards
Bird
Reptile
Amphibian
Canine
Feline
Rodent
Butterfly
Beetle
Mammal
Monkey
Fish
Marsupial
Structural Adaptation Cards
Body covering -
This animal has fur, feathers, or
scales (choose which is appropriate
for your animal type)
Mouth shape -
This animal has a mouth that is well
adapted for what it eats (choose
what is appropriate for your animal
type)
Tail shape -
This animal’s tail is useful for
balance or propulsion, or as an
extra hand
Coloration -
This animal uses bright colors to
communicate with other animals
Claws -
This animal has sharp claws that
help it find food by catching it,
climbing for it, or digging it up
Super senses -
This animal relies on a powerful
sense of smell, hearing, or eyesight
to help locate food or predators
Mimicry -
This animal looks like something
more dangerous or less palatable
Camouflage -
This animal has coloring that helps
it blend in with its surroundings
Foot shape -
This animal has feet that are adapted
to where it lives. Choose what makes
sense for your animal (may be
webbed, prehensile, small, or big)
Size and shape of body -
The shape of this animal’s body
helps it survive (choose what is
appropriate for your animal type -
big, small, long and skinny, etc.)
Back to Top 29

Behavioral Adaptation Cards
Migration -
This animal needs to be able to
move from the forest floor to the
tree canopy
Migration -
This animal moves to breeding
grounds in colder, northern climates
Large groups -
This animal lives in a colony or
family group for protection
Diurnal -
This animal is active during the day
Solitary -
This animal primarily lives by itself
Nocturnal -
This animal is only active at night
Vocalization -
This animal makes certain sounds
or calls for communication
Huddling -
This animal gathers with others of
its species for protection
Animal Niche Cards
Herbivore -
This animal only eat plants
Frugivore -
This animal only eats fruit
Carnivore -
This animal eats other animals
Insectivore -
This animal eats insects
Ground dweller -
This animal spends almost all of its
life on the forest floor
Nectarivore -
This animal prefers to eat flowers
and nectar
Arboreal -
This animal lives primarily in trees
Aquatic -
This animal has to live in or near
water
Back to Top 30

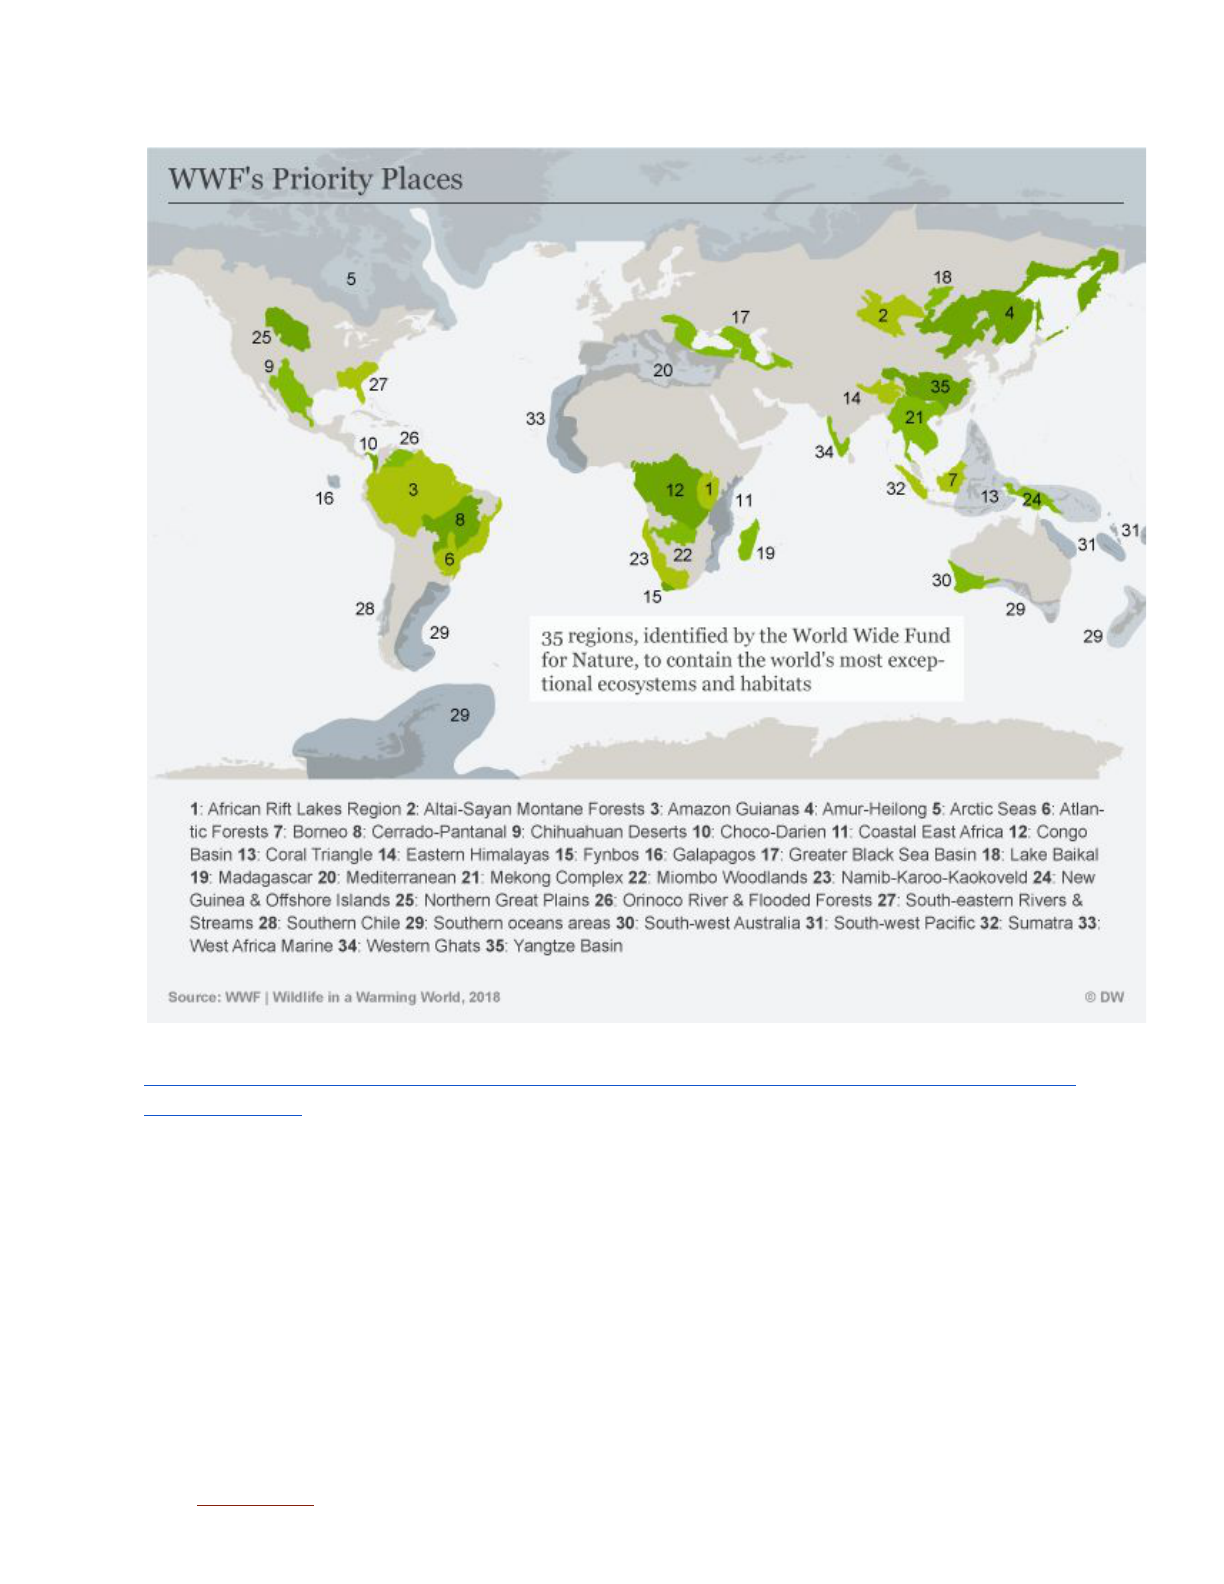
ACTIVITY 7 - Biodiversity and Earth’s Rainforests
Ages: 4th-5th grade
Time: 45-60 minutes
Overview: Students will review biomes and use a world map to find tropical rainforests. They
will learn about biodiversity and compare the location of tropical rainforest biomes with
biodiversity hotspots. Lastly, they will create a poster project to demonstrate their understanding
of biodiversity hotspots and human impacts.
Standards: Earth & Space Science: Earth’s Systems, Earth & Human Activity; Visual Arts:
Creating art to share a message
Materials:
● Biome coloring pages (provided in Resources)
● Colored pencils, markers, or crayons
● Drawing paper
● Projector or TV monitor
● Map of Biodiversity Hotspots (provided in Resources)
Prep: Print biome coloring pages (one per student)
Procedure:
Part 1: Biomes review
● Review the definition of a biome with your students.
○ A biome is a large region of Earth that has a certain climate and certain types of
living things. The plants and animals of each biome have traits that help them to
survive in their particular biome.
Part 2: Tropical rainforest biome mapping
● Provide students with a biome coloring page (see Resources). Review the list of biomes
provided in the key and briefly describe their characteristics. In this lesson we are
focusing on rainforest biomes.
● Ask students to color in all the biomes, or, depending on instructor discretion, just the
rainforest biomes, similar to how they would complete a color by number activity.
● After students have finished coloring their maps, ask them to compare their finished
drawings with a neighbor to check for accuracy.
Part 3: Biodiversity Hotspots and Rainforests
● Explain to the students that tropical Rainforests only cover 2% of earth’s land but contain
50% of the life on earth including plants and animals.
Back to Top 31
● The term scientists use to describe this immense variety of life in a particular habitat or
ecosystem is “biodiversity.”
● Explain to students that when an area of biodiversity is also threatened with destruction,
it becomes known as a “biodiversity hotspot.” The term biodiversity hotspot specifically
refers to 25 biologically rich areas around the world that have lost at least 70 percent of
their original habitat.
● Use a projector to show the class a map of the world’s Biodiversity Hotspots (provided in
Resources). Ask the class to reflect on what overlap they see between the biodiversity
hotspots and tropical rainforest biomes. Students should first think about what they
observe, share their observations with a partner, and then discuss with the class.
● After discussion, ask students to draw a star on their colored biome maps where there is
also a Biodiversity Hotspot.
● Share with students that more than half of the world’s rainforests have been destroyed,
making most of them eligible to “biodiversity hotspots.”
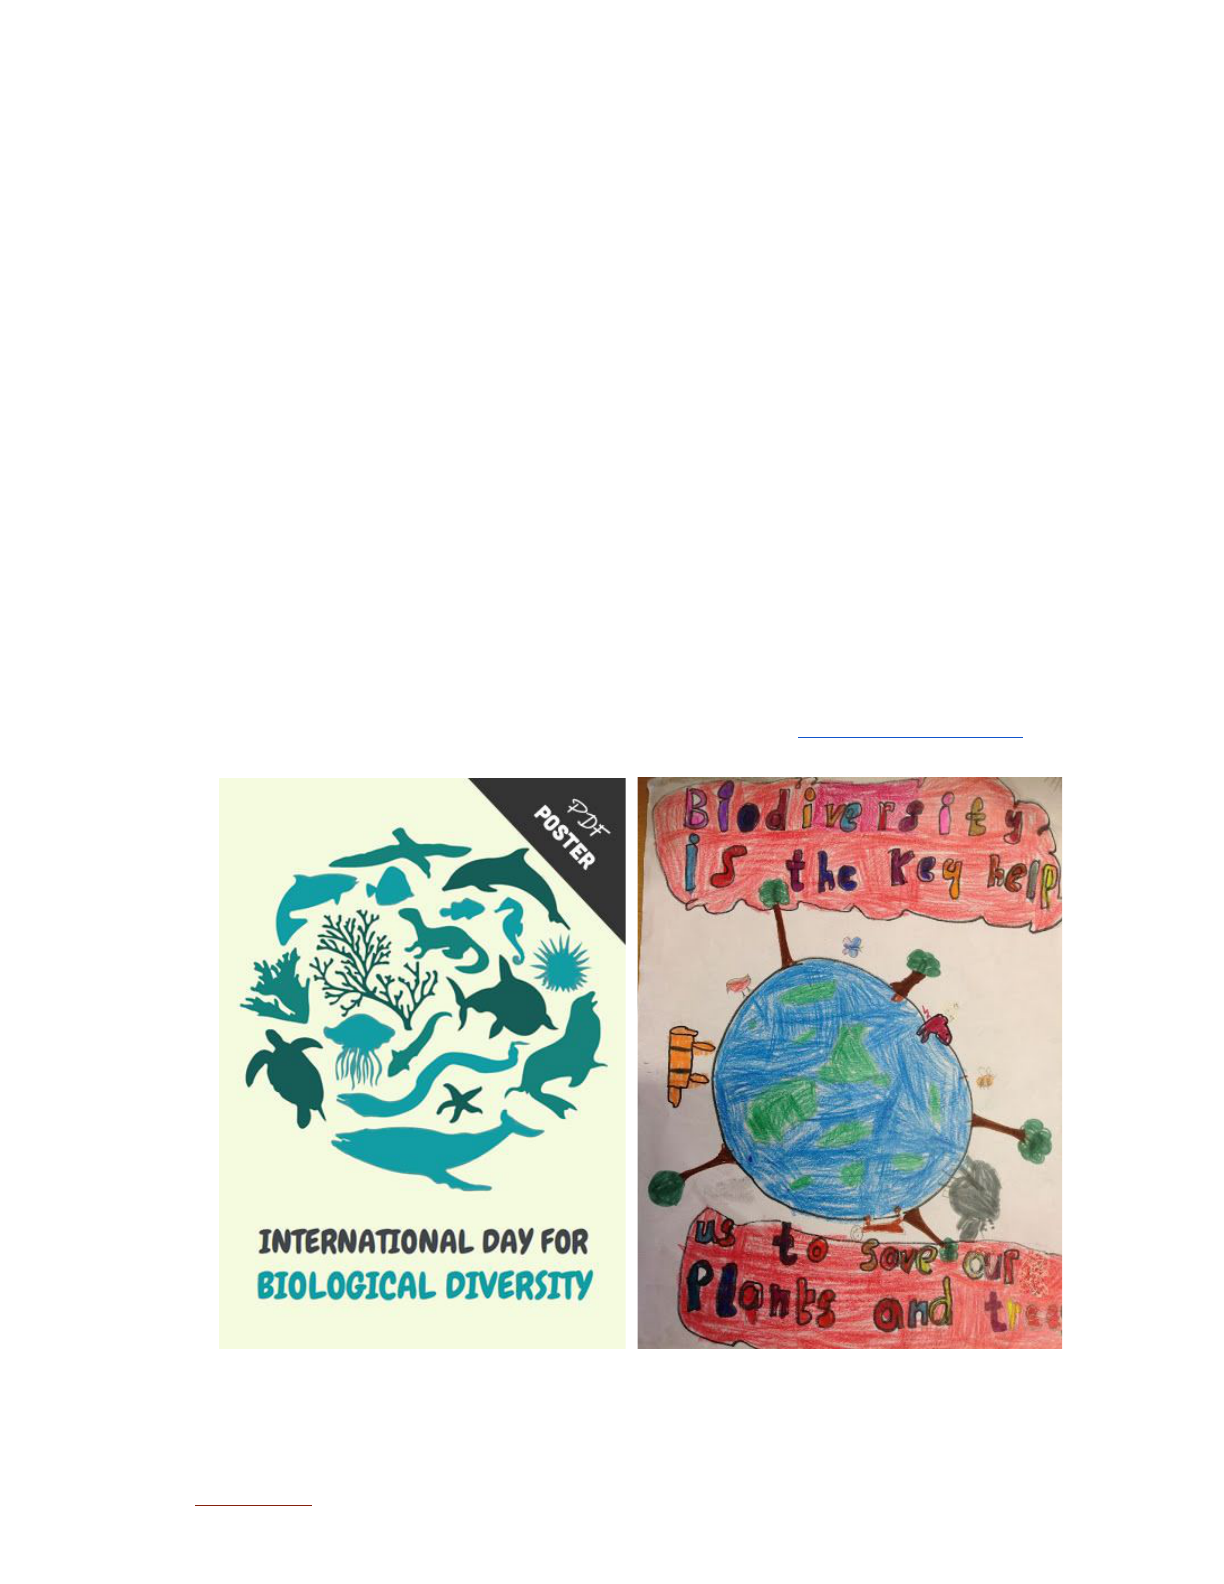
Part 4: Biodiversity awareness
● Have students create a poster for International Day for Biodiversity (May 22nd each
year), that demonstrates their understanding of the great diversity in tropical rainforest
biomes.
● For more information on International Biodiversity Day, visit https://www.cbd.int/idb/
● Example posters:
Back to Top 32

Rainforest Adventure Connection:
● Students should go through the exhibit from start to finish and count how many and what
types of animals are discussed throughout the exhibit. See the activity “Animal
Classification” in the “Exploring the Exhibit” portion of this guide for more ideas on how to
formalize this experience.
● After returning from the exhibit visit, review the term “biodiversity” and ask students to
reflect on what biodiversity they observed in this exhibit.
Resources:
● Biome coloring page, downloadable PDF
https://www.worksheetplace.com/index.php?function=DisplaySheet&sheet=Biomes-Map
-Outline&links=3&id=&link1=241&link2=454&link3=459
● Biodiversity Hotspot map from the World Wildlife Fund
https://www.dw.com/en/climate-change-threatens-half-of-wildlife-in-biodiversity-hotspots-
study-says/a-42973405
Back to Top 33

ACTIVITY 8 - Migration Headache
Grade Level: 3rd-5th grade
Time: 45 minutes
Overview (taken from Migration Headache activity guide): Students become “migrating
shorebirds,” traveling between nesting and wintering habitats. Along their journeys they
experience some of the threats that affect the survival of migratory shorebird populations.
Materials: (taken from Migration Headache activity guide)
● Large playing field or gymnasium (approximately 70 feet long by 20 feet wide)
● Two paper plates for every three students (Clearly mark the plates, perhaps with a large
X on one side, to differentiate top from bottom.)
● Additional plates based on one-fourth of the total number of plates from calculation
above.
● Factors Affecting Survival Cards or Habitat Scenarios listed in Migration Headache
Game pdf
● Flip chart and several colored markers
Prep: See the Migration Headache Game for additional information on materials and
preparation.
Procedure:
Part 1: Introduction (taken from Rainforest Adventure exhibit text)
● Share with students that about 200 bird species migrate from their summer breeding
grounds in North America to winter feeding grounds in Central and South America each
year. The majority are songbirds but many shorebirds and some raptors (hawks, kites
and vultures) also migrate. They need safe places to rest and refuel along the way.
Tropical rainforests are the final destination for some migratory birds. For others, they
make ideal stopovers on long journeys further south.
Part 2: Migration Headache Game
● Complete the Migration Headache Game originally created by Project Wild and shared
by many environmental education organizations. The pdf of this game is available in the
education resource folder provided by Minotaur Mazes or online at:
https://migration.pwnet.org/pdf/Migration_Headache.pdf
Rainforest Adventure Connection:
● While visiting the exhibit, students should find the informational panel about migratory
birds labeled, “Safe Haven.” Ask students to read the text, play the game, and observe
Back to Top 36

which types of birds were included, as well as what were the stopovers and threats
visited by birds along the route.
● After completing the visit to the exhibit, ask students to reflect on their experience,
especially on the migratory bird maze. Discuss the fact that many of the tropical
migratory birds are songbirds.
● Identify the threats that were discussed in the games and strategies for mitigating threats
to tropical migratory songbirds at home and around the world.
Back to Top 37

ACTIVITY 9 - Tropical Resources & Sustainability
Ages: 3rd-5th grade
Time: 30 minutes
Overview: Students will become familiar with a variety of everyday products that derive from the
rainforest. They will develop an understanding of stewardship and how the act of stewardship
can help preserve rainforest products into the future.
Standards: Earth & Space Science: Earth & Human Activity
Materials:
● Rainforest Products Matching sheet (provided in Resources)
● Products of the Rainforest worksheet (provided in Resources)
Prep: Print enough Rainforest Products Matching sheets so that each student has one.
Procedure:
Part 1: Products of the Rainforest
● Pass out the Rainforest Products matching sheets.
● Ask students to complete the sheet by matching the common household item to the
correct rainforest source. Review the answers as a class.
● Note: This activity may be very challenging for students to do alone because the plants
and final products look very different from each other. This activity can be done as a
class to limit frustration and emphasize the Aha! factor.
Part 2: Rainforests in my day-to-day
● After reviewing the matching sheet, ask students to circle all the things on the sheet that
they have consumed and/or used.
● Then ask the students to number the top 5 items that are most important in their daily
lives
● Ask students to share their results with a partner and compare and contrast their
choices.
Part 3: Sustainable use
● Explain to students that using materials that are from the rainforest is not a bad thing if
we do so in a way that doesn’t destroy the rainforest.
● Tell students to consider this example of people consuming oranges.
○ Eating foods that come from the rainforest is not always good. For instance, in
order to make enough orange juice for everyone, some orange juice companies
destroy rainforest land to plant orange groves. One thing we can do to help save
the rainforests is to drink orange juice made only from oranges that are grown in
Back to Top 38

the United States. Orange juice containers will say where their oranges are
grown. Oftentimes it will say that the oranges are from Brazil, which means they
were grown on cleared rainforest land. If that's the case, try to find another brand
of orange juice to buy.
Part 4: Stewardship
● Write the word steward on the board. Explain to students that people who take care of,
treat with respect, and do not harm things are stewards of those things. “Rainforest
stewards” are friends to the rainforests. They take care with the resources they consume
from the rainforest to ensure that the rainforest will be around for a long time.
● Ask students to reflect on the example about oranges. Students should think-pair-share
a response to how this example demonstrates how someone can be a steward.
● As a class, ask students to brainstorm ideas about how they can be rainforest stewards.
Responses may include eating foods that were sustainably harvested (eg. Rainforest
Alliance Certified), recycling or reusing things made from rainforest sourced materials,
and encouraging parents to buy “tree friendly” products.
Part 5: Rainforest products at home
● Ask students to return to their houses with the Products of the Rainforest worksheet and
make note of all the things in their house that come from the rainforest.
● Ask students to write a paragraph describing how they can be stewards of the Rainforest
in their homes and with their families.
Rainforest Adventure Connection:
● While visiting the exhibit, complete the activity “How Rainforests are Important” detailed
in the “Exploring the Exhibit” section of this activity guide.
Resources:
● Rainforest Products matching sheet and answer key
● Products of the Rainforest worksheet
Back to Top 39
Rainforest Products Matching
Write the name of the item from the word bank below the correct picture of its rainforest source.
____________________
____________________
____________________
____________________
____________________
____________________
____________________
____________________
____________________
____________________
Rainforest Products word bank
Coffee Chocolate Cashew nuts
Vanilla Banana Cinnamon Sugar
Black pepper Rubber Chewing gum
Back to Top 40

Rainforest Products Matching Answer Key
Write the name of the item from the word bank below the correct picture of its rainforest source.
Black Pepper
Vanilla
Rubber
Sugar
Cinnamon
Banana
Cashew nuts
Chewing Gum
Coffee
Chocolate
Rainforest Products word bank
Coffee Chocolate Cashew nuts
Vanilla Banana Cinnamon Sugar
Black pepper Rubber Chewing gum
Back to Top 41

Products of the Rainforests
Place a check next to each of these rainforest products that you’ve used or seen
Nuts
___Cashew nuts
___Macadamia nuts
___Brazil nuts
Fruits
___Lime
___Tangerine
___Pineapple
___Lemon
___Banana
___Orange
___Mango
___Grapefruit
___Papaya
___Coconut
___Avocado
___Guava
Spices
___Black pepper
___Cayenne red pepper
___Paprika
___Cinnamon
___Ginger
___Nutmeg
Beverages
___Coffee
___Tea
Treats
___Chocolate
___Vanilla
___Sugar
___Chewing gum
___Tapioca
Household items
___Rattan (wicker furniture)
___Bamboo (furniture, kitchen utensils)
___ Rubber
___ Latex balloons
___Insect Repellant (camphor)
Back to Top 42

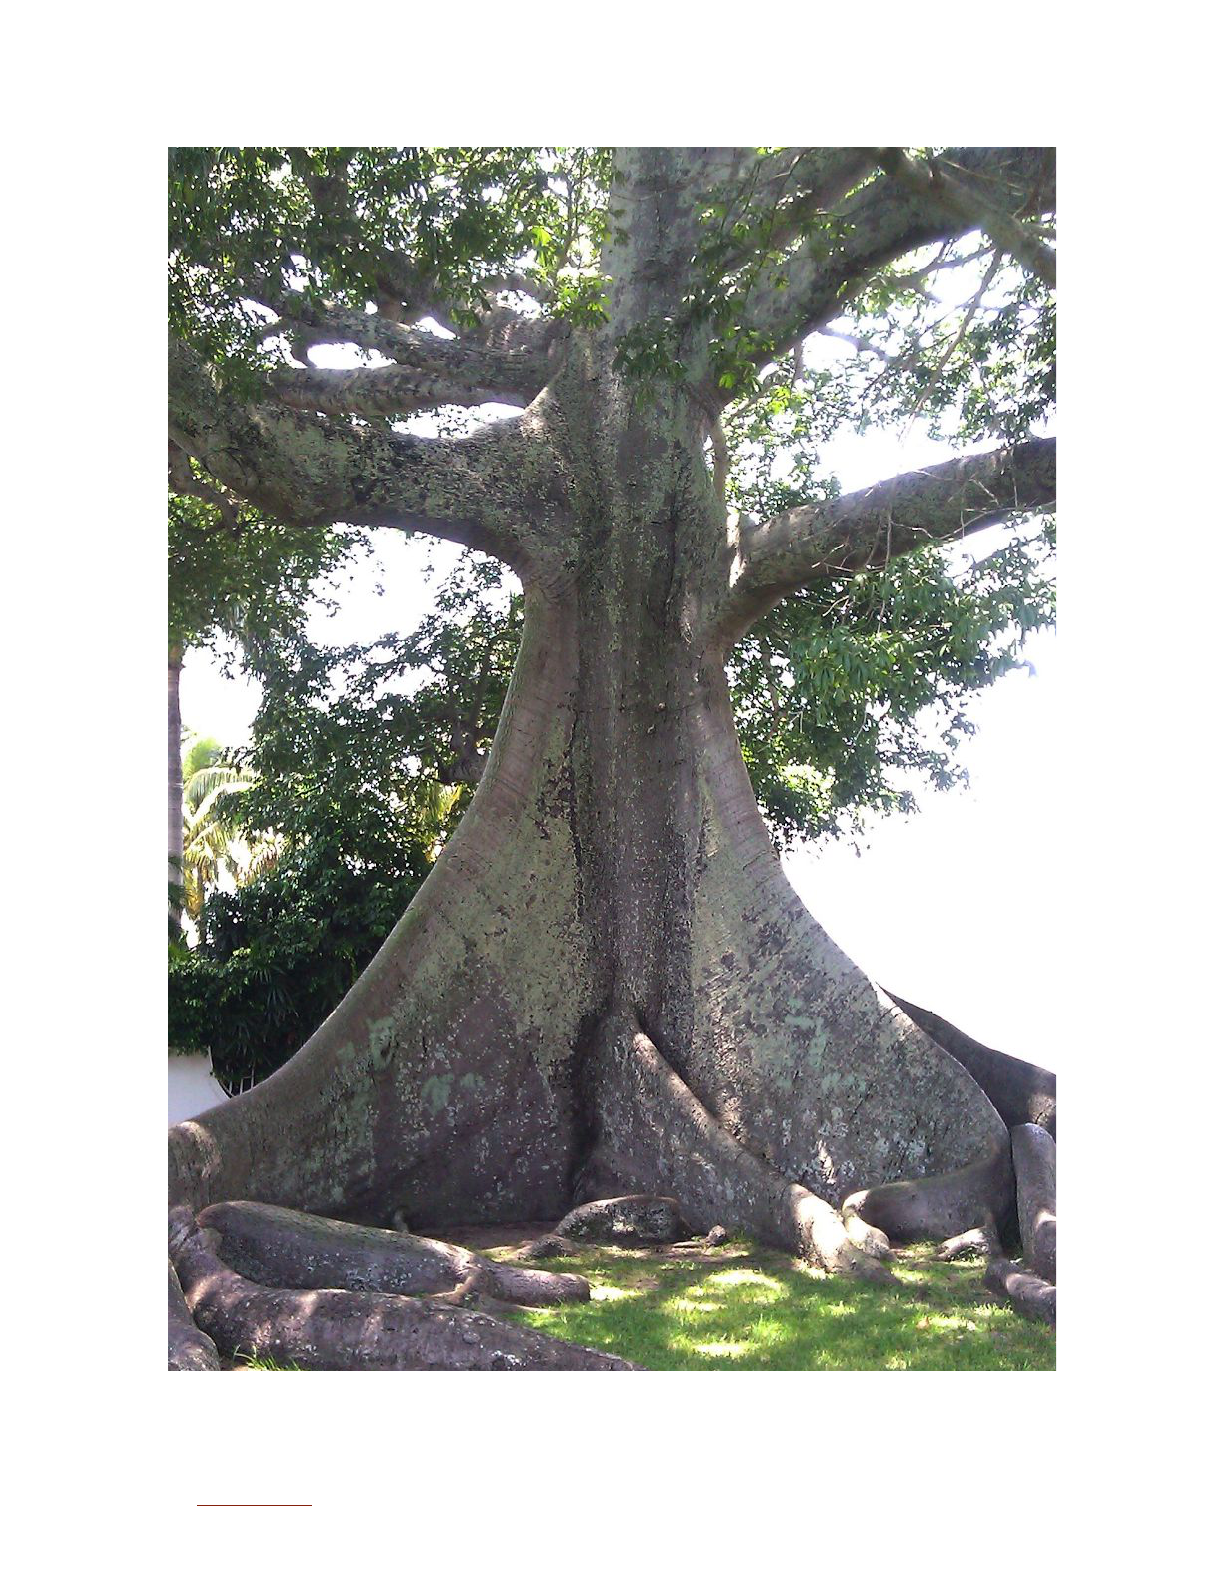
ACTIVITY 10 - Tree Architecture
Ages: 5th-8th grade
Time: 45 minutes
Overview: Rainforest trees can grow to be hundreds of feet tall despite living in thin soil. In this
activity students will use household materials to complete a challenge that models tropical trees.
Students will learn how buttress roots help massive trees stay upright in thin soil.
Standards: Life Science: Biological Evolution; Engineering Design: create and test a model
Materials:
● Brooms or yardsticks (enough so that students can work in pairs or groups of three)
● Cardboard
● Scissors
● Masking tape
● Pictures of buttress roots (provided in Resources)
● Biomimicry matching sheet (provided in Resources)
Procedure:
Part 1: Broom trees
● Divide students into partners or groups of three and spread them out around the room so
they each have space to work.
● Provide each group with a household broom (or yardstick if brooms are not available or
abundant) and challenge them to stand it on end with the handle down and broom up.
● Ask students to make observations about what is happening to their broom and why they
are unable to stand it upright.
Part 2: Buttressed brooms
● Ask students to brainstorm in their groups about what they could do to make their broom
more stable. Note: They can’t tape it to the ground. After a few minutes of brainstorming,
ask students to share ideas with the class.
● Direct student discussion toward adding support structures to the bases of the brooms.
Since this lesson is about buttress roots, try and facilitate the ideas in this direction.
● Let students build and add buttresses by cutting triangles out of cardboard and taping
them to the sides of the base. Students can experiment with different sizes, shapes and
numbers of supports. Give students 10-15 minutes to work to get their broom to stand.
Part 3: Buttress roots in nature
● After letting students add buttresses to their brooms, ask students to reflect on the
results. Did this structure help the brooms stand up?
Back to Top 43

● Show students a picture of tall rainforest trees with buttress roots to help provide
inspiration. If desired, these pictures can be shared via TV monitor or projector. See
Resources for an example image.
● Explain to the class that this structure is called a buttress and it provides support.
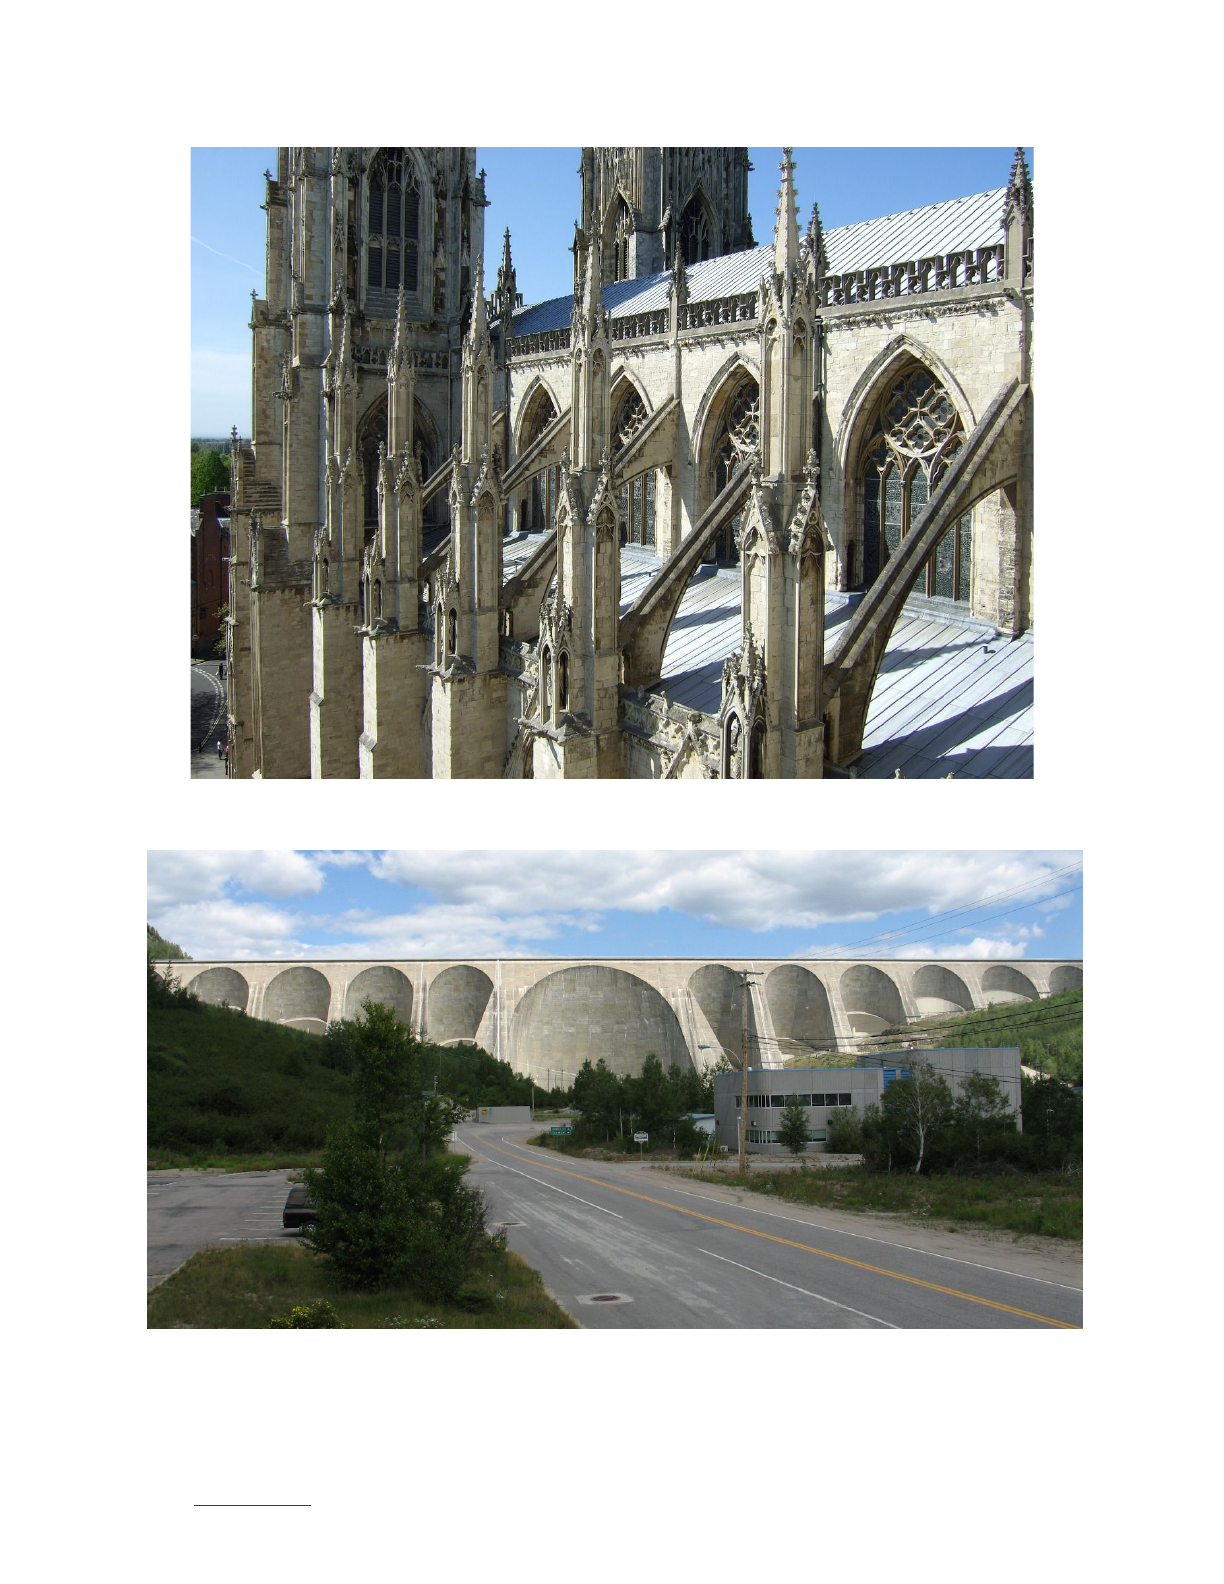
Humans copied the idea from trees and have used buttresses to stabilize structures.
Show images of human-made buttresses (i.e. cathedrals, buildings, coat trees, etc.)
○ Note, in architecture, a buttress is defined as a support built against or projecting
from a wall that serves to support or reinforce a wall.
Part 4: Nature Designs
● Tell students that humans get a lot of great design ideas from observing natural
phenomena. Provide students with a Design By Nature matching sheet of plants and
animals and the things they’ve inspired humans to engineer.
● Explain to students that humans commonly borrow good ideas from nature. This is also
known as biomimicry. Review the Design by Nature matching worksheet students just
completed and discuss the examples identified.
Rainforest Adventure Connection:
● While at the Rainforest Adventure exhibit, students should find and read the
informational panel about buttress roots. These buttress root models will give students a
hands-on example of what they look like in nature.
● As students travel through the exhibit, they can find and complete the activity titled “Can
you help these trees stand up?”
Similar Lessons:
● https://www.pbs.org/journeyintoamazonia/teacher_broom.html
● https://www.teachengineering.org/activities/view/cub_lifescience_lesson03_activity2
Resources:
● Picture of a tree with buttress roots
● Pictures of buttresses in architecture
● Design by Nature matching sheet
Back to Top 44
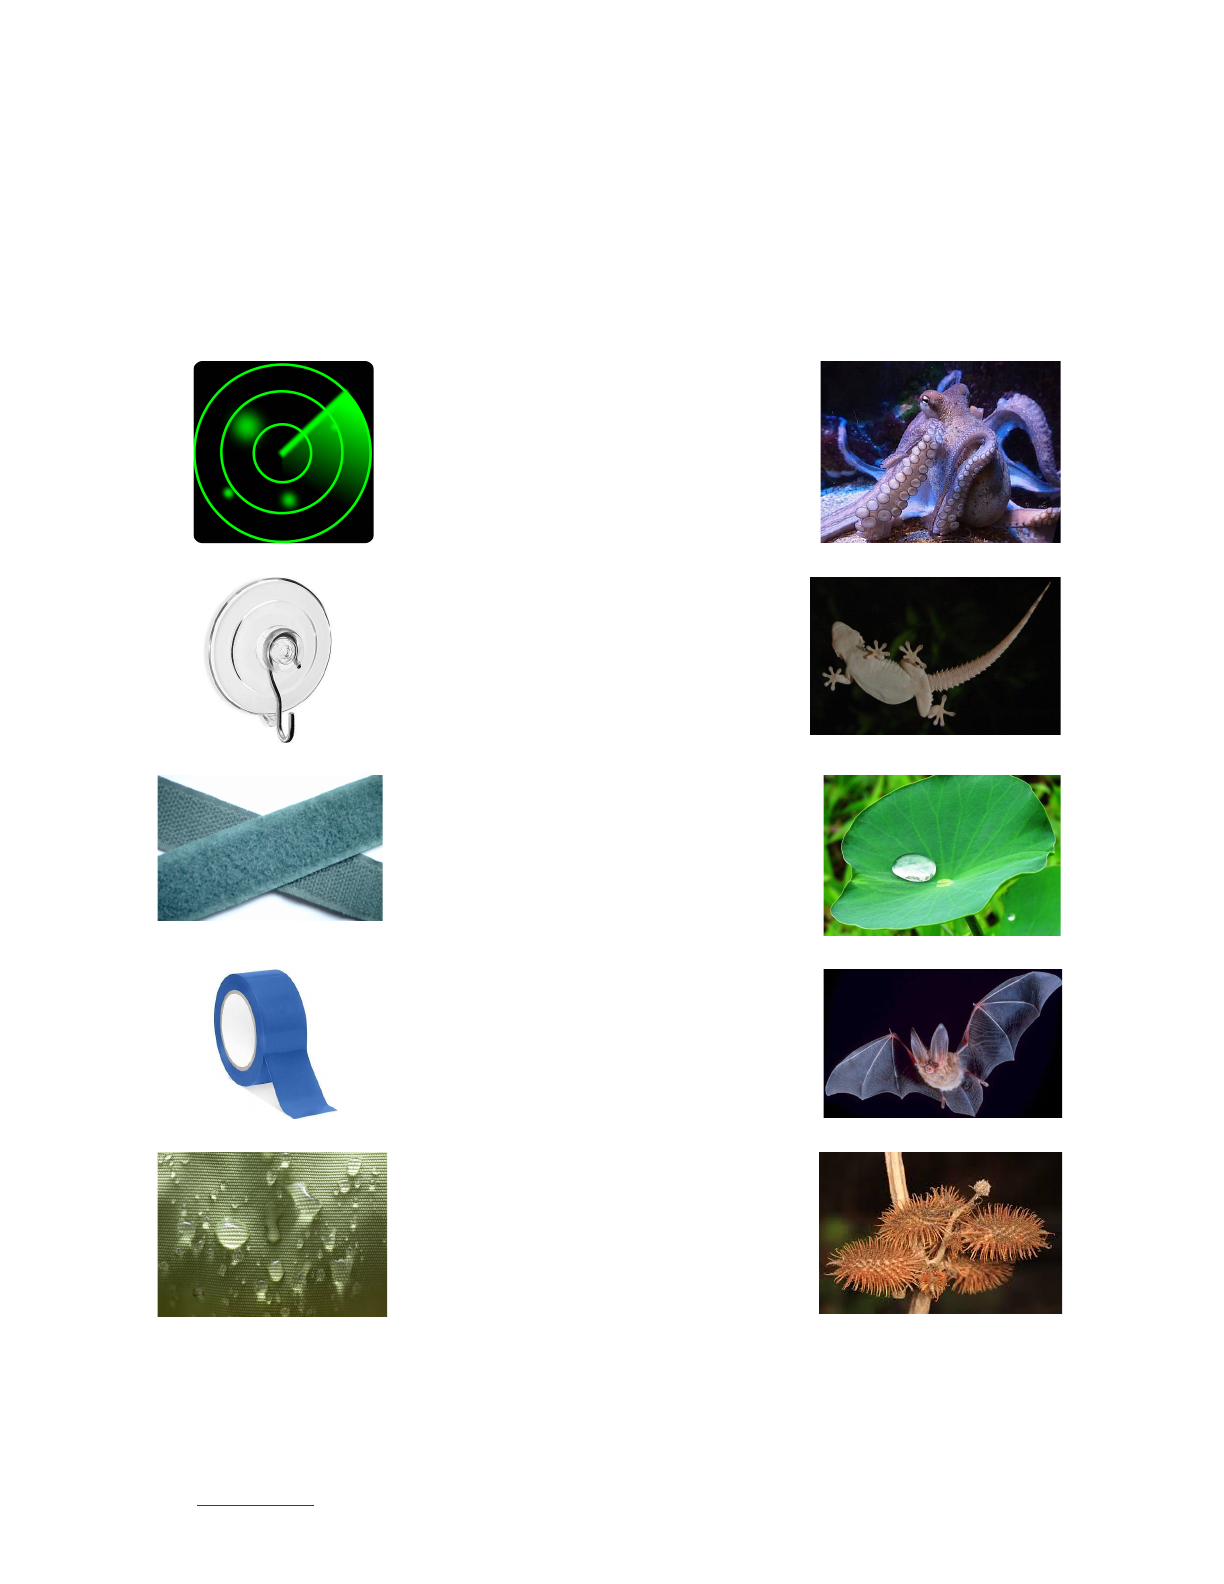
Designed by Nature Matching Sheet
Draw a line connecting an invention with the natural phenomenon that helped inspire it.
Human-made Invention
Designed by Nature
Sonar
Octopus tentacles
Suction cups
Gecko toes
Velcro
Lotus leaves
Super adhesive tape
Echolocation
Water repellent fabric
Seed burrs
Back to Top 47

ACTIVITY 11 - Tropical Resources & Sustainability
Ages: 6th-9th grade
Time: 30 minutes
Objective: Students will read content from the Rainforest Adventure exhibit and explore
concepts in sustainability as it relates to their use of everyday items.
Standards: Earth & Space Science: Earth & Human Activity, Language Arts: Key Ideas &
Details, Integration of Knowledge & Ideas
Materials:
● Products of the Rainforest worksheets (provided in Resources)
● Sustainability Stories (provided in Resources)
Prep: Print enough copies of the Products of the Rainforest sheet and Sustainability Stories for
each student. Each student only needs one of the four Sustainability Stories.
Procedure:
Part 1: Rainforest Products
● Pass out a “Products of the Rainforest” sheet to each student. Instruct students to go
through the list and mark which products they have used at least once in their lives.
Clarify any products that students are uncertain about.
● When students have finished checking off their lists, discuss the results. Ask students if
they were surprised by any of the items on the list.
Part 2: Essential Items
● Ask students to circle 5 items on the sheet they couldn’t live without. Then have them
share their answers with a neighbor. Do their answers have anything in common?
Part 3: Harvesting Raw Materials
● Explain to students that using materials from the rainforest is not necessarily a bad thing.
The most important thing is the manner in which humans harvest products from the
rainforest. Read the following example about oranges and discuss.
○ Eating foods that come from the rainforest is not always good. For instance, in
order to make enough orange juice for everyone, some orange juice companies
destroy rainforest land to plant orange groves. One thing we can do to help save
the rainforests is to drink orange juice made only from oranges that are grown in
the United States. Orange juice containers will say where their oranges are
grown. Oftentimes it will say that the oranges are from Brazil, which means they
were grown on cleared rainforest land. If that's the case, try to find another brand
of orange juice to buy.
Back to Top 48

Part 4: Sustainable Production
● Divide students into groups of 4 and give each student one of the short Sustainability
Stories to read (see provided Resources). Each student should have a different story.
These stories are taken directly from the Sustainability Stories informational panel in the
Rainforest Adventure exhibit.
● Students should read the story and think about 1) what tropical resource is being used
and 2) what sustainable action is being taken to make sure the resource stays viable.
● After reading the stories, students should share with their small groups.
● Within small groups, ask students to reflect on the stories and something that all the
stories have in common.
Part 5: The Common Thread
● Debrief the stories as a class and ask a representative from each group to share what
they think is the common thread between the stories. One possible answer is that local
farmers or businesses who are connected to the land, are all working together to protect
the land and its resources.
Extension: Sustainability Mapping
● As homework, ask students to catalog activities in their communities that help achieve
the world’s Sustainable Development Goals.
● If downloading and using mobile apps are an option for you and your students, use the
Mapting app http://www.mapting.org/ to catalog these local activities. Otherwise these
reports can be handwritten and recorded in a class log.
Rainforest Adventure Connection:
● While visiting the Rainforest Adventure exhibit, students should complete the “How
Rainforests are Important” activity provided in the “Exploring the Exhibit” portion of this
activity guide. Make sure students take the Save the Rainforest pledge at the end of the
exhibit
● After visiting the exhibit, ask students to reflect on the pledge. Discuss how the actions
identified on the pledge promote sustainable use of rainforest resources.
Resources:
● Products of the Rainforest worksheet
● Sustainability Stories
Back to Top 49

Products of the Rainforests
Place a check next to each of these rainforest products that you’ve used or seen.
Then circle 5 items that you use the most frequently.
Nuts
___Cashew nuts
___Macadamia nuts
___Brazil nuts
Fruits
___Lime
___Tangerine
___Pineapple
___Lemon
___Banana
___Orange
___Mango
___Grapefruit
___Papaya
___Coconut
___Avocado
___Guava
Spices
___Black pepper
___Cayenne red pepper
___Paprika
___Cinnamon
___Ginger
___Nutmeg
Beverages
___Coffee
___Tea
Treats
___Chocolate
___Vanilla
___Sugar
___Chewing gum
___Tapioca
Household items
___Rattan (wicker furniture)
___Bamboo (furniture)
___Teak (hardwood furniture)
___ Rubber
___ Latex balloons
___Insect Repellant (camphor)
Medicines
___Ouabain
(heart medication)
___Quinine
(malaria, pneumonia)
___Vincristine/Vinblastine
(cancer treatment)
Back to Top 50

Sustainability Stories
Story 1: Foods from the Forest
Chocolate, brazil nuts, bananas and mangoes are some of the 200 varieties of tropical
fruits and vegetables we eat that can be sustainably grown within rainforests. There are
actually more than 3,000 known food types available for sustainable harvest, not
counting the spices, oils and fibers that also grow in healthy natural rainforests.
Theo Chocolate and Yachana Gourmet Jungle Chocolate are two of an ever-increasing
number of companies that are buying rainforest-grown chocolate and other produce
directly from local farmer cooperatives. The farmers get a fair price, the rainforests are
protected, and we enjoy delicious chocolate!
Story 2: Ecotourism – A Growing Business
Ecotourism is sustainable, nature-based, environmentally friendly and socially
responsible travel. Ideally that means people visit incredible natural places like
rainforests, learn about their natural history, eat local, sustainably grown food and stay in
solar-powered, green-built lodges where local workers make a living wage.
This is a growing industry that places a direct value on intact ecosystems, native wildlife
and local cultures.
The Monteverde Cloud Forest Reserve is 26,000 privately owned acres of pristine cloud
forest in the mountains of Costa Rica. The Reserve generates an average of $4.5 million
in revenue or more than $500 per acre annually. Farmland outside the reserve earns
only $100 to $300 annually.
Story 3: Sustainable Timber Sources
Tropical hardwoods have been used to build furniture, boats, musical
instruments and flooring. Unfortunately, the demand for this wood is
growing much faster than the trees can. Rainforests continue to be
clear-cut with only the valuable timber actually used.
Fortunately, there are sustainable alternatives:
- Selective harvesting allows for planting new trees within the existing
natural habitat.
- Bamboo, a fast growing grass that can be harvested in 2 to 7 years,
makes excellent flooring and paneling.
By buying sustainably harvested wood products, you can help preserve
tropical hardwoods and the rainforests they come from. Groups, such as
the Forest Stewardship Council, certify wood from forests that are
sustainably harvested and managed for long-term land use as well as the
social and economic well-being of local workers and communities.
Back to Top 51

Story 4: A Better Cup of Coffee
Farmers traditionally planted coffee under tall rainforest trees, alongside
food-bearing orange, avocado and lime trees. For a time, many farmers
turned to sun cultivation and while the beans ripened faster, the farmers
had to clear the land and purchase more fertilizers and pesticides.
Conscientious farmers are returning to traditional planting methods
because coffee grown in the shade reduces soil erosion and needs less
water and fewer chemicals. This makes it easier for farms to qualify as
organic.
International coffee importers work with farmer-owned cooperatives to
pay fair prices directly to the farmers for their rainforest-preserving,
shade-grown, organic crops.
Back to Top 52

ACTIVITY 12 - Migration Math Madness
Grade Level: 6th-8th grade
Time: 30 minutes
Overview (taken from Migration Math Madness activity): Students discover that shorebirds
migrate long distances between northern breeding grounds and southern breeding habitats,
using five corridors or “highways” in the sky. By using the migration map provided, they measure
and calculate the distances some shorebirds travel and come to understand why shorebirds
must stop to feed and rest along the way
Standards: Life Science: Ecosystems, Biological Evolution; Math: The Number System; Social
Studies: Geography
Materials: (taken from Migration Math Madness activity guide)
● Migration Math Madness activity available in educational resources provided by Minotaur
Mazes
● Twenty-centimeters pieces of string (one per student or group)
● One set of Migration Math Map Worksheets and the Migration Madness reading for each
student (available in Migration Math Madness pdf)
● Pens or crayons for each student
Prep: See the Migration Math Madness for additional information on materials and preparation.
Procedure:
Part 1: Introduction (taken from Rainforest Adventure exhibit text)
● Share with students that about 200 bird species migrate from their summer breeding
grounds in North America to winter feeding grounds in Central and South America each
year. The majority are songbirds but many shorebirds and some raptors (hawks, kites
and vultures) also migrate. They need safe places to rest and refuel along the way.
Tropical rainforests are the final destination for some migratory birds. For others, they
make ideal stopovers on long journeys further south. In this activity we’ll look at similar
migratory patterns made by shorebirds.
Part 2: Migration Math Madness activity
● Complete the Migration Math Madness activity originally created for “Seasonal
Wetlands.” Santa Clara Audubon Society. “Salt Marsh Manual: An Educator’s Guide.”
San Francisco Bay National Wildlife Refuge. The pdf of this game is available in the
education resource folder provided by Minotaur Mazes or online at the following website:
○ https://cdn1.migratorybirdday.org/wp-content/uploads/2018/05/29164124/Shorebi
rd-Migration-Games.pdf
Back to Top 53

Rainforest Adventure Connection:
● While visiting the exhibit, students should find the informational panel about migratory
birds labeled, “Safe Haven.” Ask students to read the text, play the game, observe which
types of birds were included in the maze, and important stopovers and threats visited by
birds along the route.
● After completing the visit to the exhibit, ask students to reflect on their experience,
especially on the migratory bird maze. Discuss the fact that many of the tropical
migratory birds are songbirds.
● Discuss the threats that were identified in the game and brainstorm strategies for
mitigating threats to tropical migratory songbirds at home and around the world.
Back to Top 54

ACTIVITY 13 - Animal Essays
Ages: Grades 5-9
Time: 1-3 class periods*
* One class period to watch each of the videos and take notes. One class period for
presentations. Research can be done in class or assigned as homework.
Overview: In this activity, students will research the characteristics of a variety of rainforest
organisms and present their research findings to the group. As a class, they will construct a
bulletin board that places the animals by their position in the environment, gives information
about each animal, and shows their interrelationships.
Standards: Life Science: Biological Evolution; Language Arts: Integration of Knowledge and
Ideas, Text Types and Purposes
Materials:
● Construction paper in various colors
● Art tissue paper (especially browns and greens but other colors also)
● Markers, colored pencils, crayons
● Bulletin board or poster board
● Scissors, rulers, glue
● Yarn
● Reference materials: encyclopedias, magazines, Internet
Prep: Prepare a rainforest themed bulletin board or poster board materials. If desired, students
can help with bulletin board construction. An ideal bulletin board would have a dark green
background. Tree trunks would be made from rolled newspaper covered with brown tissue
paper with rolled paper bags to resemble vines. Construction paper backed with florist's wire
with tissue paper fronds represent ferns. Bromeliads may be made from toilet paper rolls with
layers of construction paper and tissue. Flowers can be constructed from tissue. Animals will be
represented by student drawings.
Procedure:
Part 1: Video introduction
● Watch a video to introduce the content (approximately 45 minutes): Wild Amazon
Documentary HD by National Geographic
○ https://www.youtube.com/watch?v=F5UPc8dya-M
Part 2: Research introduction
● Students will use books, magazines, and internet resources to research one of a number
of organisms that live in the Amazon rainforest. For younger students, a list of organisms
Back to Top 55

should be provided, though older students should be able to identify appropriate
organisms on their own through reading or by watching the video. A list of possible
plants and animals is provided below.
○ Selected Organisms For Research:
■ Plants: Fern, Brazil Nut, Banana, Cecropia, Strangler fig, Palm trees
(many varieties), Coffee, Kapok, Cocoa, Orchid, Vanilla, Bromeliad,
Passion flower, Philodendron, Breadfruit, Cashew, Manioc, Yucca,
Heliconia, Mahogany, Rubber Fungus
■ Animals: Anaconda, Ant, Anteater, Beetle, Boa constrictor, Pit viper,
Butterfly, Fer de Lance, Capybara, Caiman, Coatimundi, Cockroach,
Electric eel, Catfish, Frog, Pink dolphin, Katydid, Grasshopper, Monkeys
(many varieties), Jaguar, Kinkajou, Puma, Macaw, Parrot, Crow,
Manatee, Mosquito, Bot fly, Parrot, Tarantula, Bat, Termite, Sloth,
Quetzal, Toucan
● As part of the final product, students should prepare a color drawing and/or model from
the provided materials for use on the display board, as well as a 5x8 inch card giving
basic information about the organism.
● Students will post their organism in the proper position on a classroom bulletin board.
The information card will be placed on the perimeter of the board with a string
connecting the information to the organism model.
● As an extension, colored yarn may be used to connect organisms to one another to
illustrate the concepts of a food web, commensalism, symbiosis, competition for
resources, or predator-prey relationships. Different colors can be used to represent
different relationships.
● After completion of the display, students should give a 2 to 5 minute presentation for the
class about their organism. The presentation should provide general characteristics and
identify the organism's diet.
Rainforest Adventure Connection:
● Complete the “Hunting for Animal Adaptations” or the “Animal Classification” activity
described in the “Exploring the Exhibit” portion of this activity guide.
Back to Top 56

Exploring the Exhibit
The following is a list of activities to help guide exploration while at the Rainforest Adventure
exhibition. Each of these activities is designed to take 15-30 minutes for students to complete.
The activities reinforce content connections made in the supplemental activity guide. The short
duration of activities solidifies content while allowing students time to free-explore within the
exhibit, discover new content, and pique curiosity in unexplored areas.
Back to Top 57

Hunting for Animal Adaptations
Ages: Upper Elementary School, Middle School
Time: 15-20 minutes
Content Area: Life Science: Biological Evolution
Overview: This activity contains two parts, one interactive part (Adaptation Activities), and one
informational part (Species Hunt). Assign one or both activities to students based on teacher
discretion and desired outcomes from the experience.
Procedure:
Preparation:
● Divide students into partners to go through the maze using a buddy system. If possible,
divide students into small groups with an adult chaperone to guide them through the
maze and help read and interpret informational text.
Part 1: Adaptation Activities
● As students go through the maze, ask them to complete the Adaptation Activities. These
are the highly interactive components of the exhibit that encourage students to embody
an animal’s specific adaptations. A worksheet is provided below, but since these
activities are very hands-on, it is preferable to let students complete the worksheet in the
classroom after the experience.
Part 2: Species Hunt
● After completing the maze and Adaptation Activities, students should go back through
the maze on a Species Hunt to find the informational panels about each of the species
listed on the provided worksheet. After reading the panels, they should write down a key
word or sentence about the animal’s adaptations for survival. If time is limited, assign 2-3
animals to each student or group of students, then have students share their findings in
the classroom after their field trip. A worksheet is provided below, but if preferred, this
worksheet can be completed in the classroom after visiting the exhibit.
Debrief:
● In the classroom after the visit, discuss the experience with students. Ask students to
share whether they thought any of the adaptations were surprising, which were the most
incredible, and how each adaptation increases the animal’s chances of survival.
Resources:
● Adaptation Activities worksheet
● Species Hunt worksheet
● Species Hunt answer key
Back to Top 58

Adaptation Activities
1. Find the informational panels with the following titles. Complete the activity.
Safe Haven
Help birds make their long journey.
Swing Like a Monkey! Can you?
Spider Monkeys
Butterfly Zip Line
Glide like a Butterfly?
Butterfly Camouflage Mural
Can you find all four stages?
Bonus Seek and Find
Can you find these animals?
Frog Jump
How Far Can You Leap?
2. After completing the activities, write in the spaces provided what the adaptation is
and how it helps the animal survive.
Back to Top 59

Species Hunt
Find the picture of each animal listed below within the exhibit, read it’s description, and
write down its unique adaptation.
Vine Snake __________________________________________________
Jaguar ______________________________________________________
Sloth _______________________________________________________
Poison Dart Frog ______________________________________________
Harpy Eagle _________________________________________________
Toco Toucan _________________________________________________
Red-eyed Tree Frog ___________________________________________
Howler Monkey _______________________________________________
Back to Top 60

Species Hunt Answer Key:
Answers are provided in phrases with key words bolded.
Vine Snake - This snake uses camouflage to look like vines.
Jaguar - Spots help camouflage this animal as it stalks its prey.
Sloth - This animal is drab and covered in moss and algae, excellent camouflage!
Poison Dart Frog - Warning colors tell predators to look elsewhere for a meal.
Harpy Eagle - These are fast, agile birds with sharp talons that can capture prey in
the trees.
Toco Toucan - These birds live in flocks and are very vocal. They are loud enough to
communicate over half a mile away.
Red-eyed Tree Frog - Suction cups on the toes of these frogs help them climb trees.
Howler Monkey - Vocalization helps these animals communicate over long distances.
Back to Top 61

How Rainforests are Important
Ages: Upper Elementary School, Middle School
Time: 15-20 minutes
Content Area: Earth & Space Science: Earth & Human Activity
Overview: Students will explore the content of the Rainforest Adventure exhibit to discover how
they depend on the rainforest, why rainforests are so important to people, regardless of where
on Earth they live, and how they can help protect rainforest resources.
Materials:
● Important Rainforests activity sheet (provided in Resources)
Procedure:
● Divide students into partners or small groups to complete this activity. If possible,
younger students should be accompanied by an adult chaperone to help students read
and understand information.
● Provide each student group, or the adult chaperone, with an “Important Rainforests”
activity sheet and writing utensil. Optional: this sheet can be completed in the classroom
after the visit if desired.
● Students should complete the 3 items indicated on the worksheet including:
○ Completing the sentence, “Rainforests are important to me because ….”
○ Identifying valuable rainforest resources by smell
○ Taking the “Save the Rainforest” pledge at the end of the exhibit
● After visiting the exhibit, make sure students have completed their “Important
Rainforests” activity sheet. As a class, go through the items on the sheet and ask
students to reflect on their answers and whether or not this exhibit changed how they
feel about rainforests.
Resources:
● Important Rainforests activity sheet
Back to Top 62

Important Rainforests
Rainforests cover only 6% of the world’s surface, but provide resources to people living
thousands of miles away, including you and me. Complete the following challenges to
learn more about how important rainforests are and how you can help protect them!
1. Find and read the panel titled, “How are Rainforests Important to You?” and
complete the sentence below:
Rainforests are important to me because ______________________________
_______________________________________________________________
_______________________________________________________________
2. Find the squeeze and sniff activity station by the “Supermarkets of the World”
panel. Can you identify these rainforest products by smell?
I got _______ out of _______ right!
One of the rainforest products that I have seen or tried before is
______________________________________________________
3. Find the Save the Rainforest pledge and place check marks next to each item
you commit to doing in your daily life.
I Pledge to:
__ Ride my bike, walk, carpool, or take the bus.
__ Bring reusable water bottles to school or work.
__ Use a lunch box rather than paper bags.
__ Eat a few plant-based meals each week.
__ Buy local produce and products.
__ Buy fair trade products like coffee, tea, and chocolate.
__ Recycle scrap paper, plastic bags, and aluminum cans.
__ Use post-consumer recycled paper.
__ Plant an organic garden.
__ Turn off lights and electronics when not in use.
__ Learn more about rainforests and share what I learn.
Back to Top 63

Layers of the Rainforest
Ages: Upper Elementary School
Time: 15-20 minutes
Content Area: Life Science: Ecosystems
Overview: Students will extend their knowledge of the four primary layers of the rainforest as
they travel through four distinct areas of the Rainforest Adventure exhibit.
Materials:
● Layers of the Rainforest activity sheet (provided in Resources)
Procedure:
● Divide students into partners or small groups to complete this activity.
● Students should go through the maze and find the informational panels describing the
four layers of the rainforest.
● Using the provided “Layers of the Rainforest” activity sheet, write down important
information about the characteristics of the layer. If desired, students can complete this
worksheet in the classroom after visiting the exhibit.
● Students should then continue through the exhibit to find informational panels about
animals that live in each layer of the rainforest.
● If time is limited, assign each group a different layer to research. Multiple groups can
learn about the same layer, but each group will only have to visit one section of the
exhibit. Groups can report back findings to the class after the visit and groups can fill in
the remaining sections of their activity sheet.
● Further differentiation by age group can include:
○ Younger students: List 2-3 examples of animals that inhabit each layer.
○ Older students: Based on text, describe the plant density and sunlight of each
layer. List 2-3 examples of animals that inhabit each layer and draw conclusions
about why they live in each layer based on available plant life and sunlight.
● Upon finishing the exhibit, students should complete the Rainforest Species Puzzle and
correctly place each animal in its corresponding habitat.
Resources:
● Layers of the Rainforest activity sheet and answer key
Back to Top 64
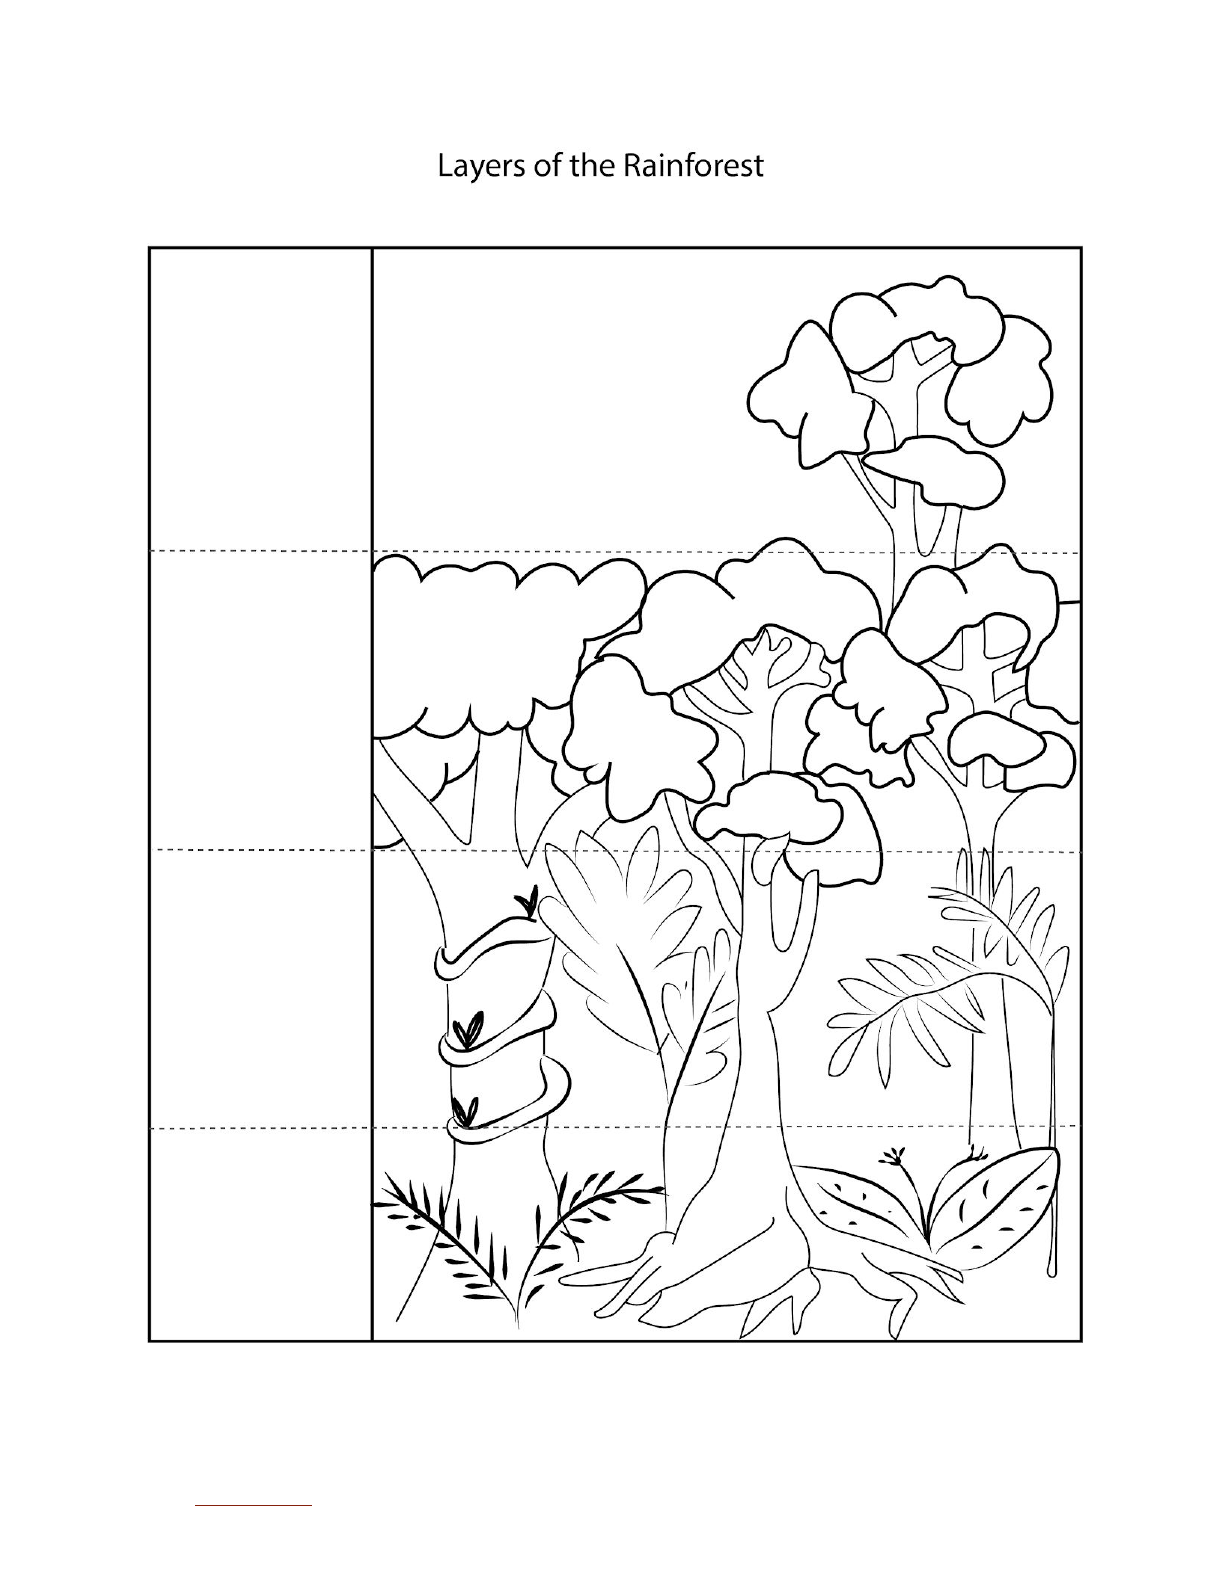

Layers of the Rainforest Answer Key:
Emergent Layer
● Description:
○ This layer is made of the tops of the tallest trees, reaching over 200 feet tall.
Sunlight is the most abundant in this layer.
● Animals:
○ Howler Monkey
○ Harpy Eagle
○ Blue Morpho Butterfly
○ Vine Snake
Canopy
● Description:
○ The roof of the forest, the canopy, is a dense layer of leaves, vines, fruits and
colorful flowering plants that allows little light to penetrate below.
● Animals:
○ Sloth
○ Toco Toucan
○ Monarch Butterfly
○ Red-eyed Tree Frog
Understory
● Description:
○ In the understory, smaller trees compete with each other for the little sunlight that
filters through the thick green roof of the canopy.
● Animals:
○ Jaguar
○ Horned Guan
○ Rhinoceros Beetle
○ Green Anaconda
Forest Floor
● Description:
○ The forest floor is a tangle of large roots and very little light to guide you.
● Animals:
○ Capybara
○ Great Curassow
○ Leaf-cutter ant
○ Poison-arrow frog
Back to Top 66

Animal Classification
Ages: 5th grade and up
Times: 20 minutes
Content Area: Life Science: Biological Evolution
Prior knowledge required: Experience with the taxonomic classification system is preferred
but not necessary.
Overview: Students will explore the great diversity of animal life within rainforests and practice
using the standard taxonomic classification system to place animals in their correct place in
Animalia.
Materials:
● Animal Classification activity sheet (provided in Resources)
Procedure:
● Before letting students explore the exhibit, prime them with the information that 10% of
animal species on Earth can be found in the rainforest. The average four-square-mile
area of tropical rainforest contains up to: 125 mammal species, 400 bird species, 100
reptile species, 60 amphibian species, 150 butterfly species, 30 to 80 million insect
species.
● Explain to the students that in this activity, their goal is to explore the exhibit and catalog
the animals they find, placing them in their appropriate taxonomic groups within the
Animal Kingdom.
● Provide students with the Animal Classification worksheet and let them explore the
exhibit.
● After completing the visit, review the answers on the worksheet, including the defining
characteristics of each group.
Resources:
● Animal Classification worksheet and activity guide
Back to Top 67

Animal Classification Worksheet
Mammals (Class: Mammalia)
Description: a warm-blooded vertebrate
animal that has hair or fur, typically gives birth
to live young, and females secrete milk to
nourish the young.
1. ___________________________
2. ___________________________
3. ___________________________
4. ___________________________
5. ___________________________
Invertebrates (Phylum: Arthropoda)
Description: an animal lacking a backbone,
such as an arthropod, mollusk, worm, etc.
1. ___________________________
2. ___________________________
3. ___________________________
4. ___________________________
5. ___________________________
6. ___________________________
Reptiles (Class: Reptilia)
Description: a vertebrate animal with dry
scaly skin, typically lays soft-shelled eggs on
land. Includes snakes, lizards, crocodiles,
turtles, and tortoises.
1. ___________________________
2. ___________________________
Amphibians (Class: Amphibia)
Description: a cold-blooded vertebrate
animal with an aquatic gill-breathing larval
stage, typically followed by a terrestrial
lung-breathing adult stage. Includes frogs,
toads, newts, and salamanders.
1. ___________________________
2. ___________________________
Birds (Class: Aves)
Description: a warm-blooded egg-laying
vertebrate with feathers, wings, and a beak
and typically able to fly.
1. ___________________________
2. ___________________________
3. ___________________________
4. ___________________________
Bonus!
Which animal group contains the most
species? (Check one)
❏ Reptilia
❏ Aves
❏ Mammalia
❏ Amphibia
❏ Arthropoda
Back to Top 68

Animal Classification Answer Key:
Mammals (Class: Mammalia)
Capybara
Howler Monkey
Jaguar
Sloth
Spider Monkey
Invertebrates (Phylum: Arthropoda)
Rhinoceros Beetle
Blue Morpho Butterfly
Leafcutter Ant
Rainforest Spiders
Monarch Butterfly
Rainforest Spider
Birds (Class: Aves)
Harpy Eagle
Horned Guan
Great Curassow
Toco Toucan
Reptiles (Class: Reptilia)
Anaconda
Vine Snake
Amphibians (Class: Amphibia)
Poison Dart Frog
Red-eyed Tree Frog
Bonus answer: Arthropoda
Back to Top 69
