
Introduction
How to Use this Document
This document introduces prospective users to SigmaPlot for Windows, which
currently runs under Windows XP/Vista/7. Those who do not own a personal
copy of SigmaPlot for Windows may access the software from various UITS
Student Technology Centers at IU. Vendor-supplied documents are available for
reference at the Swain Hall, Business/SPEA and Education Libraries' Reserve
Collections, IUPUI University Library, and at UITS Research Analytics (formerly
the Stat/Math Center). Faculty members who are interested in arranging
introductory workshops for their classes in using SigmaPlot for Windows may
contact the UITS IT Training & Education Program. Contact Research Analytics,
if you are a faculty or a staff, and interested in leasing SigmaPlot for Windows at
an educational discount.
What is SigmaPlot?
SigmaPlot for Windows is a technical graphing program designed for the
Windows Platform. It can be used effectively to produce all types of graphs and
charts, including a nonlinear curve fitter, worksheets that accommodate large
data sets and summary statistics. It has what it calls a mathematical transform
language that allows you to manipulate and analyze data.
SigmaPlot enables you to create graphs quickly. It has easy-to-read icons on the
Graph Toolbar and the interactive Graph Wizard, which prompts you for every
step of graph creation. You’ll be able to customize the graph detail by double-
clicking on any graph element and the Graph Properties dialog box shows you
how to specify different colors, sizes and symbols, and much more. SigmaPlot
graphs can be copied and pasted to any open page, report, or into any other
Windows application that supports pictures (e.g. Word, PowerPoint). SigmaPlot
also seamlessly merges with Excel. You can use the power of Excel inside
SigmaPlot, and SigmaPlot offers instant access from Excel.
Hardware and Software Requirements
The minimum hardware and software requirements for SigmaPlot for Windows
are:
• Windows XP, Vista, 7
• 1 GHz 32-bit (x86) or 64-bit (x64) Processor
• 1 GB of System Memory
• 100 MB of Available Hard Disk Space
• CD-ROM Drive
• 800x600 SVGA/256 Color Display or better
• Internet Explorer Version 6 or better

Orientation
The Interface
There are four types of windows in SigmaPlot
SigmaPlot Notebook Window:
The SigmaPlot Windows displays a list of data and graphs. While you
work on SigmaPlot, you create a file called gSigmaPlot notebook
fileh. The file contains all your SigmaPlot data and graphs. The
notebook displays what work has been done in a particular project.
Worksheet Window:
The Worksheet Window looks like a spread-sheet data editor. Graphs are
made out of data in the Window. You can directly enter data from the
keyboard or import data into this window.
Graph Page Window:
The Graph Page Window displays graphs and allows you to modify
graphs made from your worksheet data.
Column Statistics Window:
The Column Statistics Window displays descriptive statistics from the
current selected worksheet.
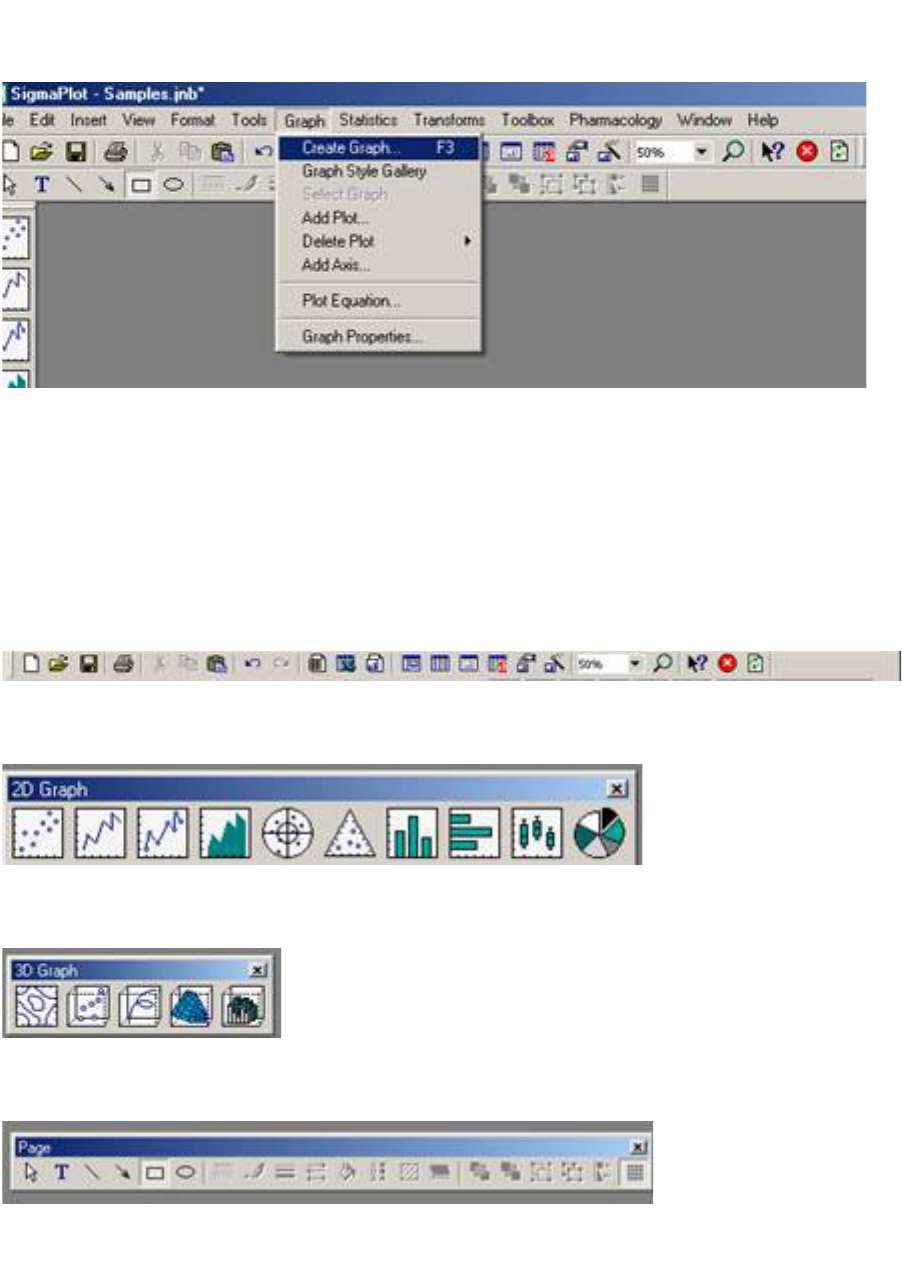
Menus in SigmaPlot
The top strip of SigmaPlot Window contains menus of things you can do. The
menu shown above lets you create graphs from your worksheet data.
Toolbars in SigmaPlot
Toolbars have commonly used command buttons. (e.g., creating / opening a new
notebook, saving and printing)
2 dimensional graph toolbar
3 dimensional graph toolbar
Drawing toolbar
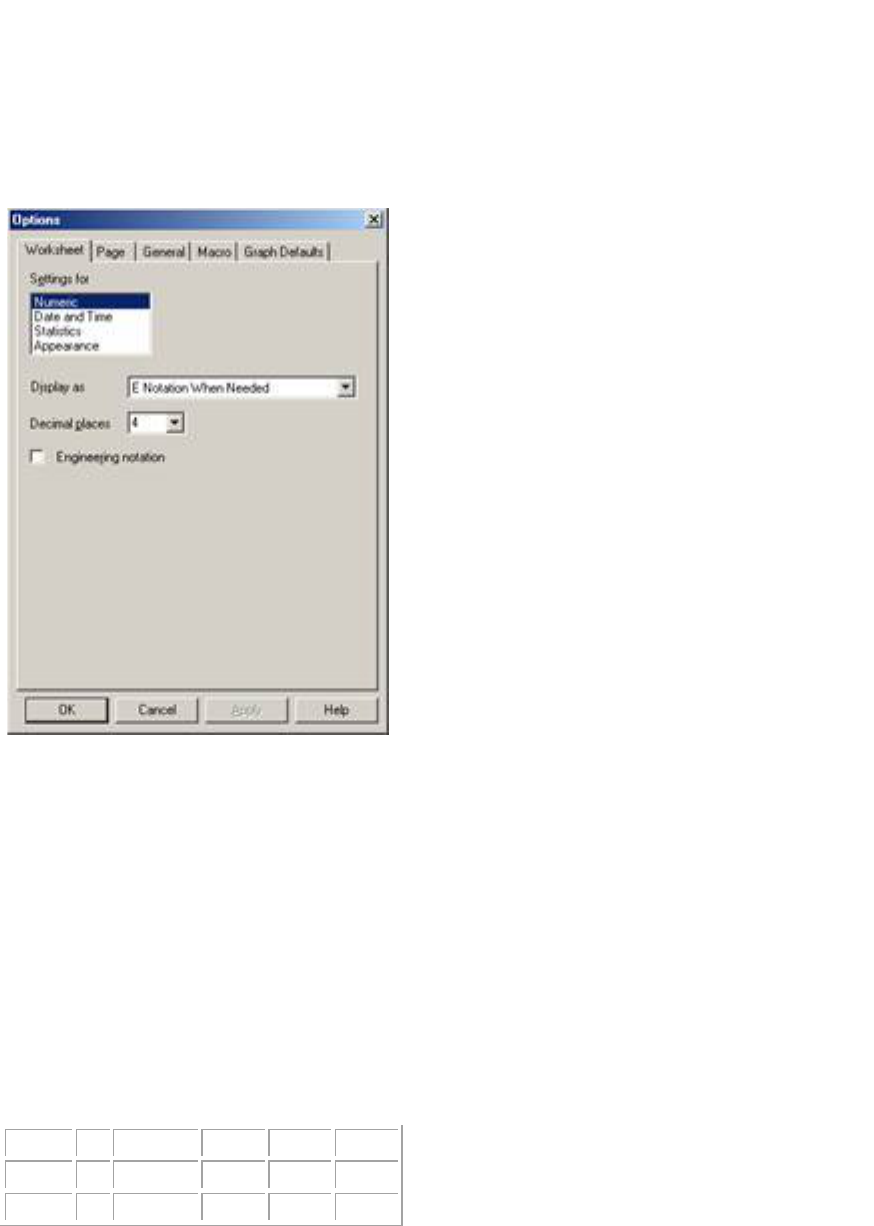
Options in SigmaPlot
You can personalize your SigmaPlot session by altering the default Options
settings.
• Select Tools/Options
• Click the tabs for the setting you want to change.
• Change the settings.
• Click OK or Apply button
Getting Started
Suppose you have three test scores collected from a class of ten students (5
females, and 5 males) during a semester. The information you have for each
student is: identification number, gender, score for test one, test two and test
three (the full data set is displayed toward the end of this section for you to enter
into the Worksheet window).
Name
ID
Gender
Test1
Test2
Test3
Tim
1
M
20
23
24
Helen
2
F
21
26
28
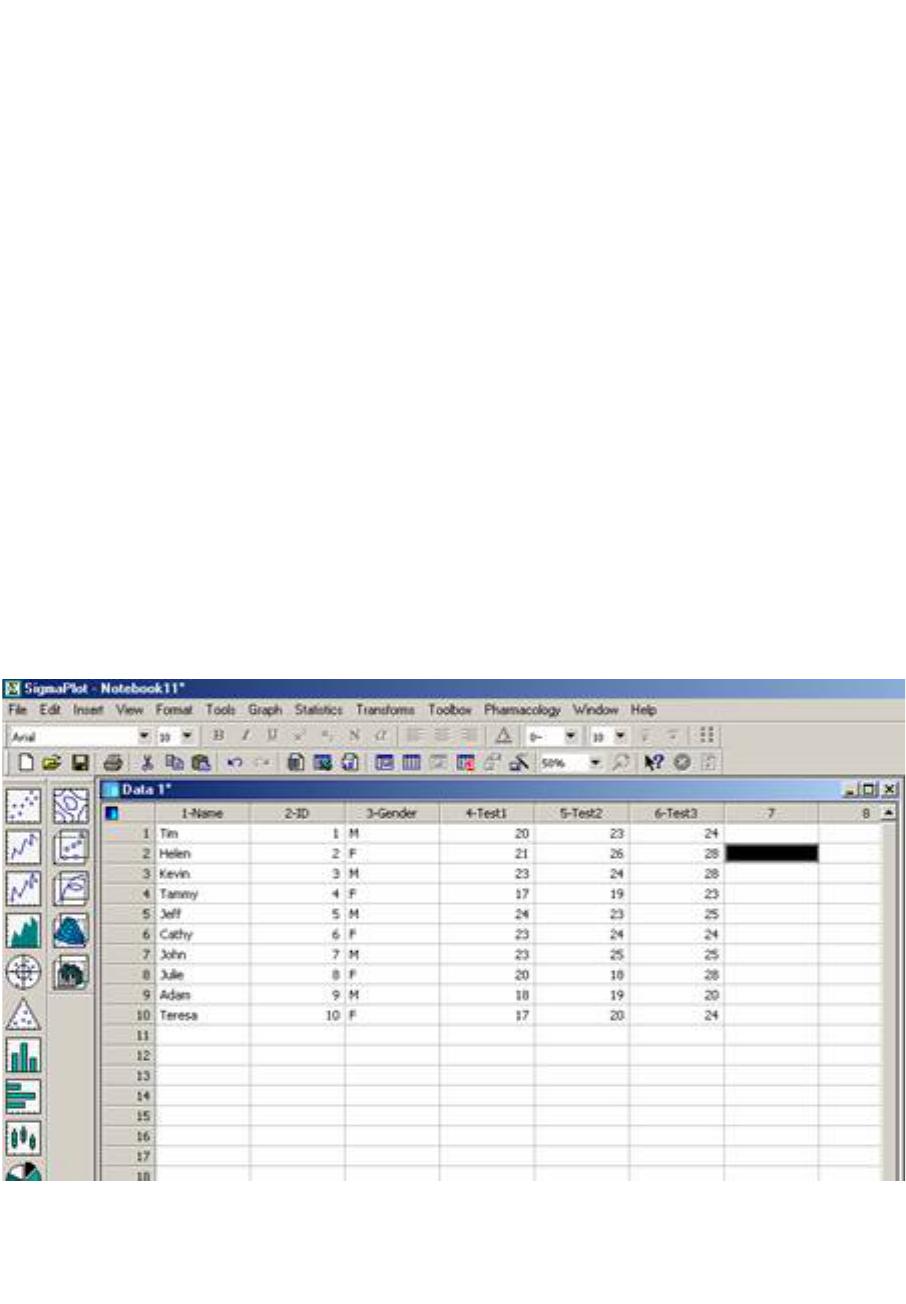
SigmaPlot needs data in the worksheet (looks like a spreadsheet) to generate
graphs. There are two ways to enter data: entering data directly or importing
external data (e.g. Excel data) into a worksheet.
Entering Data
Let us open a Worksheet and enter the variable names and the data above.
1.Select New from the File menu. A new dialog box appears. Click Ok in the
box.
2.Double-click on the top of the 1st column.
3.Type Name for the variable name. The name of the column shows 1-Name.
Define the remaining five variables as the same way.
Now, the top row should have six variable names. Let us key in the data.
4.Move the pointer to the cell below the variable Name, by clicking it.
5.Type in the data given above, pressing ENTER after each value. To move
down columns, press the down arrow. To move right columns, press TAB.
Once you finish entering the data your Worksheet will appear as shown
below.

Importing External Data
Suppose we have an Excel file (e.g. Clas.xls). We are going to import the
data into SigmaPlot.
1. Open the worksheet and Select Import from the File menu.
2.An Import File dialog box appears. Click Import in the box.
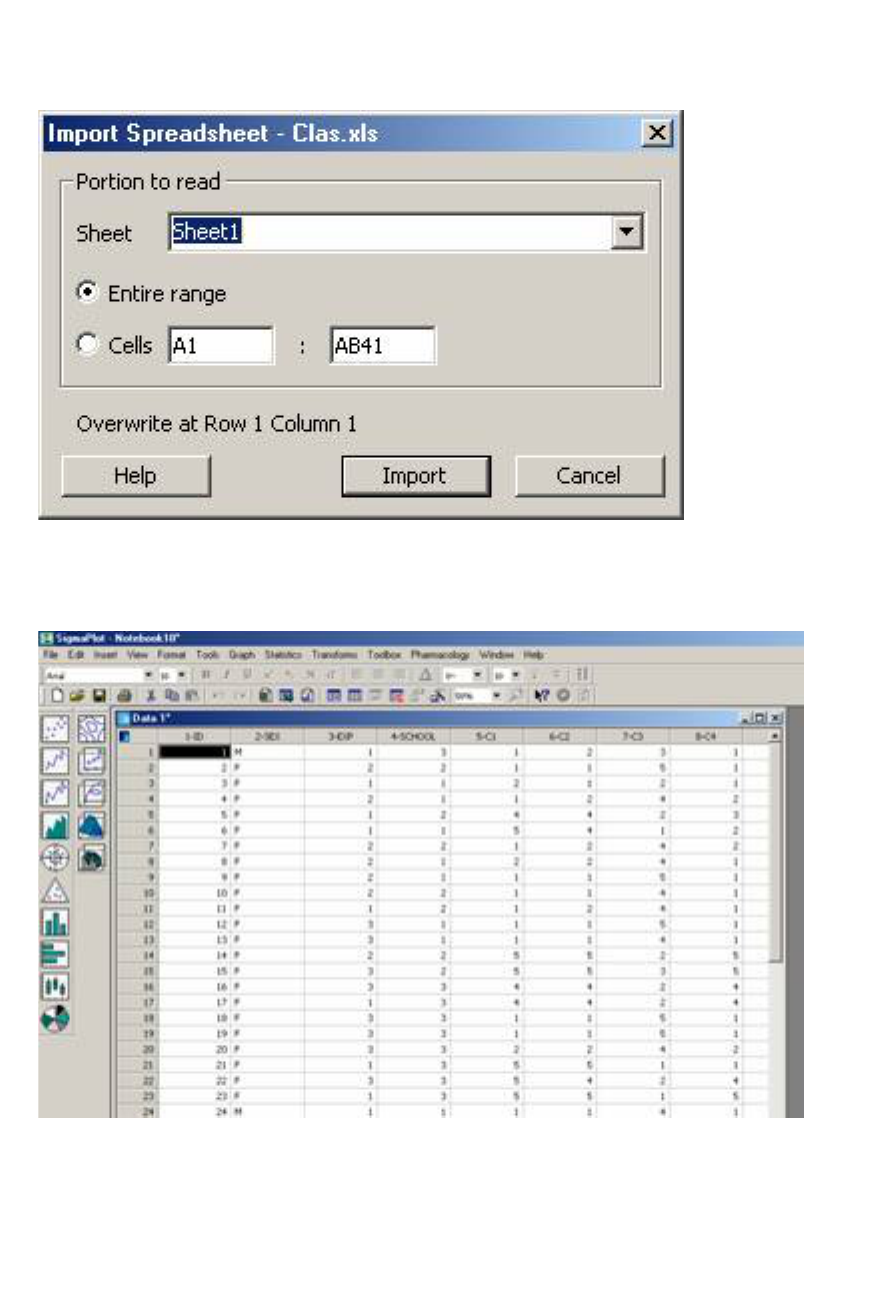
3. An Import Spreadsheet dialog box appears. This box asks you the name of
sheet from the Excel file and the range of the data. We are going to import the
entire data from Sheet1.
4.Click Import.
5.The imported data looks as below:
Generating Graphs
After the data has been entered into the worksheet, Graphs can be conducted
using this data. There are two ways of creating a graph:
• Using the Graph Wizard.
• Clicking an icon on the toolbar.
In the following examples we are going to use the Graph Wizard to generate bar
charts, error bars, 2D line plot and 3D scatter plot.
Bar Charts
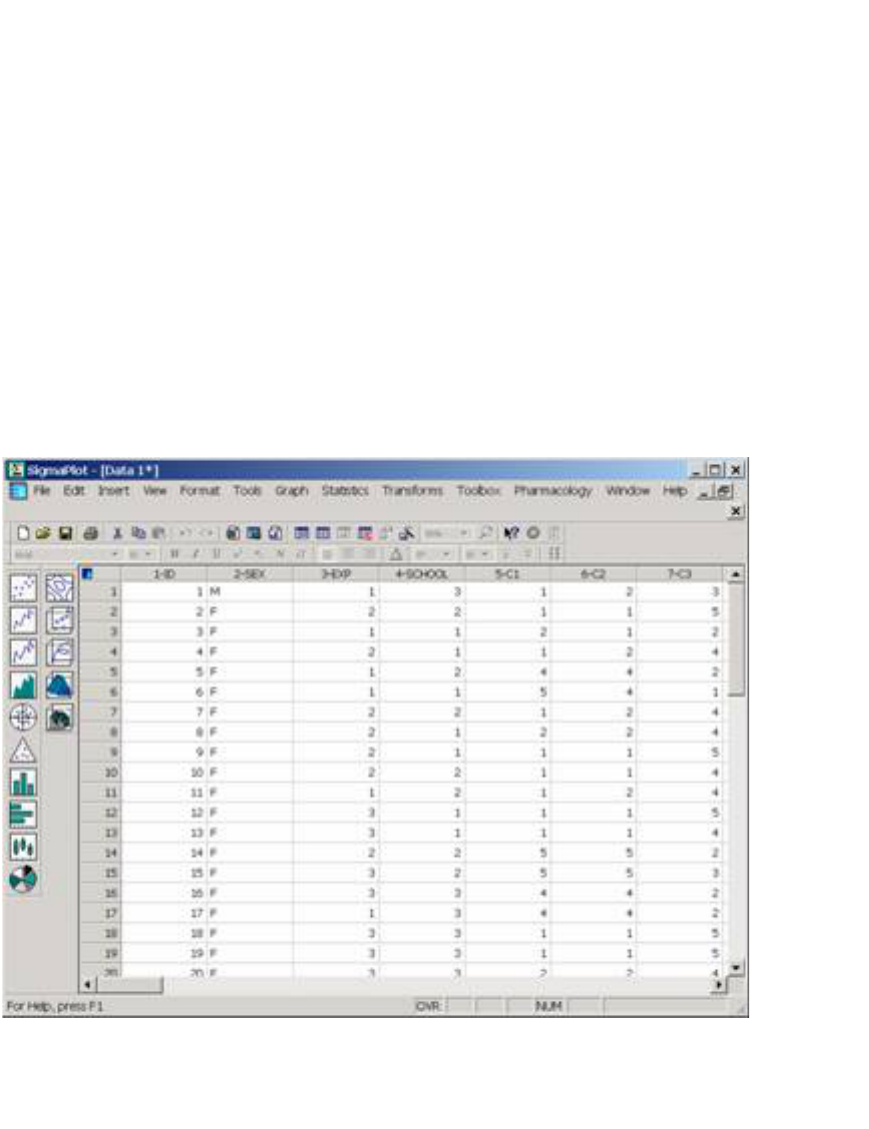
1.Shown below is the Clas.xls data imported into SigmaPlot.
2.To open the Graph Wizard, select Create Graph from Graph menu or
press F3 key. The Graph Wizard prompts you to specify a graph type.
Choose Vertical Bar Chart from the scroll down list. Then click Next.
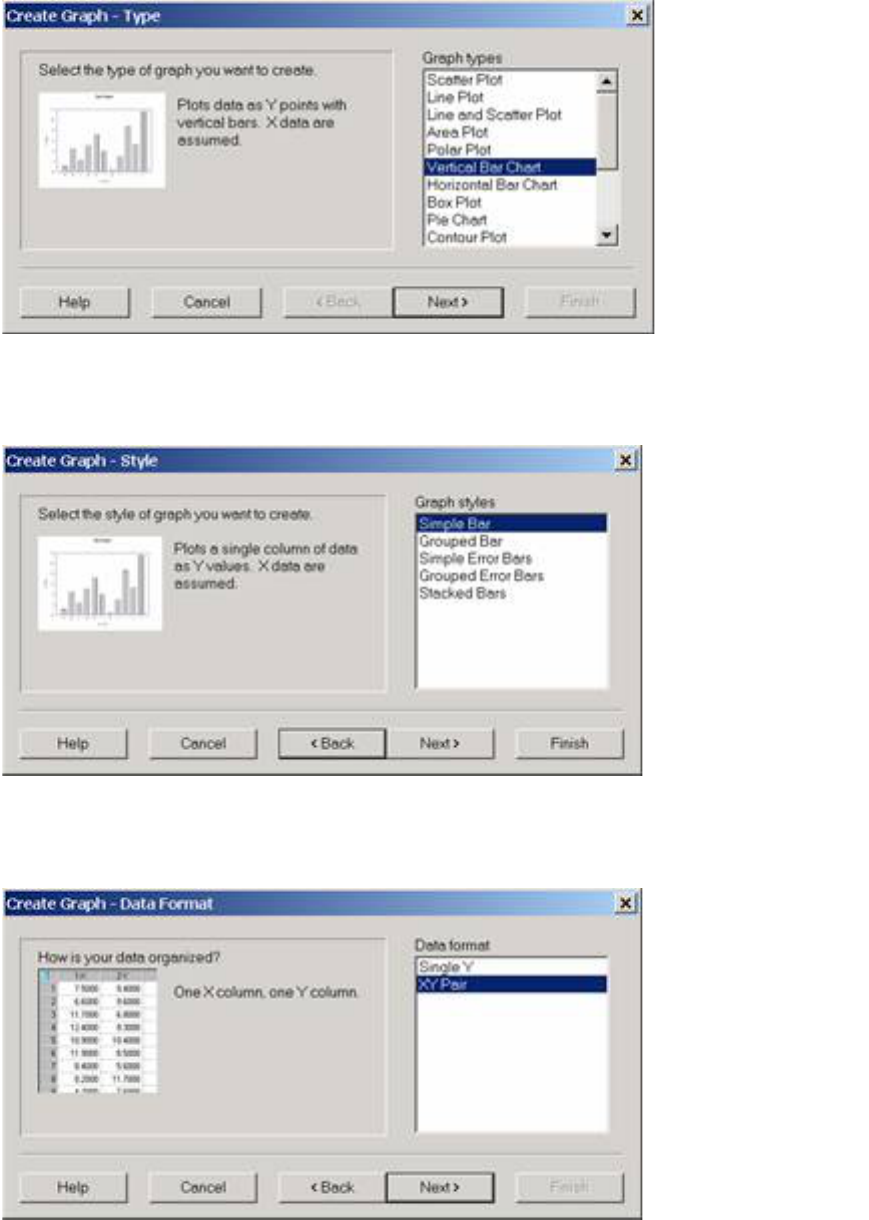
3.The Graph Wizard prompts you to specify a graph style. Choose Simple
Bar from the scroll down list. Then click Next.
4.The Graph Wizard prompts you to select a data format. Choose XY Pair from
the scroll down list. Then click Next.
5.The Graph Wizard prompts you to specify the columns of the data you want to
graph. Click the column ID in the worksheet to assign it to the X and Mathscor to
Bar. Then click Finish.
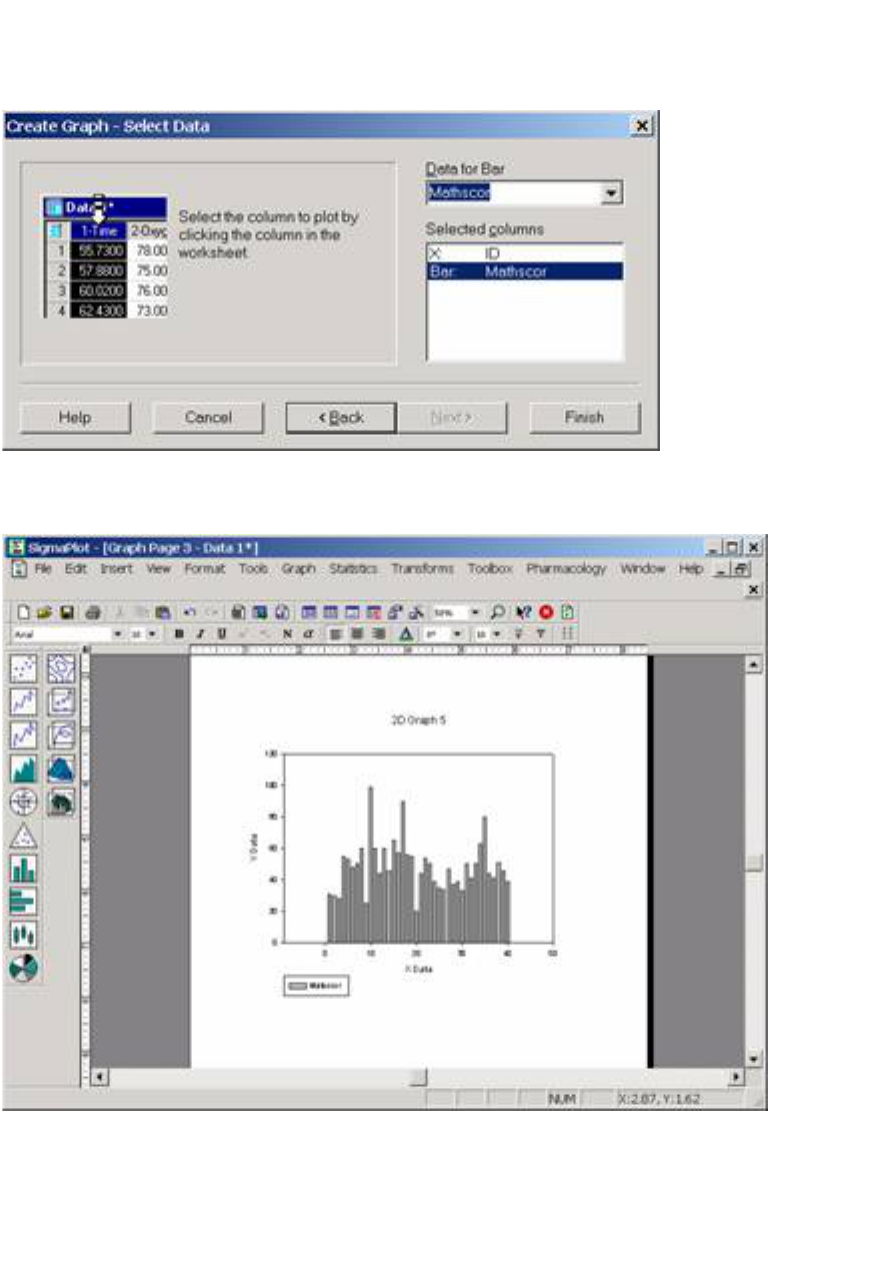
6.The bar chart generated looks like the one shown below:
Error Bars
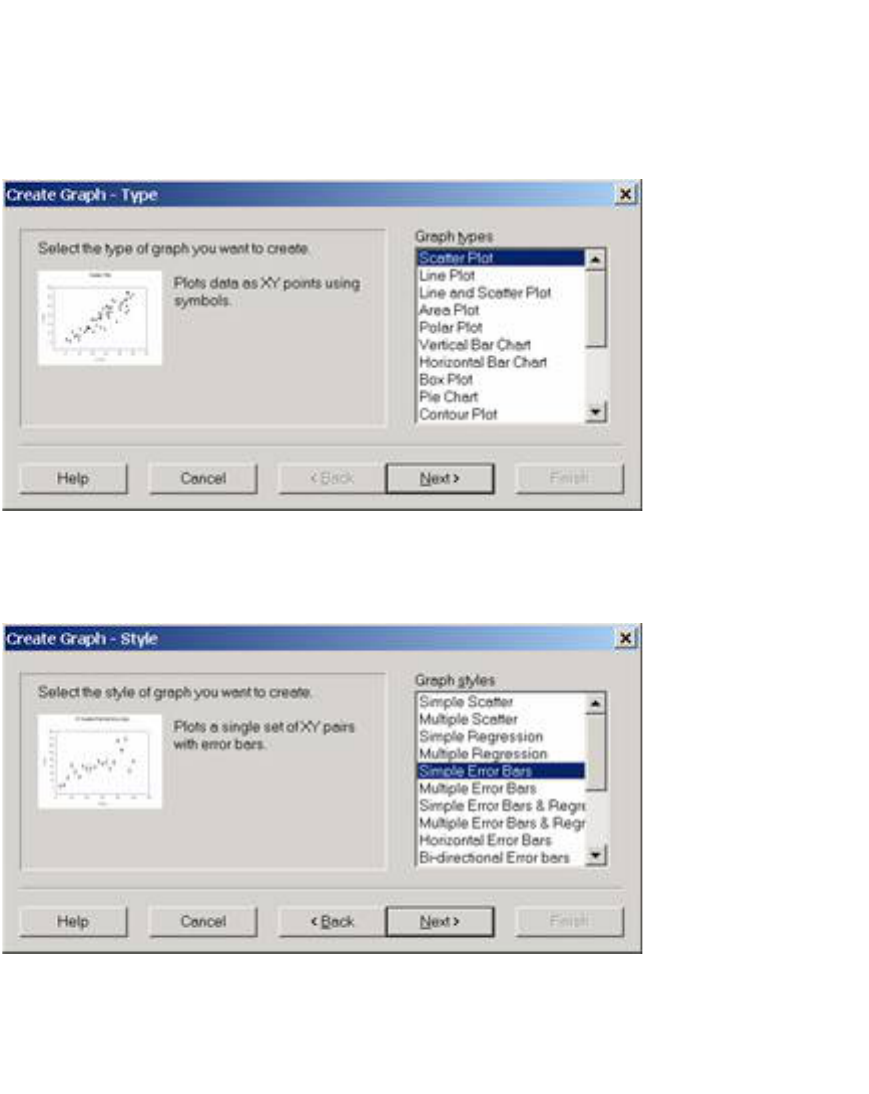
1.To open the Graph Wizard, select Create Graph from Graph menu or
press F3 key. The Graph Wizard prompts you to specify a graph type.
Choose Scatter Plot from the list of Graph Types and click Next.
2.The Graph Wizard prompts you to specify a graph style. Choose Simple Error
Bars from the list of Graph Styles and click Next.
3.The Graph Wizard prompts you to specify Symbol value and Error calculation
(upper, lower). Choose Column Means from the scroll down list as the symbol
value. Choose Standard Deviationfor both of upper and lower Error calculation.
Then click Next.
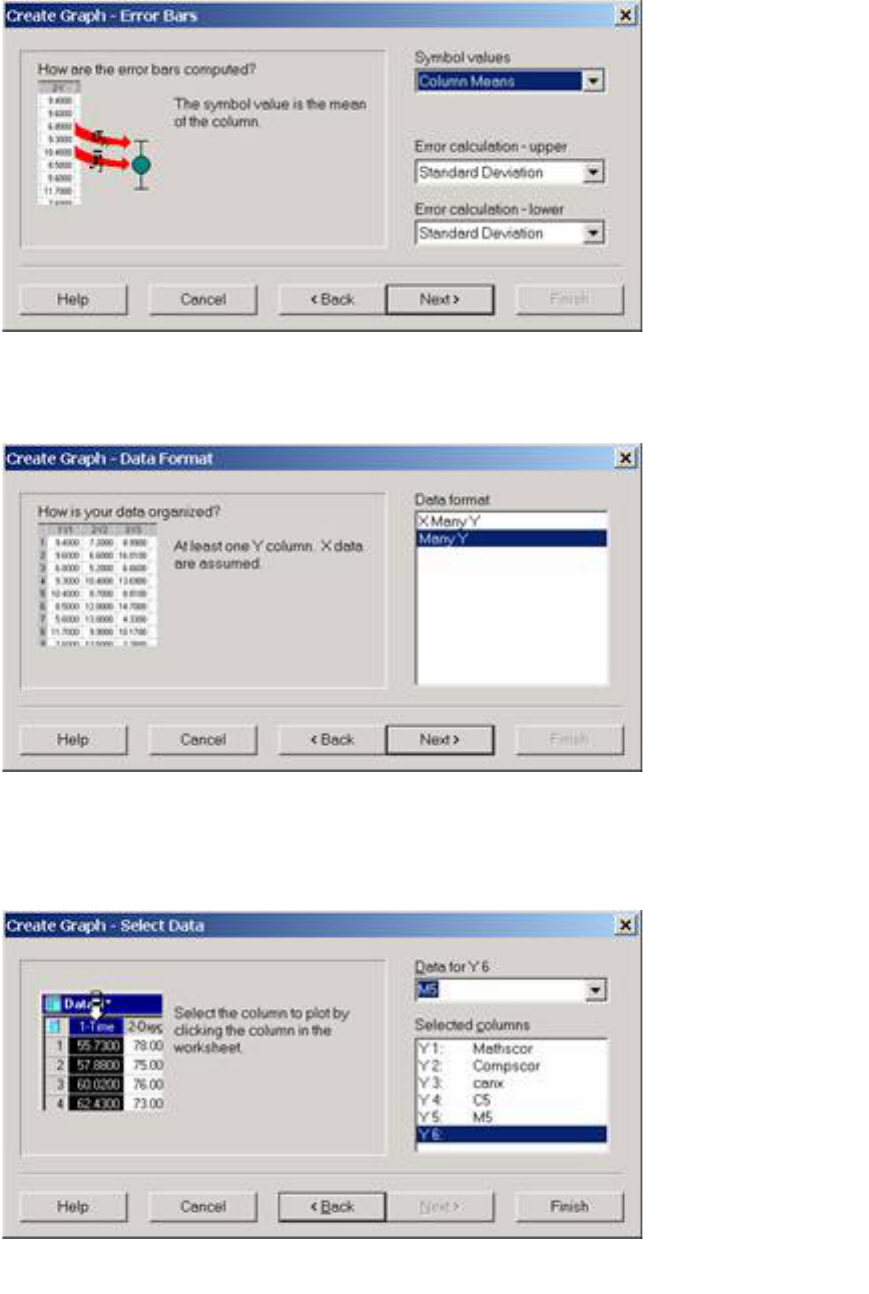
4.The Graph Wizard prompts you to select a data format. Choose Many Y and
then click Next.
5.The Graph Wizard prompts you to specify the columns of the data you want to
graph. Click the column Mathscor in the worksheet to assign it to Y1, Compscor
to Y2, canx to Y3, C5 to Y4 and M5 to Y5. Then click Finish.
6.The error bar generated looks like the one shown below:
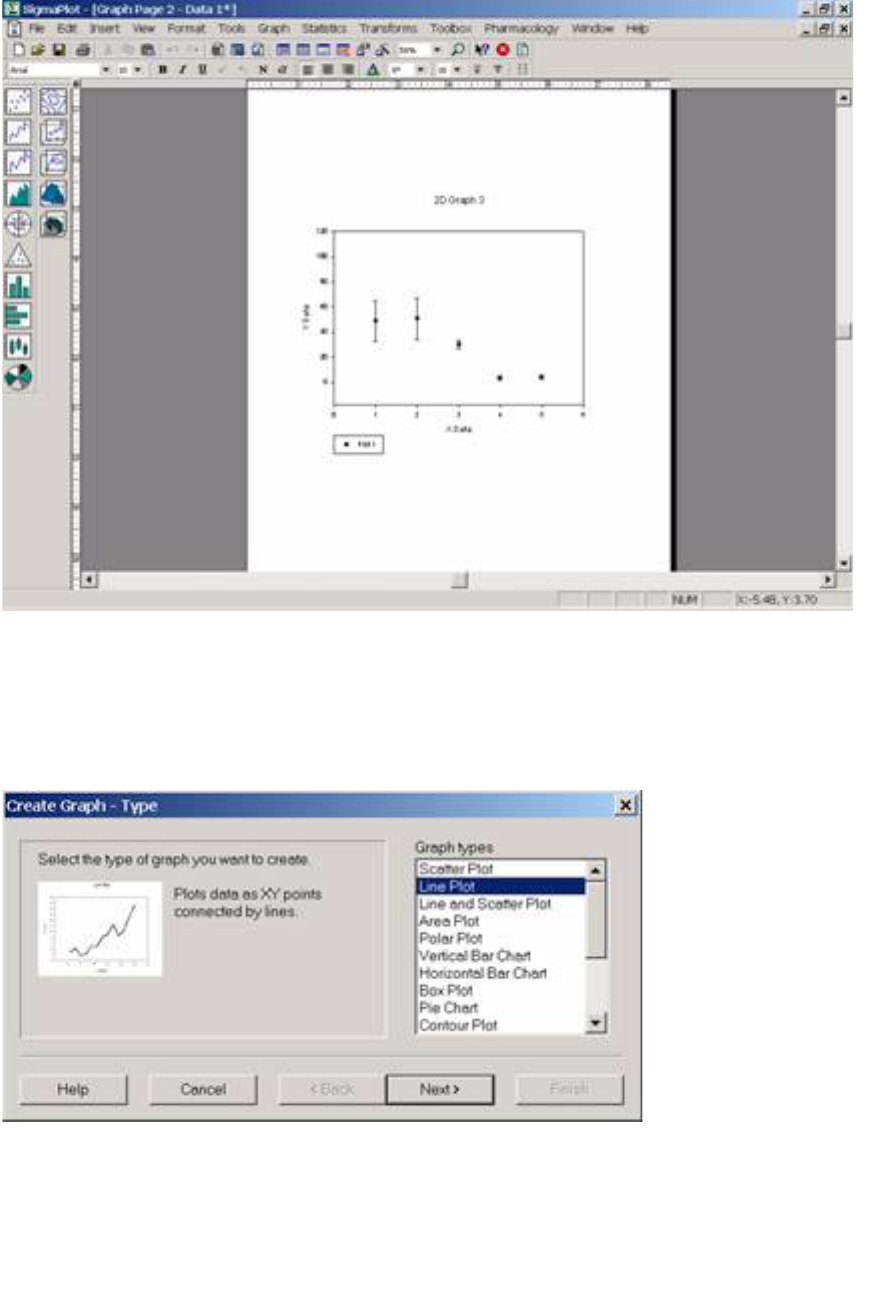
2D Line Plot
1.To open the Graph Wizard, select Create Graph from Graph menu or
press F3 key. Select Line Plot, and then click Next.

2.Select Simple Straight Line, and then click Next.
3.Select XY Pair, and then click Next.
4.Select ID on the worksheet for X, and canx for Y, then click Finish.
5.A generated 2D line plot looks like the one shown below:
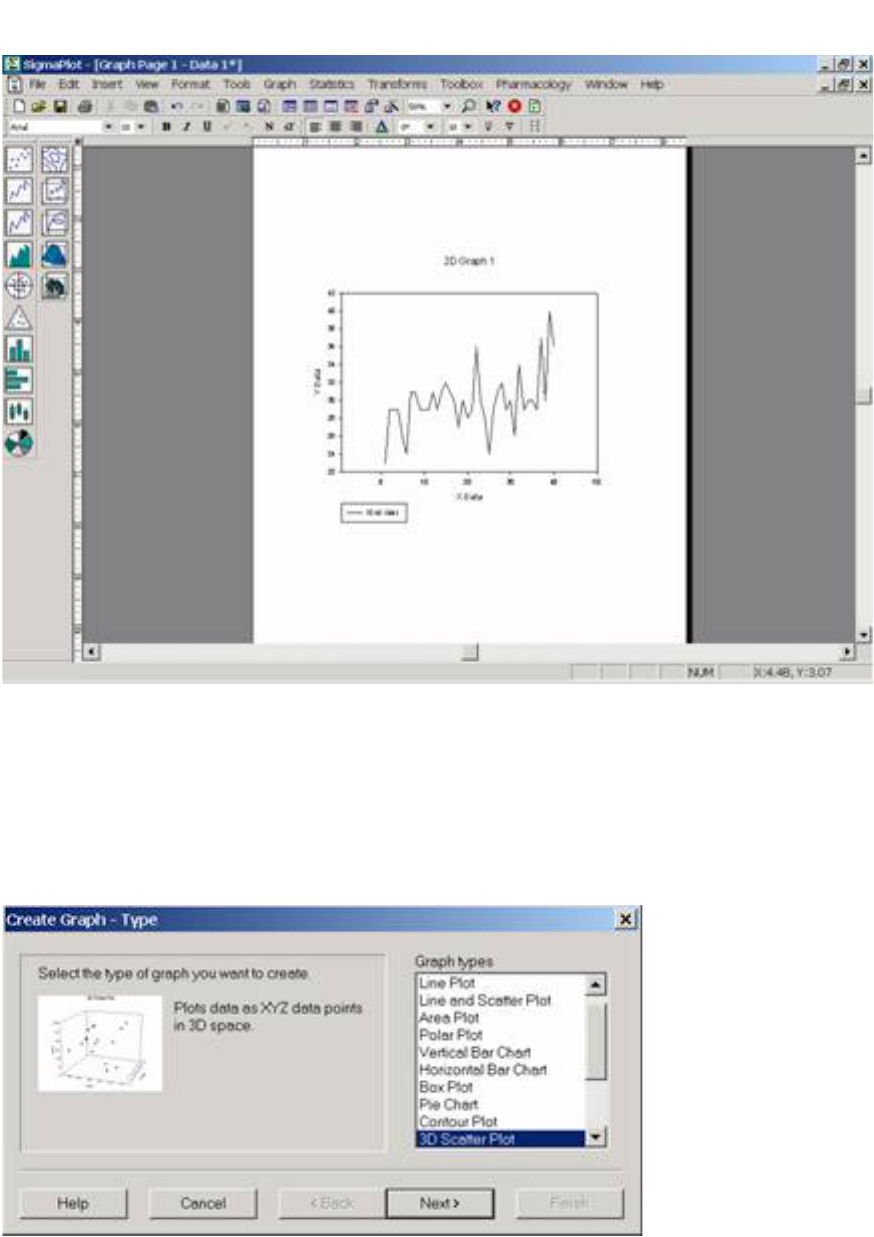
3D Scatter Plot
1.To open the Graph Wizard, select Create Graph from Graph menu or press
F3 key. The Graph Wizard prompts you to specify a graph type. Choose 3D
Scatter Plot from the list of Graph Types and click Next.
2.The Graph Wizard prompts you to select a data format. Choose XYZ
Triplet and then click Next.
3.The Graph Wizard prompts you to specify the columns of the data you want to
graph. Click the column Mathscor in the worksheet to assign it to X, Compscor to
Y and canx to Z. Then click Finish.
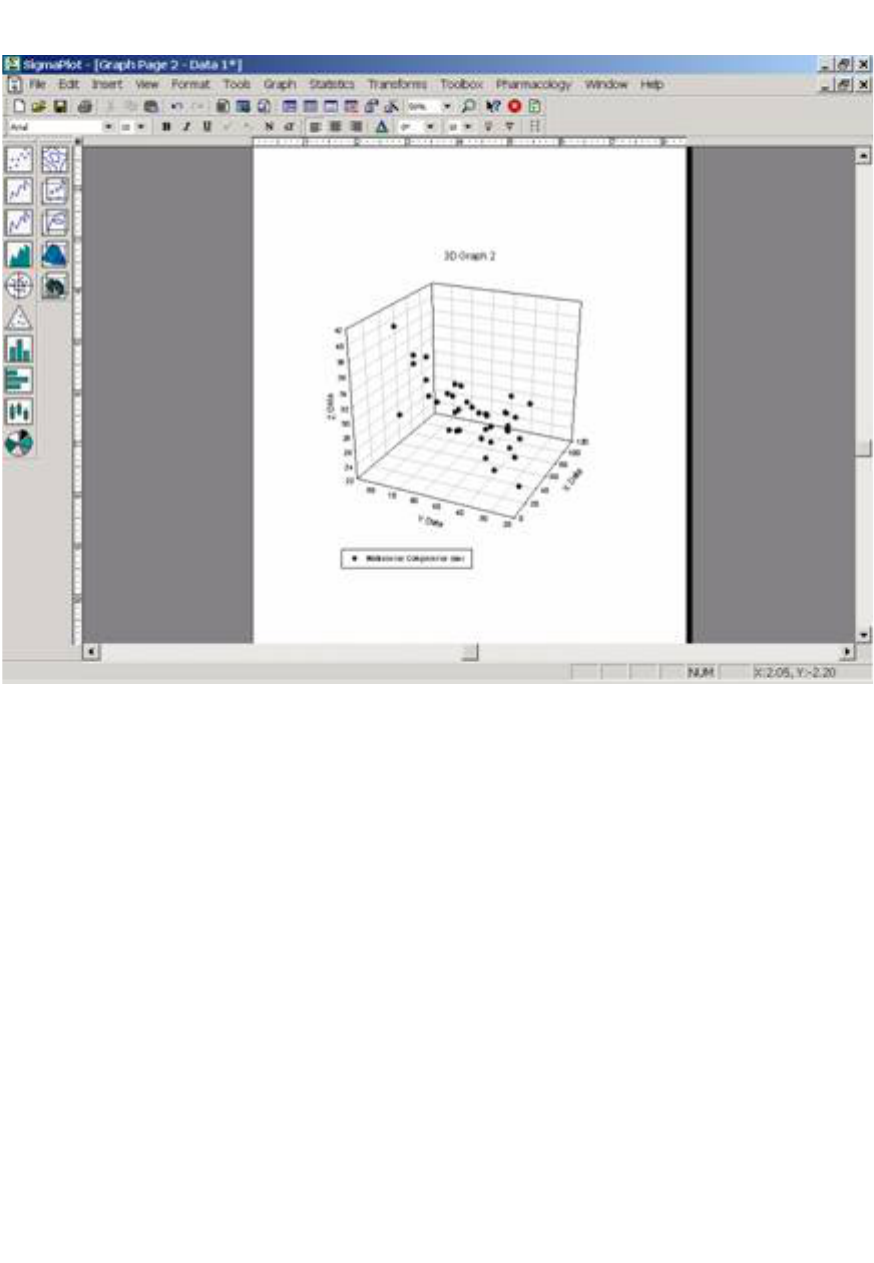
4.A generated 3D scatter plot looks like the one shown below:

Editing Graphs
From the Clas.xls data imported into SigmaPlot, (1) Select Create
Graph from Graph menu and select Scatter Plot then click Next. (2)
Select Simple Scatter then click Next. (3) Select XY Pairthen click Next. (4)
Select ID on the worksheet for X, and Mathscor for Y, then click Finish.
A 2D scatter plot generated is shown below:
Adding a Line Plot
1.Select Graph Properties from Graph menu.
2.The Graph Properties window opens. Click the Plots tab. From the scroll down
list, choose Plot1. Click Lines from the Settings for scroll down list.
Choose Solid from the Type scroll down list. Click OK.

3.A line is added into the graph like the one shown below:
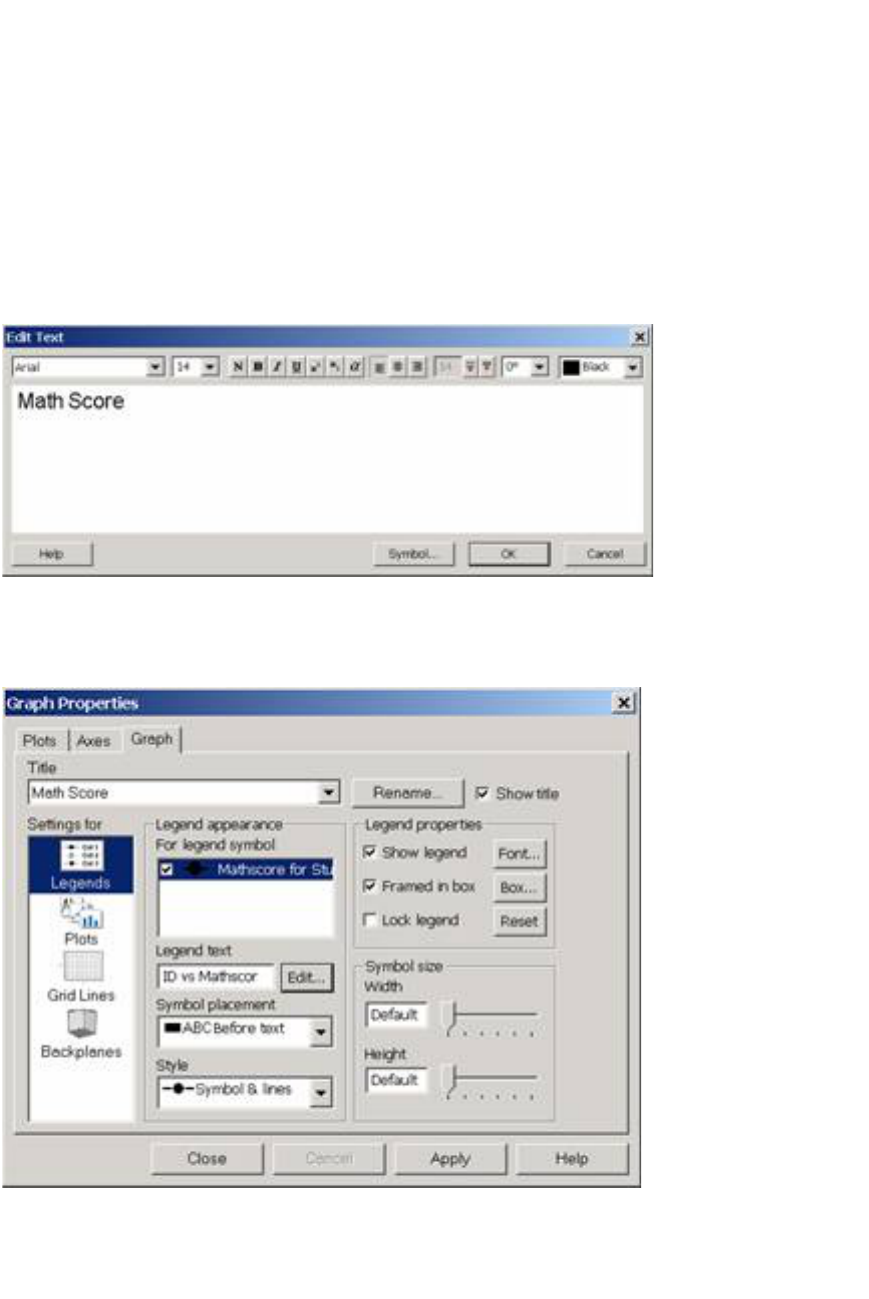
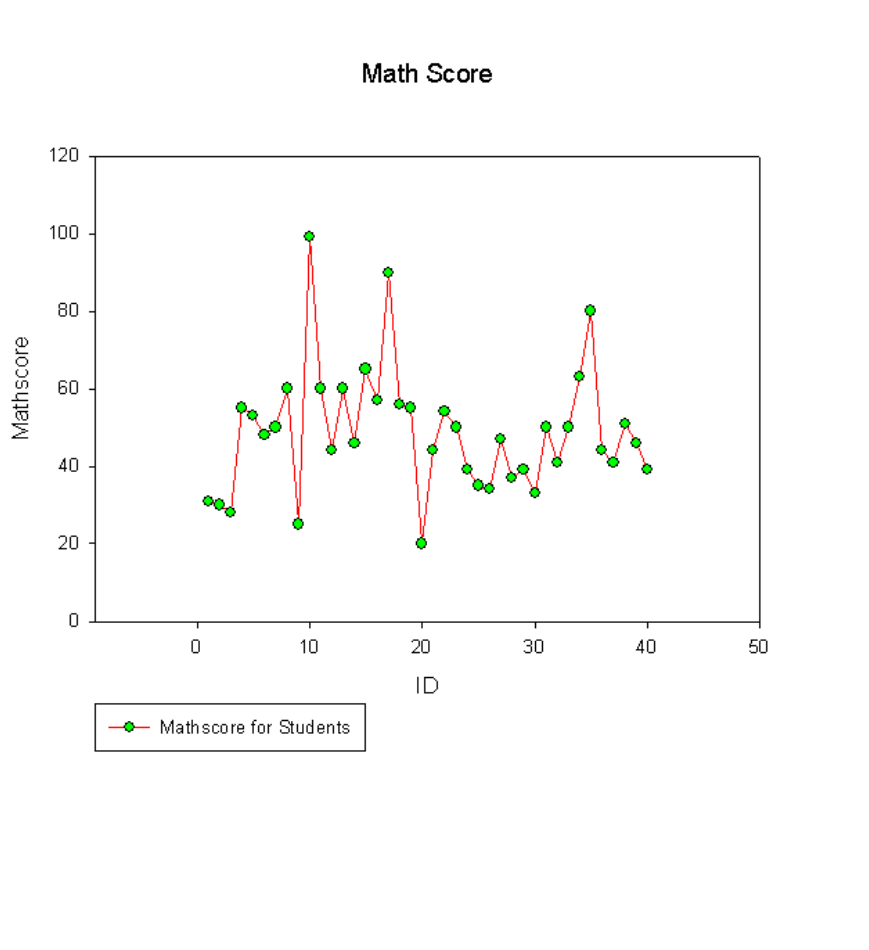
Adding a Title, Legend and Axis Titles
Most graph modifications are made using the Graph Properties dialog box. To
add a Title, Legend and Axis Titles:
1.Select Graph Properties from Graph menu.
2.The Graph Properties window opens. Click the Graph tab and then
select Plots from the Settings for scroll down list.
3.Change the Title of the graph by clicking on the Rename button and typing in
Math Score. Click OK in the Edit Text window.
4.Click Legends from the Settings for list. Click Edit to change the legend text
to Mathscore for Students. Click on Apply to apply the changes.
5.To change the axis titles, click the Axes tab. Select X data from Axis scroll
down list, then click Rename. Type the axis title ID, click OK. Rename Y data
Mathscore as a new title for Y-axis.
6.The graph looks like the one shown below:
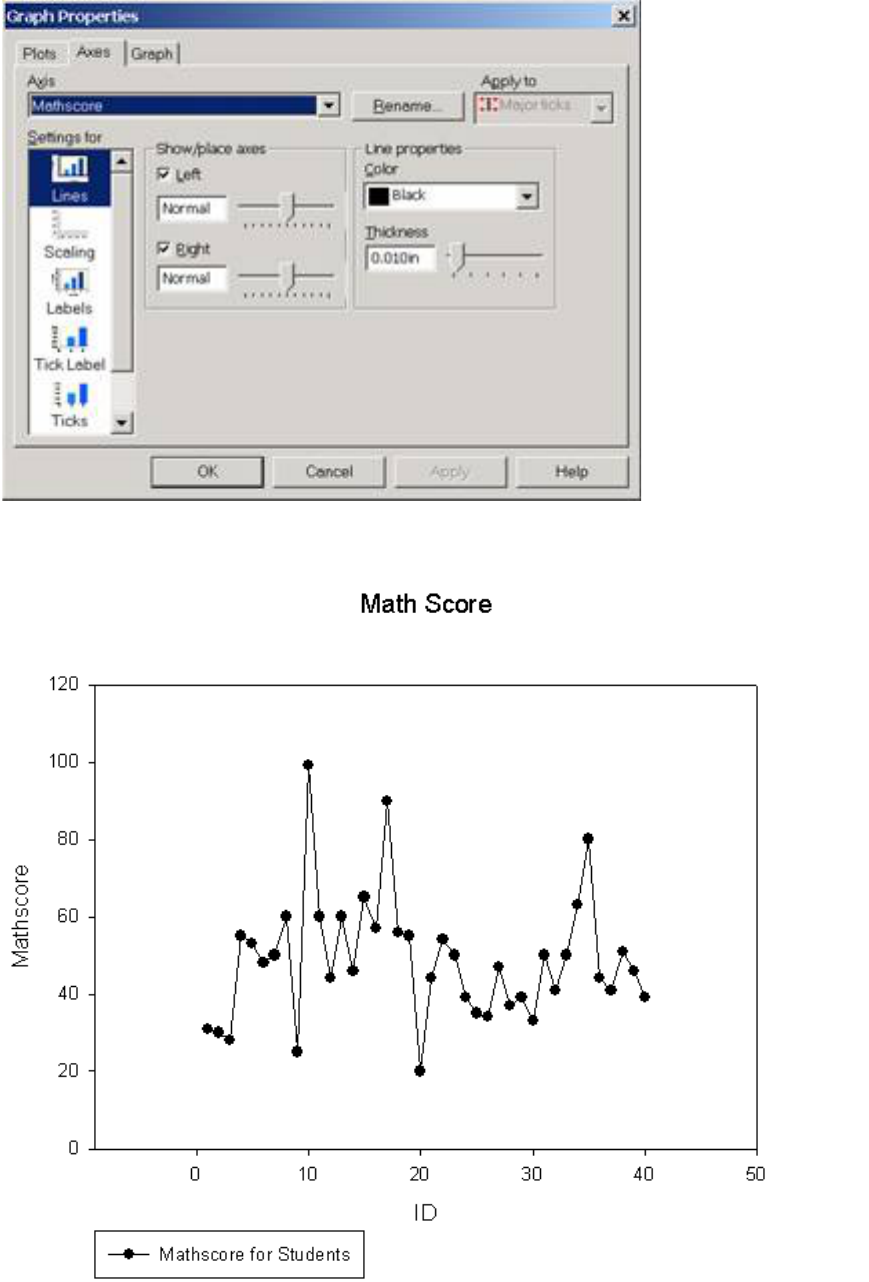
Adding / Changing Colors
Suppose you want to change the line and the symbol colors.
1.Select Graph Properties from Graph menu.
2.The Graph Properties window opens. Click the Plots tab and then
select Lines from the Settings for list. Choose Red from Line color scroll down
list. Click Apply.
3.Click Symbols from the Settings for list and choose the Green color from Fill
color scroll down list. Click Apply.
4.The graph looks like the one shown below:
Saving the Graphs
To save SigmaPlot file containing both the graph and the worksheet:
1.Select Save As from File menu.
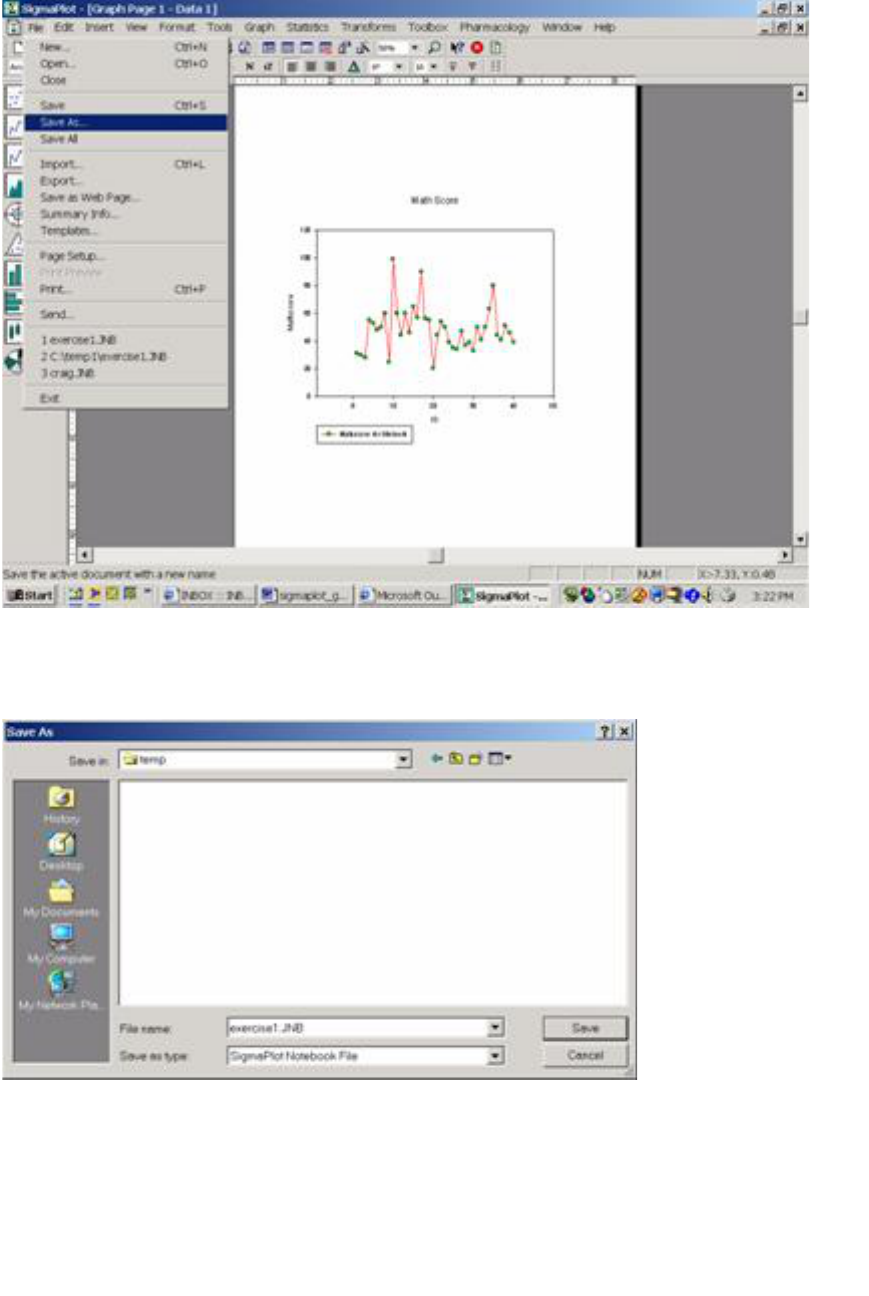
2.The Save as dialog box appears. Navigate to the directory where you want to
save your notebook (e.g. C:/temp).
3.Enter a File name for the SigmaPlot Notebook, e.g. exercise1.JNB
4.Click Save.
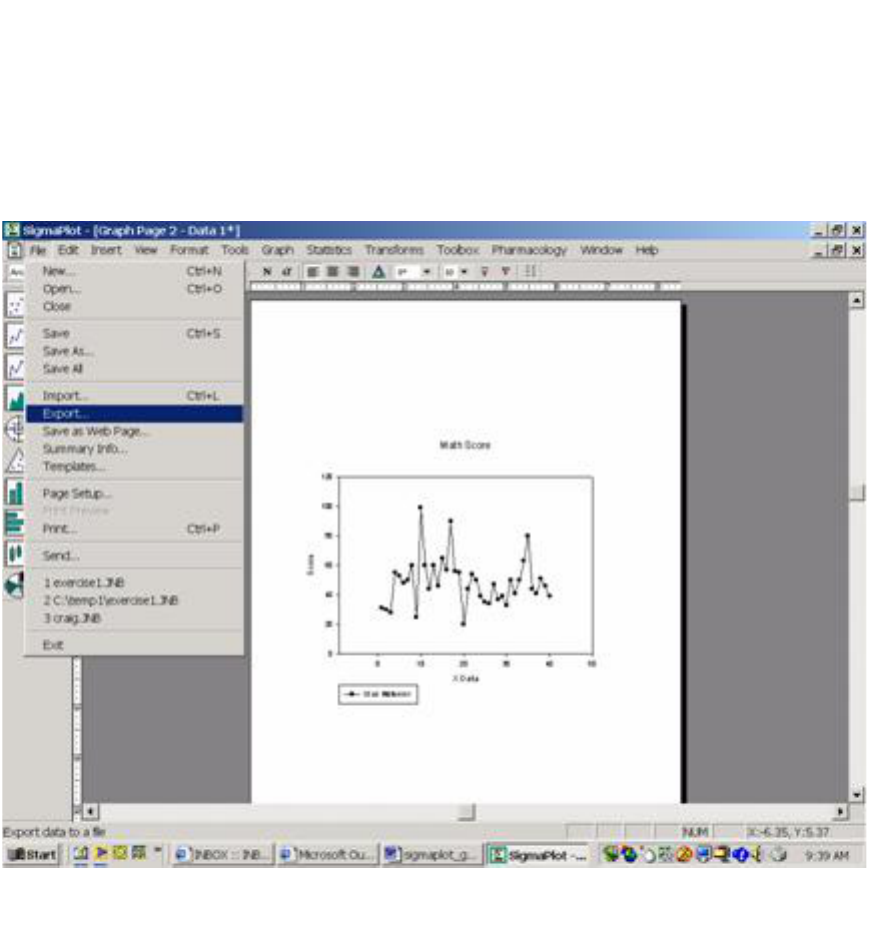
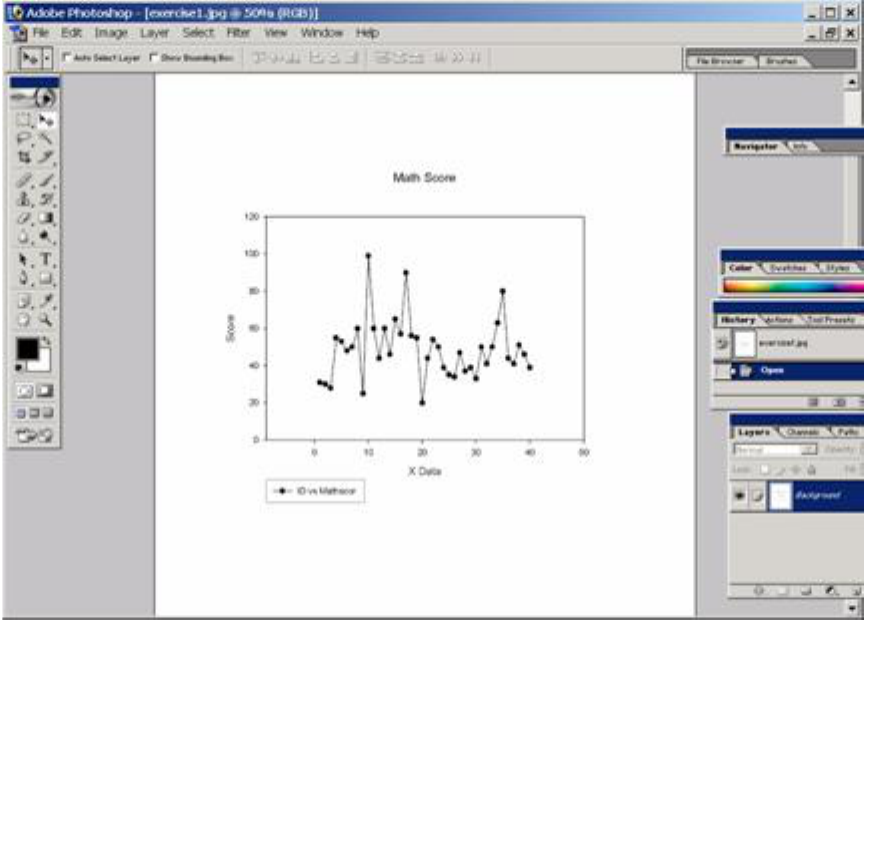
Exporting Graphs
You can export your SigmaPlot graphs (.jnb) into another format (e.g., .jpg). To
export your graphs into another format:
1. Click on the Graph Page window and then select Export from File menu.
2. Export File dialog box open, navigate to where you want to export your file,
e.g. C:/temp
3. Select the file type JPEG (*.jpg) from Save as type scroll down list.
4. Enter a file name. exercise1.jpg , then click Export.
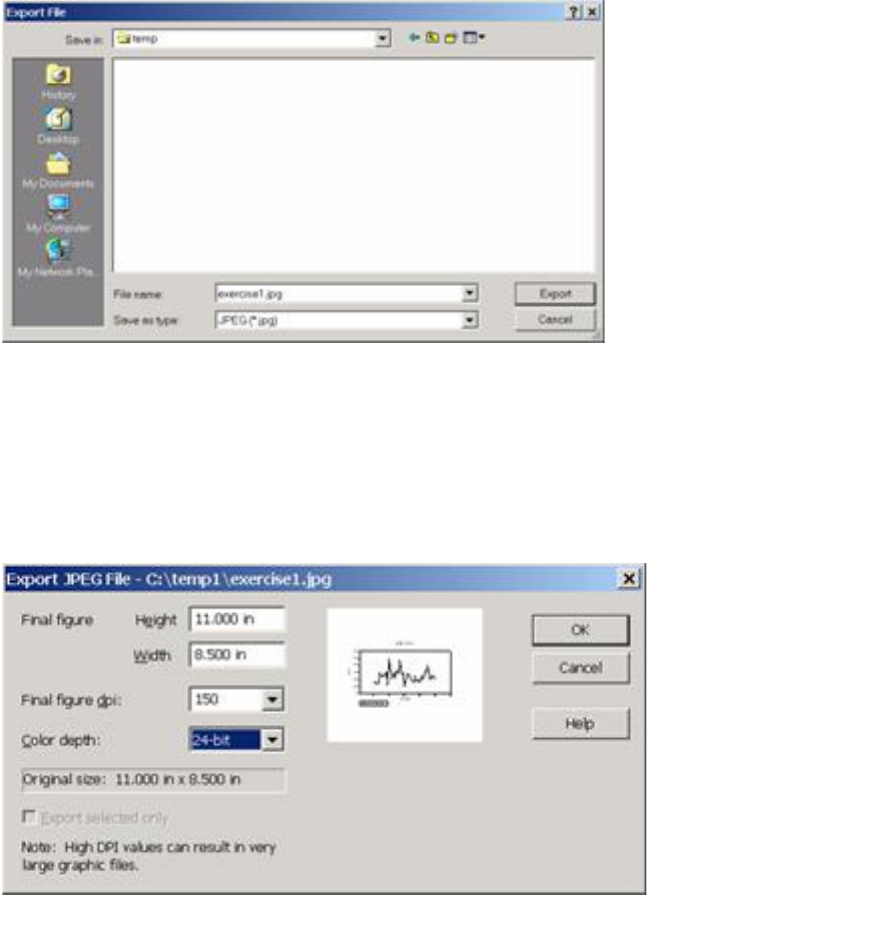
5. Export JPEG File dialog box shows up, you can edit the size of the graph, and
then click OK
.
6. The file is saved as .jpg format file and it looks like:
Publishing Graphs on the Web
To display your graphs on the web, you need to generate html web format or jpg
graphic format files.
1. Click on the Graph Page window and then select Export from File menu.
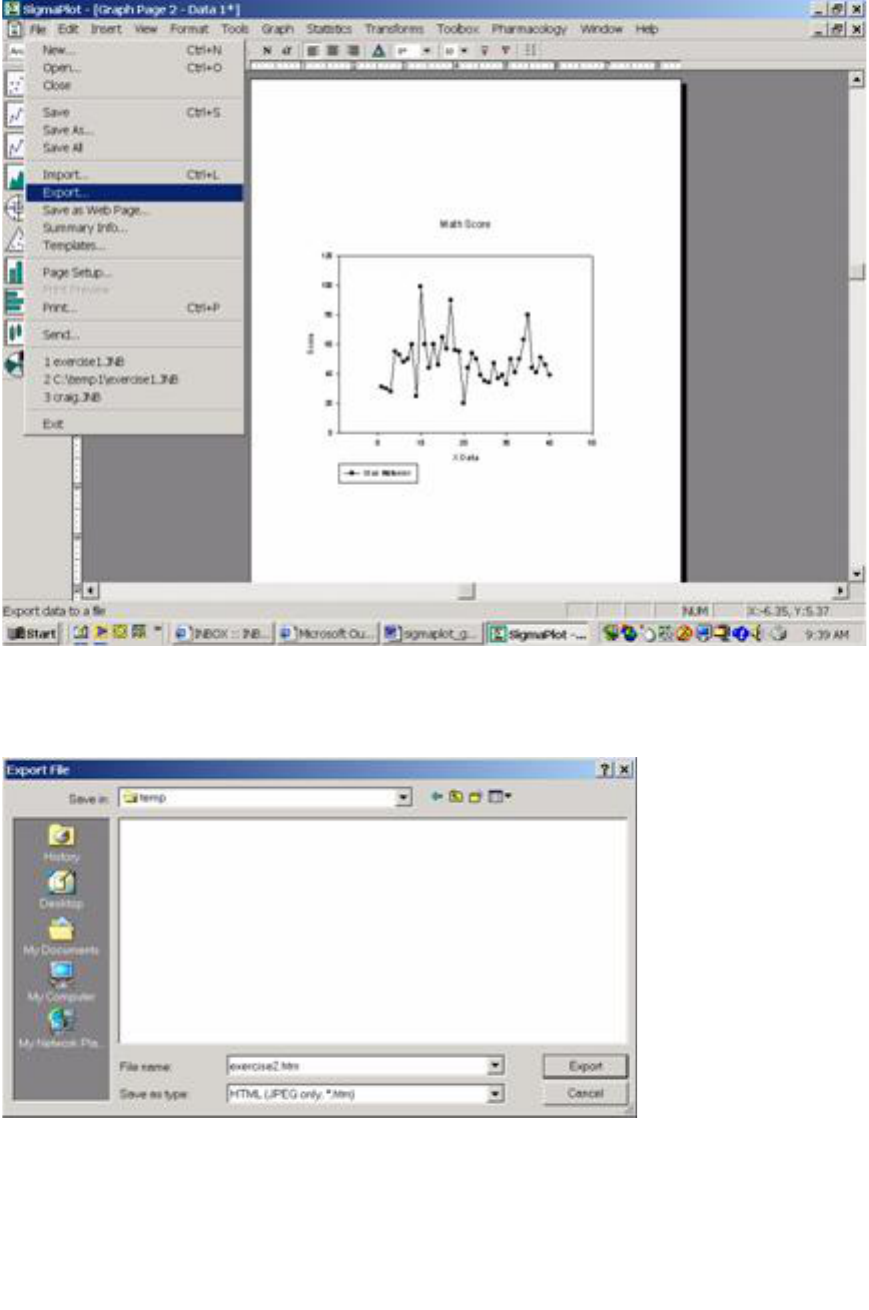
2. Export File dialog box open, navigate to where you want to export your file,
e.g. C:/temp
3. Select the file type HTML (JPEG only, *.htm) from Save as type scroll down
list.
4. Enter a file name. Exercise2.htm, then click Export.
5. Export Web Graph dialog box opens, you can edit the size of the graph, and
then click OK.

6. The file is saved as .htm format file and it looks like:
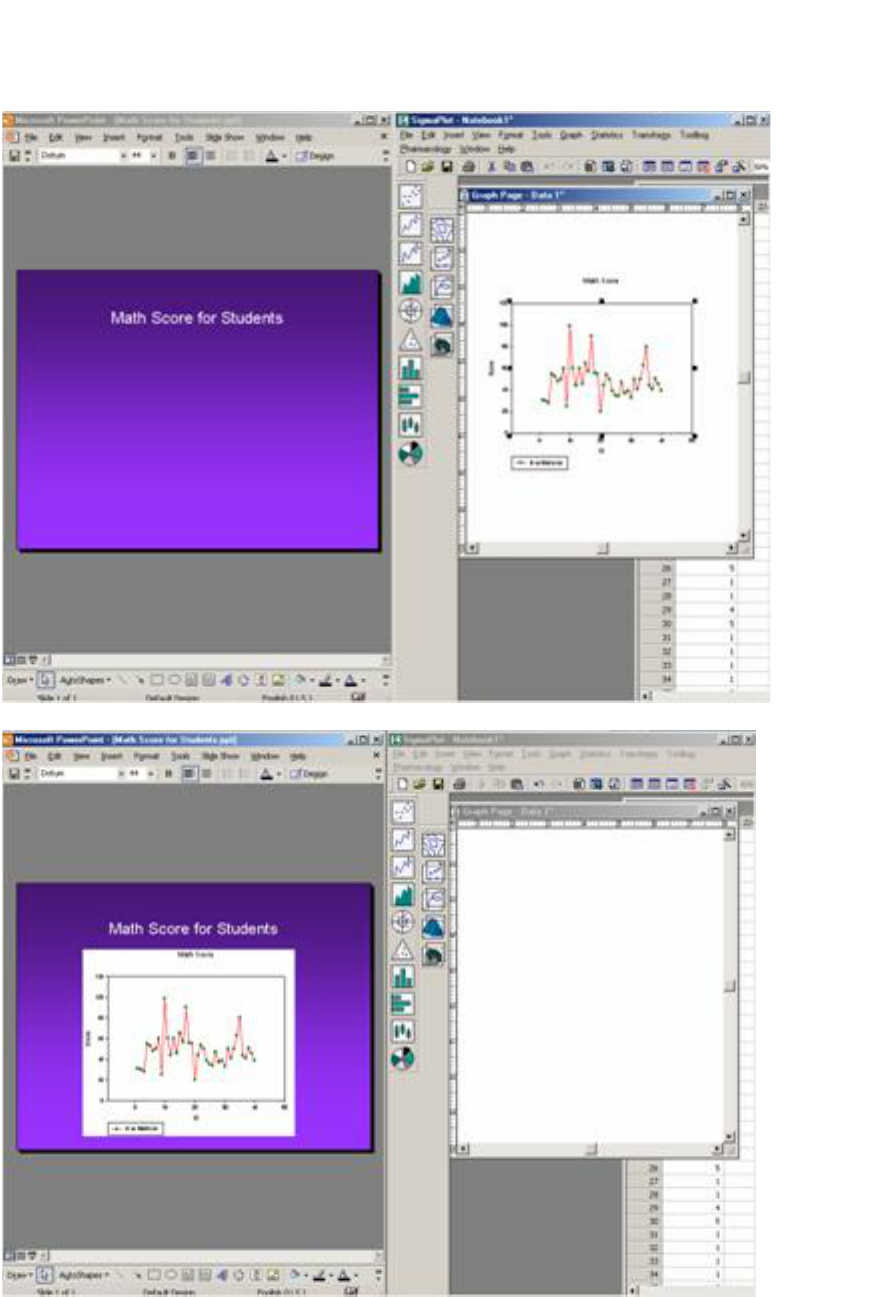
Publishing Power Point Presentation
SigmaPlot allows you to move your graphs to your PowerPoint slides by just
dragging and dropping the graphs. Within your slides, you can change text and
graph color.
1. Suppose you have a PowerPoint slide as follows:
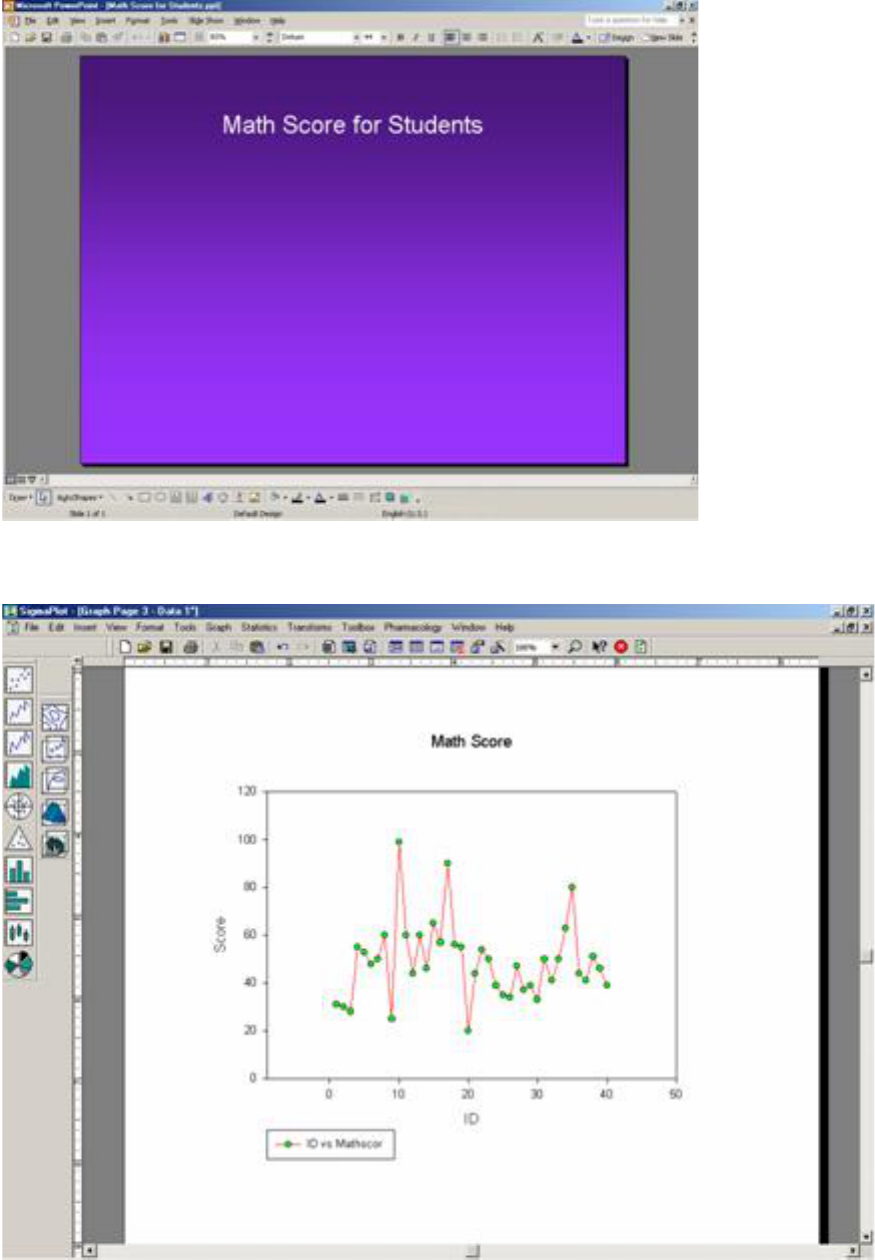
2. The graph (*1) which you want to export from SigmaPlot looks like this:
(*1) The graph above is from the previous section, Editing Graphs.
3. Point and click the graph, and drag and drop it on the PowerPoint
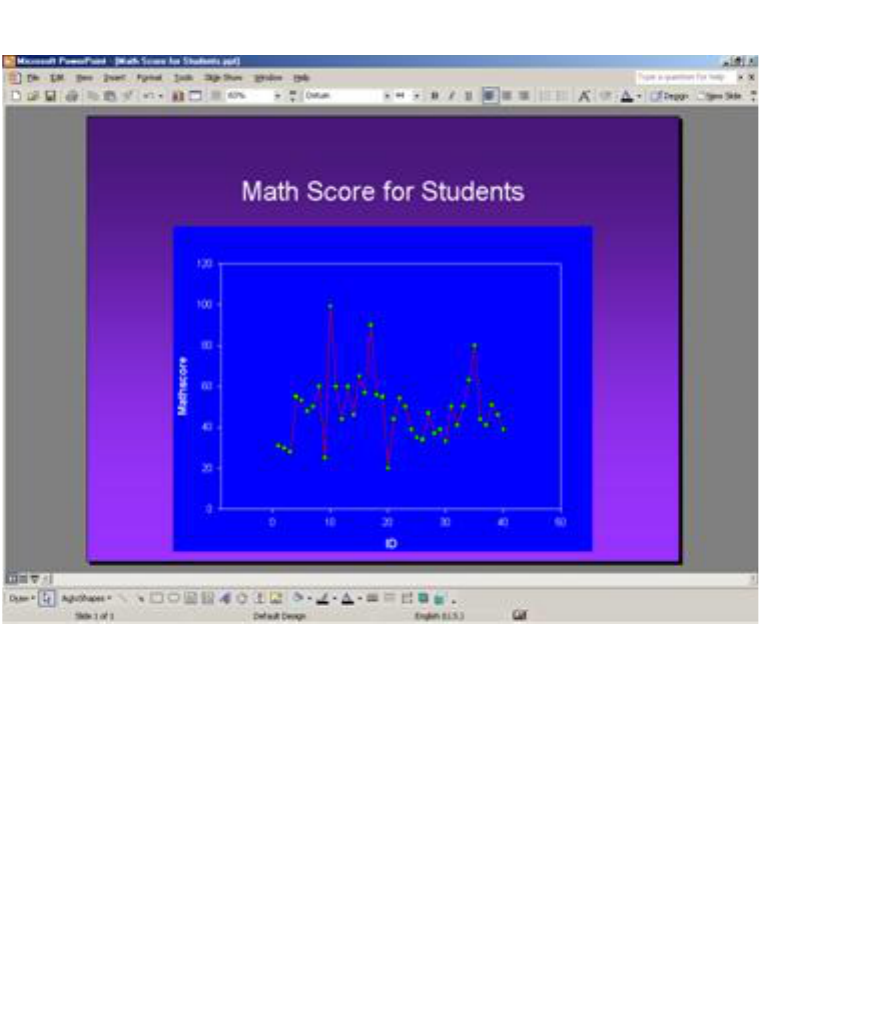
4. Within the PowerPoint slide, you can edit the graph just like other image files:
Getting Help and Further Reading
When you select Help on the top menu and then select Contents and Index,
you will see that SigmaPlot uses the standard Windows help system. There are
three tabs and only one may be selected at any one time. These are:
Contents: This opens a table of contents where you can browse various topics.
Index: This allows you to see a list of index entries. You can either type a subject
or scroll through the list.
Search: This allows you to search a particular topic or the entire Help file for a
particular word or phrase.
The material covered in this document illustrates some of the basic features of
SigmaPlot for Windows. Examining additional features of SigmaPlot for Windows
is beyond the scope of this document. For further help, refer to SigmaPlot for
Windows documents. If you need assistance in using SigmaPlot for Windows
contact the UITS Stat/Math Center.
The basic documents for SigmaPlot for Windows are:
• User's Guide
• Programming Guide
SigmaPlot PDF documents are also available online. Hardcopy documents may
be purchased through any local bookstore, or directly ordered from Systat
Software, Inc. Those who wish to contact Systat Software, Inc. directly for
general information on SigmaPlot may call (800) 797-7401 or email
