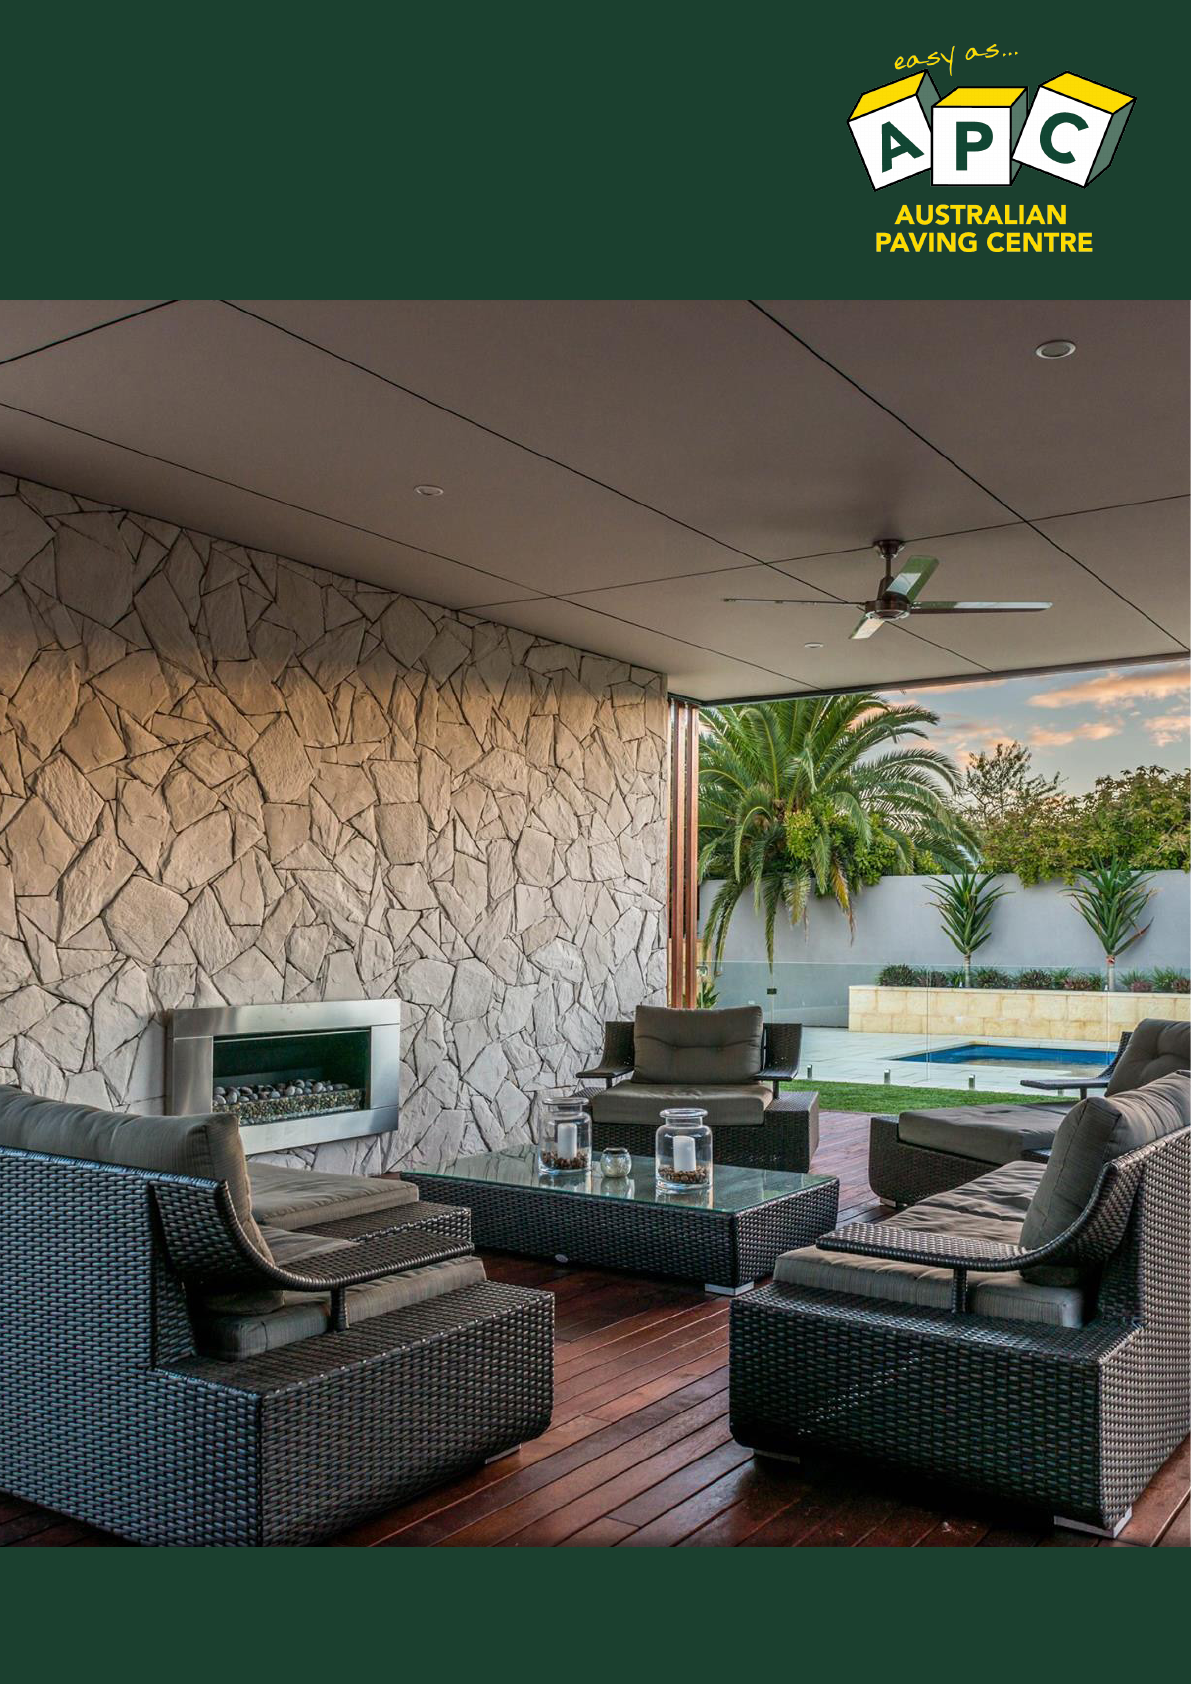
Arctic Stone | Limestone
1800 191 131
australianpaving.com.au
VENEER STONE
INSTALLATION GUIDE
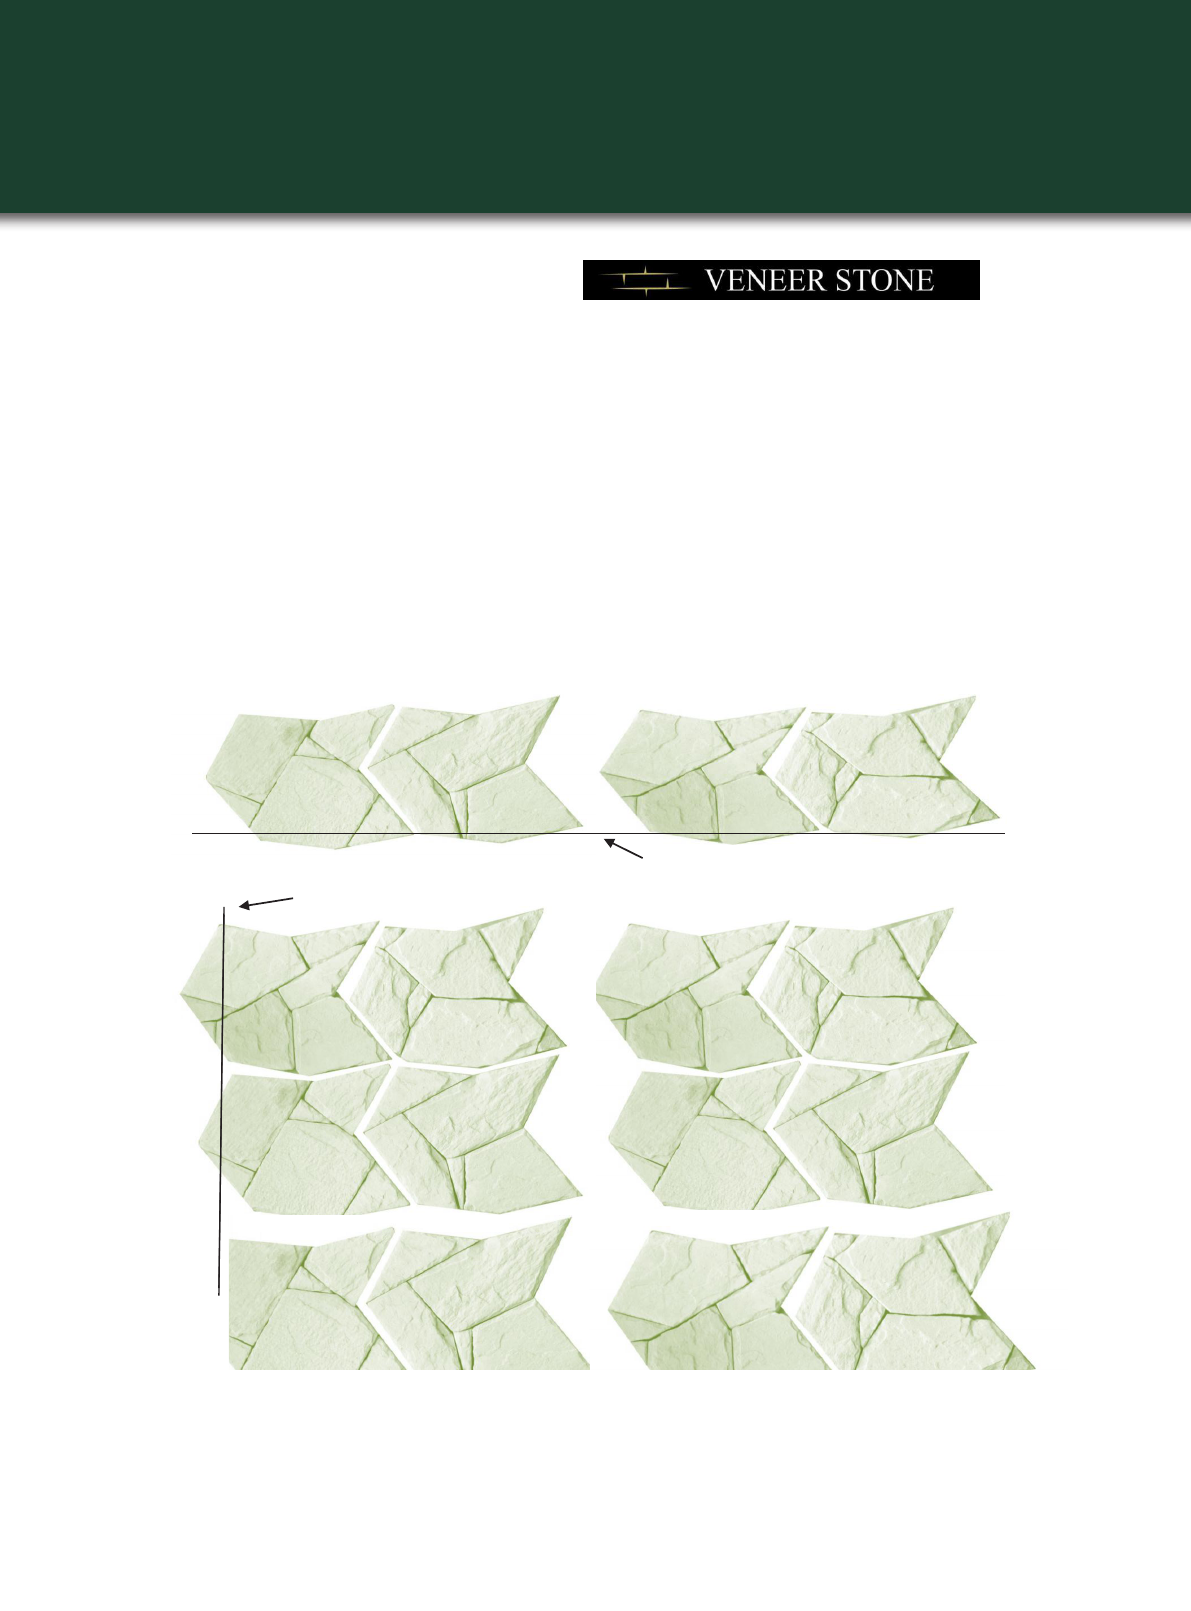
ARCTIC INSTALLATION TIPS
To retain the original fresh quarried look we suggest sealing the stone. If you would like the stone to
mellow slightly and gain the European look after years of harsh weathering don't seal the product.
For more information visit our website at www.veneerstone.com.au or call 1300 984 572
STEP 1:
Dry joint installation tip: If installing with dry joints please ensure either the wall or adhesive are a dark colour before starting.
This can be done by purchasing a dark tile adhesive or tinting mortar with black oxide. This will help cast a shadow between
stones giving a solid dry stone look. The pattern will not line up to the millimetre, you will need off cuts and thin cut stones to
fill the voids between the stone once the pattern has been laid.
Individual stones are held together with flexible webbing. Please specify if webbing isn’t required when placing order
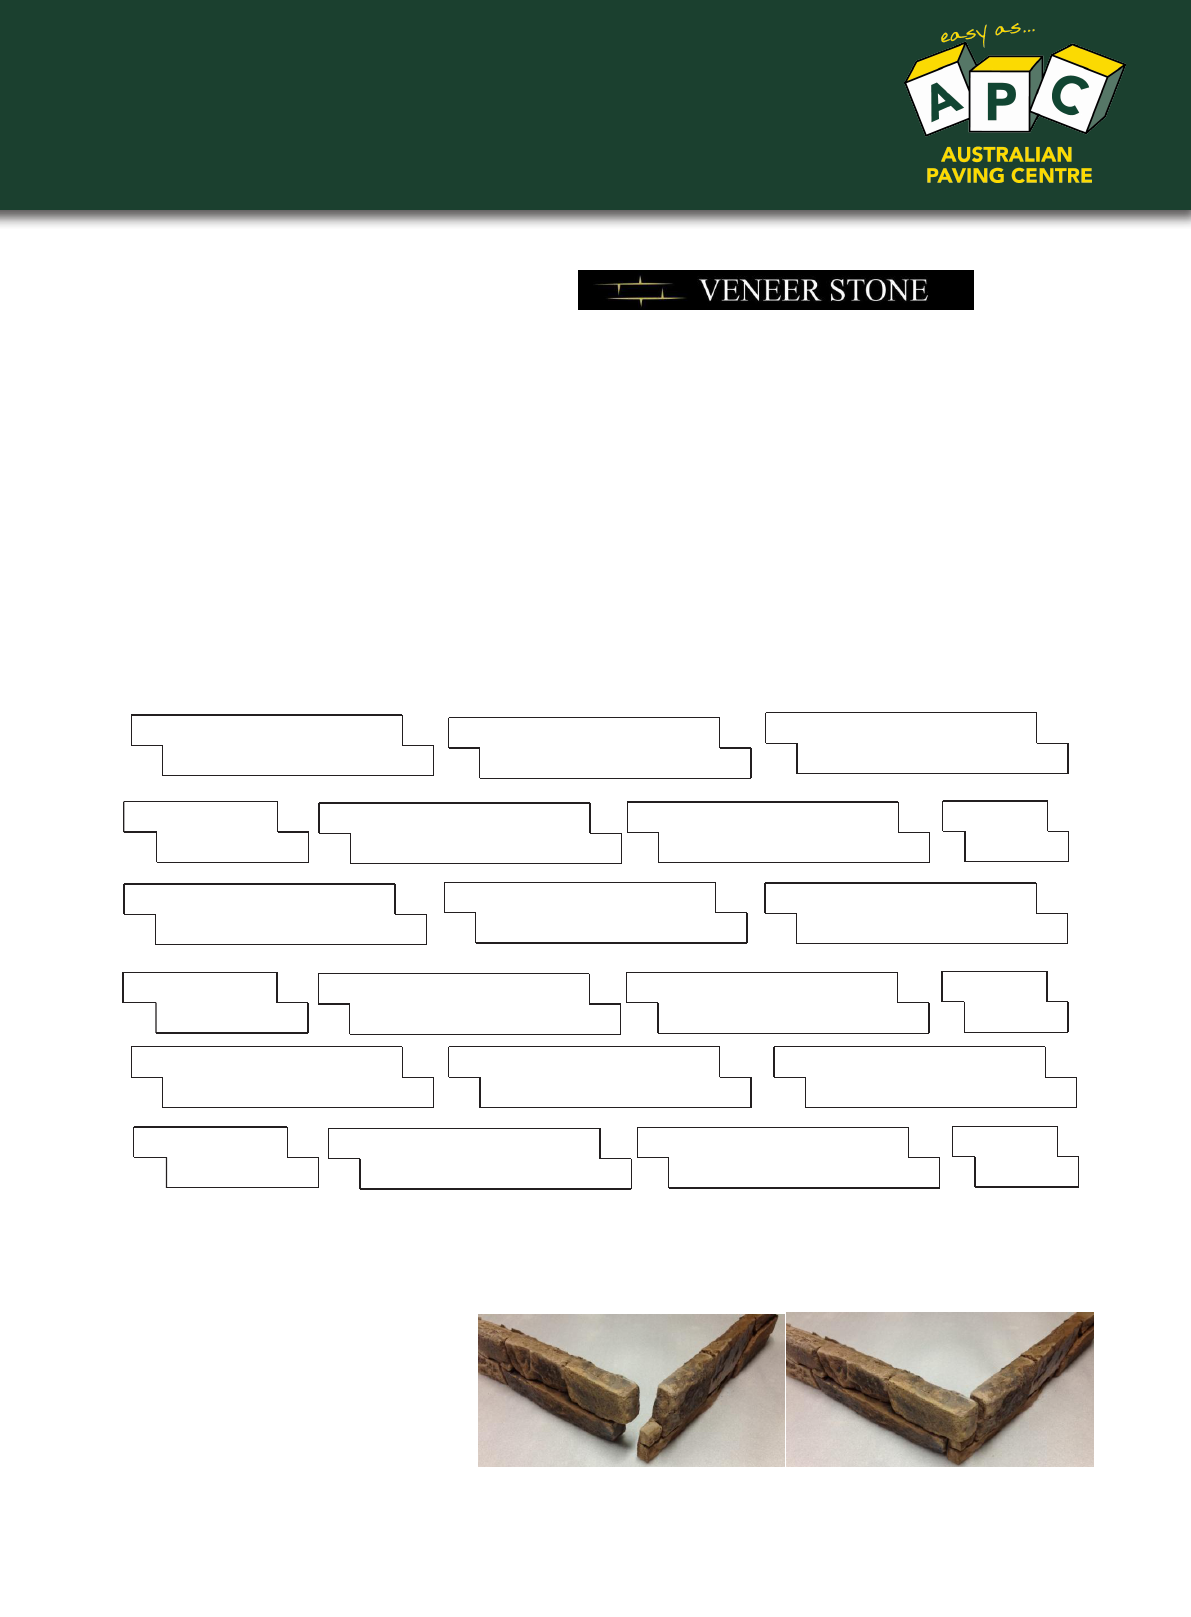
If your application requires corners, apply these first alternating the long & short return in opposite directions
Cut or trim stones using a wet saw or angle grinder with a diamond blade attached.
Lay 1st layer of product at the base of wall in packaged re-occurring pattern.
Draw a straight line across the 1st layer of stones then cut
Apply cut stone to wall in packaged re-occurring pattern.
Trim sides as installing further up the wall
STEP 2:
STEP 3:
Cut along lowest point to begin installing with a flat base
Dry joint:
Take time once the pattern is laid to cut thin stones to fill small gaps between the larger joints. This is very
important, it will break up the pattern and provide the perfect hand crafted stone masonry look
Mortar joint: Pointing mortar or tile grout can be used to fill the joints. One of the easiest & fastest ways to fill the
joints is with a piping bag. Purchase your silicon piping bag from Veneer Stone by calling 1300984572 or email
[email protected]om.au
Joint Width;
The Arctic collection has been designed to be installed with either a dry joint or an 8-12mm mortar/grout joint.
When applying the stones use timber or plastic dowels/wedges to keep the joints evenly spaced. Due to the nature of the
product stones will vary in size and may need extra wedges to allow for height variation.
ARCTIC STONE INSTALLATION TIPS
2
3
DRESSED EDGE INSTALLATION TIPS
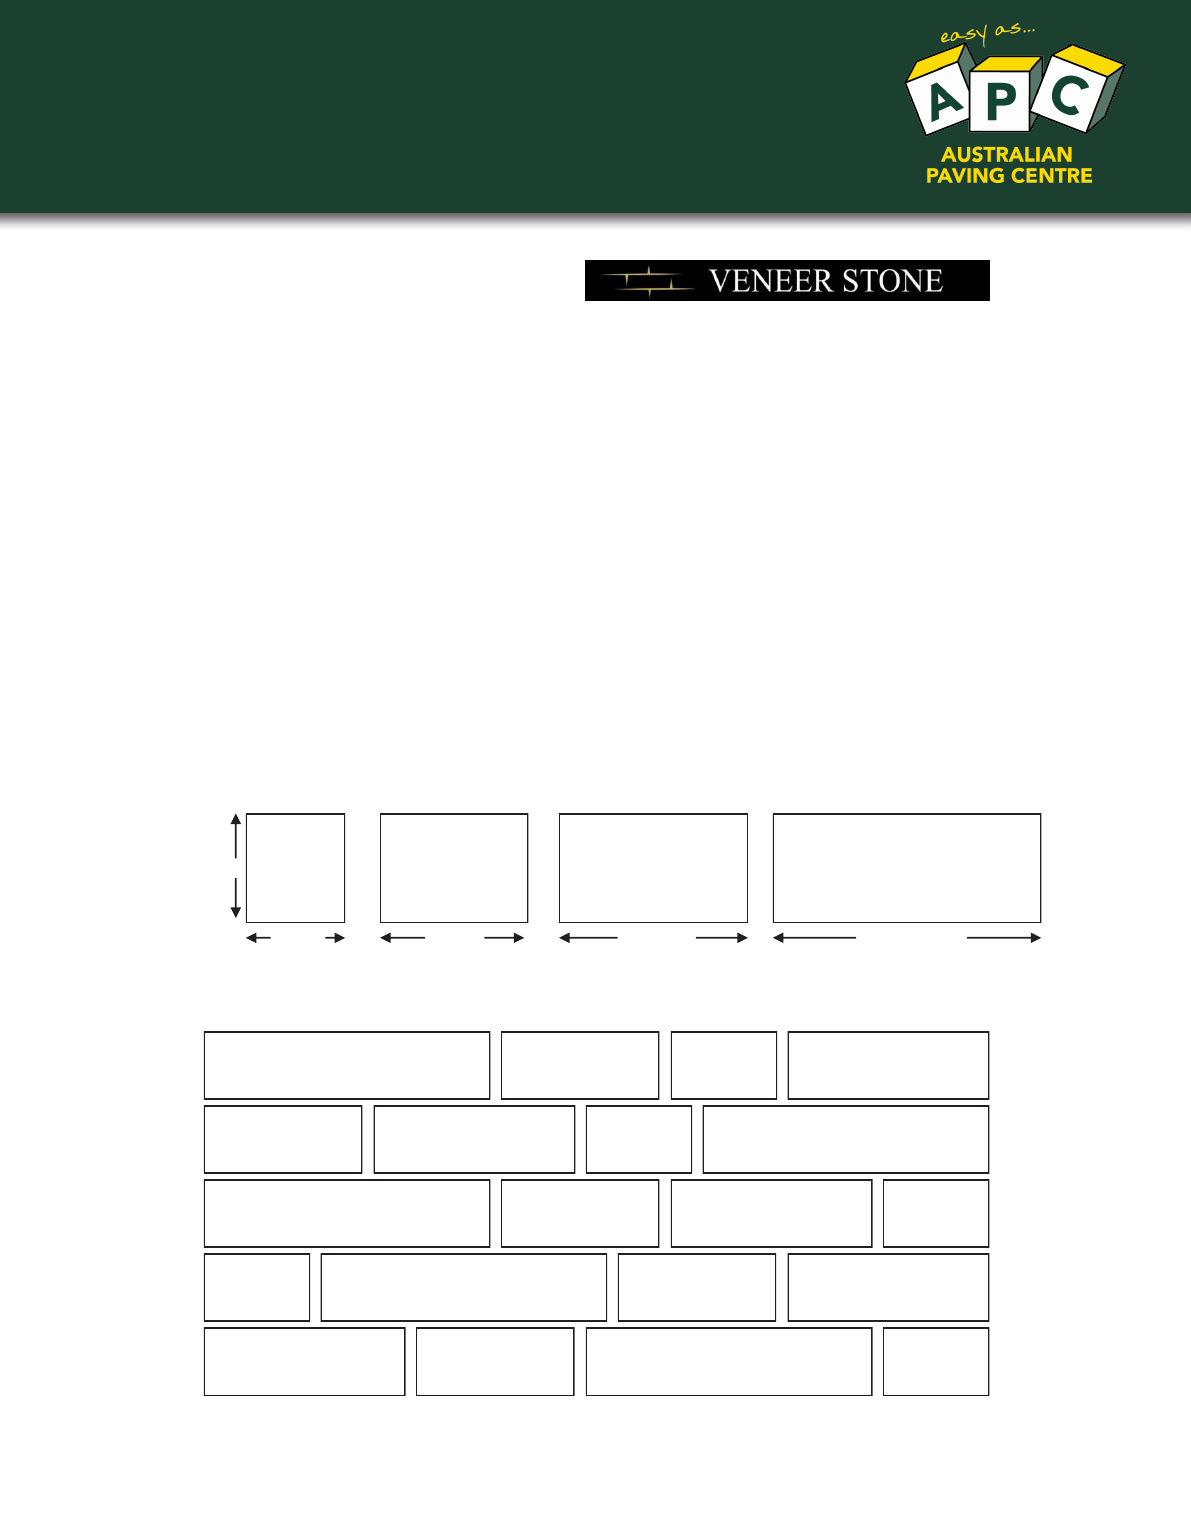
DRESSED EDGE (Stretcher Bond)
To retain the original fresh quarried look we suggest sealing the stone. If you would like the stone to
mellow slightly and gain the European look after years of harsh weathering don't seal the product.
For more information visit our website at www.veneerstone.com.au or call 1300 984 572
Sample Installation pattern – like brick work, avoid straight vertical lines when applying the stone
Joint Width;
The Dressed Edge collection has been designed to be installed with a 8-12mm mortar/grout joint. When
applying the stones use timber or plastic dowels/wedges to keep the joints evenly spaced. Due to the nature of the product
stones will vary in size and may need extra wedges to allow for height variation. An attractive look can be achieved by dry
stacking the product, If dry stacking it is important to cut stones that vary in height to allow a tight, level fit.
Installation tips;
If your application requires corners, apply these first.
After corner pieces have been applied, apply the bodies 1 layer at a time, working towards the edge.
Colour, size and texture variation is an essential aspect of a natural looking stone wall. Select stone from different
boxes and lay out across your job site to ensure you gain this look. The visual effect will be enhanced by an overall
natural mixed presentation.
The Dressed Edge collection can be cut or trimmed using a wet saw, angle grinder with diamond blade attached or
hammer & bolster.
Check levels every 300-400mm with a spirit level or draw a chalk line.
Orders will be packed as a mixed % ratio (30% 230+350mm) (30% 590mm) & (40% 470mm)
240mm high
350mm
470mm
590mm
230mm
Sizes are approx:
x 230mm
Height; 240mm
Length; 230mm, 350mm, 470mm, 590mm
·06m²
·09m²
·12m²
·15m²
Joint:
Pointing mortar or tile grout can be used to fill the joints. One of the easiest & fastest ways to fill the joints is with a
piping gun or piping bag. Purchase your silicon piping bag from Veneer Stone by calling 1300984572 or email
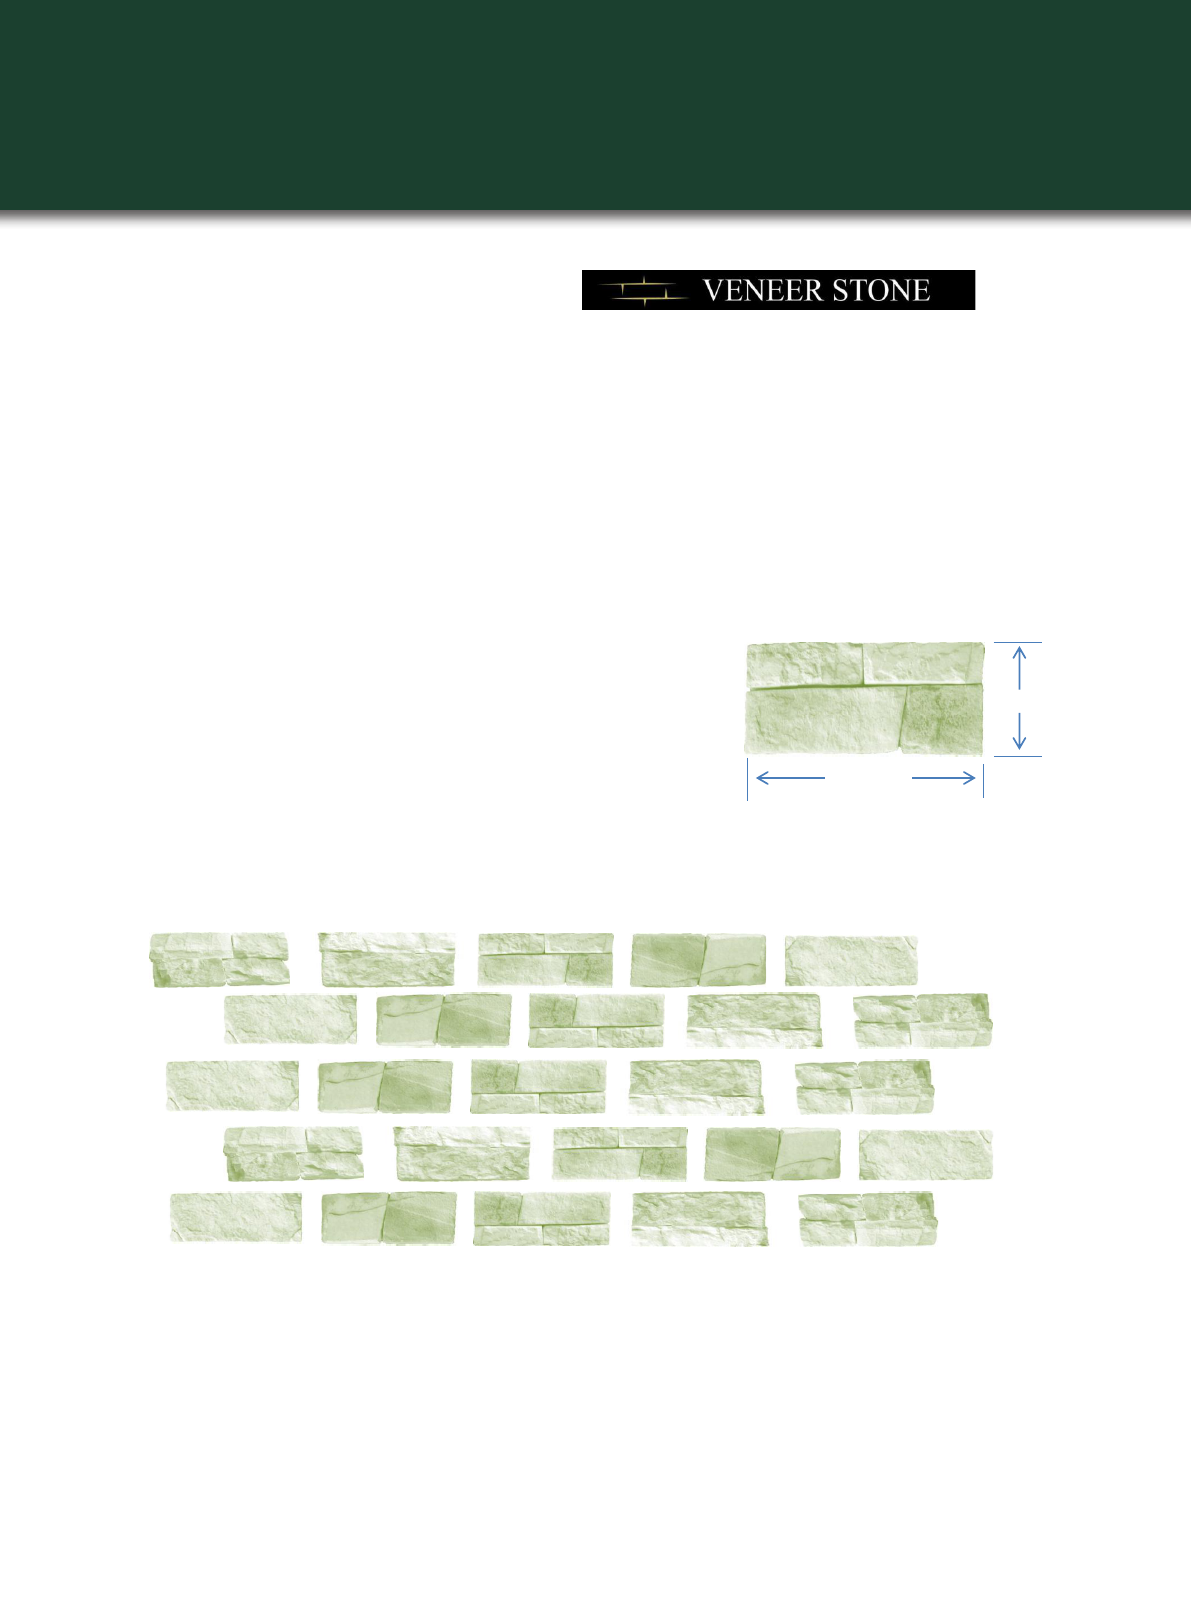
DRY STACKED INSTALLATION TIPS
4
DRY STACKED INSTALLATION
To retain the original fresh quarried look we suggest sealing the stone. If you would like the stone to
mellow slightly and gain the European look after years of harsh weathering don't seal the product.
For more information visit our website at www.veneerstone.com.au or call us on 1300 984 572
Joint Width;
The Dry Stacked collection has been designed to be installed with either a dry joint or an 8-12mm mortar/grout
joint. When applying the stones use timber or plastic dowels/wedges to keep the joints evenly spaced. Due to the nature of the
product stones will vary in size and may need extra wedges to allow for height variation.
Installation tips;
If your application requires corners, apply these first alternating the long & short return in opposite directions.
After corner pieces have been applied, apply the bodies 1 layer at a time, working towards the edge/centre.
Colour, size and texture variation is an essential aspect of a natural looking stone wall. Select stone from different
boxes and lay out across your job site to ensure you gain this look. The visual effect will be enhanced by an overall
natural mixed presentation. Cut or trim the stones using a hammer & bolster, wet saw or angle grinder with diamond
blade attached.
Check levels every 300-400mm with a spirit level.
Webbed panel sizes:
200mm high x 500mm long x 15-35mm thick
Individual stones attached to the webbing vary in sizes;
Height approx.; 40, 80, 100,120,160 & 200mm
Length; Random ranging from 50mm-500mm
500mm
200mm
Sample Installation pattern – like brick work, avoid straight vertical lines when applying the webbed panels
Mortar joint:
Pointing mortar or tile grout can be used to fill the joints. One of the easiest & fastest ways to fill the joints is with
a piping gun or piping bag. Purchase your silicon piping bag from Veneer Stone by calling 1300984572 or email
Dry Joint:
Please ensure either the wall or adhesive are a dark colour before starting. This can be done by purchasing a
dark tile adhesive or tinting adhesive mortar with black oxide. This will help cast a shadow between stones giving a deep solid
dry stone look. The Dry Stacked collection has been designed to have irregular edges to give a rustic appeal. This will create
small voids between some sections. Take time once the pattern is laid to cut thin stones to fill small gaps between the larger
joints. This is very important, it will break up the pattern and provide the perfect hand crafted stone masonry look.
Individual stones are held together with flexible webbing.
LEDGESTONE INSTALLATION TIPS
LEDGESTONE INSTALLATION TIPS
To retain the original fresh quarried look we suggest sealing the stone. If you would like the stone to
mellow slightly and gain the European look after years of harsh weathering don't seal the product.
For more information visit our website at www.veneerstone.com.au or call 1300 984 572
Important Note: Our Ledgestone collection has been designed to have irregular edges to give a rustic appeal. This will
create small voids between some panels. We suggest you prepare the wall by ensuring the colour of the wall is similar to the
stone. This can be done by tinting the glue or mortar with an oxide. Check with your local glue supplier for warranty & terms.
Sample Installation guide – (just like brick work) avoid straight vertical lines when placing the stone
All bodies interlock around corners
Ledgestone has been designed for dry stack installation/presentation. When applying the panels keep the joints as tight
as possible to retain the natural dry stone look.
If your application requires corners to be covered, apply these first.
After the corner pieces have been applied, apply the stone panel’s 1-2 layers at a time, working towards the centre.
Colour, size and texture variation is an essential aspect of a natural looking stone wall. Select stone from different boxes
and lay out across your job site to ensure you gain this look. The visual effect will be enhanced by an overall natural
mixed presentation
Cutting the stone panels:
The stone panels can be cut or trimmed using a wet saw, hammer & bolster, wide mouth
nippers or angle grinder with diamond blade attached.

HOW TO PAVEVENEER STONE INSTALLATION TIPS
6
INSTALLATION TIPS
1
Working with stone veneers can be a satisfying experience and crafting a simple stone
wall is easily within the reach of your stonemason, landscaper or average DIYER
Preparing surface for stone cladding
Veneer Stone recommends that wall construction be in accordance with the relevant
Australian and Industry standards. The contractor must examine substrates and advise the
general contractor and architect of any existing conditions or surface contamination which will
require correction before work commences. Before starting, substrates must comply with
maximum allowable deflection criteria as called for by Australian Industry Standards or the
applicable local building code. All rough, uneven or “out-of-plumb” surfaces must be made
“plumb and true” to within 1/8” in 10’ (3mm in 3m) and 1/16” in 1’ Dry, dusty concrete or
masonry surfaces must be high pressure water washed and excess water removed just prior
to the application of adhesive materials. In some cases a primer may be needed which will
seal the suface and enhance the bond of the adhesive onto the substrate.
Preparing rendered surface for stone cladding
The surface of the wall must have a wood float finish. For steel trowelled finished surfaces
ensure that the surface is mechanically or chemically abraded prior to commencing tiling, in
this particular case. Render should be allowed to fully cure before tiling commences.
Preparing Brick work for stone cladding
Ensure all brick work internally/externally is rendered before installation.
Preparing tilt up concrete panels for stone cladding
All tilt up concrete slabs have to be mechanically grinded then cleaned using high pressure
water, ensuring that all curing compounds and release agents are completely removed prior
to commencing tiling. Ensure all surfaces are clean, dry and free from dirt, dust, grease, oil,
wax, curing compounds and any loose contaminating materials which may affect the bond of
the adhesive onto the substrate.
Mechanical fixing of stone cladding
In some cases mechanical fixing may be necessary. If in doubt please contact your engineer
or seek advice from laticrete on 1800 331 012
Installing stone cladding over expansion and control joints
Existing joints in subsurface must be carried through the veneer work and must conform to
architectural details. Expansion joints must be installed where veneer abuts restraining
surfaces, such as perimeter walls, curbs, columns, corners, etc. Expansion joints must be
installed at all “changes of plane” in the veneer work. Refer to AS3958.1-2007 (current year)
for industry recommendations.
Waterproofing and crack suppression membrane
Install Laticrete hydro ban in all wet areas and over all non-structural cracks (≤1/8” or 3mm) in
the substrate(s) before veneer stone is installed. Laticrete hydro ban is to be installed in
accordance with the Laticrete written installation instructions. Refer to Laticrete DS663.0 and
DS663.5 for complete information.
Cold weather note
The curing of installation materials is retarded by low temperatures and finished work should
be protected for an extended period of time. Typically, for every 18 ºF below 70 ºF (10 ºC
below 21 ºC), installation materials take twice as long to cure.
Product selection/Variation in stone veneers
Colour, size, shape and texture variation is an essential aspect of a natural stone wall. Lay
out and mix boxes of stone to ensure you gain this look. The visual effect will be enhanced by
an overall natural mixed presentation

7
TOOLS AND MATERIALS REQUIRED
TOOLS & MATERIALS REQUIRED
To retain the original fresh quarried look we suggest sealing the stone. If you would like the stone to
mellow slightly and gain the European look after years of harsh weathering don't seal the product.
For more information visit our website at www.veneerstone.com.au or call us on 1300 984 572
Optional
Tools
Use
Product/Specification
Yes
Brick saw
Perfect straight cuts
Contemporary & Dressed edge
9” or 4” grinder with
concrete cutting blade
(diamond blade)
Cutting stone
All Products
12mm Notched trowel
Buttering tile adhesive onto wall and stone
All products
Buckets x 2
Mixing tile glue & wash up water
All Products
Sponge
Wiping excess glue off stones
All Products
Yes
Paint brush
For priming surface
Depends on surface
Yes
Step ladder or
scaffolding
Applying stone at height
Spirit level and pencil
Gain horizontal levels every 300mm
Not needed for South Coast
and Arctic collections
Tape Measure
Measure cuts when finishing off edge or top
of wall
Yes
Drill with mixing
attachment
Mixing tile adhesive
Some adhesives require
mechanical mixing.
Tile wedges
Level up individual stones
All products
Yes
Hammer & Chisel
Splitting stones to gain rough edge cut
Depends on finished look
Yes
Rubber Gloves
Keep hands clean
Yes
Extension cord
Allow cutting next to installation area
Yes
Wheel barrow
Moving stones large distance, mixing large
amounts of glue
Tools required for mortar joints
Yes
Small brush
Brushing mortar once firm
Piping gun or piping bag
Piping tile grout or mortar between joints
Yes
Sponge
Wiping mortar once firm
Materials Needed
Tile adhesive
Glue stone to wall
All Products
Yes
Surface primer
Depending on glue specifications and
substrate
All products
Pointing mortar mix or
Tile grout
Grout the joints.
Tint colour of mortar by adding
oxide
Please note: extra materials may be needed if mechanical fixing is required. In some cases an
engineer’s report may be needed to ensure correct installation practice. The tools and materials
recommended are a guide only. If in doubt please seek help from a professional tradesperson or your
local Veneer Stone stockist.
Joint: Pointing mortar or tile grout can be used to fill the joints. One of the easiest & fastest ways to
fill the joints is with a piping bag. Purchase your silicon piping bag from Veneer Stone by calling 1300
984 572 or email [email protected].au
