
Infor Enterprise Server
Administration Guide

Copyright © 2015 Infor
Important Notices
The material contained in this publication (including any supplementary information) constitutes and contains confidential
and proprietary information of Infor.
By gaining access to the attached, you acknowledge and agree that the material (including any modification, translation
or adaptation of the material) and all copyright, trade secrets and all other right, title and interest therein, are the sole
property of Infor and that you shall not gain right, title or interest in the material (including any modification, translation or
adaptation of the material) by virtue of your review thereof other than the non-exclusive right to use the material solely
in connection with and the furtherance of your license and use of software made available to your company from Infor
pursuant to a separate agreement, the terms of which separate agreement shall govern your use of this material and all
supplemental related materials ("Purpose").
In addition, by accessing the enclosed material, you acknowledge and agree that you are required to maintain such
material in strict confidence and that your use of such material is limited to the Purpose described above. Although Infor
has taken due care to ensure that the material included in this publication is accurate and complete, Infor cannot warrant
that the information contained in this publication is complete, does not contain typographical or other errors, or will meet
your specific requirements. As such, Infor does not assume and hereby disclaims all liability, consequential or otherwise,
for any loss or damage to any person or entity which is caused by or relates to errors or omissions in this publication
(including any supplementary information), whether such errors or omissions result from negligence, accident or any
other cause.
Although Infor has taken due care to ensure that the material included in this publication is accurate and complete, Infor
cannot warrant that the information contained in this publication is complete, does not contain typographical or other
errors, or will meet your specific requirements. As such, Infor does not assume and hereby disclaims all liability,
consequential or otherwise, for any loss or damage to any person or entity which is caused by or relates to errors or
omissions in this publication (including any supplementary information), whether such errors or omissions result from
negligence, accident or any other cause.
Without limitation, U.S. export control laws and other applicable export and import laws govern your use of this material
and you will neither export or re-export, directly or indirectly, this material nor any related materials or supplemental
information in violation of such laws, or use such materials for any purpose prohibited by such laws.
Trademark Acknowledgements
The word and design marks set forth herein are trademarks and/or registered trademarks of Infor and/or related affiliates
and subsidiaries. All rights reserved. All other company, product, trade or service names referenced may be registered
trademarks or trademarks of their respective owners.
Publication Information
U8854O USDocument code
10.4Release
March 26, 2015Publication date

About this document
...............23Chapter 1 To Get Started....................................................................................................
...............23Introduction..................................................................................................................
...............23Who must read this document.....................................................................................
...............24Administration in perspective.......................................................................................
...............24How to use this document...........................................................................................
...............24Setup of the guide........................................................................................................
...............25The system administrator’s tasks.......................................................................
...............25License management and validation.................................................................
...............25System recovery................................................................................................
...............25Version and release management.....................................................................
...............25User management.............................................................................................
...............26Audit Configuration Management......................................................................
...............26RDBMS Administration......................................................................................
...............26Device management..........................................................................................
...............27Text management..............................................................................................
...............27Job management...............................................................................................
...............27Infor Enterprise Server Service Manager...........................................................
...............27Additional information..................................................................................................
...............29Chapter 2 System Administrator Tasks.............................................................................
...............29System administrator tasks introduction......................................................................
...............29Overview of system management...............................................................................
...............29Administration of your LN installation.................................................................
...............30System administrator tasks..........................................................................................
...............30Act as contact person........................................................................................
...............30Have extensive knowledge about the application environment.........................
...............30Reorganize tables..............................................................................................
...............30Control disk space.............................................................................................
Table of Contents

...............31Remove temporary files.....................................................................................
...............31Create back-up files...........................................................................................
...............31Control user management.................................................................................
...............31Install updates....................................................................................................
...............31Log changes in the system................................................................................
...............31Perform all initialization procedures...................................................................
...............31Create and customize software.........................................................................
...............32Perform periodic application runs......................................................................
...............32Maintain the system log.....................................................................................
...............32Analyze problems..............................................................................................
...............33Chapter 3 License Management and Validation...............................................................
...............33License management and validation...........................................................................
...............33To license and validate LN.................................................................................
...............33Licensing solution..............................................................................................
...............34SLM license types..............................................................................................
...............34Named User license...........................................................................................
...............35License Administration in LN.............................................................................
...............37Chapter 4 System Recovery...............................................................................................
...............37System recovery..........................................................................................................
...............37System recovery overview.................................................................................
...............37Back-up strategy................................................................................................
...............38System recovery procedure...............................................................................
...............38Procedure summary...........................................................................................
...............39Chapter 5 Version and Release Management...................................................................
...............39Version and release management introduction...........................................................
...............39An overview of version and release management.......................................................
...............39Package combinations.................................................................................................
...............40Package VRCs............................................................................................................
...............41Package VRC code............................................................................................
...............42LN software environment.............................................................................................

...............43Standard environment........................................................................................
...............43Runtime environment.........................................................................................
...............44Development environment.................................................................................
...............45VRC derivation.............................................................................................................
...............48Standard software environment procedure..................................................................
...............48Procedure aim....................................................................................................
...............48Procedure result and prerequisites....................................................................
...............49Procedure summary...........................................................................................
...............49One-step software environment procedure.................................................................
...............49Procedure aim....................................................................................................
...............49Procedure result and prerequisites....................................................................
...............50Procedure summary...........................................................................................
...............51Chapter 6 LN Software Maintenance.................................................................................
...............51PMC introduction.........................................................................................................
...............51PMC Benefits.....................................................................................................
...............52PMC overview..............................................................................................................
...............52PMC Architecture...............................................................................................
...............53Where to find the PMC module..........................................................................
...............53Dependencies....................................................................................................
...............54Individual solutions.............................................................................................
...............55Collections..........................................................................................................
...............55Feature Packs and patches...............................................................................
...............56Justification of Feature Packs and patches.......................................................
...............56Feature Packs....................................................................................................
...............58To install a 'clean' Feature Pack.........................................................................
...............60Patches..............................................................................................................
...............61Distributor’s Policy.............................................................................................
...............61PMC Distributor functionality..............................................................................
...............62PMC Recipient functionality...............................................................................
...............63PMC recipient procedure.............................................................................................
...............63Setup..................................................................................................................

...............64Procedure...........................................................................................................
...............64Infor Installation Wizard and PMC.....................................................................
...............65Parameters.........................................................................................................
...............66Generation and use of update VRCs.................................................................
...............67VRC combinations.............................................................................................
...............68To create a test environment..............................................................................
...............69FTP/HTTP to download software updates.........................................................
...............70To install updates...............................................................................................
...............71Procedure steps.................................................................................................
...............71Download updates.............................................................................................
...............72Scan updates.....................................................................................................
...............72Connect update to update VRC.........................................................................
...............72Check to install...................................................................................................
...............72Install..................................................................................................................
...............72Check to uninstall...............................................................................................
...............73Uninstall.............................................................................................................
...............73Miscellaneous topics..........................................................................................
...............73Update policy.....................................................................................................
...............77Open a patch.....................................................................................................
...............77PMC cleanup.....................................................................................................
...............78To remove an update VRC.................................................................................
...............78PMC recipient session summary.................................................................................
...............78PMC recipient sessions.....................................................................................
...............81Chapter 7 User Management..............................................................................................
...............81User management introduction....................................................................................
...............81User management overview........................................................................................
...............82LN user password........................................................................................................
...............82To change your password..................................................................................
...............82To change your password via the Operating System.........................................
...............83Password Aging.................................................................................................
...............83LN user types...............................................................................................................

...............83LN user authorizations.................................................................................................
...............85Role-dependent authorizations....................................................................................
...............86Role-dependent authorization types in LN.........................................................
...............87Session authorizations.......................................................................................
...............88Table authorizations...........................................................................................
...............90Library authorizations.........................................................................................
...............90Non-role-dependent authorizations.............................................................................
...............91User data and development-related templates..................................................
...............91User-data template............................................................................................
...............91Developer-parameters template........................................................................
...............92Developer-authorization template......................................................................
...............92Text-related templates........................................................................................
...............93Default text groups template..............................................................................
...............93Default text groups by text field template...........................................................
...............93Text group authorization template......................................................................
...............93Device-related templates...................................................................................
...............93Device preference template...............................................................................
...............93Role browser................................................................................................................
...............95User-related procedures..............................................................................................
...............95Procedure aim....................................................................................................
...............96Procedure result and prerequisites....................................................................
...............96To create LN users.......................................................................................................
...............96Introduction........................................................................................................
...............97Procedure summary...........................................................................................
...............97To create remote user accounts..................................................................................
...............97Introduction........................................................................................................
...............97Procedure summary...........................................................................................
...............98To change the package combination for LN users......................................................
...............98Introduction........................................................................................................
...............98Procedure summary...........................................................................................
...............98To change the password for developer authorizations................................................

...............98Introduction........................................................................................................
...............99Procedure summary...........................................................................................
...............99To create roles and authorizations...............................................................................
...............99Procedure aim....................................................................................................
...............99Procedure result and prerequisites....................................................................
.............100Procedure introduction.......................................................................................
.............100Procedure summary...........................................................................................
.............101To create templates.....................................................................................................
.............101Procedure aim....................................................................................................
.............101Procedure result and prerequisites....................................................................
.............101Procedure Introduction (User Data template)....................................................
.............101Procedure summary (User Data template)........................................................
.............103Chapter 8 Audit Configuration Management....................................................................
.............103Audit configuration management introduction.............................................................
.............104Audit trail and audit host settings.................................................................................
.............104Audit configuration procedure......................................................................................
.............104Introduction........................................................................................................
.............104Procedure summary...........................................................................................
.............105Audit - Additional functions..........................................................................................
.............105Audit - General remarks...............................................................................................
.............108Audit - Specific issues..................................................................................................
.............108Changes in the profiles......................................................................................
.............109Changes in the audit host..................................................................................
.............109Changes in the directory of the sequence files..................................................
.............109Changes in the maximum file of the sequence files...........................................
.............109Combination of changes....................................................................................
.............111Chapter 9 RDBMS Administration.....................................................................................
.............111RDBMS administration introduction.............................................................................
.............111Overview of RDBMS administration............................................................................
.............112Database groups................................................................................................

.............113Database user....................................................................................................
.............113RDBMS administration procedures.............................................................................
.............113Procedure aim....................................................................................................
.............114Procedure result and prerequisites....................................................................
.............114Recommended RDBMS procedure.............................................................................
.............114Introduction........................................................................................................
.............115To give individual LN users access to an RDBMS.............................................
.............115To give a range of LN users access to an RDBMS............................................
.............116RDBMS maintenance procedure.................................................................................
.............116Introduction........................................................................................................
.............116To create or maintain database groups..............................................................
.............117To create or maintain database users................................................................
.............117To create or maintain a link between an LN user and a database user.............
.............118RDBMS table and index repository procedure............................................................
.............118Introduction........................................................................................................
.............118Procedure...........................................................................................................
.............119RDBMS additional procedures....................................................................................
.............120To change the database group’s password.......................................................
.............120To change the database user’s password..........................................................
.............120
To transfer the database group file and the database user file to the RDBMS
Administration module.......................................................................................
.............121Chapter 10 Device Management........................................................................................
.............121Device management introduction................................................................................
.............121Device management overview.....................................................................................
.............122Devices and logical printers supported by LN....................................................
.............123Convert print output to other formats.................................................................
.............123Paper types and associated fonts......................................................................
.............123Default report settings........................................................................................
.............123Device queue data.............................................................................................
.............124Device management setup procedure.........................................................................
.............124Procedure aim....................................................................................................

.............124Procedure result and prerequisites....................................................................
.............124Procedure summary...........................................................................................
.............126Device management maintenance procedure.............................................................
.............126Procedure aim....................................................................................................
.............126To maintain the device queue............................................................................
.............127To cancel print jobs............................................................................................
.............127To change the device status..............................................................................
.............127To purge the device queue data.........................................................................
.............127To change a printer’s paper type........................................................................
.............127Automatic paper selection for Windows printers..........................................................
.............128Paper types and paper sizes.............................................................................
.............128Automatic paper type selection..........................................................................
.............129To set up automatic paper selection..................................................................
.............130Windows printer devices..............................................................................................
.............130Windows Printer.................................................................................................
.............130Defining a Windows printer................................................................................
.............131Windows Server Printer.....................................................................................
.............131Application server operating system..................................................................
.............131Defining a Windows Server Printer on a Unix-based LN application server......
.............132Defining a Windows Server Printer on a Windows-based LN application server.
.............132Microsoft Excel devices...............................................................................................
.............132Defining a Microsoft Excel device......................................................................
.............133Printing reports to a Microsoft Excel device.......................................................
.............134Session-based reporting..............................................................................................
.............134To set up session-based reporting.....................................................................
.............135To run session-based reports.............................................................................
.............135To use the Report Viewer............................................................................................
.............136Toolbar buttons..................................................................................................
.............138Microsoft Reporting for LN...........................................................................................
.............139Chapter 11 Report Archive.................................................................................................
.............139LN Report Archive.......................................................................................................

.............140Configuration...............................................................................................................
.............140Create tables......................................................................................................
.............140Define Report Archiving Parameters.................................................................
.............141Define Report Archive Groups...........................................................................
.............141Specify the reports to be archived.....................................................................
.............141Check Report Archiving Rules...........................................................................
.............142To reprint archived reports...........................................................................................
.............142To reprint through the Archived Reports session...............................................
.............142To reprint directly through the Print Archived Reports session..........................
.............143To reprint via PDF..............................................................................................
.............143Constraints.........................................................................................................
.............143Maintenance................................................................................................................
.............143Move/delete archived reports.............................................................................
.............144Export/Import archive settings...........................................................................
.............144Technical details..........................................................................................................
.............144Tables.................................................................................................................
.............145Sessions.............................................................................................................
.............145DLLs...................................................................................................................
.............145Log file................................................................................................................
.............145Data flow during first print..................................................................................
.............146Data flow during reprint......................................................................................
.............146Report splitting...................................................................................................
.............146Authorization for archive directories...................................................................
.............147Chapter 12 Text Management.............................................................................................
.............147Text management introduction.....................................................................................
.............147Text management overview.........................................................................................
.............148Description of text-related templates.................................................................
.............148Text management parameters procedure....................................................................
.............148Procedure aim....................................................................................................
.............148Procedure result and prerequisites....................................................................
.............149Procedure summary...........................................................................................

.............150Text management maintenance procedure.................................................................
.............150Procedure aim....................................................................................................
.............150To create a range of text numbers.....................................................................
.............151To remove unused texts.....................................................................................
.............153Chapter 13 Job Management..............................................................................................
.............153Job management introduction.....................................................................................
.............153Job data.......................................................................................................................
.............154Shared job data tables.................................................................................................
.............154Job execution...............................................................................................................
.............155In Queue status..................................................................................................
.............155Free status.........................................................................................................
.............156Job status...........................................................................................................
.............157Job history...................................................................................................................
.............158Job data procedure......................................................................................................
.............158Procedure aim....................................................................................................
.............158Procedure result and prerequisites....................................................................
.............158Procedure summary...........................................................................................
.............160Job handling procedure...............................................................................................
.............160Procedure aim....................................................................................................
.............161Procedure result and prerequisites....................................................................
.............161Steps in the job management procedures.........................................................
.............162To enable and start the Job Daemon on a Windows platform...........................
.............162To start the Job Daemon on a UNIX platform....................................................
.............162To run a job with the Job Daemon.....................................................................
.............162To run the job with Activate Job (ttaad5203m000).............................................
.............163To run the job with the rc.startjob shell program................................................
.............163To run the job with the startjob.bat batch file......................................................
.............165Chapter 14 Enterprise Server Service Manager...............................................................
.............165Enterprise Server Service Manager.............................................................................
.............165Introduction........................................................................................................

.............165Overview of the Enterprise Server Service Manager snap-in............................
.............166ES Logic Service................................................................................................
.............166Shared Memory Service....................................................................................
.............167LN management procedures.............................................................................
.............168To start an LN software environment (BSE).......................................................
.............168To configure the ES Logic Service.....................................................................
.............168To configure the Shared Memory Service..........................................................
.............168To rename BSE environments...........................................................................
.............169To edit the software environment variables........................................................
.............171Chapter 15 Language Support...........................................................................................
.............171Language support introduction....................................................................................
.............171Character sets.............................................................................................................
.............171Single byte character sets..................................................................................
.............172Multi-byte character sets....................................................................................
.............172Unicode character set........................................................................................
.............173High Ascii Tolerance..........................................................................................
.............173The role of the user locale.................................................................................
.............173The role of the user locale in a single-byte installation......................................
.............174The role of the user locale in a multi-byte installation........................................
.............175The role of the user locale in a Unicode installation..........................................
.............176Conversion of “high ascii” characters.................................................................
.............177Conversions.................................................................................................................
.............177UI........................................................................................................................
.............177Web UI...............................................................................................................
.............177Reporting............................................................................................................
.............178Integration via Adapter for Infor LN....................................................................
.............178Language Translation Support.....................................................................................
.............179Chapter 16 Multilanguage Application Data.....................................................................
.............179Multilanguage application data....................................................................................
.............179Language types.................................................................................................

.............180ISO standards....................................................................................................
.............181Configuration......................................................................................................
.............182To configure Multilanguage Fields Support........................................................
.............184Data translation..................................................................................................
.............184Insertion and translation process.......................................................................
.............184Scenario 1: A user works in the base language and inserts a record................
.............185Scenario 2: A user works in another language and inserts a record.................
.............187Chapter 17 Sensitivity Labeling.........................................................................................
.............187Sensitivity labeling.......................................................................................................
.............187Concept..............................................................................................................
.............187To configure sensitivity labeling.........................................................................
.............188Runtime behavior...............................................................................................
.............191Chapter 18 Homepages.......................................................................................................
.............191Homepages introduction..............................................................................................
.............191Introduction........................................................................................................
.............192Homepage structure....................................................................................................
.............194Homepages delivery....................................................................................................
.............195Predefined homepages delivered by Infor...................................................................
.............195To install and configure Homepages............................................................................
.............197Chapter 19 Shared Memory................................................................................................
.............197Shared Memory...........................................................................................................
.............197To load objects into the shared memory............................................................
.............201Chapter 20 Customer Defined Fields and Domain Lengths............................................
.............201Customer defined fields...............................................................................................
.............201Configuration......................................................................................................
.............201Limitations..........................................................................................................
.............202Personalization..................................................................................................
.............202Customer defined domain lengths...............................................................................
.............202Changing the length for domains of type multibyte............................................

.............205Chapter 21 Scrollbars.........................................................................................................
.............205Scrollbars.....................................................................................................................
.............206To disable the scrollbar for sessions with many records....................................
.............206To disable the scrollbar for any session.............................................................
.............207Chapter 22 Image parameters............................................................................................
.............207Introduction..................................................................................................................
.............207To change the location of the image folder..................................................................
.............208Authorizations..............................................................................................................
.............209Chapter 23 HTTPS...............................................................................................................
.............209HTTPS support with SOAP..........................................................................................
.............209Prerequisites......................................................................................................
.............210Certificates to enable HTTPS......................................................................................
.............210Client certificates................................................................................................
.............210Server certificates..............................................................................................
.............211How to… (dealing with certificates).............................................................................
.............211To find out which server certificate is required...................................................
.............212How to convert a number of formats to PEM format....................................................
.............212Converting a certificate in DER encoding to PEM format..................................
.............212Converting a client certificate in PKCS12 format to PEM format.......................
.............213Viewing the contents of a PEM certificate...................................................................
.............213How to generate hashed file names of certificates......................................................
.............215Chapter 24 Date and time formatting.................................................................................
.............215Date and time formatting in the user interface.............................................................
.............215Date and time formatting in BW...................................................................................
.............215Date formatting..................................................................................................
.............221Time formatting..................................................................................................
.............223Date and time formatting in Web UI 10.0 and later......................................................
.............225Chapter 25 Document Authorization.................................................................................
.............225Document Authorization Overview..............................................................................

.............225Overview............................................................................................................
.............226Modeling and Deploying Document Authorization.............................................
.............226Prerequisites......................................................................................................
.............226Application changes...........................................................................................
.............227Checked-out Business Object states.................................................................
.............228Importing the standard model......................................................................................
.............228Creating a model.........................................................................................................
.............229Duplicating the standard model.........................................................................
.............229Adding object types to the new model...............................................................
.............229Adding actions to the object types.....................................................................
.............229Adding table relations to the object types..........................................................
.............230Adding mappings to the object types.................................................................
.............230Validating the model...........................................................................................
.............230Deploying a model.......................................................................................................
.............231Procedures for checked-out objects............................................................................
.............233Chapter 26 Data Upgrade Engine.......................................................................................
.............233Data Upgrade Engine overview...................................................................................
.............237Execution...........................................................................................................
.............238Simulation mode................................................................................................
.............238Performance and finetuning...............................................................................
.............238Troubleshooting.................................................................................................
.............238Error Recovery...................................................................................................
.............238Logging..............................................................................................................
.............239Executing a data upgrade run......................................................................................
.............239To execute a data upgrade run..........................................................................
.............243Performance and finetuning.........................................................................................
.............243Runtime class....................................................................................................
.............244Additional servers..............................................................................................
.............244Using the local server for processing.................................................................
.............245Using sub-tasks.................................................................................................
.............245Using the Call Graph Profiler.............................................................................

.............245Troubleshooting...........................................................................................................
.............245Procedure...........................................................................................................
.............246Trace level..........................................................................................................
.............246Performance and finetuning...............................................................................
.............247Chapter 27 Miscellaneous..................................................................................................
.............247Workbench applications...............................................................................................
.............247Quick Flow...................................................................................................................
.............248Enabling message and question suppression...................................................
.............248MS Excel integration....................................................................................................
.............248Introduction........................................................................................................
.............249SSI_MAX_ROWS..............................................................................................
.............251Appendix A Glossary..........................................................................................................
Index


Document summary
Infor LN is a business software solution that consists of applications, tools, and an Enterprise Modeler,
all of which work together as a fully integrated system to support all aspects of a business. This document
is an Administrator’s Guide that describes how administrators must use Infor Enterprise Server to manage
and configure LN, and includes:
▪
The main functions and objectives for the administration of LN
▪
System information on LN and how the system administration relates to the other parts of LN
To use this document effectively, you require knowledge of the following:
▪
The operating system on which you run LN
▪
The Relational Database Management System (RDBMS) you use and the relational database
concepts
This document is divided into the following chapters:
Chapter To Get Started outlines the contents of this document, how to use LN sessions, and the location
of additional information that administrators might require.
Chapter System Administrator Tasks describes the tasks and responsibilities of the system
administrator. For example, the system administrator is responsible to do the following:
▪
Assign user accounts and passwords
▪
Establish security access level
▪
Allocate storage space
▪
Watch for unauthorized access
Chapter License Management and Validation describes the license management mechanism and
the validation procedure.
Chapter System Recovery describes the steps required to carry out the hard-crash recovery procedures
for both UNIX and Windows.
Chapter Version and Release Management describes the version and release management concept.
Chapter LN Software Maintenance describes the Product Maintenance and Control (PMC) concept
and the procedures for the PMC recipient.
Chapter User Management describes LN ’s user management and authorization management.
Chapter Audit Configuration Management describes the procedure to configure the audit settings,
and provides information on various other audit management features, such as features to do the
following:
▪
Import and export profiles
▪
Generate reports
▪
Migrate from an earlier version of Infor Enterprise Server
Infor Enterprise Server | Administration Guide | 19
About this document

Chapter RDBMS Administration describes how to give LN users access to an RDBMS, and how to
optimize the database table and index repository for an improved interaction between LN and the
database.
Chapter Device Management describes how to set up devices, such as printers.
Chapter Report Archive describes how to archive reports, so you can reprint them, even several years
after they are initially printed.
Chapter Text Management describes text management in LN.
Chapter Job Management describes the procedures and sessions of LN ’s job management.
Chapter Enterprise Server Service Manager describes the ES Service Manager snap-in for the MMC.
You can use the ES Service Manager snap-in to administer Infor LN environments on your Windows
server.
Chapter Language Support describes the language support capabilities of Enterprise Server and the
tasks the administrator has to perform.
Chapter Multilanguage Application Data describes how you can enable LN to store shared application
data in multiple languages. This is very useful if users from all over the globe are using the same
environment. Depending on the user’s software language, the application data can be displayed in the
same language too.
Chapter Sensitivity Labeling describes how you can configure sensitivity labeling. Sensitivity labeling
is the capability to give information about the sensitivity of provided data.
Chapter Homepages describes how you can configure Infor LN homepages. Homepages are used as
a start point for navigation for particular roles, such as Warehouse Manager or Warehouse Administrator.
Chapter Shared Memory describes how you can load program objects and report objects into the shared
memory. Loading objects into the shared memory will enhance the performance of your LN server.
Chapter Customer Defined Fields and Domain Lengths describes how to store additional information
in tables without creating customizations. The chapter also describes how to change the length for
domains of type multibyte without creating customizations.
Chapter Scrollbars describes the scrollbar types used in LN sessions. The chapter also describes how
to disable the new scrollbar.
Chapter Image Parameters describes how you can enable Web UI users to view images in sessions
and to drop images on forms.
Chapter HTTPS describes how to use HTTPS with SOAP.
Chapter Date and time formatting describes date and time formatting in Web UI and BW.
Chapter Document Authorization describes how you can model and deploy document authorization
for Business Objects.
Chapter Data Upgrade Engine describes how you can use the Data Upgrade Engine (DUE) to update
your LN data after a Feature Pack (FP) upgrade.
Chapter Miscellaneous describes miscellaneous topics.
20 | Infor Enterprise Server | Administration Guide
About this document

The Glossary defines the terms and acronyms used in this document.
Note:
A number of figures of LN sessions in this document are from previous LN releases and can differ slightly
in appearance to your LN sessions. However, the described functionality is identical.
Comments?
We continually review and improve our documentation. Any remarks/requests for information concerning
this document or topic are appreciated. Please e-mail your comments to documentation@infor.com .
In your e-mail, refer to the document number and title. More specific information will enable us to process
feedback efficiently.
Contacting Infor
If you have questions about Infor products, go to the Infor Xtreme Support portal at www.infor.com/
inforxtreme .
If we update this document after the product release, we will post the new version on this Web site. We
recommend that you check this Web site periodically for updated documentation.
If you have comments about Infor documentation, contact documentation@infor.com .
Infor Enterprise Server | Administration Guide | 21
About this document

22 | Infor Enterprise Server | Administration Guide
About this document

Introduction
This Administrator’s Guide describes how you must use Infor Enterprise Server to manage and configure
LN, a business software solution that includes applications, tools, and an Enterprise Modeler. All of
these components work together as a fully integrated system and supports all aspects of a business.
This preface describes:
▪
Who must read this document
▪
Administration in perspective
▪
How to use this document
▪
The setup of this document
▪
How to use LN sessions
▪
Additional information
Who must read this document
This document is intended for the system administrators who set up, configure, and manage the LN
software. The Administrator’s Guide describes how to use Infor Enterprise Server to set up an LN
environment with LN users, user authorizations, database authorizations, devices, and so on.
You can use this document as a Reference Guide. The "System administrator tasks" chapter, describes
the responsibilities of system administrators.
To use this document effectively, you must be familiar with the following:
▪
The operating system on which you run LN
▪
The Relational Database Management System (RDBMS) you use and the relational database
concepts.
Infor Enterprise Server | Administration Guide | 23
1
Chapter 1
To Get Started

Administration in perspective
This document describes the main functions and objectives for the administration of LN. This document
provides information about system information in LN and how system administration is related to the
other parts of LN. After you complete the LN installation, you must carry out several administrative tasks.
For example, you must define companies, users, devices, and so on in Infor Enterprise Server before
you can use LN effectively.
No specific relation exists between the administration procedures and one or more LN modules. In fact,
the administration procedures are related to all of LN ’s modules. Therefore, the data entered during
the administration of LN is common data and is used throughout the entire LN software.
How to use this document
If you are new to LN, to familiarize yourself with the structure, setup, and use of LN, read the following:
▪
“To use LN sessions,” later in this chapter
The following section, “Setup of the guide,” outlines the content of each chapter in this document, which
you can use as an overview of LN ’s administration.
The structure of the chapters is typically as follows:
1. Overview section: Describes the administration concepts and any necessary additional
information.
2. A procedures section: Describes the aim, the prerequisites and the result of the procedures,
and contains a summary of the procedure steps.
If you are familiar with the concepts of a chapter, you can skip the overview section and proceed directly
to the procedures section.
Note
▪
For detailed information on the procedure steps, refer to the "Procedure Details" sections in
the Infor Web Help.
▪
For detailed information on the sessions that are used in the procedures, refer to the session
help.
Setup of the guide
The remainder of this document contains the following chapters:
24 | Infor Enterprise Server | Administration Guide
To Get Started

The system administrator’s tasks
This chapter describes the tasks and responsibilities of the system administrator, for example to assign
user accounts and passwords, establish security access levels, allocate storage space, and watch for
unauthorized access.
License management and validation
You can use a license management mechanism to regulate the commercial use of LN. The license
management mechanism is in fact a copy protection mechanism. The unprotected software must be
validated and patched before a specified expiration date.
After installation, the core LN application can run for 30 days without a license mechanism. However,
integrations will not work.
Users can request a temporary key for demo and trial versions. This key is valid for 14 days. The
temporary license is mainly introduced to overcome delays in delivery of permanent license keys. For
testing and demonstration purposes, unprotected software is dispatched with limited validity.
This chapter describes the license management mechanism and the validation procedure.
System recovery
If a serious error occurs, and the system cannot be rebooted, you must restore LN from a back-up file
saved on a separate system. The procedure to follow after a serious crash is referred to as the hard-crash
procedure.
This chapter describes the steps required to carry out the hard-crash recovery procedures for both UNIX
and Windows.
Version and release management
You must manage the various versions of LN packages, their corresponding releases, and the various
customizations. LN offers a comprehensive solution with the version and release management
mechanism. Within this concept, multiple versions of an application can run simultaneously in the same
LN environment.
This chapter describes the concept of version and release management and the procedures to create
a software environment.
User management
The LN administrator uses LN ’s User Management to enable users to work with LN and to give these
users authorizations related to their role.
This chapter describes the following procedures:
▪
How to create a user account
Infor Enterprise Server | Administration Guide | 25
To Get Started

▪
The Authorization Management System (AMS)
Note
If the licensing of LN is based on named users, the LN user accounts that are created in User
Management must correspond with the user names in the named user list in the Infor Solution License
Manager (SLM).
Audit Configuration Management
This chapter provides an overview of the steps you must take to configure the audit settings. According
to this configuration the audit trails are created. The audit configuration is based on audit profiles. In an
audit profile, you define which tables and fields are audited, and when the table and fields are audited.
The audit trail is stored in sequence files, which are generated for each combination of company and
table.
The chapter also describes the procedures for various other Audit Management features, such as how
to import and export profiles, generate reports, and migrate from an earlier version of Infor Enterprise
Server.
Note
Several important parameter tables must be audited mandatory. The audit history data of those tables
will be used by Infor Support.
RDBMS Administration
LN supports several relational databases (RDBMSs) for which you can authorize the LN user. An LN
user must be able to use the information that is stored in the RDBMS. Before the LN user can access
a database, you must provide the LN user permission to access the RDBMS.
This chapter describes how to give LN users access to an RDBMS and how to optimize the database
table and index repository for an improved interaction between LN and the database.
Device management
One of LN ’s most important tasks is to generate output. Raw data is fed into LN and processed into
reports, sales invoices, salary check, and so on. Before you can print the data that is processed by LN,
you must first make sure that your operating system supports the printers in your company.
You can print LN reports on various types of devices, for example, output files and printers. This chapter
describes how to set up printers for LN and the related sessions.
Note
Infor also supports the use of external reporting tools, an example is Cognos.
26 | Infor Enterprise Server | Administration Guide
To Get Started

Text management
You can use text for various purposes in LN. You can, for example, use text to provide information about
LN itself, for example, technical documentation and release notes for software components. You can
also use text to provide information on the data stored in the tables of the database: For example, a text
that is linked to a certain record can contain information about an item or sales order pertains to that
record. The text editor enables you to write queries.
This chapter describes the following procedures in regard to text management:
▪
The text parameters procedure, which defines the basic parameters for the use of text
▪
The text maintenance procedure
Job management
You can use LN ’s job management to schedule jobs at non-peak hours to improve the overall system
performance in a heavily loaded environment. You can schedule the jobs to start processes periodically,
at a defined interval, or immediately. Typically, you use LN management for print and processing sessions.
Infor Enterprise Server Service Manager
The Infor ES Service Manager snap-in for the MMC provides the tools to manage the LN Software
Environments (BSE) on your system through Microsoft’s Management Console (MMC). You can use
the Infor ES Service Manager snap-in to administer LN systems on your Windows server.
With the Infor ES Service Manager snap-in you can:
▪
View all LN environments.
▪
View the status of the LN-specific services for each LN environment.
▪
Add, change, or remove LN environment-specific services for each LN-specific environment.
▪
Install, start, and stop LN-specific services.
▪
Edit the settings of the LN-specific services.
This chapter describes the Infor ES Service Manager procedures.
Additional information
LN administrators need detailed information about their complete system, including the hardware,
network, RDBMS, operating system, and additional installed software.
The following additional LN reference materials can be helpful to administrators:
▪
Infor Enterprise Server Technical Manual (U8172)
▪
Infor Solution License Manager 2.5 - Installation and Configuration Guide (U8872)
▪
Infor LN Exchange - User Guide (U8405)
Infor Enterprise Server | Administration Guide | 27
To Get Started

▪
Infor ASM1.4 - Administrator's Guide for Application Service Manager (U7784)
▪
Infor Enterprise Server Web UI - Installation and Configuration Guide (U8715)
▪
Infor LN Installation Guide (U9498)
▪
The “Basic Tasks” section in the Infor Web Help. This section contains online manuals on the
usage of the various session types, the toolbar buttons, and so on.
▪
The “ Infor Enterprise Server 8” section in the Infor Web Help. This section contains online
manuals on various important topics, for example:
▪
Audit Management
▪
Database Management
▪
Device Management
▪
Product Maintenance and Control (PMC)
▪
Table Sharing
28 | Infor Enterprise Server | Administration Guide
To Get Started

System administrator tasks introduction
This section describes the system administrator’s tasks and responsibilities, such as to assign user
accounts and passwords, establish security access levels, allocate storage space, and watch for
unauthorized access.
To explain these tasks and responsibilities fully, this section includes:
▪
An overview of system management (p. 29)
▪
The system administrator’s tasks (p. 30)
Overview of system management
This section describes the main functions and objectives for the administration of the LN software. After
you complete the LN installation, you must carry out several administrative tasks. For example, you
must define, users, devices, and so on, in Infor Enterprise Server before you can use LN effectively.
LN ’s administration facilities are also used, for example, to create jobs, define queries, and to manage
the development environment. No specific relation exists between the administration procedures and
one or more LN modules. In fact, the administration procedures are related to all LN modules. Therefore,
the data entered during the administration procedures is common data and is used throughout the entire
LN software.
Administration of your LN installation
Because LN is a large package and can have many users, someone or some group of people must
manage the package. These individuals are referred to as the LN system administrators.
The LN system administrators must perform the following tasks on an installed LN system:
▪
System management, which includes administrative tasks on UNIX or Windows platforms
▪
Application administration, which includes administrative tasks in the application
Infor Enterprise Server | Administration Guide | 29
2
Chapter 2
System Administrator Tasks

System management and application management differ by company. Usually, these tasks are full-time
jobs.
Depending, for example, on the computer system and the number of users, a system can be managed
by a system manager and an assistant system manager. Most large companies, usually have more than
one system manager, each with specific responsibilities. In these cases, an application administrator is
usually in place to manage the applications. In smaller companies, however, one person performs system
management and application administration.
System administrator tasks
The application administration consists of a number of tasks that the system administrator must perform
with care and precision.
Act as contact person
The system administrator is the contact person between a company and LN. The application administrator
is responsible to find a solution for the questions and problems brought forward by the LN users. If
required, this task will be performed by contacting one of the Global Support Centers.
Have extensive knowledge about the application environment
The system administrator must know in which directories the LN application resides. For example, to
make a backup or to rebuild tables, the system administrator must know the exact location of the files
and programs involved.
Reorganize tables
The system administrator must frequently reorganize the database tables because the disk space of
deleted records will not immediately be given back to the system. In other words, although many records
in a table are deleted, the size of the table itself will not become smaller. Only after the table has been
reorganized will the disk space of the deleted records become available on the system. Reorganizing
the database tables becomes very important when many records in tables are deleted.
Control disk space
The system administrator must regularly check the disk space on the system because a lack of disk
space can cause application errors.
30 | Infor Enterprise Server | Administration Guide
System Administrator Tasks

Remove temporary files
LN can create several temporary files that, after use, are no longer useful. To save disk space, the
system administrator must remove the temporary files on a regular basis.
Create back-up files
To prevent a loss of data, the system administrator must create back-up files on a regular basis. The
reason to make back-up files is so if a file is damaged, the original file can be retrieved from the back-up
files.
Control user management
Before a user can work with LN, the system administrator must first define the user data. To avoid the
unauthorized use of programs, user authorizations are defined in roles that can be linked to the individual
users.
Install updates
If LN sends an update of the LN software, the system administrator must install the update on the system
as soon as possible.
Log changes in the system
The system administrator must log the changes to the system. An administrator can change many
aspects in the system, for example, the printer definition files. The logged information can be useful for
problem solving.
Perform all initialization procedures
The system administrator must know all initialization procedures, for example:
▪
How to create a new company number
▪
How to enter data for a new company number
▪
How to copy an existing company number to a company number For details on this procedure,
refer to To copy a multicompany structure in the “Enterprise Server” section in the Infor Web
Help.
Create and customize software
To optimize the use of LN, the system administrator can create or customize various software components,
for example, menus, forms, and reports.
Infor Enterprise Server | Administration Guide | 31
System Administrator Tasks

Perform periodic application runs
Some application programs must run on a regular basis. The system administrator is responsible to run
these programs, for example, to update statistics and to print and remove stock transactions.
Maintain the system log
Data about the system and the application is stored in a system log.
The system data includes information about:
▪
The application environment
▪
Any reorganization of tables
▪
The available free disk space
▪
The back-up schedule
▪
The user data reports
▪
The updates
▪
Changes in the system
▪
The error messages and solutions
Analyze problems
The system administrator must analyze any problems that occur during the usage of LN.
LN offers various logging features that are helpful for problem analysis, such as logging for database
locking.
Logging for database locking
LN offers a logging mechanism to gather statistics on database locking. You can use the statistics to
identify long waiting times, long locks, and retries, which cause performance problems.
To use this logging mechanism, complete the following steps:
1. To activate the logging, start the Logging Parameters (ttaad4153m000) session and specify
the following information:
▪
A threshold, in milliseconds, for logging database lock actions.
▪
A file to store the locking statistics.
▪
A time frame in which the logging takes place.
After you specified the logging parameters, you must convert them to runtime.
2. To analyze the logging statistics, use the Generate lock graph html output (ttstplocklog )
session. The session first generates a snapshot file, based on the locking log file(s). This file
contains all, or a subset of, the log records. Then, the session generates an html report that
displays the contents of this snapshot file.
For details, refer to the online help of the sessions mentioned.
32 | Infor Enterprise Server | Administration Guide
System Administrator Tasks

License management and validation
A license management mechanism is a copy protection mechanism used to regulate the commercial
use of LN. For testing and demonstration purposes, unprotected software is dispatched with limited
validity. The unprotected software must be validated before a specified expiration date.
To license and validate LN
LN uses a license management mechanism, and a validation mechanism to regulate the commercial
use of LN.
You validate and license your LN software with the Infor Solution License Manager (SLM). The SLM is
a stand-alone product capable of licensing various Infor products.
It’s strongly advised to install at least two physical SLM servers on two separate systems, combined as
one logical SLM server, if you use SLM to validate several Infor products.
Licensing solution
Solution License Manager (SLM) is the central license manager for the majority of the Infor products.
SLM is a central license manager in the sense that one license manager can provide licenses to a variety
of products. Installing and configuring a dedicated license manager individually by product is unnecessary.
To establish a licensing solution, you require the following three components:
▪
The Infor application or product that has adopted SLM licensing
▪
The Solution License Manager product itself for handling the licenses. The License Manager
checks the license requests from the adopting applications, according to the information stored
and validated with Infor.
▪
The Activation key that enables the Solution License Manager. Submission of the Activation
key enables the licenses that your adopting applications require to work.
Infor Enterprise Server | Administration Guide | 33
3
Chapter 3
License Management and Validation

SLM license types
Infor applications can be licensed in various ways. To see how your application must be licensed, refer
to the Software License and Support Agreement (SLSA). Depending on the Infor pricing strategy, a
restricted set of license types can be assigned to a specific application. For example, some applications
can be licensed through any license type, while others can only be licensed through a server license.
In general, the license types are distinguished in node locking and user locking. With a node-locking
license, the adopting application can only work on a specific node in your network. A network node can
be a server but also a desktop. With a user-locking license, the adopting application can only work with
specific named users or with a limited amount of concurrent users.
Currently, the Solution License Manager supports the following license types:
▪
Concurrent User license
A user-locking license in which a pool of concurrent users can use the adopting application.
▪
Named User license
A user-locking license in which a pool of specific named users can use the adopting application.
▪
Server license
A node-locking license in which a pool of specific named server or desktop computers can
use the adopting application.
▪
Instance license
An instance-locking license in which a pool of specific named instances can be used for the
adopting application. Note: With SLM 2.5, instance licensing is registered by means of server
licensing.
▪
Desktop license
A node-locking license in which a set of adopting applications are linked to a pool of specific
named server or desktop computers.
When a license request is made, the SLM server checks the license configuration (License file) to see
how many desktops, users, servers, or instances can use the application, and then, according to the
license type, checks the specific named user, server, or desktop.
Some adopting application can be licensed with all the various license types, while others can handle
only a selection of licenses.
Named User license
If an adopting application uses Named User licensing, the SLSA states the number of named users that
can use that application. The SLM server keeps track of a list of all specific users that are permitted to
use that application. The server will reject a license request from an adopting application if the SLM
server does not know the specific user name.
Infor only validates the amount of named users. Infor never knows the specific names of these users.
Some applications automatically synchronize the user names of their authorization module with the SLM
server.
34 | Infor Enterprise Server | Administration Guide
License Management and Validation

The SLM server checks for a specific user name in combination with the desktop name where the
application is running. You can specify that a specific user can run the application concurrently from
multiple desktops. Each desktop on which this user runs the application decreases the number of licenses
by one.
License Administration in LN
In case of a Named User Licence, you can use the the License Administration sessions in LN to keep
the Named User list in SLM up to date.
The following is a short description of the License Administration sessions.
▪
SLM Product IDs by User (ttslm0130m000)
Use this session to display or edit the SLM Product IDs that are used by a user.
▪
Link SLM Product IDs to Users (ttslm0230m000)
Use this session to link SLM Product IDs to Users based on the Authorization Management
System. This session links the product IDs to users, based on which sessions the users are
authorized for.
▪
Synchronize User Data with SLM (ttslm0230m100)
With this session you can synchronize user names with the Solution License Manager for
product IDs that require a Named User License.
Infor Enterprise Server | Administration Guide | 35
License Management and Validation

36 | Infor Enterprise Server | Administration Guide
License Management and Validation

System recovery
This section describes the relevant procedures and the steps required to carry out the crash recovery
procedure of an LN Software Environment (BSE) for UNIX platforms and Windows platforms.
System recovery overview
After a system crash, you must restore your LN Software Environment (BSE) from a back-up file stored
on another system. Therefore, before you use your BSE in an operational environment, you must plan
a back-up strategy for your BSE.
Back-up strategy
Before you can use LN, you must decide how you plan to protect your BSE against potential disk crashes
and other system failures. If you do not plan and implement a proper back-up procedure, you might not
be able to recover your BSE after a hard crash.
You must thoroughly test your back-up and recovery procedure before and after you move to a run-time
environment. You must perform test recoveries on a regular basis to ensure that your archiving and
backup procedures work.
To ensure a successful recovery scheme, frequent backups are essential. You must base the back-up
frequency on the frequency of changes in your BSE’s data. For example, if data changes at a high rate,
the backup frequency must be proportionally high.
The amount of time you must keep the back-up files depends on the back-up frequency of your recovery
scheme.
For additional safety, maintain two or more of your previous backup files, in case part of the current
backup file is lost or damaged.
Infor Enterprise Server | Administration Guide | 37
4
Chapter 4
System Recovery

System recovery procedure
▪
Procedure aim
The steps required in a hard crash procedure if, after a crash, you cannot reboot your operating
system and restart your BSE.
▪
Procedure result
This procedure results in a new BSE that functions the same as the initial installation.
▪
Prerequisites
You must have on another system an undamaged backup version of the files that have crashed
in your BSE environment.
Procedure summary
To recover LN after a hard crash:
1. Restore the back-up files.
2. Start and, if required, configure the Infor Solution License Manager (SLM).
3. Start the printer daemon and the shared memory:
▪
On a UNIX platform, run the rc.start shell script
▪
On a Windows platform use the Infor ES Service Manager
4. Start the BSE environment.
In addition, you might also be required to recover your operating system and database. Refer to your
operating system and database manuals for the appropriate procedures.
Note
Important information, such as database parameters, login accounts, Kernel parameters, and so on,
must be logged in a safe place, for example, in a system or database administrator’s log book, so that
you can reuse this information during a recovery.
38 | Infor Enterprise Server | Administration Guide
System Recovery

Version and release management introduction
This section describes LN ’s version and release management, which manages the various versions of
the LN packages, their corresponding releases, and customizations.
An overview of version and release management
Software is constantly changing. Therefore, you must manage various versions of packages,
corresponding releases, and all the various customizations on the standard software. Infor Enterprise
Server offers a comprehensive solution with a version and release management concept.
Advantages of the version and release concept are the following:
▪
A flexible development environment
▪
Flexible management of the following:
▪
New versions of the software
▪
Patches on the software
▪
Customizations on the software
▪
Localizations for the software
▪
Developers can create and test the customizations on the standard software in a separate
development environment.
▪
Operational users will not see new or customized software components until the components
are fully tested and released in their own run-time environment.
Package combinations
A package combination is a collection of various LN packages. Every package combination has a unique
VRC. The package combination links users to a specific version of the LN software. A package
Infor Enterprise Server | Administration Guide | 39
5
Chapter 5
Version and Release Management

combination can be linked to one or more users and to one or more companies. However, a package
combination can contain only one version of a package, which is identified by a package VRC.
The following figure shows an example of a standard package combination:
Example of a software environment with a standard package combination
This figure shows an example of a standard package combination, which contains a number of standard
package VRCs, such as the standard version of LN Financials.
Package VRCs
Each LN package is distributed as a package VRC, which represents a specific version of that package.
VRC stands for version release customer code, and it identifies the development stage of the LN software.
A VRC consists of the following:
▪
A version code that identifies a major LN software modification
▪
A release code that identifies a minor LN software modification
▪
A customer extension code that identifies LN software for a specific customer
A package, for example, LN Financials, can have more than one version. Each version is identified by
a specific package VRC. For example, LN Financials can have a package VRC that contains the standard
software of LN Financials and a package VRC that contains the customizations on the standard software
of LN Financials.
As a rule, a new package VRC is derived from a previous package VRC. To avoid duplication of software
components, a new VRC only contains those software components that have changed compared to
previous VRCs.
40 | Infor Enterprise Server | Administration Guide
Version and Release Management

The following figure shows an example of the VRC derivation structure:
An example of a VRC derivation structure
In this example, B61_a is the VRC that contains the standard software. The following two new VRCs
are derived from this VRC:
▪
The VRC B61C_a_cus1 contains a customized version of the standard software
▪
The VRC B61_b contains a new version of the standard software. From this new standard
VRC, two new customized versions are derived:
▪
B61C_b_cus1
▪
B61C_b_cus2.
The VRCs B61C_b_cus1 and B61C_b_cus2 contain several customizations on the B61_b
standard version.
Package VRC code
A unique identifier identifies package VRCs in LN. LN uses the following format to identify package
VRCs, the codes of which are described in the following table:
pp vvvt_rr_gggn
DescriptionCode
Package codepp
Version codevvv
Infor Enterprise Server | Administration Guide | 41
Version and Release Management

Type code.
Denotes customizations on standard software. This
field is not filled for the standard software. Possible
type codes include the following:
t
▪
L Localizations: Customizations for a specific
country.
▪
B Branch: Customizations for a specific line
of business.
▪
C Customer: Customizations ordered by the
customer, developed by a dealer or partner.
▪
O Own: Customizations developed by the
customer.
Release coderr
Customer code: This field is not filled for the stan-
dard software.
ggg
Sequence coden
For example, for the Strangely Brown Chicken company (SBC), the package VRC tc B61O_b_sbc1
represents the first customization on the standard software in the B61_b VRC of LN Common.
Note
Customers can only create new VRCs for their own customizations from the standard software. Infor or
a partner delivers all other VRC types.
LN software environment
To create specific software environments, you can use package combinations.
A software environment consists of the following:
▪
A package combination
▪
At least one company
You can create a special package combination to customize software components or to create new
software components.
The following table lists the possible software environments in LN:
42 | Infor Enterprise Server | Administration Guide
Version and Release Management

DescriptionSoftware environment
A package combination that contains the standard version of all LN pack-
ages.
Standard environment
A package combination that contains the package VRCs that normal users
use at runtime.
Runtime environment
A package combination that contains package VRCs in which developers
can create customizations.
Development environ-
ment
Standard environment
The standard environment contains the standard software of all LN package VRCs of all LN packages.
You can use the standard environment to compare customized software with standard software.
The following figure shows an example of the standard environment.
Standard environment
This figure shows an example of a user who is linked to a specific package combination. Use the User
Data (ttams1100s000) details session to link the user to a package combination. For more information,
refer to “To Create LN users,” in the “User Management” section.
Runtime environment
A runtime package combination can contain some package VRCs that are derived from standard package
VRCs. However, not all packages in the package combination have to have the same package VRC. If
no customizations exist for a certain package, the standard VRC of this package is used in the run-time
package combination. For example, the Service and Maintenance package (tsB61_a) in the following
figure is not customized. The other packages are customized and for these the derived package VRC
is used in the package combination.
Infor Enterprise Server | Administration Guide | 43
Version and Release Management

To specify that the package combination is customer defined, make sure you add not only the customer
extension (cus) but also the extension O. This letter indicates that the package combination is the
customer’s own.
The following figure shows an example of a runtime environment.
Run-time environment
Development environment
As in the run-time environment, a package combination in a development environment contains package
VRCs that are derived from standard package VRCs. Also, not all packages in the package combination
must have the same package VRC. If no customizations exist for a certain package, the standard VRC
of this package is used in the run-time package combination.
Developers use a development environment to develop new software components or to change existing
components.
The following figure shows an example of a development environment:
The development environment
The name of this package combination, such as the previous one, contains the character O. In this case,
the customer extension is replaced by the extension dev, which stands for development.
44 | Infor Enterprise Server | Administration Guide
Version and Release Management

VRC derivation
If a user starts a software component, for example a session, the Virtual Machine (VM) searches from
the outside to the inside, as shown in the following figure. The Virtual Machine (VM) searches for any
customizations on the component made by the customer in the own customization. If no own
customizations exist, the Virtual Machine (VM) searches for a customer-specific customization, and so
on.
The following figure shows how the Virtual Machine (VM) navigates through the customizations on a
component.
Navigation of the Virtual Machine (VM) through the VRC structure
The search path also depends on the package combination and company to which the user is linked.
For example, the package VRCs in a development package combination are derived from the VRCs in
the run-time package combination, these run-time package combinations were, in turn, derived from
standard package VRCs.
Infor Enterprise Server | Administration Guide | 45
Version and Release Management

The following figure shows the derivation structure of the development package combination.
Package VRC derivation structure
In this previous figure, the VRCs with customer extension dev are derived from the VRCs with the cus
extension, which themselves are derived from standard VRCs. If a user works with package combination
b61O_a_cus and starts a software component, the Virtual Machine (VM) searches for a customization
in the VRC with the cus extension. If such a customization is found, this customized component is started.
If no such customization exists, the component in the standard VRC is started.
If a user works with package combination b61O_a_dev and starts a software component, the Virtual
Machine (VM) searches for a customization in the VRC with the dev extension. If no such customization
is found, the Virtual Machine (VM) continues the search in the cus VRC. If this VRC also does not contain
a customized version of the component, the Virtual Machine (VM) starts the component in the standard
VRC.
If you create many package VRCs, derived from each other, the derivation structure can get complicated.
The consequences of a cluttered and complicated VRC derivation structure are:
▪
A decrease in system performance due to the longer derivation structure
▪
A cluttered directory structure due to a large number of newly-created package VRCs
For this reason, you must regularly purge the VRC derivation structure. Before you can purge a package
VRC, you must make sure that the VRC is not connected to a package combination. You can disconnect
the package VRC from a package combination with the Packages by Package Combination
(ttaad1121m000) session.
Note
If you purge a package VRC, the derived-from structure changes. The user files and fd6.2 files, for the
involved users and package combinations, are automatically regenerated so that they contain the new
derived-from structure.
46 | Infor Enterprise Server | Administration Guide
Version and Release Management
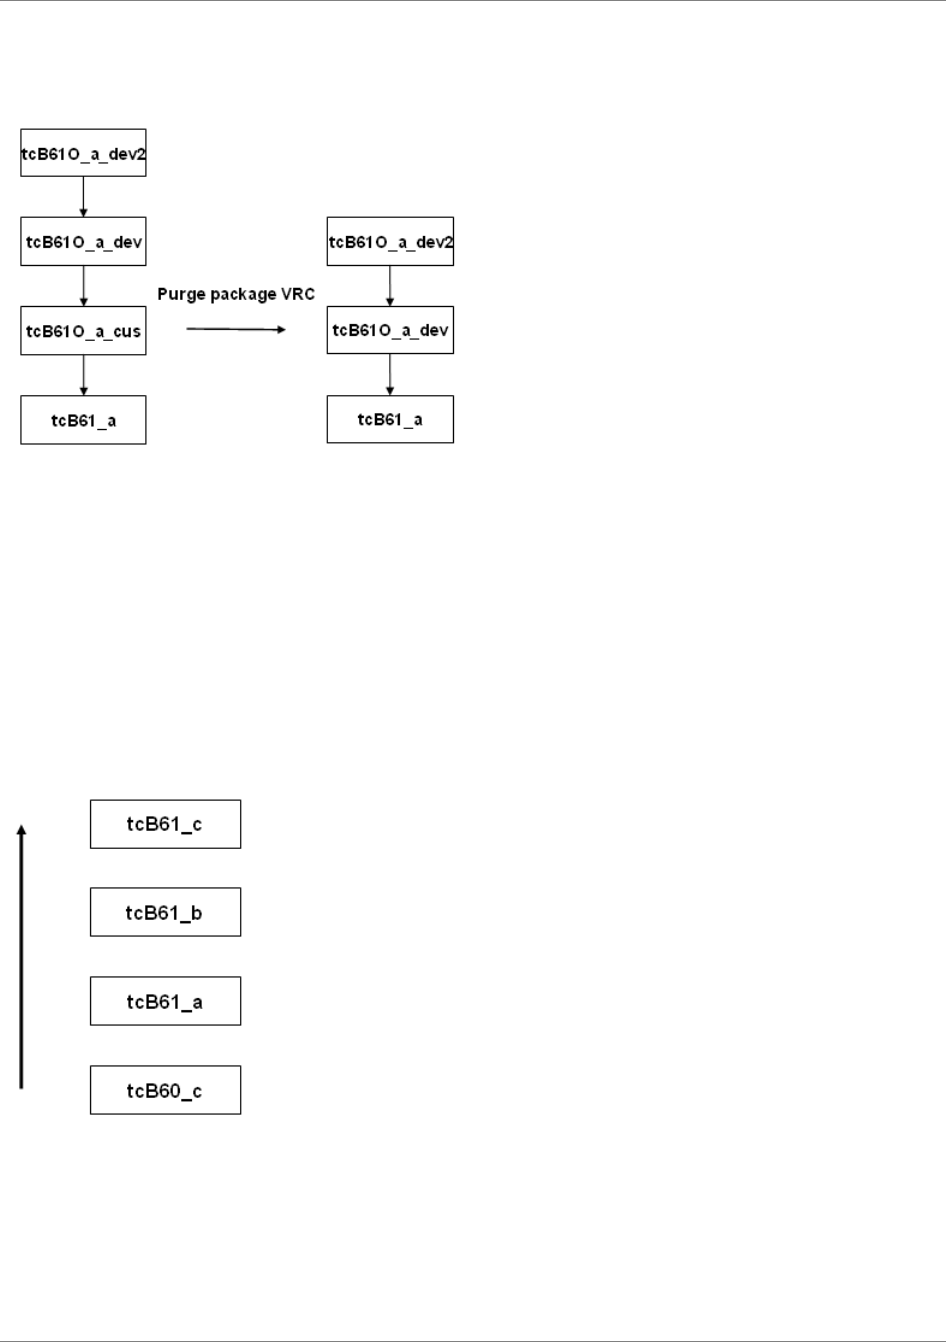
The following figure provides an example of a package VRC derivation structure before and after the
purge:
Package VRC derivation structure before and after the purge procedure
Typically, only customer-defined VRCs are purged that contain customized software components that
do not belong to a package combination. However, you can also purge the package VRCs that contain
the standard software.
For example, the following figure shows the derivation structure of the package VRCs that contain the
standard software of the LN Common package. A new standard can contain new functionality, feature
packs, bug fixes, and so on.
A new standard is put on top of its predecessor, so software components can be duplicated. Therefore,
you must purge the standard package VRCs regularly to remove the duplications.
Derivation structure of the LN Common package
Infor Enterprise Server | Administration Guide | 47
Version and Release Management

The maximum VRC depth, in other words, the number of VRC that you can stack on top of each other,
is 40 VRCs. However, for best results, keep the maximum VRC depth as low as possible.
Standard software environment procedure
Procedure aim
In this procedure, a software environment is created that you can use to create your own customized
software for LN. The environment contains a dedicated package combination and package VRCs for a
customization department.
Procedure result and prerequisites
Result
A new software environment with package combinations and package VRCs.
Prerequisites
Make sure that you have at least 10 MB free disk space and 40 MB database space available.
This section describes only the most important steps in the standard software environment procedure.
For detailed instructions on how to enter data in the sessions that are mentioned in the procedure steps,
refer to the session help.
Note
You can use the procedure on both UNIX and Windows platforms. You can use the ${BSE} notation for
both platforms, as well as for the slash (/) and backslash (\) characters.
Points of attention
Points of attention for the package combination:
▪
The new package combination must contain a VRC for each package, except Tools (tt) and
Tools Add-on (tl):
▪
The Data Director (da), OpenWorld Middleware-enabling (tm), and New Technology (nt) must
not be customized. Therefore, you must include existing (not your own!) VRCs for these
packages. For example, include the highest update or localization VRC in the derivation
structure.
▪
For the remaining packages (except tt and tl) you must include your own VRCs.
48 | Infor Enterprise Server | Administration Guide
Version and Release Management

Procedure summary
The following list shows the procedure steps and the corresponding sessions.
1. Create new package VRCs - Package VRCs (ttadv1511m000)
2. Create new directories for the software components of the new package VRCs - Directories
of Software Components (ttadv1115m000)
3. Create a new package combination - Package Combinations (ttaad1520m000)
4. Link package VRCs to the new package combination - Packages by Package Combination
(ttaad1121m000)
5. Link companies to the new package combination - Change Package Combination by Company
(ttaad1101m000)
6. Link users to new package combination - Change Package Combinations for Users
(ttaad2200m000)
7. Change the authorizations for the developers - Developer Authorization Template
(ttams1151m000)
8. Optionally: Initialize Test tool for Business Data Entities (BDEs) - Initialize Tools
(tlcom0200m000)
9. Authorize normal users for a new or other environment - User Data (ttaad2500m000)
One-step software environment procedure
Procedure aim
In this procedure, a software environment is created that you can use to create your own customized
software for LN. The environment contains a dedicated package combination and package VRCs for a
customization department.
You cannot use this procedure to maintain existing environments. To maintain existing environments,
you must use the sessions discussed in the Standard software environment procedure (p. 48) . The
prerequisites for and result of this procedure are identical to those of the Standard software environment
procedure.
Procedure result and prerequisites
Result
A new software environment with package combinations and package VRCs.
Prerequisites
Make sure that you have at least 10 MB free disk space and 40 MB database space available.
Infor Enterprise Server | Administration Guide | 49
Version and Release Management

This section describes only the most important steps in the one-step procedure. For detailed instructions
on how to enter data in the sessions that are mentioned in the procedure steps, refer to the session
help.
Note
You can use the procedure on both UNIX and Windows platforms. You can use the ${BSE} notation for
both platforms, as well as for the slash (/) and backslash (\) characters.
Points of attention
Points of attention for the package combination:
▪
The new package combination must contain a VRC for each package, except Tools (tt) and
Tools Add-on (tl):
▪
The Data Director (da), OpenWorld Middleware-enabling (tm), and New Technology (nt) must
not be customized. Therefore, you must include existing (not your own!) VRCs for these
packages. For example, include the highest update or localization VRC in the derivation
structure.
▪
For the remaining packages (except tt and tl) you must include your own VRCs.
Procedure summary
The following list shows the procedure steps and the corresponding sessions.
1. Create the software environment - Create New Package Combination / VRCs (One Step)
(ttaad1222m000)
2. Optionally: Initialize Test tool for Business Data Entities (BDEs) - Initialize Tools
(tlcom0200m000)
50 | Infor Enterprise Server | Administration Guide
Version and Release Management

PMC introduction
To help you manage software updates to your LN system, Infor offers the Product Maintenance and
Control (PMC) Tool – an efficient, highly effective tool for managing functional software updates (Feature
Packs) and other software updates (Individual Solutions).
The PMC module manages the installation of Feature Packs and Individual Solutions. The PMC module
is delivered to all customers as part of the master CD-ROM of LN. The PMC module is used to check
software updates for completeness and customization interference.
Without a tool such as PMC, software updates could be installed irrespective of other software updates
that were already installed. Technically, an update that contains an earlier version of a software component
than the version already present on your system, could be installed. In this case, you lose the updates
contained in the original software components.
The PMC module contains two sub-modules.
▪
PMC distributor
▪
PMC recipient
PMC Benefits
The PMC module is an easy-to-use tool that enables you to install, configure, and run new software with
confidence. The PMC module simultaneously addresses a wide range of software update challenges,
including:
▪
Automatic checks for updates for any previous dependencies, to ensure that these exist on
the system on which you install the update.
▪
Analysis of potential conflicts with system customizations at installation time, which enables
the user to identify any conflicting customizations.
▪
Option to maintain copies of all previous software components. This feature enables the user
to roll back updates easily to any point in history.
▪
Overview of all Feature Packs and Individual Solutions, that are installed.
Infor Enterprise Server | Administration Guide | 51
6
Chapter 6
LN Software Maintenance

Note
A customization component does not have a ‘maintenance date’ in its object. Therefore, if you deliver
customization components to a customer, whose maintenance license has expired, the customer can
still deploy the components.
PMC overview
This chapter provides an overview of the Product Maintenance and Control (PMC) module.
This chapter contains the following sections:
▪
PMC Architecture
▪
Where to find the PMC module
▪
Dependencies
▪
Individual Solutions
▪
Collections
▪
Feature Packs and Patches
▪
PMC Distributor functionality
▪
PMC Recipient functionality
PMC Architecture
The following figure illustrates the architecture of the PMC module:
52 | Infor Enterprise Server | Administration Guide
LN Software Maintenance

The software developer creates or updates software components in the Data Dictionary of the developers
ERP system. Software is packaged by the PMC distributor and stored in the PMC Registry. The software
is published on an FTP server. Software can also be shipped on other media, such as CD-ROM, or can
be sent by e-mail.
The customer can download the software from an FTP Server, or can order a software CD-ROM. PMC
recipient builds or updates the PMC Registry on the customer's ERP system. Software in the customer's
PMC Registry can be imported in the customer's data dictionary.
Where to find the PMC module
The PMC module is part of Infor Enterprise Server (Tools). The software supplier is the distributor of
the solutions, and the user or customer of the applications is the recipient. The PMC module contains
functionality and sessions for both the distributor and recipient role.
To navigate to the recipient part of the PMC module, complete these steps:
1. Log on to LN.
2. On the ERP Menu Browser, click Tools --> Software Installation --> Miscellaneous -->
Recipient.
3. Click Setup, Operational, and Miscellaneous.
Alternatively, complete these steps to navigate to the recipient part of the PMC module:
1. Log on to LN.
2. On the ERP Menu Browser, click Tools --> Application Development --> Product
Maintenance and Control --> Recipient.
3. Click Setup, Operational and Miscellaneous.
To navigate to the distributor part of the PMC module, complete these steps:
1. Log on to LN.
2. On the ERP Menu Browser, click Tools --> Application Development --> Product
Maintenance and Control --> Distributor.
3. Click Setup and Operational.
Dependencies
When the PMC recipient installs software updates, the recipient checks the presence of the required
depending solutions.
Three dependency types exist:
▪
Pre-requisites
▪
Co-requisites
▪
Post-requisites
Infor Enterprise Server | Administration Guide | 53
LN Software Maintenance

The following figure shows a pre-requisite dependency: solution 1 must be installed before solution 2.
The following section describes a customer scenario.
Example
A dependency requires you to install the previous version of a software component first. Suppose that
you installed LN from the master CD-ROM without customizations or solutions. You receive an updated
version of the Copy Sales Order (tdsls4201s000) session, which contains the session object, script, and
forms that are interdependent of each other.
You decide not to install the dump and, a few months later, you discover that a change is required in
the script to correct a problem that is keeping your sales force from selling an item. The change is sent
as a dump that contains only the session object and script. You can install this dump only if you installed
the previous version of the software component, because the dump requires the proper form of the first
solution. PMC automatically installs the previous solution.
Suppose you deliberately decided not to install a solution, for example, because you do not know if the
existing version of the Copy Sales Order (tdsls4201s000) session was customized. The PMC module
provides protection against this as well. In this case PMC informs you that the current version is
customized. You cannot overwrite software, because PMC uses update VRC levels and maintains copies
of all previous software components. This setup enables you to roll back updates easily to any point in
history.
Individual solutions
A PMC Distributor creates and publishes individual solutions.
Individual solutions created for standard products of Infor are available for download 24 hours a day,
seven days a week, from the Infor Support Web site http://www.infor.com/inforxtreme for Infor-owned
products.
54 | Infor Enterprise Server | Administration Guide
LN Software Maintenance

You can only download these solutions one by one.
After you download and scan a solution, the PMC recipient checks the dependencies with other solutions.
In some cases, other dependent solutions might be missing at the installation system and must be
downloaded and scanned, as well. The process to install individual solutions can take a long time if
many dependent solutions must be downloaded and scanned.
You can use the Multilevel Download functionality to download all the dependent solutions, without user
interaction, to simplify and speed up the download process.
Collections
Collection dumps enable customers to update their system with the latest software.
Collections are groups of all individual solutions that are released in a particular period.
These individual solutions are gathered at the PMC distributor side in a single dump file.
Collections for standard products of Infor are published on an FTP server.
You can scan collections in a single action. While you scan the collection with the Scan Solution/Patch
File (ttpmc2200s000) session, the dump file is split into all individual solutions that were included in the
collection.
Afterwards, you can install the individual solutions.
You can use collection dumps in two ways: for pro-active installation or corrective installation.
▪
Pro-active installation
The user installs all individual solutions of the collection. The user runs the most up-to-date
version of the software, including the latest released fixes.
▪
Corrective installation
The individual solutions of the collection are not installed. The solutions have status Available
in the PMC registry. If the user runs into a problem, and a solution is advised for this problem,
the user can install that solution immediately. All dependent solutions will be installed
automatically.
Feature Packs and patches
Periodically, individual solutions can be bundled into Feature Packs or patches. In general, these types
of updates contain solutions created in a larger time period than a collection. In the PMC Tool, the term
‘patch’ is used both for Feature Packs and patches. The patch entity is known at both the PMC distributor
and PMC recipient side. Feature Packs and patches are an indivisible set of solutions. You cannot install
or uninstall individual solutions that belong to a Feature Pack or a patch by the PMC recipient. You can
only install or uninstall entire Feature Packs and patches. Dependencies between Feature Packs and
patches can exist.
The subsequent sections describe the justification, characteristics, and differences of Feature Packs
and patches.
Infor Enterprise Server | Administration Guide | 55
LN Software Maintenance

Justification of Feature Packs and patches
During the life cycle of a product, in general, two types of changes are implemented in the product:
▪
Corrective fixes for defects
▪
Functional enhancements to further enrich the product
Functional enhancements are often accompanied by changes in the data model, changes in the user
interface, and changes in the behavior of the application. In general, functional enhancements require
a careful preparation before installation in an operational environment. PMC generates dependencies
between solutions, that contain the same components to guarantee that the solutions are installed in
the correct order and no necessary solutions are skipped. In some cases, users must first install a
number of functional enhancements before the users can install a corrective fix for a relative small defect.
Installation of the functional enhancements can be required at unexpected and undesirable moments.
Feature Packs enable you to separate functional enhancements from the flow of corrective fixes. This
separation enables users to adopt and implement functional enhancements in a more controlled way.
Patches do not offer this possibility.
Feature Packs
Feature Packs enable you to separate corrective fixes from functional enhancements. Multiple parallel
maintenance baselines exist for the product. Every new baseline is linked to a unique base VRC.
Functional enhancements are, in principle, only implemented at the start of a new baseline.
56 | Infor Enterprise Server | Administration Guide
LN Software Maintenance
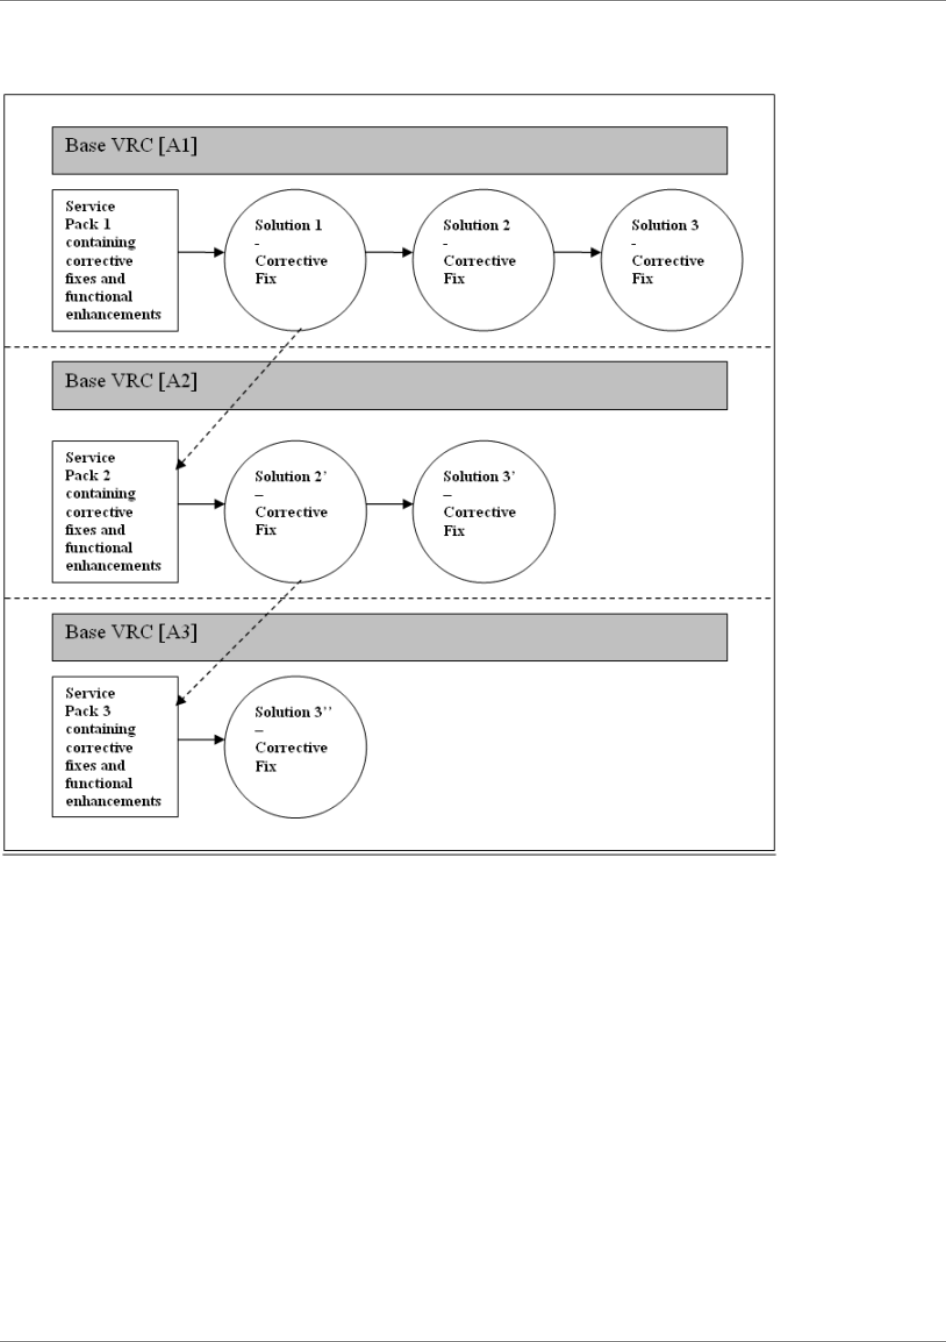
The Feature Packs mechanism is as follows:
Feature Pack 1 is linked to base VRC A1. The Feature Pack contains a number of corrective fixes and
some functional enhancements. Corrective maintenance is performed for this Feature Pack, which
results in solutions 1, 2, and 3 in the previous figure.
In parallel, the software distributor develops Feature Pack 2, which is linked to base VRC A2. Whenever
possible, the distributor immediately ports and includes corrective solutions created on top of Feature
Pack 1 in Feature Pack 2. Refer to solution 1 and the dashed arrow in the previous figure. These ported
solutions are registered in Feature Pack 2 as so-called obsolete solutions.
The same process repeats when the distributor develops Feature Pack 3, which is linked to base VRC
A3.
After the release of Feature Pack 2 and 3, the distributor also creates corrective solutions on top of these
Feature Packs.
Infor Enterprise Server | Administration Guide | 57
LN Software Maintenance

When Feature Pack 2 is being installed at a recipient, the PMC Tool checks whether all solutions that
were installed on top of Feature Pack 1 are also available for Feature Pack 2.
These solutions can be available in two different shapes for Feature Pack 2:
▪
As an obsolete solution
Included in Feature Pack 2. Refer to solution 1 and the dashed arrow in the previous figure.
These obsolete solutions are integrated in Feature Pack 2 and do not have a separate physical
solution dump.
▪
As an individual solution
Available on top of Feature Pack. Refer to solutions 2’ and 3’ in the previous figure. These
so-called missing solutions are not included in Feature Pack 2 and do have a physical solution
dump.
Note: If Feature Pack 1 is installed in multiple update VRCs, the PMC Tool performs the
missing solution check in all update VRCs, that contain Feature Pack 1.
By default, the PMC Tools will refuse to install Feature Pack 2 if not all solutions installed on top of
Feature Pack 1 are also available for Feature Pack 2. Otherwise, old defects would come back after
you install Feature Pack 2. The distributor is responsible for ensuring that all solutions of the preceding
Feature Pack are also available for the subsequent Feature Pack before publishing the subsequent
Feature Pack.
Note
You can change this default behavior, so that you can install Feature Pack updates without additional
individual solutions. For details, refer to To install a 'clean' Feature Pack (p. 58) .
Feature Packs are cumulative. Every new Feature Pack also includes all preceding Feature Packs. This
enables you to skip the installation of Feature Packs at the PMC recipient. For example, you can
immediately upgrade from Feature Pack 1 to Feature Pack 3 without installing Feature Pack 2 in between.
The installation process is optimized in such a way that only components that are changed as compared
to the current installed Feature Pack will be installed.
You can install Feature Packs in an existing update VRC. Therefore, creating a new update VRC is
unnecessary. As a result, the VRC structure at a recipient system can remain unchanged. However,
the base VRC linked to the update VRC will change. If desired, you can, of course, also install a new
Feature Pack in a new update VRC.
To install a 'clean' Feature Pack
When you update an existing environment with a Feature Pack via PMC or via the Installation Wizard,
PMC requires that all solutions, that were installed on top of a previous Feature Pack, are installed for
the new Feature Pack as well. PMC requires these additional solutions to prevent that old problems
come back after installation of the Feature Pack. This also applies if you install the Feature Pack in
another, or even in a new, Update VRC. This is because you can upgrade your companies to the Package
Combination of that Update VRC and subsequently you might see old problems again.
In some situations this functionality is too strict, for example when you want to develop customizations
for different customers on different Feature Pack levels.
58 | Infor Enterprise Server | Administration Guide
LN Software Maintenance

To change this default behavior, you must set the PMC_IGNORE_SOL environment variable to 1. You
can now install a 'clean' Feature Pack, without taking care of the content of already installed Feature
Packs and additional solutions.
You can specify the environment variable in different ways:
▪
In the command field of the BW configuration file (-set PMC_IGNORE_SOL=1). In this way
the setting only applies to the user that uses this configuration.
▪
In the $BSE/lib/bse_vars file (add the line PMC_IGNORE_SOL=1). If you use the Installation
Wizard you can add this line when you are prompted to change the bse_vars configuration
file. In this way the setting applies to all users.
Note
▪
It is recommended to remove the PMC_IGNORE_SOL setting after each Feature Pack
installation.
▪
If you install the Feature Pack in an already existing Update VRC, the solutions that were
installed in that Update VRC for the previous Feature Pack, will also be installed for the new
Feature Pack. So, the possibility to ignore additional solutions only applies to solutions of other
Update VRCs.
Example
You want to install Feature Pack 2, which includes solutions 133, 146 and 154 as obsolete solutions
already.
The following table shows, for some Update VRCs with different Feature Packs and additional solutions
installed:
▪
what happens if PMC_IGNORE_SOL is not set.
▪
what happens if PMC_IGNORE_SOL is set.
Update VRC
B61U_a_fp2B61U_a_fp1B61U_a_stnd
-FP1 including obsolete
solutions 133 and 146
-Feature Pack installed
-154133Solutions installed
168146
172154
168
Infor Enterprise Server | Administration Guide | 59
LN Software Maintenance

Install FP2 in a new Up-
date VRC.
Install FP2 in an Update
VRC with FP1 and some
additional solutions in-
stalled.
Install FP2 in an 'FP0'
Update VRC with some
individual solutions in-
stalled.
Action
Fails unless additional
solutions 168 and 172
are present.
Fails unless additional
solutions 168 and 172
are present.
Fails unless additional
solutions 168 and 172
are present.
Result if PMC_IGNORE_
SOL is not set
Reason for failure:Reason for failure:Reason for failure:
Solutions 168 and 172
were installed on top of
Both solutions were al-
ready installed in this
Update VRC.
Solution 168 was already
installed in this Update
VRC, and solution 172
was installed on top of
FP1 in Update VRC
B61U_a_fp1.
FP1 in Update VRC
B61U_a_fp1.
Succeeds.Fails unless additional
solutions 168 and 172
are present.
Fails unless additional
solution 168 is present.
Reason for failure:
Result if PMC_IGNORE_
SOL is set to 1
Reason for success:
PMC can ignore all solu-
tions, because it is a new
Update VRC.
Reason for failure:
Both solutions were in-
stalled in this Update
Solution 168 was in-
stalled in this Update
VRC, so it is needed on
top of FP2. VRC, so they cannot be
ignored.
Solution 172 can be ig-
nored now.
Important!
Do not set PMC_IGNORE_SOL to 1 if you install the Feature Pack in an Update VRC and Package
Combination, and you plan to upgrade your companies to this Package Combination. This can result in
old problems coming back or, even worse, loss of data if additional solutions on top of the previous
Feature Pack introduced new table fields.
Patches
Patches do not enable you to separate corrective fixes from functional enhancements. Only one
maintenance baseline of the product exists. Changes are always implemented in the latest version of
a software component. The base VRC remains the same. Functional enhancements will be included in
the chain of depending corrective solutions.
60 | Infor Enterprise Server | Administration Guide
LN Software Maintenance
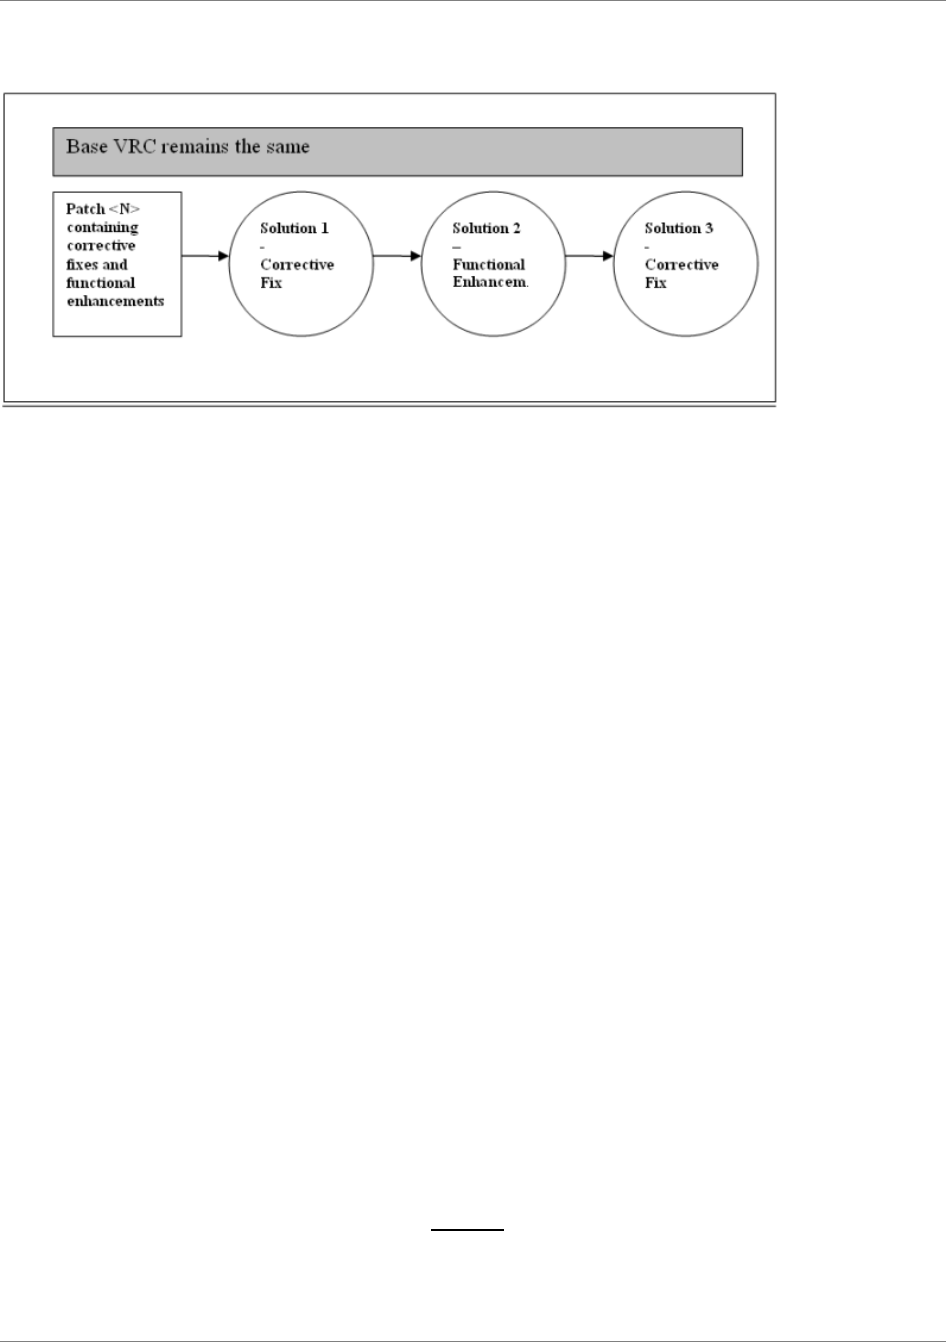
The Patch mechanism is as follows:
To install solution 3 in the this picture, you must first install solution 2, which contains a functional
enhancement.
Patches are not cumulative, which means you cannot skip the installation of Patches at a recipient's
location. For example, before you install Patch 3, you always must install Patch 2 in advance. You cannot
immediately upgrade from Patch 1 to Patch 3.
Distributor’s Policy
The software distributor decides if Feature Packs or Patches are being applied. A mix of both types is
also possible:
▪
When applying Feature Packs, the distributor can decide to release a functional enhancement
as an individual PMC solution on top of one of the released Feature Packs.
▪
When applying Feature Packs, the distributor can decide to periodically also release Patches
on top of the Feature Pack.
When applying Feature Packs, the distributor’s policy determines how many base VRCs are maintained
in parallel and how long the base VRCs are maintained.
PMC Distributor functionality
The software developer generates additional software and makes software changes on the existing LN
software packages.
The supplier of the LN software uses the PMC Distributor functionality to manage the software updates
and prepares those updates for delivery to the customers.
The following is a process overview of the PMC Distributor module.
▪
Create individual solutions
a. Define a unique identifier for the solution and a brief description.
Infor Enterprise Server | Administration Guide | 61
LN Software Maintenance

b. Link one or more software components to the solution.
c. Define or generate the dependencies on other solutions.
d. Export the solution, the software dumps are now created.
e. Release the solution, the solution is now ready for delivery.
▪
Create collections
a. Define a unique identifier for the collection and a brief description.
b. Link one or more individual solutions to the collection.
c. Export the collection.
d. Release the collection.
▪
Create patches
a. Define a unique identifier for the patch and a brief description.
b. Link one or more individual solutions to the patch.
c. Define or generate the dependencies on other patches.
d. Validate the patch.
e. Export the patch.
f. Release the patch.
▪
Create Feature Packs
a. Define a new base VRC for the Feature Pack.
b. Define a unique identifier for the Feature Pack and a brief description.
c. Define the dependency on previous Feature Packs.
d. Generate the Feature Pack, in other words, link all components in a specified VRC to the
Feature Pack.
e. Validate the Feature Pack.
f. Export the Feature Pack.
g. Release the Feature Pack.
▪
Additional distributor functionality
▪
Mutilevel export.
▪
SCM integration.
▪
Maintenance History.
PMC Recipient functionality
Customers use the PMC Recipient module to install the LN software updates on their ERP system.
The following is an overview of the PMC Recipient module.
▪
Download solutions
You can download solutions from the FTP server or copy the solutions from a medium such
as a CD-ROM.
62 | Infor Enterprise Server | Administration Guide
LN Software Maintenance

▪
Scan and connect solutions
The downloaded solution files can be scanned. In other words, the user must extract and store
the solutions into the PMC registry. The extracted solutions are also connected to an update
VRC.
▪
Process solutions
a. Check to install. Report the following: Pre- and post-installation instructions, customized
components, and missing dependent solutions.
b. Install the solutions: Store the software components in the data dictionary, report additional
post-installation instructions.
▪
Additional recipient functionality
▪
Uninstall
▪
Mutilevel download
▪
Compare installed solutions
▪
Solution History
▪
PMC cleanup
▪
Copy PMC registry
▪
View installation runs.
PMC recipient procedure
This chapter describes the PMC recipient procedures. This chapter contains the following sections:
▪
Setup
▪
To install updates
▪
Miscellaneous topics
Setup
PMC recipient is fully configured by the Infor Installation Wizard during the installation of the base Infor
products such as Infor LN and Infor Enterprise Server. This section describes this setup and how to
make changes to the setup.
The setup consists of the following sections:
▪
Procedure
▪
Infor Installation Wizard and PMC
▪
Parameters
▪
Generation and use of update VRCs
▪
VRC combinations
▪
To create a test environment
▪
FTP for downloading software updates
Infor Enterprise Server | Administration Guide | 63
LN Software Maintenance

Procedure
This section shows the recipient setup procedure steps in a flowchart. The following sections provide a
detailed explanation of the procedure.
Recipient Setup procedure
Infor Installation Wizard and PMC
The PMC Tool has a seamless integration with the Infor Installation Wizard. If you install updates by
means of the Infor Installation Wizard, the wizard activates the PMC Tool in the background.
You can use both the PMC Tool and the Infor Installation Wizard to install updates in an existing
environment. However, both tools serve their own specific goal in the update installation process:
The Infor Installation Wizard is primarily intended to do the following:
▪
Install the initial master media
▪
Install Feature Packs
64 | Infor Enterprise Server | Administration Guide
LN Software Maintenance

The PMC Tool is primarily intended to do the following:
▪
Install individual solutions
▪
Install collections
▪
Install patches
You can also install individual solutions, collections, and patches by means of the Infor Installation
Wizard. However, this has the following drawbacks:
▪
The installation process is more labor intensive (more mouse clicks)
▪
You can miss essential information during the installation process. The so-called pre installation
and post installation instructions are not presented in an active way.
▪
The Infor Installation Wizard installs all solutions present in the staging area and/or server.
You cannot select a subset of solutions from the available solutions.
For these reasons, to install individual solutions, collections and patches, be sure to use the PMC Tool
directly.
On the other hand, you can install Feature Packs directly by means of the PMC Tool. This has the
drawback that you must also perform a number of additional steps manually after you install the Feature
Pack. These steps include running the Convert to Runtime Data Dictionary (ttadv5215m000), Compile
Labels (ttadv1243m000) and Create Tables (ttaad4230m000) sessions. If you use the Infor Installation
Wizard, all required steps are executed automatically in the installation process. In addition, the Infor
Installation Wizard offers some extra features that can be very useful during installation of Feature Packs,
such as the automatic creation of new VRC structures and creation of Package Combinations in which
the Feature Pack can be installed.
You cannot however perform the initial installation of initial master media by means of the PMC Tool.
To perform this installation, you must use the Infor Installation Wizard. During installation of the master
media, the Infor Installation Wizard initializes the PMC Tool in such a way that the environment is
immediately ready for installing updates. You can also initialize the PMC Tool manually by means of
the PMC Tool itself. This initialization process is described in the following sections. The following
sections describe which steps are performed automatically when you use the Infor Installation Wizard.
Parameters
The very first step in the Recipient setup procedure is to define the PMC parameters.
The following parameter groups are available:
▪
Recipient
The PMC recipient part of the PMC module uses these parameters and these parameters
must be filled.
The parameters are paths on the operating system, on which the solution dumps will be stored.
▪
Distributor
Even if you do not use the PMC distributor part of the PMC module, you must fill the parameters
of this group for technical reasons.
For details refer to the Parameters (ttpmc0100s000) session.
Infor Enterprise Server | Administration Guide | 65
LN Software Maintenance

Note
Because parameter definition is a one-time step, you must be aware of the impact if you change the
parameters afterwards.
If you change the operating system paths, you must move the directories and files according to the new
path specifications.
Hint
If you have more than one ERP environment running, for example, a Production and a Test environment,
you can share the solution dump directories on the ERP environments, which reduces disk-space
consumption.
Generation and use of update VRCs
PMC uses update VRCs. The software of an initial standard master product is installed in a root VRC
that is predefined by the software supplier. The update VRC is created on top of this root VRC. Feature
Packs and individual solutions that you download from the Infor Support Web site http://www.infor.com/
inforxtreme are also installed in this update VRC. The update VRCs are created automatically during
the installation of the master product.
You can use the Generate Update VRC structure (ttpmc2240s000) session to generate these update
VRCs. In addition,you can define update VRCs by means of the Update VRC's (ttpmc2140m000) session.
In general, the VRC structure for standard Infor LN resembles the following figure:
B61_a is the VRC that contains the baseline, which is the very first shipment of Infor LN 6.1. From this
point on, Individual solutions and Servic Packs are installed in the B61U_a_stnd VRC.
For the Infor Enterprise Server (packages tt, tl, tm, da and nt) no new update VRCs are created and
used.
After a fresh installation of Infor LN, the following update VRCs are present in PMC:
66 | Infor Enterprise Server | Administration Guide
LN Software Maintenance

The heading of the first column in the table, Pack., refers to the package to determine the VRC structure.
VRC combinations
In PMC you use a VRC combination to control co-requisite dependencies between solutions of various
base VRCs.
Update VRCs that must be updated simultaneously, for example, an update VRC for standard Infor LN
and an update VRC for a localization, must be grouped in a VRC combination by the VRC Combinations
(ttpmc2150m000) session and the Update VRC's (ttpmc2140m000) session.
The following figure shows a VRC structure, including a localization:
The following shows the possible Update VRCs in LN when applying a localization.
The heading of the first column in the table, Pack., refers to the package to determine the VRC structure.
Infor Enterprise Server | Administration Guide | 67
LN Software Maintenance
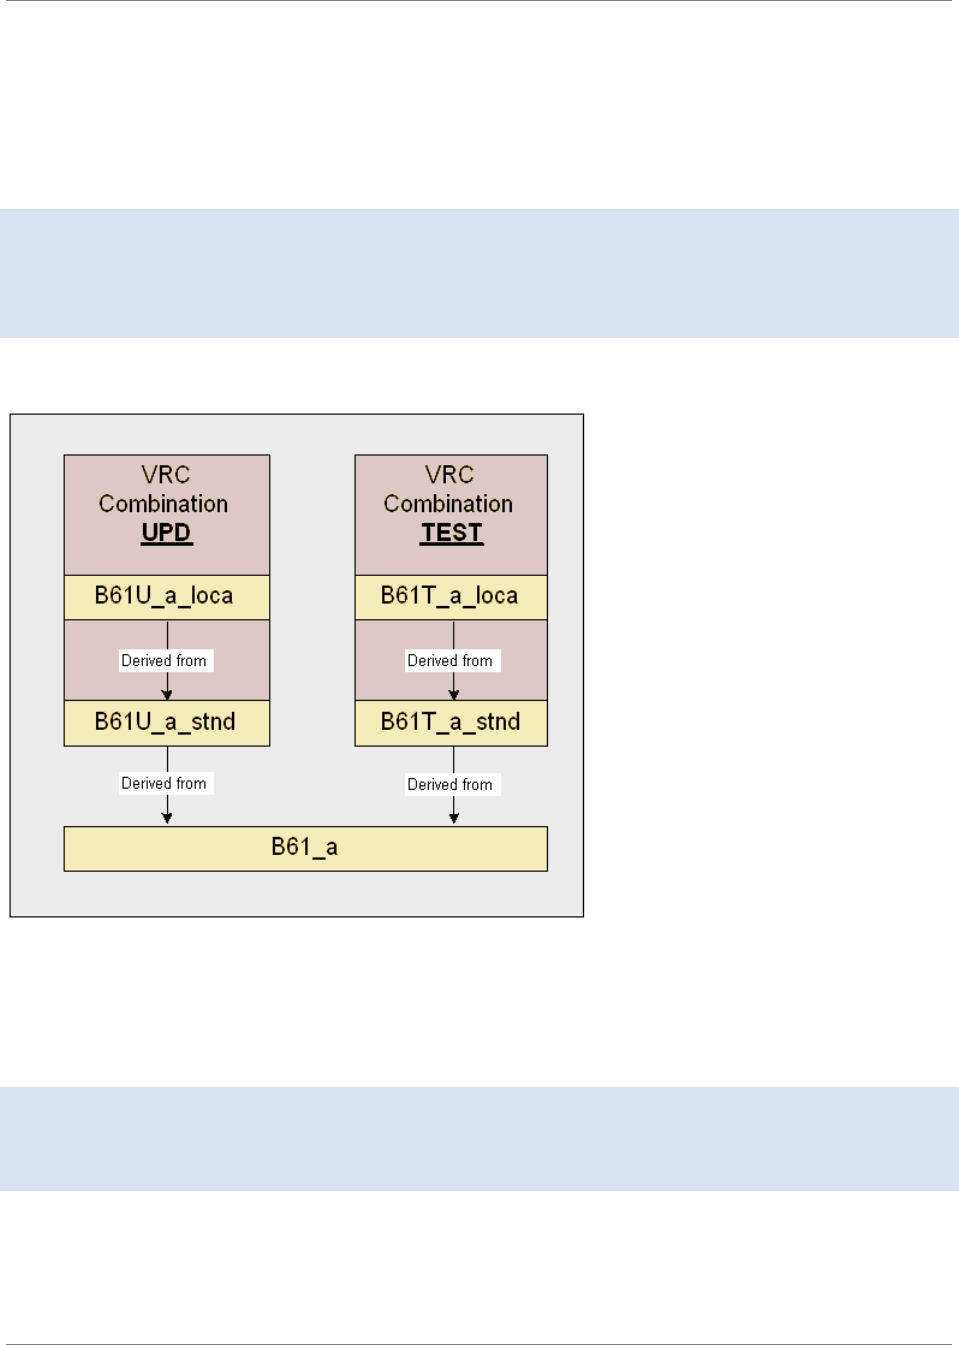
To create a test environment
Best practise is to test the software updates in a test environment before you implement the updates in
your live environment.
To test the software updates, create the update VRCs and the VRC combination for your test environment.
Note
For the Infor Enterprise Server (Tools), no update VRC is created. Therefore, you cannot create an
update VRC for testing purposes. To test the Infor Enterprise Server software updates before installation
in your live environment, you require a separate installation of LN.
Create the update VRC for a test environment parallel to the VRCs in your live environment. The following
figure provides an example:
The update VRCs that are grouped in a VRC combination, for example, B61U_a_stnd and B61U_a_loca
will be updated simultaneously.
The B61T_a_stnd and the B61T_a_loca are updated in the same way. These VRCs represent a test
environment.
Note
If you do not have a localization and/or extension installed, you do not need a VRC combination. The
only update VRC you need for your test environment is B61T_a_stnd.
68 | Infor Enterprise Server | Administration Guide
LN Software Maintenance

To create a PMC test environment, take the following steps:
1. Start the Generate Update VRC structure (ttpmc2240s000) session and complete the following
fields:
▪
Always fill the Package to Determine VRC Structure field with the package tf. Do not
use any other packages, such as cp.
▪
You can choose any customer VRC extension for the Update Customer field. Note that
the Update Customer fields are the five fields on the far right in the VRC Information
group box. Infor recommends that you use stnd for standard VRCs and the same value
as the base VRC customer code for localizations and extensions. If you do not have a
localization installed, leave the Localizations fields blank.
▪
Fill the VRC Combination field and a description. This step is not required if you do not
have a localization installed.
▪
The Customization Type field can contain any character, but the character T is
recommended for a test.
▪
Select the Create Update VRCs check box.
▪
Clear the Change Derivation of Other VRCs check box to specify that you do not want
to derive the current VRCs from the new update VRC.
▪
Clear the Update Package Combinations check box to specify that you do not want to
change the VRCs in package combinations.
2. If you do not yet have a package combination that contains the new VRC structure, you must
create a package combination. Use the Package Combinations (ttaad1520m000) and Packages
by Package Combination (ttaad1121m000) sessions to set up a package combination.
3. Start the Create Runtime Data Dictionary (ttadv5210m000) session.
Enter the information in the dialog box. Click Create Runtime for all package combinations
in the range of updated package combinations, you selected in the Generate Update VRC
structure (ttpmc2240s000) session.
Select all the options:
▪
Domains
▪
Tables
▪
Check before create runt.
▪
Reconfigure tables
▪
Sessions
▪
Print Errors
FTP/HTTP to download software updates
If the dumps of the solutions you want to install are located on an FTP/Web server, you can use the
Download, Scan and Connect Solution (Multi-Level) (ttpmc2210s000) session to download the dumps.
Before you start the download, ensure the correct download settings are specified.
To specify the download settings:
1. Start the Parameters (ttpmc0100s000) session.
Infor Enterprise Server | Administration Guide | 69
LN Software Maintenance

2. Under Download Settings, select whether you want to use an HTTP or an FTP download.
3. If you selected the HTTP protocol, specify this information:
▪
Download Site: The web server where the solutions can be found.
Default = secure2.support.baan.com
▪
Download User: Your login name for this server.
Default = your current login name including the domain. For example, infor\
<Loginname>
▪
Download Password: The password required to log on to the web server.
▪
Download Directory: The folder where the solutions can be found.
Default = /ftpdownload/updates/ (note the starting and ending slash).
4. If you selected the FTP protocol, specify this information:
▪
Download Site: The ftp server where the solutions can be found.
Default = ftp://ftp.support.baan.com/
▪
Download User: Your login name for this server.
Default = your current login name including the domain. For example, infor\
<Loginname>
▪
Download Password: The password required to log on to the ftp site.
▪
Download Directory: The folder where the solutions can be found.
Default = /updates/ (note the starting and ending slash).
5. To test the settings, click Test Connection.
6. If you selected the FTP protocol, optionally generate an FTP script by clicking Generate FTP
Script. The name of the generated FTP script is ftpbaan. The script is stored in the $BSE/
lib directory on the ERP server.
The Download, Scan and Connect Solution (Multi-Level) (ttpmc2210s000) session uses either method
to make the connection to the FTP/HTTP server and to download the solution dumps.
To install updates
This section describes the procedures for the recipient of updates to manage the PMC administration.
The procedure consists of the following sections:
▪
Procedure steps
▪
Download updates
▪
Scan updates
▪
Connect update to update VRC
▪
Check to install
▪
Install
▪
Check to uninstall
▪
Uninstall
70 | Infor Enterprise Server | Administration Guide
LN Software Maintenance

Procedure steps
This section illustrates the procedure steps to install software updates by means of PMC in a flowchart.
The following sections provide a detailed explanation of the procedure.
Install Update Procedure
Download updates
To download updates you can use the Download, Scan and Connect Solution (Multi-Level)
(ttpmc2210s000) session. The session automatically scans the downloaded solutions, and connects
the solutions to the specified update VRC. The purpose of scanning the solutions is to make the solutions
known to the system, and to identify installation conditions. After the solutions are scanned, you might
find that the solutions cannot be installed unless other solutions are downloaded and installed as well.
In that case, the session also downloads, scans and connects these solutions. This step is repeated,
until all required solutions are downloaded, scanned, and connected. If the related solutions are already
present on your system, but connected to another VRC, the solutions are not downloaded again, but
are only connected to the specified update VRC.
Infor Enterprise Server | Administration Guide | 71
LN Software Maintenance

You can also download solutions manually, in which case you must also complete the following steps
in this section. These steps are integrated in the Download, Scan and Connect Solution (Multi-Level)
(ttpmc2210s000) session, and can be skipped if you downloaded the solutions using this session.
Note
You can only use this session can only be used for downloading if the solution dumps are published on
the FTP server defined in the Generate ftp script (ttpmc2211s000) session.
Scan updates
After solutions are downloaded to the system, the first step to make the solutions available to the PMC
registry is to scan the solution files by means of the Scan Solution/Patch File (ttpmc2200s000) session.
The solutions receive the status Available in the update VRC for which the scan is carried out. Scanned
files can contain Feature Packs, patches, collections, or individual solutions. All the relevant PMC data
is stored in the PMC registry.
Connect update to update VRC
Use the Connect Solutions/Patches to VRC (ttpmc2201s000) session to make the solutions available
in other update VRCs. You can disconnect the solutions by means of the Disconnect Solutions/Patches
from VRC (ttpmc2202s000) session.
Check to install
All the following functionality is controlled by the Process Solutions (ttpmc2101m000) session and the
Process Patches (ttpmc2102m000) session.
The solutions with the status Available that are connected to the update VRCs must be checked by
means of the Check Solution/Patch to Install (ttpmc2203s000) session. The related solutions are checked
as well. The solutions, including the related solutions, which must be installed receive the status To
Install. Optionally, detailed information is given on customized components and components that exist
in non-supported languages.
Install
You can install the solutions with status To Install, by means of the Install Solution/Patch (ttpmc2205s000)
session. If the PMC registry was changed after the solution received the To Install status, the solution
must be checked again before the solution can be installed. The related solutions are installed as well.
After the solutions are installed, the status of the solutions is Installed.
Check to uninstall
All the following functionality is controlled by the Process Solutions (ttpmc2101m000) session, the
Process Patches (ttpmc2102m000) session and the Installation runs (ttpmc2503m000) session.
72 | Infor Enterprise Server | Administration Guide
LN Software Maintenance

If a solution must be uninstalled, for example, because the solution was a bad fix, use the Check
Solution/Patch to Uninstall (ttpmc2206s000) session. The solution status and the status of related
solutions becomes To Uninstall.
Note
You can use Check to uninstall from the Installation runs (ttpmc2503m000) session if you want to
uninstall all solutions that were installed together in one run, for example, a solution including all
prerequisite solutions or solutions of a collection that were installed in a range.
Uninstall
Run the Uninstall Solution/Patch (ttpmc2208s000) session to set the status of the solution, including
the related solutions, back to 'Available'.
Note
If during installation or uninstallation the process is stopped, for example, due to a system crash, process
kill, and so on, the solution that was being processed at that point still has the status Installing or
Uninstalling. With the next start of a processing session from the Process Solutions (ttpmc2101m000)
session, PMC recognizes this situation and starts the stopped process again for the interrupted solution.
If a sequence of solutions was to be installed or uninstalled, you must restart the process for the remaining
solutions.
Miscellaneous topics
This section describes the following topics:
▪
Update policy
▪
Opening a patch
▪
PMC cleanup
▪
Removing an update VRC
Update policy
This section describes a procedure to install, test and make a new Feature Pack operational in your live
environment. The procedure minimizes the impact in terms of system downtime for the operational
environment.
Scenario
Suppose you have installed the master product in VRC B61_a and Feature Pack 1, including a number
of individual solutions, on top of Feature Pack 1 in update VRC B61U_a_stnd. This update VRC is linked
to package combination b61au. Customizations are available in the B61U_a_cus VRC that is linked to
the b61cus package combination. Various operational companies are linked to package combination
b61cus.
Infor Enterprise Server | Administration Guide | 73
LN Software Maintenance
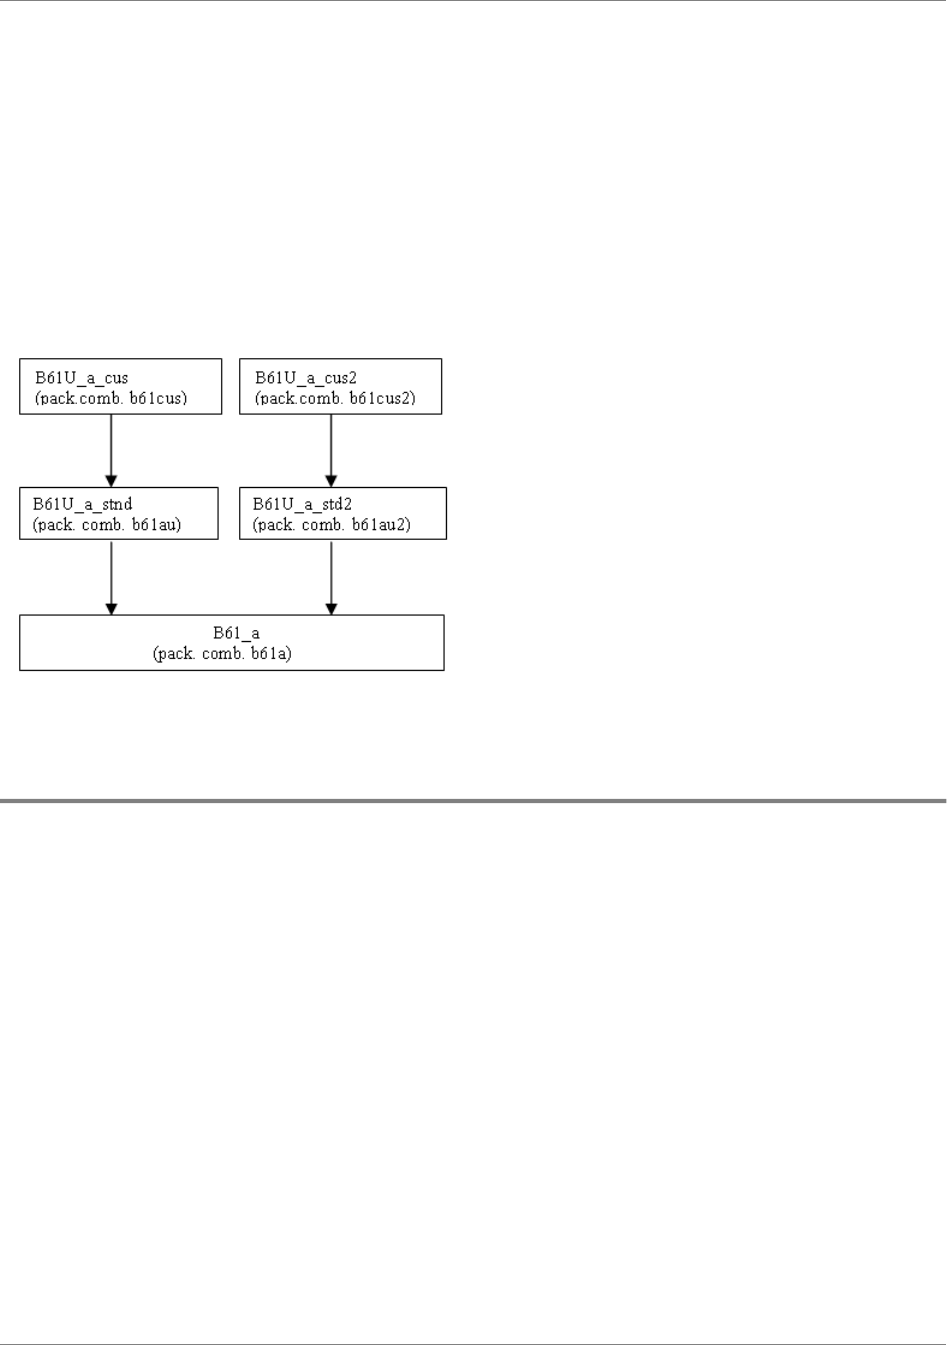
You now want to install Feature Pack 2. However, you first want to explore the new Feature Pack in a
separate environment without disturbing the operational business.
Two methods are available to explore the new Feature Pack in a test environment:
▪
Method 1
Switch companies between VRC branches.
▪
Method 2
Have a permanent separate test VRC branch.
The following table describes both methods in detail . Steps 1 through 7 in both methods are identical.
The following is the recommended update procedure for Feature Packs:
Procedure for both methods
Install Feature Pack 2 in the new Update VRC, for
example, B61U_a_std2. The new update VRC must
1
be derived from the master product VRC B61_a. In
addition, create a new package combination, for
example, b61au2. If you install the Feature Pack
using the Infor Installation Wizard, you can have
the Infor Installation Wizard create the new update
VRC and package combination automatically. The
PMC tool guarantees that all individual solutions
that were installed on top of Feature Pack 1 in the
B61U_a_stnd VRC will also be installed in the
B61U_a_std2 VRC, if these solutions are not al-
ready included in Feature Pack 2. Therefore, from
a maintenance perspective, the B61U_a_stnd and
74 | Infor Enterprise Server | Administration Guide
LN Software Maintenance

B61U_a_std2 VRCs will be synchronous after instal-
lation of Feature Pack 2.
Having companies linked to the b61au2 package
combination enables you to investigate on runtime
2
the behavior of the standard product without cus-
tomizations. To achieve this, link one or more test
companies to the new package combination
b61au2. You can do this in various ways:
▪
Install the demo companies that are included
in the SP2 medium.
▪
If you have existing test companies linked to
the b61au package combination, you can re-
link these companies to the b61au2 package
combination using the Change Package
Combination by Company (ttaad1101m000)
session.
▪
Copy an existing company linked to package
combination b61au using the Copy Company
Data (tccom0214m000) session. Next relink
the newly copied company to the b61au2
package combination using the Change
Package Combination by Company
(ttaad1101m000) session.
You can now explore the Feature Pack 2 that is in-
stalled in the B61U_a_std2 VRC.
3
Create package VRCs B61U_a_cus2 and the relat-
ed package combination b61cus2.
4
Copy the contents of the B61U_a_cus VRC to the
B61U_a_cus2 VRC using the Copy Software
5
Components to New Package VRC
(ttadv6265m000) session. Make the b61cus2
package combination runtime using the Create
Runtime Data Dictionary session. Note that, at this
point, the customizations are still not synchronized
with Feature Pack 2.
Copy one or more companies linked to package
combination b61cus using the Copy Company Data
6
(tccom0214m000) session. Next relink the newly
copied company to the b61cus2 package combina-
Infor Enterprise Server | Administration Guide | 75
LN Software Maintenance

tion using the Change Package Combination by
Company (ttaad1101m000) session.
After you explore the new Feature Pack, upgrade
customizations in the B61U_a_cus2 VRC, and
7
prepare your organization to use the new Feature
Pack, verify whether additional solutions were in-
stalled in the B61U_a_stnd VRC after you per-
formed Step 1. To perform this verification use the
Compare Installed Solutions (ttpmc2405s000) ses-
sion. Install the missing solutions in the B61U_a_
std2 VRC as well. Synchronize the customizations
again if required.
Method 1: Switch companies between VRC branches
Transfer the operational companies from the b61cus
to the b61cus2 package combination. To perform
8
this transfer, use the Change Package Combination
by Company (ttaad1101m000) session.
After complete the previous steps, all operational
companies and users will be linked to the b61au2
9
package combination. To install the subsequent
Feature Pack 3, you must repeat the process, but
now in the opposite direction: You install Feature
Pack 3 in the B61U_a_stnd update VRC. Again,
you can, of course, create an additional VRC branch
for Feature Pack 3. However, this process requires
more installation time and disk space. The test
companies are relinked to the b61au package
combination. Feature Pack 3 is explored and finally
the operational companies are linked to the b61au
package combination.
In theory you can apply the same mechanism for patches. However, one important difference applies.
Patches are not cumulative. Installation of a patch requires that you at least have installed the preceding
patch. Therefore, you cannot directly install Patch 2 in the B61U_a_std2 update VRC. You first must
install Patch 1, followed by the installation of Patch 2. In the same way, you first must install Patch 2
in update VRC B61U_a_stnd before you can install Patch 3.
Method 2: Have a permanent separate test VRC branch
Install Feature Pack 2 in the B61U_a_stnd VRC.
Copy the contents of the B61U_a_cus2 VRC to the
8
76 | Infor Enterprise Server | Administration Guide
LN Software Maintenance

B61U_a_cus VRC using the Copy Software Com-
ponents to New Package VRC (ttadv6265m000)
session. Make the b61cus2 package combination
runtime using the Create Runtime Data Dictionary
session.
To install the subsequent Feature Pack 3, repeat
the process.
9
In principle you can apply the same procedure for patches when you use Method 2.
Advantages and disadvantages of both methods
Method 2 has the disadvantage that you must install Feature Pack 2 twice. As a result the system
downtime is greater if you use Method 2.
The system downtime for Method 1 consists of the following elements:
▪
Time required to reconfigure the application database and relink the company and users.
The system downtime for Method 2 consists of the following elements:
▪
Time required to install and make the Feature Pack runtime.
▪
Time required to reconfigure the application database.
Open a patch
Only in exceptional situations you can decide not to carry out a complete installation of a patch, but to
install a selection of one or more of the indiviual solutions contained in the patch. Therefore, you can
open a patch to select individual solutions. To open a patch, you will require a password. To obtain a
password contact Infor Support. You can start the Open Patch (ttpmc2105s000) session from the
appropriate menu of the Process Patches (ttpmc2102m000) session.
Note
You cannot open a Feature Pack.
PMC cleanup
Cleaning up PMC is useful for saving disk space. You can run the cleanup by means of the PMC Cleanup
(ttpmc2220m000) session.
This session can clean up three types of PMC data:
▪
Solution dumps
▪
Uninstall dumps
▪
PMC registry
Infor Enterprise Server | Administration Guide | 77
LN Software Maintenance

To remove an update VRC
Removing an update VRC can be useful for saving disk space and for a clear VRC structure. You can
remove an update VRC by means of the Delete Update VRC Structure (ttpmc2241s000) session.
PMC recipient session summary
PMC recipient sessions
DescriptionTitle
Maintain the parameters for the PMC module.Parameters (ttpmc0100s000)
Display the solutions that are present in the registry of
solutions and connected to the specified update VRC.
Process Solutions (ttpmc2101m000)
Various options are present to process the solutions.
Display the patches that are present in the registry of
solutions and connected to the specified update VRC.
Process Patches (ttpmc2102m000)
Various options are present to process the patches.
Enter a password to open a patch. If you open the
patch, you can handle the solutions contained in the
patch individually.
Open Patch (ttpmc2105s000)
Maintain the update VRCs.Update VRC's (ttpmc2140m000)
This session registers the update VRCs to which solu-
tions can be connected.
Maintain the VRC combinations.VRC Combinations (ttpmc2150m000)
Scan an export dump that contains one or more solu-
tions that is placed on the recipient system. You can
also use this session to scan collections and patches.
Scan Solution/Patch File (ttpmc2200s000)
Connect solutions or patches that are already available
on the system to an update VRC.
Connect Solutions/Patches to VRC
(ttpmc2201s000)
78 | Infor Enterprise Server | Administration Guide
LN Software Maintenance
Disconnect solutions or patches from an update VRC.Disconnect Solutions/Patches from VRC
(ttpmc2202s000)
Check if the solutions can be installed. The session
also signals the problems in regard to customizations.
Check Solution/Patch to Install (ttpmc2203s000)
Check the selected solution or a range of solutions to
see whether you can install the solution or range. If all
Check and Install Solutions (ttpmc2204s000)
conditions for all solutions in the selected range and
their dependency chains comply, the solutions are in-
stalled. This session performs the combined function-
ality from the Check Solution/Patch to Install
(ttpmc2203s000) and Install Solution/Patch
(ttpmc2205s000) sessions.
Install the solution. This process is performed on multi-
level. In addition the previous version of the compo-
Install Solution/Patch (ttpmc2205s000)
nents to install is saved to enable you to uninstall the
solution.
Check the solutions to see whether you can uninstall
the solutions.
Check Solution/Patch to Uninstall
(ttpmc2206s000)
You can also use this session to check an installation
run to be uninstalled.
Uninstall the solution. This process is performed on
multilevel.
Uninstall Solution/Patch (ttpmc2208s000)
This session is also used to uninstall an installation
run.
Print the solutions that are installed in an installation
run.
Check Installed Solutions (ttpmc2209s000)
Download, scan, and connect solutions, including the
related solutions. You can also use this session for
solutions delivered in a collection.
Download, Scan and Connect Solution (Multi-
Level) (ttpmc2210s000)
Specify some basic data required to download updates
from the LN FTP-server.
Generate ftp script (ttpmc2211s000)
Log on at the LN FTP server to download solutions,
collections, or patches.
Login for FTP Server (ttpmc2212s000)
Infor Enterprise Server | Administration Guide | 79
LN Software Maintenance

Clean up PMC. This process helps save disk space.PMC Cleanup (ttpmc2220m000)
Set up an environment in which PMC works well.Generate Update VRC structure
(ttpmc2240s000)
Delete an update VRC structure.Delete Update VRC Structure (ttpmc2241s000)
Copy the solution registry from one update VRC, the
source VRC, to another update VRC, the target VRC,
that is directly derived from that source VRC.
Copy Solution Registry to Derived Update VRC
(ttpmc2290m000)
Print detailed information of solutions and patches in
update VRCs.
Print Solution/Patch by Update VRC
(ttpmc2401m000)
List the differences in status between solutions in two
update VRCs.
Compare Installed Solutions (ttpmc2405s000)
Print the dependencies between solutions in an update
VRC.
Print Dependencies by Update VRC (Multi-level)
(ttpmc2440m000)
Print all update VRCs for each of the VRC combinations
in the specified range.
Print VRC Combinations (ttpmc2450m000)
Print the history of the changes of a solution or patch.Print Solution/Patch History (ttpmc2460m000)
Display all installation runs. From this session, you can
use several options on the solutions that are installed
with an installation run.
Installation runs (ttpmc2503m000)
Display solutions by installation run.Solutions by Installation Run (ttpmc2504m000)
Display history base VRCs by update VRC.History Base VRCs by Update VRC
(ttpmc2541m000)
Maintain history solutions by update VRC.History Solutions by Update VRC
(ttpmc2542m000)
Display the history of the changes of a solution or patch
in an update VRC.
Solution History (ttpmc2560m000)
80 | Infor Enterprise Server | Administration Guide
LN Software Maintenance

User management introduction
This chapter describes how to create LN users and to authorize these users to use LN. You can define
the authorizations for LN in roles and templates that are linked to the LN users. The role and template
concept provides you with a user-friendly method to quickly add new users or to update user
authorizations.
This chapter includes the following:
▪
User management overview (p. 81)
▪
User-related procedures (p. 95)
▪
To create roles and authorizations (p. 99)
▪
To create templates (p. 101)
User management overview
You can use LN ’s user management to define the user data and authorizations. The user’s authorizations
are dependent on their role in a company.
To be able to work with LN, a user must have:
▪
An LN user logon with a password, and the proper authorizations
▪
A system logon for the operating system on which LN is installed, such as UNIX, or Windows.
For information about user accounts on your operating system, refer to the appropriate
Installation Manual.
This overview includes the following topics:
▪
LN user password (p. 82)
▪
LN user types (p. 83)
▪
LN user authorizations (p. 83)
▪
Role-dependent authorizations (p. 85)
▪
Non-role-dependent authorizations (p. 90)
Infor Enterprise Server | Administration Guide | 81
7
Chapter 7
User Management

▪
Role browser (p. 93)
LN user password
An LN user must be linked to an Operating System user. If you log on to the LN application server using
the logon procedure of Web UI or Worktop you have to supply a password. The password that you have
to supply is not a special LN user password, but it is really the Operating System password.
One of the System Administrator tasks is to define the password policy for the organisation.
The password policy includes:
▪
Restricted passwords, for example you are enforced to supply a password of at least 6
characters and you are enforced to enter at least one numeric or special character in the
password.
▪
Password history, for example you can not re-use recently used passwords.
▪
Password aging, for example you are enforced to change your password every two months.
To change your password
A System Administrator can give you a new password. You can change your own password if the System
Administrator has given permission to change the password.
To change your own password, you must run the Change Password (ttstpchangepw) session. This
session prompts for the current password and then prompts for the new password twice.
Note
The session checks whether your user account is used to log on to a remote system. If so, the
corresponding password in the Remote User Data (ttaad201) table is updated automatically.
Only run this session on a Master Application Server (MAS). If you run this session on an application
server (AS), only the password in the remote user data on the AS is changed. The password on the
MAS is not updated. As a result, you cannot log on to the MAS anymore.
If the passwd command in the UNIX operating system of the LN server expects input parameters other
than old password- new password- new password, an error message is displayed. For details,
refer to the online help of the Change Password (ttstpchangepw) session.
To change your password via the Operating System
Alternatively, you can change your password via the Operating System of your LN server:
▪
In a Windows environment you can change your password in the User Accounts section of
the Control Panel.
82 | Infor Enterprise Server | Administration Guide
User Management

▪
In a Unix environment you can change your password on the Command Line. You can, for
example, use the passwd command.
Note
If your user account is used to log on to a remote system, you must update the corresponding password
through the Remote User Data (ttaad2101s000) session.
Password Aging
Password Aging is supported for Web UI and Worktop in a Windows Environment.
In a Unix environment Password Aging for Web UI and Worktop is only supported if Pluggable
Authentication Modules are installed and enabled.
If your password is nearly expired, you are prompted to change your password.
If you decide to change your password, a dialog box, where you must specify your old and new password,
is displayed. After your password has been changed, a confirmation message is displayed.
Note
The session checks whether your user account is used to log on to a remote system. If so, the
corresponding password in the Remote User Data (ttaad201) table is updated automatically.
LN user types
LN users are divided into the following two groups:
▪
Normal users: These users have restricted authorizations to start sessions, access table fields,
work with data that pertains to specific company numbers, and so on.
▪
Super users: These users have unrestricted authorizations. A system administrator is a good
example of a super user.
With the proper authorizations, developers can customize LN in a development environment. A
development environment in LN consists of a company, a package combination, and multiple package
VRCs.
LN user authorizations
Initially, normal users cannot use LN at all. Therefore, you must define some authorizations for the
various LN software components. The authorizations of an employee in a company are related to the
employee’s functionality or role in that organization, some employees have more authorizations than
others. Likewise, LN ’s Authorization Management System (AMS) also uses a role concept to define
the authorizations of LN users.
Infor Enterprise Server | Administration Guide | 83
User Management

In addition to these role-dependent authorizations, you can define some additional dependent
authorizations that are not defined by the employee’s role: for example, the development parameters,
device preferences, and so on. These non-role-dependent authorizations are defined in templates, which
you can then connect to the user profile.
The following figure shows a schematic overview of how the user authorizations are split up into
role-related authorizations and non-role-dependent authorizations:
Schematic overview of the authorization concept in LN
Note
At minimum, users must have some sort of session authorization, table authorization, and library
authorization to use LN. During the installation of LN, some default roles are automatically created. The
default roles ensure that the normal users can use the Worktop browser and the browser’s associated
functions and commands.
Session Authorization (DEM and AMS)
You can use two different methods for defining employee roles. First you can define roles in the Dynamic
Enterprise Modeler (DEM). Second you can define roles in the Authorization Management System
(AMS).
▪
DEM
In DEM you can model Business Processes. Business Processes contain activities to be
executed. Those activities can be LN sessions.
Roles are linked to Business Processes, activities and employees. This way the access to the
LN sessions is controlled.
On runtime the employee has a specific DEM menu, the Process browser in Web UI or Worktop.
When an employee executes LN sessions from the Process browser, then the modeled DEM
authorizations are used for those sessions. The DEM authorizations are deduced from the
modeling information and are not stored into static authorization tables.
Note: If you launch sessions from the Process browser, LN ignores any roles and authorizations
defined in AMS. However, the AMS authorizations are applicable if you launch sessions
through the Run Program command in Web UI or Worktop.
84 | Infor Enterprise Server | Administration Guide
User Management

▪
AMS
In AMS you can define roles for Session Authorization, Table Authorization and Table Field
Authorization. Those roles can be linked to normal users. By default normal users do not have
any authorization. Super users have Full authorization for all sessions and all tables.
You can define different authorization types, for example Full authorization, Read Only
authorization, and so on.
You can launch sessions from the Menu browser in Web UI or Worktop. The roles that are
linked to your LN user account decide what is allowed to execute or not.
The DEM roles and authorizations are not applicable if you launch sessions from the Menu
browser.
In connection with the Sarbanes - Oxley Act (officially titled the Public Company Accounting Reform and
Investor Protection Act of 2002) customers feel the need to have a clear overview of the authorizations
of a certain employee for the LN applications.
The following sessions are available to print the session authorizations:
▪
DEM
Print DEM Session Authorizations (tgbrg8441m000)
▪
AMS
Print Session Authorizations by User (ttams3400m000)
Role-dependent authorizations
From a user point of view, a role represents a functionality in a company. In LN ’s Authorization
Management System (AMS), a role represents a set of authorizations for a functionality in a company.
User authorizations that are defined by role instead of by user significantly reduce the redundant data.
The authorizations for normal users are, therefore, defined in roles to which the authorizations can be
linked. The role concept provides you with a user-friendly method to quickly add new users or to update
user authorizations.
Because an employee can have more than one functionality in a company, you can assign the user to
more than one role. A role can also contain more than one sub-role, which itself can also have sub-roles.
All these roles and sub-roles form a role tree, which you can view with the role browser. The role browser
shows the role tree in a graphical user interface.
Ultimately, the employee’s role is a combination of all the authorizations defined in the user’s roles and
sub roles. Recursive role structures are not allowed. For example, a junior software engineer cannot
have the authorizations of a senior software engineer in a sub role.
Infor Enterprise Server | Administration Guide | 85
User Management

The following figure shows an example of the combined authorizations of two different roles:
Example of combined authorizations for more than one role
For example, a department manager has more responsibilities than the employees in the department
and therefore has more database authorizations. Consequently, the manager has two roles:
▪
The role of the employee with the appropriate restricted authorizations
▪
The manager’s role with additional authorizations, which are only relevant for the manager
The restrictions on the table authorizations of the two roles are combined for the department manager.
However, if the table authorizations are restricted for one role but not for the other role, the department
manager will ultimately have permission to carry out the database actions.
Role-dependent authorization types in LN
You can define the role-dependent authorizations at the following component levels in LN:
▪
Session authorizations (p. 87)
▪
Table authorizations (p. 88)
▪
Library authorizations (p. 90)
If the role-dependent authorizations change, conversion indicators are automatically set. Changes to
the session authorizations, table authorizations, and the library authorizations are only converted to the
86 | Infor Enterprise Server | Administration Guide
User Management

run-time data dictionary when the conversion indicator is set to avoid unnecessary conversion of the
authorization data to the run-time data dictionary.
Session authorizations
The session authorizations define which sessions the users can start and what the users can do with
these sessions in LN. You can specify the session authorizations and on several levels for either a
specific company or for all companies. For example, you can give the users authorizations for only
specified sessions in a module or only the sessions in a specified package.
The session authorization priorities in the following table show that the session authorization with the
highest priority (1) is stated at the most specific level and the lowest priority (8) is stated at the most
global level. The session authorizations that you define for a specific company have a higher priority
than those defined for all companies:
All companiesOne company
21Session authoriza-
tions per session
43Session authoriza-
tions per module
65Session authoriza-
tions per package
87Session authoriza-
tions per company
You can define the session authorizations with the following sessions in LN ’s AMS:
▪
Session Authorizations by Company (ttams3133m000), which defines the session authorizations
at company level
▪
Session Authorizations by Package (ttams3130m000), which defines the session authorizations
at package level
▪
Session Authorizations by Module (ttams3131m000), which defines the session authorizations
at module level
▪
Session Authorizations by Session (ttams3132m000), which defines the session authorizations
at session level
Infor Enterprise Server | Administration Guide | 87
User Management

Table authorizations
The table authorizations define the actions the users can perform on specified database tables and the
associated fields in the database table. You can specify the table authorizations for a specific company,
or for all companies, and on several levels. For example, you can give the users authorizations for
specified tables in a module or only some table fields in a database table and so on.
The table authorizations that you define in LN ’s AMS are applicable to the databases for which the user
is authorized. You can define the databases for which the user must be authorized in the RDBMS
Administration module. For more information about the LN ’s table authorization, refer to the “RDBMS
administration” section.
The table authorization priorities in the following table show that the table authorization with the highest
priority (1) is stated at the most specific level and the lowest priority (14) are stated at the most global
level.
The table authorizations that you define for a specific company have a higher priority than those defined
for all companies.
88 | Infor Enterprise Server | Administration Guide
User Management
All companiesOne company
21Database table field
data authorization
43Database table field
authorization
65Database table autho-
rization per table data
87Database table autho-
rization per table
109Database table autho-
rization per module
1211Database table autho-
rization per package
1413Database table autho-
rization per company
You can define the database-table authorizations and the database-table-field authorizations with the
following sessions in LN ’s AMS:
▪
Table Authorizations by Company (ttams3144m000)
▪
Table Authorizations by Package (ttams3140m000)
▪
Table Authorizations by Module (ttams3141m000)
▪
Table Authorizations by Table (ttams3142m000)
▪
Table Data Authorizations (ttams3145m000)
▪
Table Field Authorizations (ttams3143m000)
▪
Table Field Data Authorizations (ttams3146m000)
Important!
Table field authorizations and Table Field Data Authorizations have no effect on reports. If a user has
no authorization at all for a table field, the field is still printed.
Infor Enterprise Server | Administration Guide | 89
User Management

Library authorizations
LN uses the Business Object Layer (BOL) integration technology, and OLE, DDE, OCX, and ORB
interfaces to integrate programs with the LN environment. These programs communicate with LN through
the Dynamic Link Libraries (DLLs). The Library authorizations define whether the users who are linked
to the role can access the functions that are defined in DLLs.
Note
For details on the Business Object Layer (BOL), refer to To Model a Business Object in the Infor Enterprise
Server Web Help
You can specify the library authorizations at several levels. For example, you can give the users
authorizations only for specified libraries in a module or only the libraries in a specific package and so
on.
The library authorization priorities in the following table show that the library authorization with the highest
priority (1) is stated at the most specific level, and the lowest priority (3) is stated at the most global level:
1Library per library
2Library per module
3Library per pack-
age
You can define the library authorizations at the various levels with the following sessions:
▪
Library Authorizations by Package (ttams3150m000)
▪
Library Authorizations by Module (ttams3151m000)
▪
Library Authorizations by Library (ttams3152m000)
Non-role-dependent authorizations
The user data that is not related to the user’s role can also be grouped to reduce redundant data. To
reduce this data, you can use LN ’s AMS to create templates, which contain the user’s authorizations
that are not dependent on the employee’s role. The templates can also contain additional parameters
that are required for developers to be able to customize software components in LN.
The templates contain data a group of users share. However, the templates are linked to individual
users. The templates in LN offer a user-friendly method to add new data quickly or to update data for a
group of users by linking the users to the templates.
90 | Infor Enterprise Server | Administration Guide
User Management

The templates in LN ’s AMS can be divided into the following categories:
▪
User data and development-related templates (p. 91)
▪
Text-related templates (p. 92)
▪
Device-related templates (p. 93)
User data and development-related templates
In these templates, you can enter the default settings and parameters for a group of ordinary LN users
and for LN users who develop software components in LN.
The data a user needs to maintain or create software components is defined in the following templates:
▪
User-data template
▪
Developer-parameters template
▪
Developer-authorizations template
User-data template
You can use the user-data template to define the common user data that by a group of LN users share.
The template contains the required system data and some non-role-related authorizations. The user-data
template is used as an example in “To create templates,” later in this chapter.
You must use the User Data Template (ttams1110m000) session to create the user-data template.
Developer-parameters template
You can also use the template parameters that application developers use. For example, you can choose
to run an automatic compilation after you create or change menus or forms. You can also specify
commands and options, which the user can employ in the development environment.
Application parameters are settings the application developer requires to develop software components.
Parameters are available for the following:
▪
Automatic compilation to the run-time data dictionary after changes to forms or menus
▪
Actions after the Copy to Current Package VRC option
▪
The parameters that the editor can use to develop software
For every LN user, the data in this template is dumped to LN ’s run-time data dictionary in the User
Application Parameters (ttadv010) table.
You must use the Development Parameters Template (ttams1150m000) session to create the
developer-parameters template
Infor Enterprise Server | Administration Guide | 91
User Management

Developer-authorization template
You can use this template to define some of the authorizations for developers who must customize LN
software components. This session is password-protected. You can only use this session if you have
system administrator’s rights.
In this template, you can specify the following:
▪
The package VRC for which the developer must be authorized to customize and develop
software components. This specific package VRC overrides the Default Authorization for
all Package VRCs check box in the User Data (ttams1100s000) session.
▪
The languages and modules of the specified package VRC for which the developers must be
authorized to customize and develop software components.
If you select the Authorization for all Modules and Authorization for all Languages check boxes in
this template, the users who are linked to the template are authorized to maintain and develop software
components in all modules in LN and in all languages. If the check boxes are cleared, you must specify
the specific modules and languages for which the user must be authorized.
If you select the Components of other Developer check box in this template, the user is authorized
to maintain the software components that are created by other users. This option is helpful, for example,
for a senior application developer.
The data in this template is dumped to LN ’s run-time data dictionary for each individual LN user to the
Version Authorizations by User (ttadv041) table.
You must use the Developer Authorization Template (ttams1151m000) session to create the developer’s
authorization template.
Text-related templates
A normal user must have some basic authorizations to use, update, or read text. The necessary data
and authorizations are defined in the text parameters.
These text parameters are defined in these templates:
▪
Default text groups template
▪
Default text groups by text field template
▪
Text group authorization template
You can specify text parameters for a specific company or for all companies. If you select the All
Companies check box in these sessions, the users who are linked to the templates are authorized to
edit text in all companies. To restrict the users to a specific company, you must define that specific
company in the Comp field. The text parameters that are defined for a specific company take precedence
over defaults that are defined for all companies.
92 | Infor Enterprise Server | Administration Guide
User Management

Default text groups template
You can use this template to define default text groups in LN. If a text is written in a text field for which
no default text group is defined, LN uses the default text group defined in this template. You must use
the Default Text Groups Template (ttams1121m000) session to create the default text groups template.
Default text groups by text field template
You can use this template to define default text groups for text fields in LN. If text is written in a text table
field, the text is linked to the default text group of that field. You must use the Default Text Groups by
Text Field Template (ttams1120m000) session to create the default text groups by text field template.
Text group authorization template
You can use this template to define the following authorizations for each text group: the use, update,
and read. A text group defines how text must be presented in a window by defining the text editor, default
window, and dimensions of the window. You must use the Text Group Authorization Template
(ttams1122m000) session to create the default text groups authorization template.
Device-related templates
You can define the device-related data in the device preference template.
Device preference template
You can use this template to group devices and define an order of preferences for these devices. For
example, you can define a range of printers, as well as give the highest priority to the printer closest to
the user. The data in this template is dumped for each individual LN user to the Device Preferences
(ttaad306) table.
You must use the Device Preference Template (ttams1140m000) session to create the device preference
template. If the template is linked to a user who is not authorized for all devices, the user is only authorized
to use the devices that are defined in this template. You can authorize a user for all devices if you select
the Authorization for all Devices check box in the User Data Template (ttams1110m000) session.
Role browser
You can view the roles and sub roles in the role browser, which shows a graphical representation of the
roles in a role tree. The role browser uses the display logic of the existing desktop browser to ensure a
consistent interface across the various browsers in LN.
The role tree represents a role with all its sub roles, which subsequently can also contain sub-roles. You
can define the authorizations for the sub-roles in the same fashion as for the roles.
Infor Enterprise Server | Administration Guide | 93
User Management
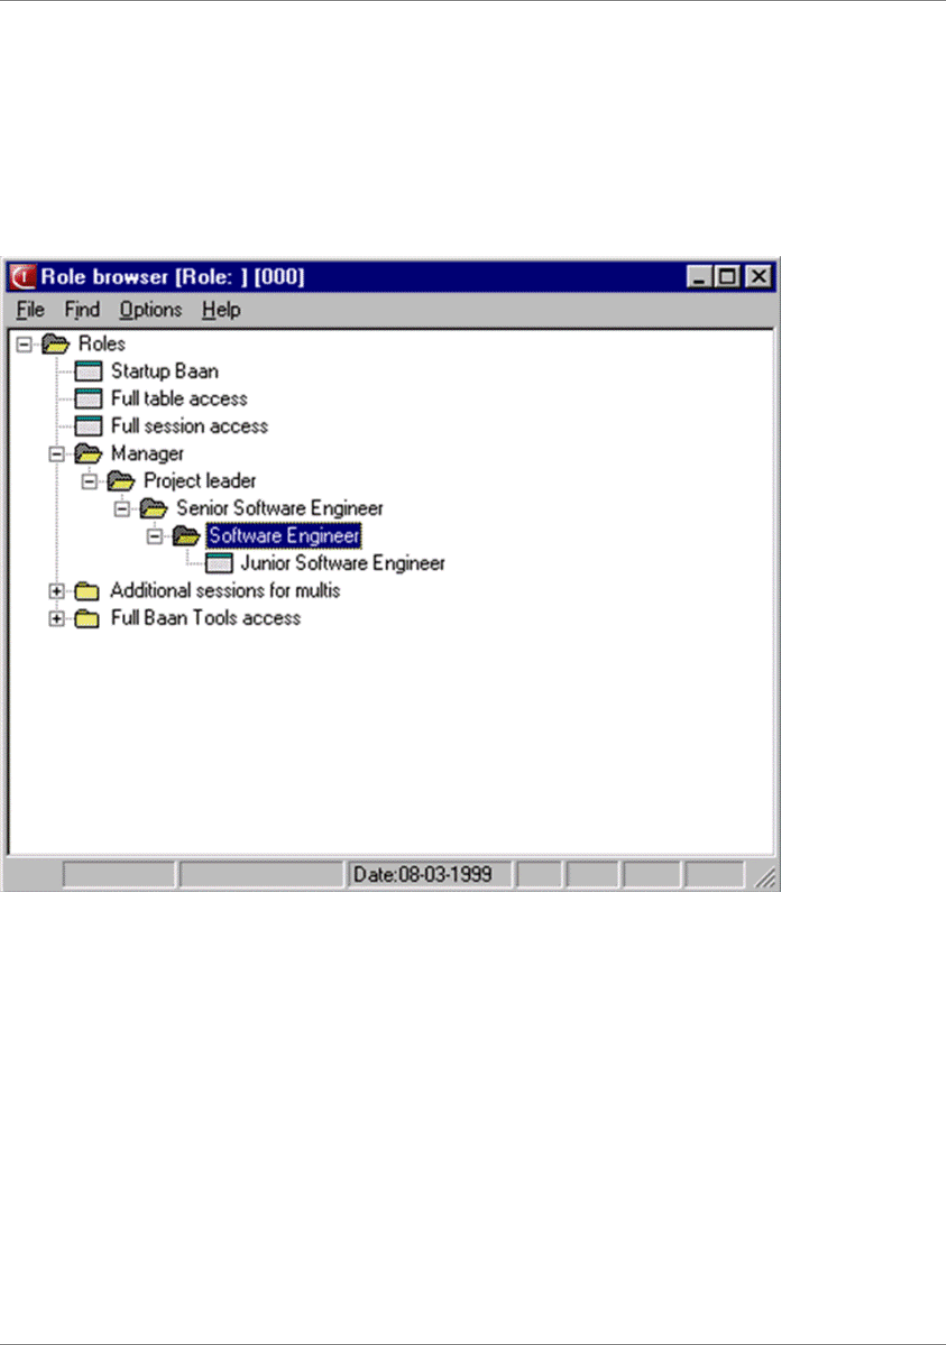
In the role browser, you can double-click a role folder to view the sub-roles in the role. To start the Role
Data (ttams2100m000) session, select a role or sub role, and on the Options menu, click Role Data.
The following figure shows an example of a role with sub-roles. The manager has a number of roles
linked to the manager role. The manager has not only the manager’s authorizations, but also the
authorizations of the product architect, product consultant, and project leader, all of whom are defined
in their respective roles. The project leader role also has additional sub-roles. The Role Browser shows
all the manager’s authorizations from the manager’s role to the role of the lowest-ranked employee:
Role Browser
You cannot define a recursive role structure. For example, a junior software engineer cannot have the
authorizations of a senior software engineer in a sub-role. The Role Browser identifies and highlights
recursive roles. You must delete the highlighted recursive roles.
94 | Infor Enterprise Server | Administration Guide
User Management
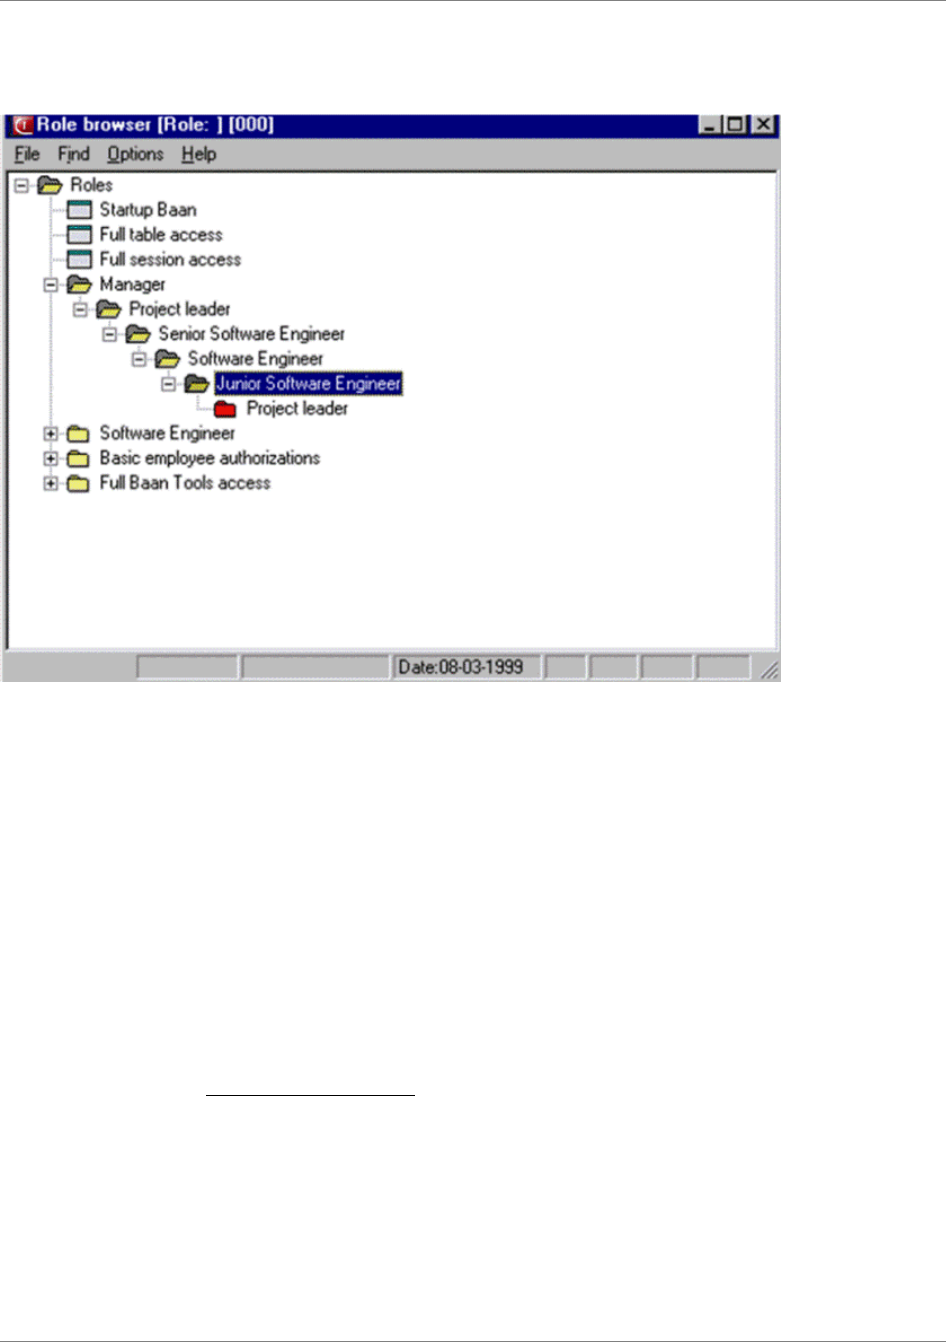
The following figure shows an example of a cyclical role. The junior software engineer also has the role
of the senior software engineer, which of course is not the case:
Example of a cyclical role
User-related procedures
Procedure aim
The User Management module contains the procedures that you must use to authorize employees to
use LN.
With these procedures, you can:
▪
Create LN users.
▪
Create remote user accounts for the LN users in a client/server environment.
▪
Change the package combinations for LN users
▪
Maintain the user’s developer authorizations.
Infor Enterprise Server | Administration Guide | 95
User Management

Procedure result and prerequisites
Result
As a result of these procedures, the user can start LN, use the Menu Browser, and start sessions. The
user can also use LN in a client/server environment. Developers will have the proper development
authorizations. The LN user also has permissions on a database level that can be restricted with LN ’s
Authorization Management System (AMS).
Prerequisites
The following prerequisites are necessary to create LN users:
▪
The user must have a system account for the operating system on which LN is installed, such
as UNIX or Windows. If the user does not have a user account on the operating system, refer
to the appropriate Installation Manual for your specific operating system.
▪
On a DB2 installation, you must also add the user to the LN db group with the Windows User
manager.
▪
If the licensing of LN is based on named users, the LN user accounts that are created by
means of User Management must correspond with the user names in the named user list in
the Infor Solution License Manager (SLM).
▪
To create remote user accounts for LN users, the LN user must have a user account on the
local system or workstation.
▪
The roles and templates to which you can link the normal users are already defined. If these
components are not defined, refer to the To create roles and authorizations (p. 99) and To
create templates (p. 101) sections.
▪
The development-environment data for the developers must be defined.
This section describes only the most important steps in the procedures. For detailed instructions on how
to enter data in the described sessions, refer to the online help of the sessions.
To create LN users
Introduction
To be able to work with LN, a user must have a user logon, a password, and the proper authorizations.
The authorizations are dependent on the user’s role in a company. You can use the User Management
module to define the user’s user data and authorizations.
Upon completion of this procedure, the new users can log on. If you changed the user data for existing
users, these users must log off and log on again to use the new settings.
96 | Infor Enterprise Server | Administration Guide
User Management

Procedure summary
The following list shows the procedure steps and the corresponding sessions.
1. Define the basic user data - User Data (ttaad2500m000)
2. Convert the changes to the runtime data dictionary - Convert Changes to Runtime DD
(ttams2200m000)
3. Create a database user - Convert Infor ERP User to Database User (ttdba0915m000)
To create remote user accounts
Introduction
If the LN database runs on a remote system, the following situations can occur:
▪
The database driver runs on the (local) application server and communicates with the remote
database through the database’s own connection utility, for example, iConnect (Informix) or
SQL NET (Oracle). In this case, you do not have to create remote user files. This case is the
most common situation.
▪
The database driver runs on the remote database server. In this case, you must create remote
user accounts for the LN users. The LN users connect to the remote system through remote
user accounts. You can create remote user accounts on the local system or from the remote
system.
If you create the remote user file from another remote system, the Startup System field in the user
template must contain the user's system name.
Make sure that the application manager or system administrator who creates the remote user account
for the LN user has a user account on the LN user’s system. The LN user account is in fact a remote
user account of the application manager or system administrator.
Procedure summary
The following list shows the procedure steps and the corresponding sessions.
1. Define the remote user data - Remote User Data (ttaad2501m000)
2. Convert the changes to the runtime data dictionary - Convert Changes to Runtime DD
(ttams2200m000)
3. The relevant users must log off and log on again.
Infor Enterprise Server | Administration Guide | 97
User Management

To change the package combination for LN users
Introduction
A package combination is a collection of various LN packages. For example, the package combination
B61a contains the packages LN Common, LN Financials, LN Manufacturing, and so on. Every package
combination has a unique package VRC. The package combination links LN users to a specific LN
version.
If you change the package combination of a company, you must also change the user’s package
combination. You can only change the user's package combination into a package that matches the
package combination of the user's default company.
The default company's package combination can only differ from the user's new package combination
under the following conditions:
▪
Both package combinations include the same packages.
▪
Various package VRCs are used in the package combinations.
The package VRCs can only differ in the package combinations in the following instances:
▪
Both VRCs are derived from each other.
▪
Both package VRCs are derived from the same VRC and no changes in data definitions or
domains have been made in the derived VRCs.
Procedure summary
The following list shows the procedure steps and the corresponding sessions.
1. Change the package combination for a specific LN user or a range of LN users - Change
Package Combinations for Users (ttaad2200m000)
2. The relevant users must log off and log on again.
To change the password for developer authorizations
Introduction
The authorization data in the User Data (ttams1100s000) session and the Developer Authorization
Template (ttams1151m000) session are password protected.
98 | Infor Enterprise Server | Administration Guide
User Management

Procedure summary
The following list shows the procedure steps and the corresponding sessions.
1. Change the password for developer authorizations - Change Password for Developer
Authorizations (ttadv0143m000)
To create roles and authorizations
Procedure aim
Initially, normal users do not have any authorizations for LN. Therefore, you must define the
role-dependent authorizations for their function. This section provides information and instructions on
how you can use LN ’s Authorization Management System (AMS) to create roles for normal users and
the associated role-dependent authorizations.
You can use the authorization management system to:
▪
Create roles and authorizations.
▪
Create templates.
Procedure result and prerequisites
Result
The authorization management procedures create a user environment with clearly defined tasks and
duties for the normal users in a company.
Prerequisites
The following prerequisites are required to create roles and authorizations:
▪
The functions and associated tasks are clearly defined for the employees.
▪
The software components to which access is required for the functions are clearly defined.
The following case study explains how to create roles and authorizations and helps you understand the
functions and features of LN ’s AMS. The case study also describes the role concept in the context of
a real situation.
The case study describes authorization management at Global Enterprises, which has offices in The
Netherlands and the United States. These offices are designated as the Holland Company and the USA
Company. Employees of Global Enterprises must be able to use the company’s data dictionary and the
databases of both offices.
For detailed instructions on how to enter data in the described sessions, refer to the online help of the
sessions
Infor Enterprise Server | Administration Guide | 99
User Management

Procedure introduction
The authorization management procedure is split up into several smaller procedures, which the system
administrator can use as stand-alone procedures to maintain the authorizations at the various levels.
The additional roles, which define additional authorizations on top of the standard role, can also be
created with this procedure.
Case study - Authorization management at Global Enterprises
The system administration department at Global Enterprises is responsible for management of the
employees’ authorizations. Authorization management involves the definition of the role-dependent
authorizations for the employees in roles. To ensure that the user authorizations are easily maintainable,
the system administrator defines one standard role with the most basic authorization, as well as additional
roles for specific tasks.
The authorizations defined in the standard role are required by the users to use Global Enterprises’
general data dictionary and the data of the offices in The Netherlands and the USA.
In the standard role, the system administrator defines the session authorizations and library authorizations
at the various levels. In addition, the system administrator makes sure that the users cannot change
their own user data.
Procedure summary
The following list shows the procedure steps and the corresponding sessions.
1. Take inventory of the roles in your organization
2. Define the authorizations per role - Role Data (ttams2100m000)
Via the appropriate menu in this session, you can:
▪
define session authorizations
▪
define database authorizations (table and table field authorizations)
▪
define library authorizations
▪
Optionally: define authorizations in sub-roles and link these sub-roles to the main role -
Subroles by Role (ttams2101m000)
For details on the authorization types, refer to the Role-dependent authorizations (p. 85)
section.
3. Convert the user file to the runtime data dictionary (ttams2200m000)
4. The relevant users must log off and log on again.
100 | Infor Enterprise Server | Administration Guide
User Management

To create templates
Procedure aim
A template contains common data for a group of users. This section provides information that you need
to create templates. In these templates, you can define the non-role-dependent authorizations for a
group of normal users. You can also enter additional template parameters that a group of users share.
Procedure result and prerequisites
Result
By using templates, the system administrator has an efficient method to define user data and additional
parameters that are required for groups of LN users.
Prerequisites
To create templates:
▪
The functions in the company must be defined.
▪
The required system data, development parameters, text parameters, and so on must be
defined for the employees.
Procedure Introduction (User Data template)
This section uses the User Data template as an example. The procedure is representative for most
templates in LN ’s Authorization Management System (AMS). You can convert changes to the template
to the run-time data dictionary. On the appropriate menu in these sessions, click Convert to Runtime
DD to start the Convert Changes to Runtime DD (ttams2200m000) session. For a detailed description
of this session, refer to the session's online help.
As soon as the template data has changed, conversion indicators are automatically set for all individual
LN users who are linked to the templates. The user data is only converted to LN ’s run-time data dictionary
if the data in the templates has changed. The conversion is, therefore, only performed when necessary.
This section describes only the most important steps in the user data template procedure. For detailed
instructions on how to enter data in the described sessions, refer to the online help of the sessions.
Procedure summary (User Data template)
The following list shows the procedure steps and the corresponding sessions.
1. Take inventory of the user data that can be shared
2. Define the User Data template - User Data Template (ttams1110m000)
3. Convert the user template data to the runtime data dictionary - Convert Changes to Runtime
DD (ttams2200m000)
Infor Enterprise Server | Administration Guide | 101
User Management

4. The relevant users must log off and log on again.
102 | Infor Enterprise Server | Administration Guide
User Management

Audit configuration management introduction
You use LN audit features to fully or partially log changes that users make to the LN database tables
when they use LN sessions.
You can view or print the history of modifications.
You can also use the history modifications to update external databases by using the LN Exchange
package or by using the Business Object Layer (BOL/BOR) functionality
The audit functionality is centered on the concept of audit profiles. You define which tables and fields
are audited and when, in the context of an audit profile. To bundle profiles in the same functional area,
you can relate the profiles to audit categories. You can export and import audit profiles with various
options to enable a quick configuration. The audit trail is stored in sequence files, which are generated
for each combination of company and table.
This section provides the following:
▪
Audit trail and audit host settings (p. 104) : These settings provide the information that is required
to create the audit trails.
▪
Audit configuration procedure (p. 104) : This section provides an overview of the steps you
must take to configure the audit settings. According to this configuration, the audit trails are
created.
▪
Audit - Additional functions (p. 105) : This section contains some information about other
functions, such as importing and exporting profiles, generating reports, and migrating from an
earlier version of Infor Enterprise Server.
▪
Audit: To determine the net result of the audit configuration: This section describes how you
can determine the net result of the audit configuration when the configuration is converted to
run time.
▪
Audit - General remarks (p. 105) : This section lists a number of important facts and rules that
you must bear in mind.
▪
Audit - Specific issues (p. 108) : These sections describes what happens if you convert new
audit settings to run time while not all users have left their bshell.
Infor Enterprise Server | Administration Guide | 103
8
Chapter 8
Audit Configuration Management

Audit trail and audit host settings
The audit trail and audit host settings provide the required information to create audit trails.
Before you can create an audit trail, the following information is required:
▪
The size of the trail files (sequence files) that are created. Define the trail file size in the Audit
Trail File Sizes (ttaud3135m000) session. Because the maximum number of sequence files
for each table/company combination is 999, and you cannot delete the currently active file,
you must choose a file size that enables you to delete old files, while keeping at least the
currently active file. The trail file size must be large enough to store the audit trail of a large
transaction, otherwise, the transaction is stopped.
▪
The path to the directory where the audit trail files are stored. Define the paths in the Audit
Trail Paths (ttaud3136m000) session.
▪
The security settings for reading, maintaining, and deleting the sequence files. Define the
security settings in the Audit Trail Security (ttaud3137m000) file.
▪
The audit host settings: Define the audit hosts in the Audit Hosts (ttaud3130m000) session.
You can define audit hosts for each company. Defining audit hosts is optional. If no host is
defined for a company, the local system is used as host. If your system uses a master
application server, and one or more other application servers, for best results, be sure to define
audit hosts. Otherwise, the transaction IDs in the audit trail might not be successive.
Note
To activate these settings, you must use the Create Runtime Audit Definitions (ttaud3200s000) session,
with the correct check boxes selected, to convert the settings to run time. Only the security settings are
effective immediately, and must not be converted to run time.
Audit configuration procedure
Introduction
This section provides an overview of the steps you must take to configure the audit settings, assuming
that no audit settings are yet present.
Procedure summary
The following list shows the procedure steps and the corresponding sessions.
1. Define audit categories - Audit Categories (ttaud3100m000)
2. Define company groups - Company Groups (ttaud3140m000)
3. Define which companies are related to the company groups - Companies by Company Group
(ttaud3145m000)
104 | Infor Enterprise Server | Administration Guide
Audit Configuration Management

4. Define audit profiles - Audit Profiles (ttaud3110m000)
5. Define the tables that must be audited - Audit Tables by Profile (ttaud3120m000)
6. Configure the audit settings for specific fields - Audit Fields by Table (ttaud3125m000)
7. Convert the audit settings to run time - Create Runtime Audit Definitions (ttaud3200s000)
Audit - Additional functions
The audit configuration management sessions provide the following additional functions:
You can export and import profiles through the following sessions:
▪
Export Audit Profiles (ttaud3201s000)
▪
Import Audit Profiles (ttaud3202s000)
▪
Import Audit Profile from Additional File (ttaud3203s000): You can use this session for profiles
that are delivered with the LN software.
You can analyze the audit profiles, and view where specific tables and fields are used, by means of the
following sessions:
▪
Where Used Audit Tables (ttaud3521m000)
▪
Where Used Audit Table Fields (ttaud3526m000)
To help you to migrate to from an earlier version of LN, you can use the following session:
▪
Audit Configuration Migration (ttaud3204s000) session.
To maintain the generated sequence files, you can use the following sessions:
▪
Display Audit Sequences (ttaad4560s000): Use this session to display information about the
sequence files.
▪
Print Range of Audit Files (ttaad4461m000) and Print Range of Audit Files (Multi Lines)
(ttaad4463m000): Use these sessions to print the content of sequence files.
▪
Transaction Notifications (ttaud1510m000): Use this session to view detailed information about
all transactions in a specific company and table.
▪
Check Audit Files Integrity (ttaad4460m000): Use this session to check the integrity of the
sequence files.
▪
Purge Audit Files (ttaad4261m000)
Audit - General remarks
The commands that cause a table transaction to be audited, are only the commands that affect the table
data, that is, Insert, Update, and Delete commands. Several table level commands that affect all rows
in a table are also audited, such as Create Table, Drop Table, and Clear Table.
Infor Enterprise Server | Administration Guide | 105
Audit Configuration Management

The audit configuration uses a positive approach, which means that you can only define the tables and
fields that must be audited, but not the tables and fields that must not be audited. To compensate for
this feature, you can load lists of all packages, modules, tables or fields through the appropriate menu
of the sessions concerned.
Because you can use tables and fields in various profiles with conflicting settings, the following rules
determine which setting take precedence over the conflicting setting:
▪
A higher level takes precedence over a lower level. Therefore, if you define in profile A that
all tables in a module must be audited, but in profile B that only one table in this module must
be audited, the result, if you convert these profiles to run time, is that all modules in the package
concerned are audited.
▪
The setting Always takes precedence over Changed. Therefore, if profile A defines that a
field must only be audited, when the profile is changed, and profile B defines that this field
must always be audited, the field is always audited.
The following tables illustrate this behavior.
Result of conflicting audit type settings
Audit TypeTableModulePackage
Always*advtt
Changed200advtt
Result
Always*advtt
Result of conflicting audit type settings
Audit TypeTableModulePackage
Changed*advtt
Always200advtt
Result
Changed*advtt
Always200advtt
106 | Infor Enterprise Server | Administration Guide
Audit Configuration Management

If company groups are also added to a profile, the result of the convert to run time action on these profiles
is determined by these company groups also, as illustrated in the following table.
Result of conflicting audit type settings
Audit TypeCompanyTableModulePackage
Changed001, 002**tt
Always002, 003*advtt
Changed002, 004200advtt
Result
Changed001, 002**tt
Always002, 003*advtt
Changed004200advtt
The following table displays the same information, but now by company, and only for table ttadv200.
Possible combinations of audit type and field specification
CommentAudit TypeCompanies
2Changed001
4Always002, 003
Changed004
For other companies, table
ttadv200 is not audited.
-005
You can configure audit settings for tables in another package combination. However, you cannot zoom
to these tables. You must enter these tables manually.
Infor Enterprise Server | Administration Guide | 107
Audit Configuration Management

If you convert the audit configuration to run time, the result is stored in the following four files, which you
can find in the $BSE\lib directory:
▪
audit_spec
▪
audit_cols
▪
audit_hosts
▪
auditdef6.2
Audit - Specific issues
The following sections describe the impact of several changes you can make in the audit settings. The
impact of a change depends on the specific situation. The situations described arise if changes in the
audit settings are converted to run time while not all users did leave LN. As a result, some users create
audit trails based on the old configuration, while users that start afterwards create audit trails based on
the new configuration.
Changes in the profiles
The following table summarizes the impact of the changes for a particular table in a company:
Impact of changes for a particular table in a company
ConsequenceChange
Users that still use the old settings do not audit
some transactions.
Add a table.
Some transactions that must not be audited with
the new settings are still audited by users that use
the old settings.
Remove a table.
Some transactions are audited according to the old
settings, while other transactions are audited accord-
ing to the new settings.
Change the audit type for a table or field.
After you audit transactions in the table with the
new settings, users that use the old settings can no
Add or remove a field.
longer perform transactions on this table. As a re-
sult, users with the old settings can be forced to
restart LN.
108 | Infor Enterprise Server | Administration Guide
Audit Configuration Management

Notes
▪
If you switch field-specific auditing for a table on or off, and this results in a different number
of fields to be audited, the impact of this change is the same as adding or removing a field.
▪
Not every change in the audit settings results in other settings at run time. If you convert the
new settings to run time, the net result of the changes for the entire configuration might be
zero.
Changes in the audit host
An important part of the audit trail is formed by the transactions IDs. To be useful, the transaction IDs
must be successive. The transaction IDs are generated for each combination of table and company by
the audit server, which runs on the audit host. If the audit host settings change, users with the new
settings use another audit host, and, therefore, another audit server than users with the old settings. As
a result, the transaction IDs are not successive, and the audit trail is corrupted. However, the user does
not notice this problem.
Changes in the directory of the sequence files
If the directory where the sequence files are stored is changed, users that use the old settings can still
create new sequence files in the old directory. As a result, the sequence numbers in the file names are
no longer an indication for the sequence of the files. However, the user does not notice this problem.
Changes in the maximum file of the sequence files
If the maximum file size of the sequence files is changed, and this change is converted to run time, the
new file size is immediately effective, both for users with the old settings, and for users with the new
settings. If the file size was enlarged, the current file will grow until this new size. If the file size was
diminished, and the current file already exceeds this size, a new file will be created the next time a
transaction is logged.
Combination of changes
The changes described in the previous sections can also be combined. A combination of changes can
have several advantages. A noticeable example is the combination of a change in the audit profile and
a change in the directory where the sequence files are stored. This combination provides the following
advantages:
▪
The audit trails created with the new settings are not mixed with the audit trails created with
the old settings.
▪
The users can continue their work.
Note, however, that problems can still occur, beginning with the problem already described, that the
sequence of the sequence files becomes unclear. However, a user can also start LN on the moment
Infor Enterprise Server | Administration Guide | 109
Audit Configuration Management

that the new audit settings are converted to run time. As a result, the user can use the new settings for
the profiles, but the old settings for the directory of the sequence files.
110 | Infor Enterprise Server | Administration Guide
Audit Configuration Management

RDBMS administration introduction
This section describes how to give LN users access to an RDBMS, and how to optimize the database
table and index repository for an improved interaction between LN and the database.
This section provides the following:
▪
Overview of RDBMS administration (p. 111)
▪
RDBMS administration procedures (p. 113)
▪
Recommended RDBMS procedure (p. 114)
▪
RDBMS maintenance procedure (p. 116)
▪
RDBMS table and index repository procedure (p. 118)
▪
RDBMS additional procedures (p. 119)
Overview of RDBMS administration
LN supports several Relational Database Management Systems (RDBMSs) for which you can authorize
the LN user. An LN user must be able to use the information that is stored in the RDBMS. Before the
LN user can access a database, you must give the LN user permission to access the RDBMS.
An RDBMS is a relational database or database management system that consists of tables made up
of rows and columns. In a relational database, the rows of a table represent records and the columns
represent fields with the particular attributes of a record. The records are collections of information about
separate items. The attributes of the records are represented in the columns.
A database administrator (DBA) or system administrator manages an RDBMS and determines the
content, internal structure, and access strategy for an RDBMS, defines security and integrity, and
monitors performance.
You can use the RDBMS Administration module to:
▪
Give LN users access to an RDBMS.
Infor Enterprise Server | Administration Guide | 111
9
Chapter 9
RDBMS Administration

▪
Transfer the database user file and database group file to the RDBMS Administration module.
You can use these tools if, during a migration to an updated LN environment, data is lost in
the RDBMS tables.
▪
Optimize the table and index repository to optimize the interaction between LN and the
database.
The following figure shows the link between the LN user and the Database user:
LN uses the following entities to make the data in the RDBMS tool manageable:
▪
Database group
▪
Database user
Database groups
In LN, a database user must belong to a database group. A database group enables the DBA to assign
a specific set of privileges to multiple users. All members of a group have the same privileges. Before
you create a database user, the database group to which the user will be assigned must already exist.
A database group is already defined during the installation of the LN software.
Notes
A database base group is password protected.
The database group password is a default password and is not visible for the LN user.
An LN user has only access to the database via the LN application.
It is not allowed for an LN user to logon directly to the database.
112 | Infor Enterprise Server | Administration Guide
RDBMS Administration

Database user
A database user is a user who has access privileges to specific databases stored in the database server.
The configuration information for the database user contains all necessary settings to log on to a database.
These settings are automatically loaded when the LN user logs on. The group to which the user belongs
determines the access privileges of the database user. Before you can add a database user, you must
create a database group to which you can assign the user.
The table authorizations of an LN user are role-dependent. As a result, you can restrict the LN user to
those tables or table fields in the RDBMS that are applicable for the employee’s role in an organization.
You can use LN ’s Authorization Management System (AMS) to define the database restrictions.
It is possible to link a database user to one or more LN users (1 - many relationship).
Notes
A database user is password protected.
The database user password is a default password and is not visible for the LN user.
An LN user has only access to the database via the LN application.
It is not allowed for an LN user to logon directly to the database.
RDBMS administration procedures
Procedure aim
LN ’s RDBMS Administration contains the following two main procedures, which you can use to authorize
LN users for RDBMSs and to maintain the data in the RDBMS Administration module:
▪
The recommended RDBMS Administration procedures for the following:
▪
A range of LN users
▪
Individual LN users
▪
The RDBMS Administration maintenance procedure, which you can use to maintain the
database users data, database groups data, and the link data. You can also use this procedure
to change the database user’s password and the database group’s password.
Additional procedures are included in the RDBMS Administration module, which you can use to do the
following
▪
Change the database group’s password and the database user’s password.
▪
Transfer the database group file and the database user file to the RDBMS Administration
module.
Infor Enterprise Server | Administration Guide | 113
RDBMS Administration

Procedure result and prerequisites
Result
As a result of the RDBMS Administration procedures, the LN users have access to an RDBMS.
Prerequisites
The following prerequisites are required to authorize the LN user for an RDBMS:
▪
The employee user must have a system logon for the operating system on which LN is installed.
If the user does not have a user account on the operating system, refer to the appropriate
Installation Manual for your operating system.
▪
The employee must have an LN user account. In other words, the employee must be an LN
user. If the employee does not have an LN account, refer to the procedure Creating an LN
user.
▪
A database group must exist. The database group is usually created during the installation of
LN. If the database group is not created successfully during the installation, see the following
section, “Recommended RDBMS administration procedures.”
Recommended RDBMS procedure
Introduction
The recommended RDBMS Administration procedure is the best and fastest method to give LN users
access to an RDBMS.
You can use this procedure for individual LN users or for an entire range of LN users. Giving a range
of LN users access to an RDBMS is especially helpful during the installation of LN, or when a new an
RDBMS is introduced.
You can use the recommended RDBMS Administration procedure to convert LN users to database
users. The link between the LN user and the database user is automatically created during the process.
Note
For information on how to change default parameters, refer to “RDBMS maintenance procedure,” later
in this chapter.
You can use the recommended RDBMS procedure to do the following:
▪
Give individual LN users access to an RDBMS
▪
Give a range of LN users access to an RDBMS
This section describes only the most important steps in the procedures. For detailed instructions on how
to enter data in the sessions described in the procedure steps, refer to the Infor Web Help.
114 | Infor Enterprise Server | Administration Guide
RDBMS Administration

The following figure illustrates the recommended RDBMS Administration procedure to convert LN users
to database users:
To give individual LN users access to an RDBMS
You can use this procedure to give individual LN users access to a database.
You can restrict the LN user’s database authorizations with LN ’s Authorization management System
(AMS).
Procedure summary
The following list shows the procedure steps and the corresponding sessions.
▪
Select one LN user - User Data (ttaad2500m000).
▪
Convert the selected user to a database user - Start the Convert Infor ERP User to Database
User (ttdba0915m000) session from the appropriate menu. You will be prompted to enter the
Database Administrator password using session Enter Data Base Administrator Password
(ttdba0200s000).
To give a range of LN users access to an RDBMS
You can use this procedure to give a range of LN users access to a database.
You can restrict the LN user’s database authorizations with LN ’s Authorization management System
(AMS).
Procedure summary
The following list shows the procedure steps and the corresponding sessions.
▪
Convert a range of users to a database user - Convert Infor ERP User to Database User
(ttdba0915m000). You will be prompted to enter the Database Administrator password using
session Enter Data Base Administrator Password (ttdba0200s000).
Infor Enterprise Server | Administration Guide | 115
RDBMS Administration

RDBMS maintenance procedure
Introduction
You can use this procedure to maintain the data in the RDBMS Administration module.
The RDBMS Administration maintenance procedure contains the procedures to do the following:
▪
Create or maintain database groups
▪
Create or maintain database users
▪
Create or maintain a link between the LN user and the database user
You can use these procedures as separate and independent procedures, or as steps in a procedure,
which gives individual LN users access to an RDBMS.
This section describes only the most important steps in these procedures.
Important!
Some databases cannot handle uppercase characters. Therefore you must create all database user
names and group names in lowercase.
The following figure illustrates the RDBMS Administration maintenance procedure:
To create or maintain database groups
A database group enables you to assign a specific set of permissions to multiple users. All members of
a database group have the same privileges. A database user must belong to at least one database
group. Before you can create a database user, you must create a database group. The reason for this
is because the database user must be assigned to an existing database group. You can use the following
procedure to create database groups, and to maintain the database group’s data.
116 | Infor Enterprise Server | Administration Guide
RDBMS Administration

Procedure summary
The following list shows the procedure steps and the corresponding sessions.
▪
Create or maintain database groups
The following sessions are used:
▪
Database Groups (ttdba0520m000)
▪
Database Groups (ttdba0120m000)
▪
Enter Password (ttdba0201s000)
▪
Enter Data Base Administrator Password (ttdba0200s000)
Important!
Create all database group names in lowercase.
To create or maintain database users
A database user is a user who has access privileges to specific databases stored in the database server.
The configuration information for the database user contains all necessary settings to log on to a database.
These settings are automatically loaded when the LN user logs on. The group to which the user belongs
determines the access privileges of the database user.
Before you can create a database user, you must make sure that a database group exists. The reason
for this is because you must assign an existing database group to a database user. To create or maintain
database users, and to maintain the database group’s data, you can use the following procedure:
Procedure summary
The following list shows the procedure steps and the corresponding sessions.
▪
Create or maintain database users
The following sessions are used:
▪
Database Users (ttdba0515m000)
▪
Database Users (ttdba0115m000)
▪
Enter Password (ttdba0201s000)
▪
Enter Data Base Administrator Password (ttdba0200s000)
Important!
Create all database user names in lowercase.
To create or maintain a link between an LN user and a database
user
An LN user has RDBMS permissions through the link between the LN user and the database user. After
you establish the link, the LN user will have database permissions for a specific RDBMS.
Infor Enterprise Server | Administration Guide | 117
RDBMS Administration

Before you can use this procedure, you must make sure that the LN user and the database user are
already defined. If the LN user has not yet been created, use the User Data (ttaad2500m000) session
to create the user. If the database user has not yet been created, use the Database Users
(ttdba0515m000) session to create the database user.
Procedure summary
You can use the following procedure to give the LN user RDBMS permissions. This procedure links an
LN user to a database user. You can also use this procedure to give the LN user permissions for more
than one RDBMS.
▪
Create or maintain a link between an LN user and a database user
The following sessions are used:
▪
Links Between Infor ERP Users and Database Users (ttdba0510m000)
▪
Links between Infor ERP Users and Database Users (ttdba0110m000)
Note
In addition to enabling you to link a single LN user to a single database user of the same name, the
Links between Infor ERP Users and Database Users (ttdba0110m000) session provides additional
flexibility. For example, you can use this session to link many LN users to a single database user, or to
link an LN user with a database user of a different name.
RDBMS table and index repository procedure
Introduction
With this procedure, you can convert the [RDBMS]_storage file from the runtime data dictionary to
the RDBMS Administration module. During the conversion process, the [RDBMS]_storage file is split
up into two separate files:
▪
The database storage parameter file, [RDBMS]_storage_param
▪
The database driver parameter file, [RDBMS]_driver_param
If you split up the [RDBMS]_storage file, the interaction between LN and the database will be improved.
For example, this reduces the time required to run a query.
Procedure
To optimize the table and index repository:
118 | Infor Enterprise Server | Administration Guide
RDBMS Administration

Step 1: Convert the table and index repository.
Complete these steps:
1. Start the Convert Table and Index Repository (ttdba0540m000) session.
2. Convert the table and index repository. During the conversion process the [RDBMS]_storage
file is split up into the [RDBMS]_storage_param file and the [RDBMS]_driver_param file.
Splitting up the [RDBMS]_storage file into two separate files is a once-only action. After you split up
the [RDBMS]_storage file, the file still exists, but has expired; therefore the file is no longer used.
The next two steps are for maintenance purposes of the [RDBMS]_storage_param file and the
[RDBMS]_driver_param file.
Step 2: Optimize the storage parameters.
Complete these steps:
1. Start the Storage Parameters Optimization (ttdba0132m000) session.
2. Use this session to maintain the [RDBMS]_storage_param file, which is a part of the
[RDBMS]_storage file.
Step 3: Optimize the driver parameters.
Complete these steps:
1. Start the Driver Parameters Optimization (ttdba0137m000) session.
2. Use this session to maintain the [RDBMS]_driver_param file, which is a part of the
[RDBMS]_storage file.
Result
As a result of this procedure, the interaction between LN and the database is improved. This results in
an improved performance of LN.
Warning
The information in the Table and Index repository affects the data transfer to the database. Be sure to
store the correct information in the repository to ensure that you do not corrupt the data transfer.
RDBMS additional procedures
The RDBMS Administration module contains some additional procedures, which you can use to:
▪
Change the database group’s password and the database user’s password.
▪
Transfer the database group file and the database user file to the RDBMS Administration
module.
Infor Enterprise Server | Administration Guide | 119
RDBMS Administration

To change the database group’s password
You can use the following procedure to change the database group’s password.
The list shows the procedure steps and the corresponding sessions.
▪
Display the database groups using the Database Groups (ttdba0520m000) session.
▪
Click the password buttton for a selected database group using the Database Groups
(ttdba0120m000) session.
▪
Enter de DBA password using the Enter Data Base Administrator Password (ttdba0200s000)
session.
▪
Change the database group password using the Enter Password (ttdba0201s000) session.
To change the database user’s password
This procedure is almost identical to the procedure that you can use to change the database group’s
password. This section only discusses the differences between the procedures.
The list shows the procedure steps and the corresponding sessions.
▪
Display the database users using the Database Users (ttdba0515m000) session.
▪
Click the password buttton for a selected database user using the Database Users
(ttdba0115m000) session.
▪
Enter de DBA password using the Enter Data Base Administrator Password (ttdba0200s000)
session.
▪
Change the database user password using the Enter Password (ttdba0201s000) session.
To transfer the database group file and the database user file to the
RDBMS Administration module
You usually create the database groups and database users during the LN installation. If the installation
was not completed successfully, or was only partially successful, you must use the following procedures
to create the database group file and the database user file in the RDBMS Administration module.
You can use the following procedure to transfer the database group file and the database user file to
the RDBMS module:
The list shows the procedure steps and the corresponding sessions.
▪
Transfer Database Group File to RDBMS Administration Module (ttdba0521m000)
▪
Transfer Database Group File to the RDBMS Administration Module (ttdba0121s000)
▪
Transfer Database User File to RDBMS Administration Module (ttdba0511m000)
120 | Infor Enterprise Server | Administration Guide
RDBMS Administration

Device management introduction
LN reports can be printed on various types of devices, such as output files and printers. This chapter
describes how to set up printers for LN and how to manage the printer environment.
This chapter describes the following:
▪
Device management overview (p. 121)
▪
Device management setup procedure (p. 124)
▪
Device management maintenance procedure (p. 126)
▪
Automatic paper selection for Windows printers (p. 127)
▪
Windows printer devices (p. 130)
▪
LN Report Archive (p. 139)
Device management overview
You can use the device management functionality to set up print devices for LN and to print LN reports
to those print devices.
Raw data is fed into LN and processed into reports, sales invoices, paychecks, and so on. Before you
can print the data that LN processes, you must first make sure that your operating system supports the
printers in your company.
Before LN carries out a print job, the print job is stored in a temporary file in the ${BSE_TMP} directory.
The printer daemon automatically removes the print jobs after the print jobs are printed. The number of
hours between handling a print request and deleting the temporary file is called delete delay time. A
record is created for each print request in the Printer Queue (ttaad320) table.
The print requests are not automatically removed when the report is printed. Therefore, you must use
LN ’s device management to purge the printer queue table.
Infor Enterprise Server | Administration Guide | 121
10
Chapter 10
Device Management

Devices and logical printers supported by LN
If some physical printers in your company are located in close proximity, you can group the printers in
one logical printer. LN ’s printer daemon checks the paper types of the printers in the logical printer and
directs the output to the first printer in the logical printer with the paper type that is required for the print
job. LN ’s device management supports an entire range of device types.
In LN, an output device can be one of the following:
▪
printer
A physical printer in a UNIX environment. The print job is sent to the temporary file on the
server and queued to the selected record.
▪
logical printer
A group of physical printers in a UNIX environment. LN sends the output data to a printer in
this group.
▪
screen
The output data appears in a display browser on your monitor.
▪
append file
An attachment file in which LN stores the output of a process. If the file does not exist, the file
is created automatically.
▪
rewrite file
An attachment file in which LN stores recurring data. If the file does not exist, the file is created
automatically. The existing files are overwritten.
▪
direct
A physical printer in a UNIX environment. A device type that you can use if you do not want
the printer daemon to handle the printing. At the Device Queue prompt, you must enter the
UNIX command to direct the print job to the desired printer.
▪
windows printer
A physical printer that Microsoft Windows supports. The client sends the print job to a temporary
file on the server. LN ’s print tool, BWPrint, then starts and directs the print job to the selected
printer. For details, refer to Windows printer devices (p. 130) .
▪
windows server printer
A physical printer that Microsoft Windows supports. The printing is handled by a separate
Windows printer server with the Infor ES Reporting Service installed. Users do not need the
BWPrint software on their client PCs. For details, refer to Windows printer devices (p. 130) .
▪
External Reporting Services
A device to print LN reports by means of a report design that is stored on a Microsoft Report
Server. This Report Server will render the report. The destination of the report depends on
the arguments filled in the Argument field in the Device Data (ttaad3100s000) session. For
details on Microsoft Reporting for LN, see the Infor Enterprise Server Plug-in for Microsoft
SQL Server Reporting Services Administration Guide (U9656).
In LN ’s authorization management, you can define a device preference list in a template. You can link
this template to a group of users with the same role in your company.
122 | Infor Enterprise Server | Administration Guide
Device Management

Convert print output to other formats
You can configure a file device in such a way that the print output will be converted into a special format.
The following fields must be used to specify the conversion parameters:
▪
Device
You can choose a unique name for a device, however the name SMTP is reserved for Microsoft
Outlook to send the print file directly to e-mail and the name FAX is reserved to print directly
to a FAX device.
▪
4GL program
Depending on which print output format you want to use, you must specify the name of the
conversion script. Examples: ttstpconv, ttcmfprint
▪
Argument
You must use this field to specify the print output format. Examples: ascii, html, XML, rtf, XML
-PDF.
Certain arguments can be appended with :[Client program] to start a program on the client
PC to view the print output. Examples: ascii:excel, html:iexplore, rtf:winword.
For details on how to configure a device refer to the Device Data (ttaad3100s000) session.
Paper types and associated fonts
With LN ’s device management, you can define the paper types, fonts, and dimensions of the sheets of
paper on which you can print reports. LN can generate various types of output, each of which must be
printed on a specific paper type. The paper that is loaded in the physical printers must be suitable for
the particular output.
A paper type indicates the characteristics of the paper on which the output can be printed. You can
define specific paper types for every type of output. For example, if you want to print paychecks, you
must define the characteristics of the preprinted checks that must be loaded in the printer.
Default report settings
The report defaults define a report’s default paper type and font. These values appear in the device
selection window, which appears when you start the Select Device (ttstpsplopen ) session.
Device queue data
Every print request, except the request of printer type Direct, is added to the device queue. LN uses the
status of the print job in the device queue to do the following:
▪
Restart the print job.
▪
Preserve the print job.
▪
Display the print job.
Infor Enterprise Server | Administration Guide | 123
Device Management

The printer queue data tells you who made the print request, the contents of the request, and the time
the request was started up. The data also shows to which the print job is directed and the status of the
print request.
Device management setup procedure
Procedure aim
LN ’s Device Management contains the procedures that you can use to create devices and specify the
paper types and fonts for the printouts.
Additional procedures are included in device management, which you can use to do the following:
▪
Create devices
▪
Define paper types
▪
Define the fonts for the paper types
▪
Group devices in a logical printer
Procedure result and prerequisites
Result
This procedure results in a range of devices that you can use to view or print data that LN processes.
Prerequisites
Ensure that the physical printers are installed on your operating system. If the printers do not exist on
the operating system, refer to the appropriate Installation Manual for you operating system.
A printer in an LN environment must have a printer information file or printer device driver, which contains
the printer commands, for example, ESC and CTRL. The printer information file also contains the
sequences for fonts, reverse video, underlining, and bold.
This section describes only the most important steps in the device management procedures. For detailed
instructions on how to enter data in the sessions mentioned in the procedure steps, refer to the online
session Help.
Procedure summary
Before LN can print the processed data, you must complete the following steps to create the devices
and the associated data:
124 | Infor Enterprise Server | Administration Guide
Device Management
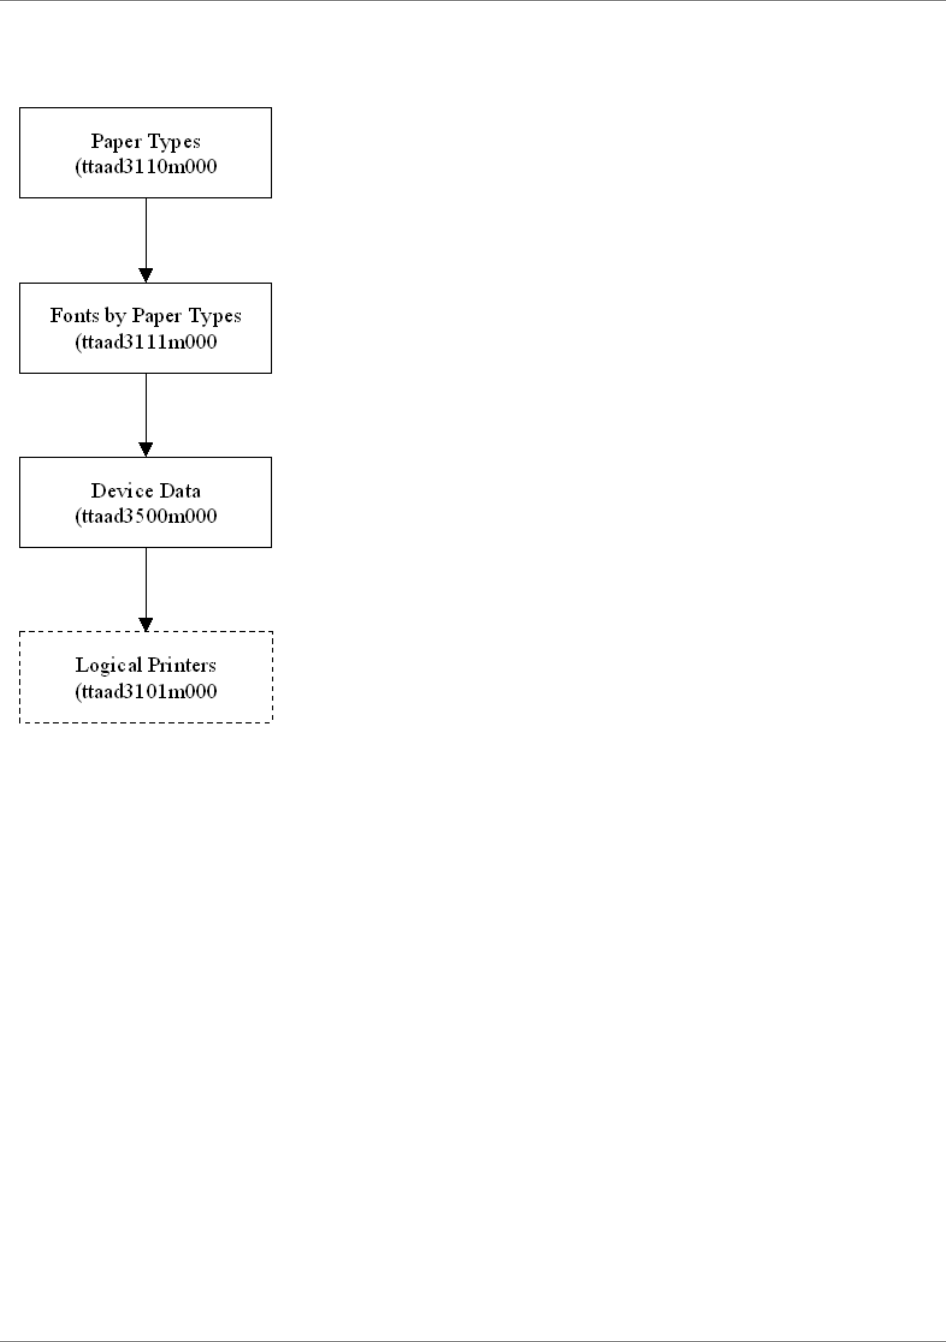
The following figure illustrates the main steps in the device management procedure:
Step 1: Define paper types
Define the characteristics of the paper that can be loaded in a physical printer. You can define specific
paper types for every type of output. For example, if you want to print paychecks, you must define the
characteristics of the preprinted checks that must be loaded in the printer.
Session: Paper Types (ttaad3110m000)
Step 2: Define the fonts for the paper type
Define the fonts to use for each paper type. The fonts define the number of characters that can fit on
one line and the number of lines that can fit on a sheet of paper. You must also define the width and
height of the sheet of paper. LN uses these dimensions to check whether the report fits on the selected
paper type.
Session: Fonts by Paper Type (ttaad3111m000)
Infor Enterprise Server | Administration Guide | 125
Device Management

Step 3: Create the devices
You must create the devices to which LN can send processed data. These devices can be physical
devices, such as printers or logical printers, or a file.
Sessions: Device Data (ttaad3500m000) and Device Data (ttaad3100s000)
Step 4: Create the logical printers
You can group printers in close proximity into a logical printer. If a user sends a print request to a logical
printer, the printer daemon checks the paper type of each printer in the logical printer and automatically
directs the output to the first printer in the logical printer that contains the required paper type.
Session: Logical Printers (ttaad3101m000)
Device management maintenance procedure
Procedure aim
After you complete the Device management setup procedure (p. 124) , you can print LN ’s processed
data. LN ’s device management also gives you the tools to maintain the device management data.
You can, for example:
▪
Maintain the device queue.
▪
Cancel print requests from users and devices.
▪
Change the device status.
▪
Purge the device queue.
▪
Change paper types.
This section describes only the most important steps in the device management procedures. For detailed
instructions on how to enter data in the sessions described in the procedure steps, refer to the online
session Help.
To maintain the device queue
If the status of the print job is Waiting, and the device is physical printer, you can maintain the print job
data. You can, for example, change the date and time of the actual print, the print job’s status, the
number of copies, and so on.
After the print job is complete, the print request status changes to Done. After the delete delay time
expires, the printer daemon automatically removes the temporary file in the ${BSE_TMP} directory.
Although the status of the request changes to Removed, the request is not deleted from the printer
queue table. However, a print request with the status Removed cannot be displayed or reprinted.
If the status of a request is set to Preserved, the output file is not removed if the delete delay time has
passed.
126 | Infor Enterprise Server | Administration Guide
Device Management

Session: Device Queue (ttaad3520m000)
To cancel print jobs
You can only cancel a print job if the status of the print job is Waiting, Active, or Being Converted. You
can cancel the print jobs by user or by device.
As a result , the print request receives the Canceled status.
Sessions: Cancel Device Requests by User (ttaad3220m000) and Cancel Device Requests by Device
(ttaad3230m000)
To change the device status
You can change the status of a device. For example, when a printer changes location, you can change
the status of the printer to Down. Even though the printer is down, users can still send print jobs to this
printer. The print jobs are queued and will be printed as soon as the status returns to Up.
Note
You can only change the device status when the Printer Daemon is running.
Session: Change Device Status (ttaad3240m000)
To purge the device queue data
In the previously described sections, you were able to change the status of a print request without having
to remove the request from the printer queue. As a result, the contents of the printer queue table will
increase rather than decrease. As a result, you must purge the printer queue regularly. However, requests
with the Waiting, Active, or Being Converted status cannot be deleted. Instead, the requests must first
be canceled and then removed.
Session: Purge Device Queue (ttaad3221m000)
To change a printer’s paper type
If you change the paper in a printer, check to see if you need to change the printer’s paper type.
Session: Change Paper Type of Printer (ttaad3102m000)
Automatic paper selection for Windows printers
You can configure LN so that the correct paper type is automatically selected when you print a report
to a Windows printer device.
Infor Enterprise Server | Administration Guide | 127
Device Management

Important!
This section applies only to devices of type "Windows Printer".
Paper types and paper sizes
Enterprise Server enables you to link multiple paper types to each Windows Printer device. You can
link each paper type to a Windows paper size code. The Windows printing process uses this code to
select the correct setting for the printer.
You can only use paper sizes as defined by Microsoft. For details, refer to: http://msdn2.microsoft.com/
en-us/library/ms776398.aspx .
Automatic paper type selection
When you select a Windows printer device in the Select Device (ttstpsplopen ) session, the session
checks whether the report fits on the default paper type of the selected printer device. If the report does
not fit, the session automatically suggests another paper type that is large enough.
Note
▪
This functionality only works if another (large enough) paper type is linked to the selected
Windows printer device.
▪
You can overrule the suggested paper type with another paper type defined for the selected
Windows printer device.
Example
The "WINPRINTER" device is linked to the A3 and A4 paper types. The paper types are linked to the
following Windows paper size codes:
Windows Paper Size
Code
Paper Type
A3 (297 x 420 mm)A3
A4 (210 x 297)A4
If a report does not fit on the A4 paper type, the Select Device (ttstpsplopen ) session automatically
suggests A3.
128 | Infor Enterprise Server | Administration Guide
Device Management

To set up automatic paper selection
To set up automatic paper selection for a Windows printer, you must:
1. Find out which paper sizes are supported by the Windows printer.
2. Link these paper sizes to paper types.
3. Link these paper types to the Windows printer.
For details, see the following procedure steps.
Step 1: Find out which paper sizes are supported by the Windows printer.
Paper types are supported either by hardware (different trays) or by software.
You can find the supported paper sizes for a printer in the printer's manual, or via the BWPrint preview
feature.
To find the supported paper types via the BWPrint preview feature:
1. Start a print session, for example Print Companies (ttaad1400m000).
2. Enter the selection ranges, and click Print. The Select Device (ttstpsplopen ) session starts.
3. Select the Windows printer and select Preview. Click Continue.
4. Right-click in the preview window and on the shortcut menu, select Paper size > Change
device specific paper size. The Page Setup dialog box appears.
5. You can view the supported paper sizes in the Size list.
Step 2: Link paper sizes to paper types
Link each supported paper size you want to use to a paper type.
To link a paper size to a paper type:
1. Start the Paper Types (ttaad3110m000) session.
2. Link the paper size to an existing paper type, or create a new paper type and link the paper
size to it. In the Paper Size field, you can zoom to the Windows Paper Size (ttaad3512m000)
session.
Note: the orientation is also important. Many printers have a software option to “Rotate” printing, but
there are also printers that have a separate tray for “rotated paper”.
Step 3: Link paper types to printer
Link the desired paper types to the Windows printer:
1. Start the Device Data (ttaad3500m000) session and double click the Windows printer. The
Device Data (ttaad3100s000) details session starts.
2. Enter the printer's default paper type in the Paper Type field.
Infor Enterprise Server | Administration Guide | 129
Device Management

3. Link the additional paper types to the printer: On the appropriate menu, select Papertype by
Device. The Papertype by Device (ttaad3107m000) session starts. Enter the desired paper
types.
Windows printer devices
You can define devices of type Windows Printer and Windows Server Printer.
Both device types use the Windows printing services and drivers. This offers various advantages:
▪
The Windows printing services have a common set of API's for a very wide range of printer
devices. A Windows printer driver is available for almost every printer type.
▪
Infor does not have to deliver printer-specific driver/configuration files with the LN software.
▪
Barcode printing from LN is widely supported for Windows printers.
▪
You can use Windows printers to print characters from various character sets on the same
report (Unicode printing).
▪
The Windows API is fully BIDI (bi-directional) enabled.
▪
Any printer supported by Windows can print BIDI reports.
▪
Windows takes care of mirroring and conversion from logical to display order.
▪
Windows fonts can be used to render Hebrew and Arabic characters.
Windows Printer
This device type is used for local printing via both, Web UI and Worktop. To print to a "Windows Printer"
device, users need the BWPrint software on their client PCs.
Important!
To install BWPrint, the users must install the LN windows interface (BW) on their PCs. BWPrint is installed
automatically during this installation.
Defining a Windows printer
To create a "Windows Printer" device:
1. Start the Device Data (ttaad3500m000) session.
2. Add a device. In the Device Type field, select Windows Printer.
3. Specify the remaining device properties. See the online help of the Device Data (ttaad3100s000)
session.
130 | Infor Enterprise Server | Administration Guide
Device Management

Windows Server Printer
This device type provides the possibility to print reports via a Windows driver. This enables you to reroute
printing of reports from Unix-based LN environments to a Windows system. This is particularly of interest
for reports related to batch processes. It reduces the need for LN-related Unix device drivers.
Application server operating system
You can define devices of type Windows Server Printer on Unix-based and Windows-based LN
application servers:
▪
On Unix-based LN application servers, this device type requires a separate Windows printer
server with the Infor ES Reporting Service installed.
▪
On Windows-based LN application servers, this is not required. Here you can directly use a
local OS printer, that is for example connected to a TCP/IP port.
Defining a Windows Server Printer on a Unix-based LN application
server
Step 1: Configure the printer server
Install the Infor ES Reporting Service on the printer server. During the installation, you must assign a
port number to the Infor ES Reporting Service. See the Infor LN Installation Guide (U9498).
Step 2: Define the printer server as a remote system
Complete these steps:
1. Start the Systems (ttaad0550m000) session.
2. Add a record that represents the printer server. In the Service Type field, select Infor ES
Reporting Server. See the online help of the Systems (ttaad0150s000) session.
Step 3: Define a Windows Server Printer
Complete these steps:
1. Start the Device Data (ttaad3500m000) session.
2. Add a Windows Server Printer. Points of attention:
▪
In the Device Type field, select Windows Server Printer.
▪
In the Argument for Conversion Program field, you must specify this text:
server=[the name of the printer server, as defined in the Systems
(ttaad0150s000) session] port=[the port number that is assigned
to the Infor ES Reporting Service]
For example: server=cnl10050 port=7688
Infor Enterprise Server | Administration Guide | 131
Device Management

See the online help of the Device Data (ttaad3100s000) session.
Defining a Windows Server Printer on a Windows-based LN
application server
To define a Windows Server Printer:
1. Start the Device Data (ttaad3500m000) session.
2. Add a Windows Server Printer. Points of attention:
▪
In the Device Type field, select Windows Server Printer.
▪
In the Device Queue field, specify a printer that is accessible for all users.
For example, specify a local OS printer that is connected using a Standard TCP/IP port
and that is available on the network.
Note: Do not specify a "network printer" because a "network printer" is not accessible for
all users. A "network printer" is only visible in the Windows user profile of the user that
defined the "network printer".
See the online help of the Device Data (ttaad3100s000) session.
Microsoft Excel devices
You can define devices that allow you to print reports to an MS Excel spreadsheet.
Note
Printing reports to an MS Excel device is not supported in Worktop.
Defining a Microsoft Excel device
To create a Microsoft Excel device:
1. Start the Device Data (ttaad3500m000) session.
2. Add a device. The Device Data (ttaad3100s000) session starts.
3. Complete these steps:
a. Specify the name and description for the device.
b. In the Device Type field, select External Reporting Services.
c. Leave the 4GL Program empty.
d. In the Argument field, specify -excel, optionally followed by other parameters. For
example:
▪
-excel
132 | Infor Enterprise Server | Administration Guide
Device Management

Print the data to an Excel file. The file is stored in a folder on your computer. This
folder is specified in the Path field. The filename has this format: [report
name]_[company number]_[yyyymmdd-hhmmss].xlsx
This is a sample filename: ttaad340001000_000_20130626-202842.xlsx
▪
-excel -open
Similar to -excel. The Excel file is automatically opened.
▪
-excel -nodatetimestamp
Similar to -excel. The Excel file has no date- and timestamp.
The filename has this format: [report name]_[company number].xlsx
This is a sample filename: ttaad340001000_000.xlsx
▪
-excel -server
Similar to -excel. The file is stored in a folder on the server. This folder is specified
in the Path field.
e. In the Path field, specify the folder where the Excel file will be stored.
Note
▪
If you use the -server option in the Argument field, specify a folder on the LN server.
For example, /home/jdoe/tmp (Unix).
▪
If you do not use the -server option in the Argument field, specify a folder on your
computer. For example, c:\temp.
f. Specify the remaining device properties and save the device. For details, see the online
help of the Device Data (ttaad3100s000) session.
Printing reports to a Microsoft Excel device
To print a report to a Microsoft Excel device:
1. Start the print session to which the report is linked.
2. Print the report.
Points of attention:
▪
In the Device tab in the print session, select Advanced Device.
▪
In the Printer tab in the Select Device (ttstpsplopen ) session, select the Microsoft Excel
device.
A flat file with all input fields of the report is generated.
Infor Enterprise Server | Administration Guide | 133
Device Management

Session-based reporting
Most reports in LN are 4GL reports. These reports consist of a layout part and, optionally, a report script.
You can edit these report layouts in the classic report editor. For details, refer to the Infor LN Development
Tools Development Guide (U8883).
LN also supports Report Viewer enabled reports. When printed, these reports are displayed in the LN
Report Viewer. Developers can edit these reports in the Reporting Studio Report Designer. The Report
Designer offers various useful features to beautify the reports.
You can convert existing 4GL reports to Report Viewer enabled reports. These converted reports are
called session-based reports. The following sections describe how to set up session-based reporting
and how to print session-based reports.
To set up session-based reporting
To set up session-based reporting, complete the following steps:
Step 1: Convert the reports to XML report designs
To convert the reports to XML report designs, complete the following steps:
1. Start the Enable Reports for RPT Design (ttadv3241m000) session.
2. Enter the required information and click Convert.
For details, refer to the session help.
Note
▪
The generated report designs are stored in the report sources folder and have a ".rptdesign"
filename extension.
▪
Developers can transfer the report designs to their client PCs and beautify the layout of the
converted reports in the Reporting Studio. For example, developers can add a graph or a
company logo to the report layout. For details, refer to To create session-based reports in
the Infor LN Development Tools Development Guide (U8883).
▪
To change the structure of a session-based report, for example to add layouts, input fields,
or labels, developers must use the classic report editor. For details, refer to the Infor LN
Development Tools Development Guide (U8883).
Step 2: Create a Report Viewer device
To print session-based reports, you need a device that sends the report output to the LN Report Viewer.
To create a Report Viewer device, complete the following steps:
1. Start the Device Data (ttaad3500m000) session.
2. Add a device with the following properties:
134 | Infor Enterprise Server | Administration Guide
Device Management

▪
Device: RPT
▪
Description: Report Viewer
▪
Device Type: Rewrite File
▪
Locale: <empty>
▪
Intermediate File in XML Format: Yes
▪
Driver: <empty>
▪
Shell Command: <empty>
▪
4GL Program: <empty>
▪
Argument: XML -RPT
▪
Path: ${HOME}/rpt
To run session-based reports
To print a session-based report to the LN Report Viewer, complete the following steps:
1. Start Web UI and log onto your LN server.
2. Start the print session to which the report is linked.
3. Enter the required selection ranges and print options, and click Print. The Select Device
(ttstpsplopen ) session starts.
4. Select a Report Viewer device and click Continue.
Note
All business logic defined in the session and the original 4GL report is executed. Therefore, the report
can be part of the business process. For example, the report can perform transactions in the database
or change the status of a record.
The LN Report Viewer only works with Web UI. Worktop users cannot print Report Viewer enabled
reports.
From the Report Viewer, you can send a report to, among other things, a printer or a PDF file. For details,
refer to To use the Report Viewer (p. 135) .
To use the Report Viewer
The Report Viewer is used to display session-based and query-based reports.
Infor Enterprise Server | Administration Guide | 135
Device Management

In the Report Viewer you can perform the following actions:
▪
Navigate through the report data.
▪
Export report data.
▪
Print the report.
For details, refer to the descriptions of the toolbar buttons.
Toolbar buttons
The following toolbar buttons are available.
DescriptionNameButton
Starts the Export Data dialog,
where you can select report
Export data
columns and meta data, such as
layout names and data types, to
be exported. The data is exported
in csv (Comma Separated Values)
format. You can store the data in
136 | Infor Enterprise Server | Administration Guide
Device Management

a file or view it directly, for exam-
ple in MS Excel.
Starts the Export Report dialog,
where you can select the follow-
ing:
Export report
▪
The output format: Excel,
PostScript, PDF, Word, or
PowerPoint.
▪
The pages to export.
▪
The report size.
You can store the data in a file or
view it directly.
Starts the Print Report dialog,
where you can select the follow-
ing:
Print report
▪
The output format: HTML or
PDF.
▪
The report size (only for
PDF).
▪
The pages to export.
The output is displayed in a print
preview window. If you selected
HTML, you are automatically
prompted to select a printer. If you
selected PDF, click Print to print
the output.
Navigates to the first page.First page
Navigates to the previous page.Previous page
Navigates to the next page.Next page
Navigates to the last page.Last page
Navigates to the page specified in
the Go to page field.
Go to
Infor Enterprise Server | Administration Guide | 137
Device Management

Microsoft Reporting for LN
You can create a device of type External Reporting Services. This device can print LN reports by
using report designs that are stored on a Microsoft Report Server. This report server renders the reports.
The destination of the reports depends on the arguments filled in the Argument field in the Device Data
(ttaad3100s000) session.
For details on Microsoft Reporting for LN, see the Infor Enterprise Server Plug-in for Microsoft SQL
Server Reporting Services Administration Guide (U9656).
138 | Infor Enterprise Server | Administration Guide
Device Management

LN Report Archive
The LN Report Archive solution enables you to archive reports, so you can reprint them, even several
years after they are initially printed.
Archiving is particularly useful for external documents, which are reports that are sent, for example, to
customers and suppliers, such as invoices and orders.
In some countries, such as in Germany, having this type of reports that can be reprinted for at least 10
years after the reports are initially printed is a legal requirement.
In the LN Report Archive solution, you can do the following:
▪
Specify which reports must be archived. When printed, these reports are automatically stored
in an archive folder.
▪
Reprint the archived reports.
▪
Maintain the archived reports, for example, move archived reports to another folder or to a
CD-R(W)/DVD.
Note
Reports that are printed to Business Objects Reports are archived in the same way as other reports.
However, you cannot reprint archived reports on a Business Objects device.
For details on the LN Report Archive, refer to the following sections:
▪
Configuration (p. 140)
▪
To reprint archived reports (p. 142)
▪
Maintenance (p. 143)
▪
Technical details (p. 144)
Infor Enterprise Server | Administration Guide | 139
11
Chapter 11
Report Archive

Configuration
Before you can start to archive and reprint reports, you must configure the LN Report Archive. For
example, you must define the basic parameters for the archive and you must specify which reports must
be archived.
To configure the LN Report Archive, take the following steps:
1.
Create tables (p. 140)
2.
Define Report Archiving Parameters (p. 140)
3.
Define Report Archive Groups (p. 141)
4.
Specify the reports to be archived (p. 141)
After you complete the configuration steps, you can check the Report Archiving Rules. In other words,
you can verify, for various run time settings, whether a report will actually be archived. Refer to Check
Report Archiving Rules (p. 141) for details.
Create tables
Use the General Table Maintenance (ttaad4100 ) session to create the following tables:
in company 000 only:
▪
Report Archiving Parameters (ttaad340)
▪
Report Archive Groups (ttaad341)
▪
Report Archiving Rules (ttaad342)
in all companies where reports must be archived:
▪
Archived Reports (ttaad345) Create this table also for company 000 if you want to archive
Tools reports.
Note
To create tables for a company, you must log on with a user account that belongs to the package
combination to which the company is linked.
For example: company 000 is linked to package combination b61a. To create tables for company 000,
log on with a user account that belongs to this package combination.
To find out to which package combination a user or a company is linked, use the User Data
(ttaad2500m000) and Companies (ttaad1100m000) sessions.
Define Report Archiving Parameters
Use the Report Archiving Parameters (ttaad3140s000) session to define the basic parameters, such as
the directory where the reports must be archived, for the report archive.
140 | Infor Enterprise Server | Administration Guide
Report Archive

Define Report Archive Groups
Use the Report Archive Groups (ttaad3541m000) session to create one or more Report Archive Groups.
You can use Report Archive Groups to group reports of the same type, for example, Sales Invoices and
Purchase Orders.
In the file system, you can store the archived reports by Report Archive Group: the archive folder specified
in the Report Archiving Parameters (ttaad3140s000) session usually contains one or more subdirectories
for each Report Archive Group.
This enables you to maintain an overview of the archive and improves the file system performance.
Most operating systems begin to respond more slowly if a large number of files are stored in a single
directory.
Specify the reports to be archived
Use the Report Archiving Rules (ttaad3542m000) session to define rules that specify which reports must
be archived.
In a rule you must do the following:
▪
Specify the criteria that determine whether a specific report is archived.
▪
Link the report to a Report Archive Group.
▪
Specify how the report must be split when the report is archived.
You can define multiple rules for the same report. For example:
▪
The Sales Invoice report must always be archived.
▪
The Sales Invoice report must not be archived if the report is printed in company 755 (test
company).
As a result, the Sales Invoice report is always archived, unless the report is printed in company 755.
For details on rules, and the way in which multiple rules for the same report are evaluated, refer to the
online Help of the Report Archiving Rules (ttaad3542m000) session and the Check Report Archiving
Rules (ttaad3442m100) session.
For details on report splitting, refer to: Report splitting (p. 146) and to the online Help of the Report
Archiving Rules (ttaad3542m000) session.
Check Report Archiving Rules
You can use the Check Report Archiving Rules (ttaad3442m100) session to test the effect of the Report
Archiving Rules that were defined. You can, for example, verify for various runtime settings whether a
report will actually be archived.
This session is particularly useful if you defined various rules for the same report code.
Infor Enterprise Server | Administration Guide | 141
Report Archive

Example
You defined the following rules for the SALES ORDER report:
▪
all companies/sessions/VRCs: Archiving on
▪
company 100/all sessions/all VRCs: Archiving off
▪
all companies/session X/all VRCs: Archiving on
You can use the Check Report Archiving Rules (ttaad3442m100) session to check, for example, whether
the SALES ORDER report will be archived when the report is printed in company 100, using session X.
In this example, the report will indeed be archived because, according to the priority rules, the session
is more important than the company number.
For details about the evaluation of report archiving rules, refer to the online help of the Check Report
Archiving Rules (ttaad3442m100) session.
To reprint archived reports
You can reprint archived reports in the following ways:
▪
To reprint through the Archived Reports session (p. 142)
▪
To reprint directly through the Print Archived Reports session (p. 142)
▪
To reprint via PDF (p. 143)
To reprint through the Archived Reports session
Use this method only if the archived reports are stored in the Infor LN native report format.
To reprint a report:
▪
Start the Archived Reports (ttaad3545m000) session and search the report that must be
reprinted. You can search on properties such as report archive group, keywords, user and
print date/time.
▪
Select the report that must be reprinted and click Print to start the Print Archived Reports
(ttaad3445m000) session.
▪
Click Reprint in this session to reprint the report.
To reprint directly through the Print Archived Reports session
Use this method only if the archived reports are stored in the Infor LN native report format, and if you
know the properties of the reports that must be reprinted.
To reprint reports:
▪
Start the Print Archived Reports (ttaad3445m000) session and enter the report properties,
such as the Report Archive Group and keywords in the selection range fields.
142 | Infor Enterprise Server | Administration Guide
Report Archive

▪
Click Reprint to reprint the reports.
You can print only a limited number of reports in one run.
To reprint via PDF
Use this method only if the archived reports are stored in PDF format.
To reprint a report:
▪
Start the Archived Reports (ttaad3545m000) session and search the report that must be
reprinted. You can search on properties such as report archive group, keywords, user and
print date/time.
▪
Double-click the report to view the details. Among other things, the full path name of the report
file is displayed.
▪
Open and print the report file via PDF, for example via Acrobat Reader.
Constraints
▪
You cannot reprint archived reports on a Crystal device.
▪
You might experience some layout problems if you reprint an archived report on a device other
than the device on which the original report was printed. The problems occur if device
properties, such as locale, paper type, and page length, differ for both devices.
▪
Reprinting via PDF may lead to layout differences because PDF is proportional font based
while certain device types are fixed font based.
Maintenance
This section covers the following topics:
▪
Move/delete archived reports (p. 143)
▪
Export/Import archive settings (p. 144)
Move/delete archived reports
If the disk on which the report archive is stored is nearly full, you can use the Move/Delete Archived
Reports (ttaad3445m100) session to do the following:
▪
Move a range of archived reports to another folder on the LN server.
▪
Move a range of archived reports to an offline storage medium, for example, CD_R(W), DVD,
or tape.
▪
Remove a range of archived reports.
Refer to the online help of the Move/Delete Archived Reports (ttaad3445m100) session for details.
Infor Enterprise Server | Administration Guide | 143
Report Archive

Export/Import archive settings
The settings for the report archive, such as parameters and archive groups, can be exported to and
imported from XML files. This is useful, for example, if you want to distribute archive settings to multiple
LN servers, or if you want to load predefined archive settings from an XML file that is provided by LN.
▪
To export archive settings, run the Export Archiving Settings (ttaad3241m000) session.
▪
To import archive settings, run the Import Archiving Settings (ttaad3242m000) session.
Technical details
This section contains an overview of the components of the LN Report Archive solution, and describes
their function in the report archiving and reprinting processes.
Refer to the following sections for details:
▪
Tables (p. 144)
▪
Sessions (p. 145)
▪
DLLs (p. 145)
▪
Log file (p. 145)
▪
Data flow during first print (p. 145)
▪
Data flow during reprint (p. 146)
▪
Report splitting (p. 146)
▪
Authorization for archive directories (p. 146)
Tables
The solution contains the following tables:
▪
Report Archiving Parameters (ttaad340) This table contains general settings, such as the base
path for the archive, and is maintained through the Report Archiving Parameters
(ttaad3140s000) session. This table must be created in company 000 only.
▪
Report Archive Groups (ttaad341) This table contains the settings, such as extension path
and keywords, for the various report groups and is maintained through the Report Archive
Groups (ttaad3541m000) session. This table must be created in company 000 only.
▪
Report Archiving Rules (ttaad342) This table contains the rules that determine which reports
must be archived and is maintained through the Report Archiving Rules (ttaad3542m000)
session. This table must be created in company 000 only.
▪
Archived Reports (ttaad345) This table contains details, such as the location of the print file
and the report code, on the reports that are already archived. To view these details and reprint
archived reports, use the Archived Reports (ttaad3545m000) and Print Archived Reports
(ttaad3445m000) sessions respectively. You must create this table in all companies where
reports must be archived.
144 | Infor Enterprise Server | Administration Guide
Report Archive

Sessions
The solution contains the following sessions:
▪
Report Archiving Parameters (ttaad3140s000)
▪
Report Archive Groups (ttaad3541m000) overview + editable details session
▪
Print Report Archive Groups (ttaad3441m000)
▪
Report Archiving Rules (ttaad3542m000) overview + editable details session
▪
Check Report Archiving Rules (ttaad3442m100)
▪
Print Report Archiving Rules (ttaad3442m000)
▪
Archived Reports (ttaad3545m000) overview + editable details session
▪
Print Archived Reports (ttaad3445m000)
▪
Move/Delete Archived Reports (ttaad3445m100)
▪
Export Archiving Settings (ttaad3241m000)
▪
Import Archiving Settings (ttaad3242m000)
DLLs
The solution uses the following DLLs:
▪
ttdllreparch: A new DLL that is used to check whether a report must be archived and to reprint
archived reports.
▪
ttstprepdll: This DLL already existed in Tools and was modified to support report archiving.
This DLL splits a print job, depending on the report archiving rule, into various separate files.
For details on report splitting, refer to: Report splitting (p. 146) and to the online Help of the Report
Archiving Rules (ttaad3542m000) session.
Log file
If errors occur during the archiving of a report, these errors are logged in the ${BSE}/log/log.reprint log
file. Reading the content of this log file is useful if, due to a new report archiving rule, a report is archived
for the first time.
Data flow during first print
When a user issues a print command, the ttdllreparch DLL checks whether the Report Archiving Rules
(ttaad342) table contains a rule that indicates that the report must be archived.
If the report must be split, the ttstprepdll splits the print job, depending on the split expression specified
in the rule.
The split reports are saved as printer-independent files on the location that is specified in the Report
Archiving Parameters (ttaad3140s000) session and the Report Archive Groups (ttaad3541m000) session.
That location is: Base path for Archive/ Extension path for Archive.
Infor Enterprise Server | Administration Guide | 145
Report Archive

The extension path can contain variables and is evaluated at the moment the files are written.
For details on report splitting, refer to: Report splitting (p. 146) and to the online Help of the Report
Archiving Rules (ttaad3542m000) session.
Data flow during reprint
If a user issues a reprint command through the Print Archived Reports (ttaad3445m000) session, the
user must select a device on which the report will be reprinted.
Subsequently, the ttdllreparch DLL searches in the Archived Reports (ttaad345) table for the location
of the print files. If the file is found, the report is reprinted on the selected device.
Report splitting
When you print an LN report, a temporary print file is always generated. This file contains the report
layout and the data of the records to be printed.
If you print a report that is selected to be archived, the report's temporary print file is usually split into
several smaller print files, which are stored in the report archive folder The splitting is based on the Split
Expression that is defined in the report archiving rule.
Example
The Report Archiving Rules (ttaad342) table contains a rule that indicates that the invoice report must
be archived. In this rule, the invoice number is selected as the Split Expression.
You run the Print Invoices session and print a range of 200 invoices. This results in a single temporary
print file that contains the layout and the data for 200 invoices. The content of this temporary file is
printed.
Because the report must be archived, the temporary file is split into 200 separate files, one for each
invoice, which are stored in the report archive folder.
Later on, for example, after nine years, you can reprint any of these 200 invoices individually.
Authorization for archive directories
Archived reports are stored in several subdirectories under the base path that is specified in the Report
Archiving Parameters (ttaad3140s000) session. Usually each archive group has its own subdirectories.
See also Extension path for Archive and the online Help of the Report Archive Groups (ttaad3541m000)
session.
A user can only archive a report, if the user has write authorization for the directory (base path/extension
path) in which the report will be stored.
To avoid authorization problems, verify that all users have write authorization for all subdirectories under
the base path.
146 | Infor Enterprise Server | Administration Guide
Report Archive

Text management introduction
The information about LN and its functionality is written with the tools supplied by LN ’s Text Management.
This chapter describes the procedures that are required to create and maintain an environment that you
can use to create texts in LN.
This chapter describes the following:
▪
Text management overview (p. 147)
▪
Text management parameters procedure (p. 148)
▪
Text management maintenance procedure (p. 150)
Text management overview
You can use text in LN ’s Text Management for various purposes. LN ’s text management provides the
tools to write and maintain text in LN. You can use LN ’s text editor, for example, to write the online Help
and write queries in LN ’s SQL Queries module. You can also provide information about the data stored
in the database tables.
You can, for example, do the following:
▪
Link information to a record that defines the contents of the record.
▪
Give additional information, for example, about an item or sales order.
You can also use LN ’s text management to create the text-related templates that define the user’s text
authorizations. You can define the text-related authorizations in templates, which you can link to the
users with LN ’s User Management module.
Note
The text in LN is typically written in the multiline editor. Although the Infor ERP editor is still supported,
the multiline editor, which is more user-friendly, is preferred.
Infor Enterprise Server | Administration Guide | 147
12
Chapter 12
Text Management

Description of text-related templates
A normal user must have some basic text authorizations. You can define the following text authorizations
for the user:
▪
Use
The user is authorized to read texts and link the text to a record, for example, an order, item,
and so on. The user cannot change the texts.
▪
Update
The user is authorized to create, change, and read text. The user is also authorized to link
the text to a record.
▪
Read
The normal user can only read texts for the specified text group. The user has no authorization
to link or update texts.
The necessary data and authorizations are defined in the text parameters. These text parameters are
defined in the following templates:
▪
Text group authorization template
▪
Default text groups template
▪
Default text groups by text field template
For each text group, you must specify the text authorizations, which define the read, use, or update
authorizations in a template. If a text is written in a text field for which no text group is defined, LN uses
the default text group that is defined for the specified text field in the text groups by text field template.
If no default text group is defined for the specified text field, LN uses the information that is defined in
the default text group template.
You can specify text parameters either for a specific company or for all companies. The text parameters
that are defined for a specific company take precedence over the defaults that are defined for all
companies.
Text management parameters procedure
Procedure aim
You must use the text parameters procedure to define the basic parameters that are required to use
text in LN. These parameters provide the users with the basic requirements to write and edit text.
Procedure result and prerequisites
Result
The users have the authorization and means to create and edit text in LN.
148 | Infor Enterprise Server | Administration Guide
Text Management

Prerequisites
No prerequisites are required for the environment.
Procedure summary
To define the text parameters, you must complete the steps shown in the following figure:
Step 1: Create text windows
You must specify the text window’s properties that define the layout of the text window. For example,
the text window’s frame, color, size and shape.
If you use the multiline editor as the external editor, only the number of columns and number of rows
are relevant. In that case, the frame and color are defined by default. However, you must make a selection
in all fields because you can also use other editors for the text group.
Sessions: Text Windows (tttxt1520m000) and Text Windows (tttxt1120s000)
Step 2: Create text groups
You must define the text group’s properties. For every type of text, you can define text groups with
specific properties. You must assign the text editor best suited to the text window’s function. For example,
you can use a multiline editor to write queries, or use Microsoft Word for texts that contain additional
information, for example, about items and sales orders.
Session: Text Groups (tttxt1110m000)
Infor Enterprise Server | Administration Guide | 149
Text Management

Step 3: Create the template for the text group authorizations
In the text group authorizations template, you must specify the user’s authorization to edit the text in
LN. For example, you can grant the users who are linked to the template permission to read, use, or
update text. The text group authorization template is linked to the user in the User Data (ttams1100s000)
session.
Session: Text Group Authorization Template (ttams1122m000)
Step 4: Create the default text groups by text field template
In the default text groups by text field template, you must specify the text group for a specific text field.
If you do not specify a default text group for a text field, LN uses the template that is defined in the default
text group template:
Session: Default Text Groups by Text Field Template (ttams1120m000)
Step 5: Create the template for the default text groups
In the default text groups template, you must specify the text group LN must use if you have not specified
a specific text group for a text field.
Session: Default Text Groups Template (ttams1121m000)
Text management maintenance procedure
Procedure aim
This section describes the following procedures:
▪
The procedure to create a range of text numbers
▪
The procedure to remove unused texts
This section describes only the most important steps in the text management procedures. For detailed
instructions on how to enter data in the sessions described in the procedure steps, refer to the online
session Help.
To create a range of text numbers
You can use the text numbers to exchange text with LN's Exchange module between various locations
or sites. Make sure that, for each site, you define unique ranges for the text groups to avoid conflicts
with identical text numbers on separate sites.
Session: Text Number Range by Text Group (tttxt0130m000)
150 | Infor Enterprise Server | Administration Guide
Text Management

To remove unused texts
Unused texts are texts that are no longer linked to a record.
A text becomes unused, for example, if you remove the record, for example, the sales order or the item,
to which the text was linked, or if you unlink the text from a record, using the Disconnect command in
the Text Editor.
Removing the unused texts occasionally is useful to avoid pollution in the database.
Session: Delete or Print Unused Texts (tttxt1210m000)
Infor Enterprise Server | Administration Guide | 151
Text Management

152 | Infor Enterprise Server | Administration Guide
Text Management

Job management introduction
You can use job management in LN to schedule jobs based on your organizational requirements. For
example, you can schedule jobs at non-peak hours to improve the overall system performance in a
heavily loaded environment. A job consists of one or more sessions or shell commands, or both, that
run without user interaction. The sessions and shell commands in a job can be started while you are
not logged on to LN. You can schedule jobs to start processes periodically, at a defined interval, or
immediately. Typically, you use LN job management for print and processing sessions.
This chapter provides the following:
▪
Job data (p. 153)
▪
Shared job data tables (p. 154)
▪
Job execution (p. 154)
▪
Job history (p. 157)
▪
Job data procedure (p. 158)
▪
Job handling procedure (p. 160)
Job data
To create a job, you must specify basic job data and link sessions or shell commands, or both, to the
job. In the basic job data you specify whether the job is periodical. For periodical jobs, you specify how
the job will be scheduled.
You can use a job to run one or more sessions as follows:
▪
At a predefined time
▪
Repeatedly, at specific times
▪
Periodically
You can use the job management calendar to define the date and time the job must be started. Using
the job calendar, you can start the job during quiet periods. For example, you can schedule processing
and printing jobs to run during after office hours to improve the system performance during the day.
Infor Enterprise Server | Administration Guide | 153
13
Chapter 13
Job Management

In LN, you can create the following two job types:
▪
Periodical jobs that are carried out multiple times
For a periodical job, you must specify a time interval or a calendar is specified. If desired, you
can restart the job automatically.
▪
Non-periodical jobs that are carried out only once
When the job is carried out, the job data is removed automatically.
See Job data procedure (p. 158) .
Shared job data tables
Typically, each company stores its own basic job data. As a result, a job runs for a particular company.
However, in a job, you can also run sessions in more than one company. You can run sessions in multiple
companies when the job data tables of the associated companies are physically mapped to a single
main company.
You can use the Logical Tables (ttaad4120m000) session to link the following job tables as logical tables
to one physical table:
▪
Job Data (ttaad500)
▪
Sessions by Job (ttaad501)
▪
Job Input Variables (ttaad503)
▪
Job Daemon Indicator (ttaad505)
▪
Calendars (ttaad506)
▪
Dates by Calendar (ttaad507)
▪
Job History (ttaad510)
▪
Job Session History (ttaad511)
▪
Job Session History (ttaad512)
Before you add a session to a job, you must check the company number. If a job applies to more than
one company, you must switch to the other companies with the Change Company command in the
user interface to define the job for each company. You can then define the job data for the other
companies.
Job execution
Jobs can be started in multiple ways. The job’s status defines how you can start the job. You can start
the job if the job’s status is In Queue or Free.
154 | Infor Enterprise Server | Administration Guide
Job Management

In Queue status
If the job’s status is In Queue, you can use the Job Daemon to start the job. You must start the Job
Daemon before the daemon can activate any job.
The implementation of the Job Daemon depends on the operating system of the LN server:
▪
On a UNIX server
The Job Daemon is the shell program rc.startjobdm, which is located in the ${BSE]/etc directory.
To start the Job Daemon, you can include the ${BSE}/etc/rc.startjobdm command in the
${BSE}/etc/rc.start file. As a result, the Job Daemon is activated when you start the LN
environment.
▪
On a Windows server
The Job Daemon is a service that you can manage by means of the Application Services
Manager (ASM)
When the Job Daemon runs, you can stop the Virtual Machine (VM) without any problem. The Job
Daemon, and not your VM, carries out the job.
To run a job for multiple companies, you must start a Job Daemon for each company.
See Job handling procedure (p. 160) .
Free status
If the job’s status is Free, you can start the job in the following ways:
▪
Use the Activate Job (ttaad5203m000) session
▪
Use the rc.startjob shell command (UNIX platform)
▪
Use the startjob.bat batch file (Windows platform)
Activate Job (ttaad5203m000)
If you start the job before the time and date of execution, the job’s status changes to Waiting. While the
job is being carried out, the job’s status changes to Running. Because the Virtual Machine (VM) of the
user who starts the job carries out the job, the user cannot quit the VM until the job is finished.
If a job that belongs to more than one company must be started, you must use the Change Company
command on the Menu browser’s Option menu to switch to the required company.
The rc.startjob shell command (UNIX)
You can also start the job with the UNIX ${BSE}/etc/rc.startjob shell script. For this purpose, you must
enter the following syntax at the UNIX prompt: ${BSE}/etc/rc.startjob [job name].
You can include the rc.startjob script in a UNIX user job scheduler (crontab), which can automatically
start jobs. For this purpose, some UNIX variables must be defined in the shell script. For more information,
see the shell script.
Infor Enterprise Server | Administration Guide | 155
Job Management

To run a job for multiple companies, you must create a unique version of rc.startjob for each company.
The startjob.bat batch file (Windows)
If LN runs on a Windows server, you can also start the job with the startjob.bat batch file.
To start a job, you must enter the following syntax at the Windows command prompt: startjob.bat [job
name]
Before you can enter this syntax, you must run the fillenv.bat batch file to set the LN environment
variables.
To automate the execution of jobs, you can run startjob.bat with a scheduler.
To run a job for multiple companies, you must create a unique version of startjob.bat for each company.
See Job handling procedure (p. 160) .
Job status
The following table lists the statuses a job can have during its life span:
156 | Infor Enterprise Server | Administration Guide
Job Management

DescriptionStatus
The job’s basic job data is defined and is ready to
be started.
Free
The job is started and is running.Running
The job is started and is waiting to be carried out
at the next execution date and time.
Waiting
The Job Daemon will not start the job.
The job is queued and will be started automatically
when the Job Daemon runs.
In queue
The job is blocked and cannot be started. To start
the job, set the status to Free or In Queue.
Blocked
The job has been stopped with the Cancel Jobs
(ttaad5204m000) session. A job is also canceled
when the maximum duration is exceeded.
Canceled
This status signals an error during the execution
of the job.
Runtime error
If required, you can cancel a job that the Job Daemon starts, for example, to change the job’s basic job
data. To cancel the job, use the Job Data (ttaad5500m000) session. On the appropriate menu, click
Cancel Job. If you cancel a job, the current session of the running job is carried out, but the following
sessions in the job will not be started. The job’s status changes from In Queue to Canceled. To restart
a canceled job, you must release the job to change the job’s status to In Queue or Free.
To temporarily stop a job, start the Job Data (ttaad5500m000) session. On the appropriate menu, click
Block Job.
Job history
When the execution of a job stops, for example, when the job completes successfully or when a runtime
error occurs, information is written to a history log. The job history contains information, such as the
date and time of the execution and the reasons why the job and its associated session ended.
Use the Print Job History (ttaad5411m000) session to print this history.
Infor Enterprise Server | Administration Guide | 157
Job Management

During the execution of a job, messages are suppressed. These suppressed messages are also logged
in a history. You can use the Job History Messages (ttaad5512m000) session to print these messages.
If you start jobs regularly, you must purge the job history list and the message history list regularly with
the Delete Job History (ttaad5210m000) session.
Job data procedure
Procedure aim
LN ’s Job management contains the procedures that you can use to create jobs, and define the time
and date in which the job must be carried out in the job calendar.
Procedure result and prerequisites
Result
A job ready to be started.
Prerequisites
No prerequisites are required for the environment.
Procedure summary
Before you can use periodical jobs in LN, you must complete the following steps to define a job calendar
and the basic job data. In LN, you can start periodical jobs according to a schedule that is defined in the
job calendar or a regular interval. You can define the interval in the basic job data. After you define the
basic job data, you can add sessions and shell commands to the job. The default settings of the sessions
in the job can be maintained, when necessary, with an optional step in the procedure.
158 | Infor Enterprise Server | Administration Guide
Job Management

The following figure illustrates the sessions in the basic job procedure:
Step 1: Create a job calendar
To start periodical jobs, you can use a job calendar. The job calendar contains the dates and times the
job must be carried out.
Session Calendars (ttaad5106m000).
Step 2: Specify the dates in a job calendar
In the job calendar, you must define the date and time that the job must be started.
Session Dates by Calendar (ttaad5107m000)
Step 3: Define the basic job data
Before you can add sessions to a job with the Add Session to Job (ttaad5102s000) session, you must
first define the basic parameters for the job. To make a periodical job non-interactive, in the sessions
Job Data (ttaad5500m000) and Job Data (ttaad5100s000), you can specify a predefined job calendar
or a regular interval to start the job.
Infor Enterprise Server | Administration Guide | 159
Job Management

If you select the Suspend Job until Next Execution check box, the job is suspended until the next
execution date. For jobs started by the Activate Job (ttaad5203m000) session, the UNIX shell program
rc.startjob, or the Windows batch file startjob.bat, the job’s status is set to Waiting. The job is automatically
restarted at every subsequent execution date that is defined in the calendar.
If you clear the Suspend Job Until Next Execution check box, the job is carried out once and then
terminated. For jobs started by the Activate Job (ttaad5203m000) session, the UNIX shell program
rc.startjob, or the Windows batch file startjob.bat, the job’s status is set to Free. To restart the job, you
must manually start the Activate Job (ttaad5203m000) session, the UNIX shell program rc.startjob, or
the Windows batch file startjob.bat.
Step 4: Add sessions to a job
A job must contain one or more sessions, which must be carried out according to the data specified in
the session Job Data (ttaad5100s000) session. Typically, a job starts print or process sessions.
Under Error Handling, you can enter how LN must continue if an error occurs during the execution of
the session. You can, for example, indicate that LN must execute, or skip, a number of sessions of the
job if an error occurs during the execution of the session.
Step 5: Add a shell command to the job
This procedure is optional, and you can use this session to link the job to a shell command to a job to
manipulate the command’s execution. To ensure that the shell command has the right effect on the job,
you must test the script. Typically, to test the job and shell script, you can redirect the output to a file or
printer. You can redirect the output to a file or printer with one of the operating system's output redirection
facilities.
Session Add Shell Command to Job (ttaad5205m000).
Step 6: Change the default settings of the sessions in the job
This procedure is optional, and you can use this procedure to change the settings of the sessions that
are linked to the job. For example, you can change the execution order of the sessions or the device to
which the output of a session is sent.
Session Sessions by Job (ttaad5501m000).
Job handling procedure
Procedure aim
With the job handling procedures, you can start, block, cancel, queue, and release jobs.
160 | Infor Enterprise Server | Administration Guide
Job Management

Procedure result and prerequisites
Result
This procedure results in a job that runs according to the job calendar or interval that is defined in the
job’s basic data, without user interaction. This helps you to use LN ’s resources more efficiently.
Prerequisites
You can only use the job handling procedure when the job data procedure is completed.
Steps in the job management procedures
Depending on the job’s status, the following methods are available to start a job:
If the job status is In Queue, the Job Daemon starts the job.
If the job’s status is Free, you can start the job in the following ways:
▪
Run the Activate Job (ttaad5203m000) session
▪
Use the rc.startjob shell command (UNIX platform)
▪
Use the startjob.bat batch file (Windows platform)
The following figure illustrates the steps in the job handling procedure translated into the session or
action that you must carry out to complete the procedure:
This figure shows that the Job Daemon can start the job if the job’s status is In Queue. If you use the
Job Daemon, the job starts automatically and a running VM is not necessary. The Job Daemon starts
a VM in the background, which starts the UNIX shell program rc.startjob. The UNIX shell program then
starts the job with the Activate Job Daemon session and the Activate Job (ttaad5203m000) session.
You must start the Job Daemon to make sure that the Job Daemon can start any job. If the Job Daemon
runs, you can exit the VM without any problem because the Job Daemon, and not your VM, carries out
the job.
Infor Enterprise Server | Administration Guide | 161
Job Management

If the job’s status is Free, you can use the Activate Job (ttaad5203m000) session, the UNIX shell program
rc.startjob, or the Windows batch file startjob.bat to start the job manually. In this case, you must have
a running VM.
To enable and start the Job Daemon on a Windows platform
The Application Services Manager (ASM) manages (externally) the Job Daemon service.
Typically, a Job Daemon runs jobs for one company. To run jobs for more companies, you must create
a Job Daemon entry, in ASM, for each company. Per entry, use the BSE_COMPNR and
PACKAGE_COMB variables to specify the company for which a Job Daemon must be started, and the
package combination to which that company is linked.
To start the Job Daemon on a UNIX platform
To start the Job Daemon, you can include the ${BSE}/etc/rc.startjobdm command in the ${BSE}/etc/rc.start
file. As a result, the Job Daemon starts when you start the LN environment.
Typically, a Job Daemon runs jobs for one company. To run jobs for multiple companies, you must
change the rc.start file to start Job Daemons for each company. Per Job Daemon entry, use the
BSE_COMPNR and PACKAGE_COMB variables to specify the company for which a Job Daemon must
be started, and the package combination to which that company is linked.
Stop the Job Daemon
To stop the Job Daemon you can include the ${BSE}/etc/rc.stopjobdm command in the ${BSE}/etc/rc.stop
script. As a result, the Job Daemon stops when you stop the LN environment. To stop jobs for multiple
companies, you must include multiple entries of rc.stopjobdm in the rc.stop file. Use the BSE_COMPNR
and PACKAGE_COMB variables to specify the company for which a Job Daemon must be stopped,
and the package combination to which that company is linked.
To run a job with the Job Daemon
To use the Job Daemon to start a job, you must ensure that the job’s status is In Queue.
Session Job Data (ttaad5500m000)
To run the job with Activate Job (ttaad5203m000)
Because your running Virtual Machine (VM) starts the job, you cannot close the Virtual Machine (VM)
until the job is finished. If the job is started prior to the time and date of execution, the job’s status changes
to Waiting. After the job is carried out, the job’s status changes to Running.
If you must start a job that belongs to more then one company, you must switch to the required company
with the Change Company command, before you start the job.
162 | Infor Enterprise Server | Administration Guide
Job Management

To run the job with the rc.startjob shell program
You can also start the job with the UNIX shell program ${BSE}/etc/rc.startjob.
To start the job, at the UNIX prompt you must enter:
${BSE}/etc/rc.startjob [job name]
Scheduling
If the rc.startjob program is included in a UNIX crontab, the program can automatically start jobs. For
this purpose, some UNIX variables must be defined in the shell script. Additional information about how
to define the UNIX variables is included in the shell script of the rc.startjob.
Run jobs for multiple companies
If you must start jobs that pertain to different company numbers, different versions of the rc.startjob
script are created.
To run the job with the startjob.bat batch file
On a Windows platform you can start jobs with the startjob.bat batch file.
To start a job, take the following steps:
▪
Start a Command Prompt (cmd) on your LN server
▪
Go to the ${BSE}\bin directory
▪
Run the fillenv.bat batch file to set the LN environment variables
▪
Type startjob.bat [job name] to start the job
Scheduling
To automate the execution of jobs, you can include startjob.bat in an external job scheduler, for example,
the Windows scheduler. For this purpose, you must set the LN environment variables in the startjob.bat
batch file. To achieve this, you can copy the settings in the fillenv.bat batch file to the startjob.bat file.
Run jobs for multiple companies
If you must start jobs that pertain to different company numbers, different versions of startjob.bat are
created.
Infor Enterprise Server | Administration Guide | 163
Job Management

164 | Infor Enterprise Server | Administration Guide
Job Management

Enterprise Server Service Manager
Introduction
You can manage LN on your Windows server by means of an Infor Enterprise Server Service Manager
snap-in for the Microsoft Management Console (MMC).
You can use the Infor ES Service Manager snap-in to do the following:
▪
View all LN environments.
▪
View the status of the LN-specific services for each LN environment.
▪
Add, change, or remove LN-environment-specific variables.
▪
Install, start, and stop LN-specific services.
▪
Edit the settings of the LN-specific services.
This chapter includes the following:
▪
An overview of the ES Service Manager snap-in
▪
The LN management procedures
Overview of the Enterprise Server Service Manager snap-in
The Enterprise Server Service Manager snap-in for the Microsoft Management Console (MMC) enables
you to manage LN Software Environments (BSE) on your system.
The ES Service Manager snap-in installs automatically on the LN server during the installation of LN.
The ES Service Manager lists the LN environments (BSEs) on your system. You can independently
administer the displayed BSEs.
The ES Service Manager does the following:
▪
Displays the ES Logic Service for every ERP LN installation.
You can use the ES Service Manager to enable or disable the Logic Service for each LN
installation.
Infor Enterprise Server | Administration Guide | 165
14
Chapter 14
Enterprise Server Service Manager

▪
Displays the Shared Memory Service for every BSE.
You can use the ES Service Manager to enable or disable the Shared Memory Service for
each BSE.
ES Logic Service
Use the ES Logic Service to configure the LN connection protocols. The ES Logic Service connects the
LN Windows (BW) client to the LN server and checks whether the user has the authorization to connect
to the LN server. With the ES Logic Service, you can start/stop the LN Virtual machine (VM) and the
database driver.
The ES Logic Service offers you the following methods to connect to the LN server:
▪
Rexec
The standard remote execution protocol. Rexec does not use passwords encryption.
▪
BaanLogin
Encrypts the password of the users.
▪
Federation Services
Provides central authentication and authorization for multiple applications. Federation Services
makes single-sign-on (SSO) available for LN
▪
Security Support Provider Interface (SSPI)
Only available on Windows and later.
Single-sign-on (SSO) is a mechanism with which a single action of user authentication and authorization
can permit a user access to all computers and systems on which the user has access permission, without
the need to enter multiple passwords.
SSO does not use passwords, but uses the Windows user authentication. With SSO, users are no longer
required to perform multiple logons, nor must users remember multiple passwords to access network
resources. The user logs on once on Windows and no further passwords are required.
All SSO-specific information is stored in a single repository, the Active Directory, which provides a single,
authoritative listing of each user’s rights and privileges. You can change a user’s privileges and the
results will be distributed network wide.
If the SSPI protocol is used for authentication, the Infor ES Logic service must run on a system, which
has sufficient rights to authenticate identities of incoming user requests, using/accessing the Active
Directory Server for the Windows Domain the Infor LN server is member of. If that system cannot
authenticate the user identity, the user logon is denied. Contact your local Windows administrator
regarding trusts and authentication settings of the Infor LN system and the Active Directory Server/Domain
controller(s). Such relationship(s) must exist before (domain) users can be validated. See the Infor
Enterprise Server Single Sign On User Guide (U9559).
Shared Memory Service
With the Shared Memory Service, you can configure LN ’s shared memory. The shared memory is a
part of the physical memory intended for common use. Programs communicate with each other with
166 | Infor Enterprise Server | Administration Guide
Enterprise Server Service Manager

shared memory. The use of shared memory results in faster access to the components loaded in shared
memory. Before you start the application, you must initialize and set up the shared memory.
The following components can be loaded into shared memory:
▪
Report objects
▪
Program objects
▪
Table definitions
LN management procedures
The ES Service Manager provides the tools to manage and administer LN on your system.
With the ES Service Manager, you can:
▪
Start or stop an LN Software Environment (BSE).
▪
Enable, disable, start, or stop the Shared Memory Service of the current BSE environment.
▪
Configure the ES Logic Service.
▪
Enable, disable, start, or stop the ES Logic Service for a system’s LN environments.
▪
Configure the shared memory parameters.
▪
Rename BSE environments.
▪
Edit the BSE variables.
Note
For ERP releases prior to Infor Baan 5.2a, you can also use the Infor ES Service Manager to enable,
disable, start, or stop the following:
▪
The Job Daemon service by ERP installation
▪
For porting sets prior to 7.1d.12: the ERP Licensing Service by BSE. From porting set 7.1d.12
licensing is managed externally by the Infor Solution License Manager (SLM).
These options are not available for newer releases. For Infor Baan 5.2a and later, the following applies:
▪
The Solution License Manager (SLM) manages licensing externally.
▪
For porting sets prior to 8.3a the Application Services Manager (ASM) manages the Job
Daemon service externally. From porting set 8.3 a you can choose whether you want to use
ASM or the Job Daemon Service.
Important!
Optionally, you can start, stop and disable services via the Windows Service Manager, or via the -start,
-stop, and -remove command line options. However, to enable a service you must use the ES Service
Manager snap-in. You cannot enable services via the Windows Service Manager or via the -install
command line option.
It is recommended to perform all actions via the ES Service Manager snap-in.
Infor Enterprise Server | Administration Guide | 167
Enterprise Server Service Manager

To start an LN software environment (BSE)
The following procedure describes how to start or stop an LN software environment (BSE):
▪
Start the ES Service Manager from the Microsoft Windows Start menu.
▪
In the Tree pane of the ES Service Manager, expand the LN server node that contains the
software environment.
▪
Select the LN software environment (BSE) you want to start and, on the toolbar, click the Start
Service button. The BSE is now running.
To configure the ES Logic Service
To configure the ES Logic Service of an LN Software Environment (BSE), take the following steps:
▪
Start the ES Service Manager.
▪
Start the ES Logic Service Properties dialog box.
▪
Enter or modify the Service Properties
▪
Save the Service Properties changes
▪
Restart the Logic Service
▪
Restart the Shared Memory Service.
To configure the Shared Memory Service
To configure the Shared Memory Service of an LN Software Environment (BSE), take the following
steps:
▪
Start the ES Service Manager.
▪
Select the LN Software Environment (BSE) for which you want to configure the shared memory.
▪
Start the Shared Memory Properties dialog.
▪
Enter or modify the shared memory properties.
▪
Save the changed shared memory properties.
▪
Restart the Shared Memory Service.
Note
The Loaded Shared Memory tab shows the loaded shared memory objects. The Shared Memory
Areas tab shows a list of the available shared memory areas and their addresses.
To rename BSE environments
You must make sure that the BSE environments on your system are unique. You can, therefore, rename
environments if required.
To rename a BSE environment, take the following steps:
▪
Start the ES Service Manager.
▪
Rename a selected BSE environment.
168 | Infor Enterprise Server | Administration Guide
Enterprise Server Service Manager

To edit the software environment variables
You can use the Enterprise Server Service Manager to edit the software environment variables to change
the behavior of the Enterprise Server.
To edit the software environment variables, take the following steps:
▪
Start the ES Service Manager.
▪
Start BSE Properties dialog
▪
Enter the variable name, for example, BSE_SORT.
▪
Enter the value of the variable, for example, for the BSE_SORT variable, enter the path to the
directory where the temporary data must be stored during the sort process.
▪
Save the new variable.
Infor Enterprise Server | Administration Guide | 169
Enterprise Server Service Manager

170 | Infor Enterprise Server | Administration Guide
Enterprise Server Service Manager

Language support introduction
This section describes the language support capabilities of Infor Enterprise Server and the corresponding
administrator tasks.
This section includes the following:
▪
Character sets (p. 171)
▪
Conversions (p. 177)
▪
Language Translation Support (p. 178)
Character sets
A character set is a set of alphabetic or other characters used to construct the words and other elementary
units of (a) native language(s).
During the installation of the Infor LN application you must choose a character set. So only one character
set applies for the whole LN environment. Therefore only those languages can be stored which are
supported by the character set that was chosen.
You can choose the following character set types:
▪
single byte character sets
▪
multi-byte character sets
▪
Unicode character set
Single byte character sets
Single byte character sets only need one byte to store the character information. As a consequence
max 256 characters are available. The ISO 8859 standard defines several characters sets, also called
locales, to cover the characters of mainly the European languages.
Infor Enterprise Server | Administration Guide | 171
15
Chapter 15
Language Support

Examples of single byte character sets are:
▪
ISO 8859-1: mainly west European languages like French, German, Italian etc
▪
ISO 8859-5: supporting Cyrillic languages (Russian).
The lower range, character 000 -127, is the same for all ISO 8859 character sets, the upper range
character 128 – 255, is specific per locale.
The alphabet is encoded in the lower range and therefore the English language is supported with each
ISO 8859 locale (English does not need any additional characters).
The sorting is binary based: The sorting is based on the order the characters are defined in the encoding.
All upper case alphabetical characters, for instance, are sorted before the lower case alphabetical
characters. For example, the ‘Z’ is sorted before the ‘a’.
Multi-byte character sets
Multi-byte characters sets are typically required for languages that have more than 256 characters. A
typical example is Chinese. In the context of LN the multi-byte character sets require 4 bytes per character.
Examples of multi-byte character sets are:
▪
BIG5: Chinese
▪
Wansung: Korean
Sorting is binary based.
Unicode character set
The Unicode character set is a standardized character set supporting all (modern) languages. This takes
away the limitation of supporting a small set of languages within one LN environment. When you choose
Unicode as character set, you can have for example Chinese, English and French in one LN environment.
Another advantage of the Unicode character set is that it comes with linguistic sorting rules. When the
data must be visualized in a sorted form, the data will be shown based on the sorting rules as defined
by the ICU standard.
Note
The ICU standard also defines ‘tailoring’, that is fine-tuning the sorting rules to a specific language, which
is not supported by the LN tools.
As a consequence the database size of a Unicode based LN environment is bigger, and the CPU and
memory load on the system are higher than for a multi-byte or single byte based character set. The
choice for Unicode is typically made when multiple languages must be supported or when linguistic
sorting is a preference.
172 | Infor Enterprise Server | Administration Guide
Language Support

High Ascii Tolerance
Important!
The following only applies to LN environments that do not run in Unicode mode.
You must set the high_ascii_tolerance resource to 0 in the following situations:
▪
If your LN environment is a production environment and you plan to convert the environment
to Unicode.
▪
If your LN environment is a development environment and you plan to deliver software
components or translations. If high_ascii_tolerance is not set to 0, problems will occur when
the delivered components are imported in Unicode environments.
To set high_ascii_tolerance to 0, add the following line in the $BSE/lib/defaults/all file:
high_ascii_tolerance:0
The role of the user locale
This section describes the role of the user locale in the following types of installations:
▪
single-byte
▪
multi-byte
▪
unicode
Important!
It is technically possible to define a different locale for each user ( User Data Template (ttams1110m000)
session). However, this can cause problems. Therefore Infor does NOT support the usage of multiple
user locales. Consequently all users in an LN environment must have the same user locale.
The role of the user locale in a single-byte installation
In a single-byte installation the user locale defines the character set that can be used throughout the
application.
Important!
Infor strongly advises the following:
▪
Use a user locale that matches the character set used in the database. In this way “3rd party”
database tools can access the data.
▪
Use a locale that defines a binary sorting order (also known as collation).
▪
Choose a binary sorting order in the database as well. For example, in West-European countries
you can use the ISO_BIN1 locale. The character set of this locale is the same as the ISO-8859-1
locale, but the sorting order is binary.
▪
Ensure all users have the same user locale. Note that this is not enforced by the tools or
porting set.
Infor Enterprise Server | Administration Guide | 173
Language Support

The user locale has impact on the following:
▪
The way data is stored in the database. The user locale determines the code points that are
used to store single-byte characters.
▪
Some bshell (3GL) functions:
▪
mb.locale.info(), including the TSS_GET_IFACTOR and TSS_GET_EFACTOR aspects
▪
set.min()
▪
set.max().
▪
set.fmin()
▪
set.fmax()
▪
The non-Unicode version of BWPrint, which must convert to the proper Windows code page.
Note: to convert data from the ISO locales to Windows code pages, BWPrint uses the _WIN32
versions of the user locale.
The role of the user locale in a multi-byte installation
In a multi-byte installation the user locale defines the character set that can be used throughout the
application.
Important!
Infor strongly advises the following:
▪
Use a user locale that matches the character set used in the database. This character set
must use a binary sorting.
▪
Data is stored in the database using the character set of the user locale. Ensure the correct
character set is specified for the database, so the database treats the characters in the correct
way. In this way “3rd party” database tools can access the data. Otherwise the data could
show up garbled.
▪
Ensure all users have the same user locale. Note that this is not enforced by the tools or
porting set. If users have different user locales, conversion errors occur when a user processes
data of another user, who has a different user locale. This mainly impacts processes that write
to and read from the database. Consequently the user locale impacts any integration that
interacts with the database.
The user locale has impact on the following:
▪
The conversion of data from “native” format (MBCS) to TSS and vice versa. The user locale
determines the meaning of the term “native”.
▪
The way data is stored in the database. The user locale determines the code points that are
used to store multi-byte characters.
▪
Some bshell (3GL) functions:
▪
mb.import$(). This function converts data from “native” format to TSS.
▪
mb.export$(). This function converts data from TSS to “native”.
174 | Infor Enterprise Server | Administration Guide
Language Support

▪
utf8.export$(). The Baan IV porting set uses the “native” format as intermediate format to
convert from TSS to UTF-8. If the user locale does not match with the data, this can result
in conversion errors.
▪
mb.width(). This function returns the width of a string, where width is defined in “number
of display positions”. For example, in the ISO8859n character sets, the “LATIN SMALL
LETTER E WITH ACUTE” character takes 1 display position. However, in the GB2312
character set, it takes 2 display positions.
▪
mb.locale.info(), including the TSS_GET_IFACTOR and TSS_GET_EFACTOR aspects.
▪
set.min()
▪
set.max()
▪
set.fmin()
▪
set.fmax()
▪
The appearance of log messages. The text in log messages is converted from the TSS
character set to “native” format.
▪
The non-Unicode version of BWPrint, which must convert TSS data to “native” format.
The role of the user locale in a Unicode installation
Since the introduction of the Unicode character set, the role of the user locale has become less important.
In a pure Unicode environment all characters are represented by unique code points. All code points
have a unique interpretation. However, there are still some areas where conversions from and to Unicode
occur.
Example
You work in a Unicode environment. However, your personal user locale is ISO8859. You want to
exchange data between the Unicode environment and another environment. When you perform an
export from the Unicode environment, for example through LN Data Director or EDI, the export files are
in ISO8859 format.
The user locale has no impact on the following:
▪
The way data is stored in the database. All data in multi-byte columns is stored in Unicode.
The data in single-byte columns is stored “as is” in Unicode; effectively it is interpreted in the
ISO-8859-1 locale. For example, the “LATIN LETTER A” is stored as Unicode code point 0x41.
The code point 0x9e is stored as the Unicode code point 0x9e, which represents the “LATIN
SMALL LETTER E WITH ACUTE” character (é).
▪
The normal operation of the bshell. This excludes the following functions:
▪
Conversion functions, such as mb.export$() and mb.import$().
▪
Functions to acquire information about the current user locale, such as mb.locale.info().
Note: The following functions are not impacted by the user locale:
▪
set.min()
▪
set.max()
▪
set.fmin()
▪
set.fmax()
Infor Enterprise Server | Administration Guide | 175
Language Support

▪
The appearance of log messages. The text in log messages is converted from UTF-T to UTF-8
format.
▪
The Unicode version of BWprint.
The user locale has a small impact on the dump files as created by the bdbpre utility. Data in the
bdbpre-dump files is in the UTF-8 character set. If the database contains “high ascii” characters, these
characters are converted in the context of the current user locale. Note that the high_ascii_tolerance
resource has no effect on this process. For details, refer to the comment on the conversion of “high
ascii” characters below.
The user locale has impact on the following:
▪
The conversion of data from “native” format (MBCS) to Unicode (UTF-T) and vice versa. The
user locale determines the meaning of the term “native”.
▪
The conversion of so-called “high ascii” characters. See below.
▪
Some bshell (3GL) functions:
▪
mb.import$(). This function converts data from “native” format to UTF-T.
▪
mb.export$(). This function converts data from UTF-T to “native”.
▪
mb.width() This function returns the width of a string, where width is defined in “number
of display positions”. For example, in the ISO8859n character sets, the “LATIN SMALL
LETTER E WITH ACUTE” character takes 1 display position. However, in the GB2312
character set, it takes 2 display positions.
▪
mb.locale.info(), excluding the TSS_GET_IFACTOR and TSS_GET_EFACTOR aspects.
▪
The non-Unicode version of BWPrint, which must convert UTF-T data to “native” format. This
can result in conversion errors because the “native” character set supports only a limited
subset of UTF-T. Therefore, Infor strongly advises to use the Unicode version of BWPrint in
a Unicode installation.
Conversion of “high ascii” characters
The occurrence of “high ascii” characters poses a problem, because one code point can have different
meanings in different character sets.
Example
In the ISO-8859-1 locale, the code point 0xe9 (decimal 233) is interpreted as the “LATIN SMALL LETTER
E WITH ACUTE” character (é).
In the ISO-8859-7 locale, this code point is interpreted as the “GREEK SMALL LETTER IOTA” character
(ι).
To determine the meaning of a “high ascii” character, LN uses the current user locale. If the user locale
is an ISO8859n variant, then this character set is used to determine the correct meaning; otherwise the
ISO85591 character set is used.
176 | Infor Enterprise Server | Administration Guide
Language Support

Example
The user locale is ISO88597. A string, which contains the 0xe9 code point, must be converted to UTF-T.
The code point is interpreted as the “GREEK SMALL LETTER IOTA” character. The resulting UTF-T
code point is 0x9bbc87b9.
The user locale is ISO88591 and the same string must be converted. The code point is interpreted as
the “LATIN SMALL LETTER E WITH ACUTE” character. The resulting UTF-T code point is 0x9bbc81e9.
Infor advises to keep the installation clean from “high ascii” characters. To achieve this, set the
high_ascii_tolerance resource to 0.
Conversions
Character sets can have several encodings; a certain character is represented by an integer and that
integer is converted to a certain encoding.
Unicode for example has 3 standard encodings: UTF-8, UTF-16 and UTF-32.
For Infor LN a Unicode encoding is introduced that fits most with the current architecture. This encoding
is called UTF-T and is in line with the TSS concept. TSS is the Infor LN specific encoding for the other
character sets.
UTF-T is only used during runtime, that means that storage of data is always done in a standard encoding.
UI
Worktop/BW/BWPrint
These clients perform a conversion from Windows Unicode encoding to UTF-T or another TSS character
set, dependent on the character set of the Infor LN environment. So, communication between these
clients and the back-end is in TSS format.
Web UI
Web UI handles all data in Unicode and also passes the data to the back-end in standard UTF8. In the
back-end the transformation to the TSS character set of the back-end (so, in case of Unicode to UTF-T)
takes place.
Reporting
▪
On UNIX
On Unix the support for printing in various languages is very limited. The printer drivers, in
contrast to Windows, provide very limited conversion support. Therefore the capabilities of
the printer determine which languages can be supported.
Infor Enterprise Server | Administration Guide | 177
Language Support

▪
On Windows
On Windows the Infor LN reports are printed via BWPrint. BWPrint converts to the Windows
Unicode encoding and therefore any language can be printed.
Integration via Adapter for Infor LN
The Adapter for Infor LN communication is based on Unicode.
Language Translation Support
LN uses Language Translation Support (LTS) to reduce the language dependency of the LN applications
and lower the costs of media creation and distribution.
For details, refer to:
▪
Language Translation Support in the Infor Web Help
▪
To translate software components in the Infor LN Development Tools Development Guide
(U8883)
178 | Infor Enterprise Server | Administration Guide
Language Support

Multilanguage application data
If your LN system uses the Unicode character set, you can run multiple languages of the LN software,
such as Chinese, English, and French in one LN environment. Also, you can enable LN to store shared
application data in multiple languages. This is useful if users from all over the globe are using the same
environment. Depending on the user’s software language, the application data can also be displayed
in the same language. If a report for a business partner is printed, the layout and data of the report are
in the business partner’s language.
To store shared application data in multiple languages, you must configure Multilanguage Fields Support.
For details, refer to the following section.
Note
You can only configure Multilanguage Fields Support for fields of the Multibyte String data type.
To support all languages available for LN in one environment, you must install LN in Unicode mode.
Unicode is the standard for multilanguage support and provides a unique code for each character
regardless of the language.
Language types
The following language types exist:
The language in which the software components,
such as forms and reports, are displayed. For each
Software Language
Infor Enterprise Server | Administration Guide | 179
16
Chapter 16
Multilanguage Application Data

user, the default software language is defined in
the LN user data.
The language in which the application data is dis-
played. Data languages are linked to users and
software languages.
Data Language
The fallback language used to display application
data.
LN uses the following fallback mechanism:
Base Language
1. LN displays the application data in the data
language specified in your user data.
2. If no data language is specified in your user
data, LN displays the application data in the
data language linked to your software lan-
guage.
3. If no data language is linked to your software
language, LN displays the application data in
the base language.
ISO standards
In Infor Enterprise Server versions prior to 8.4.1, the coding of data languages is based on the ISO 639-2
standard. However, this standard is not sufficient for coding languages such as Simplified Chinese,
Traditional Chinese and Portuguese, and Brazilian Portuguese.
To support these languages, language coding in Infor Enterprise Server 8.4.1 and higher is done
according to the ISO standards used for Java programs. A data language code consists of:
▪
A language code based on the ISO 639-1 standard.
▪
Optional: a country code based on the ISO 3166-1 standard.
The language code and the country code are separated by an underscore (_).
For example:
180 | Infor Enterprise Server | Administration Guide
Multilanguage Application Data

DescriptionData Language
Germande
English_UNITED KING-
DOM
en_GB
English_UNITED STATESen_US
Hebrewhe
Italianit
Japaneseja
Dutch; Flemishnl
Portuguese_BRAZILpt_BR
Portuguese_PORTUGALpt_PT
Chinese_CHINA (Simpli-
fied)
zh_CN
Chinese_TAIWAN (Tradi-
tional)
zh_TW
Important!
To use the new Enterprise Server 8.4.1 coding standards, a migration can be required for data languages
created in earlier Enterprise Server versions. For details, refer to the Specific Installation Guide - Updates
(U9497 US), chapter To migrate Data Langauages.
Configuration
To support multilanguage fields, LN must be installed in Unicode mode. You can choose the Unicode
character set in the LN Installation Wizard.
For more information on the prerequisites for a Unicode installation, refer to the Technical Notes.
Infor Enterprise Server | Administration Guide | 181
Multilanguage Application Data

Important!
Before you start the configuration of Multilanguage Fields Support, it is recommended you create a
backup of the application data. For example, you can extract your application data through the Create
Sequential Dump of Table (ttaad4226m000) session, or you can create a backup through the backup
tools in your RDBMS.
To configure Multilanguage Fields Support
Step 1: Enable support for Multilanguage Fields
To enable support for Multilanguage Fields, complete the following steps:
1. Start the Parameters Multi Language Support (ttadv4106m000) session.
2. Configure Multibyte and Unicode, and perform the required steps for this configuration. See
the instructions displayed in the session's window.
3. Select the Multi Language Fields Support check box.
4. Save the changes and close the session.
Step 2: Define data languages
To define data languages, complete the following steps:
1. Start the Data Languages (ttaad1111m000) session.
2. Define the desired data languages. A data language consists of an ISO 639-1 language code
and, optionally, an ISO 3166-1 country code. You can zoom to the ISO 639 Languages
(ttaad1512m000) session and the ISO 3166-1 Countries (ttaad1513m000) session.
3. Define the base language: Select a data language and, on the appropriate menu, click Make
Base Language.
Note: The base language is used as a fall back language. Application data is displayed in the
base language if both of the following scenarios occur:
▪
No data language is defined in the user data of an LN user.
▪
No data language is linked to the user's software language.
4. Convert the data languages to the runtime data dictionary. On the appropriate menu, click
Convert Data Languages to Runtime. The conversion process generates the
$BSE/lib/data_langs file.
Important:
▪
Only perform this step if you are sure you no longer want to change the base language.
See the restrictions listed in the online help of the Data Languages (ttaad1111m000)
session.
▪
During the conversion to runtime, all users must be logged off.
▪
When the conversion to runtime has finished, you must restart the LN environment.
5. Close the session.
182 | Infor Enterprise Server | Administration Guide
Multilanguage Application Data

Data Languages have a status that is used to control their life cycle. For details, refer to "Life cycle of
a data language" in the online help of the Data Languages (ttaad1111m000) session.
Step 3: Link data languages to software languages
You must link data languages to the corresponding software languages.
To link a data language to a software language, complete the following steps:
1. Start the Software Languages (ttaad1510m000) session.
2. To start the Software Languages (ttaad1110s000) session, double-click a software language.
In the Data Language field, enter the desired data language.
Note:
▪
You can zoom to the Data Languages (ttaad1111m000) session.
▪
You can only select data languages with status "Base Language" and "Available".
▪
If you leave the Data Language field blank, LN displays the application data in the data
language defined in the user data of an LN user, or in the base language.
3. Save the changes and close the sessions.
To ensure that application software and application data are displayed in the same language, link the
data languages to the software languages.
Step 4: Register Multilanguage Tables and Table Fields
Register the tables and table fields that must be multilanguage enabled.
For all package combinations you want to be multilanguage-enabled, complete the following steps:
1. Start the Registered Tables with Multi Language Fields (ttadv4137m000) session.
2. Select a package combination.
3. Add the tables you want to be Multilanguage Enabled.
4. Double-click a table. The Registered Multi Language Fields (ttadv4138m000) session starts.
5. For each field you want to be multilanguage enabled, select the Enabled check box.
6. Save the changes and close the sessions.
Step 5: Convert to runtime
To convert the multilanguage settings to the runtime data dictionary, complete the following steps:
1. Start the Convert to Runtime Data Dictionary (ttadv5215m000) session.
2. Select the Tables check box and the Reconfigure Tables check box.
3. For package combinations, packages, and tables, enter the appropriate selection ranges.
4. Click Convert to Runtime.
Infor Enterprise Server | Administration Guide | 183
Multilanguage Application Data
Note
Optionally, start the User Data (ttaad2500m000) session, and define a data language per user. The
data language specified in the user data takes precedence over the data language linked to a software
language. For more information, refer to "Language types" earlier in this section.
Data translation
When a user inserts new records, the multilanguage field descriptions are stored in the user's data
language. LN automatically copies the new field descriptions to the other data languages. These
descriptions must be translated to ensure that all users who are running another data language code
can read the new fields in their own language.
It is recommended to assign dedicated users to perform the data translation; these users must be
authorized to switch between different data languages.
To ensure that a user can switch to another data language, you must select the Switch Data Languages
check box in the user's user data template properties ( User Data Template (ttams1110m000) session).
Web UI and Worktop users can switch to another data language:
On the Options menu, click Infor ERP Options.
Subsequently, click Change Data Language.
Web UI user
On the Tools menu, click Change Data Lan-
guage.
Worktop user
Insertion and translation process
The steps that you must take to translate multilanguage field descriptions depend on the data language
the new records are entered in. See the following sample scenarios:
Scenario 1: A user works in the base language and inserts a record
1. When the user inserts a record, the descriptions of the multilanguage-enabled table fields are
inserted in the base language code, and are automatically copied to all other linked data
languages.
2. For each table involved, you must run the Print Multi Language Application Data
(ttadv4438m000) session. The session prints a report that shows the records that must be
translated to other languages.
3. Switch to the other data language(s) and translate the descriptions of these records.
184 | Infor Enterprise Server | Administration Guide
Multilanguage Application Data

Scenario 2: A user works in another language and inserts a record
1. When the user inserts a record, the descriptions of the multilanguage enabled table fields are
inserted in the other language code, and are automatically copied to all other available data
languages and the base language.
2. For each table involved, you must run the Print Multi Language Application Data
(ttadv4438m000) session. The session prints a report that shows the records that must be
translated.
3. Switch to the base language and translate the descriptions of these records to the base
language. The translated descriptions are automatically copied from the base language code
to all other available data language codes except the language code in which the records
were created first.
4. Run the Print Multi Language Application Data (ttadv4438m000) session again for each table
involved . The session prints a report that shows the records that must be translated from the
base language to other languages.
5. Switch to the other data language(s) and translate the descriptions of these records.
You must also check whether the descriptions stored in the original language code, that is,
the language code in which the records were created, are still correct.
To remove the corresponding records in the check report, save a dummy change of these
descriptions .
Infor Enterprise Server | Administration Guide | 185
Multilanguage Application Data

186 | Infor Enterprise Server | Administration Guide
Multilanguage Application Data

Sensitivity labeling
Sensitivity labeling enables you to provide feedback to the end user about the sensitivity of the information
on an LN screen.
Concept
Sensitivity labels have an inherent hierarchy, as each label implies a more restrictive sensitivity than
the next. For example, sensitivity labels have different levels of sensitivity, such as “Company Sensitive”
and “Highly Sensitive”, which increase in order of sensitivity.
You must define the sensitivity level at either the table-field level or at the table level. Each field or table
requiring a certain sensitivity level must be assigned the appropriate sensitivity label. When you specify
a table, all fields in the table have the same sensitivity level, except those fields for which you have
defined another sensitivity.
You can assign a sensitivity label to individual sessions and reports. Sometimes the assignment based
on table fields is not applicable. For example, a calculated value on a report may be sensitive because
it is based on a sensitive table field.
Sensitivity labels are shown on forms and reports.
To configure sensitivity labeling
To configure sensitivity labeling, take the following steps:
Step 1: Enable sensitivity labeling
Start the Maintain Parameters (ttaad0100m000) session and select the Sensitivity Labeling check
box.
Step 2: Define sensitivity labels
Start the Sensitivity Labels (ttaad3150m000) session.
Infor Enterprise Server | Administration Guide | 187
17
Chapter 17
Sensitivity Labeling

This session allows you to:
▪
Define sensitivity labels and their sensitivity level.
▪
Assign color schemes (which are only used during form presentation) to sensitivity labels.
Step 3: Assign sensitivity labels to table fields
Start the Sensitivity Level of Table fields (ttaad3151m000) session. This session allows you to assign
sensitivity labels to tables or table fields.
The Print Impacted Components session allows you to print a list of reports which will get a sensitivity
label based on the defined fields.
Step 4: Optionally: Assign sensitivity levels to specific sessions and reports
You can use the Sensitivity Level of Reports and Sessions (ttaad3152m000) session to assign sensitivity
levels to specific sessions and reports.
Step 5: Convert sensitivity labels to runtime
Convert the sensitivity label definitions to the runtime data dictionary. This generates various files, whose
names start with ‘sensitivity’ in the $BSE/lib directory.
At runtime, Infor LN uses these files to identify whether sensitivity labels must be applied.
Note: Reports registered for the Production Reporting Service ( Infor BI Production Reporting Registered
Reports (ttaad3546m000)) will be recompiled. As a result, a new design document is published on the
blackboard.
Runtime behavior
Sessions
LN determines the sensitivity label on session level. If multiple fields of a session have sensitivity labels
assigned, the most sensitive label is allocated.
The label is displayed in the upper left corner of the data area of the form. The font size is a predefined
size of 1.5 (default size), and the font style is bold.
The color of the label is based on the color scheme assigned during configuration.
Reports
The sensitivity label is repeated and displayed in the upper left corner of each new page.
Output devices with font size capabilities, such as PDF and Windows printing, use the following font
settings:
▪
Font size: 1.5 times the default font of the report.
188 | Infor Enterprise Server | Administration Guide
Sensitivity Labeling

▪
Font style: bold.
Infor Enterprise Server | Administration Guide | 189
Sensitivity Labeling

190 | Infor Enterprise Server | Administration Guide
Sensitivity Labeling

The homepages described in this chapter are only available in classic style Web UI, not in Infor Ming.le.
In Infor Ming.le, you can create your own homepages. For details about the Infor Ming.le homepages,
see the Infor LN Role Based Home Pages Administration Guide (LN UI) (U9887).
Homepages introduction
Introduction
Infor delivers various predefined homepages with Infor LN, such as the following:
▪
Sales Administrator homepage.
▪
Accounts Payable Administrator homepage.
▪
Accounting Manager homepage.
▪
Service Coordinator homepage.
Homepages are used as a start point for navigation for particular roles, such as Warehouse Manager
or Warehouse Administrator. A homepage automatically preselects all the work a user must do in LN.
Each homepage contains various dockable panels that can show HTML content. The homepage functions
as an up-to-date dashboard on performance and workload.
Note
Homepages are only available in Web UI.
Infor Enterprise Server | Administration Guide | 191
18
Chapter 18
Homepages
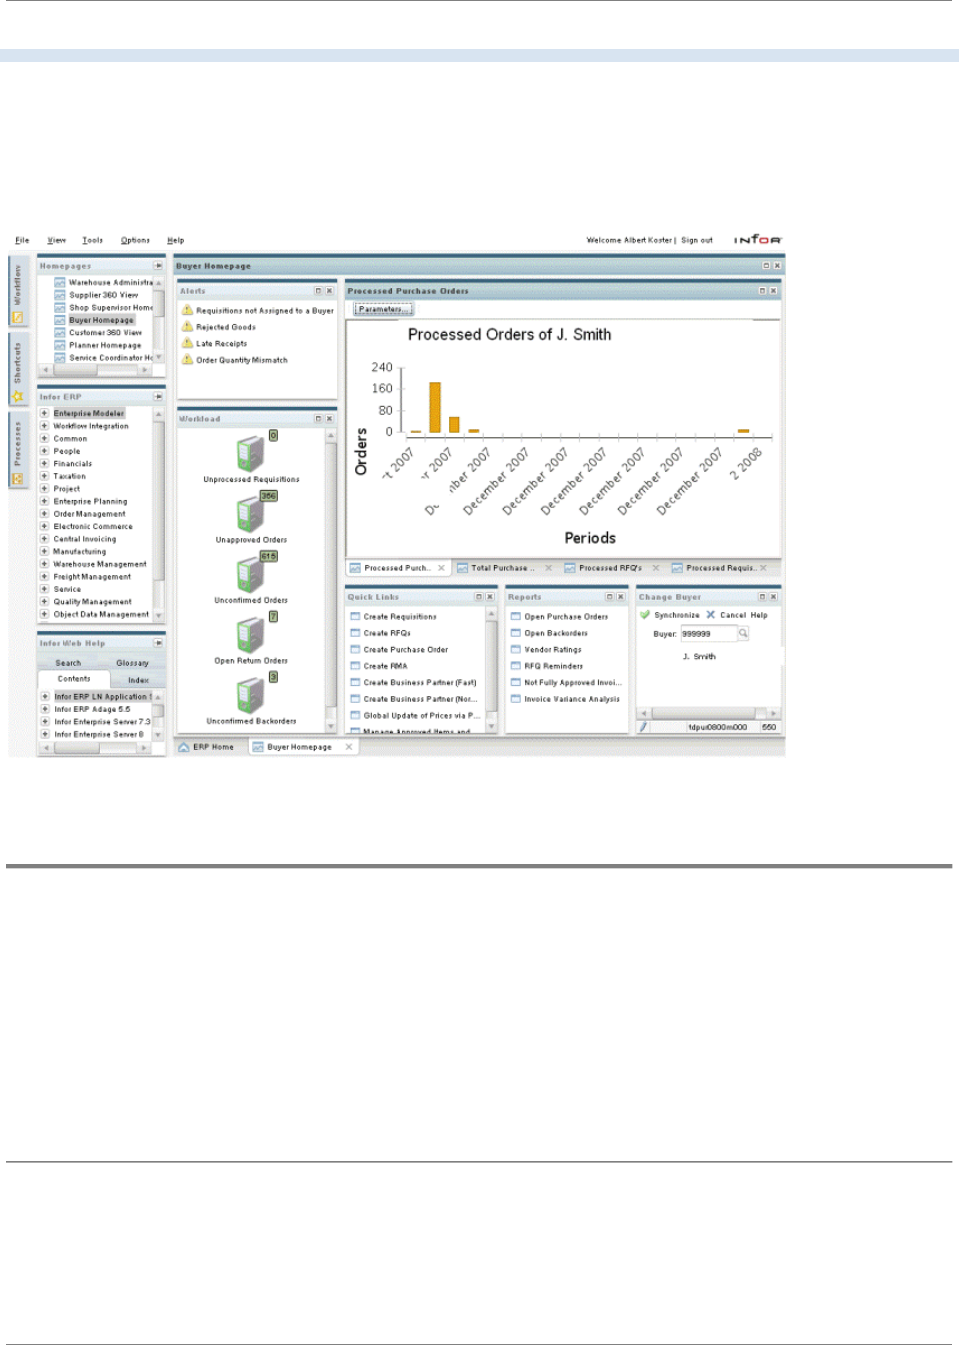
Homepage structure
A homepage consists of multiple panes such as the following.
A homepage delivered by Infor usually consists of the following panes, but this is not mandatory:
Displays the alerts (if any).Alert pane
Examples of alerts are:
▪
Orders that have passed the due date.
▪
Late receipts.
▪
Orders that are not released yet.
▪
A price variance that falls outside the toler-
ance.
Alerts are linked to conditions. An Alert is only dis-
played if the corresponding condition is met.
Displays the workload assigned to a specific record,
for example a specific buyer.
Workload pane
192 | Infor Enterprise Server | Administration Guide
Homepages

The Workload pane in the previous figure shows
the tasks that you must perform for a specific buyer:
▪
There are purchase orders waiting for ap-
proval.
▪
A number of purchase orders must be con-
firmed.
▪
There are no requisitions that must be pro-
cessed.
▪
And so on.
When you double-click a task, the corresponding
(overview) session starts. For example, when you
double-click the Unapproved Orders task, the Pur-
chase Orders (tdpur4100m000) session starts.
Displays useful quick links.Shortcut pane (Quick Links pane)
A quick link is a shortcut to a details (data entry)
session, or to a batch session, for example a global
update session.
Contains hyperlinks to frequently used reports. The
hyperlinks can start LN sessions or Web pages, for
example Cognos reports.
Report pane
Displays reports that show major statistics or key
performance indicators. The reports offer many
useful features, such as:
Graph pane
▪
Many chart types are supported, for example
pie charts, line charts, and bar charts.
▪
A graph can have a dialog attached, where
you can enter selection criteria.
Resource files
The language-dependent content of an LN homepage, such as the homepage's title and the titles of the
panes used in the homepage, is stored in resource files.
Each resource file contains data for only one language. The homepages and reports developed by Infor
are delivered with English resource files. To run these homepages and reports in other languages, you
must translate the corresponding resource files.
For more information, refer to To translate resource files.
Infor Enterprise Server | Administration Guide | 193
Homepages

Personalization by Web UI end users
To change the look and feel of their homepages, end users can do the following:
▪
Move and dock panels in different locations.
▪
Resize, minimize, and maximize panels.
▪
Drag items to another position within the Work Load pane, the Alert pane, and the Shortcut
pane.
▪
Add new shortcuts.
▪
Switch between large and small icons.
▪
Personalize the Work Load pane and Alert pane: For example, an end user can define
thresholds. A Web UI administrator can also specify refresh rates.
For more information, refer to the Web UI online help.
Homepages delivery
The homepages are stored as additional files on the LN server.
For each homepage, Infor delivers two additional files:
▪
A homepage archive file, which contains the language independent content of the homepage,
such as the structure of the homepage and its panes.
▪
A homepage property file, also known as a resource file. This file contains language-dependent
content in the language the homepage was developed in. The homepages that Infor delivers
are developed in English.
The additional files are delivered during the installation of LN. Updates and new homepages are delivered
through PMC solutions.
File names
The names of the homepage archive files and homepage property files have the following structure:
File name structureFile type
[homepage-id (max. 28 characters)].HPAHomepage archive file
[homepage-id (max. 28 characters)]_[ISO 639 lan-
guage code]_[ISO 3166 country code].properties
Note: The country code is optional, and is only used
for a few languages.
Homepage property file
194 | Infor Enterprise Server | Administration Guide
Homepages

Example:
The following files are delivered for the Warehouse Manager homepage:
▪
warehousemanagerhomepage.HPA: Homepage archive file
▪
warehousemanagerhomepage_en.properties: English Property file
Note
You can translate the contents of the homepage property files to other languages. For details, refer to
the Infor LN Development Tools Development Guide (U8883).
Predefined homepages delivered by Infor
Various predefined homepages are available in LN, such as:
▪
Accounts Receivable Administrator
▪
Buyer
▪
Planner
▪
Project Manager
▪
Sales Administrator
▪
Service Coordinator
▪
Shipping/Receiving Administrator
▪
Shop Floor Supervisor
▪
Warehouse Administrator
▪
Warehouse Manager
To obtain these homepages, install PMC solutions 221767 and 221768.
To install and configure Homepages
Before Web UI users can use homepages, you must import the corresponding additional files into their
Web UI user profiles.
Prerequisites
▪
The homepages you want to import must be present as additional files on your LN server. If
an additional file is not present, you must first install the corresponding PMC solution.
▪
To view the reports in the homepages delivered with LN, install the LN Report Viewer on the
Web UI server. For details, refer to the Infor Enterprise Server Web UI - Installation and
Configuration Guide (U8715).
Infor Enterprise Server | Administration Guide | 195
Homepages

To import homepages
To import homepages, complete the following steps:
Step 1: Start the Web UI administration console
To start the Web UI administration console, point your browser to the appropriate URL; this URL has
the following structure: http://[hostname]:[port]/[webui-root]/servlet/admin.
Step 2: Open the Homepage Import page
1. In the Infor Web UI Administration pane, click Infor LN. A list of Web UI administration pages
is displayed.
2. Open the Homepage Import page. The Web UI user profiles are displayed in the page’s right
pane.
Step 3: Import the homepages
In the Homepage Import page, complete the following steps:
1. Connect to the LN server: In the Login group box, select an Infor LN environment, enter a
login code and a password, and click Connect.
2. In the Package Combination field, select a package combination. The homepage archives
in the selected package combination are displayed per package/module.
3. Select the homepage archives you want to import.
4. Select the Web UI user profiles into which you want to import the homepage archives.
5. Click Import.
Note
▪
Before Web UI users can use the new homepages, they must log off and log on using the
updated user profiles.
▪
Homepages created in the first release of Web UI 8.4 are delivered in .zip files. To import
homepages from a .zip file, use the Homepage Import From File page; this page is located
under the Infor Web UI Administration node. For more information, refer to the Infor Enterprise
Server Web UI - Installation and Configuration Guide (U8715).
196 | Infor Enterprise Server | Administration Guide
Homepages

Shared Memory
The shared memory is a part of physical memory intended for common use. Programs communicate
with each other through shared memory. Shared memory results in faster access to the components
loaded in shared memory. To enhance the performance of your LN system, you can load program
objects and report objects into the shared memory. Before you set up and initialize shared memory, you
should verify that the hardware and internal memory is sufficient.
To load objects into the shared memory
After the installation of LN, various objects are already loaded in the shared memory.
This section describes the procedure to load additional objects into the shared memory.
LN uses a lot of DLLs; therefore, it is difficult to decide which objects should be loaded into the shared
memory. Before you fill the shared memory, you can use measurement tools to identify which objects
are frequently used and suitable to load into the shared memory.
A shared memory configured based on the measurement information improves the processing speed
of your LN application.
To load objects into the shared memory, complete the following steps:
Step 1: Activate logging
To gather statistics on the usage of objects, start the Logging Parameters (ttaad4153m000) session.
Optionally, click Cleanup to remove the currently stored shared memory measurement data.
Specify the time frame in which shared memory logging must take place. If you do not define a time
frame, no logging will be done.
After you specify the logging parameters, click Convert to Runtime. You can only run the Convert to
Runtime command on a Master Application Server.
The measurement will start for all bshells started after the conversion is run, taking the defined time
frame into account. The logged information of a bshell is stored when the bshell is closed.
Infor Enterprise Server | Administration Guide | 197
19
Chapter 19
Shared Memory

For details, refer to the session help.
Step 2: View object usage statistics
After the period of shared memory measurement has ended, start the Shared Memory Object
Measurement (ttaad4152m000) session.
Use this session to view statistics on the object usage in the bshell. The session displays, among other
things, the number of times an object was loaded during the measurement period. This information helps
identify which objects are frequently used and should be loaded into the shared memory.
Optionally, click Print to print a Shared Memory Object Measurement report.
Optionally, on the appropriate menu, click Cleanup to remove the shared memory measurement data.
For details, refer to the session help.
Step 3: Optional: Allocate shared memory for package combinations
Start the Shared Memory Data (ttaad4156m000) session and click Allocate. The Allocated Memory
Shared Memory (ttaad4155m000) session starts. Specify, per package combination, the amount of
memory (in MB) allocated for object usage in shared memory.
For details, refer to the session help.
Note: This step is optional. If you do not allocate memory for a package combination, or if you allocate
0 MB for a package combination, the amount of shared memory for the package combination will be
unlimited.
Step 4: Specify shared memory data
Start the Shared Memory Data (ttaad4156m000) session. In this session, you can specify shared memory
data in the following ways.
On the appropriate menu, click Import Objects
from Measurement. The Import Objects from
Measurement (ttaad4255m000) session starts.
Import objects from measurement
(Recommended)
Use this session to do one of the following:
▪
Import a range of program objects and/or re-
port objects from the object measurements
into the shared memory data.
▪
Import the most frequently used objects until
the allocated memory, defined in the Allocated
Memory Shared Memory (ttaad4155m000)
session, is reached. To do this, you must se-
lect the Fill remaining allocated memory
with most counted objects check box. The
198 | Infor Enterprise Server | Administration Guide
Shared Memory

current shared memory data is deleted first,
except the objects marked as Fixed.
This option is recommended. A shared mem-
ory filled with the most frequently used objects
improves the processing speed of your LN
application.
On the appropriate menu, click Import Objects
from DD. The Import Objects from DD
Import objects from DD
(ttaad4254m000) session starts. Use this session
to import a range of program objects and/or report
objects from the Data Dictionary (DD) into the
shared memory data.
To manually enter objects in the grid, click New.Manually add objects
Note
▪
If one or more objects are defined for a package combination, the domains and table definitions
of that package combination will also be loaded into the shared memory. You cannot add
individual domains and table definitions.
▪
Tools objects (objects of packages tt and tl) do not belong to a package combination, and are
therefore stored in the dummy <empty> package combination. To create a list of Tools objects
to be loaded into shared memory, leave the Package Combination field empty.
▪
You can mark objects as Fixed. Fixed objects will not be removed from the shared memory
data when you run the Import Objects from Measurement (ttaad4255m000) session with the
Fill remaining allocated memory with most counted objects check box selected.
For details, refer to the session help.
Step 5: Convert the shared memory data to Runtime
On the appropriate menu in the Shared Memory Data (ttaad4156m000) session, click Convert to
Runtime. You can only run this command on a host defined as Master Application Server (MAS).
When the conversion is complete, click OK and close the session.
Step 6: Restart the shared memory
The procedure to restart the shared memory depends on the operating system of the LN server.
ProcedureOperating System
Infor Enterprise Server | Administration Guide | 199
Shared Memory

To restart the shared memory, complete the follow-
ing steps:
Windows
1. Start the Enterprise Server Service Manager.
2. Right-click the Shared Memory Service, and
on the shortcut menu, click Stop.
3. Right-click the Shared Memory Service again,
and on the shortcut menu, click Start.
To restart the shared memory, complete the follow-
ing steps:
UNIX
1. Log off from LN.
2. Log onto the LN server as user root.
3.
Enter the following commands:
# cd $BSE/bin
# ./srdd_init6.2 -i
Note
For more information on shared memory, refer to Infor Enterprise Server Technical Manual (U8172).
200 | Infor Enterprise Server | Administration Guide
Shared Memory

Customer defined fields
You can use the Customer Defined Fields (CDF) sessions in LN to store additional information in tables
without creating so-called customizations. These sessions are available in the Tools menu, under
Application Configuration.
Configuration
To configure customer defined fields:
1. Start the Customer Defined Fields Parameters (ttadv4590m000) session. Select CDF Active
and click OK.
2. Define customer defined fields in one of these ways:
▪
Use the Customer Defined Fields option in the View menu of an already started session.
▪
Use the Customer Defined Fields (ttadv4591m000) session.
If you want to create customer defined fields of type ‘List’, specify the lists and their
constants in the Lists (ttadv4592m000) and List Constants (ttadv4593m000) sessions.
3. Start the Convert to Runtime Data Dictionary (ttadv5215m000) session. Convert the customer
defined fields and the related domains to the runtime data dictionary.
Limitations
▪
You cannot specify more than 20 customer defined fields for a table.
▪
You cannot define customer defined fields for tables within Tools (the tl and tt packages).
▪
External integrations, such as Infor Integration, EDI, Exchange, Office Integration, and
SOA-based integration, do not support customer defined fields.
▪
You can use customer defined fields within 4GL reports. For external reporting, only Microsoft
Reporting and Cognos support customer defined fields.
▪
Customer defined fields cannot store application data in multiple data languages.
Infor Enterprise Server | Administration Guide | 201
20
Chapter 20
Customer Defined Fields and Domain Lengths

Note
The full functionality of customer defined fields is only available within Web UI. Customer defined fields
are not displayed in the classic Infor LN BW UI.
Personalization
A session can contain two types of customer defined fields:
1. Customer defined fields of the main table. These are regular customer defined fields. If set to
active, these fields are initially visible in the session. See Customer Defined Fields
(ttadv4591m000).
2. Referenced customer defined fields. These are active customer defined fields that belong to
a table that is referenced by the main table of the session. Referenced customer defined fields
are initially invisible in the session.
A referenced customer defined field is linked to a session if its table is referenced through:
▪
A table definition (so-called hard-reference)
▪
A reference specified in the form definition, in particular in the Input/Ref Express property of
a form field
▪
A query.extend.select() call in the UI script of the session
If a session contains customer defined fields, you can perform these actions:
▪
Hide/unhide these fields.
▪
Move these fields to a different location, such as a different tab.
See Personalize Grid (ttadv9210m000).
Customer defined domain lengths
You can change the length for domains of type multibyte without creating customizations.
Changing the length for domains of type multibyte
Note
For details about the sessions mentioned in the steps below, see the session help.
To change the length of a multibyte domain:
1. Start the Customer Defined Domain Lengths (ttadv4105m100) session.
2. Select the domain and specify the desired length. You must specify a length that is greater
than the original domain length.
202 | Infor Enterprise Server | Administration Guide
Customer Defined Fields and Domain Lengths

In form and report layouts, fields that use the modified domain are automatically adjusted to
the new length.
3. On the appropriate menu, select Convert to Runtime Data Dictionary.
The Convert to Runtime Data Dictionary (ttadv5215m000) session starts. Run this session to
make the changed domain lengths available in the database. Runtime forms, that contain
fields that use the domain for which you changed the domain length, are automatically adjusted.
4. Return to the Customer Defined Domain Lengths (ttadv4105m100) session and, on the
appropriate menu, select Process Forms.
The Process Forms for Customer Defined Domain Lengths (ttadv4205m100) session starts.
Use this session to (re-)dump the forms that use the changed domain. A list of changed forms
is printed, so you can verify the changes in the forms. If required, you can customize the forms.
5. Return to the Customer Defined Domain Lengths (ttadv4105m100) session and, on the
appropriate menu, select Process Reports.
The Process Reports for Customer Defined Domain Lengths (ttadv4205m200) session starts.
Use this session to (re-)compile the reports that use the changed domain. A list of changed
reports is printed, so you can verify the changes in the reports. If required, you can customize
the reports.
6. Optionally, return to the Customer Defined Domain Lengths (ttadv4105m100) session and,
on the appropriate menu, select Copy to Package Combination.
The Copy Customer Defined Domain Lengths to Package Combination (ttadv4205m300)
session starts. Use this session to copy the customer defined domain length to another package
combination.
Infor Enterprise Server | Administration Guide | 203
Customer Defined Fields and Domain Lengths

204 | Infor Enterprise Server | Administration Guide
Customer Defined Fields and Domain Lengths

Scrollbars
LN sessions support these types of scrollbars:
This scrollbar is inaccurate. The scrollbar slider has
a fixed size. It does not reflect the number of
Old scrollbar
records in the session. The slider is at the top, in
the middle, or at the bottom of the scrollbar. It does
not indicate the relative position in the dataset.
This scrollbar is only supported in Worktop. In Web
UI, navigation buttons are displayed instead of this
scrollbar.
This scrollbar is more advanced. The size of the
scrollbar slider is inversely proportional to the
New scrollbar
number of records in the session. The position of
the slider indicates the relative position in the
dataset.
This scrollbar is supported in Worktop and Web UI.
The new scrollbar requires calculation at session startup. Therefore it can affect the performance of a
session. The impact on the performance is proportional to the number of records in a session.
To avoid a performance decrease, you can:
▪
Disable the new scrollbar for sessions that contain many records.
For details, refer to To disable the scrollbar for sessions with many records (p. 206) .
▪
Disable the new scrollbar for any session, irrespective of the number of records. This is useful
for sessions with not so many records, which start slowly.
Infor Enterprise Server | Administration Guide | 205
21
Chapter 21
Scrollbars

For details, refer to To disable the scrollbar for any session (p. 206) .
If you start a session with a disabled scrollbar in Worktop, the old scrollbar is displayed.
If you start the session in Web UI, no scrollbar is displayed. Instead, navigation buttons are displayed.
To disable the scrollbar for sessions with many records
To disable the scrollbar for sessions with many records:
1. Start the Maintain Parameters (ttaad0100m000) session.
2. In the Count field, enter a value.
The scrollbar is automatically disabled for sessions that contain more records than the specified
value.
3. Save the changes and close the Maintain Parameters (ttaad0100m000) session.
To disable the scrollbar for any session
To disable the scrollbar for a session:
1. Start the Maintain Parameters (ttaad0100m000) session.
2. Click Sessions with a Disabled Scrollbar. The Sessions with a Disabled Scrollbar
(ttaad4180m000) session starts.
3. Add the session, for which you want to disable the new scrollbar, to the list.
For details, refer to the session help.
4. Save the changes and close the sessions.
206 | Infor Enterprise Server | Administration Guide
Scrollbars

Introduction
In some LN sessions, Web UI users can drag an image from a Web browser or Windows explorer
window, and drop it on the session's form. The dropped image is stored in an image repository on the
server.
Each image in the image repository belongs to an image set. Each image set is linked to an LN table in
a particular company number.
The image repository consists of these components:
▪
Images (ttaad710) table
This table should not be shared between companies.
▪
An image folder
By default, this folder is located in ${BSE}/images. You can change the location of the image
folder. For more information, refer to To change the location of the image folder (p. 207) .
The location of the image folder is stored in the Image parameters (ttaad700) table.
To view images in sessions and to drop images on forms, users need authorizations. For more information,
refer to Authorizations (p. 208) .
Note
Drag and drop of images is only supported in sessions where the image is linked to the current main
table or secondary table.
To change the location of the image folder
To change the location of the image folder:
1. Ensure all users have signed out of LN.
2. Start the Image Parameters (ttaad7100m000) session.
Infor Enterprise Server | Administration Guide | 207
22
Chapter 22
Image parameters

3. In the Target Directory field, enter the new directory.
4. Click Move Directory.
5. Sign out of LN and sign on again.
6.
If necessary, modify the user authorizations. For more information, refer to Authorizations
(p. 208) .
Note
To view the contents of the image folder, in the Image Parameters (ttaad7100m000) session, click
Images.
Authorizations
To view images in sessions, users need these authorizations:
▪
Read authorization, on operating system level, on the image folder and its contents.
▪
Read authorization on the Images (ttaad710) table. For more information, refer to Table
authorizations (p. 88) .
To drop images on forms, users need these authorizations:
▪
Read and Write authorization, on operating system level, on the image folder and its contents.
▪
Read and Write authorization on the Images (ttaad710) table.
208 | Infor Enterprise Server | Administration Guide
Image parameters

HTTPS support with SOAP
HTTPS, (Hypertext Transfer Protocol Secure), is not a separate protocol. It refers to the combination of
a normal HTTP interaction over an encrypted Secure Sockets Layer (SSL) or Transport Layer Security
(TLS) connection. HTTPS connections are often used for payment transactions on the World Wide Web
and other sensitive transactions. SOAP, (originally defined as Simple Object Access Protocol), is a
standard protocol used to communicate with Web Services.
In order to use HTTPS with SOAP, some prerequisites must be met. The correct versions of the porting
set, 4GL Engine and Application Studio must be installed. Also, the mandatory certificates that enable
HTTPS must be installed and accessible by the porting set.
Prerequisites
In order to use HTTPS with SOAP meet these prerequisites:
▪
Porting set 8.7a.02
▪
Porting set 8.7a.02 is the first porting set to contain proper support for HTTPS and SSL.
The porting set uses the cURL and OpenSSL libraries, and offers 3GL functions to enable
HTTPS.
▪
4GL Engine build 3971, solution 1009866
▪
The SOAP DLL in this build of the 4GL Engine contains functions such as
SoapService.SetClientCertFile() and SoapService.SetCertAuthorityDir() which are required
for HTTPS.
▪
Application Studio build 8.7.0.0229
▪
The WSDL2Baan tool in this build of the Application Studio supports HTTPS and generates
wrapper functions for using client and server certificates.
▪
OpenSSL tool version 1.0 (recommended)
▪
The OpenSSL command line tool is required for converting certificates from DER and
PKCS12 format to PEM format. It may also be used to generate the hashed file names of
Infor Enterprise Server | Administration Guide | 209
23
Chapter 23
HTTPS

server certificates (see "To generate the hashed file name of a certificate"). Furthermore,
it can be used to diagnose problems connecting to web sites. If the proper certificates are
already available in PEM format, and no hashed file names are needed, the OpenSSL
tool is not required.
▪
Perl (optional)
▪
Perl (Practical Extraction and Reporting Language) is a scripting language. It is needed
for the c_rehash utility script, which may be used to create hashed file names of server
certificates. Note that this utility is not shipped with every distribution of OpenSSL.
Certificates to enable HTTPS
It is recommended that certificates are stored in the $BSE/security/certs folder, under the client
and server sub-folders.
The administrator must install the appropriate certificates in the correct location. See “Dealing with
certificates” for some guidance on how to obtain the certificates.
Client certificates
Client certificates authenticate the client side of a connection to the server side (website or web service).
Client certificates can be used to authenticate a user, an organizational unit, or a server. The client
certificate is presented to the server during the SSL negotiation. If the server cannot verify the client
certificate, the connection is refused.
For security reasons the client certificate must be password protected. The password must be kept
secret. Anyone having access to both the certificate and the password can assume the identity of the
legitimate owner of the certificate.
Preferably, client certificates must be stored in PEM format in the $BSE/security/certs/client
folder.
The client certificate is specified with the SoapService.SetClientCertFile() SOAP function. Its
accompanying password is set with the SoapService.SetPrivateKeyPasswd() SOAP function.
Server certificates
So-called server certificates authenticate a server. They can be self-signed (less secure) or signed by
a recognized certificate authority (CA) such as VeriSign. The server certificate is presented to the client
210 | Infor Enterprise Server | Administration Guide
HTTPS

during the SSL negotiation. The client trusts the server if it has access to the root certificate of the server
certificate. If the server certificate cannot be verified, the connection is refused.
Preferably, server certificates must be stored in PEM format in the $BSE/security/certs/server
folder. The administrator can decide to store the certificates in another location.
Furthermore, if the SoapService.SetCertAuthorityDir() SOAP function is used, the hashed file
names must exist in that directory, and link to or have the contents of the appropriate certificate. An
example of a hashed file name is 415660c1.0, which is a hashed file name of the vsign3.pem certificate.
It is also possible to use a so-called CA-bundle, which is a file that contains multiple (root) certificates.
In that case the SoapService.SetCertAuthorityFile() SOAP function must point OpenSSL to
the file name of the CA-bundle.
How to… (dealing with certificates)
Certificates must be in PEM format and may need hashing in order for OpenSSL to find the correct
certificate.
This section describes:
▪
How to convert a number of formats to PEM format.
▪
How to generate hashed file names of certificates.
▪
Other commands that may prove handy at some point.
To find out which server certificate is required
To find out which server root certificate is required by a secured website or web service, use the OpenSSL
command openssl s_client –showcerts –connect host:port. For example::
openssl s_client -showcerts -connect ccapi.client.qvalent.com:443
In the output of the command you will find the certificate chain that is used by the secured connection.
Look for the words “Certificate chain”. Under these words you will find text that resembles the following:
0 s:/C=AU/ST=NSW/L=Wallsend/O=QVALENT Pty Ltd/OU=Terms of use at www.verisign.
com/rpa (c)00/CN=ccapi.client.qvalent.com i:/O=VeriSign Trust Network/
OU=VeriSign, Inc./OU=VeriSign International Server CA - Class 3/OU=www.
verisign.com/CPS Incorp.by Ref. LIABILITY LTD.(c)97 VeriSign
-----BEGIN CERTIFICATE-----
-----END CERTIFICATE-----
1 s:/O=VeriSign Trust Network/OU=VeriSign, Inc./OU=VeriSign International
Server CA - Class 3/OU=www.verisign.com/CPS Incorp.by Ref. LIABILITY LTD.
(c)97 VeriSign i:/C=US/O=VeriSign, Inc./OU=Class 3 Public Primary
Certification Authority
Infor Enterprise Server | Administration Guide | 211
HTTPS

-----BEGIN CERTIFICATE-----
-----END CERTIFICATE----- ---
You may have noticed that the issuer of a certificate (preceded with “i:” in the output) is the subject of
the certificate (preceded with “s:” in the output) that is next in the chain.
The required root certificate is the one whose subject equals the issuer of the last certificate in the chain.
How to convert a number of formats to PEM format
The OpenSSL command can be used to convert certificates of another format to PEM format.
Converting a certificate in DER encoding to PEM format
A certificate in DER encoding has the extension .crt. To convert for example a vsign3 certificate to PEM
format use this OpenSSL command:
▪
openssl x509 -inform der -in vsign3.crt -out vsign3.pem
Converting a client certificate in PKCS12 format to PEM format
A client certificate from PKCS12 format has the extension .pfx. To convert for example a ccapi client
certificate to PEM, take these steps:
1. Type the OpenSSL command:
openssl pkcs12 -in ccapi.pfx -out ccapi.pem
2. If the pkcs12 file is password protected, OpenSSL will prompt for the password. Specify the
Import Password.
3. When the password is accepted OpenSSL displays the message: "MAC verified OK"
4. OpenSSL will then prompt you for a new password (or pass phrase). Specify the new pass
phrase.
5. Re-enter the same pass phrase, to verify the pass phrase when OpenSSL prompts you with
the message: "Verifying - Enter PEM pass phrase:"
6. When re-entering the password was successful, OpenSSL will exit.
7. On failure OpenSSL will report Verify failure.
212 | Infor Enterprise Server | Administration Guide
HTTPS

Viewing the contents of a PEM certificate
You can view the contents of a certificate in PEM format. To view for example the vsign3 certificate, use
this OpenSSL command: openssl x509 -text -noout -in vsign3.pem
How to generate hashed file names of certificates
OpenSSL needs hashed file names of server certificates. The hashed file name consists of a hash
obtained from OpenSSL, with a numerical extension starting at 0.
During SSL negotiation OpenSSL receives a server certificate. It calculates the hash of the certificate
and uses the hash to find the appropriate certificate. For example, the hash of the vsign3 certificate can
be 415660c1. OpenSSL attempts to open the file named 415660c1.0. When successful OpenSSL
compares the contents with the received server certificate. If they match OpenSSL continues. Otherwise,
OpenSSL attempts to open the file named 415660c1.1, and follows the same procedure etc. If in the
end no matching certificate is found, the connection is refused. The hash of a certificate, in this case
the vsign3 certificate, can be obtained with this command:
openssl x509 -hash -noout -in vsign3.pem
Note
Use version 1.0 or later of OpenSSL. The hashes of earlier versions of OpenSSL are incompatible with
the version of the OpenSSL library linked to the bshell.
The first part 415660c1 of the hashed file name is the hash returned by the openssl command. The
extension .0 of the hashed file name is there to support multiple certificates that have the same hash;
one of them gets extension .0, the other gets extension .1.
The OpenSSL distribution can contain the c_rehash script. This convenient Perl script can be used to
create hashed file names of all certificates in a certain folder. For example, to create hash file names
of all certificates in the $BSE/security/certs/server folder use this command:
c_rehash $BSE/security/certs/server
Ensure that the c_rehash script uses OpenSSL version 1.0 or later, otherwise unusable hash names
are created. Set the environment variable OPENSSL to use a specific installation of OpenSSL.
Infor Enterprise Server | Administration Guide | 213
HTTPS

214 | Infor Enterprise Server | Administration Guide
HTTPS

Date and time formatting in the user interface
LN supports two user interfaces: classic BW and Web UI. Date and time formatting is handled differently
in these user interfaces.
Date and time formatting in BW
In BW, formatting of date and time fields is based on the Windows date and time settings and the LN
format codes that are linked to the fields. Format codes refer to formats that are defined in the Date
Formats (ttadv4580m000) and Time Formats (ttadv4586m000) sessions. A format determines, for
example, whether a date field shows the year with or without the century, or whether a time field shows
only hours and minutes and no seconds.
Date formatting
This section describes how the Windows settings and the LN date formats are combined and used to
format date fields in BW.
The properties of the field format are retrieved and verified. If the format is defined to use week numbers
and no day number is defined, this format is incompatible with the Windows Date control. This table
shows how the format’s properties are changed in that scenario:
Infor Enterprise Server | Administration Guide | 215
24
Chapter 24
Date and time formatting
ValueProperty
In MonthDay Number
NoneDay Name
NumberMonth Number
AbbreviatedMonth Name
With CenturyYear Number
Note
If the ERP format specifies that the Day Name or the Month Name must be displayed, the Windows
long format is used; otherwise, the Windows short format is used.
This Windows format is then combined with the ERP format. The Windows format determines the order
of the individual parts. The ERP format determines how the individual parts are formatted.
This table shows the rules that are applied:
This format is used if the ERP format uses a day
number; otherwise, this format is skipped. This for-
Format d or dd
Day number of the month
mat is mapped to the day number of the month,
regardless of whether the ERP format uses the day
number of the week or the day number of the year.
If the Zero Fill check box in the Date Formats
(ttadv4180s000) session is selected, Windows for-
mat dd is used; otherwise format d is used.
This format is used, regardless of whether the ERP
format does not use day numbers. If the ERP format
Format ddd or dddd
Day name of the week
uses complete day names, Windows format dddd
is used. If the ERP format uses abbreviated names,
ddd is used. If the ERP format does not specify
which format to use, the current Windows format is
used.
This format is used if the ERP format uses a month
number; otherwise, this format is skipped. If the
Format M or MM
Month numbers
Zero Fill check box in the Date Formats
216 | Infor Enterprise Server | Administration Guide
Date and time formatting

(ttadv4180s000) session is selected, Windows for-
mat MM is used; otherwise format M is used.
This format is used if the ERP format uses a month
name or a month number. If the ERP format uses
Format MMM or MMMM
Month names
complete month names, Windows format MMMM
is used. If the ERP format uses abbreviated names,
MMM is used. If the ERP format does not specify
which format to use, the current Windows format is
used.
This format is used, regardless of whether the ERP
format does not use the year number. If the ERP
Format yy or yyyy
Year numbers
format uses years with the century, Windows format
yyyy is used. If the century is not required, the Zero
Fill check box determines whether format yy or y
is used.
Note: When the cursor is in a date field, the year is
displayed with the century.
The specified text is used.Any literal text between single quotes
This is treated as a date separator. The first time a
character such as the period (.) is found in a date,
Any character
that character is used as the date separator. If dif-
ferent characters are used as date separators, this
character is used in place of the other characters.
For example, Windows format dd.MM-yyyy be-
comes dd.MM.yyyy.
Example 1
This table shows the Windows date formats for a Dutch user:
d-M-yyyy
For example, 9-1-2012
Short Date
dddd d MMMM yyyy
For example, maandag 9 januari 2012
Long Date
A date field uses ERP format 001. This table shows the properties for this format:
Infor Enterprise Server | Administration Guide | 217
Date and time formatting
NoneDay Name
In MonthDay Number
NoneWeek Number
NoneMonth Name
NumberMonth Number
Without centuryYear Number
YesZero Fill
Because no Day Name or Month Name is defined, the date is formatted based on the Windows Short
Date format. The date value is formatted as dd-MM-yy, for example, 09-01-12.
Example 2
This table shows the Windows date formats for a user in the United States:
M/d/yy
For example, 1/9/12
Short Date
dddd, MMMM dd yyyy
For example, Monday, January 09, 2012
Long Date
A date field uses ERP format 002. This table shows the properties for this format:
218 | Infor Enterprise Server | Administration Guide
Date and time formatting

NoneDay Name
In MonthDay Number
NoneWeek Number
NoneMonth Name
NumberMonth Number
With centuryYear Number
YesZero Fill
Because no Day Name or Month Name is defined, the date is formatted based on the Windows Short
Date format.
The date value is formatted as: MM/dd/yyyy, for example, 01/09/2012.
Example 3
This table shows the Windows date formats for a user in the United States (same as in example 2):
M/d/yy
For example, 1/9/12
Short Date
dddd, MMMM dd yyyy
For example, Monday, January 09, 2012
Long Date
A date field uses ERP format 003. This table shows the properties for this format:
Infor Enterprise Server | Administration Guide | 219
Date and time formatting

NoneDay Name
In MonthDay Number
NoneWeek Number
AbbreviatedMonth Name
NoneMonth Number
With centuryYear Number
NoZero Fill
Because the abbreviated Month Name must be used, the date is formatted based on the Windows Long
Date format. The date value is formatted as: dddd, MMM d yyyy, for example, Monday, Jan 9 2012.
Example 4
This table shows the Windows date formats for a German user:
dd.MM.yyyy
For example, 09.01.2012
Short Date
dddd, d. MMMM yyyy
For example, Montag, 9. Januar 2012
Long Date
A date field uses ERP format 008. This table shows the properties for this format:
220 | Infor Enterprise Server | Administration Guide
Date and time formatting

CompleteDay Name
In monthDay Number
NoneWeek Number
CompleteMonth Name
NoneMonth Number
With centuryYear Number
YesZero Fill
Because the complete Day Name and Month Name must be used, the date is formatted based on the
Windows Long Date format. The date value is formatted as dddd, dd. MMMM yyyy, for example, Montag,
09. Januar 2012.
Time formatting
This section describes how the Windows settings and the LN time formats are used to format time fields
in BW.
The data of the field format is retrieved and combined with the Windows time format. The Windows
format determines the order of the individual parts; the ERP format determines how the individual parts
are formatted.
Note
In all scenarios, the Windows long time format is used.
This table shows the rules that are applied:
Infor Enterprise Server | Administration Guide | 221
Date and time formatting

This is mapped to the Windows hh format.Format h or hh
12 hour notation
This is mapped to the Windows HH format.Format H or HH
24 hour notation
If the ERP format uses minutes, this is mapped to
the Windows mm format.
Format m or mm
Minutes
If the ERP format uses seconds, this is mapped
to the Windows ss format.
Format s or ss
Seconds
This is taken over.Format tt
AM or PM symbol
The first time a character such as the colon (:) is
found in a time value, that character is used as
the time separator.
Any character
Example 1
A user has this Windows long time format: H:mm:ss
A time field uses ERP format 003. This table shows the properties for this format:
12 Hour FormatHour Format
NoMinutes
NoSeconds
The time value is formatted as HH, for example, 16, which is four o’clock in the afternoon.
Example 2
A user has this Windows long time format: H:mm:ss
A time field uses ERP format 099. This table shows the properties for this format:
222 | Infor Enterprise Server | Administration Guide
Date and time formatting
12 Hour FormatHour Format
YesMinutes
NoSeconds
The time value is formatted as: HH:mm, for example, 16:24.
Example 3
A user has this Windows long time format: h:mm:ss tt
A Time field uses ERP format 001. This table shows the properties for this format:
24 Hour FormatHour Format
YesMinutes
YesSeconds
The time value is formatted as hh:mm:ss tt, for example, 04:24:37 PM.
Date and time formatting in Web UI 10.0 and later
The formatting of date and time fields in Web UI is simpler than in BW. All formatting is done based on
the Windows Date and Time settings only. The linked LN format code is not taken into account.
Date formatting uses the Windows Short Date format. These rules apply:
▪
Format d becomes dd.
▪
Format M becomes MM.
▪
Format yy becomes yyyy.
Time formatting uses the Windows Long Time format.
Note
On Linux client PCs, the local date and time conventions are used.
Infor Enterprise Server | Administration Guide | 223
Date and time formatting

224 | Infor Enterprise Server | Administration Guide
Date and time formatting

Document Authorization Overview
Overview
Database Change Management (DBCM) supports Document Authorization, using ION Workflow.
Document Authorization is about approving or rejecting changes made to Business Objects, in a controlled
way.
If a user makes changes to a Business Object in ERP Enterprise, these changes must be submitted for
approval. Only when these changes are approved, the Business Object may be processed further.
Example
A user changes a Sales Order object, by modifying header data, or by adding, changing, and/or removing
lines. The user must submit the changes for approval. After approval, the Sales Order object may be
processed further.
Through DBCM, two versions of the same Business Object can exist during a certain time-frame: a
checked-in version and a checked-out version.
If a user changes a Business Object, automatically a checked-out version is created. This checked-out
version is only visible in maintain sessions for that particular Business Object. The rest of the ERP
system does not know this version. This checked-out version is a kind of scratch version. A user can
change anything, but the changes will not become available to the rest of the system until the user
submits the changes, and someone approves these changes. It is also possible to undo these changes,
and revert back to the original version.
Administrators can use the Checked-out Objects (ttocm9599m000) session to view the objects that are
currently checked out, and to perform corrective actions in case of errors. See Procedures for checked-out
objects (p. 231) and the session help.
Infor Enterprise Server | Administration Guide | 225
25
Chapter 25
Document Authorization

Modeling and Deploying Document Authorization
To support Document Authorization for a Business Object, a Model must be defined using the Object
Change Management modeling sessions (ttocm0101m000). A model defines for which user actions
Document Authorization is supported.
A model contains multiple object types. Per object type, this information is specified:
▪
Actions
▪
Table relations, if the object contains data from multiple tables
▪
Mappings
Infor delivers a predefined model. You can copy this model and customize it to your needs. You can
choose for which Business Objects you want to use Document Authorization, by specifying this in a
Deployment. See Overall procedure.
If the Model describes two Object Types A and B, and you use Document Authorization for Object Type
A, DBCM will not create checked-out versions for instances of Object Type B. Instances of Object Type
A are always checked-out.
Depending on the active user actions in the Deployment, one of these events occurs when changes are
submitted:
▪
To get approval, the LN application logic publishes a Workflow BOD to ION.
▪
The object is automatically checked in.
Prerequisites
To support Document Authorization, these prerequisites must be met:
▪
ION Workflow must be installed.
▪
The workflow definitions that are specified in the actions of the object types must exist in ION
Workflow.
▪
The LN application must use the DAL2 concept. The DAL of the root table must implement
these hooks:
▪
on.submit()
This hook is executed when changes made are submitted for approval.
▪
on.recall()
This hook is executed when the submit must be recalled. Both these hooks must publish
a Workflow BOD to ION Workflow.
▪
The LN application must be adapted. See Application changes (p. 226) .
Application changes
To support Document Authorization, the application must be adapted.
226 | Infor Enterprise Server | Administration Guide
Document Authorization

Once a Business Object is checked-out, no changes to any related Business Objects of another Object
Type are allowed. Therefore the DAL may only update tables that belong to the Business Object itself.
Only during checking-in, Business Objects of other Object Types may be updated. To support this, you
must use the dbcm.object.is.being.checked.in() function.
If a session can be used to change data of a Business Object for which Document Authorization must
be supported, this session must specify the selected Object Type, so the portingset knows whether to
include checked-out versions when selecting data from the database. For maintain sessions this is done
automatically by the 4GL Engine, based on the main table. For update sessions, you must use these
funtions to achieve this: dbcm.select.object.type() or dbcm.select.object.instance.
The session must indicate the user action which is being performed. For example, if the user presses
the Release to Warehousing button , and this supports Document Authorization, the application must
indicate that this action is being performed by the application logic. DBCM can then determine whether
this action requires approval.
The 4GL Engine supports these standard actions via the User Interface:
▪
Inserting
▪
Updating
▪
Deleting
Any other, application-specific, actions must be selected by the application using the dbcm.select.
object.action function.
Checked-out Business Object states
This table shows the states a Business Object can have:
DescriptionState
The object is checked-out, it can be modified and
any changes can be submitted. Any changes can
Draft
be undone by performing a Revert to Approved in
the User Interface.
The object is in the Draft state, for a second time;
this state is equal to the Draft state, except that an
Draft (Revision)
object can only enter this state after a Recall of any
submitted changes was successful.
Any changes to the object have been submitted
and the user must wait until the changes are Ap-
proved or Rejected. The object cannot be modified.
Pending
Infor Enterprise Server | Administration Guide | 227
Document Authorization

The user made a request to ignore any submitted
changes, because the user, for example, wants to
Recall Requested
make more changes to the object. The object can-
not be modified.
Any submitted changes to the object were not ap-
proved. The user must either make other changes
Rejected
and re-submit them, or perform a Revert to Ap-
proved. The object can be modified.
Usually this state will not be visible to the user. It
can only be visible if somehow, after receiving an
Approval Received
Approval, the object cannot be checked-in. In this
situation an administrator must force a check-in, or
discard any changes and perform a Revert to Ap-
proved. The object can be modified.
Any submitted changes to the object have been
Approved, and the object has been checked-in. The
object can be modified.
Approved
Importing the standard model
To import the standard model:
1. Start the Models (ttocm0101m000) session.
2. On the appropriate menu, select Import standard model.
Creating a model
To create your own model, perform these tasks:
1. Duplicate the standard model.
2. Add object types to the new model.
3. Add actions to the object types.
4. If the object consists of multiple tables, add table relations to the object type.
5. Add mappings to the object type.
6. Validate the model.
See the following sections.
228 | Infor Enterprise Server | Administration Guide
Document Authorization

Upon completion of this procedure, you must deploy the model. See Deploying a model (p. 230) .
Note
When you customize a model, you may also have to modify scripts and libraries. See the LN Programmer's
Guide.
Duplicating the standard model
To duplicate the standard model:
1. Start the Models (ttocm0101m000) session.
2. Select the standard model and click Duplicate.
3. Specify the model code and description for the new model.
4. Save the new model.
Adding object types to the new model
You can add multiple object types to the model.
To add an object type to the new model:
1. In the Models (ttocm0101m000) session, select the new model.
2. On the appropriate menu, select Object Types. The Object Types (ttocm0102m000) session
is started.
3. Add an object type. See the session help.
4. Save the new object type.
Adding actions to the object types
You can add one or more actions to each object type.
To add an action an object type:
1. In the Object Types (ttocm0102m000) session, navigate to the object type.
2. On the Actions tab, click New Action.
3. Add an action. See the session help.
4. Save the new action.
Adding table relations to the object types
If the object contains data from multiple tables, you must specify table relations between the tables used
in the object.
Infor Enterprise Server | Administration Guide | 229
Document Authorization

For example, the sales order object is based on the Sales Orders (tdsls400) and Sales Order Lines
(tdsls401) tables. An order header without lines is useless. Therefore, for the sales order object type,
you must specify a relation from the Sales Order (orno) field in the tdsls401 table to the tdsls400 table.
To add a table relation to an object type:
1. In the Object Types (ttocm0102m000) session, navigate to the object type.
2. On the Table Relations tab, click New Table Relation.
3. Add a table relation. See the session help.
4. Save the new table relation.
Adding mappings to the object types
You can add one or more mappings to each object type.
To add a mapping to an object type:
1. In the Object Types (ttocm0102m000) session, navigate to the object type.
2. On the Mappings tab, click New Mapping.
3. Add a mapping. See the session help.
4. Save the new mapping.
Validating the model
To validate the model:
1. In the Models (ttocm0101m000) session, select the new model.
2. On the appropriate menu, select Validate. A message, indicating whether the validation was
successful, is displayed.
3. If errors occurred, view the log file and solve the problem.
Deploying a model
To deploy a model:
1. Generate a deployment. Complete these steps:
a. In the Models (ttocm0101m000) session, select the model.
b. On the appropriate menu, select Deploy.... The Deploy Model (ttocm0101m100) session
is started.
c. Specify a description for the deployment and specify the package combination to which
the deployment will be linked.
d. Click Deploy. The deployment is generated.
230 | Infor Enterprise Server | Administration Guide
Document Authorization

2. Deploy the actions of the deployment. Complete these steps:
a. Start the Deployments by Package Combination (ttocm0111m000) session.
b. Select the deployment and, on the appropriate menu, select Deployed Actions. The
Deployed Actions (ttocm0112m000) session is started.
c. Enable the desired actions. To enable an action, select the Enabled check box in the
corresponding row. To enable all actions directly, on the appropriate menu, select Enable
All.
d. Save the changes and close the Deployed Actions (ttocm0112m000) session.
3. Activate the deployment. Complete these steps:
a. Ensure all users are logged off.
b. In the Deployments by Package Combination (ttocm0111m000) session, select the
deployment.
c. On the appropriate menu, select Activate.
Conversion/reconfiguration indicators are updated and the Convert to Runtime Data
Dictionary (ttadv5215m000) session is started. This session automatically updates the
table definitions and reconfigures the related tables for the concerning package
combination(s). The Convert to Runtime Data Dictionary (ttadv5215m000) session is
started without UI; if the session is password-protected, you are prompted to specify the
password.
d. Log off and log on again.
The changes are now fully actualized. All users can log on again.
Procedures for checked-out objects
In the Checked-out Objects (ttocm9599m000) session, you can perform these actions on checked-out
business objects:
▪
Check In
▪
Recall
▪
Revert To Approved
▪
Submit
See the online help of the Checked-out Objects (ttocm9599m000) session.
Infor Enterprise Server | Administration Guide | 231
Document Authorization

232 | Infor Enterprise Server | Administration Guide
Document Authorization

Data Upgrade Engine overview
The Data Upgrade Engine (DUE) is used to update the customer data after a Feature Pack (FP) upgrade.
To perform a data upgrade, you must execute a Data Upgrade Run. In some situations, LN automatically
generates a data upgrade run. You can also manually create data upgrade runs.
Each data upgrade run belongs to a particular package combination and performs a data upgrade for
one or more companies that are linked to that package combination.
A data upgrade run consists of upgrade tasks. Each task executes one upgrade program for one company.
Each upgrade program upgrades a particular table.
Example
Companies 410 and 411 are linked to package combination b61ua6. Data upgrade run 19 is linked to
package combination b61ua6 and contains these upgrade tasks:
Infor Enterprise Server | Administration Guide | 233
26
Chapter 26
Data Upgrade Engine

Upgrade programCompany
tcsptdll0901 - Upgrade of table
tcfin020
410
tcsptdll0902 - Upgrade of table
tcfin015
410
tcsptdll0905 - Upgrade of table
tccom000
410
tcsptdll1902 - Upgrade of table
tccom710
410
tcsptdll0901 - Upgrade of table
tcfin020
411
tcsptdll0902 - Upgrade of table
tcfin015
411
tcsptdll0905 - Upgrade of table
tccom000
411
tcsptdll1902 - Upgrade of table
tccom710
411
Note
You do not have to upgrade all companies of a package combination in one run. You can define multiple
runs for different companies of the same package combination. For example, you can define different
runs for live companies and for test companies, and execute these runs at different times. See the
following example.
Example
These companies are linked to package combination A:
▪
901 - live data
▪
902 - live data
▪
903 - test data
▪
904 - test data
234 | Infor Enterprise Server | Administration Guide
Data Upgrade Engine

You define these runs for package combination A:
▪
1 - to upgrade data for company 901 and 902
▪
2 - to upgrade data for company 903 and 904
See this figure:
Data upgrade runs are executed in these situations:
NoteDescriptionSituation
Infor Enterprise Server | Administration Guide | 235
Data Upgrade Engine

A new data upgrade run is gener-
ated automatically after this ac-
tion.
You must initialize and execute
this data upgrade run.
You installed a new feature pack
( service pack) in a package com-
bination.
1
A new data upgrade run is gener-
ated automatically after this ac-
tion.
You must initialize and execute
this data upgrade run.
You moved companies to another
package combination through the
Change Package Combination by
Company (ttaad1101m000) ses-
sion.
2
An upgrade is only required if this
change affects tables. In that
In a package combination, you
replaced a VRC by another VRC.
3
case, you must manually create
and execute a data upgrade run.
For example, in package combina-
tion A, you replaced VRC tdXXXX
by tdZZZZ.
Tables are affected, for example:
▪
If the new VRC belongs to a
new feature pack, and
therefore contains changed
table definitions
▪
If the new VRC is derived
from a VRC that belongs to
a new feature pack
An upgrade is only required if this
change affects tables. In that
You changed the VRC derivation
structure.
4
case, you must manually create
and execute a data upgrade run.
Tables are affected, for example,
if you derive a VRC from a VRC
that belongs to a new feature
pack.
For example:
▪
Package combination A
contains VRC tdYYYY,
which is derived from an FP5
VRC. You change the
derivation, so that tdYYYY is
derived from an FP6 VRC,
which contains changed ta-
ble definitions.
236 | Infor Enterprise Server | Administration Guide
Data Upgrade Engine

▪
You must create and exe-
cute a data upgrade run for
package combination A.
Note
If a data upgrade run is generated, or created manually, the involved companies are locked. Normal
users cannot access these companies anymore. In the Companies (ttaad1100m000) session, these
companies have the Upgrade Needed status.
You can start a run in simulation mode: the Data Upgrade Engine will run the upgrade without actualizing
the transactions.
Execution
During a data upgrade run, various upgrade programs are executed. Some upgrade programs must
have finished successfully before another program can start.
To enhance the performance of the data upgrade process, you can run the DUE using multiple bshells.
In this case multiple CPUs can be utilized. The DUE gathers the list of upgrade programs that must be
executed and spreads the work over the different bshells. When you start a data upgrade run, you can
specify the number of bshells you want to activate.
The sequence in which the upgrade programs are executed depends on:
1. Upgrade Batch
Each upgrade program belongs to one of these batches:
▪
First
▪
Middle
▪
Last
During a data upgrade run, first the upgrade programs of the First Batch are executed. Then
the Middle Batch is executed. Finally the Last Batch is executed.
2. Prerequisite dependencies within batches
An upgrade program can depend on other upgrade programs in the same batch, which must
have been executed successfully before the current program can start.
An upgrade program can only be started if its pre-requisites have been executed.
3. Runtime Class
If a batch contains multiple upgrade programs whose pre-requisites have been executed,
these programs are started based on their runtime class.
Each upgrade program belongs to one of these runtime classes:
▪
Huge
▪
Large
▪
Medium
▪
Small
Infor Enterprise Server | Administration Guide | 237
Data Upgrade Engine

▪
None
First the upgrade programs with runtime class Huge are executed. Then the Large programs
are executed. Subsequently the Medium programs are executed. Finally the Small programs
are executed.
Upgrade programs with Runtime Class None do not have to be executed, but can be a
prerequisite for other programs.
A task can have a higher runtime class than its prerequisite. During execution, the prerequisite
gets this higher class.
For details on how to create and execute a data upgrade run, see Executing a data upgrade run (p. 239)
.
Simulation mode
You can start a run in simulation mode. During a simulation, the Data Upgrade Engine runs the upgrade
without actualizing the transactions. This is useful for testing purposes.
See the online help of the Data Upgrade Engine (ttspt2201m000) session.
Performance and finetuning
You can optimize the performance of the Data Upgrade Engine. See Performance and finetuning (p. 243)
.
Troubleshooting
If one or more upgrade programs fail during a data upgrade run, use the troubleshooting procedure.
See Troubleshooting (p. 245) .
Error Recovery
Each upgrade program runs in a separate process. The upgrade programs can return status information
about the success or failure of the execution. Some statuses interrupt a part of the upgrade process.
Other statuses only inform you that something went wrong, or that the upgrade program was executed
successfully. If a fatal error occurs, such as error 606, "reference not found", only upgrade programs
that are dependent on the failing upgrade program cannot be executed anymore. All other upgrade
programs can still be executed.
Logging
Upgrade programs can generate reports of errors and changes. When you start a data upgrade run,
you can indicate that only errors should be reported.
You can access log information from the Data Upgrade Tasks (ttspt2520m100) session.
238 | Infor Enterprise Server | Administration Guide
Data Upgrade Engine

Executing a data upgrade run
This section describes how to create and execute a Data Upgrade Run.
To execute a data upgrade run
To execute a data upgrade run:
Step 1: Display the run information
Complete these steps:
1. Start the Data Upgrade Runs (ttspt2500m000) session.
2. Go to the Run Information tab.
Step 2: If the data upgrade run already exists, initialize the run
Perform this step only if the data upgrade run you want to execute already exists, for example because
it was generated automatically.
To initialize an existing run:
1. Select the run and on the appropriate menu, select Initialize Data Upgrade Run. The Initialize
Data Upgrade Run (ttspt2200m000) session starts.
2. Fill out the fields in the session. Among other things, specify this information:
▪
If applicable, an Upgrade Task Source
For example, you can specify a PMC Solution on which the initialization will be based.
▪
The companies you want to upgrade
The Source Feature Pack is already filled in.
Caution!
Ensure the correct source feature pack number is filled in. The data upgrades to be performed
will be based on the specified source feature pack number:
▪
If the number is too low, too much data will be converted. Possibly data will be overwritten
with wrong values.
▪
If the number is too high, not all data will be converted. Possibly data will not be consistent.
Note
▪
The initialization process assigns the specified feature pack number to all upgrade tasks
in the run.
▪
After an incorrect initialization, you can correct the Source Feature Pack for the upgrade
tasks/ upgrade programs in the run. To perform this correction, use the Global Change
Source Feature Pack (ttspt2220m000) session.
Infor Enterprise Server | Administration Guide | 239
Data Upgrade Engine

3. Click Initialize.
4. When the initialization is finished, a "Process completed" message is displayed. To remove
the message box, click OK.
5. Close the Initialize Data Upgrade Run (ttspt2200m000) session.
Step 3: If the data upgrade run does not exist yet, create and initialize a new run
Perform this step only if the data upgrade run does not exist yet.
To create and initialize a new run:
1. In the Data Upgrade Runs (ttspt2500m000) session, click New. The Initialize Data Upgrade
Run (ttspt2200m000) session starts.
2. Fill out the fields in the session. Among other things, specify this information:
▪
If applicable, an Upgrade Task Source
For example, you can specify a PMC Solution on which the initialization will be based.
▪
The companies you want to upgrade
▪
The number of the Source Feature Pack, such as 6 in case of FP6
Caution!
Ensure the correct source feature pack number is filled in. The data upgrades to be
performed will be based on the specified source feature pack number:
▪
If the number is too low, too much data will be converted. Possibly data will be
overwritten with wrong values.
▪
If the number is too high, not all data will be converted. Possibly data will not be
consistent.
Note
▪
The initialization process assigns the specified feature pack number to all upgrade
tasks in the run.
▪
After an incorrect initialization, you can correct the Source Feature Pack for the
upgrade tasks/ upgrade programs in the run. To perform this correction, use the Global
Change Source Feature Pack (ttspt2220m000) session.
Note: if you select the Start Data Upgrade Engine After Initialization check box, the run
starts automatically after the initialization is finished. You cannot check the source feature
pack or finetune the run before it is started.
3. Click Initialize.
4. When the initialization is finished, a "Process completed" message is displayed. To remove
the message box, click OK.
5. Close the Initialize Data Upgrade Run (ttspt2200m000) session. The new run is displayed in
the Data Upgrade Runs (ttspt2500m000) session.
240 | Infor Enterprise Server | Administration Guide
Data Upgrade Engine

Step 4: Finetune the run.
To finetune the run, you can select these actions on the appropriate menu in the Data Upgrade Runs
(ttspt2500m000) session:
Starts the Companies by Data Upgrade Run
(ttspt2510m000) session.
By default, all companies of a package combination
are processed in the same run. To split the upgrade
Companies by Data Upgrade Run
process, you can move companies to other runs.
In this way you can, for example, process a package
combination's live companies and archive compa-
nies in two separate runs.
To move companies to another run:
1. In the Companies by Data Upgrade Run
(ttspt2510m000) session, select the compa-
nies you want to move.
2. On the appropriate menu, select Move Com-
panies to Another Run. The Move Compa-
nies to Another Run (ttspt2210m000) session
starts.
3. Enter the required information:
▪
Optionally, change the company selection.
▪
Specify the destination run. You can cre-
ate a new run, or select an existing run.
4. Click Move.
Note: companies that are related to each other must
be linked to the same run. You can only move a
company to another run, if you also move its related
companies. If the company selection does not
contain all related companies, an error message is
displayed. The message specifies the missing
companies that must be included in the selection.
Click Make Valid to automatically select the missing
companies.
Starts the Data Upgrade Tasks (ttspt2520m000)
session. Double-click an upgrade task to start the
Data Upgrade Tasks
Data Upgrade Tasks (ttspt2520m100) details ses-
sion.
Infor Enterprise Server | Administration Guide | 241
Data Upgrade Engine

Use this session to change, for example, these
properties of an upgrade task:
▪
The Source Feature Pack
▪
The Runtime Class
Important!
▪
Set the Runtime Class to Huge, Large,
Medium, or Small.
▪
The Real Run Status
Important!
▪
Only change this status in case of trou-
bleshooting. See Troubleshooting (p. 245)
.
▪
If you set the Real Run Status to Re-
leased, the task will not be processed. In
this way you can skip tasks that would fail
during execution, and ensure the run suc-
ceeds anyway. This can cause unpre-
dictable results or even data corruption.
Therefore setting the Real Run Status to
Released is at your own risk.
For more information, refer to the session help.
Step 5: Execute the run
Complete these steps:
1. Select the run in the Data Upgrade Runs (ttspt2500m000) session.
2. On the appropriate menu, select Data Upgrade Engine. The Data Upgrade Engine
(ttspt2201m000) session starts.
3. Fill out the fields in the session and click Continue. See the session help.
Note
If a task fails during the execution of the run, an error message is displayed in the progress bar. In case
of a fatal error, the failing upgrade program stops. All dependent upgrade programs cannot be executed
anymore. The run continues to execute all other upgrade programs.
You can solve the problem that caused the error and start the failed task again. See Troubleshooting
(p. 245) .
242 | Infor Enterprise Server | Administration Guide
Data Upgrade Engine

Performance and finetuning
This section describes how you can optimize the performance of the Data Upgrade Engine ( DUE).
The performance of the DUE is influenced by:
▪
The runtime class of the upgrade tasks. See Runtime class (p. 243) .
▪
The usage of additional servers. See Additional servers (p. 244) .
▪
The usage of the local server for processing. See Using the local server for processing (p. 244)
.
▪
The usage of sub-tasks. See Using sub-tasks (p. 245) .
You can use the Call Graph Profiler to identify potential performance bottlenecks. See Using the Call
Graph Profiler (p. 245) .
Runtime class
During initialization of the DUE run, the upgrade programs determine their runtime class. This is based
on factors such as parameter settings, table sizes, and source feature pack. Common rules are used.
For your specific environment there may be factors that lead to a not optimal determination of the runtime
class. As a result long running tasks may be scheduled later than small tasks. This causes a longer total
elapsed time.
We recommend to perform a test upgrade run before you start the real run. You can analyze the results
of the test run, and optimize the running class where necessary. Complete these steps:
1.
Perform a test run. See Executing a data upgrade run (p. 239) .
For a realistic test, perform this test run on companies that are copied from the real live data
companies.
2. Print and analyze the results of the test run.
a. Start the Print Data Upgrade Run Information (ttspt2400m000) session.
b. Select the Data Upgrade Run Information [Flat File] report and print the data of the test
run to a file.
c. Optionally, import this file in MS Excel.
d. Analyze the results. Per upgrade task, view the runtime class and the duration.
3. Optimize the running class in these situations:
▪
A task, which lasts long, has a low running class.
Select a higher running class for the task.
▪
A task, which takes a short time, has a high running class.
Select a lower running class for the task.
Infor Enterprise Server | Administration Guide | 243
Data Upgrade Engine

For example:
▪
A task has running class Medium and lasts 3 hours. Change the running class to
Large or Huge.
▪
A task has running class Huge and lasts only 30 minutes. Change the running class
to Large or Medium. Other tasks will take advantage of this.
The duration of an upgrade task differs per company because it depends on many variables.
Therefore, for each company or set of companies, it is important to investigate the maximum
duration of an upgrade task before you change the runtime class.
Additional servers
In the Number of Additional Servers field in the Data Upgrade Engine (ttspt2201m000) session, you
can specify the number of additional bshells that will be used to run the Data Upgrade Engine.
Additional bshells can greatly improve the performance of the DUE because several upgrade tasks can
be started in parallel.
Important!
If the whole system capacity can be used for the DUE, we recommend to specify one additional bshell
per CPU. For example, if your LN server contains 8 CPUs, specify 8 additional bshells.
The DUE is very high CPU intensive and other users are hampered when the number of additional
upgrade tasks is too high. Therefore reduce the number of additional bshells if not the whole system
can be used for the DUE.
The additional bshells perform a lot of I/O actions. It is not recommended to add more bshells than the
I/O subsystem can handle. If you do not know the I/O capacity of the I/O sub system, as a rule of thumb,
specify one additional bshell per CPU.
Note
If you set the Number of Additional Servers field to 0, the DUE is run in a single bshell.
Using the local server for processing
When you use additional bshells, the local bshell , where the Data Upgrade Engine (ttspt2201m000)
session is started, schedules the upgrade tasks. This local bshell gathers the list of upgrade programs
that must be executed and spreads the work over the different bshells.
If you select the Use the local Server for processing check box in the Data Upgrade Engine
(ttspt2201m000) session, the local bshell will not only schedule the upgrade tasks but will also run
upgrade tasks.
We recommend the following:
▪
Select the Use the local Server for processing check box if you select 1 additional bshell
in the Number of Additional Servers field.
244 | Infor Enterprise Server | Administration Guide
Data Upgrade Engine

▪
Clear the Use the local Server for processing check box if you select more than 1 additional
bshell in the Number of Additional Servers field. The local bshell only schedules the upgrade
tasks. If the local bshell also had to run upgrade tasks, it might be too busy to schedule tasks
for the different additional bshells in time.
Using sub-tasks
Some long running upgrade tasks have sub-tasks. These sub-tasks are defined in the upgrade programs
delivered by Infor and are created during the initialization of a DUE run. Each sub-task has its own data
range to perform a part of the upgrade task. To improve the performance of the DUE, sub-tasks can be
run in parallel in different bshells. If a task is sub-task enabled, you can manually add, change, or remove
sub-tasks. See the online help of the Sub-Tasks (ttspt2535m000) session. This session runs in a tab in
the Data Upgrade Tasks (ttspt2520m100) details session.
Using the Call Graph Profiler
To identify potential performance bottlenecks, you can run the Data Upgrade Engine with the Call Graph
Profiler activated.
To view the generated files, use the Files (ttspt2530m000) session. The names of the generated files
have this format:
profile.[bshell.pid].ttspt2203m000.[pid].html
To use the Call Graph Profiler, these conditions must be met:
▪
The PROFILE_ALL environment variable must be set to 1.
▪
The PROF_CLIENT environment variable must not be set.
For details on the Call Graph Profiler, see these documents:
▪
Infor LN - Performance, Tracing and Tuning Guide (U9357)
▪
LN Programmer's Guide
Troubleshooting
Procedure
Use this procedure if one or more upgrade programs fail during a Data Upgrade Run.
1. Start the Data Upgrade Runs (ttspt2500m000) session.
2. Select the run and, on the appropriate menu, select Data Upgrade Tasks. The Data Upgrade
Tasks (ttspt2520m000) session starts.
3. Select View > Sort By > Upgrade Tasks by Real Status.
4. Navigate to the upgrade tasks with Real Run Status Failed.
Infor Enterprise Server | Administration Guide | 245
Data Upgrade Engine

5. Double-click a task. The Data Upgrade Tasks (ttspt2520m100) details session starts.
6. In the Files by Data Upgrade Task tab, double-click a log file.
7. View the contents of the log file.
8. Solve the problem that caused the failure. For example:
▪
Create a correction program.
▪
Contact Infor Support.
▪
Contact a consultant.
9. If the problem is solved, ensure the task is restarted.
▪
If the Data Upgrade Run is still running, set the Real Run Status of the task to Ready for
Retry. You must perform this action in the Data Upgrade Tasks (ttspt2520m100) details
session.
▪
If the Data Upgrade Run does not run anymore, restart the run and ensure the failed task
is started:
a. Select the run in the Data Upgrade Runs (ttspt2500m000) session.
b. On the appropriate menu, select Data Upgrade Engine. The Data Upgrade Engine
(ttspt2201m000) session starts.
c. Select the Include failed upgrade tasks check box.
d. Fill out the remaining fields and click Continue.
Trace level
If you set the DUE_TRACE environment variable to 1, an additional Trace Level field is displayed in
the Data Upgrade Engine (ttspt2201m000) session.
The trace level indicates the amount of information that will be written to the $BSE/log/log.due file.
This information provides insight in the scheduling and the communication between the multiple bshells.
You can select these trace levels:
▪
0 - No Extra Logging
▪
1 - Some Details
▪
2 - More Details
▪
3 - Full Details
For details on how to set environment variables, see Infor Enterprise Server Technical Manual (U8172).
Performance and finetuning
You can optimize the performance of the Data Upgrade Engine. See Performance and finetuning (p. 243)
.
246 | Infor Enterprise Server | Administration Guide
Data Upgrade Engine

Workbench applications
You can install and deploy workbench applications in LN.
The LN workbench applications run in a Web UI environment, which is hosted in an Infor Ming.le
environment. The workbench applications can only be accessed within the intranet environment, not
from the internet.
For details about the system requirements and the installation steps, see the Infor LN Workbench
Application Installation Guide (U9732).
Quick Flow
Various features in LN sessions are enabled for Quick Flow. Infor Ming.le-LN Plug-in users can use
Quick Flow to optimize a specific process by suppressing process steps.
For example, to optimize print processes or process actions in a session’s menu or toolbar, a user can
suppress these components:
▪
Device selection dialogs for reports
▪
Option dialogs for menu actions
▪
Question dialogs
▪
Message dialogs
Note
▪
To ensure users can suppress messages and questions, you must specify LN parameters
and authorize the users. See Enabling message and question suppression (p. 248) .
▪
Quick flow is only available for form commands where the Suppression of Dialog Allowed
check box is selected. See the online help of the Form Commands (ttadv3118s000) session.
Infor Enterprise Server | Administration Guide | 247
27
Chapter 27
Miscellaneous

The procedure, for end users, for using quick flow/message suppression is documented in the Infor
Ming.le-LN Plug-in - User Guide (U9647).
Enabling message and question suppression
To ensure users can suppress messages and questions:
1. Specify LN parameters. Complete these steps:
a. Start the Maintain Parameters (ttaad0100m000)) session.
b. Select these check boxes:
▪
Suppress Messages
▪
Enable Remember Question Selection
2. To authorize a user to suppress messages and remember question selections, you must
modify the user's user data template. Complete these steps:
a. Start the User Data Template (ttams1110m000) session.
b. Navigate to the template you want to modify.
c. Select these check boxes:
▪
Manage Remember Question Selection Allowed
▪
Manage Suppress Messages
d. On the appropriate menu, select Convert Changes To Runtime DD.
All users linked to the modified template are now authorized to suppress messages and remember
question selections.
MS Excel integration
Introduction
In LN sessions that show data directly from a table, you can export data to, and import data from, MS
Excel. After starting such a session, you can select the tabs and columns you want to export. Then you
can perform a quick export or an advanced export. During the export, a .xlsx workbook is generated.
After exporting data from a session, you can edit the Excel export workbook and import the workbook
back into the same session. Only cells with edit permissions are imported.
Note
▪
The export functionality is available in Infor Ming.le-LN Plug-in and classic Web UI.
▪
The import functionality is available in Infor Ming.le-LN Plug-in.
For details, see these sections:
▪
"MS Excel integration" in the Infor Ming.le-LN Plug-in - User Guide (U9647)
248 | Infor Enterprise Server | Administration Guide
Miscellaneous

▪
"MS Excel integration" in the Infor ES Web UI online help
SSI_MAX_ROWS
If a session contains a lot of data, a full export from that session can slow down or block the entire
database. To prevent this, you can limit the number of records that can be exported by setting the
SSI_MAX_ROWS parameter.
To limit the number of records that can be exported, set SSI_MAX_ROWS to a value greater than zero.
For example, if SSI_MAX_ROWS = 500, 500 records can be exported at most.
If SSI_MAX_ROWS has a value that is less than or equal to zero, there is no limit (except the MS Excel
limit) for the number of records that can be exported.
Infor Enterprise Server | Administration Guide | 249
Miscellaneous

250 | Infor Enterprise Server | Administration Guide
Miscellaneous

appropriate menu
Commands are distributed across the Views, References, and Actions menus, or displayed as buttons.
In previous LN and Web UI releases, these commands are located in the Specific menu.
base VRC
A means in PMC to identify products in a unique way. Updates at the distributor side are provided with
the base VRC identifier. A base VRC can contain the code of the physical VRC in which the related
master product is installed, for example, B61_a, but can also be a code not related to a physical VRC,
for example, 7.6_a_tt. At the recipient side, every update VRC is linked to a base VRC identifier. The
installation process checks if the base VRC identifier of the update matches with the base VRC identifier
of the update VRC. If not, you cannot install the update in that update VRC.
BOL
See: Business Object Layer (p. 251)
Business Object Layer
A set of standard DLLs from LN 6.0 onwards. The Business Object Layer invokes LN business logic
methods that handle the persistency of a Business Object
Acronym: BOL
BW
See: LN windows interface (p. 253)
collection
In PMC, a collection is a group of individual solutions. At the PMC distributor side, you can perform
grouping in various ways, for example, manual grouping based on a functional topic or grouping based
on solutions created in a particular period etc. You cannot define dependencies between collections. At
the recipient side, the entity collection is not available. When a collection is scanned, the individual
solutions are added to the PMC registry and can be processed individually.
Infor Enterprise Server | Administration Guide | 251
A
Appendix A
Glossary

co-requisite
In general, co-requisites are defined between solutions of a standard product and derived products.
Co-requisites guarantee that related products are updated simultaneously under the condition that the
update VRCs of the related products are linked to the same VRC combination. The order of installation
is not relevant. The solutions can have the same base VRC, or different base VRCs.
customization
A derived product, meant to fulfill the requirements of a specific customer or group of customers.
database group
A group of database users with the same authorizations and rights. When you add a database user to
a database group, the user automatically receives the group's authorizations and rights.
database user
An LN user that is also authorized to access the database. The configuration information for the database
user contains all the necessary settings to log on to a database. When the user logs on, these settings
are automatically loaded. Every database user must belong to a database group.
data language
The language in which the application data is displayed. Data languages can be linked to users and to
software languages.
A data language consists of an ISO 639-1 language code and, optionally, an ISO 3166-1 country code.
See Multilanguage application data (p. 179) .
Data Upgrade Engine
A framework that executes application data upgrade programs.
The Data Upgrade Engine is used after installation of a Feature Pack.
Acronym: DUE
data upgrade run
The execution of multiple upgrade programs for multiple companies.
252 | Infor Enterprise Server | Administration Guide
Glossary

dependency
In PMC, the relation between solutions. Dependencies are defined at the PMC distributor side and are
part of the meta data of a PMC solution and guarantee that PMC solutions are installed in the correct
configuration and sequence at the PMC recipient side.
The following values indicate the dependency type between solutions.
Three dependency types are available:
▪
Pre-requisites
▪
Co-requisites
▪
Post-requisites
You can only install solutions that are dependent on other solutions if the other solutions are already
present, or are also installed.
The same dependency types exist between patches. However, to keep the descriptions readable, only
solutions are mentioned, but patches are meant as well. One exception applies: the post-requisite type
is not applicable to patches.
DUE
See: Data Upgrade Engine (p. 252)
Feature Pack
See Service Pack.
Acronym: FP
FP
See: Feature Pack (p. 253)
installation run
In PMC, a group of solutions that were installed together. This can be a range of solutions, a solution
with pre-requisites, or a combination of both.
LN user
A person who uses the LN application.
LN windows interface
A Windows-based interface program between the user and the LN servers. The LN windows interface
runs on the user workstation and communicates with the Bshell.
Acronym: BW
Infor Enterprise Server | Administration Guide | 253
Glossary

obsolete solution
Obsolete solutions are an administrative aid to manage the synchronization of updates at the PMC
recipient side when you install a Service Pack. An obsolete solution does not contain software
components.
package combination
A combination of several different packages with specific VRCs. A package combination represents a
complete usable version of LN.
In the User Data (ttaad2500m000) session, each user is linked to a package combination, that determines
which version of the software the user can use. In the Companies (ttaad1100m000) session, each
company is linked to a package combination, to indicate which version of LN is appropriate to handle
the data in that company.
package VRC
A version of a package, for example, tc B61O a cus1. In general, one version of a software component,
such as a session, a table, or a form, is stored in one particular package VRC.
A developer can usually modify software components only in a particular package VRC.
The code of a package VRC consists of:
▪
Package code, for example, 'tc'
▪
A version (VRC) code, for example 'B61O a cus1', built up of:
▪
Version
▪
Release
▪
Customer
package VRC
See: Version - Release - Customer (p. 258)
PAM
See: Pluggable Authentication Modules (p. 255)
password aging
Password aging is a technique used by system administrators to defend against bad passwords within
an organization. Password aging means that after a set amount of time, usually 90 days, the user will
be prompted to come up with a new password. The theory behind this is that if a user is forced to change
his password periodically, a cracked password is only useful to an intruder for a limited amount of time.
The downside to password aging, however, is that users are more likely to write their passwords down.
With password aging the system administrator can set minimum and maximum lengths of time for which
the password is valid. Maximum time lengths force users to change passwords regularly. Minimum
lengths prevent users from quickly changing the passwords back.
254 | Infor Enterprise Server | Administration Guide
Glossary

patch
In PMC, a patch is a collection of Solutions. In general a patch contains solutions created in a larger
time period. The patch entity is both known at the PMC distributor and PMC recipient side. Patches are
an indivisible set of solutions. You cannot install or uninstall individual solutions that belong to a patch
at the PMC recipient. You can only install or uninstall patches as a whole. Yo can define dependencies
between patches. Patches leave the Base VRC that is linked to the update VRC at the PMC recipient
unchanged. The existing PMC registry will remain and will be extended with data of the newly installed
patch. Patches only permit the most recent version of software components to be maintained. Patches
in general mainly contain corrective solutions.
Note
In PMC versions earlier than LN 6.1, the synonym Service Packs was often used for patches.
Pluggable Authentication Modules
Pluggable authentication modules or PAM are a mechanism to integrate multiple low-level authentication
schemes into a high-level API, which allows for programs that rely on authentication to be written
independently of the underlying authentication scheme. PAM were first developed by Sun Microsystems,
and are currently supported in AIX, HP-UX, Solaris, Linux, FreeBSD and NetBSD.
Acronym: PAM
PMC
See: Product Maintenance and Control (p. 256)
PMC distributor
The functional part of PMC that manages the creation of Updates. PMC Distributor is especially used
by software vendors who create updates.
PMC recipient
The functional part of PMC that manages the installation of Updates. Customers, who install updates
in particular use PMC recipient.
post-requisite
Post-requisites are mainly meant to prevent the installation of bad solutions. In general, a post-requisite
is a link from an earlier, bad solution to a more recent, correct solution.
Infor Enterprise Server | Administration Guide | 255
Glossary

pre-requisite
Pre-requisites mainly steer the sequence in which solutions are installed. In general a pre-requisite is
the link from a more recent solution to a predecessing solution. Pre-requisites are the most common
type of dependencies. A pre-requisite dependency exists between two solutions if one solution must
have been installed before the other solution is installed. In that case, the first solution is a pre-requisite
for the other solution. Typically, pre-requisite dependencies exist between a solution and a previous
solution, if these solutions have one or more components in common. Pre-requisite dependencies can
only be created to solutions in the same Base VRC.
Product Maintenance and Control
Product Maintenance and Control (PMC) is a tool that helps a customer manage the updates of the LN
system.
With the PMC tool, you can check all patches against the customer's LN system to verify their
completeness, check any potential interference with the customization, and detect dependencies.
These capabilities ensure the complete and accurate installation of each software patch and Service
Pack. In addition, using the PMC tool enhances the quality of the support being available to customers.
PMC consists of a PMC distributor part and a PMC recipient part.
Acronym: PMC
PVRC
See: Version - Release - Customer (p. 258)
RDBMS
See: Relational Database Management System (p. 256)
Relational Database Management System
A relational database or database management system that consists of tables made up of rows and
columns. In a relational database, the rows of a table represent records and the columns represent fields
with the particular attributes of a record. The records are collections of information about separate items.
The attributes of the records are represented in the columns. The relational database management
system uses data in a specified column of one table to find additional data in another table.
Acronym: RDBMS
role
From a user point of view, a function, or part of a function in an organization. For example, manager,
secretary, and so on. From an authorization point of view, an identifying name for a group of users. A
role can contain several sub roles.
256 | Infor Enterprise Server | Administration Guide
Glossary

SCM
See: Software Configuration Management (p. 257)
Service Pack
In PMC, a Service Pack is a collection of solutions. In general, a Service Pack contains solutions created
in a larger time period. In PMC the term 'patch' is also applied for Service Packs. The patch entity is
both known at the PMC distributor and PMC recipient side. A property in the patch entity makes the
difference between patches and Service Packs. Service Packs are an indivisible set of solutions. You
cannot install or uninstall solutions that belong to a Service Pack at the PMC recipient. You can only
install or uninstall Service Packs as a whole. You can define dependencies between Service Packs.
Service Packs are intended to enable you to maintain multiple Base VRCs in parallel. Service Packs
change the base VRC that is linked to the update VRC at the PMC recipient. The existing PMC registry
for the update VRC will be moved to history and a new registry will be started for the update VRC. This
type of patch in general contains a significant amount of functional changes.
Note
Service Packs as described in the preceding definition do not exist in PMC versions earlier than LN 6.1.
Acronym: SP
Software Configuration Management
With software configuration management, a developer can modify and test an own revision of a software
component. Using a check-out and check-in functionality, a software component is locked for others
developers. This method guarantees that no more than one developer can modify the same software
component at the same time.
Acronym: SCM
solution
In PMC, the smallest, indivisible type of update. A solution is identified both at the distributor and recipient
side by a unique solution code. The term individual solution is also frequently used and has the same
meaning.
Note
In the PMC software the term solution is often used as an alternative for the term update. A solution can
then be an individual solution, which is the smallest, indivisible type of an update, or a patch.
SP
See: Service Pack (p. 257)
Infor Enterprise Server | Administration Guide | 257
Glossary

update
In PMC, an update is a set of changed software components, including PMC metadata, which is required
to install the update in a safe and correct way. An update can contain corrective changes or functional
enhancements.
Updates can be delivered in four different configurations:
▪
Solutions
▪
Collections
▪
Patches
▪
Service Packs
update VRC
A physical VRC at the PMC recipient side in which updates are installed. Every update VRC has a
base VRC linked.
upgrade program
A DLL that contains the logic to upgrade a particular table after installation of a more recent Feature Pack
of Infor LN.
upgrade task
The execution of an upgrade program for a particular company.
Version - Release - Customer
The version - release - customer (VRC) code is an identification of a stage in the development of the
LN software. An example of a VRC is B61_a_ams.
A VRC code consists of:
▪
Version
A stage in the development in which a major part of the software is modified.
▪
Release
A stage in the development in which a minor part of the software is modified.
▪
Customer
An Extension, Localization, or Customization of the software for a single customer or a small
group of customers.
A VRC can be derived from a preceding VRC. Every software component that is contained in the
preceding VRC and not explicitly modified or set to expired in the current VRC will also be available in
the current VRC.
Synonym: package VRC
Acronym: VRC, PVRC
258 | Infor Enterprise Server | Administration Guide
Glossary

VRC
See: Version - Release - Customer (p. 258)
VRC combination
A VRC Combination is defined at the PMC recipient side and consists of a set of related Update VRCs.
The VRC Combination will guarantee that, if required, the related update VRCs are updated
simultaneously at the PMC recipient side. In this way, you can avoid compatibility problems between
related update VRCs. For example, if you use the standard application and you also have an extension
installed, you will have two update VRCs defined. If a co-requisite dependency is defined between a
standard solution and a solution for the extension, PMC installs both solutions in one run if you linked
the update VRCs for both standard and extension in one VRC combination.
Infor Enterprise Server | Administration Guide | 259
Glossary

260 | Infor Enterprise Server | Administration Guide
Glossary

AMS, 99, 101
Application administration
overview, 29
system administrator tasks, 29, 30
appropriate menu, 251
architecture, 52
Archiving, 139, 140, 142, 143, 144
Audit configuration management
additional functions, 105
audit trail and audit host settings, 104
configuration procedure, 104
general remarks, 105
introduction, 103
specific issues, 108
Authorization Management System, 99, 101
authorizations, 90
Authorizations, 83, 85, 93, 99
base VRC, 251
benefits, 51
BOL, 251
Business Object Layer, 251
BW, 253
CDF, 201
certificates, 210, 213
collection, 55, 251
content, 213
convert, 212
co-requisite, 252
Customer defined domain lengths, 202
customization, 252
database group, 252
database user, 252
data language, 252
Data Upgrade Engine, 252
data upgrade run, 239
finetuning, 243
overview, 233
performance, 243
troubleshooting, 245
data upgrade run, 252
Data Upgrade Run
execute, 239
Date and time
format, 215, 215, 223
formatting, 215, 215, 223
dependency, 53, 253
Developer authorization, 98
Device management
introduction, 121
maintenance procedure, 126, 150
overview, 121
setup procedure, 124
device
Excel device, 132
Microsoft Excel device, 132
MS Excel device, 132
Document Authorization
overview, 225
DUE, 252
data upgrade run, 239
finetuning, 243
overview, 233
performance, 243
troubleshooting, 245
Enterprise Server Service Manager
ERP LN management procedures, 167
introduction, 165
overview, 165
ES Service Manager
introduction, 165
feature pack, 56
Feature Pack, 253
feature packs and patches, 55
format, 211
FP, 253
hash, 213
Index

homepages
configuration, 195
delivery, 194
installation, 195
introduction, 191
predefined, 195
structure, 192
Web UI, 191, 192, 194, 195, 195
HTTPS, 209
image
authorizations, 208
drag and drop, 207, 207, 208
folder, 207
repository, 207
Infor Installation Wizard and PMC, 64
Infor Solution License Manager, 33
installation run, 253
introduction, 51
Job management
introduction, 153
job data, 153
job data procedure, 158
job execution, 154
job handling procedure, 160
job history, 157
share tables, 154
labels
sensitivity_labeling, 187
Language support
character set, 171
conversion, 177
introduction, 171
Language Translation Support, 178
LTS, 178
translation, 178
License management, 33
LN user, 253
LN windows interface, 253
Message Suppression
enable, 247
Model
create, 228
customize, 228
deploy, 230
import, 228
MS Excel integration
export, 248
import, 248
obsolete solution, 254
openssl, 213
overview, 52
package combination, 254
Package combination, 39
change the package combination for LN
users, 98
one-step software environment procedure,
49
standard software environment procedure,
48
package VRC, 254, 258
Package VRC, 40
one-step software environment procedure,
49
standard software environment procedure,
48
PAM, 255
paper
paper type, 127
password aging, 254
patch, 60, 255
open a patch, 77
PEM, 211, 212
Pluggable Authentication Modules, 255
PMC distributor, 255
functionality, 61
policy, 61
PMC, 256
architecture, 52
benefits, 51
check update to install, 72
check update to uninstall, 72
cleanup, 77
collection, 55
connect update to update VRC, 72
dependency, 53
distributor functionality, 61
distributor policy, 61
download updates, 71
feature pack, 56
feature packs and patches, 55
FTP/HTTP for downloading software updates,
69
individual solution, 54
Infor Installation Wizard and PMC, 64
install update, 72
install update procedure, 71

introduction, 51
open a patch, 77
overview, 52
patch, 60
recipient functionality, 62
recipient parameters, 65
recipient session summary, 78
recipient setup, 63
recipient setup procedure, 64
remove an update VRC, 78
scan updates, 72
test environment, 68
uninstall update, 73
update policy, 73
update VRC, 66
VRC combination, 67
where to find the PMC module, 53
PMC recipient, 255
FTP/HTTP for downloading software updates,
69
functionality, 62
install update procedure, 71
parameters, 65
setup, 63
setup procedure, 64
test environment, 68
post-requisite, 255
prereq, 209
pre-requisite, 256
printer
Multilanguage Application Data, 179
windows printer, 127, 130
windows server printer, 130
Product Maintenance and Control, 256
PVRC, 258
Question Suppression
enable, 247
Quick Flow
support, 247
RDBMS, 256
RDBMS administration
additional procedures, 119
introduction, 111
maintenance procedure, 116
procedures, 113
recommended procedure, 114
table and index repository procedure, 118
recipient
session summary, 78
Relational Database Management System, 256
reporting
Microsoft Reporting for LN, 138
Reporting, 139, 140, 142, 143, 144
query-based reports, 135
Reporting Studio, 134, 135
reports, 134, 135
report viewer, 135
session-based reporting, 134
session-based reports, 135
role, 256
Roles, 85, 93, 99
SCM, 257
scrollbar
disable, 205
Service Pack, 257
Shared Memory
configure, 197
fill, 197
SLM, 33
SOAP, 209
Software Configuration Management, 257
software environment, 42
Software environment
one-step software environment procedure,
49
standard software environment procedure,
48
solution, 257
individual solution, 54
Solution License Manager, 33
SP, 257
System administrator
overview, 29
tasks, 29, 30
System management
overview, 29
system administrator tasks, 29, 30
System recovery, 37
Templates, 101
Text management
introduction, 147
overview, 147
parameters procedure, 148
Troubleshooting
procedure, 245
update, 258

check to install, 72
check to uninstall, 72
connect to update VRC, 72
download updates, 71
install, 72
install procedure, 71
policy, 73
scan updates, 72
uninstall, 73
update VRC, 258
connect update, 72
generate update VRC structure, 66
remove, 78
upgrade program, 258
upgrade task, 258
User management
authorizations, 83, 85, 90
change the package combination for LN
users, 98
change the password for developer
authorizations, 98
create LN users, 96
create remote user accounts, 97
create roles and authorizations, 99
create templates, 101
introduction, 81
overview, 81, 111
role browser, 93
Session Authorization (DEM and AMS), 84
user password, 82
user-related procedures, 95
user types, 83
Version and release management
introduction, 39
one-step software environment procedure,
49
overview, 39
package combinations, 39
package VRCs, 40
software environment, 42
standard software environment procedure,
48
VRC derivation, 45
Version - Release - Customer, 258
view, 213
VRC, 258
VRC combination, 67, 259
VRC derivation, 45
Web UI
homepages, 191, 192, 194, 195, 195
Workbench applications
deploy, 247
install, 247
