
How to Register for Courses
1. Sign into your My.IllinoisState.edu account.
2. Sign into Central Login.
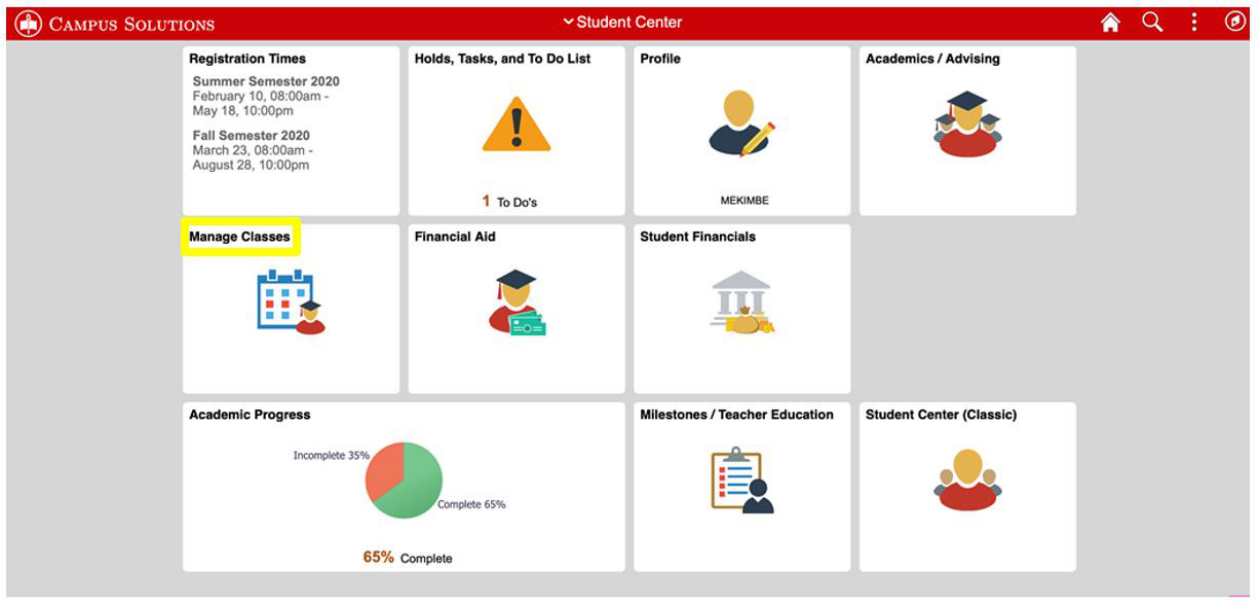
3. Select the “Manage Classes” tile.

Menu Options
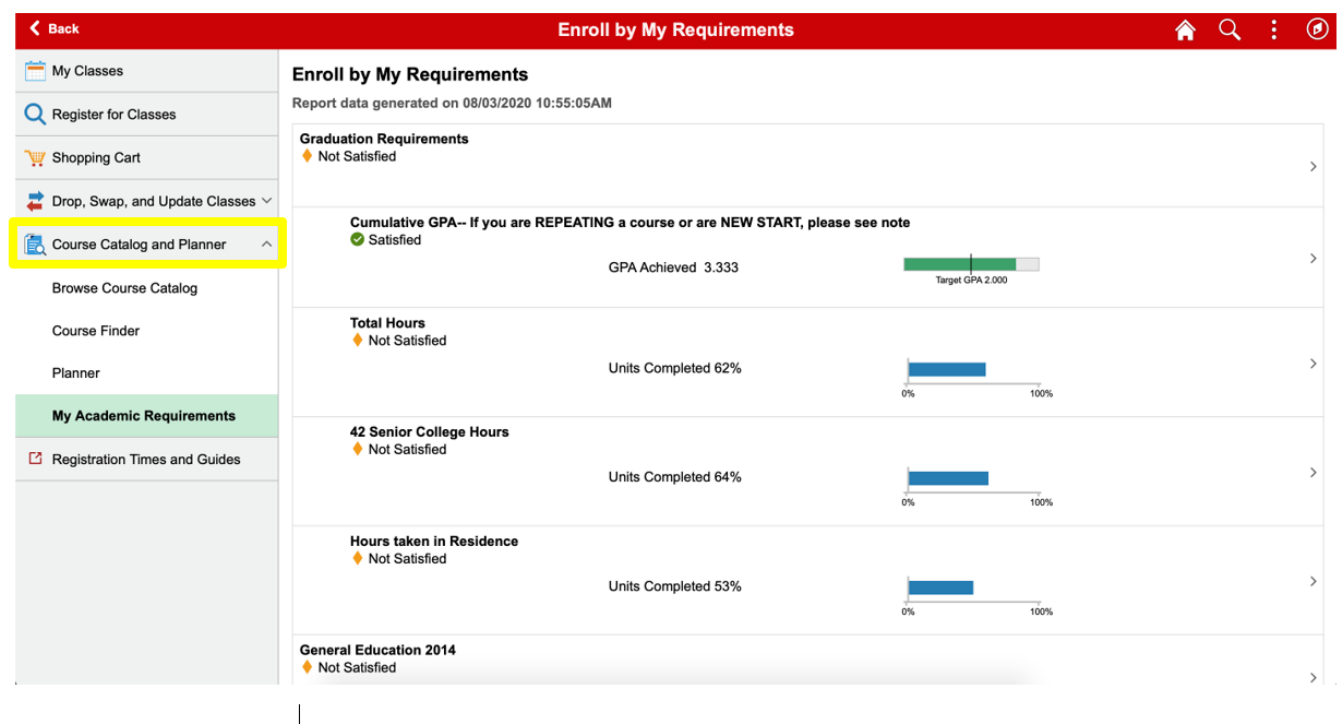
4. Select the “Course Catalog and Planner” option. You can “Browse Course Catalog”, search for courses in
“Course Finder”, and in the “Planner”, you can store courses for future use. Students can add courses to
their schedule directly from the course catalog and make edits to your Planner for future semesters.
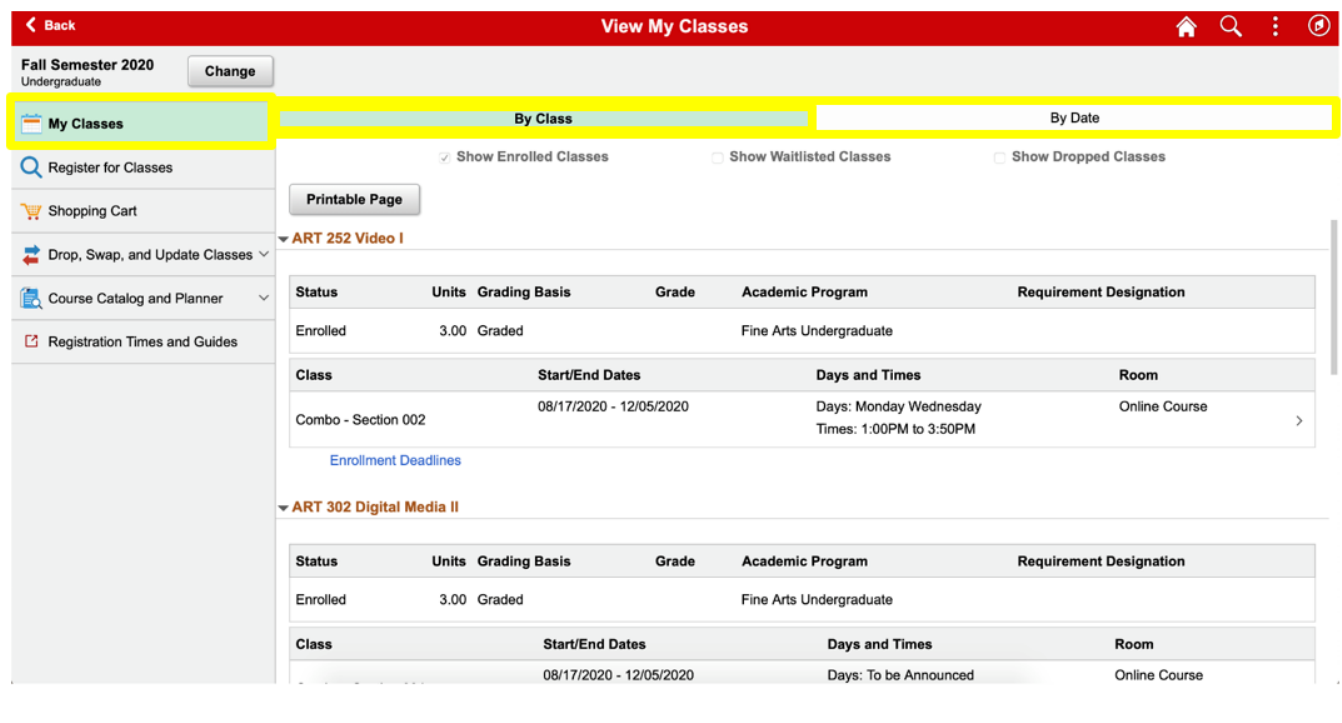
5. Select “My Classes”. This page will give you the option to view courses in alphabetical order by selecting
“By Class” or by the date/times of the courses when selecting “By Date”. By selecting the checkboxes at the
top of the page, you can review your enrolled, waitlisted, and/or dropped courses.
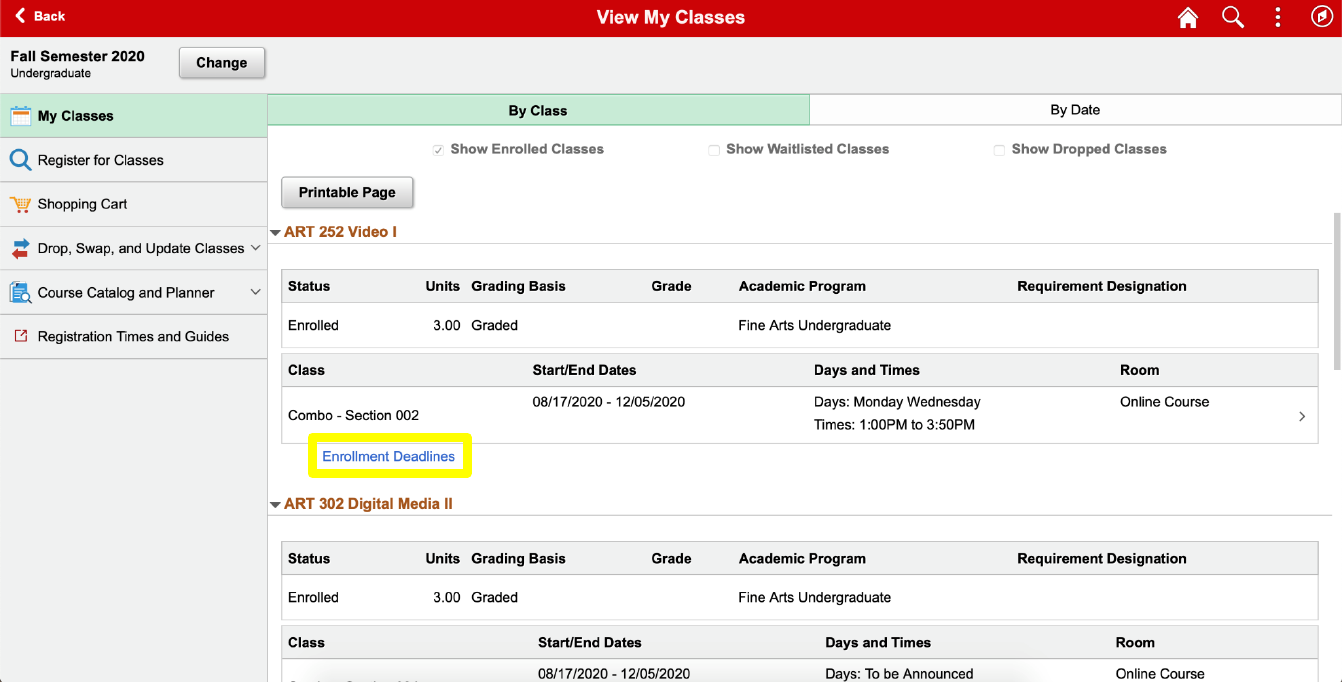
6. On the “My Classes” page, the “Enrollment Deadlines” link will show important drop deadlines for each
course. The enrollment system refers to the Enrollment Deadlines as “With or Without Penalty”, they are
also known as “WX Deadlines”.
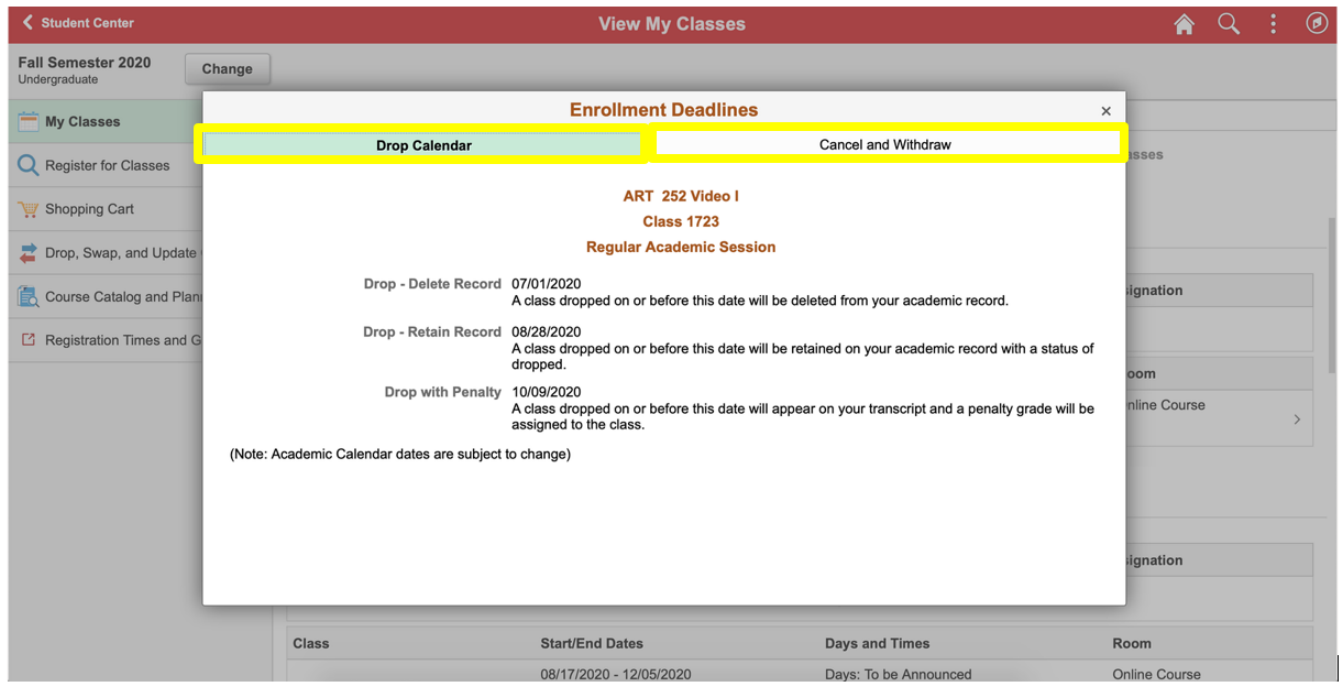
7. After selecting the “Enrollment Deadlines” link, you will have the option to view a “Drop Calendar” or
“Cancel and Withdraw”.

How to Add a Course
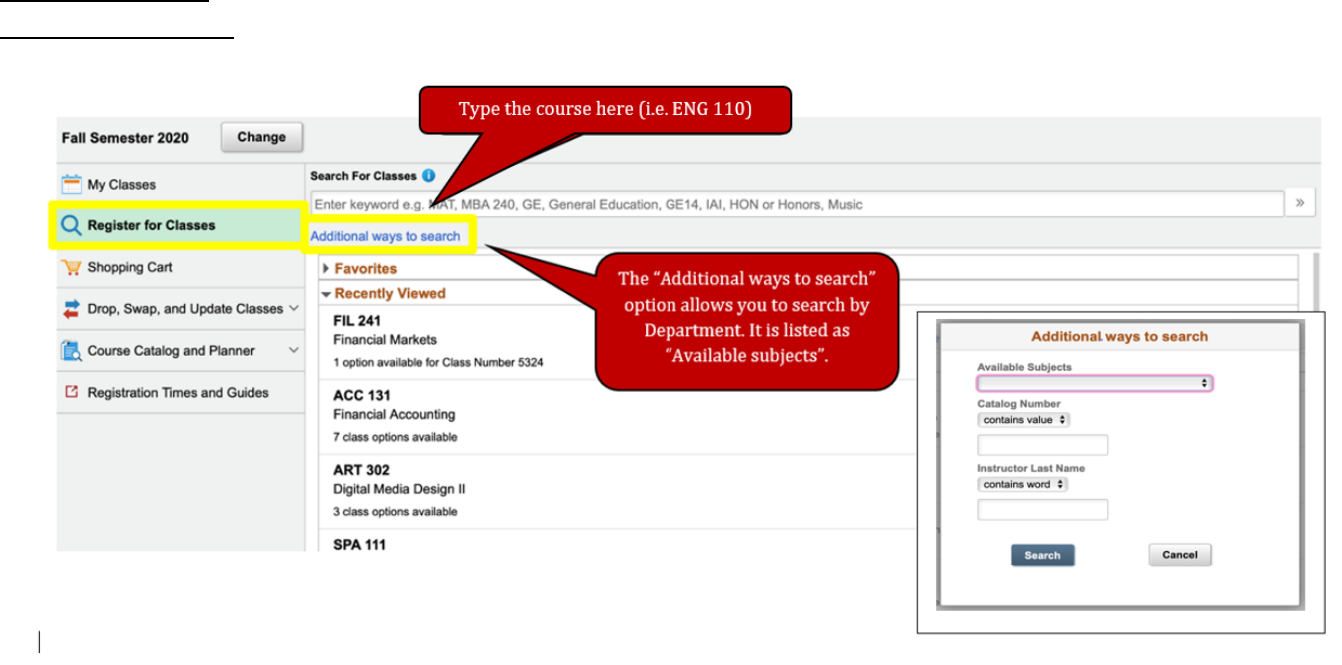
1. Select the “Register for Classes” link. You can enroll from this link or from the “Shopping Cart” link if you
already have classes held there. Then, select the term for which you’d like to enroll.
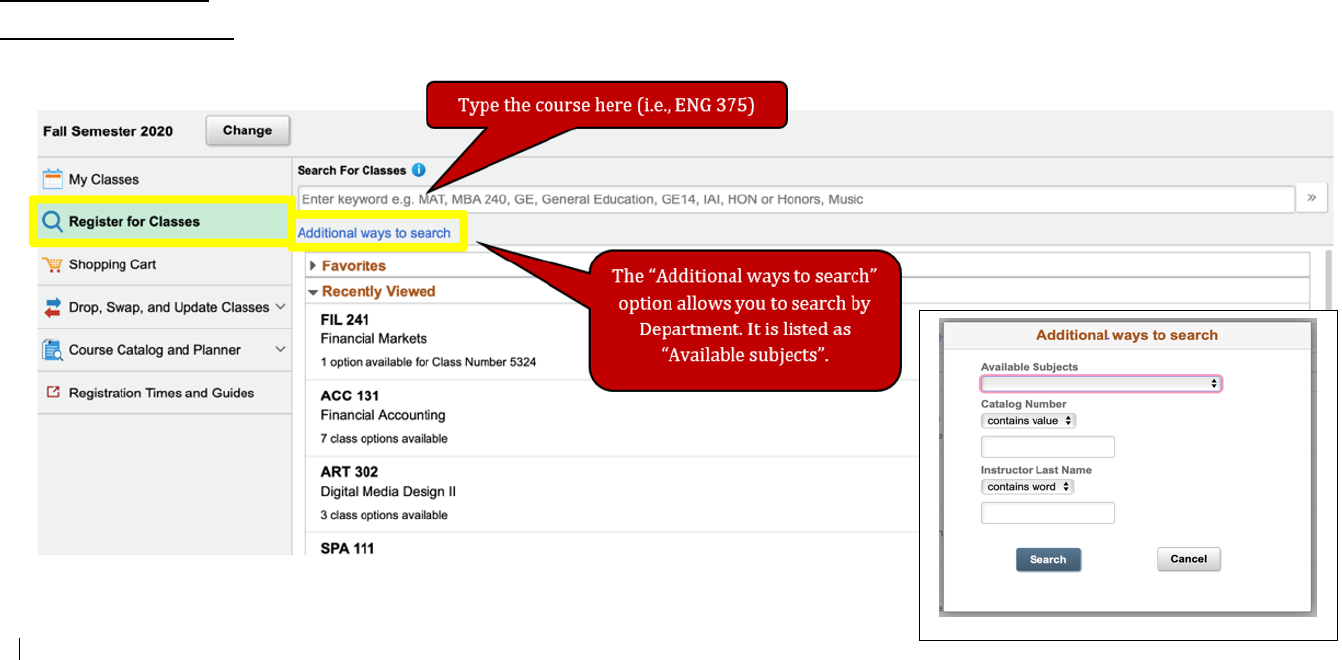
2. Search using the “Search For Classes” and the “Additional ways to search” links.
Course Number: ENG 375
Department Code: “ENG” = English
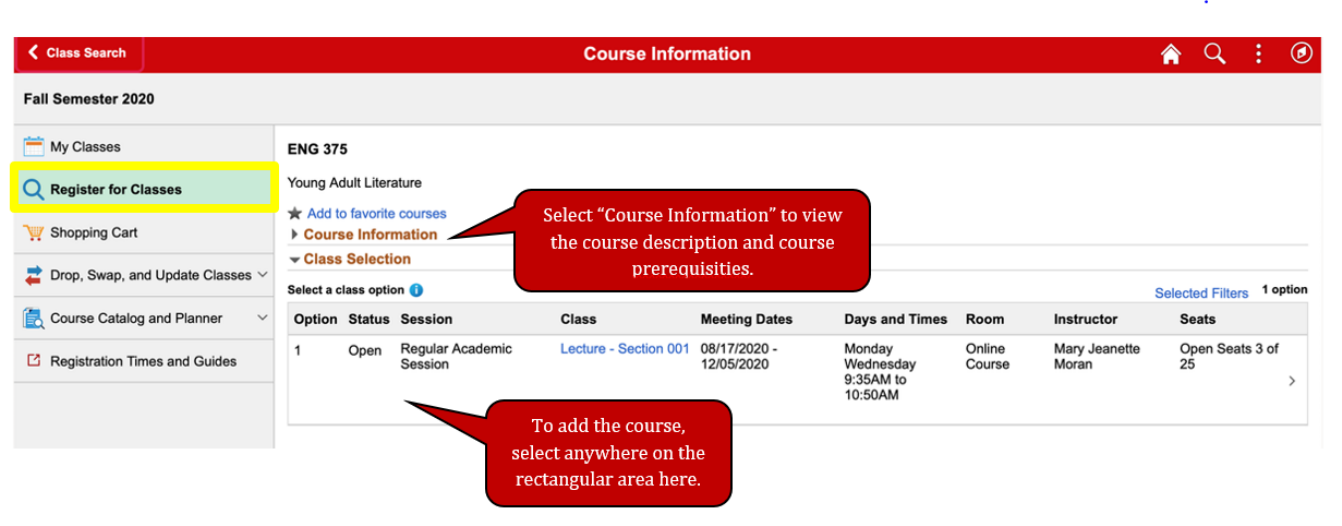
3. Select any space in the rectangular area with the course information to select the course you want to
enroll in.
List of Department Codes
ACC Accounting
AGR Agriculture
ART Art
BSC Biological Sciences
BUS Business Administration
BE Business Education
CHE Chemistry
CHI Chinese
COM Communication
CSD Communication Sciences and Disorders
CTK Creative Technologies
CJS Criminal Justice Sciences
DAN Dance
ECO Economics
EAF Educational Administration and Foundations
ENG English
ESL English for Academic Purposes
FCS Family and Consumer Sciences
FIL Finance, Insurance, and Law
FRE French
GEO Geography, Geology, and the Environment
GER German
HSC Health Sciences
HIS History
HON Honors
IT Information Technology
IDS Interdisciplinary Studies
IB International Business
ITA Italian
JPN Japanese
KNR Kinesiology and Recreation
LAN Languages, Literatures, and Cultures
LAT Latin
LAL Latin American and Latino/a Studies
LGS Legal Studies
MQM Management and Quantitative Methods
MKT Marketing
MBA Master of Business Administration
MAT Mathematics
MSC Military Sciences
MUS Music
NUR Nursing
PHI Philosophy
PHY Physics
POL Politics and Government
POR Portuguese
PSY Psychology
SWK Social Work
SOC Sociology
SPA Spanish
SED Special Education
STT Student Teaching
TCH Teaching and Learning
TEC Technology
THE Theatre
WGS Women and Gender Studies

4. Select “Review Class Selection” step and then choose “Next” in the upper right corner.
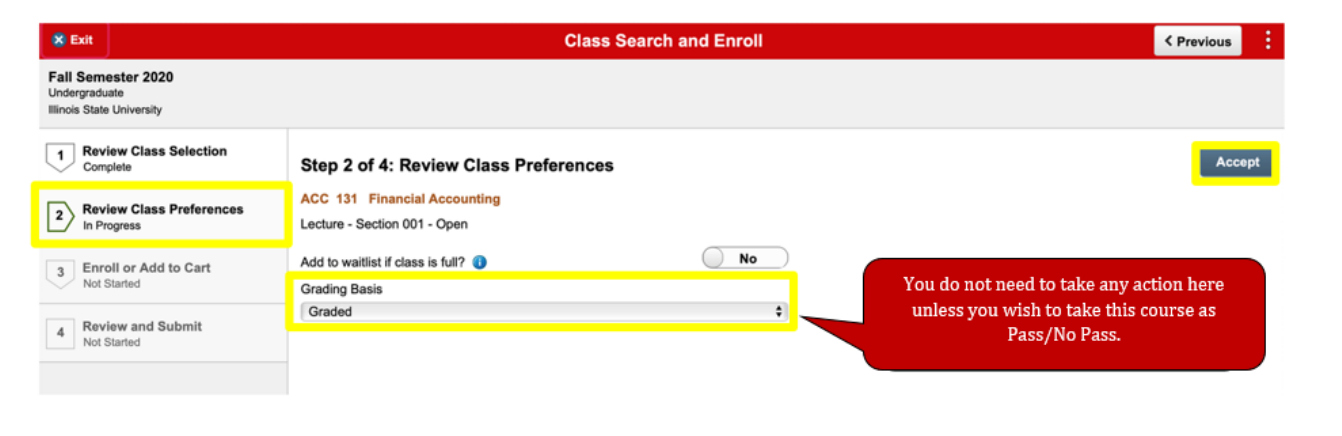
5. Select the “Review Class Preferences” step. Adjust hours enrolled or grading basis using the drop-down
menus if permitted per catalog. Then choose “Accept” in the upper right corner.
What is the difference between Graded and Passing/Not Passing (P/NP)?
An undergraduate student, (except a first-semester freshman), who is not on academic probation may choose to
register in some courses under the option that allows the student to be graded on the basis of P (Passing) or NP
(Not Passing) rather than on the basis of A, B, C, D, or F grades. Courses in a student’s major or minor, may not
be take on the P/NP option.
No Group 1 course in General Education may be taken under the P/NP option. If a General Education course is
required by a student’s declared major, that course may not be taken P/NP; it must be taken for a grade.
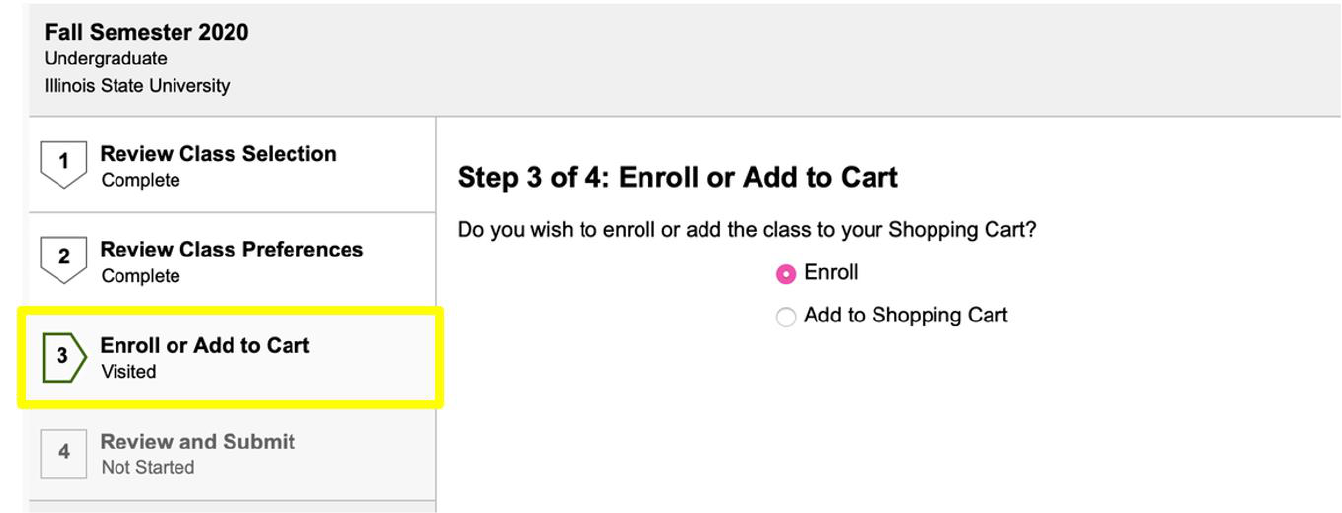
6. Review the “Enroll or Add to Cart” step. Select “Enroll” if you wish to enroll.
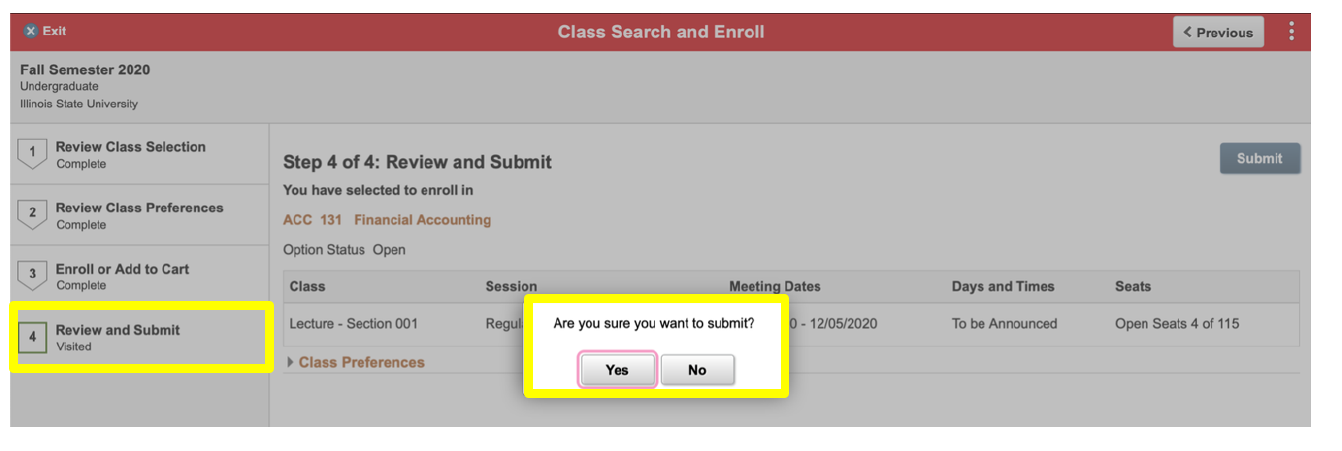
7. Select the “Review and Submit” step. When ready, select “Submit” and confirm “Yes” when prompted.
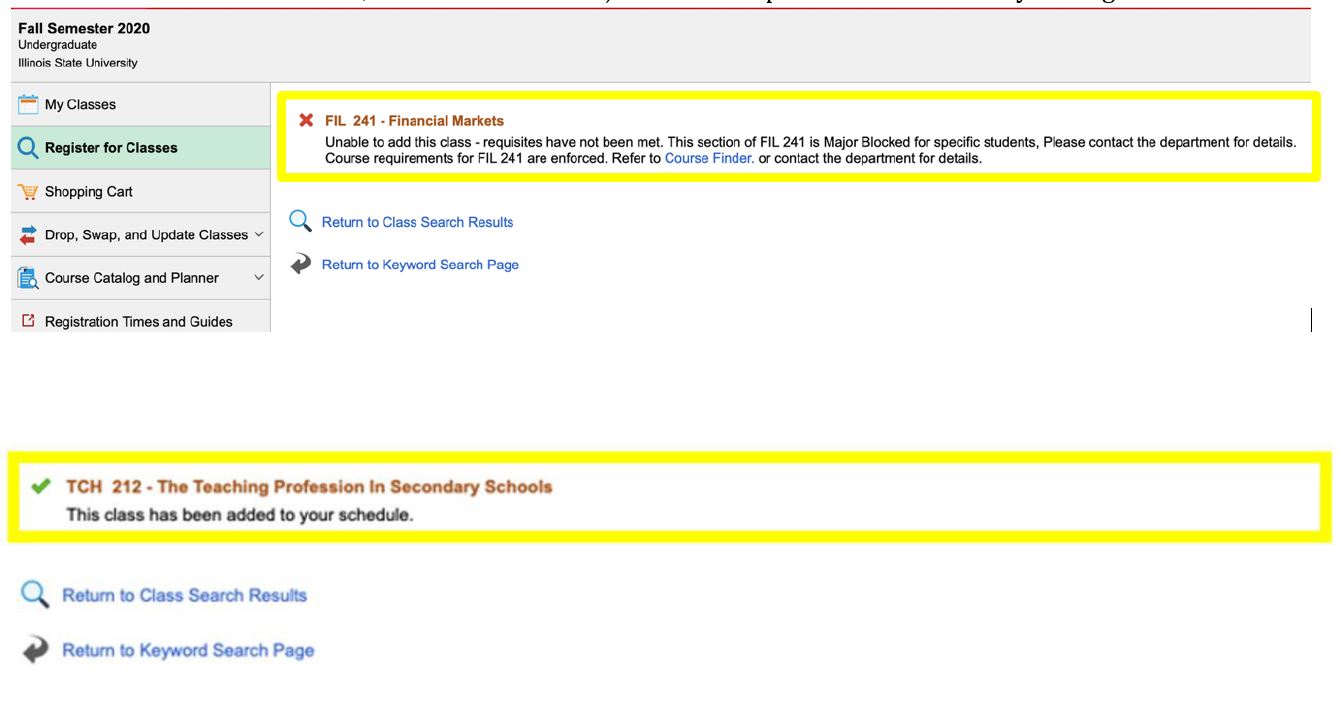
8. An Error or Confirmation screen will appear following each action: enrolling, dropping, updating, and
swapping. Error messages will state the outcome, reason, and recommended steps to resolve the error.
Error Screen- In this case, the course had a major block that prevented successfully adding the course.
Confirmation Screen- The course has been successfully added to your schedule.
How to Drop a Course
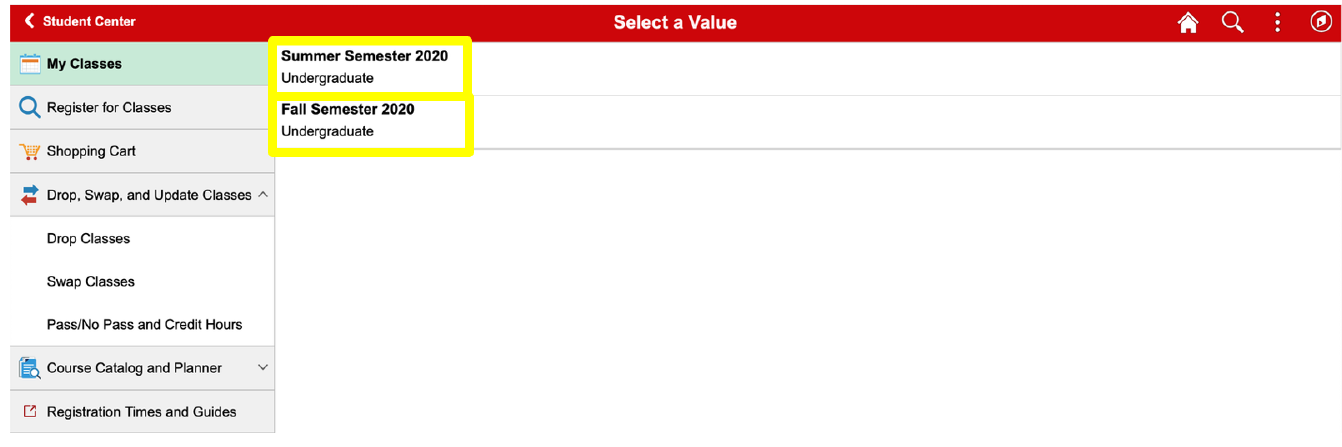
1. Select “Drop, Swap, and Update Classes” and then select the “Drop Classes” link. Then, select the term you
want to enroll in.
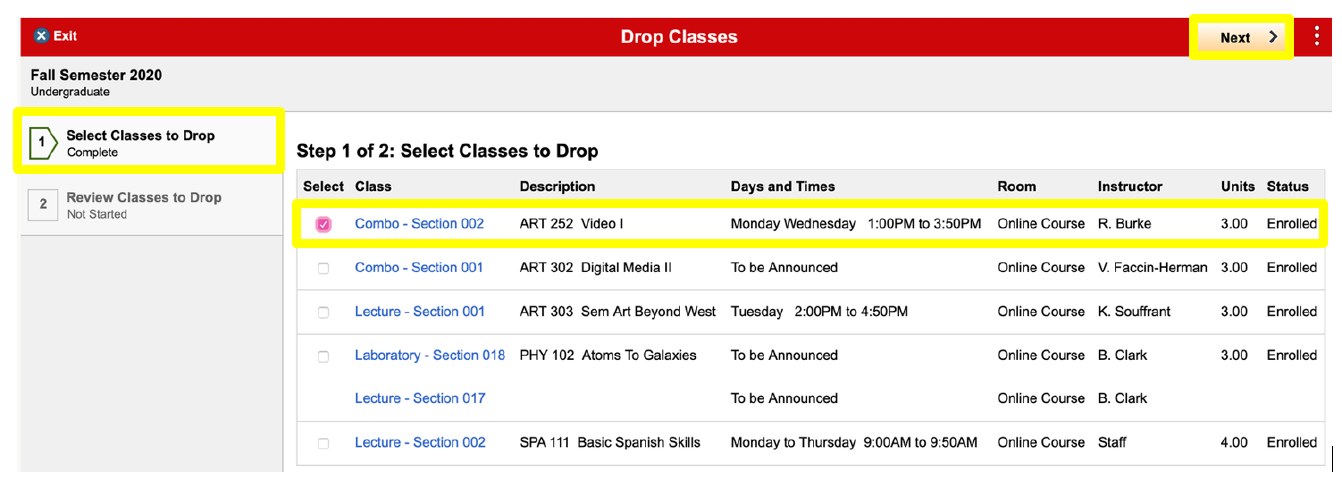
2. Select the “Select Classes to Drop” step. Select the corresponding checkbox next to the class to be dropped.
The “Next” button will appear in the upper right corner after a selection is made.

3. On the “Review Classes to Drop” step, ensure you have selected the appropriate course/s you want to
drop. Select “Drop Classes” in the upper right corner.
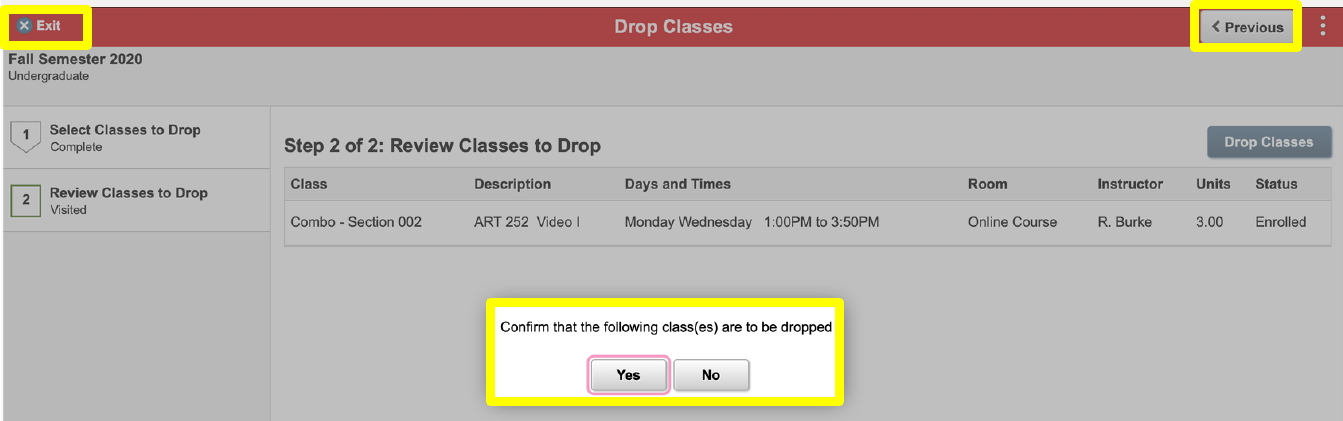
4. Review and select “Yes” to confirm dropping the course/s.
How to Swap Classes
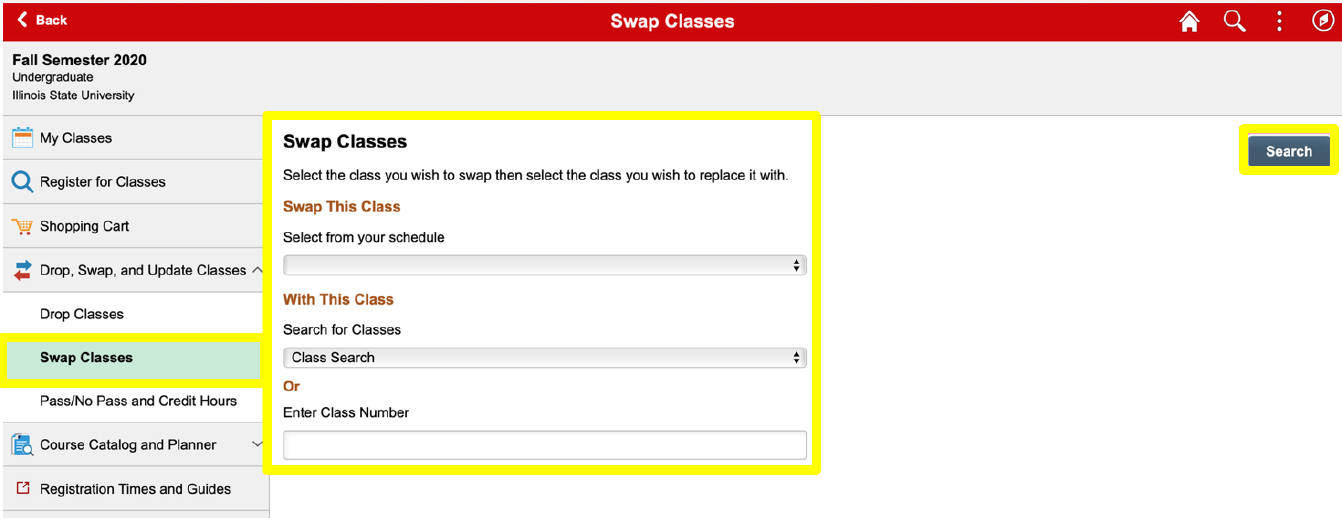
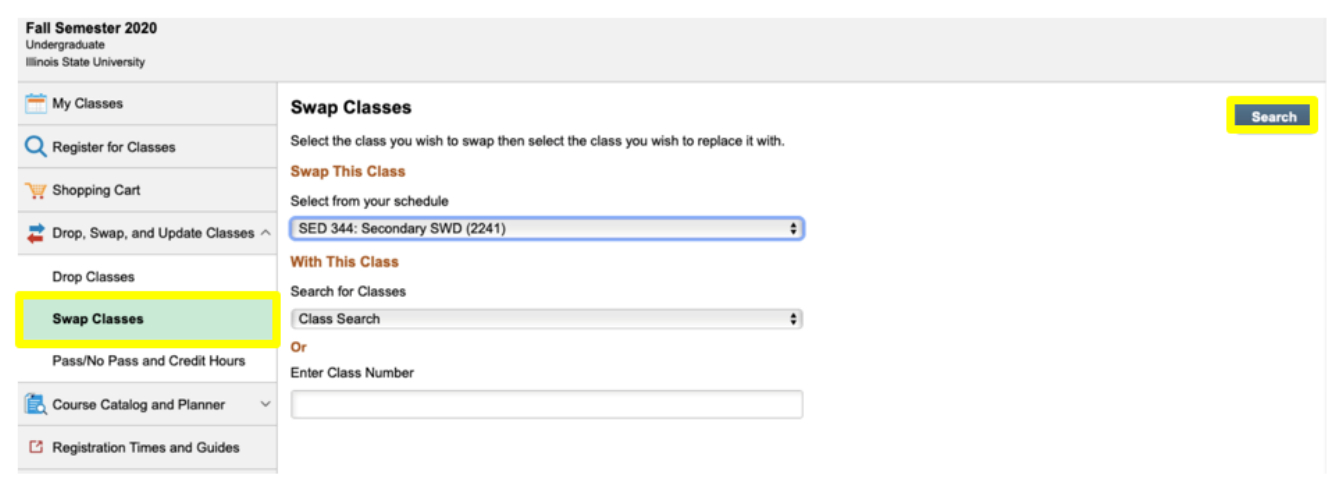
1. Select “Drop, Swap, and Update Classes” and then select the “Swap Classes” link. Use this process to swap
from one enrolled course to another.
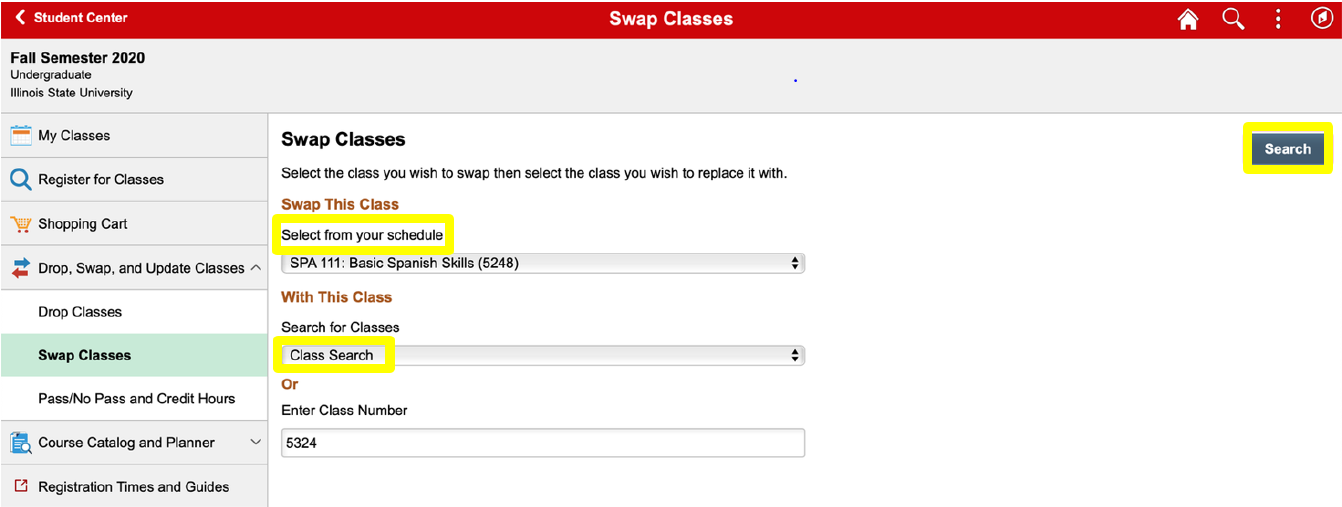
2. Choose the “Select from your schedule” box and the class that you would like to swap.
3. Choose a class to replace the course by selecting “Class Search”.
4. Select the “Search” button in the upper right corner.
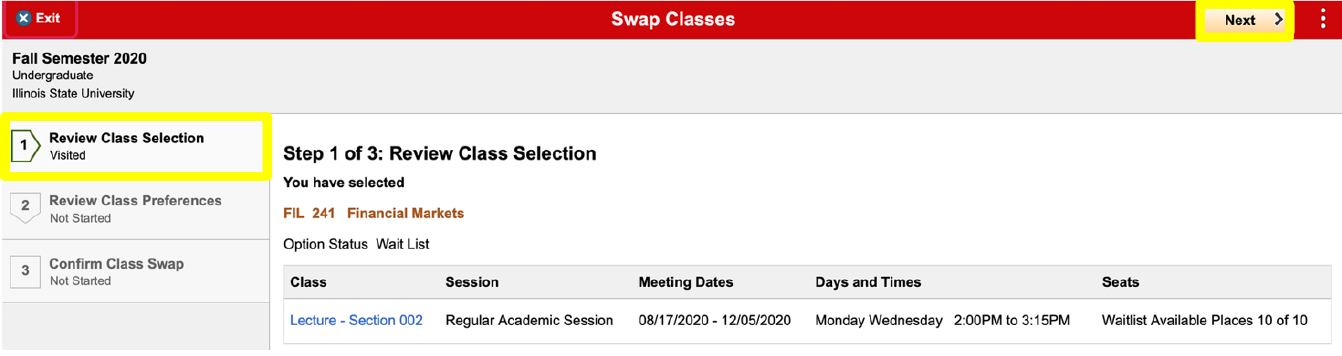
5. Review the “Review Class Selection” step. When ready, select “Next”.
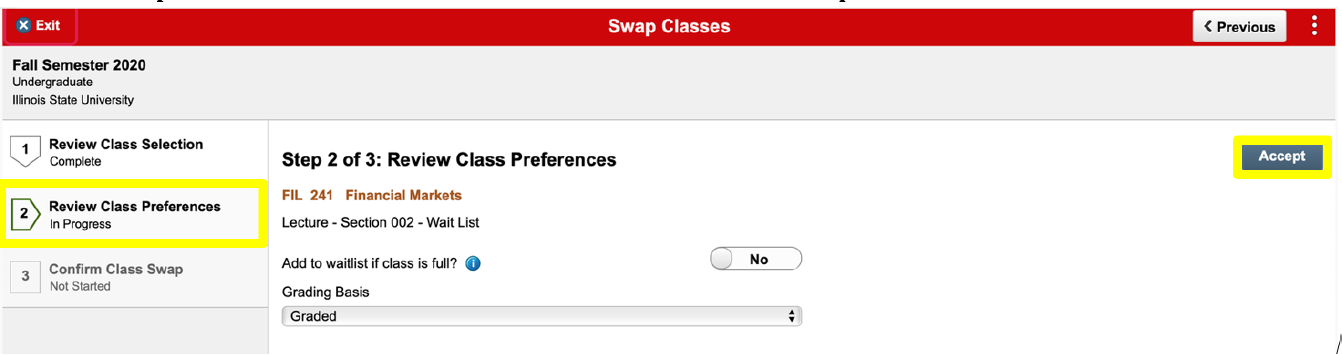
6. Review the “Review Class Preferences” step. Adjust hours enrolled or grading basis using the drop-down
menus if permitted per catalog. Then choose “Accept” in the upper right corner.
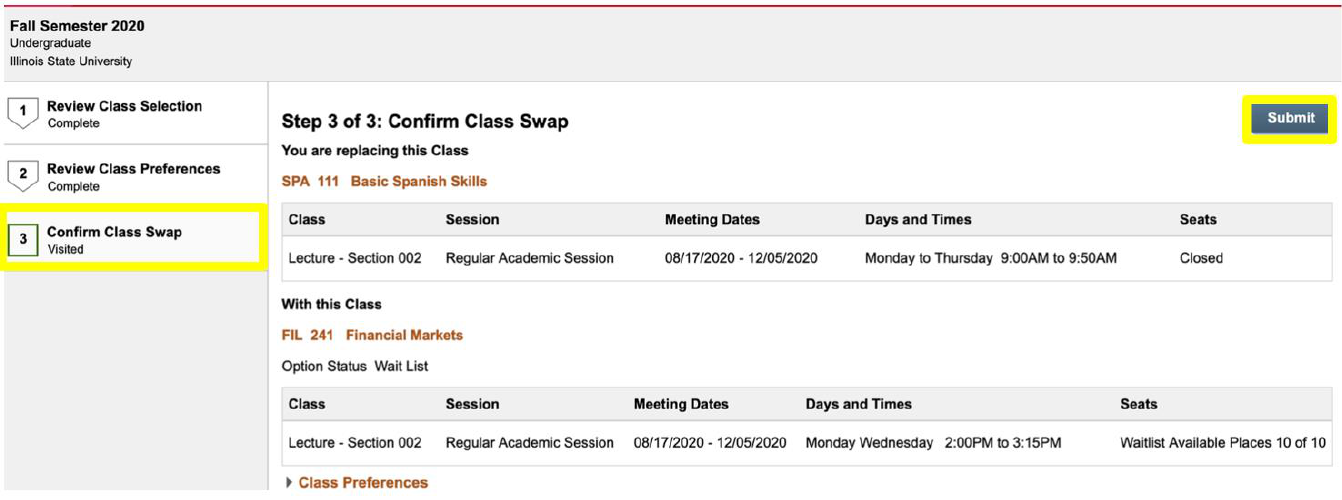
7. Review the “Confirm Class Swap” step and then select “Submit”.
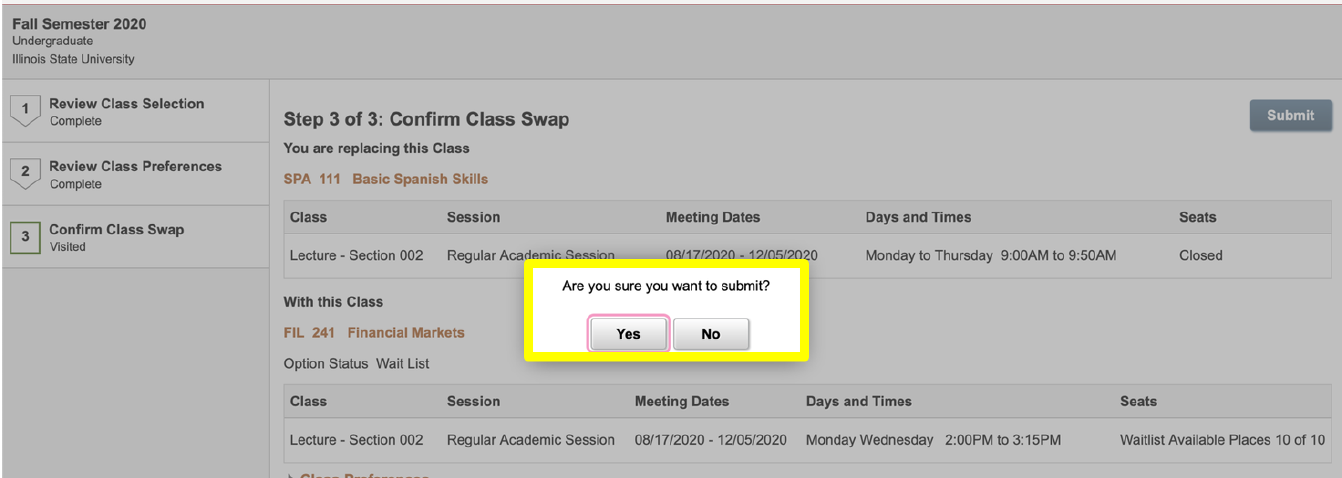
8. When prompted “Are you sure you want to submit?”, submit “Yes” or “No”.

9. An Error or Confirmation screen will appear following each action: enrolling, dropping, updating, and
swapping. Errors messages will state the outcome, reason, and recommended steps to resolve the error.
Confirmation Screen- The swap has been confirmed.
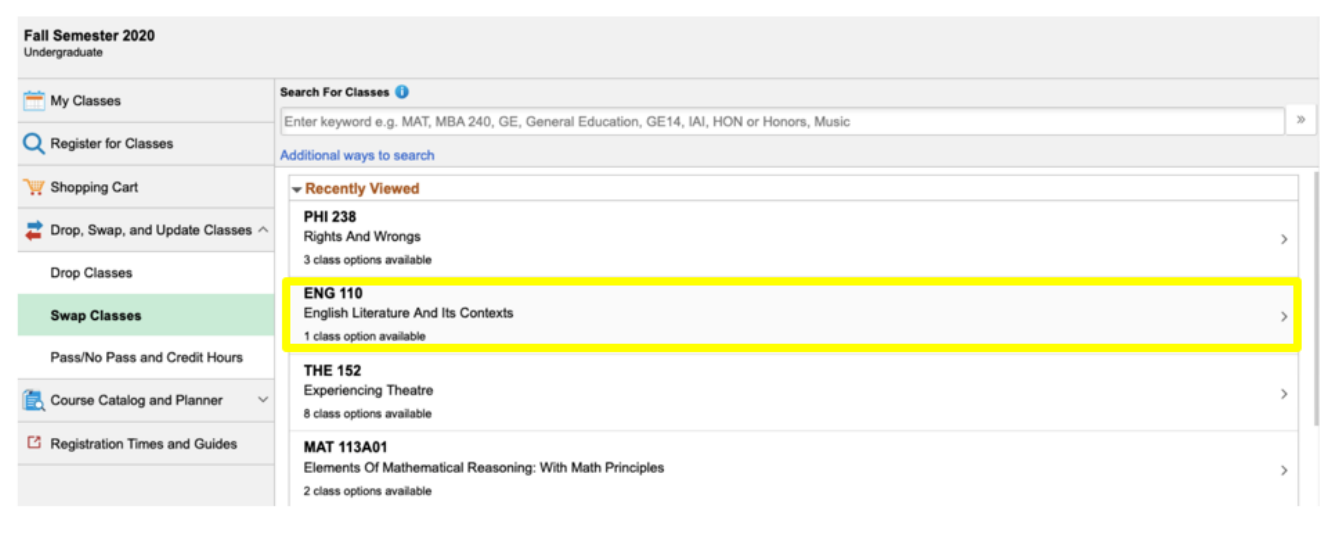
How to Add a Wait Listed course
1. Select the “Register for Classes” link. Search using the “Search For Classes” and the “Additional ways to
search” links.
Course Number: ENG 110
Department Code: “ENG” = English
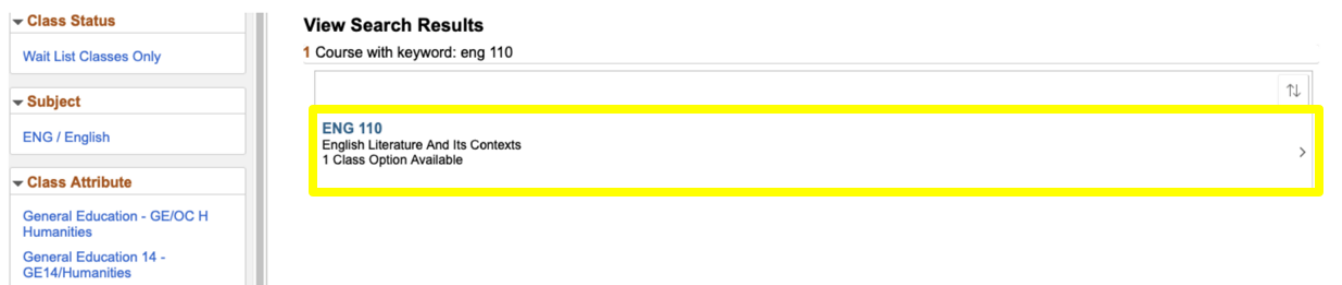
2. View your search results and select the course you would like Wait Listed.
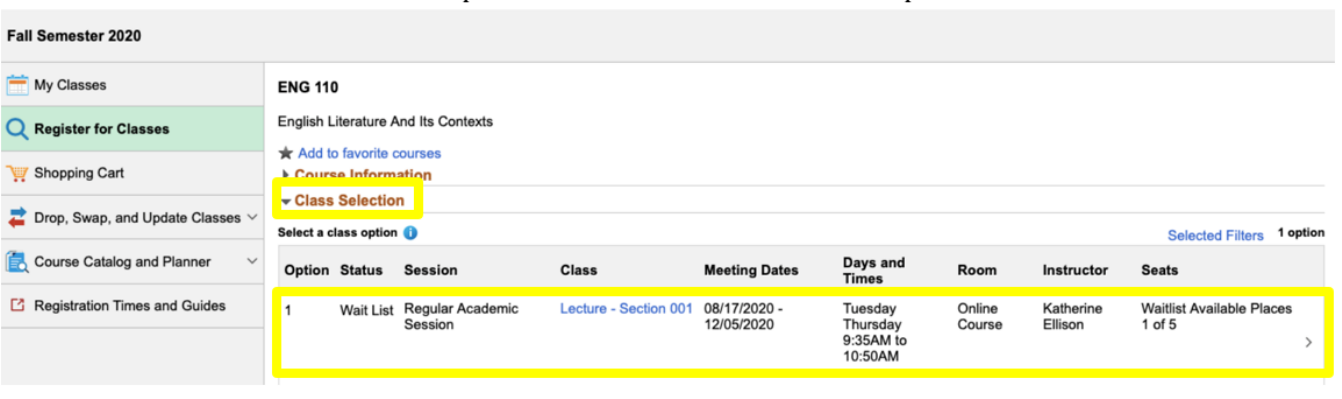
3. The selected course will then show up. You can select “Class Selection” option to see course details.
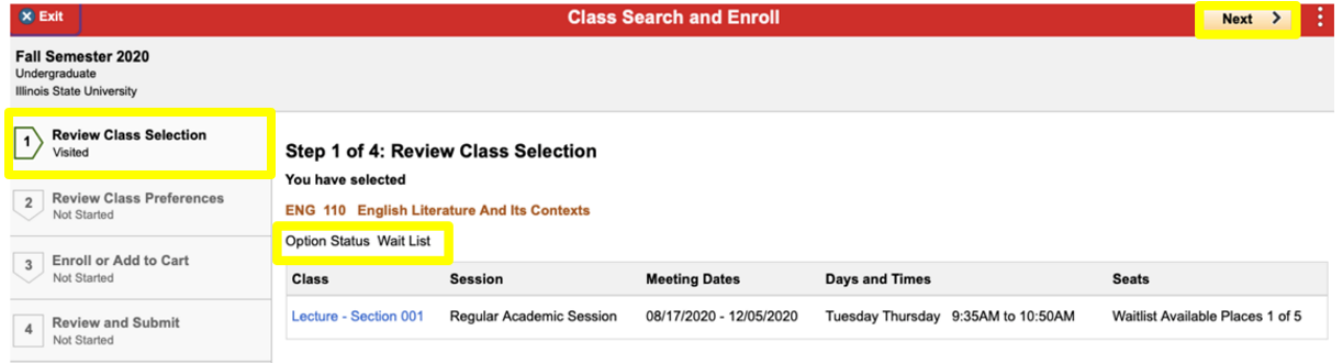
4. Review the “Review Class Selection” step. Confirm that the option status says “Wait List”. Then select
“Next”.
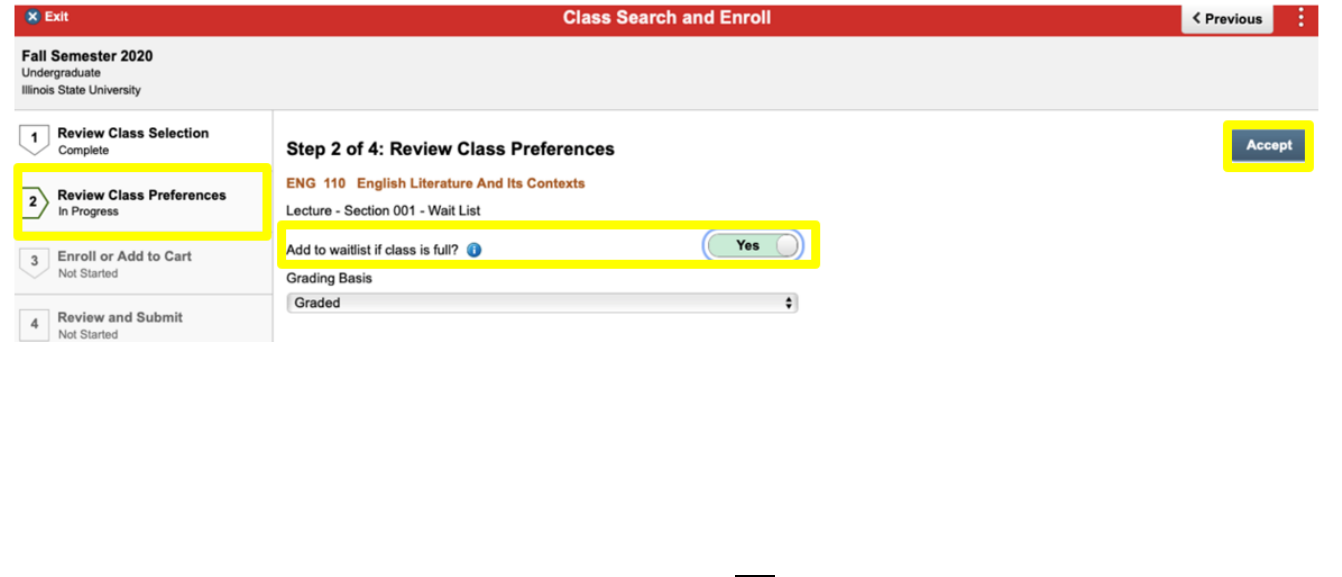
5. Review the “Review Class Preferences” step. The page asks “Add to waitlist if class is full?” Change the toggle
button from “No” to “Yes”. Then select “Accept”.
What is the difference between Graded and Passing/Not Passing (P/NP)?
An undergraduate student, (except a first-semester freshman), who is not on academic probation may choose to
register in some courses under the option that allows the student to be graded on the basis of P (Passing) or NP
(Not Passing) rather than on the basis of A, B, C, D, or F grades.
Courses in a student’s major or minor, may not be taken on the P/NP option.
No Group 1 course in General Education may be taken under the P/NP option. If a General Education course is
required by a student’s declared major, that course may not be taken P/NP; it must be taken for a grade.
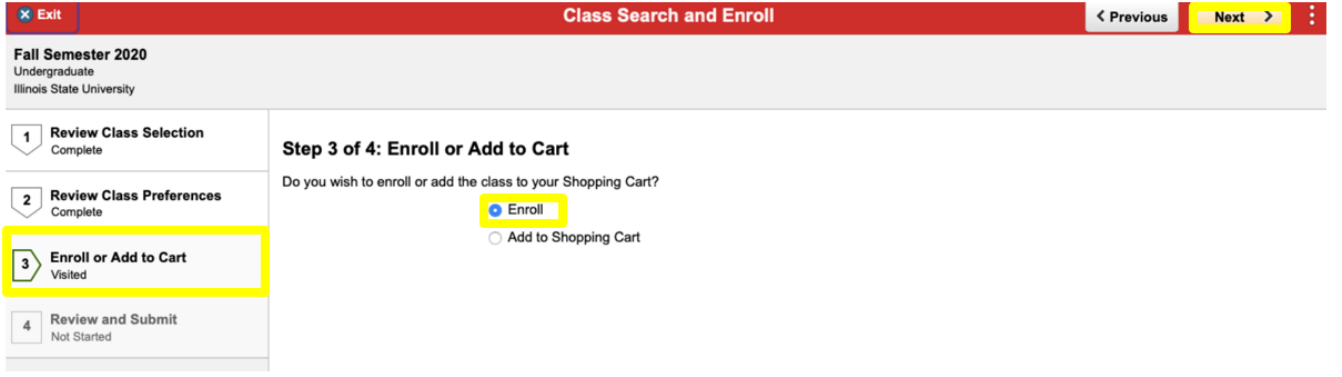
6. Select the “Enroll or Add to Cart” step. Select “Enroll” and then select “Next”. If you choose “Add to
Shopping Cart”, the course will be saved for later enrollment. Later enrollment is not guaranteed and is
dependent on course availability.

7. On the “Review and Submit” step, click “Submit” on the upper right side. Then confirm when prompted
with a pop-up message.

8. An Error or Confirmation screen will appear following each action: enrolling, dropping, updating, and
swapping. Errors messages will state the outcome, reason, and recommended steps to resolve the error.
Confirmation Screen- The Wait Listed course has been successfully added to your schedule.
How to Swap a Wait Listed Course
You will not be removed from the course you are enrolled in unless the Wait Listed course opens.
1. Under “Swap Classes” select the course you are already enrolled in from the “Select from your schedule”
drop-down menu.
2. Under “With This Class” select “Class Search” from the “Search for Classes” drop-down menu.
3. Select the “Search” tab to search for a wait listed course.
4. Select the course you would like to have wait listed.
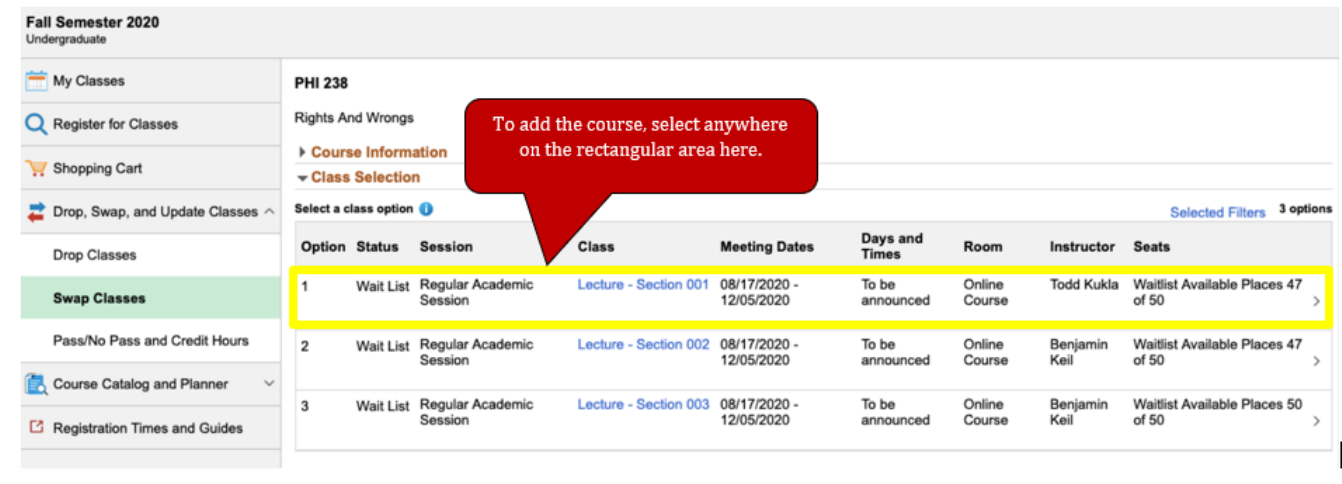
5. To add the wait listed course, select anywhere on the rectangular area where the course information is
shown.
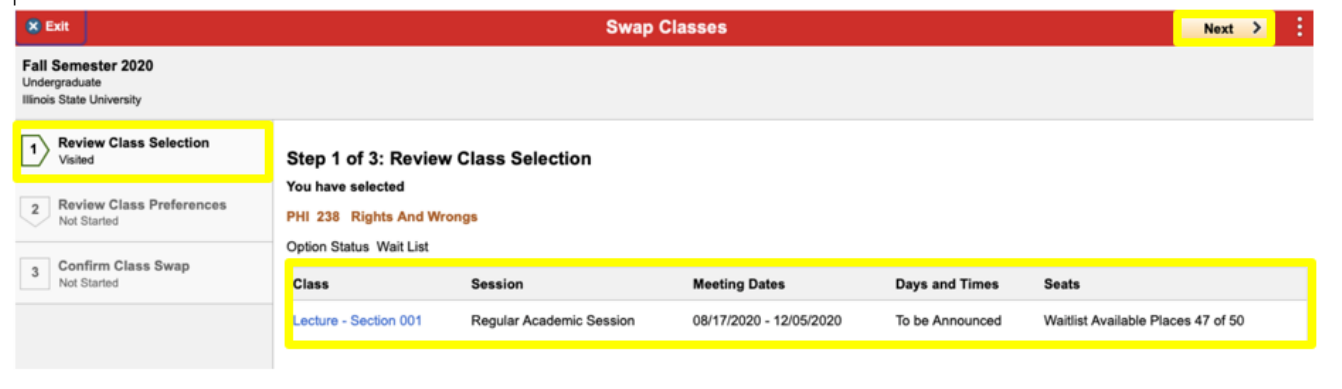
6. Review and select “Next”.
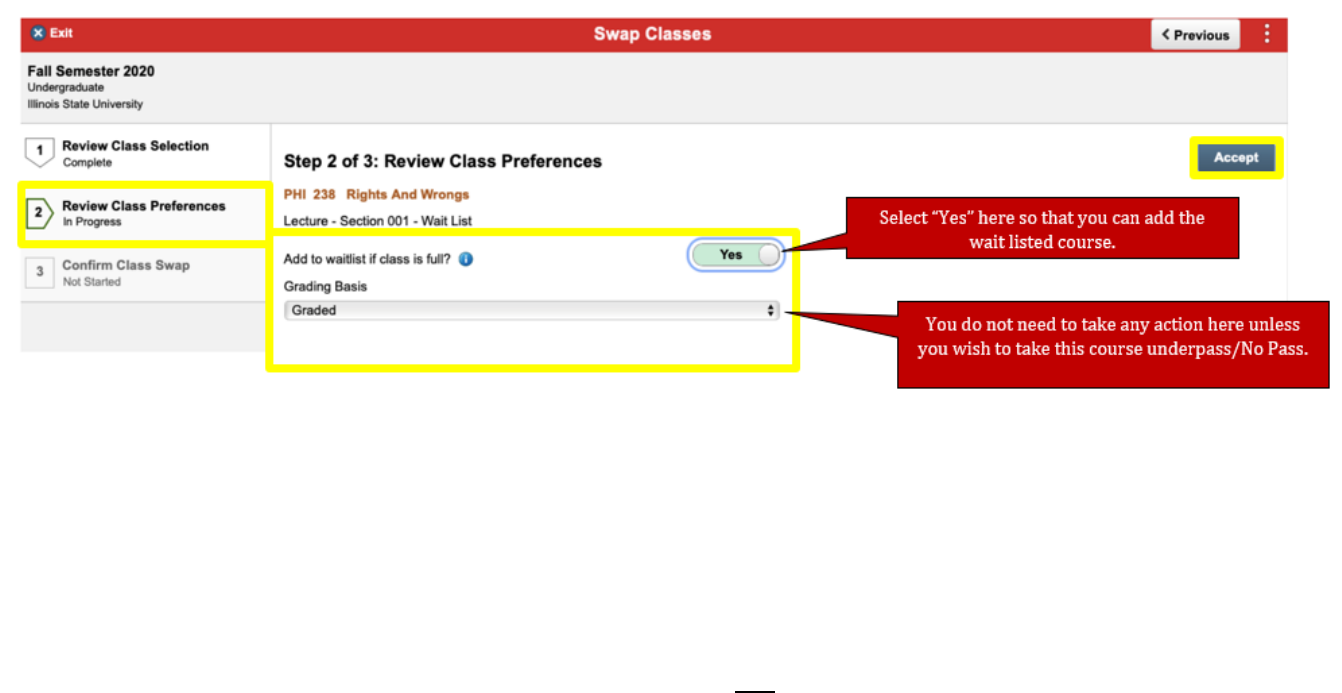
7. Select “Review Class Preferences”. The page asks “Add to waitlist if class is full?” Change the toggle button
from “No” to “Yes”. Adjust the grading basis using the drop down menu if permitted per catalog. Click
“Accept”.
What is the difference between Graded and Passing/Not Passing (P/NP)?
An undergraduate student, (except a first-semester freshman), who is not on academic probation may choose to
register in some courses under the option that allows the student to be graded on the basis of P (Passing) or NP
(Not Passing) rather than on the basis of A, B, C, D, or F grades.
Courses in a student’s major or minor, may not be taken on the P/NP option.
No Group 1 course in General Education may be taken under the P/NP option. If a General Education course is
required by a student’s declared major, that course may not be taken P/NP; it must be taken for a grade.
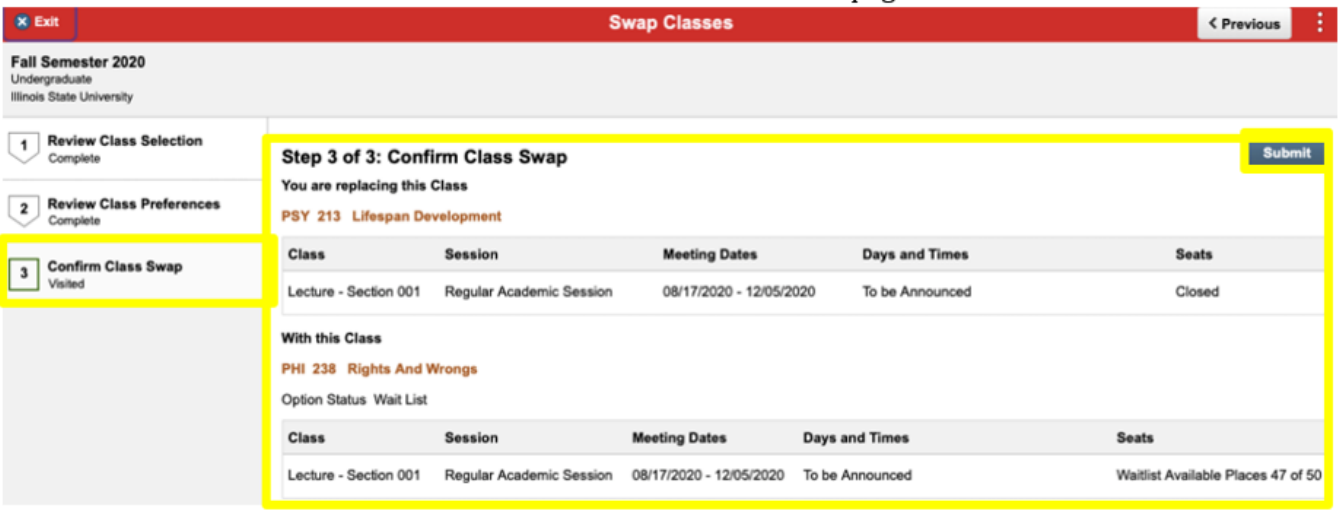
8. Review the “Confirm Class Swap” page and select “Submit”.
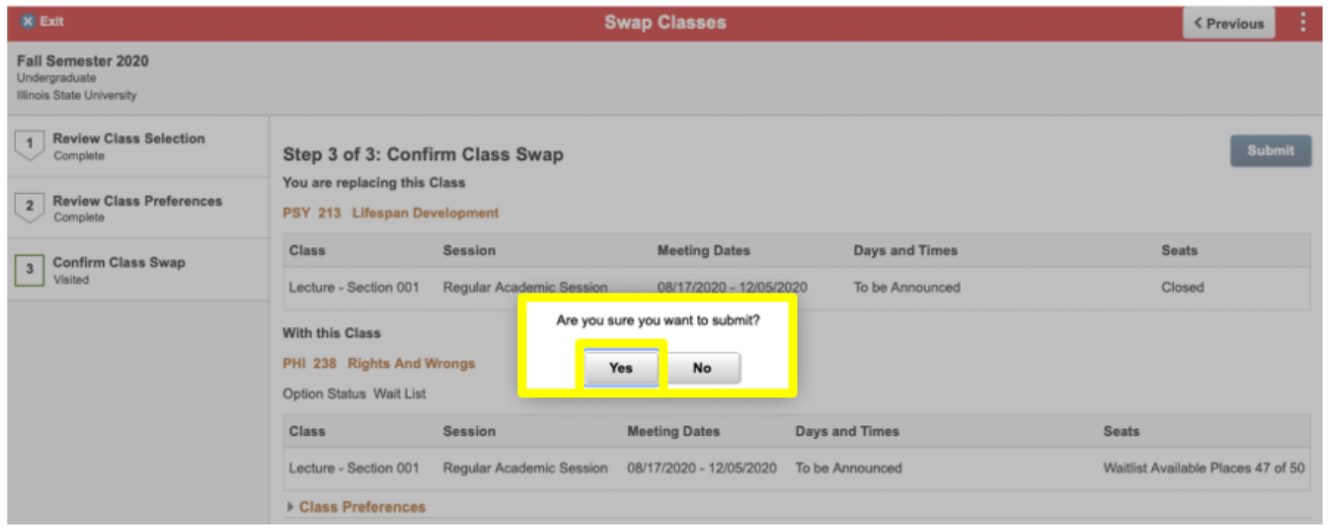
9. Select “Yes” on the pop-up message stating “Are you sure you want to submit?”
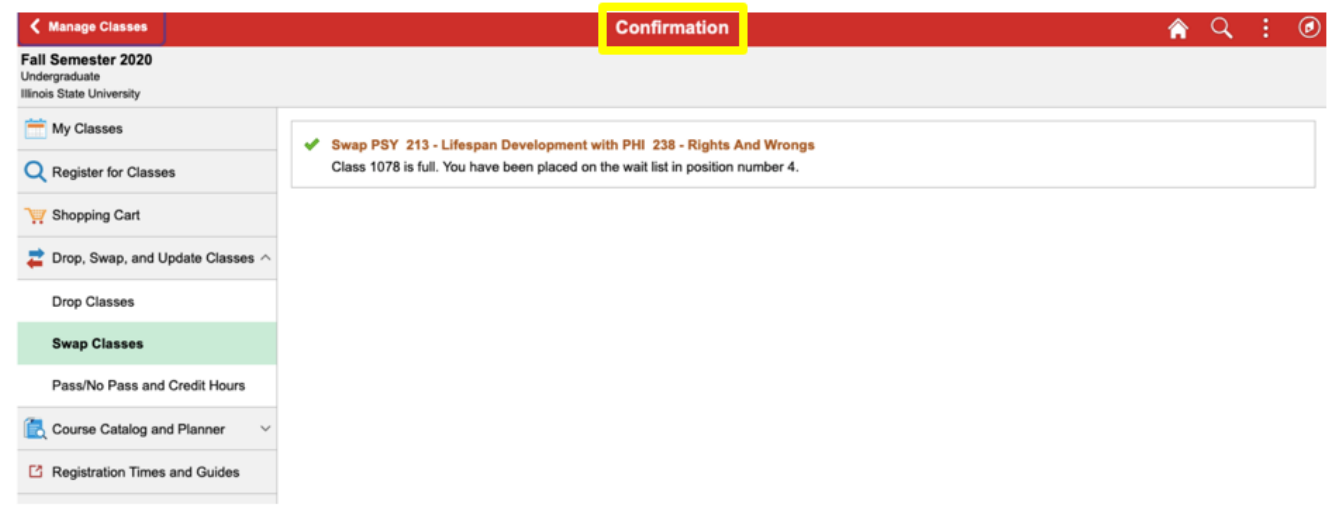
10. Confirmation or Error Screen: If confirmed, you will get a confirmation message with a green check
mark. If you get an error message, you will need to review the error message and follow the
recommended steps to resolve the error.
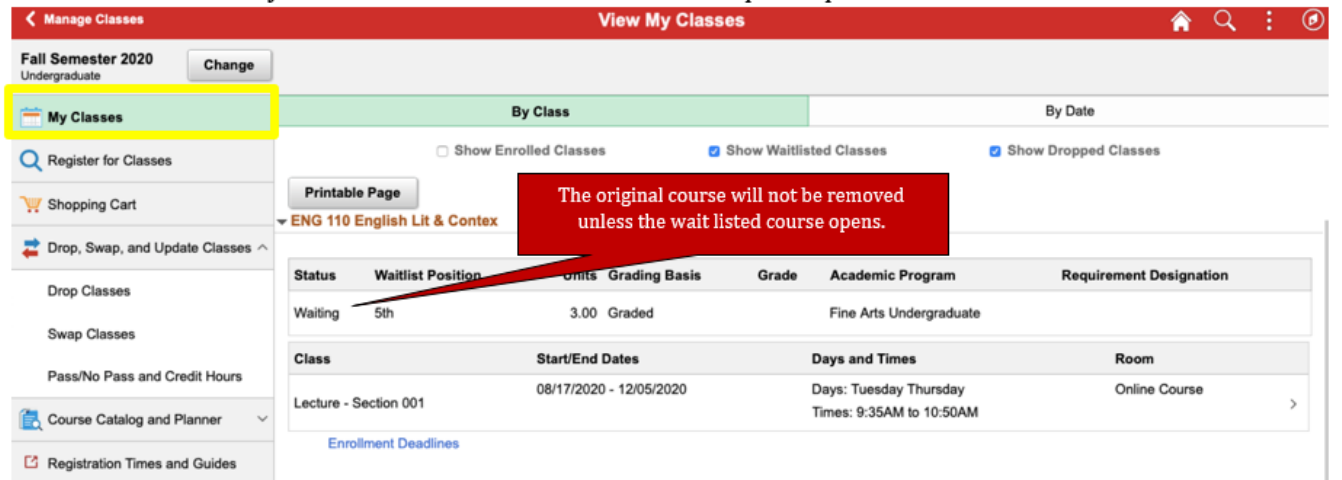
11. Verify the Swap: To verify the swap, click on “My Classes”. The original course will remain on your
schedule and will only be removed if the wait listed course opens up.

To Check if a Course is Major Blocked
1. On the “Register for Classes” link, select the “Lecture # – Section #” hyperlink.
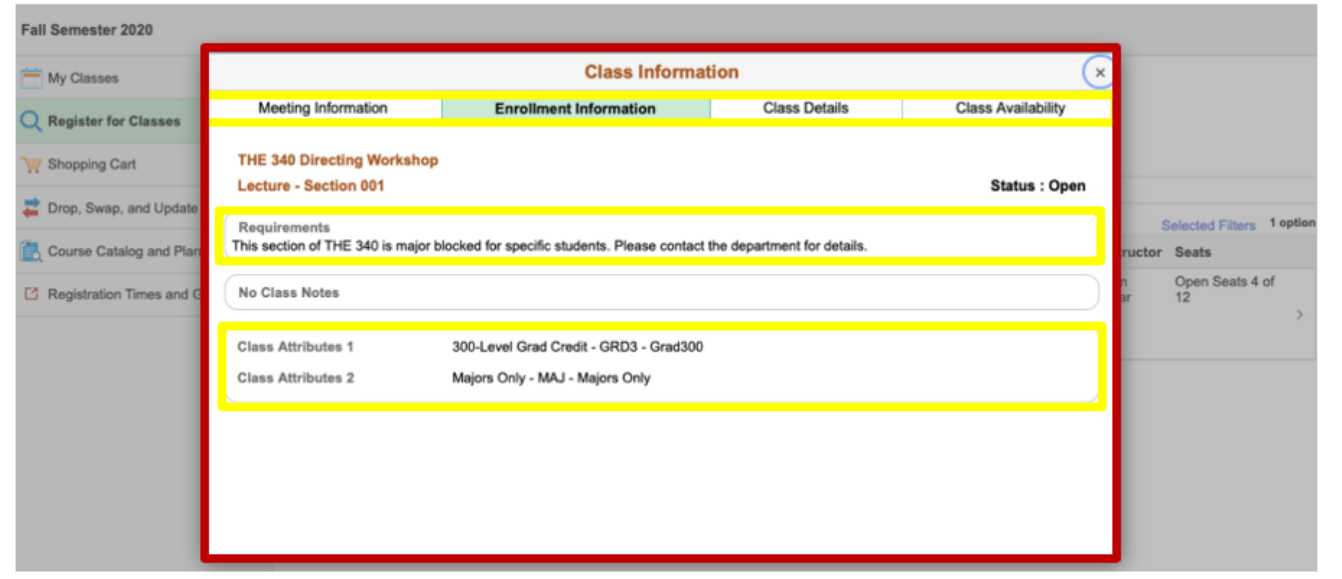
2. A pop-up box will populate. This will list additional class information such as, Class Details, Meeting
Information, Enrollment Information, and Class Availability.
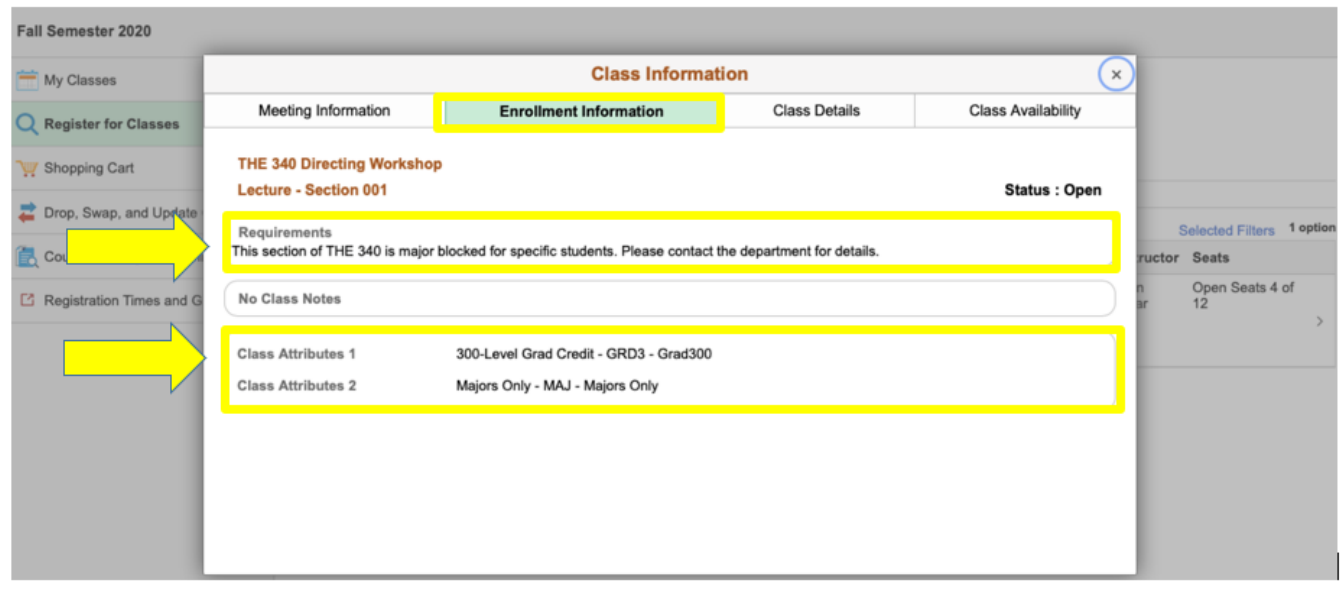
3. The “Enrollment Information” tab will show details regarding if a course is reserved for “Majors Only”.
