
HP Enterprise, HP Managed - HP Universal
Scan Solution User Guide
SUMMARY
Learn how to install, set up, and use the HP Scan application (app).
Copyright and License
© Copyright 2023 HP Development
Company, L.P.
Reproduction, adaptation, or translation
without prior written permission is
prohibited, except as allowed under the
copyright laws.
The information contained herein is subject
to change without notice.
The only warranties for HP products and
services are set forth in the express
warranty statements accompanying such
products and services. Nothing herein
should be construed as constituting an
additional warranty. HP shall not be liable
for technical or editorial errors or omissions
contained herein.
Edition 3.0, 05/2023
Trademark Credits
Microsoft®, Windows®, and Windows Server®
are U.S. registered trademarks of Microsoft
Corporation.

Table of contents
1 Introduction............................................................................................................................................................................................................................................... 1
Requirements ................................................................................................................................................................................................................................... 1
Supported file types................................................................................................................................................................................................................... 2
Supported devices ...................................................................................................................................................................................................................... 2
2 Install or Uninstall the HP Scan app....................................................................................................................................................................................... 3
Install the HP Scan app............................................................................................................................................................................................................. 3
Download the driver ........................................................................................................................................................................................................ 3
Install the software using the Install Wizard .................................................................................................................................................. 4
Launch the Set up wizard.................................................................................................................................................................................. 5
Connect using a USB cable ............................................................................................................................................................................6
Connect using a wired network ...................................................................................................................................................................8
Connect wirelessly............................................................................................................................................................................................... 11
Install the plug-ins for the basic web pack.................................................................................................................................................... 13
Install the basic driver using a command prompt...................................................................................................................................13
Add a printer or scanner to the app..............................................................................................................................................................................15
Remove a device from the app..........................................................................................................................................................................................17
Uninstall the HP Scan app ....................................................................................................................................................................................................19
Uninstall the HP Scan app using One Click..............................................................................................................................................................19
3 HP Scan App overview.................................................................................................................................................................................................................. 21
HP Scanner Assistant tabs ................................................................................................................................................................................................. 21
Overview of the scan home screen ............................................................................................................................................................................. 23
Overview of Scan Shortcuts ............................................................................................................................................................................................. 26
Desktop Shortcut of HP Scan shortcuts..................................................................................................................................................................29
Overview of the scan preview window.......................................................................................................................................................................30
Overview of the editing tools ............................................................................................................................................................................................34
Overview of the Detailed Adjustments settings................................................................................................................................................. 35
4 Use the HP Scan app ....................................................................................................................................................................................................................38
Open the HP Scan app...........................................................................................................................................................................................................38
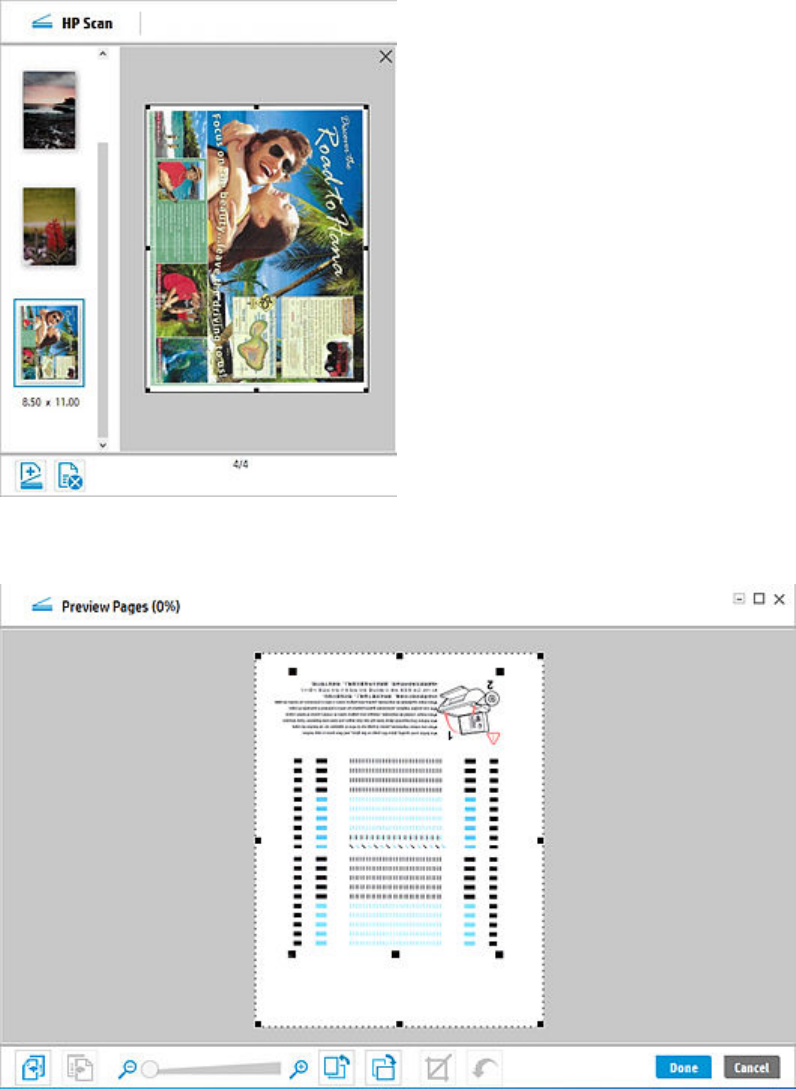
Scan a document or photo and use scan preview to edit pages...........................................................................................................39
Scan to .jpg or .pdf format and save to local destination............................................................................................................................. 42
Scan as .jpg or .pdf format and email to local destination..........................................................................................................................44
Scan documents into editable text...............................................................................................................................................................................46
Store a scan job using the Job Reservation feature .......................................................................................................................................48
Save scanned documents with an auto-generated file name .................................................................................................................50
iii
Use the Auto Classification feature for scanned documents.................................................................................................................. 52
Count scan jobs using the Batch Counter feature ........................................................................................................................................... 54
Enable multi-page scanning ..............................................................................................................................................................................................56
Reduce vertical lines or streaks on scanned images.....................................................................................................................................58
Correct folds, curves, or warping in scanned book pages..........................................................................................................................60
Find features available in the HP Scan app............................................................................................................................................................62
5 Use the scan preview window to edit scanned pages..........................................................................................................................................65
View scanned pages in a thumbnail grid in the scan preview window...............................................................................................65
View scanned pages in a document list in the scan preview window.................................................................................................66
View a scanned page using zoom mode in the scan preview window ...............................................................................................68
Use the scan preview window to crop pages..........................................................................................................................................................71
Use the scan preview window to delete or remove pages...........................................................................................................................74
Use the scan preview window to add pages or images .................................................................................................................................75
Use the scan preview window to change page order ......................................................................................................................................76
Use the scan preview window to change page orientation.........................................................................................................................77
Use the scan preview window to insert a divider, page break, or job separator .........................................................................80
Scan and add more pages in the scan preview window ............................................................................................................................... 82
Edit the Scanned Document ............................................................................................................................................................................................84
6 Configure the HP Scan app.......................................................................................................................................................................................................87
Create a new Scan Shortcut ..............................................................................................................................................................................................87
Enable the Scan to computer feature ........................................................................................................................................................................88
Enable the Scan to USB feature .....................................................................................................................................................................................90
Change the scanner IP address.....................................................................................................................................................................................92
7 Multiple Zonal Data.........................................................................................................................................................................................................................95
Creating Multiple Zonal Data ............................................................................................................................................................................................95
Save a scan zone with the OCR text and Bar code values in the file name.....................................................................................97
Save a scan zone to a folder auto-named with OCR text and Bar code values ..........................................................................99
Parse scan zones into separate documents........................................................................................................................................................101
Save bar code and zone metadata to an XML file...........................................................................................................................................104
8 Manage Shortcuts.........................................................................................................................................................................................................................110
Create a new Scan Shortcut ............................................................................................................................................................................................110
Rename a Scan Shortcut.................................................................................................................................................................................................... 112
Deleting, renaming, and restoring Shortcuts .......................................................................................................................................................113
Save changes to a Scan Shortcut ............................................................................................................................................................................... 114
Restore a Scan Shortcut to default settings........................................................................................................................................................115
Import/Export Scan Shortcuts to/from XML......................................................................................................................................................... 115
Show/Hide Scan Shortcuts...............................................................................................................................................................................................116
iv
Delete a Scan Shortcut........................................................................................................................................................................................................118
9 Manage and maintain the scanner....................................................................................................................................................................................119
Open the Embedded Web Server (EWS)..................................................................................................................................................................119
Change or assign the device connection type..................................................................................................................................................120
Change the scanner settings......................................................................................................................................................................................... 122
Maintain the scanner.............................................................................................................................................................................................................124
View device, firmware, or network information.................................................................................................................................................. 126
Index.............................................................................................................................................................................................................................................................. 129
v

Introduction1
Use this guide to learn how to install, use, and manage the HP Scan application with HP Enterprise and
HP Managed printers and scanners.
Users can also use this guide to learn about application features including basic and advanced
scanning options such as how to email or save a scanned document as PDF/JPEG, and how to enable
Everyday scan or Scan as Editable Text (OCR) settings.
Requirements
Learn about prerequisites for installing and using the HP Scan app.
Operating System Requirements
HP Scan can be used in the following operating systems:
NOTE: The HP Scan app is 32-bit and will run in 32-bit compatibility mode on all 64-bit operating
systems.
● Windows 11
● Windows 10
● Windows 8.1 (32-bit and 64-bit)
● Windows 8 (32-bit and 64-bit)
● Windows 7 (32-bit and 64-bit)
Minimum System Requirements
HP Scan must be used with Windows 7 or newer and the following minimum system requirements:
● 2 GHz processor
● 2 GB RAM
● 170 MB hard disk space for TWAIN and ISIS drivers
● USB 2.0
● 1024x768 SVGA monitor
Recommended System Requirements
The following system requirements are recommended to install and use HP Scan:
● Intel® Core™2, 2 GHz, Duo Processor or equivalent
● 4 GB RAM
● 1.6 GB hard disk space
Introduction
1

● USB 2.0
● 1024x768 SVGA monitor
Supported file types
Learn about file types supported by the HP Scan app.
File Type indicates the file format of the scanned image. Both image file formats (JPEG, BMP, TIFF, PNG
or PDF) and document file formats (Text, Rich text, Word, Excel, CSV, and Searchable PDF) are supported.
The following file types are supported in HP Scan:
NOTE: The supported file types vary depending on the shortcut selected.
Shortcut Supported file types
Save as PDF PDF, Searchable PDF, PDF/A(.pdf)
Save as JPEG JPEG
E-mail as PDF PDF, Searchable PDF, PDF/A(.pdf)
E-mail as JPEG JPEG
Save as Editable Text (OCR) RTF, TXT, DOC, DOCX, XLS, XLSX, CSV, XML
Everyday Scan All formats allowed
Supported devices
Learn about devices that can use the HP Scan app.
The following multifunction printer (MFP) and scanner families running HP FutureSmart firmware can
use the HP Scan app:
● HP LaserJet Enterprise MFP
● HP LaserJet Managed MFP
● HP PageWide Enterprise MFP
● HP PageWide Managed MFP
● HP ScanJet Enterprise Flow
● HP ScanJet Enterprise
● HP ScanJet Pro
● HP Digital Sender Flow
2
Chapter 1 Introduction

Install or Uninstall the HP Scan app2
This chapter provides information on how to install and set up, or uninstall and remove, the HP Scan app.
Install the HP Scan app
Use the steps in this chapter to set up and install HP Scan.
There are three methods that can be used to set up and install HP Scan.
● Install the Full software including the basic driver and recommended plug-ins using the install wizard
● Install the Basic driver .exe and recommended plug-ins separately one by one
● Install the Basic driver .msi using a command prompt and manually associate the connection type
Download the driver
The latest driver or full software build is available for download on HP.com.
There are two types of web packs: Full software and a Basic driver.
● Full software includes the HP Scan Device Software and all of the associated Plug-ins.
● Basic driver includes only HP Scan Basic Device Software. The Plug-ins must be installed separately.
To download the web pack, follow these steps:
1. Go to http://www.support.hp.com.
2. Under the Support tab, select Software & Drivers.
3. Select Other.
Install or Uninstall the HP Scan app
3
4. Click Let HP detect your product, or type the model name of the scanner, select the scanner, and
then click Submit.
5. Wait for your product to be detected and for the drivers and software to display.
6. Expand the Basic Drivers or Driver-Product Installation Software section, depending on the
installation method that you want to use.
7. Click Download.
8. Click Save to automatically download the web pack to the Downloads folder.
NOTE: The web pack download can also be saved to a preferred location on your PC. To do this,
select Save As, navigate to the location on your PC where you want to save the file, and then click
Save.
9. If you downloaded the Basic driver option, you will also need to download any recommended
plug-ins for that scanner.
NOTE: Plug ins are included in the Full software web pack. You do not need to download these plug
ins if you downloaded the Full Feature Software and Driver option.
a. On the product download page, expand the Update section.
b. Click Download for each recommended plug in.
Install the software using the Install Wizard
Follow these steps to install the HP Scan software, drivers, and plug-ins using the set up wizard.
4
Chapter 2 Install or Uninstall the HP Scan app
NOTE: Installation using the basic web pack is similar to the full web pack except the basic web pack
does not install the plug-ins. The plug-ins will need to be installed separately.
Launch the Set up wizard
Launch the install wizard to start the set up process.
Do NOT connect the USB cable to the product until prompted.
1. Double click the .exe file you saved previously.
2. Select Yes to allow the program to continue.
3. Read the End User License Agreement and Data collection settings, select the check boxes to
accept the terms, and then select Next.
Launch the Set up wizard
5

4. Wait for the wizard to prepare and install the software.
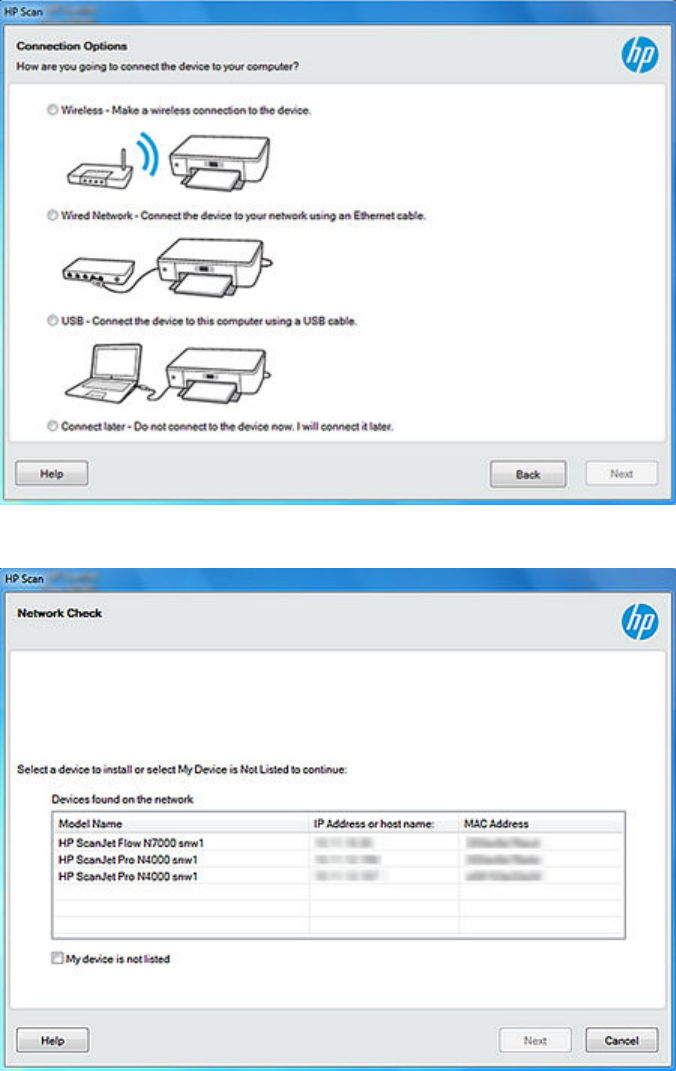
Connect using a USB cable
Finish installing the software using a USB cable.
Do NOT connect the USB cable to the product until prompted.
1. Select the connection option.
● Automatic Setup – Make sure the USB is connected and then select this option to automatically
detect the connection type.
NOTE: If the USB cable is not connected from the device to the computer, then the installer
will check for Wired/Wireless connection options.
6
Chapter 2 Install or Uninstall the HP Scan app
● Manual Setup – Select this option to manually select the preferred connectivity set up.
a. Select USB and select Next.
b. When prompted, connect the USB cable to the scanner and wait for the scanner to be
detected.
Connect using a USB cable
7
2. Wait for the connection and set up process to complete.
3. Select Finish to complete the installation. A shortcut to HP Scan is created on the desktop and in
the Start menu, and the software redirects to the registration screen.
Connect using a wired network
Install the software with a wired network connection.
8
Chapter 2 Install or Uninstall the HP Scan app

1. Select the connection option.
● Automatic Setup – Select this option to automatically detect the connection type.
NOTE: If the device is connected to the computer using USB cable, then the installation will
continue with USB connectivity. If USB connectivity is not detected, it will check for Wired/
Wireless options.
● Manual Setup – Select this option to manually select the preferred connectivity set up.
a. Make sure the network cable is connected.
b. Select Wired Network and select Next.
Connect using a wired network
9
c. Wait for the scanner to be detected, select the device, and then select Next.
2. Wait for the connection and set up process to complete.
10
Chapter 2 Install or Uninstall the HP Scan app
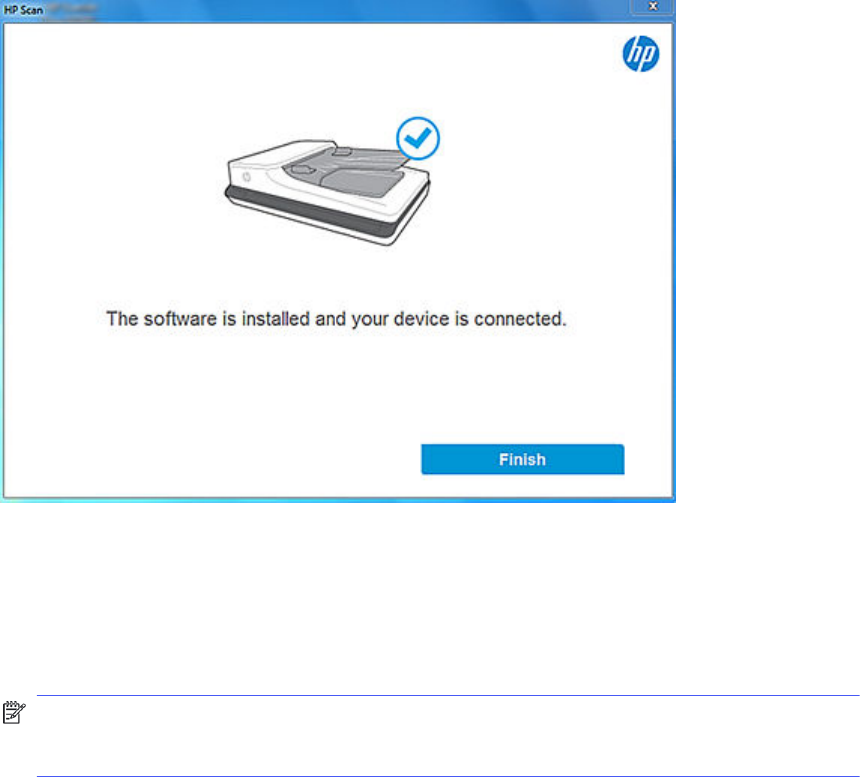
3. Select Finish to complete the installation. A shortcut to HP Scan is created on the desktop and in
the Start menu, and the software redirects to the registration screen.
Connect wirelessly
Install the software with a wireless connection.
1. Select the connection option.
● Automatic Setup – Select this option to automatically detect the connection type.
NOTE: If the device is connected to the computer using USB cable, then the installation will
continue with USB connectivity. If USB connectivity is not detected, it will check for Wired/
Wireless options.
● Manual Setup – Select this option to manually select the preferred connectivity set up.
Connect wirelessly
11
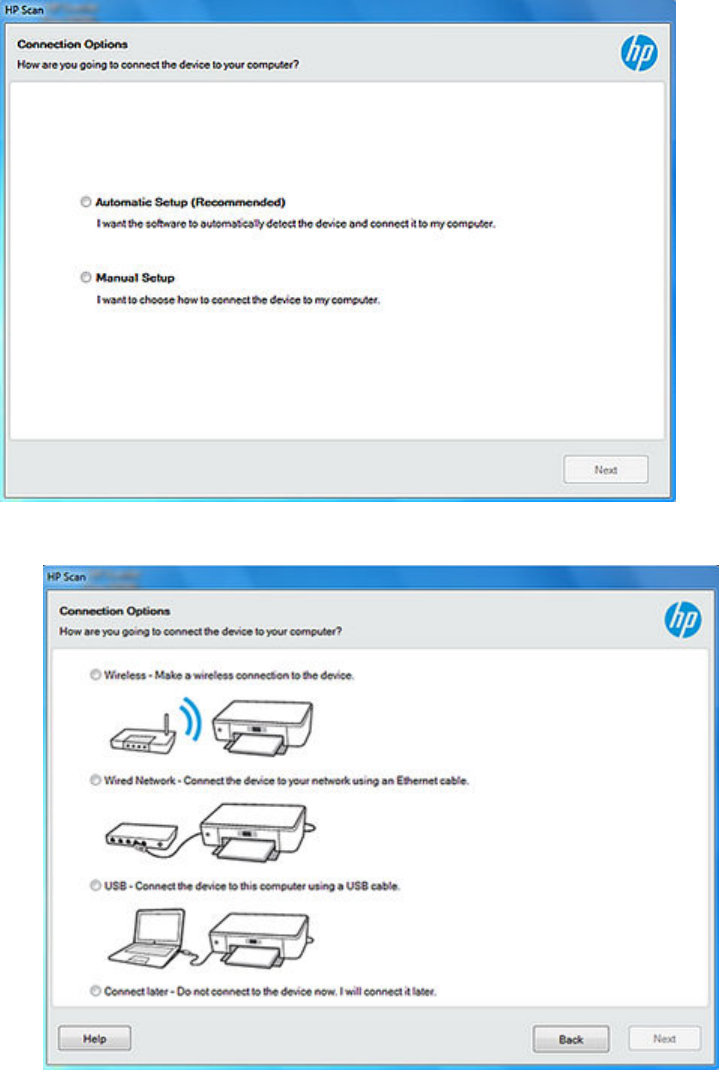
a. Select Wireless and then select Next.
b. Wait for the scanner to be detected, select the device, and then select Next.
2. Wait for the connection and set up process to complete.
12
Chapter 2 Install or Uninstall the HP Scan app
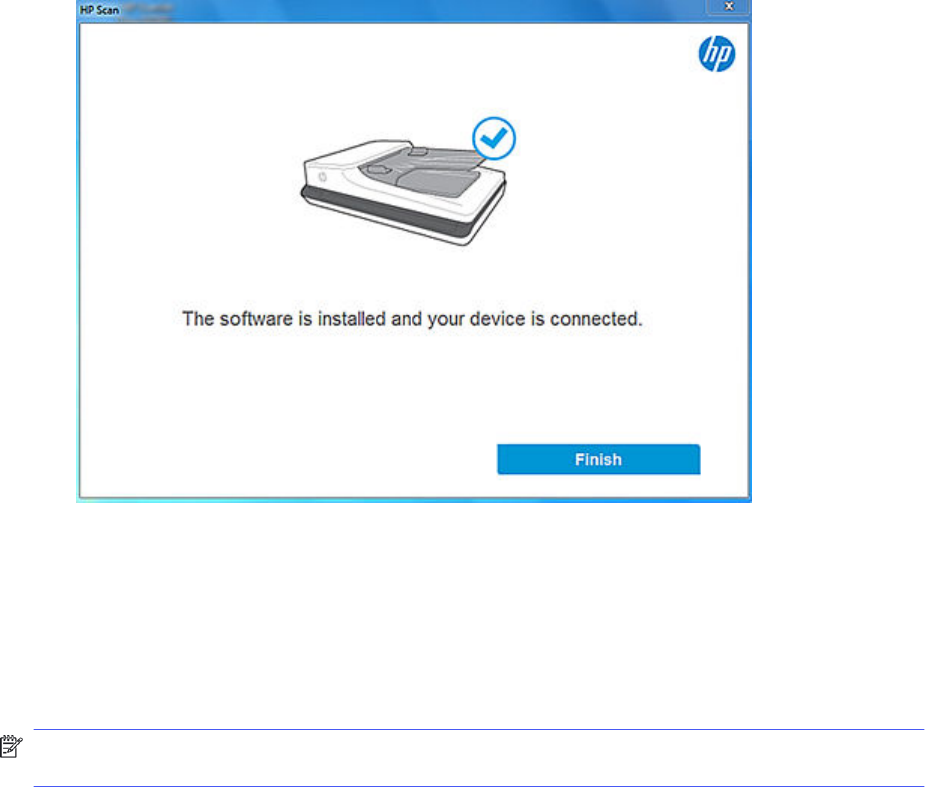
3. Select Finish to complete the installation. A shortcut to HP Scan is created on the desktop and in
the Start menu, and the software redirects to the registration screen.
Install the plug-ins for the basic web pack
Follow these steps to install the plug-ins needed to complete the basic web pack installation.
Installation using the basic web pack is similar to the full web pack except the basic web pack does
not install the plug-ins. The plug-ins must be installed separately. Plug-ins are needed to provide support
for specific features or functionalities. After installing the basic driver, follow these steps to install the
plug-ins.
NOTE: If you installed the full software, you can skip this step. Plug-ins are automatically installed as
part of the full software installation process.
1. Locate the plug-in files you downloaded previously.
2. Double-click to launch the file and then select Run.
3. Follow any onscreen prompts to complete the process.
4. Repeat for each additional plug in.
Install the basic driver using a command prompt
The app supports command line installation option for silent installs and/or for customizing network
installs. For a silent installation, download the Full/Basic web pack, extract the folder, and then search for
the .msi file.
1. Go to the location where you saved the web pack
.msi
and select the file depending on your system
configuration (32-bit or 64-bit).
2. Right-click the
.msi
file and select Properties.
Install the plug-ins for the basic web pack
13
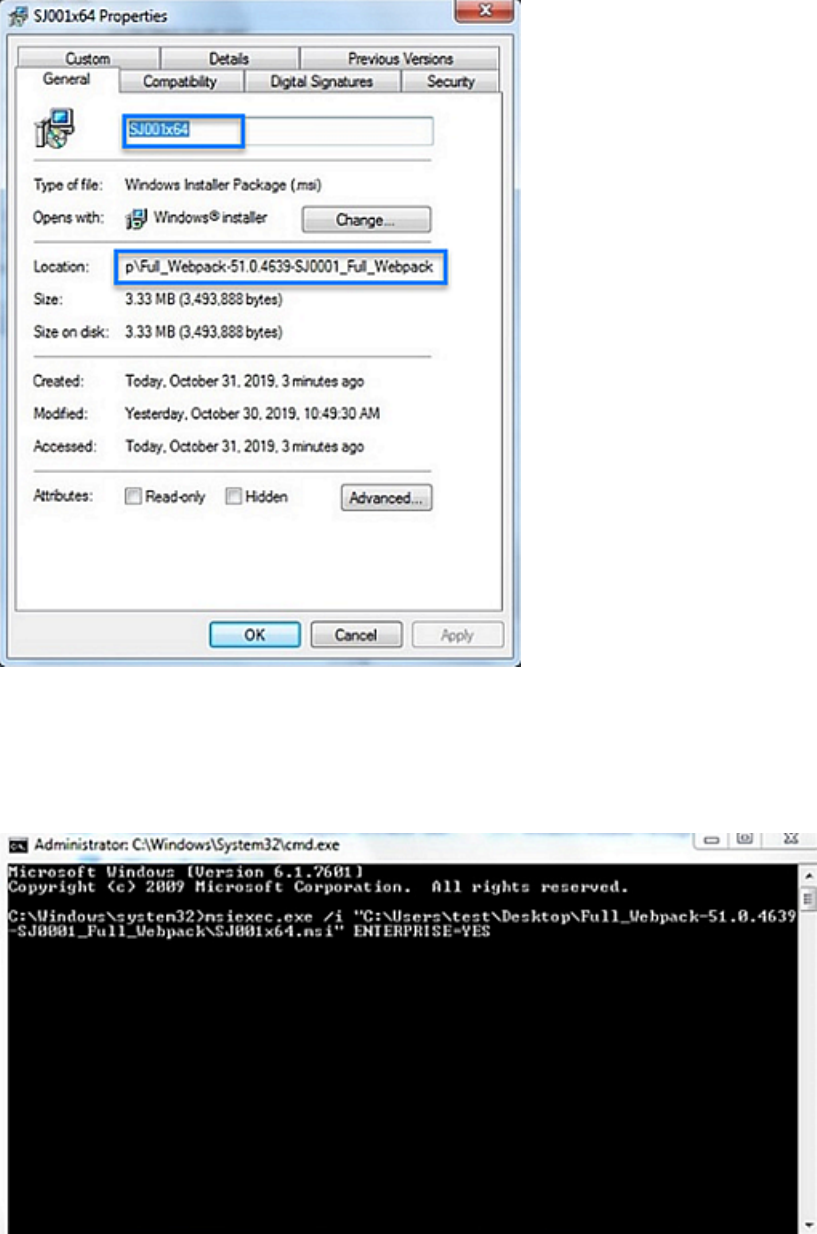
3. On the General tab, take note of the device name and the path location.
4. Open a command prompt window as an administrator.
5. Type the following command replacing path with the location you noted previously and replacing
devicename with the name you noted previously:
msiexec.exe /i "path\devicename.msi" ENTERPRISE=YES
14
Chapter 2 Install or Uninstall the HP Scan app
6. Wait for the installation to complete.
7. After running the command to install the software, go to devicesetuplauncher to provide the
connection type.
Add a printer or scanner to the app
To add a device to the HP Scan app, follow these steps.
1. Open the HP Scan app.
Add a printer or scanner to the app 15
2. Open Settings by clicking the gear icon from the Homescreen.
3. Select the plus icon and select a device.
4. Select Add to confirm.
5. If prompted, select one of the following options to get the latest firmware or software updates
available for the device.
● Download - Selected by default; this option enables the user to download the latest Software/
Firmware package now from the HP store.
● Review and Download - Select this option to first review the details of the available Software/
Firmware package from HP, and then download it from HP store.
● Remind me later - Select this option to skip the Software /Firmware update notification and be
be reminded later (in 30, 60, 90, or 180 days).
16
Chapter 2 Install or Uninstall the HP Scan app
NOTE: This notification displays only if when the user has an active internet connection. You can
also manually update the firmware or software as needed.
<image here>
Remove a device from the app
Remove a device from the HP Scan application.
1. Open the HP Scan app.
Remove a device from the app 17

2. Open Settings by clicking the gear icon from the Homescreen.
3. Select a device and then click Delete.
18
Chapter 2 Install or Uninstall the HP Scan app
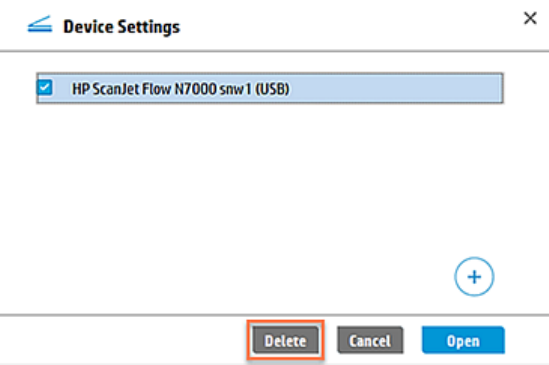
4. Select Delete to confirm.
Uninstall the HP Scan app
Learn how to uninstall the HP Scan application.
1. From the Start menu, select Control Panel.
2. Select Programs and Features.
3. Select HP Scan+ Basic Device Software, right-click the option, and then select Uninstall.
4. Select OK to confirm.
5. Under Devices and Printers, make sure the device has been removed.
Uninstall the HP Scan app using One Click
For an end user who has installed the full webpack and wishes to uninstall it, One Click Installation
is an additional feature that keeps track of all HP supported items to uninstall in a list. At the time of
uninstallation, this list is displayed. The user can opt to select the items to be uninstalled fully or partially.
Uninstall the HP Scan app
19
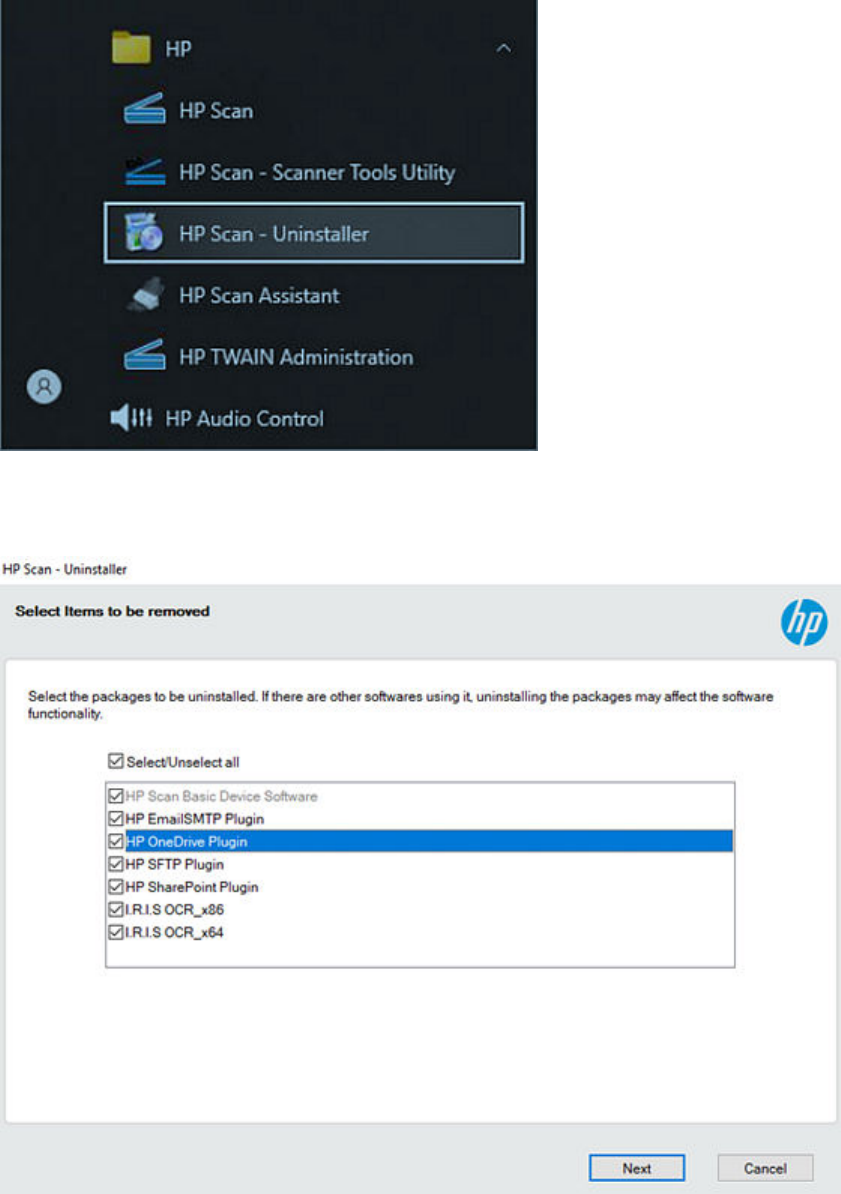
1. From the Start menu, select the HP Scan - Uninstaller (this is the One Click Uninstallation app run
from the HP directory).
The Uninstaller displays the list of items to be uninstalled.
2. Select all of the items to uninstall and then click Next.
3. After uninstallation is complete, manually remove any failed items, if any.
20
Chapter 2 Install or Uninstall the HP Scan app
HP Scan App overview3
Use the steps in this chapter to get acquainted with the HP Scan app.
HP Scanner Assistant tabs
Learn about the different features and tabs in the HP Scan app.
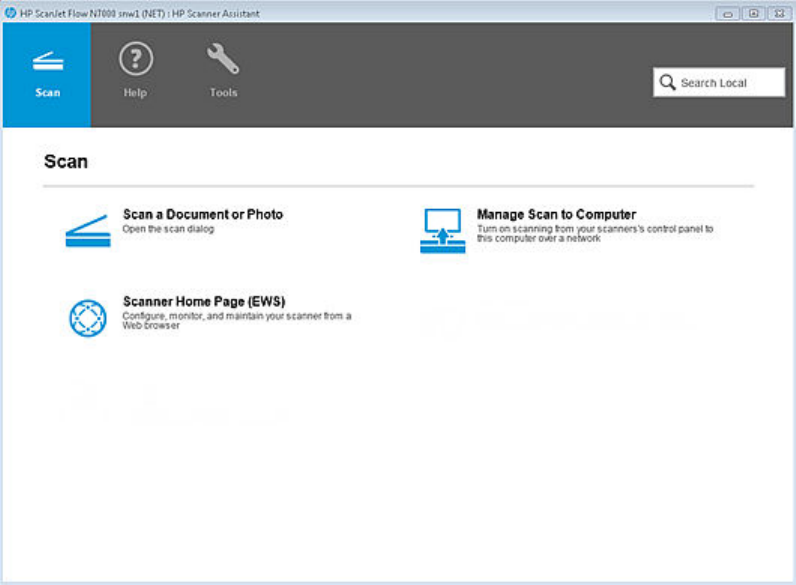
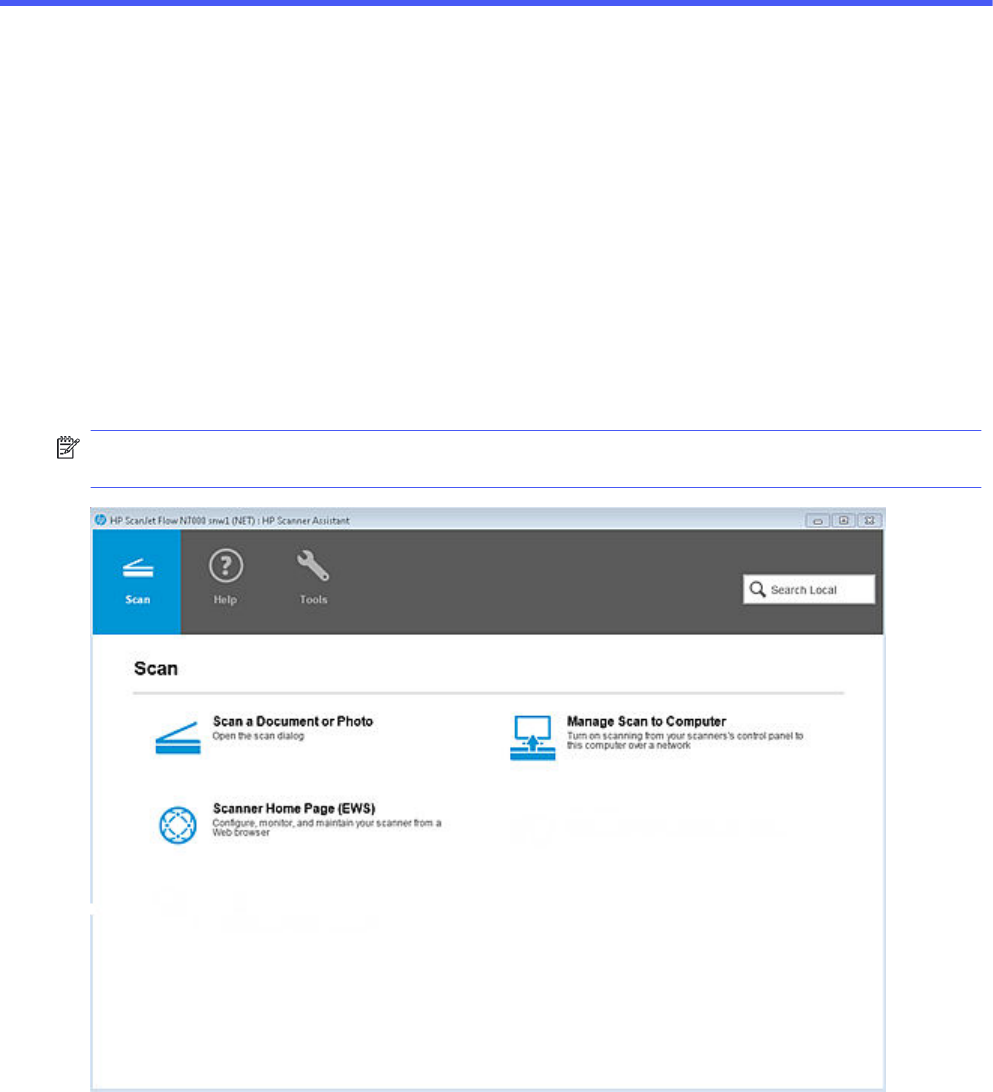
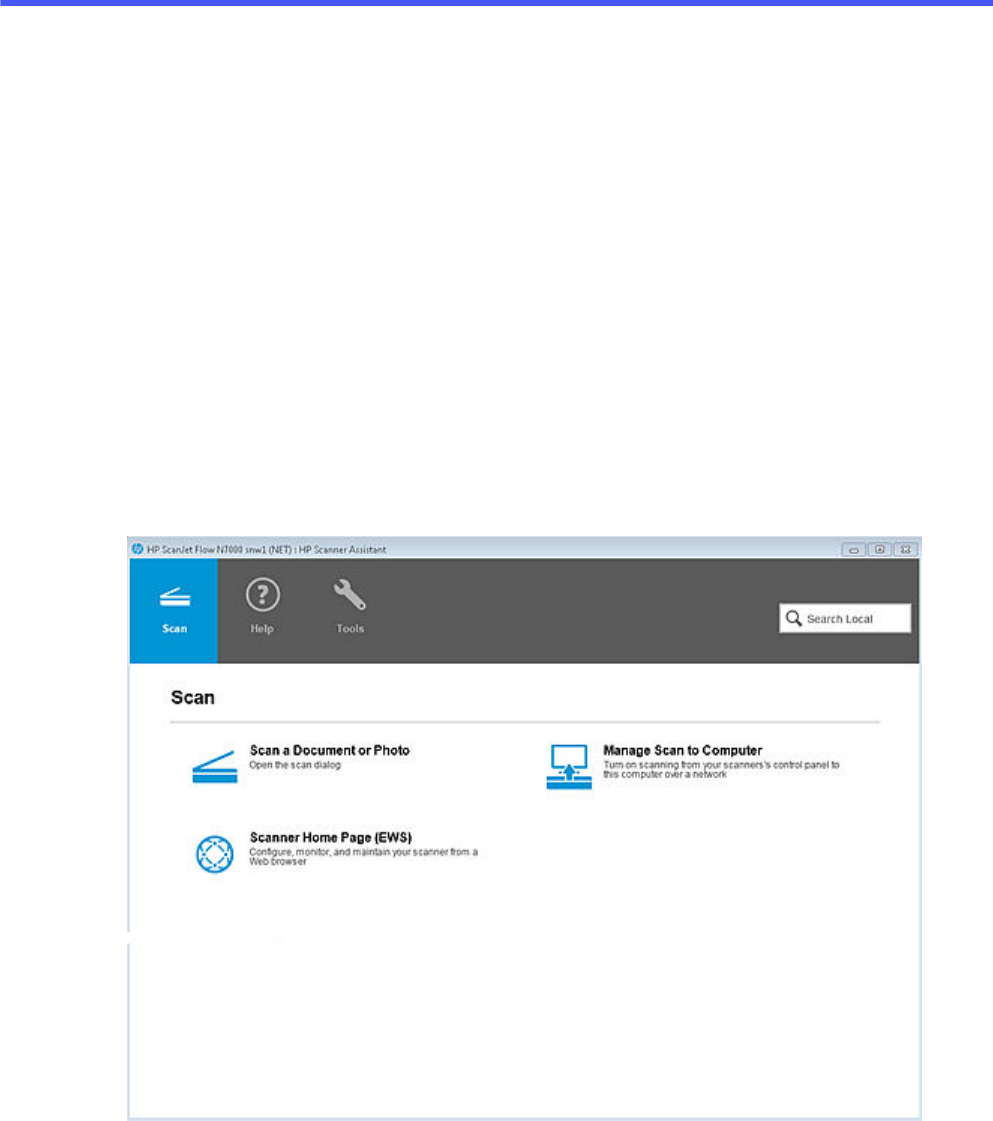
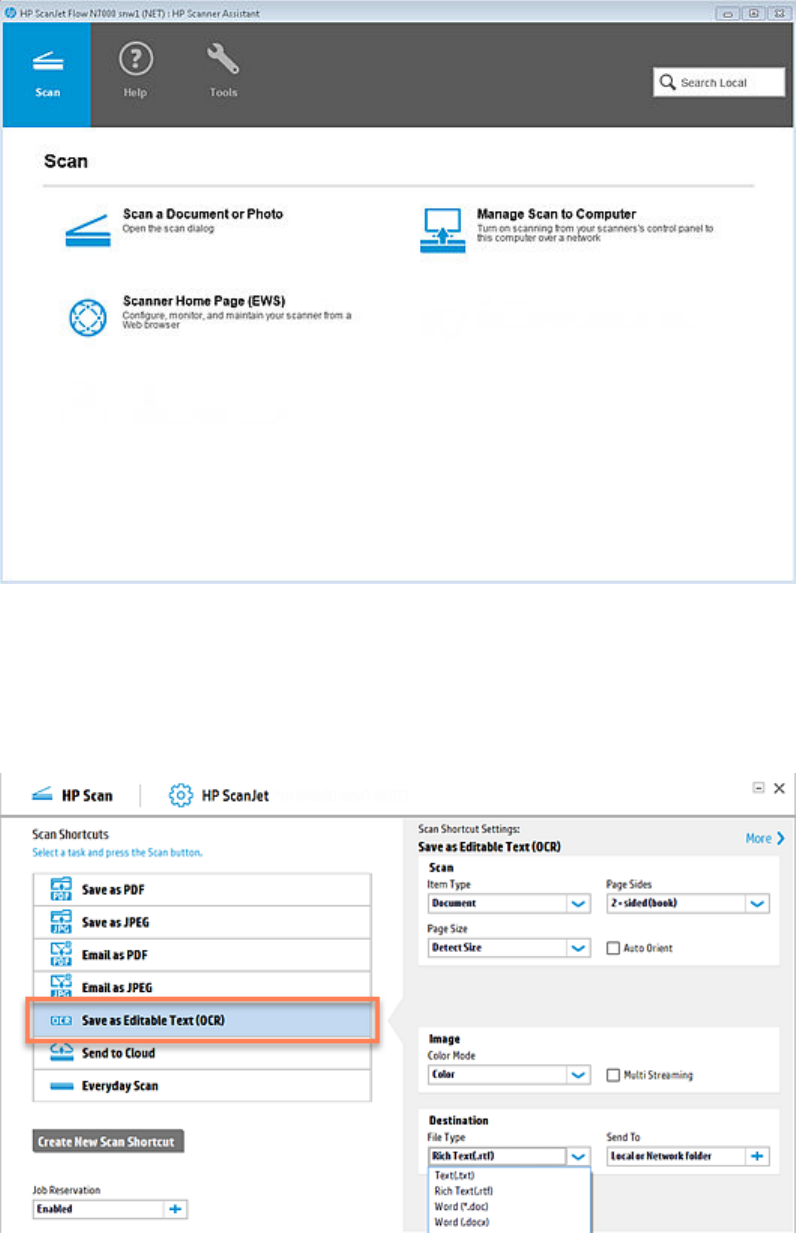
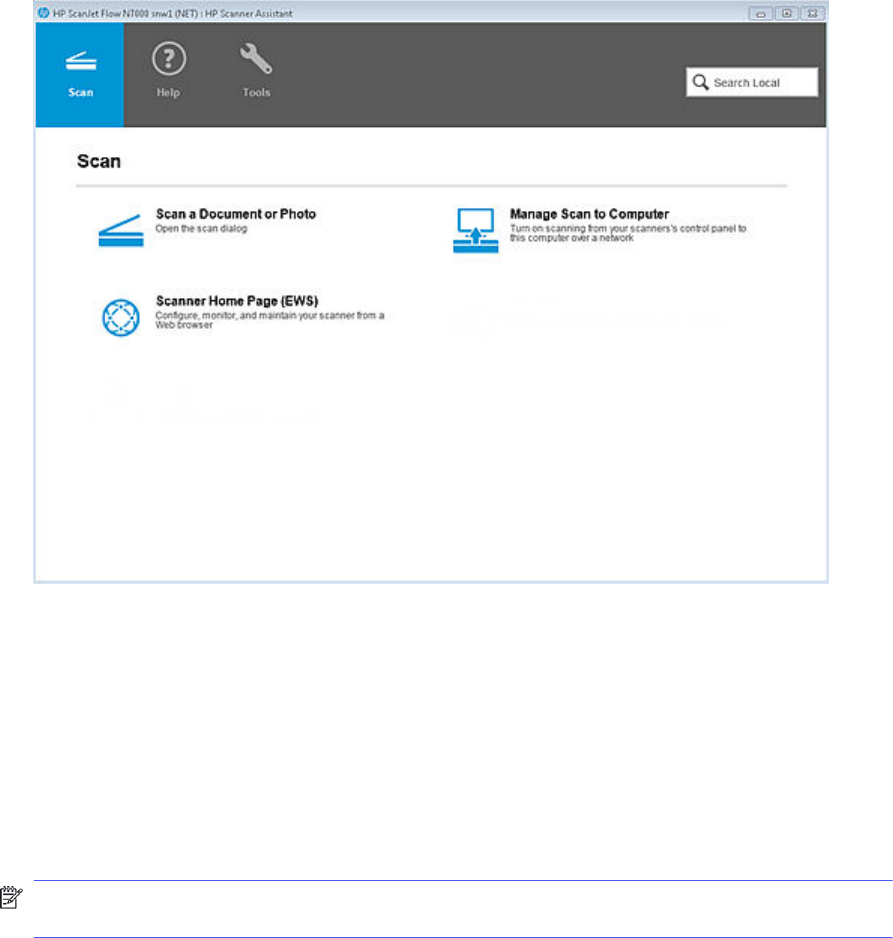
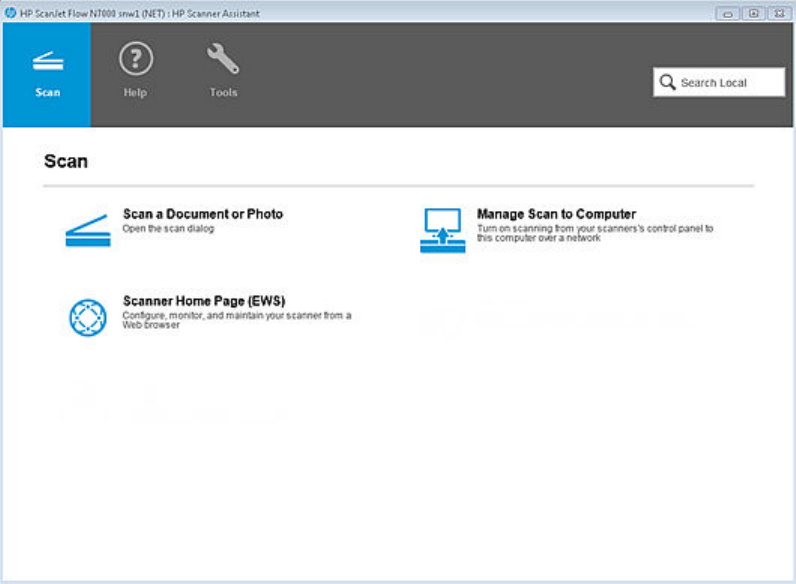
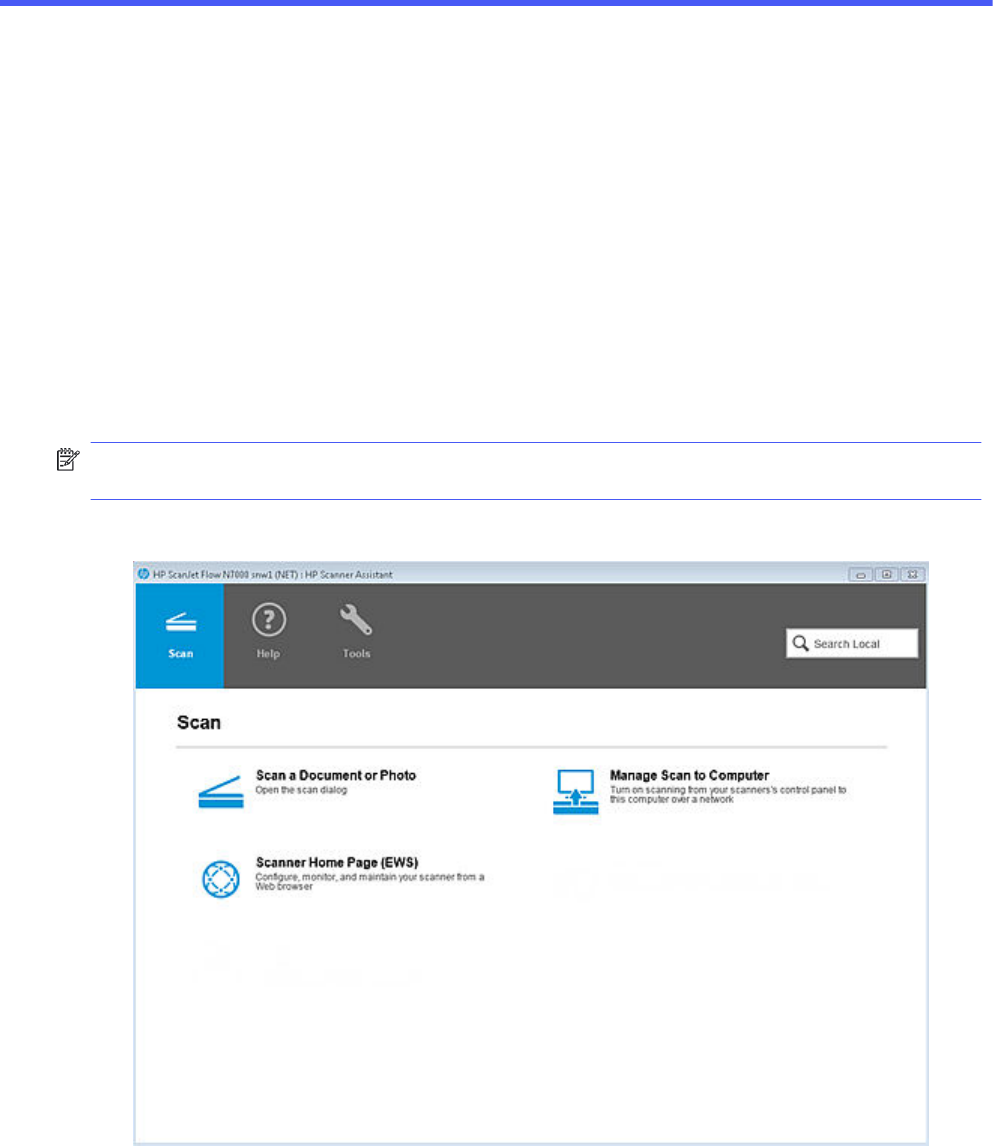
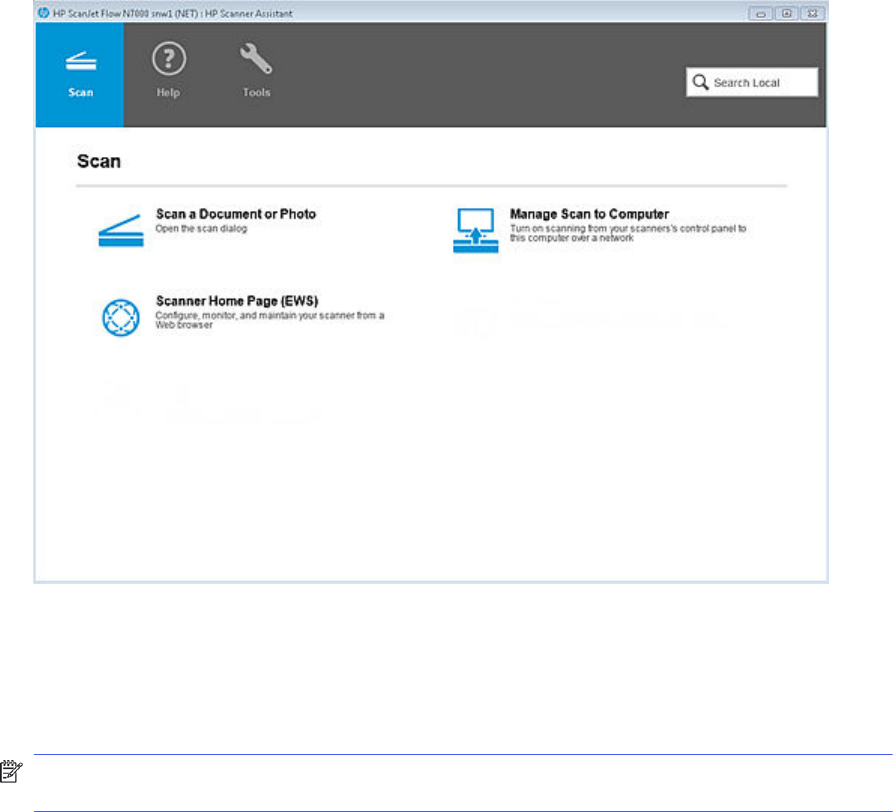
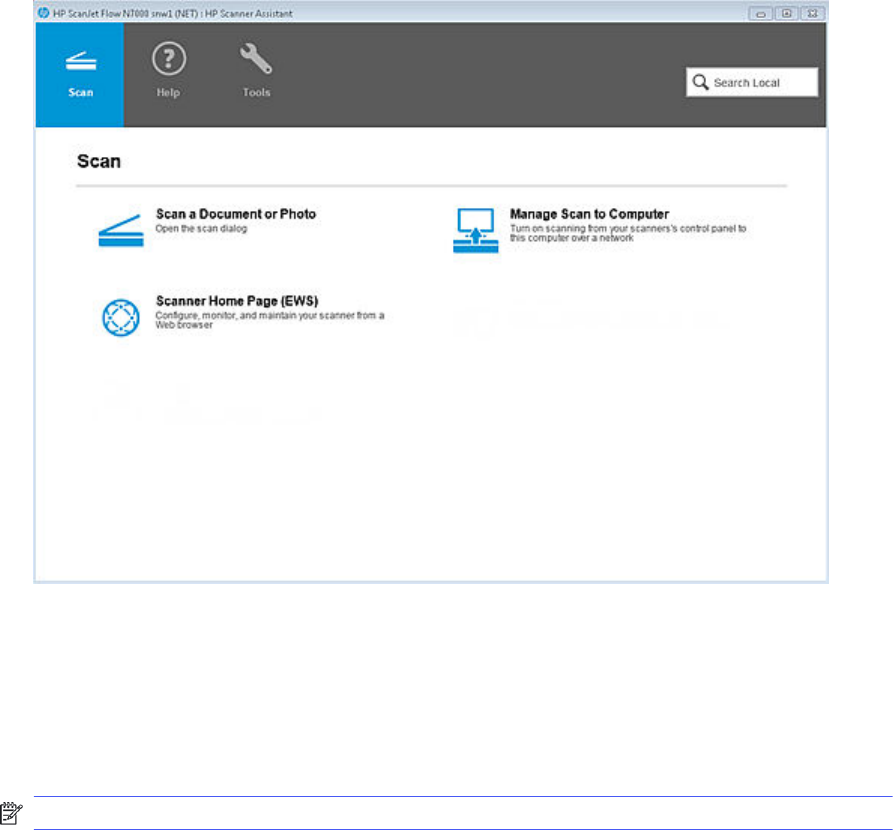
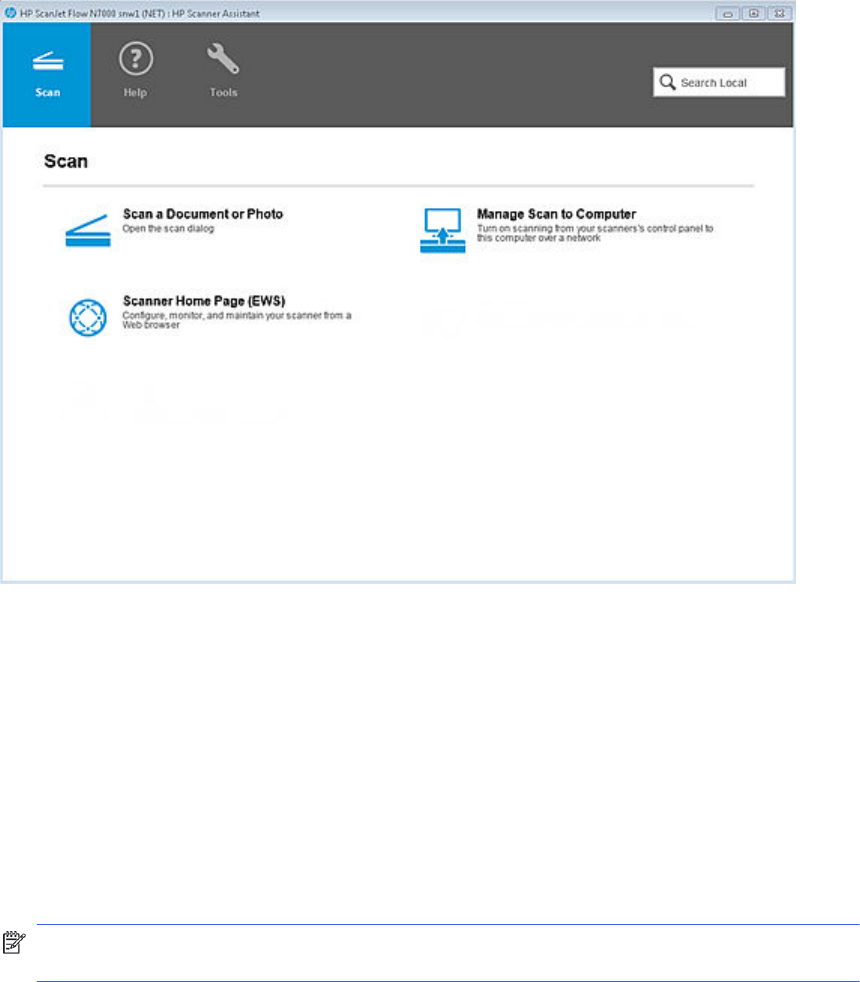
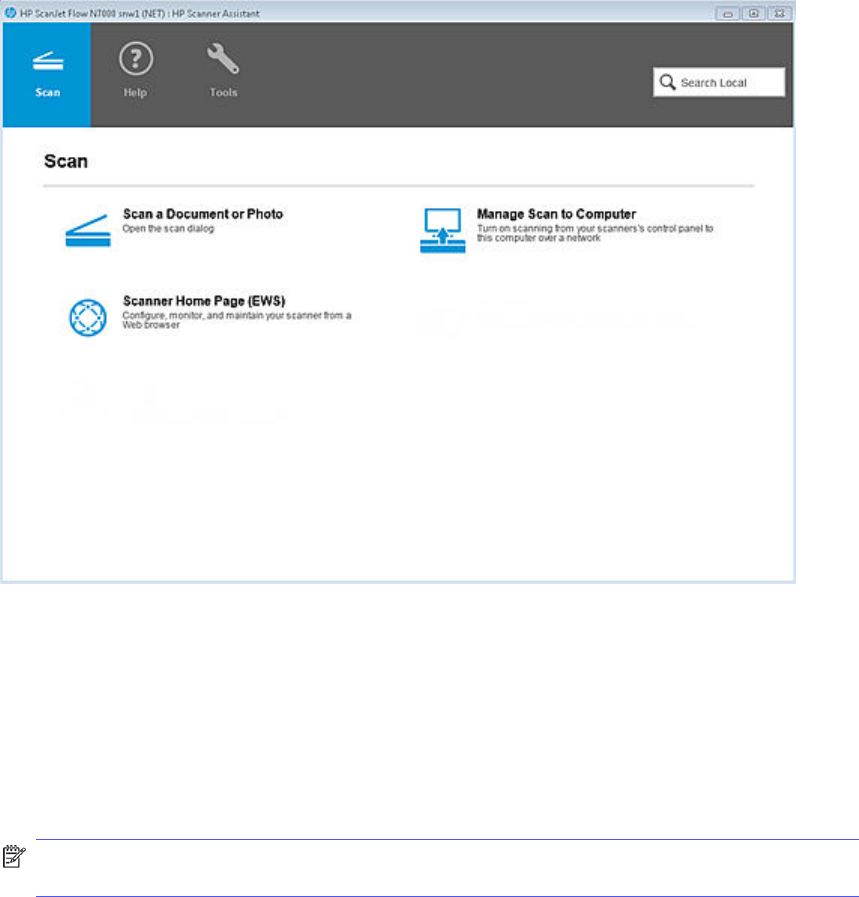
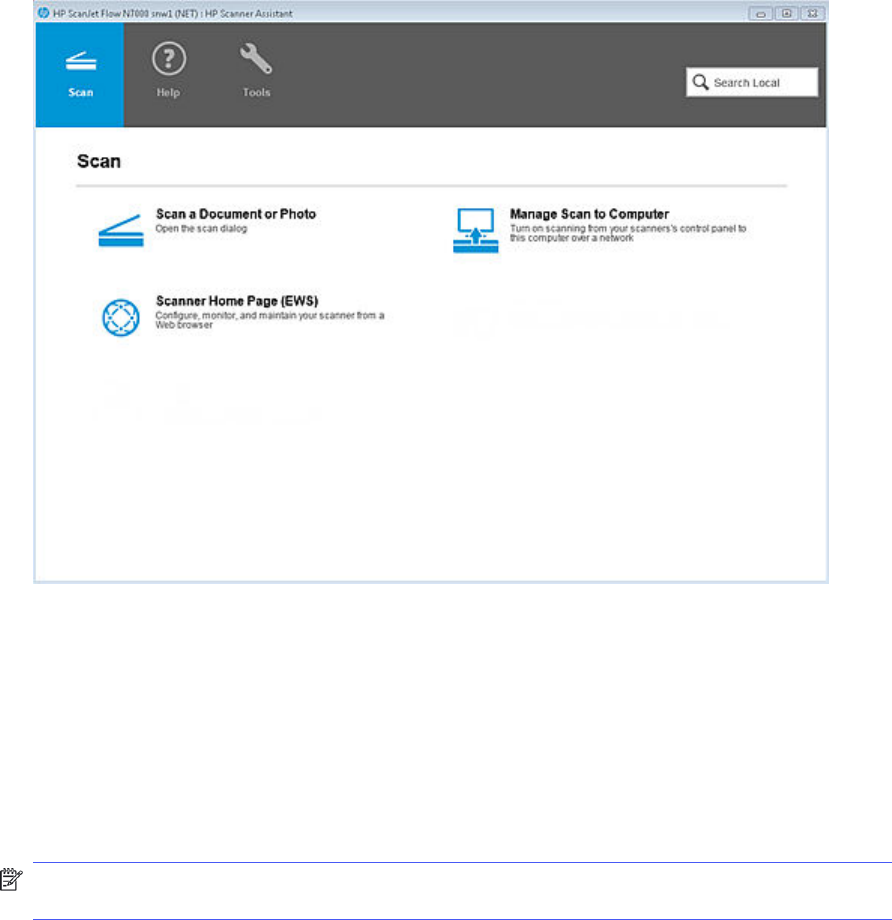
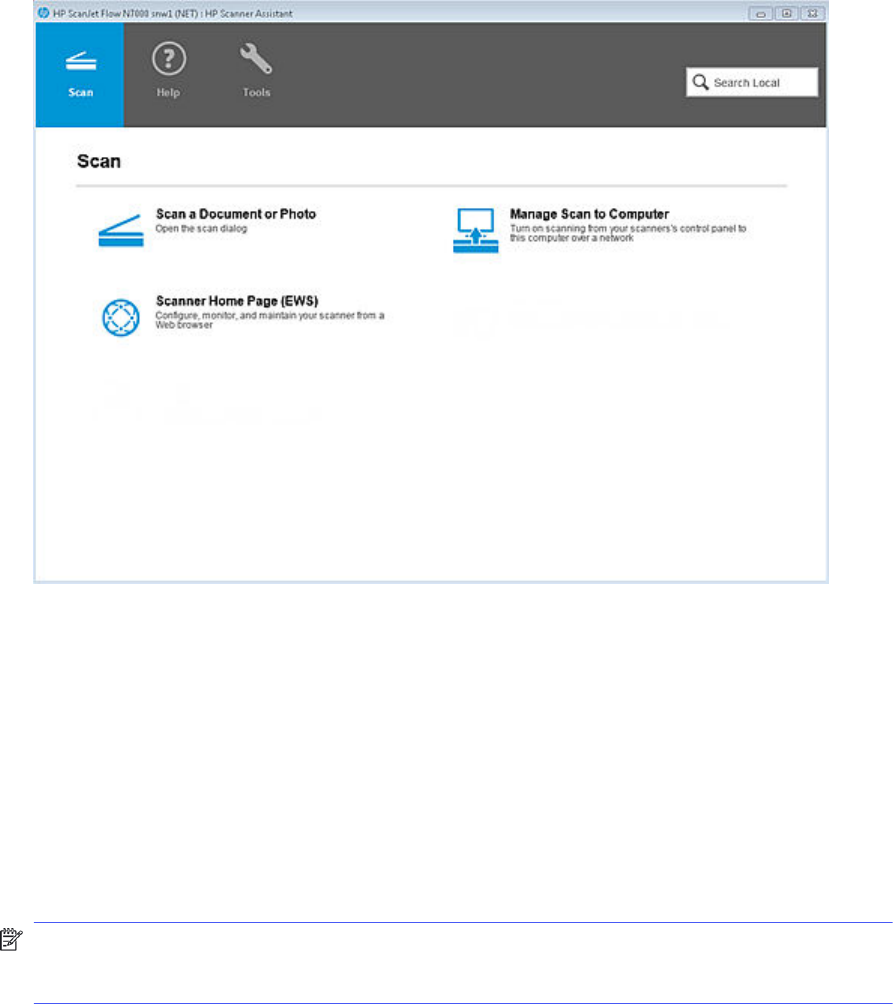
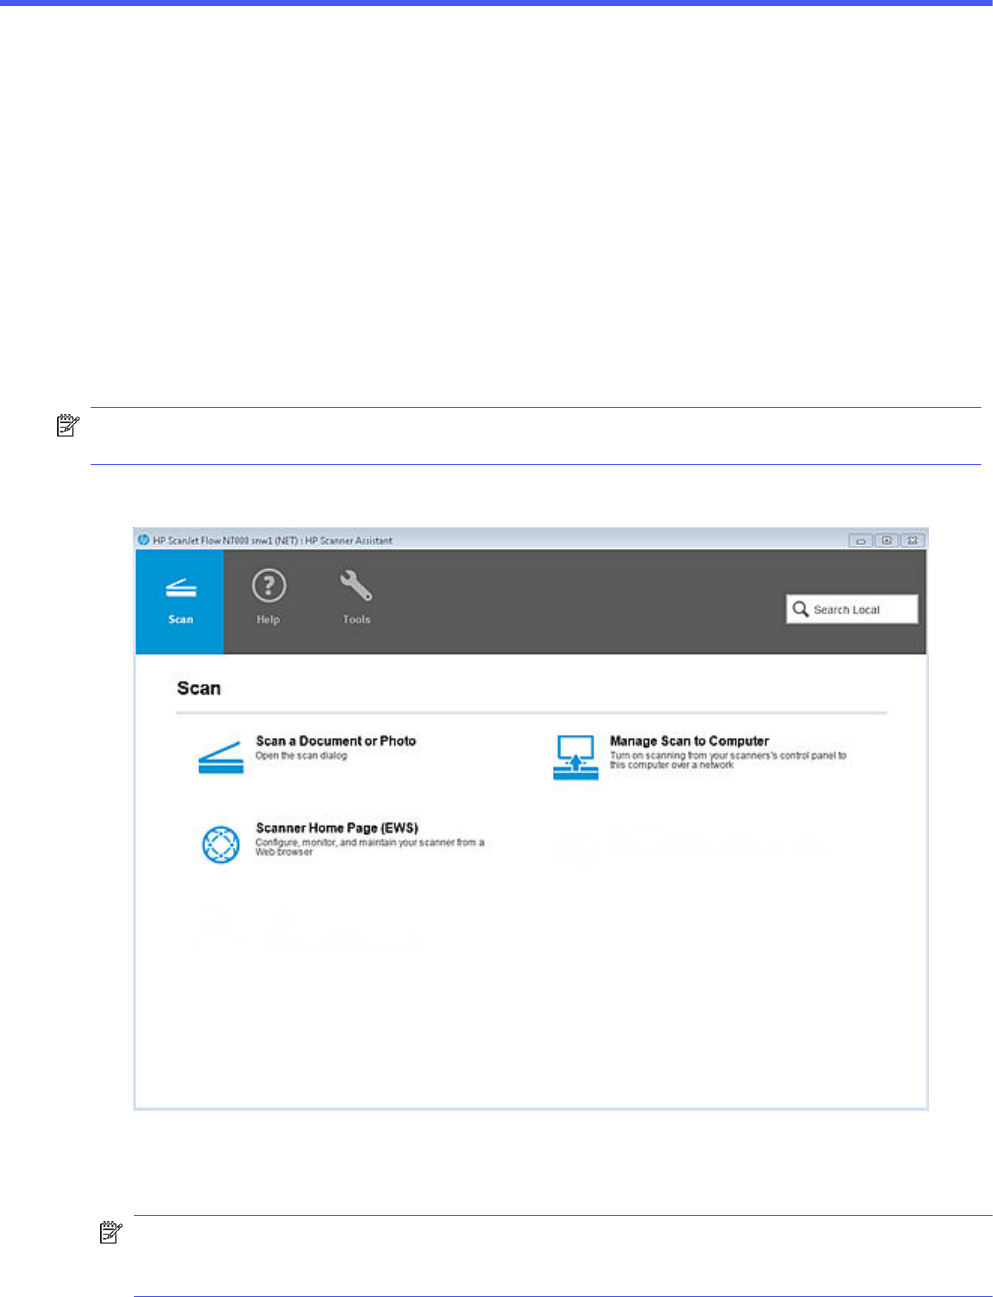
The HP Scan app has several tabs: Scan, Help, and Tools.
Scan tab
The Scan tab is used to launch the scan interface. It also includes the following options:
NOTE: When the device is connected through USB, Manage Scan to Computer and Scanner Home
Page (EWS) options are not visible.
● Scan a Document or Photo - use to open the scan interface.
● Scanner Home Page (EWS) - when the device is connected to a network, use to open the Embedded
Web Server (EWS) to view device, firmware, and network information.
● Manage Scan to Computer - available when the device is connected to a network, use to enable
scanning from the device to the computer.
Help tab
HP Scan App overview
21
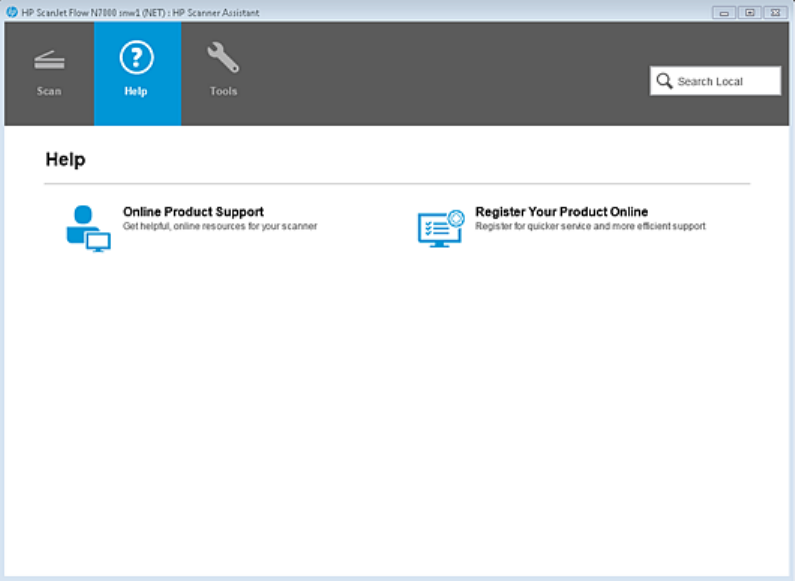
The Help tab includes the following options:
● Online Product Support - use to view online help resources.
● Register Your Product Online - use to register the scanner.
Tools tab
The Tools tab includes the following options:
22
Chapter 3 HP Scan App overview
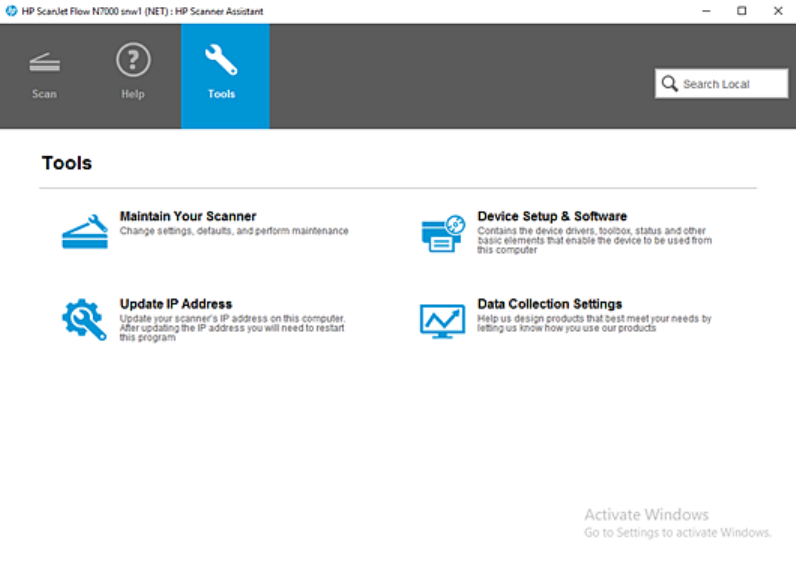
● Maintain Your Scanner - Use to change settings, defaults, and perform scanner maintenance tasks.
● Device Setup & Software - Use to view the scanner status and toolbox, etc.
● Update IP Address - Use to change the IP address for the scanner.
● Data Collection Settings - Use to allow HP to collect information to improve scanner design.
Overview of the scan home screen
Learn about HP Scan app scan interface home screen including available Scan Shortcuts and basic
settings used for Scan Shortcuts before scanning.
Home screen
The home screen first opens after you launch the HP Scan app and select the Scan a Document or
Photo option. When the scan interface opens, the model name of the connected device is displayed at
the top of the home screen.
Overview of the scan home screen
23
Left pane of the home screen
The left pane of the home screen provides a list of tasks called Scan Shortcuts. Scan Shortcuts enable
the user to quickly select the desired scan output and destination in one step.
24
Chapter 3 HP Scan App overview
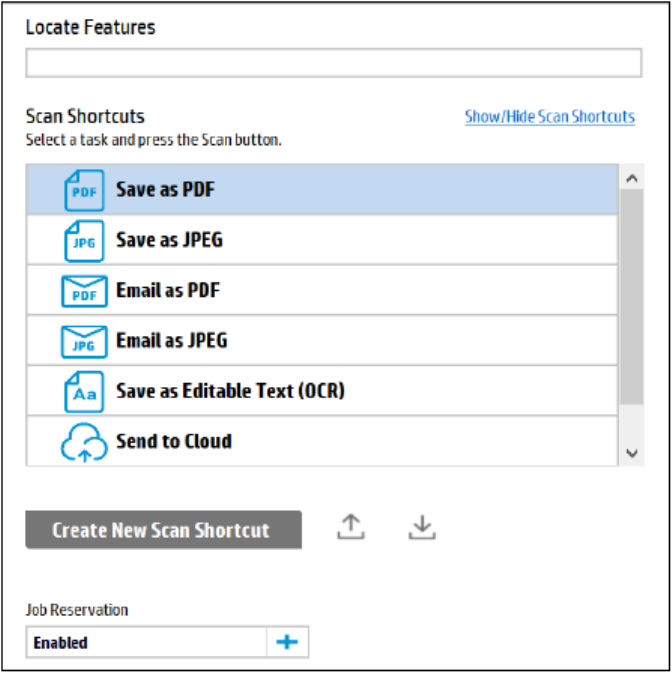
This left pane can also be used to create a new Scan Shortcut with a custom scan output and
destination using the Create New Scan Shortcut option, or to enable job storage and assign the scan a
PIN using the Job Reservation option.
Right pane of the home screen
The right pane of the home screen displays the options that can be used to modify the scan settings
prior to selecting the Scan button. The available options will vary according to the Scan Shortcut
selected in the left pane and will be unique to the output and destination. For more information, see the
section
Overview of Scan Shortcuts
.
Overview of the scan home screen
25
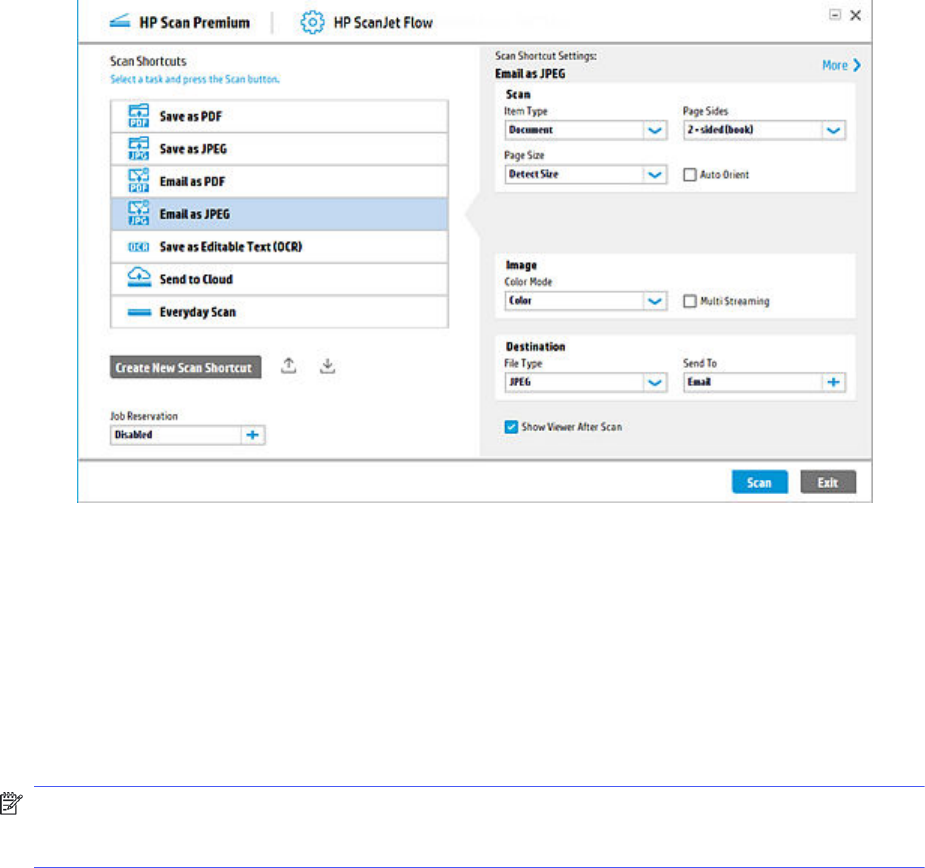
Overview of Scan Shortcuts
Learn about the Scan Shortcuts and settings included in the scan interface of the HP Scan app.
When you first open the HP Scan app and select the Scan a Document or Photo option, the Scan
Shortcuts display in the left pane of the scan interface home screen.
Scan Shortcuts are a list of tasks used repeatedly that enable the user to quickly select the desired
scan output and destination in one step. The shortcuts include scan settings, image processing
information, and instructions for the scanned images.
26
Chapter 3 HP Scan App overview

The following Scan Shortcuts are a pre-defined list created by HP based on common outputs and
destinations:
NOTE: Because these shortcuts are pre-defined, they cannot be renamed or deleted. However,
custom Scan Shortcuts can be created for specific outputs and destination depending on the user
needs and preferences. For more information, see the section
Create a new scan shortcut
.
● Save as PDF - Save the scan as a PDF output to a local or network folder destination.
● Save as JPEG - Save the scan as a JPEG output to a local or network folder destination.
● Email as PDF - Email the scan as a PDF output to an email recipient.
● Email as JPEG - Email the scan as a JPEG output to an email recipient.
● Save as Editable Text (OCR) - Save the scan as an editable text (OCR) output to a local or network
folder destination.
● Send to Cloud - Save the scan as a preferred output and send it to a cloud destination.
● Everyday Scan - Save the scan as a preferred output to a local or network folder destination.
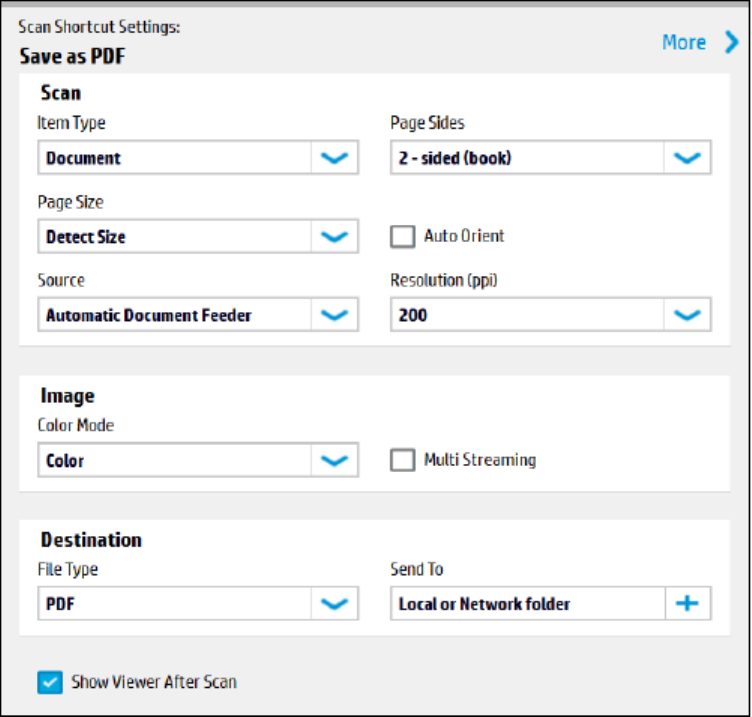
Shortcut Settings
Overview of Scan Shortcuts
27

After selecting a Scan Shortcut from the left pane, the right pane can be used to modify the scan
shortcut settings prior to selecting the Scan button.
NOTE: The available options will vary according to the Scan Shortcut selected in the left pane and will
be unique to the output and destination.
You can adjust the the following basic scan, image, and destination options in the right pane before
scanning:
NOTE: These cannot be changed after selecting the Scan button. For ADF scanning, these options
are limited to Item Type, Page Sides, Page Size, and Auto Orient.
● Scan
– Item Type: Document, Photo, or Auto Detect
– Page Sides: 1-sided (front), 1-sided (back), 2-sided (book), or 2-sided (tablet)
NOTE: Book and Tablet refers to the binding point of the scanned page. The application will
automatically adjust the back side of a duplex page to be right side up based on this setting.
– Page Size: The options available vary depending on the sizes supported by the device. The
default size is Detect Page Size. The page size can also be manually entered using Custom
Page Size. For more information, refer to
Supported page sizes and detection methods
in the
Appendices.
28
Chapter 3 HP Scan App overview

– Auto Orient - Use to enable the auto orient feature. The feature is OFF by default. For this
feature, the minimum supported resolution is 300 dpi if IRIS OCR is installed and it is 200 dpi if
IRIS OCR is not installed.
NOTE: This feature is for document types only; it is disabled if the selected Item Type is Photo.
In pre-scan mode, the document language can be selected from the Page Orientation dropout.
● Image
– Color Mode - Use to adjust the image color to match the color type of the scanned image.
NOTE: When Auto Detect Color is selected, the app will automatically detect the output color
for the final scan.
– Multi-Streaming - Use to enable or disable multi-streaming.
● Destination - Section includes the the file type and the actual destination.
– File type - Use to change the file type.
– Send To - Use to change the Send-to destination.
NOTE: The default depends on the scan shortcut selected. If installed, account destinations
will also be visible here (Box, DropBox, GoogleDrive, EverNote, OneDrive, Sharepoint,
SugarSync, etc.)
● Show Viewer After Scan - Use to preview the scan and edit pages as needed. This check box is
selected by default. If the check box is cleared, only a scan progress dialog displays after clicking
the Scan button.
● Scan button - Use to initiate the scan. If Show Viewer After Scan is selected, the scan preview
window displays.
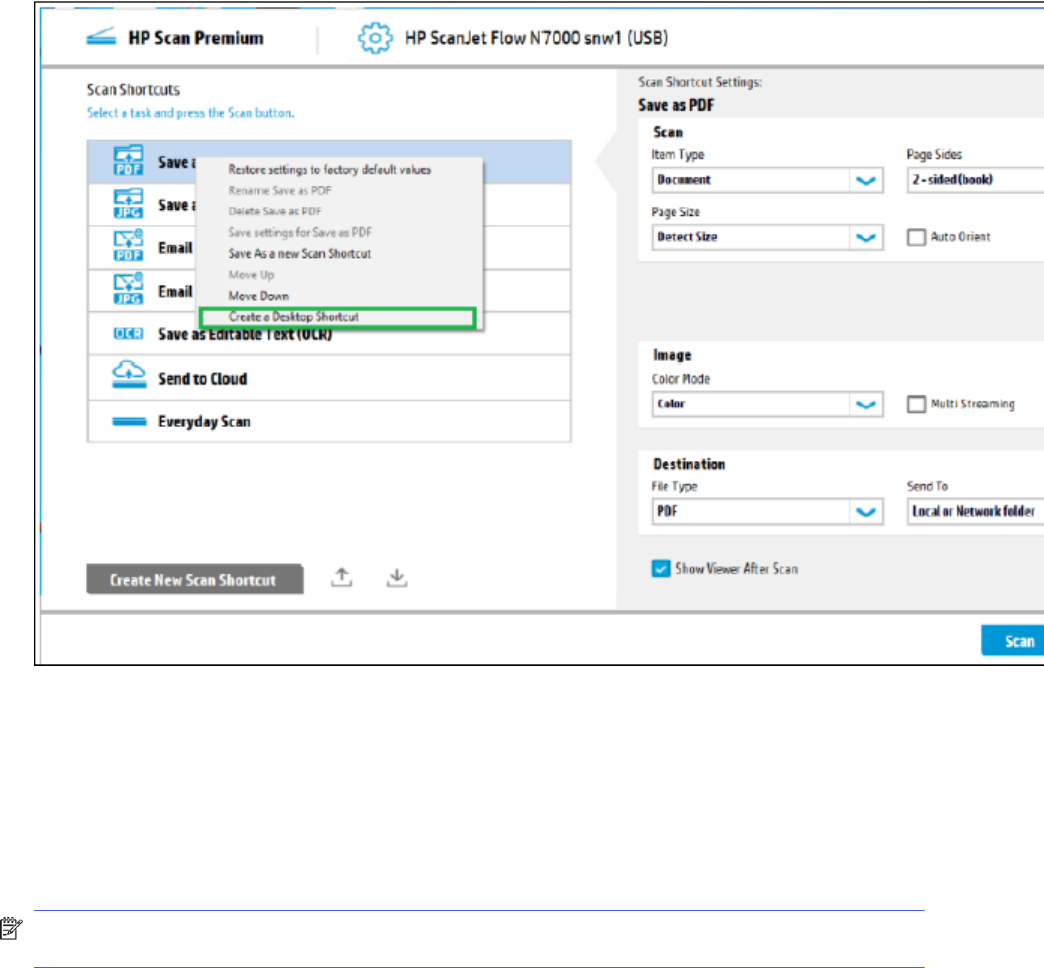
Desktop Shortcut of HP Scan shortcuts
Learn how to create a shortcut for a Scan Shortcut on the desktop.
The user has the option of creating desktop shortcuts of the available scan shortcuts in the UI. This can
be done for the user’s convenience to access these shortcuts directly from the user’s desktop.
Right click on any of the HP Scan Shortcuts, a context menu pops up. Select the option Create a Desktop
Shortcut. The shortcut is created and placed on the user’s desktop.
Desktop Shortcut of HP Scan shortcuts
29
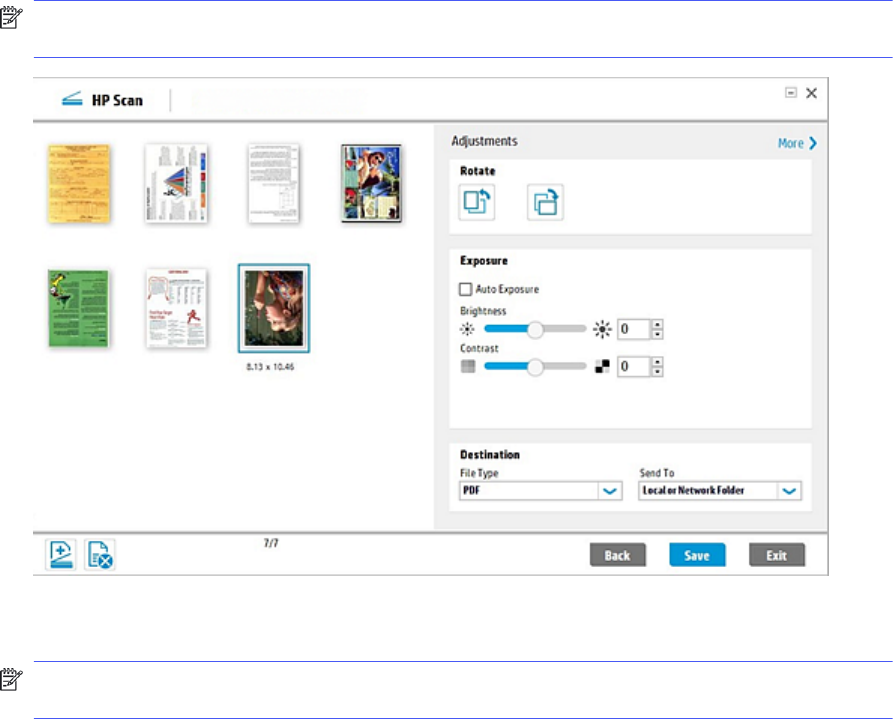
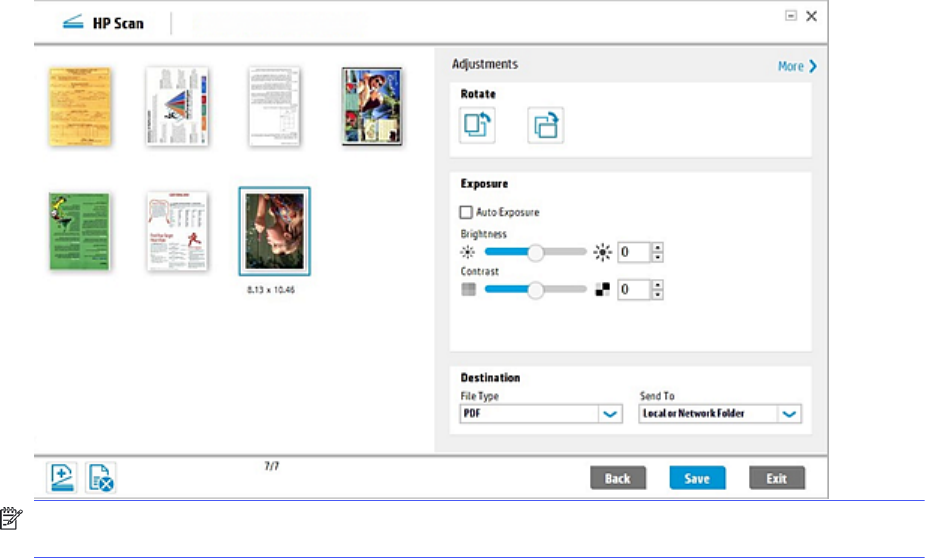
Overview of the scan preview window
The Scan preview window can be used to view and/or edit the scanned image(s) after scanning.
Show Viewer After Scan checkbox
The Scan preview window will display automatically after scanning documents when the Show Viewer
after scan check box is selected in the lower right pane of the home screen:
NOTE: If the Show Viewer After Scan check box is cleared, then only a scanning progress dialog will
display and no edits can be made.
30
Chapter 3 HP Scan App overview
Scan preview window
After selecting the Scan button, the Scan preview window displays:
Left pane of the scan preview window
Overview of the scan preview window
31
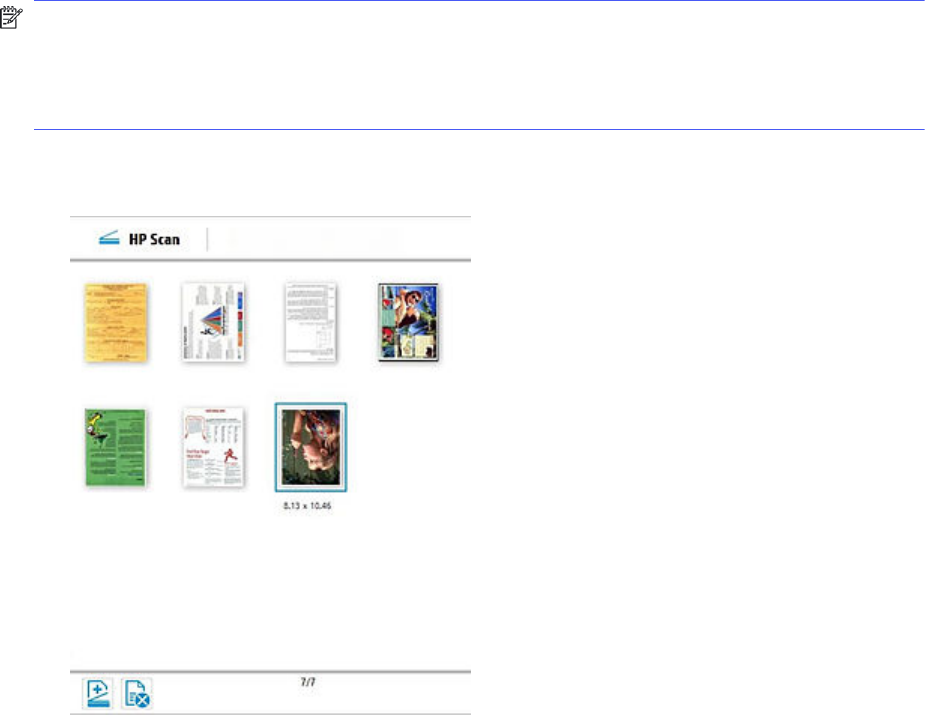
The left pane of the scan preview window has two primary views: Document view and Thumbnail view.
NOTE: Regardless of view, the size of each image is displayed below the corresponding thumbnail
when the page is selected. Values are shown in inches or centimeters based on the region installed.
The size of thumbnail images is remembered from session to session. To adjust the size of the
individual thumbnails, move the slider bar to increase or decrease thumbnail size. The grid will readjust
to display all images at the chosen size.
● Thumbnail view - Displays a set of scanned documents as an array of thumbnails, one for each of
the pages scanned. This is the default view.
● Document view - Displays a document or set of documents in a list of thumbnails in the far left
pane with a single document view area in the center. Changes applied in this view apply to only one
page at a time. The Single Image View consists of a single wide thumbnail strip, a single image view
area, and a basic adjustments panel (right pane). To view a page in the center view area, click the
thumbnail in the left pane. To view documents in a list of large preview images, toggle the view icon.
32
Chapter 3 HP Scan App overview
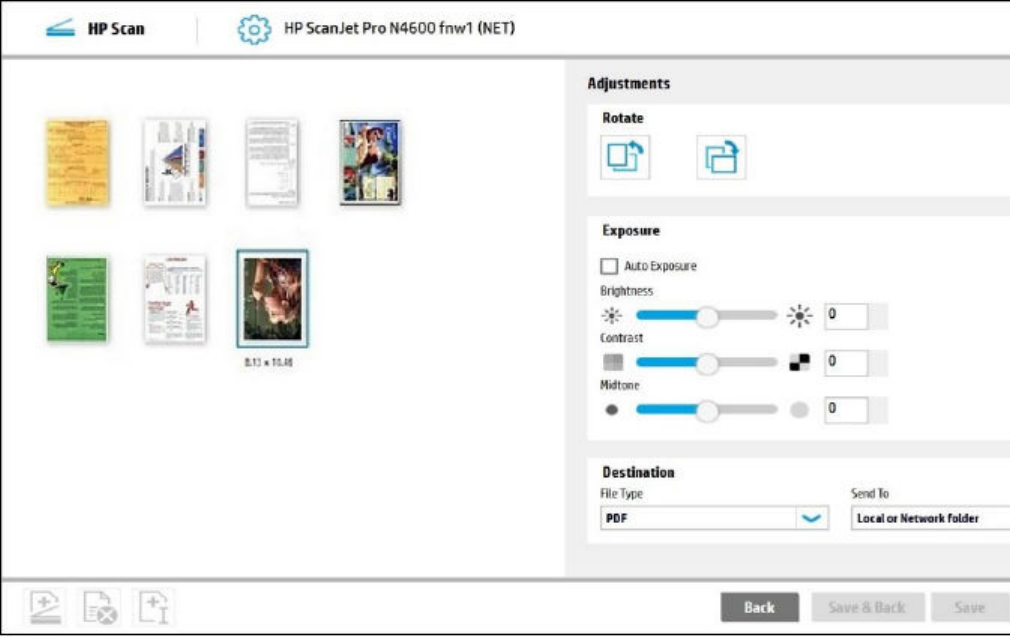
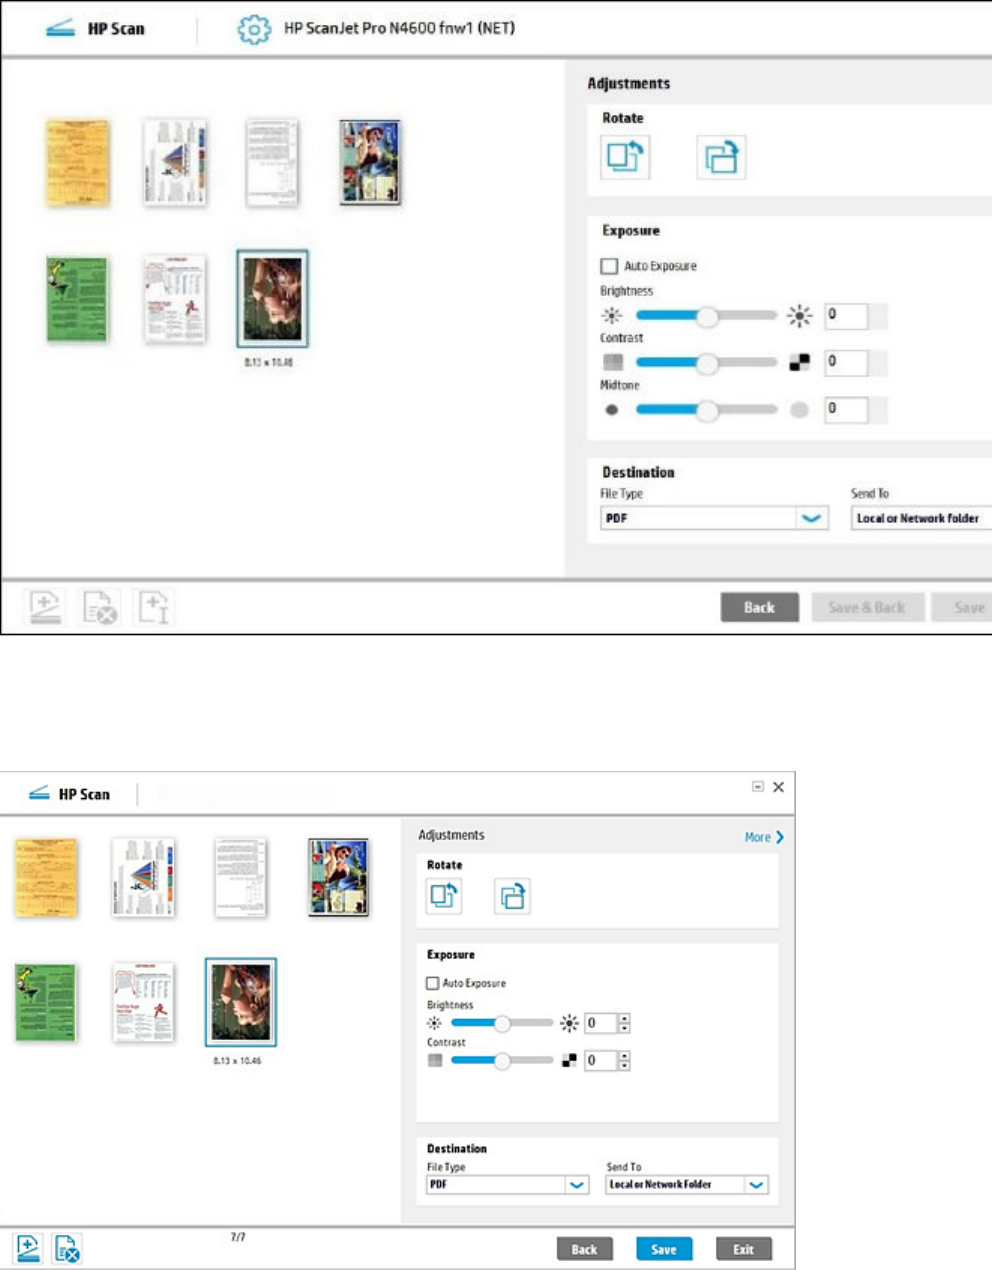
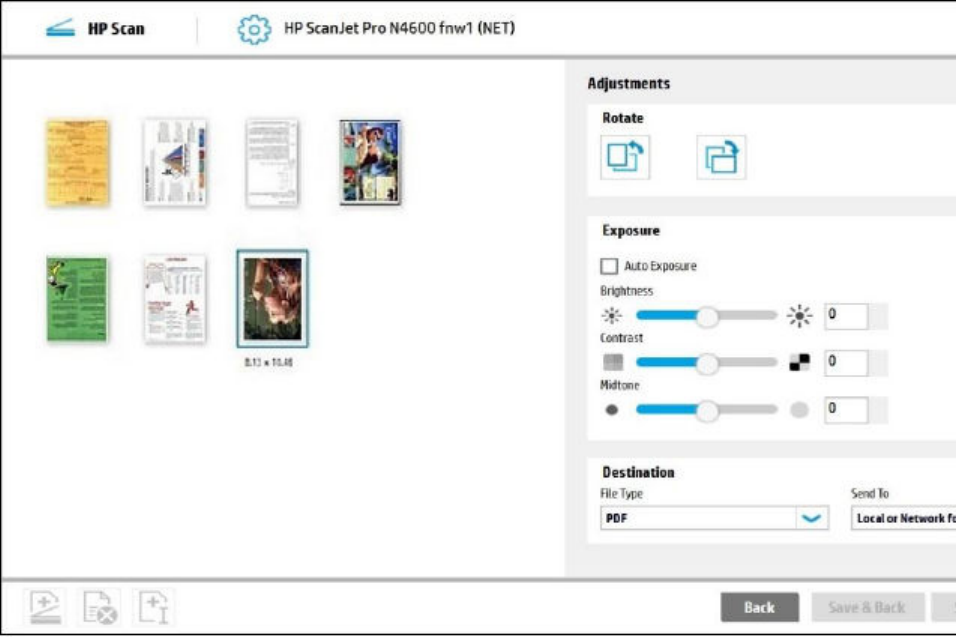
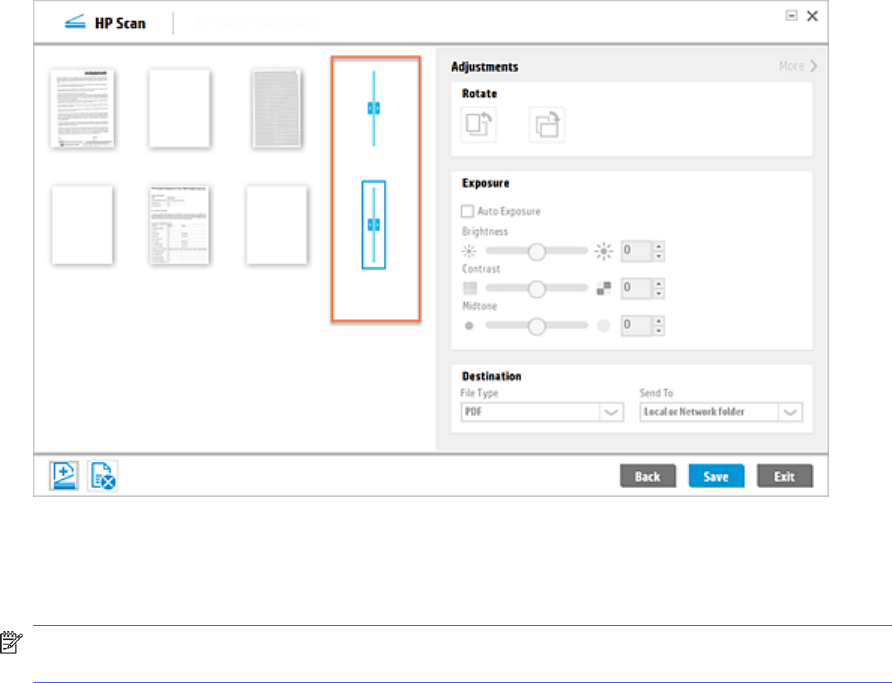
Right pane of the scan preview window
The right pane of the scan preview window provides a basic adjustments area used to edit the scanned
pages before saving them. When adjustment settings are changed, they apply only to the selected
pages.
Overview of the scan preview window
33
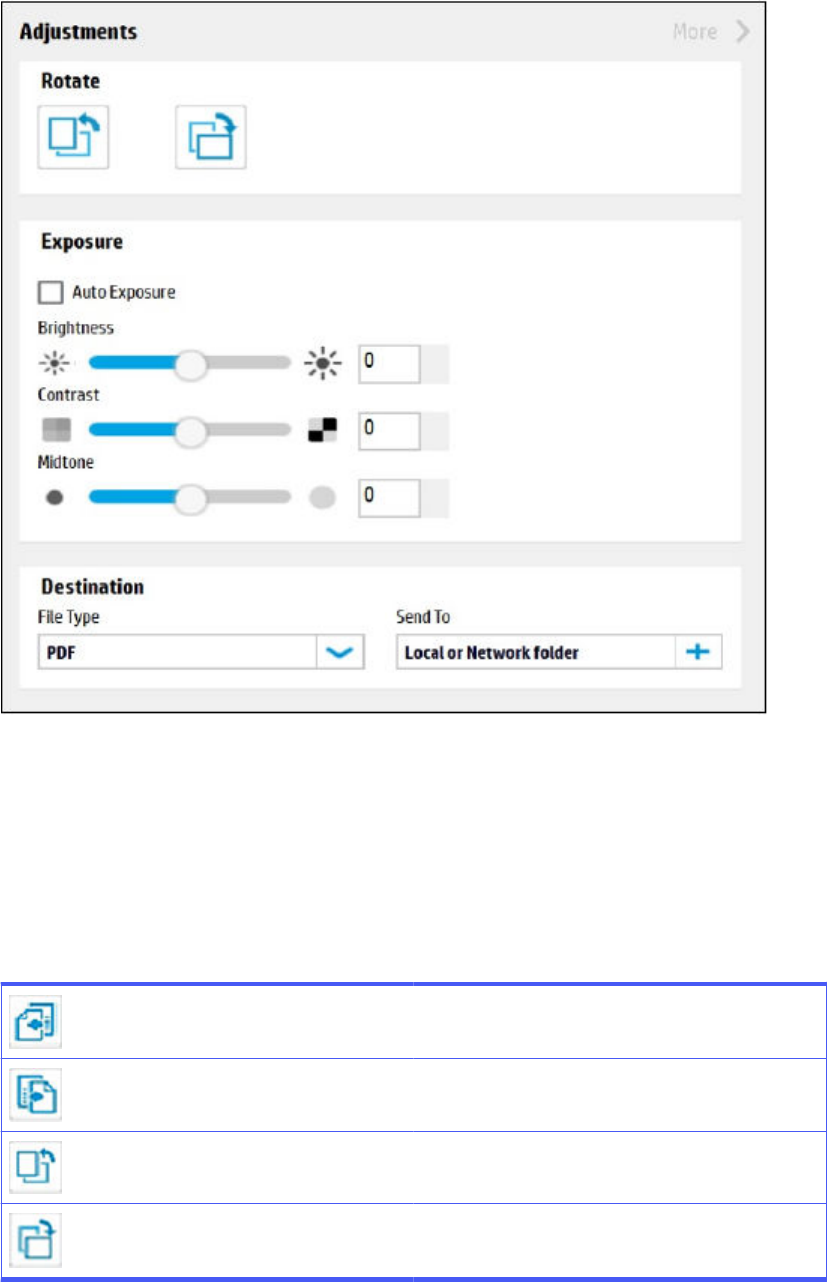
Overview of the editing tools
The Adjustments pane in the Scan Preview window is used to make basic edits to the scanned pages
using either the thumbnail and/or the document view.
Editing tools
The following editing tools display as icons in the scan preview window and some other areas of the user
interface:
Select to scroll left to view additional scanned pages in
the scan preview window.
Select to scroll left to view additional scanned pages in
the scan preview window.
Select to rotate the page 90° to the left. This cannot be
undone.
Select to rotate the page 90° to the right. This cannot be
undone.
34 Chapter 3 HP Scan App overview

Select to crop the selected page in the zoom scan
preview window. This option is only available in the zoom
view.
Select to undo a crop operation in the zoom scan
preview window. This option is only available in the zoom
view.
Select to scan and add more pages from the ADF or
flatbed. Selecting this icon will revert to the scan settings
panel view.
Select to mark a scanned page for deletion in the scan
preview window. Pages marked for delete are indicated
by an 'X' and will not be included in the final processing.
Select to insert a page break or separator between
pages or jobs.
User interface buttons
The following buttons are used to interface with the app:
Back Use this button to return to the HP Scan home screen or
main dialog.
Cancel Select this button to cancel the scan and return to the
Done Select this button to save and send images to the TWAIN
application.
Exit Select this button to exit and close the application.
Save Select this button to save the scan to a local or network
folder. This button will vary depending on the destination
selected.
Scan Select this button to start a scan.
Send Select this button to save the scan, and to send via
E-mail or E-mail SMTP. This button will vary depending
on the destination selected.
Upload Select this button to save the scan, and to upload it to a
selected destination such as SharePoint. This button will
vary depending on the destination selected.
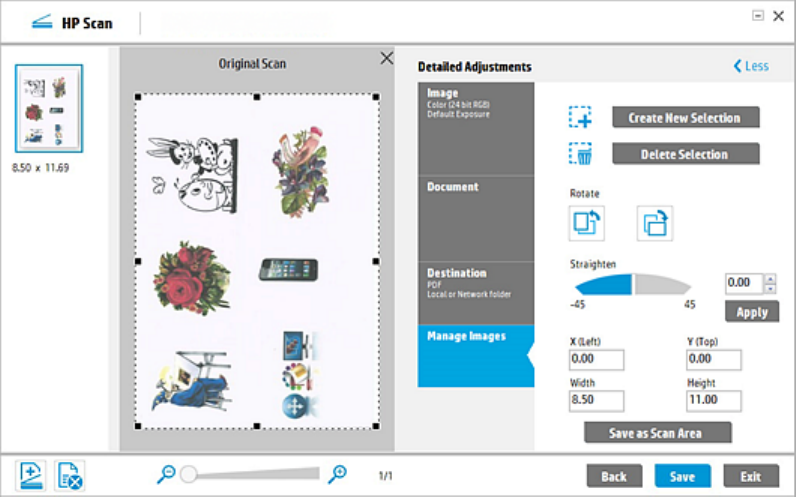
Overview of the Detailed Adjustments settings
The Detailed Adjustments settings are available in the Scan Preview window.
In the scan preview window, the More toggle in the upper right of the Adjustments pane can be used to
expand or collapse the Detailed Adjustment options.
When this view is opened, it covers up the basic adjustments area.
NOTE: When detailed adjustment options are changed, they apply to only the selected thumbnail(s)
and can only be changed before saving the scanned pages.
Overview of the Detailed Adjustments settings
35
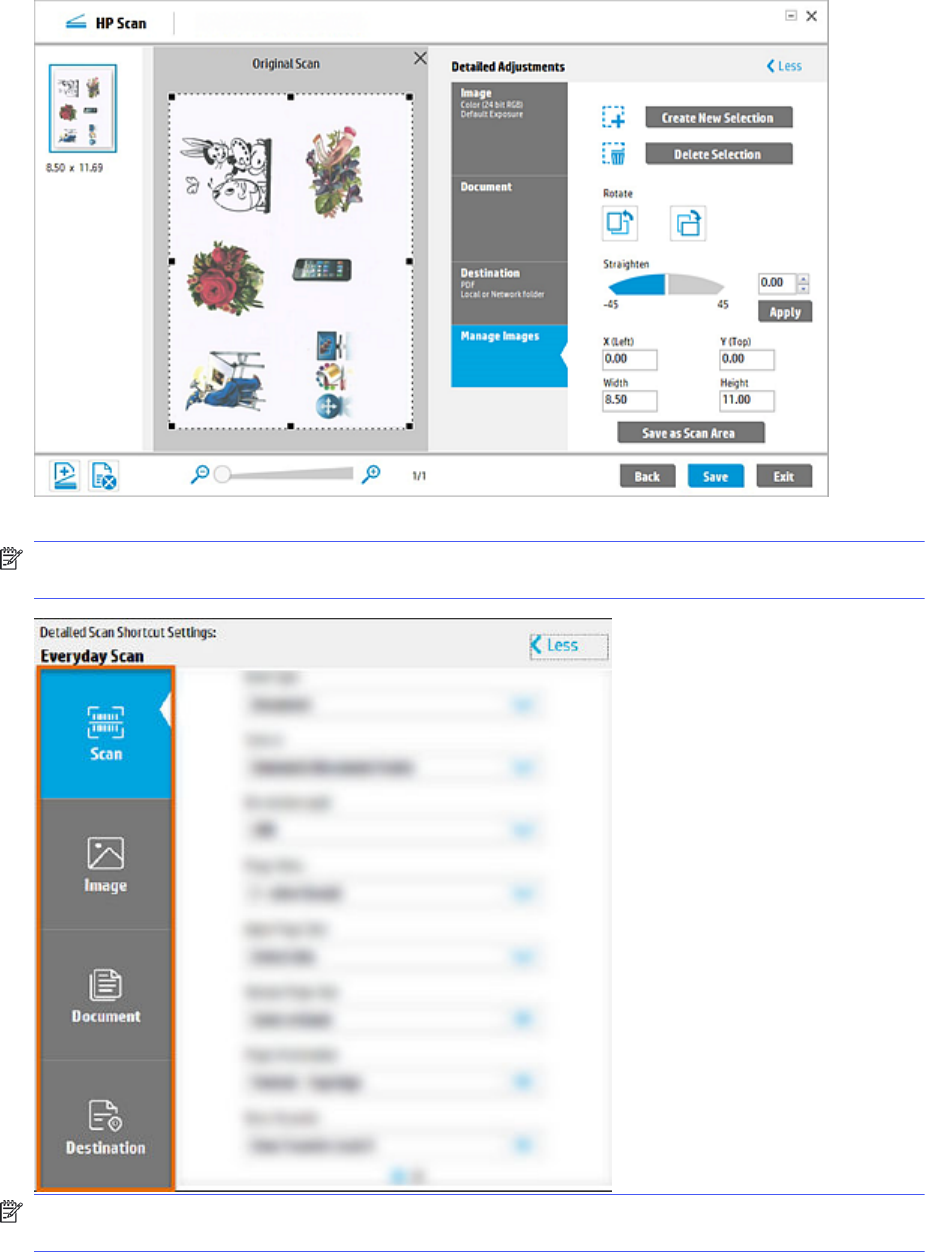
The Detailed Adjustments view includes the following tabs:
NOTE: The detailed scan settings available on these tabs will vary depending on the scan shortcut
selected in the left pane.
NOTE: If a setting is enabled, then a short description of the applied setting is listed below the name
of the tab. If a setting is not enabled, no summary information will display on that tab.
● Scan tab - Use to adjust scan settings such as type of scan, page sides, page size, page orientation,
and more. These settings cannot be modified after clicking the Scan button.
36
Chapter 3 HP Scan App overview

● Image tab - Use to adjust the appearance of a single image by changing the exposure, dither, or
threshold settings, or to select a specific color from the scanned page using the Multi-color dropout
option. These settings can be adjusted after clicking the Scan button.
NOTE: The available exposure controls change depending on the current image or thumbnail
selected. For example, if a Color or Gray image is selected, the exposure controls are displayed. For
Halftone images, the exposure controls and the dither control are displayed. If a Black/White image
is selected, the threshold controls are displayed.
● Document tab - Use to adjust the features for a single image in a document scan or to improve
the output appearance of a scanned image. These settings can be adjusted after clicking the Scan
button.
NOTE: This tab will be inactive if the Item Type selected is Photo.
● Destination tab - Use to adjust the destination location for an entire scan job. These settings do not
apply to a specific image.
● Manage Images tab - Use to adjust image features for a single image using the Original Scan view
(the raw image as scanned).
To return to the Basic Adjustments pane, click the Less toggle in the upper right pane.
Overview of the Detailed Adjustments settings
37
Use the HP Scan app4
Use the steps in this chapter to learn how to use the HP Scan app.
Open the HP Scan app
Use one of two methods to open the HP Scan app and the scan interface.
Follow these steps to open the HP Scan app and the scan interface.
1. To open the app, use either the Start menu or the desktop shortcut:
● Double-click the HP Scan Universal Desktop Control (UDC) icon on the desktop. This was
automatically created after installation; OR
● From the Start menu, open All Programs, and select HP Scan.
The HP Scan app opens.
2. To open the scan interface, select Scan a Document or Photo.
38
Chapter 4 Use the HP Scan app
The scan interface home screen displays.
Scan a document or photo and use scan preview to edit pages
Learn how to scan a document or photo using EveryDay Scan, how to adjust the Shortcut settings
before a scan, and how to use the scan preview window to edit scanned pages and/or settings after
scanning.
Scan a document or photo and use scan preview to edit pages
39

1. Open the HP Scan app.
2. On the Scan tab, select Scan a Document or Photo.
The scan interface opens.
3. Place a set of documents in the document feeder or on the scanner flatbed.
4. On the scan interface home screen under Scan Shortcuts in the left pane, select EveryDay Scan.
40
Chapter 4 Use the HP Scan app
5. Make any desired changes to the basic Scan Shortcut changes in the right pane prior to scanning.
6. Select the Show Viewer after scan check box.
7. Select Scan.
8. After scanning, edit the pages using the basic Adjustments settings in the right pane of the scan
preview window.
NOTE: Any changes applied in the basic Adjustments settings will apply to all thumbnails listed in
the left pane.
9. If desired, apply more advanced edits to the pages by clicking the More toggle and using the
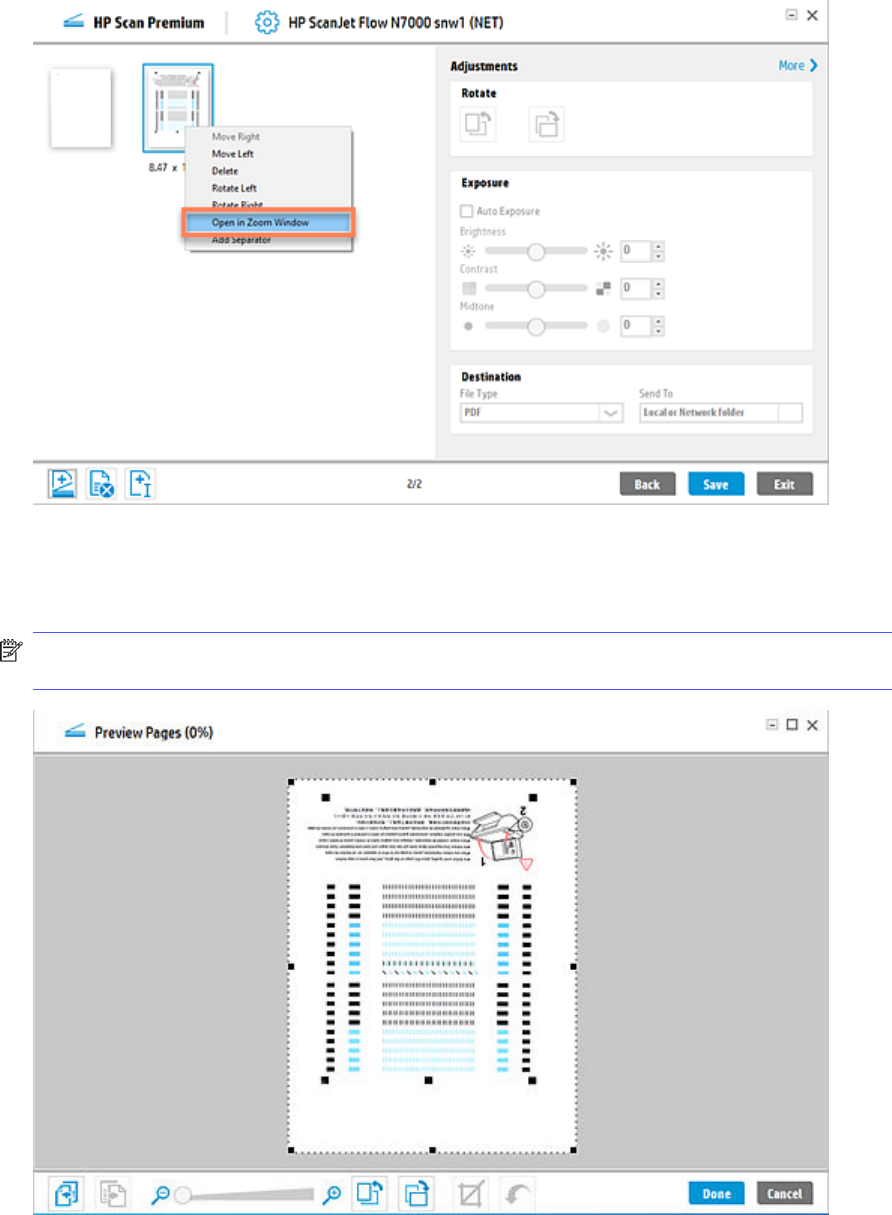
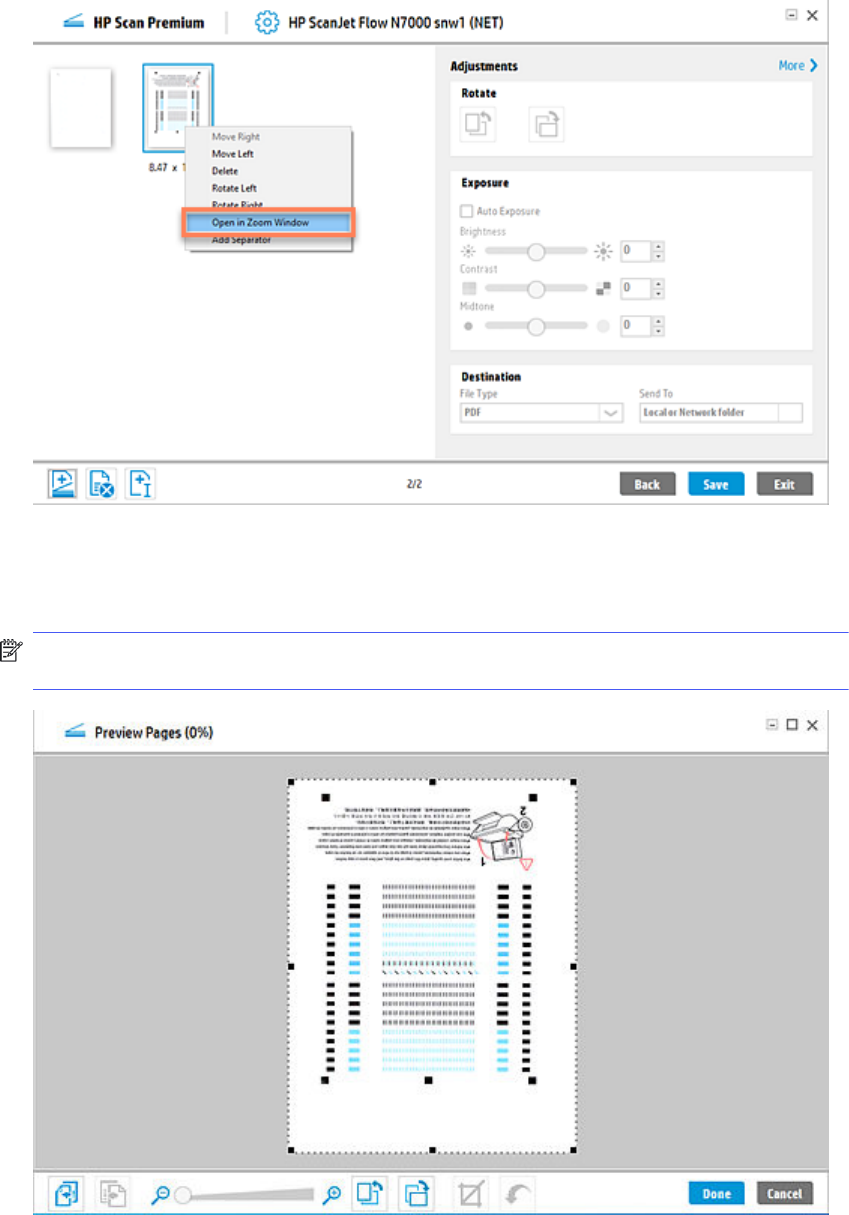
Detailed Adjustments settings, or by right-clicking the image and selecting Open in a Zoom window.
NOTE: Edits in the Detailed Adjustments or full screen zoom windows are applied one page at a
time.
Scan a document or photo and use scan preview to edit pages
41
10. When finished, select Save.
Scan to .jpg or .pdf format and save to local destination
To save a scan as a .jpg or .pdf format and save it to a local or network folder destination, follow these
steps.
42
Chapter 4 Use the HP Scan app

1. Open the HP Scan app.
2. On the Scan tab, select Scan a Document or Photo.
The scan interface opens.
3. Place a set of documents in the document feeder or on the scanner flatbed.
Scan to .jpg or .pdf format and save to local destination
43

4. On the scan interface home screen under Scan Shortcuts in the left pane, select either the Save as
PDF or Save as JPEG.
5. Make any desired changes to the basic Scan Shortcut changes in the right pane prior to scanning.
6. Select Scan.
7. If prompted, type a name for the .jpeg or .pdf output.
Scan as .jpg or .pdf format and email to local destination
To save a scan as a .jpg or .pdf format and email it to an email recipient, follow these steps.
44
Chapter 4 Use the HP Scan app

1. Open the HP Scan app.
2. On the Scan tab, select Scan a Document or Photo.
The scan interface opens.
3. Place a set of documents in the document feeder or on the scanner flatbed.
Scan as .jpg or .pdf format and email to local destination
45
4. On the scan interface home screen under Scan Shortcuts in the left pane, select either the Email
as PDF or Email as JPEG.
5. Make any desired changes to the basic Scan Shortcut changes in the right pane prior to scanning.
6. Select Scan.
7. If prompted, type or select an email recipient.
Scan documents into editable text
To scan a document into editable text, use the Save as Editable Text (OCR) Scan Shortcut feature in the
HP Scan app.
NOTE: When scanning using the editable text option, the resolution will automatically default to 300
dpi. This is the minimum resolution required for OCR file types. This option is available only when the full
web pack is installed.
46
Chapter 4 Use the HP Scan app
1. Open the HP Scan app.
2. On the Scan tab, select Scan a Document or Photo.
The scan interface opens.
3. Place a set of documents in the document feeder or on the scanner flatbed.
4. On the scan interface home screen under Scan Shortcuts, select Save as Editable Text (OCR).
5. Make any desired changes to the basic Scan Shortcut changes in the right pane prior to scanning.
Scan documents into editable text
47

6. Select Scan.
Store a scan job using the Job Reservation feature
To scan a job and assign it a storage PIN for security purposes (optional), use the Job Reservation
feature.
1. Open the HP Scan app.
2. On the Scan tab, select Scan a Document or Photo.
The scan interface opens.
3. Select a Scan Shortcut for the job type and destination where you want to store the scan.
48
Chapter 4 Use the HP Scan app
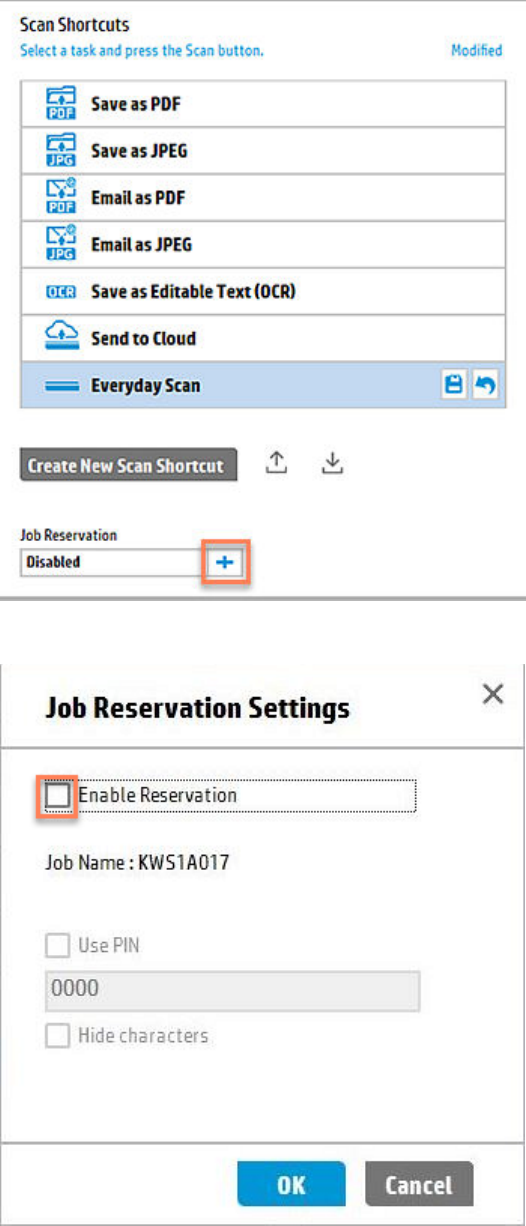
4. From the Home screen in the left pane under the list Scan Shortcuts, click the plus sign to expand
the Job Reservation option.
5. Select the Enable Reservation check box to enable the feature.
Store a scan job using the Job Reservation feature
49
6. To assign a PIN for security purpose, select the Use PIN check box, type a numeric PIN (up to four
digits). This step is optional.
7. When finished, select OK. A Job Name is automatically assigned and notification displays.
8. Adjust the Scan Shortcut settings in the right pane and when finished, select Scan.
9. To release the reserved job scan from the front panel of the scanner, select the Job Name, and then
type the PIN (if you created one).
Save scanned documents with an auto-generated file name
To save scanned documents with an auto-generated file name, use the Intelligent File Naming feature in
Scan Shortcuts.
This feature allows the user to save the scanned document with an auto-generated file name. The
document contains data based on Pepper Teams Intelligent File-naming feature. The file names are
generated using algorithms which can identify multiple keywords and/or headers in the document,
based on which file name is fetched.
Currently, the file-naming feature is available with the following options:
● Base name
● Date & Time
● Document Counter
● Batch Counter
● Barcode value
● Zonal Text/Barcode
50
Chapter 4 Use the HP Scan app

1. Open the HP Scan app.
2. On the Scan tab, select Scan a Document or Photo.
The scan interface opens.
3. Place a set of documents in the document feeder or on the scanner flatbed.
4. On the scan interface home screen under Scan Shortcuts, select a Scan Shortcut such as
Everyday Scan.
5. Select the Destination tab in the right pane.
Save scanned documents with an auto-generated file name
51
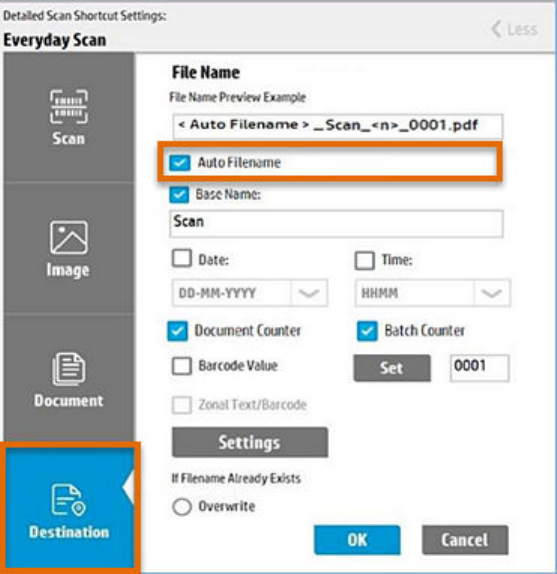
6. Select the Auto Filename check box.
7. Make any other desired changes and then click OK to save.
Use the Auto Classification feature for scanned documents
To identify scanned documents and separate them into different types like Photo, Document, Receipt,
and Business Card, use the Auto Classification feature.
52
Chapter 4 Use the HP Scan app
1. Open the HP Scan app.
2. On the Scan tab, select Scan a Document or Photo.
The scan interface opens.
3. Place a set of documents in the document feeder or on the scanner flatbed.
4. On the scan interface home screen under Scan Shortcuts, select a Scan Shortcut such as Save as
PDF.
5. Select the Destination tab in the right pane.
6. Select the Auto Classification check box.
NOTE: When Auto Classification is enabled, a new settings window will display in which users can
set a pre-defined folder for each type of the document in Settings window.
Use the Auto Classification feature for scanned documents
53
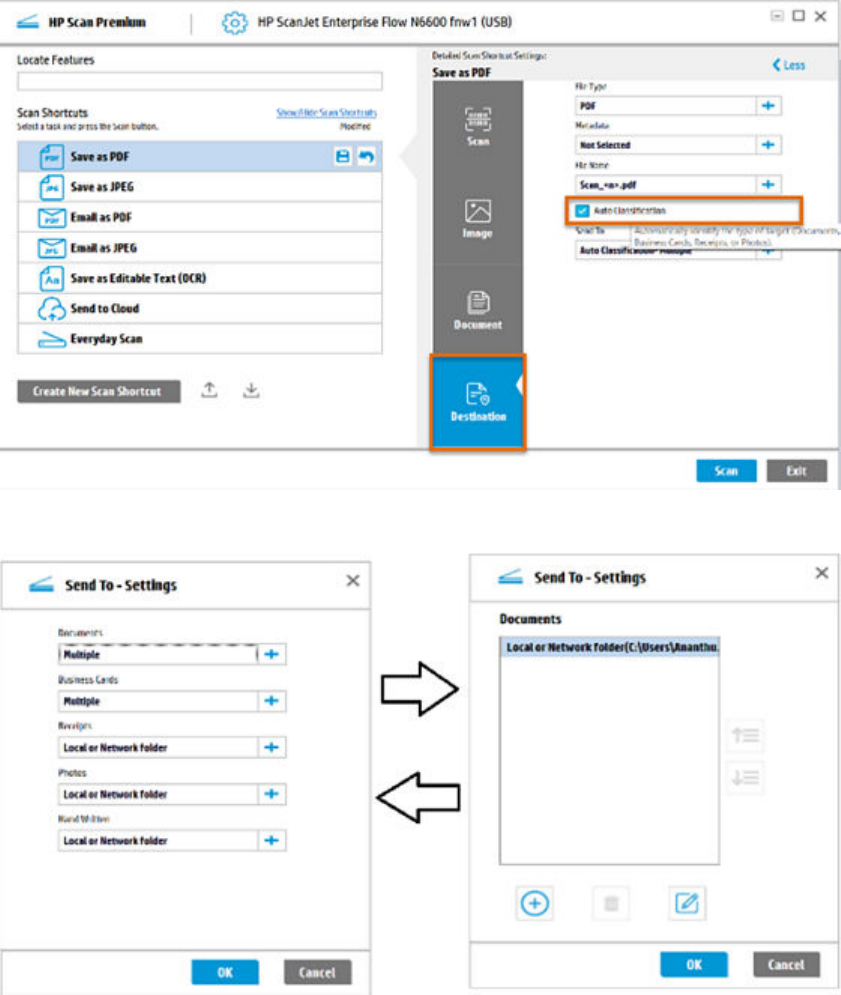
7. Before scanning, select a separate folder type for each document and click OK.
8. Select Scan.
Count scan jobs using the Batch Counter feature
To count scan jobs per Shortcut, use the Batch Counter feature in Scan Shortcuts.
The Batch Counter feature adds a value for each shortcut starting from 0001. For every scan job done,
the batch counter increments by one and the new value will be reflected after a successful batch scan.
Each short cut will have its own Batch Counter values.
The set button will reset the value to either 0001 or user defined value. The sequence of Batch Counter
in the file name can be changed from the Sequence settings window.
54
Chapter 4 Use the HP Scan app
The Batch Counter value will be displayed in the File Name Preview as shown below:
1. Open the HP Scan app.
2. On the Scan tab, select Scan a Document or Photo.
The scan interface opens.
3. Place a set of documents in the document feeder or on the scanner flatbed.
4. On the scan interface home screen under Scan Shortcuts, select a Scan Shortcut such as
Everyday Scan.
5. Select the Destination tab in the right pane.
Count scan jobs using the Batch Counter feature
55
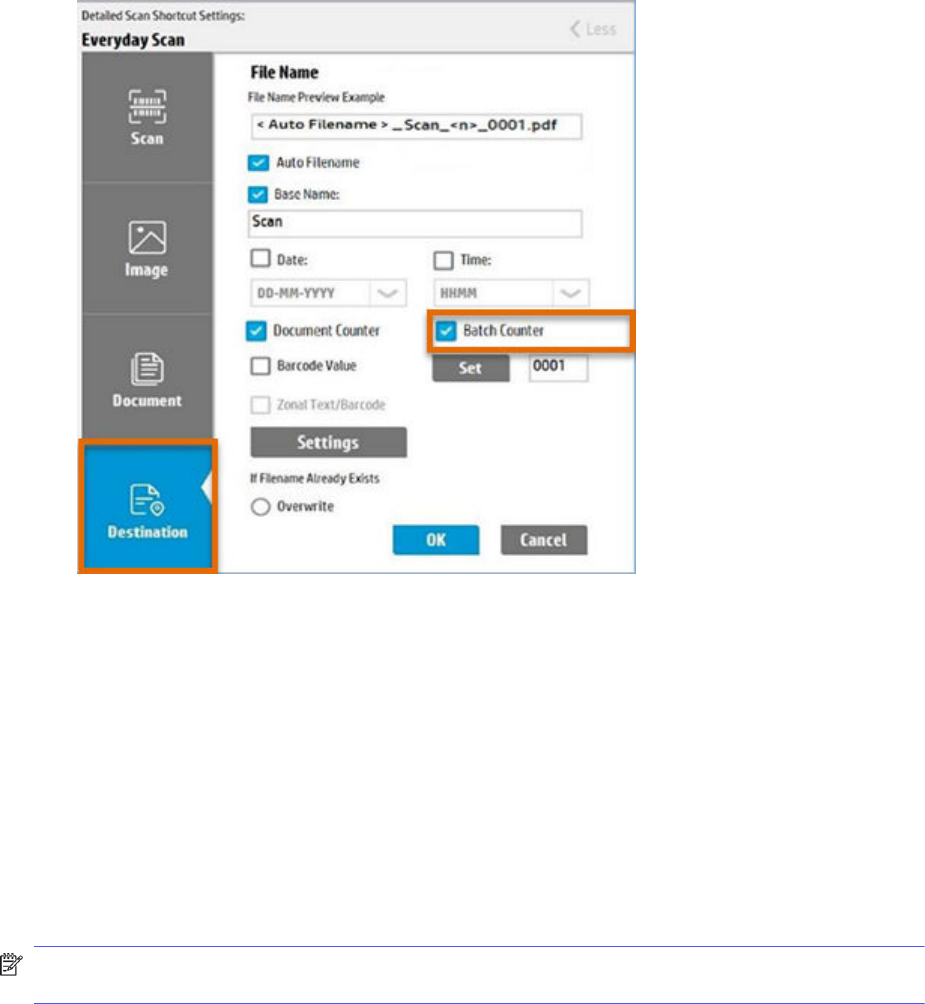
6. Select the Batch Counter check box.
7. If preferred, change the default 0001 value the starting value of your choice and then click Set.
8. Make any other desired changes and then click OK to save.
9. Select Scan.
Enable multi-page scanning
To scan multiple pages to a single file, enable the Multi Page Detect option on the Scan tab.
This feature captures multiple documents that are loaded on to the flatbed in a single scan and
can apply enhancements individually to each page. This feature will be useful when multiple small
documents like cards or receipts are to be saved as separate documents. The minimum target size
required is 1 x 1 inches.
NOTE: This option is only applicable when the selected scanner source is Flatbed. There is a limitation
to detect the pages especially the white targets on white background.
56
Chapter 4 Use the HP Scan app

1. Open the HP Scan app.
2. On the Scan tab, select Scan a Document or Photo.
The scan interface opens.
3. Place a set of documents in the document feeder or on the scanner flatbed.
4. On the scan interface home screen under Scan Shortcuts, select a Scan Shortcut such as
Everyday Scan.
5. Select the Scan tab in the right pane.
Enable multi-page scanning
57
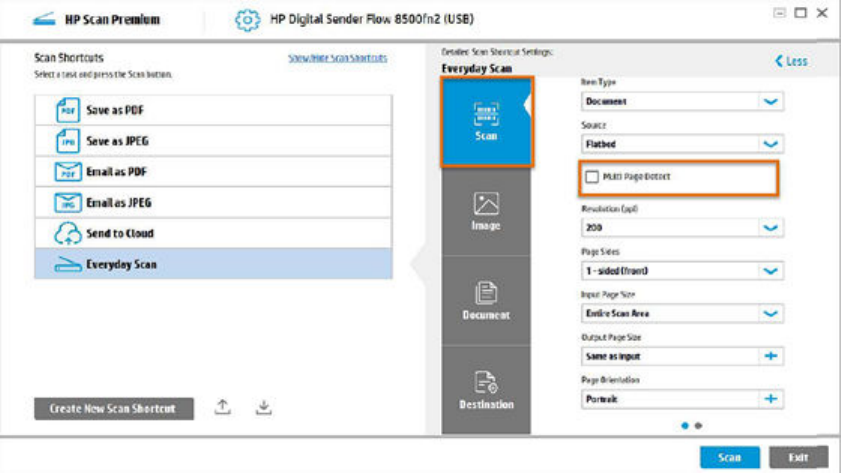
6. Select the Multi Page Detect checkbox.
7. Make any other desired changes and select Scan.
Reduce vertical lines or streaks on scanned images
To reduce black or white vertical lines and streaks on scanned images, use the Reduce Vertical Streaks
feature.
If black or white vertical lines appear when scanning from the ADF or flatbed due to scanner hardware
issues, this feature provides the option to remove the vertical streaks from the scanned images.
58
Chapter 4 Use the HP Scan app

1. Open the HP Scan app.
2. On the Scan tab, select Scan a Document or Photo.
The scan interface opens.
3. Place a set of documents in the document feeder or on the scanner flatbed.
4. On the scan interface home screen under Scan Shortcuts, select a Scan Shortcut such as Save as
PDF.
5. Select the Document tab in the right pane.
Reduce vertical lines or streaks on scanned images
59
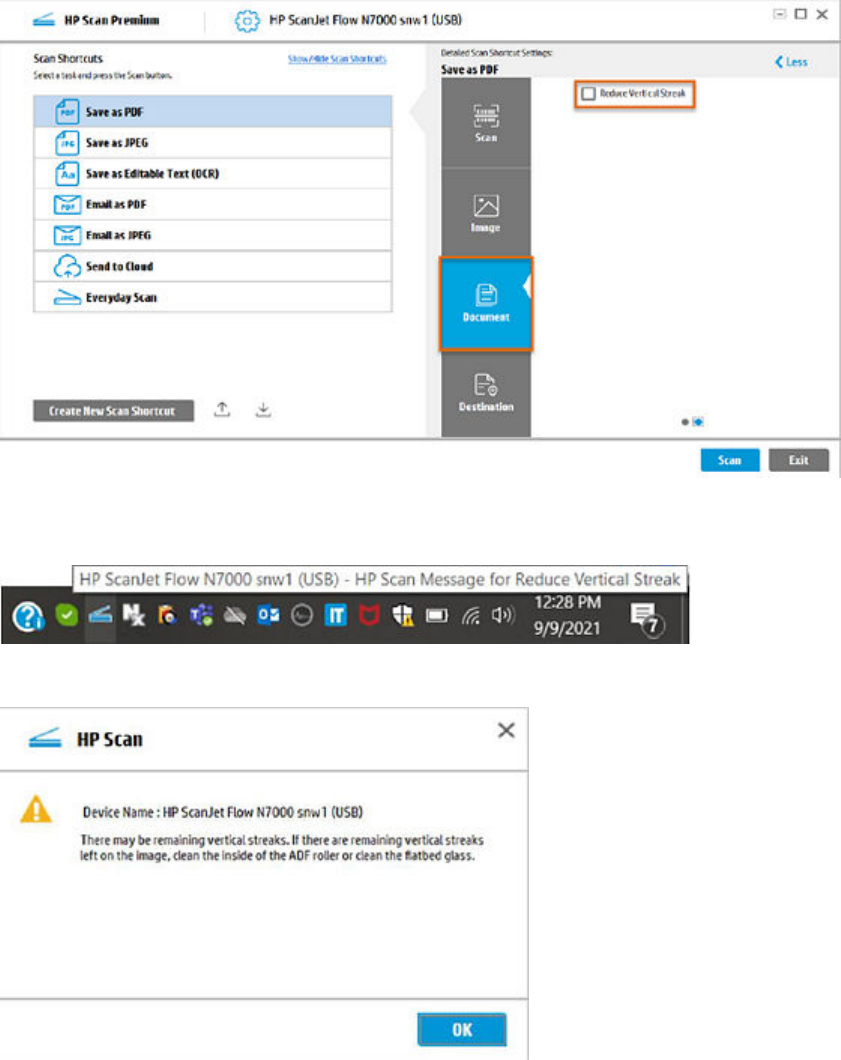
6. To enable this feature, select the Reduce Vertical Streak check box before scanning.
7. On scanning a document with Reduce Vertical Streak feature enabled, the HP Scan icon will be
displayed in the tray notification after showing the preview.
8. After double-clicking the tray icon, a message is displayed. Click OK.
9. If any vertical streaks are seen on the image after this operation, either clean the flatbed glass or
clean the roller on the inside of the Automatic Document Feeder (ADF), depending on the product
type.
Correct folds, curves, or warping in scanned book pages
To correct folds, curves, or warping in scanned book pages, use the Book setting from Scan Shortcuts.
60
Chapter 4 Use the HP Scan app
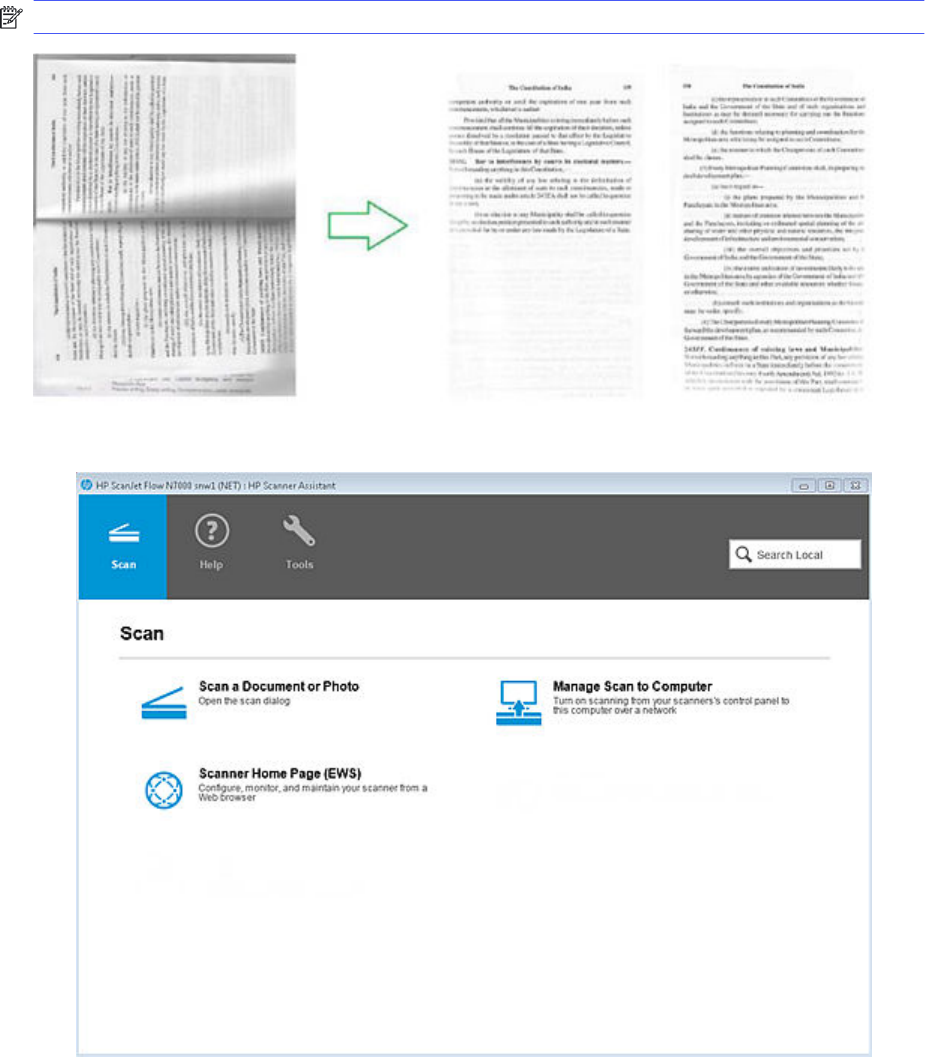
This feature flattens the warped/curved pages scanned and removes the middle-folded area in the
book. The sample input and expected output is shown below.
NOTE: This feature is available only in Flatbed scanners.
1. Open the HP Scan app.
2. On the Scan tab, select Scan a Document or Photo.
The scan interface opens.
3. Place a set of documents in the document feeder or on the scanner flatbed.
4. On the scan interface home screen under Scan Shortcuts, select a Scan Shortcut such as Save as
PDF.
Correct folds, curves, or warping in scanned book pages
61

5. Select the Book option from the Item Type list.
6. Make any other desired changes and select Scan.
Find features available in the HP Scan app
Use the Locate Features search field to find features available in the HP Scan app.
62
Chapter 4 Use the HP Scan app

1. Open the HP Scan app.
2. On the Scan tab, select Scan a Document or Photo.
The scan interface opens.
3. Place a set of documents in the document feeder or on the scanner flatbed.
4. On the scan interface home screen above Scan Shortcuts, use the Locate Features field to search
for and find a scan feature.
Find features available in the HP Scan app
63
After typing a desired feature in the text box, the path to locate that feature will be displayed in the
edit box.
64 Chapter 4 Use the HP Scan app
Use the scan preview window to edit
scanned pages
5
The scan preview window can be used to preview and edit scanned pages after scanning.
View scanned pages in a thumbnail grid in the scan preview
window
The thumbnail grid view enables basic adjustments page by page using the right pane of the scan
preview window.
NOTE: The size of selected images is shown below the corresponding thumbnail. Values are shown in
inches or centimeters based on the installed locale.
1. Open the HP Scan app.
2. Place a set of documents in the document feeder or on the scanner flatbed.
3. Select the Show Viewer after scan check box.
4. Select Scan.
Use the scan preview window to edit scanned pages
65
The documents are displayed as an array of thumbnails in the scan preview window. This Thumbnail Grid
View is the default preview when the Show Viewer after scan check box is selected.
NOTE: To view a thumbnail in the single image view, double-click the single thumbnail to open it. Click
the 'X' in the upper right corner of the window to close it and return to the thumbnail preview.
View scanned pages in a document list in the scan preview
window
The document list view enables basic adjustments page by page using the right pane of the scan
preview window.
66
Chapter 5 Use the scan preview window to edit scanned pages
1. Open the HP Scan app.
2. Place a set of documents in the document feeder or on the scanner flatbed.
3. Select the Show Viewer after scan check box.
4. Click the Document/Thumbnail icon to toggle to the document view. A list of document document
thumbnails is displayed in the Document view of the scan preview window.
NOTE: The Thumbnail Grid view is the default preview when the Show Viewer after scan check box
is selected.
View scanned pages in a document list in the scan preview window
67
5. To view a document in the single image view, double-click the image to open it. Click the 'X' in the
upper right corner of the window to close it and return to the list preview.
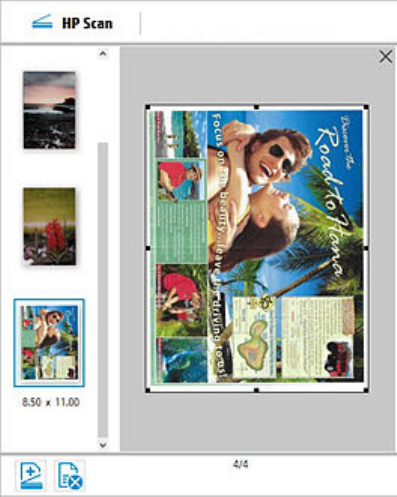
View a scanned page using zoom mode in the scan preview
window
The zoom option enables basic adjustments using a full screen view in the scan preview window. The
zoom feature allows the user to enlarge or reduce the image for editing purposes only.
68
Chapter 5 Use the scan preview window to edit scanned pages
1. Open the HP Scan app.
2. Place a set of documents in the document feeder or on the scanner flatbed.
3. Select the Show Viewer after scan check box.
4. Select Scan.
5. Select a thumbnail image, right-click, and then select Open in a Zoom window. The image opens in a
full screen view.
NOTE: You can also double-click the thumbnail image to open it in the zoom view for editing.
View a scanned page using zoom mode in the scan preview window
69
The image opens in a full screen view.
6. In the full screen view, use the slider bar to zoom in (enlarge) or zoom out (reduce) the image size for
editing purposes.
NOTE: Document separators and the “new image” thumbnail are not displayed in the zoom
preview window.
70
Chapter 5 Use the scan preview window to edit scanned pages

7. Use the zoom window tool icons to make any desired changes.
NOTE: The changes on each page must be saved separately. If you make any changes and
attempt to scroll without saving, a dialog prompt is displayed. If prompted, select Yes to save any
changes made in the current page preview before scrolling.
Select to rotate the page 90° to the left. This cannot
be undone.
Select to rotate the page 90° to the right. This cannot
be undone.
Select to crop the selected page in the zoom scan
preview window.
Select to undo a crop operation in the zoom scan
preview window.
8. Use the previous or next page icons to scroll and make any additional changes to other pages.
Select to scroll left to view additional scanned pages
in the scan preview window.
Select to scroll left to view additional scanned pages
in the scan preview window.
9. When finished, select Done.
Use the scan preview window to crop pages
After scanning pages, the preview window can be used to crop pages in the zoom view.
Use the scan preview window to crop pages
71

1. Open the HP Scan app.
2. Place a set of documents in the document feeder or on the scanner flatbed.
3. Select the Show Viewer after scan check box.
4. Select Scan.
5. Select a thumbnail image, right-click, and then select Open in a Zoom window.
NOTE: You can also double-click the thumbnail image to open it in the zoom view for editing.
72
Chapter 5 Use the scan preview window to edit scanned pages

The image opens in a full screen view.
6. In the full screen view, use the slider bar to zoom in (enlarge) or zoom out (reduce) the image size for
editing purposes.
NOTE: Document separators and the “new image” thumbnail are not displayed in the zoom
preview window.
Use the scan preview window to crop pages
73
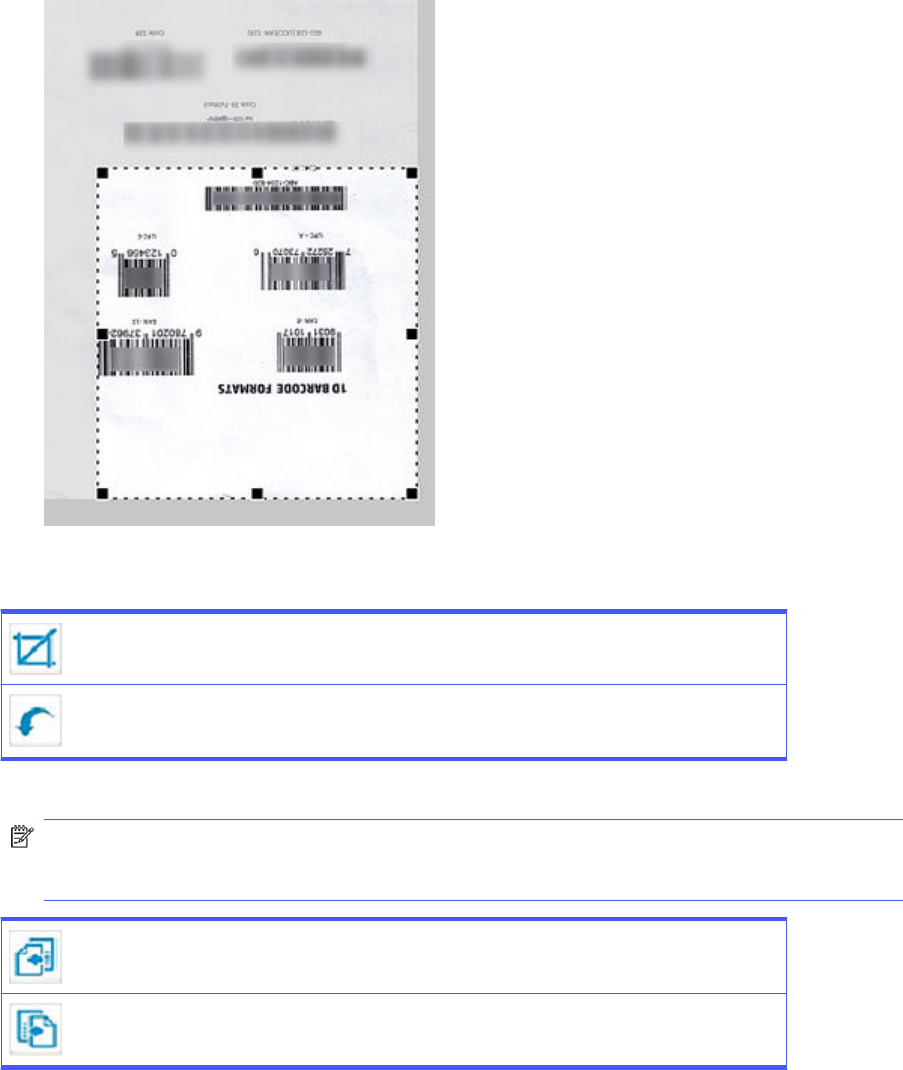
7. To crop an area of interest, use the mouse to select the area and then release the mouse. After
releasing the mouse, the crop option becomes available.
8. From the tools at the bottom of the screen, select the Crop icon to crop to the selected area. To
undo and start again, select the Undo icon.
Select to crop the selected page in the zoom scan preview window.
Select to undo a crop operation in the zoom scan preview window.
9. Use the previous or next page icons to scroll and make any additional changes to other pages.
NOTE: The changes on each page must be saved separately. If you make any changes and
attempt to scroll without saving, a dialog prompt is displayed. When prompted, select Yes to save
any changes made in the current page preview before scrolling.
Select to scroll left to view additional scanned pages in the scan preview window.
Select to scroll left to view additional scanned pages in the scan preview window.
10. Select Done when finished to exit the zoom window.
Use the scan preview window to delete or remove pages
After scanning pages, the preview window can be used to remove pages and/or images, or to mark them
for deletion.
74
Chapter 5 Use the scan preview window to edit scanned pages
After scanning pages, the preview window has an icons that enable the user to remove pages, or
options to mark them for deletion.
1. Open the HP Scan app.
2. Place a set of documents in the document feeder or on the scanner flatbed.
3. Select the Show Viewer after scan check box.
4. Select Scan.
5. Use the icons in the lower left of the window to mark an image or page for deletion. Pages marked
for deletion are indicated with an 'X' and will not be included in the final processing.
● Remove page or image icon - Select the page and then click the icon to remove the page. OR
● Delete icon - Select the page and then click the icon to remove the page. OR
● Right-click the page and select Delete to mark the page for deletion. OR
NOTE: To unmark a page for deletion, right-click the image, and then select the option to
remove the flag.
● Select the page and then select Delete on the keyboard.
6. When finished making adjustments, click Save.
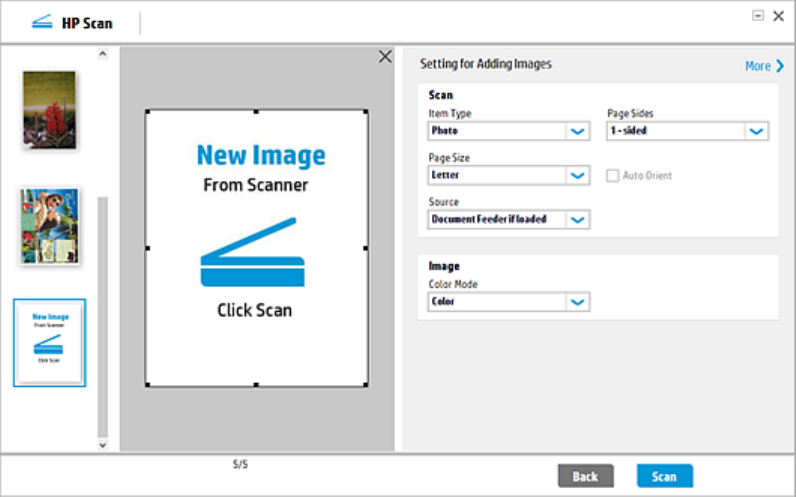
Use the scan preview window to add pages or images
After scanning pages, the preview window can be used to add pages or images.
Use the scan preview window to add pages or images
75
After scanning pages, the preview window has icons that enable the user to insert pages. It will
determine where additional pages are placed in the array of scanned pages. This icon is always initially
shown at the end.
1. Open the HP Scan app.
2. Place a set of documents in the document feeder or on the scanner flatbed.
3. Select the Show Viewer after scan check box.
4. Select Scan.
5. Use the icons in the lower left of the window to add a blank page or add an existing image.
● Add blank page icon - Click the icon and click Save. A blank page is appended to the end of
document set.
NOTE: If the blank page is moved to a different location within the document set, any newly
added blank pages will be appended after that blank page.
● Add existing image icon - Click the icon and select the existing image.
6. When finished making adjustments, click Save.
Use the scan preview window to change page order
After scanning pages, use the preview window to re-order or change the order of pages.
76
Chapter 5 Use the scan preview window to edit scanned pages

1. Open the HP Scan app.
2. Place a set of documents in the document feeder or on the scanner flatbed.
3. Select the Show Viewer after scan check box.
4. Select Scan.
5. Right-click the thumbnail image for the page you want to move. The selected image is outlined with
a blue border.
6. From the drop-down menu, select either Move Right, or Move Left.
NOTE: To move a page, you can also drag-and-drop the image to a new location in the document
set.
7. When finished making adjustments, click Save.
Use the scan preview window to change page orientation
After scanning pages, the preview window can be used to change the orientation of pages.
Use the scan preview window to change page orientation
77
1. Open the HP Scan app.
2. Place a set of documents in the document feeder or on the scanner flatbed.
3. Select the Show Viewer after scan check box.
4. Select Scan.
5. Right-click the thumbnail image for the page you want to change. The selected image is outlined
with a blue border.
6. From the drop-down menu, select either Rotate Left (clockwise 90 degrees) or Rotate Right
(clockwise 90 degrees), or select Open in a Zoom window and then follow the steps below.
NOTE: You can also double-click the thumbnail image to open it in the full screen zoom view for
editing.
78
Chapter 5 Use the scan preview window to edit scanned pages
a. Select a thumbnail image, right-click, and then
The image opens in a full screen view.
b. In the full screen view, use the slider bar to zoom in (enlarge) or zoom out (reduce) the image
size for editing purposes.
NOTE: Document separators and the “new image” thumbnail are not displayed in the zoom
preview window.
Use the scan preview window to change page orientation
79

c. Use the zoom window tool icons to rotate the page orientation.
NOTE: This change cannot be undone.
Select to rotate the page 90° to the left.
Select to rotate the page 90° to the right.
d. Use the previous or next page icons to scroll and make any additional changes to other pages.
NOTE: The changes on each page must be saved separately. If you make any changes and
attempt to scroll without saving, a dialog prompt is displayed. If prompted, select Yes to save
any changes made in the current page preview before scrolling.
Select to scroll left to view additional scanned pages in the scan preview window.
Select to scroll left to view additional scanned pages in the scan preview window.
7. When finished making adjustments, click Save or Done.
Use the scan preview window to insert a divider, page break, or
job separator
After scanning pages, the preview window can be used to insert a divider, page break, or job separator
between pages or a group of pages.
Divider bars are visible in the scan preview window to indicate where documents will be separated. To
insert a separator using the thumbnail preview window, follow these steps.
After scanning pages, the preview window can be used to insert a divider or page break.
80
Chapter 5 Use the scan preview window to edit scanned pages
1. Open the HP Scan app.
2. On the Scan tab, select Scan a Document or Photo.
The scan interface opens.
3. Place a set of documents in the document feeder or on the scanner flatbed.
4. Select the Show Viewer after scan check box.
5. Select Scan.
6. Right-click the thumbnail image that displays after the location where you want to insert a divider or
page break. The selected image is outlined with a blue border.
7. Select Add Separator.
NOTE: If this option is greyed out or unavailable, make sure to enable the Separate documents
feature for this job. To do this, click More, select the Document tab, and then select the Separate
pages into multiple documents check box and/or turn Blank Page Separation On.
Use the scan preview window to insert a divider, page break, or job separator
81
The separator is inserted before or after the selected thumbnail (depending on your placement
setting).
8. When finished making adjustments, click Save.
NOTE: To delete a page separator, select it, right-click, and then select Delete from the drop-down
menu.
Scan and add more pages in the scan preview window
After scanning pages, the preview window can be used to scan and add more pages to the job.
82
Chapter 5 Use the scan preview window to edit scanned pages

1. Open the HP Scan app.
2. Place a set of documents in the document feeder or on the scanner flatbed.
3. Select the Show Viewer after scan check box.
4. Select Scan.
5. In the scan preview window, select the Add Scan icon. A 'New Image' thumbnail placeholder is
added to the display.
NOTE: To move this placeholder, drag-and-drop the image to a new location in the set of
documents.
Scan and add more pages in the scan preview window
83
6. Adjust any settings as needed and select Scan.
Edit the Scanned Document
After scanning pages, the preview window can be used to edit the scanned document.
The scanned document can be edited using basic tools before saving it to the computer.
84
Chapter 5 Use the scan preview window to edit scanned pages

1. Open the HP Scan app.
2. Place a set of documents in the document feeder or on the scanner flatbed.
3. Select the Show Viewer after scan check box.
4. Select Scan.
Edit the Scanned Document
85
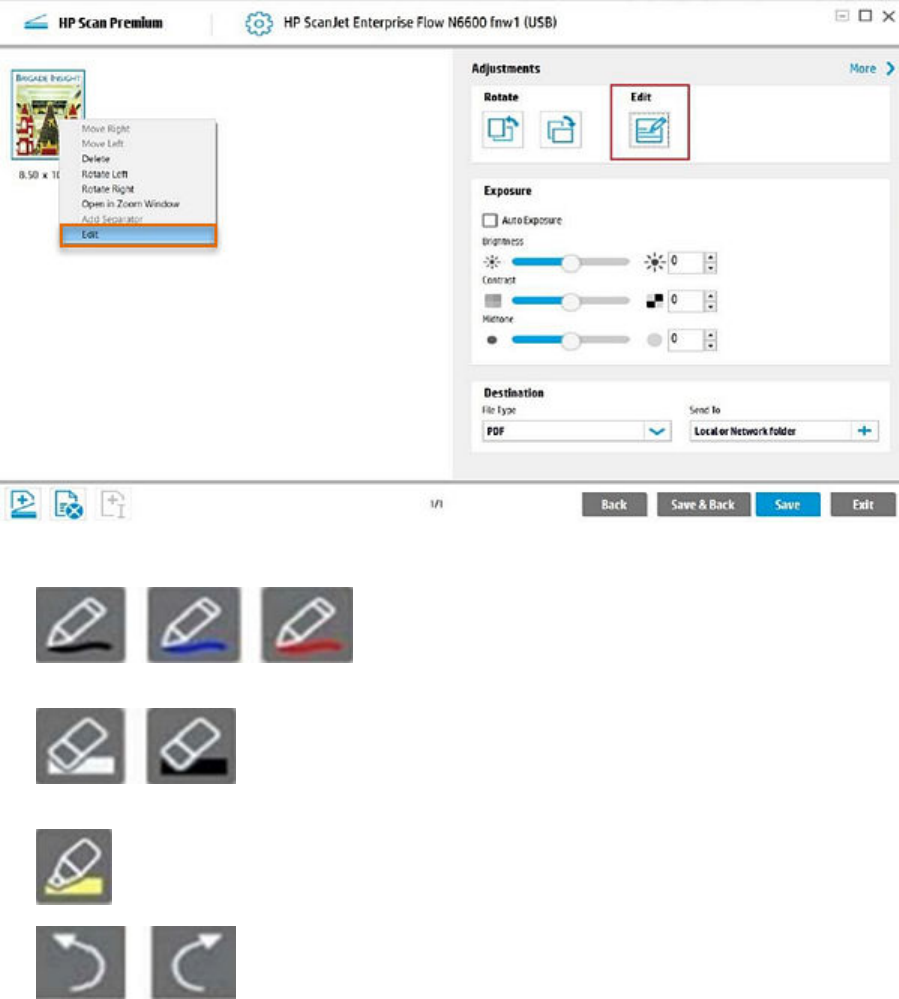
5. In the scan preview window, either click the Edit button in the right pane, OR right-click the scanned
image thumbnail in the left pane and select Edit.
6. Use the image editing options to modify the scanned image.
● - Markup icons are used to draw a free form line on the
scanner image. Black, Blue, and Red colors will be available for drawing.
● - Redaction icons are used to Black-out or White-out (erase) the
contents on a scanned image.
● - Highlight icon is used to highlight the contents on the scanned image.
● - Undo / Redo icons are used to revert, or reapply, all edits made to the
scanned document.
7. Adjust any settings as needed and select Scan.
86
Chapter 5 Use the scan preview window to edit scanned pages
Configure the HP Scan app6
Use the steps in this chapter to set up and configure the HP Scan app.
Create a new Scan Shortcut
To add a new custom Scan Shortcut to the left pane of the home screen, follow these steps.
A custom or user defined Scan Shortcut is created by clicking the Create New Scan Shortcut button.
The shortcut is associated only with the specific scanner or scanning device. It includes the shortcut
name, an associated icon, and a set of scan settings.
NOTE: A maximum of 100 shortcuts including default shortcuts can be displayed in the left side of the
HP Scan home screen under Scan Shortcuts.
1. Open the HP Scan app.
2. From the Home screen in the lower left pane, click Create New Scan Shortcut.
3. Type a name for the new Scan Shortcut.
NOTE: Duplicate names are not allowed. The name should be unique and 128 characters or less
(single-byte or double-byte). If a duplicate name error displays, select OK to return to the Create
New Scan Shortcut dialog and modify the name.
Configure the HP Scan app
87
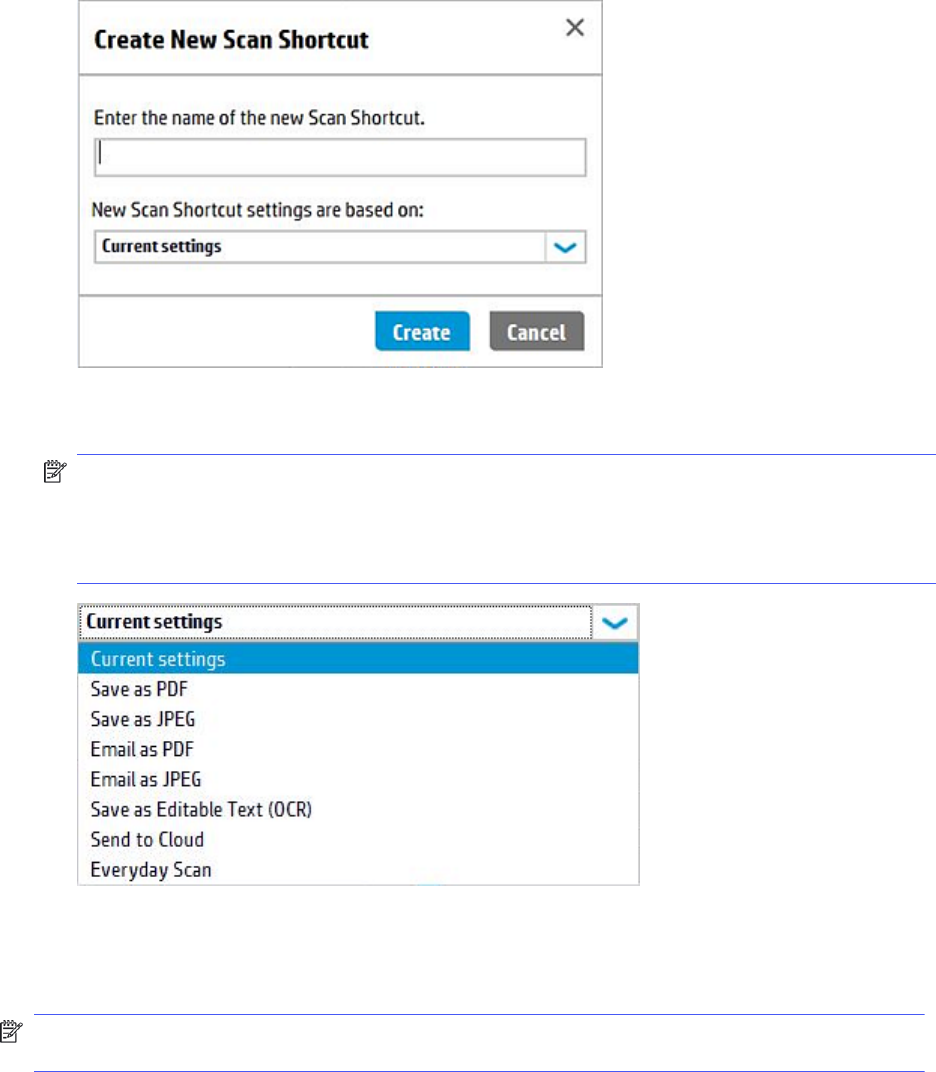
4. Select either Current settings (to copy from current) or select any of the currently defined
shortcuts from the list. This selection will define the initial settings for the new shortcut.
NOTE: By default, new shortcuts are created based on the selected Current settings shortcut
type (the settings associated with that shortcut type will be the initial settings for the new shortcut).
There is no “create brand new shortcut” option that will create a static default set of settings. To
change the settings, select from any of the currently defined shortcuts in the drop-down list, and
then edit the settings after you finish creating the new shortcut.
5. Select Create.
A new shortcut is created with a default icon and displays at the top of the Scan Shortcuts list in the left
pane. The newly created shortcut is now the selected shortcut.
NOTE: The new shortcut icon is assigned based on the Item Type and Destination chosen for the
shortcut.
Enable the Scan to computer feature
To start a scan from the device to the computer, enable the Scan to Computer feature.
88
Chapter 6 Configure the HP Scan app
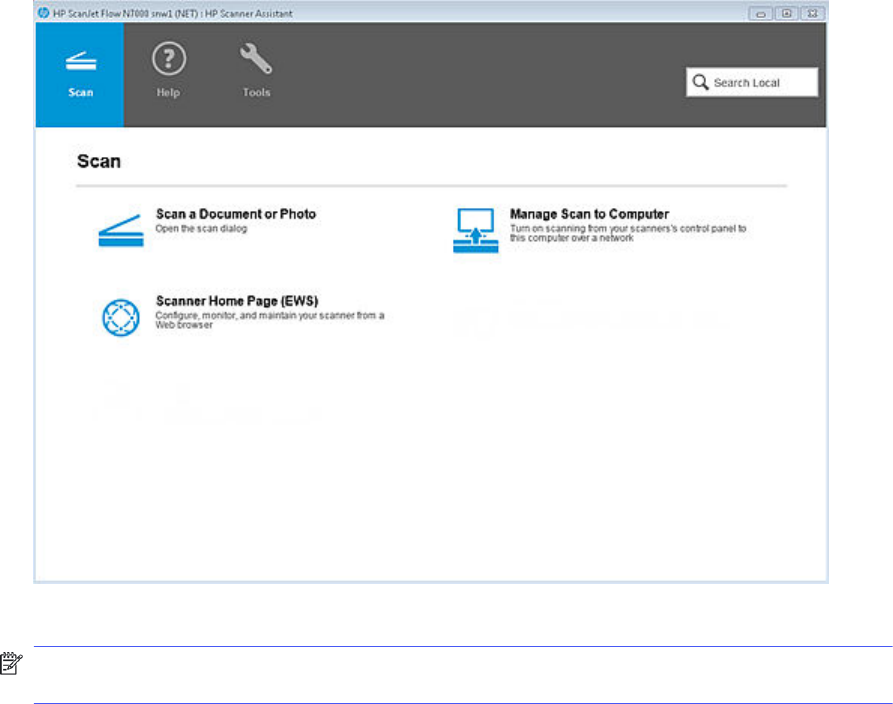
1. Open the HP Scan app.
2. On the Scan tab, select Manage Scan to Computer.
NOTE: The Manage Scan to Computer option is only available when the scanner is connected to a
wired or wireless network.
3. Enable the Scan to Computer option.
After enabled, a confirmation message displays.
Enable the Scan to computer feature
89
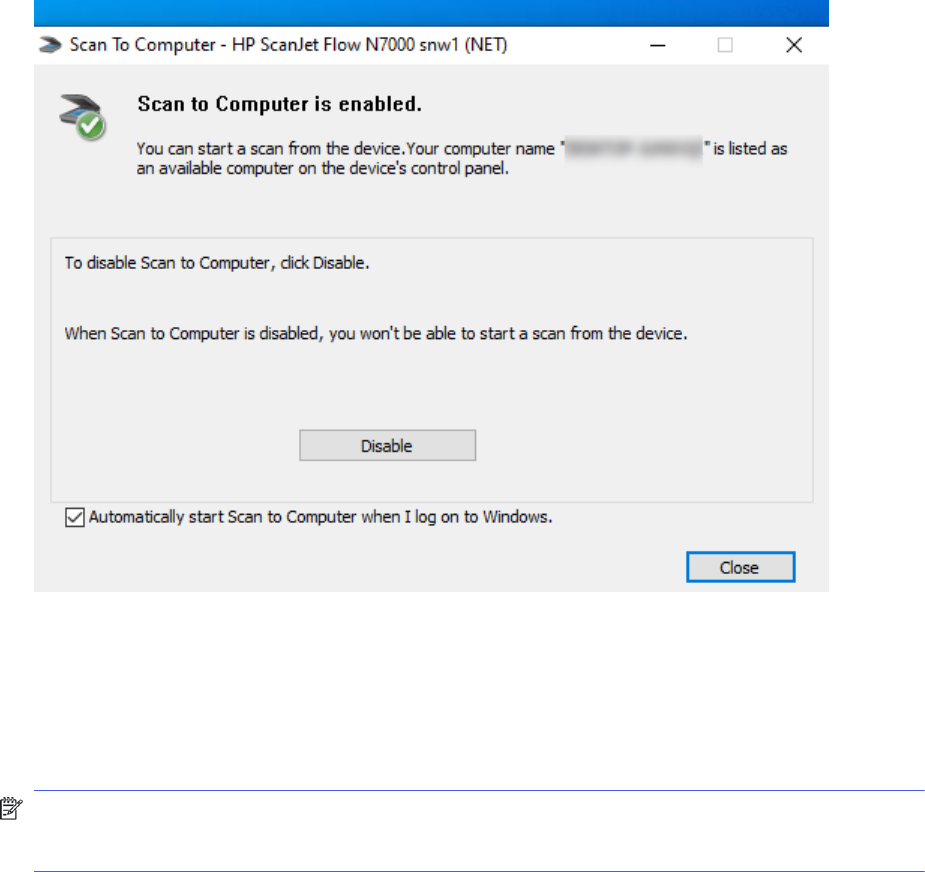
Enable the Scan to USB feature
Enable the Scan to USB feature on the scanner control panel option using the HP Scan app.
Scan To USB is an option that can be enabled on the scanner control panel. To enable this feature, use
the HP Scan app.
NOTE: The Scan To USB feature is used from the scanner control panel during a scan-to-usb
operation from the scanner control panel to update scan settings by sending them to the hardware via
an LEDM protocol.
90
Chapter 6 Configure the HP Scan app
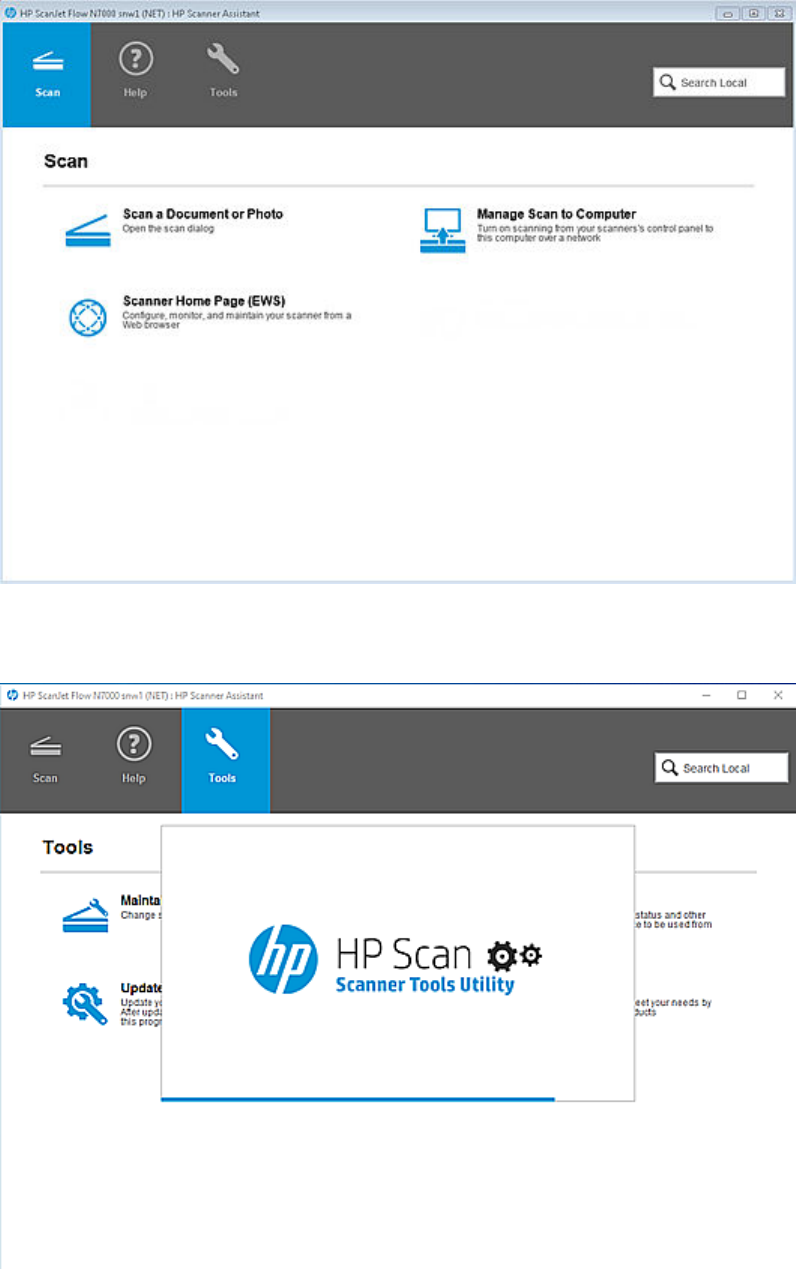
1. Open the HP Scan app.
2. Select Maintain Your Scanner.
The Scanner Tools Utility opens.
Enable the Scan to USB feature
91
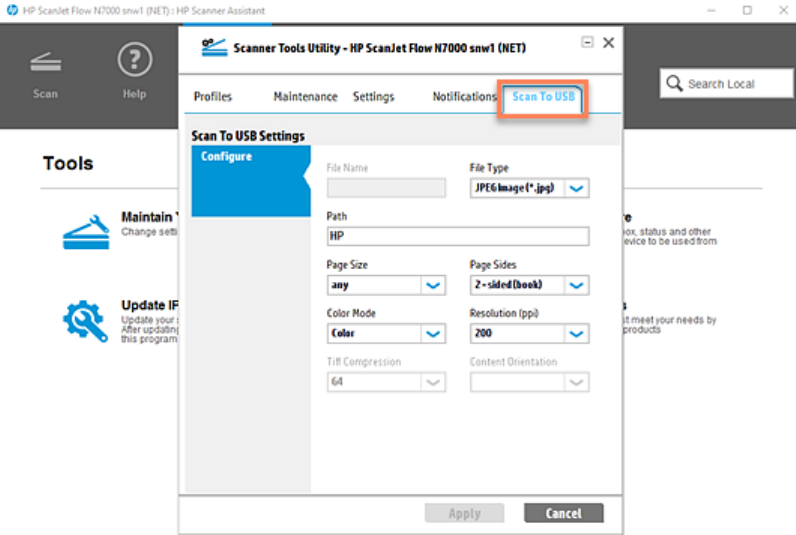
3. Enable the Scan to USB feature.
4. Select the Scan to USB tab.
5. Select the Scan to USB settings and click Apply.
Change the scanner IP address
Update the device IP address using the HP Scan app.
92
Chapter 6 Configure the HP Scan app

1. Open the HP Scan app.
2. Select the Tools tab.
3. Select Update IP Address.
Change the scanner IP address
93
4. Change or update the IP address as needed and click Apply.
5. Close the HP Scan app, and then reopen it to apply the change.
94 Chapter 6 Configure the HP Scan app
Multiple Zonal Data7
The Multiple Zonal Data feature allows user to create multiple zones in scanned images. Learn how to
create multiple scan zones and other features using the HP Scan app.
Creating Multiple Zonal Data
To scan a document and create multiple scan zones, use the Create/Edit Zone option in the HP Scan
app.
Follow these steps to create multiple scan zones.
NOTE: This feature is available in the Enterprise Edition only.
1. Open the HP Scan app.
2. On the Scan tab, select Scan a Document or Photo.
The scan interface opens.
3. Place a set of documents in the document feeder or on the scanner flatbed.
4. On the scan interface home screen under Scan Shortcuts, select a shortcut such as Everyday
Scan.
Multiple Zonal Data
95
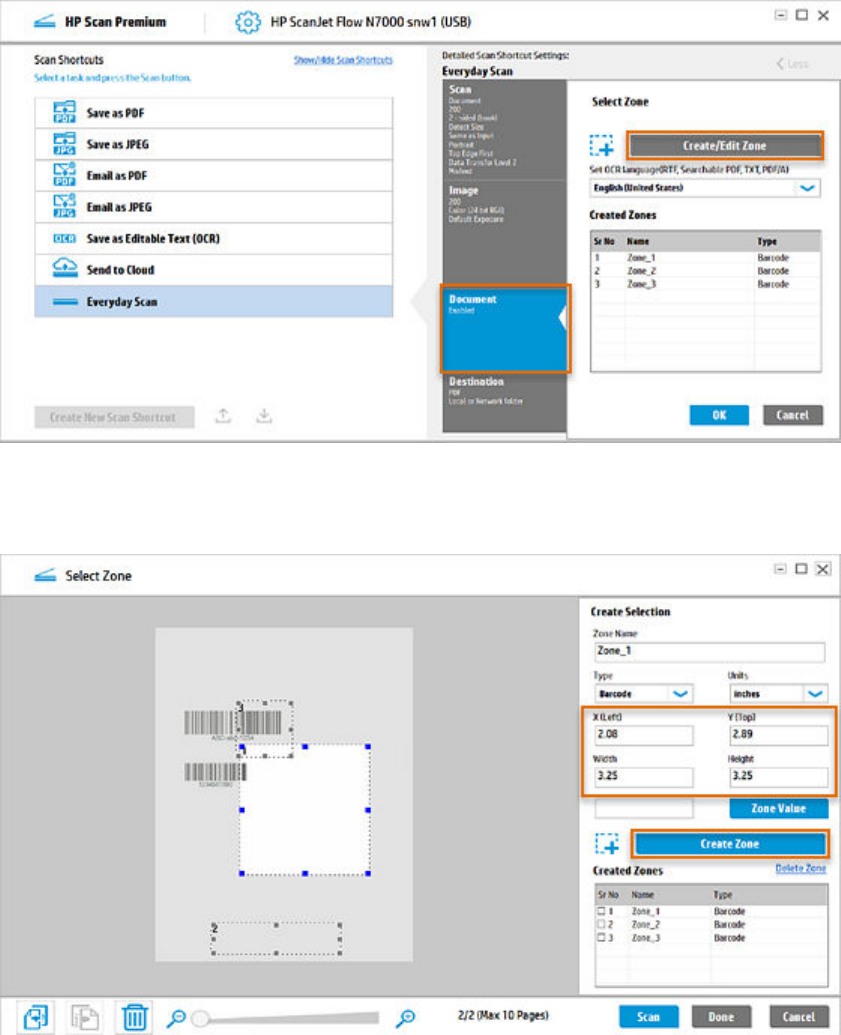
5. In the right pane, select the Document tab, and then click the Create/Edit Zone button.
6. Click the Create Zone button or use the X, Y, Width, and Height coordinates to draw a new zone on
the scanned preview image, and then add the new zone to the Created Zones list. Repeat for any
additional zones.
7. To adjust an existing zone, manually adjust the coordinates in the X, Y, Width, and Height fields.
8. Select Scan or Done.
96
Chapter 7 Multiple Zonal Data

Save a scan zone with the OCR text and Bar code values in the
file name
Learn how to auto-generate a file name with OCR text or Bar code values for the scanned zone using the
Multiple Zonal Data feature in the HP Scan app.
Follow these steps to auto-generate a file name with OCR text or Bar code values for the scanned
zone(s).
NOTE: This feature is available in the Enterprise Edition only.
1. Open the HP Scan app.
2. On the Scan tab, select Scan a Document or Photo.
The scan interface opens.
3. Place a set of documents in the document feeder or on the scanner flatbed.
Save a scan zone with the OCR text and Bar code values in the file name
97
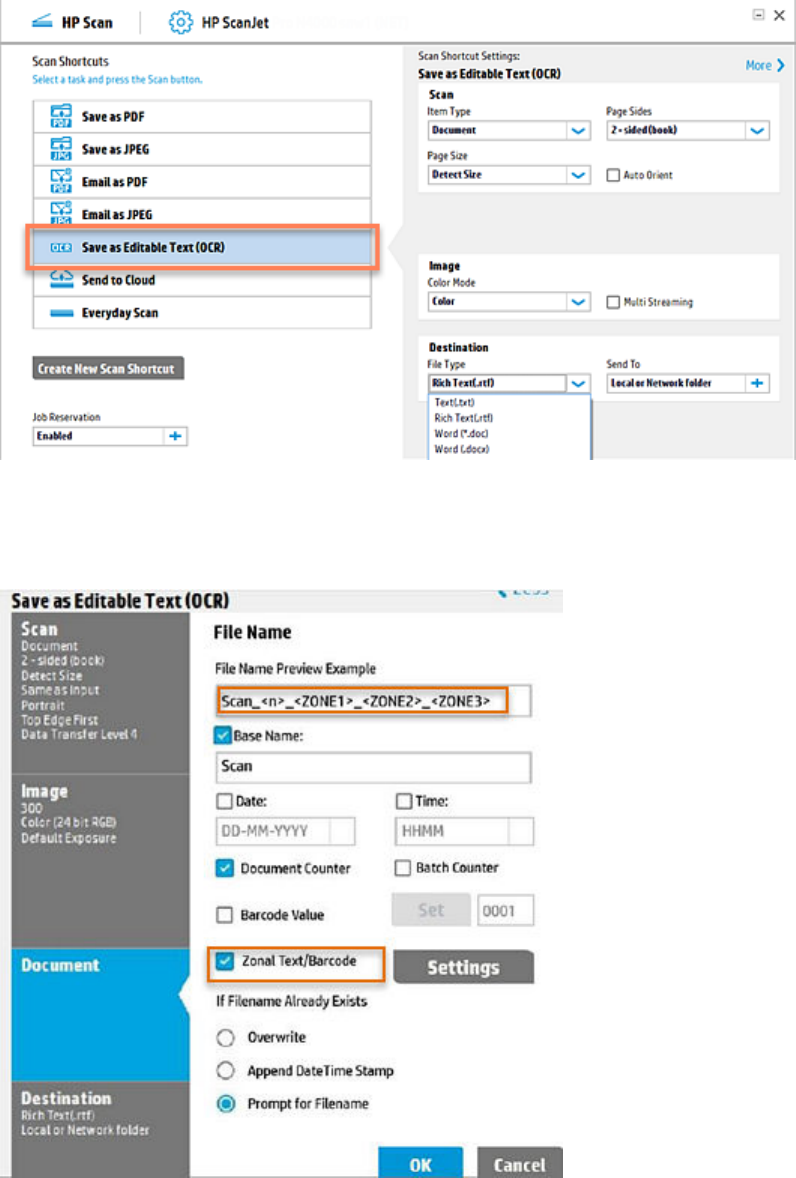
4. On the scan interface home screen under Scan Shortcuts, select the Save as Editable Text (OCR)
shortcut.
5. Select the Document tab in the right pane and click More in the upper right pane.
6. In the right pane under the File Name section, view the auto-generated name in the File Name
Preview Example field.
7. Click the Settings button to adjust the selected zones and file naming information.
98
Chapter 7 Multiple Zonal Data
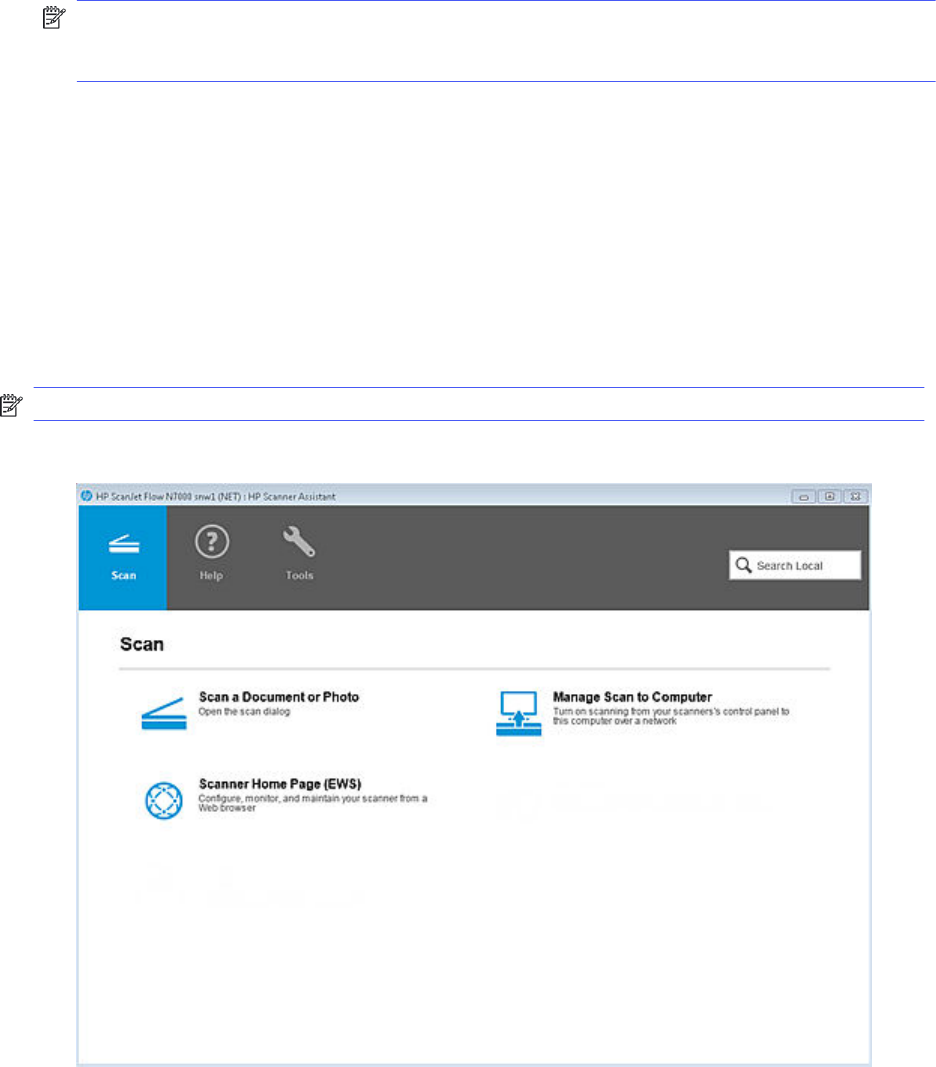
8. Select the Zonal Text/Barcode check box.
NOTE: The scanned pages are saved with information from the selected zones including a zonal
OCR/barcode value. If there is no zonal OCR/Barcode provided, then the Zonal Text/Barcode check
box will be disabled.
9. When finished, select OK.
Save a scan zone to a folder auto-named with OCR text and Bar
code values
Learn how to save the scan to a local or network folder auto-named with OCR text or Bar code values
using the Multiple Zonal Data feature in the HP Scan app.
Follow these steps to auto-generate a local or network folder name with OCR text or Bar code values for
the scanned zone(s).
NOTE: This feature is available in the Enterprise Edition only.
1. Open the HP Scan app.
2. On the Scan tab, select Scan a Document or Photo.
The scan interface opens.
3. Place a set of documents in the document feeder or on the scanner flatbed.
Save a scan zone to a folder auto-named with OCR text and Bar code values
99
4. On the scan interface home screen under Scan Shortcuts, select the Save as Editable Text (OCR)
shortcut.
5. In the right pane under the Destination section, use the Send To “+” icon to select Local or Network
Folder. The Local or Network folder Settings dialog opens.
6. Browse to and select the folder location/name where you want to save the scan, and select the
folder format.
7. Select the Send to sub-folder named by OCR Text/Barcode check box, and then select a zone from
the Select Zone list.
NOTE: The Select Zone list is enabled only when Send to sub-folder named by OCR Text/Barcode
check box is selected.
100
Chapter 7 Multiple Zonal Data
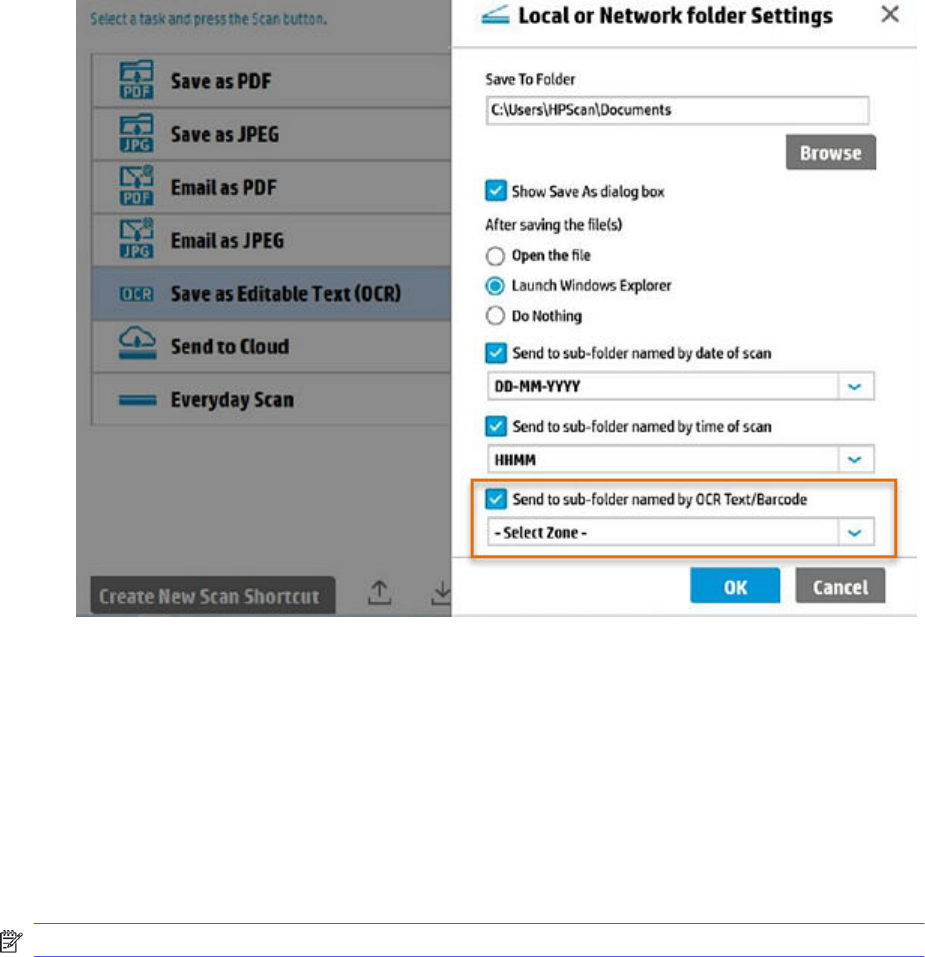
8. When finished, select OK.
The scanned pages are saved in a folder named with information from the selected zone including the
zonal OCR/barcode value.
Parse scan zones into separate documents
Learn how to parse scan zones into separate documents using the Multiple Zonal Data feature in the HP
Scan app.
Follow these steps to create separate documents by scan zone.
NOTE: This feature is available in the Enterprise Edition only.
Parse scan zones into separate documents
101

1. Open the HP Scan app.
2. On the Scan tab, select Scan a Document or Photo.
The scan interface opens.
3. Place a set of documents in the document feeder or on the scanner flatbed.
4. On the scan interface home screen under Scan Shortcuts, select the Save as Editable Text (OCR)
shortcut.
102
Chapter 7 Multiple Zonal Data
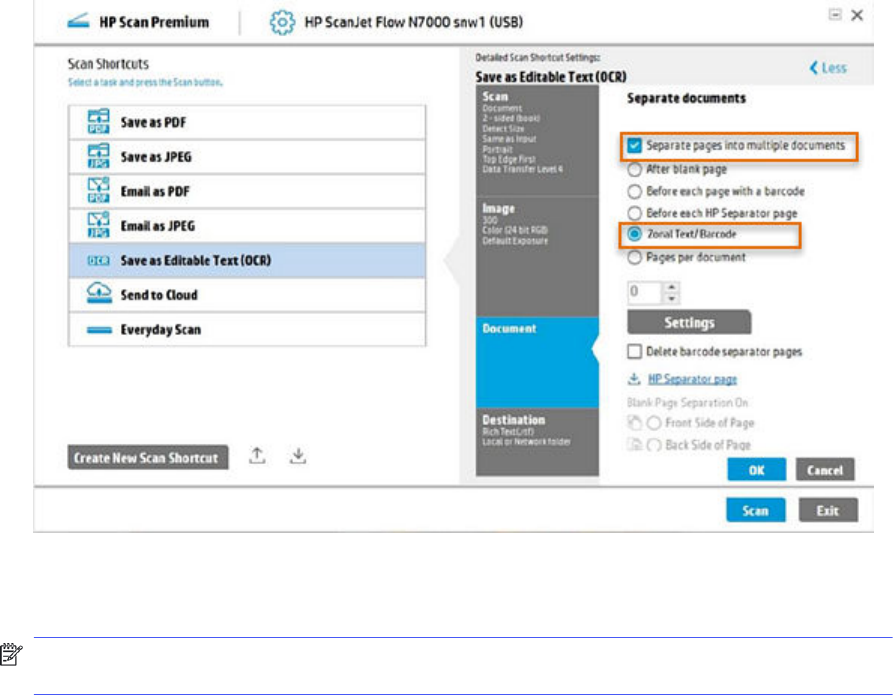
5. Select the Document tab in the right pane and click More in the upper right pane.
6. In the right pane under Separate documents, select the Separate pages into multiple documents
check box and the Zonal Text/Barcode option.
7. Click the Settings button to open the zone settings dialog.
8. In the Zone Settings dialog, select the Barcode format(s) and the Zones.
NOTE: By default, all specified formats will be selected. To add a document separator, under the
Select Zones section, enter a separator value in the Value column for the selected zone.
Parse scan zones into separate documents
103
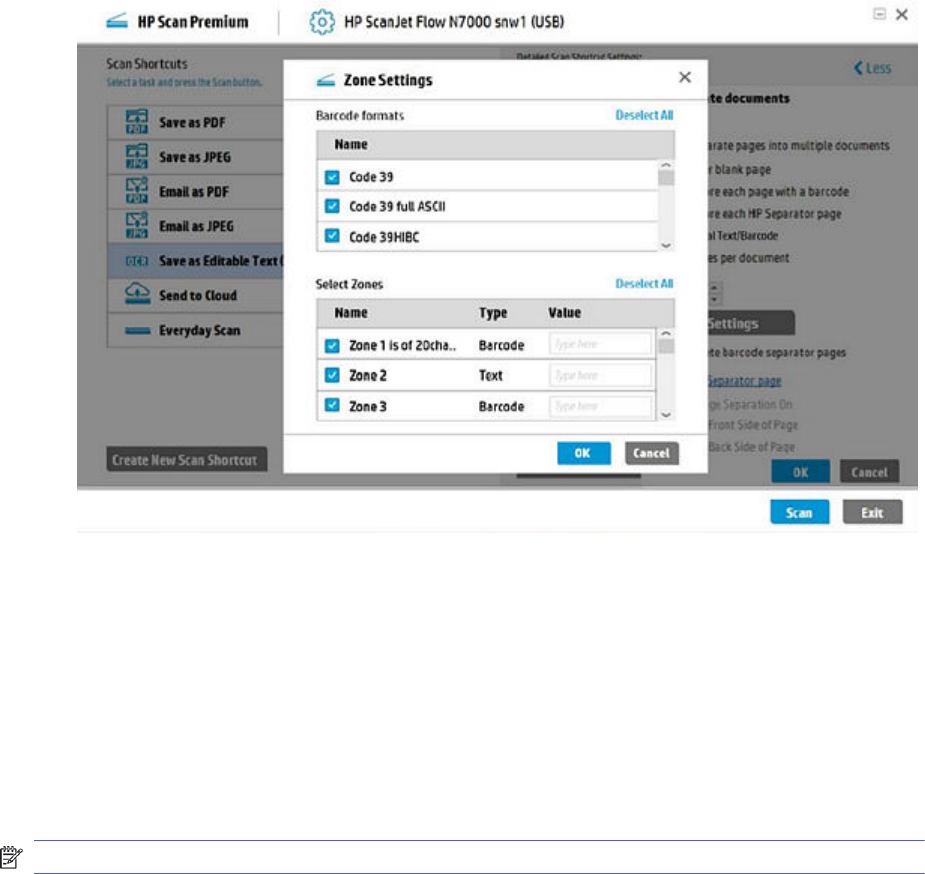
9. When finished, select OK.
The scanned pages are parsed into separate documents according to the selected zones and any
defined page separators.
Save bar code and zone metadata to an XML file
Learn how to generate and save bar code and zone metadata to scanned files using the Multiple Zonal
Data feature in the HP Scan app.
Follow these steps to apply bar code or scan zone metadata to scans.
NOTE: This feature is available in the Enterprise Edition only.
104
Chapter 7 Multiple Zonal Data

1. Open the HP Scan app.
2. On the Scan tab, select Scan a Document or Photo.
The scan interface opens.
3. Place a set of documents in the document feeder or on the scanner flatbed.
4. On the scan interface home screen under Scan Shortcuts, select the Save as Editable Text (OCR)
shortcut.
Save bar code and zone metadata to an XML file
105
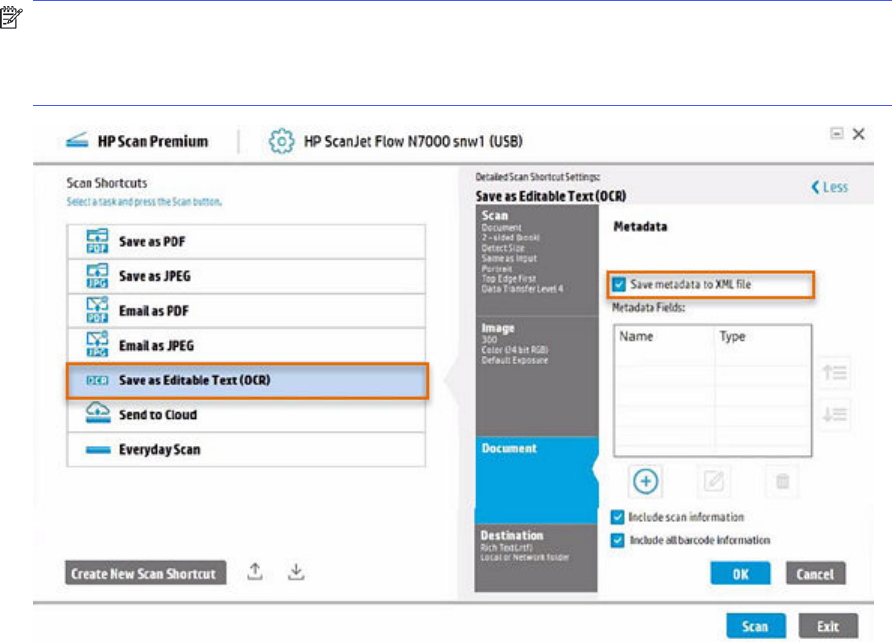
5. Select the Document tab in the right pane and click More in the upper right pane.
6. In the right pane under Metadata, select the Save metadata to XML file check box and the Include
all barcode information check box.
NOTE: By default, all barcodes in the page will be included in the metadata file. If the Include all
barcode information check box is selected, then the details of the selected barcode will also be
included in the metadata file. You can also select the Include scan information check box to include
additional scan details.
7. Click the '+' icon and add a metadata field to the table.
106
Chapter 7 Multiple Zonal Data
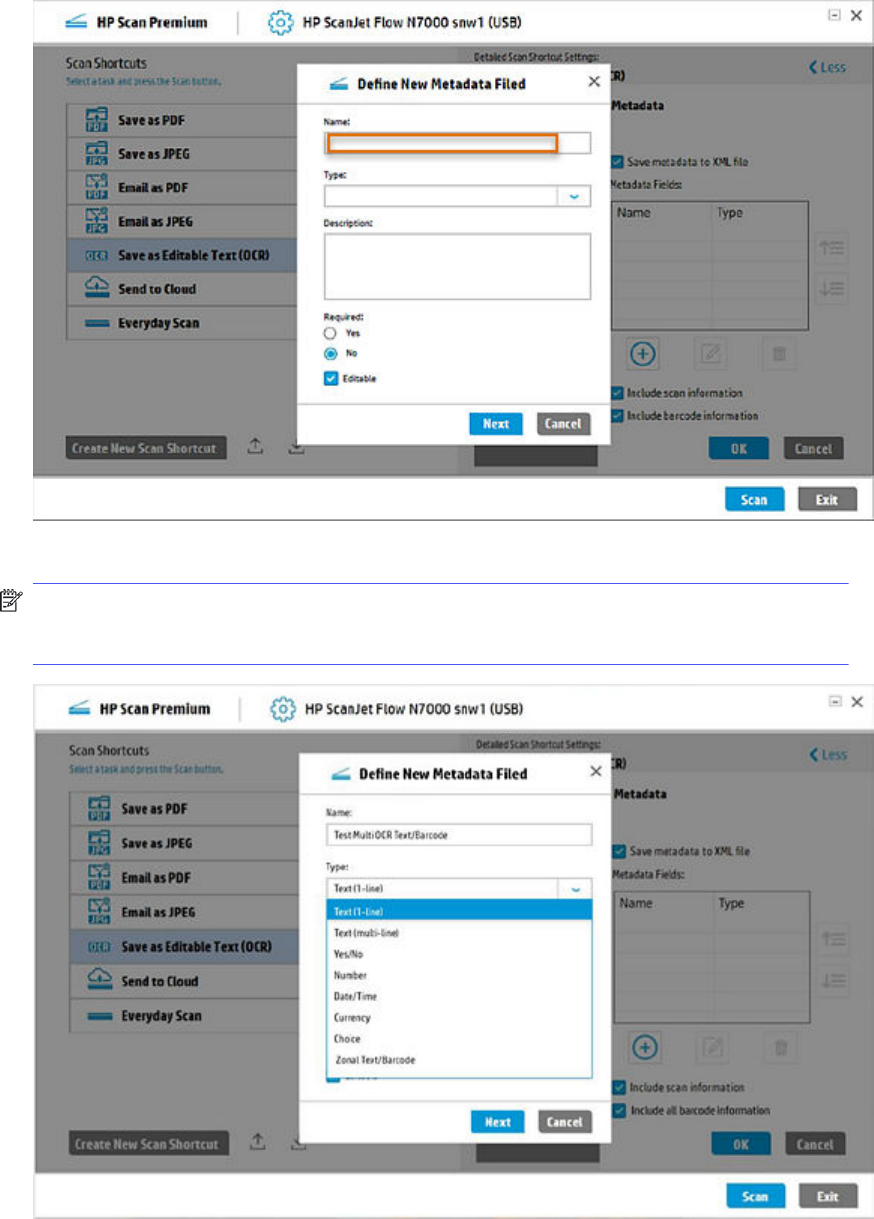
a. In the Define New Metadata dialog, type a Name for the new field.
b. Select the (OCR) Zonal Text/Barcode option as the metadata type in the Type list.
NOTE: The Type list is available only if one or more zones are
created
. Also, the metadata will
only contain OCR Zonal Text/Barcode values if a zone is
selected
. When multiple zones are
created and selected, multiple zone OCR values will be saved in the metadata file.
c. Type a metadata zone Description if desired.
Save bar code and zone metadata to an XML file
107
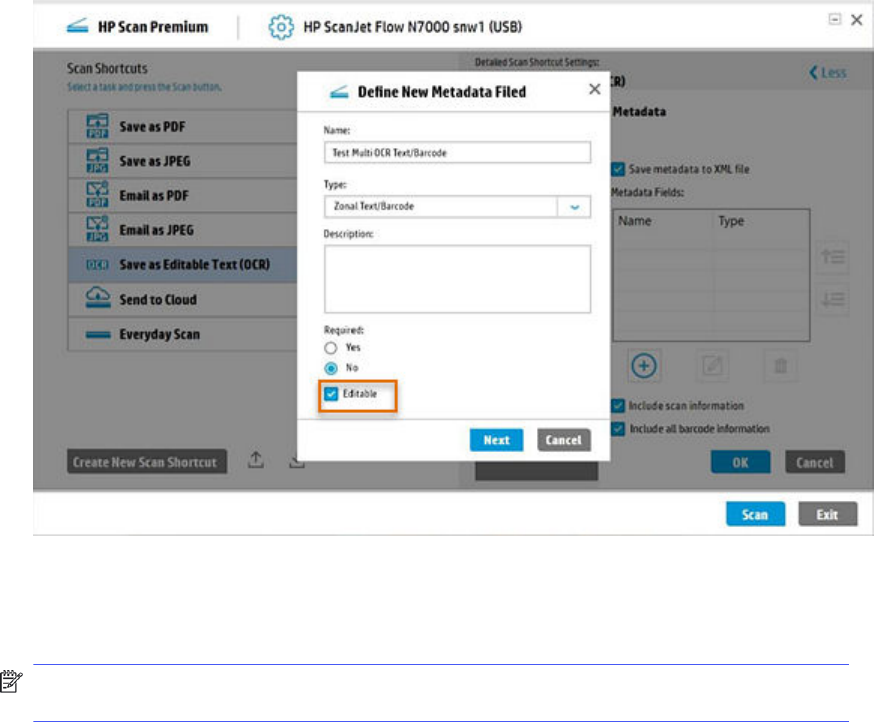
d. Select the Editable check box (if you want the different metadata type values to be editable
after created).
e. Click Next to open the Settings dialog where a list of the created zones of Text and Barcode
types along with the zone name and zone type is displayed.
f. Select the zone you want included in the metadata file and click Finish.
NOTE: Only one zone can be selected at a time. If the Include All barcode information check
box is selected, then all barcode details are saved in the metadata file.
108
Chapter 7 Multiple Zonal Data
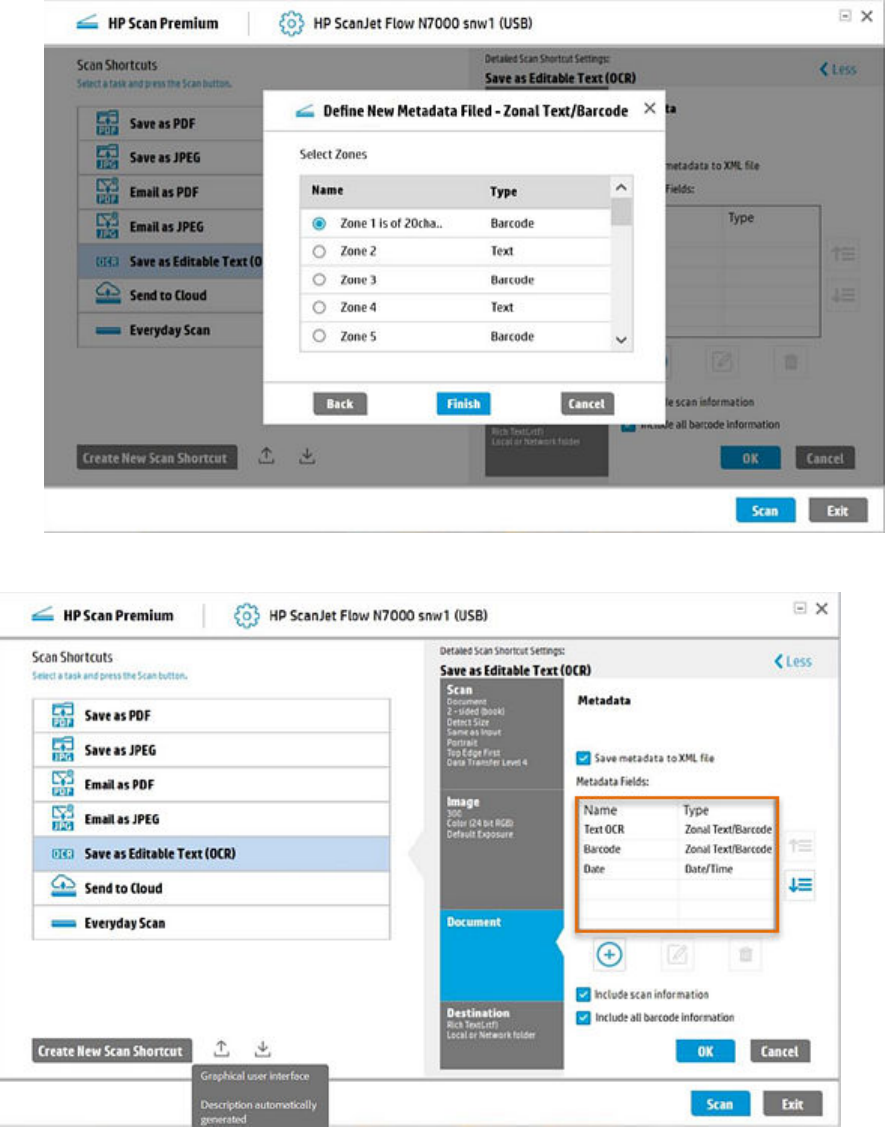
The defined metadata field for Zonal Text/Barcode type is added to the Metadata Fields table.
8. Repeat the steps above for each metadata field for each zone that you want included in the table.
9. When finished, select OK.
Save bar code and zone metadata to an XML file
109

Manage Shortcuts8
Learn how to rename, delete, or restore modified shortcuts to default settings in the HP Scan app.
NOTE: Shortcuts included with the app cannot be renamed or deleted. Only custom created
shortcuts can be renamed or deleted.
Create a new Scan Shortcut
To add a new custom Scan Shortcut to the left pane of the home screen, follow these steps.
A custom or user defined Scan Shortcut is created by clicking the Create New Scan Shortcut button.
The shortcut is associated only with the specific scanner or scanning device. It includes the shortcut
name, an associated icon, and a set of scan settings.
NOTE: A maximum of 100 shortcuts including default shortcuts can be displayed in the left side of the
HP Scan home screen under Scan Shortcuts.
1. Open the HP Scan app.
2. From the Home screen in the lower left pane, click Create New Scan Shortcut.
110
Chapter 8 Manage Shortcuts
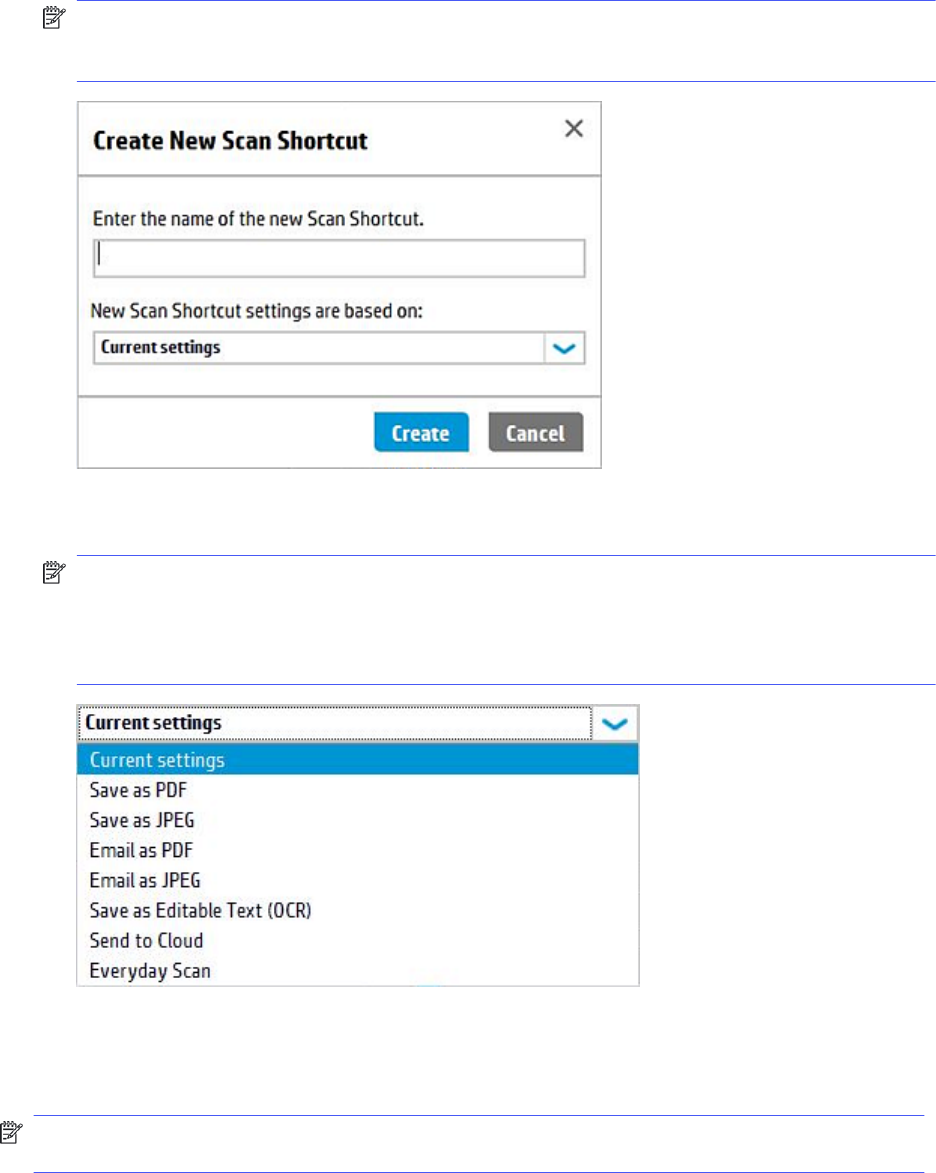
3. Type a name for the new Scan Shortcut.
NOTE: Duplicate names are not allowed. The name should be unique and 128 characters or less
(single-byte or double-byte). If a duplicate name error displays, select OK to return to the Create
New Scan Shortcut dialog and modify the name.
4. Select either Current settings (to copy from current) or select any of the currently defined
shortcuts from the list. This selection will define the initial settings for the new shortcut.
NOTE: By default, new shortcuts are created based on the selected Current settings shortcut
type (the settings associated with that shortcut type will be the initial settings for the new shortcut).
There is no “create brand new shortcut” option that will create a static default set of settings. To
change the settings, select from any of the currently defined shortcuts in the drop-down list, and
then edit the settings after you finish creating the new shortcut.
5. Select Create.
A new shortcut is created with a default icon and displays at the top of the Scan Shortcuts list in the left
pane. The newly created shortcut is now the selected shortcut.
NOTE: The new shortcut icon is assigned based on the Item Type and Destination chosen for the
shortcut.
Create a new Scan Shortcut
111
Rename a Scan Shortcut
To change the name of a custom Scan Shortcut you created in the HP Scan app, follow these steps.
1. Open the HP Scan app.
2. On the Scan tab, select Scan a Document or Photo.
The scan interface opens.
3. In the left pane of the home screen, right-click the shortcut and select Rename Scan Shortcut.
4. Type a new name for the Scan Shortcut and select OK.
NOTE: Duplicate names are not allowed. The name should be unique and less than 128
characters.
112
Chapter 8 Manage Shortcuts

Deleting, renaming, and restoring Shortcuts
Scan operations available for Shortcuts depends on whether they are custom Scan Shortcuts or
Factory-defined shortcuts in the HP Scan app.
Factory defined shortcuts cannot be renamed or deleted. They can be restored to defaults.
User defined shortcuts cannot be restored to defaults. They can only be reset to the last saved state for
that shortcut.
To edit shortcuts, right-click on a shortcut selects that shortcut list area and opens a menu applicable to
that shortcut. The menu is the same for all shortcuts, however, the enabled menu options differ based
on factory-defined shortcuts and user-defined shortcuts.
Use the following table as a guide.
Table 8-1
Shortcut Functions
Function (in order) Right-click menu text Description Shortcut type
Restore defaults "Restore settings to
factory defaults"
Restore all settings of this shortcut to be
the same as when the program was initially
installed.
Factory Default only
Rename “Rename <shortcut>" Edit the name of this shortcut in place. The
menu items for the function appears in the
shortcut name.
User Defined only
Delete "Delete <shortcut>" Display a dialog to confirm deletion of this
shortcut. The menu items for the function
appears in the shortcut name.
User Defined only
Save "Save settings" Save any changes to this shortcut Factory Default &
User Defined shortcuts
Save As "Save As a new
shortcut"
Display a dialog to save any changes to a new
shortcut name.
Factory Default &
User Defined shortcuts
Change Position of
shortcuts Upwards
"Move Up" Change the position of current shortcut to the
immediate top position in the list
Factory Default &
User Defined shortcuts
Change Position
of shortcuts
Downwards
"Move Down" Change the position of current shortcut to the
immediate bottom position in the list
Factory Default &
User Defined shortcuts
Additional notes about actions in the Shortcut List Area:
● One and only one Shortcut is selected at a time.
● New shortcuts are inserted at the top of the list.
● A user created shortcut can be deleted but factory default shortcuts cannot be deleted.
● Shortcuts can be re-ordered using move-up or move-down on the right-click context menu.
● The delete key on the keyboard can be used to delete the currently selected shortcut, if the shortcut
list has the active focus. The shortcut gets displayed with light blue color and a focus rectangle
when this action can be performed. A confirm delete window pops up.
Deleting, renaming, and restoring Shortcuts
113
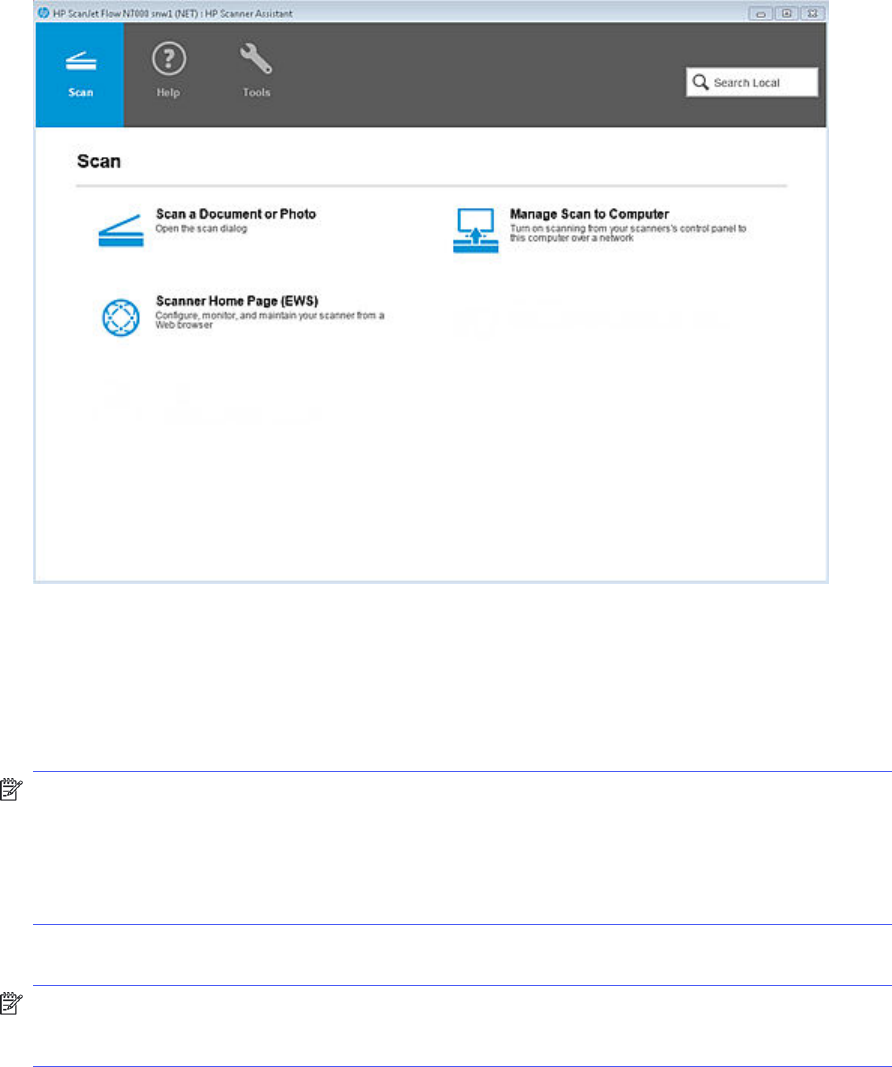
Save changes to a Scan Shortcut
Learn about saving changes to a custom Scan Shortcut.
If changes are made to shortcut settings, these changes are "sticky" only during the current session of
the HP Scan app. To save the updated settings to the shortcut to apply in the future, follow these steps.
1. Open the HP Scan app.
2. On the Scan tab, select Scan a Document or Photo.
The scan interface opens.
3. In the left pane of the home screen, select the shortcut.
4. Make any changes to the Scan Shortcut.
NOTE: When changes are made to a shortcut on the main screen, two icons display to the right of
the shortcut name: Save and Undo icons. These icons indicate that unsaved changes are currently
pending for the shortcut. The shortcut does not need to be selected to resolve the pending
changes. After a scan has occurred, if there are pending changes to the shortcut that was used
while scanning, the Save and Undo icons are displayed on the adjustments screen to the right of
the title area in the adjustments panel.
5. To save the changes to the shortcut, use one of the following options:
NOTE: If you want to preserve existing settings for the shortcut and do not want to the temporary
changes to be saved for the next time the shortcut is used, skip this step and click Scan. You can
also click the Undo icon to revert the shortcut to the last saved setting.
114
Chapter 8 Manage Shortcuts
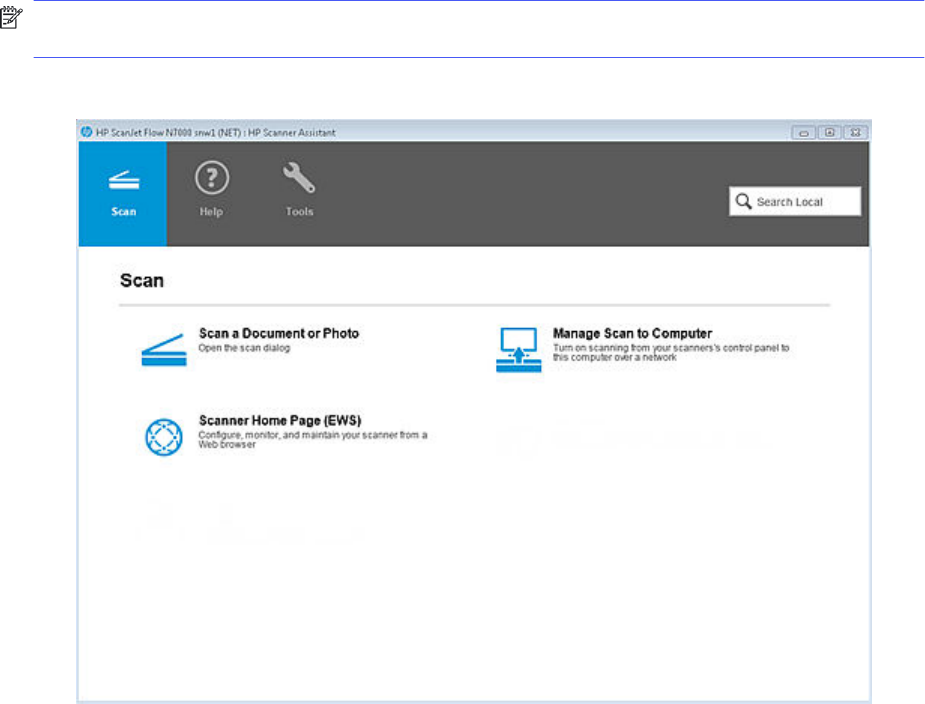
● When the application is open, click the Save Shortcut icon, or right-click the shortcut name and
select Save.
● Close the application and, when prompted, click Yes.
The changes to the shortcut are saved and will be available the next time the shortcut is used.
Restore a Scan Shortcut to default settings
To restore a Scan Shortcut in the HP Scan app to its default settings, follow these steps.
NOTE: This option is only available in the drop-down menu for factory default Scan Shortcuts and
cannot be used with custom-created Scan Shortcuts.
1. Open the HP Scan app.
2. On the Scan tab, select Scan a Document or Photo.
The scan interface opens.
3. In the left pane of the home screen, right-click the shortcut and select Restore Defaults.
4. Select Yes to confirm. This cannot be undone.
The Scan Shortcut settings are resets to the factory default values.
Import/Export Scan Shortcuts to/from XML
Scan Shortcuts can be exported to or imported from an XML file using the HP Scan app.
Restore a Scan Shortcut to default settings
115
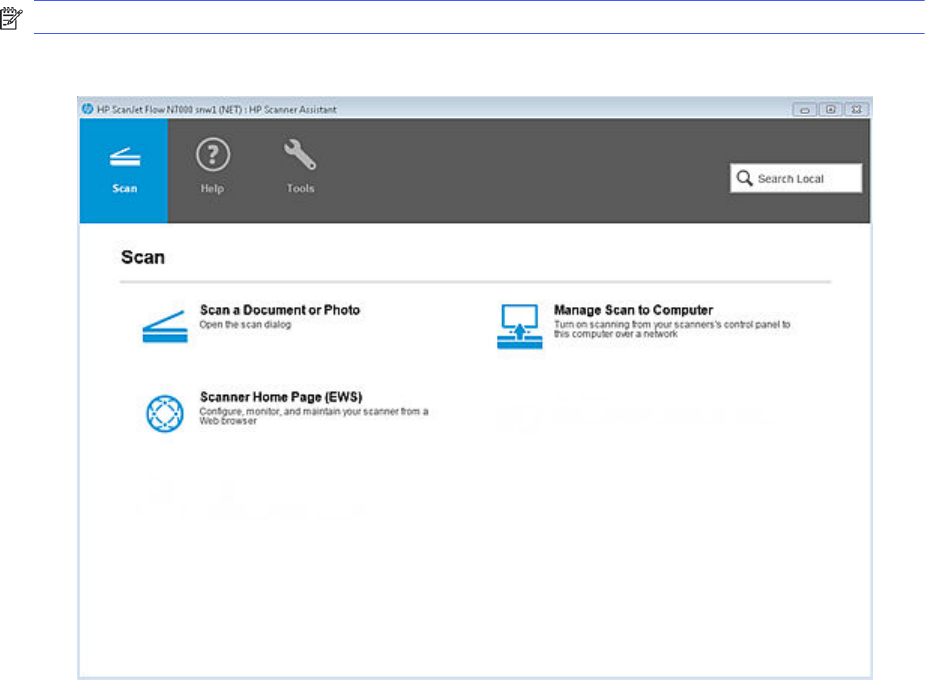
Administrators can create Scan Shortcut profiles for a workgroup and share custom Scan Shortcuts
with each other using .xml files.
Show/Hide Scan Shortcuts
To show or hide custom Scan Shortcut(s) you created in the HP Scan app, follow these steps.
NOTE: Factory default Scan Shortcuts cannot be hidden.
1. Open the HP Scan app.
2. On the Scan tab, select Scan a Document or Photo.
The scan interface opens.
116
Chapter 8 Manage Shortcuts
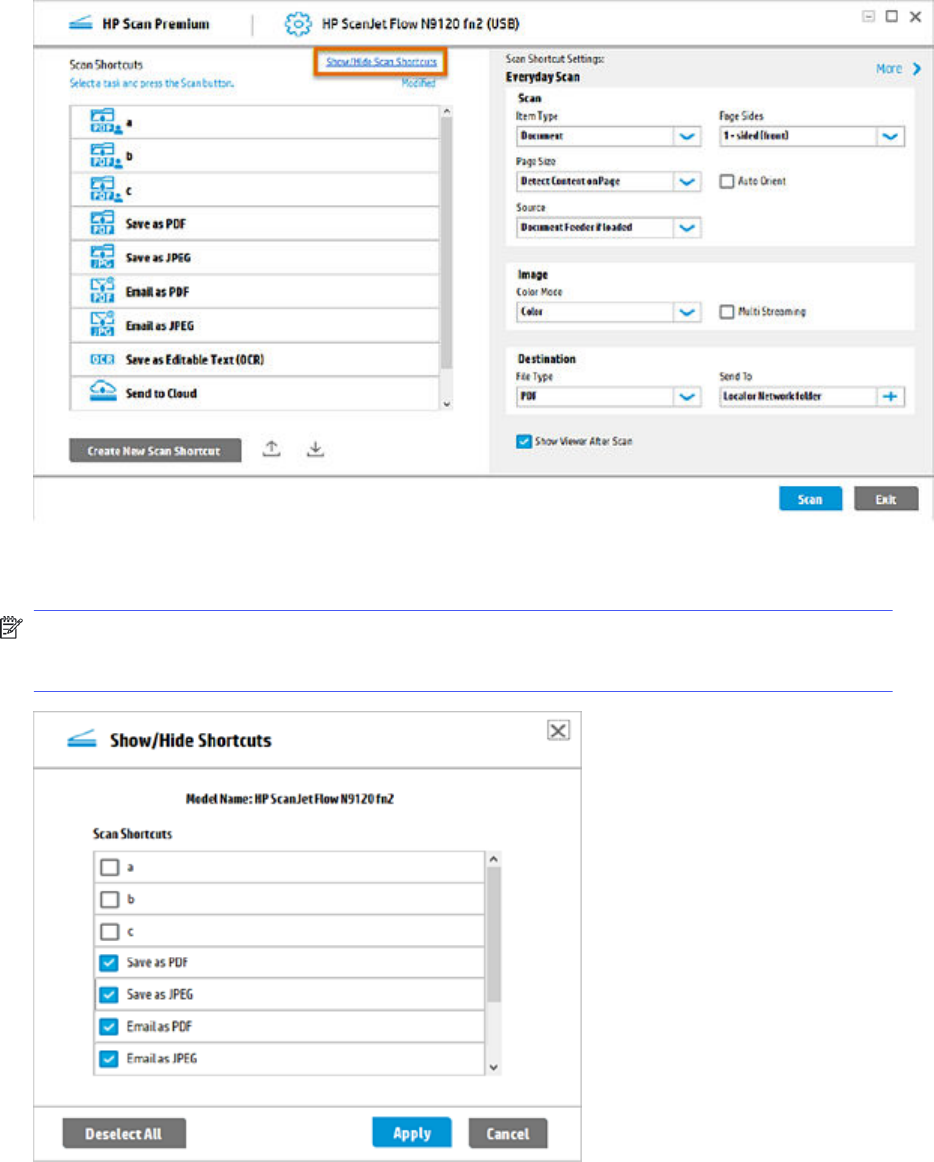
3. Click the Show/Hide Scan Shortcuts link.
4. In the Show/Hide Shortcuts dialog, clear the check boxes next to the custom Scan Shortcuts that
you want to hide. The list is displayed in the same order in which they appear in the HP Scan app.
NOTE: The selected checkboxes are the Shortcuts that will be shown. By default, all the available
shortcuts that display in the user interface are checked. At least one shortcut must be selected to
be shown.
5. When finished, click Apply.
All the selected shortcuts are displayed and any unselected shortcuts are hidden in the HP Scan app.
Show/Hide Scan Shortcuts
117

Delete a Scan Shortcut
To delete a custom Scan Shortcut you created in the HP Scan app, follow these steps.
NOTE: Factory default Scan Shortcuts cannot be deleted.
1. Open the HP Scan app.
2. On the Scan tab, select Scan a Document or Photo.
The scan interface opens.
3. In the left pane of the home screen, right-click the shortcut and select Delete <Shortcut name>.
4. Select Yes to confirm delete. This cannot be undone.
118
Chapter 8 Manage Shortcuts
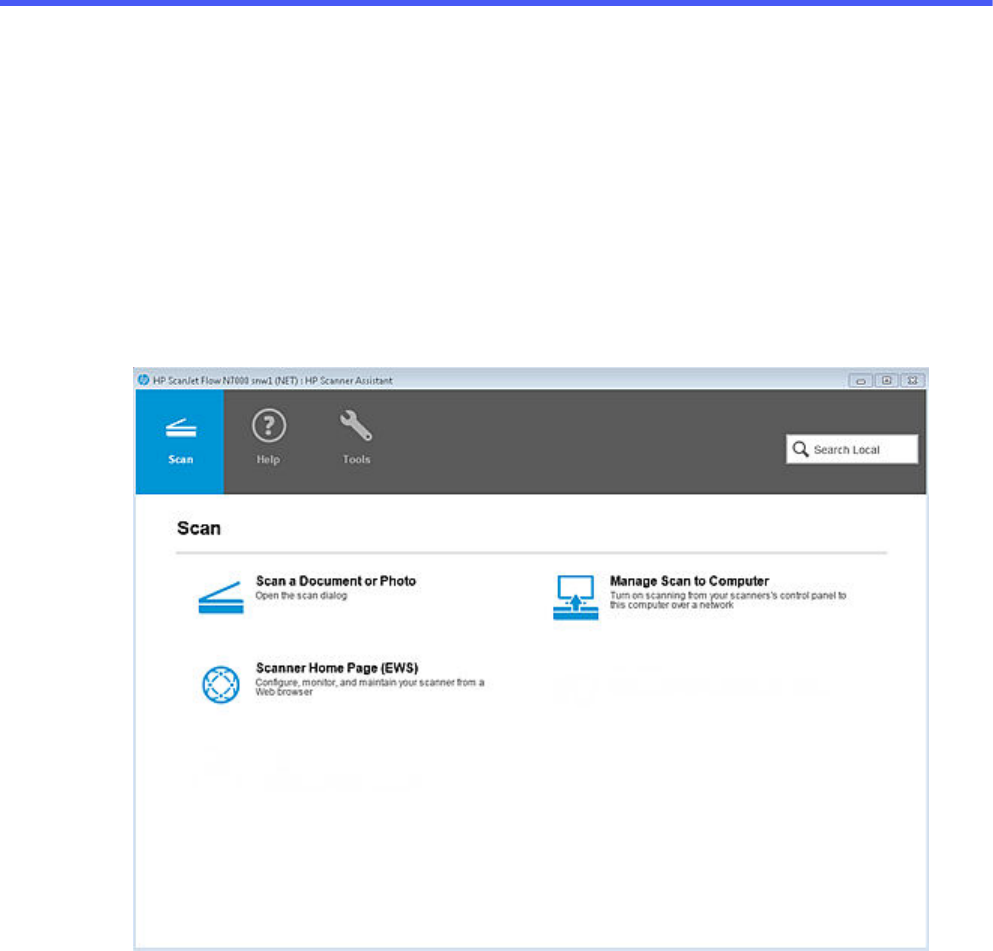
Manage and maintain the scanner9
Use the steps in this chapter to manage and maintain the scanner on a device using the HP Scan app.
Open the Embedded Web Server (EWS)
Learn how to open the device Embedded Web Server (EWS) using the HP Scan app to view and
configure scan information.
1. Open the HP Scan app.
2. On the Scan tab, select Scanner Home Page (EWS).
The EWS opens.
Manage and maintain the scanner
119
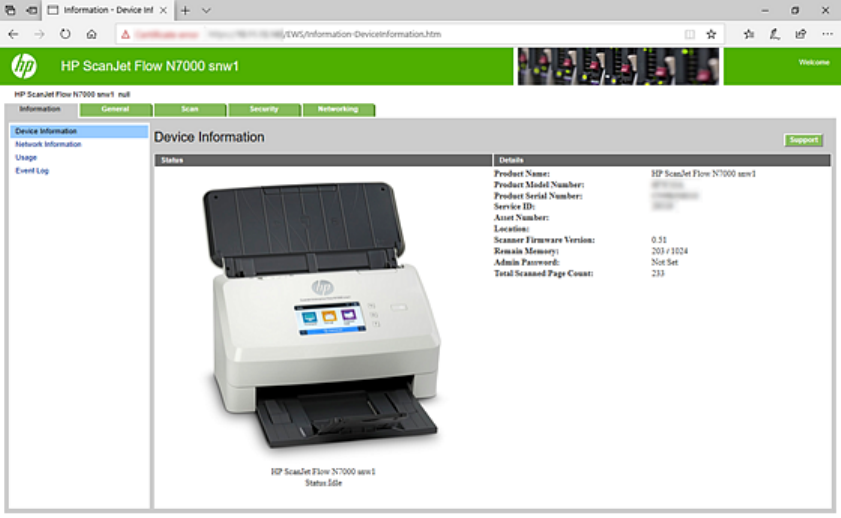
Change or assign the device connection type
To assign or change the device connection type, use the Tools tab.
If you skipped the connection configuration process during initial set up, or if you want to change the
connection type, follow these steps.
120
Chapter 9 Manage and maintain the scanner
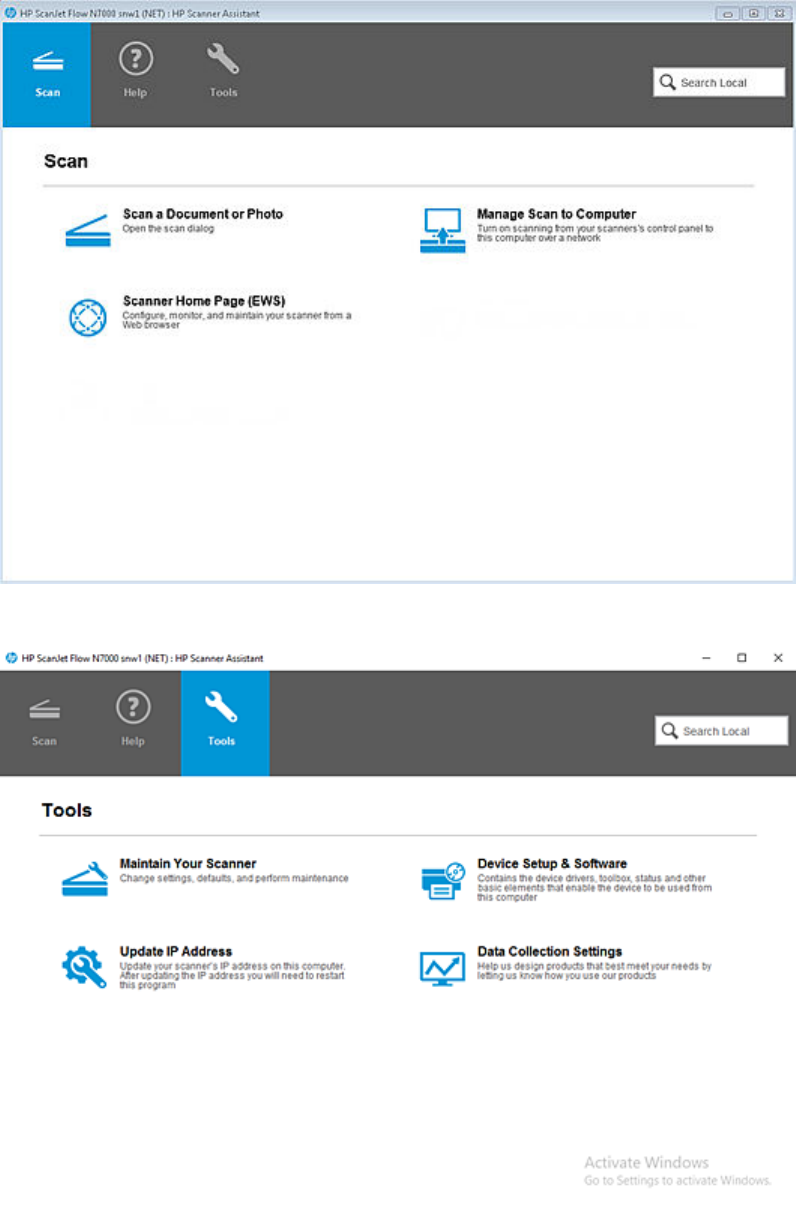
1. Open the HP Scan app.
2. Select the Tools tab.
Change or assign the device connection type
121

3. Select Device Setup & Software.
You will be redirected to the installation set up process to change the connection.
Change the scanner settings
To change the scanner settings using the HP Scan app, use the Scanner Tools Utility (STU).
1. Open the HP Scan app.
122 Chapter 9 Manage and maintain the scanner

2. Select the Tools tab.
3. Select Maintain Your Scanner.
The Scanner Tools Utility opens.
Change the scanner settings
123

Maintain the scanner
To maintain the scanner using the HP Scan app, use the Scanner Tools Utility (STU).
1. Open the HP Scan app.
124 Chapter 9 Manage and maintain the scanner

2. Select the Tools tab.
3. Select Maintain Your Scanner.
The Scanner Tools Utility opens.
Maintain the scanner
125

View device, firmware, or network information
To view device, firmware, or network information, use the HP Scan app to open the Embedded Web
Server (EWS).
1. Open the HP Scan app.
2. On the Scan tab, select Scanner Home Page (EWS).
The EWS opens.
126
Chapter 9 Manage and maintain the scanner

3. Select the Information tab and then select Device information from the left pane.
View device, firmware, or network information
127

Revision history
View a list of document revisions.
The information contained herein is subject to change without notice. HP shall not be liable for technical
or editorial errors or omissions contained herein.
Table Revision history
Revision number Revision date Revision notes
1.0 03/2021 New release User Guide for the HP Scan
app.
128 Chapter 1 Revision history

Index
A
add
device 15
divider 80
page break 80
scanner 15
separator 80
add pages
blank 75
scan preview window 82, 84
adjust
page settings after scan 39
scanned pages after scan 39
ShortCut settings before
scan 39
Adjustments area 34
Adjustments window 30
app, overview, menus 21
assign
connection type 120
assign PIN 48
auto-named 99
B
Bar code 97, 99
buttons
user interface 34
C
change
connection type 120
default settings 122
ip address 92
scanner settings 122
change page order 76
change page orientation 77
configure
Scan To USB 90
configure, set up 87
connection
change to network 120
change to usb 120
change to wireless 120
create
job reservation 48
scan shortcuts 87, 110
stored job 48
crop pages 71
D
data
multiple zonal 95
default settings 122
delete
scan shortcuts 113, 118
delete pages 74
delete, scanner, device 17
Detailed Adjustment settings 35
Document view 30
Download
driver 3
full software 3
web pack 3
E
edit pages 65
editable text 46, 95
editing tools 34
email scan
jpeg 44
pdf 44
Embedded Web Server 119, 126
enable
scan to computer 88
Scan To USB 90
EveryDay Scan 39
F
file name 97
folder 99
H
home screen 23
I
icons
add scan 34
crop 34
delete page 34
insert separator 34
next 34
previous 34
rotate 34
undo 34
information
device 126
firmware 126
network 126
insert
divider 80
page break 80
separator 80
install 4
administrator 13
basic web pack 13
command prompt 13
HP Scan 3
plug-ins 13
silent 13
usb cable connection 6
wired network connection 8
wireless connection 11
install, app 3
Introduction, Scope 1
ip address
change 92
J
job separator 80
job storage 48
L
Less link 35
M
maintain
scanner 119
Maintain Your Scanner 122
maintainenance 124
manage
app 119
shortcuts 110
metadata 104
More link 35
multiple scan zones 95
multiple zonal 95
O
OCR Text 97, 99
Index
129
open
app 38
Embedded Web Server 119
home screen 38
Open in a Zoom window 68, 71, 76,
77
overview
home screen 23
scan shortcuts 26, 29
Scan Shortcuts 23
settings 26, 29
tabs 21
P
password protect 48
perform maintainenance 124
preview scan 65
preview window 74-77
R
re-order pages 76, 77
remove pages 74, 75
rename
scan shortcuts 112, 113
restore
scan shortcuts 113
restore defaults
scan shortcuts 115
revision history 128
S
save
scan shortcuts 114
Save as Editable Text (OCR) 46,
95, 97, 99, 101, 104
save scan
jpeg 42, 44
local folder 42
network folder 42
pdf 42, 44
Scan a document or photo 39
Scan a Document or Photo 38
scan preview 65, 82, 84
crop 71
document list view 66
full screen 68
thumbnail view 65
zoom 68
scan preview window 80
Scan preview window
Detailed Adjustment
settings 35
Document view 30
Thumbnail view 30
scan shortcuts
create 87, 110
delete 118
export 115
hide 116
import 115
rename 112, 113
restore defaults 115
save 114
Scan Shortcuts
about 23, 26, 29
Email as JPEG 26, 29
Email as PDF 26, 29
Everyday Scan 26, 29
Save as Editable Text
(OCR) 26, 29
Save as JPEG 26, 29
Save as PDF 26, 29
Send to Cloud 26, 29
settings 26, 29
scan to
computer 88
editable text 46, 95, 97, 99, 101,
104
Scan To USB
control panel option 90
enable 90
scan zones 101
scanner maintainenance 124
scanner tools utility 124
Scanner Tools Utility (STU) 122,
124
separate 101
set up wizard
start 5
shortcuts
delete 110
rename 110
restore defaults 110
show
scan shortcuts 116
Show Viewer after scan 65, 66,
68
store scan job 48
supported
devices 2
file types 2
printers 2
scanners 2
system requirements
minimum 1
operating 1
recommended 1
T
tabs
Help 21
Scan 21
Tools 21
thumbnail view 65
Thumbnail view 30
toggle
More
Less 35
U
UDC icon 38
uninstall 19
One-Click 19
use, open, other 38
V
view
device information 126
document 66
firmware information 126
full screen 71, 76, 77
list 66
network information 126
thumbnails 65
zoom 71, 76, 77
Z
zone 97
zoom 68
130
Index
