
Getting Started with Minitab Connect
®

Contents
1 Overview 3
Minitab Connect Tools 3
The story 4
2 Prepare Your Data for Analysis 5
Create a custom view of your data 5
Send an export of a view by email 7
3 Get Your Data Into Minitab Connect 9
Add a new table 9
Add a new form 12
Create a connection and schedule the data imports 13
Modify a data flow 14
4 Push and Pull Your Data to External Applications 17
Export a Minitab
®
worksheet 17
FTP and SFTP Connectors 17
Create a connection to Minitab Model Ops 18
5 Display Your Data in Custom Graphs 20
Create a new graph 20
Modify the spline chart 21
Using graph options 25
Use a view to create a graph with a subset of data 26
6 Import and Share Your Data with Dashboards 28
Create a Dashboard 28
Add a slicer to your dashboard 28
Share the dashboard 29
Index 30
minitab.com/connect 2
Getting Started with Minitab Connect
®
1. Overview
The Getting Started with Minitab Connect
®
guide introduces you to some of the most common features and tasks in
Minitab Connect. Use this guide to learn how to complete the following tasks:
•
Create a custom view of your data
•
Create and send an export of your data
•
Add a new table
•
Add a new form
•
Connect with an external data source
•
Schedule data imports
•
Modify a data flow
•
Export data to other applications
•
Visualize data
•
Create a dashboard to share your analyses
Minitab Connect Tools
Minitab Connect is a powerful collection of tools that lets you import data into its platform, clean the data, and prepare
the data for analysis. Also, you can create visualizations of the data and easily share files with other applications. Each
tool in Minitab Connect performs a specific job, but all the tools seamlessly work together to allow for quick and flexible
access to your data and analyses.
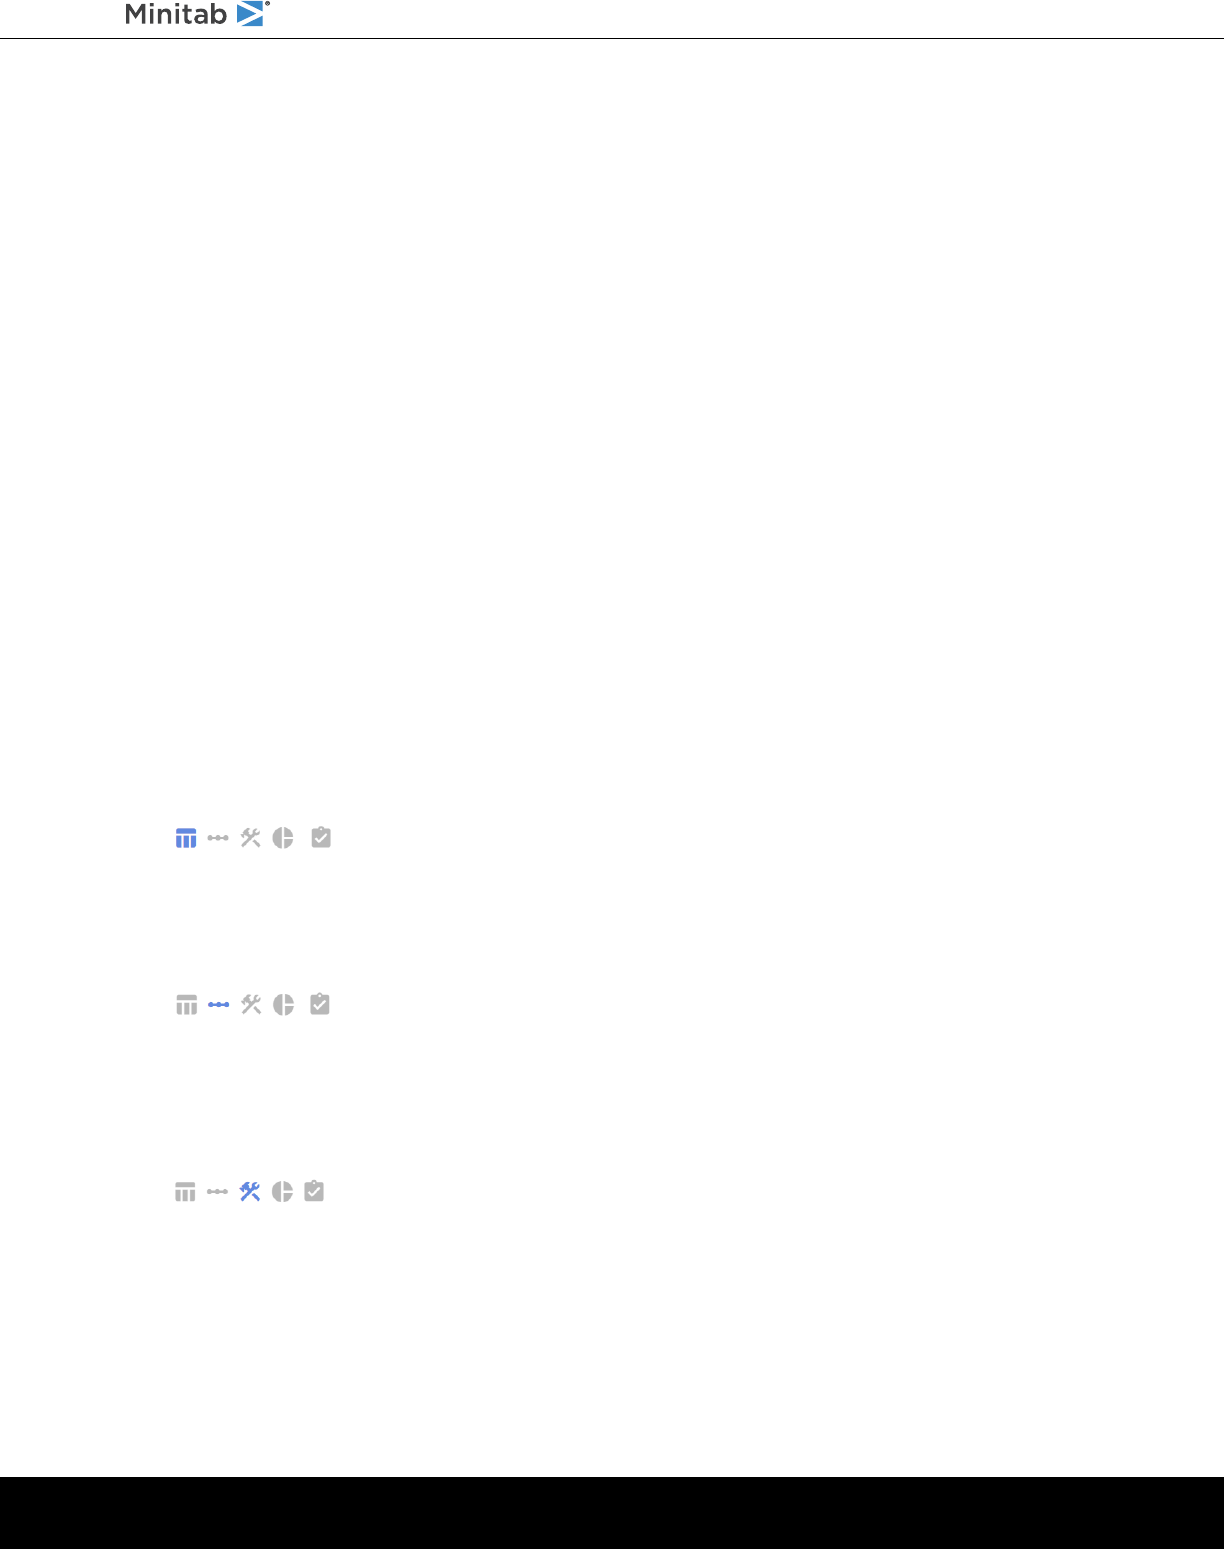
Minitab Connect includes three core tools to manage, store, and clean your data.
Base Tool
The Base Tool stores the data that flows in and out of the platform into a centralized data warehouse. Use the Base
Tool for immediate access to all your integrated data resources and manage your data resources without risking
data quality, integrity, or security.
Flow Tool
Use the Flow Tool to flow your data through the platform. Data flow in and out automatically or manually through
the connections that you set up. With the Flow Tool you can eliminate manual data clean-up tasks and automate
the movement of data between different sources and platforms. Minitab Connect includes hundreds of pre-built
connectors and integrations, or you can create your own.
Prep Tool
Use the Prep Tool to easily view and query your data. Also, use the Prep Tool for data cleanup and data aggregations
based on the processes that you specify. You can set up the prepping routine once, and all your data are processed
accordingly.
Minitab Connect also includes tools for visualizing and summarizing your data:
minitab.com/connect 3
Getting Started with Minitab Connect
®

Visualize Tool
Use the Visualize Tool to chart your data and share dashboards with colleagues across your organization.
Audit Tool
The Audit Tool displays a summary of your table. Use the Audit Tool to easily see the size, fields, flows, views, and
processes as well as general information about your data table.
The story
A company that sells online book downloads collects a large amount of data to understand the target audience and to
increase online book sales.
Throughout the Getting Started with Minitab Connect
®
guide, you analyze data from this fictitious company as you learn
to use Minitab Connect. While Minitab Connect is a powerful platform that can handle large and complicated data sets,
our examples are generally simple to illustrate the features available in the platform.
Note: The primary data set for this example is located in the Minitab Data Set Library. The steps to open this data set are in the section Import
data from an existing data file into a Minitab Connect table on page 5.
You can follow the chapters in sequence, or you can skip to the chapter of interest. Areas of focus include opening data
sets, creating new tables and forms, creating connections, visualizing data, and reporting results.
Tip: You might find it helpful to create your own folders when saving the tables and graphs from the examples in this guide. Or, you can use
unique names so that the other users on your platform do not overwrite your work.
minitab.com/connect 4
Getting Started with Minitab Connect
®
2. Prepare Your Data for Analysis
Often, the first step in data analysis is to prepare your data. In many cases, you have too much data or incorrectly formatted
data. It is important to clean and subset the data to focus on the variables of interest. Use the Prep Tool to do the following:
•
Create a custom data view to easily explore your data
•
Design and run a custom data prep
•
Export a data report
Create a custom view of your data
You can create a custom view of your data so that you can focus on the fields of interest. Each data table can have
multiple views that you can save and name. These views can be used throughout the platform for ease of data reporting
and analysis. Views do not change the actual data, but only change the presentation of the data. At any time, you can
select Reset Config to see all the data in the table.
In this example, the marketing analyst collects daily sales data. To focus on the daily breakdown of downloads by category,
the marketing analyst creates a new view of the data that includes only the variables of interest.
Import data from an existing data file into a Minitab Connect table
First, the marketing analyst imports data from a Microsoft Excel (.xlsx) file into a new Minitab Connect table. After the file
is imported, the data in Minitab Connect is independent of the original data file. Therefore, changes made to one source
will not affect the other. Follow these instructions to create a standard table from an existing data file.
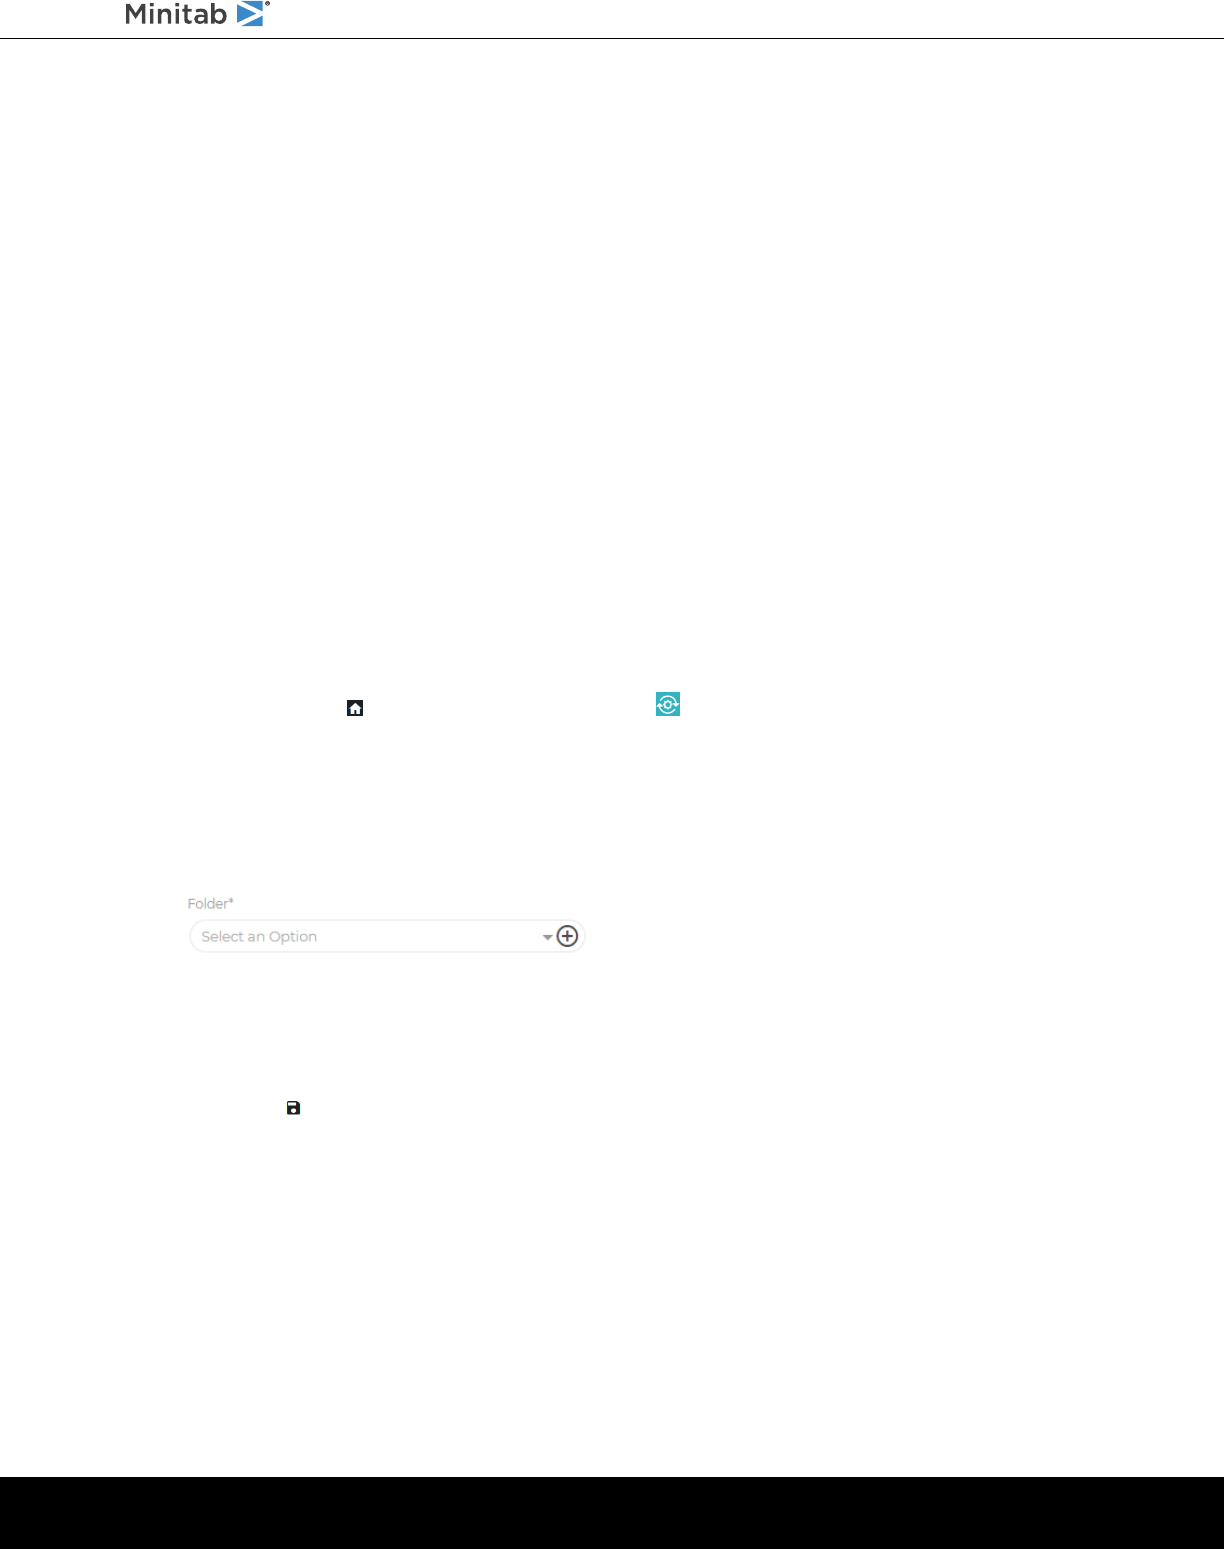
1. From the Home screen , select the Minitab Connect button to open the Navigation pane. Under Tables, select
Add New Table.
Or, from the Home screen, select the Add button under Tables.
2. On the Dataset tab, enter the following:
a. Under Name, enter Online Downloads to identify the new table.
b. Under Folder, select the plus button to create a new folder.
Tip: You might find it helpful to create your own folders when saving the tables and graphs from the examples in this guide. Or you
can use unique names so that the other users on your platform do not overwrite your work.
c. Under Name, enter Download Data to name the folder that stores the new table.
d. Under Parent, keep /(root) to create the new folder at the root level of Minitab Connect.
Alternatively, you can browse to another location to create the new folder.
e. Select Save .
f. Under Status, select Development.
You can also enter optional fields, which are helpful to describe your data set.
minitab.com/connect 5
Getting Started with Minitab Connect
®

3. From the Tables gallery, select File/Text/Template.
4. Under Import Type, select File and browse to your file.
For this example, use the data set in the Minitab Data Set Library, Online Downloads Data.
5. Select Save .
When you save the table, the Prep Tool opens. Select Reset Config to view the data.
Note: Select the Notifications and Issues button to display problems with your data. For instance, you can see whether the data have
imported properly.
Create a summary view of your data
Next, the analyst specifies the fields of interest. Because the analyst wants a summary of the total downloads by genre
and purchase date, the analyst creates a view with these fields and one of the system fields created by Minitab Connect.
Note: Every data table includes four system fields, which are created by Minitab Connect and help identify the data. You cannot remove
system fields from the table; however, they do not appear unless you add them to a view.
Follow these instructions to create a summary view of the data.
1. On the Fields tab, select Remove All Fields to start with an empty field list.
Depending on the number of columns, it may be easier to add or remove fields.
2. Under Add a Field, select the fields to add to the view.
For this example, add Purchase Date and Genre.
For this example, we also need to add System: ID, which is a unique ID for each record.
3. Under System: ID, select the View button.
minitab.com/connect 6
Getting Started with Minitab Connect
®
4. Select Add Prep and select Count.
For this example, the analyst wants a summary of each genre for each day.
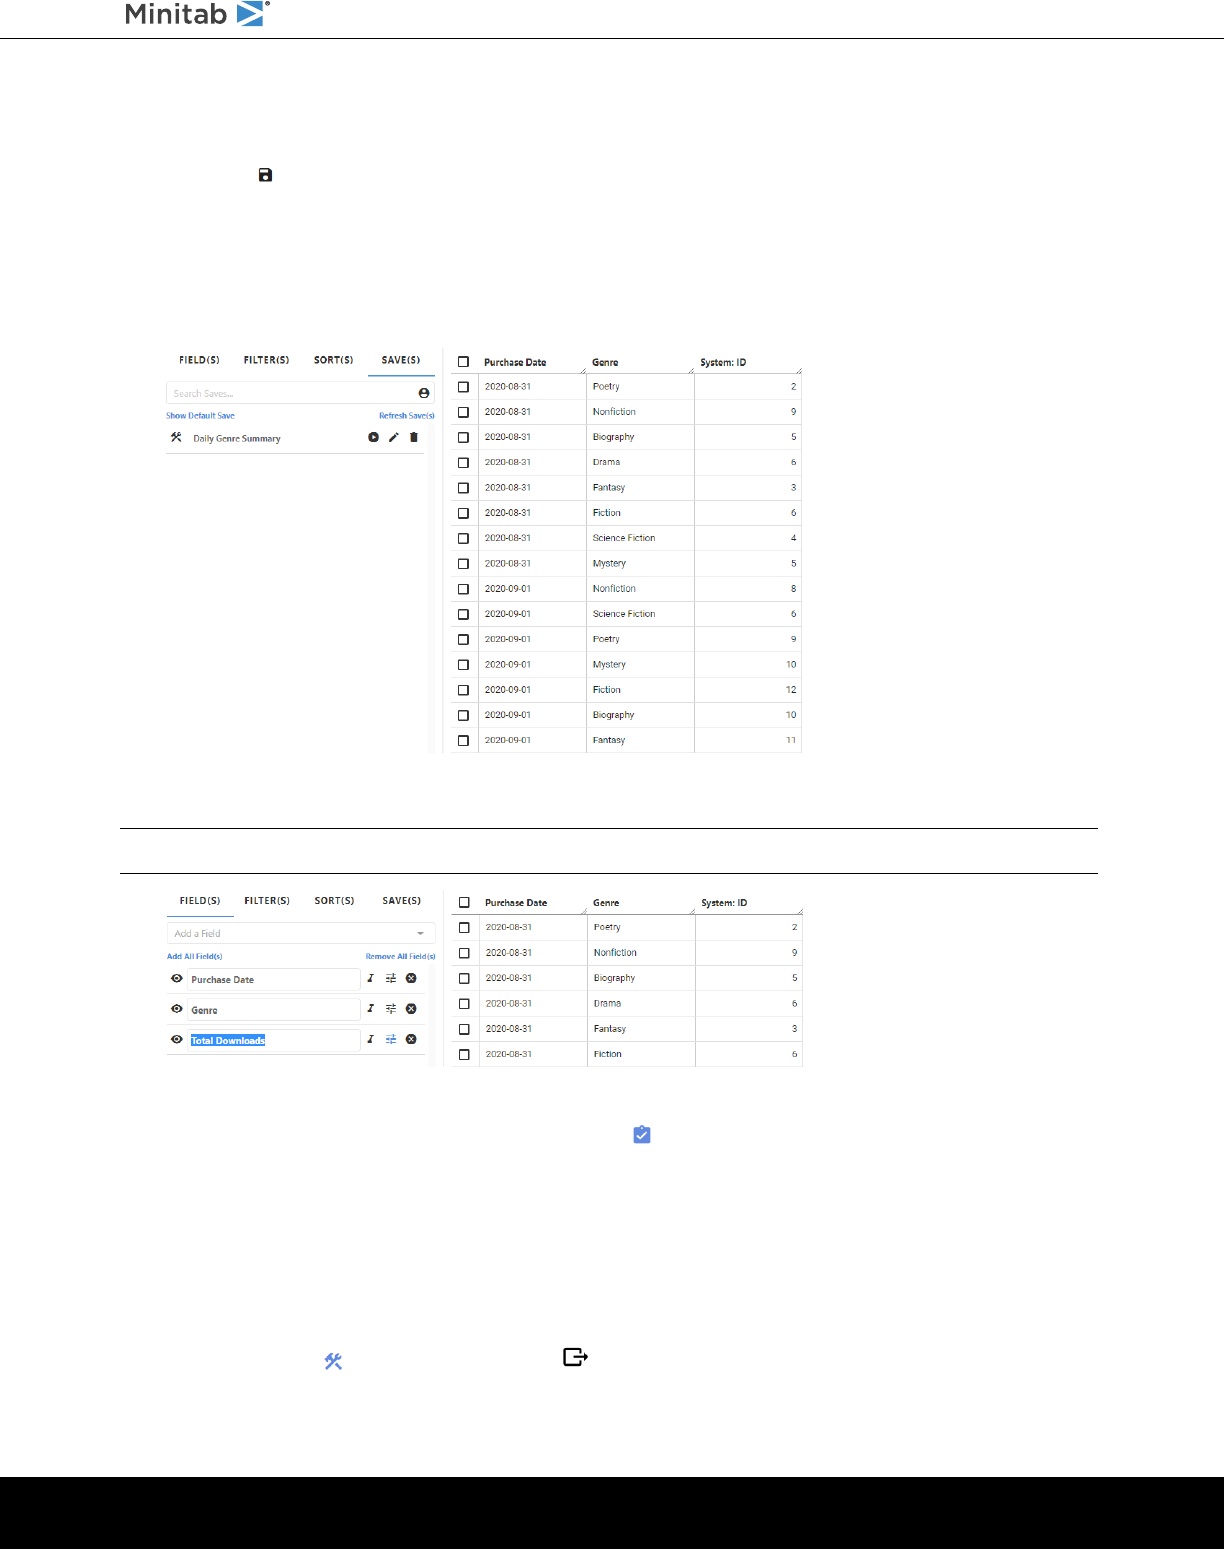
5. Select Save .
6. Under View, select New View. Under Name, enter Daily Genre Summary to identify the new view.
7. Select Save.
You now have a saved view called Daily Genre Summary that you can use throughout the Minitab Connect platform to
view the summary data.
When you add aggregate data preparations such as Count, Sum, Min, or Max, the results are sorted by the other
fields that do not have an aggregate Prep. For this example, the data are sorted by Purchase Date and Genre.
Tip: You might find it helpful to rename the system field with a more meaningful name. From the Fields tab, highlight the name you want to
change and enter a new name.
In this example, Total Downloads is more descriptive.
You can create other views at any time. Open the Audit Tool to see a list of all the views for the active table.
Send an export of a view by email
After a view is created, you can export the data from this view to share with others. In this example, a marketing analyst
sends an email of the daily summary to the marketing team. Follow these instructions to create an export of the data
view.
1. From the Prep Tool , select the Export button .
minitab.com/connect 7
Getting Started with Minitab Connect
®
2. In the Export Data dialog box, enter the following:
a. Under Export, select New Export.
b. Under Name, enter Daily Genre Export.
c. Under View, select Daily Genre Summary to select the view to export.
d. Under Delivery, select Email - Attachment.
You can also send an email as an inline attachment.
Note: When you send information from Connect by email, it is recommended that you select an email encryption option from the
PGP / GPG Encryption drop down.
3. Open the Delivery tab and enter the following:
a. Under Email To, enter the email addresses, separated by commas, to the recipients of the export.
Select the envelope icon to populate the field with your email address.
b. Under Email Subject, enter the subject header for the email.
For this example, keep the other default settings. You can also enter optional fields, which are helpful to describe
your export.
4. Select Save.
5. Select Run.
You now have a saved export called Daily Genre Export that you can use throughout the Minitab Connect platform to
export the summary data. You can create other exports at any time.
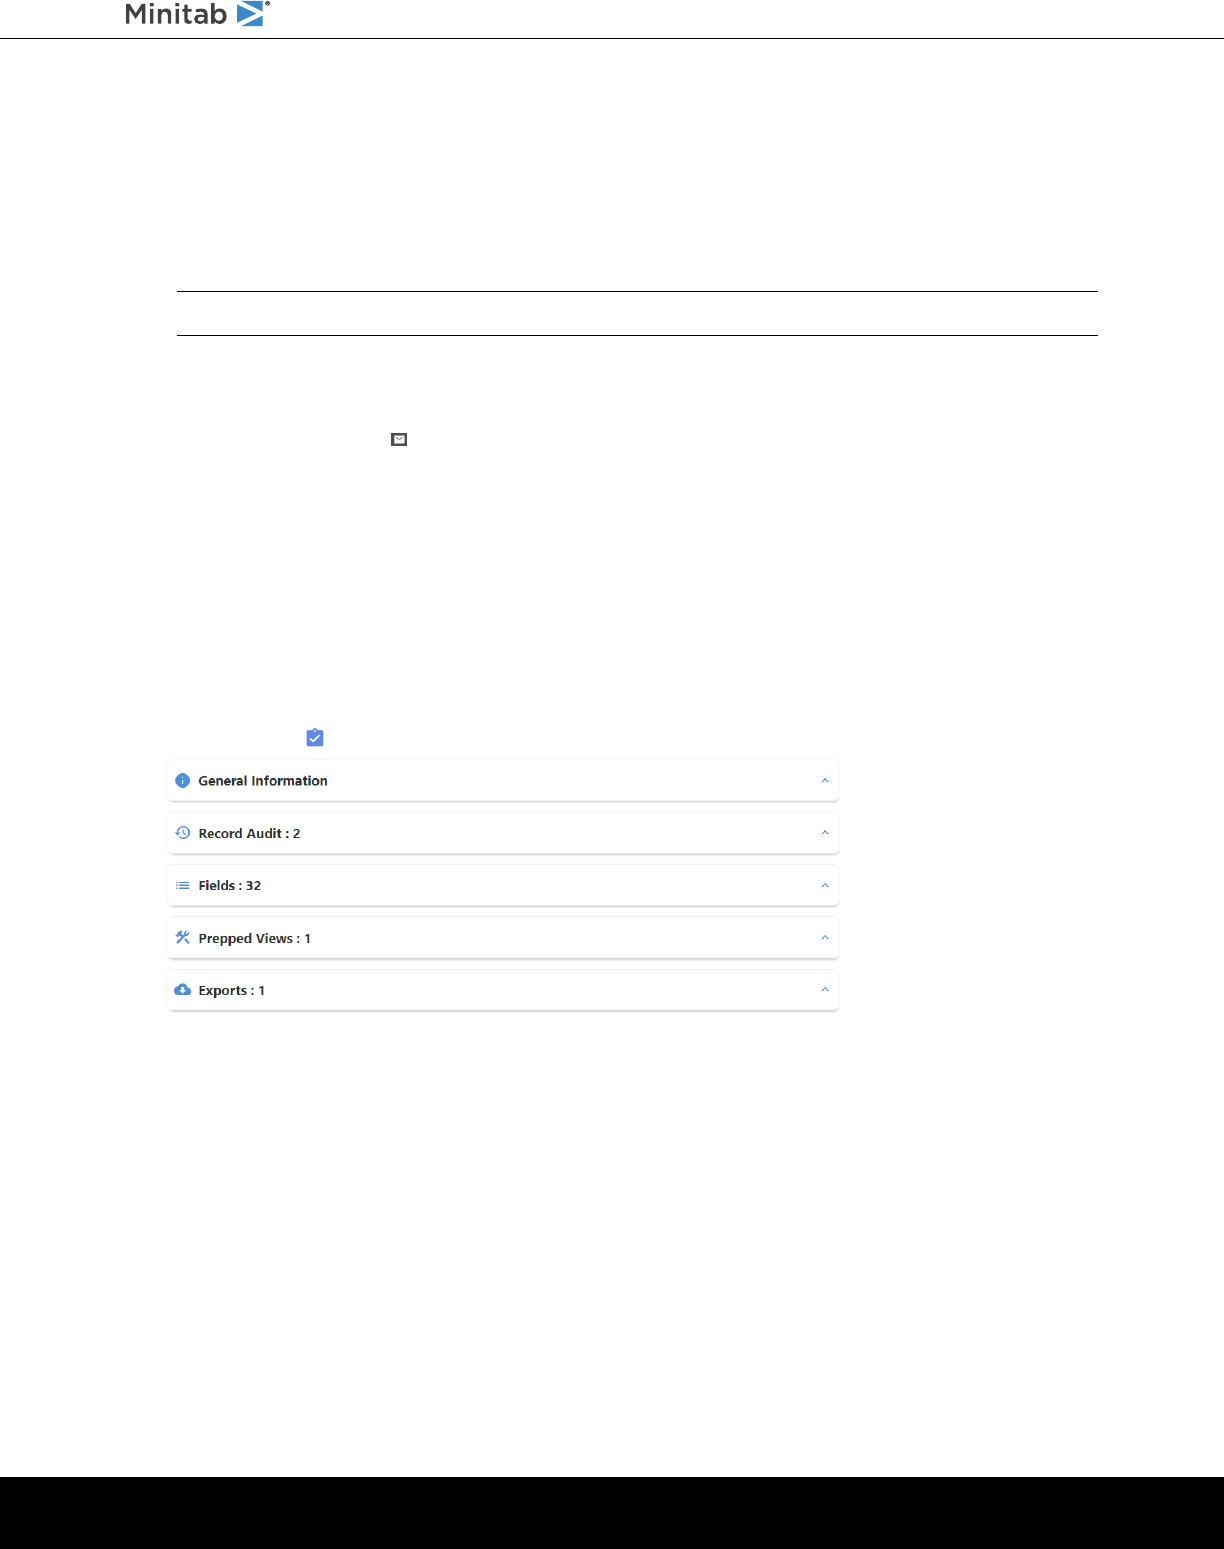
Open the Audit Tool to see a list of all the exports for the active table.
Currently, this table has 32 fields, one prepped view, and one export. Expand each section to see more details.
minitab.com/connect 8
Getting Started with Minitab Connect
®
3. Get Your Data Into Minitab Connect
All data used by Minitab Connect are stored within tables. You can add data to a Minitab Connect table several different
ways.
•
Create a standard table and manually enter your data
•
Create a connection to import your data one time only or at a frequency that you specify
•
Use custom SQL to pull data from an existing data set
•
Import from a file
•
Combine two or more existing data sets
Add a new table
In this example, a customer services representative enters customer complaint data into a standard table. The representative
either speaks on the phone or chats online with the customer about their concerns.
Create a standard table to include specified fields
First, the customer representative creates a standard table with the required fields. For this simple example, the customer
representative collects the date, the customer ID, the customer region, and the type of issue. Follow these instructions
to create a standard table for manual data entry.
1. From the Home screen , select the Minitab Connect button to open the Navigation pane. Under Tables, select
Add New Table.
Or, from the Home screen, select the Add button under Tables.
2. On the Dataset tab, enter the following:
a. Under Name, enter Download Issues to identify the new table.
b. Under Folder, select the plus button to create a new folder.
c. Under Name, enter Customer Team to name the folder that stores the new table.
d. Under Parent, keep /(root) to create the new folder at the root level.
Alternatively, you can browse to another location to create the new folder.
e. Select Save .
f. Under Status, select Development.
You can also enter optional fields, which are helpful to describe your data set.
3. Under Tables, select Standard.
minitab.com/connect 9
Getting Started with Minitab Connect
®
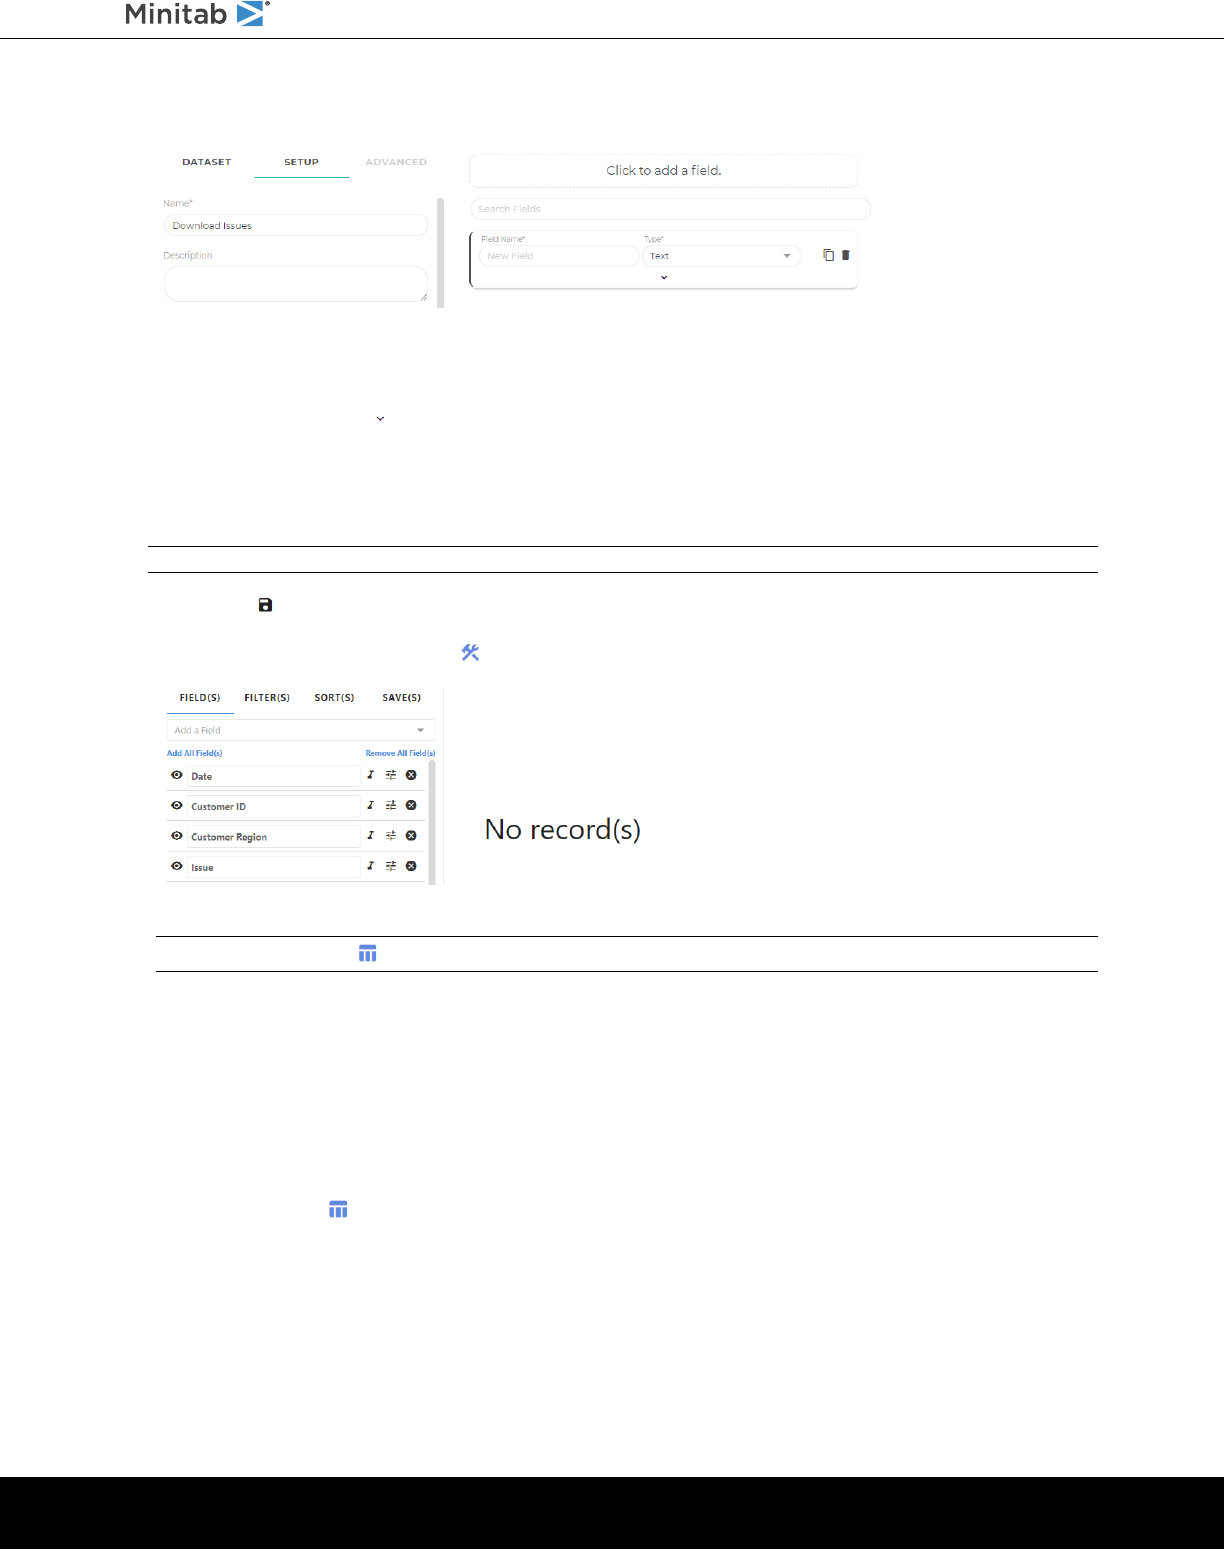
4. On the Setup tab, add a new field for each variable in your table.
Click to add a field opens a data entry field.
a. Under Field Name, enter Date.
b. Under Type, select Date.
c. Select the down arrow to expand this field. Under Format, select Date.
You can also enter optional fields, which are helpful to describe your data set.
5. Repeat Step #4 for Customer ID, Customer Region, and Issue.
The Customer ID and Customer Region fields are numeric, and the Issue field is text.
Note: For Text and Number fields, the default length values are usually adequate, but you can increase or decrease as you like.
6. Select Save .
When you save the table, the Prep Tool opens and you can now add data to the table.
This table has the four fields that you added. Select Add a Field at the top of this list to add any of the system fields
to this view.
Note: Use the Base Tool to add more data fields to this table.
Create a list field for a variable
In the next section, Add a new form on page 12, the customer service team creates a form to collect data. Because the
team wants to use standard values for the customer region and the issue type, the analyst specifies a list for these fields
to create dropdown lists in the data collection form.
Follow these instructions to create dropdown lists for customer region and issue.
1. Open the Base Tool .
minitab.com/connect 10
Getting Started with Minitab Connect
®
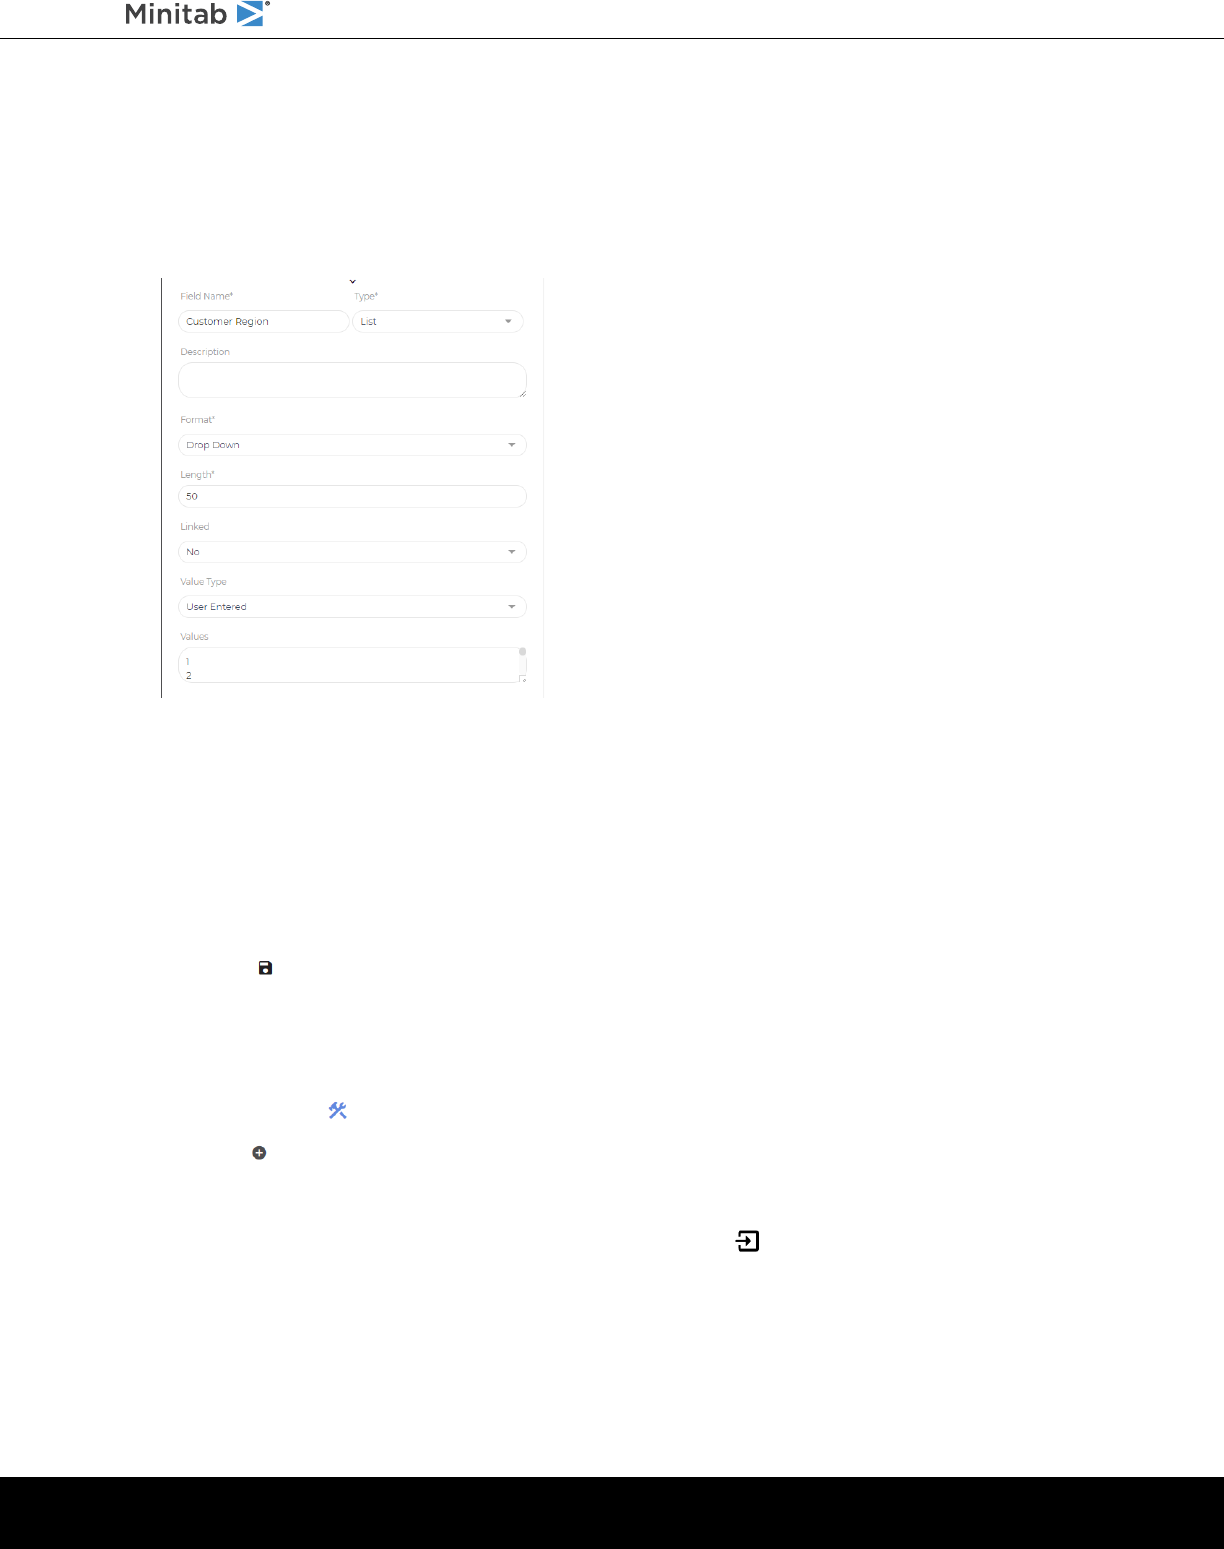
2. On the Setup tab, expand the Customer Region field.
a. Change the Type from Number to List.
b. Under Format, select Drop Down.
c. Under Value Type, select User Entered.
d. Under Values, enter 1, 2, 3, 4, 5, 6, 7. Use the enter key between entries so each issue is on a separate line.
3. Repeat Step #2 for Issue.
a. Change the Type from Text to List.
b. Under Format select Drop Down.
c. Under Value Type select User Entered.
d. Under Values enter Browser, Incorrect Billing, Incorrect Link, Return, Other. Use the enter key between entries
so each issue is on a separate line.
4. Select Save .
Add data into the new table
Next, the analyst enters data into the table.
1. Open the Prep Tool .
2. Select Add and populate the desired fields.
3. Select Submit to add the record to the table.
4. If you want to import several records at the same time, use the Import button.
•
Under Type, select Text to copy and paste multiple records at the same time.
•
Under Type, select File to import a file with all the records.
minitab.com/connect 11
Getting Started with Minitab Connect
®
Add a new form
In the previous section, the customer representative created a standard table with the required fields. However, because
the entire customer service team needs to standardize the data collection, the team decides to create a form that all
team members can access.
You can use the Form Tool to design customized forms that have user-specific instructions to minimize data entry errors.
The data entries are then stored in the corresponding data table.
For this example, create a form to collect the date, the customer ID, the customer region, and the type of issue. Follow
these instructions to create a new form for manual data entry.
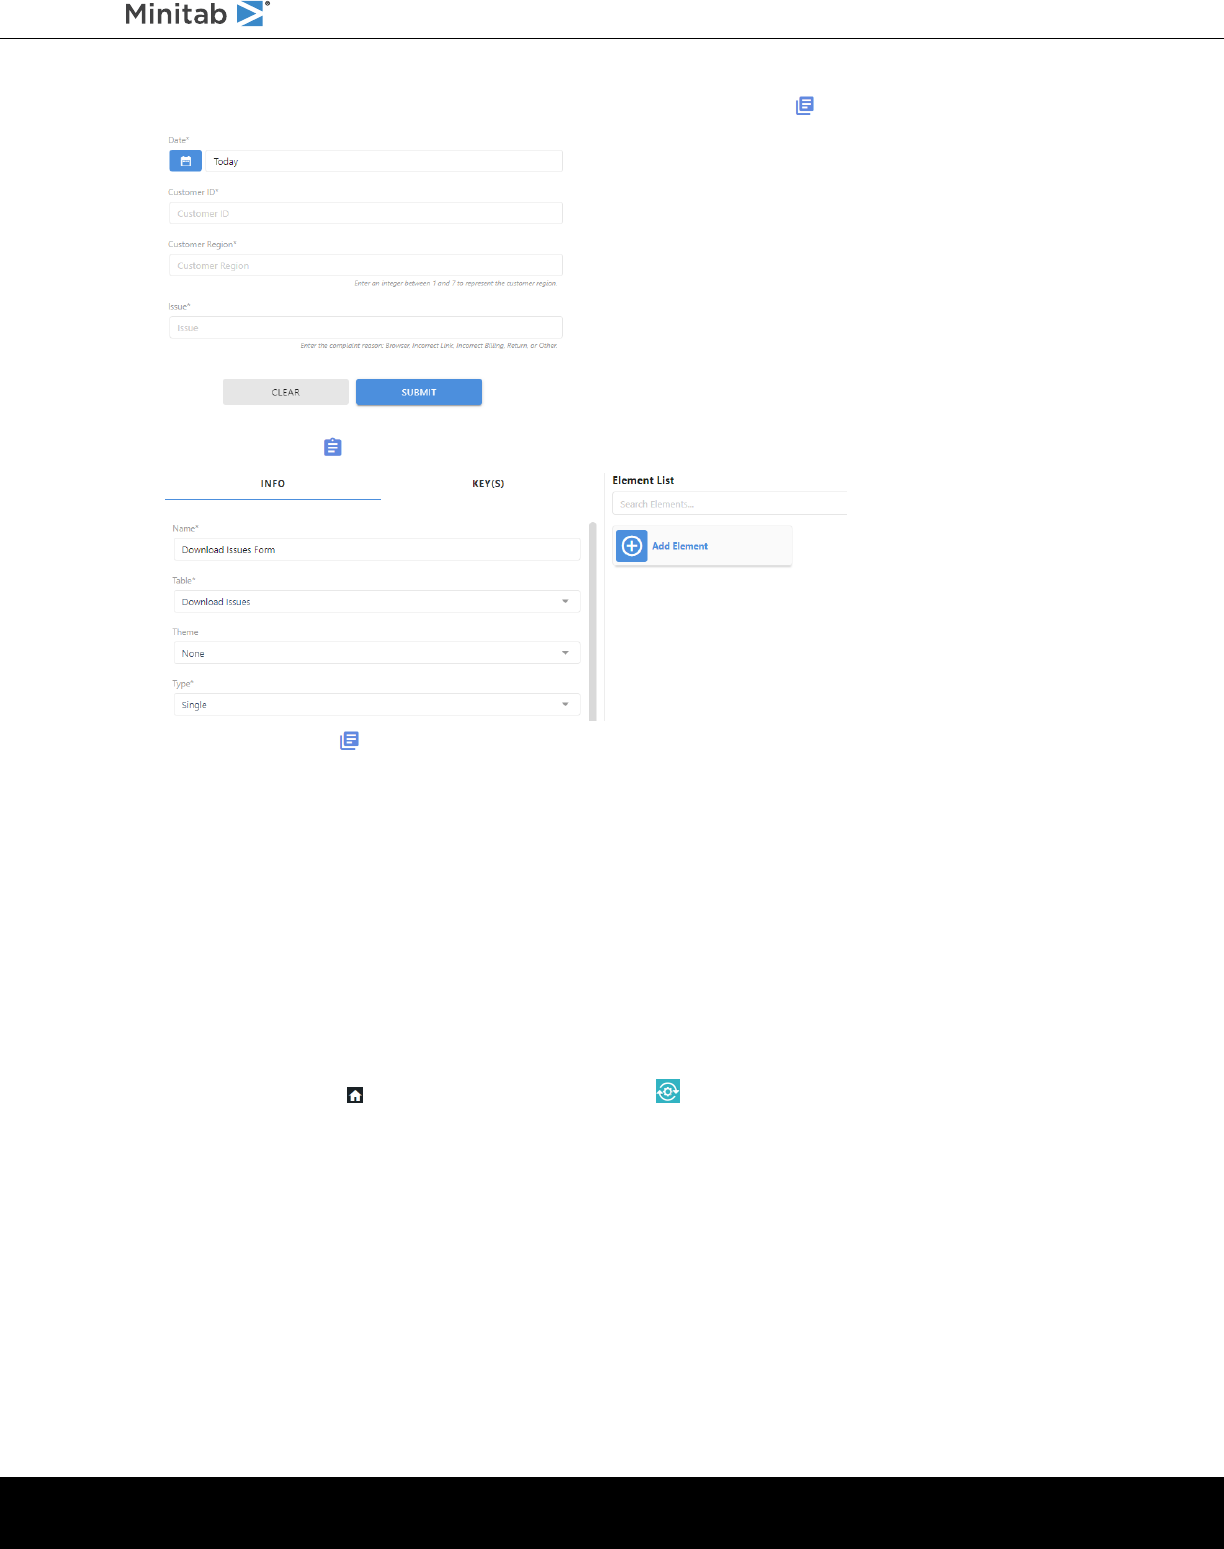
1. Go the Navigation pane. Under Forms, select Add New Form.
2. On the Info tab, enter the following:
a. Under Name, enter Download Issues Form.
b. Under Table, select Download Issues.
Minitab Connect populates this field when you generate a form from a table.
c. Under Type, select Single.
d. Under Type, select External.
For this example, keep the other default settings. You can also enter optional fields, which are helpful to describe
your form.
3. Select Add Element.
For this example, add elements for date, customer ID, customer region, and the type of issue.
4. Under Type, select Date. Under Options, select Required.
5. Select Add to save the Date element.
6. Select Add Element. Under Type, select Customer ID. Under Options, select Required.
7. Select Add to save the Customer ID element.
8. Select Add Element. Under Type, select Customer Region and enter the following:
a. Under Help Text, enter Enter an integer between 1 and 7 to represent the customer region.
This instruction will display on the form.
b. Under Options, select Required.
9. Select Add to save the Customer Region element.
10. Select Add Element. Under Type, select Issue and enter the following:
a. Under Help Text, enter Enter the complaint reason: Browser, Incorrect Billing, Incorrect Link, Return, or Other.
This instruction will display on the form.
b. Under Options, select Required.
11. Select Add to save the Issue element.
12. Select Save to save the form.
Tip: Another way to create a new form is from the Flow Tool . Under the Inputs tab, select the plus button next to Forms to add a
new form. You can follow the same steps as above.
minitab.com/connect 12
Getting Started with Minitab Connect
®
When you save the form, you can toggle between the Form and the Form (Base) .
Use the Form Tool to enter data.
Use the Form (Base) update your form.
Create a connection and schedule the data imports
In this example, a marketing analyst creates a connection to a database that contains key data. After this connection is
set up, the analyst can use the same connection to pull additional data. Follow these instructions to create a connection
for data import.
Create a connection
Minitab Connect offers hundreds of connectors that can bring data into the platform. This example shows how to connect
to a database. Your specific steps will depend on the connector that you select.
1. From the Home screen , select the Minitab Connect button to open the Navigation pane. Under Tables, select
Add New Table.
Or, from the Home screen, select the Add button under Tables.
2. On the Dataset tab, under Datasets, search for MySQL or the connection that you want to create.
3. On the Setup tab, enter the following:
a. Under Name, enter the name that identifies the table.
b. Under Folder, select the folder that stores the table or create a new folder.
c. Under Status, select whether the table is in development or production.
You can also enter optional fields, which are helpful to describe your data set.
minitab.com/connect 13
Getting Started with Minitab Connect
®

4. Under Connection, select New Connection and enter the Name that identifies the connection.
5. Under Setup, enter the Hostname and Port.
6. Select Next.
7. Under Setup, enter the Username and Password.
Contact your IT department if you do not know the database username and password.
8. Select Next.
9. Under Setup, select your Database.
10. Select Save.
Now the analyst can pull the data using this connection. From the Navigation pane, under System > Connections, you
can see all the data connections that are currently set up.
Schedule data imports
Next, the analyst specifies how often to retrieve the database data. If you import data from a different type of connector,
then your steps will be different.
1. Under Connection, select where to import the data from.
2. Under Update Frequency, select the how often you want to import the data pull.
3. On the Setup tab, select Type of Pull, then select Next.
•
Single Table to pull data from one table
•
Multiple to pull data from multiple tables
•
All to pull data from all data sources
For this example, the analyst selects Single Table. If you select Multiple or All, you need to specify the other data
sources to use.
4. Under Setup, you can specify whether you want to use your own SQL. Under Skip to SQL, select one of the following:
•
No to use the default setup steps. A step-by step process walks you through the options.
•
Yes if you are familiar with SQL and want to enter your own code.
5. Under Table, select the table that contains the data, then select Next.
6. Under Setup, select the data fields, then select Next.
7. Under Setup, add a filter if you like, then select Next.
For example, you can enter a filter for Date if you want to specify a date range.
8. Select Save to run the data pull.
When you save the table, the Prep Tool opens. You can display your notifications to see if the data have imported
properly. Select Reset Config to see the data.
Modify a data flow
In this example, a marketing analyst generates weekly data but wants to reschedule and flow the data daily. Follow these
instructions to modify the data flow schedule.
minitab.com/connect 14
Getting Started with Minitab Connect
®
Modify the data schedule
This example shows a scheduled change from weekly to daily data. Your specific steps depend on the type of flow trigger
that you select.
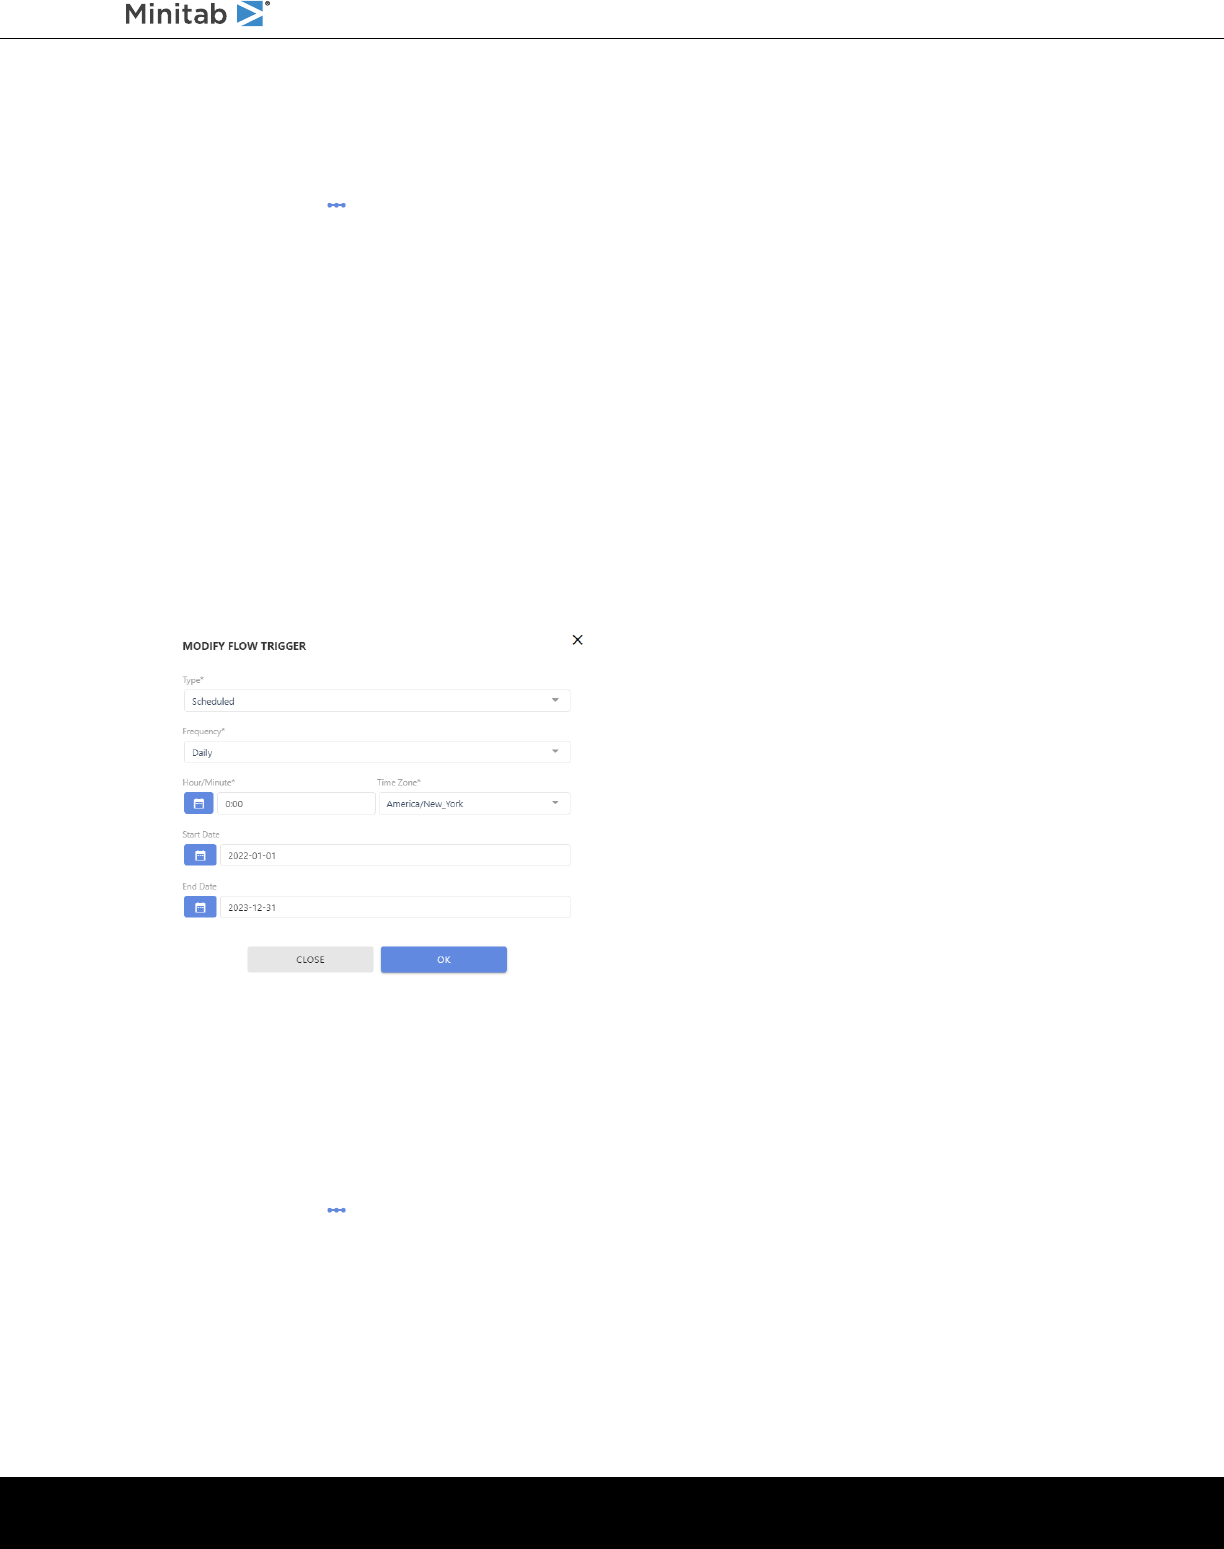
1. Open the Flow Tool .
2. Select the existing scheduled flow to open the Modify Flow Trigger dialog box.
3. Under Type, select one of the following options:
•
Manual runs the process when requested.
•
Scheduled runs the process as specified by a schedule.
•
Data Event runs the process when new data are inserted or updated, or when old data are deleted.
•
Form Submission runs the process when a form is submitted.
•
Flow Completion allows you to chain multiple data flows together. For example, you can use Flow Completion
to run Flow 2 after Flow 1 runs, or you can use flows from different data sets.
4. For this example, the analyst selects Scheduled.
5. Under Frequency, select Daily and specify the time and the start and end dates.
6. Select Save.
You can enter the details as needed for your scheduled flow.
Add a new flow to an existing flow
In addition to the daily data pull, the marketing analyst also wants to add the daily summary export to the flow. Your
specific steps depend on the type of flow trigger that you select.
This example shows how to add a new flow item with an existing flow.
1. Open the Flow Tool .
2. Under the existing scheduled flow, select the New Flow Item button.
3. Under Name, enter Daily Report to name the new flow item.
4. Under Type, select Export.
5. Under Export, select Daily Genre Export.
6. Select OK to save the new flow item.
minitab.com/connect 15
Getting Started with Minitab Connect
®

When you save the flow, the new flow item is added. You now have a saved flow that pulls data, creates an export, and
emails the summary data daily.
minitab.com/connect 16
Getting Started with Minitab Connect
®

4. Push and Pull Your Data to External
Applications
With Minitab Connect you can push or pull your prepped data into various applications. You can push data with a simple
export. You can pull data by setting up a connection from the external application to import data into Minitab Connect.
Export a Minitab
®
worksheet
Minitab Connect provides ways for you to export your prepped data to other applications, such as Minitab
®
Statistical
Software.
•
To create a Minitab
®
worksheet (MWX) for in-depth analysis, select the Export to Minitab button from the Prep
Tool.
•
To export to other formats, select the Export button .
FTP and SFTP Connectors
Use a File Transfer Protocol (FTP) or a Secure File Transfer Protocol (SFTP) to communicate and transfer files between a
server and Minitab Connect. You need the username and password for the server to access the files and import them
into Connect. For a SFTP connector, you can alternatively use a Secure Shell (SSH) key instead of a username and
password.
Both SFTP and FTP connectors interact with Connect the same way; however, the SFTP connection provides more
security than the FTP connection.
Set up a new connection
Complete the following steps to set up a connection in Minitab Connect.
1. Select the Minitab Connect button to open the Navigation pane.
2. Select System > Connections and select Add New Connection.
3. Enter a Name that identifies the table and a Description for the table.
4. In Type, enter FTP or SFTP and select the appropriate connector from the results.
5. On the Setup tab, enter the following:
•
Under Beacon, specify which beacon you want the connection to go through if you have multiple beacons. Usually,
the default works best.
•
Under FTP Host or SFTP Host, enter the host of the server.
•
For a SFTP Port, you usually use port 22.
•
If you use a FTP connection, you must enter the Username and Password for the sever. Contact your IT department
if you do not know the database username and password.
6. Select Next.
7. For an SFTP connection, use Authentication Method to select whether to authenticate the server using a password
or an SSH key. If you use an SSH key, Connect creates a unique public key that you must add to the authorized keys
on your SFTP server.
minitab.com/connect 17
Getting Started with Minitab Connect
®

8. Under FTP Path or SFTP Path, enter the path to the connection. The path name must end with a back slash (/). If you
want to connect to a sub-folder, then enter the path to an existing sub-folder. Leave a single back slash to connect
to the root folder.
9. Select Next.
After you complete the setup, Connect communicates with the server to ensure that the credentials and directories are
valid. If the connection is successful, Connect displays a list of files and folders that are found on the server.
Export a file to a connection
Complete the following steps to export data from a Minitab Connect table.
1. Open the Outputs tab of the Flow Tool .
2. Select the plus sign beside Export to add a new export.
3. From Export, select New Export to set up an export to a server. If you select One Time Download, Connect downloads
the file to your computer and does not create an export.
4. Enter a Name for the export.
5. Under View, select a saved view of the table. If you select None, Connect exports all the data from the table.
6. Under Delivery, select Connection.
7. Under Connection, select the FTP or SFTP connection that you previously set up.
8. Under FTP Path or SFTP Path in the Delivery column, enter the path to store the file. The path name must end with
a back slash (/). If you want to export to a sub-folder, then enter the path to an existing sub-folder. Leave a single back
slash to export to the root folder.
You can specify the file type and file name along with other options. After you save the export, Connect adds it to the list
of exports in the Outputs tab. Select Run to run the export.
Create a connection to Minitab Model Ops
Minitab Model Ops
®
provides the ability to use a variety of sophisticated models to make predictions. You can set up a
connection so that anytime you add records to a table, Connect sends the new data to Minitab Model Ops. Then Minitab
Model Ops generates predictions for the new data and sends the predictions back to Connect. Finally, Connect stores
the new predictions in the original table. For more information on Minitab Model Ops, go to Minitab Model Ops.
Note: You cannot create a connection using mashup tables, SQL tables, or tables that you prep with an aggregate function.
1. On the Flow Tool, create a new flow and add a New Flow Item.
2. From the Type drop down, select Model Scoring (Minitab Model Ops). Select a view from the View drop down or
select None.
3. Under API Key, enter the API key for the Minitab Model Ops model. When you create an API key in Minitab Model
Ops, there are two available scopes; Manage Models and Score Models. The key that you enter in Connect must
have both scopes.
4. From the Model drop down, select the model that you want from Minitab Model Ops.
minitab.com/connect 18
Getting Started with Minitab Connect
®
5. Under Model Variables and Model Responses, pair the parameters from Minitab Model Ops with fields in Connect.
Pair a field for the MTB correlation ID, each predictor, and the predicted response. If you have a categorical response,
also pair a field for the predicted probability for each class in the response variable. If you do not pair a parameter
with a field, Connect does not store the data for that parameter in the table when you send new data to Minitab Model
Ops.
Note: If you do not have a field for each Minitab Model Ops parameters, you can use the Base Tool to add new fields to your table.
6. Under Prediction Timestamp, pair the timestamp from Minitab Model Ops
®
to a field in the Connect table.
7. To run the connection each time you enter a new record into the Connect table, select the Manual box. From the
Type drop down, select Data Event. Under Event Type, select On Inserted Records.
8. Name the flow and save.
When you add a new record to the table, Connect sends the data to Minitab Model Ops. Minitab Model Ops generates
predictions and sends them back to Connect. Connect stores the new values in the table.
minitab.com/connect 19
Getting Started with Minitab Connect
®

5. Display Your Data in Custom Graphs
The Minitab Connect Visualize Tool provides a variety of dynamic chart types, such as line charts, bar charts, word clouds,
and many others, so that you can easily explore data and share visualizations securely.
Create a new graph
In this example, the marketing analyst wants to investigate the effectiveness of email and social media campaigns. The
team collects data for when a customer accepts an email or social media offer after the first, second, or third offer attempt.
Minitab Connect provides many types of graphs to show relationships between variables. Choose the graph that is best
for your situation.
Create a spline chart
For this example, the analyst wants to create a chart of the number of offer acceptances from the first email offer by date.
The analyst chooses a spline chart. A spline chart is a type of line chart that draws a curved line between points in a data
series. With the spline chart, the analyst can determine patterns in the data.
1. Open the Online Downloads table that you created previously in Import data from an existing data file into a Minitab
Connect table on page 5.
2. Open the Visualize Tool .
3. In the first dropdown box, select Current Config.
If you want to use a specific view for the data source, choose that view instead.
Note: The current configuration selection represents the active view of data in the Prep Tool . Select Reset Config in the Prep
Tool to see all the data in the table.
4. Under Type, select Spline.
5. Under Metric, specify the fields to display on the y-axis of the chart.
For this example, select Accept First Email Offer.
6. Under Dimension, specify the fields to display on the x-axis.
For this example, select Purchase Date.
7. Select Run to generate your chart.
8. Select Save to save this visual.
9. Under Visual, select New Visual and enter a Name.
For this example, enter Email Offer #1 by Date.
10. Select Save.
Example of email offer #1
Here is our first saved visuals with our data table.
minitab.com/connect 20
Getting Started with Minitab Connect
®
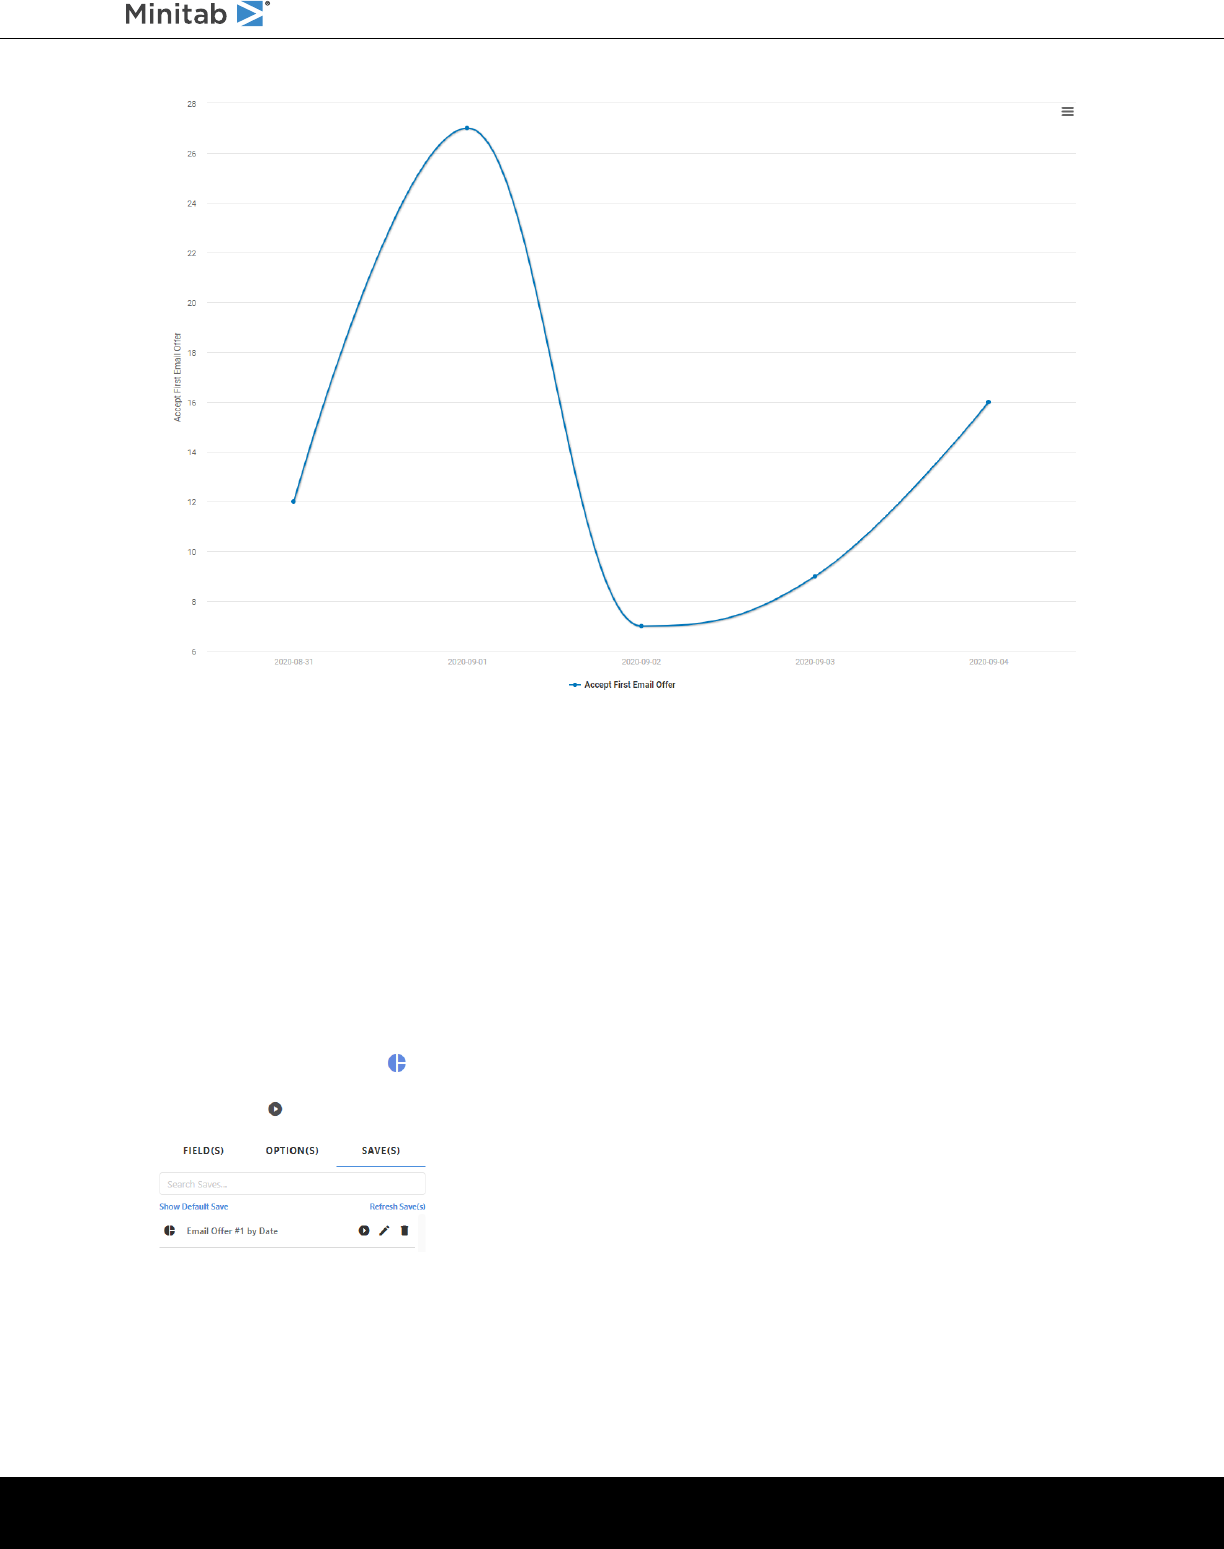
This graph shows the number of acceptances of the first email offer, by date.
Modify the spline chart
In the previous section, the analyst created a graph that shows the number of acceptances of the first email offer. Minitab
Connect has many options to add variables and customize graphs. The analyst decides to add more variables and
customize scale options.
Add more variables to your chart
In this example, the analyst wants to add data from the second and third email offers and the social media offers.
1. Open the Email Offer #1 by Date graph that you created previously in #unique_32.
a. From the Visualize Tool , open the Saves tab.
b. Click Run to open the chart.
2. On the Fields tab, select Add Metric.
3. Under Metric, select Accept Second Email Offer.
4. Select Add Metric.
5. Under Metric, select Accept Third Email Offer.
minitab.com/connect 21
Getting Started with Minitab Connect
®

6. Select Run to generate your chart.
7. Select Save to save this visual.
8. Under Visual, select New Visual and enter a Name.
For this example, enter All Email Offers by Date.
9. Select Save.
Example of all email offers
We now have two saved visuals with our data table.
This graph shows the number of acceptances for all email offers, by date. When you hover over the lines, you can
see the data labels that identify the individual data points. This data label shows that 8 offers were accepted from
the second email attempt on September 3.
Example of all email and social media offers
Repeat the steps from above to add the data from the social media offers. Add Accept First SM Offer, Accept Second
SM Offer, and Accept Third SM Offer.
minitab.com/connect 22
Getting Started with Minitab Connect
®
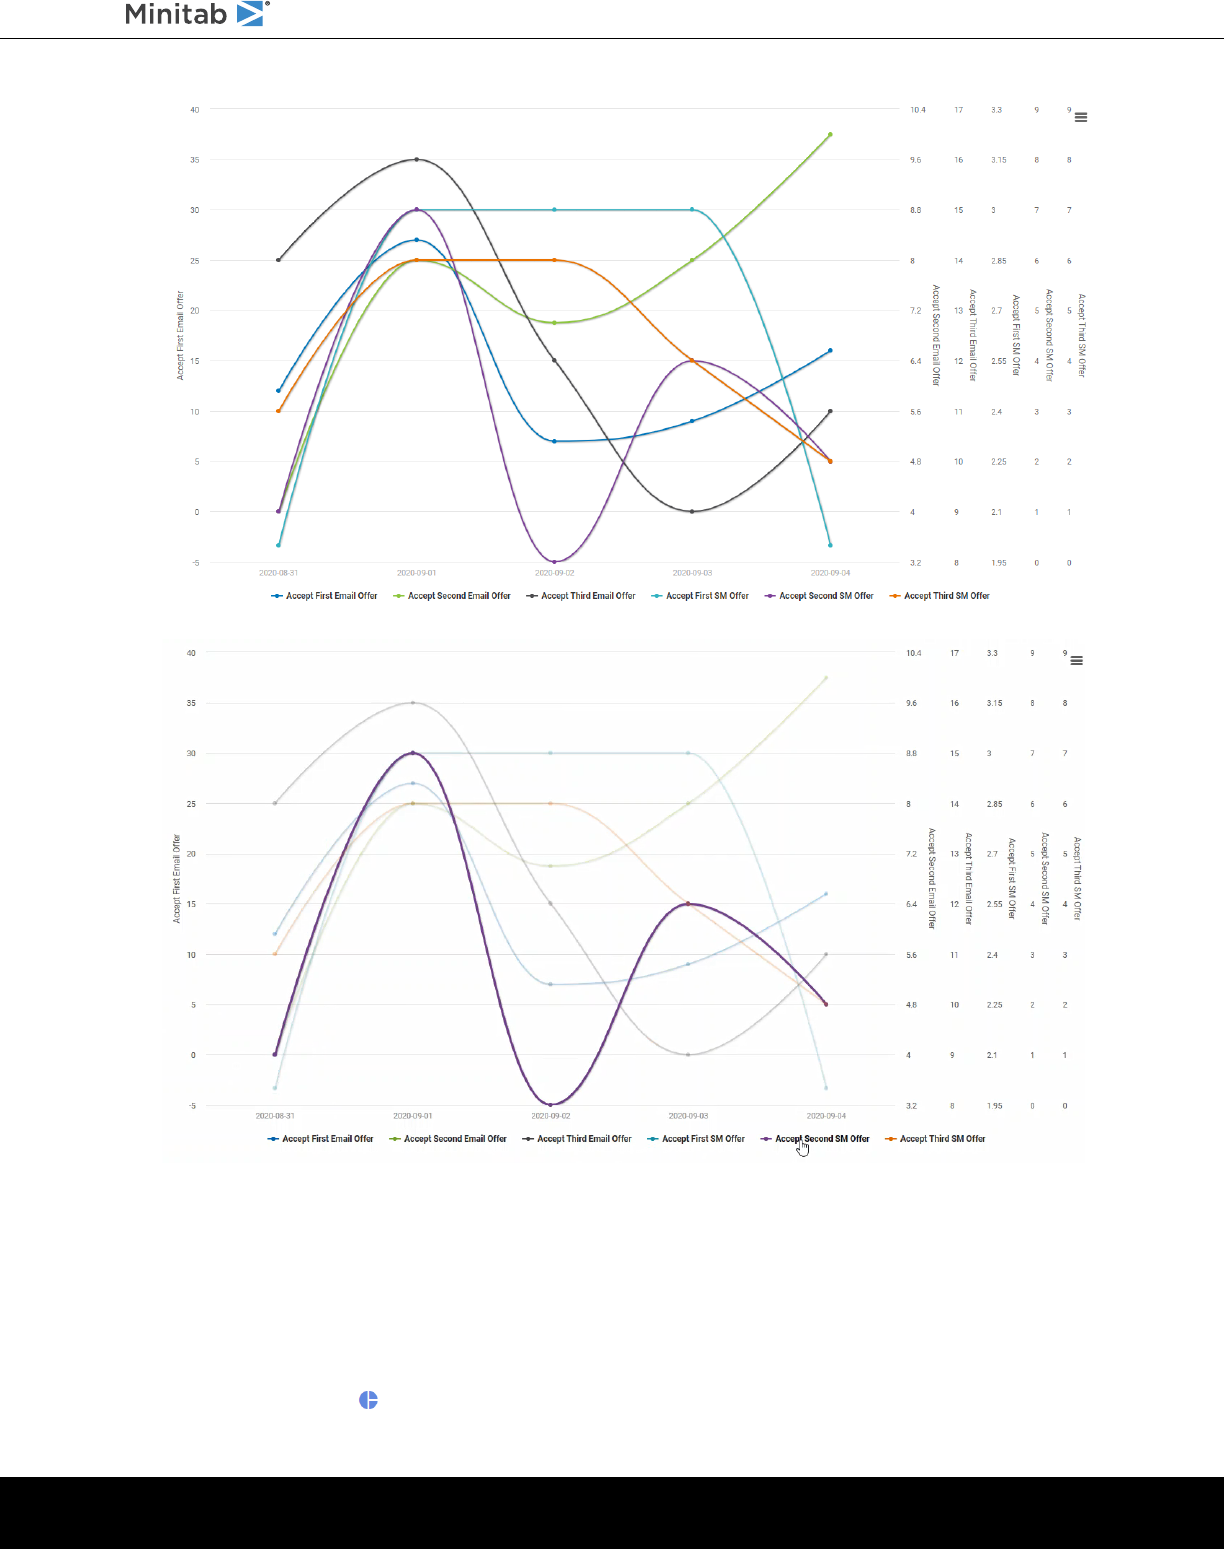
This graph shows the number of acceptances for all email and social media offers, by date.
You can add or remove individual variables by selecting the variables in the legend. You can also hover over a
particular variable in the legend to bring it into focus.
Use the same scale to compare variables
From the previous section, the analyst created a graph that shows the number of acceptances for all email and social
media offers. Notice that each field has a unique scale. However, in most cases, it is easier to compare variables when
the scales are the same. Follow these instructions to use the same scale.
1. From the Visualize Tool , open the Fields tab.
minitab.com/connect 23
Getting Started with Minitab Connect
®
2. Select the button next to the Accept First Email Offer field to access more options for this field.
3. Under Axis Label, enter Acceptances.
4. Select the button again to close the options for this field.
5. Select the button next to the Accept Second Email Offer and under Axis Label, enter Acceptances.
6. Repeat these steps to update all the axis labels to Acceptances.
7. Select Run to generate your chart.
8. Select Save to save this visual.
9. Under Visual, select New Visual and enter a Name.
For this example, enter All Offers on Same Scale.
10. Select Save.
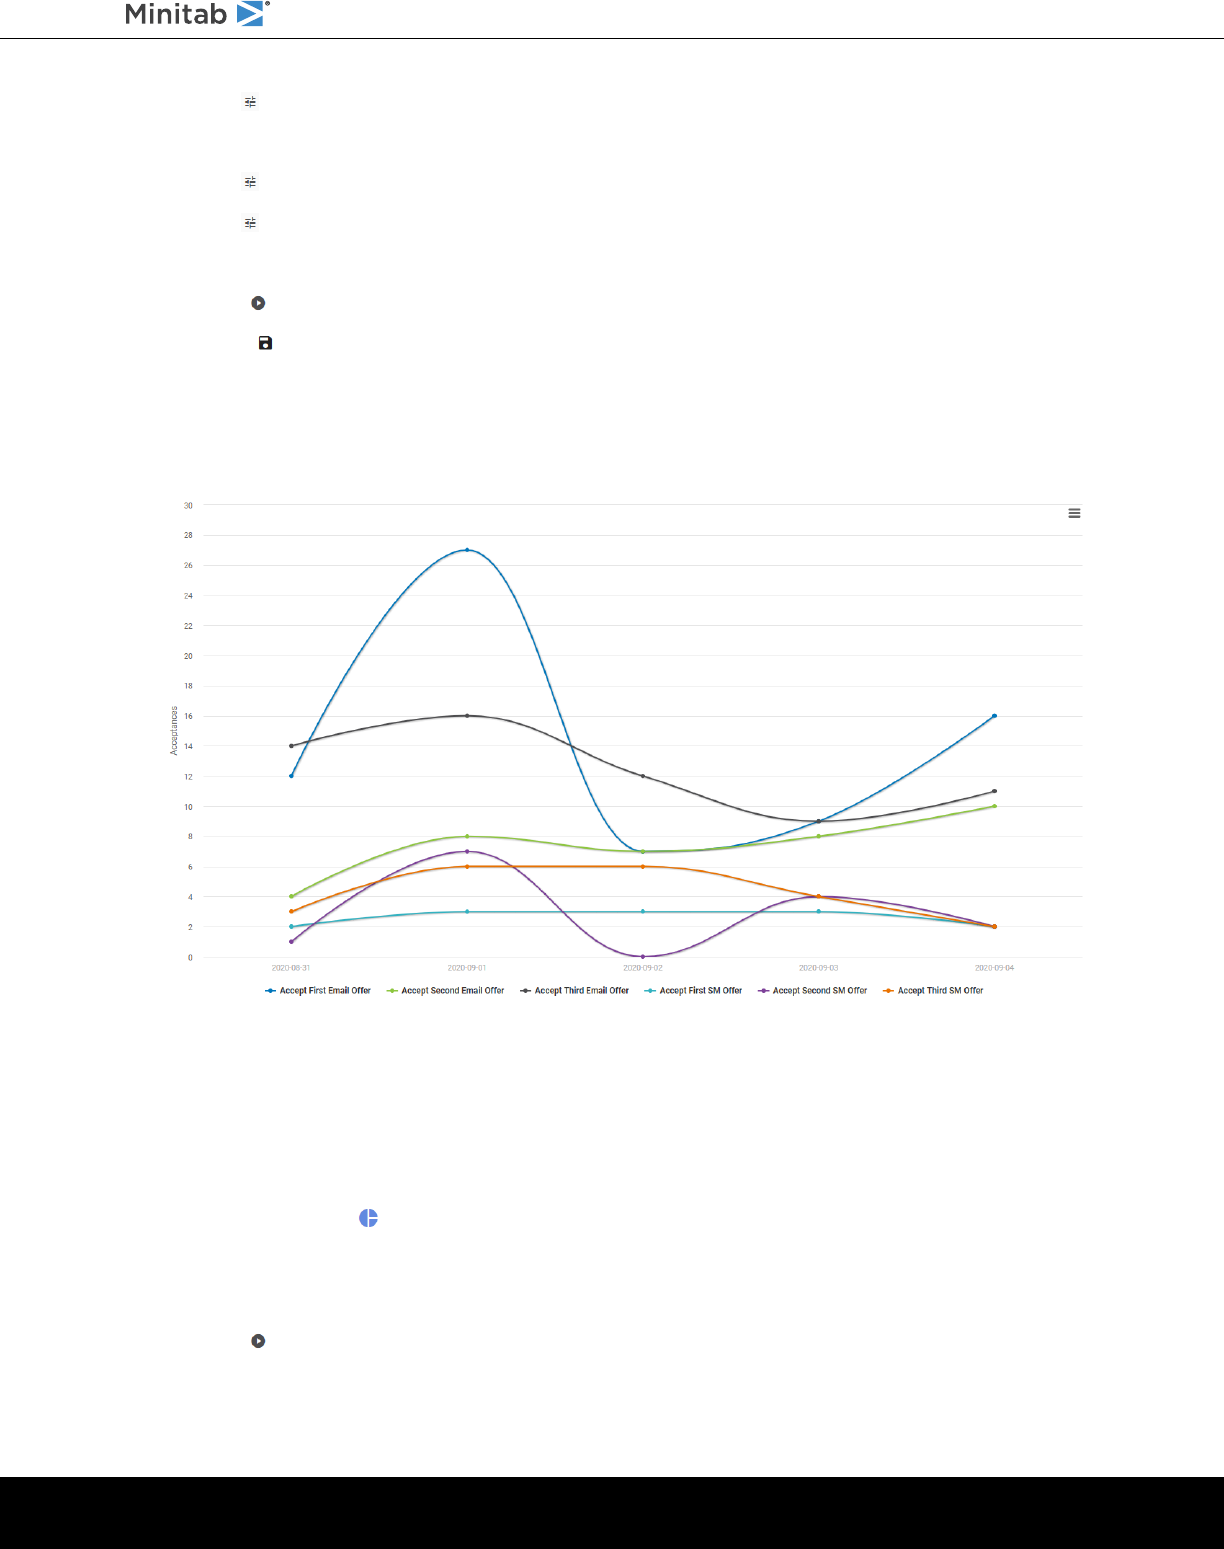
This graph shows the number of acceptances for all email and social media offers, by date, using the same scale for
easy comparison.
Add a breakdown to your graph
In the previous section, the analyst created a graph that shows the number of acceptances for all email and social media
offers with the same scale. Let's add a breakdown to see this data grouped by genre type.
1. From the Visualize Tool , open the Fields tab.
2. On the Fields tab, select Add Breakdown.
3. Under Breakdown, select Genre.
4. Select Run to generate your chart.
minitab.com/connect 24
Getting Started with Minitab Connect
®

This graph shows the number of acceptances for all email and social media offers, by date and by genre, using the
same scale for easy comparison.
With Minitab Connect, you can create graphs that contain a great deal of information. Next, we will explore different graph
options.
Using graph options
In the previous section, the analyst created various spline charts that show the number of acceptances for all email and
social media offers for all genre types. While spline charts are useful, the analyst wants to explore other chart types.
Change the graph type
Follow these instructions to change the chart type to a bar chart.
1. From the Visualize Tool , open the Saves tab.
2. Open the All Offers on Same Scale graph that you created previously in the section, Use the same scale to compare
variables on page 23.
3. Select Run to generate the chart.
4. Open the Fields tab.
5. Under Type, select Bar to create a bar chart.
Investigate other chart types to see which one works best for your application.
6. Select Run to generate your chart.
7. Select Save to save this visual.
8. Under Visual, select New Visual and enter a Name.
For this example, enter All Offers on Same Scale Bar Chart.
9. Select Save.
minitab.com/connect 25
Getting Started with Minitab Connect
®
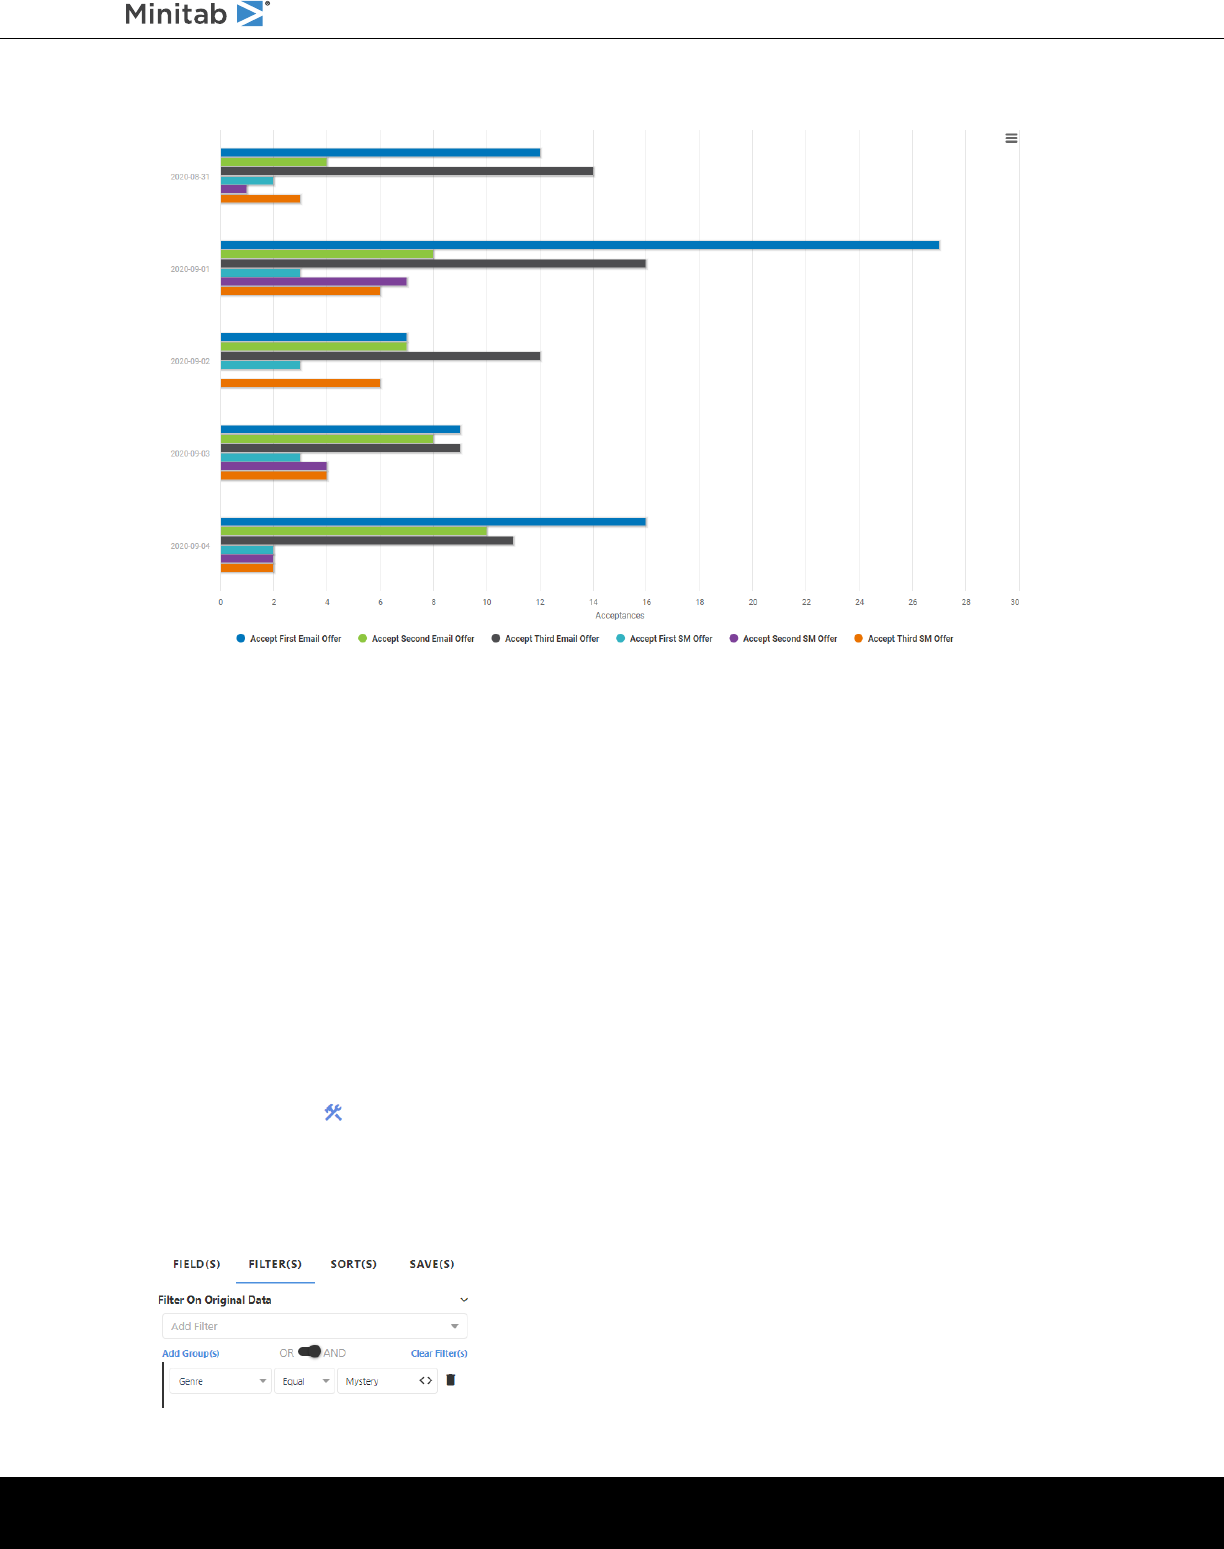
Like the spline chart, this bar chart also shows the number of acceptances for all email and social media offers, by date.
The analyst uses this chart to easily compare the number of acceptances between email and social media offers.
Use the advanced options
Feel free to explore the graph options on the Options tab. Each graph type has several available options, such as legend
placement, display of minimum and maximum scale values, and colors.
Use a view to create a graph with a subset of data
With Minitab Connect you can easily subset your data. The analyst wants to customize options for a subset of data.
Create a data view with a filter on the data
In the previous section, the analyst created a graph that shows the number of acceptances for all email and social media
offers for all genre types. The manager of the mystery book division wants a custom graph to study the offer response
rates to only the mystery selections. First, create a view using a filter for Mystery.
1. From the Prep Tool , open the Filters tab.
2. Select on the Add Filter field and select Genre.
a. In the next expression field, select Equal.
b. In the last field, enter Mystery.
minitab.com/connect 26
Getting Started with Minitab Connect
®
3. Select Run to filter the data.
4. Select Save to save this view.
5. Under View, select New View and enter a Name.
For this example, enter Mystery Offers.
6. Select Save.
Use the saved view to create a chart
From the previous section, Change the graph type on page 25, the analyst has a graph that shows the number of
acceptances for all the email offers and all social media offers on the same scale. We can duplicate this graph, but this
time, focusing only on the mystery book purchases.
1. Open the Visualize Tool .
2. On the Fields tab, change the first drop-down, from Current Config to Mystery Offers.
3. Select Run to generate your chart.
4. Select Save to save this visual.
5. Under Visual, select New Visual and enter a Name.
For this example, enter Mystery Offers on Same Scale.
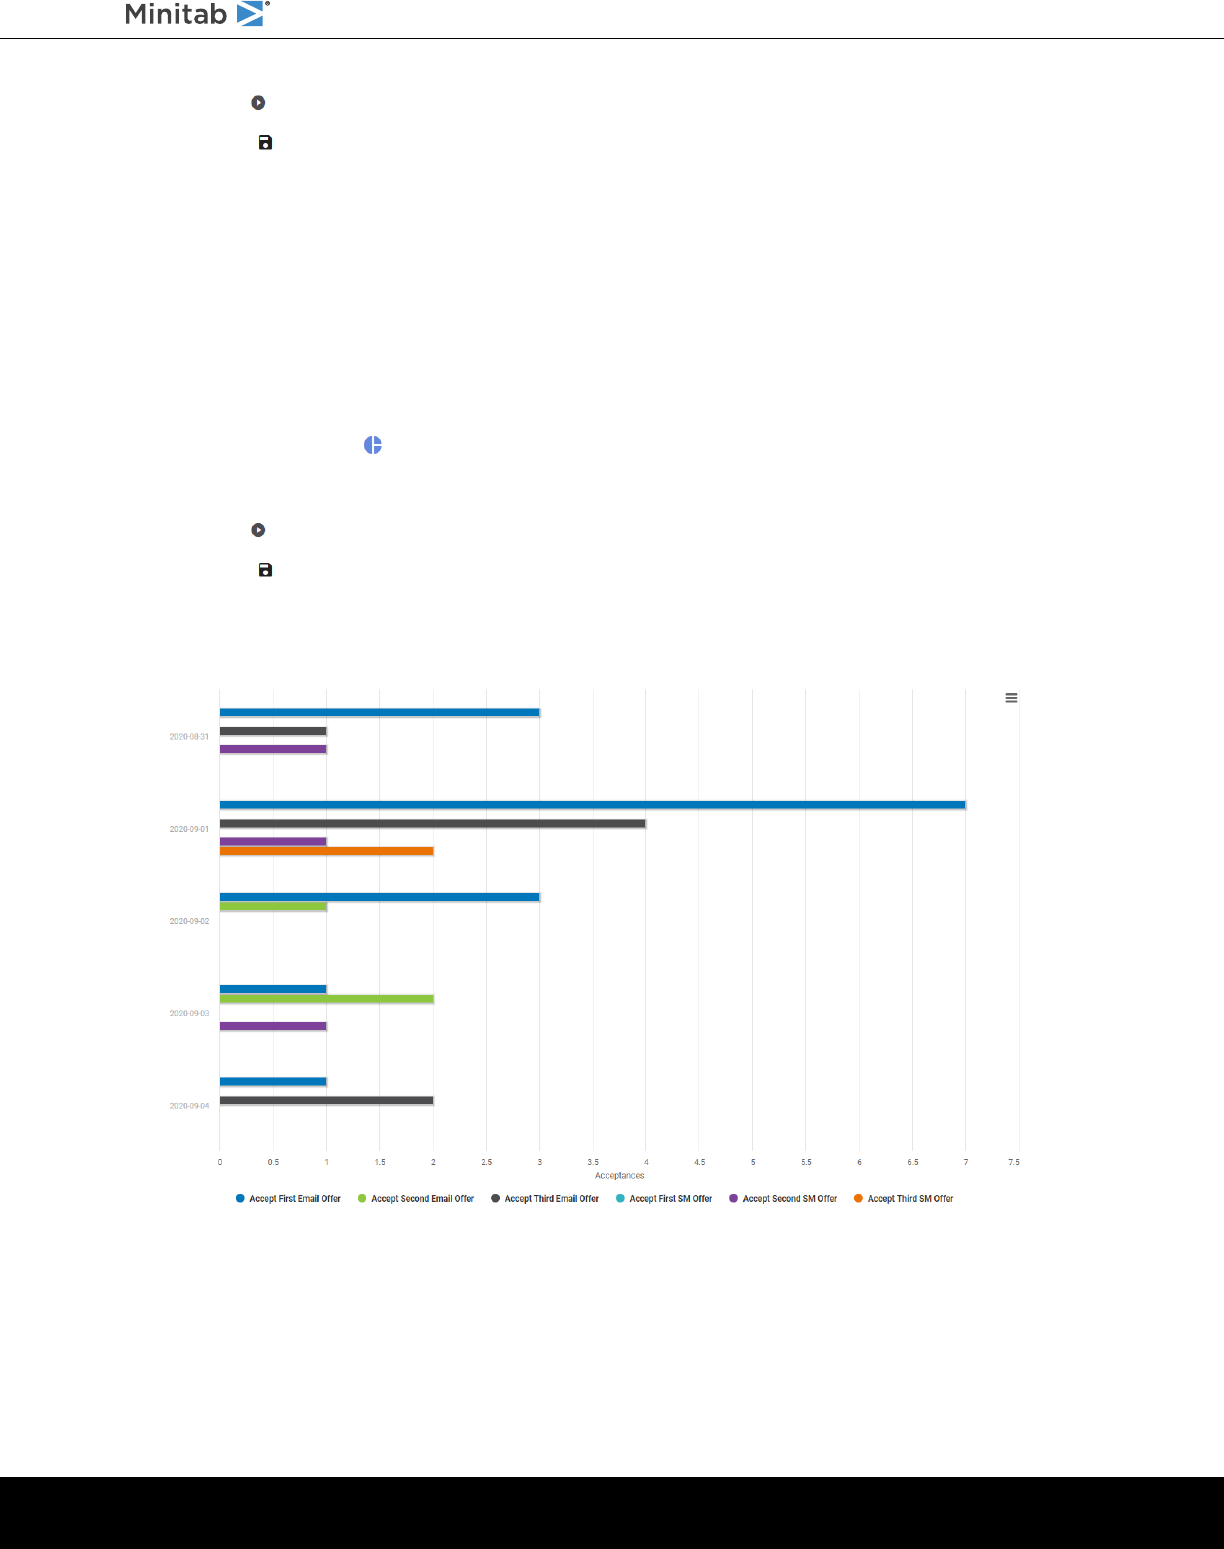
This graph shows the number of acceptances of all email and social media offers for mystery book purchases, by
date using the same scale for easy comparison.
minitab.com/connect 27
Getting Started with Minitab Connect
®
6. Import and Share Your Data with Dashboards
Dashboards provide powerful resources for proactive data monitoring. You can share your custom dashboards with
anyone inside or outside of your organization. Dashboards allow you to create graphs and visualizations that you can
easily resize and reposition.
Create a Dashboard
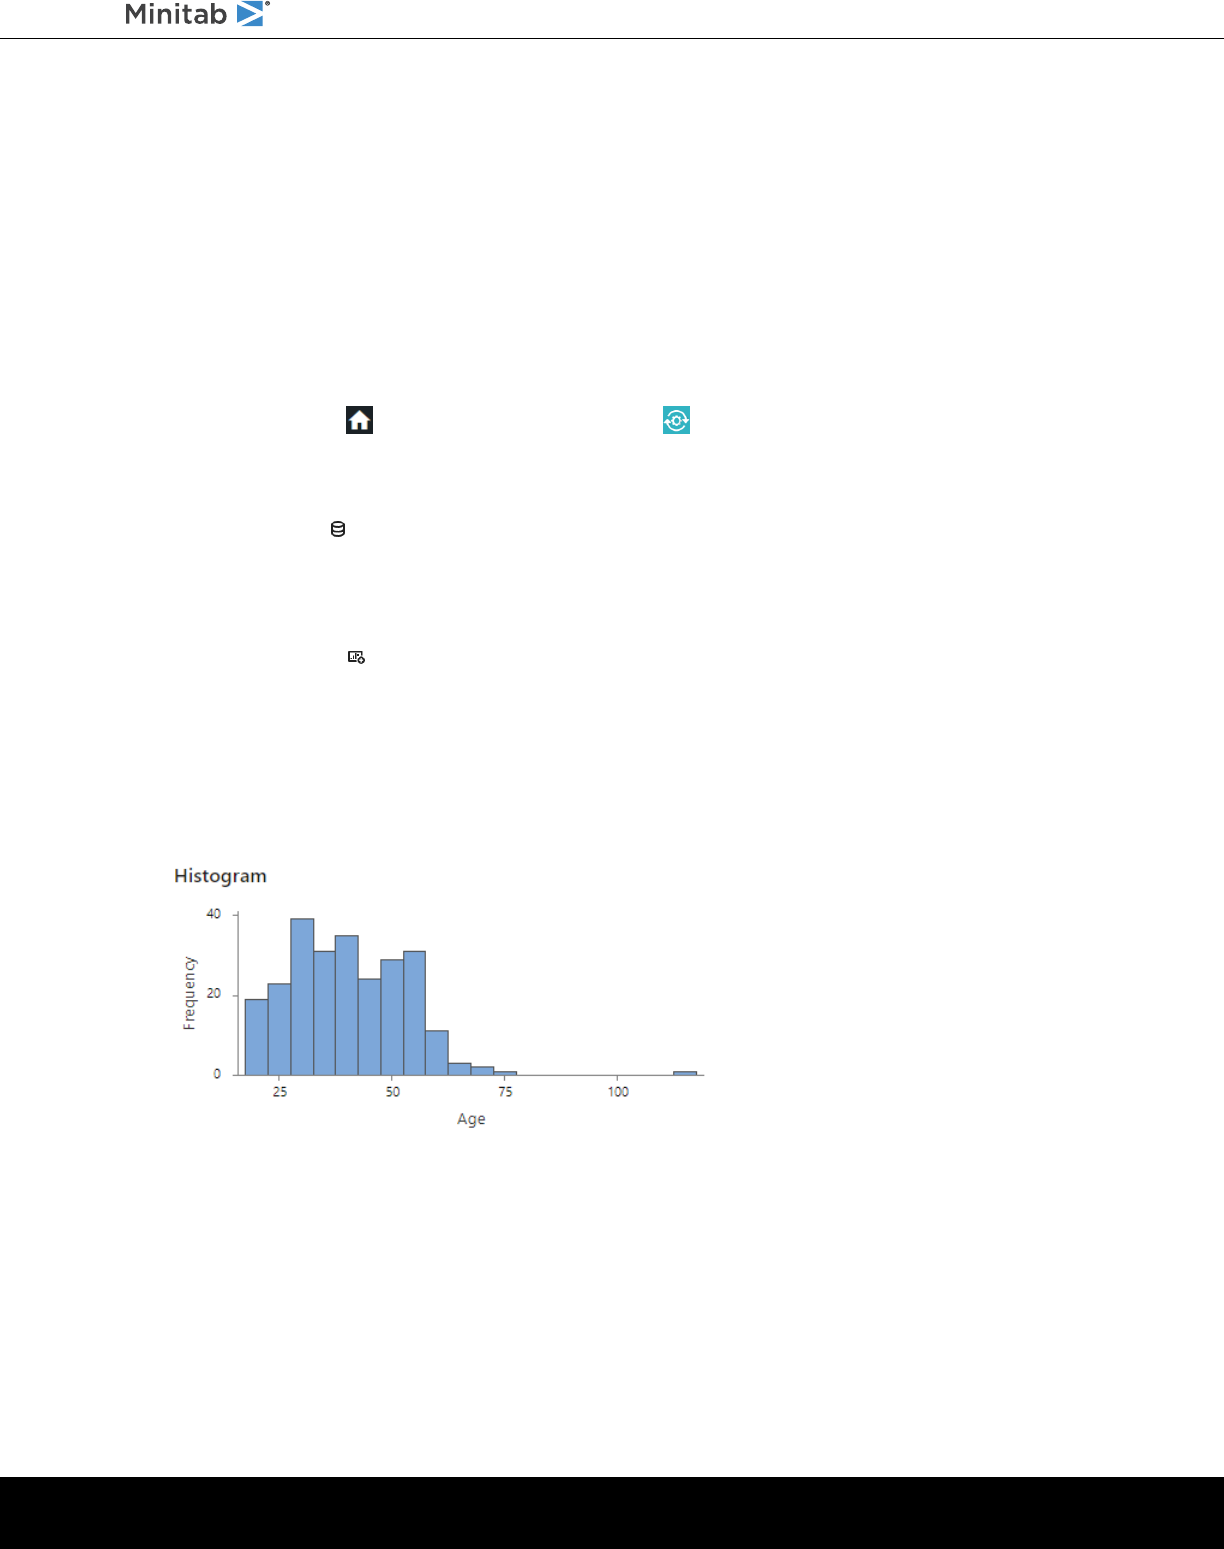
In this example, a marketing analyst wants to investigate the age of the customer. The analyst wants to add a histogram
that shows the distribution of ages.
1. From the Home screen , select the Minitab Connect button to open the Navigation pane. Under Dashboards,
select Add New Dashboard.
Or, from the Home screen, select the Add button under Dashboards.
2. Select the Data icon and select Select.
3. Select the Folder and Table that contain the saved data view. Then in Select a data view, select Online Downloads.
4. Select Open View.
5. Select the Assets icon and double click Histogram.
6. Select Open.
7. In Continuous variables enter Age.
8. Select Create
The dashboard now displays the histogram.
The histogram shows an age well above 100 years. This outlier alerts the analyst, who decides to investigate the
reason for the incorrect data point.
Add a slicer to your dashboard
Add a slicer to the dashboard to easily narrow a number range, date range, or set of categories instead of creating a
new view with that filter in the table.
minitab.com/connect 28
Getting Started with Minitab Connect
®
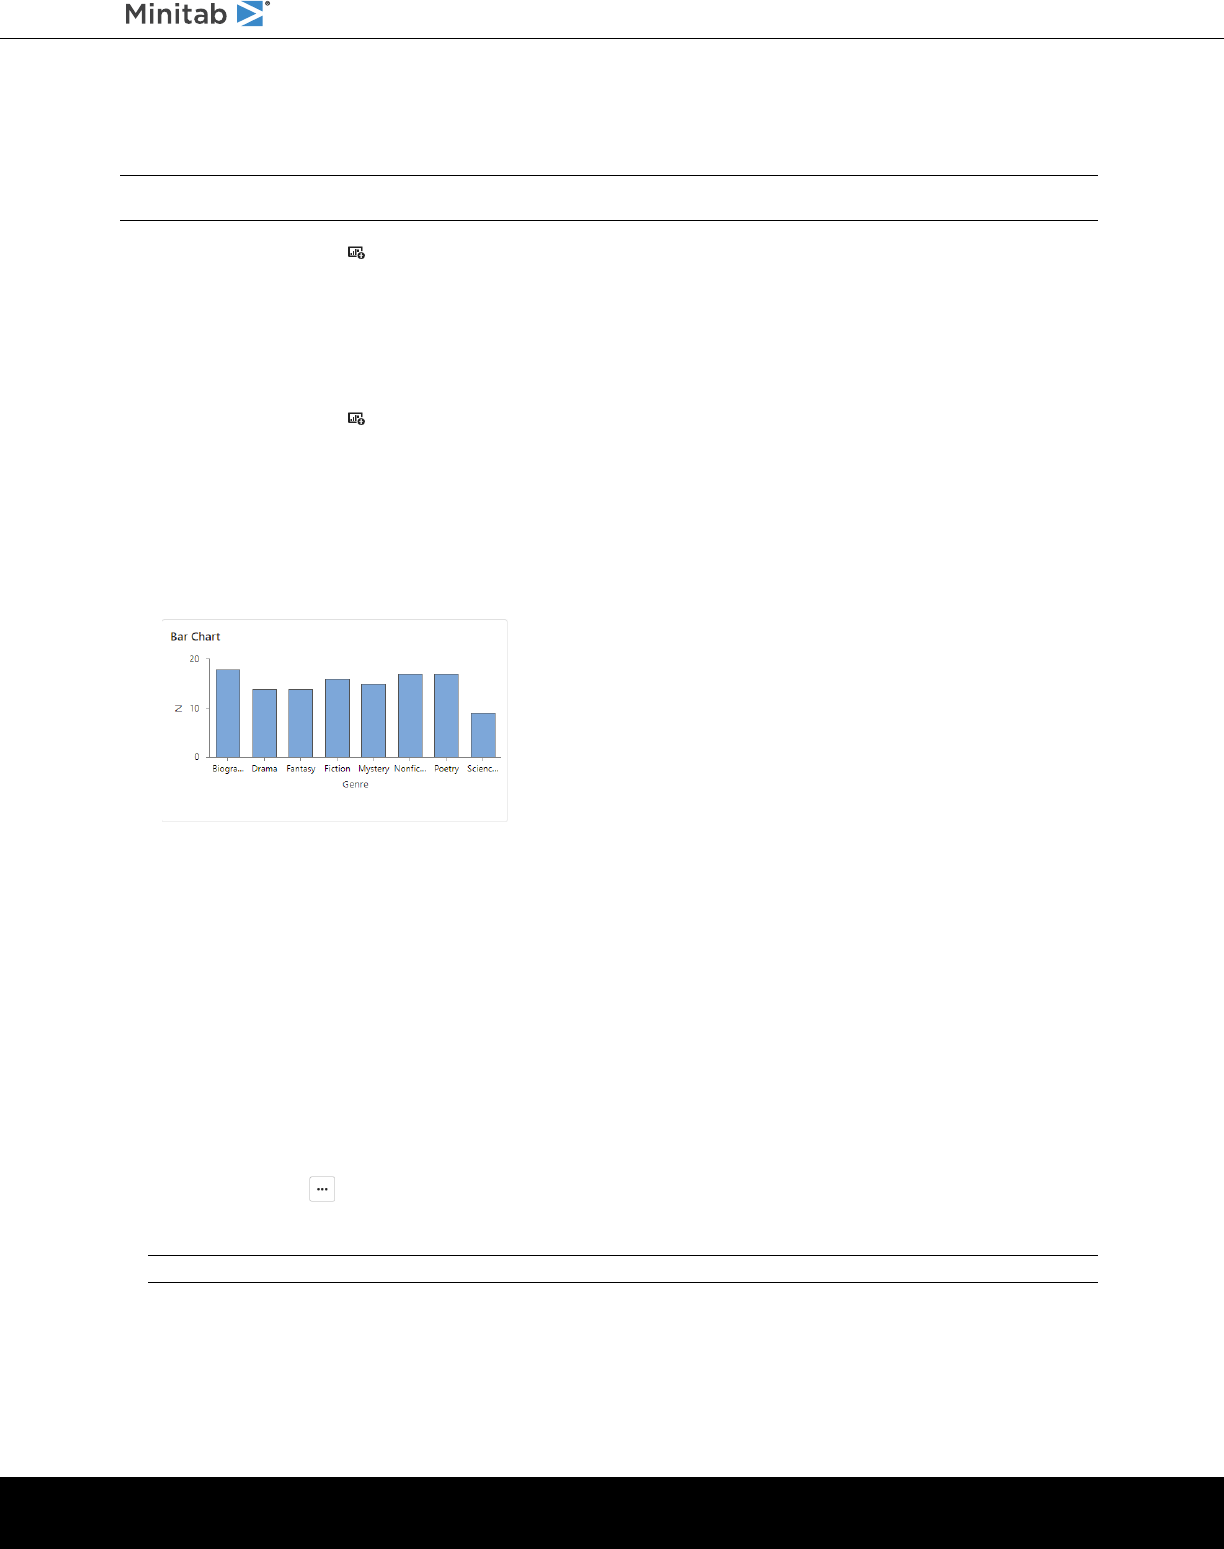
In this example, the marketing analyst knows that their supervisors are interested in customers between the ages of 40
and 60. The analyst creates a bar chart to show the number of books per genre that customers buy. Then, the analyst
adds a slicer in the dashboard to show only customers between the ages of 40 and 60.
Note: Slicers allow you to change the dashboard while you view it. While you edit a dashboard, the data include the entire range of possible
values.
1. Select the Assets icon and double click Bar Chart.
2. Select Open.
3. In Categorical variables enter Genre.
4. Select Create
5. Select the Assets icon and double click Number Range Slicer.
6. On the right navigation, under Variable select Age.
7. Above the dashboard, select Preview.
8. In the number range, enter 40 for the lower endpoint and 60 for the upper endpoint. These changes only exist
temporarily during a session. When you select Edit, the data will reset to include the entire range of possible data
values.
Each asset on the dashboard displays only rows of data where the age is between 40 years and 60 years. The
analyst easily sees that this age range bought between 13 and 16 books of each genre except for Science Fiction,
which had only 8 purchases.
Share the dashboard
You can easily create a unique URL to share your custom dashboard with anyone inside or outside of your organization.
In this example, the analyst shares the dashboard with their supervisors.
1. Select Save.
2. Under Dashboard Name, enter Online downloads dashboard.
3. Select a folder and select Save.
4. Select the ellipses and select Share. The dialog displays two links that display the view-only version of the
dashboard. You can share an Internal Link with anyone that has a Connect subscription. You can share a Public Link
with anyone, even if they don't have a Connect login, because Connect appends a restricted apikey to the URL.
Note: Only users with the Admin and Developer roles can share a Public Link.
5. Copy a link to your clipboard, and select OK. You can now share this link with anyone to give them access to view
the dashboard.
minitab.com/connect 29
Getting Started with Minitab Connect
®

Index
A
add data filter 26
add data to a table 11
add new form 12
add new graph 20
add new table 9
Audit tool 4, 7, 8
B
bar chart 25
Base tool 3, 10
C
connectors 13
connect to database 13
scheduled frequency 14
D
data flow 14
add new flow 15
modify schedule 15
data view
custom 5
E
export
data 7, 17
Minitab worksheet 17
other formats 17
via email 8
F
filter 26
Flow tool 3, 15
Form (Base) tool 13
Form tool 12
forms
create list field 10
create new form 12
G
graph options 25
advanced 26
graphs
add graph breakdown 24
add more variables 21
change grape type 25
create spline chart 20
saved view 27
use same scale 23
I
import data 5, 17
schedule frequency 14
L
list
create list field 10
M
Minitab Statistical Software 17
P
Prep tool 3, 5, 10, 20, 26
R
reset configuration 5, 6, 14, 20
S
sample data set 4, 6
schedule data import 14
spline chart 20
system fields 6
T
tables
add data 11
create a standard table 5
create standard table 9
tools 3
V
view 5
create graph 27
summary 6
use filter 26
Visualize tool 4, 20, 27
minitab.com/connect 30
Our mission is to help people discover valuable insights in their data.
Minitab helps companies and institutions to spot trends, solve problems and discover valuable insights in data by delivering a comprehensive and best-in-class
suite of data analysis and process improvement tools. Combined with unparalleled ease-of-use, Minitab makes it simpler than ever to get deep insights from data.
Plus, a team of highly trained data analytic experts ensure that users get the most out of their analysis, enabling them to make better, faster and more accurate
decisions.
For nearly 50 years, Minitab has helped organizations drive cost containment, enhance quality, boost customer satisfaction and increase effectiveness. Thousands
of businesses and institutions worldwide use our products to uncover flaws in their processes and improve them. Unlock the value of your data with Minitab.
©
2024 Minitab, LLC. All rights reserved.
Minitab
®
, Minitab Connect
®
, Minitab Model Ops
®
, Minitab Engage
®
, Minitab Workspace
®
, Salford Predictive Modeler
®
, SPM
®
and the Minitab
®
logo are all registered
trademarks of Minitab, LLC, in the United States and other countries. Additional trademarks of Minitab, LLC can be found at www.minitab.com. All other marks
referenced remain the property of their respective owners.
