BlackBerry Developer Summit
Workbook - iOS

27-Sep-18
Page 2 of 65
<Legal Notice>
© 2018 BlackBerry. All rights reserved. BlackBerry® and related trademarks, names and logos are the property of
BlackBerry Limited and are registered and/or used in the U.S. and countries around the world. All other trademarks
are the property of their respective owners. This documentation is provided "as is" and without condition,
endorsement, guarantee, representation or warranty, or liability of any kind by BlackBerry Limited and its affiliated
companies, all of which are expressly disclaimed to the maximum extent permitted by applicable law in your
jurisdiction.

27-Sep-18
Page 3 of 65
Table of Contents
<Legal Notice> ................................................................................................................................ 2
Setup and Installation: BlackBerry Dynamics Development Environment .................................... 5
1. Overview ............................................................................................................................. 5
2. Compatibility........................................................................................................................ 5
3. Prepare for BlackBerry Dynamics Application Development ............................................. 6
4. Run BlackBerry Dynamics Sample Application.................................................................. 8
5. Xcode Template for a BlackBerry Dynamics Project ....................................................... 13
Session: Secure Your First BlackBerry Dynamics App................................................................ 19
1. Overview ........................................................................................................................... 19
2. Preparation ........................................................................................................................ 19
3. Setting the BlackBerry Dynamics Identifiers .................................................................... 19
4. Adding the BlackBerry Dynamics Runtime Library .......................................................... 21
5. Adding the BlackBerry Dynamics Resources ................................................................... 25
6. BlackBerry Dynamics Build-Time Configuration .............................................................. 26
7. Connecting to the BlackBerry Dynamics Platform ........................................................... 27
A. Create an Event Handler .............................................................................................. 27
B. Initiate Platform Connection ......................................................................................... 29
8. Implementing the BlackBerry Dynamics Authorisation Life Cycle ................................... 30
A. Authorisation State........................................................................................................ 30
B. Event-Handler Skeleton ................................................................................................ 31
C. User interface monitoring and security ......................................................................... 33
D. Application Launch........................................................................................................ 35
9. Running the Application .................................................................................................... 40
Session: Secure Communication and Protecting Data in Transit ................................................ 42
Preparation ................................................................................................................................ 42

27-Sep-18
Page 4 of 65
Exercise One: Send an HTTP REST Request to a Configured Server ................................... 44
Exercise Two: Authenticate the User at the Enterprise Server ................................................ 45
Exercise Three: Open Socket Connection ............................................................................... 47
Session: Secure Storage and Protecting Data at Rest ................................................................ 49
Preparation ................................................................................................................................ 49
Exercise One: Secure Store File............................................................................................... 49
Exercise Two: Secure Store Directory ...................................................................................... 50
Exercise Three: Secure SQL Database ................................................................................... 51
Session: Application Management, Policies, and Configuration ................................................. 53
Application Configuration Exercises ......................................................................................... 53
Preparation ................................................................................................................................ 54
Exercise One: Upload Custom App Configuration to BlackBerry UEM ................................... 54
Exercise Two: Retrieve Initial Custom App Configuration Settings ......................................... 58
Exercise Three: Be Notified of Changes to App Configuration Settings .................................. 58
Exercise Four: Change the Configuration Definition ................................................................ 59
Appendix - BlackBerry Dynamics with XCode 10…………………………………………………...59
Appendix – Installing BlackBerry Access ..................................................................................... 61
A. Download BlackBerry Access ....................................................................................... 61
B. Installing & Configuring BlackBerry Access ................................................................. 61
Appendix – Provision an Application in the BlackBerry Developer Lab ...................................... 63
Appendix - Tips for Xcode ............................................................................................................ 65
A. Edit the bare XML of a Property List ............................................................................ 65
27-Sep-18
Page 5 of 65
Setup and Installation: BlackBerry Dynamics Development Environment
1. Overview
This section includes how to set up and install BlackBerry Dynamics SDK for iOS and
addresses the basics of BlackBerry Dynamics development. BlackBerry Dynamics was
previously Good Dynamics™. The earlier product name appears in some locations, and so does
the abbreviation GD.
The tasks include:
• Install the BlackBerry Dynamics SDK
• Run a sample BlackBerry Dynamics application
• Run a BlackBerry Dynamics application in Enterprise mode.
• Create a Basic BlackBerry Dynamics application using BlackBerry Dynamics
Application template for iOS
2. Compatibility
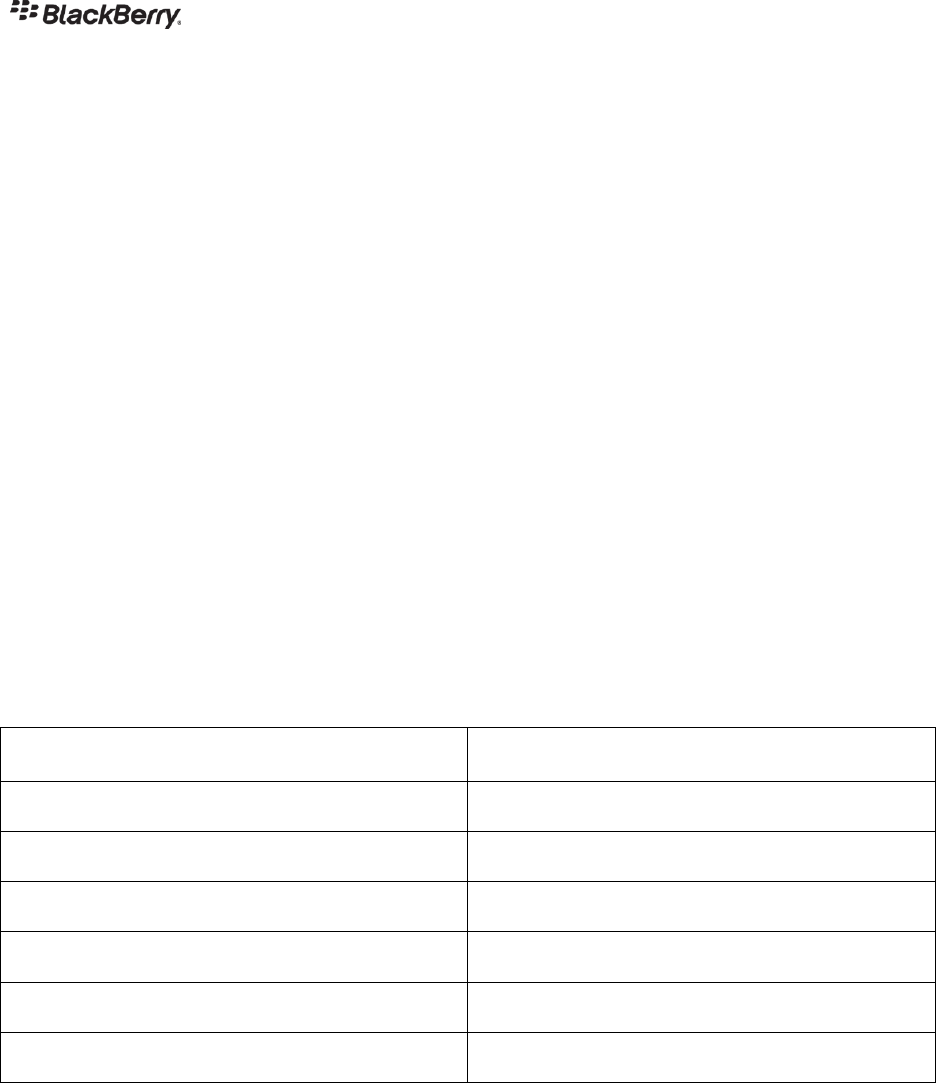
The instructions in this workbook have been tested in the following environment:
Component
Version
Xcode
10.0
iOS simulator running iOS
12.0
iPhone device running iOS
12.0
BlackBerry Dynamics SDK for iOS
4.2.0.133 or 4.2.1.16
BlackBerry UEM
12.9.x
OS X
10.13.x

27-Sep-18
Page 6 of 65
3. Prepare for BlackBerry Dynamics Application Development
Get the Tools
To develop BlackBerry Dynamics applications for iOS, download and install the following:
• Xcode (Apple ID login required)
• BlackBerry Dynamics SDK for iOS (BlackBerry Online Account login required)
After installing Xcode, download and build a sample app from Apple to ensure you can run the
sample app on iOS Simulator or a test device.
BlackBerry Developer Resources
The BlackBerry Developers site (https://developers.blackberry.com) provides resources for
developing applications with the BlackBerry Platform.
Some resources are available without registration, but login is required to:
• download BlackBerry software,
• access to technical resources
• post questions on the BlackBerry Developers Forum.
Create Your BlackBerry Online Account for free with your work email address.
(Note: If you are a BlackBerry employee, register with your “blackberry.com” email address.)
Install the BlackBerry Dynamics SDK for iOS
Login to BlackBerry Dynamics SDK site and download the BlackBerry Dynamics SDK for iOS.
Once downloaded, open the installer and follow the steps.
Tip: Run Xcode at least once before installing the BlackBerry Dynamics SDK to ensure that the
SDK would be installed correctly.
BlackBerry Dynamics SDK API Reference for iOS
The online version of the application programming interface (API) reference documentation is
available. Login to the BlackBerry Dynamics API References site.
BlackBerry Developers Forums
Visit BlackBerry Developer Forums for questions and other resources when integrating with the
BlackBerry Platform.
You can test your installation by running a BlackBerry Dynamics sample application, see below.

27-Sep-18
Page 7 of 65
Test BlackBerry Dynamics Development Environment
Once the installation is complete, test the BlackBerry development environment by launching
one of the official BlackBerry Dynamics sample applications – RSS Reader.
Follow the instructions below:
1. Locate the sample applications directory. The default location is under your home
directory in the sub-directory:
~/Library/Application Support
/BlackBerry/Good.platform/iOS/Examples/objective-c/
Or
~/Library/Application Support
/BlackBerry/Good.platform/iOS/Examples/swift
Or use the Go to Folder and enter the path above.
Note: You might need to set the Finder to display hidden files and folders or hold down
CMD-Shift-. (dot).
2. Choose the RSS Reader sample application in the com.good.gd.example.rssreader
sub-directory.
3. You can work in the sample sub-directory directly or make a copy of the sub-directory,
com.good.gd.example.rssreader and then complete the remaining steps using the
copied one. Open the code project in Xcode.For example, double click on the
.xcodeproj file.
4. If you are using XCode 10, refer to Appendix – BlackBerry Dynamics with XCode 10.
5. Fix the signing provisioning settings, if necessary.
6. Build and run the program.
You can use the iOS Simulator, or an iOS device. You can do this from the Xcode
application menu, by selecting: Product, Run.
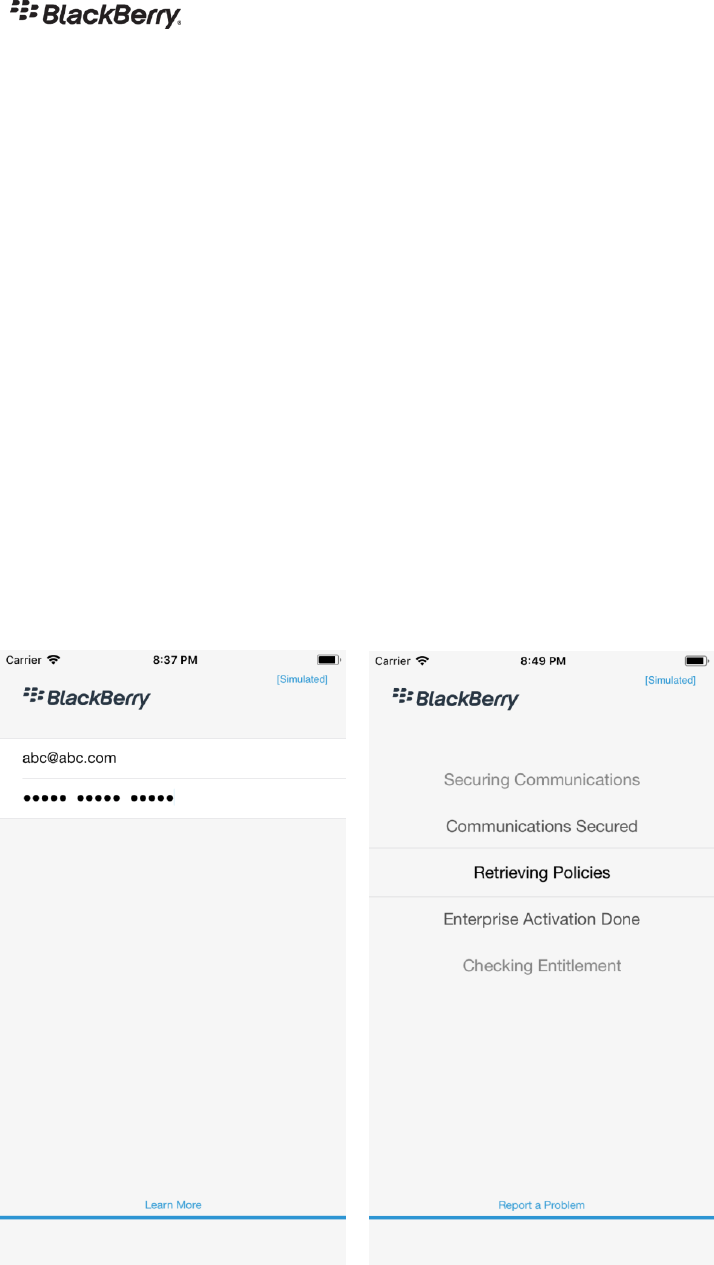
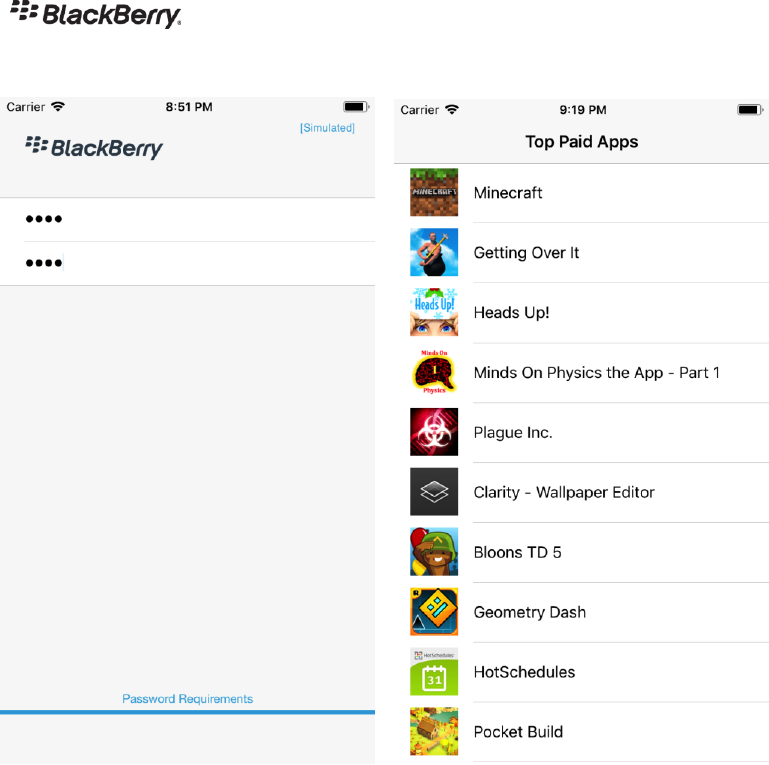
The sample application should prompt for activation credentials, as shown in the following
screen capture images.

27-Sep-18
Page 8 of 65
This test proves that your BlackBerry Dynamics SDK for iOS is installed OK. You can then
move on to activating the sample application.
4. Run BlackBerry Dynamics Sample Application
BlackBerry Dynamics Apps can be run in two modes:
• Enterprise Simulation Mode
The authentication of the user is simulated. There is no need for a valid activation key,
no communication with BlackBerry Dynamics servers, UEM. Communication with the
BlackBerry Dynamics Network Operation Center does still take place in enterprise
simulation mode.
• Enterprise Mode
Default mode for BlackBerry Dynamics apps. The application is activated and authorized
against a BlackBerry UEM server via BlackBerry infrastructure. An instance of the UEM
server is provided during the developer summit event for developers to do exercises in
this mode.
Option1: Run Your App in Enterprise Mode
In general, BlackBerry Dynamics applications should run in Enterprise Mode. In this mode, all
features of BlackBerry Dynamics can be used.
The Enterprise Mode works in the following:
• On a physical iOS device
• On the iOS Simulator

27-Sep-18
Page 9 of 65
Set Enterprise Mode
Setting the mode is a build-time configuration.
• Open the RSSReader-Info.plist file in the editor, either property list or source code.
• Locate the property: GDLibraryMode. Set the value of the GDLibraryMode property to
GDEnterprise.
(Note: If Enterprise Simulation mode is switched on then the value of the property will be
GDEnterpriseSimulation.)
This selects normal enterprise mode. The GDEnterprise mode is the default mode. If the
GDLibraryMode is not defined, the app will run in the GDEnterprise mode.
Provision an Application and Generate an Access Key via UEM
Follow the steps in Appendix – Provision an Application in the BlackBerry Developer Lab to
activate the application. Note that this step is only required the first time you run this sample
and does not need to be repeated as you update it.
Activate the BlackBerry Dynamics Application
After you have switched on normal enterprise mode, run the application. When it launches, after
the splash screen:
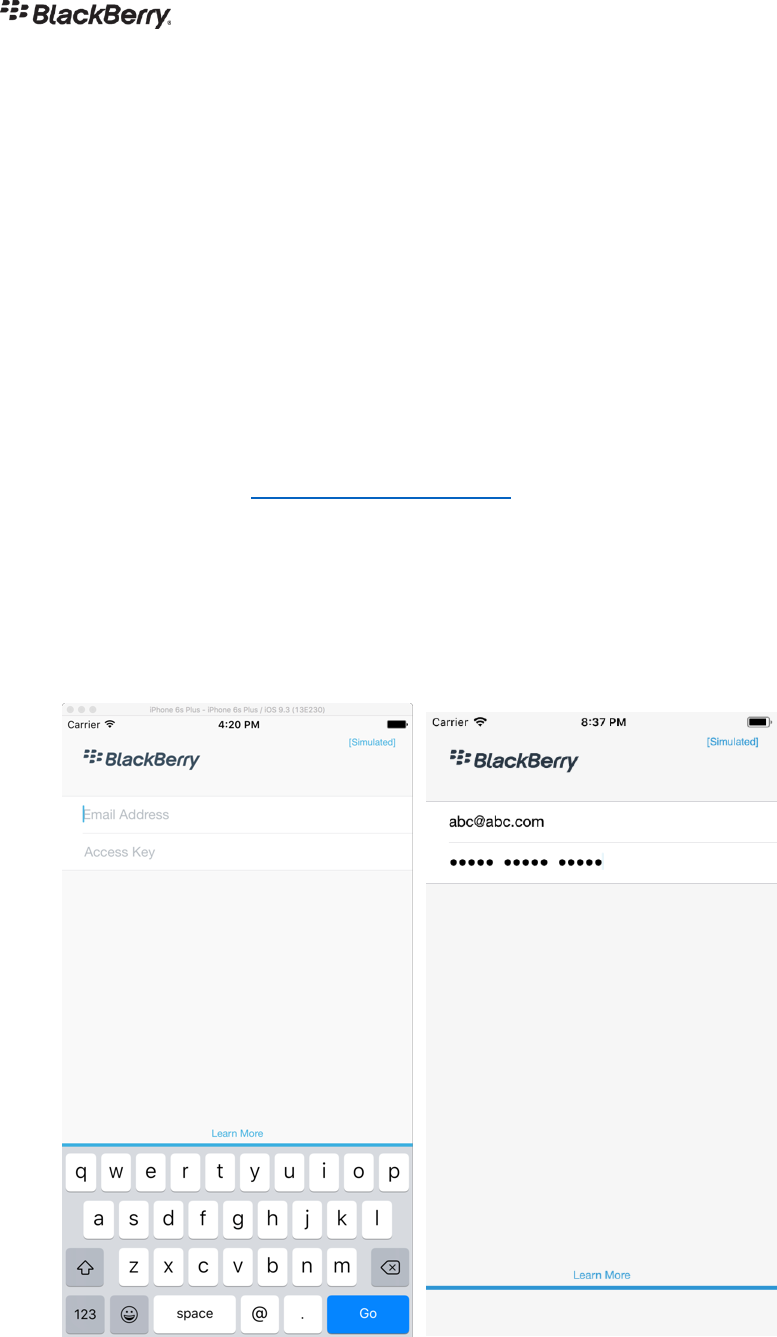
1. The activation screen will be shown. The screen has the following elements.
• Logo.
• Email address entry field, in which you enter the email address of the end user
that is activating the application.
• Access Key entry field, in which you enter the access key.
Enter the values and click Go or press Return on your keyboard.
2. The activation processing carousel will scroll through its stages.
3. The set-password screen will be displayed. You must set a password, which you will
later use to start or unlock the application. Enter the same password twice and click Go
or press Return on your keyboard.
The password complexity requirements will have been retrieved from the management
console.
The application user interface will then be displayed.
Completing activation of an application in normal enterprise mode confirms that:
• Your SDK installation is OK.
• Your deployment is OK.
27-Sep-18
Page 10 of 65
Options 2: Run Your App in Enterprise Simulation Mode
You can also run a BlackBerry Dynamics app under the Enterprise Simulation mode. In this
mode, the connection to the Dynamics Infrastructure isn’t made.
You can only utilize the Enterprise Simulation mode with a simulator, not with a real
device. Set a simulated device as the destination before building. This can be done in the
Xcode application menu by selecting Product, Destination, and then one of the iOS Simulators.
To switch to the enterprise simulation mode:
• Open the RSSReader-Info.plist file in the editor, either property list or source code.
• Locate the property: GDLibraryMode. Change the value to GDEnterpriseSimulation.
For more information, visit Enterprise Simulator mode page in the BlackBerry Dynamics API
References.
After you have configured Enterprise Simulation mode, run the application.
When it launches,
1. The activation screen will be shown as below:
The screen has the following elements.

27-Sep-18
Page 11 of 65
• Logo.
• Enterprise Simulation mode warning, [Simulated].
• Email address entry field, in which you enter any email address in this mode.
e.g. abc@abc.com
• Access Key entry field, in which you enter any 15 characters.
e.g. qqqqq ppppp bbbbb
Enter the values and click Go or press Return on your keyboard.
2. The activation processing carousel will scroll through its stages.
Note: You may see “Setup Failed, Failed to Connect Push Channel” which can just be
ignored by clicking OK.
3. The set-password screen will be displayed. You must set a password, which you will
later use to start or unlock the application. Enter the same password twice and click Go
or press Return on your keyboard.
The password complexity requirements for Enterprise Simulation mode are built into the
SDK.
The application user interface will then be displayed.

27-Sep-18
Page 12 of 65
Note that it is not possible to upgrade from Enterprise Simulation mode to normal Enterprise
mode. Uninstall the enterprise simulation mode application from the simulated device before
installing the normal enterprise mode.
Troubleshooting Enterprise Simulation Mode
Note that connection to the Network Operation Center (NOC) is still required in Enterprise
Simulation mode. The NOC is accessible to the Internet. If you don’t have general Internet
access, you might need to configure or request a route to the NOC.
The API Reference page for Enterprise Simulation mode has a link to the official page that lists
the NOC server addresses. These are the servers to which you require access to complete
activation in Enterprise Simulation mode, and in normal Enterprise mode.

27-Sep-18
Page 13 of 65
5. Xcode Template for a BlackBerry Dynamics Project
The instructions below will help you to create a basic BlackBerry Dynamics application for iOS,
which has:
• All the essential authentication code.
• A minimal user interfaces.
• Placeholders for new code that you will write.
BlackBerry Dynamics Application Template via Xcode
The BlackBerry Dynamics SDK for iOS comes with a template that you can use to create a new
BlackBerry Dynamics application project.
1. Open Xcode and select in the menu File, New, Project.
Or Select Create a New Xcode Project on the Welcome to Xcode dialog.
This opens a dialog on which you choose a template for the new project.
2. Under iOS > Application, select BlackBerry Dynamics, then click Next. This opens a
dialog to choose options for the project.
3. If you are using XCode 10, refer to Appendix – BlackBerry Dynamics with XCode 10.
4. Enter the required values. If you are unsure what to put, you can follow these guidelines:
• Product Name: Something suitable as a display name, for example Developer
Exercise.
• Organization Name: Your name, or your employer’s name, or the name of the
enterprise that you represent.
• Organization Identifier: A reversed Internet domain that you own or your
name.The general form is com.mycompany.app_name.
• Language: Objective-C, the default or Swift.
• Devices: Universal, also the default.
• For this exercise, you don’t have to check for Use Core Data, or Include Unit
Tests, or Include UI Tests.
Click Next. This opens a file chooser dialog.
5. Navigate to save the project, and click Create. Xcode will create a new sub-directory for
your project.
After you click Create, the project will open in a new window. The project navigator
shows the groups into which Xcode divides the project files: one with the same name as
the application, then one each for Frameworks and Products. The first group, the main

27-Sep-18
Page 14 of 65
group, contains all the source files and configuration for the project and is the one that
will be used the most.
If the navigator isn’t displayed, you can open it from the Xcode menu by selecting View,
Navigators, Show Project Navigator.
6. Open the Info.plist file. Set the BlackBerry Dynamics Application Identifier
and Version in the app’s Info.plist as advised:
GDApplicationID
BlackBerry Dynamics has its own scheme for identification of applications. In principle,
this is separate from the native scheme - Bundle Identifier, which is used by the iOS
operating system. In practice, the identification schemes do have possible interactions
and it is advisable to approach them together.
It is OK to express the GDApplicationID as a variable.
You have an option to make the GDApplicationID and Bundle Identifier to be the same
as long as meeting the naming rules for GDApplicationID.
• The general form is com.mycompany.app_name (only lower cases, no spaces
and must not begin with com.good or com.blackberry).
Use the same GDApplicationID for apps for a single app for different platforms (
iOS and Android) and avoid including the platform specific information. For
example, do not use com.mycompany.app_name_for_ios as a GDApplicationID.
Instead, use com.mycompany.app_name for both iOS and Android versions.
Important: Throughout this workbook, use the GDApplicationID you have been
assigned for the BlackBerry Developer event. Your GDApplicationID has been pre-
configured in the UEM server for the event.
Example: com.bbdevsummit.devapp###,
The ### is your own number assigned to you and given.
GDApplicationVersion
• A version number is four parts.
• Use 1.0.0.0 for the first BlackBerry Dynamics app.
Tip: It is not recommended to change the version unless it’s required to provide
different access to specific users or to differentiate a new app from existing
versions of the app due to newly added services.
Save your changes.
7. Check build-time configuration.

27-Sep-18
Page 15 of 65
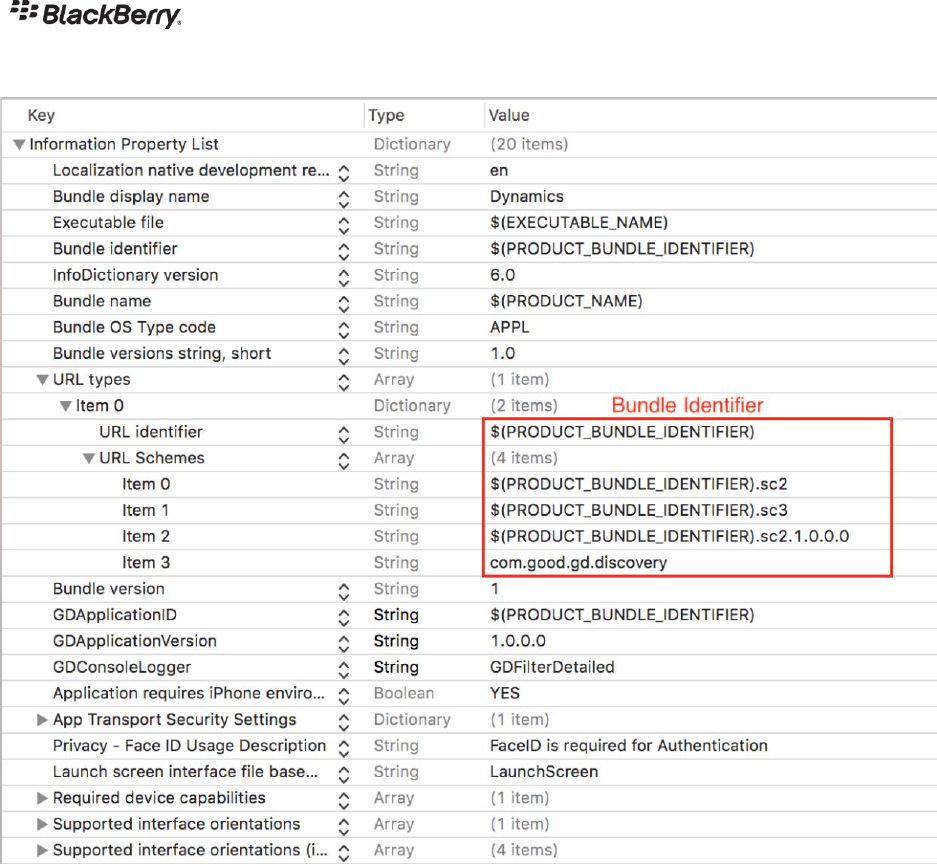
The BlackBerry Dynamics platform also relies on other properties.
It is mandatory for applications to have some particular settings in the URL Types and
URL Schemes properties. These are documented in detail in the API Reference, in the
Appendix, on the Build-Time Configuration page. It is OK to express the values of these
properties as a variable, in some cases with a suffix.
• Open the Info.plist file, which is in the main group, and locate and expand the
URL Types array property.
• Enter the Bundle Identifier value in the URL Types array. It occurs as the URL
Identifier, and it occurs as Item 0 and Item 1 of the URL Schemes if you expand
the URL Schemes array property.
• Check that there is discovery URL Schemes. If missing, add:
o com.good.gd.discovery
Example
The following screen capture shows an extract from a property list that includes all the
identifiers, as well as selection of normal enterprise mode.
27-Sep-18
Page 16 of 65
In addition, whenever you changed the Bundle Identifier for a BlackBerry Dynamics app:
• Change the URL Types array to contain the new value of the Bundle Identifier
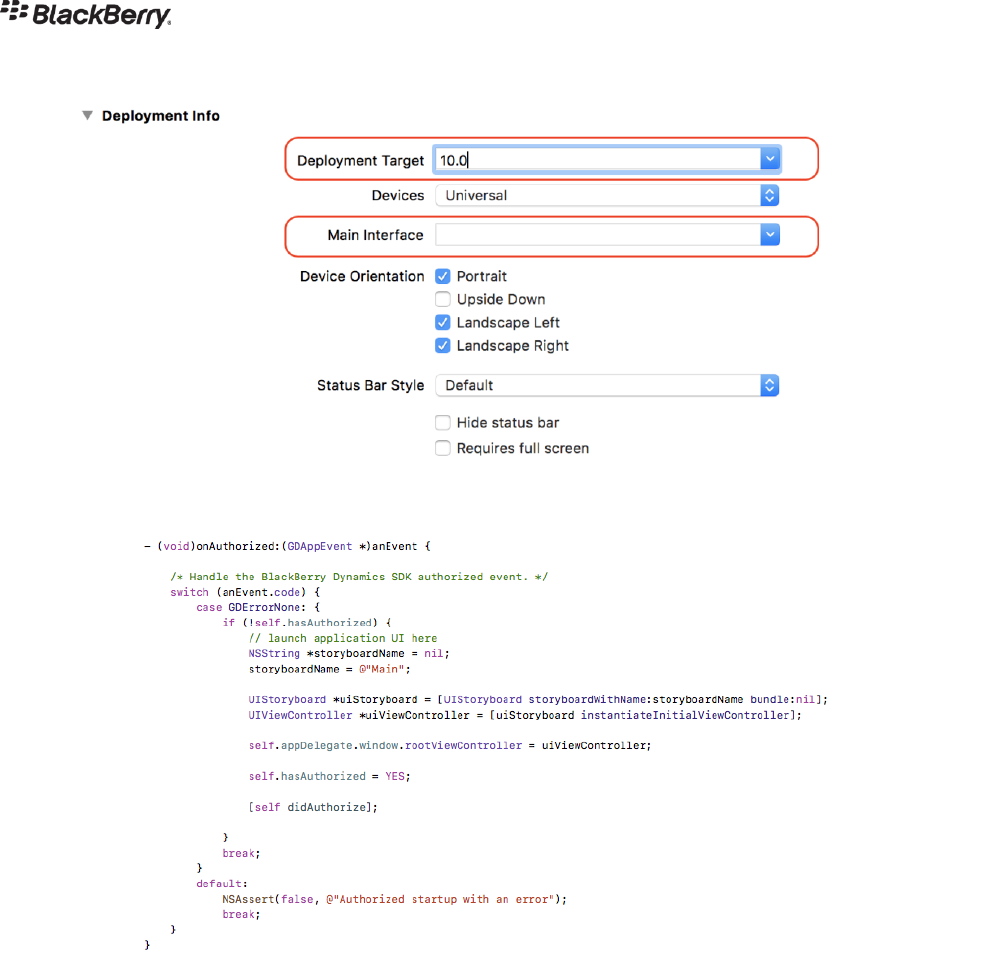
8. Next, move the code launching the application main UI. To work as a BlackBerry
Dynamics application, launch code execution must be delayed until the end user has
been authorised.
• Set the Deployment Target to 10.0
• Switch off automatic loading of the main storyboard by removing the static Main
Interface.
27-Sep-18
Page 17 of 65
• Review the onAuthorized event code. It loads the main storyboard
programmatically, when the end user has been authorised.
9. Run the application in GDEnterprise mode according to the instructions in the section,
Run your App in Enterprise Mode.
Alternatively, you can run the application in GDEnterpriseSimulation mode following
the instructions in the section, Run your App in Enterprise Simulation Mode.
At this stage, the user interface is a blank white screen.
10. Switch on detailed logging
The BlackBerry Dynamics runtime logs its activity to the IDE console. This logging can
be useful if you are resolving problems, for example with activation, but may make it
more difficult to read the logging from your own code.
You can switch on detailed logging, as follows.
• Open the Info.plist file.

27-Sep-18
Page 18 of 65
• Add a new property GDConsoleLogger with the value GDFilterNone.You can
do this by, for example, selecting the top-level item, Information Property List,
and then selecting in the menu Editor, Add Item.
• Rebuild your application.
This completes the steps to create a new application project using the BlackBerry Dynamics
template. Review the basic BlackBerry Dynamics app created by Xcode template to learn more
about the authorization and activation process.

27-Sep-18
Page 19 of 65
Session: Secure Your First BlackBerry Dynamics App
1. Overview
This session takes you through the steps necessary to add BlackBerry Dynamics security to an
existing iOS application using the BlackBerry Dynamics SDK for iOS.
The instructions in this session use one of the Objective-C sample applications from the Apple
iOS Developer website as an example. You could instead follow the same steps to add
BlackBerry Dynamics to an application of your own for which you have the source.
2. Preparation
Before you begin you will need to have installed the BlackBerry Dynamics SDK for iOS. You
should also ensure that you have access to the application developer portal. Instructions can be
found in this workbook, section Setup and Installation: BlackBerry Dynamics Development
Environment, under the headings Prepare for Application Development.
You will also need a copy of source code for the application to which you are going to add
BlackBerry Dynamics security. This will involve editing the source and project files, so take a
copy before you begin.
In this session, it uses an Apple sample application for iOS: LazyTableImages. The source of
the sample application can be downloaded from the Apple developer website. Click this link
Download LazyTableImages sample code or search for “download lazy table images sample
code” on the Apple developer home page.
Check that your copy of the application project builds and runs as is, before making any
changes.
Provision an Application and Generate an Access Key via UEM
Follow the steps in Appendix – Provision an Application in the BlackBerry Developer Lab to
activate the application. Note that this step is only required the first time you run this sample
and does not need to be repeated as you update it.
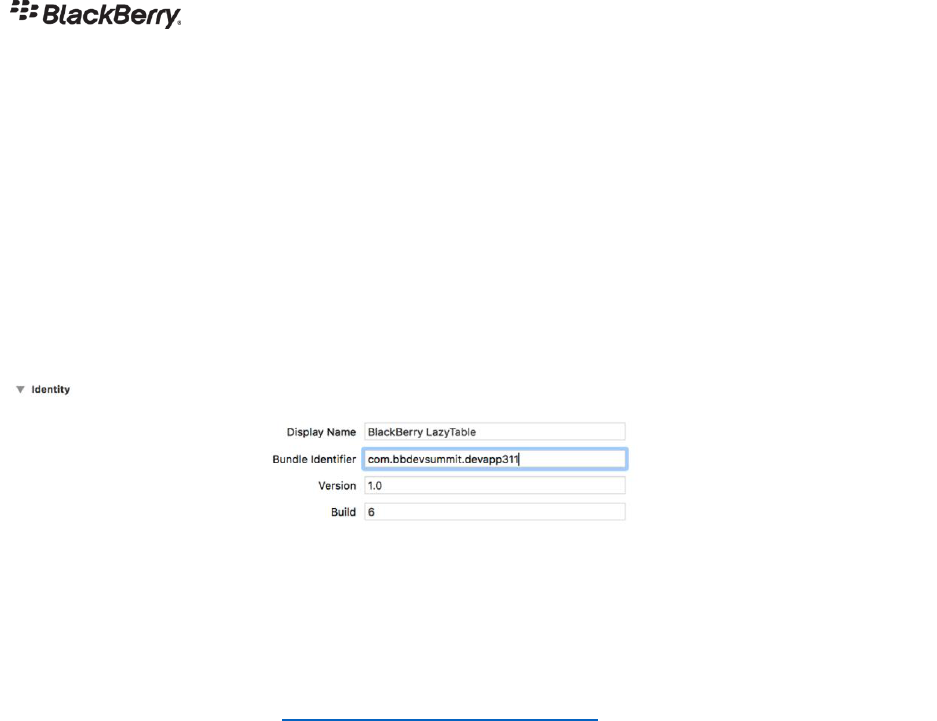
3. Setting the BlackBerry Dynamics Identifiers
Follow the steps below to configure your BlackBerry Dynamics app.
1. Change the Bundle Identifier of the LazyTableImages sample to your own instead of the
com.example.apple-samplecode.LazyTable.
For example, use the application ID assigned to you for the event. It’s not required to set
the GDApplicationID to be the same as application bundle ID.
com.bbdevsummit.devapp###
2. Open info.plist, configure the values of the URL identifier and URL Schemes
according to the Bundle Identifier you set.

27-Sep-18
Page 20 of 65
3. Add two rows.
• GDApplicationID
• GDApplicationVersion
4. Set GDApplicationID value. Use the GDApplicationID you have been assigned at the
BlackBerry Developer event.
com.bbdevsummit.devapp###
Note: GDApplicationID and Bundle Identifier are not required to be the same. In this
workbook however, we are setting both to be the same to be simple.
5. Set the value of GDApplicationVersion to 1.0.0.0
6. Add another row, GDLibraryMode and set its value to:
• GDEnterpriseSimulation
This mode runs your BlackBerry Dynamics app on the iOS simulator without the
BlackBerry NOC
• GDEnterprise
This mode runs your BlackBerry Dynamics app on the iOS simulator or a
physical device with the BlackBerry NOC
7. Add another row, Privacy - Face ID Usage Description and set its value to: FaceID for
Password
The relevant part of the Info.plist file should look something like the following screen
capture.
27-Sep-18
Page 21 of 65
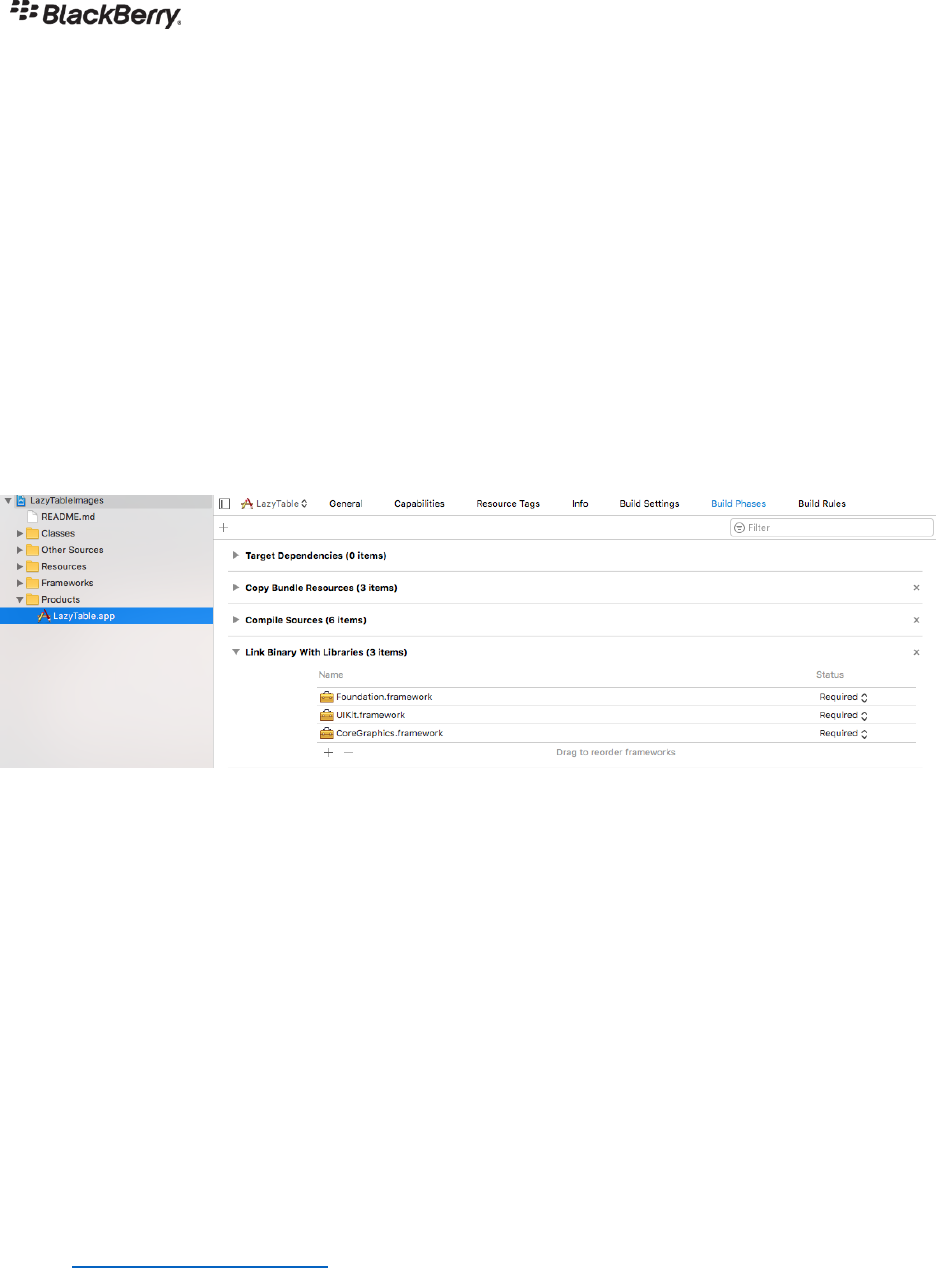
4. Adding the BlackBerry Dynamics Runtime Library
Start by adding the BlackBerry Dynamics runtime library, and other necessary libraries and
frameworks, into the application.
Open the project in Xcode and proceed as follows.
1. Select the project target.
2. Click Build Phases.
3. Expand Link Binary With Libraries.
(If you have downloaded a sample application, Xcode might report issues that can be
resolved automatically. It is OK to select to resolve the issues before doing the above.)
The following screen capture shows the required screen and tab.
4. Add the required frameworks and libraries as below:
• CFNetwork.framework
• CoreData.framework
• CoreTelephony.framework
• GD.framework
• libz.dylib or libz.tbd
• LocalAuthentication.framework
• MessageUI.framework
• MobileCoreServices.framework
• Quartzcore.framework
• QuickLook.framework
• Security.framework
• SystemConfiguration.framework
• WebKit.framework
Note: The API Reference page lists all the required frameworks in its Appendix, on the
Third Party Software page.
The frameworks and libraries might appear in the application level, not in the
Frameworks folder. You can drag and drop them into the Frameworks folder, for

27-Sep-18
Page 22 of 65
tidiness. When you do that, the frameworks and libraries might be highlighted in red in
the target Build Phases. That can be resolved by closing and opening the project.
If your application doesn’t have a Frameworks folder, you can create one. Highlight all
the frameworks and libraries, then right-click on one of them and select New Group from
Selection in the context menu that appears. Drag and drop the new Frameworks folder
to the bottom of the project, or just above the Products folder, for tidiness.
5. Set the required linker flags.
Open the project Build Settings tab and locate the C++ Standard Library setting, which is
in the Apple LLVM 9.0 - Language - C++ group. The easiest way to do this may be to
select to view All, instead of Basic, and then type C++ standard in the Search box.
Select the value: libc++ (LLVM C++ standard library with C++11 support).
6. Configure use of the BlackBerry Dynamics SDK loader.
Create a configuration settings file named default.xcconfig in the project directory.
Enter the following settings in the file:
FIPS_PACKAGE=$(CURRENT_ARCH).sdk
LDPLUSPLUS=~/Library/Application
Support/BlackBerry/Good.platform/iOS/FIPS_module/$FIPS_PACKAGE/bin/gd_fipsld
LD=~/Library/Application Support/BlackBerry/Good.platform/iOS/FIPS_module/$FIPS_PACKAGE/bin/gd_fipsld
ENABLE_BITCODE=NO
ENTITLEMENTS_REQUIRED=YES
CODE_SIGN_ENTITLEMENTS[sdk=iphonesimulator10.*]=$(SRCROOT)/$(PROJECT_NAME)/Entitlements.plist
If you installed the SDK in a location other than the default, then change the initial part of
the LDPLUSPLUS and LD settings in the file to your install path.
Note: If you are using XCode 10, refer to Appendix – BlackBerry Dynamics with XCode
10.
Note: The default installed location of the SDK is as follows:
~/Library/Application Support/BlackBerry/Good.platform/iOS/
Tip: You can create an empty file by right-clicking the project in the Project Navigator,
and selecting New File in the context menu that appears. Then select iOS, Other (will
need to scroll down), Empty then Next. Type default.xcconfig in as the Save As the
filename.
Tip: Create a new application from the Xcode template for BlackBerry Dynamics. The
project will contain a default.xcconfig file that you can copy. See the instructions in
this workbook section Setup and Installation: BlackBerry Dynamics Development
27-Sep-18
Page 23 of 65
Environment, under the heading, BlackBerry Dynamics Application Template via Xcode.
You need only follow the instructions as far as saving the project for the first time.
7. If you are using XCode 10, refer to Appendix – BlackBerry Dynamics with XCode 10.
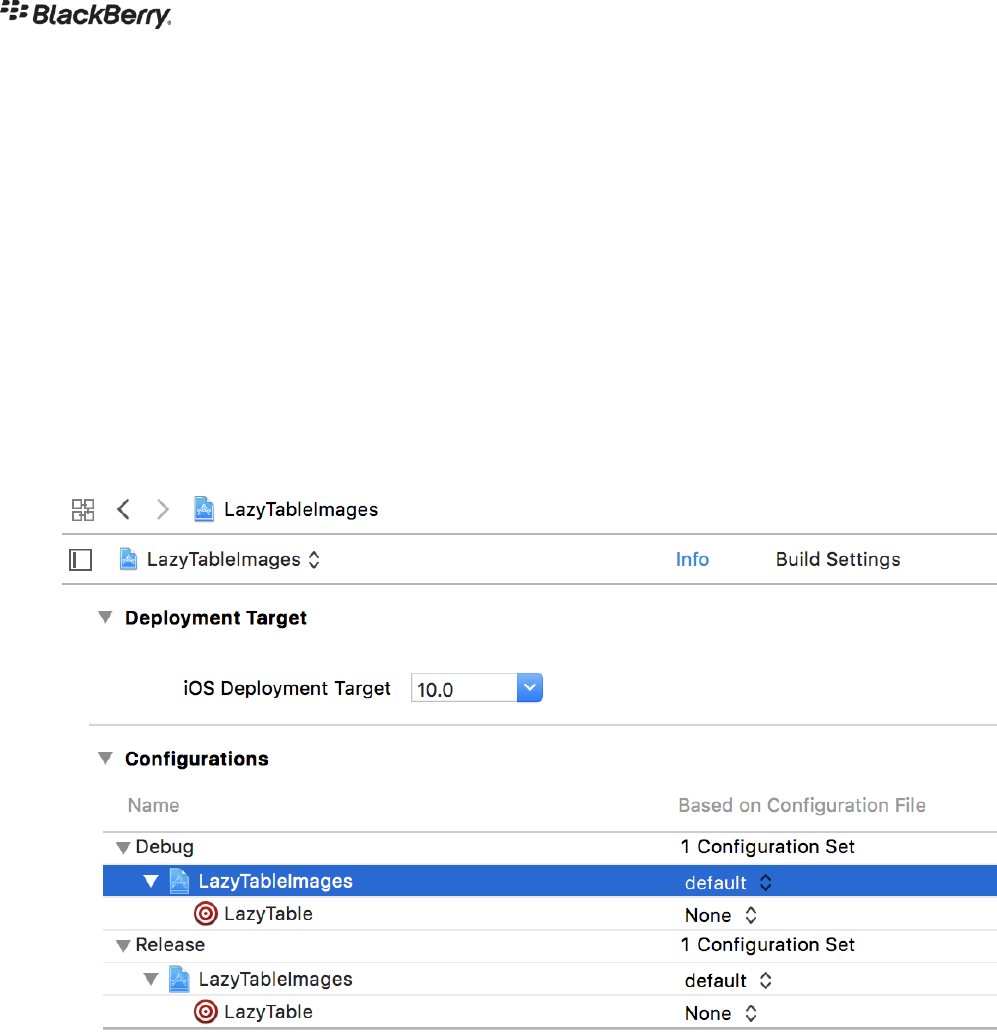
8. Make the required build settings.
Open the project‘s tab and set the iOS Deployment Target under deployment of the
project to at least the minimum supported by your installed BlackBerry Dynamics SDK
for iOS. The minimum supported version is iOS 10.0.
On the same tab, select the loader configuration created in the previous step. Do this by
selecting “default” as the file on which each configuration is based.
The following screen capture shows the required screen, tab, section and value.
9. Switch off Bitcode support.
The version of the SDK for iOS listed in the Compatibility section doesn’t support
Bitcode. Switch off Bitcode support as follows.
Open the project Build Settings tab. Under Build Options, select Enable Bitcode: No.
The easiest way to locate the setting may be to select to view All, instead of Basic, and
then enter “bitcode” in the search box.
10. Save and build the project to check that no mistakes have been made.

27-Sep-18
Page 24 of 65
27-Sep-18
Page 25 of 65
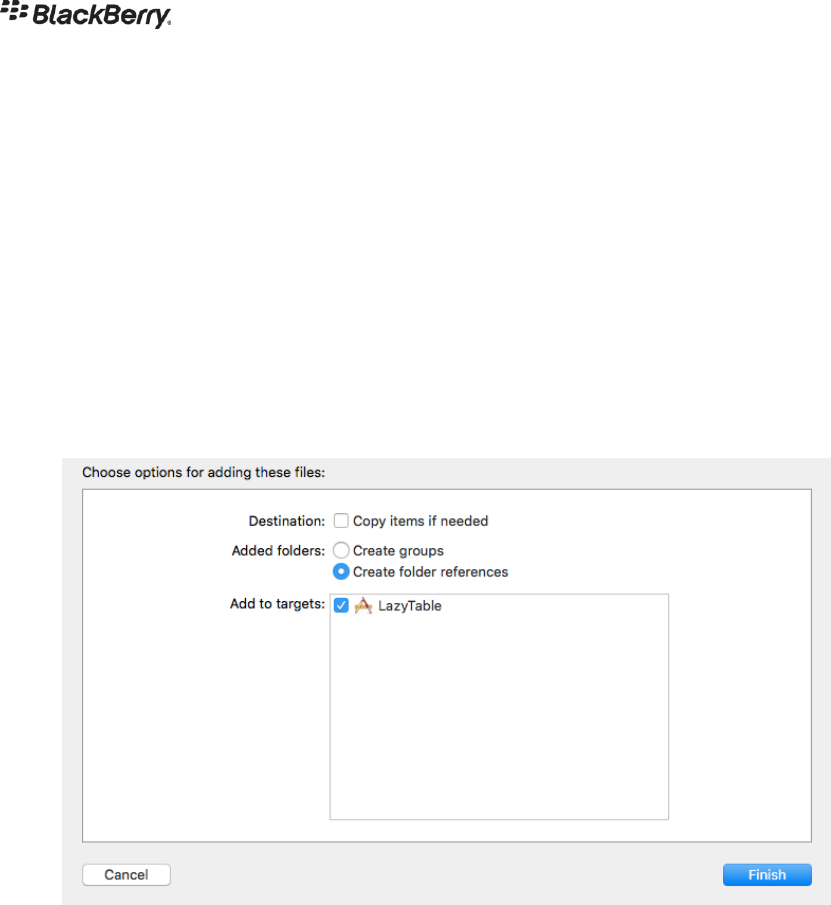
5. Adding the BlackBerry Dynamics Resources
Add the BlackBerry Dynamics runtime resources to the application, as follows.
1. Select GD.framework in the Project Navigator pane and right click to show the context
menu. Select Show in Finder.
2. In the Finder window that opens, navigate through the GD.framework and Resources
directories, so that GDAssets.bundle is visible. Drag GDAssets.bundle and drop it
under Resources folder in the LazyTableImages project.
3. When you drop the bundle, you will be prompted to choose options for adding the
constituent files. The required settings are shown in the following screen capture.
The options are:
o Not to Copy items.
o To Create folder references for any added folders.
These might not be your default options. Selecting these options ensures that it
isn’t necessary to add the bundle again after upgrading the SDK.
Move the GDAssets.bundle to the Resources folder if it’s not already.
That can be done by dragging and dropping in the project navigator if there already is a
Resources folder in your application. If there isn’t a Resources folder, you can create
one by highlighting GDAssets.bundle in the Project Navigator and selecting New Group
from Selection in the context menu that appears.
The asset link may be highlighted in red in the target Build Phases. That can be resolved
by closing and opening the project.
4. Save and build the project.
27-Sep-18
Page 26 of 65
6. BlackBerry Dynamics Build-Time Configuration
There is a mandatory build-time configuration for all BlackBerry Dynamics applications. This
enables BlackBerry Dynamics secure Inter-Container Communication (ICC), which is required
for enforcement of any authentication delegation policy set by the enterprise. ICC is also
required for use of Application- Based Services in the BlackBerry Dynamics Shared Services
Framework.
First, check the native bundle identifier, which can be found in the General tab of the project
target. The following screen capture shows the required screen and tab.
If you are working with a new copy of a sample application, you should set this value to
something other than the default. You’ve already completed this in the step 3. Setting the
BlackBerry Dynamics Identifiers
More information and instructions for setting the mandatory build-time configuration can be
found on the following page, Build-Time Configuration for iOS under Inter-Application
Configuration.
Tip: The text editor method is probably easiest. In case you are unfamiliar, see the instructions
in this workbook in the section Appendix - Tips for Xcode, under Edit the bare XML of a property
list. You should be able to copy the XML from the above page in the API Reference, then paste
it directly into your Info.plist file, then edit the application identifiers.
Note: The bundle identifier shown could include a variable reference, for example
$(PRODUCT_BUNDLE_IDENTIFIER). It is OK to include a variable reference in the
URL scheme and URL identifier specifiers.

27-Sep-18
Page 27 of 65
7. Connecting to the BlackBerry Dynamics Platform
Establishing a connection to the BlackBerry Dynamics platform requires authorisation of the end
user, and of the application. Both authorisations are initiated by a single function call.
To initiate authorisation processing, add code as follows.
A. Create an Event Handler
The results of authorisation processing are communicated to the application by the dispatch of
events. There are a number of approaches to implement handling of these events. This
workbook gives instructions for a particular approach that is easy to comprehend and extend.
The instructions in this section create a minimal handler, which is added to by later instructions.
The handler is a static singleton, i.e. a class of which there is only ever a single instance in the
program.
1. Open the application project in Xcode.
2. In the application menu, select File, New, File. Then select iOS, Source, and Cocoa
Touch Class and click Next. This opens a dialog on which you select the name and other
options for the new file.
Enter a name in the Class text box. One convention would be to use the same prefix as
the AppDelegate class and GDiOSDelegate as a suffix. In the Lazy Table Images
application, the AppDelegate class is named LazyTableAppDelegate, so the new class
could be named LazyTableGDiOSDelegate.
Leave the subclass as NSObject, select not to create a XIB file, and leave the language
as Objective-C.
Click Next. This opens a dialog on which you select where to save the new file.
Save the file in a directory that already contains class files for the application. In the Lazy
Table Images application, this is the Classes/sub-directory of the project directory.
Select the group Classes, if not already the default. Click Create to create the class.
You now have two new files, a .h file that contains the class declaration, and a .m file
that contains the class implementation.
3. Open the LazyTableGDiOSDelegate.h file.
Include the GDiOS.h header, by adding a statement like:
@import GD.Runtime;
Declare the class as implementing the GDiOSDelegate protocol.
Declare the class as having a static function, sharedInstance, that returns an instance
of itself.
The code should look like this:
@import GD.Runtime;
#import <Foundation/Foundation.h>
@interface LazyTableGDiOSDelegate : NSObject <GDiOSDelegate>

27-Sep-18
Page 28 of 65
+(instancetype)sharedInstance;
@end
4. Open the file LazyTableGDiOSDelegate.m. At this point, the file will contain an
incomplete implementation warning.
Add static initialiser code: An init function that is declared as private, and a
sharedInstance implementation that guarantees only one instance is ever created.
Add a dummy “handleEvent” for the required GDiOSDelegate functions:
The code should look like this:
#import "LazyTableGDiOSDelegate.h"
@interface LazyTableGDiOSDelegate()
-(instancetype)init;
@end
@implementation LazyTableGDiOSDelegate
+(instancetype)sharedInstance {
static LazyTableGDiOSDelegate *lazyTableGDiOSDelegate = nil;
static dispatch_once_t onceToken = 0;
dispatch_once(&onceToken, ^{
lazyTableGDiOSDelegate = [[LazyTableGDiOSDelegate alloc] init];
});
return lazyTableGDiOSDelegate;
}
-(instancetype)init {
self = [super init];
return self;
}
-(void)handleEvent:(GDAppEvent *)anEvent {}
@end
This completes the minimal handler code.
27-Sep-18
Page 29 of 65
B. Initiate Platform Connection
Connection to the BlackBerry Dynamics platform will be initiated in an early stage of the
application’s execution cycle: when it finishes launching.
1. Open the LazyTableGDiOSDelegate.m file, add #import “LazyTableAppDelegate.h”
2. Open the LazyTableAppDelegate.m file which contains the implementation of the
UIApplicationDelegate class of the application.
Include the declaration of the new class:
#import "LazyTableGDiOSDelegate.h"
Locate the application didFinishLaunchingWithOptions: function in the
implementation file, or add the function if it is not there.
Insert a call to the GDiOS authorize: function near the end, just above the return
statement. Pass a reference to an instance of the new singleton class, above, as the
parameter, as in the following code:
[[GDiOS sharedInstance] authorize:[LazyTableGDiOSDelegate
sharedInstance]];
return YES;
Note that GDiOS is also a singleton class, accessed by a sharedInstance function.
3. Save and build the application to check that no mistakes have been made.
You should be prompted to enter Email and Access Keys.
Note: The most likely cause of linking errors is a missing framework or library during the ‘Link
Binary with Libraries’ build phase. Check the list in the application target against the list in the
on-line API Reference.
27-Sep-18
Page 30 of 65
8. Implementing the BlackBerry Dynamics Authorisation Life Cycle
The application must implement the BlackBerry Dynamics authorisation life cycle. The
implementation can be basic, as shown in the following.
A. Authorisation State
Add tracking of whether the application has ever authorized, as follows:
1. Open the LazyTableGDiOSDelegate.h file that contains the declaration of the new
static singleton class.
Add a read-only property, hasAuthorized, of type BOOL.
The LazyTableGDiOSDelegate.h file looks like this, after the addition:
@import GD.Runtime;
#import <Foundation/Foundation.h>
@interface LazyTableGDiOSDelegate : NSObject <GDiOSDelegate>
@property (assign, nonatomic, readonly) BOOL hasAuthorized;
+(instancetype)sharedInstance;
@end
The property will be initialised to NO implicitly. You could add an explicit initialisation, in
the init function, if you like.
2. Open the LazyTableGDiOSDelegate.m file that contains the corresponding
implementation. In the previous instructions.
Override the read-only property just added to be writeable internally. Do this by adding a
property declaration in the interface declaration in the implementation file. The interface
declaration looks like this, in context, after the addition:
#import “LazyTableAppDelegate.h”
#import "LazyTableGDiOSDelegate.h"
@interface LazyTableGDiOSDelegate()
@property(assign, nonatomic) BOOL hasAuthorized;
//Line above was just added
-(instancetype)init;
@end
@implementation LazyTableGDiOSDelegate
3. Save and build the application to check that no mistakes have been made.

27-Sep-18
Page 31 of 65
B. Event-Handler Skeleton
Expand the minimal event handler inserted in the previous steps to a skeleton event handler by
replacing it with the following code and see the Tip, below: (There are three functions.)
1. Open LazyTableGDiOSDelegate.m file, add the following methods:
#pragma mark - Good Dynamics Delegate Methods –
(void)handleEvent:(GDAppEvent *)anEvent {
/* Called from _good when events occur, such as system startup. */
switch (anEvent.type) {
case GDAppEventAuthorized: {
[self onAuthorized:anEvent];
break;
}
case GDAppEventNotAuthorized: {
[self onNotAuthorized:anEvent];
break;
}
case GDAppEventRemoteSettingsUpdate: {
//A change to application-related configuration or policy
settings.
break;
}
case GDAppEventServicesUpdate: {
//A change to services-related configuration.
break;
}
case GDAppEventPolicyUpdate: {
//A change to one or more application-specific policy
settings has been received
break;
}
case GDAppEventEntitlementsUpdate: {
//A change to the entitlements data has been received.
break;
}
default: {
NSLog(@"Unhandled Event");
break;
}
}
}
- (void)onNotAuthorized:(GDAppEvent *)anEvent {
/* Handle the Good Libraries not authorized event. */
switch (anEvent.code) {
case GDErrorActivationFailed:
case GDErrorProvisioningFailed:
case GDErrorPushConnectionTimeout:
case GDErrorSecurityError:
case GDErrorAppDenied:
case GDErrorAppVersionNotEntitled:
case GDErrorBlocked:
case GDErrorWiped:
case GDErrorRemoteLockout:
case GDErrorPasswordChangeRequired: {
27-Sep-18
Page 32 of 65
// an condition has occurred denying authorisation, an
application may wish to log these events
NSLog(@"onNotAuthorized %@", anEvent.message);
break;
}
case GDErrorIdleLockout: {
// idle lockout is benign & informational
break;
}
default:{
NSAssert(false, @"Unhandled not authorized event");
break;
}
}
}
- (void)onAuthorized:(GDAppEvent *)anEvent {
/* Handle the Good Libraries authorized event. */
switch (anEvent.code) {
case GDErrorNone: {
if (!self.hasAuthorized) {
// launch application UI here
self.hasAuthorized = YES;
}
break;
}
default:
NSAssert(false, @"authorized startup with an error");
break;
}
}
2. Save and build the application to check that no mistakes have been made.
Tip: Create a new application from the Xcode template for BlackBerry Dynamics. Code similar
to the above can easily be copied from the [*]GDiOSDelegate.m file in the new application.
In case you are unfamiliar, see the instructions in this workbook section Setup and Installation:
BlackBerry Dynamics Development Environment, under the heading, BlackBerry Dynamics
Application Template via Xcode. You need only follow the instructions as far as saving the
project for the first time.
27-Sep-18
Page 33 of 65
C. User interface monitoring and security
Change the application user interface to be monitored and secured by the BlackBerry Dynamics
Runtime, as follows.
1. Open the LazyTableGDiOSDelegate.h file that contains the declaration of the new
static singleton class.
Include the declaration of the root view controller of the application, by adding a
statement like:
#import "RootViewController.h"
Add a property, rootViewController, for a weak reference to an instance of the root
view controller.
The LazyTableGDiOSDelegate.h file looks like this, after the additions:
@import GD.Runtime;
#import <Foundation/Foundation.h>
#import "RootViewController.h"
@interface LazyTableGDiOSDelegate : NSObject <GDiOSDelegate>
@property (weak, nonatomic) RootViewController *rootViewController;
@property (assign, nonatomic, readonly) BOOL hasAuthorized;
+(LazyTableGDiOSDelegate *)sharedInstance;
@end
The property will be initialised to nil implicitly. You could add an explicit initialisation to
the init function, if you like. This is a weak reference because the view controller object
is allocated outside the application code.
2. Open the the RootViewController.m file in the Classes group which contains the
implementation of the root view controller.
Include the declaration of the new class if not added already:
#import "LazyTableGDiOSDelegate.h"
Locate the viewDidLoad function. At the end of the function, add an assignment of the
new property in the static singleton class to a reference to this instance of the view
controller, for example as in the following code:
[LazyTableGDiOSDelegate sharedInstance].rootViewController = self;
You could instead call the setter, which would have the same result.
3. Open the LazyTableAppDelegate.m file that contains the implementation of the
UIApplicationDelegate class of the application.
27-Sep-18
Page 34 of 65
Look for any code that accesses the root view controller via the user interface hierarchy,
for example by searching for “viewcontroller”. In the LazyTableImages application,
this happens in two places: in the completion block of the parser, and in the
handleError: callback.
Replace access via the user interface hierarchy with access via the new property in the
static singleton class, as shown in the following code:
// RootViewController *rootViewController = (RootViewController*)
// [(UINavigationController*)weakSelf.window.rootViewController
// topViewController];
RootViewController *rootViewController =
[LazyTableGDiOSDelegate sharedInstance].rootViewController;
The commented out lines in the above snippet are a single logical line in the original.
The next two lines are the new assignment.
You could instead call the getter, which would give the same result.
4. In the same file, locate the application function didFinishLaunchingWithOptions:
This function has a call to the authorize: function, which was added in earlier
instructions.
Above the call to the authorize function, set the application window to the BlackBerry
Dynamics window, as shown in the following code:
5. Save and build the application to check that no mistakes have been made.
This completes the required changes to monitor the user interface.
self.window = [[GDiOS sharedInstance] getWindow];
// Line above was just added.
[[GDiOS sharedInstance] authorize:[LazyTableGDiOSDelegate
sharedInstance]];
return YES;
}
27-Sep-18
Page 35 of 65
D. Application Launch
The original launch code for the application would be in:
• The didFinishLaunchingWithOptions function of the UIApplicationDelegate
implementation.
• The viewDidLoad function of the root view controller, and any other functions there that
might be invoked when the main storyboard is loaded.
The launch code would be run whenever the application is started by the user. To work as a
BlackBerry Dynamics application, launch code execution must be delayed until the end user has
been duly authorised.
One way to accomplish this is to:
• Switch off automatic loading of the main storyboard. Instead, load the main storyboard
programmatically, and only when the end user has been authorised.
• Move any launch code from the application delegate into a new function.
• Call the new function only when the main storyboard has finished loading. Note that the
storyboard only starts loading after the user has been authorised.
This change can be accomplished as follows.
1. Open the LazyTableGDiOSDelegate.h file that contains the declaration of the new
static singleton class.
Include the declaration of the application delegate class, by adding a statement like:
#import "LazyTableAppDelegate.h"
Add a property, lazyTableAppDelegate, for a weak reference to an instance of the
application delegate.
The LazyTableGDiOSDelegate.h file looks like this, after the additions:
@import GD.Runtime;
#import <Foundation/Foundation.h>
#import "RootViewController.h"
#import "LazyTableAppDelegate.h"
@interface LazyTableGDiOSDelegate : NSObject <GDiOSDelegate>
@property (weak, nonatomic) RootViewController *rootViewController;
@property (weak, nonatomic) LazyTableAppDelegate *lazyTableAppDelegate;
@property (assign, nonatomic, readonly) BOOL hasAuthorized;
+(LazyTableGDiOSDelegate *)sharedInstance;
@end
27-Sep-18
Page 36 of 65
The property will be initialised to nil implicitly. You could add an explicit initialisation to
the init function, if you like. This is a weak reference because the application delegate
object is allocated outside the application code.
2. Open theLazyTableAppDelegate.h file that contains the declaration of the application
delegate class.
Add a declaration for a new function, didAuthorize, to be called after authorisation is
complete. The new function will have no parameters and doesn’t return any values.
The LazyTableAppDelegate.h file looks like this, after the addition:
#import <UIKit/UIKit.h>
@interface LazyTableAppDelegate : UIResponder <UIApplicationDelegate>
@property (nonatomic, strong) UIWindow *window;
-(void)didAuthorize;
// Line above was just added.
@end
3. Open the LazyTableAppDelegate.m file that contains the implementation of the
application delegate class.
Locate the didFinishLaunchingWithOptions: function. This function already has some
code added by previous instructions, including code to set the application window.
Above the window-setting code, add an assignment of the new property in the static
singleton class to this instance of the application delegate, for example as in the
following code:
[LazyTableGDiOSDelegate sharedInstance].lazyTableAppDelegate = self;
4. Move any original application launch code, which would be above the line just added, to
a new didAuthorize function. The function was declared in the preceding instructions.
The changed and new functions in the LazyTableAppDelegate.m file now look like this:
- (BOOL)application:(UIApplication *)application didFinishLaunchingWithOptions:
(NSDictionary *)launchOptions{
[LazyTableGDiOSDelegate sharedInstance].lazyTableAppDelegate = self;
self.window = [[GDiOS sharedInstance] getWindow];
[[GDiOS sharedInstance] authorize:[LazyTableGDiOSDelegate
sharedInstance]];
return YES;
}
-(void)didAuthorize {

27-Sep-18
Page 37 of 65
NSURLRequest *request = [NSURLRequest requestWithURL:[NSURL
URLWithString:TopPaidAppsFeed]];
// create an session data task to obtain and the XML feed
NSURLSessionDataTask *sessionTask =
[[NSURLSession sharedSession]
dataTaskWithRequest:requestcompletionHandler:^(NSData *data,
NSURLResponse *response, NSError *error) {
// in case we want to know the response status code
//NSInteger HTTPStatusCode = [(NSHTTPURLResponse *)response
statusCode];
//
// ... About 60 lines of code here ...
//
[self.queue addOperation:self.parser]; // this will start the
"ParseOperation"
}
}];
[sessionTask resume];
// show in the status bar that network activity is starting
[UIApplication sharedApplication].networkActivityIndicatorVisible = YES;
}
5. Open the Info.plist file in the Resources group that contains the property list file of
the application.
Locate the Main storyboard file base name property, the key for which is
UIMainStoryboardFile.
Make a note of the value of this property, which will be needed later. In the
LazyTableImages application, the value is “MainStoryboard”.
Delete the property. This will switch off automatic loading of the storyboard at application
start-up.
Tip: You may find it easiest to delete the property in source code editing mode, as
shown in the BlackBerry Dynamics Build-Time Configuration section, above.
6. Open the LazyTableGDiOSDelegate.m file that contains the implementation of the new
static singleton class.
Add a new private method, didAuthorize, that checks whether the end user has been
authorized, and checks that properties for the view controller and application delegate
have been set, and then calls the application delegatedidAuthorize function if all
those conditions are met. (See the code snippet below.)
Add custom setters for the view controller and application delegate properties that call
the new function, as well as setting the property values

27-Sep-18
Page 38 of 65
The new functions should look something like the following, in context:
@interface LazyTableGDiOSDelegate()
@property(assign, nonatomic) BOOL hasAuthorized;
-(instancetype)init;
-(void)didAuthorize;
@end
@implementation LazyTableGDiOSDelegate
-(void)setRootViewController:(RootViewController *)rootViewController {
_rootViewController = rootViewController;
[self didAuthorize];
}
-(void)setLazyTableAppDelegate:(LazyTableAppDelegate *)
lazyTableAppDelegate {
_lazyTableAppDelegate = lazyTableAppDelegate;
[self didAuthorize];
}
-(void)didAuthorize {
if (self.hasAuthorized && self.rootViewController &&
self.lazyTableAppDelegate ){
[self.lazyTableAppDelegate didAuthorize];
}
}
//
// Rest of the class code is here
//
@end
The didAuthorize function is declared in the private @interface section, which also
includes the init function in the above snippet.
7. Locate the function onAuthorized that is executed when BlackBerry Dynamics
authorisation processing completes for the first time.
In the case where there is no error and the end user is not already flagged as
authorised. (See also the code snippet below.)
Add code to load the main storyboard, the name of which you recorded above when
deleting it from the property file.
Add code to instantiate and launch the initial view controller.
Add a call to the new didAuthorize function that was just added.
The code should look something like the following, in context:
- (void)onAuthorized:(GDAppEvent *)anEvent {
/* Handle the Good Libraries authorized event. */

27-Sep-18
Page 39 of 65
switch (anEvent.code) {
case GDErrorNone: {
if (!self.hasAuthorized) {
// launch application UI here
self.hasAuthorized= YES;
// Following lines are new.
UIStoryboard *uiStoryboard =[UIStoryboard
storyboardWithName:@"MainStoryboard"
bundle:nil];
UIViewController *uiViewController =
[uiStoryboard instantiateInitialViewController];
self.lazyTableAppDelegate.window.rootViewController =
uiViewController;
[self didAuthorize];
// End of new code.
}
break;
The above code initiates programmatic launch of the storyboard and loading of the view
controller, which in turn results in the view controller’s viewDidLoad being run.
8. Save and build the application to check that no mistakes have been made.
This completes the relocation of application launch, and hence the implementation of the
BlackBerry Dynamics authorisation life cycle.
The above approach and code may seem complex. It is designed to ensure that the
application’s user interface isn’t shown, and the application’s launch processing doesn’t take
place, before the end user has been authorised. Changes to the application delegate are
somewhat complex, but changes to the view controller and storyboard are minimal.
27-Sep-18
Page 40 of 65
9. Running the Application
You can now run the application on a real device or on a simulator.
• Run the application in GDEnterprise mode according to the instructions in the section,
Run your App in Enterprise Mode.
• Alternatively, you can run the application in GDEnterpriseSimulation mode following
the instructions in the section, Run your App in Enterprise Simulation Mode.
Note: The BlackBerry Dynamics Enterprise Simulation mode can only be used by
applications running on a simulator, not on a real device. You need an Internet
connection to use the Enterprise Simulation mode.
An error message might be displayed that a push channel couldn’t be set up. This error can be
ignored.
The screenshots below are capturing the activation process for the BlackBerry Dynamics
LazyTable app before loading the main page.
[Activation screens running on GDEnterpriseSimulation Mode]
27-Sep-18
Page 41 of 65

27-Sep-18
Page 42 of 65
Session: Secure Communication and Protecting Data in Transit
The exercises in this section don’t depend on completion of any other sections and can’t be
done with an application running in Enterprise Simulation mode. If necessary, see the section
Setup and Installation: BlackBerry Dynamics Development Environment for instructions on
running applications in normal enterprise mode.
Sample projects have been created for these exercises that contain a complete and incomplete
implementation called “BlackBerry-Dynamics-Incomplete-iOS-[Objective-C] or [Swift]” and
“BlackBerry-Dynamics-Complete-iOS-[Objective-C] or [Swift]” The complete samples can be
used as a reference of the sample solutions. The incomplete projects use native APIs that
require modification to use BlackBerry Dynamics APIs. It also has missing sections you will
need to code from scratch. The complete sample does not contain the sample solutions for
additional exercises.
Preparation
Download iOS sample projects: www.blackberrydevsummit.com
Review BlackBerry Dynamics iOS APIs for Secure Communication
Open the BlackBerry-Dynamics-Incomplete-iOS-Objective-C or Swift project and compete
the exercises below. Review the ReadMe file in the project to build and run.
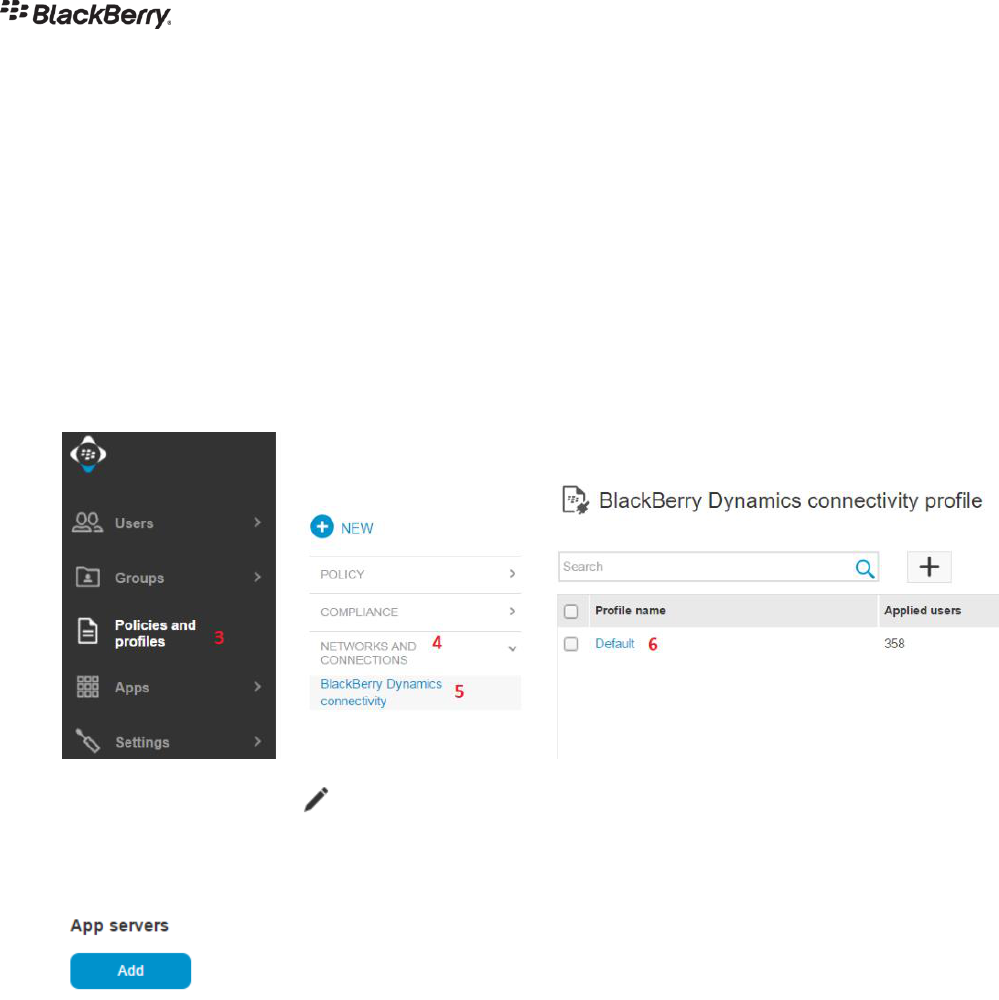
UEM Administration Actions
The sample requires a BlackBerry Dynamics Connectivity profile be configured in the
BlackBerry UEM Administration console. This allows the administrator - which is you today – to
remotely configure the server and port the application connects to. In production setting, this
takes the burden of configuring the application out of an end user’s hands.
Perform the following steps to configure a BlackBerry Dynamics Connectivity profile for this
sample application.
1. Within BlackBerry Access, navigate to: https://uem02.blackberrydevsummit.com/admin/
If you do not yet have BlackBerry Access installed, refer to Appendix - Installing
BlackBerry Access.
Alternatively, you can access the same site using
https://uem.blackberrydevsummit.com:10443/admin/ in a regular browser if connections
over port 10443 are allowed in your environment.
2. Log in using the following credentials:
• User Name: DevUser###
• Replace ### with the number assigned to you when you arrived at the
BlackBerry Developer Summit.
27-Sep-18
Page 43 of 65
• Password: DevUser!2018
• Domain: blackberrydev
3. Click on Policies and profiles.
4. Click on NETWORK AND CONNECTIONS.
5. Click on BlackBerry Dynamics connectivity.
6. Click on the “Default” BlackBerry Dynamics Connectivity profile. The screenshot below
illustrates steps 3, 4, 5 and 6.
7. Click on the Pencil icon near the top right are of the screen to edit the connectivity
profile.
8. Scroll to the bottom of the page and click on the Add button under App Servers.
9. In the window that appears, search for “Dev Summit App ###” where ### is the number
assigned to you when you arrived at the BlackBerry Developer event.
e.g. Dev Summit App 305
10. Click on your app name in the search results and click the Save button.

27-Sep-18
Page 44 of 65
11. Locate the “Dev Summit App ###” entry that was added to the profile screen and click
the + icon.
12. Add the following app server information:
• Server: anonymous.blackberrydevsummit.com
• Port: 80
• Priority: Primary
• Primary BlackBerry Proxy cluster: First
13. Click the Save button to add the app server.
14. Click the Save button on the bottom of the page to save the connectivity profile.
You have now configured the app server for the BlackBerry Dynamics connectivity profile that
will be delivered to your application.
Provision an Application and Generate an Access Key via UEM
Follow the steps in Appendix – Provision an Application in the BlackBerry Developer Lab to
activate the application. Note that this step is only required the first time you run this sample
and does not need to be repeated as you update the app source code and run.
Exercise One: Send an HTTP REST Request to a Configured Server
This exercise doesn’t depend on completion of any other exercises.
For Objective-C, open the project BlackBerry-Dynamics-Incomplete-iOS-Objective-C:
1. Open the file HttpRestViewController.m
2. Retrieve the server details from the management console by completing the section
#paragma mark - Exercise One: Send an HTTP REST Request to a configured
server.
For you to complete this task, there must be a server address and port number
configured for your application in the management console(UEM).
• A server name and port has been preconfigured in BlackBerry UEM for this
sample and is ready to be retrieved.

27-Sep-18
Page 45 of 65
For programming:
• Use the getApplicationConfig method in the GDiOS class, to retrieve a
collection of configuration settings.
• The GDAppConfigKeyServers item from the collection will contain the server
details that were entered in the management console.
• Print the server details.
3. Write code to send a REST request to the preconfigured enterprise application server
that you retrieved previously. Change the configured application server to be one that is
only accessible via the BlackBerry Dynamics platform infrastructure.
If the enterprise server is not configured as listed in this workbook, your app will not be
able to retrieve data.
• Use the native NSURLSession class.
• Print the response.
Check that the server logs show a request being received or ask a system administrator
to do that.
For Swift, open the project BlackBerry-Dynamics-Incomplete-iOS-Swift:
• Open the file HttpRestViewControeller.swift.
• Follow the steps 2-3 above.
Exercise Two: Authenticate the User at the Enterprise Server
This exercise builds on the previous exercise.
URLs for the BlackBerry Developer Lab which can be used for this exercise:
• Anonymous: http://anonymous.blackberrydevsummit.com
• Basic: http://basic.blackberrydevsummit.com
• Kerberos Constrained Delegation: http://kcd.blackberrydevsummit.com
• Kerberos: http://kerberos.blackberrydevsummit.com
For Objective-C, open the project BlackBerry-Dynamics-Incomplete-iOS-Objective-C:
Code the following:
1. Open the file HttpViewController.m. You will be completing the section:
#pragma mark - Exercise Two: Authenticate the User at the Enterprise
Server.

27-Sep-18
Page 46 of 65
2. Start by writing code requesting a public Internet address as the application server. For
example, you could use www.example.com and port 80. You will also be able to browse
this address from any browser with Internet access to check your results.
3. Next, send an HTTP request to the Anonymous URL listed above by completing the
code in the section. Your app should be able to retrieve data from the configured
application server getting HTTP 200 response.
4. Next, receive a response that authorisation is required.
Change the configured application server to be one of the above URLs that:
• Requires authorization of the end user. Try Kerberos Constrained Delegation
(KCD) first and then Kerberos.
• Observe that no changes to the application were required for KCD
authentication. KCD authentication is handled by BlackBerry UEM.
Your code from the previous exercise should work for this step, without modification. The
expected response is an HTTP 401 for all authenticated URLs except KCD.
5. Switch to the Kerberos URL and send user credentials.
Change your application to send a second HTTP request that includes credentials, after
receiving the response that authorisation is required.
For credentials:
• Use the username and password supplied to you at the BlackBerry Developer
Summit.
o user name: “DevUser###@blackberrydevsummit.com
o password: DevUser!2018
• Or use the getApplicationConfig method in the GDiOS class to obtain the
email address of the end user. The address will be in the
GDAppConfigKeyUserPrincipalName item, if present, or in the
GDAppConfigKeyUserId item otherwise. Set the email address as the user name
for authorisation.
• Or code a user interface to accept a value from the user.
If you are using NSURLSession:
• Implement the NSURLSessionTaskDelegate protocol and supply the credentials
in the didReceiveChallenge callback for
NSURLAuthenticationMethodNegotiate.
27-Sep-18
Page 47 of 65
Check that your credentials are accepted. Your application should receive an OK
response to the second HTTP request.
6. Use Kerberos Constrained Delegation URL instead of sending credentials.
Your code should already work for this step, without modification. The expected
sequence is that the first HTTP request returns the requested resource and doesn’t
receive a response that authorisation is required.
Note: This is because the response is intercepted and handled by the BlackBerry
Dynamics runtime and the management console.
For Swift, open the project BlackBerry-Dynamics-Incomplete-iOS-Swift:
• Open the file HttpViewController.swift,
• Follow the step 2-3 above.
Screenshot(s) to reference:
Exercise Three: Open Socket Connection
This exercise doesn’t depend on completion of any other exercises.
For Objective-C, open the project BlackBerry-Dynamics-Incomplete-iOS-Objective-C:
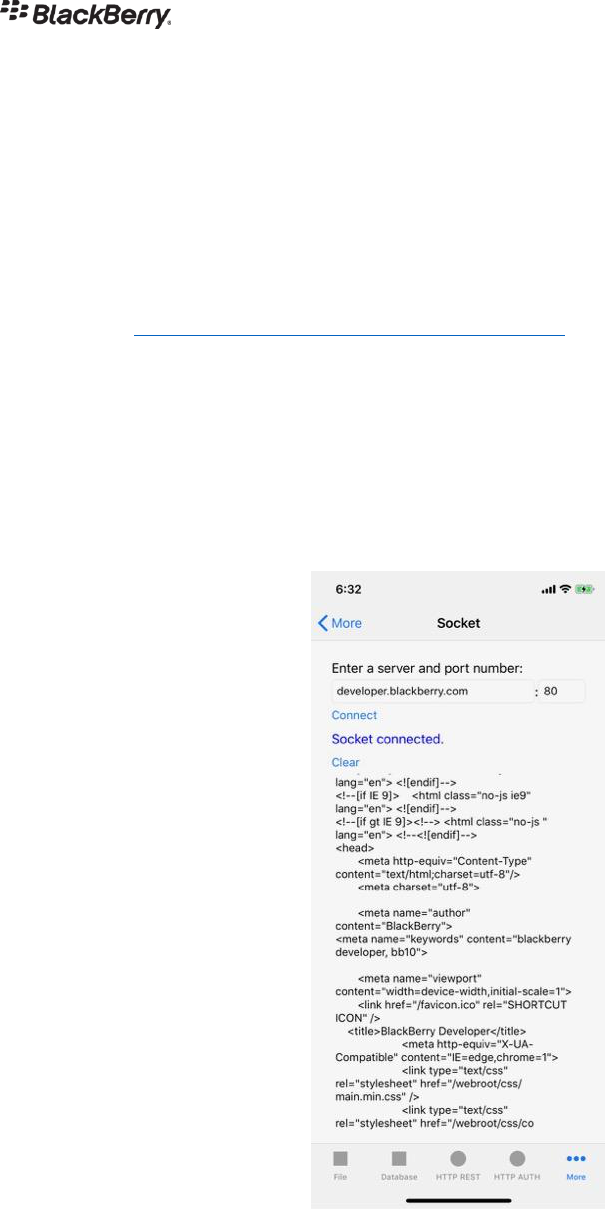
27-Sep-18
Page 48 of 65
1. Open the file SocketViewController.m.
2. Send an HTTP request to a Configured Server, by opening a socket connection instead
of sending an HTTP request by completing the section:
#pragma mark - Exercise three: Open socket connection.
• Use the hostname and port provided to you at the BlackBerry Developer Summit:
http://anonymous.blackberrydevsummit.com
• Or retrieve the configured enterprise server information
For Swift, open the project BlackBerry-Dynamics-Incomplete-iOS-Swift:
• Open the file SocketViewController.swift,
• Follow the step 2 above.
Screenshot(s) to reference:
27-Sep-18
Page 49 of 65
Session: Secure Storage and Protecting Data at Rest
The exercises in this section don’t depend on completion of any other sections. These exercises
can be done with an application running in Enterprise Simulation mode, or in normal enterprise
mode.
Sample projects have been created for these exercises that contain a complete and incomplete
implementation called “BlackBerry-Dynamics-Incomplete-iOS” and “BlackBerry-Dynamics-
Complete-iOS”. The complete sample can be used as a reference of the sample solution. The
incomplete project uses native iOS APIs that require modification to use the BlackBerry
Dynamics APIs. You can use it to implement the BlackBerry Dynamics APIs. It also has missing
sections you will need to code from scratch. The complete sample does not contain the sample
solutions for the additional exercises.
Preparation
Download iOS sample projects: www.blackberrydevsummit.com
Review BlackBerry Dynamics iOS APIs for Secure Storage.
Open the BlackBerry-Dynamics-Incomplete-iOS-Objective-C or Swift project and complete
the steps below. Review the ReadMe file in the project to build and run.
Provision an Application and Generate an Access Key via UEM
Follow the steps in Appendix – Provision an Application in the BlackBerry Developer Lab to
activate the application. Note that this step is only required the first time you run this sample
and does not need to be repeated as you update it.
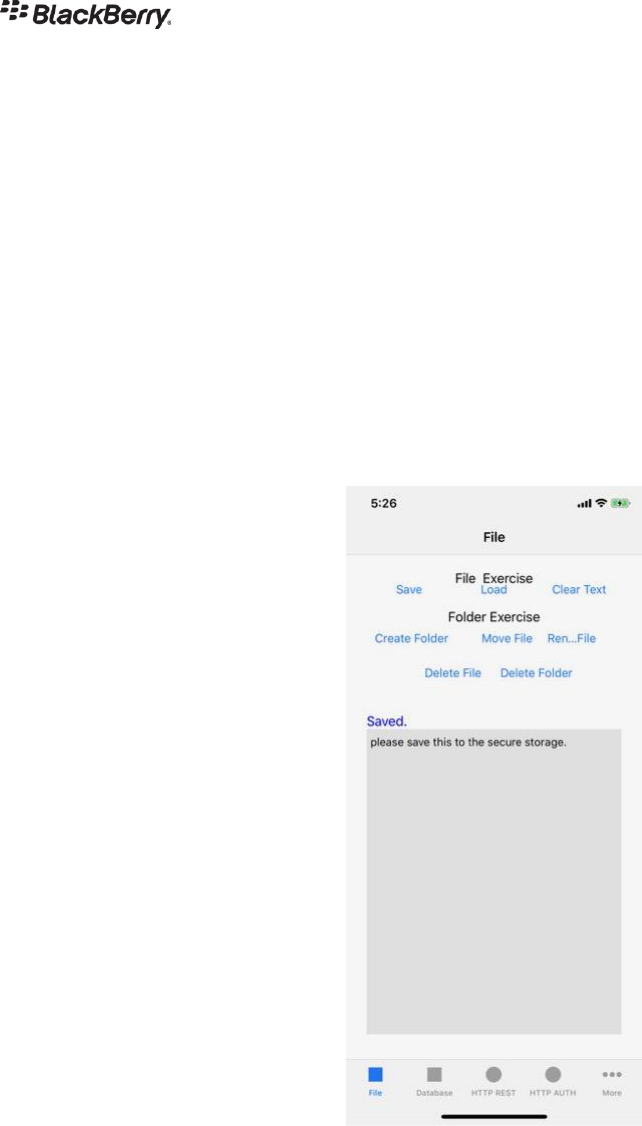
Exercise One: Secure Store File
This exercise doesn’t depend on completion of any other exercises.
For Objective-C, open the project BlackBerry-Dynamics-Incomplete-iOS-Objective-C:
1. Open FileViewController.m file, complete the section:
#pragma mark -Exercise One: Secure Store File.
2. Create and then read back a text file in the secure file system:
• Use the native NSSearchPathForDirectoriesInDomains function to set the
initial part of the path of the file.
• Use the GDFileManager class, or the GDFileHandle class, or both to create and
read the file. Don’t use GDFileSystem, which is deprecated.
• For this exercise, you can use NSLog or a similar native function to display output
in the Xcode console.
27-Sep-18
Page 50 of 65
3. Check that the data is encrypted by:
• Getting the native path by using the GDFileManager
getAbsoluteEncryptedPath method.
• Printing the path to the Xcode console.
For Swift, open the project BlackBerry-Dynamics-Incomplete-iOS-Swift:
• Open FileViewController.swift file, complete the section:
#pragma mark - Exercise One.
• Follow the step 2-3 above.
Screenshot(s) to reference:
Exercise Two: Secure Store Directory
This exercise builds on the previous exercise.
For Objective-C, open the project BlackBerry-Dynamics-Incomplete-iOS-Objective-C:
1. Open the file FileViewController.m
2. Code the directory management operations by completing the section:

27-Sep-18
Page 51 of 65
#pragma mark - Exercise Two: Secure Store Directory.
3. Create a directory.
• Use the native NSSearchPathForDirectoriesInDomains function to set the
initial part of the path of the directory.
• Use the GDFileManager class. Don’t use the GDFileSystem class, which is
deprecated.
4. Display the path of the directory.
5. Move the file created in the previous exercise into the directory.
6. Rename the file.
7. Delete the file.
8. Delete the directory.
For Swift, open the project BlackBerry-Dynamics-Incomplete-iOS-Swift:
• Open FileViewController.swift file, complete the section
#pragma mark - Exercise Two: Secure Store Directory.
• Follow the step 2-8 above.
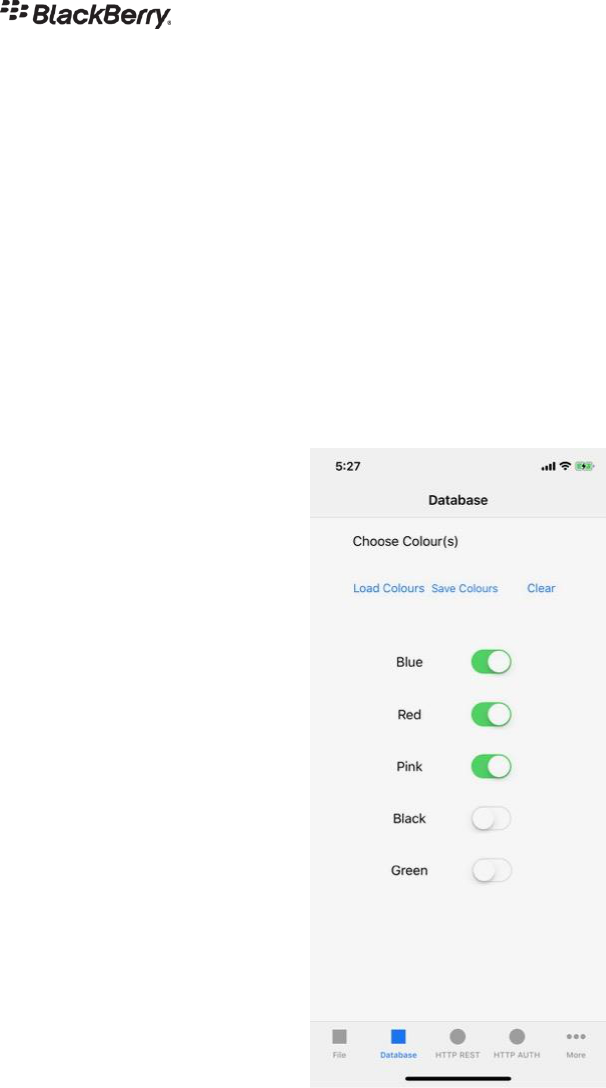
Exercise Three: Secure SQL Database
This exercise builds on the previous exercise.
For Objective-C, open the project BlackBerry-Dynamics-Incomplete-iOS-Objective-C:
1. Open the file DatabaseViewController.m.
2. Code the following SQL database operations by completing the section:
#pragma mark - Exercise Three: Secure SQL Database.
3. Create and open a database:
• Use the Secure SQL Database API, which is linked from the front page of the
API Reference on the application developer portal. The API is almost identical to
the C API of SQLite.
• There is only a C API for the Secure SQL Database for iOS.
• Use the native NSSearchPathForDirectoriesInDomains function to set the
initial part of the path of the database file.
4. Create a table of “Colours”.
27-Sep-18
Page 52 of 65
5. Select multiple colours and Save into the database created.
6. Clear selections and load the saved database.
If you have extra time, try inducing an error in each step and printing the error message.
For Swift, open the project BlackBerry-Dynamics-Incomplete-iOS-Swift:
• Open DatabaseViewController.swift file, complete the section:
#pragma mark - Exercise Three: Secure SQL Database.
• Follow the step 2-6 above.
Screenshot(s) to reference:
27-Sep-18
Page 53 of 65
Session: Application Management, Policies, and Configuration
These exercises can’t be done with an application running in the Enterprise Simulation mode.
Application Configuration Exercises
This section uses the term Application Configurations, which is what is now used in BlackBerry
UEM. In Good Control the same concept is known as Application Policies. Both terms may
appear in online documentation and refer to the same thing.
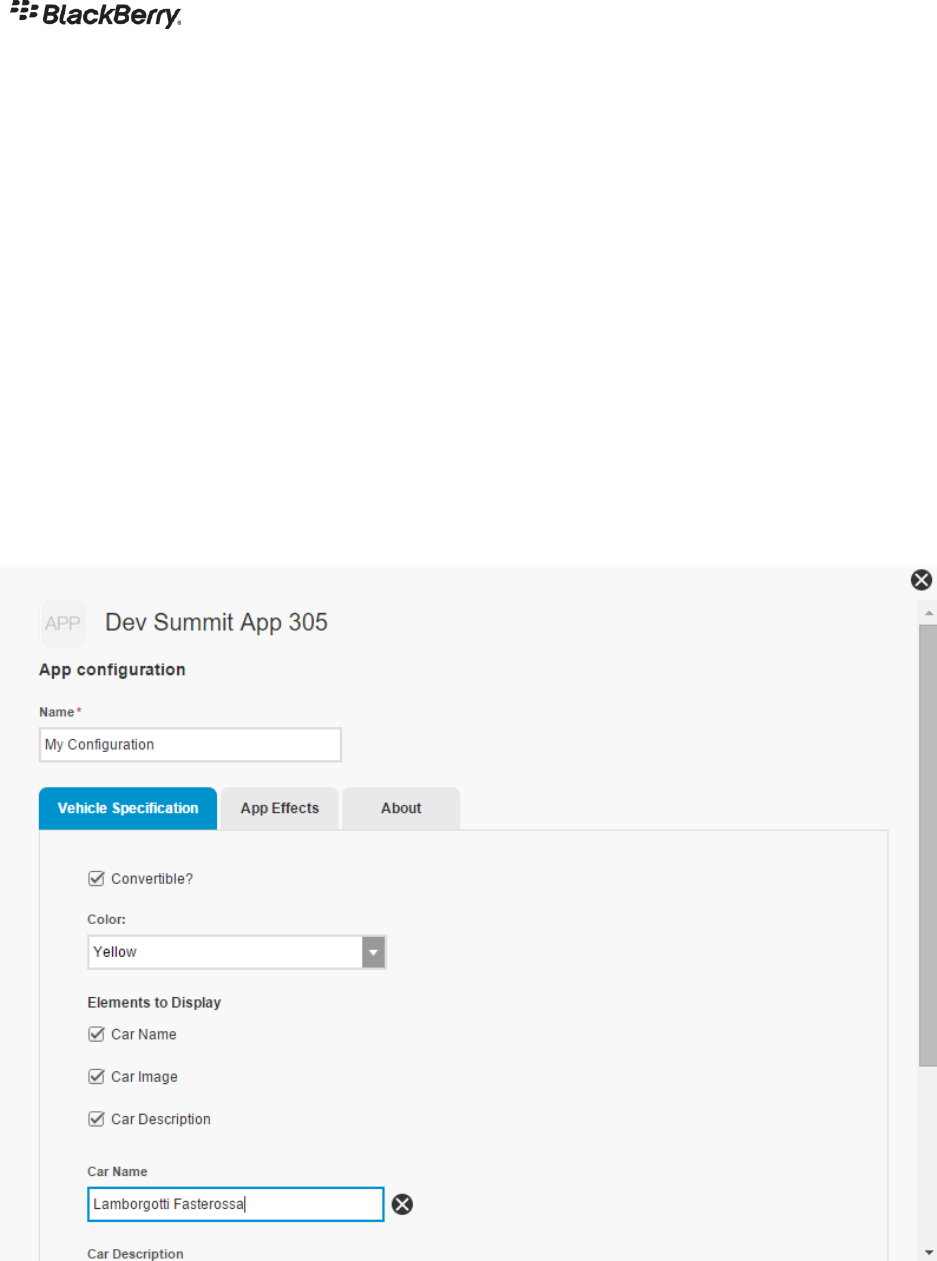
By using a Custom Application Configuration, you provide an administrator with a user interface
in the BlackBerry Dynamics management console to configure your application. An example is
shown in the screenshot below. The Application Configuration definition that is loaded into the
console is defined in an XML file. When the configuration settings are changed, the new values
are pushed to all applications activated against the BlackBerry Dynamics deployment. The
running applications are notified when the updated configuration settings arrive.
Screenshot of an Application Configuration shown in the UEM management console

27-Sep-18
Page 54 of 65
Preparation
Download iOS sample projects: www.blackberrydevsummit.com
Review BlackBerry Dynamics iOS APIs for Application Configuration Definition, available in the
Appendix page.
Open the BlackBerry-Dynamics-Incomplete-iOS-Objective-C or Swift project and complete
the steps below. Review the ReadMe file in the project to build and run.
Provision an Application and Generate an Access Key via UEM
Follow the steps in Appendix – Provision an Application in the BlackBerry Developer Lab to
activate the application. Note that this step is only required the first time you run this sample
and does not need to be repeated as you update it.
Exercise One: Upload Custom App Configuration to BlackBerry UEM
This exercise doesn’t depend on completion of any other exercises.
Sample projects have been created for this exercise that contain a complete and incomplete
implementation called “BlackBerry-Dynamics-Complete-iOS-Objective-C or Swift” and
“BlackBerry-Dynamics-Incomplete-iOS-Objective-C or Swift”. The complete sample can be
used as a reference of the sample solution. The incomplete project has missing sections you
will need to code from scratch.
Upload the custom App Configuration to the BlackBerry UEM Server
1. Open the app configuration definition file The Configurator App Configuration.xml in a
text editor. This file is located in the root of the sample directory. Observe how the
configuration is defined.
2. Within BlackBerry Access, navigate to: https://uem02.blackberrydevsummit.com/admin/
If you do not yet have BlackBerry Access installed, refer to Appendix – Installing
BlackBerry Access. Alternatively, you can access the same site using
https://uem.blackberrydevsummit.com:10443/admin/ in a regular browser if connections
over port 10443 are allowed in your environment.
3. Login to UEM as an admin using the following credentials:
• User Name: DevUser###
o Replace ### with the number assigned to you when you arrived at the
BlackBerry Developer Summit.
• Password: DevUser!2018
• Domain: blackberrydev
4. Click on Apps.
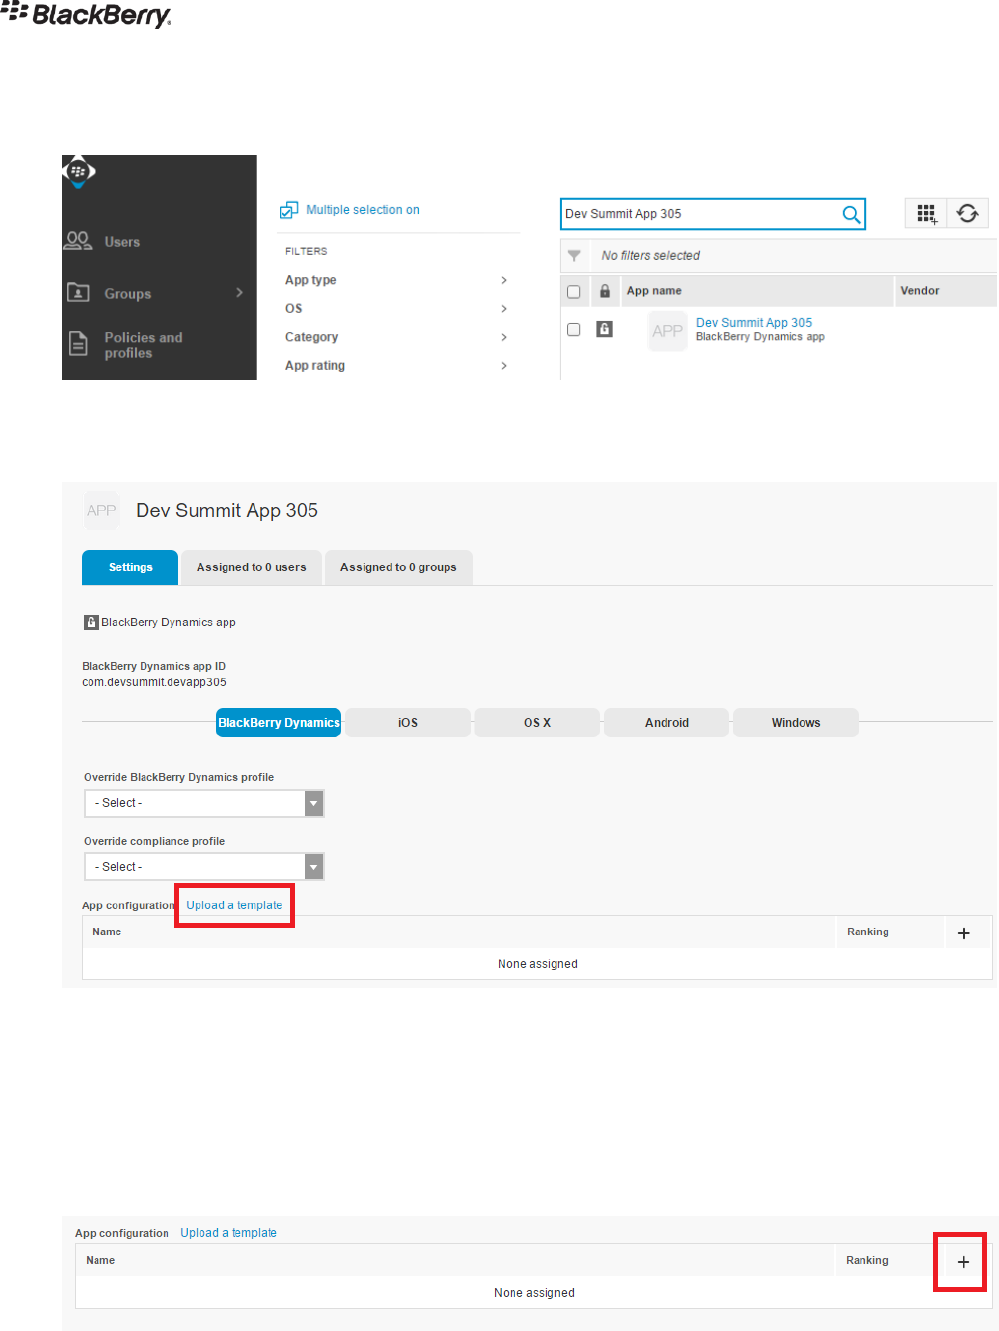
27-Sep-18
Page 55 of 65
5. In the search bar, enter “Dev Summit Lab ###”, replacing ### with the number assigned
to you.
6. Click on your assigned application.
7. Click on “Upload a template” under App Configuration.
8. Click on the Browse button and choose The Configurator App Configuration.xml
located in the root directory of the sample.
9. Click the Save button.
10. Read the important message displayed and then press OK.
11. Click on the + under App Configuration.
12. Enter an app configuration name.
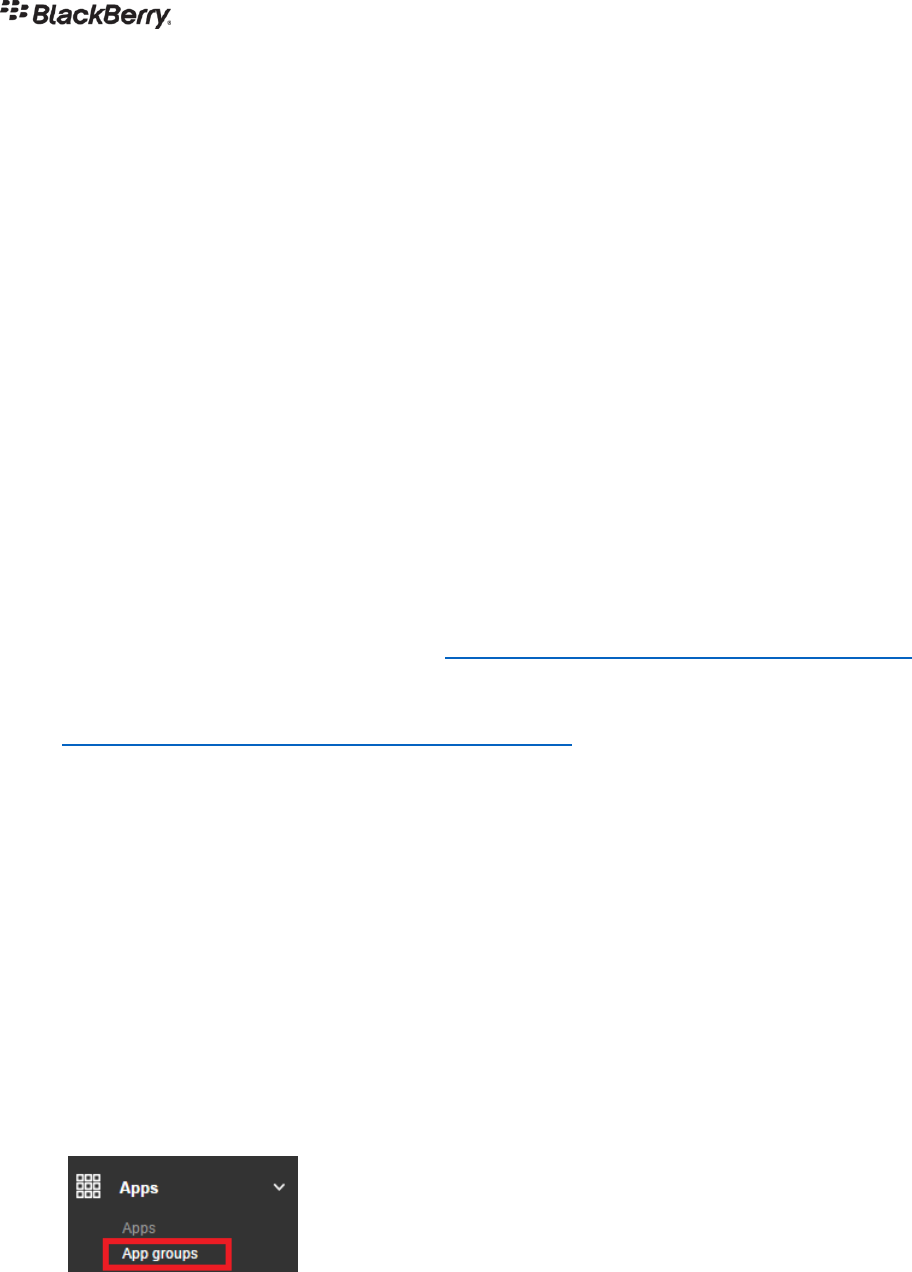
27-Sep-18
Page 56 of 65
13. Modify some configuration values.
14. Click Save.
15. If a default configuration appears under App Configurations, delete it by pressing the X
at the right of its row.
16. Click Save.
Apply the Application Configuration to Your Account
In a typical production deployment, application configurations are applied to groups of users.
For this lab, each attendee has a unique application for their account, so the configuration is
applied on an individual basis. These steps only need to be done once. You do not need to
repeat these steps after changing application configuration settings (from the previous section).
Complete the following steps to apply the application configuration you just created to your
account.
1. Skip step 2 and 3 if you are already logged in.
2. Within BlackBerry Access, navigate to: https://uem02.blackberrydevsummit.com/admin/
If you do not yet have BlackBerry Access installed, refer to Appendix – Installing
BlackBerry Access. Alternatively, you can access the same site using
https://uem.blackberrydevsummit.com:10443/admin/ in a regular browser if connections
over port 10443 are allowed in your environment.
3. Login as an admin using the following credentials:
• User Name: DevUser###
o Replace ### with the number assigned to you when you arrived at the
BlackBerry Developer Summit.
• Password: DevUser!2018
• Domain: blackberrydev
4. Click on Apps.
5. Click on App Groups.
6. Click on “BlackBerry DevSummit” folder.
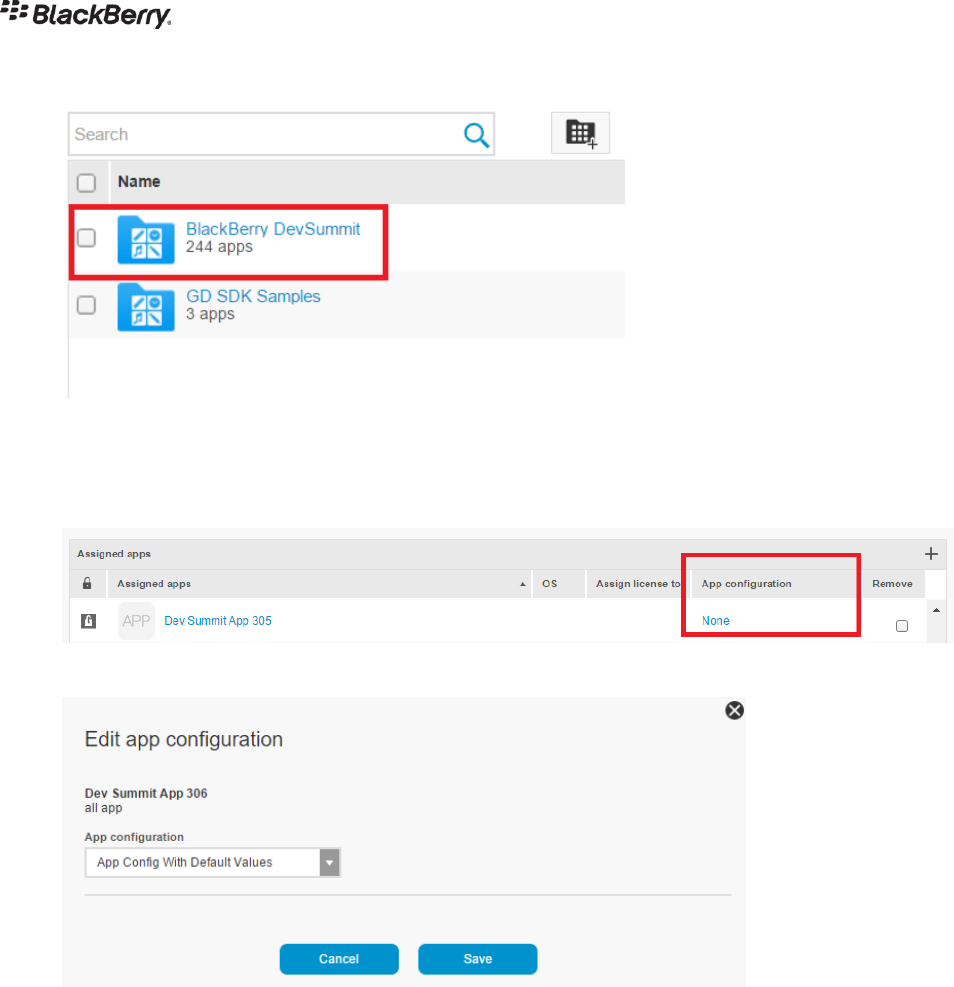
27-Sep-18
Page 57 of 65
7. Scroll down and locate your Dev Summit App ###, where ### is the number you were
assigned.
8. Click on None under App configuration.
9. Choose the app configuration you created and click Save.
10. Click Save.
11. Click Save again on the bottom of the dialog.

27-Sep-18
Page 58 of 65
Exercise Two: Retrieve Initial Custom App Configuration Settings
This exercise builds on the previous exercise.
Open the BlackBerry-Dynamics-Incomplete-iOS-Objective-C or Swift project and complete
the steps below.
1. Open the AppConfigurationViewController.m file for Objective-C or the
AppConfigurationViewController.swift file for Swift.
2. Retrieve the configuration settings in your application by completing the section:
#pragma mark - Exercise Two: Retrieve Initial Custom Application
Configuration Settings.
Write code to retrieve the policy settings. You can use either of the following methods in
the GDiOS class:
• getApplicationPolicy
• getApplicationPolicyString
Print or display the retrieved policy settings:
• For this exercise, you can use NSLog or a similar native function to display output
in the Xcode console.
3. Change a configuration setting in the UEM management console and restart the
application to observe the changes. It may take a minute or two for the changed setting
to become available in the mobile application. You can refer to the steps in the “Upload
the custom App Configuration to the BlackBerry UEM Server” section of the previous
exercise as a refresher to see where to make these changes.
Note that you do not have to upload the XML file again.
Exercise Three: Be Notified of Changes to App Configuration Settings
This exercise builds on the previous exercise.
1. Open the AppDelegate.m and AppConfigurationViewController.m files for
Objective-C or the AppDelegate.swift and
AppConfigurationViewController.swift files for Swift.
Code a listener for changes to Application Policy settings by completing the section:
#pragma mark - Exercise Four.
• In your GDiOSDelegate handleEvent code, check for an event with type:
GDAppEventConfigurationUpdate.
Print or display the configuration settings.
27-Sep-18
Page 59 of 65
2. Change a configuration setting in the management console. Refer to the previous
exercise for instructions on how to do this in the BlackBerry Dynamics management
console.
Check that your listener is invoked. It might take a minute or two.
Exercise Four: Change the Configuration Definition
This exercise builds on the earlier exercise to retrieve custom policy settings.
1. Open the policy definition file, The Configurator App Configuration.xml.
Make a copy of the Application Policy file that you installed in the management console
in the earlier exercise. Open the file in a suitable editor. The file format is XML.
The format is documented in the online API References of the SDKs. In the Appendix,
Application Configuration Definition.
2. Add some more settings.
Refer to the file itself, and to the API Reference, for details of the format.
Every setting you add will have to be added in two places.
• Add a <setting> element to define the setting. The definition includes the data
type how it is presented and labelled in the policy editor user interface of the
management console.
• Add a <pe> element in the <pview> section of the definition to define where the
setting appears in the structure.
Tip: The easiest types of setting to add are the hidden and checkbox data type.
3. Install your modified definition in the management console. Follow the same instructions
as you did for the initial installation.
4. Check that the modifications appear in the management console.
Follow the same instructions as you did for changing policy settings.
It might take multiple attempts to get the definition working as you want it. It’s a good
idea to make an obvious visible change prior to every update installation. For example,
the sample definition has an About tab that contains fixed text. Change the text before
the upload and then check that the change is reflected in the policy editor in the
management console.
If you don’t see your changes you likely have a syntax error that is causing the updated
policy file to fail to load. In this scenario, the server continues to use the previous
working version.
5. Check that the modifications appear at the application.

27-Sep-18
Page 60 of 65
Retrieve the configuration settings as before, in exercise three or four. Check that the
extra settings are present.

27-Sep-18
Page 61 of 65
Appendix – BlackBerry Dynamics with XCode 10
There are two ways to make existing apps compatible with XCode 10.
1. Change path in the xcconfig file.
Update the existing path for LDPLUSPLUS and LD from
LDPLUSPLUS=~/Library/Application
Support/BlackBerry/Good.platform/iOS/FIPS_module/$FIPS_PACKAGE/bin/g
d_fipsld
LD=~/Library/Application
Support/BlackBerry/Good.platform/iOS/FIPS_module/$FIPS_PACKAGE/bin/g
d_fipsld
to
LDPLUSPLUS=$(HOME)/Library/Application
Support/BlackBerry/Good.platform/iOS/FIPS_module/$FIPS_PACKAGE/bin/g
d_fipsld
LD=$(HOME)/Library/Application
Support/BlackBerry/Good.platform/iOS/FIPS_module/$FIPS_PACKAGE/bin/g
d_fipsld
Note the change from ~ to $(HOME).
2. Switch to Legacy Build System.
You can switch to Legacy Build System in XCode by going to File>Project Settings>Build
System.
Appendix – Installing BlackBerry Access
The BlackBerry Developer Lab has been configured similar to a corporate network environment,
in that the application servers used in the exercises are not publicly available over the internet.
You will use the BlackBerry Dynamics secure connectivity and a BlackBerry UEM Server to
access them.
To access these servers and the BlackBerry UEM administration console, BlackBerry Access
will be used.
A. Download BlackBerry Access
Use the following links to download BlackBerry Access:
• https://ca.blackberry.com/support/business/enterpriseapps/blackberry-mobility-
suites#Downloads
B. Installing & Configuring BlackBerry Access
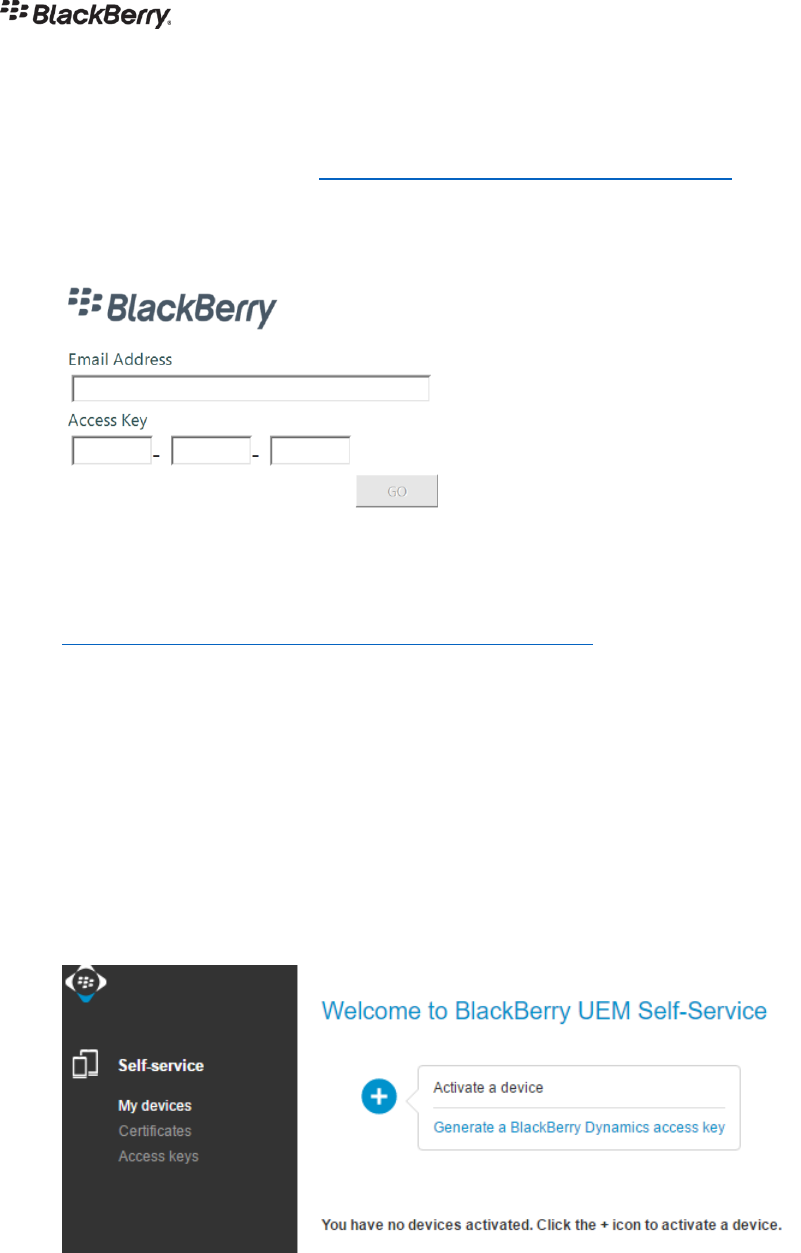
27-Sep-18
Page 62 of 65
1. Install BlackBerry Access using the installation file you downloaded in the previous step.
On first run it will prompt you for an email address and access key.
2. Enter an email address of DevUser###@BlackBerryDevSummit.com, replacing ### with
the number assigned to you when you arrived at the summit.
3. Navigate to the BlackBerry UEM Self Service Portal to generate an access key:
https://uem.blackberrydevsummit.com:10443/index.jsp
4. Log in using the following credentials:
• Username: DevUser###
o Replace ### with the number assigned to you when you arrived at the
summit.
• Password: DevUser!2018
• Domain: blackberrydev
5. Once logged in, click on the + button and choose “Generate a BlackBerry Dynamics
access key”.
6. Return to BlackBerry Access and enter the access key you just generated.
7. Create a password that will be required to start BlackBerry Access.
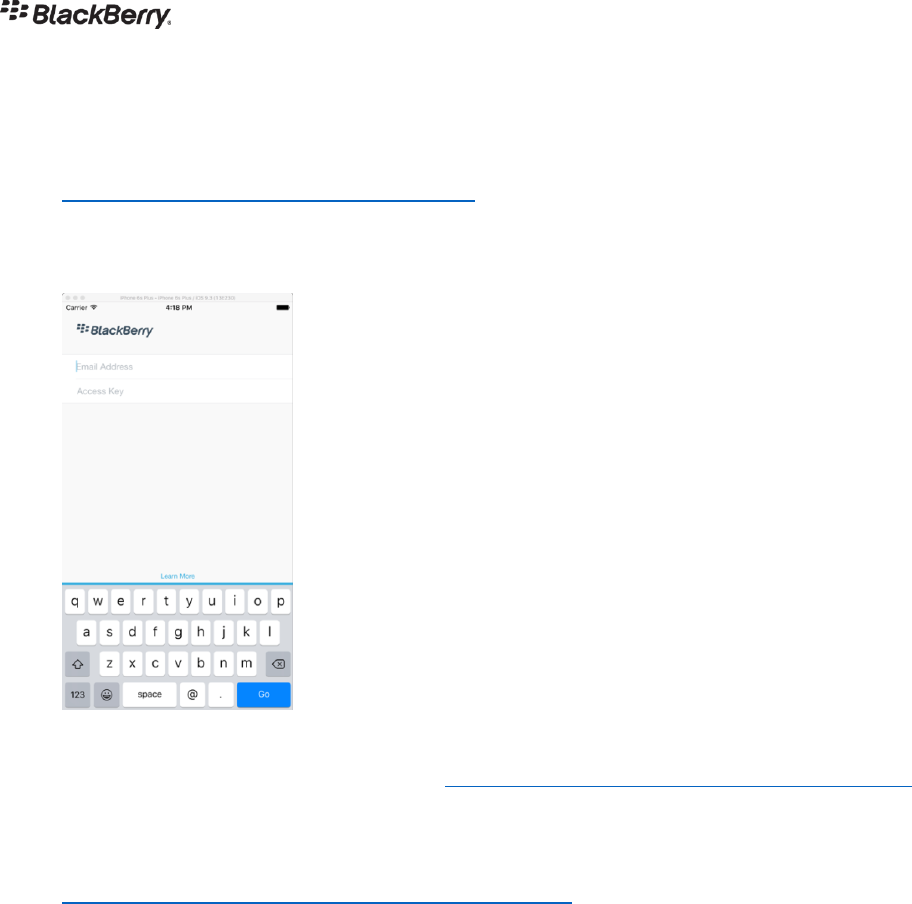
27-Sep-18
Page 63 of 65
Appendix – Provision an Application in the BlackBerry Developer Lab
1. In activation screen of your sample application enter an email address of
DevUser###@BlackBerryDevSummit.com, replacing ### with the number assigned to
you when you arrived at the summit. The activation screen will appear as shown in the
screenshot below.
2. Within BlackBerry Access, navigate to: https://uem02.blackberrydevsummit.com/admin/
If you do not yet have BlackBerry Access installed, refer to Appendix – Installing
BlackBerry Access
Alternatively, you can access the same site using
https://uem.blackberrydevsummit.com:10443/admin/ in a regular browser if connections
over port 10443 are allowed in your environment.
3. Log in using the following credentials:
• Username: DevUser###
o Replace ### with the number assigned to you when you arrived at the
summit.
• Password: DevUser!2018
• Domain: blackberrydev
4. Once logged in, click on the + button and choose Generate a BlackBerry Dynamics
access key.
27-Sep-18
Page 64 of 65
5. Return to your sample application and enter the access key you just generated.
6. Press the OK button.
7. The activation processing carousel will scroll through its stages.
8. Create a password that will be required to start the application.
The application user interface will then be displayed. Note that activation isn't necessary when
you reinstall the application as an upgrade, without uninstalling.
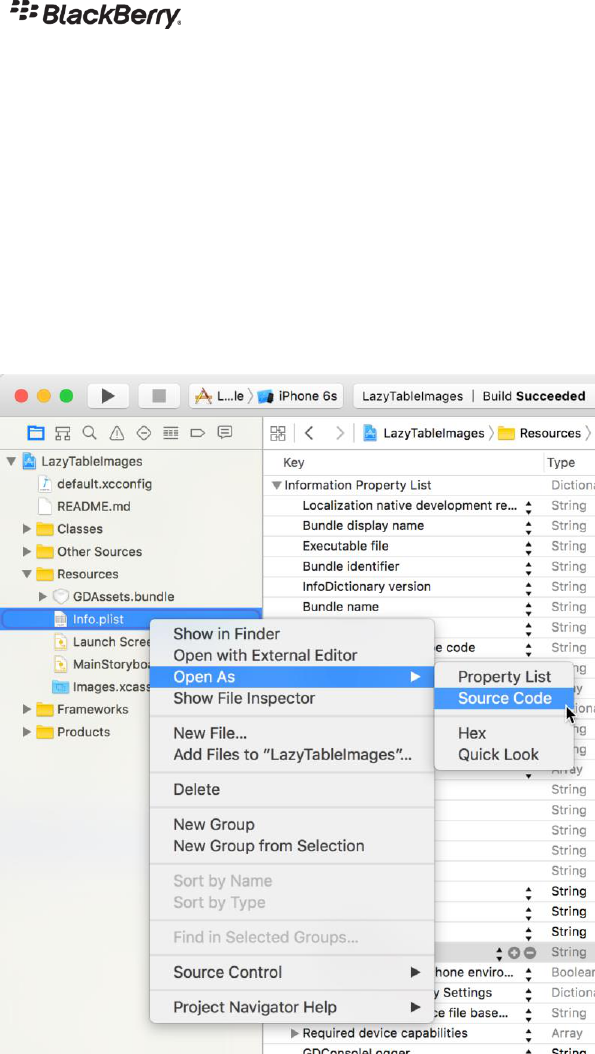
27-Sep-18
Page 65 of 65
Appendix - Tips for Xcode
A. Edit the bare XML of a Property List
Some changes to the application Info.plist are easier to make by editing the bare XML of the
file, instead of editing as key-value pairs. This could apply to other property list files too.
To open the underlying XML of a property list, right click on the file in the navigator, then select
Open As, Source Code in the context menu that appears. This is shown in the following screen
capture.
