• 35 •
Epilog Job Manager Instructions
Epilog Job Manager
Instructions
The Epilog Job Manager is a powerful new tool that will
quickly become one of your favorite features on your
laser system. From one piece of software, you can access
any job you have sent to the laser, view the settings
you used on any past job, re-run projects, access your
material database, and much more. It’s a great addition to
the Epilog Laser product features, and we look forward to
seeing how our customers use this software!
• Windows 7/8/10 is required to use the Epilog Job
Manager.
Installing the Job Manager for the Mini, Helix, Zing,
Fusion and FiberMark systems requires you to install
three pieces of software:
1. The Job Manager
2. New Drivers - you must reboot your computer after
you install the new driver.
3. The DAT converter if you have previous DAT files
that you will want to use.
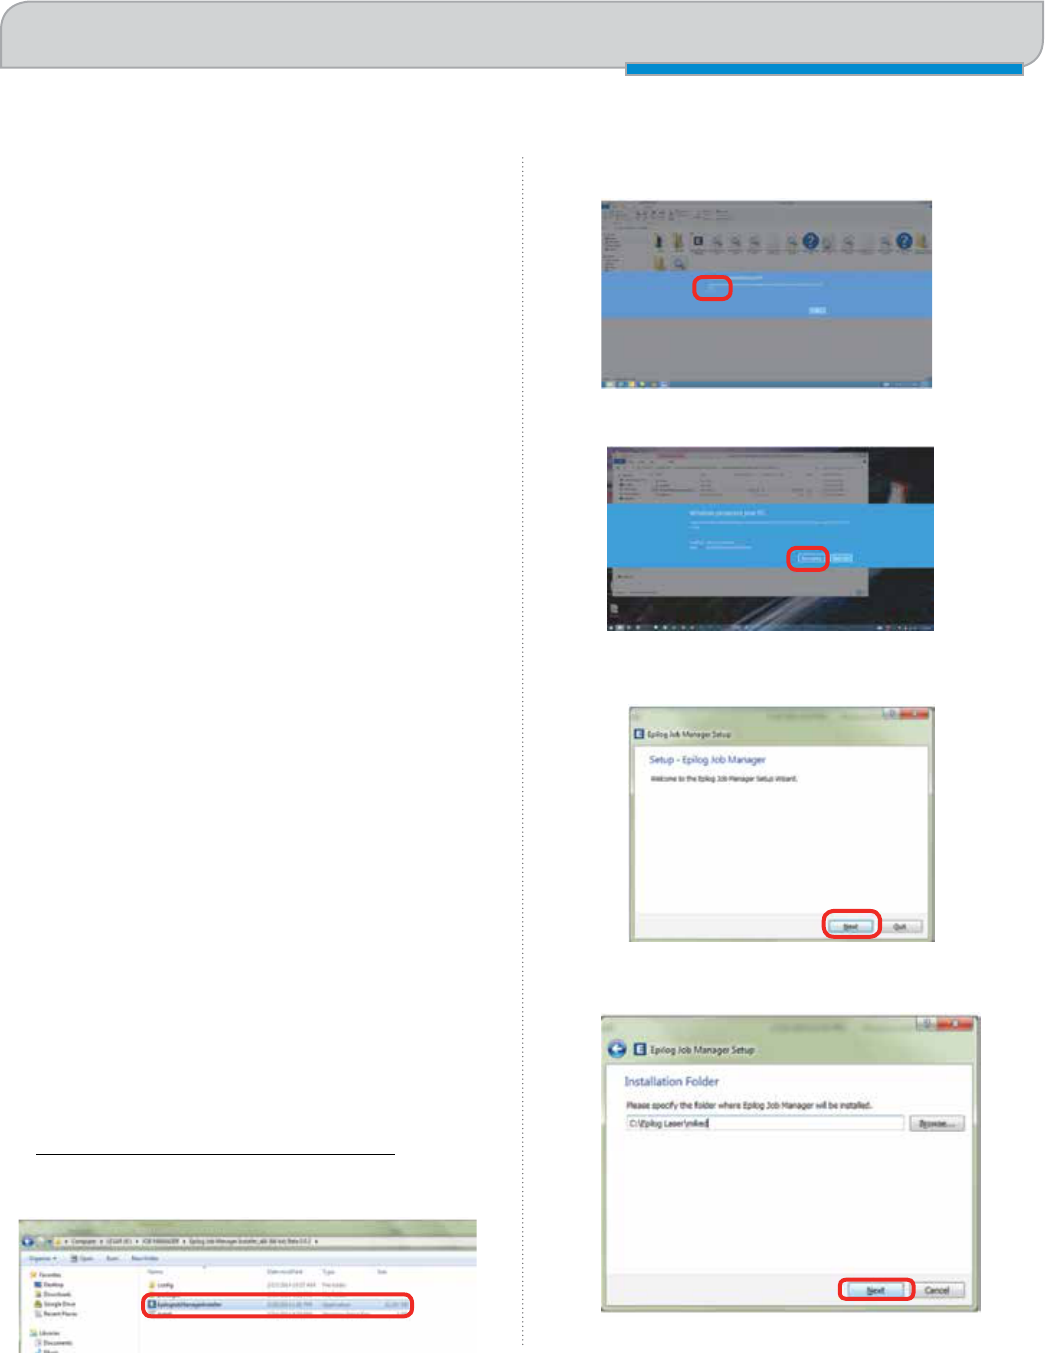
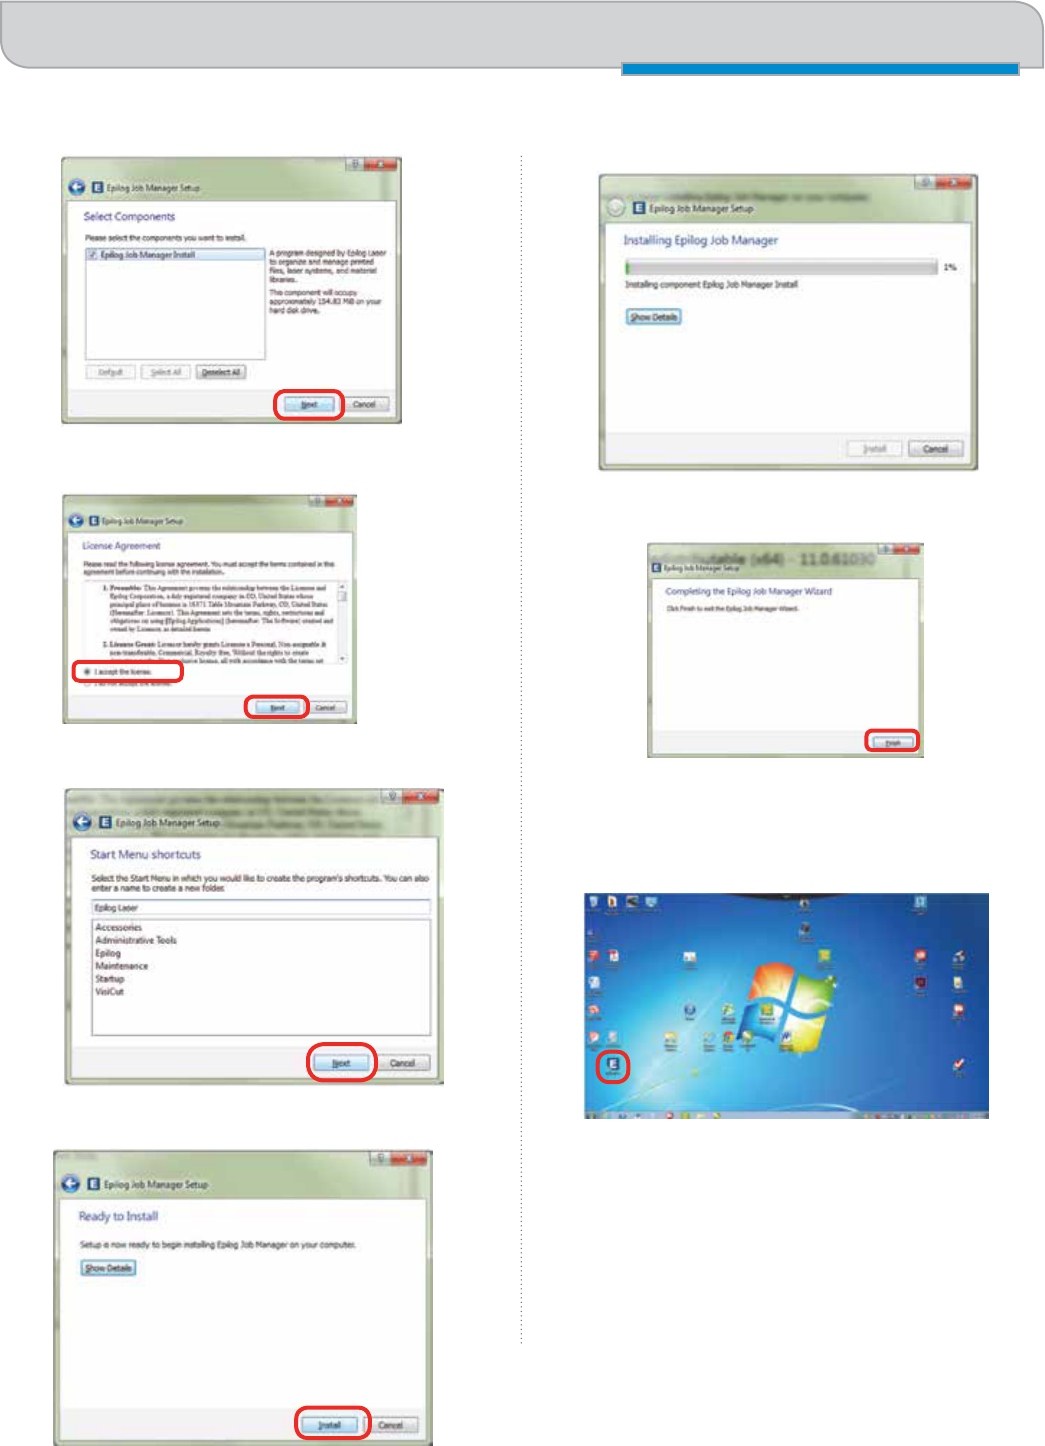
How to Install the Epilog Job
Manager
1. If you have a previous version of the Epilog Job
Manager installed, you must uninstall it before you
continue.
2. After downloading the Job Manager from
epiloglaser.com/tech-support/drivers.htm, access
the Epilogjobmanagerinstaller.exe. Double click to
start.
3. In Windows 8 or 8.1 you may see this message.
Click More Info.
4. Click Run Anyway.
5. Click Next.
6. Click Next
SECTION 4: THE EPILOG JOB MANAGER
• 36 •
Trouble Shooting Job Manager Installation
SECTION 4: THE EPILOG JOB MANAGER
7. Click Next.
8. Accept the license, then click Next.
9. Click Next.
10. Click Install.
11. The installation will take a few moments.
12. Click Finish and the Job Manager is installed.
13. A Job Manager icon will be automatically added to
your Desktop. You are now ready to use the Job
Manager.
• 37 •
Trouble Shooting Job Manager Installation
SECTION 4: THE EPILOG JOB MANAGER
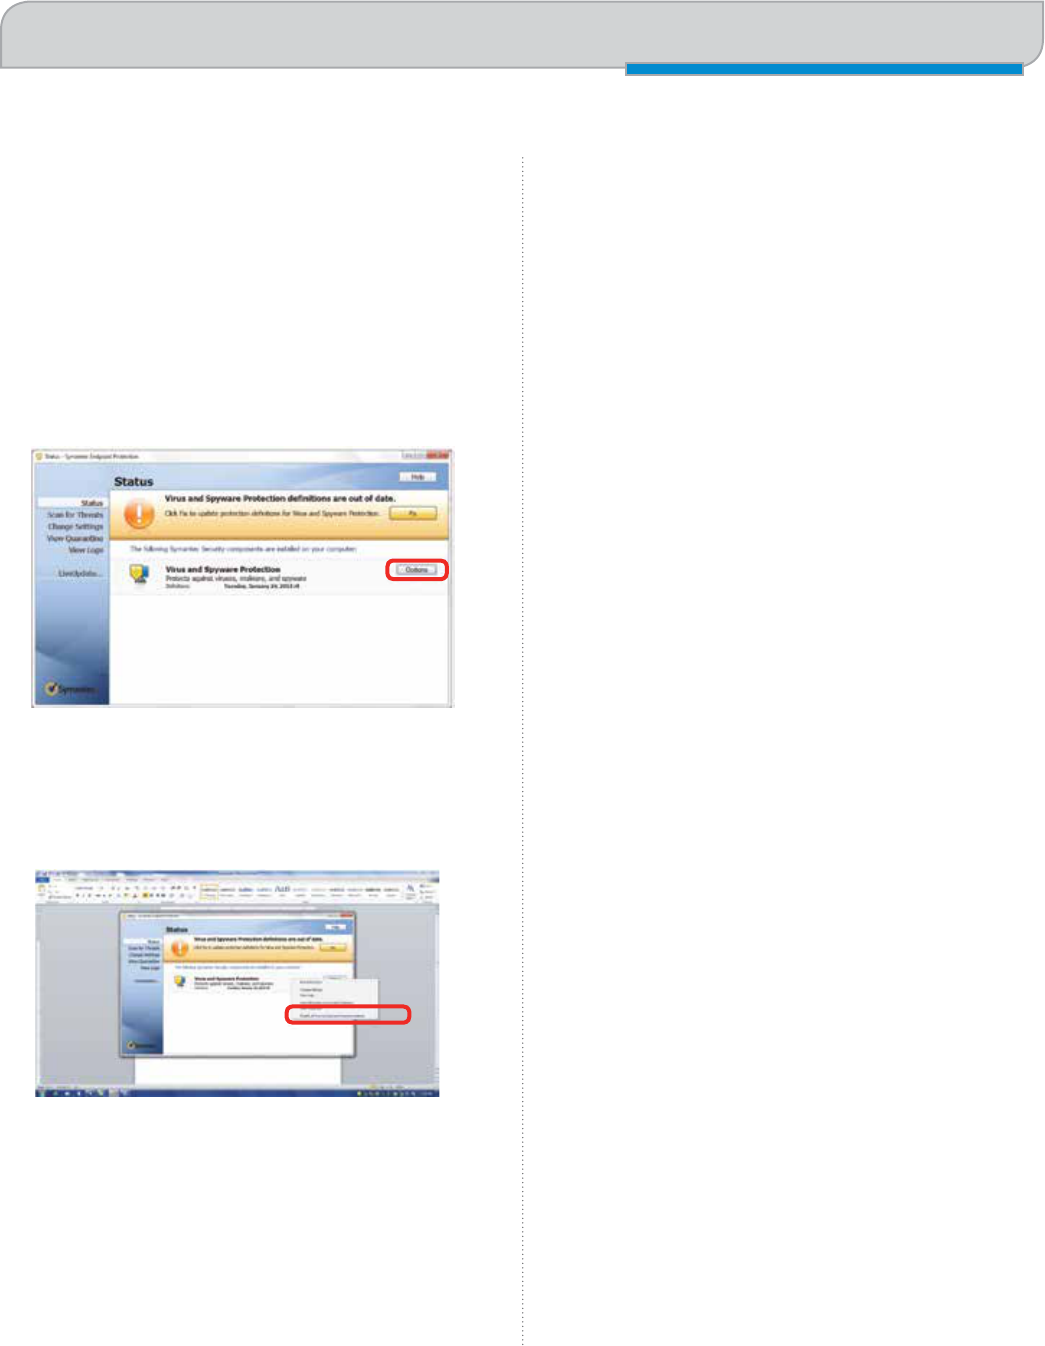
Trouble Shooting Job
Manager Installation
If you were unable to install the Job Manager it’s possible
that your Anti-Virus software is blocking installation.
To disable Symantec Anti-Virus software, choose
Options. Other anti-virus packages should have
something similar to Symantec.
Disable all Virus and Spyware Protection Features. After
the Job Manager has been installed go back into your
Anti-Virus software and re-enable the setting that was
disabled.
• 38 •
SECTION 4: THE EPILOG JOB MANAGER
Important Epilog Job Manager Notes
Important Epilog Job Manager Notes
• Warning: Before activating your laser, install the newest version of the driver to properly associate the
correct machine with the Job Manager.
• We suggest a minimum of 1 GB of free RAM space when managing very large raster and vector jobs.
Using the Epilog Job Manager
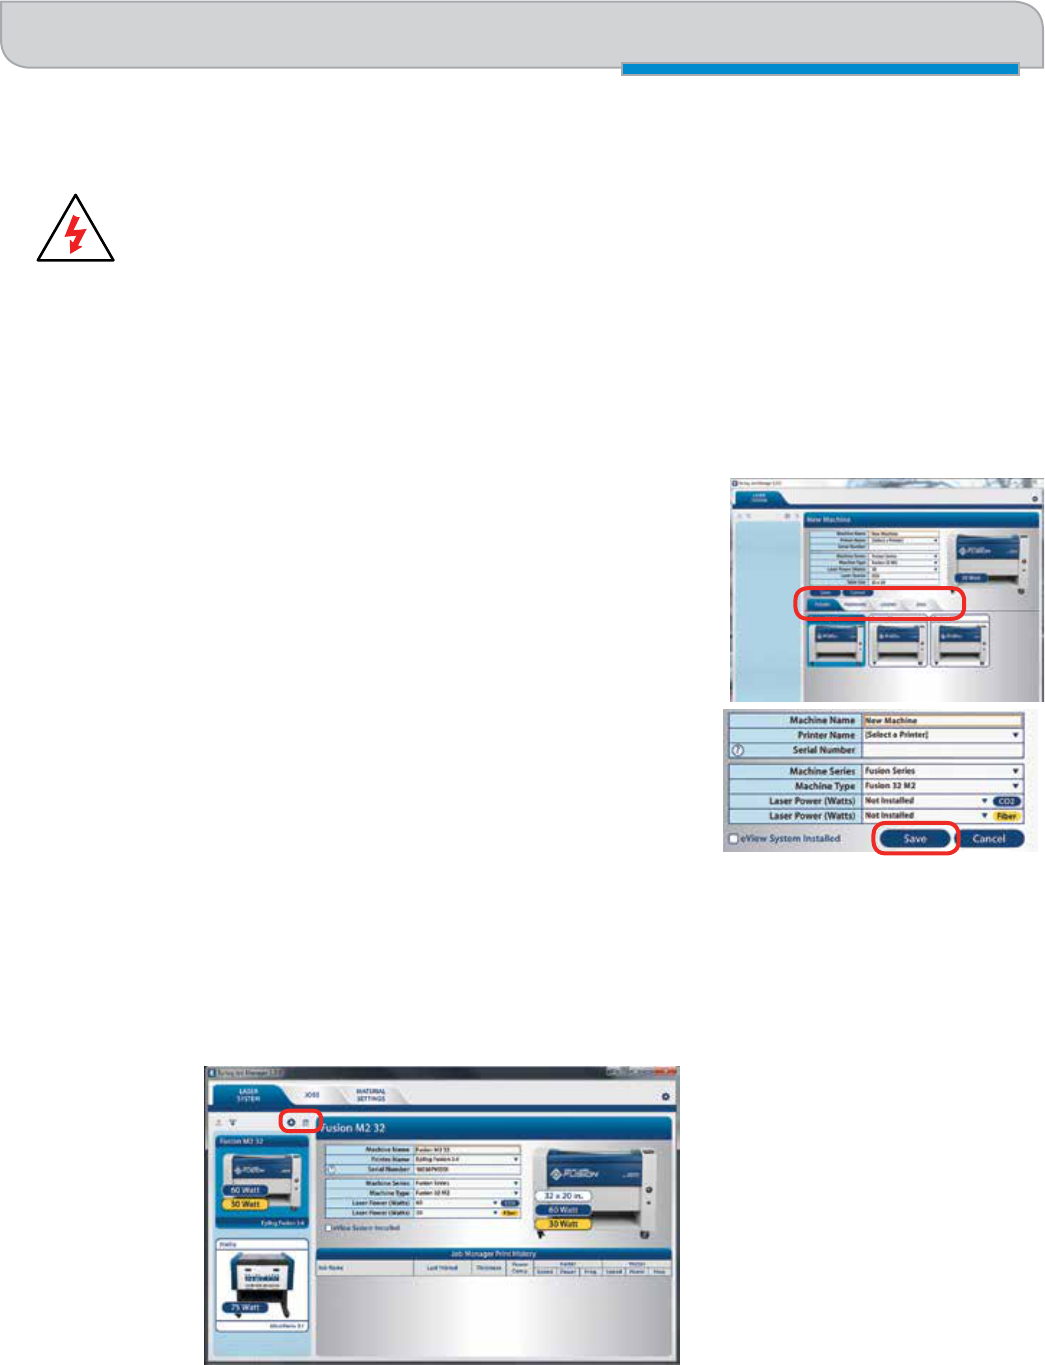
Activate a Laser
1. The first time you open the Job Manager you’ll see a tab for each of the
models. You will need to activate your laser system to get started. Click the
correct tab, then your system. You can activate multiple machines if you have
more than one laser.
2. To activate your machine:
● Give your machine a name.
● Choose your laser from the drop-down list of printers. This is very
important - if you do not choose the correct printer you will not be able to
print from the Epilog Job Manager!
● Select the correct machine type, wattage, etc. The Laser Power is very
important because it will automatically load the proper material setting
files for your specific wattage of laser.
● Select eView System Installed if you have the optional eView Camera Module installed.
● Click Save.
3. Your new laser has been activated in the Job Manager and appears in the left panel. Use the Add or Delete buttons
to add additional machines or to remove a laser. The Job Manager is now ready to accept jobs from the print driver.
Using the Epilog Job Manager
• 39 •
SECTION 4: THE EPILOG JOB MANAGER
Setting Up an eView Camera
Module
To associate your eView Camera with the correct laser,
follow the following steps:
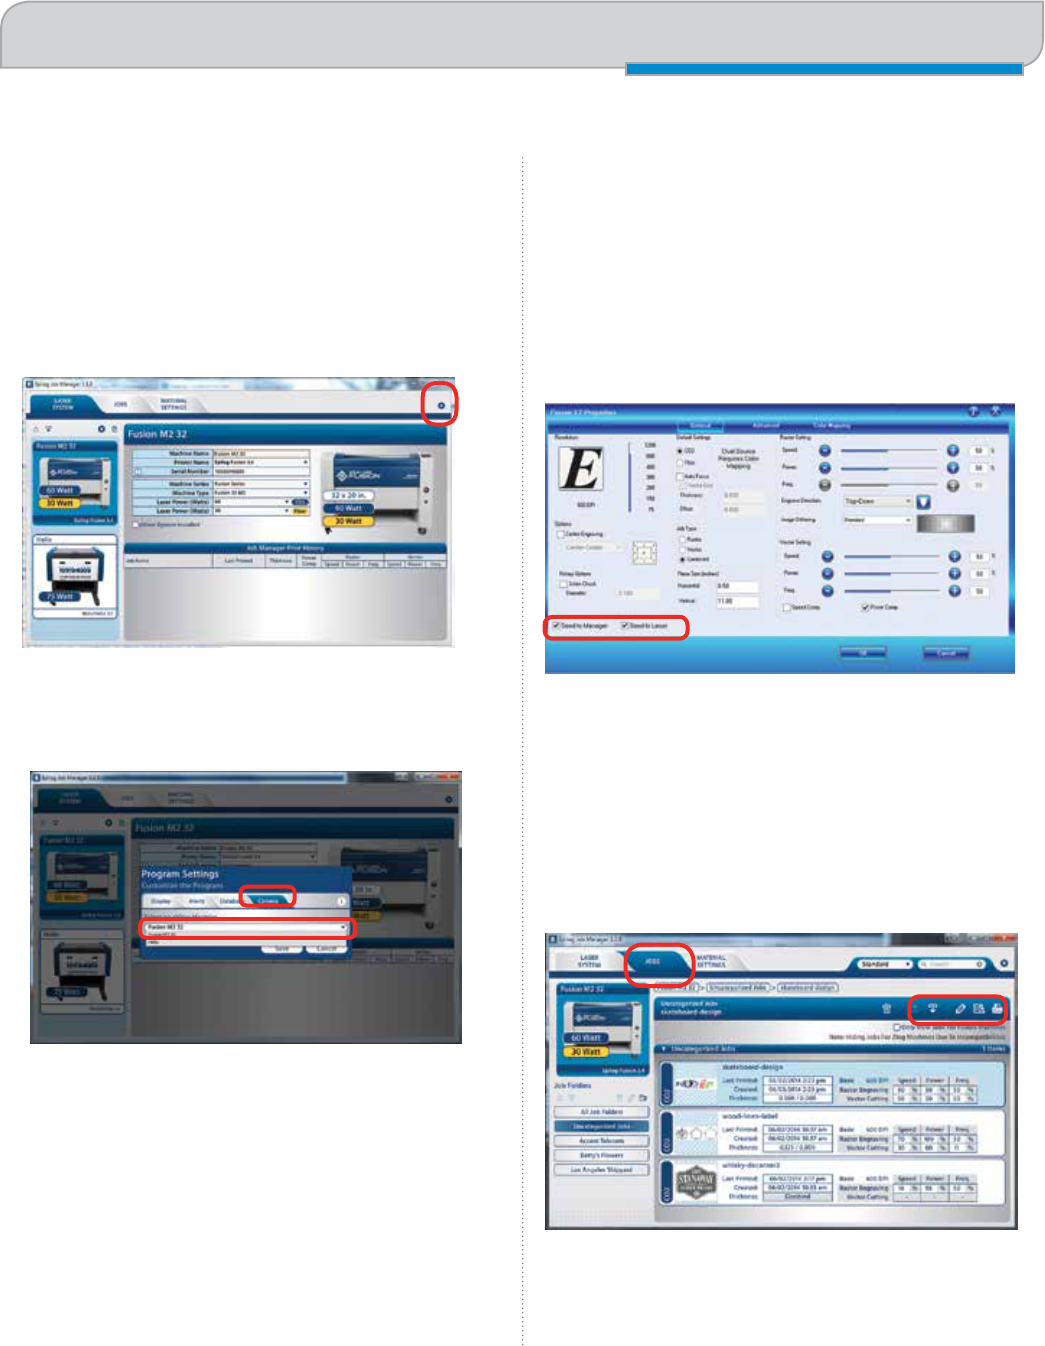
1. Click on the Gear icon in the top left corner to open
the Program Settings.
2. Select the Camera tab, then select the system you
activated from the drop-down list if you have more
than one laser activated.
Printing to the Epilog Job Manager
Create a file in your graphic software and set your laser
parameters in the print driver.
In the driver you’ll see a selection available under the
Center-Engraving area. You can choose to print to either
the printer (your laser system), the Job Manager, or both.
This allows you to send your job to the Job Manager
without sending it to the laser so you can then print that
job directly from the Job Manager at a later time without
accessing your graphic software. This is an easy way to
set up an entire day’s jobs all in one place.
Organizing Your Print Jobs
Click the Jobs tab. All print jobs will be displayed in the
Uncategorized folder. Click on your job to highlight it (the
skateboard file is highlighted in light blue). You can now
Print, Edit, Preview or Delete this job using the available
icons.
• 40 •
Using the Epilog Job Manager
SECTION 4: THE EPILOG JOB MANAGER
Create and Delete Job Folders
Click the Add Job Folders icon to add folders. We added
folders for this customer’s three largest customers. You
can add as many folders as you’d like.
Create Subfolders
First, highlight the Job folder in the left panel where you
want to add a subfolder. Below we have highlighted the Los
Angeles Shipyard folder. Make sure that Category is listed
at the top of the page, then click the Add Subfolder icon.
We’ve already added a January subfolder, and after clicking
on the check mark we will create the February subfolder.
Move an Uncategorized File to a
Subfolder
When you highlight a subfolder you will see From
Uncategorized on the right side of the folder. Click From
Uncategorized to move a job from the Uncategorized
folder to this subfolder.
Select the job you want to move and click OK.
Move a Job Between Folders
You can also move any job to another folder or subfolder
by double-clicking on the job. Select the Folder and
Subfolder from the drop-down menus where you want to
save the job. You can save the job with the same name or
you can save as a new job. You can also modify your
laser settings and save them with the job. Click Save to
continue.
• 41 •
Using the Epilog Job Manager
SECTION 4: THE EPILOG JOB MANAGER
Using the Material Setting
Configurations
The Material Settings tab stores all of the suggested laser
parameters like speed, power, etc. These settings were
loaded based on the wattage you specified in the Laser
System tab (adding your laser was the very first thing
you did to start using the Job Manager).
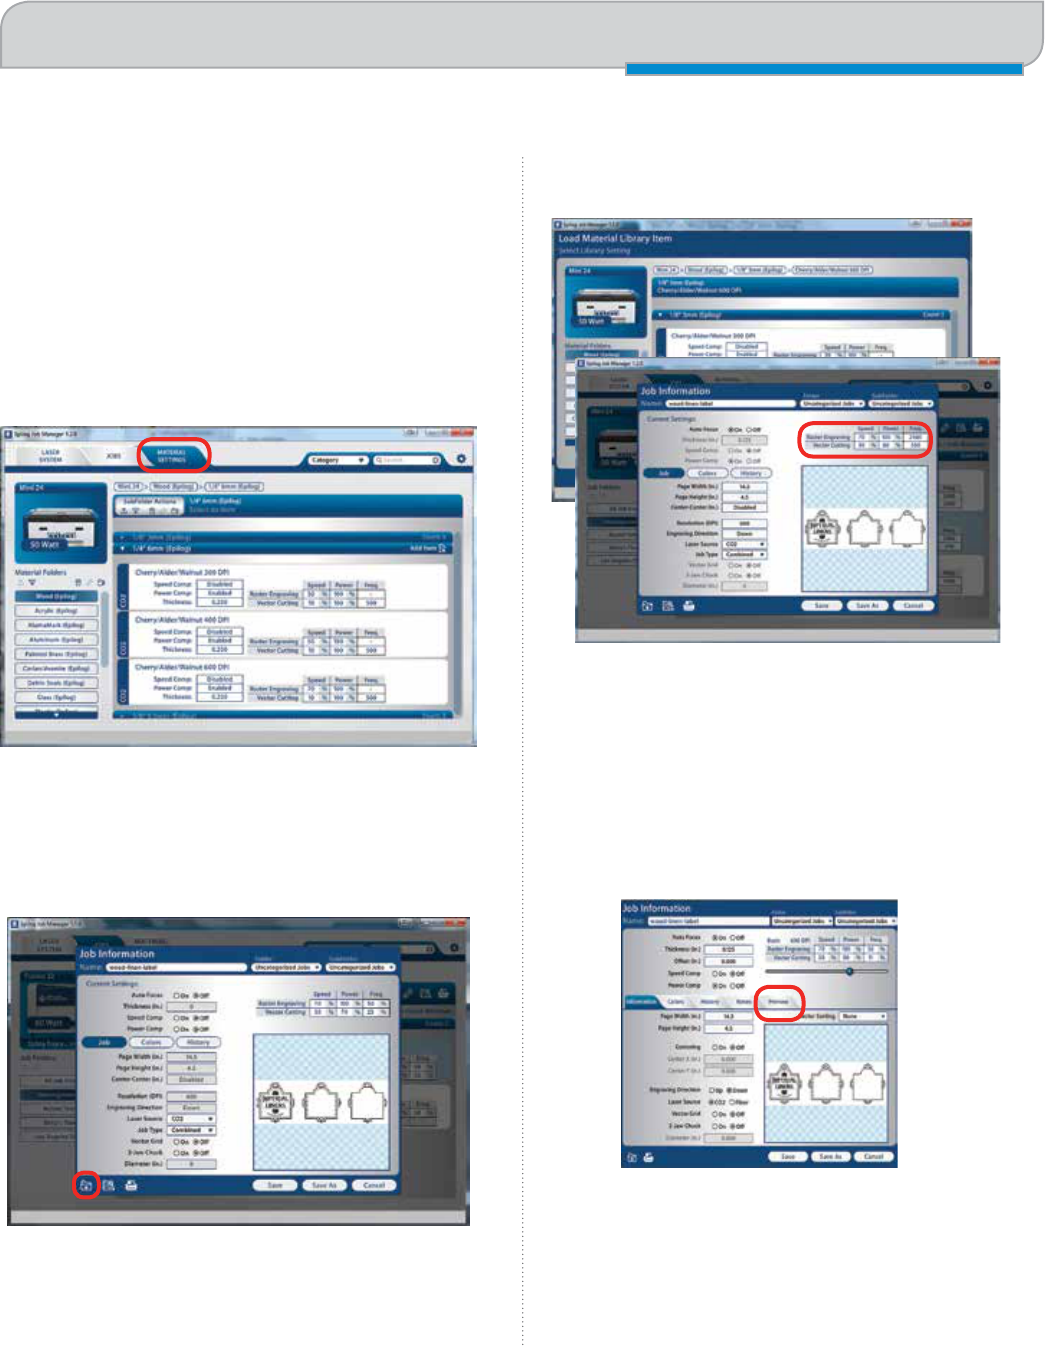
To use the material settings that are automatically loaded
in your Job Manager, go to the Jobs tab and double-click
on the job you want to process.
Click the Import icon.
Navigate to the material setting you need. We have
highlighted 1/8” Cherry/Alder/Walnut 600 DPI. Click OK.
Your new settings have been automatically applied to
your job file. You can now save this file, save the file as a
different name or print from this window. Double clicking
on the artwork will take you to the full preview window,
which is explained in the next frame.
Previewing Your Job
To view a preview of the job, click on the Preview tab.
• 42 •
Using the Epilog Job Manager
SECTION 4: THE EPILOG JOB MANAGER
In the Preview mode can preview just the raster
components of your job, or just the vector components.
We have selected vector to show only the vector
components of this job. The preview mode is very useful
in identifying unwanted vector components in a job.
Searching For a Job
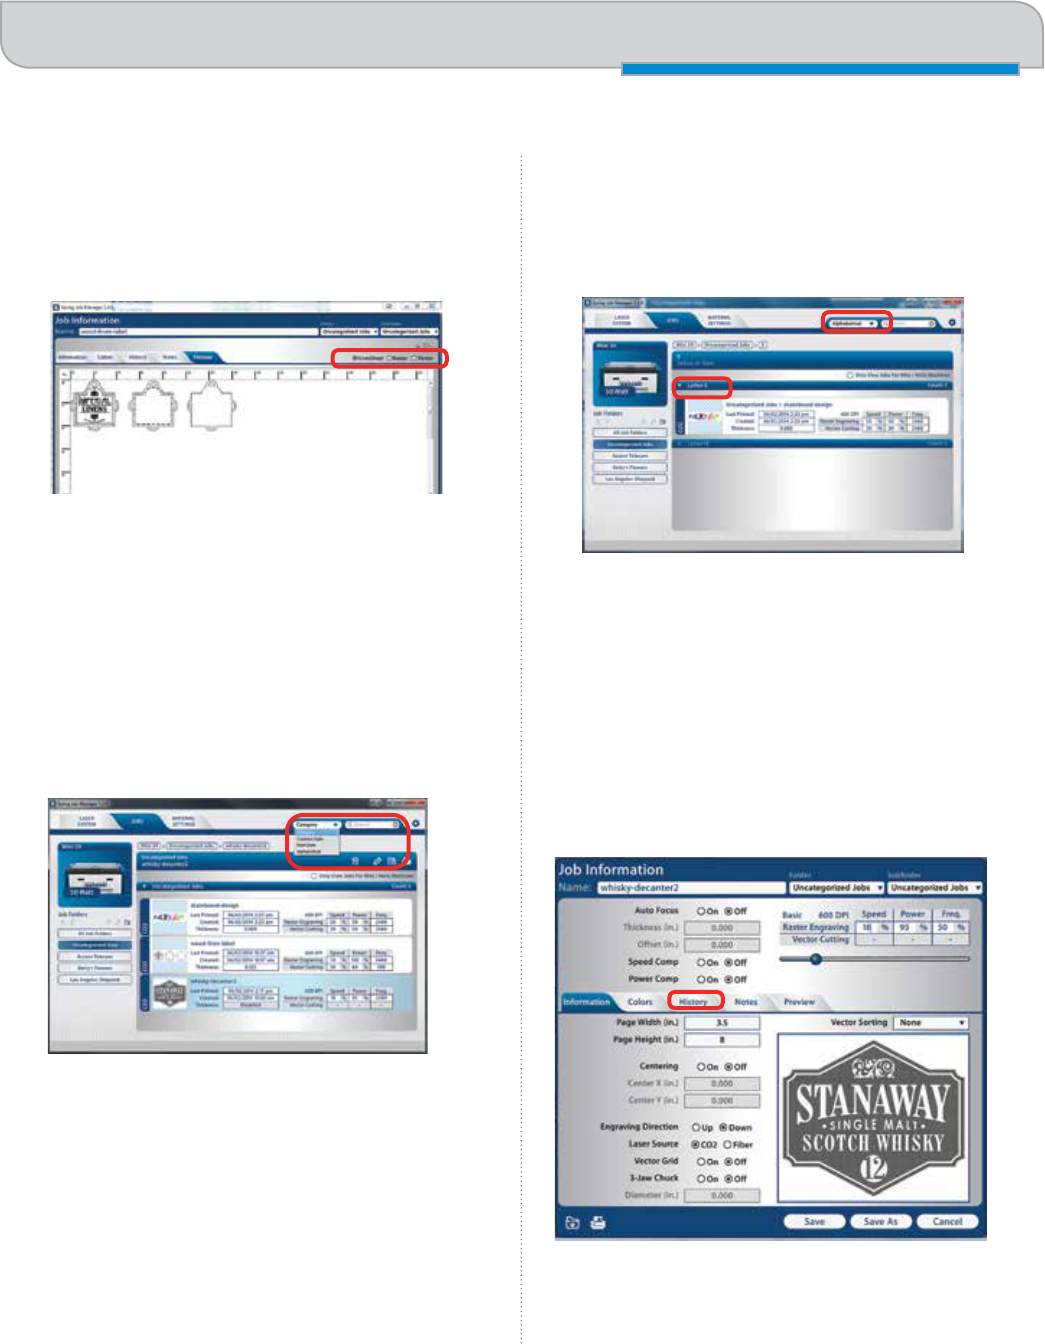
The Job Manager has a powerful search function.
Type in part of a file name and press enter to find all files
related to that name.
You can organize files by category, creation date, print
date, or alphabetically to find a specific file.
Notice that the jobs are displayed differently if you
change the search category to Alphabetical. Your jobs
are now displayed in alphabetical order. Once the search
is finished and the job is found, most users revert back to
the default selection of category.
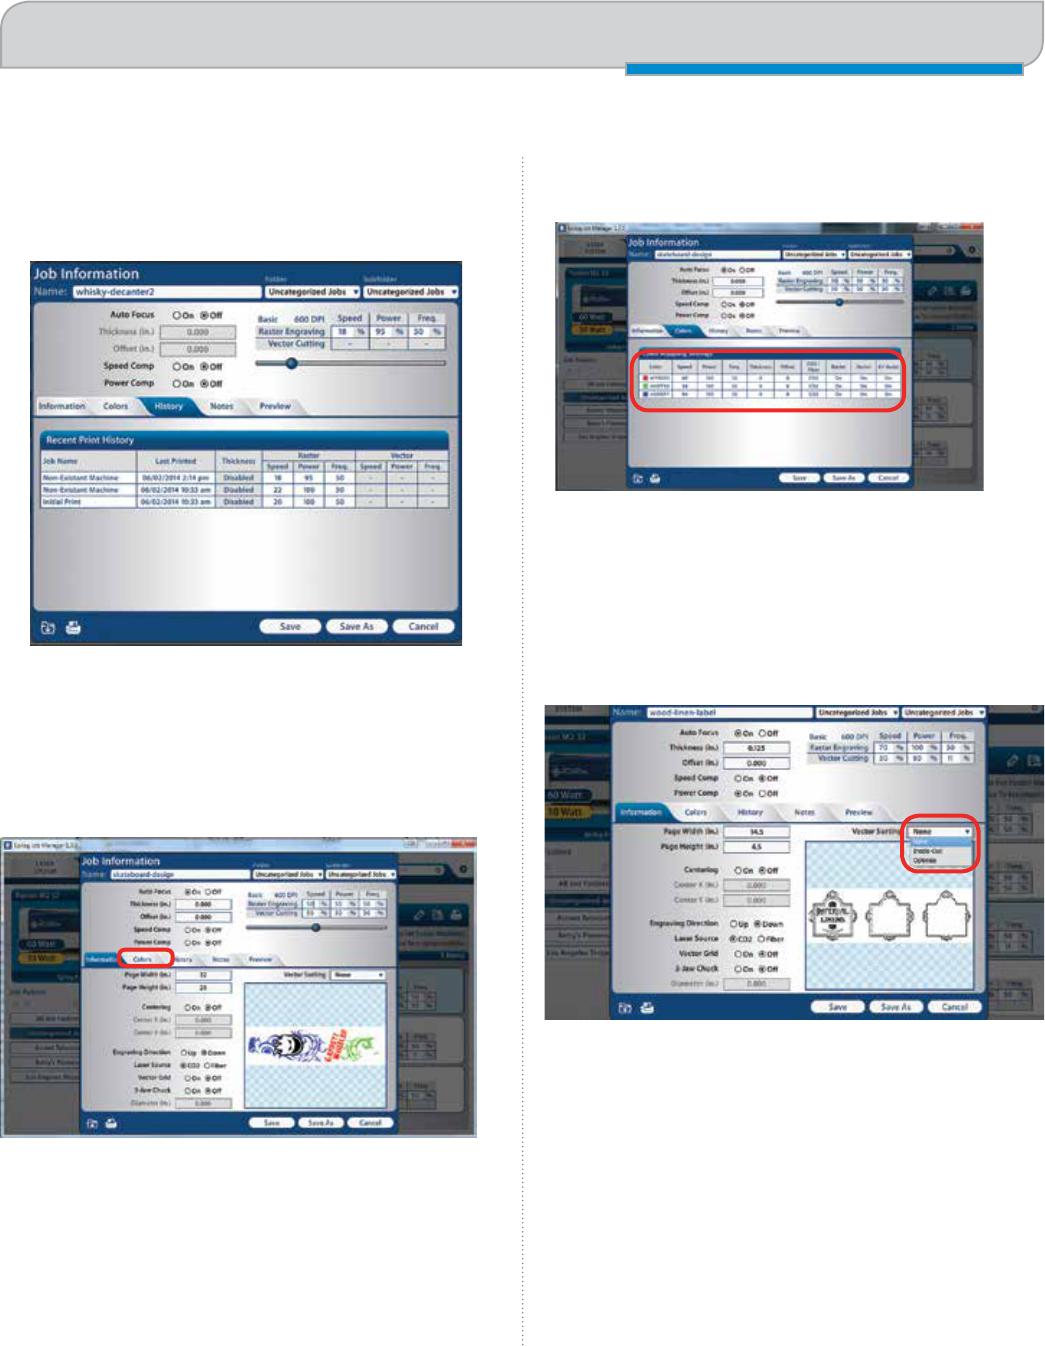
Finding Job History
The Job Manager allows you to see a full print history of
a job, including settings you used in each print. The
History window shows you the history of this job, what
machine it was printed to, when it was first printed (Initial
Print), all subsequent prints, and all laser parameters
used. To access this, double-click on the job, then select
History.
• 43 •
Using the Epilog Job Manager
SECTION 4: THE EPILOG JOB MANAGER
You can now modify, print or save from this window
using the listed settings or with new setting. The new
setting will be saved as the next print job complete with
time stamp and date.
Color Mapping
To access the Color Mapping settings used in a file,
double-click on the file to open the Job Information, then
click the Colors button.
You can modify the settings, save as a new job, save as
the same job, print, preview, etc. from this window.
Vector Sorting
You can determine the cutting order of vector lines directly
from the Epilog Job Manager.
You can choose from two different vector sorting options:
1. Optimized: The laser will process the vector lines
looking for the next closest node for quicker
vectoring.
2. Inside/Out: All internal vector paths in the file will
be process prior to the external vector paths. For
example, if cutting the letter O, the inner oval will be
cut before the outer oval.
Notice that the jobs are displayed differently if you
change the search category to Alphabetical. Your jobs
are now displayed in alphabetical order. Once the search
is finished and the job is found, most users revert back to
the default selection of category.
Finding Job History
The Job Manager allows you to see a full print history of
a job, including settings you used in each print. The
History window shows you the history of this job, what
machine it was printed to, when it was first printed (Initial
Print), all subsequent prints, and all laser parameters
used. To access this, double-click on the job, then select
History.
• 44 •
Using the Epilog Job Manager
SECTION 4: THE EPILOG JOB MANAGER
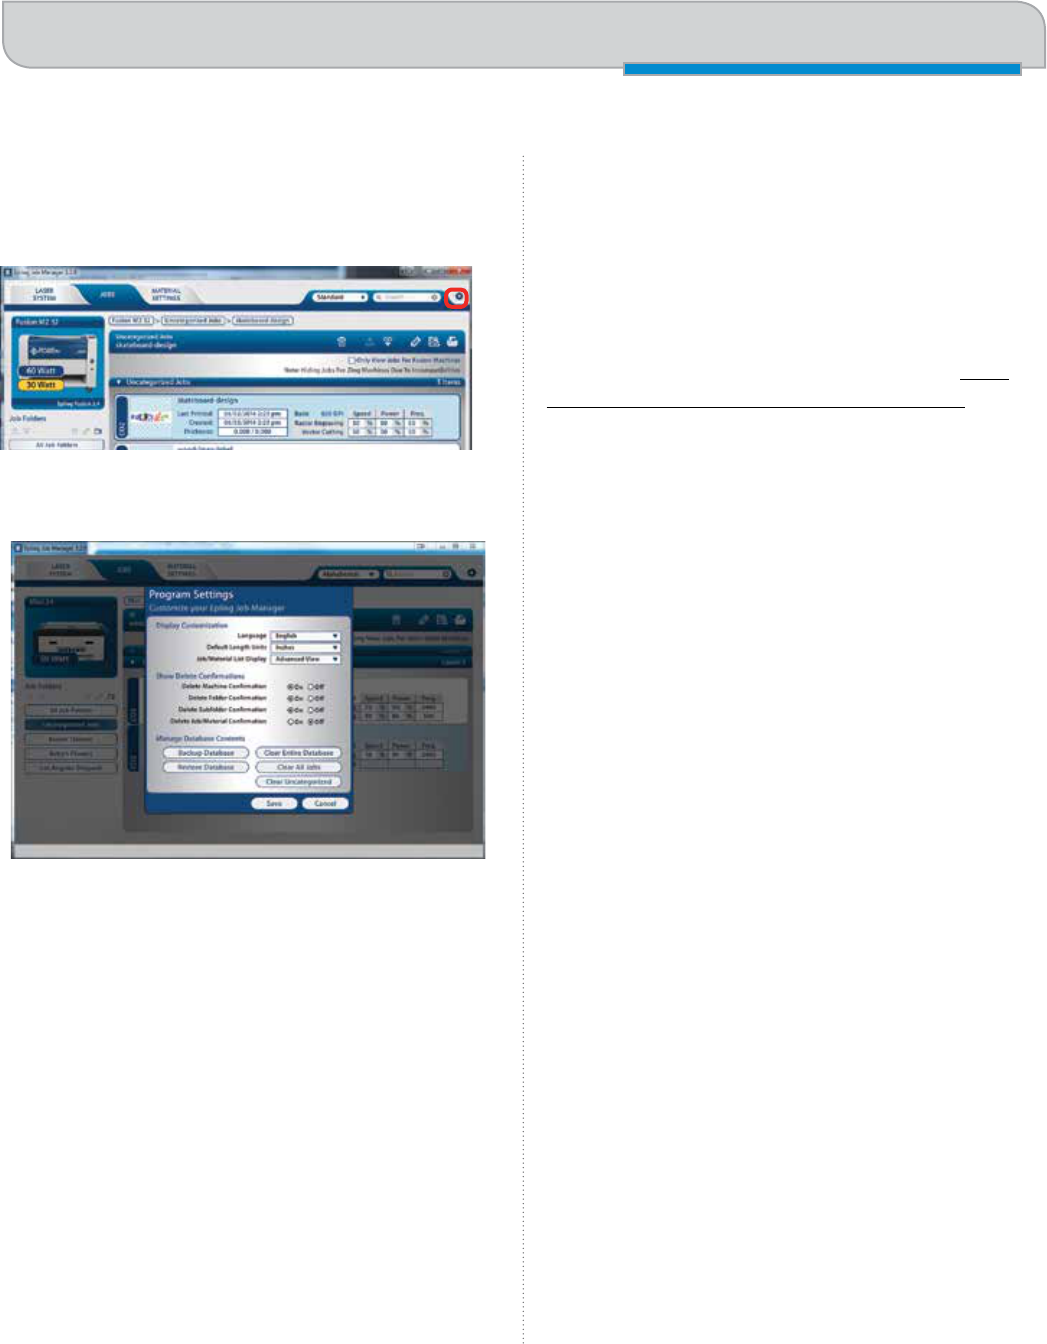
Changing Program Settings
You can access the Program Settings by clicking on the
gear at the top left of the page.
On this screen you can set several different system
settings, including:
• Language: Choose from several languages.
• Default Length Units: Choose from inches,
millimeters, or centimeters.
• Job/Material List Display: To speed up job loading
when you have a long job list, you may want to
change to basic view for faster loading.
• Delete Machine/Folder/Subfolder/Job/Material
Confirmation: Turn delete confirmation message on
or off.
• Backup Database: Save a backup of all files, material
settings, etc.
• Restore Database: Reload settings from a previous
backup.
• Clear Entire Database: Delete all settings, machines
and jobs from the database.
• Clear All Jobs: Delete all jobs in the database.
• Clear Uncategorized: Clear out all uncategorized
jobs in the database.
We will be adding new features to the software often, so
sign up for the Driver Update Notification list at www.
epiloglaser.com/tech-support/epilog-drivers.htm.
