
Instructor User’s Guide
Spring Semester 2015, v3.5

2
All materials copyright © Wolters Kluwer. All rights reserved.
Contents
In This Guide
Acknowledgments .....................................................3
Introduction...........................................................3
About Lippincott DocuCare.........................................................3
Additional Learning Resources ......................................................5
Technical Resources ...............................................................6
User’s Guide Objectives ............................................................8
Getting Started........................................................8
Navigating Lippincott DocuCare.........................................9
Initial Account Set-Up/Create a Class ...................................10
Managing My Classes .................................................12
Inviting a Co-Instructor to Join a Class/Managing Co-Instructors ..........13
Registering as a Co-Instructor .........................................15
Creating a Library of Cases/Charts......................................16
Establishing Case Editing Rights ........................................19
Copying or Deleting Cases/Charts ......................................20
Editing a Case/Chart ..................................................21
Creating Assignments .................................................23
Editing or Copying an Assignment ......................................26
Managing Student Enrollment .........................................27
Evaluating Student Assignments (Instructor-Initiated Assessments) .......28
Evaluating Student-Initiated Clinical Charts .............................31
Using Barcode Scanning ...............................................34
Viewing the Patient Barcode ...................................................... 34
Setting Up Medication Barcodes ...................................................35
Downloading and Printing Barcodes ................................................37
Using Barcode Scanning in an Assignment.......................................... 38
Product and Technical Support .........................................39
Cover photo courtesy of the University of Tennessee, Knoxville, Center for Executive Education in the College of
Business Administration.
3
All materials copyright © Wolters Kluwer. All rights reserved.
INSTRUCTOR USER’S GUIDE
Acknowledgments
Introduction
Thank you for adopting Lippincott DocuCare, a comprehensive EHR solution built by educators specifically for
the academic setting. We thank you for inviting us into your classroom, simulation lab or clinical practice and we
welcome your feedback.
About Lippincott DocuCare
Teach students to think critically about documentation with Lippincott DocuCare. This innovative digital solution
integrates nearly 200 patient scenarios with web-based academic EHR simulation software, allowing students
to learn how to use an EHR in a safe, true-to-life setting, while enabling instructors to measure their progress.
Lippincott DocuCare’s non-linear solution works well in the classroom, simulation lab, and clinical practice.
Lippincott DocuCare is:
Ready to use: Lippincott DocuCare comes pre-populated with nearly 200 patient records that include
course-related learning activities.
Easy to navigate: User-friendly navigation allows students to explore the web-based patient charts at
their own pace, with tabbed navigation that provides anywhere, anytime access to the entire patient
chart.
A curriculum solution: Rather than just teaching documentation, Lippincott DocuCare teaches nursing
content in the context of a patient record for a richer, real-world experience. Patient charts cover the
entire nursing curriculum with a variety of diseases, conditions, and demographics.
Customizable: Create your own patient records to further integrate Lippincott DocuCare into your
curriculum. Students can also create privacy-protected records as a follow-up to clinical practice.
Just-in-time Learning: Students are immersed in an engaging environment where key information is just
a click away. Patient records include SmartSense links
to evidence-based content used every day by
practicing nurses.
An ideal teaching tool: Lippincott DocuCare lets you interact with students, track their progress, and
focus your teaching strategy using evaluation tools, pre-populated cases, and a unified simulation
experience.
Matt Bell, MSN, CRNA
Adjunct Faculty, College of Nursing
University of Tennessee, Knoxville
Xueping Li, Ph.D.
Director, iLab (The Ideation Laboratory)
Co-Director, HITS (Health Information Technology &
Simulation) Lab
Associate Professor
Department of Industrial and Systems Engineering
University of Tennessee, Knoxville
Chayawat “Yo” Indranoi
The University of Tennessee Medical Center
Tami H Wyatt, PhD, RN, CNE, ANEF
RWJF Executive Nurse Fellow
Associate Professor | MSN Chair
Director, Graduate Studies
Chair, Educational Tech & Simulation
Co-Director, HITS Lab
University of TN-Knoxville | Nursing
4
INSTRUCTOR USER’S GUIDE
All materials copyright © Wolters Kluwer. All rights reserved.
As an instructor in Lippincott DocuCare, discover a variety of options to manage and customize this academic EHR
to create a unique teaching and learning opportunity for your program.
Registration
My Classes
My Case
Library
Enrollment
Assignments
Evaluations
Instructor
Resources
n
Login to thePoint to access Lippincott DocuCare and a variety of Instructor
Resources to help you implement Lippincott DocuCare into your program.
n
Create and manage multiple classes.
n
Generate a class code for students to easily enroll in your class.
n
Add co-instructors to classes for shared viewing of student results.
n
Explore over 170 pre-populated patient records and add them to your case
library for easy assignment to your classes.
n
Edit existing patient records to adapt scenarios to your class needs.
n
Create your own patient records from scratch to personalize your program’s
experience.
n
Students self-enroll in your class using the class code that you created
n
Manage student enrollment, as necessary
n
Assign patient records and documentation activities to students directly
from your Lippincott DocuCare account.
n
Customize instructions for each assignment that you create.
n
Choose from a variety of included assignments in your Instructor Resources
or create your own.
n
Set deadlines for assignment completion.
n
Provide feedback on student documentation and note whether each section
of an assignment is satisfactory or needs improvement.
n
Students are able to review evaluations and make corrections and
re-submit if necessary.
n
Access multiple tools to help you get started with and implement Lippincott
DocuCare including:
n
User Support
n
Implementation Tools
n
Training Resources
n
Learning Activities
n
Getting Started Exercises
5
All materials copyright © Wolters Kluwer. All rights reserved.
INSTRUCTOR USER’S GUIDE
Additional Learning Resources
Elevate the student learning experience with additional curriculum resources from Wolters Kluwer Health for a
comprehensive solution for your entire program.
vSim for Nursing
Ensure that your students develop clinical decision-making skills, competence, and confidence with vSim for
Nursing. Designed to simulate real nursing scenarios, vSim for Nursing, co-developed by Laerdal Medical and
Wolters Kluwer Health, allows students to interact with patients in a safe, realistic environment that is available
anytime, anywhere. Online interactive virtual simulations with integrated curriculum resources provide a full
simulation learning experience for every student. The virtual simulation is student-directed, with a variety of nursing
actions included for an individualized learning experience. Actions during the simulation are recorded, resulting in a
personalized feedback log to help each student identify areas of strengths or needed improvement. Learn more at:
http://thepoint.lww.com/vsim
Lippincott CoursePoint
Lippincott CoursePoint is the only integrated digital course solution for nursing education, combining the power of
adaptive learning with the integrated textbook and interactive resources. Powered by prepU, Lippincott CoursePoint
creates a truly personalized learning experience. Targeted practice quizzes adapt to each student’s knowledge
level, becoming more difficult as the student masters each nursing topic or client needs category. SmartSense
links to practice-focused content remediate weaknesses and prepare students for real-world nursing. Lippincott
CoursePoint deepens students’ understanding, increases course success, and prepares them for success in practice
by integrating knowledge acquisition, assessment and remediation, skills mastery, patient-centered learning, and
real-world practice to simulate the types of challenges they will encounter in daily practice.
Further enhance the course solution by incorporating vSim for Nursing with Lippincott CoursePoint. Lippincott
CoursePoint+ allows students to apply knowledge gained within the course content and adaptive quizzing to
patient-centered virtual simulations.
Learn more at: http://thepoint.lww.com/coursepoint
Medical Scenarios and Simulators
Throughout Lippincott DocuCare, you will find many patient records that correspond to Laerdal Medical simulation
scenarios. Enrich your simulation lab by incorporating Laerdal Medical simulation scenarios with Lippincott
DocuCare. Visit http://mysimcenter.com to find more information about available scenarios for Laerdal Medical
simulators.
Customer Success
Get the most out of your digital solutions… Experience the Lippincott Customer Success Difference!
As your trusted partner in nursing education, we understand the challenges you face in the classroom and the
dedication you bring to your role in preparing your students for confident, competent nursing in the 21st century.
You need a training program that will take you from the basics of using the product to meaningful curriculum
integration that can transform student engagement.
Learn more about the training program available from Lippincott Customer Success to support your use of
Lippincott DocuCare at: http://thepoint.lww.com/success
To contact Tech Support, please see Technical Support later in this guide.
6
INSTRUCTOR USER’S GUIDE
All materials copyright © Wolters Kluwer. All rights reserved.
Technical Resources
Systems Requirements
By integrating clinical scenarios with web-based EHR simulation software, Lippincott DocuCare teaches students
to think critically about documentation while enabling instructors to measure their progress. Our non-linear EHR
solution works well in the classroom, simulation lab, and clinical practice. With Lippincott DocuCare, an EHR can
easily be integrated into a curriculum to prepare students for real-world practice.
To use this online product, you must have access to the Internet and an up-to-date browser.
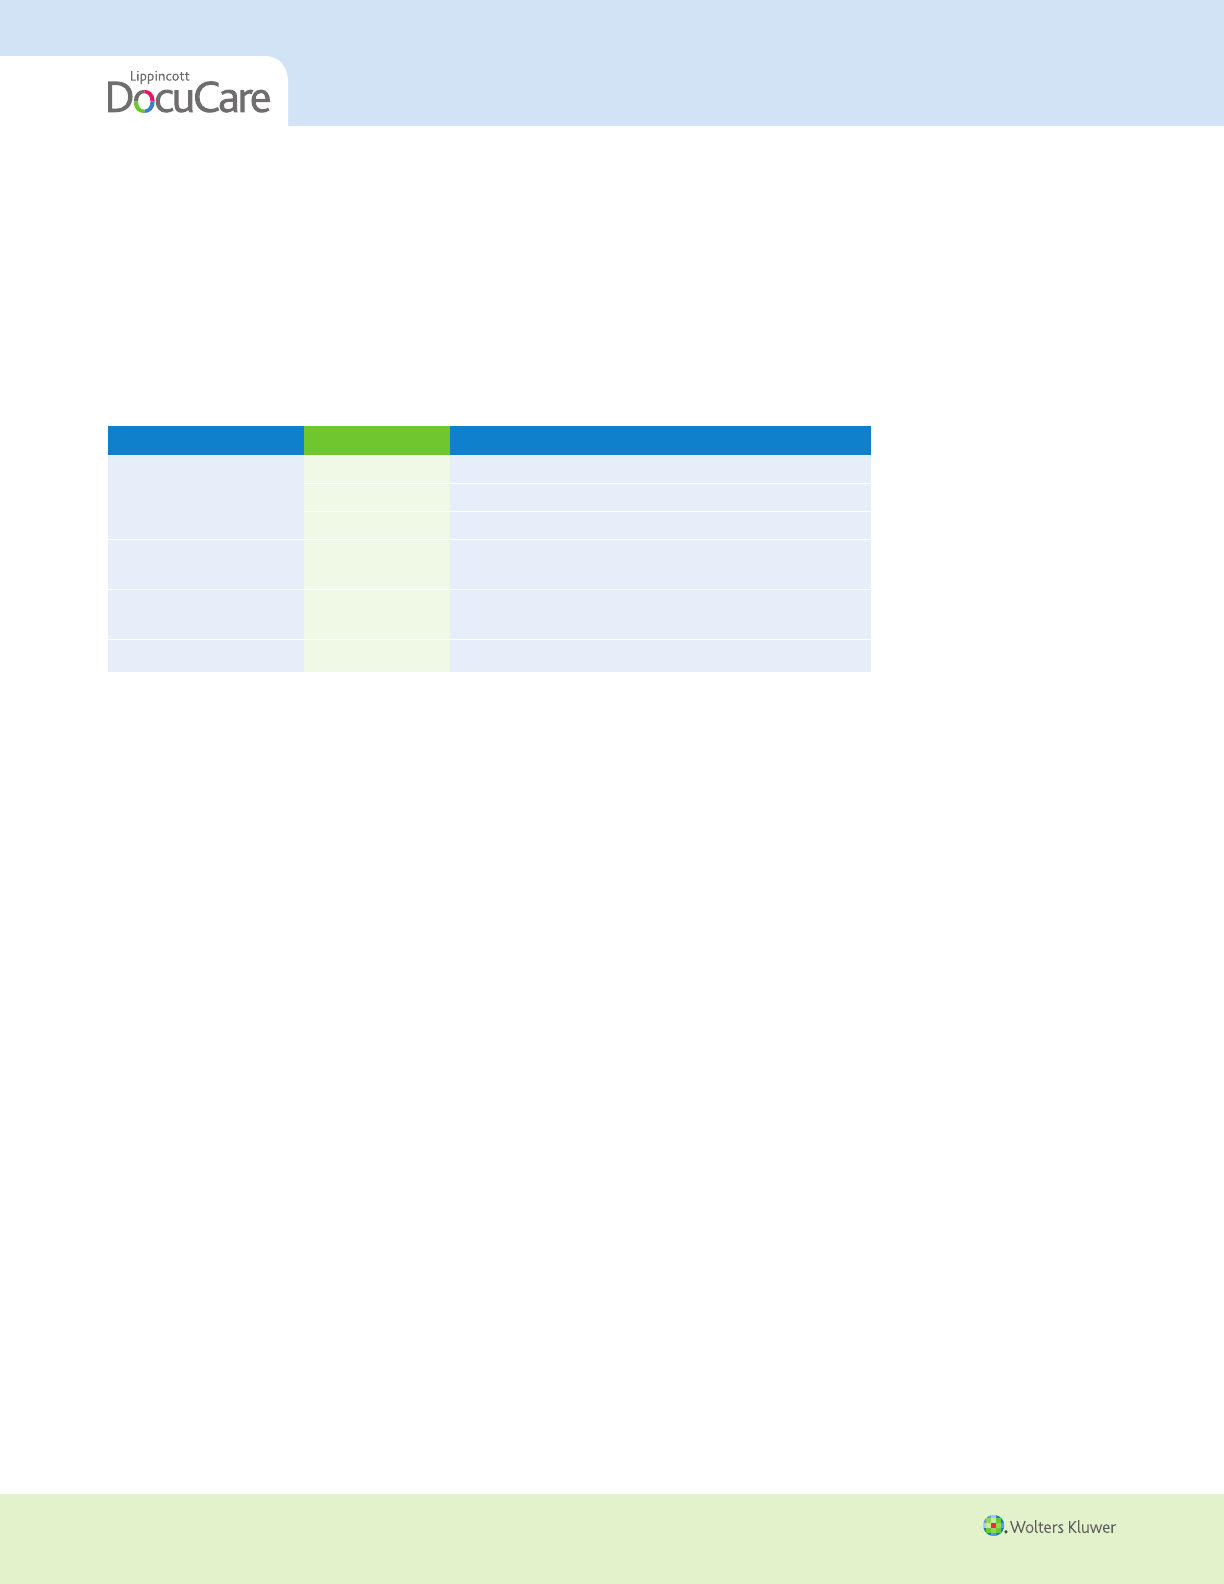
Browser Version Operating System
Internet Explorer 9 Windows 7, Vista SP2
10 Windows 7 SP1+, Windows 8
11 Windows 8.1, Windows 7 SP1+
Mozilla Firefox 24+ Windows Vista, Windows 7,
Windows 8, Windows 8.1, OS X 10.6-10.9 (Mac)
Google Chrome 32+ Windows 8, Windows 7, Windows Vista,
OS X 10.6 (Mac)
Apple Safari 6+ OS X v10.7.4 (Mac)
Optimized for Tablet Devices
iPad 2
iPad 4
Samsung Galaxy Nexus 10
Surface Pro
iPad Air
iPad 3
iPad Mini
Amazon Kindle Fire HD 8.9
Surface RT
Google Nexus 10
Screen Resolution Display Results
1024 x 768 pixels for standard display
A screen resolution lower than 1024 x 786 pixels will cause the program to dynamically adjust to t
Most tablet devices do not allow users to change the screen resolution.
To Figure out Your Screen Resolution for Windows:
Method 1:
Click Start > Run/Search > type “desk.cpl” in the open text box.
Method 2:
Click Start > Control Panel > Click on “Adjust screen resolution” located under “Appearance and Personalization”
To Figure out Your Screen Resolution for Mac OS:
Method 1:
1. Click on the Apple logo in the upper-left corner of your display.
2. Click “System Preferences” then click “Displays.”
3. Click “Display” if it is not already selected
4. Select a resolution from the list of available resolutions (User may have to check the Scaled check box).
5. Mac OS X immediately applies the new setting.
Method 2:
1. Click the magnifying glass (spotlight search) in the top right of the screen.
2. Search for keyword “Display.”
Cookies
If you lter cookies, you must allow session cookies. JavaScript must also be enabled (in most browsers, cookies and
JavaScript are enabled by default).
7
All materials copyright © Wolters Kluwer. All rights reserved.
INSTRUCTOR USER’S GUIDE
Instructions to enable Javascript (which is generally enabled by default with most browsers) can be found at:
https://support.google.com/accounts/answer/23852?rd=1
To learn how to enable cookies on your browser, visit: http://www.wikihow.com/Enable-Cookies-in-Your-In-
ternet-Web-Browser#Steps
You must also have a recent version Adobe Flash on your computer.
You can check your Flash compatibility via the Adobe Flash system check at:
http://helpx.adobe.com/flash-player.html
Flash downloads are available for both Windows and Mac systems at:
http://www.adobe.com/support/flashplayer/downloads.html
Domain White List
White Lists are used frequently with e-mail applications to ensure that communications are safely delivered to
students and instructors instead of ltered out as spam. Please turn this list over to your IT administrator for imple-
mentation to ensure optimal performance of Lippincott DocuCare.
The following domains need unrestricted http communication by network routers, rewalls, proxy servers, and lo-
cal security software such as Antivirus, Security Suites, Network or Personal Firewalls (Norton, Mcafee, Windows
Firewall, Windows Defender, etc).
Domain Names to Allow/Trust:
1.
.lww.com or specically:
thepoint.lww.com
securedownloads.lww.com
download.lww.com
nursingconcepts.lww.com
securedownload.lww.com
procedures.lww.com
www.lww.com
downloads.lww.com
advisor.lww.com
2.
.wkhpe.com (this is the service domain for WK Health) or specically at least:
sso.wkhpe.com
images.thepoint.wkhpe.com
lnareference.wkhpe.com
3.
simadviser.com (WK SimAdviser Product)
4.
.lwwdocucare.com (LWW DocuCare Product)
5.
.ipublishcentral.net and . ipublishcentral.com (ebook Platform)
wk-trusted-auth.ipublishcentral.com
wdn.ipublishcentral.net
6. www.prep-u.com - PrepU
Other Domains that Lippincott DocuCare uses for web analytics or other runtime resources:
1. wolterskluwerhealth.d2.sc.omtrdc.net (Omniture - Web Analytics package)
2. Google - Uses various fonts and libraries
fonts.googleapi.com
www.google.com/recaptcha/api/i
themes.googleusercontent.com
ajax.googleapi.com
Technical Support
To get the most out of Lippincott DocuCare, we recommend you:
Contact our technical support team whenever you need help! If you have any questions about registering
for or using this product, call 1-800-468-1128 or e-mail techsupp@lww.com.
8
INSTRUCTOR USER’S GUIDE
All materials copyright © Wolters Kluwer. All rights reserved.
Take advantage of training provided through Lippincott Customer Success. Visit http://thepoint.lww.
com/success to learn more.
Make use of the Faculty Support and Documentation, Training Resources, Integrating EHR materials, and
other Instructor Resources provided on thePoint: http://thepoint.lww.com/Book/Show/247900
User’s Guide Objectives
This User Guide will help you:
Get started with Lippincott DocuCare
Understand the components and features of this product
Use Lippincott DocuCare to view and evaluate your students’ work
Getting Started
Lippincott DocuCare is an online product that is accessed through Wolters Kluwer Health’s instructor and student
support site, thePoint (http://thePoint.lww.com), or directly via the Lippincott DocuCare site at http://www.
lwwdocucare.com.
New users will receive login information and detailed instructions on how to access thePoint and Lippincott
DocuCare. If you have not yet received this information, please contact your sales representative or contact our
Online Product Support team at 1-800-468-1128 or by e-mail to techsupp@lww.com.
If you have previously registered on thePoint, your account will be automatically updated to include Lippincott
DocuCare.
To access Lippincott DocuCare from thePoint:
1. Go to http://thepoint.lww.com.
2. Click on Return User.
3. Log in with your username and password.
4. When you log into thePoint, you will arrive in your My Content page. Locate Lippincott DocuCare in your
list of products and click on the blue “Launch DocuCare” link.
To access Lippincott DocuCare directly on the product site:
1. Go to http://www.lwwdocucare.com.
2. Click on Return User.
3. Log in with your username and password.
TIP! If you forget your password, click Forgot Your Password? and enter your email address. Your
password will be emailed to you. To change your password, log in to thePoint and click My Account
near the top right of the page.
9
All materials copyright © Wolters Kluwer. All rights reserved.
INSTRUCTOR USER’S GUIDE
Note: The first time you launch Lippincott DocuCare, you will need to complete an initial account set-up.
You will have the option to do this only once.
Reference: See Initial Account Set-up later in this guide.
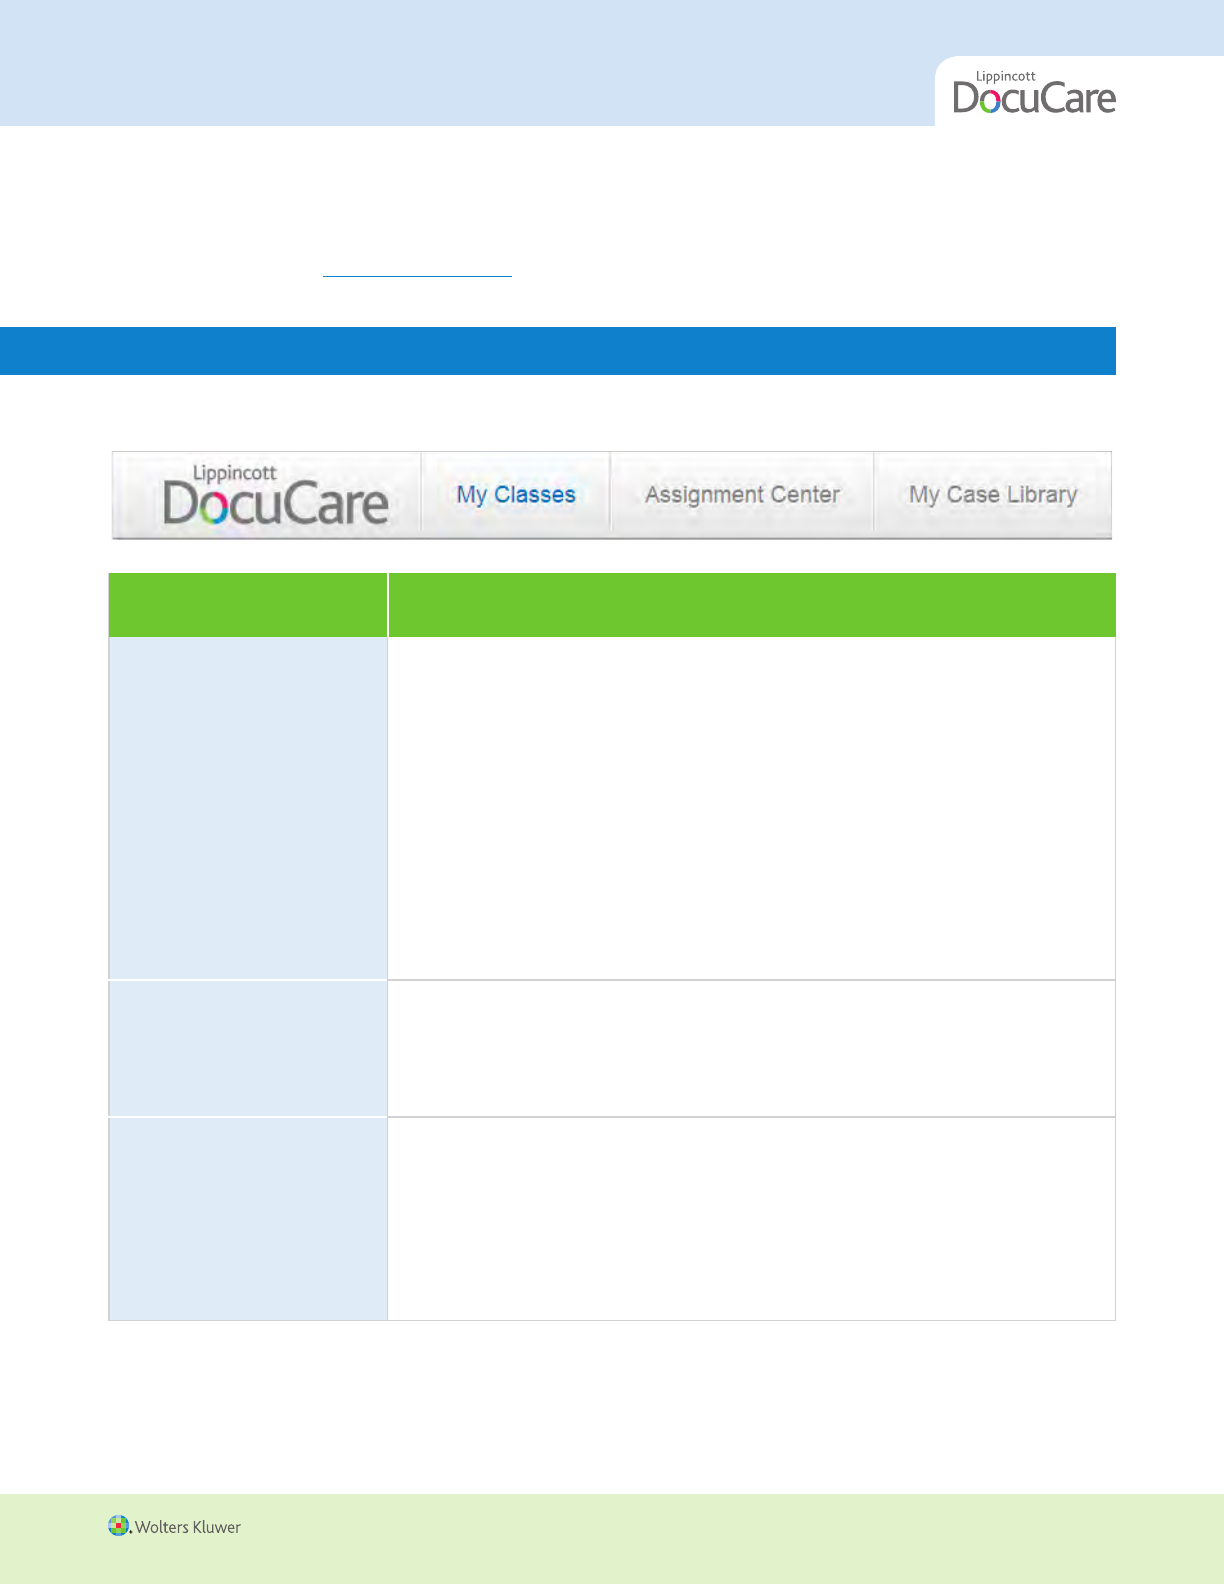
Navigating Lippincott DocuCare
An overview of the navigation system for Lippincott DocuCare is described below.
Click... To...
My Classes
n
View your class details, including the class codes, your co-instructors,
and term/section information
n
View a list of your active assignments in each class, including due
date, and status of student submissions (i.e., how many students have
completed the assignment and how many student submissions you
have to review)
n
Link to view your complete class details, including all assignments,
student enrollment, and co-instructor status. From here, you can also
create an assignment for that specific class. From here, you can also
view the class as a student would.
n
Create a new class or edit an existing one
n
View your inactive classes
Assignment Center
n
View your assignments across all classes (active, past, future)
n
Create a new assignment
n
Link to evaluate student assignments and/or clinical charts, or copy/edit
assignments
My Case Library
n
Author your own case/chart
n
Edit an existing case/chart in your library
n
Copy or delete cases from your library
n
View and add cases from the DocuCare pre-populated case library to
your case library. You can view brief descriptions of each case and add
them to your library for further editing or assignment.
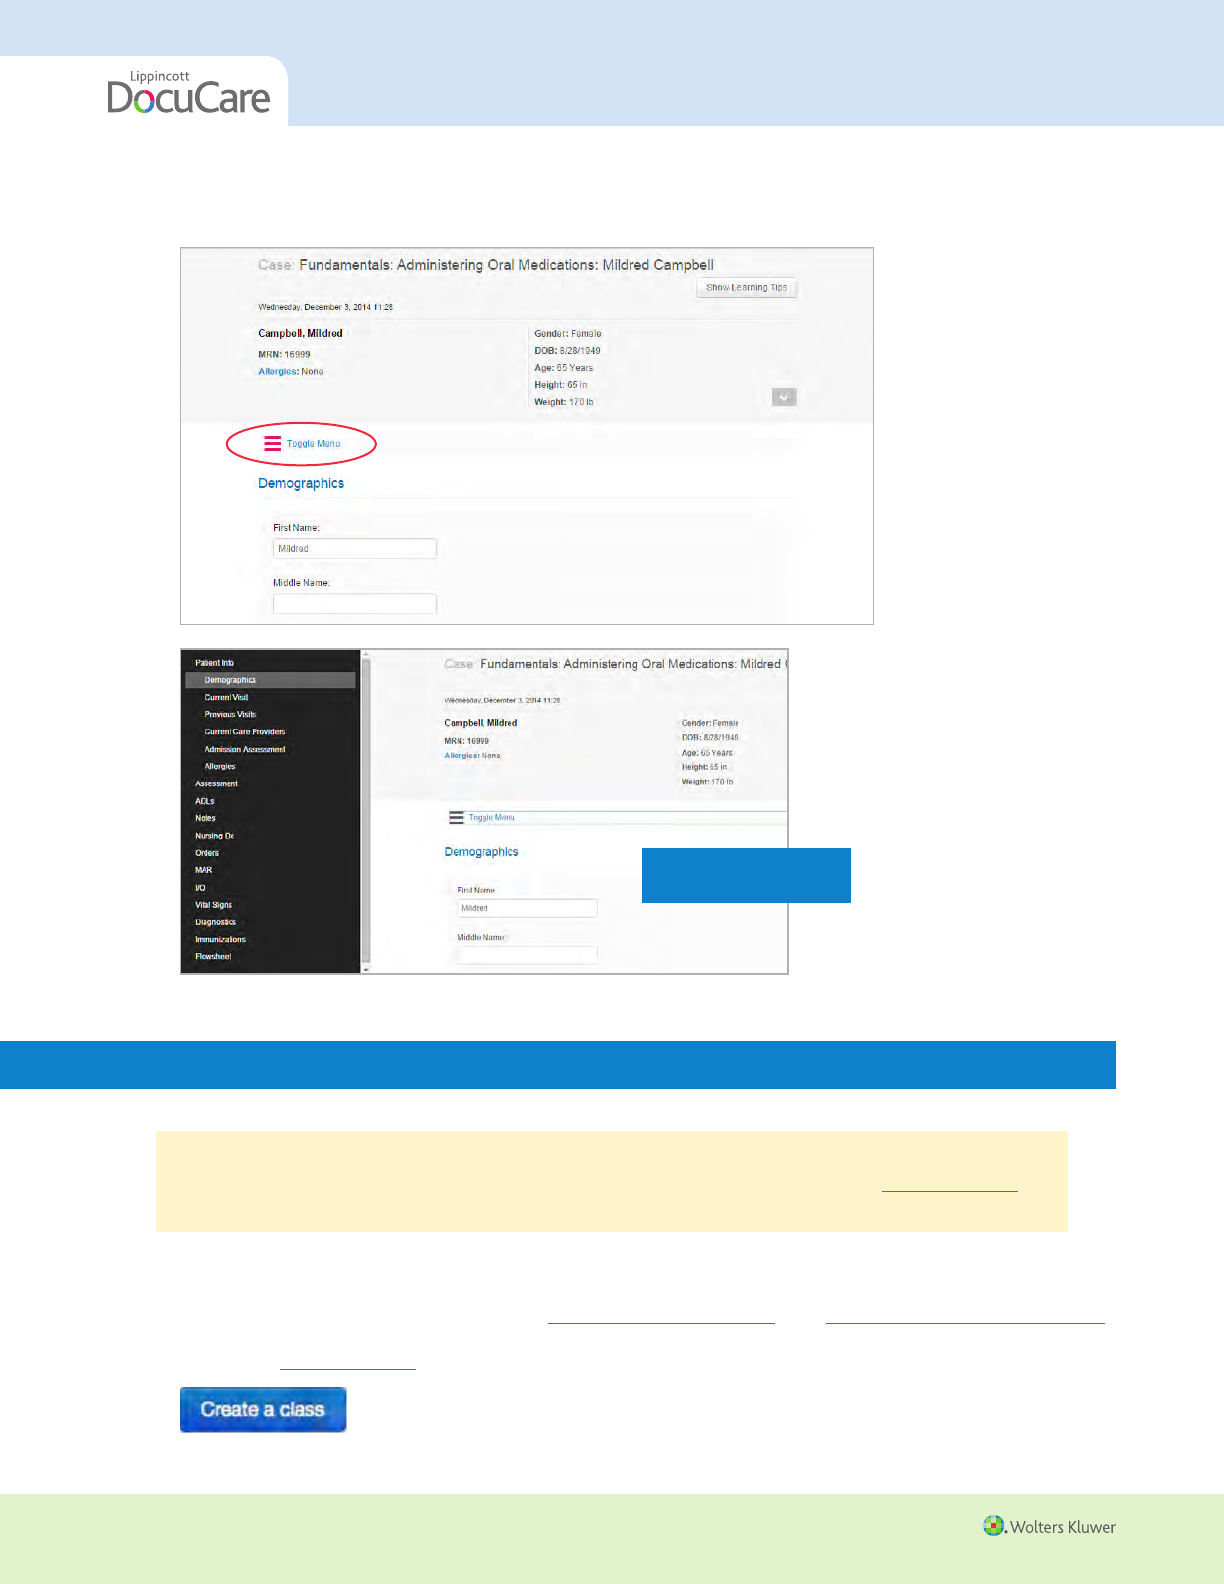
Depending on the device you use to view DocuCare AND your screen resolution, the screen appearance
will vary. The chart adapts automatically to work with tablet devices so the content is easier to review on a
10
INSTRUCTOR USER’S GUIDE
All materials copyright © Wolters Kluwer. All rights reserved.
smaller screen. Even if you are on a regular laptop/desktop, if your screen resolution is under 1024 x
768, DocuCare tabs will display vertically.
Left-hand navigation
menu in tablet view
Initial Account Set-Up/Create a Class
TIP! Before you set up your account, you must register with thePoint and create an account. You will
also be prompted to create a class immediately upon logging into DocuCare. (See Getting Started
earlier in this guide.)
Procedure Follow these steps to set up your account and create your first class.
1. Log in to Lippincott DocuCare either from http://thepoint.lww.com or at http://www.lwwdocucare.com.
2. Review the Getting Started directions and select the “Create a Class” button.

11
All materials copyright © Wolters Kluwer. All rights reserved.
INSTRUCTOR USER’S GUIDE
3. The new class window will display.
4. First, create an <adoption name>. The adoption name should be the name of your institution
(e.g., Grossman College or New York University).
5. Complete the following fields to create your first class.
Field Enter the…
Class Name
(required field) Name of the class.
Section Class section, if any.
Time Time the class meets (e.g., MWF 11-11:5). This is particularly helpful if you are
teaching multiple sections of the same class in a term.
Term Term name and year (e.g., Fall 2013).
Location Class location (e.g., school name, campus, building).
Instructions Instructions and/or information about the class. You may want to add class
objectives and directions for students in their use of DocuCare (e.g., how
often they should access the system, your assignment expectations). We
have included pre-populated language that you can edit as you see fit.
6. Select the Unit of measurement you wish to use for data entry: Imperial/English, or Metric. Note: This will
be the default unit of measurement for the program. You will be given opportunities to adjust the unit of
measurement for each case during case creation.
12
INSTRUCTOR USER’S GUIDE
All materials copyright © Wolters Kluwer. All rights reserved.
7. Click the “Class is active” checkbox to select an active status for the class.
If you want the class to be… Then …
Active (immediately available for student Click the checkbox.
enrollment and visible to students).
Inactive (unavailable to students until you Leave the checkbox unchecked.
activate it at a later time)
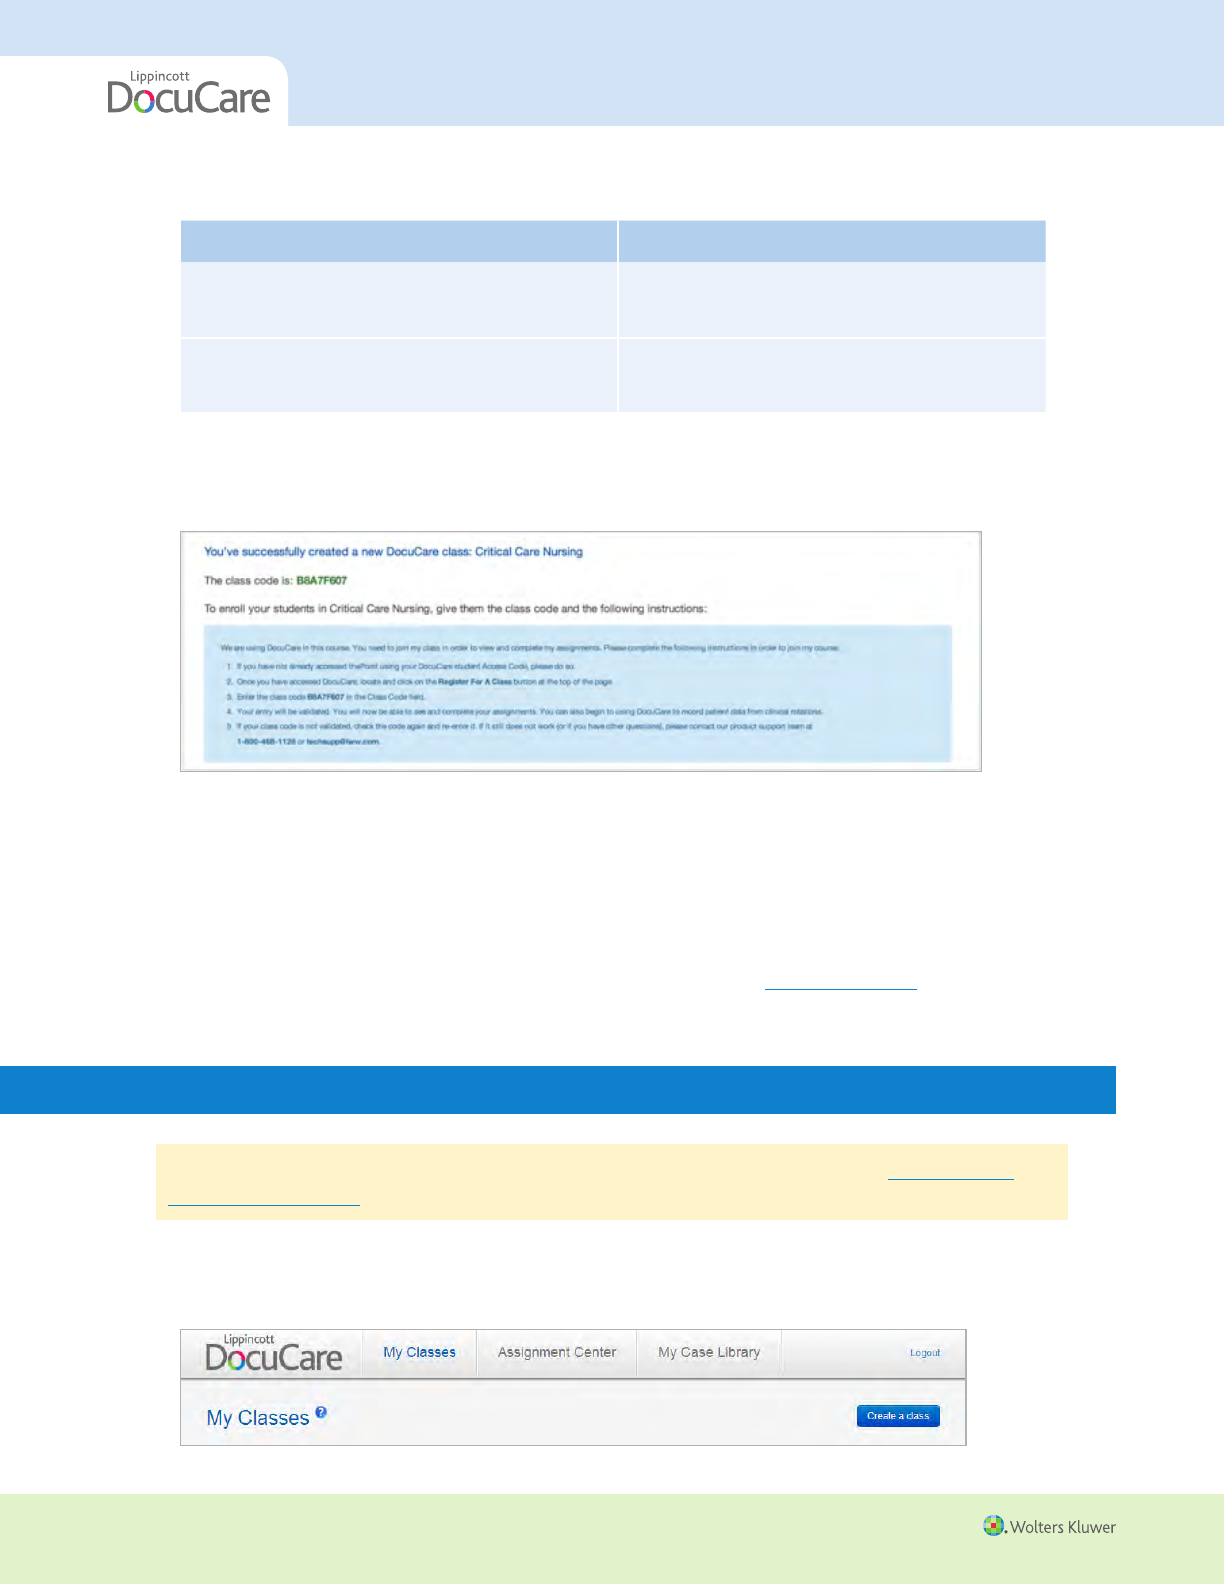
8. You will be taken back to your main class dashboard with a message that your class was successfully
created. You will also see instructions for distributing a class code (an 8-digit code) to your students so they
can view and complete your assignments.
9. To add additional classes, go to the My Classes page and select the “Create a class” button. Repeat steps
5-8 for each new class you want to create.
10. To preview the class dashboard as a student, click on Preview as Student from the
main class page.
Alert! You cannot enter data or edit charts in this mode. To work through charts as a student, you need
to establish a separate student (dummy student) account. Contact technical support to request a student
access code to create such an account.
Managing My Classes
TIP! Before you can edit an existing class you must have created a new class. (See Initial Account
Set-Up/Create a Class earlier in this guide).
Procedure Follow these steps to edit an existing class.
1. Go to “My Classes.”
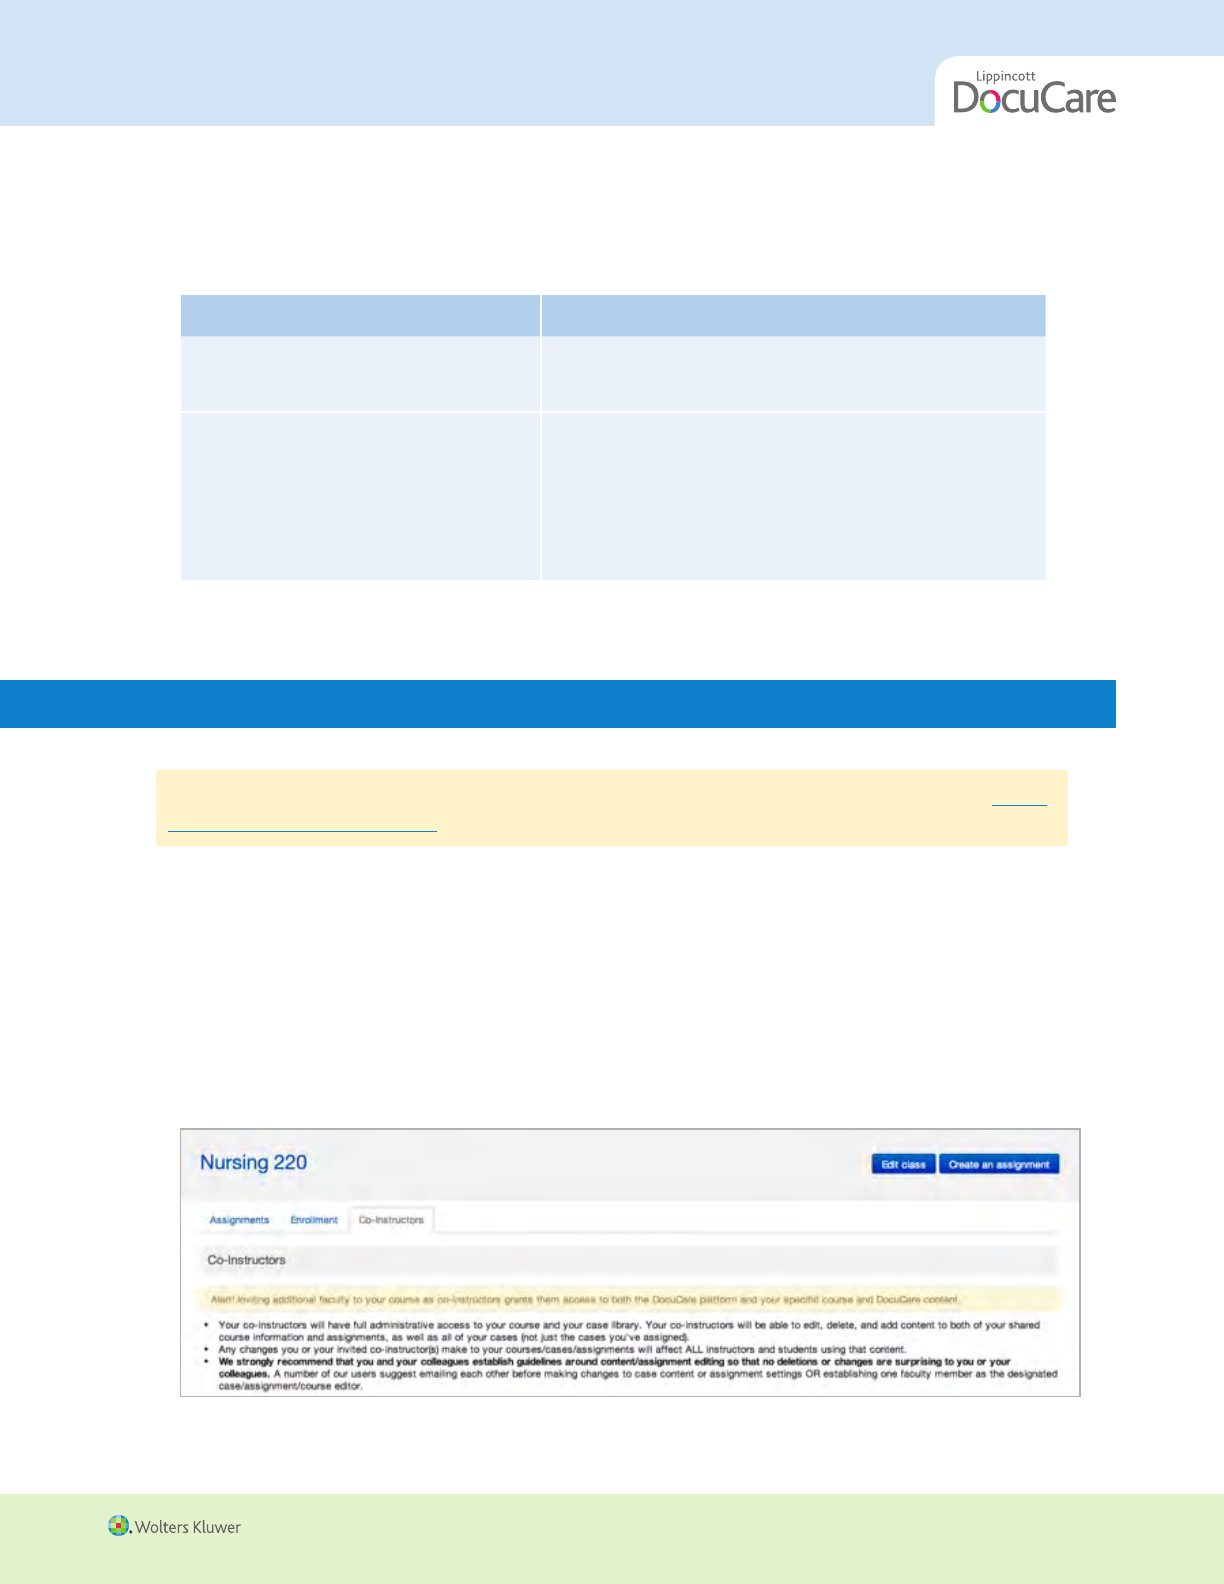
13
All materials copyright © Wolters Kluwer. All rights reserved.
INSTRUCTOR USER’S GUIDE
2. Click the <Class Name> for the class you wish to edit. Your active and inactive classes are all clickable via
the My Classes page.
3. Click on “Edit class”
If you want to… Then …
Remove or re-add students Click the Enrollment Tab (to the right of the
to your class Assignments overview view)
Invite co-instructors to your course Click the Co-Instructor Tab (to the right of the
Enrollment tab). Please read the tips related to
co-instructor ground rules on the screen.
Edit class details (e.g. class name, Click the Edit class button.
section, time, instructions)
4. Click “Save.”
Inviting a Co-Instructor to Join a Class/Managing Co-Instructors
TIP! Before you can add a co-instructor to a class, you must have created a class already. (See Initial
Account Set-Up/Create a Class earlier in this guide.)
Procedure Follow these steps to add a co-instructor to a class.
1. Go to “My Classes.”
2. Click <Class Name> in the Active or Inactive Class list. You will then be taken to the Class
Detail page.
Note: Active classes are listed first; inactive classes are visible when you expand the Inactive Classes menu
bar.
3. Click on the “Co-Instructors” tab (to the right of the Enrollment tab).

14
INSTRUCTOR USER’S GUIDE
All materials copyright © Wolters Kluwer. All rights reserved.
4. Enter the <e-mail address of the instructor you wish to invite>.
Note: You can invite multiple co-instructors by separating them by a semicolon and a space.
5. Click “Invite.”
Result: An invitation granting access to Lippincott DocuCare will be e-mailed to the invited
co-instructor(s) and will prompt them to accept your invitation/access DocuCare.
Alert! Once they’ve accepted your invitation, your co-instructor(s) will have full access to Lippincott
DocuCare.
Co-instructors have full administrative access to your course and your case library. Your co-instructors
will be able to edit, delete, and add content to both of your shared course information and
assignments, as well as all of your cases (not just the cases you’ve assigned).
Any changes you or your invited co-instructor(s) make to your courses/cases/assignments will affect ALL
instructors and students using that content.
We strongly recommend that you and your colleagues establish guidelines around content/
assignment editing so that no deletions or changes are surprising to you or your colleagues. Some of
our users suggest:
Making a copy of a case you did not create before editing it.
Emailing your co-instructors before making changes to case content or assignement settings.
Establishing one faculty member as the designated case, assignment, and course editor.
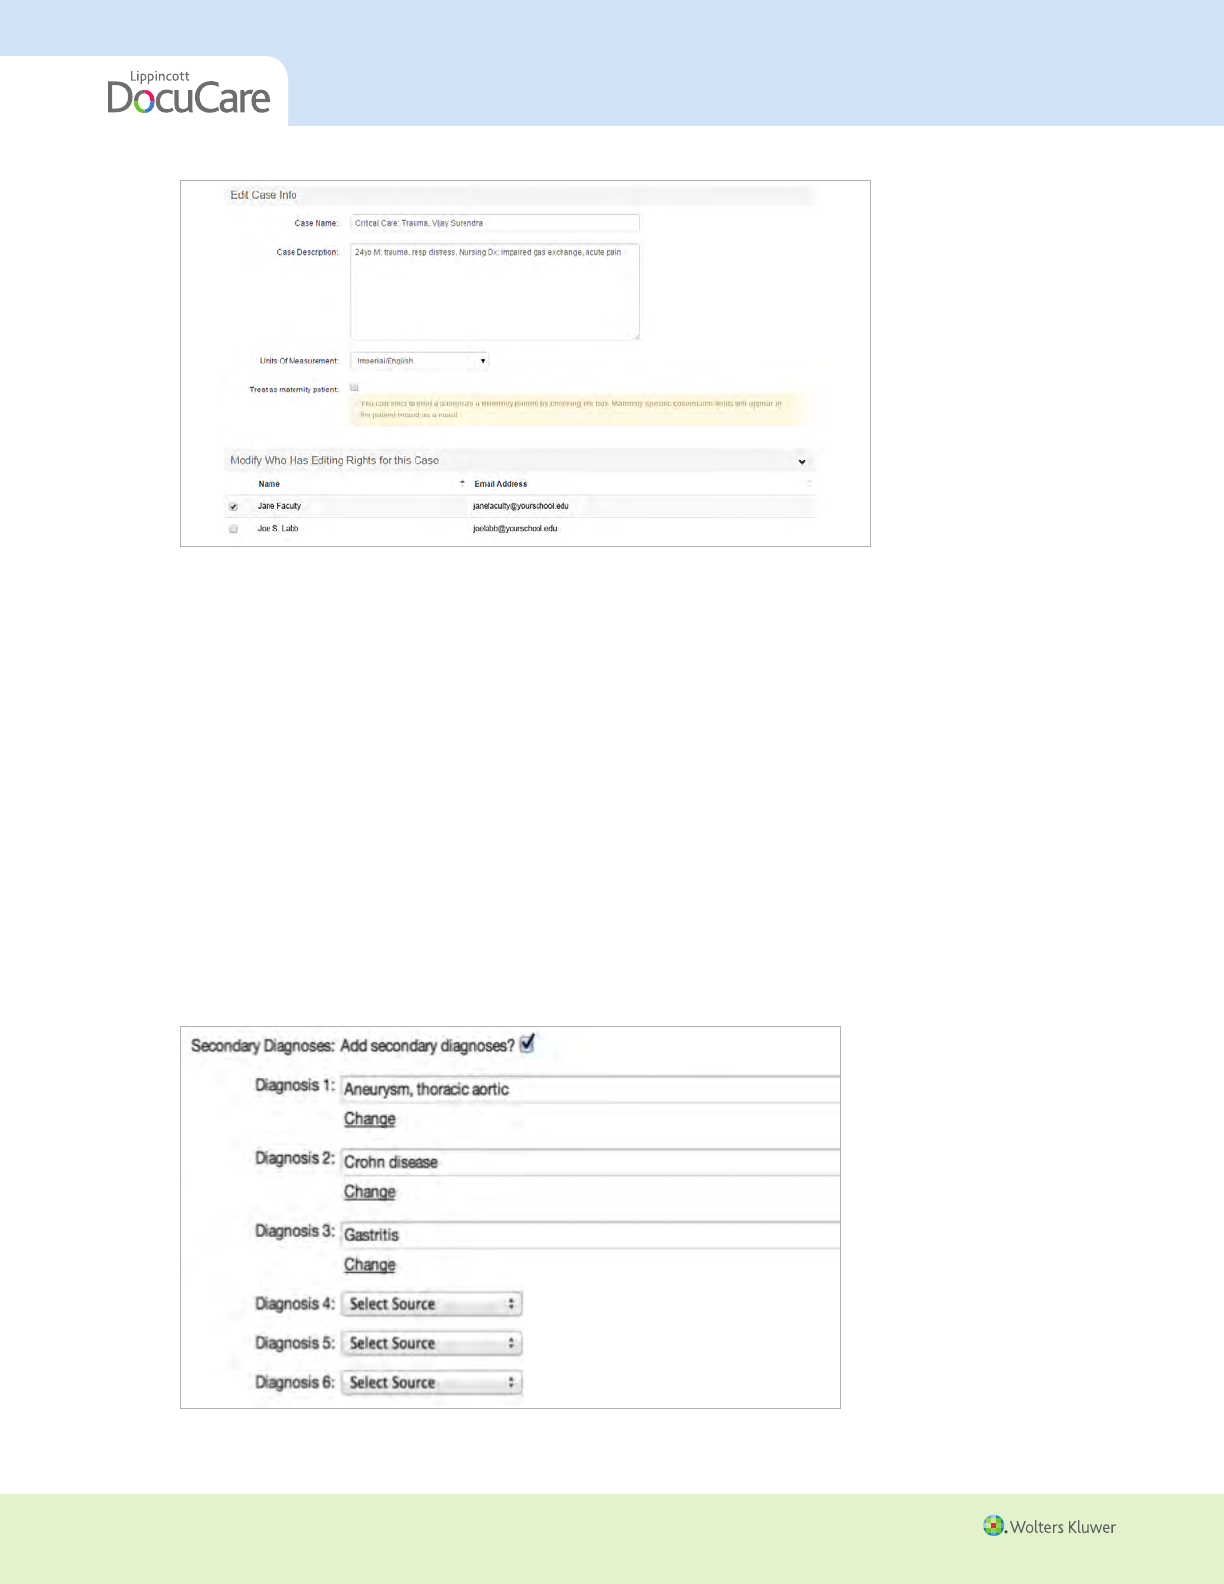
NEW for Spring 2015! You can select which of your co-instructors have editing and deletion rights for each
of your cases in the “Edit Case Info” page (accessed by clicking on the name of the case). See Establishing
Case Editing Rights for more info.
6. You can always return to the Co-Instructors Tab to invite new co-instructors, as well as view a list of
confirmed co-instructors (i.e. instructors who have accepted your invitation) and pending co-instructors
(i.e. instructors who have not yet accepted your email invitation to join your class.).
15
All materials copyright © Wolters Kluwer. All rights reserved.
INSTRUCTOR USER’S GUIDE
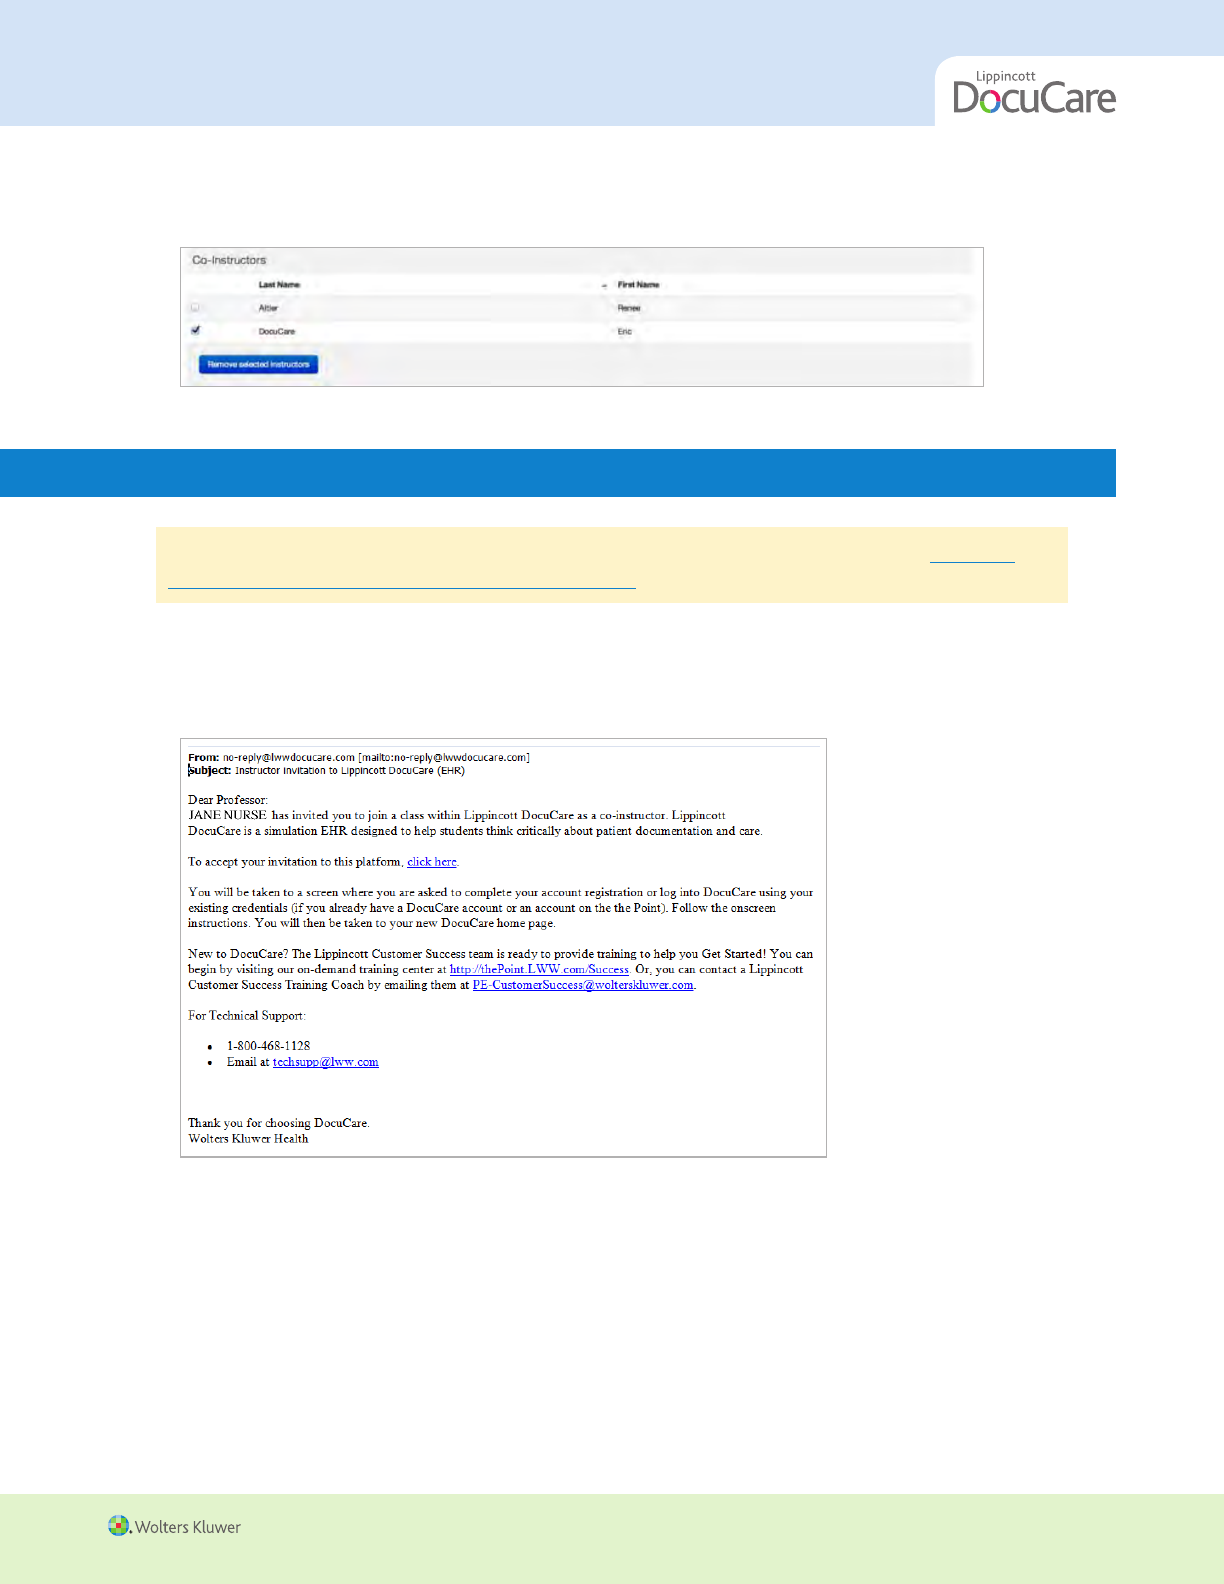
7. You can also delete co-instructors from your courses. To delete a co-instructor, simply select the check box
next to the instructor(s) you wish to remove, and then click on the Remove selected instructors.
Registering as a Co-Instructor
TIP! Before you can register as a co-instructor, you must be invited to join a class. (See Inviting a
Co-Instructor to Join a Class/Managing Co-Instructors earlier in this guide.)
Procedure Follow these steps to register as a co-instructor.
1. Open the e-mail invitation from Lippincott DocuCare system to be an instructor with access to Lippincott
DocuCare (EHR).
2. Locate “To accept your invitation to this platform, click here” and select the “click here” hyperlink.
Result: The Lippincott DocuCare Login or Register page will appear.
3a. Log into your existing account on thePoint.
Result: You will be taken to a screen where you are asked to complete your account registration or log
into DocuCare using your existing credentials. If you already have an account on thePoint, log in with your
normal credentials. You will then be taken to your new DocuCare home page.

16
INSTRUCTOR USER’S GUIDE
All materials copyright © Wolters Kluwer. All rights reserved.
3b. If you do not have an account with thePoint
Register with thePoint. You will be prompted to answer a series of simple questions to create your new
account.
Result: You will be taken to your new DocuCare home page.
4. You now have full access to DocuCare, including the ability to:
access all cases and assignments related to the class you are co-instructing
create new cases and assignments
edit or delete cases or assignments
remove students from the class
create new classes
invite other co-instructors to classes.
We strongly recommend that you and your colleagues establish guidelines around content/
assignment editing so that no deletions or changes are surprising to you or your colleagues.
Some of our users suggest:
Making a copy of a case you did not create before editing it.
Emailing your co-instructors before making changes to case content or assignement settings.
Establishing one faculty member as the designated case, assignment, and course editor.
You can also remove co-instructors from your course as needed!
Creating a Library of Cases/Charts
TIP! Before you create a library of cases (or patient charts), you must register with thePoint and
create an account. (See Getting Started earlier in this guide.)
Procedure Follow these steps to create a case library.
1. Click “My Case Library” from the top site navigation.
2. Locate the “View Pre-Populated Case/Chart Library” or “Author my own case” buttons at the top right
corner of the page.
17
All materials copyright © Wolters Kluwer. All rights reserved.
INSTRUCTOR USER’S GUIDE
If you want to... Then …
Author your own chart from scratch Click the Author my own case button
(completely blank record)
Access and edit a pre-populated chart Click the View Prepopulated Case/Chart
(a chart with pre-existing data/patient Library
information that can be edited)
Note: DocuCare includes nearly 200 pre-populated charts. All can be edited/augmented to suit your needs.
We’ve created a helpful document (Case Details Document) with notable details on each case. To access
this, click on the View Details link next to the DocuCare Pre-Populated Case/ Chart Library headline. You
can also view short descriptions within the Case Library itself. (See step 3a for details).
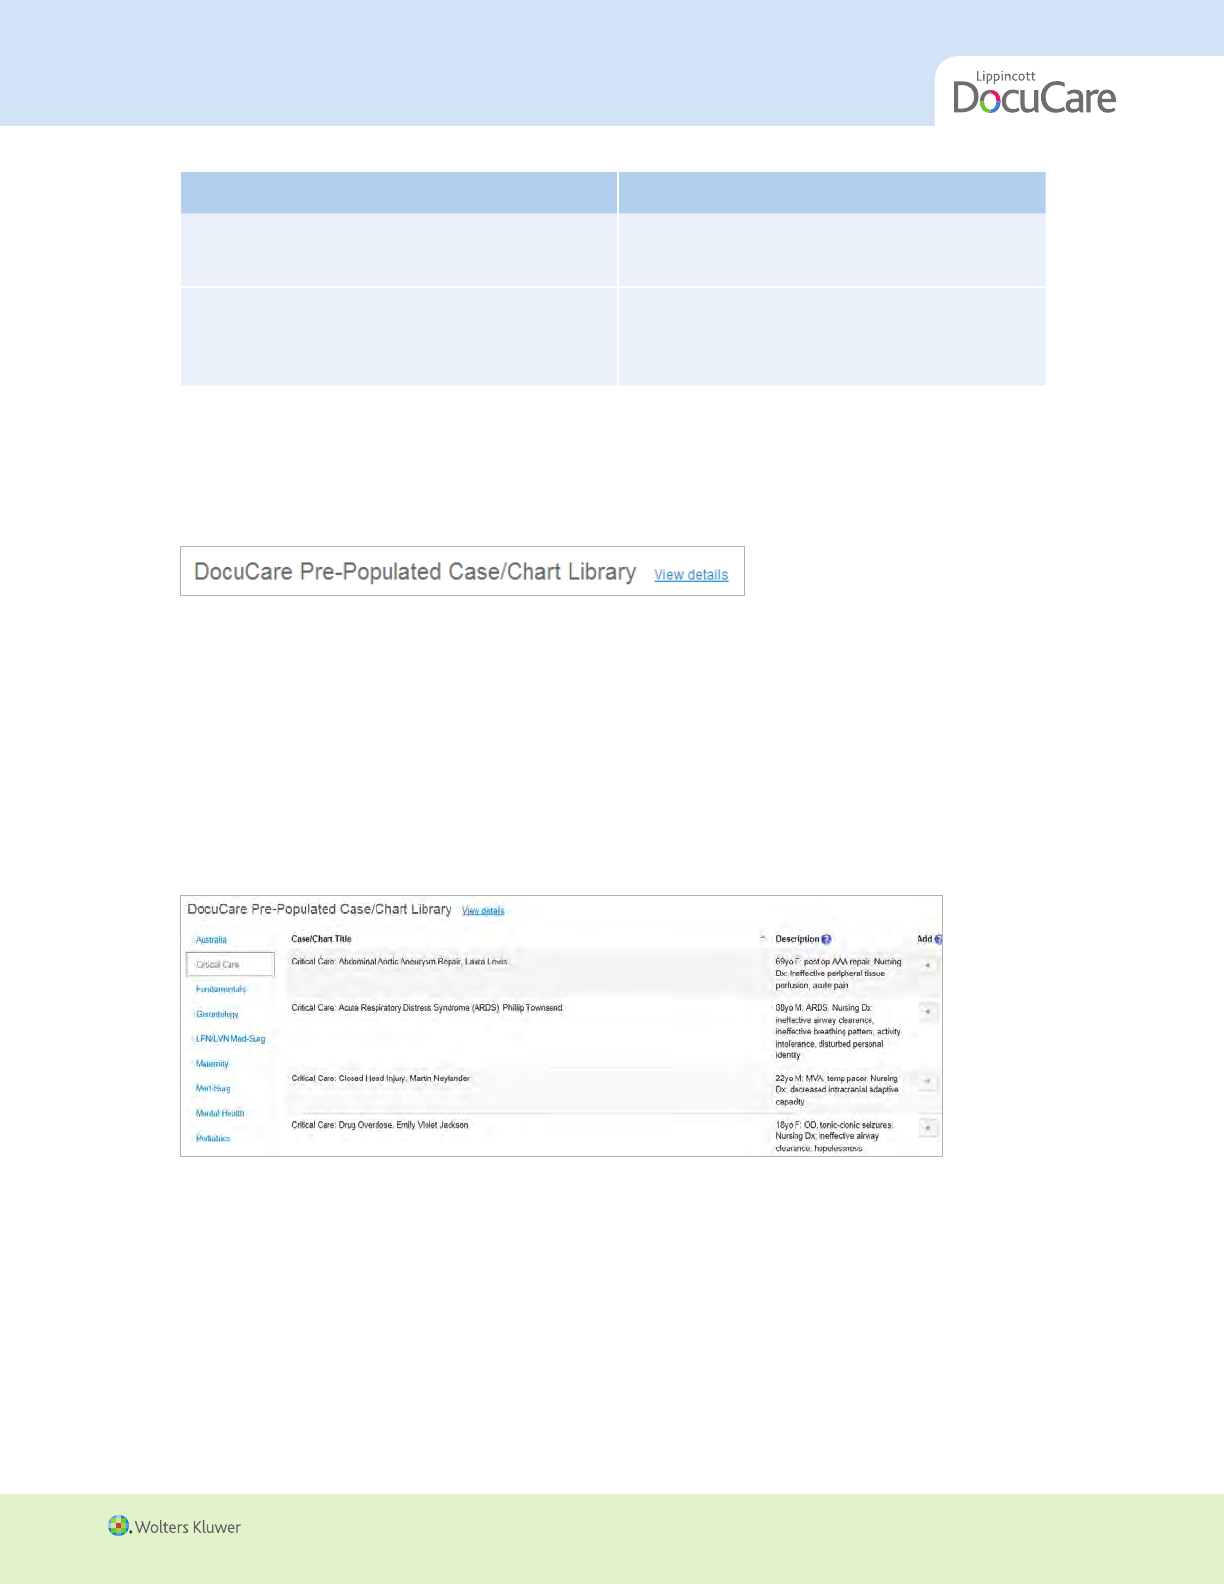
3a. To use a DocuCare pre-populated case,
Click on the “View Pre-Populated Case Library” button. You will be taken to the list of pre-populated
cases within DocuCare.
The cases (charts) are organized by course using a vertical tabbing structure (on the left). Locate the
appropriate course (e.g., Fundamentals). A list of pre-populated cases, along with their brief descriptions
(overview, nursing diagnoses) will appear.
To add a case to your library for editing/assignment, simply click the Add icon (+) next to the case you
want to add.
Repeat these steps for as many DocuCare cases as you’d like to add to your personal library.
Note: You can only edit the DocuCare cases once you’ve placed them into your personal library (My Case
Library). NEW! You can now control which of your co-instructors has editing rights to your cases and which
of your co-instructors will have read-only rights to your cases using the “Modify Who Has Editing Rights to
this Case” section on the Edit Case Info page.
18
INSTRUCTOR USER’S GUIDE
All materials copyright © Wolters Kluwer. All rights reserved.
3b. To author your own case/chart from scratch:
Click on the Author my own case button. You will be taken to a new case-authoring screen.
Affiliate the case to a specific adoption (this option will only be available to you if you are linked to
multiple adoptions, likely as a co-instructor).
Designate a case name, description, and units of measurement. Note: the case description is not visible
to students. It will only be visible to you and your co-instructors.
Create your patient details: name, age, date of birth, gender, facility, and admission length. You can also
elect to treat a patient as a pediatric patient (regardless of age) or maternity patient.
Click “Save.”
Note: You can elect to treat a patient as a pediatric patient (regardless of age). This will prompt certain
demographic information to appear in the demographics and select assessment tabs. You can also elect
to treat a patient as a maternity patient (regardless of gender). This will prompt certain demographic
information to appear in the demographic screens and will add a Maternity tab with revelant assessments.
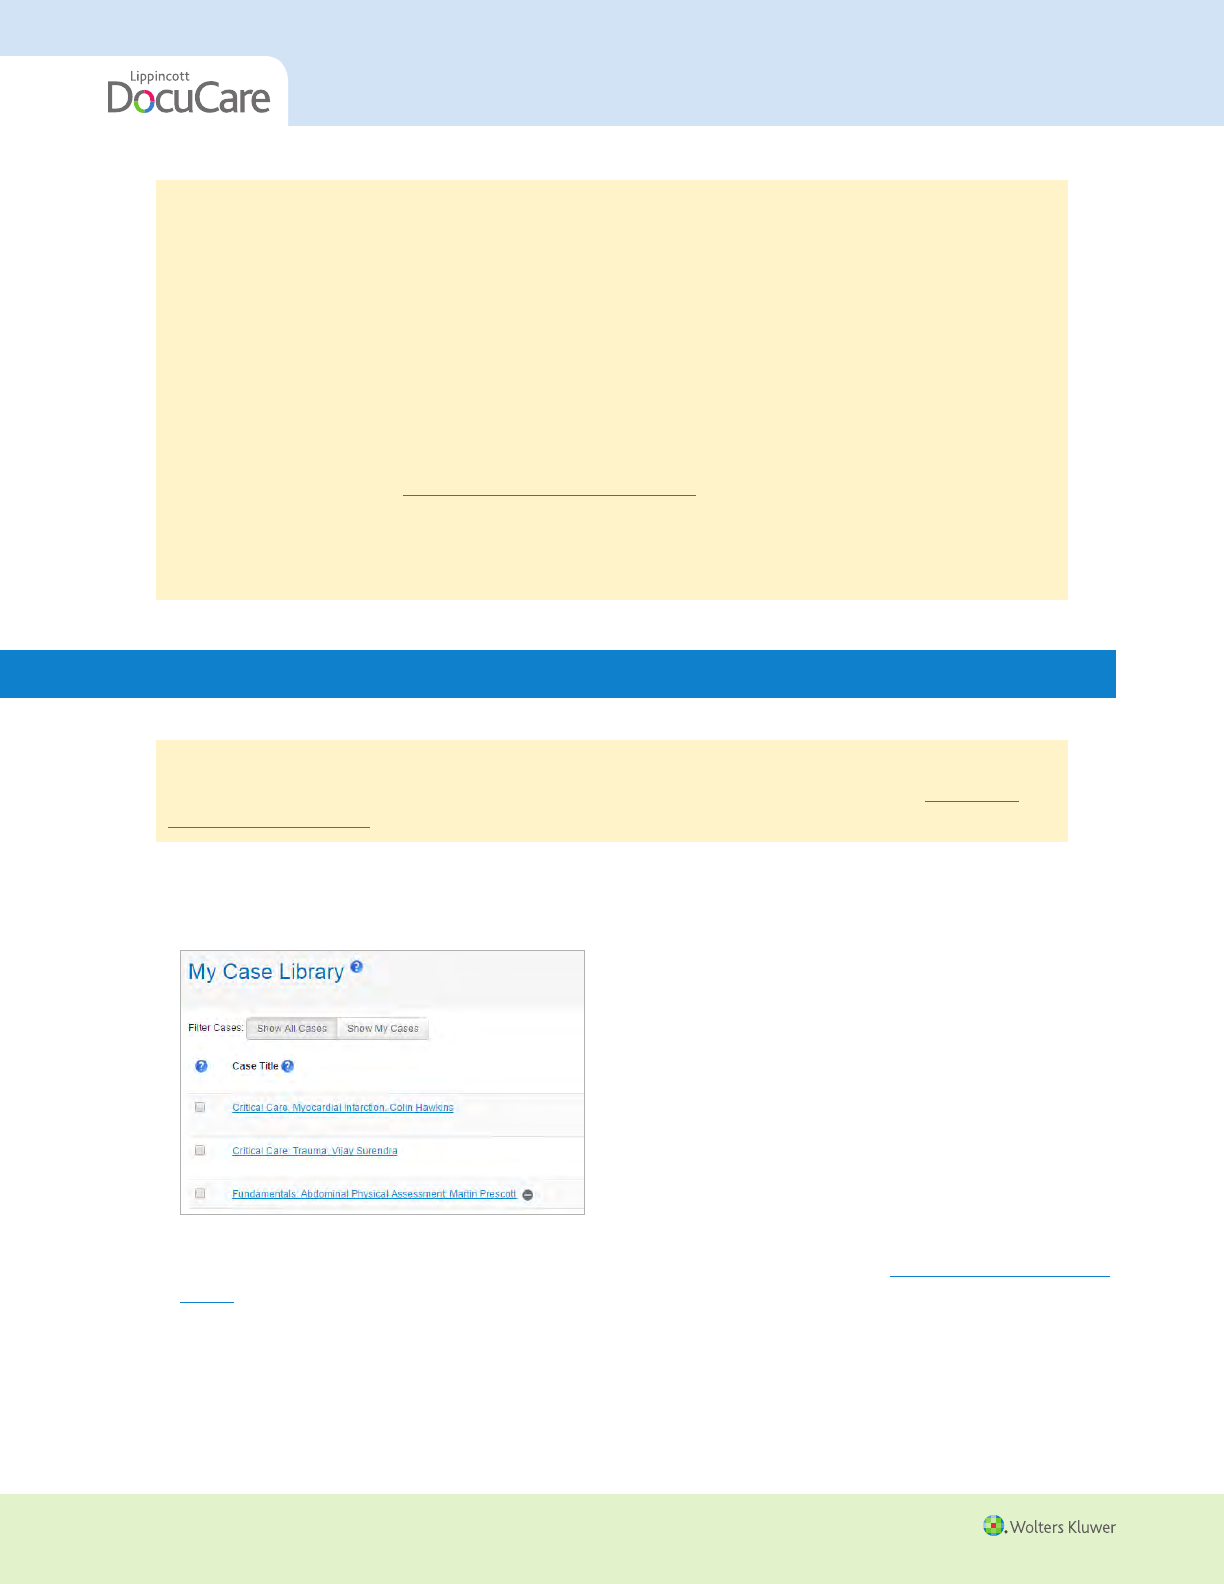
3c.
Add secondary diagnoses, if applicable:
19
All materials copyright © Wolters Kluwer. All rights reserved.
INSTRUCTOR USER’S GUIDE
4. Click on Lippincott DocuCare’s tabs to fill in the requested case data.
Note: Click on the SmartSense logo to open a pop-up window providing more information on a
disease, condition, or medication. Clicking on the SmartSense logo will open a new page. It will not close
the case creation page you are working on.
5. Click the “Save Assessment,” “Save,” or “Sign” buttons as you complete the information required in each
tab. Modifications that are not saved in each tab will be lost.
Establishing Case Editing Rights
Your Case Library contains cases that you have added from the Pre-Populated Case/Chart Library and cases that you
have authored yourself, as well as any cases created or added by your co-instructors or other faculty at your school.
NEW for Spring 2015! In your Case Library, you will be listed as the Case Owner for all cases that you have added
or created. You can select which of your co-instructors have editing and deletion rights for each of your cases in the
“Edit Case Info” page (accessed by clicking on the name of the case). Cases for which you have read-only rights are
marked with a gray icon
.
20
INSTRUCTOR USER’S GUIDE
All materials copyright © Wolters Kluwer. All rights reserved.
TIPS!
Co-Instructors that have editing rights will be able to edit, delete, and add content to your
cases. Any changes you or your co-instructor(s) make to your cases will affect ALL instructors
and students using those cases. We strongly recommend that you and your colleagues establish
guidelines around content editing so that no deletions or changes are surprising to you or your
colleagues. Some of our users suggest:
Making a copy of a case used in other courses before editing it.
Emailing your co-instructors before making changes to case content.
Establishing one faculty member as the designated case, assignment, and course editor.
To modify a case to which you have copy/read-only rights, make a copy of the case in the Edit
Case Info screen. See Copying or Deleting Cases/Charts.
Only the Case Owner can change editing permissions.
Cases may be deleted by the Case Owner or any co-instructors with editing rights.
Use the Show My Cases button to view only the cases for which you are the Case Owner.
Copying or Deleting Cases/Charts
TIP! Before you copy a case, you must have cases in your personal case library, either by selecting
them from DocuCare’s Pre-Populated Case Library or by authoring your own case. (See Creating a
Library of Cases/Charts earlier in this guide.)
Procedure Follow these steps to copy or delete a case.
1. Go to “My Case Library.”
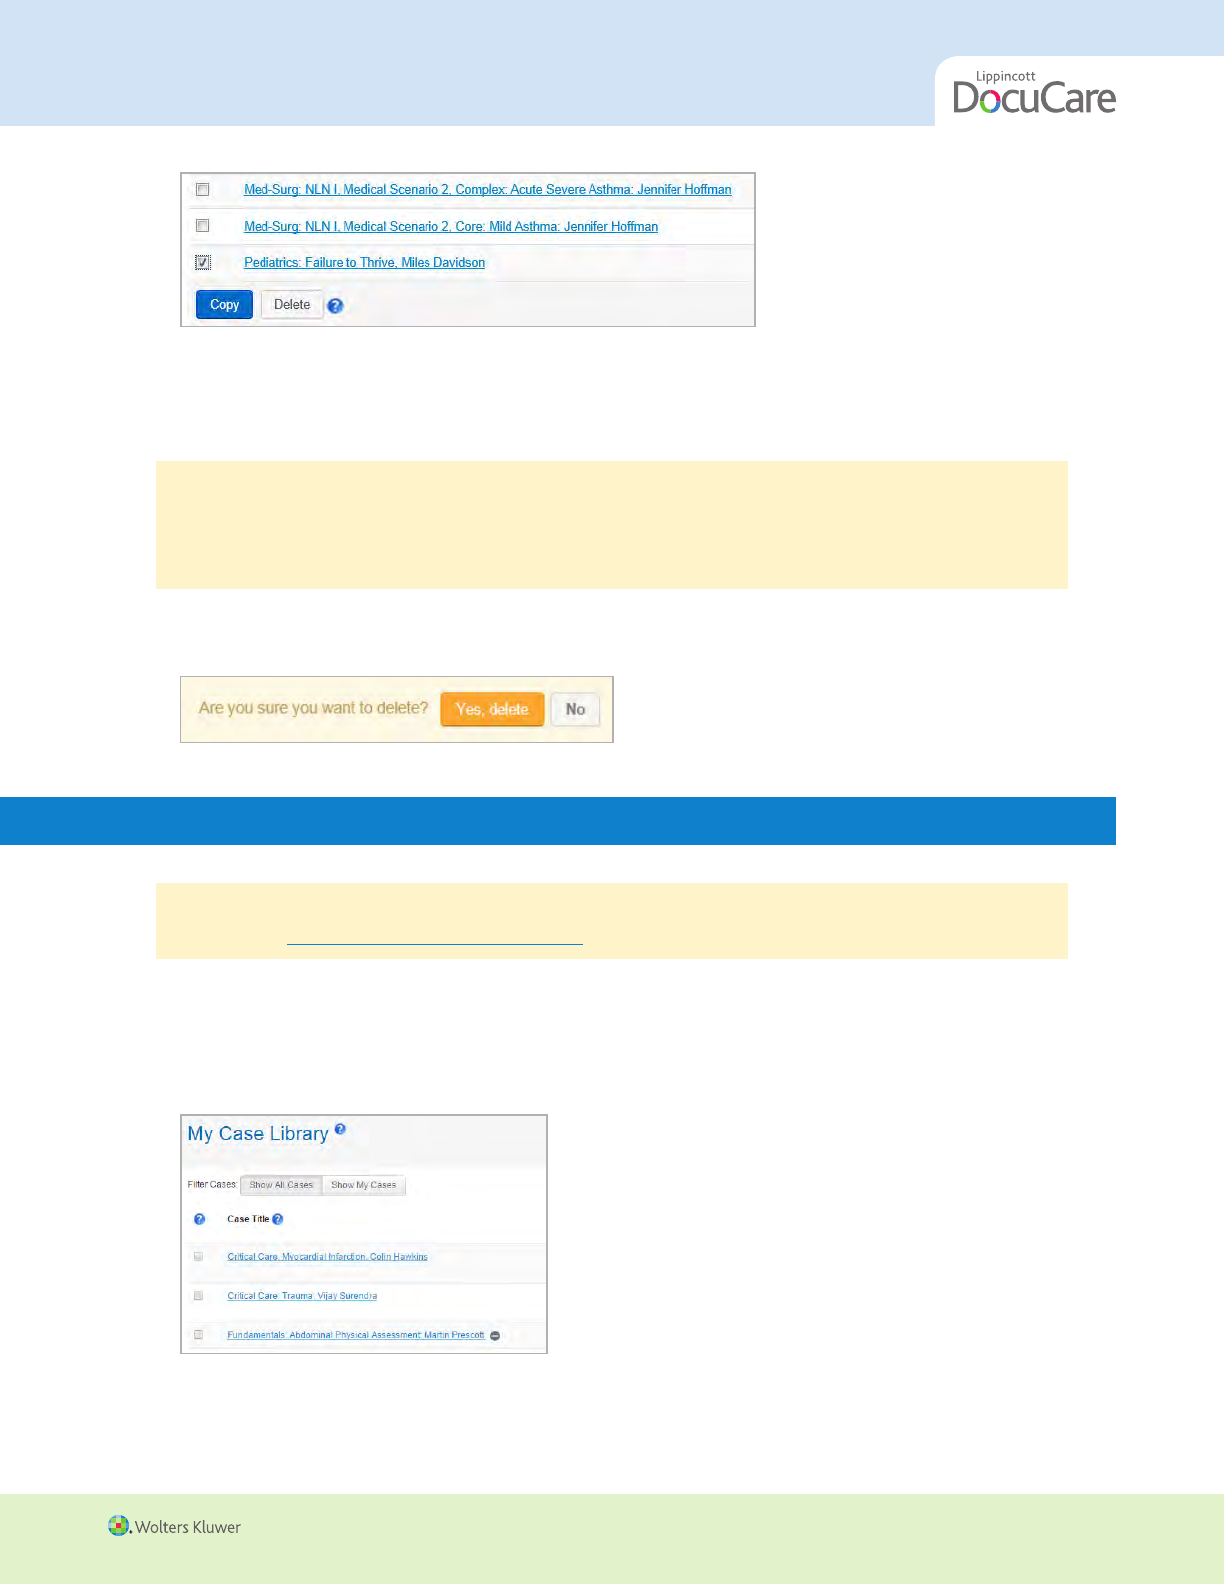
2. Locate the case you want to copy or delete via the <Case Title> column. (Refer to Establishing Case Editing
Rights for tips on copying and deletion rights for cases in your Case Library.)
3. Select the checkbox to the left of the case title.
21
All materials copyright © Wolters Kluwer. All rights reserved.
INSTRUCTOR USER’S GUIDE
4a. Click on the “Copy” button to make a copy of the case. A copy will appear underneath the original case
and will be titled “Copy of <Case Title>”. You can then click on the copied case to edit the case name and
edit the chart as you see fit.
TIP! Want to have your students prepare a “clinical packet” the night before simulation? No problem!
Create a copy of your simulation case and then assign it separately (Pre-Simulation Case). By creating
a pre-sim and simulation assignment, students can preview a patient chart the night without facing
any timing issues in the chart during the actual simulation.
4b. Click on the “Delete” button to delete a case. You’ll be prompted to confirm your deletion. Click “Yes” and
your case will be deleted from your case library.
Editing a Case/Chart
TIP! Before you can edit an existing case you must have added cases to your case library (My Case
Library). (See Creating a Library of Cases/Charts earlier in this guide.)
Procedure Follow these steps to edit a case.
1. Go to “My Case Library.”
2. Click <case name> you want to edit (the case title appears as a hyperlink).
22
INSTRUCTOR USER’S GUIDE
All materials copyright © Wolters Kluwer. All rights reserved.
Note: You can only edit cases where you are the Case Owner or have been granted editing rights. To make
edits a case to which you don’t have editing rights. make a copy of the case first. See Copying and Deleting
Cases/Charts.
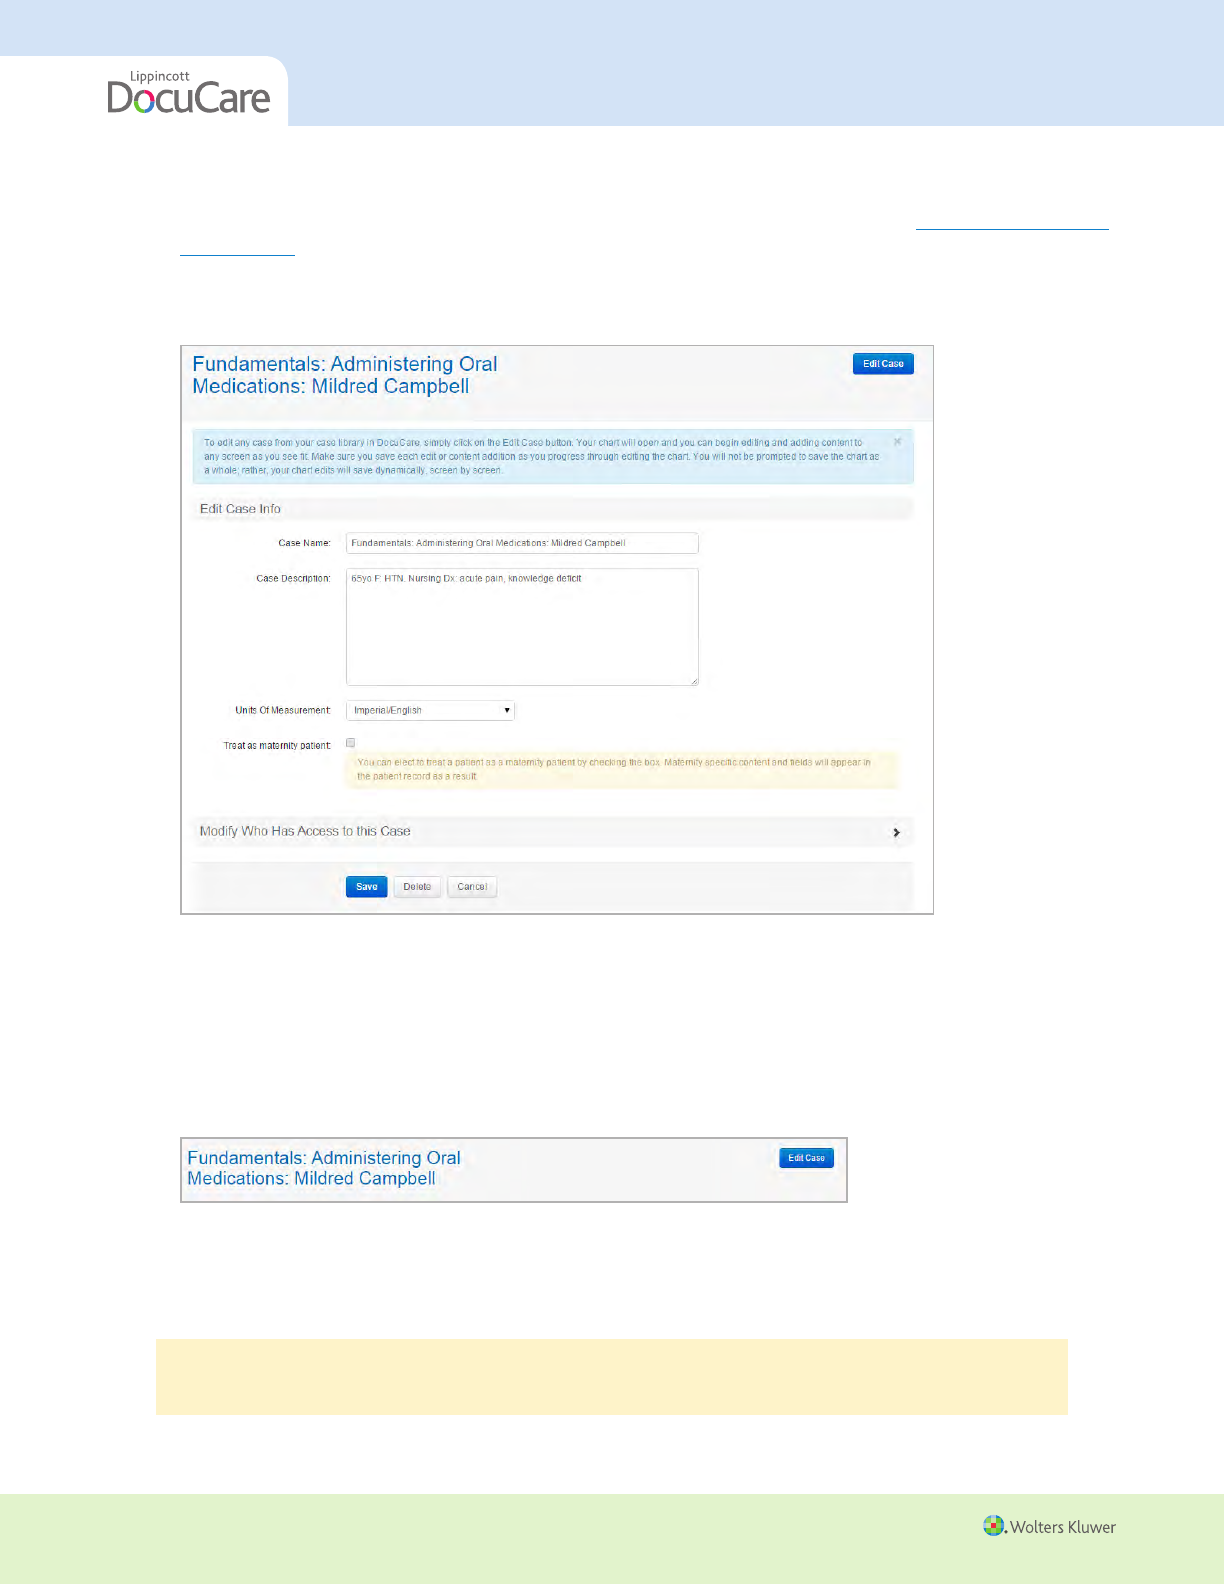
3. A new screen will appear. To edit the case name, description, and unit of measurement, simply make
your edits to the screen and click save.
Result: Your changes will save and you will receive a confirmation message. You can now go into the chart
via the Edit Case button next to the case title.
Note: The case description is not visible to students; this is for you and your co-instructors. You can create
case instructions for students via the Assignment tools.
4a. A new screen will appear. Locate and select “Edit Case” button, located next to the case title.
Result: Your patient’s chart will launch and will be editable.
4b. You can now edit your patient’s chart!
TIP! You can now add or change information inline. Unlike previous versions of Lippincott DocuCare,
you do not need to open a window to add new content.

23
All materials copyright © Wolters Kluwer. All rights reserved.
INSTRUCTOR USER’S GUIDE
Alert! Be sure to save each individual screen as you progress through editing or creating your chart.
You can exit the chart at any time and return to the chart later to make additional edits.
Creating Assignments
TIP! Before you create an assignment, you must create a class. (See Initial Account Set-Up/Create
a Class in this guide.)
Procedure Follow these steps to create an assignment for an existing class.
1. Click “Assignment Center” from the top navigation of the site.
Note: Alternatively, you can open your individual class page (from My Classes) to create individual
assignments from your class page.
24
INSTRUCTOR USER’S GUIDE
All materials copyright © Wolters Kluwer. All rights reserved.
2. Click “Create an assignment.”
Result: a New Assignment window displays.
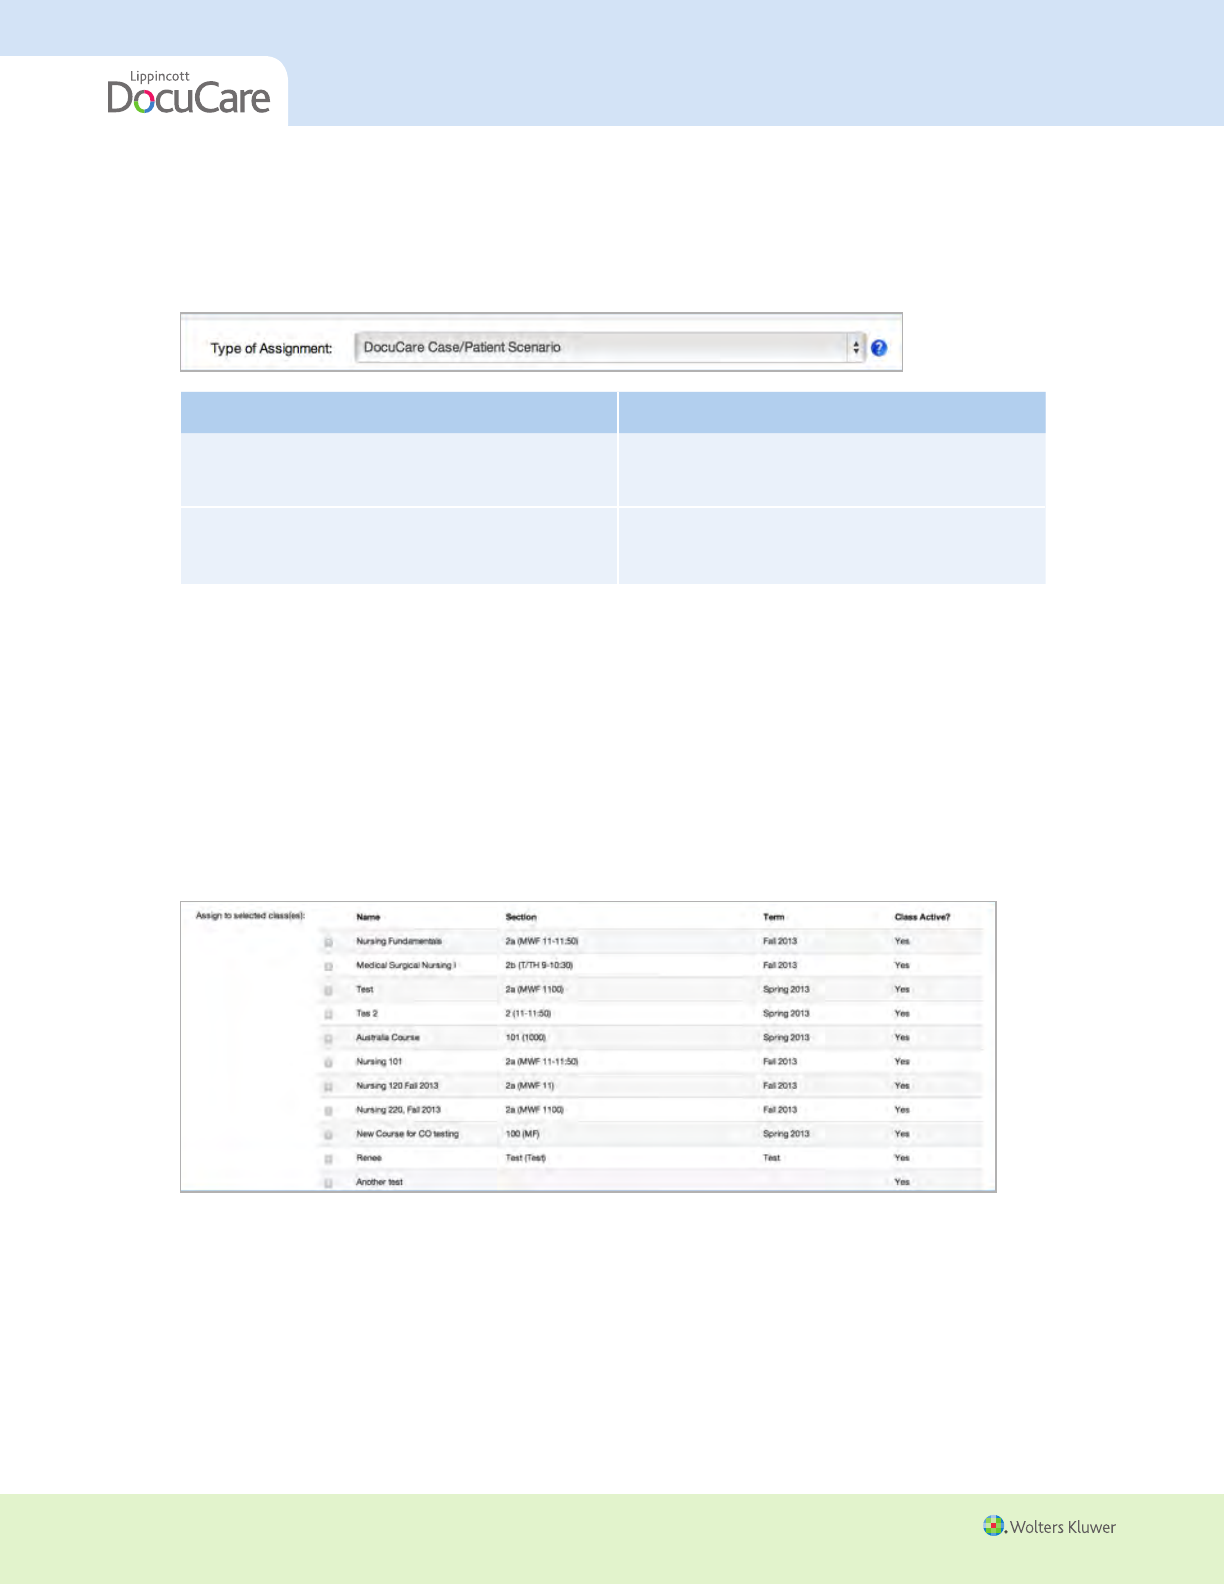
3. Select the Type of Assignment from the drop-down list.
If you want the assignment to be… Then …
Completed at a medical facility with an
n
Select Student Clinical
actual patient (clinical rotation)
n
Go to Step 4a
Completed based on fictitious case
n
Select DocuCare Case/Patient Scenario
data provided
n
Go to Step 4b
4a. If you selected “Student Clinical” (assignment completed at a medical facility/clinical rotation)
Note: Lippincott DocuCare will not allow students to enter Protected Health Information (PHI), including:
Specific patient name • Social security number • Occupation or employer • Insurance • Patient addresses or
phone number • Next of kin • Any biological identifiers (e.g., finger print, retina scan) • Age (students will be
directed to select patient age from a range of ages and the system will generate a false birth date).
Select “Student Clinical.”
Give your assignment a name (e.g., “Clinical, Week 1”)
Select the class(es) where the assignment will be available. You can assign assignments to multiple
classes by selecting each class you’d like to link the assignment too.
Indicate the dates and times that the assignment will be available for students to complete.
Note: The default duration period for assignments is two weeks. Assignments will be available for students
to complete immediately if you enter the current date. To leave the completion date open-ended, enter a
date in the future. You can also assign to multiple classes.
Enter additional instructions for students. These will be visible to students after they open the chart.
Click “Save.”
25
All materials copyright © Wolters Kluwer. All rights reserved.
INSTRUCTOR USER’S GUIDE
Result: You will be taken to the main Assignment Center page. Your assignments will appear under the
headings Active, Future, or Past Assignments.
4b. If you selected “DocuCare Case/Patient Scenario” (assignment completed in classrooms, simulation
labs, and/or at home based on case data)
Select “DocuCare Case/Patient Scenario.”
Click on the “Choose a Case” drop-down list and choose one from your case library (My Case Library).
Enter the Assignment Name.
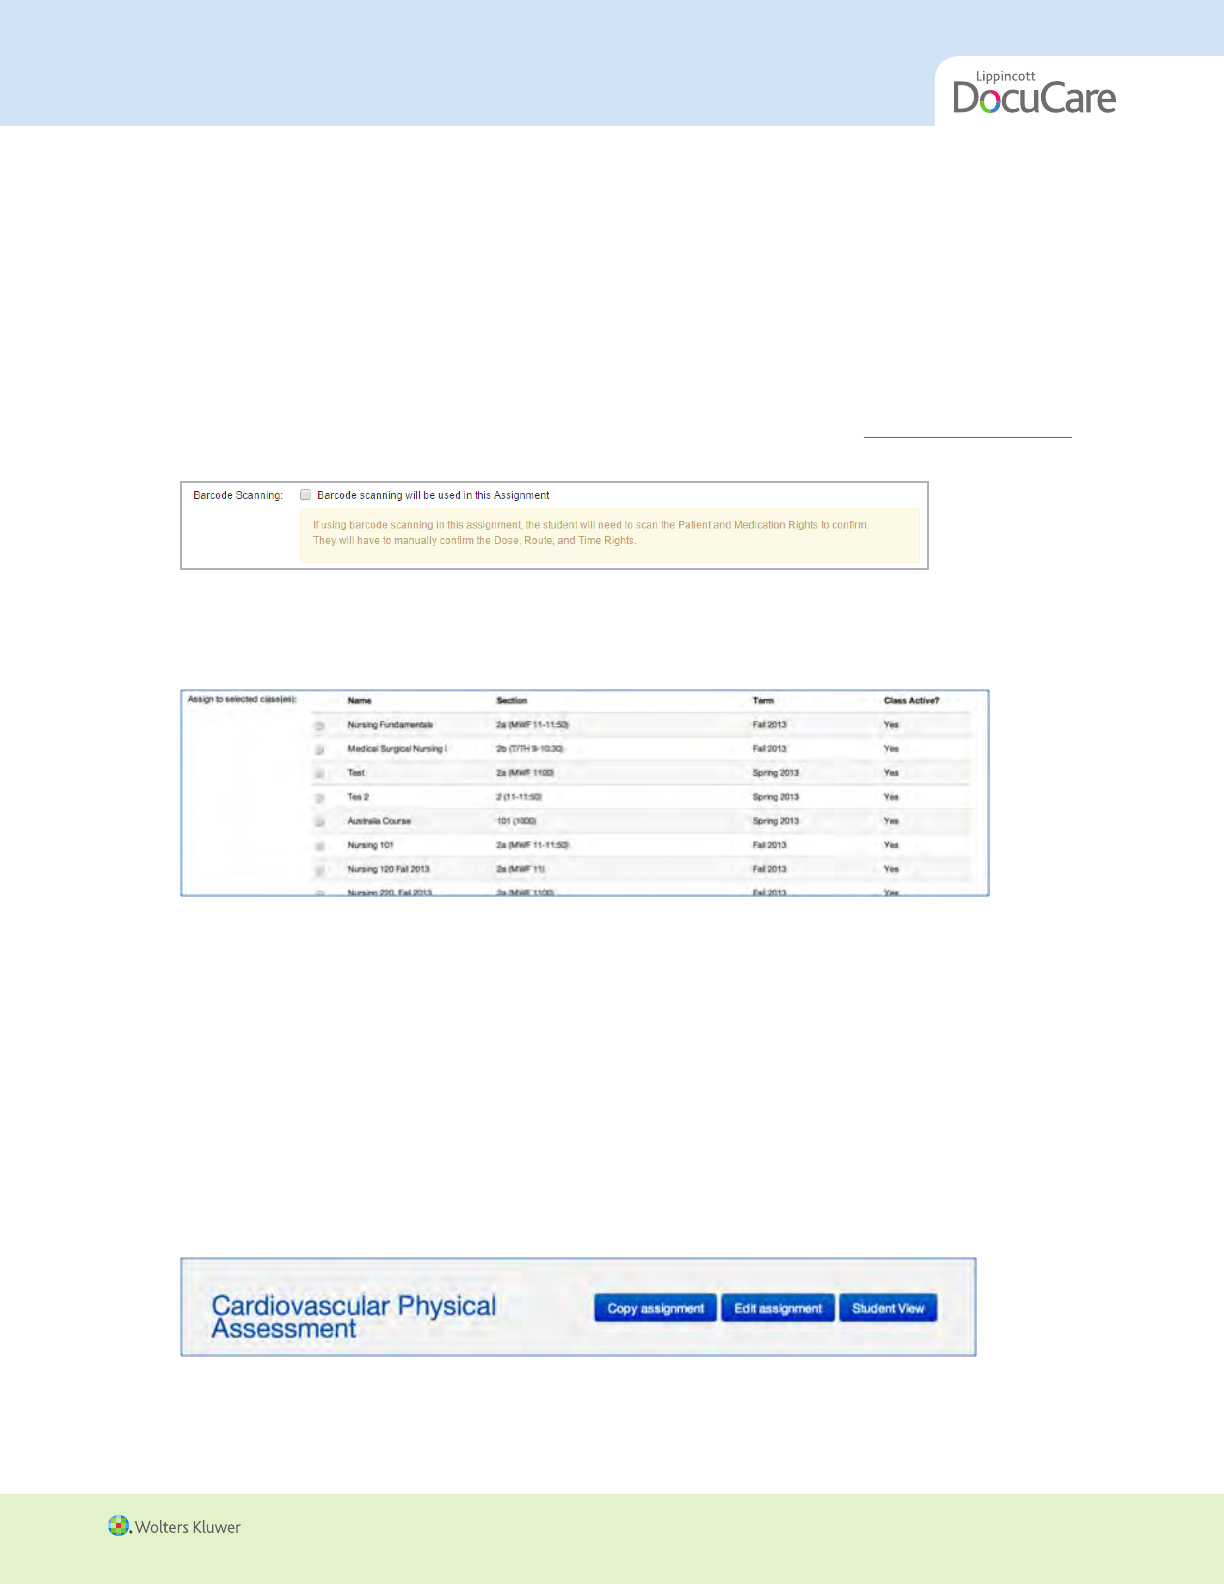
NEW! Select if you will be using barcode scanning with the assignment (see Using Barcode Scanning for
more information).
Enter the Learning Objectives for your students.
Select the class(es) where the assignment will be available. You can assign assignments to multiple
classes by selecting each class you’d like to link the assignment too.
Indicate the dates/times that the assignment will be available for students to complete.
Note: The default assignment duration period is two weeks. Assignments will be available for students
to complete immediately if you enter the current date. To leave the completion date open-ended, enter a
future end date.
Click “Save.”
Result: You will be taken to the Assignments page. Assignments will appear under the headings Active,
Future, or Past Assignments.
5. If you’d like to see your assignment (and chart) as a student, click on the student view button from the
main Assignment page.
26
INSTRUCTOR USER’S GUIDE
All materials copyright © Wolters Kluwer. All rights reserved.
Editing or Copying an Assignment
TIP! Before you edit an assignment, you must have created an assignment initially. (See Creating
Assignments in this guide.)
Procedure Follow these steps to EDIT an assignment.
1. Go to the Assignment Center page.
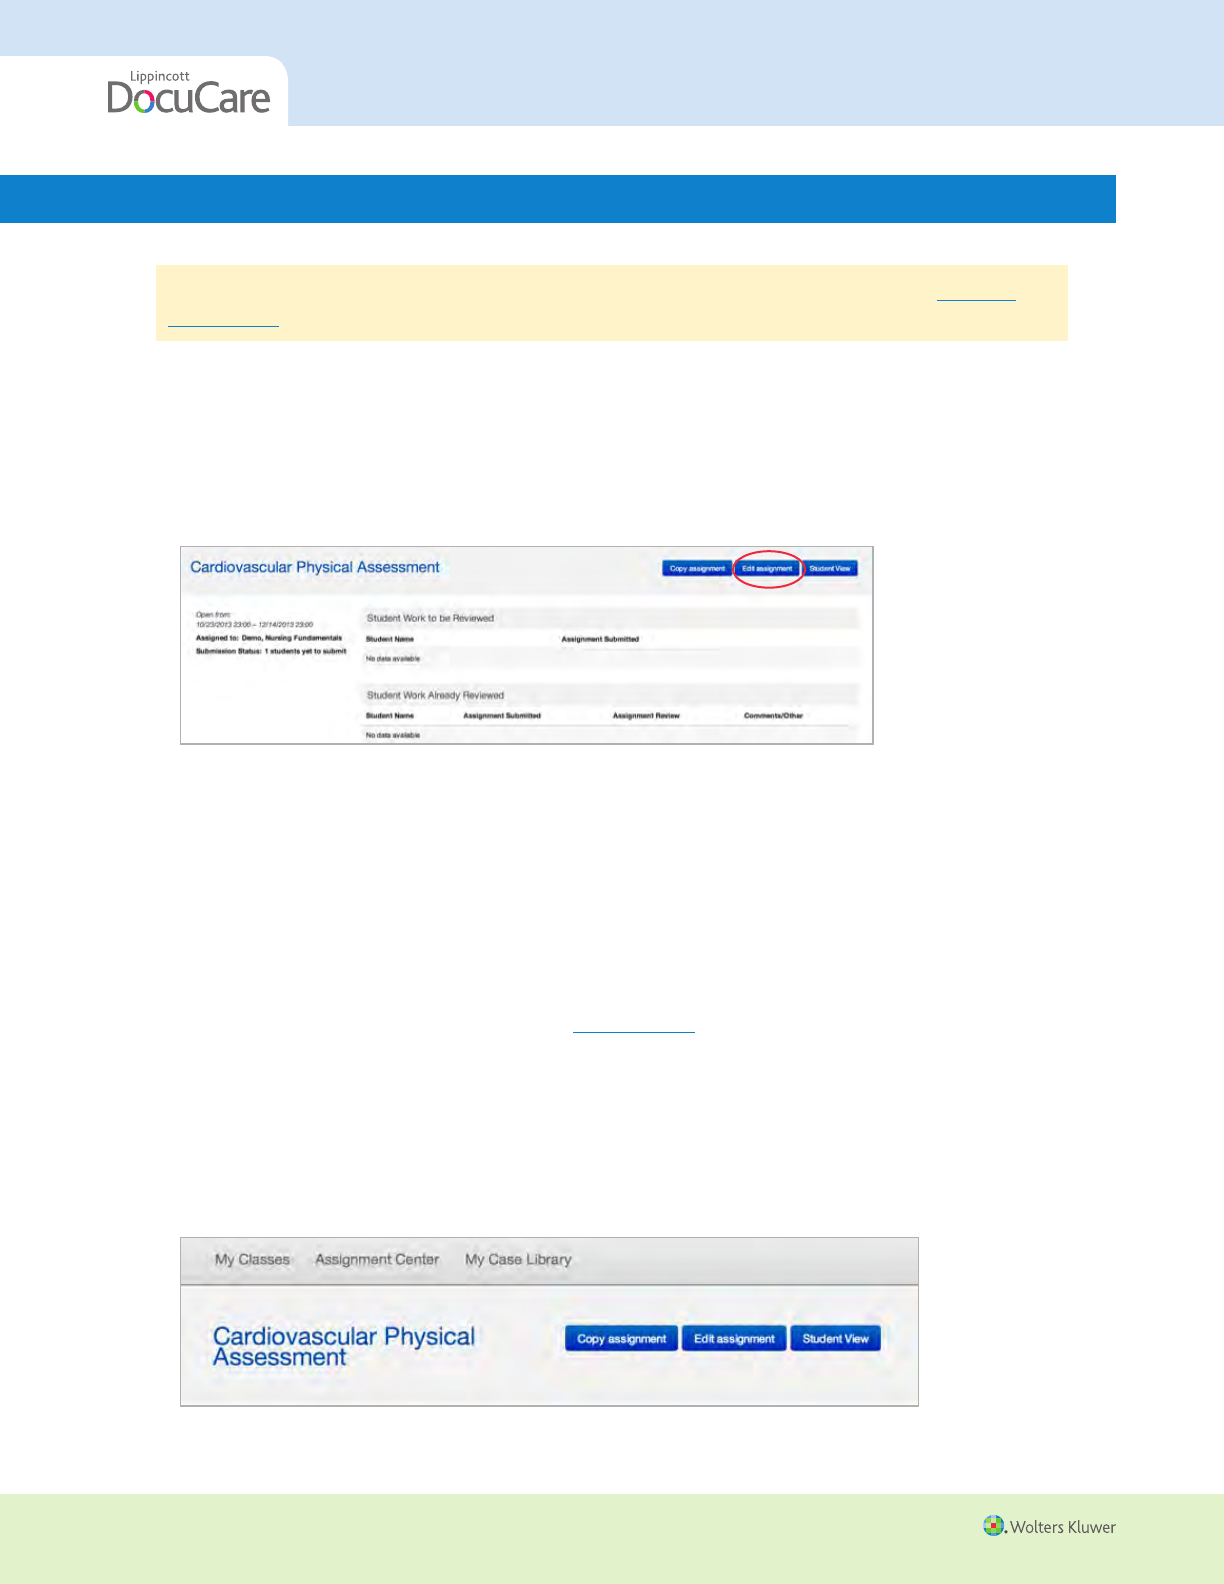
2. Click on <Assignment Name>. A new page will open with assignment status details.
3. Click on the “Edit assignment” button.
4. Modify as necessary, including:
Assignment name
Learning objectives
Classes offering the assignment
Assignment instructions
Assignment open and close dates/times
Note: You cannot make edits to the case associated with the assignment during this step. You must edit
your case through the Case Library page. See Editing a Case earlier in this guide.
Procedure Follow these steps to COPY an assignment.
1. Go to the Assignment Center page.
2. Click on <Assignment Name>. A new page will open will additional status details.
3. Click on the “Copy assignment” button.
27
All materials copyright © Wolters Kluwer. All rights reserved.
INSTRUCTOR USER’S GUIDE
4. You will see a copy of the assignment appear, which you can then click on, modify, and save to make
adjustments. The copied assignment title will simply be called “Copy of <Assignment Name> “
Managing Student Enrollment
TIP! Before communicating enrollment information to students you must create a class and
assignment(s). (See Initial Account Set-Up/Create a Class, and Creating Assignments earlier in this
guide. Note: You should create assignments before distributing the class code to students to avoid
confusion.)
Procedure Follow these steps to communicate enrollment information to students.
1. Click on <the Class name> on the page “My Classes.”
Note: Active classes are listed under Active Classes on the Classes page. Students will not have access to
Inactive Classes.
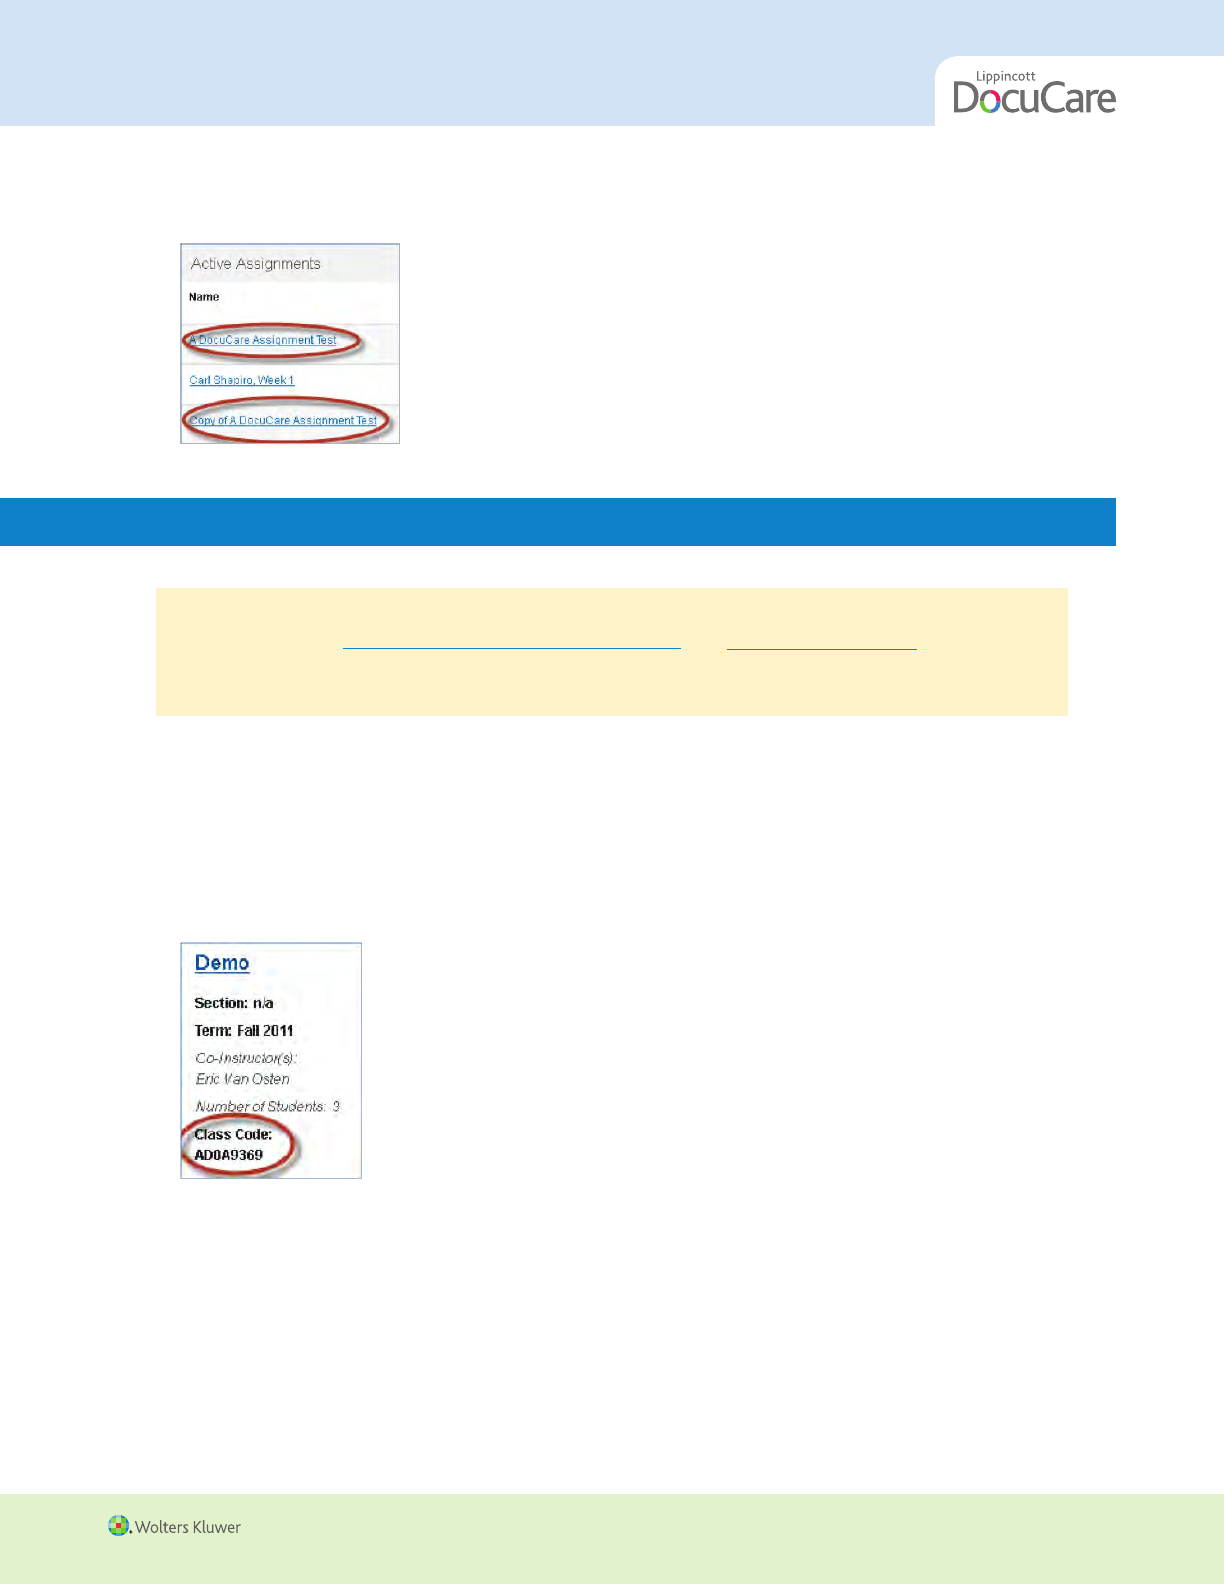
2. Locate the class code.
Note: The class code is a randomly generated 8-digit class code is located on the My Classes page. It
is listed under the Class’s information in the left column. The class code will always be visible on your
dashboard for your reference.
3 Distribute the 8-digit class code to your students and any other enrollment information (if applicable). Feel
free to use the following language:
We are using DocuCare in this course. You need to join my class in order to view and complete my assignments.
Please complete the following instructions in order to join my course:

28
INSTRUCTOR USER’S GUIDE
All materials copyright © Wolters Kluwer. All rights reserved.
1. If you have not already accessed thePoint using your DocuCare student Access Code, please do so.
2. Once you have accessed DocuCare, locate and click on the Register For A Class button at the top of the
page.
3. Enter the class code <class code> in the Class Code field.
4. Your entry will be validated. You will now be able to see and complete your assignments. You can also begin
to use DocuCare to record patient data from clinical rotations.
5. If your class code is not validated, check the code again and re-enter it. If it still does not work (or if you have
other questions), please contact our product support team at 1-800-468-1128 or techsupp@lww.com.
4. Once your students have your class code, they can register for your course and begin completing your
assignments. Enrollment can be reviewed by clicking on the class name.
5. To review your student enrollment, go to the class detail page and select the Enrollment tab.
Result: A list of enrolled students and the date that they enrolled will appear.
6. Manage student enrollment by removing and re-adding students, as necessary.
If you want to… Then…
Remove a student from the class
n
Check the checkbox next to an
enrolled student’s name and click
.
Re-Add a student that was previously
n
Check the checkbox next to a
removed from the class removed student’s name and click
.
Evaluating Student Assignments (Instructor-Initiated Assessments)
TIP! Before evaluating student assignments you must create a class and assignment(s), and activate
the assignment(s). (See See Initial Account Set-Up/Create a Class, and Creating Assignments earlier in
this guide. Note: This topic pertains to evaluating student work assigned by you.)
29
All materials copyright © Wolters Kluwer. All rights reserved.
INSTRUCTOR USER’S GUIDE
Procedure Follow these steps to review student submissions.
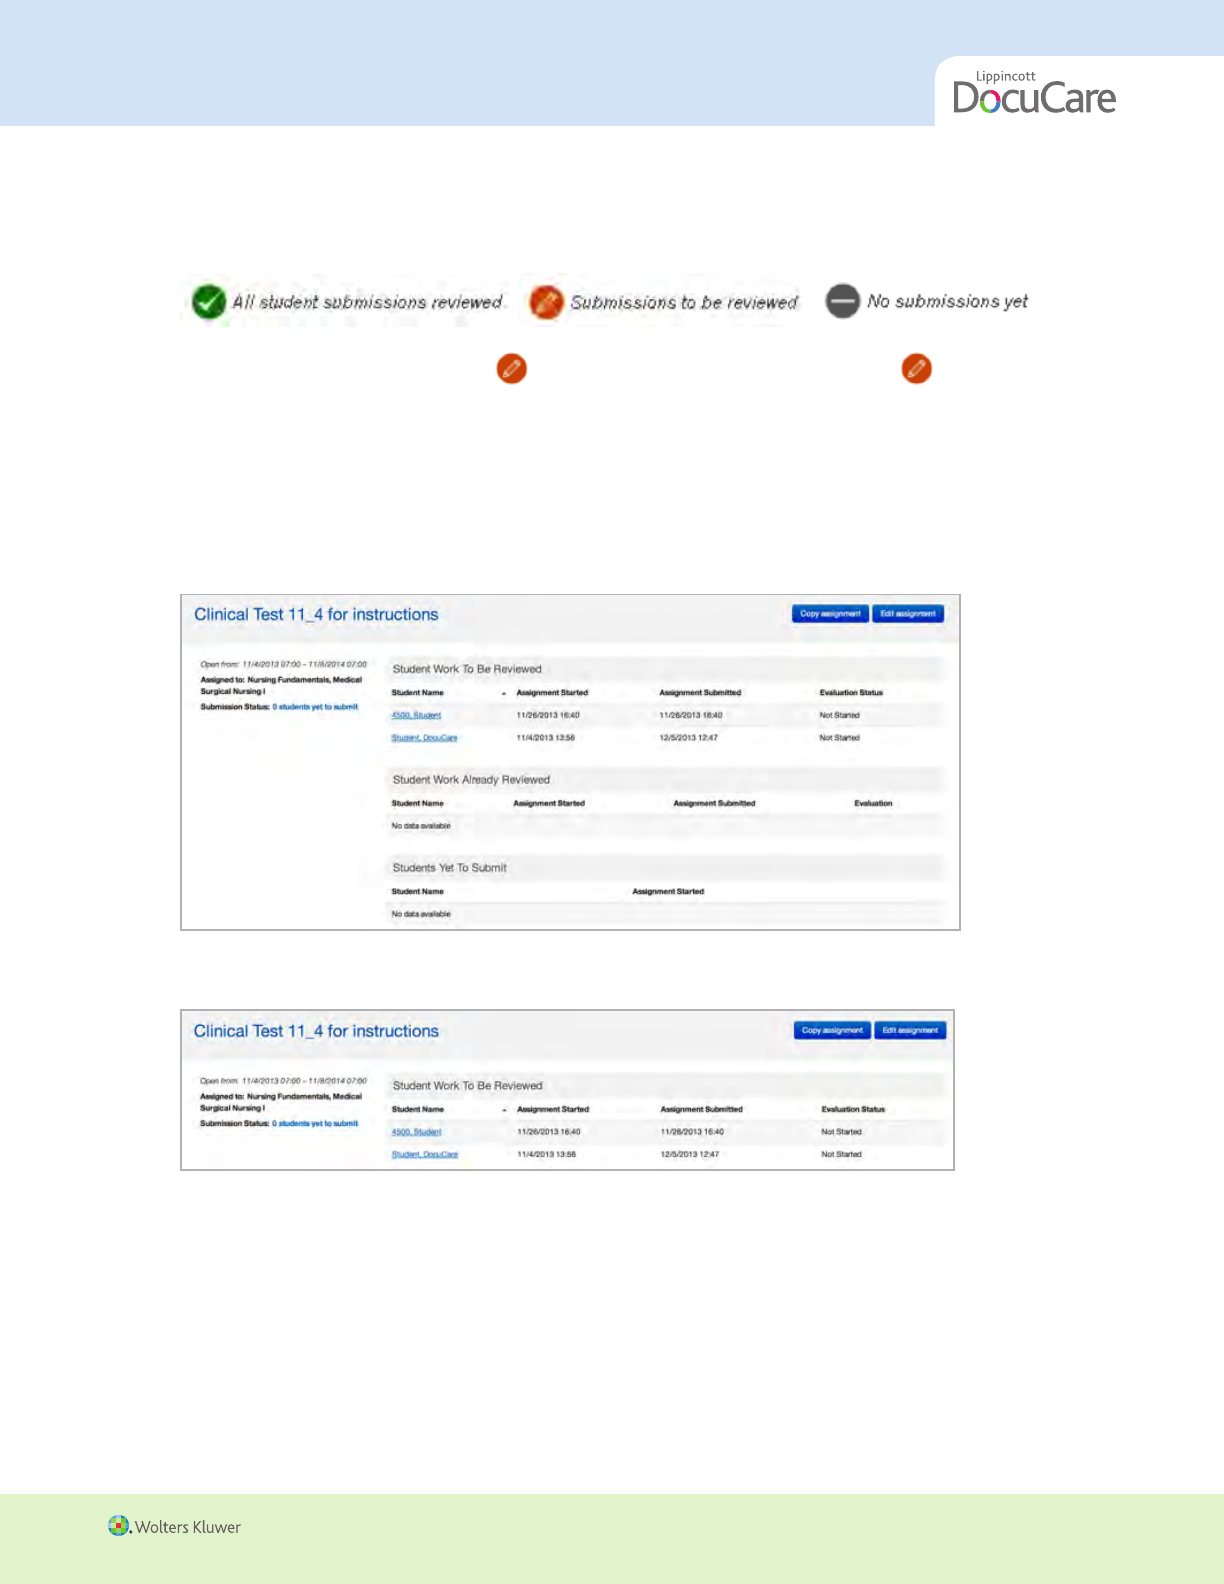
1. On the “My Classes” page, view at a glance the status of student submissions via the three icons:
Click on an assignment that has the icon. You will notice a number next to the icon; this indicates
the number of student submissions you need to evaluate.
2. Click on the assignment name for the assignment you’d like to edit. You will then be taken to the main
assignment page, broken into three status categories:
Student Work to be Reviewed (submitted, needs your evaluation)
Student Work Already Reviewed (charts you’ve already evaluated)
Students Yet to Submit (students who have not submitted their work to you yet)
3. Click on the desired student name to evaluate the work. The students chart will open.
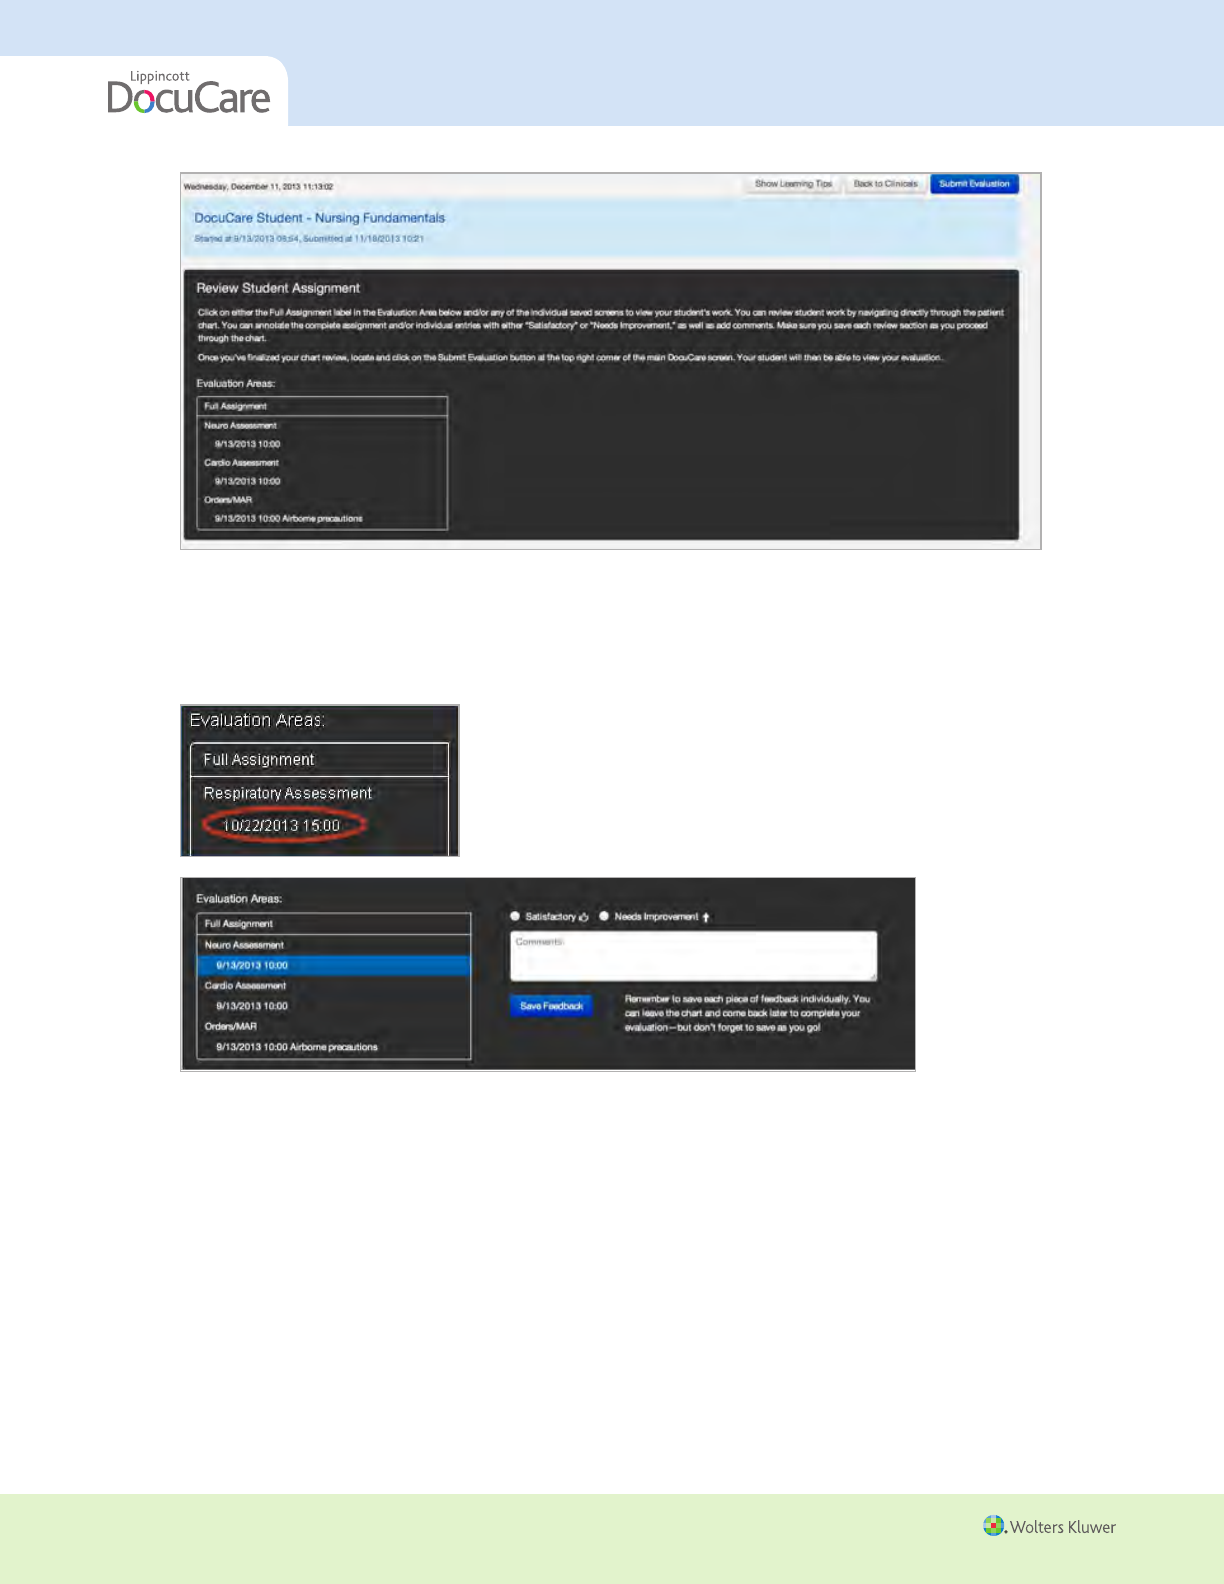
4. The student name and assignment data (start, submission date/time) will appear in a blue box above a
floating black box. The floating black box includes instructions for evaluation as well as a detailed list of all
of the student’s entries into the chart. You can review and leave feedback for every individual screen the
student submitted, as well as an overall evaluation for the full assignment.
30
INSTRUCTOR USER’S GUIDE
All materials copyright © Wolters Kluwer. All rights reserved.
To review individual screens, click on a timestamp in the black box, then scroll down to review the
submitted work. As you scroll down and review, the box will follow your lead. You can choose “Satisfactory”
or “Needs Improvement” and also type comments in the free text box. When you complete the evaluation
for this screen, click “Save Feedback.”
Alert! You MUST click Save Review for each individual screen you’ve evaluated, as well as your
overall evaluation (Full Assignment). Your comments/evaluation will not be saved until and unless
you click on the Save Feedback button for each item.
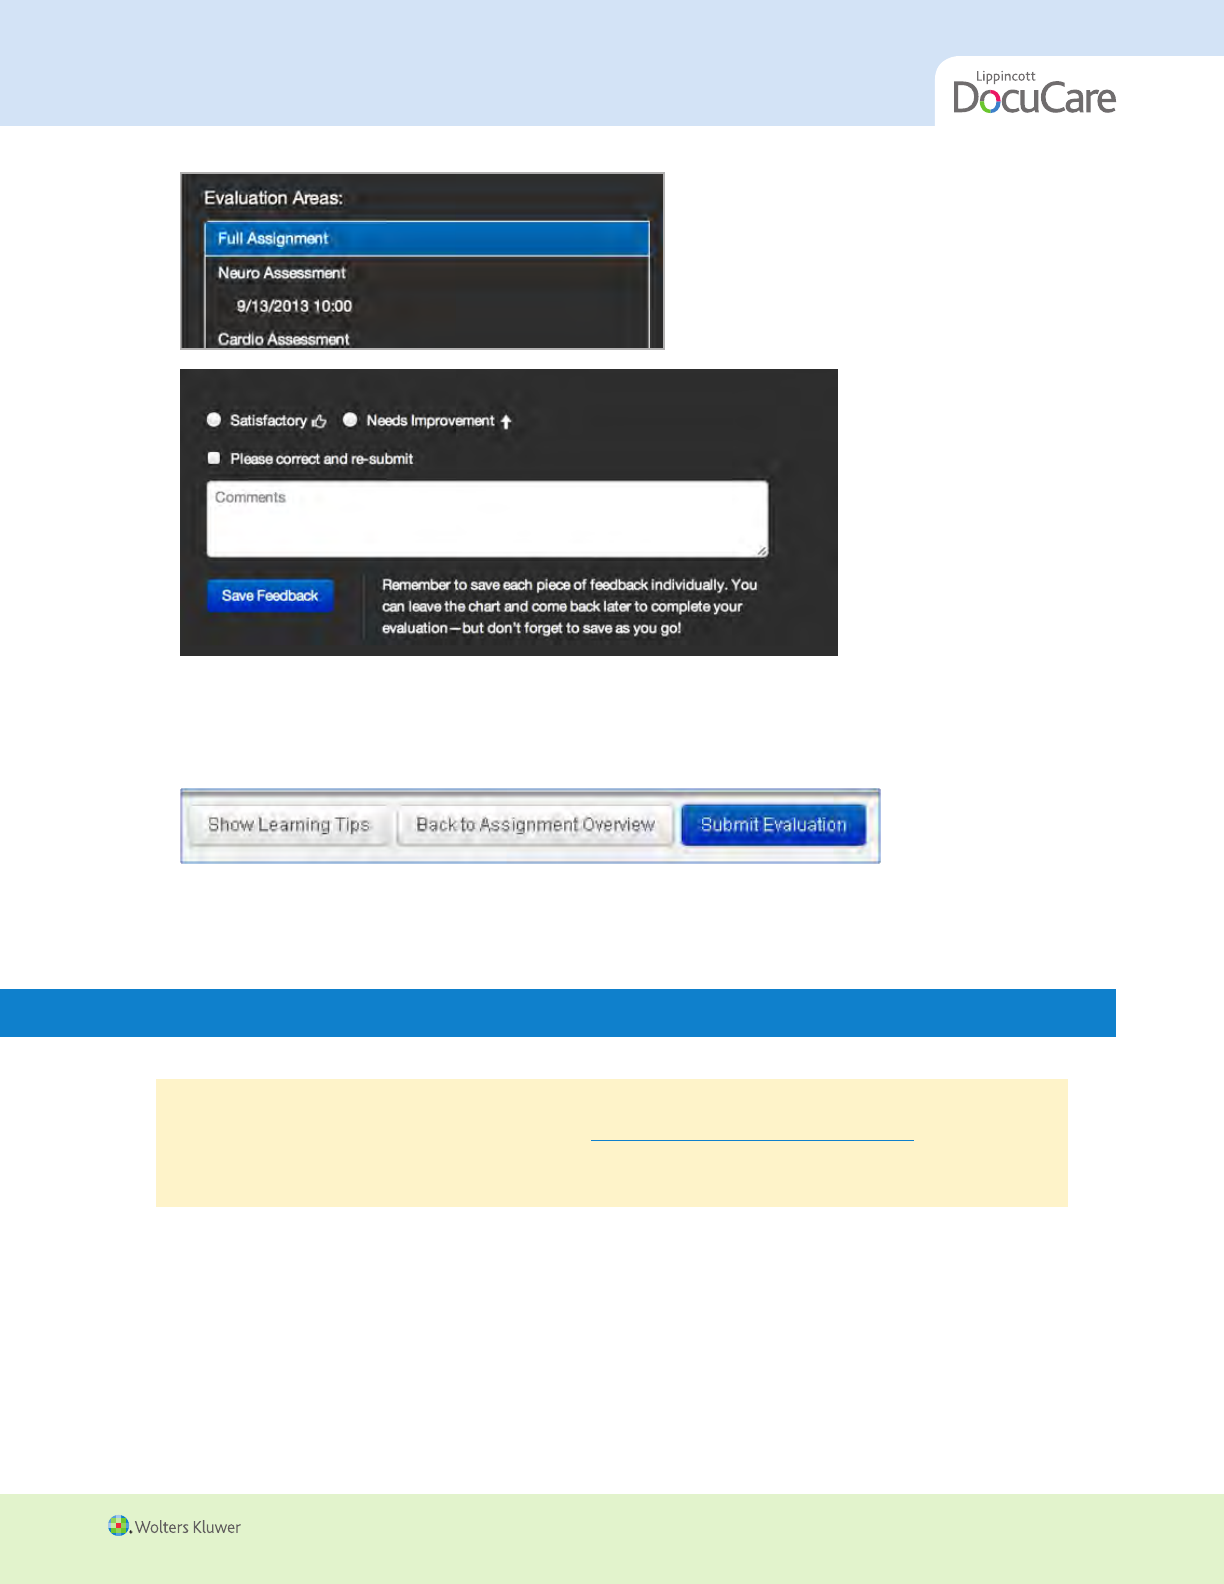
The overall review works similarly, but offers you one more option.
Click on the Full Assignment link. Add your overall assessment of the student’s work (satisfactory or
needs improvement) and any comments you’d like to add,
New! From here, you can also ask the student to correct and re-submit the chart. If you elect to request
this, students will be able to edit and update the chart and re-submit their work to you.
Click “Save Feedback”
31
All materials copyright © Wolters Kluwer. All rights reserved.
INSTRUCTOR USER’S GUIDE
5 When you have completed your evaluation, click on the button “Submit Evaluation” on the top right
corner of the screen (above the chart). This will send a notification to the student that they can review your
evaluation, and if applicable, correct the chart and re-submit it to you.
6 Click “Back to Assignment Overview” to review the full list of students who have submitted their work and
your evaluation status.
Evaluating Student-Initiated Clinical Charts
TIP! Before evaluating student work, you must have created a class and enabled yours students to
join your class and submit work to you. (See See Initial Account Set-Up/Create a Class). Note: This
topic pertains to evaluating student work done independently of an assignment [i.e., student-initiated
clinical charting].)
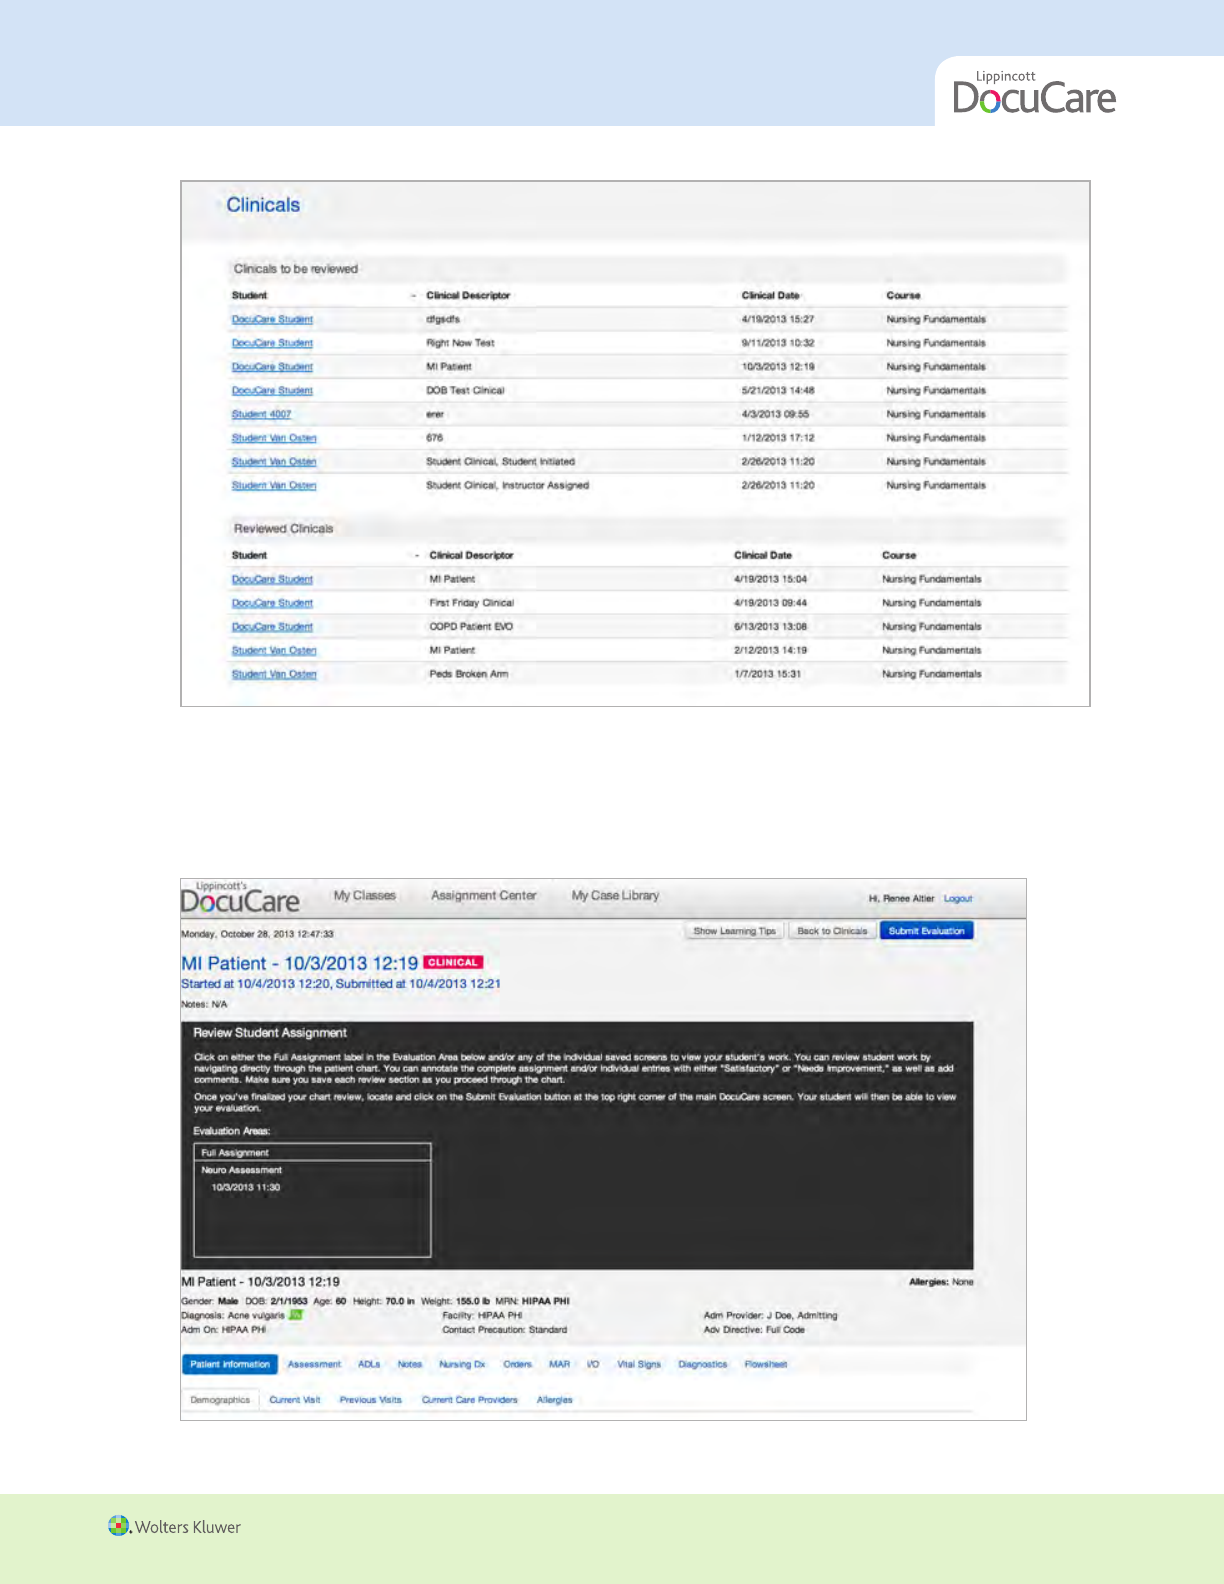
Procedure Follow these steps to review independent student submissions.
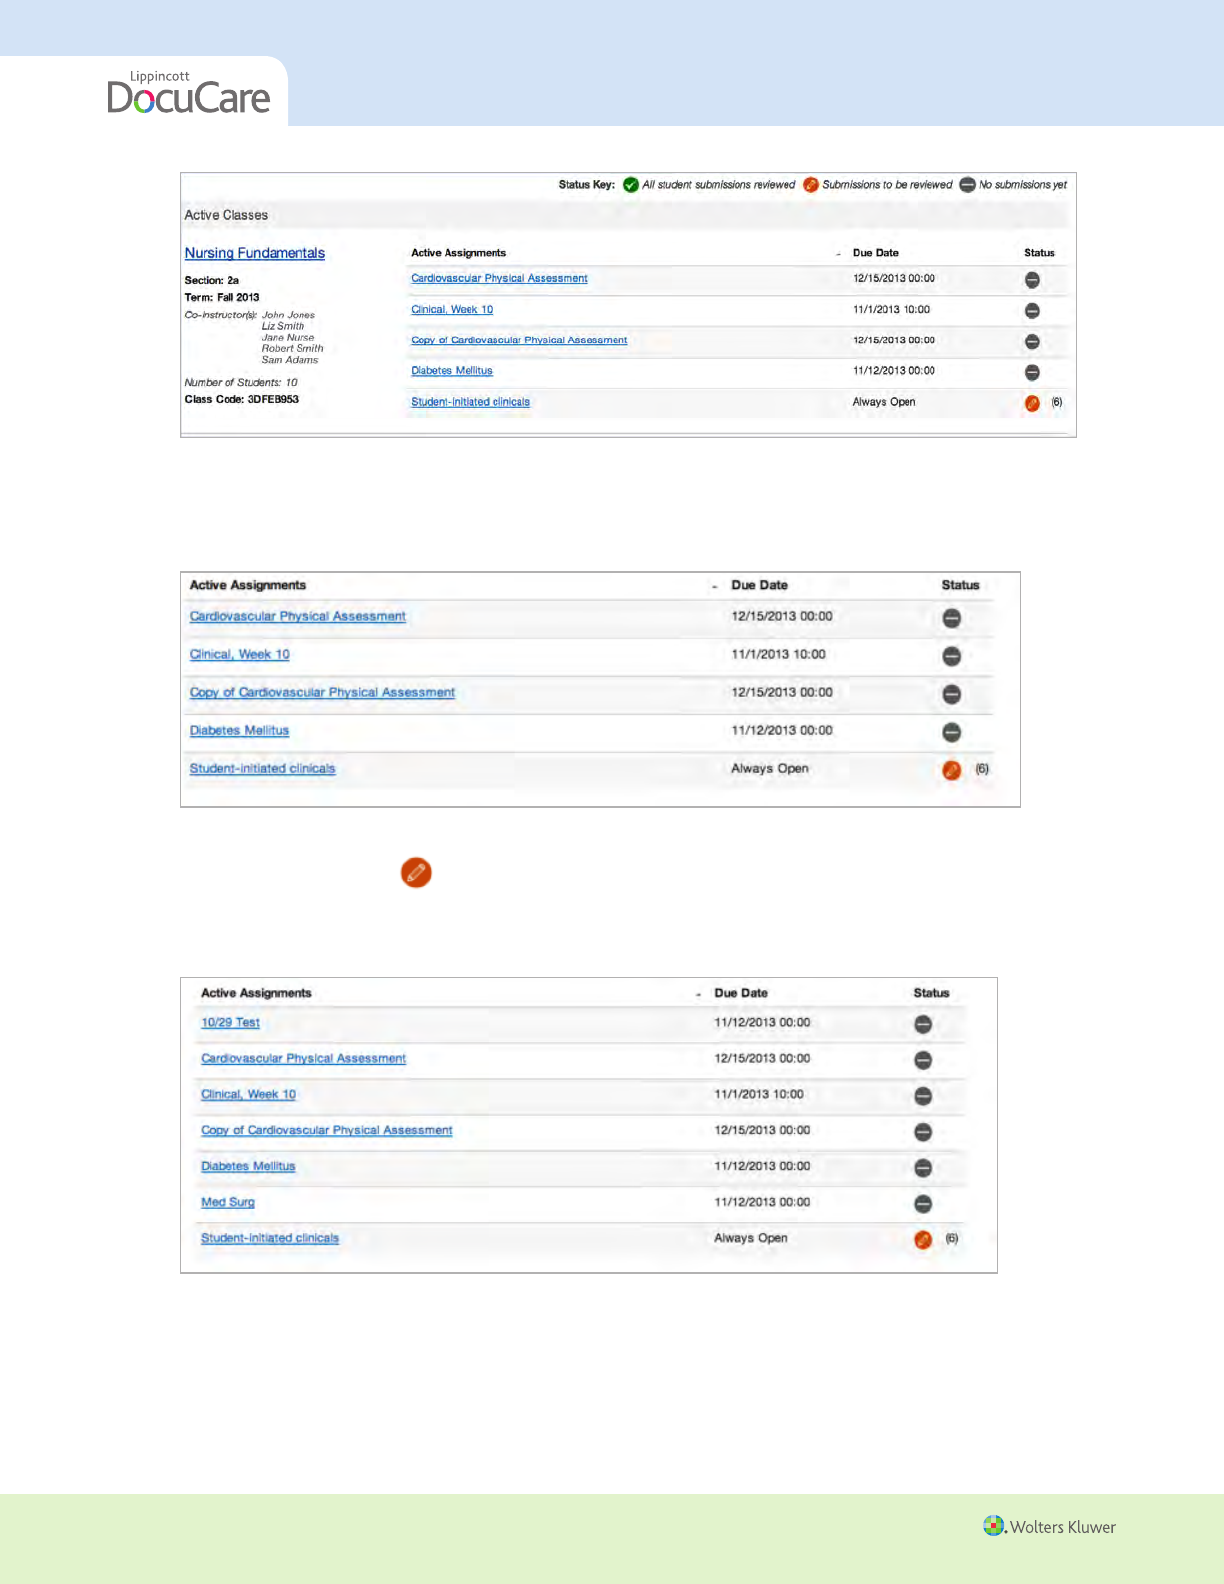
1. On the “My Classes” page, your classes will list both assignments you’ve created as well as student-
initiated clinical submissions. DocuCare allows students to chart their clinical work via a blank patient
record (without having to link to an assignment). Students can do this work independently and then submit
their clinical rotation charts to you via this mechanism.
32
INSTRUCTOR USER’S GUIDE
All materials copyright © Wolters Kluwer. All rights reserved.
New! You can now see your evaluation work in total from the My Classes (and the individual class page).
The list of active assignments and submissions includes both work completed for your assignments as well
as work done independently by students for clinical charting.
2. If your students have submitted independent clinical charts, the status icon next to “Student-initiated
clinicals” will include the
icon. The number next to the icon indicates the number of student clinical
submissions you need to evaluate.
Click on the Student-initiated clinicals hyperlink.
Result: You will be taken to your list of new submissions to review, as well as your list of student
submissions that you’ve already evaluated (when applicable).
33
All materials copyright © Wolters Kluwer. All rights reserved.
INSTRUCTOR USER’S GUIDE
3. Click on the student name to evaluate their clinical documentation. The student’s chart will open. The
only differentiating factors (between this and a non-clinical submission) are:
Pink banner denoting the submission as a CLINICAL chart.
Demographic and current visit data is only denoted as HIPPA PHI to protect patient privacy.

34
INSTRUCTOR USER’S GUIDE
All materials copyright © Wolters Kluwer. All rights reserved.
4. Proceed to evaluate your student’s clinical chart just as you would a regular assignment. When you’ve
added all of your comments, click Submit Evaluation Your student will then be able to see your comments
and evaluation.
You will be returned to your Clinical dashboard; your newly submitted work will then be moved to the
“Reviewed Clinicals” category.
Using Barcode Scanning
New for Spring of 2015! Lippincott DocuCare now allows the use of barcode scanning to confirm patients and
medication orders.
To use barcode scanning with DocuCare, your barcode scanner must be compatible with Code 128 barcodes. Check
the technical specifications section of your barcode scanner’s operation manual or specification sheet to determine
if your barcode scanner is compatible.
Many barcode scanners simply plug into a USB port on your computer and are ready to scan. Refer to your barcode
scanners operation manual for instructions for your specific barcode scanner.
TIP! With many barcode scanners, you can quickly check if it is working by opening a Word document
or other blank document file and scanning a barcode. The numeric code from the barcode should
appear in your Word document.
Viewing the Patient Barcode
Each of the existing cases in your Case Library
will be automatically populated with a patient
barcode. If you create a new case, it will also be
automatically assigned a patient barcode. The
patient barcode will appear on the Demographics
tab, and can also be accessed via the Manage
Barcodes button for each case in the case Library.
35
All materials copyright © Wolters Kluwer. All rights reserved.
INSTRUCTOR USER’S GUIDE
Note: The patient barcode is generated based on the patient’s name and medical record number (MRN). If
either the patient name or MRN is changed, DocuCare will generate a new patient barcode.
Setting Up Medication Barcodes
Barcode scanning in Lippincott DocuCare offers three flexible options for medication barcodes so you can choose
which works best for your program. There are three options for medication barcodes:
DocuCare-generated barcode – You can elect to have DocuCare generate a barcode for a medication.
You can then print out the barcode and put it on a medication or container that doesn’t already have a
barcode.
Manufacturer barcode – If you using a medication that already has a barcode (for example, a
manufacturer’s bottle of Tylenol), you can scan the barcode and save it to your DocuCare case.
Simulation barcode – If you are using practice medications that already have a barcode, you can scan the
barcode on the practice medication and save it to your DocuCare case.
Note: By default, all existing medications in your cases will be assigned a DocuCare-generated barcode.
You can replace the DocuCare-generated barcode with a manufacturer or simulation barcode by following
the instructions that appear below. When adding a new medication to a case, you will be prompted to
select which type of barcode you’d like to use.
To set up medication barcodes:
1. Click on My Case Library.
2. Within your Case Library, click on the name of the case for which you’d like to set up medication barcodes.
3. Select the Edit button in the upper right-hand corner of the Edit Case Info screen.
4. Click on the Orders tab.
36
INSTRUCTOR USER’S GUIDE
All materials copyright © Wolters Kluwer. All rights reserved.
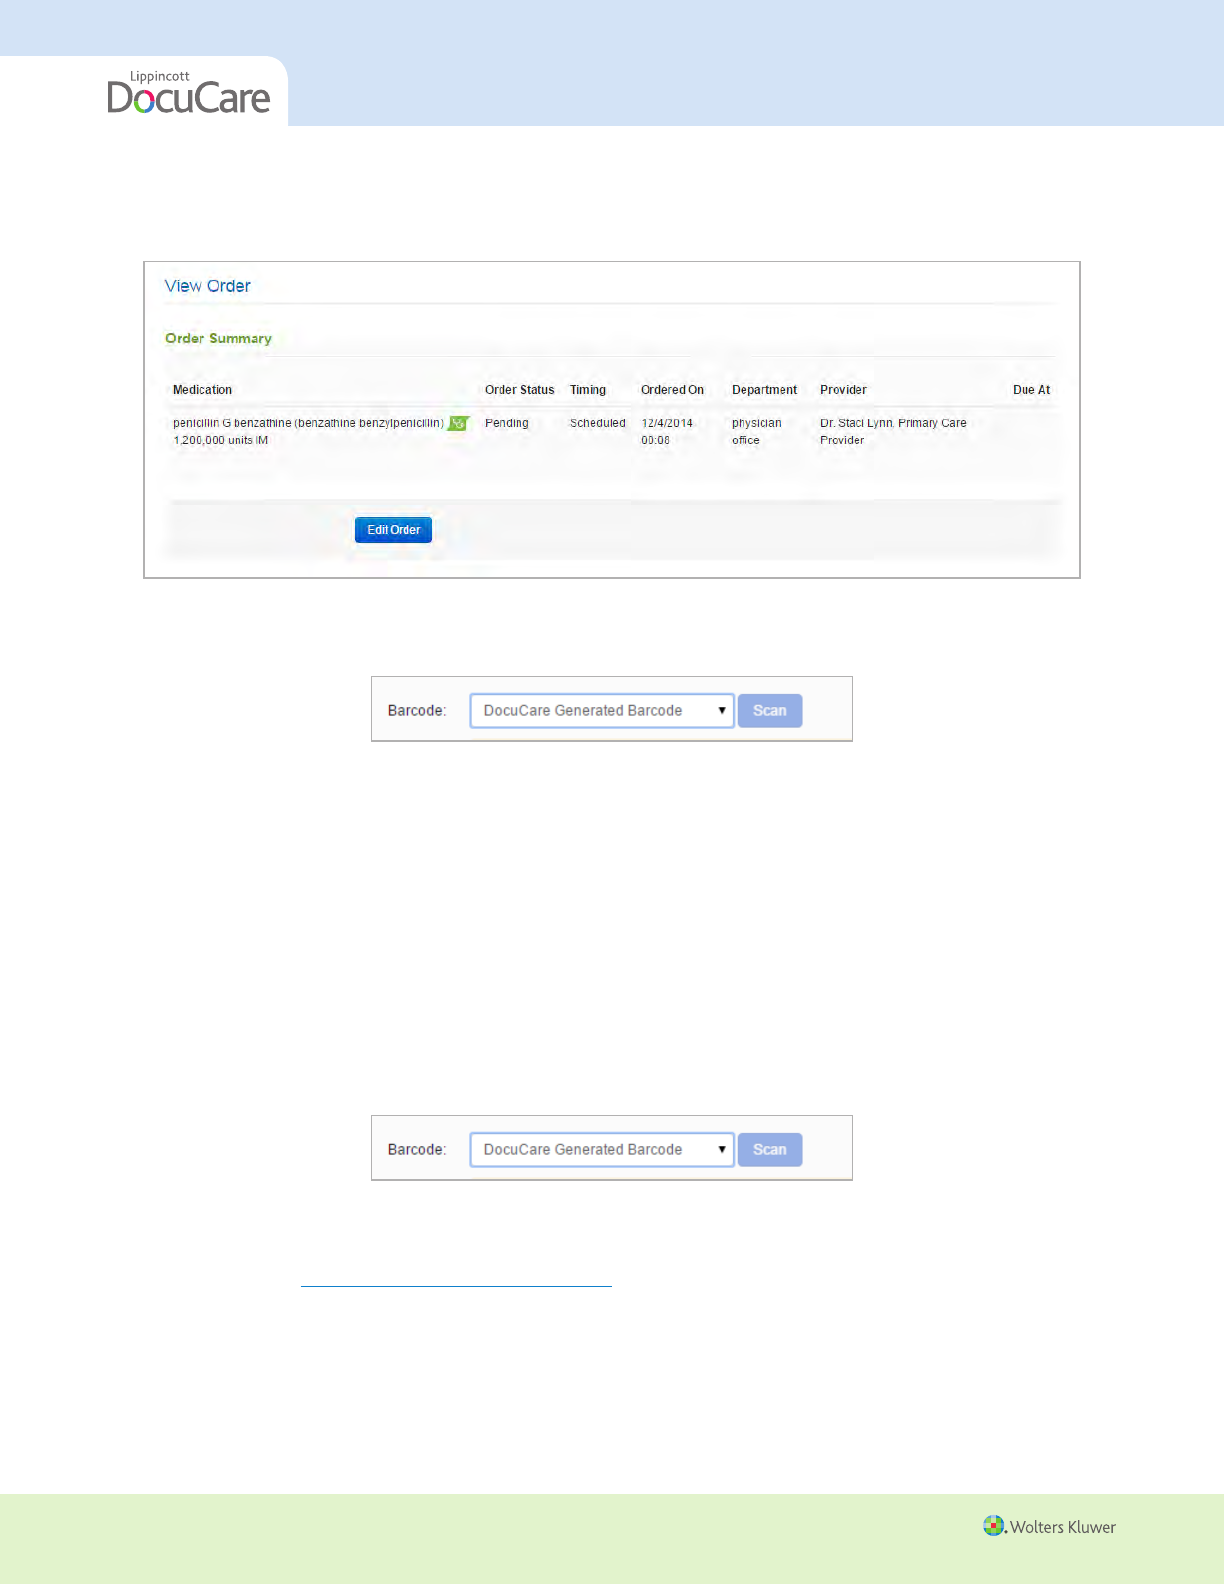
5a. To edit the barcode for an existing medication:
Click on the name of the drug you’d like to edit. The View Order page will open.
Click Edit Order.
Scroll to the bottom of the Edit Order page to locate the Barcode field.
Select either “Manufacturer Barcode” or “Simulation Barcode” from the drop-down menu and click Scan.
Use your barcode scanner to scan the barcode on the manufacturer or simulation medication you plan on
using for this medication and click Save. The default DocuCare-generated barcode will be replaced with the
scanned barcode, associating the barcode on the bottle you scanned with the medication in DocuCare.
5b. To set up a barcode for a new medication:
Click on Add New Medication Order. The Add New Medication Order page will open.
Complete the Provider Information and Order and Administration fields.
If you do not plan on using a manufacturer or simulation medication with an existing barcode, DocuCare
will automatically create a medication barcode as a default. To have DocuCare create a new barcode for the
medication:
Select DocuCare Generated Barcode from the Barcode drop-down menu.
Click Save.
The DocuCare-generated barcode will be added to the list of barcodes in the Manage Barcodes section for
this case (see Downloading and Printing Barcodes).
To scan an existing manufacturer or simulation medication barcode:
Select either “Manufacturer Barcode” or “Simulation Barcode” from the drop-down menu.
Click Scan.
37
All materials copyright © Wolters Kluwer. All rights reserved.
INSTRUCTOR USER’S GUIDE
Use your barcode scanner to scan the barcode on the manufacturer or simulation medication you plan on
using for this medication.
Click Save.
The scanned barcode will be added to the list of barcodes in the Manage Barcodes section for this case (see
Downloading and Printing Barcodes).
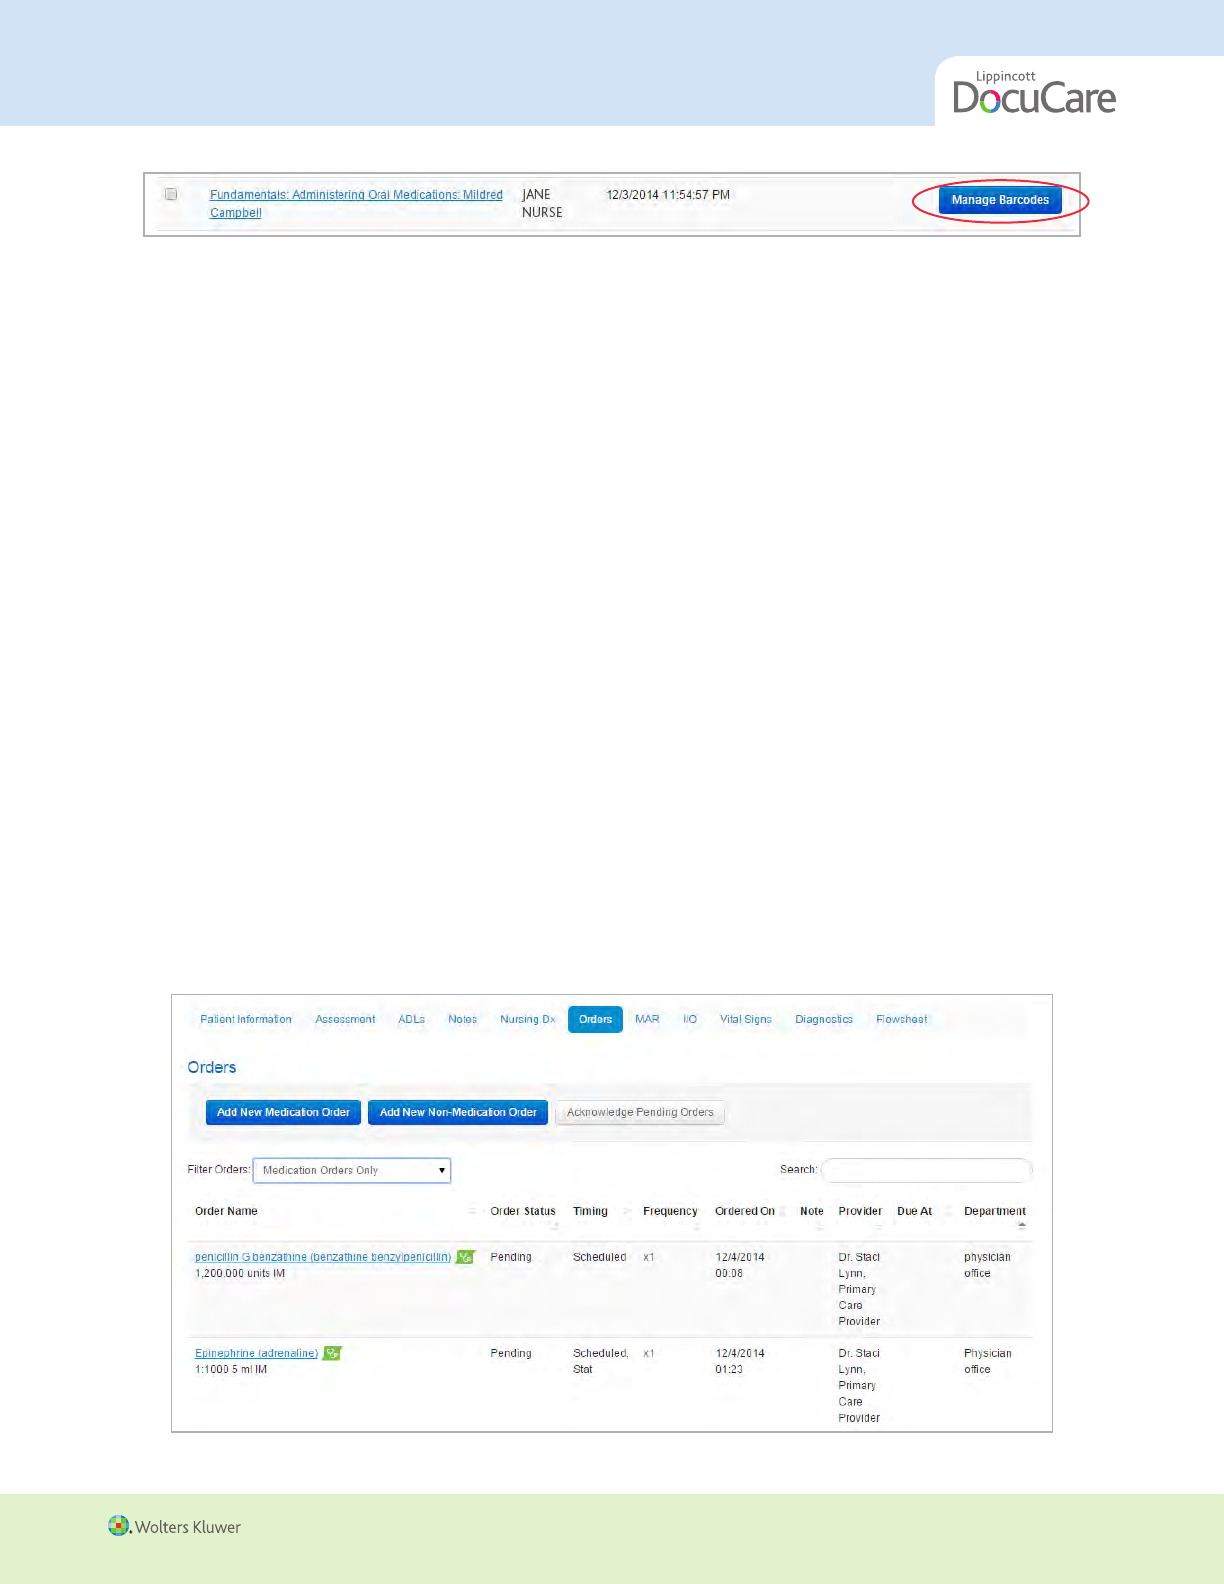
Downloading and Printing Barcodes
Barcodes can be downloaded and printed from the Manage Barcodes tab. To access the Manage Barcodes tab:
1. Click on My Case Library.
2. Click on the Manage Barcodes button to the right of the case name for which you’d like to download and print
barcodes, or Click the name of the case and select the “Manage Barcodes” tab in the Edit Case Info screen.
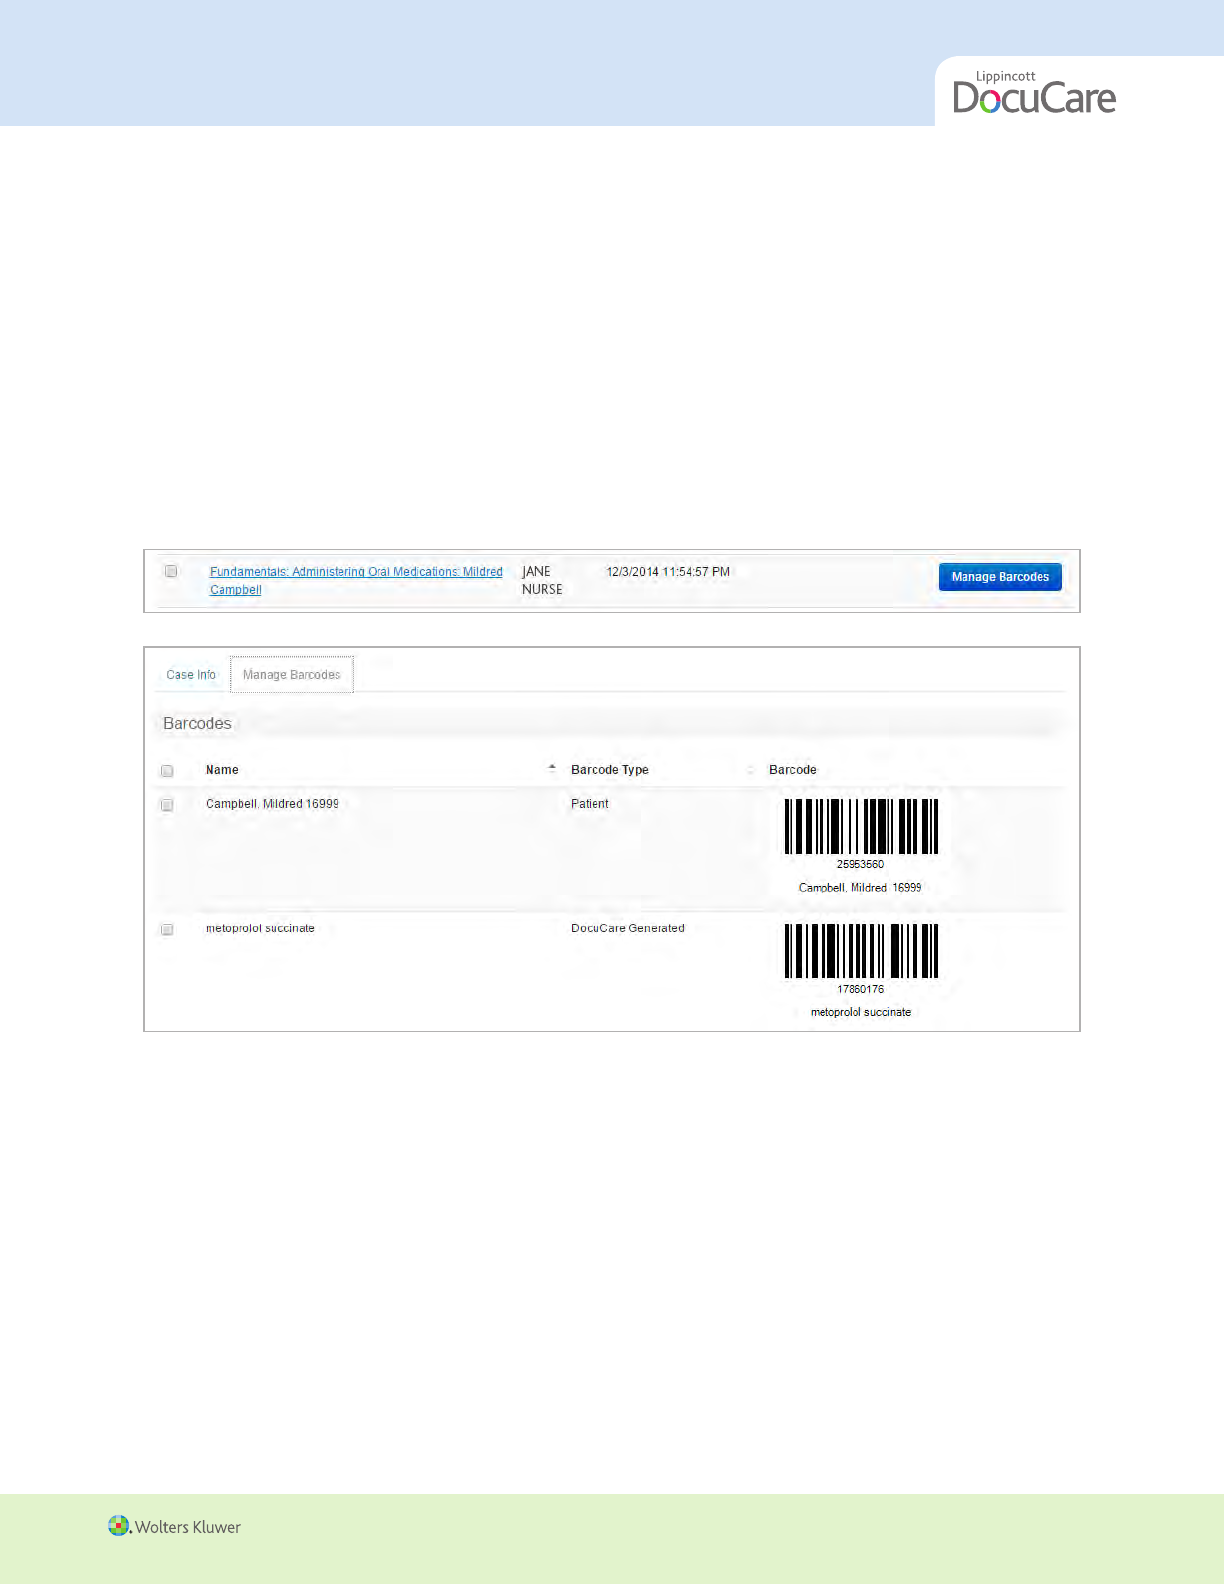
From the Manage Barcodes tab, you can print or download any of the barcodes associated to the case.
Use the checkboxes in the left column to select the barcodes to print or download. Use the check box at
the top of the column to select/deselect all items.
Selecting Print will open a print dialogue window. All selected barcodes will be automatically be
arranged on a page for printing.
Selecting Download will create a .png image file of each selected barcode. These image files may be used
with your label making software (refer to your software’s user’s guide for specifics) or with other image
editing software.

38
INSTRUCTOR USER’S GUIDE
All materials copyright © Wolters Kluwer. All rights reserved.
TIPS!
To ensure that your printed barcodes can be successfully scanned:
Make sure your printer has enough toner. A fuzzy or light image will not scan.
If resizing a download image, be aware that reducing the size too much will make it difficult for
the scanner to recognize. In addition, reducing the width of the barcode may place the lines of
the code too close together to be successfully scanned.
Be aware of where you place your barcode. The scanner must be able to read the entire width
of the barcode at one time, and this may not be possible if the label is wrapped around a small
bottle.
Note that most barcode scanners will not be able to scan a barcode from a computer screen.
Printouts work best.
Using Barcode Scanning in an Assignment
You can choose which assignments will require your students to scan patient armbands and medication barcodes
when creating or editing an assignment. To turn on barcode scanning for an assignment:
1. Click on “My Classes.”
2. Create a new assignment by clicking on “Create an assignment” or click on the name of an existing assignment
and click the “Edit assignment” button.
3. Check the box that indicates that barcode scanning will be used with the assignment, and click Save.
When selected, students will be required to use barcode scanning in order to administer medications in the
assignment.
For students to administer medications:
1. The student logs into DocuCare and clicks on the assignment name to launch the assignment.
2. In the Orders tab, he or she will first acknowledge the orders individually or by bulk.
3. Once acknowledged, the orders will move over to the MAR tab, where the medication orders are administered.
4. The student will click on the first medication to be administered, and will be prompted to scan the barcode for
the patient to confirm that they have the correct patient.
5. The student should click Scan, then scan the patient barcode.
If the student scans a barcode that does not match the patient message, they will receive a message
indicating that it is not the correct code for the patient in the medical record. They may scan a different
code.
When the student scans the correct patient barcode, they are prompted to administer the medication.
6. After scanning the patient barcode, students will need to scan the correct medication barcode for the
medication being administered. Students will then need to check the three checkboxes to indicate that they
have confirmed the route, dose, and time.
39
All materials copyright © Wolters Kluwer. All rights reserved.
INSTRUCTOR USER’S GUIDE
TIP! Notes on the Learning Process
The barcode functionality in DocuCare allows the student to experience the barcode scanning
process. Students learn from the muscle memory of the process of scanning patient and
medication.
The remaining rights in medication administration need to be checked by the student. The
student gets the experience of barcode scanning but is still required to think critically and
confirm dose, route and time prior to medication administration.
If a patient has an allergy to a medication documented in the system, DocuCare will not alert
the student to the allergy in the Orders tab or the MAR tab. To ensure the student is thinking
critically and noting allergies, DocuCare will allow the student the opportunity to make a
mistake and administer a medication to which the patient is allergic.
Product and Technical Support
Wolters Kluwer Health is pleased to offer support if you need assistance with Lippincott DocuCare or any of our
other digital products. Before you contact us, please be sure to:
Note the Internet browser and version that you are using (on the browser About page)
Review System Requirements and be familiar with the versions of software you are using.
Copy the URL where the problem or error occurred so you can email it to our support team, if needed.
Copy the exact error message provided if an error message is displayed. Capturing a screen shot of the
error can be helpful.
Write down the sequence of events that led to the problem.
We also recommend the following training videos to help you take full advantage of this site:
http://thepoint.lww.com/support
http://thepoint.lww.com/Book/Show/247900, “Training Resources” under the Instructor
Resources tab
If you require technical assistance, contact Wolters Kluwer Health Online Product Support at 1-800-468-1128 or
techsupp@lww.com. Live help is available:
Monday–Thursday: 8:00 a.m. to 12:00 a.m. EST
Friday: 8:00 a.m. to 7:00 p.m. EST
Sunday: 4:00 p.m. to 12:00 a.m. EST
