How to set up e-Consent in REDCap | 2020
1. Login to REDCap (https://ccts-redcap.ihrp.uic.edu/
)
To create an e-consent project, the full access user right is required. If you need to set up your REDCap
account, refer to this page: https://ccts.uic.edu/tools/redcap/account-setup/
Creating a consent form in REDCap is a similar process to set up a regular data entry form with the
survey settings that requires basic understandings about REDCap features. If you are new to REDCap,
please watch the introduction videos added in CCTS REDCap training resource page:
https://ccts.uic.edu/tools/redcap/training/
and Vanderbilt training videos:
https://projectredcap.org/resources/videos/
If you need REDCap e-consent consultation please submit your request here:
https://webapps.ccts.uic.edu/CCTS_Service_Requests/login.aspx
2. Before using REDCap e-consent, get the IRB approval after reviewing regulatory component.
IRB approval must be obtained before using REDCap e-consent. If you need any regulatory support
related to e-consent process, submit your service request here: https://ccts.uic.edu/services/regulatory/
3. Some options to consider before starting.
a. If you have the consent document approved before setting up in REDCap and don’t need to use
the general template, start from a blank form or project in REDCap. Then, you can add texts in
REDCap form such as Descriptive Text, Text, Radio Buttons field types for study descriptions, other
paragraphs and questions. Signature fields and image uploads are supported in REDCap.
b. For the informational paragraphs except for some interactive fields asking participants agreement
(yes/no) or e-signature in your approved consent document, you can either 1) save each page as
image file such as .jpg and upload it in the REDCap form between sections and questions to show
the original document as images, or 2) type in or copy/paste the texts in each REDCap text fields.
Font edit options are supported similarly as in Word documents.
c. You can use the eConsent template uploaded in the CCTS REDCap by creating a new project. This
template includes all additional languages with some instructions, so substantial amount of
customizations will be required.
4. Create a new project to download the eConsent Template
Once you log in to REDCap, find ‘New Project’ tab on the top menu options. Then add project title and
select ‘Research’ at Purpose of this Project. Information about PI, project type, IRB number should be
entered as applicable.

How to set up e-Consent in REDCap
Figure 1. Create a project
a. Select a template
After adding the project info (title, purpose of this project, PI, IRB number), you can either select the
template ‘Biological Consent Template’ UIC CCTS generated or start from a blank project if you have
your own form to create.
Figure 2. Select a template
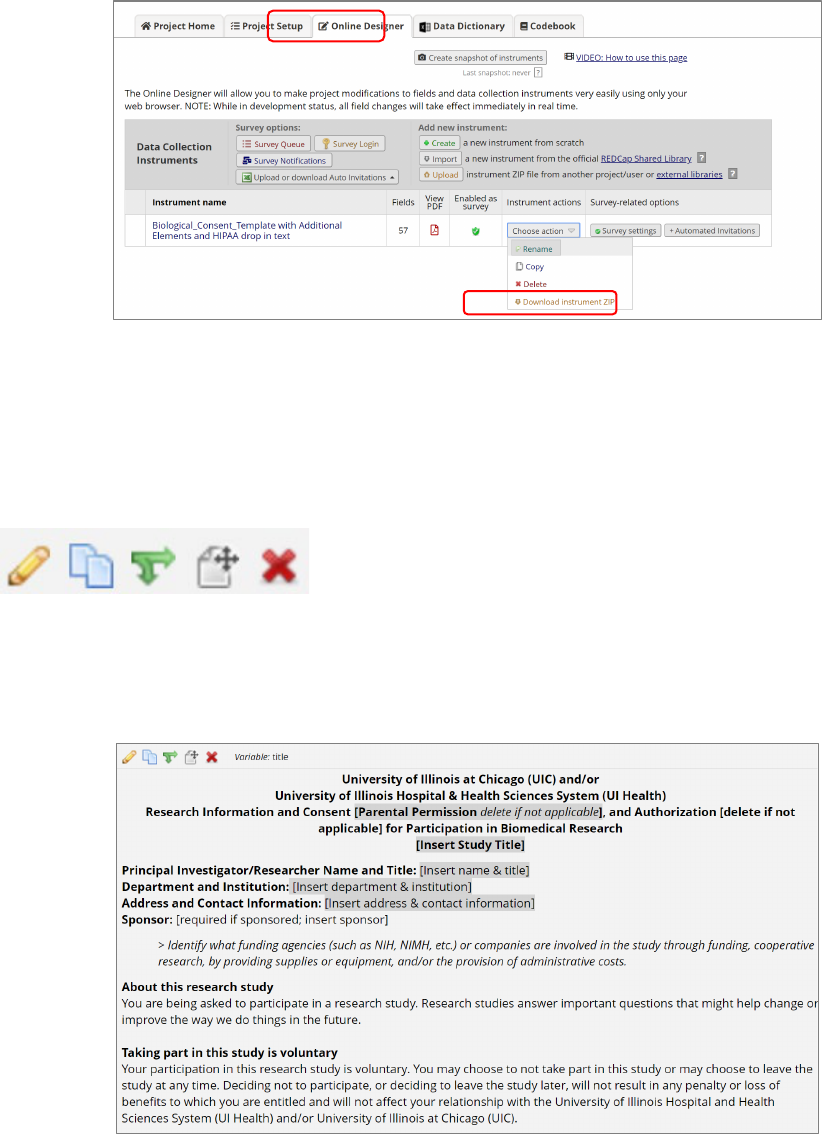
b. Adding a template form to your existing project
A consent form can be added to your existing REDCap project where other data collection forms
such as screening and follow-up forms are located. If you want to add a consent template form to
another REDCap project, download the form as a zip file after creating a project using the consent
template and upload it in Online Designer.
How to set up e-Consent in REDCap
Figure 3 Downloading a ZIP file of consent form
c. Customizing texts
You should edit your study specific languages and delete unnecessary paragraphs from the provided
template in REDCap Online Designer.
Edit delete
Figure 4. Descriptive text field
How to set up e-Consent in REDCap
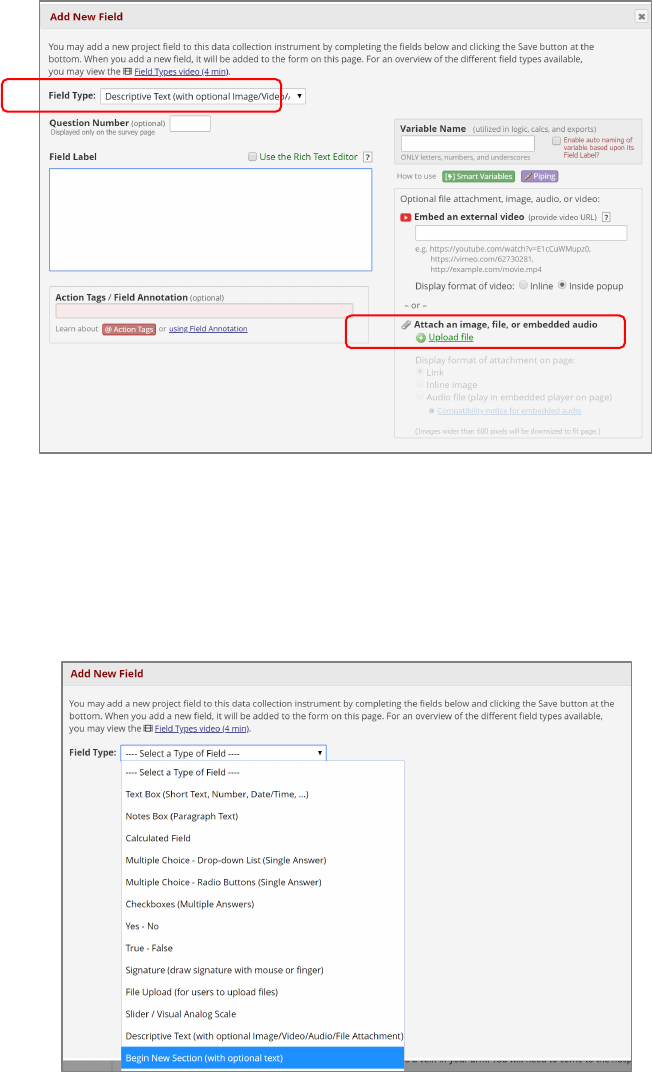
5. Uploading image of document
Instead of adding texts in Filed Label, a pdf or other image file can be uploaded up to 10Mb using
Descriptive Text field type.
Figure 5. Uploading a document of image
6. Survey page break
To display separate sections or paragraphs in different pages so that participants can move to the next
pages instead of showing all in one screen requiring scrolls, add ‘Begin new section’ field and select
Question Display Format as ‘One section per page’ in Survey settings.
Figure 6. Adding a section header for page break
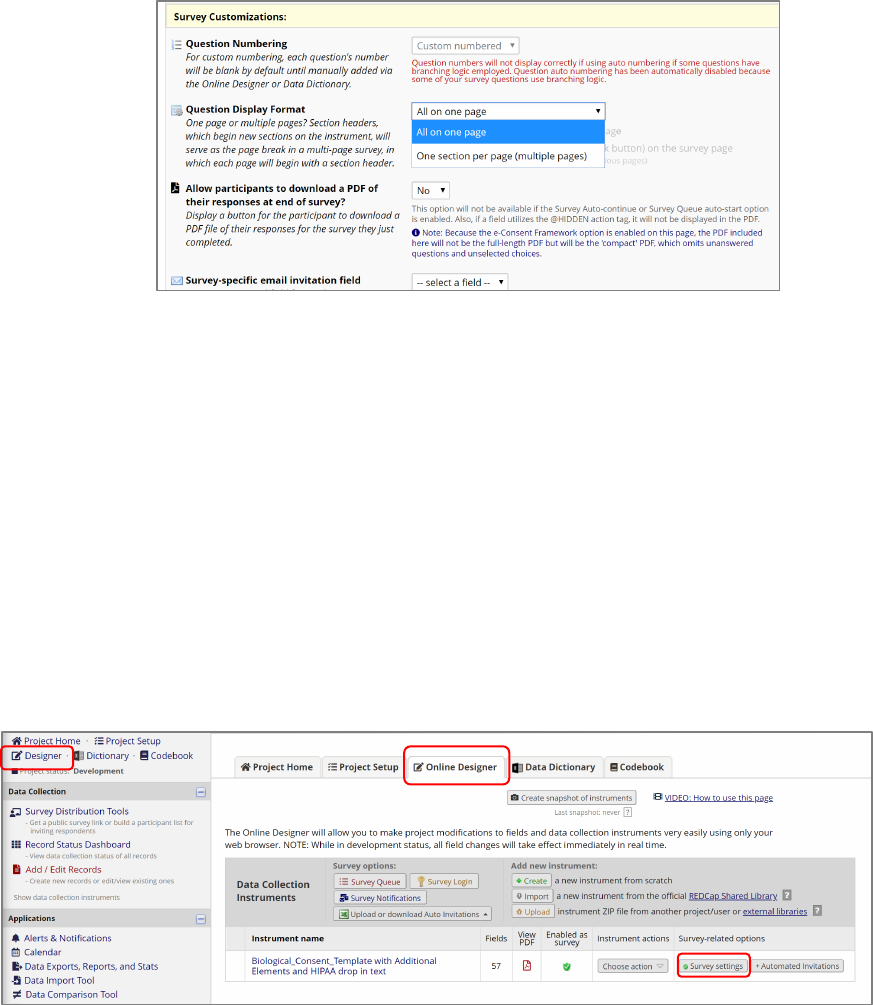
How to set up e-Consent in REDCap
Figure 7. Survey Settings to show one section per page
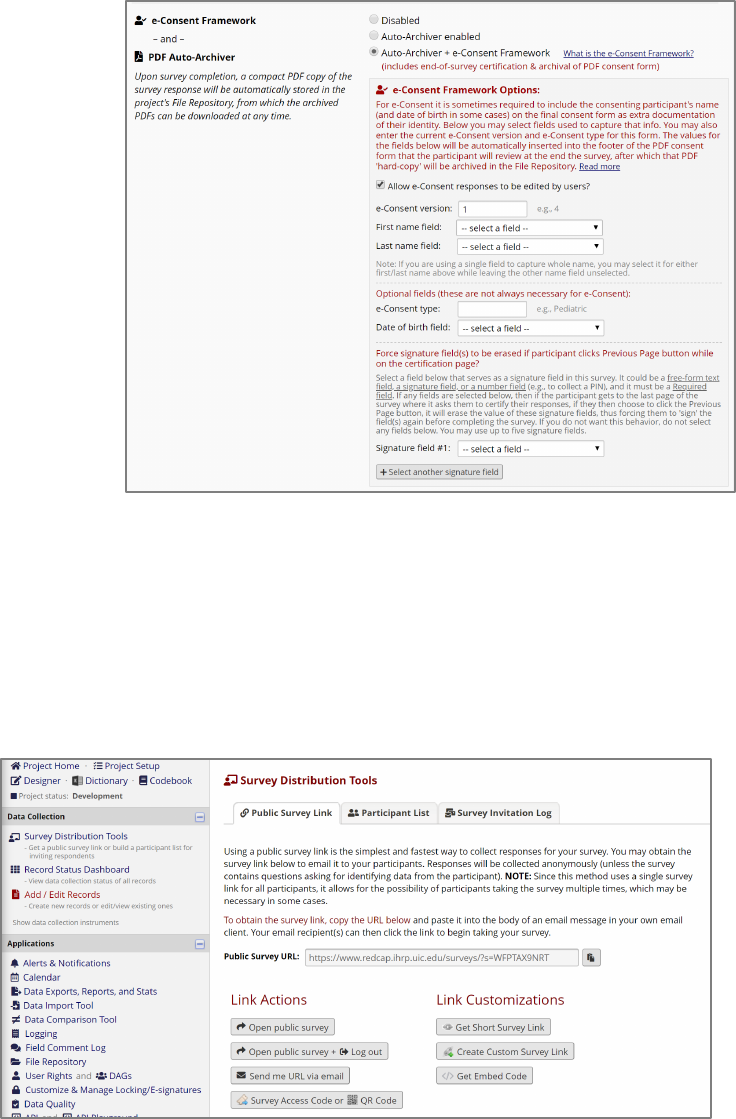
7. Survey Settings
To enable e-consent features in REDCap, the form must be set up as a survey. Make sure to enable ‘Use
Survey in this project’ option in Main Project Setting in Project Setup. Then, in Online Designer enable
survey on the consent form. This default survey setting is already made in the e-consent template
project, but when you add the consent form in other existing project enabling survey option will be
needed.
Your study specific information and e-consent instructions including e-consent framework can be added
and setup in Survey Settings at Online Designer. If you like to add study logo or IRB stamp, review Survey
Design Options in Survey Settings.
Figure 8 Survey Setting for e-consent framework
How to set up e-Consent in REDCap
Figure 9 e-Consent Framework
8. Sending consent form to participants
There are different options to send out the e-consent form to participants.
1) Using Public Survey Link
Public link is only available when the consent form is the first form in your REDCap project, and
when the link needs to be sent to multiple people in one email message. So anyone who clicks the
link can access the consent form for multiple times using the same link.
2) Using Survey Distribution Tool
When you have individual participant’ email address the e-consent survey form can be sent to each
participant using unique survey link so that the response status and follow-up can be done using the

How to set up e-Consent in REDCap
individually linked information. If there is a separate data entry form where the study participants’
information including email address is entered by the study staffs, turn on the option ‘Designate an
Email field for sending survey invitations’ in Project Setup. Then the participant list in survey
distribution tool will automatically shows up all entered email address, and from there you can send
the invitation.
3) Using data entry form (Add/Edit Records)
When the study participants are unable to send the consent form by themselves or don’t have email
address available the study staff should open the e-consent form on their device and let them fill
out the form. When the public survey link is not available and(or) the participant’s information is
already entered in the other form, the study staff can create a new record or open an existing
record to go the survey page linked to the record. If you don’t see Survey Options in data entry
form, click ‘Save and Stay’.
Figure 10. Open survey from data entry form (Add/Edit Records)
How to set up e-Consent in REDCap
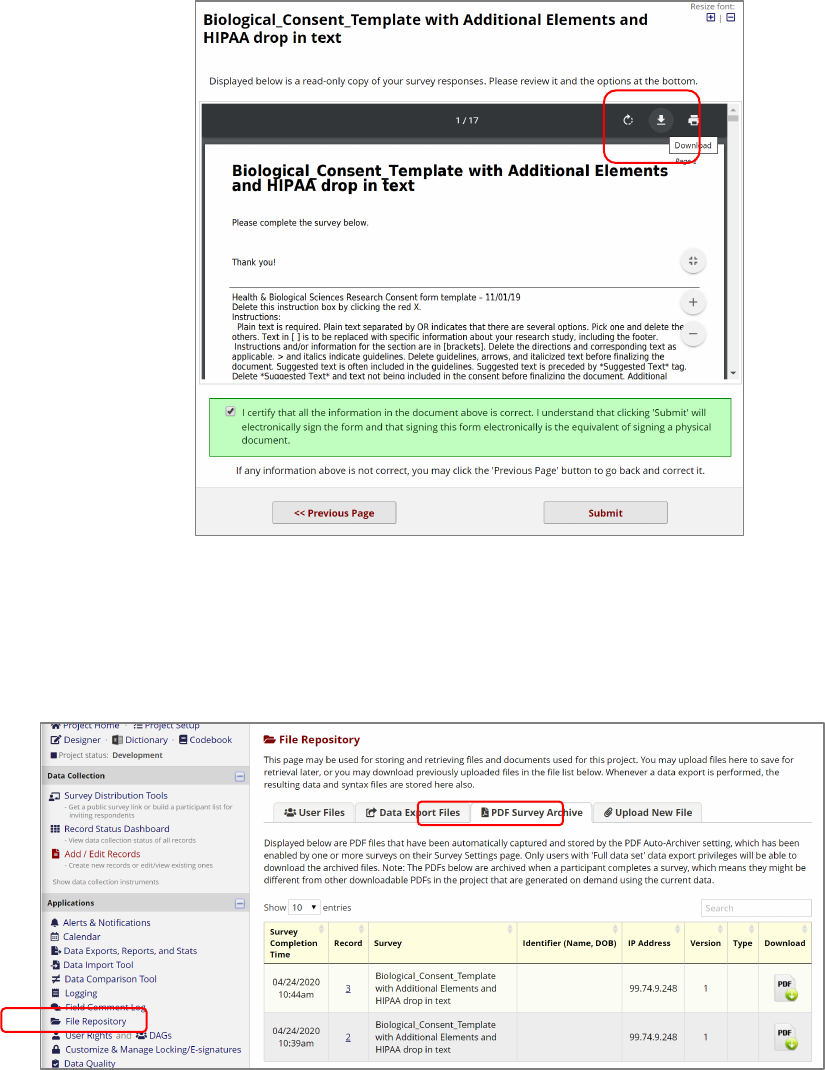
9. Study participants will look at the option to download the signed consent form in pdf.
When e-consent frame work is setup, at the end of consent form participant will be asked to
certify the information before submitting. Downloading option is given as marked in the image
below.
Figure 11. Consent form submission page
10. Archive of pdf consent forms
Submitted consent form will be archived in File Repository PDF Survey Archive so that the study team
with given access right can view and download when it is needed.
How to set up e-Consent in REDCap
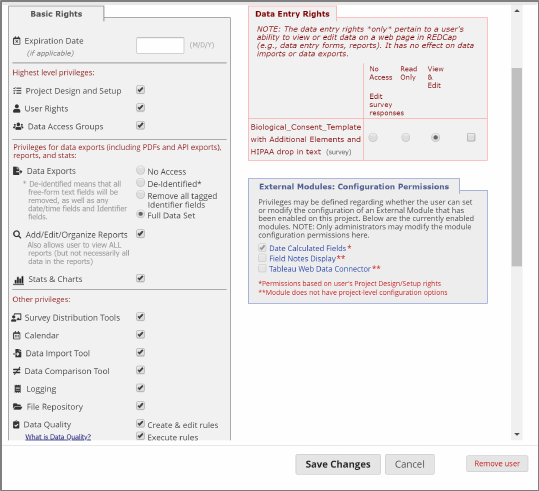
11. Setting up User Rights
The study team members should have corresponding access right on your e-consent form project in
User Rights. The user who has the access to ‘User Rights’ must add other users and set up their access
level.
Figure 12. User Rights
