

CONTENTS
The use of digital content from online libraries and publishers for braille production .................. 1
Contents ................................................................................................................................................................ 2
AUTHORS AND CONTRIBUTORS .................................................................................................................. 4
1. INTRODUCTION ......................................................................................................................................... 6
2. where to get digital files of books .............................................................................................................. 9
2.1 Sugamya Pustakalaya ............................................................................................................................. 9
2.1.1 Registering with Sugamya Pustakalaya ................................................................................. 9
2.1.2 Searching ......................................................................................................................................... 11
2.1.3 Downloading: ................................................................................................................................... 12
2.2 Bookshare ................................................................................................................................................ 14
2.2.1 Membership ..................................................................................................................................... 14
2.2.2 Browse, Search and Download books from Bookshare .................................................... 15
2.3 Online book stores .................................................................................................................................. 17
2.4 Publisher Files ......................................................................................................................................... 18
3. Format Conversion From different downloaded formats to Ms-word ................................................ 18
3.1 Epub to Word: .......................................................................................................................................... 19
3.2 Daisy Text to Word ................................................................................................................................. 20
3.3 PDF to Word using Easy Converter ..................................................................................................... 22
3.4 PDF to word using Adobe acrobat Pro ................................................................................................ 24
3.5 Online conversion of PDF TO WORD ................................................................................................. 25
3.6 InDesign or Page Maker files to Doc Conversion .............................................................................. 26
3.7 Dealing with Image PDF files ................................................................................................................ 29
4. DEALING WITH NON-UNICODE BASED FONTS IN PUBLISHER FILES ..................................... 30
4.1 The problem: ............................................................................................................................................ 32
4.2 The Solution: ............................................................................................................................................ 33
4.2.1 Font converters to convert legacy fonts into Unicode based fonts. ......................................... 34
4.2.2 Challenges in font conversion: ..................................................................................................... 35
4.2.3 Google-Drive OCR: ......................................................................................................................... 36
5. Preparing Microsoft Documents for Braille Production ........................................................................ 36
5.1 Templates from Duxbury: SWIFT and BANA Braille template ......................................................... 37
5.1.1 Linking of SWIFT to MS Word ....................................................................................................... 38
5.1.2 Installation of SWIFT ...................................................................................................................... 39
5.1.3 Linking BANA Braille template to MS Word ................................................................................ 41
5.1.4 How can you use the BANA Template with Microsoft Word?................................................... 42
5.1.5 How to use BANA and Swift for existing files .............................................................................. 43
5.2 Heading Styles ........................................................................................................................................ 43
5.3 Table creation in braille using DBT templates .................................................................................... 47
5.3.1 Creation of a table in Microsoft Word ........................................................................................... 48
5.3.2 Applying markup to generate tables in braille ............................................................................ 51
5.3.3 Inline Feature ................................................................................................................................... 52
5.4 Acronym ................................................................................................................................................... 53
5.5 Computer Braille Code (CBC) ............................................................................................................... 55
6. Handling Math Expressions & Symbols for braille production ............................................................ 56
6.1 Steps for making equations accessible (Compatible for braille translation): ................................. 56
6.2 Process of Braille Translation: ............................................................................................................. 60
6.3 Rules for Typing & Editing Math Equations ........................................................................................ 60
References .......................................................................................................................................................... 61

AUTHORS AND CONTRIBUTORS
This guide has been prepared by a team of resource persons led by Dipendra
Manocha, Director of Capacity Building, DAISY Consortium
The following resource persons provided their invaluable contributions in the
preparation of this guide:
Sreeja Parameswaran: DAISY Consortium
Kunal Kwatra, Piyush Chanana, Akashdeep Bansal, Jyotsna: Assistech Lab,
IIT Delhi
Md. I. Ahmed: National Institute for Empowerment of Persons with Visual
Disabilities
Abdul Wazid: Saksham
Nirmal Verma: Special Education Consultant
Rakesh Jain: Rehabilitation Society for Visually Impaired
Homiyar Mobedji: Bookshare
Special thanks go to Professor Sam Taraporevala and his team members Neha
Trivedi, Rebecca Carvalho and Mimansa Vahia from Xavier’s Resource Centre for
the Visually Challenged, Mumbai, for providing guidance in dealing with math
content in Microsoft Word and the rules to be followed for its conversion into Nemeth
braille.

1. INTRODUCTION
When a braille press receives a book to be produced for persons who are blind, it
scans the book to produce a digital file in Microsoft Word. If optical character
recognition (OCR) is not available for a specific language, the whole book must be
manually typed with a keyboard. Unfortunately, most Indian languages do not have
usable OCR software and almost all Indian language books produced in braille, at
braille presses, are typed in braille format on Duxbury braille software using a six key
input method. This is very time-consuming and laborious and requires a high level of
braille expertise for data entry.
At the same time, persons with print disabilities are increasingly using smart digital
devices, such as smart phones, tablets and computers, as is the case with the
general population. Persons with print disabilities can use these devices with the
help of screen reading software. This is increasing the need for - and thus the
availability of - content that is directly available in digital formats. These digital files
have the potential to be used in braille production and, therefore, there is a need to
review the current workflow for braille production, learn about the tools that can help
us use digital files, and retrain ourselves to incorporate these tools in our standard
workflows.
The accessible format digital files of books are available through various sources,
such as Sugamya Pustakalaya (DFI Online Library), Bookshare, the web sites of
textbook boards, soft files shared by publishers and from digital book stores such as
Amazon Kindle. There are about 325,000 books available on Bookshare/Sugamya
Pustakalaya and about fourmillion (40 Lakh) books on Amazon Kindle in India.
These files can be used for the production of braille books without the need for data
entry. Although we have the benefit of Indian language support on braille translation
software, the books available from various online sources come to us in different
formats and fonts. There is a need to know about the various tools that can be
utilised to convert these different format files into a format suitable for braille
production.
Furthermore, accessible e-text files include formatting and mark-up for headings,
tables, etc. These features can be utilised for the auto-formatting of braille files
through the braille translation software. Knowledge about the formatting styles of
EPUB files in Microsoft Word, and their impact on braille file formatting when
imported into braille translation software, is not common among the staff of braille
presses. This results in the under-utilisation of features of the software and, as a
result, data entry operators manually format book elements such as tables, table of
contents, etc. that could be automatically formatted by the software itself.
Single file – multiple distribution format: It is now possible to prepare one master
digital file and use it for braille production, large print production and for reading with
the help of screen reading or screen magnification software on mobile phones,
computers, tablets, DAISY players or refreshable braille displays. Therefore, it is
essential that entry of data for braille production is done following guidelines that
enable the same file to be used for multiple format production. Similarly, when a
digital file is being produced for reading on digital devices, we need to follow
guidelines that enable use of the same file for braille production. It is also essential
that these files can be shared with the production units for different accessible
formats for persons with print disabilities. This manual will introduce such formatting
guidelines and explain how we can produce digital files that can be used for all
accessible formats for persons with print disabilities.
Inclusive publishing: mainstream publishing is moving towards adopting standards
for digital files that would enable master files to become available directly from the
publishers themselves, thereby eliminating the need for the data entry of books for
persons with print disabilities. Until such standards are universally adopted,
publishers will continue to produce files in many different formats and in multiple
non-Unicode fonts. Even with this hurdle, some software tools do exist that can help
with the extraction of useful text from files available from publishers. We will describe
the various digital file formats that we can expect to receive from differing resources
and explain how to convert these formats into useful master digital documents.
In the case of India, we have found that braille presses are using the Duxbury Braille
Translation software. Among these braille presses, Microsoft Word is the preferred
format when preparing digital documents for importing into Duxbury for braille
production. Microsoft Word has specialized features and add-on tools that can deal
with a variety of elements of books, such as headings, tables etc., and that can
convert these elements into a properly formatted braille document when imported
into Duxbury. In this manual, we will introduce a few of these tools and methods for
the most commonly used mark-ups in a Microsoft Word document for the purpose of
its proper conversion into braille file in Duxbury software. Although Duxbury Systems
INC provides manuals for such formatting, we will present the same in a method that
would work as an introduction to such concepts and that would allow for easy
adoption in existing work-flows and other requirements of braille presses in
developing countries in their local languages.
Thus, the key purpose of this manual is to introduce:
various sources of digital files that can be utilised for braille production;
tools and methods that will help with the conversion of digital files available
from online libraries, online book stores and from publishers to Microsoft Word
and Unicode based font;
tools and mark-ups that can be applied to Microsoft Word files for braille
production;
facilities and systems for the sharing of master digital files to avoid
duplication.
This manual has been produced by the DAISY Consortium as part of a capacity
building project with the Accessible Books Consortium, in partnership with
Bookshare of India and with the generous funding of the United Nations and Skoll
Foundations. It is hoped that this manual will help with better utilisation of digital files
during book production.
Target group:
This manual will be a useful resource for managers and data entry operators of
Braille presses, large print production units, Talking Book libraries, accessible format
e-text book libraries, etc. It will also be useful for persons with print disabilities and
their families and friends who go through the struggle of obtaining books in
accessible format for their studies or leisure reading. Special educators may also find
the manual helpful when providing services to persons with print disabilities.
Expected outcomes:
braille press experts will be able to increase their braille production output;
users will have more titles available to them in braille;
digital books available in online libraries and digital book stores will be able to
serve as input files for braille production;
data entry operators will be able to utilise more features of braille translation
software;
files being prepared for braille production could also be utilised for large print
production or for reading with the aid of screen reading software;
braille presses will be able to use files that are made available by publishers.

2. WHERE TO GET DIGITAL FILES OF BOOKS
When a request for braille production of a particular book is received, it is highly
recommended to check first if a digital version of that book is already available on
any digital platform. These include online libraries such as Sugamya Pustakalaya
and Bookshare, commercial platforms such as Amazon Kindle, or a platform run by
the book’s publisher. Obtaining a digital copy can greatly reduce the time and work
required for converting a book into braille. The manual typing, or scanning and
editing, of an entire book can take a lot of time. A very time-consuming process
reduces not only the efficiency and capacity for braille production, but also affects
the education of students as books cannot be provided on time. It is, therefore,
always advisable to check online resources and publishers for the availability of a
book in a digital format before starting a manual typing or scanning process.
If a book to be converted into braille is already available in a digital format from any
of the above sources, all that needs to be done is to download, convert, format and
emboss the book. This process takes much less time than manually typing, or
scanning and editing a book. Even a 200 page book can be prepared for braille
production in just one day.
Below are a few resources from which digital books can be obtained for braille
production:
2.1 SUGAMYA PUSTAKALAYA
Sugamya Pustakalaya is India’s largest online digital library for persons with print
disabilities. More than 330,000 books have been made available in diverse
languages by integrating national and international libraries such as the National
Talking Book Library of NIEPVD and Bookshare. If you have to download a title that
is available on Bookshare through Sugamya Pustakalaya, you must have a
membership with both libraries; i.e. Bookshare and Sugamya Pustakalaya.
The following steps explain how to download a book available on Sugamya
Pustakalaya for its subsequent conversion into braille.
2.1.1 REGISTERING WITH SUGAMYA PUSTAKALAYA

Registration is required for downloading books from Sugamya Pustakalaya. You can
register as a Guest user, end user, library or publisher. The following describes
these roles.
Guest user – you can become familiar with and browse the library only.
End user – To become an end user, you must register with any DFI member
organization. You can be an end user of Sugamya Pustakalaya through your
registered member organization. Once a registered member, you can access
books and download them through a mobile phone, daisy player,
computer/laptop or even through a refreshable Braille display. You can also
request a braille copy via member organizations that have braille presses.
Library: Governmental, Non-Governmental, not-for-profit organizations
serving persons with print disabilities, educational institution libraries, public
libraries and braille presses can all become members of DFI and Sugamya
Pustakalaya and share the entire collections with their members who are print
disabled.
Publisher: Publishers can contribute by sharing their accessible content.
Braille presses can register as libraries with Sugamya Pustakalaya. When you
register as a library, you will be assigned an “Admin Role”. Using this role, you can
create more roles for your staff to perform various tasks. You will learn more about
roles and their duties when you register with Sugamya Pustakalaya. After
registration, you will be able to download books that you want to convert or upload
previously converted books. Although it is not mandatory to upload braille books to
be converted, it is highly recommended to do so in order to share these books with
other braille presses, libraries and users of digital devices. This helps to avoid the
creation of master copies of the same book in multiple locations.
You can visit the following link for registration:
https://library.daisyindia.org/NALP/signupLink.action

Fig: screen shot of registration page of Sugamya Pustakalaya
2.1.2 SEARCHING
Once registered, you can use the login ID and password created at the time of
registration to log into Sugamya Pustakalaya and search for books that you want to
download. Searching can be done in two ways:
Quick Search: This can be done by typing the title, author’s name or any other
information about the book on the text book provided at the top of any page
Advance search: This can be used to perform a specific search by entering
multiple criteria for a book. For example, you can enter the grade, subject and
author of a book when searching. You can also specify whether you want to
search for the book on Sugamya Pustakalaya, Bookshare or both. More
accurate results can be found using the advanced search.

Fig: Advance search page of Sugamya Pustakalaya
2.1.3 DOWNLOADING:
Once you have found a book, clicking on the title of the book will open a link to a
page with information about that book. You should then select the format in which
you would like to download the book and click on the download button. You will
receive the message ‘your download request has been registered successfully’.
Books in Sugamya Pustakalaya can be obtained in several formats. These include
DAISY Audio Only, EPUB text only, EPUB Media-overlay, DAISY text only, DAISY
full text full audio and Braille Formatted Files (.brf). Of these formats, all are suitable
for braille production except for DAISY Audio Only.

Fig: Book information page
If you go to “my download request link”, you will see that the status of your download
is N/A. It takes a few hours to generate the link due to the background process.
Once the link is generated, you will receive an e-mail notification that you can
download the book.
Fig: Download request page of Sugamya Pustakalaya

2.2 BOOKSHARE
Although Bookshare books can be viewed and downloaded from Sugamya
Pustakalaya, you can also access Bookshare directly through its website:
http://www.bookshare.org. Bookshare is the world’s largest accessible online library
for people with print disabilities. More than 324,000 titles are available in India.
Bookshare has books in more than 6 Indian languages.
The following steps show how to download a book that is available in Bookshare.
2.2.1 MEMBERSHIP
Before downloading, you must be a Bookshare member. Bookshare membership is
limited to persons with print disabilities only, and there are two types of membership:
Individual: You can sign up for an individual membership by providing proof of
disability signed by a recognized authority and paying a low membership fee.
Organization: This membership is for organizations working for the print
disabled. Organizations must submit the Bookshare organizational agreement
form and pay a minimal fee to become a member. Once registered,
organizations can buy book blocks (30, 60 or 100 books) and offer books to
their members or students.
Braille presses can register as organizations.
You can visit the link https://www.bookshare.org/cms/get-started/sign to sign up as a
Bookshare member.

Fig: screenshot of Bookshare membership page
During the membership registration process, you will create a username and
password that will be required every time you log into Bookshare. Once logged in,
you will have permission to download books. Without logging in, you will be limited to
searching and browsing Bookshare’s collection only.
2.2.2 BROWSE, SEARCH AND DOWNLOAD BOOKS FROM BOOKSHARE
Browse
You can browse Bookshare’s huge collection of titles using different search criteria,
such as author, category, language, grade, new books, most popular downloads, or
newspapers and magazines. Browsing allows you to find details on books offered by
Bookshare.

Fig: Screenshot of Browse page of Bookshare
Search
Searching can be done in two ways:
1. Quick search: Use the search box at the top of any page to search books by
typing the title, author or any other information that you have about the book.
2. Advance Search: Use advance search at the top of any page for more
targeted searches. The advanced search allows you to enter multiple criteria
for searching a book.
Fig: Screen shot of advance search page of Bookshare

Downloading books from Bookshare
If your search returns a title of interest, you can download it and save it on your
computer or other reading device. Bookshare offers different formats for
downloading, including EPUB, Daisy Audio, daisy text only, BRF etc. All books in
Bookshare’s collection are available for download in any of the listed formats. For
purposes of braille production, EPUB is the recommended format. Results from your
search will provide a list of the books that match your search criteria and include
details of the author, date added, available formats etc. Choose the format that you
want downloaded and click on the download button.
Fig: screenshot of search results and download page of Bookshare
2.3 ONLINE BOOK STORES
Bookstores such as Amazon, Flipkart, Kobo, etc. sell digital books through their
online stores. As these are commercial mainstream operations, the number of titles
available on these platforms is much greater than those available on any of our
special libraries. For example, about four-million books are available in India on
Amazon.in. These include thousands of titles in Indian languages. Another
encouraging factor is that these bookstores make the digital format of a book
available on the same day that the book is released in hardcopy. The reading apps of
bookstores such as Amazon, called the Kindle, have been made accessible and can
be used with the help of screen reading software. It is also possible to use these

digital books for the production of braille books. For this reason, it is important that
braille presses search for a title through online bookstores before manually scanning
or typing a book.
2.4 PUBLISHER FILES
All books published on paper are born as digital files. Immense efforts are made in
the writing and proofing of these files in order to remove all errors. In an ideal world,
the same digital files would be made available to braille presses for braille
production. We are taking steps in this direction by working with the Government of
India to establish a policy to make digital files of all textbooks available to Sugamya
Pustakalaya so that these textbooks can be utilised in alternative format book
production for persons with print disabilities. In fact, a large collection of Bookshare’s
library is made up of files that were converted into accessible formats from publisher
files. Some publishers in India are also happy to provide the digital files of their
books. This is very useful as it helps us avoid having to start the book conversion
process from scratch. Unfortunately, publishers generally provide Indian language
books in Non-Unicode formats. We often receive files from publishers in formats
such as Image PDF, Page Maker or InDesign. These formats are not directly usable
for braille production. Therefore, we need to convert these files into Microsoft Word
before we can prepare them for braille translation.
3. FORMAT CONVERSION FROM DIFFERENT DOWNLOADED
FORMATS TO MS-WORD
The books that are downloaded from Sugamya Pustakalaya, Bookshare, Amazon or
obtained from publishers can include the following formats:
1. EPUB
2. Daisy text only
3. Kindle
4. PDF
5. InDesign or PageMaker
These files must be converted into Microsoft Word before they can be formatted and
passed to Duxbury for braille printing. The process and tools used for file conversion
is explained below:

3.1 EPUB TO WORD:
Codex software is used to convert from E-pub to Ms-Word format. Codex is a
software application that is easy to use, customizable and accessible. It uses
Calibre E-book management software at the backend for all its processes. It is also
free to download.
Codex offers a simple to use interface. In this dialog box, select the input file by
clicking on Add files. Select the format of Output as MS-Word and click on convert.
Fig: Codex software
You can also do this by going to Windows Explorer, opening the file location, and
right clicking on the file. You will see codex as an option. Go to convert and select
the format you desire. The picture below provides more details.

Fig: using codex through windows explorer.
Codex is available as a free download from: http://jscholes.net/project/codex/ and
can also assist in preparing digital files purchased from online bookstores for braille
production by converting them into EPUB or MS-word formats.
3.2 DAISY TEXT TO WORD
Daisy text only books can be converted to RTF using the Daisy Pipeline software.
Daisy pipeline is an open source software that can be used for format creation and
transformations. RTF (Rich text format) retains formatting structures, such as
heading levels, and can be directly opened in Microsoft Word. The following steps
explain how to convert from Daisy text only to RTF using Daisy pipeline.
1. Open daisy pipeline
2. Go to file – new – pipeline job
3. Go to Create and modify – dtbook to rtf

Fig: New Job Wizard of Daisy Pipeline
4. Give the paths of the source and destination files and click on the finish button
Fig: Daisy Pipeline
5. Go to menu Run-> and click on Run
This will initiate the conversion process that will take a few seconds to finish.
Now you can check your output folder for the rtf file.

Fig: Daisy pipeline.
To learn more about the DAISY pipeline software or to download it, please visit:
www.daisy.org/pipeline. Articles and tutorials related to DAISY pipeline are available
at www.daisy.org/daisypedia/
3.3 PDF TO WORD USING EASY CONVERTER
Easy Converter is a software prepared and sold by Dolphin Systems Pvt. Ltd, a
company based in the UK. This software can be used to convert from PDF to word.
This software is not free. A one-month only trial version can be downloaded free of
charge. Multiple format conversions can be done using this software. Step-by-step
instructions for converting PDF to Word using Easy Converter are as follows:
1. Open Easy Converter and select the quick conversion option. This will open
the conversion wizard. Click on the next button.
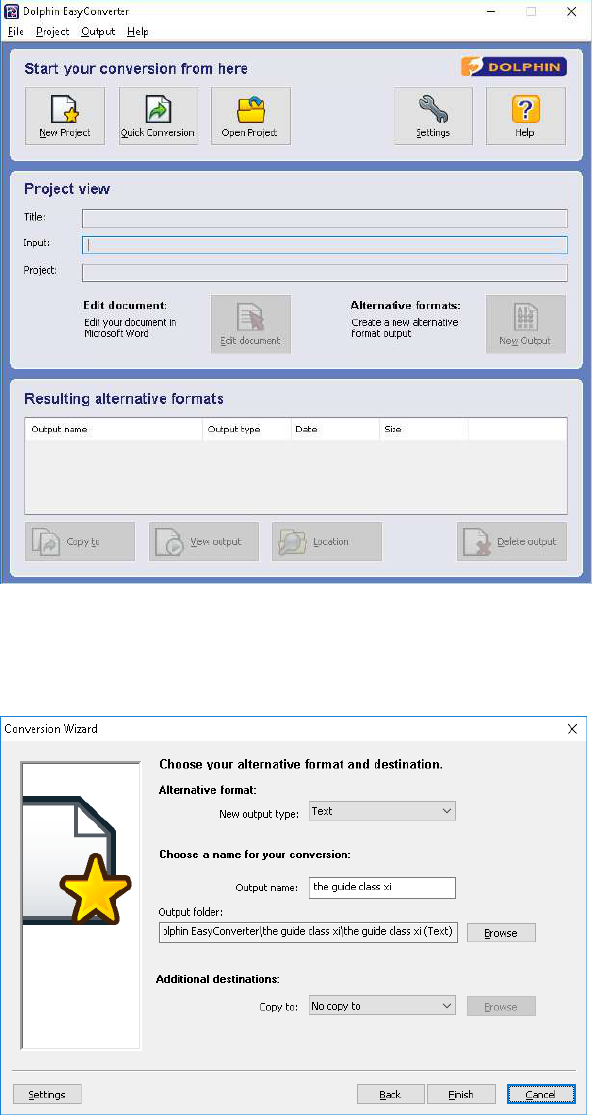
2. Select the output format as text, provide an output name and select the path
where you would like to save the output file. Then click on finish.
3. It will take a few seconds or minutes to complete the conversion process
depending on the size of the file. Once the process is complete, it stores the
file in txt format in the selected output location. However, the file should be in
DOC format, so click on the edit document button. This will open the file in
Microsoft Word along with an intermediate document editor. Save the
Microsoft Word file in your preferred location and either close the Microsoft
Word file or click on the save and return button of the intermediate document
window.

More details about Easy Converter are available at:
https://yourdolphin.com/easyconverter
3.4 PDF TO WORD USING ADOBE ACROBAT PRO
Acrobat Pro is a software sold by the Adobe company for the creation and editing
of PDF documents. The software also provides import and export features in
several other formats, including Microsoft Word. The following simple steps can
be performed to get a well-formatted word document from a PDF file using
Acrobat Pro:
1. Open the PDF file in Adobe Acrobat.

2. Export to PDF.
In this way, you will get a Microsoft Word file that can be used for braille conversion.
3.5 ONLINE CONVERSION OF PDF TO WORD

PDF Documents that are small in size can be converted using online sites. There are
many sites that provide this service, such as pdf2doc.com, pdfonline.com,
freepdfconvert.com etc. The file that is to be converted must be uploaded; the
document is then processed and a link is provided for download. Some sites may
email you the converted file. A picture of pdf2word.com appears below.
3.6 INDESIGN OR PAGE MAKER FILES TO DOC CONVERSION
Follow these steps for converting InDesign files to Microsoft Word:
1. Go to the file Menu, Open the InDesign file using the “InDesign” software.
A Page Maker file can also be imported into InDesign.
2. Go to the file menu and click the export option.
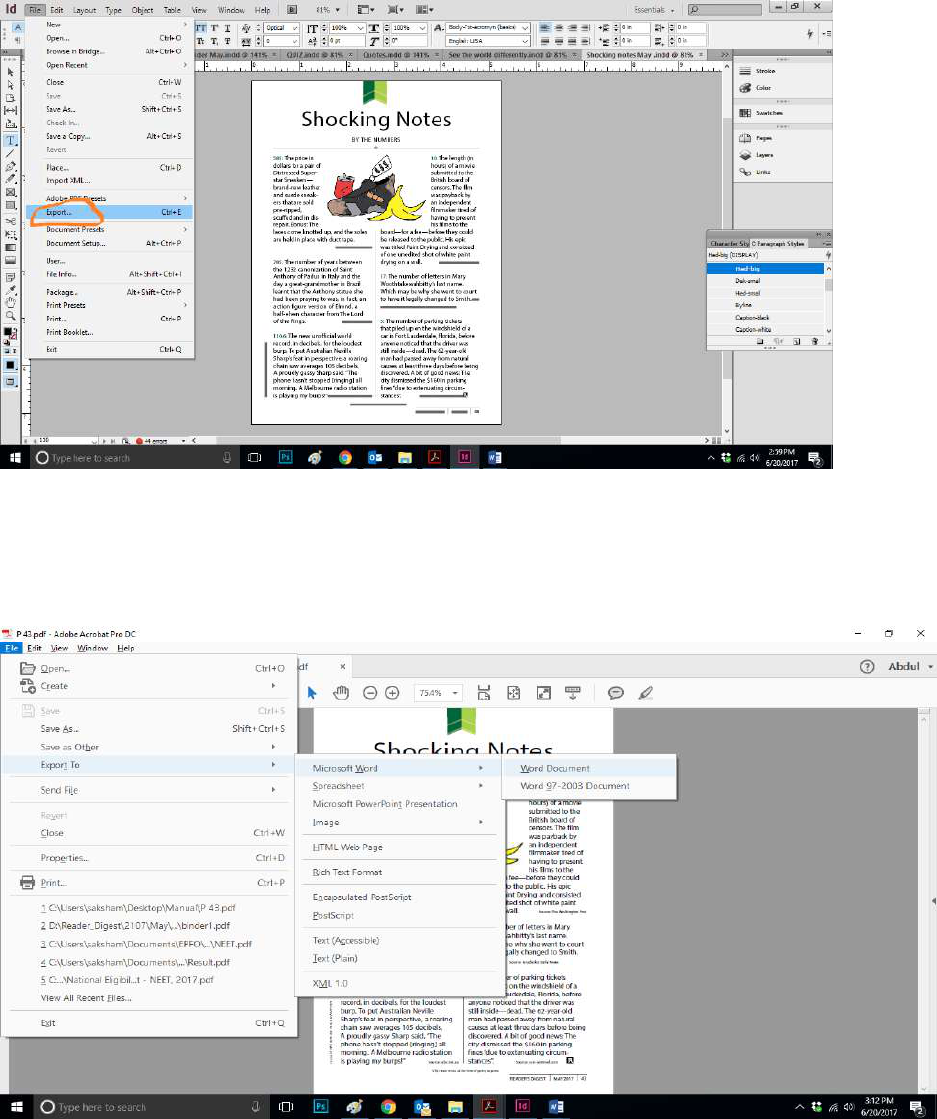
3. After “Exporting” the InDesign file, the User will get a PDF file.
4. Open the exported PDF file using Adobe Acrobat.
5. Go to the file menu and select the option “Export to” MS-WORD.
6. The user will get a Word file.
Another option for this conversion is to create an EPUB file first using InDesign and
then convert this file to Microsoft Word. Follow the process below for this method:
1. Open the Page maker or InDesign file received from a publisher in the
adobe “InDesign” software.

2. Go to the file menu and select export to “EPUB”
3. Open the exported file using Codex Software.
4. Convert the EPUB file into Microsoft Word by using the codex software
(For more details, review the section on using codex).

3.7 DEALING WITH IMAGE PDF FILES
There are many documents, such as agreements, meeting notes etc. that we scan
and save in PDF. These PDFs are saved as image files. We also sometimes receive
files from publishers that are saved as Image PDF documents. One way of
converting such image files to Word format is by using the ABBYY fine reader OCR,
with which many people working in accessibility are familiar. Unfortunately, ABBYY
Fine Reader does not support any Indian languages. Another possibility is to use the
Google OCR for converting from image to text files. Google Drive is a file storage
and synchronization site created by Google. It allows users to store files in the
Cloud, and share and edit documents. With two simple steps, it is also possible to
convert PDF to Microsoft Word using Google’s OCR, as follows:
1. Open Google Drive and sign in using your Google/Gmail account. Click on the
My Drive button, click on Upload Files and select the PDF file you want to
convert. In this case, there is a file size limit of 2MB or 10 pages. This means
you cannot upload a file larger than 2 MB or a file containing more than 10
pages.
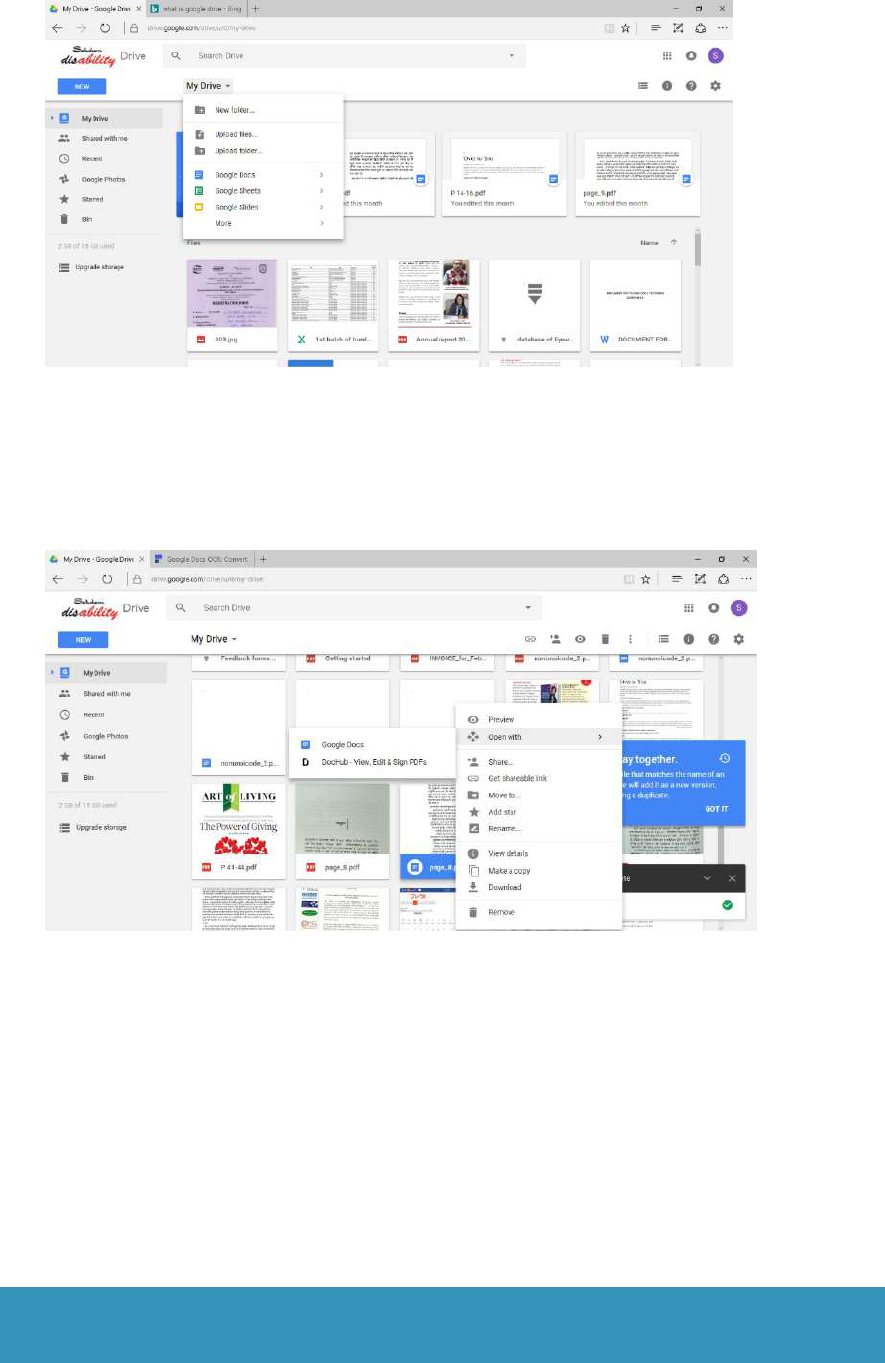
Fig: Google Drive Upload
2. Once the file is uploaded, you will see it on Google Drive. Right click on the
file and select Open With -> Google Docs. Google will now convert your file
into the Doc format by using OCR.
Fig: Google Drive OCR
3. Now you can download the Google Docs document as a Microsoft Word
document and save it on your hard disk.
The Google Drive OCR does support Indian languages. It can also handle multi-
lingual and multi-font documents.
4. DEALING WITH NON-UNICODE BASED FONTS IN PUBLISHER
FILES
Have you ever faced the problem whereby you receive the text of a book in an Indian
language on a CD from a publisher but the braille translation software is unable to
convert the text and, instead, shows garbage characters on the screen? Let us
understand why this happens so that we might solve this problem.
Computers, mobile phones, modern radio broadcasts or television telecasts, CDs
and cameras are all digital devices. There are many other devices that could also be
classified as digital devices. What does the word “digital” mean here? Computers
can only store numbers. All text, sounds and pictures are converted into numbers for
their storage or transmission. Every character of every language is assigned a digital
code, that is, a specific number assigned to every character of every language.
When we transfer or transmit data from one digital device to another, or from one
software to another, it is this digital code that is transferred. The receiving device or
software converts the code back into characters that are once again displayed.
It is very important that these digital codes are universally acceptable. The digital
code for any given character must be the same all over the world. To achieve this,
the Unicode Consortium has published a list of all possible characters from every
language worldwide along with their digital codes. All Indian languages are part of
this Unicode list.
Every character can be written in several different shapes. Each of these shapes is
called the font. For example, the letter “a” can be written in many different shapes
and styles. However, the digital code representing the letter “a” never changes. The
effect of this for the end user is that, when we select text and change its font, all the
letters remain the same and only the writing style of the characters changes. The
screen-shot below shows how the letter A remains the letter “A” even after its font
has been changed:

Screen reading software converts the alphabet to sound while braille translation
software converts the alphabet to braille. Both screen reading software and braille
translation software deal with the digital codes of letters and not directly with the
letters themselves. Let us understand this with an example:
The number assigned to capital A is 0041. When a screen reading software receives
the digital code 0041, it reads it aloud as ‘A’. Similarly, when a braille translation
software receives the digital code 0041, it converts it into the Braille dot 1 with the
capital prefix. If a font-making company uses the number 0041 as code for another
letter, screen reading software and Braille translation software will still see it as
capital A only. To avoid this confusion, a consortium of various stakeholders and
country representatives has assigned digital codes to every character of every
language. This consortium is called the Unicode Consortium and the scheme of
digital codes for all languages is known as Unicode.
4.1 THE PROBLEM:
Fonts are designed by different companies or organizations. Many of the Indian
language FONTS were created before Unicode came into existence. These fonts are
also referred to as legacy fonts. These fonts use digital codes assigned to the
English alphabet but display Indian language characters on screen. Each font has its
own keyboard layout for being typed. Data entry persons in the publishing industry
have become accustomed to the keyboard layout associated with these legacy fonts.
At the same time, there has been a dearth of Unicode based fonts that are good
enough to be used for the professional publishing of books. Therefore, it has been

difficult for data entry persons to shift to using Unicode based fonts. Additionally,
organizations and companies involved in the type-setting of and data entry for books
are still using very old versions of DTP software, such as page-maker. Older
versions of these softwares do not support Unicode based fonts.
Legacy fonts do not follow the scheme proposed by the Unicode Consortium. For
example, the digital code in Unicode scheme of the Hindi character “ka” is 0915,
whereas the Krutidev font assigns the digital code 0064 to the same character. In the
Unicode scheme, the code 0064 is assigned to the lower-case English letter “d”. If
we try to convert a Hindi document typed in Krutidev font into braille, then the braille
conversion software will convert this character into braille dots 145, which is the
braille code for the letter “d” and not the Hindi letter “क” (ka). On the other hand, if
you type the lower-case letter “d” on the screen and apply the Krutidev font, then it
will display the Hindi character “ka” on the screen. The screen reading software will
still read it as “d”.
For this reason, when a braille press obtains a digital file of a book from the
publisher, we still are not able to use the file for braille printing and must retype the
whole document.
4.2 THE SOLUTION:
Some promising developments have taken place in the past few years:

All versions of DTP software, such as Adobe Indesign released after 2012,
support Unicode based fonts for Indian Languages.
Add-ons are also available for older versions of DTP software, such as page
maker, to support Unicode based fonts.
Almost all font making companies, such as Shrilipi and Kritidev, etc. have
released Unicode based versions of their fonts that are suitable for the
publishing of books. These fonts have the same keyboard layouts as their
legacy fonts. Thus data entry operators do not need to re-learn the typing of
new keyboard layouts.
Most digital bookstores, such as flipkart or Amazon, do not accept files in the
non-Unicode legacy fonts for sale on their platforms as these fonts are not
compatible with various digital book reading devices and mobile applications.
Therefore, publishers are interested in shifting to Unicode based fonts in order
to look after their commercial interests.
In light of the above, there is a strong case for requesting a document from the
publisher for the purpose of braille production in a Unicode based font. Central and
State governments of India are in the process of adopting policies to ensure that the
digital files of their textbooks are created in Unicode based fonts. Once such a policy
is implemented, we will be able to get files directly from textbook boards that will be
usable in braille production.
Until this happens, however, we will continue to receive documents in legacy fonts.
In such cases, we can use either of the two approaches described below to convert
these files into Unicode based fonts:
4.2.1 FONT CONVERTERS TO CONVERT LEGACY FONTS INTO
UNICODE BASED FONTS.
Due to the increased commercial interest in making this shift, several
solutions for font conversion are available at low or no cost. For example,
several free converters for different fonts are available at:
https://1drv.ms/f/s!ApxjKLaaOEcOgQYuZOk-dw3jjZZN. Most of the font
converters available at this URL are in HTM files for different fonts that can be
opened in any web browser. You can simply copy and paste the content of
the selected font supported by a specific htm file to get the converted text in
the result area. We can copy and paste this text back into our document. An
example screen-shot of the converter from Chanakya font to Unicode font is
provided below.

One drawback of these font converters is that we lose the formatting of a document
in the converted text. Elements such as headings, tables, etc. have to be re-
formatted in the new document.
There are some tools that claim to retain formatting during font conversion in RTF,
docx, htm or EPUB files and also convert Legacy fonts to Unicode based fonts. One
such Linux based tool, which has been developed at the Assistech lab of IIT Delhi,
can convert non-Unicode fonts to Unicode fonts in EPUB files. Another example of
such a tool is the SIL converter that can retain formatting in Microsoft Word files.
The tool and its documentation are available at:
http://scripts.sil.org/cms/scripts/page.php?item_id=EncCnvtrs#download. There are
font map files available from Google that can be attached to the SIL converter to
enhance its capability and add support for additional fonts.
4.2.2 CHALLENGES IN FONT CONVERSION:
There are many non-Unicode based fonts that make the task of conversion very
difficult. Often, a document is created using more than one font. Each of these fonts
will have a different coding system. Thus, a font converter that supports only a single
font would not be able to correctly convert such a document. Several variants of
legacy fonts make it difficult to choose the correct conversion tool. For example,
there are eight to ten variants of the Chanakya font that are popular in the publishing
industry. Moreover, we have multi-lingual books and it is common to find English text

in Indian language books. These font converters will not support such multi-font and
multi-lingual conversions. Therefore, font conversion still requires manual proof
reading and correction and considerable time may still be needed to prepare a high-
quality digital document in Unicode based font.
4.2.3 GOOGLE-DRIVE OCR:
The Google Drive OCR is a good alternative to font conversion. The process for
using Google Drive OCR is as follows:
a. Save any non-digital file with non-Unicode font as an image. To do this,
follow the steps given below:
open the Non-Unicode file
Open the print dialog box
Under the printer options, select print to PDF. You can select the
number of pages you want to print here.
Click on the print button; this will open a save-as dialog box.
Select the path and give the file a name. The file will be saved
as an image PDF. A screen shot appears below:
b. Upload the image file to Google Drive.
c. Follow the instructions provided for using the Google Drive OCR in
section 3.7 of this manual.
5. PREPARING MICROSOFT DOCUMENTS FOR BRAILLE
PRODUCTION

A braille paper can typically accommodate about 34 to 40 characters per line
and about 27 to 29 lines per page. An A4 size print page can accommodate
about 65 to 70 characters per line and about 54 to 60 lines per page.
Therefore, when we import a Microsoft Word document into braille translation
software, the page formatting is changed. Braille representation also differs in
many places from print formatting due to limited unique characters in Braille
script. A braille book is always ‘read only’ material. For example, at the end of
a chapter, we cannot expect students to complete “fill in the blanks” type
questions in the same book. We also cannot create a workbook in braille
where students answer questions in the book itself. Thus, there is no point in
providing large writing spaces or large blank lines in a braille book. To
minimize the manual effort required for re-formatting braille documents after
translation from print, braille translation software includes special styles and
templates that can be applied to Microsoft Word documents. These styles and
templates enable the braille translation software to identify various elements
of a document, such as headings, sub-headings, different types of tables,
acronyms, lists, e-mail and website addresses, lists, etc. so that the
appropriate formatting can be applied directly by the software. This helps to
reduce the need for manual effort. Such use of styles also enables
transcribers to generate table of contents with auto detection of braille page
numbers. There are two main tools available in the Duxbury Braille
Translation Software: SWIFT and BANA Template. In this chapter, we will
describe the installation and usage of both these tools to prepare a Microsoft
Word Document for braille production. Usage of these tools will increase the
productivity of braille transcribers and enable the faster production of braille,
especially when using the digital files available from publishers and online
libraries and online bookstores.
5.1 TEMPLATES FROM DUXBURY: SWIFT AND BANA BRAILLE
TEMPLATE
SWIFT (Sending Word document Immediately for Translation): SWIFT is an add-on
for Microsoft Word that adds various commands and styles for formatting documents
for braille production. When we install this add-on, a separate “Braille” menu is
added to the Microsoft Word ribbon. Using SWIFT, one can also send the current
document directly for embossing instead of opening it in Duxbury. SWIFT is
compatible with DBT version 11.3 or higher.
BANA Braille: This is basically a macro template that works in conjunction with
Microsoft Word. It has various options to apply the mark-ups (tags) to an Microsoft
Word document. The text marked up with styles and tags provided by this template
will be converted to braille, applying the BANA braille formatting guide.


5.1.2 INSTALLATION OF SWIFT
For this version of SWIFT to work as designed, you will need DBT 11.3 SR1 or later.
The process for installing SWIFT is quite simple, but ideally requires the use of
Microsoft Word for Windows 2007 or later. Locate the SWIFT installation file on your
system, and double click on it to begin the installation, which will initially display the
Welcome dialog shown below.
Click next to continue. The installer will check your system for a valid version of
Word and DBT and ask you to confirm that you wish to proceed. Click Next to
continue.
You will now be presented with a dialog concerning the End User License
Agreement (EULA). You must accept this by activating the "I Agree" radio button,
then clicking the "Next" button in order to proceed. You are now ready to proceed
with the installation. SWIFT will normally be installed within your own user account
and the folder will be displayed on the next screen. We suggest you accept the
defaults.

If you select the "Disk..." button, you will then be presented with a list of your
available disk drives, their size, available space and how much space SWIFT will
require on the selected drive. You can normally accept the default path and click
Next.
The next dialog is simply to Confirm Installation. This is your last chance to abort the
installation.
The usual progress bar will be displayed as SWIFT is installing.

When the installation is complete, you will receive a confirmation as shown below.
You may then click the "Close" button.
SWIFT is now installed and you can click the Close button.
After you have installed SWIFT, you should now find an additional "Braille" ribbon
when you run Word for Windows, as shown here. (A Braille menu and toolbar will
appear if you are using Word 2003, which has no ribbon).
Note: For detailed documentation, please refer to the link below:
http://www.duxburysystems.com/documentation/SWIFT_Book_International.pdf
5.1.3 LINKING BANA BRAILLE TEMPLATE TO MS WORD
The BANA template is used for formatting Word documents that are to be opened in
Duxbury for Braille Translation. The BANA Template sets Styles for braille
documents.
Installation of BANA Braille template
If you have Duxbury, you have the BANA template.
When installing Duxbury, you will be asked: "Would you like to install the BANA
Template"?
YES! You can check the box.

Where is the BANA Template located?
When Duxbury is installed, a backup copy of the template should appear in
C:\Program Files\Duxbury\DBT 11.3\Templates. Inside the templates folder you can
see BANA Braille 2015.dot. This template opens in Microsoft Word
5.1.4 HOW CAN YOU USE THE BANA TEMPLATE WITH MICROSOFT
WORD?
5.1.5 Using BANA template for new files
As the BANA template is already present in the Duxbury folder, you can create a
shortcut to the template on your desktop for easy access. Go to the location where
the BANA template is saved, right click on the template and select the option “send
to” and select “create shortcut in desktop”. Doing this will create a shortcut icon for
the template on the desktop. When you open this template, it will open in Microsoft
Word with an additional menu item “BRAILLE”. The Braille menu will not display all
controls for both BANA and SWIFT templates. In order to merge both, you must do
the following:
1. Go to the BRAILLE menu and click on options.
2. Select “All controls” and press enter on the ok button.
Now when you open the BANA template you will find the controls for both BANA and
SWIFT. You can start creating your new file.

5.1.5 HOW TO USE BANA AND SWIFT FOR EXISTING FILES
For existing files, carry out the following steps:
1. Open the BANA template from your desktop.
2. Open your existing file.
3. Select the entire document by pressing control+A keys.
4. Copy the text.
5. Go to a blank document opened in the BANA template and paste the text from
your existing document.
Now you have the contents of your existing file in a template file. Let us take a look
at a few styles and tags and their impact on the formatting of a braille document:
5.2 HEADING STYLES
Apply the Heading-1 style to title and chapter headings. Apply the Heading-2 style to
sub-sections inside chapters. If any section has further sub-sections, apply the
Heading-3 style to these titles. In addition to using the style command in Microsoft
Word, you can also use the keyboard shortcuts Alt+Control+1 for the Heading-1
style, Alt+Control+2 for the Heading-2 style and so on. An example of the use of
appropriate styles for headings is available in the document itself.
Applying Heading styles in Microsoft Word will result in generating a Table of
Contents (TOC) section automatically in the Duxbury Braille Translator. To do this,
follow the steps below:
1. Apply the desired heading styles to the Microsoft Word document to be
translated.
2. Remove the TOC from the print file, so that it can be generated in DBT.
3. Add the TOC section in the Microsoft Word file at the desired location using
the templates.
4. Go to Braille Add Ins Page setup Contents Page to add mark-up for the
“Contents” section.

A “Contents” section will be generated in Microsoft Word, as shown below with
heading style 1
In addition, apply the basic formatting in Microsoft Word (which includes removal of
images, modifying bullets, etc.).
Import the document into the Duxbury braille translator by following the below steps:
1. Launch DBT
2. Go to file: Open

3. Select the desired library, depending upon the language. In this case, it is
“English (BANA Pre-UEB) - Literary Format”.
4. Translate the document to generate the braille output.
5. View codes under the “View” tab or use Alt +F3.
6. Move the cursor to the position where the TOC page is to be generated.
7. Under the Layout tab, click “Generate Table of Contents”.

This option enables the automatic generation of a Table of Contents. It can produce
Braille or Print Page numbers.
Note: This option is only available when a Braille document is in focus.

Remove braille content from “Centred Heading”, “Left Column Heading” and “Right
Column Heading” as it has already been added in the reference page.
(Note: In case the mark-up for the Contents page is not added in Microsoft Word,
this option within Duxbury can be used).
“Character for Guide Dots” can be modified depending upon the requirement.
In the “Use” section, click on the dropdown list to change from Print Page numbers to
braille page numbers, as we have braille content.
Braille output after the generation of the Table of Contents page:
If you have made any changes after the generation of the table of contents in
Duxbury, it is possible that the braille page numbers will have also changed and will
not be updated in the table of contents automatically. So it is recommended that the
table of contents be removed and regenerated after making changes in order that
correct page numbers appear in the table of contents.
5.3 TABLE CREATION IN BRAILLE USING DBT TEMPLATES
There are 5 styles for creating tables in DBT. These are:
1. Columnar
2. Linear
3. Listed
4. Stair step
5. Unrelated Columns

Each column of a table must be given a unique style for proper formatting in braille.
You can use built-in styles that Microsoft Word offers, such as emphasis, quote,
strong etc., or you can create your own styles. In this manual, we will show how to
create new styles.
5.3.1 CREATION OF A TABLE IN MICROSOFT WORD
In order to create a table in Word, select "Insert", and then "Table" from the Microsoft
Word table menu. Microsoft Word will then display the following dialog. For this
example, make sure you select three columns and insert as many rows as you want.
You may now complete your table as shown below. Note that when you tab from the
bottom right hand corner box, a new row will be created automatically.
Now we have to differentiate between the three columns by applying three different
styles.
We now need to create two styles in Word - French and Spanish.
From Word's Format menu, select "Styles and Formatting" and then click on the New
button, which will display the following dialog.
In the Properties, Name: text box, type in your style’s name e.g. “French”.
Next, make sure you select "Character" for the Style Type - THIS IS IMPORTANT!

For visual help, we suggest you select a different color font for your French Style.
Click on the A icon to bring up the color choice grid shown above, and then click on a
color. Click on OK.
Repeat the above exercise to create a Spanish character style, but this time select a
different color. In our example, we have used blue.
Now we need to apply these styles.
We first need to select a column. You can do this in two ways. Place your cursor in
the appropriate column and 1) go to Word's "Table" menu, choose "Select" and then
"Column"; or 2) move the I bar cursor slowly up until it changes to a downward
pointing arrow, then click the left mouse button.
When the column is highlighted as shown above, click on Word's “Style” drop down
list and select French.

Select the Spanish column in the same way, and apply the Spanish Style. Your
Word table should now look like this.

5.3.2 APPLYING MARKUP TO GENERATE TABLES IN BRAILLE
Columnar
1. Bring the cursor to the blank line just before the table.
2. Go to Braille Tables select “Columnar”. This will insert a Columnar tag
just before the table.
3. Save the document.
4. Open the Doc file in Duxbury.
5. Use Alt +f3 to view the codes (verify that the “Columnar” tag has been applied
properly).
The codes are shown below:

Use Ctrl +T to translate the document to braille.
Similar steps can also be followed for the remaining types of tables (i.e. Linear,
Listed, Stair step, and Unrelated Columns).
5.3.3 INLINE FEATURE
1) In-line format
This requires some additional effort in Word and may, in some cases, be preferred,
especially since it uses less paper.
Place your cursor anywhere in the table, and from Word's Table menu, choose
"Select", and then "Table". Your complete table should now be highlighted.
Go back to Word's “Table” menu, select "Convert", and "Table to Text".

The following dialog will appear
In this example, we have used a hyphen (-) to separate the text between cells. When
you click on OK, your Word table will now appear as follows:
Convert it into braille using Ctrl + T.
5.4 ACRONYM
An acronym is a word or name formed as an abbreviation from the initial
components in a phrase or a word, usually individual letters e.g. WHO, DAISY etc.
Besides the “all caps” indicator, an acronym is always written in Grade-1 braille,
even if it is part of a document in grade-2 braille. For example, "Do you know who
WHO is? It is the World Health Organization". In this case, the upper case “WHO”

would be in grade-1 braille, whereas the first occurrence of lower case “who” would
have a contraction for “wh”. This feature is added only when SWIFT is added. The
acronyms added are not document specific. Once added, use of the same acronym
in any other documents will be automatically taken as an acronym.
The Append Acronym option is shown below. This can be found under the BRAILLE
Menu.
You will now see the Acronym dialog appear on the right hand side of your Word
screen, as shown here.
In this very simple example, where WHO (Note the upper case) has already been
added to the list, we would simply press the "Apply All" button at the bottom right for
Word's Acronym Character Style to be applied only to “WHO" in upper case. When
the file is opened in DBT, the appropriate rule will be applied.
You may also create Custom Acronym Tables when required. See Acronym
Manager.
This is where you may add new Acronym Tables for specific subjects.
It should be noted that anything added to the Normal Acronym List will be applied
when you apply Acronyms to a document.
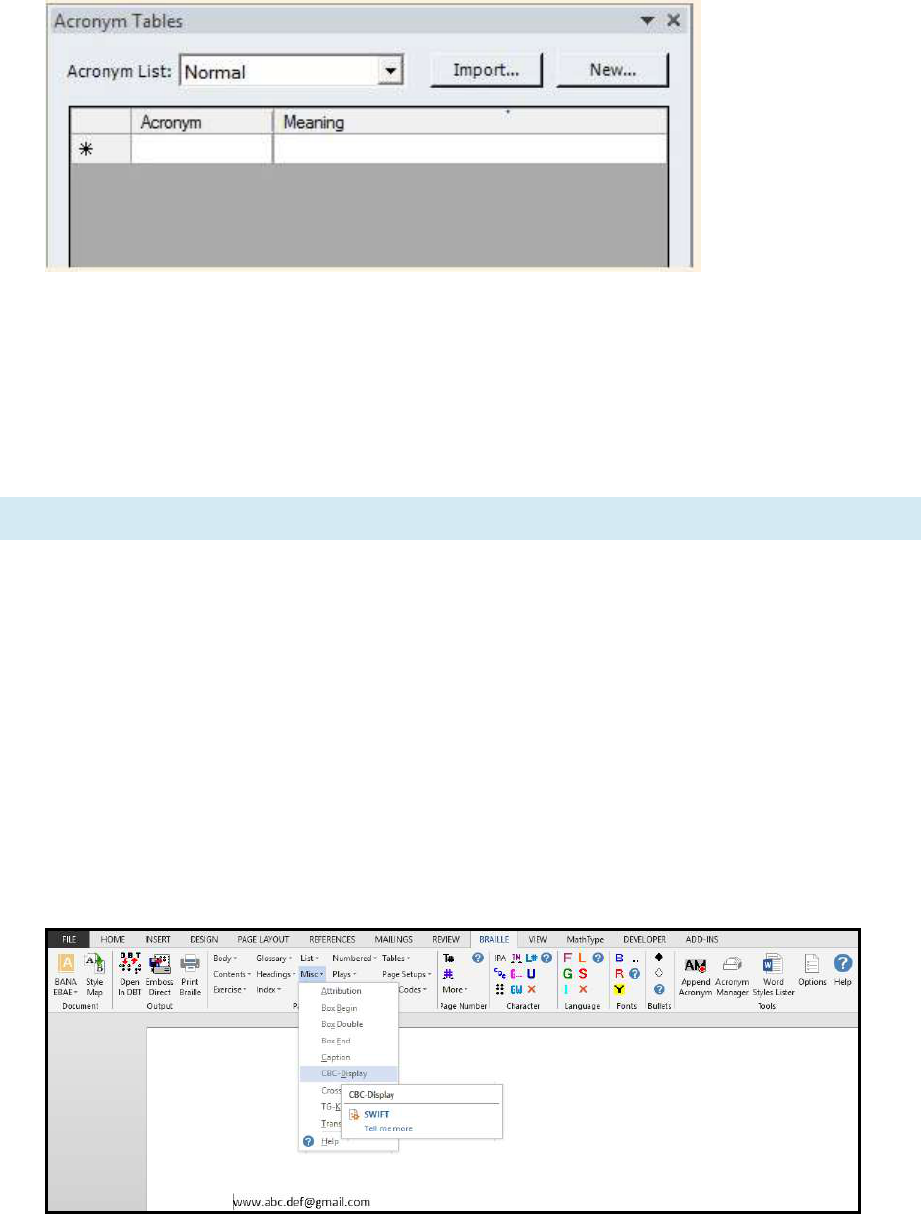
5.5 COMPUTER BRAILLE CODE (CBC)
A separate braille code is used for e-mail addresses and web addresses in braille
documents. These are always in grade-1 braille and the braille signs of characters
like (at the rate) “@” etc. when used normally are different to those used in literary
braille. These codes are called Computer Braille Code(CBC). When preparing files
for braille translation, it is essential to mark email and website addresses as text to
which CBC code should be applied. To mark any text for conversion into CBC code,
do the following:
1. Bring the cursor to the beginning of the text that you want to mark as CBC.
2. Go to Braille Misc CBC- Display.
3. The output after translation is shown below.

6. HANDLING MATH EXPRESSIONS & SYMBOLS FOR BRAILLE
PRODUCTION
When you get an editable Word document from sources such as Kindle or from
publisher files, mathematical equations in the document will be in two formats, i.e.
Image format: The math equation is inserted in the document as an image;
MS-Word equation: Math symbols that can be inserted using Microsoft Word’s
math editor feature.
Neither of these formats is accessible. We cannot use them directly in braille
translation or read them with a screen reading software. To get math content in the
correct format, we need to install and use a special math typing tool. This tool is:
MathType by Design Science (www.dessci.com) (Licensed version or the
Free Lite version).
MathType is a powerful interactive equation editor for Windows that lets you
create mathematical notation for word processing, web pages, desktop
publishing, presentations, MathML documents, etc.
6.1 STEPS FOR MAKING EQUATIONS ACCESSIBLE (COMPATIBLE FOR
BRAILLE TRANSLATION):
If the equation is in an image format, rewrite it using MathType:
Method 1:
Remove the image and rewrite the equation using the “Math type” software, using
the following steps:

1. Go to the Start Menu and open “MathType”.
2. A MathType Equation Editor Window, as shown below, opens on your
screen.
3. Type out the equation using the appropriate symbols etc. from the
MathType Equation Editor.
4. Copy-Paste these symbols to the Word file.
or
Method 2:
1. While keeping the cursor in the position where you want the Math
equation or symbol, press ‘Ctrl + Alt + Q’ or select ‘Inline’ from the
‘Insert Equation’ section in the MathType menu ribbon in the Word
file.
2. A MathType Equation Editor dialog box opens on your screen.
3. Type out the equation using the appropriate symbols from the MathType
Equation Editor.
4. Close & save.
Below are the screenshots for reference.

Refer to the following links in ‘Additional Information’ for more information on
working with MathType:
https://www.dessci.com/en/company/training/misc/tipstricks-full.pdf
https://www.dessci.com/en/dl/MathType5WinManual.pdf
For a Microsoft Word equation, convert into a MathType form.
Equations of Microsoft Word are not accessible, i.e. we cannot use them directly for
braille translation. In order to make an equation compatible for the Duxbury braille
translator, the equation must be converted into a MathType equation.
Follow the steps below for this conversion:
1. Open the Microsoft Word document and choose the option shown below
for converting the images to MathType equations; ensure that the “Convert
Equations” dialogue box and wait.
NOTE: Avoid any other activity on the PC while the equations are being
converted to avoid the conversion stalling.

2. Save as a .docx file: File > Save As > Save as Type: “Word Document
(.docx)”
3. Most of the equations will be converted automatically into a MathType
equation using the “Convert Equations” option. However, in some cases,
the equation may fail to convert.
4. In such cases, edit the equation or rewrite it using MathType.
Once all the equations are in MathType form, they will be compatible for braille
translation.
Important: How to recognize whether the equation is a Math type equation or a
simple Microsoft Word equation.

If a dotted box appears when an equation is clicked, this means the equation
is in MathType.
Representation of a MathType equation
If a rectangular box appears along with an arrow at the bottom after it is
clicked, then it is a simple Microsoft Word equation, which needs to be
converted into MathType form for braille translation.
Representation of a simple MS-Word equation
6.2 PROCESS OF BRAILLE TRANSLATION:
1. Open the Microsoft Word document (which contains equations). Use File
Open.
2. Use library “English (BANA Pre-UEB Textbook DE) – BANA Nemeth” as
shown in the image.
3. Translate the document into braille (using Ctrl +T).
6.3 RULES
FOR
TYPING & EDITING MATH EQUATIONS
An equation may look correct for normal printing but not convert into proper
Nemeth braille code. Nemeth has strict rules regarding spacing etc. The
team at Xavier’s Resource Centre for Visually Challenged, following some
trials, has prescribed rules for the typing and formatting of math equations in
Microsoft Word. These rules are provided in Annexure 1 of this document. It
is important to follow these rules in Microsoft Word files to get proper
Nemeth braille output.

REFERENCES
The following sites or links were referred to when creating this manual.
1. Swift Manual by Duxbury Systems:
http://www.duxburysystems.com/documentation/SWIFT_Book_International.pdf
2. Sugamya Pustakalaya (DFI online library) www.library.daisyindia.org
3. Bookshare online library: www.bookshare.org
4. Web site for documentation and downloading codex software for conversion of
digital files: http://jscholes.net/project/codex
5. Help documentation of Codex available as part of the software after installation.
6. Calibre: open source e-book management and conversion software:
https://calibre-ebook.com
7. Web site to download free of cost font conversion utilities for various
Devanagari fonts: https://1drv.ms/f/s!ApxjKLaaOEcOgQYuZOk-dw3jjZZN
8. Sil: Free of cost font conversion software from non-Unicode to Unicode based
fonts: http://scripts.sil.org/cms/scripts/page.php?item_id=EncCnvtrs#download.
9. Accessible Digital Book Production Guideline 1.0 published by Xavier’s
Resource Centre for Visually Challenged, Mumbai: www.xrcvc.org
10. Online PDF to MS-word converter: www.pdf2doc.com
11. Knowledge database with several tutorials and articles on Accessible Digital
books production and playback options: www.daisy.org/welcome-daisypedia
For more information or clarification, you can send an e-mail to:
For information related to math content, you can write to [email protected]
For information on inserting tactile graphics in braille books, you can write
