Histology
Embedding SOP
IRF Instrumentation Resource Facility - University of South Carolina School of Medicine
Standard Operating Procedure (SOP) for Embedding Tissues
Thermo Scientific TN1550 Embedding Center
Location: IRF Lab Room B60
REQUIREMENTS
All users are required to undergo proper embedding training. All users must read and
sign the microtome SOP before operating the instrument independently. A list of trained
individuals is to be kept by the histology manager. To schedule time to embed tissues,
contact the histology manager.
If there is any issue with the embedding center, the histology manager should be
notified:
This instrument is maintained by Karmen Owen
Email: [email protected]
Cell Phone: (803) 237-9583
TEMPERATURE
Molten wax is kept at 60°C therefore the station will be heated up and will be hot. Avoid
touching surfaces without gloves on to prevent burns. An apron or lab coat may be used
to protect your clothing from paraffin splashes.
EMBEDDING PROCEDURE
1. To turn on the embedding station, the switch on the back should be flipped on.
The arrow button on the display should then be pressed to turn on “manual”
mode.
2. The cooling station switch should be turned on. It takes about 15 minutes to cool
down.
3. After tissues are fully processed, they should be transferred to the embedding
station chamber.
4. A mold should be picked that is the appropriate size for the specimen. The molds
are in the other chamber or extra molds are in the drawer underneath the
embedding station.
5. Choose a cassette from the chamber to start to embed. Remove the lid from the
cassette and throw it away.
6. Push back the lever to dispense paraffin into the mold.
7. If the machine is running low on paraffin, paraffin pellets can be placed in the
back reservoir of the embedding station.
8. Place the specimen in the mold with heated forceps.
9. Orient the specimen properly. Use the cold plate to slightly solidify the paraffin to
the bottom of the mold which can then be used to ‘hold’ the specimen in place.
The mini cold plate on this instrument only works a little bit. The cooling station
can also be used.
10. Place the now empty cassette on top of the embedding mold and be sure it is
seated properly.
11. Fill the top of the cassette with more paraffin.
12. Carefully place the embedded specimen on to the cold plate in an orderly
manner.
13. Blocks can be removed from the molds when they have completely solidified and
are cold to the touch.
14. Blocks should come out of the mold easily, do not try to force a block out of the
mold.
15. Repeat procedure with all specimens.
SHUT DOWN
1. Remove the collection trays under both chambers of the embedding center and
empty the used paraffin into the trash can.
2. Using a spatula, scrape the extra paraffin from around the hot plates and discard
in the trash can.
3. Use gauze to wipe down the area around the hot plates and rub the extra paraffin
away from the outer surfaces of the embedding center.
4. After all of the blocks have been removed from the molds, replace the metal
molds back into the chamber for reuse and close the chambers.
5. Flip the switch on the back of the embedding station to the ‘off’ position.
6. Switch the cold plate off.
SAFETY
In case of injury, seek first aid. A first aid kit is located at the front of the lab benches. An
IRF staff member should be notified of the injury and an incident report should be filled
out.

Microtome SOP
IRF Instrumentation Resource Facility - University of South Carolina School of Medicine
Standard Operating Procedure (SOP) for Microtome Sectioning
Reichert-Jung 2030 Rotary Microtome and Leica RM 2255 Automatic Microtome
Location: IRF Lab Room B60
REQUIREMENTS
All users are required to undergo proper microtome training. All users must read and
sign the microtome SOP before operating the instrument independently. A list of trained
individuals is to be kept by the histology manager. All users are required to log their
usage time in the log book. Reserved time on the microtome can be booked through an
iLabs account.
If there is any issue with histology, the histology manager should be notified:
This instrument is maintained by Karmen Owen
Email: [email protected]
Cell Phone: (803) 237-9583
PROCEDURE - SET UP
1. Tissue specimens should be properly embedded in paraffin wax. Blocks should
then be placed on an ice block to keep them properly cooled.
2. Select the desired trimming thickness. To trim the block, the settings should be at
around 10um and for sectioning the settings should be around 5um.
3. During cutting, the block holder moves up and down as the handwheel is rotated.
After the up stroke, the block holder moves forward in increments of the set
trimming thickness setting.
4. Make sure the handwheel is rotated until the specimen clamp is in the uppermost
position.
5. Insert the block into the block holder by pushing the lever towards you. Release
the handle to secure the block. A block can be positioned horizontally or
vertically.
6. Insert a new blade into the blade holder CAREFULLY and tighten the blade
holder. Angle the blade and specimen so that the block face is parallel to the
knife edge.
7. Make sure all bolts are tightened before unlocking the handwheel.
8. Use the handwheel to advance the knife forwards to move the specimen close to
the knife.
Different sections of the blade can be used at different times. If there are blade marks
starting to show while sectioning, move the blade down to a newer section of blade. Start at
one side of the blade and then move the blade down when it needs to be changed.
SECTIONING
1. Start to turn the wheel slowly to see how close the blade is to the block. Advance
or retract the specimen block based on what is needed.
2. Blocks should be faced to expose the entire tissue by trimming it at 5-10μm.
Continue trimming by rotating the microtome wheel until the specimen is fully
exposed to the point desired for sections.
3. After facing the block, put the block back on ice to keep them cold before
sectioning. When ready to start sectioning, the section thickness should be set to
5μm.
4. After trimming move the blade to a different portion of blade to start sectioning.
5. Keep rotating the hand wheel clockwise to start making sections. A ribbon should
start forming.
6. Gently, pick up the ribbon and lay it on top of the water bath.
7. Multiple sections can fit on to a slide. Orientation and location of the tissue
should be considered before placing the tissue.
8. To change blocks, move the specimen clamp to the upper end position and
activate the handwheel lock. Remove the blade before changing blocks.
9. Always keep the knife guard up and the hand wheel locked when not actively
using the microtome.
WATER BATH
1. Fill a water bath with distilled water and let it heat to 10° less than the melting
point of the paraffin being used.
2. Gently, pick up the ribbon and let it float on top of a heated water bath. The
sections should flatten out.
3. A long ribbon can be separated in the bath into individual sections.
4. Orient a glass slide next to a section and slip the slide under the water at a 45°
angle. Move the slide underneath the wanted section and touch it to the ribbon.
5. Lift the slide up at an angle.
6. After the desired sections are on slides, let the slides air-dry.
7. Make sure to turn off the water bath after use.
CLEANING
1. When you are done sectioning, lock the handwheel with the specimen holder in
the top position.
2. Remove the blade from the knife holder and discard it in the sharps container.
3. Remove the block from the block holder.
4. Brush loose paraffin into the waste paraffin tray with gauze. Empty the paraffin
tray into the trash by pulling it out until the magnets release the tray. Return the
empty paraffin tray.
5. Unwanted paraffin trimmings can be disposed of in a regular trash bin.
6. Paraffin can be wiped from the area using gauze. Wipe down the microtome and
water bath with 70% ethanol on a Kimwipe.
7. Empty ice bath in the sink and replace with water and return it back to the
freezer.
8. Empty the water bath in the sink and make sure it is turned off
9. Remember to record your time in the log book.
STAINING
1. Air dry the slides at room temperature.
2. Place in an oven at 70° for at least 20 minutes to melt the paraffin. This is an
essential step, as otherwise the sections will fall off the slide.
3. Stain the slides using whichever stain protocol is wanted.
4. Coverslip slides in the coverslipper machine using mounting media and glass
coverslips.
BLADES
Use with caution!! Microtome blades are very sharp and can cause serious injuries.
Never touch a blade with your fingers. Always lock the handwheel when manipulating
the blade. Do not clean the blade along its length. Wipe the blade from the back edge to
the cutting edge with a brush when cleaning. Put blade guard up when not sectioning.
Never leave the microtome unattended with an exposed blade in position. If you need to
step away, remove the blade or use the blade guard.
After Use: Remove the blade when you have finished using the microtome. Never
leave a used blade in the blade holder in the microtome. All used blades should be
properly disposed of in the appropriate sharps container located on the lab bench. Do
not place blades in the trashcan or laying on the benchtop.
WASTE MANAGEMENT
All trimmings and sections of tissue that accumulate on the microtome should be
brushed into the waste container below the microtome. This waste container with all of
the trimmings should be emptied into a trashcan. All blades should be disposed of
properly in the designated sharps container on the lab bench.
PREVENTATIVE MAINTENANCE AND CLEANING
Before cleaning the instrument, make sure to lock the rotary hand wheel. Make sure all
blades are removed and disposed of. All surfaces of the microtome can be disinfected
using 70% ethanol. Gauze can help get the paraffin off the microtome.
SAFETY
In case of injury, seek first aid. A first aid kit is located at the front of the lab benches. An
IRF staff member should be notified of the injury and an incident report should be filled
out.

CRYOSTAT SOP
IRF Instrumentation Resource Facility - University of South Carolina School of Medicine
Standard Operating Procedure (SOP) for Frozen Sectioning
Thermo Scientific Cryostat Microm HM 525
Location: IRF Lab Room B60
REQUIREMENTS
All users are required to undergo proper cryostat training. All users must read and sign
the cryostat SOP before operating the instrument independently. A list of trained
individuals is to be kept by the histology manager. All users are required to log their
usage time in the log book. Reserved time on the cryostat can be booked through an
iLabs account.
If there is any issue with the cryostat, the histology manager should be notified:
This instrument is maintained by Karmen Owen
Email: [email protected]
Cell Phone: (803) 237-9583
PROCEDURE - SET UP
9. Samples should be brought down to the core on ice or dry ice.
10. Pick the desired mold for your sample. Place the sample in the mold face down
and cover it with OCT media until the entire well is covered. Avoid air bubbles.
Put it in the cryostat and let it freeze.
11. Once it is completely frozen and is white in color, it can be popped out of the
mold. Apply a small amount of OCT on the specimen chuck and mount the
specimen onto it. Allow OCT media to harden. Let it briefly freeze before
mounting it.
12. Turn the cryostat light on. Lock the handwheel in the upper position before
working with hands inside the cryostat.
13. Insert the chuck into the specimen holder and tighten the screw. The specimen
can be manipulated by untightening the clamp on the right side of the specimen
holder.
14. Insert new blade into the blade holder CAREFULLY and tighten the blade holder.
Angle the blade and specimen so that the block face is parallel to the knife edge.
15. Select the desired trimming thickness. The most common thickness for frozen
sectioning is
16. 10um. During cutting, the block holder moves up and down as the handwheel is
rotated. After the up stroke, the block holder moves forward in increments of the
set trimming thickness setting.
17. Make sure all bolts are tightened before unlocking the handwheel.
18. Press the motorized coarse feed button to move the specimen close to the knife.
The knife angle on this cryostat sometimes does not stay in the correct position.
Make sure to set the angle tightly at 5-6 μm and avoid hitting the clamp during
sectioning.
SECTIONING
10. Keep your samples in the cryostat until they are ready to be sectioned. Do not
allow the tissue to thaw at any time. It is best to only work with one sample at a
time.
11. During trimming, keep the antiroll device up. Advance the knife by turning the
handwheel and start trimming the block face. Continue trimming until the
specimen is exposed to the point desired for sections. Discard the first 2-3
sections to ensure that desired thickness is achieved.
12. Keep the knife and specimen free of debris by brushing upwards with a brush.
13. When ready to section, lower the antiroll device glass onto the stage in the
correct position. This will catch the sections as they are cut.
14. Continue to advance the knife to start taking sections. When a desired section is
cut, lift the antiroll plate and touch a glass slide face down onto the section. The
section should jump and stick onto the slide.
15. Multiple sections can fit on to a slide. Orientation and location of the tissue
should be considered before placing the tissue. If a section needs to be
repositioned in any way, a brush can be used to manipulate the section.
16. The slides can be stored in the cryostat while sectioning. Let the slides dry at
room temperature before staining.
SHUT DOWN
1. When you are done sectioning, lock the handwheel with the specimen holder in
the top position. Press the rewind button to move the specimen holder all the way
to the back, to the rear position.
2. Remove the blade from the knife holder and discard it in the sharps container.
3. Remove the chuck from the specimen holder and also remove the specimen
from the chuck. The specimen can also be removed with running warm water.
Clean the chuck with water at the sink or 70% ethanol and wipe the chuck with a
Kimwipe.
4. The cryostat chamber and accessories can be cleaned using 70% ethanol on a
Kimwipe.
5. Make sure the window is down and the chamber light is off. Leave the main
power on. Do not shut down the main power of the instrument.
STORAGE
Slides can be stored in -20°C if being used in the next few weeks and should be stored
in -80°C if they are going to be stored for months or years at a time. The slides should
only be thawed when they are ready to be used.
BLADES
Use with caution!! Microtome blades are very sharp and can cause serious injuries.
Never touch a blade with your fingers. Always lock the handwheel when manipulating
the blade. Do not clean the blade along its length. Wipe the blade from the back edge to
the cutting edge with a brush when cleaning. Put blade guard up when not sectioning.
Never leave the microtome unattended with an exposed blade in position. If you need to
step away, remove the blade or use the blade guard.
After Use: Remove the blade when you have finished using the cryostat. Never leave a
used blade in the blade holder in the cryostat. All used blades should be properly
disposed of in the appropriate sharps container located on the lab bench. Do not place
blades in the trashcan or laying on the benchtop.
TEMPERATURE
• Temperature range of the cryostat is -20°C to -35°C. Do not go above -20°C.
• Keep temperature of the cryostat on -23°C. If you change the temperature of the
cryostat, put it back on -23°C when you are done using it.
• The cryostat operates at extremely low temperatures and is capable of causing
frostbite. Be sure to wear gloves when working in the chamber.
• If sections are accumulating on the knife edge, the temperature may be too
warm. Keep the glass door shut as much as possible. Freeze spray may also be
used.
• If sections are curling, the temperature may be too cold. Place your finger on the
specimen to warm it up.
WASTE MANAGEMENT
Do not leave specimens in the cryostat. The waste container below the blade holder
should be emptied into a trashcan. All trimmings and sections of tissue that accumulate
in the cryostat should be swept into the holes in the back of the cryostat. Any leftover
specimens should be taken back to your own lab for disposal. All blades should be
disposed of properly in the designated sharps container on the lab bench.
PREVENTATIVE MAINTENANCE AND CLEANING
Before cleaning the instrument, make sure to lock the rotary hand wheel. Make sure all
blades are removed and disposed of. All surfaces of the cryostat can be disinfected
using 70% ethanol. To defrost the cryostat, the main power should be turned off. All
parts of the cryostat should be removed and cleaned separately. Everything should be
thoroughly dried before being reinserted back into the chamber to prevent icing. The
chamber should also be completely dried out before switching the cryostat back on.
SAFETY
In case of injury, seek first aid. A first aid kit is located at the front of the lab benches. An
IRF staff member should be notified of the injury and an incident report should be filled
out.
Instrumentation Used
Autostainer: Leica Autostainer XL
Leica ASP 300 Tissue Processor
Leica CV 5000 Automatic Coverslipper
Thermo Scientific Microm HM 525 Costat
Reichert-Jung 2030 Rota Microtome
Thermo Scientific TN1550 Embedding Center
Nikon Eclipse E600 Light Microscope
Lab Vision PT Module for Antigen Retrieval
Leica RM 2255 Automatic Microtome (Karmen’s)
Tissue Flotation Bath
Laborato Oven

Histology
• Study of microscopic structure of cells, ssues, and organs
• Thin slice of ssue under a microscope
Steps of Histology
1. Fixaon
2. Dehydraon
3. Clearing
4. Paran Inltraon
5. Embedding
6. Seconing
7. Drying
8. Staining
Processing
• Series of alcohols, xylene, and paran
• Overnight protocol
• (6 hours, 45 minutes)
Dehydraon: the removal of water by increasing concentraons of ethanols
• Water molecules are removed from ssue
Clearing: ethanol is replaced by xylene
• Paran and ethanol are immiscible!
Paran Inltraon: ssue is inltrated with a supporng medium
• Xylene is replaced with molten wax under vacuum
Staining
• H&E stain is the most common
Regressive staining – ssue is overstained with hematoxylin and dierenator is used to remove excess
hematoxylin (Harris Hematoxylin, Weigert’s Hematoxylin)
Progressive staining – ssue is stained with hematoxylin up to a point and excess hematoxylin is not
removed (Mayer’s Hematoxylin, Gill’s Hematoxylin)
PAS Stain – Glycogen
Masson’s Trichrome - Collagen

FIXATION
• Preserves tissues by stopping autolytic changes but allows tissues to remain
unchanged by subsequent treatment.
• Functions to kill the tissue by denaturing proteins so that the postmortem activities
of decay, or putrefaction (bacterial attack), and autolysis (enzyme attack) are
prevented.
• Helps maintain the proper relationship between cells and extracellular substances.
• Tissues are hardened slightly.
• Resistant to further changes.
• Delayed fixation causes autolysis – fixation should be performed immediately after
tissue has been removed.
FACTORS AFFECTING FIXATION
Temperature – Increase in temperature increases the rate of fixation but also increases rate
of autolysis. Fixation should normally be done at room temperature. After 24 hours, can be
stored in 4°C.
Size – Effects reagent penetration. Maximum size should be no more than 10mm for
adequate fixation.
Volume Ratio – Fixative volume should be at least 20X greater than the tissue volume.
Fixative Used – Different fixatives penetrate at different rates. Most commonly used is 10%
buffered neutral formalin or 4% paraformaldehyde (pH should be 7.2 to 7.4)
Time – Interval between interruption of the blood supply and placement of tissue in
fixative should be minimal. Changes in tissue begin to occur within seconds so speed is
essential.
Duration – 24 (small) to 48 hours (larger) (depends on size of tissue)
AFTER FIXATION
Rinse with distilled water and change to 70% ethanol. Can be stored long term in 4°C.

OVERNIGHT TISSUE PROCESSING
PROTOCOL
• 70% Ethanol – 45 minutes
• 70% Ethanol – 30 minutes
• 95% Ethanol – 30 minutes
• 95% Ethanol – 30 minutes
• 95% Ethanol – 30 minutes
• 100% Ethanol – 20 minutes
• 100% Ethanol – 20 minutes
• 100% Ethanol – 20 minutes
• Xylene – 20 minutes
• Xylene – 20 minutes
• Xylene – 20 minutes
• Paraffin – 45 minutes
• Paraffin – 45 minutes
• Paraffin – 30 minutes
Dehydraon
Paran
Inltraon
Clearing
Routine H & E Protocol
1)
XYLENE - 5 minutes
2)
XYLENE - 5 minutes
3)
100% ETHANOL - 2 minute
4)
100% ETHANOL - 2 minute
5)
95% ETHANOL - 1 minute
6)
95% ETHANOL - 1 minute
7)
WASH 1 - WATER - 1 minute
8)
HEMATOXYLIN - 6 minutes
9)
WASH 2 - WATER – 5 minutes
10)
WASH 3 - WATER - 2 minutes
11)
ACID ALCOHOL - 2 seconds
12)
WASH 4 - WATER - 5 minute
13)
BLUING - 1 minute
14)
WASH 5 - WATER - 5 minutes
15)
95% ETHANOL - 2 minutes
16)
EOSIN - 1 minute 30 seconds
17)
95% ETHANOL - 30 seconds
18)
95% ETHANOL - 30 seconds
19)
100% ETHANOL - 1 minute
20)
100% ETHANOL - 2 minute
21)
100% ETHANOL - 1 minute
22)
XYLENE - 5 minutes
23)
XYLENE - 5 minutes
24)
XYLENE - Exit

Autostainer (H&E) Reagents
Bluing:
5 drops ammonia in water
Make fresh each day!
(Or use premade bluing reagent)
Hematoxylin:
Filter Daily
Eosin:
Stir daily
Acid Alcohol:
1% HCl in 70% ETOH
(1L) 10mL HCl and 990mL 70% ETOH
70% ETOH (1L):
700mL 100% ETOH
300mL H20
Switch reagents frequently
Karmen.Owe[email protected].edu
(803) 237-9583
(Frozen) Rapid H & E Protocol
25)
FORMALIN – 2 minutes
26)
95% ETHANOL - 1 minute
27)
WASH 2 – WATER – 20 seconds
28)
WASH 3 – WATER – 20 seconds
29)
HEMATOXYLIN – 1 minute
30)
WASH 1 - 1 minute
31)
ACID ALCOHOL – 2 seconds
32)
WASH 4 - WATER – 10 seconds
33)
BLUING – 10 seconds
34)
WASH 5 - WATER – 30 seconds
35)
95% ETHANOL – 5 seconds
36)
EOSIN – 15 seconds
37)
95% ETHANOL - 5 seconds
38)
95% ETHANOL - 5 seconds
39)
100% ETHANOL – 5 seconds
40)
100% ETHANOL – 5 seconds
41)
100% ETHANOL – 5 seconds
42)
XYLENE – 5 seconds
43)
XYLENE – 5 seconds
44)
XYLENE - Exit

Periodic Acid Schi (PAS) Stain
Purpose: The Periodic Acid Schi (PAS) stain is intended for use in demonstraon of lymphocytes and
mucopolysaccharides. It is also used to demonstrate glycogen, basement membranes, cellulose, and
starch. PAS posive material will be stained magenta. Nuclei will be stained black or blue.
Posive Controls: Kidney, Intesne, Liver
Reagents: Periodic Acid Soluon, Schi’s Soluon, Mayer’s Hematoxylin, Bluing Reagent
Principle: The periodic acid oxidizes the carbon to carbon bond forming aldehydes that react with the
Schi’s soluon, which forms the magenta color.
Use: The PAS stain is intended for use in histological demonstraon of lymphocytes and
mucopolysaccharides. The staining paern of the lymphocytes are helpful in making therapeuc
decisions in established cases of lymphocyc leukemia. The PAS stain can also be used for the
demonstraon of fungal organisms in ssue secons. Can be used to detect glycogen deposits in the
liver when glycogen storage disease is suspected.
Periodic Acid Schi (PAS) Stain
1. Deparanize and hydrate to water (program 3 on autostainer)
2. Immerse slide in Periodic Acid Soluon for 5 minutes (7 minutes for kidney, skin and liver)
3. Rinse in dislled water
4. Immerse slide in Schi’s Soluon for 15 minutes (20 minutes for kidney, skin and liver)
5. Rinse slide in hot running tap water (beaker in oven)
6. Rinse slide in dislled water
7. Stain slide in Mayer’s Hematoxylin for 1 minute
8. Rinse slide in running tap water for 2 minutes
9. Apply Bluing Reagent for 10 seconds
10. Rinse in dislled water
11. Dehydrate by using program 2 on the autostainer
12. Mount with mounng media and coverslip
Note: Save all reagents in original containers
Note: The Periodic Acid Soluon and the Schi’s Soluon are located in
the refrigerator
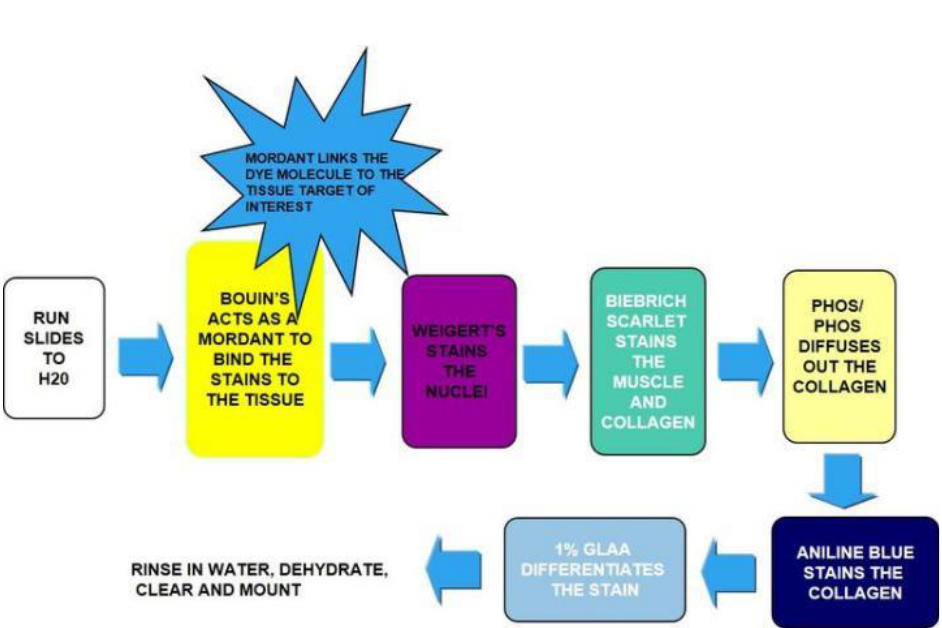
Masson’s Trichrome Stain
Purpose: Demonstraon of collagen and smooth muscle. Collagen bers will be stained blue. Nuclei will
be stained black, and the muscle, cytoplasm, and keran are stained red.
Posive Controls: Skin, Lung, Stomach, Intesne, Uterus, Appendix, Fallopian Tube
Reagents: Bouin’s Soluon, Weigert’s Iron Hematoxylin Stock Soluon A&B, Biebrich Scarlet-Acid Fuchsin
Soluon, Phosphomolybdic-Phosphotungsc Acid, Aniline Blue Soluon, 1% Acec Acid Soluon
Principle: Post-xaon in Bouin’s increases the intensity of the stain. The negavely charged nuclei are
then stained with the posively charged hematoxylin. An acidic dye is applied to the secon which binds
all of the acidophilic elements including collagen and muscle. The phosphomolybdic-phosphotungsc
acid then displaces the acid dye from the collagen. Collagen is more permeable than cytoplasm and the
large phosphomolybdic-phosphotungsc molecule cannot displace the acid dye from the cytoplasm. It
also acts as a mordant for the aniline blue to bind to collagen. Acec acid helps clear the slide of any
loosely bound dye.
Use: This method is used to dierenate between smooth muscle and of collagen bers in ssue
secons. This stain can assess the degree of brosis in the liver, which gives important informaon about
stage and progression of a disease. Liver diseases such as hepas B and C viral infecons, fay liver
disease, alcoholic liver disease and chronic biliary diseases show the formaon of brous ssue including
brous septa leading to the end-stage process called cirrhosis.

Masson’s Trichrome Stain
1. Deparanize and hydrate to water (program 3 on autostainer)
2. Mordant in Bouin’s xave for 1 hour in the oven (70°)
3. Cool and wash in running water unl yellow color disappears
4. Rinse in dislled water
5. Place in Weigert’s Iron Hematoxylin Working Soluon for 10 minutes
6. Wash in running water for 10 minutes
7. Rinse in dislled water
8. Place in Biebrich Scarlet-Acid Fuchsin for 2 minutes. Save soluon in original container when
nished.
9. Rinse in dislled water
10. Place in phosphotungsc-Phosphomolybdic acid for 12 minutes.
11. Place in Aniline Blue soluon for 5 minutes. Save soluon in original container when nished
12. Rinse in dislled water
13. Place in acec acid 1% aqueous for 4 minutes. Pour used acid in waste container.
14. Dehydrate by using program 2 on the autostainer
15. Mount with mounng media
Working Soluon is made by adding equal parts of stock soluon A and stock
soluon B. Mixture is good for 2 weeks. This step will be premade for you.
When nished, pour mixture back into the original container.
Note: Pour used acid in labeled waste container
Note: Bouin’s xave has highly toxic fumes. Make sure fume hood is on
and limit exposure. Close the lid on the container before pung it in the
oven

Picrosirius Red Stain
Purpose: Stains brillar type I and type III collagen. Collagen will be stained red. Type I will be stained
yellow, and type III will be stained green.
Posive Controls: Heart, Lung, Uterus, Muscle, Kidney
Reagents: Phosphomolybdic Acid, Picrosirius Red Stain, .1 N Hydrochloride Acid
Principle: Picric acid dye is a small and slightly hydrophobic molecule and Sirius Red is a red acid dye that
is large and hydrophilic. This method stains collagen red, and cytoplasm and other protein rich material
being stained dierent shades of yellow. Thick secons stain more yellow than thin secons.
Use: Picrosirius red method is used to stain collagen I and III. The stain will quanfy the amount of
collagen in a given area of myocardial ssue. Picrosirius Red Stain binds specically to collagen brils of
varying diameter that is used to disnguish collagen type I from collagen type III. Collagenous structures
of the mandible stain brilliant red. Dennal tubules, Sharpey’s bers and other structures not easily seen
in secons stained with hematoxylin and eosin alone were seen clearly aer this procedure. Under
polarized light collagen bers could be specically idened and their orientaon determined. Picrosirius
Red Stain hematoxylin is recommended for examinaon of normal or pathologic dental specimens.
Picrosirius Red Stain
1. Deparanize and hydrate to water (program 3 on autostainer)
2. Place in Phosphomolybdic Acid for 2 minutes
3. Rinse in dislled water
4. Place in Picrosirius Red Stain for 1 hour. Save soluon in original container when nished.
5. Place in .1 N Hydrochloride Acid for 2 minutes
6. Place in 70% Ethanol for 45 seconds
7. Dehydrate by using program 2 on the autostainer
8. Mount with mounng media
Note: Pour used acid in labeled waste container
OIL RED O
Purpose:
The demonstraon of neutral lipids in frozen ssue secons. Fat occurring in an abnormal place such as
fay emboli that may develop aer either a bone fracture or an injury that crushes a fay body area may
be demonstrated. The fat stain may verify that the emboli caused death. Degenerang material
containing fat, such as cell membranes or myelin, may coalesce into fat droplets that are demonstratable
with fat stains, and tumors arising from fat cells (liposarcomas) can be dierenated from other types of
tumors.
Principle:
Staining with oil soluble dyes is based on the greater solubility of the dye in the lipoid substances than in
the usual hydroalcoholic dye solvents. This is a physical method of staining and the dye used must (1) be
more soluble in the ssue lipid than in the solvent in which it is dissolved, (2) not be water soluble, (3) be
strongly colored, and (4) act with ssue constuents only by soluon. The solvent used is crical, with
isopropanol removing a minimal amount of lipid and propylene glycol not extracng any lipid.
Notes:
Lipids are removed by any xave or soluon containing alcohol or organic solvents, so secons cannot
be processed for paran embedding. Frozen secons are most frequently used, but the use of water
soluble wax for embedding will allow the demonstraon of fat.
Free-oang secons stain more readily; however free-oang secons are dicult to obtain with the
cryostat, and secons mounted on slides may be used. The staining me may need to be adjusted.
Secons that have been xed previously also may tend to loosen from the slides.
To improve the microtomy of frozen secons, formalin xed ssues may be inltrated with 30% sucrose
soluon before freezing.
Aqueous mounng media must be used, because the organic solvent present in synthec resinous media
will dissolve the fat.
The fat in the secon is relavely liquid and mobile, so care should be taken that no pressure is placed
on the coverglass or the fat may be displaced. If air bubbles are present in the secon, remove the
coverslip by soaking the slide in warm water. If glycerin jelly is used for mounng, it should not be
overheated because this may melt the fat and also displace it.
OIL RED O
Reagents:
Oil Red O Stock Soluon
Oil Red O - 2.5g
Isopropanol, 98% - 500mL
Mix well.
Oil Red O Working Soluon
Oil Red O Stock Soluon – 24mL
Dislled Water – 16mL
Mix well and let stand for ten minutes. Filter. The ltrate can be used for several hours.
Procedure:
1. Cut frozen secons, x in 40% formaldehyde for 1 minute, and wash well in tap water;
blot o excess water; if the ssue has been previously xed, there is no need to rex.
2. Stain secons in oil red O for 10 minutes
3. Wash secons in tap water
4. Stain for 1 minute in Harris hematoxylin containing acec acid (glacial acec acid,
2mL/hematoxylin, 48mL)
5. Wash secons in tap water
6. Blue in ammonia water (or bluing)
7. Wash in tap water
8. Mount secons with an aqueous mounng medium
9. Seal the edges of the coverslip with ngernail polish
DAKO – Envision+ Dual Link System-HRP
• Envision+ Dual Link System-HRP has been opmally diluted for use with primary anbodies from
mouse and rabbit in immunohistochemical procedures based on the labelled Polymer method.
• The Envision+ Dual Link System-HRP is a two-step IHC staining technique. This system is based on
an HRP labelled polymer which is conjugated with secondary anbodies. The labelled polymer
does not contain avid or bion. Consequently, nonspecic staining resulng from endogenous
avidin-bion acvity in liver, kidney, lymphoid, and cryostat secons is eliminated or signicantly
reduced.
• Kit is stored at 4C. All steps should take place at room temperature. Do not allow ssue secons
to dry during the staining procedure.
Principle: Any endogenous peroxidase acvity is quenched by incubang the specimen with an
endogenous blocking reagent. The specimen is then incubated with a diluted rabbit primary anbody,
followed by incubaon with the labeled polymer, using two sequenal 30-minute incubaons. Staining is
completed by a 5-10 minute incubaon with a substrate-chromogen.
Descripon: Ki-67 is a nuclear protein, which is expressed in proliferang cells. Ki-67 is preferenally
expressed during late G1-, S-, M-, and G2 phases of the cell cycle, while cells in the G0 (quiescent) phases
are negave for this protein.
Posive Controls: Spleen, Tonsil, Breast
Labeled polymer: Peroxidase labelled polymer conjugated to goat an-rabbit immunoglobulins in Tris-
HCl buer containing stabilizing protein and an an-microbial agent.
Dako Anbody Diluent: intended for the preparaon of primary and secondary anbody diluons and
negave control reagents for use in immunohistochemical (IHC) staining procedures.
Protocol:
1. Deparanizaon and Angen Retrieval
a. Make 1.5L 1X Angen Retrieval Buer from stock 100X Citrate Buer (pH 6.0).
(15mL Citrate + 1.5L Dislled Water)
b. Pour this soluon into one tank of the Lab Vision PT Module.
c. Place slides in the slide holder and suspend the slide holder over the bath.
d. Turn the module on and press “run” on the side that corresponds with the lled bath.
e. Protocol takes about 2 hours including heang and cooling.
2. Endogenous Enzyme Block
a. The following steps should be performed rapidly enough to prevent the ssue from
drying out.
b. Once module is cooled down, remove slides from slide holder.
c. Tap o excess buer onto paper towels and wipe the area around the ssue specimen
with a kimwipe.
d. Use a Pap pen to draw a circle around the ssue.
e. Place slides on a staining tray and apply Dual Endogenous Enzyme Block dropwise
enough to cover the specimen without overowing the circle.
f. Incubate for 10 minutes.
g. Remove slides from staining tray and tap o the Enzyme Block onto paper towels.
h. Place slides upright in PBS for 30 seconds.
3. Primary Anbody or Negave Control Reagent
a. Remove the slides from PBS and tap o the excess and wipe the slides as before.
b. Briey spin down primary anbody (Ki-67, rabbit monoclonal, which has been diluted
1:200 in anbody diluent) or negave control reagent.
c. Using a transfer pipee, apply enough diluted primary anbody or negave control
reagent to cover the specimen.
d. Incubate for 30 minutes.
e. Tap o excess soluon and place in PBS for 5 minutes.
f. Repeat for a total of 2 washes.
4. Labelled Polymer-HRP
a. Tap o excess and wipe slides as before.
b. Apply labeled polymer dropwise to cover specimen.
c. Incubate for 30 minutes.
d. Tap o excess and place in PBS for 5 minutes.
e. Repeat for a total of 2 washes.
f. While waing, add 1 mL DAB+ Substrate Buer to an Eppendorf tube, then add 1 drop of
chromogen.
g. Invert the mixture several mes to mix.
h. Fill another tube with DI water.
5. Substrate-Chromogen
a. Tap o excess buer and wipe slides as before.
b. Using a transfer pipee, apply enough substrate-chromogen soluon to cover specimen.
c. Incubate for 10 minutes.
d. Using a transfer pipee, remove the soluon from the slide and deposit it in the
hazardous waste container designated for chromogen waste.
e. Using the same transfer pipee, to move any unused substrate-chromogen soluon to
the chromogen waste container, then move the DI water from the Eppendorf tube to the
tube that contained the substrate-chromogen soluon. Close the tube, invert, and then
pour into the chromogen waste container.
f. Place slide upright in DI water for 1-2 minutes.
6. Hematoxylin Counterstain
a. Remove slide from DI water and promptly transfer to autostainer,
b. Use program #14 on autostainer and load the samples.
c. Mount with mounng media and a cover slip.
