
User Manual
Pro50 I Pro100 I Pro100x

2
• Read all instructions.
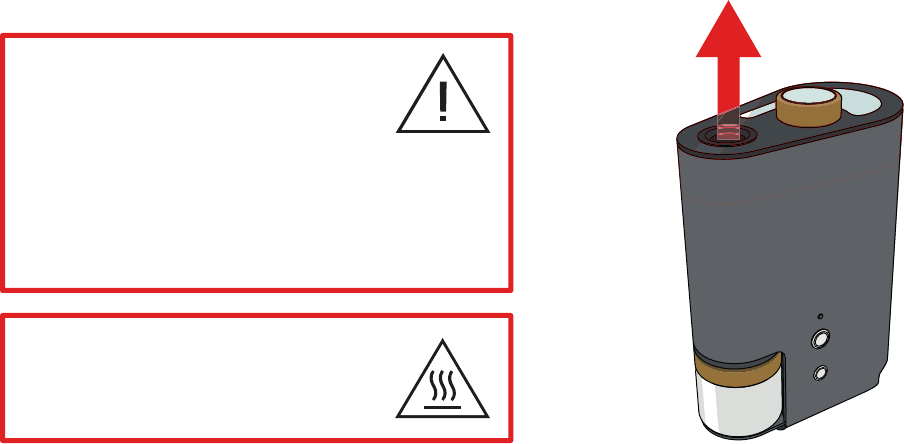
• Do not touch hot surfaces. Use handles or knobs. This is the hot surface symbol.
It indicates that a surface gets hot and must not be touched.
• To protect against electrical shock do not immerse cord, plugs, or the appliance in water or other liquid.
• Close supervision is necessary when any appliance is used by or near children.
• Unplug from outlet when not in use and before cleaning. Allow to cool before
putting on or taking off parts.
• Do not operate any appliance with a damaged cord or plug or after the appliance
malfunctions or has been damaged in any manner. Return appliance to the nearest
authorized service facility for examination, repair, or adjustment.
• The use of accessory attachments not recommended by the appliance
manufacturer may cause injuries.
• Do not use outdoors.
• Do not let cord hang over edge of table or counter, or touch hot surfaces.
• These safety instructions continue on the following page.
• Do not place on or near a hot gas or electric burner, or in a heated oven.
• Extreme caution must be used when moving an appliance containing hot oil or other hot liquids.
3
• Always attach plug to appliance rst, then plug cord into the wall outlet. To disconnect,
turn any control to off, then remove plug from wall outlet.
• Do not use appliance for other than intended use.
• The instructions for cleaning this appliance (located on page 22) must be followed.
• This appliance must not be operated by means of an external timer or separate remote-control system.
• In order to override the smart enabled function, unplug the appliance.
• This appliance is intended to be used in household and similar applications such as:
• Staff kitchen areas in shops, ofces and other working environments;
• Farmhouses
• By clients in hotels, motels and other residential type environments;
• Bed and breakfast type environments.
• This appliance can be used by children aged from 8 years and above and persons with reduced
physical, sensory or mental capabilities or lack of experience and knowledge if they have been given
supervision or instruction concerning use of the appliance in a safe way and understand the hazards
involved. Children shall not play with the appliance. Cleaning and user maintenance shall not be
made by children unless they are older than 8 and supervised. Keep the appliance and its cord out
of reach of children less than 8 years.
• Save these instructions.
Never leave the
appliance unattended

4
• Lisez toutes les instructions.
• Ne pas toucher les surfaces chaudes. Utiliser les poignées prévues à cet effet.
Ceci est le pictogramme pour les surfaces chaudes. Il indique les surfaces
pouvant devenir très chaudes et qui ne doivent pas être touchées.
• An d’éviter tout risque d’électrocution ne pas mettre les câbles, prises ou autre
partie de l’appareil dans l’eau ou dans quelque autre liquide.
• Faire preuve d’une grande prudence lors de l’utilisation de l’appareil par ou à proximité d’enfants.
• Débrancher l’appareil lorsqu’il n’est pas en état d’utilisation et avant nettoyage. Laissez refroidir
l’appareil avant d’ajouter ou de retirer des pièces.
• Ne pas utiliser si les câbles ou prises sont endommagés, en cas de quelconques
dysfonctionnements ou autres dommages de l’appareil. Restituer l’appareil dans le centre de
réparation le plus proche pour toute vérication, réparation ou ajustement.
• L'utilisation d'accessoires non recommandés par le fabricant peut causer dommage et blessures.
• Ne pas utiliser en extérieur.
• Ne pas laisser le câble pendre au bord d’une table, d’un plan de travail ou sur une surface chaude.
• Ne pas mettre l’appareil sur ou près d'un brûleur à gaz allumé, d'un élément électrique ou dans
un four allumé.
• Faire preuve d’une grande prudence lors du déplacement d’un appareil contenant de l’huile ou
autre liquide très chaud.
5
• Toujours brancher le câble à l’appareil avant de brancher le câble à la prise de terre. Pour arrêter
l’appareil, l’éteindre puis le débrancher ensuite de la prise de terre.
• Ne pas utiliser l’appareil à d’autres ns que celles prévues par le fabricant.
• Pour le nettoyage de l’appareil, se référer aux consignes page 22.
• Ne pas utiliser l’appareil à l’aide d’un minuteur ou d’une télécommande externes.
• Pour arrêter le système Smart, débrancher l’appareil.
• Cet appareil est destiné à être utilisé dans des applications domestiques et similaires telles que:
• Cuisine du personnel dans les magasins, bureaux et autres environnements de travail;
• Fermes
• Pour clients d'hôtels, motels et autres environnements de type résidentiels;
• Environnements de type chambres d'hôtes.
• Cet appareil peut être utilisé par des enfants âgés plus de 8 ans et des personnes ayant des
capacités physiques, sensorielles ou mentales réduites ou un manque d'expérience et de
connaissances s'ils reçoivent une supervision ou des instructions concernant l'utilisation de
l'appareil en toute sécurité et comprennent les risques impliqué. Les enfants ne doivent pas
jouer avec l'appareil. Le nettoyage et l'entretien par l'utilisateur ne doit pas être effectué par des
enfants à moins qu'ils ne soient âgés de plus de 8 ans et supervisés. Gardez l'appareil et son
cordon hors de portée de main des enfants de moins de 8 ans.
• Conserver ces consignes de sécurité.
Ne pas laisser l’appareil sans
surveillance quand il est allumé
6

7
01 Welcome and contents of the pack
02 Your IKAWA Sample Roaster
03 Positioning your roaster
04 Setting up your roaster
05 Connecting the IKAWA PRO App to the roaster
06 Roasting: Priming with coffee
07 Removing the beans from the roaster
08 Troubleshooting
09 Maintenance, repair and disposal
10 One year warranty
8
9
10
11
12
13
19
20
22
23
Designed and manufactured by IKAWA in London.
8
01
|
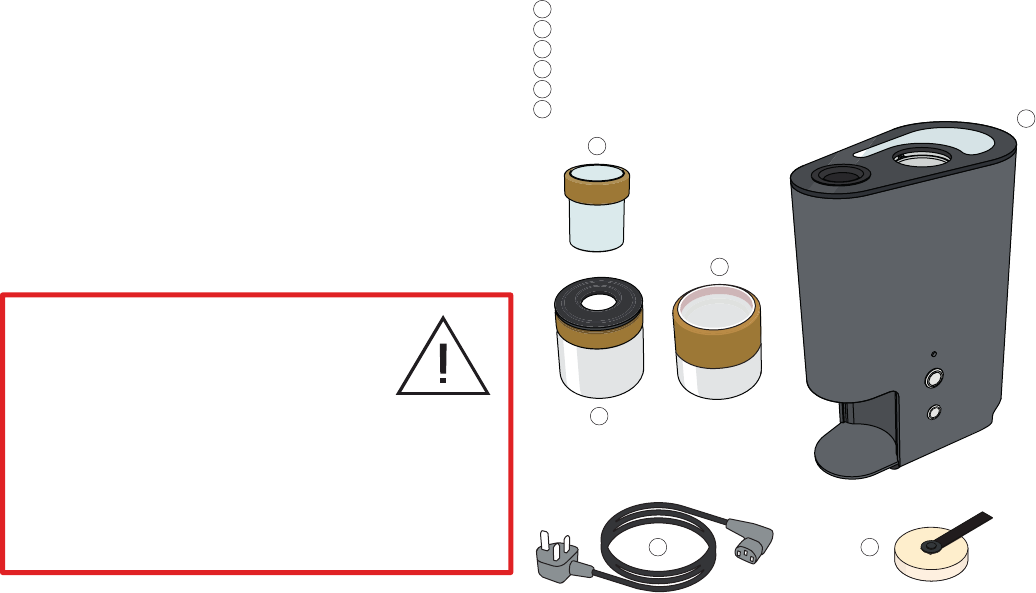
Welcome and thank you for purchasing an IKAWA Sample Roaster.
IKAWA is continuously improving its product range. Please visit
for all updates. Products manufactured
by IKAWA are safe and without risk provided they are installed,
used and maintained in good working order in accordance with
our instructions and recommendations. To enjoy the full potential
of your new product, please take the time to read this User Manual
thoroughly, and keep it handy for future reference.
Welcome and thank you for purchasing an
IKAWA Pro Sample Roaster.
One IKAWA Pro Sample Roaster
One Doser
Chaff Jar
Bean Jar (100g models only)
One Power Cord (country speci c)
Felt Cover
1 Read all of these instructions including
important safeguards.
2 Retain this User Manual for later use.
3 Pass on this User Manual in the event
of change of ownership.
4 Follow all warnings, cautions and instructions
contained in this User Manual.
5 When the product has reached the end of
its serviceable life, it should be disposed
of in accordance with WEEE directive.
1
1
2
2
3
3
4
4
5
6
5 6
9
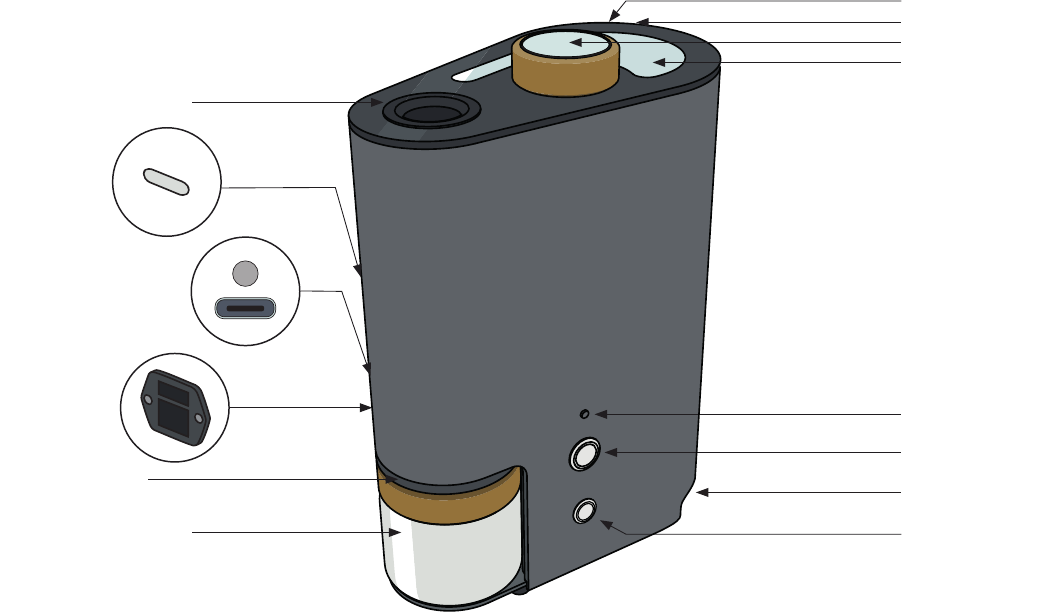
Air Inlet
Blow Over Button
Status Light
Roaster Lid
Doser
Roasting Chamber
Bluetooth
Window*
Power Socket
And Switch
Air Vent
Top Button
02
|
Jar Lid
Collection Jar
* only on Pro50 and Pro100
** only on Pro100x
Roasting Light**
Bluetooth Indicator Light**
USB-C Power**
10
03
|
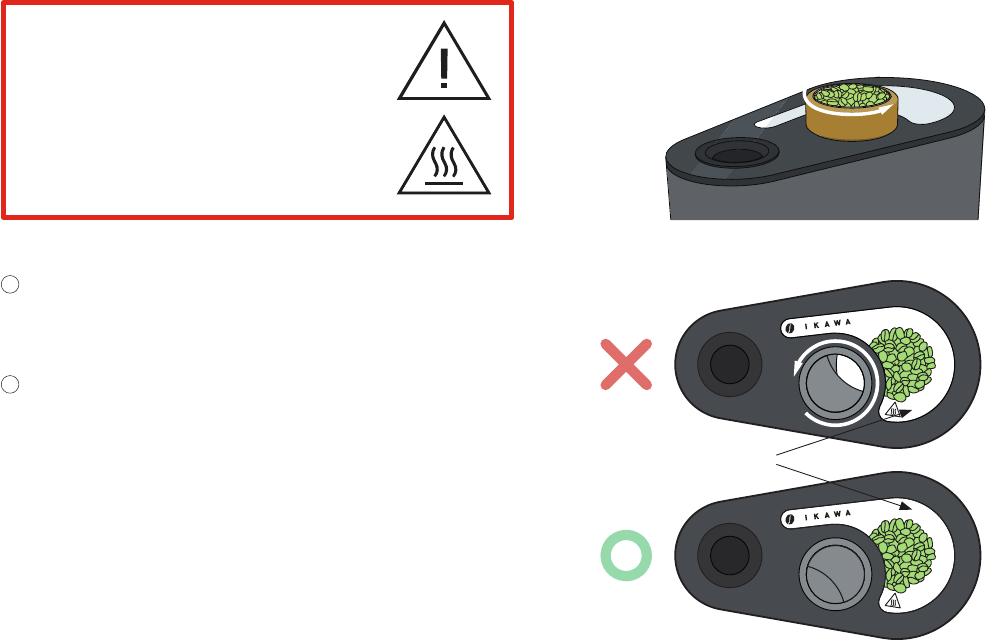
1 Place your roaster on a hard surface with plenty of space around it to
access all of the sides and the top of the roaster. Never use the roaster
on a soft surface or tablecloth as that may affect the air ow.
2 During the roasting process hot air is released through the Air Vent at top
of the roaster. Do not obstruct the Air Vent or place anything on top of it.
The roaster heats up during the roasting
process and some surfaces can get very hot.
Take care as touching these surfaces may
cause injury.
Do not touch any parts of the Roaster Lid
or Air Inlet.
Do not touch surfaces of the roaster that
are within 25mm of the Roaster Lid.
This is the hot surface symbol.
It indicates that the surface is
hot and must not be touched.
25mm
11
04
|
Ensure the Roaster Lid is on the roaster.
Place the Doser into the hole at the top of the roaster.
Place the Jar Lid on top of the Collection Jar and slide into the
opening at the bottom of the roaster.
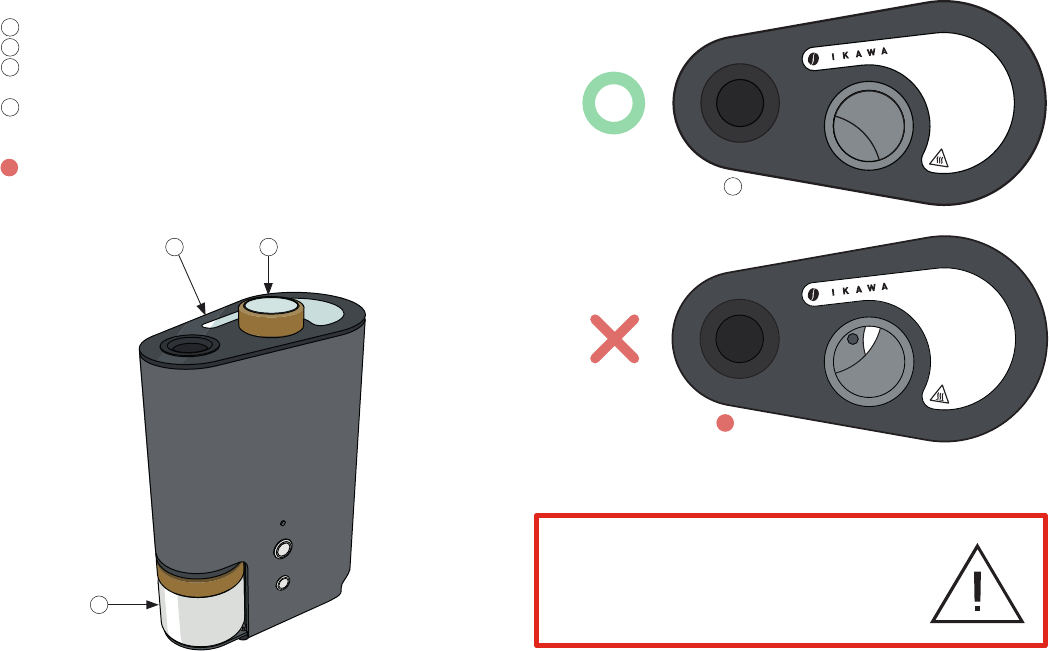
Ensure that the Doser completely seals off the Roasting Chamber.
If not, turn the Doser until it is sealed.
Please note Pro100x Doser requires particular insertion,
ensure the 'hard stop' screw is not visible.
Ensure the Collection Jar with Jar Lid is in place.
Ensure the Roaster Lid is in place.
1
1
2
2
3
3
4
4
5
5

12
0 I
1
05
|
Before starting this step ensure that you have gone through
previous and that your roaster is plugged into a wall socket.
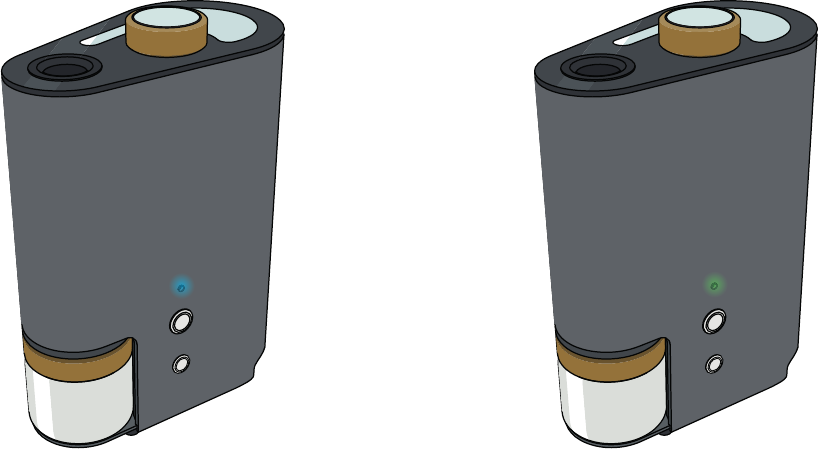
Turn the roaster ON by pressing the 1-side of the
roaster’s Power Switch, located on the left side.
The Status Light should now be green and the Top Button
should light-up white.
(If the Status Light ashes red/green alternating —
shut the doser as indicated on the previous page).
When Bluetooth is enabled on your iOS or Android device,
the IKAWA Pro App will automatically connect to the roaster.
Once connected, send a Roast Pro le to the. Instructions on
how to use the IKAWA Pro App are provided separately as the
app design can change over the life of the roaster. Instructions
for the latest app are available by scanning the QR code below
or visiting
1
2
Distance — max. 5m
Status Light
Top Button
13
Preheat your roaster by pressing the Top Button.
The Roaster will start pre-heating to the starting
temperature of the selected Roast Pro le.
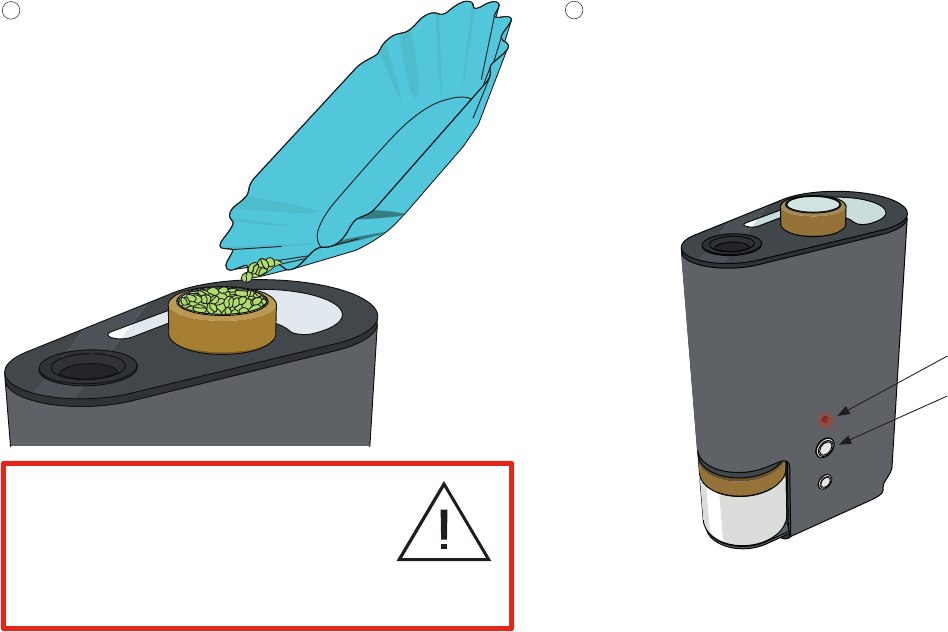
Weigh your green coffee and pour
it into the Doser.
1
2
06
|
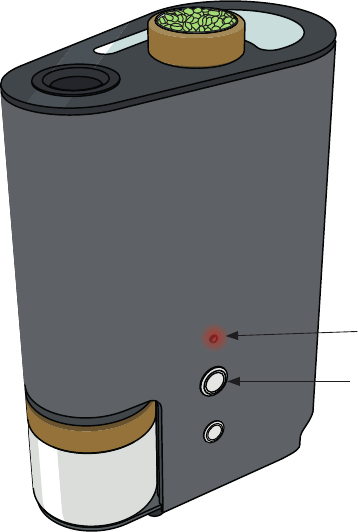
Status Light
Top Button
Before continuing, ensure that the roaster is
not in operation and that the Doser is closed
(see previous page) and the Collection Jar
with the Jar Lid is in position.
14
06
|
The IKAWA Pro App will show that the roaster is pre-heating by
displaying the current temperature in the roaster.
If you want to cancel the roast, press the Top Button on the roaster.
The roaster will go into Cool Down mode (see following pages).
Once the roaster has heated to the starting temperature,
the Status Light on the roaster blinks red.
If the roaster temperature does not reach and stabilise at the
Roast Pro le’s starting temperature, or the user does not turn
the Doser to start the roast, within two minutes, the roaster will
go into Cool Down mode and the Status Light will ash blue.
It is unusual for the roaster not to reach and stabilise at the
starting temperature. Factors that may affect this are; very cold air
temperature, very high starting temperature, very high fan speed.
If this happens, consider having a slightly lower start temperature,
or slightly reduce the fan speed.
Status Light
Top Button
15
Turn the Doser halfway so that all the beans fall through
the hole of the Doser into the Roasting Chamber.
The fan will stop while the Doser is open and Status Light
will blink red and green.
Turn the Doser back so that it closes off the
Roasting Chamber completely.
The fan will speed up again and the Status Light on the roaster
should stop blinking and be steadily red (if this is not the case,
the Doser is probably not shut properly).
The roast will now start.
06
|
Roasting Chamber
Hot surface — the Roaster Lid could be very hot.
Do not touch any parts or surfaces other than
the cork grip on the Doser.
1
2

16
There are some variations in roasting with the IKAWA Pro100x
including Auto-Detect 1st Crack and Target Development Mode.
Scan the QR Code to access more in depth information.
06
|
06
|
During the roast the IKAWA Pro App remains connected to
the roaster via Bluetooth and will show the measured Inlet
and Exhaust temperature.
Even if the IKAWA Pro App is not connected, the roaster will
execute the Roast Prole stored in its memory – the last one used.
You can roast without using the app.
If the roaster has been programmed with a Roast Prole that
is not suitable for the coffee, the beans can burn or in extreme
cases catch re.
We advise you to follow these steps during the roasting process.
1
2
When the roast starts ensure that the
beans are rotating freely.
If the beans are not rotating freely stop
the roast by pressing the Top Button.
1
2
18
06
|
Once the roasting process is nished, the roaster goes into Cool
Down mode. This is indicated by the blue Status Light on the roaster.
Wait until the fan stops running and the Status Light becomes
green again. The Cool Down process has now nished.
19
Now, press and hold the Blow Over Button on the roaster
to make the beans blow over to the Collection Jar. Or press
it just once for a timed Blow Over.
ROASTER
To prevent damage to the USB-C socket, do not leave
charging cable plugged in when Roaster not in use.
07
|
Take the Collection Jar, containing chaff out of the roaster
and throw the chaff away (remember to take off the Jar Lid).
Put the Collection Jar with Jar Lid back in the roaster.
31
2
3
4
0 I
4
5
5

20
08
|
The beans inside the roaster don't rotate.
1. The air inlet lter may have become blocked with chaff
or other debris.
2. The roaster may be programmed with a roast prole
with inadequate air ow. Factors such as extreme altitude,
resulting in very low air pressure or exceptionally dense
beans can effect this.
1. Check that the inlet lter is clear of debris. If it is blocked
follow maintenance and repair instructions to remove the
blockage, see section 9.
2. Program the roaster with a higher fan speed using the
IKAWA Pro App.
The Status Light on the roaster turns purple colour and the roaster
does not work.
The roaster in an Error State that could be triggered by a number
of problems.
The most likely cause is that the Exhaust Temperature Sensor is
broken.
Contact , quoting your roaster
serial number.
21
The beans inside the roaster do not blow over after the roast.
This may happen because your beans have not roasted
sufciently. They may be too heavy to be transferred from
the Roasting Chamber into the Collection Jar.
1. First try to tilt the roaster slightly to the left, then try to Blow
Over again. The tilting should help the beans to move across.
2. If this is unsuccessful, turn off your roaster and disconnect
the power supply.
3. Ensure your roaster has cooled by letting it stand for
at least 30 minutes.
4. Then take out the Doser and Collection Jar.
5. Remove the Roaster Lid by pulling upwards on each side
(the lid is attached magnetically).
6. Remove the beans by tilting the machine on its side to pour
them out.
7. If the problem persists contact ,
quoting your roaster serial number.
It is normal for the temperature not to follow the line at the beginning
of a roast when the cold coffee drops into the roast chamber.
If the App shows that the roaster is not following the prescribed
Roast Prole in the latter stages of the roast.
This can be caused by the beans stalling in the roast chamber and not
rotating.
1. The air inlet lter may have become blocked with chaff
or other debris.
2. The roaster may be programmed with a roast prole with
inadequate air ow.
1. Check that the inlet lter is clear of debris. If it is blocked follow
maintenance and repair instructions to remove the blockage,
see section 9.
2. Program the roaster with a higher fan speed using the
IKAWA Pro App.
3. If the problem persists contact ,
quoting your roaster serial number..
22
09
|
Before attempting any maintenance ensure
that the roaster is unplugged from any
power source, and that the roaster is at room
temperature.
Do not repair the IKAWA system yourself.
By doing so you invalidate any warranty,
and risk injury or death.
Ensure that no liquid penetrates the Louvre
Vents in the bottom of the Roasting Chamber.
Do not use wire wool to clean the roaster.
The Collection Jar can be washed with warm, soapy water but
only when the cork grip is removed. The cork should not get wet.
The Collection Jar cannot go in the dishwasher or microwave.
To clean the Roaster Lid, rst remove the Doser. Second, remove
the Roaster Lid by pulling upwards on each side (the lid is attached
magnetically). You can wash the Roaster Lid including the metal vent
with warm, soapy water. The Roaster Lid cannot go in the dishwasher
or microwave.
To clean the Roasting Chamber, use the Felt Cover and follow
the instructions by scanning the QR code below or visiting
Contact us to learn about preventative maintenance services.
If your system is not working correctly, refer to Chapter 08
(Troubleshooting).
If your IKAWA Pro Sample Roaster is no longer working please
contact the team at for assistance.
Waste and electrical products should not be disposed of with
household waste. Please contact our technical team for recycling/
disposal advice as regional variations apply.
23
10
|
This product carries. A one-year warranty from the date
of purchase. If any defect arises due to faulty material or
faulty workmanship, faulty products must be returned to
IKAWA for repair or replacement.
The following conditions apply:
1 The product must be installed and used in
accordance with the instructions contained in
this User Manual.
2 It does not cover wear and tear, damage,
misuse or consumable parts.
3 IKAWA has no responsibility for incidental,
consequential loss or damage.

Designed and made by IKAWA in London
©IKAWA limited 2010-2023
www.ikawacoffee.com I support@ikawacoffee.com
IKAWA Ltd. Unit 9, Bayford Street Business Centre,
Bayford Street, London, E8 3SE, United Kingdom
