Epson Connect Guide
NPD4706-00 EN

Contents
Epson Connect and Other Mobile
Solutions
What Is Epson Connect?..................... 3
User Page.............................. 4
Email Print............................. 5
Scan to Cloud........................... 6
Epson iPrint (3.x)........................ 7
Epson Remote Driver (Windows only)......... 9
Other Company Network Solutions............ 10
Google Cloud Print...................... 10
AirPrint.............................. 12
Setting up the Services
Setting Up from Your Computer.............. 13
Setup workflow......................... 13
Setting up with the printer software disc....... 13
Setting up without using the printer software
disc (Windows only)..................... 16
Registering an additional printer............ 17
Setting up using Web Config............... 17
Setting Up from Your Smartphone or Tablet..... 18
Setup workflow......................... 18
Setting up using Web Config............... 19
Setting Up Google Cloud Print............... 21
Creating a Google account................. 21
Registering a printer..................... 22
Using the Services
Epson Connect Services..................... 23
User Page............................. 23
Email Print............................ 23
Scan to Cloud.......................... 26
Epson iPrint (3.x) ....................... 27
Epson Remote Driver (Windows only)........ 31
Settings for email notifications.............. 32
Other Company Network Services............. 33
Google Cloud Print...................... 33
AirPrint.............................. 35
Suspending Services....................... 36
From the User Page...................... 36
From a printer......................... 36
Deleting Your Epson Connect Account. . . . . . . . . 37
Deleting your registered printers............ 38
Deleting your Epson Connect account........ 39
Notes on Transferring or Disposing of the
Printer............................... 40
Troubleshooting
Restrictions.............................. 41
Epson Connect........................... 41
Email Print............................ 41
Scan to Cloud.......................... 43
Epson iPrint (3.x)....................... 43
Remote Print.......................... 44
Other Company Network Services............. 44
Google Cloud Print...................... 44
AirPrint.............................. 45
Appendix
System Requirements...................... 46
Operating system....................... 46
Network Environment................... 46
Copyrights.............................. 46
Epson Connect Guide
Contents
2

Epson Connect and Other Mobile Solutions
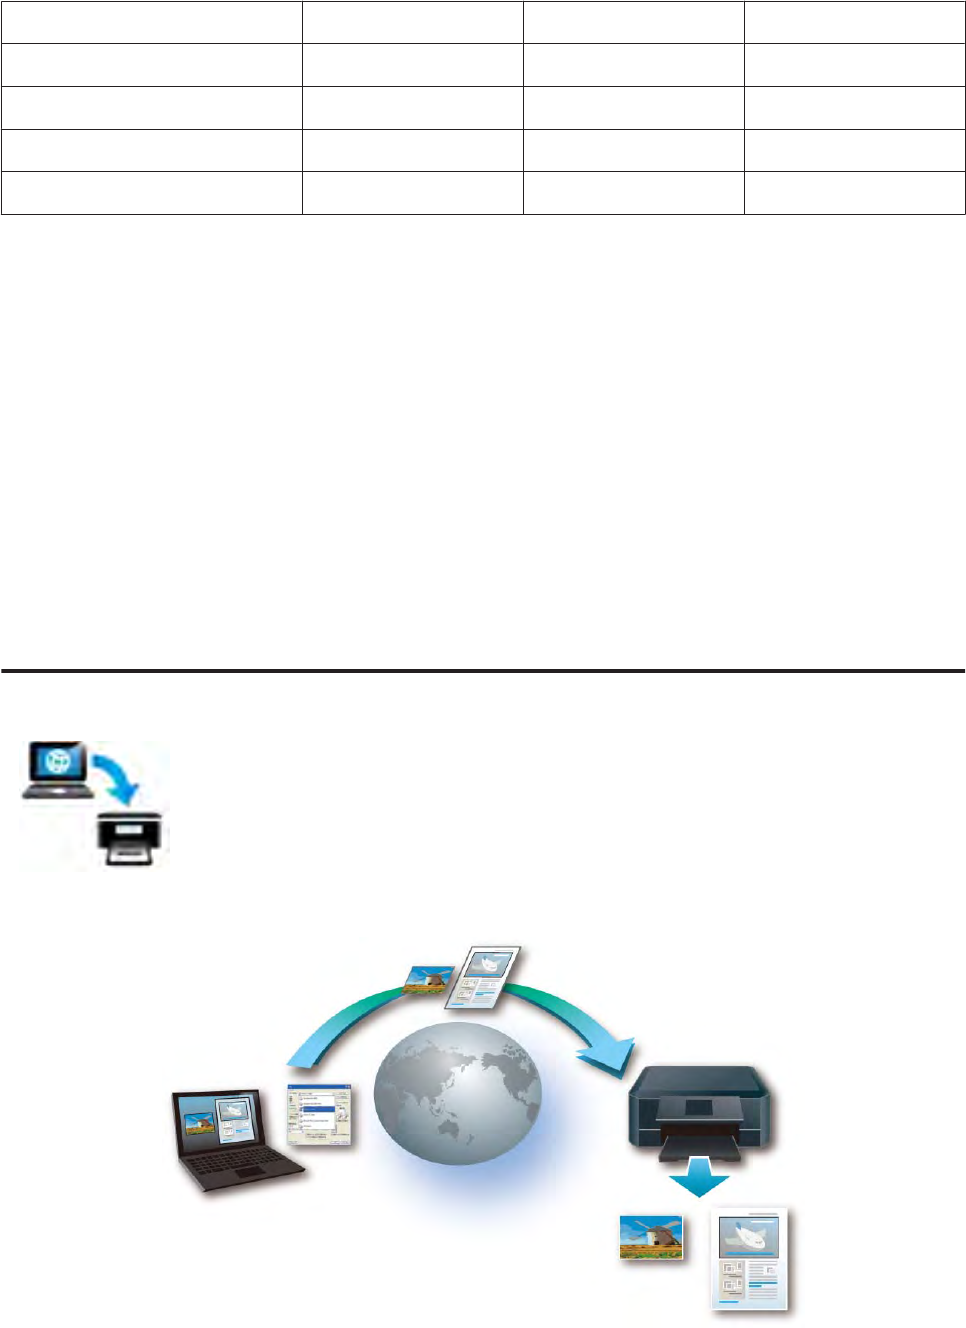
What Is Epson Connect?
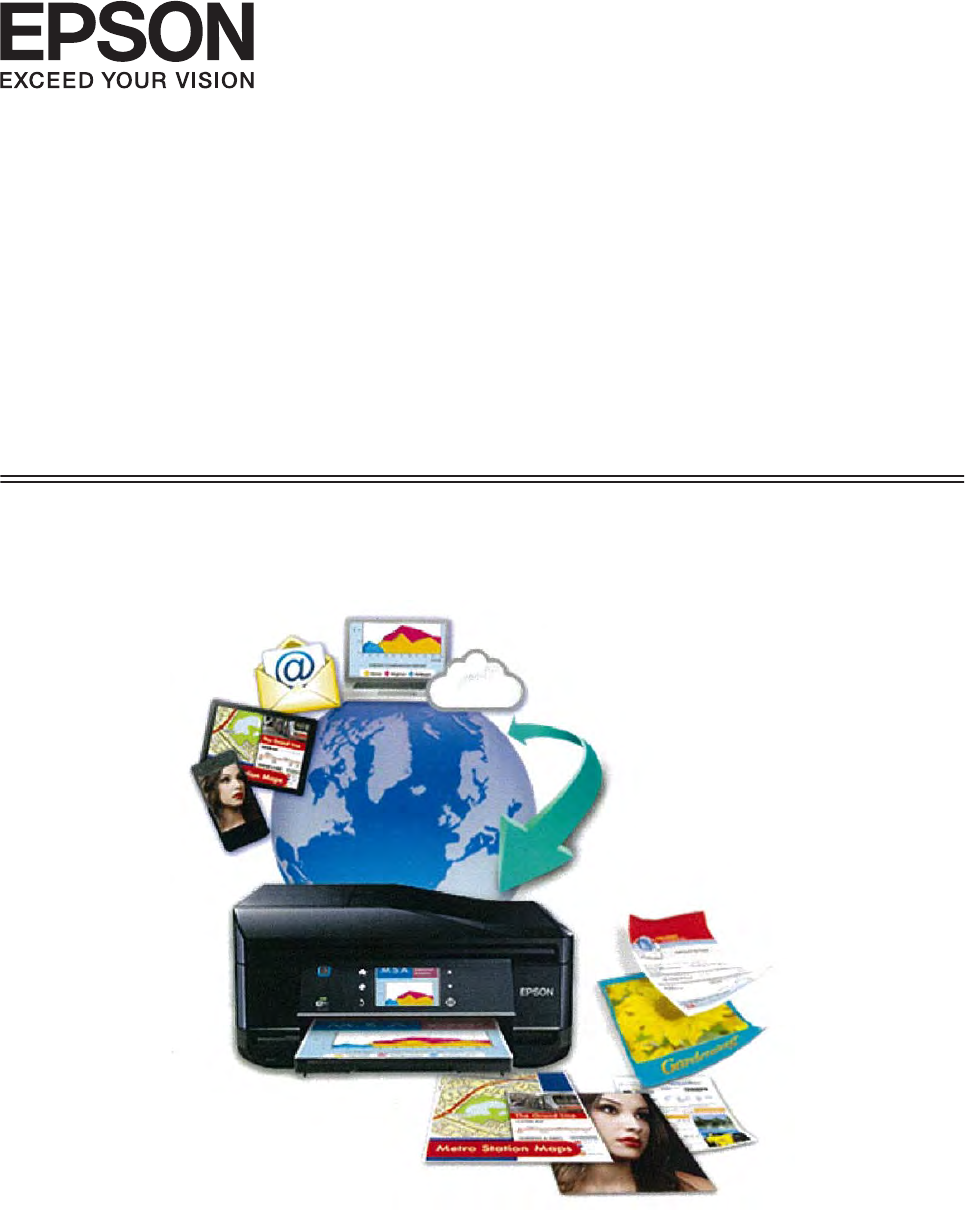
Epson Connect provides mobile services that allow you to print and scan from anywhere.
You can print photos and documents using your smart phone, tablet, or mobile computer from your home, your
office, or anywhere in the world. If you send scanned data to an Epson Connect compatible printer, you can use the
printer as a color fax. You can also use your Epson printer to scan a file and upload it to a specific destination, such as an
online storage or “Cloud” account.
Access the Epson Connect portal website from the following URL: https://www.epsonconnect.com/
The following services are available.
❏ Email Print (Print your photos and documents from anywhere by simply sending an email.)
❏ Scan to Cloud (Scan your documents and photos to a “Cloud”.)
❏ Epson iPrint (A wireless printing app for iOS or Android smartphones and tablets.)
❏ Epson Remote Driver (For remote printing over the Internet.)
Note:
Available services may differ depending on the model being used. Information on services may also be updated. For more
details on available services or for the latest information, see your regional Epson website.
You also need to make settings on the User Page to use the Epson Connect services. The following section provides a
summary of each service.
Epson Connect Guide
Epson Connect and Other Mobile Solutions
3
User Page
On the User Page, you can manage your account and printer information, and configure print settings or email
notifications. Access the User Page from your smartphone, tablet, or computer connected to the Internet.
Access the Epson Connect User Page Sign-In page from the following URL: https://www.epsonconnect.com/user/
After registering your printer and account to Epson Connect, you can do the following from the User Page:
❏ Displaying the registered printer(s) list for the Epson Connect service
❏ Displaying and cancelling print jobs for Email Print and the Remote Print service
❏ Creating and editing the Approved Senders List for the Email Print service
❏ Editing information for the user account and registered printer for the Epson Connect service
❏ Suspending and resuming Email Print
❏ Settings for email notifications
❏ Enabling Remote Print and setting an Access Key for the Remote Print service
❏ Creating and editing the Destination List for the Scan to Cloud service
Note:
❏ If you want to use Remote Print services (Epson iPrint or Epson Remote Driver), you have to check that Remote Print is
enabled on the User Page.
❏ If you want to use the Scan to Cloud service, you have to create a Destination List.
& See “3. Creating a Destination List for the Scan to Cloud service” on page 16.
Epson Connect Guide
Epson Connect and Other Mobile Solutions
4
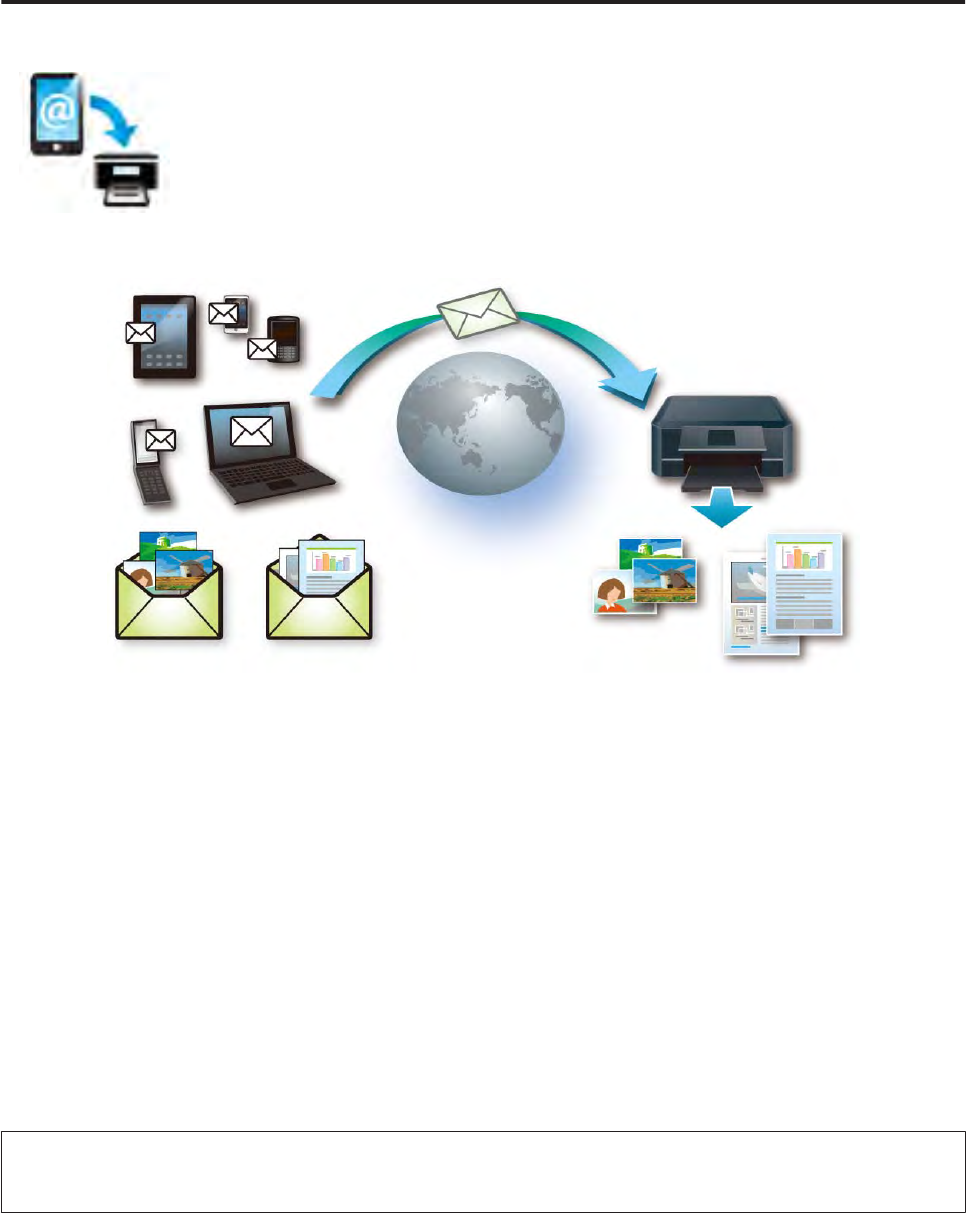
Email Print
When you register your Epson Connect compatible printer and your account to the Epson
Connect service, an email address is assigned to your printer. Now you can print to anyone
with an Epson printer, anywhere in the world, from your mobile device or computer. Print
your emails and attached Microsoft Office documents, PDFs, and photos whether you’re next
to the printer or on the other side of the world.
Compatible devices
Any device that can send an email such as computers, smartphones, tablets, and mobile phones.
& See “Operating system” on page 46.
Required connection environment
❏ Printers that are connected to the Internet by a wireless (Wi-Fi) or wired (Ethernet) network and that are
registered to the Epson Connect service.
❏ Devices that can connect to the Internet.
Compatible file types
Word (doc, docx), Excel (xls, xlsx), PowerPoint (ppt, pptx), PDF, JPEG, BMP, GIF, PNG, TIFF
Note:
You cannot print a text file (plain text) except from the body of an email or a compressed file.
Examples
❏ Printing documents or photos from mobile devices
Send photos that you took while traveling to your printer at home.
Epson Connect Guide
Epson Connect and Other Mobile Solutions
5
❏ Sending photos to families living far away
Send emails with attached photos to your family’s printer.
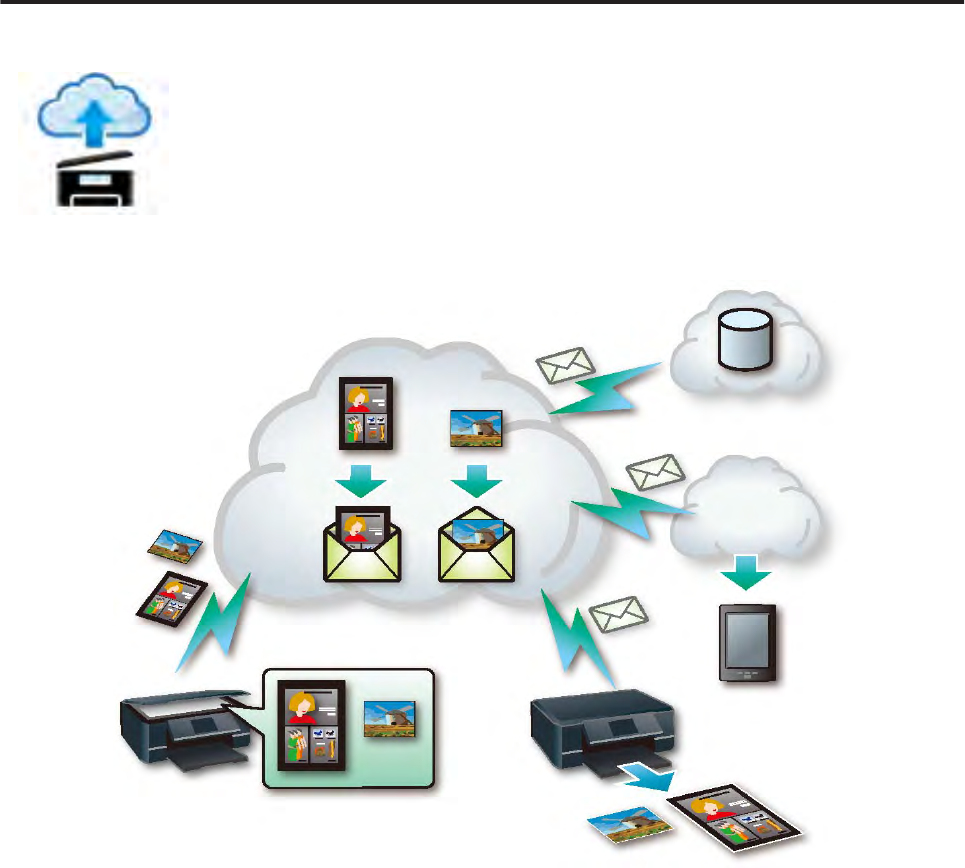
Scan to Cloud
You can send scanned files to destinations that you specified on the User Page. All you need to
do is scan your files with a Scan to Cloud compatible printer that is connected to the Internet.
By sending scanned files to an Epson Connect compatible printer’s email address, you can use
this service as a color fax service. You can also send scanned files to online services provided by
other companies such as Evernote, eFax, or Kindle (you may need to create an account and
pay a fee to use these services).
Required connection environment
❏ Printers must be connected to the Internet by a wireless (Wi-Fi) or wired (Ethernet) network and that are
registered to the Epson Connect service.
❏ Before you can utilize the Scan to Cloud feature of the Epson Connect, you must create a Destination List on the
User Page.
Compatible file types
Jpeg, PDF
Epson Connect Guide
Epson Connect and Other Mobile Solutions
6

Examples
❏ Using as a color fax service
You can use the Email Print and Scan to Cloud services to turn your Epson printer into a color fax service.
❏ Uploading handouts to your online storage
Scan and upload handouts as PDFs to the online storage services.
❏ Sending documents to the Kindle
Scan and send documents to the Email address for your Kindle Personal Document Service, to read the
documents on your Kindle.
Epson iPrint (3.x)
You can print your documents and photos on an Epson printer connected to a wireless
(Wi-Fi) network from your smartphone or tablet (iOS/Android). You can even scan and save
files on your device to send them as an email, or upload to an online storage service such as
Evernote, Google Docs, Dropbox, and Box.
If your printer supports Email Print, you can use the Internet to print remotely.
Compatible devices
Any device that run iOS or Android such as smartphones and tablets.
Epson Connect Guide
Epson Connect and Other Mobile Solutions
7
Required connection environment
Available functions and compatible file types vary depending on the network environment to which the printer is
connected.
The following outlines the relationship between the connection environment and available functions.
Network environment and available functions
Available functions may differ depending on the printer’s operating environment and the device being used.
For example, if your network is not connected to the Internet, you cannot print contents on the web, even though you
can print data saved on the device.
Item Device and Printer are Connected to the same Local Area
Network
External Operations over
the Internet
Cannot Connect to
Internet
Can Connect to Internet
Print data on the device Y* Y Y
Print data on an online storage serv-
ice
NYY
Print a Web page on the device N Y Y
Remote Scanning from the device Y Y N
Storage
destination
for scanned
data
Device Y Y -
Web storage
service
NY -
Attached to email Y Y -
* Depending on the file format, you may need an Internet connection.
Compatible file types
File compatibility between different networks and OS types.
For example, Android devices can only print PDF and JPEG data through a local network connection. Other data types
can be printed by using remote printing over the Internet.
Note:
The list of supported file types may have been updated. See your regional Epson website for the latest information.
Item Device and Printer are Connected to the same Local Area
Network
External Remote Printing
over the Internet
Print from iOS device Print from Android device
PDF (pdf) YYY
PowerPoint (ppt, pptx) Y N Y
Word (doc, docx) Y Y* Y
Excel (xls, xlsx) Y Y* Y
Epson Connect Guide
Epson Connect and Other Mobile Solutions
8
JPEG (jpg, jpeg) YYY
PNG (png) YYY
BMP (bmp) Y N Y
GIF (gif) Y N Y
TIFF (tif, tiff) Y N Y
* The Internet connection is required.
Examples
❏ Printing photos and documents saved on your mobile device
Print photos and documents saved on your device at any time without drivers or cables.
❏ Saving scanned files to your mobile device or an online storage service
Scan documents to your device or to an online storage service such as Evernote and Dropbox.
❏ Attaching scanned files to an email
Scan a printed image, attach it to an email, and then send it to someone.
❏ Printing handouts on a printer at your office from a remote location
By saving handouts to an online storage service, you can print from anywhere. You can make print settings such as
paper size, paper type, and print quality, as well as display a print preview.
Epson Remote Driver (Windows only)
You can use an Epson Connect compatible printer over the Internet from a remote office.
When printing documents or photos, you can print as if you were using the printer connected
to your computer.
Epson Connect Guide
Epson Connect and Other Mobile Solutions
9

Compatible devices
Windows computers
Required connection environment
❏ Printers that are connected to the Internet by a wireless (Wi-Fi) or wired (Ethernet) network and that are
registered to the Epson Connect service.
❏ Devices that can connect to the Internet.
Compatible file types
Applications with printing functions such as Word, Excel, and PowerPoint.
Examples
❏ Printing handouts in a video conference
Print additional handouts on a printer at a remote office over the Internet during a video conference. To print
using Remote Print, simply select the printer over the Internet.
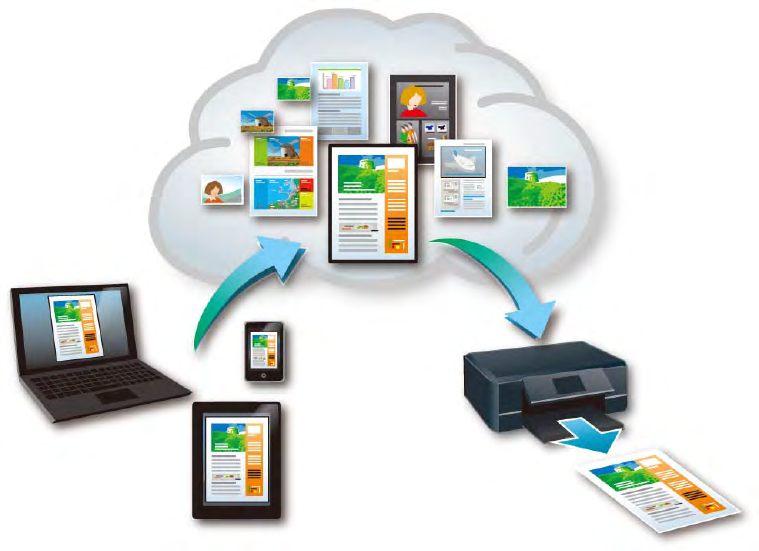
Other Company Network Solutions
Epson printers support other mobile solutions. Available services may differ depending on the model being used. See
your regional Epson website to check which services are available for your printer.
Google Cloud Print
Google Cloud Print allows you to print on the go from your smartphone or tablet with Gmail
or Google Docs accounts and other supported apps. You can also print from Chromebooks
and the Google Chrome browser without drivers or cables, and share the printer with others.
For more details about Google Cloud Print, see the Google website.
Epson Connect Guide
Epson Connect and Other Mobile Solutions
10
Compatible devices
Any device that can connect to the Internet and sign in to the Google website using a Google account, such as
computers, smartphones, or tablets.
Required connection environment
❏ Printers that are connected to the Internet by a wireless (Wi-Fi) or wired (Ethernet) network and that are
registered to the Google Cloud Print service.
❏ Devices that can connect to the Internet.
Compatible file types
❏ Files that can be printed from Google Chrome
❏ Emails from Gmail
❏ Files that are supported by Google Docs
For more details about compatible file types, see the Google website.
Examples
❏ Printing files on Google websites
Print emails received in Gmail and data in Google Docs from anywhere. If Google Chrome is installed on your
computer, you can print displaying web pages, PDFs, images and so on by using Google Cloud Print.
Epson Connect Guide
Epson Connect and Other Mobile Solutions
11
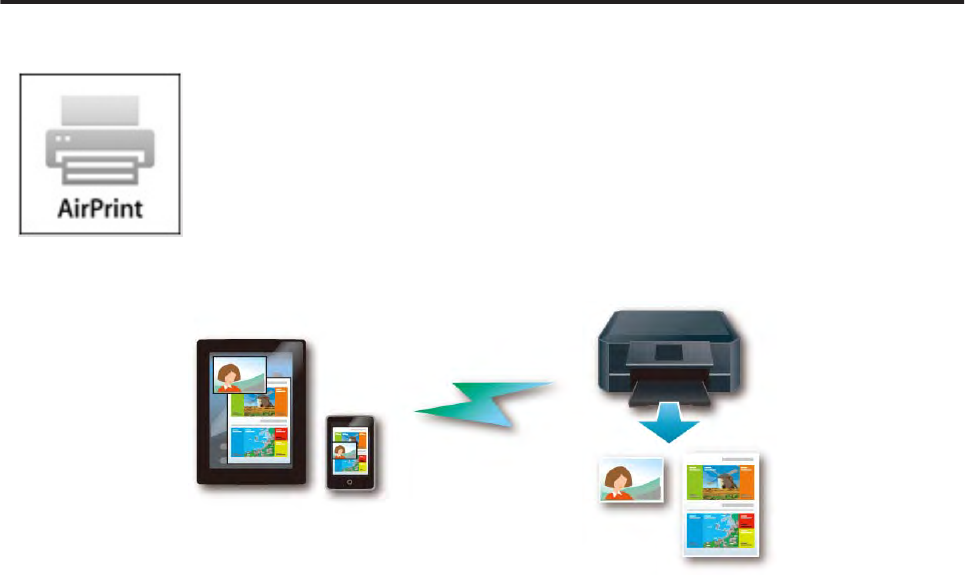
AirPrint
AirPrint makes it simple to print your emails, photos, web pages, and documents straight
from your iPad, iPhone, or iPod touch. You do not need to download any software, install
any drivers, or connect any cables. With just a few taps, you can go from viewing something
on screen to holding a printed copy.
For more details about AirPrint, see the Apple website.
Compatible devices
iPad (all models), iPhone (3GS or later), iPod touch (3rd generation or later) running the latest version of iOS
Required connection environment
❏ Printers connected to a local network.
❏ Devices connected to the same network as the printer.
Compatible devices
Files that are supported by AirPrint compatible applications.
Examples
❏ Printing web pages that you are browsing
When you come across a website that you like on Safari, you can print it easily with just a few taps.
Epson Connect Guide
Epson Connect and Other Mobile Solutions
12
Setting up the
Services
To use the Epson Connect services and other mobile
services, you need to first register your printer.
Setting Up from Your
Computer
You can start up the Epson Connect services from your
computer by using the installer provided on the printer
software disc.
Setup workflow
1. Basic printer setup
Install the ink cartridges
Setup on the printer’s control panel
Insert the printer software disc
Connect to the network
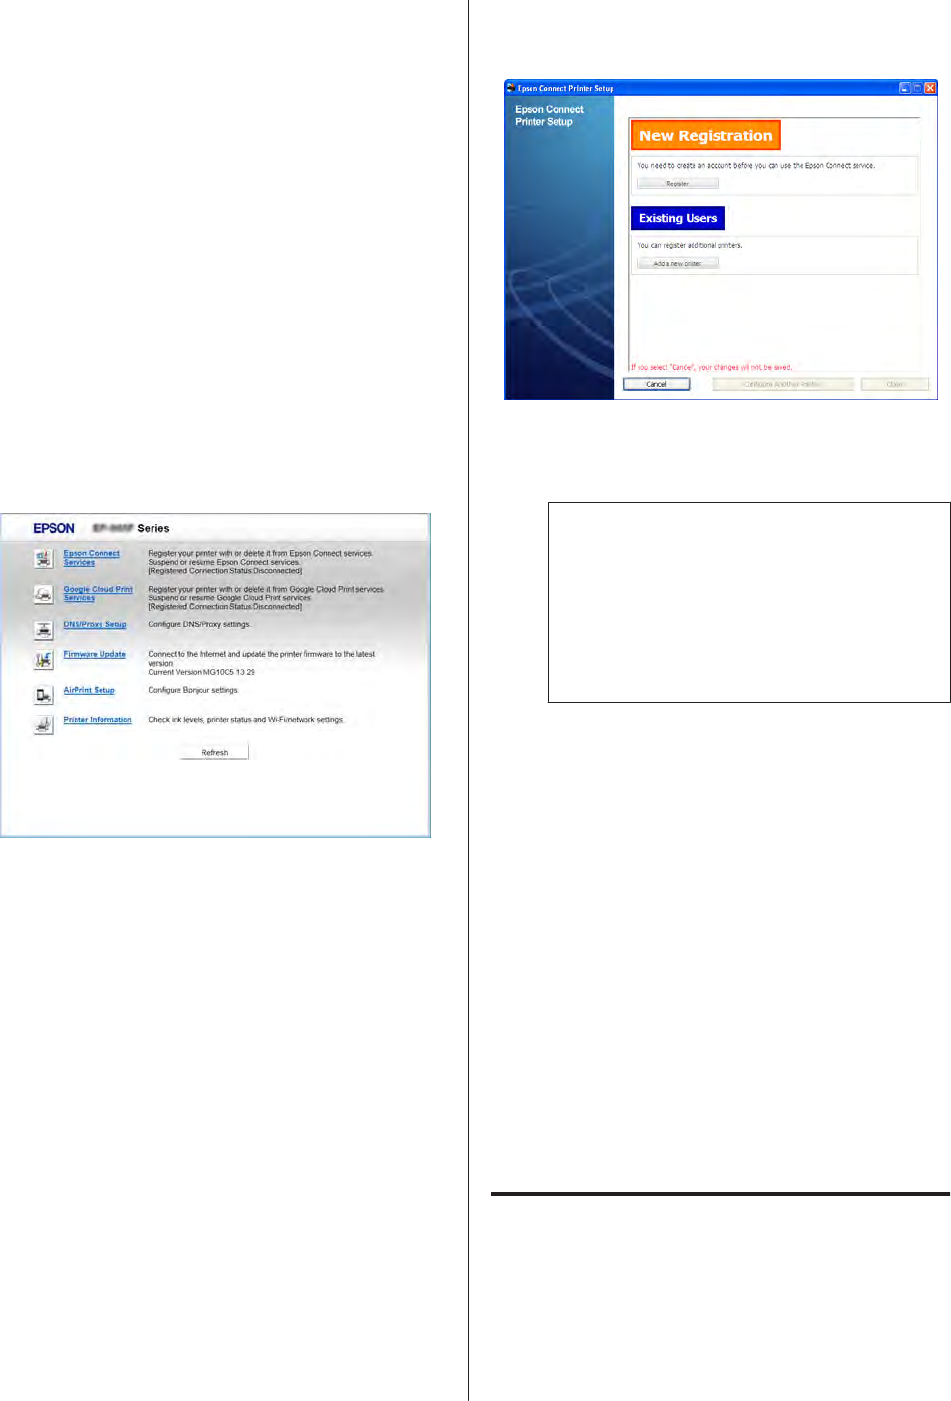
2. Connecting to Epson Connect
Register Printer and User Information
3. Setting up Scan to Cloud
Create Scan to Cloud Destination List
4. Setting Remote Print service
Check that remote printing is enabled
Setting up with the printer
software disc
Create your Epson Connect account and register your
printer to the Epson Connect service.
Before starting setup, check that your computer is
connected to the Internet with a Wi-Fi or Ethernet
network.
Note:
❏ JavaScript must be enabled in your browser to
register the printer.
❏ If you need to use a proxy server for your printer to
connect to the Internet, check that the correct proxy
settings have been made in Internet Explorer.
❏ The following Internet connection is recommended
to register the printer.
Minimum download speed: 512 Kbps or faster
Recommended download speed: 1 Mbps or faster
1. Basic printer setup
First, connect your printer to the network so that it can
be used from a computer. Follow the instructions in the
“Start Here” setup guide to perform your printer’s initial
setup and network setup.
Note:
Depending on the model being used, setup for Epson
Connect may start straight after the printer’s initial
setup. If it does start, follow the on-screen instructions.
2. Connecting to Epson Connect
Next, use the Epson Connect Printer Setup to create
your Epson Connect account and register your printer.
Note:
If you do not perform setup straight after the printer’s
initial setup, check that the printer is on.
Epson Connect Guide
Setting up the Services
13

For Windows
A
Select Mobile Print Services Setup from the
installer’s main menu.
Note:
If you do not perform setup straight after the printer’s
initial setup, follow the steps below.
1. Insert your printer’s software disc into the computer.
2. Click Run InstallNavi.exe.
3. When the License Agreement is displayed, select the
check box to agree, and then click Next.
B
Click Next.
C
Click Epson Connect Printer Setup.
D
Automatically search for printers. Select the
printer, and click Next.
E
The License Agreement is displayed. Select
Agree, and then click Next.
F
Load paper into your printer, and then click OK
when the printing confirmation screen is
displayed. The process for registering your
printer to the Epson Connect service starts.
G
Click Register, when the user account
registration screen is displayed.
!
Caution:
If you do not finish registering a user
account, you cannot use the Epson Connect
service.
H
Follow the on-screen instructions to enter your
account information.
For more details on registering information, see
“Creating your Epson Connect account ” on
page 15.
When registration is complete, a setup
information sheet is printed from the printer you
registered, and a notification email is sent to your
email address.
I
Click Close, and the Epson Connect portal
website opens automatically.
You can now use the Epson Connect service.
For Mac OS X
A
Launch Download Navigator.
Double-click Macintosh HD > Applications >
Epson Software > Download Navigator then
double-click on the Download Navigator icon.
Note:
If you cannot find the Download Navigator,
install it from your printer’s software disc.
B
When the Epson Connect Printer Setup is
displayed, select it and install it.
C
Launch the Epson Connect Printer Setup, and
then follow the on-screen instructions.
Double-click [Macintosh HD], [Applications],
[Epson Software], and then [Epson Connect
Printer Setup].
D
Automatically search for printers. Select the
printer, and click Next.
E
The License Agreement is displayed. Select
Agree, and then click Next.
F
Load paper into your printer, and then click OK
when the printing confirmation screen is
displayed. The process for registering your
printer to the Epson Connect service starts.
Epson Connect Guide
Setting up the Services
14
G
Click Register, when the user account
registration screen is displayed.
!
Caution:
If you do not finish registering a user
account, you cannot use the Epson Connect
service.
H
Follow the on-screen instructions to enter your
account information. For more details on
registering information, see “Creating your
Epson Connect account ” on page 15.
When registration is complete, a setup
information sheet is printed from the printer you
registered, and a notification email is sent to your
email address.
I
Click Close, and the Epson Connect portal
website opens automatically.
You can now use the Epson Connect service.
Creating your Epson Connect account
You have to create an Epson Connect account to register
your printer for the first time.
A
Click Register.
Note:
Windows: The same screen as step 5 in “For
Windows” on page 14.
Mac OS X: The same screen as step 7 in “For Mac
OS X” on page 14.
B
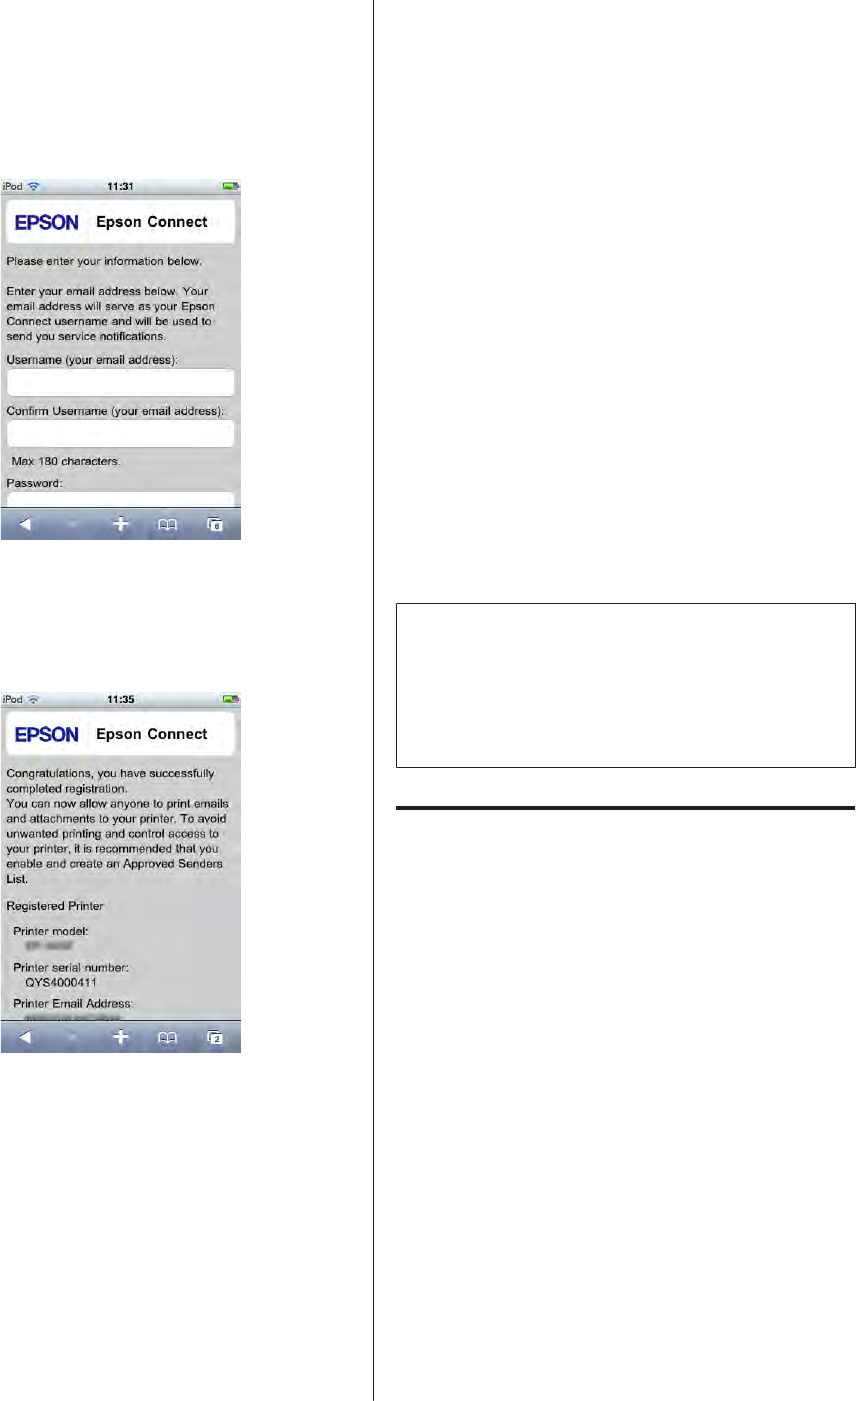
Enter your account information.
C
When you have finished entering your account
information, click Register.
If your printer supports the Scan to Cloud
service, go to “3. Creating a Destination List for
the Scan to Cloud service” on page 16.
Information necessary to register to Epson
Connect
The following provides detailed descriptions for each
item.
Username (your
email address)
Enter your email address. You
cannot copy and paste the
address. This email address is
your ID used to sign into Epson
Connect.
Confirm Username
(your email
address)
Enter the Username (your email
address) again to make sure there
were no typing errors in the
address.
Password
Enter the password used to sign
into the Epson Connect services.
The password must be a
minimum of 6 and a maximum of
32 characters.
Password
(confirmation)
Enter the password again to
make sure there were no typing
errors.
Language
Select the language used to
display the User Page and email
notifications.
Country / Region
Select the country or region in
which the printer is located.
Epson Connect Guide
Setting up the Services
15
Time Zone
Select the time zone in which the
printer is located.
Select to receive the date of print
and scan logs. The time displayed
is for Daylight Saving Time
(summer time). Daylight Saving
Time (summer time) is
automatically applied to the time
displayed for the selected time
zone.
Time Format
Select the time format you want
to use.
This setting is applied to the date
display for the print log.
3. Creating a Destination List for the
Scan to Cloud service
To use the Scan to Cloud service, you need to register
email addresses to the Destination List on the User Page.
A
After registering a user account, the Epson
Connect portal website opens. Click Go on the
right of “Login to Epson Connect”.
B
The Sign-In page opens. Sign in to the User Page.
Note:
If multiple printers have been registered, select the
printer you want to configure from the printer list.
C
Select Destination List for Scan to Cloud from
the menu on the left.
D
Click Add and enter the email address and the
Display Name in the Edit Destination window,
and then click OK. Repeat as necessary.
E
Check that all of your registered email addresses
are listed in the Destination List.
You can now use the Scan to Cloud service.
4. Setting the Remote Print service
To allow users to use the printer over the Internet,
Remote Print must be enabled.
For more information on using Remote Print:
& Epson iPrint: See “Using Epson iPrint over the
Internet (Remote Print)” on page 30.
& Epson Connect Remote Driver (Windows only): See
“Epson Remote Driver (Windows only)” on page 31
Epson Remote Driver service is only available for
Windows computers.
A
Sign in to the User Page.
B
Select Print Settings for Remote Print from the
menu on the left of the User Page.
C
Check that “Enable Remote Print” is enabled.
Note:
❏ Select “Enable Remote Print” if it has not
been selected.
❏ If you want to allow specified users to print,
enter an access key, and then give them the
key.
D
Click Apply.
E
Setup is complete. Click the Sign Out button, and
sign out of the User Page.
Setting up without using the
printer software disc (Windows
only)
You can use the following procedure to perform the
setup if you cannot use the printer software disc (for
example, if your computer does not have a CD/DVD
drive).
Note:
❏ The following Internet connection is recommended
to register the printer.
Minimum download speed: 512 Kbps or faster
Recommended download speed: 1 Mbps or faster
❏ Check that the printer is on.
A
Access your regional Epson website, and
download “Web Installer” or “ComboInstaller”.
(The names for these applications vary
depending on your region or country.)
Epson Connect Guide
Setting up the Services
16
B
Follow the on-screen instructions to launch the
installer, and then connect your printer to the
network.
Continuously refer to the next section
“Registering an additional printer”, and create
your Epson Connect account and register your
printer.
Registering an additional printer
You can perform the following procedure if you want to
add a printer registered to the Epson Connect service.
Note:
The following Internet connection is recommended to
register the printer.
Minimum download speed: 512 Kbps or faster
Recommended download speed: 1 Mbps or faster
A
Turn on the printer.
B
Launch the Epson Connect Printer Setup, and
then follow the on-screen instructions.
Windows: Click Start > All Programs > Epson >
Epson Connect Printer Setup and then Epson
Connect Printer Setup.
Mac OS X: Macintosh HD > Applications >
Epson Software and then Epson Connect
Printer Setup.
Note:
If you cannot find Epson Connect Printer Setup,
download the Download Navigator using one of
the following options, and then launch Epson
Connect Printer Setup.
❏ From Software Update: Click Start > All
Programs > Epson > Software Update
❏ From the following URL: http://
support.epson.net/dnavi/
C
Click Add a new printer, when the user account
registration screen is displayed.
Note:
If you are registering your printer to Epson
Connect for the first time, click Register.
D
Follow the on-screen instructions.
When registration is complete, a setup
information sheet is printed from the printer you
registered, and a notification email is sent to your
email address.
E
Click Close, and the Epson Connect portal
website opens automatically.
You can now use the Epson Connect service.
Setting up using Web Config
You can setup the Epson Connect service by using Web
Config (a web page embedded in the printer).
Note:
Before you start making settings, enable JavaScript and
cookies in your browser.
To open Web Config
Open the browser and enter your printer’s IP address as
shown below.
http://<Printer IP address> (without the < >)
Note:
You can check your printer’s IP address using one of the
following methods. For more information on the network
status, see the documentation provided with your
printer.
❏ The network status on the printer’s control panel
❏ The network status sheet
❏ The network connection check report
Epson Connect Guide
Setting up the Services
17
1. Basic printer setup
First, connect your printer to the network so that it can
be used from a computer. Follow the instructions in the
“Start Here” setup guide to perform your printer’s initial
setup and network setup.
2. Setting up Epson Connect
Create your Epson Connect account and register your
printer to the Epson Connect service.
A
Turn on the printer.
B
Open Web Config for the printer.
To display Web Config, see “To open Web
Config” on page 17.
C
Click Firmware Update, and then follow the
instructions to update the printer’s firmware.
D
Click Epson Connect Services.
E
Click Register, when the user account
registration screen is displayed.
F
Follow the on-screen instructions to enter your
account information.
!
Caution:
Do not close your browser until user account
registration is complete and the setup
information sheet is printed.
If you close your browser before registration
is complete, you cannot use the Epson
Connect service.
After registration is complete, if you want to
setup Scan to Cloud or Remote Print, click the
URL to open the User Page.
For more information on setting up these
services, see “3. Creating a Destination List for
the Scan to Cloud service” on page 16 or “4.
Setting the Remote Print service” on page 16.
Setting Up from Your
Smartphone or Tablet
You can also start the Epson Connect services from your
smartphone or tablet without having to use a computer.
Setup workflow
1. Basic printer setup
Epson Connect Guide
Setting up the Services
18

Install the ink cartridges
Setup on the printer’s control panel
Connect to the network
Download and install Epson iPrint
2. Connecting to Epson Connect
Register printer and user information from Web Config
3. Setting up Scan to Cloud
Create Scan to Cloud Destination List
4. Setting up Remote Print service
Check that remote printing is enabled
Setting up using Web Config
You can setup the Epson Connect service by using Web
Config (a web page embedded in the printer).
1. Basic printer setup
First, connect your printer to a Wi-Fi network.
A
Follow the “Start Here” setup guide to perform
the initial setup for your printer.
B
Connect the printer to the local area network
from the printer’s control panel.
For more information on the connection
procedure, see the printer’s documentation.
2. Setting up Epson Connect
Create your Epson Connect account and register your
printer from Web Config.
A
Turn on the printer.
B
Open Web Config for the printer.
To display Web Config, see “To open Web
Config” on page 17
C
Tap Firmware Update, and then follow the
instructions to update the printer’s firmware.
D
Tap Epson Connect Services.
E
The printer registration screen is displayed.
Tap Register.
Epson Connect Guide
Setting up the Services
19
F
The License Agreement is displayed. Tap Epson
Connect Member Service Terms and
Conditions, and read the information displayed.
Select Accept, and then tap Next.
G
The process for registering your printer to the
Epson Connect service starts.
H
Load paper into your printer, and then tap OK
when the following screen is displayed.
I
Tap Register, when the user account registration
screen is displayed.
Epson Connect Guide
Setting up the Services
20
J
Enter your account information, then tap
Register.
For more information about details that need to
be filled in, see “Creating your Epson Connect
account ” on page 15.
K
Registration is complete.
If you want to setup Scan to Cloud or Remote
Print, tap the URL to open the Epson Connect
portal website, and then make your settings.
3. Creating a Destination List for the
Scan to Cloud service
To use the Scan to Cloud service, you need to register
destinations on the User Page For more information on
registering the Destination List, see “3. Creating a
Destination List for the Scan to Cloud service” on
page 16.
4. Setting the Remote Print service
Before you can use the remote printing function, you
need to enable Remote Print on the User Page. For more
information on making settings, see “4. Setting the
Remote Print service” on page 16.
Setting Up Google Cloud
Print
Google Cloud Print allows you to print from anywhere
over the Internet.
To use this service, you need to register your printer to
Google Cloud Print. Epson printers support Google
Cloud Print, which allows you to use your printer
without drivers or cables.
Create your Google account first, and then setup this
service from Web Config using your device.
Note:
❏ The strings of Google website in this section may be
changed.
❏ For more information about Google Cloud Print, see
the Google website.
Creating a Google account
You need to create a Google account to use Google
Cloud Print.
If you already have a Google account, you do not need to
create a new one. If you do not have an account, follow
the steps below.
A
Navigate to google.com on your device.
B
Click or tap Sign in.
C
Click or tap SIGN UP in the Sign in page.
D
Fill out the form, and then follow the on-screen
instructions.
Epson Connect Guide
Setting up the Services
21

Registering a printer
After creating your Google account, use Web Config to
register your printer to Google Cloud Print.
Sign in to Google using your account.
A
Navigate to google.com on your device, then
click or tap Sign in.
B
Enter the email address and password, and then
click or tap Sign in.
C
Open Web Config on your printer.
& See “To open Web Config” on page 17.
D
Tap Firmware Update, and then follow the
instructions to update the printer’s firmware.
E
Click or tap Google Cloud Print Services.
F
Click or tap Register.
G
Click or tap Usage Advisory and read it carefully,
select Accept, and then click or tap Next.
A confirmation screen is displayed.
H
Click or tap OK to open the Google Cloud Print
registration screen.
Note:
❏ If you are not signed into the Google website,
the Sign in page is opened.
❏ If you already have a Google account, sign in
using that account.
❏ If you do not have one, create a new Google
account.
& See “Creating a Google account” on
page 21.
I
Click or tap Finish printer registration on the
Google Cloud Print registration screen.
J
When registration is complete, an information
sheet is printed from the printer you registered.
You can now use Google Cloud Print.
Epson Connect Guide
Setting up the Services
22

Using the Services
Epson Connect Services
This section explains how to use the Epson Connect
services. Available services may differ depending on the
model being used. See your regional Epson’s website to
check which services are available for your printer. To
view Epson’s website, select your country/region, and
then click Go at the bottom-right of the Epson Connect
portal website.
User Page
On the User Page, the owner of the printer can manage
the registered printer’s information. Once you have
created your account and registered your printer, you
can use the User Page functions.
For more information on the operations for each screen
on the User Page, access the User Page and then see the
Help.
Required settings on the User Page
To use the following functions, finish setting up Epson
Connect from your computer or device, and then access
the User Page and make settings.
Approved Senders List
If you don’t enable the Approved Senders List, all emails
are printed despite of mail sources. Therefore, it is
recommended the use of the Approved Senders List to
prevent the wrong or malicious emails.
A print log of an email from address that is not in the
Approved Senders List is recorded.
For more details about creating the Approved Senders
List, see Help of User Page (https://
www.epsonconnect.com/user/)
Scan to Cloud
To use the Scan to Cloud service, you need to register
destinations on the User Page. If you do not create a
Destination List, you cannot use the Scan to Cloud
service.
User Page functions
The following functions are available on the User Page.
Available functions differ depending on the model.
❏ Displaying the registered printer(s) list for Email
Print
❏ Displaying and cancelling print jobs for Email
Print and Remote Print
You can check print and scan jobs that have been
sent to the Epson Connect server, and you can also
cancel these jobs.
❏ Creating and editing the Approved Senders List
for Email Print
You can create and edit a list that contains email
addresses that are allowed to send emails to the
printer.
❏ Editing information for the user account and
registered printer for the Epson Connect service
You can configure settings such as your personal
email address, language, and time zone.
❏ Suspending and resuming print service
You can suspend or resume the Email Print and the
Remote Print service.
❏ Settings for email notifications
You can make email notification settings. When the
Epson Connect server receives an email or an error
occurs, an email notification is sent to the owner of
the printer and the sender of the email.
❏ Enabling Remote Print and setting an Access Key
for the Remote Print service.
❏ Creating and editing the Destination List for the
Scan to Cloud service
You can create and edit the list of destinations that
you want to scan and send to.
Email Print
You can print to any Epson Email Print compatible
printer from any device that can send email, such as
your smartphone, tablet, computer, or mobile phone.
Sending an email
You can send an email from not only a computer, but
also a smartphone, tablet, or mobile phone.
Epson Connect Guide
Using the Services
23
A
Create an email and attach the photos or
documents you want to print.
Note:
❏ Text in the body of the email will print
separately from the attachment.
❏ You can set whether or not to print the body
of the email in Print Settings on the User
Page.
B
Enter the printer’s email address and send an
email.
You can check the printer’s email address using
one of the following methods.
❏ On the information sheet printed when you
completed the setup for Epson Connect.
❏ On the Printer List on the User Page.
❏ On the printer LCD panel.
❏ On the network connection report or the
network status sheet.
Note:
For more information on the network connection
report and the network status sheet, see the
documentation provided with the printer.
Notes when sending an email
Note the following when sending an email.
❏ Do not enter more than one address in the To, Cc,
or Bcc fields. As a security measure, Email Print
only prints emails that are sent to a single recipient.
❏ You can attach 10 files.
❏ You can attach files up to a total of 20 MB including
the body of the email.
❏ The following file types are supported.
Word (doc, docx), Excel (xls, xlsx), PowerPoint
(ppt, pptx), PDF, JPEG, GIF, BMP, PNG, TIFF
- Except for the body of the email, text files (plain
text) cannot be printed.
- Zip compressed files cannot be printed.
❏ Short Message Services (SMS) unique to mobile
phone providers are not supported.
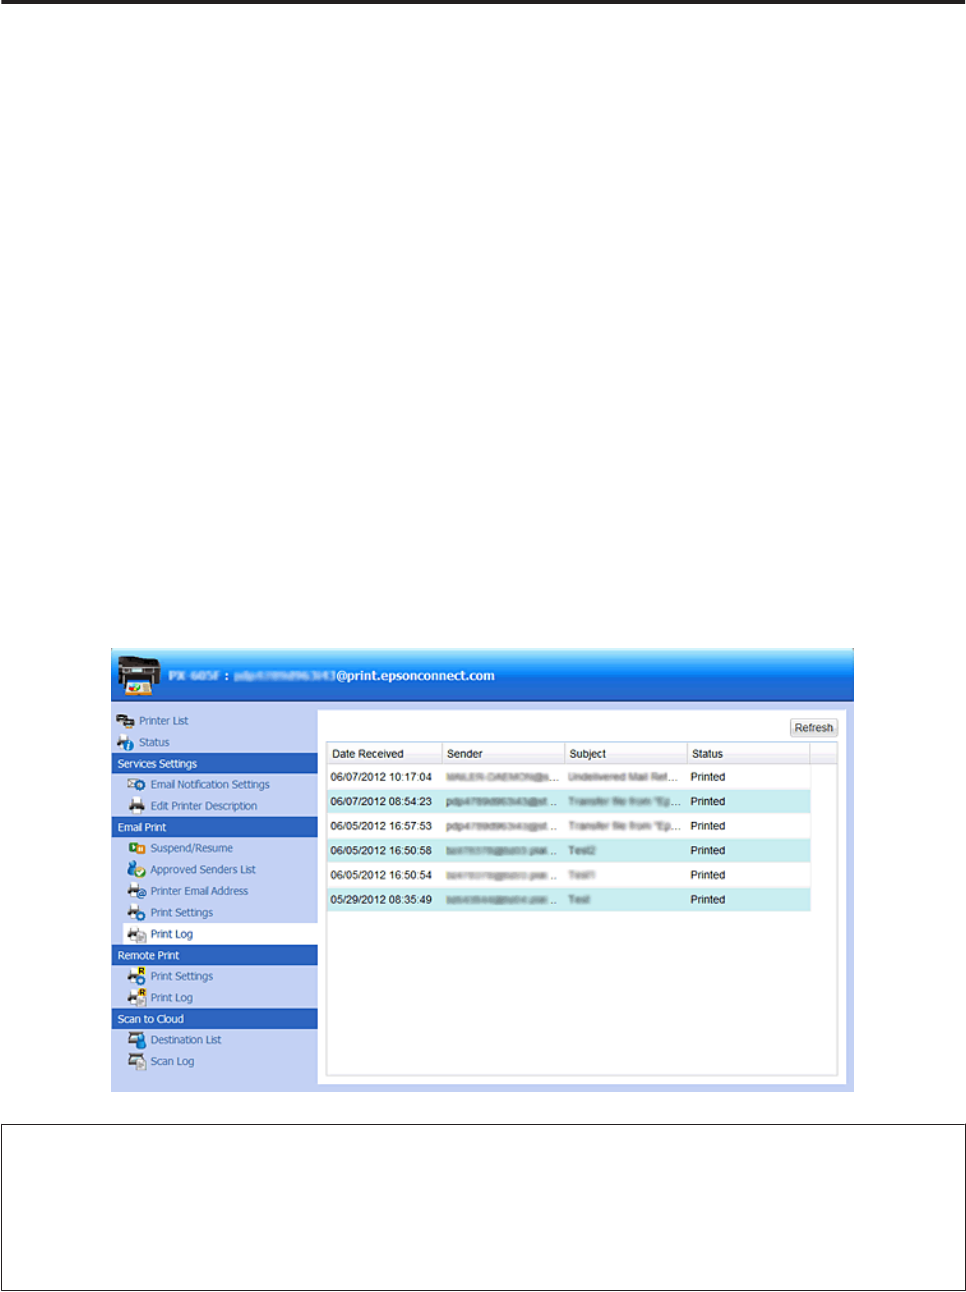
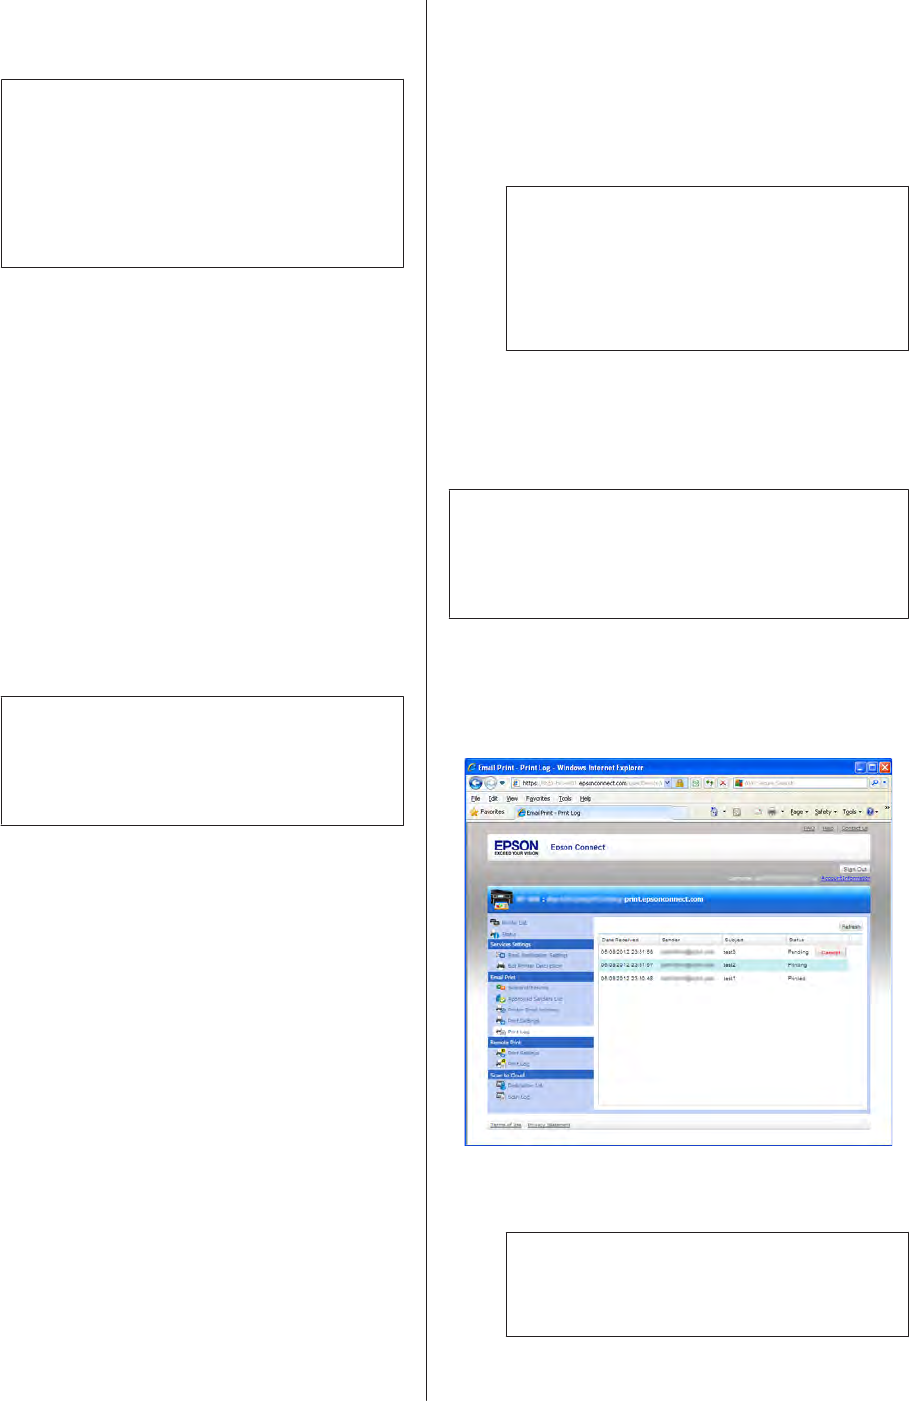
Cancelling print jobs
You can cancel printing after sending a print job.
Note:
❏ If printing has already started, cancel the
print job from the printer’s control panel.
❏ You can cancel pending print jobs from the
User Page.
From a printer’s control panel
Press the stop/cancel button on a printer’s control panel
during printing.
Note:
The name and location of the stop/cancel button varies
by printer. See the documentation provided with your
printer.
From the User Page
Sign in to the User Page, and cancel a print job from the
Print Log.
A
Sign in to the User Page.
Note:
If mul tiple printers hav e been registered , s elec t the
printer you want to configure from the printer list.
Epson Connect Guide
Using the Services
24
B
Select Print Log in Email Print from the menu on
the left.
C
The print job is displayed. Click or tap Cancel in
the Status column.
D
When the Status changes to Cancel, the print job
has been canceled.
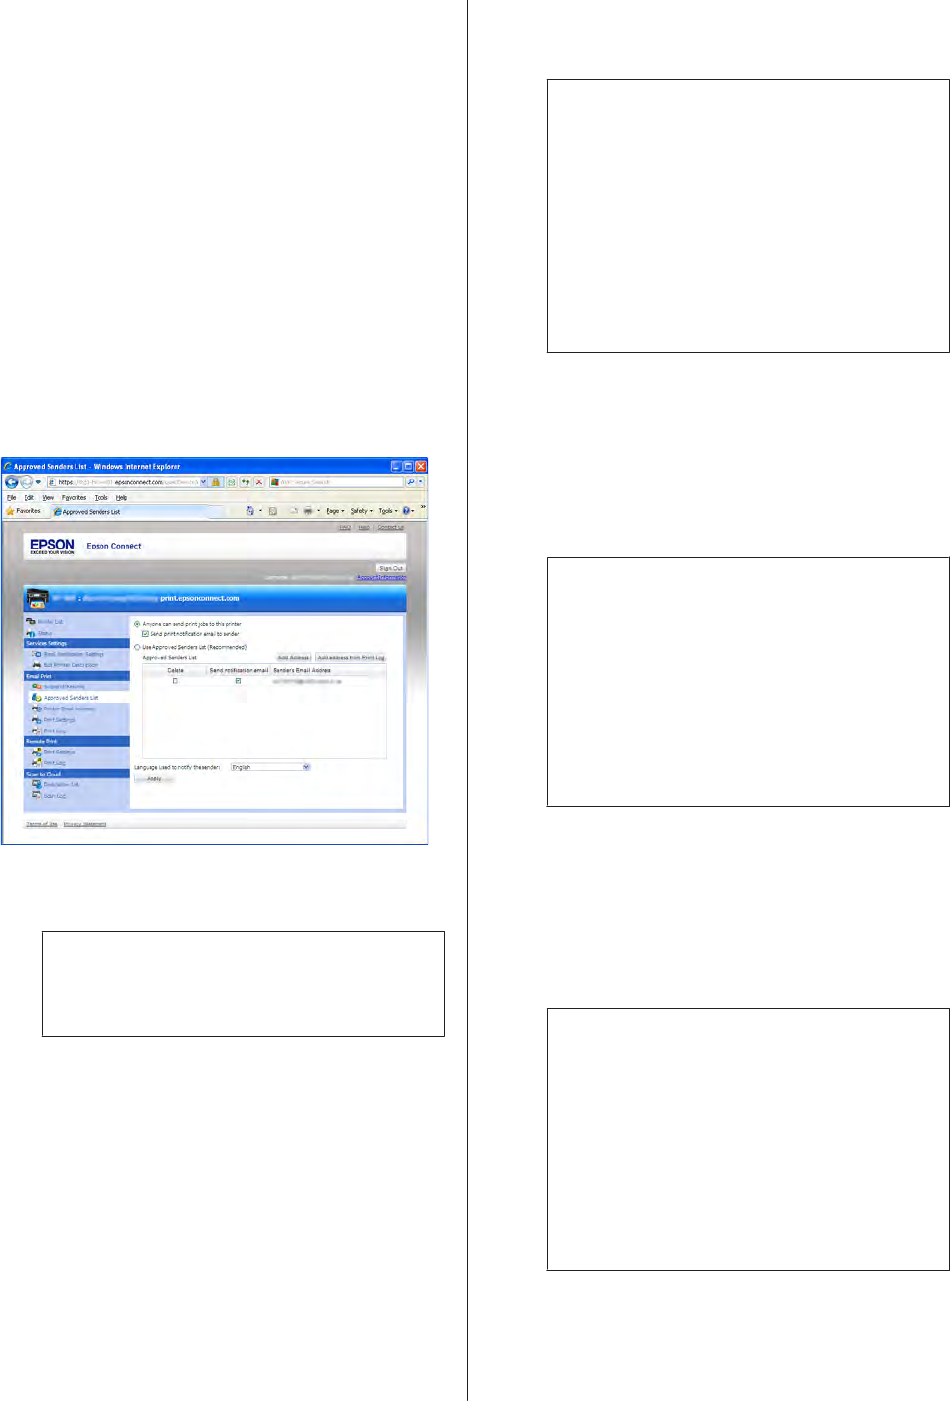
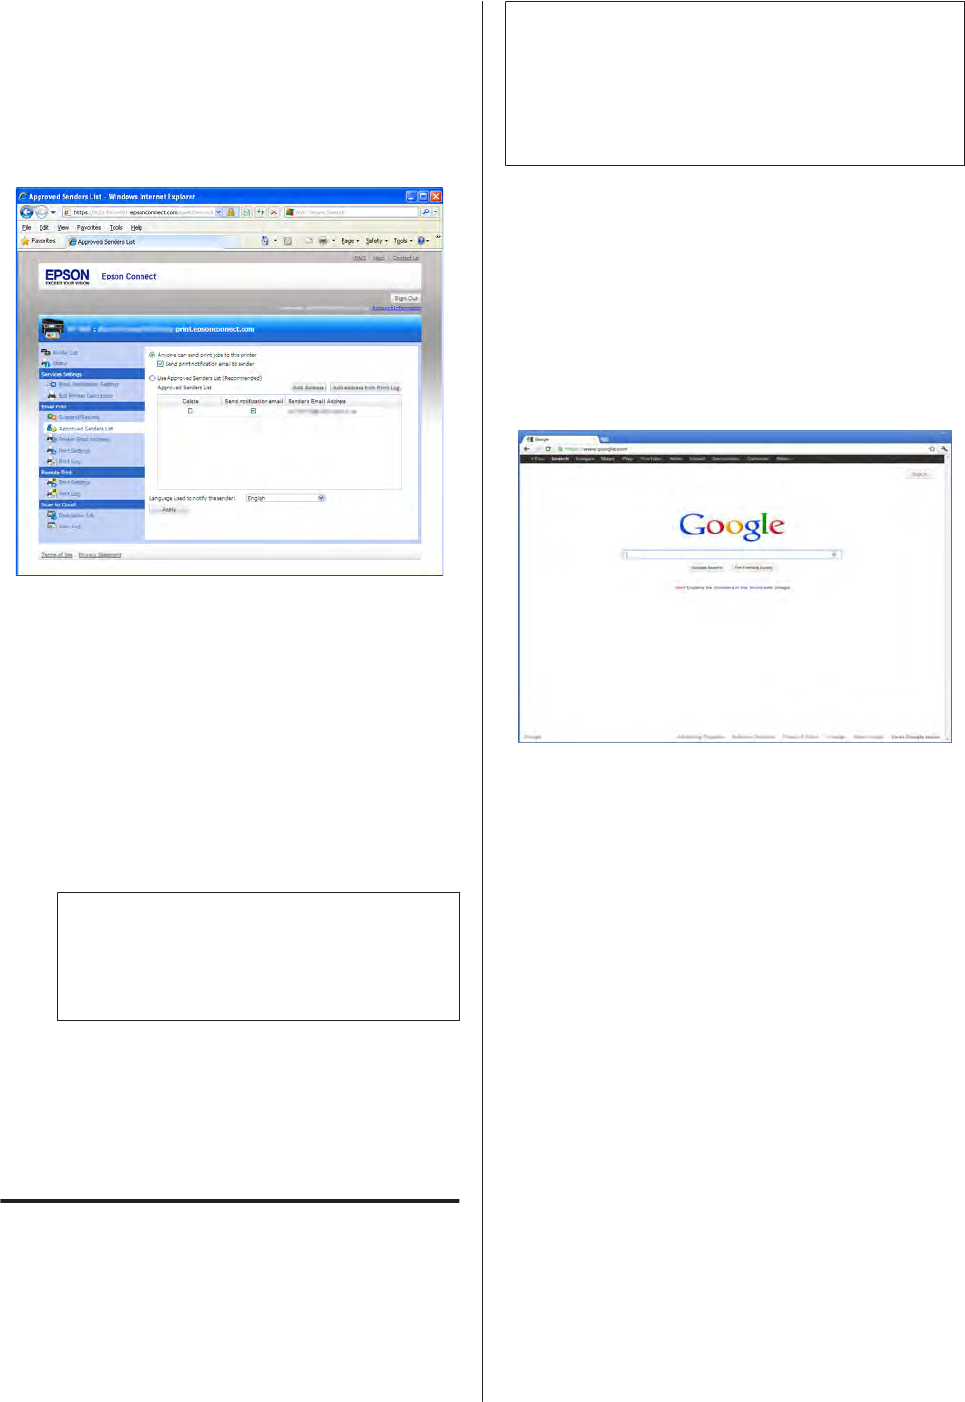
Enabling and editing the Approved
Senders List
By enabling the Approved Senders List, you can allow
only trusted senders access to your printer and block
malicious emails. The Approved Senders List is disabled
by default.
A
Sign in to the User Page.
Note:
If multiple printers have been registered, select the
printer you want to configure from the printer list.
B
Select Approved Senders List in Email Print
from the menu on the left.
C
Select “Use Approved Senders List
(Recommended)”.
D
Click or tap Add Address or Add address from
Print Log.
Note:
❏ Your email address (username) is listed by
default.
❏ If you want to add an email address that is
not in your print log or add a domain
address, select Add Address.
❏ If you want to add an email address that you
have received an email from before, select
Add address from Print Log.
E
If you select Add Address, enter the email
address or domain that you want to add.
If you select Add address from Print Log, select
the email you received from the address you want
to add.
Note:
❏ By adding a domain name, the printer can
receive emails from email addresses that
have the same domain.
❏ When adding a domain name, make sure
you include “@” (e.g. @epson.com).
❏ You cannot add a domain from Add address
from Print Log.
F
Click or tap Add.
G
Check that the address you added is listed in the
Approved Senders List, and then click or tap
Apply.
Note:
❏ If you want to delete a registered email
address or domain name address, select the
Delete column for the address you want to
delete from the Approved Senders List, and
then click or tap Apply.
❏ If you want to disable the Approved Senders
List, select “Anyone can send print jobs to
this printer”, and then click or tap Apply.
Epson Connect Guide
Using the Services
25

Change Print Settings
When you select print settings, all emails are printed
according to your settings. When multiple printers have
been registered, you can select print settings for each
printer.
A
Sign in to the User Page.
Note:
If multiple printers have been registered, select the
printer you want to configure from the printer list.
B
Select Print Settings in Email Print from the
menu on the left.
C
Select the print settings you want to use.
Note:
Print settings may differ depending on the model
being used.
D
Click or tap Apply.
This setting is enabled the next time email is
received.
Scan to Cloud
You can send your scanned file as an email to
destinations you registered previously from the
printer’s control panel. Your scanned file is
automatically sent to the Epson Connect server and a
destination address as an email.
Depending on the model, the Scan to Cloud service may
not supported. See your regional Epson website to check
if the Scan to Cloud service is available for your printer.
Creating the Destination List
You need to register addresses to the Destination List on
the User Page to use the Scan to Cloud service. For more
information on registering the Destination List, see “3.
Creating a Destination List for the Scan to Cloud
service” on page 16.
Operating the printer’s control panel
This section describes how to scan originals and send
data.
Note:
The screen displays may differ from your actual printer,
but the instructions are the same.
A
Turn on the printer and check that it is connected
to the network
When the printer is connected to the network, a
network icon is displayed on the LCD screen. For
more information about the network icon, see
the documentation provided with the printer.
Note:
You need to register your printer and your
account to the Epson Connect service, and then
you need to register a Destination List.
& See “3. Creating a Destination List for the Scan
to Cloud service” on page 16.
B
Enter Scan mode from the Home menu, or press
the Scan button to enter Scan mode.
Epson Connect Guide
Using the Services
26
C
Select Scan to Cloud from the Scan mode menu.
D
Select the destination where you want to send
your data.
E
Press Settings (or OK).
F
Make the scan settings you want to use. Available
settings may differ depending on the model
being used.
G
Set the original(s) you want to scan on the
document glass or ADF, and then press the Start
button.
Your scanned data is sent to the destination.
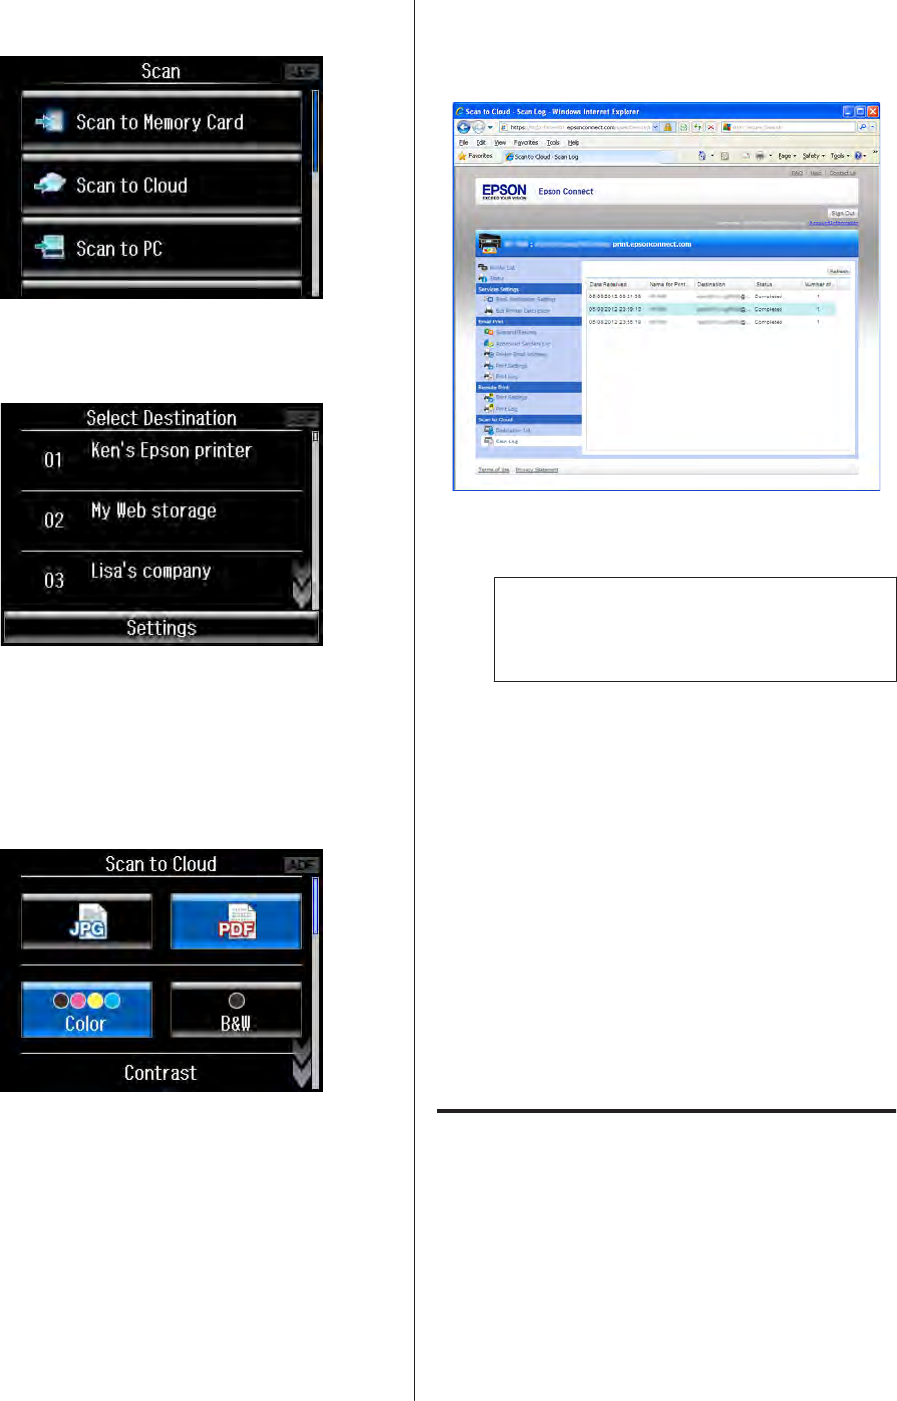
Checking the Scan Log
You can check your scan jobs on the User Page.
A
Sign in to the User Page.
Note:
If mul tiple printers hav e been registered , s elec t the
printer you want to configure from the printer list.
B
Select Scan Log in Scan to Cloud from the menu
on the left.
You can check the destinations to which you sent
the scanned data and the scan results.
About destinations
By sending scanned files to an Epson Connect
compatible printer’s email address, you can use this
service as a color fax service.
You can also send scanned files to online services such as
Evernote or eFax.
Epson iPrint (3.x)
You can print your documents and photos on an Epson
printer connected to a wireless (Wi-Fi) network from
your smartphone or tablet (iOS/Android). You can even
scan and save the file on your device to send it as an email
or upload to an online storage service.
If your printer supports Email Print, you can use the
Internet to print remotely.
Epson Connect Guide
Using the Services
27
Installing Epson iPrint
Download and install Epson iPrint from the App Store
or from Google Play. This app is free and you can find it
by searching for “Epson iPrint”.
Using Epson iPrint in a local Wi-Fi
network
Print and scan your documents and photos to an Epson
printer connected to the same local Wi-Fi network as
your smartphone or tablet. If you can access the Internet
from the Wi-Fi network, you can even print web pages
and upload files to a cloud service.
Setting up a printer
First, you have to setup a printer in Epson iPrint.
A
Launch Epson iPrint.
B
Tap Maintenance.
C
Tap Printer.
Note:
❏ Local: Displays a list of printers that are
currently connected to the local network.
❏ Remote: Displays a list of printers that have
been setup for remote printing.
D
Tap Local.
E
Select the printer that you want to use.
The display returns to the Maintenance screen.
Note:
If the printout is unexpectedly faint or if dots are
missing and you want to print a nozzle check
pattern or clean the print head, tap Nozzle Check
or Head Cleaning on the Maintenance screen
and follow the instructions.
F
Tap Home (iOS) or press the Back button
(Android).
G
Tap Scan.
H
Tap (iOS) or press the Menu button and
Scan Settings (Android).
I
Check that the name of the printer you selected in
step 5 is displayed.
If it is displayed, tap Done and Home (iOS) or
press Done and the Back button (Android).
If it is not displayed, follow the steps below.
❏ For iOS: Tap
, Scanner, and then select
the printer you selected in step 5.
❏ For Android: Press the Menu button, tap
Scan Settings, Scanner, and then select the
printer you selected in step 5.
You can now use Epson iPrint on a local Wi-Fi
network.
Photos
Print photos saved on your device.
A
Tap Photos.
B
Tap the photos you want to print, and then tap
Next.
Note:
If you use iPad, you do not have to tap Next.
C
Selected photos are displayed.
Tap to select more photos.
Epson Connect Guide
Using the Services
28
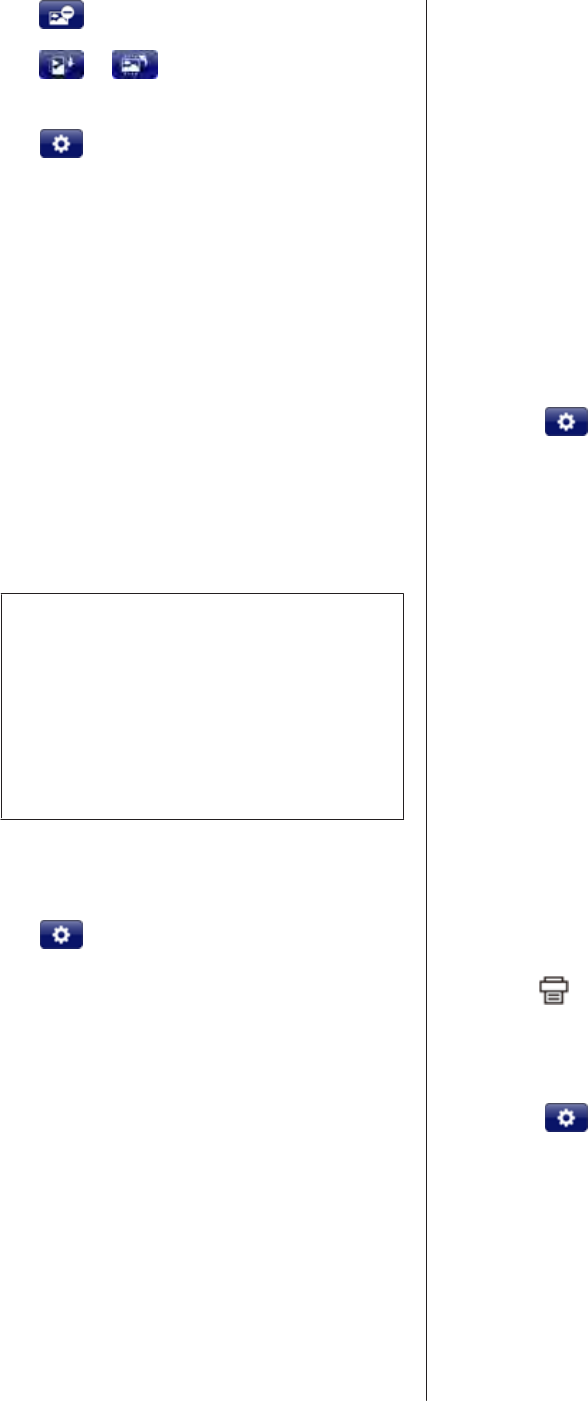
Tap to delete a displayed photo.
Tap
or to rotate the paper
orientation.
D
Tap (iOS), or press the Menu button and
tap Print Settings (Android).
Select the print settings you want, and then tap
Done.
E
Tap Print.
Saved Documents
Print documents stored in the document folder on your
device.
A
Tap Saved Documents.
B
Tap the document you want to print.
Note:
Follow the steps below to delete files or create a
new folder on the Documents screen.
iOS: Tap Edit.
Android: Press and hold a file to delete it, or press
the Menu button, and then tap New Folder to
create a new folder.
C
The selected document is displayed.
D
Tap (iOS), or press the Menu button and
tap Print Settings (Android).
Select the print settings you want, and then tap
Done.
E
Tap Print.
Online Storage
Print files uploaded to online storage services such as
Evernote, Google Docs, Dropbox, Box.
If you want to use this function, create an account for the
online service you want to use. You also need to be able
to access the Internet from the Wi-Fi network to which
your device is connected.
A
Tap Online Storage.
Select the service from the displayed online
storage services.
B
Tap Sign In at the top-right and sign in with your
account.
Your files are displayed.
C
Select the file you want to print.
D
The selected file is downloaded and displayed.
E
Tap (iOS), or press the Menu button and
tap Print Settings (Android).
Select the print settings you want, and then tap
Done.
F
Tap Print.
Web Page Print
Print web pages that you are browsing. You also need to
be able to access the Internet from the Wi-Fi network to
which your device is connected.
A
Tap Web Page Print.
B
Enter the URL for the web page you want to print.
The web page is displayed.
C
Tap Print (iOS), or press the Menu button and
tap
(Android).
D
The web page is displayed.
E
Tap (iOS), or press the Menu button and
tap Print Settings (Android).
Select the print settings you want, and then tap
Done.
F
Tap Print.
Epson Connect Guide
Using the Services
29
Scan
Scan files to your device from a printer that supports
Epson iPrint. You can even send scanned files by email
or upload to an online storage service.
A
Place the original in the printer.
B
Tap Scan.
C
Tap (iOS), or press the Menu button and
tap Print Settings (Android).
Select the print settings you want, and then tap
Done.
D
Tap Scan.
Start scanning to display the scan results.
E
Select what you want to do with the scanned file.
❏ Save: You can save a scanned file to your
device or an online storage service.
- Camera Roll (iOS only): Save to your
Camera Roll.
- Local Folder: Save to a specific folder.
- Open In...: Display with a specific
application.
- Online storage services: Save to online
storage services.
❏ Mail: Send an email with a scanned file
attached.
❏ Print: Print a scanned file.
Using Epson iPrint over the Internet
(Remote Print)
If your printer supports the Epson Connect service, you
can use the Remote Print function for Epson iPrint.
You need to check the following points before you can
use Remote Print.
❏ The printer that you want to use for remote printing
is registered to Epson Connect.
❏ Remote Print is enabled on the User Page.
Enable Remote Print in Epson iPrint
You need to enable the Remote Print functions in Epson
iPrint.
A
Launch Epson iPrint.
B
Tap Epson Connect on the Home menu.
C
Tap Manage Remote Printers.
D
Tap Add.
E
Enter the printer’s email address.
Note:
❏ You can check the printer’s email address
using one of the following methods.
- On the information sheet printed when you
completed the setup for Epson Connect.
- On the Printer List on the User Page.
❏ If you are not the owner of the printer and
you do not know the printer’s email address,
contact the owner of the printer.
F
Tap Done.
Note:
❏ If an access key has been set, the access key
entry screen opens. Enter the access key, and
then tap Done.
❏ If you do not know the access key, contact the
owner of the printer.
Now you can use the Remote Print function in Epson
iPrint.
Printing files over the Internet
Even if you are out, you can use a printer connected to
your home or small office network.
A
Connect your device to the Internet (for
example, Wi-Fi spots, 3G).
B
Launch Epson iPrint.
Epson Connect Guide
Using the Services
30
C
Select and display photos or documents that you
want to print from each menu on the Home
screen.
Note:
For more information on the printing method, see
each section in “Using Epson iPrint in a local
Wi-Fi network” on page 28.
D
Tap (iOS) or press the Menu button and
Print Settings (Android).
Note:
The icons indicate the following network
connection status.
❏
: Printers that are currently connected to
a local network.
❏
: Printers that have been setup for remote
printing.
E
Tap Printer.
F
Tap Remote, and select the printer.
G
Make the print settings you want, and then tap
Done.
H
Tap Print.
Checking a print log and cancelling a print job
You can check your print jobs on the User Page.
A
Tap Maintenance.
B
Tap Printer.
C
Tap Remote, and then select the printer for
which you want to check the print log.
D
Tap Print history, to display the Print Log from
Remote Print on the User Page.
To cancel a pending print job, tap Cancel in the
Status column.
Epson Remote Driver (Windows
only)
By using Epson Remote Driver you can print files on a
remote printer over the Internet from a computer
connected to the network. To use Epson Remote Driver,
the printer’s owner needs to confirm that Remote Print
is enabled.
For more information on checking Remote Print
settings, see “4. Setting the Remote Print service” on
page 16.
Installing the Epson Remote Driver
and registering a printer
Download and setup the Epson Remote Driver.
A
Download Epson Remote Driver from the
following URL: http://support.epson.net/
wrdriver/
B
Double-click “Setup.exe” of Epson Remote
Driver.
C
Select EPSON Remote Print, and then click
OK.
D
Read the license agreement, select Agree, and
then click OK.
The printer registration screen is displayed.
Epson Connect Guide
Using the Services
31
E
Enter the printer’s email address.
Note:
❏ You can check the printer’s email address
using one of the following methods.
- On the information sheet printed when you
completed the setup for Epson Connect.
- On the Printer List on the User Page.
❏ If you are not the owner of the printer and
you do not know the printer’s email address,
contact the owner of the printer.
F
Click OK.
Note:
❏ If an access key has been set, the access key
entry screen is displayed. Enter the key, and
then click OK.
❏ If you do not know the access key, contact the
owner of the printer.
Printing with Epson Remote Driver
A
Open the data you want to print from an
application.
B
Select Print in the application.
C
Select Epson Remote Driver as the printer name.
D
Select print settings in Property, and then start
printing.
Note:
For more information about Epson Remote
Driver, see the printer driver’s Help.
Settings for email notifications
Email notifications are automatically sent to the
printer’s owner or the sender of the email under the
following conditions.
❏ An error occurs
❏ Settings are changed
❏ Emails are received
You can make email notification settings on the User
Page.
Sending email notifications to the
printer’s owner
A
Sign in to the User Page.
Note:
If mul tiple printers hav e been registered , s elec t the
printer you want to configure from the printer list.
B
Select Email Notification Settings in Services
Settings from the menu on the left.
C
Select the notifications you want to receive.
D
Click or tap Apply.
The email notification setting is changed.
Epson Connect Guide
Using the Services
32
Sending email notifications to the
sender of the email
You can change email notification settings for the
sender of the email in Approved Senders List on the
User Page.
A
If the Approved Senders List is enabled, select the
check box in the Send notification email
column of the email or domain address to which
you want to send notifications.
If you the Approved Senders List is not enabled,
select the check box in the Send print
notification email to sender.
B
Click or tap Apply.
Note:
If an error occurs from the sender’s side, a
notification will automatically be sent to the
sender, regardless of the settings.
Other Company Network
Services
Google Cloud Print
You can print data over the Internet on a printer that
supports Google Cloud Print. You can use this service
from a computer or a smart device.
Note:
❏ The strings of Google website in this section may be
changed.
❏ For more information about Google Cloud Print, see
the Google website.
Printing from a computer
The following is an example of using Google Cloud
Print to print from Google Chrome. You can download
Google Chrome from the Google website.
A
Launch Google Chrome, and then go to the
Google website.
B
Click Sign in.
C
Enter your Google Account credentials, and then
click Sign in.
D
Open the web page you want to print.
Epson Connect Guide
Using the Services
33
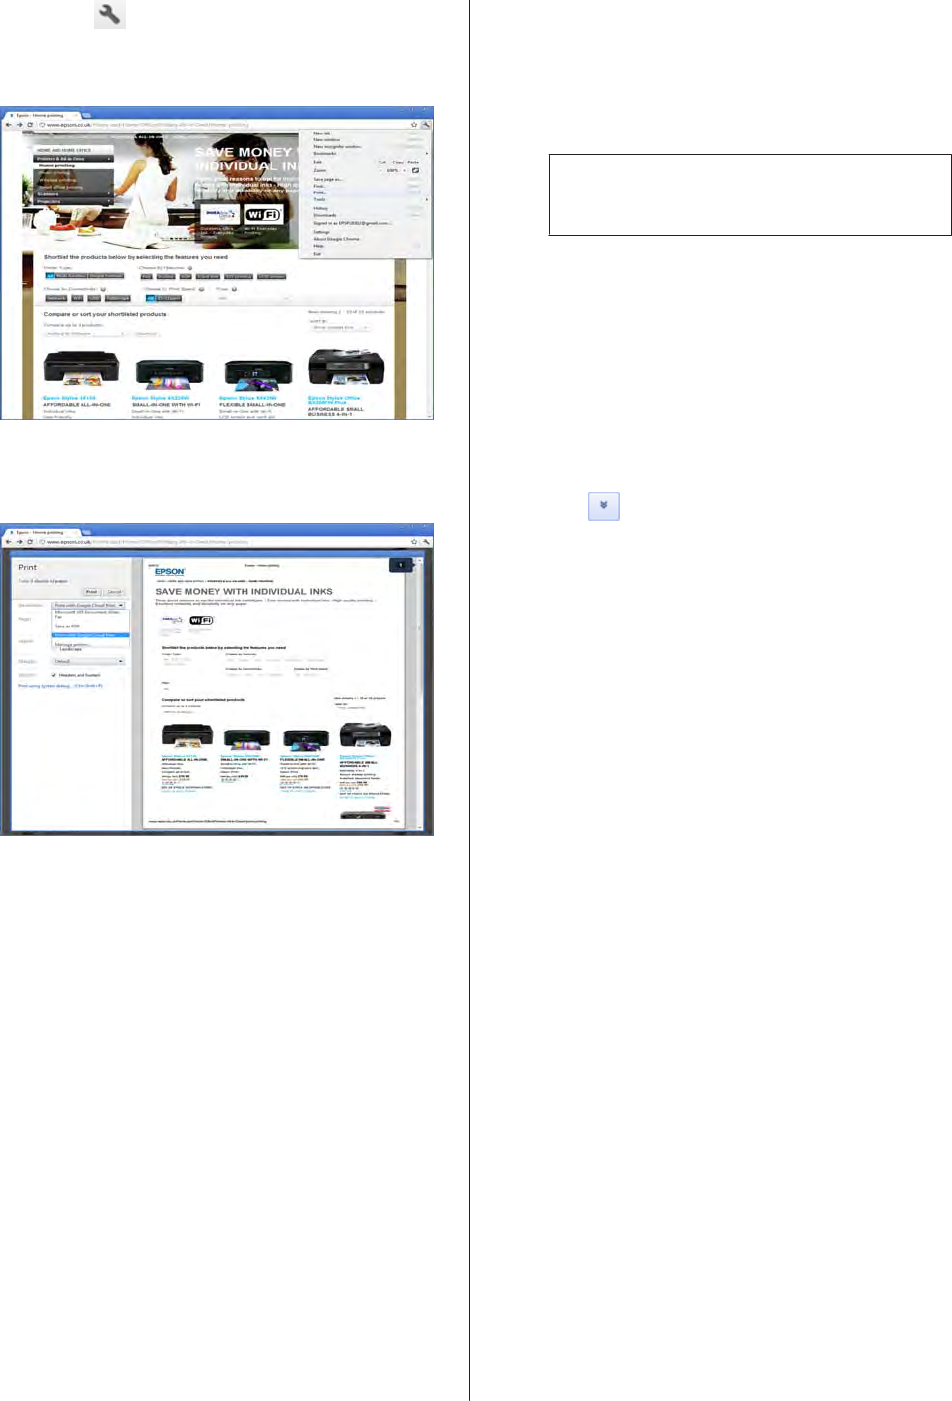
E
Click at the top right, and then select Print.
The print screen is displayed.
F
Select Print with Google Cloud Print as the
Destination.
G
Click Print.
A list of the printers registered to Google Cloud
Print are displayed.
H
Select a printer.
I
Click Print.
Printing from a smartphone or tablet
The following is an example of using Google Cloud
Print to print Gmail from your smartphone or tablet.
A
Launch the browser on your smartphone or
tablet, and then open the Google website.
B
Tap Sign in.
C
Enter the email address and password, and then
tap Sign in.
Your ID (email address) is displayed in the same
location as the Sign in.
Note:
Smartphones may not display your ID.
D
Select Gmail from the top of the screen.
If you want to print from a smartphone, use the
built-in browser to access Gmail, do not use the
Gmail application for smartphones.
E
Select the email you want to print.
F
Tap , and then select Print.
Printer(s) registered to Google Cloud Print are
displayed.
G
Select a printer to display the print settings.
H
Configure the print settings, and then tap Print.
Sharing the printer and checking
print jobs
You can share the printer with other Google accounts
and check print jobs on the Google Cloud Print
maintenance page.
Accessing the maintenance page
A
Navigate to google.com, and click or tap Sign
in.
B
Enter your account details (email address and
password), and then click or tap Sign in.
C
Click or tap the email address displayed at the
top-right of the screen, and then select Account.
D
Click or tap Products.
E
Click or tap Google Cloud Print.
Epson Connect Guide
Using the Services
34
F
Click or tap Printers.
G
A list of the printers registered to Google Cloud
Print are displayed.
Sharing the printer
A
Select the printer you want to share.
B
Click or tap Share.
C
A list of users with access to the printer is
displayed.
The email address for the printer’s owner is
displayed by default.
D
Enter the email address with which you want to
share the printer.
E
Click or tap Share.
F
Click or tap Close.
The printer is now shared and can be accessed
from other Google accounts.
Checking print jobs
A
Select a printer.
B
Click or tap Show Print Jobs.
The list of print jobs is displayed.
AirPrint
The following is an example of using AirPrint to print
from Safari.
Note:
❏ The strings of Apple website in this section may be
changed.
❏ For more information about AirPrint, see the Apple
website.
A
Launch Safari and open the web page you want to
print.
B
Tap .
C
Tap Print.
D
Tap Printer, and then select the printer.
Note:
Once the printer has been detected, you do not
need to set the printer the next time you connect to
the same network.
E
Press or to set the number of copies,
and then tap Print.
Note:
❏ To use AirPrint, connect the printer to a
wireless (Wi-Fi) or wired (Ethernet)
network.
❏ Use iOS 5.x or later to use AirPrint with
Epson printers. If your device is iOS 4.x,
update to iOS 5.x or later. Printing with iOS
4.x may adversely affect the printing results.
AirPrint settings
You can use Web Config to make settings for AirPrint
(Bonjour settings).
A
Open Web Config on your printer.
& See “To open Web Config” on page 17.
B
Tap AirPrint Setup.
C
Configure the following settings:
Bonjour Service Name: this is the name used on
Bonjour. The printer’s model name is used by
default.
Bonjour Location: this is for entering
information to identify the printer (for example,
the installation location of the printer). This is
blank by default.
Top Priority Protocol: this allows you to set the
top priority protocol. This is set to “IPP” by
default.
Epson Connect Guide
Using the Services
35

D
Tap OK.
Suspending Services
You can suspend services when you want (for example,
when you want to prevent print jobs from being
interrupted for the Email Print service).
Services can be suspended from the User Page, the
printer’s control panel, or Web Config. Services that can
be suspended depend on where you are suspending
from.
From the User Page
You can suspend the following Epson Connect services:
Email Print and Remote Print.
Email Print
If you suspend the Email Print service from the User
Page, emails are not received and an email notification is
sent to the sender of the email.
A
Sign in to the User Page.
Note:
If multiple printers have been registered, select the
printer you want to configure from the printer list.
B
Select Suspend/Resume in Email Print from the
menu on the left.
C
Click or tap Suspend Service.
Email Print is suspended. To resume Email Print,
click or tap Resume Service from Email Print.
Remote Print
If you suspend the Remote Print service, you cannot use
the following services.
❏ Epson Remote Driver from a computer.
❏ Remote Print for Epson iPrint from a smartphone
or tablet.
A
Sign in to the User Page.
Note:
If mul tiple printers hav e been registered , s elec t the
printer you want to configure from the printer list.
B
Select Print Settings in Remote Print from the
menu on the left.
C
Clear Enable Remote Print.
D
Click or tap Apply.
Remote Print is suspended.
From a printer
If you suspend the Epson Connect services or the
Google Cloud Print service from the printer’s control
panel or from Web Config, you cannot use any of the
services.
However, emails can still be received, and print jobs
remain on the Epson Connect service. These print jobs
are deleted automatically after reaching the maximum
pending time of 72 hours since the email was received.
From the printer’s control panel
Suspend the Epson Connect services or the Google
Cloud Print service from the printer’s control panel.
Note:
The screen displays may differ from your actual printer,
but the instructions are the same.
Epson Connect Guide
Using the Services
36
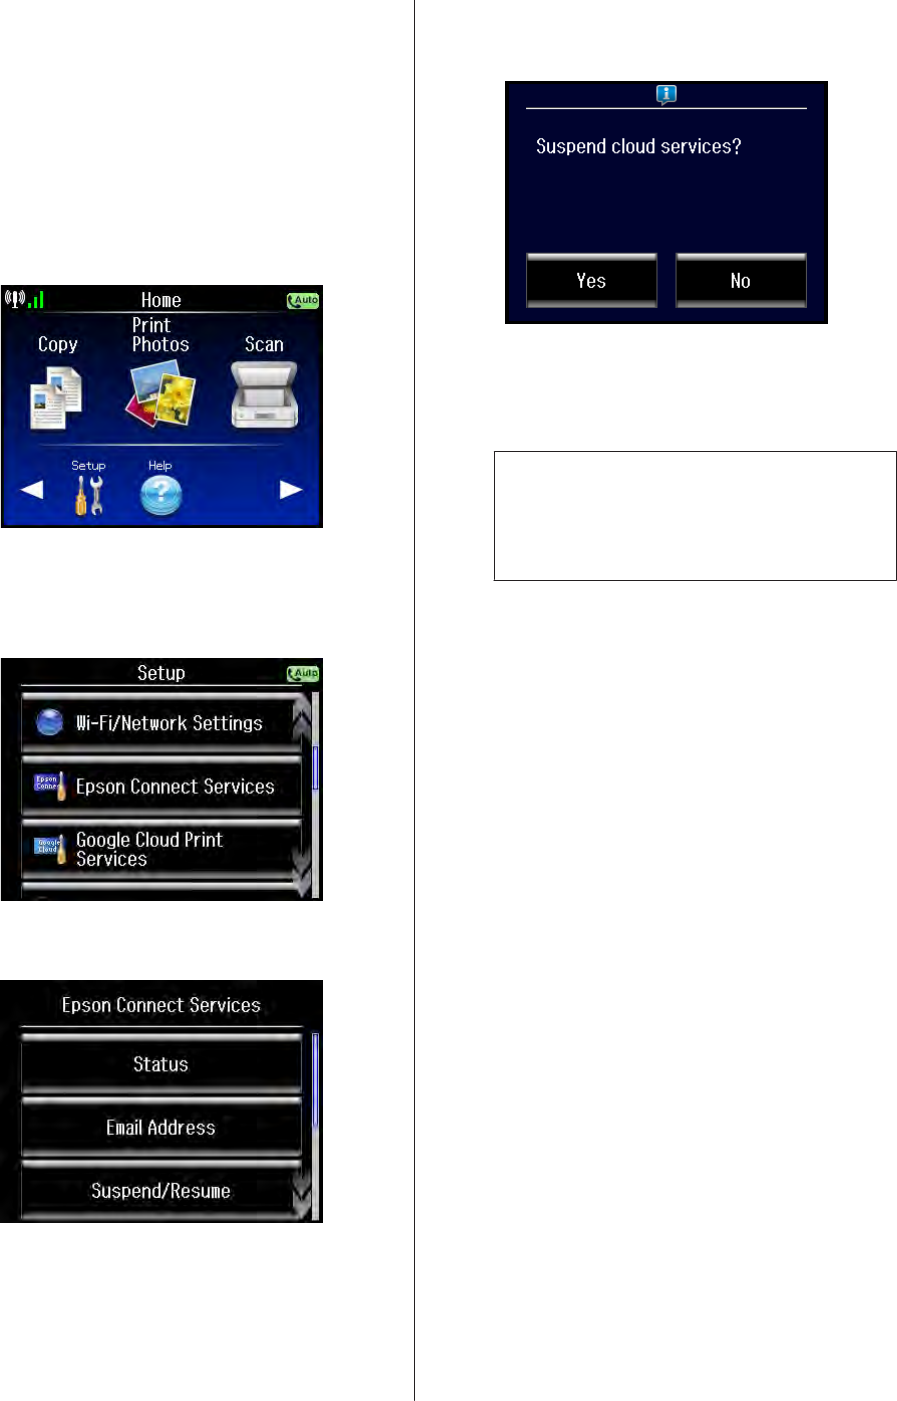
A
Turn on the printer and check that it is connected
to the network.
When the printer is connected to the network, a
network icon is displayed on the LCD screen. For
more information about the network icon, see
the documentation provided with the printer.
B
Enter Setup mode from the Home menu, or
press the Setup button to enter Setup mode.
C
Select the service (Epson Connect Services or
Google Cloud Print Services) that you want to
suspend.
D
Select Suspend/Resume.
E
Select Yes, when the confirmation message is
displayed.
F
The finish message is displayed. The Epson
Connect or Google Cloud Print service is now
suspended.
Note:
To resume the services, select Suspend/Resume
from the Epson Connect Services or Google Cloud
Services again.
From Web Config
Suspend the Epson Connect services or the Google
Cloud Print service from Web Config.
A
Open Web Config on the printer.
& See “To open Web Config” on page 17
B
Click or tap Epson Connect Services or Google
Cloud Print Services.
C
Click or tap Suspend.
D
The complete screen is displayed.
The Epson Connect or Google Cloud Print
service is now suspended.
Close the browser.
Deleting Your Epson
Connect Account
To delete your Epson Connect account, you first need to
delete all registered printers from the Epson Connect
services.
Epson Connect Guide
Using the Services
37
Deleting your registered
printers
You can delete your registered printers from the Epson
Connect services by using Epson Connect Printer Setup
from a computer or by initializing the services from the
printer’s control panel.
From a computer
A
Launch the Epson Connect Printer Setup, and
then follow the on-screen instructions.
Windows: Click Start > All Programs > Epson >
Epson Connect Printer Setup and then Epson
Connect Printer Setup.
Mac OS X: Double-click Macintosh HD >
Applications > Epson Software and then Epson
Connect Printer Setup.
Note:
If you cannot find Epson Connect Printer Setup,
download the Download Navigator using one of
the following options, and then launch Epson
Connect Printer Setup.
❏ From Software Update: Click Start > All
Programs > Epson > Software Update
❏ From the following URL: http://
support.epson.net/dnavi/
B
Select the printer that you want to delete from the
Epson Connect services, and then click Next.
C
Select Printer Removal, and then click Next.
D
Click OK.
E
Click Close.
Note:
If you want to delete another printer, click
Configure Another Printer, and then follow the
on-screen instructions.
From the printer’s control panel
To delete a printer from the printer’s control panel,
select Restore Default Settings for each service.
Note:
❏ The screen displays may differ from your actual
printer, but the instructions are the same.
❏ By initializing the network settings to their factory
defaults from the printer’s control panel,
information about the Epson Connect services and
the Google Cloud Print service is also deleted.
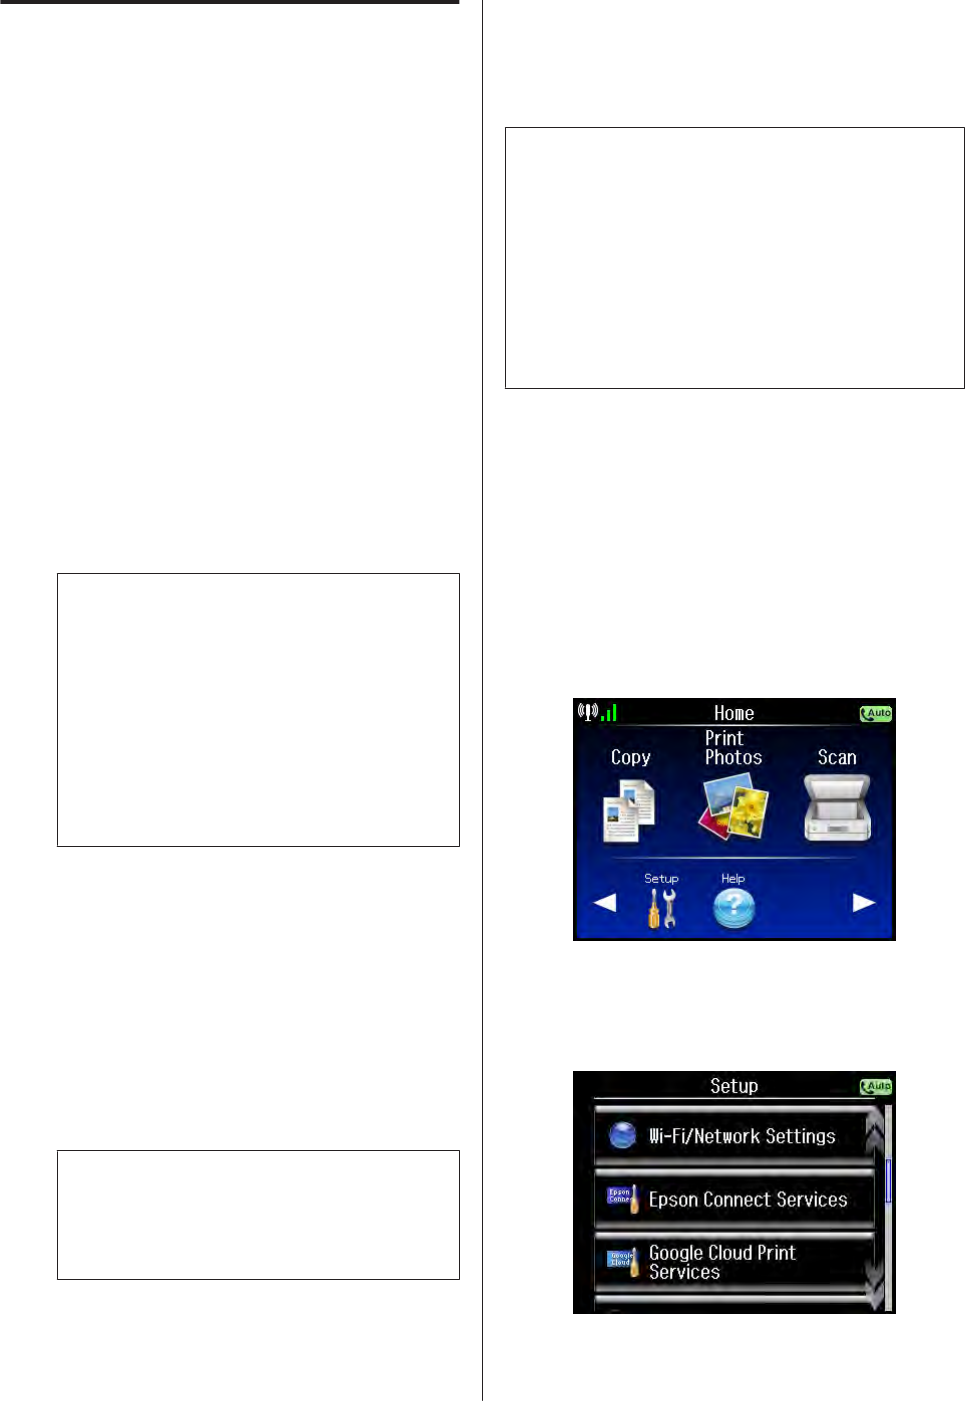
However, the server continues to receive email but it
does not send notifications to the sender.
A
Turn on the printer and check that it is connected
to the network.
When the printer is connected to the network, a
network icon is displayed on the LCD screen. For
more information about the network icon, see
the documentation provided with the printer.
B
Enter Setup mode from the Home menu, or
press the Setup button to enter Setup mode.
C
Select the service (Epson Connect Services or
Google Cloud Print Services) that you want to
delete.
Epson Connect Guide
Using the Services
38
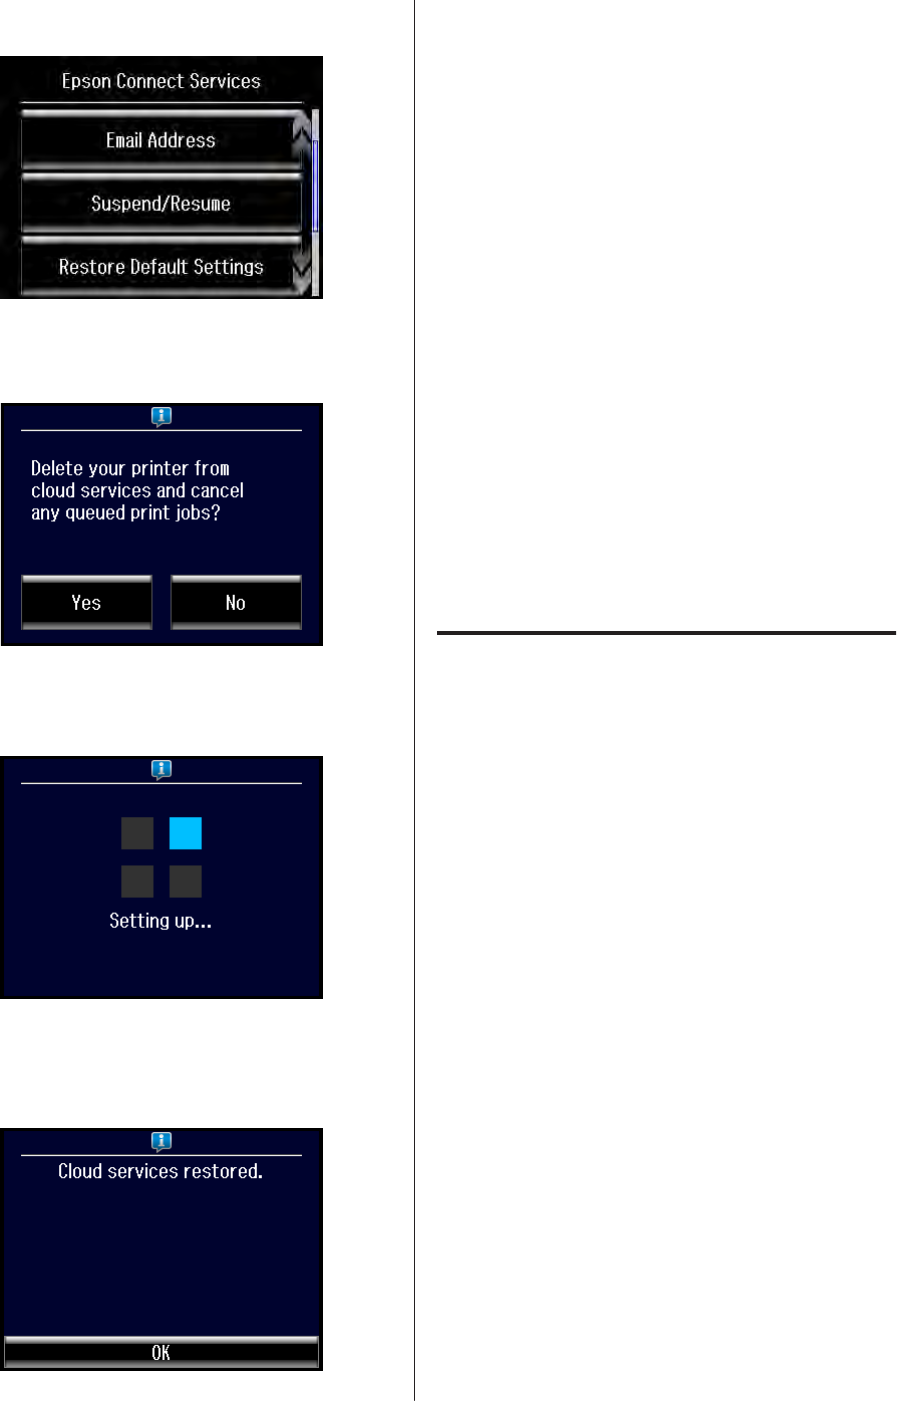
D
Select Restore Default Settings.
E
Select Yes when the confirmation message is
displayed.
The printer begins communicating with the
server.
F
Select OK and return to the Setup mode. Your
printer is deleted from the Epson Connect or
Google Cloud Print service.
From Web Config
You can also delete a registered printer from Web
Config.
A
Open Web Config on the printer.
& See “To open Web Config” on page 17.
B
Click or tap Epson Connect Services or Google
Cloud Print Services.
C
Click or tap Delete.
D
Click or tap OK when the confirmation message
is displayed.
E
The complete screen is displayed.
Your printer is deleted from the Epson Connect
or Google Cloud Print service.
Close the browser.
Deleting your Epson Connect
account
Once you’ve deleted all registered printers from the
Epson Connect service, you can delete your Epson
Connect account. Follow these steps to delete your
account:
A
Sign in to the User Page, and then click or tap
Account Information at the top right.
B
Click or tap Delete User Account.
C
Click or tap Delete.
D
Click or tap OK when the confirmation message
is displayed.
Your account is deleted from the Epson Connect
service.
Epson Connect Guide
Using the Services
39

Notes on Transferring or
Disposing of the Printer
Private information may be registered to the printer,
and the printer itself has a unique email address
assigned to it by the Epson Connect service. When
transferring or disposing of the printer, we suggest that
you delete all private information.
Private information on the printer
Network setup information and telephone numbers
(for fax capable models) are registered to the printer
itself. We suggest that you delete the setup information
by following the printer’s documentation.
Private information in the Epson
Connect service
If you have used the Epson Connect service, make sure
you delete registered printers when transferring or
disposing of the printer. If the registration is not deleted
and the “Approved Senders List” was not being used, the
printer prints any emails it receives. This could cause
private information to leak to a third party. The Scan to
Cloud Destination List is also registered.
Epson Connect Guide
Using the Services
40

Troubleshooting
Restrictions
The following restrictions apply to the Epson Connect
and Google Cloud Print services.
❏ Epson Connect does not support IPv6.
❏ The connection cannot pass through more than one
proxy server.
❏ Because Epson Connect uses XMPP
communication protocol, you need to open port
5222.
Epson Connect
Email Print
Checking for an error
The following features are useful for identifying the
cause of an error.
❏ Print Log
You can view the status of emails sent to the Email
Print service by using the Print Log on the User
Page.
❏ Email Notifications - to the owner
When you enable Email Notifications on the User
Page, the Email Print service notifies the owner of
the printer when an error occurs. For more
information on sending email notifications to the
printer’s owner, see “Sending email notifications to
the printer’s owner” on page 32.
❏ Email Notifications - to the sender
When you enable Email Notifications on the User
Page, the Email Print service notifies the sender of
the email when an error occurs. For more
information on sending email notifications to the
sender of an email, see “Sending email notifications
to the sender of the email” on page 33.
Email is not received
The following situations may prevent an email from
being received, even if the email was sent to the printer.
❏ Email rejected because sender not registered to
the Approved Senders List:
The email sender’s email address is not on the
Approved Senders List. Register the sender’s email
address to the Approved Senders List, and then
re-send the email.
For more information on the Approved Senders
List, see “Enabling and editing the Approved
Senders List” on page 25.
When you enable Email Notifications on the User
Page, the server notifies the sender of the email
when this error occurs.
❏ Error in email destination address:
More than one address is entered in the To, Cc, or
Bcc fields. As a security measure, Email Print only
prints emails with one recipient.
When you enable Email Notifications on the User
Page, the server notifies the sender of the email
when this error occurs.
❏ Email too large:
The combined size of the email and the
attachment(s) exceeds the maximum limit.
The maximum size for an email and attachment(s)
is 20 MB.
When you enable Email Notifications on the User
Page, the server notifies the sender of the email
when this error occurs.
❏ Too many attachments:
The number of files attached to the email exceeds
the maximum limit. The maximum number of
attachment(s) is 10.
When you enable Email Notifications on the User
Page, the server notifies the sender of the email
when this error occurs.
❏ Too many print jobs pending:
The number of pending emails in the printer’s print
queue exceeds the maximum limit. The maximum
number of pending emails is 100. Print pending
emails or delete them to make more space.
When you enable Email Notifications on the User
Page, the server notifies the sender of the email
when this error occurs.
Epson Connect Guide
Troubleshooting
41

❏ The printer owner has suspended the Email Print
service:
The printer owner has suspended the Email Print
service for the printer.
When you enable Email Notifications on the User
Page, the server notifies the sender of the email
when this error occurs.
❏ The Email Print service has been suspended for
system maintenance:
The Email Print service is suspended during server
maintenance. Wait for a while, and then try sending
the email again.
❏ User account registration to the Epson Connect
service is not complete:
If you registered your account by using Web
Config, you may have closed the browser before
registration was complete. Delete the printer from
the Epson Connect service, and then register it
again.
Email body text or attachment(s) are
not printed
The following situations may prevent an email from
being printed, even if the email has been received.
❏ Files that are not supported are attached to the
email:
There are files that are not supported attached to the
email. You may be able to print by converting the
unsupported files to PDF format.
& See “Compatible file types” on page 5.
❏ There is nothing to be printed:
There is nothing to be printed in the sent email.
Check the following, and then resend the email.
- The email has printable content in the body of the
email or in the attachment(s).
- The email has printable content in the
attachment(s) if Print Email Body is disabled.
- There is a photo in the attached files if Photo Paper
Printing is set for a single source printer.
❏ Print job was deleted due to expiration of storage
time:
Print jobs are deleted when the maximum storage
time for pending files is exceeded. The maximum
pending time is 72 hours.
When you enable Email Notifications on the User
Page, the server notifies the printer’s owner when
this error occurs.
❏ The print job was deleted:
The print job was deleted from the Print Log by the
printer’s owner.
❏ The print job was cancelled:
Printing was cancelled from the printer’s control
panel.
❏ The printer is not ready for printing:
Check the printer’s status, and then clear any
problems.
- Printer is off
- Paper out
- Ink is near end
- Paper jam occurred
- Printer cannot connect to the network
For more information on printer operations, see
the printer’s documentation.
❏ Port 5222 is not open:
Enterprise networks may restrict access to this port.
Open port 5222 to use the Email Print service. For
more information, contact your network
administrator.
❏ The printer passes through two or more proxy
servers:
Only one proxy server connection is supported.
Change the printer’s connection so that it only
passes through one proxy server.
❏ The printer is connected to the IPv6 network:
Email Print does not support the IPv6 network.
Connect the printer to the IPv4 network.
Printing is slow to start or paper is
ejected before printing is complete
Check the Internet environment to which the printer is
connected.
We recommend using the following printer Internet
connection.
- Minimum download speed: 512 Kbps or faster
- Recommended download speed: 1 Mbps or faster
Problems with printer setup
You can check the printer’s status from the control
panel, a network status sheet, a network connection
report, and so on.
For more information on printer operations, see the
printer’s documentation.
Epson Connect Guide
Troubleshooting
42

Scan to Cloud
Cannot scan
❏ The Destination List is not set:
Before you can use the Scan to Cloud service, you
need to create a Destination List on the Epson
Connect User Page.
When you send data using Scan to Cloud, the
Destination List is displayed from the Epson
Connect server.
For more information on registering the
Destination List, see “3. Creating a Destination List
for the Scan to Cloud service” on page 16.
❏ Cannot connect the printer to the Internet:
Check that the printer is connected to a network
that can connect to the Internet.
You cannot use Scan to Cloud if the network cannot
connect to the Internet.
❏ The printer is connected to a dedicated IPv6
network:
You cannot use this function on a network that is
only for IPv6.
If the network supports IPv4 and IPv6, this function
connects using IPv4.
An error mail is printed
Error emails from the Scan to Cloud destination address
may be printed as Email Print jobs. Check that the
destination’s service can receive emails directly.
The Scan to Cloud menu is not
displayed
Check that the printer supports the Scan to Cloud
service.
You can check supported printers for each service from
Epson’s website.
If the menu is not displayed even though the printer
supports with this function, the printer firmware may
need to be updated. Click or tap Firmware Update in
Web Config, and then follow the on-screen instructions
to check and update the firmware.
Epson iPrint (3.x)
The printer is not found in the local
network
❏ The printer or the wireless router are off:
Check that the printer and the wireless router are on
and connected to the network.
❏ The network is not connected:
Check that the device containing Epson iPrint is
connected to the network.
❏ The device and the printer are not on the same
network:
Check that the wireless LAN network (SSID) that
the device is connected to is same as the printer’s
network. Epson iPrint searches for printers that are
on the same network. If the wireless router (the
access point) supports several networks (SSIDs),
the printer may be connected to another network
(SSID).
Cannot find the printer over the
Internet
❏ Cannot connect the device containing Epson
iPrint to the Internet:
Check that the device containing Epson iPrint is
connected to the Internet. Otherwise, remote
printing is not available.
❏ The printer is not registered to the Remote Print
function
Before you can use Epson iPrint over the Internet,
register the printer that you want to use. For more
information on registering the printer, see “Enable
Remote Print in Epson iPrint” on page 30.
Remote printing over the Internet is
not available
❏ Before you can use this function, you need to enable
Remote Print on the User Page. For more
information on making settings, see “4. Setting the
Remote Print service” on page 16.
❏ Port 5222 is not open:
Connecting using port 5222 may be restricted on
enterprise networks. Port 5222 needs to be open to
use the remote printing service. For more
information, contact your network administrator.
Epson Connect Guide
Troubleshooting
43

❏ The printer is connected to a dedicated Ipv6
network:
You cannot use this function on a network that is
only for IPv6.
If the network supports IPv4 and IPv6, this function
connects using IPv4.
Cannot print Office format files
For Android, you cannot print Office format files when
printing directly through the local network. Try
converting the file to PDF format, or printing over the
Internet.
For more information on supported formats, see
“Epson iPrint (3.x)” on page 7.
Printing or scanning is too slow
If another application is running or the device enters
power saving mode while printing or scanning using
Epson iPrint, printing or scanning may stop or slow
down. Printing or scanning resumes when Epson iPrint
becomes active again.
Cannot change and save the scanned
file name
If prohibited symbols or characters (such as /,:,*,?,<,>,|)
are used in the file name, the display returns to the
previous screen when you tap Save. Enter a file name
without symbols.
Remote Print
Remote printing is not available
❏ The printer or the wireless router are off:
Check that the printer and the wireless router are on
and connected to the network, and that the network
is working normally. Also, check that the network
to which the computer using Remote Print is
connected is working normally.
❏ Port 5222 is not open:
Connecting using port 5222 may be restricted on
enterprise networks. Port 5222 needs to be open to
use the remote printing service. For more
information, contact your network administrator.
❏ The printer is connected to a dedicated Ipv6
network:
You cannot use this function on a network that is
only for IPv6.
If the network supports IPv4 and IPv6, this function
connects using IPv4.
Cannot install the driver
❏ Your computer’s operation system does not
support this driver.
Epson Remote Driver is for Windows only.
The following operating systems are supported.
Windows 7, Vista, XP
Printing is slow to start or paper is
ejected before printing is complete
Check the Internet environment to which the printer is
connected.
We recommend using the following printer Internet
connection.
- Minimum download speed: 512 Kbps or faster
- Recommended download speed: 1 Mbps or faster
Other Company Network
Services
Google Cloud Print
For more information on supported applications and
details on the Google Cloud Print functions, see the help
page.
& http://www.google.com/support/cloudprint/
For more information on supported printers, see
Epson’s website.
Cannot register the printer or cannot
print
The Google Cloud Print service may have been updated.
In this case, it may be necessary to update the printer’s
firmware.
Epson Connect Guide
Troubleshooting
44

Select Firmware Update from Web Config, and then
check that the printer is using the latest firmware
version.
The printer does not appear in the list
❏ The printer is not registered.
You need to register the printer to the Google Cloud
Print service in advance. For more information on
registering the printer, see “Setting Up Google
Cloud Print” on page 21.
❏ The printer is not shared.
You need to share the printer if you want to print
from an account that you did not use to register the
printer. Check that the account is registered in
printer sharing, or contact the owner of the printer.
For more information on sharing the printer, see
“Sharing the printer and checking print jobs” on
page 34.
Cannot print
❏ The printer or the wireless router are off:
Check that the printer and the wireless router are on
and connected to the network, and that the network
is working normally.
❏ The service is turned off on the printer or the
printer is not connected to the service.
Check the Google Cloud Print connection status on
the printer. You can check the connection status on
the network status sheet or the network connection
report.
For more information on the network status sheet
or the network connection report, see the manuals
provided with the printer.
❏ The application is not available with this service:
You can only print from applications that are
supported by Google Cloud Print.
When using a smart device, you may not be able to
print from applications that are unique to the smart
device, even if that application is supported by
Gmail or Google Docs. Try accessing Gmail or
Google Docs through a web browser, and then print
using the menu on the web.
❏ The printer is connected to a dedicated Ipv6
network:
You cannot use this function on a network that is
only for IPv6.
If the network supports IPv4 and IPv6, this function
connects using IPv4.
❏ Port 5222 is not open:
Connecting using port 5222 may be restricted on
enterprise networks. Port 5222 needs to be open to
use the remote printing service. For more
information, contact your network administrator.
AirPrint
The printer is not found
❏ The printer is not available with this function:
Check that the printer supports AirPrint on Epson’s
website.
❏ The network does not work:
Check that the printer and the wireless router are on
and connected to the network, and that the network
is working normally.
❏ The device and the printer are not on the same
network:
Check that the device and the printer are connected
to the same network. You cannot print from a
different segment.
Cannot print
❏ The application does not support AirPrint:
You can only print from applications that support
AirPrint.
Epson Connect Guide
Troubleshooting
45

Appendix
System Requirements
The Epson Connect service is available under the
following conditions.
Operating system
Computer
❏ Windows 7, Windows Vista, Windows XP,
Windows XP x64
❏ Mac OS X 10.5.x or later
Smartphone, tablet
❏ iOS: iPhone or iPod Touch with iOS v 4.1 or later, or
iPad with iOS v 4.2 or later
(Device) iPhone 4, iPhone 3G, iPhone 3GS, iPod
Touch 3rd Generation or later, iPad
❏ Android: Android OS v 2.1 or later
Web Browser
❏ Computer: Internet Explorer ver. 7 or later, Safari
ver. 5.0 or later, Firefox ver. 13 or later, Google
Chrome ver. 19 or later
❏ Smartphone/Tablet:
iOS: Standard browser for iOS 5.0 or later
Android 2.x: Firefox 10 or later
Android 3.x or later: Standard Android browser
Network Environment
❏ Printer connected to Wi-Fi or Wired LAN
❏ Printer connected to Wi-Fi/Wired LAN router (or
access point) that is connected to the Internet
❏ Recommended Internet connection.
- Minimum download speed: 512 Kbps or faster
- Recommended download speed: 1 Mbps or faster
Copyrights
❏ Microsoft
®
, Windows
®
, and Windows Vista
®
are
registered trademarks of the Microsoft
Corporation.
❏ Apple, Mac OS, and Macintosh are trademarks of
Apple Inc., registered in the U.S. and other
countries. AirPrint and the AirPrint logo are
trademarks of Apple Inc.
❏ Wi-Fi
®
is a registered trademark or trademark of
the Wi-Fi Alliance.
❏ Google Cloud Print
™
and Android
™
are
registered trademarks of Google Inc.
General Notice: Other product names used herein are
for identification purposes only and may be the
trademarks of their respective owners. Epson disclaims
any and all rights in those marks.
Copyright 2012 Seiko Epson Corporation. All rights
reserved.
Epson Connect Guide
Appendix
46
