
Family Tree Maker 2019
Step by Step Guide:
Reports
Step by step guide - reports Page 1 11/09/2023
Introduction
This guide demonstrates how to use FTM to produce reports for coursework. Both the contents
and format can be customised to provide an effective way of visualising and communicating the
results of your research. Reports in FTM are produced in a similar way to charts. Remember to
open up the example FTM tree for Charles Rennie Mackintosh if you have trouble reading the
images below.
Basics 2
The starting point for producing reports is to select the “Publish” workspace.
Note the Collection tab is opened by default, as is “Charts” from the
Publication Types panel. Click on one of the Report types listed at the left to
see the options available (the example above shows Relationship Reports).
The reports available are shown in the Report panel. Single click on a report
to highlight it.
Details of the highlighted report are shown in these panels (4 & 5). The
highlighted report can be created by clicking on the “Create Report” button, or
1
1
1
4
1
2
3
1
2
3
1
5
1
5
1
4
1

Step by step guide - reports Page 2 11/09/2023
by double clicking on a report name in the Report panel, or by clicking on the
“Detail” tab.
The reports most frequently required for coursework are:
Genealogy Reports:
Ahnentafel Report (a.k.a. an Ancestor Report)
Descendant Report
Relationship Reports:
Family Group Sheet
Outline Descendant Report
Source Reports:
Source Usage Report
Other reports may be helpful in the process of researching and checking coursework, but you will
not be asked to submit any of those. Examples include the Data Errors Report (in Person Reports)
and the Undocumented Facts Report (in Source Reports).
Creating Reports
We are going to create a Family Group Sheet report to demonstrate the options available in FTM.
So, select a Family Group Sheet as shown in step 4 above. You can click on the ‘Relationship
Reports’ publication type, then on the ‘Family Group Sheet’ option and then on ‘Create Report’.
You will get a screen like the one below.
We will look at each of these areas in a bit more detail.
1
2
3
6
5
4
Step by step guide - reports Page 3 11/09/2023
Report preview panel
This contains a view of the current report. Note that this can be sized by dragging the right-hand
margin to the left or right.
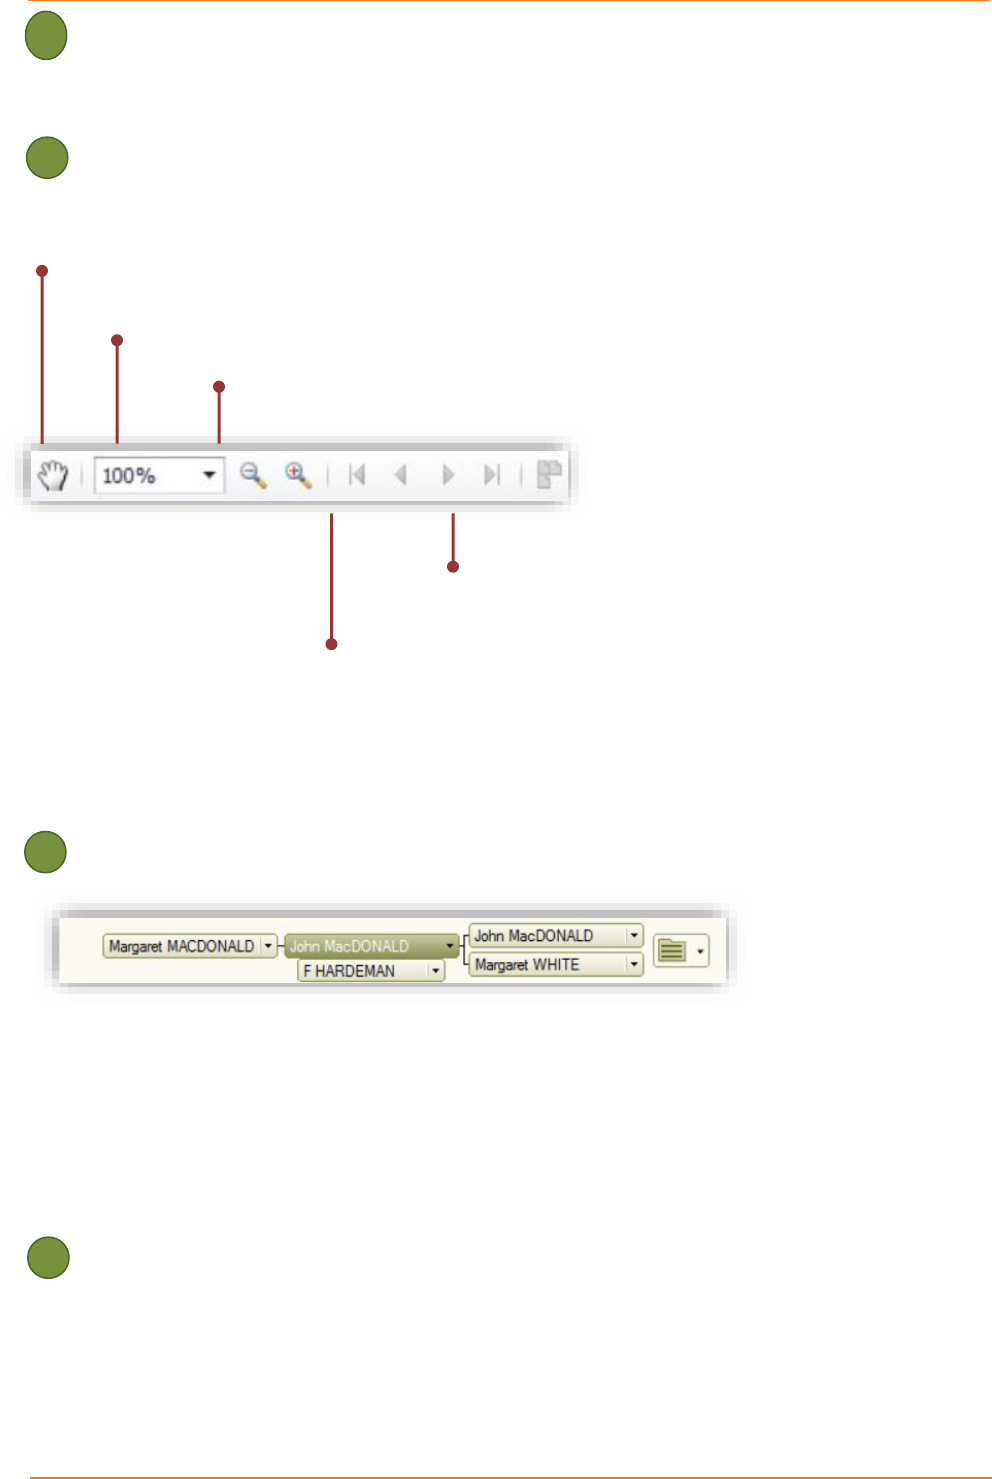
Report Preview Tools
Hand tool which if selected allows you to manually move the view of the report in the Preview
pane.
The zoom control provides a variable control of the level of zoom.
Zoom in and out (in 10% steps).
Multipage view – allows you to choose to display
multiple pages.
Page controls to change the report page displayed to the first,
previous, next, or last page.
The use of these controls only changes what is displayed on the screen, not the final output. We
will not dwell on them further here; they are straightforward.
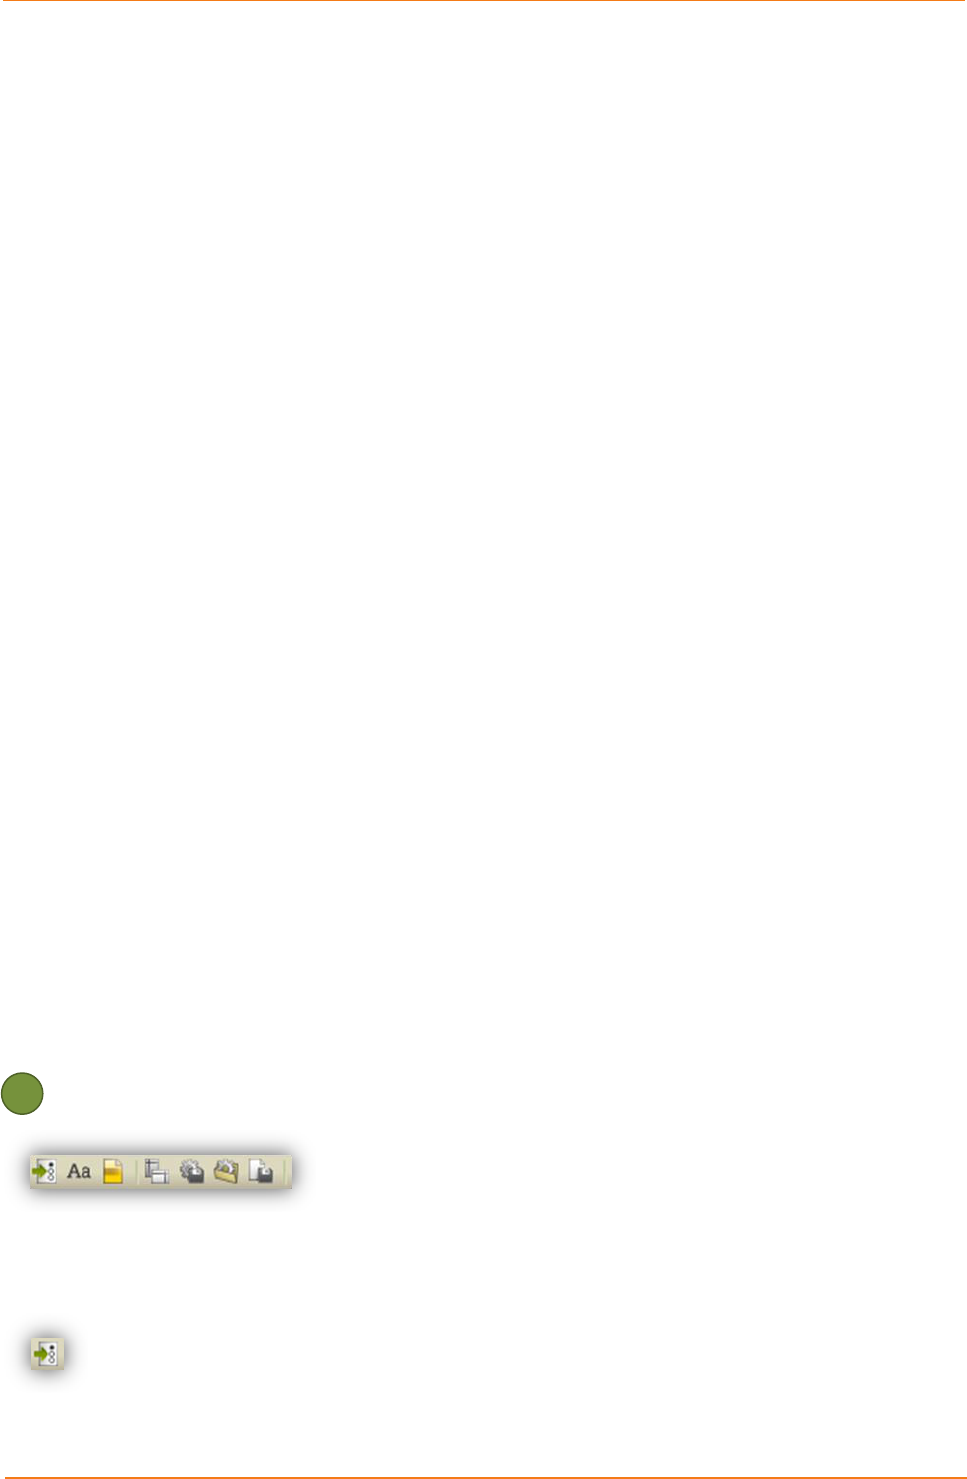
Pedigree Navigation Bar
The Pedigree Navigation Bar enables you quickly to find and select a person to be the subject of
the report. Click on persons on the right to go back along an ancestral line (i.e. earlier) or on the
left to move down a descendant line. To select a different child in the family, click the down arrow
by a person’s name to reveal a menu listing all their children. Click on the folder icon to show an
Index of Individuals to select a person from a different branch.
Report Options Panel
The Report Options panel provides controls affecting the appearance of the report. The controls
made available vary with the report being worked on. For example, the Family Group Sheet has
the ability to choose between different spouses. Some of the key controls provided on the reports
used for coursework include:
1
2
3
4

Step by step guide - reports Page 4 11/09/2023
• Spouse(s) (FGS): If the report subject has more than one marriage, you can select which
spouse will be the focus in the report.
• Background & Pictures (FGS, Ahnentafel, Descendant, Source Usage): We recommend
that you do not add backgrounds or pictures when presenting your coursework.
• Extra Children (FGS): Insert additional blank spaces for children whose details haven’t
been recorded. Perhaps useful during the research process but should not be used when
presenting coursework. If you are aware of additional children, but do not know their
names, then use () as the name and include them.
• Include other spouse(s) (FGS): Includes a field for each person in the report who was
married more than once showing the name of each spouse.
• Include section dividers (FGS): Inserts additional lines in the report. Generally
unnecessary.
• Include LDS section (FGS): Includes LDS data for each individual. We do not require this
for coursework.
• Show blended families (FGS): Includes step children of the primary person. Each child is
shown with an icon indicating whether they are a child of the father (blue man icon) or the
mother (green woman icon), or both if appropriate!
• Generations (Ahnentafel, Descendant, Outline): Enables you to choose how many
generations are shown in a report. Make sure this is not set too low, otherwise your
research may not be output and thus not seen.
• Show a divider between individuals/sources (Ahnentafel, Source Usage): Inserts lines
between individuals.
• List non-vital facts separately box (Ahnentafel, Descendant): Shows non-vital facts
beneath the vital facts in a bulleted list format – we strongly encourage you to tick this
box.
• Include parent/child relationship types (Ahnentafel, Descendant): This should, if checked,
include the relationship of a child to its parents (e.g. John SMITH, son of John SMITH and
Mary JONES). In practice, it just seems to turn parentheses on or off around the
relationship.
• Exclude children (Ahnentafel): Check this to exclude the list of children for each couple in
the report. Can be useful in some circumstances but beware of this resulting in your
research not being shown. Generally best left unchecked, unless otherwise requested.
• Generation indicators (Descendant): Determines how generations are indicated in the
report. This is best set to “simple” for coursework.
• Numbering system (Descendant): Determines the numbering system used in the report.
For coursework we use the register system.
• Descendants (Outline): This can be used to create a specific line of descent to the selected
individual. For coursework “All descendants” is appropriate.
Step by step guide - reports Page 5 11/09/2023
• Starting number (Outline): Shows the generation number of the first (subject) person. This
will usually be 1.
• Indentation (Outline): Controls the level of indentation and the character used. Default
settings are usually adequate. Beware having too high a level of indentation if you are
reporting on many generations!
• Space between individuals (Outline): A setting of 1 can help presentation.
• Include generation number (Outline): Turns generation numbers on or off. Generation
numbers should be included for coursework.
• Include spouses (Outline): If checked, this includes all spouses of each individual.
• Include (B-D) (Outline): Included birth and death year dates in parentheses for each
individual, in addition to the birth and death facts (if shown). Best avoided for coursework
as we prefer the detail!
• Individuals to include (Source Usage): Allows you to include immediate family, all or a
selection of individuals. This is best set to “All” for coursework.
• Show facts (Source Usage): Includes the facts derived from each source. Best checked.
• Show notes (Source Usage): Shows reference notes, if used. We do not encourage the
use of the notes space in sources for coursework, instead use the Fact Notes spaces (see
the Using FTM guide for more on this).
• Show citations (Source Usage): Includes source citations – this option should almost
always be checked for course work; we want to see them. This will generate a list of your
citations at the end of the report. To include citations on other types of reports, see the
‘items to include’ section of this guide.
• Include preparer information (all reports): Prints your contact data as a footer to the report.
This is not necessary for coursework.
The generate report button will update the report for all changes in settings. Some changes are
updated automatically, but not all.
Chart Detail Options
These small boxes provide further powerful options to customise the content and format of reports.
They are discussed in some detail below.
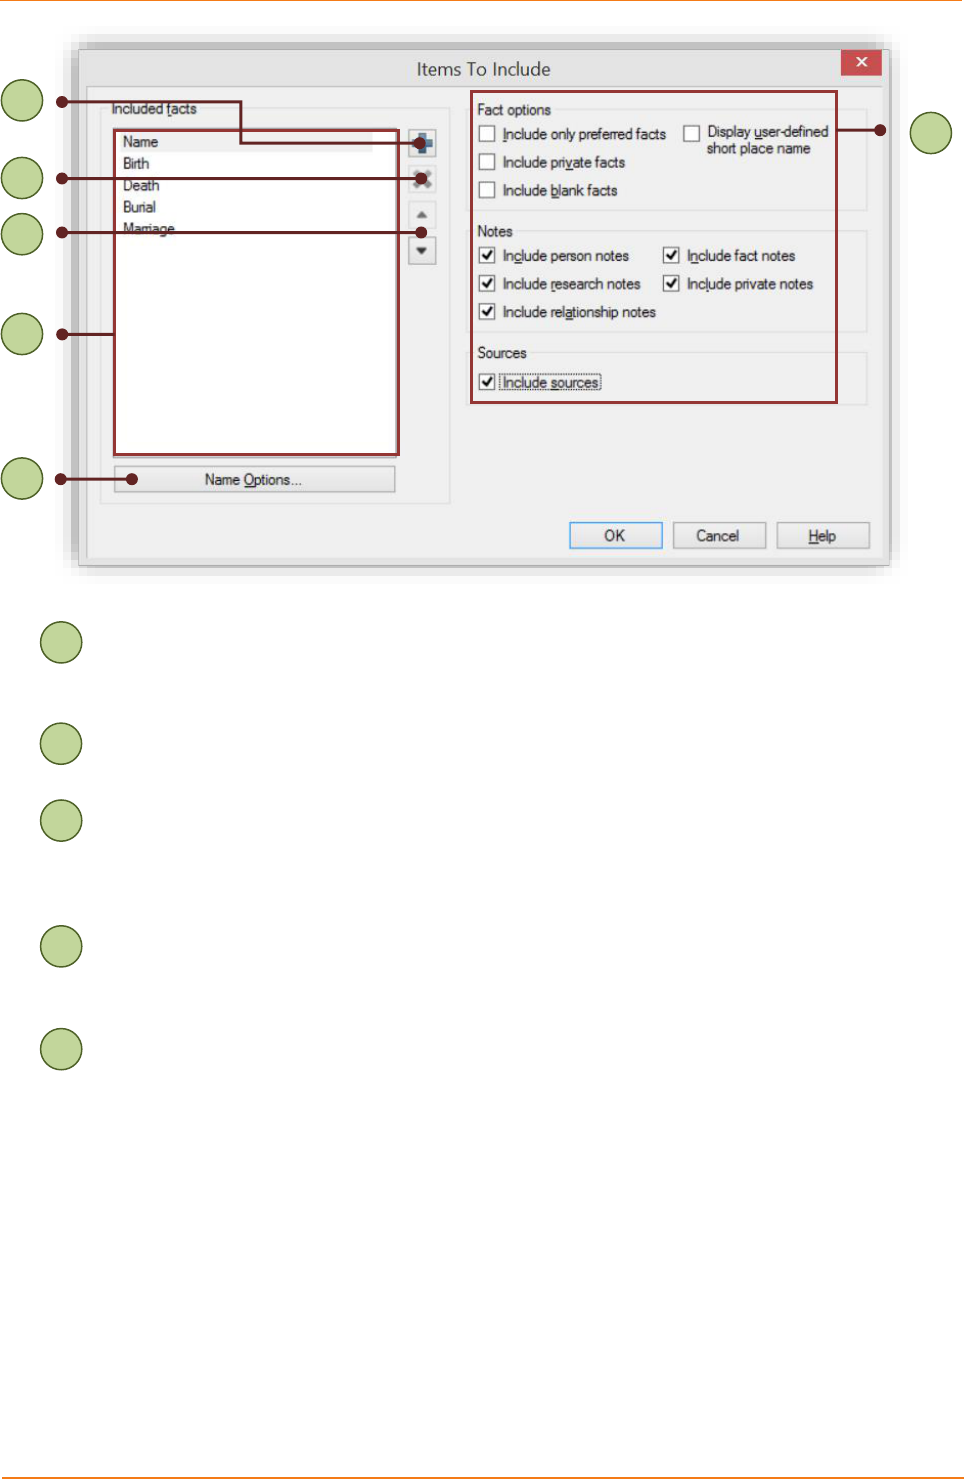
Items to include: Click on the icon to display the Items to Include window.
5
Step by step guide - reports Page 6 11/09/2023
The Included facts list provides a summary of all facts included in the current
report. The default fact or facts may vary. For a Family Group Sheet vital facts
are included.
Additional facts can be added by clicking on the add fact icon.
Remove fact – deletes the selected fact or facts from the Included facts list. To
select a range of facts, click on the first fact you want to select and hold shift &
click on the last fact, or to select several non-adjacent facts hold control & click
on the second and subsequent facts.
The direction arrows change the order of the selected fact in the list and the
order in which they appear in reports. However, some reports may insist on vital
facts preceding non-vital facts.
Name [or other selected fact] Options opens a dialogue box for the selected fact.
The precise contents vary for each fact, but in general this allows you to select
which fact fields are displayed (e.g. date, place and description), and whether
the fact has a label (e.g. Birth, b.). For example, the Birth fact option has the
following dialogue box.
2
3
1
4
5
6
1
2
4
1
3
1
5
1
Step by step guide - reports Page 7 11/09/2023
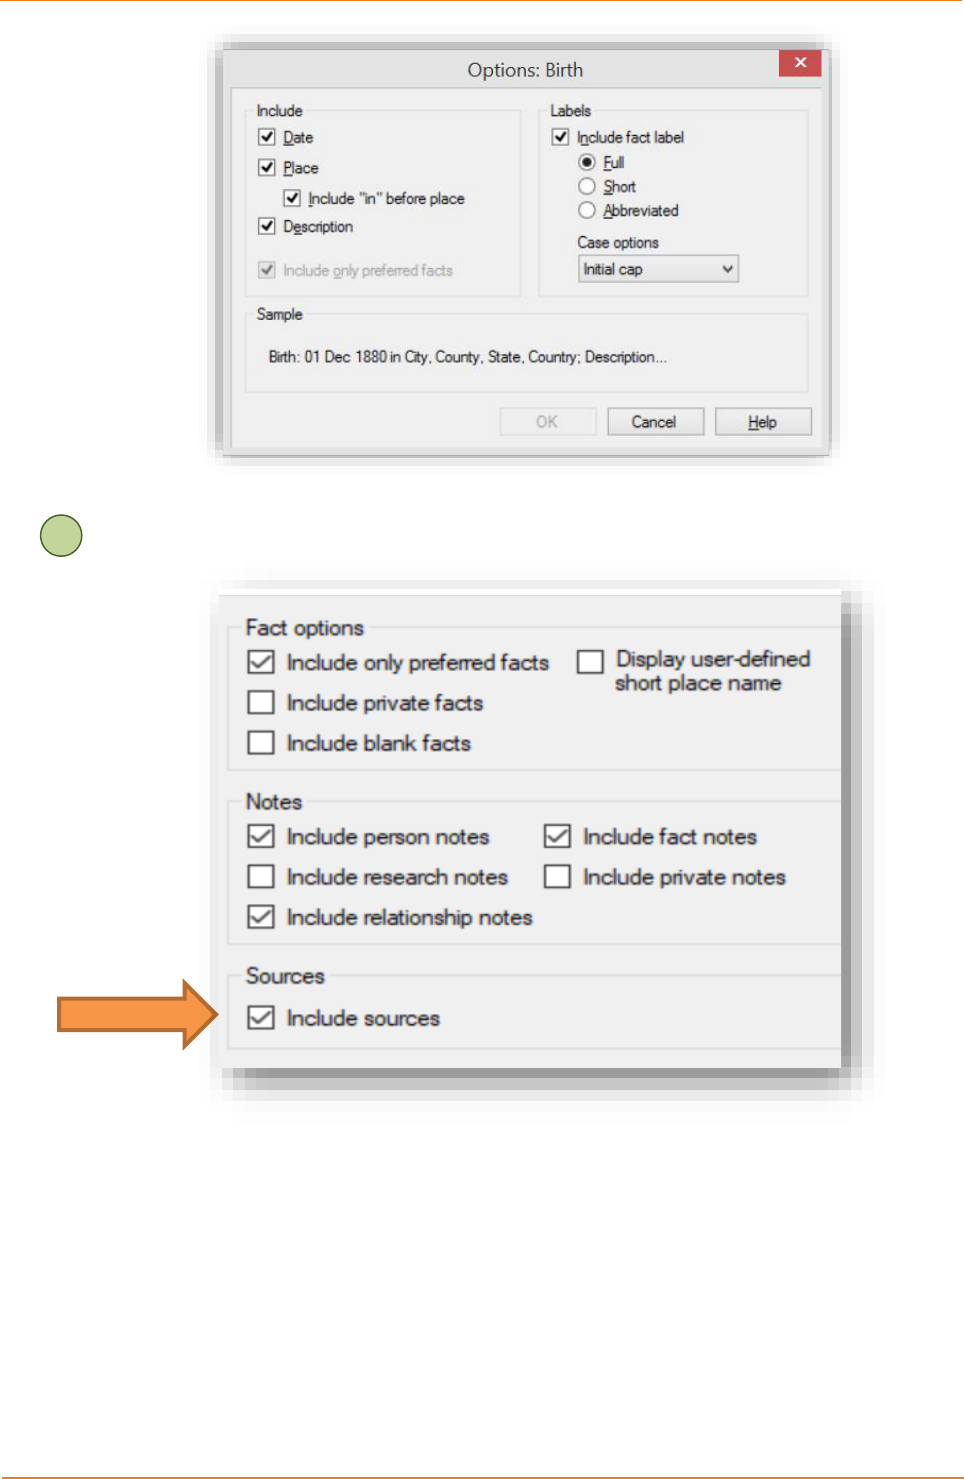
Fact options allow you to control the types of facts included or excluded in the
report
They are:
• Include only preferred facts: Sets a default setting for the report, though
this may be over-ridden by settings in the [selected fact] options. For
most reports provided in the course, we want you to provide all
fact, not just the preferred ones so untick this box.
• Display user-defined short place name: Not necessary for coursework.
• Include private facts: Private facts are unnecessary for coursework.
However, if used, this is where they can be included or excluded from a
report.
• Include blank facts: If ticked, this prints a heading for a fact that has no
6
1

Step by step guide - reports Page 8 11/09/2023
data. This can usually be left unchecked.
• Use specified order: Some reports have an option to “use specified
order” which lists facts in the order determined in the Included Facts list.
For reports created for the course, we ask that you use this option. There
is a bug in FTM which means that this option is not always acted upon by
the program.
• Include Notes and Sources: Be sure to tick these boxes as both
Notes and Sources (your references) should always be printed on
reports.
Fonts: Clicking on this icon opens the Fonts dialogue box. This can be used to
customise any text elements in the chart. Usually the default settings are adequate (Arial is our
usual preference for coursework).
Header/Footer: Tick the options to include page numbers and the date of printing in the
footer. Unfortunately, there is no option to include your name or the course assignment or
assessment number (unlike some charts).
Page setup: This opens a familiar dialogue box to control the paper size, orientation and
margins. Coursework should be submitted on A4 size documents.
Step by step guide - reports Page 9 11/09/2023
Save settings: This is a useful and timesaving technique. Once you have changed the
various report options you can save them as a template. If saved as a preferred template, the
settings will become the default for new reports, overwriting the previous settings. The create new
template option is a safer bet – this saves the settings to a new template file (ftmt) which is saved
in the Templates subfolder of the Family Tree Maker 2019 Program Files. If you produce complex
templates and work on more than one computer, just copy any template files you create into the
same folder on the other computer.
Note: saving settings is different to saving a report (see option below). This saves just the
formatting options, not the data to which they are applied. Name the template sensibly so that it is
clear from the name what the template is used for.
Use saved settings: This option allows the use of a template created with previous save
settings dialogue. It simply allows you to pick any template saved in the templates folder.
Save report: Click on this icon to save the current report (data and formatting). The
dialogue box provides a list of previously saved reports, which can be updated (overwritten) by
clicking on the name. Alternatively, if a new report, use or adapt the name suggested by FTM. It is
helpful if the name includes the type of report, name of subject and perhaps the course module it
relates to – so for example perhaps “A1 Family Group Sheet for JP MUDDOCK.”
Output Options
Print: Clicking on the Print icon will open a print dialogue box, similar to other
programs.
Share: Clicking on the share icon will reveal a menu with a number of options allowing
you to upload, send or export the current report. The export options are important and useful,
permitting you to save the report as a pdf file, a comma separated variable (csv) file, a rich text
format (rtf) file used for word-processing or as hypertext (html) used for web pages.
Files exported in pdf or rtf format can be inserted into other documents (see separate Step by Step
Guide). For coursework, we suggest that you choose the ‘Export as PDF’ option.
6

Step by step guide - reports Page 10 11/09/2023
We have focused on the Family Group Sheet just as an example. The process of using and
adapting other reports is very similar, although there are a few minor differences in the options
available.
Additional hints and tips for coursework
Reports are used to present your coursework to tutors. It is important that all relevant research
you have done is shown in the report. Smart use of notes will allow you to include commentary on
your research, qualitative assessment of facts discovered and your conclusions.
Generally, all facts you have discovered should be included, but this may depend on the precise
purpose of the report. The table on the following page suggests some usual settings for reports
created for coursework. This is only a suggestion, and there will be times during course and
client work when it is necessary or sensible to deviate from these suggestions.
As with other features of FTM, the best way of learning is through practice and experience. It is
strongly suggested that you spend some time becoming familiar with creating reports at an early
stage of the course.
Step by step guide - reports Page 11 11/09/2023
Recommended report settings:
Family Group
Sheet
Ahnentafel
Report
Descendant
Report
Outline
Descendant
Report
Source Usage
Report
General Settings
Report background
Pictures
na
na
Extra children
na
na
na
na
Include other spouse(s)
✓
na
na
na
na
Include section dividers
na
na
na
na
Include LDS section
na
na
na
na
Show blended families
na
na
na
na
Generations
na
*
1
*
1
*
1
na
Show a divider between individuals/sources
na
na
na
na
List non-vital facts separately
na
✓
✓
na
na
Include parent/child relationship types
na
✓
✓
na
na
Exclude children
na
na
na
na
Generation indicators
na
na
Simple
na
na
Numbering system
na
na
Register
na
na
Descendants
na
na
na
All
na
Starting number
na
na
na
1
na
Indentation
na
na
na
...
na
Space between individuals
na
na
na
1
na
Include generation number
na
na
na
✓
na
Include spouses
na
na
na
✓
na
Include (B-D)
na
na
na
na
Individuals to include
na
na
na
na
All
Show facts
na
na
na
na
✓
Show Notes
na
na
na
na
Show citations
na
na
na
na
✓
Include preparer information
Items to include
B,M,D
✓
✓
✓
✓
na
Baptism
As
req’d
As
req’d
As
req’d
As
req’d
na
Other facts
As
req’d
✓
✓
na
Include private facts
✓
✓
✓
✓
na
Include blank facts
na

Step by step guide - reports Page 12 11/09/2023
Include sources
✓
✓
✓
✓
na
Fonts
Default
Default
Default
Default
Default
Headers & Footers
*
2
*
2
*
2
*
2
*
2
Page Setup
Paper size
A4
A4
A4
A4
A4
Orientation
Portrait
Portrait
Portrait
Portrait
Portrait
Key:
✓ Check
Leave unchecked
na Not applicable
*
1
Normally, show all required generations (generally everyone you have researched).
Coursework may require you to choose a different number of generations.
*
2
Tick the options to include page numbers and the date of printing in the footer.
