
Word -
Mail Merge
IT Training
St. George’s, University
of London

Microsoft Word – Mail Merge
Contents
Understanding Mail Merge ............................................................................................................................. 2
Understanding The Mail Merge Process ........................................................................................................ 3
Creating A Recipient List................................................................................................................................ 4
Creating The Starting Document ................................................................................................................... 5
Starting The Mail Merge Wizard .................................................................................................................... 6
Selecting A Recipient List .............................................................................................................................. 7
Inserting Mail Merge Fields ............................................................................................................................ 8
Previewing The Merged Documents .............................................................................................................. 9
Completing The Merge................................................................................................................................. 10
Practice Exercise ......................................................................................................................................... 11
Practice Exercise Data ................................................................................................................................. 12
If you have a St. George’s username and password you can access all the files that goes with this
manual.
Files can be found in a folder on the N drive in the IT Training folder named:
Word - Mail Merge
H-lookup N:\IT Training\ Word - Mail Merge

Microsoft Word – Mail Merge
UNDERSTANDING MAIL MERGE
Mail Merge is a very handy feature in Word. It
allows you to send identical or very similar letters
to large volumes of people with ease. Instead of
having to type each address and name as you
go, Mail Merge inserts this information
automatically so all you have to do is print the
letters and put them in an envelope! You can also
create emails, envelopes, labels or a directory.
What Is Mail Merge?
The mail merge process is where you merge variable data (content that will change from document
to document) with consistent data (content that will be the same in each document). For example,
you may want to send an end-of-year letter to all members of staff at your workplace. The message in
each letter will be the same, wishing everyone the best for the coming year and thanking them for their
hard work. This end-of-year message is the consistent data because it will be the same in each
letter. The names and addresses of each staff member (or recipient) are the variable data because
no two letters will have exactly the same name and address.
Typing these letters individually would take quite a long time and would be a very boring and tedious
job!
How Does It Work?
For the mail merge to work, you must have two documents which are known in Word as the recipient
list (contains the variable data) and the starting document (contains the consistent data).
The recipient list comprises the contact details for each person who will receive the mail
merge document. This list must be set out in a table or some other tabular layout where each
recipient occupies a row in the table and each item of data, such as their title and first name, is
stored in separate columns in the table.
The starting document contains the content you want to send to the recipients. This
document is often a letter or an email. You can use an existing document, a Word mail merge
letter template, or even create a new document during the mail merge.
When you have finished merging the recipient list with the starting document, you will have created
your mail merge document which is the final, finished product.
Mail Merge Fields
As part of the mail merge process, you insert mail merge fields into
the starting document. These fields take information you specify and
add it to each letter so that you don’t have to manually type the
information into each letter. For instance, the Address Block is a
single mail merge field that combines several mail merge fields
including Title, First Name, Last Name, Company Name, Address and
so on. The Address Block gathers the information from your
recipient list. Additionally, the Greeting Line mail merge field lets you
determine how you wish to start each letter, such as ‘Dear Miss
Smith’ or ‘Hi Anne’ and then inserts the appropriate greeting line into
each letter based on the information you specified.
The Mail Merge Wizard
If you use the Step-by-Step Mail Merge Wizard (as we recommend)
to perform a mail merge, you’ll find the mail merge process really
easy. Once initiated, the Wizard opens the Mail Merge pane to the
right of the window (see the image to the right).
As the name suggests the Wizard takes you step-by-step through the
six steps of the Mail Merge process, explaining each step as you
come to it and prompting you to complete each task as necessary.

Microsoft Word – Mail Merge
UNDERSTANDING THE MAIL MERGE PROCESS
There are three main stages involved in the mail
merge process. Firstly you must have an existing
or create a new recipient list, then you must
have or create a starting document which you
will insert mail merge fields into. Finally you
merge the two documents together to create a mail
merge document that is ready to distribute.
Recipient List
Starting Document
Mail Merge Document

Microsoft Word – Mail Merge
CREATING A RECIPIENT LIST
Try This Yourself:
Before starting this
exercise open a new
blank document…
Click on the
INSERT tab,
then click on
Table in the
Tables
group to open the
Insert Table gallery
Select
Insert Table to
open the
Insert Table
dialog box
Type
7 in Number of
columns
then press
and type
6 in Number of
rows
Click on
[OK]
to insert the
table into your document
Type the text as shown
Click on the
FILE tab,
then click on
Save As to
open the Save As place
Ensure
Computer is
selected, then click on
[Browse]
to open the
Save As dialog box
Click on
(C:) drive and
navigate to
Course Files
for Microsoft Word 2013
Type
My Data Source in
File name
then click on
[Save]
to save the
document, then close the
document
1
3
To complete a mail merge you must have
access to, or create your own recipient list (or
mailing list). A recipient list contains contact
information such as the names and addresses of
those you wish to send your document to. This data
is merged with the content of your document so it’s
important this information is accurate. Here we will
create our recipient list in a Word document table.
5
For Your Reference…
To create a recipient list in Word:
1. Insert a table with the appropriate number of
columns (one per merge field) and rows (one
per recipient)
2. Add the relevant data
3. Save your document
Handy to Know…
If you have the contact details of your
recipients stored in an existing Excel
worksheet, you can use it as your recipient
list instead of creating a new one. You can
also use your Outlook contacts.
8

Microsoft Word – Mail Merge
CREATING THE STARTING DOCUMENT
Try This Yourself:
Before starting this exercise
open a new blank
document…
Type the first paragraph as
shown then press
Type the second paragraph
as shown
Press twice and type
Yours sincerely,
This doesn’t look much like
a letter yet but it’s important
to remember the missing
parts, such as the name of
the addressee, are mail
merge fields and will be
added from the data in our
recipient list…
Click on the
FILE tab, then
click on
Save As to open
the Save As place
Ensure
Computer is
selected in the middle
pane, then click on
[Browse]
to open the
Save
As dialog box
Open the
(C:) drive, then
navigate to
Course Files
for Microsoft Word 2013
and save your document as
My Letter.docx
Close the document
1
During the first step of the mail merge process
you need to produce the starting document.
Depending on the type of document you want to
create, you may find it easier to quickly type one
during the mail merge process or you could use an
existing document instead. Generally more
complex documents such as certificates and the
like will need to be created beforehand.
2
3
For Your Reference…
To create the starting document:
1. Type the content of your document
2. Save the document
Handy to Know…
Instead of typing a document, saving it and
then reopening it when you start the Wizard,
it is possible to create a document as part of
the mail merge process. Simply open a
blank document, start the Mail Merge Wizard
and begin typing!

Microsoft Word – Mail Merge
STARTING THE MAIL MERGE WIZARD
1
Try This Yourself:
Before starting this exercise
ensure you open a new blank
document…
Click on the
MAILINGS tab, then
click on
Start Mail Merge to open
a menu of options
Select
Step-by-Step Mail Merge
Wizard
to open the Mail Merge
pane
Click on each option under
Select
document type
to see a brief
description of it under the second
heading
As our starting document is a
letter, we must select ‘Letters’…
Ensure
Letters is selected, then
click on
Next: Starting document
at the bottom of the pane to go to
Step 2 of 6
Select
Start from existing
document
under Select starting
document
We could have kept the file
created in the last exercise open
and selected Use the current
document, but this way you see
how to use an existing document…
Click on
[Open] under Start from
existing
to display the Open
dialog box
Navigate to and select W1323 Mail
Merge Letter.
docx, click on
[Open]
to open it, then leave it
open for the next exercise
2
For Your Reference…
To start the Mail Merge Wizard:
1. Click on the MAILINGS tab, then click on
Start Mail Merge
2. Select Step-by-Step Mail Merge Wizard
3. Follow the steps
There are two ways you can conduct a mail
merge using the merge tools in Word. You can
use the individual commands on the MAILINGS
tab of the ribbon or you can use the Step-by-
Step Mail Merge Wizard. The Wizard is by far the
easiest and quickest method as it guides you
through each step of the merge process so you
always know what you need to do at each point.
Handy to Know…
You can move and resize the Mail Merge
pane quickly and easily by using the drop
arrow to the right of the title. If you select
Move from the menu, your pointer becomes
a four-headed arrow. You can then move the
pane by pointing wherever you like and
clicking to anchor it in its new location.
4
5

Microsoft Word – Mail Merge
SELECTING A RECIPIENT LIST
The recipient list is vital to performing a mail
merge as without it you would not be able to
complete the merge. The Wizard gives you the
option of using an existing list, selecting from
your list of Outlook contacts or typing a new list. If
you want to use an existing list you can either
choose to use a document that was created in
Word or in another application such as Excel.
Try This Yourself:
Same
File
Continue using the previous file
with this exercise or open
W1323 Mail Merge
Letter.docx…
In the
Mail Merge
pane, ensure
Step 2 of 6
is completed then
click on
Next: Select
recipients to go to Step 3 of 6
Ensure
Use an existing list is
selected
under Select
recipients
Click on
[Browse] under Use
an existing list
to open the
Select Data Source dialog box
Navigate to
(C:)
drive then click
on Course Files for Microsoft
Word 2013
Click on
W1323 Mail Merge
Data.docx
then click on
[Open]
to open the
Mail Merge
Recipients dialog box
Click on
[OK] to confirm that
this is the correct mailing list
and it is in the desired format
Notice the file path of your
recipient list now appears
under Use an existing list and
you have the option to Select a
different list or Edit the recipient
list…
In the
Mail Merge pane, click
on
Next: Write your letter to
go to Step 4 of 6
1
5
For Your Reference…
To select an existing recipient list:
1. Proceed to step 3 of the Mail Merge Wizard,
then ensure Use an existing list is selected
2. Click on Browse and navigate to the folder
containing the data source
3. Double-click on the data source file, select
the recipients, then click on [OK]
Handy to Know…
To remove individual records (recipients)
from the recipient list, click on Edit recipient
list in the Mail Merge pane at step 3 to
display the Mail Merge Recipients dialog
box. Click on the tick box beside the required
recipient until it appears without a tick. Click
on
[OK]
.
6
Microsoft Word – Mail Merge
INSERTING MAIL MERGE FIELDS
Try This Yourself:
Same
File
You must continue using the
previous file with this exercise…
Ensure you are at
Step 4 of 6
in
the
Mail Merge pane
You can still add content to your
document. Let’s add our name
to the end of the letter…
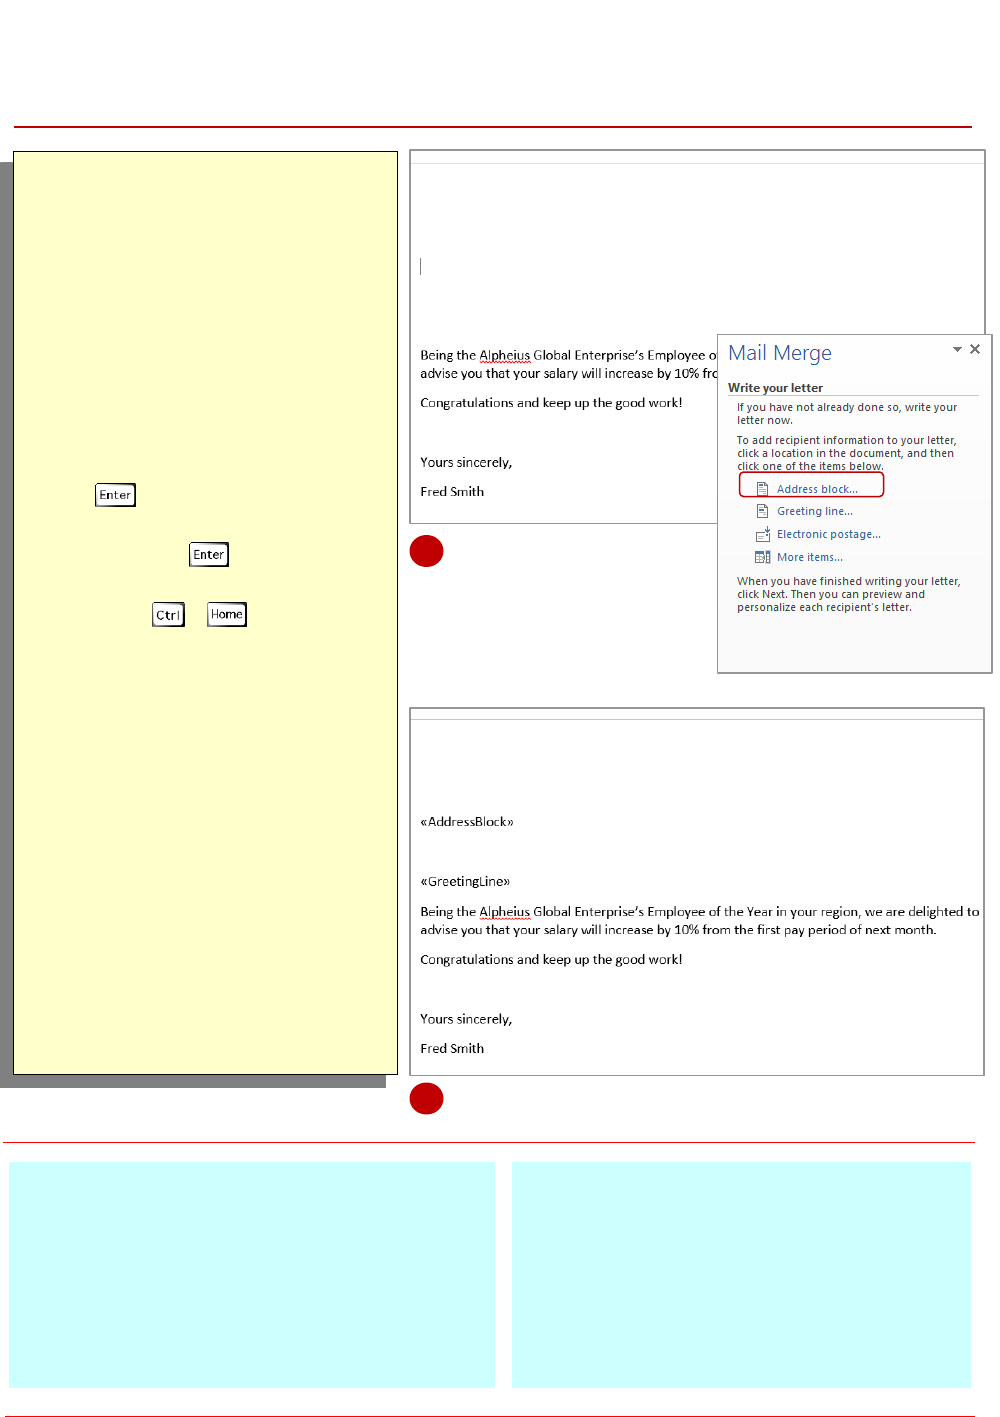
In the document, click at the
end of
Yours sincerely, press
and type your name
Click in front of the word
Being
and press three times to
move the paragraph down
Press +
to position the
insertion point at the start of the
document, then click on
Address block
in the Mail
Merge
pane to open the Insert
Address Block dialog box
Click on
[OK] to insert the
Address block
with the default
formatting at the insertion point
Click above the word
Being
and
click on
Greeting line in the
Mail Merge
pane to open the
Insert Greeting Line dialog box
Click on
[OK] to insert the
greeting line with the default
formatting at the insertion point
Leave this file open for the next
exercise
Once you’ve selected your starting document and
told the Wizard what file you want to use as your
data source, it’s time to decide where you want to
place your mail merge fields. These fields, such
as Address, First Name and Title can be placed
anywhere in your document by positioning your
insertion point and selecting the field you require in
the Mail Merge pane.
4
For Your Reference…
To insert merge fields into a document:
1. Proceed to step 4 of the Mail Merge Wizard
2. Position the insertion point for the address,
click on Address block and click on [OK]
3. Position the insertion point for the greeting
line, click on Greeting line, adjust the
settings as required and click on [OK]
Handy to Know…
When you are at Step 4 of 6 of the Wizard
there is an option called More items. If you
click on it, the Insert Merge Field displays. If
you had included additional information such
as the company name or phone number in
your recipient list, you could use More items
to add these fields to the Address block.
7

Microsoft Word – Mail Merge
PREVIEWING THE MERGED DOCUMENTS
Try This Yourself:
Sa
me
File
Continue using the previous
file with this exercise…
In the
Mail Merge pane,
click on
Next: Preview
your letters
to go to
Step 5
of 6
of the Wizard
Notice the Address block
and Greeting line have
been replaced with data
from your recipient list…
Click on the
next arrow
under Preview your letters
to preview each letter
Click on
Previous: Write
your letter
to return to step
4 of the Wizard
In the document, select the
«AddressBlock» field, click
on the
PAGE LAYOUT tab
then click on the down
spinner arrow for
After in
the
Paragraph
group until it
reaches
0
Let’s exclude Recipient 5...
In the
Mail Merge pane,
click on
Next: Preview
your letters
to return to
Step 5 of 6
Click on the
next
arrow until
Melissa Quinn’s
letter is
displayed, then click on
[Exclude this recipient]
Melissa Quinn is no longer
a recipient
1
For Your Reference…
To preview merged documents:
1. Proceed to step 5 of the Mail Merge Wizard
2. Click on Next and Previous recipient to
preview the merged document for each
recipient
Handy to Know…
To include a recipient in the Mail Merge, go
to Step 5: Preview your letters of the Mail
Merge Wizard and click on Edit recipient
list to open the Mail Merge Recipients
dialog box. Find the recipient and click in the
tick box that appears beside their name so
that it appears with a tick. Click on [OK].
The Mail Merge Wizard gives you the option of
previewing the merged documents to see how
they will appear when printed or distributed. At
this step you can check the merge process has
worked correctly, and if necessary, go back and
make any final adjustments to areas such as the
formatting and page layout. You can also select
recipients to exclude from the merge if desired.
4
5
Notice the spacing you applied to the Address block has been applied
to the data.

Microsoft Word – Mail Merge
COMPLETING THE MERGE
Try This Yourself:
Same
File
You must continue using the
previous file with this
exercise…
In the
Mail Merge
pane, click
on
Next: Complete the
merge to display Step 6 of 6
Click on
Edit individual
letters
to open the Merge to
New Document
dialog box
Let’s save all merged letters
as a new document...
Ensure
All is selected under
Merge records, then click on
[OK]
to create a new
document
Scroll through the document
Each letter is on a separate
page as you can see here…
Click on the
FILE tab, then
click on
Save As to open the
Save As place
Ensure
Computer is
selected then click on
[Browse]
to open the Save
As dialog box
Open the
(C:) drive then
navigate to
Course Files for
Microsoft Word 2013
and
save the document as
My
Merged Letters.docx
Close the document then
save and close the
Mail
Merge document
For Your Reference…
To merge the records:
1. Proceed to step 6 of the Mail Merge Wizard
2. Click on Edit individual letters to edit and
save the merged records, or
Click on Print to print the form letters
Handy to Know…
If you wish to print the merge document
without editing any of the individual letters,
click on Print in the Mail Merge pane. The
Merge to Printer dialog box will open which
lets you select which letters to print.
At the final step of the Mail Merge Wizard,
Completing the merge, Word will merge the
records (recipients) with the main document and
create a merge document for each record. At
this step you need to choose whether to merge the
records directly to the printer and print the letters,
or merge the records into a new document which
lets you edit individual letters if desired.
2
4

Microsoft Word – Mail Merge
PRACTICE EXERCISE
Performing A Mail Merge
Tasks:
Completed:
Before starting this exercise you MUST have completed all of the topics in
the chapter Performing A Mail Merge…
Using a blank document, create the recipients list as shown at sample
A
on
the next page and save it as PE_Data Source (Completed).docx
Using a blank document, start the mail merge wizard and create a letter
from the current page
Select the recipients list that you created at step
1
Write the letter using the details shown at sample
B on the next page
Note: You will have to reduce the Spacing After for all paragraphs to 0 pt
(PAGE LAYOUT tab)…
Preview the merged document, then complete the merge creating a new
merged document containing the four recipients’ letters
Use the
Save As command to save the merged document as
PE_Performing A Mail Merge (Completed).docx
Files required for
exercise:
None
Files/work created by
student:
PE_Data Source (Completed).docx
, PE_Performing A Mail Merge
(Completed).docx
Exercise Completed:

Microsoft Word – Mail Merge
PRACTICE EXERCISE DATA
Performing A Mail Merge
A
B
