
INSTRUCTIONS FOR PREPARING AND GIVING AN INJECTION OF ENBREL USING THE
ENBREL AUTO-INJECTOR
This section is divided into the following sub-sections:
Introduction
Step 1: Preparing for an Enbrel injection
Step 2: Choosing an injection site
Step 3: Injecting the Enbrel solution
Step 4: Disposing of the used Auto-injector
Introduction
The instructions below explain how to use the Auto-injector to inject Enbrel. Please read the instructions
carefully, and follow them step by step. Your doctor or nurse will tell you how to inject Enbrel. Do not
attempt to administer an injection until you are sure that you understand how to use the Auto-injector
properly. If you have questions about how to inject, please ask your doctor or nurse for help.
This injection should not be mixed with any other medicine.
Diagram 1.
The Enbrel Auto-injector
Step 1: Preparing for an Enbrel injection
1. Select a clean, well-lit, flat surface.
2. Gather the items that you will need for your injection, and place them on the chosen surface:
a. One Enbrel Auto-injector and one alcohol swab (take these from the carton of Auto-injectors you keep in
your refrigerator). Do not shake the Auto-injector.
b. One cotton ball or gauze
3. Check the expiry date (month/year) on the Auto-injector. If the date has passed, do not use the Auto-
injector and contact your doctor, nurse or pharmacist for assistance.
4. Inspect the solution in the Auto-injector by looking through the clear inspection window. The solution
should be clear to milky, colourless to yellow or pale brown, and may contain small white or almost
transparent particles. This appearance is normal for Enbrel. Do not use the solution if it is discoloured, cloudy
or if particles, other than those described above, are present. Instead, use a different Auto-injector. If you are
concerned with the appearance of the solution, contact your doctor, nurse or pharmacist for assistance.
5. Leave the white needle cap in place and wait 15-30 minutes to allow the Enbrel solution in the Auto-
injector to reach room temperature, then use it immediately. Do not warm in any other way. Always leave the
Auto-injector out of sight and reach of children.
Whilst waiting for the solution in the Auto-injector to reach room temperature, read Step 2 (below), and
choose an injection site.
Step 2: Choosing an injection site (see Diagram 2)
1. The recommended injection site is the middle of the front of either thigh. If you prefer, you may
alternatively use the stomach area, but make sure you choose a site at least 5 cm away from the belly

button (navel). If someone else is giving you the injection, the outer area of the upper arms may also
be used.
Diagram 2.
2. Each injection should be given at least 3 cm from where you last injected. Do not inject into tender, bruised
or hard skin. Avoid scars or stretch marks. (It may be helpful to keep notes on the location of the previous
injections.)
3. If you have psoriasis, you should try not to inject directly into any raised, thick, red, or scaly skin.
Step 3: Injecting the Enbrel solution
1. After waiting at least 15 minutes for the solution in the Auto-injector to warm to room temperature, wash
your hands with soap and water.
2. Clean the injection site with the alcohol swab using a circular motion, and allow it to dry. Do not touch this
area again before injecting.
3. When the skin has dried, pick up the Auto-injector, and remove the white needle cap by pulling it straight
off (see Diagram 3). To avoid damaging the needle inside the Auto-injector, do not bend the white needle cap
while you are removing it, and do not re-attach it once it has been removed. After removal of the needle cap,
you will see a purple needle safety shield extending slightly from the end of the Auto-injector. The needle will
remain protected inside the Auto-injector until the Auto-injector is activated. Do not use the Auto-injector if it
is dropped with the needle cap off.
Diagram 3.
White needle cap
Purple needle safety shield
4. Lightly pinching the skin around the injection site between the thumb and index finger of your free hand
may make the injection easier and more comfortable.
5. Without pressing the green activation
button on top of the Auto-injector, hold the Auto-injector at a
right angle (90º) to the injection site. Press the open end of the Auto-injector firmly against the skin so
that the needle safety shield is pushed completely inside the Auto-injector. A slight depression in the skin will
be seen (see Diagram 4). The Auto-injector can only be activated when the needle shield is completely
pushed inside the Auto-injector.
Diagram 4.
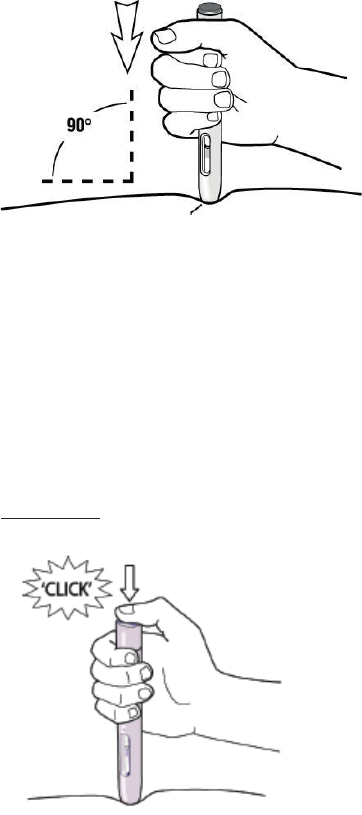
Needle safety shield disappears completely
inside the Auto-injector
6. Whilst pushing the Auto-injector firmly against the skin to ensure that the needle safety shield is fully
depressed inside the Auto-injector, press the centre of the green button on top of the Auto-injector with
your thumb to start the injection (see Diagram 5). On pressing the centre of the button, you will hear a click.
Continue to hold the Auto-injector firmly against your skin until you hear a second click, or until 10
seconds after the first click (whichever happens first).
Note –
If you are unable to depress the green button, or do not hear a click when you try to press the button
press the Auto-injector more firmly against your skin, then press the green button again.
Diagram 5.
7. On hearing the second ‘click’ (or, if you do not hear a second ‘click’, after 10 seconds have passed), your
injection will be complete (see Diagram 6). You may now lift the Auto-injector from your skin (see
Diagram 7). As you lift the Auto-injector, the purple needle safety shield will automatically extend to cover
the needle.

8. The Auto-injector inspection window should now be completely purple, confirming that the dose has been
injected correctly (see Diagram 8). If the window is not completely purple, contact your doctor, nurse or
pharmacist for assistance, since the Auto-injector may not have injected the Enbrel solution completely. Do
not try to use the Auto-injector again, and do not try to use another Auto-injector without agreement from
your doctor, nurse or pharmacist.
Diagram 8
9. If you notice a spot of blood at the injection site, you should press the cotton ball or gauze over the injection
site for 10 seconds. Do not rub the injection site.
Step 4: Disposing of the used Auto-injector
The Auto-injector should be used once only - it should never be re-used. Dispose of the used Auto-injector in
a Sharps container as instructed by your doctor, nurse or pharmacist. Do not attempt to recap the Auto-
injector.
If you have any questions, please talk to a doctor, nurse or pharmacist who is familiar with Enbrel.
Pzer Australia Pty Ltd, Sydney, Australia. ®Registered trademark. Pzer Medical Information: 1800 675 229. www.pzer.com.au
PP-ENB-AUS-1110. October 2023.
