
Form 1221-2
(June 1969)
UNITED STATES
DEPARTMENT OF THE INTERIOR
BUREAU OF LAND MANAGEMENT
MANUAL TRANSMITTAL SHEET
Release
1-1766
Date
03/09/2015
Subject
H-1297-1 Creating Section 508 Compliant Documents
1. Explanation of Material Transmitted: This handbook provides step-by-step instructions to
assist BLM employees in creating accessible documents compliant with Section 508 of the
Rehabilitation Act of 1973, as amended (29 U.S.C. 794d). Section 508 requires the federal
government to ensure that the electronic and information technology that it develops, procures,
maintains, or uses is accessible to persons with disabilities.
2. Reports Required: None.
3. Material Superseded: None.
4. Filing Instructions: File as directed below.
REMOVE INSERT
Total: 108 sheets
Janine Valesco
Assistant Director,
Business, Fiscal, and Information Resources Management
BLM Handbook Rel. No. 1-1766
03/09/2015
Handbook
for
Creating
Section 508
Compliant
Documents
This document contains basic recommended
guidelines for development of documents and PDF
files.
H-1297-1 Handbook for Creating Section 508 Compliant Documents (P)
i
BLM Handbook Rel. No. 1-1766
03/09/2015
Table of Contents
Table of Contents
............................................................................................................................ i
Chapter 1 - Introduction to 508 Compliance ............................................................................. 1-1
Chapter 2 - Microsoft Word Document Creation ...................................................................... 2-1
A. Font Group versus Style Group ................................................................................. 2-1
B. Tables ........................................................................................................................... 2-1
C. Lists ............................................................................................................................... 2-1
D. Fillable Forms .............................................................................................................. 2-1
E. Backgrounds, Fancy Borders, and Text Boxes ......................................................... 2-1
F. Symbols ........................................................................................................................ 2-2
G. Special Effects .............................................................................................................. 2-2
H. Additional “Do’s and Don’ts” .................................................................................... 2-2
Chapter 3 - Formatting your Document .................................................................................... 3-1
A. Styles ............................................................................................................................. 3-1
B. Headings ....................................................................................................................... 3-2
C. Create Your Own Style Set ........................................................................................ 3-3
D. Sharing Style Sets ........................................................................................................ 3-6
F. Table of Content .......................................................................................................... 3-7
G. Paragraph Formatting ................................................................................................ 3-7
H. Bullets and Numbered Lists ...................................................................................... 3-9
I. Captions ..................................................................................................................... 3-10
J. Automatic Footnotes ................................................................................................. 3-11
K. Headers and Footers ................................................................................................. 3-11
L. Page Numbering ........................................................................................................ 3-11
M. Avoiding Text Boxes ................................................................................................. 3-13
N. Placing Text in Shapes .............................................................................................. 3-14
O. Insert Images and Graphics ..................................................................................... 3-14
H-1297-1 Handbook for Creating Section 508 Compliant Documents (P)
ii
BLM Handbook Rel. No. 1-1766
03/09/2015
P. Alternate Text ............................................................................................................ 3-15
Q. Optimize Images and Graphics ................................................................................ 3-16
R. Grouping Images and Graphics ............................................................................... 3-18
S. Columns ..................................................................................................................... 3-19
T. Strong Contrast with the Background Color ......................................................... 3-20
V. Tables.......................................................................................................................... 3-22
X. Tables are Only for Tabular Data ........................................................................... 3-22
Y. Label the Columns .................................................................................................... 3-23
Z. Check for Merged or Split Cells in Heading Rows ................................................ 3-23
AA. Making a Table Look Like it has a Merged Cell .................................................... 3-24
BB. Other work-arounds for Merged and Split Cell “Looks” ..................................... 3-24
CC. Indicate the Header Rows......................................................................................... 3-25
DD. Restrict the Table Cells to a Single Page ................................................................. 3-25
EE. Attaching Alternative Text to a Table in MS Word .............................................. 3-25
FF. Providing Unique Hyperlink Labels ........................................................................ 3-26
GG. Forms .......................................................................................................................... 3-28
HH. Saving as a Template and Create Editable Regions ............................................... 3-29
Chapter 4 - Is Your Document Compliant? ............................................................................... 4-1
A. Check Your Document For Accessibility .................................................................. 4-1
B. Additional Information ............................................................................................... 4-1
C. MS Word 508 Checklist .............................................................................................. 4-3
Chapter 5 – PDF File Creation in MS Word ............................................................................. 5-1
A. Converting Your Documents to Accessible PDF files .............................................. 5-1
B. Convert Your Document to a PDF File ..................................................................... 5-1
Chapter 6 - Excel Document Creation ....................................................................................... 6-1
A. Set Document Language ............................................................................................. 6-1
B. Change the Default Language for a Workbook ....................................................... 6-1
C. Provide Text Alternatives for Images and Graphical Objects ................................ 6-1
D. Tips for Writing Alternative Text .............................................................................. 6-1
H-1297-1 Handbook for Creating Section 508 Compliant Documents (P)
iii
BLM Handbook Rel. No. 1-1766
03/09/2015
E. Tips for Writing Longer Descriptions ....................................................................... 6-1
F. Add Alternative Text to Images and Graphical Objects ........................................ 6-2
G. Format Your Cells ....................................................................................................... 6-2
H. Named Styles ................................................................................................................ 6-2
I. Format a Cell with Default Named Styles ................................................................ 6-2
J. Other Cell Characteristics .......................................................................................... 6-3
K. Define Cell Names ....................................................................................................... 6-3
L. Create Accessible Charts ............................................................................................ 6-3
M. Other Chart Considerations ....................................................................................... 6-4
N. Use Other Content Structuring Features .................................................................. 6-5
O. Avoid “Floating” Elements ......................................................................................... 6-5
P. Format of Text ............................................................................................................ 6-5
Q. To Change the Text Size for a Default Named Style ................................................ 6-5
R. Use Sufficient Contrast ............................................................................................... 6-6
S. Avoid Using Color Alone ............................................................................................ 6-6
T. Navigational Instructions ........................................................................................... 6-6
U. Accessibility Checker .................................................................................................. 6-6
V. To Evaluate PDF Accessibility in Adobe Acrobat Professional .............................. 6-7
W. Excel 508 Checklist ...................................................................................................... 6-8
Chapter 7 - Multimedia Creation ............................................................................................... 7-1
A. Multimedia 508 Checklist ........................................................................................... 7-1
Chapter 8 - PowerPoint Creation, Preparing Accessible Presentations ................................... 8-1
A. Create a New Presentation ......................................................................................... 8-1
B. Properties ..................................................................................................................... 8-1
C. Set Document Language ............................................................................................. 8-2
D. Create Accessible Templates ...................................................................................... 8-3
E. Slide Layouts ................................................................................................................ 8-4
F. Adding New Layouts and Placeholders .................................................................... 8-5
G. Use Built-In Layout and Styling Features................................................................. 8-6
H-1297-1 Handbook for Creating Section 508 Compliant Documents (P)
iv
BLM Handbook Rel. No. 1-1766
03/09/2015
H. Use Built-In Slide Layouts .......................................................................................... 8-6
I. Customize Using Master Slides ................................................................................. 8-6
J. Columns of Text .......................................................................................................... 8-6
K. Slide Design .................................................................................................................. 8-7
L. Fonts and Font Size ..................................................................................................... 8-8
M. Use of Color and Contrast .......................................................................................... 8-8
N. Set a Logical Tab Order ............................................................................................. 8-8
O. Tips for Setting a Logical “Tab Order” for "Floating" Objects ............................ 8-9
P. Use Slide Notes ........................................................................................................... 8-9
Q. Add Alternative Text to Images and Objects ......................................................... 8-10
R. How to Group Small Graphics/Images ................................................................... 8-12
S. Header Rows on Tables ............................................................................................ 8-12
T. Specify Colum Information in Tables ..................................................................... 8-13
U. Add alt text for Tables: ............................................................................................. 8-13
V. Avoid Using Blank Cells to Format Tables ............................................................. 8-14
W. Ensure that all Slides Have Unique Titles ............................................................... 8-14
X. Use Hyperlink Text that is Meaningful ................................................................... 8-14
Y. To Change the Text of a Hyplerink ......................................................................... 8-15
X. Include Closed Captions for any Audio or Video ................................................... 8-15
Y. Ensure that the Reading Order of Each Slide is Logical ....................................... 8-15
Z. Increase Visibility for Colorblind Viewers ............................................................. 8-16
AA. Animations and Transitions ..................................................................................... 8-16
BB. Convert PowerPoint to Other Formats ................................................................... 8-16
CC. PowerPoint 508 Checklist ......................................................................................... 8-18
Chapter 9 - PDF Checking and Problem Solving ...................................................................... 9-1
A. PDF Document Properties .......................................................................................... 9-1
B. 508 Compliance Check ............................................................................................... 9-1
C. Avoid Scanned Documents ......................................................................................... 9-3
D. Adding Tags to Your Document ................................................................................ 9-5
H-1297-1 Handbook for Creating Section 508 Compliant Documents (P)
v
BLM Handbook Rel. No. 1-1766
03/09/2015
E. Checking Your Document for Accessibility .............................................................. 9-6
F. Reflow .......................................................................................................................... 9-6
G. Read Aloud................................................................................................................... 9-6
H. Forms ............................................................................................................................ 9-7
Chapter 10 - Tips and Tricks on Correcting Errors in a PDF file ......................................... 10-1
A. Tables - Summaries Failed ....................................................................................... 10-1
B. Tables - Headers Failed ............................................................................................ 10-1
C. Regularity Failed ....................................................................................................... 10-1
D. Add New Tags to the Table ...................................................................................... 10-5
E. Touchup Reading Order in a PDF file .................................................................... 10-7
F. Using the Touch Up Reading Order Tool to Add Alternate Text ........................ 10-8
G. To Correct Reading Order ....................................................................................... 10-8
H. Correct Out of Order Tags ..................................................................................... 10-10
I. Setting Content to Background ............................................................................. 10-11
J. Changing Content Tags .......................................................................................... 10-11
K. List Errors ................................................................................................................ 10-11
L. Annotation Errors ................................................................................................... 10-13
M. Tagged Form Fields ................................................................................................ 10-13
N. Tab Order ................................................................................................................ 10-13
O. Encoding Errors ...................................................................................................... 10-13
P. Using the Acrobat XI Pro Accessibility Checker ................................................. 10-14
Appendix 1 - Font Index .......................................................................................................... A1-1
Appendix 2 - Symbol Shortcuts ............................................................................................... A2-1

H-1297-1 Handbook for Creating Section 508 Compliant Documents (P)
1-1
BLM Handbook Rel. No. 1-1766
03/09/2015
Chapter 1 - Introduction to 508 Compliance
Section 508 of the Rehabilitation Act of 1973 (Section 508) requires the federal government to
ensure that the electronic and information technology that it develops, procures, maintains, or
uses is accessible to persons with disabilities. Section 508 Standards are part of the Federal
Acquisition Regulation (FAR) and address access for people with physical, sensory, or
cognitive disabilities. They contain technical criteria specific to various types of technologies
and performance-based requirements, which focus on functional capabilities of covered
products. Specific criteria cover hardware, software applications and operating systems, web-
based information and applications, computers, telecommunications products, video and multi-
media, and self-contained closed products.
The BLM no longer prints many of its documents, but posts them to the internet. While
documents are now much more accessible, and it is a very cost effective and an environmentally
responsible way to distribute information, individual authors now assist in carrying out the
requirements to ensure Section 508 compliance. This handbook provides step-by-step
instructions to assist BLM employees in creating accessible documents compliant with Section
508.
Thanks to the National Wildfire Coordinating Group for all of their work on this document.
What is 508 Compliance?
508 Compliance is a web-based standard by which documents, video, multimedia, and
websites are developed to allow equal access to information for all individuals with sensory
impairments. Individuals with visual or hearing impairments can then use assistive
technology software to interpret the content and provide either screen captions or have the
content read out loud to the user.
Purpose
Section 508 requires that when any federal agencies develop, procure, maintain, or use
electronic information technology, any person with a disability has access to and use of
information, and data that is comparable to the access and use by federal employees who are
not individuals with disabilities.
How does this law impact my program?
All federal agencies are required to ensure that their websites and the contents are
compliant with Section 508 of the Act.
Video that appears on government websites must be captioned for the deaf and hard
of hearing.
PDF documents and forms on government websites must be accessible to blind and low
vision individuals, both government employees and the general public.

H-1297-1 Handbook for Creating Section 508 Compliant Documents (P)
2-1
BLM Handbook Rel. No. 1-1766
03/09/2015
Chapter 2 - Microsoft Word Document Creation
Please Read First
Following are some of the most common mistakes made when converting documents to
PDF. Avoid these mistakes to save time and frustration:
A. Font Group versus Style Group
Figure 1 - Home Tab Ribbon Bar
Avoid using the Font Group on the Home tab of the ribbon bar to change the font, size, color,
etc. The Styles group allows the document to maintain formatting required for Adobe Acrobat
to interpret the documents structure when converting to PDF. Styles also are instrumental in
developing the Table of Contents (TOC) which allows for easy navigation in MS Word and
Bookmarks in PDF. This is probably the most important step you will take in creating
accessible MS Word documents. If you use the Font window to change a Style it will break the
formatting. For more information visit Chapter 3A, “Styles.”
B. Tables
If constructed incorrectly, tables can be very time intensive to fix in PDF. Please read the
section on tables and learn the proper way to create them. For more information visit Chapter
3V, “Tables.”
C. Lists
Lists are also very time intensive to fix in PDF. Always use the Paragraph Group List
formats when creating bulleted or numerical lists. For more information visit Chapter 3H,
“Bullets and Numbered Lists”
D. Fillable Forms
The only way to create a 508 compliant fillable PDF form is to create the fillable areas in the
Adobe Acrobat PDF. Fillable areas created in other programs will not transfer when
converted to PDF. For more information visit Chapter 3GG, “Forms.”
E. Backgrounds, Fancy Borders, and Text Boxes
Backgrounds, fancy borders, and text boxes are visually appealing, but can cause many
difficulties when trying to create a 508 compliant PDF. When converted to PDF, backgrounds,
fancy borders, and often text boxes are read as images and text in text boxes will not read.
Anything read as an image will require alt text within the PDF or have to be converted to
H-1297-1 Handbook for Creating Section 508 Compliant Documents (P)
2-2
BLM Handbook Rel. No. 1-1766
03/09/2015
backgrounds. For more information visit Chapter 3M“Avoiding Text Boxes.”
F. Symbols
Special Characters using fonts such as Wingdings are likely to fail. They throw encoding
errors which are very hard to fix in PDF. Instead, on the Insert Tab use Symbols utilizing a
standard font, or Alt + Keys to create special characters such as check boxes, etc. If you get
encoding errors in your PDF, you’ve used the wrong type of characters. For more
information visit Appendix 2, “Symbol Shortcuts.”
G. Special Effects
Remove any drop shadows, glows, bevels, etc. from any text that is not inside a shape and that
will be converted to PDF for electronic web submission. Sorry.
H. Additional “Do’s and Don’ts”
Do
1. Include alternative text for all graphics/images. Summaries have to be done in the PDF as
they do not stay when documents are converted to PDF.
2. Include appropriate keywords, document titles, and subject under properties.
3. Number your pages using the automated ‘page numbers’ option. See “Page Numbering”
4. Use page breaks to start a new page instead of hitting return till you reach a new page.
Press Control + Enter.
5. Put periods or commas at the end of each list item. This may not be grammatically
correct, but assistive technology needs the period or comma to recognize and pause at
the end of a line of text. Otherwise, all list text would read in a continuous, non-stop
string.
6. Optimize and reduce graphic file size and dimensions in MS Word. See “Optimize
Images and Graphics.”
7. Use an Underscore or Dash between words in a filename, never spaces. Spaces show
up as %20 symbols when uploaded to a website.
Don’t
1. Write-protect the document.
2. Put any personal information in the document.
3. Use a period, slash, or other special characters (!, @, #, $, %, ^, &, *, etc.) when creating
filenames. Periods are reserved for file extensions and are automatically appended to the
end of a filename. Slashes indicate directory structure.
4. Underline text – it can make reading difficult for some.
5. Use all caps in body text.
H-1297-1 Handbook for Creating Section 508 Compliant Documents (P)
2-3
BLM Handbook Rel. No. 1-1766
03/09/2015
I. New Document Set-up
Document properties, also known as metadata, are details about a file that describe or identify
it. Document properties include details such as title, author name, subject, and keywords that
identify the document’s topic or contents.
This information can be viewed without opening the document and helps users decide
whether or not to open it. Properties are also important for documents that are posted on
websites. Search engines use this information to identify documents that users might want to
look at more closely.
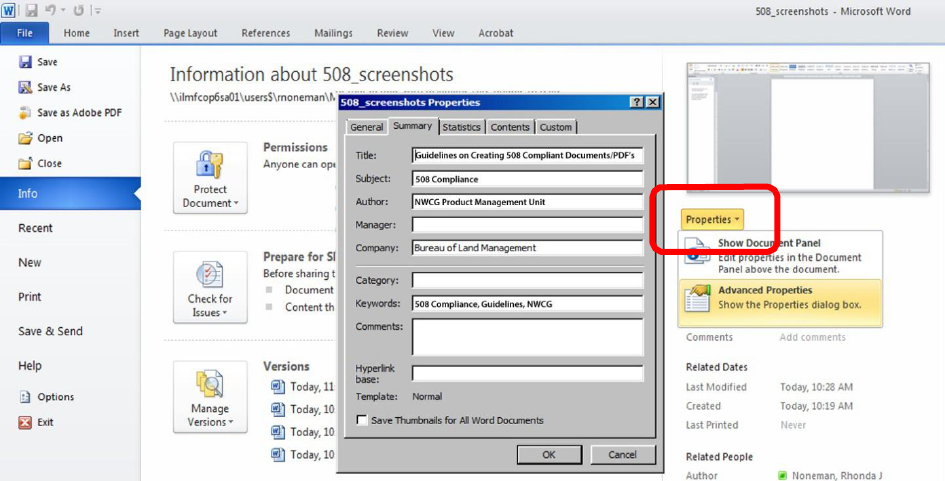
1. In MS Word 2010 open your document.
2. Click on FILE (new screen will appear).
3. On the right side click on word PROPERTIES
4. Click on ADVANCED PROPERTIES – Summary screen will appear.
Figure 2 - Properties Dialog Box
File: Displays the name of the file. Try to use short descriptive names with a date.
Title: Actual title of the document.
Subject: Brief identification of the subject of the document.
Author: Your Committee name.
Company: Branch name. Example: “National Wildfire Coordinating Group.”
Keywords: The keywords are associated with the document during a search and will
effectively rank the document for relevance. The closer the search words match your
keywords, the higher the document will be ranked in the search. When using multiple
keywords, separate them with a comma.
Be sure to choose words that are relevant to the content
H-1297-1 Handbook for Creating Section 508 Compliant Documents (P)
2-4
BLM Handbook Rel. No. 1-1766
03/09/2015
Set a default language for the document.
Select the File tab and then Options.
Select Language in the navigation panel. Be sure U.S. English is chosen as the
default language. If it isn’t, locate it in the drop-down menu and choose Add.
Select OK when you’re finished.
H-1297-1 Handbook for Section Creating 508 Compliant Documents (P)
3-1
BLM Handbook Rel. No. 1-1766
03/09/2015
Chapter 3 - Formatting your Document
Properly formatting your document is essential. It will help your document maintain a clean
and consistent look, save you time when editing, and be much more accessible.
A. Styles
Styles are so important to document creation that roughly half of that toolbar is taken up with
the styles. Styles not only affect the look of text, but they also embed hidden structure codes
which help screen readers to better navigate the document as well as create bookmarks for
PDFs.
Rather than changing font size, color, and font-face from the Font Group on the ribbon bar,
you need to use the built-in headings in the Styles Group – so that the structure of your
document becomes screen-readable and navigable.
In Word 2010, the Styles tools appear on the Home tab of the ribbon bar.
Ideally, you should have no more than 10 to 20 styles in use. The fewer the number of styles,
the cleaner your document is and the easier it is for Assistive Technology to understand the
document structure and hierarchy.
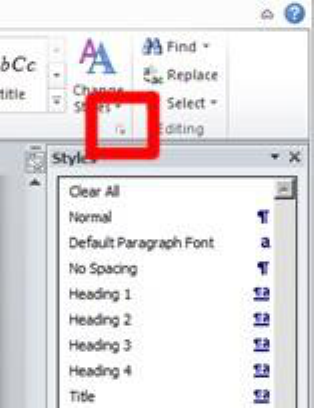
From the Styles Group, select the double down button at the bottom right corner or press
(ALT+ CTRL + SHIFT + S) to show the Styles window.
Figure 3 - Styles Group Button
1. From the bottom of the Styles window select OPTIONS to bring up the Style Pane
Option Window.
2. Go to the “select styles to show” drop down option and select “IN USE” to see the
current styles in use within the document. You can choose the default, or select another.
If you want to modify the Styles, you can save them as a new template for later use.
H-1297-1 Handbook for Section Creating 508 Compliant Documents (P)
3-2
BLM Handbook Rel. No. 1-1766
03/09/2015
*There is more information below for assistance creating your own Style Set.
More information on creating styles (paragraph styles such as text alignment or tabs) is
available on the Microsoft website at: http://office.microsoft.com/en-us/word-help/style-
basics-in-word- HA102647012.aspx.
B. Headings
A good heading structure is probably the most important accessibility consideration in most
Word documents. Headings will allow screen readers to navigate through the page easily and
will make the page more usable for everyone. Heading structure also provides the bookmark
formatting for PDFs.
Headings should be used to convey structural information about a document — indicating
main points and sub-points.
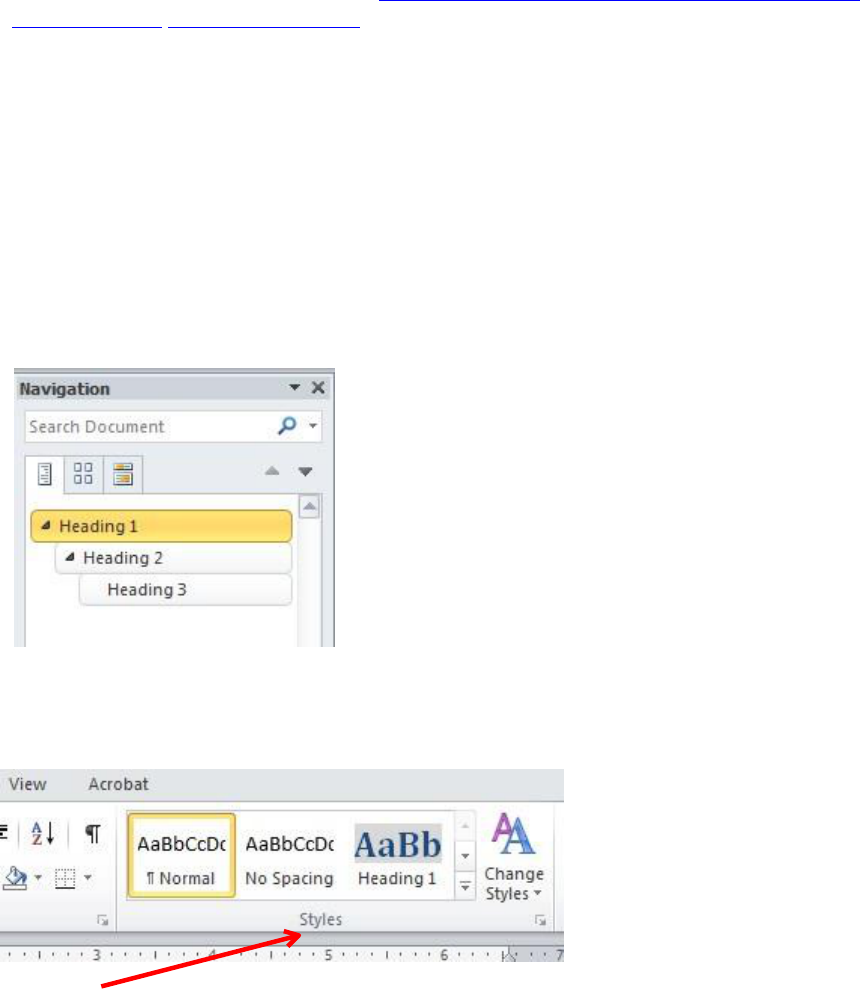
Figure 4 - Heading Hierarchy
Headings create the necessary hierarchy for navigation in both MS Word, and bookmarks in
PDFs. Try to use only three heading levels to keep the table of contents easy to navigate.
Figure 5 - "Built-in" Styles Panel Group
Use “built-in”, predefined styles to create titles, section headings, captions, etc.:
•
Title: used only for the document’s title page (to be used only on the cover, or at the
top of the document).
•
Heading 1: used for major headings in the document.
•
Heading 2: used for sub-headings of H1 in the document.
H-1297-1 Handbook for Section Creating 508 Compliant Documents (P)
3-3
BLM Handbook Rel. No. 1-1766
03/09/2015
•
Heading 3: used for sub-sub headings of H2 in the document.
•
The body of text in your document should use the style “Normal.”
•
Captions: use captions for figures and tables. It will automatically renumber
each element if you have to insert more at a later time.
If you want to change the appearance of a style, simply right-mouse-click on its name
and select MODIFY.
“Strong vs Bold” We previously said that you should not use the font group on the ribbon
bar to change font features. However, there are exceptions. Use Strong from the Styles panel
if you want a screen reader to pronounce STRONGLY a word ─ for example someone
yelling FIRE, and use bold when the word simply needs to visually be pronounced.
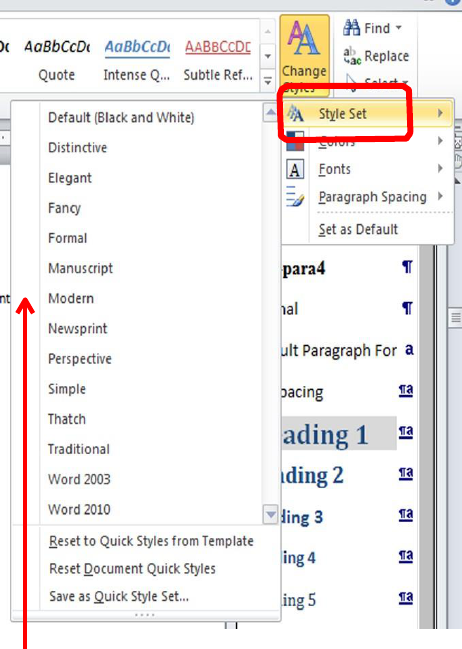
C. Create Your Own Style Set
You can create your own Style Set to be saved and used on other documents or shared
with others so documents maintain a consistent theme.
To set up or alter a Style Set:
1. From the Change Styles Group, select Style Sets.
Figure 6 - Style Sets drop down options

H-1297-1 Handbook for Section Creating 508 Compliant Documents (P)
3-4
BLM Handbook Rel. No. 1-1766
03/09/2015
2. From the fly out menu choose Default, or choose a style with elements that you like,
which you won’t have to edit much.
3. Use the double down arrows, or press ALT + CTRL + SHIFT to bring up the styles
pane.
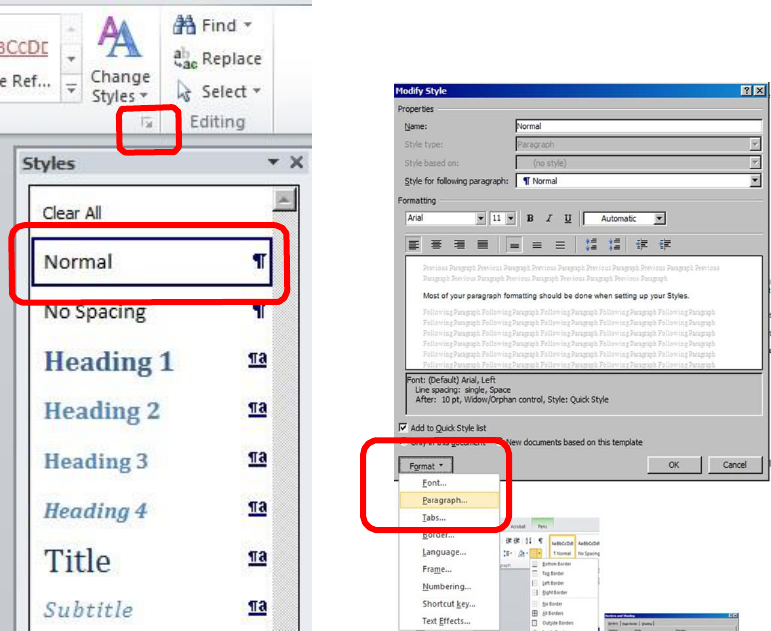
Figure 7 - Styles Pane
4. In the Styles Pane, change font, size, color, etc. by selecting a style element and using
the arrow down button or right clicking, and then select “Modify.”
5. If you don’t see a style in the panel (i.e.; caption, TOC, etc.), you can check to see if it
is hidden, or add a new style by selecting the appropriate button at the bottom of the
Styles Panel (new style, style inspector, or manage styles).

H-1297-1 Handbook for Section Creating 508 Compliant Documents (P)
3-5
BLM Handbook Rel. No. 1-1766
03/09/2015
Figure 8 - Styles Options Buttons
Note: It is suggested you limit your document to two fonts, and reserve one color for
headlines or text you want to bring special attention to. Too much variety can cause
the document to look busy and unprofessional, causing it to be hard to read.
H-1297-1 Handbook for Section Creating 508 Compliant Documents (P)
3-6
BLM Handbook Rel. No. 1-1766
03/09/2015
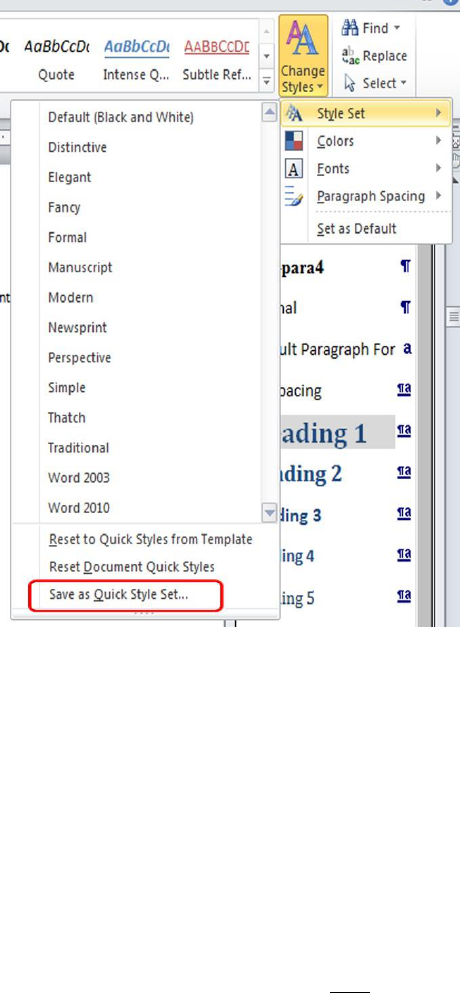
6. After you have made your style changes, click on the Change Styles button, highlight
Style Set, and choose Save as a Quick Style Set in the fly out menu.
Figure 9 - Save Quick Style Set Menu
7. Save with a new File Name that clearly identifies this new style set. You now have a
Style Set that you can use each time you open MS Word
DO NOT create a second set of headings or other elements in a Style Set. Acrobat will only
recognize one of each.
D. Sharing Style Sets
You can share a template of the document with your new style set and then upload to your
Google Drive or email to colleagues. They can then open the file and save the style as a
QuickStyle set that will be saved to their computer.
The Style set is saved to: C:/users/user name/Appdata/Roaming/Microsoft/Quickstyles.
To delete a Quickstyle Set go to: C:/Program files/Microsoft Office/Office14/1033/QuickStyles.
E. Recommended Fonts
Not all fonts are compatible with screen readers, and unfortunately, Section 508 of the
H-1297-1 Handbook for Section Creating 508 Compliant Documents (P)
3-7
BLM Handbook Rel. No. 1-1766
03/09/2015
Rehabilitation Act does not specify which fonts are compatible. As a general rule, Times New
Roman and Arial are two of the most common fonts with the greatest readability, and have the
greatest cross-platform compatibility with Microsoft, Macintosh, and UNIX based systems.
There is a list of Microsoft tested fonts at the end of this document.
For more information visit
Appendix 1,
“Font Index.”
F. Table of Content
Setting up the Table of Content (TOC) in MS Word is as simple as pushing one button.
TOC uses the Heading Styles to determine the content structure of your document. In fact,
Table of Contents, or TOC’s, are so simple and easy to update. NEVER again will you
manually type a TOC.
1. Go to the first page of your document and place your cursor on the line just under
the Title and before any paragraph text. You may have to create a hard return to
create a space to place your cursor.
2. Go to the Insert Tab and select Page Break.
3. Next go to the Reference tab and click on the Table of Contents button.
4. Select one of the preset styles.
5. Presto. You have a Table of Contents.
6. You can place your cursor right under the table of contents and add another page break
if you want your table of contents on its own page.
7. As you add new sections with headings to your document, you will want to place your
cursor in the TOC, go back to the Reference tab, select Update Table next to the TOC
button and select Update Entire Table. The updated table will have your new sections
as long as you used Headings Styles.
8. To alter the number of levels within your TOC, click on the Table of Contents button,
select Insert Table of Contents, and set the number desired.
9. Click Okay and say Yes when it asks you if you want to replace the current Table of
Contents.
10. DO NOT make manual changes to your TOC within your document or it will not work
afterwards. If you do, you will need to go to the Reference tab, click on table of
contents and Remove the TOC. You will then have to insert a new TOC following the
steps previously mentioned.
11. If you want the TOC to be seen in the navigation pane, use Heading 1. If not, use
TOC Heading found farther down in the Styles panel.
G. Paragraph Formatting
Paragraph formatting will help your document maintain the correct document structure. Using
the space bar instead of setting up the ”Indent Text” in paragraph styles, or using the tab key
instead of the “Center Text” option in the Paragraph Group are two very common mistakes that
can break Styles formatting and make updating a document very time consuming.
Paragraph formatting should be done when setting up your Styles from the Styles Group panel.
H-1297-1 Handbook for Section Creating 508 Compliant Documents (P)
3-8
BLM Handbook Rel. No. 1-1766
03/09/2015
Figure 10 - Styles Panel Formatting
1. Use the double down arrow to open the Styles panel.
2. Right click on the Style and choose “Modify.”
3. In the bottom left corner open Format and select Paragraph.
H-1297-1 Handbook for Section Creating 508 Compliant Documents (P)
3-9
BLM Handbook Rel. No. 1-1766
03/09/2015
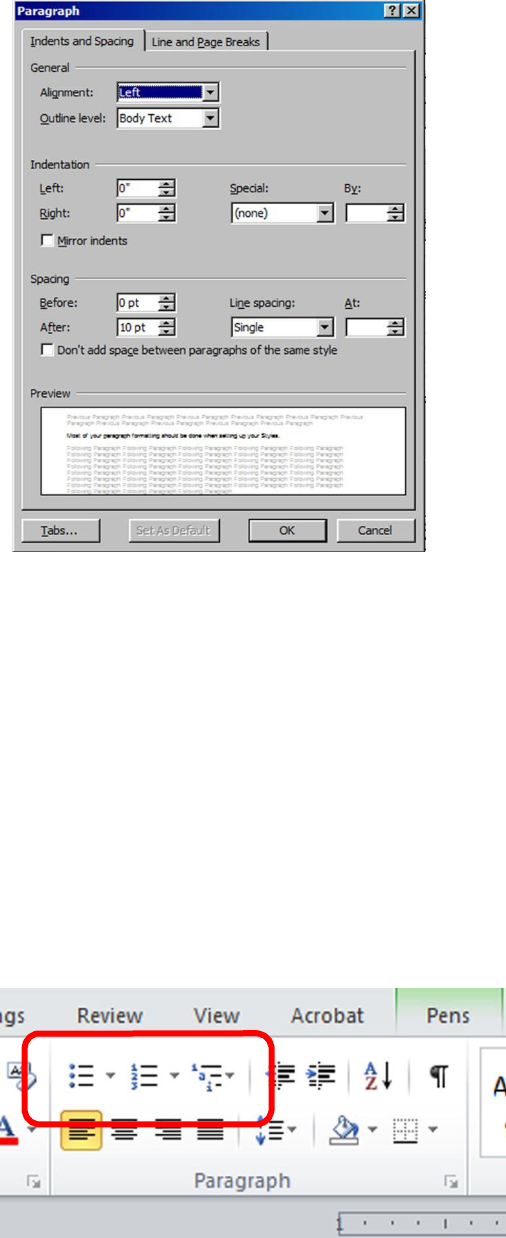
Figure 11 - Paragraph Formatting Window
4. Set your paragraph options in the paragraph window; indents, spacing before and after
paragraph, line spacing, alignment, etc.
H. Bullets and Numbered Lists
Avoid using graphical (or non-standard) bullets because they may not be recognized by
some Assistive Technology. For a document to be fully compliant with section 508, bullets
and numbers must be created automatically, not inserted manually:
1. From the Home tab, click the Bullets or Numbering icons in the Paragraph group.
2. If you are selecting a bullet, choose a bullet style from the drop-down list.
3. If you are selecting a number, choose a number style from the drop-down list.
4. The bullet or number will appear in the text as you type.
Figure 12 - Bullets and Numbered Lists Buttons
H-1297-1 Handbook for Section Creating 508 Compliant Documents (P)
3-10
BLM Handbook Rel. No. 1-1766
03/09/2015
Group items as numbered lists (if they are sequential) or bulleted (if they are related) so they
will be announced as lists by screen readers.
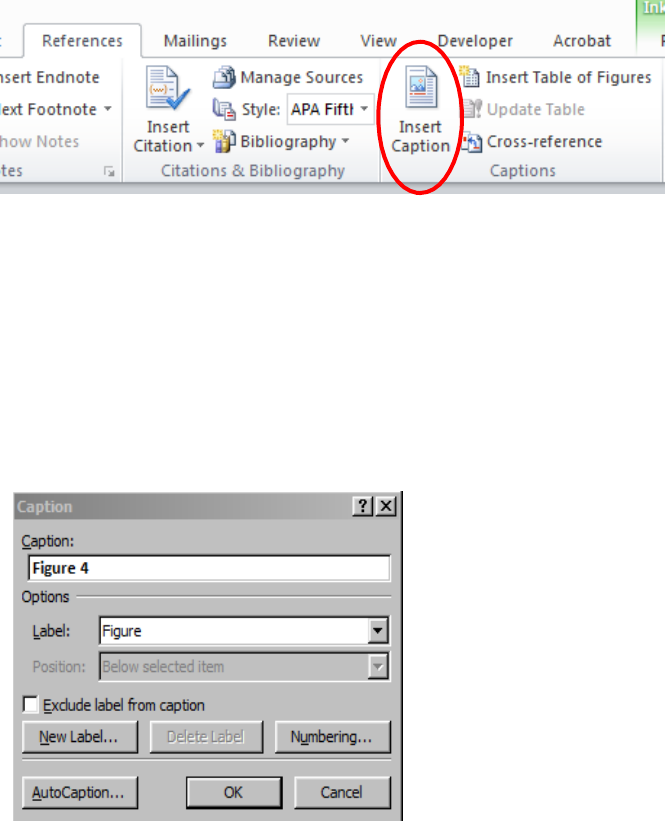
I. Captions
Use captions when inserting images or tables. If you need to insert more elements later on, it
will automatically renumber all other elements. We suggest inserting your caption above the
graphic or table so the user is aware of what will be read next.
Figure 13 - Insert
caption
1. You may either use menu bar References>Insert Caption or right click mouse “Insert
Caption.”
2. Under “Label” choose whether it is a figure or table.
3. Type a short description.
4. Create a new label style or set numbering preference. Example: Figure 1, or Figure
1.1 (chapter 1, section 1), Figure 2.1 (chapter 2, section 1), etc.
Figure 14 - Caption menu
H-1297-1 Handbook for Section Creating 508 Compliant Documents (P)
3-11
BLM Handbook Rel. No. 1-1766
03/09/2015
J. Automatic Footnotes
When creating a footnote, using automatic footnotes instead of typing them in manually will
make a document 508 compliant. You should number continuously if you are putting the notes
at the end of the document, by page if you will put your notes at the bottom of your page:
1. At the place in the text where the footnote is to appear, click Insert Footnote from the
Footnotes group on the References tab.
2. The footnote number will be added next to the text and the cursor will be placed at
the bottom of the page.
3. Type the footnote text next to the footnote number. When finished, click back on
the paragraph and continue typing.
K. Headers and Footers
Do not place vital content in the header or footer. Screen readers do not read content located
in the header or footer. Use the header or footer area for repetitious content such as page
numbers, document numbers, etc. – things that don’t need to be read for every page.
Insert a Header or Footer by going to Insert tab, Header & Footer and choose a style in the
drop down. Or simply double click at the top or bottom of a page. To leave the header and
footer area, double click in the main body of the document.
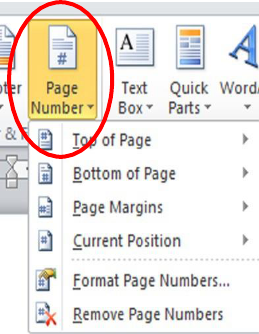
L. Page Numbering
There are two ways to insert Page Numbers, either directly on the page or in the footer area.
First, use the automatic Page Number found in the Header & Footer group under the Insert
tab, and place your number at the top or bottom of the page. Second, double click in the
Footer area and insert a Page Number from the Header and Footer Group. Both are correct.
Inserting the Page Number in a Footer keeps the page number from being read on every page.
We suggest placing your page numbers in the Footer.
Figure 15 - Page Number Drop-down Options
Start numbering on a different page
H-1297-1 Handbook for Section Creating 508 Compliant Documents (P)
3-12
BLM Handbook Rel. No. 1-1766
03/09/2015
If you will be using a title page and possibly a preface, you may want to start the numbering on
a different page. To start numbering on a different page, instead of on the first page of the
document, you need to add a section break before the page where you want the numbering to
begin.
1. Click at the beginning of the page where you want the numbering to begin.
2. You can press HOME to make sure that you're at the start of the page.
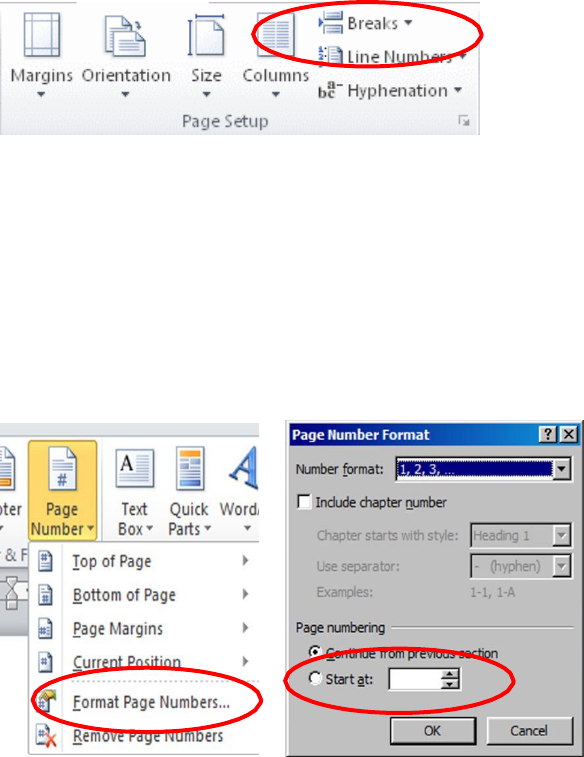
3. On the Page Layout tab, in the Page Setup group, click Breaks.
4. Under Section Breaks, click Next Page.
Figure 16 - Page Breaks
5. Double-click in the Footer area of the same page (near the bottom of the page).
6. This opens the Header & Footer Tools tab in the ribbon bar.
7. In the now visible Header & Footer Tools>Navigation group, click Link to Previous
to un-highlight, which turns it off.
8. With your cursor still in the Footer area, click on Page Number in the Header &
Footer group on the ribbon bar and add page number to bottom (footer area).
9. To start numbering with 1, click Page Number in the Header & Footer group, then
click Format Page Numbers, click Start at, and enter 1.
Figure 17 - Format Page Numbers
10. Double click in the body of your document leave the footer area, or click Close Header
and Footer on the Design tab (under Header & Footer Tools).
11. Note: you may need to manually delete numbers from pages prior to the page break if
your document already had numbers.
H-1297-1 Handbook for Section Creating 508 Compliant Documents (P)
3-13
BLM Handbook Rel. No. 1-1766
03/09/2015
M. Avoiding Text Boxes
Text boxes provide a means to add text to a document, and locate it anywhere on the page.
Unfortunately, text boxes work more like images than text. Because of this, text boxes only
show up in the 'print layout' view, and Screen Reading technology is unable to access the
information in a text box.
Instead of using text boxes, style formatting can be used to locate the text in the desired area
on the page. Style (paragraph-level) formatting may take a few more steps to achieve than
using text-boxes, but style formatting is much more accessible for Screen Readers.
Text Boxes Alternatives
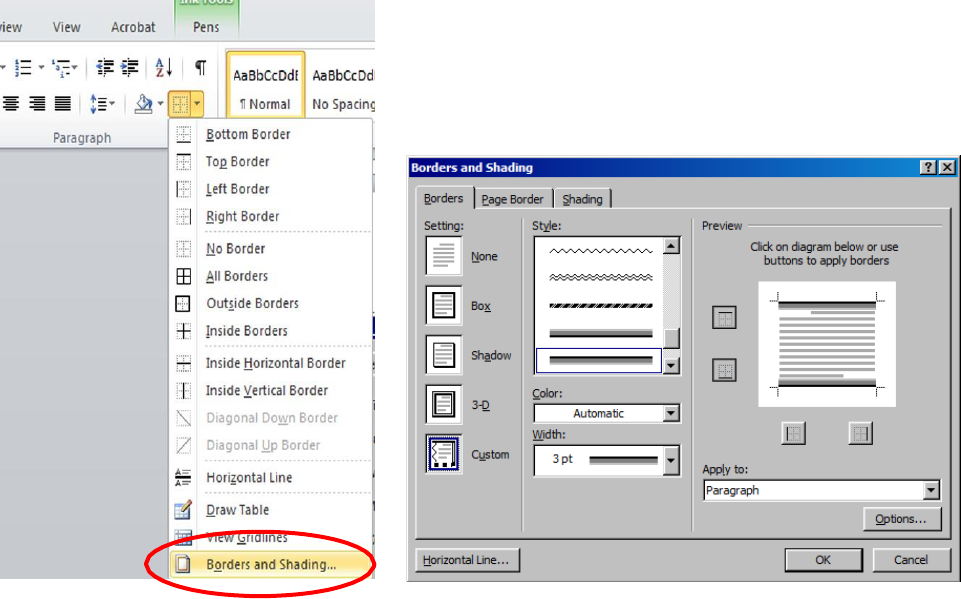
In-Line text, using borders (simply a paragraph of text with borders around it), is another
alternative to text boxes. However, use ONLY solid borders as several of the fancy borders
will throw 508 compliancy errors.
1. From the Home Tab, open Borders and Shading.
Figure 18 - Borders and Shading
2. Set the style of a solid line you want (dashed lines will throw errors). Use shading to
make it really stand out.
3. Use the Margins to set indents, left or right, to give the appearance of a call out text box.
H-1297-1 Handbook for Section Creating 508 Compliant Documents (P)
3-14
BLM Handbook Rel. No. 1-1766
03/09/2015
Figure 19 - Alternative Text Boxes
Figure 20 - Set Margins
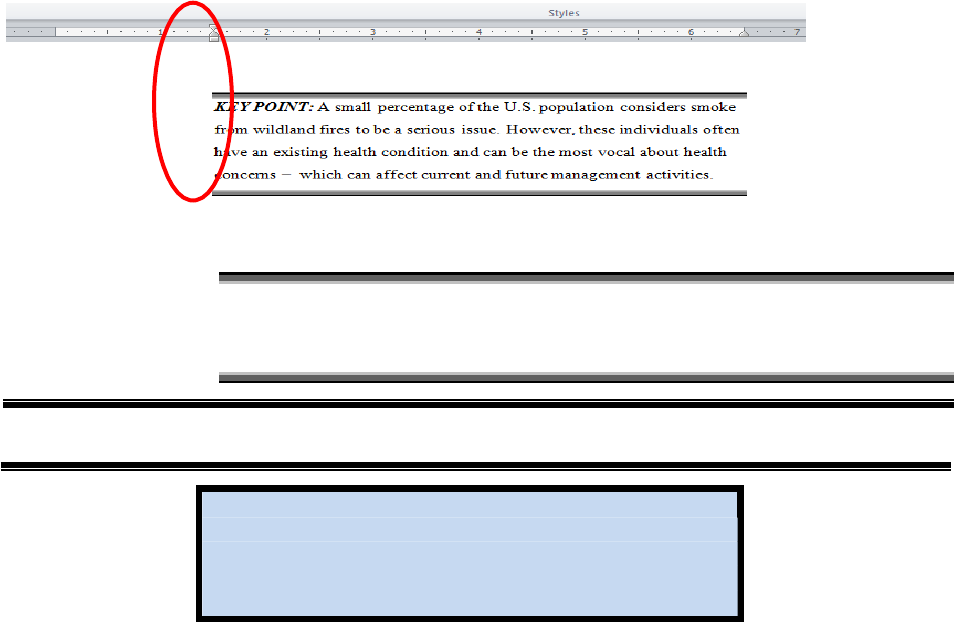
KEY POINT: Here is text set with a fancy border above and below. You
can adjust line and paragraph spacing to create greater impact, as well.
This paragraph also has its left margin set to 1.5” to offset the look.
KEY POINT
:
The text has been set to Copperplate gothic to give even greater visual impact, with
line spacing adjusted to 1.5. A fancy border adds flair.
KEY POINT
:
this looks very much like a text box
by setting the border to all four sides and giving it
a colored background. The margins have been set
to 1.5” left, and 1.5” right to create a centered box.
Another alternative to text boxes is to insert a picture, “Wrap” text, and add alternative text
(Alt text). This will allow a screen reader to “see” the picture and communicate the content
and continue on with the text.
Do not use a text box to insert a picture or graphic.
N. Placing Text in Shapes
Using shapes can provide you with a little more creative flexibility. Because a shape does
not use formatted paragraph text, and is not associated with a style, you can use the font
group to customize the font, AND you can add Text Effects as long as your text is in a
shape! A shape looks like a text box, but doesn’t act like one. However, you will have to set
the Wrap, add Alt Text, and fix the reading order when saved to PDF just like images.
O. Insert Images and Graphics
While images and graphics will always need to be double checked for reading order after
saving to PDF, they have a better chance of maintaining the format when converted if “Wrap
in-line with text” is used.
To “Wrap In-Line”:

H-1297-1 Handbook for Section Creating 508 Compliant Documents (P)
3-15
BLM Handbook Rel. No. 1-1766
03/09/2015
1. Insert image or graphic.
2. Right click image or graphic and select “Wrap in-line with text”.
Figure 21 - Wrap In-Line with Text
P. Alt Text
All photos, images, charts, diagrams, and other graphics which convey information must
have an embedded alternate text label. This allows users who cannot see the image to
understand what they are missing from the document. It is important that each image have a
unique description in the alternative text label – even if the same image is used in more than
one location in a document.
Without alternative text, screen readers say “picture” for each image. If you have several
images in a row, the screen reader says “picture, picture, picture, picture, picture …” – which
can be frustrating (not knowing what information is missing).
Any complex images, charts, tables, or other complex items should have a text-caption prior
to the item which explains what ideas the item is meant to communicate. The caption should
communicate the ideas rather than a spatial narrative.
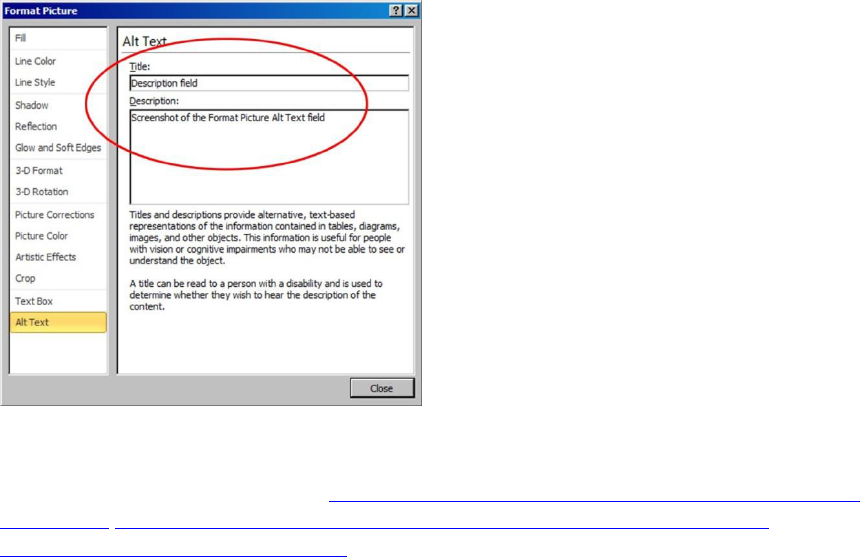
How to insert Alt Text in all Microsoft Office 2010 applications:
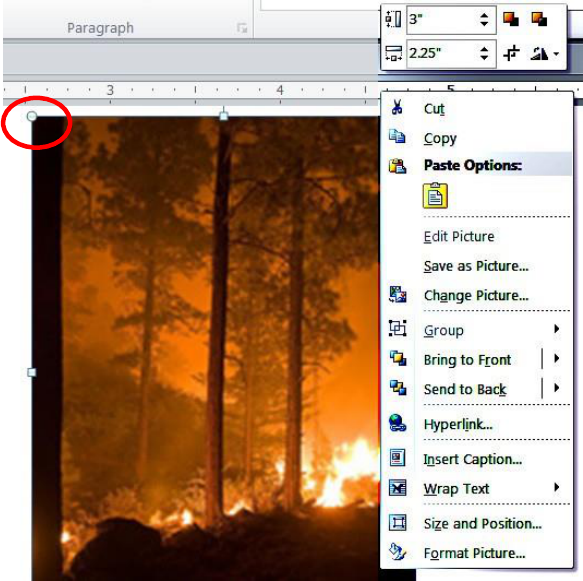
1. Open any Microsoft Office document and select an image so that square anchors
are visible (note the small circles at the corners of the image).
2. Right click the mouse and select Format Picture.
3. In the Format Picture window, select the Alt Text tab on the right, then insert the Alt
text into the Description field. Click the Close icon to finalize Alt text.
H-1297-1 Handbook for Section Creating 508 Compliant Documents (P)
3-16
BLM Handbook Rel. No. 1-1766
03/09/2015
Figure 22 - Insert Alt Text
Example: The Alt text for the image above might read, “Heavy smoke with burning
ponderosa pine and underbrush during the Rattlesnake Complex fire, Idaho 2010.”
Use Long Description for Charts and Graphs
In some instances, an image is too complex to describe in a few words. Charts and graphs are
primary examples of such images. Although there does not appear to be any limit to the length
of text in an “alt” attribute, “alt text” is meant to be relatively brief and to the point.
If you have a detailed explanation for the image, you should present it in your caption, for
example: “Figure 10 - Venn diagram of student access to fire training, explained below”.
Then use a style such as “Emphasis” to bring attention to the special text.
By including the long description below the graphic you will add information that can be
used by all readers, not just those with disabilities.
Q. Optimize Images and Graphics
Reducing graphic file size creates smaller documents for posting on the internet. Depending
on your abilities and software, there are a few ways to optimize or reduce the file size of your
graphics: on the ribbon bar in MS Word, via File>Options>Advance menu in MS Word, or
in a graphics program,
From MS Word:
H-1297-1 Handbook for Section Creating 508 Compliant Documents (P)
3-17
BLM Handbook Rel. No. 1-1766
03/09/2015
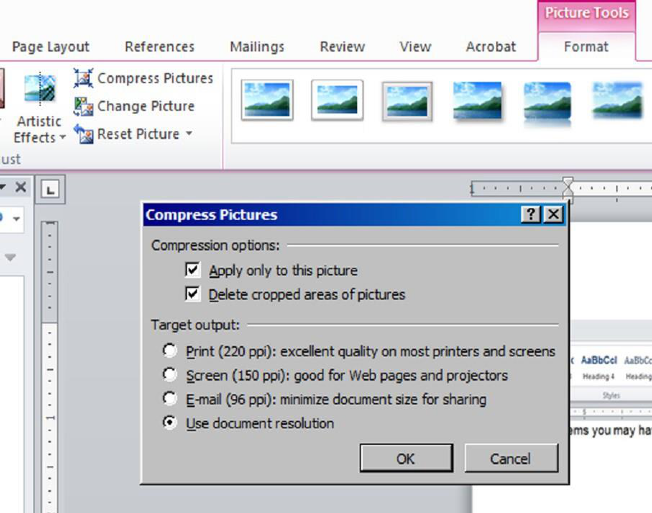
1. To optimize graphics you must select the image to see the Picture Tools > Format
tab at the top of the ribbon bar.
2. Select Compress Pictures in the Adjust Group on left side of ribbon bar.
You will be prompted with these options:
Figure 23 - Compress Pictures
3. Check “Apply only to this picture”, or uncheck if you want to do all graphics in your
document at once.
4. Check Delete cropped areas of pictures. *Note you will not be able to recover any of
the cropped area after this, so you should have original copies saved elsewhere.
5. While 220 ppi is selected here, we suggest Screen 150ppi for documents that will
be posted to the internet. Do not use less than 220 if the document will be printed
on a commercial press.
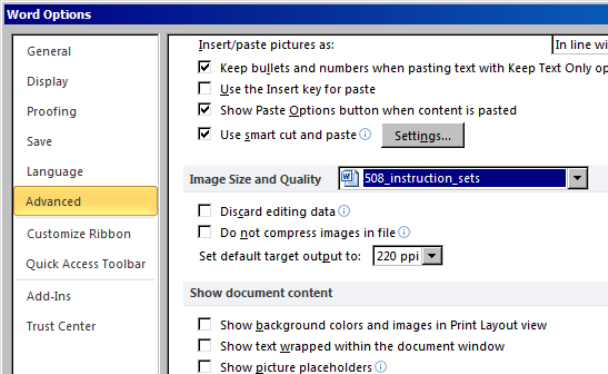
From the File tab:
1. Select File>Options>Advanced and scroll down to Image Size and Quality.
2. Set default target output to: 150 ppi. This will compress all images in the document
at once.
H-1297-1 Handbook for Section Creating 508 Compliant Documents (P)
3-18
BLM Handbook Rel. No. 1-1766
03/09/2015
Figure 24 - Advanced Compress Pictures Option
From a graphics program:
•
Photos should be optimized (reduce file size) in a graphics type program, prior
to including them in documents that will be posted to the internet.
•
Use Only GIF, JPEG, and PNG file formats.
•
Index colors at 256 or lower for GIFs.
•
Turn off interlacing (it adds to the file size).
•
Using transparency (transparent backgrounds) for GIFs and PNGs adds to the size of
the file, so gauge the use of these against the importance of download time.
•
Resolution for graphics on the web should be no more than 96 dpi and 200 dpi for print.
Graphic dimensions should be no larger than 576 pixels wide by 736 pixels in height
(equal to 8”X10” - using graphics that may be 72 dpi but over 1,000 pixels wide results in
a file size of almost 14MB).
•
When saving JPEGs:
o Compress file at no lower than setting 6 (high). Compressing a JPEG more
than that can cause the quality of the graphic to degrade.
o Note that using "Progressive Scan" will add bytes to the file size.
o Use either "Baseline Standard" or "Optimized" under "Format Options.”
•
Be aware that graphic images, when converted to PDF, may not read in correct order and
will still need to be manually checked in your final PDF document, and adjusted for 508
Compliancy. (See “Touchup Reading Order in a PDF file” under PDF section).
R. Grouping Images and Graphics
There is no way to group text, objects and photos/ images in MS Word. So, if you want to put
text, arrows and/or boxes on your photos/images, you may want to group them in a graphics
program or in PowerPoint and then copy those back to MS Word so the objects will stay
linked with the photos/images. A graphics program will flatten the layers when saved as a GIF,
PNG or JPEG (making it one graphic), but PowerPoint will group the individual elements. If
you use PowerPoint, each element will still require Alt text before being grouped and saved
H-1297-1 Handbook for Section Creating 508 Compliant Documents (P)
3-19
BLM Handbook Rel. No. 1-1766
03/09/2015
back to MS Word. After copying back to word, you will need to add the Alt Text and
Summary AGAIN for the group. If you ungroup the image after placing in MS Word, you will
break the Alt text format of the group and have to start over.
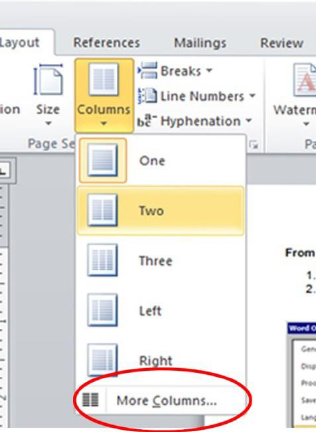
S. Columns
Use the Columns command in Word to create columns
•
Columns in your document? Do not use tabs to make space between your columns.
Use the “Column” commands to create column styling within the document.
•
All text you type in Word 2010 is already formatted in columns — if it's only one
column of text per page, it still counts as a column. Clicking Columns command button
(in the Page Setup Group on the Page Layout tab) displays a menu of handy column-
formatting options. Splitting your text into columns is as easy as choosing a column
format from that list.
•
To be more specific with the number of columns or their layout, choose the MORE
COLUMNS command, and then use the Columns dialog box that appears to create
and design multiple columns for your document.
Figure 25 - Columns Drop Down
Figure 26 - More Columns command
•
Mixing column formats
o Your whole document doesn't have to sport just one column format. You can
split things up so that part of the document is in one column and another part is
in two columns, and then maybe another part goes back to just one column.
The secret is to use the Columns dialog box.
Warning: Mixing columns creates editing difficulties and can break formatting,
which can become very time consuming to fix during editing. If you have a large
document, or one that will go through the editing process many times…avoid
columns.
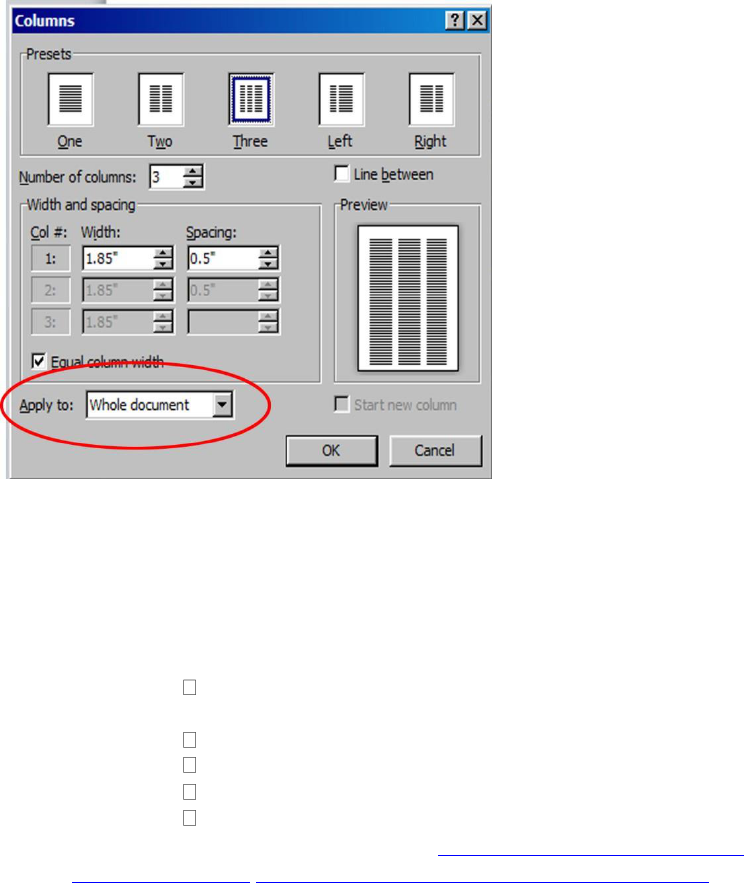
o When you’re choosing a new column format, be sure to select the
appropriate
H-1297-1 Handbook for Section Creating 508 Compliant Documents (P)
3-20
BLM Handbook Rel. No. 1-1766
03/09/2015
“Apply To” drop-down list. When you choose Whole Document, the format
applies to the entire document.
Figure 27 - Columns Dialog Window
•
Going back to one column
o The easiest way to undo a multi-column document is to return it to a single
column. From the COLUMNS button in the Page Layout tab, choose the
item One. That restores your document back to single column mode, which
is how Word naturally creates documents.
o When a document is split into sections, or when you have multiple column
formats sprinkled throughout a document, the process is a little more involved:
From the Page Setup area on the Page Layout tab, choose
Columns→More Columns.
The Columns dialog box is displayed.
Choose One from the Presets area.
From the Apply To drop-down list, select Whole Document.
Click OK.
•
For more directions on columns visit: http://www.dummies.com/how-
to/content/how-to- insert-columns-in-a-word-2010-document.html
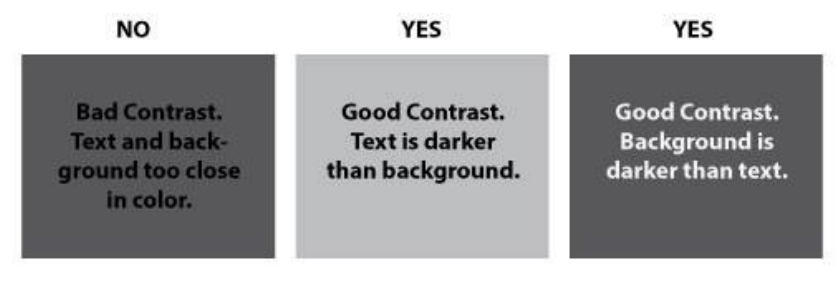
T. Strong Contrast with the Background Color
Individuals who have low-vision or color-blindness may have difficulty reading your
documents if the text color does not strongly contrast with the background color. Over 5% of
people have partial color blindness (either having difficulty distinguishing red from green, or
distinguishing blue from yellow), and choosing poor color combinations can make reading a
struggle.
Readers with macular degeneration, glaucoma, or other eye diseases may have great
difficulty reading text which is small or which does not contrast strongly with the
H-1297-1 Handbook for Section Creating 508 Compliant Documents (P)
3-21
BLM Handbook Rel. No. 1-1766
03/09/2015
background.
The problem with colored text also arises in printing out documents on a black-and-white
printer. If there is not enough contrast between the foreground and background colors, the
words become extremely hard to read.
•
Use text and page background color combinations of significant brightness and contrast.
•
Word does not provide an option for testing high-contrast. Use the Operating
System display settings instead. Turn on High Contrast before starting Word. The
Windows shortcut for switching to high-contrast mode is ALT+Left SHIFT+Print
Screen.
•
To produce multiple access/high-contrast documents, create a Word template that uses
a high contrast foreground/background color combination.
To check high contrast combinations:
•
Print the document in grayscale and/or turn down the color on the computer monitor
•
Examine items to ensure that there is sufficiently high contrast for elements,
e.g.:
o Table headers (text versus background fill).
o Text in foreground versus background colors or images.
o Text in images.
o Watermarks versus text in foreground (the watermark should not interfere with
the
foreground text, as can happen when there is too little contrast).
Figure 28 - Contrast Comparison
U. Avoiding Colored Text
“All the requirements for this project are in red.”
What is wrong with this?
Well, for one, if you are red-green color blind, you can’t tell which text is red and which is not.
Worse still, if you are blind, you don’t see any colors. Color alone should never be used alone
to indicate a condition or category. Make sure that text or other notation accompanies the color
in order to communicate the category or condition the color is meant to represent.
For example:
H-1297-1 Handbook for Section Creating 508 Compliant Documents (P)
3-22
BLM Handbook Rel. No. 1-1766
03/09/2015
All the requirements for this project are in red.
Requirement: documents need to follow established formats.
Requirement: the file format for your paper must be in Word 2010 or newer.
Requirement: the paper must be 2000 to 2500 words including a cover
page.
You should avoid the use of colored text in these circumstances. This will lead to your
document being more usable and accessible for all readers.
V. Tables
Microsoft Word does not provide an easy method for creating accessible tables. If you have
complex tables it is highly recommended that a description or explanation of the table
contents be included in the text of the document. If at all possible, construct the table so it
will read logically from left to right, top to bottom order.
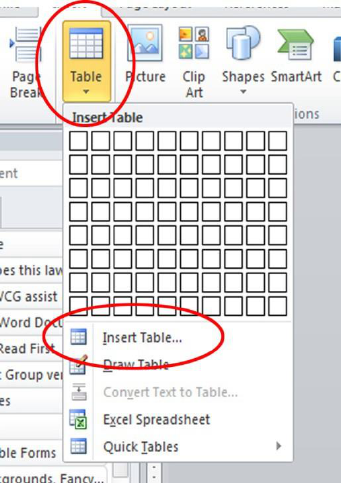
W. Creating Tables
Tables that are properly inserted and labeled, including specified row and column headers: Use
the “INSERT TABLE” command to create properly formatted tables.
Figure 29 - Insert Table
X. Tables are Only for Tabular Data
Screen readers expect a table structure to contain spreadsheet-like information (tabular data).
It can become very confusing for users of screen readers if a table structure is used for page
H-1297-1 Handbook for Section Creating 508 Compliant Documents (P)
3-23
BLM Handbook Rel. No. 1-1766
03/09/2015
layout and design. It is important to restrict the use of tables to the purpose of presenting
tabular data.
Y. Label the Columns
When data must be displayed, it is important to provide appropriate column labels. Whenever
possible, tables should be organized so that they can be read from left-to-right a single row at
a time. Always include appropriate column headers to describe the contents of each column.
Tables should be described in the body text of the document, just above the table, to provide
an introduction (so that blind users know what the structure is before they start hearing the
information from the table)
Z. Check for Merged or Split Cells in Heading Rows
When merged cells are used, the number of columns or rows may not be uniform and
screen readers will likely announce the wrong column header text with the data.
Microsoft Word does not provide the support for header and data cell association with
row and column spans that assistive technology needs to properly announce header cell
text. The author should ensure data tables have a one-to-one association between data and
header cells.
Table should be absent of merged cells. When creating a PDF, if there are merged cells it
will fail the 508 compliancy test.
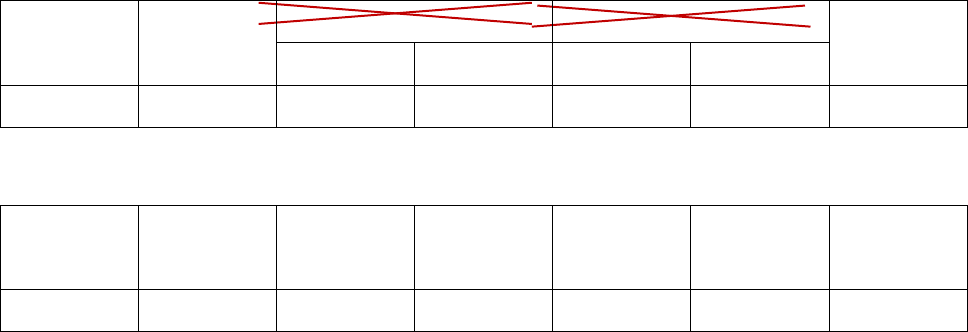
It’s best to place captions above tables, introducing the number and title of the
table.
Table 1.1 1 - Table with merged cells (X in FY 2011 and FY 2010 represents there should be no merged cells).
Key
Outcome
FY 2012
Target
FY 2011
FY 2010
FY 2009
Target
Target
Actual
Target
Actual
$’s left
Baseline
Base Line
$4,650.00
Base Line
$8500.00
Baseline
Table 1.1 2 - Table Fixed – no merged cells.
Key
Outcome
FY 2012
Target
FY 2011
Target
FY 2011
Actual
FY 2010
Target
FY 2010
Actual
FY 2009
Target
$’s left
Baseline
Base Line
$4,650.00
Base Line
$8500.00
Baseline
The following table shows how a table should look. Table number, title “Fires per Region”
and then listed below: State, Fire Name, Acres Burned, and Ongoing. The name of the
Table is outside the Table in the Caption area and the table is arranged with a column
representing each state and rows representing the fire name, acres burned, and if the fire is

H-1297-1 Handbook for Section Creating 508 Compliant Documents (P)
3-24
BLM Handbook Rel. No. 1-1766
03/09/2015
ongoing or not. To pass the accessibility “Check” you need to have the same number of
columns as you do rows.
Table 1.1 3 - : Fires per Region
State
Fire Name
Acres Burned
Ongoing
Idaho
Little Dino
500
yes
Texas
Big Red
1,300
no
California
Red Tree
45
yes
AA. Making a Table Look Like it has a Merged Cell
Above your table insert a new paragraph. If you can’t get your cursor before the table add a page
break, type the Heading, then press the delete button to bring your table back to that page.
1. With your cursor in the new heading, click on Borders in the Paragraph menu bar.
2. Select OUTSIDE BORDERS from the drop-down menu.
3. Adjust your margins to the same width as your table (it will be off just a bit,
but that is okay).
4. Click on Line and Paragraph Spacing in the Paragraph menu bar drop down and
select remove space after paragraph, or select Line Spacing Options and do the next
step.
5. Set line spacing to “0 pts” after paragraph so the paragraph will butt to the table
You now have an area that looks like a merged cell and will pass the accessibility test. If
you need to make it look like you have two or more merged cells all you have to do is set
a BAR tab and place it on your ruler to appear in your paragraph.
Sample: Even though the lines are not exactly lined up it appears to be a merged cell. You
can drag the small circle at the bottom right of the table to line up the new box above the
table or use the margins on the ruler bar.
Fires per State
Fire Name, Acres Burned, Ongoing
Montana
Little Fire
590
yes
Idaho
Little Dino
500
yes
Texas
Big Red
1,300
no
Table 1.1 4 - Fire Information (must put caption below to work with this table
style)
BB. Other work-arounds for Merged and Split Cell “Looks”
The table below still has three columns and 4 rows, even though it looks like one cell is

H-1297-1 Handbook for Section Creating 508 Compliant Documents (P)
3-25
BLM Handbook Rel. No. 1-1766
03/09/2015
split and the other is merged. It’s a trick. Use the BAR tab to split a cell, or remove the
BORDER of a cell to appear merged.
Table 1.1 5 - Merged Cell "look"
Header
Header
Header
Data
Data
Use BAR Ta
to give split ce
However, tex
lines.
b within the cell
ll appearance.
t will cross the
Data
Data
Data
To give the appearance of a However, text will not type
merged cell, use BORDERS across the invisible cell
drop down menu and delete boarder giving you a two
the middle line. column appearance.
CC. Indicate the Header Rows
A must when creating an accessible data table is to designate Column and/or Row
headers. Identify the header row:
1. Select just the top row of your table, right click, and choose Table Properties.
2. Select the Row tab.
3. Check the box labeled “Repeat as header row at the top of each page”.
Note: Alternate method is to select first row of table, select the table, go to Layout tab
on menu bar and click on “Repeat as Header Rows” button.
DD. Restrict the Table Cells to a Single Page
To do this:
1. Select the entire table and right click, and choose Table Properties.
2. Then, select the Row tab.
3. Finally, uncheck the box labeled “Allow rows to break across pages.” Be sure there
are no marks inside the box.
EE. Attaching Alternative Text to a Table in MS Word
As with most objects in MS Word, you need to add alternate text to a table. MS Word allows
you to add “title” text and “description” text. However, when converting the file to a PDF the
description text is not always transferred. Best practice is to enter both, but double check the
summary field in PDF.
1. Place the cursor in the table, left click to highlight.
2. Right click and select “Table Properties…” from the pop-up menu.
H-1297-1 Handbook for Section Creating 508 Compliant Documents (P)
3-26
BLM Handbook Rel. No. 1-1766
03/09/2015
3. The table properties dialog box has 5 tabs – Table, Row, Column, Cell, Alt Text –
click the “Alt Text” tab. Enter the table summary in the “description” field and
click OK.
Figure 30 - Insert Alt Text to Table
See the Microsoft video on adding alternative text to tables and other objects in MS Word
2010 on the Microsoft website at: http://office.microsoft.com/en-us/powerpoint-help/add-
alternative- text-to-a-shape-picture-chart-table-smartart-graphic-or-other-object-
HA010354748.aspx?CTT=1#BM14
Things You Should Not Do
•
Do not create your table using the Draw Table tool, which is available only with the
Table tools on the Insert ribbon.
•
Do not create page layouts with tables.
•
Do not merge cells, and do not split cells.
•
Do not control spacing in your table with blank rows or columns. Adjust line
spacing instead.
FF. Providing Unique Hyperlink Labels
One of the features of screen readers is that they can allow the user to hear just the hyperlinks
on a page. This aids in navigation, since the user does not have to hear the entire page in order
to locate the links.
There are many varying opinions on how to display them. Some URL’s, also known as a web
address, are very long. These can quickly clutter up a document with ugly strings of letters,
backslashes, dots and other characters. So what’s the answer? First, always make sure the URL
is identified. Don’t just type “Click Here”, with the link hidden.
The problem with typing just the words like “Go to NWCG” or “Click Here,” is that assistive
technology won’t identify the actual web address, and if the document is printed, it won’t

H-1297-1 Handbook for Section Creating 508 Compliant Documents (P)
3-27
BLM Handbook Rel. No. 1-1766
03/09/2015
identify the web address either. So what we suggest is:
•
For a document with just one or two web addresses, go ahead and type the
whole address.
•
For documents with more than two web addresses or just really ugly, long strings,
you can type the landing page web address, such as www.nwcg.gov, and in the
hyperlink context box put in the full address that will show in Alt Text as well. At the
bottom, in the footer, or at the back of the document you can place the complete
string for printing purposes. This keeps your document much cleaner, it is 508
compliant, and the actual address is printable.
To create a hyperlink:
1. Type the URL. It automatically creates the link, but you’ll want to adjust the text.
2. Click on the hyperlink text and go to the Insert Tab on the ribbon bar and under Links
click on the Hyperlink button.
3. The Text to display box displays what is going to be seen on the page.
4. In the address box make sure it has the full address with the http:// included, which is
the complete address that you want the link to take people to.
5. On the top right of this window is a button called Screen Tip. Click on it.
6. This is the Alt Text that the assistive technology will read and should say something
like: “This link goes to …. at:” and place the complete web address here as well. You
can copy and paste from the address window. Click OK to leave both of these windows.
You will now see the URL in blue with an underline indicating it is a link. If you hover over the
link, it will show the Screen Tip text with the complete address. Then remember to place the full
URL address in the footer or at the back of your document for a printable version, if necessary.
The following table provides some poor examples contrasted with some good examples
of proper hyperlink links.
Table 1.1 6 - Hyperlinks
Poor Examples
Problem
Good Example
Google search
engine, click here
Ask search
engine, click
here
Dog Pile search
engine, click
here
The link titles are
not unique.
Search Engines to use:
Google.com Ask.com
DogPile.com

H-1297-1 Handbook for Section Creating 508 Compliant Documents (P)
3-28
BLM Handbook Rel. No. 1-1766
03/09/2015
NWCG provides
consistent and
uniform guidance
to the National
Wildfire
Coordinating
Group (NWCG)
organization…
More information
on the fire
website at NW
CG.
When materials
are printed on a
photocopier, the
URL cannot be
followed if its
full string is not
visible.
NWCG provides consistent and uniform guidance to
the National Wildfire Coordinating Group (NWCG)
organization… More information is available
at:
http://www.nwcg.gov.
Link 1
Link titles are no
descriptive of the
underlying
content.
NWCG Mission Statement at:
http://www.nwcg.gov/nwcg_admin/organize.htm#Missi
on
GG. Forms
According to Section 508 Guidelines, when electronic forms are designed to be
completed online, the form shall allow people using assistive technology to access the
information, field elements, and functionality required for completion and submission of
the form, including all directions and cues.
Form layouts are typically created in Word first, then often saved as a PDF but, to be
compliant, they must have tooltips associated with a field. Tooltips can be created within the
originating document, but can also be added to the completed PDF.
Note; MS Word document form fields will not transfer to PDF. Form fields must be set in
Adobe Acrobat for fillable PDF forms.
From MS Word, first make sure the Developer Options is turned on by selecting
File>Options>Customize the Ribbon. In the right hand column drop-down titled “Main
Tabs” check the box next to Developer. Click OK.
1. Open the form in Word as you normally would.
2. Highlight the field you want to use as a form field.
3. Select the Rich Text Content Control button. A properly tagged field will be
added to the document. Repeat the process for each remaining field.
From Adobe Acrobat, first save the Word document as a PDF.
1. Open the PDF in Adobe Acrobat.
2. Choose Tools>Forms and “Create.”
3. Choose “Create from Existing Document.”
4. Select each fillable box and right click Properties and add Title and Tooltip. The
Tooltip should match the Title.
5. See PDF Checking and Problem Solving>Forms for how to fine tune your Acrobat
PDF
Fillable Form.
H-1297-1 Handbook for Section Creating 508 Compliant Documents (P)
3-29
BLM Handbook Rel. No. 1-1766
03/09/2015
HH. Saving as a Template and Create Editable Regions
Templates are a huge time saver, especially if you have repetitious documents that need
to maintain a standard look regardless of who prepares them. There’s no need to reinvent
the wheel every time.
1. Save the document as a template first.
2. Go to the File Tab and Save As, choose Word Template in the drop down and select
the folder location where you want to store your documents. Think about creating a
Template folder. We also suggest adding the word Template to the end of your
document name and keep an original separate, especially if you will be adding a
password to protect the template document from being edited. If you lose the password,
you will not be able to open the document. We suggest you keep your original unlocked.
3. If you think some people are still working in older versions of Word you can save it as a
Word 97-2003 Template.
That is how to save a basic template. However, you may want to add content controls or
restrict editing of certain areas. All these can be found on the Developer Tab on the Ribbon
bar.
1. Go to the Developer Tab on the ribbon bar. If you don’t see the Developer Tab, go to
the File Tab, select Options, and under Customize Ribbon check the developer box
on the right panel, and click OK.
2. The Controls Group has several options. The colored double Aa is Rich Text. The
plain double Aa is of course Plain Text. Next to that is the Picture Content control.
There’s a Building Block, a Combo Box, a Dropdown Menu, a Date Picker, a
Checkbox, and a group of legacy tools if you are editing an older document that used
Controls. There is also a Design Mode, a Properties, and Group option.
3. Select the text or images you want to protect or you can add a text control box.
4. Now on the Developer Tab in the Controls Group select the colored double Aa to
add a Rich Text Control. This places a text box on your document – these don’t appear
to cause 508 errors. If you want to add instructions on how to fill out the content of the
text box, select the Text Box and in the Control Group on the ribbon bar select
Design Mode. You should now see new chevron boxes on each side of the text inside
the textbox. Highlight the current text and replace it with whatever you want to say.
Now click the design mode button to unhighlight.
5. If you want the placeholder text to disappear when the user types, click inside the Text
Box, and on the ribbon bar click on the Properties button in the Control Group and
select “Remove content control when contents are edited.” And click OK.
6. To restrict editing to only the areas you want users to be able to change, go to the
Developer Tab on the ribbon bar, and under the Protect Group select Restrict
Editing, which opens a new panel on the right side of the window. By holding our
control key down, we can select individual areas from anywhere on the page.
7. On the right side of our screen Under Step 2 in the restrict formatting panel put a
check in the “Allow only this type of editing in the document,” then choose “No
changes (read only)” in the drop down. Now, under the exceptions, put a check in the
box next to “Everyone.” In step 3 say “yes, start enforcing protection” and add a
password.
8. If you click anywhere on the screen to unselect our items, you’ll see the editable areas
H-1297-1 Handbook for Section Creating 508 Compliant Documents (P)
3-30
BLM Handbook Rel. No. 1-1766
03/09/2015
are highlighted in yellow. Editable regions can be anything on the page: headings,
body text, tables, images, etcetera.
9. Go to File and Save As, make sure it is a Word Template format, and make sure you
add the word “template” to the end of the file name.
Tada, you now have a document you can share with others that you can be confident will only
be edited in the areas you have specified. Remember though, if you are sending PDFs that you
need assistance with making 508 compliant you must provide us with the password. We can’t
do anything with locked documents.
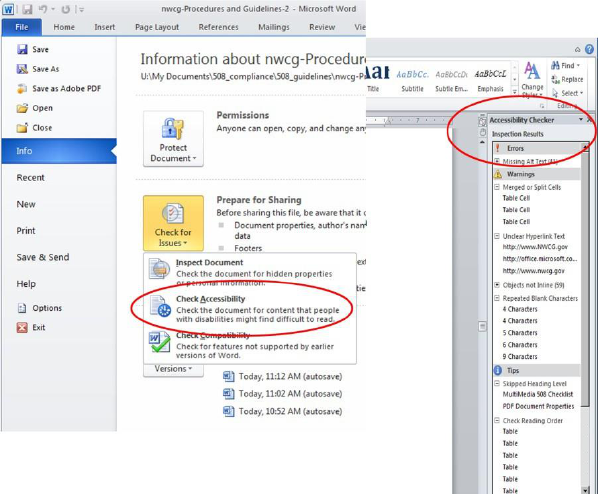
H-1297-1 Handbook for Creating Section 508 Compliant Documents (P)
4-1
BLM Handbook Rel. No. 1-1766
03/09/2015
Chapter 4 - Is Your Document Compliant?
MS Word has a feature that checks to see if your document has been formatted properly for
508 compliance. However, it’s a good idea to use the MS Word 508 Checklist at the end of
this chapter to double check your document against the list, and fix those items you may have
missed before running the following checks.
A. Check Your Document For Accessibility:
1. Click on File.
2. In the middle column under “Information about Procedures & Guidelines”
click on Check for Issues Icon
3. Click on “Check for Accessibility.”
4. A screen will appear on the right side of the screen.
5. This will list your Inspection results for the document you have created.
Troubleshooting Tip: If you receive the error message: "unable to run the accessibility checker
cannot check the current file type for accessibility issues" you may need open the document in a
more recent version of Word and save the document before running the Accessibility Checker.
If there are errors click on each error and see what you need to do to correct the error.
B. Additional Information

H-1297-1 Handbook for Creating Section 508 Compliant Documents (P)
4-2
BLM Handbook Rel. No. 1-1766
03/09/2015
The following link offers full directions on making your MS Word compliant: Creating
Accessible documents using MS Word http://office.microsoft.com/en-us/word-help/creating-
accessible-word- documents-HA101999993.aspx

H-1297-1 Handbook for Creating Section 508 Compliant Documents (P)
4-3
BLM Handbook Rel. No. 1-1766
03/09/2015
C. MS Word 508 Checklist
ID
Requirements for all Documents
Yes
(Pass)
No
(Fail)
N/A
1.1
Does the document file name not contain
spaces and/or special characters?
1.2
Is the document file name concise,
generally limited to 20-30 characters, and
does it make the contents of the file clear?
1.3
Have the Document Properties for Title,
Author, Subject (AKA Description),
Keywords, Language, and Copyright
Status been applied?
1.4
Does the document utilize recommended
fonts (i.e., Times New Roman, Verdana,
Arial, Tahoma, Helvetica, or Calibri)?
1.5
Have track changes been accepted or
rejected and turned off?
1.6
Have comments been removed and
formatting marks been turned off?
1.7
Is the document free of background
images or watermarks?
1.8
Do all images, grouped images, and non-
text elements that convey information
have meaningful alternative-text
descriptions?
1.9
Do complex images (i.e., charts and
graphs) have descriptive text near the
image (perhaps as a caption)?
1.10
Are all URLs spelled out and linked to
correct Web destinations?
1.11
Are e-mail links accessible?
1.12
Has a separate accessible version of the
document been provided when there is no
other way to make the content accessible?
H-1297-1 Handbook for Creating Section 508 Compliant Documents (P)
4-4
BLM Handbook Rel. No. 1-1766
03/09/2015
ID
Requirements for all Documents
Yes
(Pass)
No
(Fail)
N/A
1.13
If there are tables, are blank cells
avoided?
1.14
Is all of the text easy to read in
comparison to the background of the
document (i.e., has a color-contrast ratio
of 4.5:1)?
1.15
Has the document been reviewed in Print
Preview for a final visual check?
2.0. General Layout and
Formatting Requirements
Yes
(Pass)
No
(Fail)
N/A
2.1
Has the document been formatted
using Style elements (Heading 1,
Heading 2) and/or Outline in a
hierarchical manner (i.e. Heading 1
to Heading 2 to Body Text)?
2.3
Are page numbering codes used as
opposed to manually typed page
numbers?
2.4
If footnotes are present, have they
been created through Word
Footnote linking?
2.5
If color is used to emphasize the
importance of selected text, is there
an alternate method also used?
2.6
Is the list style being used as
opposed to manually typed
characters (e.g. Hyphens, numbers,
or graphics)?
2.7
Is the document free of text boxes?
2.8
If the document contains a Table of
Contents (TOC), was it created
using the TOC field (e.g., created
using the TOC Command in MS
Word)?
H-1297-1 Handbook for Creating Section 508 Compliant Documents (P)
4-5
BLM Handbook Rel. No. 1-1766
03/09/2015
2.0. General Layout and
Formatting Requirements
Yes
(Pass)
No
(Fail)
N/A
2.9
Does the document avoid using
underscores (using the space bar or
tab feature to create a line) to create
lines?
ID
3.0. Document Image Requirements
Yes
(Pass)
No
(Fail)
N/A
3.1
Are images set to “Wrap in line” with
text flush left?
3.2
Are multiple associated images on the same
page (e.g., boxes in an organizational chart)
grouped as one object?
3.3
Have all multilayered objects been flattened
into one image and does that image use one
alternative text description for the image?
3.4
Do images/graphics appear crisp and
legible?

H-1297-1 Handbook for Creating Section 508 Compliant Documents (P)
4-6
BLM Handbook Rel. No. 1-1766
03/09/2015
ID
4.0. Document Table Requirements
Yes
(Pass)
No
(Fail)
N/A
4.1
If the document has a tabular appearance,
is that tabular structure made using the
table option (as opposed to manual tabs
and/or spaces)?
4.2
Do all tables have a logical reading order
from left to right, top to bottom?
4.3
Do data tables have the entire first row
designated as a ‘Header Row’ in table
properties?
4.4
Is the table free of Merged Cells?
4.5
Are all tables described and labeled (where
appropriate
4.6
In table properties, is “Allow row to
break across pages” unchecked?

H-1297-1 Handbook for Creating Section 508 Compliant Documents (P)
5-1
BLM Handbook Rel. No. 1-1766
03/09/2015
Chapter 5 – PDF File Creation in MS Word
A. Converting your documents to accessible PDF files
You should have Adobe Acrobat X or XI Pro software installed to continue on with making
your 508 compliant PDF file.
Now that the document has a structure, alternative text for images, formatted columns, and
correctly styled tables, it is ready to be converted to the PDF file format. These general steps
will help get your document to an accessible, 508 Compliant PDF.
1. Click on Review Tab on the menu bar.
2. Turn Track Changes Off: If Track Changes is on, click the Track Changes Icon under the
Review tab. It should not be highlighted.
3. Under Show Markup, turn off comments: Note: Always perform this step. Comments
may be hidden.
4. Under Show markup: turn off formatting.
5. Go to File>Options>Display and turn off all formatting marks.
B. Convert your document to a PDF file
There are a few ways to save a PDF. Each handles the file a little differently and while one
may resolve an error, the other two methods may make it worse. If that happens then try the
alternate method.
Method One:
1. With the document open in Word select the Acrobat Tab on the ribbon bar.
2. Click the Create PDF Icon.
3. You have now created a PDF file.
4. The PDF will automatically open and you will now be working in your opened PDF file.
Figure 31 - Acrobat and Create PDF icons on the MS Word toolbar
H-1297-1 Handbook for Creating Section 508 Compliant Documents (P)
5-2
BLM Handbook Rel. No. 1-1766
03/09/2015
Method Two:
1. Go to File and select “Save As Adobe PDF”.
2. Save to a folder and open your PDF to run the compliancy test.
Method Three:
1. Go to File and select Save As.
2. In the “Save As Type” Choose Adobe PDF.
3. Save to a folder and open your PDF to run the compliancy test.
In ALL cases, make sure the Protect Document is UNCHECKED. We cannot help you fix your
PDF if it is protected.
Go to “PDF Checking and Problem Solving” and learn how to check your PDF for 508
Compliancy, and to correct any errors your document may have.
H-1297-1 Handbook for Creating Section 508 Compliant Documents (P)
6-1
BLM Handbook Rel. No. 1-1766
03/09/2015
Chapter 6 - Excel Document Creation
A. Set Document Language
At this time, it is not possible to indicate the natural language of selected cells within an Excel
2010 workbook. In order for assistive technologies (e.g., screen readers) to be able to present
your document accurately, it is important to indicate the language of the document.
B. Change the default language for a workbook:
1. Go to menu item: File.
2. Select Options from the list in the left window pane.
3. Select Language from the list in the left of the Options dialog.
4. Under Chose Editing Languages, select the editing language you want to use.
Note: to add an editing language, select the language from the drop down list
labeled [Add additional editing languages].
5. Select Set as Default.
Close all Office 2010 programs and open them again for the changes to take effect.
C. Provide Text Alternatives for Images and Graphical Objects
When using images or other graphical objects, such as charts and graphs, it is important to
ensure that the information you intend to convey by the image is also conveyed to people who
cannot see the image. This can be accomplished by adding concise alternative text to each
image. If an image is too complicated to concisely describe in the alternative text alone
(artwork, flowcharts, etc.), provide a short text alternative and a longer description as well.
D. Tips for Writing Alternative Text
•
Try to answer the question "what information is the image conveying?"
•
Alternative text should be fairly short, usually a sentence or less and rarely more than
two sentences.
•
If more description is required (e.g., for a chart or graph), provide a short description
in the alternative text (e.g., a summary of the trend) and more detail in the long
description, see below.
E. Tips for Writing Longer Descriptions
•
Long descriptions should be used when text alternatives (see above) are insufficient
to answer the question "what information is the image conveying?"
•
In some situations, the information being conveyed will be how an image looks (e.g.,
an artwork, architectural detail, etc.). In these cases, try to describe the image without
H-1297-1 Handbook for Creating Section 508 Compliant Documents (P)
6-2
BLM Handbook Rel. No. 1-1766
03/09/2015
making too many of your own assumptions.
•
One approach is to imagine you are describing the image to a person over the phone.
•
Ensure that you still provide concise alternative text to help readers decide if they are
interested in the longer description.
F. Add Alternative Text to Images and Graphical Objects:
1. Right-click* the object.
2. Select Format Picture…
3. Select the Alt Text option from the list.
4. Fill in the Title. If more description is required (e.g., for a chart or graph), provide a
short description in the Title (e.g., a summary of the trend) and more detail in the
Description.
G. Format Your Cells
As you begin adding content, your spreadsheet will require structuring to bring meaning to
the data, make it easier to navigate, and help assistive technologies read it accurately. One
of the easiest ways to do this is to ensure that you properly format the cells.
H. Named Styles
You should make use of the named styles that are included with the office application (e.g.,
“Heading”, “Result”, etc.) before creating your own styles or using the character formatting
tools directly. Named styles help your readers understand why something was formatted in a
given way, which is especially helpful when there are multiple reasons for the same
formatting (e.g., it is common to use italics for emphasis, Latin terms and species names).
For more information on formatting using named styles, see Technique 9.
Note: While office application suites support headings in much the same way, the named
styles often differ.
Formatting header and result cells brings order to the spreadsheet and makes it easier for users
to navigate effectively. For example, you can format header rows and columns using
“Heading” styles to apply bolded, enlarged, and italicized text (among other characteristics).
You may also want to format cells containing results of calculations to appear bold and
underlined to help distinguish them from the rest of your data.
I. Format a cell with default named styles:
1. Highlight the cells that you want to format.
Note: to apply a style to an entire row or column, select the row or column
indicator and follow the next steps.
2. Go to menu item: Home.
H-1297-1 Handbook for Creating Section 508 Compliant Documents (P)
6-3
BLM Handbook Rel. No. 1-1766
03/09/2015
3. In the Styles section, select the Cell Styles icon.
4. Select the desired formatting style from the drop-down menu.
Note: To modify a style, right-click* the desired formatting style from the drop-down menu and
select Modify. Changes made to the style will affect all instances of the style within your
workbook.
J. Other Cell Characteristics
Ensure your cells are formatted to properly represent your data, including number and text
attributes.
To format cell characteristics:
1. Highlight the cells that you want to format.
2. Go to menu item: Home.
3. In the relevant sections (e.g. Numbers, Font, etc.) make your adjustments.
Note: When formatting your spreadsheet, it is best to avoid merging cells. At times, it
may seem easier to present your data by merging cells, but this can make it more
difficult for users of assistive technologies and people navigating your spreadsheet
using the keyboard.
K. Define Cell Names
Naming the different data ranges within your spreadsheet makes it easier to navigate through
the document and find specific information. By associating a meaningful name to a data range,
you will be enhancing the readability of your document. These named ranges can be
referenced in multiple locations of your document and within calculations and equations.
To define a name:
1. Highlight the cells you would like to name.
2. Go to menu item: Formulas.
3. In the Defined Names section, select the Define Name button.
4. In the Name text box, enter the name for the data range.
5. In the Scope drop-down list, select scope within which the name can be referenced.
6. Select OK.
L. Create Accessible Charts
Charts can be used to make data more understandable for some audiences. However, it is
important to ensure that your chart is as accessible as possible to all members of your
audience. All basic accessibility considerations that are applied to the rest of your document
must also be applied to your charts and the elements within your charts. For example, use
shape and color, rather than color alone, to convey information. As well, some further steps
should be taken to ensure that the contents are your chart are appropriate labeled to give users
reference points that will help them to correctly interpret the information.
H-1297-1 Handbook for Creating Section 508 Compliant Documents (P)
6-4
BLM Handbook Rel. No. 1-1766
03/09/2015
To create a chart:
1. Select the data that you want to include in the chart.
2. Go to menu item: Insert.
3. In the Charts section, select the icon of the type of chart you would like to insert.
4. Select a Chart Type from the Chart Gallery in the drop-down menu.
To add titles and labels:
1. In the Chart Tools menu section, go to menu item: Layout.
2. In the Labels section, select the type of title or label you would like to define (e.g.,
Chart Title, Axis Titles, Data Labels).
Note: It is a good idea to use as many of the titles and labels available in this
section as possible.
To apply a predefined Chart Layout:
1. In the Chart Tools menu section, go to menu item: Design.
2. In the Chart Layouts section, select a Quick Layout from the scrolling Chart Layouts
gallery.
To change to a different predefined Chart Type:
1. In the Chart Tools menu section, go to menu item: Design.
2. In the Type section, select the Change Chart Type icon.
3. In the Change Chart Type dialog, select a chart type from the left pane.
4. Select a Chart Design from the right pane.
5. Select OK.
To apply alternative text to a chart:
1. Right-click* the chart.
Note: Make sure you are right-clicking the whole chart, not just an element within the
chart. It is possible to add descriptions to the many elements that make up a chart, but
this is not recommended.
2. In the Format Chart Area dialog, select Alt Text.
3. Enter a Title in the Title box.
4. Enter a longer description of the chart contents in the Description box.
5. Select Close.
M. Other Chart Considerations
•
When creating line charts, use the formatting options to create different types of
dotted lines to facilitate legibility for users who are color blind.
•
Change the default colors to a color safe or gray-scale palette.
•
Use the formatting options to change predefined colors, ensuring that they align
H-1297-1 Handbook for Creating Section 508 Compliant Documents (P)
6-5
BLM Handbook Rel. No. 1-1766
03/09/2015
with sufficient contrast requirements.
N. Use Other Content Structuring Features
While cell formatting is the most common method of structuring documents, other
content structuring features should be used where appropriate:
1. Document Title.
2. Insert a descriptive and meaningful title
3. To change the title of the current document.
a. Go to menu item: File.
b. Select Info from the list in the left window pane.
c. In the right window pane, select the Title text box.
d. Enter the Title.
Note: The Title defined in the properties is different than the file name. It is also
unrelated to the template name, discussed above.
O. Avoid “Floating” Elements
Avoid "floating" elements (other than charts) such as floating images, objects, tables or text
boxes. Similarly, avoid placing drawing objects directly into the document (e.g., as borders,
to create a diagram). Instead, create borders with page layout tools and insert complete
graphical objects.
P. Format of Text
When formatting text, especially when the text is likely to be printed, try to:
•
Use font sizes between 12 and 18 points for cell contents.
•
Use fonts of normal weight, rather than bold or light weight fonts. If you do choose to
use bold fonts for emphasis, use them sparingly.
•
Use standard fonts with clear spacing and easily recognized upper and lower case
characters. Sans serif fonts (e.g., Arial, Verdana) may sometimes be easier to read
than serif fonts (e.g., Times New Roman, Garamond).
•
Avoid large amounts of text set all in caps, italic or underlined.
•
Use normal or expanded character spacing, rather than condensed spacing.
•
Avoid animated or scrolling text.
Q. To Change the Text Size for a Default Named Style:
1. Go to menu item: Home.
2. In the Styles section, select the Cell Styles icon.
3. Select the style to modify from the list.
4. Right-click* and select: Modify…
H-1297-1 Handbook for Creating Section 508 Compliant Documents (P)
6-6
BLM Handbook Rel. No. 1-1766
03/09/2015
5. In the Style dialog, select the Format button.
6. In the Format Cells dialog, select the Font tab.
7. In the Size text box, type the desired size or select it from the list.
Select OK.
R. Use Sufficient Contrast
The visual presentation of text and images of text should have a contrast ration of at least
4.5:1. To help you determine the contrast, here are some examples on a white background:
•
Very good contrast (Foreground=black, Background=white, Ratio=21:1)
•
Acceptable contrast (Foreground=#767676, Background=white, Ratio=4.54:1)
•
Unacceptable contrast (Foreground=#AAAAAA, Background=white,
Ratio=2.32:1) Also, always use a single solid color for a text background rather than a
pattern.
S. Avoid Using Color Alone
Color should not be used as the only visual means of conveying information, indicating an
action, prompting a response, or distinguishing a visual element. In order to spot where color
might be the only visual means of conveying information, you can create a screenshot of the
document and then view it with online gray-scale converting tools.
T. Navigational Instructions
Provide a general description of the spreadsheet contents and instructions on how to navigate
the data effectively. The best way to do this is to make a cell at the beginning of the data
(e.g., A1) with this information. It will be the first cell accessed by assistive technologies. If
you are using this cell for a label or data, you can attach a comment note to the cell
containing navigational instructions.
U. Accessibility Checker
1. Go to menu item: File.
2. Select Info in the left window pane.
3. Under Prepare for Sharing, an alert will appear if a potential accessibility issue has
been detected.
4. To view and repair the issues, select Check for Issues and then Check Accessibility.
5. An Accessibility Checker task pane will open, showing the inspection results.
6. Select a specific issue to see Additional Information.
7. Follow the steps provided to fix or revise the content.

H-1297-1 Handbook for Creating Section 508 Compliant Documents (P)
6-7
BLM Handbook Rel. No. 1-1766
03/09/2015
V. To Evaluate PDF Accessibility in Adobe Acrobat Professional:
1. Go to menu item: Advanced > Accessibility > Full Check…
2. In the Full Check dialog, select all the checking options.
3. Select the Start Checking button.
More information can be found on the Microsoft Help in creating Accessible Excel
Workbooks website: http://office.microsoft.com/en-us/excel-help/creating-accessible-
excel-workbooks-
HA102013545.aspx?CTT=5&origin=HA102671874
**Note: Remember to use the 508 compliancy checklist at the end of this document to
be certain you have followed all steps necessary to make your PDF document
compliant.

H-1297-1 Handbook for Creating Section 508 Compliant Documents (P)
6-8
BLM Handbook Rel. No. 1-1766
03/09/2015
W. Excel 508 Checklist
ID
1.0.Master Requirements for all
Documents
Yes
(Pass)
No
(Fail)
N/A
1.1
Does the document file name not contain
spaces and/or special characters?
1.2
Is the document file name concise,
generally limited to 20-30 characters, and
does it make the contents of the file clear?
1.3
Have the Document Properties for Title,
Author, Subject (AKA Description),
Keywords, Language, and Copyright Status
been applied per HHS guidance?
1.4
Does the document utilize recommended
fonts (i.e., Times New Roman, Verdana,
Arial, Tahoma, Helvetica, or Calibri)?
1.5
Have track changes been accepted or
rejected and turned off?
1.6
Have comments been removed and
formatting marks been turned off?
1.7
Is the document free of background images
or watermarks?
1.8
Do all images, grouped images, and non-
text elements that convey information have
meaningful alternative-text descriptions?
1.9
Do complex images (i.e., charts and
graphs) have descriptive text near the
image (perhaps as a caption)?
1.10
Are all URLs linked to correct
Web destinations?
1.11
Are e-mail links accessible?
1.12
Has a separate accessible version of the
document been provided when there is no
other way to make the content accessible?
1.13
If there are tables, are blank cells avoided?
H-1297-1 Handbook for Creating Section 508 Compliant Documents (P)
6-9
BLM Handbook Rel. No. 1-1766
03/09/2015
ID
1.0.Master Requirements for all
Documents
Yes
(Pass)
No
(Fail)
N/A
1.14
Is all of the text easy to read in comparison
to the background of the document (i.e., has
a color-contrast ratio of 4.5:1)?
1.15
Has the document been reviewed in Print
Preview for a final visual check?
ID
2.0. General Layout and Formatting
Requirements
Yes
(Pass)
No
(Fail)
N/A
2.1
Is the table free of merged cells? (If not,
but the final format will be PDF or
HTML, then merged cells are okay).
2.3
Do the active worksheets have clear and
concise names that allow users (and
assistive technology) to identify the
table’s source and content?
2.4
Is each table prefixed (titled) with the
table name and table number?
2.5
Does the table header repeat at the top of
the table as it goes from one page to
another?
2.6
If color is used to emphasize important
text, is there is an alternate, compliant
method used as well?
2.7
Have all extraneous comments have
been removed?
2.8
Is the document free of text boxes

H-1297-1 Handbook for Creating Section 508 Compliant Documents (P)
6-10
BLM Handbook Rel. No. 1-1766
03/09/2015
ID
3.0. Charts/Image Requirements
Yes
(Pass)
No
(Fail)
N/A
3.1
Are associated images on the same page,
such as boxes in an organizational chart,
grouped as one object?
3.2
Have all multilayered objects been
flattened into one image?
3.3
Do all non-text elements that convey
information - including images - have
descriptive captions (alternative text does
not currently work when a PDF is made
from Excel)?
3.4
Do all charts have titles, legends, and axis
labels?

H-1297-1 Handbook for Creating Section 508 Compliant Documents (P)
7-1
BLM Handbook Rel. No. 1-1766
03/09/2015
Chapter 7 - Multimedia Creation
If you create Podcasts and other sound files, Videos and multimedia presentations, Software
to play videos, audio, and multimedia for your website, visit the Howto.gov website for step-
by-step directions on making these files accessible.
**Note: Remember to follow the 508 compliancy checklist at the end of this document
to be certain you have followed all steps necessary to make you PDF document
compliant.
A. Multimedia 508 Checklist
ID
1.0.Master Requirements for all
Documents
Yes
(Pass)
No
(Fail)
N/A
1.1
Does the document file name not contain
spaces and/or special characters?
1.2
Is the document file name concise, generally
limited to 20-30 characters, and makes the
contents of the file clear in the context in
which it is presented?
1.3
Does the document utilize recommended
fonts (i.e., Times New Roman, Verdana,
Arial, Tahoma, Helvetica, or Calibri?
1.4
Does the document refrain from using
flashing/flickering text and/or animated text?
1.5
Are all URLs linked to correct
Web destinations?
1.6
Are e-mail links accessible?
1.7
Has a separate accessible version of the
multimedia file been provided when there is
no other way to make the content
accessible?
H-1297-1 Handbook for Creating Section 508 Compliant Documents (P)
7-2
BLM Handbook Rel. No. 1-1766
03/09/2015
ID
2.0. Secondary Sensory-Channel
Requirements
Yes
(Pass)
No
(Fail)
N/A
2.1
If a video—Does the video or animation
contain synchronized captioning?
2.2
If an animation—Does the animation
have a text equivalent?
2.3
If a sound file—Does the sound file
have a matching transcript file?
ID
3.0. Functional Control Requirements
Yes
(Pass)
No
(Fail)
N/A
3.1
Does the file have the minimum required
media controls of video resizing, volume
control, play/stop buttons, and the ability
to turn captions on and off?
3.2
Are all media controls keyboard
accessible?
3.3
Is the media embedded in a way that
allows the user to use keyboard controls
to move in and out of the video in relation
to surrounding content?
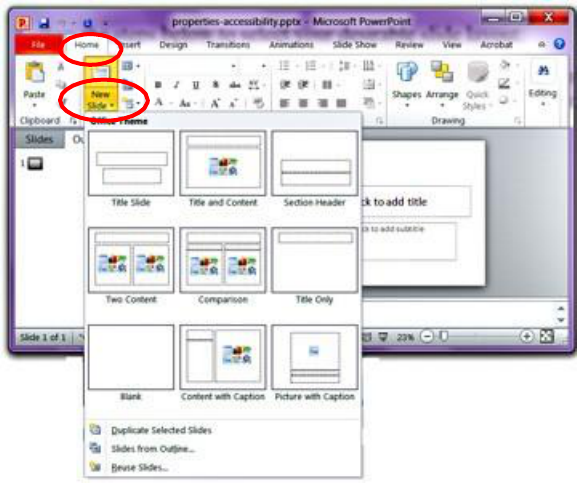
H-1297-1 Handbook for Creating Section 508 Compliant Documents (P)
8-1
BLM Handbook Rel. No. 1-1766
03/09/2015
Chapter 8 - PowerPoint Creation, Preparing Accessible Presentations
A. Create a New Presentation:
1. Click on Home.
2. New slide.
3. Select appropriate layout.
Figure 32 - Insert New Slide
Figure 33 - Create a New Presentation screen
B. Properties
Populating certain document properties (Author, Title, Subject, and Keywords) and setting
the language are required to make an electronic file 508 compliant.
To specify properties:
1. Click on File in the upper left corner.
2. New field will appear on the right.
3. Choose “Properties.”
4. Choose Advanced Properties and then the Summary screen will appear.
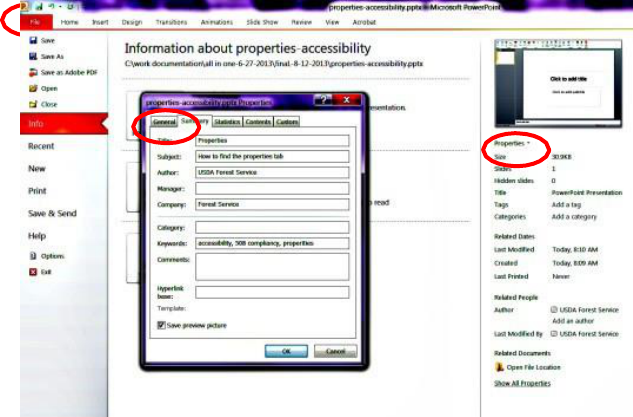
H-1297-1 Handbook for Creating Section 508 Compliant Documents (P)
8-2
BLM Handbook Rel. No. 1-1766
03/09/2015
Figure 34 - Document Properties Window
Fill out: the title of the document, subject, and author (do not use your name; rather, use Forest
Service), company and keywords. The other fields are optional.
C. Set Document Language
In order for assistive technologies (e.g., screen readers) to be able to present your document
accurately, it is important to indicate the natural language of the document. If a different
natural language is used for a paragraph or selected text, this also needs to be clearly
indicated.
To change the default language:
1. Go to menu item: File.
2. Select Options from the list in the left window pane.
3. Select Language from the list in the left of the Options dialog.
4. Under Choose Editing Languages, select the editing language you want to use.
Note: to add an editing language, select the language from the drop down list
labeled [Add additional editing languages].
5. Select Set as Default.
6. Close all Office 2010 programs and open them again for the changes to take effect.
To apply a language directly to selected text:
1. Select the text.
2. Go to menu item: Review.
3. In the Language section, select the Language button.
4. Select Set Proofing Language.
5. In the Mark selected text as box, select the language from the list.
6. Select OK.
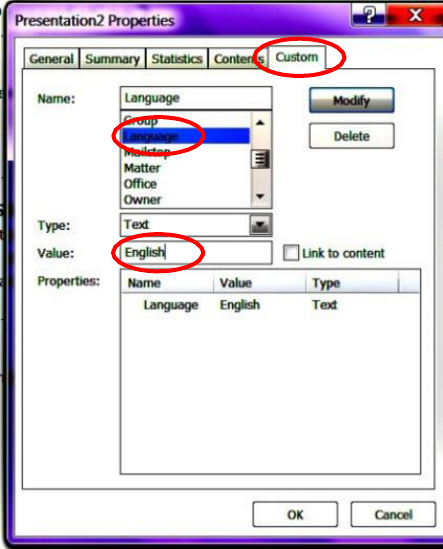
H-1297-1 Handbook for Creating Section 508 Compliant Documents (P)
8-3
BLM Handbook Rel. No. 1-1766
03/09/2015
To set the language:
1. Access the properties menu (see above).
2. Choose “Advance Properties.”
a. Choose the “Custom” tab.
b. You will notice a blank to the right of Name. Select “Language” from the list.
c. Type is “Text”.
d. Value - type in “English”.
e. Click “Add” and then “OK”.
Figure 35 - Set Language Window
D. Create Accessible Templates
Areas of a PowerPoint - Default View
1. The major elements of a normal default view include:
2. Slide and Outline area on the left.
3. Content stage area in the center and right.
4. Notes pane area below the content stage area.
5. View button below Notes pane for Normal, Slide Sorter, or Slide Show view.
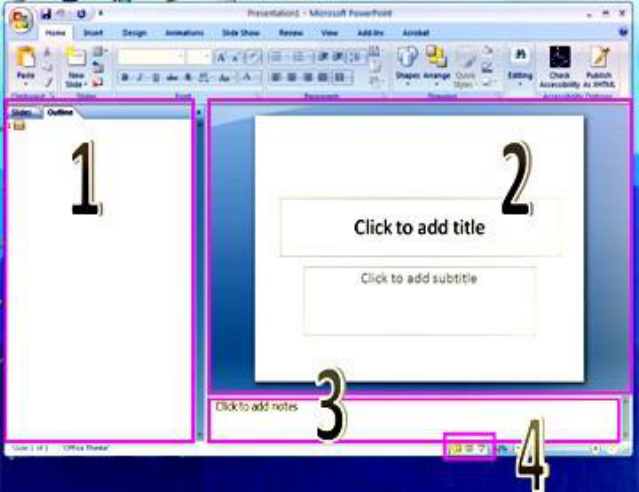
H-1297-1 Handbook for Creating Section 508 Compliant Documents (P)
8-4
BLM Handbook Rel. No. 1-1766
03/09/2015
Figure 36 - Fields of a PowerPoint screen
All slide text must be viewable in the Outline view.
It is critical that you learn to create slides via the Master Slide group. DO NOT use text
boxes from the ribbon bar or drop graphics on a slide without using placeholders.
A PowerPoint document will not be accessible if you place images, graphics, or text on a
slide without using PowerPoint’s content placeholders. Content placeholders can only be
added via the Master Slide window. All text must appear in the outline view of a
presentation.
•
Click the Outline tab in the Slide and Outline area to display the outline pane. Only
text displayed on the outline pane will be read by a text-to-speech reader.
o Ensure each slide has a slide title. The slide title serves as the structure
in navigating and understanding the logical flow of the slide
presentation.
•
The Outline is viewable when you are in Normal view.
•
To switch between slide view and outline view, click the tabs at the top left
navigation window.
•
NOTE: Text added to the Notes Pane of a slide will not appear in the outline and will
not be accessible by assistive technology.
E. Slide Layouts
PowerPoint is designed to encourage the use of slide layouts, especially in newer versions. Using
these templates correctly will ensure that your files have correctly-structured headings and lists,
proper reading order, etc. The correct use of slide layouts is probably the most significant thing
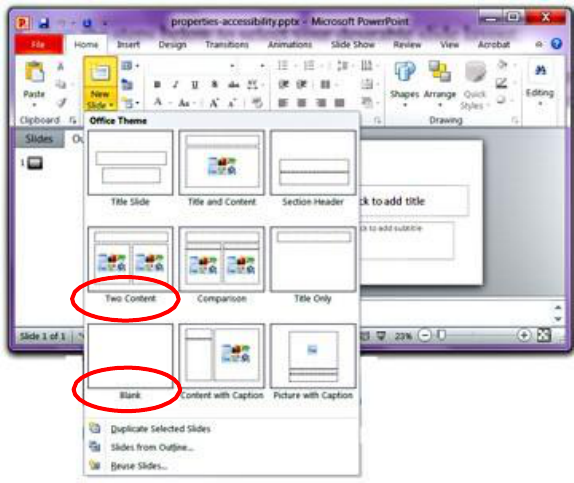
H-1297-1 Handbook for Creating Section 508 Compliant Documents (P)
8-5
BLM Handbook Rel. No. 1-1766
03/09/2015
you can do to ensure that your content is accessible.
For each slide you create, select a preset layout with as many placeholders (placeholders may be
text boxes, pictures, videos, etc.) as you will need for that slide. If the template doesn’t have an
option with enough placeholders, create an additional layout option that does (View/Slide
master, Insert layout, Insert placeholder). If you do not use the available placeholders or create
an additional lay out option, your presentation may not convert to a PDF properly. This can
result in 508 error.
Extra placeholders can easily be moved, resized, removed, or ignored, slide by slide. If the
preset options aren’t adequate or you did not create a slide with enough placeholders, you will
need to create a new layout option. Always use the available slide layouts never insert a blank
slide and add text boxes. Adding text boxes to a slide may cause 508 errors.
Select Home > New Slide, or select the New Slide button, and a menu of slide types
will appear.
Figure 37 - New Slide drop down menu
F. Adding New Layouts and Placeholders:
1. Select Slide Master from the view menu.
2.
Select Insert Layout.
3. Click on Insert Placeholder to select type (repeat as needed). Don’t be shy – you can
drag them off the page and out of the way until you need them, or delete them later.
4. Close Slide Master by going to the View tab and selecting Normal.
5. From the Home tab use the New Slide button to create a new slide using one of the
master templates found there.
H-1297-1 Handbook for Creating Section 508 Compliant Documents (P)
8-6
BLM Handbook Rel. No. 1-1766
03/09/2015
G. Use Built-In Layout and Styling Features
PowerPoint 2010 does not offer “True Headings” or “Named Styles” as does Word 2010.
H. Use Built-In Slide Layouts
Instead of creating each slide in your presentation by starting from a blank slide, check
whether there is a suitable built-in layout.
Note: The built-in layouts can be more accessible to users of assistive technologies
because they technologies sometimes read the floating items on the slide in the order
that they were placed on the slide. The built-in layouts have usually taken this into
account (e.g., “Title” first followed by other items, left to right and from top to
bottom). If you create slide layouts from scratch, it is sometimes difficult to keep
track of the order elements were placed.
I. Customize Using Master Slides
If a layout must be customized, it is recommended that Master Slides be used.
Every slide layout in a presentation is defined by its master slide. A master slide determines
the formatting style for various elements of the slide layout. This includes font styles,
character formatting, and the positioning of elements. Essentially, each master slide acts as a
design template for the slide layout.
If you edit any aspect of the slide layout in the master slide, the change will affect all slides
that were created based on it. For this reason, it is good practice to edit the master slide and
use the slide layouts before building individual slides. It is essential that you create and use
master slides that meet the accessibility requirements.
J. Columns of Text
If you put two or more columns of text on a page, use a standard layout that has two side-by-
side text box placeholders. Never use the Tab key to separate lists of text into columns within a
single text box. By using text box placeholders, a screen reader will read the entire first text
box, and then move to the next text box in the slide's reading order. This will make much more
sense to the listener.
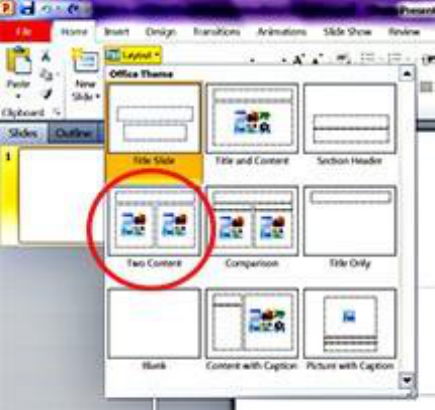
H-1297-1 Handbook for Creating Section 508 Compliant Documents (P)
8-7
BLM Handbook Rel. No. 1-1766
03/09/2015
Figure 38 - Using Columns for text
To create or customize a master slide:
1. Go to menu item: View.
2. In the Master Views section, select the Slide Master icon.
3. The current slide master with its associate layouts appears.
Note: If you have the Normal view open, the slide master is the larger slide image
in the slide thumbnail pane. The associated layouts are positioned beneath the
slide master.
4. Customize the existing master slide and its associated layouts to suit your needs (e.g.,
apply a design, theme-based colors, fonts, effects, backgrounds) ensuring that your
changes meet accessibility requirements.
5. Go to menu item: File > Save As.
6. In the File name box, type a file name.
7. In the Save as type list, select PowerPoint template.
8. Select Save
K. Slide Design
Use the built-in designs offered in PowerPoint; however please know that not all of these
design options have ‘accessible’ color contrast or other design elements. Please ensure that
whatever design is chosen meets all the design considerations discussed in this section.
To access these design choices, go to the Design tab, and scroll through the options. The
number of choices may be expanded by using the drop down menu highlighted below. From
the Design tab menu, color selection and font choices can also be controlled.
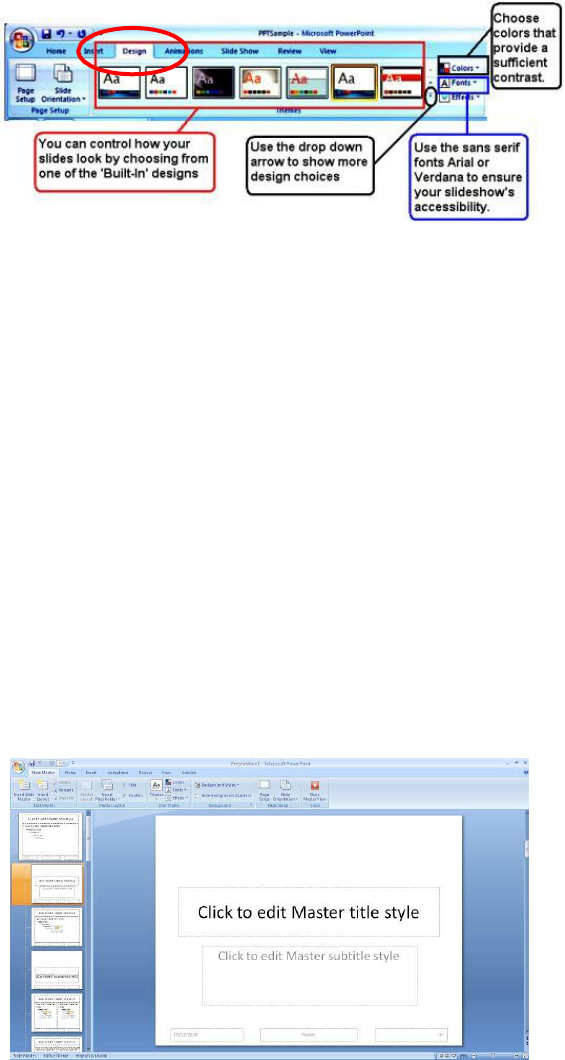
H-1297-1 Handbook for Creating Section 508 Compliant Documents (P)
8-8
BLM Handbook Rel. No. 1-1766
03/09/2015
Figure 39 - Slide Design Tab
L. Fonts and Font Size
Because they are the easiest to read, only use Sans Serif fonts, such as Arial and Verdana.
Since a PowerPoint presentation will most likely be projected onto a large screen consider
how far the audience will be from the screen and choose a font size accordingly. The
minimum font size for a PowerPoint presentation is 24 points.
M. Use of Color and Contrast
Make sure your text color provides enough contrast with the background color that people
can easily read it.
•
Always put text on a plain, solid-colored background. Text placed on top of an image
or patterned background is harder to see.
•
Be sure to provide enough contrast between the text color and the background color.
Figure 40 - View of blank PowerPoint Master screen
On the Slide Master tab, in the Close section, select Close Master View.
N. Set a Logical Tab Order
H-1297-1 Handbook for Creating Section 508 Compliant Documents (P)
8-9
BLM Handbook Rel. No. 1-1766
03/09/2015
Many presentation applications create content composed almost exclusively of "floating"
objects. This means that they avoid the transitions between in-line content and secondary
"floating" objects (text boxes, images, etc.) that can cause accessibility issues in word
processors.
However, when you are working with "floating" objects, it is important to remember that the
way objects are positioned in two dimensions on the screen may be completely different from
how the objects will be read by a screen reader or navigated using a keyboard. The order that
content is navigated sequentially is called the "Tab Order" because often the "Tab" key is used
to navigate from one "floating" object to the next.
O. Tips for Setting a Logical “Tab Order” for "Floating" Objects
•
The tab order of floating objects is usually from the “lowest” object on the slide to the
“highest”.
•
Because objects automatically appear “on top” when they are inserted, the default
tab order is from the first object inserted to the last. However, this will change if
you use features such as “bring to front” and “send to back”.
•
The slide’s main heading should be first in the tab order.
•
Headings should be placed in the tab order immediately before the items (text,
diagrams, etc.) for which they are acting as a heading.
•
Labels should be in the reading order placed immediately before the objects that
they label.
•
For simple slide layouts, it may be possible to simply insert objects in a logical tab order.
•
For more complex layouts, it may be easier to simply to create the slide as usual
and then set the tab order (see below).
To set the tab order using the ‘Selection Pane’:
1. Go to menu item: Home.
2. In the Drawing section, select Arrange > Selection Pane…
3. In the Selection and Visibility pane, all the elements on the slide are listed in reverse
chronological order under Shapes on this Slide.
4. Elements can be re-ordered using the Re-order buttons located at the bottom of the
Selection and Visibility pane.
Note: The tab order of elements begins at the bottom of the list and tabs
upwards.
P. Use Slide Notes
A useful aspect of presentation applications is the facility to add notes to slides, which can
then be read by assistive technologies. You can use these slide notes to explain and expand on
the contents of your slides in text format. Slide notes can be created as you build your
presentation.
Figure 41 - View of Slide Notes page
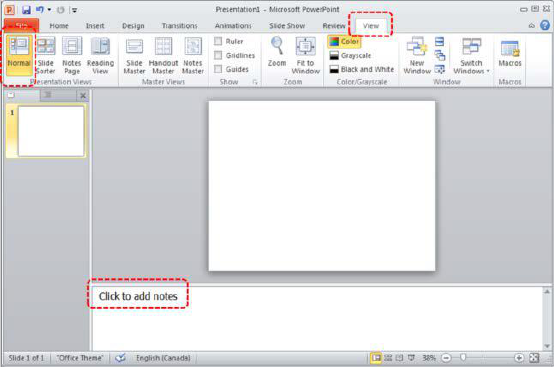
H-1297-1 Handbook for Creating Section 508 Compliant Documents (P)
8-10
BLM Handbook Rel. No. 1-1766
03/09/2015
To add notes to your slides:
1. Go to menu item: View.
2. In the Presentation Views section, select Normal to ensure that the notes panel is
in view.
3. Note: You can then select menu item Home, to access text formatting options.
4. The Notes Pane can be found at the bottom of the window, below the slide.
5. Type and format your notes within the Notes Pane below each slide.
Q. Add Alternative Text to Images and Objects
Alternative text appears when you move your pointer over a picture or object, and helps
people using screen readers understand the content of images in your presentation. Alt text
should be included for any of the following objects in your presentation:
Pictures.
Clip Art.
Charts.
Tables.
Shapes (that don’t contain text and are not in groups).
SmartArt graphics.
Groups (all objects in this list, with the exception of shapes, should also have alt text
when in groups).
Embedded objects.
Video and audio files.
To add alternative text to an image, Right click on picture choose Format Picture.
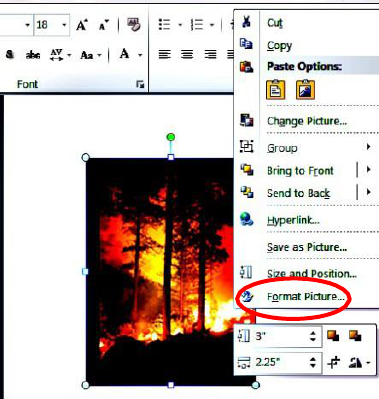
H-1297-1 Handbook for Creating Section 508 Compliant Documents (P)
8-11
BLM Handbook Rel. No. 1-1766
03/09/2015
Figure 42 - Format Pictures
With the Format Picture menu open, select the option for Alt Text in the sidebar. Two fields
will appear one labeled Title and one labeled Description. Type out the Title of your picture
or object and then add descriptive text to the Description field.
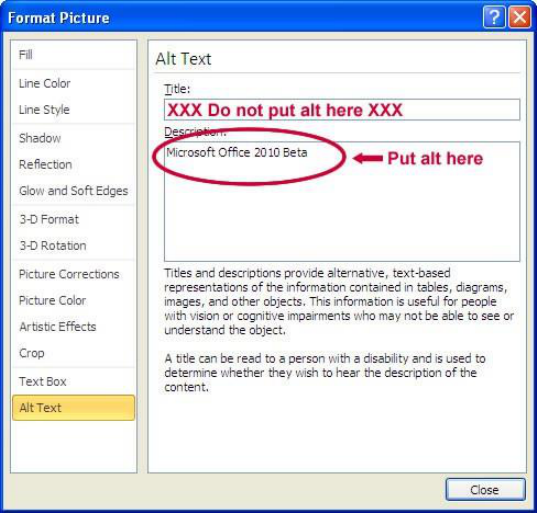
H-1297-1 Handbook for Creating Section 508 Compliant Documents (P)
8-12
BLM Handbook Rel. No. 1-1766
03/09/2015
Figure 43 - Description Field
R. How to Group Small Graphics/Images
•
Select one of the images.
•
Hold down the “Shift” key and select the other images that are to be part of the group.
•
Right-click the image.
•
Scroll to “Grouping” and then mouse over to click “Group.”
•
Alternative Method
o Open the “Drawing” toolbar by going to View>>Toolbar>>Drawing.
o Click and drag to select all elements you would like to group.
o Right-click the image, scroll to “Grouping” and select “Group.”
**Note: images and shapes will not group together in MS Word. You can
copy and paste into PowerPoint, group and copy back to Word. However,
grouped items will lose their Alt text description and you will need to
reapply.
S. Header Rows on Tables
Each table created must have the header row (first row in the table) clearly defined so that
screen reader software will read the table in a manner that is understandable to the end user.
Create the table as you would normally and select the table by clicking it. The best way to
select a table is to click the four way cursor in the top left-hand corner of the table.
If tables must be used, they should be constructed with header rows, and may not contain
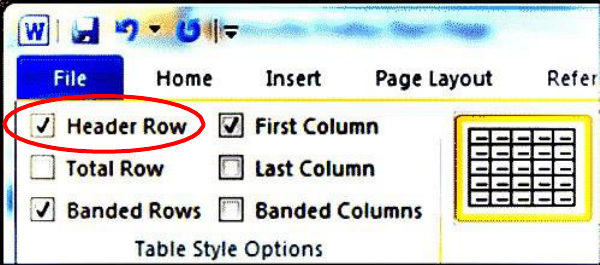
H-1297-1 Handbook for Creating Section 508 Compliant Documents (P)
8-13
BLM Handbook Rel. No. 1-1766
03/09/2015
merged cells. Also make sure reading order is left to right, top to bottom.
A header row is the first row or column in the table. The table should also include a title and if
applicable a short description if the table is too complex.
T. Specify Colum Information in Tables
In addition to adding alt text that describes the table, having clear column headings can
help provide context and assist navigation of the table’s contents.
Designating Table Headers:
1. Click on the first row in the table and highlight the row.
2. Go to the Table Tools.
3. Click on Design.
4. Check the Header Row check box for the First Column and/or First Row.
5. Type (or retype) your column headings.
6. Press the Enter key.
Figure 44 - Designating Table Headers
Use simple table structure
By not using nested tables, or merged or split cells inside of data tables, the data is
predictable and easy to navigate.
To test and simplify the table structure, do the following:
1. Select the first cell of the table.
2. Press the Tab key repeatedly to make sure that the focus moves across the row and then
down to the first cell of the next row.
U. Add alt text for Tables:
1. Right click on the Table, and then click Format.
2. Click Format Shape.
3. Click Alt Text.
4. Enter descriptive text of the Table into the Title and Description text boxes.
**Tip: Use clear, but concise descriptions. For example, “a red Ferrari” tells the
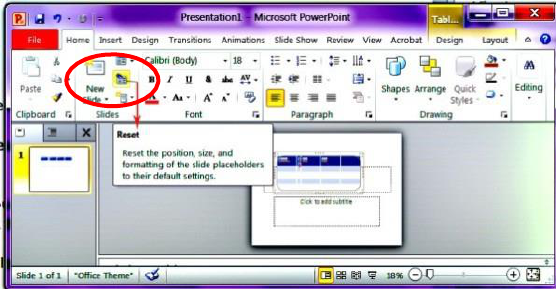
H-1297-1 Handbook for Creating Section 508 Compliant Documents (P)
8-14
BLM Handbook Rel. No. 1-1766
03/09/2015
reader more about the image than “a car.”
5. Click Close
V. Avoid Using Blank Cells to Format Tables
Using blank cells to format your table could mislead someone using a screen reader to believe
that there is nothing more in the table. You can fix this by deleting unnecessary blank cells or,
if your table is used specifically to layout content within your presentation, you can clear all
table styles by doing the following:
1. Select the entire table.
2. On the Table Tools Design tab, in the Table Styles group, click the arrow next to the
style gallery to expand the gallery of table styles.
3. On the menu below the gallery, click Clear.
W. Ensure that all Slides Have Unique Titles
Slide titles are used for navigation and selection by people who are not able to view the slide.
To add visible titles to your slides, do the following:
1. On the Home tab, in the Slides group, click Reset to restore slide placeholders for
the selected slide.
2. Type a unique name in the Title text box.
3. If you do not want the title to be visible on your slide, do the following:
a. On the Home tab, in the Drawing group, click the Arrange menu.
b. Click Selection Pane.
c. Click the eye icon next to the text box to toggle its visibility.
Figure 45 - Reset Slide
X. Use Hyperlink Text that is Meaningful
Hyperlink text should provide a clear description of the link destination, rather than only
providing the URL. To add a hyperlink to your document, do the following:

H-1297-1 Handbook for Creating Section 508 Compliant Documents (P)
8-15
BLM Handbook Rel. No. 1-1766
03/09/2015
1. Place your cursor where you want the hyperlink.
2. On the Insert tab, in the Links group, click Hyperlink to open the Hyperlink dialog
box.
3. In the Text to display box, type in the name or phrase that will briefly describe the
link destination.
4. In the Address box, type the link URL.
5. Click OK.
Y. To Change the Text of a Hyplerink
1. Select the link and then, on the Insert tab in the Links group, click Hyperlink to open
the hyperlink dialog box.
2. In the Text to display box, make any necessary changes to the text.
3. Click OK.
Additionally, you can include ScreenTip text that appears when your cursor hovers over
a hyperlink, and can be used in a similar way to alt text. To add ScreenTip text, do the
following:
1. Place your cursor in the hyperlink you want to add ScreenTip text to.
2. On the Insert tab, in the Links group, click Hyperlink to open the hyperlink dialog box.
3. Click ScreenTip…
4. Type in your text in the ScreenTip text box.
5. Click OK.
X. Include Closed Captions for any Audio or Video:
1. Whenever you use additional audio or video components in a presentation, ensure that
the content is available in alternative formats for users with disabilities, such as closed
captions, transcripts or alt text.
2. If you’re using PowerPoint 2010, you can download and install the Sub-titling text add-
in for Microsoft PowerPoint (STAMP): http://office.microsoft.com/en-
us/powerpointhelp/redir/HA102540315.aspx?CTT=5&origin=HA102013555, which lets
you easily create closed captions for video and audio in your presentations.
Y. Ensure that the Reading Order of Each Slide is Logical
People who cannot view the slide will hear slide text, shapes and content read back in a specific
order. If you are using objects that are not part of the slide template, it is important to be sure
that they will be read by a screen reader in the order that you intend them to be.
To check the order in which your slide content will be read back, do the following:
1. On the Home tab, in the Drawing group, click Arrange and then choose Selection
Pane.
2. The Selection Pane lists the objects on the slide. Objects will be read back beginning
with the bottom list item and ending with the top list item. Correct any out of order
items using the Re-order arrows on the bottom of the pane.
H-1297-1 Handbook for Creating Section 508 Compliant Documents (P)
8-16
BLM Handbook Rel. No. 1-1766
03/09/2015
Z. Increase Visibility for Colorblind Viewers
Colorblindness affects a significant number of people, most often as an inability to
distinguish between red and green, or seeing red and green differently. When creating
presentations, it’s important to choose elements that increase visual contrast so viewers who
cannot rely on color distinction can still understand what they’re seeing. Some things you
can do when building a slide deck include:
•
Avoid using orange, red, and green in your template and text.
•
Use texture in graphs, instead of color, to highlight points of interest.
•
Circle or use animation to highlight information, rather than relying on laser
pointers or color.
•
Keep the overall contrast in your presentation high.
AA. Animations and Transitions
Avoid animation and automatic slide transitions since they:
•
Can be distracting.
•
Can cause screen readers to re-read slides.
•
Can read parts of the slide out of order, and/or.
•
May not give users enough time to read slide content.
Tips:
•
Accept or reject and turn off track changes.
•
Remove all comments from the document.
•
All slides should be absent of flickering/flashing text and/or animated text.
BB. Convert PowerPoint to Other Formats
PowerPoint is a good format for live presentations, but it is not the best format for
distributing content on the web. PowerPoint files can be large, and users must either have
Microsoft Office or a special plug-in in order to view them. The slides by themselves usually
do not offer a complete summary of the information conveyed. If PowerPoint files are
distributed or posted on the web it is recommended that they are exported to PDF.
Converting your presentations to a PDF
To save the accessible functionality of the PowerPoint document that has been created, it
must be saved as a PDF.
Preferably you have Adobe Acrobat X or XI Pro software installed to continue on with
making your PDF file.
Now that the document has a structure, alternative text for images, formatted columns, and
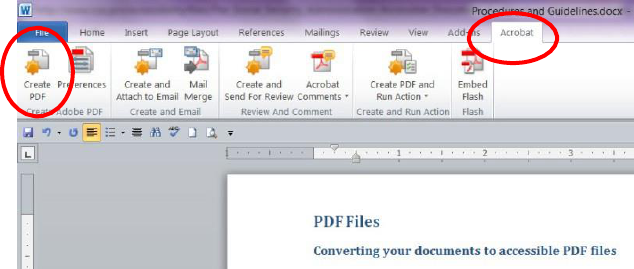
H-1297-1 Handbook for Creating Section 508 Compliant Documents (P)
8-17
BLM Handbook Rel. No. 1-1766
03/09/2015
correctly styled tables, it is ready to be converted to the PDF file format. These general steps
will help get your document to an accessible PDF.
•
Turn Track Changes Off: Check to see if Track Changes is on or off. Track Changes is
a toggle. If Track Changes is on click the Track Changes Icon under the Review tab.
•
Remove All Comments: Note: Always perform this step. Comments may be hidden.
•
To remove comments Click on the Reject Change/Delete Show Markup under the
Review tab and make sure Comments in unchecked
•
All Formatting Marks Turned Off: All formatting marks must be turned off.
•
Click on Tools; Then Options to display the Option Menus. Formatting marks may
be found under the View tab. Ensure that all formatting marks are turned off.
Convert your document to a PDF file:
1. With the document open and from the Word toolbar or ribbon, select Adobe PDF or
Acrobat.
2. Click the Create PDF Icon.
3. You have now created a PDF file.
4. You will now be working in your opened PDF file. Follow the directions below.
Figure 46 - Create PDF
Evaluate PDF accessibility in Adobe Acrobat Professional:
1. Go to menu item: Advanced > Accessibility > Full Check…
2. In the Full Check dialog, select all the checking options.
3. Select the Start Checking button.
**Note: Remember to use the 508 compliancy checklist at the end of this document to
be certain you have followed all steps necessary to make your PDF document
compliant.

H-1297-1 Handbook for Creating Section 508 Compliant Documents (P)
8-18
BLM Handbook Rel. No. 1-1766
03/09/2015
CC. PowerPoint 508 Checklist
ID
1.0.Master Requirements for all
Documents
Yes
(Pass)
No
(Fail)
N/A
1.1
Does the document file name not contain
spaces and/or special characters?
1.2
Is the document file name concise,
generally limited to 20-30 characters, and
does it make the contents of the file
clear?
1.3
Have the Document Properties for Title,
Author, Subject (AKA Description),
Keywords, Language, and Copyright
Status been applied?
1.4
Does the document utilize recommended
fonts (i.e., Times New Roman, Verdana,
Arial, Tahoma, Helvetica, or Calibri)?
1.5
Have track changes been accepted or
rejected and turned off?
1.6
Have comments been removed and
formatting marks been turned off?
1.7
Does the document refrain from using
flashing/flickering text and/or animated
text?
1.8
Is the document free of background
images or watermarks?
1.9
Do all images, grouped images, and non-
text elements that convey information
have meaningful alternative-text
descriptions?
1.10
Do complex images (i.e., charts and
graphs) have descriptive text near the
image (perhaps as a caption)?
1.11
Do all URLs contain the correct
hyperlink and display the full URL? It
should
read http://www.nwcg.gov . NOT
NWCG.
1.12
Are all URLs linked to correct
Web destinations?

H-1297-1 Handbook for Creating Section 508 Compliant Documents (P)
8-19
BLM Handbook Rel. No. 1-1766
03/09/2015
ID
2.0. General Layout and Formatting
Requirements
Yes
(Pass)
No
(Fail)
N/A
2.1
Can all slide text be viewed in the Outline
View?
2.2
Do all of the slides avoid using
flickering/flashing text and/or animated text?
2.3
Do all of the slides avoid using text boxes or
graphics with text within them?
2.4
Is the list style being used as opposed to
manually typed characters (e.g. Hyphens,
numbers, or graphics)?
2.5
If multimedia is present, did the multimedia
pass the Multimedia Checklist?
ID
1.0.Master Requirements for all
Documents
Yes
(Pass)
No
(Fail)
N/A
1.13
Are e-mail links accessible?
1.14
Has a separate accessible version of the
document been provided when there is no
other way to make the content accessible?
1.15
If there are tables, are blank cells
avoided?
1.16
Is all of the text easy to read in
comparison to the background of the
document (i.e., has a color-contrast ratio
of 4.5:1)?
1.17
Has the document been reviewed in Print
Preview for a final visual check?
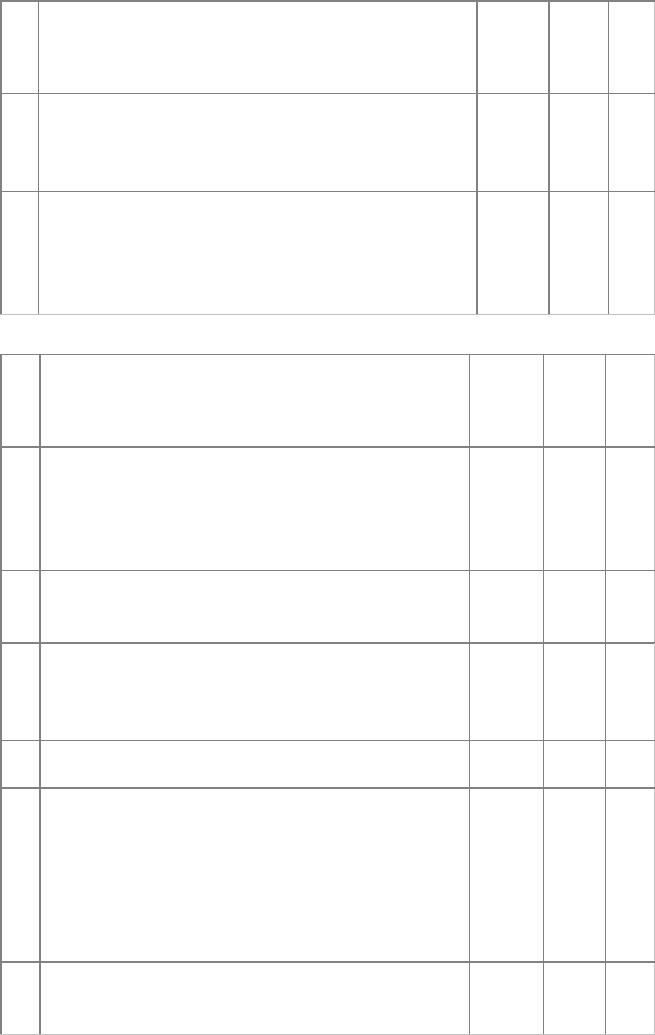
H-1297-1 Handbook for Creating Section 508 Compliant Documents (P)
8-20
BLM Handbook Rel. No. 1-1766
03/09/2015
ID
3.0. Document Images Requirement
Yes
(Pass)
No
(Fail)
N/A
3.1
Are multiple associated images on the same
page (e.g., boxes in an organizational chart)
grouped as one object?
3.2
Have all multilayered objects been flattened
into one image and does that image use one
alternative text description for the image?
ID
4.0. Document Tables
Yes
(Pass)
No
(Fail)
N/A
4.1
If the document has a tabular appearance,
was that tabular structure made using the
table option (as opposed to manual tabs
and/or spaces)?
4.2
Do all tables have a logical reading order
from left to right, top to bottom?
4.3
Do data tables have the entire first row
designated as a ‘Header Row’ in table
properties?
4.4
Is the table free of Merged Cells?
4.5
Are all tables described and labeled (where
appropriate)? Note: In some cases
naming/numbering of tables may not be
appropriate. For example, a small data table
in a presentation may not need a reference.
4.6
In table properties, is “Allow row to
break across pages” unchecked?
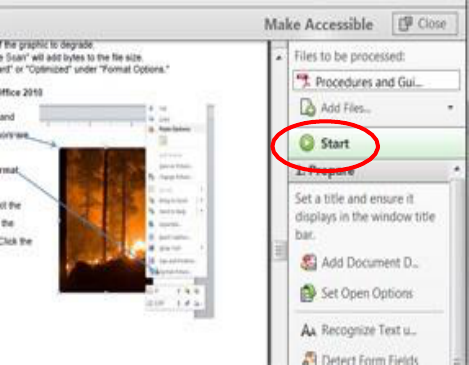
H-1297-1 Handbook for Creating Section 508 Compliant Documents (P)
9-1
BLM Handbook Rel. No. 1-1766
03/09/2015
Chapter 9 - PDF Checking and Problem Solving
A. PDF Document Properties
The Title, Subject, Author, Keywords and Language are important elements of any
document. They are used by search engines and screen readers to find and identify content in
documents.
Ensure the document properties have been filled out when the original document was created:
1. Click on File.
2. Then Properties.
3. Select the Description tab
4. Complete the form as follows:
a. Title: The actual title of the document (not the
computer file name).
b. Author: Your office…Committee name (not your
personal name).
c. Subject: Brief identification of the subject of the
document.
d. Keywords: Keywords are associated with the document during a search and
will effectively rank the document for relevance. The closer your keywords are
to the search words the user enters, the higher your document will be ranked in
the search. When using multiple keywords, separate them with a comma. Be
sure to choose words that are relevant to the content.
5. Next Select the Advanced tab.
6. Go down to Language and click on the drop down arrow and select English.
7. This part is now complete. Click on OK at the bottom of the page.
B. 508 Compliance Check
Once you have completed the Properties you will now need to check to see if it passes the 508
Compliancy test using Adobe Acrobat X or XI Pro. If you have properly structured your word
document you should have very few errors if any.
Figure 47 - "Start" icon under the Make Accessible tab in Adobe Acrobat XI
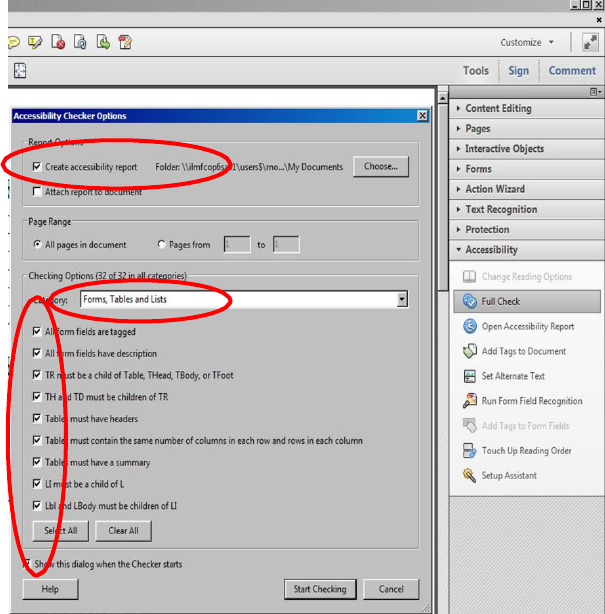
H-1297-1 Handbook for Creating Section 508 Compliant Documents (P)
9-2
BLM Handbook Rel. No. 1-1766
03/09/2015
To check your PDF using XI Pro:
1. Open up your PDF file.
2. Click on Tools (located in the upper right hand corner of your PDF).
3. Another table will appear – Select “Action Wizard.”
4. Select “Make Accessible” this action will guide you through each step in creating and
verifying an accessible PDF.
5. Click on Start. This will start the automatic fields review. As the process starts new
windows identifying each area will be displayed on your screen. All blanks need to be
filled out:
a. Description.
b. Recognize Text.
c. Is this a fillable form?
d. Set reading Language (English).
e. Acrobat will detect all figures in this document and will display any missing alt
text.
f. Accessibility Checker (In the middle of this page “Checking Options” there are 32
options available and it usually shows 31. You will need to click on the drop down
arrow and Choose “forms, Tables Lists” to add it.
g. After you have completed “f” above go to bottom of page and click Start
Checking.
Figure 48 - Adobe Acrobat Checking Options
6. Results from Check – The results will appear on the left side of your PDF file. Click
on each error and it will take you to the area in the document that needs to be fixed.
7. Also try right clicking on the error. If it says FIX, do that. Often, the fix feature will
resolve the error.
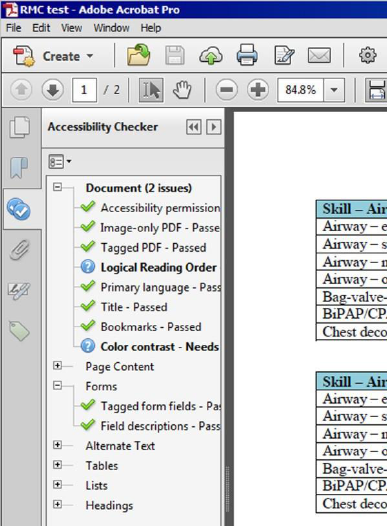
H-1297-1 Handbook for Creating Section 508 Compliant Documents (P)
9-3
BLM Handbook Rel. No. 1-1766
03/09/2015
Figure 49 - Results from Check will appear on the left side of document
C. Avoid Scanned Documents
You should avoid using text documents that have been scanned if at all possible. A scanned
text document is actually one large image per page and a screen reader will see this as a
blank page. Scanned text documents are not accessible to screen readers without additional
work that is often extensive.
To determine if a text document has been scanned, try to select some text using the Select Tool.
» Menu: Tools > Select & Zoom > Select Tool
Look at your cursor. If your cursor looks like a “cross-hairs” (+), rather than an “I-beam” (I),
you are working with a scanned document. This will present an accessibility challenge and
result in a much bigger file size. A large file size can also be a barrier for website visitors with
dialup access.
What to Do with a Scanned Image
The first step for turning scanned documents into actual text is to go through an Optical
Character Recognition (OCR) process, which turns the images of words into actual text on
a page.
To make a scanned document accessible, you must convert the image of the document into "real"
text. That is, the text must be selectable and scalable. This is usually done through OCR (Optical
Character Recognition). If the PDF version is also to be your accessible version, you'll need to add
additional accessibility mark-up – adding "tags" to your PDF, adding alternative text for images,
H-1297-1 Handbook for Creating Section 508 Compliant Documents (P)
9-4
BLM Handbook Rel. No. 1-1766
03/09/2015
graphs, and charts, and adding header information to data tables. In addition, text created from a
scanned image of a document is often converted into unexpected segments and these segments may
be out-of-order in terms of the expected read-order of the document. You'll need to perform several
checks to insure correct read- order is established, once your document is converted.
In order to insure your document is accessible to users of assistive technology, you'll need to edit
the PDF document. In Adobe Acrobat version nine:
1. When first opening a scanned or legacy PDF, the “Scanned Page Alert” pop-up
window may appear. Select OK. If it does not appear, manually enable OCR from
the Acrobat menu. Select Documents >Recognize Text using OCR>Start.
2. From the Recognize Text pop-up window click the Edit button to access the
RecognizeText Settings.
3. Set the Primary OCR Language combo box to the language used in the PDF.
4. Set the PDF Output Style combo box to “Formatted Text & Graphics”.
5. Set the Down sample Image combo box to “Lowest (600 dpi).
6. Click OK to return to the Recognize Text pop-up window.
7. From the Recognize Text window, make sure the “All pages” radio button is selected
and then click the OK button to perform OCR.
8. Add descriptive tags for non-text elements: graphs, charts, images.
9. Add accessible mark-up for tables.
10. Verify the read-order of the document.
11. As Acrobat performs its OCR process, it creates a list of "suspect" words and
characters that could not be clearly identified.
In Adobe Acrobat version 10 and 11:
1. In the Tools window on the right, open the Text Recognition tab.
2. Choose “In this file” to recognize the scanned image.
3. You can choose to search single or multiple pages.
4. Under Edit set the language, PDF output style, and down sample size. The smaller
the down sample size the smaller the file size, but the document won’t be as sharp.
Fix OCR Suspects (text that was not recognized properly)
As Acrobat performs its OCR process, it creates a list of "suspect" words and characters that
could not be clearly identified. You can see all the suspect items at once: from the
DOCUMENT menu, choose PAPER CAPTURE and FIND ALL OCR SUSPECTS. Acrobat
highlights all the suspect items in the document.
You must address each OCR suspect. Any OCR suspect that you ignore will not be
converted into readable text and will be ignored by screen readers.
Walk through the OCR suspects one by one Acrobat 9:
1. From the DOCUMENT menu, choose PAPER CAPTURE, and FIND FIRST OCR
SUSPECT.
2. The FIND ELEMENT dialog box appears showing the first "suspect" set of characters.
3. If the suspect characters are text, you'll be able to edit them in the dialog box.
Otherwise, retype the correct text characters directly in the document using advanced
editingtechniques in Acrobat.
H-1297-1 Handbook for Creating Section 508 Compliant Documents (P)
9-5
BLM Handbook Rel. No. 1-1766
03/09/2015
4. Once you have corrected the suspect, choose "Accept and Find" to go to the
next suspect item.
5. When you have corrected all suspect items, save your document.
To edit or delete text that was not recognized correctly:
1. Select Tools - Advanced Editing - Touchup Text Tool.
2. Left click on document and correct the OCR mistakes.
3. To turn off the Touchup Text Tool, activate the Hand tool located on the Acrobat
toolbar.
Walk through the OCR suspects one by one Acrobat 10 and 11:
1. Under Text Recognition in the tools panel select OCR Suspects, either one at a time or
all at once.
2. To fix any OCR suspects open the Touch Up Reading Order tool box under the
Accessibility Tab.
3. Click on each suspect and apply the correct format.
Verifying Your Document Text
After you have performed OCR and addressed all the suspect characters, you can do a
quick check to insure that the text of your document is available to screen readers: Save as
text (accessible).
1. From the FILE menu, choose "SAVE AS."
2. In the "SAVE AS" dialog box, change the "SAVE AS TYPE" to "Text (Accessible)
(*.txt)."
3. Click SAVE. Adobe converts your document to a plain text file using the same text
that would be accessible to assistive technology, including alternative text for
images and graphics.
4. Open your newly saved text version in Adobe. Compare the text in the plain text
version to the text in the PDF version – are they the same? If not, edit the text and/or
edit the tags in the PDF version and re-save as "Text (Accessible)" to check again.
D. Adding Tags to Your Document
Once you are certain that the necessary text is available on the document, you can add tags to
your document. Adding tags creates a duplicate of your document that is marked-up for
accessibility. Only the very latest assistive technology can read an untagged PDF. Plus,
untagged PDF cannot be reflowed to fit available screen size and cannot contain additional
information, such as alternative text for images. Thus, only a tagged PDF can be considered
accessible.
You can use Acrobat's automated feature to add tags to your document:
1. From the ADVANCED menu, choose ACCESSIBILITY (version 9), Tools Panel
Accessibility Tab (version 10 & 11) and "ADD TAGS TO DOCUMENT".
2. Acrobat generates a tagged version of your document that can only be viewed in the tags
window. To open the tags window:
H-1297-1 Handbook for Creating Section 508 Compliant Documents (P)
9-6
BLM Handbook Rel. No. 1-1766
03/09/2015
a. From the VIEW menu, choose NAVIGATION TABS and TAGS (version 9).
Open the Tags Panel in the left toolbar (version 10 & 11).
b. Use the asterisk (*) key on the Number Key Pad to open all tag levels.
c. Use the minus (-) key on the Number Key Pad to close all tag levels.
3. Check tags for accuracy, completeness, and read-order.
E. Checking Your Document for Accessibility
After adding tags, you can do a few quick-checks to insure your document will work well with
assistive technology. You can also use these techniques at any point in your conversion
process to check the accessibility of your document.
Highlighting content is a simple method to confirm:
1. Text is readable by a screen reader. Text that cannot be highlighted/selected is likely
to be skipped or ignored by screen readers. Perform another OCR and confirm that
deselected text is not a "suspect character".
2. Read-order of the document. The order that text is highlighted/selected is also the
order the text will be read by a screen reader. Pay particular attention to text in tables
or columns. Does the text in one cell bleed into the text in another? Can you select
all of one column and then all of the next? Read-order can be changed by
rearranging the tags.
F. Reflow
Document reflow assists users who enlarge the text or who are using small screens or
resolutions, by reformatting the document to fit in the available screen. Without reflow, users
may be forced to scroll widely horizontal as well as vertically.
To check for reflow:
1. Increase the text size to 300% or greater.
2. From the VIEW menu, choose REFLOW (version 9). View>Zoom>REFLOW (version 10 &
11).
Note that how a document reflows also depends on read-order.
G. Read Aloud
The best way to check a document's accessibility is to use the same assistive technology your
users will use to access the document. However, if you don't have access to a screen reader or
screen enlarger, you can still get a sense of how those technologies will interpret your document
by listening to it being read by Acrobat's "Read Out Loud" feature. Although not practical for
lengthy documents, such as dissertation chapters or articles, this is a good strategy for shorter
documents that will receive high circulation on your web site or will be required reading for your
users.
To read out loud:
H-1297-1 Handbook for Creating Section 508 Compliant Documents (P)
9-7
BLM Handbook Rel. No. 1-1766
03/09/2015
1. From the VIEW menu, choose READ OUT LOUD.
a. Press SHIFT + CNTRL + Y to quickly read the current page.
b. Press SHIFT + CNTRL + B to read the entire document.
2. To stop reading: go to the VIEW menu, READ OUT LOUD, and choose STOP or
press SHIFT + CNTRL + E.
For longer documents, you may want to narrow your reading to only a few key pages: in
particular, those pages that contain graphics, tables, columns, or text boxes.
However, if your document is not reading correctly, see “Check Reading Order” under Tips and
Tricks on Correcting Errors in a PDF file.
H. Forms
1. Forms must be created in Adobe Acrobat. Form fields will not convert from MS
Word to PDF.
2. Open the document in Adobe Acrobat Professional as you would normally.
3. Select Edit from the Forms Sub Menu on the right of the document.
4. Depending on the form, Adobe will ask to detect form fields for you. Click Yes.
Adobe Acrobat will tag and label each form field that it detects.
5. Go through your document to make sure all form fields were detected.
6. On each form field, right-click and select Properties. Verify that there is a
description in the “Name” area, and the same description in the “Tooltips” area.
Fields will not work without both.
If a field is missing, create one by:
1. With the Form Menu open, click “Add New Field” and select the appropriate item
(text field, check box, radio button, etc.).
2. Place the crosshairs at the insertion point, and hold down the mouse button while
dragging.
3. Apply the appropriate Field Name.
4. Right-click to open the Properties dialog box and add a “Tooltip” description.
Fixing Reading Order in Forms:
If you had to add any new fields, then the reading order may be wrong. To fix:
1. With the Form Menu open, click the Tab Order arrow and in the drop down menu
select Show Tab Numbers.
2. The info box that pops up is simply telling you to sort by tab order manually and you
will do that next, so click OK.
3. Numbers should now be seen in each field. This is the order in which the fields will be
read. If there are any numbers out of order on the screen go to the Tabs Oder again and
select Order Tabs Manually. The next info box is simply telling you that we cannot
reorder the fields between pages, so click OK.
4. Drag the tabs to the correct order.
H-1297-1 Handbook for Creating Section 508 Compliant Documents (P)
10-1
BLM Handbook Rel. No. 1-1766
03/09/2015
Chapter 10 - Tips and Tricks on Correcting Errors in a PDF file
Helpful Hint: Adobe Acrobat does not let you undo changes when fixing PDFs! Therefore, if
you are correcting a lot of errors, the best practice is to make a few changes at a time, do
another accessibility check – to make sure the changes worked – if they worked, save and then
continue. In the event the change caused more problems or didn’t work, do not save and revert
back to the last good save before moving on. You’ll avoid losing hours of work because of one
faulty correction.
A. Tables - Summaries Failed:
Summaries are required to pass the 508 Compliancy test. We have found no fix at this time
to make the summaries follow the tables from MS Word when converting to PDF. They
must be redone in the PDF file.
1. To correct this error in Adobe Acrobat Click Tools > Accessibility > Touchup
Reading Order.
2. Touchup Reading Order screen will appear. Click Close.
3. Right click on the table that was identified with no summary and select “Edit Table
Summary”.
4. Enter summary information.
B. Tables - Headers Failed:
1. To correct this error click Tools > Accessibility > Touchup Reading Order.
2. Touch up Reading Order screen will appear. Click Close.
3. Right click on the table that was identified with no head and select “Table Editor.”
4. You should now see a TD in each cell.
5. At this point you need to determine which ones are the header cells.
6. Click the cell where it says TD. Right click and select “Table Cell Properties.”
7. Change Data cell to Header cell.
8. Under SCOPE drop down choose appropriate tag (whether it’s the header for a
column or a row).
C. Regularity Failed:
Regularity issues come in to play because you may have merged cells in a table. Tables must
contain the same number of columns in each row, and rows in each column – but there is a
work around to fix this issue.
The easiest way to fix this problem is to go back to your original document and fix it there.
To fix failed regularity using PDF tools:
After you perform a 508 compliancy check, click on the Tags icon. This will open up the
tags listing all sections, paragraphs, tables, etc. Tags indicate the structure of the
document and communicate the order in which the items should be read.
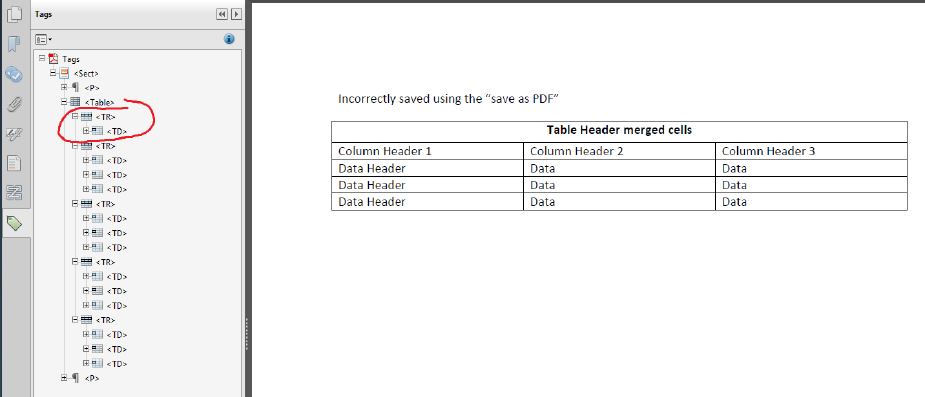
H-1297-1 Handbook for Creating Section 508 Compliant Documents (P)
10-2
BLM Handbook Rel. No. 1-1766
03/09/2015
To Fix (example table):
1. Open the tags panel on left side of screen (looks like a little tag)
2. Locate the problem table and click the + symbol to open the string.
3. Open every Table Row (TR) and find the one with the highest number of TH or TD
cells.
Note in example: there’s only one tag under the Table Header Merged cells area -
there should be three tags.
4. You need to change this by adding more TH or TD tags.
Figure 50 - Tags section displaying the table data and header cells
5. Start by going to Table Cell Properties and change the merged cell to a header cell, scope:
None.
a. Click on Tools.
b. Click on the Touch Up Reading Order.
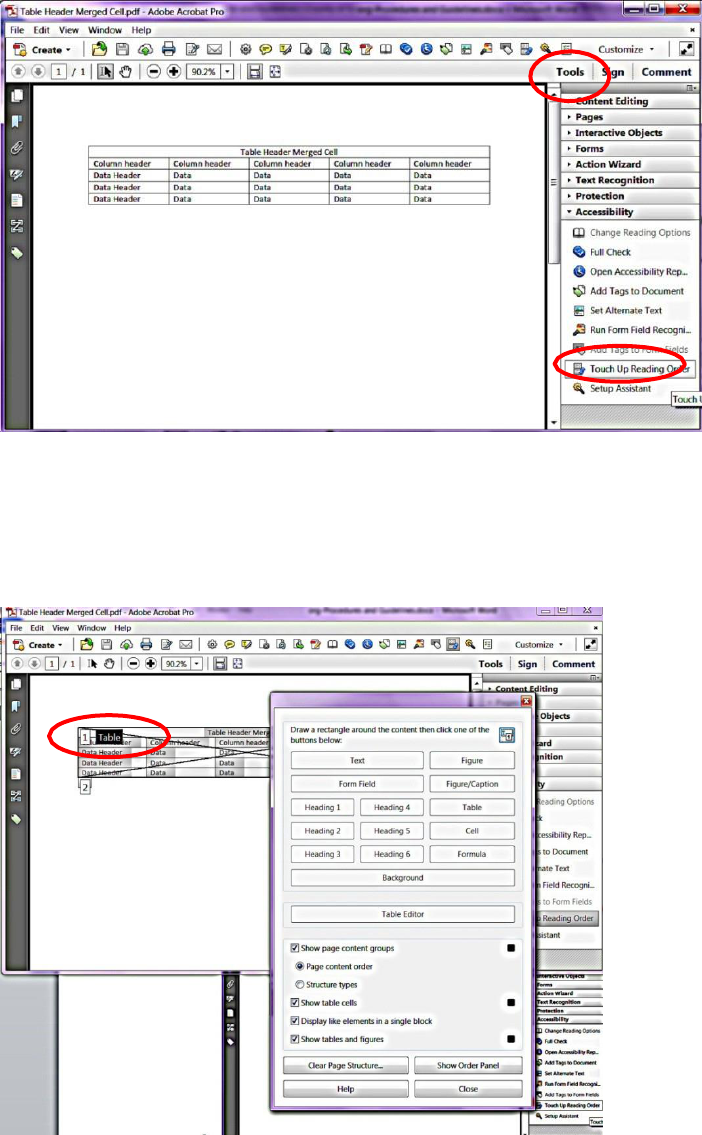
H-1297-1 Handbook for Creating Section 508 Compliant Documents (P)
10-3
BLM Handbook Rel. No. 1-1766
03/09/2015
Figure 51 - Acrobat displaying the Touch up Reading Order icon
c. Once the Touch up Reading Order screen appears, click on Close (this action merely
highlights the items on the page for you).
d. Right click on the table and select Table Editor to show you the TH and TD cells (See
Figure 21 below.)
Figure 52 - Touch up Reading Order screen
e. Right Click on TD to select the Table Properties screen.
f. Change the merged cell (Table Header merged cells) to a header cell, scope: None.
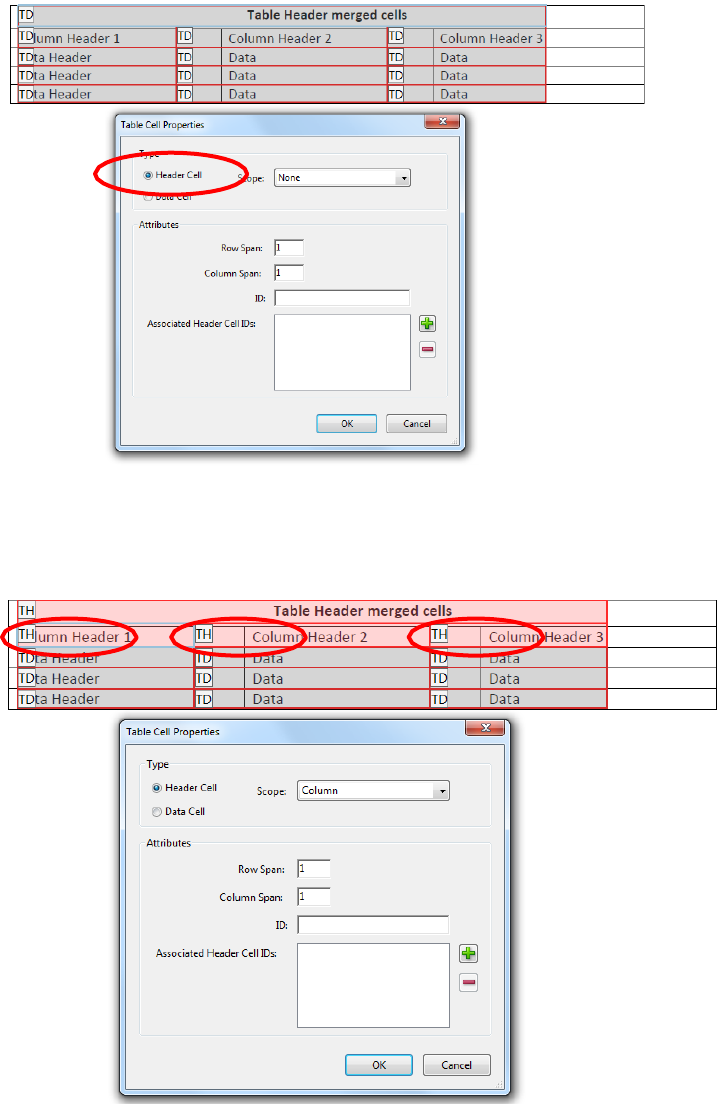
H-1297-1 Handbook for Creating Section 508 Compliant Documents (P)
10-4
BLM Handbook Rel. No. 1-1766
03/09/2015
Figure 53 - Table Cell Properties menu
g. Next change the cells labeled “Column Headers” to Header cells, scope: Column.
Figure 54 - Table Cell Properties menu showing column headers
h. If your table also has Header Rows change the cells labeled “Data Headers” to
Header cells, scope: Row.
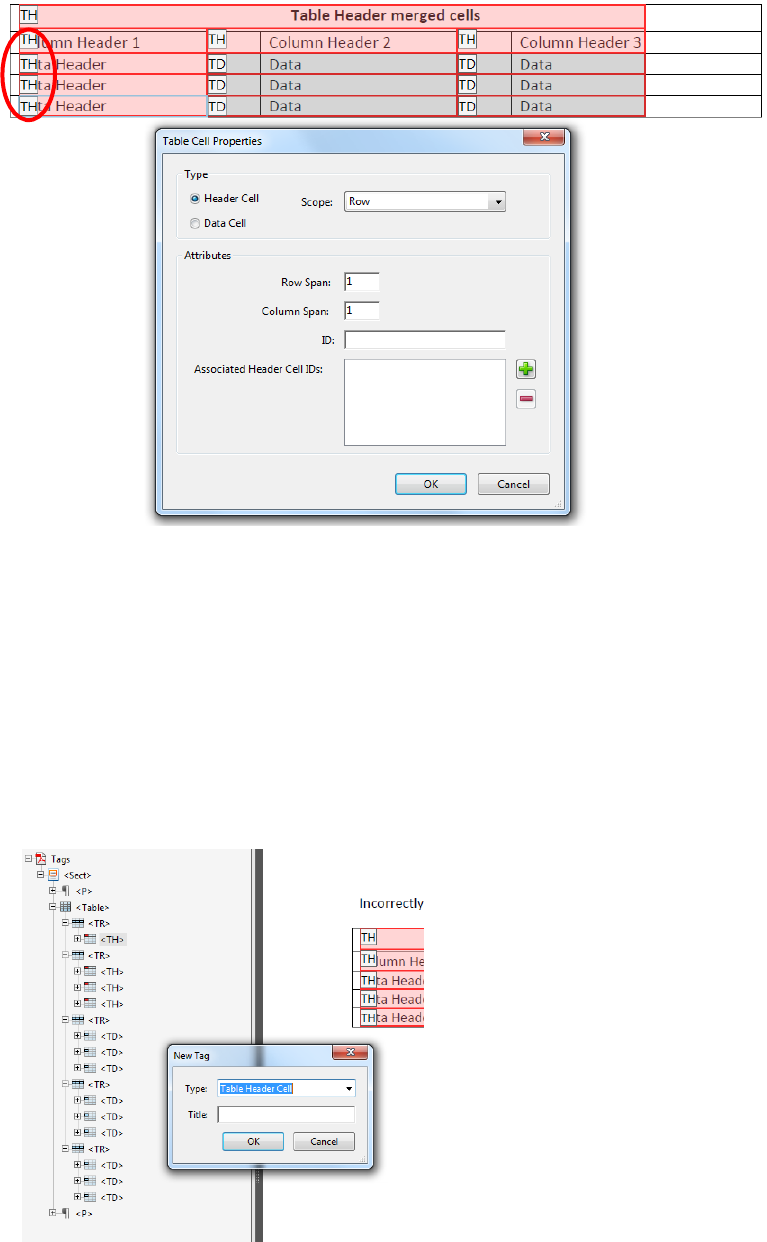
H-1297-1 Handbook for Creating Section 508 Compliant Documents (P)
10-5
BLM Handbook Rel. No. 1-1766
03/09/2015
Figure 55 - Table Cell Properties menu showing row headers
D. Add New Tags to the Table:
1. Open the Tags panel again and locate the problem table.
2. Open the first Table Row (TR) in the Tags panel.
3. Right click and select NEW TAG.
4. Set Type to Table Header Cell from the drop down menu and click OK.
5. Repeat step until number of TH tags match other Table Rows. All TR sections
should have the same number of tags.
Figure 56 - Tags on the left side of the page and the New Tag menu opened

H-1297-1 Handbook for Creating Section 508 Compliant Documents (P)
10-6
BLM Handbook Rel. No. 1-1766
03/09/2015
Make sure new tags are nested under the Table Row and not the Table. You can drag to the
correct area if needed. For Table Rows with TH and TD tags (if you need to add more tags),
there should only be one TH…the rest can be TDs. Repeat New Tag steps and change Type
to “Table Data Cell” for TDs.
Figure 57 - Tags menu with correct tag structure
Your irregular table should now be fixed and read correctly.
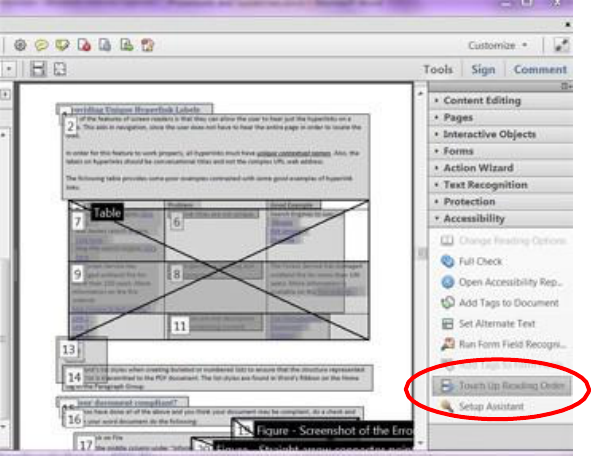
H-1297-1 Handbook for Creating Section 508 Compliant Documents (P)
10-7
BLM Handbook Rel. No. 1-1766
03/09/2015
E. Touchup Reading Order in a PDF file
Choose Tools > Accessibility > Touchup Reading Order to select the Touchup Reading
Order tool.
Figure 58 - Touch up Reading Order view
The Touchup Reading Order tool provides the easiest and quickest way to fix reading order
and basic tagging problems. When you select the Touchup Reading Order tool, a dialog box
opens that lets you see overlay highlights that show the order of page content. Each
highlighted region is numbered and highlighted with gray or colored blocks; the number
indicates the region’s placement in the page’s reading order.
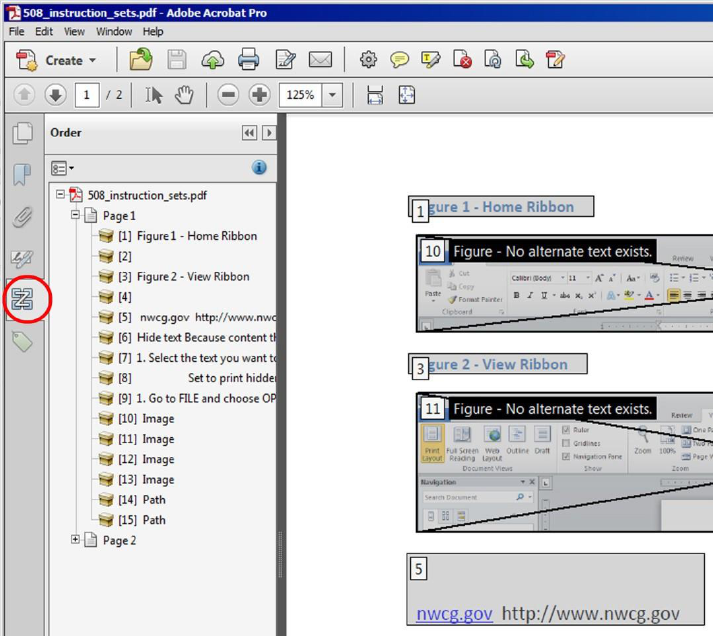
H-1297-1 Handbook for Creating Section 508 Compliant Documents (P)
10-8
BLM Handbook Rel. No. 1-1766
03/09/2015
F. Using the Touch Up Reading Order Tool to Add Alternate Text
1. Select the Touch Up Reading Order Tool.
2. Select Show Tables and Figures in the dialog box.
3. Right click the figure, and choose Edit Alternate Text from the pop-up menu.
4. In the Edit Alternate Text dialog box, type a new (or edit an existing) description for the
figure, then click OK.
G. To Correct Reading Order:
1. From the “Touch up Reading Order” window, select show order panel.
2. On left side of screen, under “Order”, select the out of order item and drag it to
the correct location in the reading order.
After you visually check the reading order of the page it’s a good idea to use the “Read
Out Loud” feature, found under VIEW, to be sure the Assistive Technology is reading
the page correctly.
Figure 59 - Z Order or Reading Order Panel
Unfortunately, more often than not, graphic images will not be in order, and using the “Z”
order panel may not correct the problem. Also, you may find that when you drag an element it
merges with another and then will not read correctly. Do not save and revert if this happens.
H-1297-1 Handbook for Creating Section 508 Compliant Documents (P)
10-9
BLM Handbook Rel. No. 1-1766
03/09/2015
Instead correct tagging issues as needed using the following steps in Correct Out of Order
Tags.
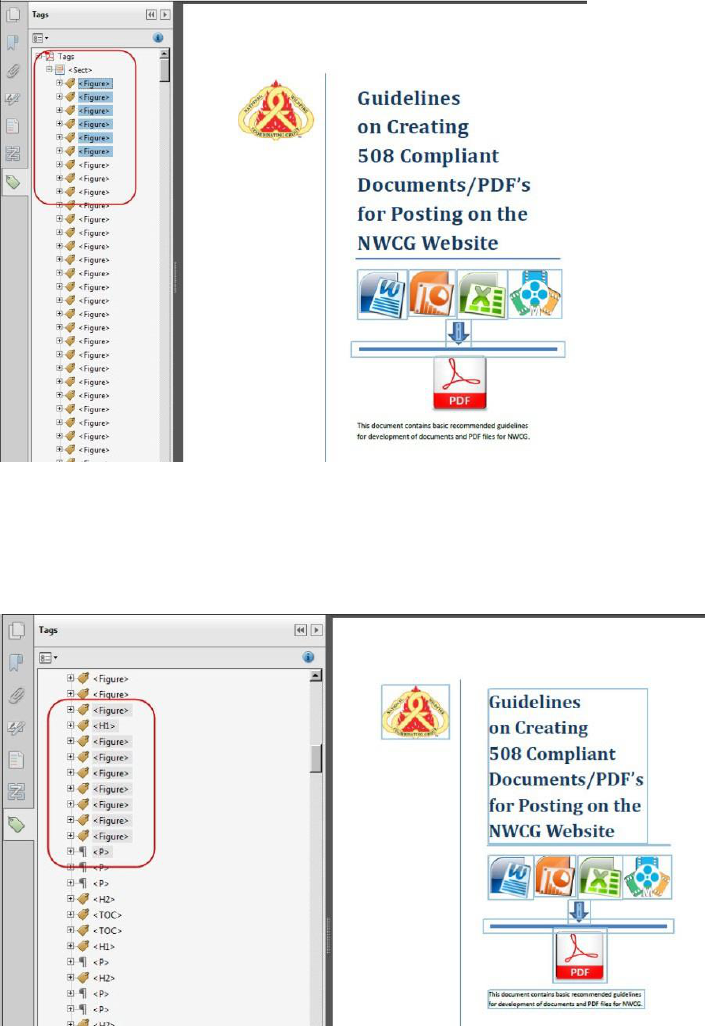
H-1297-1 Handbook for Creating Section 508 Compliant Documents (P)
10-10
BLM Handbook Rel. No. 1-1766
03/09/2015
H. Correct Out of Order Tags:
1. Open the Tags panel.
2. Find the Tag that is out of order (Figures are often at the beginning or
very end of the tag structure).
Figure 60 - Incorrect Tag Structure
3. Drag the tag(s) to the correct location in the tags panel to match the
screen layout. Do this for each page where the graphics or text is not in
order. Note how “Figures” are now below the “H1” and above the “P”.
Figure 61 - Correct Location of Tags

H-1297-1 Handbook for Creating Section 508 Compliant Documents (P)
10-11
BLM Handbook Rel. No. 1-1766
03/09/2015
I. Setting Content to Background:
Often content such as decorative lines between paragraphs or borders around pages don’t
offer anything other than visual appeal and don’t necessarily need to be read aloud. These
kinds of images can be set to background so assistive technology won’t attempt to read them.
1. Open the Touch Up Reading Order window.
2. Select the item by either clicking on it or dragging your cursor while holding down the
right mouse button over the entire image. It helps to zoom in.
3. With the element selected, click the background button in the Touch Up Reading Order
Screen. Or right click and choose background from the flyout menu.
4. You may need to go into the Tags panel and delete any empty tags left there after you
have set them to background. An empty tag does not have a (+) sign in front of it.
J. Changing Content Tags:
Sometimes Adobe gets it wrong. You may see content that was labeled a table instead of text,
or a labeled a paragraph instead of a heading. If text is not labeled at all, you will need to apply
one. Simply select the incorrect group and either use the Touch Up Reading order window and
apply the correct label, or right click and select the correct label from the drop down window.
From the Tags panel you can select the tag, right click and choose Properties to apply to correct
label
type.
K. List Errors
If you don’t create lists using the correct tools on the Home tab, you’re in for a bad time.
They are time consuming to fix and if you’ve got a lot of them it can get confusing.
Figure 62 - Correct order for List Items in the tag structure
List <L> is always the main folder for the group.
List Item <LI> is the folder for the numbered items and items listed under that
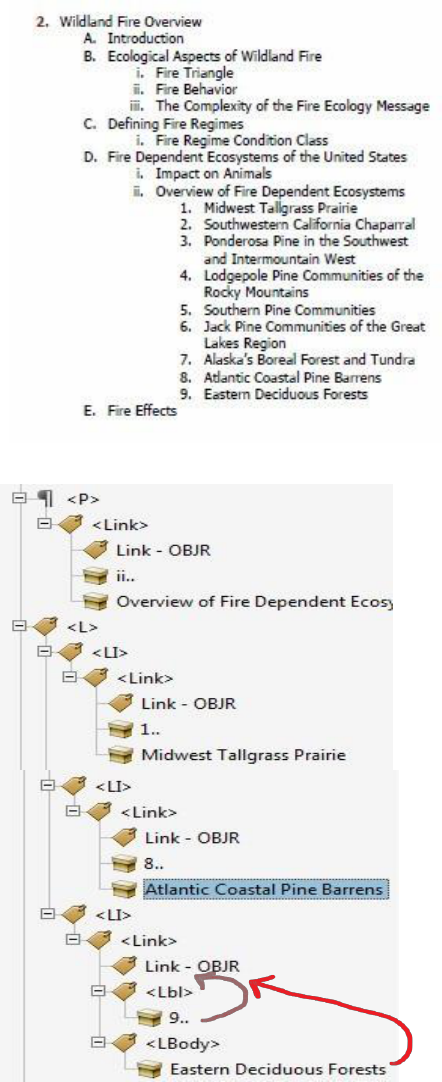
H-1297-1 Handbook for Creating Section 508 Compliant Documents (P)
10-12
BLM Handbook Rel. No. 1-1766
03/09/2015
number. List Body <LB> is the folder for the actual text. This goes under List Item.
Lists are also created when we have linked content from a TOC or Table of Content structure.
Figure 63 - Example of a complex list structure
Figure 64 - Example of Linked List tag structure
If your list Links from another part of the document such as the Table of Contents, you will
see a Link – OBJR. This folder will reside under the <LI> folders.
H-1297-1 Handbook for Creating Section 508 Compliant Documents (P)
10-13
BLM Handbook Rel. No. 1-1766
03/09/2015
Acrobat may incorrectly place content in the wrong structure and you will have to fix it.
Simply drag the <Lbl> and <LBody> content, not the folder, under the Link – OBJR folder
and delete the now empty <Lbl> and <LBody> folders.
L. Annotation Errors
There are many kinds of annotations. The key is, knowing what you are looking at before
you begin.
If you get a Tagged Annotations Failed error when you do an accessibility, to fix:
1. Right click on the listed error to see what the error is on the page. Note what kind
of content it is.
2. In the error panel right click on the listed error and choose View in Content Panel.
3. In the Content Panel it will have the error listed under the Annotations.
4. Choose the Options drop down and select Find.
5. In the Find Element window select Unmarked Annotation.
6. Choose Search Page or Entire Document.
7. Click on the Find button at the bottom of the window. If it finds anything the Tag
element box will become available.
8. Note what is highlighted on the page first and then click the Tag Element button.
9. Select the Type (most common is a Link or Form) and say OK.
10. The Tag Element button will remain available until all untagged annotations have
been resolved.
M. Tagged Form Fields
When Tagged Form Fields fail, follow the same steps as above. After clicking the Tag
Element button, choose the Type dropdown and select Form.
N. Tab Order
With a Tab Order – failed, try right clicking on the error first and select
fix. To manually fix the tab order for links, form fields, comments, and
other annotations:
1. Click the Pages panel on the navigation pane.
2. Click a page thumbnail, and then choose Page Properties from the Options menu.
3. In the Page Properties dialog box, choose Tab Order. Then, select Use Document
Structure, and click OK.
O. Encoding Errors
Encoding errors happen when one; a document created on a Mac using special characters is
saved as a PDF and then opened on a PC, or two; font conflicts occur. The best way to avoid
these issues is to use Open Type, or install the missing fonts on your computer. For Mac
users saving documents for PC use, convert fonts to curves/outlines prior to saving as a
PDF.

H-1297-1 Handbook for Creating Section 508 Compliant Documents (P)
10-14
BLM Handbook Rel. No. 1-1766
03/09/2015
We can’t recreate one of these errors, but we can suggest how to fix them if you encounter one.
1. Click on the error in the
A
cces
s
i
bi
li
t
y
Checker
panel to locate the element on the
page.
2. Next open the Content
E
d
i
t
i
ng
tab in the Tools
pa
nel
.
3.
S
e
l
e
c
t
E
di
t
Text &
I
ma
ge
s
.
4. Highlight the error on the page itself and under format try changing the
f
o
nt
.
If
you can find a font that is compatible with what
was
us
ed
,
it may fix the
p
r
ob
le
m
.
5. If this doesn’t w
o
r
k
,
and you have no way of obtaining the original to ed
i
t
,
you
can
d
el
et
e
the offending element and try replacing it by adding a new text
element or image. Be careful not to change content
essential
to the meaning of
the
do
c
ument
.
P. Using the Acrobat XI Pro Accessibility Checker
A complete walkthrough of Acrobat XI's Accessibility Checker, as well as the Make
Accessible action wizard.
•
Adobe Acrobat XI Pro Accessibility Guide: Using the Accessibility Checker
(PDF,9.2M).
http://wwwimages.adobe.com/www.adobe.com/content/dam/Adobe/en/accessibility
/pr oducts/acrobat/pdfs/acrobat-xi-accessibility-checker.pdf
•
Acrobat XI Pro PDF Accessibility Repair Workflow.
http://wwwimages.adobe.com/www.adobe.com/content/dam/Adobe/en/accessibility
/pr oducts/acrobat/pdfs/acrobat-xi-pdf-accessibility-repair-workflow.pdf
Analyze PDF files and add enhancements to make documents accessible to all users.

H-1297-1 Handbook for Creating Section 508 Compliant Documents (P)
A1-1
BLM Handbook Rel. No. 1-1766
03/09/2015
Appendix 1 - Font Index
Following are fonts commonly found in MS Word, and at this time known to be compliant. We
suggest limiting your document to no more than two fonts.
Word 508 Compliant Fonts
Agency FB
Constantia
Albany
Cooper
Albertus
Copperplate Gothic
Algerian
Corbel
Andale
Cordia Coronet
Andalue
Cornet
Angsana New
Courier
Antique Olive
Curlz
Aparajita
DauaPeah
Arabic typesetting
DFKai
Arial
Dillenia
Baskerville Old Face
DokChamps
Batang
Dotum
Bauhaus
Ebrima
Bell
Edwardian Script
Berlin Sans
Elephant
Bernard
Engravers
BlackLadder
Eras
Bodoni
Estrangelo
Book Antiqua
Eurcrozia
Bookman Old Style
Euphemia
Bookshelf Symbol 7
FangSong
Bradley Hand
Felix Titling
Britannic Bold
Footlight
Browallia New
Forte

H-1297-1 Handbook for Creating Section 508 Compliant Documents (P)
A1-2
BLM Handbook Rel. No. 1-1766
03/09/2015
Word 508 Compliant Fonts
Brush Script
Franklin Gothic
Calibri
Freesia
Californian
Freestyle Script
Calisto
French Script
Cambria
Gabriola
Candara
Garamond
Castellar
Gautami
Centaur
Georgia
Century
Freesia
Century Gothic
Freestyle Script
Century Schoolbook
French Script
CG Omega
Gabriola
CG Times
Garamond
Chiller
Gautami
Clarendon
Georgia
Colonna
Freesia
Comic Sans
Gigi
Consolas
Gill Sans
Gloucester
Microsoft Himalaya
Goudy Old Style
Microsoft Jheng Hei
Goudy Stout
Microsoft New Tai Lue
Gulim
Mocrosoft PhagsPa
Gungsuh
Microsoft Sans Serif
Hattenschweiler
Microsoft Tai Le
Harlow Solid
Microsoft Ughur
Harrington
Microsoft YaHei
High Tower
Microsoft Yi Baiti
Impact
MingLiU
Imprint
Mistral

H-1297-1 Handbook for Creating Section 508 Compliant Documents (P)
A1-3
BLM Handbook Rel. No. 1-1766
03/09/2015
Word 508 Compliant Fonts
Informal
Modern No. 20
Iris
Mongolian Baiti
Iskoola Pota
Monoty[e Corsiva
Jasmin
MoolBoran
Jokerman
MS Gothic
Juice
MS Mincho
KaiTi
MS Outlook
Kalinga
MS PGothic
Kartika
MS PMincho
Khmer
MS Reference Sans
Kodchiang
MS Reference Specialty
Kokila
MS UI Gothic
Kristen
MT Extra
Kunsteler Script
MV Boli
Lao
Niagara Engrave and Solid
Latha
NSimSun
Leelawadee
Nyala
Letter
OCR
Lucida Bright
Old English Text
Lucida Caligraphy
Onyx
Lucida Console
Palace Script
Lucida Fax
Palatino
Lucida handwriting
Papyrus
Lucida Sans Typewriter
Parchment
Lucida Sans Unicode
Perpetua
Magneto
Plantagenet Cherokee
Maiandra
Playbill
Malgun
PMing
Mangal
Poor Richard

H-1297-1 Handbook for Creating Section 508 Compliant Documents (P)
A1-4
BLM Handbook Rel. No. 1-1766
03/09/2015
Word 508 Compliant Fonts
Marigold
Pristina
Marlett
Raavi
Matura
Rage
Meiryo
Ravic
Rockwell
Tempus
Sakkai majalla
Times New Roman
SAPDings
Traditional Arabic
SAPIcons
Trebuchet
Script
Tunge
Segoe
TW Cen
Shonar Bangla
Universe
Showcard gothic
Utsaah
Shruti
Vani
SimiHei
Verdana
Simplified Arabic
Vijaya
SimSun
Viner Hand
Snap
Vivaldi
Stencil
Vladimire Script
Sylfaen
Vrinda
Symbol
Wide Latin
Tahoma

H-1297-1 Handbook for Creating Section 508 Compliant Documents (P)
A1-5
BLM Handbook Rel. No. 1-1766
03/09/2015
These are the fonts known to have issues. We suggest not using them.
Word Fonts with Known 508 compliant Issues
Adobe Arabic
Giddyup
Adobe Caslon
Hobo
Adobe Fan Heiti
Kozuka Gothic
Adobe Fangsong
Levenim
Adobe Garamond Pro
Lithos
Adobe Gothic
Lucida Sans
Adobe Hebrew
Mesqutte
Adobe Heiti
Minion pro
Adobe kaiti
Miriam
Adobe Ming
Myriad Pro
Adobe Myungjo
Narkisim
Adobe Nash
Nueva
Adobe Song
Orator
Aharoni
Poplar
Birch
Prestige
Blackoak
Rod
Chaparral Pro
Rosewood
Charlemagne
Tekton
David
Trajan Pro
FrankRuehl

H-1297-1 Handbook for Creating Section 508 Compliant Documents (P)
A2-1
BLM Handbook Rel. No. 1-1766
03/09/2015
Appendix 2 - Symbol Shortcuts
Alt + (the number)
☺
1
▲
30
<
60
Z
90
x
120
û
150
┤
180
╥
210
≡
240
☻
2
▼
31
=
61
[
91
y
121
ù
151
╡
181
╙
211
±
241
♥
3
spac
32
>
62
\
92
z
122
ÿ
152
╢
182
╘
212
≥
242
♦
4
!
33
?
63
]
93
{
123
Ö
153
╖
183
╒
213
≤
243
♣
5
"
34
@
64
^
94
|
124
Ü
154
╕
184
╓
214
⌠
244
♠
6
#
35
A
65
_
95
}
125
¢
155
╣
185
╫
215
⌡
245
•
7
$
36
B
66
`
96
~
126
£
156
║
186
╪
216
÷
246
◘
8
%
37
C
67
a
97
⌂
127
¥
157
╗
187
┘
217
≈
247
○
9
&
38
D
68
b
98
Ç
128
₧
158
╝
188
┌
218
°
248
◙
10
'
39
E
69
c
99
ü
129
ƒ
159
╜
189
█
219
∙
249
♂
11
(
40
F
70
d
100
é
130
á
160
╛
190
▄
220
·
250
♀
12
)
41
G
71
e
101
â
131
í
161
┐
191
▌
221
√
251
♪
13
*
42
H
72
f
102
ä
132
ó
162
└
192
▐
222
ⁿ
252
♫
14
+
43
I
73
g
103
à
133
ú
163
┴
193
▀
223
²
253
☼
15
,
44
J
74
h
104
å
134
ñ
164
┬
194
α
224
■
254
►
16
-
45
K
75
i
105
ç
135
Ñ
165
├
195
ß
225
255
◄
17
.
46
L
76
j
106
ê
136
ª
166
─
196
Γ
226
↕
18
/
47
M
77
k
107
ë
137
º
167
┼
197
π
227
‼
19
0
48
N
78
l
108
è
138
¿
168
╞
198
Σ
228
¶
20
1
49
O
79
m
109
ï
139
⌐
169
╟
199
σ
229
§
21
2
50
P
80
n
110
î
140
¬
170
╚
200
µ
230
▬
22
3
51
Q
81
o
111
ì
141
½
171
╔
201
τ
231
↨
23
4
52
R
82
p
112
Ä
142
¼
172
╩
202
Φ
232
↑
24
5
53
S
83
q
113
Å
143
¡
173
╦
203
Θ
233
↓
25
6
54
T
84
r
114
É
144
«
174
╠
204
Ω
234
→
26
7
55
U
85
s
115
æ
145
»
175
═
205
δ
235
←
27
8
56
V
86
t
116
Æ
146
░
176
╬
206
∞
236
∟
28
9
57
W
87
u
117
ô
147
▒
177
╧
207
φ
237
↔
29
:
58
X
88
v
118
ö
148
▓
178
╨
208
ε
238
;
59
Y
89
w
119
ò
149
│
179
╤
209
∩
239
Some other often used Symbol shortcuts: TM (Alt+Ctrl+T), © (Alt+Ctrl+C), ® (Alt+Ctrl+R)
