
6 Antares Drive, Phase 1, Suite 200, Ottawa, ON K2E 8A9 Canada
Tel: 613.232.4295 Fax: 613.232.7276
www.crgroup.com
Changer
TM
For Microsoft Dynamics GP
Version 2016
Use Changer to change or combine General Ledger
Accounts, Vendor Numbers, Item Numbers and Customer
Numbers for all current and historical transactions. In
addition, Changer can transfer Employee ID with all
current and historical transactions to new Employee IDs.

Corporate Renaissance Group
Changer
TM
for Microsoft Dynamics GP
Version 2016
This License Agreement is your proof of license.
Please treat it as valuable property.
Corporate Renaissance Group License Agreement
This is a legal agreement between you (either an individual or an entity) and Corporate Renaissance Group. By opening the sealed
software packages and/or by using the SOFTWARE, you agree to be bound by the terms of this Agreement. If you do not agree to the
terms of this Agreement, promptly return the disk package and accompanying items (including printed materials and binders or other
containers) to the place you obtained them for a full refund.
Corporate Renaissance Group Software License
1. GRANT OF LICENSE. This Corporate Renaissance Group License Agreement (“License”) permits you to use one copy of the
specific version of the Corporate Renaissance Group software product identified above, which may include user documentation
provided in “online” or electronic form (“SOFTWARE”), on any single computer, provided the SOFTWARE is in use on only
one computer at any time. If this package is a License Pak, you may make and use additional copies of the SOFTWARE up to
the number of Licensed Copies authorized above. If you have multiple Licenses for the SOFTWARE, then at any time you may
have as many copies of the SOFTWARE in use as you have Licenses. The SOFTWARE is “in use” on a computer when it is
loaded into the temporary memory (i.e. RAM) or installed into the permanent memory (e.g. hard disk, CD ROM, or other
storage device) of that computer, except that a copy installed on a network server for the sole purpose of distribution to other
computers is not “in use”. If the anticipated number of users of the SOFTWARE will exceed the number of applicable Licenses,
then you must have a reasonable mechanism or process in place to ensure that the number of persons using the SOFTWARE
concurrently does not exceed the number of Licenses. If the SOFTWARE is permanently installed on the hard disk or other
storage device of a computer (other than a network server) and one person uses that computer more than 80% of the time it is in
use, then that person may also use the SOFTWARE on a portable or home computer.
2. UPGRADES. If the SOFTWARE is an upgrade from another product, whether from Corporate Renaissance Group or another
supplier, you may use or transfer the SOFTWARE only in conjunction with that upgraded product, unless you destroy it. If the
SOFTWARE is an upgrade from a Corporate Renaissance Group product, you now may use that upgraded product in accordance
with this License, except that if the software is an upgrade from a component of a package of software programs which you
licensed as a single product, the SOFTWARE may be used and transferred only as part of that single product package, and
according to the License Agreement provided earlier with that single product package.
3. COPYRIGHT. The SOFTWARE (including any images, “applets”, photographs, animations, video, audio, music, and text
incorporated into the SOFTWARE) is owned by Corporate Renaissance Group or its suppliers and is protected by United States
and Canadian copyright laws and international treaty provisions. Therefore, you must treat the SOFTWARE like any other
copyrighted material (e.g. a book or musical recording) except that you may either (a) make one copy of the SOFTWARE solely
for backup or archival purposes, or (b) transfer the SOFTWARE to a single hard disk provided you keep the original solely for
backup or archival purposes. You may not copy the printed materials accompanying the SOFTWARE, nor print copies of any
user documentation provided in “online” or electronic form.
4. OTHER RESTRICTIONS. This License is your proof of license to exercise the rights granted herein and must be retained by
you. You may not rent, lease or transfer the SOFTWARE.
5. DUAL-MEDIA SOFTWARE. You may receive the SOFTWARE in more than one media. Regardless of the type or size of
media you receive, you may use only the media appropriate for your single designated computer or network server. You may
not use the media on any other computer or computer network, or loan, rent, lease, or transfer them to another user except as part
of a permanent transfer (as provided above) or other use expressly permitted by this License.
6. The Customer agrees that the SOFTWARE contains proprietary information, including trade secrets, know-how and confidential
information, that is the exclusive property of Corporate Renaissance Group. During the period this Agreement is in effect and at
all times after its termination, the Customer and its employees and agents shall maintain the confidentiality of this information
and not sell, license, publish, display, distribute, disclose or otherwise make available this information to any third party nor use
such information except as authorized by this Agreement.
7. The Customer shall not disassemble, unassemble, or decode any portion of the SOFTWARE. The Customer shall not modify
any portion of the SOFTWARE, or merge or embed the SOFTWARE in another computer program.
Limited Warranty
1. LIMITED WARRANTY. Corporate Renaissance Group warrants that (a) the SOFTWARE will perform substantially in
accordance with the accompanying printed materials for a period of ninety (90) days from the date of receipt; and (b) any
hardware accompanying the SOFTWARE will be free of defects in materials and workmanship under normal use and service for
a period of one (1) year from the date of receipt. Any implied warranties on the SOFTWARE and hardware are limited to ninety
(90) days and one (1) year respectively. Some states/jurisdictions do not allow limitations on duration of an implied warranty, so
the above limitation may not apply to you.
2. CUSTOMER REMEDIES. Corporate Renaissance Group’s entire liability and your exclusive remedy shall be, at Corporate
Renaissance Group’s option, either (a) return of the price paid or (b) repair or replacement of the SOFTWARE or hardware that
does not meet Corporate Renaissance Group’s Limited Warranty and that is returned to Corporate Renaissance Group with a
copy of your receipt. This Limited Warranty is void if failure of the SOFTWARE or hardware has resulted from accident,
abuse, or misapplication. Any replacement SOFTWARE will be warranted for the remainder of the original warranty period or
thirty (30) days, whichever is longer. Outside the United States or Canada, neither these remedies nor any product support
services offered by Corporate Renaissance Group are available without proof of purchase from an authorized non-U.S. or non-
Canadian source.
3. NO OTHER WARRANTIES. To the maximum extent permitted by applicable law, Corporate Renaissance Group disclaims all
other warranties, either express or implied, including but not limited to implied warranties of merchantability and fitness for a
particular purpose, with respect to the SOFTWARE, the accompanying written materials, and any accompanying hardware.
This limited warranty gives you specific legal rights. You may have others, which vary from state/jurisdiction to
state/jurisdiction.
4. LIMITATIONS OF LIABILITY.
(1) Licensee’s Remedies. Your sole and exclusive remedies for any damages or loss in any way connected with the
products or services furnished by Corporate Renaissance Group whether due to any negligence or any other cause,
shall be, at Corporate Renaissance Group’s option: (a) to bring the performance of the product into substantial
compliance with the functional specifications; (b) re-performance of services; or (c) return of an appropriate portion
of any payment made by you with respect to the applicable portion of the Software or services.
(2) Not Responsible. Corporate Renaissance Group will not be responsible under this Agreement (a) if the product is not
used in accordance with its specifications; or (b) if the defect is caused by you, any modification to the product, third-
party software, or third-party database. CORPORATE RENAISSANCE GROUP SHALL NOT BE LIABLE FOR
ANY CLAIMS OR DAMAGES ARISING FROM INHERENTLY DANGEROUS USE OF THE SOFTWARE
AND/OR THIRD-PARTY SOFTWARE LICENSED HEREUNDER.
(3) Limitation of Liability. ANYTHING TO THE CONTRARY HEREIN NOTWITHSTANDING, UNDER NO
CIRCUMSTANCES SHALL CORPORATE RENAISSANCE GROUP BE LIABLE TO YOU OR ANY OTHER
PERSON OR ENTITY FOR AN AMOUNT OF DAMAGES IN EXCESS OF THE AMOUNT PAID TO
CORPORATE RENAISSANCE GROUP FOR THE PRODUCTS AND SERVICES PURCHASED BY YOU
UNDER THIS AGREEMENT. For further clarity, to the maximum extent permitted by applicable law, in no event
shall Corporate Renaissance Group or its suppliers be liable for any damages whatsoever (including, without
limitation, damages for loss of business profits, business interruption, loss of business information, or other pecuniary
loss) arising out of the use or inability to use this Corporate Renaissance Group product, even if Corporate
Renaissance Group has been advised of the possibility of such damages. Because some state/jurisdictions do not
allow the exclusion or limitation of liability for consequential or incidental damages, the above limitation may not
apply to you.
(4) Severability of Actions. IT IS EXPRESSLY UNDERSTOOD AND AGREED THAT EACH AND EVERY
PROVISION OF THIS AGREEMENT WHICH PROVIDES FOR A LIMITATION OF LIABILITY, DISCLAIMER
OF WARRANTIES, OR EXCLUSION OF DAMAGES IS INTENDED BY THE PARTIES TO BE SEVERABLE
AND INDEPENDENT OF ANY OTHER PROVISION AND TO BE ENFORCED AS SUCH.
U.S. Government Restricted Rights
1. The SOFTWARE and documentation are provided with RESTRICTED RIGHTS. Use, duplication, or disclosure by the
Government is subject to restrictions as set forth in subparagraph (c)(1)(ii) of the Rights in Technical Data and Computer
Software clause at DFARS 252.227-7013 or subparagraphs (c)(1) and (2) of the Commercial Computer Software - Restricted
Rights at 48 CFR 52.227-19, as applicable. Manufacturer is Corporate Renaissance Group at 6 Antares Dr., Phase 1, Suite 200,
Ottawa ON K2E 8A9 Canada.
Trademarks
1. CRG Changer™ is a trademark of Corporate Renaissance Group and is one of the family of utility products for Dynamics,
eEnterprise and Dynamics SQL developed by Corporate Renaissance Group.
2. If you acquired this product in the United States, this Agreement is governed by the laws of the State of Washington.
3. If this product was acquired in Canada, this Agreement is governed by the laws of the Province of Ontario.
4. If this product was acquired outside the United States or Canada, then local law may apply.
5. Should you have any questions concerning this Agreement, or if you desire to contact Corporate Renaissance Group for any
reason, please contact or write: Corporate Renaissance Group at 6 Antares Dr., Phase 1, Suite 200, Ottawa ON K2E 8A9
Canada.
Entire Agreement
This agreement is the complete and exclusive statement of agreement between the parties relating to the subject-matter of this
agreement and supercedes all proposals, written or oral, and all other communications between the parties relating to subject-matter of
this agreement. The parties agree that this agreement may be modified from time to time only by an instrument in writing signed by
an authorized representative or representatives of both parties.
Changer for Microsoft Dynamics GP User’s Guide
Corporate Renaissance Group Page i
Table of Contents
Table of Contents i
Introducing Changer ..................................................................................................................... 1
Introduction ............................................................................................................................................ 1
Installation .................................................................................................................................... 3
Changer Hardware/OS and Software Requirements .............................................................................. 3
Changer Installation ............................................................................................................................... 3
Installation Procedures 3
Server Installation of Changer ............................................................................................................... 5
Setting Security Access for Changer Windows and Reports ................................................................... 8
Accessing and Registering Changer ....................................................................................................... 8
Changer Maintenance ............................................................................................................................ 9
Uninstalling Changer ............................................................................................................................. 9
Preparing for Changer (Operational checklist) ................................................................................... 13
The Changer Process ................................................................................................................ 15
Chapter 1 .................................................................................................................................... 19
Main Changer Control Window ........................................................................................................... 19
To Access the Main Changer Control Window: 19
Changer Main Window Controls 21
Changer PA Main Window Controls 22
Chapter 2 .................................................................................................................................... 25
Changer Options window ..................................................................................................................... 25
Chapter 3 .................................................................................................................................... 27
Setting Up Changer Requests ............................................................................................................... 27
To access a Changer Maintenance Window: 27
Maintenance Window Controls ............................................................................................................ 28
Selecting Accounts for Setup 28
Wildcards 30
Account Validation 33
Maintenance Window Table Display 34
Marking Changes for Processing 35
Assigning Changes to Batch Processing 35
Changer for Microsoft Dynamics GP User’s Guide
Page ii Corporate Renaissance Group
Chapter 4 .................................................................................................................................... 39
Batch Adjustments ................................................................................................................................. 39
To access the Changer Batch Window: 39
Batch Window Controls 40
Chapter 5 .................................................................................................................................... 43
Processing Assigned Batches ................................................................................................................ 43
Printing Changer History ..................................................................................................................... 45
Chapter 6 .................................................................................................................................... 47
Notes ..................................................................................................................................................... 47
Chapter 7 .................................................................................................................................... 48
Changer with Dates .............................................................................................................................. 48
Appendices 50
Appendix A ................................................................................................................................. 50
Changer Illustrations ............................................................................................................................ 50
Changer Procedures ............................................................................................................................. 51
Appendix B ................................................................................................................................. 53
Validation Rules .................................................................................................................................... 53
Appendix C ................................................................................................................................. 55
Import GL Accounts for Mass Account Modification ........................................................................... 55
Import RM Customer ID for Mass Customer ID Modification ............................................................. 56
Import PM Vendor ID for Mass Vendor ID Modification..................................................................... 57
Import IV Item Numbers for Mass Item Number Modification ............................................................. 59
Select the Import file. ................................................................................................................. 60
Import Payroll Employee ID for Mass Employee ID Modification ...................................................... 60
Import Project Numbers for Mass Modification ................................................................................... 61
Import Contract Numbers for Mass Modification................................................................................. 62
Appendix D ................................................................................................................................. 64
Third party products and GP non-core modules (additional products) updated by Changer: ............. 64
Appendix E ................................................................................................................................. 66
Minimum Hardware and Operating System Requirements for Microsoft Dynamics GP: .................... 66
Changer for Microsoft Dynamics GP User’s Guide
Corporate Renaissance Group Page 1
Introducing Changer
Introduction
Microsoft Dynamics GP does not allow changing the GL account numbers, Customer
Numbers, Vendor IDs, Item Numbers, and Employee IDs once they are created in GP.
Changer provides you with a tool to change/merge account numbers and allows for
multiple accounts to be consolidated into a single account. All associated transactions
and summary details from the old accounts “are transferred” to the “new account”.
Changes made by Changer do not in any way change the standard Dynamics GP
functionality.
Changer changes GL account numbers, RM customer numbers, PM vendor IDs, IV item
numbers and Payroll employee IDs. Changer is comprised of distinct components that
deal with each series separately (GL/RM/PM/IV/Payroll).
Another module of Changer (Changer PA) changes Project Numbers and Contract
Numbers in the Project Accounting module of Microsoft Dynamics GP.
1. GL Accounts (General Ledger)
The GL Changer allows you to globally change or consolidate one or more GL account
numbers (and all associated transactions). Changer also allows you to transfer the
transactions of one account to another account only after a specified date. GL Changer is
very useful in ever-changing business scenarios that require changes to chart of accounts
originally set-up.
2. RM Customer (Receivable Management)
The RM Changer allows you to globally change customer identification numbers and all
associated transactions into an existing or new single customer. RM Changer is useful if
same customer is set up multiple times by mistake or if customer consolidation is
required due to company mergers etc.
3. PM Vendor (Payables Management)
The PM Changer allows you to globally change or consolidate vendor identification
numbers and all associated transactions. PM Changer is useful if same vendor is set up
multiple times by mistake or if vendor consolidation is required due to company mergers
etc.
Changer for Microsoft Dynamics GP User’s Guide
Page 2 Corporate Renaissance Group
4. IV Items (Inventory)
The IV Changer allows you to globally change or consolidate item numbers and all
associated transactions (Some restrictions apply. Please check Appendix B for Validation
Rules). IV Changer is useful if same item is set up multiple times by mistake, or if
manufacturers code for an item changes and GP item numbers are same as these codes or
if item consolidation is required.
5. Payroll Employee (US Payroll/Canadian Payroll)
The Payroll Changer allows you to globally change employee IDs and all associated
transactions. Payroll Changer is useful if Employee IDs need to be changed.
6. Project Numbers and Contract Numbers (Project Accounting)
Changer PA (Changer for Project Accounting) allows you to globally change project
numbers and contract numbers in Project Accounting module. Changer PA is useful if
contract numbers or projects numbers need to be changed at a later stage after they are set
up.

Changer for Microsoft Dynamics GP User’s Guide
Corporate Renaissance Group Page 3
Installation
Changer Hardware/OS and Software Requirements
Changer is designed to work with Microsoft Dynamics GP version 2016 and hence
supports the requirements that Dynamics GP version 2016 supports. Refer to Appendix
E for the minimum hardware and operating system requirements for Dynamics GP as
per the Installation guide of Microsoft Dynamics GP.
Changer Installation
Before beginning Changer installation, be sure your system meets the following
requirements:
♦ Microsoft Dynamics GP version 2016 installed and configured.
♦ Microsoft Dynamics GP version 2016 – client installed and configured
on all the workstations that Changer will be used from.
Installation Procedures
Same steps can be followed for upgrading Changer from previous versions of
Microsoft Dynamics GP.
1. Download Changer version 2016 setup file from the download section
of Corporate Renaissance Group web site www.crgroup.com.
2. Once downloaded, open the file “Setup.exe”.
3. A message will appear confirming “This will install Changer for
Microsoft Dynamics GP 2016. Do you wish to continue?” Select
“Yes”.
Note: If an instance of Changer for Microsoft Dynamics GP 2016 is
already installed on the machine, you will receive a message that
another version of the product is already installed. If you wish to
install a new instance of Changer in addition to the previous
instance for a separate install of Dynamics GP, remove the previous
instance through Add/Remove Program and run the Changer Setup
Changer for Microsoft Dynamics GP User’s Guide
Page 4 Corporate Renaissance Group
again. During the installation point to the directory where the
additional instance of Dynamics GP is installed.
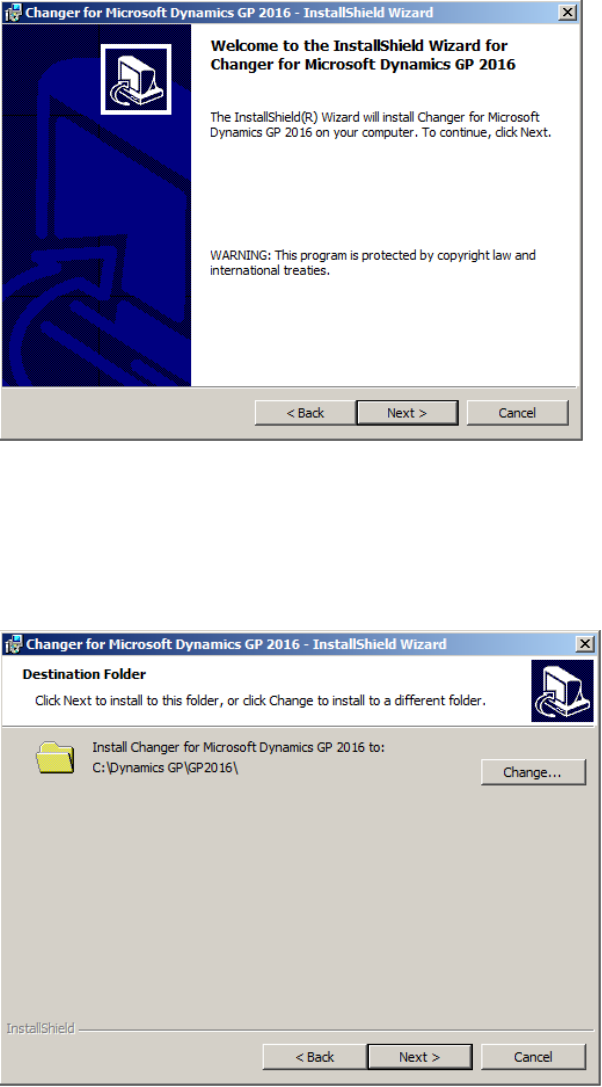
4. The welcome screen will appear. Select “Next”
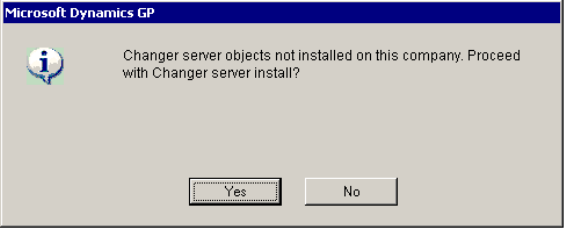
5. After accepting the License Agreement, the next window requires
the destination location of where Changer will be installed on the
workstation. Select the same directory where Microsoft
Dynamics GP is installed.
Changer for Microsoft Dynamics GP User’s Guide
Corporate Renaissance Group Page 5
6. Click on Browse to change location or just select ‘Next’ to accept the
default.
7. The Setup program now lets you review and, if necessary, change the
settings. Selecting ‘Next’ will begin copying the files, ending the
Client Installation process.
8. Start Microsoft Dynamics GP. When GP is launched the first time
after installing Changer, the user will be prompted with a message
“New code must be included in the DYNAMICS.SET dictionary.
Do you wish to include new code now?”. Selecting “Yes” will
create the Changer dictionary, synchronize the Changer dictionary
and update the GP launch file. If “No” is selected, this message will
appear each time GP is launched, until the new code is included in
the Dynamics set file.
9. The installation (steps 2 to 8) should be run on each workstation on
which you wish to use Changer.
Server Installation of Changer
Running Changer Server Installation will create tables and stored procedures on
SQL Server and set permissions on these objects. If updating from a previous
versions of Microsoft Dynamics GP, the server installation will update the tables
and stored procedures.
Server installation should be run for each company on which you wish to run
Changer. User must be logged on as ‘sa’ to run Changer Server Installation.
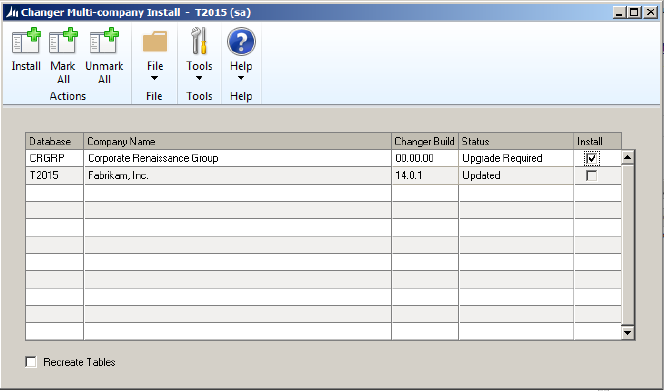
When Microsoft Dynamics GP is launched after running the Changer setup, the
following dialog box will automatically come up for server installation (only for
‘sa’ user) when the user logs in to a company on which the server installation
process is not done.
Changer for Microsoft Dynamics GP User’s Guide
Page 6 Corporate Renaissance Group
Server installation can be done simply by selecting ‘Yes’.
This dialog box gives users a choice of not installing Changer on the company on
which they do not wish to use it.
If the above dialog box does not open after GP is launched or if you wish to install
Changer on other companies within Dynamics GP, follow the procedure below to
open the server installation window.
To attach Changer Server Installation form to your shortcuts bar:
1. On the Navigation Pane, right-click on the Shortcuts option (or click on the
arrow at the bottom of the Navigation pane) and select ‘Add’ > ‘Add
Window…’
2. In the ‘Add Window Shortcut’ window, double-click Changer, double-click 3
rd
Party and select ‘Changer Multi-company Install’.
3. Click the ‘Add’ Button. ‘Changer Multi-company Install’ will be added to
Navigation pane. Click on the ‘Done’ button to close the ‘Add Window
shortcut’ window.
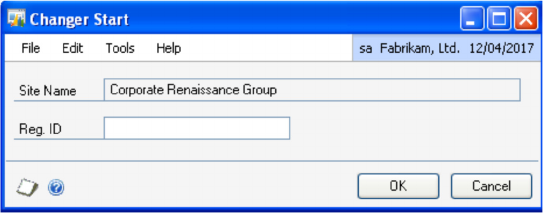
To run Changer Server Installation on one or more company databases, choose
‘Changer Multi-company Install’ from the navigation pane. The following window
will open listing all the Dynamics GP companies along with Changer build
information as well as Status of Changer install.
Changer for Microsoft Dynamics GP User’s Guide
Corporate Renaissance Group Page 7
Select the companies you wish to install Changer on by clicking the check-box in
the ‘Install’ column. All the companies can be marked or un-marked by using the
‘Mark All’ and ‘Unmark All’ buttons respectively. Once the companies are selected
for installation, click the Install button to start the installation. After successful
installation, the status will change to ‘Updated’ for each company and the Changer
build will show the latest Changer build.
• If the client workstation has an older build of Changer than the server
version, the Status column in the Changer Multi-Company Install window
will show as ‘Client Upgrade Required’. In this scenario, it will be required
to un-install the current version and re-install the new version of Changer on
the workstation so that client is up-to-date with server.
• If there are table structure changes since the last upgrade of Changer, these
tables will be updated automatically. If there are no changes to table
structures, the tables will be recreated only if ‘Recreate Tables’ is marked
on the Changer Multi-Company Install window.
Changer for Microsoft Dynamics GP User’s Guide
Page 8 Corporate Renaissance Group
Setting Security Access for Changer Windows and
Reports
User ‘sa’ (who is a power user in GP) will always have access to Changer windows
and reports. For other users, there are multiple ways of setting up security access for
Changer windows and reports.
1. During server installation of Changer, a security task called
CHANGERDEFAULUSER is created. This task can be assigned to any existing
role. The users with that role will have access to Changer.
2. A new role called ‘CHANGER USER’ is also created with
CHANGERDEFAULTUSER task assigned to this role. This role can be
assigned to any user. That user will have access to Changer.
3. Alternatively, a new task can be manually created or Changer windows and
reports can be added to an existing task which in turn can be assigned to a new
or existing role. If a new role is created, it can then be assigned to appropriate
users.
Accessing and Registering Changer
As part of installation, Changer automatically gets added to the Dynamics GP menu.
To access the Main Changer Control Window, select Microsoft Dynamics GP -
Tools – Utilities – Company - Changer.
To access the Main Changer Control Window for Changer PA, select Tools –
Utilities – Company – Changer PA.
At this point, if you have not registered Changer, you will be prompted with a screen
requiring you to either register Changer for use or to use it as demo on the sample
company (Fabrikam, Inc.).
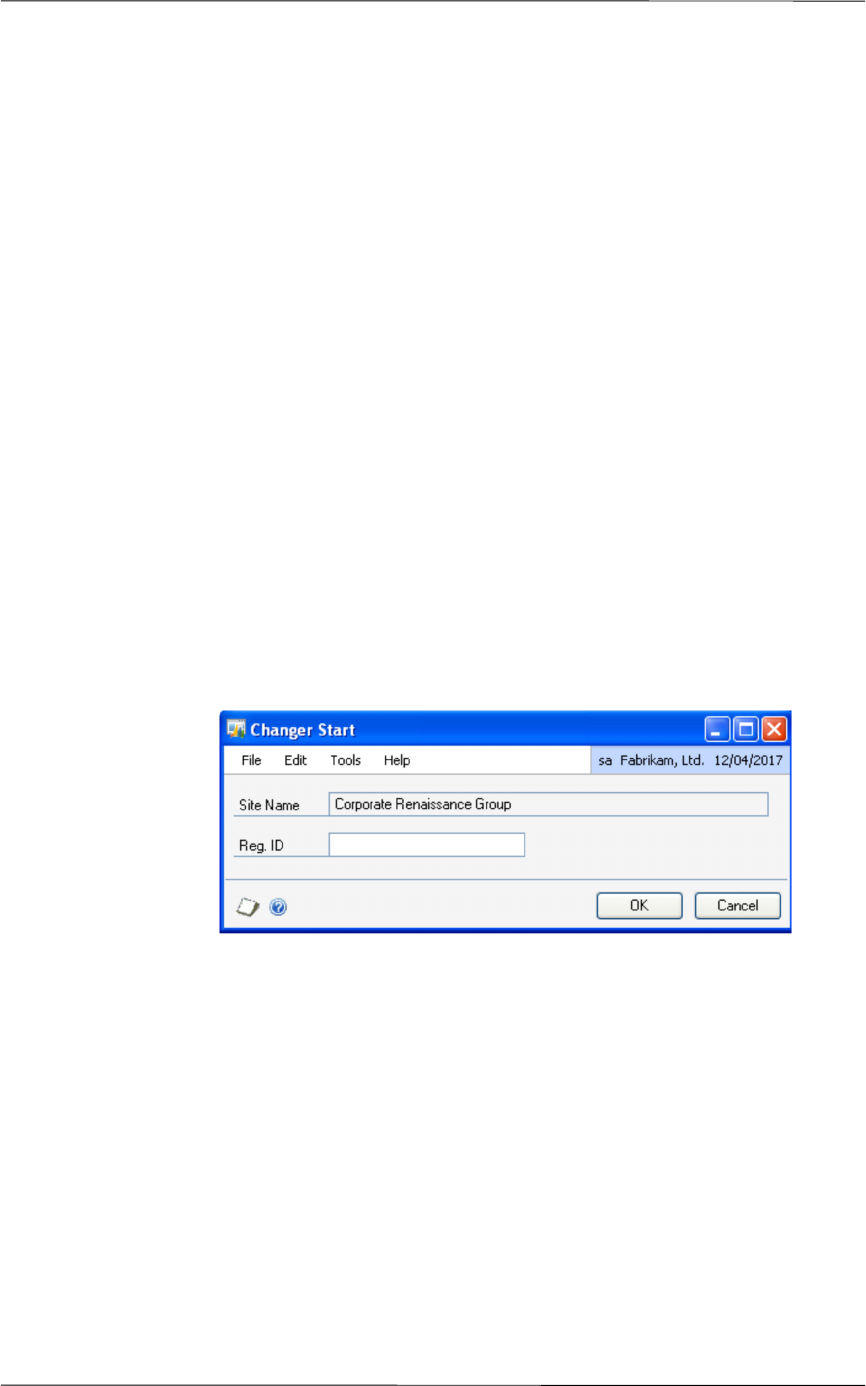
If you have received your Registration ID from Corporate Renaissance Group and
select to register, the Changer Start window appears as below.
Changer for Microsoft Dynamics GP User’s Guide
Corporate Renaissance Group Page 9
Enter the Registration ID provided to you in the corresponding field. Select the Save
button to validate your license to use Changer.
Note: Changer registration ID is based on the Changer modules purchased. If the
registration key changes at any time due to purchase of additional modules, the
registration window can be accessed by adding the Changer Registration window to
the Navigation Pane under Home - Shortcuts. Changer Registration window can be
found under Changer – Financial on the ‘Add Window Shortcut’ window.
Changer Maintenance
Changer does not require any ongoing maintenance (such as separate data
backup) outside the maintenance procedures required for Dynamics GP.
Changer uses the Microsoft Dynamics GP Dexterity customization and extension
capabilities. For information on modifications to Changer reports and windows,
refer to ReportWriter.pdf and ModifierUserGuide.pdf in the Dynamics GP
[Installation]\Documentation folder.
Uninstalling Changer
Users may have three scenarios while un-installing Changer:
• Scenario 1: User wants to remove Changer entirely from GP.
• Scenario 2: User wants to remove Changer from one company only.
• Scenario 3: User wants to remove Changer only from the workstation. It will
still be used from other workstations.
Depending on your scenario, you can follow the steps below:
Changer for Microsoft Dynamics GP User’s Guide
Page 10 Corporate Renaissance Group
Scenario 1: User wants to remove Changer entirely from GP
The following steps should be followed in the same order:
1. Go to Start – Control Panel – Add and Remove Programs. Select Changer for
Dynamics GP 2016 and click on the Remove button. Repeat this process on
each workstation from which you want to remove Changer entirely.
2. The following process should be run for each company on which you wish to
un-install Changer. Users must be logged on to GP as ‘sa’ to run the Changer
Server Un-install process. Running Changer Server Un-install will remove
tables and stored procedures from the company database on SQL Server.
• On the Navigation Pane, right-click on the Shortcuts option and select
‘Add’ > ‘Add Window…’
• In the ‘Add Window Shortcut’ window, double-click Changer, double-click
3
rd
Party and select ‘Changer Server Un-Install’.
• Click the ‘Add’ Button. ‘Changer Server Un-Install’ will be added to
Navigation pane. Click on the ‘Done’ button to close the ‘Add Window
shortcut’ window.
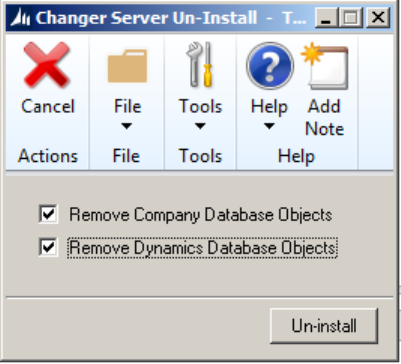
• Choose ‘Changer Server Un-Install’ from the navigation pane. The
following widow will show.
• ‘Remove Company Database Objects’ is always checked and cannot be
changed. Select ‘Remove Dynamics Database Objects’ and click the ‘Un-
Changer for Microsoft Dynamics GP User’s Guide
Corporate Renaissance Group Page 11
Install’ button. The ‘Changer Server Un-Install’ window will close
automatically after the installation is complete.
• Repeat this process for each company. After the process is run for all the
companies, remove the ‘Changer Server Un-install’ shortcut from the
navigation pane.
3. Remove Changer from the Dynamics.set file:
• Open the Dynamics.set file (located in the GP installation folder on the
workstation) in notepad.
• Change the number on the top line of the Dynamics.set file to 1 less than
what it is currently. (For example if the number on the top line shows as 14,
change it to 13.)
• Find and delete the following five lines from the file:
342
Changer
{Directory where GP is installed}/CHANGER.DIC
{Directory where GP is installed}/Data/FRM342.DIC
{Directory where GP is installed}/Data/RPT342.DIC
• Save the Dynamics.set file.
Note: This will need to be completed on all client installations on which
Changer was installed.
4. Remove Changer.dic file from the GP installation folder. This will need to be
done on all client workstations on which Changer was installed.
5. If ‘Changer Server Installation’ shortcut or any other shortcuts are added to
Navigation Pane to open Changer windows directly from the Navigation Pane,
these should be removed as these will no longer work after the un-install.
6. If CHANGERDEFAULTUSER task and CHANGER USER role are not used
for giving access to any windows other than Changer windows, these can also
be deleted as this task and role will not be required.
Scenario 2: User wants to remove Changer from one company only
Changer for Microsoft Dynamics GP User’s Guide
Page 12 Corporate Renaissance Group
Login to the company on which you wish to un-install Changer. Users must be
logged on to GP as ‘sa’ to run the Changer Server Un-install process. Running
Changer Server Un-install will remove tables and stored procedures from the
company database on SQL Server.
• On the Navigation Pane, right-click on the Shortcuts option and select
‘Add’ > ‘Add Window…’
• In the ‘Add Window Shortcut’ window, double-click Changer, double-click
3
rd
Party and select ‘Changer Server Un-Install’.
• Click the ‘Add’ Button. ‘Changer Server Un-Install’ will be added to
Navigation pane. Click on the ‘Done’ button to close the ‘Add Window
shortcut’ window.
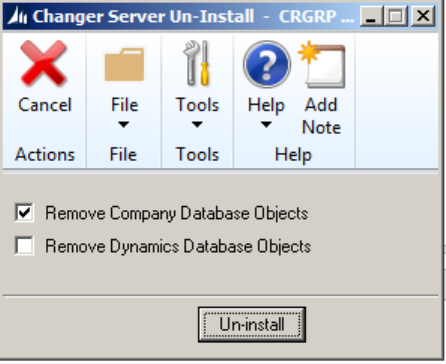
• Choose ‘Changer Server Un-Install’ from the navigation pane. The
following widow will show.
‘Remove Company Database Objects’ is always checked and cannot be changed.
DO NOT select ‘Remove Dynamics Database Objects’. This will make sure that
Changer can run on other companies on which it is already installed. Click the
‘Un-Install’ button. The ‘Changer Server Un-Install’ window will close
automatically after the installation is complete.
Scenario 3: User wants to remove Changer only from the workstation. It will still
be used from other workstations
Changer for Microsoft Dynamics GP User’s Guide
Corporate Renaissance Group Page 13
1. On the workstation that you wish to un-install Changer from, go to Start –
Control Panel – Add and Remove Programs. Select Changer for Dynamics GP
2016 and click on the Remove button.
2. Remove Changer from the Dynamics.set file:
• Open the Dynamics.set file (located in the GP installation folder on the
workstation) in notepad.
• Change the number at the top of the Dynamics.set file to 1 less than what it
is currently.
• Delete the following lines from the file:
342
Changer
{Directory where GP is installed}/CHANGER.DIC
{Directory where GP is installed}/Data/FRM342.DIC
{Directory where GP is installed}/Data/RPT342.DIC
• Save the Dynamics.set file.
3. Remove Changer.dic file from the GP installation folder.
Preparing for Changer (Operational checklist)
Before making any changes, check Data Integrity of GP data. Within Microsoft
Dynamics GP, complete the following:
a)
Check Links (for all files). If running Changer PA, also complete the PA
Check Links.
b)
Print Open and Historical trial balance and receivable/payables summary.
These reports can be used for reference after the Changer process.
In addition to the above procedures, please follow the guidelines below while running
Changer.
• Make a complete backup of the existing data before and after the file maintenance
procedure and before processing Changer.
• For information about using Changer with third party products (or any additional
modules/products outside Dynamics dictionary such as Fixed Assets, Project
Accounting etc.), please refer to Appendix D.
Changer for Microsoft Dynamics GP User’s Guide
Page 14 Corporate Renaissance Group
• Although users other than ‘sa’ can process Changer, the user must have full access to
all the tables and accounts. If you are not sure about the security level of the user,
please log in as ‘sa’ to process Changer batches.
• If multiple accounts are merged into a single account, the information (such as account
description, Alias, category, active/inactive) from the first account set to be changed
will be copied to the new account. If the first ‘From’ account is inactive, the new
account will be created as ‘inactive’ if created by Changer.
• If Project Accounting module is used and Payroll Changer is used to change an
employee ID that has project related expenses, make sure that PM Changer is used to
change the related Vendor ID to exactly the new Employee ID. If Vendor ID is not
changed, the link between employee and vendor will be broken.
• If intercompany transactions are used and the GL accounts that are used in another
company are changed using Changer, the accounts in the other company do not get
changed as Changer does not work across companies.
• If Sub Account Format is used in Project Accounting, it may be required to manually
re-enter the Override Values for the Sub Acct Format for both the Project
Maintenance and Contract Maintenance.

Changer™ for Microsoft Dynamics GP User’s Guide
Corporate Renaissance Group Page 15
The Changer Process
To successfully change or merge accounts, it is imperative to understand the steps
in the Changer process. The following illustrates the major steps in the Changer
process:
NOTE: Unless otherwise specified, “accounts” includes GL accounts, Customer
Numbers, Vendor Ids, Item Numbers and Employee IDs.

Changer for Microsoft Dynamics GP User’s Guide
Page 16 Corporate Renaissance Group
WARNING! DO NOT PROCESS CHANGER WHILE ANY OTHER
ACTIVITY IS BEING PERFORMED ASSOCIATED WITH GP
(including activities such as running Management Reporter Reports,
using Business Portal).
Due to the nature of the Changer process, make sure that all users (other
than the Changer user) exit from GP before running Changer.
1. Set Up Account/Customer/Vendor/Item/Employee Change
Requests.
Using the Changer Maintenance Windows, setup the accounts, customers, vendors,
items or employees to change. This “mapping” of accounts is referred to as setting
up change requests. In this step, the mapping of accounts, customers, vendors or
items to an existing account or new account is completed. For Employee Ids
mapping can be done to new non-existing codes only.
2. Validate Change Requests.
Changer includes a validation process that ensures that the change requests are valid.
In the case of GL accounts, Changer will only allow accounts of the same type
(Posting Account, Unit Account etc..) and the same posting type (Balance Sheet,
Profit and Loss) to be merged. Changer will not allow the consolidation of a Balance
Sheet account with an Income Statement account or a unit account with a posting
account. In case of Item numbers, Changer will only allow to merge the items with the
same Quantity of Decimals, Item Type, Valuation Method and U of M Schedule ID.
Changer will not allow merging of items if they are defined as kit or as BOM.
Changer will also not allow merging of items if the item tracking option is serial
number. A “change” request will not be processed unless it is validated. A
comprehensive listing of all validation rules is included in Appendix B.
3. Mark Changes for Processing.
Once the change requests are validated, they must be marked before they can be
assigned to a batch. This provides flexibility in the timing of Changer processing. If
there are a large number of change requests, processing could be very time consuming.
Changer allows you to individually mark change requests, so that you can assign them to
a batch allowing you to control both the amount and scope of processing. The batches
can then be processed separately.

Changer™ for Microsoft Dynamics GP User’s Guide
Corporate Renaissance Group Page 17
4. Assign Change Requests to Batches.
All marked change requests must be assigned to a batch. To further enhance flexibility
in processing, Changer also provides the functionality to specify a maximum number
of change requests to be assigned per batch. Batches will then be automatically
tagged in sequence and referenced to the original batch ID. The “batch” function
provides the ability to assign changes to multiple batches.
5. Select the batches to process.
Changer allows you to select the batches that you want to process. This is extremely
useful if a large number of change requests are to be processed and you don’t have the
available time to process all the change requests at once. By default, all batches are
flagged to be processed.
6. Process the batches.
At this stage, all change requests have been selected, validated, marked, assigned to
batches, and the respective batches selected for processing. The final step is to initiate
the processing of each batch.
7. Run File Maintenance
Check Links process is recommended for all files in the series for which Changer has
processed. If Account Format is changed using Changer, Check Links process after
Changer will take longer than usual.
NOTE: For information about using Changer with third party
products (or any additional modules/products outside
Dynamics dictionary such as Fixed Assets, Project
Accounting etc.), please refer to Appendix D.
Changer™ for Microsoft Dynamics GP User’s Guide
Corporate Renaissance Group Page 19
Chapter 1
Main Changer Control Window
To Access the Main Changer Control Window:
In Microsoft Dynamics GP, select Microsoft Dynamics GP - Tools - Utilities –
Company - Changer from the main menu.
To access Changer PA, select Tools – Utilities – Company – Changer PA.
At this point, if you didn’t register Changer, you will be prompted with a screen
requiring you to either register Changer for use or to use it as demo on the sample
company (Fabrikam, Inc.).
NOTE: If Changer has been registered before,
skip to the next page showing the
Changer Control Window.
If you have received your Registration ID from Corporate Renaissance Group
and wish to register, the Changer Start window appears as below.
Enter the Registration ID provided to you in the corresponding field. Select the
Save button to validate your license to use Changer.
Note: Changer registration ID is based on the Changer modules purchased. If
the registration key changes at any time due to purchase of additional modules,
the registration window can be accessed by adding the Changer Registration
window to the navigation pane. Changer Registration window can be found
under Changer – Financial on the ‘Add Window Shortcut’ window. For
instructions on how to add a window to navigation pane, refer to Installation
Chapter (page 3)
Changer for Microsoft Dynamics GP User’s Guide
Page 20 Corporate Renaissance Group
If it is the correct Registration ID then the Changer Control Window is
displayed. The previous registration process is only completed once at initial
startup. This window will appear directly after choosing Microsoft Dynamics
GP > Tools > Utilities > Company > Changer (or Changer PA) once
registration has been completed. Note that separate registration keys are required
to access Changer and Changer PA.
Before processing any changes, the accounts to be changed and/or merged must
be set up, validated, and assigned to a batch. Once this is accomplished, Changer
requests can be processed.
The following section describes the functionality and processing features of the
main Changer window.
Changer:
Changer™ for Microsoft Dynamics GP User’s Guide
Corporate Renaissance Group Page 21
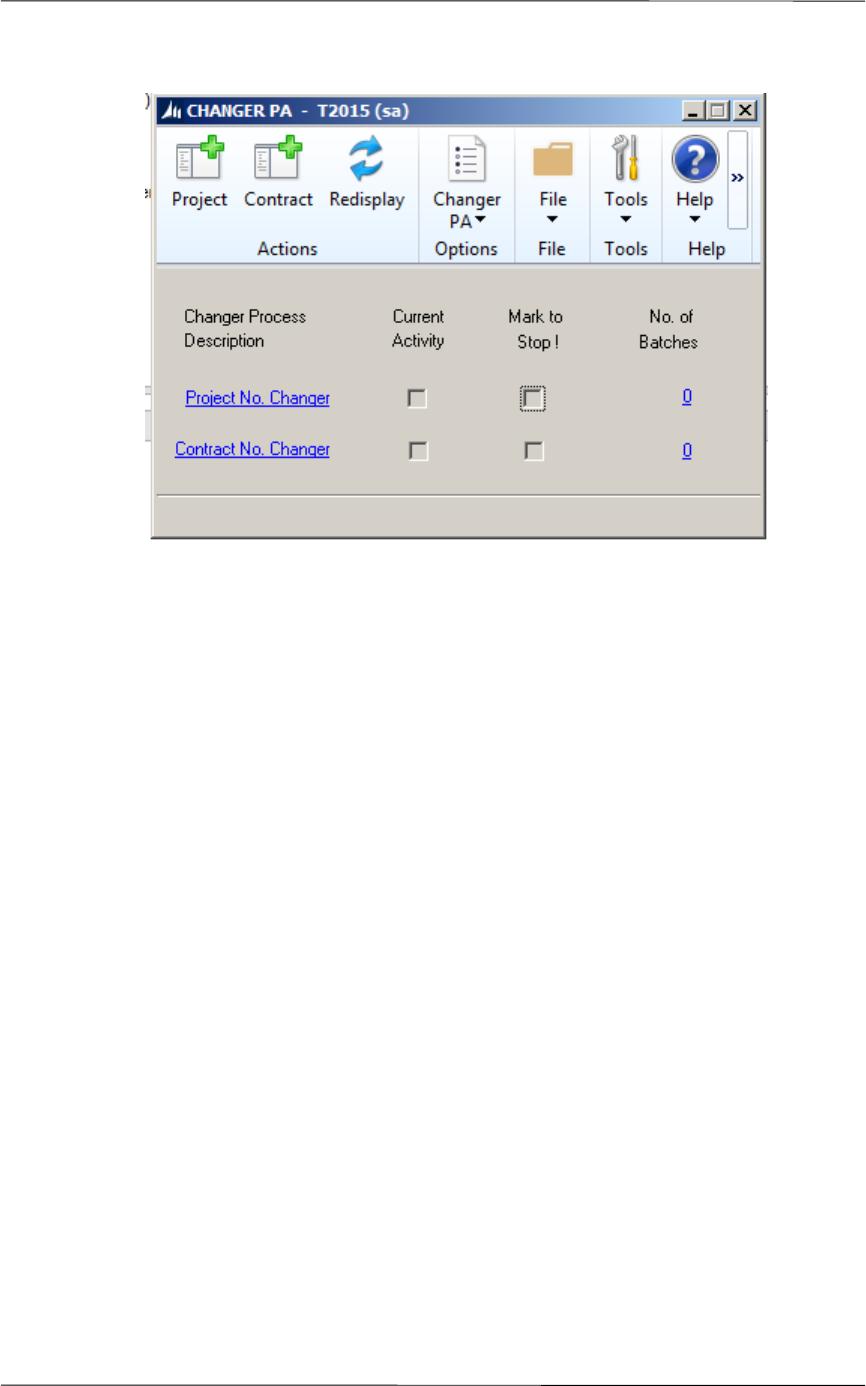
Changer PA:
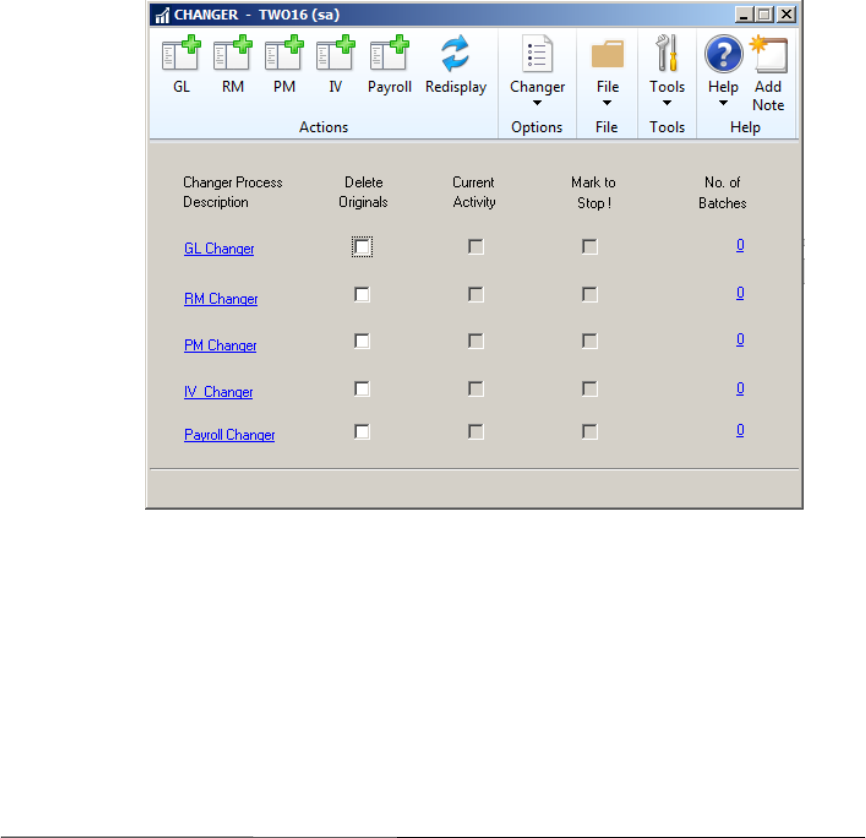
Changer Main Window Controls
1. GL, RM, PM, IV, Payroll buttons
These buttons initiate the respective Changer processes, which perform the
changes. GL will process the change requests for GL accounts while RM,
PM, IV and Payroll will process the change requests for customers,
vendors, items and employees respectively. Changer change requests should
be set up prior to processing using the maintenance windows which can be
accessed using the respective links in blue.
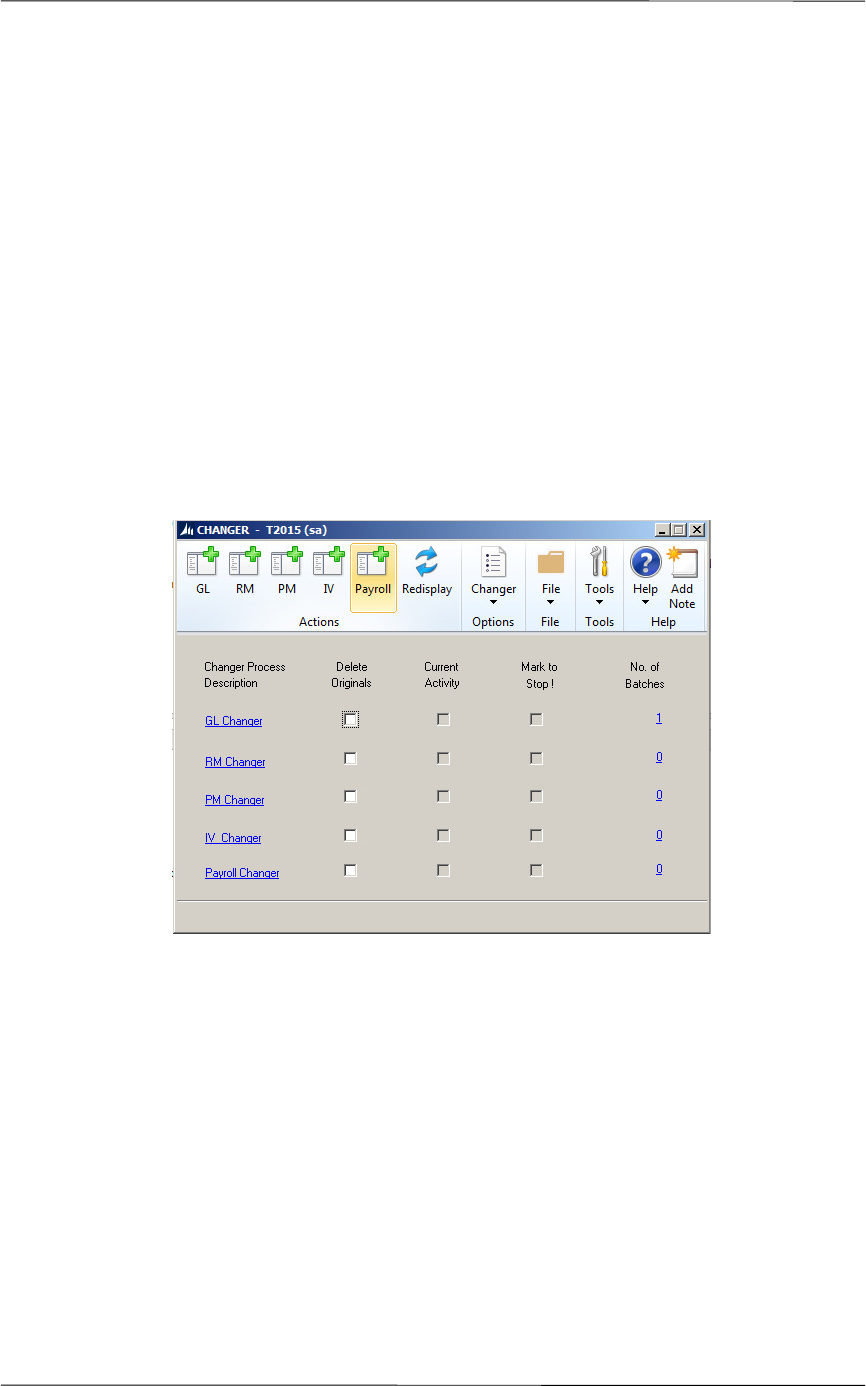
2. Changer Process Description
In this column, the five main components of Changer are listed: GL Changer,
RM Changer, PM Changer, IV Changer and Payroll Changer. Each row has
four status columns. They provide information on whether the component is
processing, whether the process has been marked to stop, how many batches
have been assigned, and whether the accounts should be deleted after the
Changer process.
In order to set up change requests, you need to activate the corresponding
[GL/RM/PM/IV/Payroll] Changer Maintenance Window. To do this,
position the cursor on the text describing the relevant Changer Process

Changer for Microsoft Dynamics GP User’s Guide
Page 22 Corporate Renaissance Group
Descriptions (e.g. RM Changer). When the cursor is positioned over the text
RM Changer, it changes its shape from an arrow to a pointing hand.
Clicking on the mouse when the cursor is in the shape of a pointing hand will
open the RM Changer Maintenance Window or the GL/PM/IV/Payroll
Changer Maintenance window depending on which button is selected.
3. Delete Originals
This column provides the functionality to delete all the original accounts
once they have been changed for any or all of the modules. Once the change
requests are processed with this function, it is not possible to reverse it.
4. Current Activity
This column indicates whether a Changer component is currently processing.
If an ‘X’ is marked in any of the boxes in this column, the corresponding
Changer component is currently processing. Changer components can only
be processed one at a time.
5. Mark to Stop
An ‘X’ marked in any of the boxes in this column indicates that the
corresponding Changer process has been marked to be halted upon
completion of the current batch. This can be accomplished by checking
‘Mark to Stop’ checkbox for the appropriate Changer component.
6. No. of Batches
This column indicates how many batches are ready for processing in each of
the Changer components.
7. Redisplay
Selecting redisplay refreshes the contents of the window to display the
current Changer activity status.
Changer PA Main Window Controls
1. Project, Contract
These buttons initiate the respective Changer processes, which perform the
changes. Project button will process the change requests for Project
Numbers while Contract button will process the change requests for
Contract Numbers..

Changer™ for Microsoft Dynamics GP User’s Guide
Corporate Renaissance Group Page 23
2. Changer Process Description
In this column, the main components of Changer are listed: Project No.
Changer and Contract No. Changer. Each row has three status columns.
They provide information on whether the component is processing, whether
the process has been marked to stop as well as how many batches have been
assigned.
In order to set up change requests, you need to activate the corresponding
[Project/Contract] Changer Maintenance Window. To do this, position the
cursor on the text describing the relevant Changer Process Descriptions (e.g.
Project No. Changer). When the cursor is positioned over the, it changes its
shape from an arrow to a pointing hand. Clicking on the mouse when the
cursor is in the shape of a pointing hand will open the Changer Maintenance
window.
3. Current Activity
This column indicates whether a Changer component is currently processing.
If an ‘X’ is marked in any of the boxes in this column, the corresponding
Changer component is currently processing. Changer components should
only be processed one at a time.
4. Mark to Stop
An ‘X’ marked in any of the boxes in this column indicates that the
corresponding Changer process has been marked to be halted upon
completion of the current batch.
5. No. of Batches
This column indicates how many batches are ready for processing in each of
the Changer components.
6. Redisplay
Selecting Redisplay refreshes the contents of the window to display the
current Changer activity status.
Changer™ for Microsoft Dynamics GP User’s Guide
Corporate Renaissance Group Page 25
Chapter 2
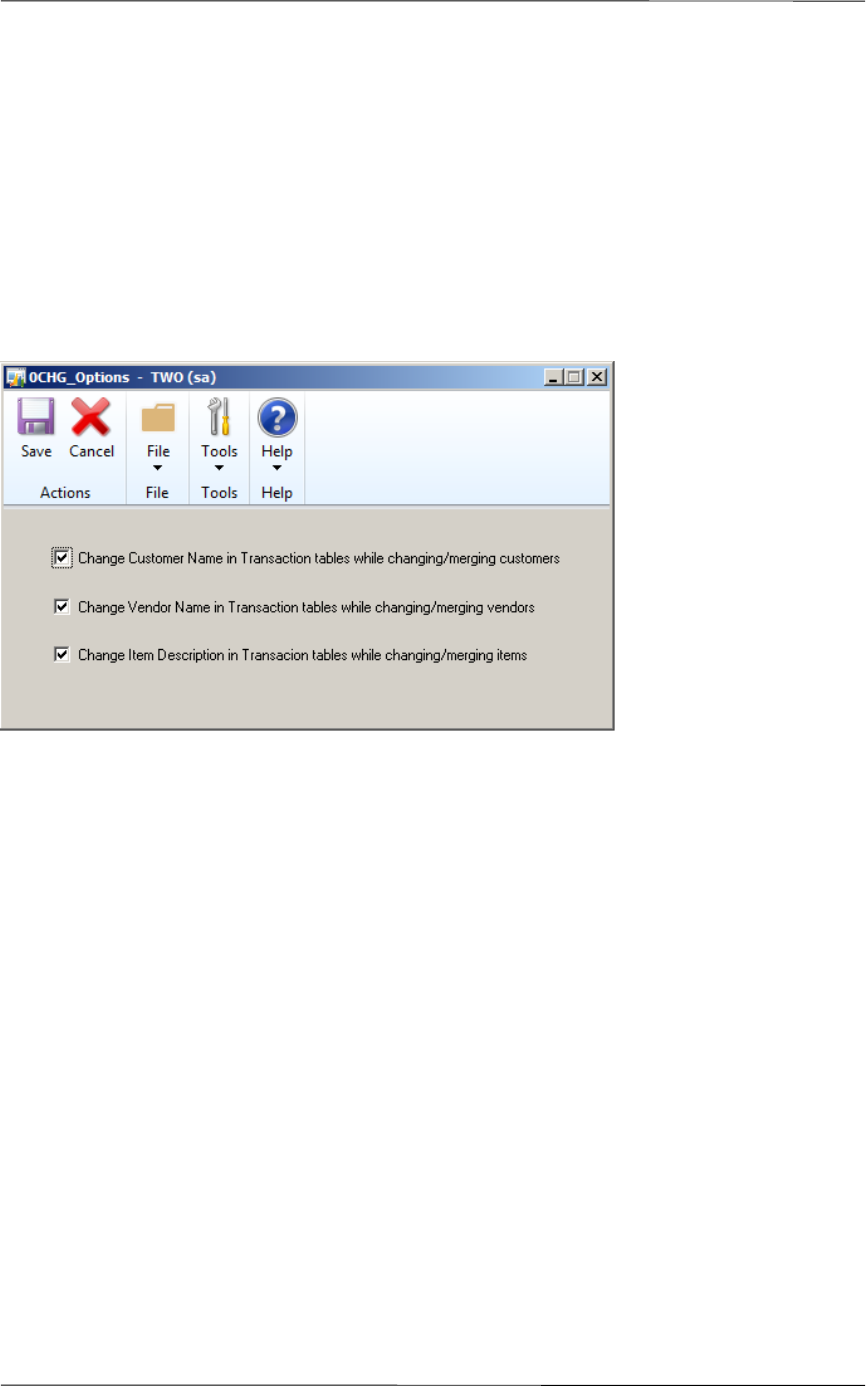
Changer Options window
A ‘Changer’ menu item will be available on the Main Changer Control window when this
window is open.
Select Changer > Changer Options from the menu. The Changer Options window will open.
Changer Options window allows users to decide whether to change the Item Description,
Customer Name and Vendor Name in transactions during the Changer process.
By default these check boxes are checked.
Customer Name Change Option ‘Change Customer Name in Transaction tables while
changing/merging customers’ -
If the customer name is changed from the default customer name to a different name while
creating invoices, this option can be cleared so that the customer name will not be changed by
Changer in any of the invoices. When this box is cleared, customer names will not change in any
transaction tables when the customer numbers are changed or merged.
Item Description Change Option ‘Change Item Description in Transaction tables while
changing/merging items’ –
If the item description is being changed from the default description to a new description while
creating invoices, this option can be cleared so that the item descriptions will not be changed by

Changer for Microsoft Dynamics GP User’s Guide
Page 26 Corporate Renaissance Group
Changer in any of the invoices. When this box is cleared, the item descriptions will not change in
any transaction tables when the items are changed or merged.
Vendor Name Change Option ‘Change Vendor Name in Transaction tables while
changing/merging vendors’ –
If the vendor name is changed from the default vendor name to a different name while creating
invoices, this option can be cleared so that the vendor name will not be changed by Changer in
any of the invoices. When this box is cleared, vendor names will not change in any transaction
tables when the vendor IDs are changed or merged.

Changer™ for Microsoft Dynamics GP User’s Guide
Corporate Renaissance Group Page 27
Chapter 3
Setting Up Changer Requests
To make GL account, vendor, customer, item, or employee changes, you must
first access the corresponding Changer Maintenance Window; [GL Changer
Maintenance, RM Changer Maintenance, PM Changer Maintenance, IV Changer
Maintenance or Payroll Changer Maintenance] and set up the change request. A
change request basically represents information about the mapping of accounts.
Thus change 000-1150-02 to 000-1950-02 is an example of a change request.
The appearance of each Changer Maintenance Window is nearly identical, but
each window sets up change requests for the given Changer component. GL
Changer Maintenance assigns change requests for GL accounts while RM, PM,
IV Changer and Payroll Changer Maintenance assign change requests for
Customer, Vendor, Item numbers and Employee numbers respectively.
Project Changer Maintenance window assigns change requests for Project
Numbers and Contract Changer Maintenance window assigns change requests
for Contract Numbers.
To access a Changer Maintenance Window:
1. Position the cursor over the Changer component in the Changer Process
Description column that you wish to setup changes for.
2. The shape of the cursor will change to a magnifying glass.
3. Click the mouse.
Changer for Microsoft Dynamics GP User’s Guide
Page 28 Corporate Renaissance Group
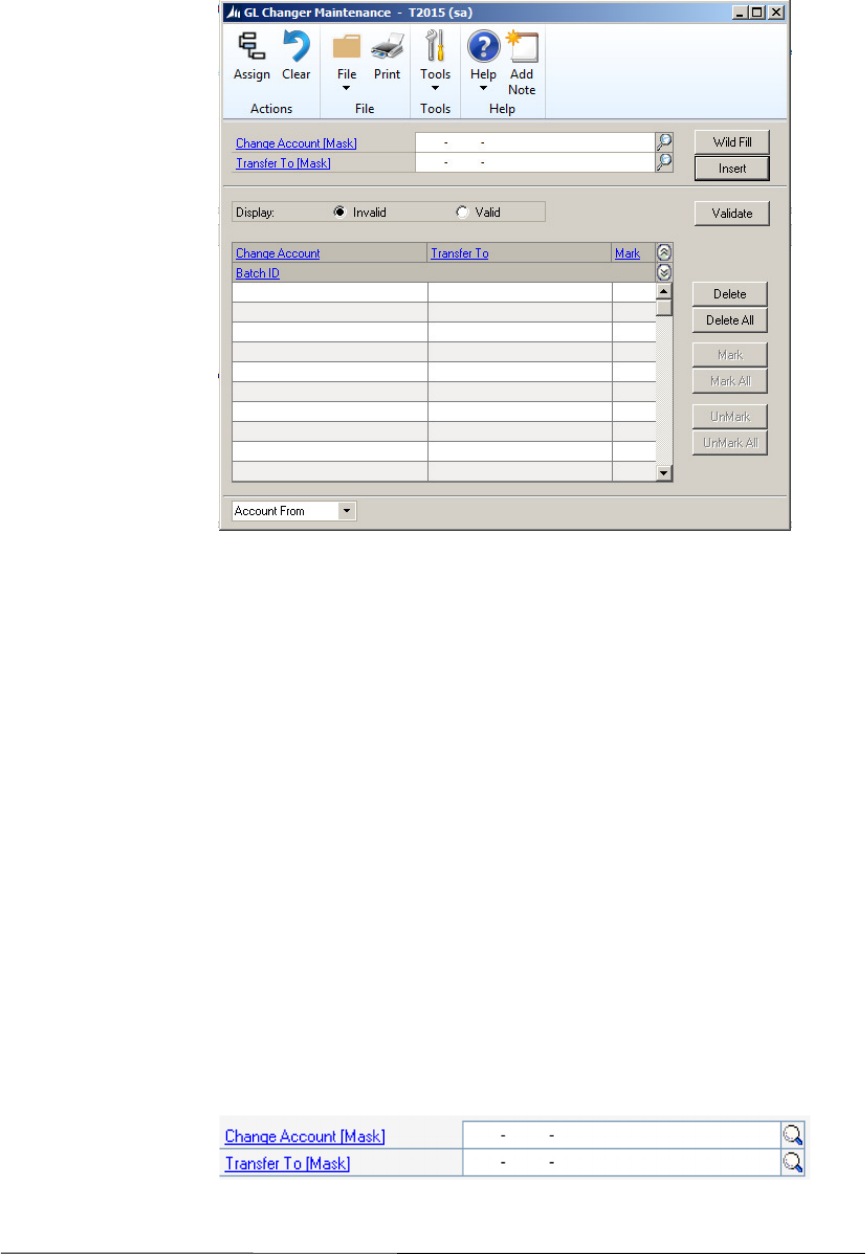
The following Changer Maintenance Window will appear, if the cursor is
positioned over GL Changer and the mouse is clicked:
To access the RM, PM, IV and Payroll Changer Maintenance Windows, position
the cursor over the text RM / PM/ IV/Payroll Changer and click.
To access the Project and Changer maintenance windows, position the cursor on
‘Project No. Changer’/ ‘Contract No. Changer’ in the Changer PA window and
click.
Maintenance Window Controls
The Maintenance Windows are workplaces where you select the accounts,
customers, or vendors to be changed, set up change requests, mark them, and
assign them to batches.
Selecting Accounts for Setup
1. Change Account [Mask]/ Transfer To [Mask]
In the GL Changer Maintenance Window it appears as follows:
♦

Changer™ for Microsoft Dynamics GP User’s Guide
Corporate Renaissance Group Page 29
♦ GL Changer Maintenance
Change Account [Mask] represents the account(s) you wish to change,
modify, or merge. Enter or lookup the account number you wish to
change. Transfer To [Mask] represents the new account to which the
account(s) to Cbe changed will be transferred. You may use wildcards in
both these modes to set up multiple change requests.
♦ RM Changer Maintenance
Change Customer [Mask] represents the customer(s) you wish to change,
modify, or merge. Enter or look up the customer number you wish to
change. Transfer To [Mask] represents the new customer to which
customer(s) will be transferred to. You may use wildcards in both these
masks to set up multiple change requests.
♦ PM Changer Maintenance
Change Vendor [Mask] represents the vendor(s) you wish to change,
modify, or merge. Enter or look up the vendor ID you wish to change.
Transfer To [Mask] represents the new vendor name where the Change
Vendor [Mask] vendor(s) will be transferred to. You may use wildcards
in both these masks to set up multiple change requests.
♦ IV Changer Maintenance
Change Item [Mask] represents the item(s) you wish to change or merge.
Enter or look up the item number you wish to change. Transfer To
[Mask] represents the new item number where the Change Item [Mask]
item(s) will be transferred to. You may use wildcards in both these
masks to set up multiple change requests.
♦ Payroll Changer Maintenance
Change Employee [Mask] represents the employee(s) you wish to
change. Enter or look up the emplyee ID you wish to change. Transfer
To [Mask] represents the new employee ID where the Change Employee
[Mask] employee(s) will be transferred to. You may use wildcards in
both these masks to set up multiple change requests.

Changer for Microsoft Dynamics GP User’s Guide
Page 30 Corporate Renaissance Group
2. Insert, Wild Fill
Select Insert to enter a “change request” from the Change Account [Mask]
/Transfer To [Mask] to the listing. However, Insert will not enter a change
involving wildcards. Select Wild Fill to insert a change request that uses
wildcards. Selecting Wild Fill will use the wildcard mask(s) and select the
matched patterns, to set up change requests.
Wildcards
In each of the Changer Maintenance Windows as well as Changer PA
Maintenance Windows, you may use wildcards in both Change Account [mask]
and Transfer To [mask]. If the Account Numbers/Customer Numbers/Vendor
Ids/Item Numbers/Employee IDs that need to be changed have a common pattern
in their numbering scheme, wildcards can help you enter multiple change
requests in one pass. You can use one or more wildcards to specify groups of
accounts, customers, or vendors. While GL Changer supports only the question
mark (?) as a wildcard, other Changer support both the question mark (?) and the
asterisk (*) to represent single and multiple pattern matches respectively. The
following three examples illustrate the use of wildcards.
NOTE: The examples illustrated have been designed
to help you understand how Changer
performs pattern matching.
Importing ‘Changer Requests’
For instructions on importing the ‘Changer Requests’ refer to Appendix C.
Changer™ for Microsoft Dynamics GP User’s Guide
Corporate Renaissance Group Page 31
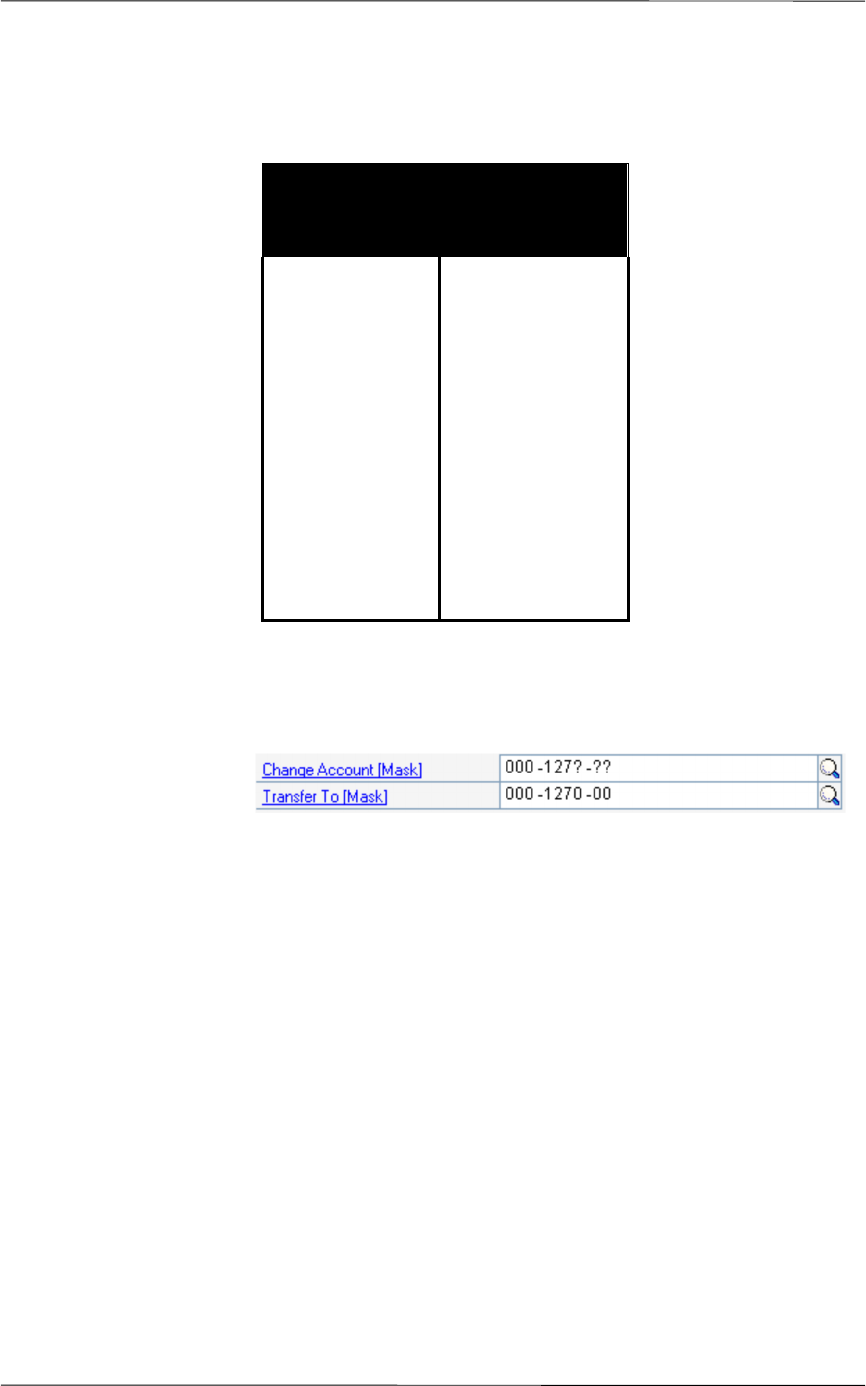
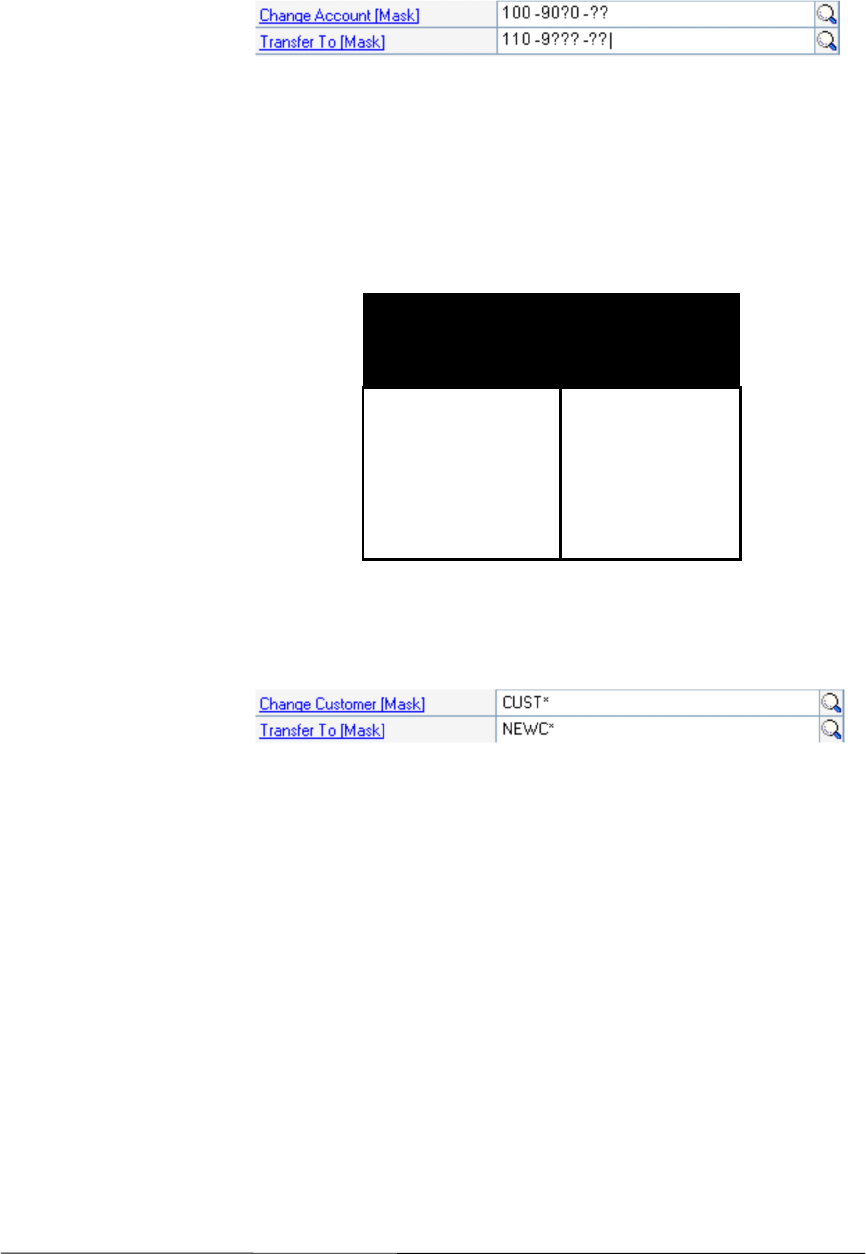
1. In the GL Changer Maintenance Window:
The following accounts will be merged into a single account:
Using wildcards, the entry would look as follows:
If you use wildcards in the Change Account [mask], only while the
Transfer To [mask] is set up with a single account number, the wild
fill will result in setting up multiple accounts [which match the
wildcard pattern] to be merged into a single transfer to account.
Changer DOES NOT support the opposite process shown below.
Transactions from one account cannot be divided up and transferred
into several accounts (e.g. from 000-1270-00 to 000-127?-??).
2. In the GL Changer Maintenance Window:
NOTE: The following example illustrates the use
of wildcards in both Change Account
From and Transfer To Account fields.
The setup for the account change requests
is displayed below.
Change
Account From
Transfer To
Account
000-1271-00
000-1272-00
000-1273-00
000-1274-00
000-1275-00
000-1276-00
000-1277-00
000-1270-00
---*---
---*---
---*---
---*---
---*---
---*---
Changer for Microsoft Dynamics GP User’s Guide
Page 32 Corporate Renaissance Group
Using wildcards, the change requests can be setup using only one
entry. The entry would look as follows:
Wildcards in both Change Account From and Transfer To Account
indicate multiple changes to accounts. The Account Mask Set up in
the Transfer To Account is used to generate the new account number.
3. In the RM Changer Maintenance Window:
This example illustrates the use of asterisks (*) in Customer From
and Customer To.
The entry would appear as follows:
All accounts beginning with ‘CUST’ will now begin with ‘NEWC’.
NOTE: Changer performs standard DOS pattern
matching. This results in all characters to
the right of a * being ignored during a
pattern match. CUST*5 will only search
all data beginning with CUST, the 5 is
ignored. Also, characters may only be
overwritten, no insertion is permitted.
Change Account
From:
Transfer To
Account:
100-9010-00
100-9020-00
100-9030-00
110-9010-00
110-9020-00
110-9030-00
Changer™ for Microsoft Dynamics GP User’s Guide
Corporate Renaissance Group Page 33
Account Validation
1. Display(Invalid/Valid)
Display allows you to look at valid change requests or change
requests yet to be validated. Selecting Invalid will display all change
requests that have not been validated or are invalid. Selecting Valid
displays all change requests that have been validated.
2. Validate
After setting up the change requests, they must be validated.
Validation determines whether the change requests are legal or
illegal. For example, GL Changer will not allow the consolidation of
a Balance Sheet account with an Income Statement account. A list
of validation rules is provided in Appendix B.
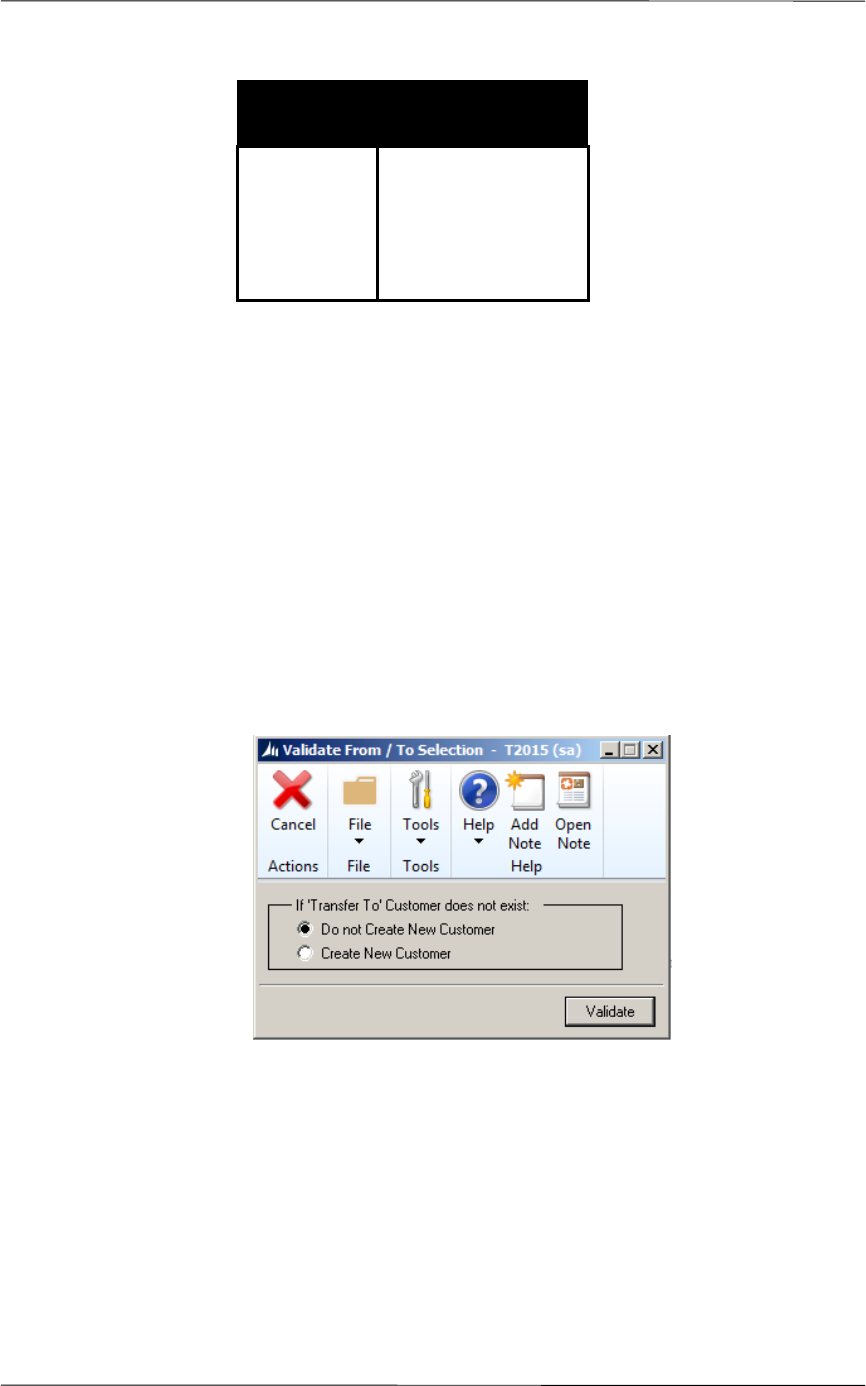
3. Case: Transfer To Account Does Not Exist
When Validate is selected, a window appears asking you the action
to be taken if the Transfer To Account does not exist. If Transfer To
Account does not exist, select Create New Account, otherwise select
Don't Create New Account. Validate checks the validity of all
changes in the table. If the “change request” is legal, Changer
moves the “change request” to the valid table. Select Display -
Change
Customers
To Customers
Cust00001 NewC00001
Cust00002 NewC00002
Cust00003 NewC00003
Cust00004 NewC00004

Changer for Microsoft Dynamics GP User’s Guide
Page 34 Corporate Renaissance Group
Valid, to view the change. If the “change request” is illegal, it will
remain on the Invalid table.
NOTE:
In case of Payroll validation, New Employee must be
created during the validation process as Changer
does not support merging of employees.
For Changer PA, validation will check non-existence
of the ‘New’ Project and Contract Numbers.
Maintenance Window Table Display
The table displays all relevant information about accounts, customers, vendors,
items and employees that have been selected for “change request”. Five
elements are displayed in the table: The ‘From’
Account/Customer/Vendor/Item/Employee/Project/Contract, transfer ‘To’
Account/Customer/Vendor/Item/Employee, Batch ID, Sequence Number, and
Marked status.
The word “Accounts” is used to designate GL accounts, Customer Numbers,
Vendor IDs, Item Numbers, Employee IDs, Project Numbers and Contract
Numbers.
1. Sort By
Located at the top left hand corner of all Maintenance Windows, this drop
down list allows you to sort the table by Account/Customer
/Vendor/Item From or by Account/Customer/Vendor/Item/Employee To.
2. Change Account:
This column displays all accounts, which are to be changed or merged.
3. Transfer To Account:
Represents the new account or merged account.
4. Mark:
Indicates which requests are ready to be assigned to a batch. You cannot
assign a change request to a batch request unless it is marked and you cannot
mark a change request unless it is validated.

Changer™ for Microsoft Dynamics GP User’s Guide
Corporate Renaissance Group Page 35
5. Batch ID:
This is the name of the batch to which the change request has been assigned.
If a maximum number of change requests per batch is specified, Changer will
generate as many batches as are required to assign all the marked change
requests. Changer will simply append a sequence number (beginning with
the number 1) to the end of the batch ID thus generating a unique batch ID +
Sequence number combination for each batch.
Marking Changes for Processing
1. Delete // Delete All
This function removes a change request from the list. The change request
can be deleted before or after it is assigned to a batch. Selecting Delete All
will delete all change requests listed in the window. To delete an individual
change request, highlight the “change request” in the window and select
Delete.
2. Mark // Mark All
This feature provides flexibility in processing your change requests by
determining which change requests will be assigned to a batch.. If a change
request is not marked it cannot be assigned to a batch. Therefore, all changes
that have been marked will be assigned to a batch while the change requests
that are unmarked will not be assigned to a batch.
To mark a change request, highlight the desired “change request” and select
Mark. To mark all change requests, select Mark All.
3. UnMark // UnMark All
To un-mark a “change request”, highlight the “change request” and select
UnMark. To un-mark all change requests, select UnMark All.
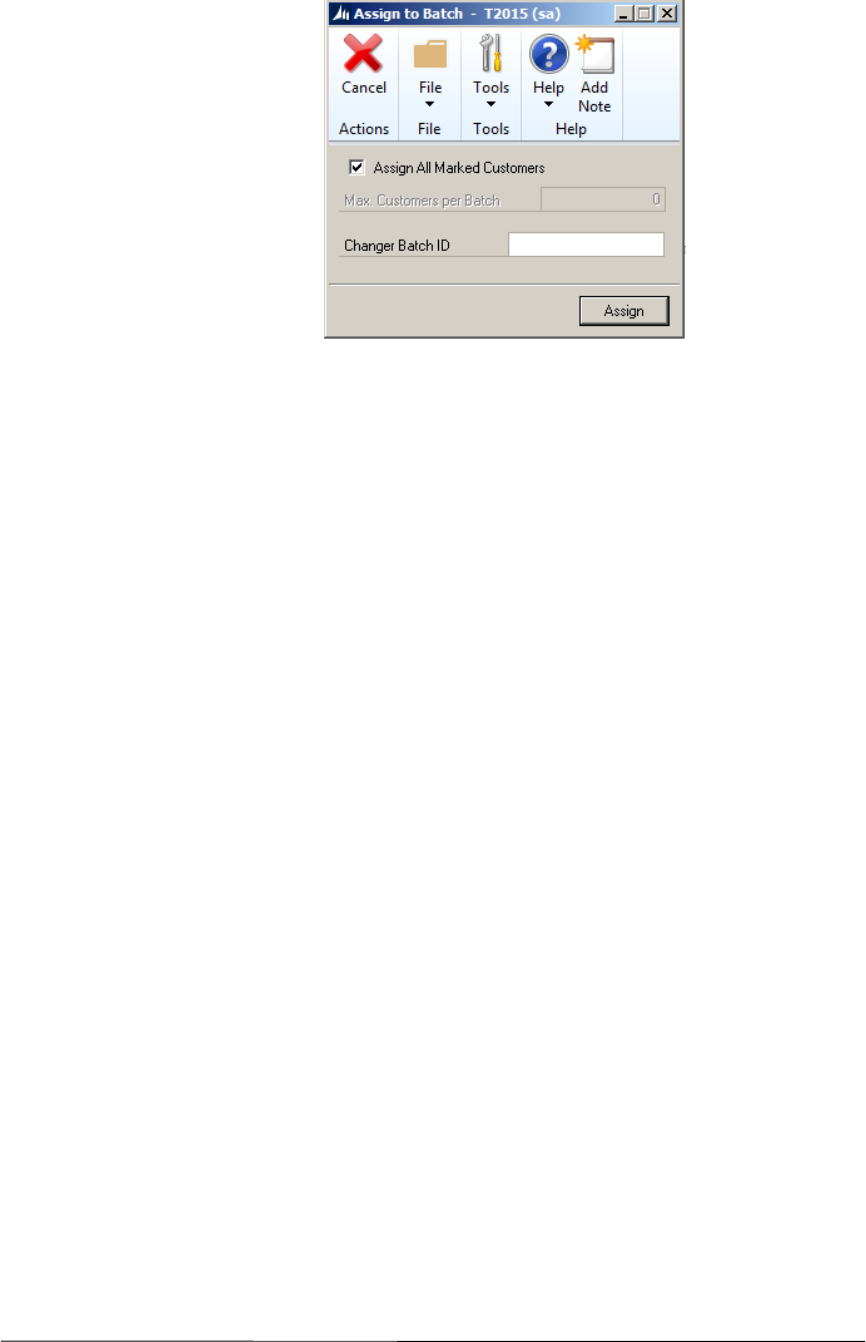
Assigning Changes to Batch Processing
Having setup, validated, and marked the desired change requests, you must now
assign them to a batch. Select Assign to assign change requests to a batch. The
following window appears:
Changer for Microsoft Dynamics GP User’s Guide
Page 36 Corporate Renaissance Group
This window is designed to assign GL account changes to batches. The RM,
PM, and IV Assign to batch windows are identical except that they refer to
“Customers”, “Vendors”, “Items” and “Employees” instead of “Accounts”.
If you want all marked change requests to be assigned to one batch, select Assign
All Marked Accounts. However, if the batch contains a large number of
changes, you may want to break the batch up to processes in smaller intervals.
The following steps are required to achieve this:
1. If an ‘X’ is marked in Assign All Marked Accounts, click the box to
deactivate the function.
2. Specify the number of change requests per batch by setting Max. Accounts
per Batch to a preferred value.
3. In the Changer Batch ID field, give the batch a name. The batch name can
be any text with a maximum length of 15 characters. Changer will append a
sequence number (starting with number one) to the end of the batch ID to
create a new batch ID for each new batch.
Example
There are 130 changes assigned to a batch called “TEST” and Max. Accounts
per Batch is set to 50. Changer will use the batch ID “TEST” and generate a
sequence numbers to create 3 smaller batches:
Changer would assign the first 50 changes to TEST1, the next 50 to TEST2, and
the remaining 30 to TEST3. This increases flexibility in processing times
because Changer enables you to process each batch separately.

Changer™ for Microsoft Dynamics GP User’s Guide
Corporate Renaissance Group Page 37
Please note that if multiple accounts are being merged into a single account,
Changer may automatically create more batches than expected in order to make
the processing easy.
This method of using multiple batches is highly recommended if you have many
change requests. To process requests all at once (a single batch) it may be an
overload on the network and/or server. Also, if nightly backups are run while
Changer is still processing requests, the process will quit before final completion
because the files Changer needs to access are locked due to the backup. The entire
process will have to be restarted. If multiple batches are used, then in the same
situation only the batch Changer was processing at the time of disruption would have
to be restarted. The previously completed batches would not need to be rerun.
Since process is done completely on the SQL server, your workstation looks free but
that may not be true. To get the status of the Changer Process, select the Microsoft
Dynamics GP > Process Monitor and if it is not completed you will see a process
still working.
Changer™ for Microsoft Dynamics GP User’s Guide
Corporate Renaissance Group Page 39
Chapter 4
Batch Adjustments
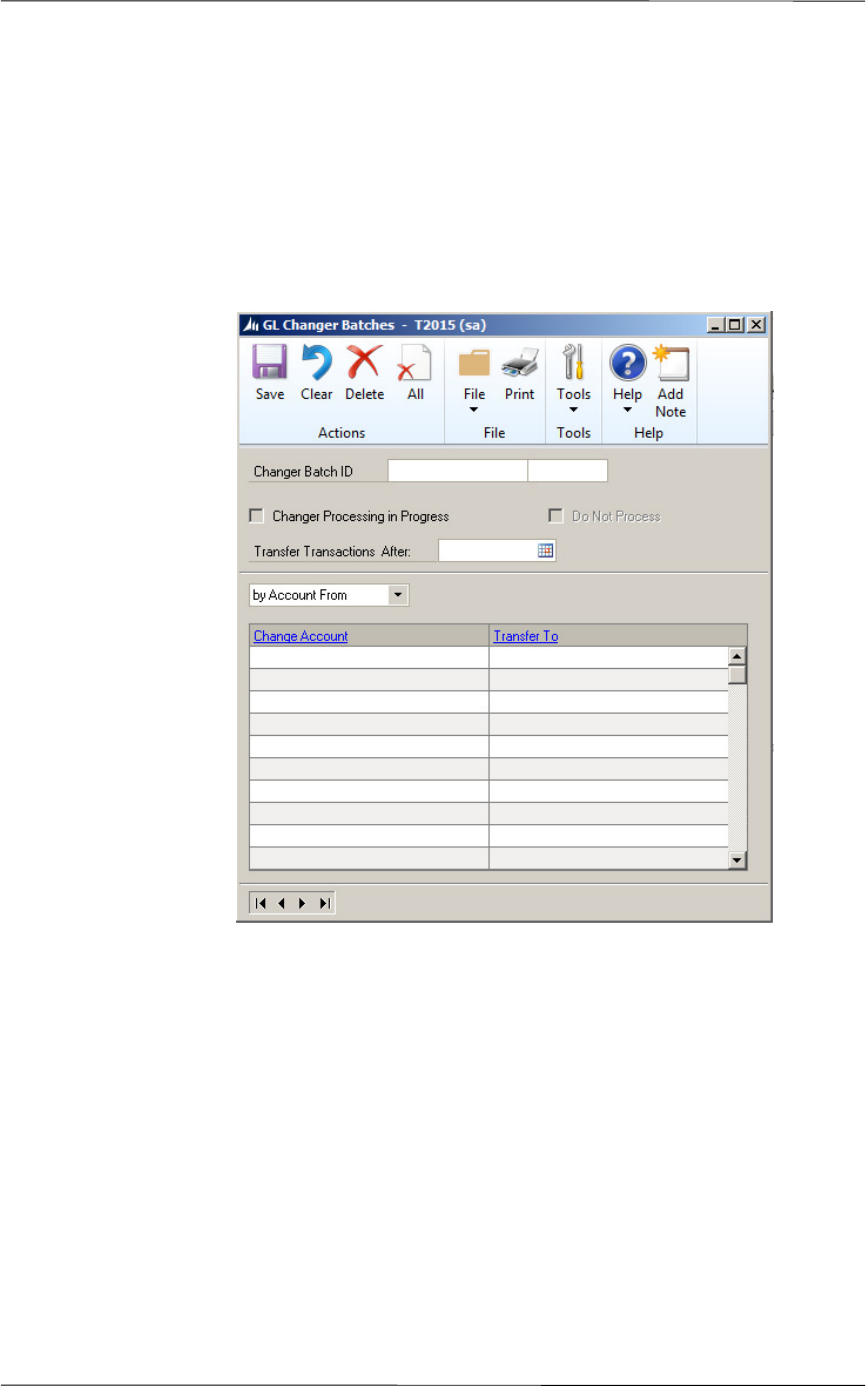
Once all change requests have been assigned to a batch, you may want to specify
which batches are processed. The following window accomplishes this task:
The window displayed is the GL Changer Batches. The RM, PM, IV and Payroll
Changer Batches are identical in layout and functionality.
To access the Changer Batch Window:
1. From the Main Changer Control Window, position the cursor over the
corresponding Changer component in the No. of Batches column.
2. The shape of the cursor will transform into a pointing hand.
3. Click the mouse.
Changer for Microsoft Dynamics GP User’s Guide
Page 40 Corporate Renaissance Group
The window allows you to do the following:
♦ Review the batches to verify that they are correct.
♦ Determine which batches you want to process.
♦ For GL Changer, if you want to transfer the transactions of the
‘From’ Account only after a certain date to the ‘To’ Account,
you can specify the date on this window. For all the accounts in
the batch for which a date is specified, only the transactions after
the specified date will be transferred to the ‘To’ Account. All the
setup information will be transferred to the ‘To’ Account. i.e. All
the information of the ‘From’ Account will be transferred to the
‘To’ Account except the transactions before the specified date.
For more information please refer to Appendix E.
To review the batches you have created, browse batches using the video buttons
in the bottom left corner of the window . The name of the batch will
be displayed in the field Changer Batch ID. The box to the right of the batch ID
shows the generated sequence number if the “max. number of changes per batch”
function was used. The corresponding change requests are listed in the scrolling
window.
Batch Window Controls
1. Sort By
The drop down menu listing by Change Account From and by
Transfer To Account, allows you to sort the table by Change
Account From or by Transfer To Account.
2. Remove
To remove any change requests assigned to the batch, select
Remove. This will un-assign the request from the batch, leaving it as
an un-marked request.
3. Delete
If you want to delete an entire batch, browse to the desired batch and
select Del. If you want all batches to be deleted, select All.

Changer™ for Microsoft Dynamics GP User’s Guide
Corporate Renaissance Group Page 41
NOTE: Delete from the batch control window will
simply move all assigned changes back to
the un-marked status on the Maintenance
Control Window.
4. Do Not Process
To flag the batches you do not want to process, browse to the appropriate
batches and select Do Not Process. You may also remove the Do Not
Process mark so that the batch may be processed.
5. Changer Processing in Progress
If an “X” is marked in Changer Processing in Process field, it indicates that
Changer is currently processing the batch or sub-batch.
Changer™ for Microsoft Dynamics GP User’s Guide
Corporate Renaissance Group Page 43
Chapter 5
Processing Assigned Batches
After assigning all change requests to batches, close all open windows to return back to
the Main Changer Control Window.
This window provides information on the number of batches in each category, (GL
Changer, RM Changer, PM Changer, IV Changer, Payroll Changer). Choose whether to
delete original accounts after the process, then select the respective category button to
begin processing for the category, (i.e. select the GL button to begin GL Changer).
The Main Control window for Changer PA is similar as below. Click the respective
category button to begin processing for the category. For Changer PA, the original codes
are always replaced with the new codes, hence the ‘Delete Originals’ option is not
available.

Changer for Microsoft Dynamics GP User’s Guide
Page 44 Corporate Renaissance Group
NOTE: Although users other than ‘sa’ can process Changer, the user must have
the full access to all tables and accounts. If you’re not sure about the
security level of the user, please log in as ‘sa’ to process Changer batches.
After making a selection, the following window will appear requesting confirmation of
the process.
Select the Cancel button to return to the Main Changer Control Window without
processing or click Process.
NOTE: Use Process Monitor to check the status
of the Changer SQL process.
Once completed, perform “Check Links” as described in the Microsoft Dynamics
GP User’s Guide.
After the process, a report is printed which shows the changes made by Changer
process. The report includes the accounts that have been changed. An example
of the report is shown below.
09/01/07 11:34:51 AM Fabrikam, Inc. 1
Changer GL : List of Changed Accounts
Changer™ for Microsoft Dynamics GP User’s Guide
Corporate Renaissance Group Page 45
-------------------------------------------------------------------------------
Account Number New Account Number Status of Old
Account
-----------------------------------------------------------------------------
000-1100-00 000-1100-99 Deleted
000-1101-00 000-1101-99 Deleted
000-1103-99 000-1103-00 Deleted
000-1104-00 001-1104-11 Deleted
000-1105-00 000-1105-11 Deleted
000-1106-00 000-1106-22 Deleted
000-1107-00 000-1107-22 Deleted
000-1110-00 000-1110-22 Deleted
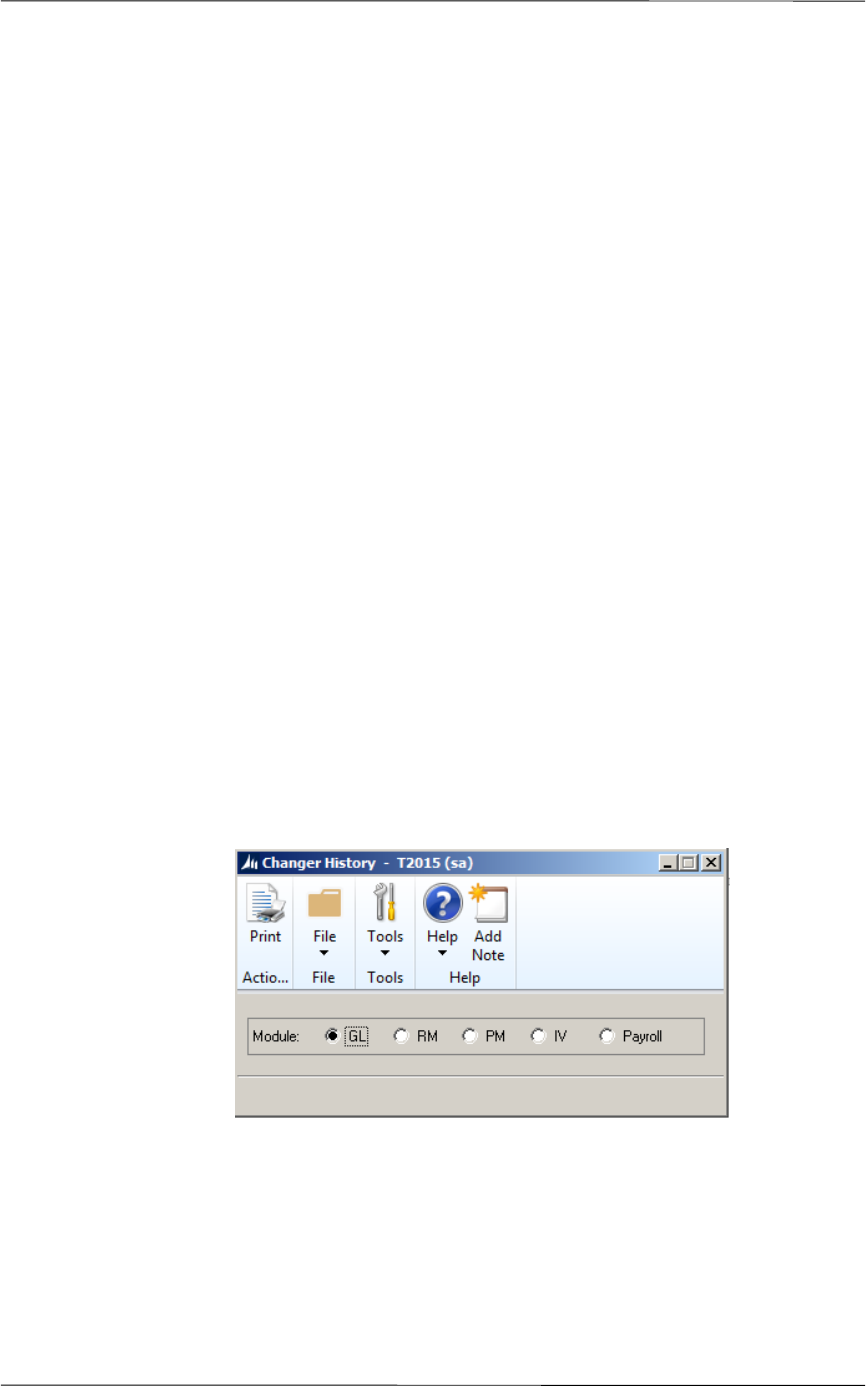
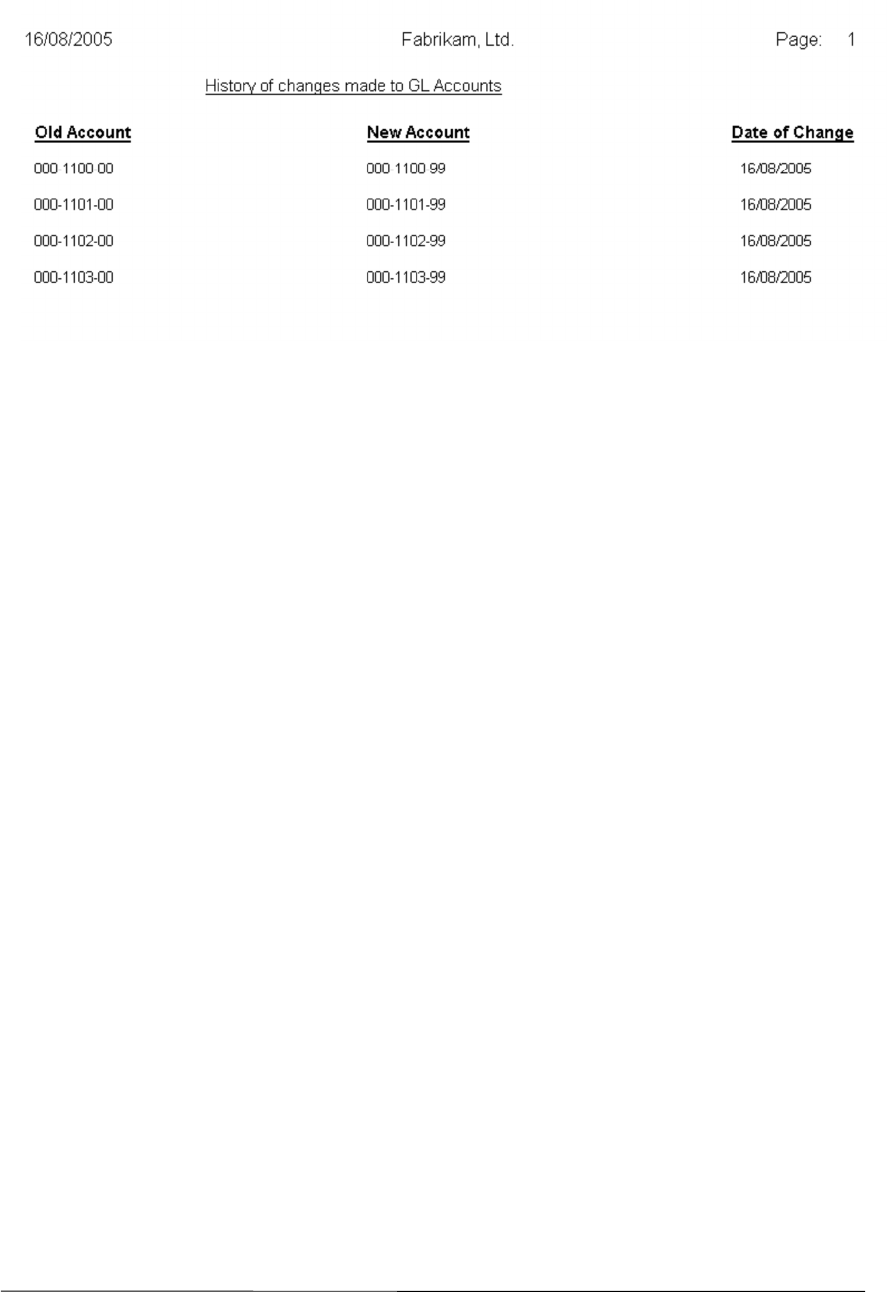
Printing Changer History
A report can be printed for each module to see the history of changes made using
Changer.
To print the Changer History report, select Changer >> Changer History (or
Changer PA >> Changer History). This menu is available only when the main
Changer window is open. The following window will open when this menu item
is selected.
To print the Changer PA History report, select Extras >> Changer PA >>
Changer History. This menu is available only when the main Changer PA
window is open.
An example of the history report is shown below:
Changer for Microsoft Dynamics GP User’s Guide
Page 46 Corporate Renaissance Group

Changer for Microsoft Dynamics GP User’s Guide Chapter 6
Corporate Renaissance Group 47
Chapter 6
Notes
RM Changer
If more than one customer is consolidated (merged) into a single customer, the
summary details pertaining to the “Highest Balance” and “Average Days to Pay”
of the remitting consolidated customer may not necessarily reflect the correct
amounts.
Old Accounts
If you did not select “Delete Originals” when performing change requests, the
old account is not removed automatically by the Changer process. Once the
process is complete, do the following in Dynamics to delete the old accounts:
Cards > Financial > Mass Modify (for old GL account)
Tools > Utilities > Sales > Mass Delete (for old Customer ID)
Tools > Utilities > Purchases > Mass Delete (for old Vendor ID)
Cards > Inventory > Item Number (for old Item Number, item by item)
Cards > Payroll > Employee (for old Employee ID in US Payroll, one
by one)
Cards > Payroll-Canada > Employee (for old Employee ID in Canadian
Payroll, one by one)
The following are a few suggestions for checking the data after the Changer
process has been run. It is, however, not an exclusive list.
♦ Print Open and historical trial balance.
♦ Print Receivables/ Payables summary.
♦ Select accounts/customers/vendors/items/Employee to check the detail.

Chapter 7 Changer for Microsoft Dynamics GP User’s Guide
48 Corporate Renaissance Group
Chapter 7
Changer with Dates
To keep the transactions before a certain date under ‘old’ Account number ‘Changer
Batch Window’ can be used. This feature is available only for GL Changer. Following is
the procedure if you are using this feature while changing GL Account Number.
1. If you do not specify any date in the ‘Changer Batch Window’ for any
existing batch, all the transactions will be transferred to the new Account
Number. If you specify a date for any batch in this window in the ‘Transfer
Transactions After’ field, the transactions of all the ‘old’ accounts in that
batch AFTER the specified date will be transferred to the new accounts
numbers and all the transactions UPTO the specified date will remain under
‘old’ account. For example, if the date specified is 01/01/2009, all
transactions from 01/02/2009 onwards will be transferred to the new
accounts. To transfer all the transactions from 01/01/2009 to the new
account, specify 12/31/2008 in the ‘Transfer Transactions After’ field. Even
if ‘delete originals’ check box is marked on the main Changer window,
accounts in this batch will not be deleted as transactions may exist for the old
accounts.
2. Date can be specified only from an open financial year.
3. All the un-posted transactions will transfer to new accounts irrespective of
the date.
4. Summary will not be adjusted during the Changer process if a date is
specified. Reconciling the financial information will update the summary
information. If you keep history information, reconcile current and all history
years (Microsoft Dynamics GP > Tools > Utilities > Financial > Reconcile,
check and select the appropriate year), else reconcile only the current year.
5. All the setup information will be changed to the new account. This feature
works on the assumption that user wants to change all the data and setup
information to new account except the data up to the specified date.

Changer for Microsoft Dynamics GP User’s Guide Chapter 7
Corporate Renaissance Group 49
6. Please note that this feature is available only for GP core modules. If you
have any third party products or modules/additional products outside the GP
dictionary (such as Project Accounting, Fixed Assets etc.), data in those
modules will not change to new account number if a date is specified while
running Changer. The data in third party modules will change if no date is
specified in the ‘Changer Batch Window’ as per the list of products/modules
supported by Changer. (please refer to Appendix D for list of products
supported by Changer)
Appendix A Changer for Microsoft Dynamics GP User’s Guide
50 Corporate Renaissance Group
Appendices
Appendix A
Changer Illustrations
The following step by step example provides a thorough understanding of the
Changer process. The example uses account, customer and vendor change
requests with normal and wildcard entries.
Assume “Fabrikam, Inc.”, the sample company provided with GP, requires the
following changes to their accounts.
Change
Account
From
Transfer To
Account
000-1220-00
000-1220-01
000-1220-02
000-1220-03
000-1220-04
000-1220-10
000-1220-10
000-1220-10
000-1220-10
000-1220-10
000-8020-00 000-8888-00
100-6100-00
100-6110-00
100-6120-00
100-6130-00
100-6140-00
100-6150-00
100-6160-00
100-6170-00
100-6180-00
100-6190-00
100-9900-00
100-9910-00
100-9920-00
100-9930-00
100-9940-00
100-9950-00
100-9960-00
100-9970-00
100-9980-00
100-9990-00
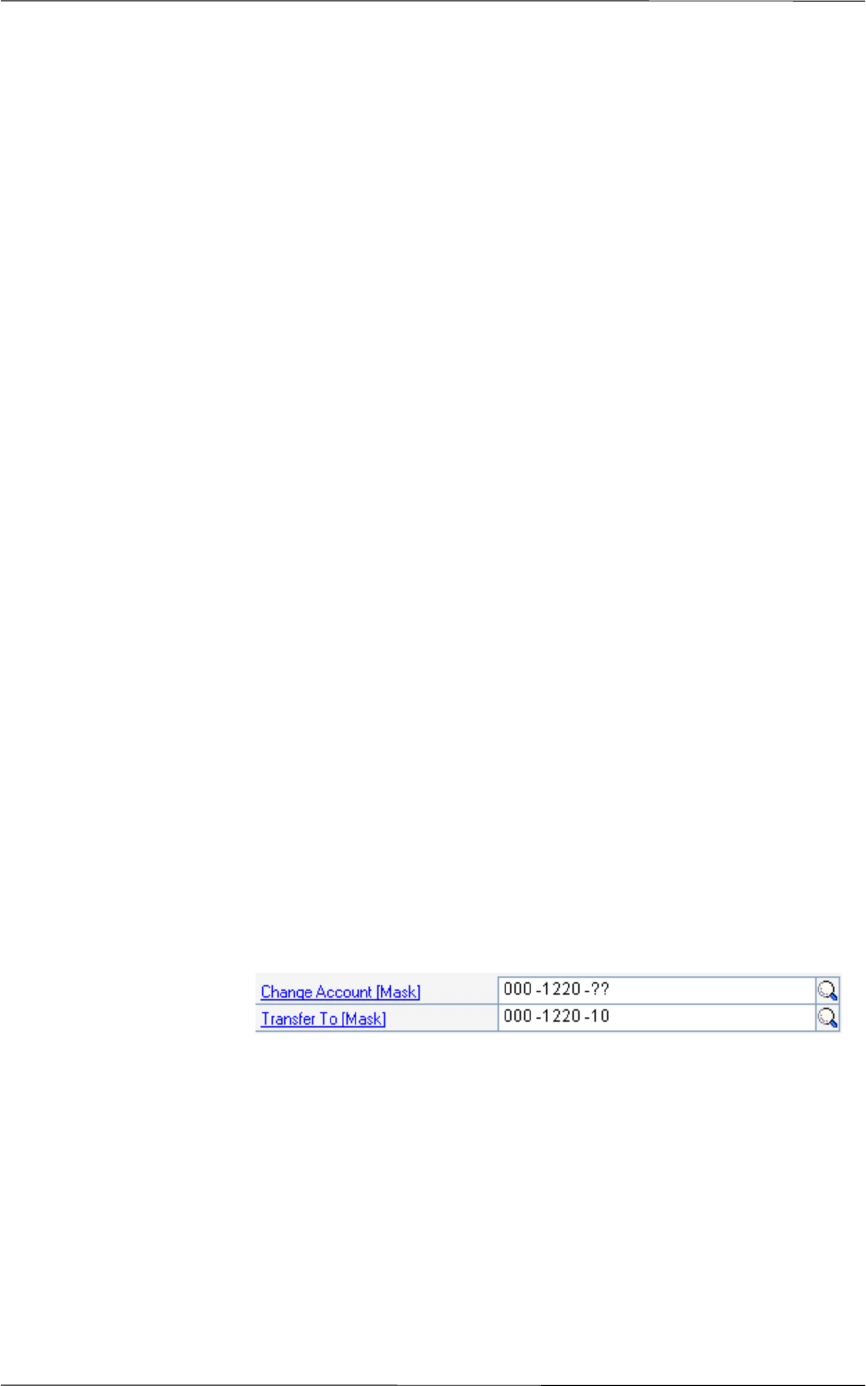
Changer for Microsoft Dynamics GP User’s Guide Appendix A
Corporate Renaissance Group 51
In the first “change request”, Fabrikam, Inc, would like to consolidate its credit
card receivables into a single account. They also require interest expense
account numbers 000-8020-00 to be renumbered as 000-8888-00. Finally, all
Administration expenses need to be renumbered for accounting purposes.
Changer Procedures
1. Install Changer (see Chapter Installation for details).
2. To Start:
a)
Launch Microsoft Dynamics GP.
b)
Select Tools > Utilities > Company > Changer from the main
menu
When the Changer Control window appears, position the cursor over
GL Changer in the Changer Process Description column.
The shape of the cursor will transform into a magnifying glass.
Click the mouse button.
3. Setup Change Requests
Setup the account change requests in GL Changer Maintenance
window.
a)
The first entry is a consolidation of 5 GL accounts into a single
account.
The first entry is as follows:
Because the first seven positions of Credit Card Receivables are
identical, placing wildcards in the final two positions will allow all
Credit Card Receivable accounts to be merged into a single account.
Select Wild Fill to insert the “change request” into the table.
b)
The second entry changes the account designation of interest
expense.
Enter the following to “change” the interest expense designation:
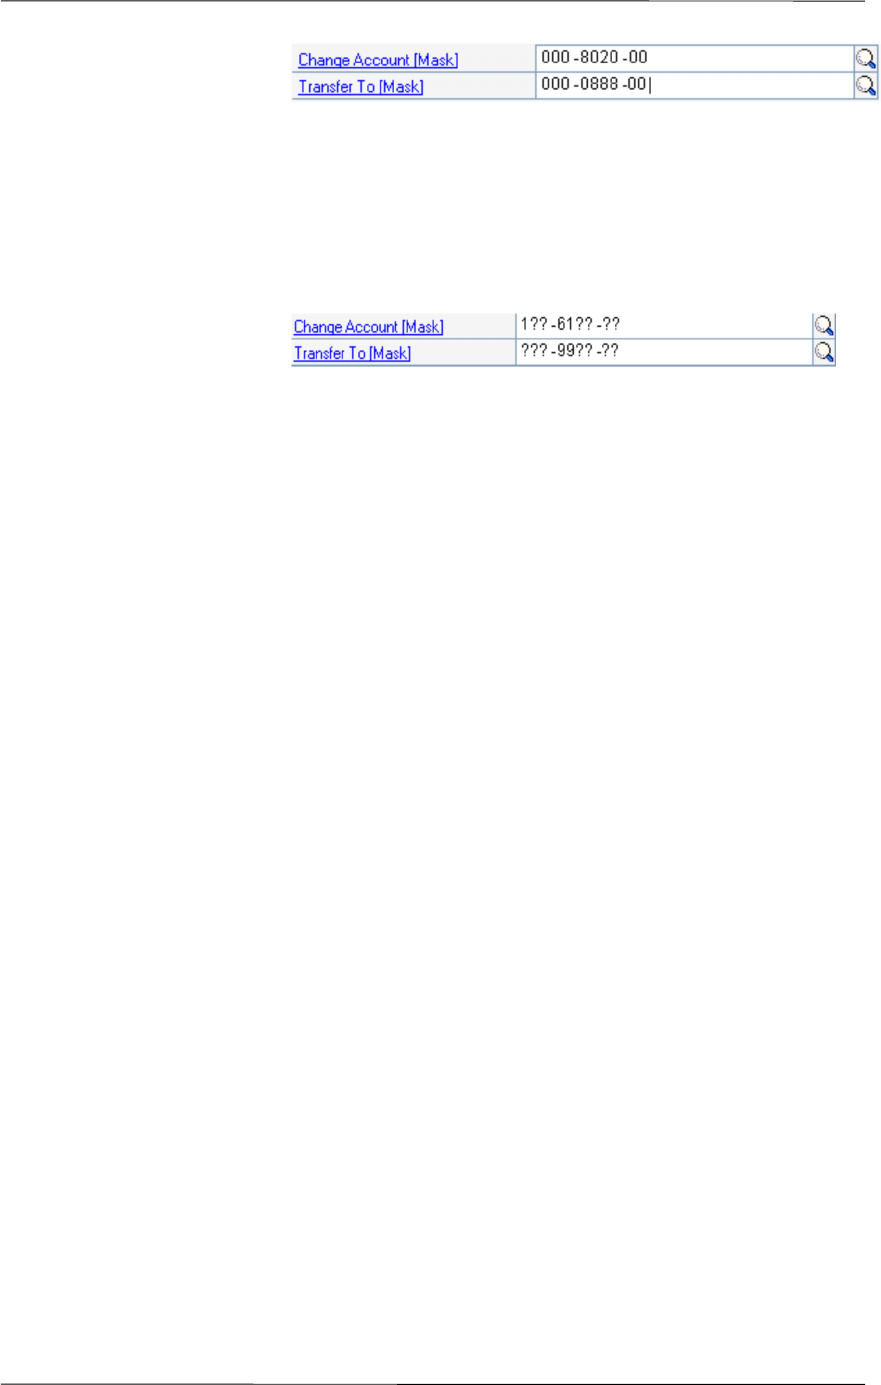
Appendix A Changer for Microsoft Dynamics GP User’s Guide
52 Corporate Renaissance Group
Select Insert to input the “change request” to the table.
c)
The third entry requires all Administration expenses to be
renumbered.
The following “change request” accomplishes this task:
In this “change request”, all accounts with ‘1’, ‘6’, and ‘1’ in
positions one, four, and five will be affected. Those account
numbers will be translated according to the notation denoted in
Transfer To [Mask] T. Positions four and five of the accounts
will be converted to ‘9’ and ‘9’, respectively.
4. Validation
Select “Invalid” from the Display panel to list any changes not yet
validated. Select Validate, or if the Transfer To account does not
already exist, select Create New Account otherwise select Don’t
Create New Account. All valid changes will be moved from the
Invalid Display list to the Valid Display list.
5. Mark Changes
Select Mark All to mark the changes for processing.
1. Assign Changes
Select Assign to assign all marked changes to a batch. Assign all
changes to one batch called TESTBATCH.
7. Activate Processing
Close the Maintenance Control Window to access the Main
Changer Control Window. To commence processing of GL
Changer, click on GL located at the top of the main Changer
Control Window. This will initiate GL Changer processing.

Changer for Microsoft Dynamics GP User’s Guide Appendix B
Corporate Renaissance Group 53
Appendix B
Validation Rules
These rules specify the conditions, which should be met in order for a change
request to be considered valid.
If the accounts are being merged:
Both the ‘account changed from’ and the ‘account transferred to’ must:
a) exist
b) be the same account type
c) be the same posting type
If customers are being merged:
Both the ‘changed from’ and the ‘transferred to’ customers must:
a) exist
b) have the same Currency ID and Tax Schedule ID
c) have the same Balance Type
If vendors are being merged:
Both the ‘changed from’ and the ‘transferred to’ vendors must:
a) exist
b) have the same Currency ID and Tax Schedule ID
If items are being merged:
Both from and To item transferred to must:
a) be of same Quantity of Decimals.
b) be of same Currency of Decimals.
c) be of same Item Type.
d) be of same Valuation Method.
e) be of same U of M Schedule ID.
f) Not defined as kit or BOM.
g) Not assigned with serial numbers or lot numbers as tracking
option.
Please refer to the notes below if merging items.

Appendix B Changer for Microsoft Dynamics GP User’s Guide
54 Corporate Renaissance Group
Note:
1. On Purchase orders and Receiving entries, the notes attached to ‘From’
items will be lost if items that are being merged into, are in the same PO.
2. The price levels of ‘From’ items are not added to the existing price levels of ‘To’
items when items are being merged. If you wish to use the price levels of old
items after merging, please add these prices levels to ‘To’ items manually. These
items will still be validated and can be merged. This applies only to merging
items. If item is being changed to a brand new item, all the price levels will be
carried forward to the new item.
3. Items cannot be merged if manufacturing module is used.
If Employee IDs are being changed:
The Employee ID transferred to must be:
a) A new ID (i.e. should not exist in GP). The new Employee ID
will be created by Changer.
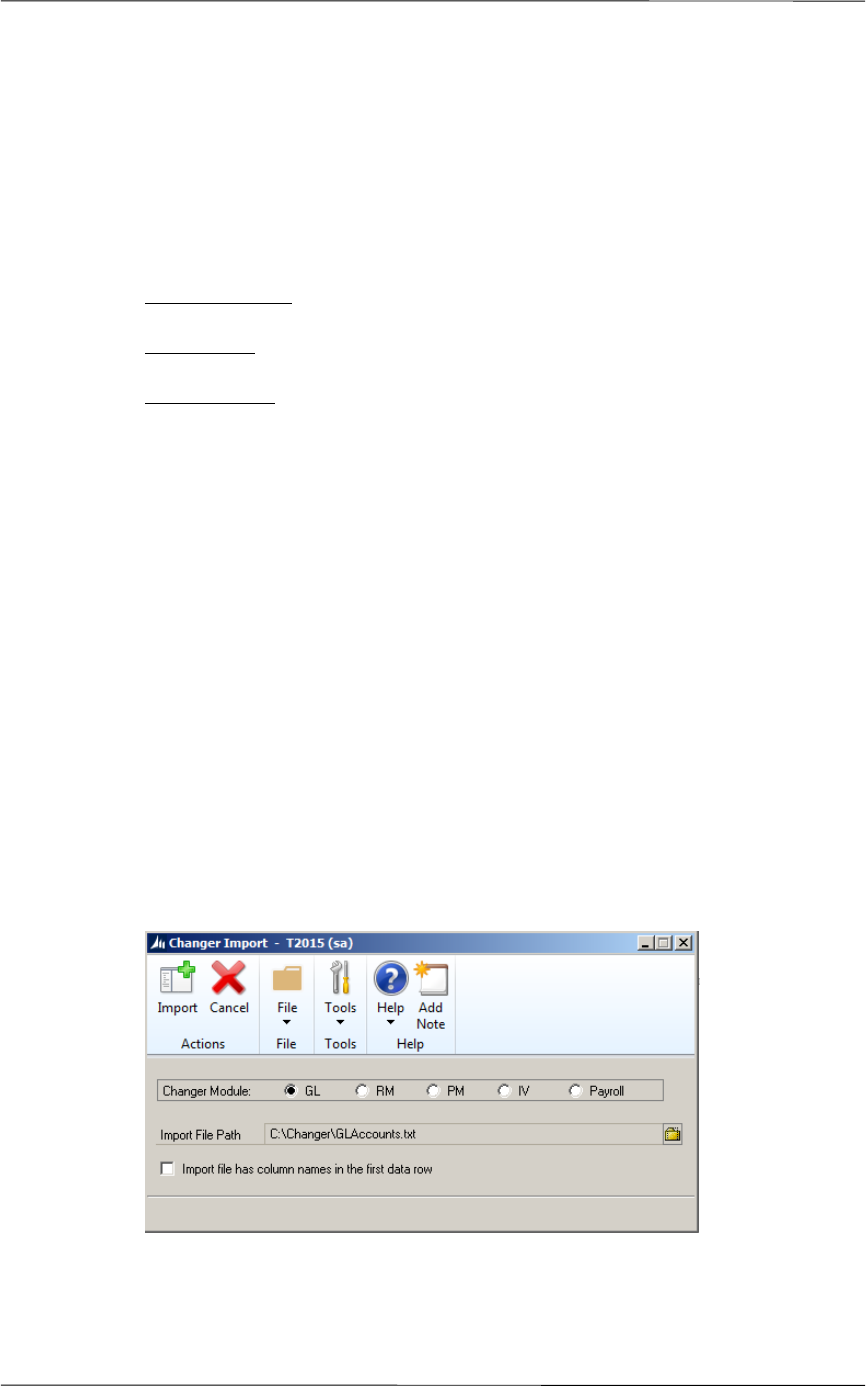
Changer for Microsoft Dynamics GP User’s Guide Appendix C
Corporate Renaissance Group 55
Appendix C
Import GL Accounts for Mass Account Modification
1. Create a tab-delimited text file with the following three fields in the following
order:
Change Account - the original account in GP
Transfer To - the new account to be changed to
Account Index - the index for the original account*.
Example: GLBTIMP.TXT
1
st
column 2
nd
column 3
rd
column
100-100-000 100-100-123 121
All three fields should be in text format with Account Numbers with dashes (-) as
shown above.
*SmartList may also be used to get the account index.
A ‘Changer’ menu item will be available on the Main Changer Control window
when this window is open.
Select Changer > Changer Import from the menu. The Changer Import window
will open.
Select ‘GL’ as the Changer Module.
Select the Import file.

Appendix C Changer for Microsoft Dynamics GP User’s Guide
56 Corporate Renaissance Group
Check the ‘Import file has column names in the first data row’ checkbox if the
file has a header row and click Import.
A message will be displayed after the import process is complete. If any records
are not imported, a message will be displayed to check reject.rjt file placed in the
same folder as the import file.
2. After importing the accounts, the GL Changer Maintenance window (on user’s
guide p.19) should be filled in with the accounts. Click the Validate button to
validate the imported accounts. The rest of the procedures can be read from
Chapter 3.
Import RM Customer ID for Mass Customer ID
Modification
1. Create a tab-delimited text file with the following two fields:
Change Customer - the original customer in GP
Transfer To - the new customer to be changed to
Example: RMBTIMP.TXT
1
st
column 2
nd
column
AARONFIT0001 AARONFIT
Both fields should be in the above order.
A ‘Changer’ menu item will be available on the Main Changer Control window
when this window is open.
Select Changer > Changer Import from the menu. The Changer Import window
will open.

Changer for Microsoft Dynamics GP User’s Guide Appendix C
Corporate Renaissance Group 57
Select ‘RM’ as the Changer Module.
Select the Import file.
Check the ‘Import file has column names in the first data row’ checkbox if the
file has a header row and click Import.
A message will be displayed after the import process is complete. If any records
are not imported, a message will be displayed to check reject.rjt file placed in the
same folder as the import file.
2. After importing the RM Customer ID’s, the RM Changer Maintenance window
should be filled with the customer IDs. Click the Validate button to validate the
imported customers. The rest of the procedures can be read from Chapter 3.
Import PM Vendor ID for Mass Vendor ID Modification
1. Create a tab-delimited text file with the following two fields:
Change Vendor - the original vendor in GP
Transfer To - the new vendor to be changed to
Example: PMBTIMP.TXT
1
st
column 2
nd
column
ACETRAVE0001 ACETRAVEL
Both fields should be in a text format and in the above order.
A ‘Changer’ menu item will be available on the Main Changer Control window
when this window is open.
Select Changer > Changer Import from the menu. The Changer Import window
will open.
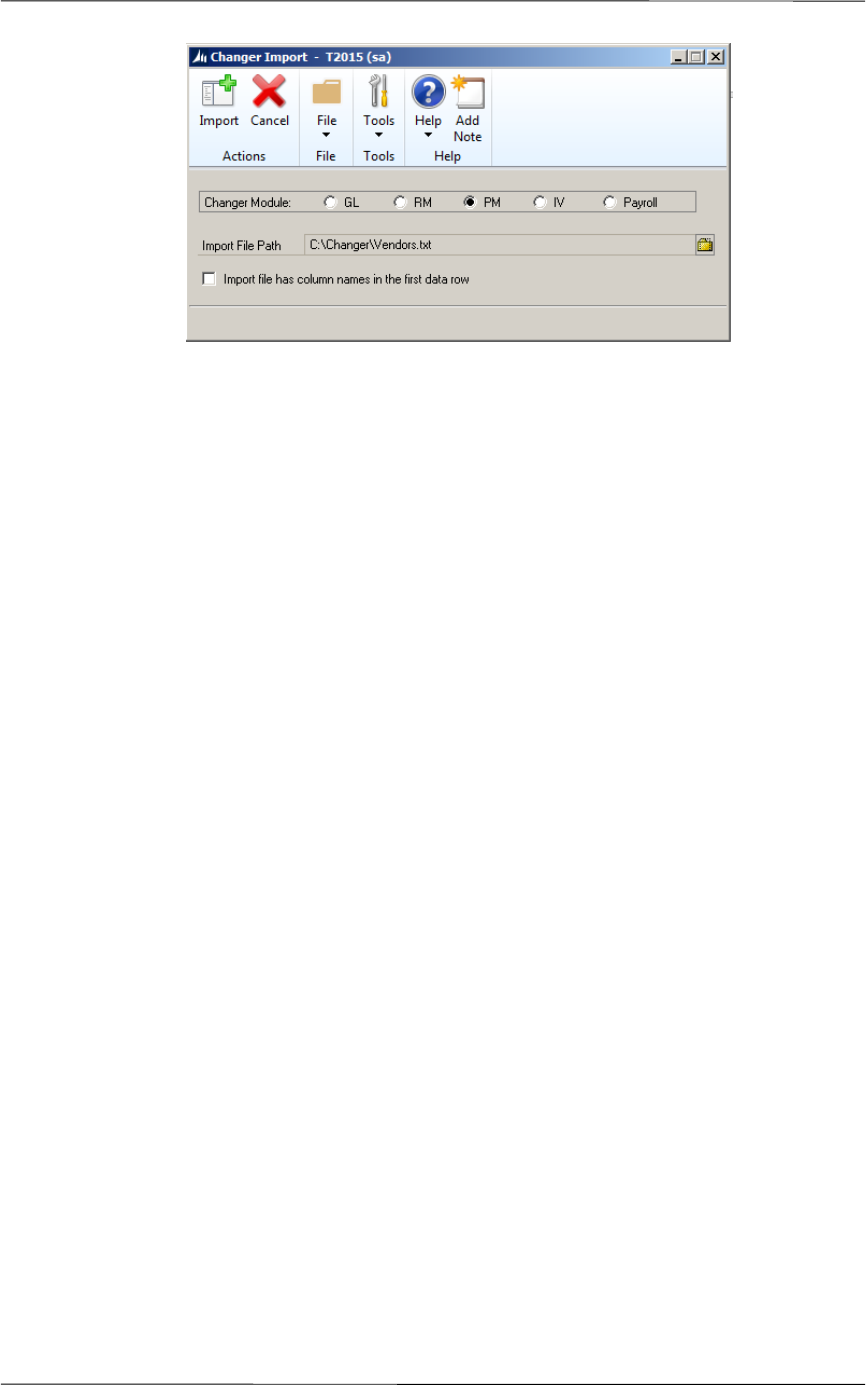
Appendix C Changer for Microsoft Dynamics GP User’s Guide
58 Corporate Renaissance Group
Select ‘PM’ as the Changer Module.
Select the Import file.
Check the ‘Import file has column names in the first data row’ checkbox if
the file has a header row and click Import.
A message will be displayed after the import process is complete. If any
records are not imported, a message will be displayed to check reject.rjt file
placed in the same folder as the import file.
After importing the PM Vendor ID’s, the PM Changer Maintenance window
should be filled with the vendor ID’s. Click the Validate button to validate the
imported vendors. The rest of the procedures can be read from Chapter 3.
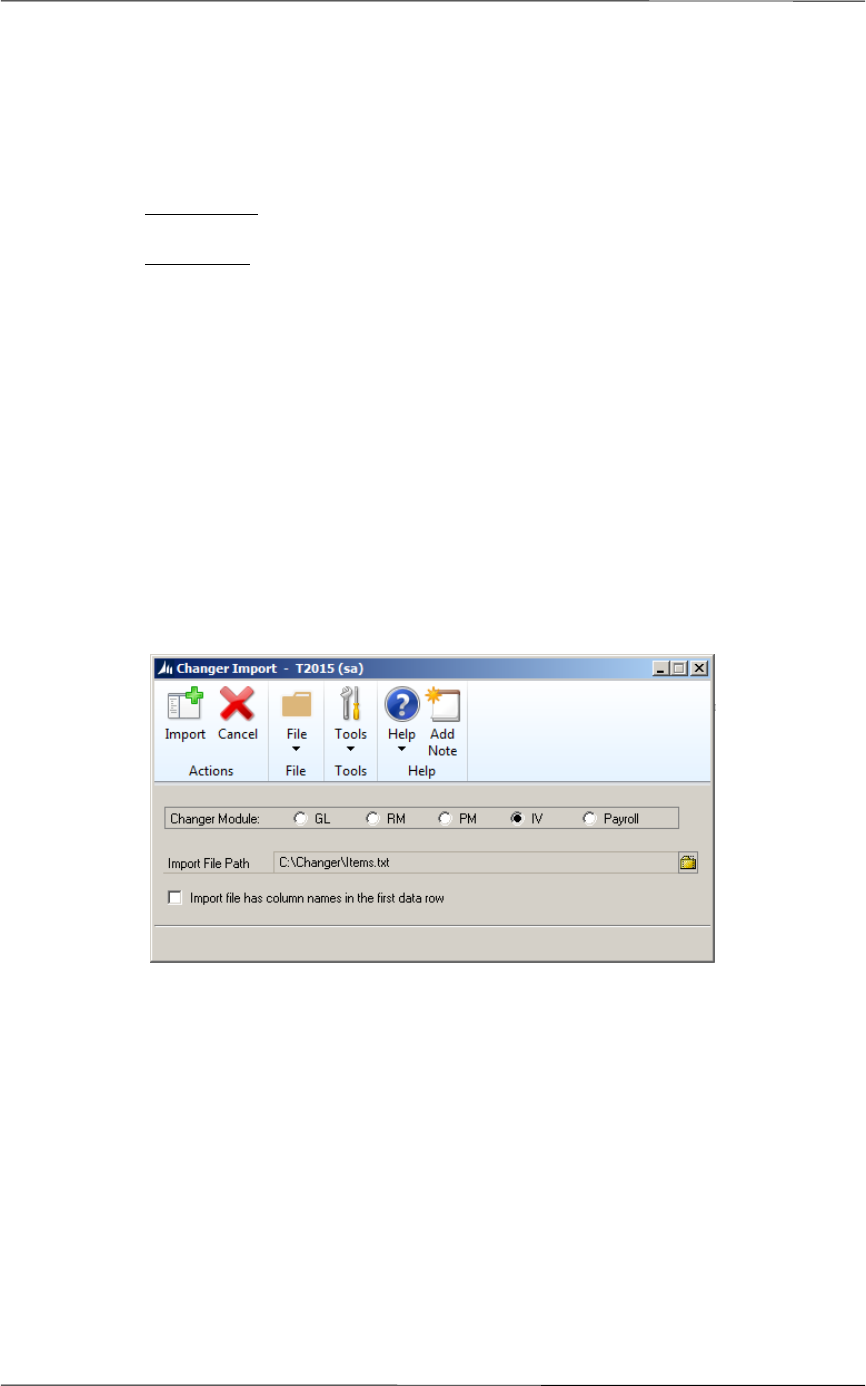
Changer for Microsoft Dynamics GP User’s Guide Appendix C
Corporate Renaissance Group 59
Import IV Item Numbers for Mass Item Number
Modification
1. Create a tab-delimited text file with the following two fields:
Change Item - the original Item in GP
Transfer To - the new Item to be changed to
Example: IVBTIMP.TXT
1
st
column 2
nd
column
ACCS-CRD-12WH PHCORD0112
Both fields should be text fields in the above order.
A ‘Changer’ menu item will be available on the Main Changer Control window
when this window is open.
Select Changer > Changer Import from the menu. The Changer Import window
will open.
Select ‘IV’ as the Changer Module.

Select the Import file. Changer for Microsoft Dynamics GP User’s Guide
60 Corporate Renaissance Group
Select the Import file.
Check the ‘Import file has column names in the first data row’ checkbox if the
file has a header row and click Import.
A message will be displayed after the import process is complete. If any records
are not imported, a message will be displayed to check reject.rjt file placed in the
same folder as the import file.
2. After importing the IV Item Numbers, the IV Changer Maintenance window
should be filled with the item numbers. Click the Validate button to validate the
imported items. The rest of the procedures can be read from Chapter 3.
Import Payroll Employee ID for Mass Employee
ID Modification
1. Create a tab-delimited text file with the following two fields:
Change Employee - the original Employee in GP
Transfer To - the new Employee to be changed to
Example: PRBTIMP.TXT
1
st
column 2
nd
column
ALVA001 AMARIA
Both fields should be text fields in the above order.
A ‘Changer’ menu item will be available on the Main Changer Control window
when this window is open.
Select Changer > Changer Import from the menu. The Changer Import window
will open.
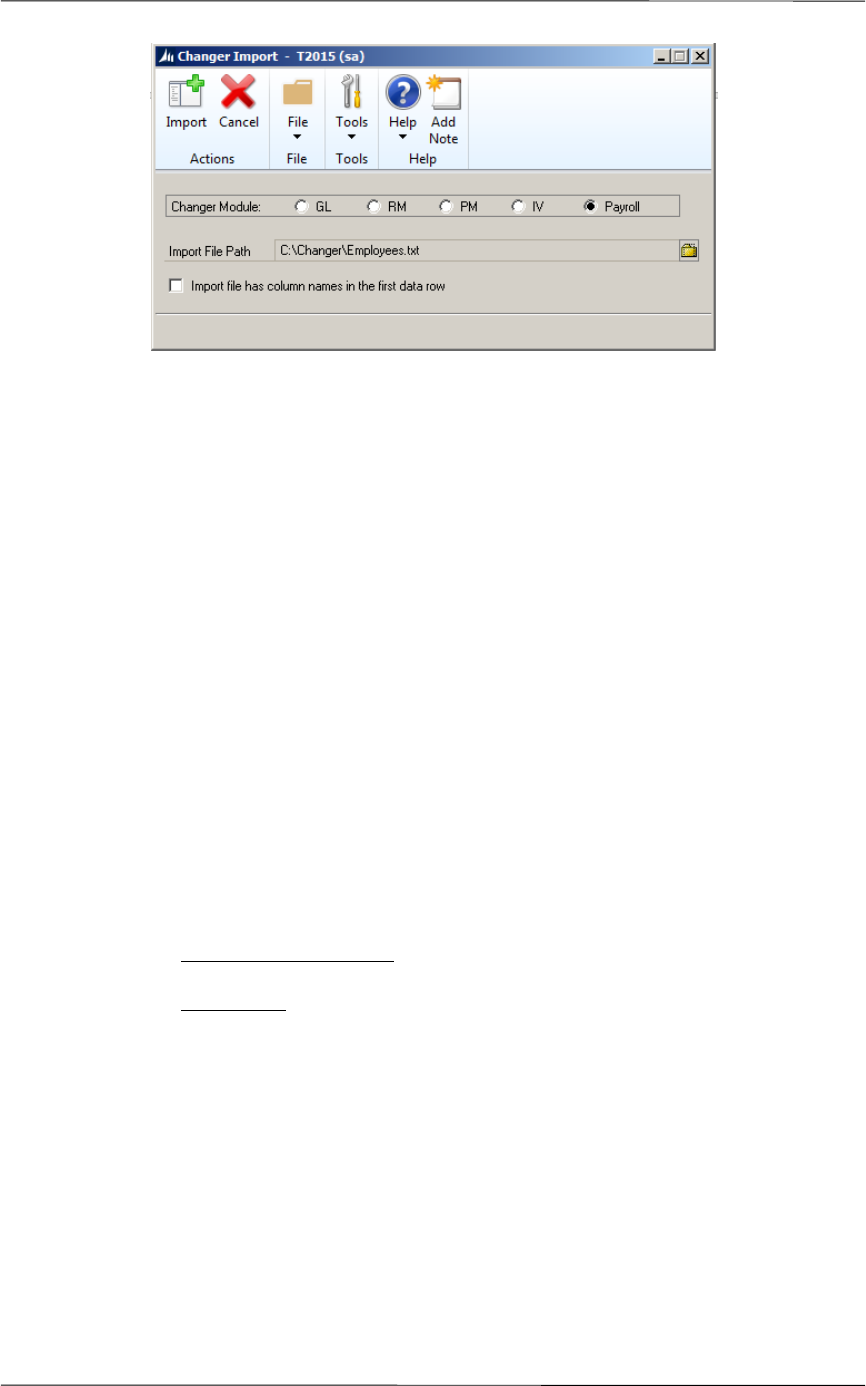
Changer for Microsoft Dynamics GP User’s Guide Select the Import file.
Corporate Renaissance Group 61
Select ‘Payroll’ as the Changer Module.
Select the Import file.
Check the ‘Import file has column names in the first data row’ checkbox if the
file has a header row and click Import.
A message will be displayed after the import process is complete. If any records
are not imported, a message will be displayed to check reject.rjt file placed in the
same folder as the import file.
2. After importing the employees, the Payroll Changer Maintenance window should
be filled with the employee IDs. Click the Validate button to validate the imported
employees. The rest of the procedures can be read from Chapter 3.
Import Project Numbers for Mass Modification
1. Create a tab-delimited text file with the following two fields:
Change Project Number - the original Project Number in GP PA
Transfer To - the new Project number to be changed to
Both fields should be text fields in the above order.
A ‘Changer PA’ menu item will be available on the Main Changer PA Control
window.
Select Changer PA > Changer PA Import from this menu. The Changer PA
Import window will open.
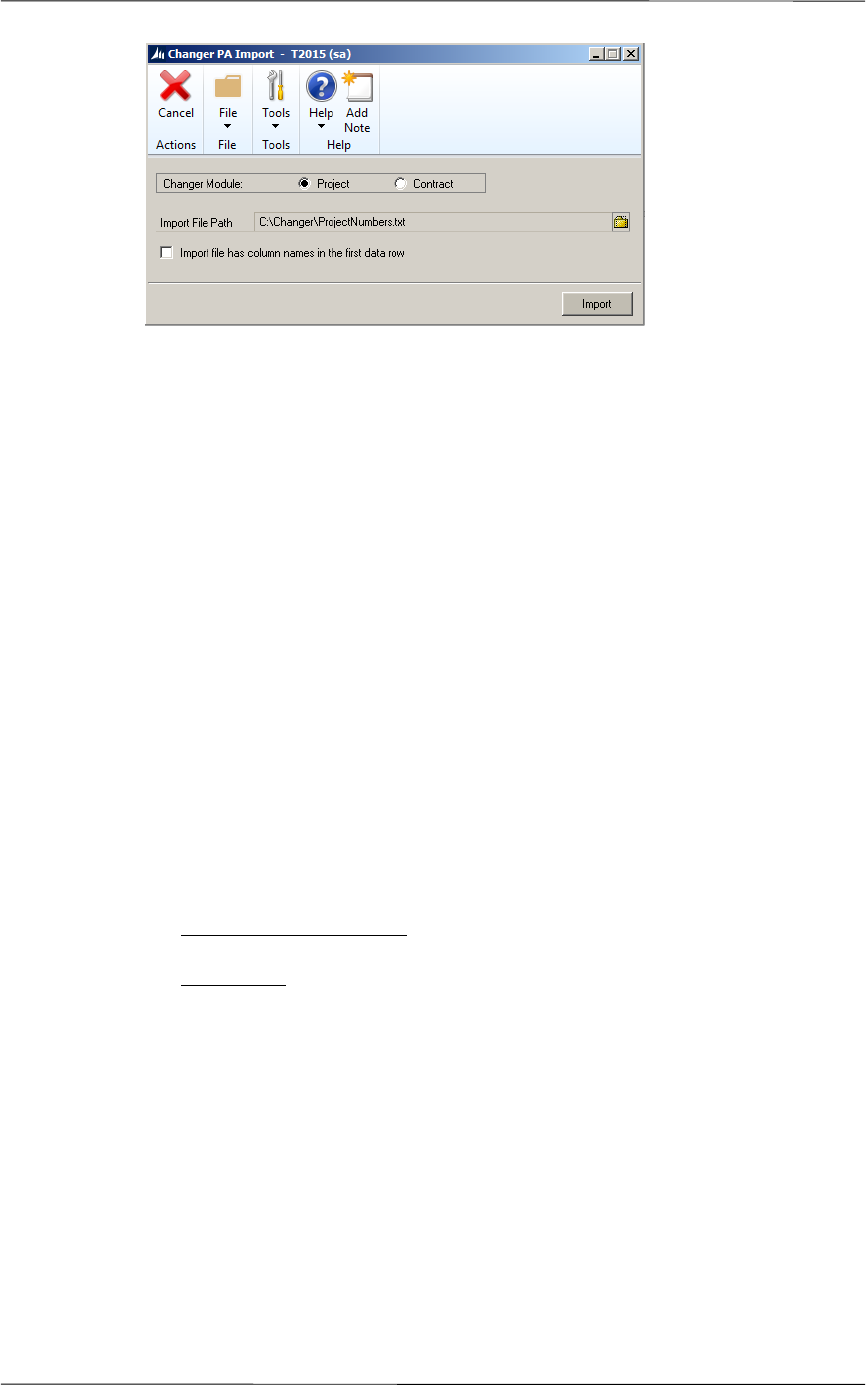
Select the Import file. Changer for Microsoft Dynamics GP User’s Guide
62 Corporate Renaissance Group
Select ‘Project’ as the Module.
Select the Import file.
Check the ‘Import file has column names in the first data row’ checkbox if the
file has a header row and click Import.
A message will be displayed after the import process is complete. If any records
are not imported, a message will be displayed to check reject.rjt file placed in the
same folder as the import file.
After importing the project numbers, the Project Changer Maintenance window
should be filled with the project numbers. The rest of the procedures can be
read from Chapter 3.
Import Contract Numbers for Mass Modification
2. Create a tab-delimited text file with the following two fields:
Change Contract Number - the original Contract Number in GP PA
Transfer To - the new Contract number to be changed to
Both fields should be text fields in the above order.
A ‘Changer PA’ menu item will be available when the Main Changer PA Control
window is open.
Select Changer PA > Changer PA Import from this menu. The Changer PA
Import window will open.
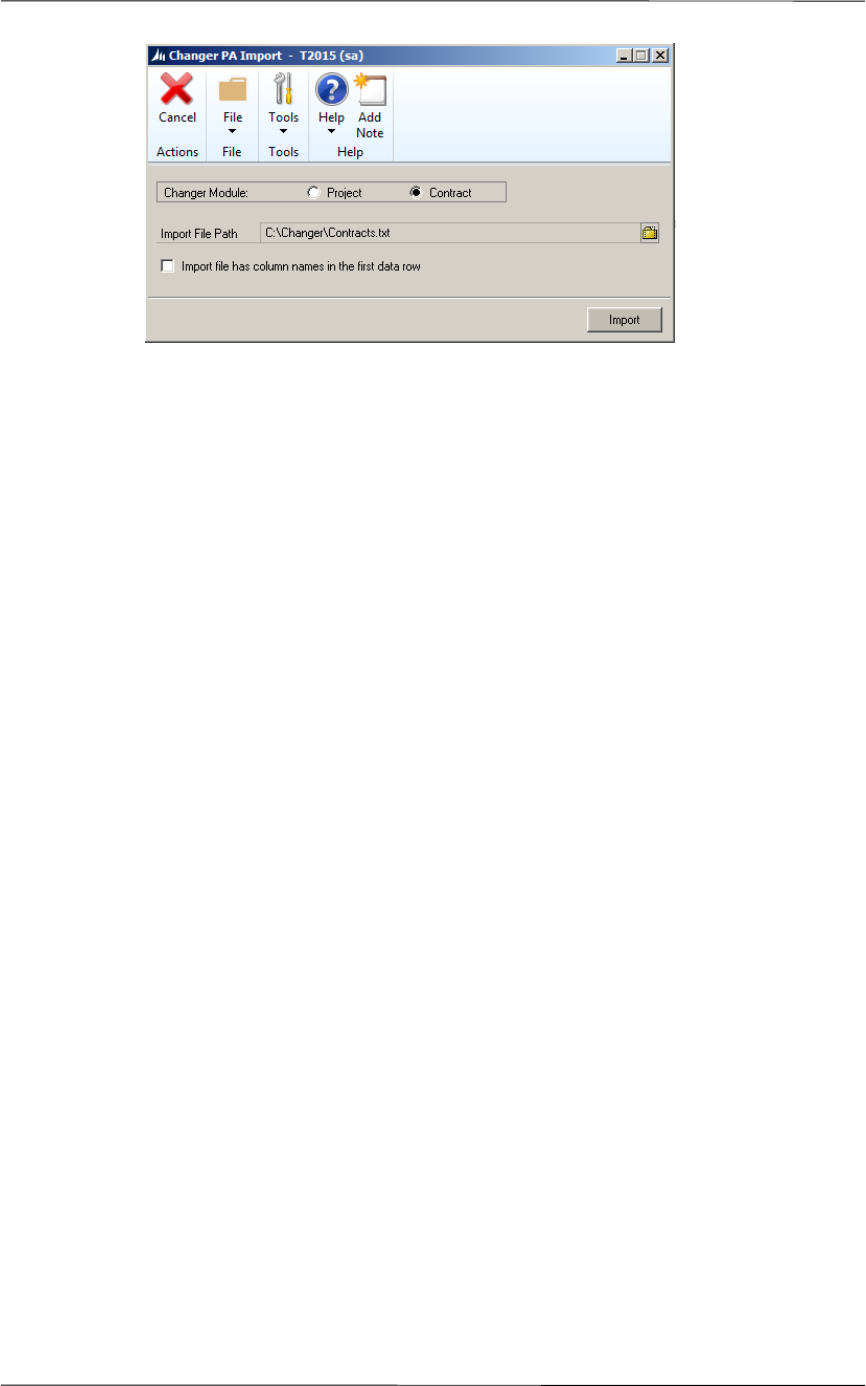
Changer for Microsoft Dynamics GP User’s Guide Select the Import file.
Corporate Renaissance Group 63
Select ‘Contract’ as the Module.
Select the Import file.
Check the ‘Import file has column names in the first data row’ checkbox if the
file has a header row and click Import.
A message will be displayed after the import process is complete. If any records
are not imported, a message will be displayed to check reject.rjt file placed in the
same folder as the import file.
After importing the contract numbers, the Contract Changer Maintenance
window should be filled with the contract numbers. The rest of the procedures
can be read from Chapter 3.

Appendix D Changer for Microsoft Dynamics GP User’s Guide
64 Corporate Renaissance Group
Appendix D
Third party products and GP non-core modules
(additional products) updated by Changer:
1. Fixed Assets
2. Project Accounting
If Personal Data Keeper is installed, you may need to re-setup PDK on machines working
offline.
3. Collections Management
4. EFT for Receivables Management
5. EFT for Payables Management
6. Safe Pay
7. Electronic Reconcile
8. Cash Flow Management
9. Human Resources
10. Revenue Expense Deferral
11. MICR (by Mekorma)
12. Canadian Payroll
13. Service Advantage (Field Service)
14. Manufacturing (Items cannot be merged if using Manufacturing module)
15. PO Enhancements
16. Billing Series (by Encore Business Solutions)
17. Project Tracking (by Encore Business Solutions)
18. Tax Distribution (Formerly referred to as GST/PST Distribution by Encore Business
Solutions)
19. Interfund
• Changer does not check segment IDs in the setup of Interfund. Only account
numbers in the setup will be changed. The account number may no longer match
the segment ID and will have to be updated manually.
20. Encumbrance Management
21. Electronic Bankrec (by Encore Business Solutions)
22. Enhanced Commitment Management
23. Control Account Management

Changer for Microsoft Dynamics GP User’s Guide Appendix D
Corporate Renaissance Group 65
• Changer does not check segment IDs in the setup of Control Account
Management. Only account numbers in the setup will be changed. The account
number may no longer match the segment ID and will have to be updated
manually.
24. Enhanced Customer Statements (by Encore Business Solutions)
25. Wennsoft (Job Cost and Service Management)
26. Wennsoft (Equipment Series)
27. Cashbook (Bank Management)
28. Integrity Data (HRMSS)
29. Analytical Accounting
30. Grant Management
31. Payment Document Management
32. ML Checks
33. VAT Daybook
34. Dynamics Online Services
35. Extender
36. Horizons Manufacturing Module (HMS)
37. Project Cost (Olympic Systems) (GL Changer only)
38. Diamond Software (GL Changer only)
39. Binary Stream Multi-Entity Management
If you are using any of these modules, Changer should be processed from a workstation that has
all of these products/modules installed. Make sure that the latest service packs for these
products/modules are installed.
Appendix E Changer for Microsoft Dynamics GP User’s Guide
66 Corporate Renaissance Group
Appendix E
Minimum Hardware and Operating System
Requirements for Microsoft Dynamics GP:
Although the minimum requirements are provided here, we strongly recommend
referring to the Microsoft installation documentation to install Microsoft Dynamics
GP
Client Requirements:
Operating System One of the following:
• Windows Vista Business,
Ultimate or Enterprise (32-bit
and 64-bit)
• Windows XP Professional (32-
bit only)
Processor Intel Pentium IV 2.4 gigahertz (GHz) or
higher
Available Hard Disk Space 800 megabytes (MB) or more on the
system root
Minimum Available RAM 512 MB (1 gigabyte (GB)
recommended)
Network card 100-MB Ethernet Full Duplex or 1-GB
Ethernet
Microsoft Office
(required for the
Outlook area to display on the
Microsoft Dynamics GP home page)
One of the following:
• 2007 Microsoft Office System
• Office 2003
• Office XP
Microsoft Internet Explorer Internet Explorer 7 or 6 SP1
Adobe Adobe 8.0, 7.0, or 6.0
Server Requirements:
Changer for Microsoft Dynamics GP User’s Guide Appendix E
Corporate Renaissance Group 67
Microsoft Dynamics GP server requirements depend on customer profile. Below
are the customer profiles and minimum requirements for each profile as per the
documentation provided by Microsoft.
(Although the minimum requirements are provided here, we strongly recommend
referring to the Microsoft installation documentation to install Microsoft Dynamics
GP)
Customer profile 1
The following profile applies if you:
• Use only Financial Series modules
• Have 0-20 concurrent users
• Use Report Writer, Crystal Reports or FRx
• Process fewer than 100 transactions a day
• Import very little data
• Have a dedicated server with SQL Server only
Operating System One of the following:
• Microsoft Windows Server 2003 Standard
Edition SP2, R2 Standard Edition SP2, x64
Standard Edition SP2, or R2 x64 Standard
Edition SP2
• Windows Small Business Server 2003 Premium
Edition SP2 or R2 Premium Edition SP2
• Windows Small Business Server 2003 Standard
Edition SP2 or R2 Standard Edition SP2
Processor One dual-core or two single-core
RAM 1 GB or greater
Network card 100-MB Ethernet Full Duplex or 1-GB Ethernet
Disk configuration Minimum: RAID 5 for operating system,
applications, and SQL database log and data files
Customer profile 2
The following profile applies if you:

Appendix E Changer for Microsoft Dynamics GP User’s Guide
68 Corporate Renaissance Group
Use Financial Series modules
Use Distribution Series modules moderately
Use Field Service Series modules
Use Manufacturing Series or Project Series modules moderately
Have 20-60 concurrent users
Use Terminal Services
Use Report Writer, Crystal Reports, or FRx
Perform some online analytical processing (OLAP) cube generation
Use an import routine/eConnect/Integration Manager
Process 1,000–4,000 transactions a day originating in Sales (Sales Order
Processing and/or Receivables Management), Payables Management, or
General Ledger
Have a dedicated server with SQL Server only
Operating system One of the following:
♦ Windows Server 2003 x64 Enterprise Edition SP2, R2 x64
Enterprise Editon SP2, x64 Standard Edition SP2, or R2
x64 Standard Edition SP2
♦ Windows Server 2003 Enterprise Edition SP2, R2
Enterprise Edition SP2, Standard Edition SP2, or R2
Standard Edition SP2
Processor One dual-core or two single-core
Disk configuration RAID 1 for operating system and applications (two disks)
RAID 1 for SQL database log files (two disks)
RAID 5 (four disk minimum) or RAID 10 (eight disk
minimum) for SQL data files
RAID 1 for TempDB (two disks)—optional, but recommended
RAID 0 for SQL backups (full disk volume and log) (two disks)
RAM 4 GB or more
Network card 100-MB Ethernet Full Duplex or 1-GB Ethernet

Changer for Microsoft Dynamics GP User’s Guide Appendix E
Corporate Renaissance Group 69
Customer profile 3
The following profile applies if you:
♦ Use Financial Series and Distribution Series modules extensively
♦ Use Field Service Series, Manufacturing Series, and Project Series
modules extensively
♦ Have 60-100 concurrent users
♦ Use Terminal Services
♦ Use Report Writer, Crystal Reports, or FRx extensively
♦ Use an import routine -- such as eConnect – extensively
♦ Process more than 4,000 transactions a day originating in Sales (Sales
Order Processing and/or Receivables Management), Payables
Management, or General Ledger
♦ Perform OLAP cube generation to a different machine
♦ Have a dedicated server with SQL Server only
Operating system One of the following:
♦ Windows Server 2003 x64 Enterprise Edition
SP2, R2 x64 Enterprise Edition SP2, x64
Standard Edition SP2, or R2 x64 Standard
Edition SP2
♦ Windows Server 2003 Enterprise Edition SP2
or R2 Enterprise Edition SP2
Processor Two dual-core or four single-core
Disk configuration
♦ RAID 1 for operating system and applications
(two disks)
♦ RAID 1 for SQL database log files (four disks)
♦ RAID 10 for data files (eight disk minimum)
♦ RAID 1 for TempDB (four disks)
♦ RAID 0 for SQL backups (full disk volume
and log) (two disks)
RAM 8 GB or more

Appendix E Changer for Microsoft Dynamics GP User’s Guide
70 Corporate Renaissance Group
Network card 1-GB Ethernet
