USER MANUAL
evolved 4k


1

2
CONTENTS
1.0 WELCOME ................................................................................................... 4
1.1 BEFORE YOU GET UP IN THE AIR ................................................................. 4
1.2 GENERAL SAFETY ...........................................................................................4
2.0 PRODUCT CONTENTS ................................................................................ 5
2.1 PRODUCT OVERVIEW .....................................................................................6
2.2 CONTROLLER OVERVIEW .............................................................................. 6
3.0 BATTERY SAFETY ........................................................................................ 7
4.0 INSTALLING THE BATTERY .......................................................................... 9
5.0 INSTALLING A MICRO SD CARD* ............................................................... 9
5.1 REPLACING ROTOR BLADES .......................................................................10
5.2 FOLDING/UNFOLDING THE EVOLVED 4K DRONE .................................. 11
6.0 STATUS INDICATOR LIGHTS ...................................................................... 11
6.1 REMOTE CONTROL ...................................................................................... 13
7.0 REMOTE CONTROL FUNCTIONS ............................................................. 14
7.1 SWITCHING BETWEEN FLIGHT MODES ....................................................14
7.2 LCD SCREEN DISPLAY ..................................................................................14
7.3 CAMERA ANGLE ADJUSTMENT .................................................................14
7.4 PHOTO/VIDEO CONTROLS ......................................................................... 15
7.5 ONE-KEY TAKE OFF & LANDING ................................................................15
7.6 ONE-KEY RETURN TO HOME BUTTON .....................................................15
7.7 DRONE LOW BATTERY WARNING .............................................................16
7.8 REMOTE CONTROL LOW BATTERY WARNING ........................................ 16
7.9 SIGNAL STRENGTH INDICATOR ................................................................. 17
7.10 LOCK / UNLOCK THE DRONE ..................................................................... 17
8.0 THROTTLE CONTROL STICK MODE ......................................................... 18
8.1 THROTTLE MODE SWITCH .......................................................................... 18
8.2 HOW TO CHANGE THROTTLE MODE ....................................................... 18
9.0 SETTING UP THE MOBILE PHONE HOLDER ............................................. 19
10.0 DOWNLOADING THE EVOLVED 4K APP TO YOUR MOBILE PHONE ....... 20
10.1 WHERE TO DOWNLOAD .............................................................................20
10.2 ZERO-X EVOLVED 4K APP ............................................................................20
10.3 CONNECTING TO THE EVOLVED 4K WIFI.................................................20

3
10.4 SAVING PHOTOS AND VIDEOS ..................................................................20
11.0 PRE-FLIGHT CHECKLIST ............................................................................ 21
12.0 FLIGHT SAFETY ......................................................................................... 21
13.0 FLYING YOUR EVOLVED 4K DRONE ......................................................... 21
13.1 PAIRING YOUR DRONE AND REMOTE CONTROL ...................................21
13.2 CALIBRATING YOUR DRONE .......................................................................22
13.3 GYROSCOPE CALIBRATION ........................................................................24
13.4 OPTIMAL TRANSMISSION ZONE ................................................................24
13.5 SETTING A HOME POINT ............................................................................25
13.6 BASIC FLIGHT CONTROLS ...........................................................................25
14.0 BEGINNER MODE ..................................................................................... 26
15.0 SPEED MODE ............................................................................................ 27
16.0 HEADLESS MODE ..................................................................................... 27
17.0 FLY AROUND-ME MODE ........................................................................... 27
18.0 FOLLOW ME MODE (GPS MODE ENABLED) ............................................ 28
19.0 WAY POINT FLIGHT (GPS MODE ENABLED) ............................................ 29
19.1 RETURN HOME (GPS MODE ENABLED) ....................................................30
19.2 OPTICAL FLOW .............................................................................................32
19.3 PHOTO MODE ...............................................................................................32
19.4 VIDEO MODE .................................................................................................32
19.5 VIEWING PHOTOS AND VIDEOS ................................................................ 33
20.0 ACTIVATING SEARCH FUNCTION FOR A LOST EVOLVED 4K DRONE ..... 33
20.1 DRONE MAINTENANCE ..............................................................................33
20.2 REPLACEMENT PARTS ..................................................................................34
21.0 WARRANTY TERMS & CONDITIONS ......................................................... 35
22.0 NOTES ....................................................................................................... 38
4
1.0 WELCOME
Thank You for a purchasing a Zero-X Pro Evolved 4K Drone. The Zero-X
Pro range has been specifically designed to provide the intermediate to
advanced user with a great flight experience. Please take the time to read
the following safety warnings and operating instructions carefully.
1.1 BEFORE YOU GET UP IN THE AIR
Before you familiarise yourself with the Zero-X Pro Evolved 4K Drone, we ask
that you read "BATTERY SAFETY" ON PAGE 7 before you start charging
your drone’s battery.
WARNING:
PLEASE DO NOT MOVE THE CAMERA MANUALLY AS IT CAN
DAMAGE THE GIMBAL AND CAMERA.
1.2 GENERAL SAFETY
Please familiarise yourself with your local legislation regarding drone
usage before you begin using your Zero-X Pro Evolved 4K Drone. Included
in the package contents of your Zero-X Pro Evolved 4K Drone are the
Australian CASA guidelines, please read them carefully and understand this
information as operating a drone outside of these guidelines may result
in legal issues. Zero-X takes no responsibility for operation of this product
outside of what is legally permissible in your area.
• Do not fly your Evolved 4K Drone any closer than 30 metres from people,
animals or buildings. Check to make sure you are no closer than 5.5
kilometres from any airfields or airports. For more information on CASA’s
Australian legislation visit: http://www.casa.gov.au/
• You must not fly your drone higher than 120 metres (400 ft) above the
ground.
• You must only fly during the day and keep your drone within visual line-of
sight
• For information outside Australia please visit the website of your local
aviation authority.
• Do not attempt to modify the Evolved 4K Drone or any of its components
in any way, doing so will void your warranty and may affect the operation
of the drone.
• Do not use the Evolved 4K Drone in any conditions that could affect,
damage or impair your view including wet, dusty or sandy conditions.
These elements will damage the components of your Evolved 4K Drone.
• Please do not attempt to touch the Evolved 4K Drone when the Remote
Control is powered on, or if the rotor blades are turning.
• When flying your Evolved 4K Drone, please keep in mind the privacy of
others.
5
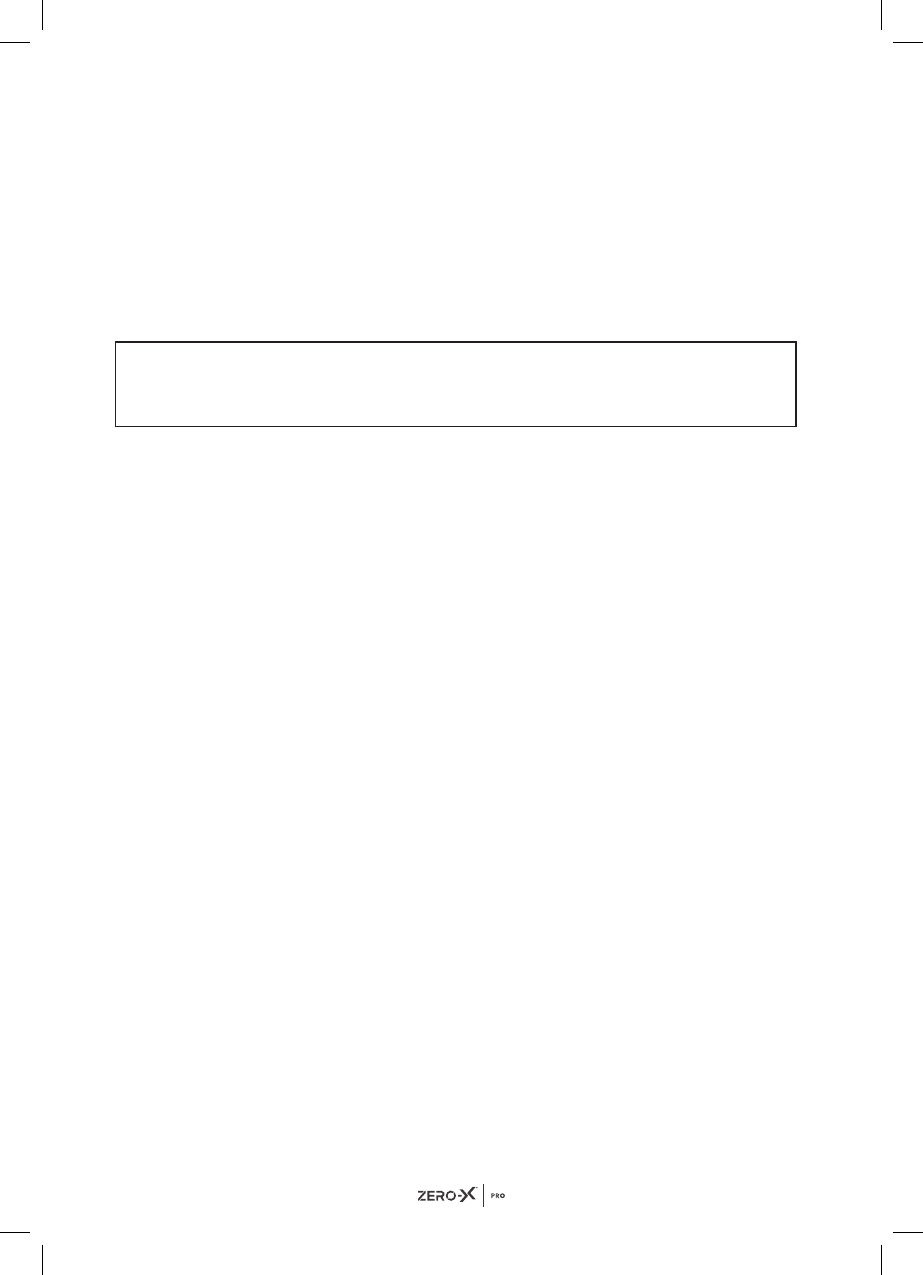
2.0 PRODUCT CONTENTS
1. Evolved 4K Drone
2. Remote Control
3. Rotor Blades x 4
4. USB AC Wall Charger
5. USB Charging Cable
6. User Manual
7. Small Screw Driver
8. Screws
1
2
6
4
5
3
8
7
6
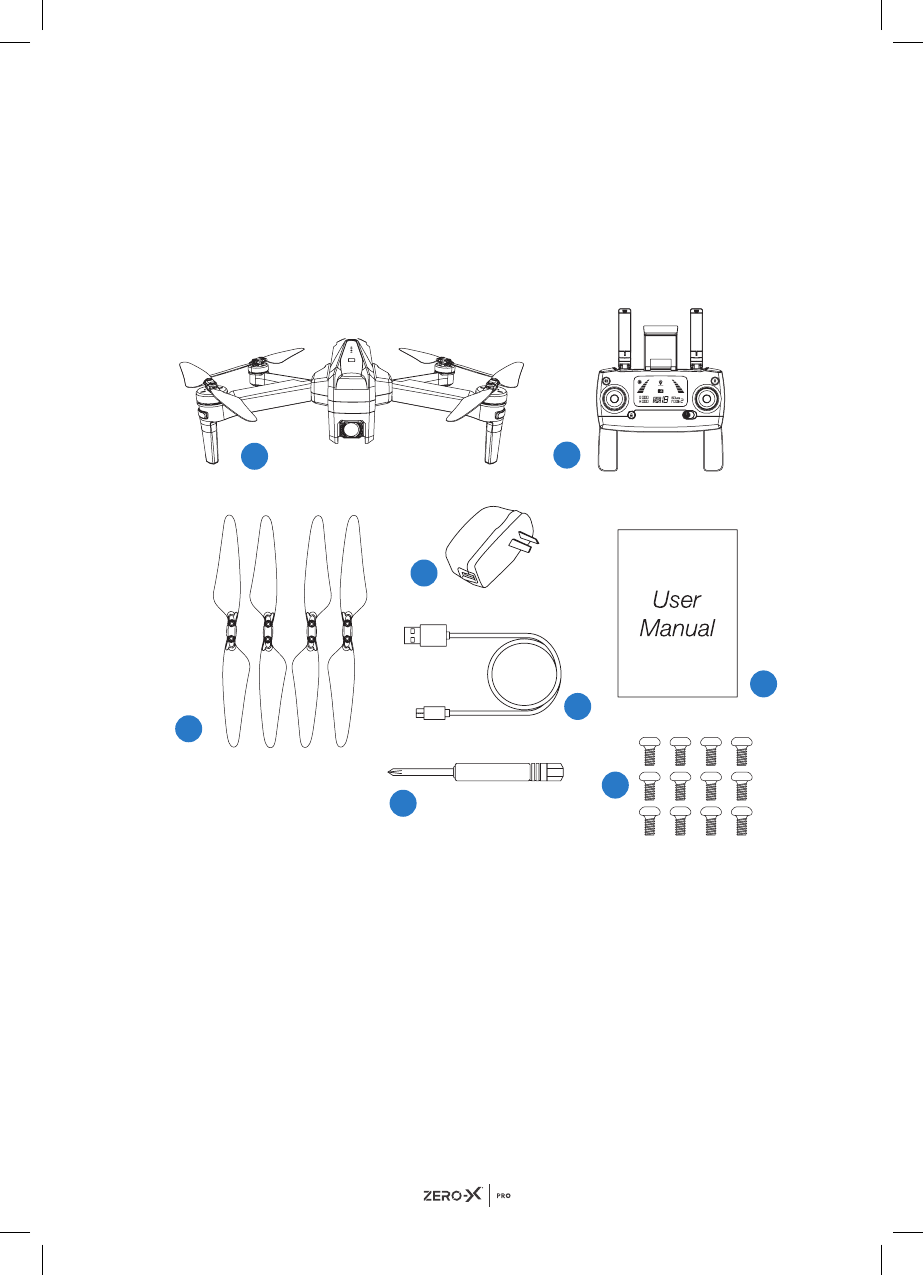
2.1 PRODUCT OVERVIEW
2.2 CONTROLLER OVERVIEW
1. Camera
2. Rotor blades
3. Motor
4. Power Button
5. Battery Release
Buttons
6. Bottom Lights
7. Front Lights
8. Optical Flow Camera
9. Rear Light
7
6
8
9
4
3
2
1
5
1. Photo/Video
2. Left Thumb Stick
(Yaw left/Right)
3. Lock/Unlock Button
4. Mobile Phone Holder
5. Return to Home Button
6. Right Thumb Stick
(Forward/Backward, left/
Right)
7. Power On/Off
8. LCD Screen
9. Take Off/Landing Button
10. Camera Up/Down
11. Light Switch (Quick Press),
High/Low Speed
(Long Press)
12. GPS Switch
10
11
9
1
5
2 6
3
7
8
4
12
7
IMPORTANT INFORMATION - PLEASE READ BEFORE USE
3.0 BATTERY SAFETY
When handled incorrectly, Lithium polymer batteries can be
dangerous and can potentially harm and do damage to persons or
property. Zero-X does not accept any liability for damage to persons
or property if the battery is not correctly charged, stored or protected.
• Always unwind all cables before charging.
• Do not over charge the battery. Once the charging process is
completed, remove the battery from the charger as soon as
possible.
• Only use the included or replacement Zero-X Pro Evolved 4K
chargers and batteries.
• You must charge the Lithium polymer battery in a safe area away
from flammable materials.
• The battery is only to be charged under adult supervision, do not
leave charging batteries unattended. You should always remain in
constant observation to monitor the charging process and react
immediately to any potential problems that may occur.
• Do not charge the battery in temperatures hotter than 40°C or
colder than 0°C.
• Do not cover the batteries when charging. Do not leave batteries in
direct sunlight.
• After each flight & or crash, please check battery for any damage or
swelling.
• If the battery is damaged, leaking, making noise, punctured or
malformed in any way DO NOT attempt to use it. Please dispose of
the battery immediately and safely in the correct manner.
• Do not bend, puncture, crush or scratch the drone’s battery. Do
not store batteries in your pockets, on your person or in extreme
temperatures.
• After flying/discharging the battery you must allow it to cool to
ambient/room temperature before recharging.
• If at any time during the charge or discharge process the battery
begins to balloon or swell, discontinue charging or discharging
immediately. Quickly and safely disconnect the battery, then place it
in a safe, open area away from flammable materials to observe it for
at least 15 minutes. Continuing to charge or discharge a battery that
has begun to balloon or swell can result in a fire. A battery that has
ballooned or swollen even a small amount must be removed from
service completely.
• Never plug in a battery and leave it to charge unattended overnight.
• Non-compliance with the above warnings may result in the failure of
the battery.
8
PLEASE NOTE: YOUR ZERO-X DRONE COMES WITH A CERTIFIED
ZERO-X USB AC CHARGING ADAPTER AND CABLE FOR 240V
CHARGING OF YOUR DRONE BATTERY. USE OF A NON ZERO-X
CERTIFIED USB AC CHARGING ADAPTER AND CABLE WILL VOID
YOUR WARRANTY AND MAY DAMAGE BOTH YOUR BATTERY
AND DRONE.
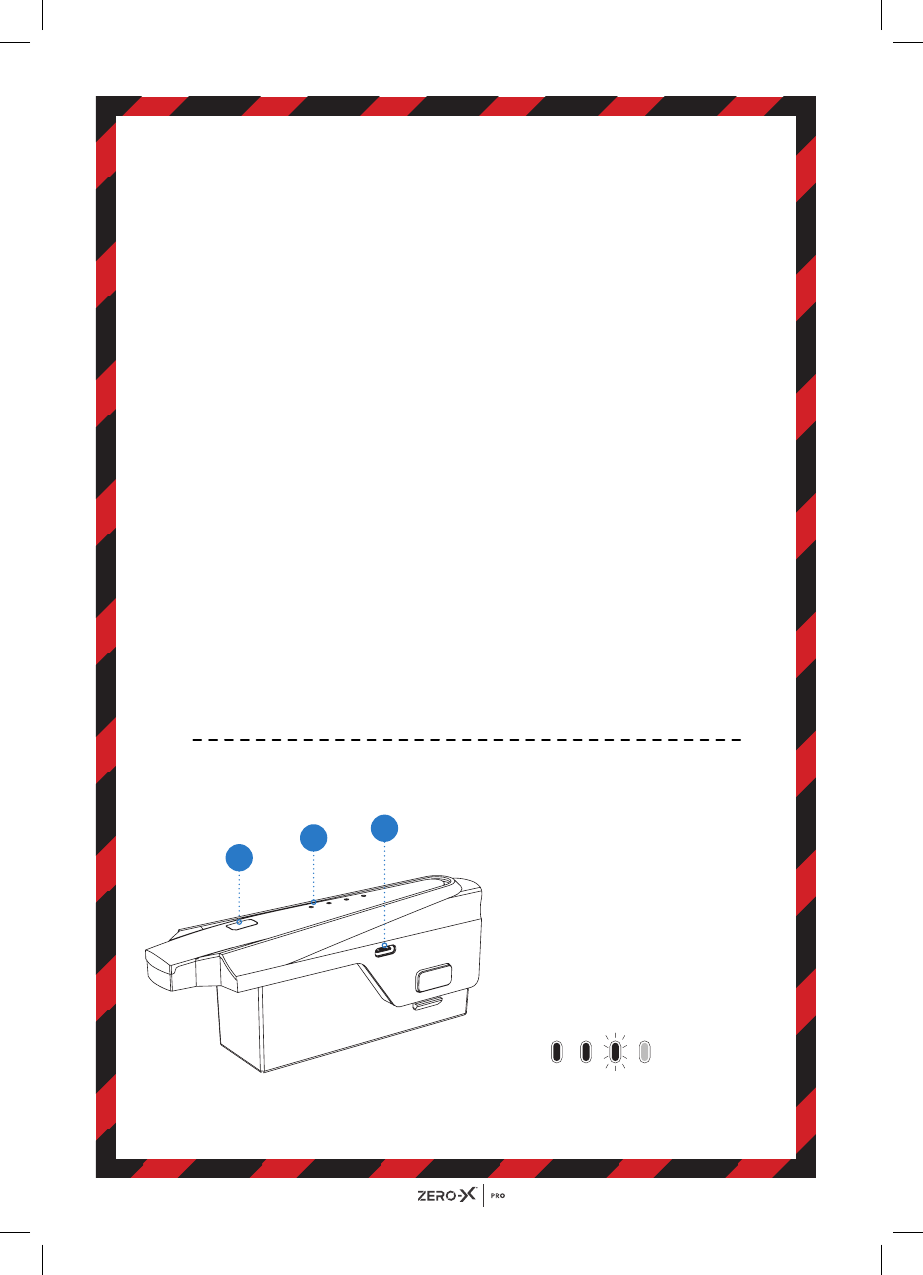
Press the buckle and pull out the battery from the your Evolved 4K
drone. Connect the drone battery to the charging cable. The light on
the battery will blink blue during charging. The light on the battery will
turn solid blue once charging is complete. Once the battery is in a low
power state, the blue power indicator will start flashing. At this time,
please fly the drone back immediately and charge the battery to avoid
unnecessarily losing your drone.
To keep the battery life as long as possible avoid removing the battery
from the charging cable before charging is complete. If you have just
finished flying your Evolved 4K drone, please allow the battery to cool
down for at least 30 minutes before recharging.
1. The Evolved 4K battery may take up to 5 hours to charge. If the
battery has been on charge for any longer than 6 hours and the
indicator on the charging cable is not showing that the battery is
charged, please remove the battery from the charger.
2. When the Evolved 4K battery has finished charging it is advised
that the battery is removed from the charger as soon as possible.
Overcharging will damage the battery and affect the flight time.
1
2
3
1. Battery on/off button
2. Battery power indicator
3. USB charging port
Low
High
9
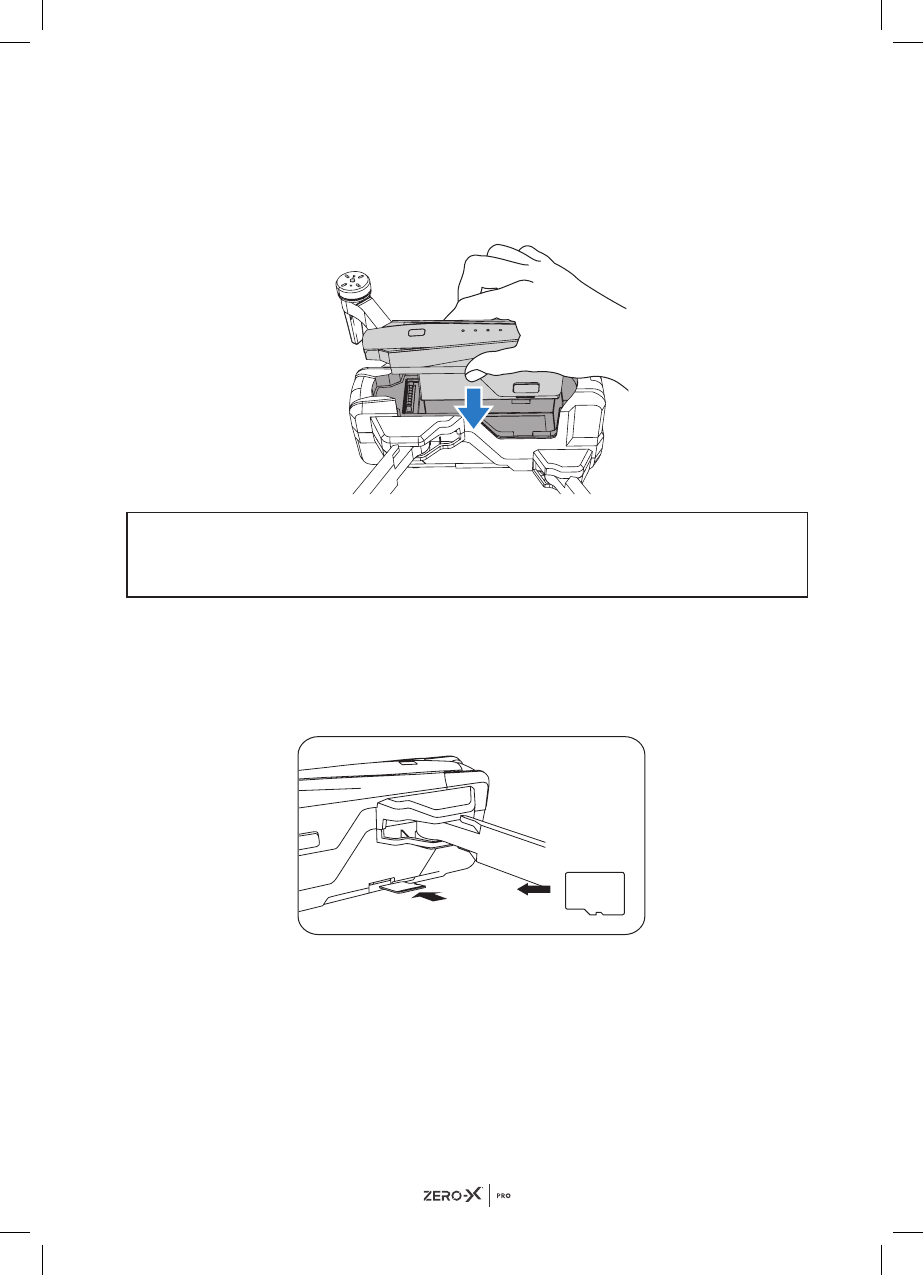
4.0 INSTALLING THE BATTERY
1. Ensure that the battery is fully charged.
2. Insert the battery into the middle of drone in the correct orientation.
3. Slide the battery all the way down until it securely slots into place.
NOTE
• Do not force the battery, if the battery is not fitting into position, please
check that you have the battery in the correct orientation.
5.0 INSTALLING A MICRO SD CARD*
The Micro SD Card slot is on the left bottom side of the drone. Slot the
Micro SD Card into the slot on the left side of the Evolved 4K drone with the
Micro SD Card copper contacts facing toward the drone. Gently press the
card in until you hear the lock click into place.
REMOVING A MICRO SD CARD
To remove your Micro SD Card, follow the instructions below.
1. Press the Micro SD Card in until a click is heard and the card releases.
2. The card will now release and the Micro SD Card will now be removable.
(Micro SD Card not included)*.
3. The recommended memory card is Class 10 with a minimum 64GB &
maximum 128GB capacity.
SD
10
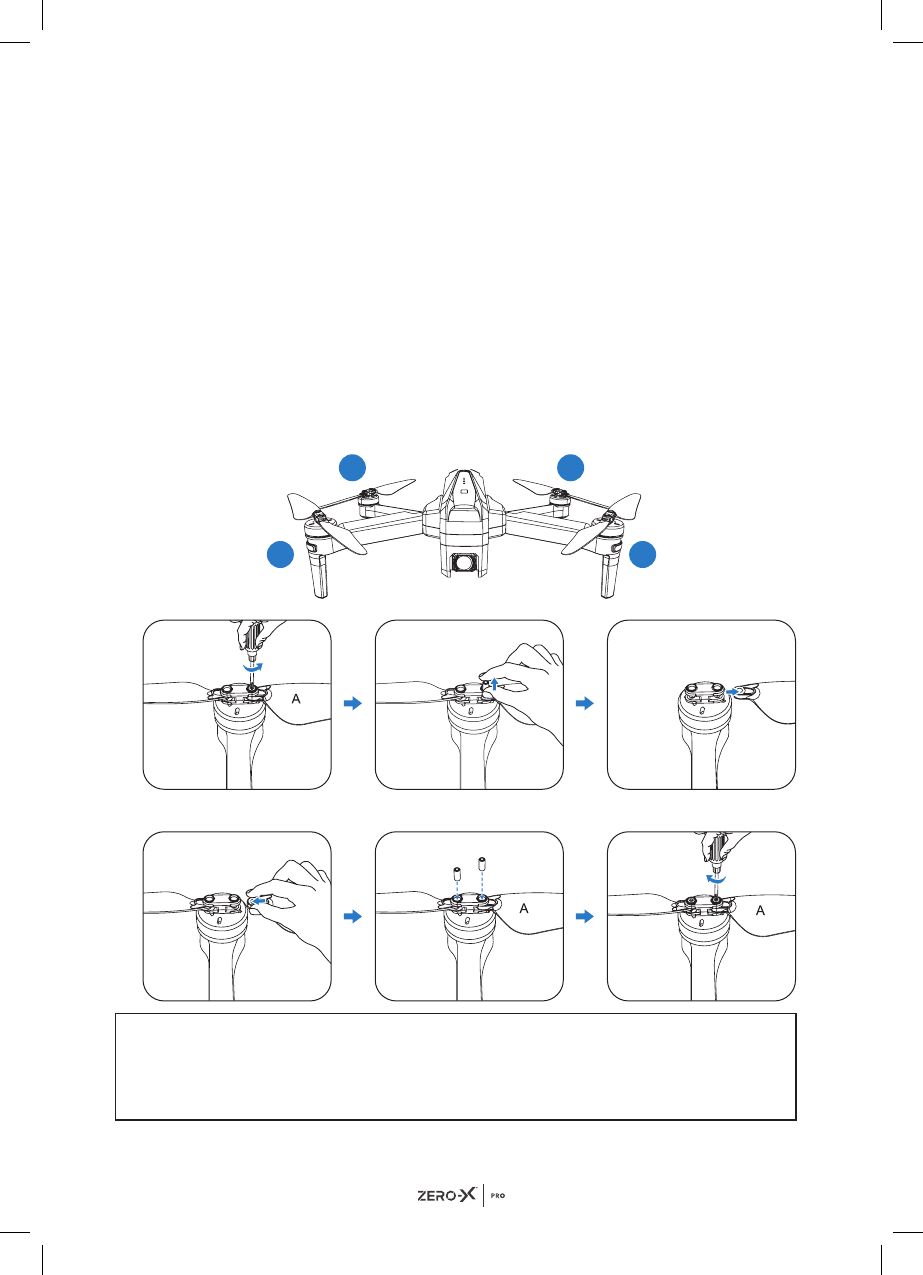
5.1 REPLACING ROTOR BLADES
To remove and replace the rotor blades, please follow the instructions
below.
1. Unscrew the two screws on the top of the rotor blades using the
supplied screwdriver. It is advised that you replace the blades one at a
time to avoid losing screws or installing blades incorrectly.
2. Remove the copper plate cover from the blade clamp.
3. Replace the rotor blade with a replacement blade marking sure to match
with motors.
4. Firmly press the blade into position making sure that you have aligned
the motor stem with the hole in the rotor blade.
5. Lock the blade into position by putting the copper plate cover back over
the screws that were removed in step 1 making sure not to over tighten.
NOTE
• It is important that the correct rotor blades are installed on the correct
motors as if they are installed incorrectly the drone will not fly and you
could potentially burn out the drone’s motors.
A
B
B
A
11
• Be aware of the sharp edges on the blades. Please handle them with care.
• Only use the Zero-X Pro Evolved 4K Blades.
Do not mix with other blades.
• To avoid injury do not touch the blades when they are spinning.
• Only use blades that are in good condition. If they are chipped or
broken replace them as this may compromise the flight.
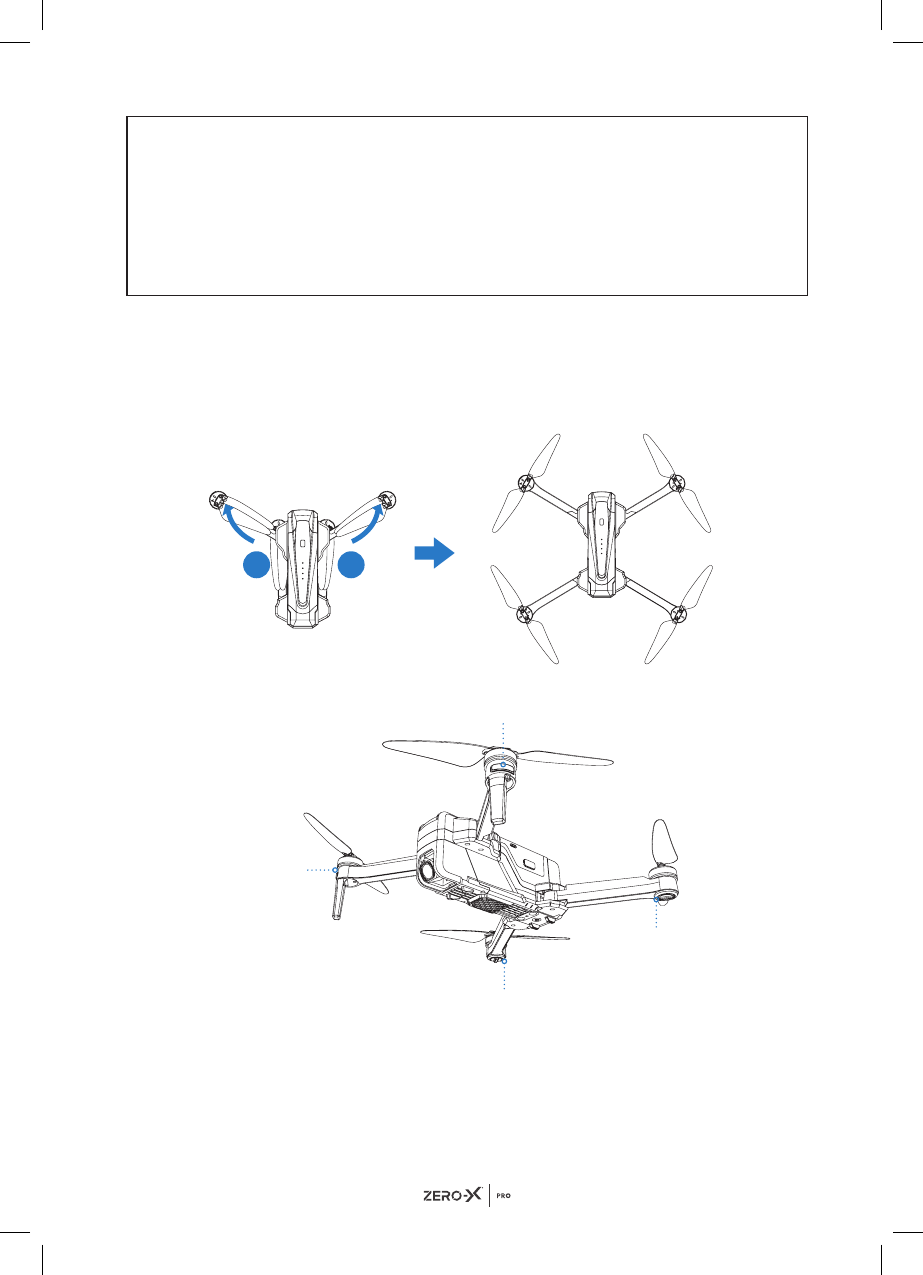
5.2 FOLDING/UNFOLDING THE EVOLVED 4K DRONE
The Evolved 4K can be folded for easy storage and transport.
The Evolved 4K's arms are designed to fold out in a specific order with the
front arms folding outward first and the back arms folding outward second.
To fold down, fold in back arms first and then front arms second.
6.0 STATUS INDICATOR LIGHTS
1 1
Front light
Front light
Rear light
Rear light
12
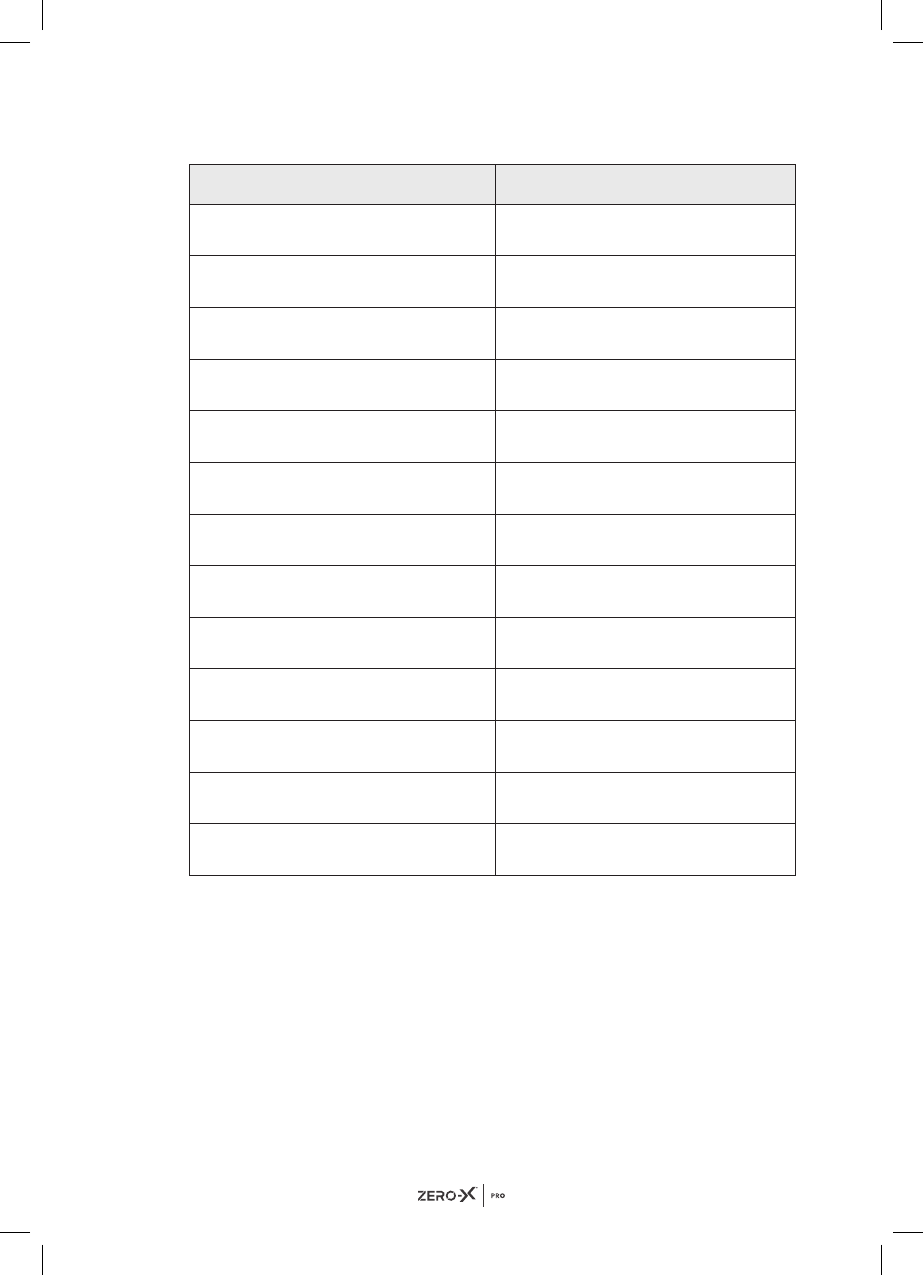
Please see the table below for reference when your drone status indicator
lights are activated and what they mean.
LED Status Indicates
Front & rear lights flash yellow
rapidly
Drone is disconnected from the
controller.
Front & rear lights flash red, green
and yellow alternatively.
Drone is in initialisation detection
mode.
Front lights glow solid red, rear
lights glow solid yellow.
No GPS signal, drone is in non-GPS
mode.
Front lights glow solid red, rear
lights glow solid green.
Good GPS signal, drone is
preparing for GPS mode.
Front & rear lights flash green rapidly
Drone is in gyroscope calibration
mode.
Front & rear lights flash yellow
alternatively
Drone is in compass horizontal
calibration mode.
Front & rear lights flash green
alternatively.
Drone is in compass vertical
calibration mode.
Front light glows red, rear light
flashes red slowly.
Drone battery is getting low, only
1/6 of charge left.
Front light glows red, rear light
flashes red rapidly.
Drone battery is very low, only 1/8
of charge left.
Front & rear lights flash red once,
stop for 1.5secs and reflash
Error with the gyroscope.
Front & rear lights flash red twice,
stop for 1.5secs and reflash
Error with the barometer.
Front & rear lights flash red three
times, stop for 1.5secs and reflash
Error with the compass.
Front & rear lights flash red four
times, stop for 1.5secs and reflash
Error with the GPS module.
13
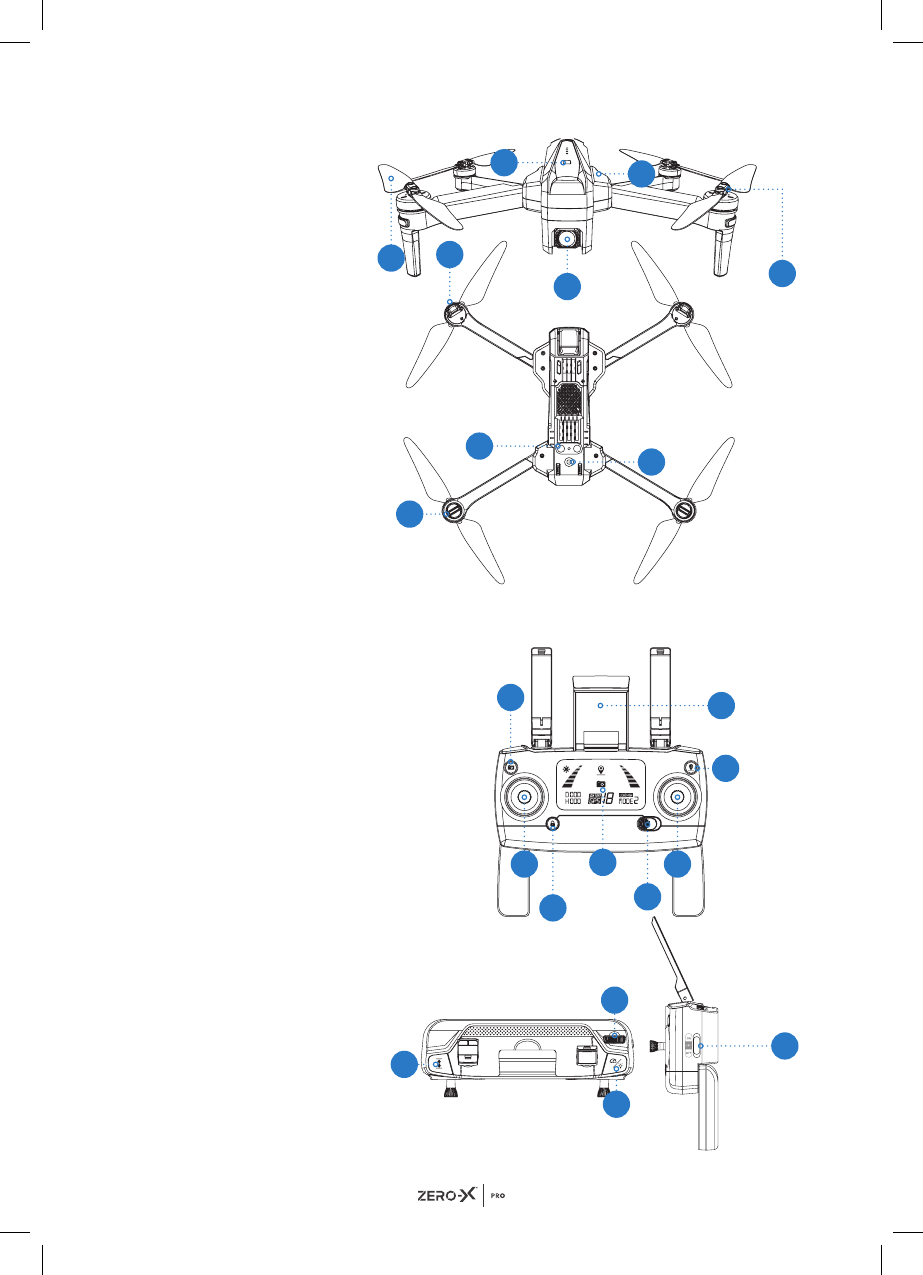
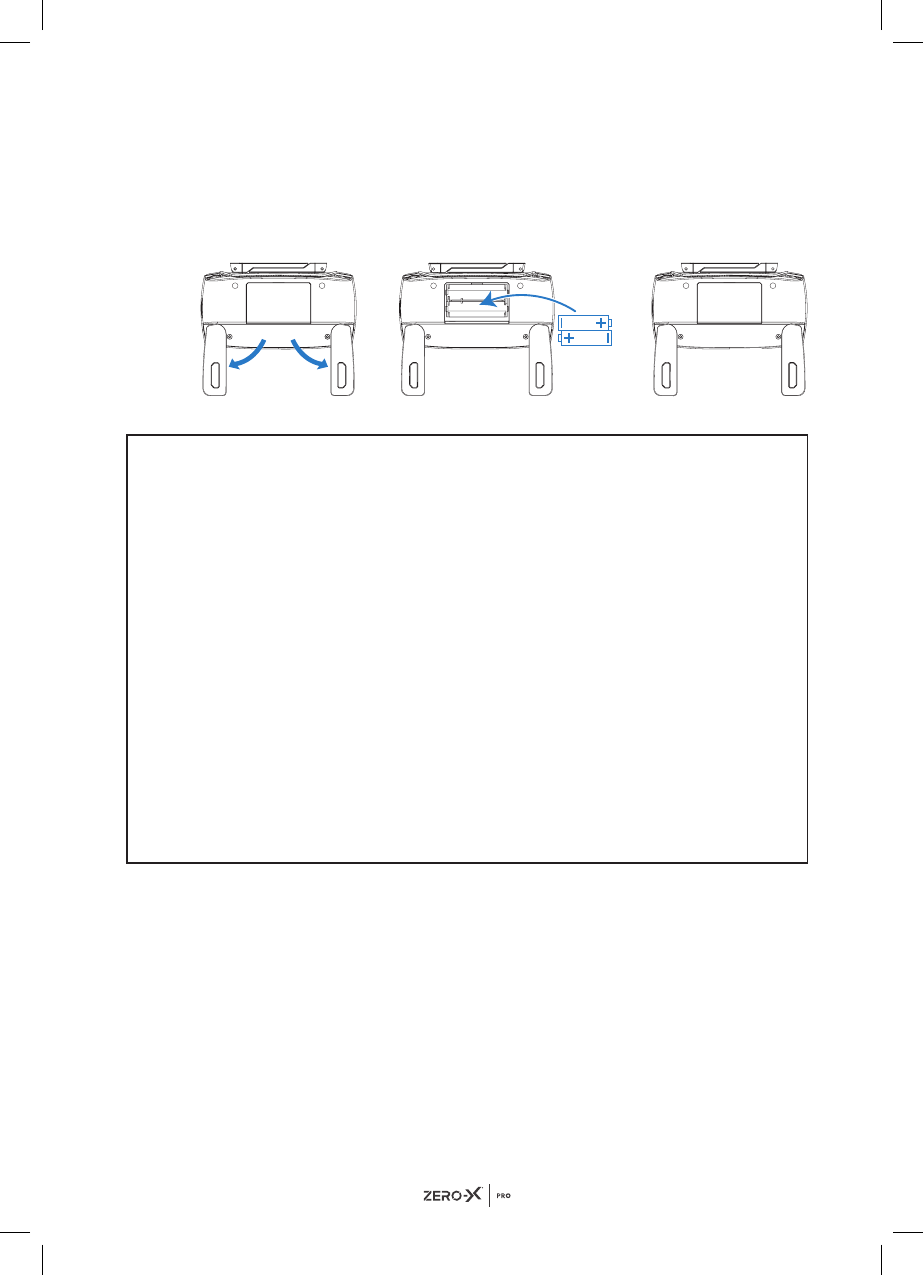
6.1 REMOTE CONTROL
The remote control is battery operated and will require two AA batteries to
use. To access and open the battery door you will need to unfold the hand
sticks. Place the two batteries in the correct positions and close the battery
door. To Power On the remote control slide the Power On button to the
right. To Power Off, slide the button to the left.
NOTE:
• Insert the batteries in the correct orientation.
• Do not charge non-rechargeable batteries. The transmitter needs two
charged and working AA batteries to operate.
• Do not mix old and new batteries. This may compromise the power of
the remote control.
• Do not use a combination of batteries. Only use one type being
either 2 x Standard (Carbon zinc batteries), 2 x alkaline batteries or 2 x
rechargeable (Nickel-cadmium batteries).
• Always fully charge rechargeable batteries before using them. The
remote control does not charge them during use.
• Children should handle rechargeable batteries with adult supervision.
• Always remove empty batteries from the remote control to avoid
confusion for use on the next flight.
• Do not short circuit the supply terminals.
* AA Batteries are not included
14
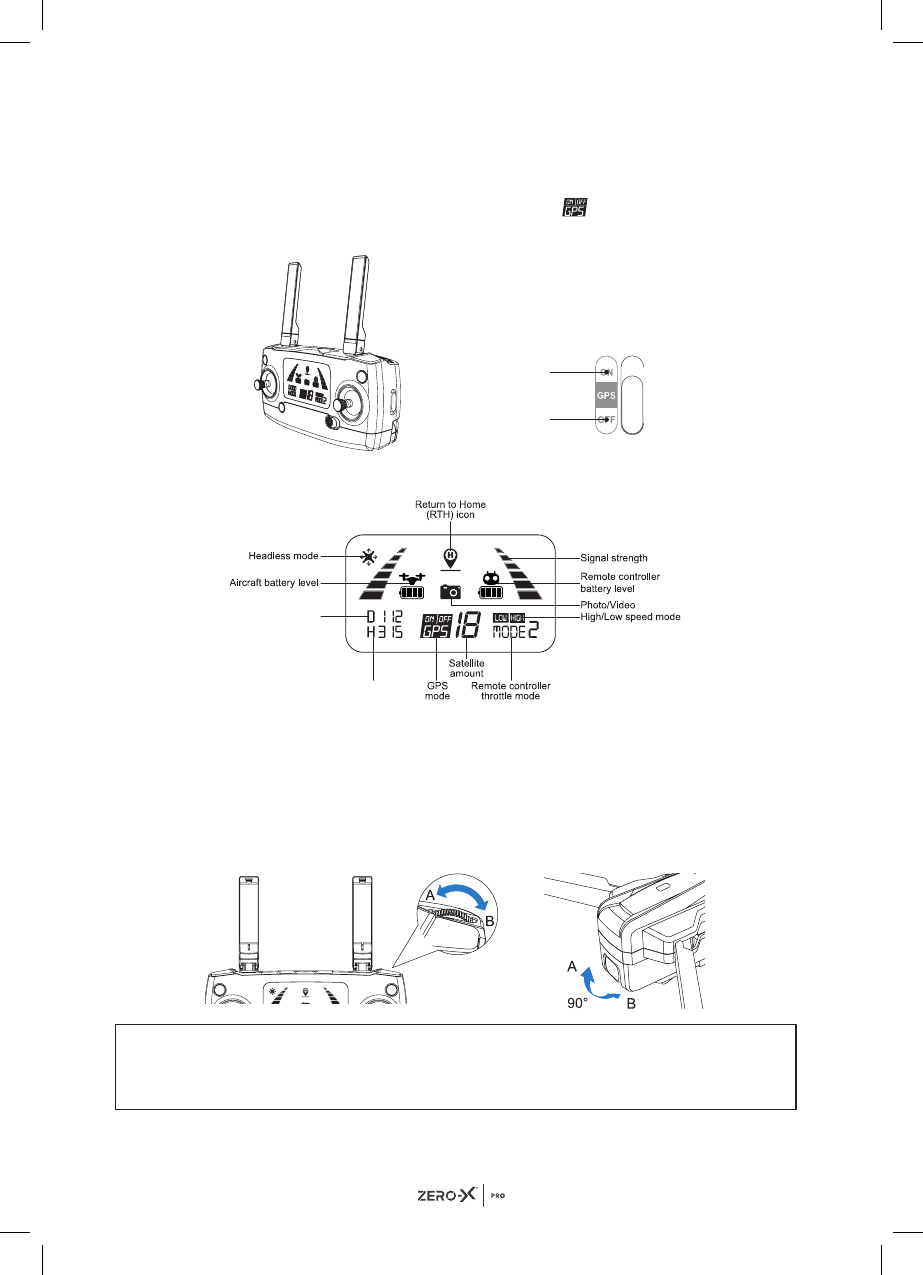
7.0 REMOTE CONTROL FUNCTIONS
7.1 SWITCHING BETWEEN FLIGHT MODES
To choose which mode to fly your drone in, switch the GPS button to either
the ON or OFF positions. The ON flight mode
is shown on the LCD
display.
7.2 LCD SCREEN DISPLAY
7.3 CAMERA ANGLE ADJUSTMENT
You can adjust the angle of your camera within a 90° range by using the
gimbal trimmer. Adjusting the camera angle can help in obtaining a better
aerial experience. To tilt the camera upwards, scroll the gimbal trimmer to
the left (in the direction of 'A' in the diagram). To tilt the camera downwards,
scroll the gimbal trimmer to the right (in the direction of 'B' in the diagram).
WARNING:
PLEASE DO NOT MOVE THE CAMERA MANUALLY AS IT CAN
DAMAGE THE GIMBAL AND CAMERA.
GPS mode ON
GPS mode OFF
Distance from
Home Point
Altitude from
Home Point
15
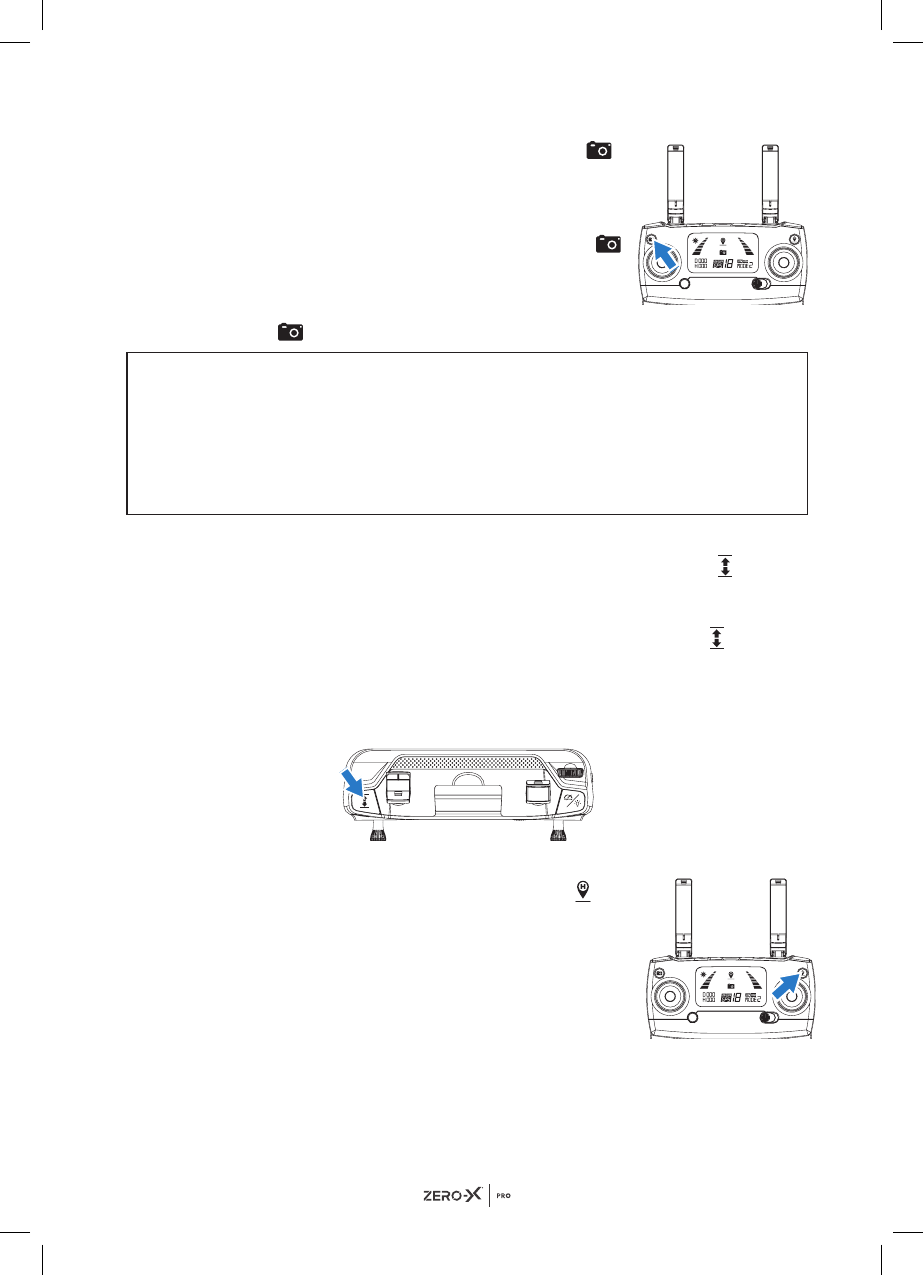
7.4 PHOTO/VIDEO CONTROLS
To take a photo with your drone, short press the
button on the remote control. The same icon on the
LCD screen will flash once, indicating that one photo
has been taken.
To record a video with your drone, long press the
button on the remote control. The same icon on the
LCD screen will slowly flash continuously, indicating
that the drone is recording. To stop recording long
press the
button again.
NOTE
• To take 4K UHD photos and videos you must have the micro SD card
inserted into the drone's camera. If the micro SD card is not formatted
correctly the drone will not be able to capture any images or footage.
• The quality of photos and videos recorded on your smart phone will be
de-scaled to save space.
7.5 ONE-KEY TAKE OFF & LANDING
When you have unlocked your Evolved 4K drone, short press the
button
on the remote control (as shown in the picture below). The drone will
automatically take off and hover 1.5m off the ground.
To automatically land your drone during a flight, short press the
button on
the remote control (as shown in the picture below). The drone will
automatically land on the ground safely. During the descent in the one key
landing mode if you toggle any of the joysticks it will cause the drone to exit
this mode.
7.6 ONE-KEY RETURN TO HOME BUTTON
To activate the return to home mode press the
button on the top right side of the remote control
(as shown in the picture on the right). The buzzer will
beep to indicate that auto return home has been
activated.
The drone will return to the last home point. Press
the button shortly again, the drone will exit return
home mode.
16
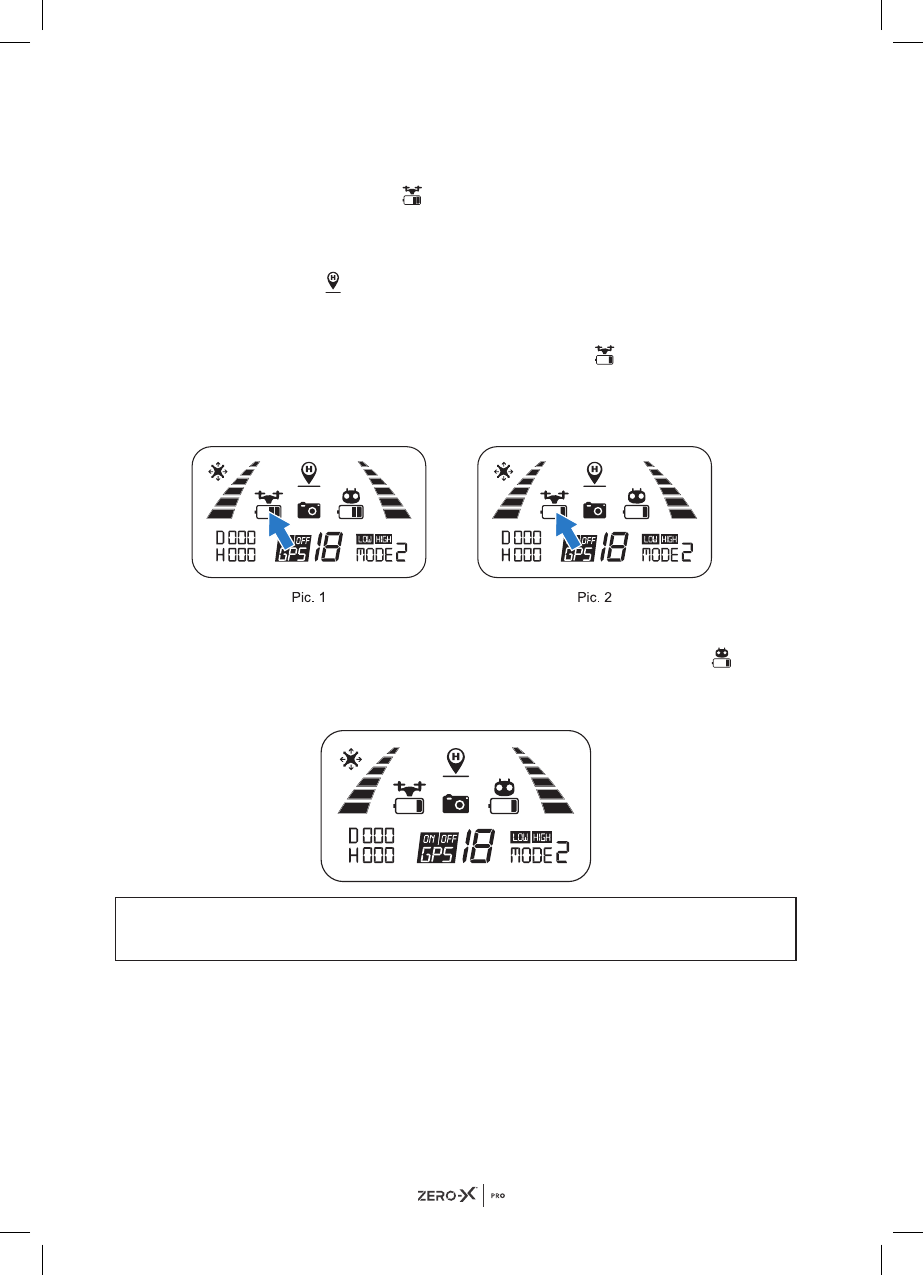
7.7 DRONE LOW BATTERY WARNING
If the rear indicator lights on the drone are flashing red slowly, this indicates
your battery level is starting to get low. The battery icon on the remote
control LCD screen will be
(See Pic 1 below for reference). If your drone is
more than 100 metres away or more than 30 metres in altitude from the take
off location (home point), it will return home automatically. If your drone is
flying within a 100 metre range, you can cancel the automatic return home
by pressing the "
" button on your remote control.
If the front light glows a solid red and the rear lights are flashing red rapidly,
this indicates your battery levels are very low, you should finish your flight.
The battery icon on the remote LCD screen will be
accompanied by a
steady 'beep beep' sound (See Pic 2 below for reference). If your drone is
more than 15 meters away or more than 15 meters in altitude compared to
its take off location, it will automatically land on the ground.
7.8 REMOTE CONTROL LOW BATTERY WARNING
When the batteries in your remote control are running very low, a
icon
will appear on the remote LCD screen accompanied with a 'beep beep'
sound. Change batteries to new AA or fully charged (rechargeable)
batteries.
NOTE
These batteries must be the same type. Please do not mix battery types.
17
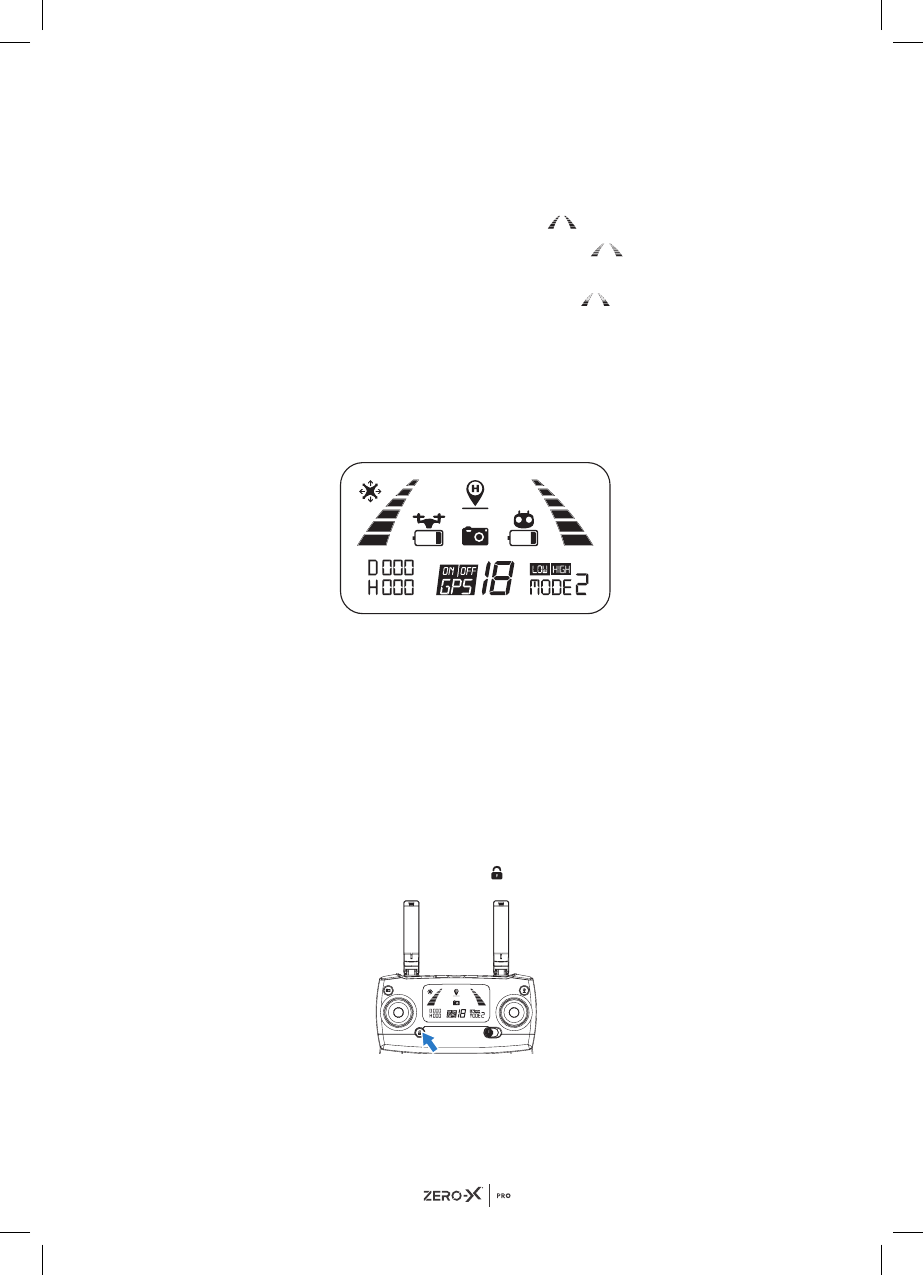
7.9 SIGNAL STRENGTH INDICATOR
On the remote LCD screen you will see identical bars on the left and right,
these indicate the strength of the connection between your remote control
and the drone. The stronger the signal is, the more bars will show.
• If the signal is strong the bars will appear .
• If the signal is connecting, the bars will appear leveling up in a
constant rotation pattern.
• If the signal is weak, 2 or less bars will appear .
There are two reasons as to why the connection is weak and will show 2
bars or less:
1. There is too much distance between the drone and the remote
control, causing the signal to weaken.
2. The battery in the drone is removed after connecting to the
remote control - terminating the connection.
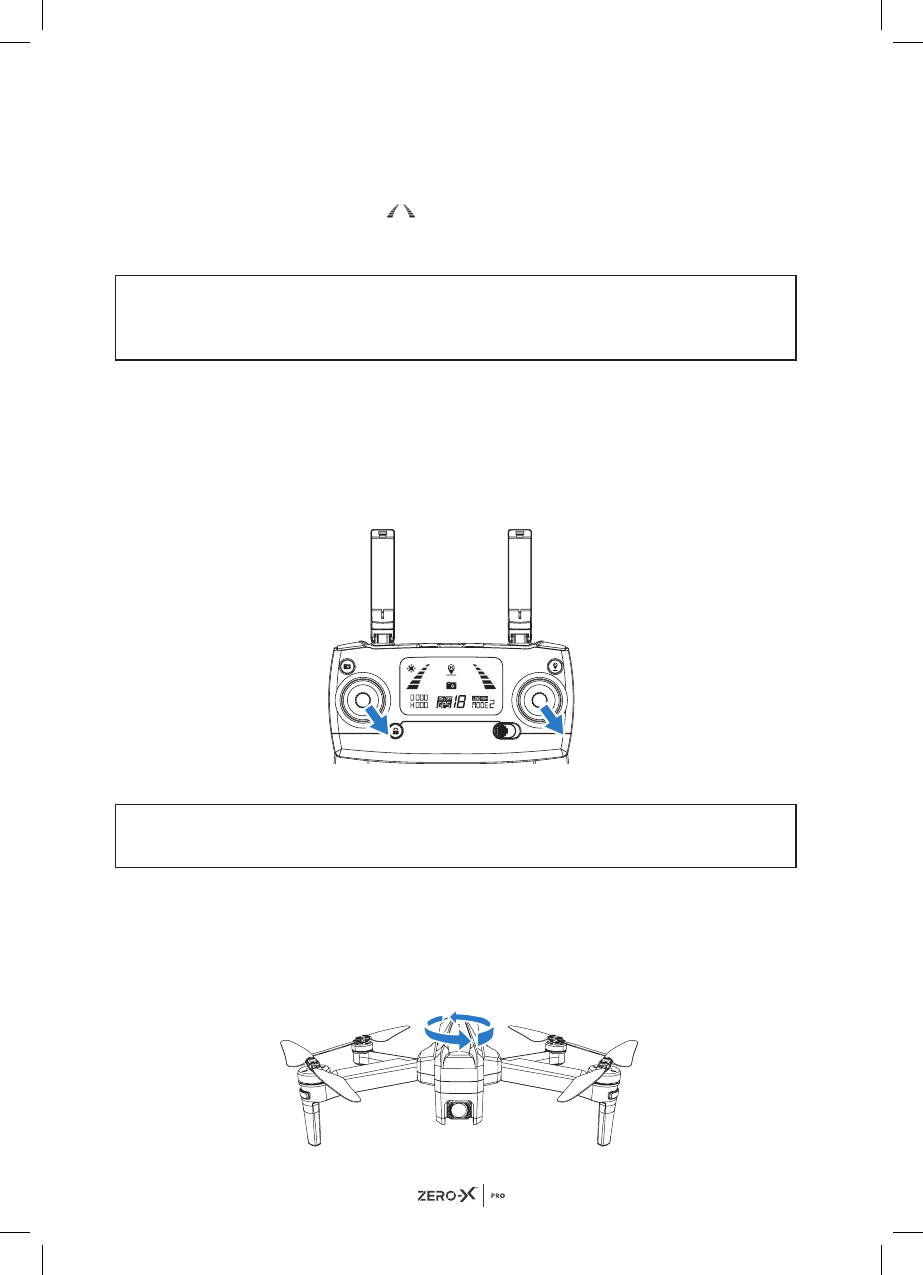
7.10 LOCK / UNLOCK THE DRONE
In case of an emergency or after your Evolved 4K drone has landed you are
able to lock the motor.
There are two ways to lock the motors:
1. After you have successfully landed the drone, pull the throttle down (refer
to section 8.1 Throttle Control) to the bottom and hold for 3 seconds.
This will stop the motors and lock the drone.
2. If there is no activity for longer than 15 seconds the drone will
automatically lock.
To unlock the drone, short press the
button, this will activate the motors.
18
NOTE
• You can use the button in case of an emergency to lock the drone's
motors. Hold the button for 3 seconds to activate the lock. Please do
not use this in normal flight, only in emergency situations.
• Please ensure there is a safe distance between you and the drone before
locking the motors.
• The emergency stop operation will only activate when the drone is
within 15 metres (distance and altitude) from the take off location (home
point), and only when the GPS function is active with strong drone signal
strength (more than 7 satellites).
CAUTION: Locking the drone motors during flight will cause the drone to
drop immediately which may result in injury and damage to your drone.
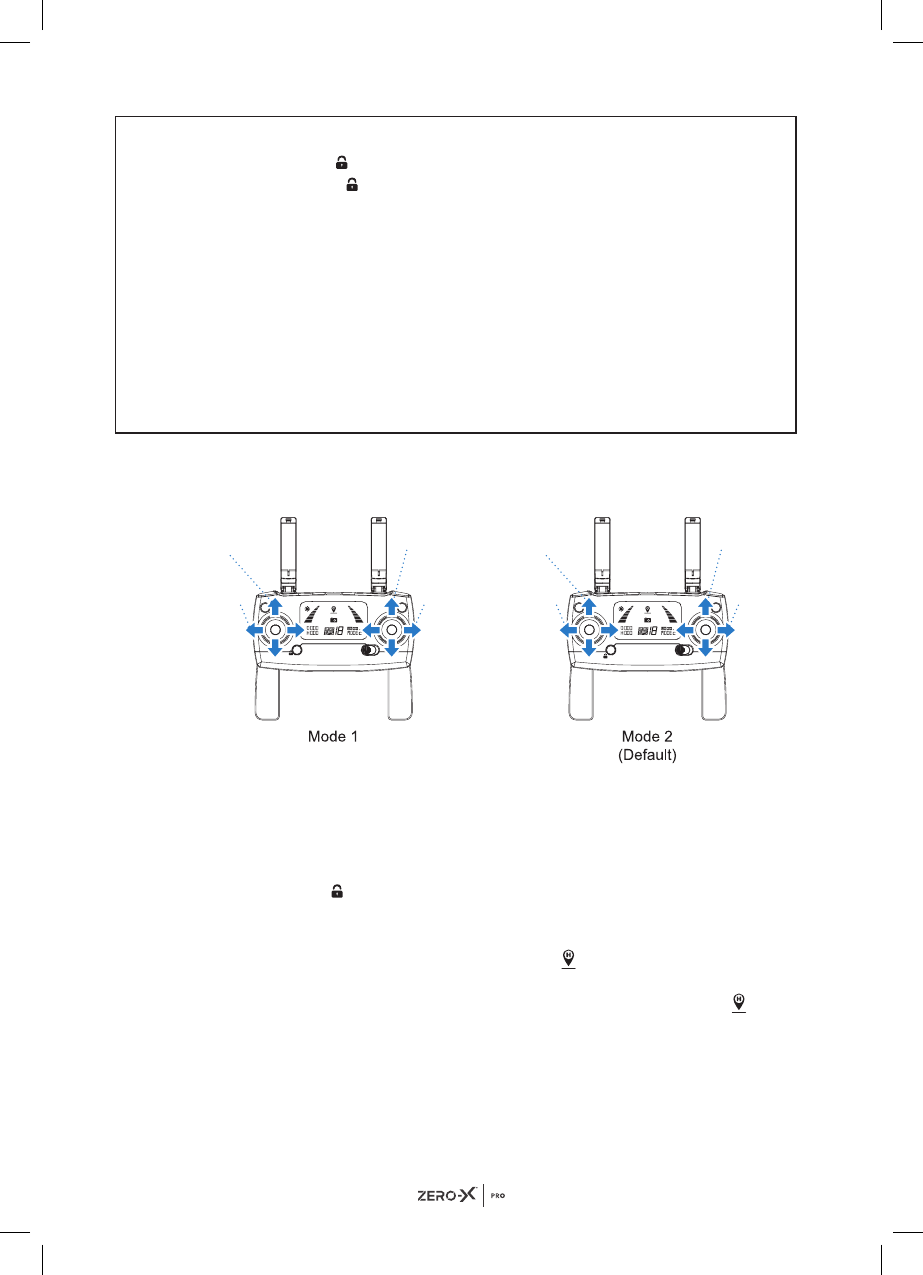
8.0 THROTTLE CONTROL STICK MODE
8.1 THROTTLE MODE SWITCH
In Mode 1 the right control stick controls the throttle. In Mode 2 the left
control stick controls the throttle. The factory settings in the remote control
are set to Mode 2 (Default).
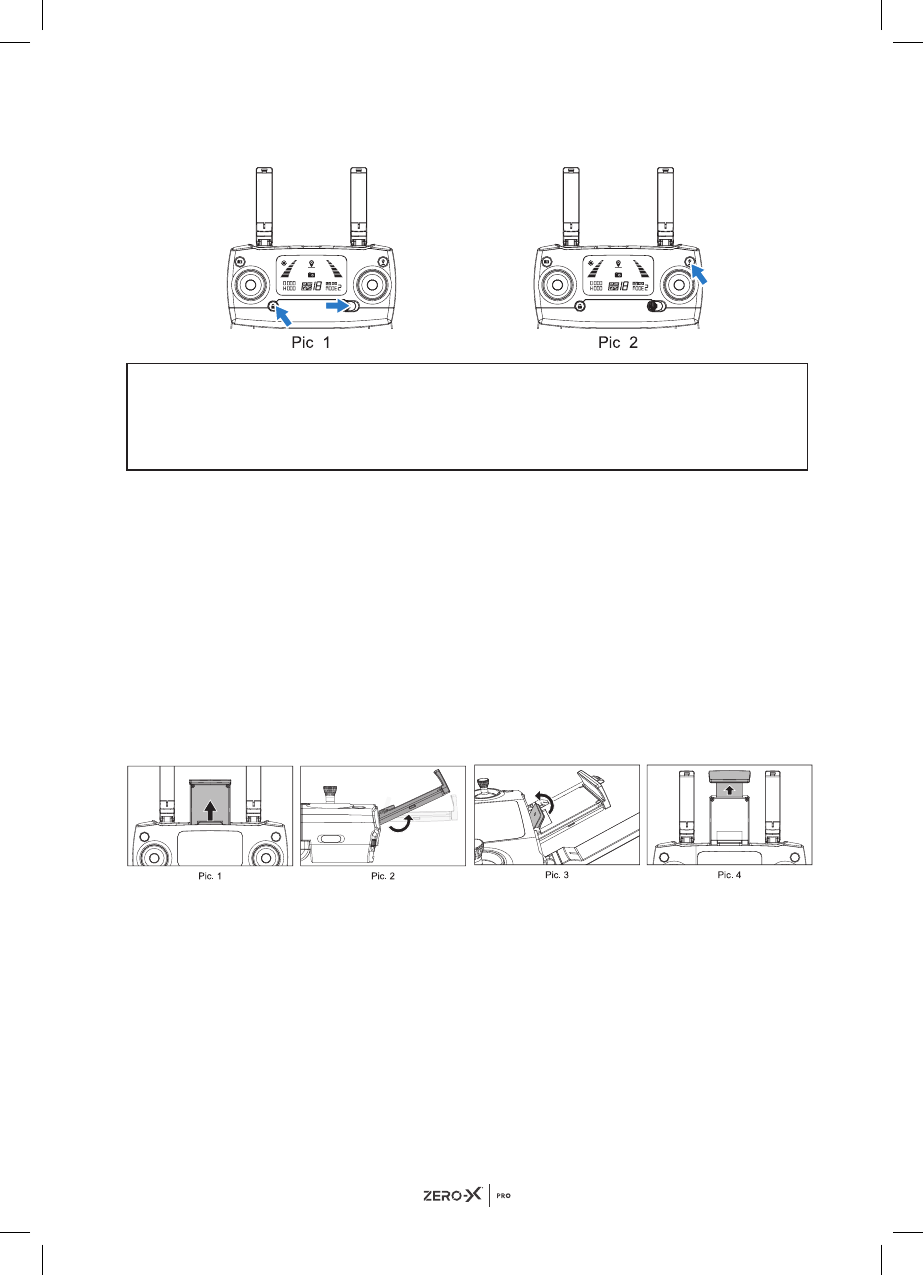
8.2 HOW TO CHANGE THROTTLE MODE
1. Hold down the button and swipe the Power ON button to the right to
turn on the remote control. The signal bars will go into signal connection
mode. (See Pic 1 below for reference).
2. Now hold down the Return to Home button for 3 seconds (See Pic 2
below for reference). The remote control will beep when the throttle
mode changes. To revert to original throttle mode hold down the
button again for 3 seconds, the remote control will beep again to confirm
the change.
Throttle
Control
Throttle
Control
Flight
Control
Left/Right
Flight
Control
Left/Right
Turn Left/
Right
Control
Turn Left/
Right
Control
Flight
Control
Forward/
Backward
Flight
Control
Forward/
Backward
19
The mode number you are currently on will be displayed on the remote
LCD screen at the bottom right.
NOTE
In order to change the throttle mode the signal must be in signal
connection mode. If it is not in this mode it will not allow you to change the
throttle mode.
9.0 SETTING UP THE MOBILE PHONE HOLDER
1. Pull out the mobile phone holder, it will click in place when it has been
completely pulled out. This can be found on the top of the remote
control between the two antennas.
2. Tilt the phone holder towards you about 30° to click in place. Note the
holder will only tilt towards you if it has been fully extended.
3. Tilt the support board towards you. This will sit against the body of the
remote control.(See Pic 3 below for reference).
4. Pull up the top of the phone holder to adjust in accordance to the size of
your phone. You can now place your phone into the holder and it will
securely clamp and hold your phone in place.
20
10.0 DOWNLOADING THE EVOLVED 4K APP TO YOUR MOBILE PHONE
10.1 WHERE TO DOWNLOAD
For iPhones - go to the Apple App Store and search for the Zero X Evolved
4K App.
For Android phones - go to the Google Play Store and search for the Zero X
Evolved 4K app.
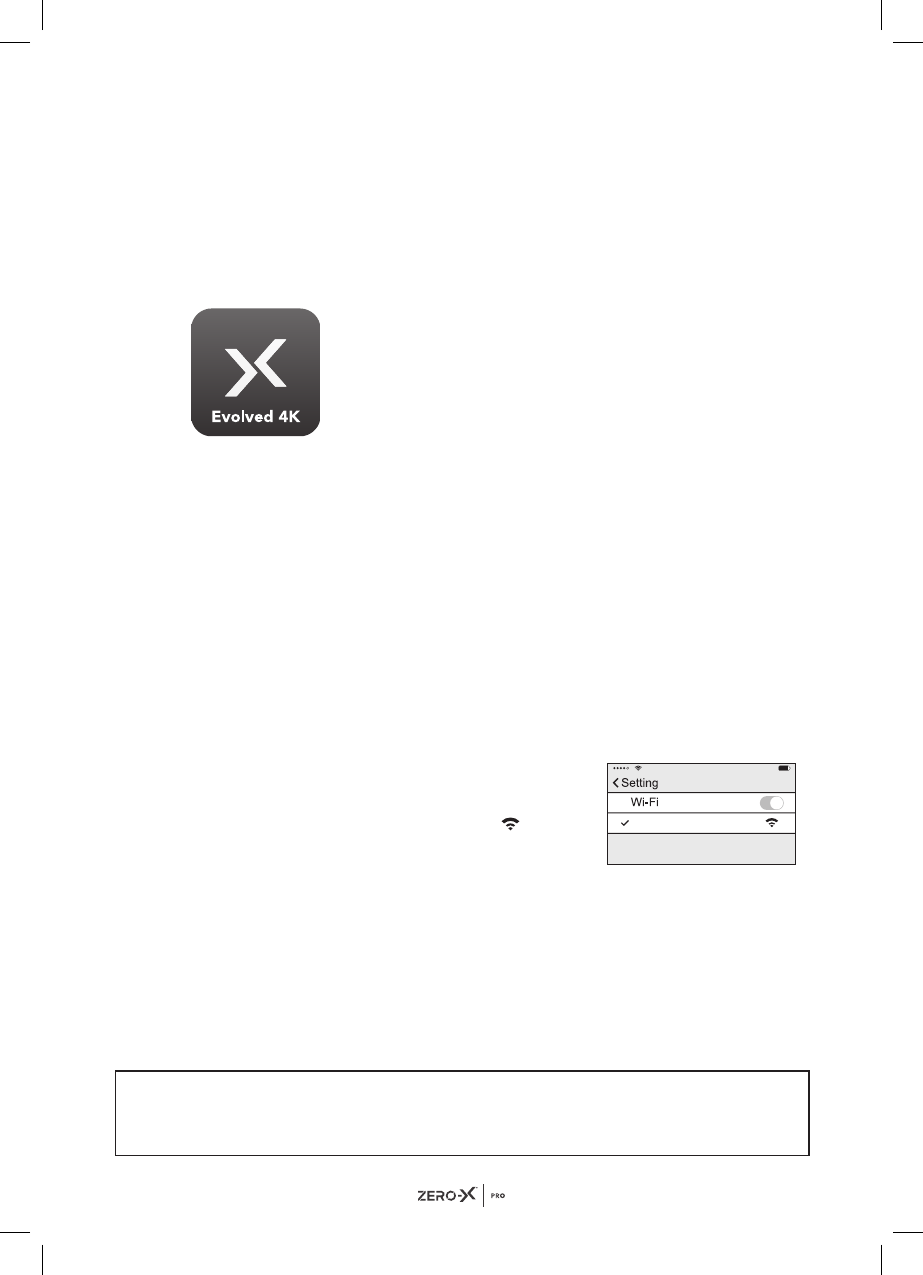
10.2 ZERO-X EVOLVED 4K APP
The Evolved 4K drone has built in WIFI connection which
us used to wirelessly connect your Smartphone to your
Evolved 4K drone allowing you to view the drone camera
live view, trigger recording, control and fly your Evolved 4K
drone.
To connect your Smartphone to the Evolved 4K drone
please follow the instructions below.
Go to Google Play store if you are using an Android Smartphone, or the
Apple Store if you are using an iPhone and search for the App named
“ZXP-EVD4K or Zero-X Evolved 4K”, once located please download and
install the App.
Connect the App, then go into the WIFI settings on your smartphone and
select the connection named ZXP-EVD4K_XXXX (XXXX will be your unique
drone number). Once connected, open the ZXP-EVD4K App on your
smartphone
10.3 CONNECTING TO THE EVOLVED 4K WIFI
1. Go to your mobile phones settings menu and enter the WiFi settings.
2. Turn on your Evolved 4K drone.
3. If your WiFi is turned off, turn it on and search
for ZXP-EVD4K_XXXXXXX in the available
networks. Select ZXP-EVD4K_XXXXXXX,
once the connection is successful a
icon
will appear next to it.
10.4 SAVING PHOTOS AND VIDEOS
• If your drone does not have a micro SD card inserted, all photos and videos
will be saved with the App onto your smartphone. However, the image
quality will not be as sharp on your connected mobile device compared to
images and videos that are saved onto the micro SD card.
• If you have the micro SD card inserted, all photos and videos will be saved to it.
• You can also download all the images that have been saved onto the micro
SD card onto your Zero X Evolved 4K app.
NOTE
Only mobile phones that support the 5G WiFi (802.11.ac) can make FPV
connections.
ZXP-EVD4K_XXXXXX

21
11.0 PRE-FLIGHT CHECKLIST
• Drone, controller and your device are all fully charged.
• All blades are installed correctly.
• All arms are fully unfolded.
• Camera lens is clean, free of dirt and dust.
• All parts used are genuine Zero-X Pro Evolved 4K products. Using other
parts that are not made specifically for the Evolved 4K drone may cause
safety issues or cause the drone to malfunction.
• The Zero-X Pro Evolved 4K App is downloaded and installed on your
device.
12.0 FLIGHT SAFETY
Before flying your drone make sure that you are in a safe surrounding.
CASA restrictions regarding flying drones require the drone to be no closer
than 5.5 kms from any airport or airfield while flying. Drones should also not
be flown higher than 120 metres above the ground, over populated areas or
any closer than 30 metres from vehicles, people or animals.
It is also required that you check your surroundings before taking off,
making sure there are no obstacles or dangers in the area including
overhead power lines and bodies of water. If there are hazards present in
your intended area of flight, please consider an alternative location. Tall
structures and large metal structures may affect the accuracy of the inbuilt
GPS and compass.
Be sure to fly your drone in appropriate weather conditions, it is advised to
refrain from flying during very high temperatures, snow, extremely strong
winds, rain or fog. Please also note this drone's GPS system is unable to be
used in polar regions.
For safety, Default control of the drone is set to Beginner where the flight
parameters are fixed. To change the parameters, Please deselect the
Beginner mode in the App's Flight Settings. To download the App please
refer to page 20
13.0 FLYING YOUR EVOLVED 4K DRONE
Please read through all of the instructions below before attempting to start
the launch the Evolved 4K drone.
13.1 PAIRING YOUR DRONE AND REMOTE CONTROL
1. Hold down the button and swipe the Power ON button to the right to
turn on the remote control.
2. Ensure that the battery is connected correctly to the drone. Power ON
your drone by pressing down the button on the top of the battery for 3
seconds. The drone will make a sound and the 4 lights will come on in a
sequence. The front lights will flash red and the rear lights flash green.
The drone will then beep two times and the lights will switch to flashing
alternatively yellow, green and red front and rear.
22
3. The remote control will begin to pair with the drone automatically. Once
a successful connection has been made the remote control will beep two
times. The drone's indicator lights will change to alternatively flashing
yellow for front and rear. The signal connection bars on the remote LCD
screen will now show
. The remote control will show both the battery
level of the drone and the remote control on the LCD screen. Please
charge your drone if the battery level is running low.
NOTE
• To avoid any signal errors when connecting the drone to the controller,
ensure you turn on the remote control first and then the drone.
13.2 CALIBRATING YOUR DRONE
To enter into calibration mode, you must unlock the drone first. To do this
pull both thumb sticks to the bottom right corner together at the same
time. (See picture on the right for your reference).
There are two steps to calibrate your drone successfully: Horizontal
calibration & Vertical calibration.
NOTE
• It is recommended to calibrate your drone before each flight.
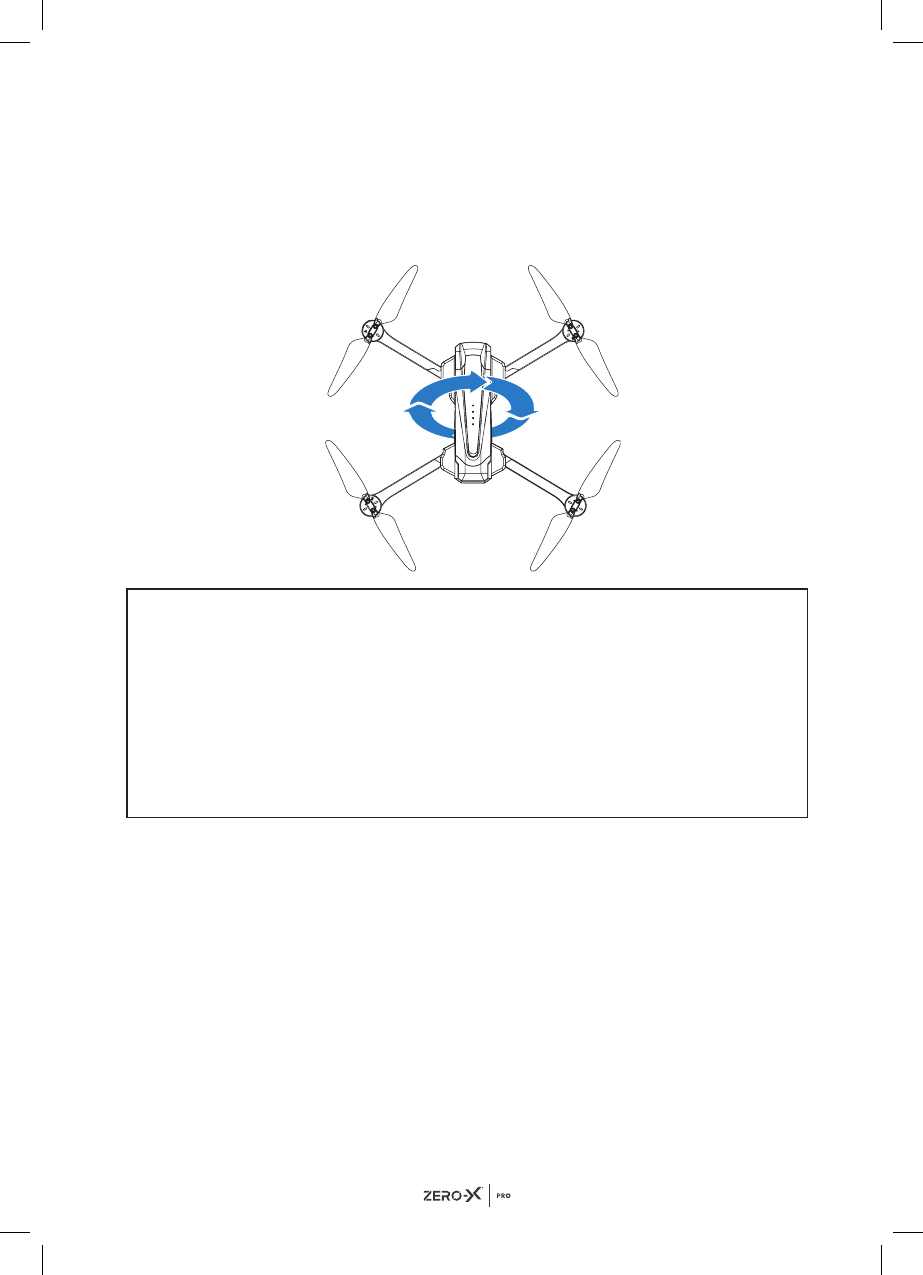
STEP 1: HORIZONTAL CALIBRATION
Now that the drone is paired with the remote control the front and rear
lights will be alternating flashing yellow. Hold the drone horizontally and
rotate it 360° degrees by the centre at least 3 times. When the horizontal
calibration has completed the lights will change to flashing green.
23
STEP 2: VERTICAL CALIBRATION
Hold the drone vertically with the camera facing up and rotate it 360° by the
centre at least 3 times. Be sure to keep the camera always facing up,
otherwise calibration will not work. When the vertical calibration is
completed and successful the lights will change to solid red on the front
lights and yellow on the rear lights.
NOTE
• Do not calibrate the drone in an area with strong magnetic fields,
parking lots or construction sites with underground reinforcement.
• Do not carry any magnetic objects or materials (such as keys or mobile
phones) on you when you are calibrating your drone.
• Keep away from large metal objects during the calibration process.
• It is recommended not to wear smart watches while flying your drone as
it may interfere with the GPS signal.

24
13.3 GYROSCOPE CALIBRATION
After the drone has finished calibrating, put the drone on flat ground and
pull both thumb sticks to the bottom left corner together at the same time.
(See picture below for reference). Once the calibration is complete the
front and rear lights turn from flashing green to solid red at the front and
yellow at the rear.
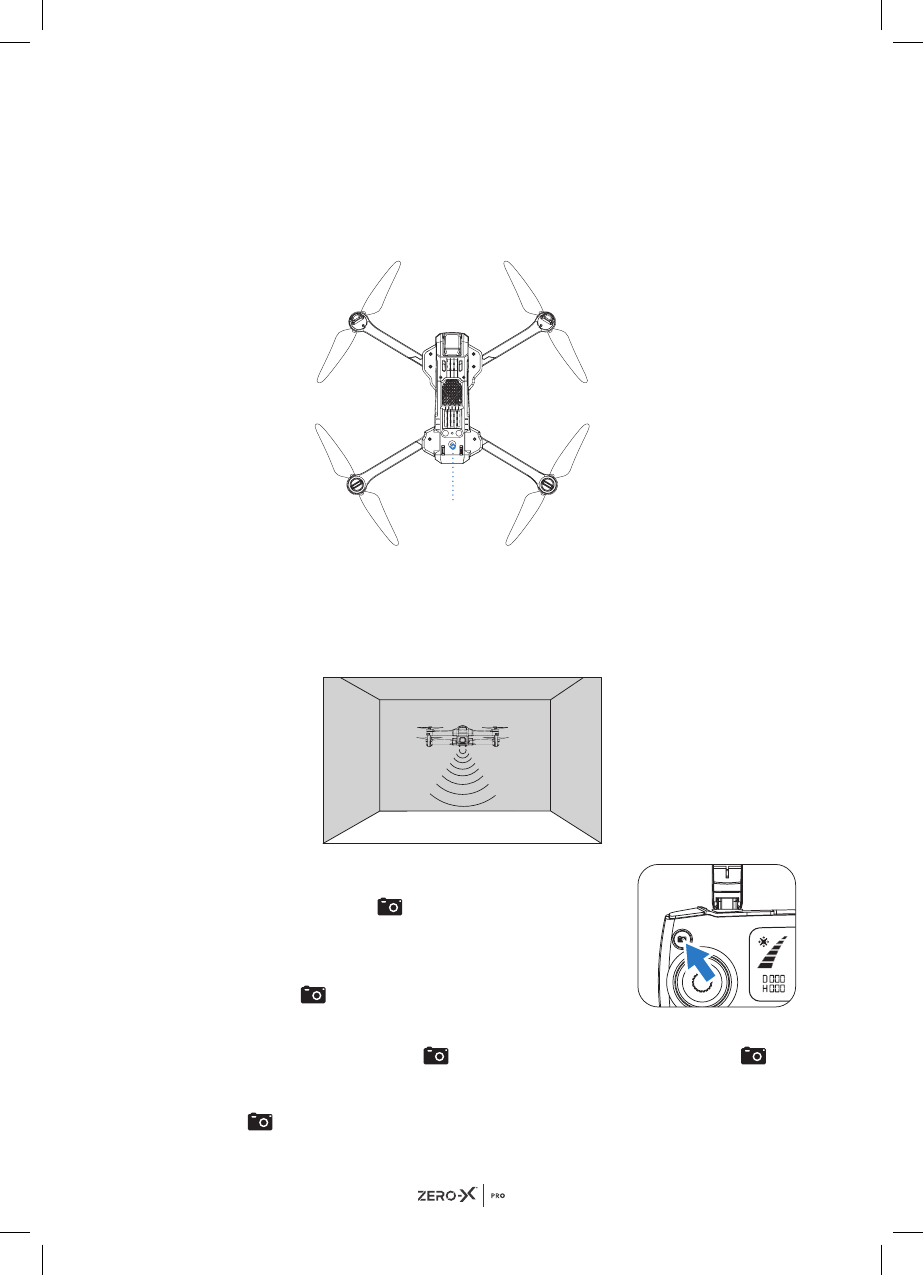
13.4 OPTIMAL TRANSMISSION ZONE
To ensure that your flight experience is as best as possible, make sure that
your drone is flying in front of your remote control with no obstacles in
between the drone and remote control.
NOTE FOR INDOOR FLYING:
• When flying indoors, please turn off the "GPS switch" of the remote
control to avoid the drone getting out of control due to the weak GPS
signal indoors.
• Optical Flow positioning system is typically activated and useful for
indoor environments when GPS signal is weak or not available. Optical
Flow positioning system works best when the drone is less than 3
meters from the ground level, as the drone has to continuously scan the
ground. Please refer to the "OPTICAL FLOW" part of the manual on
page 32.

25
NOTE:
• You can connect to the WIFI at this time to view the real time video.
Please refer to "CONNECTING TO THE EVOLVED 4K WIFI" on page
20 on how to connect to WIFI.
13.5 SETTING A HOME POINT
If the GPS signal is strong (Satellite level over 7) before take off, the take
off location will automatically be saved as the drone's Home Location.
The strength of the GPS signal is shown on the remote LCD screen at the
bottom middle. You will see the strength indicated as
on the remote
control. The drone's front indicator lights will turn solid red and rear
indicator lights will turn solid green when the home point is successfully
recorded.
13.6 BASIC FLIGHT CONTROLS
To get smooth and stable movement in video, push the control sticks gently.
Push the left control stick up to gain
altitude and down to descend.
UP AND DOWN
Push the right control stick up to go
forward and down to go backwards.
FORWARD AND BACKWARDS
Push the left control stick left to turn
left and right to turn right.
ROTATION
Push the right control stick left to fly
left and right to fly right.
LEFT/RIGHT FLIGHT
26
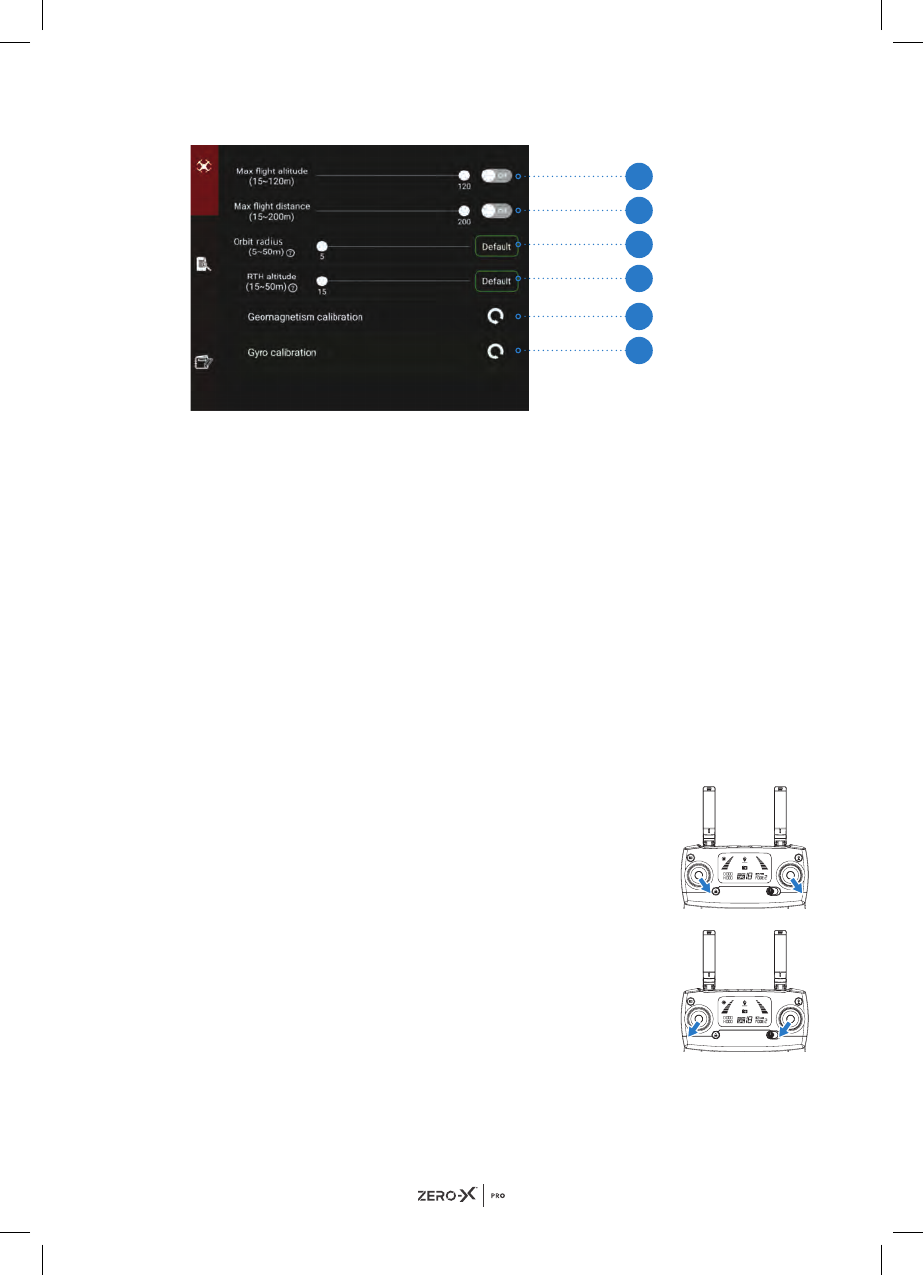
14.0 BEGINNER MODE
1. Max flight altitude - The default factory setting is OFF, therefore the
drone can reach a maximum altitude of 120 metres. If you want to change
the maximum altitude the drone can reach, switch the setting to ON and
move the slider to set the desired altitude (between 15m-120m).
2. Max flight distance - The default factory setting is OFF, therefore the
drone can reach a maximum flight distance of 1000 metres. If you want
to change the maximum flight distance the drone can reach, switch the
setting to ON and move the slider to set the desired distance
(between 15m-200m).
3. Orbit radius - The default factory setting is 5 metres. If you want
to change the orbit radius move the slider to set the desired radius
(between 5m - 50m).
4. Return to Home (RTH) - The default factory setting is 15 metres.
To change this, move the slider to set the new RTH altitude
(between 15m - 50m).
5. Geomagnetism calibration - If you press this icon you
can replace one of the compass calibration processes
which involves using the remote control. Alternatively,
if you would like to continue using the remote control
method, push both control sticks to the bottom
right corner (5pm direction), see the image to the right.
6. Gyro calibration - If you press this icon you can replace
one of the gyro calibration processes which involves
using the remote control. Alternatively, if you would like
to continue using the remote control method,
push both control sticks to the bottom left corner
(7pm direction), see the image on the right.
1
2
3
4
5
6
27
15.0 SPEED MODE
The Evolved 4K Drone has 2 speed
modes that control the acceleration
and maneuverability of the drone.
To cycle through the Speed Modes,
use the Speed Button on the top right
of the controller.
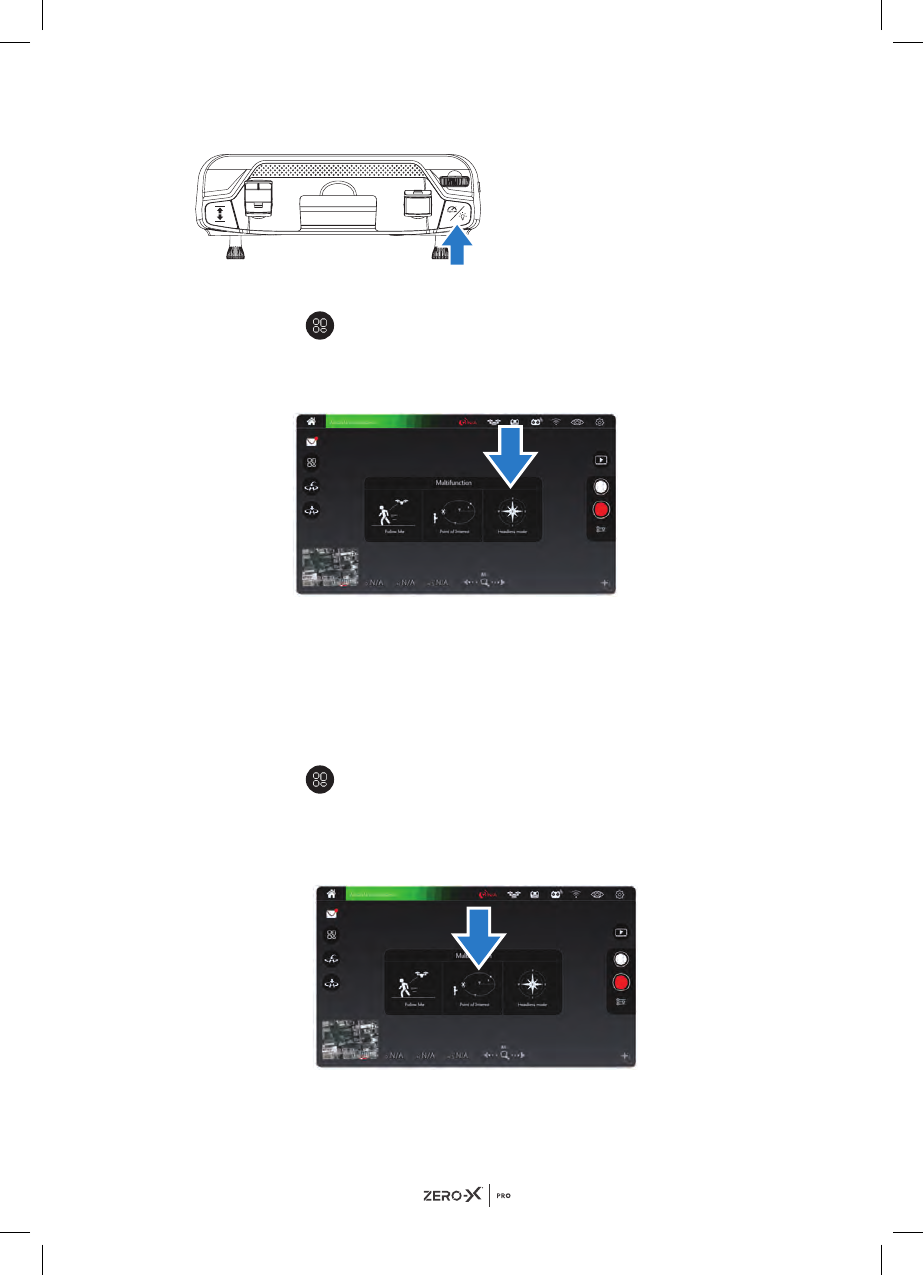
16.0 HEADLESS MODE
1. Press the icon on the left side of the App to launch options.
2. Press the headless mode button on the App
(shown in the diagram below).
3. When headless mode is enabled, the drone will move in the direction
of the remote control, regardless of its orientation. This makes it easy to
bring the drone home when it is far away from you.
17.0 FLY AROUND-ME MODE
When activated, the Evolved 4K will undertake fixed point encircling around
the desired point of interest.
1. Press the icon on the left side of the App to launch options.
2. To activate Fly Around-Me Mode, while the drone is in air, aim the Evolved
4K at the desired point of interest. Press the orbit flight button on the App,
it will set the drone fly surround radius range (within 5-50 metres)
.
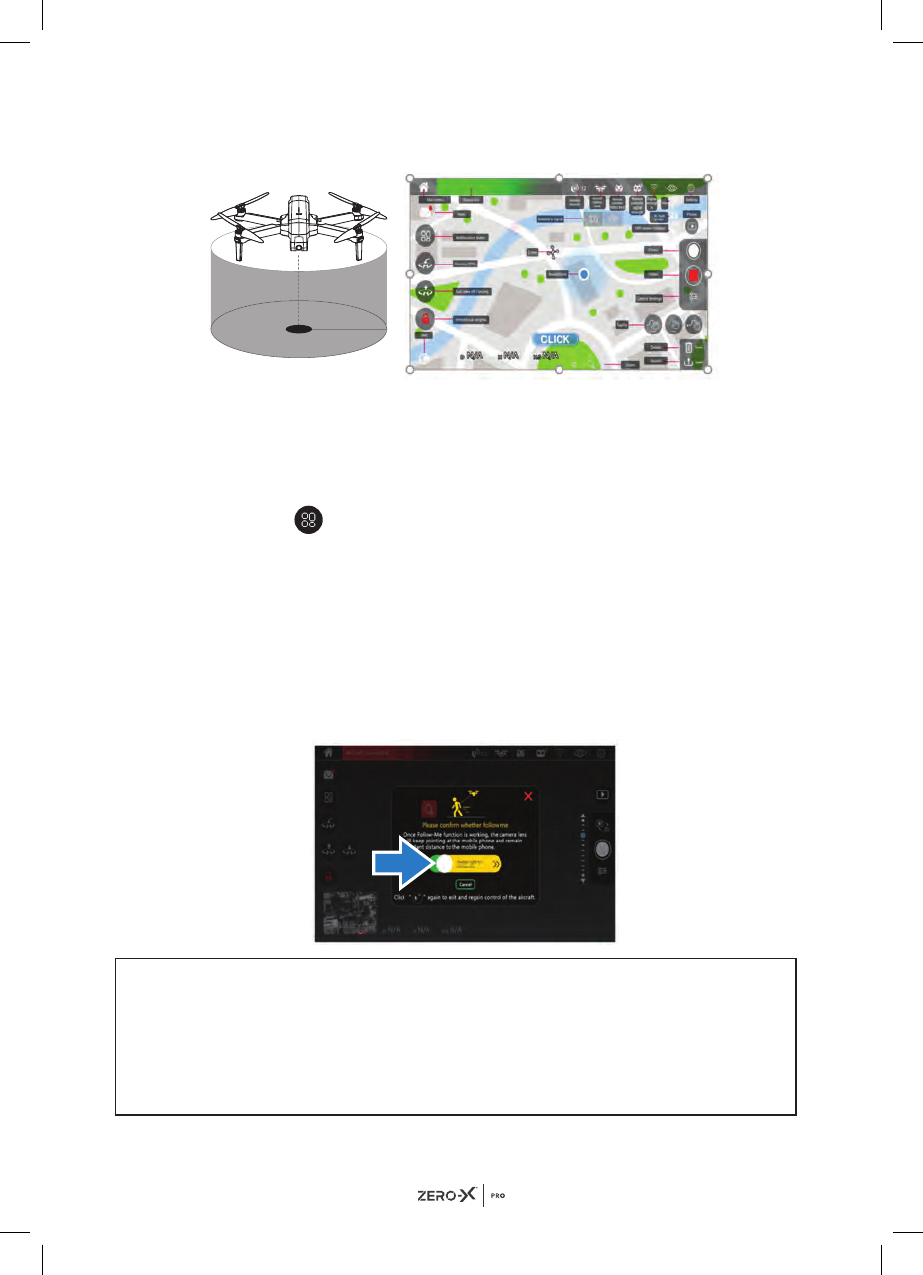
28
3. Click the point of interest icon again to exit out of this mode and regain
control of your drone.
18.0 FOLLOW ME MODE (GPS MODE ENABLED)
To activate the Follow-Me Function, the drone will follow your smartphone
wherever you go. Please make sure the smartphone is connected with your
Evolved 4K drone successfully and the Zero-X Evolved 4K App is installed
and open.
1. Press the icon on the left side of the App to launch options.
2. Fly the drone a minimum 5 metres and maximum 30 metres away
from the drone pilot or person who is holding the smartphone that is
connected to the drone via GPS.
3. Click the follow me icon on your App.
4. Swipe right to activate the follow me function, the drone will then start
following the smartphone.
5. Click the follow me icon again to exit out of this mode and regain
control of your drone.
NOTE
• Follow Me mode depends on the GPS signal of the mobile device.
The GPS signal can vary depending on the amount of buildings, trees,
mobile towers or congestion from too many mobile phones in vicinity.
• Please fly the drone in open areas. The Evolved 4K drone is not
equipped with obstacle avoidance.

29
19.0 WAY POINT FLIGHT (GPS MODE ENABLED)
To activate the way point flight, the drone will fly according to the path
which you have set. Please make sure your smartphone is connected with
your Evolved 4K drone successfully and the App is working. Also make sure
that you have downloaded and saved the local map onto your smartphone.
1. To enter into the way point flight mode, click the map on the bottom left
corner of the App screen. After you have clicked the map, a blue circle
will appear (your location) and the drone's current position on the map.
2. Please enlarge the map and then press the button on the bottom
right of the App screen to choose waypoint flight mode. You can now
either draw a route by pressing the
Track
button or mark route points by
pressing the
Points
button and tapping different points on the map.
3. Once you have either drawn or marked the way point points on your
map (max 18 points), click submit and swipe right to confirm your
waypoint route. The drone will now fly according to the saved path.

30
4. Press the button again to exit the way point flight mode and regain
flight control of the drone.
5. To reset the flight path, press the delete button on the bottom right
corner of the App screen..
NOTE
Please note the Way Point Flight mode may not function correctly if there is
WiFi interference.
19.1 RETURN HOME (GPS MODE ENABLED)
The Return Home Button will initiate the automatic landing
sequence. Please make sure there are no obstructions,
people or animals under the drone when this is selected.
If the drone's flying altitude is less than 15 meters from
ground level and the Return Home button is pressed, the
drone will gain altitude first and then return home. If the drone is not
connected with the App, Please press the Return to home button on the
controller for the drone to safely land at the starting point. There are 3
different types of Return to Home scenarios: Smart Return to Home, Low
Battery Return to Home and Failsafe Return to Home.
SMART RETURN TO HOME
Press the return to home button on your remote control or click the return
to home on your App and follow the instructions on screen, the remote
control will start beeping. Your drone will return to the take off point if the
return to home button is pressed on the remote control, this will cause the
remote control to start beeping. To stop return to home function, please
press the return to home button again.
31
LOW BATTERY RETURN TO HOME
When the drone senses the battery level is low, a failsafe is triggered. It is
recommended to initiate the Return to Home function with your drone or
land it immediately. There are two warnings for low battery levels:
1. When the rear indicator lights are flashing red slowly, you will notice the
battery icon displayed as on the remote LCD screen. This will cause
the remote control to beep. If your drone is more than 100 metres away
or more than 30 metres away in altitude from the take off location (home
point), it will return home automatically. If it is within the 100 metre
distance you can terminate the Return to Home by simply pressing the
button on your remote control.
2. When the rear indicator lights are flashing red slowly but the battery icon
is displayed as on the remote LCD screen, a steady beep sound will
come from the remote control. If your drone is more than 15 metres it
will Return to Home automatically. If it is within the 15 metre distance the
drone will automatically land and lock the motors.
FAILSAFE - OUT OF CONNECTION RETURN TO HOME
If the GPS control signal is continuously interrupted for longer than 6
seconds and the app controls are turned off, the drone's internal flight
control system will take over control and return the drone to the home
point. If the GPS signals are restored during the Return to Home, the drone
will continue its return, to cancel this and regain control press the
button
on your remote control.
NOTE:
• The drone is not equipped with obstacle avoidance.
• When the drone is in automatic Low Battery Return to Home mode you
cannot cancel this unless stated above. To continue flying you will need
to charge the battery or put in a spare charged battery. (Spare battery is
not provided)
32
19.2 OPTICAL FLOW
The optical flow system consists of the optical flow lens modules. This
system is an image positioning system, it will obtain the drone's position
through the optical image which ensures safe flights and accurate
positioning. See below for reference where the optical flow camera is
located within your drone.
VISION POSITIONING SYSTEM
This system is typically activated and used in indoor environments when the
GPS signal is weak or not available. The vision positioning system works
best when the drone is less than 3 metres from the ground.
19.3 PHOTO MODE
Press the photo button
on the remote control or
click the photo icon on the App. A picture will be shown
on the App indicating a photo has been captured. If the
drone is not connected with the App, please press the
photo button
on the remote control.
19.4 VIDEO MODE
Long press the photo button
on the remote control. A video icon
on the remote control LCD screen will begin to flash slowly, indicating that
a video is being recorded. To exit out of video mode, long press the photo
button
again.
Optical Flow
Camera
33
19.5 VIEWING PHOTOS AND VIDEOS
To view your recorded footage and videos you will need to connect the
Micro SD card to your computer via either a USB Micro SD card reader
or via a SD card converter if your computer has a SD card reader. (Not
provided) or you can click the media gallery on your App to view the picture
and video.
NOTE:
• The quality of videos or photos recorded on your smart phone will be
de-scaled to save space. The recommended micro SD card is Class 10
with a minimum capacity of 32GB and maximum capacity of 128GB.
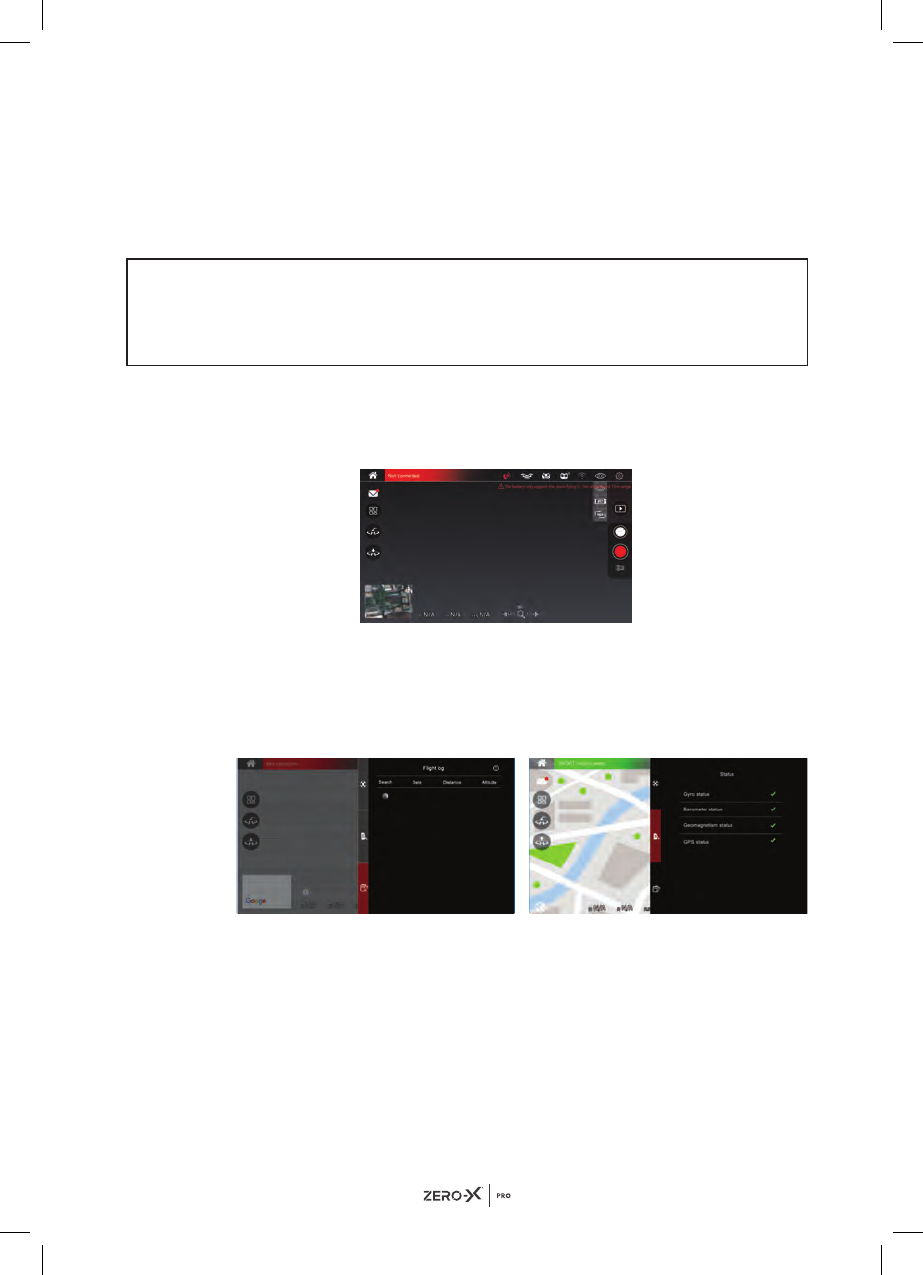
20.0 ACTIVATING SEARCH FUNCTION FOR A LOST EVOLVED 4K DRONE
1. Check that your mobile phone has disconnected from the drone's WiFi.
2. Click on the "Settings" button in the app.
3. Click on the "Flight Log" button within the settings menu, and then click
the "Search" button to view the approximate flight position from when
the WiFi connection got disconnected. You can also view the drone's
position in "Flight Log" on the map via the longitude and latitude
coordinates by swiping left on the screen.
20.1 DRONE MAINTENANCE
Avoid exposing your Evolved 4K and it's accessories to dust, sand and
moisture as these can damage the Evolved 4K. If the Evolved 4K is exposed
to dust or sand, use a soft brush to remove any visible particles.
34
20.2 REPLACEMENT PARTS
We understand that it’s not always easy learning how to fly a drone, and
sometimes a close call can turn into a crash landing. To thank you for your
support of Zero-X and your drone purchase, we would like to help you build
your confidence in learning how to fly your drone. We would like to offer
you 50% off your first two orders of any spare parts, by using the codes in
the coupons below.
There you will be able to find and buy the spare parts listed below.
Visit www.zero-x.com.au | www.zero-x.co.nz to make your purchase.
• Battery
• Rotor Blades
• Front Arm & Motor Set A
• Front Arm & Motor Set B
• Rear Arm & Motor Set A
• Rear Arm & Motor Set B
50% OFF
THANK YOU FOR YOUR SUPPORT!
PLEASE VISIT OUR WEBSITE &
USE PROMO CODE:
OOPSIBROKEITAGAIN
to receive
your spare parts purchase!
50% OFF
THANK YOU FOR YOUR SUPPORT!
PLEASE VISIT OUR WEBSITE &
USE PROMO CODE:
OOPSIBROKEIT
to receive
your spare parts purchase!

35
21.0 WARRANTY TERMS & CONDITIONS
Our goods come with guarantees that cannot be excluded under the
Australian Consumer Law. You are entitled to a replacement or refund for
a major failure and for compensation for any other reasonably foreseeable
loss or damage. You are also entitled to have the goods repaired or
replaced if the goods fail to be of acceptable quality and the failure does
not amount to a major failure.
This warranty is provided in addition to your rights under the Australian
Consumer Law. Directed Electronics Australia Pty Ltd (Directed Electronics)
warrants that this product is free from defects in material and workmanship
for a period of 12 months from the date of purchase or for the period stated
on the packaging. This warranty is only valid where you have used the
product in accordance with any recommendations or instructions provided
by Directed Electronics.
This warranty excludes defects resulting from alterations of the product,
accident, misuse, abuse or neglect. In order to claim the warranty, you must
return the product to the retailer from which it was purchased or if that
retailer is part of a National network, a store within that chain, along with
satisfactory proof of purchase. The retailer will then return the goods to
Directed Electronics.
Directed Electronics will repair, replace or refurbish the product at its
discretion. The retailer will contact you when the product is ready for
collection. All costs involved in claiming this warranty, including the cost of
the retailer sending the product to Directed Electronics, will be borne by
you.
Zero-X Address: 115-119 Link Road, Melbourne Airport, Victoria 3045
Australia
Ph: +61 03 8331 4800
Email: [email protected]
INDEMNITY
You agree to defend, indemnify and hold harmless Zero-X and its
subsidiaries and affiliates from and against any and all claims, proceedings,
injuries, liabilities, losses, costs and expenses (including reasonable legal
fees), including but not limited to, claims alleging negligence, invasion
of privacy, copyright infringement and/or trademark infringement against
Zero-X and its subsidiaries and affiliates or the Zero-X services, relating to
or arising out of your breach of any provision of these terms, your misuse
of the Zero-X or Zero-X services, or your unauthorized modification or
alteration of products or software.
36
WARRANTY AND WARRANTY DISCLAIMER
Zero-X has a limited warranty on whereby Zero-X warrants to you and only
to you that the Zero-X drones and accessories, computer software, or other
hardware, computer software, or other hardware. And accessories will be
free from defects in materials and workmanship for one (1) year from the
date of your purchase of the on Zero-X drones and accessories, computer
software, or other hardware (unless a longer warranty period is required by
law). The specifics of this Zero-X limited warranty are at https://www.zero-x.
com.au/warranty
To the extent possible under governing law, other than the above product
warranty for the Zero-X drones and accessories, computer software, or
other hardware you understand and agree that the Zero-X services are
provided on an "as is" and "as available" basis. Zero-X makes no warranty
that the Zero-X services will meet your requirements or that use of the
Zero-X services will be uninterrupted, timely, secure or error-free nor
does Zero-X make any warranty as to the accuracy or reliability of any
information obtained through the Zero-X services (including third party
content), that any defects in the Zero-X services will be corrected or that
the Zero-X products or Zero-X services will be compatible with any other
specific hardware or service. Further, Zero-X does not warrant that the
Zero-X services or the Zero-X servers that provide you with data and content
are free of viruses or other harmful components. Zero-X also assumes no
responsibility for and shall not be liable for any damages caused by viruses
that may infect your Zero-X drones and accessories, computer software, or
other hardware.
You agree that Zero-X is not an insurer and that Zero-X is not providing me
with insurance of any type. Any amounts that you pay Zero-X for the Zero-X
service are not insurance premiums and are not related to the value of
your vehicle or property, anyone else’s property located in your vehicle or
premises, or any risk of loss in your vehicle or at your premises. If you want
insurance to protect against any risk of loss at your vehicle or premises, you
will purchase it. In the event of any loss, damage or injury, you will not look
to Zero-X to compensate you or anyone else. You release and waive for
yourself and your insurer all subrogation and other rights to recover against
Zero-X arising as a result of the payment of any claim for loss, damage or
injury.
Zero-X’s equipment and services do not cause and cannot eliminate
occurrences of certain events, including, but not limited to, fires, floods,
burglaries, robberies and medical problems. Zero-X makes no guarantee
or warranty, including any implied warranty of merchantability or fitness
for a particular purpose, that the Zero-X equipment and services provided
will detect or avert such incidents or their consequences. Zero-X does not
undertake any risk that you or your vehicle or property, or the person or
property of others, may be subject to injury or loss if such an event occurs.
The allocation of such risk remains with you, not Zero-X.

37
Other than the above product warranty for the Zero-X drones and
accessories, computer software, or other hardware, Zero-X and its suppliers
disclaim all warranties of any kind, whether express, implied, or statutory,
regarding the Zero-X equipment and any associated app/service. Including
any implied warranty of title, merchantability, fitness for a particular purpose,
or non infringement of third party rights. Because some jurisdictions do not
permit the exclusion of implied warranties, the last sentence of this section
may not apply to you. Zero-X hereby further expressly disclaims all liability
for any claims for service failures that are due to normal product wear,
product misuse, abuse, product modification, improper product selection or
your non-compliance with any and all applicable federal, state or local laws.
This warranty and warranty disclaimer give you specific legal rights, and you
may have other rights that vary by state, province, or country. Other than
as permitted by law, Zero-X does not exclude, limit or suspend other rights
you have, including those that may arise from the nonconformity of a sales
contract. For a full understanding of your rights you should consult the laws
of your state, province, or country. For our Australian Customers: please
note that this warranty is in addition to any statutory rights in Australia in
relation to your goods which, pursuant to the Australian consumer law,
cannot be excluded.
LIMITATIONS OF ZERO-X LIABILITY
Under no circumstances will Zero-X be liable in any way for any content,
including, but not limited to, the loss of content, any errors or omissions in
any content, or any loss or damage of any kind incurred in connection with
use of or exposure to any content posted, emailed, accessed, transmitted,
or otherwise made available via the Zero-X app.
Zero-X liability for damages, especially for breach of duty or obligation,
delay in performance, non-performance, or malperformance shall be
precluded, except when these are due to negligent breaches of any
significant contractual duty or obligation on the part of Zero-X. Any liability
for negligence is limited to direct losses usually and typically foreseeable
in such case. Should the claim for damages be based on willful or grossly
negligent breach of contractual duty or obligation on the part of Zero-X, the
preclusion and limitation of liability mentioned in the preceding sentences
will not apply. The preceding preclusion and limitation of liability will also
not apply to claims for damages arising out of loss of life, bodily injury
or health impacts for which Zero-X may be liable, or for non-contractual
liability.
Some states and countries do not allow the exclusion or limitation of
incidental or consequential damages, so the above limitation or exclusion
may not apply to you. Additionally, this provision is not intended to limit
Zero-X's liability in the event of Zero-X's willful or intentional misconduct.
38
22.0 NOTES
39
40

Capture the skies.™
www.zero-x.com.au | www.zero-x.co.nz
© Zero-X v1.0 2021
All Images, Information and Content are
Copyright © 2021 Directed Electronics
Australia Pty Ltd. All Rights Reserved.
