
© 2015 Anishu, Inc. Page 1
HomeBudget
Anishu, Inc.
Data Import – User Guide
Overview
HomeBudget supports import of OFX/QFX and CSV formatted financial transactions from bank and
credit card accounts.
OFX/QFX data format
OFX stands for Open Financial Exchange. QFX is Quicken’s version of OFX. When importing OFX/QFX
data, HomeBudget looks for TRNTYPE, DTPOSTED, TRNAMT, NAME/MEMO and FITID fields in the
file, in addition to BANKTRANLIST, STMTTRN fields.
CSV data format
CSV files must confirm to the following requirements:
• The first line of the CSV file must include column headers. The required columns are:
Date
,
Description
and
Amount
, as shown below. Other columns, if present, are ignored.
Date,Description,Amount
20151110,Coffee,-2.95
20151111,Electricity,-14.95
20151115,Interest from CD,67.00
• By default, the date is expected to be in the YYYYMMDD format. In case the date does not
confirm to the YYYYMMDD format, you can specify the data format in the Date header in
parenthesis, as shown below:
Date(DD/MM/YYYY),Description,Amount
10/11/2015,Coffee,-2.95
11/11/2015,Electricity,-34.95
15/11/2015,Interest from CD,67.00
• The amount column must be a single column. If your file contains 2 amount columns, combine
income and expense columns into one column. Positive amounts are income. Negative
amounts are expenses, and must begin with a negative sign.
• The amount column must not contain currency symbols, or commas instead of decimal places.
• Columns can to be separated by either “,” or “;”

© 2015 Anishu, Inc. Page 2
Importing Data
There are two methods to import data:
1. File based import. You can download the OFX/QFX formatted files from your bank or credit card
account, and then load the data files into the app.
2. Network import. You can configure HomeBudget to directly connect to your financial institution,
and download transaction data. Please note that only a limited number of institutions offer this
service. While most institutions offer this service free, some do require monthly payments or
special activation. Please check with your financial institution.
File-based Import
This method of data import involves the following 3 steps:
I. Downloading the OFX/QFX data file, and loading it into the app
II. Associating the loaded data file with an account in HomeBudget
III. Reviewing and processing of the transactions
I. Downloading the OFX/QFX data file, and loading it into the app
Log in to your bank or credit card account site, and go to the section that allows download of monthly
statement or transactions. Look for the download format named OFX or QFX. Alternatively, you can
also look for a format compatible with MS Money. Most banks and credit card institutions support
these formats. This may take some trial and error the first time. Once you find the right format,
download the file in your browser.
If you are using the Mac or Windows version of HomeBudget, the downloaded file will usually go into
the Downloads folder; please go to section II below for further instructions. If you are using the iPhone,
iPad or Android version of HomeBudget, there are 3 possible ways to load the data file into
HomeBudget:
1. When you download the file in your browser on an iPhone, iPad or Android device, the browser
will likely provide option "Open in HomeBudget", as shown below. Depending on the website that
you are connected to, this may or may not always work. When you get this option, simply tap the
"Open in HomeBudget" option to load the data file into HomeBudget.
2. In case the method above does not work, you can download the statement first to your computer,
email the file to yourself as an attachment, and open the email attachment on your iPhone, iPad or
© 2015 Anishu, Inc. Page 3
Android device. In this case, the mail application will provide the option to "Open in HomeBudget"
as shown above.
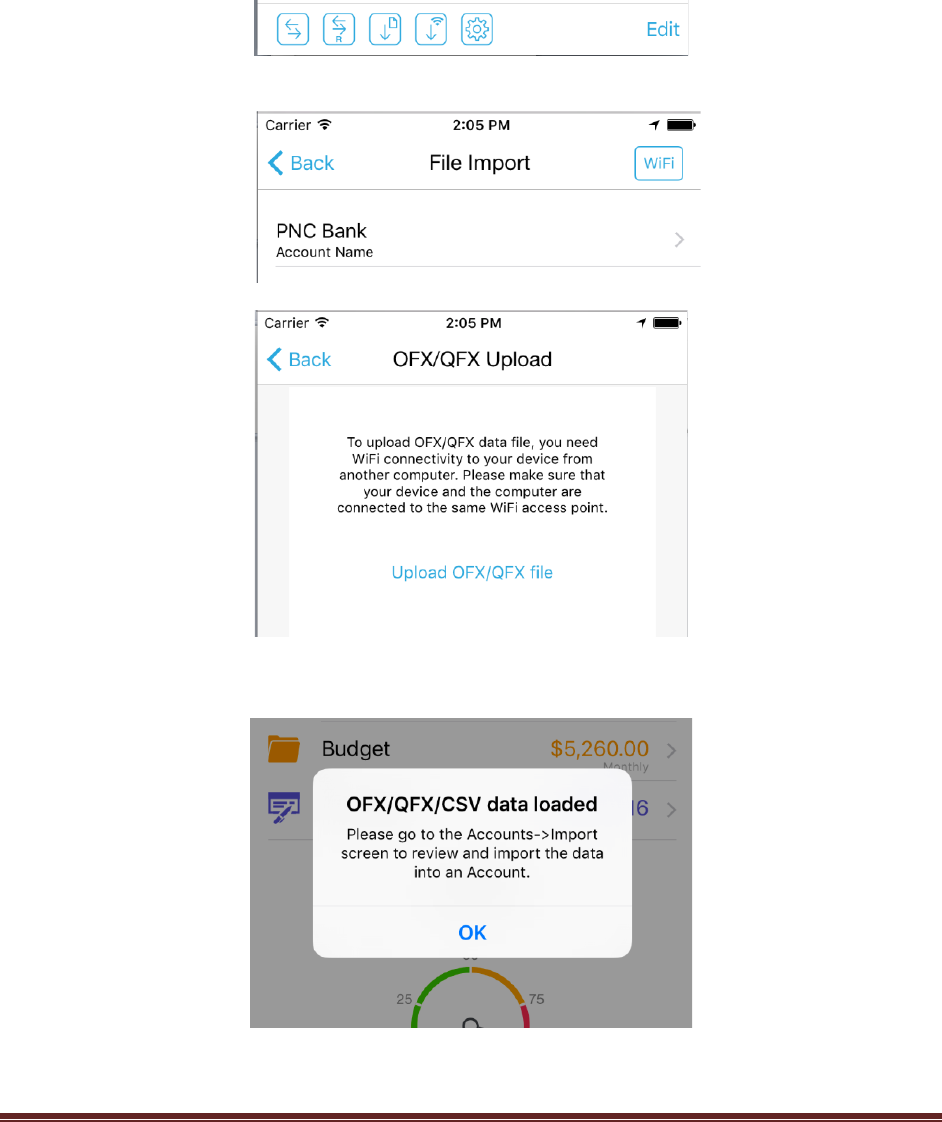
3. A third option is to first download the file on to your computer, and then load it into HomeBudget
over Wifi . For this, go to the Accounts->Import (3
rd
button on bottom left in Accounts) screen, and
tap by Wifi button on top right and follow the instructions provided.
In all cases, when a file is loaded, HomeBudget will display the following message:
© 2015 Anishu, Inc. Page 4
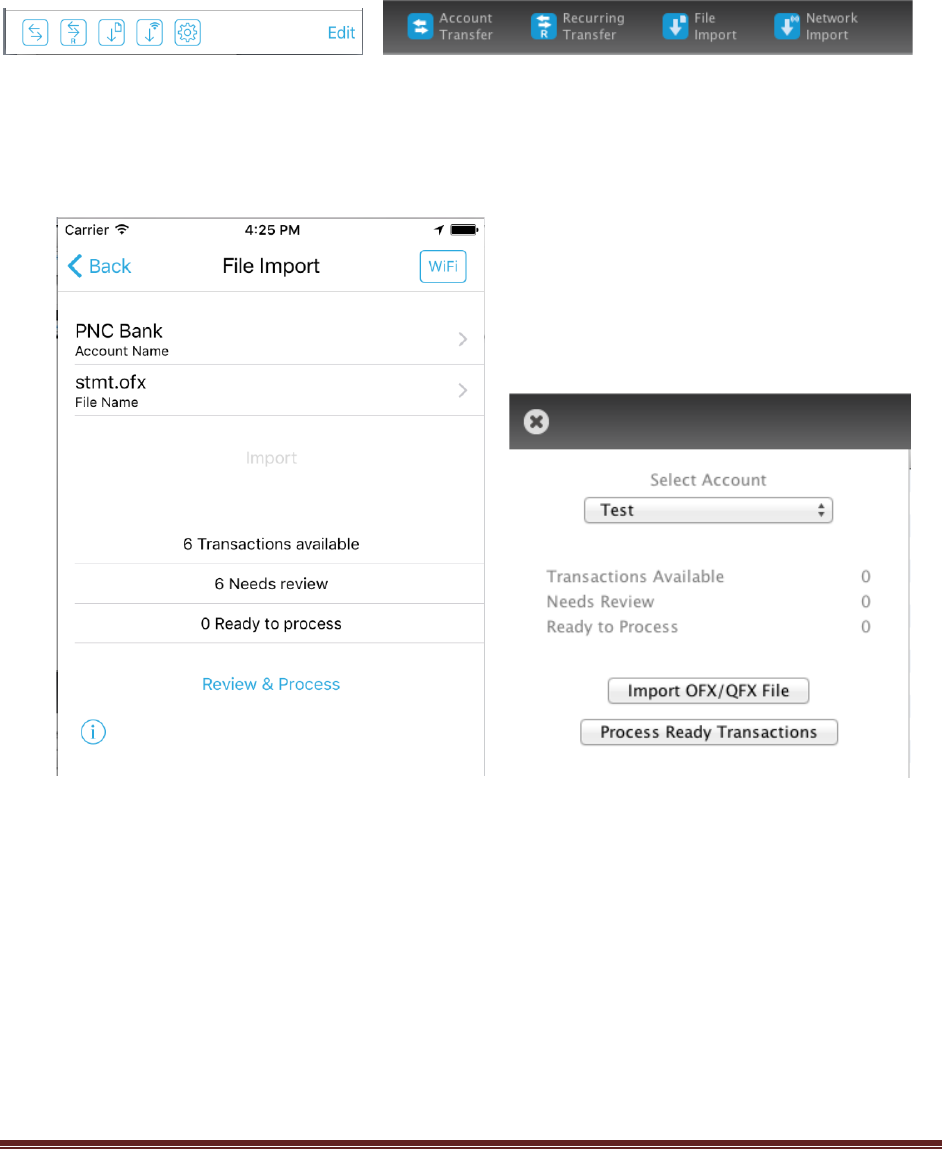
II. Associating the loaded data file with an account
This step is fairly simple. First go to the Accounts screen, then to the File Import screen (3
rd
button).
In this screen, for iPhone/iPad/Android, simply select the account, then the loaded file, and then tap
the "Import" button as shown below. On a Mac/Windows, first select the account and then tap the
Import OFX/QFX button; HomeBudget will prompt with the “Select File..” dialog to select the file for
import.
When the file is successfully imported, HomeBudget will list the transactions available.
III. Reviewing and processing of the transactions
Tap the Review and Process button, and go to the review screen. This step involves going through
each transaction and indicating how HomeBudget should process each transaction.
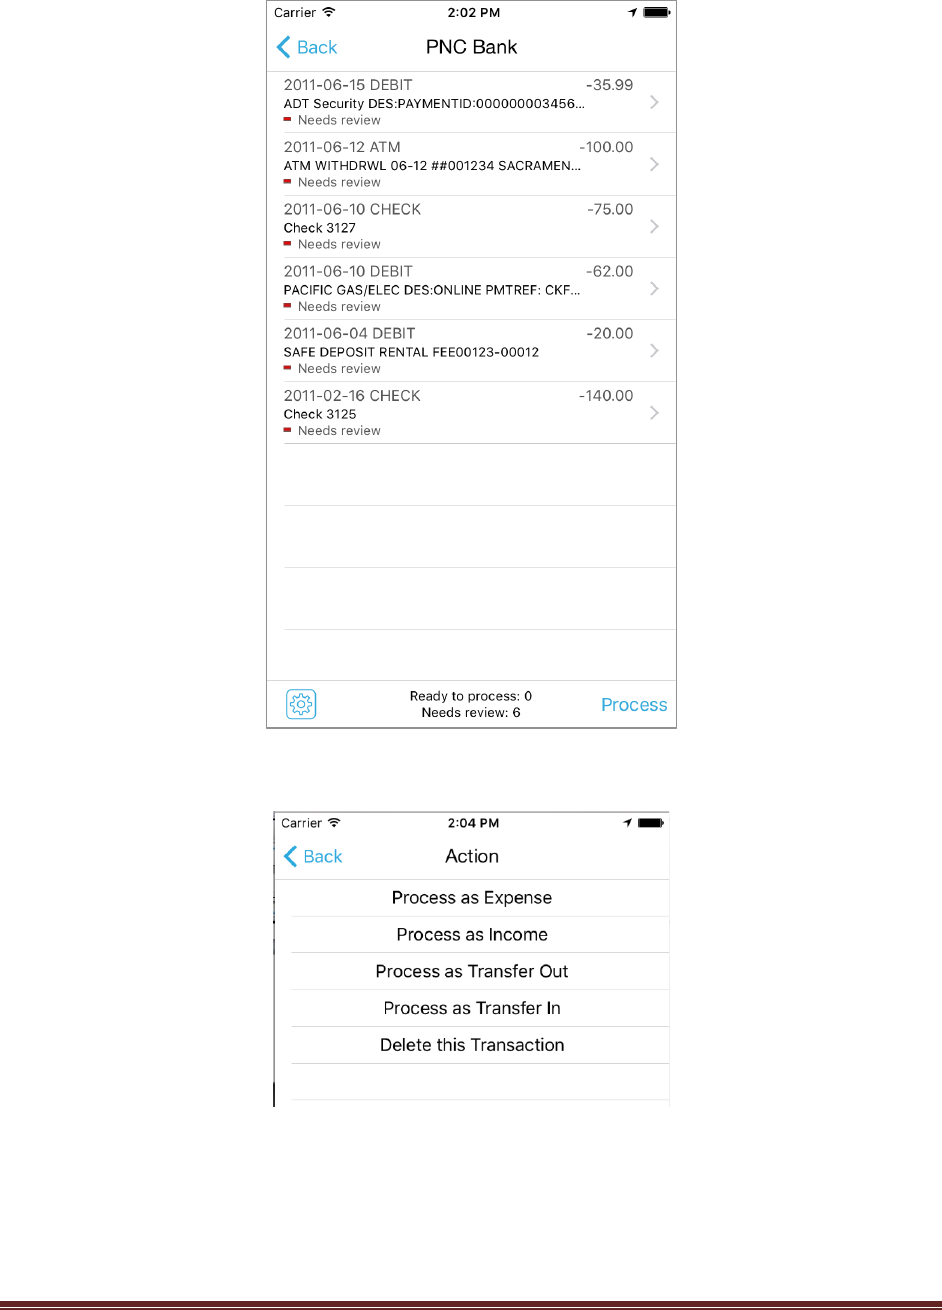
© 2015 Anishu, Inc. Page 5
One of the following actions can be associated each transaction.
For Expense transactions, you will need to specify the category and an optional payee. For Transfers
in/out, you will need to specify the other HomeBudget account to which the transfer should be
effected. HomeBudget remembers your selections and attempts to apply the same logic for similar
transactions in the future. Thus, this review process should become simpler over time. Similar
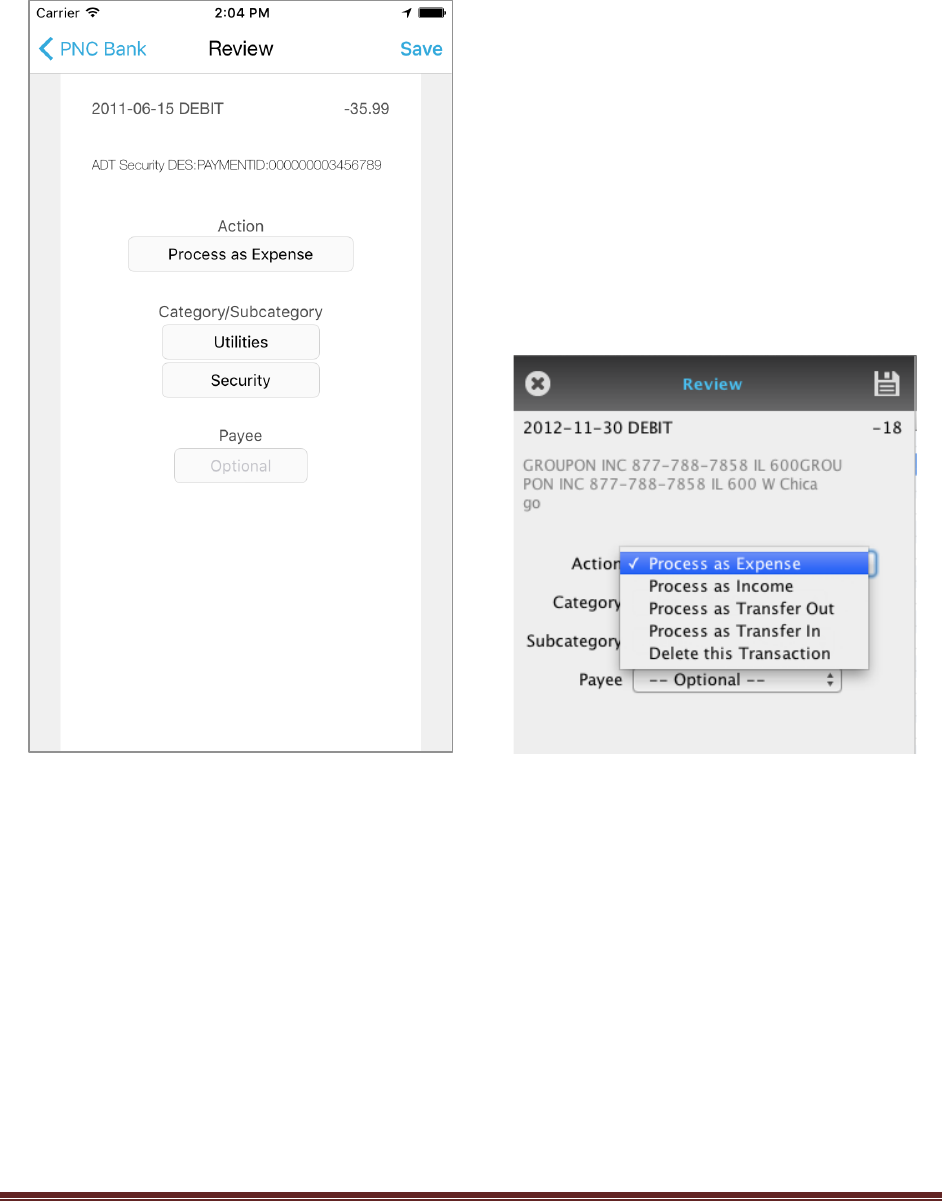
© 2015 Anishu, Inc. Page 6
transactions are identified by matching the initial prefix part of the description for each new transaction
with description in previously processed transactions. The prefix match length is by default 16. You can
change the match length using the Settings button in the Review screen.
Once you have indicated the action for the transactions, tap the Process button. HomeBudget will
process the transactions that are in the "Ready to process" state. Once the transactions are processed,
they can be found in the various Expense/Income/Account transaction screens within the app as any
other regularly entered HomeBudget transactions.
Notes
• When using Family Sync, make sure to import the data on only one of the devices in the group.
• Duplicate uploads are handled appropriately. That is, you if load the same file multiple times (or
multiple files for overlapping time periods), HomeBudget will handle the duplicates and will not
load a transaction a second time. This is the key benefit of using OFX/QFX compared to other
formats.
© 2015 Anishu, Inc. Page 7
Network-based Import
Please note that Network-based import is offered merely as a convenience feature for our customers.
We don’t charge extra for this feature. There is no guarantee that it will work (or continue to work) with
your financial institution.
This method of data import involves:
1. Configuring the accounts in HomeBudget to be able connect to your financial institution
2. Periodically downloading transactions
3. Review and processing of downloaded transactions.
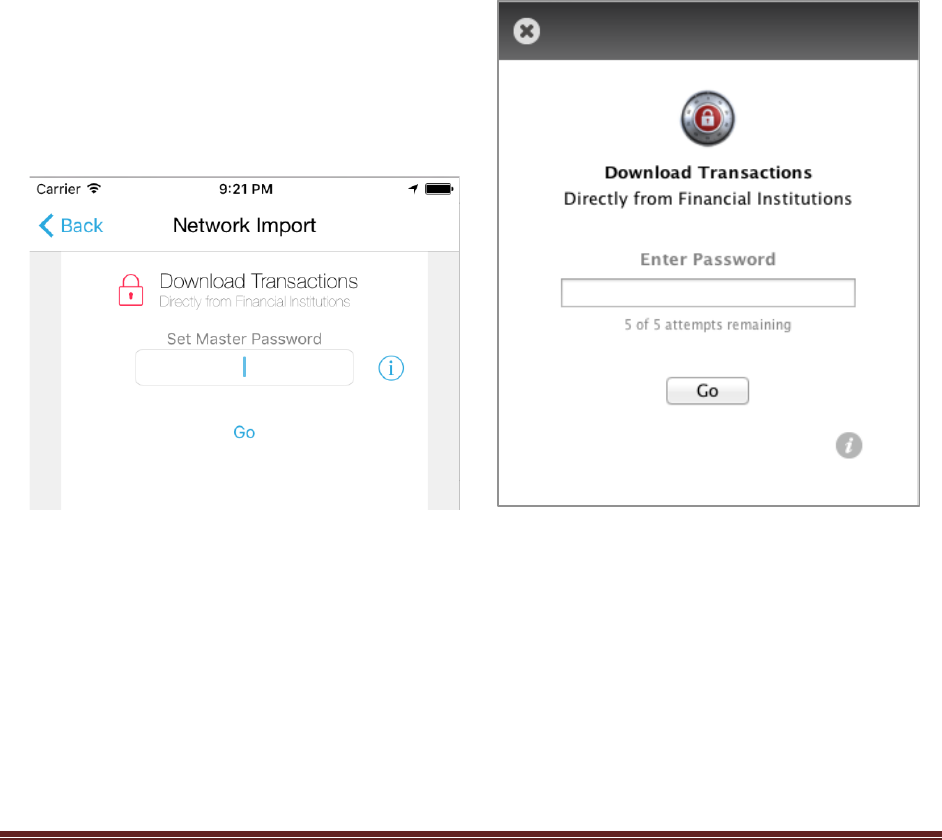
To get started, you will need to set a master password for this part of the application. It is paramount
that you choose a very strong password for protecting your data, and memorize the password. You will
be required to enter the password every time you open this part of the application. This is the master
password that protects all of your account access information (usernames and passwords).
• All of your financial access information is stored entirely within your device in a secure database.
This database is encrypted using 256-bit AES encryption and protected by the key that only you
know. The key is not stored on the device or anywhere else, and hence should you happen to
forget the password, the only option is to reset the database, and set up this section again. Also,
note that this database is not part of Backup/Restore and not synced when using Family Sync.
(When using Family Sync, make sure to import the data on only one of the devices in the group).
Once you have set the master password, you will be able to link your HomeBudget accounts with the
financial institutions. Tap the + button on top right to configure the institution. In the Direct Connect
screen:
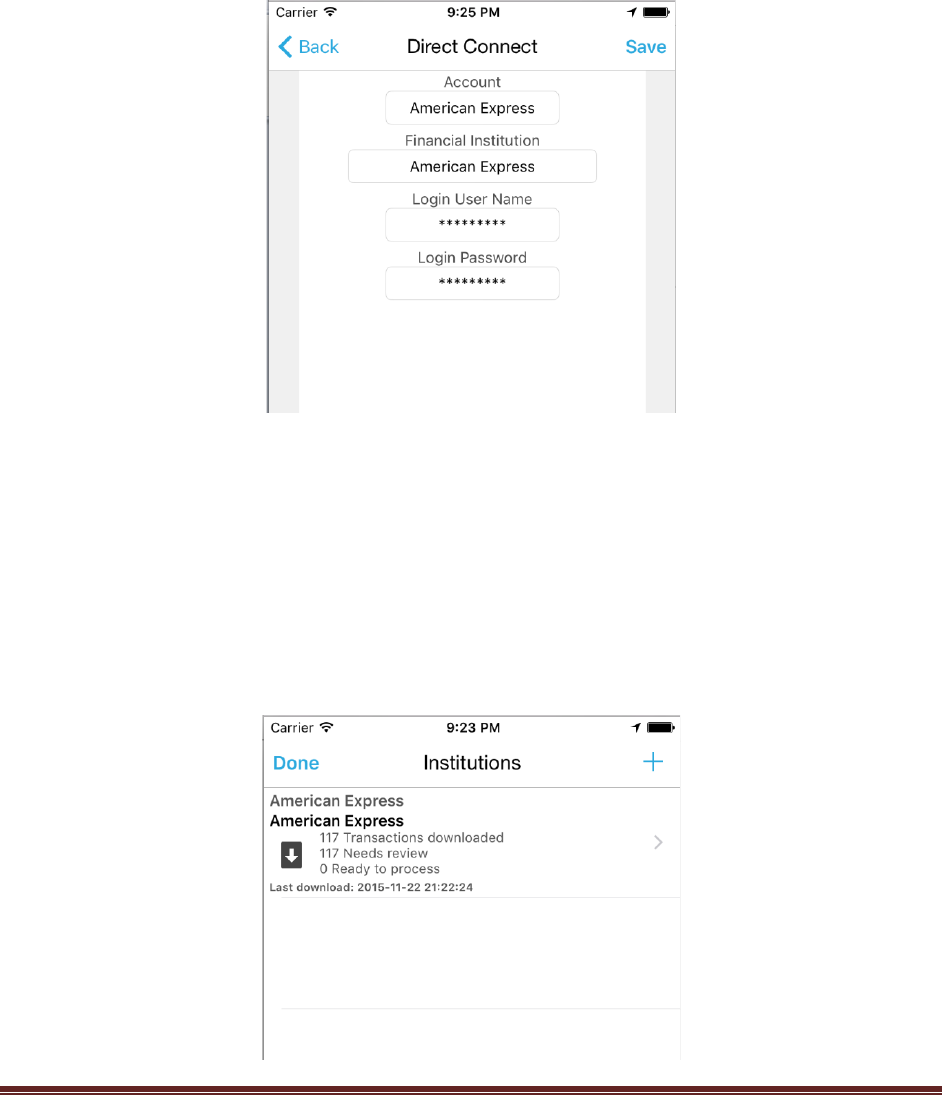
© 2015 Anishu, Inc. Page 8
1. Select your HomeBudget account
2. Select your institution from the list of financial institutions.
3. Enter your user/account name and password for the financial institution.
Tap Save. HomeBudget will validate the access information by connecting to the financial institution. In
case there are multiple accounts, it will prompt you to select the account. Once the validation is
complete, HomeBudget will download the transactions.
The next step is to review the downloaded transactions, and process them. This step is identical to step
3 described in the File-based Import section above. Please refer to the File-based Import section for
instructions.
Whenever you need to download transactions, you will need to login to this section of the app. To
download transactions from a financial institution, tap the down-arrow button for the financial
institution. On a Mac or Windows, select the account and then click the Download Transactions button.
Please note that HomeBudget automatically handles duplicates and imports a transaction only once,
and hence your can download as many times as you like.

© 2015 Anishu, Inc. Page 9
Notes
For some banks, you will need to call customer service and ask them to "enable transaction
downloading in Quicken". There may be a monthly charge for this convenience, but the fee is waived
when you have monthly direct deposit.
With some banks such as ING Direct, it is free, but you will need to login, go to the 'My Info' section of
ING Direct and enable Personal Finance Access Code. You then use this code instead of your
password when connecting.
Brokerage accounts are not supported at present.
