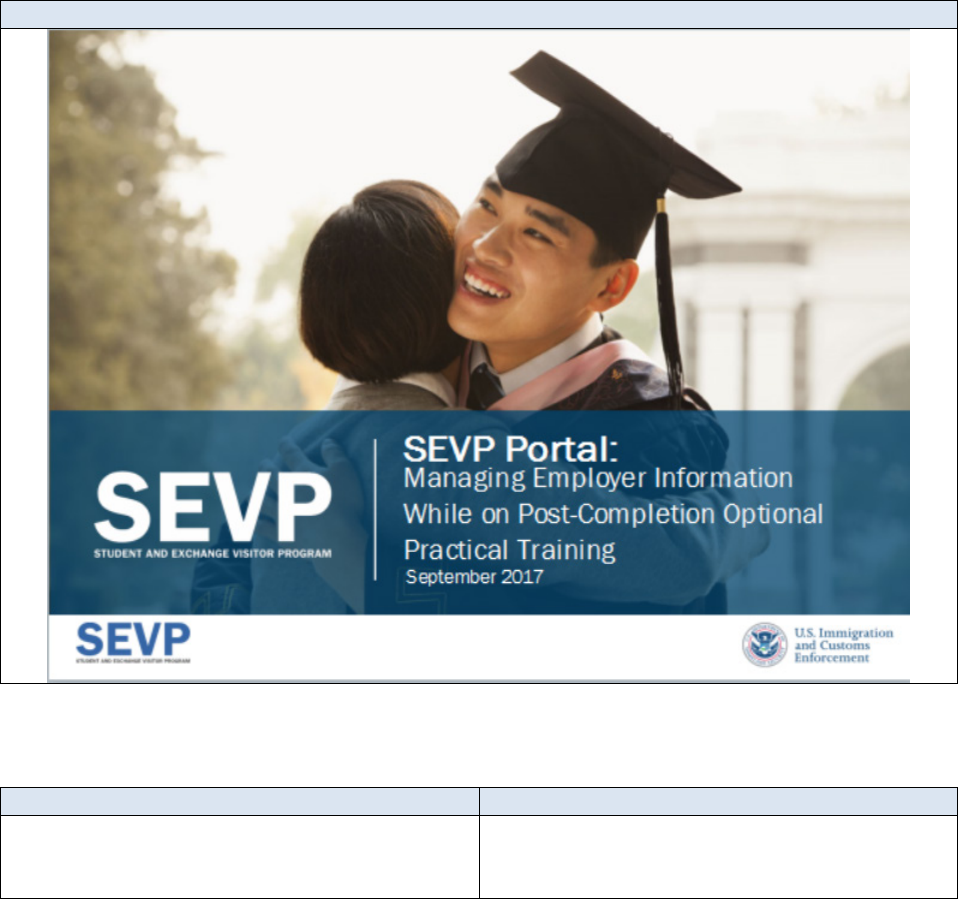
SEVP Portal Video: Managing Employer
Information While on Post-completion OPT
Transcript
Scene 1 – Title Slide
Scene Description
Narration
The slide displays no instructional images or
animations
Welcome to the SEVP Portal video on
Managing Employer information while on
post-completion optional practical training
Scene 2 – Section Title - Overview
Scene Description
Narration
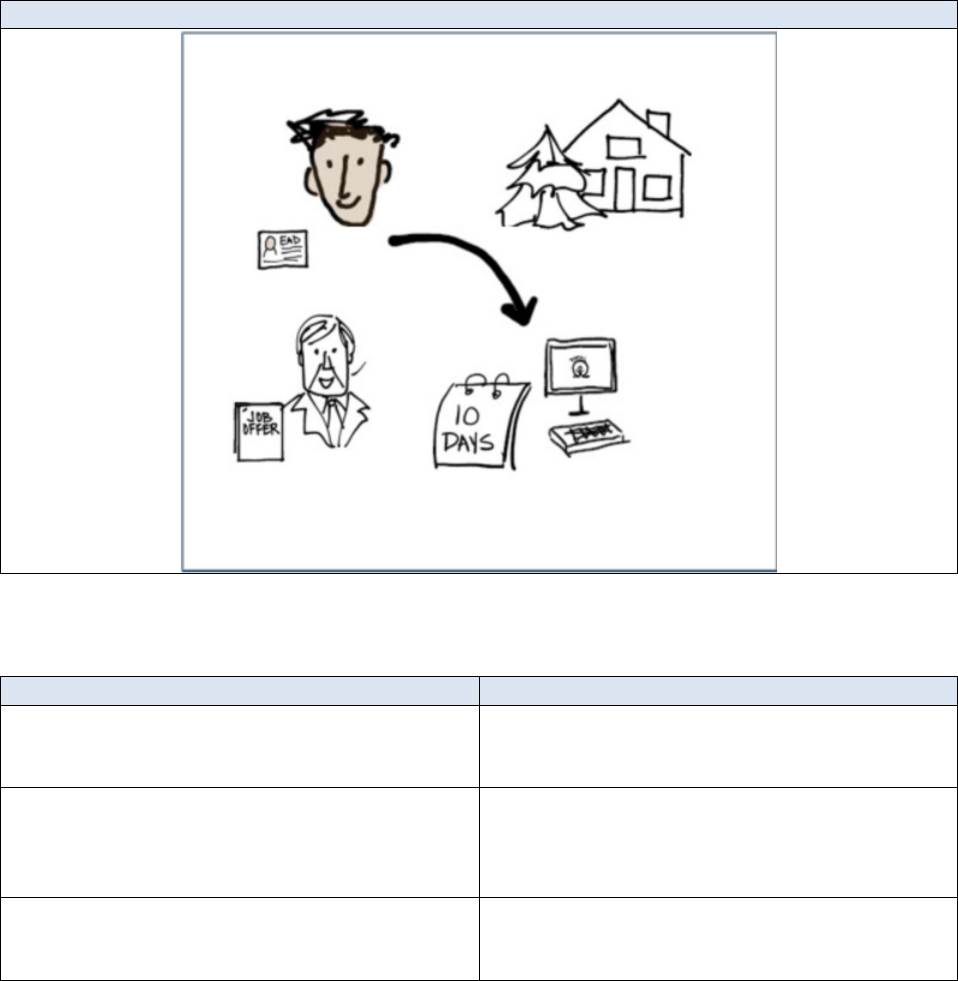
Student and an employment authorization
document appear on screen.
Luc is approved for post-completion optional
practical training or OPT.
A house, a man with a job offer, and a
computer with a calendar reading “10 days”
display.
He knows he is required to report any
changes in his home address or employer
information within ten days of the change.
An arrow point from the student to the
computer
He plans to use the SEVP Portal to update
his employer information.
Scene 3 – Section Title – Add Employer
Scene Description
Narration
The slide displays no instructional
images or animations
Adding Employer Information
Scene 4 – The Job Offer
Scene Description
Narration
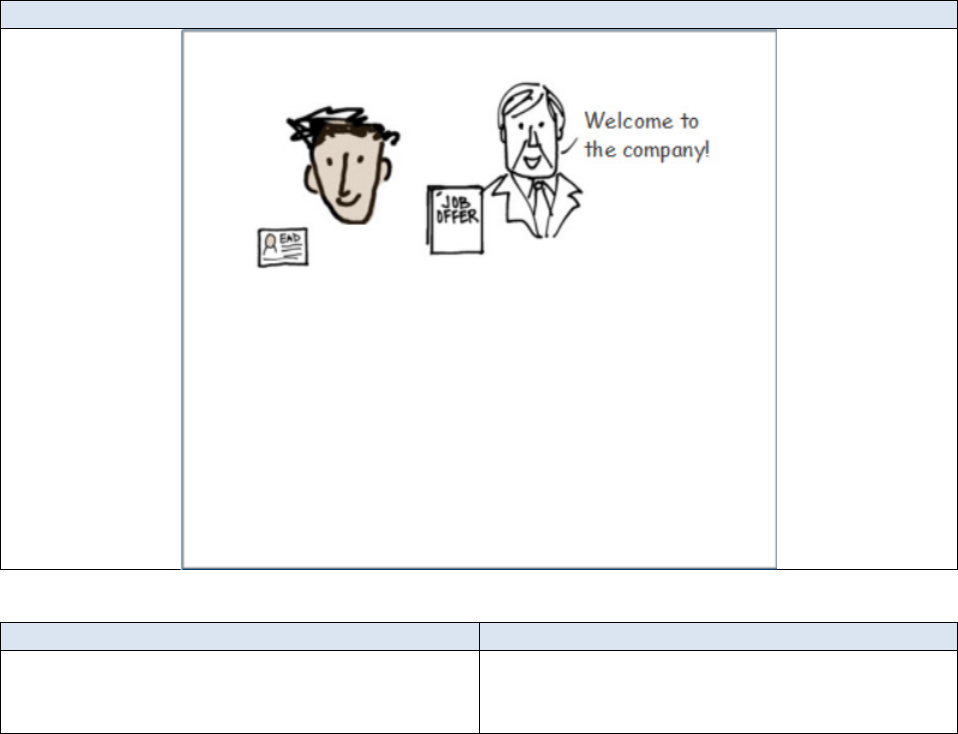
Image of Luc with an employer
Luc has been offered a job at a company
where he will use what he learned in school.

Scene 5 – Portal Sign in Page
Scene Description
Narration
Screenshot of portal Sign In page.
He goes to the Portal Sign In page.
Luc enters his email address and his
password to log in.
Scene 6 – The
Attestation
page
Scene Description
Narration
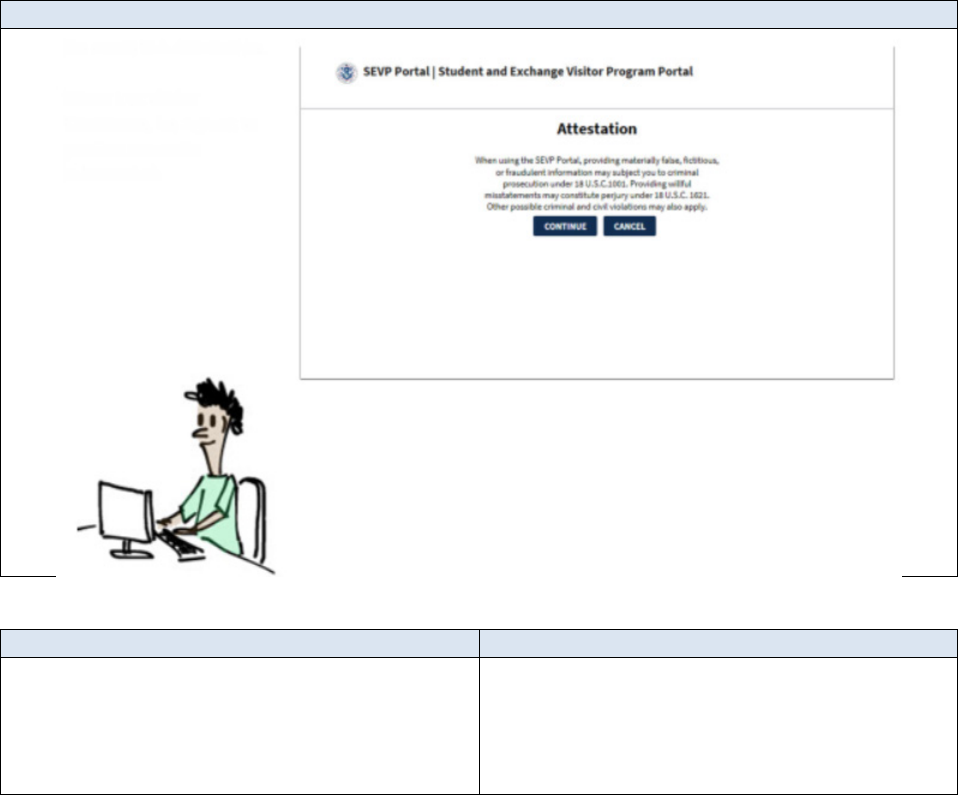
Screenshot of the Attestation page.
He reads the attestation.
When Luc clicks Continue, he agrees to
provide accurate information.
Scene 7 – The
Profile
page
Scene Description
Narration
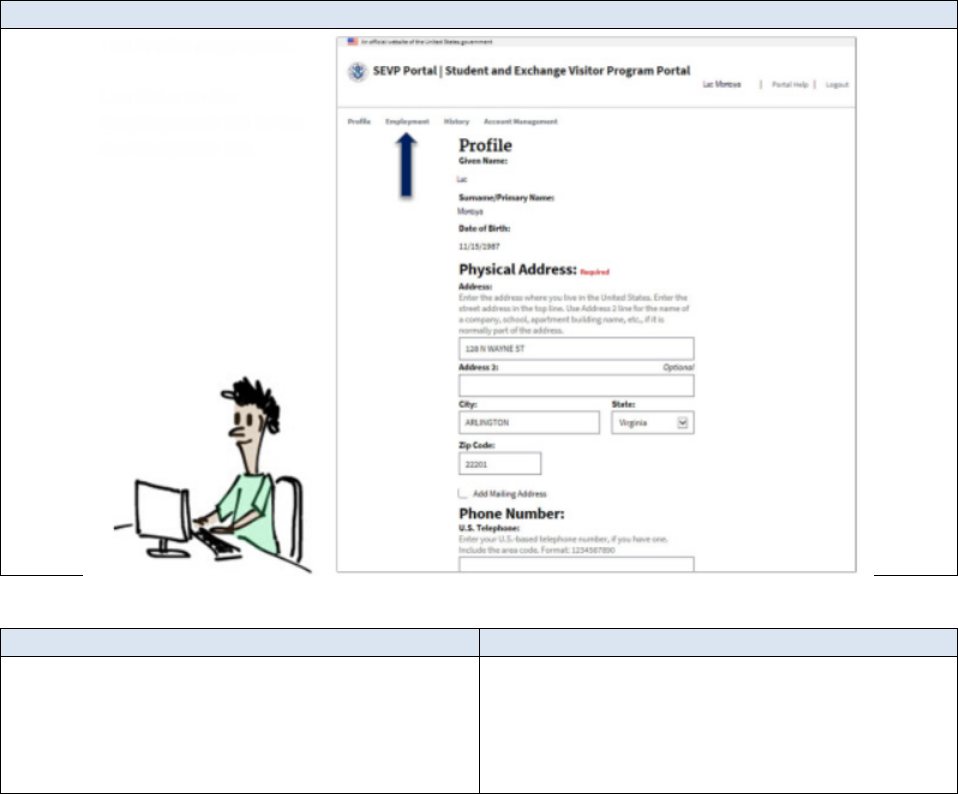
Screenshot of the Profile Page. An arrow
points to the employment tab.
The Profile page opens.
Luc clicks on the Employment tab in the top
Navigation Bar.

Scene 8 –The
Employment
page – default view
Scene Description
Narration
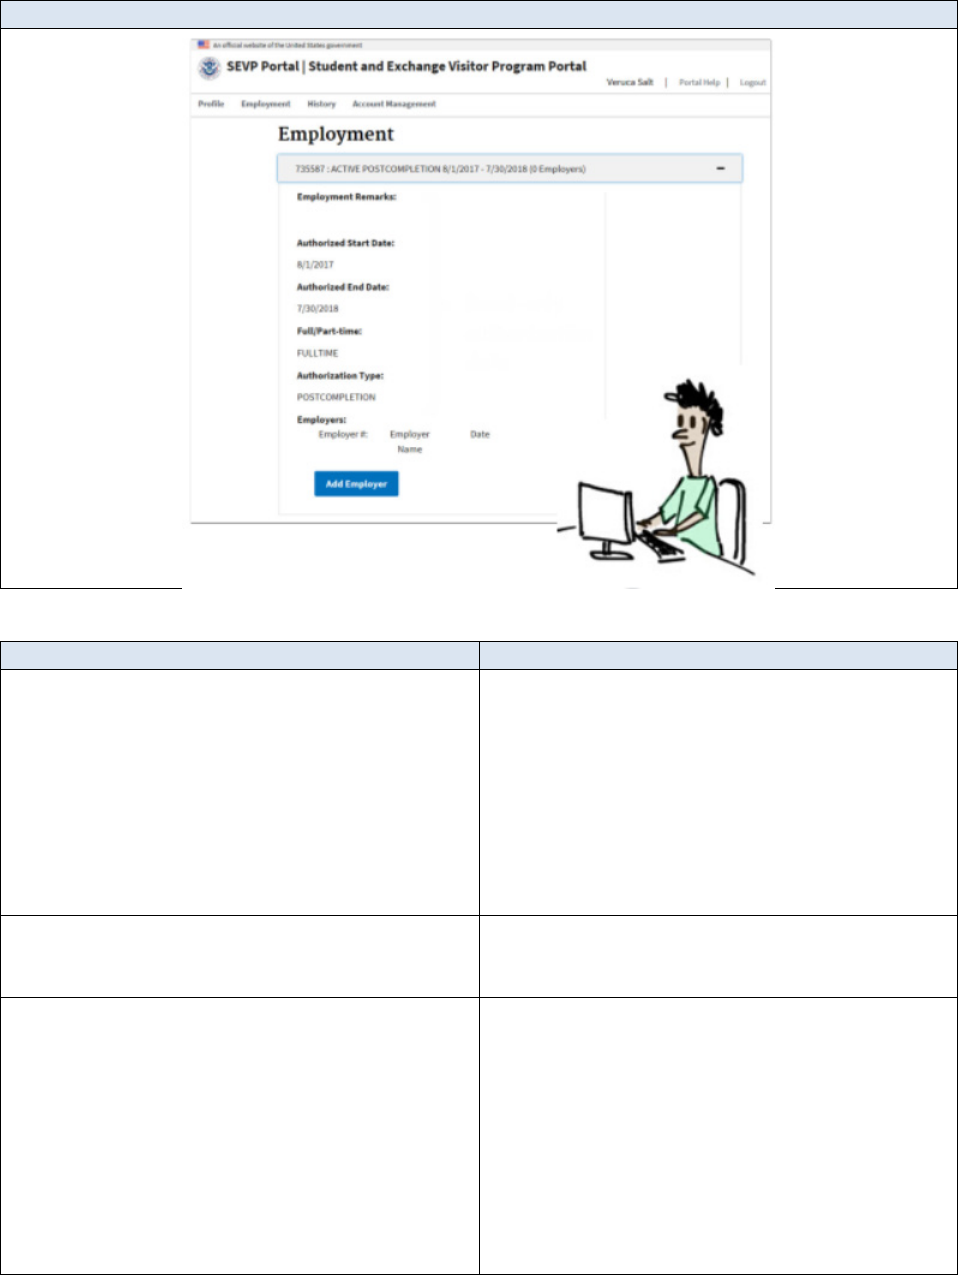
Screenshot of the Employment page.
This opens the Employment page.
The default view of the page is a list of all
employment authorizations Luc can see in
the Portal.
The Portal summarizes each authorization
in its own shaded box.
The summary includes:
A bracket highlights each part of the
summary as it is mentioned.
•
A SEVIS-assigned identifier for the
authorization itself. This number
makes it easier for SEVIS and the
Portal to share data about this OPT.
This number has no meaning outside
of SEVIS and the Portal.
• The type of OPT authorization.
•
The actual OPT start and end dates.
• The number of employers he is
working for. This number will go up or
down as employers are added or
deleted from the record. In his case,
Luc does not have any employers at

Scene Description
Narration
this time.
• A “Plus” symbol that indicates the
section can expand to show more
data. Click anywhere in the gray box
to show the data. The “Plus” symbol
will change to a “Minus” sign.
Clicking the gray area again, hides
the data.
Luc clicks the Plus sign to expand the
section
Scene 9 –Employment authorization section expanded – default for no employers
Scene Description
Narration
Screenshot of the Employment page with
the OPT authorization expanded. A bracket
calls out the read-only data about the
authorization.
Once expanded, the portal displays:
• Read-only data about the
authorization. This includes any
employment remarks the DSO may
have entered, the start and end date
of the authorization, whether the
authorization is full- or part-time, and
the type of OPT.
Arrow points from student in lower right
hand corner of the screen to a DSO on the
left side of the screen.
If any of this information is wrong, Luc
would have to work with his DSO to get it
corrected.
A bracket calls out the listing of employers
section.
And
• A list of employers already in SEVIS.
Students on Post-completion OPT can add,
edit, and delete employer information.
In this case, Luc doesn’t have any employers
in the system. His only option is to add an
employer.
Luc clicks the Add Employer button.
Scene 10 –Employer Section Expanded – Add Employer
Scene Description
Narration
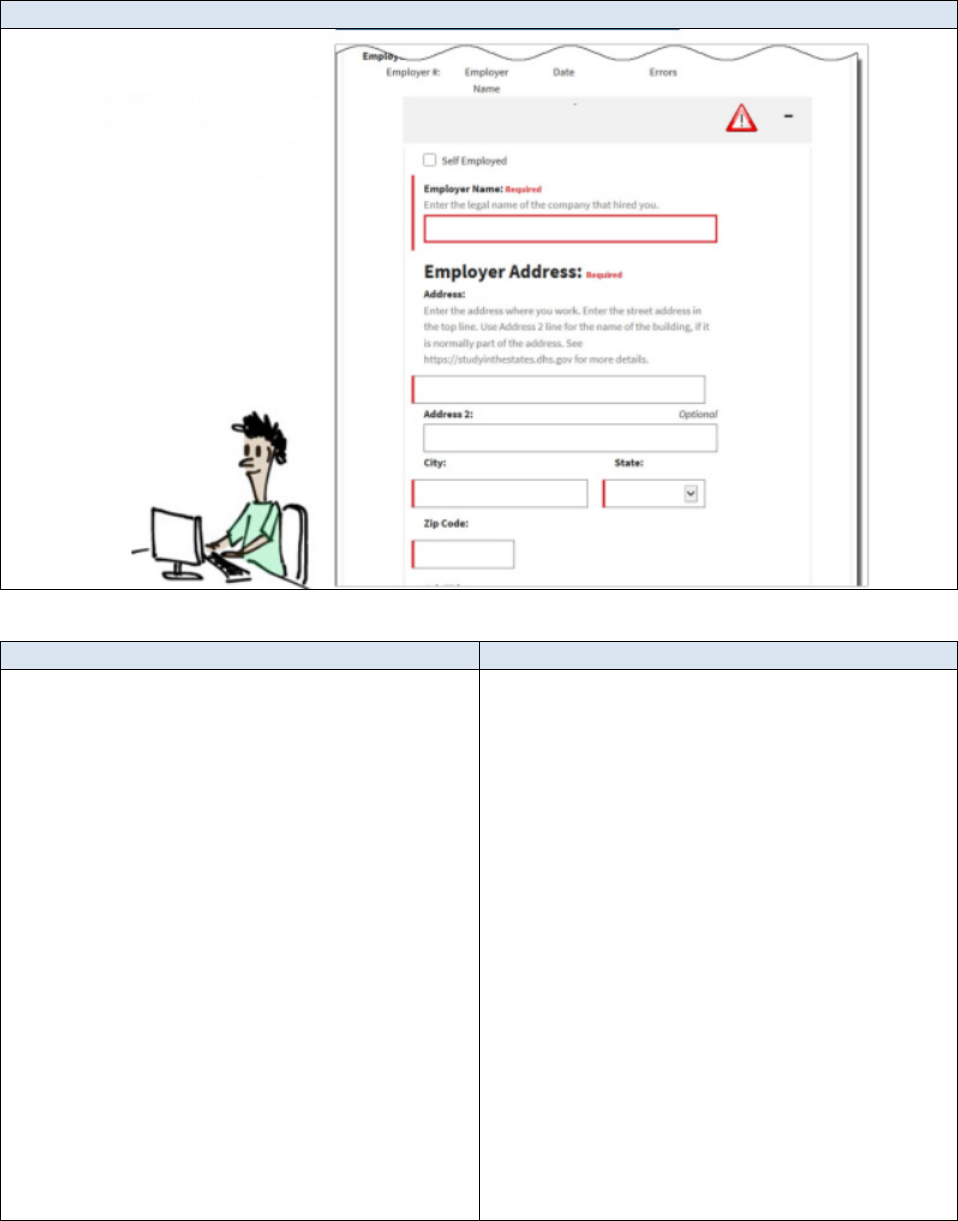
Screenshot of the Employment page with
the Employer section expanded.
The portal displays employer summary
information in a gray box – in this case, the
box is blank – and the fields for the entry of
employer data.
By default, the portal displays a warning
symbol in the employer summary and
outlines all required fields in red. The
warning symbol will display as long as any
required field is empty.
Luc begins to enter data about his new job.
If he works for himself; for example, if he is
a musician and hires himself out for gigs,
Luc would click the “Self Employed”
checkbox. The Portal would automatically
put his name in the Employer Name field.
But Luc is not self-employed, so he enters
the name of the company he works for and
the address of the physical location where
he performs the work.

Scene Description
Narration
The portal checks the address against the
U.S. Postal Service’s database to be sure it
is a valid address.
Scene 11 – Sub-Section Title Slide
Scene Description
Narration
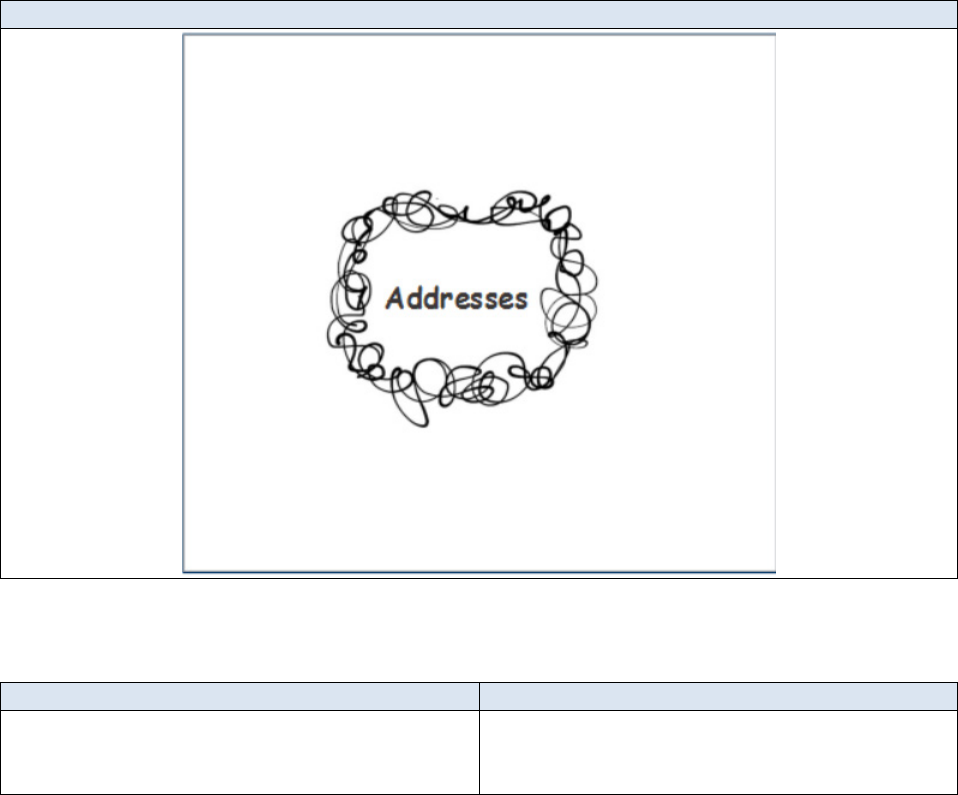
The word “Addresses” appears center
screen, surrounded by a squiggly wreath.
Let’s take a quick detour to talk about
addresses in the portal.
Scene 12 – Address Tips
Scene Description
Narration
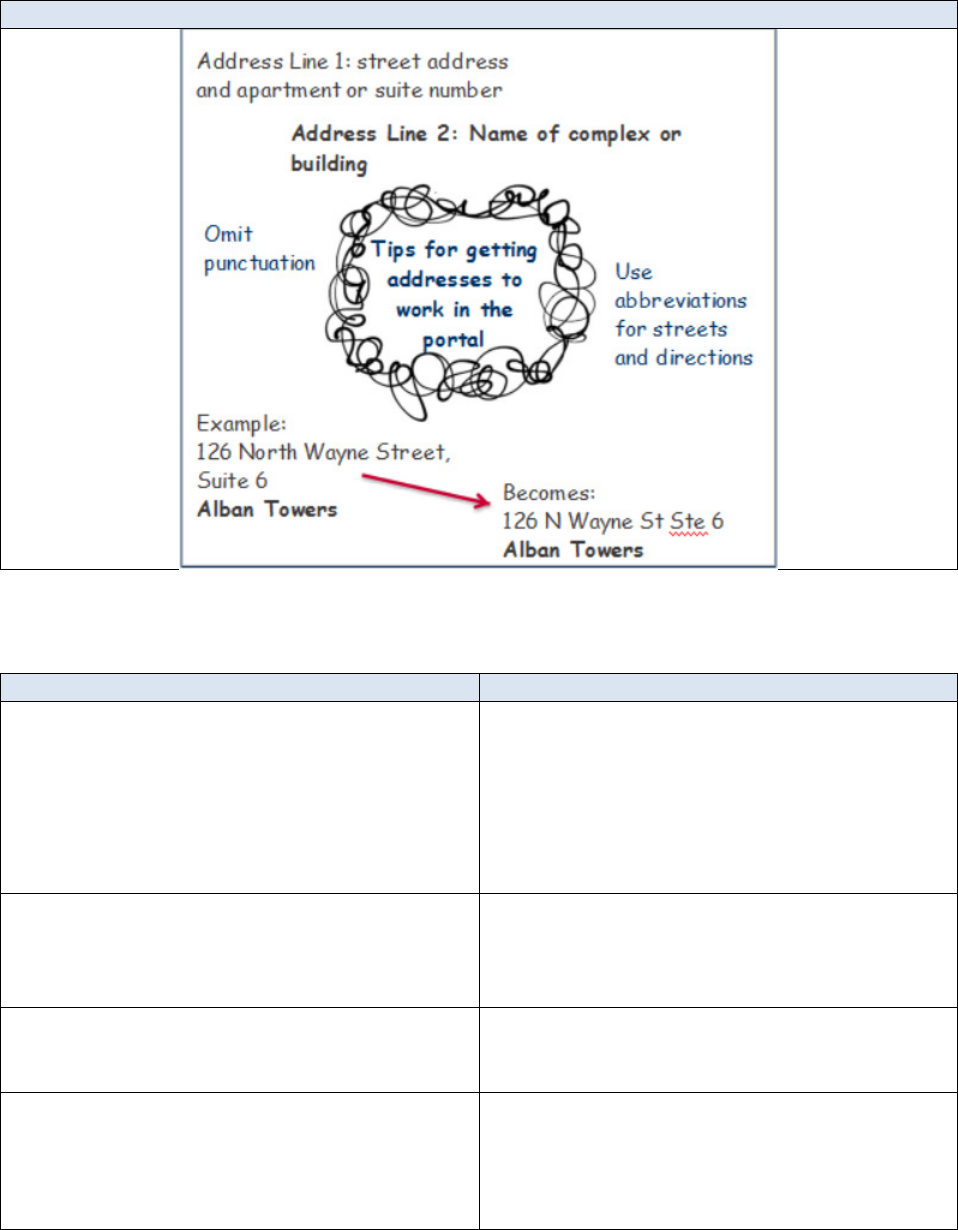
The words “Tips for getting addresses to
work in the portal” appear center screen
surrounded by a squiggly wreath
Instructions for address line one display in
the upper left corner of the screen; the
example in the bottom left corner.
Address line one is for the street address
and apartment or suite number. For
example: 126 North Wayne Street, Suite 6
Data entry tips appear on both sides of the
squiggly wreath.
The validation tool used by the portal:
• Abbreviates streets and directions
• Omits punctuation
An arrow points from the example address
to a converted address that displays in the
lower right hand corner of the screen.
So, 126 North Wayne Street, Suite 6
becomes 126 N Wayne St Ste 6.
Instructions for Address line two appear
immediately above the squiggly wreath
Both the example address and the
converted address display “Alban Towers: in
the second line of the address.
Address line 2 is for the name of the
building or complex.
Example: Alban Towers
Scene 12 – USPS Publication 28
Scene Description
Narration
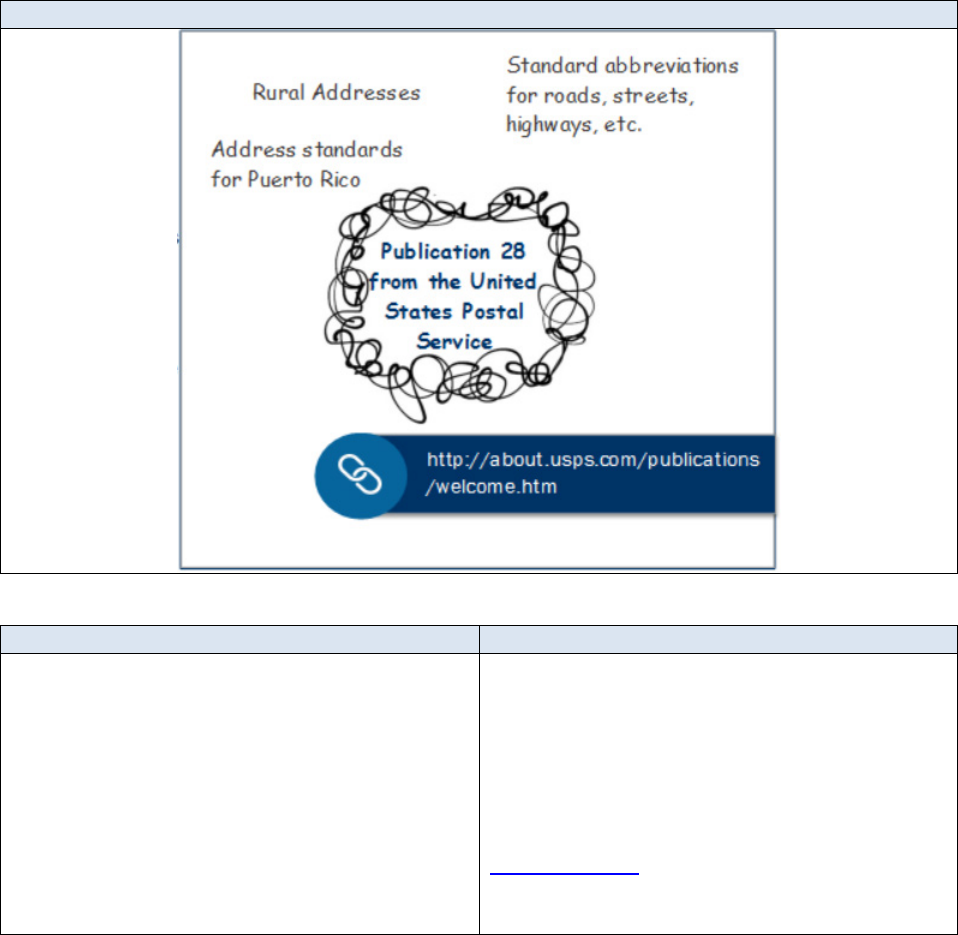
Text displays on the screen with a call out
for the URL for where to locate U.S. Postal
Service publications.
Publication 28 from the United States
Postal Service (USPS) offers guidance on
acceptable formats and abbreviations for
different types of addresses. This includes:
• Standard street suffixes
• Rural addresses
• Addresses in Puerto Rico
Publication 28 is available on the USPS
website.
Scene 14 – Address Error Messages
Scene Description
Narration
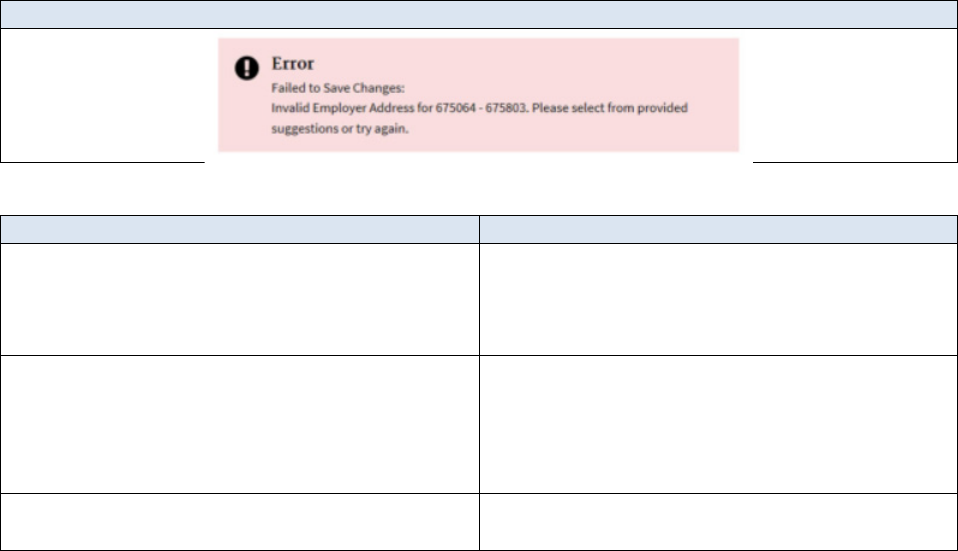
Screenshot of the error message for
employer addresses that appears on the top
of the page.
If the Portal does not find an exact match
for the address, it will display an error
message on the page.
A bracket displays below the SEVIS-assigned
OPT authorization number in the error
message.
The error message for employer addresses
contains a series of numbers that refer to
the SEVIS-assigned OPT authorization
number and
A bracket appears below the SEVIS
employer id number in the error message.
and the SEVIS-assigned employer number, if
there is one.
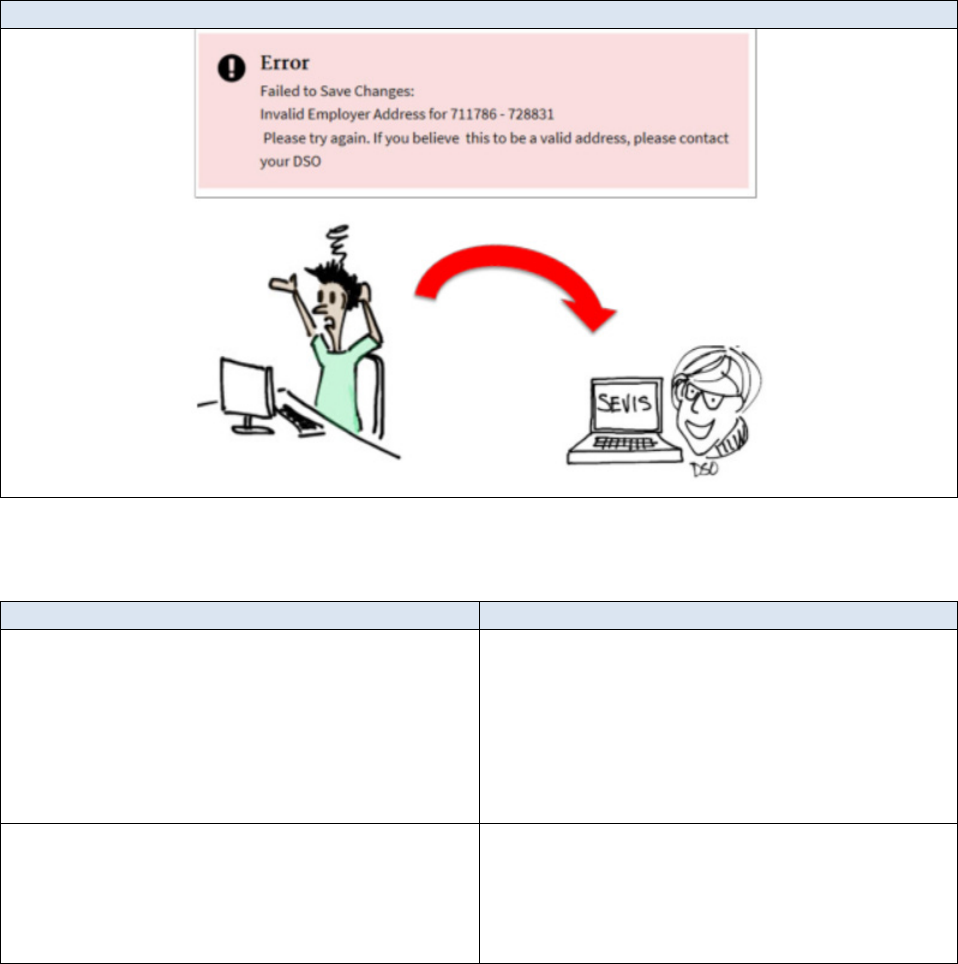
Scene 15 – First Type of Address Error Message
Scene Description
Narration
Frustrated student sits at his desk looking at
a screenshot of an error message.
There are two kinds of error messages for
addresses.
The first is when the portal finds no
matches.
Check the accuracy of the address entered
to be sure it is correct.
An arrow points from the student to a DSO
If the address is correct, a DSO will have to
enter it in SEVIS.
Students are not able to override the
address validation in the portal.
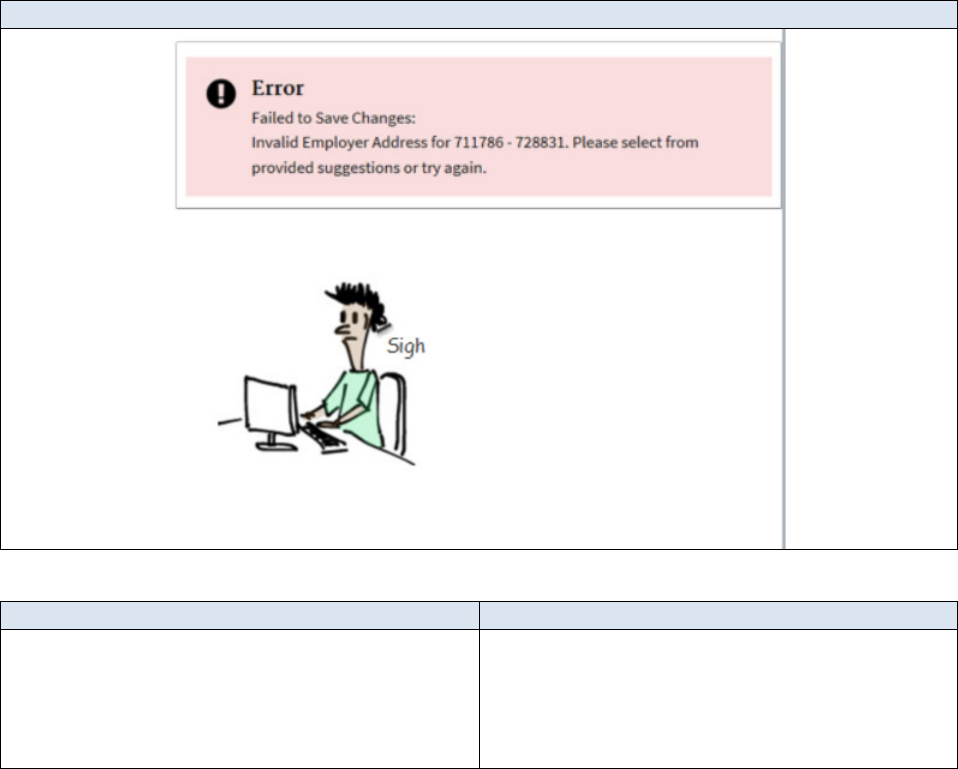
Scene 16 – Second type of address error message
Scene Description
Narration
Frustrated student at a computer with a
screenshot of error message.
The second kind of error message displays
when the portal finds a possible match.
This message will display even if the
address is correct, but is not in the
software’s preferred format.
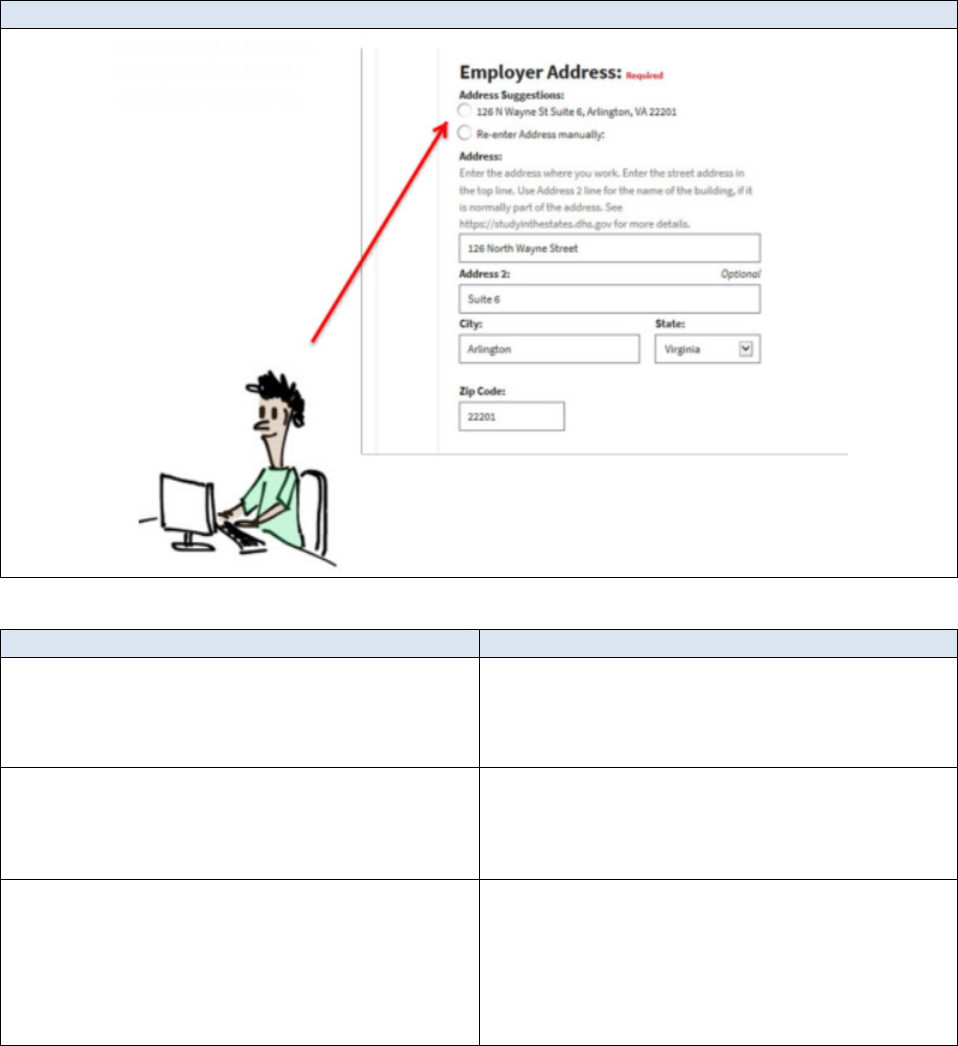
Scene 17 – Employer Address Suggestions
Scene Description
Narration
A student sits at a computer. A screenshot
of Employer address section with suggested
addresses displays. An arrow points to the
option to select the suggested address.
It will also give students the option to select
the suggested address
An arrow points to the option to re-enter the
address manually.
or to re-enter the address manually.
This option allows the student to correct the
address, if it was entered incorrectly.
An arrow points from the student to a DSO
who appears on screen.
It does not allow the student to get around
the validation.
If the address is right, and the portal does
not accept it, the student must work with a
DSO to enter the information in SEVIS.

Scene 18 – Continue Entering Employer Information
Scene Description
Narration
Screenshot of the Employment page with
the Employer section expanded.
Now let’s return to Luc who has entered his
employer’s address.
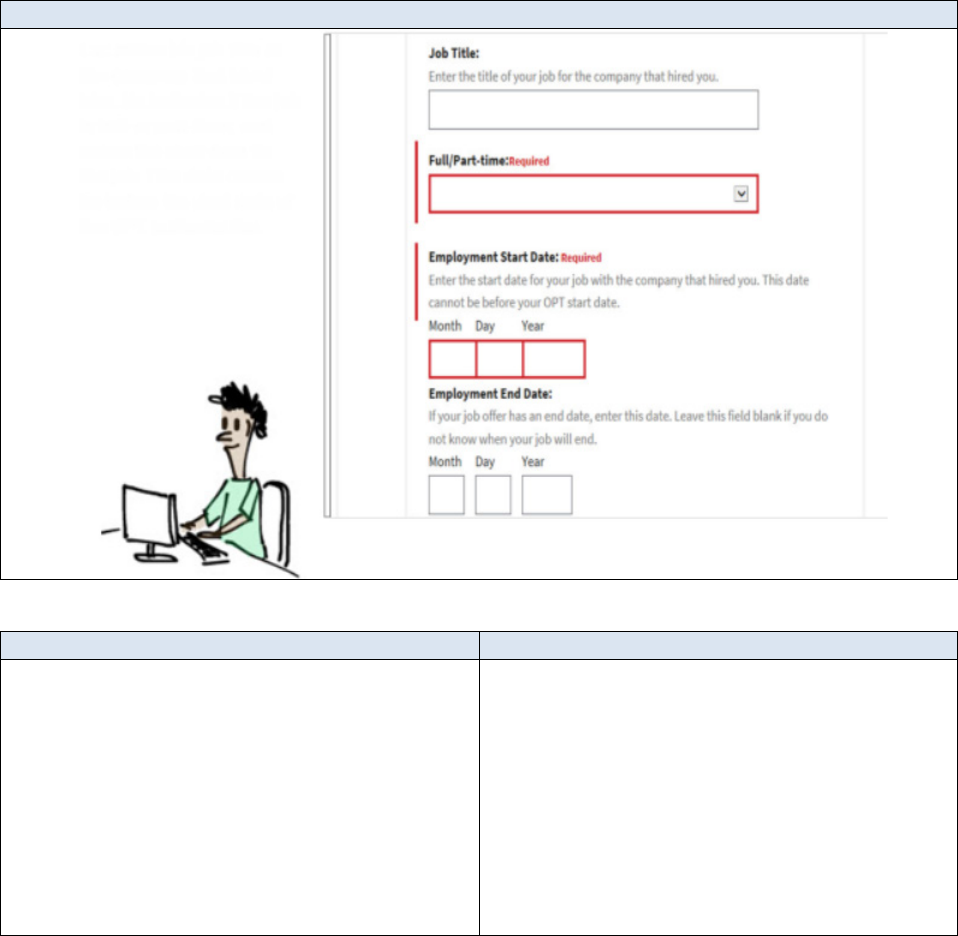
Scene 19 –Employer data continued
Scene Description
Narration
Screenshot of the Employment page with an
OPT employer section expanded to show
employer data fields.
Luc enters his job title at the company that
hired him. He indicates if the job is full- or
part-time, and enters the start date for the
job. This date cannot be before the start
date of the OPT authorization.
Luc can enter an end date for his job, if he
knows it. This date cannot be after the end
date for the OPT authorization.
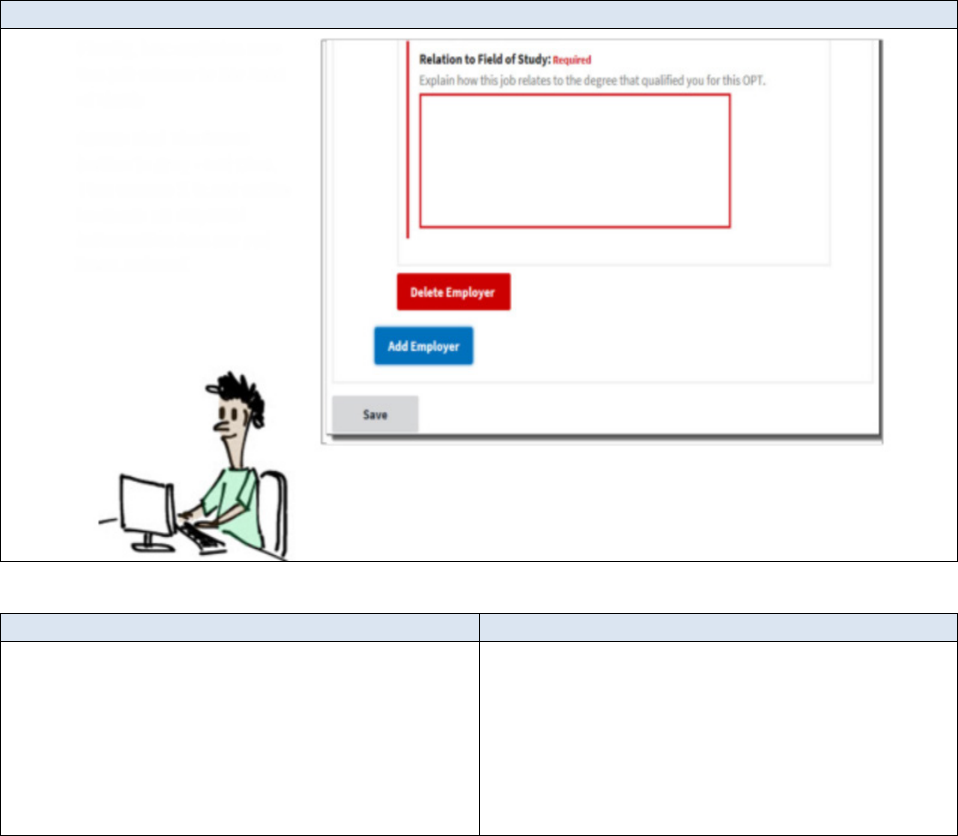
Scene 20 –Final employer data element
Scene Description
Narration
Screenshot of the Employment page with an
OPT employer section expanded to show
employer data fields.
Finally, Luc explains how the job relates to
his field of study.
Notice that the
Save
button is gray –not
blue. This means it is not active because all
required information has not yet been
entered.
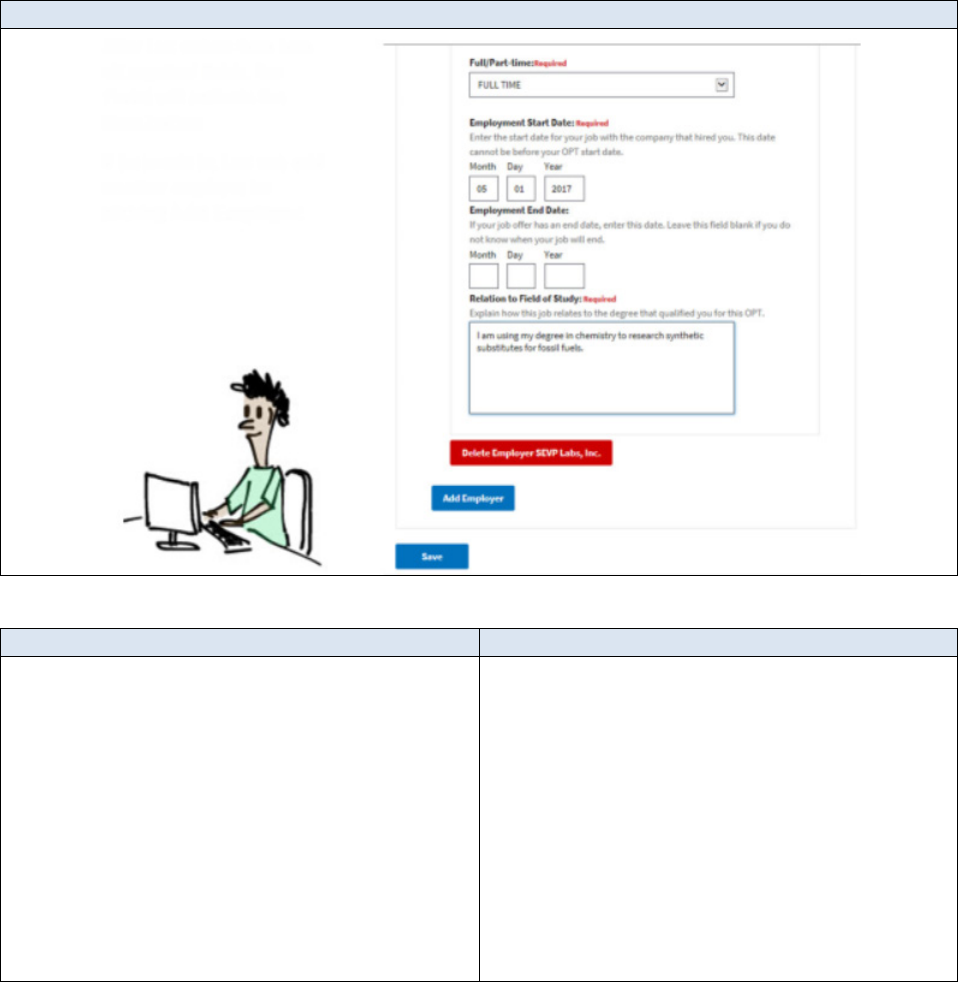
Scene 21–Complete Employer Information
Scene Description
Narration
Screenshot of the Employment page with an
OPT employer section expanded to show
employer data fields.
After Luc enters data into all required fields,
the Portal will activate the Save button.
If he needs to, Luc can add another
employer by clicking
Add Employer
.
Since he only has one employer, he clicks
Save.
The portal will not save any employer
information until Luc clicks the Save button.
The portal then sends the employer
information to SEVIS.
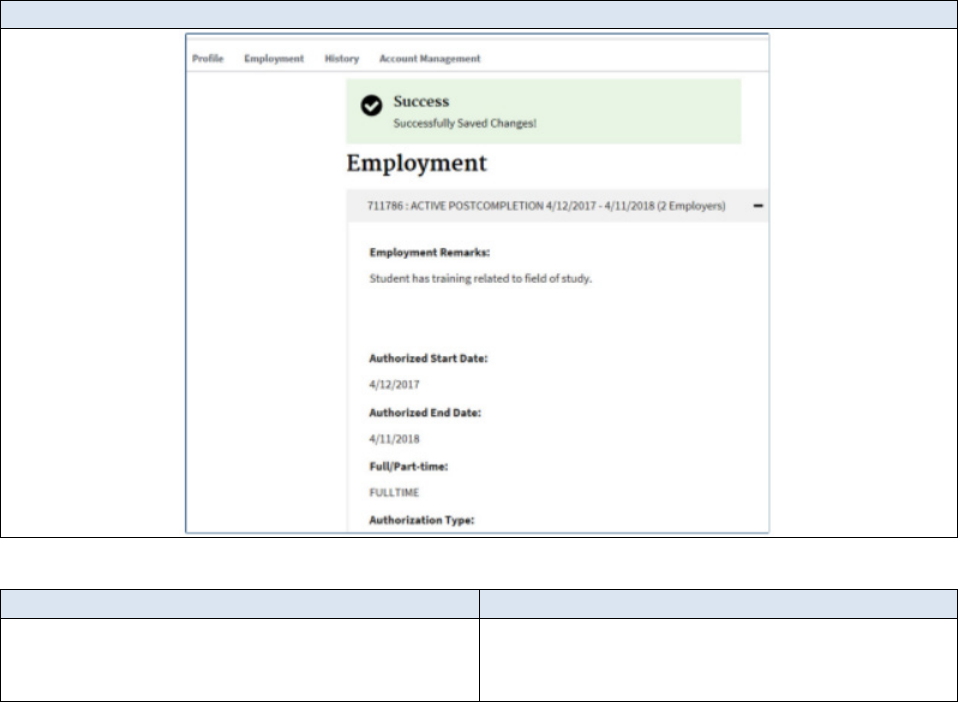
Scene 22 –Success
Scene Description
Narration
Screenshot of the Employment page with a
success message.
The portal displays a Success message at
the top of the page.
Scene 23 – Employer Summary Bar
Scene Description
Narration
Screenshot of the list of employers on the
expanded Employment page. A student
examines a bracket which highlights a
specific data element on the box. The
student and the bracket move across the
screen to highlight each data element is
described.
Luc can now see a list of his employers.
Each employer is in a shaded box that
displays summary information:
• A SEVIS-assigned Employer Number -
This number has no meaning outside
of SEVIS and the portal. It only helps
SEVIS exchange data with the portal
about that specific job. It is not the
same thing as the company’s official
Employer Identification Number (or
EIN) that is assigned by the United
States Internal Revenue Service. No
number displays here until SEVIS
receives the employer information
from the Portal, assigns a unique
number and sends it back to the
Portal. This can take a day.
•
It also shows: The employer name,
•
The start and end date of the job,
•
Any warning signs that indicate
required information is missing,
and…
•
A “Plus” symbol to indicate the

Scene Description
Narration
section can expand to show
employer details. Click anywhere in
the gray box to show the data. Click it
again to hide it.
Scene 24 –Section title – Edit or Delete Employer Information
Scene Description
Narration
The slide displays no instructional images or
animations.
Edit or Delete Employer Information
Scene 25 –
Employment
page
Scene Description
Narration
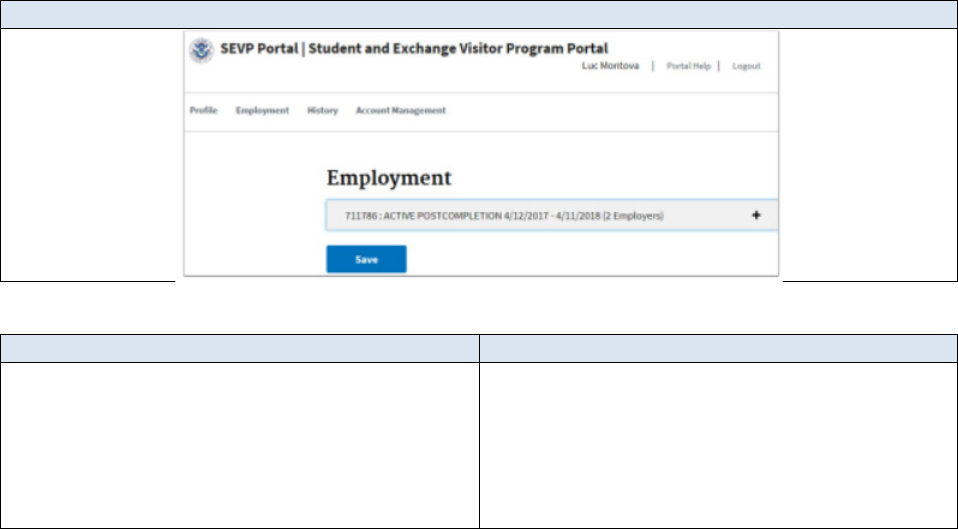
Screenshot of the default view of the
Employment page.
While on post-completion OPT, Luc can edit
employer information.
From the Employment page, he clicks the
gray OPT Summary bar to display employer
information.
Scene 26– List of Employers
Scene Description
Narration
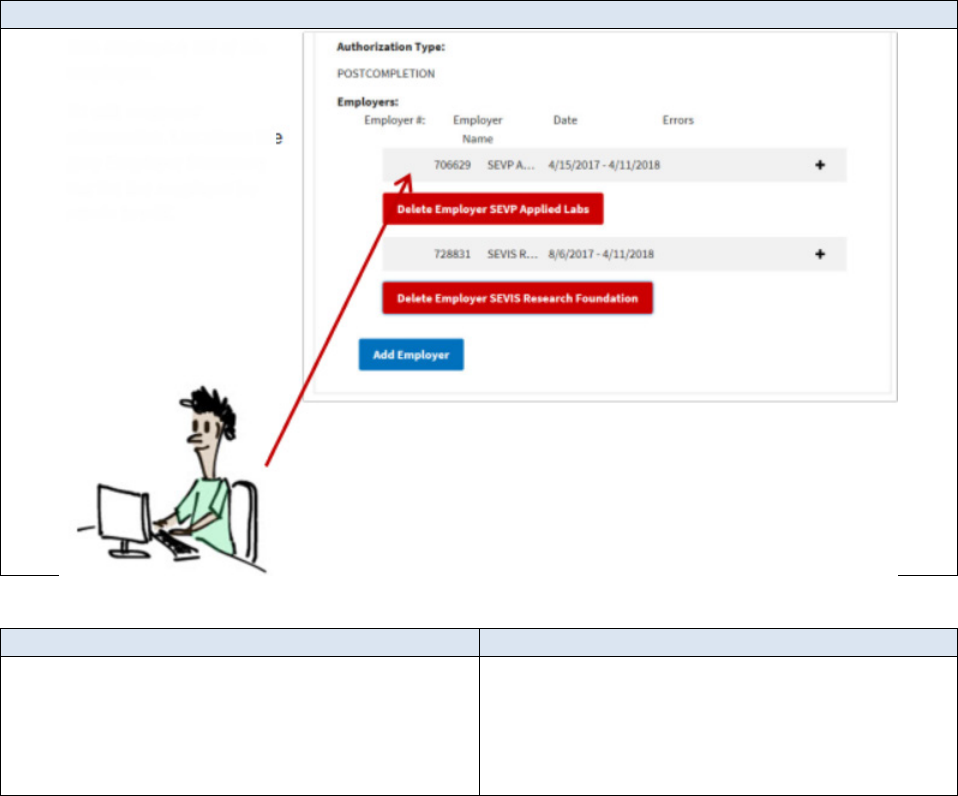
Screenshot of the list of employers on the
expanded Employment page.
This displays a list of his employers.
To edit employer information, Luc clicks the
gray Employer Summary bar for the
employer he wants to edit.
Scene 27–
Scene Description
Narration
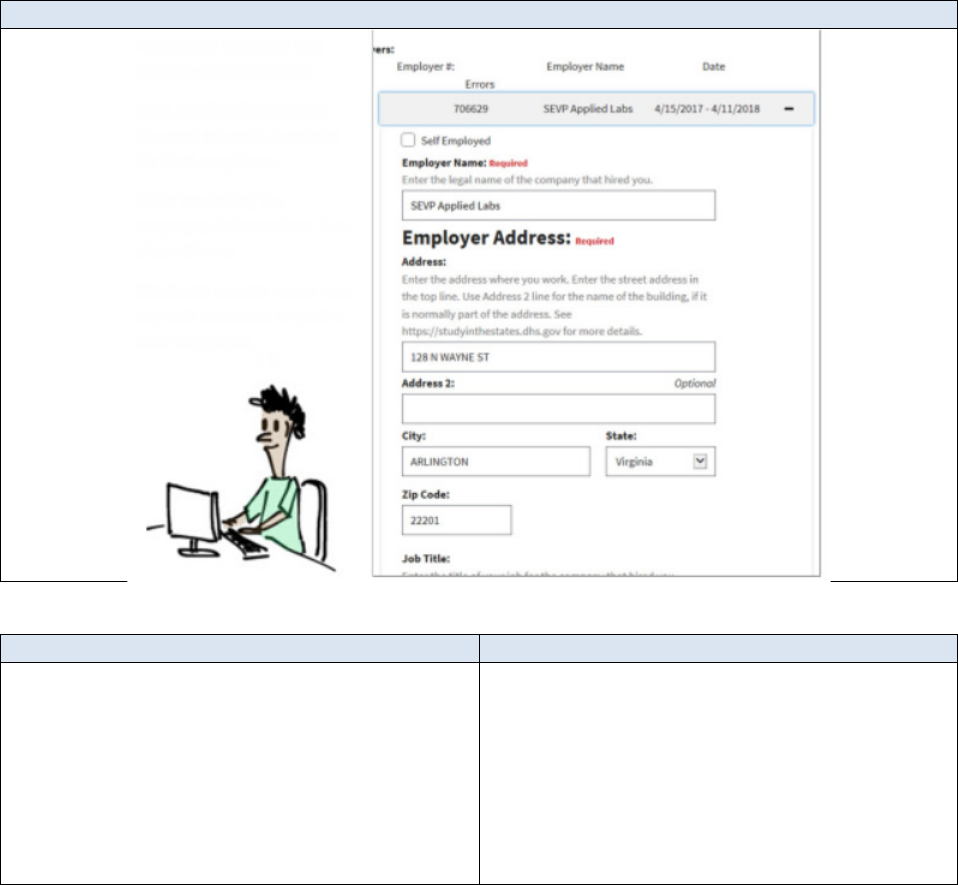
Screenshot of the Employment page with
the Employer section expanded.
The portal displays the employer
information.
With the fields revealed, Luc can change the
data for that employer.
After updating the employer information,
Luc clicks Save.
Students should never use the edit function
to add a new employer.
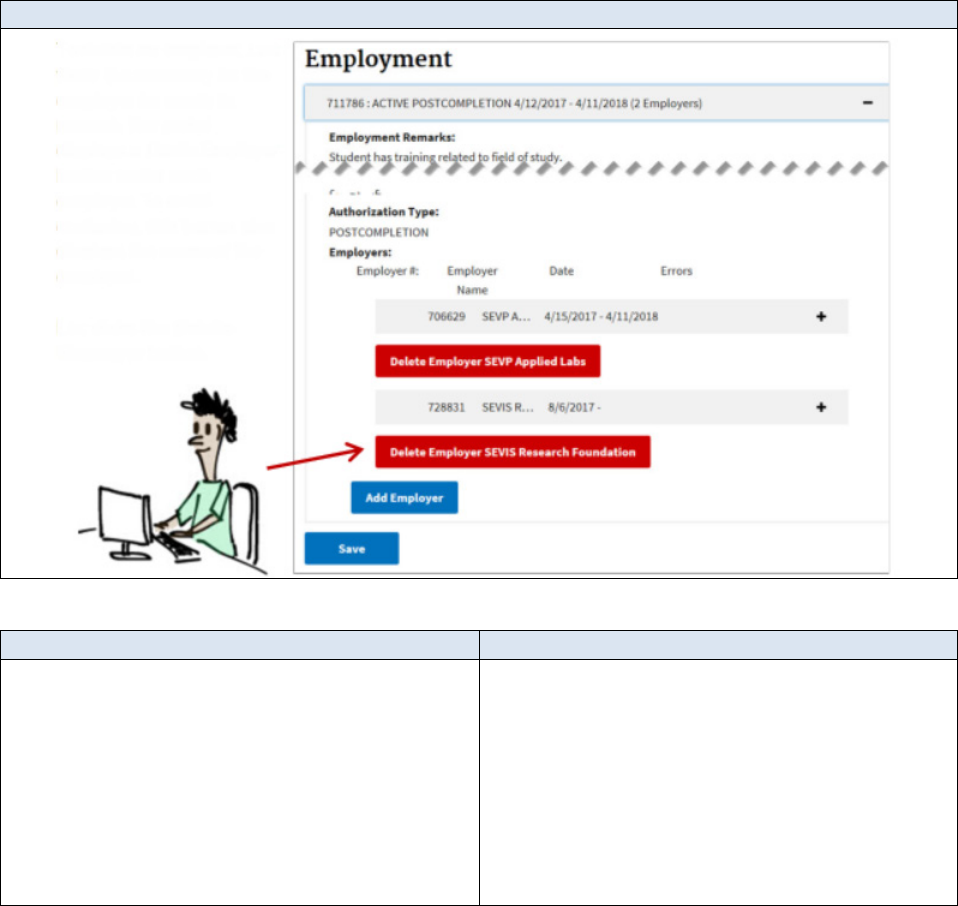
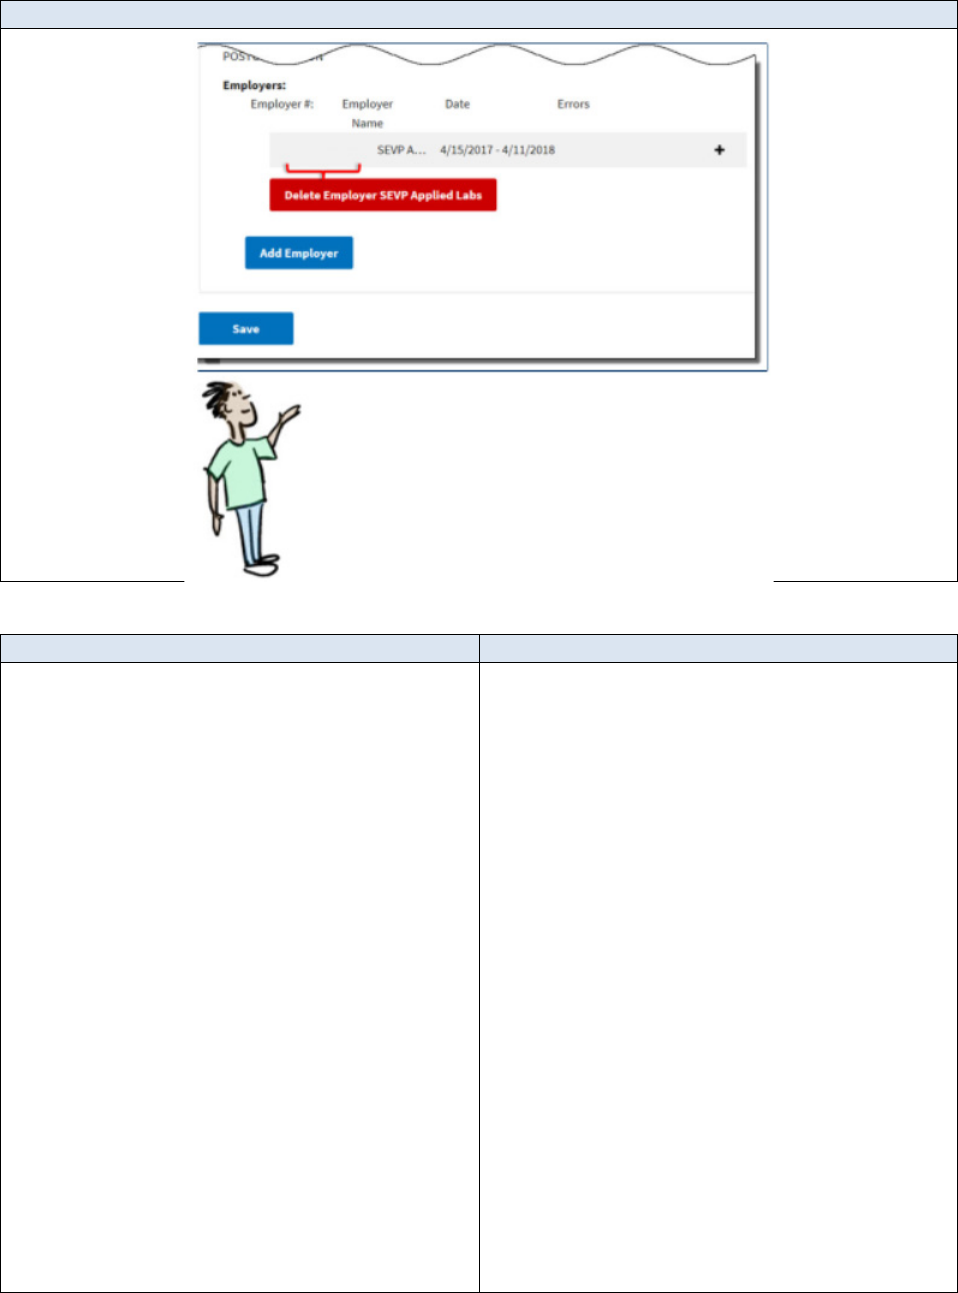
Scene 28– Delete Employer
Scene Description
Narration
Screenshot of the list of employers on the
expanded Employment page. An arrow
points to the
Delete Employer
button.
To delete an employer, Luc finds the
summary for the employer he wants to
remove. The portal displays a Delete
Employer button under each employer. To
avoid confusion, this button also displays
the name of the employer.
Luc clicks the Delete Employer button.
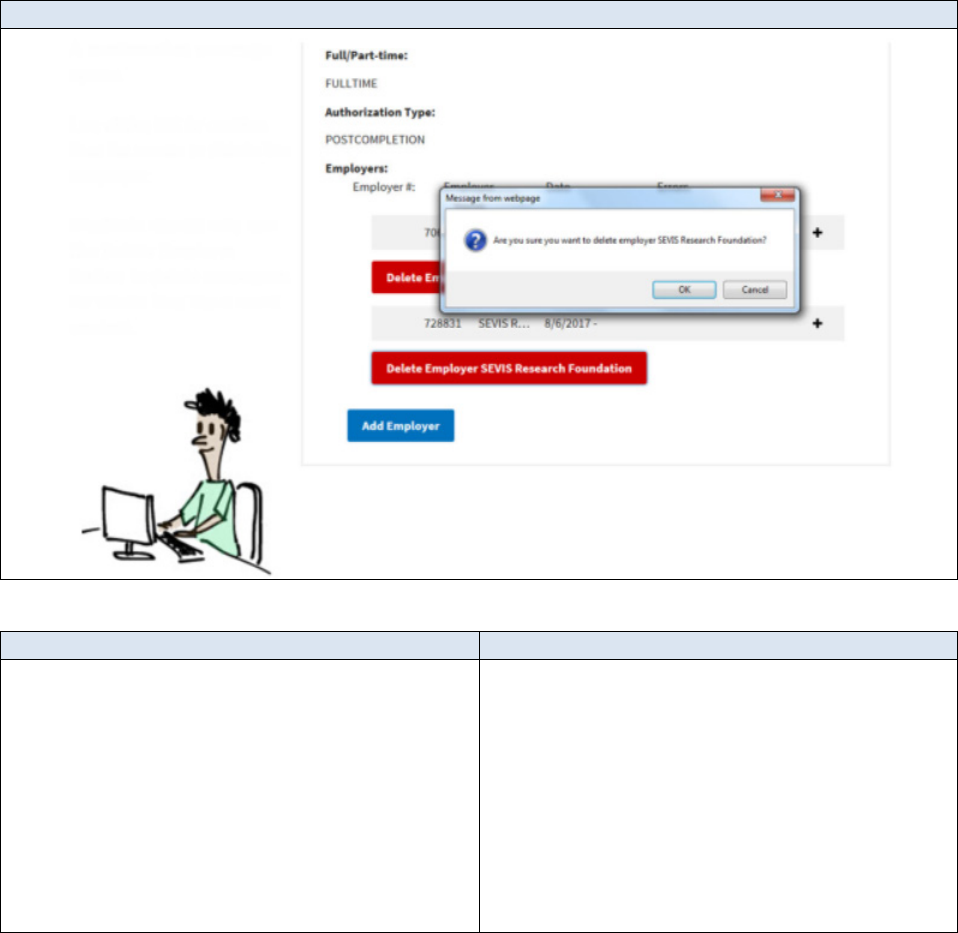
Scene 29– Delete Employer Confirmation
Scene Description
Narration
Screenshot of the list of employers on the
expanded Employment page with the
confirmation modal open.
A confirmation message opens.
Luc clicks OK to confirm that he wants to
delete the employer.
Students should only use the Delete
Employer button to delete employers for
whom they have never worked.
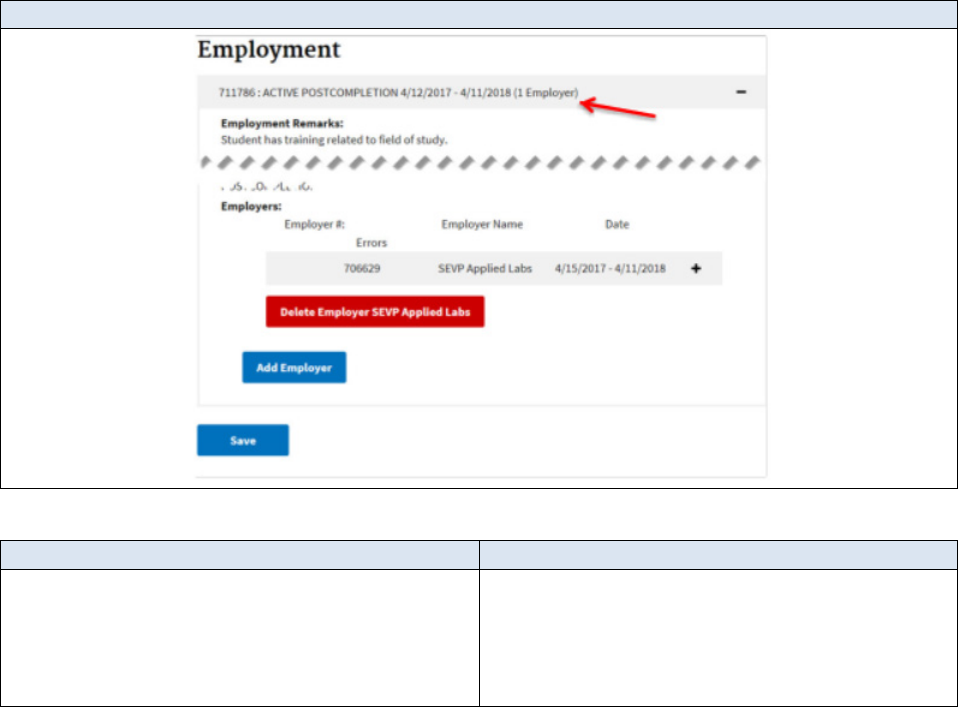
Scene 30–
Employment
Page – Post Deletion
Scene Description
Narration
Screenshot of the list of employers on the
expanded Employment page. Arrow points
to the employer counter in the OPT
authorization summary bar.
There is no success message, but the
employer no longer appears on the page
and the number of employers is down to
one.
Scene 31 –Section title – Student Reporting Requirements
Scene Description
Narration
The slide displays no instructional images or
animations
STUDENT REPORTING REQUIREMENTS
WHILE ON OPT
Scene 32 – Post Completion OPT Reporting
Scene Description
Narration
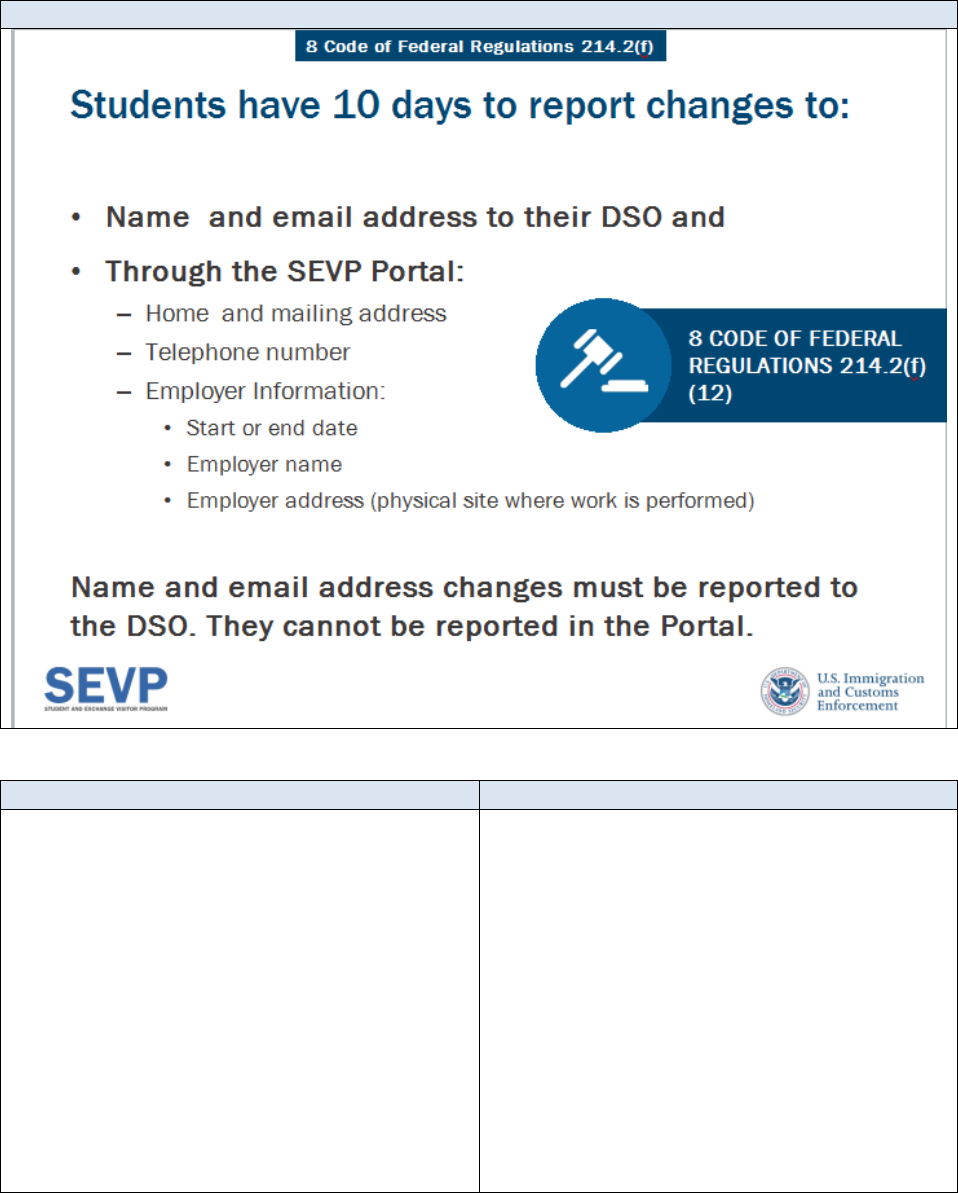
Text slide
Students have ten days from the change to
report new name, email address, home and
mailing address, telephone number, and
employer information like the start or end
date of employment, employer name,
employer address which is the physical site
where the work is performed.
Name and email address changes must be
reported to the DSO. They cannot be
reported in the portal. The regulations are
found at 8 Code of Federal Regulations
214.2(f)(12)
Scene 32–Key Facts
Scene Description
Narration
The slide displays no instructional images or
animations.
Key facts about the portal.
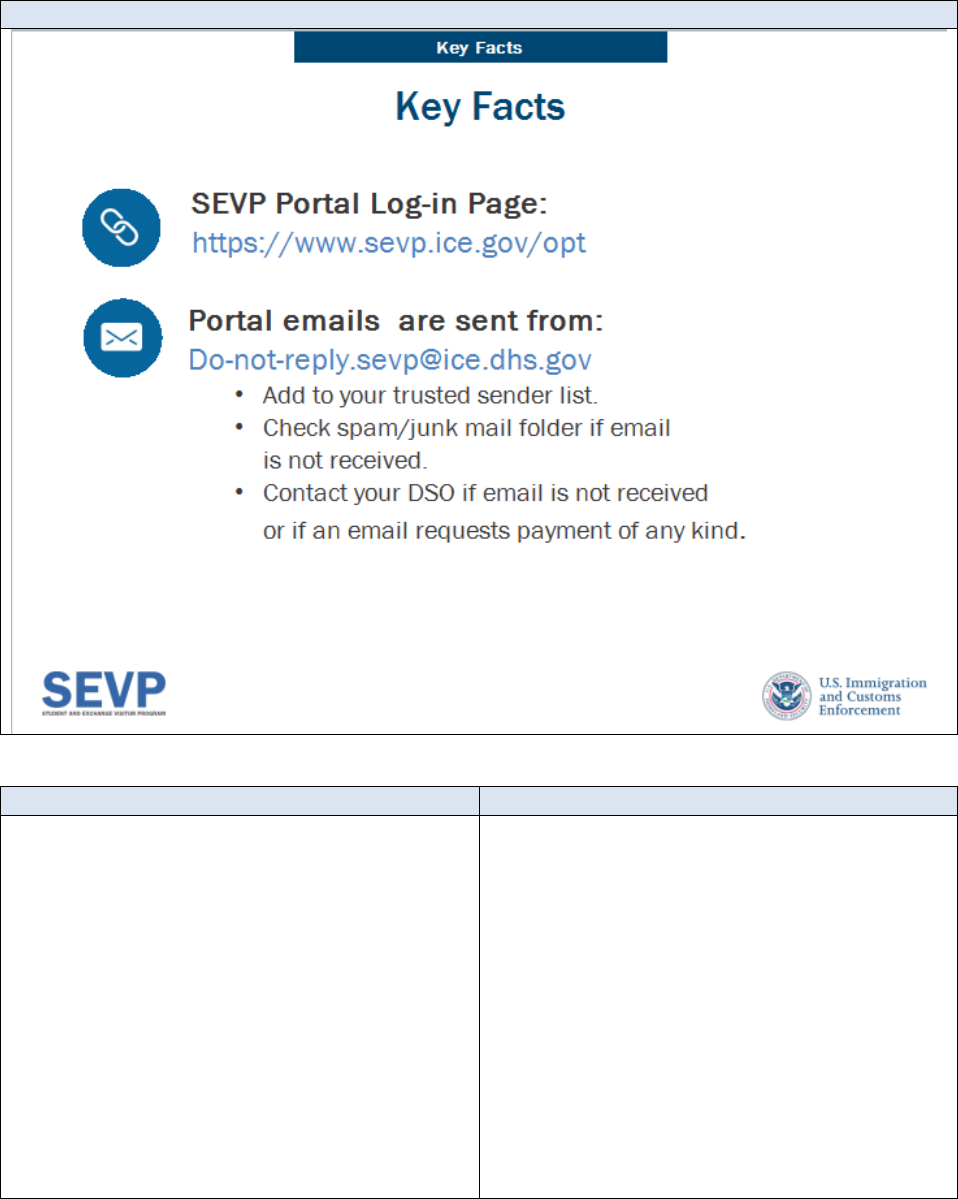
Scene 33 –Key Facts
Scene Description
Narration
Text Slide
Students have ten days from the change to
report new name, email address, home and
mailing address, telephone number, and
employer information like the start or end
date of employment, employer name,
employer address which is the physical site
where the work is performed.
Name and email address changes must be
reported to the DSO. They cannot be
reported in the portal. The regulations are
found at 8 Code of Federal Regulations
214.2(f)(12)

Scene 34 – Section Title - Resources
Scene Description
Narration
Section title slide
What resources are available for the portal?
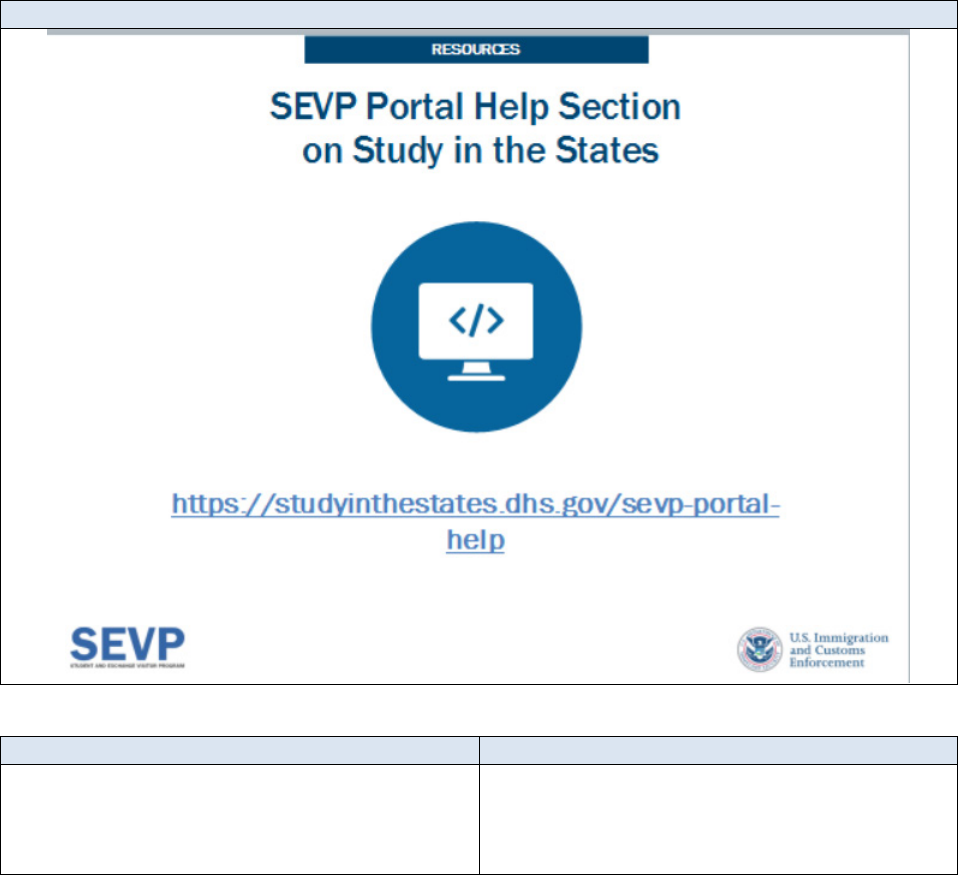
Scene 35 – SEVP Portal Help Section
Scene Description
Narration
Text slide
Complete instructions and helpful resources
for using the portal are available on the
SEVP Portal Help section of the Study in the
States website.
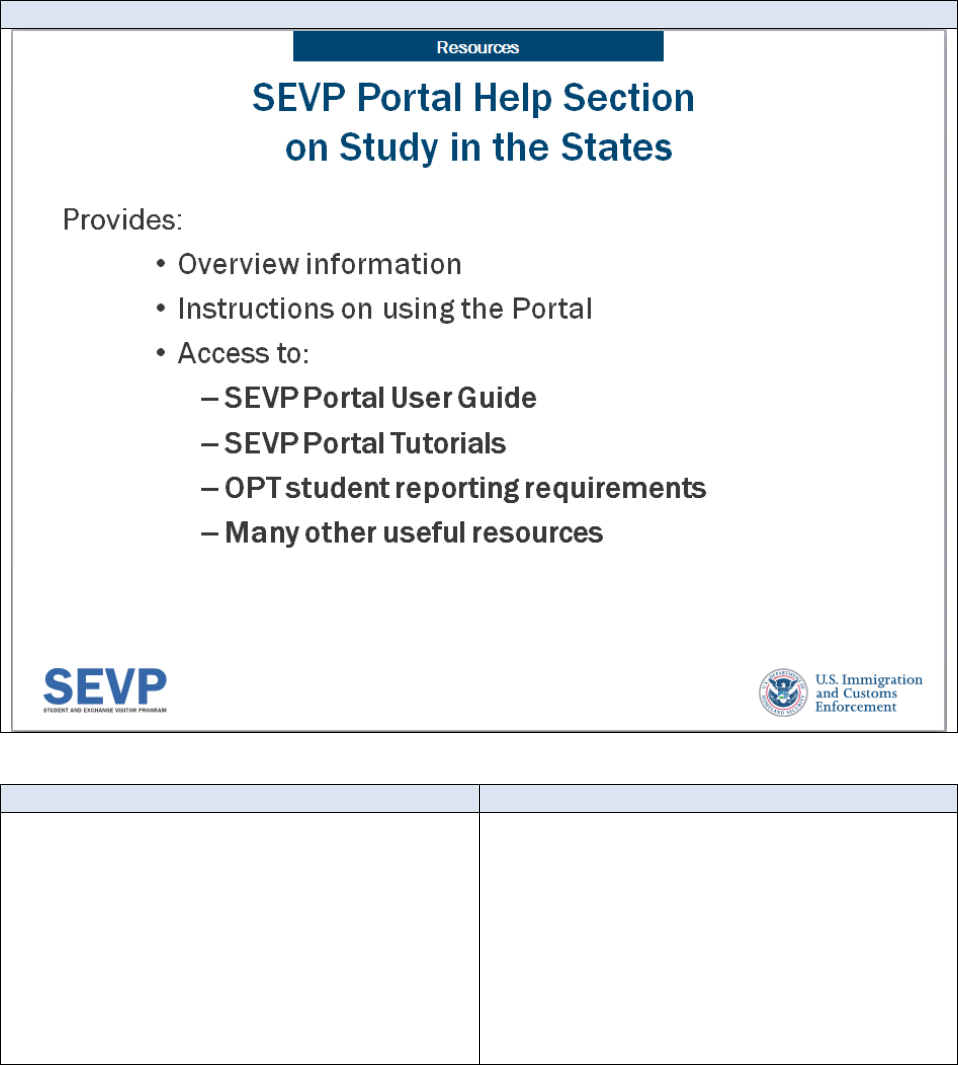
Scene 36 – SEVP Portal Help Section
Scene Description
Narration
Text slide
This site provides:
• overview information
• instructions on using the portal
• and access to:
o SEVP Portal User Guide
o SEVP Portal videos
o OPT student reporting
requirements
And many other helpful resources
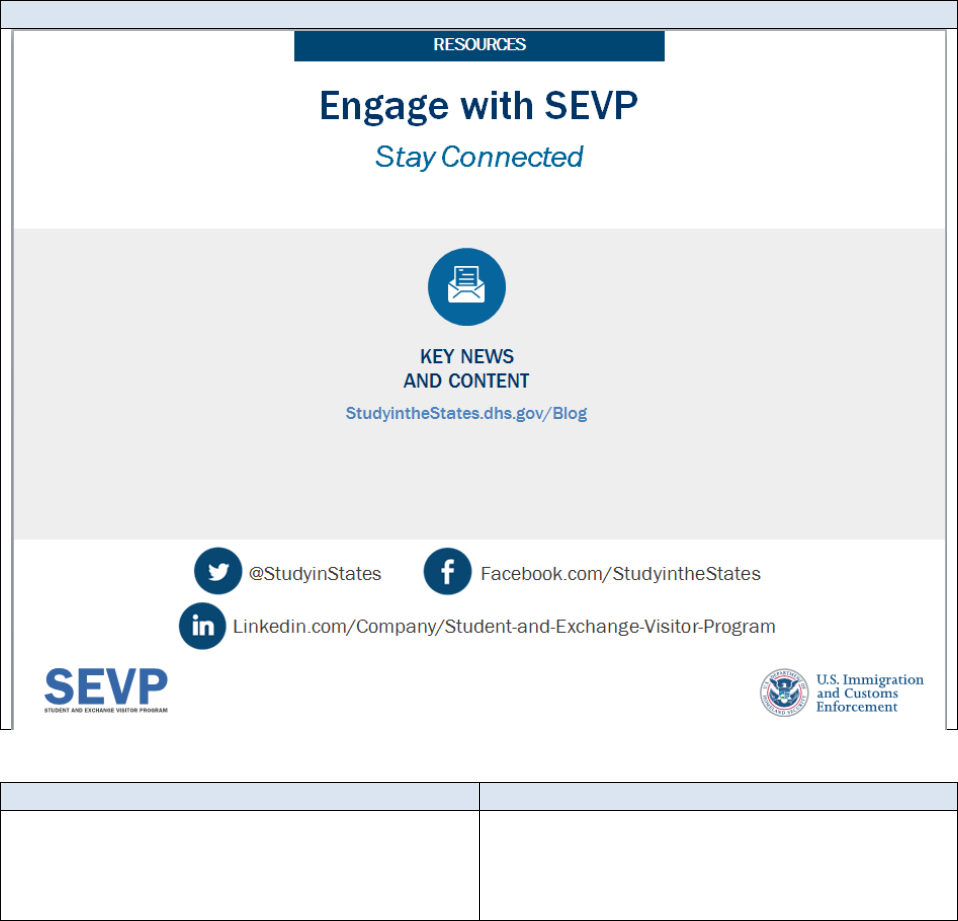
Scene 37 – Engage with SEVP
Scene Description
Narration
Text slide
Engage with SEVP. Stay connected! Access
key news and content in the Study in the
States blog. Follow us on Twitter, Facebook,
and Linked In.
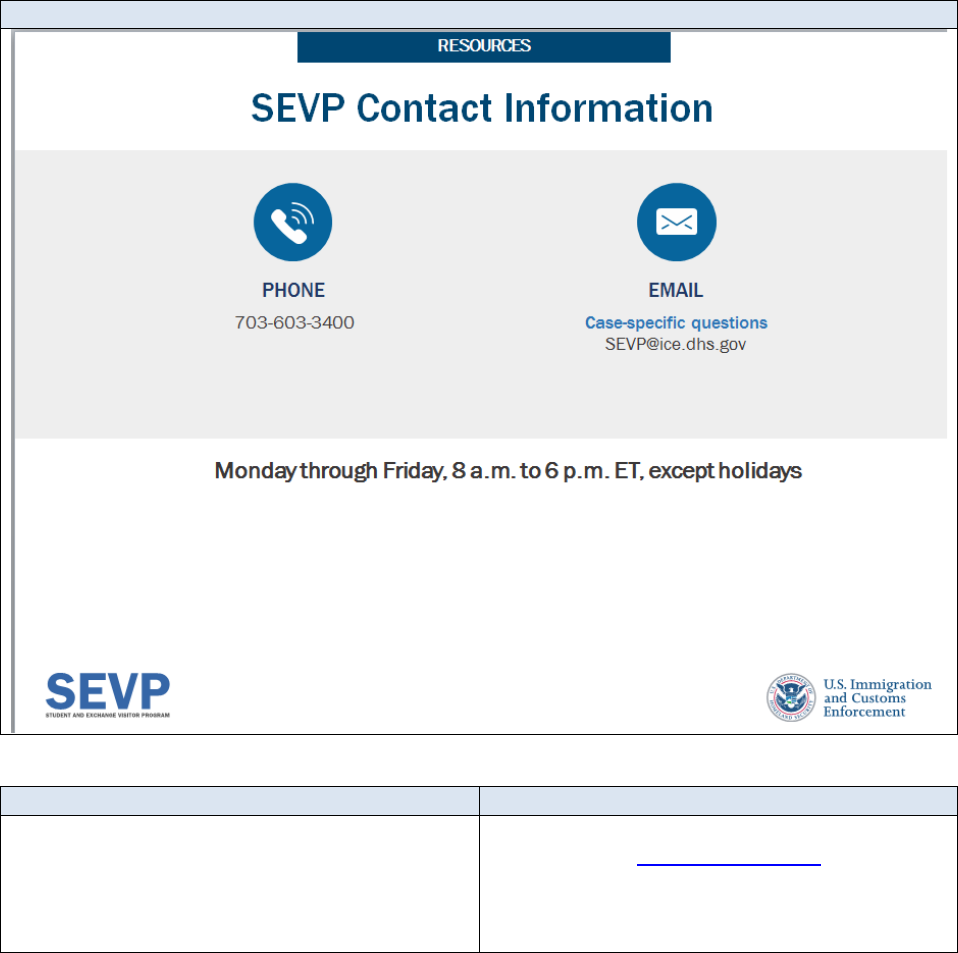
Scene 38 – SEVP Contact Information
Scene Description
Narration
Text slide
Contact SEVP by phone at (703) 603-3400
or by email at [email protected].
The office is open Monday through Friday 8
AM to 6 PM Eastern time, except for
holidays.
Scene 39 – Closing slide
Scene Description
Narration
Thank you for watching! Check out other
videos on the SEVP Portal Help pages on
Study in the States!
