The
Financial
Edge
™
Journal Entry Guide
101811
©2011 Blackbaud, Inc. This publication, or any part thereof, may not be reproduced or
transmitted in any form or by any means, electronic, or mechanical, including photocopying,
recording, storage in an information retrieval system, or otherwise, without the prior written
permission of Blackbaud, Inc.
The information in this manual has been carefully checked and is believed to be accurate.
Blackbaud, Inc., assumes no responsibility for any inaccuracies, errors, or omissions in this
manual. In no event will Blackbaud, Inc., be liable for direct, indirect, special, incidental, or
consequential damages resulting from any defect or omission in this manual, even if advised of
the possibility of damages.
In the interest of continuing product development, Blackbaud, Inc., reserves the right to make
improvements in this manual and the products it describes at any time, without notice or
obligation.
All Blackbaud product names appearing herein are trademarks or registered trademarks of
Blackbaud, Inc.
All other products and company names mentioned herein are trademarks of their respective
holder.
FE-JournalEntryGuide-101811

Contents
J
OURNAL
E
NTRY
. . . . . . . . . . . . . . . . . . . . . . . . . . . . . . . . . . . . . . . . . . . . . . . . . . . . . 1
Understanding Batches . . . . . . . . . . . . . . . . . . . . . . . . . . . . . . . . . . . . . . . . . . . . . . . . . . . . . . . . . . . . . . . . 2
Accessing Journal Entry . . . . . . . . . . . . . . . . . . . . . . . . . . . . . . . . . . . . . . . . . . . . . . . . . . . . . . . . . . . . . . . 3
Creating Default Sets . . . . . . . . . . . . . . . . . . . . . . . . . . . . . . . . . . . . . . . . . . . . . . . . . . . . . . . . . . . . . . . . . 5
Creating Transaction Distribution Templates . . . . . . . . . . . . . . . . . . . . . . . . . . . . . . . . . . . . . . . . . . . . . 10
Creating Regular Batches . . . . . . . . . . . . . . . . . . . . . . . . . . . . . . . . . . . . . . . . . . . . . . . . . . . . . . . . . . . . . 14
Creating Recurring Batches . . . . . . . . . . . . . . . . . . . . . . . . . . . . . . . . . . . . . . . . . . . . . . . . . . . . . . . . . . . 20
Managing Batches . . . . . . . . . . . . . . . . . . . . . . . . . . . . . . . . . . . . . . . . . . . . . . . . . . . . . . . . . . . . . . . . . . . 31
Validating, Posting, and Reversing Batches . . . . . . . . . . . . . . . . . . . . . . . . . . . . . . . . . . . . . . . . . . . . . . . 45
Working with Gift Transactions from The Raiser’s Edge . . . . . . . . . . . . . . . . . . . . . . . . . . . . . . . . . . . . 52
I
NDEX
. . . . . . . . . . . . . . . . . . . . . . . . . . . . . . . . . . . . . . . . . . . . . . . . . . . . . . . . . . . 61

1chapter
Journal Entry
Understanding Batches . . . . . . . . . . . . . . . . . . . . . . . . . . . . . . . . . . . . . . . . . . . . . . . . . . . . . . . . . . . . . . . . . . . . . . . . 2
Accessing Journal Entry . . . . . . . . . . . . . . . . . . . . . . . . . . . . . . . . . . . . . . . . . . . . . . . . . . . . . . . . . . . . . . . . . . . . . . . 3
Finding and Opening a Batch Record . . . . . . . . . . . . . . . . . . . . . . . . . . . . . . . . . . . . . . . . . . . . . . . . . . . . . . . . . . . . . . . 4
Creating Default Sets . . . . . . . . . . . . . . . . . . . . . . . . . . . . . . . . . . . . . . . . . . . . . . . . . . . . . . . . . . . . . . . . . . . . . . . . . 5
Creating Transaction Distribution Templates . . . . . . . . . . . . . . . . . . . . . . . . . . . . . . . . . . . . . . . . . . . . . . . . . . . . . 10
Manually Creating a Transaction Distribution Template . . . . . . . . . . . . . . . . . . . . . . . . . . . . . . . . . . . . . . . . . . . . . . . 10
Creating a Transaction Distribution Template Using an Existing Template . . . . . . . . . . . . . . . . . . . . . . . . . . . . . . . . 12
Creating Regular Batches . . . . . . . . . . . . . . . . . . . . . . . . . . . . . . . . . . . . . . . . . . . . . . . . . . . . . . . . . . . . . . . . . . . . . 14
Entering Transactions in a Regular Batch . . . . . . . . . . . . . . . . . . . . . . . . . . . . . . . . . . . . . . . . . . . . . . . . . . . . . . . . . . . 16
Entering Transaction Distributions in a Regular Batch . . . . . . . . . . . . . . . . . . . . . . . . . . . . . . . . . . . . . . . . . . . . . . . . 18
Creating Recurring Batches . . . . . . . . . . . . . . . . . . . . . . . . . . . . . . . . . . . . . . . . . . . . . . . . . . . . . . . . . . . . . . . . . . . 20
Creating a Recurring Amount Batch . . . . . . . . . . . . . . . . . . . . . . . . . . . . . . . . . . . . . . . . . . . . . . . . . . . . . . . . . . . . . . . 21
Creating a Recurring Percent Batch . . . . . . . . . . . . . . . . . . . . . . . . . . . . . . . . . . . . . . . . . . . . . . . . . . . . . . . . . . . . . . . 22
Entering Transactions in a Recurring Batch . . . . . . . . . . . . . . . . . . . . . . . . . . . . . . . . . . . . . . . . . . . . . . . . . . . . . . . . . 24
Entering Transaction Distributions in a Recurring Batch . . . . . . . . . . . . . . . . . . . . . . . . . . . . . . . . . . . . . . . . . . . . . . . 26
Using a Recurring Batch to Create a New Batch . . . . . . . . . . . . . . . . . . . . . . . . . . . . . . . . . . . . . . . . . . . . . . . . . . . . . 29
Managing Batches . . . . . . . . . . . . . . . . . . . . . . . . . . . . . . . . . . . . . . . . . . . . . . . . . . . . . . . . . . . . . . . . . . . . . . . . . . . 31
Approving Batches . . . . . . . . . . . . . . . . . . . . . . . . . . . . . . . . . . . . . . . . . . . . . . . . . . . . . . . . . . . . . . . . . . . . . . . . . . . . . 31
Changing Batch Status . . . . . . . . . . . . . . . . . . . . . . . . . . . . . . . . . . . . . . . . . . . . . . . . . . . . . . . . . . . . . . . . . . . . . . . . . . 33
Copying a Batch of Transactions . . . . . . . . . . . . . . . . . . . . . . . . . . . . . . . . . . . . . . . . . . . . . . . . . . . . . . . . . . . . . . . . . . 34
Editing a Batch . . . . . . . . . . . . . . . . . . . . . . . . . . . . . . . . . . . . . . . . . . . . . . . . . . . . . . . . . . . . . . . . . . . . . . . . . . . . . . . . 35
Globally Change Transactions . . . . . . . . . . . . . . . . . . . . . . . . . . . . . . . . . . . . . . . . . . . . . . . . . . . . . . . . . . . . . . . . . . . . 35
Importing Transactions . . . . . . . . . . . . . . . . . . . . . . . . . . . . . . . . . . . . . . . . . . . . . . . . . . . . . . . . . . . . . . . . . . . . . . . . . 36
Exporting Batch Information . . . . . . . . . . . . . . . . . . . . . . . . . . . . . . . . . . . . . . . . . . . . . . . . . . . . . . . . . . . . . . . . . . . . . 42
Deleting a Batch . . . . . . . . . . . . . . . . . . . . . . . . . . . . . . . . . . . . . . . . . . . . . . . . . . . . . . . . . . . . . . . . . . . . . . . . . . . . . . . 45
Validating, Posting, and Reversing Batches . . . . . . . . . . . . . . . . . . . . . . . . . . . . . . . . . . . . . . . . . . . . . . . . . . . . . . 45
Validating Batches . . . . . . . . . . . . . . . . . . . . . . . . . . . . . . . . . . . . . . . . . . . . . . . . . . . . . . . . . . . . . . . . . . . . . . . . . . . . . 45
Posting a Batch . . . . . . . . . . . . . . . . . . . . . . . . . . . . . . . . . . . . . . . . . . . . . . . . . . . . . . . . . . . . . . . . . . . . . . . . . . . . . . . . 48
Reversing a Posted Batch . . . . . . . . . . . . . . . . . . . . . . . . . . . . . . . . . . . . . . . . . . . . . . . . . . . . . . . . . . . . . . . . . . . . . . . . 50
Working with Gift Transactions from The Raiser’s Edge . . . . . . . . . . . . . . . . . . . . . . . . . . . . . . . . . . . . . . . . . . . . 52
Linking The Raiser’s Edge to General Ledger . . . . . . . . . . . . . . . . . . . . . . . . . . . . . . . . . . . . . . . . . . . . . . . . . . . . . . . . 52
Interfund Entries . . . . . . . . . . . . . . . . . . . . . . . . . . . . . . . . . . . . . . . . . . . . . . . . . . . . . . . . . . . . . . . . . . . . . . . . . . . . . . 54
Posting Gifts from The Raiser’s Edge to General Ledger . . . . . . . . . . . . . . . . . . . . . . . . . . . . . . . . . . . . . . . . . . . . . . . 56

2
C
HAPTER
With Journal Entry, you create batches of transactions for posting to your General Ledger accounts. Each batch
contains individual debit and credit transactions. By using batches, you can group transactions according to
source, date, time, and function.
Journal Entry provides tools you can use to make your journal and posting process more efficient, including
recurring batches and batch default sets.
A recurring batch is a template you create to post regularly occurring transactions to General Ledger accounts.
You create a recurring batch once and then reuse it by simply updating the post date and/or amounts. Examples
of recurring transactions you could use in a recurring batch template include, lease payments for office space or
computer rentals.
A batch default set is a set of common transaction information you can use to enter duplicate transaction
information. By using a default set you can save time and increase efficiency by quickly entering duplicate
transaction details within a batch. For example, a batch default set can include information such as a default post
date, journal, transaction reference, reverse on date, notes, project ID, description, status, and/or source type.
When entering transactions in General Ledger, you can add additional characteristics to each item, which enables
you to run more specific reports and financial statements. Those characteristics include projects, transaction
classes, journals, transaction attributes, and transaction codes.
You can also configure Journal Entry to simplify entering batches containing transactions from multiple funds by
automatically creating balancing interfund entries. For example, if you have a batch with a $100 debit to Fund 1
and a $100 credit to Fund 2, the batch is out of balance. But, if you mark the corresponding business rules,
General Ledger automatically creates a $100 credit to Fund 1 and a $100 debit to Fund 2.
Other General Ledger features, including import, query, export, and global change, work in conjunction with
Journal Entry to help you efficiently enter and manage your transaction data. Access to all Journal Entry functions
is limited by the security rights you are assigned in Security. Defining security rights specific to Journal Entry is
important to the process of entering and posting transactions. There are six security settings available for batches
in Journal Entry. The system administrator can assign rights to view, edit, add, validate, post, and approve
batches.
This chapter begins with a section explaining batches and other basic information to help familiarize you with
Journal Entry. Later sections include information and procedures for completing day-to-day tasks in Journal Entry.
These procedures include creating, saving, validating, posting, and reversing batches.
Understanding Batches
When you create a batch, you compile a group of debit and credit transactions that you can post to your ledger
accounts. Transactions are entries into the ledger that indicate to the program what accounts to debit or credit.
Placing transactions into a batch allows you to group transactions according to source, date, time, and function. A
batch may contain hundreds of transactions or as few as two.
Glossary: A batch is a group of debit and credit transactions you can post to your ledger accounts. Placing
transactions into a batch allows you to group transactions according to source, date, time, and function.
Warning: For the latest documentation and information, visit our Web site at www. blackbaud.com.
Glossary: A transaction attribute is a characteristic you use to categorize a group of transactions. Unlike
projects and transaction codes, transaction attributes cannot retain an equity balance from year to year.
Glossary: A transaction code is an additional field on each transaction that helps you categorize information
for reporting and closing fiscal years. Transaction codes retain equity, but do not offer budgets, media, or
notes. Transaction codes are available only with the optional module Projects and Grants. For more
information about setting up transaction codes, see the Configuration Guide for General Ledger.

J
OURNAL
E
NTRY
3
You can create general journal batches, which are referred to as “regular batches” in General Ledger, to post
transactions. In Journal Entry, you can also create recurring batches, which are templates you can use to
efficiently create batches of transactions that occur on a periodic or repetitive basis. See “Creating Recurring
Batches” on page 20 for more information and procedures.
During the regular batch creation process you enter transactions that debit and credit accounts, projects, classes,
and/or transaction codes. You can enter these transactions using several different methods. The most common
method is by manually entering transactions into the journal entry grid on the batch record. Manually entering
transactions is the default method included in the procedures for creating regular and recurring batches.
However, you can also enter transactions by using the New Transaction screen, which enables you to see all the
journal entry grid information at once, instead of having to scroll through the grid to access each column. The
New Transaction screen is available only when creating a regular batch.
Another method of entering transactions is by copying a batch, which is helpful if you need to create a batch
similar to one previously created. By copying a batch, you save time because you are copying transactions from
an existing batch into a new batch. You can then post the new batch to General Ledger. The last method available
to enter transactions into a batch is by importing them from an external source. The procedure for importing
transactions and other files is located in the Importing Records chapter of the Administration Guide for The
Financial Edge. Because importing transactions is a detailed process, we recommend that you read the Importing
Records chapter before attempting to import any files.
Before creating batches you may want to create default sets to use in your batches. These are helpful if you are
creating batches of multiple transactions with similar characteristics. See “Creating Default Sets” on page 5 for
more information. You may also want to create distributions in Configuration to save time when creating
batches. Instead of manually entering transactions, you can simply load a distribution from a table. See “Creating
Transaction Distribution Templates” on page 10 for more information. Creating default sets and distributions are
not required to create and post batches, but you may want to consider using them to save time.
Accessing Journal Entry
Tip: To move between rows in a grid column, press CTRL + the up or down arrow key.
Note: You can set user options for Journal Entry that affect how the program looks and runs on the
workstation you are using. For more information, see the Options chapter of the Program Basics Guide.
4
C
HAPTER
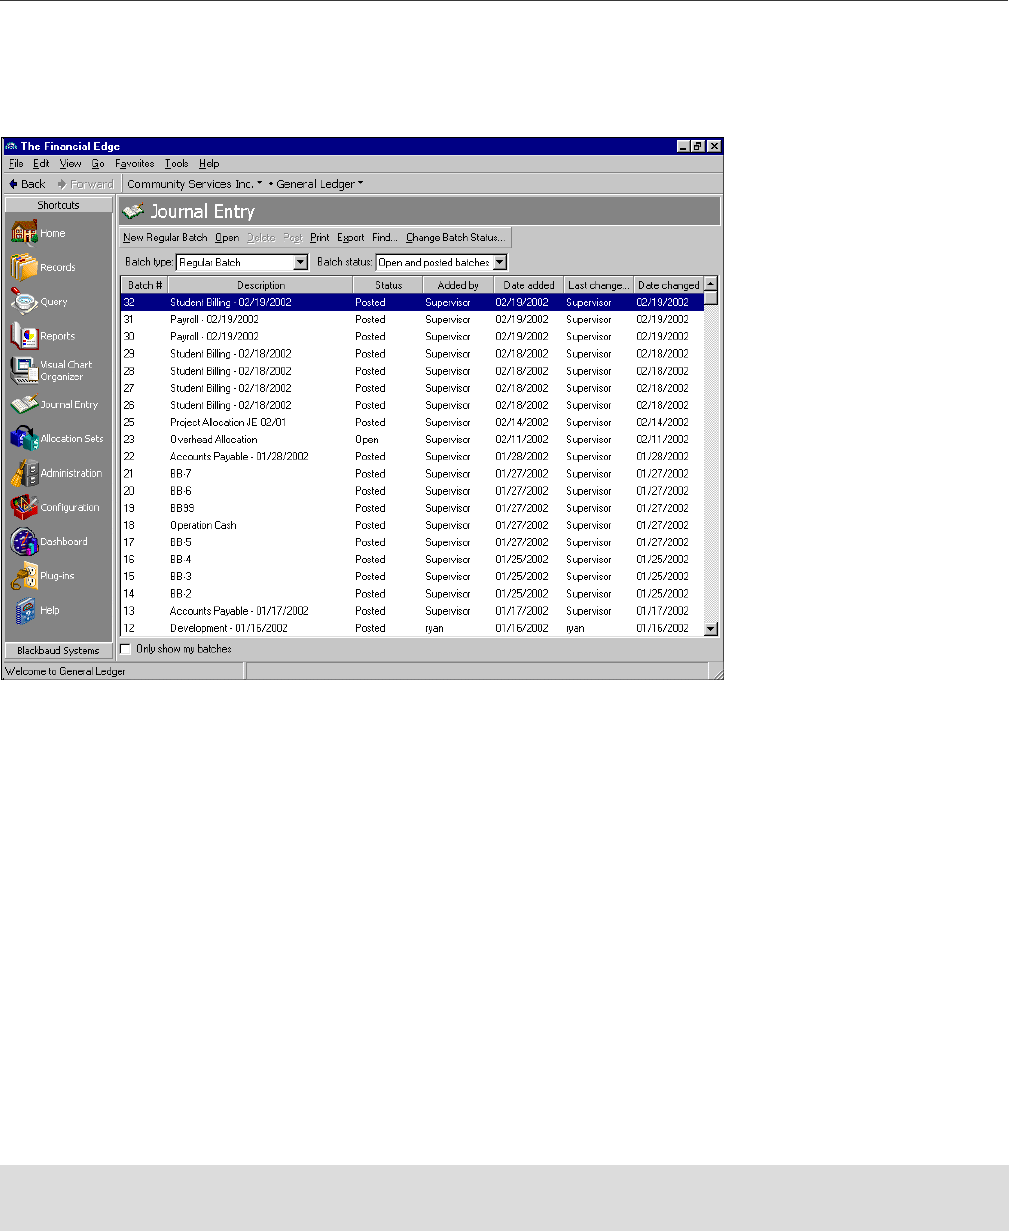
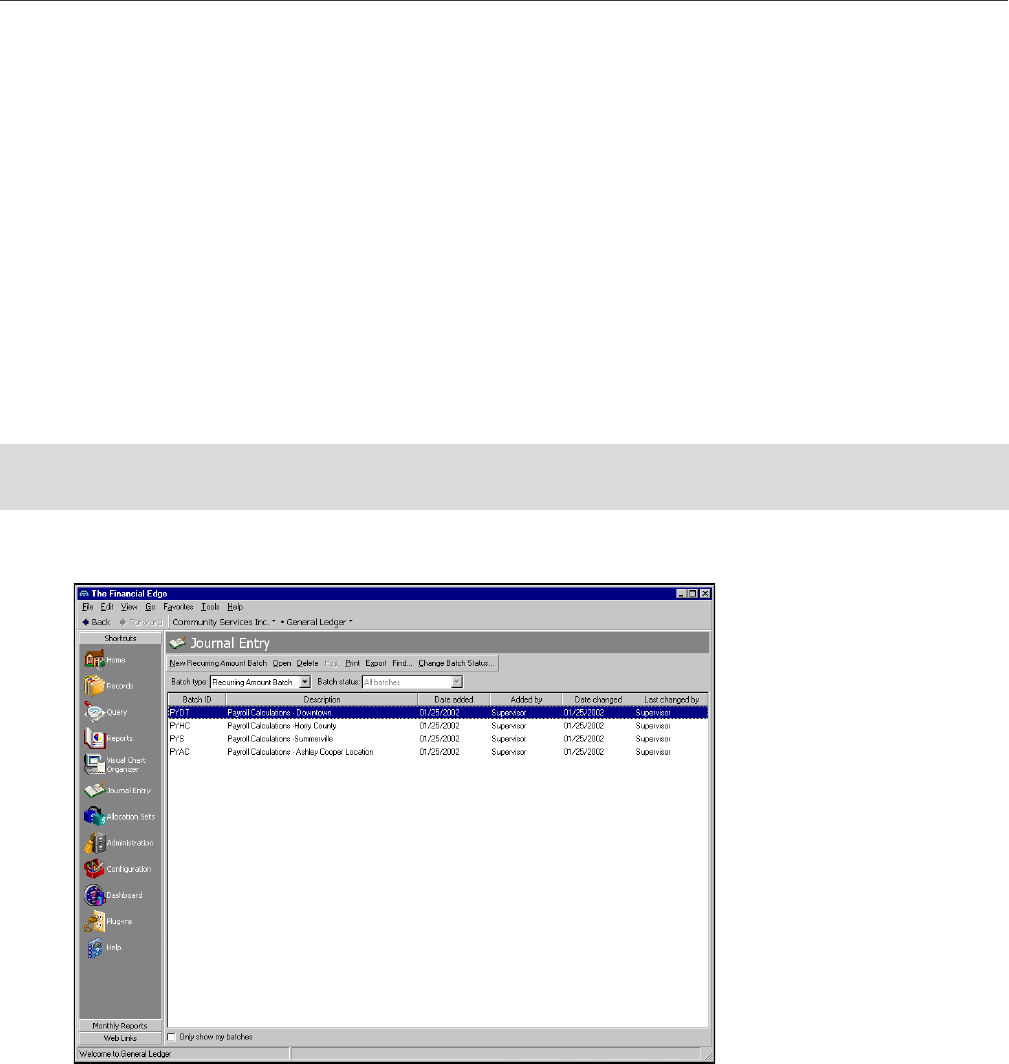
The Journal Entry page is the central location for accomplishing Journal Entry tasks. From this page you can
create, open, delete, post, print, export, and search for regular and recurring batches of transactions. You can
also quickly and efficiently change the status of regular batches. Select Journal Entry from the navigation bar and
the Journal Entry page appears.
The information displayed on the Journal Entry page depends on the type of batch you select in the Batch type
field. You can further define which batches appear by selecting a specific status in the Batch status field. For
example, if you select “Regular Batch” in the Batch type field and Posted batches only in the Batch status field,
the screen displays all posted regular batches existing in the system. Another helpful feature of the Journal Entry
page is the ability to display only batches that you have created by marking the Only show my batches checkbox
at the bottom of the screen.
The Journal Entry page also displays the vital statistics of each batch, including the batch number, description,
status, user that created the batch, date created, date approved, date posted, user that deleted the batch, date
deleted, and user that last changed the batch.
In addition to the specific Journal Entry features, this page also contains the common areas of the The Financial
Edge program shell, which include the navigation bar, menu bar, toolbar, and status bar.
Finding and Opening a Batch Record
Every regular or recurring batch of transactions you create in General Ledger has a batch record. Each record
includes a batch description, batch notes (if applicable), transaction information, and the current status of the
batch, whether open, approved, pending approval, or posted. All batch records are easily accessed from the main
Journal Entry page.
Opening a batch record from the Journal Entry page
1. From the navigation bar, select Journal Entry. The Journal Entry page appears.
Warning: If the user opening a batch does not have security rights to access specific accounts or projects
included in the batch, the batch opens with only an asterisk in the grid fields for those affected items.

J
OURNAL
E
NTRY
5
2. In the Batch type and Batch status fields, select the type and status of batch you want to open. All the
saved batches of that type and status are displayed on the screen.
3. Scroll through the batches and highlight the batch you want to open.
4. Click Open on the action bar. The batch record opens.
Creating Default Sets
A default set is a record of default transaction information that you can create and load in a batch. By using
default sets, you can make the process of entering transactions in a batch more efficient because you spend less
time entering common transaction information. For example, say you regularly create a batch of transactions
with the same account number, post date, journal, and source type. To save data entry time, you can create a
transaction default set with those same characteristics. Once the default set is created and you go to create a
batch with those characteristics, you can simply load the default set instead of individually reentering the same
information.
Creating default sets is an optional task you can use to speed data entry. You may want to set up several batch
default sets before you start creating multiple batches, especially if you need to create batches with similar
transaction information. You can create transaction default sets that include default values for the following:
Tip: You can also double-click the batch you want to open on the Journal Entry page.
• Account number • Type • Journal reference
• Amount • Journal • Source number
•Reverse on •Notes •Attributes
•Source type •Source system mask •Distributions
•Post date
6
C
HAPTER
Once you create a default set, you can load it into any batch. After loading the default set, the values appear in
the Default (D) row of the journal entry grid. To enter the default value in additional cells, place your cursor in a
cell and click F2. If you enter a default by mistake, just delete it. You are not locked into using those defaults for
each transaction; you can always manually enter a different value when necessary.
You can create a batch default set from the Tools menu or from the New Batch screen. Step-by-step procedures
for creating default sets using both methods are included in this section.
Creating a batch default set from the Tools menu
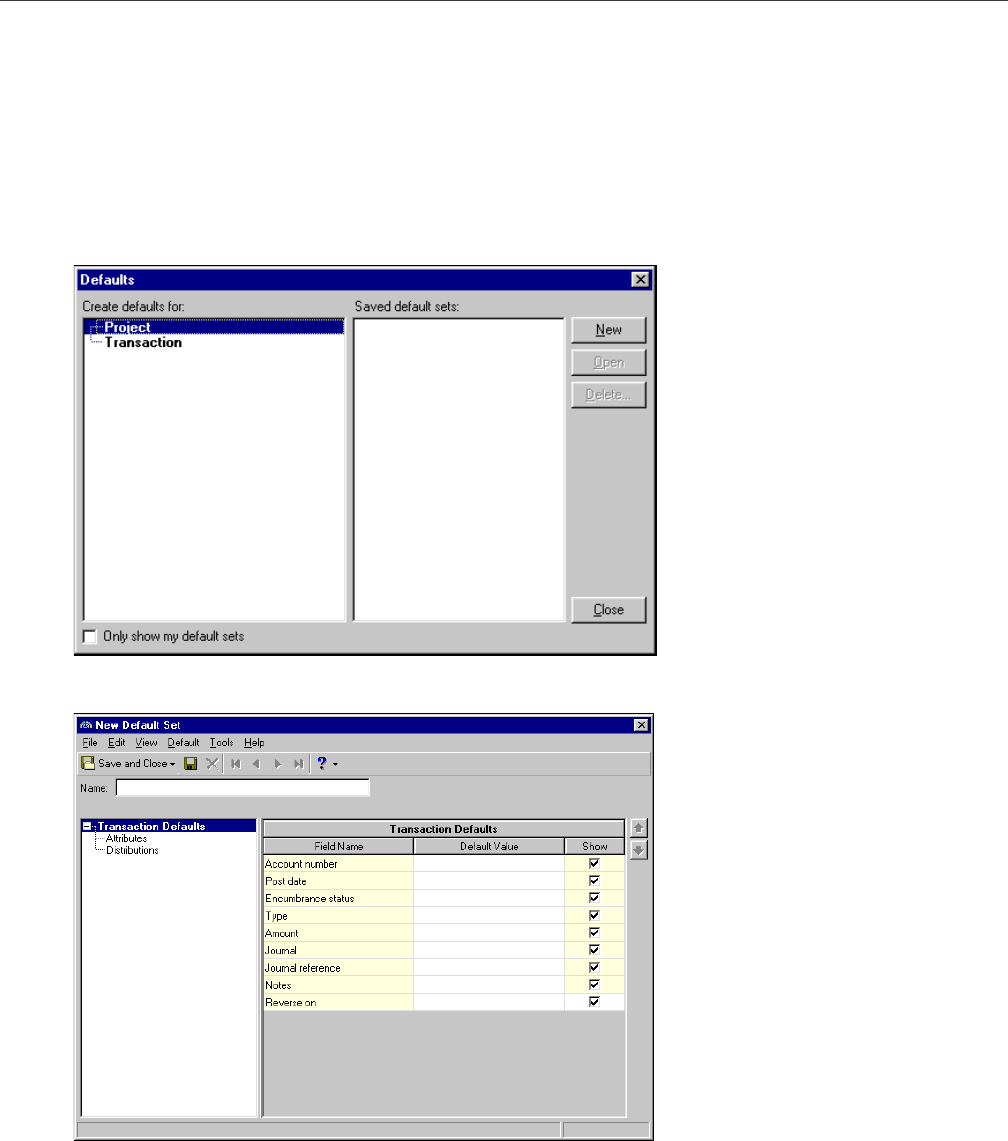
1. From any page in General Ledger, select Tools, Organize/Create Defaults. The Defaults screen appears.
2. In the Create default for box, highlight Transaction and click New. The New Default Set screen appears.
3. In the Name field, enter a descriptive name to easily identify this batch default set.
4. Highlight Transaction Defaults in the box on the left side of the screen. The Transaction Defaults grid
appears.
5. Enter a value in the corresponding field for each transaction default you want to include in this default
set.

J
OURNAL
E
NTRY
7
6. To enter default attributes and distributions, click the plus (+) sign next to Transaction Defaults. The
treeview expands and displays the Attributes and Distributions branches.
7. To enter default attributes, highlight Attributes. The Transaction Defaults-Attributes grid appears.
8. Enter the attribute type in the grid. The Required checkbox is marked or unmarked based on selections
made for each attribute type in Configuration.
9. To enter default distributions, highlight Distributions. The Transaction Defaults-Distributions grid
appears.
10. If you have the optional Projects and Grants module, you can enter project IDs and transaction codes in
the Transaction Defaults-Distributions grid. Use the scroll bar at the bottom of the screen to access
additional columns.
11. If you want to distribute by class, enter a class in the Class column.
12. Enter a percent or amount in the Percent and Amount columns respectively.
13. Select File, Save and New to save the batch default set and open a new one, or select File, Save and Close
to save and exit the New Default Set screen.
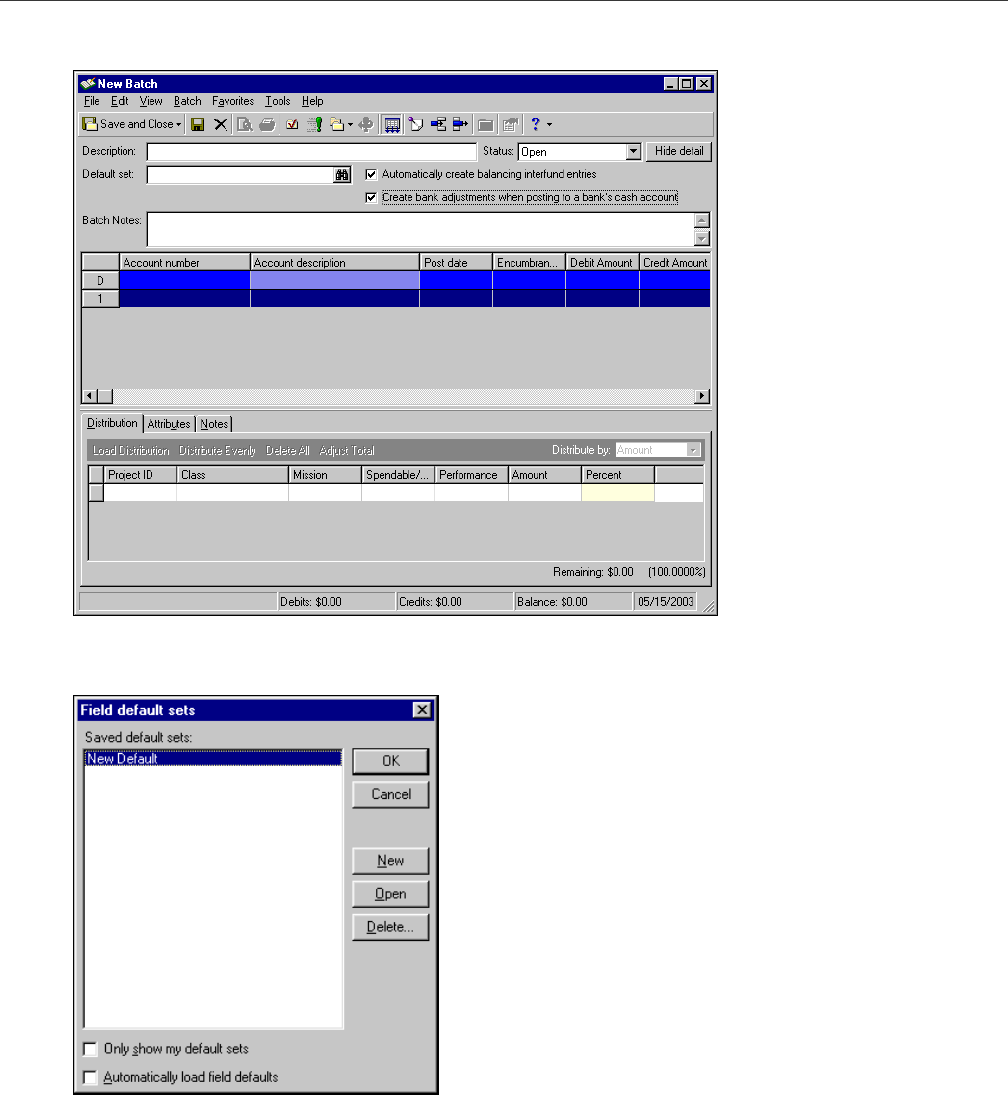
Creating a batch default set from the New Batch screen
1. From the navigation bar, select Journal Entry. The Journal Entry page appears.
2. In the Batch type field, select “Regular Batch”.
Tip: To move between rows in a grid column, press CTRL + the up or down arrow key.
8
C
HAPTER
3. On the action bar, click New Regular Batch. The New Batch screen appears.
4. In the Default set field, click the binoculars. You may be prompted to save the batch at this point, click
Yes or No. The Field default sets screen appears.
J
OURNAL
E
NTRY
9
5. Click New and the New Default Set screen appears.
6. In the Name field, enter descriptive name that enables you to identify this batch default set.
7. In the Transaction Defaults grid, enter a value in the Default Value column for each default you want to
include in this batch default set. For certain defaults you can mark or clear the checkbox in the Show
column to show or hide corresponding defaults on batch records.
8. To enter default attributes and distributions, click the plus sign next to Transaction Defaults. The
treeview expands and displays the Attributes and Distributions branches.
9. To enter default attributes, highlight Attributes. The Transaction Defaults-Attributes grid appears.
10. Enter the attribute type in the grid. The Required checkbox is marked or unmarked based on selections
made for each attribute type in Configuration.
11. To enter default distributions, highlight Distributions. The Transaction Defaults - Distributions grid
appears.
Tip: In the distribution grid, you can use the ENTER key, as well as the TAB key, to move from cell to cell.

10
C
HAPTER
12. If you have the optional Projects and Grants module, you can enter project IDs and transaction codes in
the Transaction Defaults - Distributions grid. Use the scroll bar at the bottom of the screen to access
additional columns in the grid.
13. If you want to distribute by class, enter a class in the Class column.
14. Enter a percent or amount in the Percent and Amount columns respectively.
15. Select File, Save and New to save the batch default set and open a new one, or select File, Save and Close
to save and exit the New Default Set screen.
Creating Transaction Distribution Templates
You can use transaction distribution templates in Journal Entry to quickly and efficiently distribute activity to
projects, classes, and transaction codes. For example, a school could create a “Sports” transaction distribution
template that evenly distributes transactions to each team within the athletic department. Distribution
templates are especially helpful if you commonly distribute transactions to the same set of projects, classes, and
transaction codes.
From the batch record in Journal Entry, you have several options for entering transaction distributions. You can
load a distribution template previously created in Configuration or create a new template from the batch record.
You can also manually enter distributions without a template or load a distribution from a previous transaction.
Once you create a transaction distribution template in Configuration, you can load it into the distribution grid on
a batch record in Journal Entry. This process speeds data entry and saves time because you do not need to
manually enter distributions for each batch. You can also load multiple distributions in a record, as long as the
total is equal to or less than 100% of the transaction total.
This section provides step-by-step procedures for manually creating a transaction distribution template manually
and using a previously created distribution. You may find it useful to refer to these procedures when creating a
Journal Entry batch.
Manually Creating a Transaction Distribution Template
The following procedure walks you through the steps involved in manually creating a transaction distribution
template in Journal Entry. By “manually creating” we mean creating a distribution template from a batch record,
without using a previously created distribution template. The purpose of using transaction distribution templates
in Journal Entry is to quickly and efficiently distribute activity to projects, classes, and transaction codes.
Distribution templates are especially helpful if you commonly distribute amounts to the same set of projects,
classes, and transaction codes.
You can also manually create a distribution template in Configuration, which you can then load from a batch
record. See the Configuration Guide for General Ledger for more information.
Manually creating a transaction distribution template
1. From an open batch record in Journal Entry, select the Distributions tab.
J
OURNAL
E
NTRY
11
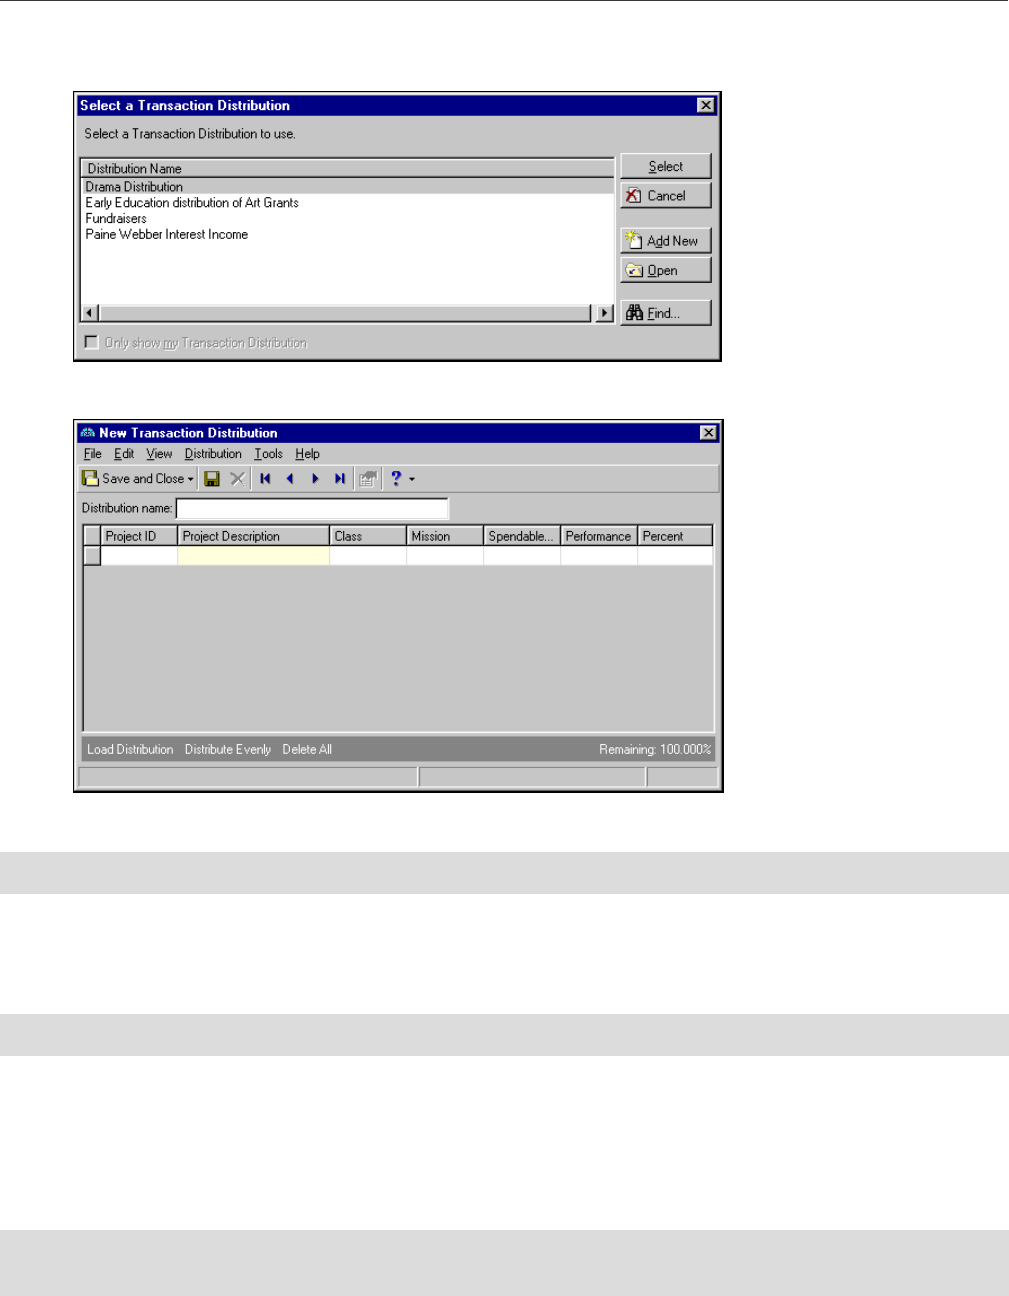
2. Click the Load Distribution button once and select from Table. The Select a Transaction Distribution
screen appears.
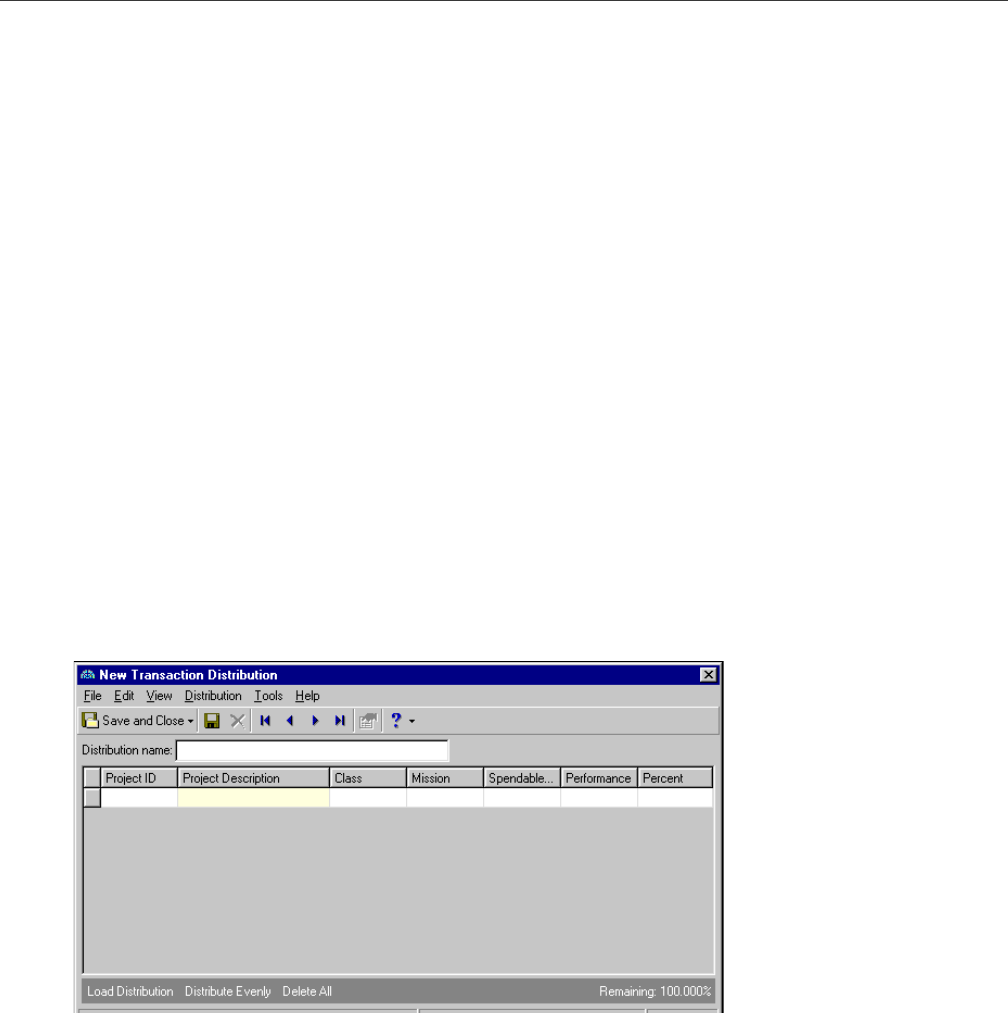
3. Click Add New. The New Transaction Distribution screen appears.
4. In the Distribution Name field, enter a name to help identify this distribution.
5. In the distribution grid, you can enter a project ID if you have the optional Projects and Grants module.
Once you enter the project ID, the project description appears automatically.
6. In the Class column, enter a class if you want to distribute transactions by class. Classes are defined in
Configuration.
7. If you have the optional module Projects and Grants and your organization uses transaction codes, the
codes should appear in the grid. Select the appropriate transaction codes from the drop down list in the
corresponding cells. See the Project, Grant and Endowment Management chapter for more information.
8. In the Percent field, enter the percent you want to distribute.
9. To distribute percents evenly over the specified projects, classes, and/or transaction codes in the grid,
click Distribute Evenly.
Tip: In the distribution grid, you can use the ENTER key, as well as the TAB key, to move from cell to cell.
Tip: To move between rows in a grid column, press CTRL + the up or down arrow key.
Tip: Once you create a transaction distribution template in Configuration or Journal Entry, you can load that
template in future batch records to save time.
12
C
HAPTER
10. If you make a mistake or want to enter new distributions, you can click Delete All to clear the distribution
grid.
11. Once you enter the distributions you want, select File, Save and Close. The new transaction distribution
appears in the distribution grid on the batch record screen.
Creating a Transaction Distribution Template Using an Existing
Template
With this process, you can save time by using a previously created distribution template as the basis of a new
distribution template. Once you create the distribution, you can make any changes that are necessary. This
process is helpful if you want to create a distribution similar to one already in the system.
The purpose of using transaction distribution templates in Journal Entry is to quickly and efficiently distribute
activity to projects, classes, and transaction codes. Distribution templates are especially helpful if you commonly
distribute amounts to the same set of projects, classes, and transaction codes.
The following procedure walks you through the steps involved in creating a transaction distribution from a batch
record in Journal Entry, by using a previously created distribution template. You can also create a transaction
distribution using an existing template in Configuration, which you can then load from a batch record. See the
Configuration Guide for General Ledger for more information.
Creating a transaction distribution template using an existing template
1. From an open batch record in Journal Entry, select the Distributions tab.
2. Click Load Distribution and select from Table. The Select a Transaction Distribution screen appears.
3. Click Add New. The New Transaction Distribution screen appears.
J
OURNAL
E
NTRY
13
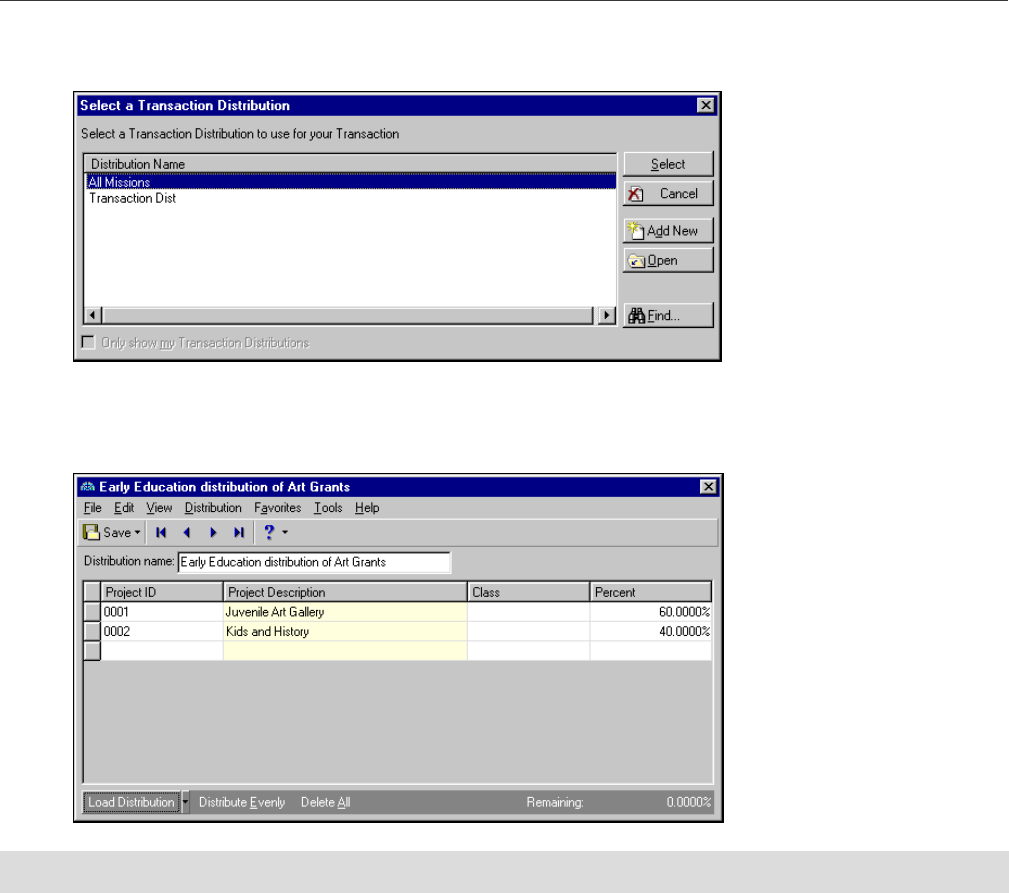
4. To load a previously created distribution, click Load Distribution. The Select a Transaction Distribution
screen appears again.
5. In the Distribution Name box, highlight the distribution template you want to use as the basis for your
new template and click Select. The template is loaded into the transaction distribution screen.
6. In the Distribution Name field, enter a new name to identify this distribution.
7. In the Project ID column of the distribution grid, you can enter projects to which you want to distribute
transactions. You can enter projects only if you have the optional Project and Grants module. Once you
enter the a project ID, the project description is automatically displayed in the Project Description
column.
8. In the Class column, select the classes to which you want to distribute transactions. Classes are defined in
Configuration.
9. If you have the optional Project and Grants module and your organization uses transaction codes, the
codes should appear as columns in the grid. Enter the appropriate transaction codes in the corresponding
cells. See the Project, Grant and Endowment Management chapter for more information.
10. In the Percent field, enter or change the percent you want to distribute.
11. To distribute percentages evenly over the specified projects, classes, and/or transaction codes in the grid,
select Distribute Evenly.
12. If you make a mistake or want to enter new distributions, you can click Delete All to clear the distribution
grid.
Tip: In the distribution grid, you can use the ENTER key, as well as the TAB key, to move from cell to cell.

14
C
HAPTER
13. Once you enter the distributions you want, select File, Save and Close. The new transaction distribution
appears in the distribution grid on the batch record screen and is also available to load from additional
batch records.
Creating Regular Batches
When you create a batch, you compile a group of debit and credit transactions in order to post to your ledger
accounts. Transactions are entries into the ledger that indicate to the program what account to debit or credit.
Entering transactions into a batch allows you to group transactions according to source, date, time, and function.
A batch may contain hundreds of transactions or as few as two.
In General Ledger, you can enter transactions into Journal Entry batches before locking balances, but you cannot
post batches unless all funds are locked for all accounts used in those transactions. You can, however, lock only
one fund to start entering transactions, but you can post those batches only if all transactions use accounts only
from that locked fund. If you use accounts from other funds you will receive an error message.
You can create traditional batches, which are referred to as “regular batches” in General Ledger, to post
transactions. Once you create a batch, you can enter transactions, distributions, attributes, or notes. As a
time-saving measure, you can use the right-click menu to sort and reorder columns in the batch grid. You can also
include or exclude specific columns of information. This is especially helpful for hiding columns your organization
does not use. For more information, see the “Sorting Information” section in the Program Basics chapter.
Creating and using default sets is an efficient way to speed data entry. A default set can contain various batch
information, including the account number, posting date, and type.
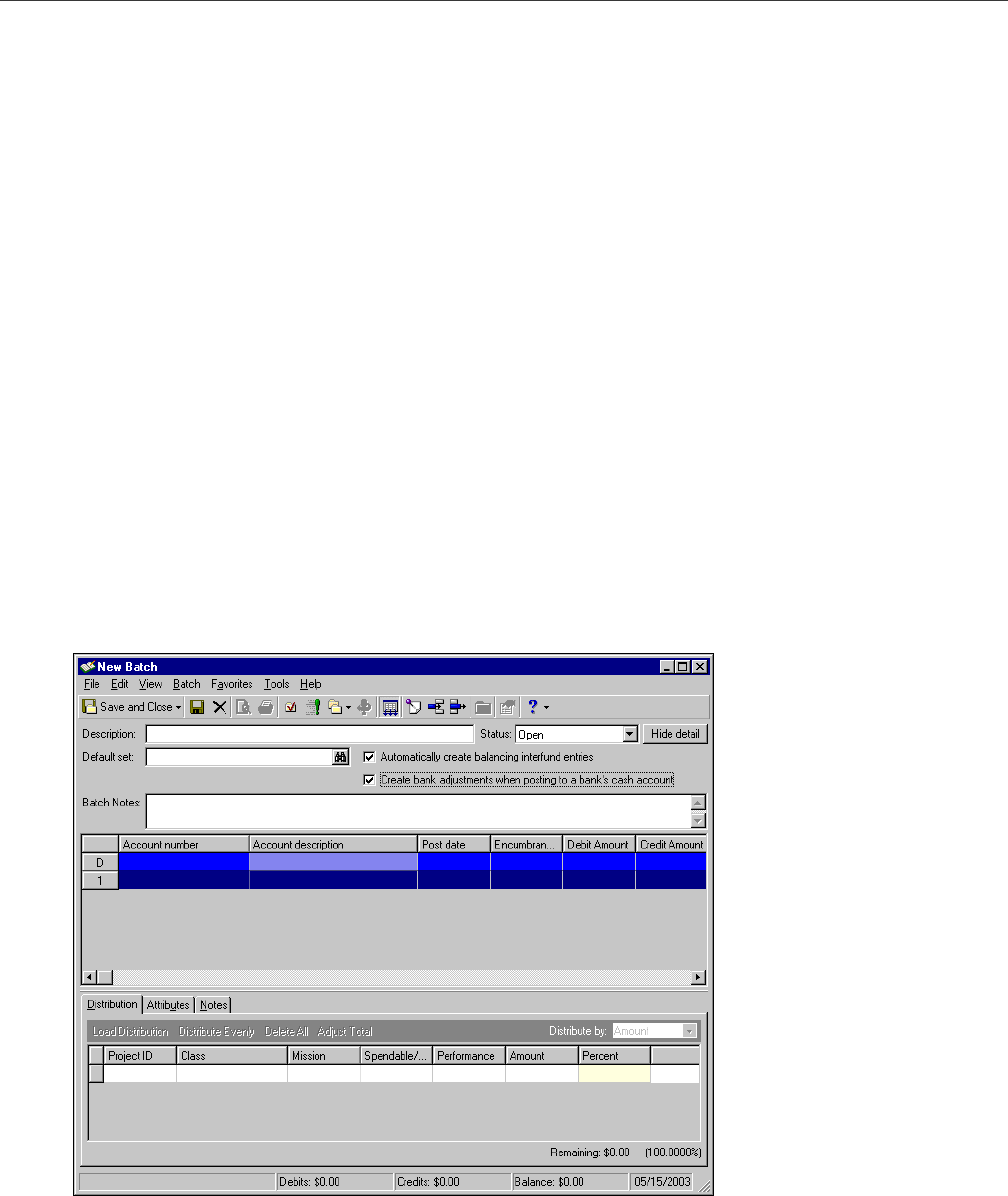
Creating a regular batch
1. From the navigation bar, select Journal Entry. The Journal Entry page appears.
2. In the Batch type field, select “Regular Batch”.
Note: If you are unsure what command a toolbar button on a batch record represents, you can place your
cursor directly over the button to access a pop-up description of the button. You must have the Show tooltips
option marked on the General tab of the Options screen for the tooltips to appear.
Note: By setting user options on the Records tab of the Options screen, you can specify options for journal
entries. For example, you can have the batch screen maximize automatically when opened, set a default tab
and row, and other options.
J
OURNAL
E
NTRY
15
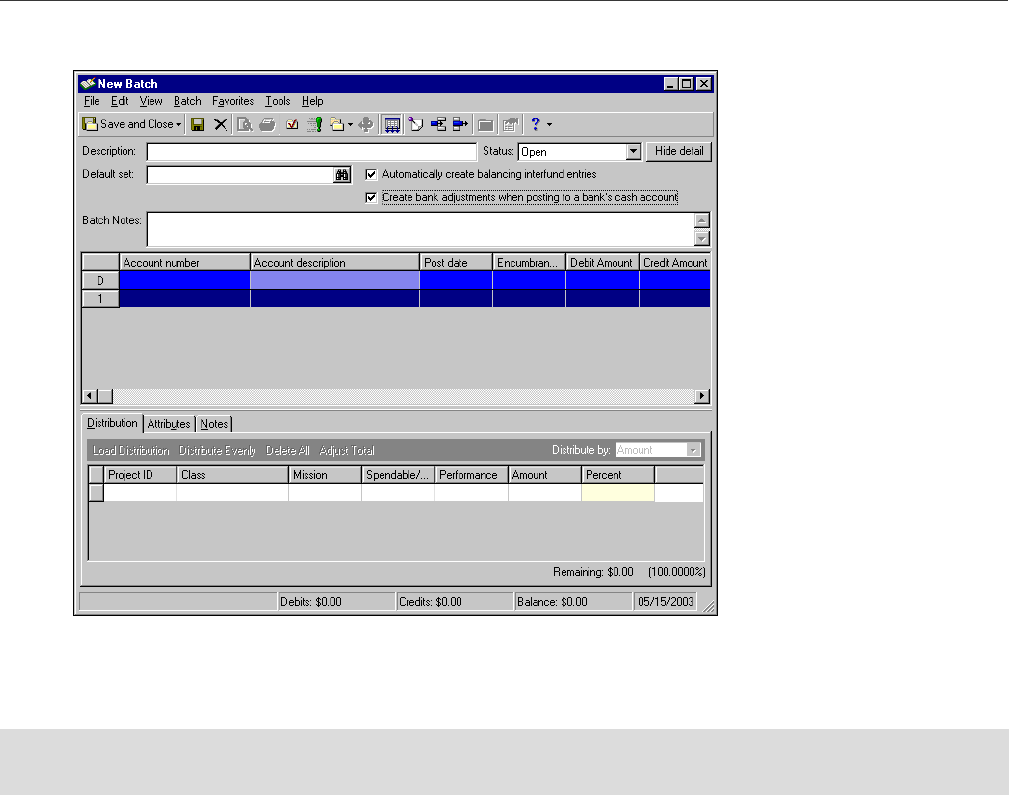
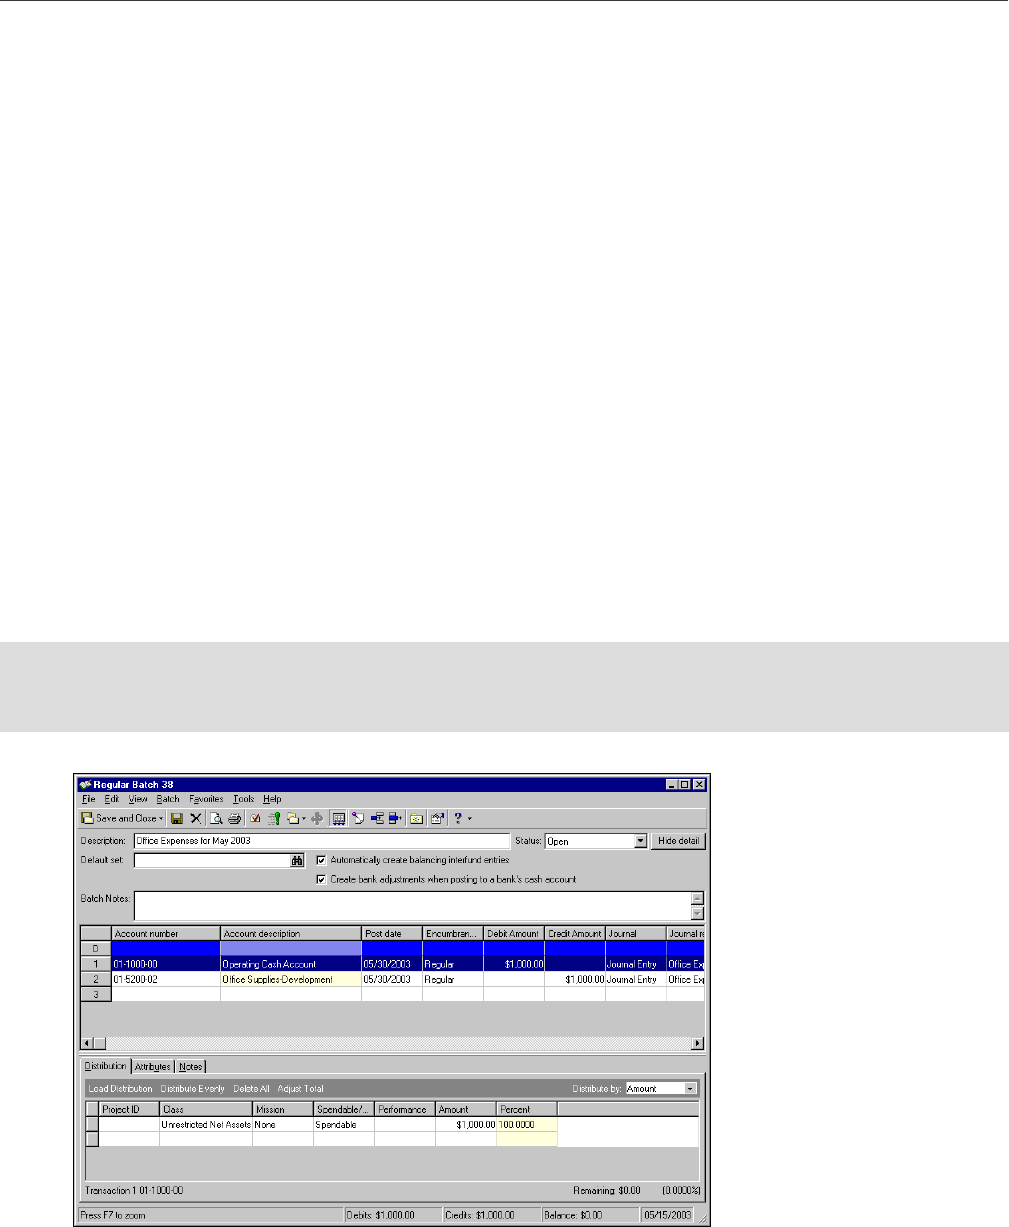
3. On the action bar, click New Regular Batch. The New Batch screen appears.
4. In the Description field, enter a description for this batch. For example, “Office Expenses for October
2003”.
5. In the Status field, select “Open”, “Pending Approval”, or “Approved” as the status of this batch.
6. If you want to use a default set for this batch, click the binoculars to access the Field default sets screen.
Select the default set you want to use and click OK. When you choose a default set, the values appear in
the Default (D) row of the journal entry grid. When entering transactions, you can quickly enter the
default value in additional cells by placing your cursor in a cell and pressing F2. See “Creating Default
Sets” on page 5 for more information.
7. If you want to automatically create balancing interfund entries, mark the corresponding checkbox.
8. To automatically create bank adjustments when posting to a bank’s cash account, mark the corresponding
checkbox. This option is not marked by default. If you want the Create bank adjustments when posting to
a bank’s cash account checkbox to be marked by default when adding new batch records, you can do that
from the Options screen, which is accessed from the Tools menu. There is also a business rule your
organization can set to enable or disable this checkbox.
9. In the Batch notes field, enter any notes you want associated with this batch.
10. To hide the Default set and Batch notes fields, as well as the Automatically create balancing interfund
entries checkbox, click Hide Detail.
11. Once you have entered the batch detail information, you can continue by entering batch transactions
and/or distributions, or you can click Save and Close and return to the batch at a later date.
Note: Using a default set enables you to quickly enter duplicate transaction information in a batch. See the
“Creating Default Sets” section for more information.
16
C
HAPTER
Entering Transactions in a Regular Batch
Once you create a regular batch, you can enter credit and debit transactions. However, you cannot post a batch
of transactions unless all funds are locked for all accounts used in those transactions. You can enter transactions
using several different methods. You can manually enter transactions into the journal entry grid, you can use the
New Transaction screen to enter transactions individually, or you can import transactions from an external
source.
Manually Entering Transactions in a Regular Batch. This procedure takes place from the batch record.
You manually enter all your batch transactions by entering transaction details in columns and rows in the
journal entry grid.
Entering Transactions in a Regular Batch Using the New Transaction Screen. This procedure is an
alternative to manually entering transactions in a regular batch. Instead of entering each transaction in the
grid on the batch record, you enter each transaction using the New Transaction screen. The benefit of using
the New Transaction screen is that you see all journal entry grid information at once, instead of having to
scroll through the grid to see each column.
Using the New Transaction screen, you can enter transaction distributions, assign attributes, and enter
transaction notes. The procedures for entering transaction distributions, attributes, and notes are the same
as if you were entering them from the batch record.
This section contains procedures for manually entering transactions into the journal entry grid, as well as using
the New Transaction screen to enter transactions on a regular batch record. For information and procedures for
importing transactions into a batch, see the Importing Records chapter of the Administration Guide for The
Financial Edge.
Manually entering transactions in a regular batch
1. From the Journal Entry page, open the regular batch record for which you want to enter transactions.
Tip: If you chose a default set for this batch, the values appear in the Default (D) row of the journal entry grid.
When entering transactions, you can quickly enter the default value in additional cells by placing your cursor in
a cell and pressing F2.

J
OURNAL
E
NTRY
17
2. In the next available row of the journal entry grid, enter the account number affected by this transaction.
You can search for account number segments or account numbers by selecting the corresponding
binoculars button in the field. Once you select the account number, the program displays the account
description.
3. In the Post Date column, enter the date you want to post this transaction, which means to transcribe and
summarize detailed transaction data from journals or subledgers into the general ledger.
4. In the Type column, select a transaction type to indicate whether this transaction is “Regular” or
“Encumbrance”. The “Encumbrance” option is available only if your accounting system is set up for
encumbrance accounting.
5. Enter the debit amount or credit amount in the corresponding cell.
6. In the Journal column, select the source you want to use. You can also enter a journal reference in the
corresponding cell. The list of sources available is defined in the Journal table of Configuration. The
journal reference provides transaction detail information about reports.
7. If you have the optional Projects and Grants module, you can assign debits and/or credits to a project. In
the Project ID column, enter the projects to which you want to assign transactions. Click the binoculars to
look up a specific project. The project description is displayed in the Project Description column once you
select a project ID.
8. You can also enter a class and reverse on date for this batch transaction. The reverse on date creates a
reversing entry in the batch when the next batch is saved. The reversing transaction cannot be edited,
but it can be saved. Enter each in the appropriate row of the journal entry grid.
9. You can repeat this procedure to enter additional transactions. Once you have entered the batch
transactions, you can continue by entering distributions, or you can click Save and Close and return to the
batch at a later date.
Entering transactions using the New Transaction screen
1. From the Journal Entry page, open the regular batch record for which you want to enter transactions.
Tip: To make data entry easier and more efficient, you can double-click a cell in the Account Description
column to open the New Transaction screen. This screen displays all the journal entry grid information at once.
You can enter all your transaction information here, then click Save and Close to enter the information into the
grid. See “Entering transactions using the New Transaction screen” on page 17 for more information.
Tip: To make data entry easier and more efficient, you can double-click a cell in the Project Description
column to open the New Transaction screen. This screen displays all the journal entry grid information at once.
You can enter all your transaction information here, then click Save and Close to enter the information into the
grid.
Tip: To move between rows in a grid column, press CTRL + the up or down arrow key.

18
C
HAPTER
2. In the row of the journal entry grid where you want to enter the transaction, double-click a cell in the
Account description column. The New Transaction screen appears.
3. In the Account Number field, enter the account number affected by this transaction. You can search for
an account number segment or account number by selecting the corresponding icon in the field. Once
you select the account number, the program displays the account description.
4. In the Reference field, you can enter a reference for this account. This entry becomes the Journal
reference on the main grid.
5. In the Transaction type field, select “Credit” or “Debit”.
6. In the Type field, select a type to indicate whether this transaction is “Regular” or “Encumbrance”. The
Type field is visible only when your accounting system is set up for encumbrance accounting.
7. In the Amount field, enter the amount of the transaction you want to credit or debit.
8. In the Journal field, select a journal for this transaction.
9. In Post Date field, enter the date you want this transaction to post, which means to transcribe and
summarize detailed transaction data from journals or subledgers into the general ledger.
10. In the Reverse on Date field, you can enter a date to reverse the transaction creating a new transaction
with the same characteristics, excluding post date, debit/credit, and journal reference.
11. If you want to assign optional transaction distributions, attributes, and/or notes to this transaction, you
can enter them on the Distribution tab, Attributes tab, and/or the Notes tab.The procedures for entering
transaction distributions, attributes, and notes are the same as if you were entering them from the batch
record. See “Entering transaction distributions in a regular batch” on page 19 for information.
12. Once you complete this transaction, you can create another transaction for the next row in the grid by
saving the current transaction and selecting File, New. Another New Transaction screen appears allowing
you to enter transaction details for an additional transaction.
13. To return to the batch record screen, click Save and Close. The new transactions you entered appear in
the batch record journal entry grid.
Entering Transaction Distributions in a Regular Batch
Entering transaction distributions is optional and necessary only if you want to distribute transactions to projects,
classes, and or transaction codes. You can distribute transactions by project and transaction code only if you have
the optional module Projects and Grants, edited a fund in preparation, and defined transaction codes in
Configuration. Distributions and attributes can be assigned to each transaction in your batch. Some attributes
may be required if designated as such in Configuration. If you have the appropriate security rights you can also
enter notes regarding a specific transaction.
J
OURNAL
E
NTRY
19
When entering distributions, you can use previously created transaction distribution templates to quickly and
efficiently distribute activity to projects, classes, and transaction codes. Distribution templates are especially
helpful if you commonly distribute amounts to the same set of projects, classes, and transaction codes.
Entering transaction distributions in a regular batch
1. From the Journal Entry page, open the regular batch record for which you want to enter transaction
distributions.
2. Highlight the transaction for which you want to assign distributions and select the Distribution tab to
distribute activity to projects, classes, or transaction codes. From the Distribution tab you can you can
load distributions previously created in Configuration or load one from a previous transaction. You can
also distribute funds evenly and designate if the distribution is by amount or percent.
3. To load a distribution click the Load Distribution button once and select one of the following:
• “from Table”: If you choose this method, the Select a Transaction Distribution screen appears. From
this screen, highlight the distribution you want and click Select. To add a new distribution to the table,
click Add New. See “Creating Transaction Distribution Templates” on page 10 for more information.
• “from Previous”: If you choose this method, the Load Distribution screen appears and you can load a
distribution from another transaction by entering a specific transaction line number. You can then
make changes to the distribution grid.
4. You can distribute transactions to projects, classes, or transaction codes by amount or percentage. In the
Distribute by field, select “Amount” or “Percent”. If you select “Amount”, you can distribute transactions
by amount only and the Percent column is disabled. If you select “Percent”, you can distribute
transactions by percentage only and the Amount column is disabled
5. Enter the project ID, class, and/or transaction codes in the corresponding cells of the distribution grid.
6. Enter the amounts or percentages you want to distribute in the “Amount” or “Percent” column
respectively. You can distribute transactions by amount or percentage, but not by both.
7. To distribute amounts evenly to the specified projects, classes, or transaction codes, select Distribute
Evenly.
8. Click Adjust Total to apply the distribution total to the transaction amount.
Note: Assigning transaction attributes is an optional procedure. Attributes are used for grouping and enable
you to create more detailed reports.
20
C
HAPTER
9. If you make a mistake or want to enter new distributions, you can click Delete All to clear the distribution
grid.
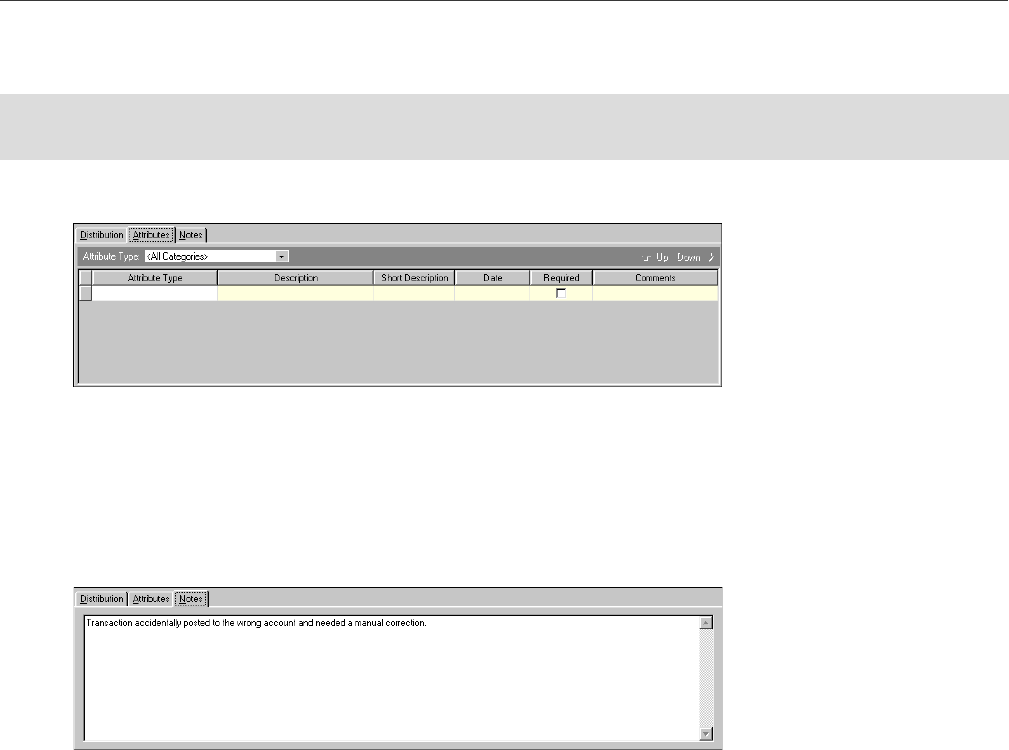
10. If you want to assign transaction attributes, select the Attributes tab. Some attributes may be required
based on selections made in Configuration.
11. In the Attribute Type field, select the type of attribute you want to attach to this record. To assign
multiple transaction attributes, enter each attribute in the attributes grid. Transaction attributes are
defined in Configuration.
12. If you want to enter notes regarding the distributions, select the Notes tab and enter any notes or
comments you want associated with the distributions. Adding transaction distribution notes is an
optional step. Notes are helpful for keeping track of additional distribution information that may not be
apparent from simply looking at the record.
13. Once you enter the distributions, attributes, and notes you want, click Save and Close to save the
distributions and return to the Journal Entry page.
Creating Recurring Batches
If you need to create batches of transactions that occur on a regular basis, you can save time by using recurring
batches. Recurring batches are like templates for quickly creating regular batches. Once you create a recurring
batch, you can use it repeatedly to create regular batches of transactions. This feature not only saves time, but
can also prevent data entry errors. There are two types of recurring batches: recurring amount and recurring
percent.
Recurring amount batch. A recurring amount batch is useful if you have transactions that occur on a regular
basis. If the amount posted to these accounts remain constant, amounts can be entered as well. For example,
an organization may use a recurring amount batch to post utility bills or lease payments without having to
create a new batch for every instance.
Once you create a recurring amount batch and save, you can continue working in the open batch by entering
the recurring transactions you want to include, or you could save and close the batch and finish entering
transactions at a later date. With recurring amount batches you can also enter specific transaction
distributions on the Distributions tab, assign attributes on the Attributes tab, and enter notes regarding the
distributions on the Notes tab.
Note: Assigning transaction attributes is an optional procedure. Attributes are helpful when generating
specific reports.
J
OURNAL
E
NTRY
21
Recurring percent batch. A recurring percent batch is useful if you have transactions that occur on a regular
basis that require the same percentage of debit and credit amounts. For example, an organization may have a
specific grant that receives a percentage of funds. That organization can use a recurring percent batch to post
that recurring grant percentage without having to create a new batch for every instance.
Once you create a recurring percent batch and save, you can continue working in the open batch by entering
the recurring transactions you want to include, or you can save and close the batch and finish entering
transactions at a later date. With recurring percent batches you can also enter specific transaction
distributions on the Distributions tab, assign attributes on the Attributes tab, and enter notes regarding the
distributions on the Notes tab.
This section provides information and procedures for creating both types of recurring batches. Once you create a
recurring batch, you can enter the recurring transactions. You can also complete a number of optional tasks that
can provide benefits to your organization if used successfully. One optional task is entering transaction
distributions, which is necessary only if you want transactions to projects, classes, and or transaction codes. You
can distribute transactions by project and transaction code only if you have the optional Projects and Grants
module. Other optional tasks include assigning transaction attributes and entering notes for the distributions.
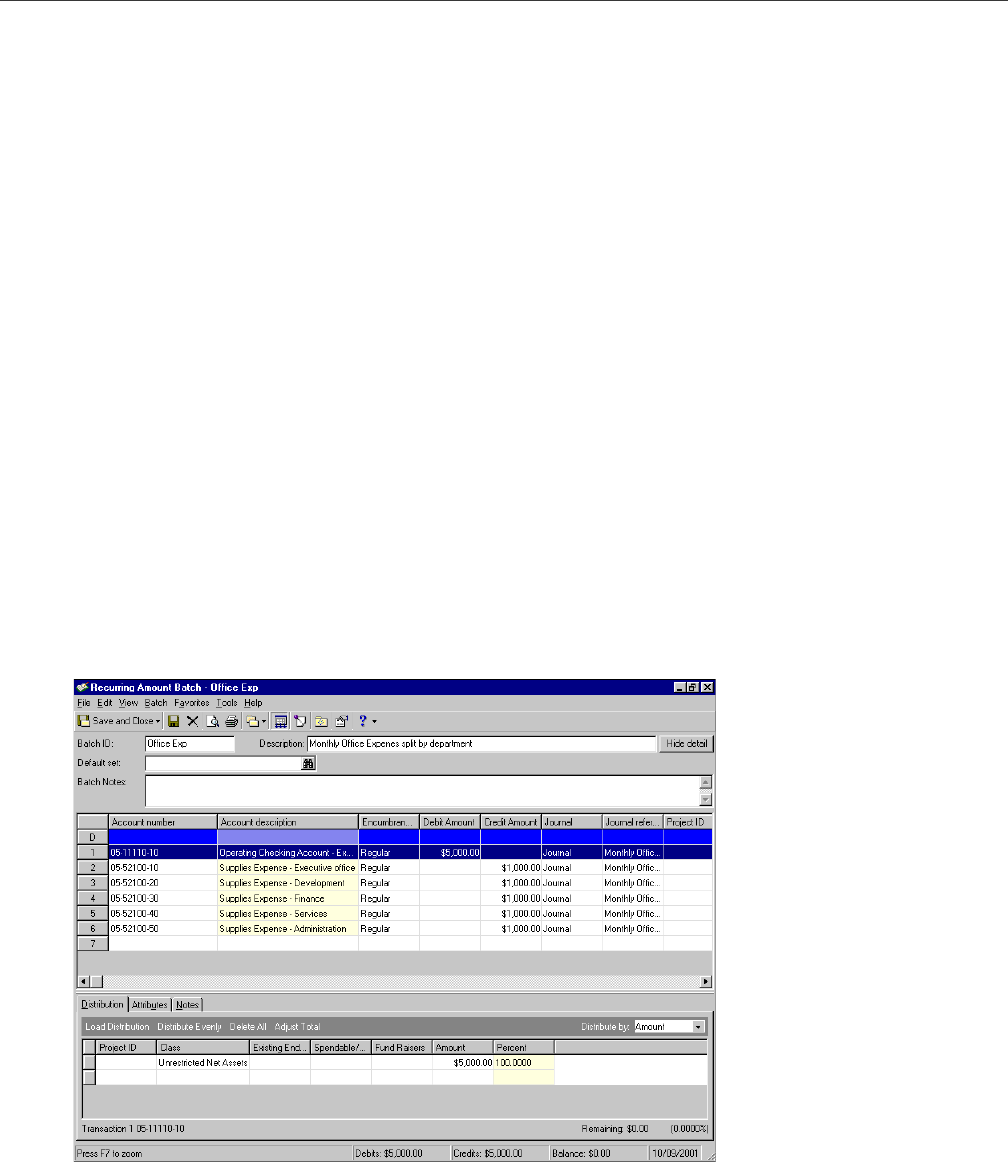
Creating a recurring amount batch
1. From the navigation bar, select Journal Entry. The Journal Entry page appears.
2. In the Batch type field, select “Recurring Amount Batch”.
Tip: You can create default sets to speed data entry when creating a batch. A default set can contain various
batch information, including the account number, posting date, and type.
22
C
HAPTER
3. On the action bar, click New Recurring Amount Batch. The New Recurring Amount Batch screen appears.
4. Enter the batch ID and the description of the batch in the corresponding fields.
5. If you want to use a default set for this recurring batch, click the binoculars to search for one. If you
choose a default set, the values appear in the Default (D) row of the journal entry grid. When entering
transactions, you can quickly enter the default value in additional cells by placing your cursor in a cell and
pressing F2.
6. In the Batch notes field, enter any comments you want to associate with this batch.
7. Once you have entered a default set and/or batch notes, you can hide the Default set and Batch notes
fields by clicking Hide Detail.
8. Once you have entered the batch detail information, you can continue by entering recurring transactions
and/or distributions, or you can click Save and Close and return to the batch at a later date.
Creating a recurring percent batch
1. Select Journal Entry from the navigation bar. The Journal Entry page appears.
Tip: You can create default sets to speed data entry when creating a batch. A default set can contain various
batch information, including the account number, posting date, and type.
J
OURNAL
E
NTRY
23
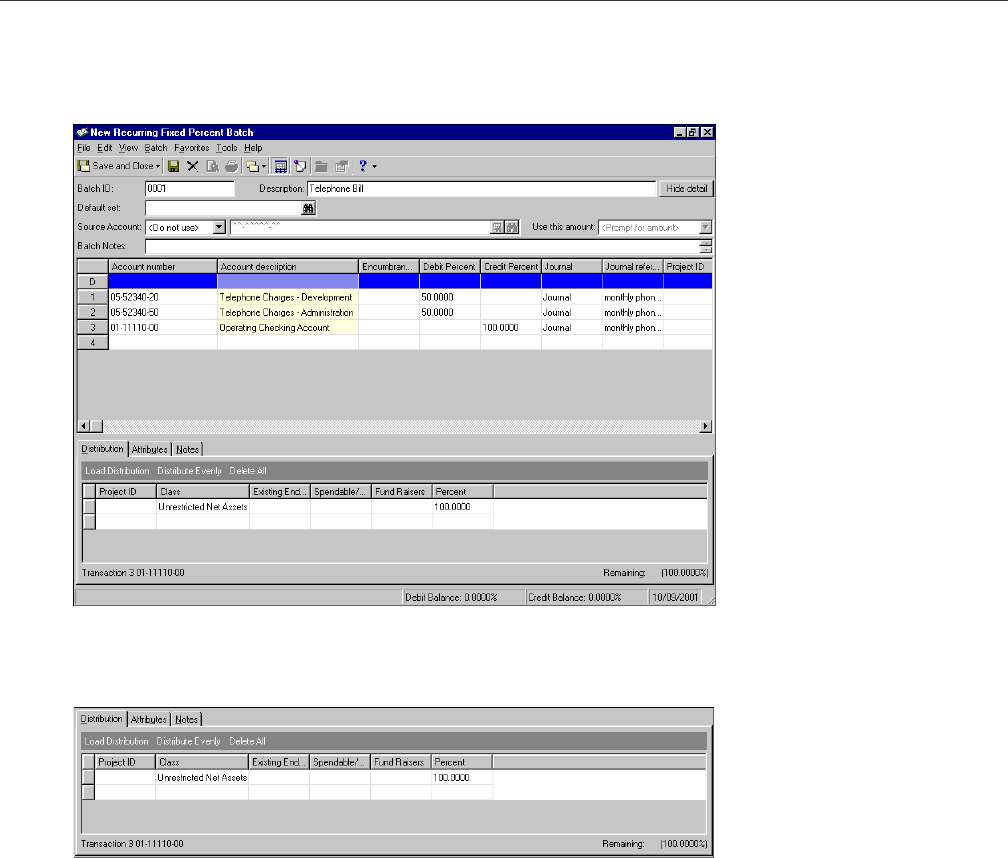
2. In the Batch type field, select “Recurring Percent Batch”.
3. On the action bar, click New Recurring Percent Batch. The New Recurring Percent Batch screen appears.
4. Enter the batch ID and the description of the batch in the corresponding fields.
5. If you want to use a default set for this recurring batch, click the binoculars to search for one. If you
choose a default set, the values appear in the Default (D) row of the journal entry grid. When entering
transactions, you can quickly enter the default value in additional cells by placing your cursor in a cell and
pressing F2.
24
C
HAPTER
6. In the Source Account field, you can choose to credit or debit a specific source account for a recurring
percent batch. If you choose to define a source account, all of the debit or credit amount goes to this
source account. To designate a source account, select “Credit” or “Debit”. If you do not want to use a
source account, select “<Do not use>”. You also need to enter an account number in the appropriate field.
You can use the binocular buttons to search for account segments or a specific account.
7. If you entered a source account, you also need to enter a selection in the Use this amount field. Your
choices are “<Prompt for amount>”, “Account balance”, or “Net change”.
8. In the Batch notes field, enter any comments you want to associate with this batch.
9. Once you have entered a default set and/or batch notes, you can hide the Default set and Batch notes
fields by clicking Hide Detail.
10. Once you have entered the batch detail information, you can continue entering recurring transactions
and/or distributions, or you can click Save and Close and return to the batch at a later date.
Entering Transactions in a Recurring Batch
Once you create a recurring amount or percent batch, you can manually enter recurring credit and debit
transactions by amount or percent, depending on the type of recurring batch you created. The process for
entering transactions in a recurring batch is similar to entering transactions in regular batch except the New
Transaction screen is not available for entering transactions into a recurring batch.
Entering recurring amount batch transactions
1. From the Journal Entry page, open the recurring amount batch record for which you want to enter
transactions.
2. In the Account Number column of first available row in the journal entry grid, enter the account number
affected by this transaction. You can search for account number segments or account numbers by
selecting the corresponding binocular buttons in the field. Once you select the account number, the
program displays the account description.
Note: The New Transaction screen is not available for entering transactions into a recurring batch.
J
OURNAL
E
NTRY
25
3. In the Type column, select a transaction type to indicate whether this transaction is “Regular” or
“Encumbrance”. The “Encumbrance” option is available only if your accounting system is set up for
encumbrance accounting.
4. Enter the debit percent or credit percent in the corresponding cell. If you have specified a source account,
either the debit percent or credit percent will not be editable.
5. In the Journal column, select the source you want to use. You can also enter a journal reference in the
corresponding cell. The list of sources available is defined in the Journal table of Configuration. The
journal reference provides transaction detail information about reports.
6. If you have the optional Projects and Grants module, you can assign debits and/or credits to a project. In
the Project ID column, enter a project ID. Click the binoculars button to look up a specific project. The
project description is displayed once you select a project ID.
7. In the Class column, you can enter a class to which you want to distribute this batch transaction. Select a
class from the appropriate row of the journal entry grid.
8. You can repeat this procedure to enter additional transactions. Once you have entered the batch
transactions, you can continue by entering distributions, or you can click Save and Close and return to the
batch at a later date.
Entering recurring percent batch transactions
1. From the Journal Entry page, open the recurring percent batch record for which you want to enter
transactions.
2. In the Account Number column of the first available row in the journal entry grid, enter the account
number affected by this transaction. You can search for account number segments and/or account
numbers by clicking the corresponding binoculars button in the field. Once you select the account
number, the program displays the account description.
3. In the Type column, select a transaction type to indicate whether this transaction is “Regular” or
“Encumbrance”. The “Encumbrance” option is available only if your accounting system is set up for
encumbrance accounting.
4. Enter the debit percent or credit percent in the corresponding cell.
26
C
HAPTER
5. In the Journal column, select the source you want to use. You can also enter a journal reference in the
corresponding cell. The list of sources available is defined in the Journal table of Configuration. The
journal reference provides transaction detail information about reports.
6. If you have the optional Projects and Grants module, you can assign debits and/or credits to a project. In
the Project ID column, enter a project ID. Click the binoculars button to look up a specific project. The
project description is displayed once you select a project ID.
7. In the Class column, you can enter a class to which you want to distribute this batch transaction. Select a
class from the appropriate row of the journal entry grid.
8. You can repeat this procedure to enter additional transactions. Once you have entered the batch
transactions, you can continue by entering distributions, or you can click Save and Close and return to the
batch at a later date.
Entering Transaction Distributions in a Recurring Batch
Entering transaction distributions is optional and necessary only if you want to distribute transactions to projects,
classes, and or transaction codes. You can distribute transactions by project and transaction code only if you have
the optional module Projects and Grants. Distributions and attributes can be assigned to each transaction in your
batch. You can also enter notes regarding a specific transaction.
When entering distributions, you can use previously created transaction distribution templates to quickly and
efficiently distribute activity to projects, classes, and transaction codes. Distribution templates are especially
helpful if you commonly distribute transactions to the same set of projects, classes, and transaction codes.
Entering recurring amount batch transaction distributions
1. From the Journal Entry page, open the recurring amount batch record for which you want to enter
distributions.
J
OURNAL
E
NTRY
27
2. Highlight the transaction for which you want to assign distributions and access the Distribution tab to
distribute activity to projects, classes, or transaction codes. From this tab you can you can load
distributions previously created in Configuration or load one from a previous transaction. You can also
distribute funds evenly and designate if the distribution is by amount or percent.
3. To load a distribution click the Load Distribution button once and select one of the following:
• “from Table”: If you choose this method, the Select a Transaction Distribution screen appears. From
this screen, highlight the distribution you want and click Select. To add a new distribution to the table,
click Add New. See “Creating a Transaction Distribution Template Using an Existing Template” on
page 12 for a detailed procedure.
• “from Previous”: If you choose this method, the Load Distribution screen appears and you can load a
distribution from another transaction by entering a specific transaction line number. You can then
make changes to the distribution grid.
4. You can distribute transactions to projects, classes, or transaction codes by amount or percent. In the
Distribute by field, select “Amount” or “Percent”. If you select “Amount”, you can distribute transactions
by amount only and the percent column is disabled. If you select “Percent”, you can distribute
transactions by percentage only and the amount column is disabled.
5. Enter the project ID, class, and/or transaction codes in the corresponding cells of the distribution grid.
6. Enter the amount or percentage you want to distribute in the corresponding columns.
7. To distribute amounts or percentages evenly to the specified projects, classes, or transaction codes, click
Distribute Evenly.
8. Click Adjust Total to apply the distribution total to the transaction amount.
9. If you make a mistake or want to enter new distributions, you can click Delete All to clear the distribution
grid.
10. If you want to assign transaction attributes, select the Attributes tab.
11. In the Attribute Type field, select the type of attribute you want to attach to this transaction. To assign
multiple transaction attributes, enter each attribute in the attributes grid. Transaction attributes are
defined in Configuration.
12. If you want to enter notes regarding the distributions, select the Notes tab and enter any notes or
comments you want associated with the transaction. Adding transaction distribution notes is an optional
step. Notes are helpful for keeping track of additional transaction information that may not be apparent
from simply looking at the record.
13. Once you enter the distributions, attributes, and notes you want, click Save and Close to save the
distributions and return to the Journal Entry page.
28
C
HAPTER
Entering recurring percent batch transaction distributions
1. From the Journal Entry page, open the recurring percent batch record for which you want to enter
distributions.
2. Highlight the transaction for which you want to assign distributions and access the Distribution tab to
distribute activity to projects, classes, or transaction codes. From this tab you can you can load
distributions previously created in Configuration or load one from a previous transaction.
3. To load a distribution click the Load Distribution button once and select one of the following:
• “from Table”: If you choose this method, the Select a Transaction Distribution screen appears. From
this screen, highlight the distribution you want and click Select. To add a new distribution to the table,
click Add New. See the Creating Distributions section for a detailed procedure.
• “from Previous”: If you choose this method, the Load Distribution screen appears and you can load a
distribution from another transaction by entering a specific transaction line number. You can then
make changes to the distribution grid.
4. You can distribute transactions to projects, classes, or transaction codes by amount or percent. In the
Distribute by field, select “Amount” or “Percent”. If you select “Amount”, you can distribute transactions
by amount only and the percent column is disabled. If you select “Percent”, you can distribute
transactions by percentage only and the amount column is disabled.
5. Enter the project ID, class, and/ or transaction codes in the corresponding cells of the distribution grid.
6. Enter the amount or percentage you want to distribute in the corresponding columns.
7. To distribute percentages evenly to the specified projects, classes, or transaction codes, select Distribute
Evenly.
8. Click Adjust Total to apply the distribution total to the transaction amount.
J
OURNAL
E
NTRY
29
9. If you make a mistake or want to enter new distributions, you can click Delete All to clear the distribution
grid.
10. If you want to assign transaction attributes, select the Attributes tab.
11. In the Attribute Type field, select the type of attribute you want to attach to this record. To assign
multiple transaction attributes, enter each attribute in the attributes grid. Transaction attributes are
defined in Configuration.
12. If you want to enter notes regarding the distributions, select the Notes tab and enter any notes or
comments you want associated with the distributions. Adding transaction distribution notes is an
optional step. Notes are helpful for keeping track of additional transaction information that may not be
apparent from simply looking at the record.
13. Once you enter the distributions, attributes, and notes you want, click Save and Close to save the
distributions and return to the Journal Entry page.
Using a Recurring Batch to Create a New Batch
Once you create a recurring batch, you can use it as a template to create new regular batches of transactions. The
type of template you use determines the information you need to enter when creating a new batch. For example,
if you use a fixed percent template, you will enter a post date and an account balance date.
Using a recurring batch of transactions to create a new batch
1. From the navigation bar, select Journal Entry. The Journal Entry page appears.
2. In the Batch type field, select “Regular Batch”.
3. Click New Regular Batch on the action bar. The New Batch screen appears.
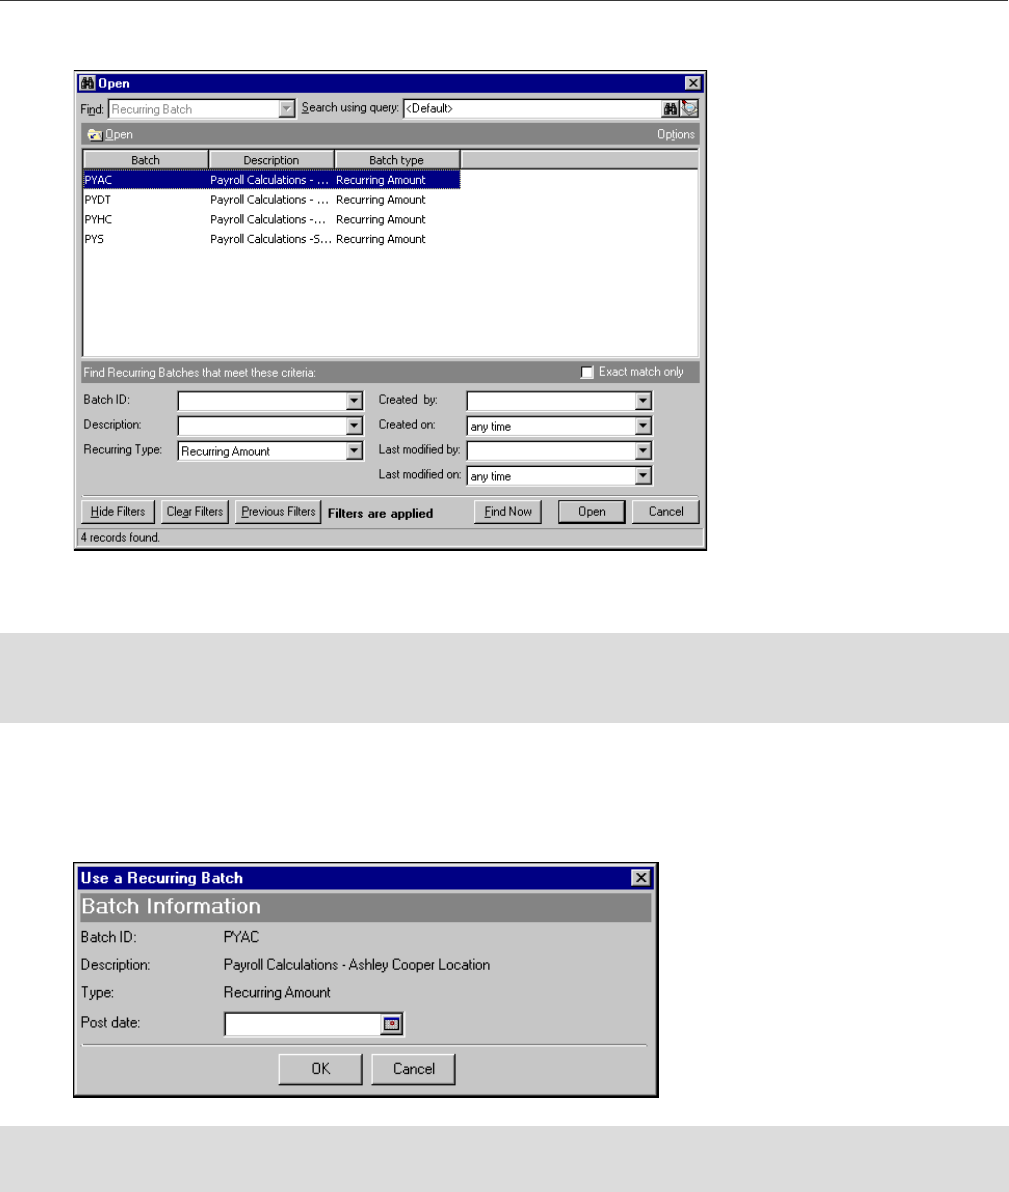
30
C
HAPTER
4. Select Batch, Use a Recurring Batch. The Open screen appears.
5. Enter the appropriate filters to help narrow your search. You can enter a batch ID, description, and/or
batch type. In the example above, we filtered by recurring batch type.
6. Click Find Now. If the search criteria you entered matches a recurring batch in the database, the results
appear in the grid on the Open screen. If you entered the first few letters or characters in the criteria
fields, or used general criteria that apply to several records, more than one record may appear in the grid.
7. Once the records are listed, you can open a record by highlighting it and clicking Open. The Use a
Recurring Batch screen appears.
8. Enter a post date in the Post Date field and a transaction amount in the Transaction amount field if
applicable.
Note: We recommend you search by one or two of the most helpful criteria types because the results that
appear in the grid must match all criteria you enter. Adding too much criteria information in the filter fields can
actually prevent you from finding a record.
Note: When you post a transaction, the program transcribes and summarizes detailed transaction data from
journals or subledgers into the general ledger.
J
OURNAL
E
NTRY
31
9. Click OK. The recurring batch information appears in the new batch.
10. Now enter the batch detail information. You can also enter additional transactions, delete transactions,
and edit any distributions.
11. Once you make the appropriate changes, click Save and Close to save the batch and return to the Journal
Entry screen.
Managing Batches
This section provides information and step-by-step procedures for completing Journal Entry tasks you can use to
manage your batches, including approving and changing the status of batches, as well as copying, editing, and
deleting batches. Also included in this section is information about globally changing and transactions. Knowing
how to effectively complete these tasks will increase the efficiency of your organization’s daily operations.
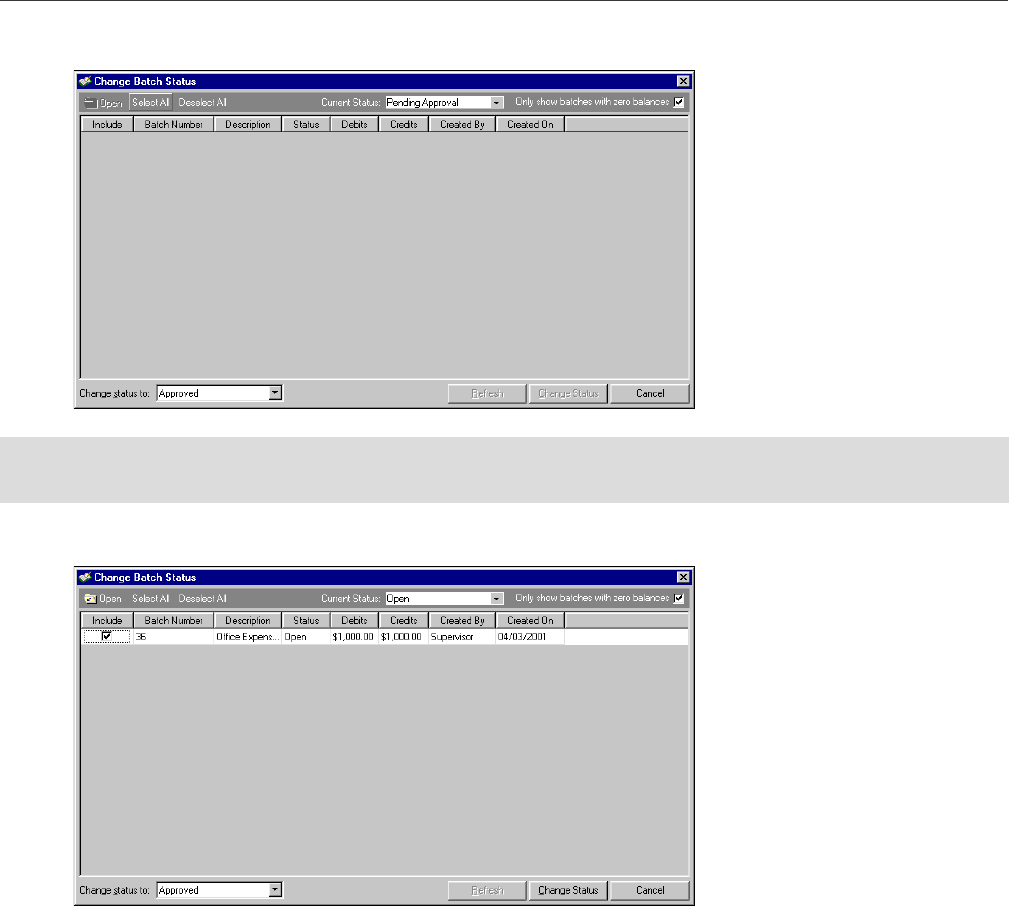
Approving Batches
You can change the status of multiple batches from the Journal Entry page. This efficient process saves time by
allowing you to approve multiple batches at once, instead of requiring you to open and approve each individual
batch record. To change the status of a batch, you must have security rights to approve batches.
You can activate the business rule requiring batch approval prior to posting and assign approval rights to specific
persons in your organization as a quality assurance check.
Any user with rights to view batches can open a saved batch, but you must have security rights to the accounts
and projects it contains to view and edit that information.
Approving batches for posting
1. From the navigation bar, select Journal Entry. The Journal Entry page appears.
Note: On the Records tab of the Options screen, you can specify options for Journal Entry processes. For
example, you can define when the program validates data entry and whether it displays a warning before
posting as well as other options.
32
C
HAPTER
2. Click Change Batch Status. The Change Batch Status screen appears.
3. On the action bar, select the current status of batches you want to approve. You can choose to display
batches that are “Pending Approval”, “Approved”, or “Open”.
4. You can mark or clear the Only show batches with zero balances checkbox.
5. To approve all displayed batches, click Select All. The Include checkbox for each batch will be marked. For
example, you could display all open batches and click Select All to change the status of all open batches
to “Approved”. Click Deselect All if you change your mind and do not want to change the status of all the
displayed batches. The checks are removed from the Include column.
6. To approve an individual batch, mark the checkbox in the Include column for each batch you want to
change.
7. In the Change status to field, select “Approved”. The options in this field depend on the batches
displayed. The statuses of “Open” and “Pending Approval” can be changed to “Approved”.
8. You can click Refresh to update the grid if you open a batch from this screen.
9. Once you have marked the batches you want to approve, click Change Status. The batches you approved
are no longer displayed in the grid.
10. To return to the Journal Entry screen, close the Change Batch Status screen. Click Cancel to cancel any
changes and return to the Journal Entry page.
Note: To open a batch from the Change Batch Status screen, highlight the batch and click Open. The Open
button is disabled unless at least one batch is highlighted.
J
OURNAL
E
NTRY
33
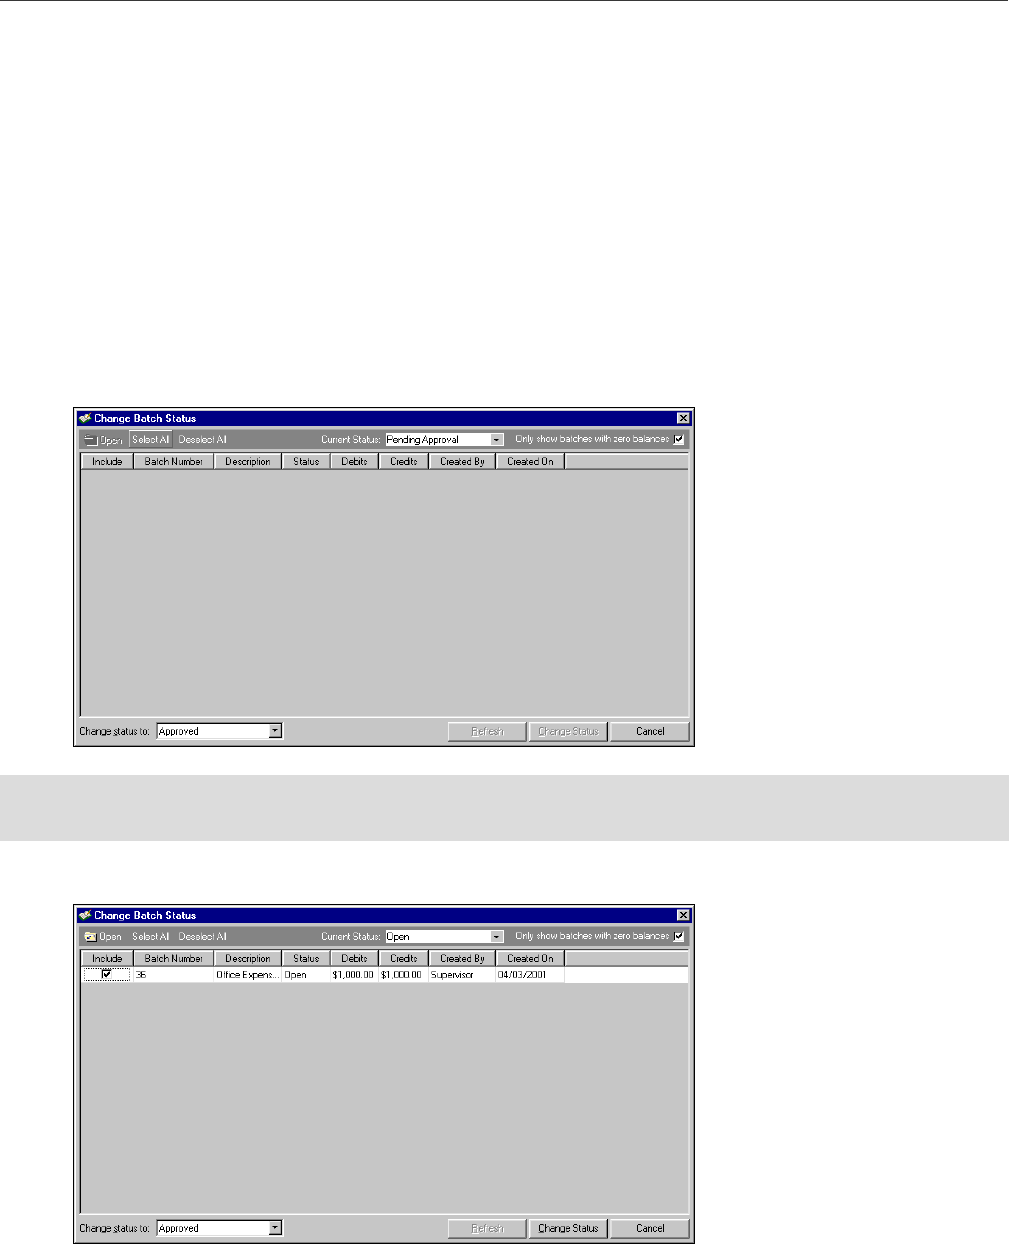
Changing Batch Status
You can change the status of multiple batches from the Journal Entry page. This efficient process saves time
because you can change the status of multiple batches at once, instead of requiring you to open each individual
batch record to make the changes. For example, if you have approved a group of batches for posting and then
realize they should not be approved, you can use this procedure to change the status from “Approved” to “Open”
or “Pending Approval”. To change the status of a batch to “Approved”, you must have security rights to approve
batches.
Any user with rights to view batches can open a saved batch, but you must have security rights to the accounts
and projects it contains to view and edit that information.
Changing batch status
1. From the navigation bar, select Journal Entry. The Journal Entry page appears.
2. Click Change Batch Status. The Change Batch Status screen appears.
3. In the Current Status field on the action bar, select the current status of batches you want to change. You
can choose to display batches that are “Pending Approval”, “Approved”, or “Open”.
4. You can mark or clear the Only show batches with zero balances checkbox.
Note: To open a batch from the Change Batch Status screen, highlight the batch and click Open. The Open
button is disabled unless at least one batch is highlighted.
34
C
HAPTER
5. To change the status of all displayed batches, click Select All. The Include checkbox for each batch will be
marked. For example, you could display all open batches and click Select All to change the status of all
open batches to “Pending Approval”. Click Deselect All if you change your mind and do not want to
change the status of all the displayed batches. The checks are removed from the Include column.
6. To change the status of an individual batch, mark the checkbox in the Include column for each batch you
want to change.
7. In the Change status to field, select “Pending Approval”, “Approved”, or “Open”. The options in this field
depend on the batches displayed. The statuses of “Open” and “Pending Approval” can be changed to
“Approved”. Batches with a status of “Approved” can be changed to “Open” or “Pending Approval”.
8. You can click Refresh to update the grid if you open a batch from this screen.
9. Once you have marked the batches you want to change and you have selected the new status, click
Change Status. The batches you changed are no longer displayed in the grid.
10. To return to the Journal Entry screen, close the Change Batch Status screen. Click Cancel to cancel any
changes and return to the Journal Entry page.
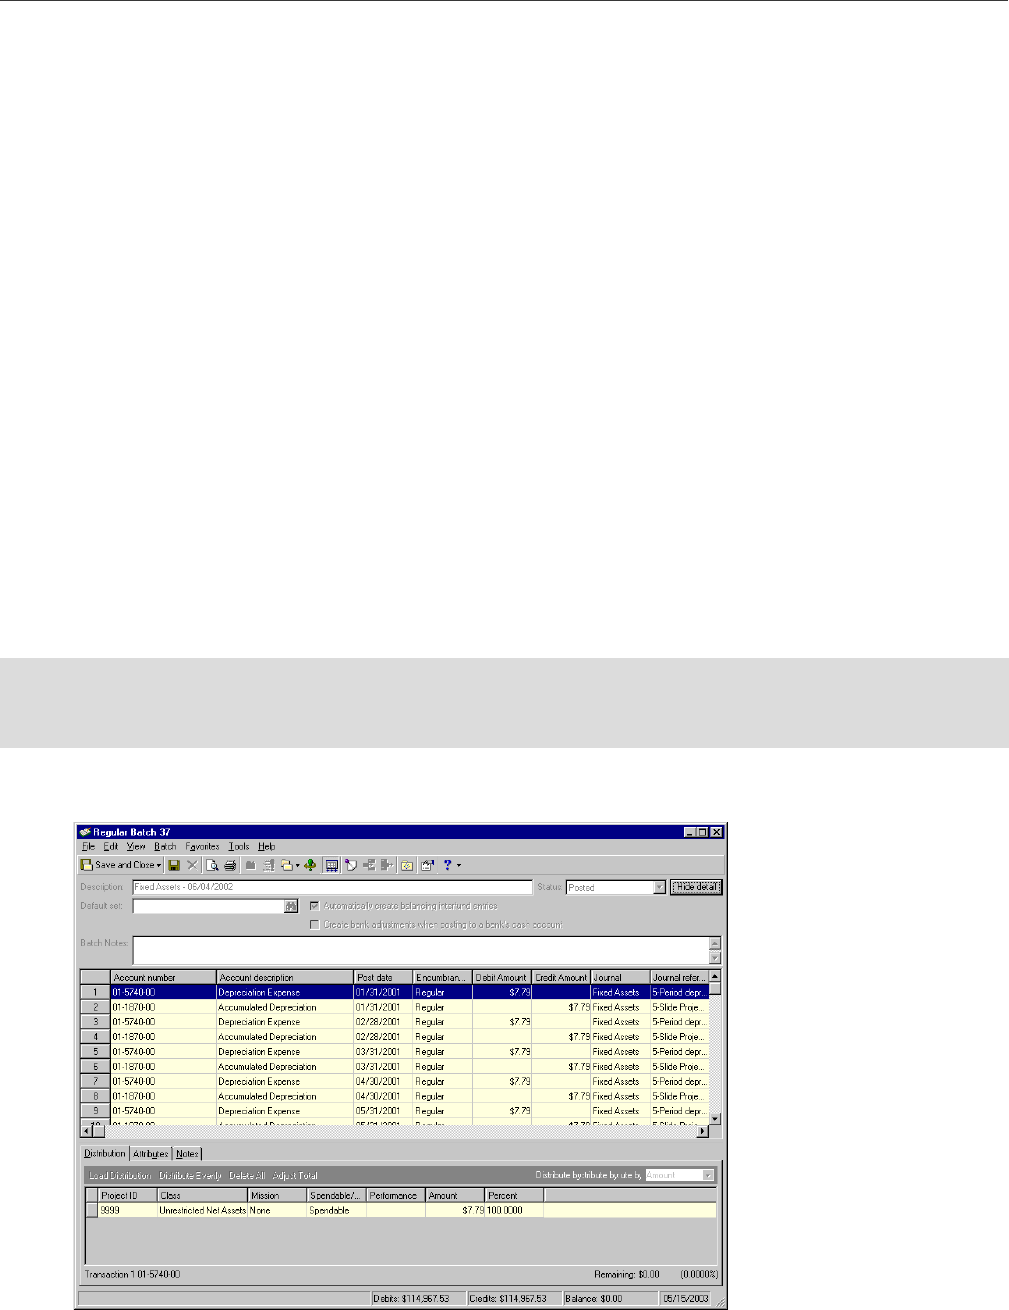
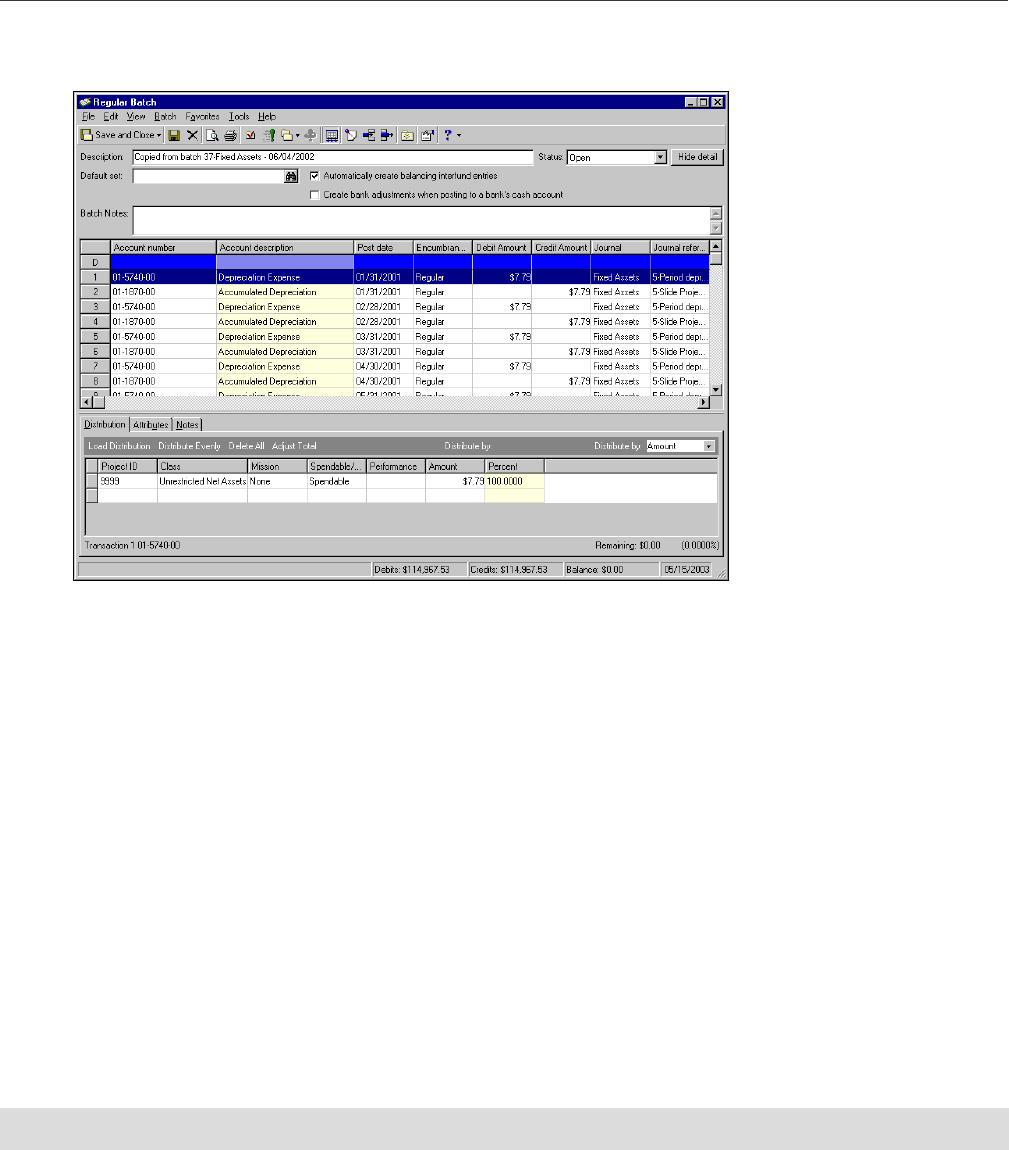
Copying a Batch of Transactions
To save time when creating similar batches of transactions, you can copy an existing batch into a new batch. The
new batch can then be saved and posted to General Ledger. You can copy from either open or posted batches.
This procedure is useful when you want to post a duplicate batch of transactions or when you need to edit
transactions in a posted batch. After creating the new batch, you can add, change, or delete transactions before
posting.
Copying a batch of transactions
1. From the navigation bar, select Journal Entry. The Journal Entry page appears.
2. Open the batch you want to copy. (You can copy transactions from an open or posted batch.)
Warning: To copy a batch, you must have security rights to view, edit, and create batches. If you do not have
security rights to the accounts and projects in the batch, the accounts and projects are masked when the batch
is copied.
J
OURNAL
E
NTRY
35
3. From the Batch menu, select Copy and one of the following options: “Copy batch as Regular”, “Copy
batch as Recurring Amount”, or “Copy batch as Recurring Fixed Percent”. The new batch appears.
4. You can now make changes to the batch. You can enter additional transactions, delete transactions,
rename the batch, and edit the distributions.
5. To save the batch and return to the Journal Entry screen, click Save and Close.
Editing a Batch
You can edit an open batch to make individual changes to each transaction. Once a batch has been posted,
however, you can no longer make changes to the transactions. If you need to make changes to a posted batch,
you can reverse the batch to create a new batch that is identical to the original except the debits and credits are
reversed. You can then copy the batch of transaction into a new regular batch and make the corrections. You
must post the new batch immediately after reversal to wash out the originally posted transactions.
If you need to edit a large number of transactions in an open batch, you can save time by globally changing the
transactions. For more information about globally changing transactions, see the Global Change chapter of the
Administration Guide for The Financial Edge. You can edit a batch only if you have the appropriate security rights.
For more information about security rights, see the Security chapter of the Administration Guide for The Financial
Edge.
Globally Change Transactions
In your organization’s day-to-day operations, you probably create large batches of transactions for posting to
General Ledger. Some of these batches may contain hundreds, even thousands of transactions. If you needed to
make changes to every transaction in a large batch, it might take hours to edit each transaction manually. But, if
you use the globally change records feature in General Ledger, you can make changes to all or selected
transactions in an open batch at the same time.
Warning: You can only globally change transactions in open batches.
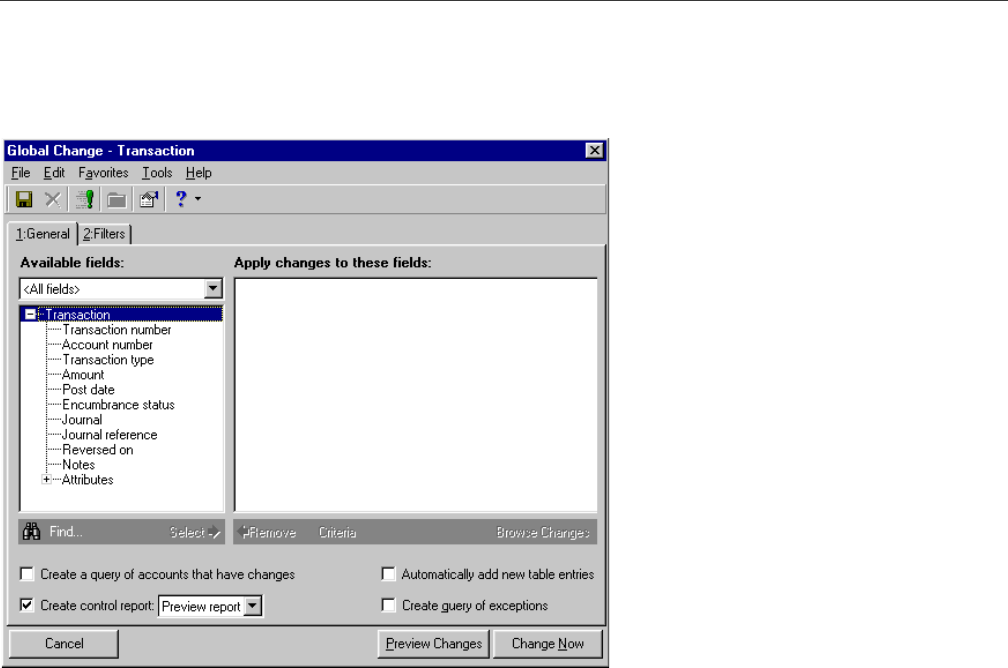
36
C
HAPTER
When globally changing transactions, you can change a transaction number, account number, transaction type,
amount, post date, encumbrance status, and other batch information. You can access the Global Change -
Transaction screen from Administration or from an open batch record by selecting Batch, Globally Change
Transactions.
The procedure for globally changing transactions and other records is located in the Global Change chapter of the
Administration Guide for The Financial Edge. Because global change is a detailed process, we recommend that
you read the Global Change chapter of that guide before attempting to globally change any records.
Importing Transactions
Importing records is an efficient process in which you move data from other programs, including The Raiser’s
Edge, into General Ledger. Importing is particularly useful if your organization maintains two databases or if you
need to combine two or more databases into one. Importing transactions is also an efficient method of entering
data into a batch from an external source. For example you could import a *.csv file from The Raiser’s Edge that
contains gift entries to post to the general ledger.
With General Ledger you can import a batch of transactions from various external sources, including other
Blackbaud programs such as Accounts Payable, Student Billing, and The Raiser’s Edge. You can also import
transactions from Fund Master or a *.csv, *.txt, or *.prn file created by a non-Blackbaud program.
You can access the Import - Batch Transaction screen from Administration or from an open batch record by
selecting Batch, Import Transactions. We recommend importing transactions from open batch records because
that method eliminates a few extra steps.
The import file used in this example includes the minimum fields required to import new transactions, plus
additional fields that are not required but are recommended for maintaining accurate and detailed records. You
may need to include others that are not used in this example but are required by your organization’s data entry
protocols or your organization’s settings in Configuration. For more information about required fields, see the
Import Guide.
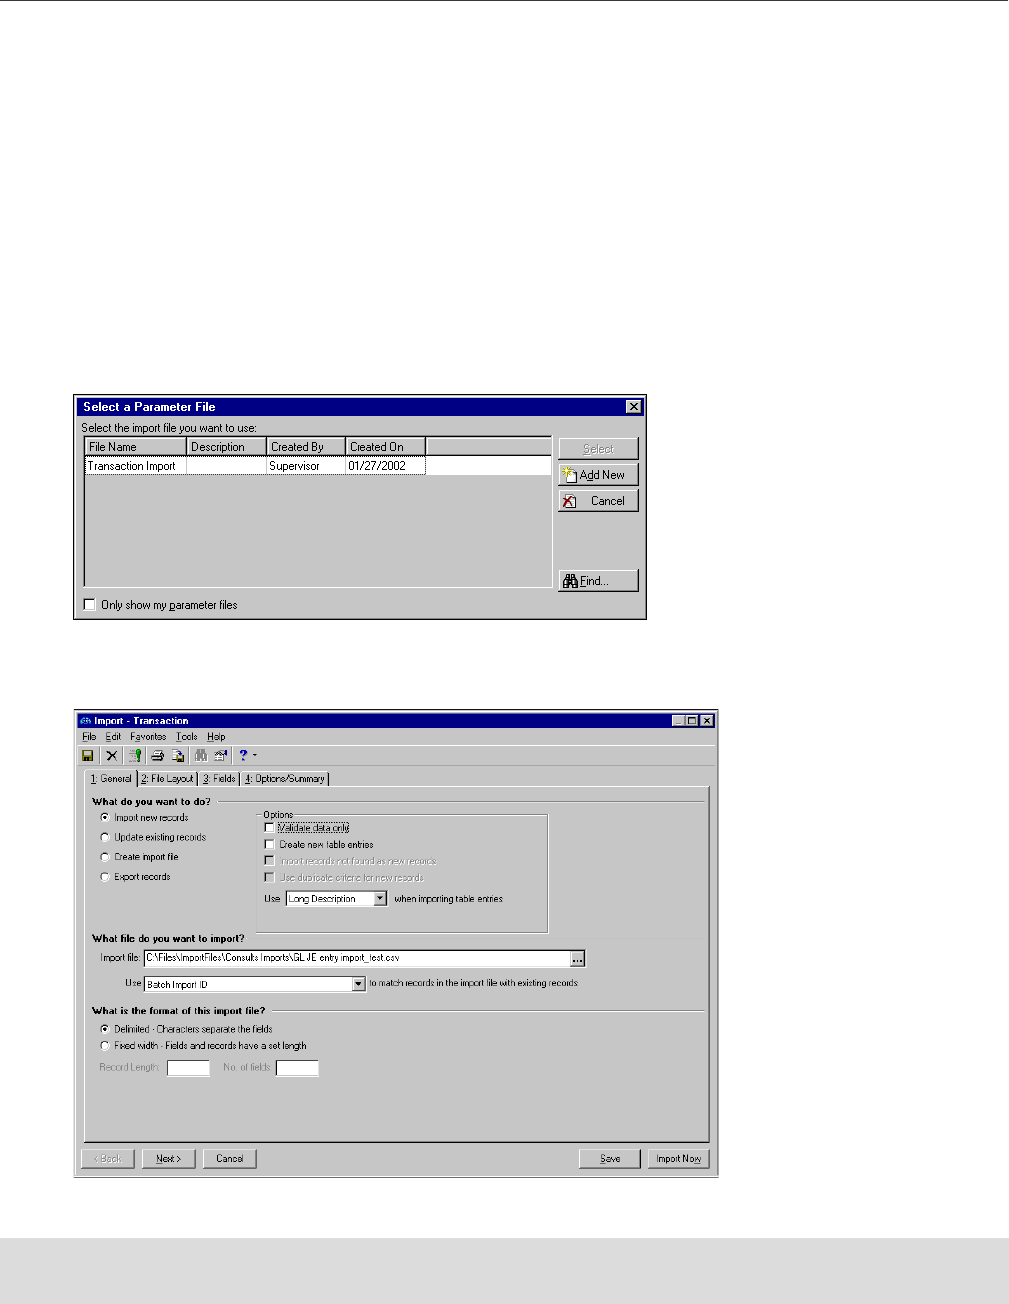
J
OURNAL
E
NTRY
37
These are the fields imported in the following procedure. Those marked with an asterisk (*) are required fields
when importing new records. Other fields may be required when updating existing records. For more information
about required fields, see the Import Guide.
Importing new journal entry transactions
1. From an open batch record, select Batch, Import Transactions. The Select a Parameter File screen
appears.
2. Select the import file that contains the transactions you want to import, and click Select.
3. The Import - Transaction screen appears on the General tab.
4. In the What do you want to do? frame, mark Import new records.
• Account number* • Journal*
• Post date* • Journal reference*
• Encumbrance Status* • Project ID
•Type* •Class
• Amount* • Transaction Codes
Warning: We recommend that you validate and test an import file before running the actual import process.
For more information about testing and validating import files, see the Import Guide.
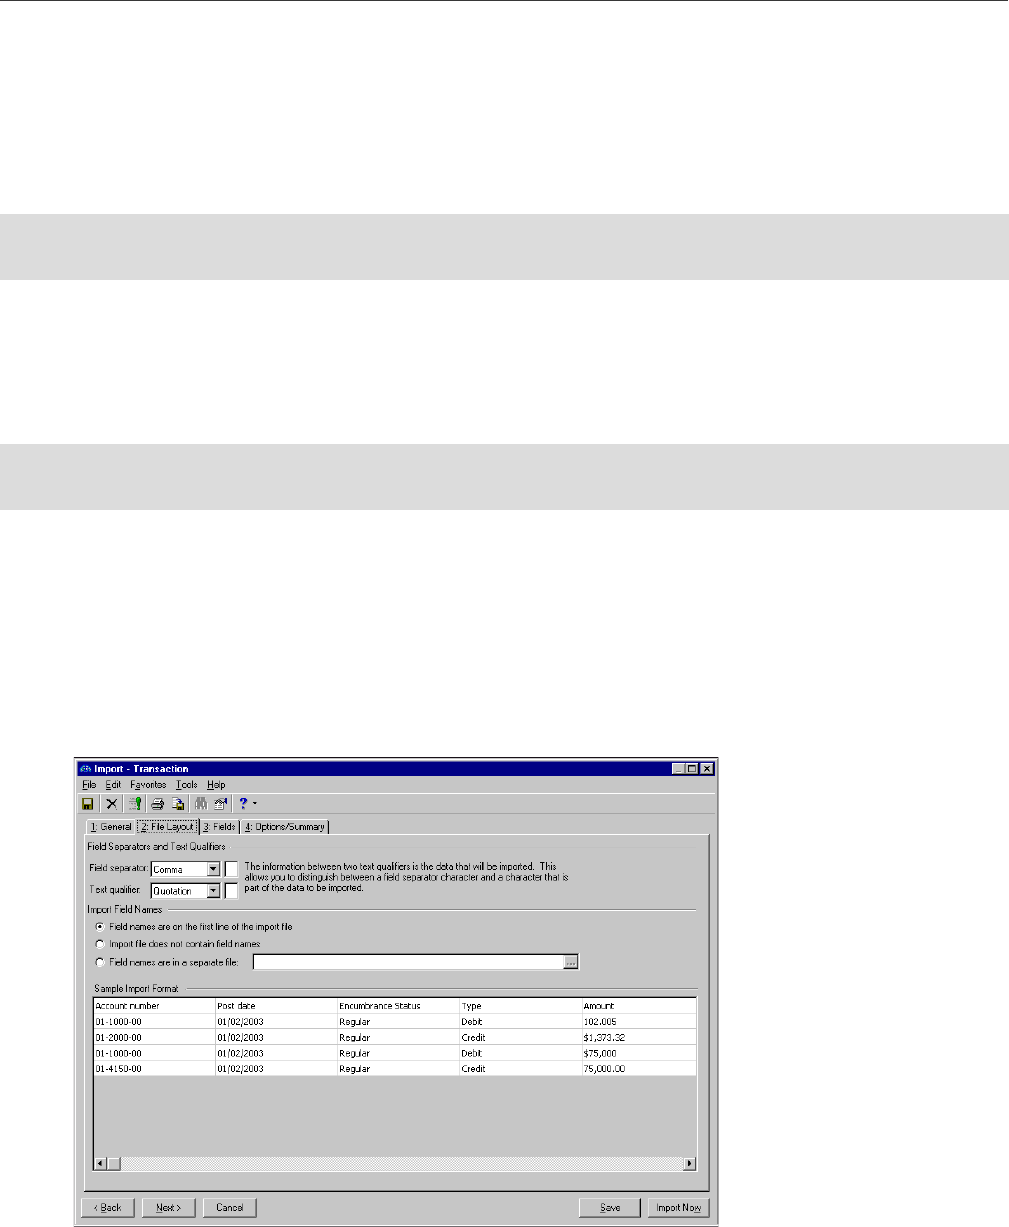
38
C
HAPTER
5. To validate the import file before actually adding records, mark Validate data only. When you later click
Validate Now, the import file is validated but no changes are made to your database. After you validate
the import file and you are ready to run the import, unmark Validate data only.
6. To import table entries not currently present in the program, mark Create new table entries in the
Options frame. We recommend that you do not add table entries when importing. It may result in
duplicate entries, some with misspellings and incorrect formatting. For example, it may add several
versions of a title, such as Dr., Dr, DR.
If you select Create new table entries when you are validating data, the program does not actually create
new table entries. Rather, the program processes records as if it were going to create new table entries.
7. In the Use [ ] when importing table entries field, select “Long Description” or “Short Description” as the
default format to use when importing fields containing table entries. The selected format is used by
default only when you do not specify a format in the import file. For more information about formatting
table entries, see the Import Guide.
8. In the Import file field, the import file you selected on the Select a Parameter File screen appears. Make
sure this is the correct import file to use.
9. In the Use [ ] to match records in the import file with existing records field, select the record ID used in
the import file — either the batch import ID or batch number. To locate the batch import ID, from the
batch record, select File, Properties. A screen appears listing system properties for the record including
the batch import ID. For more information about import IDs, see the Import Guide.
10. In the What is the format of this import file? frame, mark Delimited. For more information about using
the delimited format, see the Import Guide.
11. Click Next. The File Layout tab appears.
12. In the Field Separators and Text Qualifiers frame, select the field separators and text qualifiers used in
the import file.
Note: We recommend that you do not add table entries when importing. It may result in duplicate entries,
some with misspellings and incorrect formatting.
Tip: You can set a default file path on the File Locations tab of Options. For more information, see the Options
chapter of the Program Basics Guide.
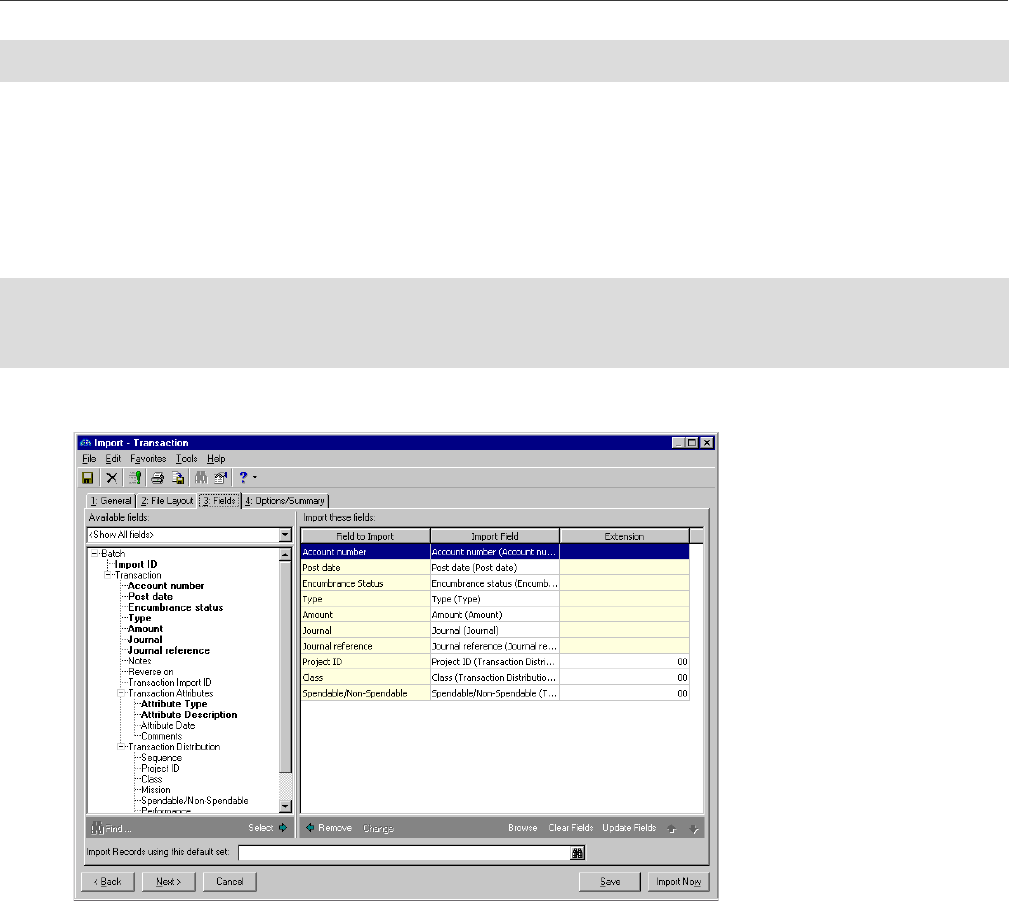
J
OURNAL
E
NTRY
39
If you select “Other” in the Field separator field or “Custom” in the Text qualifier field, enter the actual
separator and qualifier in the corresponding text box.
13. In the Import Field Names frame, mark the option designating the location of field names in the import
file. Field names can be on the first line of the import file, not included in the import file, or contained in
a separate file.
If you mark Field names are in a separate file, enter the path of the file which contains the field names or
click the ellipsis to browse to the file.
14. Click Next. The Fields tab appears. On the Fields tab, you match data in the import file with Financial
Edge record fields. For more information about mapping fields, see the Import Guide.
Note: Enter the actual separator, not the separator name. For example, enter “.”, not “period”.
Warning: When you add fields on the Fields tab, be sure you also add conditionally required fields. For
example, if you add Attribute Type on the Fields tab, you must add Attribute Description because it is now
required. For more information about required fields, see the Import Guide.
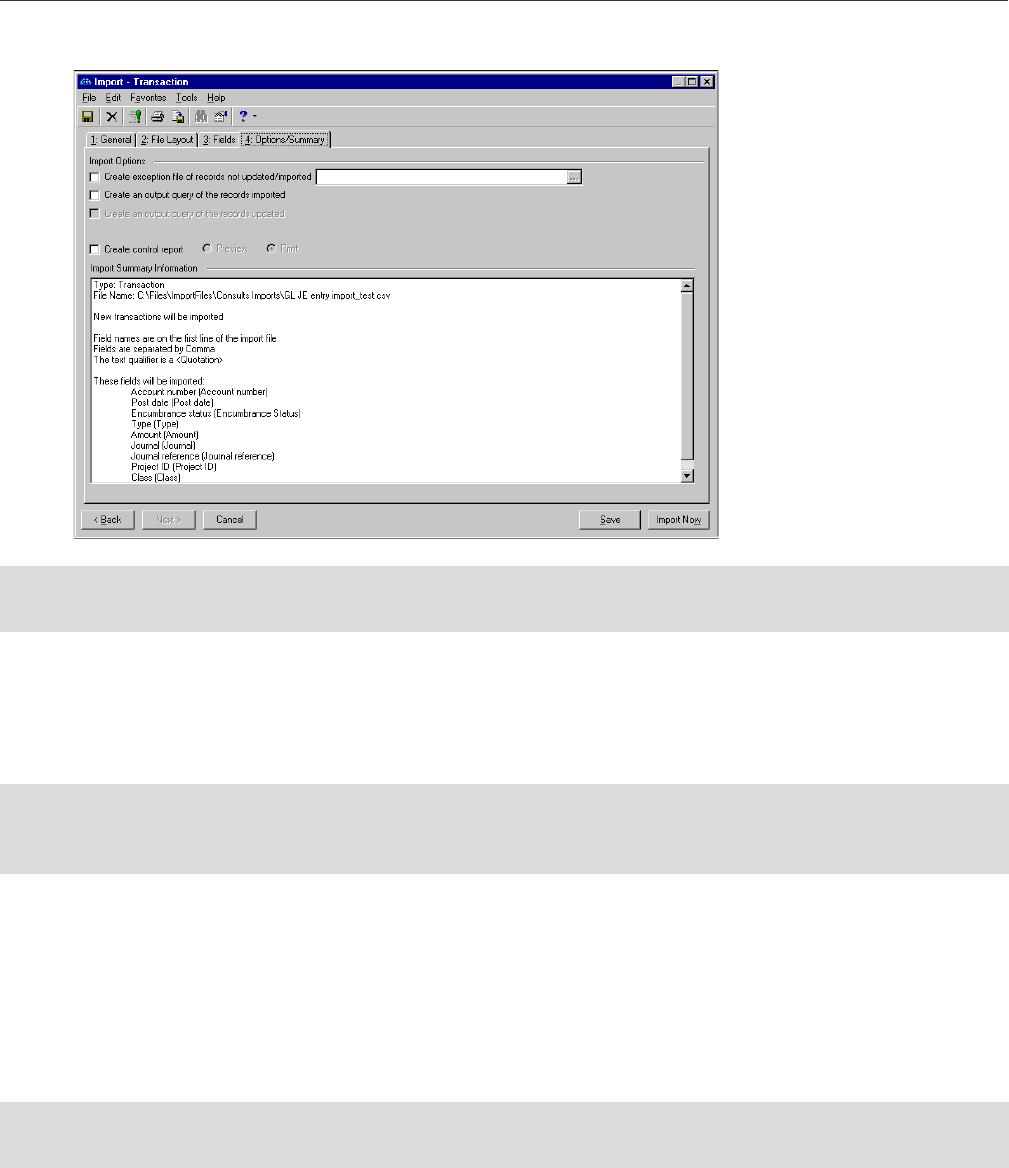
40
C
HAPTER
15. When you have finished setting all fields, click Next. The Options/Summary tab appears.
16. In the Import Options frame, mark Create exception file of records not updated/imported to create a
file of all fields that do not import successfully.
In the field to the right, enter the path where you want the file saved, or click the ellipsis to browse to the
file.
17. Mark Create an output query of the records imported to save a query of imported records.
18. Mark Create control report to view or print a report listing the import results, criteria, field mappings,
and exceptions.
If you create a control report, mark Preview to view the report on your screen or mark Print to print the
report.
19. Review information in the Import Summary Information frame. If you are satisfied with the set
parameters, click Import Now.
20. The program asks if you want to save changes. To save, click Yes. If this is the first time you have saved
the import record, the Save Import As screen appears.
21. In the Name field, enter a name for the import. In the Description field, enter a description for the
import. Mark the checkboxes to allow other users to run or modify the import. Click Save.
22. If you marked Create an output query of the records imported on the Options/Summary tab, the Save
Query As screen appears. Enter a name and description of the query and click Save.
Tip: You can set a default file path on the File Locations tab of Options. For more information, see the Options
chapter of the Program Basics Guide.
Warning: If business rules are set for the program to ask before creating an item, those items will not be
created while importing records. If you want to import them, you must change the business rule before
importing.
Note: You can use the parameters from saved import records for future imports in which you want to use the
same or similar parameters.
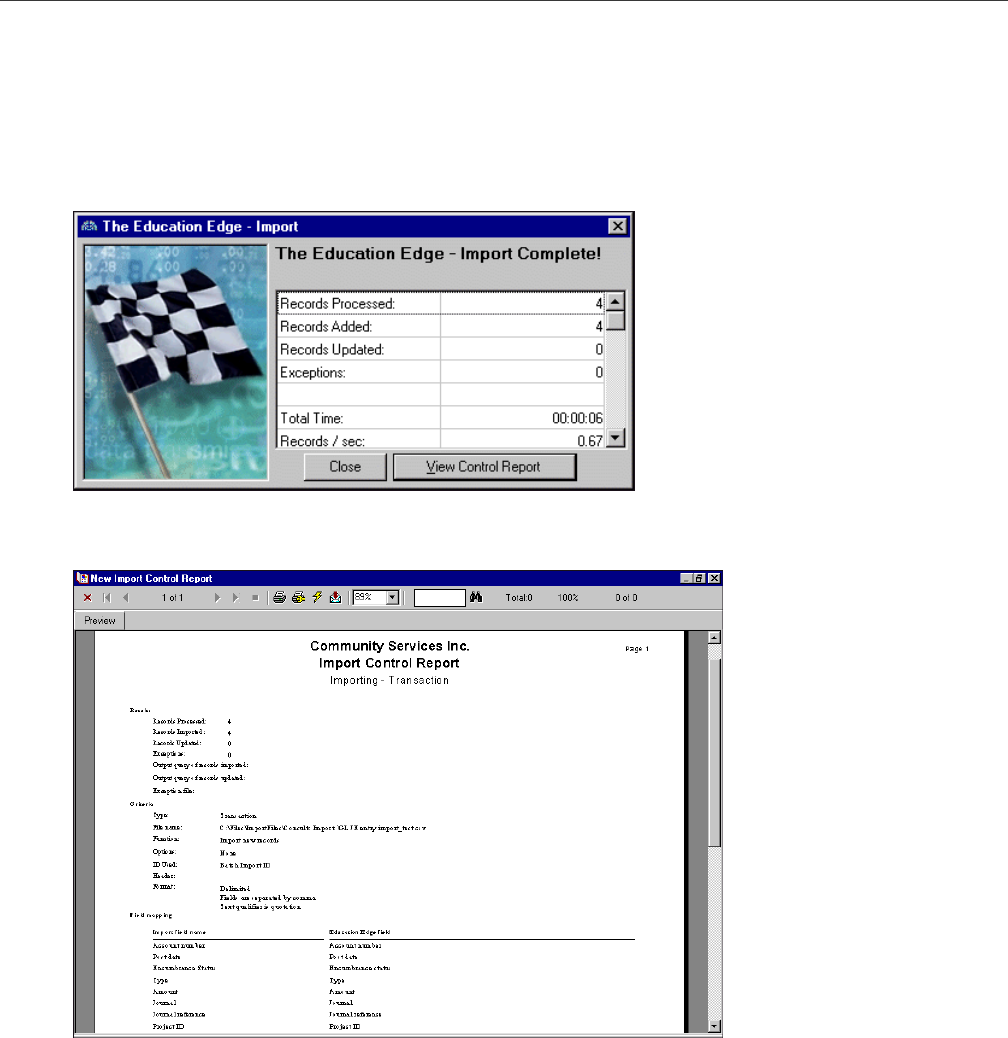
J
OURNAL
E
NTRY
41
23. Once the program begins processing the import, a progress bar appears. If you click Cancel, the Cancel
Import screen appears. On this screen, you can view a control report, resume the export, or exit the
import. If you click Exit Import, the import creation process stops, and any data imported up to the point
of cancellation is in the database. If you click View control report, the control report appears. When you
close it, you can resume or exit the import again.
When the import is finished, a completion screen appears. This screen shows the import statistics
including the number of records processed, records added, records updated, and exceptions.
24. If you selected to print or preview the control report on the Options/Summary tab, click Close on the
completion screen and the report automatically opens.
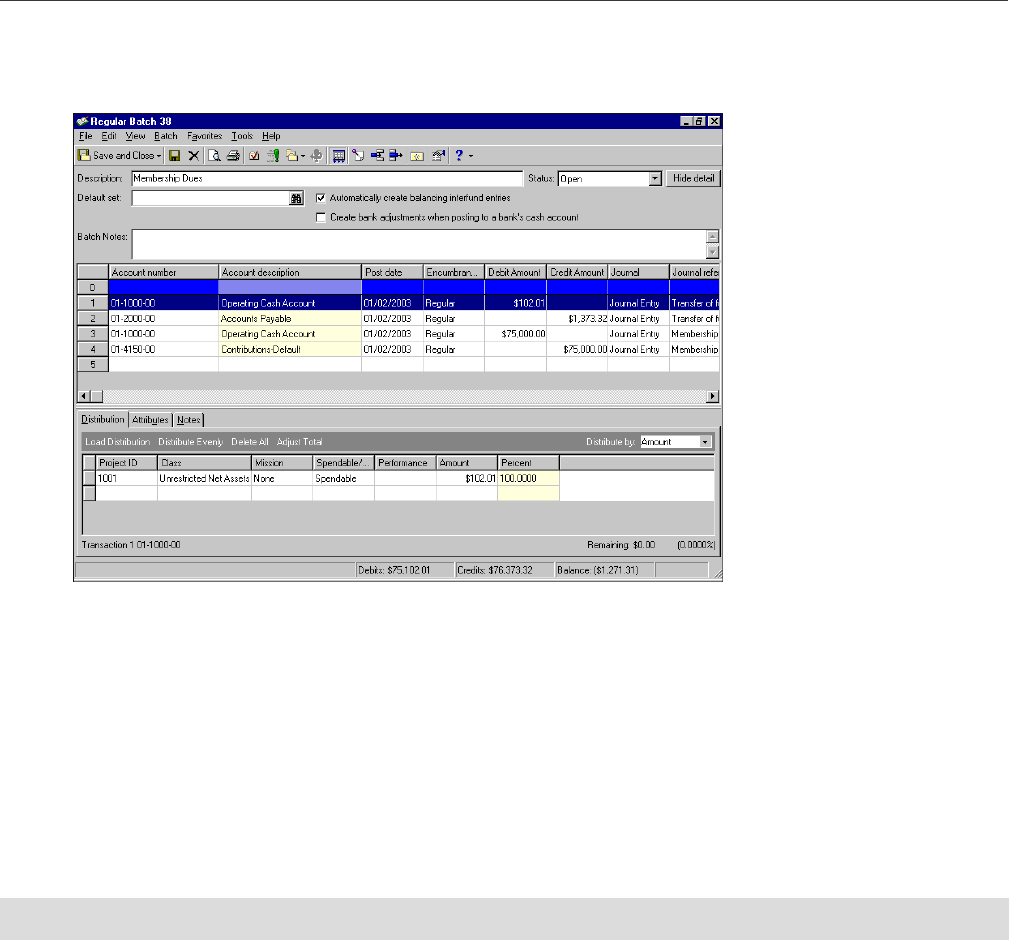
42
C
HAPTER
25. If you did not select to print or preview the control report, you can see import results by clicking View
Control Report on the Import screen. When you finish viewing the report, close the report to return to
the batch record. The new imported transactions appear in the batch record journal entry grid.
Exporting Batch Information
Exporting is useful if you routinely create custom reports using General Ledger data. With Journal Entry, you have
several different methods for exporting information, each providing flexibility for viewing and reporting your
transaction data. From the Journal Entry page, you can export all batch information in the grid directly to Excel or
format the information for use with another program. This a quick way to view and print a report of all batches in
your system. You can also export individual batch information from the Journal Entry page and from a specific
batch record.
Exporting a batch of transactions
Note: You can export transaction information from an open or posted batch.
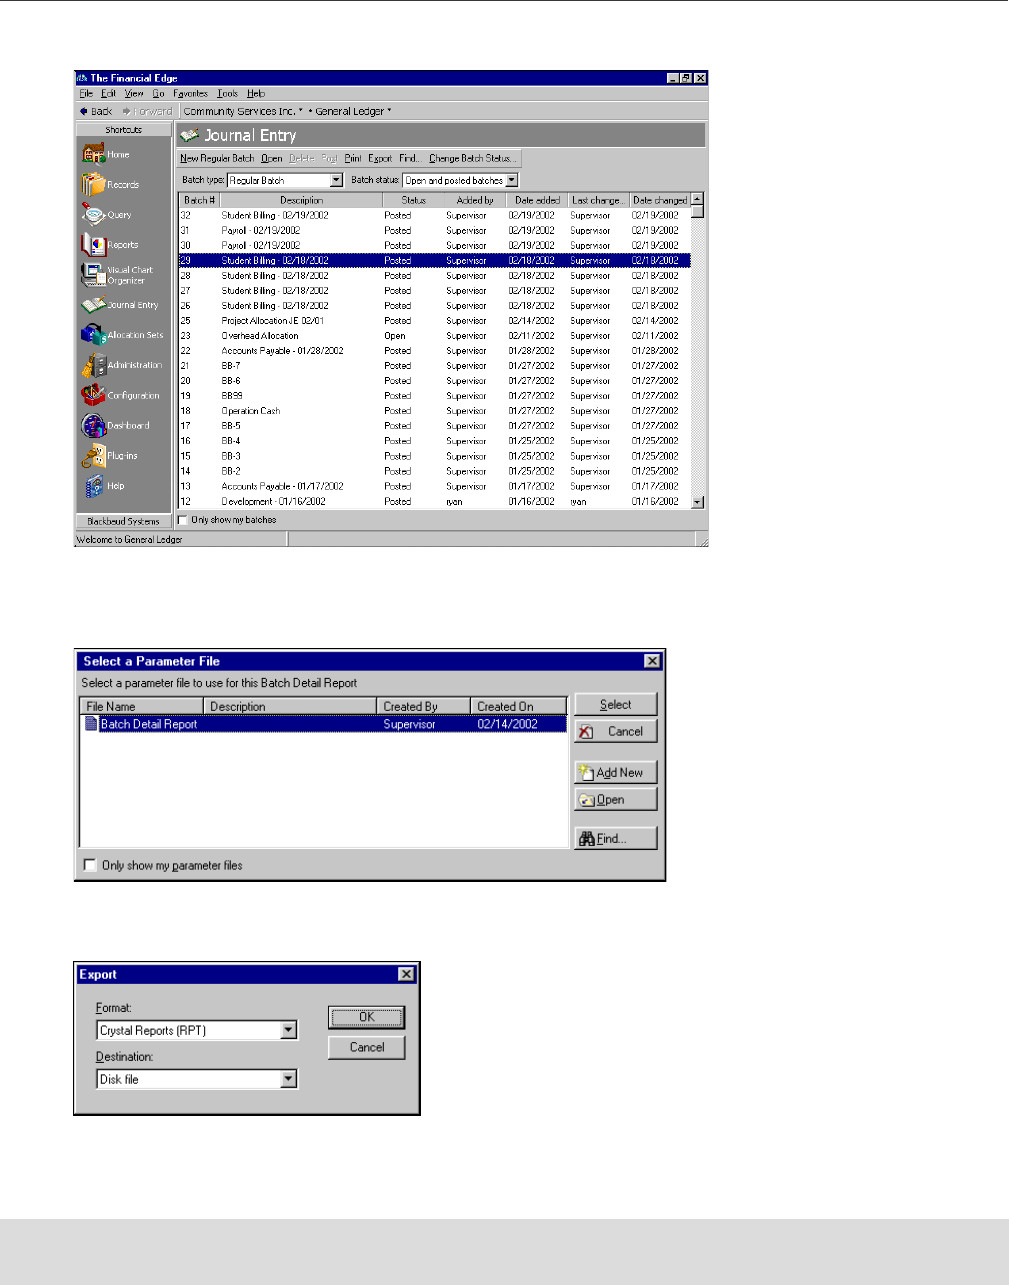
J
OURNAL
E
NTRY
43
1. On the Journal Entry page, highlight the batch you want to export.
2. On the action bar, click Export. The Select a Parameter File screen appears where you can select a batch
detail report parameter file to use for the export. You can also create a new parameter file from this
screen.
3. Highlight the parameter file and click Select. The Export screen appears where you define a format and
destination for the export file.
4. In the Format field select the format to use for the export information. For example, if you want to use
this batch information to create a custom report using Crystal Reports, select the “Crystal Reports (RPT)”
format.
Note: If you select “Disk file” in the Destination field, you are prompted to designate a save location once you
click OK.
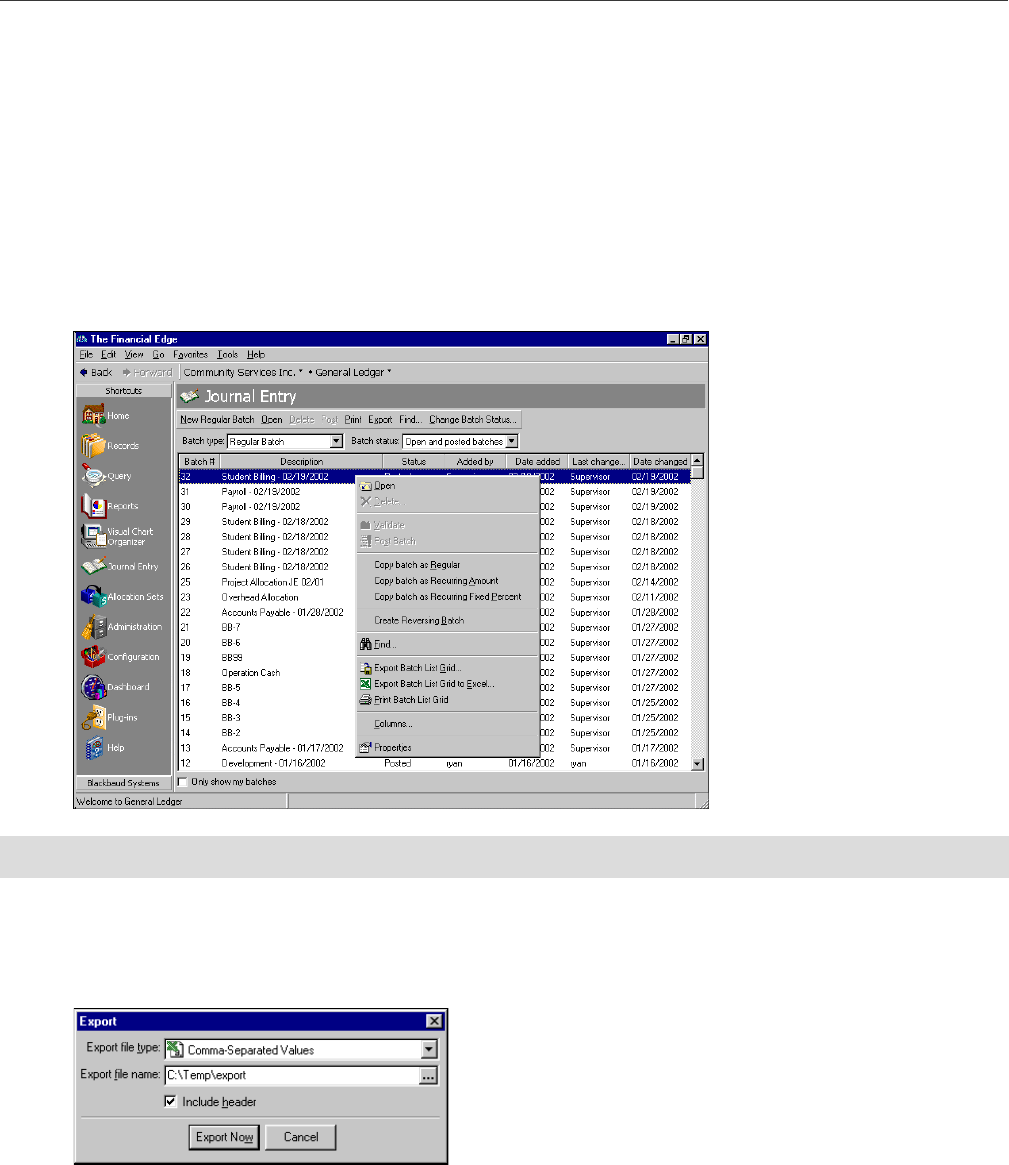
44
C
HAPTER
5. In the Destination field, select a destination for the export file. For example, if you are creating a Crystal
Reports export file and you have Crystal Reports installed on your machine, you can select “Application”
as the destination and the export file will open in Crystal Reports once the export is complete. If you want
to save the file to your computer’s hard drive or to a network location, select “Disk file”.
6. Click OK to proceed with the export. The next screen to appear depends on the format and destination
you selected. If you selected “Disk file” as the destination, you are prompted to designate a save location.
If you selected “Application” as the destination then the application affiliated with the file type opens
displaying the export information.
Exporting a list of all batches
1. On the Journal Entry page, place your cursor in the grid and right-click your mouse. A menu appears
displaying various grid-related options.
2. From this menu, you can select Export Batch List Grid to Excel to export batch information directly to an
Excel worksheet, or Export Batch List Grid to create an export file you can use with other applications. If
you export directly to Excel, a processing screen appears and Excel opens displaying the batch
information, which completes the export process. If you select Export Batch List Grid, however, the
Export screen appears.
3. In the Export file type field, select the type of export file to create. Your options include
“Comma-Separated Values” and “Microsoft Word Merge File”. You should select a file type compatible
with the application you use to view and manipulate the exported information.
Note: You can print a list of all batches displayed in the grid by selecting Print Batch List Grid from the menu.

J
OURNAL
E
NTRY
45
4. In the Export file name field, enter the path and name for the export file. The path is the location where
the file will be created once the export is complete. To browse to a location, which is then entered in the
field, click the browse button.
5. Once you enter the file type and name, click Export Now to create the export file, which is saved to the
location you designated.
Deleting a Batch
In Journal Entry you can delete an open batch of transactions, if you have the appropriate security rights. Once
you delete a batch, however, it is still recorded as a batch. For example, if you create batch number 325 and
decide you want to delete that batch, the batch number 325 cannot be reused. The deleted batch remains in your
database and is viewable from the Journal Entry page. The next new batch you create will be number 326. There
are usually ways to avoid having to delete a batch. For example, if you realize you were using an incorrect journal
or source for 150 transactions, you can use global change to quickly correct the problem. As a general rule, we
recommend that you avoid deleting batches, unless your organization believes it is truly necessary.
Deleting a batch
1. From the navigation bar, select Journal Entry. The Journal Entry page appears.
2. Highlight the batch you want to delete.
3. To continue with the deletion process, click Delete. A confirmation screen appears to make sure you
really want to delete this record.
4. Click No to cancel the deletion and return to the Journal Entry page. Click Yes to delete the record and
return to the Journal Entry page. Once deleted, the record stays in the system and is displayed on the
Journal Entry page with a status of “Deleted”.
Validating, Posting, and Reversing Batches
Once you create a batch, enter batch transactions, and transaction distributions, you can validate and post the
batch to your general ledger accounts. This process requires that you have security rights to validate and/or post
batches. You can post individual batches from Journal Entry or you can post multiple batches at the same time
from the Post page in Administration.
Once a batch is posted you cannot edit the transactions in that batch. You can, however, reverse a posted batch,
which creates a mirror image of the original batch with the debits and credits reversed. You cannot reverse a
batch posted in a year that is closed and summarized.
This section contains information and procedures for validating, posting, and reversing batches of transactions in
Journal Entry.
Validating Batches
Note: The Include header checkbox is marked by default. If you do not want to include grid header
information in the export file, clear the checkbox.
Tip: You can also delete a batch from the open batch record, if you have the appropriate security rights.
Note: On the Records tab of the Options screen, you can set a user option that defines the timing of the data
entry validation. You can set the program to validate row by row or when saving the batch.

46
C
HAPTER
The primary function of the batch validation process is to make sure your batches are in balance. If you have
security rights to view, edit, and validate batches, you can use this process to confirm that batches are in balance
by each required factor. Also, if the batch approval business rule is in effect, each batch must be approved before
validation commences. For more information about batch approval, see “Approving Batches” on page 31.
When you validate a batch, General Ledger makes sure it is in balance by the following:
The batch must also be in balance by any project, class, and/or transaction code required on the fund record. You
can validate a batch of transactions from the batch record in Journal Entry or from the Post page in
Administration.
To help you keep your batches in balance, you can choose to automatically create interfund entries. If you want
to use automatic interfund entries, mark the Allow automatic creation of interfund entries in Journal Entry
business rule in Configuration, as well as Automatically create balancing interfund entries on the batch record.
Now, when you run the validation process, batches are brought into balance by having the program automatically
create balancing interfund entries. These balancing entries are created at the end of the validation process. The
Automatically create balancing interfund entries checkbox only appears on the batch record if you marked the
Allow automatic creation of interfund entries in Journal Entry business rule in Configuration.
In addition, validation ensures that the person attempting to post has the security rights to do so. The person
attempting to post must have rights to the posting process as well as the accounts and projects included in each
transaction.
Validation also checks the status of transaction accounts and projects. Only transactions that include accounts
and projects that are marked “Active” can be posted. If you need to change the account status, you can open
account records from the batch screen. Simply highlight the account you want to open and access the Batch
menu. From the Batch menu, select Go To and Account and the account record opens. When saving a batch, the
validation process also includes a check of the batch header and each transaction to ensure that all required
fields are entered.
Transaction Required Fields
When the validation process is initiated, the program looks at each transaction to ensure that all required fields
are entered and that each entry meets certain requirements. Each transaction must include entries in the
following fields:
• Fund • Amount • Period
•Period within a fund •Journal •Type
Note: The program automatically validates each batch when it is saved and when the posting process is
initiated. You can set user options that initiate the validation process during the process of entering
transactions in a batch.
•Account Number •Amount
•Post Date •Transaction Type
•Journal •Journal Reference
• Class (if required) • Projects (if installed and required)
• Transaction Codes (if required) • Transaction Attributes (if required)
• Encumbrance Status (if installed)
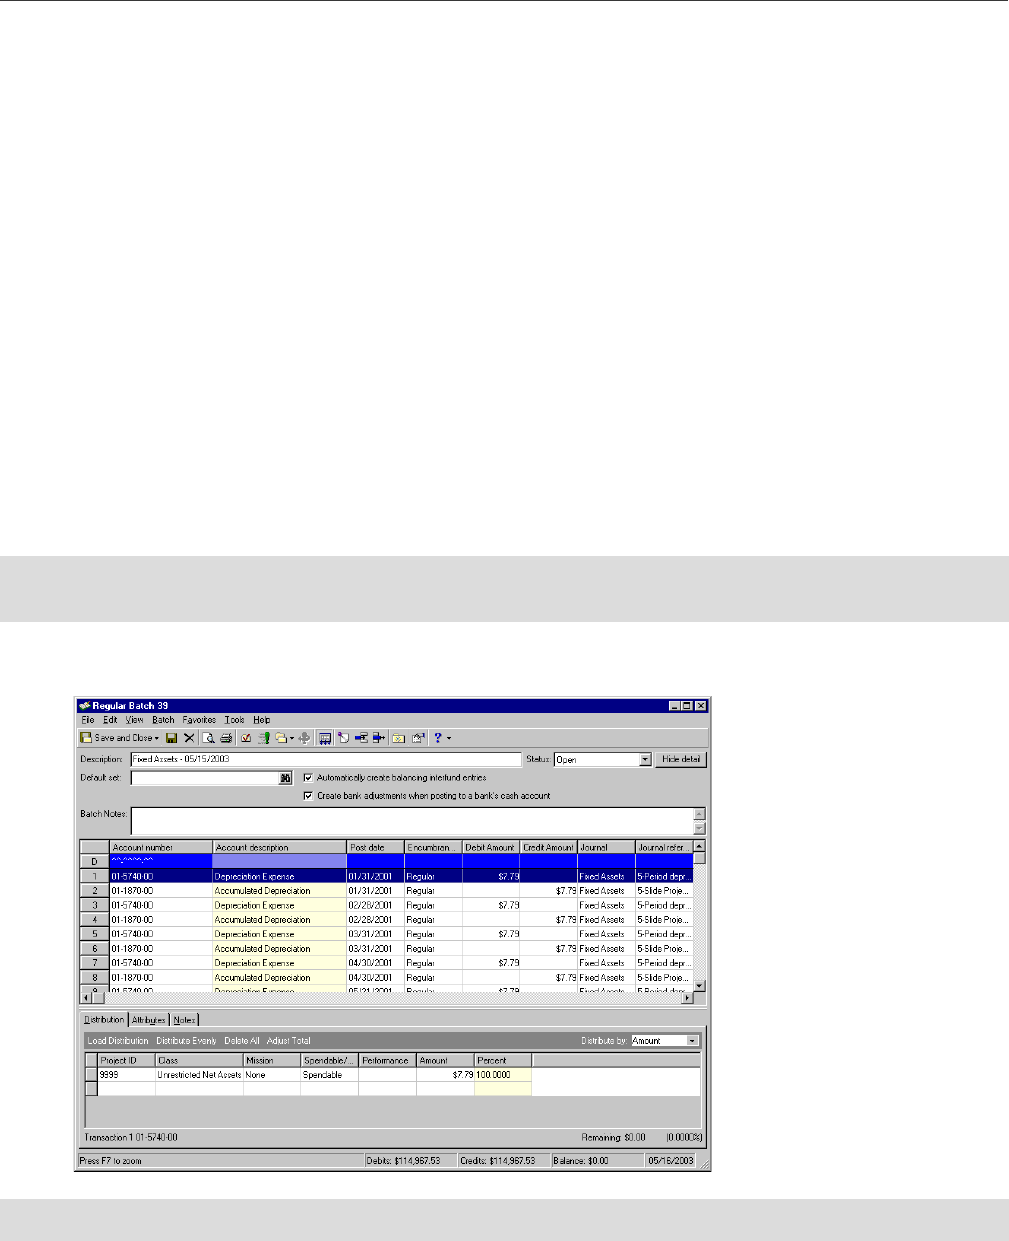
J
OURNAL
E
NTRY
47
Transaction Field Rules
After the program verifies that each of the required fields has an entry, it verifies that those entries meet certain
rules.
Account Number. Each account number must be for an active account.
Amount. The amount must be a positive number greater than $0.00, unless $0.00 transactions are allowed in
business rules.
Post Date. The post date must be in an open fiscal year, in an unlocked period, and be after the fund’s
beginning balance date.
Reverse on. The reverse on date must be in an open fiscal year and in an unlocked period.
Project ID. The project ID must be for a project with an active status.
Class. When a class is required and entered, the program verifies that the transaction distribution meets
standard distribution rules.
Transaction Codes. When transaction codes are required, the program verifies that the transaction
distribution meets standard distribution rules.
Transaction Attributes. When transaction attributes are entered, the program verifies that the entry is valid.
Validating a batch
1. From the navigation bar, select Journal Entry. The Journal Entry page appears.
2. Open the batch you want to validate. The batch record appears.
3. Select Batch, Validate Batch and the validation process begins. The status bar displays a process meter as
the transactions are validated and saved.
Warning: To validate a batch, you must have security rights to view, edit, and validate batches. You must also
have security rights to the accounts and projects in the batch.
Note: You can also click the Validate Batch button to begin the validate batch process.

48
C
HAPTER
4. If the validation process is a success, the Batch Validation Report preview screen appears or the report
prints by default, depending on the Journal Entry report options marked in User Options. If the preview
screen opens, you can view and print the validation report. Once you are done, close the preview screen
to finish the validation process.
If the validation process fails, you can view the balancing errors on the Batch Validation Report.
5. A confirmation screen appears. Click OK to return to the batch record.
Posting a Batch
Posting a batch adds transaction entries to your general ledger accounts, which updates your account balances.
In General Ledger, you can enter transactions into Journal Entry batches before locking balances, however, you
cannot post batches unless all funds are locked for all accounts used in those transactions.
To post a batch, you must have security rights to view, edit, validate, and post batches. You must also have
security rights to all the accounts and projects in a batch. And finally, funds containing accounts associated with
transactions in a batch must be locked prior to posting.
To increase efficiency, you can post batches of transactions individually from the batch record in Journal Entry or
you can post multiple batches of transactions simultaneously from the Post page in Administration. See the
Administration Basics chapter of the Administration Guide for The Financial Edge for more information about
posting multiple batches using the Post module.
When you begin the post process, the program automatically validates the batch to make sure it is in balance.
The validation process ensures that you do not post out of balance and verifies security access rights. See
“Validating Batches” on page 45 for information about the batch validation process.
Posting a batch from Journal Entry
All batches must be approved before posting if the business rule requiring approval is marked. For more
information about batch approval, see “Approving Batches” on page 31.
1. From the navigation bar, select Journal Entry. The Journal Entry page appears.
Note: On the Records tab of the Options screen, you can set user options for posting transactions. You can set
an option to display a warning before posting and a successful/unsuccessful message after post validation.
Note: If the batch does not validate successfully, view the validation report to determine the corrections that
you need to make. After you correct the transactions in your batch, you can try posting it again.
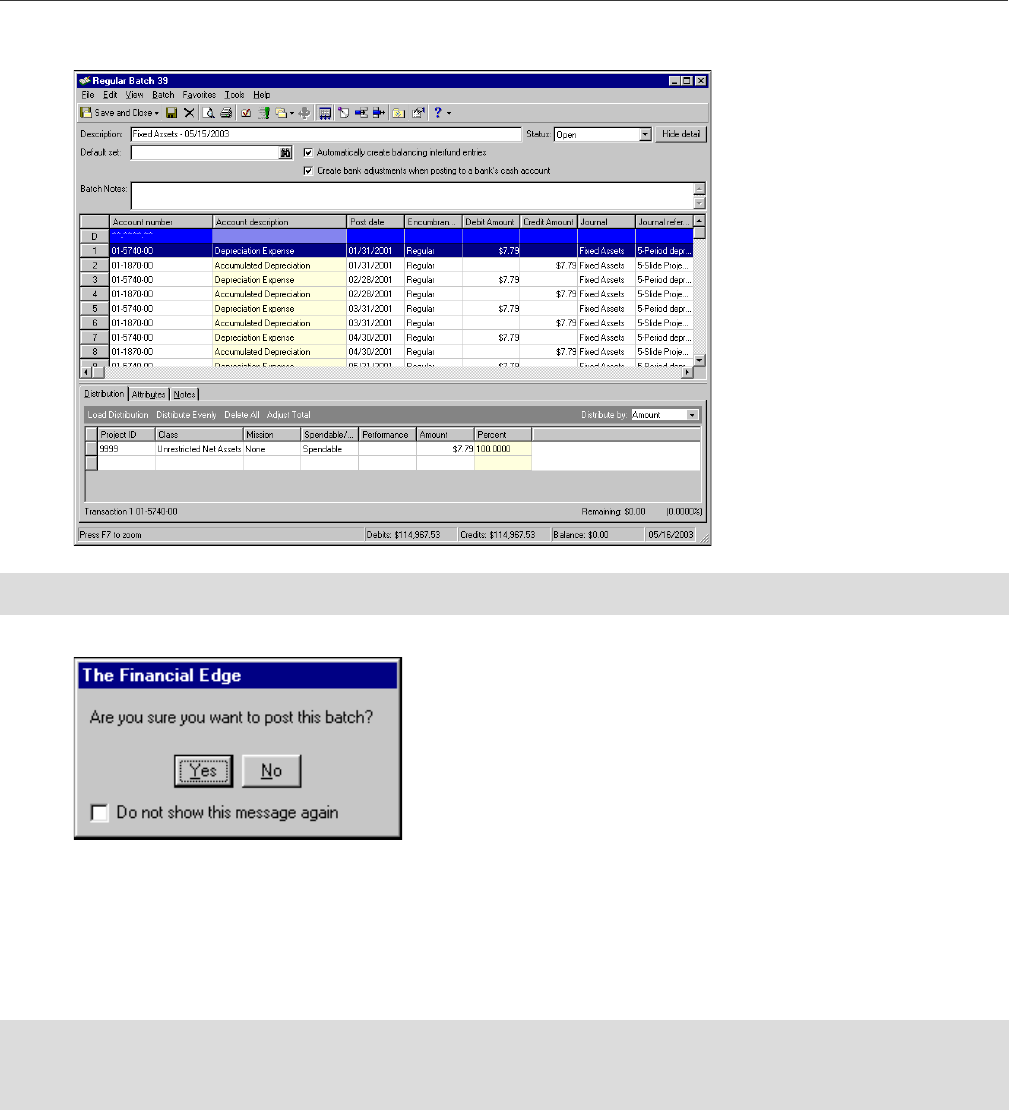
J
OURNAL
E
NTRY
49
2. Open the batch you want to post. The batch record appears.
3. Select Batch, Post Batch. A confirmation screen appears.
4. Click Yes to begin posting the transactions.The posting process begins by validating the batch. Once the
post validation process is complete, the Batch Validation Report preview screen appears or the report
prints by default, depending on the post report options marked. If the preview screen opens, close it to
continue with posting.
If the post validation fails, you will not be able to continue posting. Instead, view the balancing errors on
the Batch Validation Report and make adjustments before attempting to post again.
Tip: You can also click the Post Batch button on the batch record toolbar.
Note: If you marked the Print control report on option and selected a default printer on the Journal Entry Post
Options screen, a control report automatically prints once the post process is complete. To access the Journal
Entry Post options, select Tools, Options from the menu bar and select the Records tab.
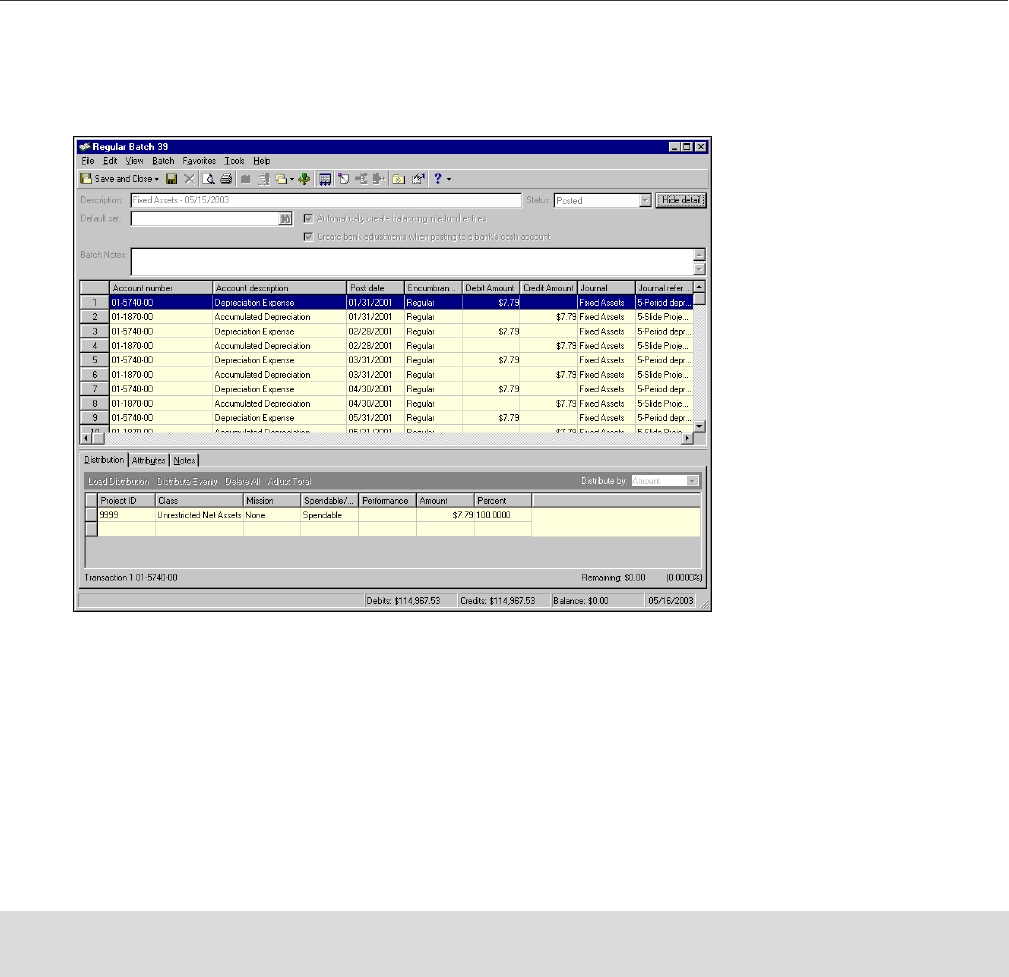
50
C
HAPTER
5. If the post process is successful, a confirmation message appears. Click OK to continue. The batch record
appears with the status of “Posted” and the batch details, transactions, and distributions are locked. If
you designated a post report on the Journal Entry Post Options screen, it opens in preview mode or prints
to the designated printer depending on the options you selected.
6. To return to the Journal Entry page, close the batch record.
Reversing a Posted Batch
Reversing a posted batch allows you to cancel the effects of transactions previously posted to General Ledger.
When you reverse a posted batch, the program creates a mirror image of the original batch with the debits and
credits reversed. You cannot reverse a batch posted to a year that is closed.
You can use the reversing a batch procedure and the copy a batch procedure to correct mistakes in posted
batches. You can first reverse the batch, then copy it into a new batch. Once the new batch is created, you can
make the necessary changes and repost.
Reversing a posted batch
To reverse a posted batch, you must have security rights to view, edit, and create batches. You must also
have security rights to the accounts and projects in the batch.
1. From the navigation bar, select Journal Entry. The Journal Entry page appears.
Note: Reversing a posted batch creates a new batch consisting of reversing entries. The original transactions
remain in the program, but after posting the reversing batch, the original transactions are offset.
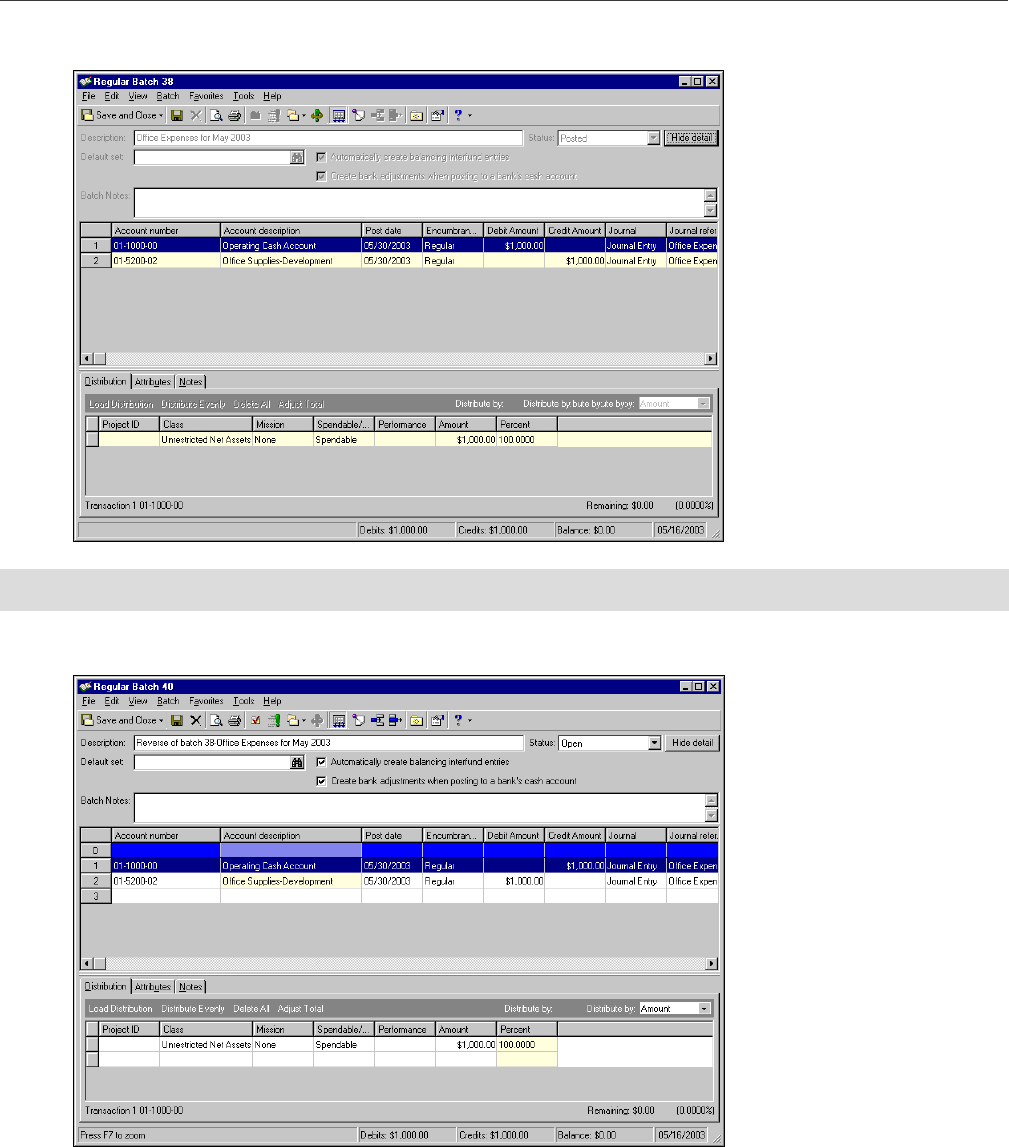
J
OURNAL
E
NTRY
51
2. Open the posted batch you want to reverse. The batch record appears.
3. To begin the reversing process, select Batch, Create Reversing Batch. Once the reversing process is
complete, the new batch record appears.
4. You can now make changes to the reversed batch, including adjusting transactions and renaming the
batch. To save the batch and return to the Journal Entry screen, click Save and Close. You must post the
new batch immediately after reversal to wash out the originally posted transactions.
Tip: You can also click the Create Reversing Batch button on the batch record toolbar.

52
C
HAPTER
Working with Gift Transactions from The
Raiser’s Edge
Posting gift transactions from The Raiser’s Edge 7 to General Ledger 7 is an efficient process that improves the
interaction between your Development and Business Offices by streamlining the gift posting process. If you are
using General Ledger 7 with The Raiser’s Edge 7, gift transactions are posted directly to General Ledger, which
means there is no longer a need to import gift transactions. The Raiser’s Edge 7 posts an “open” batch directly to
General Ledger, which gives your Business Office a chance to verify the information before committing the
transactions to the ledger. The “open” batch appears in Journal Entry and can be viewed, approved, and posted.
All settings required to establish the posting process from The Raiser’s Edge 7 to General Ledger 7 need to be
established in your organization’s The Raiser’s Edge 7 software. There are no settings required in General
Ledger 7 to enable receiving gift transactions from The Raiser’s Edge 7.
Linking The Raiser’s Edge to General Ledger
The Raiser’s Edge, our fundraising software, makes it easy for you to post gifts directly to General Ledger. In The
Raiser’s Edge, you can create a file consisting of the gift transactions you want to post. This file can then be
moved into General Ledger using the Post to General Ledger link in Administration. Once the batch of gifts is
moved to General Ledger it appears in Journal Entry as an “open batch”. Once this process has occurred, the
“open batch” can be approved and posted.
Before General Ledger can receive gift transactions from The Raiser’s Edge, the programs must be linked by
establishing settings in the Configuration module of The Raiser’s Edge. These settings enable the two programs
to work together so you can save time by entering gifts once for both programs. From Configuration in The
Raiser’s Edge, you specify several settings, including the location of your General Ledger database, whether it is a
single or multi-user version, and whether you want General Ledger to automatically check the validity of account
and project information entered into The Raiser’s Edge. You can also define Journal Reference Fields to use in the
Post to General Ledger link of Administration for posting detailed gift transactions.
Establishing settings for the interface between The Raiser’s Edge and General Ledger
1. From the Raiser’s Edge bar, select Config. The Configuration page appears.
Note: For more detailed information about gifts in The Raiser’s Edge, see the Basic Gift Records Guide, which
is part of our Raiser’s Edge documentation.
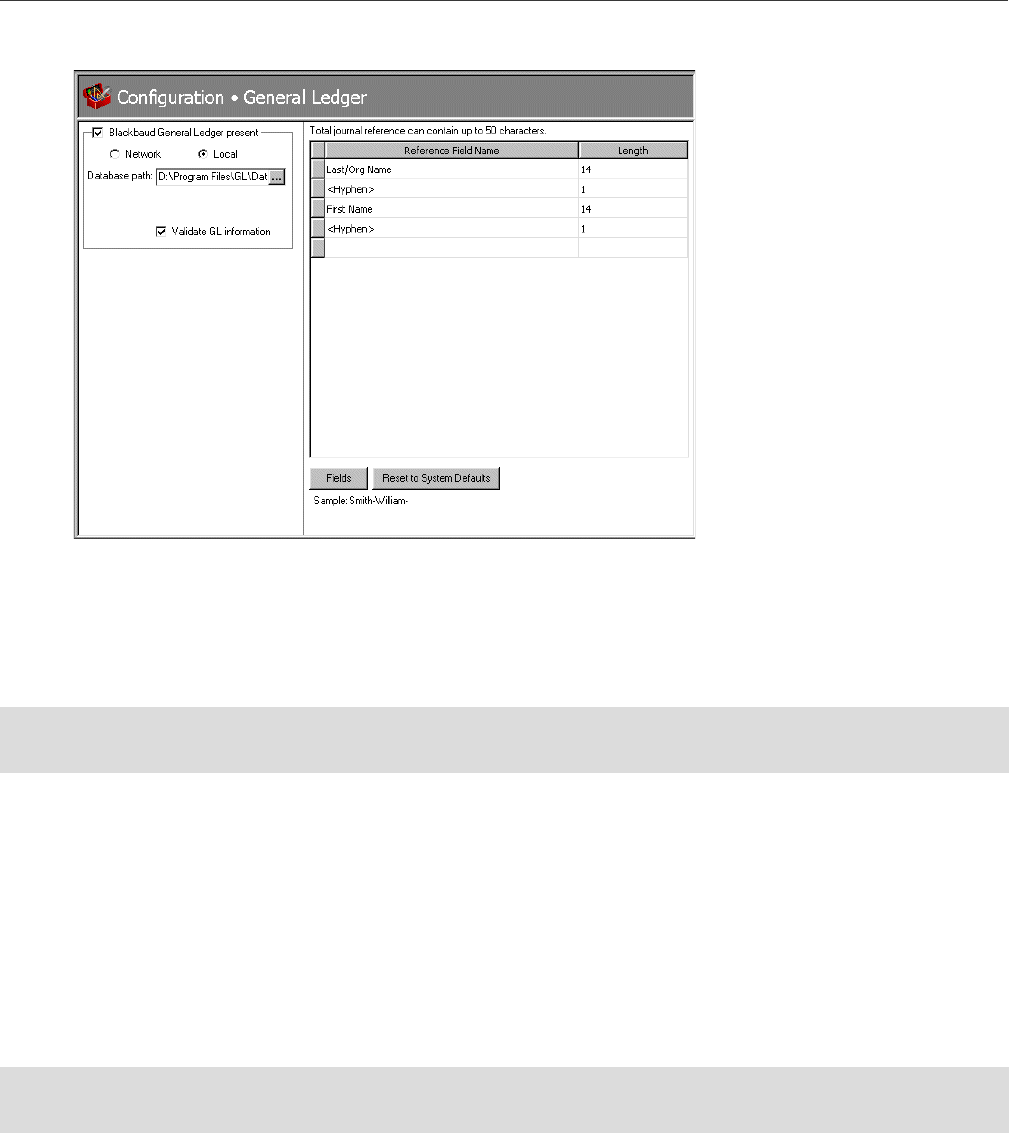
J
OURNAL
E
NTRY
53
2. Click the General Ledger link. The General Ledger page appears.
3. Mark the Blackbaud General Ledger Present checkbox.
4. You must select whether your database is accessed by many computers through a network, or by only
your computer. If you have a multi-user version of General Ledger, mark the Network option.
5. Enter the Server name for your General Ledger database engine. This name is required because it allows
The Raiser’s Edge to establish a link with the General Ledger database.
6. If you are using an alias for your General Ledger database, enter it in the Alias field. All computers on
your network use this name to locate the database linking The Raiser’s Edge and General Ledger.
7. Mark the Local option if you have a single user version of General Ledger. The Database path to General
Ledger is required. You need to enter the path to the Blackbaud database file folder in General Ledger. If
necessary, you can click the Browse button to find the path to the file.
8. If you mark the Validate GL information checkbox, The Raiser’s Edge searches the General Ledger
database to determine if the account numbers and project IDs you enter on fund records and other areas
of The Raiser’s Edge exist in General Ledger. Marking this checkbox can help eliminate errors caused by
incorrectly entered account numbers.
9. In the Journal References frame, you can select reference fields. The Raiser’s Edge sends these fields to
General Ledger as a description when you post in detail.
Note: Your network administrator should be able to supply you with your Server name and Alias if you do not
know it.
Note: You can create a field name of up to twenty characters. The total length of the journal reference can be
up to fifty characters.
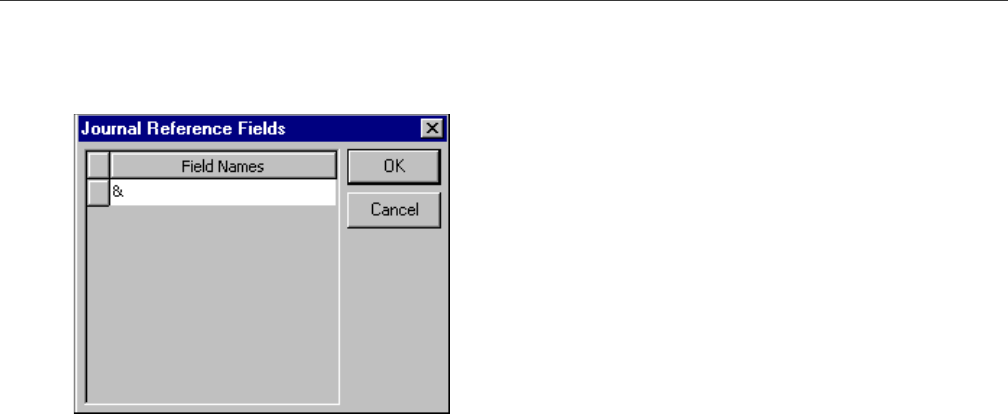
54
C
HAPTER
To define additional Journal Reference fields, or to insert spaces between fields, click Fields to access the
Journal Reference Fields screen. When you finish defining fields, click OK to return to the General Ledger
page.
10. The Sample display shows how the fields you select for the journal will format.
11. If you want to re-establish program settings, click Reset to System Defaults.
Interfund Entries
If you have both The Raiser’s Edge and General Ledger, and you have established a link between the two, an
Interfund Entries link appears on the Configuration page of The Raiser’s Edge. You can use this link to specify
General Ledger transfer accounts, which can then be entered into the GL Distributions grid on fund records.
If the first segments of a General Ledger debit and credit account are different, the General Ledger funds they
belong to are different. In this case, a transfer account must be specified. The interfund transfer ensures that
posted debits and credits associated with a gift are balanced by General Ledger fund when the debit is to one
fund and the credit to another. For example, if you post a debit to the General Ledger Playground Fund and a
credit to the General Ledger Operating Fund both from the The Raiser’s Edge General Fund, an interfund entry is
needed to create an offsetting or balancing credit to the General Ledger Playground Fund and a balancing debit
to the General Ledger General Operating Fund.
You can access account numbers directly from the General Ledger database by clicking the binoculars or pressing
F7 on your keyboard. The accounts you define here appear in the list of entries when you click the down arrow in
the Transfer column of GL Distribution grids. For more information on transfer accounts and interfund entries,
see the Configuration Guide for General Ledger.
Adding an interfund entry in The Raiser’s Edge
By adding an interfund entry, you specify a transfer account to link debit and credit accounts from different
General Ledger funds.
1. From the Raiser’s Edge bar, select Config. The Configuration page appears.
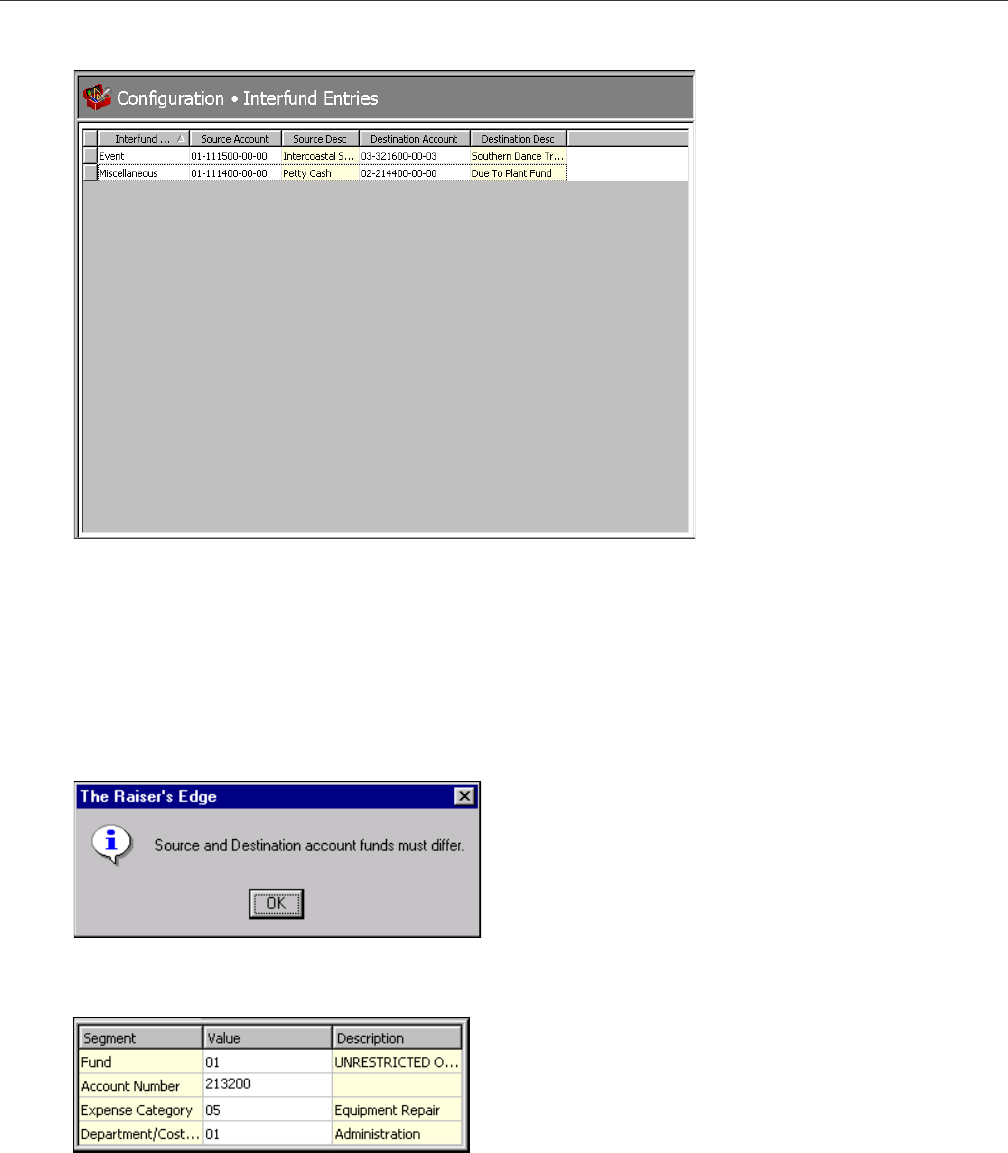
J
OURNAL
E
NTRY
55
2. Click the Interfund Entries link. The Interfund Entries page appears.
3. In the Interfund Entry column, give the entry a name of up to thirty characters. This name appears in the
list of possible entries when you click the down arrow in the Transfer column of a GL Distributions grid on
a fund record.
4. In the Source Account and Destination Account columns, you can click the binoculars to search the
General Ledger database for account numbers. The account descriptions appear when you enter an
account number. The descriptions are defined in General Ledger and cannot be edited in The Raiser’s
Edge. The source and destination account numbers must be in different General Ledger funds. If you
select the same account numbers, a message appears. If you receive this message, click OK to return to
the Interfund Entries page.
5. If you click the down arrow in the Source or Destination Account columns, a dropdown box appears. The
contents of the box break down a General Ledger account number by Segment.
6. The Segment column displays the account number segments previously defined on the Configuration
page of General Ledger. When you enter a Value for a particular segment, the Description column is
locked with the description of that value entered in General Ledger.
7. When you leave the Interfund Entries page, the new interfund entry is automatically saved.
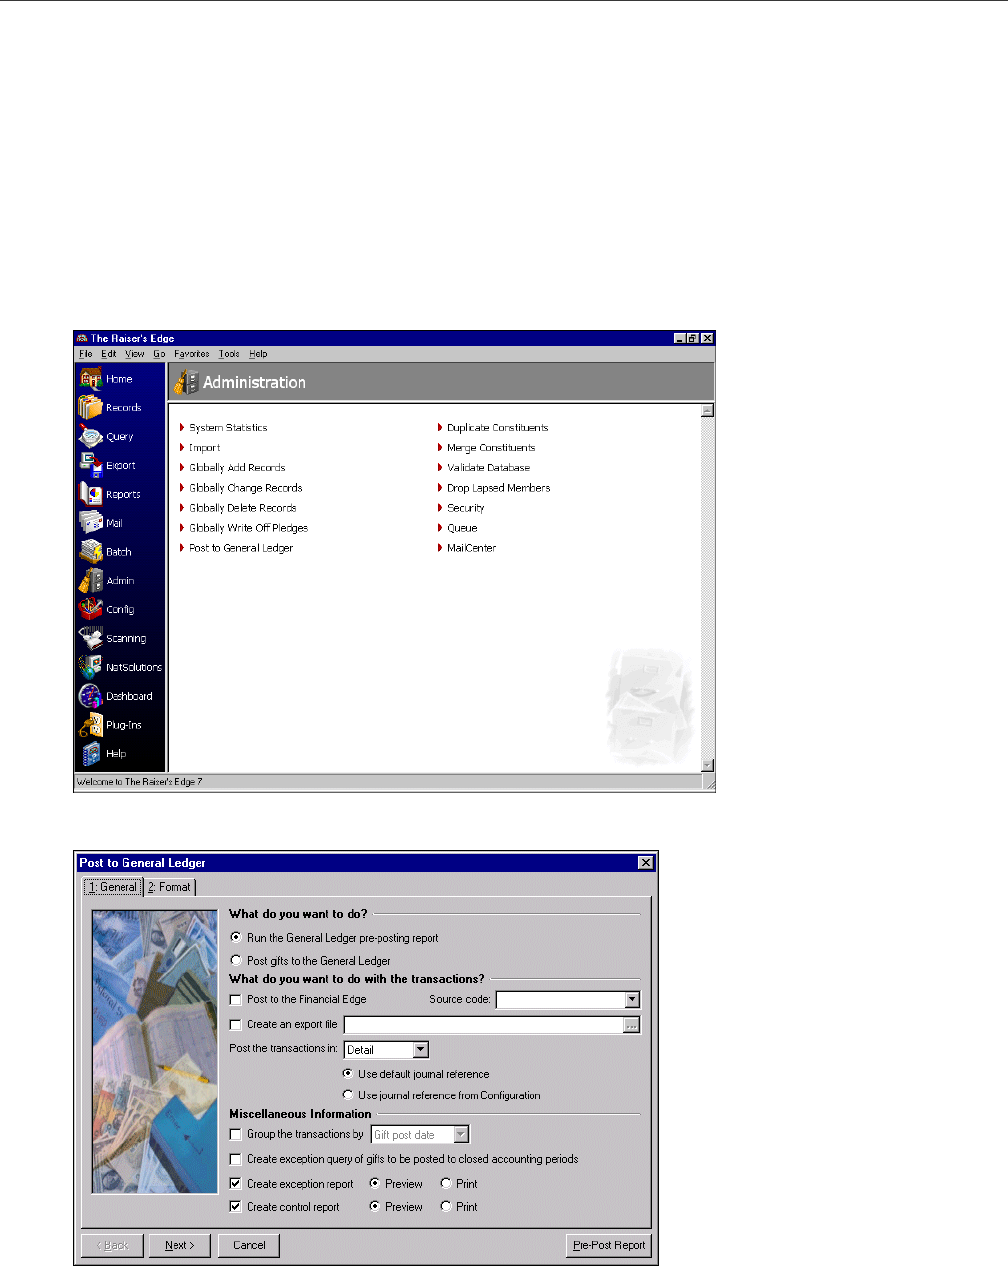
56
C
HAPTER
Posting Gifts from The Raiser’s Edge to General Ledger
The Post to General Ledger link on the Administration page of The Raiser’s Edge allows you to post gifts entered
in The Raiser’s Edge directly to General Ledger 7 in a few simple steps. Once you run the automatic posting
option, the status of all gifts involved in the process automatically changes to “Posted” on the Miscellaneous tab
of the gift record.
Posting gifts to General Ledger 7
If you are posting gifts to General Ledger, you must open the accounting program before running the posting
procedure.
1. From the Raiser’s Edge bar, select Admin. The Administration screen appears.
2. Select Post to General Ledger. The Post to General Ledger page appears, displaying the General tab.

J
OURNAL
E
NTRY
57
3. In the What do you want to do? frame, you can select to Post gifts to the General Ledger directly or Run
the General Ledger pre-posting report and view all gifts eligible for posting to the General Ledger. If you
select to run the report, the post status of the gifts does not change. You must select the Post gifts to the
General Ledger option to change the status.
If you use General Ledger 7, and you select the Post gifts to the General Ledger option, the Post to
Financial Edge checkbox in the What do you want to do with the transactions? frame is automatically
marked.
4. In the What do you want to do with the transactions? frame, you can mark one of the following
checkboxes.
• Post to Blackbaud’s General Ledger - If you use a version of General Ledger prior to 7, this checkbox
appears. Gifts do no post directly to General Ledger accounts. A posting file is created in the data
directory of the General Ledger system path entered in the General Ledger link in Configuration. This
file can then be imported into General Ledger. In the Source code field, click the drop-down arrow to
access a list of source codes available in General Ledger.
• Post to Financial Edge - If you use Blackbaud’s General Ledger 7, this checkbox appears. Mark this
checkbox and the program posts all gifts directly to Journal Entry as an open batch. In the Source code
field, click the drop-down arrow to access a list of source codes available in General Ledger.
• Create an export file - If you mark this checkbox, you must save the file. Click the binoculars to access
the Save As screen. Enter the File name and path for your export.
• Post the transaction in - You can select a Detail or Summary transaction posting.
If you select Detail, the program creates a separate General Ledger transaction record for each gift
posted. You must then select a journal reference: Use default journal reference uses key name and gift
type; Use journal reference from Configuration uses the journal reference you defined in the General
Ledger link in Configuration.
If you select Summary, summary totals appear for each gift type per fund. You must then select how
the gifts are summarized. You have the following options.
Gift post date - This posts all gifts based on the date specified in the Post Date field on the gift record.
GL Fiscal Period - This posts all gifts with a post date during an open fiscal period.
Month - This summarizes gifts for each month.
Quarter - This summarizes gifts for each quarter.
Specific date - This summarizes gifts for the date you enter in the Date field.
5. In the Miscellaneous Information frame, you can mark checkboxes for various report options and
grouping preferences.
• Group transactions by - You can select to group your transactions by Batch or Gift post date.
• Create exception query of gifts to be posted to closed accounting periods - The program creates a
query of the gifts posted to closed accounting periods in General Ledger. This option is enabled only if
you selected the Check GL numbers in Configuration.
• Create exception report - This generates a report of all transactions posted to closed accounting
periods in General Ledger. The report displays Post Date, Account Number, Account Description,
Project Description, and Reference. You can opt to Preview the report on screen or Print out a
hardcopy. This checkbox is enabled only if you selected the Check GL numbers on the General Ledger
link in Configuration.
• Create control report - This generates a report displaying Post Date, Description, Created By, No. of
Trans., Total Debits, Total Credits, and Status of all gift records posted to General Ledger. You can opt
to Preview the report on your computer screen or Print the report.
Note: Click Back to return to the General tab.

58
C
HAPTER
6. Click Next to move to the Format tab. The options offered on this tab change based on what you select in
the What do you want to do with the transaction frame on the General tab. The following screen
appears if you select Run General Ledger pre-posting report.
7. In the How do you want your posting to be reported? frame, you can select to Preview report after
posting and have the report display on your computer screen or Print report after posting to print the
report directly. You can Display report in Landscape or Portrait.
8. In the Sort report by grid, you can select the fields to use when sorting your report.Your choices include
the following.
In the Order column, you can select Ascending or Descending.
9. If you selected the Detail posting option on the General tab, in the Anonymous gift format field, select
how you want anonymous gifts to appear on your report. You can select Leave name intact, Use
Anonymous, or Asterisk at end of line.
•Post date •Account number
• Account description • Project description
• Reference • Amount
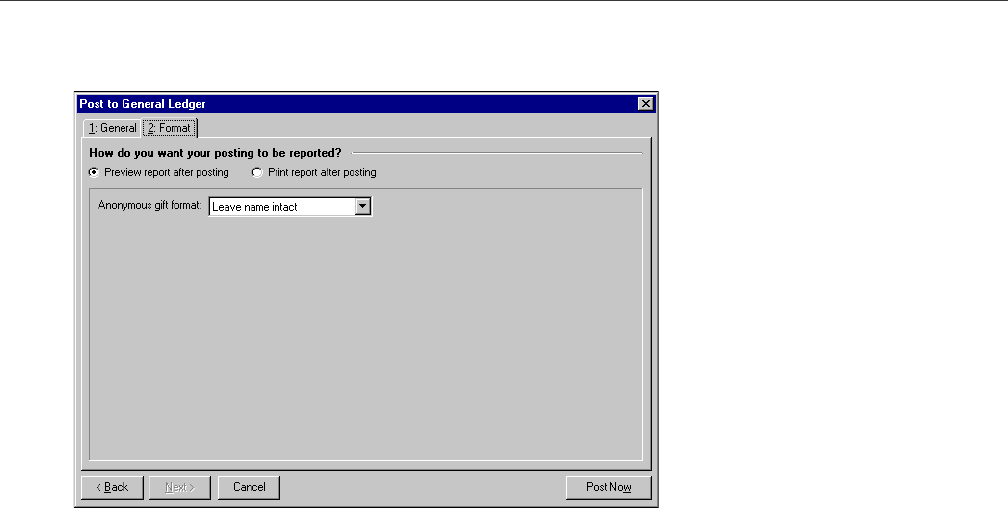
J
OURNAL
E
NTRY
59
10. If you access the What do you want to do with the transaction frame on the General tab and select Post
to Financial Edge, new options are displayed on the Format tab.
11. In the How do you want your posting to be reported? frame, you can select to print your report or to
preview it first on your screen. If you select the preview option, you can later print the report from the
preview screen.
12. In the Anonymous gift format field, select how you want anonymous gifts to appear on your report. Your
options include: “Leave name in tact”, Use ‘Anonymous’”, and “Asterisk at end of line”.
13. Click Post Now to post the gifts based on the parameter settings you established.
When the process is complete, the General Ledger post report appears, displaying post dates, account
numbers, account descriptions, project descriptions, references, and debit and credit amounts.
14. Close the General Ledger post report. If there are any exceptions during the posting process and you
marked the Create exception report checkbox on the General tab, the General Ledger exceptions report
appears, displaying all accounts that did not post.
15. Close the exceptions report. If you marked the Create control report checkbox on the General tab, the
General Ledger post control report appears, displaying post dates, account numbers, who created the
accounts, number of transactions, total debits, total credits, and status of the account.
16. Close the General Ledger post control report to return to the Administration page.

60
C
HAPTER

A
accessing Journal Entry
3
adding
batch default sets
6
,
7
interfund entries in The Raiser’s Edge
54
regular batches
29
transaction distributions
18
,
26
approving batches
31
B
batch
approving
31
changing status
33
copying
34
deleting
45
editing
35
exporting
42
globally changing transactions
35
importing transactions
36
managing
31
overview
2
posting
45
,
48
regular
adding
14
adding transaction distributions
18
reversing
45
,
50
validating
45
,
47
batch default set
adding
from new batch screen
7
from tools menu
6
overview
5
batch record
finding
4
opening
4
batch status, changing
33
C
changing
see also editing
batch status
33
copying batches
34
D
default set
adding
from new batch screen
7
from tools menu
6
overview
5
values
5
deleting batches
45
E
editing batches
35
exporting batch information
42
F
field, transaction
47
finding batch records
4
G
General Ledger
interfacing with The Raiser’s Edge
52
interfund entries
54
linking to The Raiser’s Edge
52
posting gift transactions
56
posting gifts
56
gift transaction
52
gift, posting to General Ledger
56
globally changing transactions
35
I
importing transactions
36
interfacing General Ledger with The Raiser’s Edge
52
interfund entry
adding in The Raiser’s Edge
54
overview
54
J
Journal Entry
Index

62
accessing
3
posting batches
48
journal entry, overview
2
L
linking The Raiser’s Edge to General Ledger
52
O
opening batch records
4
P
posted batch, reversing
50
posting
batches
45
,
48
batches from Journal Entry
48
gift transactions from The Raiser’s Edge
56
gifts to General Ledger
56
R
Raiser’s Edge, The
adding interfund entries
54
gift transactions
52
interfacing with General Ledger
52
interfund entries
54
linking to General Ledger
52
posting gift transactions
56
recurring amount batch
adding
21
adding transaction distributions
26
adding transactions
24
defined
20
recurring batch
adding transaction distributions
26
,
28
adding transactions
24
using to create regular batches
29
recurring percent batch
adding
22
adding transaction distributions
28
adding transactions
25
defined
21
regular batch
adding
14
adding from recurring batches
29
adding transaction distributions
18
adding transactions
16
overview
14
required fields for transactions
46
reversing batches
45
,
50
rule, transaction fields
47
S
status, changing
33
T
template for transaction distributions
12
template, for transaction distributions
10
transaction
from The Raiser’s Edge
52
gift
52
,
56
globally changing
35
importing
36
required fields
46
transaction distribution
adding to regular batches
18
transaction distribution template
adding
using an existing template
12
adding with existing template
12
creating manually
10
manually adding
10
overview
10
transaction field rules
47
transfer account see interfund entry
V
validating batches
45
value, default
5
