
Initial Training Workbook
SoftDent Scheduler
Your Guide to a Successful Transition
carestreamdental.com
800.944.6365
NG941-05
SoftDent Scheduler
Initial Training Workbook
Notice
© 2021 Carestream Dental LLC.. No part of this publication may be reproduced, stored in a retrieval system, translated to another language, or transmitted in any form by any means,
electronic, mechanical, photocopied, recorded, or otherwise, without prior written permission.
NEITHER CARESTREAM DENTAL LLC NOR ITS PARENTS, AFFILIATES, OR ANY OF ITS SUBSIDIARIES MAKE ANY WARRANTY OF ANY KIND WITH RESPECT TO THIS
MATERIAL, INCLUDING, BUT NOT LIMITED TO, THE IMPLIED WARRANTIES OF MERCHANTABILITY, NONINFRINGEMENT, AND FITNESS FOR A PARTICULAR
PURPOSE, WHICH ARE HEREBY DISCLAIMED IN THEIR ENTIRETY.
The information in this document is subject to change. Neither Carestream Dental LLC nor its parents, affiliates, or any of its subsidiaries shall be liable for errors contained herein,
omissions herefrom, or for indirect, incidental, consequential, or special damages (including, without limitation, lost profits or lost revenue) in conjunction with the furnishing,
performance, or use of this material.
SoftDent is a trademark of Carestream Dental Technology Topco Limited.
All other trademarks and registered trademarks are the property of their respective owners.
Current Dental Terminology (CDT) © American Dental Association (ADA). All rights reserved.
Manual Name: SoftDent Scheduler Initial Training Workbook
Part Number: NG941
Revision Number: 05
Print Date: March 2021
The names of persons and the data reflected in this guide are fictitious and are not intended to represent any real individual, event, or condition. Any resemblance or similarity of the
names of persons or data reflected in this guide to any actual person’s name or any event or condition is purely coincidental and unintended.

SoftDent Scheduler Initial Training Workbook (NG941-05) iii of iv
Contents
Lesson 1—Getting Started
Setting Up the Columns . . . . . . . . . . . . . . . . . . . . . . . . . . . .1
Setting Up the Schedule . . . . . . . . . . . . . . . . . . . . . . . . . . .2
Defining Office Hours . . . . . . . . . . . . . . . . . . . . . . . . . . .2
Viewing and Changing Hours . . . . . . . . . . . . . . . . . . . .3
Defining Office Holidays . . . . . . . . . . . . . . . . . . . . . . . . .3
Creating Daily Templates . . . . . . . . . . . . . . . . . . . . . . . . .3
Creating Non-Working Time Slots . . . . . . . . . . . . . . . . . .4
Using Ideal Day Scheduling. . . . . . . . . . . . . . . . . . . . . . . .4
Setting Up Scheduling Classes . . . . . . . . . . . . . . . . . . .5
Applying Ideal Day Classes . . . . . . . . . . . . . . . . . . . . .6
Defining Provider Hours. . . . . . . . . . . . . . . . . . . . . . . . . .6
Viewing and Changing Hours . . . . . . . . . . . . . . . . . . . .6
Defining Production Goals. . . . . . . . . . . . . . . . . . . . . . . . . . .7
Lesson 2—Navigating the Scheduler
Using the Search Field. . . . . . . . . . . . . . . . . . . . . . . . . . . . 11
Displaying Dates . . . . . . . . . . . . . . . . . . . . . . . . . . . . . . . 11
Day View . . . . . . . . . . . . . . . . . . . . . . . . . . . . . . . . 11
Full Day View . . . . . . . . . . . . . . . . . . . . . . . . . . . . 11
Weekly View. . . . . . . . . . . . . . . . . . . . . . . . . . . . . . . 11
Real Time Bar . . . . . . . . . . . . . . . . . . . . . . . . . . . . . . 12
Calendar . . . . . . . . . . . . . . . . . . . . . . . . . . . . . . . . . 12
Navigation Buttons . . . . . . . . . . . . . . . . . . . . . . . . . . . 12
Scheduler View Items . . . . . . . . . . . . . . . . . . . . . . . . . . . . 12
Using Keyboard Shortcuts. . . . . . . . . . . . . . . . . . . . . . . . . . 12
Links to Features in the Practice Management Software. . . . . . . . . . 13
Lesson 3—Customizing Views and Setting Up Treatment
Categories
Using the Overlays . . . . . . . . . . . . . . . . . . . . . . . . . . . . . .15
Configuring the Overlays . . . . . . . . . . . . . . . . . . . . . . . .15
Creating Custom Views . . . . . . . . . . . . . . . . . . . . . . . . . . .16
Creating Global Custom Views . . . . . . . . . . . . . . . . . . . . . 16
Setting Up Treatment Categories . . . . . . . . . . . . . . . . . . . . . .17
Using the Privacy Display . . . . . . . . . . . . . . . . . . . . . . . . . . 18
Printing the Schedule . . . . . . . . . . . . . . . . . . . . . . . . . . . .18
Printing Routing Slips . . . . . . . . . . . . . . . . . . . . . . . . . . . .18
Lesson 4—Managing Appointments
Adding a New Patient . . . . . . . . . . . . . . . . . . . . . . . . . . . . 22
Scheduling Doctor and Assistant Time . . . . . . . . . . . . . . . . . . .23
Viewing Production Goals. . . . . . . . . . . . . . . . . . . . . . . .23
Using the Appointment Card . . . . . . . . . . . . . . . . . . . . . . . .24
Confirming Appointments . . . . . . . . . . . . . . . . . . . . . . . . . . 25
Cancelling Appointments . . . . . . . . . . . . . . . . . . . . . . . . . .25
Rescheduling Appointments . . . . . . . . . . . . . . . . . . . . . . . . . 26
Checking a Patient In and Out. . . . . . . . . . . . . . . . . . . . . . . .26
Managing Patient Recare . . . . . . . . . . . . . . . . . . . . . . . . . .27
Using the Auto Scheduler . . . . . . . . . . . . . . . . . . . . . . . . . .27
Creating Notes and Messages . . . . . . . . . . . . . . . . . . . . . . .28
Scheduling Family or Group Appointments . . . . . . . . . . . . . . . . .28

iv of iv SoftDent Scheduler Initial Training Workbook (NG941-05)
Lesson 5—Generating Lists
Generating Confirmation Lists . . . . . . . . . . . . . . . . . . . . . . . 33
Generating Pending Lists . . . . . . . . . . . . . . . . . . . . . . . . . 33
Generating Short Call Lists . . . . . . . . . . . . . . . . . . . . . . . . 34
Index
SoftDent Scheduler Initial Training Workbook (NG941-05) 1 of 10
Lesson 1
Getting Started
The Scheduler is designed to bring you the functionality you need
to manage your appointments. Information and options are
displayed in a progressive manner, which means one level of
information flows into the next level.
Using the Scheduler, you can perform the following appointment-
related functions:
• Scheduling
• Editing details
• Confirming
• Cancelling
• Rescheduling
See the Scheduler online help for more information.
Setting Up the Columns
The Scheduler's primary interface is the Day View, which contains
columns that represent a provider or specific chair or operatory
within an office or location.
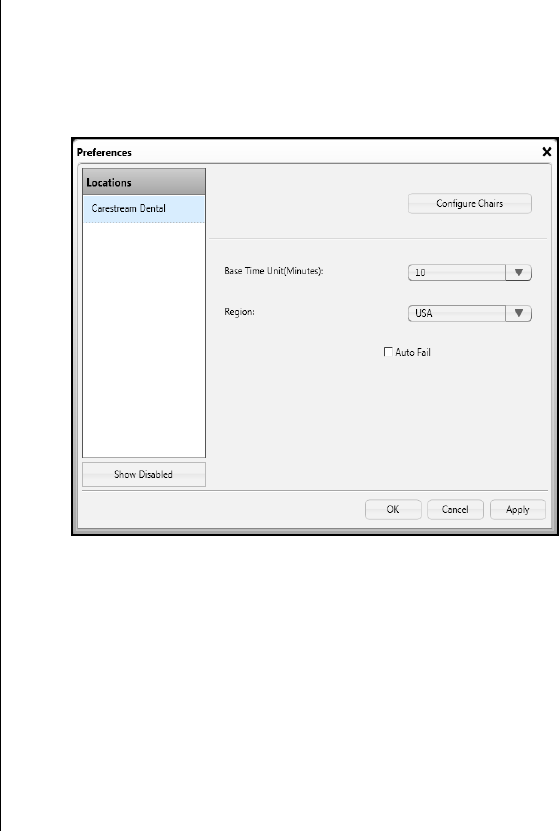
To set up columns:
1 In the Scheduler, select Settings > Office Settings. The
Preferences window is displayed.
2 In the Locations list, select the office you are setting up.
3 Select a base time unit and region for the location.
4 If you want appointment failures to be recorded, select Auto
Fail.
2 of 10 SoftDent Scheduler Initial Training Workbook (NG941-05)
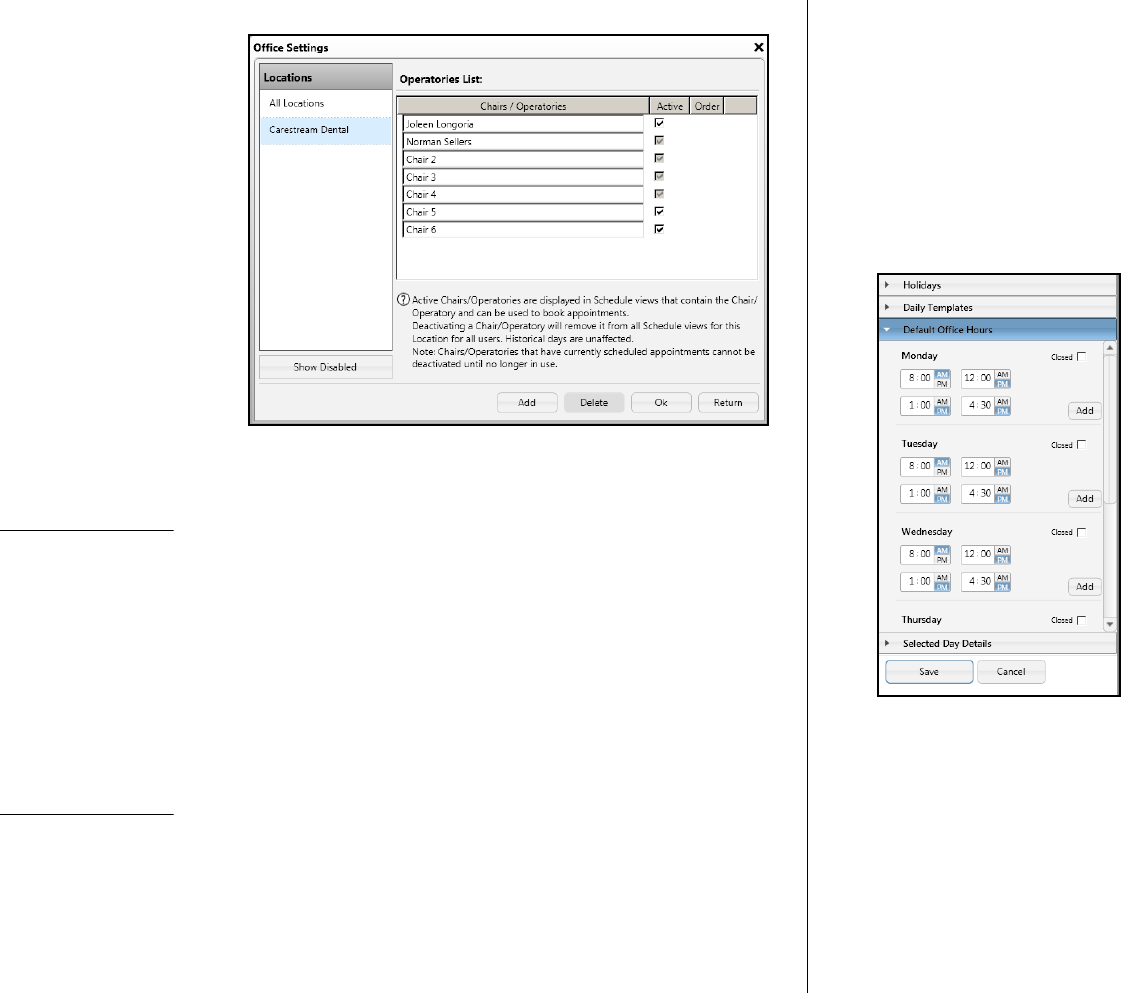
5
Click Configure Chairs. The Operatories List is displayed.
6 To create a chair or column, click Add and type a name.
7 In the Active fields, select the chair or column you want to
display in the Day View.
8 To change the order, hold the cursor under the Order button
until arrows are displayed. Click an up or down arrow.
9 Click OK.
Setting Up the Schedule
On the Schedule Planning tab, set these options for your office:
• Default Office Hours
• Holidays
• Daily Templates
• Provider’s Default Hours
Defining Office Hours
To define or change the default office hours:
1 Select Settings > Schedule Planning. The Schedule
Planning tab is displayed.
2 In the Calendar view for field, select the office location.
3 Click Default Office Hours and Edit. The Default Office
Hours panel is displayed.
4 Enter or change the hours for each day of the week. Select
Closed for the days that the office is closed.
5 Click Save.
Note
If you deactivate a
chair, you remove it
from all views in the
Scheduler.
Note
A legend at the bottom
of the screen explains
the colors used for
particular days.

SoftDent Scheduler Initial Training Workbook (NG941-05) 3 of 10
Viewing and Changing Hours
To view the office hour settings for a particular day, click Selected
Day Details and select a day on the schedule.
To change the settings:
• Edit day—Edit the hours.
• Go to—Jump directly to the day in the Day View.
• Close the day—Show the office as closed for the day.
• Remove the template—Remove the daily template from
the day.
Defining Office Holidays
To define holidays for an office:
1 Select Settings > Schedule Planning. The Schedule
Planning tab is displayed.
2 In the Calendar view for field, select the office location.
3 Click Holidays. The Holidays panel is displayed.
4 In the Name field, type the name of the holiday.
5 In the Hours field, select All Day.
OR
Deselect All Day and designate the hours the office opens
and closes.
6 To use the same template every year, select one:
• Repeat yearly by day of the month
• Repeat yearly by date
7 Select the day in the calendar and click Apply to selected
days.
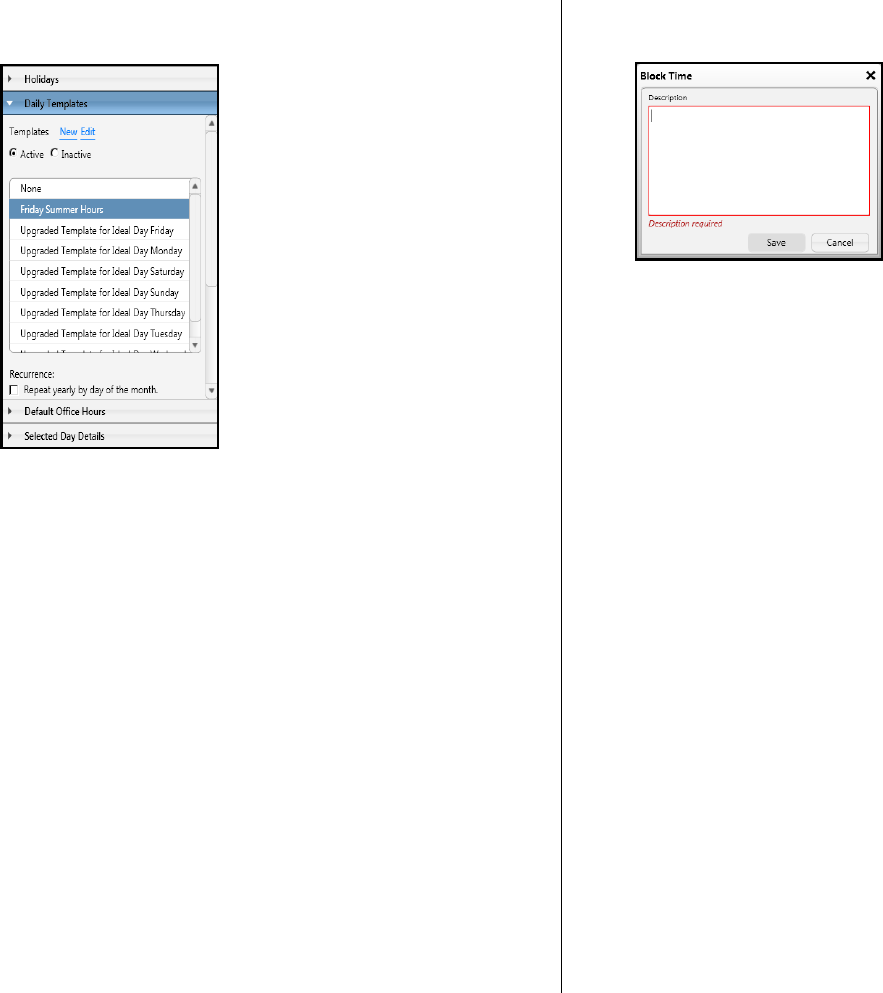
Creating Daily Templates
You can create multiple templates that are different from the
default office hours.
You can also use daily templates to apply ideal day settings that
block out times and columns for specific types of appointments or
for non-working time. See “Using Ideal Day Scheduling” for more
information.
Daily templates specify time ranges only and must be applied to
selected days on the calendar.
To create a daily template:
1 Select Settings > Schedule Planning. The Schedule
Planning tab is displayed.
2 In the Calendar view for field, select the office location.
Tip
A black triangle in the
corner of a day
indicates
appointments are
scheduled; a red
exclamation point
indicates a scheduling
conflict.
4 of 10 SoftDent Scheduler Initial Training Workbook (NG941-05)
3
Click Daily Templates. The Daily Templates panel is
displayed.
4 To create a new template, click New, name the template,
define the hours, and click Save.
5 To edit an existing template, select the template, click Edit,
make the changes, and click Save.
Creating Non-Working Time Slots
You can designate blocks of time as non-working time. To create a
non-working time slot:
1 Select a template.
2 Click Edit.
3 Click Non-working Time.
4 Click Create non-working time.
5 Click and drag in the time slots you want to block. The Block
Time window is displayed.
6 Type a description.
7 Click Save.
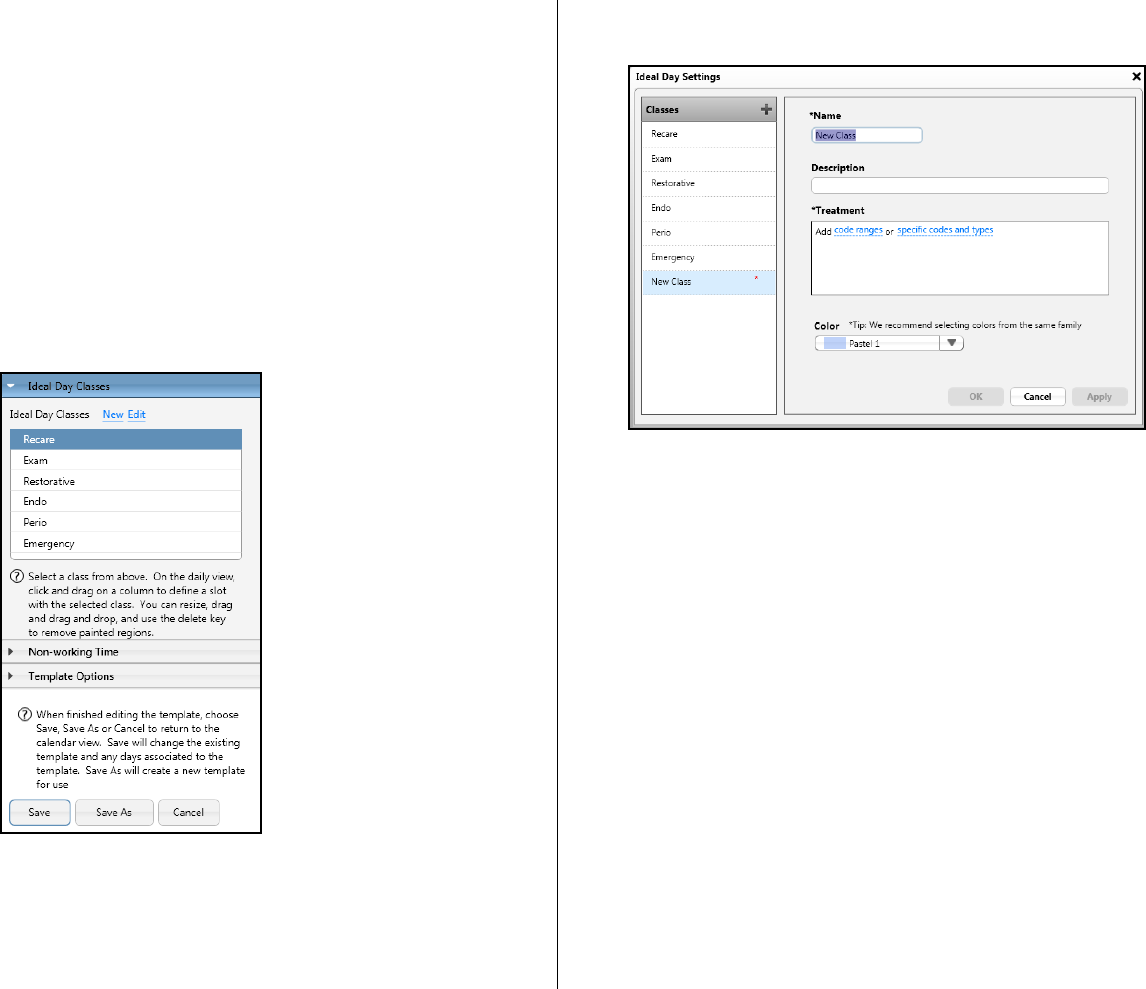
Using Ideal Day Scheduling
Use the Ideal Day feature to set up blocks of time for specific
types of appointments. By creating scheduling classes, you can
use colors to display the best times to schedule specific types of
work, depending on the availability and preferences of the
providers in your practice.
When you try to schedule an appointment in a block of time
allocated for a different appointment type, a message is displayed
reminding you of the conflict.
To implement Ideal Day scheduling:
• Set up scheduling classes
• Apply the classes to the schedule
SoftDent Scheduler Initial Training Workbook (NG941-05) 5 of 10
Setting Up Scheduling Classes
To set up Ideal Day scheduling classes:
1 Select Settings > Schedule Planning.
2 Click Daily Templates and:
• Click New.
OR
• Select a template and click Edit.
3 Click Ideal Day Classes. The Ideal Day Classes panel is
displayed.
4 To create a class, click New. The Ideal Day Settings window
is displayed.
5 Enter a name and description.
6 In the Treatment section, click to add code ranges or specific
codes and types.
7 In the Color section, use the arrow to select the color for the
class.
8 Click OK.
To edit an Ideal Day class:
1 In the Ideal Day Classes panel, select a class.
2 Click Edit.
3 Make the changes.
4 Click OK.
6 of 10 SoftDent Scheduler Initial Training Workbook (NG941-05)
Applying Ideal Day Classes
To apply Ideal Day scheduling classes to a day profile, or to paint
the day:
1 In the Ideal Day Classes panel, select the class.
2 Click and drag the class on a time slot in a column. The class
is displayed in the appropriate color.
3 To move or resize the class, select it and drag it again.
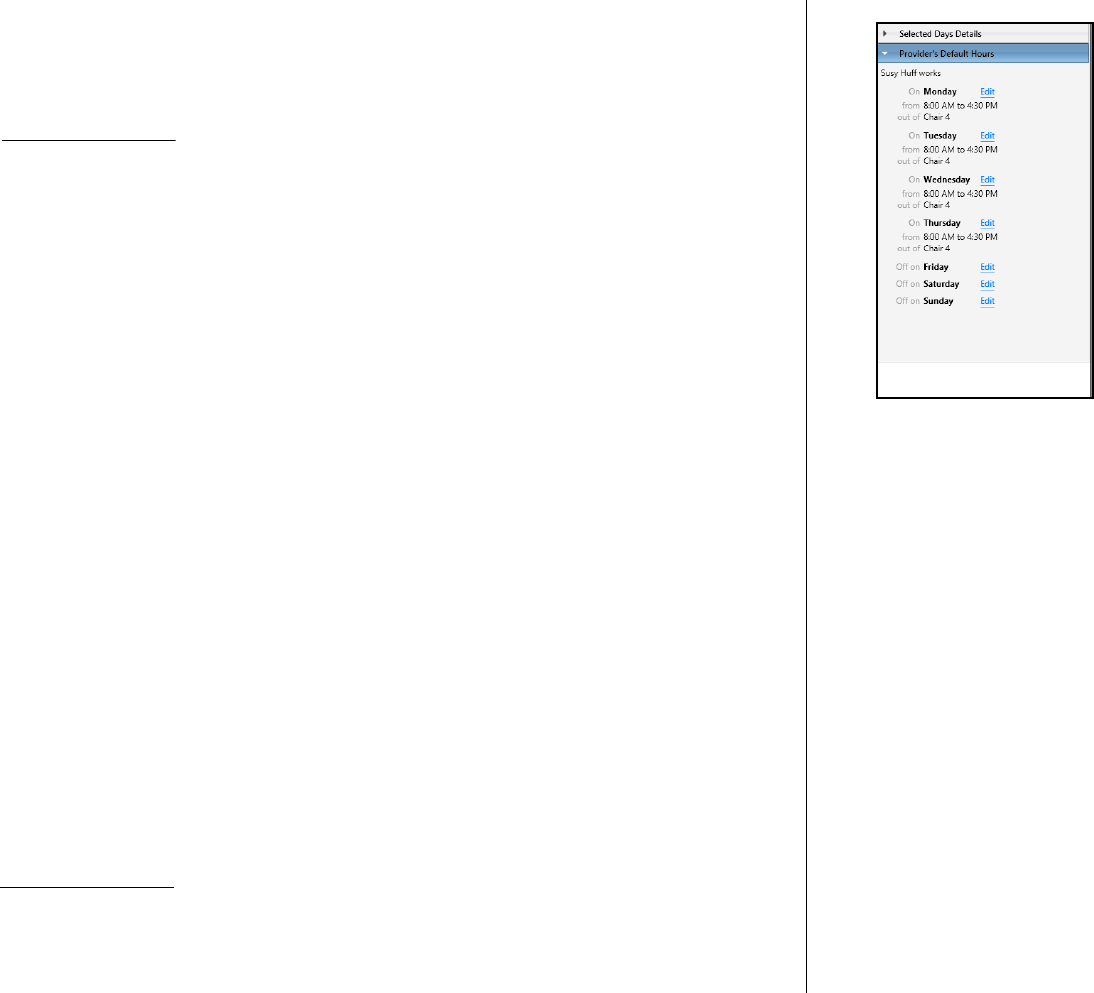
Defining Provider Hours
Use the Scheduler Planning tab to set up working hours and to
assign chairs for each provider.
When you define working hours for a provider, you save the
schedule as a template. You can select from multiple templates
when you want to change a provider's regular schedule.
To define the working hours for a provider:
1 Select Settings > Schedule Planning. The Schedule
Planning tab is displayed.
2 In the Calendar view for field, select the provider. The
Provider panel is displayed.
3 Click Edit next to the day you want to add or change.
4 Set the hours and select the chair number. If the provider
wants non-working time during the day, such as a lunch hour,
end the first working time block and then click Add to begin
another time block.
5 Click Save.
Viewing and Changing Hours
To view the office hour settings for a particular provider, click
Selected Day Details and select a day on the schedule.
To change the settings:
• Go to—Jump directly to the day in the Day View.
• I’m off!—Designate the day as a day off.
• Edit—Modify the hour and chair settings for the day.
• Reset—Use the default settings for the day.
Note
To delete a class,
select it and press
Delete.
Note
Providers can be
assigned to more than
one chair on any day.
SoftDent Scheduler Initial Training Workbook (NG941-05) 7 of 10
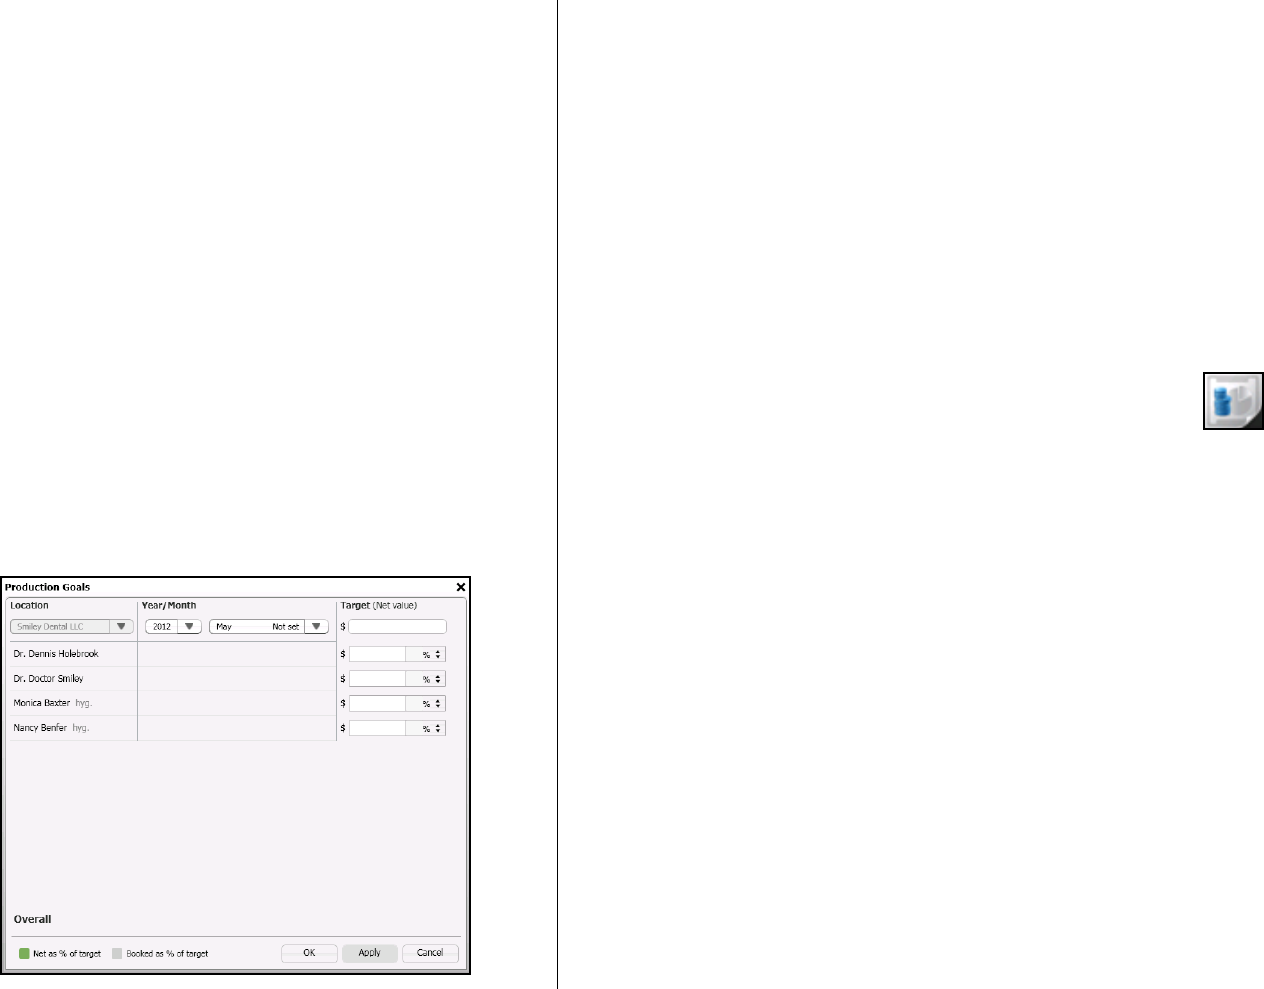
Defining Production Goals
You can define monthly financial targets for a given location and
for individual producers. You can track progress toward these
goals and consider them when scheduling appointments.
To assist in scheduling decisions, the percentage of a target is
displayed for the producers in the Calendar and the Day View.
Goals are tracked by booked production in gray bars and net
production in green bars. The Scheduler pulls data for the graph
from the procedures scheduled for each producer and from the
production amounts posted in the software.
On the Schedule Planning tab, you can click the Production
Activity Overlay to view the progress that is being made by your
office and your providers towards their goals.
To define production goals:
1 Select Settings > Production Goals. The Production Goals
window is displayed.
2 Select the location for which you are setting goals.
3 Select the target year and month for which you are defining,
editing, or viewing goals.
4 Enter a target net value dollar amount for the month.
5 Assign a target for each producer. If you enter an amount, the
percentage of the target is calculated for you. If you enter a
percentage, the target dollar amount for the provider is
displayed.
6 Click OK.
Production Activity
Overlay

8 of 10 SoftDent Scheduler Initial Training Workbook (NG941-05)
Skill Sharpeners
Exercise 1—Set Up a Provider Column
A new doctor has joined your staff and has been entered in the
practice management software. You want to add a column for him
in the Scheduler. To set up a provider column:
1 Select Settings > Office Settings. The Preferences window
is displayed.
2 In the Locations list, select your office.
3 In the Base Time Unit (Minutes) field, select 15.
4 In the Region field, select USA.
5 Click Configure Chairs. The Operatories List is displayed.
6 Click Add and name the chair with the new doctor’s name.
7 Click OK.
Exercise 2—Define Office and Provider Hours
You want to define the hours for one doctor and two hygienists,
but before you can define provider hours, you must define the
office hours for the location in which they work.
To define office and provider hours:
1 Select Settings > Schedule Planning. The Schedule
Planning tab is displayed.
2 In the Calendar view for field, select the office location.
3 Click Default Office Hours and Edit. The Default Office
Hours panel is displayed.
4 Click Add, if necessary, and set the following hours:
• 8:00 AM as the beginning time for each day
• 12:00 PM as the beginning of the lunch break
• 1:00 PM as the end of the lunch break
• 6:00 PM as the closing time for Monday through
Thursday
• 5:00 PM as the closing time for Friday
• Saturday and Sunday to Closed.
5 Click Save.
6 In the Calendar view for field, select a doctor’s name. The
Provider’s Default Hours panel is displayed.
7 Click Edit and change the hours and chair for the provider.
If the provider is scheduled to be off on a day, click Edit and
select the day; then change the hours and chair.
8 Click Save.
9 Repeat these steps to define the working hours for two
hygienists.
Exercise 3—Set Up an Ideal Day
You decide to set up blocks of time each day for fillings. To use the
Ideal Day feature, you must set up a scheduling class and then
apply the class.
To set up a scheduling class:
1 Select Settings > Schedule Planning.
2 Click Daily Templates and click New.

SoftDent Scheduler Initial Training Workbook (NG941-05) 9 of 10
3 Click Ideal Day Classes. The Ideal Day Classes panel is
displayed.
4 Click New. The Ideal Day Settings window is displayed.
5 In the Name field, type Radiographs.
6 In the Description field, type All types of radiographs.
7 In the Treatment section, click specific codes and types and
type 00200.00 in the field.
8 In the Color section, click the arrow and select the Pastel 9.
9 Click OK.
To apply the class to the schedule:
1 In the Ideal Day Classes panel, select a class.
2 Click and drag in a time slot on a column.

10 of 10 SoftDent Scheduler Initial Training Workbook (NG941-05)
SoftDent Scheduler Initial Training Workbook (NG941-05) 11 of 14
Lesson 2
Navigating the Scheduler
To move around in the software, use click-and-drag. To select an
item or option, click the mouse. To display the next logical option
or choice, click and hold the mouse over some features. To select
multiple items, press Shift and click the mouse.
Using the Search Field
The Search field is located in the upper-right section of the
Scheduler window and the appointment card.
To use the Search field, type at least three characters in the field.
Search results include a patient's name, nickname, address,
phone number, birth date, and e-mail address.
To display more information and choices for a patient, click one of
the following items in the search results:
• Go to Patient
• Next scheduled appointment
• Show History
• Book Recare
• Auto Scheduler
Displaying Dates
To display dates, you can change views, scroll forward or
backward, and use the real time bar or calendar.
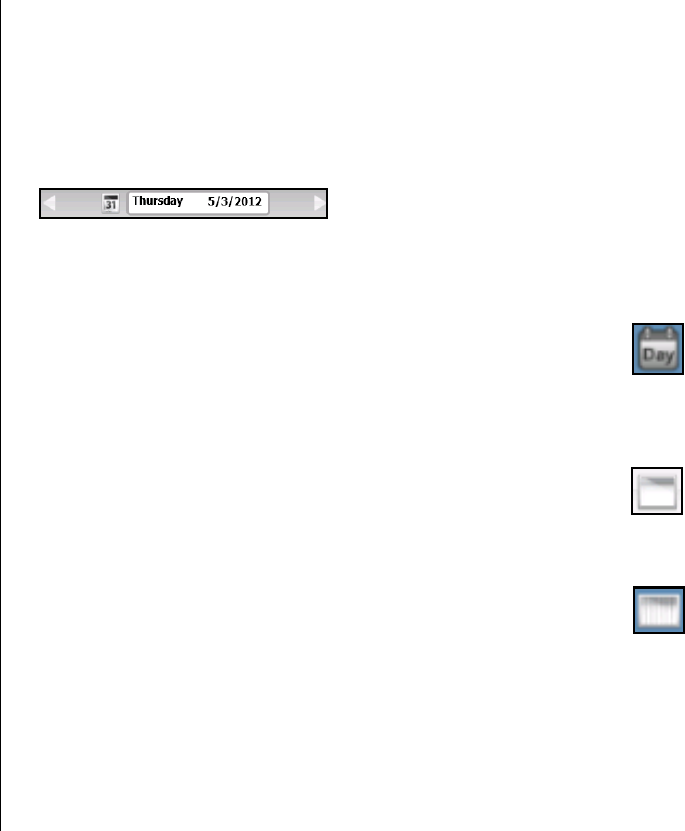
Day View
The current date is displayed by default. This is called the Day
View. Use the arrows next to the date to scroll forward or
backward one day.
You can view a single day or an entire week, and you can select
multiple days to view at once.
Full Day View
Use the Full Day View icon to toggle your Day View from a portion
of the day's schedule with details on the appointment tiles to a full
day's schedule without details on the appointment tiles.
Weekly View
Use the Weekly View icon to display the entire work week for a
displayed date. Select the icon again to return to today's date.
Day View
Full Day View
Weekly View
12 of 14 SoftDent Scheduler Initial Training Workbook (NG941-05)
Real Time Bar
The real time bar lets you know where you are in relation to your
next appointment.
Calendar
To display the calendar with the current month and the following
two months, click the Calendar icon by the date. On the calendar,
you can:
• Double-click a single date to go to that date in the
appointment book.
• Shift + click two dates to select a range of dates in the
appointment book.
• Ctrl + click individual dates to select multiple dates in the
appointment book.
Navigation Buttons
Click the Today button to return to the current date.
Use the following buttons to move forward in time:
• +1 Week
• +2 Weeks
• +1 Month
• +3 Months
• +4 Months
• +6 Months
Scheduler View Items
The following list explains the Scheduler symbols and colors:
• Circle around a day—Current day
• Slashes—Past days that are view-only
• Blue and pink—Days the office staff is working
• Dark blue—Day that uses a template
• Pink—A unique day that is not on a shared plan
• Light gray—Days the office is closed
Using Keyboard Shortcuts
You can use the keyboard shortcuts, or hot keys, to navigate the
Scheduler software. To display a list of hot keys:
1 Click the Help (?) button and select Hot Keys.
2 Click Main View or Appointment Card to expand or close the
list of keyboard shortcuts.
Calendar

SoftDent Scheduler Initial Training Workbook (NG941-05) 13 of 14
Links to Features in the Practice
Management Software
An Options panel on the left side of the Scheduler window
provides links to the practice management software and other
modules and features.
To access the features, click the Open Panel arrow.
To close the panel, click the Close Panel arrow.
Open Panel
Close Panel

14 of 14 SoftDent Scheduler Initial Training Workbook (NG941-05)
Skill Sharpener
Exercise 1—Practice Moving Around in the Scheduler
Experiment with each of these procedures:
• Click the right arrow next to the current date.
• Double-click an appointment tile. Click the X to close the
appointment card.
• Click the Calendar icon and hold the Ctrl key as you
select multiple dates. Double-click a date to view details.
• Type the first three letters of a patient’s last name in the
Search field. Select the patient and click Show History.
• Click the Day View icon and then the Weekly View icon.
• Press Alt + P to view the Pending List.
• Click the Location tab to return to the schedule.
• Scroll to the bottom of the window and click +1 Month to
view time slots one month from the current date.
• Click Today to return to the current date.
SoftDent Scheduler Initial Training Workbook (NG941-05) 15 of 20
Lesson 3
Customizing Views and Setting Up Treatment Categories
You can adjust the Scheduler window to display what you need to
see. You can:
• Create as many columns or tabs as you need to organize
your workflow.
• Use the overlay icons to display what you need to see on
the appointment tiles.
• Set up Ideal Day scheduling and treatment categories to
further customize how appointments are scheduled and
displayed on the Day View.
• Turn the privacy setting on or off.
Using the Overlays
Overlays focus the view on specific information and enable you to
perform a task or access information quickly.
For example, when you click the Confirmation Overlay icon, the
day's appointments that need to be confirmed are displayed
brightly, while confirmed appointments are shaded.
The following overlays are available in the Scheduler window:
• Confirmation—Highlights appointments that need to be
confirmed by shading those already confirmed.
• Production Goals—Displays indicators of a provider's or
location's progress toward production goal targets.
• Admin—Displays information on the tile, such as the
patient's age and scheduled procedures for the
appointment.
• Clinician—Displays clinical information on the tile, such as
medical alerts and scheduled procedures for the
appointment.
• Default—Displays your personalized view of the
Scheduler window.
• Provider Working Time—Displays the providers working
in each chair each day.
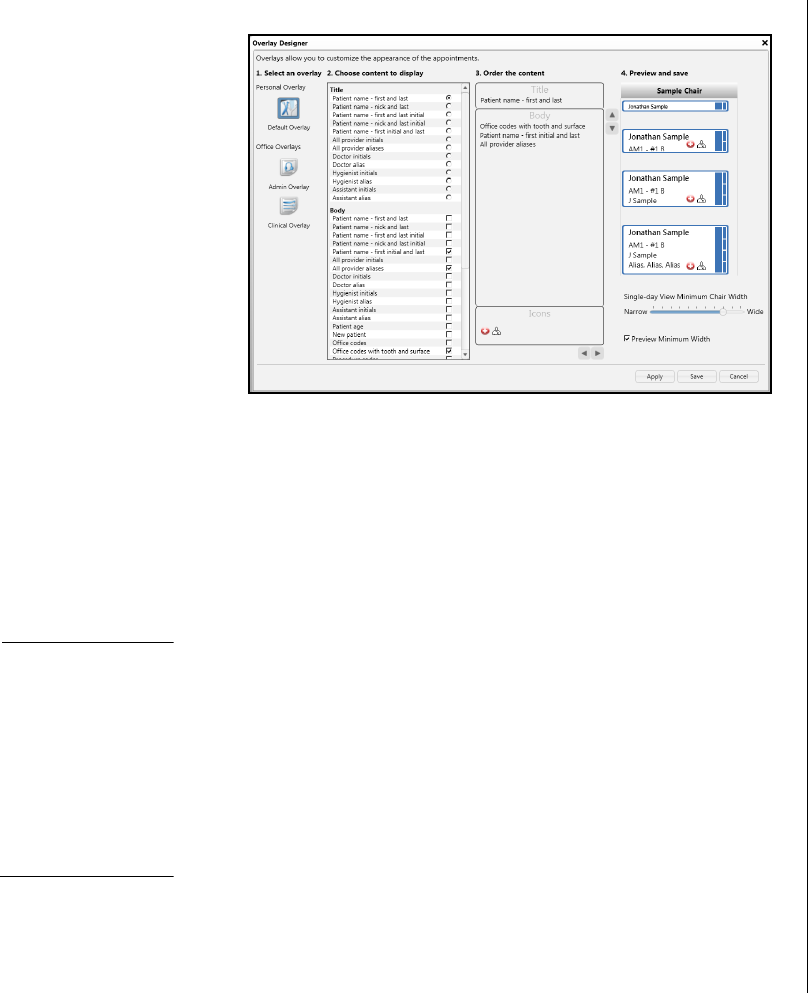
Configuring the Overlays
You can customize the appearance of appointment tiles in the
Default, Admin, and Clinician overlays. The configuration of the
Default overlay is user-specific and can be customized at every
workstation. The configuration of the Admin and Clinician
overlays is global for the office, and you must have permission to
change the settings.
To configure the Default, Admin, and Clinician overlays:
1 Click Settings > Configure Overlay.
Note
When an overlay is
active, a blue border is
displayed around the
icon on the toolbar.
Confirmation
Overlay
Production
Goals Overlay
Admin
Overlay
Clinician
Overlay
Default
Overlay
Provider
Working
Time
16 of 20 SoftDent Scheduler Initial Training Workbook (NG941-05)
The Overlay Designer window is displayed.
2 Select Default Overlay, Admin Overlay, or Clinical Overlay.
3 Select the content you want to display on the appointment
tiles.
4 Click the up and down arrows to select the order in which the
content is displayed.
5 Select the icons you want to display on the appointment tiles.
6 Click the left and right arrows to change the order in which
the icons are displayed.
7 Change the display width of the chairs, if necessary.
8 Preview the configuration, and click Apply or Save.
Creating Custom Views
You can customize the Scheduler window to display scheduling
resources in a combination that suits your needs.
Each custom view is user-specific, but one person can have
multiple personal views. After you name a view, you can save,
close, and access it any time until you delete it.
To create a personal view:
1 In any view, click and hold a column heading.
2 Drag the cursor to the tab area at the top until the outline of a
new tab is displayed.
3 Release the mouse. The tab is displayed with the name New
View.
4 Double-click the name until a rename field is enabled.
5 Rename the tab, and then click off the tab.
Creating Global Custom Views
You can create global views that can be used by more than one
user in your office.
To create global custom views:
1 Select Settings > Global Custom Views. The Global
Custom Views window is displayed.
2 Next to Schedule Views, click the plus sign.
3 Type a name for the new view and press Enter. The new view
is highlighted.
Important
The location tab is
always displayed first,
and a global custom
view cannot be
selected as the main
tab for the Day View.
Note
You can use the arrow
to disable or rename a
view. Use the
Show
Disabled
option to
display disabled views.
SoftDent Scheduler Initial Training Workbook (NG941-05) 17 of 20
4 Under Chairs/Operatories, use the arrow to select a chair
you want to display in the new view. To select additional
chairs, click Add.
5 Click Apply or Save.
6 To display the custom view:
• On the Day View, click the triangle on the Location tab. A
list displays locations and global custom views.
• Select a view.
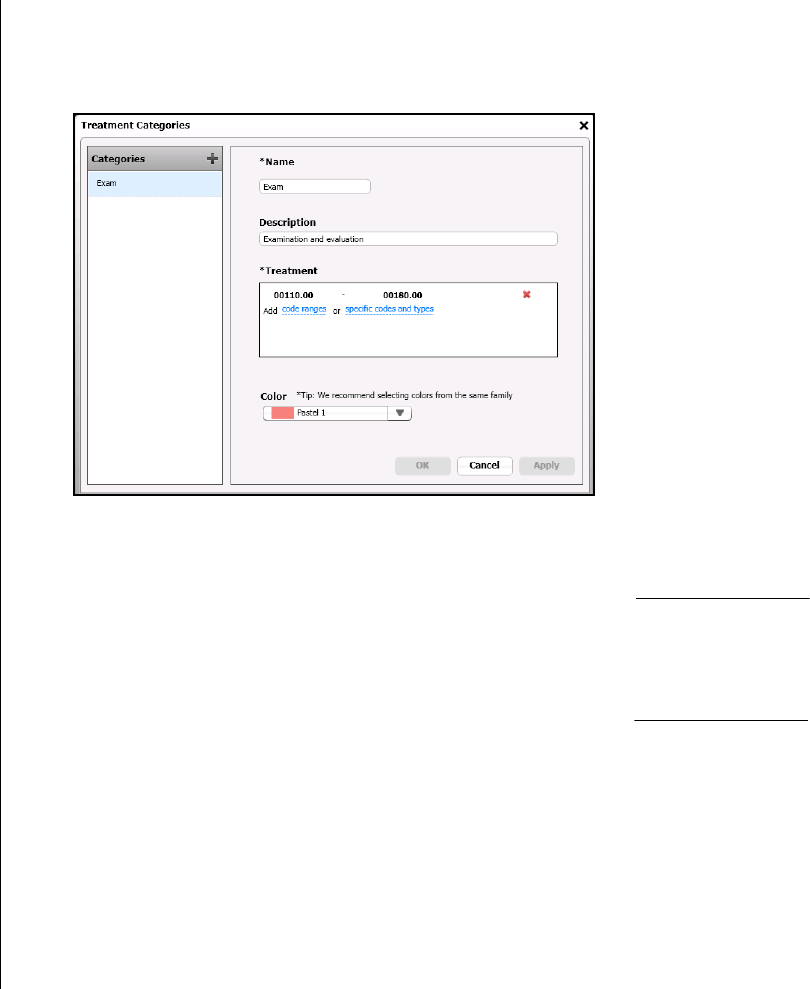
Setting Up Treatment Categories
Use treatment categories to group procedure codes into
categories and display appointment tiles in a specific color for
each category. You can then determine the type of appointment by
glancing at the Day View, without having to open the appointment
card.
The category color is displayed as a solid bar on the right side of
the tile for a scheduled appointment. If more than one category is
used for an appointment, the category for the included procedure
with the longest default time period is displayed.
To set up treatment categories:
1 Select Settings > Treatment Categories. The Treatment
Categories window is displayed.
2 In the Categories section, click +.
3 Enter a name and description for the new category.
4 In the Treatment section, click to add code ranges or specific
codes and types. Each code or range becomes an item in the
list. Continue adding until the category includes all the
appropriate codes.
5 In the Color section, select the color for the category.
6 Click OK. The category is added to the list.
Note
A procedure code can
be associated with only
one category.
Note
If you add a code or
range in error, click the
red
x
to delete it.
18 of 20 SoftDent Scheduler Initial Training Workbook (NG941-05)
Using the Privacy Display
To help you protect your patients' privacy and comply with HIPAA
standards, you can choose to display a patient's first name and
last initial on an appointment tile. The privacy setting is used also
on the flyout and the appointment card.
The active privacy setting is displayed on the Settings menu:
Privacy On or Privacy Off. Click the option to change it.
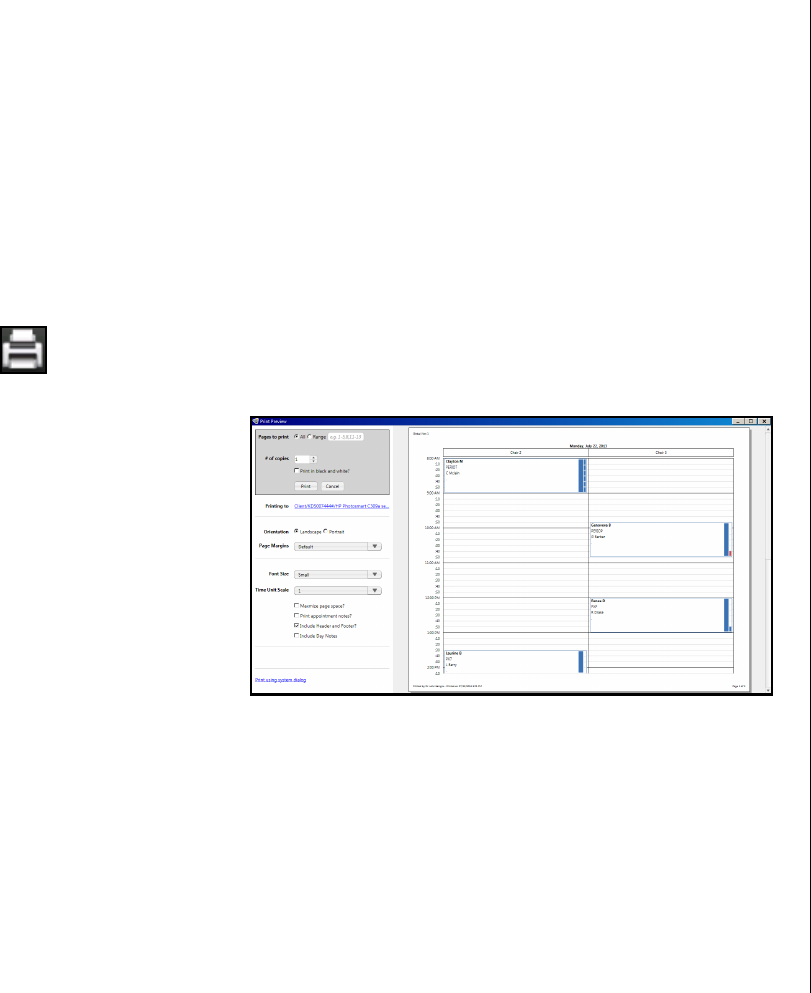
Printing the Schedule
To print the Day View:
1 Click the Print Scheduler icon, or select File > Print. The
Print Preview window is displayed.
2 Set these options:
• Pages to print
• # of copies
• Print in black and white?
• Printing to
• Orientation
• Page Margins
• Font Size
• Time Unit Scale
3 Select from these options:
• Maximize page space?
• Print appointment notes?
• Include Header and Footer?
• Include Day Notes
4 Click Print.
Printing Routing Slips
Offices typically print routing slips the night before or the day of an
office visit. To print a routing slip, select an appointment in the
Scheduler and then select the Routing Slip option in the practice
management software.
For information about printing a routing slip automatically for each
patient that is scheduled for an appointment on the current day,
see the online help.
Print Scheduler

SoftDent Scheduler Initial Training Workbook (NG941-05) 19 of 20
Skill Sharpeners
Exercise 1—Create a Personal View
You want to create views for staff members at your office. To
create personal views:
1 Click the Office Location tab and the Day View icon.
2 Select the column heading of a doctor and drag the heading
to the tab area. Release the mouse.
3 Double-click New Name until a rename field is enabled.
4 Type the doctor’s name, and then click off the tab.
5 Repeat these steps for other staff members.
Exercise 2—Set Up a Treatment Category
To see the treatments scheduled for patients, you decide to set up
a category for the most common treatments. To set up the
categories:
1 Select Settings > Treatment Categories. The Treatment
Categories window is displayed.
2 Click the plus sign in the Categories section. Entry fields for a
new category are displayed.
3 In the Name field, type Exam.
4 In the Description field, type Examination and evaluation.
5 In the Treatment section, click code ranges and type
00110.00 in the first field and 00180.00 in the second field.
6 In the Color field, click the arrow and select Pastel 3 for the
category.
7 Click OK.

20 of 20 SoftDent Scheduler Initial Training Workbook (NG941-05)
SoftDent Scheduler Initial Training Workbook (NG941-05) 21 of 32
Lesson 4
Managing Appointments
The Scheduler enables you to perform appointment-related tasks
from where you are working in the software.
To begin making an appointment:
• Click the New Appointment button on the main toolbar.
A new blank appointment card is displayed.
• Use the Search field to select a patient, and then
click-and-drag the patient to the Day View. The patient tile
hovers there while you select a time. Click the plus sign
on the time slot, and the appointment card is displayed
with the patient's information.
• Use your cursor to select a time slot in the Day View; click
the plus sign to open a new blank appointment card; and
select the patient from the appointment card's Search
field.
• Select a patient from the Pending List or the Short Call
List and click Rebook. The appointment appears in
reschedule mode hovering over the Day View.
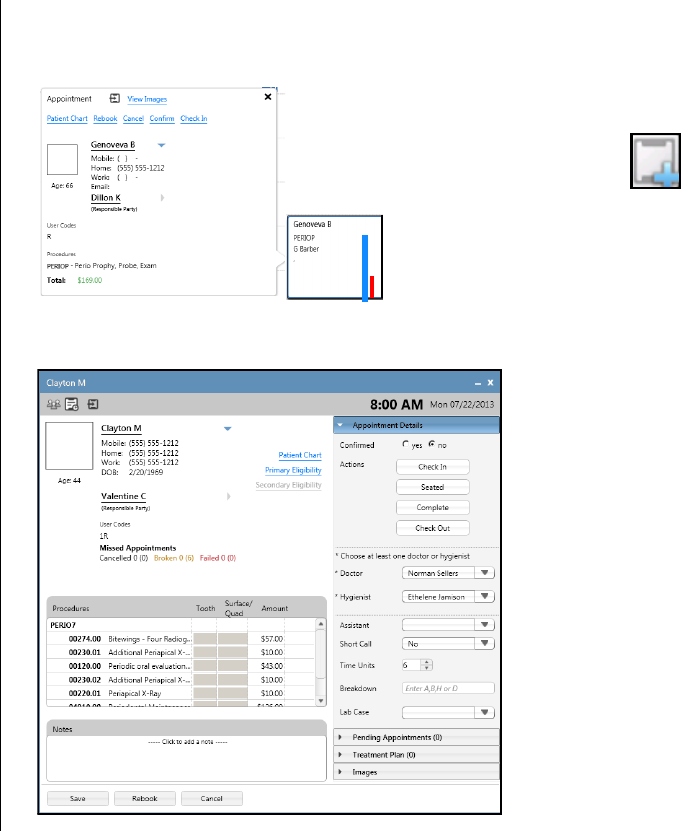
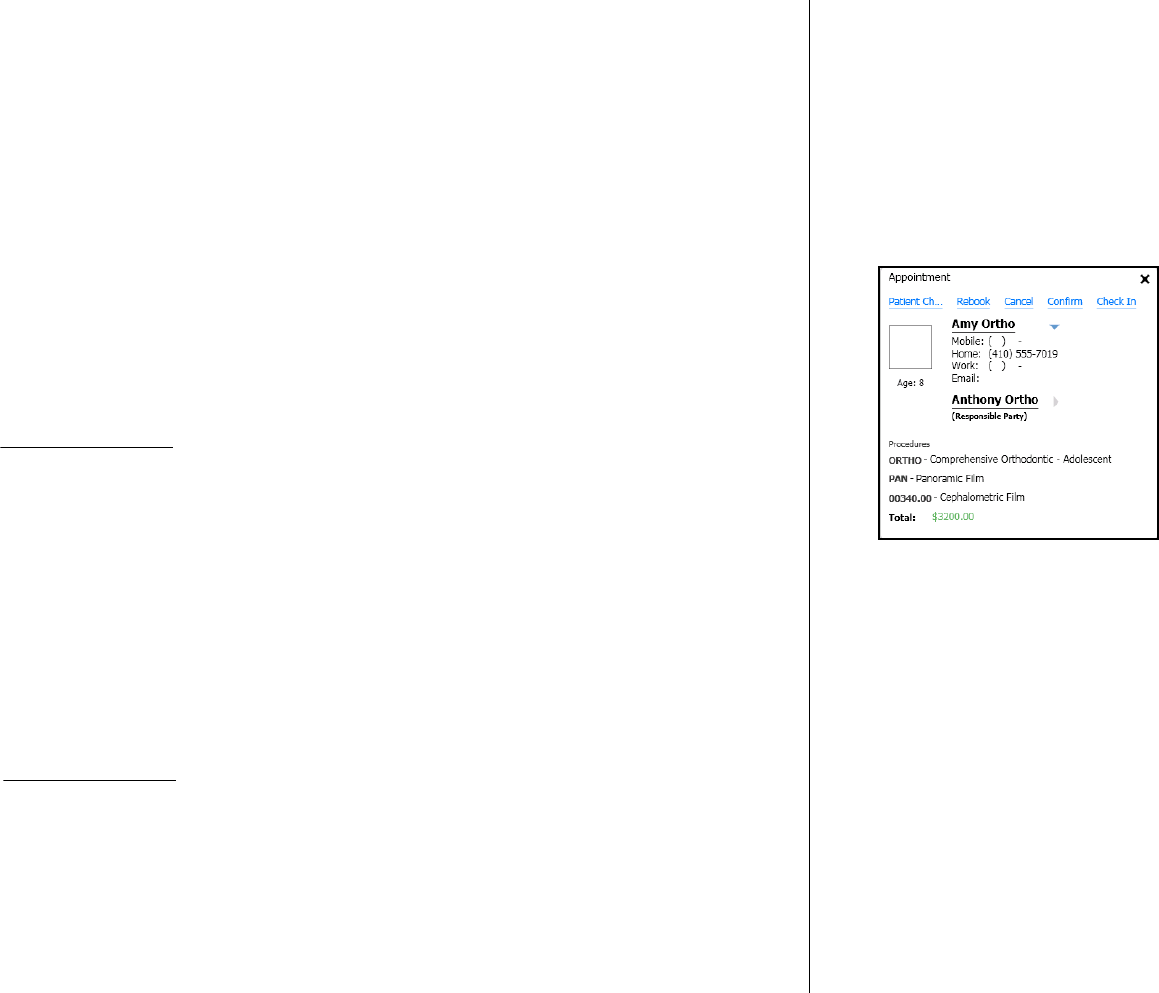
Appointments are displayed in the Day View as tiles.
Click once on a tile to display a flyout—a small panel with more
information and options.
Click twice on a tile to open an appointment card.
New Appointment
22 of 32 SoftDent Scheduler Initial Training Workbook (NG941-05)
The color and amount of information displayed on the tiles
depends on the privacy setting, the number and width of the
columns, how many appointments are booked in the same time
slot for a column, the status of the patient, and the overlay, if any,
you have selected for viewing.
Appointment tiles can also display mini icons to alert you to the
following information:
• New patient
• Medical alert
• Note attached
• Lab case pending
• Confirmed
• Group appointment
The colored blocks on the right edge of the tile represent time
units for the appointment as they relate to provider time. Use the
following guidelines:
• White—Unbooked
• Color—Booked
• Red—Overbooked
Adding a New Patient
If you are scheduling an appointment for a patient who is not in the
system, you can add the new patient's basic information in the
Scheduler window and then schedule the appointment. The
patient's basic information is saved, and the detailed information,
such as insurance, medical history, and so forth, can be entered in
the appropriate locations in the practice management software.
To add a new patient in the Scheduler:
1 Click the New Appointment button. A blank appointment
card is displayed.
2 Use the Patient Search field to confirm that the patient
record does not already exist.
3 Click Add New Patient.
New Appointment

SoftDent Scheduler Initial Training Workbook (NG941-05) 23 of 32
The New Patient Information window is displayed.
4 Enter the patient's name and date of birth. The name is
automatically entered into the Responsible Party field.
5 If the patient is the responsible party, leave the Create new
option selected. If the responsible party for the patient already
exists, select Add to existing, and use the Search field to
select the person.
6 Enter the patient's contact information. If one number is
designated as the preferred method of contact, it is
highlighted in the following places:
• Flyout panel
• Search results
• Confirmation, Pending, and Short Call Lists
• Appointment card
7 Click Save.
Scheduling Doctor and Assistant Time
The Scheduler uses a time summary indicator to display how
blocks of a provider's time are allocated to a specific appointment.
Because a provider can be assigned to more than one
appointment at a time, the indicator shows where the provider's
time is available, booked, or over-booked.
Blocks filled with the tile’s main color indicate the doctor’s time is
committed. Red blocks indicate the doctor’s time is overbooked.
When the blocks to the right of the solid bar are empty, the
doctor’s time is uncommitted.
When scheduling an appointment, you can display the time
summary indicator by dragging an appointment tile over the
column in hover mode. If that provider has been assigned to the
appointment, the time units are indicated with colored blocks.
The breakdown of clinical resources for an appointment is defined
in the Breakdown field in the Appointment Details section of the
appointment card.
Viewing Production Goals
When the Production Goal overlay is turned on, you can hover on
the title in a provider's column to see a summary of the provider's
net production toward assigned production goals. This feature is
useful when deciding which provider to book for a particular time
slot.
Note
If e-mail is the preferred
type of contact, it is
displayed on the flyout,
but not the
appointment tile.

24 of 32 SoftDent Scheduler Initial Training Workbook (NG941-05)
Using the Appointment Card
Use the appointment card to add, edit, or view the details of a
patient’s appointment, including procedures and estimated
payment details. You can also use the appointment card to check
a patient in and out.
At the bottom of the card, you can access the appointment log,
save changes, and rebook or cancel an appointment.
To use the appointment card:
1 In the Patient Information section, you can view this
information:
• Name
• Age
• Image
• Contact information
• Responsible party
• Medical alerts
• Missed appointment information
2 In the Procedures section:
• Click + Add Procedure to select procedures from the
list. Begin typing a number in the field to access the list.
• Use the Tooth and Surface columns to enter the location
of the procedure, when applicable.
• Click Estimated Payment Details to display the
estimated amounts that insurance and the patient must
pay.
• To delete a procedure, select it and click the red X.
3 In the Appointment Details section, use these options:
• Confirmed—Select Yes to confirm; No if not confirmed.
• Check In—Select when the patient arrives in the waiting
room.
• Seated—Select when the patient has been seated in the
chair.
• Complete—Select when the patient’s treatment is
completed.
• Check Out—Select to access the patient's ledger, accept
payment, and check the patient out.
• Cancel—Select to cancel changes and close the card.
• Doctor—View or change the patient’s doctor.
• Hygienist—View or change the patient’s hygienist.
• Assistant—View or change the doctor’s assistant.
• Short Call—Select No, if the patient is not interested;
select Anytime, Morning, or Afternoon, if the patient can
reschedule the appointment on short notice.
• Time Units—Enter or change the number of time units
allotted for the appointment.
• Breakdown—Enter or change these producers required
for the appointment:
• D—Doctor
• H—Hygienist
• A—Assistant
• B—Both
• Lab Case—Select None, Pending, or Received.
Note
When you perform
many functions, notes
are created
automatically in the
Notes
section. You can
also enter notes
manually.
Note
When procedure
codes are associated
with office codes, the
office codes are
displayed.

SoftDent Scheduler Initial Training Workbook (NG941-05) 25 of 32
4 Use the Pending Appointments section to view a list of the
patient's cancelled, broken, or failed appointments.
Appointments that were created and saved, but not
scheduled, are also displayed.
5 Use the Treatment Plan section to display the patient's
treatment plan and a list of procedures. Click a procedure
from the list to add it to the appointment.
6 Use the Images section to display a side panel of images.
Confirming Appointments
Depending on where you are in the software, you can confirm an
appointment in these ways:
• Day view—When you click an appointment, the
appointment flyout is displayed. Click Confirm. You can
click the Confirmation overlay to highlight unconfirmed
appointments.
• Confirmation List—When you generate a Confirmation
List, place your cursor over the appointment you want to
confirm. The Rebook, Cancel, and Confirm buttons
become active. Click Confirm.
• Patient search—When you use the Search field to find a
patient, the patient's scheduled appointments are listed in
the flyout. Click the triangle to expand the options, and
then click Confirm.
• Appointment card—The Confirmed status is displayed
under Appointment Details. Click Yes.
Cancelling Appointments
When you click Cancel for an appointment, you are prompted to
enter a cancel type and a reason for the cancellation. These types
of cancellations are available:
• Cancel
• Break
• Fail
• Delete
A cancelled appointment becomes a pending appointment and
can be accessed from the patient search results and rescheduled
without having to recreate the details.
The cancellation details are automatically added to the Notes
section of the appointment card and to the Appointment Audit
Log.
You can cancel an appointment from these locations:
• Day view—When you click an appointment, the
appointment flyout is displayed. Click Cancel. The panel
expands for you to select a cancel type and enter a
reason. Click Cancel Appointment.
• Patient search—When you use the Search field, the
patient's scheduled appointments are listed in the flyout.
Click the triangle to expand the options, and then click
Cancel. The panel expands for you to select a cancel type
and enter a reason. Click Cancel Appointment.
Note
Note
Select
Delete
if you
make an appointment
in error and you do not
want it to be tracked in
the Pending List or as
part of the patient's
appointment history.
Note
Note
When you confirm an
appointment, a note is
created automatically in
the appointment
record.
Note
Note
To close the
appointment card
without saving edits,
click
Cancel
.
26 of 32 SoftDent Scheduler Initial Training Workbook (NG941-05)
Rescheduling Appointments
When you begin to reschedule an existing appointment or
schedule an unbooked appointment, the appointment tile turns
pink and hovers above the Day View. When you find the date and
time you want, click-and-drag the tile to the new time slot.
To reschedule an appointment, you can click Rebook on the
appointment tile, card, or flyout, or in the Confirmation, Pending, or
Short Call Lists. You can also reschedule directly from the Day
View.
To reschedule an appointment from the Day View:
1 Click and hold your mouse over the appointment tile. The
appointment tile turns pink and hovers in reschedule mode.
2 Use the calendar to select another date. The date is displayed
with the appointment tile still hovering.
3 Drag the appointment to the time you want and release your
mouse.
Checking a Patient In and Out
You can check a patient in, seat the patient, mark the appointment
as completed, and check the patient out from the appointment
card and from the appointment tile in the Day View.
To check a patient in and out from the Day View:
1 Click the appointment tile and select Check In from the panel.
The tile fills with the category color.
2 When you seat the patient, click the appointment tile and
select Seated. A border surrounds the colored tile.
3 When the procedures for the appointment are complete, click
the appointment tile and select Completed. The tile becomes
a pale color.
4 To check the patient out, click the appointment tile and select
Check Out. The patient's ledger is displayed.
5 Click Post, and the appointment tile is grayed out.
Note
If you have checked a
patient in by mistake,
open the appointment
card and click
Undo
next to the
Check In
button.
Note
When you check the
patient out from an
open appointment
card, the charges are
posted automatically,
and you do not have to
click
Post
.
SoftDent Scheduler Initial Training Workbook (NG941-05) 27 of 32
Managing Patient Recare
The Scheduler tracks dates and provides links to help you manage
patient recare appointments. A recare due date is automatically
set for six months from a patient’s last recare appointment. When
a patient's recare status is Due, Overdue, or Scheduled, the
status is displayed in patient search results.
When the status is Due or Overdue, click Book recare to
schedule an appointment.
When the status is Scheduled, the appointment is included with
the list of scheduled appointments.
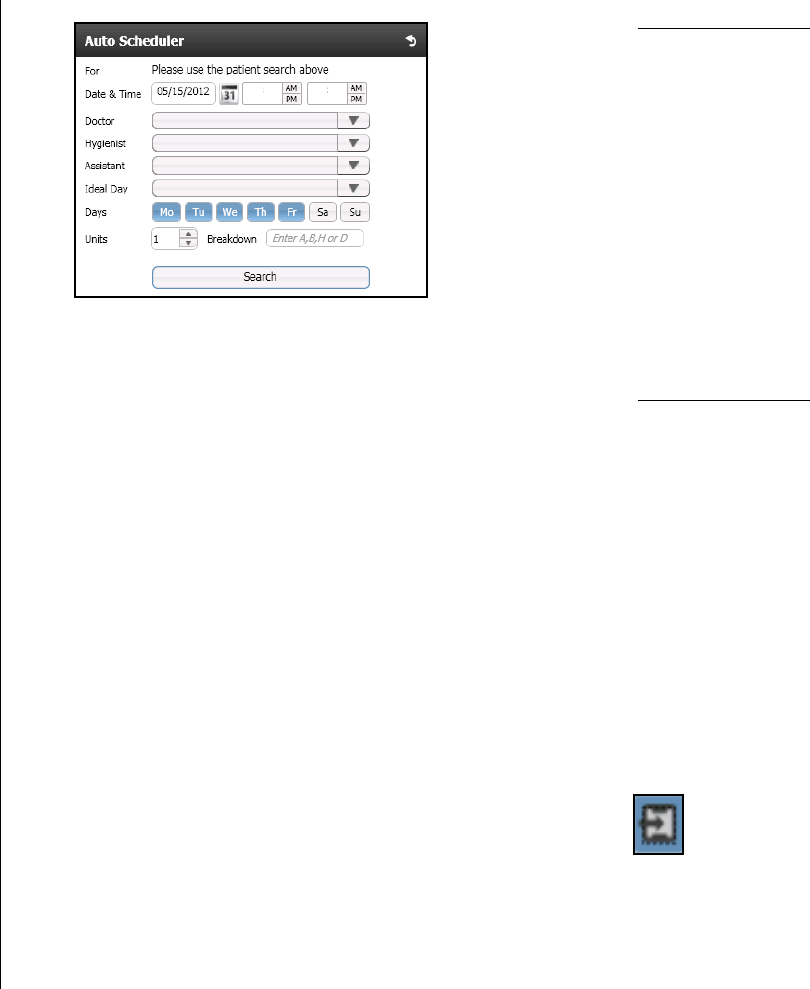
Using the Auto Scheduler
The Auto Scheduler enables you to search for open spaces in the
schedule based on specific criteria. You can access this function
from the icon below the Search field, from the patient search
results, or from the appointment card.
When you access the Auto Scheduler from an existing
appointment, the criteria from the appointment are used for the
search.
When you specify a patient, any criteria entered for the patient,
such as provider preference or mornings only, is filtered into the
search.
To use the Auto Scheduler:
1 Click the Auto Scheduler button. The Auto Scheduler
window is displayed, showing the patient's name, or you are
prompted to use the Search field to select a patient.
2 Use the Date and Time fields to select a date or time range to
search.
3 If the patient has a preferred doctor, hygienist, or assistant,
select them in the appropriate fields. If the patient has no
preference, leave the fields blank.
4 If your practice uses Ideal Day scheduling, use this field to
select the appropriate scheduling class for the appointment.
5 To search for specific days, deselect the other days.
6 Enter the number of time units for the appointment and the
appointment breakdown.
7 Click Search. A list of time slots matching the criteria is
displayed.
8 To preview an appointment in the Day View, click it once. To
open an appointment card, click it twice.
9 Schedule the appointment.
Note
When you attempt to
schedule a recare
appointment before the
due date, a message is
displayed. This feature
helps prevent denial of
insurance claims.
Auto Scheduler
Note
Patient preferences
can be changed to
expand the search.
28 of 32 SoftDent Scheduler Initial Training Workbook (NG941-05)
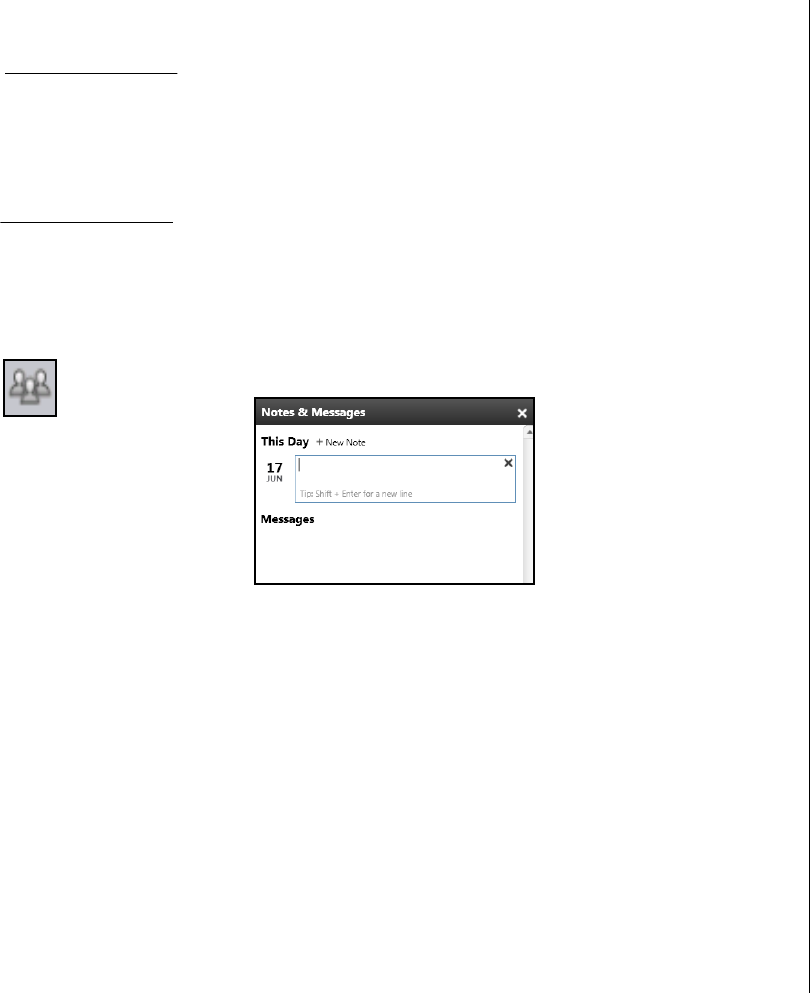
Creating Notes and Messages
You can create the following notes to share with users on other
workstations about the day's schedule, specific appointments and
patients, or other information:
• Notes—Specific to the dates for which they are entered.
• Messages—Attached to a patient's record in another part
of the software, such as the chart or ledger.
To create a note:
1 Click Day Notes. The Notes & Messages panel is displayed.
2 Click + New Note. A text box is displayed for the current date.
3 Enter the note text and press Enter. The note is displayed in
the panel with the date, time, and author of the note.
Scheduling Family or Group Appointments
The Scheduler enables you to put family members into groups for
the purpose of scheduling appointments for multiple patients at
the same time.
You can create a group by clicking the Add to Group link in the
patient search results. When you create an appointment for one
member of the group, appointment tiles are created in hover mode
for the other members. This keeps the appointments together so
you can find a date and time to schedule all of them.
To create appointments for a group:
1 In a new appointment card, use the Search field to find a
patient.
2 Click Add to Group. The Group Booking panel is displayed.
3 Use the search field to locate other patients for the group, and
click Add to Group. The Group Booking panel displays the
patients in the group, and names the group for the last name
of the first patient.
4 Move your cursor over the names in the list to activate the
options.
5 Click the arrow next to the patient you want to designate as
the group contact, and select Group Contact. The group
contact icon is displayed by the patient's name.
6 Do not close the appointment card.
Note
You can display a note
in multiple locations.
Note
Appointments that are
part of a group display
the
Group Booking
icon on the
appointment tiles.
Group Booking

SoftDent Scheduler Initial Training Workbook (NG941-05) 29 of 32
To book appointments for members of the group:
1 With the first group member's appointment card open, add
procedures and appointment details.
2 Click Book It! An appointment tile is created for each member
of the group, suspended in hover mode, enabling you to
search for a date with time slots available to schedule them at
the same time.
3 After you book the appointments, double-click them to open
the appointment cards that require more detail.

30 of 32 SoftDent Scheduler Initial Training Workbook (NG941-05)
Skill Sharpeners
Exercise 1—Schedule an Appointment for a New Patient
A new patient calls your office and asks to make an appointment
for a cleaning. You check to make sure the patient is not in the
system, then add the patient, and schedule the appointment.
To add the new patient:
1 Click the New Appointment button. A blank appointment
card is displayed.
2 Enter the patient's name and date of birth. The name is
automatically entered into the Responsible Party field.
3 If the patient is the responsible party, leave the Create new
option selected. If the responsible party for the patient already
exists, select Add to existing, and use the Search field to
select the person.
4 Enter the patient's contact information.
5 Click Save.
To schedule the appointment:
1 In the Procedure field, click + and type cleaning. Select the
procedure.
2 In the Doctor and Hygienist fields, select the staff members.
3 In the Notes field, type any notes.
4 Click Book It!
5 Click the Weekly View icon and use the arrow keys to find an
available hygienist time slot.
6 Click-and-drag the floating appointment to the time slot.
7 Close the appointment card.
Exercise 2—Confirm an Appointment
To confirm the appointment you made earlier:
1 In the Search field, type three letters of the patient’s last
name.
2 Open the patient’s appointment card. In the Appointment
Details section, the confirmation status is displayed.
3 Click Yes.
Exercise 3—Reschedule an Appointment
A patient calls the office and tells you that he must reschedule an
appointment. To reschedule:
1 In the Day View, find the patient’s appointment.
2 Click and hold your mouse over the appointment tile. The
appointment tile turns pink and hovers in reschedule mode.
3 Use the calendar to select another date. The date is displayed
with the appointment tile still hovering.
4 Drag the appointment to the time you want and release the
mouse.
Exercise 4—Check a Patient In and Out
A patient arrives at the office. Check him in, track his progress,
and check him out.
To check the patient in and out:
1 In the Day View, find the patient’s appointment and click the
tile.
2 Select Check In.
3 When you seat the patient, click the appointment tile and
select Seated.

SoftDent Scheduler Initial Training Workbook (NG941-05) 31 of 32
4 When the procedures for the appointment are complete, click
the appointment tile and select Completed.
5 To check the patient out, click the appointment tile and select
Check Out. The patient's ledger is displayed.
6 Click Post.

32 of 32 SoftDent Scheduler Initial Training Workbook (NG941-05)
SoftDent Scheduler Initial Training Workbook (NG941-05) 33 of 36
Lesson 5
Generating Lists
You can generate these lists from the Tasks tab:
• Confirmation
• Pending
• Short Call
Generating Confirmation Lists
The Confirmation List is a list of patients with scheduled
appointments that have not been confirmed, beginning with the
appointment closest to the current date and time. From the list,
you can click an appointment to view details and contact
information or to add a note. You can also select one of the Left
Message options to show information about a message if you did
not reach a patient.
When you select an appointment from the list, the Rebook,
Cancel, and Confirm buttons become active. If you select one of
these options, an entry in the Note field is created.
To generate a Confirmation List:
1 Click the Tasks tab.
2 Click the Confirmation List icon. A list of unconfirmed
appointments is displayed.
3 Use the Filter options to refine the list:
• Location—Use the arrow to select an office location.
• Provider—Use the arrow to select a provider.
• Production Value—Move the slider to select a production
value to include.
• Duration—Move the slider to select an appointment
duration length to include.
• Days From Today—Move the slider to select the number
of days from today for appointments to include.
Generating Pending Lists
The Pending List is a list of patients with appointments that were
cancelled, broken, missed, or defined but not yet scheduled. From
the list, you can click an appointment to view details and contact
information or to add a note. To reschedule an appointment, click
Rebook.
To generate a Pending List:
1 Click the Tasks tab.
2 Click the Pending List icon. A list of patients with
appointments with a status of Cancelled, Broken, Failed, or
Unbooked is displayed.
All four types are included by default. To exclude a type of
missed appointment, deselect it from the Include section.
3 Use the Filter options to refine the list:
• Location—Use the arrow to select an office location.
• Provider—Use the arrow to select a provider.
Pending List
Confirmation List
34 of 36 SoftDent Scheduler Initial Training Workbook (NG941-05)
• Include—Select whether to include appointments that
were cancelled, broken, failed, or unbooked.
• On Pending List—Move the slider to the right to include
all appointments on the Pending List.
• Order By (Oldest First)—Select Days Pending or
Scheduled Date.
• Production Value—Move the slider to select a production
value to include.
• Duration—Move the slider to select an appointment
duration length to include.
Generating Short Call Lists
The Short Call List is a list of patients with scheduled
appointments who might be available to fill an earlier time slot.
From the list, you can click an appointment to view details and
contact information or to add a note. To reschedule an
appointment, click Rebook.
To generate a Short Call List:
1 Click the Tasks tab.
2 Click the Short Call List icon. A list of patients with
non-cancelled appointments whose short call status is not set
to No is displayed.
3 Use the Filter options to refine the list:
• Availability—Select Anytime, Morning, or Afternoon.
• Location—Use the arrow to select an office location.
• Provider—Use the arrow to select a provider.
• Production Value—Move the slider to select a production
value to include.
• Duration—Move the slider to select an appointment
duration length to include.
• Days from Today—Move the slider to select the number
of days to include from the current date.
• Lab case received—Select this option to include
appointments for which lab cases have been received.
Short Call List

SoftDent Scheduler Initial Training Workbook (NG941-05) 35 of 36
Skill Sharpeners
Exercise 1—Generate a Pending List
You want to see how many appointments have been cancelled in
the last year. To generate the list:
1 Click the Task tab and the Pending List icon.
2 In the Location field, select your location.
3 In the Provider field, select All.
4 In the Include field, select only the Cancelled option.
5 In the Production Value field, move the slider to the left to
include all appointments.
6 In the Duration field, move the slider to the right to include all
appointments.
7 In the Days Before Today field, move the slider to the middle.
The list is displayed.
Exercise 2—Generate a Confirmation List
You want to see how many appointments have been confirmed for
all providers for the next ten days. To generate the list:
1 Click the Task tab and the Confirmation List icon.
2 In the Location field, select your location.
3 In the Provider field, select All.
4 In the Production Value field, move the slider to the left to
include all appointments.
5 In the Duration field, move the slider to the right to include all
appointments.
6 In the Days From Today field, move the slider to 10. The list is
displayed.
Exercise 3—Generate a Short Call List
A patient cancels a 3:00 appointment two weeks from today, and
you want to fill the time slot. To see how many patients are
available for an afternoon appointment in the next two weeks,
generate a short call list. To generate the list:
1 Click the Task tab and the Short Call List icon.
2 In the Availability field, select Afternoon.
3 In the Location field, select your location.
4 In the Provider field, select the name of the provider who was
originally scheduled.
5 In the Production Value field, move the slider to the left to
include all appointments.
6 In the Duration field, move the slider to the right to indicate
the amount of time available for the appointment.
7 In the Days from Today field, move the slider to 10. The list is
displayed.

36 of 36 SoftDent Scheduler Initial Training Workbook (NG941-05)

SoftDent Scheduler Initial Training Workbook (NG941-05) 37 of 40
Index
A
adding patients 22
Admin overlay
15
alerts
22
appointment card
adding procedures
24
details
24
opening
21
treatment plans
25
using
24
appointment log
24
appointments
28
cancelling
25
confirming
25
family or group
28
rebooking
21
rescheduling
26
scheduling
21
assistant time, scheduling
23
Auto Scheduler icon
27
B
buttons, navigation 12
C
Calendar icon 12
calendar, using
12
cancelling appointments
25
chairs, configuring
2
checking patients in and out
26
classes, scheduling
5
clinical resources, breakdown
23
Clinician overlay
15
colors
12
configuring overlays
15
Confirmation List
33
Confirmation overlay
15
confirming appointments
25
contacts, preferred
23
custom views, creating
16
customizing views
15
D
dates, displaying 11
day profile
6
Day View, using
11
Default overlay
15
doctor time
23
F
family appointments 28
family members, scheduling
28
financial targets
7
flyouts
21
Full Day View icon
11
G
global custom views, creating 16
group appointments
28
Group Booking icon
28
H
HIPAA standards, complying with 18
holidays, setting
3
hot keys
12
hours, setting
2, 6

38 of 40 SoftDent Scheduler Initial Training Workbook (NG941-05)
I
Ideal Day feature 4
images
25
K
keyboard shortcuts, using 12
L
lists
Confirmation
33
Pending
33
Short Call
34
M
messages 28
N
navigation buttons 12
New Appointment icon
21
notes
28
O
office holidays, setting 3
office hours, defining
3
office settings
1
Options panel
13
overlays
15
Admin
15
Clinician
15
Confirmation
15
Default
15
Production Goals
15
Provider Working Time
15
P
painting the schedule 6
patients
adding
22
checking in
26
checking out
26
recare
27
searching
21
tracking
26
Pending List
33
personal view, creating
16
preferences
office hours
3
setting
1
preferred contact
23
Print Scheduler icon
18
printing routing slips
18
printing the schedule
18
privacy settings
18
production goals
setting
7
viewing
23
Production Goals overlay
15
provider hours, setting
6
provider time
6
Provider Working Time overlay
15
R
real time bar 12
rebooking appointments
21
recare, managing
27
rescheduling appointments
26
routing slips, printing
18
S
schedule, printing 18
scheduling appointments
21
with Auto Scheduler
27
scheduling classes, setting up
5
Search field
11, 21
searching the Scheduler
11
Short Call List
34
symbols
12


40 of 40 SoftDent Scheduler Initial Training Workbook (NG941-05)

carestreamdental.com
800.944.6365
© 2021 Carestream Dental L
LC. 20643 AL IM Cover 0220.
