Tax Year 2023
W-2/W-3 Online
Tutorial
TY23 W-2 Online Tutorial
Page 2
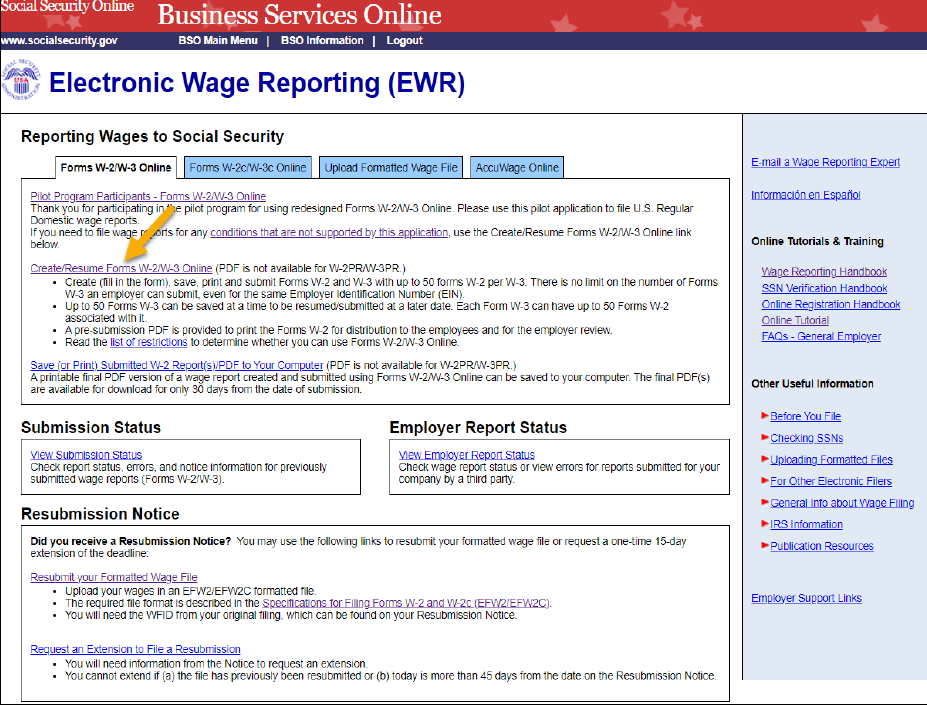
1.0 Create/Resume Forms W-2/W-3 Online
1. Select the Create/Resume Forms W-2/W-3 Online link on the EWR homepage. If there are no
unsubmitted reports, the system displays the “Before You Create Your Form(s) W-2/W-3” page;
if there are unsubmitted reports, the system displays the Forms W-2/W-3 Online “Unsubmitted
Reports” page.
See “Accessing EWR Suite of Services Tutorial” for how to access the EWR homepage.
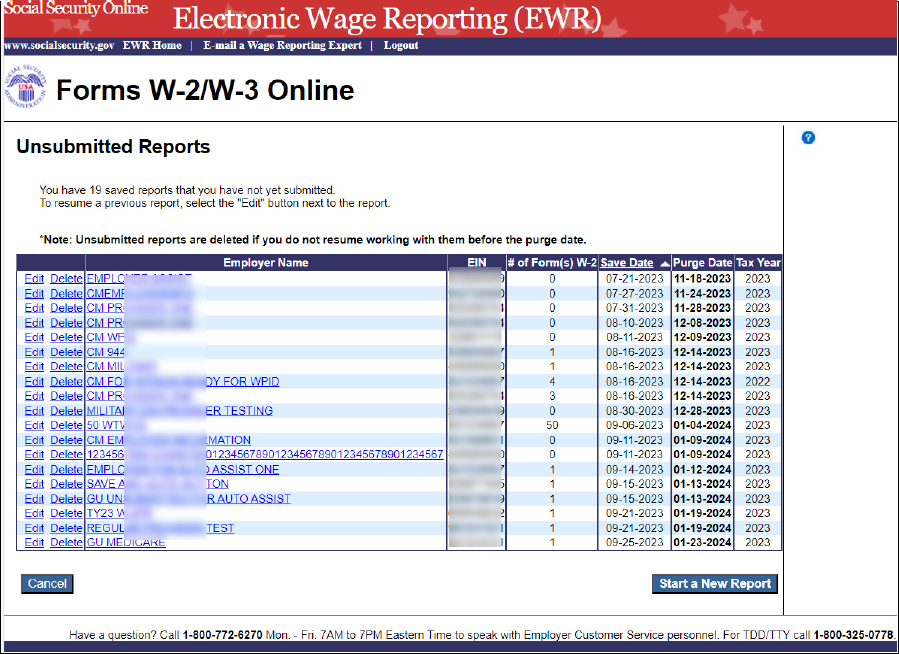
2. On the Unsubmitted Reports page:
a. Select the Start a New Report button. The system displays the “Before You Create Your
Form(s) W-2/W-3” page.
b. Select the Edit link or the Employer Name link to go to the “W-2 List for this
Submission” page.
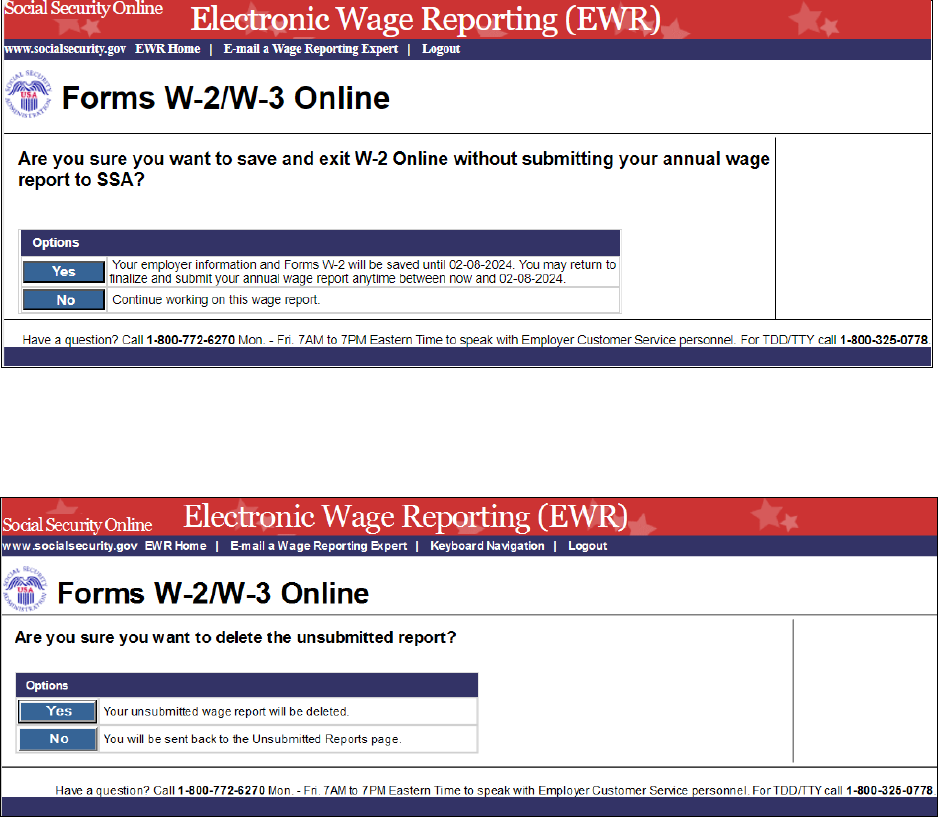
c. Select the Delete link to delete an unsubmitted report. The “Are you sure you want to
delete the unsubmitted report?” page will be displayed.
TY23 W-2 Online Tutorial
Page 3
d. Select the Cancel button to return to the EWR homepage.
Note:
You may have a maximum of fifty unsubmitted reports at one time. When you have reached
the fifty “saved” report limit, you must first submit at least one of the unsubmitted reports in
order to be able to start a new report.
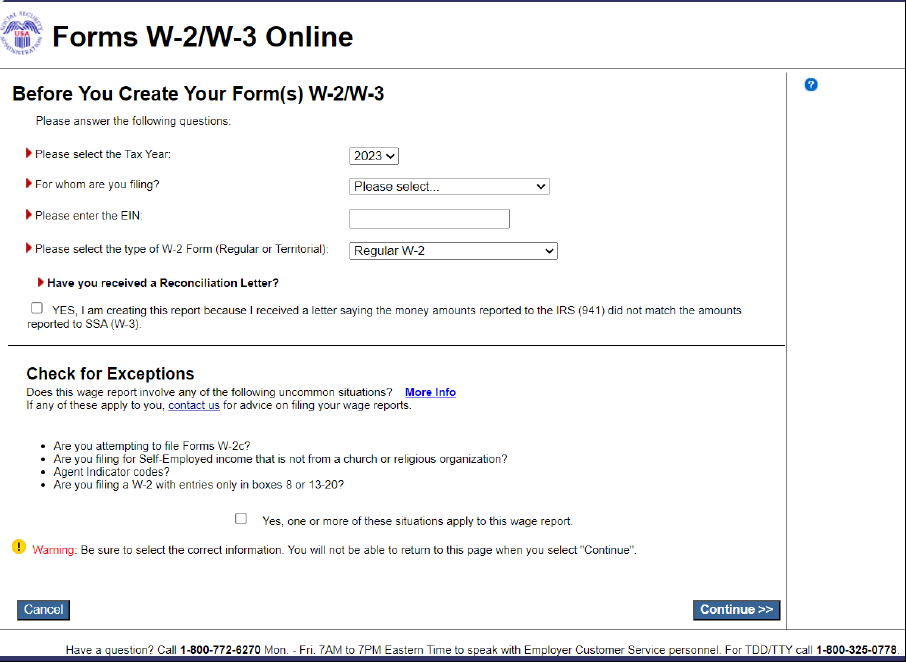
3. On the Before You Create Your Form(s) W-2/W-3 page:
a. Provide correct information related to Tax Year, company name, EIN and the type of W-
2 Form you are creating. If you received a Reconciliation Letter, select the check box.
b. If none of the situations listed in the Check for Exceptions section apply, select the
Continue button to go to the “Employer Information for this Wage Report” page.
c. If any of the situations listed in the Check for Exception section apply, select the check
box and the Continue button to go to the “W-2 Online Restrictions” page.
d. Select the Cancel button to return to the EWR homepage.
TY23 W-2 Online Tutorial
Page 4
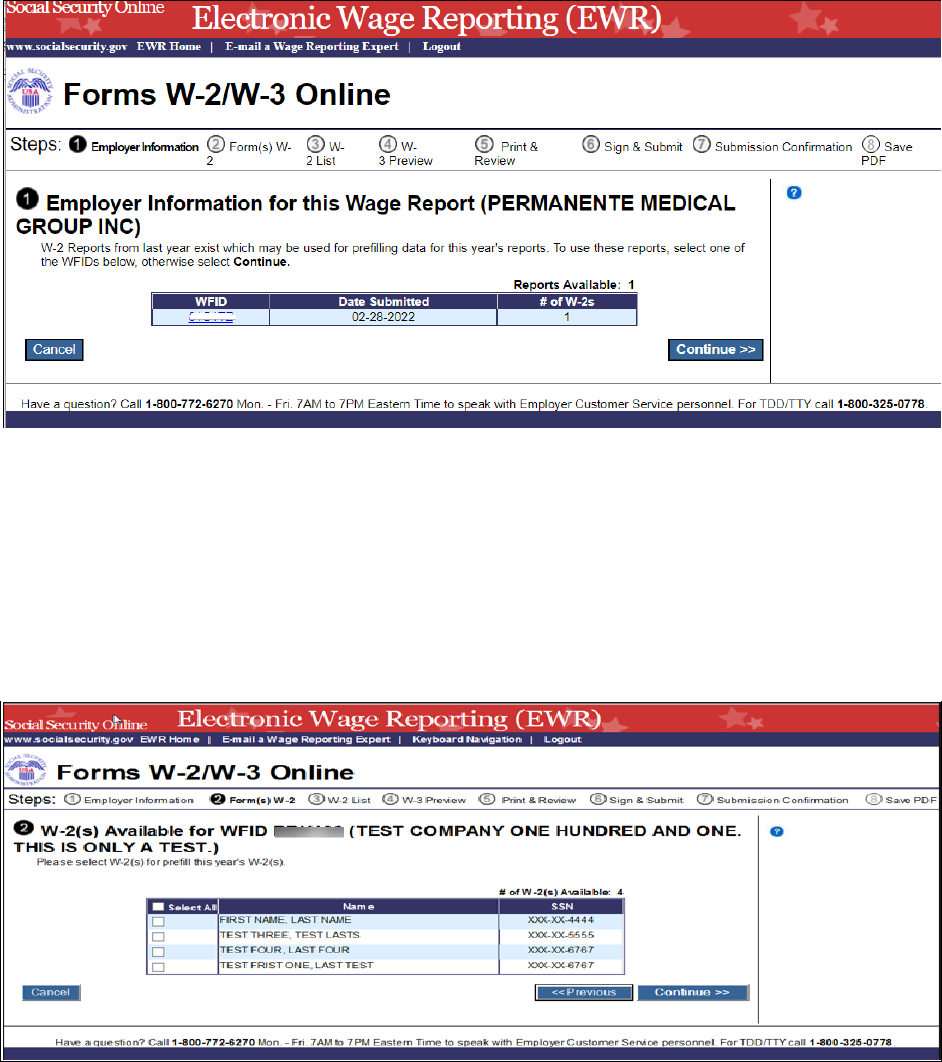
4. On the Employer Information for this Wage Report page:
Enter or review the employer information, contact person information, other Information,
select the Kind of Payer and the Kind of Employer, then select the Continue button:
a. If reports from last year exists, the system will display the Employer Information for
the Wage Report <company name> page;
b. If reports from last year do not exist, the system will display the Enter W-2
Information page.

TY23 W-2 Online Tutorial
Page 5
TY23 W-2 Online Tutorial
Page 6
4.1 On the Employer Information for this Wage Report <company name> page:
a. If the user chooses to use the reports from last year, select a WFID. The system displays the
W-2(s) Available for WFID <WFID> <company name> page.
b. If the user does not choose to use the reports from last year, select the Continue button. The
system displays the Enter W-2 Information page.
c. Select the Cancel button to return to the EWR homepage.
4.2 On the W-2(s) Available for WFID <WFID> <company name> page.
a. Select W-2(s) for prefilling this year’s W-2(s), and then select the Continue button. The system
displays the W-2 List for this Submission <company name> page.
b. Select the Previous button to return to the Employer Information for this Wage Report
<company name> page.
c. Select the Cancel button to return to the EWR homepage.
TY23 W-2 Online Tutorial
Page 7
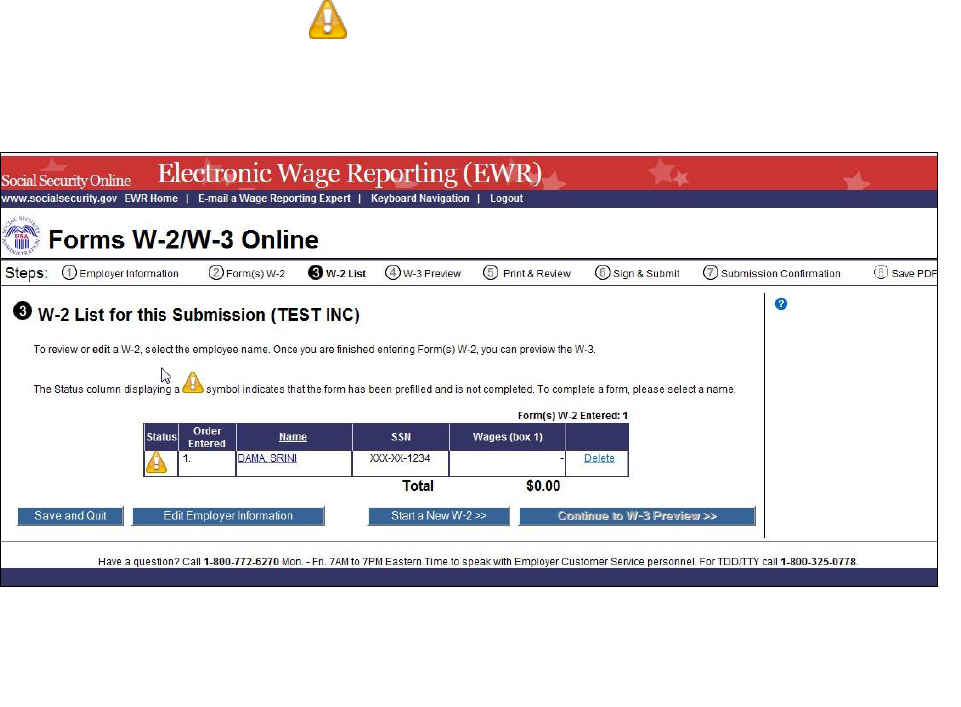
4.3 On the W-2 List for this Submission <company name> page:
The Status column displaying a symbol indicates that the form has been prefilled but has not
met the system’s minimum requirements for the W-2 Forms. To meet the system’s minimum
requirements for the W-2 Forms, select a name, the system will display the Enter W-2 Information
page.
5. On the Enter W-2 Information page:
a. Enter employee’s data. There should be at least one money value (greater than $0.00) entered
in Boxes 1 through 7 or 10 through 12.
b. Select the Save and Create a New W-2 button to save this W-2 information and create a new
W-2. The system may display some alerts. If an alert is displayed, you may proceed by
making corrections to the W-2 or by selecting the override checkbox.
c. Select the Save and Go to Next W-2 button to save this W-2 information and edit next W-2
on the W-2 List for this Submission page. The system may display some alerts. If an alert is
displayed, you may proceed by making corrections to the W-2 or by selecting the override
checkbox.
d. Select the Save and Go to W-2 List button when you finish creating or editing the W-2
Forms. The system displays the W-2 List for this Submission page.
Note:
You can enter a maximum of fifty W-2 Forms. The number of the current W-2 is displayed
at the top of the “Enter W-2 Information” page. After entering your fiftieth W-2, the
system will no longer display the Save and Create a New W-2 button.
e. Select the Cancel Changes button to discard changes made to this W-2. The system displays
the W-2 List for this Submission page.
TY23 W-2 Online Tutorial
Page 8
f. Select the Delete this W-2 button: If the form has been saved previously, the system will
display the “Are you sure you want to delete this W-2” page; If the form has not been saved
previously, the system will display the “W-2 List for this Submission” page.
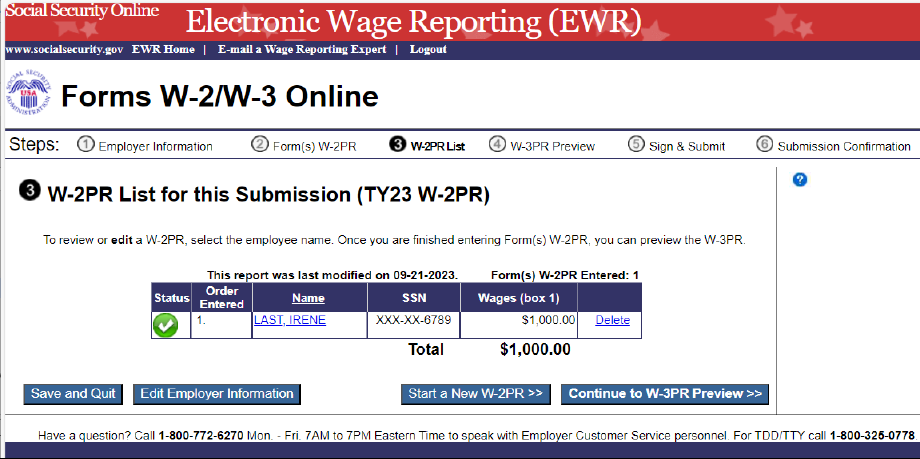
6. On the W-2 List for this Submission page:
a. Once the W-2 Form meets the system’s minimum data requirement, the Status column will
display a symbol instead of the symbol.
b. Select a name to view and edit the W-2 data.
c. Select the Delete link to delete the W-2. When you select the delete link, “Are you sure you
want to delete this W-2” page will be displayed.
TY23 W-2 Online Tutorial
Page 9
d. Select the Save and Quit button to exit W-2 Online without submitting your wage report to
the Social Security Administration (SSA). When you select this button, “Are you sure you
want to save and exit W-2 Online without submitting your annual wage report to SSA” page
will be displayed.
e. Select the Edit Employer Information button. The system displays the Employer
Information for this Wage Report page.
f. Select the Start a New W-2 button. The system displays the Enter W-2 Information page.
g. Select the Continue to W-3 Preview button. The system displays the W-3 Preview for this
Submission page. If one of the prefilled forms has not met the system’s minimum data
requirement, the Continue to W-3 Preview button will not be active.
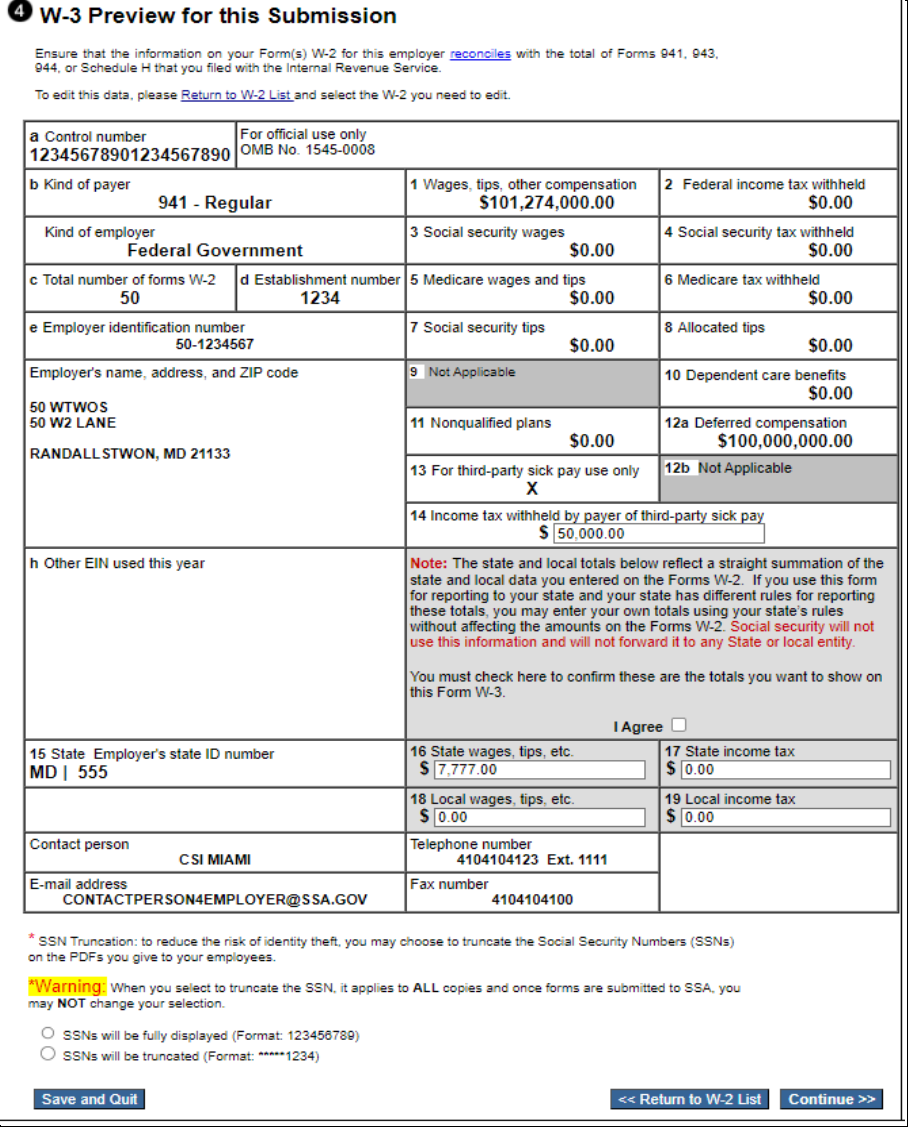
7. On the W-3 Preview for this Submission page:
a. The totals displayed in Boxes 16, 17, 18, and 19 are straight summations of state tax
information entered on the Forms W-2. If you intend to use this form for reporting to your
state and your state has different rules for reporting those totals, you may enter your own
totals and select the I Agree check box to continue. This information will not be used by
SSA, nor will it be forwarded to any state or local entity.
b. SSN Truncation: to reduce the risk of identity theft, you may choose to truncate the Social
Security Numbers (SSNs) on the PDFs you give to your employees by selecting the check
box labeled “SSNs will be truncated (Format *****1234); if you choose not to truncate the
SSNs, select the check box labeled “SSNs will be fully displayed (Format 123456789)”.
Once the Forms are submitted to SSA, you may not change your selection.
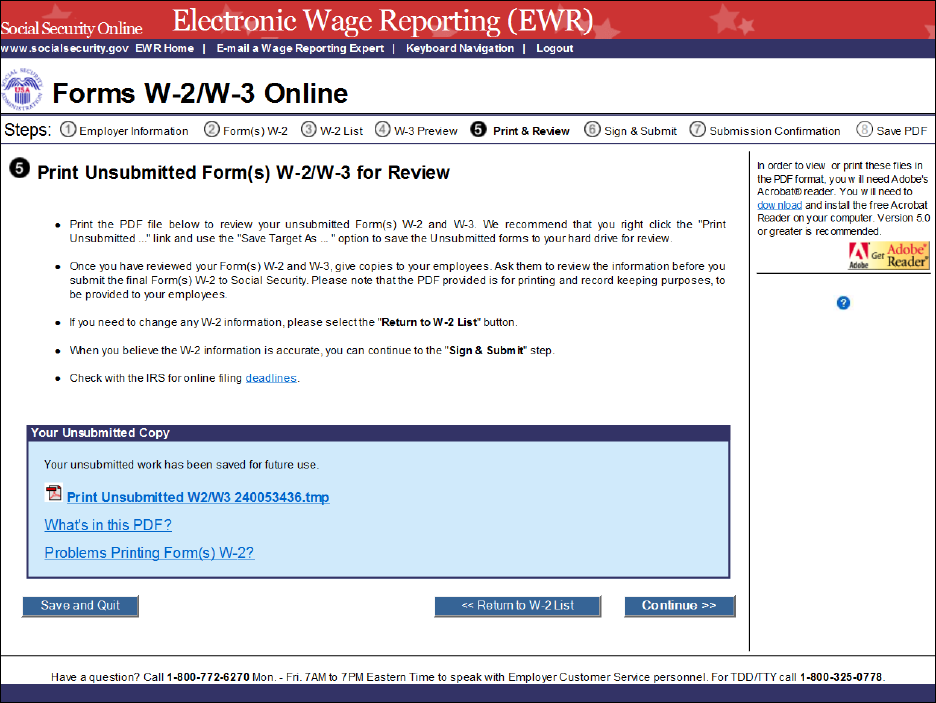
c. Select the Continue button. The system displays the “Print Unsubmitted Form(s) W-2/W-3
for Review” page.
d. Select the Return to W-2 List button. The system displays the “W-2 List for this
Submission” page.
TY23 W-2 Online Tutorial
Page 10
e. Select the Save and Quit button to exit W-2 Online without submitting your wage report to
SSA. When you select this button, “Are you sure you want to save and exit W-2 Online
without submitting your annual wage report to SSA” page will be displayed.
TY23 W-2 Online Tutorial
Page 11
8. On the Print Unsubmitted Form(s) W-2/W-3 for Review page:
a. Select the Continue button. The system will display the Sign and Submit page.
b. Select the Return to W-2 List button. The system displays the W-2 List for this Submission
page.
c. Select the Save and Quit button to exit W-2 Online without submitting your wage report to
SSA. When you select this button, “Are you sure you want to save and exit W-2 Online
without submitting your annual wage report to SSA” page will be displayed.
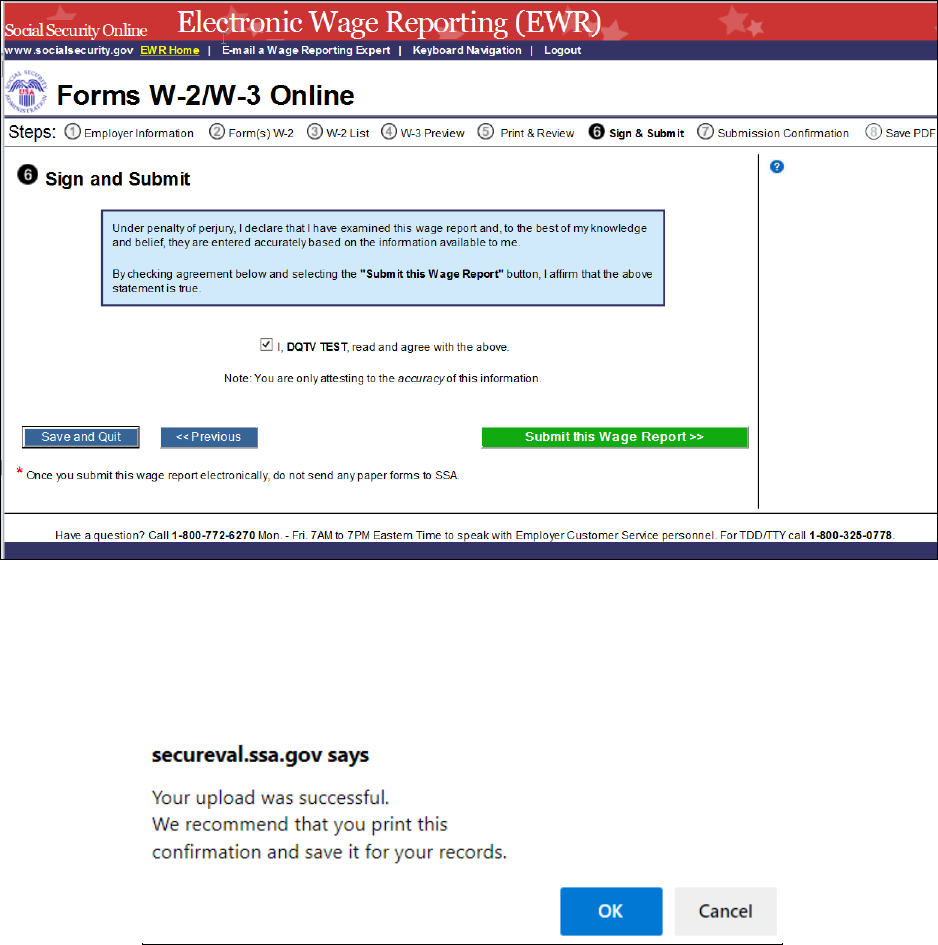
9. On the Sign and Submit page:
a. Select the check box to attest to the accuracy of the report and select the Submit this Wage
Report button to submit your wage report. The system displays the “Confirmation Receipt -
Your W-2/W-3 File Was Received” page with a pop-up window.
b. Select the Save and Quit button to exit W-2 Online without submitting your wage report
correction to SSA. When you select this button, “Are you sure you want to save and exit W-2
Online without submitting your annual wage report to SSA” page will be displayed.
c. Select the Previous button to return to the “Print Unsubmitted Form(s) W-2 for Review”
page.
TY23 W-2 Online Tutorial
Page 12
10. On the pop-up window:
a. Select the OK button to print the “Confirmation Receipt - Your W-2/W-3 File Was Received”
page.
b. Select the Cancel button to close the pop-up window.
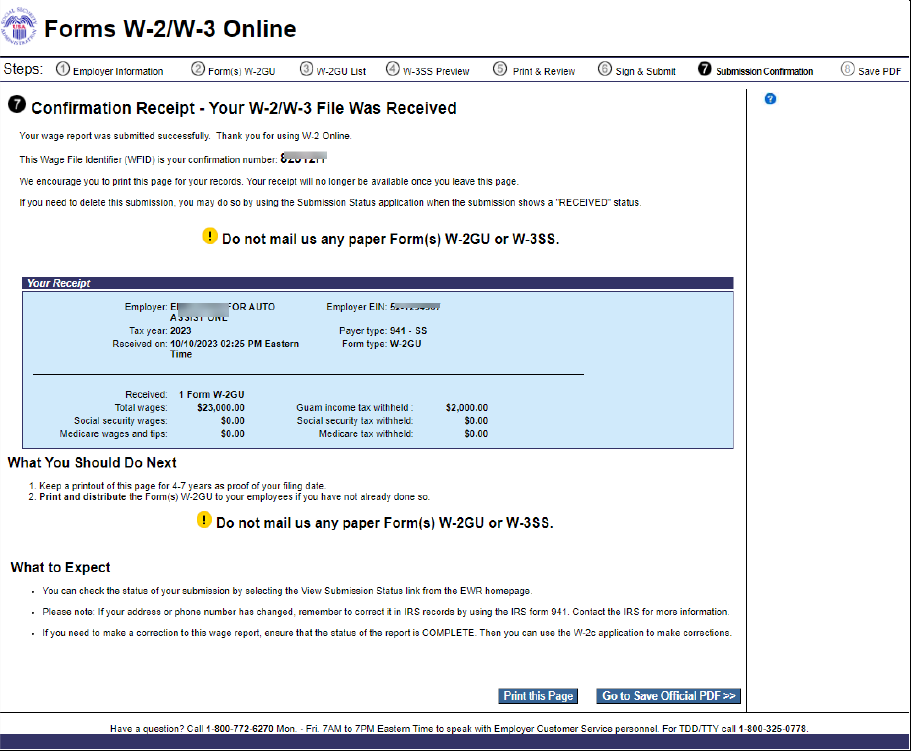
11. On the Confirmation Receipt – Your W-2/W-3 File Was Received page:
a. Select the Print this Page button to print the “Confirmation Receipt” page.
b. Select the Go to Save Official PDF button. The system displays the Save PDF page.
Note:
Your wage file will be available for you to review under your BSO account until the date
displayed on your “Save PDF” page.
TY23 W-2 Online Tutorial
Page 13
12. On the Save PDF page:
a. Right click the file name (<filename.pdf>) to view or save the submitted report.
b. Select the Start a New Report button. The system displays the “Before You Create Your
Form(s) W-2/W-3” page.
c. Select the View Unsubmitted Reports button. The system displays the Unsubmitted Reports
page.
d. Select the EWR Home button to go to the EWR homepage.

TY23 W-2 Online Tutorial
Page 14

TY23 W-2 Online Tutorial
Page 15
2.0 Download Submitted Reports
1. Select the Save (or Print) Submitted W-2 Report(s)/PDF to Your Computer link under the
Forms W-2/W-3 Online tab on EWR home page. The system displays the “Download Submitted
Reports” page.
2. Right-click the WFID link on the “Download Submitted Reports” page to display a menu
including the following options:
a. Select Save Target As to download the file onto your computer.
b. Select Open in New Window to view the file.
Note:
Adobe Acrobat Reader is required to view your downloaded wage file. If you do not have
Adobe Acrobat Reader on your computer, you can download it at adobe website.
If a submission has been deleted through the Submission Status application by the user, a
message will be displayed to let the user know that the report is not downloadable.
c. Select the Quit button to return to the EWR homepage.
d. Select the Start a New Report button to proceed to the “Before You Create Your Form(s) W-
2/W-3” page.
TY23 W-2 Online Tutorial
Page 16
3.0 Other Pages
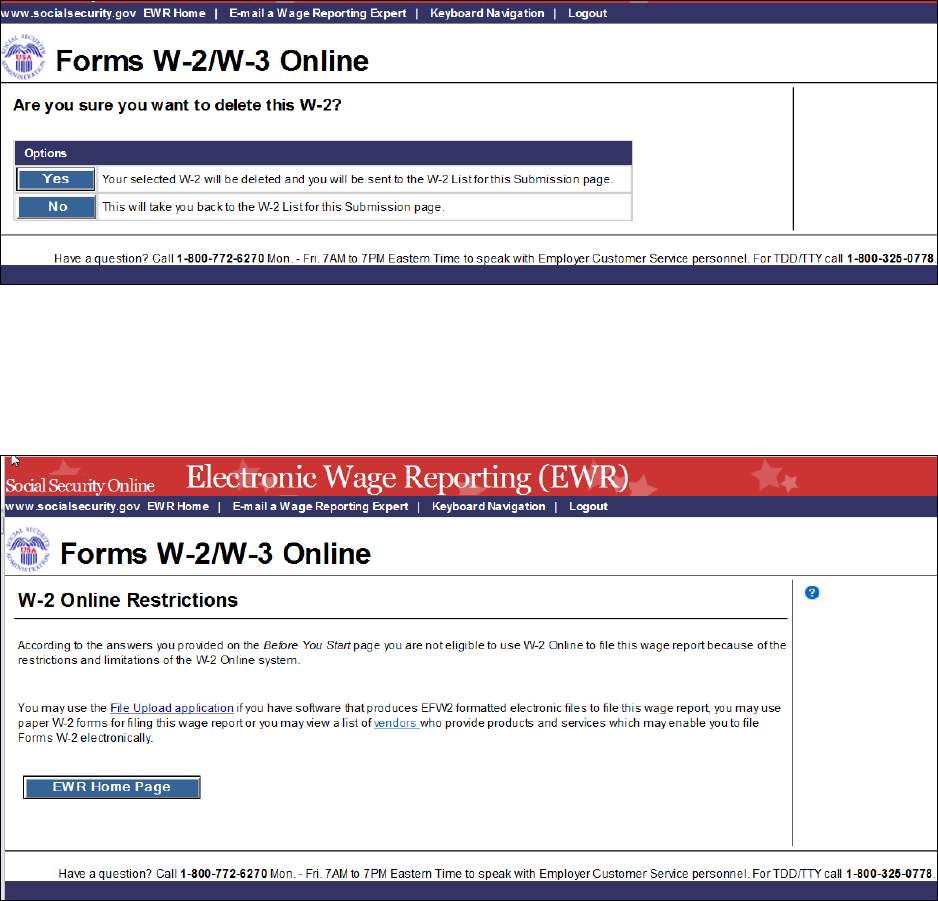
3.1 Are You Sure You Want to Delete This W-2 Page
If a user selects the Delete This W-2 button on the “Enter W-2 Information” page, or the Delete link on
the “W-2 List for this Submission” page, the system will display the “Are you sure you want to delete
this W-2” page.
3.2 W-2 Online Restrictions Page
Users can access “W-2 Online Restrictions” page by selecting the Continue button on the “Before You
Create Your Form(s) W-2/W-3” page when the check box “Yes, one or more of these situations apply to
this wage report” is selected.
3.3 Are You Sure You Want to Save and Exit W-2 Online Without Submitting
Your Annual Wage Report to SSA? Page
If a user selects the Save and Quit button on the “W-2 List for this Submission (ABC Limited)” page,
“W-3 Preview for this Submission” page, the “Print Unsubmitted Form(s) W-2/W-3 for Review” page
TY23 W-2 Online Tutorial
Page 17
or the “Sign and Submit” page, the system will display the “Are you sure you want to save and exit W-2
Online without submitting your annual wage report to SSA” page.
3.4 Are You Sure You Want to Delete the Unsubmitted Report Page
If a user selects Delete button on the “Unsubmitted Reports” page, the system will display the “Are you
sure you want to delete the Unsubmitted Report” page.
