
™
CashPoint
Passport Business Soluons ™
v12.03 and v12.04
Interfacing Counterpoint version 7 to PBS

Interface to Counterpoint 7
Passport Software, Inc. Passport Business Solutions
2
Passport Business Solutions
Interface to Counterpoint
™ 7
Updated 08/03/2015
If you have any comments about this guide, please send your feedback to:
Passport Software, Inc. (“Passport” or “PSI”) has taken reasonable preventive measures to
ensure the accuracy of the information contained in this manual. However, Passport makes
no warranties or representations with respect to the information contained herein; and
Passport shall not be held liable for damages resulting from any errors or omissions herein
or from the use of the information contained in this manual.
PROPRIETARY RIGHTS NOTICE: No part of this material may be reproduced or
transmitted in any form or by any means, electronic, mechanical, or otherwise, including
photocopying and recording or in connection with any information storage or retrieval
system, without express written permission from Passport Software, Inc.
Copyright Passport Software, Inc. © 2015. All Rights Reserved. PBS, RealWorld, and EZ
Convert are trademarks or registered trademarks of Passport Software, Inc. SQL Server
Express 2008 R2 and Windows, Windows 7, Windows 8, Windows Server 2008 and
Windows Server 2012 are registered trademarks of Microsoft Corporation in The United
States and other countries. AcuCOBOL-GT and Acu4GL are registered trademarks of Micro
Focus (IP) Limited. Additional names of companies or products may be the intellectual
property of their respective owners.
Passport Software, Inc.
181 Waukegan Rd.
Suite 200
Northfield, IL 60093
Main: www.pass-port.com
NCR Counterpoint Version 8.4 to PBS: CashPoint

Interface to Counterpoint 7
Passport Software, Inc. Passport Business Solutions
3
ATTENTION: ONLY LICENSEES CURRENTLY ENROLLED IN THE PASSPORT UPDATE PROGRAM (PUP) ARE
PERMITTED TO INSTALL AND USE, SUBJECT TO THE TERMS AND CONDITIONS OF THE LICENSE AGREEMENT
BELOW, THE ENCLOSED SOFTWARE.
License Agreement
1. License Grant
Passport Software, Inc. (Passport) hereby grants to
Licensee and Licensee accepts a non-exclusive license for
the enclosed Software with the rights, terms, and
conditions as detailed in this License Agreement:
a. You may install and use the Software on a single
computer system or single computer file server for your
own internal business purposes provided you (the
Licensee) do not exceed the number of concurrent users
licensed by Passport to access the Software. If Licensee
wishes to increase the number of licensed concurrent
users, Licensee must contact Licensee's Passport Partner
(your Passport Software supplier) or Passport directly.
b. You may make backup copies of the Software as
required for your own internal business purposes provided
that you reproduce all copyright notices and other
proprietary notices on each copy made. Backup copies
may be used at any time to re-install the enclosed
Software in the event of loss, destruction, or other
malfunction of the Software.
c. You may only transfer the Software and this license to
a successor to the whole of Licensee’s business, provided
the successor agrees to accept the terms and conditions of
this agreement. If you transfer the Software, you must
report to Passport the name of the new user of the
Software, and you may not retain any copies of the
Software yourself once you have transferred it. No other
transfers of the Software are permitted without the prior
written consent of Passport Software, Inc.
Licensee shall not export or re-export, directly or
indirectly (including via remote access) the Software,
Documentation or other information or materials provided
by Passport hereunder, to any country for which the
United States or any other relevant jurisdiction requires
any export license or other governmental approval at the
time of export without first obtaining such license or
approval from Passport. It shall be Licensee's
responsibility to comply with the latest United States
export regulations, and Licensee shall defend and
indemnify Passport from and against any damages, fines,
penalties, assessments, liabilities, costs and expenses
(including reasonable attorneys' fees and court costs)
arising out of any claim that Software, Documentation, or
other information or materials provided by Passport
hereunder were exported or otherwise accessed, shipped
or transported in violation of applicable laws and
regulations. Licensee shall comply with all laws,
legislation, rules, regulations, and governmental
requirements with respect to the Software, and the
performance by Licensee of its obligations hereunder, of
any jurisdiction in or from which Licensee directly or
indirectly causes the Software to be used or accessed. In
the event that this Agreement is required to be registered
with any governmental authority, Licensee shall cause
such registration to be made and shall bear any expense or
tax payable in respect thereof.
This non-exclusive license is effective for the useful life
of the Software. However, this license will immediately
terminate if you fail to comply with any term or condition
of this Agreement. Upon termination you must destroy all
copies of the Software.
A new version of the Software replaces the version of the
Software previously licensed. Use of a new Software
version terminates the license to use that part of the
Software replaced by the new Software version and
Licensee shall destroy or return to Passport all copies of
any prior Software version previously licensed.
EXCEPT AS STATED ABOVE, YOU MAY NOT
COPY, TRANSFER, OR DISTRIBUTE THE
SOFTWARE TO OTHERS, AND ANY
UNAUTHORIZED COPYING, TRANSFER, OR
DISTRIBUTION SHALL AUTOMATICALLY
TERMINATE YOUR LICENSE.
2. Passport Update Program
Passport makes available its subscription update service
(Passport Update Program - PUP) to licensees of the
Software. Only licensees having current and up-to-date
enrollment in PUP are permitted to install and use any
Software updates. Contact your Passport Partner (your
Passport Software supplier) or Passport directly to enroll
in this program.
3. Passport’s Proprietary Rights
The Software is copyrighted by Passport Software, Inc.
and some portions of the Software are copyrighted by
AcuCorp, Inc., a Micro Focus International PLC
company. All rights reserved.
Passport and its third party licensors retain all proprietary
and intellectual property rights in the Software and Docu-
mentation and in any trademarks affixed to the Software
or the Documentation. Licensee shall not take any action
inconsistent with such title and ownership. Licensee shall
not alter or remove any printed or on-screen copyright,
trade secret, proprietary or other legal notices contained

Interface to Counterpoint 7
Passport Software, Inc. Passport Business Solutions
4
on or in copies of any Software or Documentation.
LICENSEE ACKNOWLEDGES AND AGREES
THAT THE SOFTWARE MAY CONTAIN CODE
OR REQUIRE DEVICES THAT DETECT OR
PREVENT UNAUTHORIZED USE OF THE
SOFTWARE. Licensee shall notify Passport
immediately in the event of unauthorized possession or
use of Software or Documentation.
Licensee is not permitted (a) to decompile, disassemble,
reverse compile, reverse assemble, reverse translate or
otherwise reverse engineer the Software, (b) to use any
similar means to discover the source code of the Software
or to discover the trade secrets in the Software, or (c) to
otherwise circumvent any technological measure that
controls access to the Software.
Updates to the Software made available to Licensee
through the Passport Update Programs shall be treated for
all purposes as Software under this License and all
intellectual property rights therein shall be retained by
Passport.
4. Limited Warranty and Disclaimers
Passport warrants that the CD-ROM and/or other media
on which the Software and User Documentation is
recorded are readable by a compatible hardware system.
For a period of 90 days (the Warranty Period) after the
initial date of this license, if Licensee discovers any
defects in the readability of the original CD-ROM and/or
other media, Licensee may return it to Licensee's Passport
Partner (your Passport Software supplier) or Passport for
a free replacement, which is Licensee's sole and exclusive
remedy in the event of such defect[s].
EXCEPT AS SPECIFICALLY PROVIDED HEREIN,
THE SOFTWARE IS NOT ERROR-FREE AND IS
BEING PROVIDED "AS IS" WITHOUT WARRANTY
OF ANY KIND.
PASSPORT SOFTWARE, INC., ITS PROGRAM
LANGUAGE SUPPLIERS AND OTHER VENDORS,
HEREBY DISCLAIM ALL WARRANTIES,
WHETHER EXPRESS OR IMPLIED, ORAL OR
WRITTEN, WITH RESPECT TO THE SOFTWARE
INCLUDING, WITHOUT LIMITATION, ALL
IMPLIED WARRANTIES OF TITLE, NON-
INFRINGEMENT, MERCHANTABILITY, FITNESS
FOR ANY PARTICULAR PURPOSE, COURSE OF
DEALING OR TRADE USAGE.
NO WARRANTY IS MADE REGARDING THE
RESULTS OF ANY SOFTWARE OR SERVICES OR
THAT ALL ERRORS IN THE SOFTWARE WILL BE
CORRECTED, REGARDLESS OF THE FORM OR
NATURE OF ANY CLAIM. SOME STATES DO NOT
ALLOW THE EXCLUSION OR LIMITATION OF
IMPLIED WARRANTIES, AND DO NOT ALLOW A
LIMITATION ON HOW LONG ANY IMPLIED WAR-
RANTY LASTS, SO THE ABOVE LIMITATIONS
MAY NOT APPLY. NO PASSPORT EMPLOYEE,
SUPPLIER, OR AGENT IS AUTHORIZED TO MAKE
ANY MODIFICATIONS OR ADDITIONS TO THIS
WARRANTY.
THE ENTIRE RISK AS TO THE QUALITY AND
PERFORMANCE OF THE SOFTWARE IS WITH
YOU. SHOULD THE SOFTWARE PROVE
DEFECTIVE, YOU ASSUME THE ENTIRE COST OF
ANY NECESSARY SERVICING, REPAIR OR
CORRECTION, AND ANY INCIDENTAL OR
CONSEQUENTIAL DAMAGES.
IN NO EVENT WILL PASSPORT, ITS
PROGRAMMING LANGUAGE SUPPLIERS AND
OTHER VENDORS, DISTRIBUTORS, OR DEALERS
(PASSPORT PARTNERS) BE LIABLE FOR ANY
DAMAGES, INCLUDING LOSS OF DATA, LOSS OF
PROFITS, OR DIRECT, OR INDIRECT, INCIDENTAL,
SPECIAL, OR CONSEQUENTIAL DAMAGES
RESULTING FROM ANY DEFECT IN THE
SOFTWARE, EVEN IF THEY HAVE BEEN ADVISED
OF THE POSSIBILITY OF SUCH DAMAGE. SOME
STATES DO NOT ALLOW THE EXCLUSION OR
LIMITATION OF IMPLIED WARRANTIES OR
LIABILITY FOR INCIDENTAL OR
CONSEQUENTIAL DAMAGES, SO THE ABOVE
LIMITATIONS MAY NOT APPLY TO YOU.
THE FOREGOING RESTRICTIONS, DISCLAIMERS
AND LIMITATIONS SHALL APPLY AND REMAIN
IN FORCE EVEN IN THE EVENT OF A BREACH BY
PASSPORT HEREUNDER OF A CONDITION OR
FUNDAMENTAL TERM HEREUNDER, OR IN THE
EVENT OF A BREACH WHICH CONSTITUTES A
FUNDAMENTAL BREACH.
5. General Terms and Conditions
Nothing contained in this Agreement shall be deemed to
constitute either party as the agent or representative of the
other party, or both parties as joint venturers or partners
for any purpose. Licensee's supplier of the Software
(referred to herein as a “Passport Partner”) is an inde-
pendent contractor in relation to Passport and is not an
employee, agent or partner of Passport.
This License Agreement is governed by the laws of the
State of Illinois and jurisdiction for any claim or
controversy raised by Licensee against Passport Software,
Inc. shall only be in the Circuit Court of Cook County,
State of Illinois.

Interface to Counterpoint 7
Passport Software, Inc. Passport Business Solutions
5
If either party commences any action or proceeding
against the other party to enforce or interpret this License,
the prevailing party in such action or proceeding shall be
entitled to recover from the other party the actual costs,
expenses and attorneys' fees (including all related costs
and expenses), incurred by such prevailing party in
connection with such action or proceeding and in
connection with obtaining and enforcing any judgment or
order thereby obtained.
This License and the rights and obligations hereunder,
may not be assigned, in whole or in part by Licensee,
except to a successor to the whole of Licensee's business,
without the prior written consent of Passport. In the case
of any permitted assignment or transfer of or under this
License, this License and all of its terms and conditions
shall be binding upon, and inure to the benefit of, the
successors, executors, heirs, representatives,
administrators and assigns of the parties hereto.
This is the complete and exclusive statement of the
License between you and Passport, and this License
supersedes any prior agreements or understanding, oral or
written, with respect to the subject matter of this License.
If you have any questions regarding this License, you may
contact Passport at 847-729-7900 or email to psi@pass-
port.com.

Interface to Counterpoint 7
Passport Software, Inc. Passport Business Solutions
6
Table of Contents
Accounting Interface Overview ..................................................................................... 8
Interfacing Counterpoint to PBS Accounts Payable .................................................... 9
Counterpoint Configuration ................................................................................ 10
General Counterpoint Setup ...............................................................................................10
Vendors Setup ....................................................................................................................10
Counterpoint Export Setup .................................................................................................11
Passport Business Solutions Configuration ...............................................................17
Import setup ....................................................................................................... 17
Data Synchronization .........................................................................................................17
Account numbers ................................................................................................................17
Vendors ..............................................................................................................................17
Using multiple companies in Passport Business Solutions ................................ 17
Exporting Accounts Payable Data from Counterpoint ................................................19
Overview ............................................................................................................ 19
Running the “export” .......................................................................................... 19
Finishing the “export” ..........................................................................................................21
Importing Into PBS Accounts Payable .........................................................................23
Export file location ............................................................................................. 23
Pre-import considerations .................................................................................. 23
Safeguards .........................................................................................................................23
Special Situations ...............................................................................................................23
File naming .........................................................................................................................24
Import File location and locking ..........................................................................................24
Unix issues .........................................................................................................................24
Running the Import ............................................................................................ 24
Payables Edit list ................................................................................................................26
Error Messages During Voucher Import ..............................................................................26
Voucher Import Report .......................................................................................................27
Interfacing Counterpoint to PBS General Ledger ........................................................33
Overview ............................................................................................................ 33
Multi-Company INtegrIty .................................................................................... 33
Counterpoint Configuration ................................................................................ 33
PBS General Ledger Configuration ..............................................................................43
Exporting General Ledger Data from Counterpoint ........................................... 43
Settings required for proper export .....................................................................................44
Exporting ............................................................................................................................45

Interface to Counterpoint 7
Passport Software, Inc. Passport Business Solutions
7
Importing into PBS General Ledger Distributions .............................................. 45
Export file location ..............................................................................................................45
Unix/Linux issue .................................................................................................................46
The PBS Distributions Import Process ................................................................................46
Distributions Import Messages and Error Report ................................................................48
Multi-company integrity .......................................................................................................48
PBS Account Linking and Maintenance .......................................................................49
Cross Reference List ......................................................................................... 49
Automated Cross-reference Creation ................................................................ 50
Account number Synchronization ...................................................................... 52
Utilities ...........................................................................................................................53
Location of Export/Import Files .......................................................................... 53
Vendor Data Interface ........................................................................................ 54
Transferring vendor data from Counterpoint 7 to PBS ....................................... 57
Running the Counterpoint 7 Vendor Export ........................................................................57
Running the Import into Passport Business Solutions .........................................................57
Transferring vendor data from PBS to Counterpoint 7 ....................................... 60
Running the Export from Passport Business Solutions .......................................................60
Running the Counterpoint 7 Vendor Import .........................................................................61
Valid G/L Accounts Data Interface ..................................................................... 61
Transferring account data from Counterpoint 7 to PBS .......................................................61
Transferring account data from PBS to Counterpoint 7 .......................................................62
Passport Business Solutions Interface Technical Data ..............................................65
The Voucher Import File .................................................................................... 65
Voucher record layout ........................................................................................................65
Voucher field dependencies and requirements ...................................................................68
Distribution record layout ....................................................................................................69
Voucher import logic ...........................................................................................................70
General Ledger Distribution Import record layout .............................................. 71
Key Terms ......................................................................................................................73

Interface to Counterpoint 7
Passport Software, Inc. Passport Business Solutions
8
A c c o u n t i n g I n t e r f a c e O v e r v i e w
This document explains the setup and usage of the interface to PBS from Counterpoint
version 7.x. If you have Counterpoint Version 8.4 or higher use the CashPoint
documentation. Also see the web site for CashPoint.
The accounting interface provides a means of importing Accounts Payable vouchers and
General Ledger distributions into Passport Business Solutions from an external purchasing
or accounting system. It saves you the time of having to manually enter vouchers into
Passport Business Solutions Accounts Payable and distributions in General Ledger that
have already been entered in another accounting system.
The import also facilitates the translation of account numbers, so the account numbers in
Passport Business Solutions do not need to match the account numbers used in the
interfaced system.
Most of this document was written specifically for exporting from Counterpoint and
importing into Passport Business Solutions. The import voucher and distributions
programs in Passport Business Solutions can be used to import data from other accounting
and purchasing systems as well.
The Valid G/L Account and Vendor exports and imports were written to specifically allow
data to be shared between Passport Business Solutions with Counterpoint. These utilities
are useful when implementing a new system because it reduces data entry by moving the
data from one system to the other.

Interface to Counterpoint 7
Passport Software, Inc. Passport Business Solutions
9
I n t e r f a c i n g C o u n t e r p o i n t t o P B S
A c c o u n t s P a y a b l e
This chapter describes how to interface Counterpoint (CP) to Passport Business Solutions
Accounts Payable (A/P). This interface allows you to export voucher receivings entered
in CP and import them into Passport Business Solutions A/P payables file (vouchers).
After the vouchers are brought over, you can review them in payables entry, print an edit
list, and then post them.
The interface is implemented using an export from CP and an import into Passport
Business Solutions. There are two main steps for setting up the interface. The first step is
to setup CP for export. The second step is to setup Passport Business Solutions Accounts
Payable for import.
Once the setup is complete, you will then be able to interface by following two steps. The
first step is exporting selected receivings in CP (known as “Vouchering Receiving”). The
second step is running the import into Passport Business Solutions A/P. The frequency at
which you decide to interface CP to Passport Business Solutions A/P is up to you. You
can do it hourly, daily, weekly, monthly; whenever you decide.
It is recommended that you read this entire chapter before following any of the setup
procedures. This will insure that you understand the concepts of what is trying to be
accomplished, and apply this to your own unique situation.
The linking of the Passport Business Solutions and CP account numbers is a prerequisite
for the interface to work. The information on how to do this is in the Passport Business
Solutions Account Links chapter in this document.
Also be aware that because CP and Passport Business Solutions are separate systems, and
the integrity between them needs to be maintained manually.
If you use multiple companies in the Passport Business Solutions and CP, you will need to
insure company synchronization when performing these setup procedures, and when
performing the actual interface.
This means you should always be aware of which company you are working with in one
system so as to insure using that same company in the other system.

Interface to Counterpoint 7
Passport Software, Inc. Passport Business Solutions
10
COUNTERPOINT CONFIGURATION
This section details the specific steps necessary to setup Counterpoint (CP). You do not
need to refer to the CP manuals for any of these steps.
If you need more CP information, refer to the CP “Getting started” document (gs.pdf),
chapter 16. Note: The document name and data can change; contact your Counterpoint
support person if you cannot find this information.
GENERAL COUNTERPOINT SETUP
In order to allow “exporting” vouchers in CP, you need to have the “Keep received P.O.
history” flag set to Yes. To do this, run:
Setup > Purchasing > Control
And insure that this flag is set to Yes. This will cause P.O. receiver history to be kept,
which is needed when you export the vouchers.
VENDORS SETUP
Please bring up the Vendor maintenance screen by running:
Inventory > Vendors > Vendors
11. A/P Sync ?
This field is not applicable to the “Export” mode of interface, which is what we are using.
It only applies to the “Direct” interface type. Thus I am just pointing it out so you can
ignore it.
12. A/P Vend #
The A/P Vendor number field can be used to create a cross-reference between your CP
vendor number and your Passport Business Solutions vendor number. You will need to
use this field if your CP vendor number does not EXACTLY match your Passport
Business Solutions vendor number.
To use it, enter your Passport Business Solutions vendor number as it appears on your
Passport Business Solutions vendor maintenance screen into field number 12.
The field is not required. If it is blank, then the CP vendor number will be exported. Thus
for those CP vendor numbers that match your Passport Business Solutions vendor
numbers, leave this field blank. For those that do not match, enter the Passport Business
Solutions vendor number.
If you are entering a Vendor in CP first and will enter the Vendor in Passport Business
Solutions later, remember that you can only enter up to 6 characters in this field and it has
to be a unique number.

Interface to Counterpoint 7
Passport Software, Inc. Passport Business Solutions
11
COUNTERPOINT EXPORT SETUP
From the Counterpoint menu run:
Setup > System > Accounting Interface
Note: Starting with CP Version 7.5.5 you will find it on this menu path:
Setup > Accounting > Interface
SCREEN ONE SETUP
Setup your screen the same as the following screen shot, but refer to the following
exceptions:
The only fields that can differ from above example are “A/P Output file”, “Default
discount account”, and “Vendor Terms”. See the Counterpoint Output File section below
for details on the file name.
Note: If you are using the G/L interface, field #4 will differ from the above example.
COUNTERPOINT OUTPUT FILE

Interface to Counterpoint 7
Passport Software, Inc. Passport Business Solutions
12
The file name used here must be IMPVCH??.DAT. The ?? is equal to the Passport
Business Solutions company ID that corresponds to the company in Counterpoint 7. For
example, if the Counterpoint 7 company corresponds to your Passport Business Solutions
company 00, then the file name in the example above is the one to use.
No path has been entered in the above example. Thus, the export file will be located in the
top level Counterpoint 7 directory after exporting vouchers. Prior to import into Passport
Business Solutions A/P, it will need to be manually moved to the Passport Business
Solutions top-level directory. This is because the Passport Business Solutions A/P import
requires the file to be in that location.
If there is enough room to enter a path to the Passport Business Solutions top-level
directory, then you can enter it with the file name. This way you will not have to manually
move the file after export.
Some entries that include a path might be (For Passport Business Solutions Company 00):
Using a Universal Naming Convention (UNC)
\\Win_2000\PBS\IMPVCH00.DAT
Using a mapped drive letter:
G:\PBS\IMPVCH00.DAT
Be careful when using drive letters because they are mapped to the computer that
is running the Counterpoint 7 software. For example, one computer’s G: drive
can be mapped as the P: drive on another computer. Verify drive letter uniformity
on your system if you use this method.
Single user running everything on a local drive:
C:\PBS\IMPVCH00.DAT
(UNIX) For information on mounting NFS drives and going from UNIX to Windows and
vice-versa, contact your systems administrator.
The file naming conventions will change when moving to a different operating system
environment. Windows to UNIX, Linux to Windows, etc.
DEFAULT DISCOUNT ACCOUNT AND VENDOR TERMS
These fields are used when you voucher receivings (export) in Counterpoint 7. They are
only used to help speed up the entry of the fields on each voucher you export by allowing
you to use these as defaults. Enter values here that reflect the terms that match the
majority of your vendors.
Interface to Counterpoint 7
Passport Software, Inc. Passport Business Solutions
13
When importing the payable entries into Passport Business Solutions, there is an option to
use the Passport Business Solutions Vendor terms. If you choose to use the due days,
discount days and discount percentage from the Passport Business Solutions Vendor
record, then the value to these same Counterpoint 7 setup fields are not important. The
export file will still contain the data for these fields, but they will not import into Passport
Business Solutions.
** Warning ** Make sure the field “Use batch headers?” is NEVER set to Y. It should
always be N. This field has nothing to do with batches in Passport Business Solutions A/P.
Batches in Passport Business Solutions A/P are discussed in the “A/P Import”
documentation.
SCREEN TWO SETUP
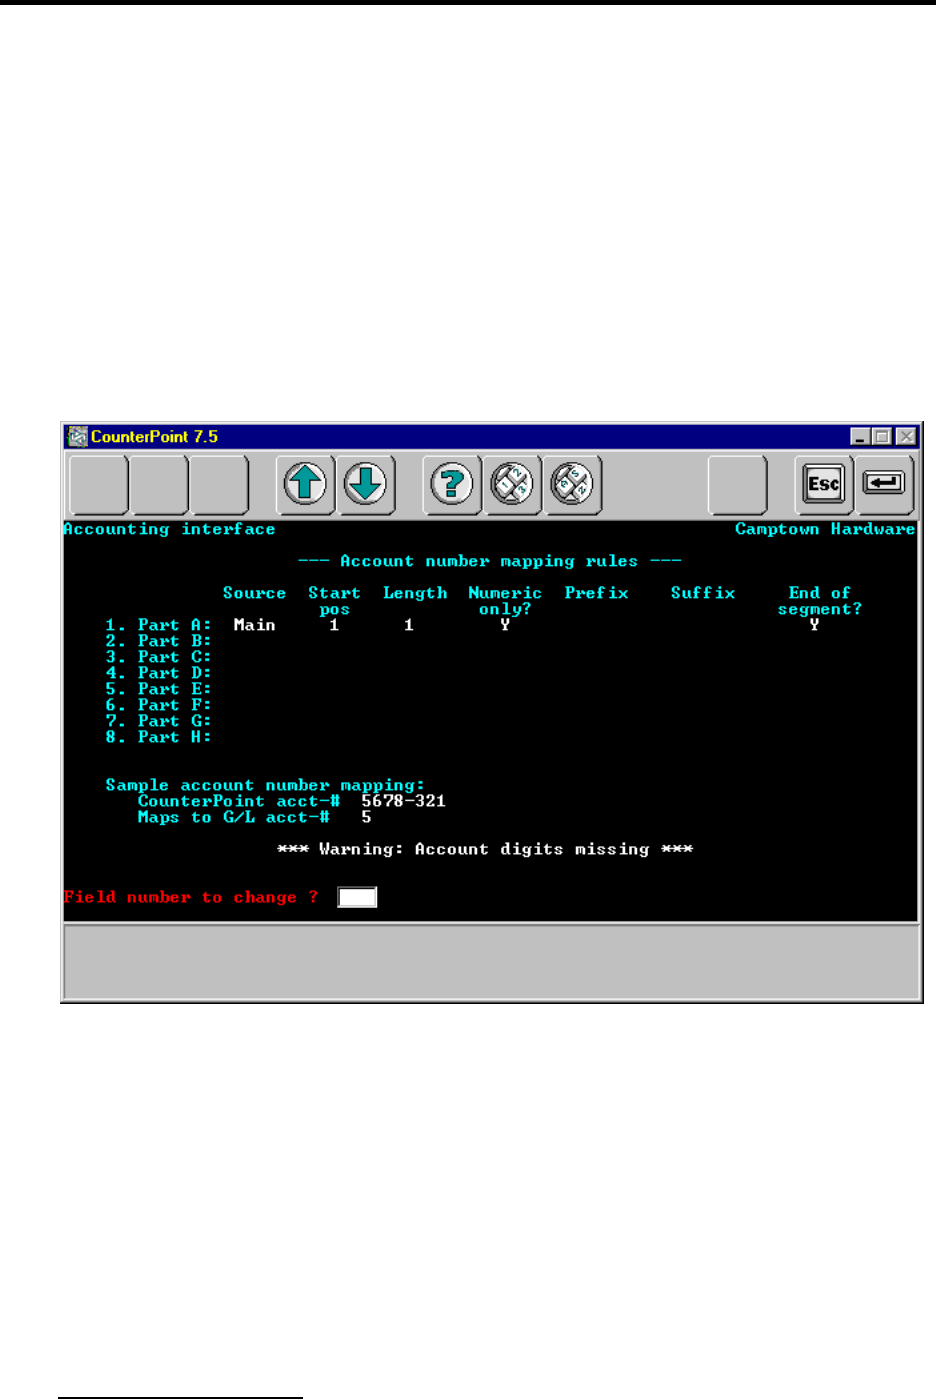
Now we will move on to the second screen, Account number mapping rules.
With the interface to Passport Business Solutions A/P, account linking (mapping) must be
set up in Passport Business Solutions.
This Counterpoint 7 screen requires entry of at least one field in order to move on to the
remaining setup screens, so enter the following into field number one:
FIELD 1. PART A:
Source Enter ‘M’
Start Position Enter ‘1’
Length Enter ‘1’
Interface to Counterpoint 7
Passport Software, Inc. Passport Business Solutions
14
Numeric only? Enter ‘Y’
Prefix Enter spaces
Suffix Enter spaces
End of segment? Enter ‘Y’
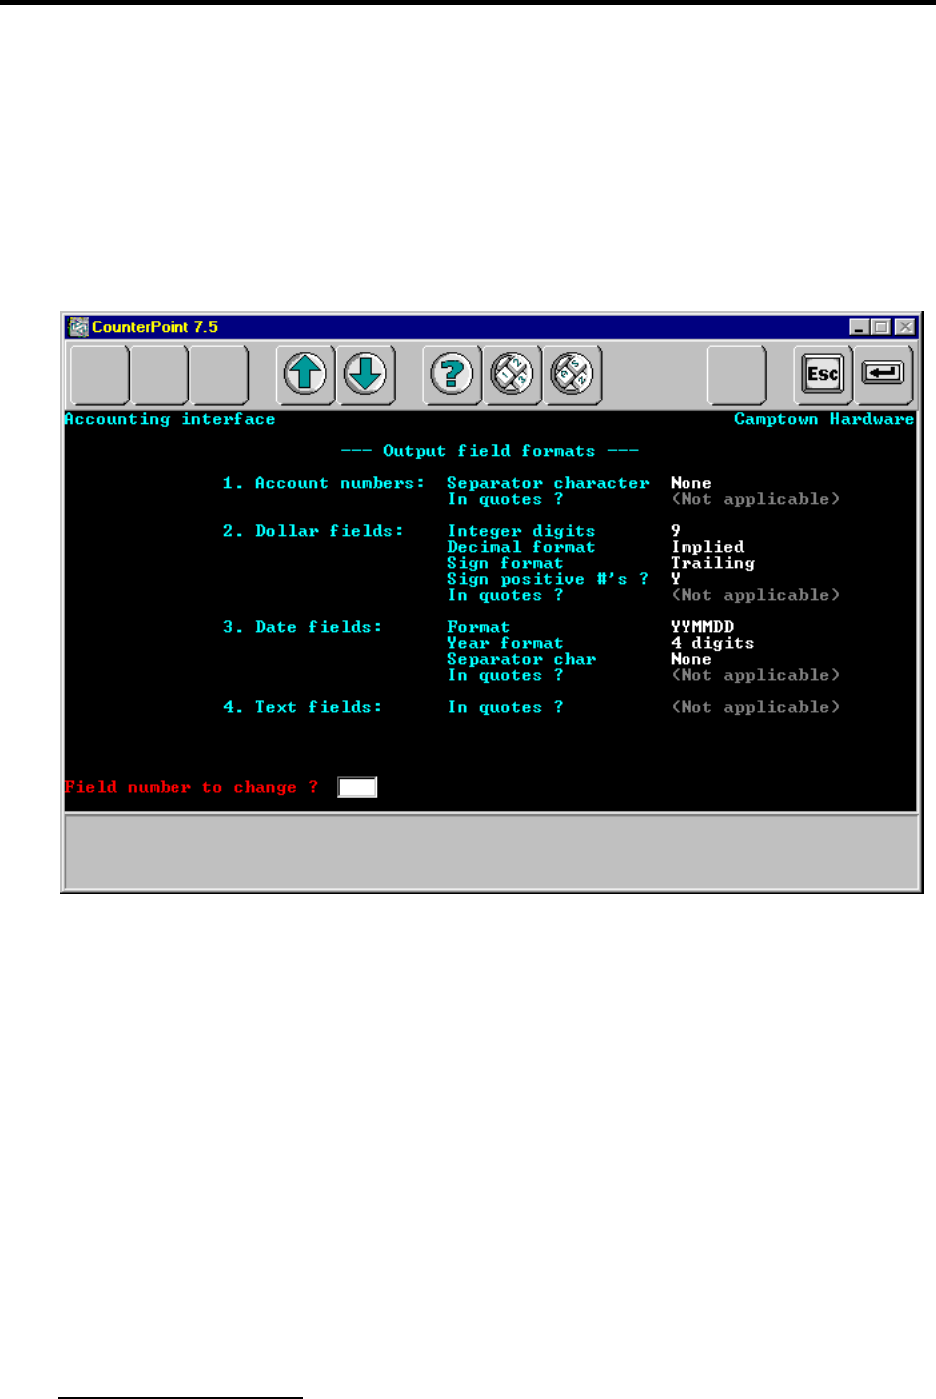
SCREEN THREE SETUP
The third screen is Output field formats. This screen should be setup as shown below with
no exceptions. Your fields must match the screen shot exactly.
After finishing this screen, you may see some G/L setup screens if you are using the G/L
interface. Enter through these until you arrive at the “A/P vouchers output format” screen.

Interface to Counterpoint 7
Passport Software, Inc. Passport Business Solutions
15
SCREEN FOUR SETUP
On the A/P vouchers output format screen you must define the layout of the export
voucher.
Enter the fields exactly as shown above.
IMPORTANT: The first field is a literal. It is used to designate the record type. It must
be entered exactly as:
<*VCHR*>

Interface to Counterpoint 7
Passport Software, Inc. Passport Business Solutions
16
SCREEN FIVE SETUP
Now we move on to the final screen A/P distributions output format. This is where we
define the layout of the export distribution.
Enter the fields exactly as shown above.
IMPORTANT: The first field literal is used to designate the record type. It must be
entered as:
<*DIST*>
This concludes the voucher export setup in Counterpoint.

Interface to Counterpoint 7
Passport Software, Inc. Passport Business Solutions
17
P a s s p o r t B u s i n e s s S o l u t i o n s
C o n f i g u r a t i o n
IMPORT SETUP
DATA SYNCHRONIZATION
This section details how data in the Passport Business Solutions software must be kept in
synchronization with data in the other accounting system.
ACCOUNT NUMBERS
All imported account numbers (discount account and distribution accounts) will be looked
up in the Passport Business Solutions external cross reference account list in order to
determine the Passport Business Solutions account to use.
Even if the account numbers in the other accounting system match your Passport Business
Solutions account numbers, you still need this list. This is because the imported account
number may not match the internal representation of the account number in Passport
Business Solutions.
To learn how to setup and use the cross-reference file, refer to Passport Business Solutions
Account Links chapter of this document and Chapter 13 of the Passport Business Solutions
System Manger PDF document (SY_PBS.pdf) on the Passport Business Solutions product
CD.
If any account numbers are added, changed, or deleted in either accounting system, the
other system will need to be updated.
Note: If you do not need to import discount information on the vouchers or distribution
records, then you do not need to setup the account cross reference.
VENDORS
The vendor number on the import voucher must have an exact match in the Passport
Business Solutions vendor file or it is considered an error and will not be imported.
If any vendor numbers are added, changed, or deleted in either accounting system, the
other system will need to be updated.
There are utilities that will export and import vendor data to and from the Counterpoint
export format. Refer to the Utilities chapter in this document for more information.
USING MULTIPLE COMPANIES IN PASSPORT BUSINESS SOLUTIONS
You must insure that you are always working in the same company under Passport
Business Solutions that you are working with under the other accounting system. The

Interface to Counterpoint 7
Passport Software, Inc. Passport Business Solutions
18
import file name helps with this, as it must contain the two-character Passport Business
Solutions company ID for the Passport Business Solutions company it is being imported
into. See the File Naming section below for more information.
Helpful information for setting up the Passport Business Solutions external cross-reference
file:
Step 1 - Print the external system’s accounts
To do this under Counterpoint 7, run:
Setup > Reports > System > Accounts
Step 2 - Setting up the Passport Business Solutions cross-reference file.
When entering the external system’s account number, enter the account number as
it appears on the report printed above in step 1. This is the account number that
will be exported from Counterpoint 7 during the interface.

Interface to Counterpoint 7
Passport Software, Inc. Passport Business Solutions
19
E x p o r t i n g A c c o u n t s P a y a b l e D a t a f r o m
C o u n t e r p o i n t
OVERVIEW
The export process in Counterpoint 7 is accomplished by building an export file through
selection of receivings to voucher. As each receiving is selected, it is added to the export
file along with its distributions. When you are finished selecting the receivings you want
to voucher, you will then import the file into Passport Business Solutions A/P. After the
file is imported into Passport Business Solutions, Passport Business Solutions will delete
it. You can then start the whole cycle over again.
Counterpoint 7 has built in safeguards that will prevent you from vouchering the same
receiver twice. It does this by flagging the receiver as having been vouchered, and will not
permit it to be vouchered again.
Feel free to read the Counterpoint 7 documentation in regards to exporting, but keep in
mind that you need to follow the exact procedures that we outlined below for it to work
with Passport Business Solutions.
Note: The Counterpoint 7 document is wrong in that it doesn’t document the export mode
when discussing how to voucher receivings. On the bottom of page 1510 of the User
Manual (um.pdf) it states that if you answer “Y” to “OK to voucher this receiving?” it will
create a voucher in your A/P. This is only true in the “Direct” interface mode. Under the
“export” interface mode, it exports the voucher rather than creating it directly into Passport
Business Solutions A/P.
RUNNING THE “EXPORT”
To bring up the export screen select:
System > Accounting Interface > Payables > Voucher Receivings
Now select a P.O. and the receivers for the P.O. that you want to voucher. You will then
be presented with the following screen:

Interface to Counterpoint 7
Passport Software, Inc. Passport Business Solutions
20
1. Dist date:
The <F1> key is used to manually mark receivers as vouchered. Doing this means an
export record will NOT be created for the voucher. You may want to use this if you don’t
need to bring a receiving over to Passport Business Solutions A/P, but want to mark it as
vouchered in Counterpoint 7.
F2 is used to create the voucher for a vendor other than the vendor to whom the P.O. was
created. For more information, see “Factoring a voucher,” page 1511 of the Counterpoint
7 User Manual (um.pdf). The page number and document name could change. If you use
this, the new vendor number that is entered will be the one exported with the voucher.
Remaining fields:
Fill in the information you want to export into the remaining fields. All of these fields are
exported as entered, except Due day(s) and Disc day(s). These two fields are only used on
this screen to calculate the due date and disc date respectively.
After entering the voucher fields, you will be presented with the distributions area, as in:

Interface to Counterpoint 7
Passport Software, Inc. Passport Business Solutions
21
Here you will be required to completely distribute the invoice amount. Each distribution
you enter will be exported individually when the voucher is exported below.
After completely distributing the invoice amount, you will be asked “OK to voucher this
receiver?” Answer Yes to complete the voucher and create the export records.
You should then see the message:
“Receiver vouchered to A/P - voucher-### Press ENTER”
The #### represents the invoice number you entered on the voucher screen.
WARNING – If you don’t see this message and the screen just goes back to the “P.O. #”
entry field, then it means that the program could NOT create the export records. This is a
problem in Counterpoint 7 where they do not display any file errors that occur when trying
to write the export records. Thus if the export file is in use when you do an export, it will
not work, and you will not see any messages. In this case, the receiving would not be
marked as vouchered, so you can just voucher it again after resolving why the export file
could not be written to.
FINISHING THE “EXPORT”
After you are finished exporting all your vouchers, make sure to back out of the program
until you get to the menu. If you don’t do this, the export file will remain locked.
Now you can run the import into Passport Business Solutions A/P > Payables (Import).
Note: You may want to bring the source documents you used to voucher the receivings
over to Passport Business Solutions A/P to verify that all the vouchers import correctly.

Interface to Counterpoint 7
Passport Software, Inc. Passport Business Solutions
22

Interface to Counterpoint 7
Passport Software, Inc. Passport Business Solutions
23
I m p o r t i n g I n t o P B S A c c o u n t s P a y a b l e
EXPORT FILE LOCATION
The export file that was created in Counterpoint 7 needs to be located in the top level
Passport Business Solutions directory.
Please refer to how you setup your Counterpoint 7 payables export to determine the
location of the export file. If the export does not put the file directly into the Passport
Business Solutions top-level directory, then you will need to manually move it there.
IMPORTANT: If you need to move the file, make sure that you MOVE it and do not
copy it. If you copy the file, then the next export will be appended to the current one. This
will cause the current vouchers to be imported a second time into Passport Business
Solutions A/P!
PRE-IMPORT CONSIDERATIONS
There are some considerations regarding the import.
SAFEGUARDS
Start out slowly to insure everything is working properly. This means you should only
export and import a few vouchers to start with. This will insure that everything is
understood and functioning properly. Remember that after importing, you still have the
ability to edit the imported transactions, and even delete them if you so choose.
During the import, any errors and warnings that occur on an import record will be printed
to the import report. The import report will also print totals for number of errors, number
of warnings, number of vouchers created, and number of distributions created.
After the import completes, the import file is deleted if there are no warning messages.
This is done to insure that it is not imported twice. If errors occurred, you will need to
correct them and run the import again. Record error and warning data can be found on the
Voucher Import report as well as the import data itself.
SPECIAL SITUATIONS
When using Batch Controls under A/P
The import will prompt for a batch prior to importing. All vouchers imported will be
assigned to the batch selected.
When using PBS Purchase Order
No receiver numbers are brought over during the import. If receivers need to be assigned,
you will need to do this manually after importing the voucher.

Interface to Counterpoint 7
Passport Software, Inc. Passport Business Solutions
24
When using PBS Job Cost
The import will only create “non job” distributions, meaning the distributions will not
contain job numbers. If you want the distributions to apply to jobs, you will need to delete
the distributions after importing, and re-enter them with appropriate job information.
FILE NAMING
The import file must be named as:
IMPVCH??.DAT
The ?? represents the Passport Business Solutions company. Thus for company 00, the
file name would be:
IMPVCH00.DAT
For company PS it would be
IMPVCHPS.DAT
IMPORT FILE LOCATION AND LOCKING
Prior to running the import, the import file must be located in the top level Passport
Business Solutions directory.
This can be accomplished in one of two ways. First, the other accounting system can
export directly to the file in this location. Second, you can manually move the file to this
location after exporting from the other accounting system.
Prior to importing, the program will test the import file to see if it is in use. If not, it will
lock it before importing the records. Thus if you are using the direct method, there may
be file locking issues between the two accounting systems. See the Running the Import
section below for more information.
UNIX ISSUES
If the import file is moved between a Unix and Windows system or vice versa, you will
need to insure that proper FTP ASCII protocols are followed. This will insure that the
correct CR/LF conversion is performed.
RUNNING THE IMPORT
This section details the step-by-step procedure for running the import in Passport Business
Solutions.
See the PBS A/P documentation for details on how the file is backed up during import.
To start the import, select

Interface to Counterpoint 7
Passport Software, Inc. Passport Business Solutions
25
AP > Payables > Import
If you are using batch controls in A/P, you will be prompted to enter a batch. This batch
screen is the same as if you were entering the vouchers as opposed to importing them. The
imported vouchers will be assigned to the batch you enter.
Graphical Mode
Whether you selected a batch or you are not using batches the following graphical mode
screen will display:
Enter the import terms.
Select the cross reference setup.
Select OK to continue or Cancel to go back to the menu without importing.
The import starts. As records are imported, they are displayed on the screen. If there are
errors with the data being imported a message displays; see Voucher Import Report Error
Messages. Go to Payables Edit list.
Character Mode
Using character mode this screen displays:

Interface to Counterpoint 7
Passport Software, Inc. Passport Business Solutions
26
There are some potential error messages that could display. These are documented later in
this section. Enter this field:
Use ‘I’mport or ‘V’ender for terms:
Choose I to use the terms from the import file or V to use the terms from the PBS vendor
file.
Do you want to continue?
Enter Y if you want to continue or N to cancel the import.
Enter cross reference:
Select the G/L account cross-reference list that you have setup for the A/P import.
You must set up a G/L account reference list before you can import payables. You do this
under Account links found on the CTL menu.
Are you sure ?
Select Y to start the import, or N to abort the import.
If you select Y you will be prompted to enter a printer destination for the Import Report.
The import starts. As records are imported, they are displayed on the screen. If there are
errors with the data being imported a message displays.
PAYABLES EDIT LIST
After the import is completed, it is recommended that you print the Passport Business
Solutions Payables edit list to view the imported vouchers. This should be done to validate
that the totals from the export accounting system match the totals of the imported records.
ERROR MESSAGES DURING VOUCHER IMPORT
Possible Import file error messages – These are the messages you may receive when
starting the import:
Import file not found
Insure that the file is named correctly and located in the top level Passport Business
Solutions directory.
Import file is empty
There are no records in the import file.
Vouchers are on file. Ok to continue with import?
The program will check to see if any vouchers are already on file. Select N to abort the
import or Y to continue the import. This gives you the option to stop the import.
It is recommended that you only import into an empty voucher file. The payables file will
only contain those vouchers that were imported.
Errors found during import. Import file anyway ?
Select Y to import the file or N to abort the process.
When the import is finished, you will be presented with one of three possible messages:
Import completed, processed with errors

Interface to Counterpoint 7
Passport Software, Inc. Passport Business Solutions
27
This message indicates some or all import records had errors. You will need to correct the
errors by editing the payables records. The report will have information about the errors.
Also the edit list may help you find the errors.
Import completed successfully.
This message indicates some the records imported without errors.
VOUCHER IMPORT REPORT
This report is printed during the import. It will list all the records imported as well as any
warnings or errors that are found on the import records. All possible error and warning
messages are described at the end of this document.
If any record receives an Error during the import, then all records will not be imported.
The file will remain in the top-level Passport Business Solutions directory. If any record
receives a warning, all records will still be imported.
The records printed on the report are imported exactly as they appear from the import file.
The only exception is that the voucher record is longer than 132 characters, thus a record is
wrapped to a second line.
To view the contents of specific fields in a record, refer to the Voucher record layout from
this manual to see where the field is located in the record.
Voucher Import Report Error Messages
The following are a list of the voucher import error messages with a description of each.
DISTRIBUTION ACCT NOT FOUND IN CROSS REFERENCE
The distribution account on the import distribution was not found in the account cross-
reference file.
VENDOR NOT ON FILE
The vendor on the import voucher was not found in the Passport Business Solutions
vendor file.
VENDOR # IS BLANK
The vendor number on the import voucher is blank
NON-DISCOUNT AMOUNT IS NOT NUMERIC
The non-discount amount on the import voucher is not numeric.
NON-DISCOUNT AMOUNT INCONSISTENT WITH INVOICE AMOUNT
This indicates one of two things based on the invoice amount. If the invoice amount is
greater than zero, then it indicates the non-discount amount is greater than the invoice

Interface to Counterpoint 7
Passport Software, Inc. Passport Business Solutions
28
amount. If the invoice amount is less than zero, then it indicates the non-discount amount
is less than the invoice amount or it is greater than zero.
INVOICE NUMBER IS BLANK
The invoice number on the import voucher is blank
INVALID DISTRIBUTION AMOUNT
The distribution amount on the import distribution is either zeros or not numeric.
INVALID DISTRIBUTION DATE
The distribution date on the import voucher is either zeros or not numeric.
INVALID INVOICE DATE
The invoice date on the import voucher is either zeros or not numeric.
INVALID INVOICE AMOUNT
The invoice amount on the import voucher is either zeros or not numeric.
P.O. IS FOR A DIFFERENT VENDOR
This will only occur of you are using the Passport Business Solutions PO module and the
P.O. # on the imported voucher was found the Passport Business Solutions PO file. The
error indicates that the vendor number on the import record does not match the vendor
number for the corresponding Passport Business Solutions PO.
INVC # ON DISTRIBUTION DOES NOT MATCH VOUCHER INVC #
The invoice number on the import distribution record does not match the invoice number
on the corresponding voucher.
DISTRIBUTION WITHOUT VALID VOUCHER
The import distribution record does not have any corresponding voucher record.
UNKNOWN RECORD TYPE
The import record is not a voucher or a distribution.
ERROR WRITING BALANCING DIST. FILE STATUS = ##

Interface to Counterpoint 7
Passport Software, Inc. Passport Business Solutions
29
Indicates an I-O error occurred when trying to create a balancing distribution. This error
should never occur, and indicates a severe problem. You should write down the message,
and contact your support rep.
ERROR WRITING NEW AP TRX REC. FILE STATUS = ##
Indicates an I-O error occurred when trying to create the A/P transaction. This error
should never occur, and indicates a severe problem. You should write down the message,
and contact your support rep.
ERROR WRITING NEW AP DISTRIBUTION REC. FILE STATUS = ##
Indicates an I-O error occurred when trying to create an A/P distribution. This error should
never occur, and indicates a severe problem. You should write down the message, and
contact your support rep.

Interface to Counterpoint 7
Passport Software, Inc. Passport Business Solutions
30
Voucher Import Report Warning Messages
The following are a list of the import warning messages and a description of each.
VENDOR'S STATUS IS "NO PURCHASES"
The vendor on the imported voucher has a status of “No Purchases”
DISCOUNT AMOUNT AND PERCENT ARE INCONSISTENT
This indicates a problem with either the discount amount and/or the discount percent on
the imported voucher. The three possible problems are:
1. One of the two amounts is zero while the other is not.
2. There is a discount amount and percent, but the non-discount amount is equal to
the invoice amount, thus no discount is allowed.
3. The calculated discount ((invoice amount – non-disc amount) * discount percent) is
not equal to the imported discount amount.
In all three of these situations, the discount amount, discount percent, and discount account
will NOT be imported. They will be set to “None” on the voucher.
DISCOUNT DATE IS LATER THAN DUE DATE
The discount date on the imported voucher is later then the due date. The voucher will be
created with no discount date.
DISCOUNT DATE IS EARLIER THAN INVOICE DATE
The discount date on the imported voucher is earlier than the invoice date. The voucher
will be created with no discount date.
DISCOUNT PERCENT IS NOT NUMERIC
The discount percent on the imported voucher is not numeric. The discount amount,
discount percent, and discount account will NOT be imported. They will be set to “None”
on the voucher.
DISCOUNT AMOUNT IS NOT NUMERIC
The discount amount on the imported voucher is not numeric. The discount amount,
discount percent, and discount account will NOT be imported. They will be set to “None”
on the voucher.
INVOICE # FOUND ON EXISTING VOUCHER FOR VENDOR
This indicates that there is an A/P transaction on file with the same invoice number and
same vendor number found on the import voucher.
INVOICE # FOUND IN VENDOR'S HISTORY

Interface to Counterpoint 7
Passport Software, Inc. Passport Business Solutions
31
This indicates that there is an A/P vendor history record on file for the same invoice
number and same vendor number found on the import voucher.
DUE DATE INVALID
Either the due date is not numeric, zeros, or less than the invoice date. In this case, it will
be set to the imported invoice date.
DISCOUNT ACCOUNT NOT FOUND IN CROSS REFERENCE
The discount account on the imported voucher could not be found in the cross-reference
file. The discount amount, discount percent, and discount account will NOT be imported.
They will be set to “None” on the voucher.
DISCOUNT DATE NOT NUMERIC
The discount date on the imported voucher is not numeric. The voucher will be created
with no discount date.
PURCHASE ORDER NOT ON FILE
This warning can only occur when using the PBS Purchase Order module.
The purchase order number on the imported voucher could not be found in the Purchase
Order Header file.
CALCULATED DUE DAYS EXCEEDS 998
When calculating the due days from the due date, the number of days exceeded 998. It
will be set to 999.
CALCULATED DISCOUNT DAYS EXCEEDS 998
When calculating the discount days from the discount date, the number of days exceeded
998. It will be set to 999.
TOTAL DISTRIBUTION AMOUNT NOT = INVC AMT. DISTRIBUTIONS
BROUGHT INTO BALANCE
The total of the imported distributions does not match the invoice amount on the imported
voucher. A distribution will be created to make up the difference. The account number
used will be the vendor’s default distribution account.
A distribution will not be created if a distribution was already imported with the vendors
default distribution account. In this case, the amount in difference will be applied to the
existing distribution.
NO DISTRIBUTIONS FOR VOUCHER! DEFAULT DISTRIBUTION CREATED

Interface to Counterpoint 7
Passport Software, Inc. Passport Business Solutions
32
There were no distributions in the import file for the imported voucher. A distribution will
be created using the invoice amount from the imported voucher, and the account number
from the vendor’s default distribution account.

Interface to Counterpoint 7
Passport Software, Inc. Passport Business Solutions
33
I n t e r f a c i n g C o u n t e r p o i n t t o P B S G e n e r a l
L e d g e r
OVERVIEW
This document describes how to interface PBS General Ledger to Counterpoint 7. The
interface allows you to import accounting distributions generate from Counterpoint into the
PBS General Ledger Distributions. After the distributions are brought over, you can then
review them, print an edit list, and post.
The interface is implemented using an export from Counterpoint 7 and an import into
Passport Business Solutions.
There are two main steps for setting up the interface. The first step is to setup
Counterpoint 7 for export. The second step is to setup Passport Business Solutions for
import.
Once everything is setup, you will then be able to interface by following two steps. The
first step is running the export in Counterpoint 7, and the second step is running the import
into Passport Business Solutions G/L. The frequency at which you decide to interface
Counterpoint 7 to Passport Business Solutions G/L is up to you. You can do it daily,
weekly, monthly, or whenever you decide.
It is recommended that you read this entire document before following any of the setup
procedures. This will insure that you understand the concepts of what is trying to be
accomplished, and apply this to your own unique situation.
Also be aware that because Counterpoint 7 and Passport Business Solutions are separate
systems, integrity between them needs to be maintained manually by you. This is covered
in the section Ongoing Maintenance.
MULTI-COMPANY INTEGRITY
If you use multiple companies in the Passport Business Solutions and Counterpoint 7, you
need to insure company synchronization when performing these setup procedures, and
when performing the actual interface.
This means making sure that you are logged into the same companies in both Counterpoint
7 and Passport Business Solutions.
COUNTERPOINT CONFIGURATION
This section details the specific steps necessary to setup Counterpoint 7. You do not need
to refer to the Counterpoint 7 manuals for any of these steps. But if you need additional
Counterpoint 7 information, refer to the Counterpoint 7 “Getting Started” document gs.pdf.

Interface to Counterpoint 7
Passport Software, Inc. Passport Business Solutions
34
From the Counterpoint menu run:
Setup > System > Accounting Interface
Note: With Counterpoint Version 7.5.5 you will find it on this menu path:
Setup > Accounting > Interface
SCREEN ONE SETUP
Setup your screen the same as the following screen shot, but refer to the following
exceptions:
The only fields that can differ from above screen are “G/L Output file” and “Correction
Account”, both under # 4. (Note: If you are using the A/P interface, field #5 may differ
from the above example)
G/L OUTPUT FILE
The file name used here must be EXDIST??.ASC where ?? is equal to the Passport
Business Solutions company ID that corresponds to the company you are working with in
Counterpoint 7. In our example, the Counterpoint 7 demo company Camptown Hardware
corresponds to the Passport Business Solutions company 00.

Interface to Counterpoint 7
Passport Software, Inc. Passport Business Solutions
35
No path is entered in the above example. Thus the file is placed in the top level
Counterpoint 7 directory after running the Counterpoint 7 export. Prior to import into
Passport Business Solutions G/L, it will need to be manually moved to the Passport
Business Solutions G/L data directory for the company you are working with. This is
because the Passport Business Solutions G/L import requires the file to be in that location.
So if the Passport Business Solutions company is ‘00’, then you must put the file in the
directory ‘GL00’.
Entering a path
If there is enough room to enter that path to the Passport Business Solutions G/L Data file
directory, then you can enter it with the file name. This way you will not have to manually
move the file after export.
Some entries that include a path might be (For Passport Business Solutions Company 00):
Using Universal Naming Conventions (UNC’s)
\\Win_2000\PBS\GL00\EXDIST00.ASC
Using a mapped drive letter:
G:\PBS\GL00\EXDIST00.ASC
Be careful when using drive letters because they are mapped to the computer that
is running the Counterpoint 7 software. For example, one computer’s G: drive
can be mapped to a different location than another computer’s G: drive.
Single user running everything on a local drive:
C:\PBS\GL00\EXDIST00.ASC
For information on mounting NFS drives and going from Unix to windows and vice-versa
contact your system administrator. If you enter a specific path, make sure you enter the
correct slashes per the operating system requirement; / for UNIX/Linux and C:\ for
Windows.
CORRECTION ACCOUNT
This field is not needed. You can set the field to ‘none’ or enter any account number to
complete the entry.
It is intended to be used to “Correct” any out-of-balance situation when exporting
distributions. For example, if debits don’t equal credits for the exported distributions, the
account that is entered here would be used to create a balancing distribution.
Instead of using this functionality, we will instead just import the out of balance
distributions into Passport Business Solutions. The correcting entry can then be added

Interface to Counterpoint 7
Passport Software, Inc. Passport Business Solutions
36
manually in Passport Business Solutions before posting. This has the built in safeguard
that Passport Business Solutions will not allow posting if the distributions are out of
balance.
USE BATCH HEADERS
**Warning ** Make sure the field “Use batch headers?” is NEVER set to Y. It should
always be N.

Interface to Counterpoint 7
Passport Software, Inc. Passport Business Solutions
37
SCREEN TWO SETUP
Now we will move on to the second screen in the Counterpoint 7 setup, “Account number
mapping rules.”
For the interface to Passport Business Solutions G/L, we do not use account mapping.
This Counterpoint 7 screen requires entry of at least one field in order to move on to the
other setup screens, so we will enter something into field number one just to “fake” it out
and get by it.
Thus we will enter the following fields so that we can move on to the next screen:
FIELD 1. PART A
Source Enter ‘M’
Start Position Enter ‘1’
Length Enter ‘1’
Numeric Only? Enter ‘Y’
Prefix Enter spaces
Suffix Enter spaces
End of segment? Enter ‘Y’
Before leaving this screen, you need to write down the length of your Counterpoint 7
account number. To do this, look at the “CP acct-#” field. To calculate the length, start
with the leftmost digit and include the separator character.

Interface to Counterpoint 7
Passport Software, Inc. Passport Business Solutions
38
So in the example above, the length of the Counterpoint 7 account number, “5678-321” is
eight.
Now we can move on to the next screen.
SCREEN THREE SETUP
The third screen in the Counterpoint 7 setup is “Output Field Formats”. This screen should
be setup as shown below with no exceptions.
Your fields must match the screen shot exactly. The last screen shot shows the screen with
the optional document number field.

Interface to Counterpoint 7
Passport Software, Inc. Passport Business Solutions
39
SCREEN FOUR SETUP
Now you will finish the Counterpoint 7 setup by completing the fourth screen, “G/L
dist
rib
utio
n
out
put
for
mat
”.
Please note that all the fields that are quoted represent literals. To create these fields, you
select Literal from the field type. If the literal is to be blank, just press enter when
prompted for the literal, otherwise type in the literal as shown above.
You need to enter your fields exactly as shown above, and then see if the following
exception applies.
The above example is only valid if the length of your Counterpoint 7 account number
(recorded from the previous setup screen) is eight. If the length is not eight, you need to
make some changes as outlined below. If it is eight you are finished with the Counterpoint
7 setup.
ALTERING THE EXPORT LAYOUT FOR DIFFERENT COUNTERPOINT 7 ACCOUNT
NUMBER LENGTHS:

Interface to Counterpoint 7
Passport Software, Inc. Passport Business Solutions
40
The Passport Business Solutions G/L Import expects the account number import field to be
40 characters long. That is why in the above example, which is written for a Counterpoint
7 account with a length of 8, fields three and four “Pad” the Counterpoint 7 account
number with 32 trailing spaces.
You need to adjust this padding to accommodate the difference between the 40 characters
that Passport Business Solutions G/L import expects, and the length of your Counterpoint
7 Account number.
Beware that this setup screen only allows literals to be a maximum of 20 characters in
length.
Some Examples:
If the length of your Counterpoint 7 account number is 4, then you would change
the length of field four to 16. This is because Counterpoint 7 account length (4) +
field three length (20) + field four length (16) = 40.
Here is a screen shot:
I
f
t
h
e
l
e
n
g
t
h
o
f
y
o
u
r
Counterpoint 7 account number is 18, then you would change field four to 2 because 18 +
20 + 2 = 40. Here is a screen shot:

Interface to Counterpoint 7
Passport Software, Inc. Passport Business Solutions
41
In both of these examples note that the length of the Counterpoint 7 account number plus
the lengths in fields three and four always equal 40. This is what you need to accomplish
with your Counterpoint 7 account number.
The document number may also be added. Here is a screen with the document number:

Interface to Counterpoint 7
Passport Software, Inc. Passport Business Solutions
42
You have now completed the Counterpoint 7 G/L setup. If you are using the A/P interface,
there will be a couple of A/P setup screens to go through before you return to the
Counterpoint 7 menu.

Interface to Counterpoint 7
Passport Software, Inc. Passport Business Solutions
43
P B S G e n e r a l L e d g e r C o n f i g u r a t i o n
The main aspect of setting up Passport Business Solutions General Ledger (G/L) is the
creation of an “account number cross reference” list.
This list is needed to translate Counterpoint 7 account numbers into Passport Business
Solutions account numbers during the import process.
Even if your account numbers in Counterpoint 7 match your Passport Business Solutions
account numbers, you still need this list. This is because the exported Counterpoint 7
account number is formatted prior to export, and does not match the internal representation
of the account number in Passport Business Solutions.
Please refer to the Passport Business Solutions “Account Links” chapter to setup this list.
At the same time, be aware of the following issues as they relate to the steps contained in
the Passport Business Solutions documentation:
Passport Business Solutions Step 1 - Print your external system’s accounts
To do this under Counterpoint 7, run:
Setup > Reports > System > Accounts
Passport Business Solutions Step 3 - Setting up the Passport Business Solutions cross-
reference file.
When entering the external system’s account number, enter the account number as it
appears on the report printed above in step 1. This is the account number that will be
exported during the interface.
EXPORTING GENERAL LEDGER DATA FROM COUNTERPOINT
Exporting is the first step for interfacing Counterpoint 7 to Passport Business Solutions
General Ledger (G/L). After completing this step, you will need to perform the import into
Passport Business Solutions G/L.
These instructions will show you how to run the export in Counterpoint 7, and the settings
you need to use. These instructions must be followed in order to export the distributions in
the correct format for the Passport Business Solutions G/L import. Beyond the described
settings, you should refer to the Counterpoint 7 manuals for detailed information on all the
other settings that are available in the export.
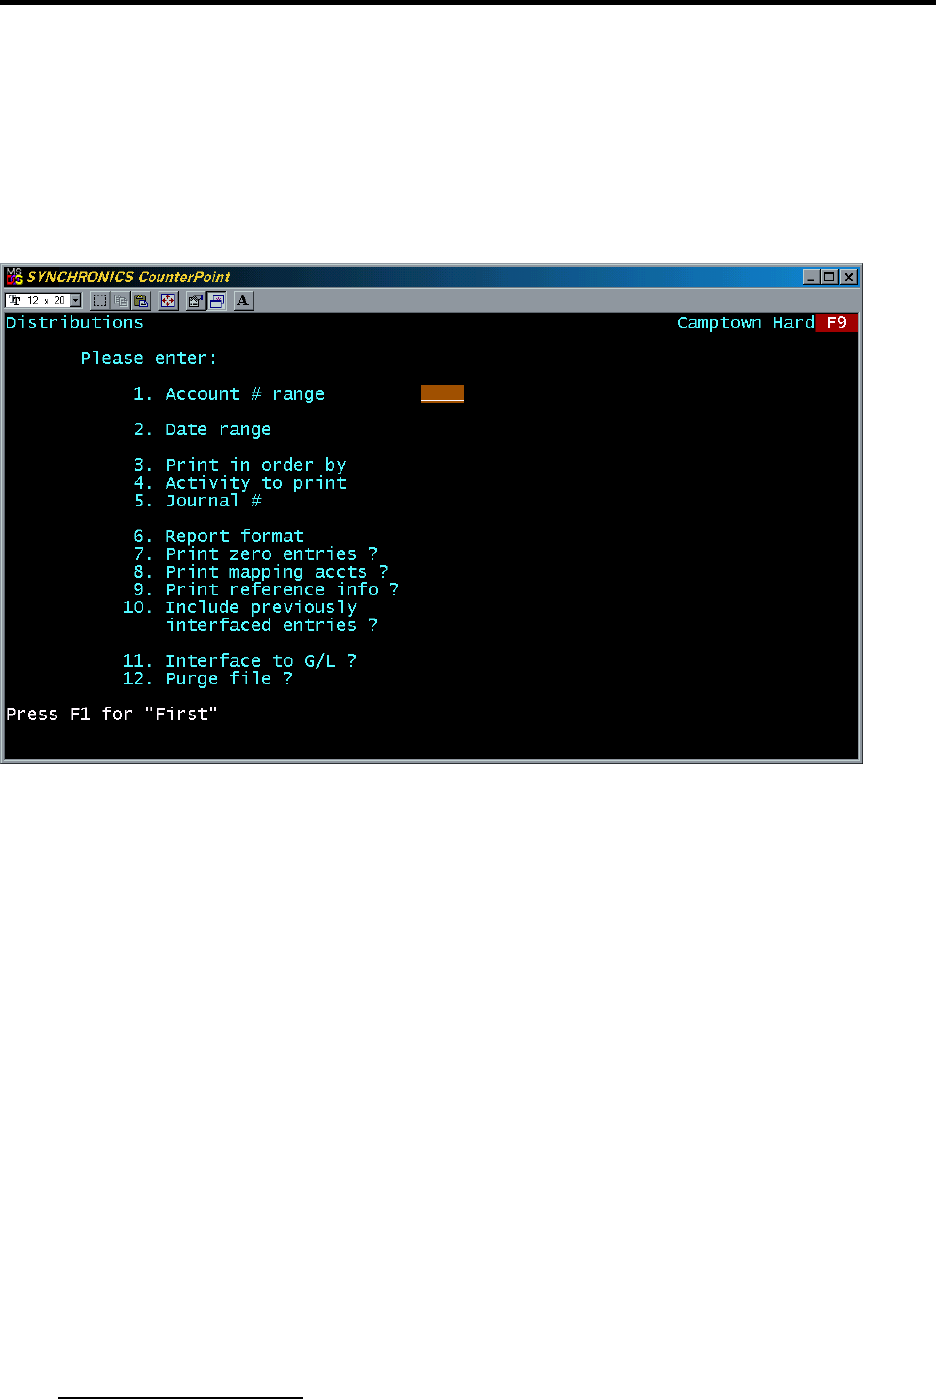
The export (called “Distributions” by Counterpoint 7) is described in chapters 89 and 92 of
the Counterpoint 7 “User Manual” (um.pdf).
To run the export in Counterpoint 7 select:
System > Accounting Interface > Distributions
Interface to Counterpoint 7
Passport Software, Inc. Passport Business Solutions
44
In Counterpoint Version 7.5.5 the menu location has changed.
To run the export in Counterpoint 7.5.5 select:
Accounting > General ledger > Distribution report
You will then see the following screen:
SETTINGS REQUIRED FOR PROPER EXPORT
(Note: These are the only required settings. For all other fields, enter settings that will
select the transactions you wish to export.)
Item “6. Report Format” must be set to Detail
Item “11. Interface to G/L” must be set to Yes
After entering Item 11 it is possible to receive the following message:
There are unposted G/L transactions on file.
Are you sure you wish to interface now ?

Interface to Counterpoint 7
Passport Software, Inc. Passport Business Solutions
45
This message is a warning that an export file already exists.
Under normal procedures, in which you export from Counterpoint 7 and then immediately
import into Passport Business Solutions G/L, you will never receive this message. This is
because the import into Passport Business Solutions G/L deletes the export file after
importing it.
If for some reason you forget the Passport Business Solutions G/L import step, and then
run this export again, you will receive this message.
If you answer ‘Yes’ to “Are you sure you wish to interface now ?”, the program will
continue and the export records will be APPENDED to the existing export file. This
means you are never at risk to losing an export if you forget to import it into Passport
Business Solutions G/L.
If you answer ‘No’, then it will change the field “11. Interface to G/L?” to ‘No’. If you run
the program with this set to ‘No’, then no export records will be written to the export file.
To summarize, you should never receive this message if you follow the procedure of
exporting from Counterpoint 7 and then immediately importing into Passport Business
Solutions G/L. The warning is illustrated here only to inform you of possible error
conditions.
EXPORTING
After you finish with this screen you will be prompted to enter a printer. The report that is
created by this program is very important. It contains a list of exported distributions,
which should be compared to the Passport Business Solutions G/L distributions after
importing. This will insure that the export and import worked properly.
After you select a printer, the program will print the report and create the export file.
If the export was successful, you will see the message:
Processing complete - press ESC
If you do not see this message, then the export did not work.
IMPORTING INTO PBS GENERAL LEDGER DISTRIBUTIONS
Importing is the second step for interfacing Counterpoint 7 to Passport Business Solutions
General Ledger (G/L) Distributions. You should perform this only after successfully
exporting from Counterpoint 7.
EXPORT FILE LOCATION
The export file that was created in Counterpoint 7 needs to be located in the Passport
Business Solutions G/L data directory for the company you are importing. For example,
for company 00 the file needs to be in the G/L00 directory.

Interface to Counterpoint 7
Passport Software, Inc. Passport Business Solutions
46
Please refer to your Counterpoint 7 G/L Export setup to determine the location of the
export file. If the export does not put the file directly into the G/L data directory, then you
will need to manually move it there.
IMPORTANT: If you need to move the file, make sure that you MOVE it and not copy
it. If you copy the file, then the next export will be appended to the current one. Thus the
current distributions will be imported a second time into Passport Business Solutions G/L!
UNIX/LINUX ISSUE
If the file is moved between a Unix/Linux and Windows system or vice versa, you will
need to insure that proper FTP ASCII protocols are followed. This will insure that the
correct CR/LF conversion is performed.
THE PBS DISTRIBUTIONS IMPORT PROCESS
Start the Passport Business Solutions G/L import by running:
GL > Distributions > Get Distributions
Fill in the fields to Get Distributions:
1. Interface with which system?
Enter ‘EX – External Cross-Reference’
This is the Passport Business Solutions import setting.
2. Cutoff date
Warning: Any import transactions that are dated beyond this date will be
dropped from the import. This means they will not be brought into the
G/L Distributions file. Instead, they are written to a file named
EXDIST??.NEW. This file will be located in the G/L data directory for
the Passport Business Solutions company you are working with. For
example, the file for company 00 would be:
(UNX) GL00\EXDIST00.NEW
It is recommended that you enter a date that is later than the latest date in
the transactions that you exported in Counterpoint 7. This way, the
Counterpoint 7 export procedure controls what records are exported
through the ranges you enter there, and the Passport Business Solutions
import will bring them all in without the possibility of losing any.
3. Type of interface
This tells the import how to compress imported transactions. For more
Information on distribution compression, see your Passport Business
Solutions G/L manual (GL_PBS.pdf).

Interface to Counterpoint 7
Passport Software, Inc. Passport Business Solutions
47
4. Purge distribution file?
This defaults to <Y> Yes and cannot be changed.
5. Cross-Reference?
This indicates which cross reference list to use when looking up account
numbers during import.
You should enter ‘1’ to use the first list unless you were already using
external cross-references prior to setting up Passport Business Solutions
G/L for interfacing to Counterpoint 7. In this case enter 2 for second.
Here is a sample screen:
After entering all the fields and continuing, you will be asked, “Are you sure?” Answer
yes to begin the import.
After a Successful Import:
You can now browse the distributions that were imported and/or print an edit list.
It is recommended that you compare the imported transactions to the report that was
printed during the Counterpoint 7 export to insure a proper interface occurred.
If the data is OK, now the G/L distributions can be posted.

Interface to Counterpoint 7
Passport Software, Inc. Passport Business Solutions
48
DISTRIBUTIONS IMPORT MESSAGES AND ERROR REPORT
EX DISTRIBUTIONS COMPLETE - <ESC> = EXIT
This indicates that the import completed successfully.
EX DISTRIBUTION FILE IS NOT AVAILABLE
This indicates that the Counterpoint 7 export file could not be found. Insure that it is in the
G/L data directory for the company that you are working with.
ERRORS ENCOUNTERED - SEE REPORT FOR DETAILS
This indicates that there is an account number in the file that does not match the Account
Links. Before you get this message, you will be asked to select a printer to print the Ex
Distributions Exception (Get Distributions) Report. Starting at column 4 this report
indicates the account number(s) that do not have a matching number in the Account links.
The import will not take place until the problem has been corrected.
You will have to correct the missing Account Link number. You may first have to enter
the account in the Valid G/L Account file and the Chart of Accounts. Once this has been
done, you can set up the Account Link and import the distribution again.
MULTI-COMPANY INTEGRITY
If you are using multiple companies, it is important to insure that all the steps you perform
in Passport Business Solutions G/L are within the company that corresponds to the
exported company from Counterpoint 7.

Interface to Counterpoint 7
Passport Software, Inc. Passport Business Solutions
49
P B S Ac c o u n t L i n k i n g a n d M a i n t e n a n c e
This chapter is an addendum to the current Passport Business Solutions documentation
regarding the Account links cross-references. It covers documentation for a new feature
added to the “Account Links” entry screen.
Although this document was written to support the A/P Voucher Import, and the interface
of Counterpoint 7 to A/P and G/L, it is generic information, and is written as such. The
documentation for A/P Import and the instructions for interfacing Counterpoint to G/L and
A/P both refer to this data in this chapter.
CROSS REFERENCE LIST
Passport Business Solutions allows two external cross-reference lists. If you are currently
using one of them, please use the other when following the procedures below. If you are
currently using both, then you will not be able to use the Counterpoint to Passport Business
Solutions interface.
The following steps outline how to manually set up the cross-reference list.
Note: If your account structure and content is the same in the external system and Passport
Business Solutions, you may be able to use the automated list setup procedure outline
below in Automated cross-reference creation
Step 1 - Print out your external system’s accounts listing
Step 2 - Enable the PBS cross-reference file:
Run Passport Business Solutions company maintenance:
CTL > Company Information
On the first screen, set field, “10. Use cross-reference file?” to Yes.
Step 3 - Setting up the PBS cross-reference file.
Run Passport Business Solutions account links maintenance:
CTL > Account Links > Enter
For every account that is in the external system’s accounts list:
Enter the corresponding Passport Business Solutions account into field 1.
Into field #5, enter the external system’s account number in the same
format that matches the external system export.
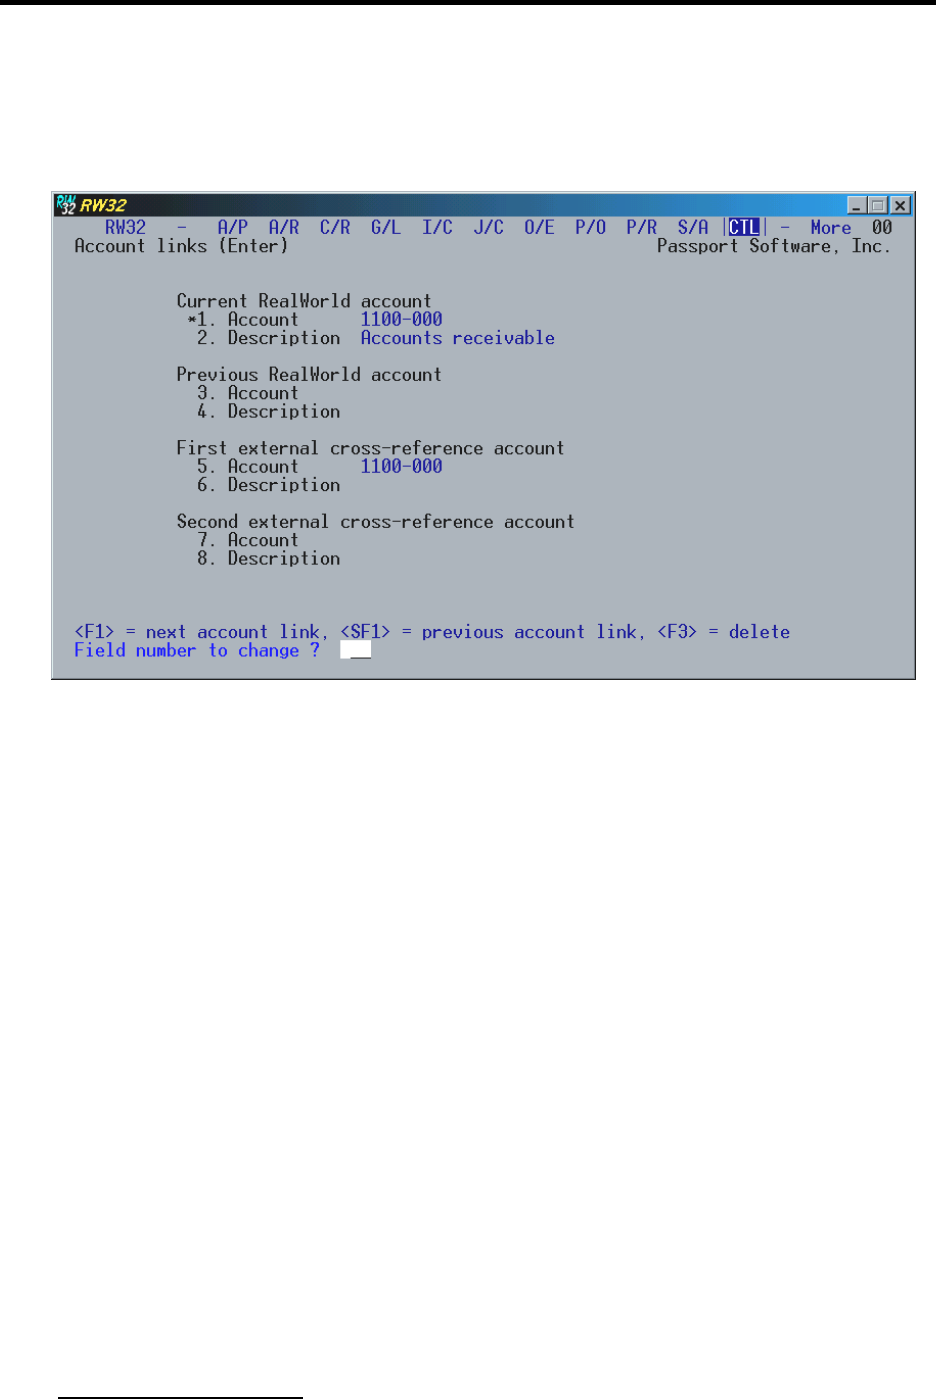
Interface to Counterpoint 7
Passport Software, Inc. Passport Business Solutions
50
You can leave field # 6 blank.
(Note: If you are setting up the second cross reference list, then use fields 7 and 8 instead)
Here is a simple example:
As you can see, the cross-reference list can be very powerful if you have completely
different account structures and/or values between an external system and Passport
Business Solutions. On the other hand, it is very tedious if you have the same structure
and values in the external system and your Passport Business Solutions system. To relieve
this tedium there is the Automated Cross-Reference Creation.
AUTOMATED CROSS-REFERENCE CREATION
To ease the creation of the cross-reference list, we have created an automated process.
You can use this process if your Passport Business Solutions account numbers are the
same in structure and content to your external account numbers.
To clarify further, you should only use this if all or most of your account numbers in
Passport Business Solutions “Look” the same as the account numbers exported from the
external system. For example, if the exported account number from the external system is:
1000-000
The corresponding Passport Business Solutions account number “looks” like:
1000-000

Interface to Counterpoint 7
Passport Software, Inc. Passport Business Solutions
51
After that you can use this process.
The process creates the cross-reference list automatically from your Chart of Accounts file
by using the formatted Passport Business Solutions account number (the one you see on
reports and on the screen) for the external cross-reference account number. (Note: For
users without G/L, the list will be created from the Valid G/L file).
The reason the word “Looks” is quoted above is to indicate how this list works and why it
is needed. Passport Business Solutions stores your accounts in a much different format
than the way they are displayed and printed. For example, when you see on a report or the
screen a Passport Business Solutions account like:
1000-100
It is really stored internally as:
0000000000000000100000001000000
Thus when attempting to directly lookup the external account 1000-100 in the Passport
Business Solutions account file, a match will not be found!
Thus a cross-reference is needed to map the external account number, 1000-100 to the
internal Passport Business Solutions account 0000000000000000100000001000000.
When you enter this mapping on the cross-reference screen, on the screen it appears you
are mapping 1000-100 to 1000-100, but it is really mapping the external account it to the
internal Passport Business Solutions representation.
The automated cross-reference creation saves you the time of having to enter these
manually when your Passport Business Solutions account display structure and content
matches the external exported account.
To use this function follow these steps:
Run Passport Business Solutions account links maintenance:
CTL > Account Links > Enter
At field # 1 press <F5> for “Auto Create External Lists”
Answer ‘Yes’ to “Do you wish to continue?”.
Enter ‘1’ to select creation of the first list.
Answer ‘Yes’ to “Do you wish to continue”
The function will now create your cross-reference list.

Interface to Counterpoint 7
Passport Software, Inc. Passport Business Solutions
52
ACCOUNT NUMBER SYNCHRONIZATION
Any Valid G/L Account or General Ledger Chart of Accounts added to Passport Business
Solutions will need to be added to Counterpoint 7 or vice versa. You can enter these
manually. In addition, you will need to update the Account links cross-reference in
Passport Business Solutions.
If the account numbers are the same in both systems, you can use the accounts file
interface utility to keep the Valid G/L accounts and Counterpoint 7 accounts in sync. In
Passport Business Solutions you will still need to update the Account links cross-
references and Chart of Accounts if you use this method. To create the General Ledger
Chart of Accounts, you can enter them manually or use the ‘Set up chart of accounts’
utility.

Interface to Counterpoint 7
Passport Software, Inc. Passport Business Solutions
53
U t i l i t i e s
There are two utilities provided with Passport Business Solutions that will convert the
Counterpoint Vendors and Accounts export files to and from the Passport Business
Solutions Vendor and Valid G/L Account files.
Note: The Data Import module provides a great deal more flexibility than these utilities for
moving any external data into PBS.
These utilities provide a means to enter the data into either Passport Business Solutions or
Counterpoint and then transfer it to the other. Therefore the data can go in either direction.
This is especially useful when you are implementing a new installation and the Vendor or
Account data has been already entered in either Passport Business Solutions or
Counterpoint and you would like to transfer this data to the other system, thus saving data
entry time.
When the systems are both active and running, the best way to update changes to these
files is to input the data manually. If this is not practical or the Vendor or Account data
has changed significantly, you can use these utilities to ‘refresh’ the data in either system.
Note: If you plan on doing this, there would need to be some strict controls put into place
so that the data remains true.
For exporting and restoring in Counterpoint 7, you will need to use the standard
Counterpoint 7 file utilities.
You must be a Passport Business Solutions administrative user to run these utilities.
LOCATION OF EXPORT/IMPORT FILES
The default location where the Counterpoint utilities place the export files is in
Syn\<company>\exports with SYN being the top-level directory. Passport Business
Solutions normally places the export files in the top-level directory but with Counterpoint
7 it is done differently. Counterpoint does not have the company number as part of the
export file name like PBS so the same export file name is used for all companies.
Therefore the data from one company must be exported to a different directory than
another company or the data will be overwritten each time. The default location for the
Counterpoint 7 export files can be changed in the Counterpoint 7 Company information,
but this documentation assumes that you have not done this.
For Passport Business Solutions Windows, you can use the File export and File import
windows and navigate to the location.
For Passport Business Solutions UNIX or Linux, because there can be multiple companies
in Counterpoint and corresponding companies in Passport Business Solutions, under the
top-level Passport Business Solutions directory, to keep the data separated by company the
Counterpoint formatted export data files go in unique directories. For example with

Interface to Counterpoint 7
Passport Software, Inc. Passport Business Solutions
54
company 00, you will need to create a directory in the top-level Passport Business
Solutions area called CPT00 and Passport Business Solutions will export and import the
files to and from this directory. You will need to create additional directories for each
company with the company number as the variable. Examples: Passport Business
Solutions Company 01 = CPT01, Passport Business Solutions Company PS = CPTPS and
so on.
VENDOR DATA INTERFACE
The Passport Business Solutions utility export and import vendor data format is the same
as the Counterpoint 7 Vendor export format. Because of this, you can use the standard
Counterpoint 7 file utilities when transferring data between Counterpoint 7 and Passport
Business Solutions.
The field sizes between both systems are different in most cases. Therefore for this data
transfer to work you will have to limit the size of the input data on certain fields or you
must allow these fields to be truncated during the transfer. With the exception of the
Address and City fields, all the Passport Business Solutions fields are shorter than the
fields in Counterpoint. Therefore when initially setting up both systems you may encounter
fewer errors when you input the data in Passport Business Solutions and then transfer it to
Counterpoint.
The Vendor number must be a unique field in both Passport Business Solutions and
Counterpoint 7.

Interface to Counterpoint 7
Passport Software, Inc. Passport Business Solutions
55
Counterpoint 7 A/P Vendor number field becomes PBS Vendor number
With the Counterpoint 7 A/P Vendor number field, you must enter only 6
characters in this field and it must be a unique number for each vendor. It can be
the same as the Counterpoint 7 Vendor number as long as it is only 6 characters in
length. When importing the file exported out of Counterpoint 7, this field will
become the Passport Business Solutions Vendor number.
PBS Reference number field becomes Counterpoint 7 Vendor number
In the case of the Passport Business Solutions Reference number, this must also
be unique for each Passport Business Solutions vendor and must be no longer that
12 characters. This field becomes the Vendor number in Counterpoint 7. If the
vendor numbers are the same in both systems, then it can only be 6 characters in
length because that is the maximum size of the Passport Business Solutions
vendor number.
There is an option on the export from PBS to use the PBS Vendor number instead
of the Reference number field. This will only work if the Vendor numbers are the
same in both systems. Then Vendor numbers do not have to be keyed into the
reference field and there is no doubt that the number is unique.
The table below shows data about the field size and the default file values.
Field
PBS input field
sizes
Counterpoint
input field sizes
Default import value
into PBS when the
record does not exist.
Vender number
6
12
None – unique with
each record
A/P Vend # (in
Counterpoint 7 only)
N/A
30
This field gets imported
into PBS Vendor
number and must be
unique in Counterpoint
7 for every Vendor.
Reference number (in
PBS only)
15
12
This field corresponds
to the Counterpoint 7
Vendor number field
and must be unique for
every Vendor. (You can
leave this field blank if
you export from PBS
and choose the option of
using the PBS Vendor
number.)
Vendor name
25
25
None – varies with file
Vendor name format
flag
1
1
C = Company
Get’s 1099 flag?
1
N/A
N = No
Address 1
30
25
None – varies with file
Address 2
30
25
None – varies with file
City
16
15
None – varies with file
State
2
2
None – varies with file
Zip
10
10
None – varies with file

Interface to Counterpoint 7
Passport Software, Inc. Passport Business Solutions
56
Country
3
15
None – varies with file
Contact 1
15
25
None – varies with file
Contact 2
15
25
None – varies with file
Phone 1
12
20
None – varies with file
Phone 2
12
20
None – varies with file
Fax 1/Fax number
12
20
None – varies with file
Terms description
15
25
None – varies with file
Vendor type
3
5
None – varies with file
Email 1
25
50
None – varies with file
Category (in PBS) –
Vendor type (in
Counterpoint 7)
3
5
None – varies with file
A/P Sync?
N/A
1
None – not available
Comments 1
N/A
25
None – not available
Comments 2
N/A
25
None – not available
Comments 3
N/A
25
None – not available
Payment group
3
N/A
Default entered value
Terms type
1
N/A
Default entered value
Due days
3
N/A
Default entered value
Discount percent
5
N/A
Default entered value
Discount days
3
N/A
Default entered value
Cutoff days
2
N/A
Default entered value
Vendor status code
1
N/A
Default entered value
Fax 2
12
N/A
Blank
Email 2
25
N/A
Blank
1099 ID #
9
N/A
Blank
A/P account #
32
N/A
A/P Control information
Discount account #
32
N/A
A/P Control information
Default distribution acct
#
32
N/A
A/P Control information
Current balance
N/A
0
Purchases PTD YTD &
Last year
N/A
0
Discounts PTD YTD &
Last year
N/A
0
Payments PTD YTD &
Last year
N/A
0
Last Purchase date
N/A
00/00/00
1099 YTD
N/A
0
1099 amount next year
N/A
0
Last check #
N/A
0
Last check date
N/A
00/00/00
Last check amt
N/A
0
During the import into Passport Business Solutions, if the vendor number exists in
Passport Business Solutions, then the only the fields on the file will be updated.

Interface to Counterpoint 7
Passport Software, Inc. Passport Business Solutions
57
TRANSFERRING VENDOR DATA FROM COUNTERPOINT 7 TO PBS
You will first export the vendor data from Counterpoint 7 and the import the data into
Passport Business Solutions. The following are the steps for transferring vendor data from
Counterpoint 7 to Passport Business Solutions.
RUNNING THE COUNTERPOINT 7 VENDOR EXPORT
1. From the Counterpoint menu select
File utilities > Inventory
2. You will be at the Inventory file utilities selection screen. Select 2. Export a file and
then select 29. Vendor file.
3. You will be prompted to create a new or append and existing file. Select ‘Create new
export file’.
4. You will then be prompted for a starting and ending file key. You can select all records,
a range of records or an individual record.
The name of the file is “IMVENF.EXP”.
The Counterpoint utilities place the export file in Syn\<CompanyName>\exports. The
company name is a variable. Syn is the default top-level directory when installing
Counterpoint 7, but may be different in some cases.
In UNIX and Linux you must copy or move the file to the directory CPTXX that must be
located in the top-level Passport Business Solutions directory, with XX being the company
number that you will be importing into Passport Business Solutions. If you have not done
so, you must create this directory before you copy the file.
The next step is to import the file into Passport Business Solutions.
Import defaults
The import will create new records when they do not exist. When they do exist, then
certain fields will be updated. The Passport Business Solutions Vendor file has more fields
than will be in the Counterpoint Vendor export file. During the import of the Counterpoint
7 Vendor file into Passport Business Solutions the fields that are not in the Counterpoint
file will be given defaults or in some cases a value of ‘0’.
The account number defaults come from the Accounts Payable Control information.
For some fields you can set a value when doing the import.
RUNNING THE IMPORT INTO PASSPORT BUSINESS SOLUTIONS
We recommend that you have a current backup of Passport Business Solutions before you
run any import into Passport Business Solutions.
As stated earlier in this document, when importing the Passport Business Solutions
Vendor number comes from the Counterpoint 7 A/P Vendor number field and must be no
longer than 6 characters. If it is neither is true, you will be given some options.

Interface to Counterpoint 7
Passport Software, Inc. Passport Business Solutions
58
If the A/P Vendor number is missing you will be given the option to use the
Counterpoint 7 Vendor number, key in a vendor number manually or use the
Counterpoint 7 Vendor number for all records. You can only do this if you plan on
having the vendor number be the same for both systems.
If the A/P vendor number is too long you will be given the option to use the
Counterpoint 7 Vendor number, key in a vendor number manually, truncate the
vendor number, or truncate all vendor numbers.
The Counterpoint 7 A/P Vendor number field must be unique for each record. The import
program does NOT check for this. If there are duplicate numbers, then some data will be
lost or incorrect.
The following are the steps for importing Counterpoint 7 vendors into PBS.
1. To run the utility in the Passport Business Solutions top-level directory type:
cpvenutil
Select the <Enter> key.
2. Enter user ID and then <Enter>. If you are using multiple companies in Passport Business
Solutions, you will first be prompted for the company number. Enter the company
number and then user ID.
3. Then you will be given the option to <I>mport or <E>xport a file. Select <I> and then the
<Enter> key.
4. The Default Values screen, similar to the following, will display.

Interface to Counterpoint 7
Passport Software, Inc. Passport Business Solutions
59
Here you enter the default values for certain fields as discussed in the “Import Defaults”
section earlier in this chapter. The field “Terms type” requires a value. For the other fields
you can either enter a value or leave them blank. Every Vendor imported will have these
values.
5. From ‘Field number to change ?’ enter the default values as needed and select the
<Enter> key.
6. In Windows an import dialog box will display, like the one below, and you have the
option of navigating to and selecting the file.
In UNIX or Linux the file will start importing.
7. In Windows, once you have found IMVENF.EXP file click on the Open button. Click
on Cancel if you decide not to import the file.
8. During the import, if any vendor numbers are invalid, you will be prompted with options
for correcting them.
9. Next a screen will display that indicates the number of records updated and the number of
records added.
This completes the transfer of Vendor data from Counterpoint 7 to Passport Business
Solutions. You can now view and change the defaulted fields as necessary in Passport
Business Solutions A/P Vendors <Enter>.

Interface to Counterpoint 7
Passport Software, Inc. Passport Business Solutions
60
TRANSFERRING VENDOR DATA FROM PBS TO COUNTERPOINT 7
You will first export the vendor data from Passport Business Solutions and then import
(restore) the data into Counterpoint 7. The following are the steps for transferring vendor
data from Passport Business Solutions to Counterpoint 7.
We recommend that you have a current backup of your Counterpoint 7 system, in
particular the vendor file, before you run this import into Counterpoint 7.
RUNNING THE EXPORT FROM PASSPORT BUSINESS SOLUTIONS
1. To run the utility in the Passport Business Solutions top-level directory type:
cpvenutil
Select the <Enter> key.
2. Enter user ID and then <Enter>. If you are using multiple companies in Passport Business
Solutions, you will first be prompted for the company number.
3. Then you will be given the option to <I>mport or <E>xport a file. Select <E> and then
the <Enter> key.
4. You will be given the option to use the A/P Vendor number instead of the using the
Reference number field. Select the appropriate option.
If the Vendor numbers in Counterpoint 7 are the same as the Vendor numbers in PBS,
then select the option to make the numbers the same.
5. In Windows you will then be see a file export windows like below. Navigate to the
directory where you can import the file into Counterpoint 7 and click on Save. If there is
an existing IMVENF.EXP file, when you click on Save there is a warning message about
overwriting the file. Click on the Cancel or select <Esc> if you want to exit without
saving the file.
In UNIX the export file will be located in CPTXX under the top-level Passport Business
Solutions directory with xx being the company number. You will have to move the file to a
location where it can be imported into Counterpoint 7.

Interface to Counterpoint 7
Passport Software, Inc. Passport Business Solutions
61
RUNNING THE COUNTERPOINT 7 VENDOR IMPORT
** IF YOU HAVE EXISTING VENDOR DATA IN Counterpoint 7 **
BACK UP THIS DATA BEFORE YOU RUN THIS IMPORT!
Printing the Vendor report in Counterpoint 7 before the import can be very useful.
You can then run the Counterpoint 7 Vendor report again after the import to
compare the differences and verify that the data is what you expect.
1. From the Counterpoint menu select
File utilities > Inventory
2. You will be at the Inventory file utilities selection screen. Select 3. Restore from an
export file and then select 29. Vendor file.
3. You will be prompted to “Create new file” or “Add records to existing file” or “Replace
records in an existing file”.
“Create new file” will overwrite everything in the file. “Add records” will just add
accounts that are not in the file. The “Replace records” will add new records that are not
there and update the data on existing account records. If the Counterpoint 7 account file
is empty, you will want to create a new file. If you have existing records, consult with
your Counterpoint 7 support/administrator on which option you should use. There is also
some additional information in the Counterpoint 7 document called FileUtilities.pdf.
4. Review the Vendors in Counterpoint 7 and/or run the vendor report to verify that the
data is what you expect.
You are now finished with the process of transferring vendor data from Passport Business
Solutions to Counterpoint 7.
VALID G/L ACCOUNTS DATA INTERFACE
If you are using the same account structure and numbers in both systems, then you can
use the accounts import and export to reduce the data entry for either system. If you are
not using the same structure or the numbers do not match then DO NOT use this utility.
This utility does NOT import into the General Ledger Chart of Accounts or create entries
in the Account links cross-references. These entries will still need to be created.
TRANSFERRING ACCOUNT DATA FROM COUNTERPOINT 7 TO PBS
You will first export the account data from Counterpoint 7 and the import the data into
Passport Business Solutions. The following are the steps for transferring account data
from Counterpoint 7 to Passport Business Solutions.
Running the Counterpoint 7 Accounts Export
1. From the Counterpoint menu select
File utilities > System
2. You will be at the System file utilities selection screen. Select 2. Export a file and then
select 1. Account file.

Interface to Counterpoint 7
Passport Software, Inc. Passport Business Solutions
62
3. You will be prompted to create a new or append and existing file. Select Create new
export file.
4. You will then be prompted for a starting and ending file key. You can select all records,
a range of records or an individual record.
The name of the file is “SYACTF.EXP”.
By default the Counterpoint utilities place the export file in
Syn\<CompanyName>\exports. The company name is a variable. Syn is the default top-
level directory when installing Counterpoint 7, but may be different in some cases.
In UNIX and Linux you must copy or move the file to the directory CPTXX in the top-
level Passport Business Solutions directory, with XX being the company number that you
will be importing into Passport Business Solutions. If you have not done so, you must
create this directory before you copy the file.
The next step is to import the file into Passport Business Solutions.
Running the import into Passport Business Solutions
We recommend that you have a current backup of Passport Business Solutions before you
do an import into Passport Business Solutions.
1. To run the utility in the Passport Business Solutions top-level directory type:
cpactutil
Select the <Enter> key.
2. Enter user ID and then <Enter>. If you are using multiple companies in Passport Business
Solutions, you will first be prompted for the company number. Enter the company
number and then user ID.
3. Then you will be given the option to <I>mport or <E>xport a file. Select <I> and then the
<Enter> key.
4. In Windows an import dialog box will display and you have the option of navigating to
and selecting the file. In UNIX or Linux the file will start importing.
5. In Windows, once you have found SYACTF.EXP file click on the Open button or click
on Cancel if you decide not to import the file.
6. Next a screen will display that indicates the number of records updated and the number of
records added.
This completes the transfer of Account data from Counterpoint 7 to Passport Business
Solutions. You can now view and change as needed the Passport Business Solutions Valid
G/L Accounts.
TRANSFERRING ACCOUNT DATA FROM PBS TO COUNTERPOINT 7
You will first export the account data from Passport Business Solutions and then import
(restore) the data into Counterpoint 7. The following are the steps for transferring accounts
from Passport Business Solutions to Counterpoint 7.

Interface to Counterpoint 7
Passport Software, Inc. Passport Business Solutions
63
Running the export from Passport Business Solutions
We recommend that you have a current backup your Counterpoint 7 system before you do
an import into Counterpoint 7.
1. To run the utility in the Passport Business Solutions top-level directory type:
cpactutil
Select the <Enter> key.
2. Enter user ID and then <Enter>. If you are using multiple companies in Passport Business
Solutions, you will first be prompted for the company number.
3. Then you will be given the option to <I>mport or <E>xport a file. Select <E> and then
the <Enter> key.
4. In Windows you will then be see a file export window like below.
Navigate to the directory where you can import the file into Counterpoint 7 and click on
Save. If there is an existing SYACTF.EXP file a warning will appear when you attempt
to over overwrite this file. Click on the Cancel or select <Esc> if you want to exit
without saving the file. You must save it with the name SYACTF.EXP.
In UNIX the export file will be located in CPTXX under the top-level Passport Business
Solutions directory with xx being the company number. You will need to move the file
to the correct Counterpoint 7 directory before restoring the file in Counterpoint 7. For
more information where to put the file read the section Location of Export/Import File
earlier in this chapter.
5. Now you are ready to import the file into Counterpoint 7.
Running the Counterpoint 7 Accounts Import

Interface to Counterpoint 7
Passport Software, Inc. Passport Business Solutions
64
** IF YOU HAVE EXISTING ACCOUNTS DATA IN Counterpoint 7 **
BACK UP THIS DATA BEFORE YOU DO THIS IMPORT!
Printing the Accounts report in Counterpoint 7 before the import can be very
useful. You can then run the Counterpoint 7 Accounts report again after the
import to compare the differences and verify that the data is OK.
The following are the steps for importing the accounts data:
1. From the Counterpoint menu select
File utilities > System
2. You will be at the System file utilities selection screen. Select 3. Restore from an export
file and then select 1. Account file.
3. You will be prompted to “Create new file”, “Add records” or “Replace records in an
existing file”.
“Create new file” will overwrite everything in the file. “Add records” will just add
accounts that are not in the file. The “Replace records” will add new records that are not
there and update the data on existing account records. If the Counterpoint 7 account file
is empty, you will want to create a new file. If you have existing records, consult with
your Counterpoint 7 support/administrator on which option you should use. There is also
some additional information in the Counterpoint 7 document called FileUtilities.pdf.
4. Review the Accounts in Counterpoint 7 and/or run the account report to verify that the
data is what you expect.
5. You are now finished with the process of transferring Account data from Passport
Business Solutions to Counterpoint 7.

Interface to Counterpoint 7
Passport Software, Inc. Passport Business Solutions
65
P a s s p o r t B u s i n e s s S o l u t i o n s I n t e r f a c e
Te c h n i c a l D a t a
Most of this document was written specifically for exporting from Counterpoint into and
importing into Passport Business Solutions. The import program in Passport Business
Solutions can be used to import data from other accounting and purchasing systems. This
chapter provides the technical data to create the export file needed for import into Passport
Business Solutions.
THE VOUCHER IMPORT FILE
The import file is a fixed-field-length ASCII import. The records can be variable length
(meaning trailing spaces are not required) but the records cannot exceed 213 characters.
The file can contain two types of records, vouchers and distributions. These two record
types are organized with a voucher record first, then the distributions for that voucher
following it. You can have up to 999999 distributions for each voucher. It is also
permitted to have a voucher without any distributions. (Please refer to the "Import
Process" section on page 44 for more information on this). A logical example of the file
would be:
Voucher record for invoice 123
Distribution record for invoice 123 for account 1000
Distribution record for invoice 123 for account 2000
Distribution record for invoice 123 for account 3000
Voucher record for invoice 334
Distribution record for invoice 334 for account 1000
Voucher record for invoice 556
Distribution record for invoice 556 for account 1000
Voucher record for invoice 883
Voucher record for invoice 99913
Voucher record for invoice ABC123
Distribution record for invoice ABC123 to account 1000
END-OF-FILE
VOUCHER RECORD LAYOUT
POSITION
LENGTH
DESCRIPTION
1
8
Literal <*VCHR*>

Interface to Counterpoint 7
Passport Software, Inc. Passport Business Solutions
66
9
6
Vendor number
15
25
Not used
40
11
Discount Amount
51
8
Discount Date
59
7
Not used
66
5
Discount percent
71
8
Distribution Date
79
8
Due Date
87
12
Invoice Amount
99
8
Invoice Date
107
15
Invoice Number
122
12
Non-discount amount
134
15
Purchase order number
149
25
Reference
174
40
Discount account
VOUCHER FIELD FORMATTING
LITERAL <*VCHR*> - The first eight characters of the voucher record must
contain <*VCHR*>
DISCOUNT AMOUNT – Eight-digit whole number with two decimal digits and
a trailing sign. The decimal point is implied. Examples:
400.10 should be formatted as 0000040010+
-400.10 should be formatted as 0000040010-
0 should be formatted as 0000000000+
INVOICE AMOUNT – Nine-digit whole number with two decimal digits and a
trailing sign. The decimal point is implied. Examples:
400.10 should be formatted as 00000040010+
-400.10 should be formatted as 00000040010-
0 should be formatted as 00000000000+
NON-DISCOUNT AMOUNT – Nine-digit whole number with two decimal digits
and a trailing sign. The decimal point is implied. Examples:
400.10 should be formatted as 00000040010+
-400.10 should be formatted as 00000040010-
0 should be formatted as 00000000000+

Interface to Counterpoint 7
Passport Software, Inc. Passport Business Solutions
67
VENDOR NUMBER –
Numeric vendor number:
Can be in alphanumeric format with trailing blanks as in: (b =
blank)
100bbb
2000bb
Or numeric format with leading zeros as in:
000100
002000
Alphanumeric vendor number:
Needs to be left justified with trailing spaces. For example: (b =
blank)
ABC should be formatted as ABCbbb
A1 should be formatted as A1bbbb
ALL DATE FIELDS - Need to be in YYYYMMDD format. Thus, July 4, 2001
needs to be formatted as:
20010704
DISCOUNT PERCENT – Two digit whole number with two decimal digits and a
trailing sign. The decimal point is implied. Examples:
10.20 should be formatted as 1020+
0 should be formatted as 0000+
INVOICE NUMBER – No formatting required. Imported as is.
PURCHASE ORDER NUMBER –
Numeric P.O. number:
Can be in alphanumeric format with trailing blanks as in: (b =
blank)
100bbbbbbbbbbbb
2000bbbbbbbbbbb

Interface to Counterpoint 7
Passport Software, Inc. Passport Business Solutions
68
Or in numeric format with leading zeros as in:
000000000000100
000000000002000
Alphanumeric P.O. number:
Needs to be left justified with trailing spaces. For example: (b =
blank)
ABC should be formatted as ABCbbbbbbbbbbbb
A1 should be formatted as A1bbbbbbbbbbbbb
DISCOUNT ACCOUNT – No formatting required. Imported as is.
REFERENCE – No formatting required. Imported as is.
VOUCHER FIELD DEPENDENCIES AND REQUIREMENTS
REQUIRED FIELDS
These fields are required when importing vouchers. Without any one of these
fields in the file, the Passport Business Solutions import will not work.
Field
Requirement
Literal
Must be <*VCHR*>
Vendor Number
Must be a valid PBS vendor
Distribution Date
Must be non zero
Invoice Amount
Must be non zero
Invoice Date
Must be non zero
Invoice Number
Cannot be blank
OPTIONAL FIELDS
These fields are optional. The table below shows what they should contain when
they are not used.
Field
Value when not used
Non-discount amount
Zero
Discount Date
Zero
Discount Amount
Zero

Interface to Counterpoint 7
Passport Software, Inc. Passport Business Solutions
69
Discount Date
Zero
Discount account
Spaces
Due Date
Zero
Discount percent
Zero
Purchase order number
Spaces
Reference
Spaces
Discount account
Spaces
Additional information:
The Due Date cannot be less than the invoice date. If so it will be set to the invoice date.
The Discount date cannot be less than the invoice date, or greater than the due date. If so it
will be set to zeros.
The Discount amount and discount percent must be used together. Thus one cannot be
zeros while the other holds a value.
The Discount account is only used if there is a discount percent and discount amount. The
imported account will be looked up in the account cross-reference file. If not found, it will
be set to spaces, and the discount amount and discount percent will be set to zeros.
DISTRIBUTION RECORD LAYOUT
This is the layout of the distributions for the voucher import.
Position
Length
Description
1
8
Literal <*DIST*>
9
12
Distribution Amount
21
15
Invoice number
36
40
Distribution Account
DISTRIBUTION FIELD FORMATTING
LITERAL <*DIST*> - The first eight characters of the distribution record must contain
<*DIST*>
DISTRIBUTION AMOUNT – Nine-digit whole number with two decimal digits and a
trailing sign. The decimal point is implied. Examples:
400.10 should be formatted as 00000040010+
-400.10 should be formatted as 00000040010-
0 should be formatted as 00000000000+

Interface to Counterpoint 7
Passport Software, Inc. Passport Business Solutions
70
INVOICE NUMBER – No formatting required. Imported as is.
DISTRIBUTION ACCOUNT – No formatting required. Imported as is.
DISTRIBUTION FIELD DEPENDENCIES AND REQUIREMENTS.
The distribution record as a whole is optional. If used, all fields are required.
INVOICE NUMBER – Must match the invoice number on the voucher that the
distribution follows in the import file. This is used as a safeguard to insure proper
matching of distributions to vouchers.
DISTRIBUTION ACCOUNT – The account must be found in the account cross-
reference file.
VOUCHER IMPORT LOGIC
This section covers special logic used to create Passport Business Solutions A/P vouchers
from the import voucher records.
The following Passport Business Solutions A/P voucher fields are loaded as follows.
VOUCHER NUMBER
This is assigned using the next available voucher number. It works the same way
as if you entered the voucher manually.
VOUCHER TYPE
When importing the voucher type will be set to ‘Regular’.
“RPT ON 1099?”
This is set to “Y” if the vendor has a 1099 ID # setup in the PBS vendor file.
DISCOUNT DAY(S)
The discount day(s) is calculated using the imported invoice date, the imported
discount date, and the vendor’s PBS Terms type. If you choose to use the Vendor
terms, then the discount days from the PBS Vendor file is used.
DUE DAY(S)
The due days(s) are calculated using the imported invoice date, the imported due
date, and the vendor’s PBS Terms type.
IMPORTING DISTRIBUTIONS
This section covers special logic used to create Passport Business Solutions A/P
distributions from the import distributions records.
The distributions created will always be in balance with the voucher invoice amount. To
do this, the program will create a distribution under the following conditions:

Interface to Counterpoint 7
Passport Software, Inc. Passport Business Solutions
71
NO DISTRIBUTION RECORDS
This occurs when there are no distribution records for a voucher. It will cause a
distribution to be created for the complete voucher invoice amount. The distribution
will use the account number from the Vendor’s “default distribution account number”
field.
TOTAL DISTRIBUTION AMOUNT DOES NOT EQUAL INVOICE AMOUNT
This occurs when the accumulated total of the distributions imported does not equal the
invoice amount. This will cause a distribution to be created that contains an amount
equal to the difference. The distribution will use the account number from the Vendor’s
“default distribution account number” field.
As distributions are created, the program will first check to see if it has already created a
distribution for the same account number. If so, the amount of the distribution will be
added to the existing distribution. Thus if you have a record sequence like this:
Voucher for invoice ABC – Invoice amount = $200
Distribution to invoice ABC, Account 1000, amount $150
Distribution to invoice ABC, Account 1000, amount $50
Only one distribution will be created using account 1000 and an amount of $200.
GENERAL LEDGER DISTRIBUTION IMPORT RECORD LAYOUT
This is the import layout to G/L distributions when using an external cross reference file.
POSITION
LENGTH
DESCRIPTION
1
3
Literal <SYN> (User ID)
4
40
External account number
44
8
Distribution date
52
6
Distribution journal number
58
1
Cost correction flag
59
6
Sequence number
65
15
Distribution amount
80
10
Source
90
25
Reference
115
15
Document number
EXDIST fields to import into GL distributions:
EX-DIST-ACCT-NO is used to look at the 1
st
or 2
nd
reference in the GL Account Link file
(EGLFIL) to get the new account number to create the distributions. Thus EX-DIST-ACCT-NO
is the cross-reference (1
st
or 2
nd
) between the external account number and PBS account #.
EX-DIST-DAT is the distribution date and is compared to the Cut-off date to decide whether a
distribution should be imported.

Interface to Counterpoint 7
Passport Software, Inc. Passport Business Solutions
72
EX-DIST-JRNL-NO is the journal number. This value will not be used when the chart of
account is set to compress.
EX-DIST-AMT is the distribution amount.
EX-DIST-SRC is the distribution source and will be set to “EX” if not loaded.
EX-DIST-CORR-FLG is the correction flag.
EX-DIST-SEQ-NO This field is not used during the import.
EX-DIST-REF and EX-DIST-DOC-NO are the reference and document number respectively for
account numbers with a compression code of “N.”.
For account with “D”ate compression, the reference is set "Net change for date/jrnl" and the
document number is cleared.
For account with “P”eriod compression, the reference is set " Net change for the period" and the
document number is cleared.

Interface to Counterpoint 7
Passport Software, Inc. Passport Business Solutions
73
K e y Te r m s
ACCOUNTS PAYABLE (A/P)
Accounts Payable is an accounting module in Passport Business Solutions and will often be
abbreviated as A/P.
COUNTERPOINT
Counterpoint is a product of Synchronics, Inc. of Memphis, TN. Counterpoint 7 may no longer be
supported by any company. Check with NCR.
EXPORT/IMPORT
To simplify this document, the word “Export” has been substituted for the Counterpoint 7 term
“Voucher receiving”. In Counterpoint 7, the term “Voucher Receiving” is used to cover the
process of selecting a Purchase Order for vouchering, selecting the receivers to voucher, entering
payment information, entering the distributions, and then exporting the voucher and distributions.
Since all of these steps are needed to produce an export record set, they will be referred to as
“Exporting”. This will become clearer as you further understand the Counterpoint 7 process.
Import is simply transferring data from a properly formatted text file into Passport Business
Solutions.
GENERAL LEDGER (GL)
General Ledger is an accounting module in Passport Business Solutions and will often be
abbreviated as G/L.
PASSPORT BUSINESS SOLUTIONS
In this document, Passport Business Solutions™ Accounting and Business Software may be
abbreviated as PBS. Passport Business Solutions (original name was RW32) is a version of the
RealWorld Classic Version 8.6 enhanced by Passport Software, Inc.
